
The most important thing to consider whenever you are
drawing clothing or any type of fabric is the direction the
fabric is going to be pulled in. Folds are caused wherever the
fabric is being stretched or pulled; figure out how exactly you
want the fabric to move, and the rest is pretty easy. Always
remember to consider the figure beneath the clothing; the
cloth should reveal the shape of the figure beneath. I'll go into
more detail on this later.
At the left are some examples of basic types of folds. Notice
the movement of each example shown; the fabric flows
downward on the top left two, for they are being pulled down
by gravity. This type of fold would be on something that
hangs loosely, such as a cape or long shirt. On the lower left
and upper right examples, the fabric is not only pulled by
gravity, but stretched to the left (probably by an arm that is
underneath the clothing). The folds become more horizontal
than vertical the further it is stretched. Also notice how
sometimes the folds are nested within one another. This will often occur at joints or areas in which loose
clothing is bunched up. The lower right picture is a slightly more complex example of a more inert piece
of cloth being pulled in a viarety of directions. Notice how the folds follow the direction that the cloth is
being pulled in.
Here are a few more examples of basic fold shapes. On the
left, the cloth is being pulled downwards by gravity and to the
right by wind or motion. One the left, the long strip of cloth is
bunched up near the top. Remember to use shading to give
your subjects more form. Generally, you shade along a fold
line, or on any places that you think a shadow would be cast.
This takes some getting used to. It helps to look at actual
folds sometimes to see where to shade. Sometimes, I'll
sketch the drapes or a towel hung over a chair just to practice
and get a better feel for how clothing is shaded.
Here are a few more random examples, of a bow and some
sleeves. The most important thing to note here is the shape of
the folds at the joint of the sleeve in the middle.
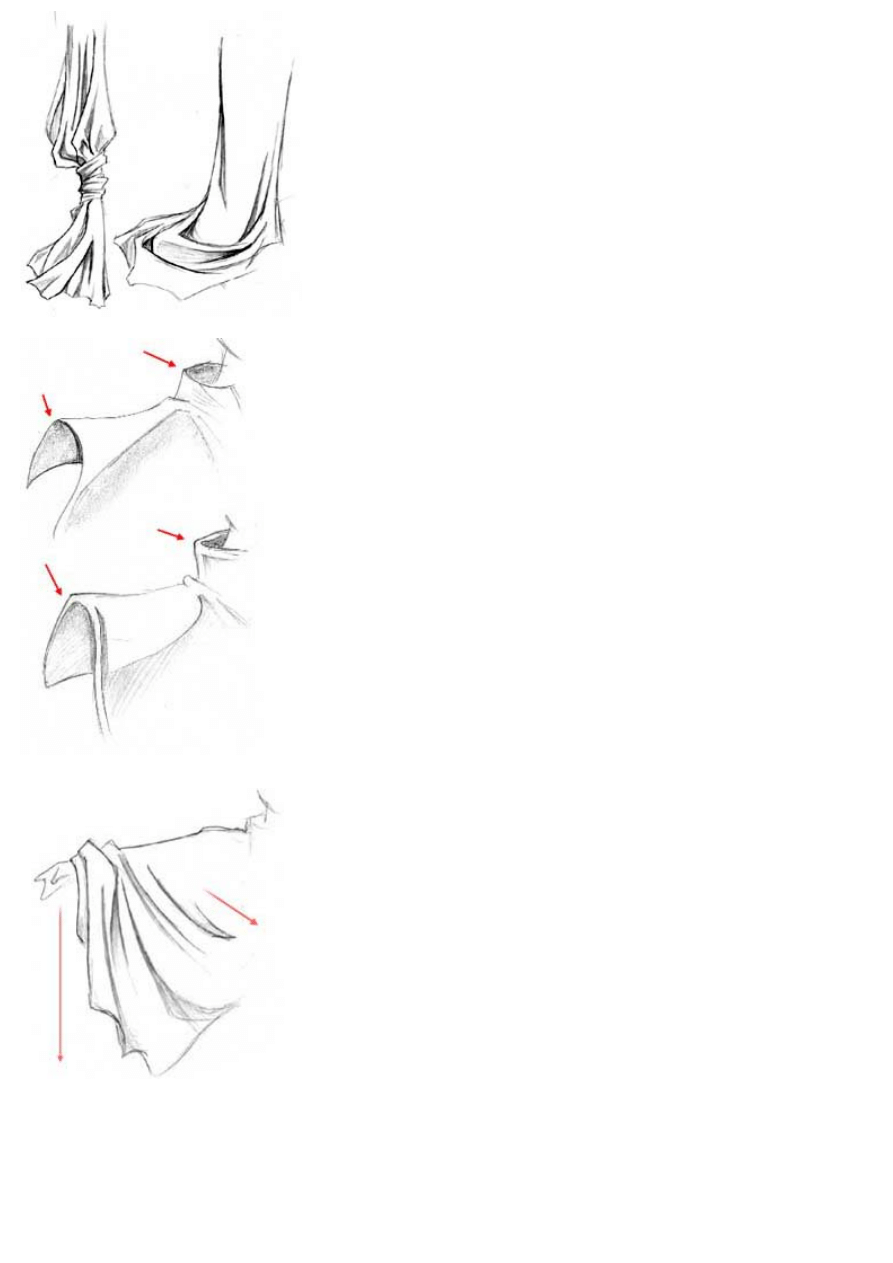
These are some more complex, overlapping and nested folds. The
more detail you put into it the folds, the more interesting it will look. On
the left, notice how the fabric bunches up where it is tied together; the
weight of the fabric pulls it down and causes extra creases and folds to
form where it is gathered together. The tie itself is drawn with lots of
detail, and the cloth beneath it blows loosely in the wind. The fabric is
shaded around the folds and in the crevasses formed by the cloth. On
the picture to the right, a length of fabric is draped upon the floor; notice
how the folds nest in one another and overlap, creating an interesting
effect.
Another thing I want to point out is the thickness of the fabric in question.
The fabric on the top example appears thinner than the fabric in the lower
example. Take note of both collars. On the top, the circular rim of the collar
connects directly to the rest of the collar, while on the bottom, there is a
space between the circular rim and the vertical part. The same applies to
the edges of the cape. While on the top example, the edge is crisp and
thin, on the bottom example there is extra space between the rim and the
rest of the cape. This extra space makes the clothing look more thick and
heavy.
Now that we know a few of the basic shapes of folds in fabric, let's move
on and see how clothing should look when it is actually being worn by
someone. At the left, we have an example of a very loose, draping
sleeve. As mentioned before, the main thing to consider is which
direction the fabric will be pulled. The sleeve here is being pulled in two
main directions: downwards because its pulled by gravity, and to the left
because its attached to the main garment and is being stretched across
the arm and torso. The folds in the sleeve will follow the direction that
the cloth is being pulled. Notice also how the cloth bunches up around
the wrist. This isn't necessary, but it does indicate the length and
looseness of the sleeve.
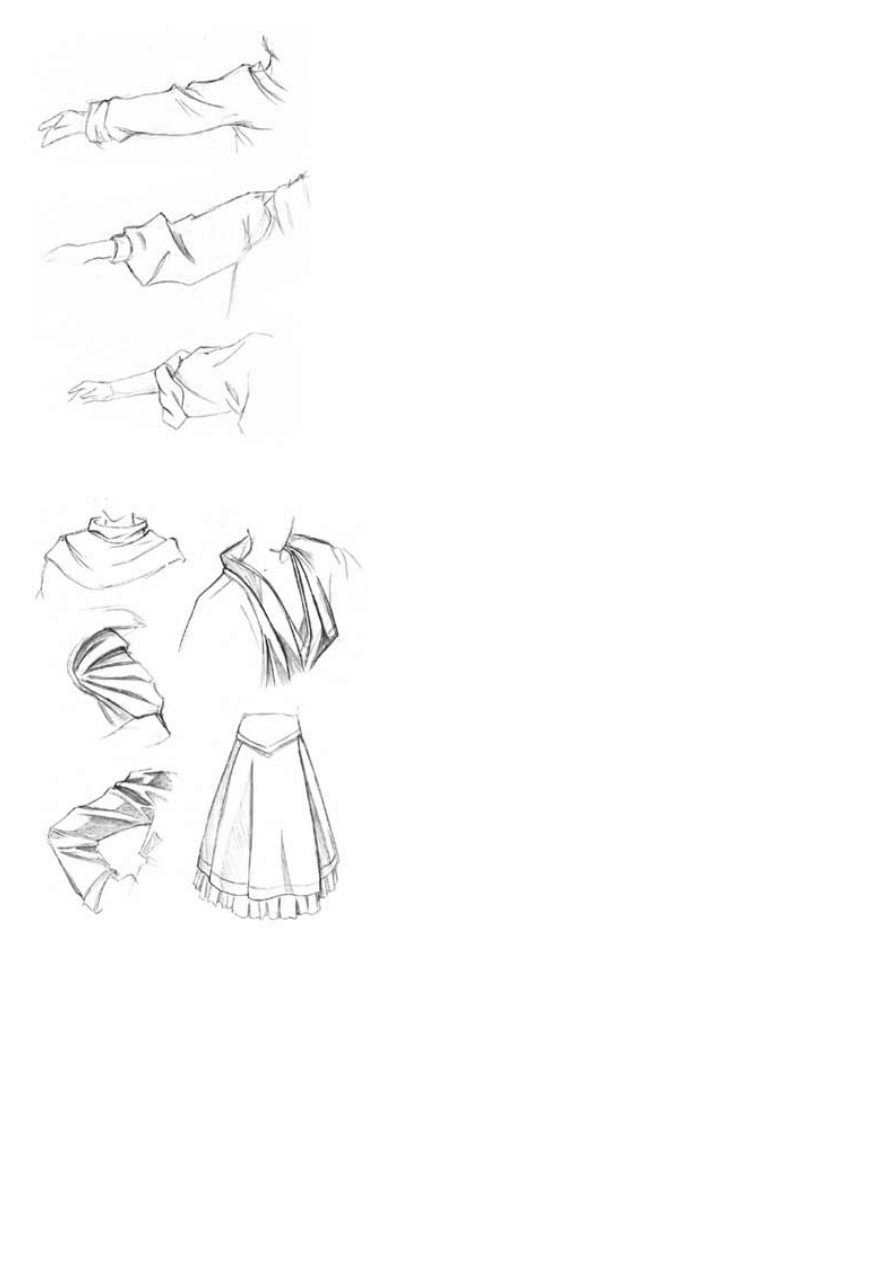
Here are three more sleeve examples. These sleeves are not as
loose as the one shown above, and all stick pretty close to the arm.
In these examples, the cloth is stretched from the arm to the
shoulder and torso, rather than being pulled down mainly by gravity.
There isn't enough material to be pulled down too greatly. Since the
fabric is pulled horizontally, the folds should reflect this. The best
example is the top picture here; notice how the folds move towards
the shoulder instead of towards the ground. The sleeve in the middle
picture is a little looser, and is pulled down by gravity more. The
sleeve in bottom picture is big and loose, but is rolled up at the
elbows, and thus doesn't hang and droop as much as the sleeve in
the previous example.
These are some miscellaneous bits of clothing that didn't fit
into any of the other sections of this tutorial, but that I wanted
to include anyway. In all these examples, try to identify where
the cloth is being pulled towards and in what direction (for
example, is it being pulled roughly towards the shoulder, or
draping loosely over the subject?). Always remember to
shade wherever the light doesn't fall, such as grooves, areas
inside the folds, and places where the cloth overlaps.
One small but important thing I would also like to go over before continuing is the
effect that stripes can have. If you are drawing clothing that has stripes or a pattern
on it, make sure that the pattern moves along with the rest of the fabric. Where the
cloth bends, the stripes and patterns will bend, as well. This can be difficult to draw
and shade, especially when you are dealing with complex patterns, but it can add a
really nice three dimensional look to your picture.
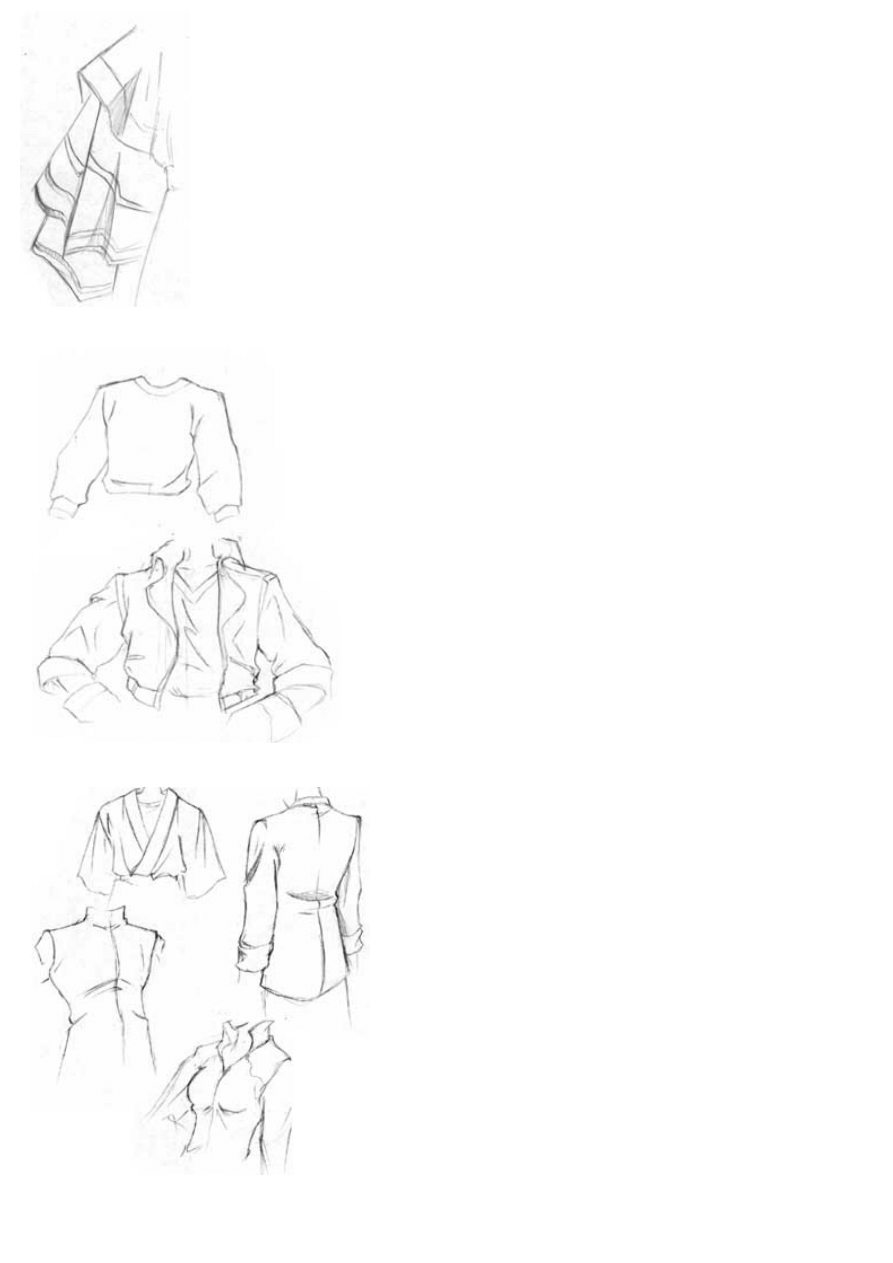
Now that we know some basic shapes and know a little more
about how clothing should fit on your subject, let's work on the
actual parts of your character's wardrobe. We'll start off by going
over basic shirts. Whatever type of shirt you draw, there are
some basic places where folds will occur. Sleeves will be
stretched towards the shoulder. Fabric generally gathers and
bunches up around the armpits and waistline. If you are drawing
a character with a heavy jacket or a loose shirt, the fabric should
be thick and baggy and full of folds and creases, while if it is a
tighter fitting garment, the clothing will stick pretty close to your
subject (which is why it is important to be able to draw bodies;
I have found that you cannot always cover up your entire
character with really loose clothing to hide the fact that you aren't
very strong in figure drawing. ^_~)
Here are some better examples of various shirts and clothing
for the upper body. Notice that while some clothing fits closer
to the body than other clothing, you still see many folds
where ever the fabric is being stretched. Generally, you'll see
folds the most at the armpits, upper portions of sleeves,
waistlines, and depending on how tight the outfit is, the chest
(as shown in the lower two examples). Also make sure that
any seams that are visible on the clothing follow the shape of
the cloth and the character that is wearing it. ^_^
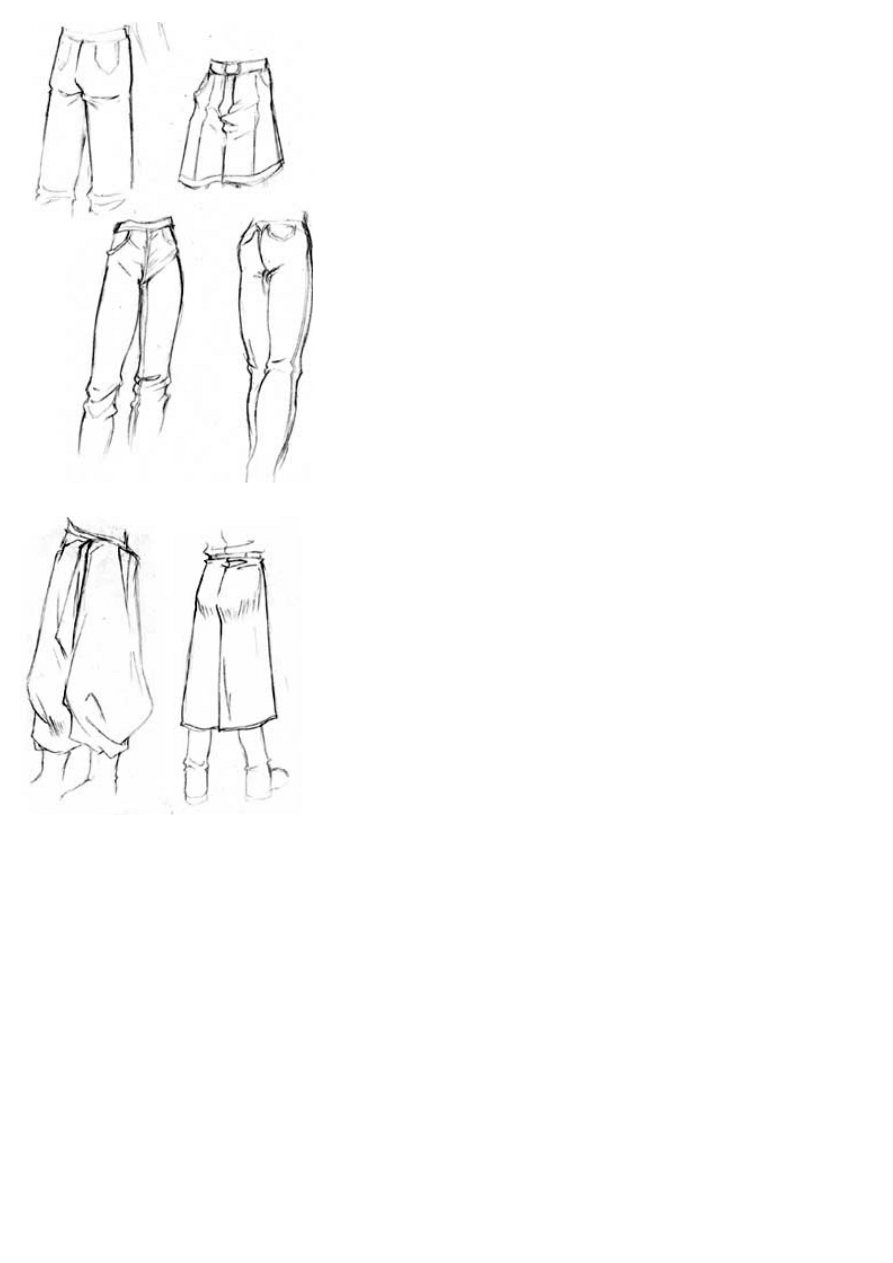
All right, let's work on the pants (something that I personally
sometimes find a little daunting... ^.^;) I have noticed that guy's pants
tend to be a little looser, while girl's pants cling closer to the subject.
Also take note that female's rears tend to be more round, while guy's
are tend to be flat and squared off (a rather strange observation, I
know. ^_^;) No matter which gender you are drawing, the fabric will
gather around the lower waist, knees, and ankles. The cloth around
the upper and lower legs is generally pulled straight down by gravity
and won't have too many folds, unless the leg is lifted up, in which
case you'll have folds similar to the sleeves on the previous page.
Here are two more examples of clothing for the lower body. The one
the left is an example of really loose, baggy pants. The material is has
more folds than normal pants, and in this case gathers at the ankles.
Notice how poofy the pants get below the knees. The example on the
right is just showing how no matter what you character is wearing, you
need to consider the form of the figure beneath the clothing. In this
case, the clothing is relatively tight, but hangs down past the knees,
and thus is drawn a little tighter around the rear. Also notice how the
loose fabric bunches up right above and below the belt. That concludes
my tutorial on drawing clothing. It isn't the most organized tutorial, but
I'm hoping that it covers enough areas so that it can be of some help to
you. ^_^
Wyszukiwarka
Podobne podstrony:
How to Draw Manga Anime Clothing And Folds Drawing
(Ebook Drawing) How To Draw Genera Manga L Anime Faces
How to draw drawing and detailing with solidworks
How to Draw Photoshop Portrait Drawing [GRAFIKA]
010212 How To Draw Anime Faces And Bodies
3100873 how to draw manga anime female figure drawing tutorial
How to draw Donkey from Shrek
How to Draw Manga Dressing Your Character in Casual Wear
How To Make It And Enjoy It
How to draw manga Body
How to cut Mini and Micro SIM to Nano SIM
How to draw KUZCO
How to Get Married and Stay Married
więcej podobnych podstron