1
Copyright 2002, Thomas Rettie
M
AKING
A
T
USK
T
ENON
FOR
K
NOCKDOWN
F
URNITURE
B
Y
T
HOMAS
R
ETTIE
In the Middle Ages, like today, peo-
ple sometimes needed portable
furniture. While we tend to think
of medieval furniture as usually
large, massive, and immobile, there
were many instances when furni-
ture needed to be broken down
and moved from place to place. In
the home, space was at a premium
and bulky items such as tables were
put up when not in use. In the
workshop, a table might be moved
to where the light was best, or tak-
en to market for use as a counter.
Even in death, prized furniture
might be sent with the deceased to
the afterlife, as with the Viking
burial ship uncovered at Oseberg.
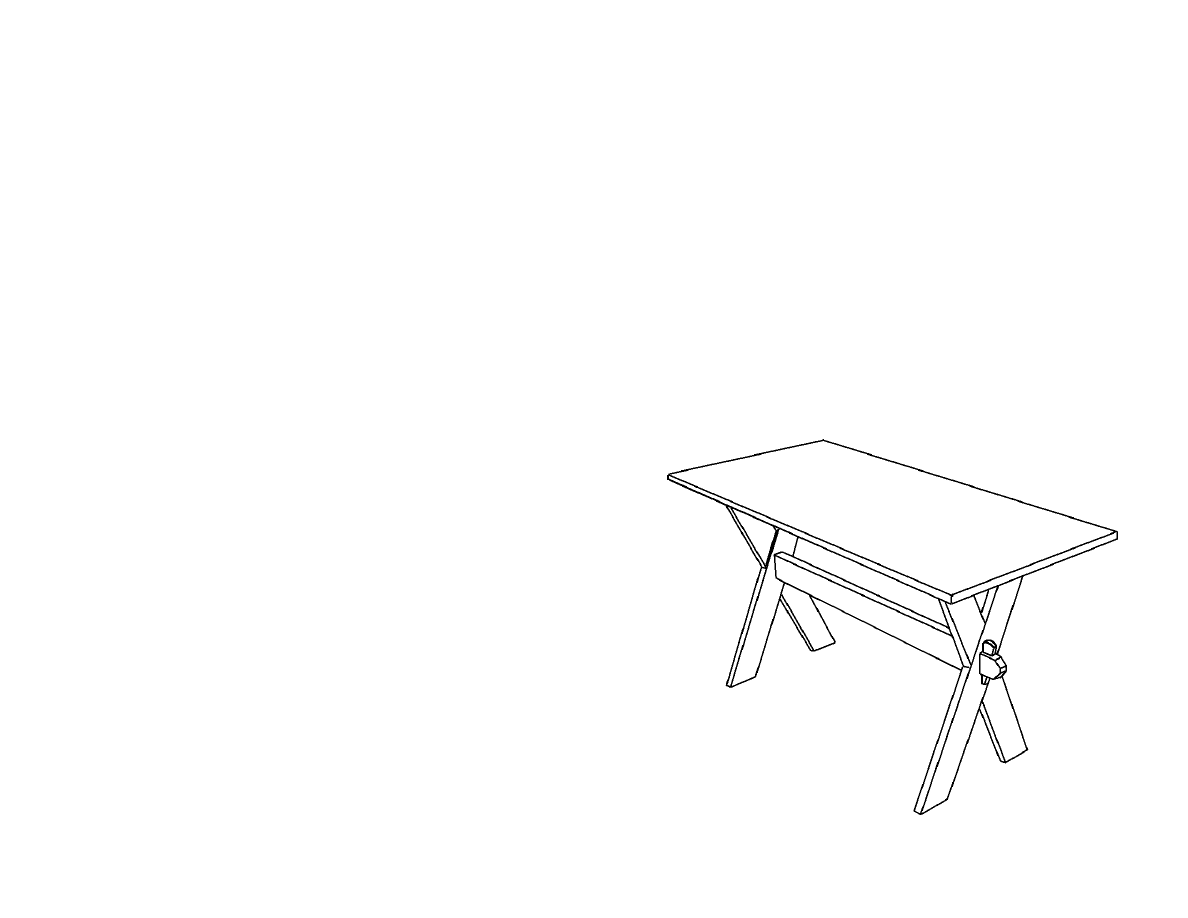
A 16th Century German work table with tusk tenon joints
(after examples in Jost Amman’s “Book of Trades”).
3
2
Copyright 2002, Thomas Rettie
Copyright 2002, Thomas Rettie
The use of tusk tenons dates back
to at least the Vikings, whose mo-
bile society made knockdown
furniture a practical necessity.
While not widely adopted in En-
glish joinery, keyed tenons are seen
frequently on German furniture,
particularly on boarded benches,
work tables, and counters. They
are also evident in heavier framed
construction, such as printing
presses, looms, and post-and-beam
buildings. Tusk tenons even made
a brief comeback in the Arts and
Crafts movement of the late 19th
and early 20th centuries.
S
SS
SS
KILLS
KILLS
KILLS
KILLS
KILLS
, T
, T
, T
, T
, T
OOLS
OOLS
OOLS
OOLS
OOLS
, , , , ,
AND
AND
AND
AND
AND
M
M
M
M
M
ATERIALS
ATERIALS
ATERIALS
ATERIALS
ATERIALS
Tusk tenons require no particular
skills beyond the ability to cut a
mortise and tenon. If you have not
attempted one before, you will
want to try a few for practice be-
fore forging ahead with tables,
benches, and the like. Most basic
woodworking books will provide
instruction on mortise and tenon
joinery; in short though, you will
need to be able to cut a straight line
and make a square hole. When you
are confident with mortise and
tenon joints in general, you should
have no problem in making a tusk
tenon joint.
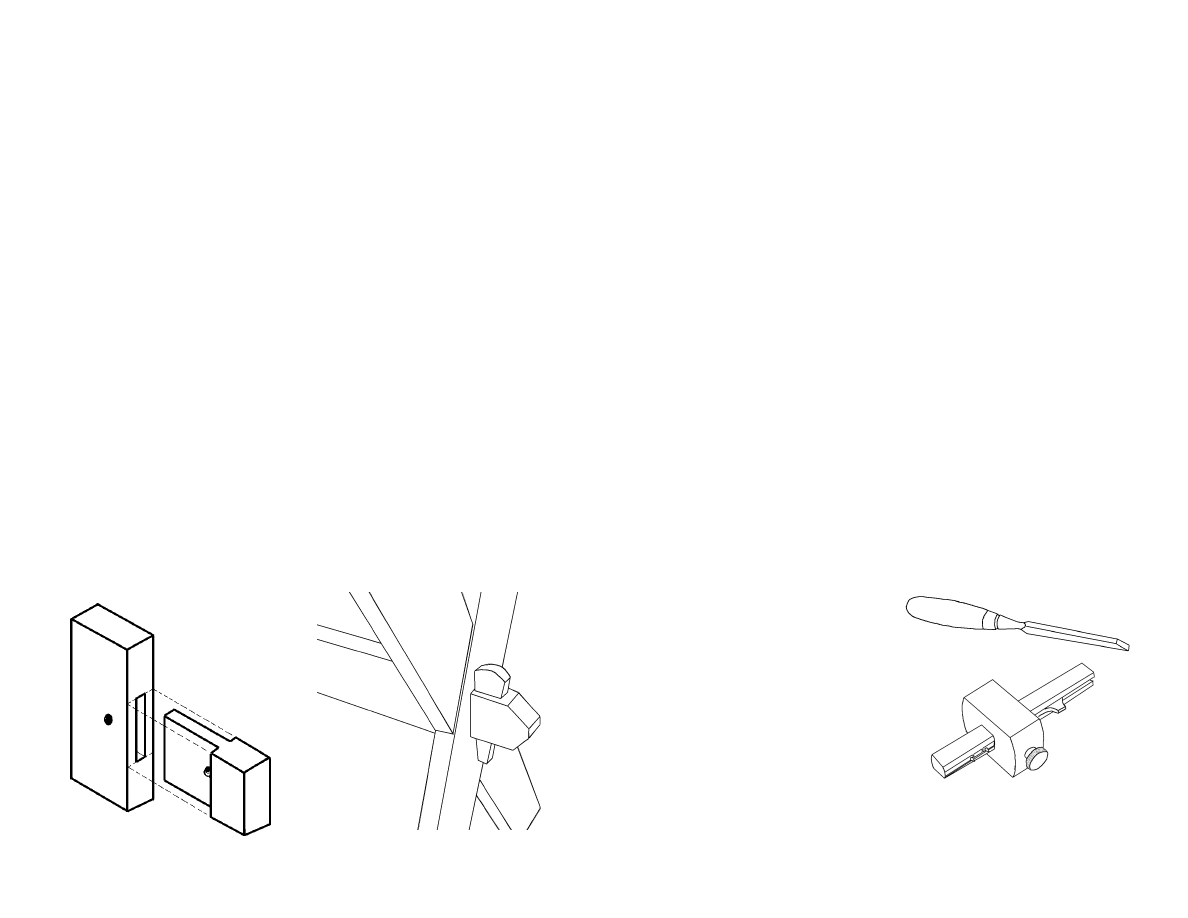
As in all woodworking, there are
many choices in the tools you can
use to make a tusk tenon. If you are
using hand tools, you will need, at
a minimum: a saw and a well-
honed mortising chisel. A
marking/mortising gauge is also
helpful in laying out the cuts, and
a brace and bit can speed things up
when removing wood from the
mortises.
If you have access to power tools, a
drill press or mortising machine
can speed things along, but you
will still need a chisel to cut the
sloping side of the mortise for the
key.
Mortising chisel and
mortising gauge.
The problem in making portable
furniture is in devising joints that
are strong when put together, but
that are easily taken apart and re-
assembled. Today we have a
profusion of temporary metal and
plastic fasteners, but in a time
when nuts and bolts had to be
forged and cut by hand, economi-
cal solutions were more limited.
One solution is the tusk tenon.
Also called a
keyed tenon or
wedged tenon, the tusk tenon is a
kind of mortise and tenon joint
that uses a wedge-shaped key to
hold the joint together.
In a common mortise and tenon
joint, a protrusion on one part (the
tenon) fits into a hole on the other
part (the mortise). Usually the joint
is then locked with a peg using a
technique called
drawboring. In
drawboring, the holes for the peg
are slightly offset so that the peg
will pull the joint tighter when it
is driven in. As the wood expands
and contracts over time, the peg
can be driven further to keep the
joint tight. The peg can also be
driven out, allowing the joint to be
disassembled if necessary.
With a tusk tenon, a key is used
instead of a peg to hold the joint
together. Not only is the key easier
to remove and replace, it also pro-
vides added strength and stability
to the joint. Because the key is out-
side the joint, tusk tenons can only
be used with through-tenons (that
is, joints where the tenon goes all
the way through and out the other
side of the mortise).
Pegged mortise and tenon joint.
Tusk tenon joint.
5
4
Copyright 2002, Thomas Rettie
Copyright 2002, Thomas Rettie
M
M
M
M
M
AKING
AKING
AKING
AKING
AKING
THE
THE
THE
THE
THE
T
T
T
T
T
ENON
ENON
ENON
ENON
ENON
K
K
K
K
K
EY
EY
EY
EY
EY
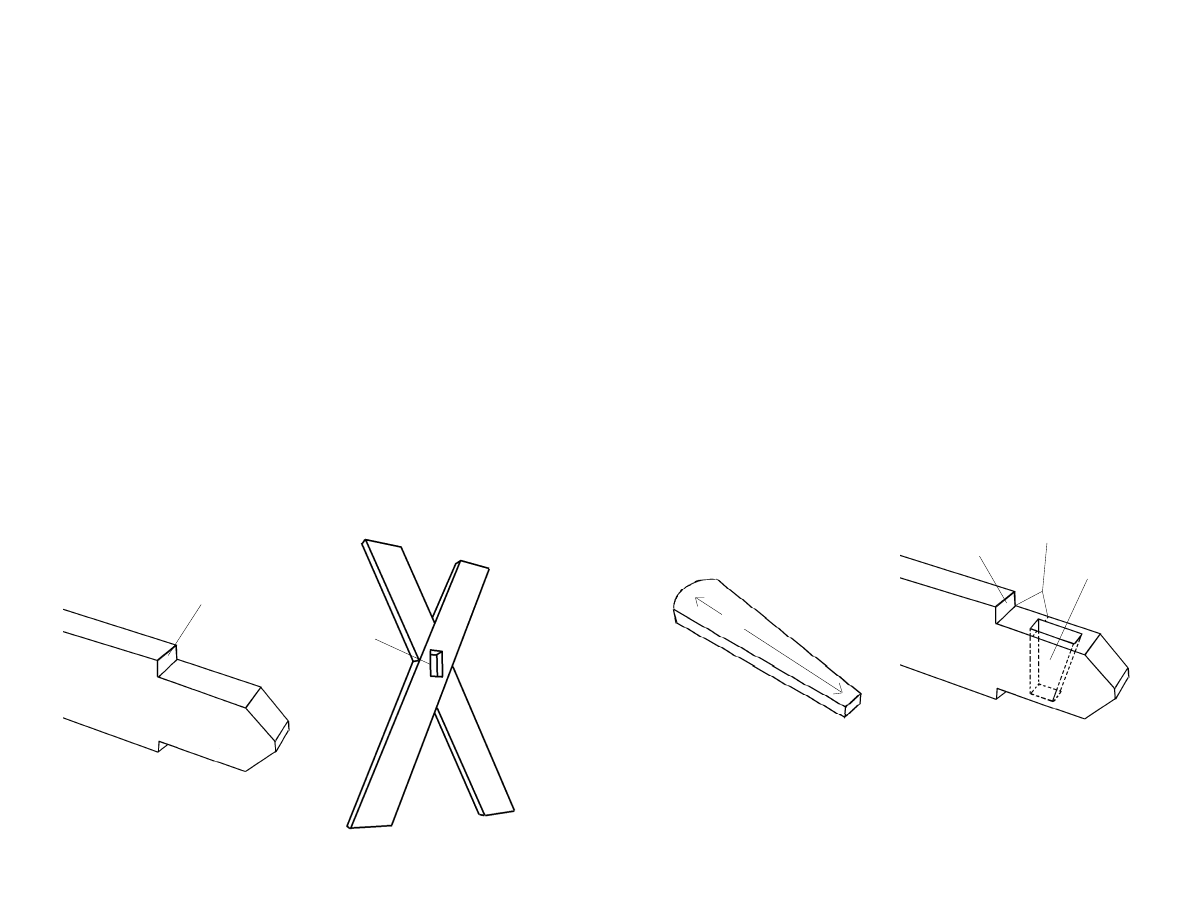
I find it convenient to next make
the tenon key. The key should be
no more than one-third the thick-
ness of the tenon it will pass
through. Ideally it should be just
slightly thinner than the thickness
of your mortising chisel. If the key
is too thick, it may split the cheeks
of the tenon.
The key is wedge shaped; straight
on the inside edge and tapering on
the outside, with the grain running
the length of the key. The top of the
key can be flat or rounded (round
will be less prone to splitting). In
general, the longer the key, the
more stable the joint will be.
K
K
K
K
K
EY
EY
EY
EY
EY
-M
-M
-M
-M
-M
ORTISING
ORTISING
ORTISING
ORTISING
ORTISING
THE
THE
THE
THE
THE
T
T
T
T
T
ENON
ENON
ENON
ENON
ENON
The mortise that will hold the key
must have approximately the same
wedge-shaped profile as the key.
Hold the key against the side of the
tenon and trace its profile, then
carry the lines across to mark the
outline of the key-mortise on top
and bottom.
The key-mortise should be placed
slightly closer to the shoulder of
the tenon than the depth of the
mortise, so that the key will pull
the shoulder towards it when it is
driven in.
Grain
Shoulder
Depth of
Mortise
Tenon Key
Tenon with Key-Mortise
Key-Mortise
For a strong joint (and less cursing
when you cut the mortises), you
will want wood with clear, straight
grain and no obvious cracks or
knots. In general, hardwoods such
as oak and poplar are excellent, but
I’ve also had good results with soft-
woods such as pine, fir, and
hemlock if they have a clear grain.
M
M
M
M
M
AKING
AKING
AKING
AKING
AKING
A
A
A
A
A
M
M
M
M
M
ORTISE
ORTISE
ORTISE
ORTISE
ORTISE
AND
AND
AND
AND
AND
T
T
T
T
T
ENON
ENON
ENON
ENON
ENON
J
J
J
J
J
OINT
OINT
OINT
OINT
OINT
Begin by making the mortise and
tenon joint. The particulars of this
joint will of course depend on the
piece of furniture you are making;
the examples shown below are for
the trestle table shown on page 17.
I normally begin by making the
tenon (others may start with the
mortise). The distance from the
shoulder to the end should be long
enough to pass through the mor-
tise with at least 4 or 5 inches to
spare on the outside. You can al-
ways cut it down later if you find
it too long; it’s much harder to add
wood back if it’s too short.
When making a through-mortise,
it is a good idea to cut in from ei-
ther side to avoid tearing or
splintering. A useful rule of thumb
is never to cut a mortise that is
more than one-third the width of
the stock you are working with.
Mortise
Tenon
Shoulder
6
Copyright 2002, Thomas Rettie
V
V
V
V
V
ARIATIONS
ARIATIONS
ARIATIONS
ARIATIONS
ARIATIONS
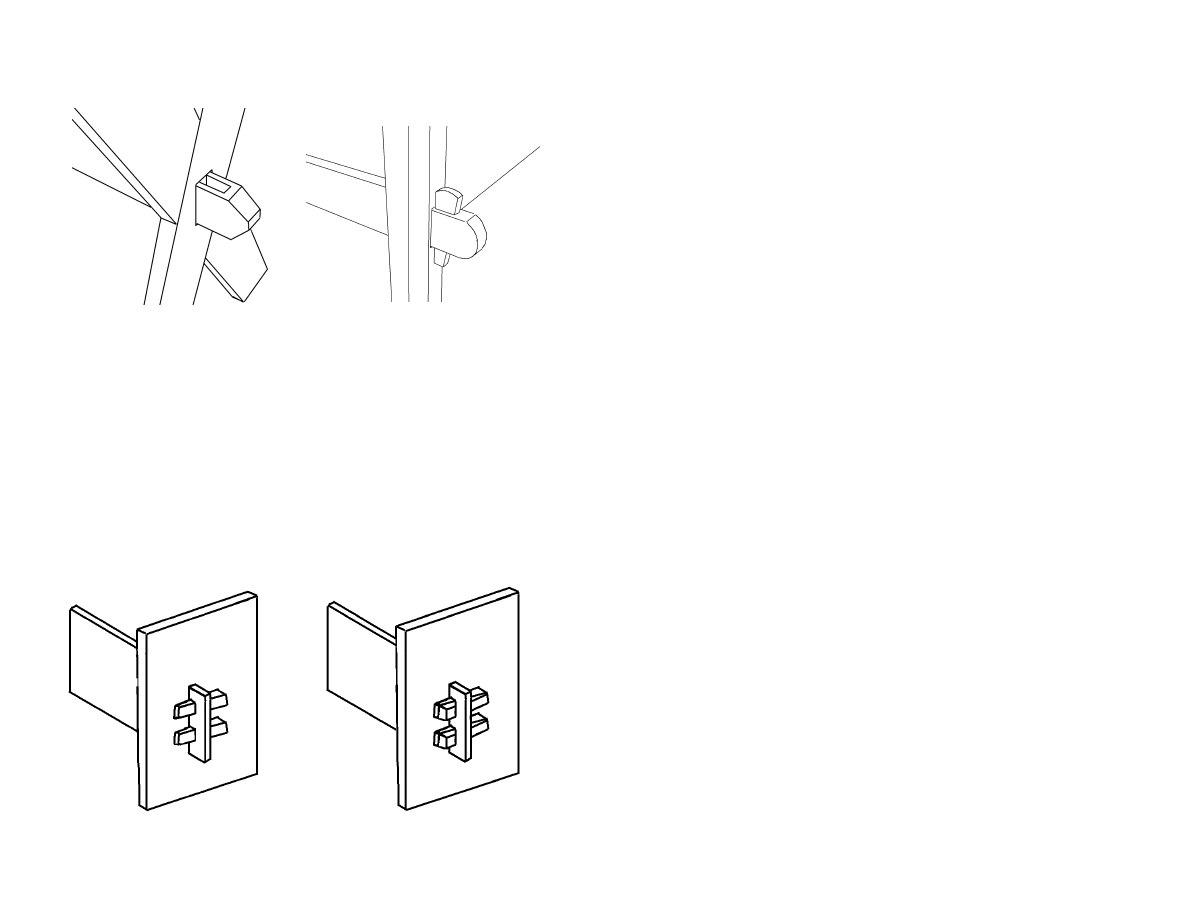
There are variations of the tusk
tenon that can be used when the
tenon is too thin to accommodate
a vertical key. Instead, pegs or hor-
izontal wedges can be used,
although this is usually a less se-
cure configuration.
Assembled Joint
Tusk Tenon Used with a Bed Rail
If using horizontal wedges, use two
key-mortises per joint to prevent
“racking” (that is, where the joint
is no longer perpendicular). Either
taper the key mortises to match
the wedges, or use two wedges
(one from either side) per mortise.
Joint with One Wedge per
Key-mortise
Joint with Two Wedges per
Key-mortise
Wyszukiwarka
Podobne podstrony:
Making Money Online For Dummies
Giving Away FREE Software But Making Them Pay For The Upgrade!
Making Money For Dummies
Making Gin & Vodka A Professional Guide for Amateur Distillers J Stone
Sexual Harassment A Cry for Help or a Money Making Scheme
eReport Wine Making For Beginners
Nine Tips for Making Better Prints QXMGKNORABPO5BEZ73ZQ5IRSNDE5VQTQHHCCLEI QXMGKNORABPO5BEZ73ZQ5IRSN
Tips Making Wine Home Making Wine For Beginners
Wood Materials for Furniture
Tips Wine Making Equipment for Making Wine At Home
An IC Amplifier User’s Guide to Decoupling, Grounding and Making Things Go Right for a Change
Tips for Making an Impact at Work
#0310 – Shopping for Furniture
więcej podobnych podstron