Microsoft Exchange 5.5
Messaging and Collaboration for Demanding Business Needs
Microsoft Outlook and Exchange
Server Tips and Tricks
White Paper— Updated with new Outlook 2000 Features!
Abstract
This whitepaper provides a number of advanced tips and tricks for Microsoft Outlook users.
Readers will find tips on using Outlook more efficiently, how to take advantage of some of the new
features of Microsoft Oulook 2000 and how to better work together with others when using
Microsoft Outlook and Exchange Server.
®

© 1998 Microsoft Corporation. All rights reserved.
The information contained in this document represents the current view of Microsoft
Corporation on the issues discussed as of the date of publication. Because Microsoft
must respond to changing market conditions, it should not be interpreted to be a
commitment on the part of Microsoft, and Microsoft cannot guarantee the accuracy
of any information presented after the date of publication.
This White Paper is for informational purposes only. MICROSOFT MAKES NO
WARRANTIES, EXPRESS OR IMPLIED, IN THIS DOCUMENT.
Microsoft, ActiveX, the BackOffice logo, Outlook, Visual Basic, Visual C++, Visual
InterDev, and Windows NT are either registered trademarks or trademarks of
Microsoft Corporation in the United States and/or other countries.
Other product and company names mentioned herein may be the trademarks of
their respective owners.
Microsoft Corporation • One Microsoft Way • Redmond, WA 98052-6399 • USA
0298

PERSONAL PRODUCTIVITY TIPS ............................................. 1
EMAIL PRODUCTIVITY TIPS .................................................. 19
CALENDAR PRODUCTIVITY TIPS........................................... 23
CONTACT PRODUCTIVITY TIPS............................................. 31
TASK PRODUCTIVITY TIPS.................................................... 44
JOURNAL PRODUCTIVITY TIPS............................................. 45
COLLABORATION TIPS .......................................................... 47
CONTENTS

Microsoft Outlook and Exchange Server Tips and Tricks
1
General Productivity Tips
QuickFind for Contacts and Exchange
Address Book
Now you can easily search and open contacts from anywhere within Outlook, by
using the new QuickFind Contact feature.
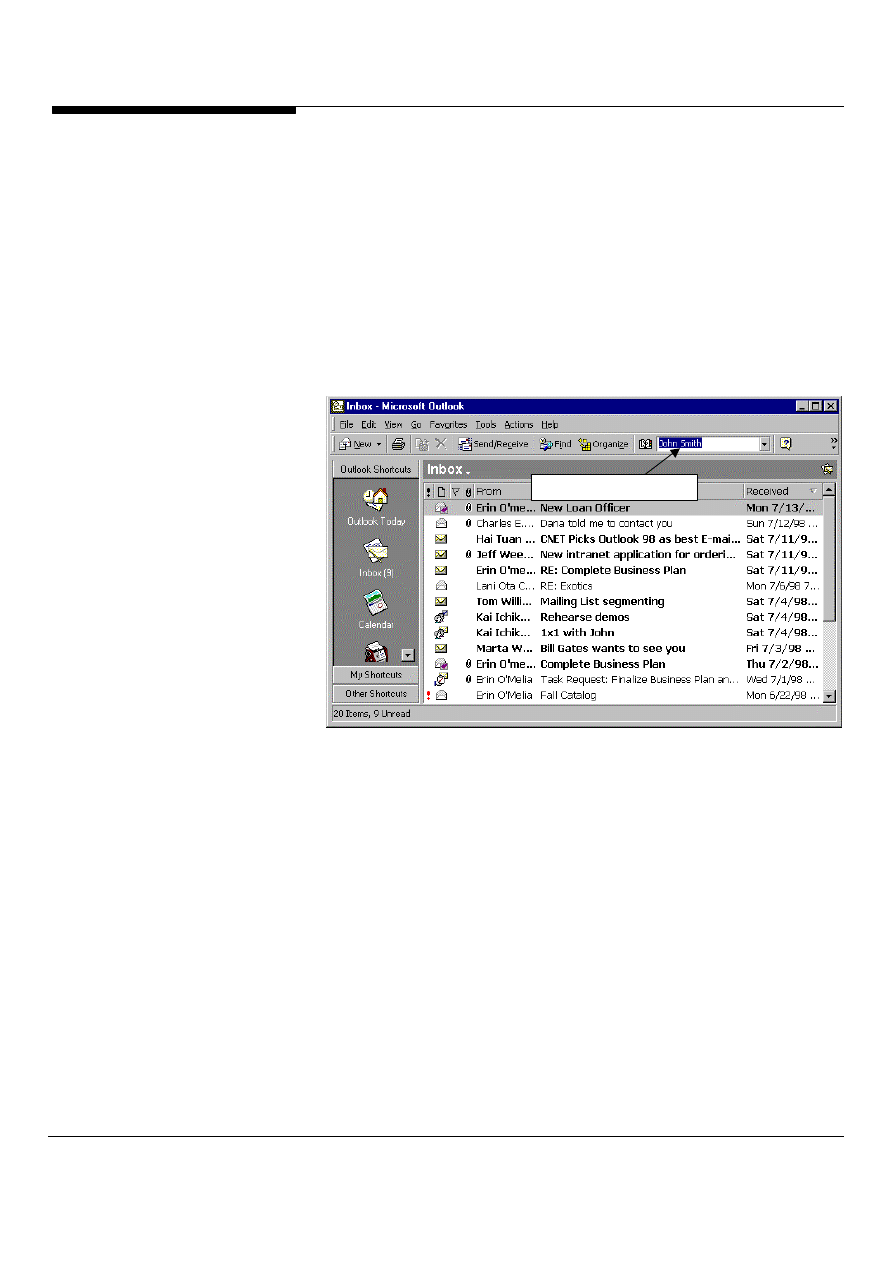
1. In the Outlook command bar, located the QuickFind feature (it will be to the far
left, next to the Address Book button) Figure 1.
QuickFind Contact tool
Figure 1: The Outlook QuickFind Feature makes it easy to find contact
information
2. To search for a particular name, simply type in the name and press enter.
3. QuickFind will search both your personal contact list(s) as well as your
exchange address book. Once a contact is found, it will display the details of it.
Use Hyperlinks to access other Office
documents and the Web
In Word and PowerPoint documents, you can use hyperlinks to jump to other Office
documents on your hard disk or network--or out to Web pages.
1. Highlight the word(s) you want to use as a link and press Ctrl-K, as shown in
Figure 2.
PERSONAL
PRODUCTIVITY TIPS
New in
Outlook
2000!
Microsoft Outlook and Exchange Server Tips and Tricks 2
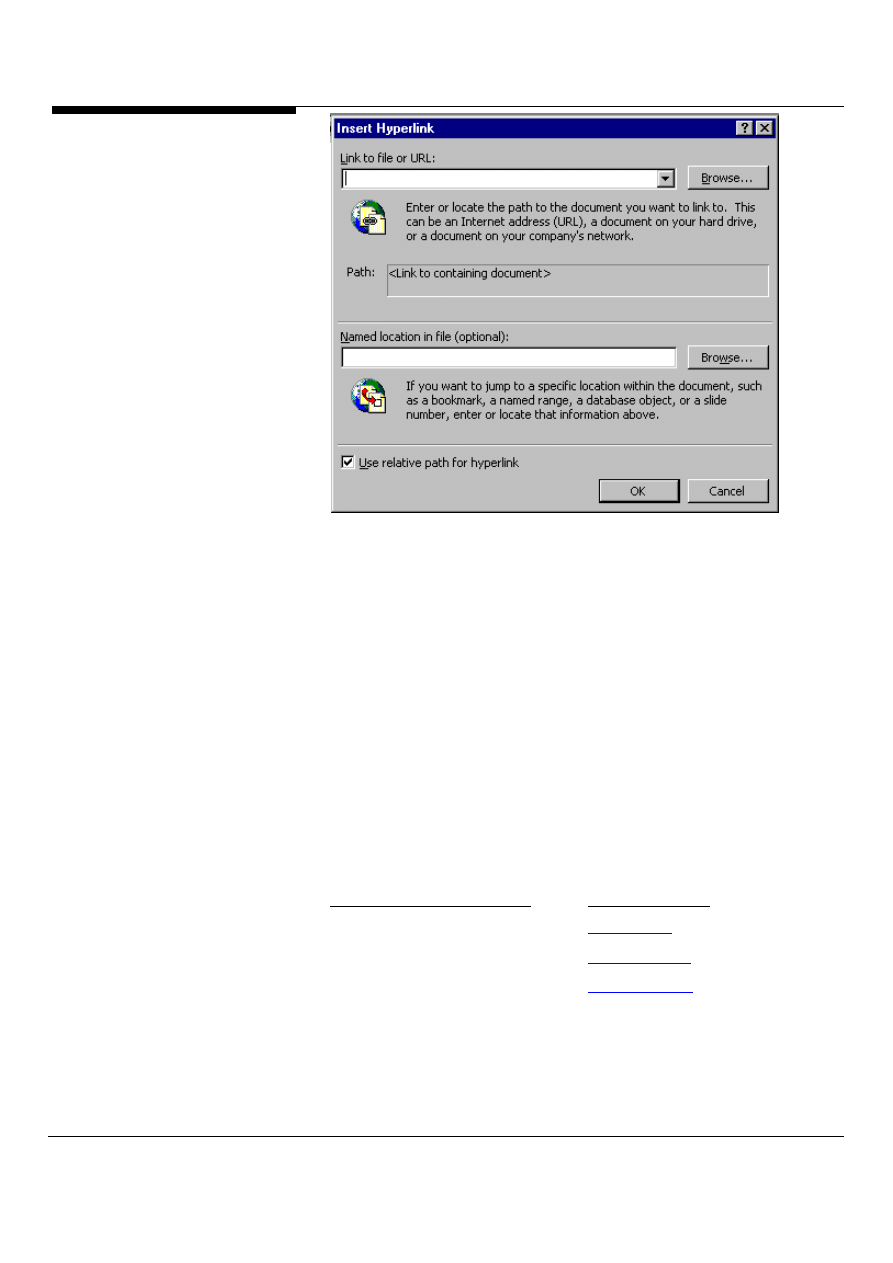
Figure 2: In the Hyperlink dialog box, choose the URL or path and filename you
want to link to, or optional add a name reference within the document.
2. In the Insert Hyperlink dialog box that appears, enter the URL or path and
filename you want to link to, or click Browse to look for it. If your browser is
running and has the relevant page loaded, switch to the browser. This
automatically puts the URL in the Link To box.
3. In the Name location in file (optional), add a name reference to a place within
the document that you're pointing to. Click OK, and the selected word(s) will
appear as a blue underlined hyperlink.
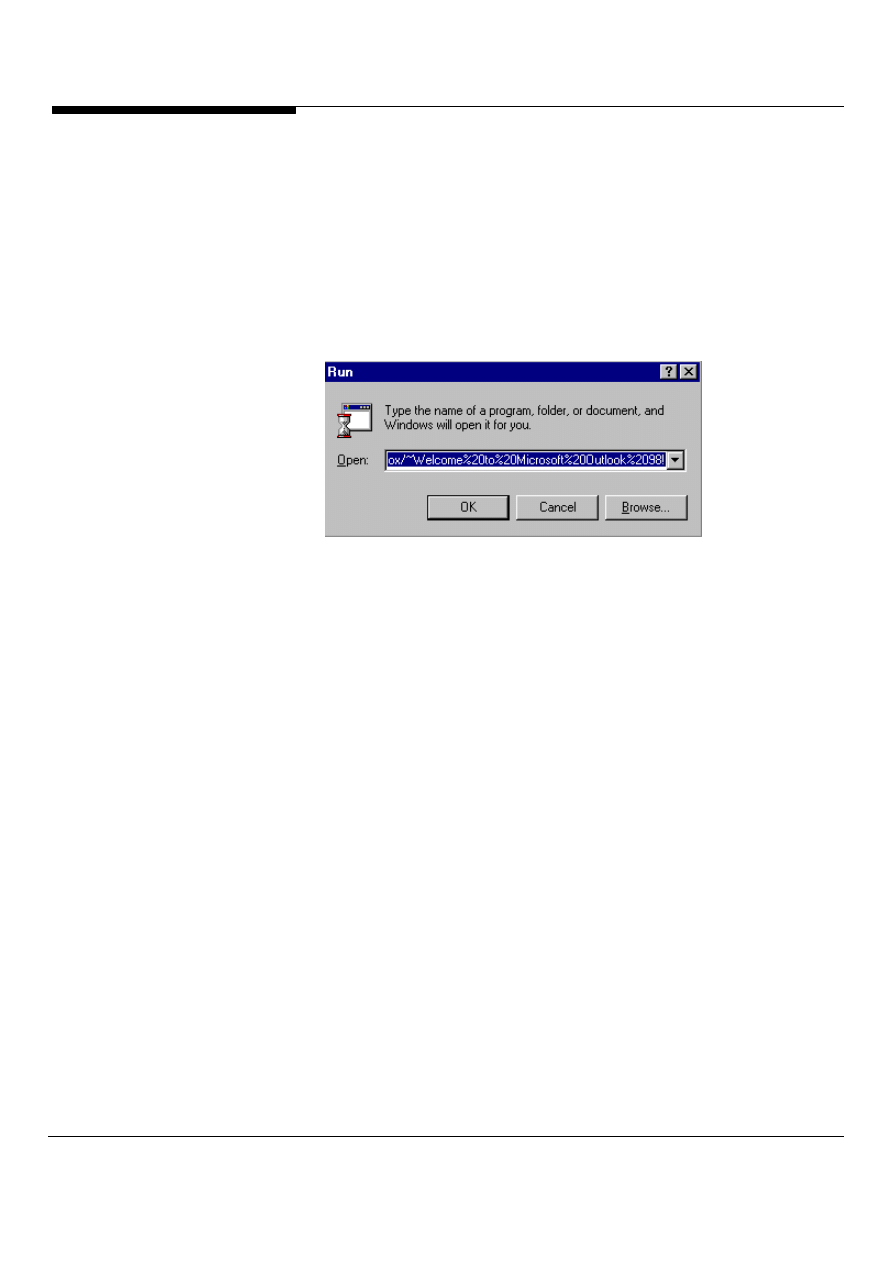
Hyperlink to Outlook data
To jump to Outlook modules from the web as hyperlinks or from command prompts,
follow the steps for linking to other Office documents, but insert specific codes in the
"Open” area of the text box, shown in Figure 3.
To link to this module:
Use this code:
the Inbox
Outlook:inbox
the Contacts list
Outlook:contacts
the Calendar
Outlook:calendar
a mailbox folder
outlook:foldername\subfolder (for example,
outlook:mytasks\inprogress)
a specific message in your mail folder
outlook:inbox/~subject of message
Microsoft Outlook and Exchange Server Tips and Tricks
3
a specific contact in your Contacts folder outlook:contacts/~name of contact
If you're not concerned with how things look, you can type the above codes directly
into your documents or email messages without designating another word to use as
the hyperlink. Office recognizes these codes and automatically turns them into blue
underlined hyperlinks. Note: If you want to link to Outlook items with spaces, for
example, a folder named my folder, you need to put %20 to represent the space. In
the my folder example, you would use outlook:my%20folder.
Figure 3: Insert the correct codes into the text box to connect to other
documents in outlook.
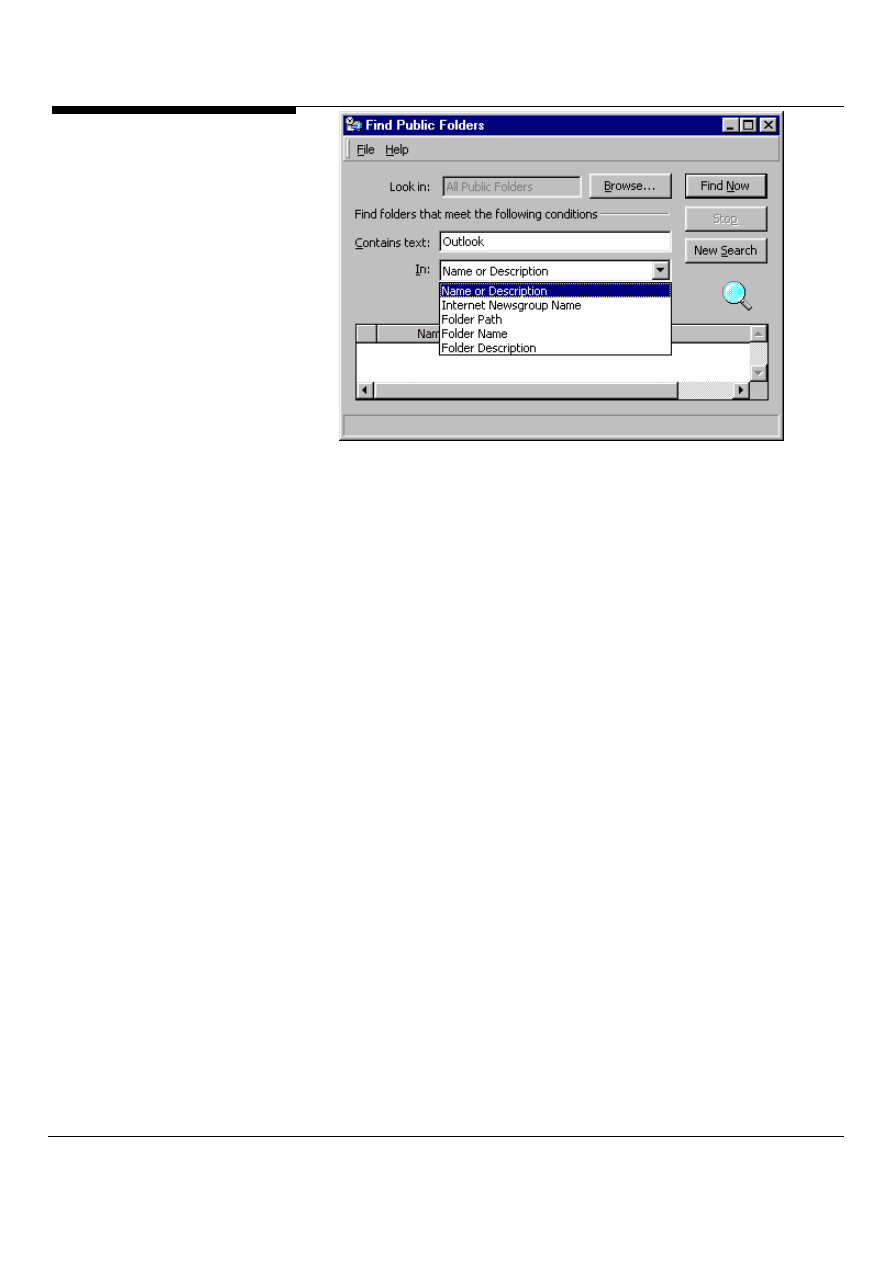
Find that Exchange Server Public Folder
Now it’s easier than ever to find Exchange Server Public Folders. Outlook 2000 allows
users to search for local or Microsoft Exchange Server folders based on the folder name
or other properties of the folder.
1. In Outlook, select the tools menu then Find Public Folder.
2. In the Find Public Folder, simply type what you are searching for and select the
Find Now Button.
You will also see, in Figure 4, you can search on a number of different parameters.
New in
Outlook
2000!
Microsoft Outlook and Exchange Server Tips and Tricks 4
Figure 4: The Find Public Folder Feature, makes it easy to find information in
and about public folders
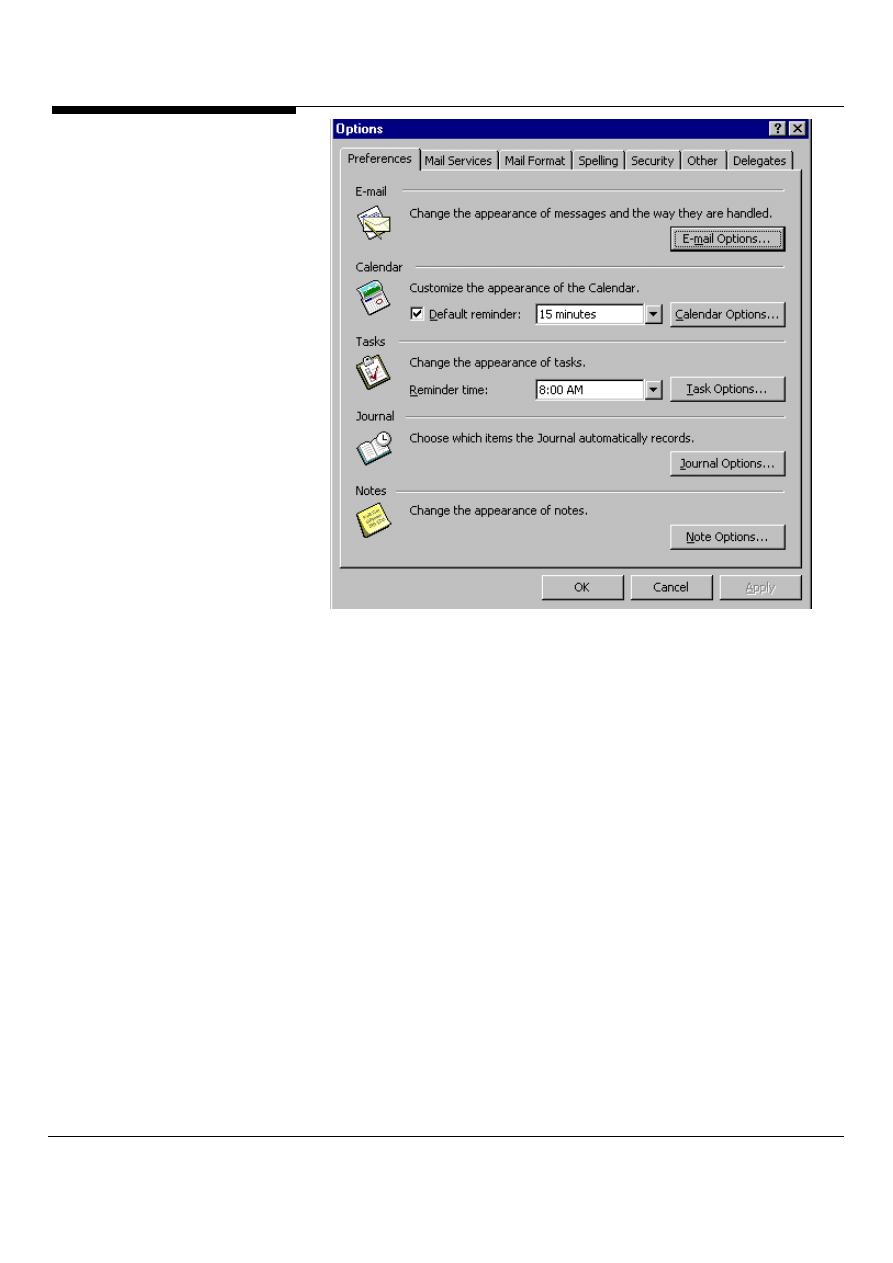
Customizing Outlook
To customize Outlook's basic functionality, begin by exploring the Options dialog
box, using the What Is feature to find out what things do before you tinker. Simply
select Tools/Options from the menu bar, shown in Figure 5 and right-mouse click
on the various options to pull up additional information, or select the option buttons
to open and change settings.
Microsoft Outlook and Exchange Server Tips and Tricks
5
Figure 5: In the options dialog box you can pull up additional information or change
settings.
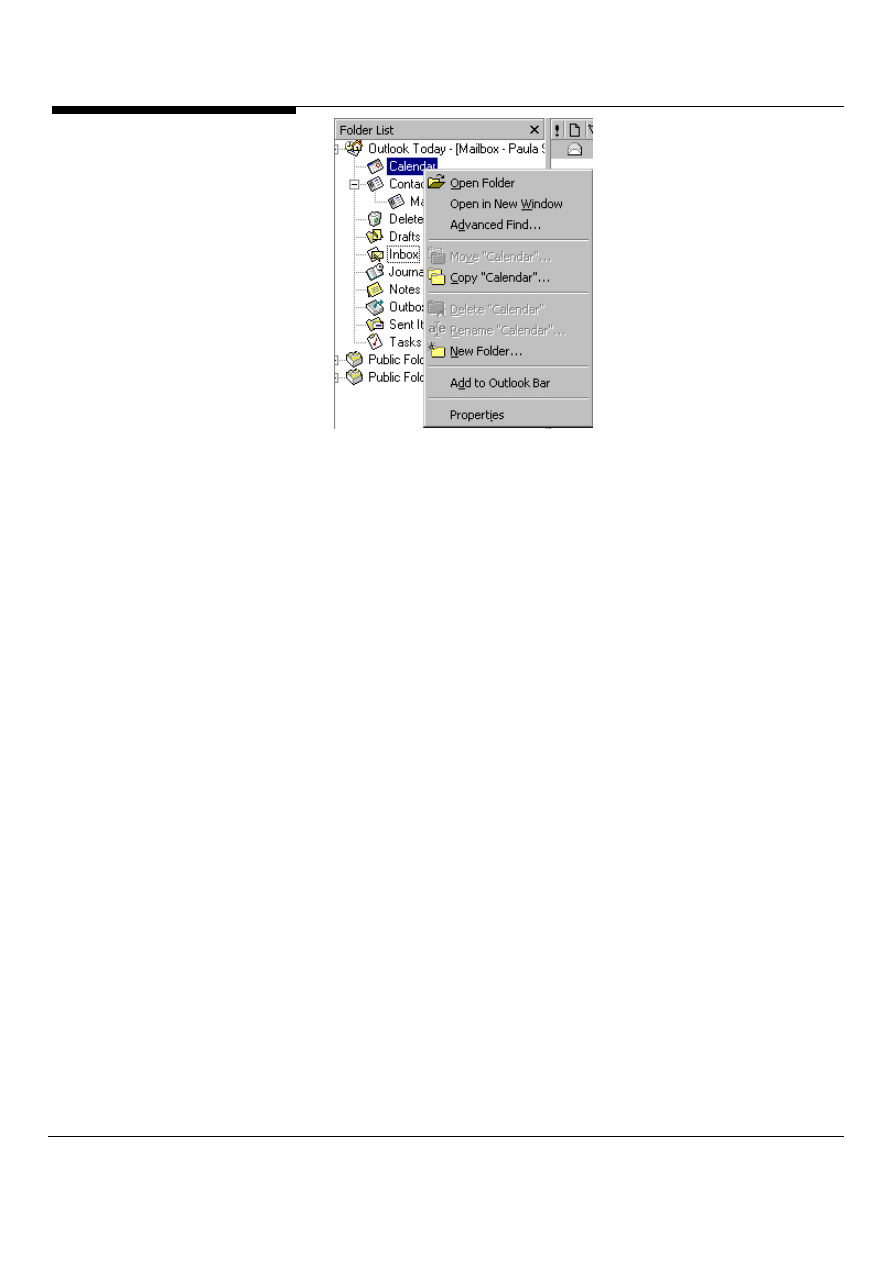
Open those modules!
If you want to have two or more Outlook modules open all the time, but you don't
want to switch back and forth between modules by clicking on the Outlook bar or
folder list, do the following:
1. Right-mouse click any of the icons in the Outlook bar (or folders in the Folder
List), shown in Figure 6.
2. Select "Open in new window." A separate window will open, letting you work in
two different modules. This can be handy when you want to drag and drop items
between modules.
Microsoft Outlook and Exchange Server Tips and Tricks 6
Figure 6: Select the “Open in new window” on the menu.
Some situations where you may want to use more than one Outlook window to
manage your information:
*You constantly switch back and forth between your Inbox and your Calendar.
Not only does it take time to reload the information each time you switch from
one folder to another, but also by default, the Calendar opens with today as the
active date instead of the date you were at previously.
* You manage the Calendar of other persons or resources. They have sent you
a link in e-mail to their Calendar and when you click the link, their Calendar
opens in a separate Outlook window.
* You have several Public Folders that you constantly use and browse. You
would like to have Outlook open each Public Folder in a separate window.
Creative columns with Outlook
You can change the column layout in most Outlook tables (such as a Task List) by
clicking a column label and dragging the column.
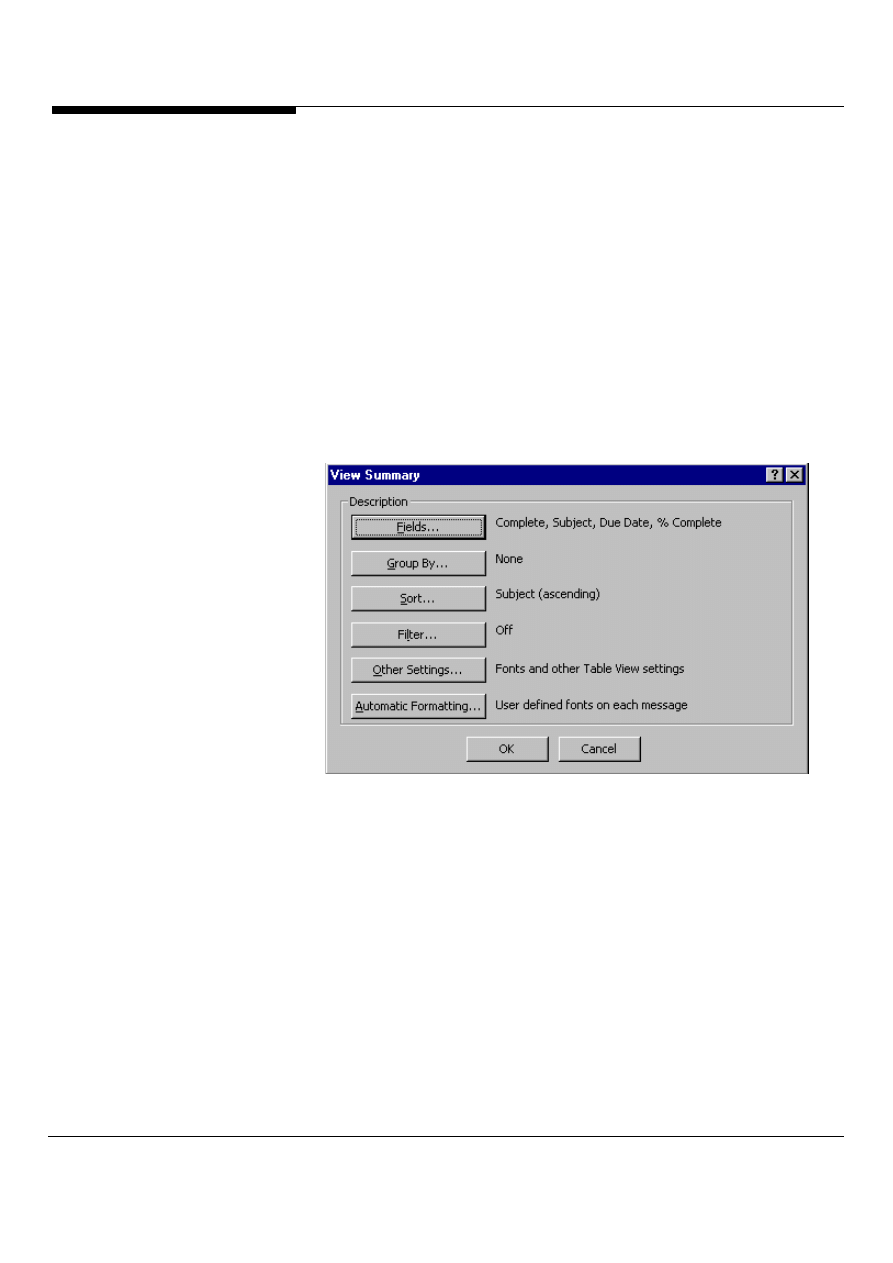
1. If you want to completely remove a column, click the column's label and drag it
above or below its current level. A large black X appears. Release the mouse while
the X is showing to remove the column from the current view. (If you accidentally
delete a column this way, select View /Current View/Customize Current View from
the menu bar, the view summary dialog box opens, shown in Figure 7, select the
fields option. The show fields dialog box opens, shown in Figure 8, select from the
Available Fields list, click the Add option, and click OK. The column reappears in
your table.)
2. If you want to rearrange columns, click the label of the column you want to move
and drag it left or right along the other columns. As you drag, sets of red arrows pop

Microsoft Outlook and Exchange Server Tips and Tricks
7
up, showing where the column will be placed if you drop it. When you've dragged
the column where you want it, drop the label, and Outlook inserts the column where
the red arrows indicate.
Figure 7: In the summary dialog box select the fields option to open the show
fields dialog box.
Figure 8: In the show fields dialog box select the available field you want ,click
add and click OK.
Microsoft Outlook and Exchange Server Tips and Tricks 8
Do you want to see what’s going on?
Outlook automatically resizes columns to fit all of a table's information into one view.
Unfortunately, this resizing can make the information inside the fields impossible to
read. If you don't want your columns resized but, instead, want to use a horizontal
scroll bar to see all the fields, do the following:
1. Select View/current view/customize current view from the menu bar. In the view
summary dialog box, shown in Figure 9, click the other settings option.
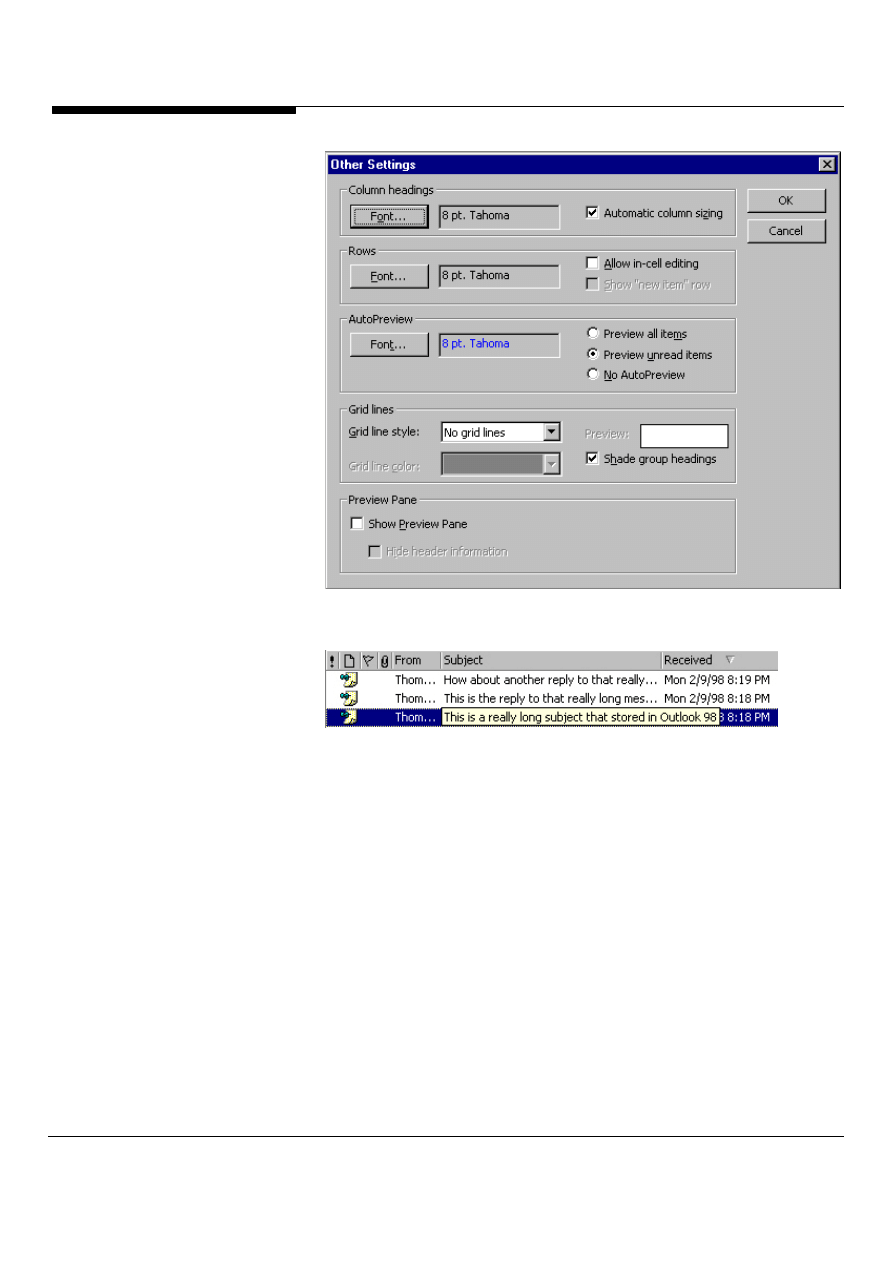
2. In the other settings dialog box, shown in Figure 10, uncheck the Automatic
Column Sizing option.
Conversely, if you want to see all the fields in a particular table, use the same
procedure to turn on Automatic Column Sizing. Outlook also supports holding the
mouse over an item’s text to see the entire text even if the text is cutoff in the view
as shown in Figure 11.
Figure 9: In the view dialog box click the other settings option.
Microsoft Outlook and Exchange Server Tips and Tricks
9
Figure 10: In the other settings dialog box uncheck the Automatic column sizing
option.
Figure 11: Outlook supports the ability to hold the mouse over cut-off text in the
view in order to see the entire line.
Copy your settings between folders
You can copy views, forms, rules, and other special settings from one folder to
another. This feature is useful if you maintain more than one contact list and want to
copy custom view settings or access privileges among them. To copy the settings:
1. Open the folder to which you want to copy the settings.
2. Select File/Folder/Copy Folder Design from the menu bar, shown in Figure 12.
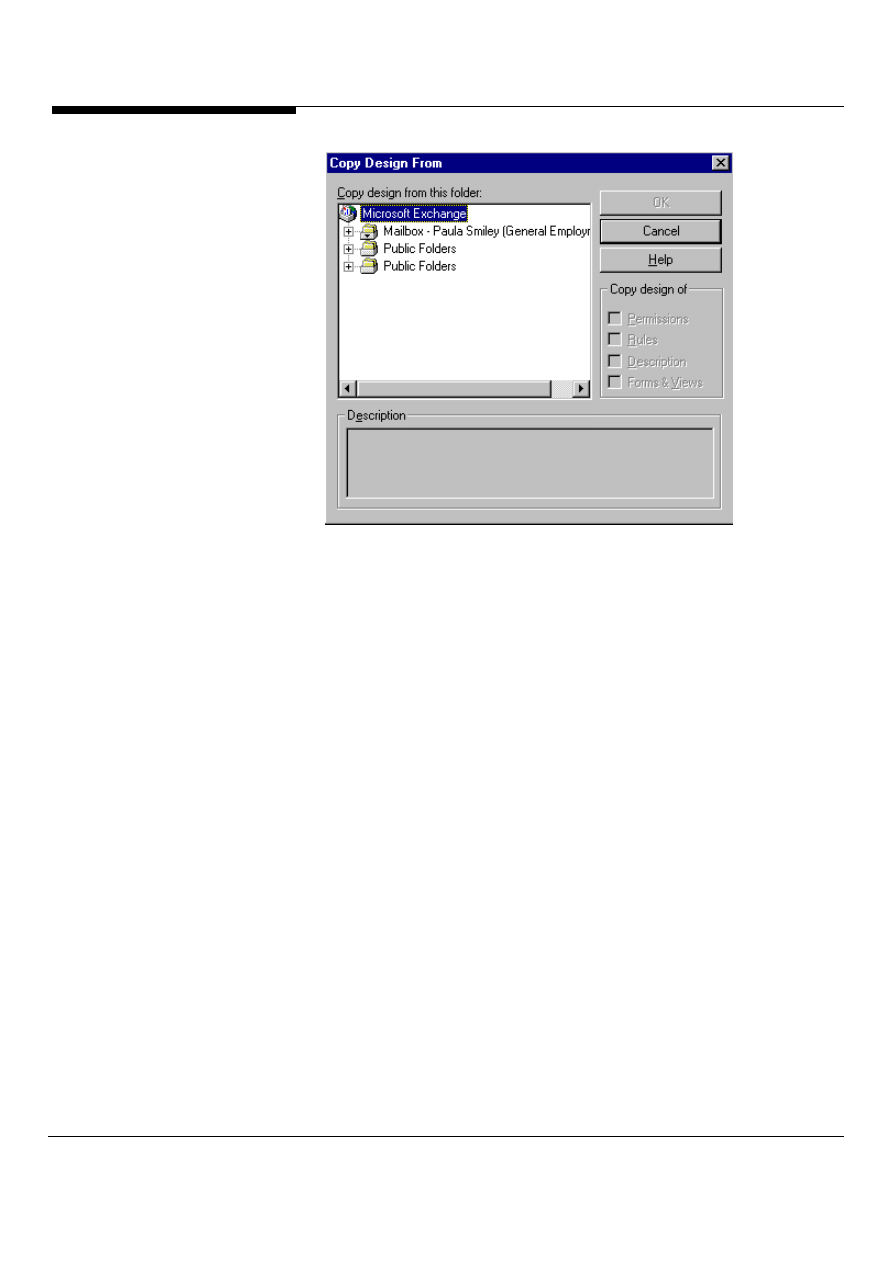
3. In the Copy Folder Design dialog box, select the folder from which you want to
copy the settings.
4. Choose the different properties (Permissions, Rules, Descriptions, and/or
Forms & Views) you want to copy and click OK.
Microsoft Outlook and Exchange Server Tips and Tricks 10
Figure 12: In the copy design dialog box, select the folder from which you want
to copy.
Don’t forget about your Exchange friends
Just because you are taking advantage of the power of Microsoft Office doesn't
mean everyone else is. If you plan to share the information in your Personal Folders
or create new folders with information that needs to be viewed by Microsoft
Exchange clients, you can set Outlook to generate two sets of files. One set retains
fields for all the new features in Outlook; the other is compatible with the Exchange
client. Here's how:
1. Right-click the banner menu (the horizontal area right below the toolbar
containing the name of the current folder, such as Inbox); select Properties, shown
in Figure 13.
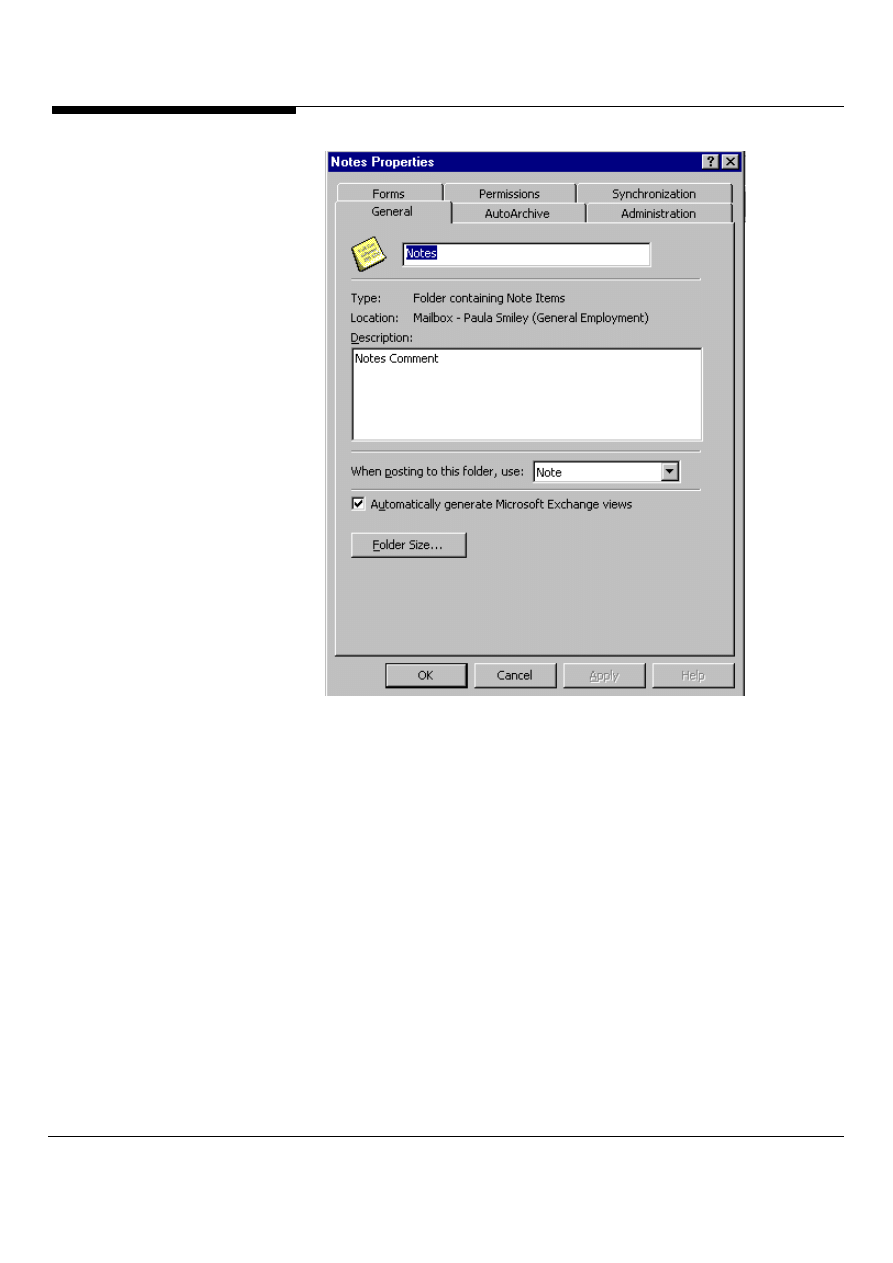
2. Under the General tab of the Properties dialog box, make sure the check box
labeled "Automatically generate Microsoft Exchange views" is checked.
Microsoft Outlook and Exchange Server Tips and Tricks
11
Figure 13: In the properties dialog box under general tab, make sure the box
labeled “Automatically generate Microsoft Exchange views” is checked.
Sort, Sort and more Sort
Outlook's inbox and tasks folders let you sort by clicking on column headings, just
as would you do in Windows 95's Explorer. But check out these slick
enhancements.
First, when you click on a column heading, an arrow shows you that the listing is
sorted by that column and in which direction. If the arrow points up, the list is sorted
in ascending order; if it points down, the list is in descending order.
Second, you can base your sort on more than one column. To accomplish this, click
the first column that you want to sort the list on. Click a second time if you want to
reverse the sort order. Then hold down the <Shift> key and click the column that
you want to use to break any ties that occur in the first sorted column. To reverse
the order of the second sort column, continue to hold down the <Shift> key and click
the second column again.

Microsoft Outlook and Exchange Server Tips and Tricks 12
If you don't like the order in which the columns appear in a Tasks or Inbox
folder, you can easily move the columns around: Just position the mouse
pointer over the column heading, then drag it to the right or left until red arrows
show where the column heading will be dropped when you release the button.
Exports made easy
Outlook makes it easy to export Outlook folders to another file format. Follow
these steps to export your Outlook folders to a different file format:
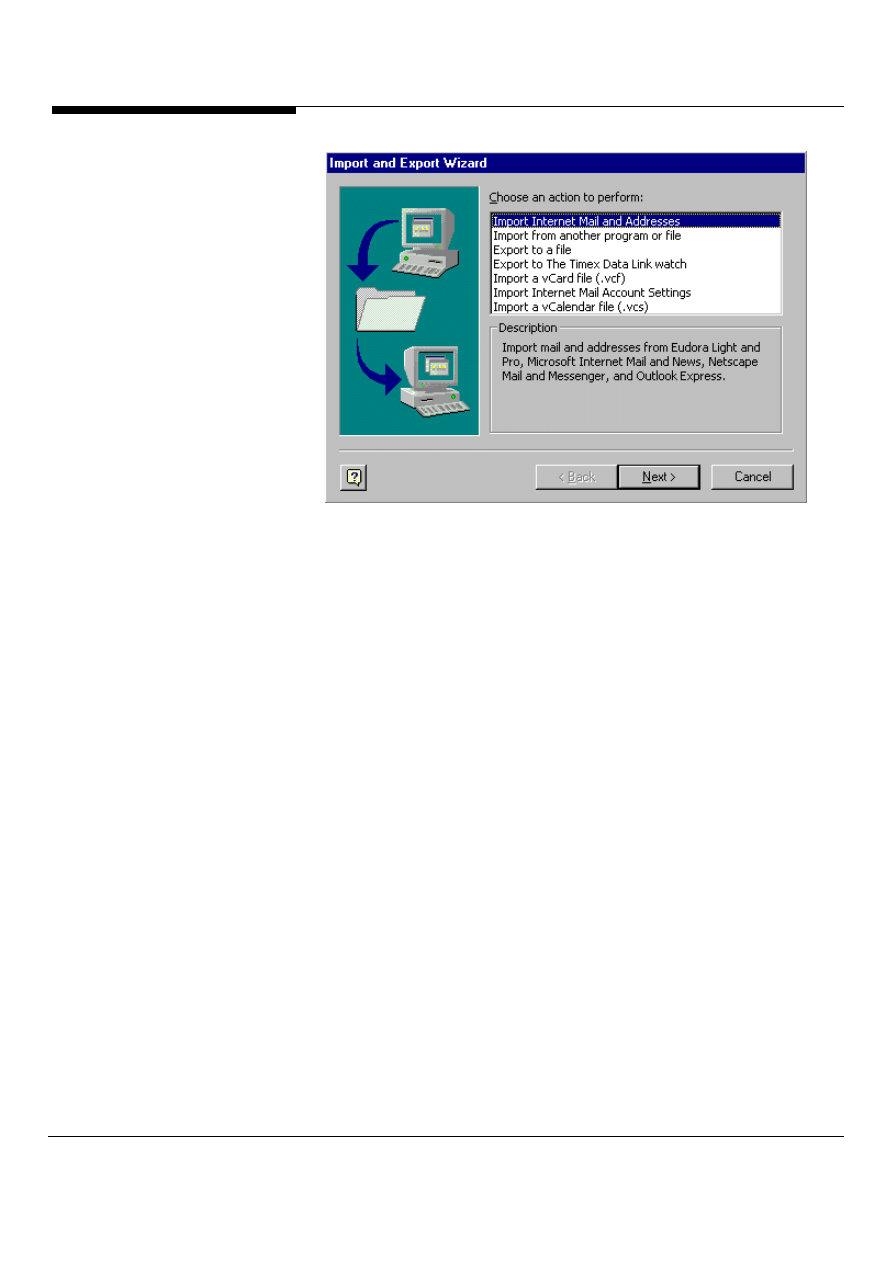
1) On the Outlook File menu, click Import And Export to open the Import And
Export Wizard, shown in Figure 14.
2)
In the "Choose an action to perform" list, click to select "Export to a file,"
and click Next.
3)
In the "Select the folder to export from" list, click to select the Outlook item
folder you want to export. For example, select your Contacts folder to
export your Contacts in a different file format.
4)
Click Next.
5)
In the "Create a file of type" list, click to select the export file format, and
click Next.
6)
In the "Save exported file as" box type a path and file name, or click Browse
to select a destination file.
7)
Click Next.
8) Click "Map Custom Fields" if you want to control how fields export;
otherwise, click Finish to start the export.
Microsoft Outlook and Exchange Server Tips and Tricks
13
Figure 14: The Import and Export Wizard, allows you to export Outlook folders
to another file.
Drag and drop and AutoCreate please!
Outlook's efficient drag-and-drop system lets you automatically create new
items and add shortcuts and links to items in seconds. Drag a Contact record to
the Calendar folder to create an appointment with that person, or drag an e-mail
message to the Tasks folder to create a task based on that message. If you
drag a file to a Contact item, you can create a shortcut to that file or attach the
file itself by holding down the right mouse button while you drag. Also, for
additional options, drag and drop and item with the right mouse button
depressed, you’ll find you can create attachments, and add the contents as
text.
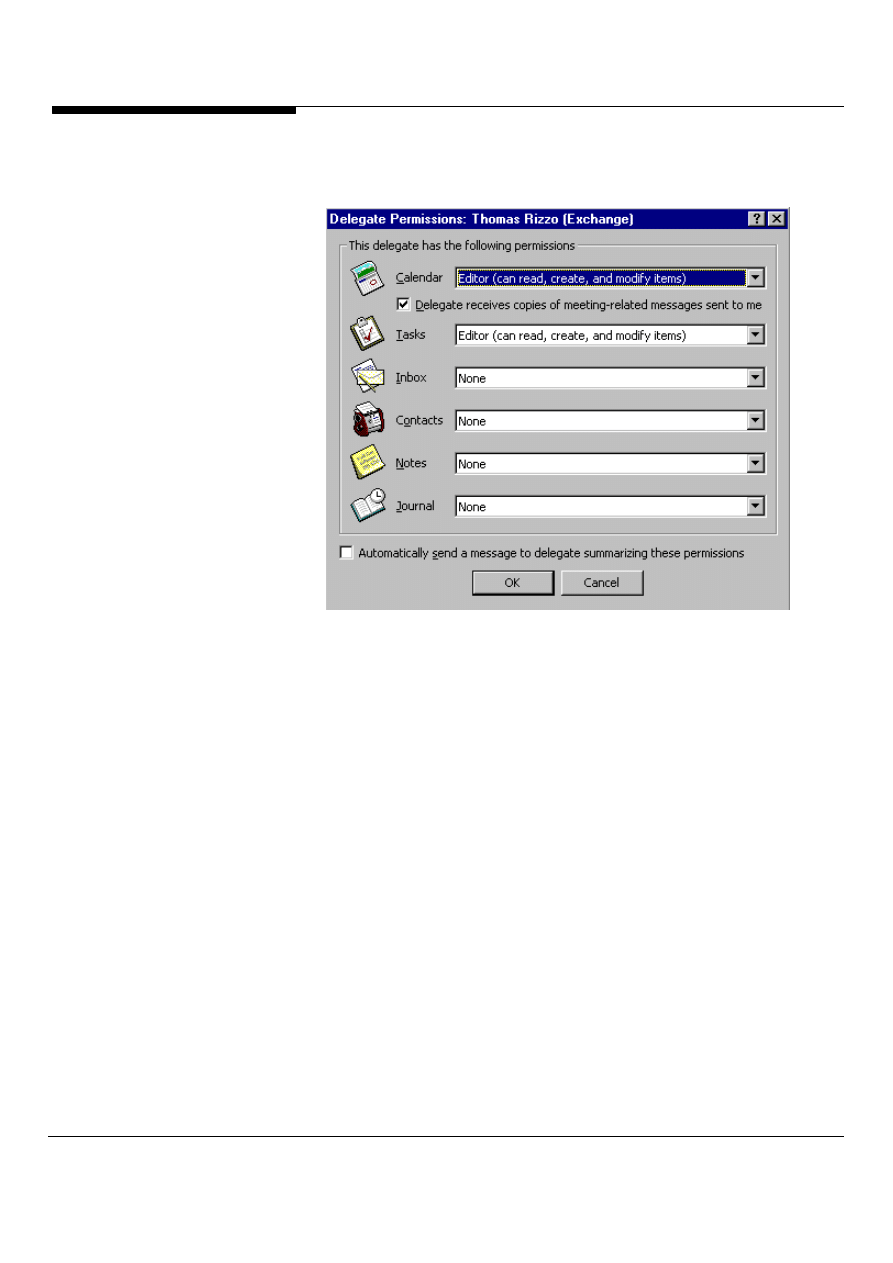
Delegate, Delegate, Delegate
On the Tools menu, click Options, and then click the Delegates tab. Click Add.
Enter the name of the delegate you want to set permissions for or select from
list box. Click Add, and then click OK. In the Delegates box, click the delegate
you just added. Click Permissions, and then select the permissions for each
Outlook folder you want the delegate to have access to, shown in Figure 15.
To send a message to notify the delegate of the delegate status and
permissions you set, select the Automatically send a message to delegate
summarizing these permissions check box. If you want your delegate to be sent
copies of your meeting requests and responses, give the delegate editor
permission, and then select the delegate receives copies of meeting-related
messages sent to me check box. To add multiple delegates simultaneously,
Microsoft Outlook and Exchange Server Tips and Tricks 14
select multiple names in the add users dialog box. The permissions you select
will apply to all the delegates.
Figure 15: Delegate Permissions by selecting from the list box.
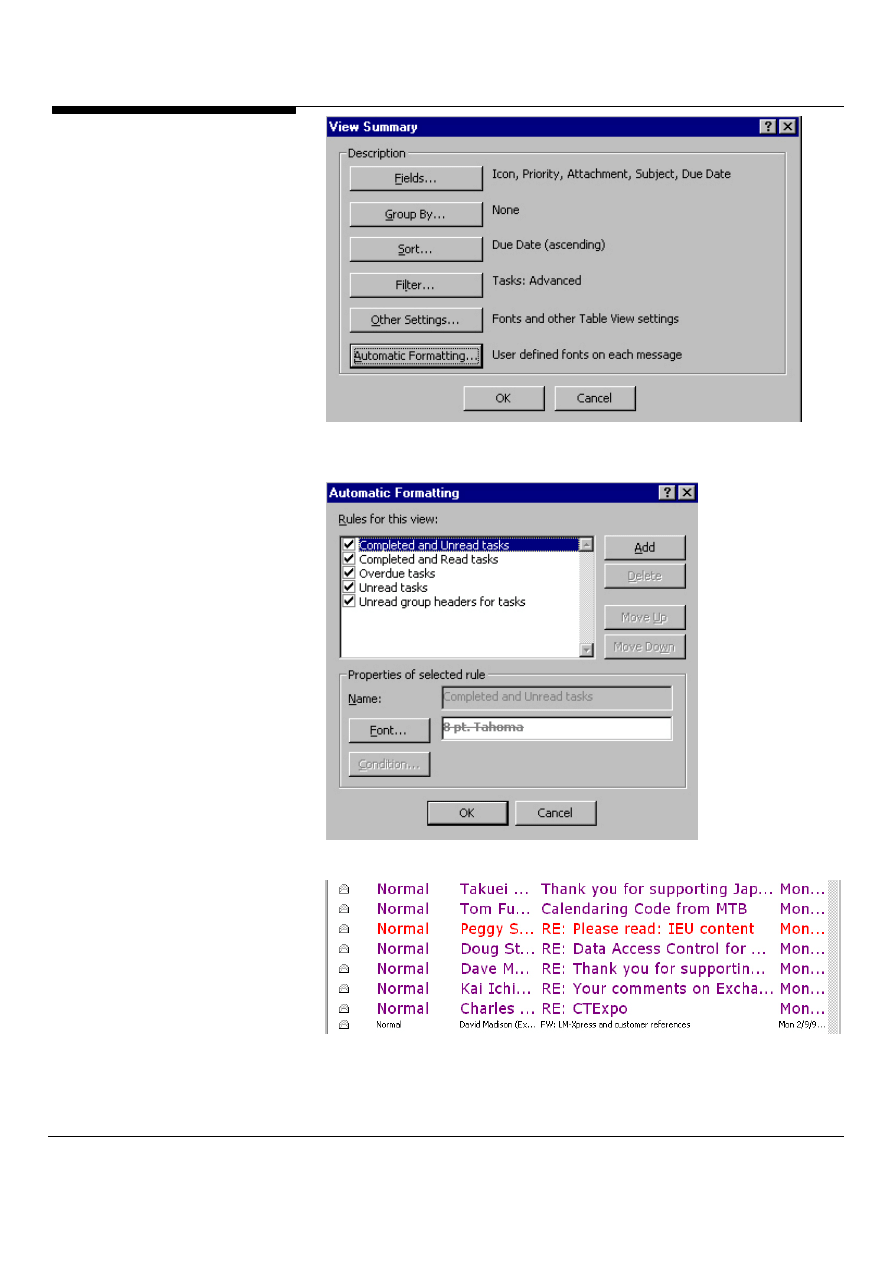
Fonts and Colors, and more fonts and colors
Outlook makes it easy to separate the wheat from the chaff when viewing
information. Outlook supports conditional formatting, which allows users to
customize how items that meet specific criteria are displayed. For example, all
items from co-workers appear in a Green Arial 10-point font while items from other
users appear in a standard black font. To set conditional formatting, you can go to
the View menu, select Current View and then Customize Current View. The View
Summary dialog box will appear as shown in Figure 16, click on Automatic
Formatting. The Automatic Formatting dialog box will appear as shown in Figure
17. To add a new format, click on Add and type in a name and the criteria for your
new format. To see how your formatting looks, go back to the folder and use the
view you just customized. Figure 18 shows a customized view of an inbox.
Microsoft Outlook and Exchange Server Tips and Tricks
15
Figure 16: The view summary dialog box
Figure 17: The Automatic Formatting dialog box
Figure 18: A customized inbox with conditional formatting applied.
Microsoft Outlook and Exchange Server Tips and Tricks 16
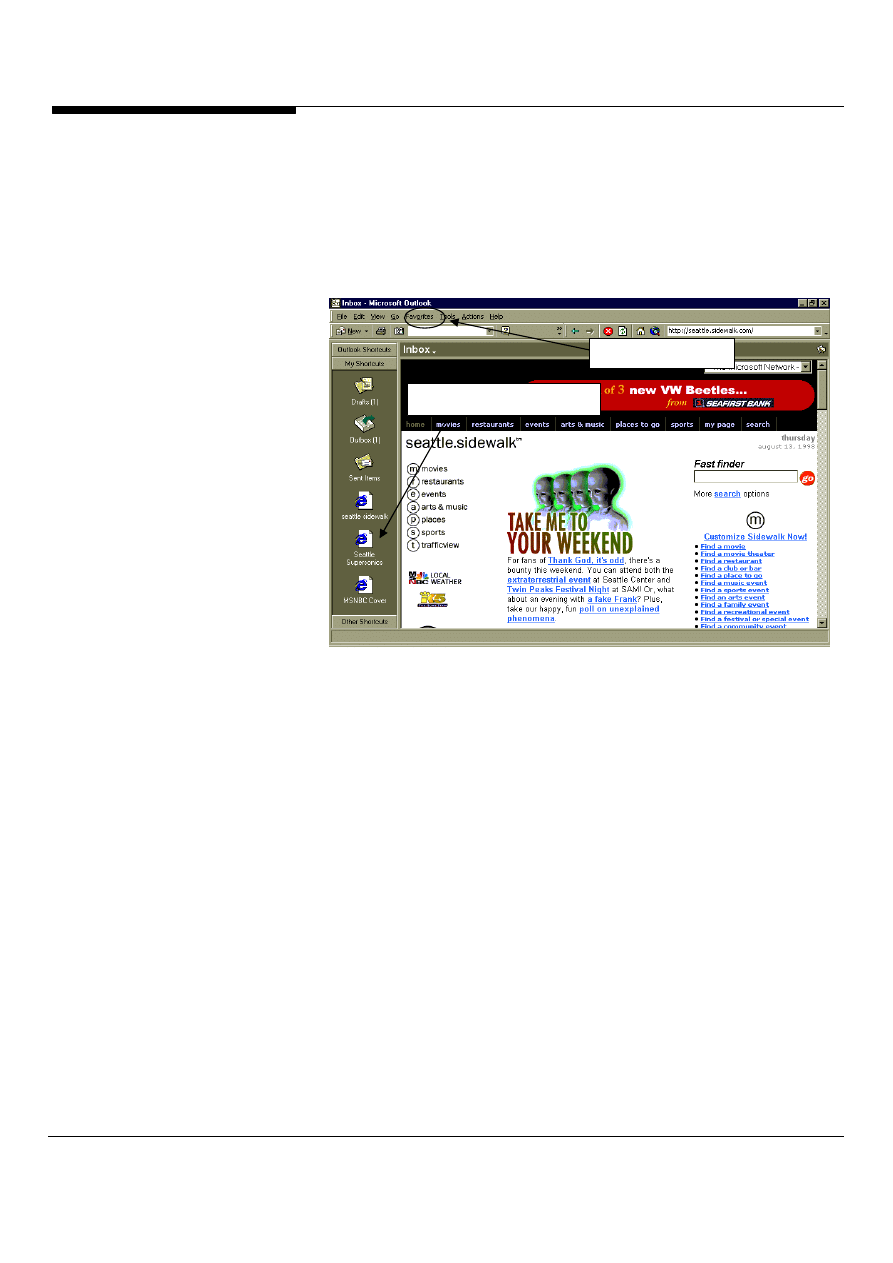
Add your favorites to the Outlook Bar
Use the Outlook Bar for easy access to your Internet Explorer Web sites, your
Netscape Navigator Bookmarks or a shortcut to any file (Figure 19). It’s
simple, just drag and drop any shortcut to the Outlook Bar. From there, you
can drag any URL to your Contacts, Calendar, and other folders or click on a
URL within Outlook to launch your browser and access the site.
Figure 19: New shortcuts in the Outlook Bar and the viewing web pages within
Outlook 2000
View those Web Pages from within Outlook
2000
In Outlook, clicking on an Outlook Bar shortcut to a Web page (a URL) displays the
related Web page in the right-hand pane to give the user quick access to frequently
used Web sites or pages (Figure 19). Furthermore, we’ve integrated the Favorites
menu within Outlook 2000, so your Internet favorites can be conveniently accessed
Note: Outlook uses the HTML rendering and security services of Microsoft Internet
Explorer to safely display HTML content in the right-hand pane. Outlook includes
the basic Web navigation features of the standard Microsoft Office Web Toolbar and
is intended to enable quick viewing of Web pages or sites. Outlook is not intended
to be a user’s full-featured primary Web browser. Outlook will not register itself as
the user’s default Web browser.
New in
Outlook
2000!
New in
Outlook
2000!
New Outlook Bar Shortcuts
Favorites Menu
Microsoft Outlook and Exchange Server Tips and Tricks
17
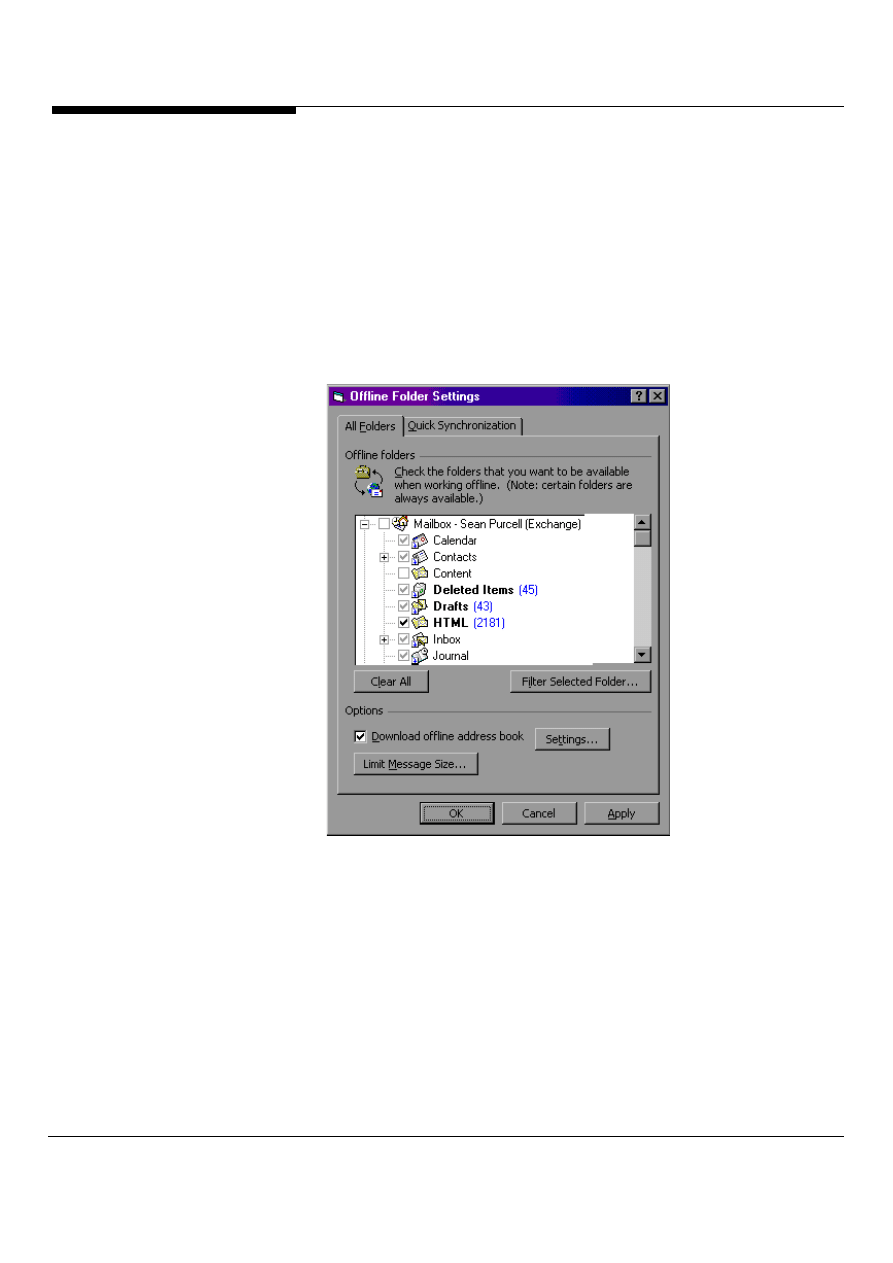
Improved User Interface in Offline Folder
Synchronization
Outlook 2000 consolidates Offline Folder synchronization settings into a single
dialog box (Figure 20) that displays a folder list to make it easy to control and
confirm which folders are available offline. This dialog box also provides access to
the filtered synchronization feature described above.
To access this dialog, select the tools menu, then synchronize then Offline Folder
Settings.
Figure 20: The Offline Folder Settings Dialog, makes it easy to setup
New in
Outlook
2000!
Microsoft Outlook and Exchange Server Tips and Tricks 18
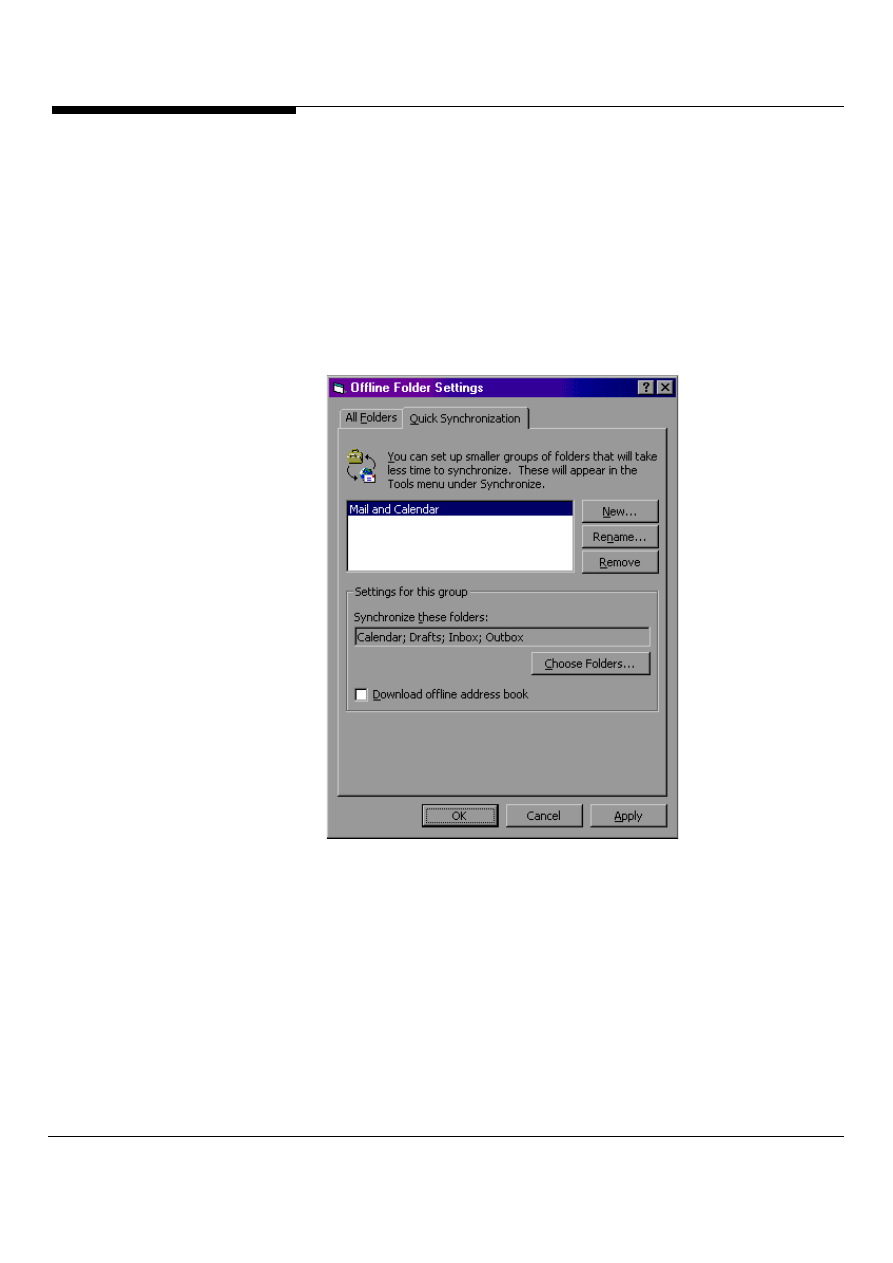
Quick Synchronization Groups
Now when you dial in using a modem or other slow link, you can specify specific
sets of folders to be synchronized by a single command, that’s because Outlook
allows you to create Synchronization Groups. For example, with a single menu
command, you can easily synchronize only Inbox and Calendar folders, or
synchronize any group of Exchange Server Public Folders that you only want to
synchronize once a week while online. Quick Synchronization Groups are managed
in the Offline Folder Settings dialog box tab shown in the following Figure 21.
Figure 21: The Quick Synchronization Dialog
New in
Outlook
2000!
Microsoft Outlook and Exchange Server Tips and Tricks
19
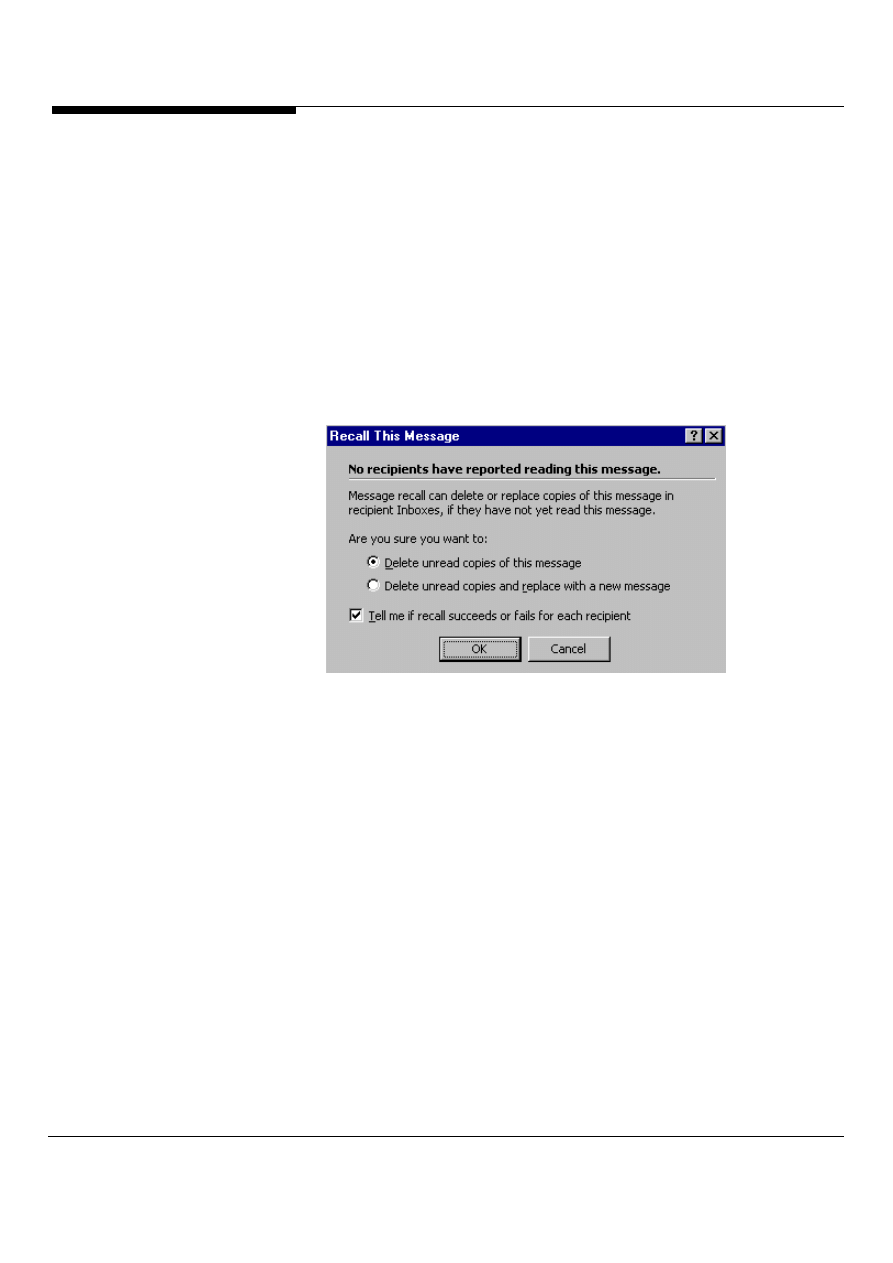
Did you really want to send that?
You can only recall or replace messages you sent to recipients who are logged
on and using Outlook and who have not read the message or moved the
message out of their Inboxes. On the Outlook Bar, click Mail. Click Sent Items.
Open the message you want to recall or replace. On the Tools menu, click
Recall This Message. To recall the message, click Delete unread copies of this
message (Figure 22). To replace the message with another, click Delete
unread copies and replace with a new message, click OK, and then type a new
message. To receive a notification about the success of the recall or
replacement for each recipient, select the Tell me if recall succeeds or fails for
each recipient check box. To replace a message, you must send a new one. If
you do not send the new item, the original message is still recalled.
Figure 22: Recall messages you didn’t mean to send
Play well with others
If you want to send a large file to a coworker, put it on your network instead,
and send that person a hyperlink to the file, not the file itself. Just type in the
URL or file://, and Outlook will change the text to a hyperlink.
Clean out that mailbox!
Oftentimes, you might save a group of related messages--the original as well as
any replies and forwarded messages--perhaps for record keeping. Eventually,
you'll want to purge those records from your Inbox. Rather than searching for
and deleting each message, you can quickly group them and then delete the
group.
To do this: Select the appropriate folder, such as Inbox, Outbox, Deleted Items,
or Sent Items. Then, go to View menu and choose By Conversation Topic.
Finally, click on the header for the group you want to delete, press the [Delete]
key, and then click Yes to confirm the deletion. That’s it!
EMAIL PRODUCTIVITY
TIPS
Microsoft Outlook and Exchange Server Tips and Tricks 20
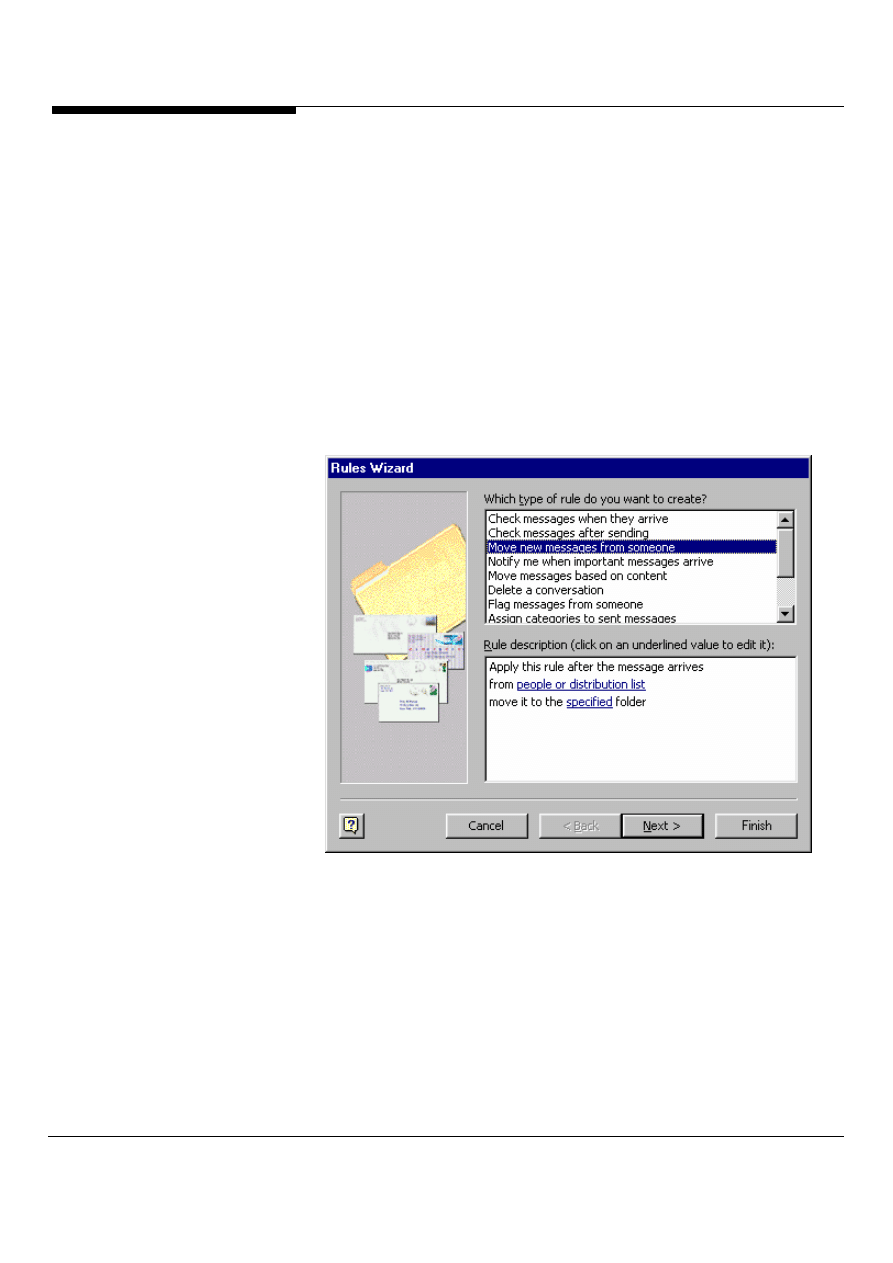
Keep your mail organized with the Rules
Wizard
The Rules Wizard allows you to automatically put into folders, delete, highlight,
forward and flag incoming and outgoing e-mail so you can better manage and
prioritize your e-mail. The Rules Wizard in Outlook uses an innovative plain -
language, hypertext user interface to build rules for a wide variety of common e-mail
and information management tasks, allowing you to easily create rules using a step-
by-step wizard. This is not a power-user feature; anyone can create standard or
custom rules easily and quickly to work the way they do (Figure 23). Users can now
easily designate which rule is to be performed if a message meets multiple rule
conditions. This ensures that the preferred action is taken when a condition is met.
Users can also establish rules based on any property of an item in Outlook,
including properties on custom forms.
Figure 23: The Rules Wizard easy to use interface
Run those Rules when you need to with Run
Rules Now
Many rules created by the Rules Wizard are used to automatically process newly
received messages or other items as they arrive in the Inbox or are sent from the
Outbox. With the new Run Rules Now feature available in the Outlook 2000, you
can manually apply any rule to any folder you choose, providing a powerful tool for
cleaning up or organizing e-mail messages, appointments, contacts or tasks that
New in
Outlook
2000!
New in
Outlook
2000!

Microsoft Outlook and Exchange Server Tips and Tricks
21
already exist in various folders. There is a new Run Rules Now feature that allows
a rule to be applied manually at any time to any folder and includes new account
criteria and new “print” and “run application” actions.
Express yourself with HTML
Support for HTML e-mail in Outlook 2000 provides you with the option to format mail
with content as rich and compelling as content on the Web so you can personalize mail
and communicate more effectively. HTML mail can be exchanged reliably over the
Internet, and because all leading e-mail applications today support HTML mail, rich
HTML mail can be exchanged between applications from different vendors. Outlook
2000 provides basic WYSIWYG HTML editing features (Figure 24); alternatively
Microsoft Word can be used as the HTML mail editor, so users can easily author rich
HTML mail.
Figure 24: Basic HTML editor in Outlook showing HTML with numbered list style
Reply annotations are also enhanced with HTML. When a user replies to your message,
a border that is the same color as the reply text will appear down the left side of the
original message. This allows you to easily track and read responses, particularly in long
e-mail threads.

Microsoft Outlook and Exchange Server Tips and Tricks 22
Note: You have the option to designate the text format (HTML, RTF or plain) for all
messages.
Choose the way you want your messages
sent
Now you can choose the basic editor in Outlook described in the previous section or
Microsoft Word to edit your mail messages by default and choose to send each
message independently in RTF, HTML or plain text format.
Change that message format on the fly
When using the built-in Outlook editor, you can switch between HTML, RTF or plain text
editing while editing a message. It makes your life a lot easier especially when you want
to reply to a message with HTML, or rich text.
Use Microsoft Office E-Mail
In addition to designating a default e-mail editor and send format, Outlook 2000 lets you
easily choose, on a per-message basis, to compose a message using any Office
application (Figure 25). The Office application appears with a Mail Command Bar at the
top of the document. You can compose the message using the powerful tools in Office
— tables, background spelling and grammar checking in Word for example; it really
helps to get your point across! Then you can simply send the e-mail as HTML, so the
recipient doesn’t need to start Office — or even have Office installed on her or his
machine — to read the mail.
Figure 25: Use other Office programs to help you send richly formatted e-mail.
New in
Outlook
2000!
New in
Outlook
2000!
Microsoft Outlook and Exchange Server Tips and Tricks
23
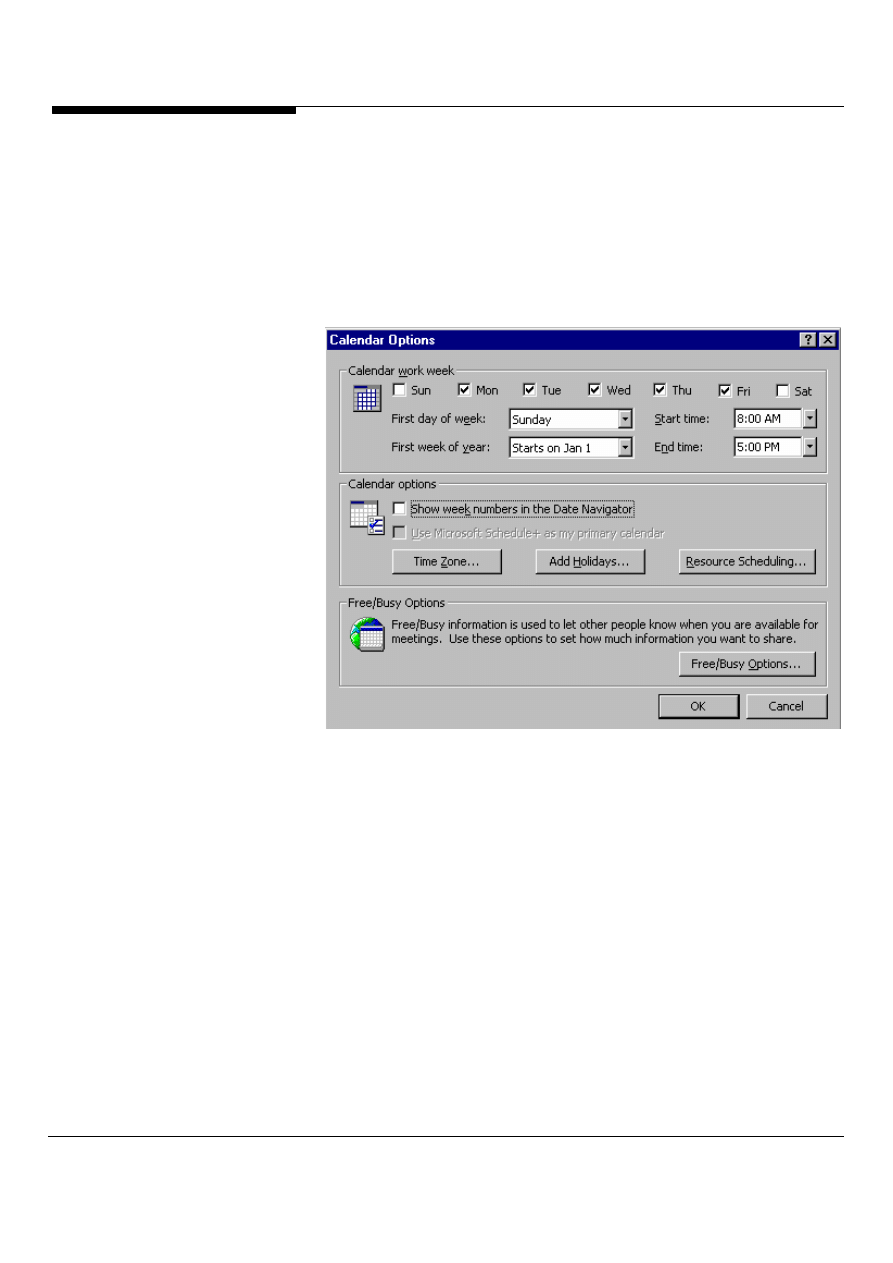
Adding Holidays to your calendar
Holidays. How can people live without them? Most people want to place their
holidays on their Outlook calendar. To do so, first open the Calendar by clicking its
icon on the Outlook Bar. Then, pull down the Tools menu and select Options. Click
on the Calendar Options button. Outlook will automatically display the Calendar
Options dialog, shown in Figure 26.
Figure 26: You can add holidays to your calendar from the Calendar Options by
selecting Add Holidays.
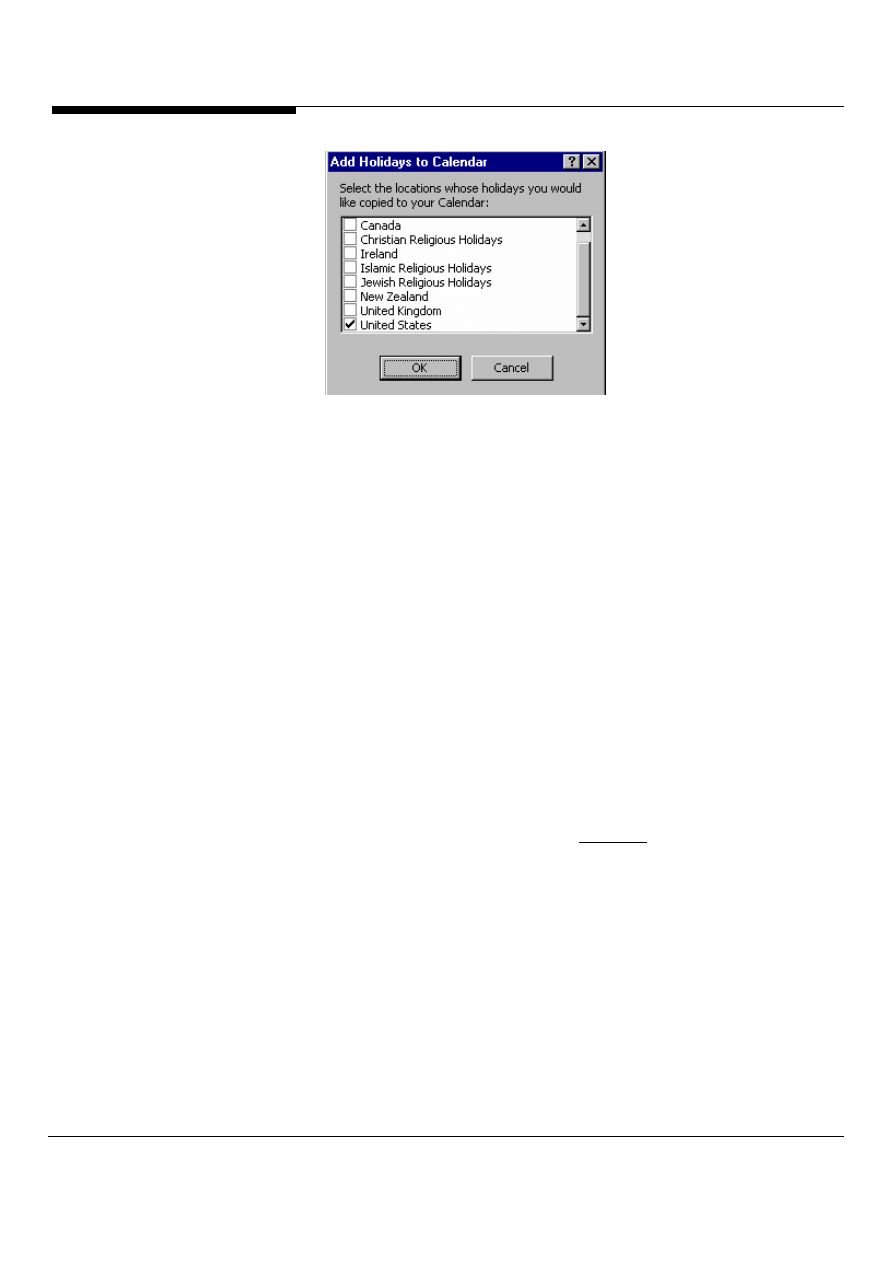
Click the Add Holidays button located in the center of the dialog box. When you do,
Outlook will display the Add Holidays to Calendar dialog box, shown in Figure 27.
Scroll down the list of national and ethnic holidays until you find the one you want to
add and click its check box. (Outlook will select your country's check box by
default.) You can add more than one set of holidays to your calendar simply by
clicking other check boxes. Once you've specified the set(s) of holidays you want to
add, click OK. Outlook will then import them into your calendar and return you to the
Options dialog box. Click OK to close the dialog box and return to your calendar,
which will now display your country's holidays.
CALENDAR
PRODUCTIVITY TIPS
Microsoft Outlook and Exchange Server Tips and Tricks 24
Figure 27: In the Add Holidays to Calendar dialog box, choose the country whose
holidays you want to add to your calendar.
Planning Ahead with the Outlook Date
Navigator
If you like to plan ahead, and even if you don’t, you can customize how many
months appear in the Date Navigator. The Date Navigator is the little calendar that
appears in the Outlook Calendar window. By clicking in the Date Navigator, you can
quickly view any day or week in your calendar.
The Date Navigator can display the current month and as many months ahead as
the size of your screen allows. You can specify how many months appear — or
whether the Date Navigator appears at all — by resizing the borders between
elements in the Calendar window. If your Date Navigator has disappeared and you
want it back, just adjust the borders to make room for it.
Drag date ranges
You can easily change the start and stop dates of an existing event or appointment
in Outlook's Calendar module.
1. Double-click the event or appointment in calendar to open it.
2. Click the Start Time drop-down box. A calendar will pop up.
3. Select a range on the displayed calendar by dragging the pointer over the desired
dates. Outlook automatically updates the start/end time values.
Do discontinuous dates
To select discontinuous dates in the Calendar module, hold down the Ctrl key while
you click in the monthly date navigator in the upper right corner. You can even
select discontinuous weeks by holding down the Ctrl key and clicking to the left of

Microsoft Outlook and Exchange Server Tips and Tricks
25
different weekly rows in the month display.
Change views instantly
You can use keyboard shortcuts to quickly change your main Calendar views. Alt-1
displays one day, Alt-2 displays two days, and so on to Alt-9, which displays nine
days side by side. Alt-- (Alt and the minus key) gives you Week mode, and Alt-= (Alt
and the equals key) serves up Month mode.
Move to mouse-click shortcuts
In the Outlook Calendar's one-day view, right-click in the area above the time-
interval labels (for example, 8 a.m. or 9 a.m.) for a list of shortcuts, such as quickly
adjusting the time scale of your daily view. You can also right-click in the date
header (Tuesday, October 1, for instance) in one-day view--or on a blank space on
the calendar grid in any view--for another list of shortcuts, such as instantly adding a
new appointment.
Drop that contact into your calendar
Drag and drop a contact to the Calendar icon to create a meeting request with
the e-mail address already populated (don’t forget to try dragging with the right
mouse button depressed for additional options!).
Talk to Outlook using Natural Language
When you specify a date in a date field in Outlook, you usually type the actual
date or choose it from a calendar. However, you can also use natural language
expressions, such as Next Thursday or Day After Tomorrow, Next Month.
To test this, activate Outlook's Calendar module and choose Day/Week/Month
from the Current View list. Then, press [Ctrl]G to display the Go To Date dialog
box. Replace the current date in the Date text box with the words Day After
Tomorrow and click OK. In response, Outlook will highlight the date that
corresponds to the day two days after the current date on the calendar.
Of course, it's usually easier to choose dates in the calendar. But if the calendar
isn't in view and you're not sure of the date, natural expressions will come in
handy. Below are some more examples of natural language expressions that
Outlook recognizes:
Yesterday Tomorrow Next Week (or Week) Next Month (or Month) Next Year
Next Monday Second Tuesday (or 2 Tue) Beginning of Next Month Start of Feb
End of the Year (End Year) End of Next Week Today (or Now)

Microsoft Outlook and Exchange Server Tips and Tricks 26
Don’t send a meeting request
If you ever need to schedule a meeting with others in your Outlook Calendar,
but do not want to generate a meeting request (if you have already gotten
verbal agreement on the phone or passing in the hall), here's how to do it.
Beside each name in the attendee list (Meeting Planner view) is an envelope
icon. Click the icon, and change it to Don't Send Meeting to This Attendee. You
can also change the response field for any attendee manually.
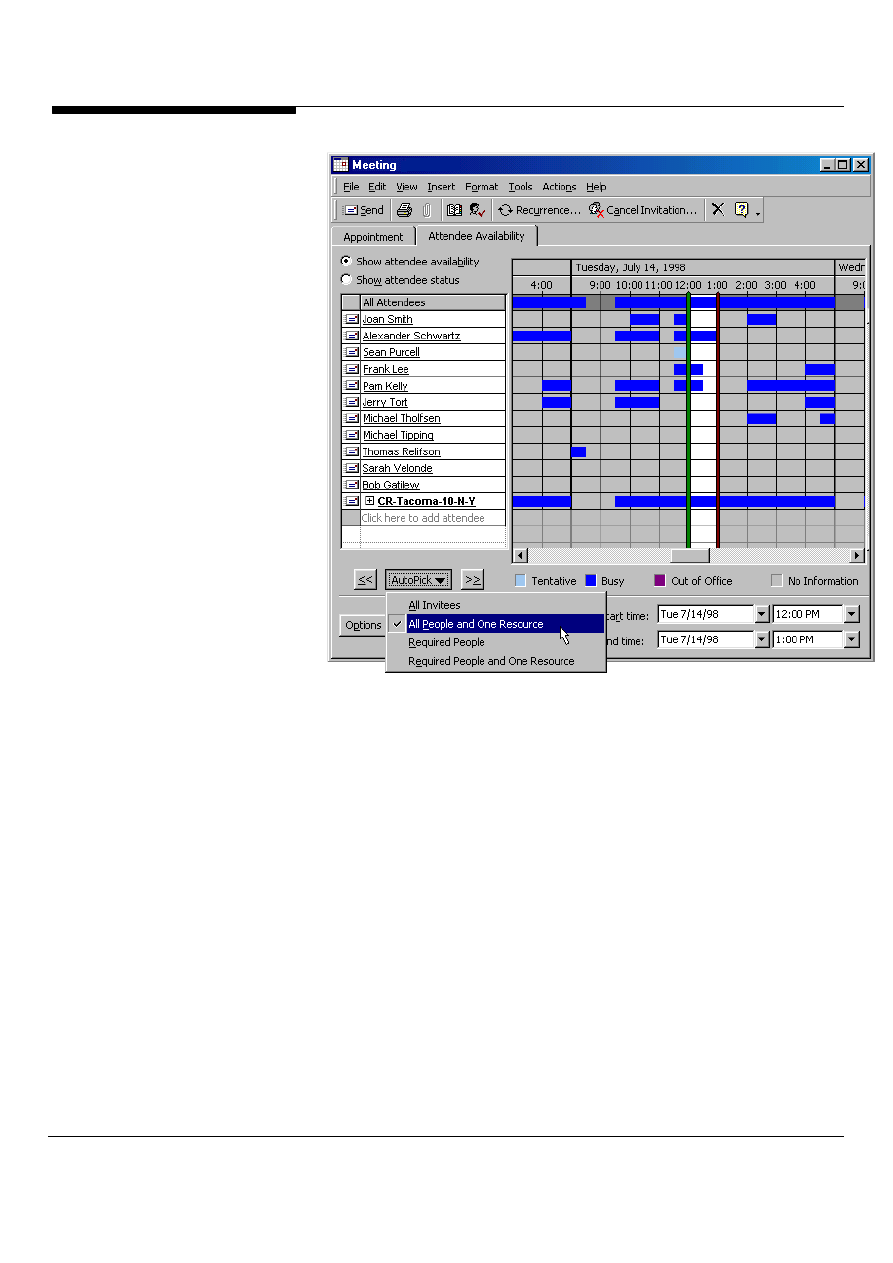
It’s easy to plan a meeting
Now when you want to schedule a meeting with others, the Meeting Planner in
Outlook gives you the tools to complete the task efficiently.
Working with distribution lists. As illustrated in Figure 28, if a you invite members of
a distribution list to a meeting, you can click on a “+” next to the distribution list in
the Meeting Planner to expand the distribution list and view the free/busy
information for specific individuals from the list. Then you can easily indicate which
members of the distribution list to include or exclude.
Improved AutoPick. The AutoPick feature automatically identifies the next time all of
the invitees are free and can recognize that only one conference room is required
and will automatically select only one conference room from a distribution list of
multiple conference rooms.
Free/busy range support. The meeting planner now gives users a visually distinct
indication (color bar) when there is no free/busy information available for an invitee,
as opposed to the meeting being outside the published range of an invitee’s
free/busy information.
Adding and Removing Attendees: Now when you organize and schedule meetings
and need to invite additional attendees or remove some of the scheduled attendees,
a meeting request or cancellation is automatically sent only to the people who have
been added or removed. If the meeting is moved or cancelled, all attendees are
informed, as in previous versions of Outlook.
New in
Outlook
2000!
Microsoft Outlook and Exchange Server Tips and Tricks
27
Figure 28: The improved Outlook Meeting Planner
Easily open other’s calendars
Now when someone shares their calendar with you or you regularly manage or open
other people’s calendars on Exchange Server, you will appreciate how Outlook lets you
quickly choose from the ten calendars most recently opened calendars (Figure 29). To
make you even more productive, Outlook will open the multiple users’ calendars when
started, as an option.
New in
Outlook
2000!

Microsoft Outlook and Exchange Server Tips and Tricks 28
Figure 29: List of most recently opened calendar
Keep your private appointments private
Now when you share your calendar with other users can easily control whether or not
they can see the appointments that are marked as private.
Date Navigator to the rescue
To select a date in Outlook's Calendar when you're in Day/Week/Month view,
simply select that date in the Date Navigator (the calendar in the top-right
corner of the screen). If the date falls in a month that's not shown, you can
scroll that month into view by clicking the arrow buttons on the top of the Date
Navigator.
Going to the right date
If the date you want to select is very far from the selected date, you might prefer
to use the Go to Date dialog box to avoid excessive scrolling. Simply press
[Ctrl]G to display this dialog box (or issue the Go/Go to Date... command).
Then, type the date you want to go to in the Date text box and click OK. For
instance, if you type 9/29/4, the Date Navigator will automatically display
September 29, 2004. By the way, you can use spaces instead of the forward
slashes when you type the date.
Shared Calendar
Outlook can provide users with quick and easy access to team calendars. Many Outlook
users have discovered that being able to open a colleague's calendar with File | Open
Microsoft Outlook and Exchange Server Tips and Tricks
29
Special Folder | Exchange Server Folder doesn't mean that you can add that folder to
your Outlook Bar. In fact, the only folders that can be added to the Outlook Bar are those
that appear in the Folder List. We found another way, though, to organize a bunch of
user calendars within Outlook. Have each person on your team drag their calendar to
the desktop to create a shortcut. Then e-mail that shortcut to everyone on the team.
Each team member can save the shortcuts into a system folder, then drag that folder to
the Outlook Bar. Voila! You'll have one folder to open all the calendars for everyone on
your team.
ScreenTips in Calendar Views
Now in the calendar, when you need additional details on an appointment or event,
simply hover your mouse over the appointment item in the calendar view, and you’ll see
a friendly screen tip appear, allowing you to see the complete subject details of the
appointment that is truncated in the Calendar view.
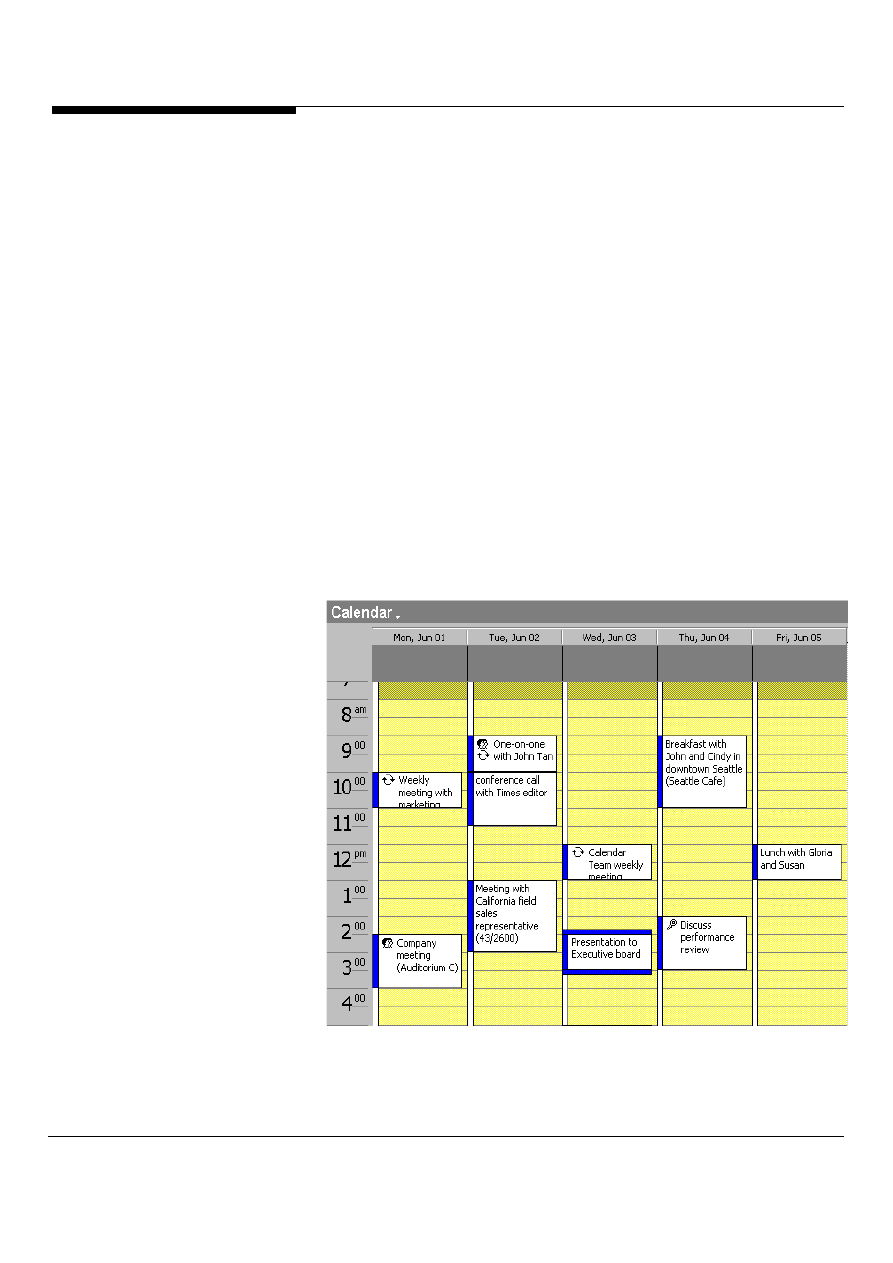
Change the color of your Calendar
Now in Outlook, you can easily change the background color of you calendar view,
making it easier to distinguish between times occupied by an appointment and free time
(Figure 30).
Figure 30: New Calendar background colors in Outlook
New in
Outlook
2000!
New in
Outlook
2000!

Microsoft Outlook and Exchange Server Tips and Tricks 30
To change the color, select the menu item, tools, then options, and in the options
dialog, select the Calendar Options, under the Preference page tab.
No more late birthday cards
Not all the names in your Contacts folder are for people who handed you their
business cards at conventions. Sometimes they're your valued colleagues, or
perhaps you include friends and relatives so that you can find their phone numbers.
If you want Outlook to remind you of a colleague's or friend's birthday or
anniversary, just double-click the person's name in the Address Cards view, click
the Details tab, and enter the date in the Birthday or Anniversary field; or select it
from a monthly calendar in the drop-down list. Outlook displays the selected date in
the Calendar.
Create reminders without creating
appointments
For example, I need to take medicine at 8am, noon, and 5pm every day (thus
recurring), but I don't want to put this task as meetings on my calendar but I do
want the reminder to be fired. Can this be done? Yes, using a Filtered View.
Assign the recurring item to a category (Edit_Categories ). It doesn't matter
which category you use, you can create a new one (e.g. Reminders). Then use
the View_Filter_Advanced tab to filter out items belonging to the category you
just created (and only show the items that are not assigned the Category =
Reminders). For example, in the define criteria area, "Categories_does not
contain_Reminders." Press OK. Then update your default view by choosing
"Day/Week/Month" again in the view selector dropdown. You'll get an alert and
choose the option to update the view. This view is then permanently set to filter
out these items.
Microsoft Outlook and Exchange Server Tips and Tricks
31
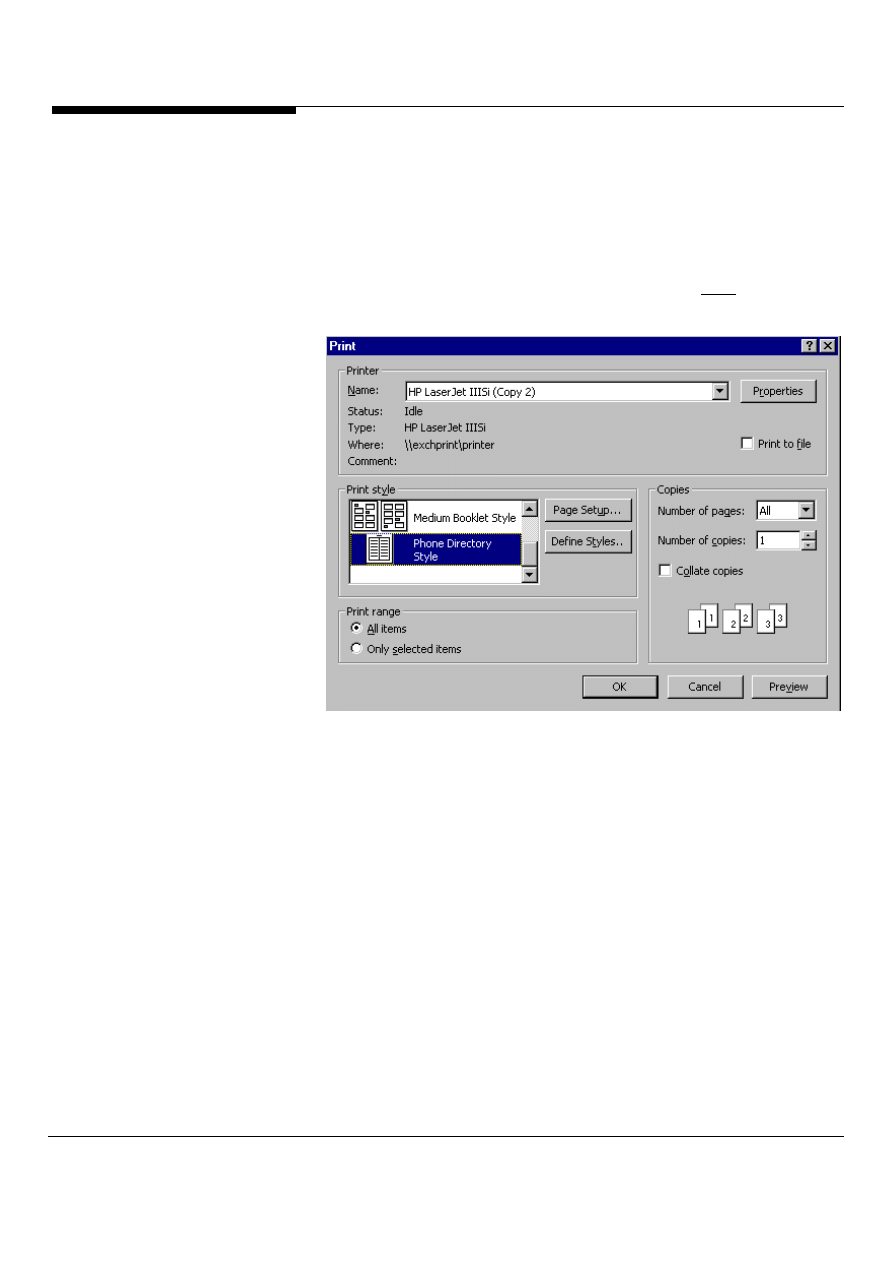
Printing a phone list from your Contacts list
You can print a phone list from Outlook's Contacts folder to carry around with you.
To do so, open Contacts, then, pull down the File menu, and select Print to open
the Print dialog box, shown in Figure 31.
In the list box in the Print Style panel, select Phone Directory Style. Click OK, and
Outlook will print the names and phone numbers in Contacts folder, separating
them alphabetically into groups, shown in Figure 32.
Figure 31: In the print dialog box, choose the phone directory style located in the
list box in the print style panel.
CONTACT
PRODUCTIVITY TIPS

Microsoft Outlook and Exchange Server Tips and Tricks 32
Figure 32: Outlook will print from the contacts folder the names and numbers
separating them in groups alphabetically.
Mail-merge the Word and Outlook way
So you have a form letter you want to send to selected contacts? Luckily, Word 97
and Outlook are natural partners in mail merge.
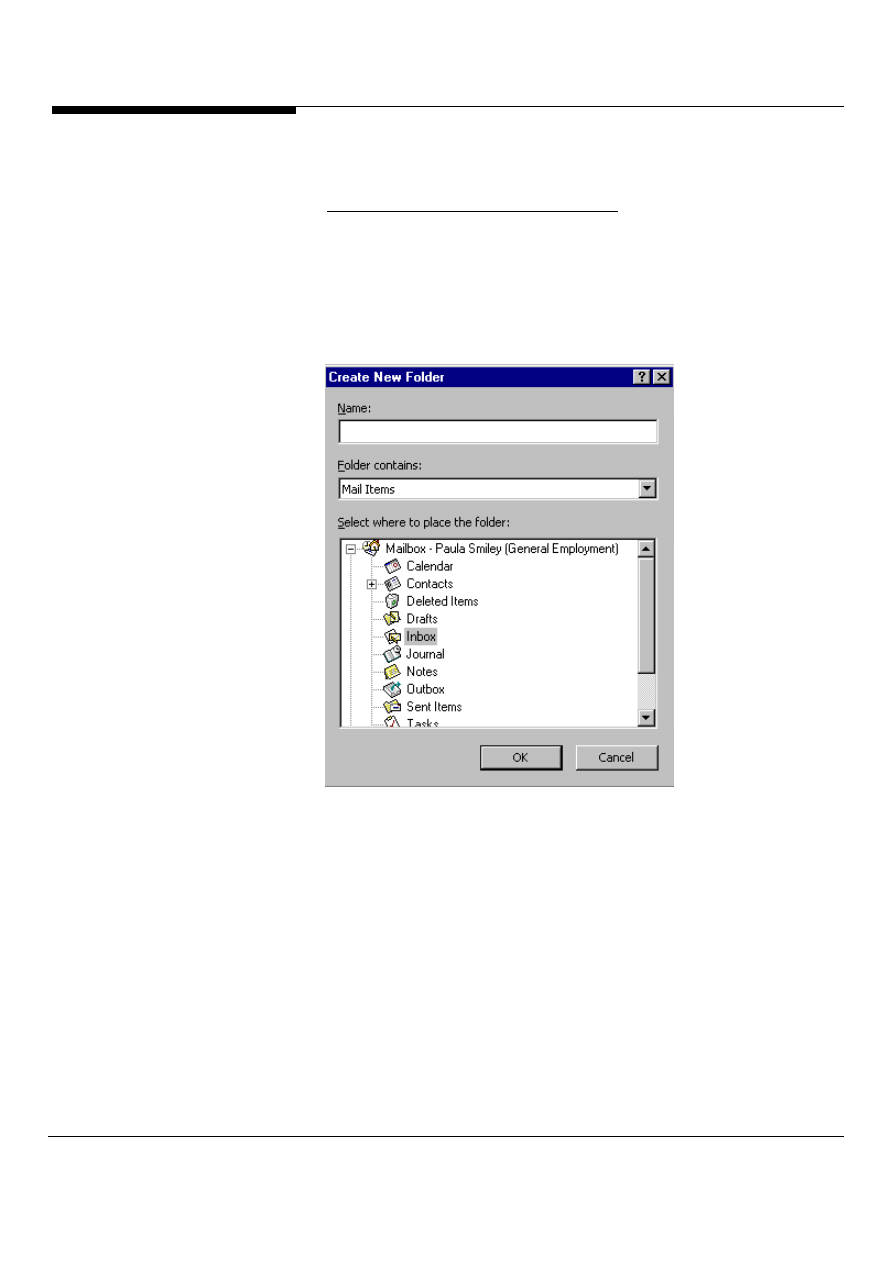
1. In Outlook, create a new Contacts folder: click the Contacts icon in the Outlook
bar, select File/New/Folder from the menu bar, name the folder, and click OK,
shown in Figure 33.
2. Select View/Folder List from the menu bar, shown in Figure 34.
3. In the main Contacts window, hold down the Ctrl button, select the contacts to
whom you want to send the mail merge, and drag them to the folder you just
created in the Folder List.
4. Switch to Word, open the document you want to mail-merge, and select
Tools/Mail Merge from the menu bar, shown in Figure 35.
5. In the Mail Merge Helper dialog box, click the Create button, then select a type of
document (Form Letters, Mailing Labels, Envelopes, or Catalog). Click the Active
Window button.
6. Click the Get Data button, then select Use Address Book/Outlook Address Book
and click OK. In the Mail Merge from Contacts Folder dialog box, select the folder
you created in steps 1 through 3 and click OK.
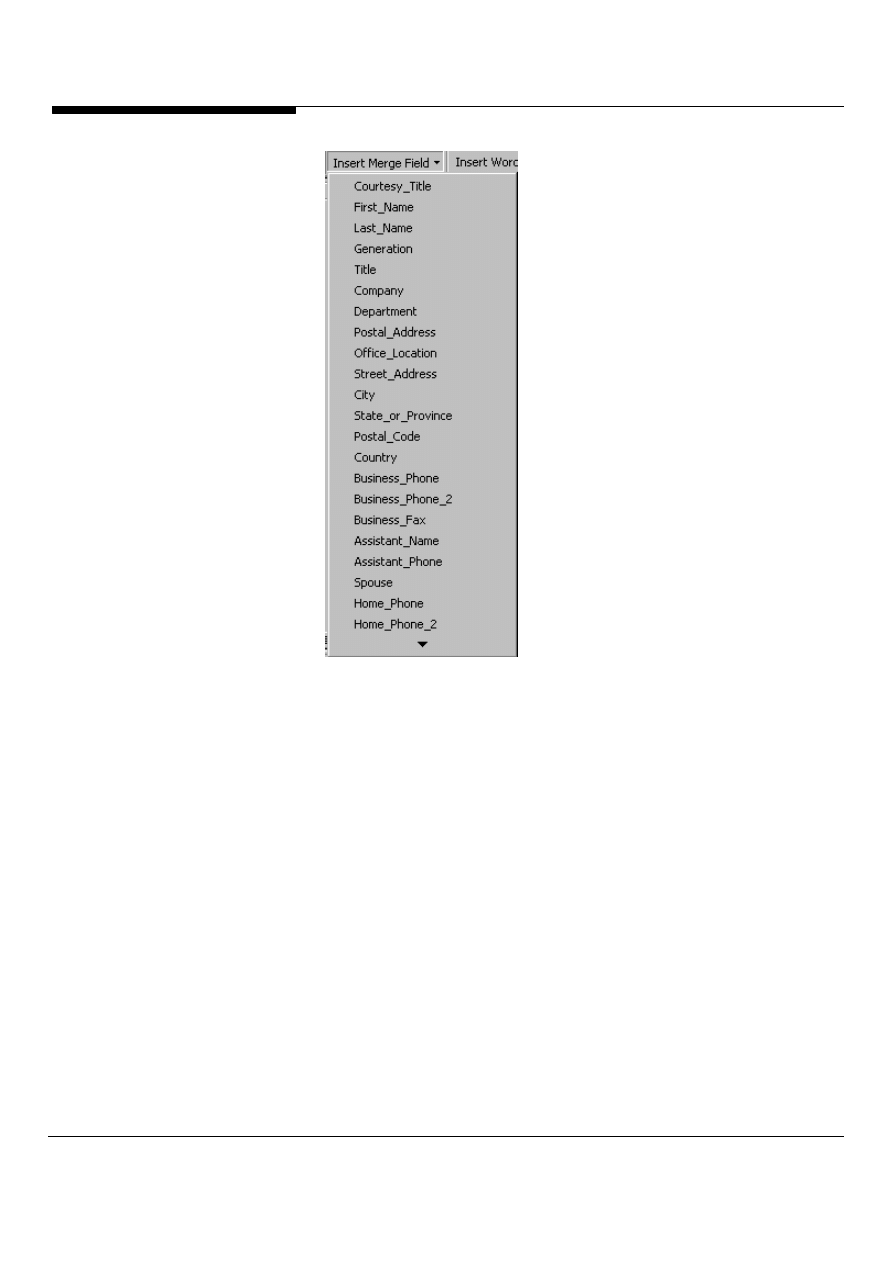
7. If you haven't yet inserted merge fields into your document, Word will display a
message to that effect. *(no message displayed) Click the Edit Main Document
button. In the main document, place the cursor where you want to insert a name,
Microsoft Outlook and Exchange Server Tips and Tricks
33
address, or any other information that changes for each contact. In the Mail Merge
toolbar (which appears automatically when you activate the Mail Merge Helper),
*(Did not activate the helper, already displayed)click Insert Merge Field and select
from the options there to insert first name and last name fields, address fields, and
more, shown in Figure 36.
8. When you're done, select Tools/Mail Merge/Merge from the menu bar, (same as
Figure 3) choose from the sending options in the Merge dialog box, and click the
Merge button to activate the merge.
Figure 33: In the new folder dialog box name the folder and click OK.

Microsoft Outlook and Exchange Server Tips and Tricks 34
Figure 34: The folder list displays the new folder you created to the left.
Figure 35: In the Mail merge dialog box you select from create, get data and
merge.
Microsoft Outlook and Exchange Server Tips and Tricks
35
Figure 36: In merge fields you select the options listed that you want to add to
your document.
Target your mail merge by filtering
You'll probably want to use a subset of your Address Book for most mail-
merges, but Word won't recognize your Outlook filters. And even using Word's
built-in query engine might not work, because it won't recognize all of Outlook's
fields. So first filter your contacts in Outlook, choose File, New Folder, and copy
the filtered contacts into that folder. In Word's Mail-Merge dialog, select this
new folder for your merge.
Customize your categories
If you have a large Contacts list, use categories to create subsets that you can use
to sort and group entries. It's a simple three-step process.
1. Open a Contact item and click the Categories button at the bottom of the form.
2. In the Categories dialog box, shown in Figure 37 check all the categories you
wish to assign to the contact and click OK.
3. Click the Save and Close toolbar button.

Microsoft Outlook and Exchange Server Tips and Tricks 36
You can even create custom categories. For example, salespeople might want to
break down their contacts by Hot Lead, Warm Lead, and Ice Cold. They could then
sort by these categories, getting a prioritized list of whom to call. To create a custom
category:
1. Open a Contact item and click the Categories button at the bottom of the form.
2. In the Categories dialog box, click the Master Category List button.
3. In the Master Category List dialog box, type the name of the custom category in
the New box and click the Add button. Repeat the process for each custom
category you want to add. When you're done, click OK.
4. Back in the Categories dialog box, check the new categories you wish to add to
the current contact, then click OK.
5. Click the Save and Close button on the toolbar.
Figure 37: In the categories dialog box check the categories you wish to assign.
Make mass mailings
Ever felt the urge to spam? Outlook makes it easy to send a mass mailing to
contacts in a category you've previously set up.
1. In the Contacts module, select View/Current View/By Category from the menu
bar.
Microsoft Outlook and Exchange Server Tips and Tricks
37
2. Select a category and drag it to the Inbox icon on the Outlook bar. Outlook will
generate an empty email message and fill the To field with the email addresses of
all the contacts in that category.
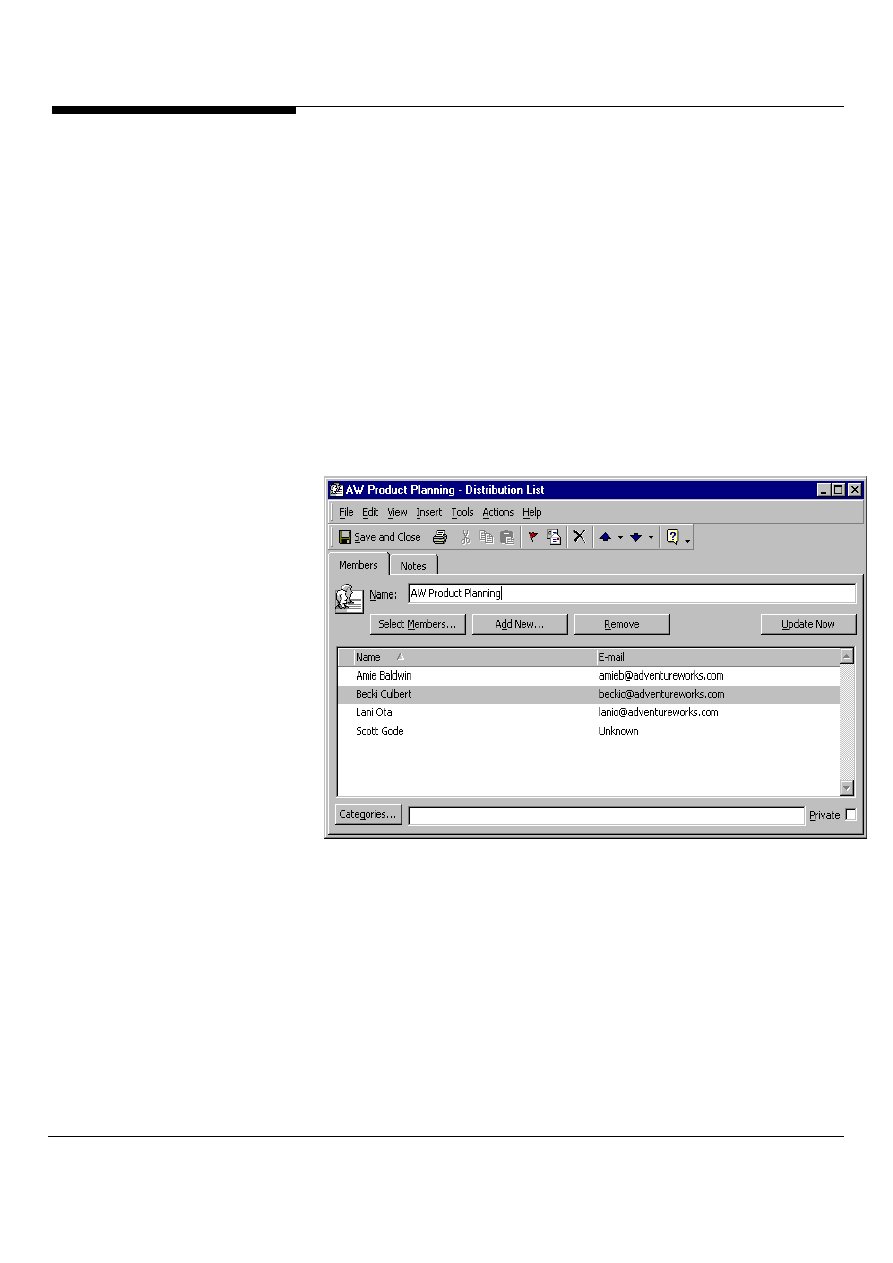
Use your personal distribution lists
Easily create personal distribution lists within any Outlook. contact folder:
Simply do the following:
1. Select the menu file then new, then distribution list, to show the distribution list
item (Figure 38)
2. Add those people you want in the distribution list, name the distribution list, and
then save.
3. Open a new mail item and type the distribution list name, you’re ready to
send!
Figure 38: Personal Distribution lists in Contacts
Note: Distribution Lists can contain contacts from users’ personal Contacts folder(s),
from shared Contacts folders on Exchange Server and from the Exchange Server
Global Address List. The inclusion of support for Distribution List items in the
Contacts folder in Outlook means users can now store all their Contacts and
Distribution Lists in one convenient place, eliminating the need to maintain a
separate Personal Address Book or other address book to store their distribution
lists. A Distribution List can also be easily forwarded to other users via e-mail,
synchronized to other computers and printed.
New in
Outlook
2000!
Microsoft Outlook and Exchange Server Tips and Tricks 38
Select your sort order
Sometimes you're interested in finding people by their company; other times you
want to find all the sales reps you know. Customizing your sort order lets you group
contacts by the fields you choose rather than simply alphabetically. To customize
the sort order of a contact list:
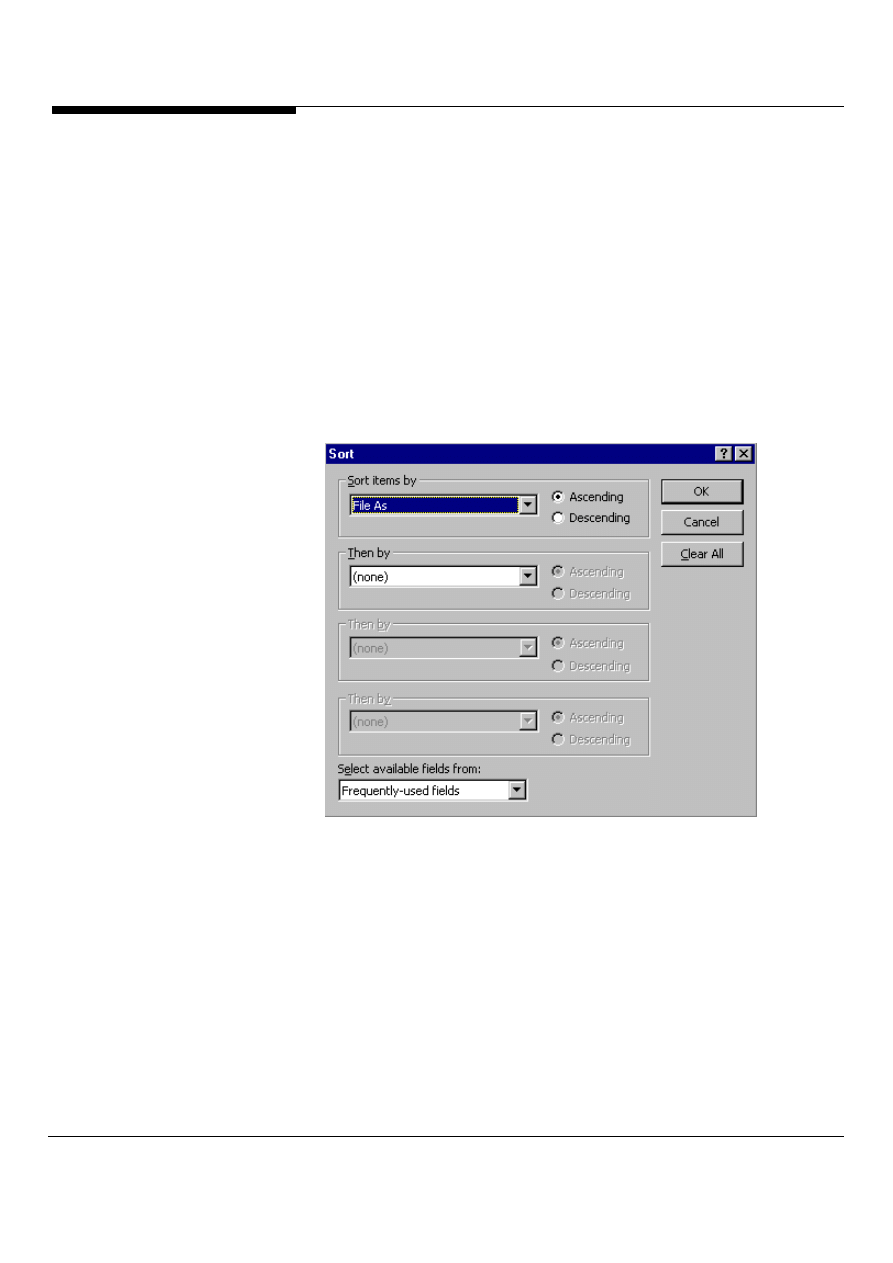
1. Open the contact list and choose View/current view/customize current view from
the menu bar.
2. In the View summary dialog box, select the sort option. In the sort dialog box,
shown in Figure 39 select available fields by which you want Outlook to sort your
contact list.
3. Click OK.
Figure 39: In the sort dialog box select available fields by which you want
Outlook to sort your contact list.
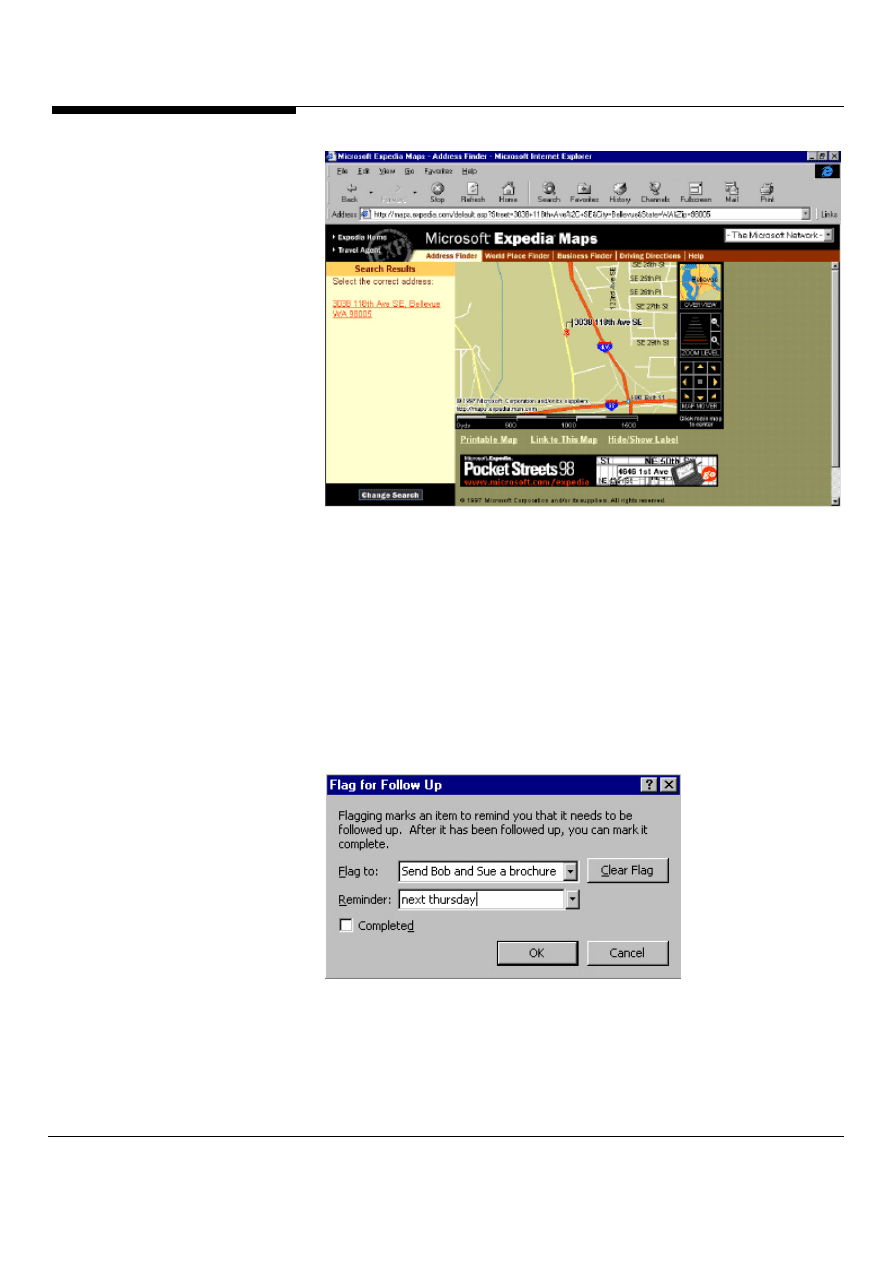
Never get lost again
Microsoft Outlook supports mapping the address of your contacts, to map the
address of a contact, simply click on the Display Map of Address button or select
Display Map of Address from the Actions menu (Figure 40).
Microsoft Outlook and Exchange Server Tips and Tricks
39
Figure 40: Detailed map to a Microsoft Outlook Contact using the new Display
Address feature.
Always follow-up with important contacts
Need to send a brochure to Bob and Sue at Xyz Corporation but always forget?
Outlook makes it easy to remember important events for important contacts by
using flags. To flag a contact in Outlook, right-click on the contact and select Flag
for Follow-up or if you have the contact open, select from the Actions menu, Flag for
Follow-up. In the Flag for Follow-up dialog box that appears, as shown in Figure
41, type in your Flag text and a date and time for Outlook to remind you about this
flagged contact. Now you’ll never forget to send those brochures!
Figure 41: The Flag for Follow-up dialog box
Microsoft Outlook and Exchange Server Tips and Tricks 40
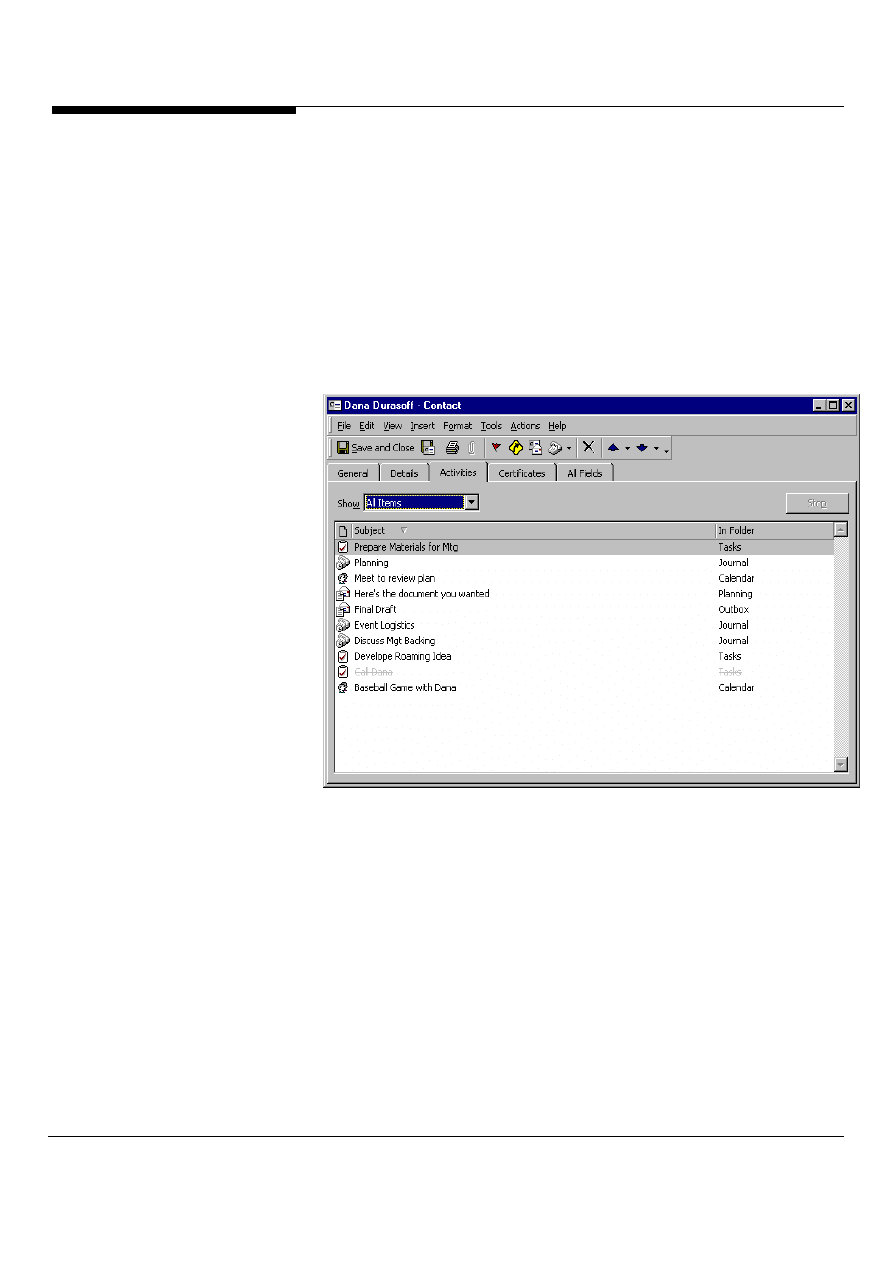
Track your contact activities
With Outlook you can now track the history of previous interactions with a contact
and be reminded of what to do in relation to the contact moving forward. Contact
Activity Tracking, gives you a dynamic view of the relationship between contacts
and activities (Figure 42).
Contact Activity Tracking allows the creation of links that associate a contact with
items from Outlook such as Phone Call Journal entries, e-mail messages,
appointments, tasks and documents. As shown in Figure 42, the Activities tab on
the Contact item allows you to view, group, sort and filter the set of associated items
and double-clicks to open the actual item.
Figure 42: Contact Item Activity tab showing associated items
If an item such as a document, e-mail message or appointment is related to a
contact, simply double-clicking on the contact activity will open the contact from the
item.
Even better, you can use the Activity Tracking in Contact Public Folders, this means
you and your organization/team can track activities related to team contacts, and
everyone can find out what’s going on. To set this up, all you need to do is select
properties for the shared Contacts folder, select the Activities page, and select the
set of folders to track activities.
Create an electronic Rolodex
The Address Card view of the Contacts folder creates the closest thing Outlook has
New in
Outlook
2000!

Microsoft Outlook and Exchange Server Tips and Tricks
41
to a Rolodex. You can find specific contacts by typing the first letter of the contact's
last name (Figure 43). If you have customized the sort order of your list, the first or
highest-order sort field will be the one indexed by your key press. For example, if
you are sorting by company first, pressing C will bring you to the first company that
begins with the letter c.
Disable in-cell editing
To achieve a Rolodex-like effect in the Phone List view, you must disable in-cell
editing. (In-cell editing starts editing the current contact item when you press a key,
inserting the letter or number you type into the current field.) To disable in-cell
editing, select View/current view/customize current view from the menu bar, in the
view summary dialog box select the other settings option. In the other settings
dialog box uncheck the Allow In-Cell Editing box, and click OK.
Transfer contacts to other users
It's easy to forward a contact to another Outlook user:
1. Select the contact, right-click, and choose Forward from the pop-up list.
2. Outlook puts the contact item in a mail message. Fill out the mailing information,
then send the email.
3. On the receiving end, the recipient can automatically add the contact by simply
dragging and dropping the included attachment onto the Contacts icon.
Use the Address Card View
In the "Address Card" view of the Contacts folder (Figure 43), you can quickly
navigate to specific contacts by typing the first letter of the contact name.
Outlook will take you to the start of the contacts that begin with that letter. This
operation will work in both the Address Cards view as well as any table view as
long as the "allow in-cell editing" option is turned off. This quick search will also
work in the Phone List view. Simply change the Phone List view so that it is
read-only; then the keyword search will work. To do this, click Format View on
the View menu and click to clear the Allow In-Cell Editing check box.

Microsoft Outlook and Exchange Server Tips and Tricks 42
Figure 43: Using the Address Card view makes it easy to find contacts and their
relevant information.
Share your contacts
To forward a contact to another Outlook user, right-click on the contact and
choose Forward; Outlook puts the contact item into a mail message. The
recipient drags the contact item from the mail message over the Contact icon
on the Outlook bar, and Outlook adds the item. You can also include an OLE
object in a message, which is useful if you're collaborating on a document; to do
this, choose Insert, Object when you're in an Appointment form or an e-mail
message. You can then either name an existing file to create a link or create a
new file to embed the object in.
Adding new contacts easily
Ever receive an e-mail from a friend or associate and want to add that person to
your contact folder? It’s easy. You can do it two ways.
1. Drag the message to your contacts folder
2. Save the new contact
or
1. In the mail item, right click on the sender’s name in the From field.
2. Select Add to Contacts
New in
Outlook
2000!
Microsoft Outlook and Exchange Server Tips and Tricks
43
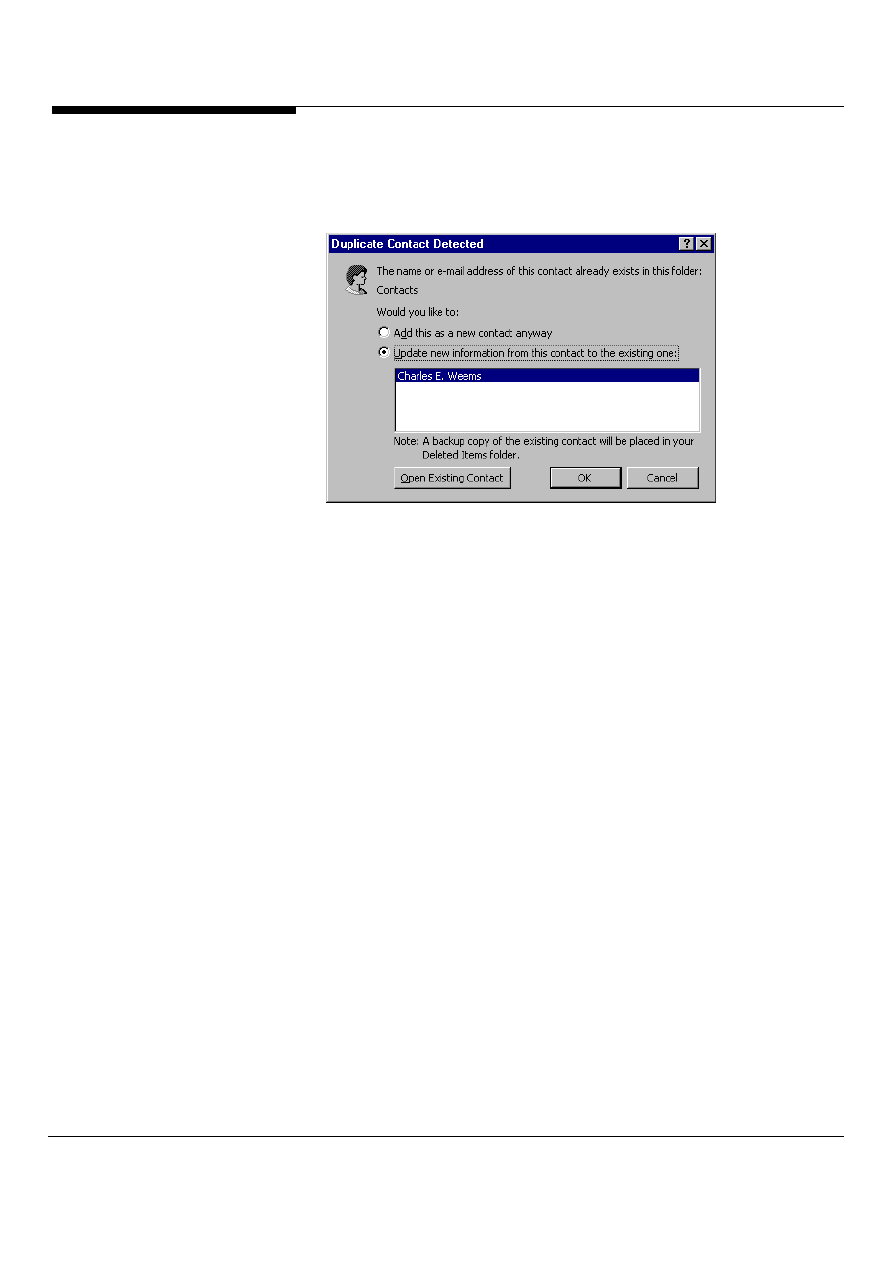
If the contact you are adding already exists in your contact folder, Outlook will ask if
you want to merge this new information with the existing contact (Figure 44) so you
don’t have duplicate contacts in your contact folder.
Figure 44: Duplicate contact detection
Microsoft Outlook and Exchange Server Tips and Tricks 44
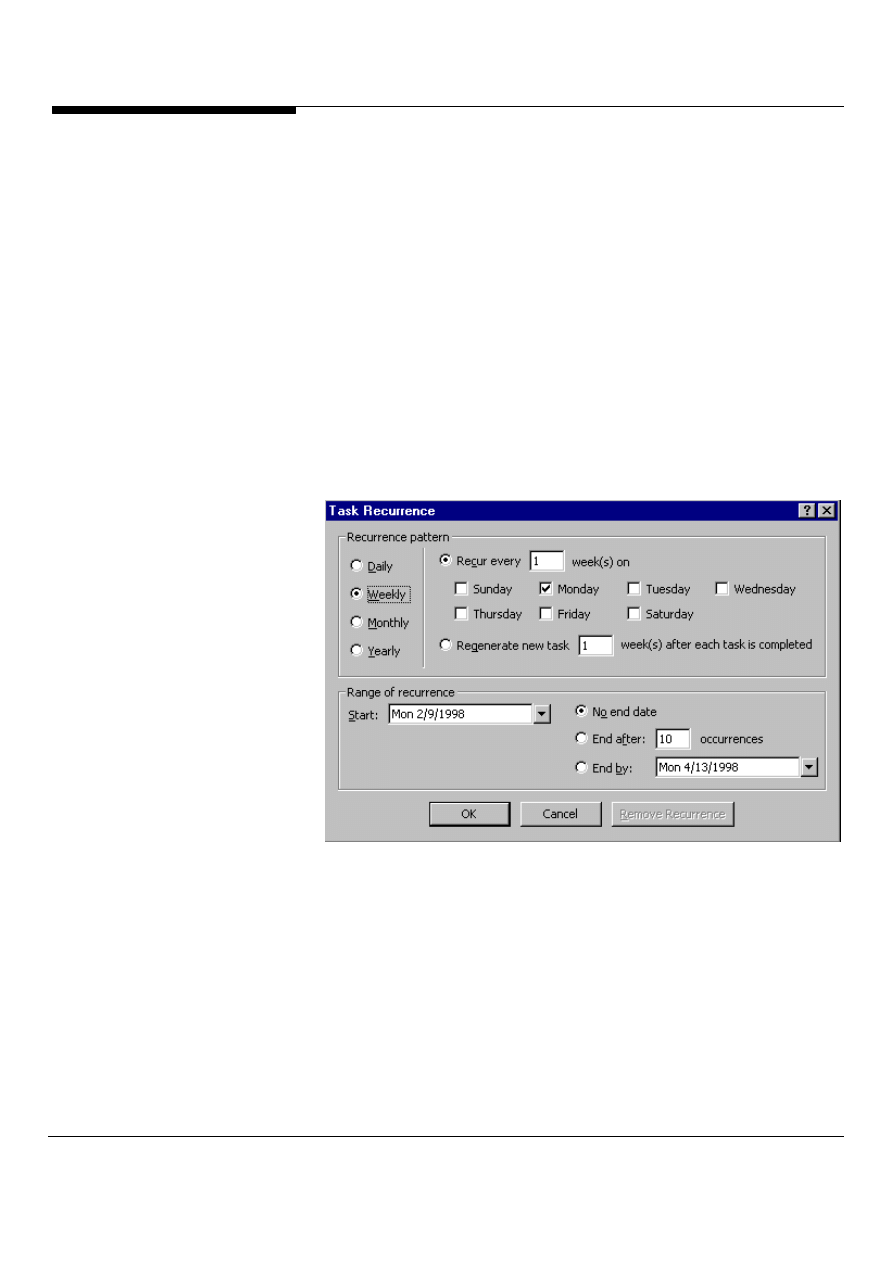
The task that wouldn’t go away
Regenerating tasks are handy for activities that recur often, but not on a regular
pattern - such as washing the car or checking the status of a project. With
Outlook, users can create tasks that regularly recur. However, not all recurring
tasks follow a regular schedule, such as every two weeks or once a month. For
these tasks, Microsoft Outlook includes Regenerating Tasks - tasks that recur
only after the previous instance is marked complete. For example, if a user
creates a task that starts on March 1 and recurs regularly every 10 days,
Outlook creates a task that appears on the task list on March 1, March 11,
March 21 and so on, regardless of when the user actually completes the task. If
the user instead creates a task that regenerates every 10 days, then the
second instance appears 10 days after the first instance is marked complete.
For example, if a user completes the first instance on March 3, then the second
instance appears on March 13.
Figure 45: Creating a regenerating task is as easy as setting some options in a
dialog box.
TASK PRODUCTIVITY
TIPS
Microsoft Outlook and Exchange Server Tips and Tricks
45
Track it all with the Journal
Outlook's Journal keeps track of all your activities in Office modules, letting you see
when you last updated a certain Word or Excel file or sent an email message. The
Journal also records all outbound calls made with Outlook's automatic dialing
feature, including information on whom you called, when, and for how long.
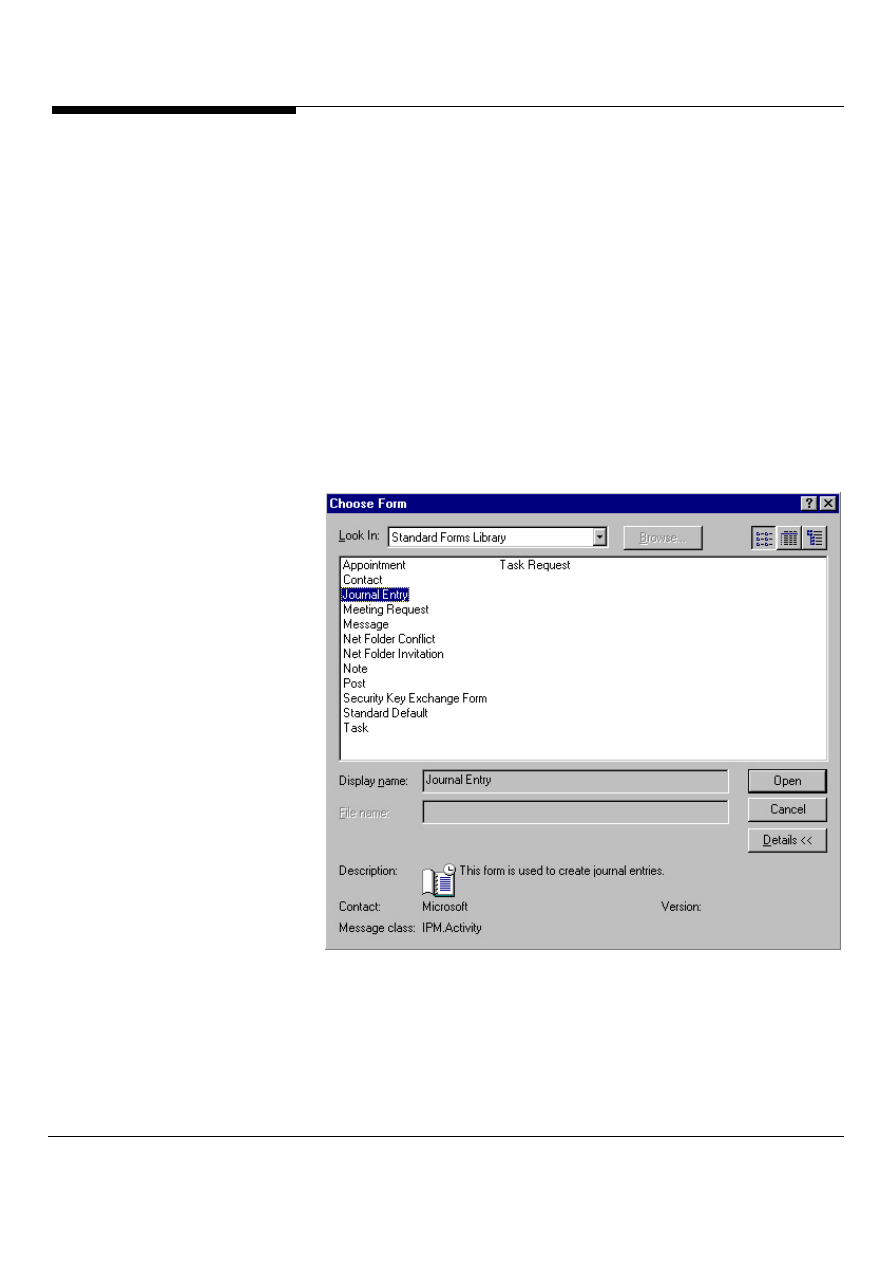
To record a phone call not dialed through Outlook:
1. Select the contact you want to call (or the one you just called).
2. In the main menu, select File/New/Choose form. A Choose form dialog box pops
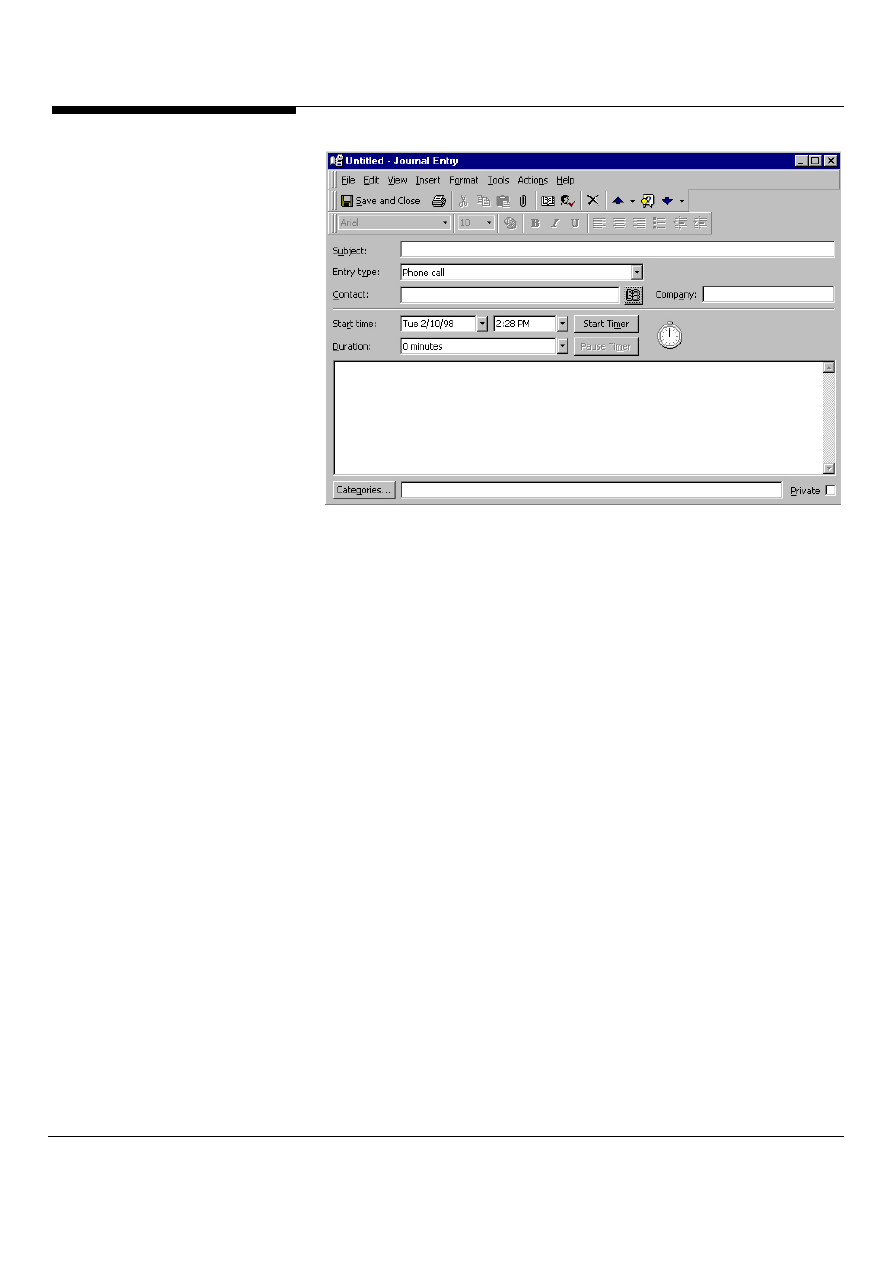
up, shown in Figure 46 select Journal entry. In the journal entry dialog box shown
in Figure 47, if you're making the call as you record it, click on the Start Timer
button and the Journal will time the call for you. If you've already made the call,
select a start date, time, and approximate duration of the call.
3. Add whatever notes you like in the text box below, then click Save and Close.
Figure 46: Select journal entry in the choose form dialog box.
JOURNAL
PRODUCTIVITY TIPS
Microsoft Outlook and Exchange Server Tips and Tricks 46
Figure 47: In the journal entry dialog box select the start timer if you are making
the call, if you have made the call select a start date and time.
Microsoft Outlook and Exchange Server Tips and Tricks
47
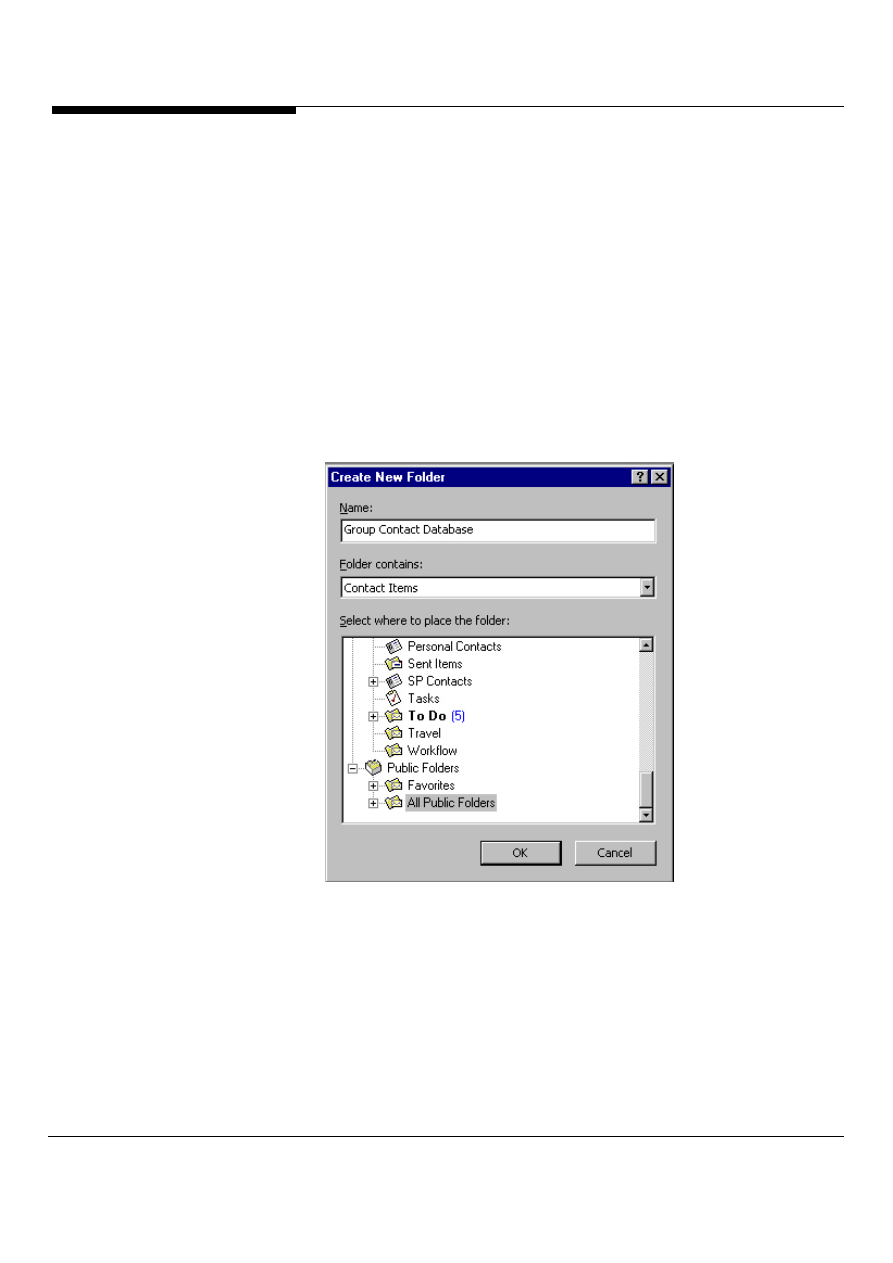
Start Collaborating Now
Microsoft Outlook and Exchange Server make it easy to start collaborating and
coordinating your team’s efforts. Using Exchange Public Folders and the built-in
Outlook modules such as Tasks, Contacts or Calendars, users can start instantly
collaborating with others. In Outlook, click on File/New then Folder. The Create
New Folder dialog box will appear as shown in Figure 48. To create a group
contact database, select Contacts in the Folder contains box. To create a group
calendar, select appointments. After creating the new folder, you can send a
shortcut to other members on your team so they can place their information in the
folder. You can even take the folder with you when you are working on a laptop and
are not connected to your network. Since this new folder is based on built-in
Outlook modules, you can start using the full power of Outlook in your instant
collaborations.
Figure 48: Creating a new folder for group contacts in an Exchange Public folder.
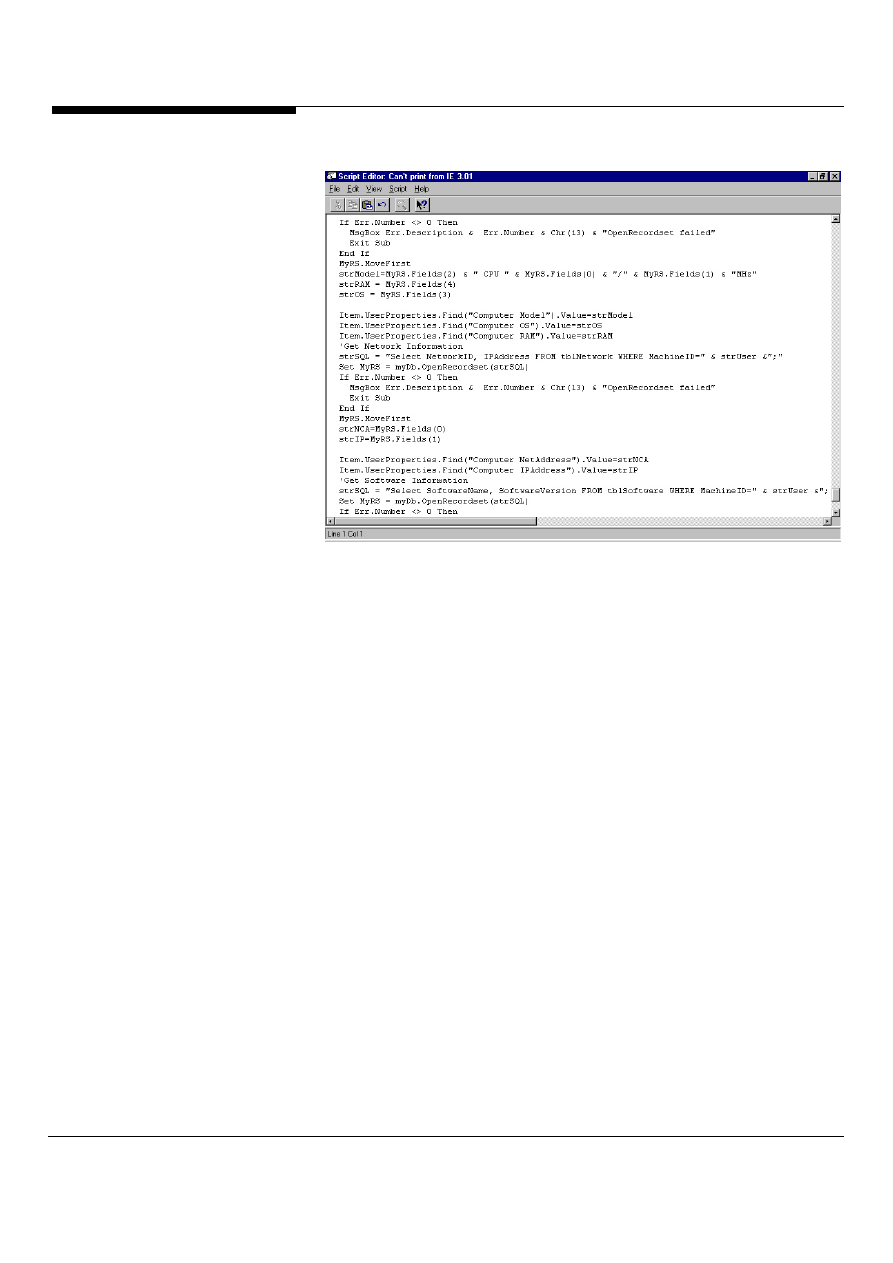
Extend your applications with VBScript
Extend the power of your Outlook applications by using VBScript in your forms.
VBScript is a subset of Visual Basic and allows Outlook developers to add custom
functionality to any Outlook form such as accessing a database, hiding controls, etc.
Figure 49 shows the VBScript editor in Microsoft
Outlook
.
COLLABORATION TIPS
Microsoft Outlook and Exchange Server Tips and Tricks 48
Figure 49: The VB Script editor in Microsoft Outlook.
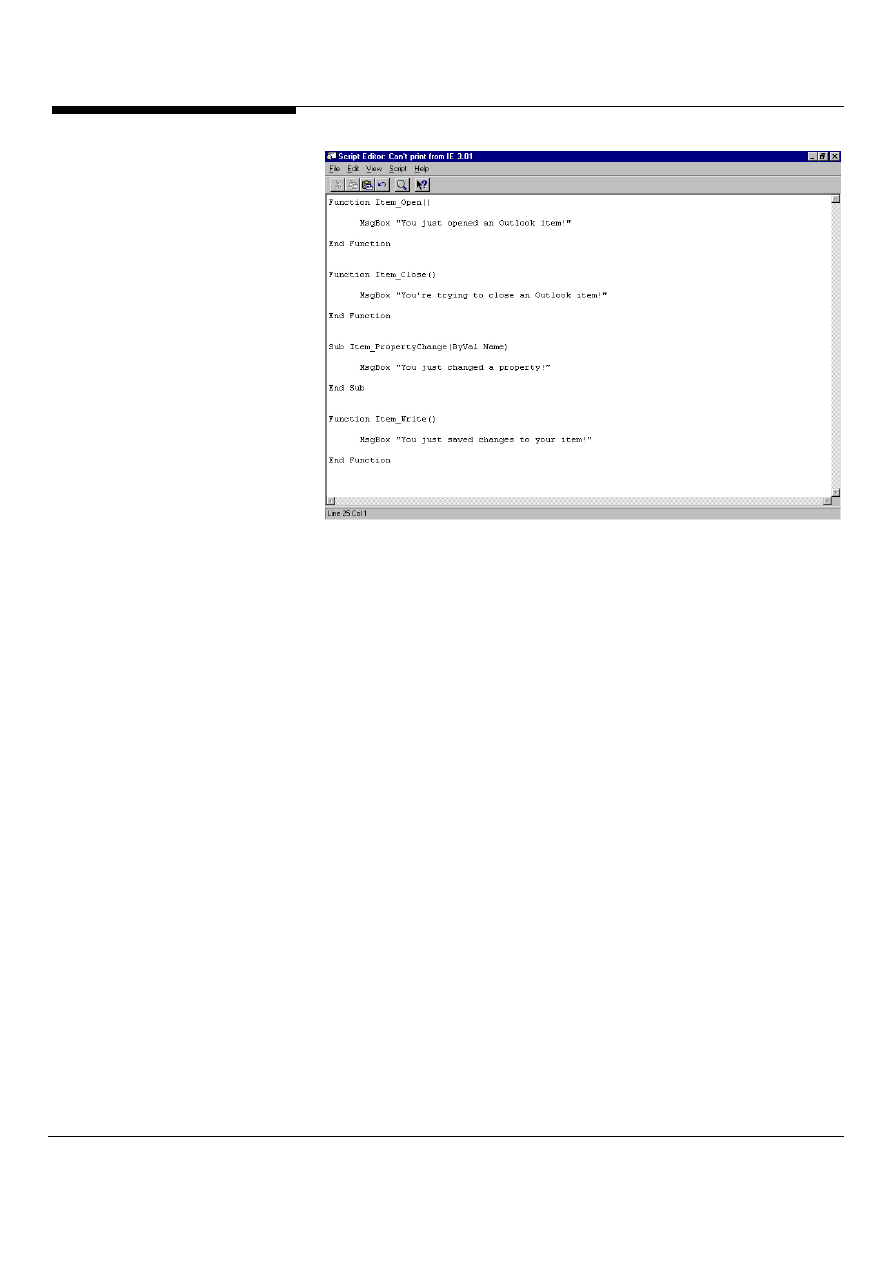
Events, Events, Events!
Outlook also exposes events so developers can control Outlook forms and actions.
Some events that Outlook supports are when an item opens, when an item is
saved, when a user changes a property such as subject or categories and when an
item is read. Figure 50 shows programming to an Outlook event using VBScript.
Microsoft Outlook and Exchange Server Tips and Tricks
49
Figure 50: Microsoft Outlook supports many different types of events in custom
forms. Here you can see some examples of the events that are supported.
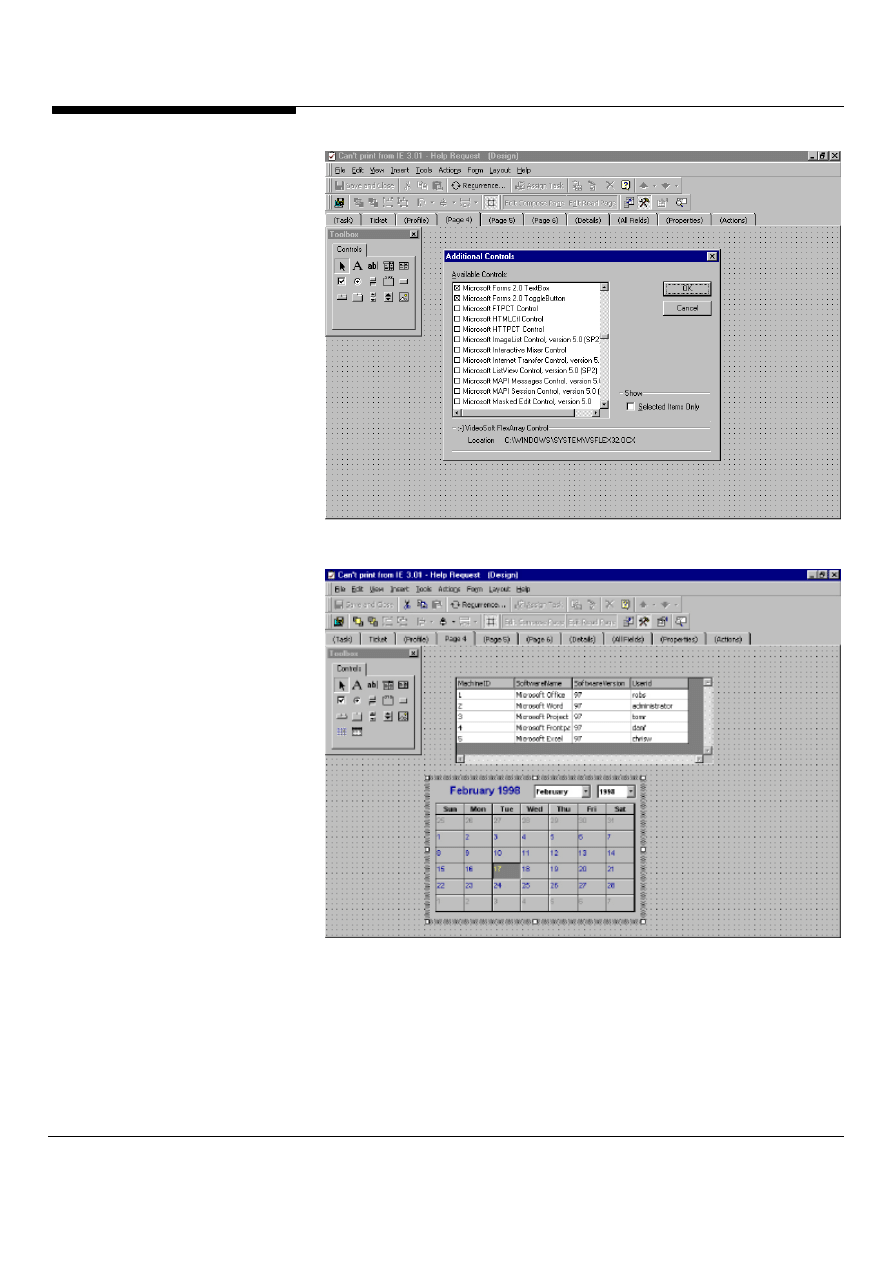
Powered by ActiveX
Microsoft Outlook supports ActiveX controls in custom forms. This means that
developers can take advantage of thousands of third-party controls in their Outlook
applications. To insert an ActiveX control on your Outlook form, go into design
mode for an Outlook form and select from the Form menu, Control Toolbox. Right-
click on the toolbox and select Custom Controls. The Additional Controls dialog box
should appear as shown in Figure 51. Select the ActiveX control you want to add
to the toolbox and hit ok. Drag and drop the new control to your form. The ActiveX
control will appear on your form as shown in Figure 52.
Microsoft Outlook and Exchange Server Tips and Tricks 50
Figure 51: Inserting an ActiveX control on the Outlook Control Toolbox.
Figure 52: ActiveX controls inserted on an Outlook form and added to the control
toolbox.
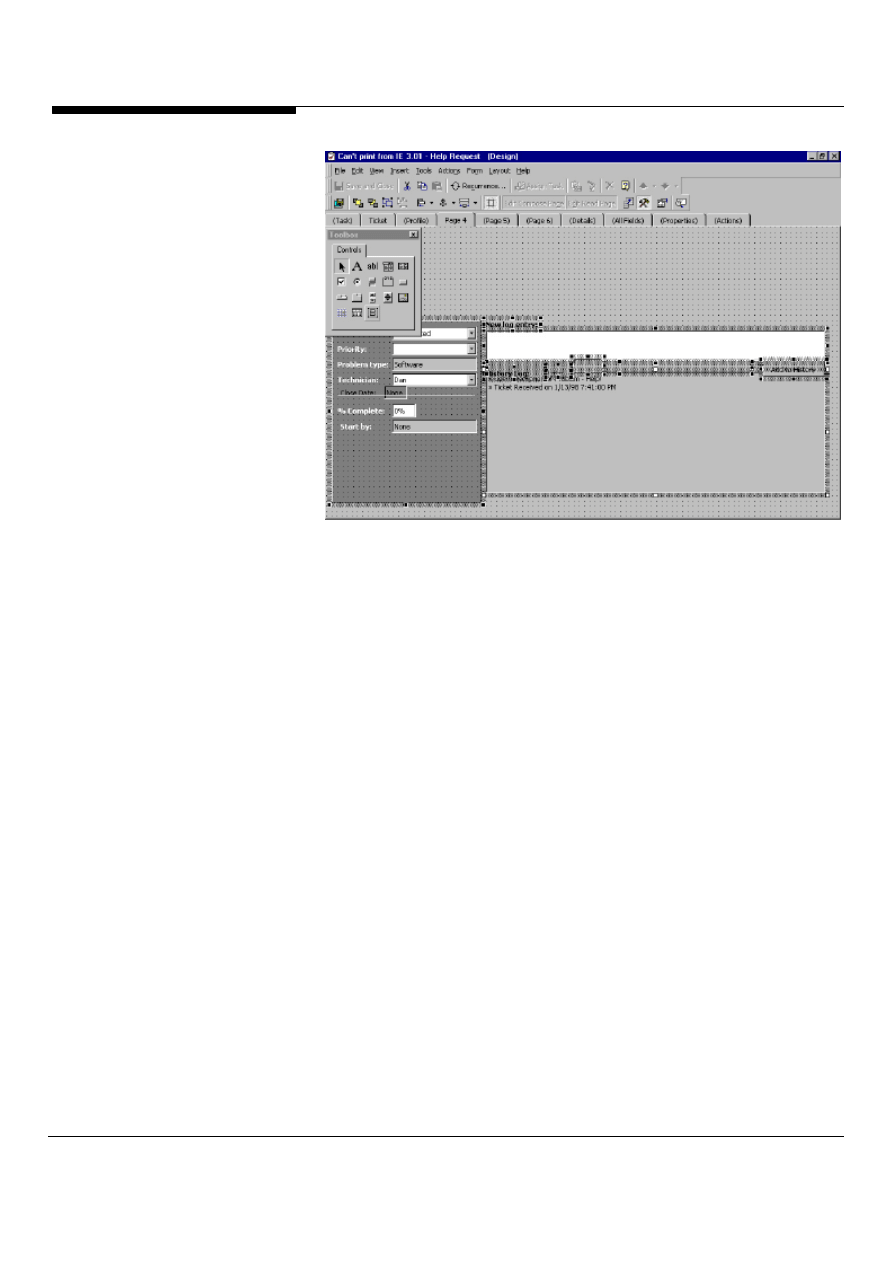
Customize your toolbox
Imagine that you want to always add certain controls to a number of forms and you
Microsoft Outlook and Exchange Server Tips and Tricks
51
want them constantly laid out the same way on each of these forms. Instead of
having to add each control manually, developers can customize their Outlook
Control Toolbox. To do this, go into design mode on an Outlook form and bring up
the Control Toolbox by selecting from the Form menu, Control Toolbox. Drop the
controls you want to use on an Outlook form as shown in Figure 53. Select all the
controls and drag and drop them onto the control toolbox. You should now see a
custom control which you can select from the toolbox which is all of the controls and
their layout that you just dropped onto the toolbox, as shown in Figure 54.
Figure 53: Create your controls on an Outlook form, select them and drag and drop
them onto the Control Toolbox to customize the toolbox.
Microsoft Outlook and Exchange Server Tips and Tricks 52
Figure 54: Dropping the new customized control from the Control Toolbox. The
new control is the group of controls and their layout that was customized.
Creating rules just became easier
Ever wanted to have a standard reply sent to users who post documents into Public
Folders thanking them for their contribution? Ever want to automatically delete
material posted into a Public Folder that does not meet certain criteria? If the
answer is yes to either of these questions, you should take a look at the Folder
Assistant in Microsoft Outlook. The Folder Assistant makes it easy to add rich rules
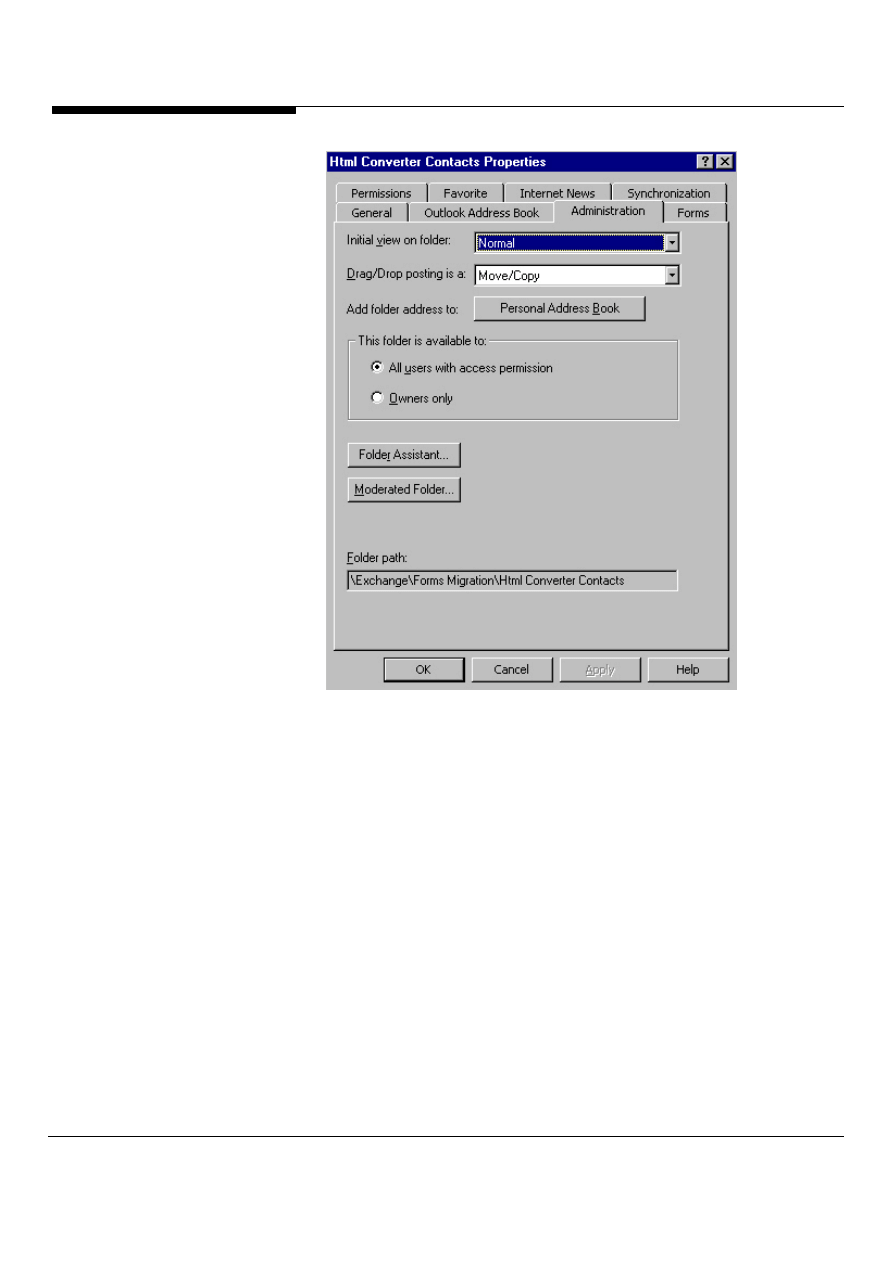
to folders without any programming. To start using the Folder Assistant, right click
on a Public Folder and select properties. Under the Administration tab of the folder
properties, there is a button name Folder Assistant as shown in Figure 55. After
clicking, the Folder Assistant button, you can fill out the specific information about
the rules you want to create. Some examples of criteria for rules include limiting
size of messages, checking for specific words in a message subject, sending back a
standard message to the user when they submit an item and checking specific
properties of documents copied into the folder such as the author property of a
Microsoft Word document. Figure 56 shows the interface for creating and editing
rules using the Folder Assistant.
Microsoft Outlook and Exchange Server Tips and Tricks
53
Figure 55: The Folder Assistant button can be found in the properties for a folder
under the Administration tab.

Microsoft Outlook and Exchange Server Tips and Tricks 54
Figure 56: Creating or editing even an advanced rule is simple with the intuitive and
powerful Folder Assistant edit rule dialog box.
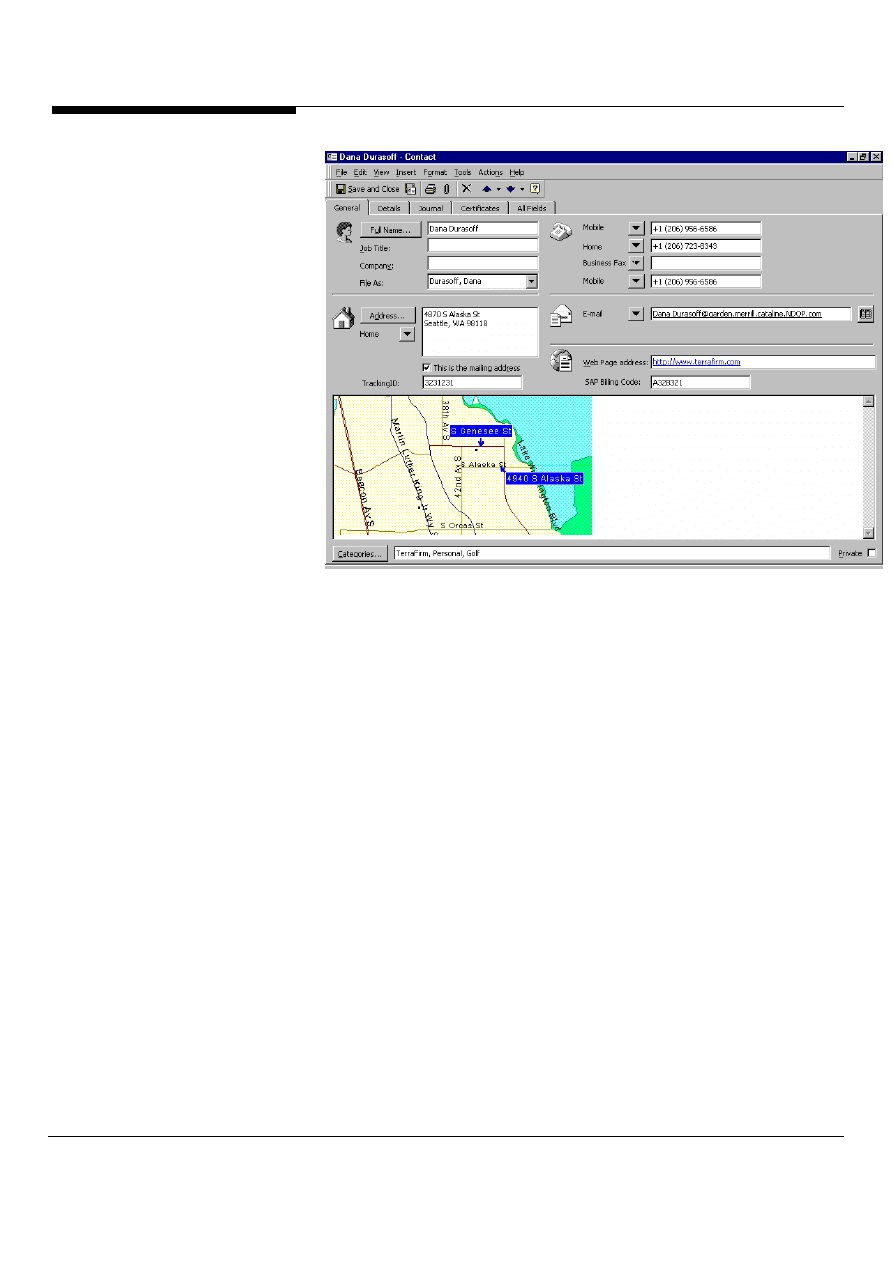
Customize that Contact Form!
Ever wanted to tweak the first page of the Outlook contact form? Outlook makes
this possible using the built-in, powerful forms development environment of Outlook.
Using the drag and drop capabilities of the Outlook forms development
environment; users can add custom fields to contact forms. Imagine if you wanted
to add a tracking ID and SAP billing code for a customer that you frequently do
business with. To do this, launch an Outlook contact form by selecting from the
Tools menu, Forms, Design a form. Select from the form list, the Contact form.
Outlook automatically brings up the Contact form in design mode. To customize the
first page of the form, create new controls or drop existing controls from the Field
Chooser onto the Contact form. An example of a customized Outlook contact form
is shown in Figure 57.
Microsoft Outlook and Exchange Server Tips and Tricks
55
Figure 57: A customized Outlook Contact form that now includes two new
properties, a TrackingID and a SAP Billing Code, on the form.
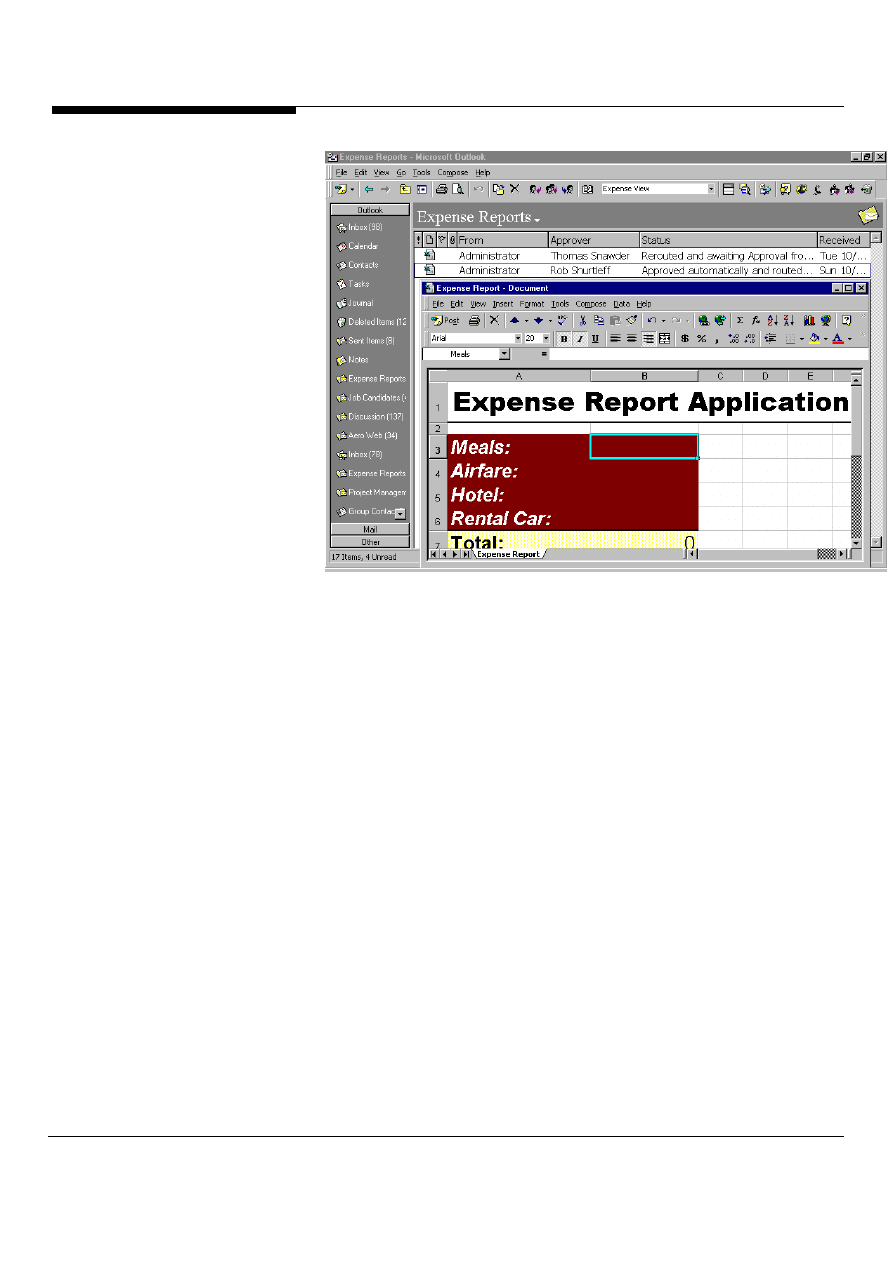
The power of Office and Outlook
Microsoft Outlook allows custom forms to be based on Office templates. This
means that developers can take advantage of the power of Microsoft Word, Excel or
Powerpoint in their applications. For example, to create a custom Outlook form for
expense reporting, a developer could use Microsoft Excel and Visual Basic for
Applications. To create an Office forms application in Outlook, click on File, New,
Office Document. Select one of the Office document types and then select whether
you want to send the Office document to another user through email or whether you
want to post the Office document in a folder. Figure 58 shows a custom Microsoft
Excel form as an Outlook custom application.
Microsoft Outlook and Exchange Server Tips and Tricks 56
Figure 58: A customized Microsoft Excel form used as an Outlook custom form.
You can see the menus of Outlook and Excel are combined on the form so users
get the full power of both applications.
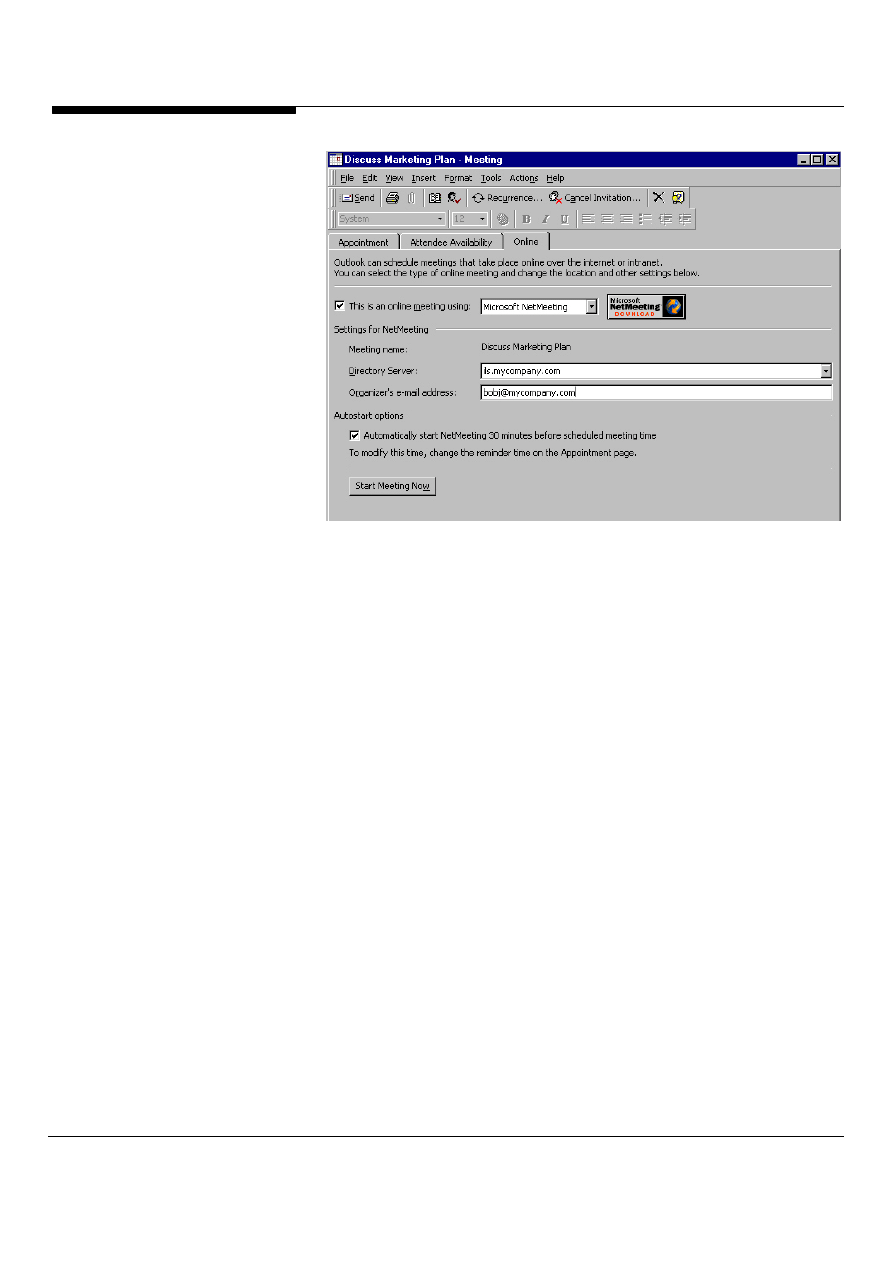
Don’t just make it a meeting, make it a
NetMeeting!
Microsoft Outlook provides rich integration with real-time collaboration. One of the
coolest new features in Outlook is the ability to create meeting requests that are not
tied to a particular location. Instead, these meetings (and their associated requests)
can take place anytime, anywhere since they are NetMeeting requests (Figure 59).
Microsoft Outlook also includes the ability to have the reminder for the meeting
automatically start NetMeeting. Now your attendees at your meetings no longer
have excuses for being late!
Microsoft Outlook and Exchange Server Tips and Tricks
57
Figure 59: The new Online meeting request in Microsoft Outlook.
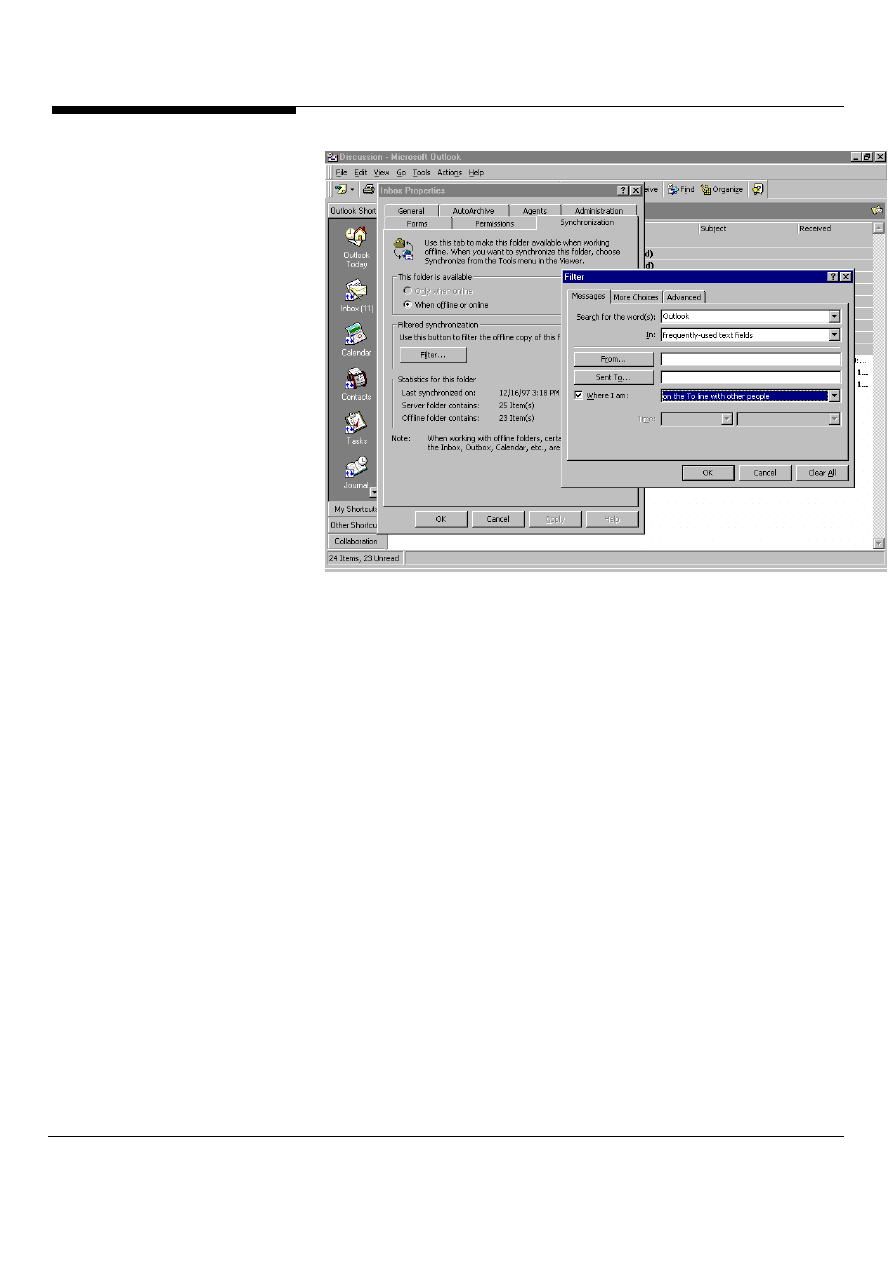
Filter your information
Many Outlook users utilize the replication capabilities of Microsoft Exchange Server
so that they can continue working on emails, contacts, their calendar or tasks while
disconnected from their network. One new feature in Microsoft Outlook is the ability
to filter the information that is replicated offline. For example, using Microsoft
Exchange Public Folders, a corporation could quickly and easily create thousands
of contacts. But, sales reps when they go offline on a business trip only want to
take a subset of these contacts, probably the ones that are their contacts in the list.
Microsoft Outlook makes filtering replicated information easy. To start filtering your
information, right-click on the folder that contains the information you are interested
in and select properties. On the synchronization tab, click on the filter button,
Outlook will present a dialog box very similar to the advanced find dialog box.
Select the properties you want to filter on. Outlook supports filtering on any
property including custom properties that you create. Figure 60 shows the filtered
replication dialog box.
Microsoft Outlook and Exchange Server Tips and Tricks 58
Figure 60: The filtered replication dialog box in Microsoft Outlook. Setting up the
properties to filter your replication on is as easy as pointing and clicking.
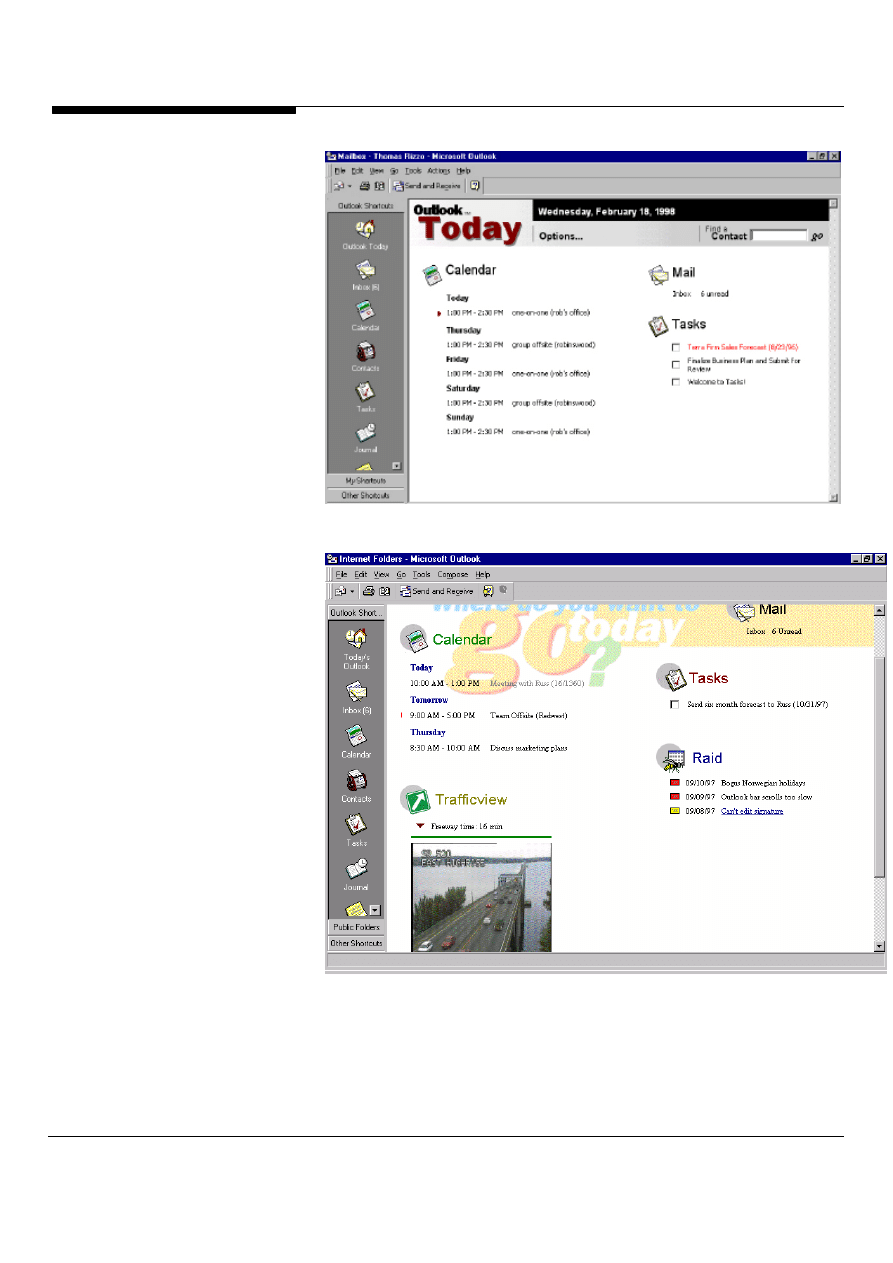
Outlook Today – One view of all your
information
One of the most innovative features of Microsoft Outlook allows users to quickly
view information that most interests them in a single window: Outlook Today.
Outlook Today is a customizable HTML page that users or developers can edit to
customize for their specific needs. Figure 61 shows the standard Outlook Today
page. After modifying some HTML, Figure 62 shows a customized Outlook Today.
Microsoft Outlook and Exchange Server Tips and Tricks
59
Figure 61: Standard Outlook Today view in Microsoft Outlook.
Figure 62: A customized Outlook Today in Microsoft Outlook.
Again: Delegate, Delegate, Delegate
Outlook lets you assign tasks to your coworkers. Just right-click on a task in your
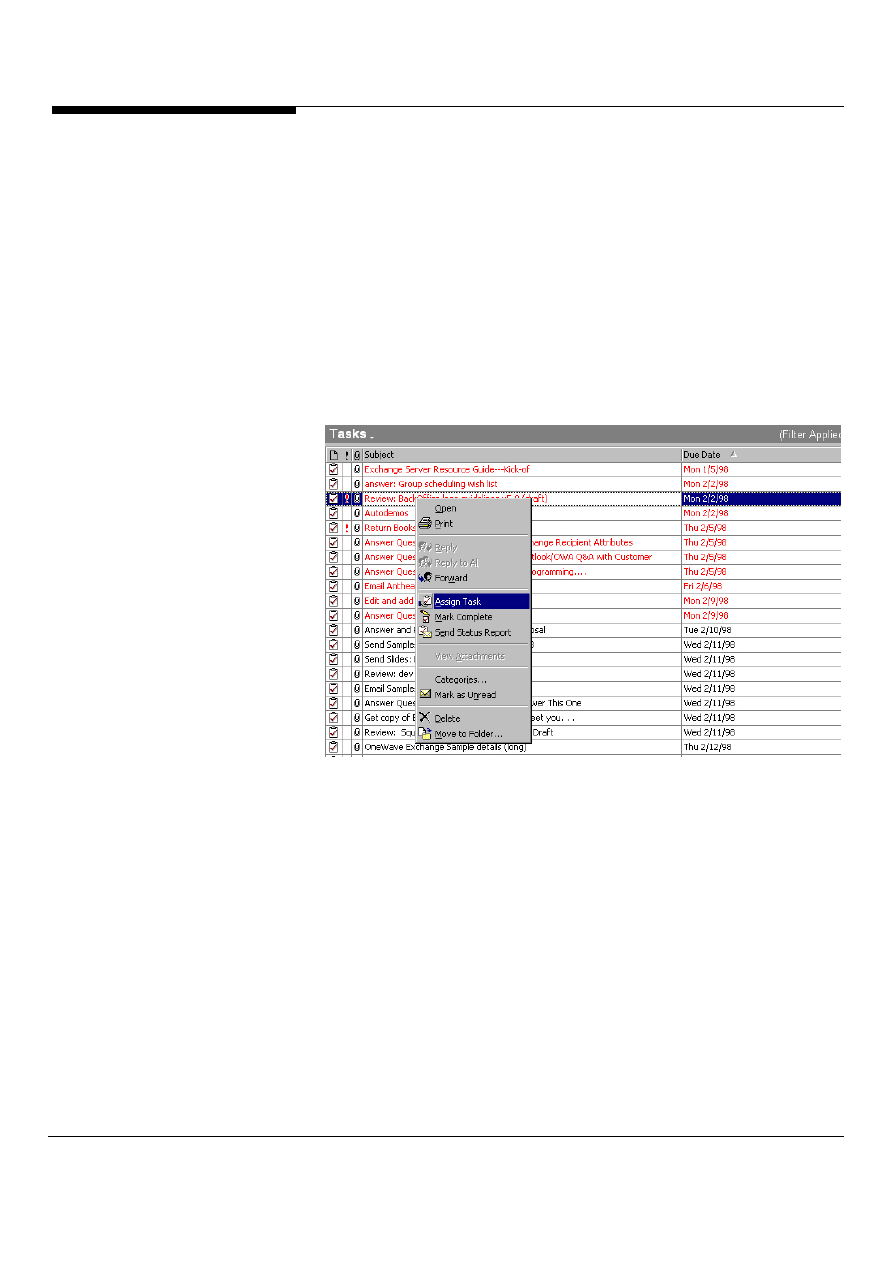
Microsoft Outlook and Exchange Server Tips and Tricks 60
task list and select Assign Task or open a task and select Task/Assign Task from
the Outlook main menu to turn the task into an email message. Type an email
address in the To field, or click the To button and choose a name from your
contacts list.
If you'd like to track the progress of the project, check the box marked "Keep an
updated copy of this task on my Task List." Any changes the recipient makes to the
task as it progresses will appear in your Task List. (Note that you will be unable to
make changes to a task that you've assigned to someone else.) And if you'd like to
be notified when the project is complete, check the box marked "Send me a status
report when this task is complete." You can also add any comments you'd like in the
window at the bottom of the dialog box. Click the Send button, and your task is
automatically assigned to your coworker via email.
Figure 63: To assign a task to someone else, right click on the task and choose
assign task.

Microsoft Outlook and Exchange Server Tips and Tricks
61
Figure 64: Keep updates on your assigned tasks by checking on the various
options before assigning the task to a co-worker.
And the winner is. . . Outlook voting
Create a new message. Click the Options button. Select the Use voting buttons
check box, and then click the voting button names you want to use in the box.
To create your own voting button names, delete the default button names, and
then type any text you want. Separate your voting options with semicolons. For
example, to ask people to vote on their shirt size, you would enter in Small;
Medium; Large; X-Large. Select the Save sent message to check box, and then
enter the folder name where you want the sent message saved. In the have
replies sent to box, select the recipient or the folder where you want replies sent
to. Outlook will automatically total the votes for you and tell you who voted for
which option and the time they voted.

Microsoft Outlook and Exchange Server Tips and Tricks 62
Figure 65: Voting with Outlook
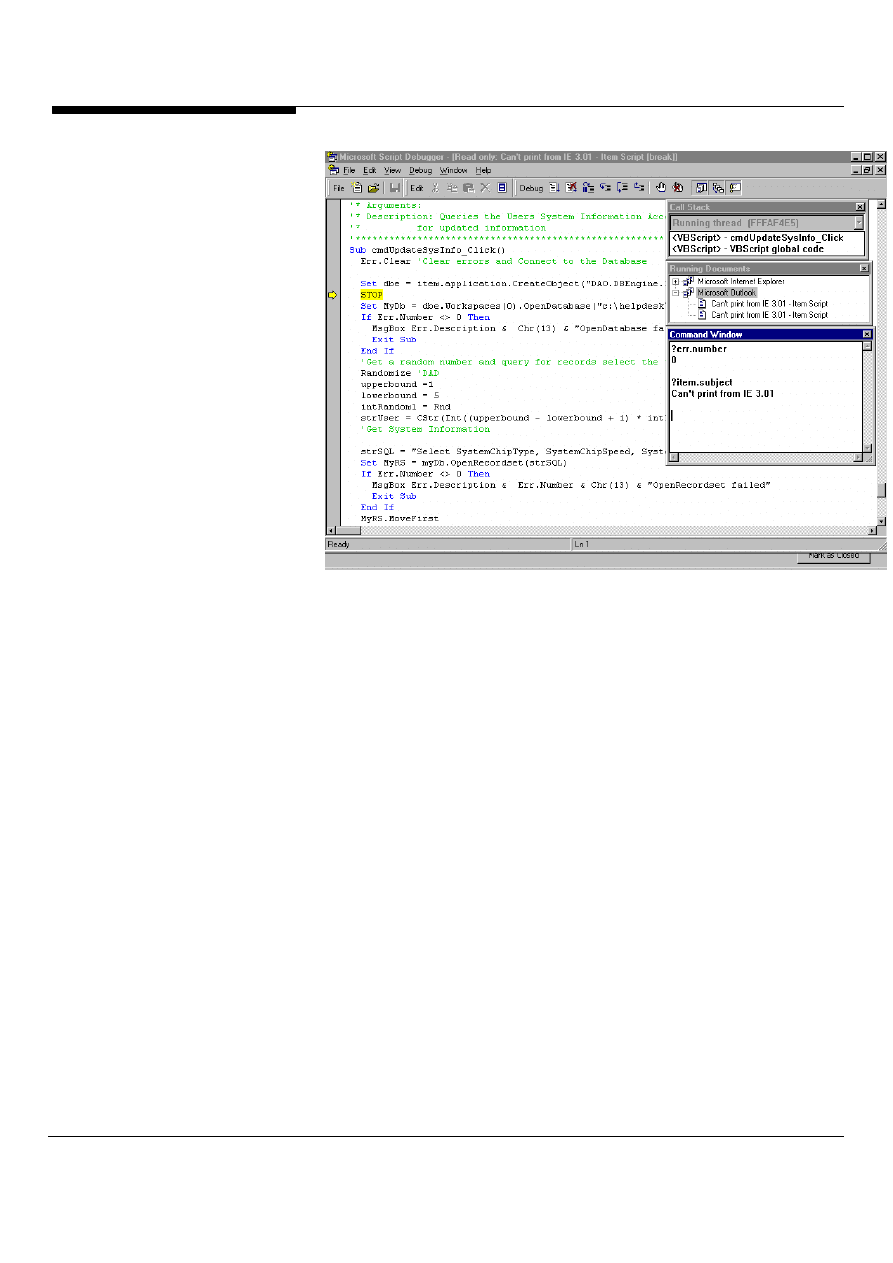
Get rid of those bugs right now
Microsoft Outlook makes writing VBScript in Outlook forms even easier. Microsoft
Outlook supports the Microsoft Script Debugger. The script debugger allows you to
set breakpoints in your Outlook VBScript, trace execution and even check variables
in the command window. To use the script debugger, install it from the Microsoft
Internet Explorer 4.0 CD or from
http://www.microsoft.com/scripting
. In Microsoft
Outlook, you can test the debugger by placing a STOP statement in your Outlook
vbscript code. Figure 66 shows the script debugger in action.
Microsoft Outlook and Exchange Server Tips and Tricks
63
Figure 66: The Microsoft Script Debugger debugging Microsoft Outlook vbscript
code in a form.
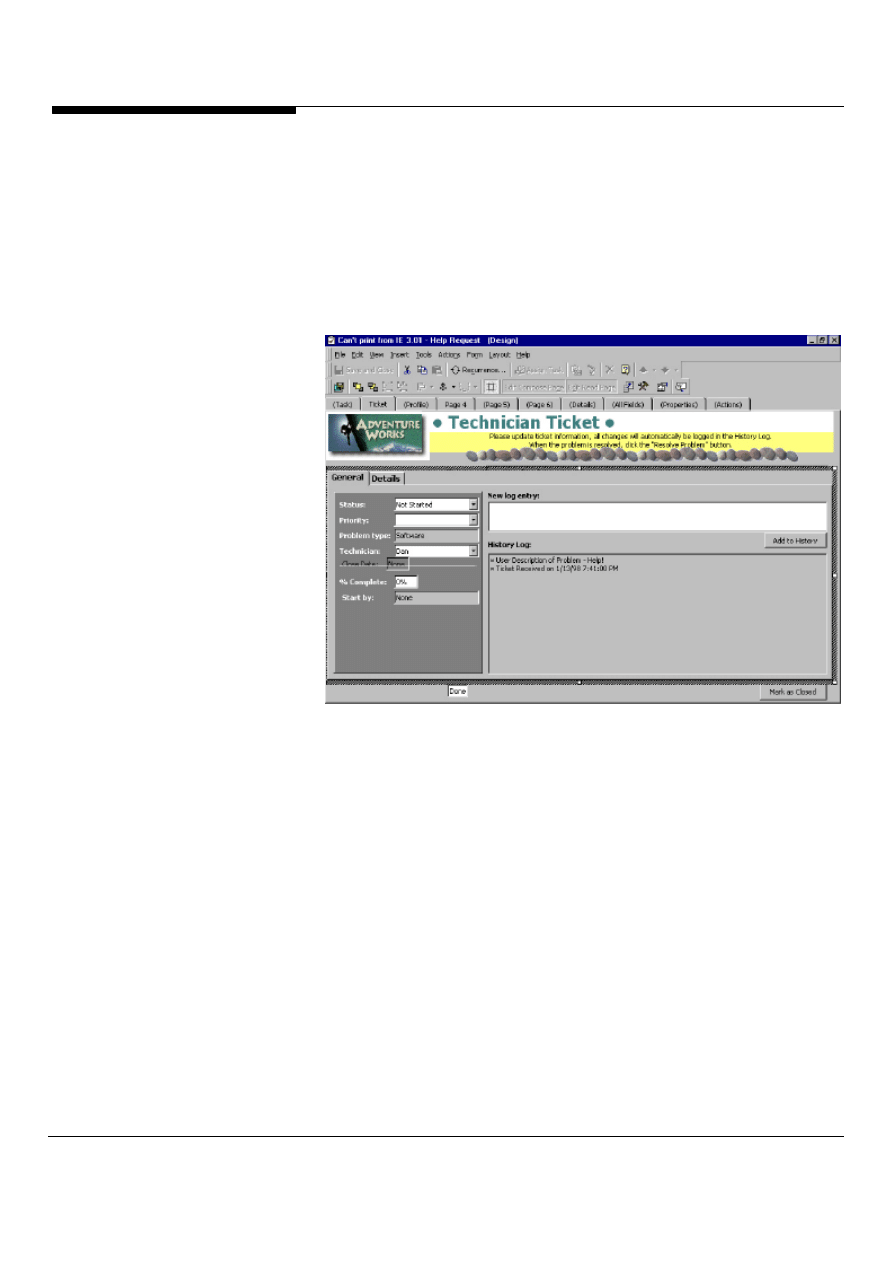
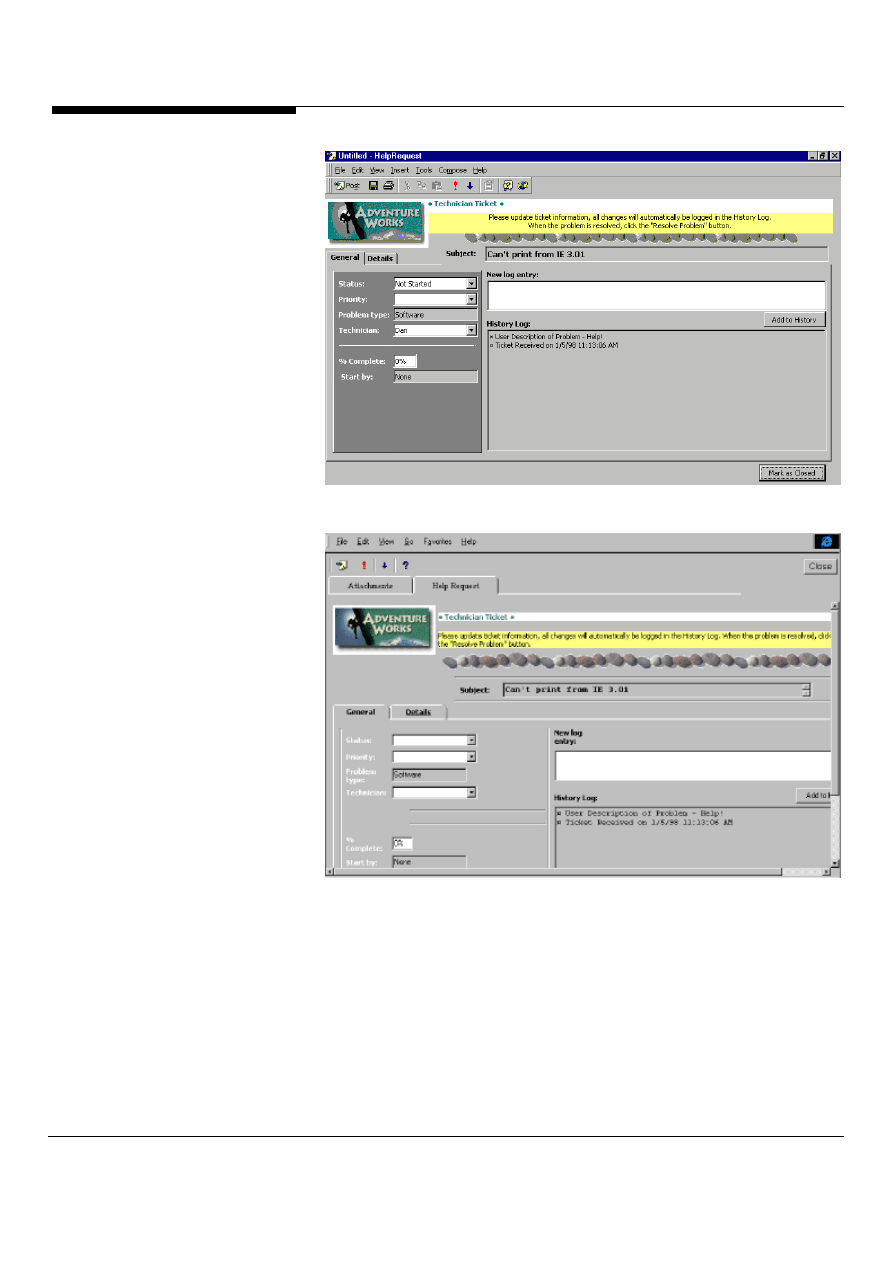
Convert your forms to HTML
One new feature in Service Pack 1 of Microsoft Exchange Server 5.5 is an Outlook
HTML Form Converter. The converter will take your current Outlook forms and
convert them to Active Server Pages and HTML documents. The converter is a
wizard-based tool that makes converting your Outlook forms to HTML easy. Figure
67 shows an Outlook Form. Figure 68 shows the same form converter to HTML.
Microsoft Outlook and Exchange Server Tips and Tricks 64
Figure 67: An Outlook Helpdesk Request Form in Microsoft Outlook
Figure 68: The same Outlook Helpdesk Request form converted to HTML
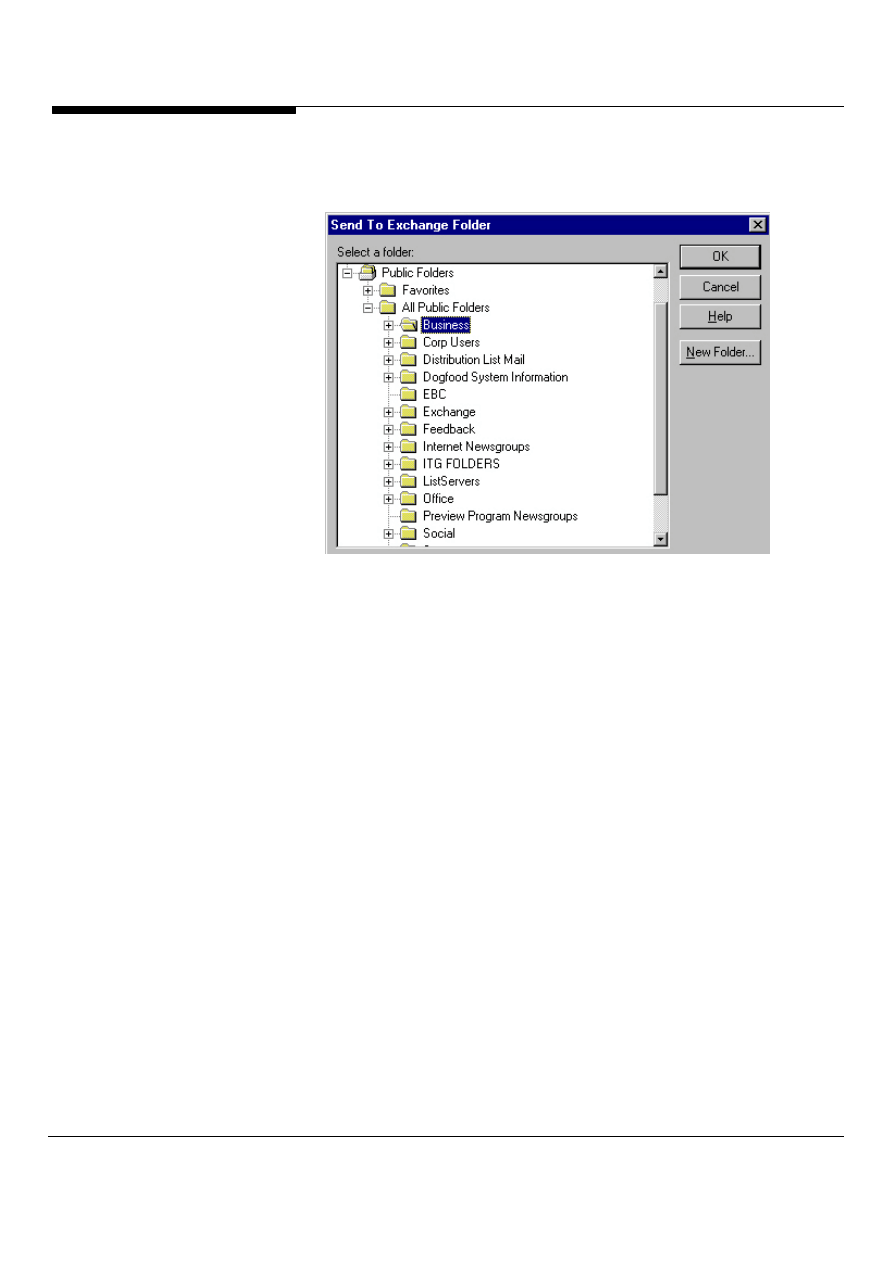
Post directly from Office to Exchange
Ever wanted to quickly post your Office documents to a Microsoft Exchange Public
Folder so other users in your organization could quickly view or comment on the
document? With Microsoft Office, you can do this. In any of the Microsoft Office
products, select the File menu then Send To. In the Send To menu, select
Exchange Folder. You will be presented with the Send To Exchange Folder dialog
Microsoft Outlook and Exchange Server Tips and Tricks
65
box as shown in Figure 69. Select the folder you want to post the document into.
After posting, other users can now collaborate on your document.
Figure 69: The Send to Exchange Folder dialog box makes it easy to post Office
documents into Exchange Public Folders.
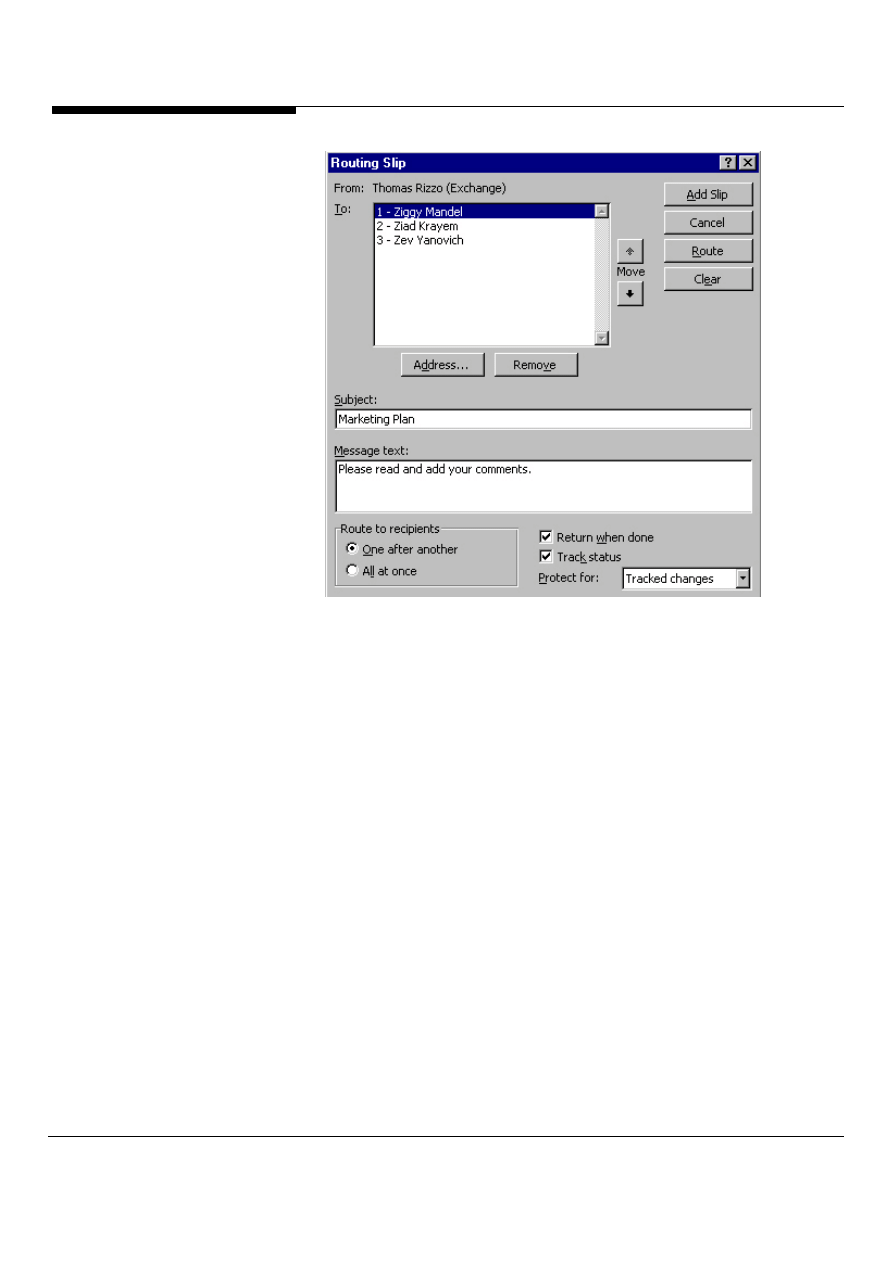
Route those documents
Microsoft Office includes the ability to route documents to other users using
Microsoft Outlook and Exchange Server. To use this feature, create a document in
Microsoft Word, Excel or Powerpoint. Select from the File menu, Send to and then
Routing Recipient. The routing slip dialog box will appear as shown in Figure 70.
This dialog allows you to select which recipients to route the item to, how to route
the item (serial or parallel) and how to track changes and status.
Microsoft Outlook and Exchange Server Tips and Tricks 66
Figure 70: The routing slip dialog box allows users to select recipients, how to route
the item and how to track changes.
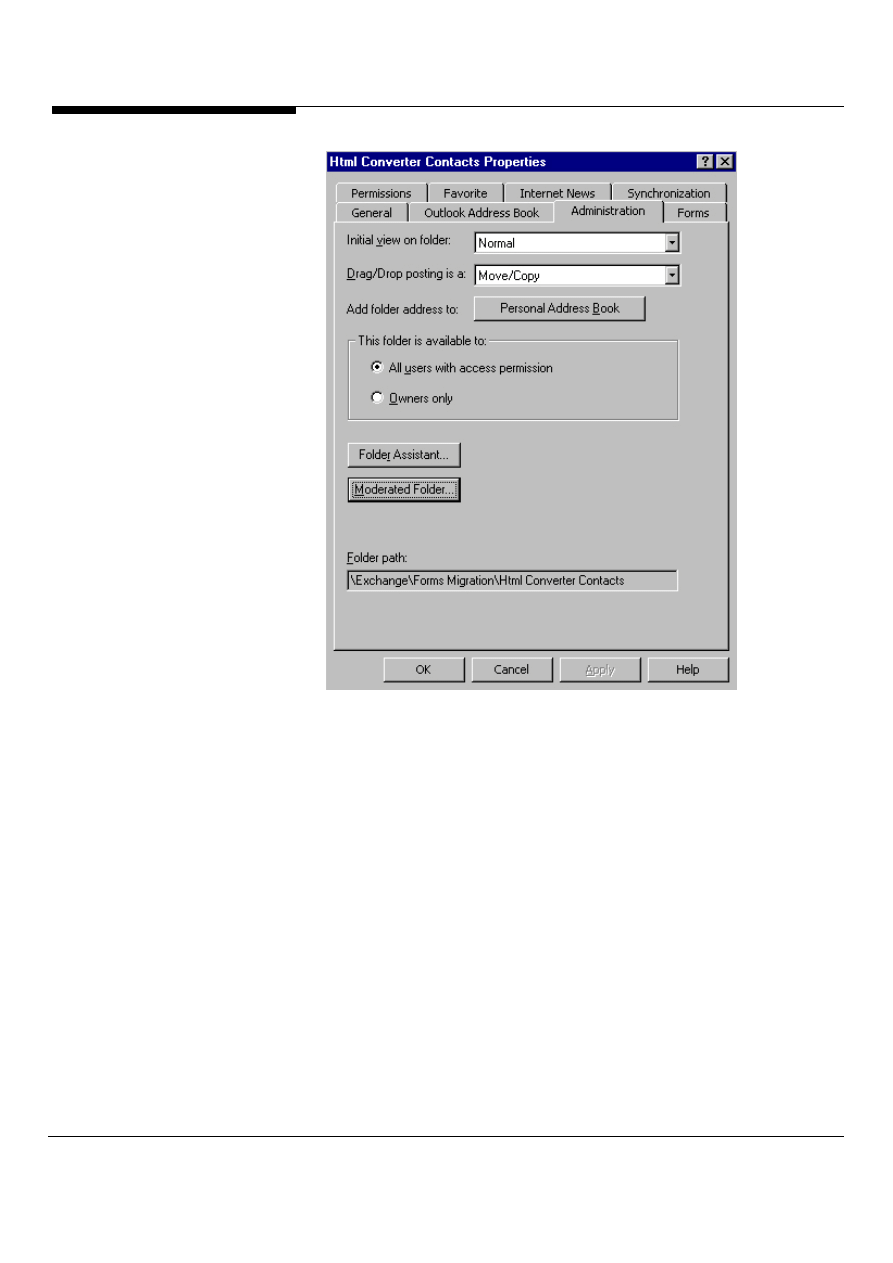
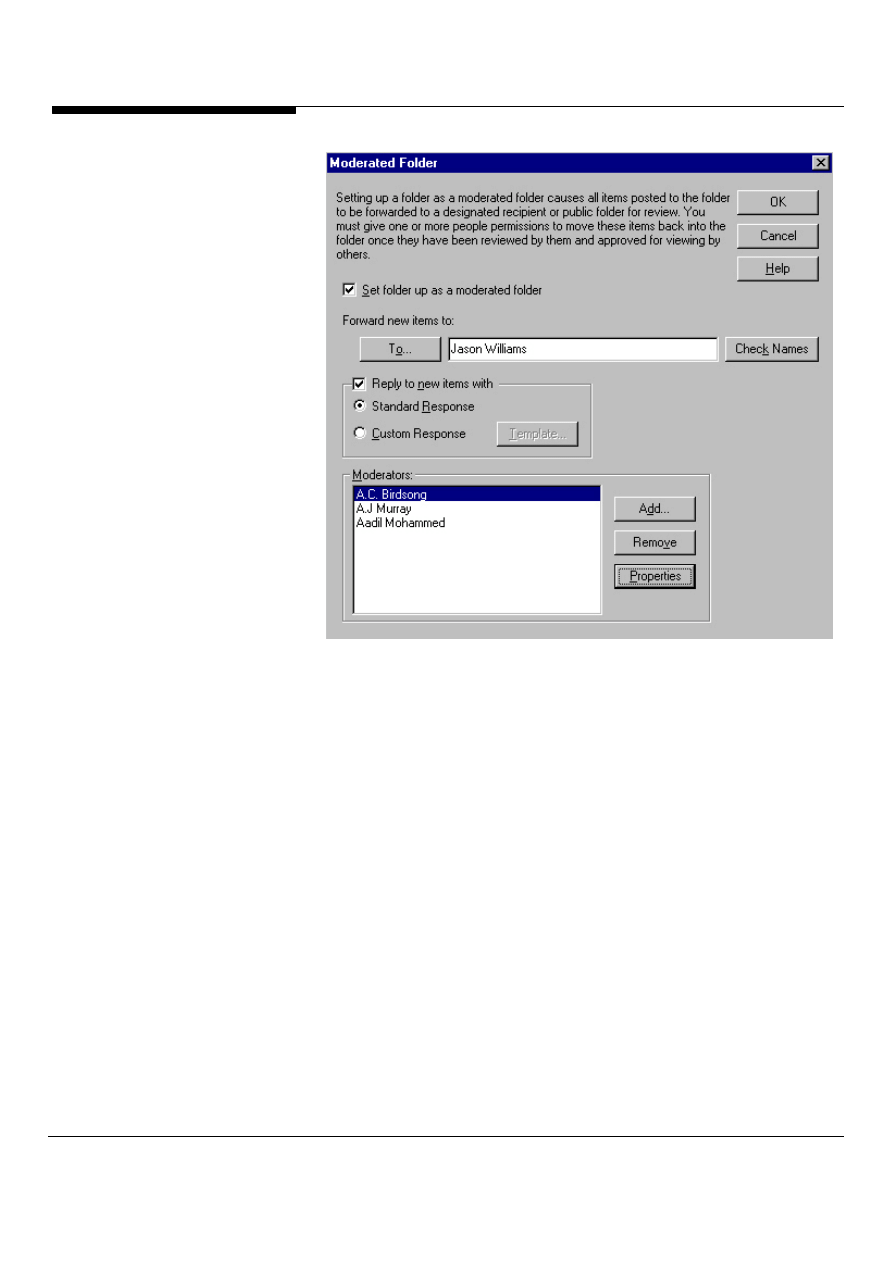
Moderate your discussions
Microsoft Outlook and Exchange Server allow users to setup moderated folders.
Moderated folders allow the folder owner to select moderators who control the
content and allow these moderators to approve items before they are posted into a
folder. Moderated Public Folders also work with any Outlook content type. This
means that you can build a moderated Public Folder that is a group contact Public
Folder. Also, you can turn existing Public Folders into moderated Public Folders by
just turning on the moderated Public Folder option; to enable a moderated Public
Folder, right-click on the folder and select properties. Under the administration tab,
as shown in Figure 71, click on the Moderated Folder button. The moderated folder
dialog box will appear as shown in Figure 72. From this dialog box, users can set
the options for the moderated folder.
Microsoft Outlook and Exchange Server Tips and Tricks
67
Figure 71: To setup a moderated Public Folder, click on the moderated folder
button under the folder properties.
Microsoft Outlook and Exchange Server Tips and Tricks 68
Figure 72: The moderated folder dialog box. From this dialog box, users can select
the options for moderated folders.
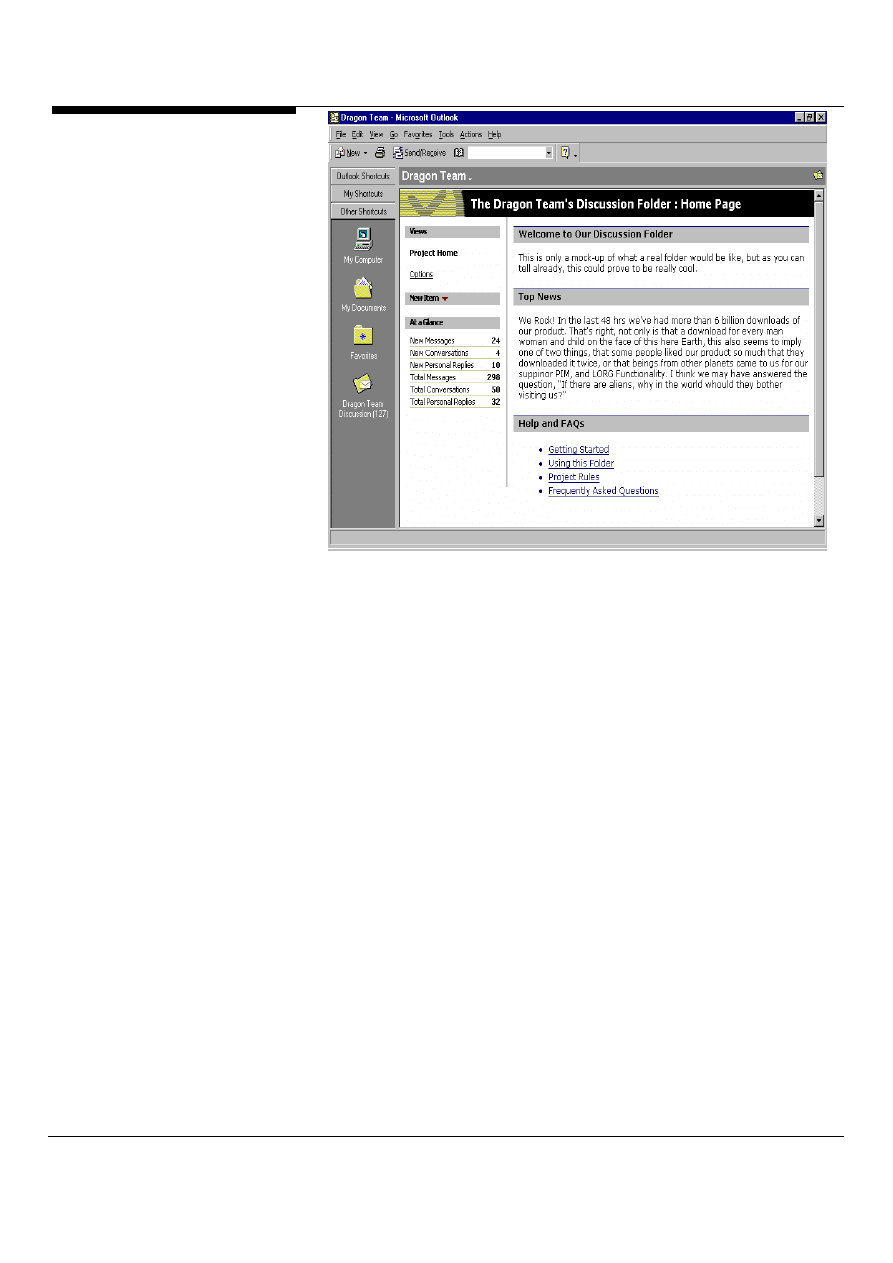
Use Folder Home Pages
Outlook takes advantage of the presentation and interactive power of the Web by
allowing a Web page to be associated with any local or Exchange Server folder
(Figure 73). The page associated with a folder and any linked pages are displayed
in the right-hand pane in Outlook when the user views the folder in Web View. (Web
View can be the default initial view on a folder.)
Folder Home Pages give application designers unlimited flexibility to add HTML and
scripted pages of instructions, tips, policies, views or reports to any folder. If a user
marks an Exchange Server folder for offline use, any Web Views pages associated
with the folder are automatically synchronized to enable offline use.
New in
Outlook
2000!
Microsoft Outlook and Exchange Server Tips and Tricks
69
Figure 73: New Outlook 2000 Folder Home Pages, helps you provide additional
information/instructions about a folder solution.
Outlook uses Microsoft Internet Explorer 4.0 or later HTML rendering, security and
offline caching services to ensure the safety of displaying HTML and active content
in Folder Home Pages.
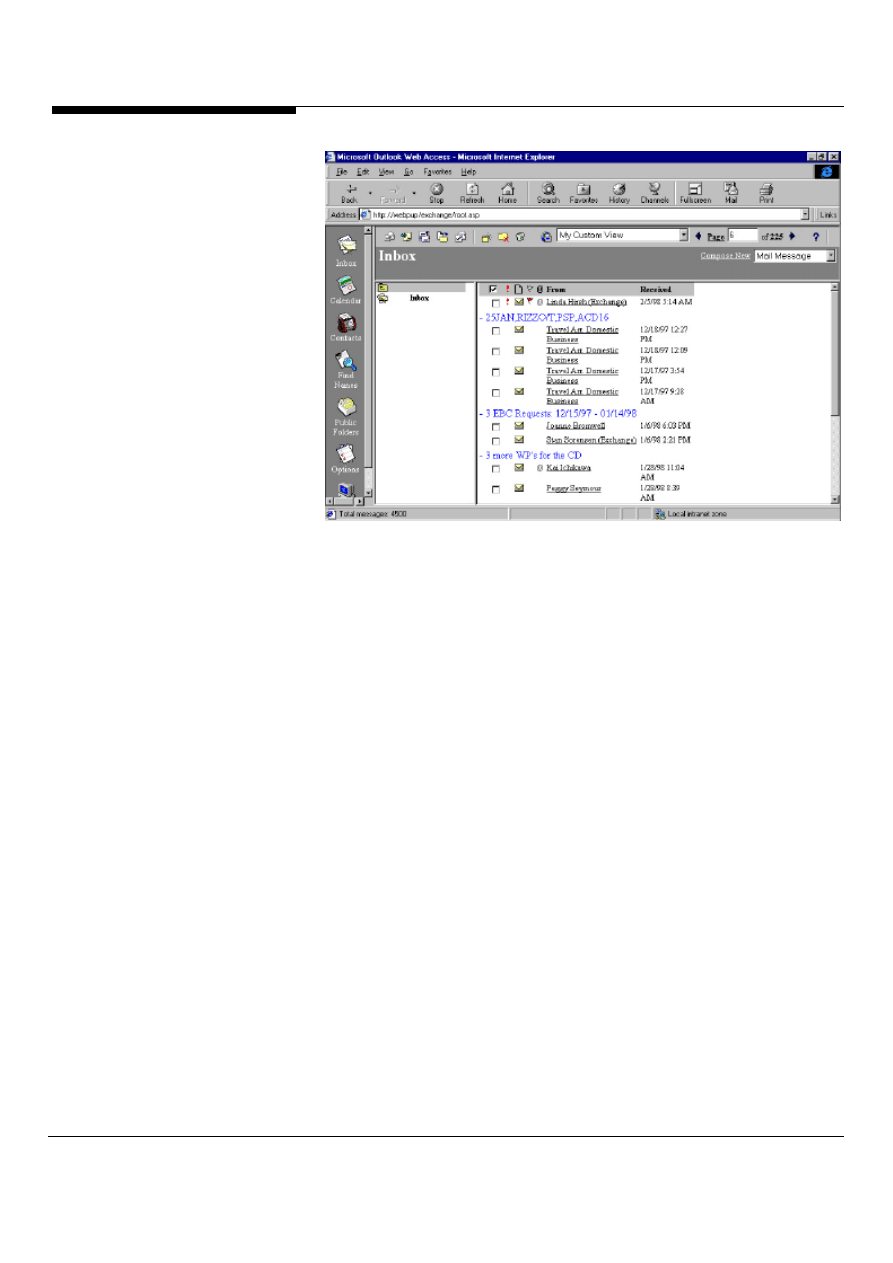
Turn your views into Web views
Microsoft Outlook Web Access allows users to use custom Outlook views in the
web browser. To use your Outlook views in Outlook Web Access, just create a new
view or modify a current view in Microsoft Outlook. To see your new view in
Outlook Web Access, select your custom view from the view drop down list.
Outlook Web Access will automatically render your custom Outlook view as HTML
as shown in Figure 74.
Microsoft Outlook and Exchange Server Tips and Tricks 70
Figure 74: A custom Outlook view called “My Custom View” viewed from Microsoft
Outlook Web Access.
Wyszukiwarka
Podobne podstrony:
1 Abramowitz Mortimer Microscope Basics and Beyond
Microsoft Assessment and Planning Toolkit 4 0 Usage Tracker Guide en
Microsoft Assessment and Planning Toolkit 4 0 Getting Started Guide en
Setup Guide Server side synchronization for CRM Online and Exchange Server
Microsoft Exchange Server 2007 Ksiega eksperta exs27k
MATLAB array manipulation tips and tricks (ang)
5800 Tips and Tricks
Tips and Tricks for Atari 400 800
Jak wykorzystac Microsoft Outlook do zorganizowania pracy i zycia osobistego
w cusb23 Microsoft Outlook Web App 2010 Free Quick Reference Card
w cusb32 Microsoft Outlook 2013 Free Quick Reference Card
Exchange Server zmiana właściwości bazy danych serwera pocztowego
więcej podobnych podstron