
FM 3-25.150(FM 21-150)
CHAPTER 2
TRAINING
This chapter discusses the trainer’s role in teaching and sustaining
effective hand-to-hand combat. It also discusses unit training, training
areas, teaching techniques, and safety precautions that must be
considered before conducting combatives training.
Section I. TRAIN-THE-TRAINER
Professional instruction is the key to success in combatives training. Instructors must be
physically fit and highly proficient in the demonstration and practical application of the
skills. They must review and be familiar with this manual. Confidence, enthusiasm, and
technical expertise are essential for success in teaching hand-to-hand combat. Assistant
instructors must also be properly trained to help supervise and demonstrate maneuvers.
Selecting the trainers is the first step in establishing an effective program.
2-1. RESPONSIBILITIES
OF
TRAINERS
Diligent effort is needed to perfect the various hand-to-hand combat techniques, to apply
them instinctively, and to teach others to safely master them. The following instructor
responsibilities are the core of planning and executing combatives training.
a. Seek maximum efficiency with minimum effort. Continually strive to reduce all
unnecessary explanations, movement, and activity. Streamline the training without
compromising content, efficiency, or safety.
b. Stress cooperation and technical mastery. Promote suppleness and controlling
aggression.
c. Reinforce the details of each technique and provide positive feedback when
warranted. Use occasional humor to motivate soldiers, but avoid degrading or insulting
them.
d. Ensure serviceable training aids are present in sufficient quantities for all soldiers
being trained. Ensure training areas are well maintained and free of dangerous
obstructions.
e. Ensure instructors and assistant instructors are well-rehearsed and prepared before
all training sessions. Conduct instructor training at least five hours weekly to maintain a
high skill level.
f. Develop as many skilled combatives instructors for each unit as possible.
Instructor-to-soldier ratios should not exceed 1 instructor for 20 soldiers. Encourage
after-duty training and education for instructors.
g. Require strict discipline of all soldiers.
2-2. SAFETY
PRECAUTIONS
To prevent injuries, the instructor must consider the following safety precautions before
conducting combatives training.
a. Supervise all practical work closely and constantly. Never leave a group
unsupervised.
2-1

FM 3-25.150
b. Familiarize the soldiers with each maneuver by a complete explanation and
demonstration before they attempt the moves.
c. Do not allow the soldiers to get ahead of the instruction.
d. Ensure the training partner offers no resistance, but allows the maneuver to be
freely executed during the learning stages and while perfecting the techniques.
e. Ensure there is adequate space between soldiers during all practical work
−
for
example, allow at least an 8-foot square for each pair of soldiers.
f. Ensure that soldiers empty their pockets, and remove their jewelry, and
identification tags before training.
g. Stress that only simulated strikes to vital points, such as the head, neck, and groin
area are to be executed. Soldiers may use light blows to other vulnerable areas; however,
they must exercise caution at all times.
h. Ensure that soldiers understand the use of both physical tapping and verbal signals
to indicate to the partner when to stop the pressure in grappling and choking techniques.
i. Make sure soldiers warm up and stretch properly before practical work.
j. Teach and practice falls before conducting throws.
k. Ensure that the soldier to be disarmed does not place his finger in the trigger
guard during rifle and bayonet disarming.
l. Make sure soldiers keep scabbards on knives and bayonets firmly attached to
rifles while learning bayonet disarming methods.
m. Use bayonet scabbards or rubber knives during knife disarming training.
n. If utilizing a sawdust pit, inspect all sandbags on retaining wall before conduct of
training to ensure that all bags are serviceable, at least 75 percent full, and that the entire
retaining wall is covered with sandbags. Any bag placed where personnel are likely to
fall will be filled with the same consistency filler as the sawdust in the pit and will also
provide a minimum of 6 inches of sawdust.
o. Maintain a buffer zone of 6 feet from retainer wall and demonstration area during
all training, especially training requiring throws and takedowns by students.
p. Rake the training pit to loosen sawdust and remove all sharp objects. Properly
inspect the pit so that all safety hazards are removed before instruction or demonstrations
are executed.
q. Perform inspections of the depth of sawdust with enough time before training to
resurface the pit. Remember that new sawdust will need to be raked and inspected for
foreign objects that may cause injuries.
Section II. UNIT TRAINING
Entry-level soldiers receive a training base in combatives during basic training and
one-station unit training (OSUT). Advanced individual training (AIT) commanders
should review the training presented during basic training and, as time permits, expand
into the more advanced techniques discussed in this manual. For soldiers to achieve and
sustain proficiency levels regular units must incorporate combatives into an organized
training program to include situational training exercises (Appendix A).
2-2

FM 3-25.150
2-3. BASIC
OR
ONE-STATION UNIT TRAINING
This is a suggested training program for basic training or OSUT. It is based on ten hours
of available training time, divided into five periods of two hours each. Training should
start with ground grappling, which is not only easier both to teach and to learn, but also
provides a sound base for the more difficult standing techniques. A program should not
begin with techniques that will take a long time to master. The result would be almost
uniform disillusionment with combatives in general.
a.
Period 1 (2 hours).
•
Introduction to combatives safety.
•
Combat demonstration performed by instructors or trainers to gain attention
and to motivate soldiers.
•
Warm-ups and stretches.
•
Stand up in base.
•
Escape the mount by trap and roll.
•
Pass the guard.
•
Achieve the mount.
•
Drill No. 1, 10 to 15 repetitions; escape the mount, pass the guard, achieve the
mount, in sequence.
•
Escape the mount by shrimp to the guard.
•
Escape the mount drill.
b.
Period 2 (2 hours).
•
Warm-ups and stretches.
•
Drill No. 1, ten repetitions.
•
Arm push and roll to the rear mount.
•
Escape the rear mount.
•
Drill No. 2: Arm push and roll to the back mount, escape the back mount.
•
Grappling for position, five minutes and then change partners. Repeat for
duration of class.
c.
Period 3 (2 hours).
•
Warm-ups and stretches.
•
Drill No. 1, ten repetitions.
•
Drill No. 2, ten repetitions.
•
Introduction to choking.
•
Rear naked choke.
•
Cross collar choke from the mount and guard.
•
Front guillotine choke.
d.
Period 4 (2 hours).
•
Warm-ups and stretches.
•
Drill No. 1, ten repetitions.
•
Drill No. 2, ten repetitions.
•
Bent arm bar from the mount and cross mount.
•
Straight arm bar from the mount.
•
Straight arm bar from the guard.
•
Sweep from straight arm bar attempt.
2-3

FM 3-25.150
e.
Period 5 (2 hours).
•
Warm-ups and stretches.
•
Drill No. 1, ten repetitions.
•
Drill No. 2, ten repetitions.
•
Review.
•
Rules introduction.
•
Competition.
2-4.
UNIT SUSTAINMENT TRAINING PROGRAM
Command emphasis is the key to a successful combatives program. Combatives training
sessions should be regular, and should be included on unit training schedules at company
and platoon level.
a. Successful unit combatives programs continue to focus on the core techniques
taught in the basic training or OSUT program. Mastery of these moves will result in more
proficient fighters than exposure to a large number of techniques will.
b. As the level of proficiency rises the natural progression of moves is as follows:
•
Advanced ground grappling.
•
Takedowns.
•
Strikes and kicks.
•
Fight strategy.
•
Situational training.
c. Primary trainers should be designated at all levels. Regular training sessions with
these trainers will ensure the quality of training at the small unit level.
d. Primary trainers should be of the appropriate rank; for instance, a platoon primary
trainer should be a squad leader or the platoon sergeant to ensure that the training actually
occurs.
e. Modern combatives allow soldiers to compete safely. To inspire the pursuit of
excellence, individual soldiers may compete during organizational day. Leaders may also
call squads, sections, or individuals to compete randomly as a method of inspecting
training levels. All combatives competitions should be conducted IAW rules established
in Appendix B of this manual. However, competition should not become the focus of
combatives training, but remain a tool to inspire further training.
Section III. TRAINING AREAS
An advantage of combatives training is that it can be conducted almost anywhere with
little preparation of the training area.
2-5. TRAINING
FORMATIONS
Formations used for physical training may also be used for combatives training
(FM 21-20). If the extended rectangular formation is used, the first and third ranks should
face the second and fourth ranks so that each soldier is directly across him a partner.
A large, grassy, outdoor area free of obstructions is suitable for training. Each pair of
soldiers should have an 8-foot square training space. When practicing throws or
disarming techniques, soldiers need twice the normal interval between ranks. Instructors
also pair soldiers according to height and weight.
2-4
FM 3-25.150
2-6. MATTED
ROOM
Because inclement weather can be a training distracter, the best training area is an indoor,
climate-controlled facility with both padded floor and walls. Mats should be sufficiently
firm to allow free movement, but provide enough impact absorption to allow safe throws
and takedowns.
2-7. PIT
CONSTRUCTION
A common area for teaching hand-to-hand combat is a sawdust pit. Sawdust pits are
designed to teach throws and falls safely, but are not very suitable for ground fighting.
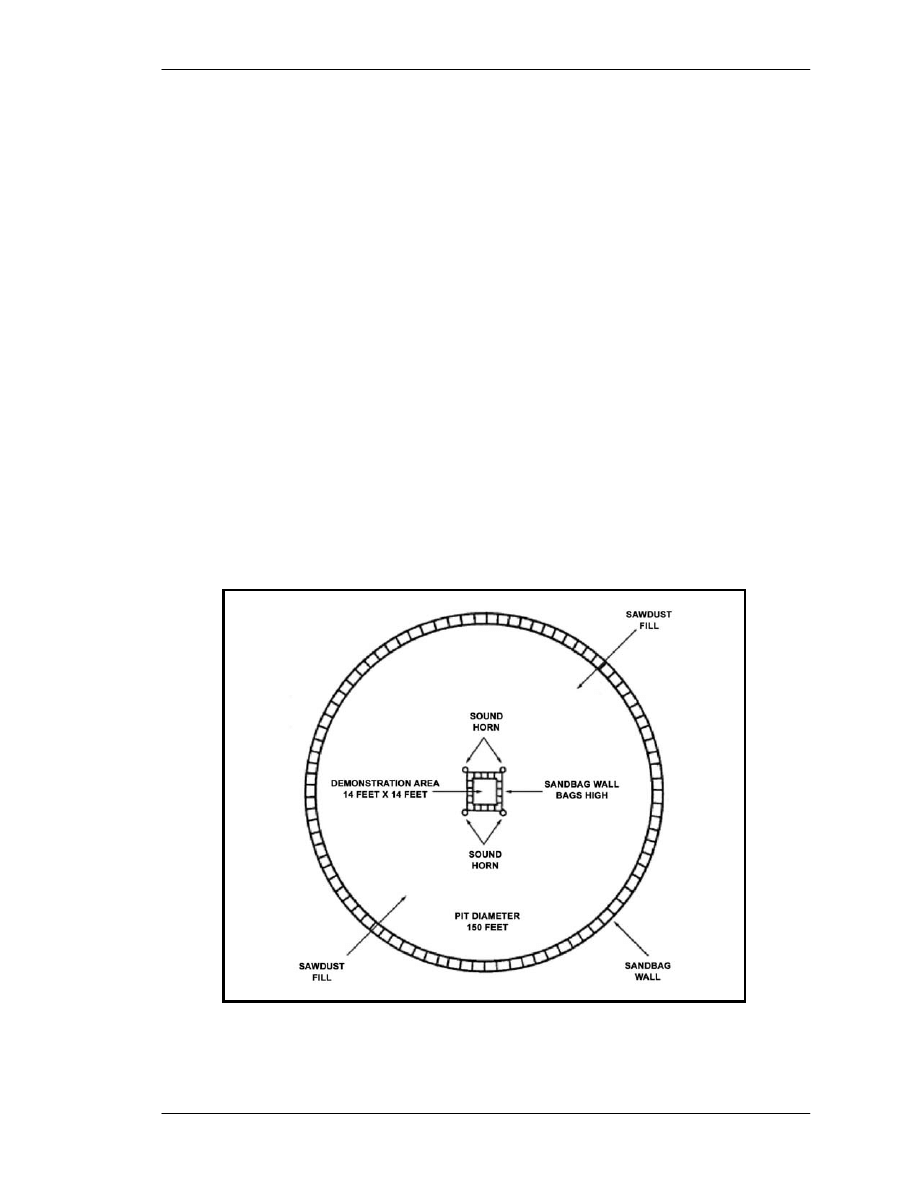
Figure 2-1 shows a training area for 200 soldiers with a sawdust pit surrounding an
instructor and a demonstrator platform.
a. To construct the pit, dig out and level an area 50 meters wide, and build a
retaining wall at least 24 inches high. The wall can be cinderblocks, sandbags, or dirt if
other materials are not available. (To prevent injuries when using a cinderblock retaining
wall, cover the wall and the top of the wall with sandbags.) Place a layer of plastic
sheeting on the ground to prevent the growth of grass and weeds, and place a sand base
up to 12 inches deep on top of the plastic. Then, place a layer of sawdust about 6 inches
deep on top of the sand.
b. Build a 14-foot square demonstration area (Figure 2-1) in the center of the pit
with the same type of retaining wall described in paragraph a. This area should be large
enough for two demonstrators and the primary instructor.
Figure 2-1. Combatives training pit.
2-5

FM 3-25.150
2-8. BAYONET
ASSAULT
COURSE
The bayonet assault course provides the commander a unique training opportunity by
allowing soldiers to employ rifle-bayonet fighting skills under simulated combat
conditions. The course can be built and negotiated so that demands placed on the
soldiers’ abilities and on their endurance approach those experienced under combat
conditions. Realistic sights and sounds of battle—fire, smoke, confusion, and
pyrotechnics—can also be created to enhance realism. The training objectives of the
bayonet assault course include:
•
Improving rifle-bayonet fighting skills.
•
Improving physical fitness and aggressiveness.
•
Improving speed, strength, coordination, and accuracy.
•
Providing realistic rifle-bayonet fighting under near combat conditions.
•
Challenging the soldiers’ determination and stamina, which are needed in
combat.
•
Providing an opportunity for team and squad leaders to develop their
leadership and control measures.
a.
Safety. The safety of the soldiers should be the primary concern of the instructor
and his assistants. The best safety aids are constant control and supervision. In addition,
instructors should brief soldiers at the beginning of each class on the requirements for
safety during rifle-bayonet training. Instructors use the following safety measures:
(1) Bayonets must be fixed and unfixed only on command.
(2) Rifles should be grounded near the targets when the soldiers are ordered to move
to the instructor’s platform for explanations or demonstrations.
(3) A level surface that does not become slippery when wet should be provided for
the training area.
(4) Left-handed soldiers should be positioned so they are opposite another
left-handed soldier when working against the targets. This type of arrangement prevents
possible injury when executing a series of movements.
(5) When using the M16 rifle against a target, the force of contact during the thrust
movement may drive the hand gripping the small of the stock into the forward assist
assembly (on the right-hand side of the weapon near the stock). To prevent injury to the
hand, the soldier must maintain a firm grip on the small of the stock. Gloves should be
worn as part of the training uniform when weather dictates.
b.
Layout. The 300-meter-long course consists of a series of targets to attack, and
obstacles to negotiate. Lay it out over natural terrain, preferably rough and wooded areas.
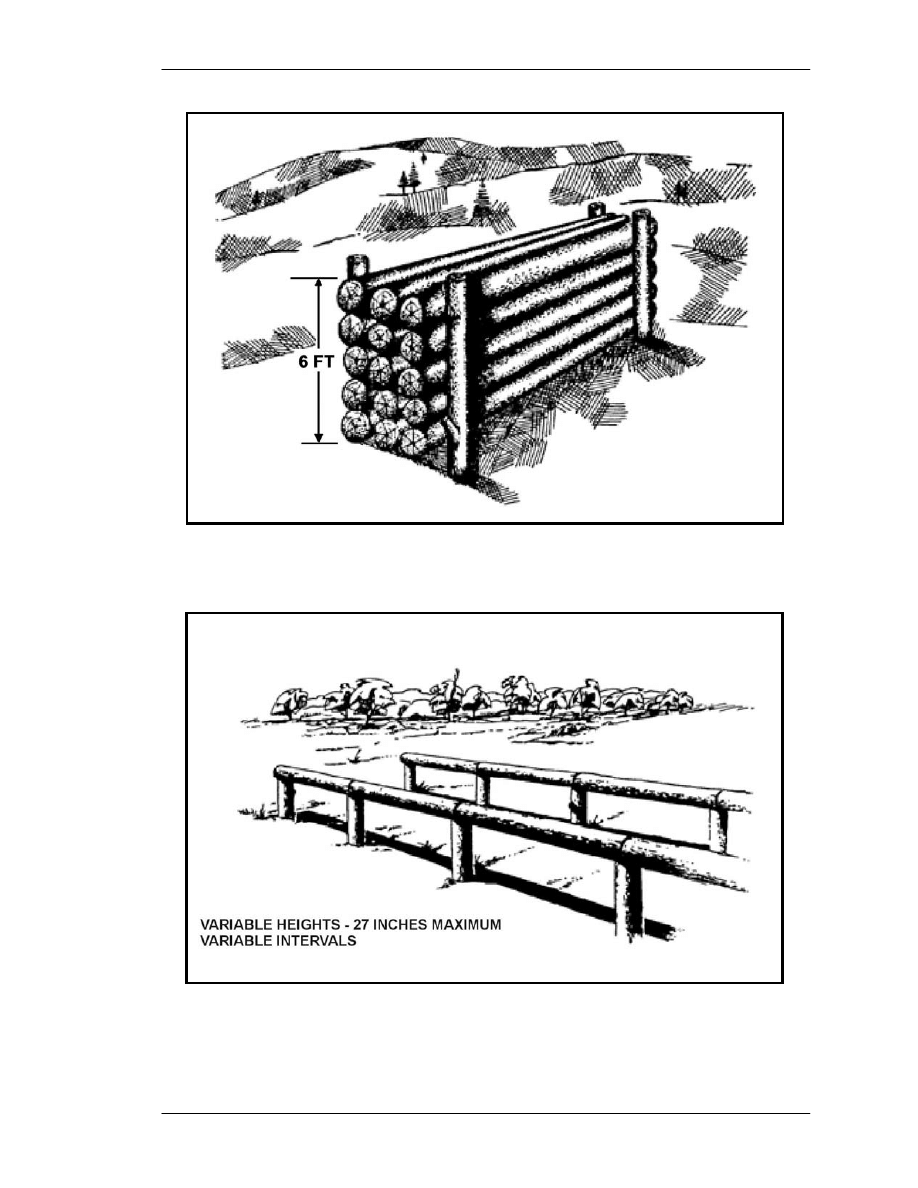
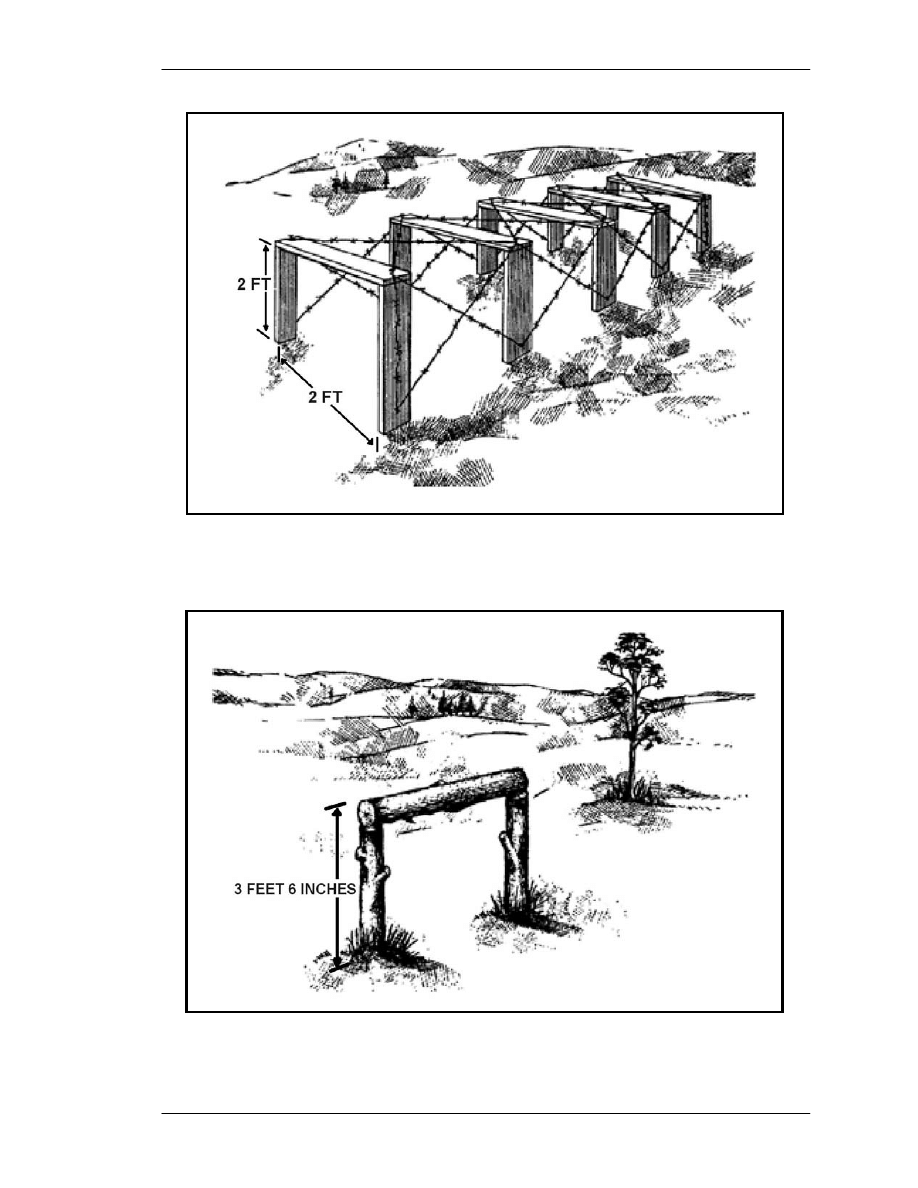
Include natural obstacles such as streams, ravines, ridges, and thick vegetation. Build
artificial obstacles such as entanglements, fences, log walls, hurdles, and horizontal
ladders (Figure 2-2).
2-6

FM 3-25.150
Figure 2-2. Example of nine-lane, 300-meter bayonet assault course.
c. Targets. Use a variety of targets to provide experience in different attacks. The
local Training and Support Center (TSC) can build the targets. Targets composed of old
tires are appropriate as well as the Ivan-type targets used by range control—that is, the
E-type silhouette, three-dimensional personnel target (large), FSN 6920-01-164-9625 or
the F-type silhouette, three-dimensional personnel target (small), FSN 6920-00-T33-8777.
2-7
FM 3-25.150
Targets should be durable but should not damage weapons. Place a sign near each target
to indicate the type of attack to be used.
d. Usage. An example of how to conduct the bayonet assault course is as follows:
(1)
Task. Negotiate the bayonet assault course.
(2)
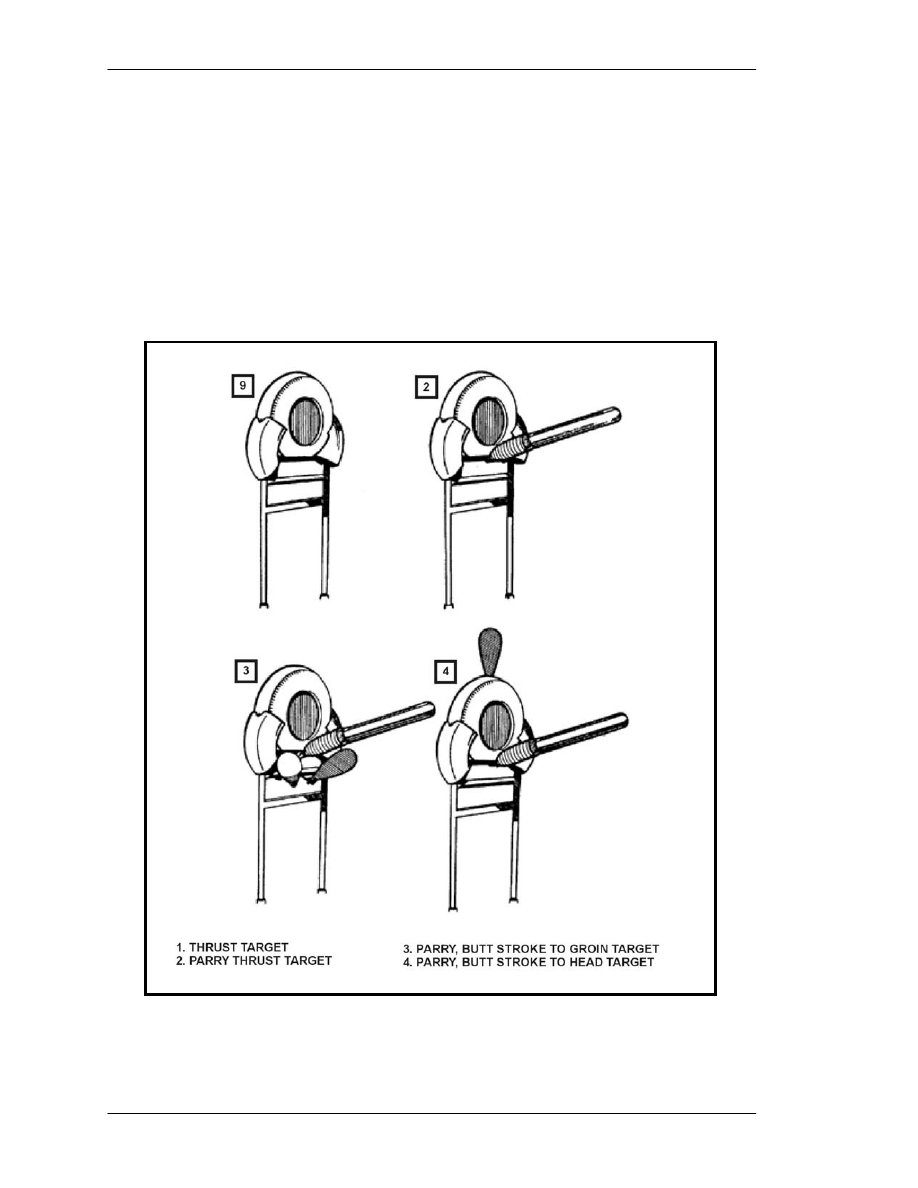
Conditions. Given nine lanes on a 300-meter bayonet assault course over irregular
terrain with four types of targets: thrust; parry thrust target; parry, butt stroke to the groin
target; and parry, butt stroke to head target (Figure 2-3). The targets are marked with a
sign to indicate the required attack. Given seven types of obstacles as shown in
Figures 2-4 through 2-10. Given a soldier in battle dress uniform with load-carrying
equipment and a rifle with a fixed bayonet.
Figure 2-3. Types of targets.
2-8
FM 3-25.150
Figure 2-4. Log wall.
Figure 2-5. Hurdles.
2-9

FM 3-25.150
Figure 2-6. Ditch jump.
Figure 2-7. Log balance and horizontal ladder.
2-10
FM 3-25.150
Figure 2-8. Tunnel crawl.
Figure 2-9. Fence vault.
2-11

FM 3-25.150
Figure 2-10. Double-apron barbwire fence.
(3)
Standards. The course must be successfully negotiated by all soldiers in the class
with each soldier obtaining kills on 75 percent of the total targets in his lane. The course
must be negotiated in 5 minutes or less (about 30 seconds for each 50 meters and time to
attack and negotiate obstacles).
WARNING
To avoid injury, instructors ensure that the proper
interval is constantly maintained.
Section IV. TEACHING TECHNIQUES
This section discusses a variety of effective teaching techniques to use while conducting
combatives training.
2-9.
WARM-UPS AND STRETCHES
Before combatives training, the soldier must be prepared for the upcoming physical
stress. A warm-up period gradually increases the internal temperature of the body and the
heart rate. Stretching prepares the ligaments, tendons, muscles, and heart for a workout,
decreasing the chances of injury. After the initial warm-up, training drills can be used to
2-12

FM 3-25.150
further warm up. This allows for the maximum use of training time combining a portion
of the warm up with building muscle memory, and refining the basic techniques.
a.
Warm-up Exercises. To begin warm-up exercises, rotate the major joints
neck,
shoulders, hips, and knees. The warm-up should include at least 7 to 10 minutes of
stretching, running in place or jogging around the training area, and calisthenics. Grass
drills and guerrilla exercises are good to use as a warm-up for combatives training. They
condition the body through motion in all ranges, accustom the soldiers to contact with the
ground, and promote aggressiveness.
b.
Stretching Exercises. Any of the stretching exercises in FM 21-20 are
recommended for hand-to-hand combat training. Five other exercises that increase
flexibility in areas of the body that benefit hand-to-hand combat movements are as
follows:
(1)
Backroll Stretch.
(a)
Position. Lay on ground on back with legs extended and arms by sides, palms
down.
(b)
Action. Raise legs over head and roll back as far as possible, trying to place toes
on the ground behind head. Keep knees locked and feet and knees together; hold for 20
seconds (Figure 2-11). Gradually return to starting position. Repeat two or three times.
Figure 2-11. Backroll stretch.
2-13
FM 3-25.150
(2)
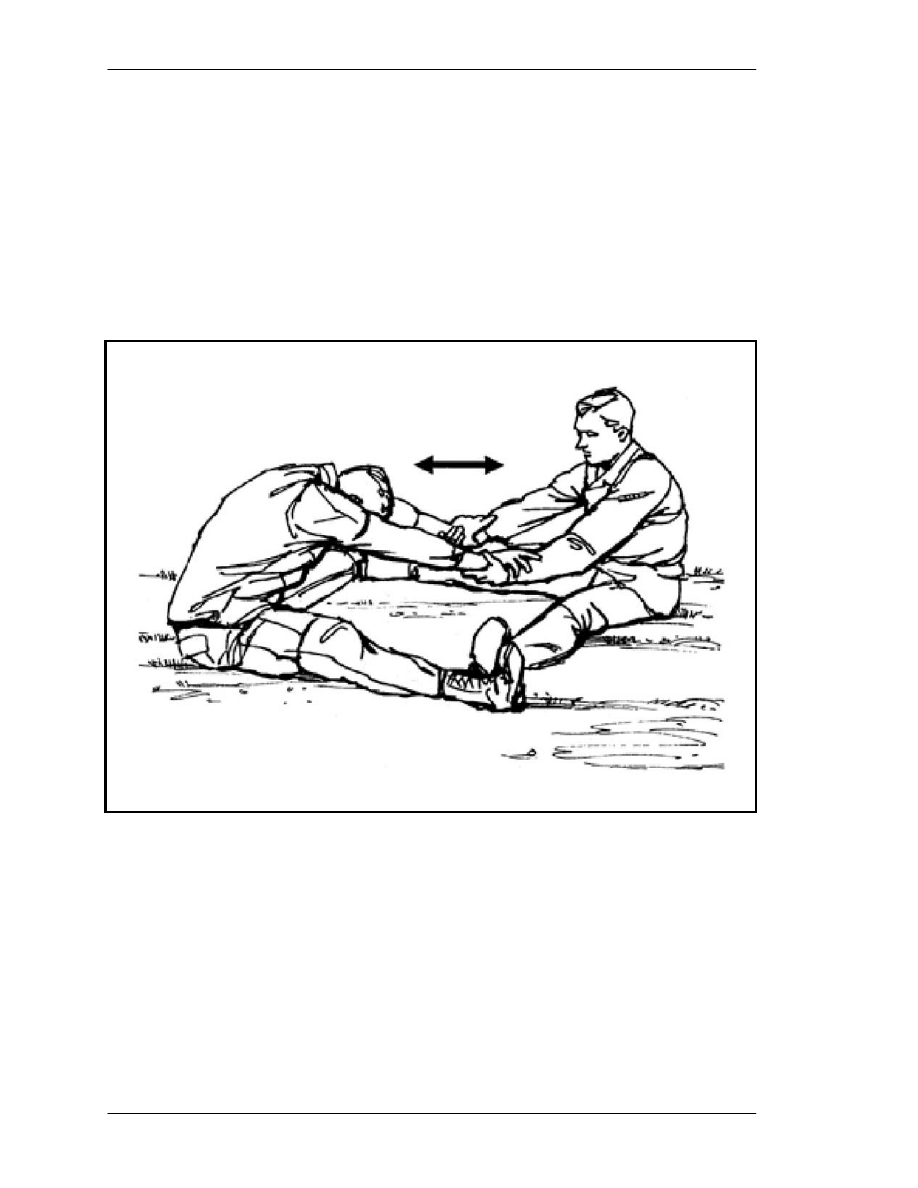
Buddy-Assisted Splits (Leg Spreader).
(a)
Position. Sit on ground facing buddy with legs extended and spread as far as
possible. Position feet inside ankles of buddy.
(b)
Action. Interlock hands with buddy and alternate pulling one toward the other,
causing the buddy to bend forward over the hips until a stretch is felt (Figure 2-12). Hold
this position for 20 seconds, then alternate and have him pull you into a stretch. Do
sequence two or three times.
Figure 2-12. Buddy-assisted splits (leg spreader).
2-14
FM 3-25.150
(3)
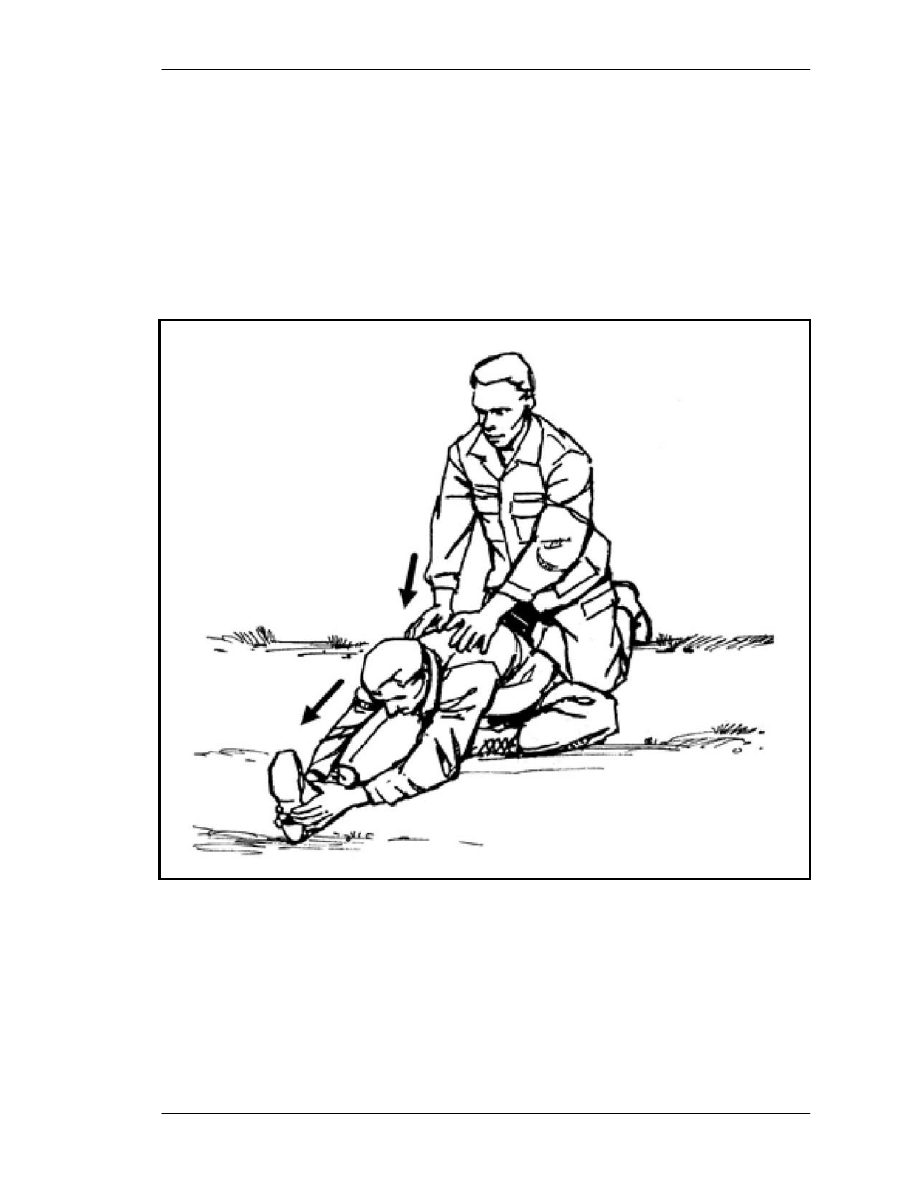
Buddy-Assisted Hamstring Stretch.
(a)
Position. Sit on ground with right leg extended to front and foot pointing up. Bend
left leg with sole touching to inside of the right thigh. Have buddy kneel behind you with
his hands on your shoulders (Figure 2-13).
(b)
Action. Slowly bend forward from hips over the right leg and reach your hands
toward ankles until stretch is felt (Figure 2-13). Hold this for 10 to 15 seconds. The
buddy then applies downward pressure and allows you to adjust your stretch. Hold for 10
to 15 seconds and repeat. Alternate legs and positions after two or three sequences.
Figure 2-13. Buddy-assisted hamstring stretch.
2-15
FM 3-25.150
(4)
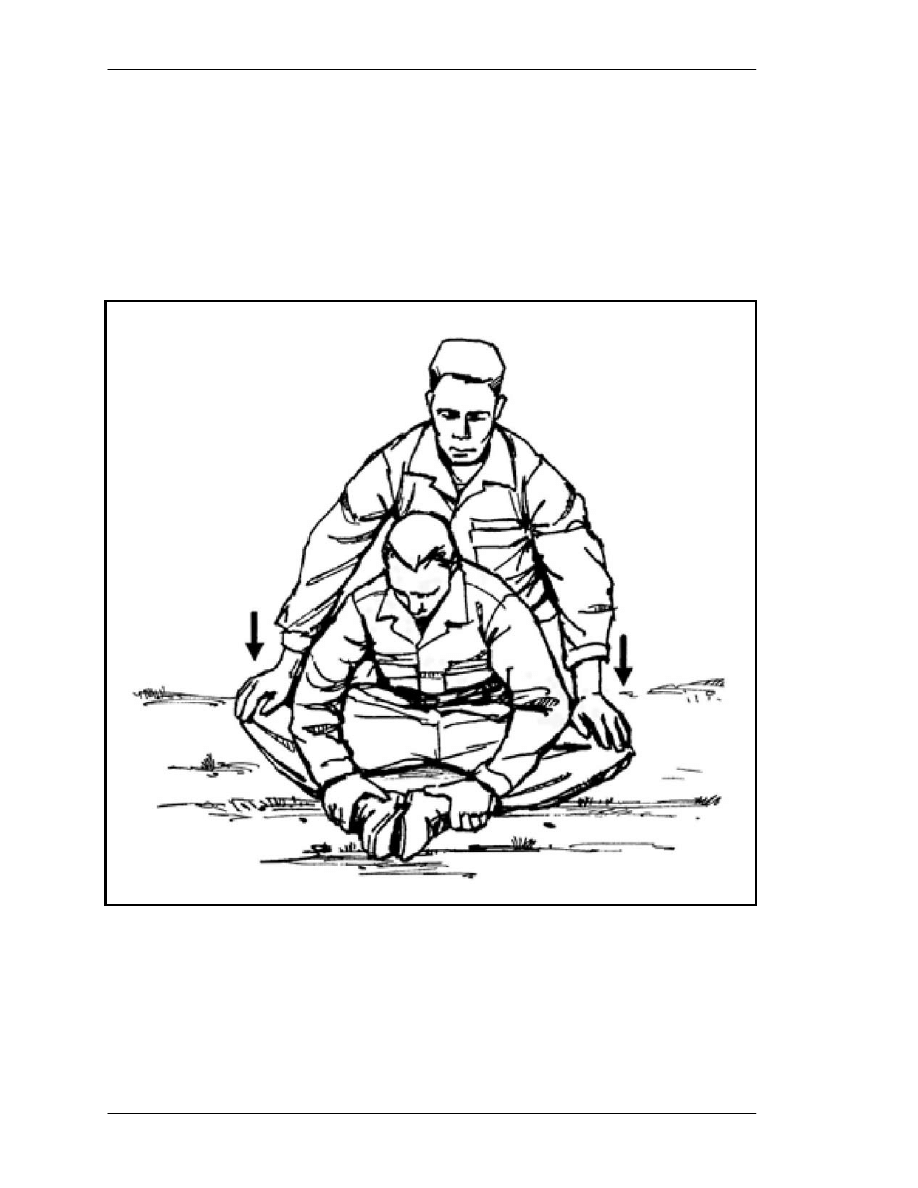
Buddy-Assisted Groin (Butterfly) Stretch.
(a)
Position. Sit on ground with the soles of your feet together, close to the torso.
Hold ankles with hands. Have buddy kneel behind you with his hands on your knees.
(b)
Action. The buddy places his hands on top of your thighs at the knees. The
buddy’s weight is supported by your shoulders while little weight is placed on the thighs.
Then, the buddy increases downward pressure on your thighs until stretch is felt (Figure
2-14). Hold for 20 seconds, then alternate positions.
Figure 2-14. Buddy-assisted groin (butterfly) stretch.
2-16
FM 3-25.150
(5)
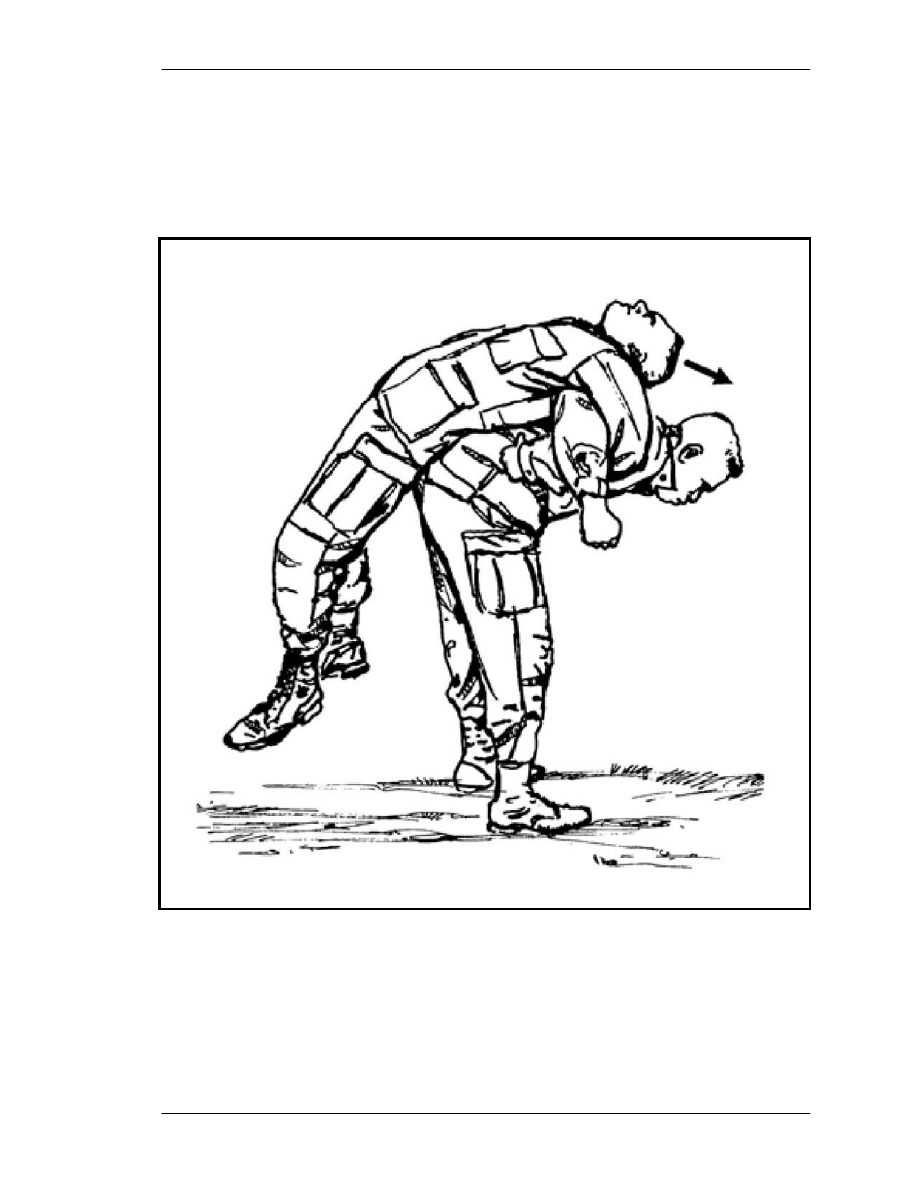
Buddy-Assisted Back Stretch.
(a)
Position. Stand back-to-back with buddy and interlock arms at your sides.
(b)
Action. Bend forward at the waist and pull buddy up on your back over your hips.
The buddy allows his back to arch and tells you when an adequate stretch is felt
(Figure 2-15). Hold this position for 20 seconds, then, change places.
Figure 2-15. Buddy-assisted back stretch.
2-17

FM 3-25.150
2-10. CRAWL, WALK, AND RUN
Training can be conducted using the crawl, walk, and run techniques, which may be
applied on two levels.
a.
First Level. The instructors use these techniques during each initial training
session.
(1)
Crawl Phase. New techniques are introduced, taught, demonstrated, and executed
by the numbers.
(2)
Walk Phase. During this phase, soldiers practice the new techniques by the
numbers, but with more fluid movement and less instructor guidance.
(3)
Run Phase. Soldiers execute the techniques at combat speed with supervision.
b.
Second Level. The instructors use these techniques when developing unit
combatives programs. Before conducting combatives training, the instructor considers the
abilities and experience level of the soldiers to be trained. During training, those soldiers
with prior martial arts experience can be a great asset; they may be used as demonstrators
or as assistant instructors. The crawl, walk, run approach to unit training ensures a high
skill level throughout the unit and minimizes the risk of training injuries.
(1)
Crawl Phase. During the crawl phase, the instructor introduces combatives to the
unit. Here, the basic skills that set the standards for advancement to other levels are
mastered. Emphasis is placed on the basic ground fighting techniques, gradually
introducing standup fighting and fight strategy. Studying the new techniques in this
method ensures that the movements are correctly programmed into the soldiers’
subconscious after a few repetitions.
(2)
Walk Phase. Once a unit has developed a sufficient proficiency level in basic
skills, begin the walk phase. Instructors introduce soldiers to more advanced ground
fighting techniques and begin serious training on closing with the enemy and takedowns.
Soldiers engage in full sparring and competitive matches.
(3)
Run Phase. In the run phase, soldiers spar using slaps to represent striking during
ground fighting, takedowns are practiced against an opponent with boxing gloves, and
scenario driven training such as multiple opponent or restrictive equipment is used.
2-11. DEMONSTRATIONS
A well-coordinated demonstration and professional demonstrators are crucial for
successful learning by soldiers. Unrehearsed presentations or inadequately trained
demonstrators can immediately destroy the credibility of the training. Two methods are
appropriate for demonstrating combative techniques based on the size of the group to be
taught.
a.
Company-Size Formation or Larger. The instructor or demonstrator uses the
talk-through method. The primary instructor talks the demonstrators through the
techniques by the numbers, and then the demonstrators execute at combat speed. The
soldiers can see how to apply the move being taught in relation to the instructor or
demonstrator. The primary instructor is free to control the rate of the demonstration and
to stress key teaching points. The demonstrators must be skilled in properly applying the
techniques so soldiers can adequately grasp the intended concepts.
b.
Platoon-Size Formation or Smaller. A good method for demonstrating to a
smaller formation is for the primary instructor to apply the technique being taught to an
2-18

FM 3-25.150
assistant instructor. The primary instructor talks himself through the demonstration. He
stresses correct body movement and key teaching points as he does them.
2-12. EXECUTION BY THE NUMBERS
Instructors use execution by the numbers to break techniques down into step-by-step
phases so soldiers can clearly see how the movements are developed from start to finish.
Execution by the numbers also provides soldiers a way to see the mechanics of each
technique. This teaching method allows the instructor to explain in detail the sequence of
each movement. For example, on the command PHASE ONE, MOVE, the attacker
throws a right-hand punch to the defender’s face. At the same time, the defender steps to
the inside of the attacker off the line of attack and moves into position for the right-hip
throw. Assistant instructors are able to move freely throughout the training formation and
make on-the-spot corrections.
2-13. EXECUTION AT COMBAT SPEED
When the instructor is confident that the soldiers being trained are skilled at executing a
technique by the numbers, he has them execute it at combat speed. Executing movements
at combat speed enables soldiers to see how effective a technique is. This builds the
soldier’s confidence in the technique, allows him to develop a clear mental picture of the
principles behind the technique, and gives him confidence in his ability to perform the
technique during an actual attack. For example, the command is, PASS THE GUARD
AT COMBAT SPEED, MOVE. The soldiers then execute this technique from start to
finish. It is important to remember that combat speed does not always mean very quickly.
Speed requires space and space often favors the defender.
2-14. DRILLS
Drills are used to warm up, to reinforce the importance of dominant body position, and to
perfect soldiers’ basic skills through repetition. During these drills, basic positional
techniques are repeated at the beginning of each training session with a different detail
emphasized each session. In this way the emphasis is kept on perfecting the basic
techniques, while at the same time making the best use of limited training time.
2-15. TRAINING
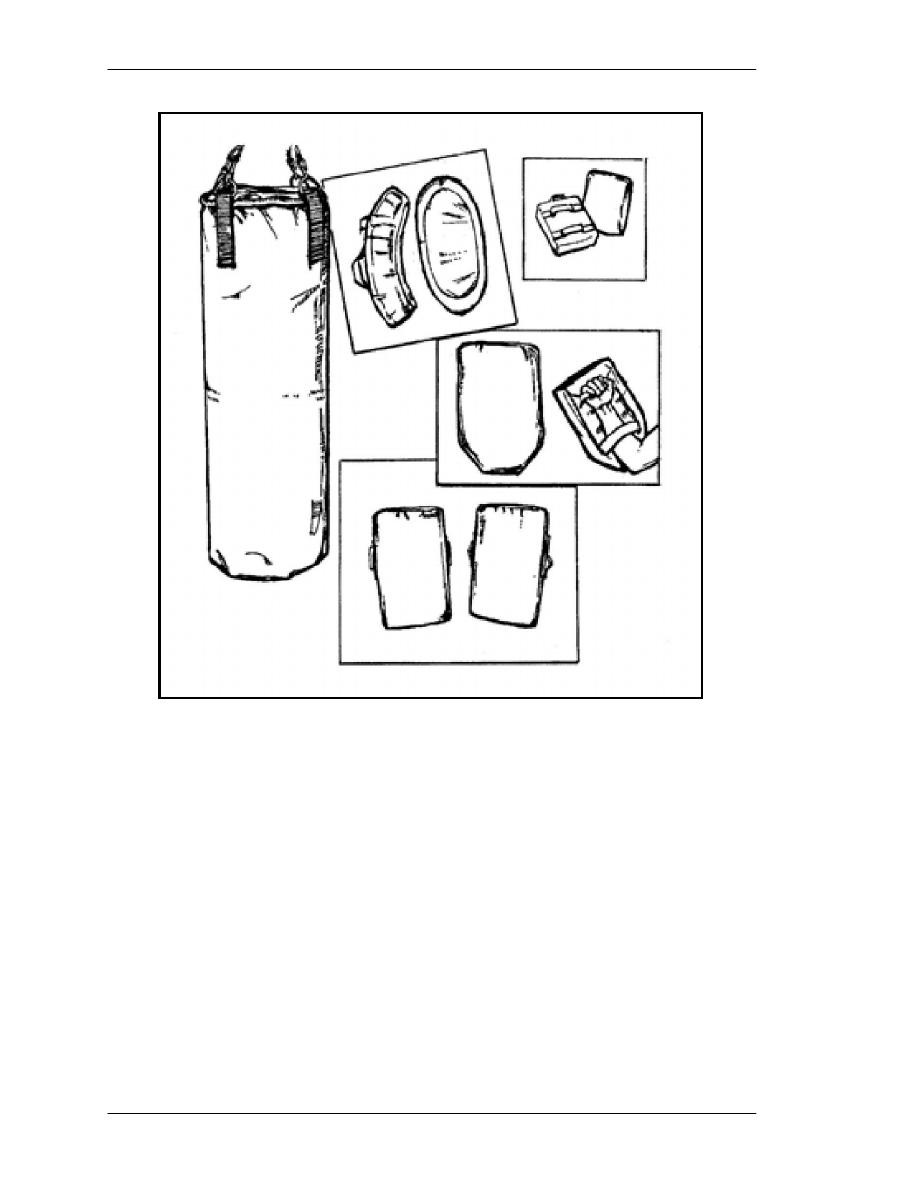
PADS AND OTHER PROTECTIVE EQUIPMENT
Training pads are highly recommended to enhance training (Figure 2-16, page 2-20).
They allow full-forced strikes by soldiers and protect their training partners. Although
striking is a inefficient way to end a fight, it is a very important part of a fight. Pads
enable soldiers to feel the effectiveness of striking techniques and to develop power in
their striking. Instructors should encourage spirited aggressiveness. Pads can be tackle
dummy pads or martial arts striking pads. Training pads can be requisitioned through
supply channels or purchased locally.
a. The use of pads is especially recommended for knee-strike practice drills, and
kicking drills. Ideally, the pad is placed on the outside of the training partner’s thigh,
protecting the common perennial nerve. Pads can also be held against the forearms in
front of the head and face to allow practice of knee or elbow strikes to this area.
b. Other protective equipment, such as shin guards, can also be useful to practice
with improvised weapons.
2-19
FM 3-25.150
Figure 2-16. Training pads.
2-20
Wyszukiwarka
Podobne podstrony:
Ch2 NonConventionalEnergygyandUtilisationResources 2 20 2 22
Ch2 NonConventionalEnergygyandUtilisationResources 2 1 2 16
ch2 (2)
Ch2 E7
ROZKLAd ch2, Kwantyle c2(p,v) rzędu p rozkładu c2 o
CH2
ch2
Ch2 E3
Ch2 E6
Ch2 E5
fema453 ch2
Ch2 Q1
ch2-chromo, spektro, Chromatografia
Ch2 FuelResourcesFromTheForest
Ch2 E1
ch2 040802
ch2
więcej podobnych podstron