
PM: Saturday Mechanic - Aim Your Headlights
http://hearst.corp.printthis.clickability.com/pt/cpt?action=cpt&title=P...
1 of 5
29/08/2006 2:15 PM
SAVE THIS | EMAIL THIS | Close
Aim Your Headlights
BY PAUL WEISSLER
Illustrations by Ron Carboni
Published in the January, 2005 issue.
CLICK HERE FOR THE SATURDAY MECHANIC ARCHIVE.
Every oncoming vehicle is flashing headlights at you, and it's not
to warn you about a speed trap ahead. Very obviously, the
oncoming drivers think you have your high beams on, so you flash
your high beams back to prove the lamps really are on low. This
just annoys them even more. Time to aim the headlamps.
DRAGGIN'
If you're on vacation and the back of the car is loaded with hunting
and fishing gear, maybe even a large catch, plus other "road
hugging weight," that's probably the cause of your headlight
problems. That extra weight pushes down the rear enough to tilt up
the front and the beams. If you periodically carry heavy rear-end
loads as part of your lifestyle, the only real cure is a pair of
load-leveling air shocks.
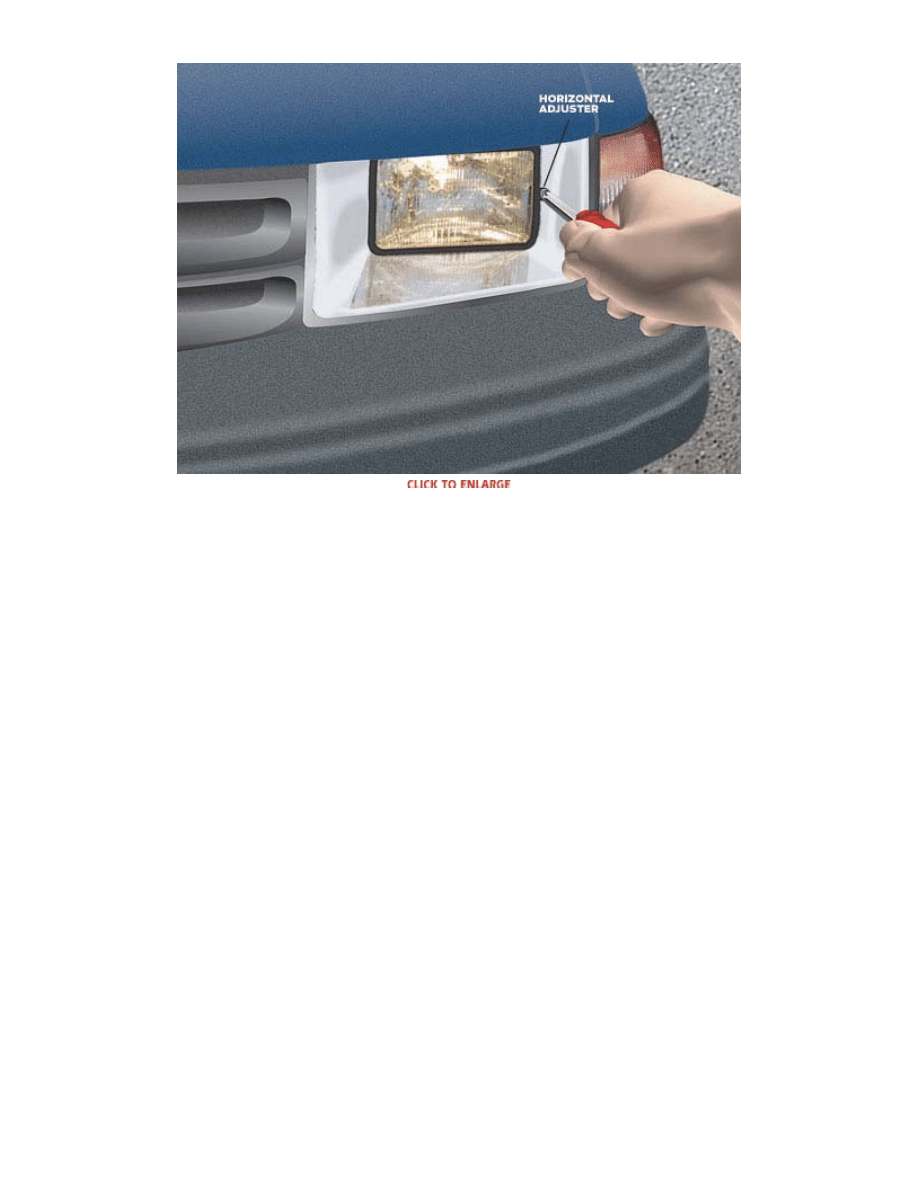
Most domestic cars specify that the point of highest
intensity be a little to the right and a little below the
center of the light. The adjustment must be done on a
dead-flat piece of pavement to be accurate. Use tape on
the wall to mark center.
PM: Saturday Mechanic - Aim Your Headlights
http://hearst.corp.printthis.clickability.com/pt/cpt?action=cpt&title=P...
2 of 5
29/08/2006 2:15 PM
Adjusters on some vehicles are reached from the front, but can be difficult to turn because of corrosion. Try
spraying with penetrating oil the day before.
NEW PARTS LATELY?
However, in most cases, the headlamp aim has gone
off, and simply needs readjustment. Why? Replacing
the front headlamp assembly certainly could do it--a
stack-up in manufacturing tolerances could affect the
way the assembly seats. Even a new halogen bulb
might be responsible, although that's less likely.
And headlamp aim doesn't last forever, particularly if
the assembly loosens and shifts or if the vehicle's
suspension sags.
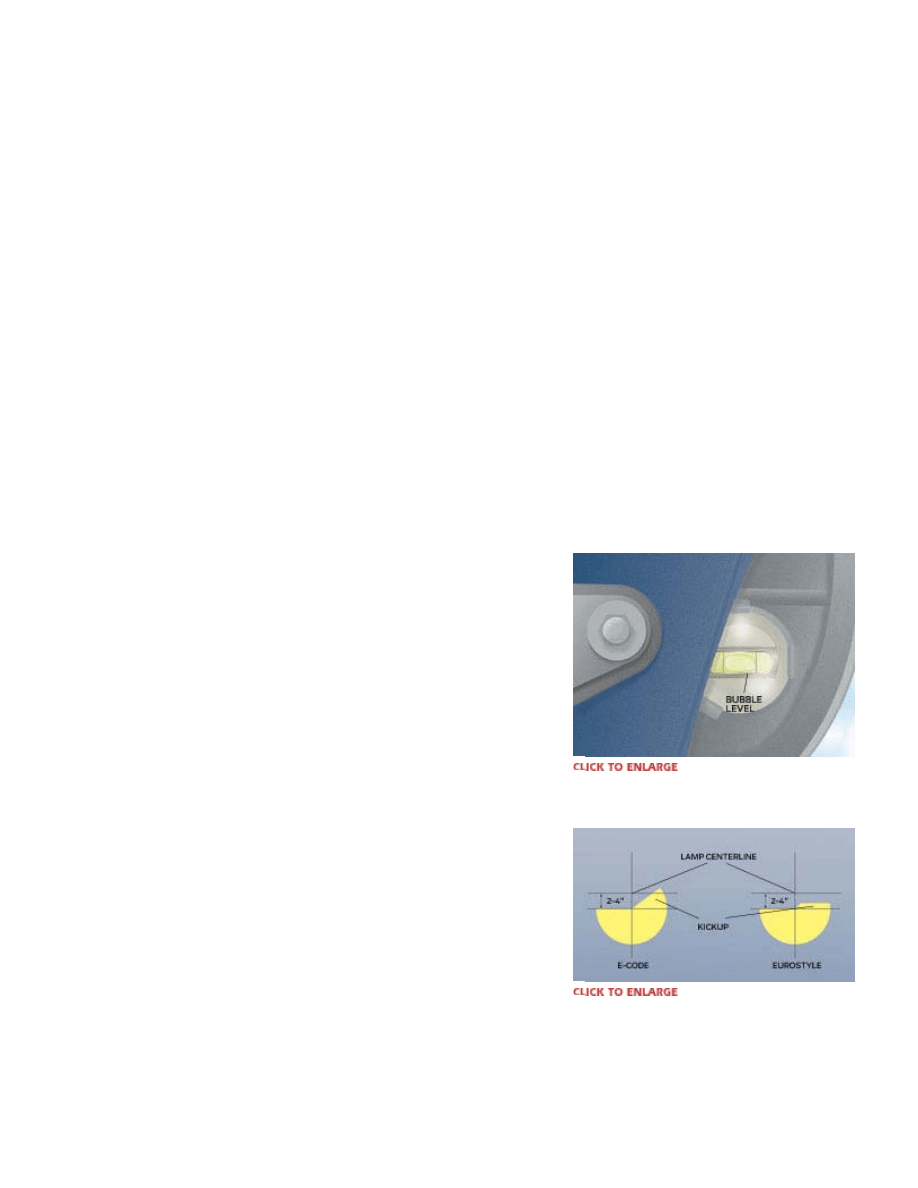
Many models (particularly Hondas and Acuras) have
a bubble level in the headlamp assembly to check
vertical aim. This does make it easier to diagnose
unwanted tilt. Just make sure the tire pressures are at
specs and the vehicle is on level ground (check with a
carpenter's bubble level on a flat surface). Have the
fuel tank half-full and someone in the driver's seat.
Reposition the car if necessary to get a level location.
Jounce each side of the front end of the car up and
down a few times to settle the suspension. Measure
from any convenient fixed point on each of the
headlamps to the ground; the measurements should be
within 1/2 in., indicating the suspension is not
sagging excessively at either side. Then, locate the
vertical adjuster and turn it to center the bubble.
On most vehicles, however, it isn't quite that simple
because there is no bubble level or horizontal
alignment indicator. All you have are the adjusters,
and in some cars, only for vertical aim. If the
horizontal aim is off and there is no horizontal
adjuster, the issue is mechanical alignment of the
housing in the front end, and all you can do for this is
shim one side of the housing--it's a cut-and-try
operation--until the alignment of the beam is
acceptable.
Without indicators in the housing or professional
headlamp alignment equipment, you have to look at
how the beams strike a vertical flat surface, and if
they're off, make adjustments.
There is a standard procedure, using a flat and level
driveway facing a gray or dull white wall that is free
of any source of peripheral light (perhaps the back
wall of your garage, interior lights off). The open
space on the wall should be at least the width of the
vehicle plus an extra 2 ft. per side. Check the tire
pressures--they have to be right. Confirm that the car
is on level ground by using a good carpenter's level
on the side of the vehicle--on an SUV try the roof,
and on most cars, the door frame. Park the car so it's
exactly 25 ft. from the wall to the face of the
PM: Saturday Mechanic - Aim Your Headlights
http://hearst.corp.printthis.clickability.com/pt/cpt?action=cpt&title=P...
3 of 5
29/08/2006 2:15 PM
Even if your headlamps have a bubble level, it's
strictly for vertical aim. It's less common, but still
possible, for the headlamp aim to be off horizontally.
The left headlamp may be aimed at the oncoming cars
instead of straight ahead or slightly to the right, and
that's equally annoying. But you might be in luck.
Some cars with a bubble level for vertical aim also
have an alignment indicator for horizontal aim (here
again, Honda and Acura). You just have to turn the
adjuster to reset the indicator.
headlamps--don't estimate. Some exceptions include
Toyota, which specifies 10 ft., Pontiac GTO at 15 ft.,
and Chrysler, which specifies 33 ft. on some models.
However, the 25-ft. procedure should produce
satisfactory results for most vehicles. Use a tape
measure in any case.
Check the suspension ride height side to side to make
sure there's no excessive suspension sag.
Now comes a lot of very careful measuring. First,
identify the physical center of each low-beam
headlamp--with today's multilamp housings, actually
turn on the lamps to be sure you have the right lamp.
Some headlamps have a small dot or circle at the
center. Make a tape cross over the center of each
lamp, and a vertical tapeline down the center of the
windshield. Using a tape measure, make the
corresponding alignment marks on the wall.
For this part, you might be able to measure at the wall from the
ground up, but it's easier (and good for a double-check) to bring the
vehicle very close to the wall. Then, again with tape, transfer the
locations to the wall (perhaps using a bubble level to span the gap
between vehicle and wall, to ensure an accurate transfer). On the
wall, make the tapelines very wide--basically a single horizontal
line for both centerlines of the headlamps, and a vertical tapeline
for the centerline of the vehicle--and long enough so that it's easy
to line up the vehicle and for the lines to form a cross. Make the
centerline vertical crossing tapes for the headlamps themselves
about 2 ft. long on the wall. The accuracy of any adjustment is only
as good as the reference points. In fact, it's a good idea to lay strips
of tape on the ground at the midpoints of the rear tires, so that
when you back up to the specified distance from the wall, you can
be sure you've maintained the overall alignment of the vehicle to
the wall. The tape on the windshield and the centerline of the wall
also should be useful visual aids.
Next, locate the headlamp adjusters. If you're a veteran Saturday
mechanic, this may sound like "are you kidding," but we're serious.
The adjusters used to be on the external rim of the sealed-beam
headlamp assemblies. But with the change to quartz halogen bulbs,
they're on the back of the headlamp assemblies. Some makers
simply buried or eliminated the horizontal adjusters. So find out
what you have, and where it is.
You'll need flat pavement to use a car's built-in level.
These bubble levels sure make things easy.
European-spec (E-code) or Eurostyle lights have a
sharp cutoff and right-side kickup--proper adjustment
is crucial for good vision.

PM: Saturday Mechanic - Aim Your Headlights
http://hearst.corp.printthis.clickability.com/pt/cpt?action=cpt&title=P...
4 of 5
29/08/2006 2:15 PM
We've seen a number of "mainstream" cars (yes, that includes
General Motors) with the vertical adjusters at the bottom of the
housings. It's not a problem if there's nothing in the way of the
adjuster, but we've seen the battery, coolant reservoir, even the
antilock brake actuator behind it. You may have to remove what's
behind the housing to confirm the location of the adjusters, or even
to be able to put a tool on the adjuster.
Once you locate the adjusters, back the vehicle up to the 25-ft.
mark and turn on the low beams--do this on a dark night. Have a
passenger sit in the driver's seat. Block the light from one
headlamp, but not by covering the headlamp assembly (it could get
hot enough to melt the plastic lens). A kitchen chair with your
jacket draped over the back a couple of feet from the bumper works
well.
Look at the light pattern on the wall. Vertical aim: The top of the
most intense part of the beam should be at or below the centerline
of the headlamp horizontal tapeline. Horizontal aim: Most of the
intense part of the beam should be to the right of the vertical
centerline of the headlamp assembly.
Specifications vary, and if your state inspection system checks
headlamp aim, it may have its own specifications, which, of course,
you should use. Otherwise, observe manufacturer's specifications
(in the lighting sections of service manuals) if available. With
today's brighter headlamps, you want to be as friendly as possible
to oncoming cars without affecting your ability to see ahead.
Some examples of factory specifications on typical vehicles
(measured below the horizontal centerline of the headlamp): zero
distance on General Motors, less than 1/2 in. on Toyota (at the
10-ft. distance), less than 1 in. to slightly more than 3-1/2 in. on
Nissan vehicles, and 2 to 6 in. on Chrysler Group vehicles. If you
don't have specifications (or a bubble level in the assembly), at
least 2 to 4 in. below the centerline at 25 ft. should be acceptable,
although slightly more certainly would eliminate any complaints
from oncoming vehicles. It may be somewhat difficult to determine
the middle of the most intense part of the beam, but there should be
very little of the top edge of the overall beam above the horizontal
line. The kickup is the part of the pattern where light is projected
above the normal cutoff. This is to illuminate objects to the right,
such as road signs or pedestrians, without throwing glare onto
oncoming traffic.
Have to make adjustments? First jounce each side of the front end
to stabilize the suspension, then turn the adjuster a quarter-turn and
look. Horizontal aim of the most intense part of the beam may be
given in the manufacturer's specifications. If not, a friendly setting
for oncoming cars is 2 to 4 in. to the right of the vertical center of
the headlamp assembly. General Motors' ultrafriendly setting is to

PM: Saturday Mechanic - Aim Your Headlights
http://hearst.corp.printthis.clickability.com/pt/cpt?action=cpt&title=P...
5 of 5
29/08/2006 2:15 PM
have the left edge of the intense part of each beam flush with the
physical vertical centerlines of the headlamp assemblies, and just
under the horizontal centerline. Repeat the procedure for the other
headlamp, trying to get the most intense part of the beam as close
to the adjustment of the first headlamp as possible.
Links referenced within this article
CLICK HERE
http://www.popularmechanics.com/automotive/sub_care_sat/
Find this article at:
http://www.popularmechanics.com/automotive/sub_care_sat/1347221.html
SAVE THIS | EMAIL THIS | Close
Uncheck the box to remove the list of links referenced in the article.
Wyszukiwarka
Podobne podstrony:
Popular Mechanics Repairing Composite Headlights
Popular Mechanics Replacing Your Water Pump
Popular Mechanics Repairing Your Rear Window Defroster
Popular Mechanics Flushing Your Cooling System
Popular Mechanics When Your Car Eats Belts
Popular Mechanics Flushing Your Brake System
Popular Mechanics Wiring Your Trailer Hitch
Popular Mechanics Repairing Composite Headlights
Popular Mechanics Turn Up Your Heater
więcej podobnych podstron