
FM 23-10
CHAPTER 4
FIELD TECHNIQUES
The primary mission of the sniper team is to eliminate selected
enemy targets with long-range precision fire. How well the sniper
accomplishes his mission depends on knowledge, understanding
and application of various field techniques that allow him to move,
hide, observe, and detect targets. This chapter discusses the field
techniques and skills that the sniper must learn before employment
in support of combat operations. The sniper's application of these
skills will affect his survival on the battlefield.
Section I
CAMOUFLAGE
Camouflage is one of the basic weapons of war. It can mean the difference
between a successful or unsuccessful mission. To the sniper team, it can
mean the difference between life and death. Camouflage measures are
important since the team cannot afford to be detected at any time while
moving alone, as part of another element, or while operating from a
firing position. Marksmanship training teaches the sniper to hit a target,
and a knowledge of camouflage teaches him how to avoid becoming
a target. Paying attention to camouflage fundamentals is a mark of a
well-trained sniper. (See FM 5-20 for more details.)
4-1. TARGET INDICATORS
To become proficient in camouflage, the sniper team must first
understand target indicators. Target indicators are anything a soldier
does or fails to do that could result in detection. A sniper team must know
and understand target indication not only to move undetected, but also to
detect enemy movement. Target indicators are sound, movement,
improper camouflage, disturbance of wildlife, and odors.
4-1
.

FM 23-10
a. Sound.
Most noticeable during hours of darkness.
Caused by movement, equipment rattling, or talking.
Small noises may be dismissed as natural, but talking will not.
b. Movement.
Most noticeable during hours of daylight.
The human eye is attracted to movement.
Quick or jerky movement will be detected faster than
slow movement.
c. Improper camouflage.
Shine.
Outline.
Contrast with the background.
d. Disturbance of wildlife.
Birds suddenly flying away.
Sudden stop of animal noises.
Animals being frightened.
e. Odors.
Cooking.
Smoking.
Soap and lotions.
Insect repellents.
4-2. BASIC METHODS
The sniper team can use three basic methods of camouflage. It may use
one of these methods or a combination of all three to accomplish
its objective. The three basic methods a sniper team can use are hiding,
blending, and deceiving.
a. Hiding. Hiding is used to conceal the body from observation by
lying behind an objector thick vegetation.
b. Blending. Blending is used to match personal camouflage with
the surrounding area to a point where the sniper cannot be seen.
c. Deceiving. Deceiving is used to fool the enemy into false
conclusions about the location of the sniper team.
4-3. TYPES OF CAMOUFLAGE
The two types of camouflage that the sniper team can use are natural
and artificial.
4-2
.

FM 23-10
a. Natural. Natural camouflage is vegetation or materials that are
native to the given area. The sniper augments his appearance by using
natural camouflage.
b. Artificial. Artificial camouflage is any material or substance that
is produced for the purpose of coloring or covering something in order to
conceal it. Camouflage sticks or face paints are used to cover all exposed
areas of skin such as face, hands, and the back of the neck. The parts of
the face that form shadows should be lightened, and the parts that shine
should be darkened. The three types of camouflage patterns the sniper
team uses are striping, blotching, and combination.
(1) Striping. Used when in heavily wooded areas and when leafy
vegetation is scarce.
(2) Blotching. Used when an area is thick with leafy vegetation.
(3) Combination. Used when moving through changing terrain. It is
normally the best all-round pattern.
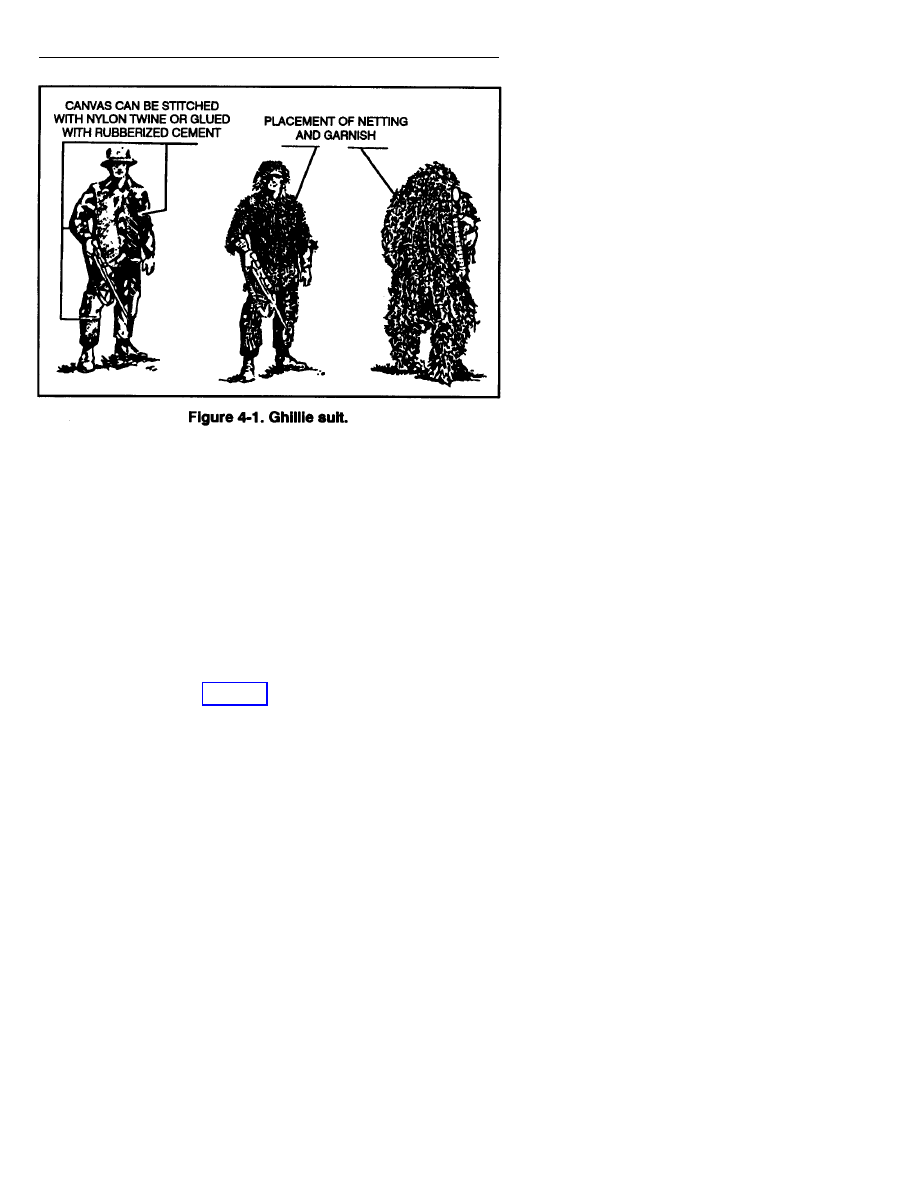
4-4. GHILLIE SUIT
The ghillie suit is a specially made camouflage uniform that is covered
with irregular patterns of garnish or netting (Figure 4-l).
a. Ghillie suits can be made from BDUs or one-piece aviator-type
uniforms. Turning the uniform inside out places the pockets inside
the suit. This protects items in the pockets from damage caused by
crawling on the ground. The front of the ghillie suit should be covered
with canvas or some type of heavy cloth to reinforce it. The knees and
elbows should be covered with two layers of canvas, and the seam of the
crotch should be reinforced with heavy nylon thread since these areas are
prone to wear out quicker.
b. The garnish or netting should cover the shoulders and reach down
to the elbows on the sleeves. The garnish applied to the back of the suit
should be long enough to cover the sides of the sniper when he is in the
prone position. A bush hat is also covered with garnish or netting.
The garnish should belong enough to breakup the outline of the sniper’s
neck, but it should not be so long in front to obscure his vision or
hinder movement.
e. A veil can be made from a net or piece of cloth covered with garnish
or netting. It covers the weapon and sniper’s head when in a firing position.
The veil can be sewn into the ghillie suit or carried separately. A ghillie
suit does not make one invisible and is only a camouflage base.
Natural vegetation should be added to help blend with the surroundings.
4-3
FM 23-10
4-5. FIELD-EXPEDIENT CAMOUFLAGE
The sniper team may have to use field-expedient camouflage if other
means are not available. Instead of camouflage sticks or face paint, the
team may use charcoal, walnut stain, mud, or whatever works. The team
will not use oil or grease due to the strong odor. Natural vegetation can
be attached to the body by boot bands or rubber bands or by cutting holes
in the uniform.
a. The sniper team also camouflages its equipment. However, the
camouflage must not interfere with or hinder the operation of
the equipment.
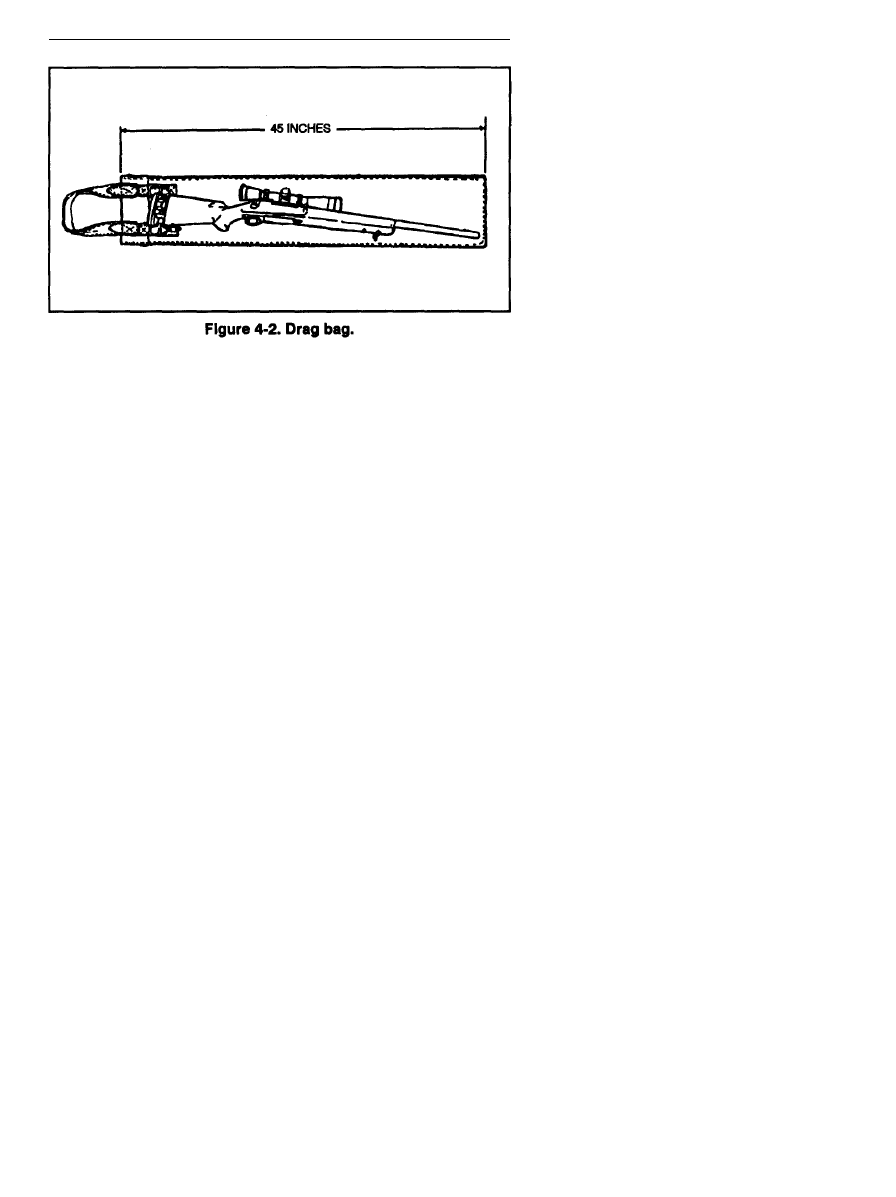
(1) Rifles. The sniper weapon system and the M16/M203 should also.
be camouflaged to break up their outlines. The sniper weapon system can
be carried in a “drag bag” (Figure 4-2), which is a rifle case made of canvas
and covered with garnish similar to the ghillie suit.
(2) Optics. Optics used by the sniper team must also be camouflaged
to breakup the outline and to reduce the possibility of light reflecting off
the lenses. Lenses can be covered with mesh-type webbing or nylon
hose material.
(3) ALICE pack. If the sniper uses the ALICE pack while wearing
the ghillie suit, he must camouflage the pack the same as the suit.
4-4
.
FM 23-10
b. The sniper team alters its camouflage to blend in with changes in
vegetation and terrain in different geographic areas. Examples of such
changes are as follows:
(1) Snow areas. Blending of colors is more effective than texture
camouflage in snowy areas. In areas with heavy snow or in wooded areas
with trees covered with snow, a full white camouflage suit should be worn.
In areas with snow on the ground but not on the trees, white trousers with
green and brown tops should be worn.
(2) Desert areas. In sandy desert areas that have little vegetation, the
blending of tan and brown colors is important. In these areas, the sniper
team must make full use of the terrain and the vegetation that is available
to remain unnoticed.
(3) Jungle areas. In jungle areas, textured camouflage, contrasting
colors, and natural vegetation must be used.
(4) Urban areas. In urban areas, the sniper team’s camouflage
should be a blended color (shades of gray usually work best).
Texutred camouflage is not as important in these environments.
c. The sniper team must be camouflage conscious from the time it
departs on a mission until it returns. It must constantly use the terrain,
vegetation, and shadows to remain undetected. At no other time during
the mission will the sniper team have a greater tendency to be careless
than during its return to a friendly area. Fatigue and undue haste may
override caution and planning. Therefore, the team needs to pay close
attention to its camouflage discipline on return from missions.
4-5

FM 23-10
4-6. COVER AND CONCEALMENT
The proper understanding and application of the principles of cover and
concealment used with the proper application of camouflage protects the
sniper team from enemy observation.
a. Cover is natural or artificial protection from the fire of
enemy weapons. Natural cover (ravines, hollows, reverse slopes) and
artificial cover (fighting positions, trenches, walls) protect the sniper team
from flat trajectory fires and partly protect it from high-angle fires and the
effects of nuclear explosions. Even the smallest depression or fold in the
ground may provide some cover when the team needs it most. A 6-inch
depression, properly used, may provide enough cover to save the sniper
team under fire. Snipers must always look for and take advantage of all
the cover that the terrain provides. By combining this habit with proper
movement techniques, the team can protect itself from enemy fire. To get
protection from enemy fire when moving, the team uses routes that put
cover between itself and the enemy.
b. Concealment is natural or artificial protection from enemy
observation. The surroundings may provide natural concealment that
needs no change before use (bushes, grass, and shadows). The sniper
team creates artificial concealment from materials such as burlap and
camouflage nets, or it can move natural materials (bushes, leaves, and
grass) from their original location. The sniper team must consider the
effects of the change of seasons on the concealment provided by both
natural and artificial materials. ‘he principles of concealment include
the following
(1) Avoid unnecessary movement. Remain still—movement attracts
attention. The position of the sniper team is concealed when the team
remains still, but the sniper’s position is easily detected when the
team moves. Movement against a stationary background makes the team
stand out clearly. When the team must change positions, it moves
carefully over a concealed route to a new position, preferably during
limited visibility. Snipers move inches at a time, slowly and cautiously,
always scanning ahead for the next position.
(2) Use all available concealment. Available concealment includes
the following
(a) Background. Background is important the sniper team must
blend with it to prevent detection. The trees, bushes, grass, earth, and
man-made structures that form the background vary in color
and appearance. This makes it possible for the team to blend with them.
The team selects trees or bushes to blend with the uniform and to absorb
the figure outline. Snipers must always assume they are under observation.
4-6

FM 23-10
(b) Shadows. The sniper team in the open stands out clearly, but the
sniper team in the shadows is difficult to see. Shadows exist under most
conditions, day and night. A sniper team should never fire from the edge
of a wood line; it should fire from a position inside the wood line (in the
shade or shadows provided by the tree tops).
(3) Stay low to observe. A low silhouette makes it difficult for the
enemy to see a sniper team. Therefore, the team observes from a crouch,
a squat, or a prone position.
(4) Avoid shiny reflections. Reflection of light on a shiny surface
instantly attracts attention and can be seen from great distances.
The sniper uncovers his rifle scope only when indexing and aiming at
a target. He uses optics cautiously in bright sunshine because of the
reflections they cause.
(5) Avoid skylining. Figures on the skyline can be seen from a great
distance, even at night, because a dark outline stands out against the
lighter sky. The silhouette formed by the body makes a good target.
(6) Alter familiar outlines. Military equipment and the human body
are familiar outlines to the enemy. The sniper team alters or disguises
these revealing shapes by using the ghillie suit or outer smock that is
covered with irregular patterns of garnish. The team must alter its outline
from the head to the soles of the boots.
(7) Observe noise discipline. Noise, such as talking, can be picked up
by enemy patrols or observation posts. The sniper team silences gear
before a mission so that it makes no sound when the team walks or runs.
Section II
MOVEMENT
A sniper team’s mission and method of employment differ in many ways
from those of the infantry squad. One of the most noticeable differences
is the movement technique used by the sniper team. Movement by teams
must not be detected or even suspected by the enemy. Because of this, a
sniper team must master individual sniper movement techniques.
4-7. RULES OF MOVEMENT
When moving, the sniper team should always remember the following rules
a. Always assume the area is under enemy observation.
b. Move slowly. A sniper counts his movement progress by feet
and inches.
c. Do not cause overhead movement of trees, bushes, or tall grasses
by rubbing against them.
d. Plan every movement and move in segments of the route at a time.
4-7
FM 23-10
e. Stop, look, and listen often.
f. Move during disturbances such as gunfire, explosions, aircraft
noise, wind, or anything that will distract the enemy’s attention or conceal
the team’s movement.
4-8. INDIVIDUAL MOVEMENT TECHNIQUES
The individual movement techniques used by the sniper team are designed
to allow movement without being detected. These movement techniques
are sniper low crawl, medium crawl, high crawl, hand-and-knees crawl,
and walking.
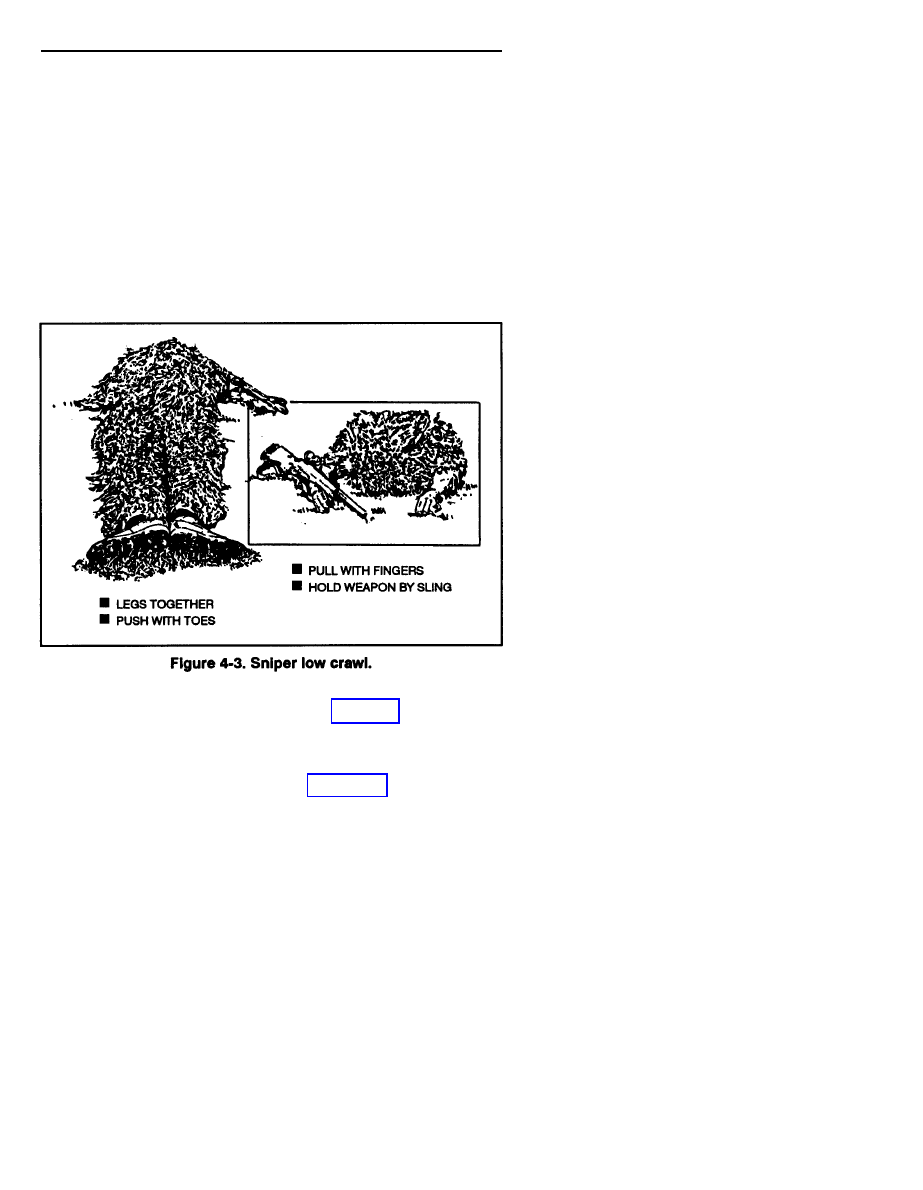
a. Sniper Lo
W
Crawl.
The sniper low crawl (Figure 4-3) is used when
concealment is extremely limited, when close to the enemy, or when
occupying a firing position.
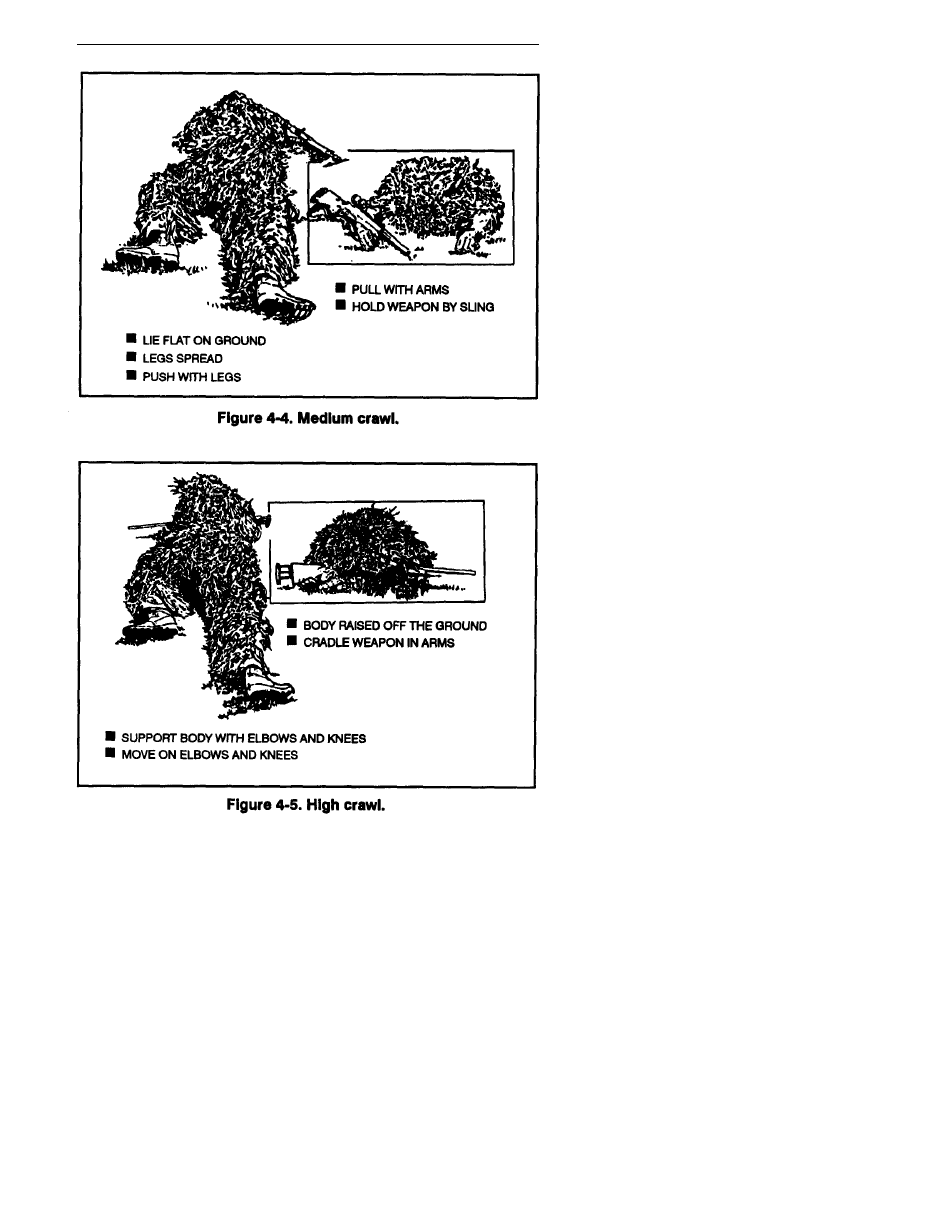
b. Medium Crawl. The medium crawl (Figure 4-4) is used when
concealment is limited and the team needs to move faster-than the sniper
low crawl allows. The medium crawl is similar to the infantryman’s
low crawl.
c. High Crawl. The high crawl (Figure 4-5) is used when
concealment is limited but high enough to allow the sniper to raise his
body off the ground. The high crawl is similar to the infantry high crawl.
4-8
FM 23-10
4-9
.
FM 23-10
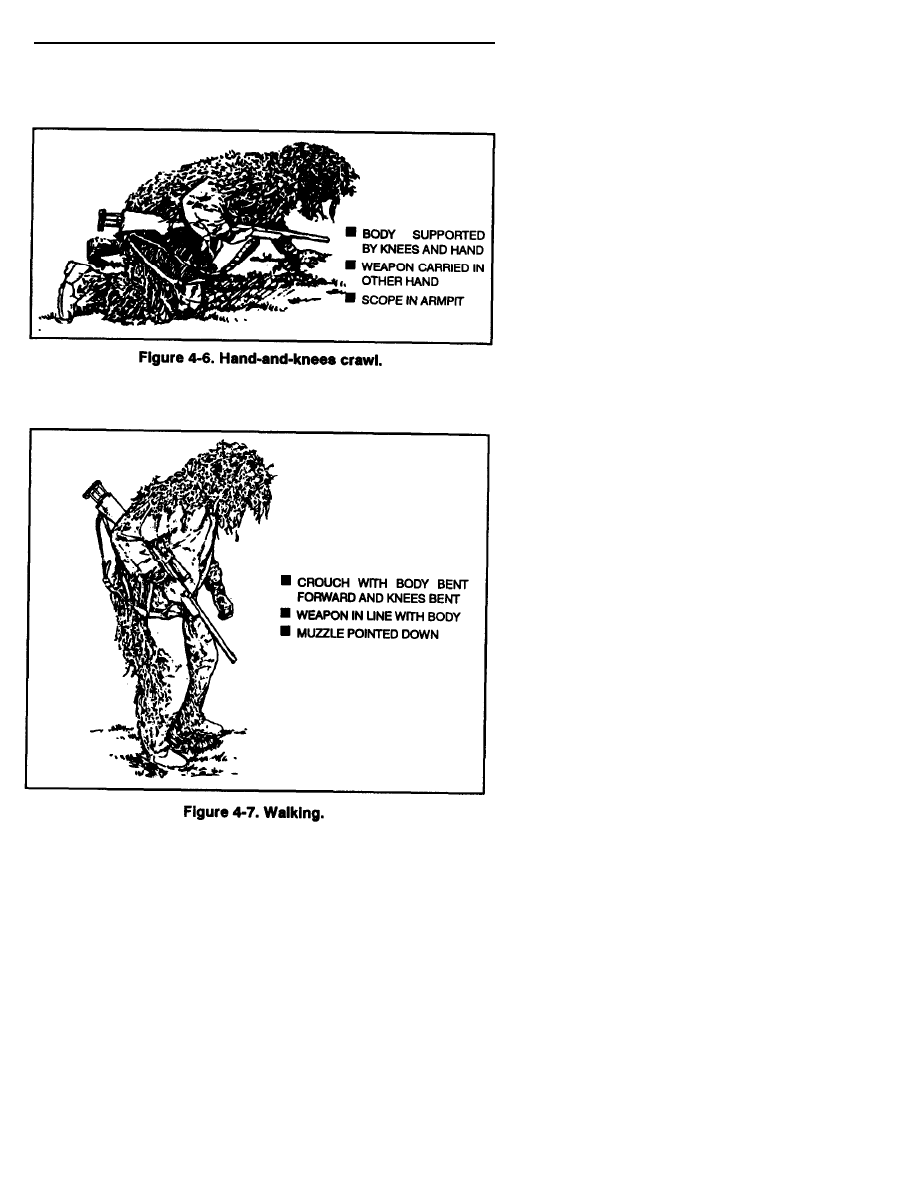
d. Hand-and-knees Crawl. The hand-and-knees crawl (Figure 4-6)
is used when some concealment is available and the sniper team needs to
.
move faster than the medium crawl.
e. Walking. Walking (Figure 4-7) is used when there is good
concealment, it is not likely the enemy is close, and speed is required.
4-10

FM 23-10
4-9. SNIPER TEAM MOVEMENT AND NAVIGATION
Due to lack of personnel and firepower, the sniper team cannot afford
detection by the enemy nor can it successfully fight the enemy in sustained
engagements.
a. When possible, the sniper team should be attached to a security
element (squad/platoon). The security element allows the team to reach
its area of operations quicker and safer than the team operating alone.
Plus, the security element provides the team a reaction force should the
team be detected. Snipers use the following guidelines when attached to
a security element:
(1) The security element leader is in charge of the team while it is
attached to the element.
(2) The sniper team always appears as an integral part of the element.
(3) The sniper team wears the same uniform as the element members.
(4) The sniper team maintains proper intends and positions in
all formations.
(5) The sniper weapon system is carried in line and close to the body,
hiding its outline and barrel length.
(6) All equipment that is unique to sniper teams is concealed from
view (optics, ghillie suits, and so forth).
b. Once in the area of operation, the sniper team separates from the
security element and operates alone. Two examples of a sniper team
separating from security elements are as follows:
(1) The security element provides security while the team prepares
for operation.
(a) The team dons the ghillie suits and camouflages itself and its
equipment (if mission requires).
(b) The team ensures all equipment is secure and caches any
nonessential equipment (if mission requires).
(c) Once the team is prepared, it assumes a concealed position, and
the security element departs the area.
(d) Once the security element has departed, the team waits in
position long enough to ensure neither itself nor the security element has
been compromised. Then, the team moves to its tentative position.
(2) The security element conducts a short security halt at the separation
point. The sniper team halts, ensuring they have good available concealment
and know each other’s location. The security element then proceeds, leaving
the sniper team in place. The sniper team remains in position until the
security element is clear of the area. The team then organizes itself as
4-11

FM 23-10
required by the mission and moves on to its tentative position. This type
of separation also works well in MOUT situations.
c. When selecting routes, the sniper team must remember its
strengths and weaknesses. The following guidelines should be used when
selecting routes:
(1) Avoid known enemy positions and obstacles.
(2) Seek terrain that offers the best cover and concealment.
(3) Take advantage of difficult terrain (swamps, dense woods, and
so forth).
(4) Do not use trails, roads, or footpaths.
(5) Avoid built-up or populated areas.
(6) Avoid areas of heavy enemy guerrilla activity.
d. When the sniper team moves, it must always assume its area is
under enemy observation. Because of this and the size of the team with
the small amount of firepower it has, the team uses only one type of
formation-the sniper movement formation. Characteristics of the
formation are as follows:
(1) The observer is the point man; the sniper follows.
(2) The observer's sector of security is 3 o’clock to 9 o’clock; the
sniper’s sector of security is 9 o’clock to 3 o’clock (overlapping).
(3) Visual contact must be maintained even when lying on the ground.
(4) An interval of no more than 20 meters is maintained.
(5) The sniper reacts to the point man’s actions.
(6) The team leader designates the movement techniques and
routes used.
(7) The team leader designates rally points.
e. A sniper team must never become decisively engaged with
the enemy. The team must rehearse immediate action drills to the extent
that they become a natural and immediate reaction should it make
unexpected contact with the enemy. Examples of such actions are
as follows:
(1) Visual contact. If the sniper team sees the enemy and the enemy
does not see the team, it freezes. If the team has time, it will do
the following
(a) Assume the best covered and concealed position.
(b) Remain in position until the enemy has passed.
NOTE: The team will not initiate contact.
4-12

FM 23-10
(2) Ambush. In an ambush, the sniper team’s objective is to break
contact immediately. One example of this involves performing
the following
(a) The observer delivers rapid fire on the enemy.
(b) The sniper throws smoke grenades between the observer and
the enemy.
(c) The sniper delivers well-aimed shots at the most threatening
targets until smoke covers the area.
(d) The observer then throws fragmentation grenades and withdraws
toward the sniper, ensuring he does not mask the sniper’s fire.
(e) The team moves to a location where the enemy cannot observe
or place direct fire on it.
(f) If contact cannot be broken, the sniper calls for indirect fires or a
security element (if attached).
(g) If team members get separated, they should return to the
next-to-last designated en route rally point.
(3) Indirect fire. When reacting to indirect fires, the team must move
out of the area as quickly as possible. This sudden movement can result
in the team’s exact location and direction being pinpointed. Therefore, the
team must not only react to indirect fire but also take actions to conceal
its movement once it is out of the impact area.
(a) The team leader moves the team out of the impact area using the
quickest route by giving the direction and distance (clock method).
(b) Team members move out of the impact area the designated
distance and direction.
(c) The team leader then moves the team farther away from the
impact area by using the most direct concealed route. They continue the
mission using an alternate route.
(d) If team members get separated, they should return to the
next-to-last designated en route rally point.
(4) Air attack.
(a) Team members assume the best available covered and concealed
positions.
(b) Between passes of aircraft, team members move to positions that
offer better cover and concealment.
(c) The team does not engage the aircraft.
(d) Team members remain in positions until attacking aircraft depart.
(e) If team members get separated, they return to the next-to-last
designated en route rally point.
4-13

FM 23-10
f. To aid the sniper team in navigation, the team should memorize
the route by studying maps, aerial photos, or sketches. The team notes
distinctive features (hills, streams, roads) and its location in relation to
the route. It plans an alternate route in case the primary route cannot
be used. It plans offsets to circumvent known obstacles to movement.
The team uses terrain countdown, which involves memorizing terrain
features from the start point to the objective, to maintain the route.
During the mission, the sniper team mentally counts each terrain feature,
thus ensuring it maintains the proper route.
g. The sniper team maintains orientation at all times. As it moves,
it observes the terrain carefully and mentally checks off the distinctive
features noted in the planning and study of the route. Many aids are
available to ensure orientation. The following are examples:
(1) The location and direction of flow of principal streams.
(2) Hills, valleys, roads, and other peculiar terrain features.
(3) Railroad tracks, power lines, and other man-made objects.
Section III
SELECTION, OCCUPATION, AND CONSTRUCTION
OF SNIPER POSITIONS
Selecting the location for a position is one of the most important tasks a
sniper team accomplishes during the mission planning phase of
an operation. After selecting the location, the team also determines how
it will move into the area to locate and occupy the final position.
4-10. SELECTION
Upon receiving a mission, the sniper team locates the target area and then
determines the best location for a tentative position by using one or more
of the following sources of information: topographic maps, aerial
photographs, visual reconnaissance before the mission, and information
gained from units operating in the area.
a. The sniper team ensures the position provides an optimum
balance between the following considerations:
Maximum fields of fire and observation of the target area.
Concealment from enemy observation.
Covered routes into and out of the position.
Located no closer than 300 meters from the target area.
A natural or man-made obstacle between the position and the
target area.
4-14

FM 23-10
b. A sniper team must remember that a position that appears to be
in an ideal location may also appear that way to the enemy. Therefore,
the team avoids choosing locations that are—
On a point or crest of prominent terrain features.
Close to isolated objects.
At bends or ends of roads, trails, or streams.
In populated areas, unless it is required.
c. The sniper team must use its imagination and ingenuity in
choosing a good location for the given mission. The team chooses a
location that not only allows the team to be effective but also must appear
to the enemy to be the least likely place for a team position. The following
are examples of such positions:
Under logs in a deadfall area.
Tunnels bored from one side of a knoll to the other.
Swamps.
Deep shadows.
Inside rubble piles.
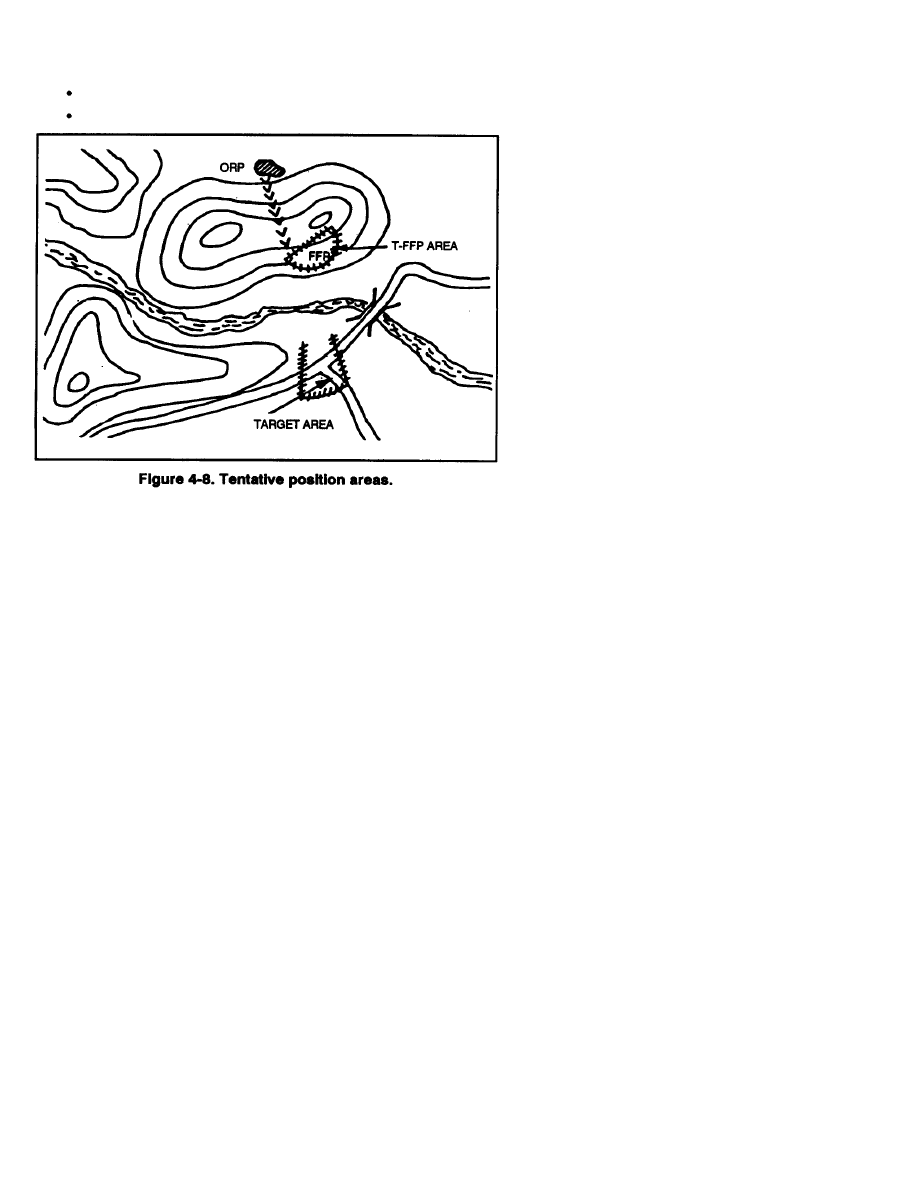
4-11. OCCUPATION
During the mission planning phase, the sniper also selects an objective
rally point. From this point, the sniper team reconnoiters the tentative
position to determine the exact location of its final position. The location
of the ORP should provide cover and concealment from enemy fire and
observation, be located as close to the selected area as possible, and have
good routes into and out of the selected area.
a. From the ORP, the team moves foward to a location that allows the
team to view the tentative position area (Figure 4-8 page 4-16). One member
remains in this location to cover the other member who reconnoiters the
area to locate a final position. Once a suitable location has been found,
the covering team member moves to the position. While conducting the
reconnaissance or moving to the position, the team—
Moves slowly and deliberately, using the sniper low crawl.
Avoids unnecessary movement of trees, bushes, and grass.
Avoids making any noises.
Stays in the shadows, if there are any.
Stops, looks, and listens every few feet.
b. When the sniper team arrives at the firing position, it—
Conducts a detailed search of the target area.
Starts construction of the firing position, if required.
4-15
FM 23-10
Organizes equipment so that it is easily accessible.
Establishes a system of observing eating resting, and latrine calls.
4-12. CONSTRUCTION
A sniper mission always requires the team to occupy some type of position.
These positions can range from a hasty position, which a team may use for
a few hours, to a more permanent position, which the team could occupy.
for a few days. The team should always plan to build its position during
limited visibility.
a. Sniper Position Considerations. Whether a sniper team is in a
position for a few minutes or a few days, the basic considerations in.
choosing a type of position remain the same.
(1) Location:
(a) Type of terrain and soil. Digging and boring of tunnels can be very
difficult in hard soil or in fine, loose sand. The team takes advantage of
what the terrain offers (gullies, holes, hollow tree stumps, and so forth).
(b) Enemy location and capabilities. Enemy patrols in the area may
be close enough to the position to hear any noises that may accidentally
be made during any construction. The team also considers the enemy’s
night vision and detection capabilities.
4-16

FM 23-10
(2) Time:
(a) Amount of time to be occupied. If the sniper team’s mission
requires it to be in position for a long time, the team constructs a position
that provides more survivability. This allows the team to operate more
effectively for a longer time.
(b) Time required for construction. The time required to build a
position must be considered, especially during the mission planning phase.
(3) Personnel and equipment:
(a) Equipment needed for construction. The team plans for the use of
any extra equipment needed for construction (bow saws, picks, axes, and
so forth).
(b) Personnel needed for construction. Coordination is made if the
position requires more personnel to build it or a security element to
secure the area during construction.
b. Construction Techniques. Belly and semipermanent hide
positions can be constructed of stone, brick, wood, or turf. Regardless of
material, every effort is made to bulletproof the front of the hide position.
The team can use the following techniques:
Pack protective jackets around the loophole areas.
Emplace an angled armor plate with a loophole cut into it behind
the hide loophole.
Sandbag the loopholes from the inside.
(1) Pit. Hide construction begins with the pit since it protects the
sniper team. All excavated dirt is removed (placed in sandbags, taken
away on a poncho, and so forth) and hidden (plowed fields, under a log,
or away from the hide site).
(2) Overhead cover. In a semipermanent hide position, logs should
be used as the base of the roof. The sniper team places a dust cover over
the base (such as a poncho, layers of empty sandbags, or canvas), a layer
of dirt, and a layer of gravel, if available. The team spreads another layer
of dirt, and then adds camouflage. Due to the various materials, the roof
is difficult to conceal if not countersunk.
(3) Entrance. To prevent detection, the sniper team should construct
an entrance door sturdy enough to bear a man’s weight.
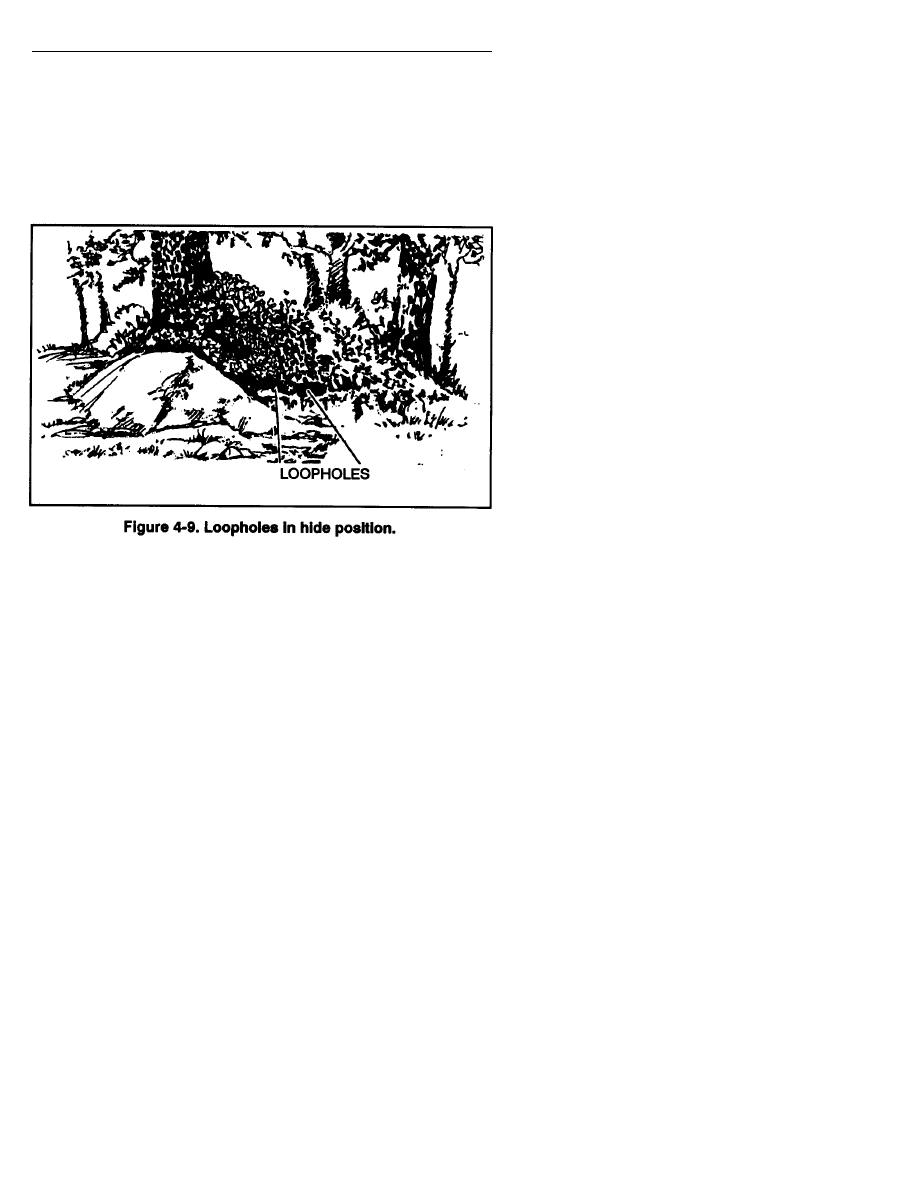
(4) Loopholes. The construction of loopholes (Figure 4-9, page 4-18)
requires care and practice to ensure they afford adequate fields of fire.
Loopholes must be camouflaged by foliage or other material that blends
with or is natural to the surroundings.
(5) Approaches. It is vital that the natural appearance of the ground
remains unaltered and camouflage blends with the surroundings.
4-17
FM 23-10
Construction time is wasted if the enemy observes a team entering the
hide; therefore, approached must be concealed. Teams try to enter the
hide during darkness, keeping movement to a minimum and adhering to
trail discipline. In built-up areas, a secure and quiet approach is needed.
Teams must avoid drawing attention to the mission and carefully
plan movement. A possible ploy is to use a house search with sniper gear
hidden among other gear. Sewers may be used for movement also.
-
c. Hasty Position. A hasty position is used when the sniper team is
in a position for a short time and cannot construct a position due to the
location of the enemy, or immediately assumes a position. The hasty
position is characterized by the following
(1) Advantages:
(a) Requires no construction The sniper team uses what is available
for cover and concealment.
(b) Can be occupied in a short time. As soon as a suitable position is
found, the team need only prepare loopholes by moving small amounts of
vegetation or by simply backing a few feet away from the vegetation that
is already thereto conceal the weapon’s muzzle blast.
(2) Disadvantages:
(a) Affords no freedom of movement. Any movement that is not slow
and deliberate may result in the team being compromised.
4-18
FM 23-10
(b) Restricts observation of large areas. This type of position is
normally used to observe a specific target area (intersection, passage,
or crossing).
(c) Offers no protection from direct or indirect fires.
(d) Relies heavily on personal camouflage. The team’s only protection
against detection is personal camouflage and the ability to use the
available terrain.
(3) Occupation time. The team should not remain in this type of
position longer than eight hours.
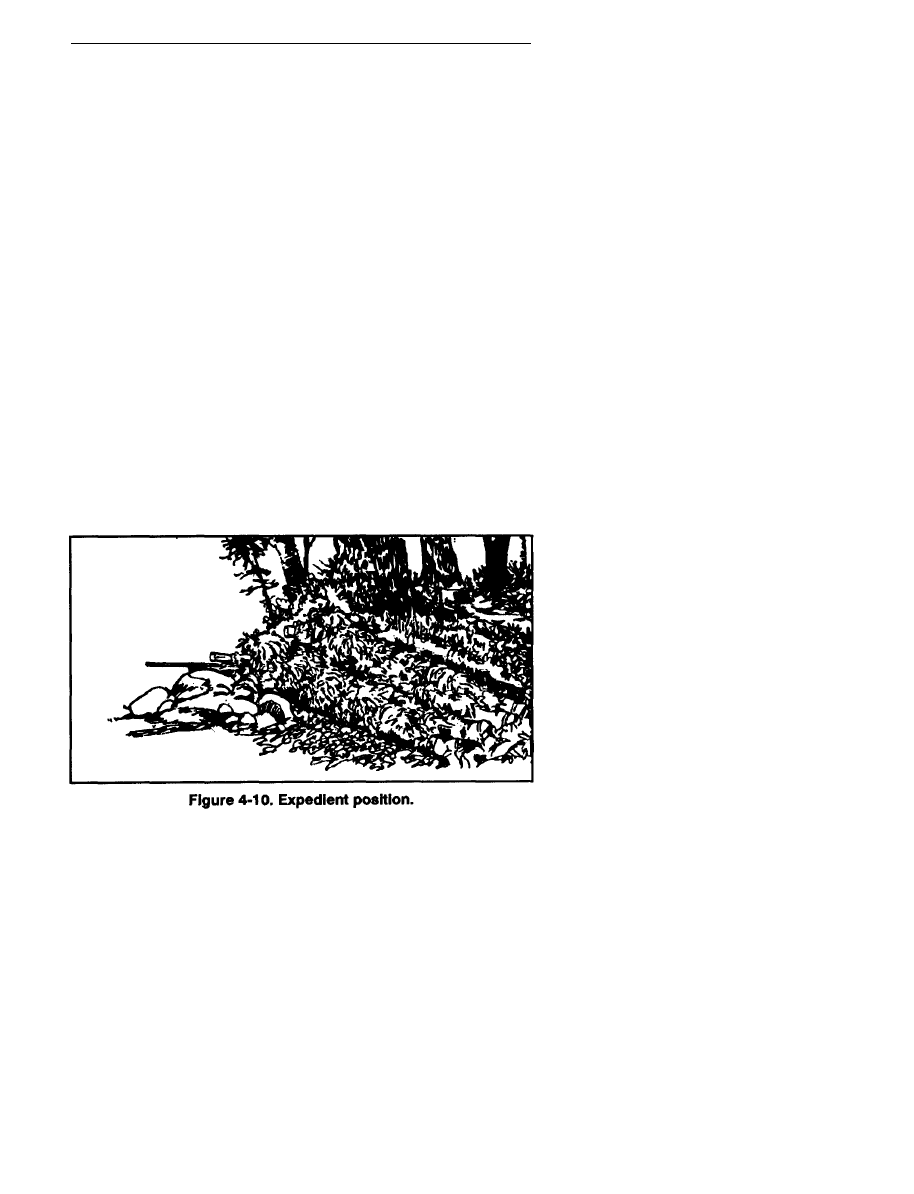
d. Expedient Position. When a sniper team is required to remain in
position for a longer time than the hasty position can provide, an
expedient position (Figure 4-10) should be constructed. The expedient
position lowers the sniper’s silhouette as low to the ground as possible,
but it still allows him to fire and observe effectively. The expedient
position is characterized by the following
(1) Advantages:
(a) Requires little construction. This position is constructed by digging
a hole in the ground just large enough for the team and its equipment.
Soil dug from this position can be placed in sandbags and used for building
firing platforms.
(b) Conceals most of the body and equipment. The optics, rifles, and
heads of the sniper team are the only items that are above ground level in
this position.
(c) Provides some protection from direct fires due to its lower silhouette.
4-19

FM 23-10
(2) Disadvantages:
(a) Affords little freedom of movement. The team has more freedom
of movement in this position than in the hasty position. Team members
can lower their heads below ground level slowly to ensure a target
indicator is not produced.
(b) Allows little protection from indirect fires. This position does not
protect the team from shrapnel and debris falling into the position.
(c) Exposes the head, weapons, and optics. The team must rely
heavily on the camouflaging of these exposed areas.
(3) Construction time: 1 to 3 hours (depending on the situation).
(4) Occupation time: 6 to 12 hours.
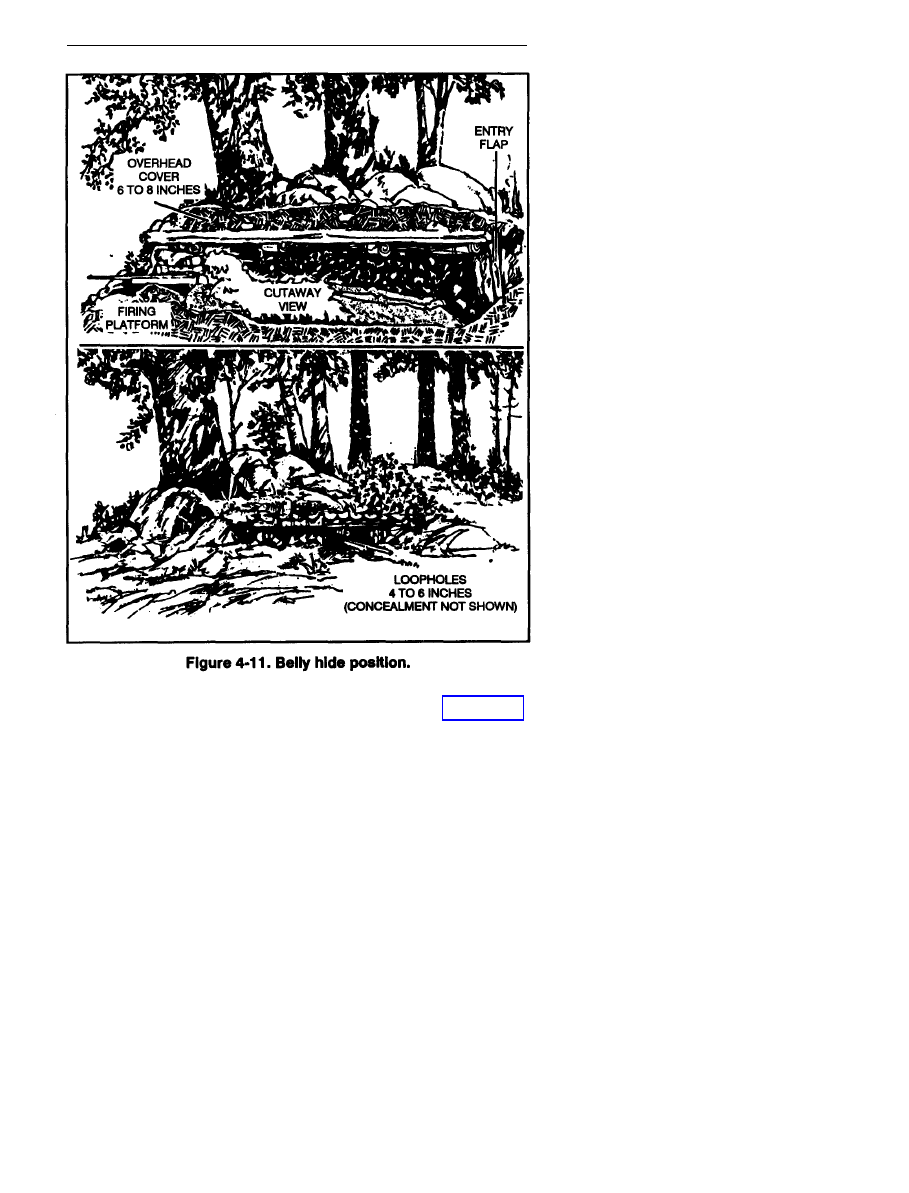
e. Belly Hide. The belly hide (Figure 4-11) is similar to the expedient
position, but it has overhead cover that not only protects the team from
the effects of indirect fires but also allows more freedom of movement.
This position can be dugout under a tree, a rock, or any available object
that provides overhead protection and a concealed entrance and exit.
The belly hide is characterized by the following
(1) Advantages:
(a) Allows some freedom of movement. The darkened area inside this
position allows the team to move freely. The team must remember to
cover the entrance/exit door so outside light does not silhouette the team
inside the position or give the position away.
(b) Conceals all but the rifle barrel. All equipment is inside the
position except the rifle barrels. Depending on the room available to
construct the position, the rifle barrels may also be inside.
(c) Provides protection from direct and indirect fires. The team should
try to choose a position that has an object that will provide good overhead
protection (rock tracked vehicle, rubble pile, and so forth), or prepare it
in the same manner as overhead cover for other infantry positions.
(2) Disadvantages:
(a) Requires extra construction time.
(b) Requires extra materials and tools. Construction of overhead
cover requires saws or axes, waterproof material, and so forth.
(c) Has limited space. The sniper team will have to lay in the belly
hide without a lot of variation in body position due to limited space and
design of the position.
(3) Construction time: 4 to 6 hours.
(4) Occupation time: 12 to 48 hours.
4-20
FM 23-10
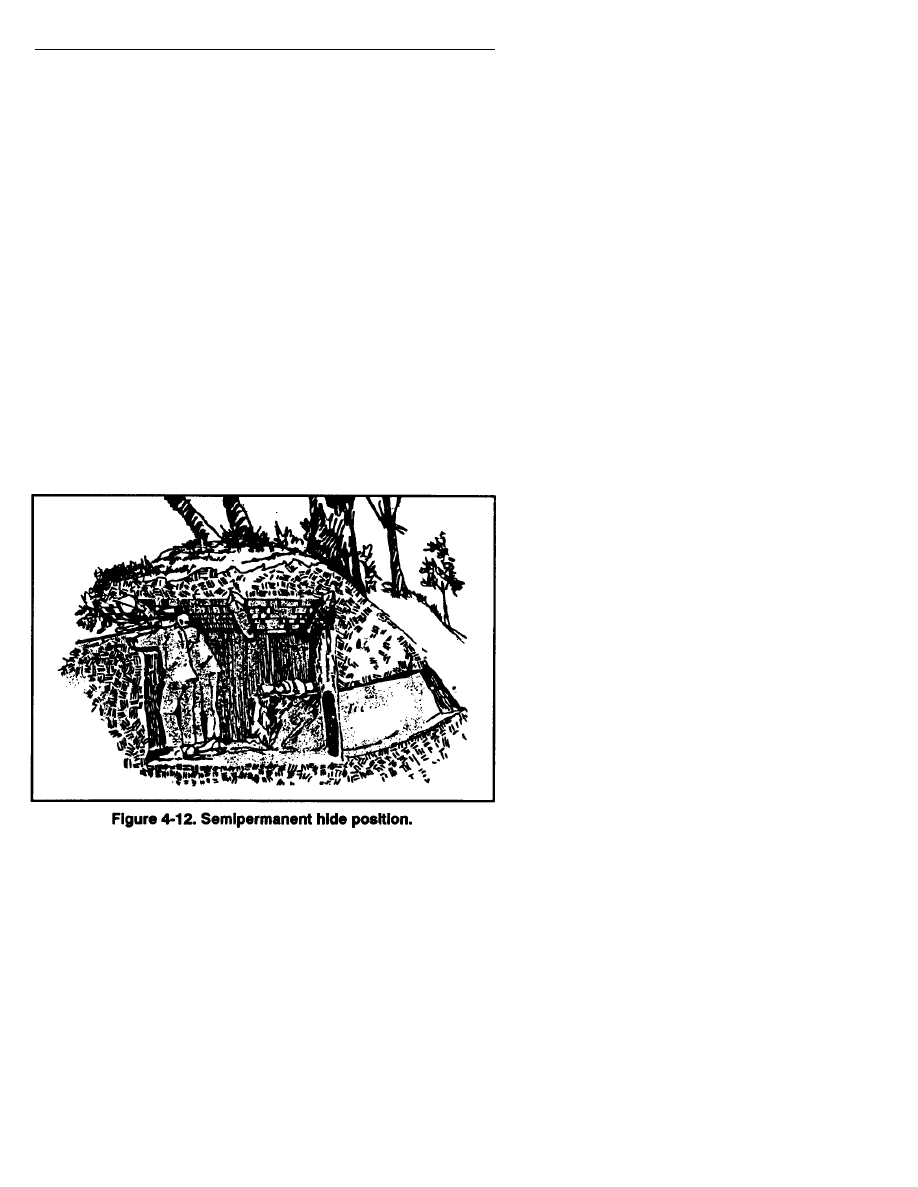
f. Semipermanent Hide. The semipermanent hide (Figure 4-12,
page 4-22) is used mostly in defensive situations. This position requires
additional equipment and personnel to construct. However, it allows sniper
teams to remain in place for extended periods or to be relieved in place by
other sniper teams. Like the belly hide, this position can be constructed by
tunneling through a knoll or under natural objects already in place.
The semipermanent hide is characterized by the following
4-21
FM 23-10
(1) Advantages:
(a) Offers total freedom of movement inside the position. The team
members can move about freely. They can stand, sit, or even lie down.
(b) Protects against direct and indirect fires. The sniper team should
look for the same items as mentioned in the belly hide.
(c) Is completely concealed. Loopholes are the only part of the
position that can be detected. They allow for the smallest exposure
possible; yet they still allow the sniper and observer to view the target area.
These loopholes should have a large diameter (10 to 14 inches) in the interior
of the position and taper down to a smaller diameter (4 to 8 inches) on the
outside of the position. A position may have more than two sets of loopholes
if needed to cover large areas. The entrance/exit to the position must be
covered to prevent light from entering and highlighting the loopholes.
Loopholes that are not in use should be covered from the inside with a piece
of canvas or suitable material.
(d) Is easily maintained for extended periods. This position allows the
team to operate effectively for a longer period.
(2) Disadvantages:
(a) Requires extra personnel and tools to construct. This position
requires extensive work and extra tools. It should not be constructed near
the enemy. It should be constructed during darkness and be completed
before dawn.
4-22
.

FM 23-10
(b) lncreases risk of detection. Using a position for several days or
having teams relieve each other in a position always increases the risk
of detection.
(3) Construction time: 4 to 6 hours (4 personnel).
(4) Occupation time: 48 hours plus (relieved by other teams).
g. Routines in Sniper Team positions. Although the construction of
positions may differ, the routines while in position are the same.
The sniper and the observer should have a good firing platform. This gives
the sniper a stable platform for the sniper weapon and the observer a
platform for the optics. When rotating observation duties, the sniper
weapon should remain in place, and the optics are handed from one
member to the other. Sniper data book, observation logs, range cards,
and the radio should be placed between the team where both members
have easy access to them. A system of resting, eating, and latrine calls
must be arranged between the team. All latrine calls should be done
during darkness, if possible. A hole should be dug to conceal any traces
of latrine calls.
4-13. POSITIONS IN URBAN TERRAIN
Positions in urban terrain are quite different than positions in the field.
The sniper team normally has several places to choose. These can range
from inside attics to street-level positions in basements. This type of
terrain is ideal for a sniper, and a sniper team can stop an enemy’s advance
through its area of responsibility.
a. When constructing an urban position, the sniper team must be
aware of the outside appearance of the structure. Shooting through
loopholes in barricaded windows is preferred; the team must make sure
all other windows are also barricaded. Building loopholes in other
windows also provides more positions to engage targets. When building
loopholes, the team should make them different shapes (not perfect
squares or circles). Dummy loopholes also confuse the enemy. Positions in
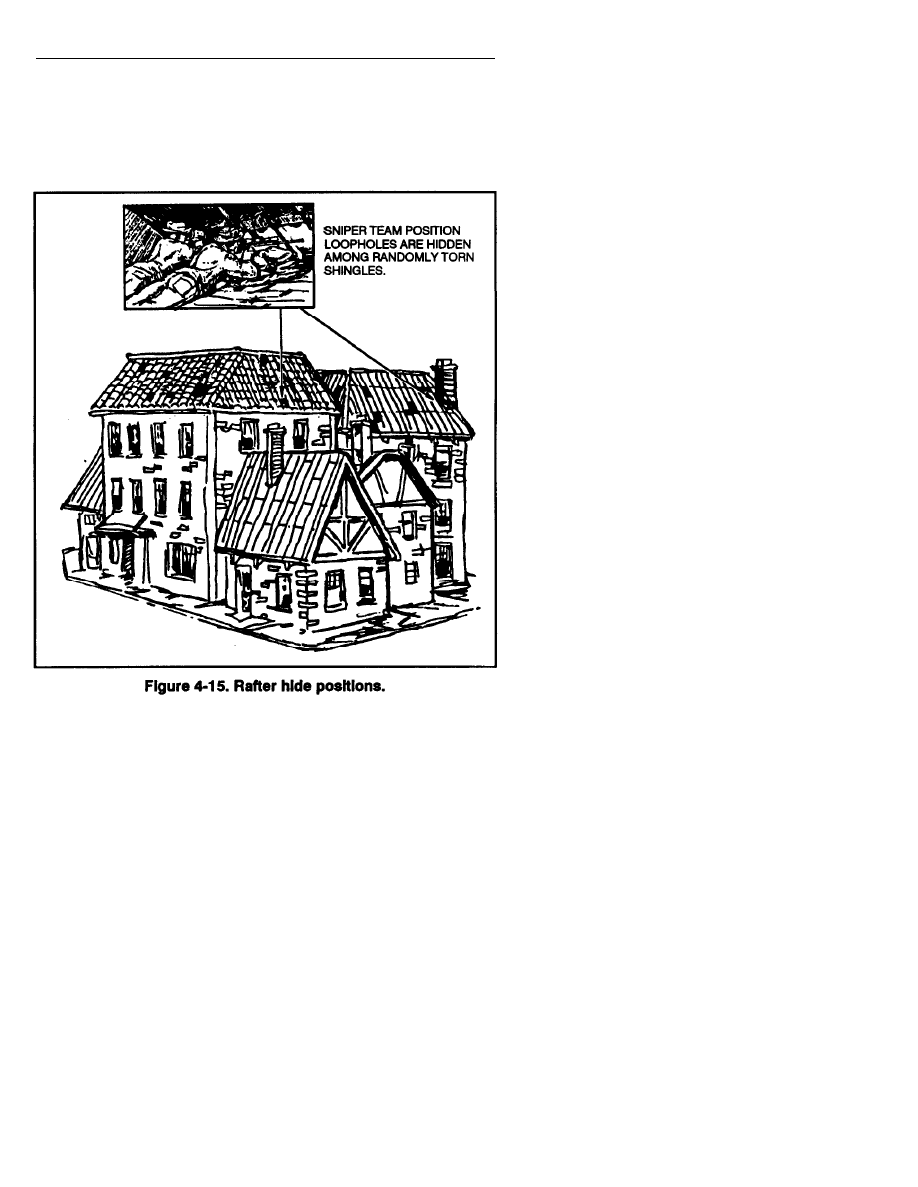
attics are also effective. The team removes the shingles and cuts out
loopholes in the roof; however, they must make sure there are other
shingles missing from the roof so the firing position loophole is
not obvious.
(1) The sniper team should not locate the position against
contrasting background or in prominent buildings that automatically
draw attention. It must stay in the shadows while moving, observing, and
engaging targets.
4-23
FM 23-10
(2) The team must never fire close to a loophole. It should always
back away from the hole as far as possible to hide the muzzle flash and to
scatter the sound of the weapon when it fires. The snipers may be located
in a different room than the loophole; however, they can make a hole
through a wall to connect the rooms and fire from inside one room.
The team must not fire continually from one position. (More than one
position should be constructed if time and situation permit.)
When constructing other positions, the team makes sure the target area
can be observed. Sniper team positions should never be used by any
personnel other than a sniper team.
b. Common sense and imagination are the sniper team’s only
limitation in the construction of urban hide positions. Urban hide
positions that can be used are the room hide, crawl space hide, and
rafter hide. The team constructs and occupies one of these positions or
a variation thereof.
WARNING
WHEN MOVING THROUGH SEWERS, TEAMS MUST BE
ALERT FOR BOOBY TRAPS AND POISONOUS GASES.
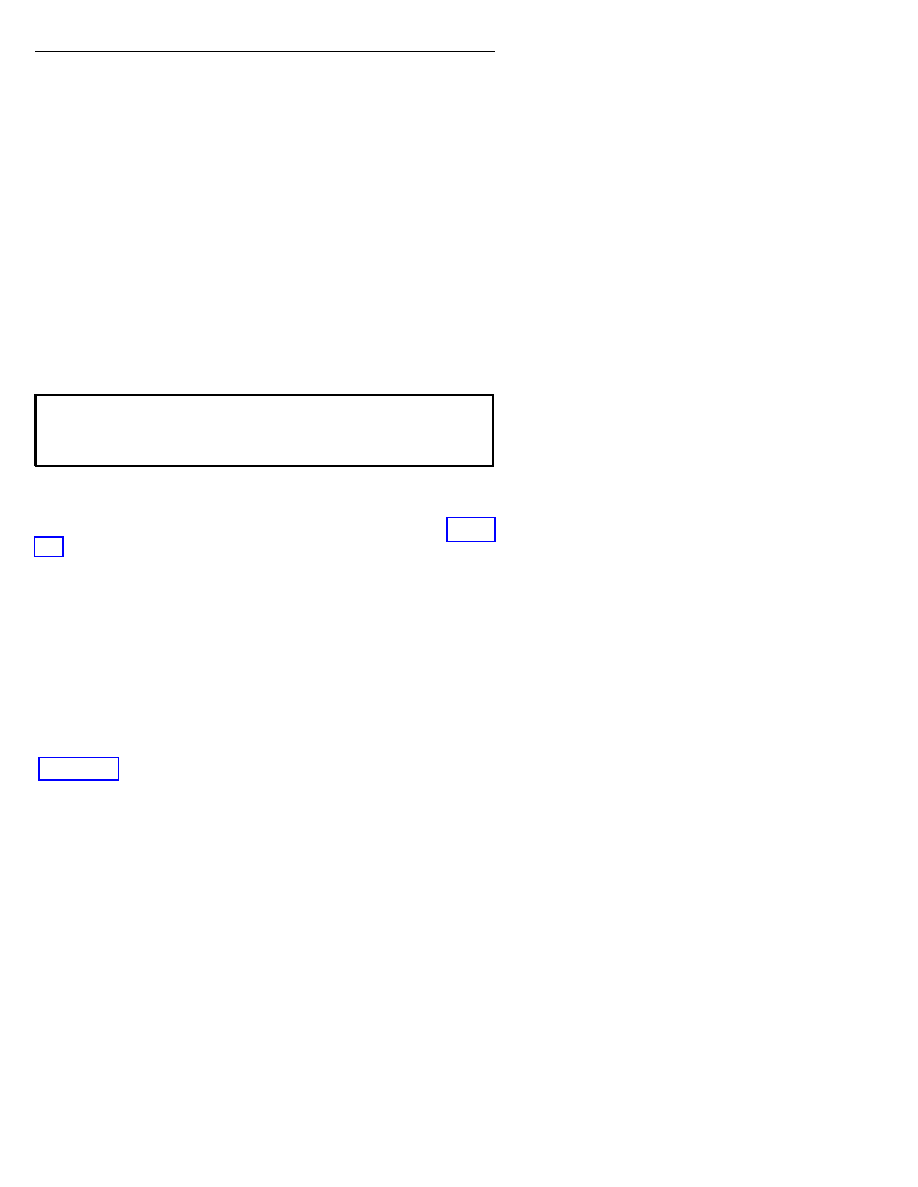
(1) Room hide position. In a room hide position, the sniper team
uses an existing room and fires through a window or loophole (Figure
4-13). Weapon support may be achieved through the use of existing
furniture-that is, desks or tables. When selecting a position, teams
must notice both front and back window positions. To avoid.
silhouetting, they may need to use a backdrop such as a dark-colored
blanket, canvas, carpet, and a screen. Screens (common screening
material) are important since they allow the sniper teams maximum
observation and deny observation by the enemy. They must not.
remove curtains; however, they can open windows or remove panes of
glass. Remember, teams can randomly remove panes in other windows
so the position is not obvious.
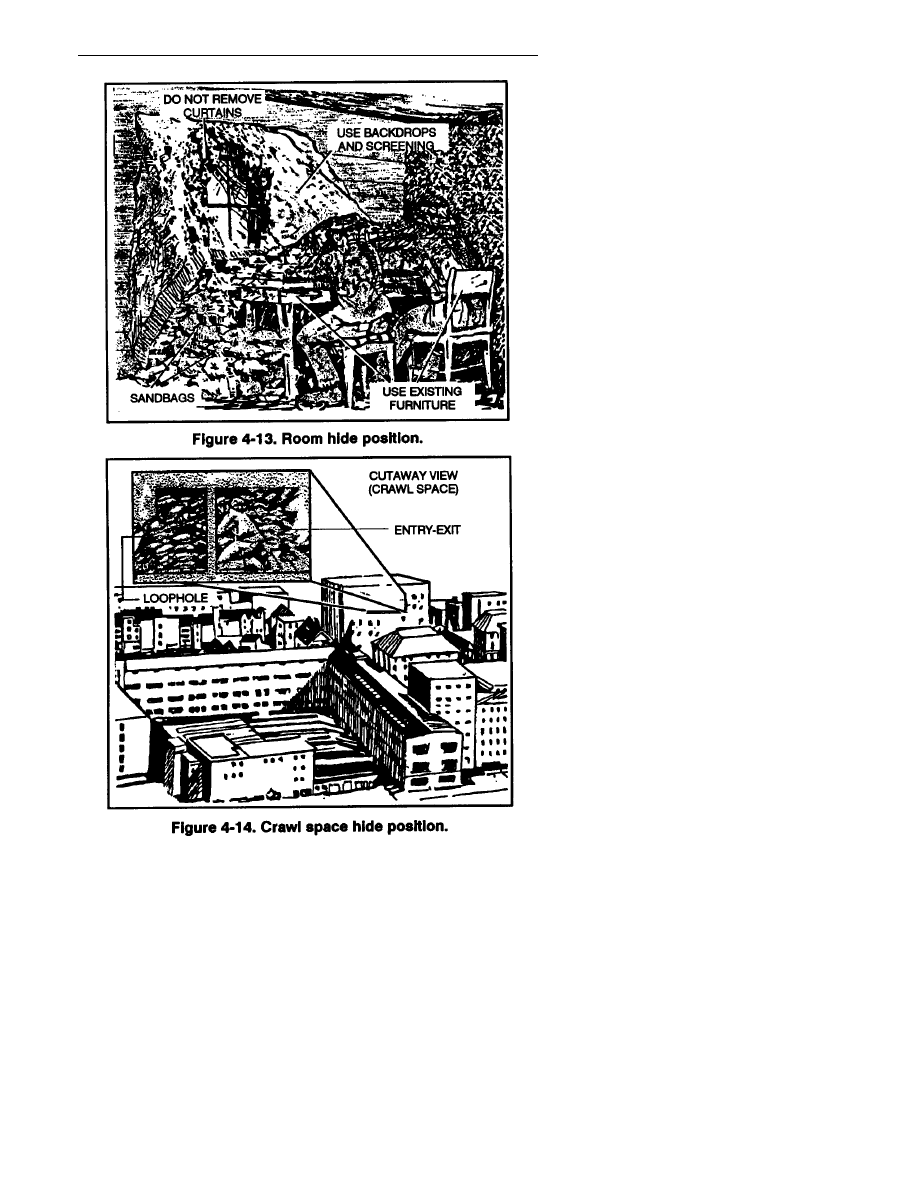
(2) Crawl space hide position. The sniper team builds a crawl space
hide position in the space between floors in multistory buildings
(Figure 4-14). Loopholes are difficult to construct, but a damaged
building helps considerably. Escape routes can be holes knocked into the
floor or ceiling. Carpet or furniture placed over escape holes or replaced
ceiling tiles will conceal them until needed.
4-24
FM 23-10
4-25
FM 23-10
(3) Rafter hide position. The sniper team constructs a rafter hide
position in the attic of an A-frame-type building. These buildings normally
have shingled roofs (A and B, Figure 4-15). Firing from inside the attic
around a chimney or other structure helps prevent enemy observation
and fire.
c. Sniper teams use the technique best suited for the urban
hide position.
(1) The second floor of a building is usually the best location for
the position. It presents minimal dead space but provides the team more
protection since passersby cannot easily spot it.
(2) Normally, a window is the best viewing aperture/loophole.
4-26
.

FM 23-10
(a) If the window is dirty, do not clean it for better viewing.
(b) If curtains are prevalent in the area, do not remove those in
the position. Lace or net-type curtains can be seen through from the
inside, but they are difficult to see through from the outside.
(c) If strong winds blow the curtains open, staple, tack, or
weight them.
(d) Firing a round through a curtain has little effect on accuracy
however, ensure the muzzle is far enough away to avoid muzzle blast.
(e) When area routine indicates open curtains, follow suit. Set up
well away from the loophole; however, ensure effective coverage of the
assigned target area.
(3) Firing through glass should be avoided since more than one shot
may be required. The team considers the following options:
(a) Break or open several windows throughout the position before
occupation. This can be done during the reconnaissance phase of the
operation; however, avoid drawing attention to the area.
(b) Remove or replace panes of glass with plastic.
(4) Other loopholes/viewing apertures are nearly unlimited.
Battle damage.
Drilled holes (hand drill).
Brick removal.
Loose boards/derelict houses.
(5) Positions can also beset up in attics or between the ceiling and roof.
(See rafter hide positions.)
Gable ends close to the eaves (shadow adding to concealment).
Battle damage to gables and or roof.
Loose or removed tiles, shingles, or slates.
Skylights.
(6) The sniper makes sure the bullet clears the loophole. The muzzle
must be far enough from the loophole to ensure the bullet’s path is not in
line with the bottom of the loophole.
(7) Front drops, usually netting, may have to be changed (if the
situation permits) from dark to light colors at BMNT/EENT due to
sunlight or lack of sunlight into the position.
(8) If the site is not multiroomed, partitions can be made by
hanging blankets or nets to separate the operating area from the
rest/administrative area.
4-27

FM 23-10
(9) If sandbags are required, they can be filled and carried inside of
rucksacks or can be filled in the basement, depending on the
situation/location of the position site.
(10) Always plan an escape route that leads to the objective
rally point. When forced to vacate the position, the team meets the
security element at the ORP. Normally, the team will not be able to leave
from the same point at which it gained access; therefore, a separate escape
point may be required in emergency situations. The team must consider
windows (other than the viewing apertures); anchored ropes to climb
down buildings, or a small, preset explosive charge situated on a wall or
floor for access into adjoining rooms, buildings, or the outside.
(11) The type of uniform or camouflage to be worn by the team will
be dictated by the situation, how they are employed, and area of operation.
The following applies:
(a) Most often, the BDU and required equipment are worn.
(b) Urban-camouflaged uniforms can be made or purchased.
Urban areas vary in color (mostly gray [cinder block]; red [brick]; white
[marble]; black [granite]; or stucco, clay, or wood). Regardless of area
color, uniforms should include angular-line patterns.
(c) When necessary, most woodland-patterned BDUs can be worn
inside out as they are a gray or green-gray color underneath.
(d) Soft-soled shoes or boots are the preferred footwear in the
urban environment.
(e) Civilian clothing can be worn (native/host country populace).
(f) Tradesmen’s or construction worker’s uniforms and accessories
can be used.
Section IV
OBSERVATION
Throughout history, battles have been won and nations conquered based
on an accurate accounting and description of the opposing forces strength,
equipment, and location. As the sniper team performs the secondary
mission of collecting and reporting battlefield intelligence, the
commander can act, rather than react. The purpose of observation is to
gather facts and to provide information for a specific intent. Observation
uses all of the sniper team’s five senses but often depends on sight
and hearing. For example, the sniper team is issued a PIR or OIR for a
specific mission. Information gathered by the sniper team is reported,
analyzed, and processed into intelligence reports. The sniper team’s
success depends upon its powers of observation. In addition to the
sniperscope, the sniper team has an observation telescope, binoculars,
4-28

FM 23-10
night vision sight, and night vision goggles to enhance its ability to observe
and engage targets. Team members must relieve each other when using
this equipment since prolonged use can cause eye fatigue, greatly
reducing the effectiveness of observation. Team members rotate periods
of observation. During daylight, observation should be limited to
10 minutes followed by a l0-minute rest. When using night vision
devices, the observer should limit his initial period of viewing to
10 minutes followed by a 10-minute rest. After several periods of viewing,
he can extend the viewing period to 15 minutes and then a 15-minute rest.
4-14. HASTY AND DETAILED SEARCHES
While observing a target area, the sniper team alternately conducts two
types of visual searches: hasty and detailed.
a. A hasty search is the first phase of observing a target area.
The observer conducts a hasty search immediately after the team occupies
the firing position. A hasty search consists of quick glances with
binoculars at specific points, terrain features, or other areas that could
conceal the enemy. The observer views the area closest to the team’s
position first since it could pose the most immediate threat. The observer
then searches farther out until the entire target area has been searched.
When the observer sees or suspects a target, he uses an M49 observation
telescope for a detailed view of the target area. The telescope should not
be used to search the area because its narrow field of view would take much
longer to cover an area; plus, its stronger magnification can cause eye
fatigue sooner than the binoculars.
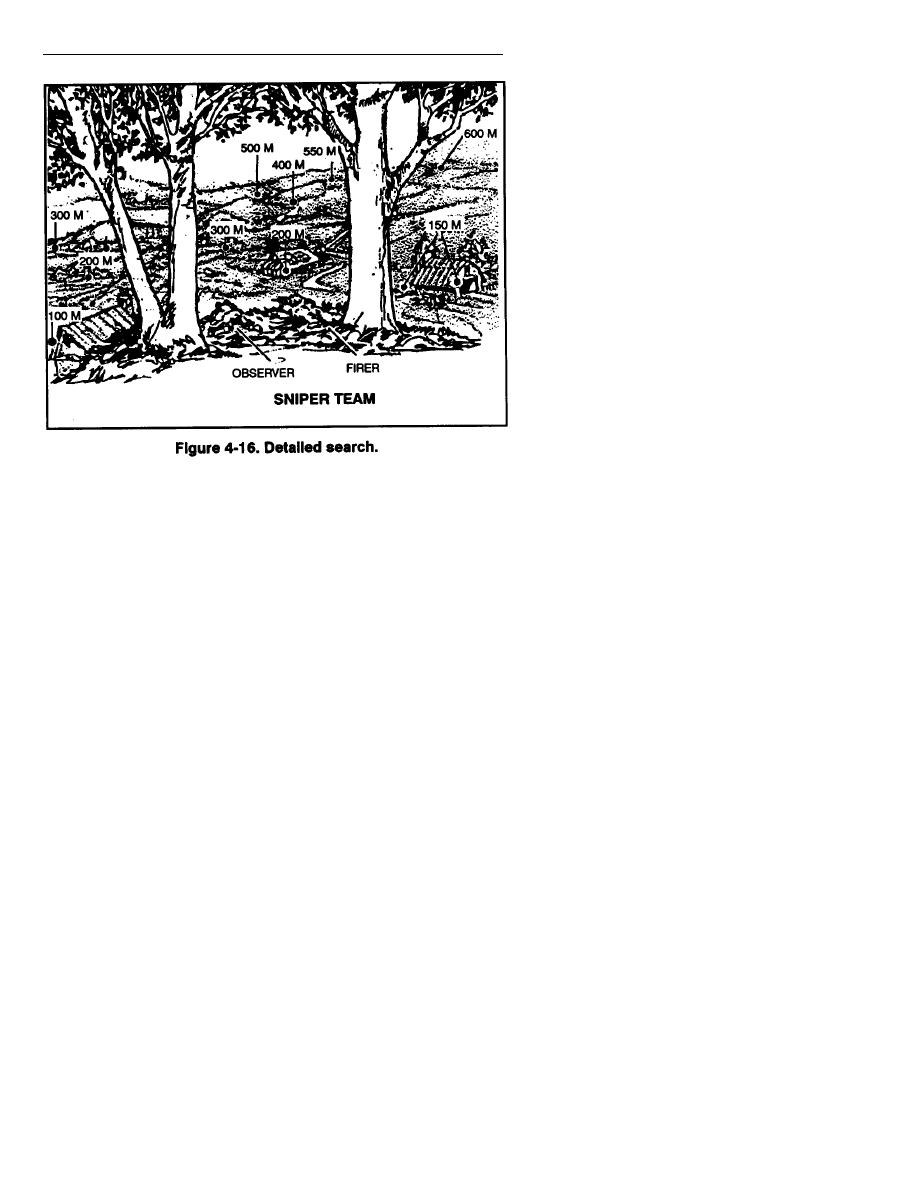
b. After a hasty search has been completed, the observer then
conducts a detailed search of the area. A detailed search is a closer, more
thorough search of the target area, using 180-degree area or sweeps,
50 meters in depth, and overlapping each previous sweep at least 10 meters
to ensure the entire area has been observed (Figure 4-16, page 4-30).
Like the hasty search, the observer begins by searching the area closest to
the sniper team position.
c. This cycle of a hasty search followed by a detailed search should be
repeated three or four times. This allows the sniper team to become
accustomed to the area; plus, the team will look closer at various points
with each consecutive pass over the area. After the initial searches, the
observer should view the area, using a combination of both hasty and
detailed searches. While the observer conducts the initial searches of the
area, the sniper should record prominent features, reference points, and
distances on a range card. The team members should alternate the task
of observing the area about every 30 minutes.
4-29
FM 23-10
4-15. ELEMENTS OF OBSERVATION
The four elements in the process of observation include awareness,
understanding, recording, and response. Each of these elements may be
accomplished as a separate processor accomplished at the same time.
a. Awareness. Awareness is being consciously attuned to a specific fact.
A sniper team must always be aware of the surroundings and take nothing.
for granted. The team also considers certain elements that influence and
distort awareness.
(1) An object’s size and shape can be misinterpreted if viewed
incompletely or inaccurately.
(2) Distractions degrade the quality of observations.
(3) Active participation or degree of interest can diminish toward
the event.
(4) Physical abilities (five senses) have limitations.
(5) Environmental changes affect accuracy.
(6) Imagination may cause possible exaggerations or inaccuracy.
b. Understanding. Understanding is derived from education,
training, practice, and experience. It enhances the sniper team’s
4-30

FM 23-10
knowledge about what should be observed, broadens its ability to view and
consider all aspects, and aids in its evaluation of information.
c. Recording. Recording is the ability to save and recall what
was observed. Usually, the sniper team has mechanical aids, such as
writing utensils, sniper data book, sketch kits, tape recorders, and
cameras, to support the recording of events; however, the most accessible
method is memory. The ability to record, retain, and recall depends on
the team’s mental capacity (and alertness) and ability to recognize what
is essential to record. Added factors that affect recording include
(1) The amount of training and practice in observation.
(2) Skill gained through experience.
(3) Similarity of previous incidents.
(4) Time interval between observing and recording.
(5) The ability to understand or convey messages through oral or
other communications.
d. Response. Response is the sniper team’s action toward information.
It may be as simple as recording events in a sniper data book, making a
communications call, or firing a well-aimed shot.
NOTE: See Chapter 9 for discussion on the keep-in-memory
(KIM) game.
4-16. TWILIGHT TECHNIQUES
Twilight induces a false sense of security, and the sniper team must be
extremely cautious. The enemy is also prone to carelessness and more
likely to expose himself at twilight. During twilight, snipers should be
alert to OP locations for future reference. The M3A telescope reticle is
still visible and capable of accurate fire 30 minutes before BMNT and
30 minutes after EENT.
4-17. NIGHT TECHNIQUES
Without night vision devices, the sniper team must depend upon eyesight.
Regardless of night brightness, the human eye cannot function at night
with daylight precision. For maximum effectiveness, the sniper team
must apply the following principles of night vision:
a. Night Adaptation. The sniper team should wear sunglasses or
red-lensed goggles in lighted areas before departing on a mission.
After departure, the team makes a darkness adaptation and listening halt
for 30 minutes.
b. Off-Center Vision. In dim light, an object under direct focus blurs,
appears to change, and sometimes fades out entirely. However, when the
4-31

FM 23-10
eyes are focused at different points, about 5 to 10 degrees away from an
object, peripheral vision provides a true picture. This aIlows the
light-sensitive portion of the eye, that not used during the day, to be used.
c. Factors Affecting Night Vision. The sniper team has control over
the following night vision factors:
(1) Lack of vitamin A impairs night vision. However, an overdose
of vitamin A will not improve night vision capability.
(2) Colds, fatigue, narcotics, headaches, smoking, and alcohol reduce
night vision.
(3) Exposure to bright light degrades night vision and requires a
readaption to darkness.
4-18. ILLUMINATION AIDS
The sniper team may occasionally have artificial illumination for
observing and firing. Examples are artillery illumination fire, campfires,
or lighted buildings.
a. Artillery Illumination Fire. The M301A2 illuminating cartridge
provides 50,000 candlepower.
b. Campfires. Poorly disciplined enemy soldiers may use campfires,
or fires may be created by battlefield damage. These opportunities give
the sniper enough illumination for aiming.
c. Lighted Buildings. The sniper can use lighted buildings to
eliminate occupants of the building or personnel in the immediate area
of the light source.
Section V
TARGET DETECTION AND SELECTION
Recording the type and location of targets in the area helps the sniper
team to determine engageable targets. The sniper team must select key
targets that will do the greatest harm to the enemy in a given situation.
It must also consider the use of indirect fire on targets. Some targets, due
to their size or location, may be better engaged with indirect fire.
4-19. TARGET INDEXING
To index targets, the sniper team uses the prepared range card for a
reference since it can greatly reduce the engagement time. When indexing a
target to the sniper, the observer locates a prominent terrain feature near
the target. He indicates this feature and any other information to the
sniper to assist in finding the target. Information between team members
varies with the situation. The observer may sound like an FO giving a call
for fire to an FDC depending on the condition of the battlefield and the
total number of possible targets from which to choose.
4-32

FM 23-10
a. Purpose. The sniper team indexes targets for the following reasons:
(1) Sniper teams may occupy an FFP in advance of an attack to locate,
index, and record target locations; and to decide on the priority of targets.
(2) Indiscriminate firing may alert more valuable and closer
enemy targets.
(3) Engagement of a distant target may result in disclosure of the FFP
to a closer enemy.
(4) A system is needed to remember location if several targets are
sighted at the same time.
b. Considerations. The sniper team must consider the following
factors when indexing targets:
(1) Exposure times. Moving targets may expose themselves for only
a short time The sniper team must note the point of disappearance of
each target, if possible, before engagement. By doing so, the team may be
able to take several targets under fire in rapid succession.
(2) Number of targets. If several targets appear and disappear at the
same time, the point of disappearance of each is hard to determine;
therefore, sniper teams concentrate on the most important targets.
(3) Spacing/distance between targets. The greater the distance
between targets, the harder it is to see their movement. In such cases, the
team should locate and engage the nearest targets.
(4) Evacuation of aiming points. Targets that disappear behind good
aiming points are easily recorded and remembered, targets with poor
aiming points are easily lost. Assuming that two such targets are of equal
value and danger, the team should engage the more dangerous aiming
point target first.
c. Determination of Location of Hidden Fires. When using the
crack-thump method, the team listens for the crack of the round and the
thump of the weapon being fired. By using this method, the sniper can
obtain both a direction and a distance.
(1) Distance to firer. The time difference between the crack and the
thump can be converted into an approximate range. A one-second lapse
between the two is about 600 yards with most calibers; a one-half-second
lapse is about 300 yards.
(2) Location of firer. By observing in the direction of the thump and
near the predetermined range, the sniper team has a good chance of seeing
the enemy’s muzzle flash or blast from subsequent shots.
(3) Limitations. The crack-thump method has the following limitations
(a) Isolating the crack and thump is difficult when many shots are
being fired.
4-33

FM 23-10
(b) Mountainous areas, tall buildings, and so forth cause echoes and
make this method ineffective.
d. Shot-Hole Analysis. Locating two or more shot holes in trees,
walls, dummy heads, and so forth may make it possible to determine the
direction of the shots. The team can use the dummy-head pencil method
and triangulate on the enemy sniper’s position. However, this method
only works if all shots come from the same position.
4-20. TARGET SELECTION
Target selection may be forced upon the sniper team. A target moving
rapidly may be lost while obtaining positive identification. The sniper
team considers any enemy threatening its position as a high-value target.
When selecting key targets, the team must consider the following factors:
a. Threat to the Sniper Team. The sniper team must consider the
danger the target presents. This can be an immediate threat, such as an
enemy element walking upon its position, or a future threat, such as enemy
snipers or dog tracking teams.
b. Probability of First-Round Hit. The sniper team must determine
the chances of hitting the target with the first shot by considering
the following:
c.
Distance to the target.
Direction and velocity of the wind.
Visibility of the target area.
Amount of the target that is exposed.
Amount of time the target is exposed.
Speed and direction of target movement.
Certainty of Target’s Identity.
The sniper team must be
reasonably certain that the target it is considering is the key target.
d. Target Effect on the Enemy. The sniper team must consider what
effect the elimination of the target will have on the enemy’s fighting ability
It must determine that the target is the one available target that will cause
the greatest harm to the enemy.
e. Enemy Reaction to Sniper Fire. The sniper team must consider
what the enemy will do once the shot has been fired. The team must be
prepared for such actions as immediate suppression by indirect fires and
enemy sweeps of the area.
f. Effect on the Overall Mission. The sniper team must consider how
the engagement will affect the overall mission. The mission may be one
of intelligence gathering for a certain period. Firing will not only alert
4-34

FM 23-10
the enemy to a team’s presence, but it may also terminate the mission if
the team has to move from its position as a result of the engagement.
4-21. KEY TARGETS
Key personnel targets can be identified by actions or mannerisms, by
positions within formations, by rank or insignias, and or by equipment
being worn or carried. Key targets can also include weapon systems
and equipment. Examples of key targets areas follows:
a. Snipers. Snipers are the number one target of a sniper team.
The enemy sniper not only poses a threat to friendly forces, but he is also
the natural enemy of the sniper. The fleeting nature of a sniper is reason
enough to engage him because he may never be seen again.
b. Dog Tracking Teams. Dog tracking teams pose a great threat to
sniper teams and other special teams that may be working in the area. It is
hard to fool a trained dog. When engaging a dog tracking team, the sniper
should engage the dog’s handler first. This confuses the dog, and other
team members may not be able to control it.
c. Scouts. Scouts are keen observers and provide valuable information
about friendly units. This plus their ability to control indirect fires make
them dangerous on the battlefield. Scouts must be eliminated.
d. Officers. Officers are another key target of the sniper team.
Losing key officers in some forces is such a major disruption to the
operation that forces may not be able to coordinate for hours.
e. Noncommissioned Officers. Losing NCOs not only affects the
operation of a unit but also affects the morale of lower ranking personnel,
f. Vehicle Commanders and Drivers. Many vehicles are rendered
useless without a commander or driver.
g. Communications Personnel. In some forces, only highly trained
personnel know how to operate various types of radios. Eliminating these
personnel can be a serious blow to the enemy’s communication network.
h. Weapon Crews. Eliminating weapon crews reduces the amount of
fire on friendly troops.
i. Optics on Vehicles. Personnel who are in closed vehicles are
limited to viewing through optics. The sniper can blind a vehicle by
damaging these optic systems.
j. Communication and Radar Equipment. The right shot in the right place
can completely ruin a tactically valuable radar or communication system.
Also, only highly trained personnel may attempt to repair these systems
in place. Eliminating these personnel may impair the enemy’s ability to
perform field repair.
4-35

FM 23-10
k. Weapon Systems. Many high-technology weapons, especially
computer-guided systems, can be rendered useless by one well-placed
round in the guidance controller of the system.
Section VI
RANGE ESTIMATION
A sniper team is required to accurately determine distance, to properly
adjust elevation on the sniper weapon system, and to prepare
topographical sketches or range cards. Because of this, the team has to
be skilled in various range estimation techniques.
4-22. FACTORS AFFECTING RANGE ESTIMATION
Three factors affect range estimation: nature of the target, nature of the
terrain, and light conditions.
a. Nature of the Target.
(1) An object of regular outline, such as a house, appears closer than
one of irregular outline, such as a clump of trees.
(2) A target that contrasts with its background appears to be closer
than it actually is.
(3) A partly exposed target appears more distant than it actually is.
b. Nature of the Terrain.
(1) As the observer’s eye follows the contour of the terrain, he tends
to overestimate distant targets.
(2) Observing over smooth terrain, such as sand, water, or snow,
causes the observer to underestimate distant targets.
(3) Looking downhill, the target appears farther away.
(4) Looking uphill, the target appears closer.
c. Light Conditions.
(1) The more clearly a target can be seen, the closer it appears.
(2) When the sun is behind the observer, the target appears to
be closer.
(3) When the sun is behind the target, the target is more difficult to
see and appears to be farther away.
4-23. RANGE ESTIMATION METHODS
Sniper teams use range estimation methods to determine distance
between their position and the target.
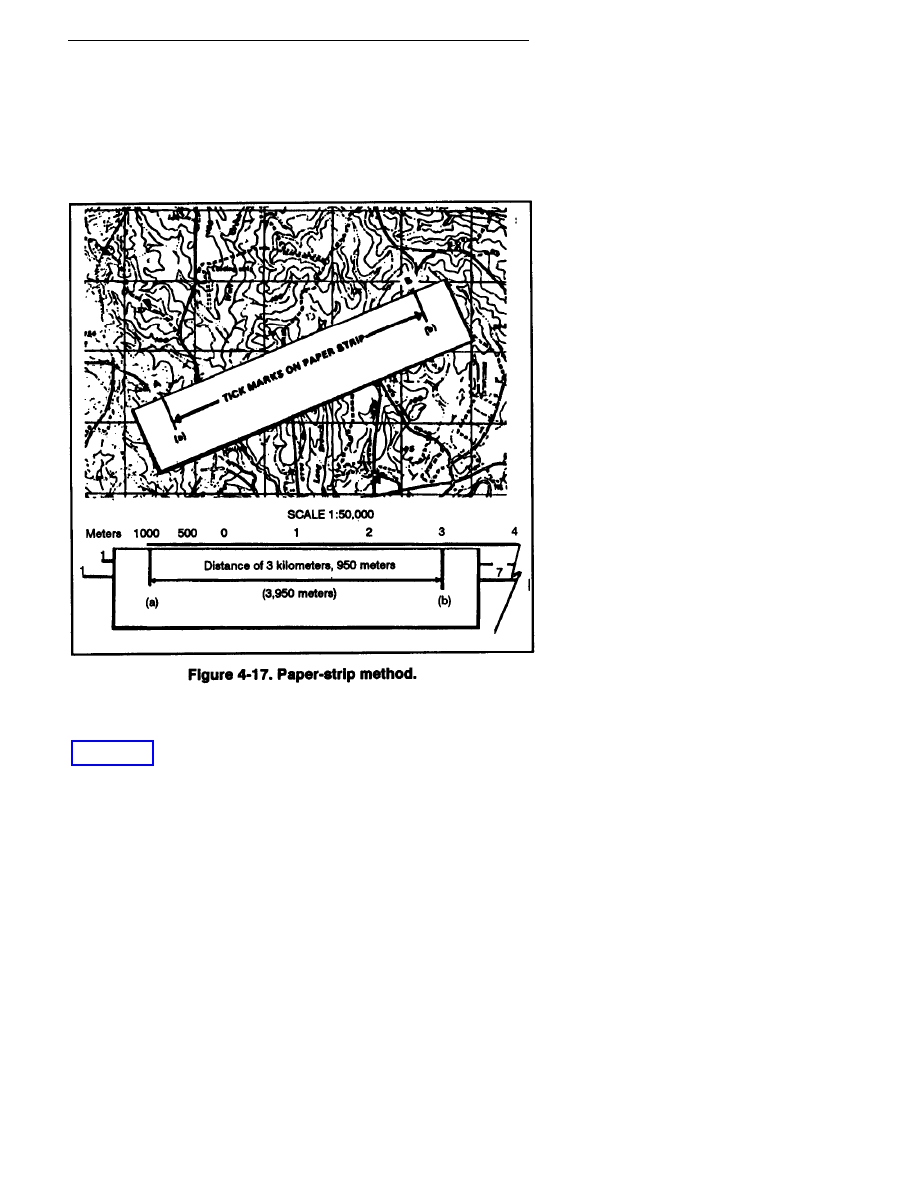
a. Paper-Strip Method. The paper-strip method (Figure 4-17) is
useful when determining longer distances (1,000 meters plus). When using
this method, the sniper places the edge of a strip of paper on the map and
4-36
FM 23-10
ensures it is long enough to reach between the two points. Then he
pencils in a tick mark on the paper at the team position and another at
the distant location. He places the paper on the map’s bar scale, located
at the bottom center of the map, and aligns the left tick mark with the 0 on
the scale. Then he reads to the right to the second mark and notes the
corresponding distance represented between the two marks.
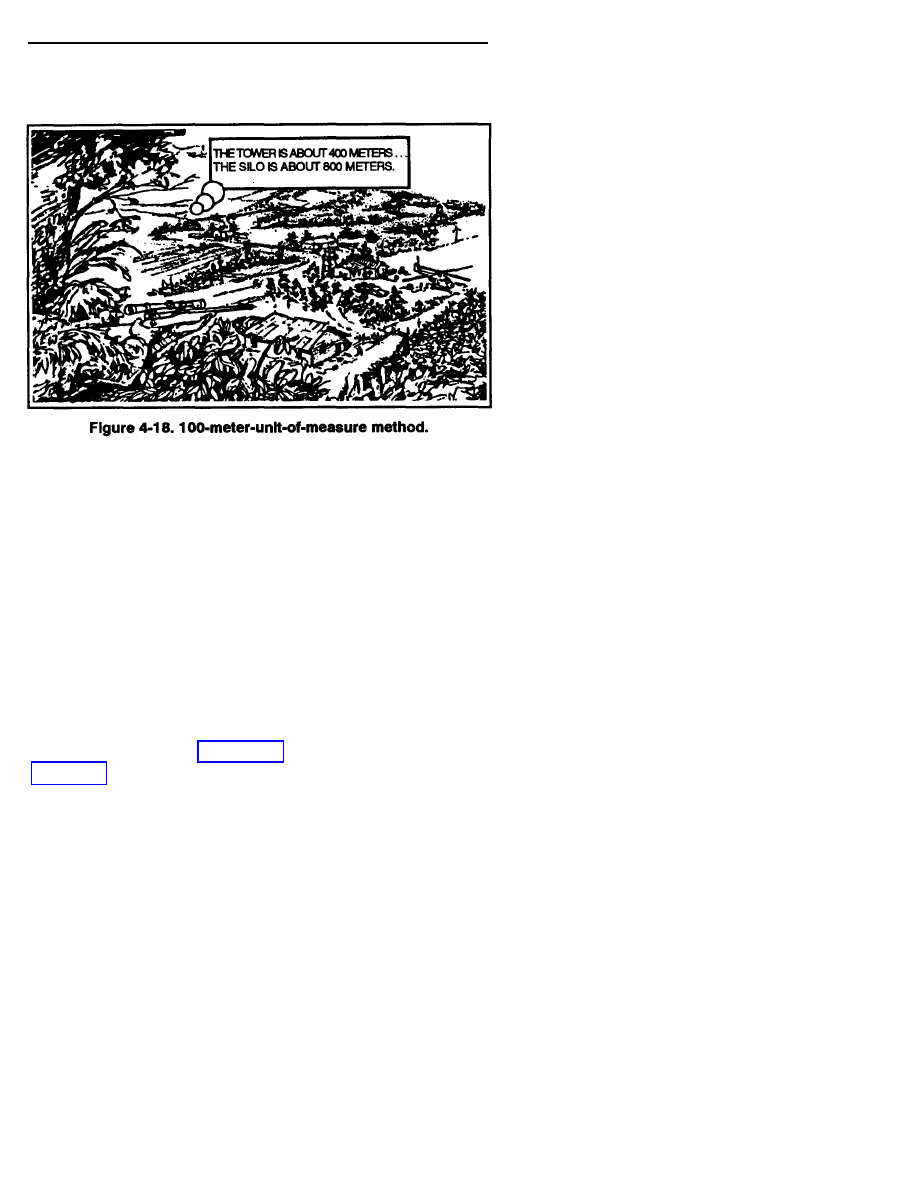
b. 100-Meter-Unit-of-Measure Method. To use this method
(Figure 4-18, page 4-38), the sniper team must be able to visualize a
distance of 100 meters on the ground. For ranges up to 500 meters, the
team determines the number of 100-meter increments between the two
objects it wishes to measure. Beyond 500 meters, it must select a point
4-37
FM 23-10
halfway to the object and determine the number of 100-meter increments
to the halfway point, then double it to find the range to the object.
c. Appearance-of-Object Method. This method is a means of
determining range by the size and other characteristic details of the object.
To use the appearance-of-object method with any degree of accuracy, the
sniper team must be familiar with the characteristic details of the objects
as they appear at various ranges.
d. Bracketing Method. Using this method, the sniper team assumes
that the target is no more than X meters but no less than Y meters away.
An average of X and Y will be the estimate of the distance to the target.
e. Range-Card Method. The sniper team an also use a range card
to quickly determine ranges throughout the target area. Once a target is
seen, the team determines where it is located on the card and then reads
the proper range to the target.
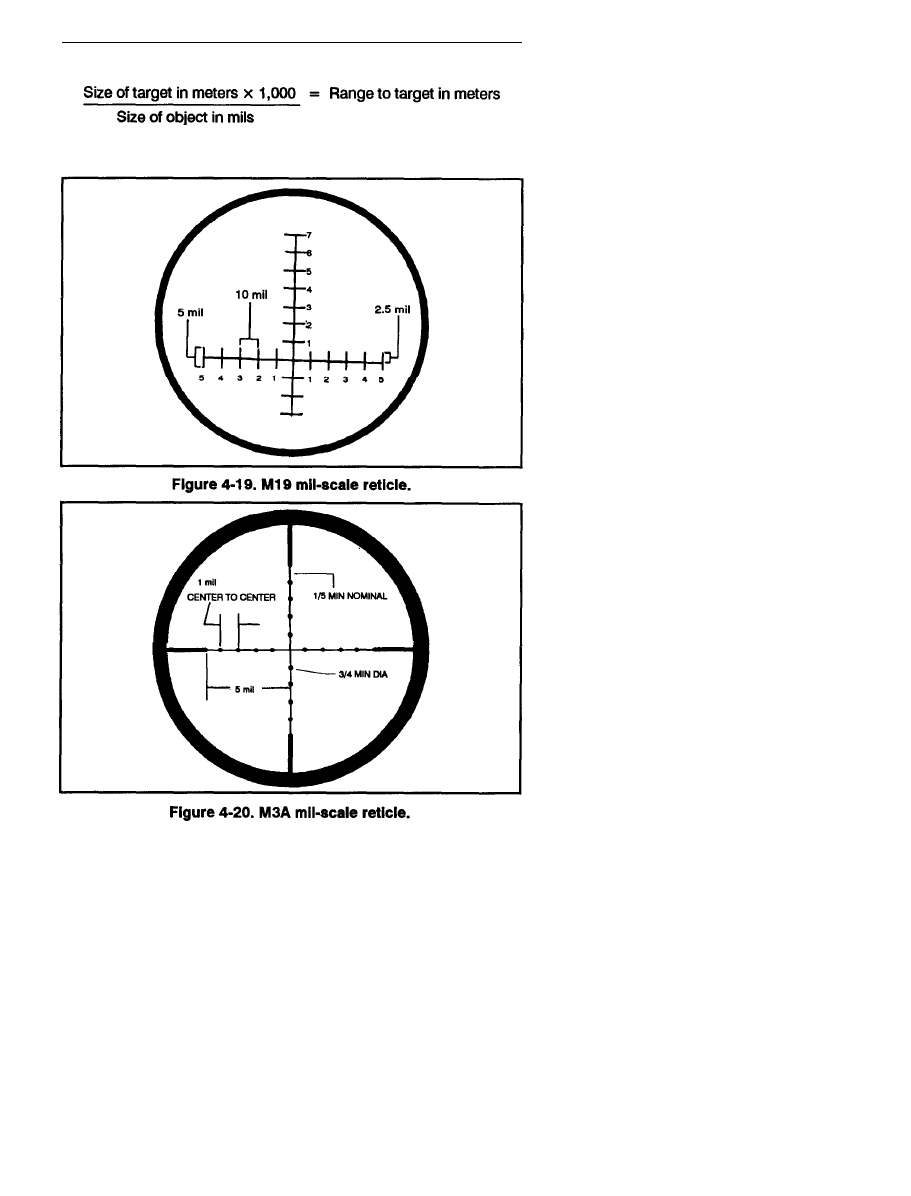
f. Mil-Relation Formula. The mil-relation formula is the preferred
method of range estimation. This method uses a mil-scale reticle located
in the M19 binoculars (Figure 4-19) or in the M3A sniperscope
(Figure 4-20). The team must know the target size in inches or meters.
Once the target size is known, the team then compares the target size to
the mil-scale reticle and uses the following formula:
4-38
FM 23-10
(To convert inches to meters, multiply the number of inches
by .0254.)
4-39

FM 23-10
g. Combination Method. In a combat environment, perfect
conditions rarely exist. Therefore, only one method of range estimation
may not be enough for the team’s specific mission. Terrain with much
dead space limits the accuracy of the 100-meter method. Poor visibility
limits the use of the appearance-of-object method. However, by using a
combination of two or more methods to determine an unknown range, an
experienced sniper team should arrive at an estimated range close to the
true range.
4-24. LASER RANGE FINDER
When the sniper team has access to a laser observation set, AN/GVS-5,
the set should always be used. It can provide the sniper team range to a
specific target with great accuracy. When aiming the laser at a specific
target, the sniper should support it much the same as his weapon to
ensure accuracy. If the target is too small, aiming the laser at a larger
object near the target will suffice (that is, a building, vehicle, tree, or
terrain feature.)
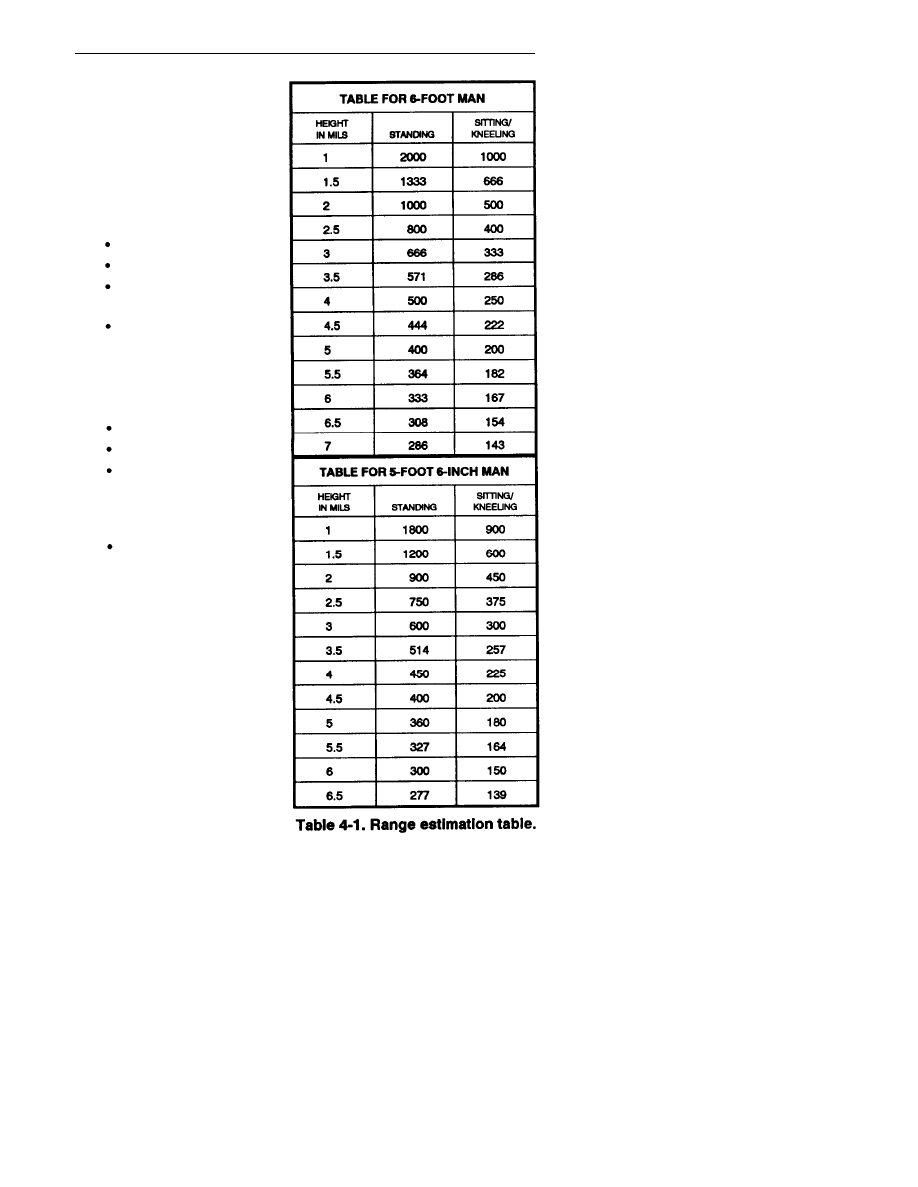
4-25. ESTIMATION GUIDELINES
If mirage is too heavy to distinguish the bottom of a target, it should be halved.
EXAMPLE
When the target is estimated to be 70 inches high, divide
the height into one-half. Use the following mil-relation
formula:
By using this technique, estimate range to targets that are only partly
visible. Such as:
The normal distance from the breastbone to the top of the
head is 19 inches.
OR
Normal height of the human head is 10 inches.
4-40
FM 23-10
This example may prove to be of
specific use when facing an
enemy entrenched in bunkers or
in dense vegetation.
a. The sniper team should
keep a sniper data book complete
with measurements.
(1) Vehicles.
Height of road wheels.
Vehicle dimensions.
Length of main gun tubes
on tanks.
Lengths/sizes of different
weapon systems.
(2) Average height of human
targets in area of operation.
(3) Urban environment.
Average size of doorways.
Average size of windows.
Average width of streets
and lanes (average width
of a paved road in the
United States is 10 feet).
Height of soda machines.
b. As the sniper team
develops a sniper data book, all
measurements are converted
into constants and computed
with different mil readings.
An example of this is Table 4-1,
which has already been computed
for immediate use. This table
should be incorporated into the
sniper data book
4-41

FM 23-10
Section VII
INFORMATION RECORDS
The secondary mission of the sniper team is the collection and reporting
of information. To accomplish this, the sniper team not only needs to be
keen observers, but it also must accurately relay the information it has
observed. To record this information, the team uses the sniper data book,
which contains a range card, a military sketch, and an observation log.
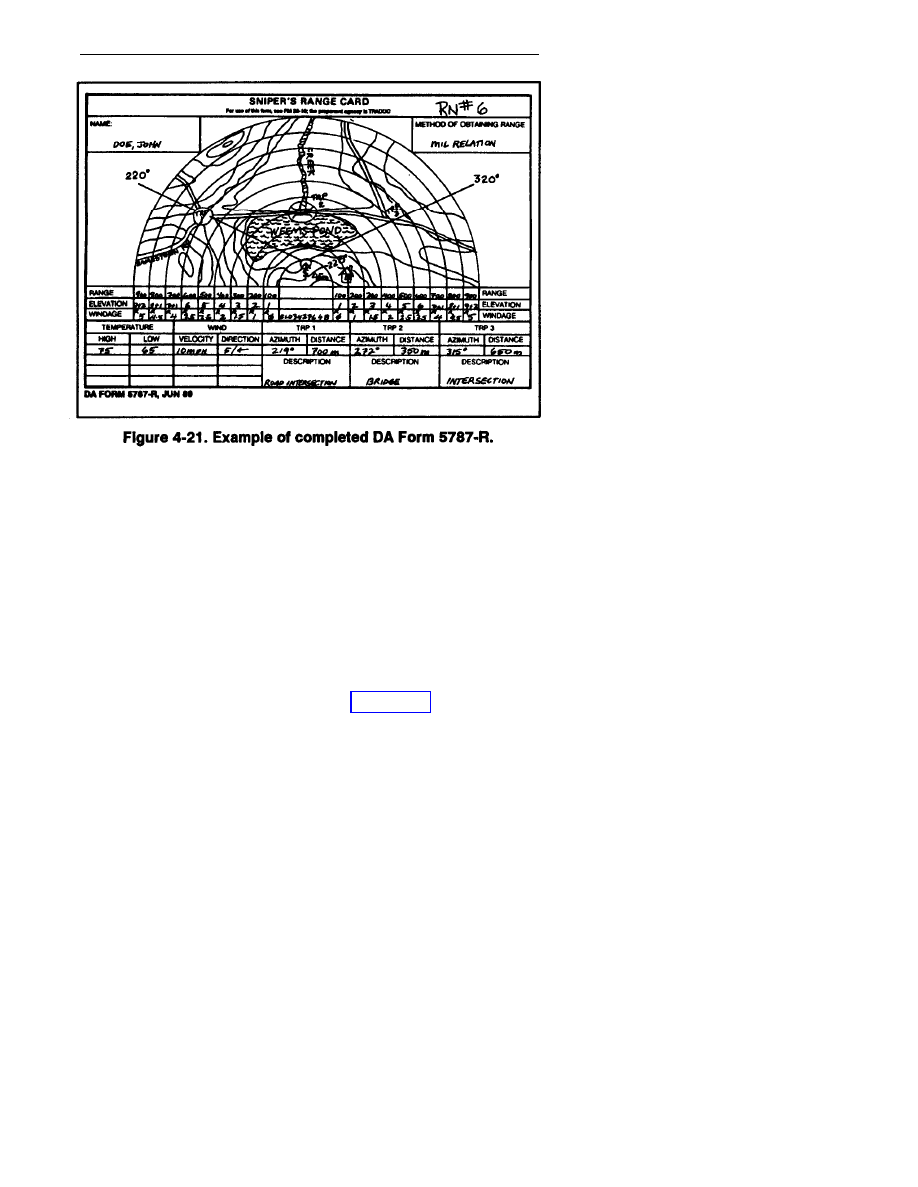
4-26. RANGE CARD
The range card represents the target area drawn as seen from above with
annotations indicating distances throughout the target area. Information
is recorded on DA Form 5787-R (Sniper’s Range Card) (Figure 4-21).
(A blank copy of this form is located in the back of this publication for
local reproduction.) The range card provides the sniper team with a
quick-range reference and a means to record target locations, since it has
preprinted range rings on it. These cards can be divided into sectors by
using dashed lines. This provides the team members with a quick
reference when locating targets-for example: “The intersection in
sector A.” A range card can be prepared on any paper the team
has available. The sniper team position and distances to prominent
objects and terrain features are drawn on the card. There is not a set
maximum range on the range card, because the team may also label any
indirect fire targets on its range card. Information contained on range
cards includes:
a. Name, rank, SSN, and unit.
b. Method of obtaining range.
c. Left and right limits of engageable area.
d. Major terrain features, roads, and structures.
e. Ranges, elevation, and windage needed at various distances.
f. Distances throughout the area.
g. Temperature and wind. (Cross out previous entry whenever
temperature, wind direction, or wind velocity changes.)
h. Target reference points (azimuth, distance, and description).
4-42
FM 23-10
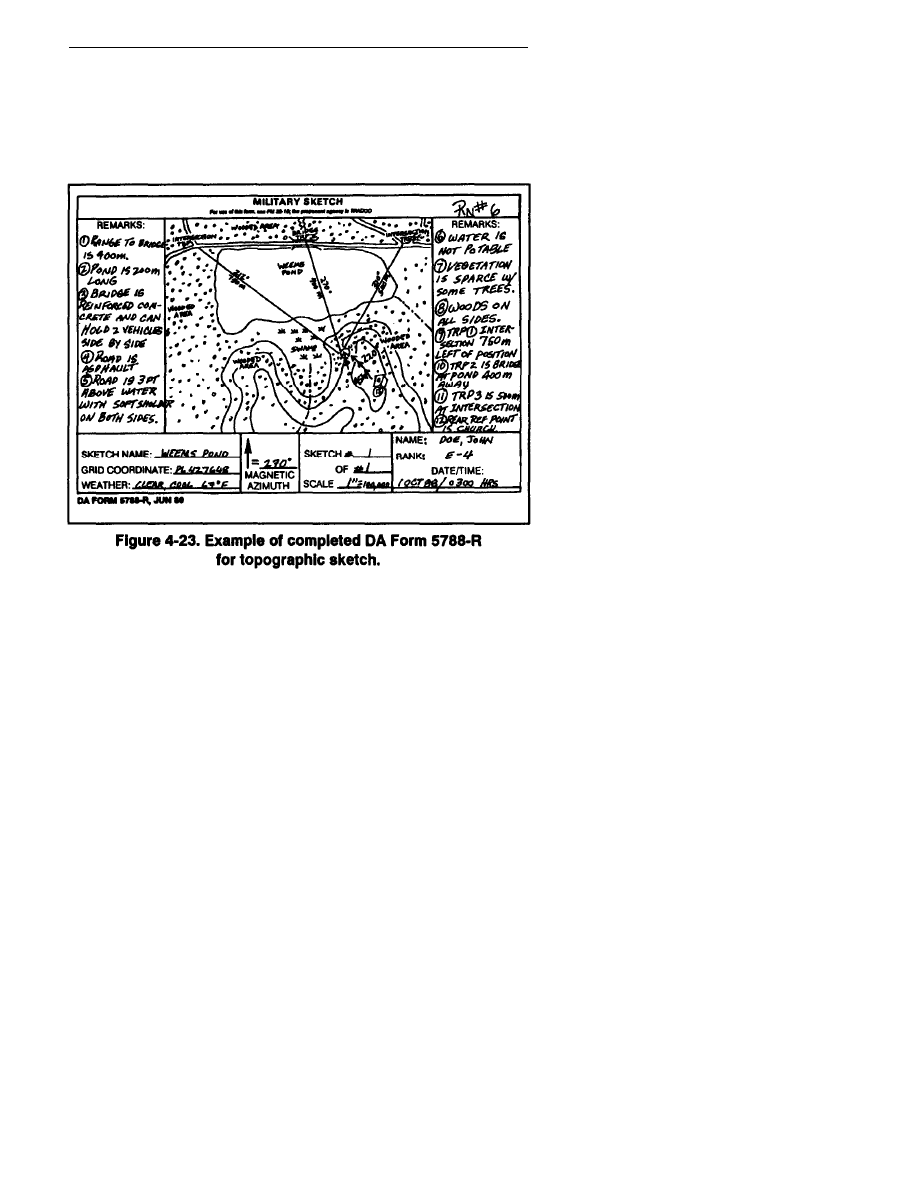
4-27. MILITARY SKETCH
DA Form 5788-R (Military Sketch) is used to record information about
a general area, terrain features, or man-made structures that are not
shown on a map. Military sketches provide intelligence sections a
detailed, on-the-ground view of an area or object that is otherwise
unobtainable. These sketches not only let the viewer see the area in
different perspectives but also provide detail such as type of fences,
number of telephone wires, present depth of streams, and so forth.
There are two types of military sketches as stated in FM 21-26 panoramic
sketches and topographic sketches. Information is recorded on
DA Form 5788-R. (A blank copy of this form is located in the back of this
publication for local reproduction.)
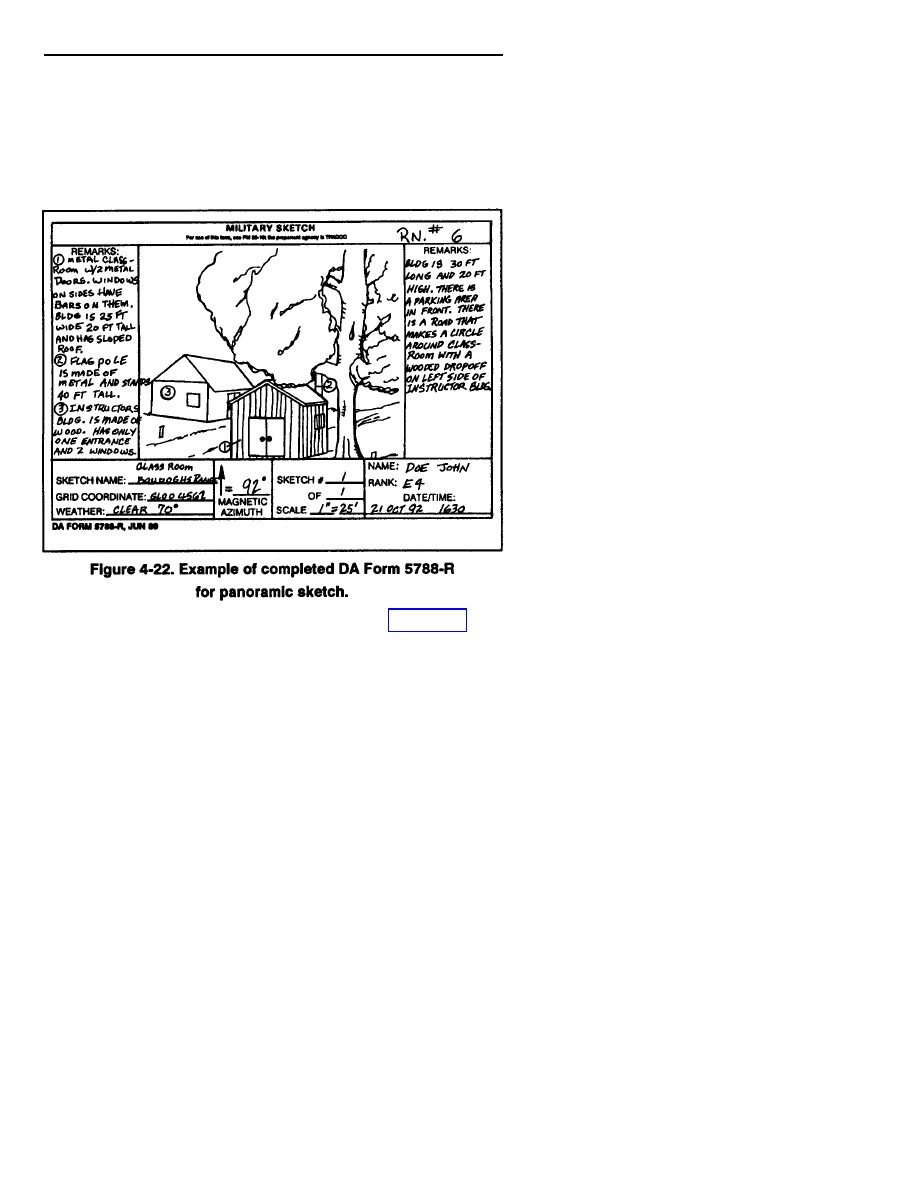
a. Panoramic. A panoramic sketch (Figure 4-22, page 4-44) is a
representation of an area or object drawn to scale as seen from the sniper
team’s perspective. It shows details about a specific area or a
man-made structure. Information considered in a panoramic sketch
includes the following:
(1) Name, rank, SSN, and unit.
(2) Remarks section (two).
4-43
FM 23-10
(3) Sketch name.
(4) Grid coordinates of sniper team’s position.
(5) Weather.
(6) Magnetic azimuth through the center of sketch.
(7) Sketch number and scale of sketch.
(8) Date and time.
b. Topographic Sketch. A topographic sketch (Figure 4-23) is a
. .
topographic representation of an area drawn to scale as seen from above.
It provides the sniper team with a method for describing large areas while
showing reliable distance and azimuths between major features. This
type of sketch is useful in describing road systems, flow of streams/rivers,
or locations of natural and man-made obstacles. ‘he field sketch can also
be used as an overlay on the range card. Information contained in a field
sketch includes the following
(1) Grid coordinates of the sniper team’s position.
(2) Name, rank, SSN, and unit.
(3) Remarks.
(4) Sketch name.
4-44
FM 23-10
(5) Grid coordinates.
(6) Weather.
(7) Magnetic azimuth.
(8) Sketch number and scale.
(9) Date and time.
c. Guidelines for Drawing Sketches. As with all drawings, artistic
skill is an asset, but satisfactory sketches can be drawn by anyone
with practice. The following are guidelines when drawing sketches:
(1) Work from the whole to the part. First determine the boundaries of
the sketch. Then sketch the larger objects such as hills, mountains, or
outlines of large buildings. After drawing the large objects in the sketch,
start drawing the smaller details.
(2) Use common shapes to show common objects. Do not sketch each
individual tree, hedgerow, or wood line exactly. Use common shapes to
show these types of objects. Do not concentrate on the fine details unless
they are of tactical importance.
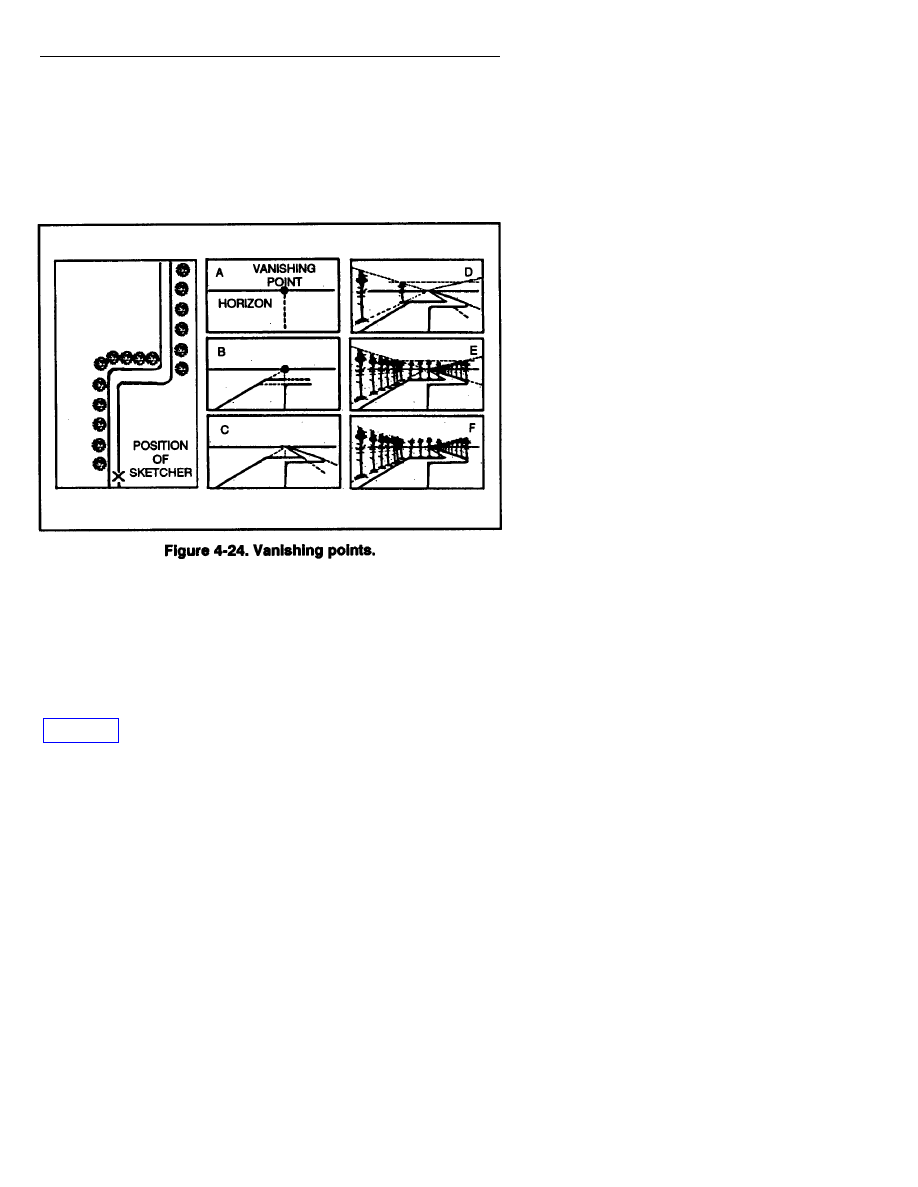
(3) Draw in perspective; use vanishing points. Try to draw sketches
in perspective. To do this, recognize the vanishing points of the area to
4-45
FM 23-10
be sketched. Parallel lines on the ground that are horizontal vanish at a
point on the horizon (Figure 4-24). Parallel lines on the ground that slope
downward away from the observer vanish at a point below the horizon.
Parallel lines on the ground that slope upward, away from the observer
vanish at a point above the horizon. Parallel lines that recede to the right
vanish on the right and those that recede to the left vanish on the left
(Figure 4-24).
4-28. SNIPER DATA BOOK
The sniper data book is a written, chronological record of all activities and
events that take place in a sniper team’s area. It is used with military
sketches and range cards; this combination not only gives commanders
and intelligence personnel information about the appearance of the area,
but it also provides an accurate record of the activity in the area.
Information is recorded on DA Form 5786-R (Sniper’s Observation Log)
(Figure 4-25). (A blank copy of this form is in the back of this publication
for local reproduction.) Information in the observation log includes:
(Completion of this form is self-explanatory.)
a. Sheet number and number of total sheets.
b. Observer’s name, rank, SSN, and unit.
c. Date and time of observation and visibility.
4-46
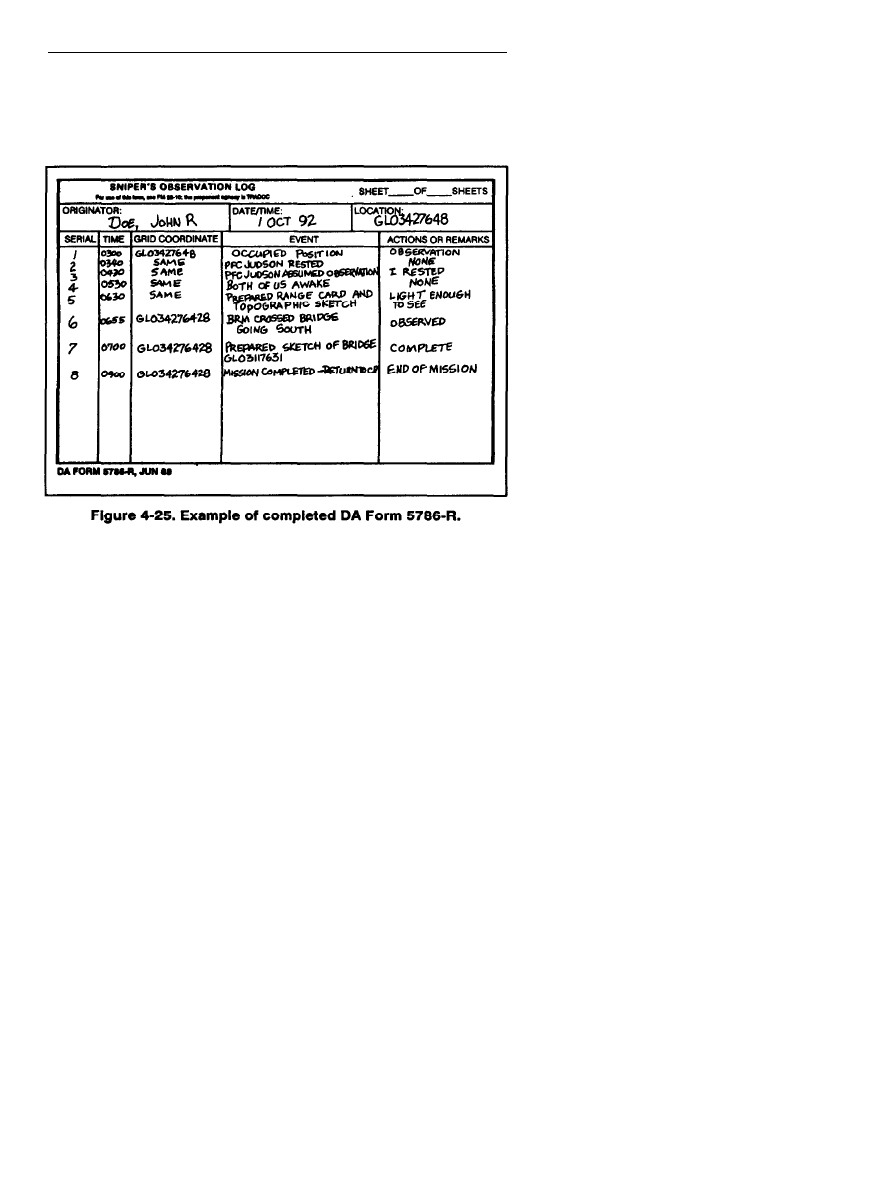
FM 23-10
d. Grid coordinates of the sniper team’s position.
e. Series number, time, and grid coordinates of each event.
f. The event that has taken place.
g. Action taken and remarks.
4-47
Wyszukiwarka
Podobne podstrony:
Co wiem o metanie CH4 id 118388 Nieznany
alkaloids of khat catha edulis ch4 the alkaloids 39 139 164
cisco2 ch4 concept G46BU62RAA2CFNJHPZEBA42IYZJAYVHBTN7NTZI
ch4 pq4zrgtn2ifpbreq3fuebb4guybbwncbm75ok4i PQ4ZRGTN2IFPBREQ3FUEBB4GUYBBWNCBM75OK4I
Ch4 SteamPowerPlant
Ch4 Q5
Ch4 Q4
Ch4 Q1
Ch4 to appendix
Ch4 CostOfWoodEnergy
ch4 pl
ch4
ch4 revised id 110510 Nieznany
CH4
ch4 pl p2
cisco2 ch4 focus PFZQFFDLFWY6P3SS2KPGATG3FAHAXNMKTVUGCTI
ch4 pl p3
CH4 (2)
więcej podobnych podstron