
–1–
WOODWORKS: INTERMEDIATE PROJECT 2001-2002
PATIO CHAIR AND LOVE SEAT
This lightweight, easy-to-build outdoor furniture can bring contemporary flair to a deck, patio or balcony. And these chairs are as easy
to store as they are to relax in.
• With their interlocking legs, both the chair and the love seat can be quickly dismantled or “knocked down” for storage without
tools. The seat section is simply pulled out and can be neatly tucked behind the back section. The top slat also has a handle hole
for easy carrying.
• The chairs were designed to be made with Western cedar because it’s both lightweight and strong.
These chairs give intermediate woodworking students the opportunity to learn a number of important, basic skills, including templating,
measuring, cutting, marking, drilling and gluing. And after you make one or both of the chairs, you’ll learn how to protect the wood and
keep it looking beautiful.
–2–
Hand Tools
– Files
– Combination square
– Carpenter’s square
– Screwdriver
TOOLS REQUIRED
Power Tools
– Table saw
– Jigsaw
– Belt sander
– Electric drill
– Power screwdriver or
screwdriver bits for drill
Miscellaneous
– Pencil
– Permanent marker, fine point
– Safety glasses
WOOD FINISHING PRODUCTS
Recommended finish
Thompson’s
®
Water Seal
®
Clear
Wood Protector, 1 gallon*
Alternate finish
Thompson’s
®
Water Seal
®
Tinted Wood Protector Sheer
Honey Gold. Also available in Sheer Natural Cedar,
Sheer Rustic Red, Sheer Nutmeg Brown and Sheer
Coastal Gray**
Miscellaneous
Gloves
Plastic drop cloths
Brush, roller, applicator pad,
deck sprayer or pump-up
garden sprayer
Mineral spirits (for cleanup)
Rags
CONTINUED - WOODWORKS: INTERMEDIATE PROJECT 2001-2002 PATIO CHAIR / LOVE SEAT
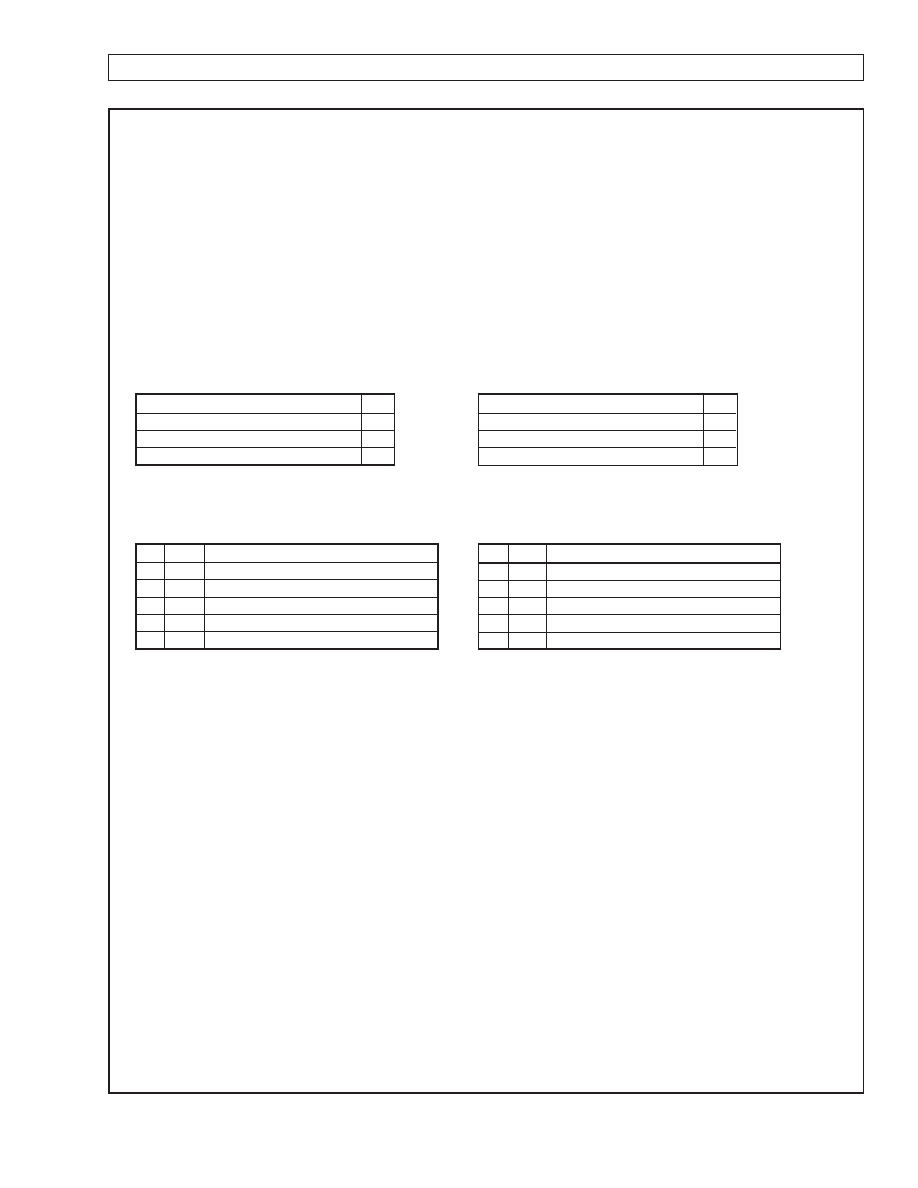
2x6 x 8’ D and better grade cedar
2
1x6 x 8’ D and better grade cedar
2
1/8” x 24” x 48” hardboard for templates 1
2” galvanized deck screws
80
Key Pcs.
Description
A
2
1-1/2” x 5-1/2” x 36” cedar (back legs)
B
2
1-1/2” x 4-15/16” x 34” cedar (seat legs)
C
1
3/4” x 4” x 20” cedar (top slat)
D
2
3/4” x 2-1/2” x 20” cedar (seat supports)
E
11
3/4” x 2” x 20” cedar (slats)
WOOD BUYING LIST
CUTTING LIST
Chair
Love seat
Love seat
Chair
2x6 x 8’ D and better grade cedar
3
1x6 x 8’ D and better grade cedar
4
1/8” x 24” x 48” hardboard for templates 1
2” galvanized deck screws
120
Key Pcs.
Description
AA
3
1-1/2” x 5-1/2” x 36” cedar (back legs)
BB
3
1-1/2” x 4-15/16” x 34” cedar (seat legs)
CC
1
3/4” x 4” x 40” cedar (top slat)
DD
2
3/4” x 2-1/2” x 40” cedar (seat supports)
EE
11
3/4” x 2” x 40” cedar (slats)
* 1 gallon of Thompson’s
®
Water Seal
®
Clear Wood Protector will protect a number of chairs and/or love seats, so product can be shared among several students.
Figure 300-400 square feet per gallon.
** 1 gallon of Thompson’s
®
Water Seal
®
Tinted Wood Protector will protect a number of chairs and/or love seats, so product can be shared among several students.
Figure 250-300 square feet per gallon.

BEFORE YOU BEGIN
Good craftsmanship begins and ends with good work habits, so make
the following steps part of your routine workshop practice. If you have
any doubts or questions about how to proceed with a project, always
discuss them with your shop instructor.
• Carefully and fully review plans and instructions before putting a tool
to the project lumber.
• Work sensibly and safely. Wear safety goggles when doing work that
creates flying chips and sawdust; wear the appropriate mask or
respirator whenever making sawdust or working with thinners or
other solvents.
• At the end of every work session, clean up your shop area and put
away all portable tools.
CUTTING AND ASSEMBLY
PROCEDURE
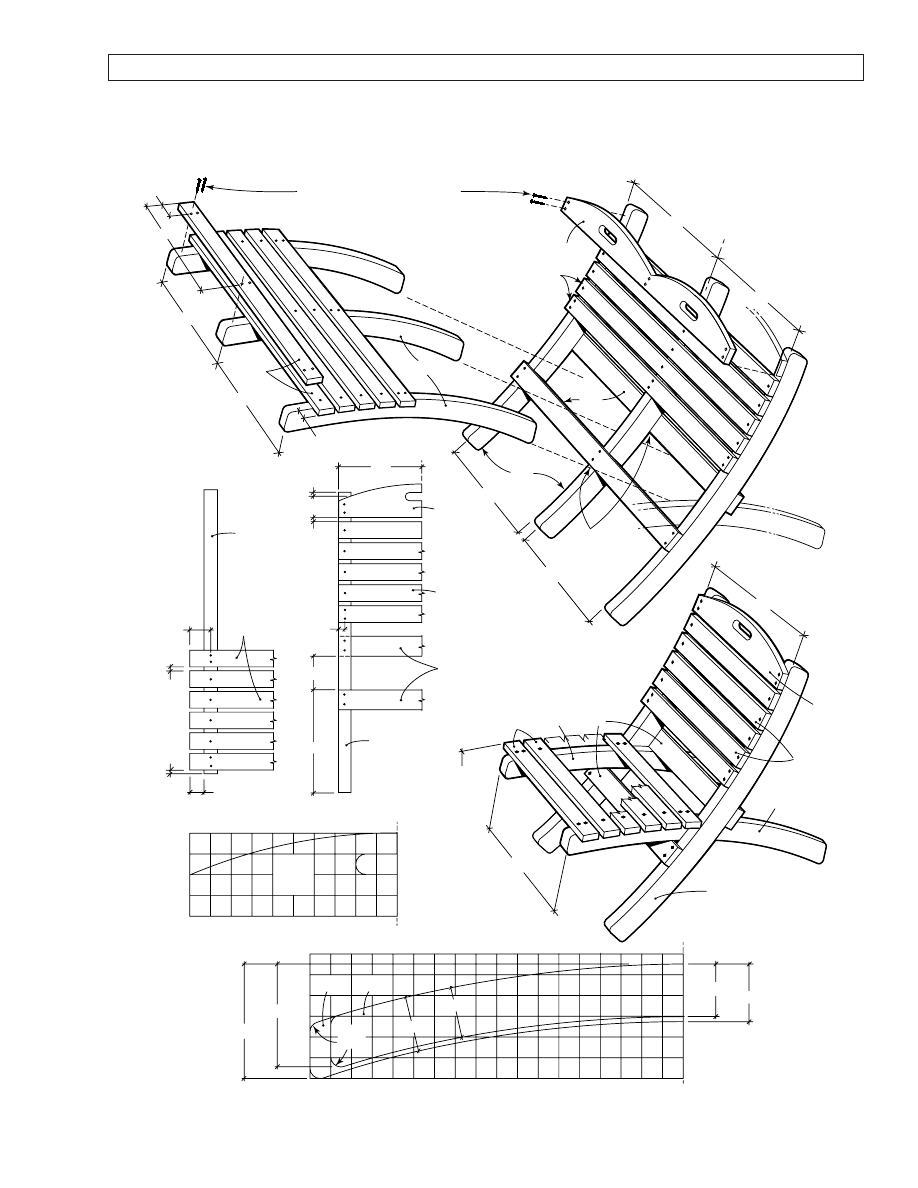
Refer to the project illustration shown on page 6.
Making the seat and back-leg templates
Whenever you need to use a shape for more than one piece, it’s best to
make a template. To start your templates for these chairs, refer to the
“Top-Slat Grid” and the “Back- and Seat-Leg Grid” on the measured
drawing. We’ve drawn half of the entire shapes on those grids because
both halves are symmetrical. You’ll thus be making one template for
half of the shape and use it to draw the entire shape. Also, because the
shape of the seat leg is so similar to the back leg, you can use the back-
leg template to make the seat-leg template.
You will transfer the dimensions from the grids when you lay out
the full-size templates. The shapes will become full size once you draw
a grid of 1” x 1” squares on the hardboard and then transfer the
shapes to it. Here’s how to proceed:
1. Cut a piece of 1/8”-thick hardboard to 6” x 18”.
2. Measure and mark 1” increments on both ends and along one side.
3. Draw the grid lines across the width using a combination square and
the marks you just drew. It’s hard to see pencil lines on hardboard, so
use a fine-point permanent marker to draw the lines.
4. Draw the grid lines across the length.
5. Transfer the points where the seat and back-leg shapes intersect the
grid in the measured drawing to the grid on your hardboard.
6. Draw lines connecting the points that you just drew. Use a 25-cent
piece to trace the 1/2” radiuses at the bottom of the leg. Now the
template is full size.
7. Cut out the template with a jigsaw and smooth the sawn edges
with sandpaper.
8. Draw centerlines that divide the length on the back-leg pieces
(A and AA). Align the back-leg template to the center line and the
bottom corner of the cedar board. Trace around the template. Flip
the template over the centerline of the board, and trace the rest of
the back-leg shape.
9. Make the seat-leg template by tracing the back-leg template shape
onto another piece of hardboard. Then draw the shape of the seat leg
inside the back-leg shape. Cut out the shape and you’ll have a separate
seat-leg (B and BB) template.
10. Using the same procedures described above, make the top-slat
(C and CC) template.
Making the chair
1. Cut all the pieces (A through E) to the dimensions given in the
Cutting List: Chair. For the legs and seat supports (A, B and D),
avoid using any pieces of cedar containing knots, which can weaken
the wood.
Woodworker’s Tip:
Be careful when you handle the cut pieces. Until the edges are
smooth, you can easily pick up a splinter from the cedar.
2. Using the back- and seat-leg templates and the top-slat templates,
trace the shapes onto the cedar pieces.
3. Cut out the seat (A), back-leg (B) and top-slat (C) shapes with a
jigsaw and sand the edges smooth and free of splinters. Sand the
curved edges of the legs with a belt sander.
4. Lay out the hand-grip hole in the top slat (C). To form the ends of
the hand grip, drill holes with a 1” spade bit. Drill in from both sides
so you won’t tear out the wood. Cut the rest of the hole with a jigsaw
and smooth the inside with a file and sandpaper.
5. Lay out, countersink and drill all the screw holes for the slats
and supports.
6. Finish-sand all the pieces with 120-grit paper, followed by 150-grit
paper. Round over any sharp edges with the sandpaper.
Woodworker’s Tip:
Cedar is soft, so when screwing the pieces together, finish driving
the screws by hand to avoid setting the heads too deep.
7. Start assembling the chair by screwing the seat supports (D) to the
back legs (A). Align the pieces using the dimensions given in the meas-
ured drawing. Use a carpenter’s square to align the seat supports at a
90-degree angle to the back legs, then drive in the screws. Also, meas-
ure and maintain the distance between the legs as you attach each seat
support. Use this method again when you attach the slats (E).
8. Align and screw the top slat (C) to the back legs (A). Then attach
five slats (E) to the back legs. Attach the other six slats (E) to the seat
legs (B) as shown in the measured drawing. To maintain equal spacing
between the slats, use a 1/2”- thick spacer to align them. Finish driving
the screws by hand to avoid setting their heads too deep.
9. Important: Before applying the wood protector, unscrew the seat
supports (D), apply a weather-resistant glue to the joints, then screw
the seat supports back onto the back legs. The glue will strengthen the
joint. The chair relies primarily on the seat supports for its strength.
Making the love seat
1. The steps for making the love seat are essentially the same as those
for the chair except for a few key differences.
2. An additional back leg (AA) and seat leg (BB) must be cut out from
the templates.
3. The top slat (CC), the seat supports (DD) and all the seat and
back slats (EE) are all twice as long as those for the chair
(parts C, D and E).
–3–
CONTINUED - WOODWORKS: INTERMEDIATE PROJECT 2001-2002 PATIO CHAIR / LOVE SEAT

PROTECTING YOUR PROJECT
The use of cedar for outdoor furniture requires application of
waterproofing protection immediately after completion to protect the
wood from water damage. We’ve chosen Thompson’s
®
Water Seal
®
Clear Wood Protector to provide complete protection for your project.
It not only prevents water damage, but the coating also resists mildew
and U.V. (ultraviolet radiation in sunlight) damage, and exceeds indus-
try standards for waterproofing on wood. In addition, Clear Wood
Protector will help maintain the natural cedar color of your wood.
Woodworker’s Tip:
Always be sure to choose a waterproofer that
claims it exceeds industry standards for waterproofing on wood.
1. Before applying Clear Wood Protector, read and follow the directions
found on the back of the can. Be sure that both surface and air temper-
ature are above 50
o
F. during application and for 48 hours after appli-
cation, and do not apply product if rain is forecasted within 24 hours
of application.
2. The surfaces must be free of all dust, dirt, oil, soot, grease and other
contaminants. If the surface is damp or wet from cleaning or weather,
allow the surface to dry thoroughly (a minimum of 48 hours) before
application.
3. Move all objects that could come in contact with overspray.
Overspray of product onto glass should be removed immediately with
paint thinner or mineral spirits.
4. When you apply Clear Wood Protector, do not mix it with other
waterproofing products because variations in the final appearance of
the surface being treated may result. Also, do not thin this product.
5. In most applications, only one light coat is necessary. Apply with a
brush, roller, applicator pad or sprayer. Regardless of which applica-
tion method is used, remove excess within 15 minutes by redistributing
it to drier areas or wiping it off with a rag.
6. Use only with adequate ventilation. Oiliness and tackiness will
result if Clear Wood Protector is over-applied or applied to wet or
damp surface or if overnight temperature falls below 50
o
F. within
48 hours of application. Excessive oiliness caused by over-application
may be removed by scrubbing wood with a concentrated degreaser.
7. Allow at least 48 hours to dry. Drying time will vary depending on
temperature and humidity.
8. Clean brushes and equipment with mineral spirits, then rinse with
clean water.
NOTE: The length of protection will vary depending on environment.
Perform the splash test once a year to see whether reapplication is
necessary. Sprinkle water on various sections of surface to be sealed.
If water absorbs and darkens color of wood within 5 seconds, the
surface is porous and considered ready to be treated. If water beads up
or otherwise sits on top of surface, then surface doesn’t need protec-
tion at this time. For maximum protection from color change and other
damage caused by the sun, reapplication is recommended every year.
Vertical and horizontal surfaces will experience color changes at
different rates.
ALTERNATE FINISH
If you decide to bring more color to your project, you can use
Thompson’s
®
Water Seal
®
Tinted Wood Protector, which provides all
the benefits of Clear Wood Protector with the addition of sheer color.
We’ve chosen Sheer Honey Gold for this project, but you can choose
from five Tinted Wood Protector colors.
1. Before applying Tinted Wood Protector, be sure that both surface
and air temperature are above 50
o
F. during application and for
48 hours after application. Do not apply product if rain is forecasted
within 24 hours of application.
2. The surfaces must be free of all dust, dirt, oil, soot, grease and other
contaminants. If the surface is damp or wet from cleaning or weather,
allow the surface to dry thoroughly (a minimum of 48 hours) before
application.
3. Move all objects that could come in contact with overspray.
Overspray of product onto glass should be removed immediately with
paint thinner or mineral spirits.
4. When you apply Tinted Wood Protector, do not mix it with other
waterproofing products because variations in the final appearance of
the surface being treated may result. Also, do not thin this product.
5. Shake well; intermix all cans of the same color to be used to assure
color uniformity.
6. Only one light coat is necessary in most applications; however, a
second coat may be applied if darker color is desired (apply approxi-
mately 12 hours after completing the first coat). Apply with a brush,
roller or sprayer. Regardless of which application method is used,
remove excess within 15 minutes by redistributing it to drier areas or
wiping it off with a rag.
7. Use only with adequate ventilation. Oiliness and tackiness will
result if over-applied or applied to wet or damp surface or if overnight
temperature falls below 50
o
F. within 48 hours of application.
IMPORTANT: Place rags, steel wool and waste immediately after use in
a sealed water-filled metal container.
8
8.. Allow at least 48 hours to dry. Drying time will vary depending on
the temperature and humidity.
NOTE: The length of protection will vary depending on environment.
Perform the splash test once a year to see whether reapplication is
necessary. Sprinkle water on various sections of surface to be sealed.
If water absorbs and darkens color of wood within 5 seconds, the
surface is porous and considered ready to be treated. If water beads up
or otherwise sits on top of surface, then surface doesn’t need protec-
tion at this time. For maximum protection from color change and other
damage caused by the sun, reapplication is recommended every year.
Vertical and horizontal surfaces will experience color changes at
different rates.
–4–
CONTINUED - WOODWORKS: INTERMEDIATE PROJECT 2001-2002 PATIO CHAIR / LOVE SEAT

PRODUCT SAFETY
Contents are COMBUSTIBLE. Keep away from heat and open flame.
Contains ALIPHATIC HYDROCARBONS.
VAPOR HARMFUL. Use only with adequate ventilation. To avoid overex-
posure, open windows and doors or use other means to ensure fresh air
entry during application and drying. If you experience eye watering,
headaches, or dizziness, increase fresh air, or wear NIOSH-approved
respiratory protection or leave the area.
Avoid contact with eyes and skin. Wash hands after using. Keep
container closed when not in use. Do not transfer contents to other
containers for storage.
FIRST AID: In case of eye contact, flush thoroughly with large amounts
of water for 15 minutes and get medical attention. For skin contact,
wash thoroughly with soap and water. In case of respiratory difficulty,
provide fresh air and call physician.
If swallowed, get medical attention immediately.
DELAYED EFFECTS FROM LONG-TERM EXPOSURE.
Contains solvents which can cause permanent brain and nervous system
damage. Intentional misuse by deliberately concentrating and inhaling
the contents can be harmful or fatal.
WARNING: This product contains chemicals known to the State of
California to cause cancer and birth defects or other reproductive harm.
DO NOT TAKE INTERNALLY. KEEP OUT OF THE REACH
OF CHILDREN.
SAFE DISPOSAL OF RAGS AND WASTE.
Rags, steel wool, or waste soaked in Thompson’s
®
Water Seal
®
Tinted
Wood Protector may spontaneously catch fire if improperly discarded.
Immediately after use, place rags, steel wool, or waste in sealed, water-
filled metal container. Dispose in accordance with local fire regulations.
This project adapted with permission from American
Woodworker
magazine, 2915 Commers Drive, Suite 700,
Eagan, MN 55121.
©
Copyright 1995. All Rights Reserved.
For subcriptions call toll-free: 800 666-3111.
CONTINUED - WOODWORKS: INTERMEDIATE PROJECT 2001-2002 PATIO CHAIR / LOVE SEAT
–5–
–6–
CONTINUED - WOODWORKS: INTERMEDIATE PROJECT 2001-2002 PATIO CHAIR / LOVE SEAT
16"
SEAT
HEIGHT
10"
3/4"
3-3/4"
12-1/2"
2-1/2"
1/2"
1/2"
1-3/4"
20"
20"
20"
17-3/4"
17-3/4"
18-1/4"
17-1/4"
19-1/4"
1-3/4"
2-1/2"
C
L
C
L
CL
C
L
2-1/2"
2-1/2"
2-3/4'
2-3/4'
4-15/16"
5-1/2"
1/2"
(TYP.)
1/2"
(TYP.)
2" GALVANIZED DECK SCREWS,
PREDRILL AND COUNTERSINK
ALL SLAT HOLES
16-1/2"
1/2"
RAD.
EACH
SQ.=1"
EACH
SQ.=1"
GLUE
DD TO AA
(TYPICAL)
BACK- AND SEAT-LEG GRID
TOP-SLAT GRID
BACK ASSEMBLY
SEAT ASSEMBLY
CHAIR
LOVE SEAT
CC
EE
EE
BB
DD
AA
C
CC
E
EE
E
D
B
C
B
A
E
D
DD
A
AA
C
CC
B
BB
E
EE
A, AA B, BB
PATIO CHAIR AND LOVE SEAT
Wyszukiwarka
Podobne podstrony:
Chair Patio Chair and Love Seat
Chair Patio Chair and Footstool(1)
Bench Patio Love Seat (1)
Bench Patio Love Seat (2)
Happiness and Love
mb and bmw seat emulator instructions
MNS and love
Patio Table and Chairs(1)
Patio Table and Chairs(2)
Patio Chair
Body Language Secrets For Power and Love
basic patio chair
Patio Table and Chairs(2)
Beatles And I Love Her
Arranged by Bob Chilcott And I love her SATB(The Beatles)
And I Love Her
więcej podobnych podstron