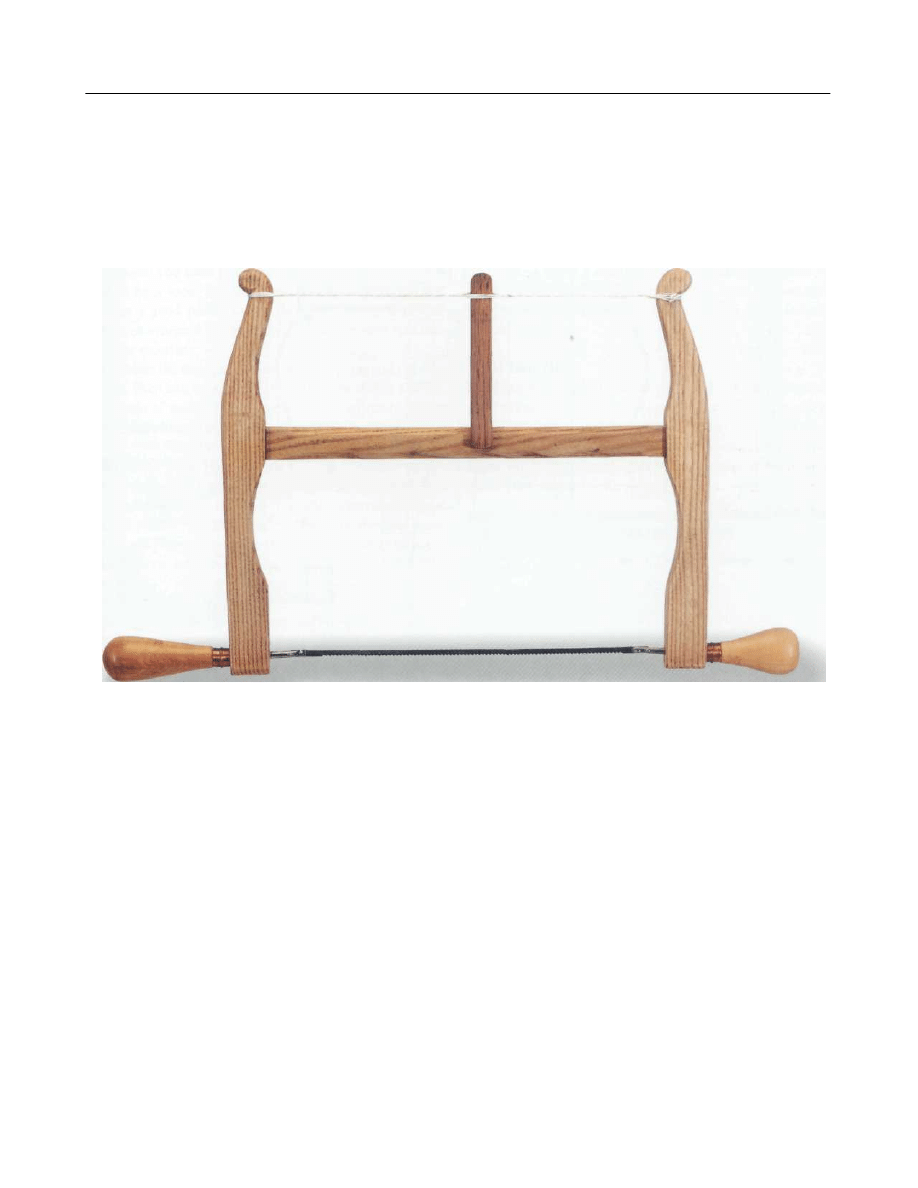
Classic Bow Saw
he classic bow saw, sometimes known as a Turner's
saw, is a tool whose design and origins go way back
into the dim and distant past. Though I've seen bow saws
of this type illustrated on Greek vases, in English medieval
manuscripts, in Albrecht Durer's etchings, and so on, the
classic design is such that it is still as useful for curved
work as it ever was. The actual workings of the saw are
fascinating: The blade is held under tension by means of
a wooden stick or tongue and a twisted twine that is
wrapped around the top of the side cheeks.
What else to say, except that if you are looking to make
a unique gift for a woodworking buddy—something
really special—then this is a beauty!
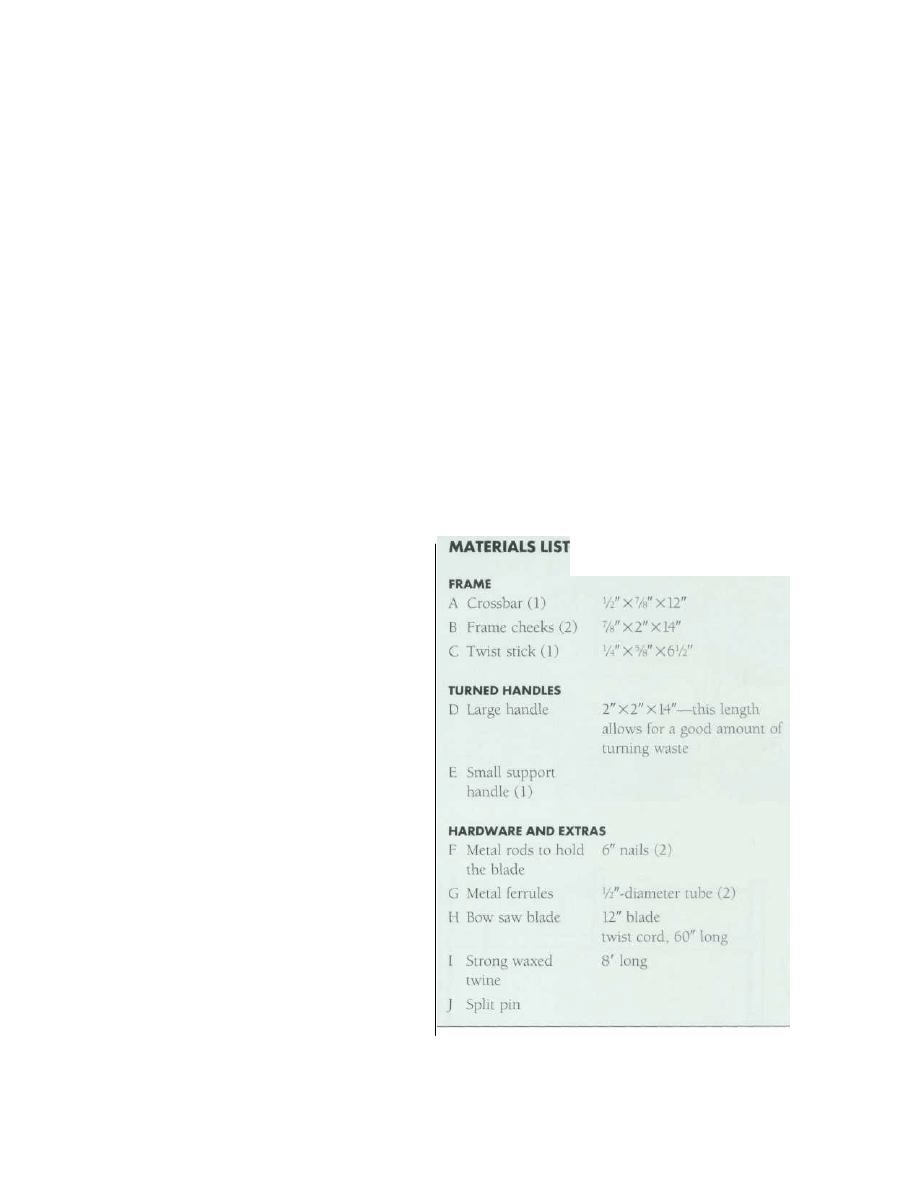
MAKING THE SAW
First things first—buy your blade. I say this because, if
your blade is a different size than the one used in this
project, you can modify the other material sizes to suit.
The bow saw is made in three parts. There are the
handles that need to be turned on the lathe; the fancy
frame sides or cheeks that are fretted out with a scroll
saw, coping saw or even a bow saw; and finally, there are
the metal parts that make up the handles. Okay, so it does
sound a bit complicated, but don't panic, it's as simple as
can be.
T
Copyright 2004 Martian Auctions
903

Copyright 2004 Martian Auctions
904
SHAPING THE FRAME
Having pencil-press transferred the designs through to
the wood, fretted out the shaped ends, and used a straight
saw to cut out the crossbar, use a small spokeshave and
a plane to skim the three component parts down to a
good finish. Cut chamfered edges on the crossbar and the
cheeks and generally round over the curved shapes, all as
shown in the working drawings.
When you come to cutting the mortise and tenon
joints—meaning where the crossbar fits into the end
cheeks—all you have to remember is that the joints both
need to be a loose fit. The best procedure is to cut the
joint for a good push fit, and then trim the ends of the
tenon to a rounded finish so that they are an easy rocking
fit in the mortise.
Establish the handle centers on the bottom ends of the
cheeks. Then run them through with a hole that is a loose
fit for your 6" nails. Finally, use a piece of offcut to make
the twist stick, sometimes called a toggle or a tongue.
TURNING THE HANDLES
Having studied the working drawings and seen how the
two handles are quite different in length, take your chosen
piece of wood—we used maple—and turn the two han-
dles in one piece. Make sure the stubs or spigots fit your
metal ferrules, and then rub them down on the lathe and
part off.
As to how you drill the holes through the handles, it
really depends on your workshop and equipment. I found
that the best way was to grip and support the handle in
the four-jaw chuck—meaning the chuck on the lathe—
and then use a drill chuck mounted on the tailstock end
of the lathe. The good thing about this method is that it is
a foolproof way of making sure that the holes are perfectly
centered. All I did was drill the larger diameter recess hole
and then follow through with a smaller diameter hole.
When you have made the handles, all nicely smooth
and drilled, then comes the tricky business of fitting the
metal parts. It's best to start by fitting the ferrules. Take
your metal tube (I used two copper plumbing fittings, but
you can just as well use a slice off the end of a brass tube)
and cut it off so that you have two 1/2" lengths or rings.
Use a file and steel wool to polish the rings to a smooth,
shiny finish, and then tap them in place on the turned
handle stubs.
Finally, pass the 6" nails through the handles and the
ends of the frame, cut them to length with a hacksaw,
and cut slots into the ends of the nails so that they fit
your chosen bow saw blades. Mark the position of the
blade-end holes. Then run 3/32"-diameter holes through
the nail ends, so that you can secure the blade ends with
small nails or split pins.
PUTTING IT TOGETHER
When you have made all six component parts—the two
scrolled cheeks, the crossbar, the two handles and the
twist stick—then comes the fun of putting the saw to-
gether. Start by fitting the H-frame together. This done,
pass the slotted nail ends through the bottom ends of the
cheeks and fit the blade with the pins. Make sure that the
teeth are looking away from the largest of the two handles.
Wrap three or four turns of strong twine/cord around the
fancy ends of the cheeks and knot the ends of the cords
together to make a loop. Finally, slide the twist stick in
place between the turns of twine and twist it over and
over so that the cheeks pull apart and the blade is held
under tension.
SPECIAL TIP
Since the bow saw cheeks are put under a lot of tension
and stress, it's vital that you choose the best possible
wood. I've checked around and seen that the handles are
usually made from beech, maple or ebony, and the H-
frame made from beech or ash. We have gone for an ash
frame and maple handles.
Copyright 2004 Martian Auctions
905
STEP-BY-STEP STAGES
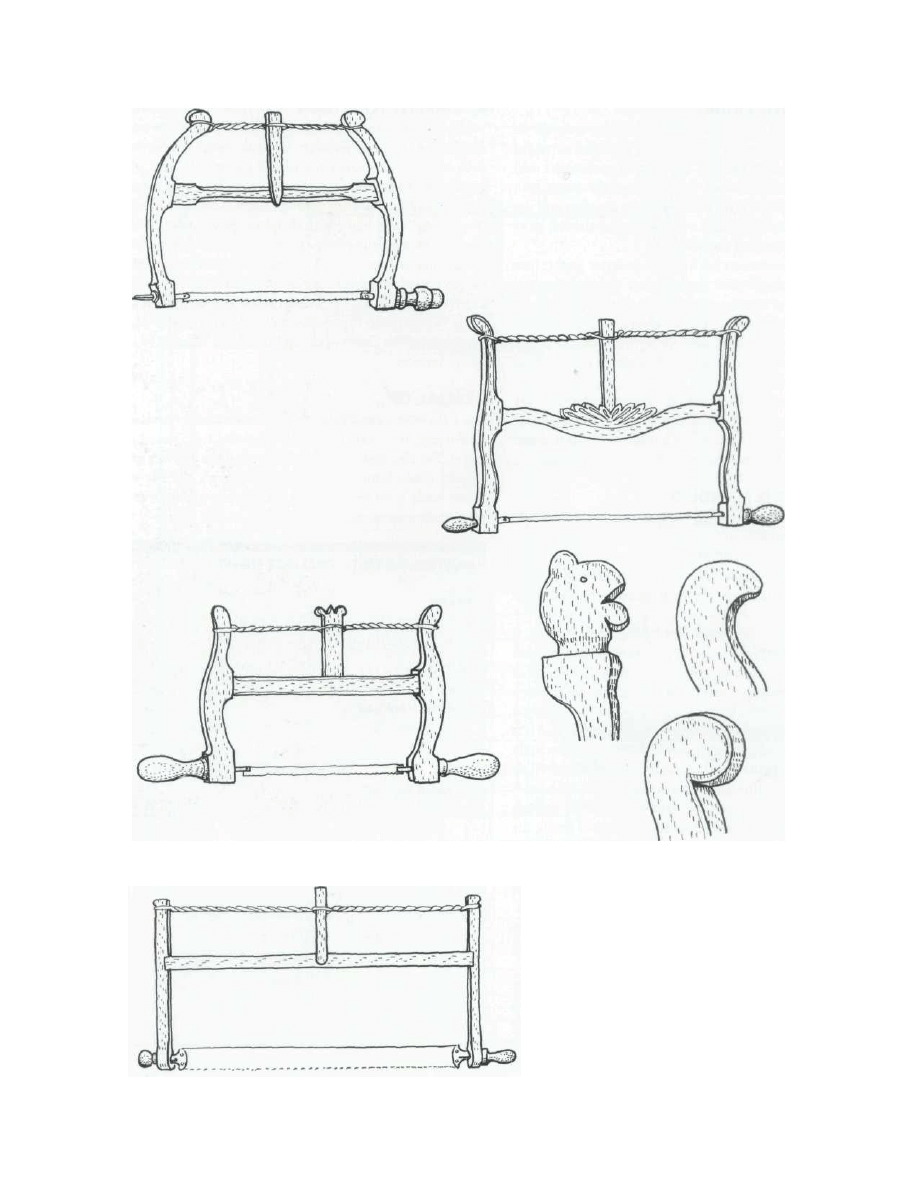
1 An old English bow saw with curved cheeks
and stop-chamfered details is shown at top left; an
old English bow saw with unusual carved detail at
top right. An English bow saw with a whittled twist
stick is shown at center left; a selection of carved
cheek scroll designs at center right. Shown at bottom,
a European bow saw tends to be bigger, with straight
cheeks and a much wider blade.
Copyright 2004 Martian Auctions
906
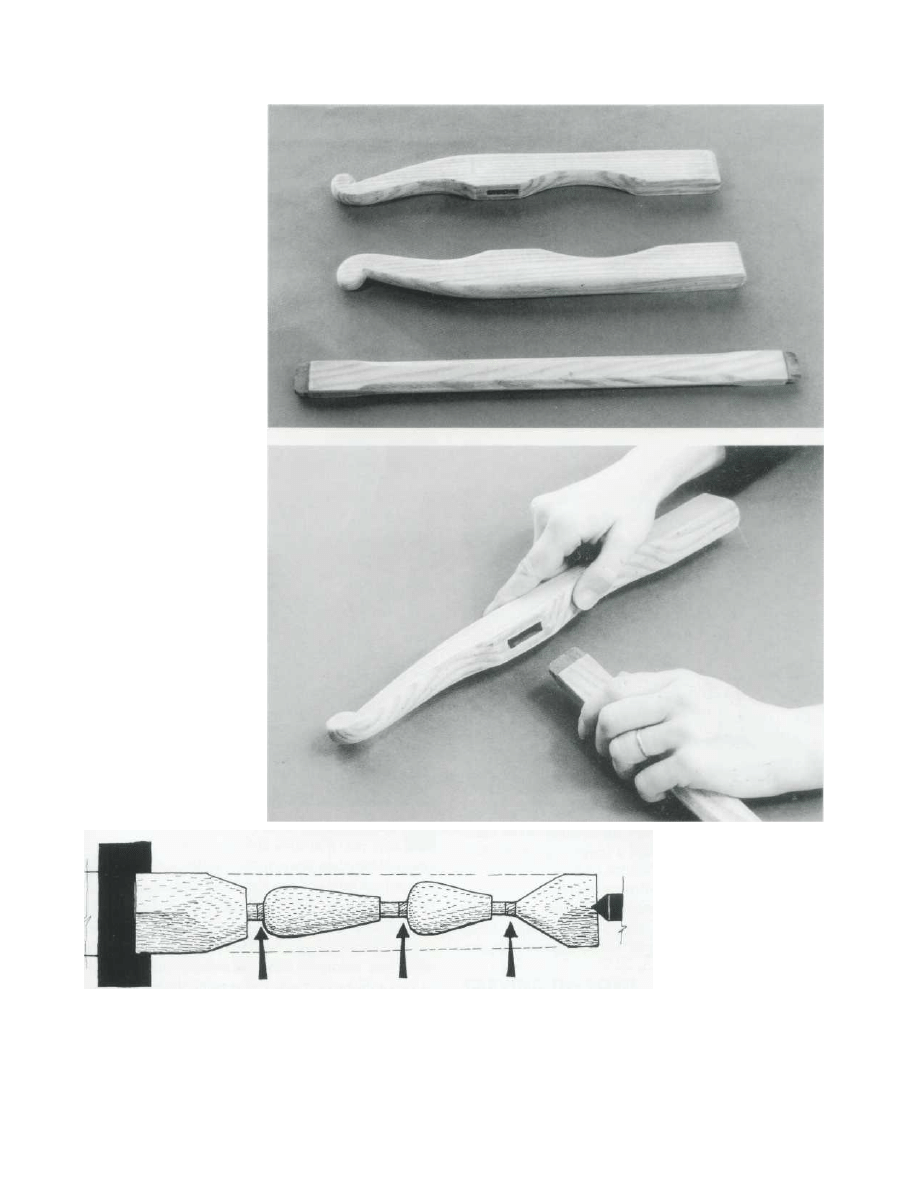
2 The three parts that
go to make the H frame:
the two scrolled cheeks
and the crossbar. If you
look closely at this
photograph and compare
it to the finished project,
you will notice that I had
to shorten the crossbar to
fit the only available blade.
3 Trim and adjust the
tenon so that it is a loose
rocking fit in the
mortise. Notice how the
corners of the mortise
need to be nipped off at an
angle.
4 The on-lathe sequence—from left to right—the
headstock waste, the parting waste, the large handle,
the ferrule stub, the parting waste, the small handle, the
ferrule stub, and finally the parting and tailstock
waste. Note that the arrows indicate the parting waste.
Copyright 2004 Martian Auctions
907
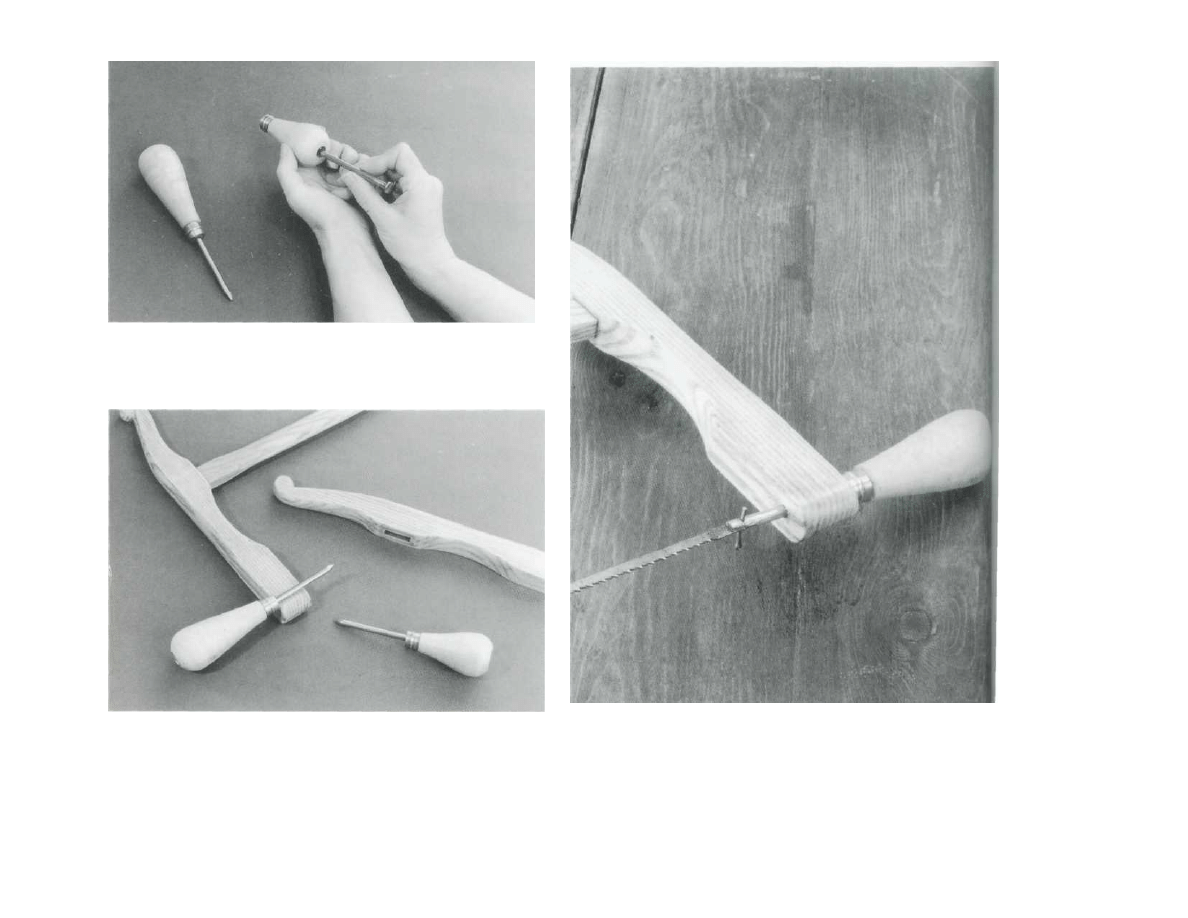
5 Bend the nail slightly and pass it through the handle for
a tight captured fit. See how the nail head fits snug and
flush in the recess.
6 Check the length of the nail against the width of
the frame and then mark the position of the blade slot
accordingly. If you need a longer nail stub, then
deepen the recess hole.
Slide the blade in the slot and fix it in place with a
split pin. If at some time you need to fit a slightly
longer blade, then you can slide washers on the nail be-
tween the ferrule and the cheek.
7
Copyright 2004 Martian Auctions
908
Wyszukiwarka
Podobne podstrony:
Nowenna do Ĺšw Ojca Pio
Mitre Saw Workstation
Rihanna Take a bow
saw
Checking Table Saw Blade Alignment
Making a Flight Bow(1)
Hunting bow
Katalog Filtry SAW
SAW prezentacja (2)
improvment of chain saw and changes of symptoms in the operators
3 saw
jama gŕbowa, weterynaria, I semestr, Anatomia i fizjologia
MEL prof SAW mems wykład
saw -piła, Opisy zdobycia archivementów i trofeów
SAW VP
Cutting Wide Boards On A Table Saw
SAW
take a bow rihanna
więcej podobnych podstron