
CHAPTER 15
SURVIVAL
As you learned in earlier chapters, being a
professional Sailor is dangerous. These dangers aren’t
limited to just your job in the Navy. In times of conflict,
your ship or shore station may be in contact with an
enemy force or ship. Regardless of your rate, rating, or
duty station, you may need to stay alive in the water until
you can reach land or be rescued. You must have the
knowledge required to live in the field with limited
equipment (survival) and to avoid the enemy (evasion).
If captured, you also have the responsibility to flee from
the enemy (escape) if possible.
This chapter contains information on the principles
and techniques of sea survival, evasion, land survival,
and escape that have been used successfully worldwide.
The information given here is by no means all-inclusive,
but should serve to help you if the need arises.
SURVIVAL AT SEA
Learning Objectives: When you finish this chapter,
you will be able to—
•
Recall the methods and procedures for
abandoning ship.
•
Identify the techniques for swimming through
oil, flames, and debris.
•
Recognize the techniques for using clothing and
buoyant objects to stay afloat.
•
Recognize the procedures used to care for and
use personal floatation devices and the use of
lifeboats and associated survival gear.
•
Recall the characteristics of, use of, and
adjustment to CO2 inflatable and inherently
buoyant life preservers.
•
Identify the responsibilities and authority of the
senior person in a survival situation.
Survival at sea depends on your knowledge,
self-control, training, and equipment. The time to learn
as much as possible about survival and rescue at sea is
before you abandon ship, not after you find yourself in
the water. The information for survival at sea is general
in nature and applies to all Navy ratings.
ABANDONING SHIP
Having to abandon ship isn’t pleasant. Your “home”
is gone along with most of your possessions and
possibly some of your shipmates. You don’t know how
long you must wait for rescue. However, with the proper
knowledge and training, frightening aspects can be
greatly reduced. Don’t panic and don’t give up hope.
Remember, the Navy knows you’re missing and is
searching for you. Also, remember that thousands of
persons have survived ships sinking in both wartime and
peacetime.
If time permits, the crew will abandon the ship
in a planned and orderly manner. In the prepare-
to-abandon-ship stage, all personnel go topside and
muster at their abandon ship stations, don life jackets,
and rig lines and ladders over the side. Bearing and
distance to the nearest land, sea and wind conditions,
and water temperature are passed over the 1MC (ship’s
general announcing system). When the order to
abandon ship is given, all boats are lowered and
lifeboats are released. The crew members then go over
the side and board them as quickly as possible.
Know Escape Routes
Many survivors have reported that their shipmates
were lost because they were unable to get topside before
the ship sank. In many of these cases, the compartments
in which personnel were trapped were not cut off—the
individuals only thought they were.
Once on board a particular ship, most Sailors learn
the easiest ways from their berthing compartments to
their stations and automatically use these routes day
after day. The habit of using the same hatches and
ladders day after day becomes so strong that a person
finds it difficult to use other routes. This habit is
15-1
Without a decisive naval force we can do nothing definitive, and with it,
everything honorable and glorious.
—George Washington
especially true of persons whose stations are in the
lower part of the ship. However, a hit from a torpedo or
bomb or a collision with another ship may flood the
compartments normally used or knock out a ladder.
Often, some measure to control flooding taken by the
damage control party closes off the normal method of
travel.
The only answer to this situation is to know your
ship. Small ships don’t present much of a problem
because they have only a few routes you can follow.
However, large ships are another matter. Aboard an
aircraft carrier or cruiser, learning all the passageways,
doors, and ladders takes a long time. During leisure
time, learn escape routes from various below-deck
sections to the weather decks. Ask the individuals who
work in those sections the best way to get topside; then
follow that route. The time to experiment is before an
emergency occurs, not during one.
Going Over the Side
As in everything else, there is a right way and a
wrong way to abandon ship. Whenever possible, go
over the side fully clothed. Shoes and clothing may
hinder you while swimming; but in lifeboats, a covering
of any kind offers protection against the effects of sun
and salt water. In a cold climate, wear a watch cap to
keep your head warm. Take along a pair of gloves and
extra clothes if you can. Even in tropical waters you may
feel cool at night because you can do little to keep warm.
Normally, you should leave from whichever side of
the ship is lower in the water; but, if the propellers are
turning, leave from the bow. Leave by the windward
side whenever possible. Leaving from the lee side might
protect you from a stiff wind, but the same wind causes
the ship to drift down on you, often faster than you can
swim. Also, if oil is on the water, you can clear the slick
sooner by swimming into the wind.
Never dive, and do not jump unless you have to. Use
a ladder, cargo net, line, or fire hose. If you must jump,
do so feet first, legs together, and body erect. (First,
check the water so you will not land on debris or on
other personnel.) Except when jumping into flames, be
sure your life preserver is fastened securely, including
the leg straps. If you are wearing a vest-type preserver,
place one hand firmly on the opposite shoulder to keep
the preserver from riding up sharply when you hit the
water (in a long drop, the force of impact might hurt
your chin or neck). Hold your nose with your other
hand. If you are wearing an inflatable preserver, inflate
it after you have entered the water.
In the Water
Once you are in the water, your immediate concern
is to clear the ship as quickly as possible. Before you
rest, you should try to be 150 to 200 yards away from the
ship. When the ship goes down, it may create a strong
whirlpool effect, which might draw you down with the
ship if you are too close. Another advantage of distance
is that you will be safer if an explosion occurs.
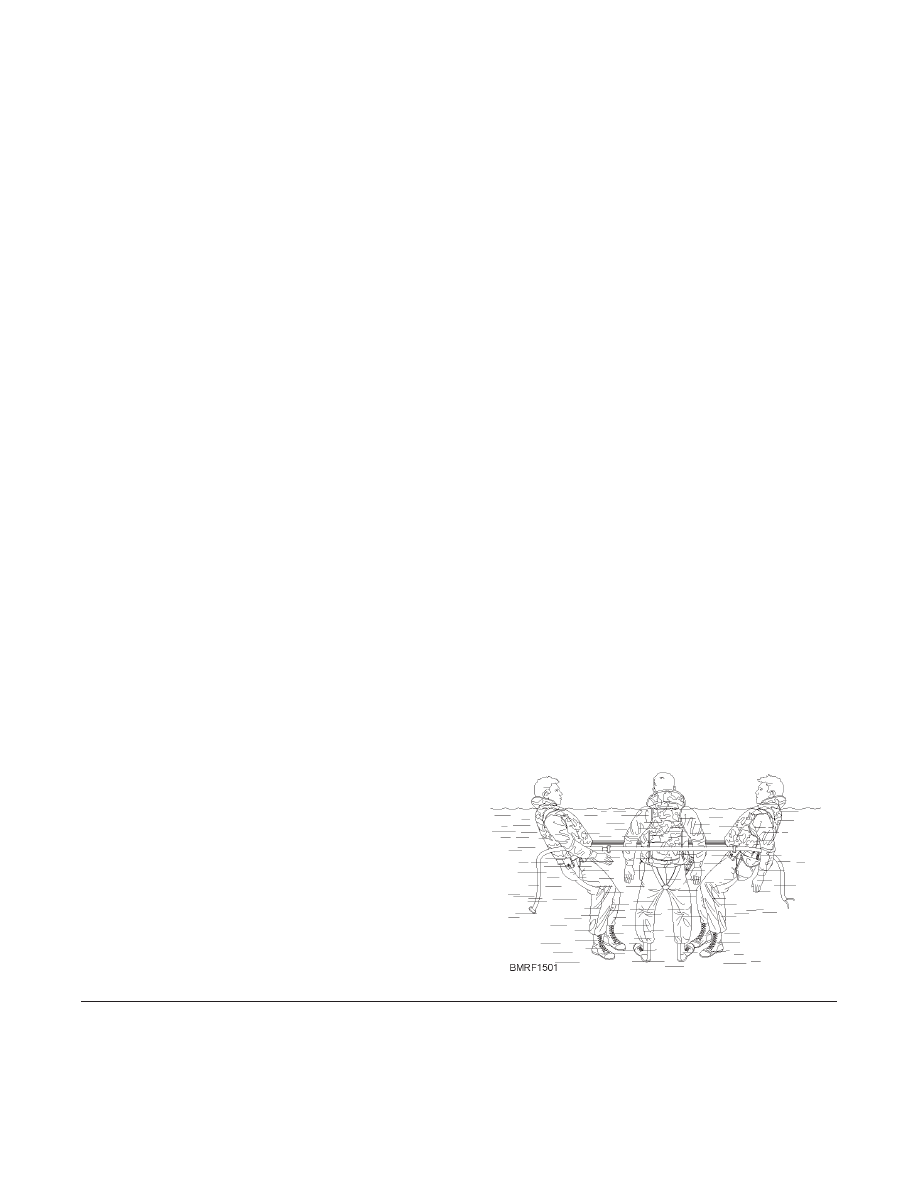
After you are safely away from the ship, conserve
your energy. Don’t splash about or shout unnecessarily.
If any danger of underwater explosions exists, float or
swim on your back with your head and chest as far out of
the water as possible. Help your shipmates all you can,
and try to stay in groups (fig. 15-1). Get on a lifeboat, of
course, as soon as you can. In the meantime, grab
anything floatable that comes by, or just relax in the
water. Above all, remain calm!
SWIMMING AND FLOATING.—Check the
chart shown below. It tells you the requirements you
must meet to qualify as a third class, second class, and
first class swimmer.
Meeting the requirements for swimmer third class
won’t help you if you have to swim ½ mile to a lifeboat.
You can see that by qualifying for swimmer second
class, you’d have a better chance to survive. Better yet,
qualifying for swimmer first class gives you the best
chance for survival.
15-2
Student Notes:
Figure 15-1.—Joining life preservers.
After abandoning ship, you may have to swim fast,
slow, on the water, or under the water. You may have to
put on or take off clothes; carry or search for objects;
float for hours; or in shark-infested waters, lie still and
keep your arms and legs from dangling. There is a lot
you might have to do. You can get ready by practicing
all the strokes you know.
Almost all the Navy’s shore installations have
swimming facilities for your use. Here, you can practice
swimming. You should practice various strokes and
extend your swimming range. Then, you will feel more
confident that you can stay afloat and swim to a distant
lifeboat or floating object.
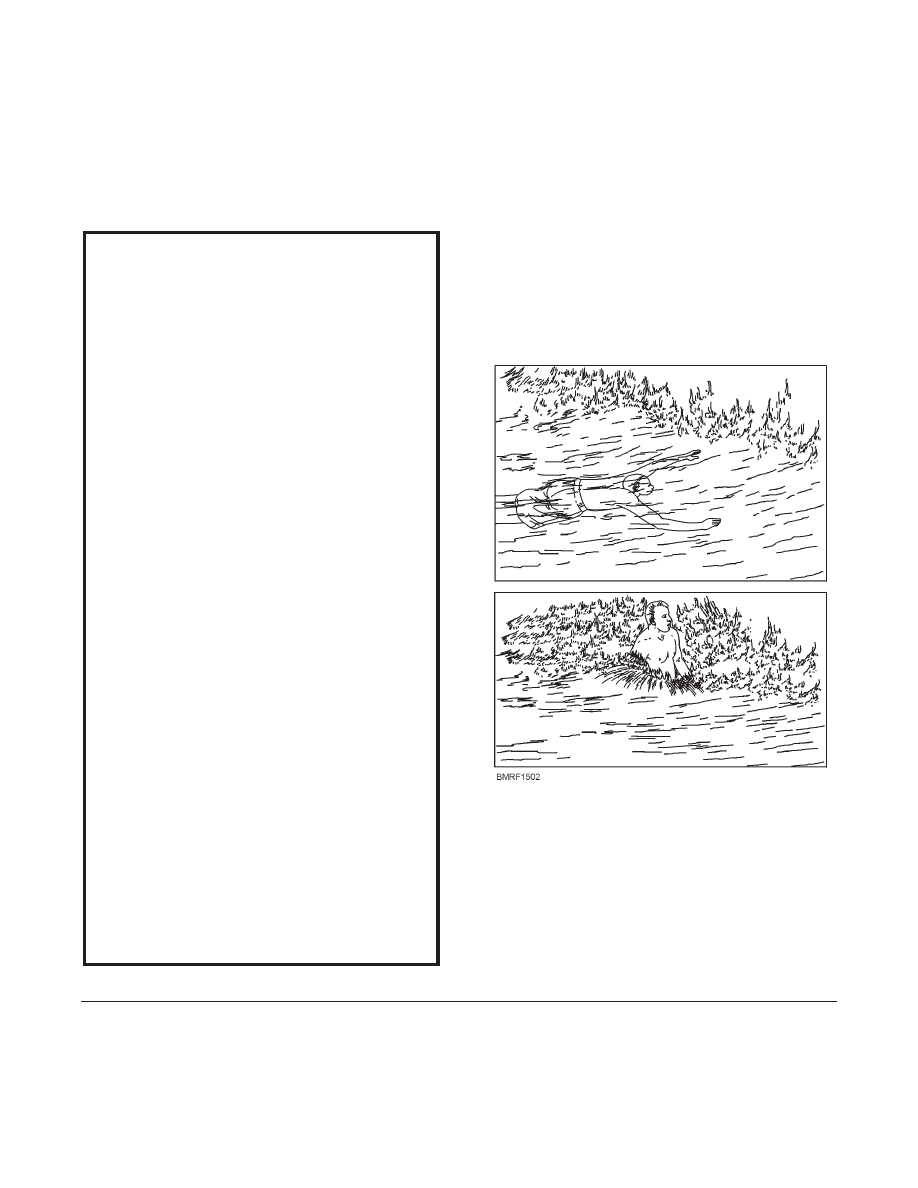
S W I M M I N G
T H RO U G H
F L A M E S . —
Flame-covered water is a terrifying sight. However, you
don’t need to be afraid of jumping into flames. If you
follow the procedures listed here, you will clear the
burning area safely (fig. 15-2).
1. Don’t wear an inherently buoyant life preserver
(if you have one on, get rid of it).
2. If you’re wearing a CO
2
preserver, keep it on but
don’t inflate it.
3. Discard your shoes because they will hinder
your underwater swimming.
4. Take a deep breath when you jump from the ship
and cover your nose and mouth with one hand
and your eyes with the other.
15-3
THIRD CLASS SWIMMER
1. Enter the water feet first from a height of 5 feet
2. Remain afloat for 5 minutes
3. Swim 50 yards
SECOND CLASS SWIMMER
1. Jump from a height of 10 feet
2. Remain afloat for 10 minutes
3. Swim 100 yards, using three survival strokes for
at least 25 yards each:
•
Breast stroke
•
Side stroke
•
Elementary back stroke
FIRST CLASS SWIMMER
1. Swim 220 yards
2. Enter the water feet first and immediately swim
25 yards underwater (you may surface for air
twice at 25-foot intervals)
3. Remove your trousers or slacks in the water and
inflate them
4. Tow another person 25 yards, using the
following methods:
•
Cross-chest carry
•
Extended reach (recommended for
struggling victims)
•
Grabbing the victims hair from behind and
use side stroke (recommended for towing
unconscious victims)
Figure 15-2.—Swimming through flames.
Student Notes:
5. Swim as far underwater as possible.
6. When you must come up for air, extend your
arms above your head, then pull them back in a
wide sweep to force the upper part of your body
above the surface.
7. When you surface, use your hands and arms to
make wide sweeping movements across the
surface to splash the water and drive away the
flames.
NOTE
As you pop up above the surface, try to
turn your back to the wind before you
take a breath.
8. Submerge again feet first, and repeat the
procedure until you’re clear of the burning oil.
When going into oil that isn’t burning, save your
preserver to use as a raft. Keep your face above the
surface. Keeping your head above the surface helps
keep oil from getting into your eyes and mouth.
AIDS FOR STAYING AFLOAT.—If you’re in
the water without a life jacket, don’t become frightened
that you can’t stay afloat—you can. Several articles of
clothing, including the white hat, provide some
flotation when used properly. The most useful article is
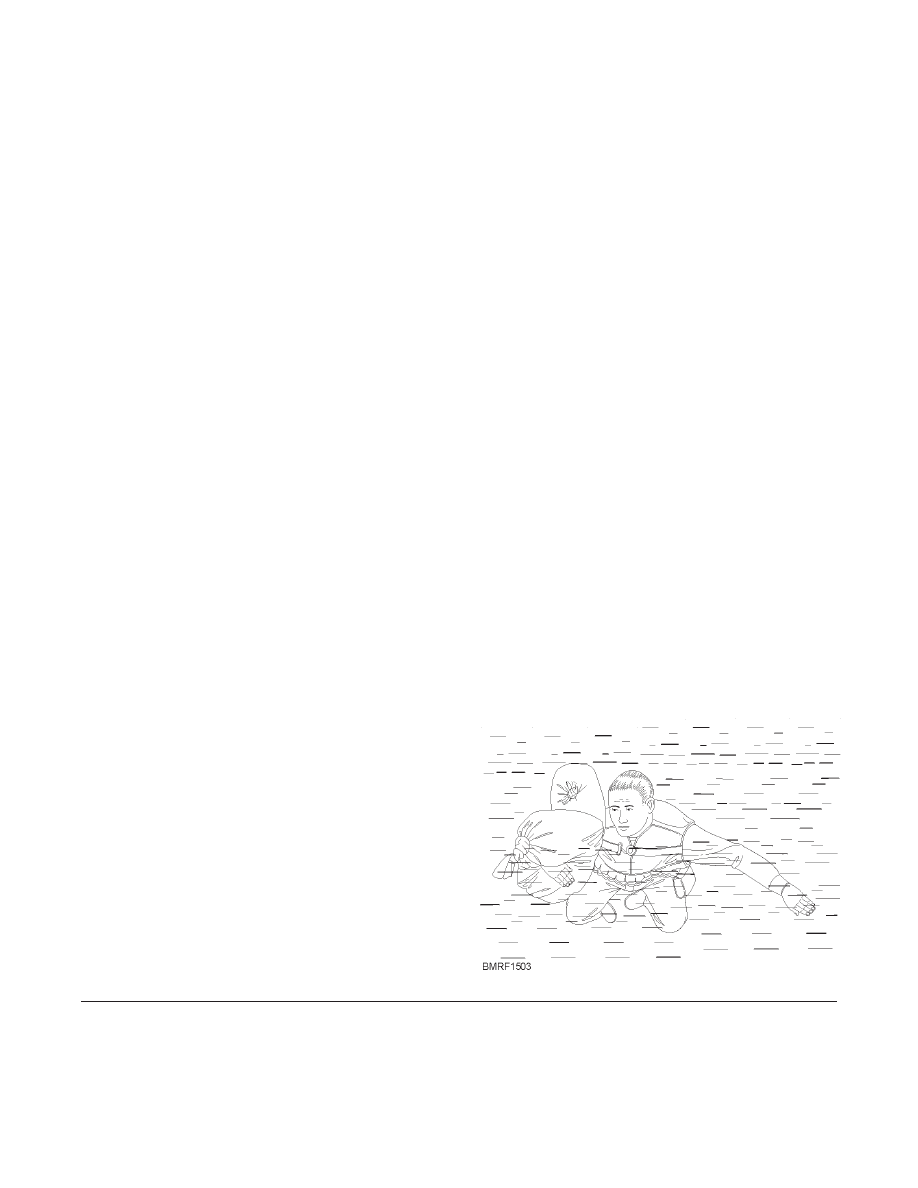
your trousers or slacks, which you can inflate to serve as
water wings.
1. To remove your trousers, lean forward in the
water and slowly slip them down over your hips
and legs. Don’t let go of them—they may sink.
To inflate your trousers—
2. Zip them; then float them on the surface with the
fly or front turned down.
3. Tie a knot in each leg as close to the cuff as
possible.
4. Work the garment around on the surface until
the legs are over your shoulders and the knots
are behind you, leaving the crotch in front of
you.
5. Grasp the waist of the trousers with one hand on
each side; then extend your arms straight
upward, kicking your feet to get your body as
high out of the water as you can.
6. When this position is reached, pull the trousers
downward smartly on the surface, trapping a
pocket of air in each leg.
7. Then gather the waist under the water and hold
in one hand (fig. 15-3). Keep the trousers legs
wet by splashing water on them to reduce the
loss of the trapped air.
You may use mattress covers, sea bags, laundry
bags, and pillowcases in a similar manner. A large
amount of debris, such as pieces of wood, empty shell
boxes, powder cans, and so forth, is usually present. You
can use this debris to stay afloat.
SURVIVAL EQUIPMENT
The two basic categories of flotation devices are life
preservers and lifeboats. Each is vital to the survival of a
ship’s crew if the ship sinks. Other than the lifeboat, the
life preserver (commonly called a life jacket) is the most
important piece of abandon ship equipment.
The inherently buoyant (vest-type) preserver is
designed so that, if adjusted properly, it supports you
and keeps your head out of the water even if you are
unconscious. With a life preserver on, you can stay
afloat for many days. Without a life preserver, you have
little chance of surviving in the water for any great
length of time.
The lifeboat presents the greatest chance of survival
because it contains food and water, provides shelter
from the elements, and contains equipment that greatly
15-4
Student Notes:
Figure 15-3.—Using inflated trousers/slacks for support.
enhance your chances for survival.
During wartime, each person aboard ship is issued a
life preserver. Wear it or keep it handy at all times.
During peacetime, life preservers are stowed in
ready-use lockers. Know where your preserver is
stowed, how to put it on, and how to release and inflate
the lifeboat.
Life Preservers
The Navy uses two types of life preservers—the
inherently buoyant and the inflatable types. The
inherently buoyant type has several designs. The vest
type is the most widely used.
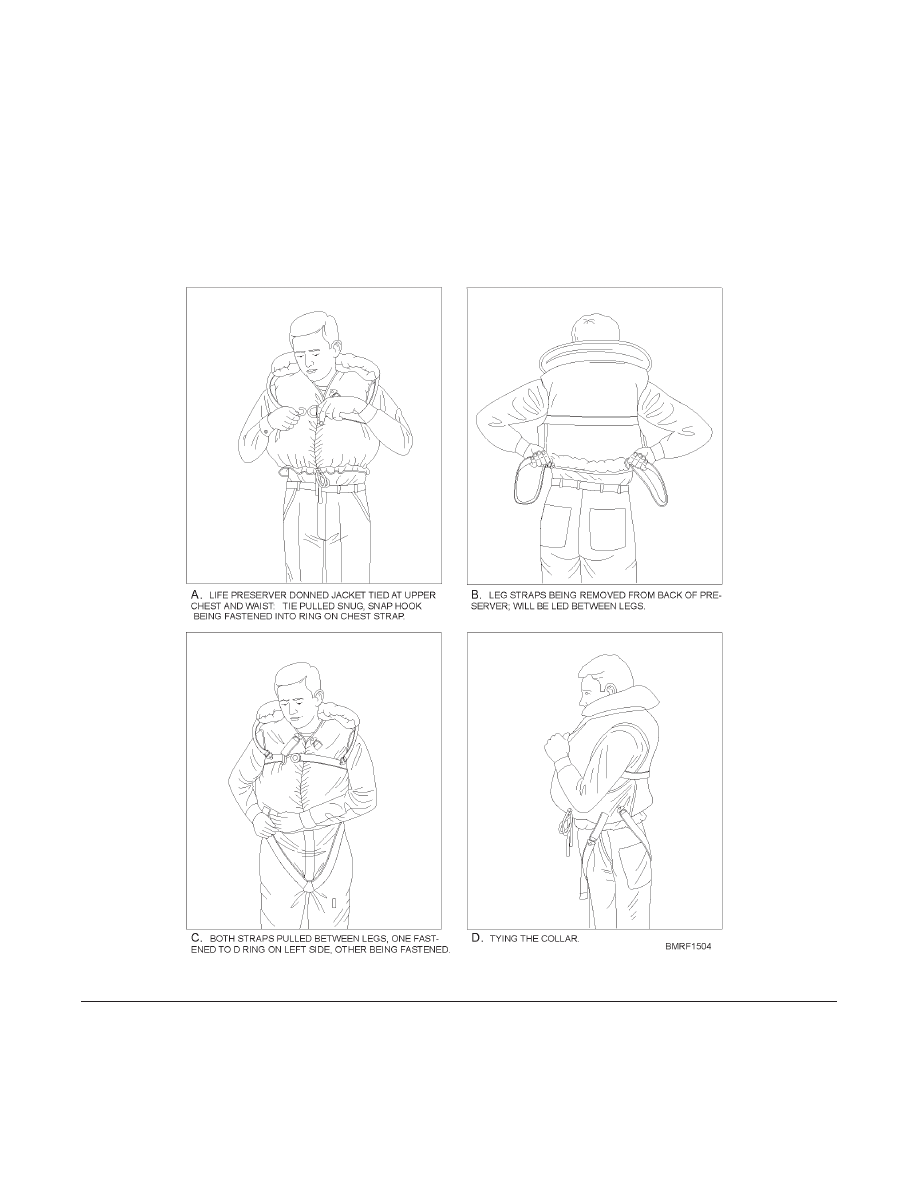
INHERENTLY BUOYANT TYPE.—The
inherently buoyant vest type of life preserver (fig. 15-4)
uses fibrous glass pads to provide buoyancy. The pads
are sealed in plastic waterproof bags placed in an outer
15-5
Student Notes:
Figure 15-4.—Adjusting the inherently buoyant vest-type life preserver.

cover or envelope. The preserver has cloth tapes to pull
tight for a close fit. Leg straps prevent it from riding up
while you are in the water. A body strap across the chest
helps give a snug fit and provides a hold for lifting you
out of the water. You can also use the strap to attach
yourself to a life raft or to other persons in the water.
Put on the vest type of life preserver over your
clothing. Tie the upper tapes to make it fit comfortably,
and pull the tape at the waist fairly tight to keep the
preserver from sliding up in the water. Then adjust the
chest strap and fasten the snap hook into the ring. Pull
the leg straps as tight as possible without producing
discomfort. Tie the collar tapes tightly under the chin.
The collar holds the head upright and helps prevent an
unconscious person from drowning.
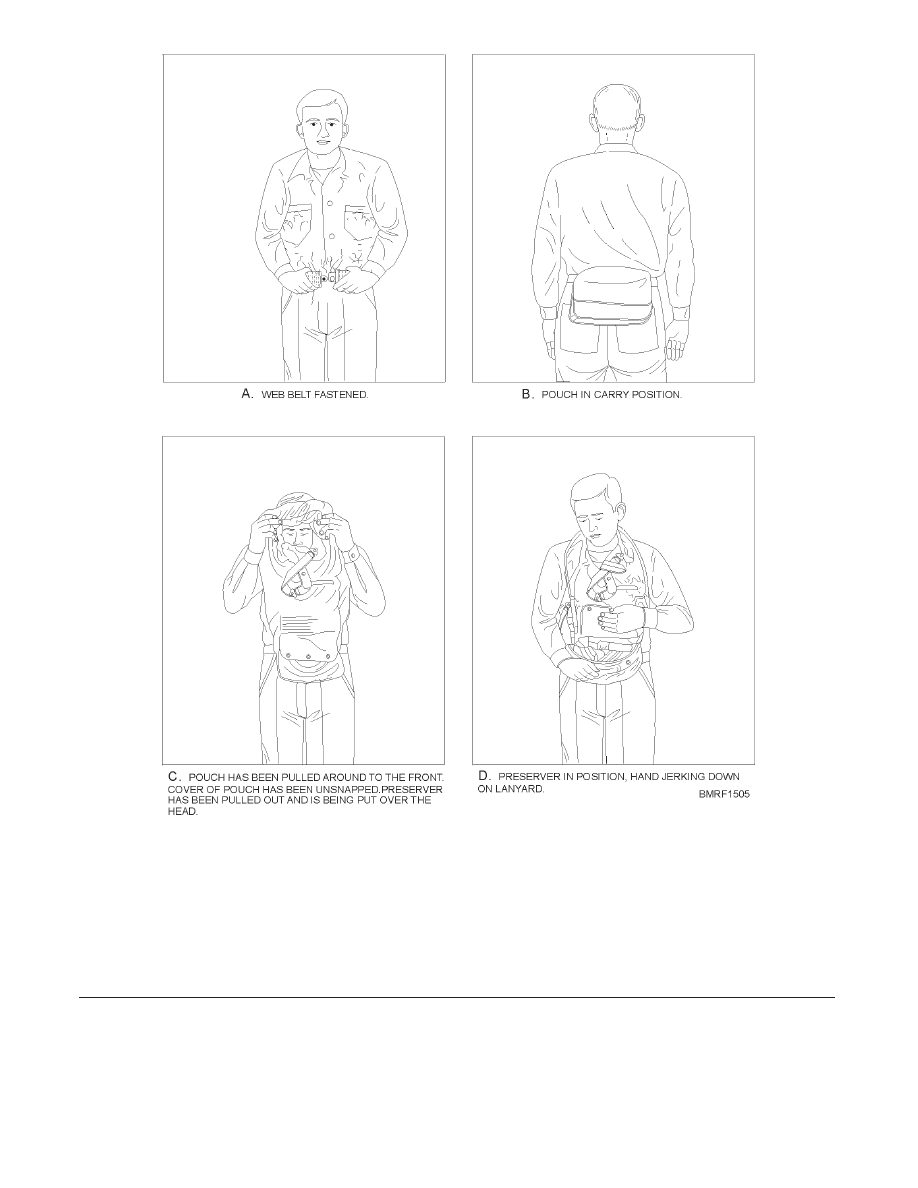
INFLATABLE TYPE.—The inflatable life
preserver (fig. 15-5) is made of lightweight,
neoprene-coated nylon. It’s carried in a pouch container
held around your waist on a web belt. You blow up the
inflatable preserver either by mouth or by using a
carbon dioxide (CO
2
) cylinder. It’s equipped with a
lifting harness, a waist belt, and a wooden toggle and a
line for attaching yourself to a life raft or another
survivor. Take the following steps when using the
inflatable life preserver:
1. Pull the pouch around to the front, remove the
preserver from its pouch, and slip it over your
head.
2. Grasp the lanyard attached to the CO
2
cylinder
and jerk downward. If you need more buoy-
ancy, the life preserver can be orally inflated by
taking the following steps:
a. Turn down the knurled ring at the base of the
oral inflation tube as far as it will go.
b. Depress the mouthpiece by force of the
mouth, and blow into the tube as if you were
blowing up a balloon.
c. Release the mouthpiece when inhaling to
prevent escape of the air.
3. When the preserver is inflated, lock the oral
valve by turning the knurled ring against the
mouthpiece.
NOTE
Always wait until you have entered the water to
inflate this type of life preserver.
The automatically inflatable work-type life
preserver provides you maximum lifesaving
protection. At the same time, it doesn’t interfere with
the jobs you do, such as working over the side,
performing underway replenishment (UNREP) duties,
working as part of a boat crew, or manning selected
battle stations. The automatically inflatable work-type
life preserver will—
•
Inflate the life preserver if you go into the water
in an unconscious or helpless state.
•
Allow you to inflate the auto inflatable preserver
orally by the auto function device or by using a
combination of the two.
T h e a u t o - f u n c t i o n d ev i c e u s e s a w a t e r-
degradable paper to release a spring that causes two
CO
2
cylinders to be punctured and inflate the
preserver.
PIN-ON LIGHTS.—Small watertight flashlights
or chemically activated light sticks have been developed
for use with life preservers to help rescuers see a person
in the water more easily at night. The flashlight consists
of a one-cell battery case to which is permanently
attached a heavy metal safety pin for fastening the light
to the preserver. The lens is dome-shaped, providing
360
E visibility from above. The chemically activated
light sticks are activated by a chemical reaction in the
stick.
Wear these lights whenever you use the life
preserver. Check the battery at least once a week to
see that it works. Replace the battery at least every 6
months. Check the light stick each time you use the
preserver, and replace it if you see any indication that
the stick has been damaged or used. Remember the
following tips when using these lights:
•
On the vest-type preserver, pin the light near the
top of your shoulder so that the lens points
upward.
•
When pinning the light on the vest-type
preserver, take care not to pierce the waterproof
15-6
Student Notes:
covering in which the fibrous glass pads are
wrapped.
•
Attach the light to the inflatable preserver to the
tab provided for this purpose.
Some ships may issue strobe lights. These lights
have a brighter intensity. The battery screws in and is
water-resistant.
Some commands are issuing chemical lights as life
vest pin-on lights. The light used for a pin-on light has a
green color when the chemical is activated. You activate
the chemical light by squeezing the lens, which crushes
15-7
Student Notes:
Figure 15-5.—Inflatable life preserver.

an inner vial; that allows the chemicals to mix, causing
the wand to glow. Dispose of these lights after one use.
CARE AND STOWAGE OF PRESERVERS.—
Some of the rules you should follow when taking care of
and stowing your preservers are contained in the
following section:
Laundering your life preserver. Inherently
buoyant life preservers—
•
Launder the outer covers after removing the
fibrous glass pads. (NOTE: Don’t launder the
pads.)
•
Clean the inflatable types with a mild soap
solution only.
Stowing your life preserver. The rules for stowing
life preservers include—
•
Don’t stow life preservers in the vicinity of oil,
paint, grease, heat, moisture, or dirt. The nylon
material will deteriorate.
•
Keep preservers clear of sharp edges, which
increase wear and tear.
•
Keep preservers away from steam lines and
radiators.
•
Dry preservers thoroughly before stowing them
to prevent mildew.
•
Don’t tamper with your life preserver or handle it
roughly.
•
Don’t sit or lie on it. This compresses and mats
the filler pads and reduces the buoyancy of the
preserver.
Inspecting your life preserver. The following
rules apply when inspecting life preservers:
•
Inspect your inflatable life preserver every time
you put it on and at least once every month (when
in your custody).
•
Inflate it by mouth to locate possible leaks in the
air chamber or inflation valve.
•
Make sure the piercing pin of the CO2 valve is in
good working order and the cylinder itself has
not been punctured.
•
Weigh the cylinder on a gram scale to make sure
it is fully charged.
Other actions. Other actions you should take with
regard to your life preserver include—
•
Being able to put the life preserver on and adjust
it in the dark.
•
Treat it like a friend; someday it might turn out to
be the best one you have!
Lifeboats
A warship doesn’t have room to carry all the
powerboats needed to transport the entire crew. At sea, a
powerboat is usually difficult and sometimes
impossible to launch rapidly. For these reasons, the
Navy has spent time and expense developing efficient
lifeboats other than powerboats.
The Navy uses several types of inflatable lifeboats.
Each boat has sufficient equipment to support the num-
ber of survivors for which the boat was designed to
carry. Each boat’s gear includes the following
equipment:
•
Canopy
•
Sea anchor
•
Lifeline
•
Boarding line
•
Rain-catcher tube
•
Air hand pumps
•
Paddles
•
Sponges
•
Boat repair kit for patching leaks
•
Floatable knife
The inflatable lifeboat (fig. 15-6) also carries—
•
Desalter kits for turning seawater into
freshwater.
•
Survival kits containing food rations, sea marker
dye, a flashlight, batteries, a signal mirror, a
15-8
Student Notes:
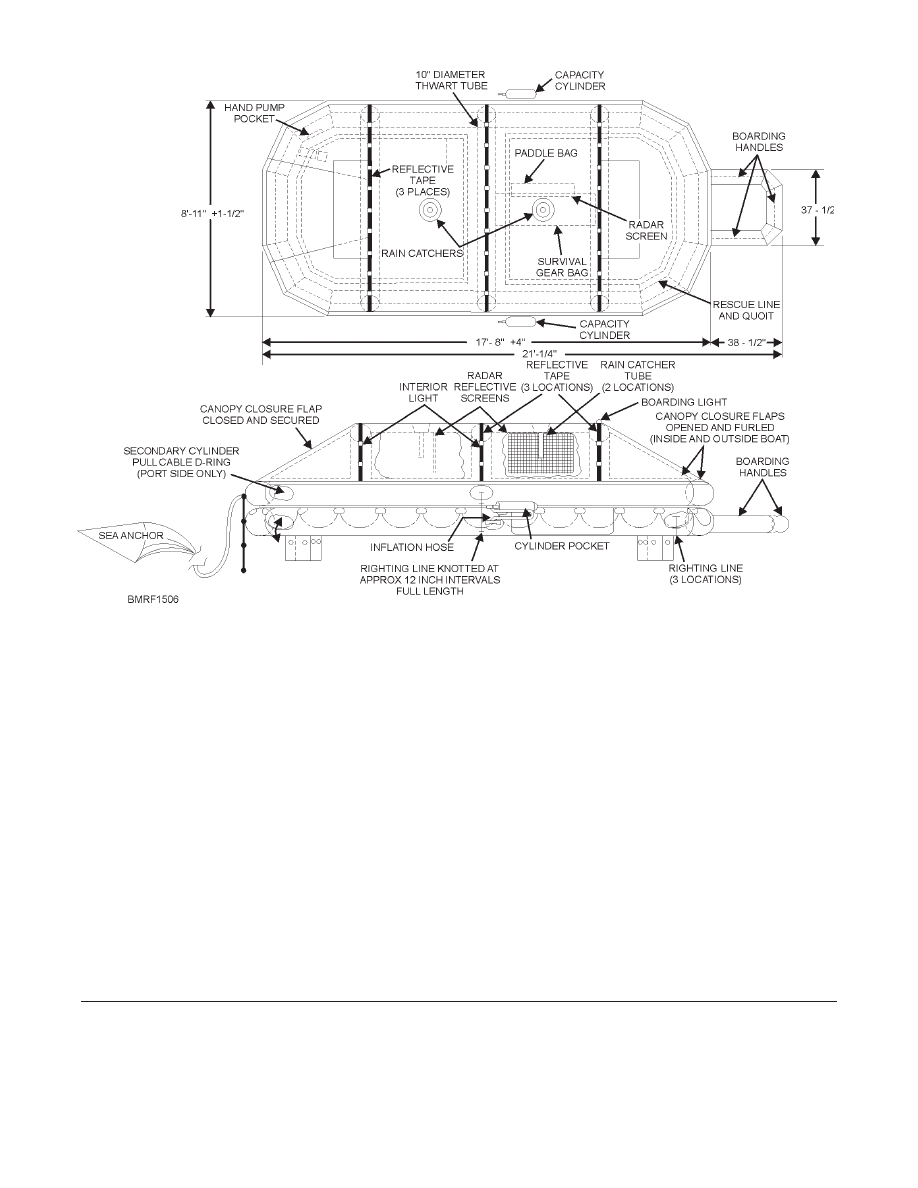
whistle, a first-aid kit, a distress signal kit, and
containers of freshwater.
•
Survival kits in the large boats are designed to
sustain 15 to 20 people for 5 days on regular
rations.
SIGNAL EQUIPMENT.—Using signaling
equipment in the lifeboat correctly might be the
difference between rescue or remaining adrift. The
opportunity to attract the attention of friendly aircraft or
surface vessels may pass quickly; you must be prepared
at all times to use the signaling equipment.
The following chart (next page) describes how to
use signaling equipment.
C A R E A N D U S E O F S U RV I VA L A N D
SIGNAL EQUIPMENT.—When using survival and
signal equipment, stow it in containers for safekeeping
and protection against the elements. Some of the items,
such as the mirror and whistle, have a lanyard for
wearing around the neck. Keep all items as dry as
possible. After using any item, replace it in its container.
Protect flashlights and knives from salt spray;
otherwise, they will soon become corroded. About the
only items that should be left out continuously are the
sponges.
EQUIPMENT FOR OBTAINING WATER.—
Never discard (throw away) any article that will hold
water. When it rains, every container that can possibly
hold water is invaluable. A rain-catcher tube attached to
the lifeboat canopy will help you fill the containers.
Even in a light rain, some water will drain from the
canopy down through the tube. After filling all available
15-9
Student Notes:
Figure 15-6.—Inflatable lifeboat.

15-10
EQUIPMENT
DESCRIPTION
HOW TO USE
Signal mirror
The mirror is an effective device when the sun is
shining. Rough water makes focusing the mirror
on a rescue ship or aircraft difficult. If the mirror is
lost or is unusable, make another one from a piece
of shiny metal.
To signal with the mirror—
1. Punch a cross-hole in its center.
2. Hold the mirror about 3 inches in front of your face and sight
through the cross at the ship or aircraft. The spot of light shining
through the hole onto your face will be seen in the cross-hole.
3. While keeping a sight on the ship or aircraft, adjust the mirror
until the spot of light on your face disappears in the hole. The
bright spot, seen through the sight, will then be aimed directly at
the search ship or aircraft
NOTE
The survival kit contains instructions for using the mirror
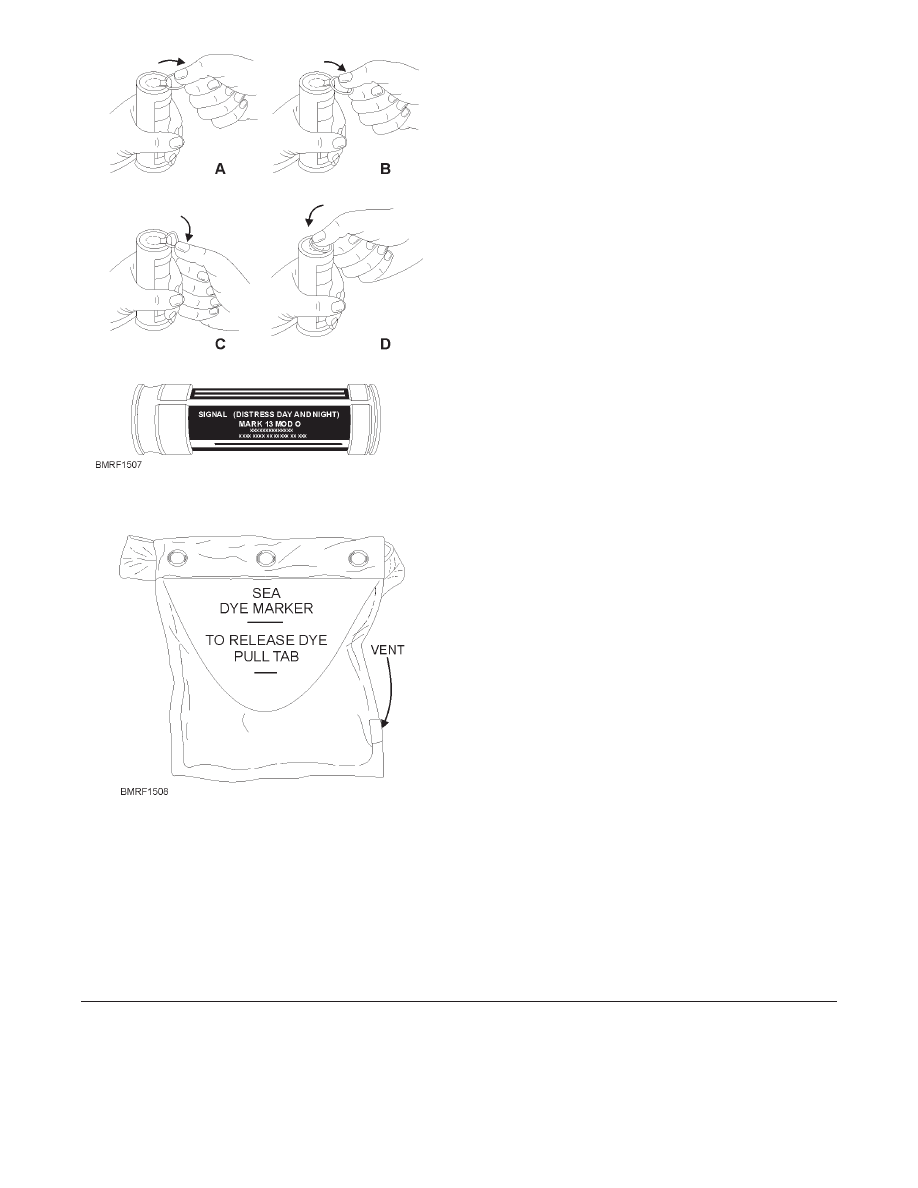
Distress signal kit
The signal kit contains 12 (Mk 13 Mod 0) distress
signals for day and night use and for providing
wind drift information to helicopters rescuing
personnel. One end of the signal tube produces an
orange smoke for day use; the other end produces
a red flare for night use. You can identify the night
flare end in the dark by a series of small beadlike
projections embossed around it. Each signal will
burn for approximately 18 seconds.
To use the signal—
1. Select the proper flare, tear off the sealing tape from around
the end of the cylinder, and remove the plastic cap to expose a
metal pull ring (fig. 15-7). (Only the night end of the flare has a
metal ring; the smoke [day] end does not have the ring.)
2. To ignite the MK 13 signal, grasp the pull ring and flip it over
the rim of the signal case, as shown in view A.
3. Press down the overhanging ring with your thumb until the
seal snaps, as shown in view B. (If the seal refuses to snap,
continue pressing on the ring so that it bends over the rim and
against the signal body, as shown in view C).
4. Flip the ring back to the top of the signal and press down, as
shown in view D, using the bent pull ring as a lever.
5. After the seal breaks, point the signal away from your face
and body and give a sharp yank on the pull ring.
6. Hold the signal at an angle of approximately 45
E from the
horizontal position with your arm fully extended. The contents
are hot, so take care not to drop any of the contents on yourself
or the lifeboat.
7. After using one end of the signal, cool it by dipping it in
water; then save it until you use the other end. Make sure the
distress signal is cool before storing it.
Dye marker
The dye marker shown (fig. 15-8) produces a
brilliant yellowish-green fluorescence when it is
submerged in water. Under good conditions, the
dye will be a good target for only about 1 hour, but
it will retain some of its color for up to 4 hours.
From an altitude of 3,000 feet, a rescue plane may
see the dye marker as far away as 10 miles. The
range decreases as the dye spreads or is diluted by
the water.
See the front of the dye marker cover.
containers, stow them carefully so that you won’t lose
any water. Cover all open containers to slow down
evaporation; use those you don’t have covers for first.
During the rain, drink all you can hold.
In polar areas, you can obtain freshwater from old
sea ice. Old sea ice is a bluish color, splinters easily, and
is nearly free from salt. New ice is milky in color, hard,
and salty. You may also obtain freshwater from
icebergs, but use caution. As its underwater portion
melts, an iceberg gets top heavy and can capsize without
warning.
SURVIVAL STEPS
Most of the following survival information applies
to persons in lifeboats, but some of this information
applies to persons in the water. In trying to survive at
sea, you will face thirst, hunger, and exposure whether
you are in a lifeboat or in the water. You can endure
these conditions, however, if you take the proper steps.
Thirst
The one absolutely essential requirement for
survival is drinking water. Without it, death will most
likely occur in 8 to 12 days. Normally, you need about 2
quarts of water a day; but because of inactivity and lack
of food, you can survive on as little as 6 ounces a day in a
lifeboat.
Water is lost from the body by the evaporation of
perspiration and through the digestive process. Some
actions you can take to reduce water loss include the
following:
•
Keep your clothes wet during the day (weather
permitting, of course), but dry them before
sundown.
•
Wear the least amount of clothes possible,
depending upon your need for protection from
the elements.
•
If water is scarce, eat sparingly.
•
Never drink seawater or urine. To do so would
only aggravate your thirst and increase body
water loss with a subsequent speedup in
dehydration.
•
Do not drink your entire daily water ration at one
time. It is better to drink small amounts three or
four times daily.
Hunger
The food rations supplied with each lifeboat are
15-11
Student Notes:
Figure 15-7.—Igniting the MK 13 distress signal.
Figure 15-8.—Dye marker.
specially designed to maintain your physical and mental
abilities and aren’t thirst-provoking. The ration is based
on an allowance of one packet per person per day; but,
you should eat only when you feel the greatest need.
Don’t take any food or water the first 24 hours. Food is
much less important for survival than water. With water,
a person can survive for 4 weeks or longer without food.
Nearly all forms of sea life are edible. Some fish are
poisonous; for example, jellyfish (which you should
never eat). Each lifeboat has a fishing kit for catching
fish.
All sea birds are edible, and practically the entire
bird is useful. In addition to the food and liquid obtained
from sea birds, you can fashion fishhooks and lures
from the bones and feathers. In cold weather, a bird’s
skin (with feathers) will protect exposed parts of your
body.
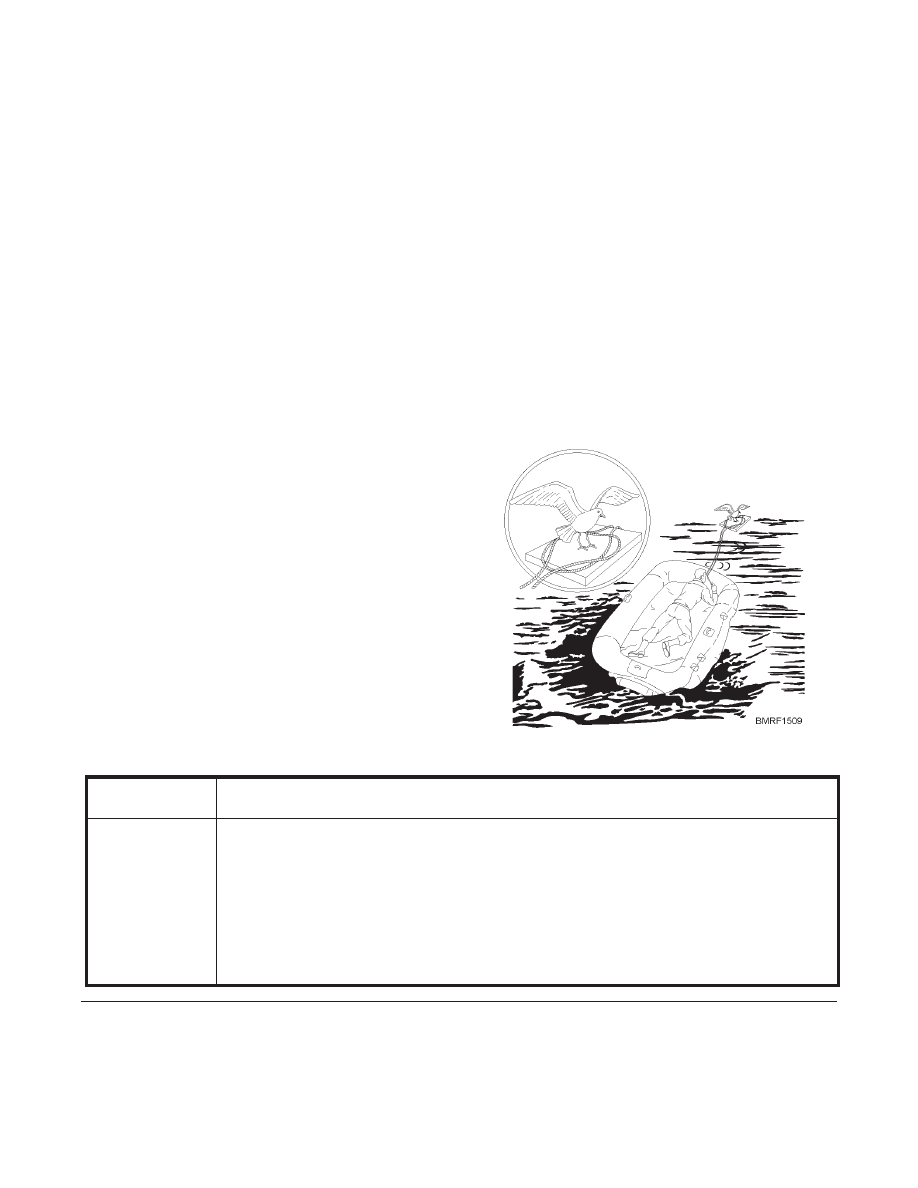
Birds sometimes settle on the raft or boat, and
survivors have reported instances where birds landed on
their shoulders. If birds are shy, try dragging a baited
hook through the water or throwing a baited hook into
the air.
You can catch gulls, terns, gannets, and albatrosses
by dragging a baited hook behind the boat or raft. You
can attract them within shooting distance by dragging a
bright piece of metal or shell behind the raft. It’s
possible to catch a bird if it lands within reach. Most
birds, however, are shy and will settle on the raft out of
reach. In that case, try a bird noose. Make it by tying a
loose knot with two pieces of line, as shown in figure
15-9. Bait the center of the loop with fish entrails or
similar bait. When the bird settles in the loop to eat the
bait, tighten the noose around its feet.
The North Atlantic and the North Pacific have
relatively few birds, and these are found mostly along
the coasts. You may see many species of birds, often
hundreds of miles from land, in southern waters.
Exposure
Exposure presents many dangers. Some dangers
include sunburn, hypothermia, frostbite, and immersion
foot. Some actions you can take to survive these
conditions are as follows:
MAN OVERBOARD
All the information in this section applies mainly to
ship disasters when your ship is sunk. Such events
normally occur in wartime but rarely in peacetime.
However, a mishap that can happen to you at any time,
and usually without warning, is to fall overboard. One
minute you are walking along the main deck; the next
15-12
Student Notes:
Figure 15-9.—Bird noose.
CONDITION
ACTION
Cold
You can’t survive for any great length of time in cold water without a special exposure suit.
In water cooler than 75
EF, you face a serious condition called hypothermia. Hypothermia
occurs when your body is exposed to subnormal temperatures. To overcome hypothermia,
minimize heat loss from your head, neck, sides, and groin. Raise as much of your body as
possible out of the water; wear a hat; and assume the fetal position or huddle in close,
side-by-side contact with others. Don’t move about. Stay calm and encourage others not to
panic.

15-13
CONDITION
ACTION
Cold
(Continued)
In cold waters, your greatest danger after abandoning ship is the effects of the cold. Wear
as much clothing as you possibly can, especially heavy undergarments. Ordinary clothing
gives you no protection against cold if you are immersed in water. You must get out of the
water as quickly as possible
Huddle together for warmth. A huddled group can survive cold that might be fatal to one
person alone. Rig wind and spray shields, but don’t block the sun’s heat. Exercise mildly, if
possible, to increase body heat; but never do so to the point of exhaustion.
Lifeboats are uncomfortable and cold. In frigid temperatures, you must keep both ends of
the inflatable lifeboat closed to keep the temperature comfortable; but this confinement
creates other discomforts. Closing the ends reduces ventilation and raises the humidity. Then
you must reopen the ends to let out the impure air and to bring in fresh air, which, of course, is
cold.
Sunburn
Shoes and clothing are a real protection against sunburn and exposure. Remove clothing
only when it is absolutely necessary. If you must remove your clothes while in the water, take
off only the heaviest articles. Because your shirt or jumper offers warmth at night as well as
protection from the sun during the day, don’t remove it. Sunburn is easier to prevent than to
treat. Try to remain out of the direct rays of the sun. If you can’t avoid direct exposure, keep
your hat on and cool your body by wetting your clothing.
Dampness
Although remaining dry on a lifeboat is always difficult, make every effort to keep your
clothing dry. Since continuous condensation of moisture causes it to drop like rain, sponge out
the boat whenever possible. Cold weather aggravates these uncomfortable conditions.
Frostbite and
immersion foot
Frostbite and immersion foot are serious injuries that can happen even when you’re
wearing enough clothing to stay fairly comfortable. Frostbite usually affects the hands, face,
or feet, and it most often occurs on windy, very cold days. Affected parts of the body turn stiff,
pale, and numb. To prevent frostbite, keep exposed parts of the body as warm as possible and
maintain circulation. If frostbite occurs, treat the affected part immediately by placing it in
contact with a warm part of your body. Cover it with your hand or put frozen fingers inside
your clothing. Don’t rub the affected parts; that could result in damage to frozen tissue.
Immersion foot is the swelling of the foot accompanied by numbness and pallor (lack of
color) or discoloration. Immersion foot is caused by poor circulation in the legs, particularly
when the foot remains wet for several days. To prevent immersion foot, exercise the ankles and
toes for a few minutes several times each day. Keep your feet warm, dry, and elevated as much
as possible. Unlace your shoes or take them off. If you have no dry socks or wrappings for your
feet, put them under the arms or in the lap of a shipmate. Never treat immersion foot by
rubbing. As with frostbite, tissue damage may result. Rewarming is the only proper treatment.
Student Notes:

minute you are in the water, swimming for your life.
If you fall overboard and someone hears or sees you
(one of the purposes of the lookout watch), you can
count on being rescued within a few minutes. Such
rescues are made in nearly every instance. However, if
no one sees you fall overboard or hears a cry for help,
you’ll be missed and rescue procedures will then be put
into action.
If you fall overboard, the most important thing to do
is stay calm. Panic will cause you more harm than
almost anything else. If you see any floating debris
nearby, hang on to it. Otherwise, remove and inflate
your trousers. Remember, you can stay afloat for a long
time, even without help, if you use the floating
positions. Don’t swim after the ship, because you’ll
only exhaust yourself needlessly, and the ship may
waste valuable time searching for you at the point where
you fell overboard.
The method used to rescue a person overboard
depends on the circumstances at the time. In daylight,
with good weather, a helicopter (if available) is
normally used. Otherwise, the ship’s motor whaleboat
is used, or you may be recovered directly over the side of
the ship.
Helicopters use three basic devices for recovering a
person in the water—
1. Sling. If the sling is used, adjust it so that it is
across your back and under your arms with the
hoisting cable in front of you.
2. Net. If the net is used, simply sit in it and hold
on.
3. Two- or three-pronged seat. If a two- and
three-pronged seat is used, sit on the prongs and
wrap your arms around the upright portion.
When a motor whaleboat is used for rescue, the boat
crew helps you into the boat. Also, a swimmer provides
assistance if you are injured or exhausted. Don’t try to
enter the boat from astern; you may be injured by the
propeller.
If neither a helicopter nor a whaleboat can be used
for rescue, the ship will maneuver to a position where a
swimmer, towing a line, can reach you. After the line is
fastened around your body, personnel on deck will haul
you in and hoist you aboard.
While awaiting rescue, remain calm. If sharks are in
the area, float on your back, using as little arm and leg
movement as possible.
To decrease your chances of having to be rescued at
all, observe all safety regulations. Don’t lean on
lifelines. Don’t go on deck in bad weather unless you
have to. Always wear a life preserver when working in
areas where you are in danger of falling overboard.
Aboard aircraft carriers, don’t walk behind a jet plane
turning up its engines because the blast can blow you
overboard.
Ships frequently hold man-overboard drills. In spite
of precautions, accidents happen. Therefore, when you
are at the beach, don’t spend all your time sunbathing.
Practice swimming and floating. Someday your life
may depend on your ability to swim and float.
REVIEW 1 QUESTIONS
Q1. When aboard ship, you should know escape
routes for what reason?
Q2. True or False. You should dive into the water to
abandon ship.
Q3. What swimming classification gives you the best
chance for survival if you have to abandon ship?
Q4. If you have to jump from a ship into burning
water, you should—
Q5. Which of the following items can you use to stay
afloat?
a. Trousers
b. Sea bag
c. Pieces of wood
d. All of the above
15-14
Student Notes:

Q6. List the two types of life preservers used by the
Navy.
a.
b.
Q7. When you have custody of your life preserver,
how often should you inspect it?
Q8. List the contents of survival kits carried by
inflatable lifeboats.
a.
b.
c.
d.
e.
f.
g.
h.
i.
Q9. What is the one essential requirement for
survival?
Q10. The food ration carried by lifeboats is based on
how many packets per person per day?
Q11. List some of the dangers you might face by
exposure.
a.
b.
c.
d.
SURVIVAL ASHORE
Learning Objectives: When you finish this chapter,
you will be able to—
•
Recall the methods and procedures for survival
ashore to include individual survival, group
survival, and methods of evasion and escape.
•
Identify the responsibilities and authority of the
senior person in a survival situation.
Survival is largely a matter of mental outlook, and
the will to survive is the deciding factor. The
experiences of hundreds of service personnel isolated
during World War II and the Korean conflict and
Vietnam police action prove that survival is largely a
matter of mental outlook. These experiences also prove
that the will to survive is the deciding factor in survival.
Whether with a group or alone, you will experience
emotional problems resulting from fear, despair,
loneliness, and boredom. Your will to live will also be
taxed by injury and pain, fatigue, hunger, and thirst.
Being prepared mentally to overcome all obstacles and
accept the worst greatly increases your chances of
coming out alive.
INDIVIDUAL SURVIVAL
The shock of being isolated behind the enemy lines,
in a desolate area, or in enemy hands can be reduced or
even avoided if you remember what each letter in the
key word S-U-R-V-I-V-A-L stands for.
S ize up the situation
U ndue haste makes waste
R emember where you are
V anquish fear and panic
I mprovise
15-15
Student Notes:

V alue living
A ct like the natives
L earn basic skills
S — Size up the situation by considering yourself, the
country, and the enemy.
In considering yourself, hope for the best, but be
prepared for the worst. Get to a safe, comfortable place
as quickly as possible. Once there, look things over,
think, and form a plan. Your fear will lessen and your
confidence will increase. Be calm! Take it easy until
you know where you are and where you are going.
Part of your fear may come from being in a strange
country; therefore, try to determine where you are by
landmarks, compass directions, or by recalling
intelligence information passed on to you by your
leaders.
In considering the enemy, put yourself in the
enemy’s shoes. What would you do? Watch the enemy’s
habits and routines. Base your plan on your observation.
Remember, you know where the enemy is; the enemy
does not know where you are.
U — Undue haste makes waste.
Don’t be too eager to move. That will make you
careless and impatient. If you begin to take unnecessary
risks, you have a good chance of being captured. Don’t
lose your temper; doing so may cause you to stop
thinking. When something irritating happens, stop, take
a deep breath, relax, and start over.
Face the fact that danger does exist. To try to
convince yourself otherwise only adds to the danger.
R — Remember where you are.
You may give yourself away because you’re used to
acting in a certain way. Doing “what comes naturally”
could be the tip off that you don’t belong there.
V — Vanquish fear and panic.
To feel fear is normal and necessary. It’s nature’s
way of giving you that extra shot of energy just when
you need it. Learn to recognize fear for what it is and
control it. Look carefully at a situation and determine if
your fear is justified. When you investigate, you will
usually find many of your fears unreal.
When injured and in pain, you’ll have difficulty
controlling fear. Pain sometimes turns fear into panic
and causes you to act without thinking. Loneliness can
also cause panic. It can lead to hopelessness, thoughts of
suicide, carelessness, even capture or surrender.
Recognizing these signs helps you overcome panic.
I — Improvise.
You can always do something to improve the
situation. Figure out what you need, take stock of what
you have, and then improvise. Learn to put up with new
and unpleasant conditions. Keeping your mind on
SURVIVAL will help. Don’t be afraid to try strange
foods.
V — Value living.
Conserve your health and strength. Illness or injury
will greatly reduce your chances of survival and escape.
Hunger, cold, and fatigue lower your efficiency and
stamina, make you careless, and increase the possibility
of capture. Knowing that will make you especially
careful because you’ll realize your low spirits are the
result of your physical condition and not the danger.
Remember your goal of getting out alive. Concentrating
on the future—on the time when you will return
home—will help you value living during your survival
situation.
A — Act like the natives.
“At a railroad station, there were German guards,”
one World War II male escapee related. “I had an urgent
need to go to the rest room. The only rest room was an
exposed one in front of the station. I felt too
embarrassed to relieve myself in front of all passersby. I
walked throughout the entire town, occasionally
stopping and inquiring if a rest room were available.”
This man was detected and captured because he
failed to accept the customs of the natives. When you
are in a foreign country, accept and adopt native
behavior to avoid attracting attention to yourself.
L — Learn basic skills.
The best life insurance is to make sure you learn the
techniques and procedures for survival so thoroughly
that they become automatic. That increases the chances
that you will do the right thing, even in panic. What you
know about survival could save your life. Be inquisitive
15-16
Student Notes:

and search for additional survival knowledge.
GROUP SURVIVAL
Just as you must make your reactions to survival
situations automatic, so must the entire squad, platoon,
or other group that you might be a member of or be
leading. The best chance for survival belongs to the
group that works together and has a leader who accepts
responsibility for the group. When you are the senior
person, accept responsibility for your group by taking
steps to lead members to work together. Some actions
you can take include the following:
Organize group survival activities. Group
survival depends largely upon the organization of its
manpower. Organized action by group members who
know what to do and when to do it, during ordinary
circumstances and during a crisis, prevents panic.
Keeping the group informed, devising a plan, and
sticking to the plan helps achieve organization.
Assume command and establish a chain of
command that includes all members of the group.
Good leadership lessens panic, confusion, and
disorganization. Make certain each person knows his or
her position in the chain of command and is familiar
with the duties of every other person, especially your
duties as the senior member. Under no circumstances
leave leadership of the group to chance acceptance by
some member after a situation arises.
Maintain respect for your leadership by using it
wisely; be the leader and set the example. Group
survival is a test of effective leadership. Watch out for
problems that could turn into serious arguments. Keep
troublemakers from attracting undue attention, and
keep those who may “crack up” from disrupting the
group. Prevent carelessness caused by fatigue, hunger,
and cold. Know yourself and the members of your
group; take responsibility for each person’s welfare.
Develop a feeling of mutual dependence within
the group by stressing that each person depends on
the others for survival. Emphasize that the group will
not leave the wounded or injured behind—that each
member’s responsibility is to make sure the group
returns intact. A feeling of mutual dependence fosters
high morale and unity. Each member receives support
and strength from the others.
Make the decisions no matter what the situation.
However, base your decisions on the information and
advice of other members of the group—much as
admirals make decisions based on input from their staff.
Above all else, never appear indecisive.
If situations require you to act immediately,
consider the facts and make decisions rapidly. The
ability to think on your feet usually determines
successful survival.
STRESS OF SURVIVAL
Survival is a state of mind. Your ability to return to
your group or to be rescued depends in a great part on
your ability to cope with frustrations. You may become
frustrated because you find you are unable to
accomplish specific tasks. Perhaps you are hungry, cold,
lost, injured, or lack the proper equipment. Being able to
improvise equipment, care for your physical needs, and
provide first aid for your injuries will help you to control
your environment, reactions, and emotions. Don’t be
afraid to experiment and use your imagination. A
logical experimental approach is the best way to solve
most problems.
Remember the following rules:
1. Almost everything is useful—don’t throw away
anything.
2. You can be lazier than you would expect, if you
just think. The least effort can be the most
efficient.
3. Everything you do should be oriented toward
rescue.
4. If your surrounding conditions don’t suit your
needs, do what you can to change them.
SURVIVAL TECHNIQUES
As a member of the armed forces, you always face
the chance of being exposed to conditions that can force
you into a life-or-death struggle. However, you can
remain alive anywhere in the world when you keep your
wits. Remember that nature and the elements are neither
your friend nor your enemy. By using your wits, you can
make them work for you instead of allowing them to
work against you.
15-17
Student Notes:

Survival depends on you. You must be physically fit
and know how to locate or collect water. You must know
what plants and animals are available for food, how to
find or catch them, how to prepare them, and how to
recognize those which will harm you. The more you
know about the conditions peculiar to the region you are
in, including the plant and animal life, the better are
your chances for survival.
Water
Without water your chances of living are slight, and
all the food in the area means little. That is especially
true in hot climates where you sweat a lot. Even in cold
weather your body needs at least 2 quarts of water each
day; a lesser amount reduces your efficiency.
When you can’t find surface water, tap through the
earth’s water table for groundwater (rain or melted snow
that has filtered through the ground). Getting to the
water table and its supply of generally pure water
depends on the contour of the land and the
characteristics of the soil.
In the desert or arid regions, watch for water
indicators. Some signs of water include—
•
Plants covering animal trails and the direction in
which certain birds fly. By searching in areas
toward which these birds fly, you will probably
find water.
•
Places that are visibly damp, where animals have
scratched, or where flies hover indicates recent
surface water. Dig in those spots for water.
Leave your handkerchief out on clear nights to
collect dew; then squeeze the water into a container.
During a heavy dew, you should be able to collect about
a pint an hour.
You may find runoff water above the water table.
Runoff water includes streams, stagnant pools, and
water in bogs. Consider this water contaminated and
dangerous even if it is away from human habitation.
Boil or treat this water with water purification tablets
before you drink it.
If you are unsuccessful in your search for ground or
runoff water or if you don’t have time to purify
questionable water, a water-yielding plant may be your
best bet. You can easily get clear, sweet sap that is pure
and chiefly water from many plants. Many plants with
fleshy leaves or stems store drinkable water. Try them
wherever you find them. Desert plants often have their
roots near the surface. Pry these roots out of the ground
and cut them into 24- to 36-inch lengths. Remove the
bark and suck out the water.
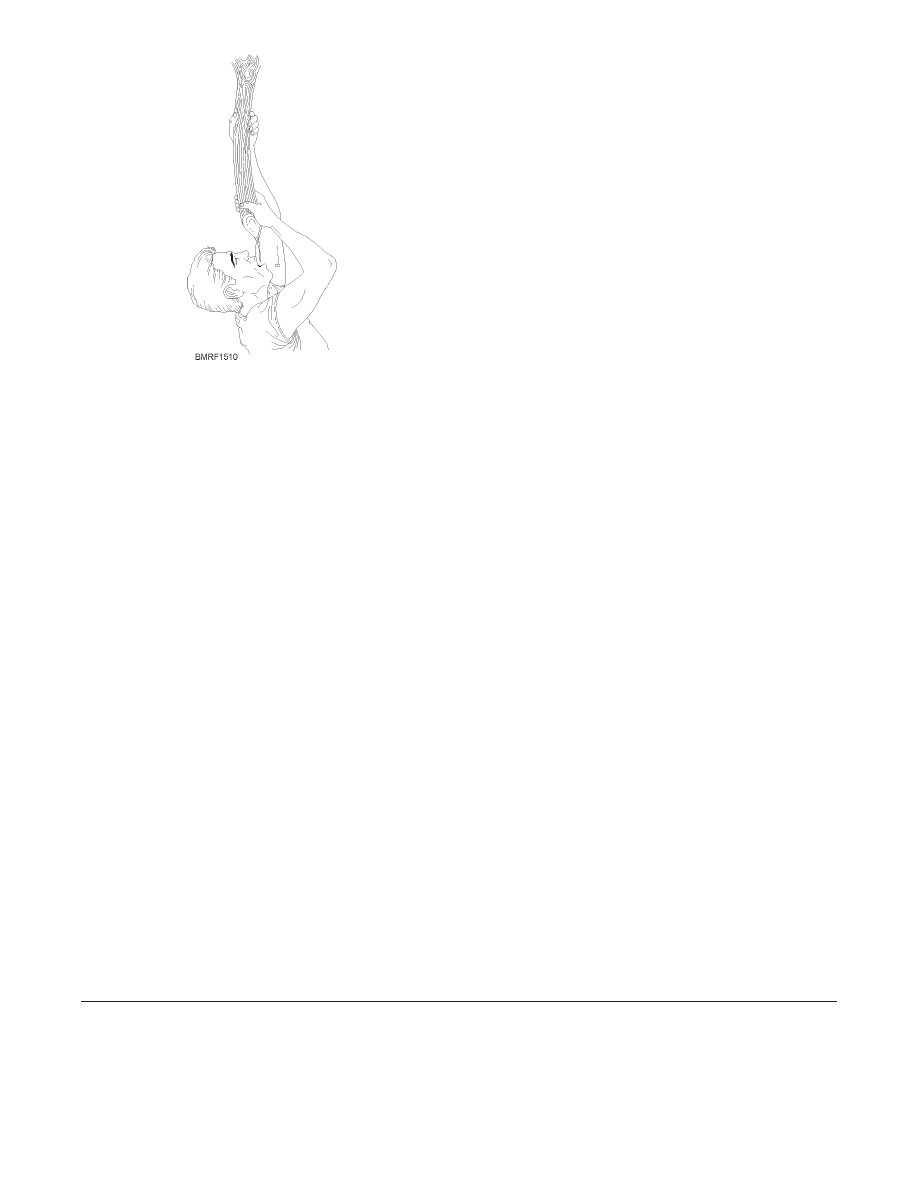
Not all vines yield palatable water, but try any vine
you find. Use the following method for tapping a vine. It
will work on any species.
1. Cut a deep notch in the vine as high up as you
can reach.
2. Then cut the vine off close to the ground and let
the water drip into your mouth or a container.
3. When the water ceases to drip, cut another
section off the vine.
4. Repeat this procedure until the supply of fluid is
exhausted (fig. 15-10).
NOTE
If the liquid is a white sap or very dark in color,
it is not drinkable. If the liquid is clear, test it for
odor. If it is slightly pink or red in color, that
normally indicates the presence of tannic acid,
which isn’t harmful. If it has no taste, or does
not taste bad, it is a good source of water.
Food
It takes little reasoning to recognize that your
second requirement is food. That’s especially true
during a time of survival when you need every ounce of
energy and endurance that you can muster.
People have been known to live for more than a
month without food; but unless you are in extremely
difficult circumstances, you don’t need to deprive
yourself of something to eat. Used properly, nature can
provide you with food. Apply the following rules as
soon as you realize you are isolated:
1. Inventory your rations and water. Estimate the
length of time you will be on your own.
2. Divide your food—two thirds for the first half of
your isolation and one third for the second half.
15-18
Student Notes:
3. Avoid dry, starchy, and highly flavored foods
and meats if you have less than 1 quart of water
for each day. Remember eating makes you
thirsty. Eat food high in carbohydrates, such as
hard candy and fruit bars.
4. Keep strenuous work to a minimum. The less
you work, the less food and water you require.
5. Eat regularly if possible—don’t nibble. Plan one
good meal each day and cook it if you can.
Cooking makes food safer, more digestible, and
better tasting. Also, the time you spend cooking
will give you a rest period in which you can
relax.
6. Always be on the lookout for food. With few
exceptions, everything you see that walks,
crawls, swims, or grows from the soil is edible.
Learn to live off the land.
PLANTS.—Experts estimate that about 300,000
classified plants grow on the earth’s surface, including
many that grow on mountain tops and ocean floors. Of
these, 120,000 varieties are edible. Obviously, you
won’t be able to learn about all of these plants from
reading this chapter. But if you know what types of food
to look for in the area in which you are stranded, can
identify them, and know how to prepare them properly,
you should find enough to keep you alive. You may even
surprise yourself with a delicious meal.
Eat those plants available in the area to provide you
with needed energy while you search for meat. You can
depend on them to keep you alive if you’re injured,
unarmed in enemy territory, or in an area where wildlife
is not abundant. Although plant food may not provide a
balanced diet, especially in the Arctic where
heat-producing qualities of meat are essential, it will
sustain you. Many plant foods, like nuts and seeds, will
give you enough protein for normal efficiency. In all
cases, plants provide energy and calorie-giving
carbohydrates.
Most sources of plant foods (fruits, nuts, and
berries) have one or more parts that have a lot of food
value. For example, certain roots and other underground
parts of plants that are rich in starch are excellent
sources of food. Some examples are shown on the
following page.
ANIMALS.—Foods derived from animals have
more food value per pound than those derived from
plants. Learning what parts of animals you can eat or
use in other ways and learning how to prepare animals
for cooking increase your chances of survival.
Methods of Cooking and Preserving Foods
Besides making most foods more tasty and
digestible, cooking makes them safer to eat by
destroying bacteria, toxins, and harmful elements in the
food. Your survival chances increase as your knowledge
of field survival skills increases. Survival skills include
your ability to improvise and to apply the following
principles of cooking and preserving the foods you
obtain in the field.
Harmful Plant and Animal Foods
Although you will encounter relatively few
poisonous plants and animals, you should learn to
recognize and avoid them.
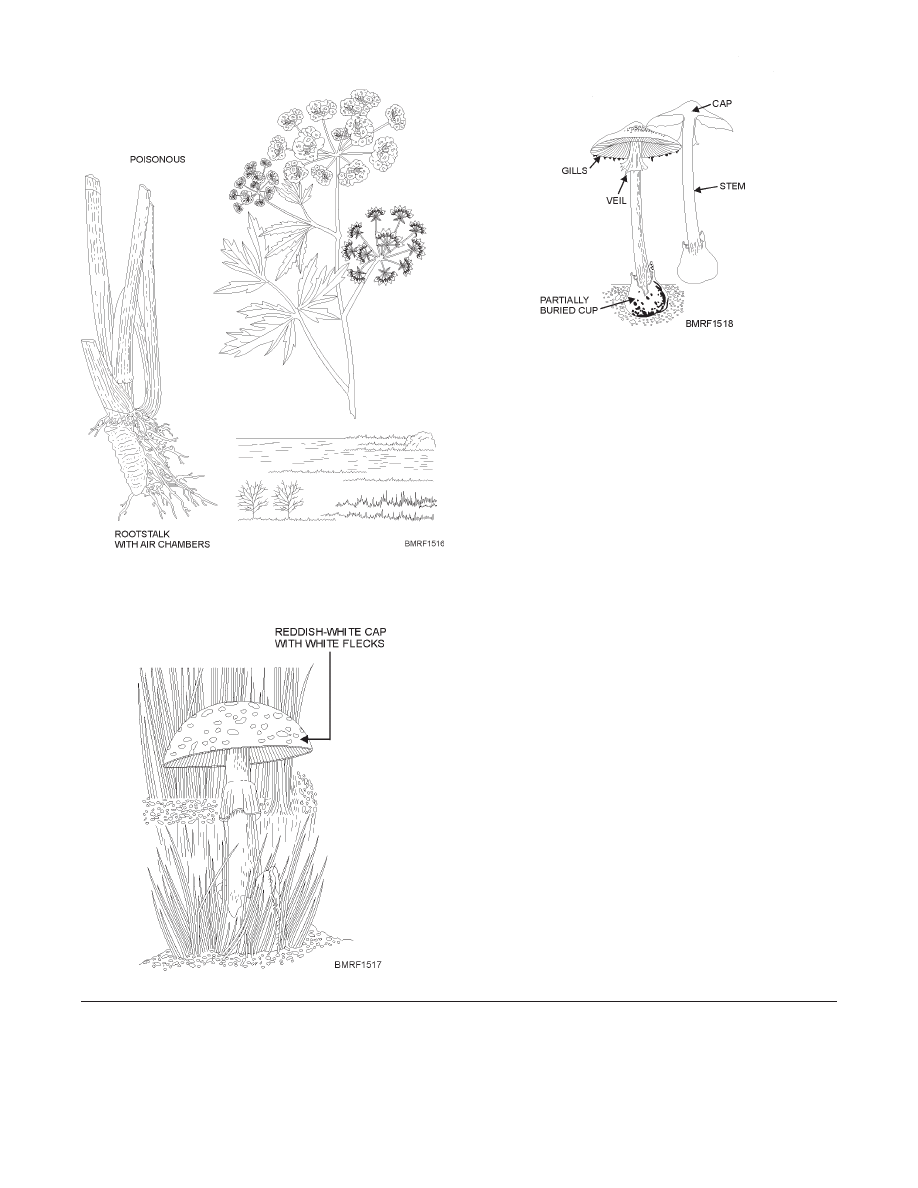
Some places, such as the Arctic and subarctic
regions, have less than a dozen plants that are
poisonous. These include the water hemlock (fig.
15-16) and the poisonous mushrooms (figs. 15-17 and
15-18).
15-19
Student Notes:
Figure 15-10.—Extracting water from vines.
15-20
Student Notes:
FOOD
CHARACTERISTICS
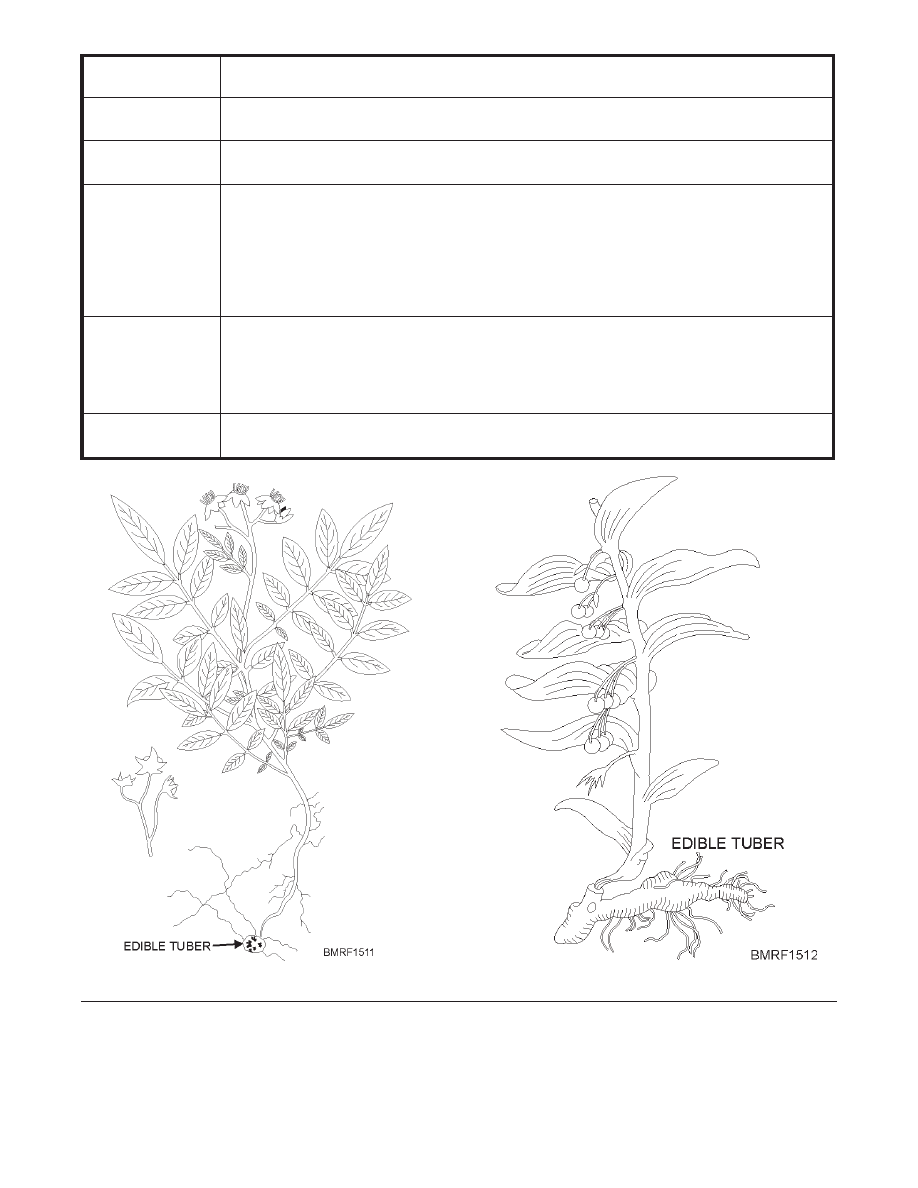
Wild potato
The wild potato is an example of an edible tuber (fig. 15-11). This small plant is found throughout
the world, especially in the tropics.
Solomon’s seal
Tubers of Solomon’s seal (fig. 15-12) grow on small plants found in North America, Europe,
Northern Asia, and Jamaica. Boiled or roasted, they taste much like parsnips.
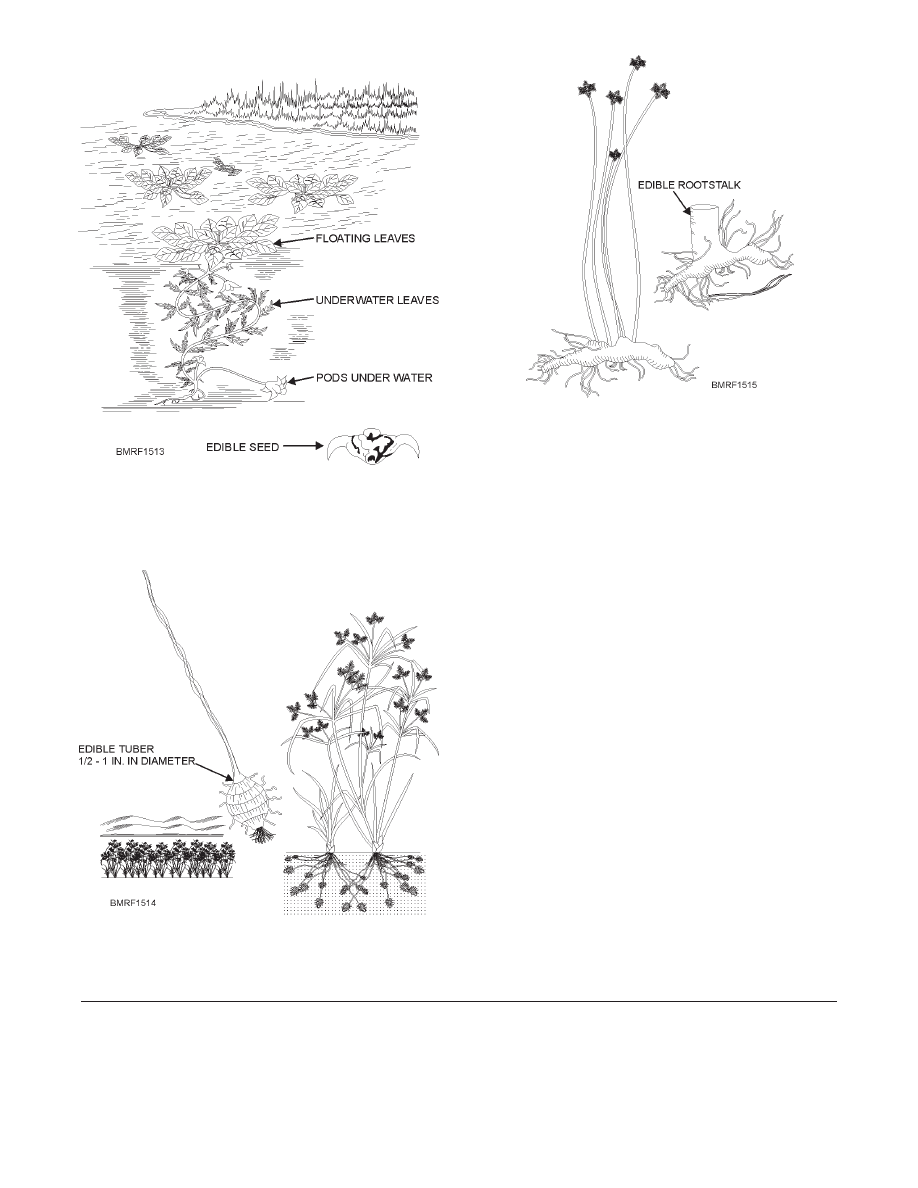
Water chestnut
The water chestnut is a native of Asia, but it has spread to both tropical and temperate areas of the
world including North America, Africa, and Australia. It is found as a free-floating plant on rivers,
lakes, and ponds in quiet water. The plant covers large areas wherever it grows. It has two kinds of
leaves—the submerged leaf, which is long, rootlike, and feathery, and the floating leaf, which forms a
rosette on the surface of the water. Beneath the water, the plant bears nuts that are 1 to 2 inches broad
with strong spines that give them the appearance of a horned steer (fig. 15-13). You can roast or boil the
seed inside the horny structure.
Nut grass
Nut grass is widespread in many parts of the world. Look for it in moist, sandy places along the
margins of streams, ponds, and ditches. It occurs in both tropical and temperate climates. The grass
differs from true grass because it has a three-angle stem and thick underground tubers that grow ½ to 1
inch in diameter. (See fig. 15-14.) These tubers are sweet and nutty. Boil, peel, and grind them into
flour; you can use the flour as a coffee substitute.
Bullrush
Bullrush is a tall plant found in the wet, swampy areas of North America, Africa, Australia, the
East Indies, and Malaya. (See fig. 15-15.) You may eat the roots and white stem base cooked or raw.
Figure 15-11.—Wild potato.
Figure 15-12.—Solomon’s seal.
The tropics have no greater proportion of poisonous
plants than the United States. If you’re in doubt about
whether plants are poisonous or nonpoisonous, observe
the habits of vegetable-eating animals, such as birds,
rodents, monkeys, baboons, and bears. Usually the
foods these animals eat are safe for humans. Cook all
plant foods because cooking removes plant poisons
(except those in poisonous mushrooms).
NOTE
Avoid eating plants that taste bitter. Also avoid
eating untested plants that have milky juices.
Don’t let the milky juice contact your skin.
You may eat most animals. However, some, like
mollusks, may introduce parasites into your body,
especially if you eat them uncooked or when they aren’t
fresh. Crustaceans are almost always edible, but they
spoil rapidly and may harbor harmful parasites. Be sure
to cook the freshwater variety; eat the saltwater variety
raw if you desire.
You have no simple way of telling whether a fish is
edible. That depends on the place in which they live,
their source of food, or even the season of the year.
Often fish that are edible in one area of the world are not
in another. At first, eat only small portions of any fish. If
you feel no ill effects, you can probably continue to eat
the fish safely.
15-21
Student Notes:
Figure 15-13.—Water chestnut.
Figure 15-14.—Nut grass.
Figure 15-15.—Bullrush.

15-22
Student Notes:
TYPE OF
ANIMAL
PROCEDURE
Birds
Cook most birds with the skin on to retain their food value. After plucking a bird, cut off the neck
close to the body and take out the internal organs through the cavity. (NOTE: Scalding most birds makes
them easier to pluck. Waterfowl are an exception; they are easier to pluck when dry.) Wash out the cavity
with fresh, clean water. Save the neck, liver, and heart for stew. Boil scavenger birds, like buzzards and
vultures, at least 20 minutes before you cook them to kill parasites.
Birds’ eggs are among the safest of foods. You can hard boil eggs and carry them for days as reserve
food.
Save all the feathers you pluck from the birds. You may use them for insulating your shoes or
clothing or for bedding.
Fur-bearing
animals
Clean and dress the carcass of a fur-bearing animal as soon as possible after death. Any delay will
make your job harder. Cut the animal’s throat and allow the blood to drain into a container. The boiled
blood is a valuable source of food and salt. Save the kidneys, liver, and heart. Use the fat surrounding the
intestines. All parts of the animal are edible, including the meaty parts of the skull, such as the brain,
eyes, tongue, and flesh.
Shellfish
Crabs, crayfish, shrimp, prawns, and other crustaceans are excellent sources of food. However,
crustaceans spoil rapidly so boil them alive immediately after capture. You can steam, boil, or bake
shellfish such as clams, oysters, and conchs in the shell. Shellfish make an excellent stew when cooked
with greens or tubers.
Other foods
You can easily catch grasshoppers, locusts, large grubs, termites, ants, and other insects to
provide nourishment in an emergency.
METHOD
DESCRIPTION
Roasting or
broiling
This is a quick way to prepare wild plant foods and tender meats. Roast meat by putting it on a stick and
holding it near the embers of your fire. Roasting hardens the outside of the meat and retains the juices.
Baking
Baking is cooking in an oven over steady, moderate heat. The oven maybe a pit under you fire, a closed
vessel, or a leaf or clay wrapping. Pit cooking protects food from flies and other pests and reveals no flame at
night.
Steaming
You can steam foods that require little cooking, like shellfish. Place your food in a pit filled with heated
stones over which leaves are placed. Put more leaves over your food. Then force a stick through the leaves
down to the food pocket. Pack a layer of dirt on top of the leaves and around the stick. Remove the stick and
pour water to the food through the holes that remains. Steaming is a slow but effective way to cook.
Parching
Parching may be a desirable method of preparing some foods, especially grains and nuts. To parch, place
the food in a metal container and heat slowly until it is thoroughly scorched. In the absence of a suitable
container, use anything that holds food or water—a heated, flat stone; turtle shells; seashells; leaves; bamboo;
or a section of bark.
Drying
Drying preserves food by ridding it of moisture. You can dry plant food and meat by exposing them to
wind, sun, air, fire, or any combination of these. To produce jerky, cut meat into 1/4-inch strips and place it
across grates; allow it to dry in either the wind or smoke until brittle.
EVASION
According to the Code of Conduct for Members of
the Armed Forces of the United States, it is your duty to
evade capture by the enemy. Your job is to get back to
your unit. Your survival will depend on your ability to
apply the techniques of evasion. No other reason is more
important for making evasion techniques part of your
basic combat skills.
Evasion means traveling through enemy-held
territory without being captured. Falling into the hands
of the enemy is an event that no military person wants to
experience. However, at some point in your career you
may find yourself in a situation where capture is a
possibility. You need to know a few basic evasion
principles to decrease your chances of winding up as a
guest of the enemy.
During World War II and the succeeding actions in
Korea and Vietnam, many of our soldiers, Sailors, and
marines were able to avoid the enemy and safely return
to friendly forces. They were successful because they
applied some or all of the guidelines presented in the
following paragraphs. You need to learn this
information so that you know how to evade the enemy. It
could mean the difference between freedom or capture;
interrogation; and possibly, inhumane treatment by
enemy forces.
Obviously, the most important consideration in
evasion is knowing where the enemy is located. If you
don’t know the enemy’s location, watch for the
15-23
Student Notes:
Figure 15-16.—Water hemlock.
Figure 15-17.—Fly agaric.
Figure 15-18.—Death angel.

following signs. They can tell you the enemy’s
location as well as other valuable information.
1. Signs that groups have passed, such as crushed
grass, broken branches, footprints, cigarette
butts, or other discarded trash, may reveal their
identity and size, their direction of travel, and
the time they passed through.
2. Workers in fields may indicate absence of the
enemy.
3. Apparently normal activities in villages may
indicate absence of the enemy.
4. Less obvious conditions may indicate the
presence of the enemy, such as the following:
a. The absence of workers in fields is an
indication that the enemy is near.
b. The absence of children in a village is an
indication that the children have been
hidden to protect them from action that may
take place.
c. The absence of young people in a village is
an indication that the enemy controls the
village.
Some evasion techniques you may find useful are
cover, concealment, and camouflage. To keep yourself
from being seen, you may have to hide in bushes or lie
flat in shallow ditches using brush as a cover or
camouflage.
When evading the enemy, remember the following
points:
1. Conceal yourself from enemy aircraft and
nearby enemy troops.
2. Move quietly; noises carry in fog, fallen snow,
heavy foliage, and over rock faces.
3. Maintain personal hygiene to prevent body
odor; cover body waste and scraps of food;
avoid activities, such as cooking and smoking,
that produce smells; such smells can reveal your
location.
4. Don’t make sudden, rapid movements that can
reveal your location.
5. Select routes for movement that avoid exposed
areas and don’t show your silhouette against the
skyline. Don’t leave obvious tracks.
Crude Direction-Finding Techniques
How do you determine direction without a
compass? Nature can help you or nature can fool
you. The two best crude sources of direction are the
sun and the stars, but you must know how to use
them.
These are very crude direction-finding techniques;
you may only use them in the Northern Hemisphere. If
your ship or aircraft is going to be operating in the
Southern Hemisphere, you should learn the techniques
for that area of the world.
Evasion Travel
The route that you select to travel while trying to
evade the enemy depends on your situation, the weather
conditions, and the nature of the terrain. Whether you
select a ridge, stream, valley, coastline, dense forest, or
mountain range to follow, be sure it is the safest, rather
than the easiest, way. Experience has proved that the
most difficult route is frequently the safest.
Travel Tips
Some tips you can use when traveling include the
following:
15-24
Student Notes:
Sun
The sun travels from the eastern sky to the
western sky. How can you use the sun to
determine an east-west direction?
You can use shadows (even on a cloudy
day) made by the sun to get an accurate
east-west line. On a flat surface, drive a stick 3
or 4 feet high in the ground. Then mark the tip
of the stick’s shadow with a rock. If you wait
awhile and then mark the shadow again, you
will see that the line connecting the tips of the
shadows inscribes an east-west line on the
ground.
Stars
To use the stars, you must have a clear
night. You may locate north by finding the
North Star (Polaris), the outermost star in the
handle of the Little Dipper.

•
Be patient, cautious, and avoid overconfidence.
An enemy’s approach isn’t a cause for panic.
Normally, you have a good chance of remaining
unobserved.
•
Conserve your strength by avoiding exhaustion.
When you have to remain in one place for an extended
period, exercise moderately to keep fit.
•
Generally, avoid eating uncooked food or
drinking unboiled water. Select a hiding place to cook
the food and boil the water you will use en route to the
next evasion objective.
•
Hold on to items of personal clothing and
equipment; they serve a useful purpose during evasion.
Keep some items that will identify you as a military
person, such as your dog tags. If you can’t positively
15-25
Student Notes:
Along a ridgeline
Using a route along a ridgeline is usually easier to follow than one through a valley.
You can frequently use animal trails on top of ridges to guide your travel. When
following a ridge-top trail, stay below the trail and move parallel to it. Never travel
along the top of a ridge. Doing so makes you an easily identifiable silhouette against
the skyline.
Use of a stream
Using a stream as a route is of particular advantage in a strange country. It provides a
fairly definite course and might lead to populated areas. It’s a potential food and water
source and may provide you a means of travel by boat or raft.
Following a
coastline
Following a coastline leads you on a long, roundabout route. However, a coastline
serves as a good starting point. It is an excellent base line from which to get your bearings
and a probable source of food.
In a dense forest
When traveling in a dense forest, you probably won’t be able to spot distant landmarks.
You can stay on course by lining up two trees forward of your position in your direction of
travel. As soon as you pass the first one, line up another beyond the second. You might find it
helpful to look back occasionally to check the relative positions of landmarks.
Marking your
route
You can mark your route with bent bushes, rocks, or notches placed on the backsides of
trees at approximately eye level. Make bush marks by cutting vegetation or bending it so that
the under, lighter sides of the leaves are facing upward. These signs are especially
conspicuous in dense vegetation, but you should be cautious in using them. By plainly
marking your route, you risk discovery.
Trails in your
general direction
Follow trails that lead in your general direction; when you come to a fork, follow the
path that appears most traveled. If you follow the wrong trail and become lost, stop and try to
remember the last time you were sure of where you were. Mark your location and start
backtracking. Sooner or later you will discover a recognizable feature with which you can
pinpoint your position.
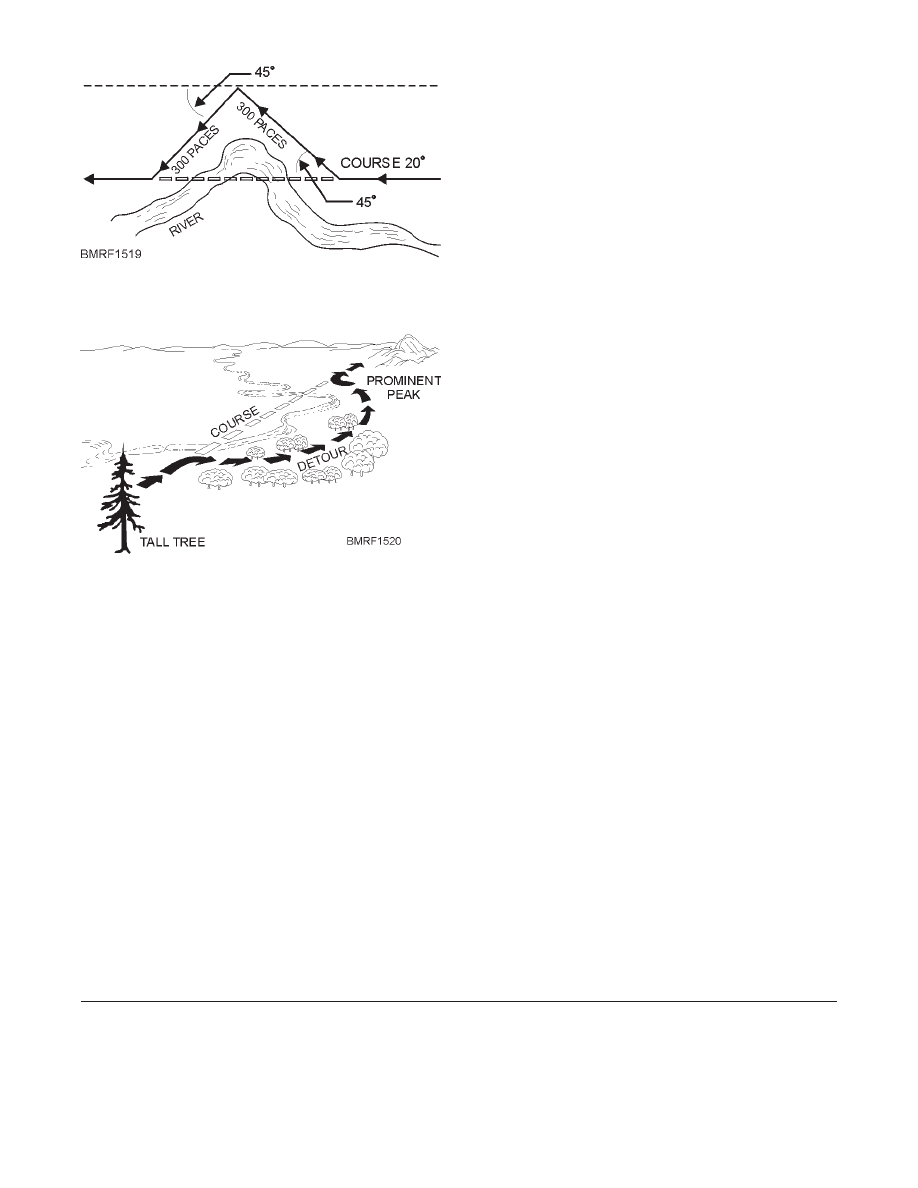
Detouring in
rough country
You might have to detour frequently in rough country. To do that, try to follow the
method shown in figure 15-19 for estimating distance and average angle of departure for
short detours. On your return from the detour, estimate the angle and distance to regain your
original line of travel. For greater accuracy, count paces and use a compass. Another method
(fig. 15-20) lets you select a prominent landmark ahead and behind your line of travel. On
returning from your detour, walk until you are again lined up on the two landmarks; then
follow your original course.
identify yourself as a military person, you may be
treated as a spy if captured or be refused assistance by
escape organizations or friendly natives.
•
Don’t leave or throw away any articles that, if
found, could give the enemy a clear picture of your
direction of travel. Bury, or otherwise dispose of, the
effects of your campsite.
•
Practice supply economy. You may have to use
the same jacket or pair of shoes throughout the entire
evasion trip, which could cover hundreds of
cross-country miles during both winter and summer
seasons. Build up your food and water supplies.
Carefully ration them so that they will last until you can
reach an evasion objective or can replenish them. If you
have food but no water, don’t eat. Since the digestive
processes require water, you will dehydrate faster if you
eat.
•
Use firearms only in an emergency. Keep them
concealed at all times during your evasion unless a
situation arises that requires a show of arms.
•
Avoid contact with people as long as possible.
However, if you can’t proceed on your own because of
sickness, lack of food, or other reasons, then, and only
then, seek out native assistance. Natives who are
sympathetic to the allied cause or members of the
underground who operate escape lines for the purpose
of returning evaders to allied control may offer
assistance. Be wary in contacting natives or accepting
their help, regardless of what they claim to be.
•
If you’re fortunate enough to travel through an
area where an organized escape line exists, the chances
are good that a spotter will seek you out. Spotters for
resistance or underground organizations are
particularly alert when they have reason to believe allied
evaders are in their area but so are enemy police and
counterintelligence agents. Persons wearing civilian
clothing in enemy-held territory are not necessarily
civilians.
Crucial Phase of Evasion
To establish contact with friendly lines or to cross
the border to a neutral country is the most crucial point
of evasion. All of your patience, planning, and
hardships will be in vain if you aren’t careful when
contacting friendly frontline forces. Many personnel
attempting to pass through friendly lines have been
killed because they didn’t identify themselves properly.
Most of these people wouldn’t have been shot if they
had been cautious and followed proper procedures. The
normal tendency is to throw caution to the wind when in
sight of friendly forces. You must control this tendency.
Regular patrols or special mission personnel
operating behind enemy lines are given the challenge
and password of the day as a security measure.
Challenges and passwords provide for the identification
of the patrol as it approaches a friendly position. In
addition, frontline troops are told the time and place
where patrols will leave and enter the lines. These
conditions exist only if you are able to rejoin your outfit
within 24 hours following your separation. After
24 hours, you must follow certain established
procedures and hope the frontline troops will also
15-26
Student Notes:
Figure 15-19.—Estimating distance and average angle of
departure.
Figure 15-20.—Using prominent landmarks.

follow them. Usually frontline troops, especially those
employed several miles forward of the forward edge of
the battle area, shoot first and ask questions later.
Contacting these troops is, at the very least, sensitive
and a calculated risk. However, in the absence of an
opportunity to contact a friendly patrol, contact with
frontline troops may be your only alternative.
Generally, frontline troops are told to honor the display
of a white flag or another white object and to advance
the unknown person to be recognized.
Once back in friendly hands, you’ll naturally want
to talk about your exploits and will undoubtedly receive
countless questions from frontline troops. However,
that is the time you should remain silent. If you talk at
this point, you may endanger the lives of those who
helped you. In addition, you may compromise methods
other service personnel might use to evade the enemy
and get out safely. Give only information of immediate
tactical importance to frontline units. Advise the first
officer or petty officer contacted that you are returning
to duty from missing in action, prisoner of war, or
internment status. Then request to be taken to someone
authorized to receive evasion and escape information.
These survival techniques are but a few of the ways
you can stay alive and live to return to friendly forces.
You can gain an in-depth knowledge of survival,
evasion, and escape techniques through special training.
The Navy provides this special training at survival,
evasion, resistance, and escape (SERE) schools located
at strategic locations throughout the world.
ESCAPE
If I am captured I will continue to resist by all means
available. I will make every effort to escape and aid
others to escape. I will accept neither parole nor special
favors from the enemy.
—Code of Conduct, Art. III
What happens if you become a prisoner of war
(POW)? After all, it is possible. Isolation, fear, and
injury all work in favor of the enemy to increase your
chances of capture in spite of a determined effort on
your part to evade. The surrender of your arms,
h ow eve r, d o e s n o t m e a n y o u f o r f e i t y o u r
responsibilities as a member of the American armed
forces. The armed forces Code of Conduct directs
that you begin planning your escape the minute you
are taken prisoner.
Escape is tough; making it work is even tougher. It
demands courage, cunning, and much planning in
seeking ways out, determining what routes to follow,
and locating friends. Above all, it demands physical
stamina under the worst conditions imaginable.
Experience has proven that “model” camps with regular
rations and considerate treatment are the exception. But
no matter what extremes you encounter as a POW, try to
keep yourself physically able and sufficiently equipped
to escape as soon as possible.
If captured, try to make your escape early. You
may never be in any better physical condition to
escape than at the moment you are captured. Prison
rations are barely enough to keep you alive; they
certainly won’t supply you with a reserve of energy.
The physical treatment, lack of medical care, and
insufficient rations of prison life soon have effects
such as physical weakness; night blindness; and loss
of coordination, reasoning power, and morale.
There are other reasons for making your escape
early after your capture. Friendly artillery fire or air
strikes occurring during that time may increase your
chances of getting away. The first guards you will have
are not as well trained in handling prisoners as those
farther back from the front lines. Some of the line guards
may even be walking wounded who are distracted by
their own condition. In addition, you know something
about the terrain where you are captured, and you know
the approximate location of friendly units. Several days
later and many miles away, you may be in strange
territory. An escape from a prison camp is much more
difficult and requires more detailed planning. It must be
organized and supported as any other military
operation. The method you should use to escape
depends on your particular situation. The only general
rules are to make an early escape and to escape when the
enemy’s attention is distracted.
Save, Add to, Take Care of (S-A-T)
Since the conditions in various POW camps differ,
it is impossible to provide a specific escape or survival
plan for each situation. What you need is a guide to help
15-27
Student Notes:

you plan to make the best of what you have. One such
guide is to remember the word S-A-T–SAVE, ADD TO,
TAKE CARE OF
Maintaining Your Health
Good physical health is essential to survival under
any circumstances. It is especially important in a POW
camp where living conditions are crowded and food and
shelter are lacking. That means you must use every
device possible to keep yourself well.
Soap and water provide a basic preventive
medicine; so keep clean. If water is scarce, collect
rainwater, use dew, or simply rub yourself daily with a
cloth or your bare hands. Pay attention to areas on your
body that are likely to develop rash and
fungus
infection–your crotch, your scalp, and between your
toes.
15-28
Student Notes:
CODE OF CONDUCT
ARTICLE I
I am an American, fighting in the forces which guard my country and our way of life. I am
prepared to give my life in their defense.
ARTICLE II
I will never surrender of my own free will. If in command I will never surrender the
members of my command while they still have the means to resist.
ARTICLE III
If I am captured I will continue to resist by all means available. I will make every effort to
escape and aid others to escape. I will accept neither parole nor special favors from the enemy.
ARTICLE IV
If I become a prisoner of war, I will keep faith with my fellow prisoners. I will give no
information or take part in any action which might be harmful to my comrades. If I am senior,
I will take command. If not, I will obey the lawful orders of those appointed over me and will
back them up in every way.
ARTICLE V
When questioned, should I become a prisoner of war, I am required to give name, rank,
service number and date of birth. I will evade answering further questions to the utmost of my
ability. I will make no oral or written statements disloyal to my country and its allies or
harmful to their cause.
ARTICLE VI
I will never forget that I am an American, fighting for freedom, responsible for my
actions, and dedicated to the principles which made my country free. I will trust in my God
and in the United States of America.

15-29
Student Notes:
Save
Save what you can in a POW camp—clothing, pieces of metal, cloth, paper, string
anything! A piece of twine may mean success or failure when the time comes for you to break
out. Hide these items under the floor or in a hole in the ground. Since they appear harmless,
little or nothing will be done to punish you if they are discovered.
Wear as few clothes as possible during your imprisonment. SAVE your shoes,
underwear, shirts, jacket, and any other items of clothing that will protect you from the
elements to wear during your escape.
Save any nonperishable foods you receive from the Red Cross or your captors. Candy,
for example, comes in handy as a quick source of energy when you are traveling. If no candy
source is available, SAVE each issue of sugar given you by the enemy. When you get enough,
boil it down into hard candy. SAVE it until you build up your supply. Store any canned foods
you receive. The enemy might puncture the cans to prevent you from saving them. However,
you can recook some food into another form that preserves it. Other foods to hoard against
the day of your escape include suet (a hard fat), cooked meat, nuts, and bread.
Save pieces of metal no matter how insignificant they may seem. Nails and pins can serve
as buttons or fasteners. You can use old cans to improvise knives, cups, or food containers. If
you are fortunate enough to have a razor blade, guard it. Use it for shaving only. Devise ways
of sharpening it; rub it on glass or stone or some other hard surface. A clean shave is a good
morale booster.
Save your strength but keep active. A walk around the compound or a few mild
calisthenics will keep your muscles toned. Sleep as much as you can. You will not get much
rest on your way back.
Add to
Use your ingenuity. Select those items that you cannot get along without and
supplement them; for example, your rations. There is more to eat in and around your
compound than you think. When you are allowed to roam around the prison campgrounds,
look for natural foods native to the area, such as roots, grasses, leaves, barks, and insects. If
possible, ADD these foods to your escape cache (supplies). They will keep you alive when
the going gets tough.
Supplement your clothing so that the more durable garments are in good repair when
you escape. A block of wood and a piece of cloth make good moccasins; that saves wear on
your shoes. Substitute rags for gloves; weave straw into hats. Do not forget to salvage
clothing from the dead.
Take care of
Probably the most important part of any plan for survival is the take-care-of phase.
Maintain what you have. You won’t receive a reissue of shoes or clothes that you wear
out or lose. Also, maintain your health; it is not easy to regain once you lose it.
Put some of your clothing into your escape cache. Watch the rest for early signs of wear,
and repair them with improvised material if needed. Use a needle made from a thorn, nail, or
splinter and thread from unraveled cloth to mend a torn pair of trousers. Wood, canvas, or
cardboard bound to the soles of your shoes will save them from wear. Even paper will suffice
as a reinforcing insole if your shoes do wear through.

Keeping clean also applies to your clothing. Use
soap and water when you can spare it. Hang your clothes
in the sun to air if soap and water are not available.
Examine the seams of your clothing and the hairy
portions on your body frequently for lice and their eggs.
Disease-infected lice can kill. A possible way to get
laundry service, or even a bath, is to tell your guard that
you are infested with lice, whether or not your
complaint is true. The prison authorities, fearing that
lice on prisoners may cause an outbreak of louse-borne
disease among the civilian and guard population, might
provide this service.
If you become ill, report your condition to the camp
authorities. The chance that you will receive aid is worth
the try.
After You Escape
Once you escape, you may have trouble contacting
friendly units even when you know where they are.
Approach the problem as you would if you were a
member of a lost patrol. Time your movements so that
you pass through the enemy forward areas at night and
arrive between the enemy and friendly units at dawn. A
good plan is to find a ditch or shell hole where you have
cover from both friendly and enemy fire. Attract the
attention of the friendly forces by waving a white cloth,
shouting, exposing or laying out a panel, or some other
method. In doing so, you alert friendly forces who are
prepared to accept any small group that appears willing
to regain contact. When you alert friendly forces, they
are not as likely to shoot you on sight.
REVIEW 2 QUESTIONS
Q1. Give the meaning of the letters in the key word
S-U-R-V-I-V-A-L.
S
U
R
V
I
V
A
L
Q2. If in a group, what action(s) makes(s) for the best
chance of survival?
Q3. List the sources of drinking water.
a.
b.
c.
d.
15-30
Student Notes:

Q4. True or False. Food derived from animals has
more food value per pound that food from plants.
Q5. List plants that you should not eat.
a.
b.
c.
Q6. List some techniques that are useful to evade the
enemy.
a.
b.
c.
Q7. What does the armed forces Code of Conduct
direct you to do?
SUMMARY
You will probably spend the majority of your naval
career aboard ship. Hopefully you will never fall or be
washed overboard or have to abandon ship.
The U.S. Navy operates in all parts of the world
from the tropics to polar regions. Each region has its
own special survival problems. You may encounter the
extreme cold of the polar regions or the heat and
humidity of a tropical jungle. Your survival in these
places will depend on your ability to take care of
yourself. Knowing how to combat hypothermia or heat
exhaustion will greatly increase your chances for
survival.
Although it could happen, hopefully you will never
find yourself stranded in enemy-held territory. To be
captured by an enemy force is one of the worst
situations you could face. Being properly prepared to
make an escape and return to your unit is not only your
duty, but it is what every POW thinks about. Knowing
how to make that escape work is even more difficult.
Knowing what the local environment has to offer in
food and water supplies will help you survive during
your escape. Maintaining the proper state of mind will
greatly increase your chances of making a successful
escape.
REVIEW 1 ANSWERS
A1. When aboard ship, you should know escape
routes so you won’t be trapped or cut off in
case of an emergency or if you must abandon
ship.
A2. False. You should never dive into the water to
abandon ship. Use a ladder, cargo net, line, or fire
hose.
A3. The swimming classification that gives you the
best chance for survival if you have to abandon
ship is the First Class Swimmer.
A4. If you have to jump from a ship into burning
water, you should take a deep breath, cover
your nose and mouth with one hand and your
eyes with the other, and swim under water as
far as possible.
A5. You can use trousers/slacks, sea bag, and
pieces of wood to stay afloat.
A6. The two types of life preservers used by the Navy
are the—
a. Inherently buoyant type
b. Inflatable type
A7. When you have custody of your life preserver,
you should inspect it once each month.
A8. The contents of survival kits carried by inflatable
lifeboats include—
a. Food rations
b. Sea marker dye
c. Flashlight
d. Batteries
e. Signal mirror
f. Whistle
g. First-aid kit
h. Distress signal kit
15-31

i. Containers of fresh water
A9. The one essential requirement for survival is
drinking water.
A10. The food ration carried by lifeboats is based on
one packet of food per person per day.
A11. Some of the dangers you might face by exposure
include—
a. Sunburn
b. Hypothermia
c. Frostbite
d. Immersion foot
REVIEW 2 ANSWERS
A1. The meaning of the letters in the key word
S-U-R-V-I-V-A-L are—
S ize up the situation
U ndue haste makes waste
R emember where you are
V anquish fear and panic
I mprovise
V alue living
A ct like the natives
L earn basic skills
A2. In a group, working together is the best chance
of survival.
A3. Some sources of drinking water include—
a. Dig to the water table
b. Collect dew during the night
c. Runoff water
d. A water-yielding plant
A4. True. Food derived from animals has more food
value per pound than food from plants.
A5. Plants that you should not eat include—
A. Water hemlock
B. Fly agaric
C. Poisonous mushrooms
A6. Some techniques that are useful to evade the
enemy include—
a. Cover
b. Concealment
c. Camouflage
A7. The armed forces Code of Conduct directs you to
make every effort to escape.
15-32

CHAPTER COMPREHENSIVE TEST
1. If time permits during abandon-ship
preparation, a message announced over the
1MC will give which of the following
information?
1. Water temperature
2. Sea and wind conditions
3. Bearing and distance to the nearest land
4. All of the above
2. If you have to go over the side and the ships’
propellers are turning, you should leave from
what point on the ship?
1. The windward side, if possible
2. The lee side, if possible
3. From the bow
4. From the stern
3. Personnel have the greatest chance for survival
in the water if they meet which of the
following swimmer requirements?
1. First class
2. Second class
3. Third class
4. If you have to swim through flames, which of
the following is a procedure to follow?
1. Use your life preserver as a raft
2. Keep your face above the surface of the
water as much as possible
3. Both 1 and 2 above
4. Swim underwater until you are clear of the
oil
5. If you must abandon ship into oily water that
is not burning, which of the following
precautions should you take?
1. Use your life preserver as a raft
2. Keep your face above the surface of the
water as much as possible
3. Both 1 and 2 above
4. Swim underwater until you are clear of the
oil
6. You can use which of the following items to
help you stay afloat?
1. Seabags
2. Pillow cases
3. Mattress covers
4. All of the above
7. The Navy uses a maximum of how many types
of life preservers?
1. One
2. Two
3. Three
4. Four
8. Which of the following benefits does the collar
on the vest-type life preserver provide?
1. Additional insulation against chill in cold
water
2. Additional buoyancy to keep the head
upright
3. A place to store survival equipment
4. A place to attach a retrieving line
9. The wooden toggle and line of an inflatable
life preserver are used to
1. permit easy removal of the preserver
2. make the preserver fit snugly around your
body
3. attach yourself to a life raft or another
person
4. provide a means for retrieving you out of
the water
10. When using a pin-on, battery-operated light on
a life preserver, you should replace the battery
at what minimum interval?
1. 18 months
2. 12 months
3.
3 months
4.
6 months
11. You may launder the fibrous glass pads in
addition to the outer cover of the inherently
buoyant preserver.
1. True
2. False
12. In addition to inspecting your inflatable life
preserver each time you wear it, you should
also inspect it for air leaks at what minimum
interval?
1. Daily
2. Weekly
3. Monthly
4. Quarterly
15-33

13. The survival kits in large lifeboats are
designed to sustain 15 to 20 people on regular
rations for what maximum number of days?
1. 20
2. 15
3. 10
4.
5
14. You can identify the red flare end of a Mk 13
Mod 0 distress signal kit in the dark by which
of the following indicators?
1. A metal pull ring
2. Beadlike projections
3. The absence of beadlike projections
4. The absence of a metal pull ring
15. Under good weather conditions, the dye
marker will retain some color for what
maximum length of time?
1. 1 hour
2. 2 hours
3. 3 hours
4. 4 hours
16. In a lifeboat, what piece of survival equipment
is provided to assist you in filling containers
with freshwater?
1. Rain catcher tube
2. Rain cistern
3. Rain bucket
4. Funnel
17. In a lifeboat, continuous exposure to the
elements will not harm which of the following
pieces of survival or signal equipment?
1. Sponges
2. Knives
3. Flashlights
4. Signal mirrors
18. In a lifeboat, you may survive on as little as
how much water a day?
1. 10 ounces
2.
8 ounces
3.
6 ounces
19. People are known to live for 4 weeks or longer
in a survival situation if a sufficient amount of
water is available.
1. True
2. False
20. Which of the following forms of sea life or
birds should NEVER be eaten?
1. Sharks
2. Jellyfish
3. Seabirds
4. Sea turtles
21. Which of the following sea birds is/are edible?
1. Albatrosses
2. Gannets
3. Terns
4. All of the above
22. At what minimum water temperature are you
at risk for a serious condition called
hypothermia?
1. 75
EF
2. 80
EF
3. 85
EF
4. 95
EF
23. What means should you use to treat frostbitten
hands and fingers?
1. Rub them
2. Exercise them
3. Place them in cold water
4. Place them in contact with a warm part of
your body
24. Assume that you have just fallen overboard.
What is the most important survival technique
for you to remember?
1. Remain calm and try to stay afloat
2. Swim after the ship and call for help
3. Remove your shoes and other heavy
clothing
4. Keep moving your arms and feet for
protection from sharks
25. Helicopters use a maximum of how many
basic devices for recovering personnel in the
water?
1. One
2. Two
3. Three
4. Four
15-34

26. If you fall overboard and sharks are in the
area, you should take which of the following
actions?
1. Swim away from the area
2. Assume the jellyfish position and try to
remain motionless
3. Float on your back and use as little arm
and leg movement as possible
4. Tread water and make wide sweeping
movements with your arms to splash water
27. In a group survival situation, good leadership
will lessen the effects of which of the
following emotional states?
1. Panic
2. Confusion
3. Disorganization
4. All of the above
28. At least how many quarts of water are required
each day to maintain your efficiency?
1. 1
2. 2
3. 3
4. 4
29. Liquids obtained from vines are undrinkable if
they have which of the following
characteristics?
1. White sap
2. Very dark in color
3. Both 1 and 2 above
4. Slightly pink color
30. In a survival situation with less than 1 quart of
water per day, you should avoid eating what
type of food?
1. High-carbohydrate
2. Highly flavored
3. Excessively sweetened
4. High-protein
31. Under survival conditions, you would obtain
the most food value from which of the
following sources?
1. Nuts
2. Tubers
3. Insects
4. Animal flesh
32. To kill any parasites scavenger birds such as
buzzards and vultures might carry, you should
boil the birds for what minimum length of
time?
1. 5 minutes
2. 10 minutes
3. 15 minutes
4. 20 minutes
33. When selecting a route for evasion travel, you
should always choose the easiest route.
1. True
2. False
34. Which of the following sources is best for
determining directions under survival
conditions?
1. The position of the stars and the sun
2. The growth of moss on trees and rocks
3. The direction of movement of birds and
animals
4. The direction of water flow in streams and
rivers
35. During evasion, if you can no longer proceed
on your own because of illness, which of the
following actions should you take?
1. Seek help from friendly natives
2. Display a white flag or other white object
3. Surrender to enemy troops by walking
toward them with raised arms
4. Select a hiding place and stay there until
you are well enough to travel
36. After evading the enemy and returning to an
area with friendly forces, you should take
which of the following actions?
1. Fire your weapon three times and give
your name
2. Arouse their attention by shouting at them
3. Display a white flag or other white object
4. Try to get through their lines at night
37. You should give friendly frontline troops
which, if any, of the following information
about your evasion experiences?
1. All information they request
2. Immediate tactical information
3. A description of the methods you used
during evasion
4. None of the above
15-35

38. If you are placed in a POW camp, which of
the following measures is the most important
part of any plan for your escape and survival?
1. Taking care of what you have
2. Adding to what you have
3. Saving everything you can get, no matter
how useless it may seem
4. All of the above
39. After you escape, when is the best time to
arrive at a location between friendly and
enemy units?
1. At noon
2. At dusk
3. At dawn
4. At midnight
15-36
Document Outline
- SURVIVAL
- SURVIVAL AT SEA
- Figure 15-1.ŠJoining life preservers.
- Figure 15-2.ŠSwimming through flames.
- Figure 15-3.ŠUsing inflated trousers/slacks for support.
- Figure 15-4.ŠAdjusting the vest-type life preserver.
- Figure 15-5.ŠInflatable life preserver.
- Figure 15-6.ŠInflatable lifeboat.
- Figure 15-7.ŠIgniting the MK 13 distress signal.
- Figure 15-8.ŠDye marker.
- Figure 15-9.ŠBird noose.
- REVIEW 1 QUESTIONS
- SURVIVAL ASHORE
- Figure 15-10.ŠExtracting water from vines.
- Figure 15-11.ŠWild potato.
- Figure 15-12.ŠSolomon's seal.
- Figure 15-13.ŠWater chestnut.
- Figure 15-14.ŠNut grass.
- Figure 15-15.ŠBullrush.
- Figure 15-16.ŠWater hemlock.
- Figure 15-17.ŠFly agaric.
- Figure 15-18.ŠDeath angel.
- Figure 15-19.ŠEstimating distance and average angle of departure.
- Figure 15-20.ŠUsing prominent landmarks.
- REVIEW 2 QUESTIONS
- REVIEW 1 ANSWERS
- REVIEW 2 ANSWERS
- CHAPTER COMPREHENSIVE TEST
- SURVIVAL AT SEA
Wyszukiwarka
Podobne podstrony:
BASIC MILITARY REQUIREMENTS 24
BASIC MILITARY REQUIREMENTS 19
BASIC MILITARY REQUIREMENTS 2
BASIC MILITARY REQUIREMENTS 1
BASIC MILITARY REQUIREMENTS 4
BASIC MILITARY REQUIREMENTS 6 b
BASIC MILITARY REQUIREMENTS 20
BASIC MILITARY REQUIREMENTS 17
BASIC MILITARY REQUIREMENTS 11
BASIC MILITARY REQUIREMENTS 21
BASIC MILITARY REQUIREMENTS 10
BASIC MILITARY REQUIREMENTS 22
BASIC MILITARY REQUIREMENTS 14
BASIC MILITARY REQUIREMENTS 7
BASIC MILITARY REQUIREMENTS 8
BASIC MILITARY REQUIREMENTS 15
BASIC MILITARY REQUIREMENTS 13
BASIC MILITARY REQUIREMENTS 18
więcej podobnych podstron