Old-Fashioned Push-Along Toys
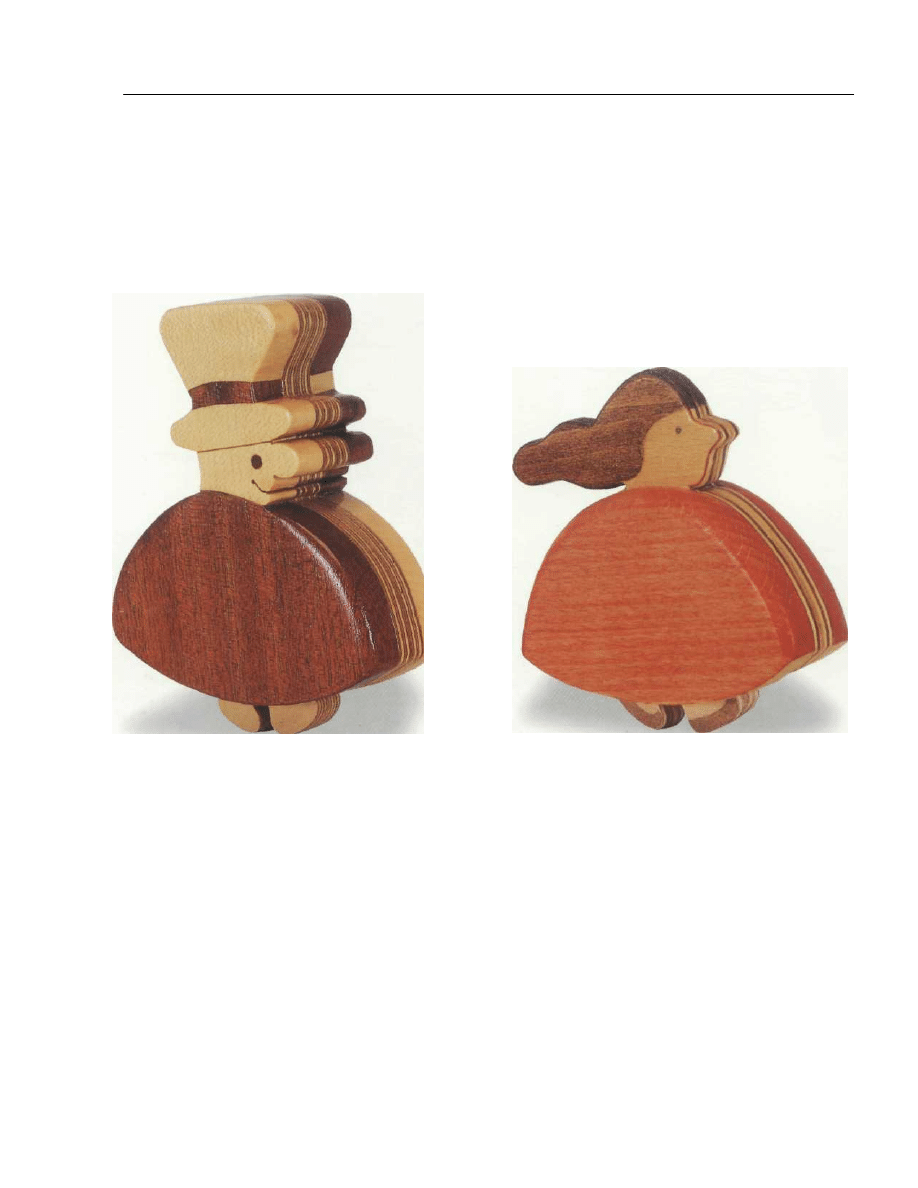
RUNNING ROSY
A doll to kiss, a doll to cuddle—at some time or other,
most of us have sought the cozy, clinging comfort of a
toy doll. Running Rosy is something more than a doll.
She's a sort of doll in a hurry, the perfect push-along-the-
carpet plaything for younger kids. This is a beautiful
plaything, a real delight for kids and adults alike. She's
strong, easy to make, nicely rounded for "learning" hands,
but best of all, her wheel-turning movement is just right
for active toddlers who like to push toys along the floor.
If you are looking to make a unique toy for a unique kid,
then this is the one.
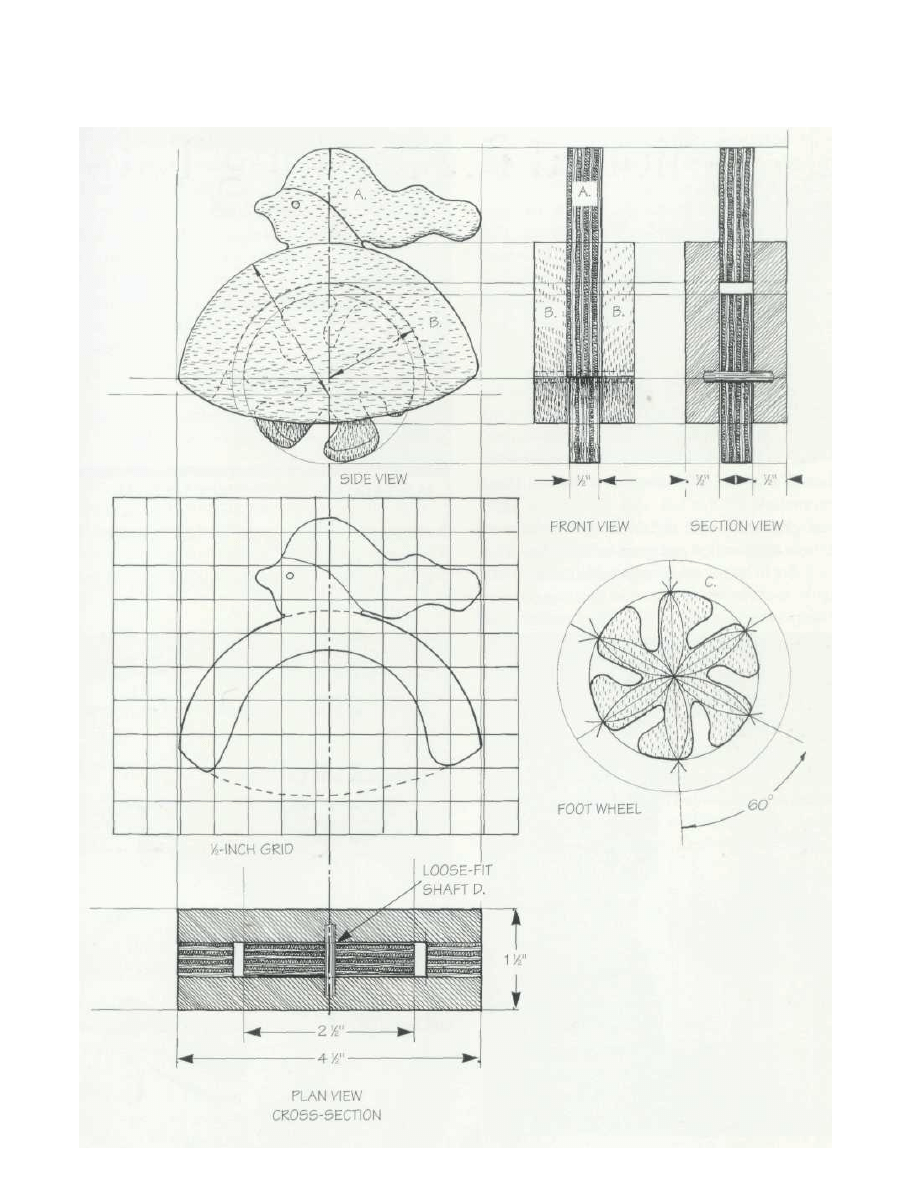
MAKING THE TOY
When you have carefully studied the working drawings,
take the tracing paper, a pencil, ruler and compass, and
carefully set out the design on the wood. If you are going
to stay with my choice of materials—plywood sand-
wiched between solid wood—then you need six cutouts
in all: two solid wood outside body parts, two plywood
head and body spacers, and two plywood foot-wheels. If
you are wondering about my choice of materials, it's
pretty straightforward and logical. While the head-and-
body spacer and the wheel need to be strong in all direc-
tions across the grain, they also need to be safe for kids,
Copyright 2004 Martian Auctions
954
Copyright 2004 Martian Auctions
955
as well as relatively easy to work with a coping saw. All
things considered, we thought that best-quality 1/4"-
thick multi-layer plywood was a winner on many counts.
It's strong, it's stable, it's easy to cut, and it's easy to
bond layers together to give extra strength.
When you have made all the cutouts, rub the two foot-
wheels down to a smooth, round-edged finish—so that
they are smooth to the touch and the total two-wheel
thickness is something less than 1/2". Next, establish the
position of the pivotal dowel holes through the wheel and
into the inside face of each solid wood body part. Then
drill them out with a bit size that gives you a slightly loose
fit for your chosen dowel.
To assemble: Glue one body part to one side of the
central head-body spacer. Set the two foot-wheels in the
cavity so that the feet are facing in the correct direction.
Slide the dowel in place, and, lastly, glue the other body
part in place so that the foot-wheels and pivotal dowel
are nicely contained.
When the glue is dry, rub the whole works down so
that the corners are rounded and good to hold. Aim for a
form that is going to be safe and comfortable in a toddler's
hands. Finally, use watercolors to tint in the imagery, give
the whole works one or more coats of clear varnish, and
the toy is finished.
SPECIAL TIP
Wooden toys must be childproof! Being mindful that tod-
dlers are, at the very least, going to stick the toy in their
mouths, it's most important that all the fixtures, fittings
and materials be totally secure and nontoxic. Perhaps
most important of all, the wood must be splinter resistant.
With all this in mind, we chose to use multi-ply for the
central layer and for the wheels, for the simple reason that
it's easy to work, good to touch, strong across short grain
"necks," and it glues and finishes well.
Don't think you can cut costs by using the coarse-
centered plywood that goes by such names as "block ply,"
"stout heart" and "Malaysian." I say this because plywood
of this type and character tends to be difficult to work,
soft, almost impossible to sand to a good finish, and prone
to splintering. No, when we say "multi-ply," we are
specifically referring to the type of plywood that is built
up in thin 1/16" layers or veneers. A plywood of this
character has a smooth, white, close-grained face, it's
tremendously strong and it's great to work. Ask for "best-
quality, multi-ply, multilayer or multi-core plywood,"
and don't be talked into anything else.
Note, a sheet of 1/4"-thick multilayer plywood
should be made up of four or five thin veneer layers.
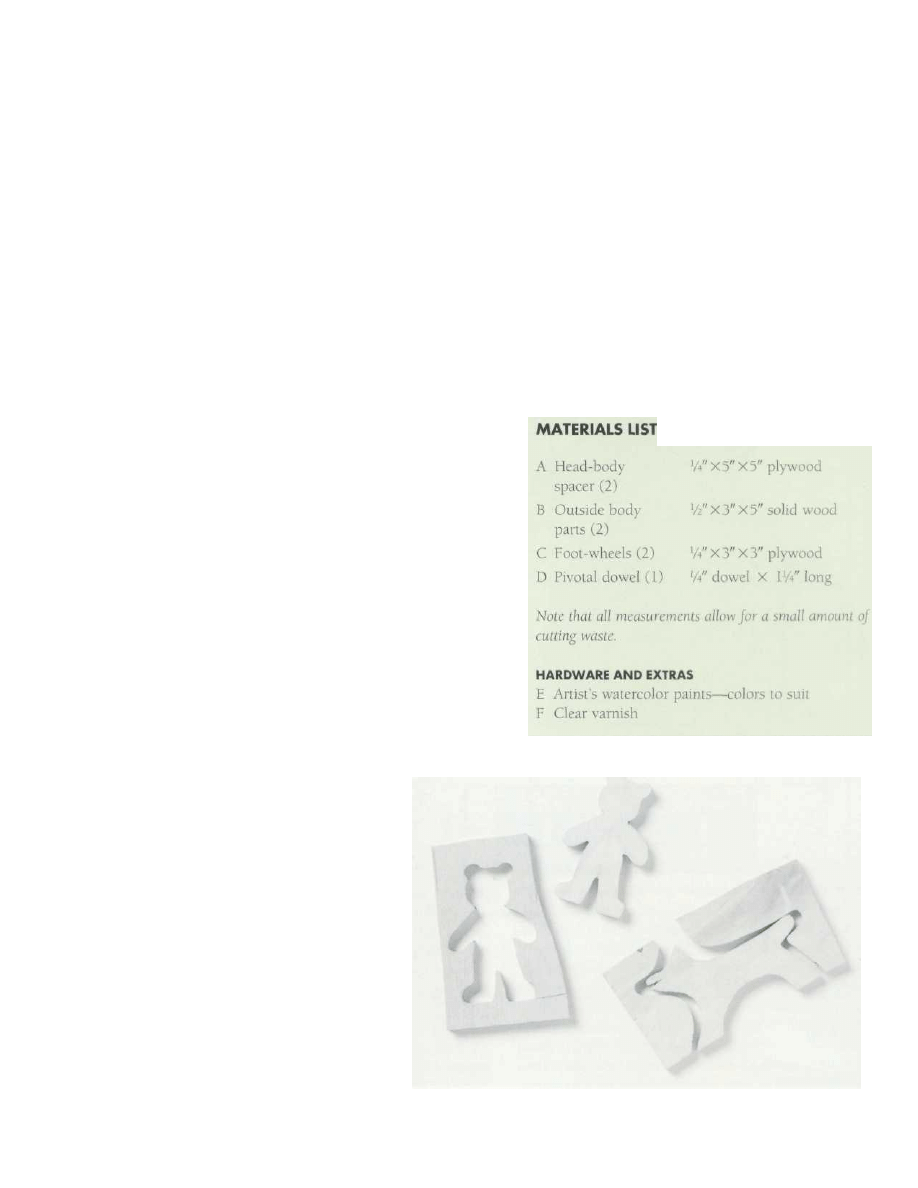
USING PLYWOOD
Best quality multi-ply is a first choice ma-
terial for small cutout type toys. It is amaz-
ingly strong and it rubs down to a good
smooth-to- touch finish.
Copyright 2004 Martian Auctions
956
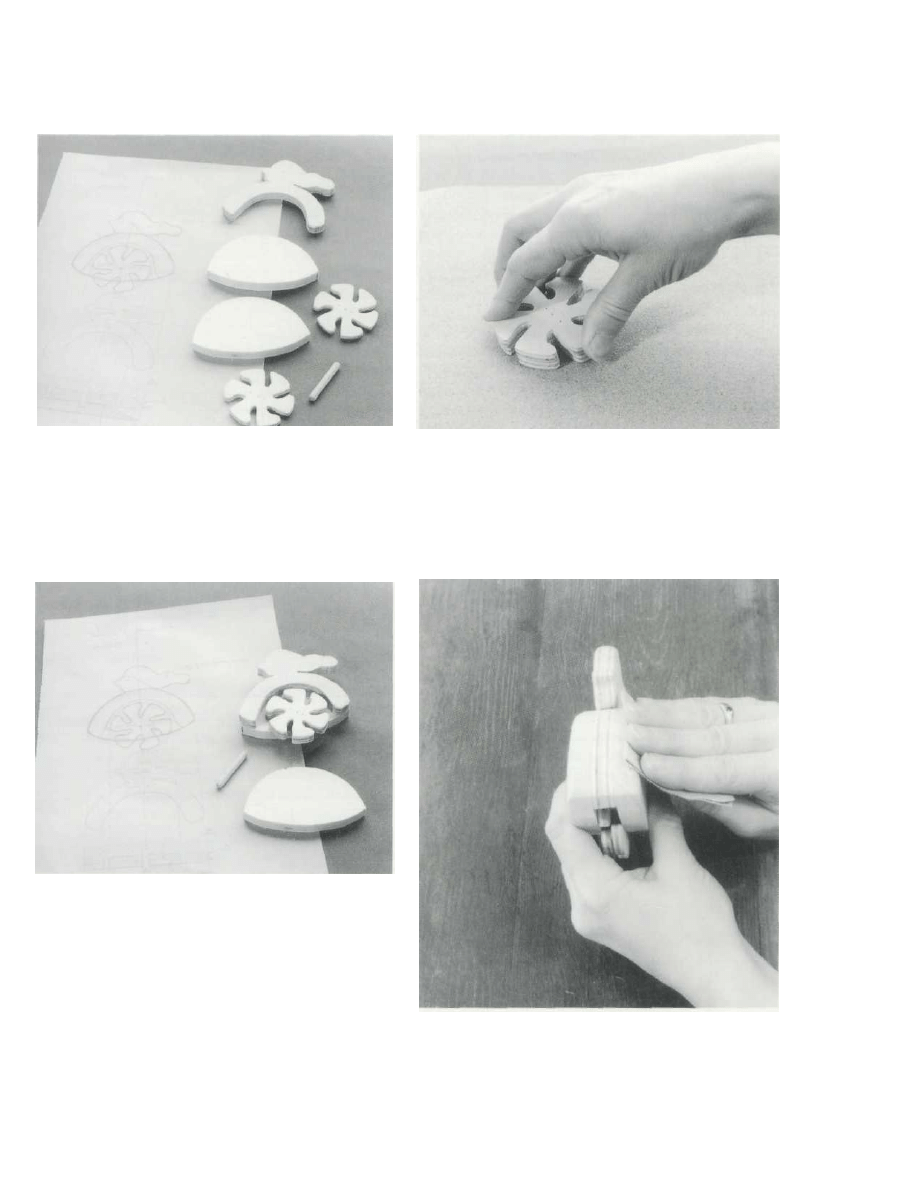
STEP-BY-STEP STAGES
1 Check the component parts against the working
draw ings. And just in case you are wondering why I
opted to use two 1/4"" thicknesses to make up the 1/2"-
thick spacer—rather than a single 1/2" thickness—the
simple answer is that I had lots of pieces of 1/4" ply
that needed to be used up.
2 Fix the two wheels together with a piece of double-
sided sticky tape and rub them down so that they are
slightly less than 1/2" in total thickness. The use of the
tape not only ensures that both wheels are identical, it
also makes them easier to handle.
3 Test the wheels in the body cavity. They need to be
an easy loose-turning fit. Note that in this test run I
have the feet running in the wrong direction!
4 Rub the whole works down to a smooth finish.
Close your eyes to test the finish—it's vital that every
surface, edge and angle be supersmooth to the touch.
Copyright 2004 Martian Auctions
957
RUNNING REG IN HARDWOOD
Kids are so perceptive! When our Rosy toy was finished
and up and running, I took it around to the 5-year-old
girl next door for a bit of no-nonsense, in-depth criticism.
Of course 1 was expecting a little bit of praise, but, oh no.
All she said was, "But. . . where is running Reg?" So there
you go, we had no other option but to make a Running
Reg toy.
COUNTERCHANGE CUTTING
The clever thing about this project is not so much the
design, but rather the way the two contrasting thicknesses
of wood are cut and then counterchanged. It's an amaz-
ingly simple but subtle technique. All you do is sandwich
two contrasting sheets of wood together, fret the design
through both layers, and then swap the cutouts around
so that the cutouts are contrasting.
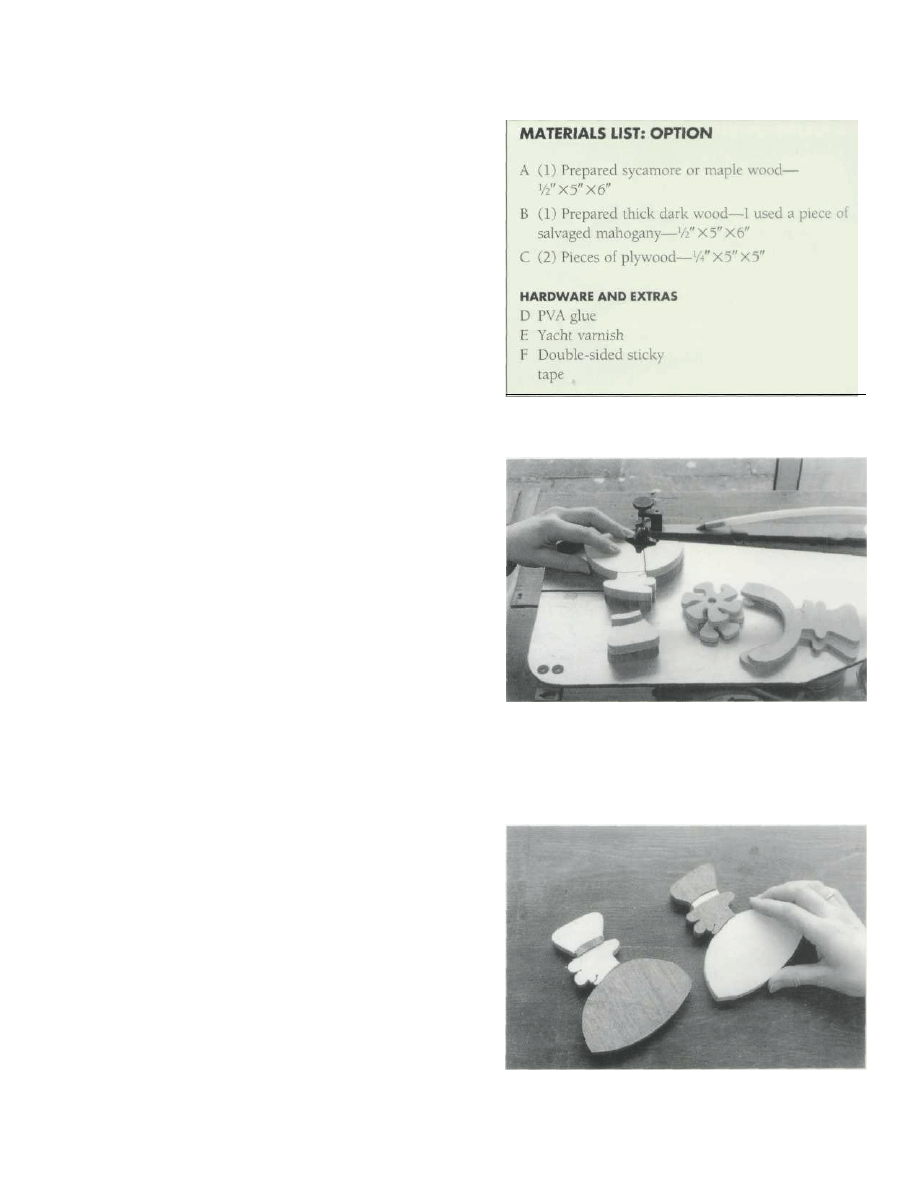
PROCEDURE
Take the four pieces of wood—the sycamore, the mahog-
any, and the two pieces of plywood—and use the double-
sided sticky tape to make a sandwich that has the plywood
as the filling. When you are happy with the arrangement,
carefully press transfer the traced imagery through to the
sycamore side of the sandwich. Use the scroll saw to fret
out the outside profile. This done, ease off the outside
layers—the sycamore and the mahogany—and stick them
together.
Cut out the plywood inner shape and the wheels.
Then comes the very clever procedure of counterchange
cutting. The method is beautifully simple. All you do is
take the two profiles— the sycamore and the mahogany,
all nicely stuck together with the double-sided tape—and
saw them down into all the little parts that go to make up
the design. For example, with this design I ran cuts
through at either side of the hat band and under the chin.
All you then do is swap the cutouts around and put the
toy together in much the same way as already described.
2 Ease the layers apart,
remove the double-sided
tape and counter-change
the parts. Note the little
cut that goes to make the
design of the mouth.
STEP-BY-STEP STAGES
1 Having fitted the very finest blade in the scroll saw,
very carefully cut the design down into its component
parts. I t ' s important that you use a new, well-
tensioned blade and go at it slowly, so that each and every
cut is well placed and square to the wood.
Copyright 2004 Martian Auctions
958

DESIGN OPTIONS
Copyright 2004 Martian Auctions
959

TOY SAFETY
Traditional wooden toys are enormous fun! Wood-
workers like making them and kids like playing with
them. But you do have to bear in mind that the average,
intelligent finger-sticky toddler is generally going to do
his level best to push the toy in his mouth and/or up his
nose, if not worse! If you are going to make wooden toys,
you have most certainly got to make sure that all the
structures and all the materials are completely safe. If you
are going to present the toys as gifts and/or make them
for sale, you are legally bound to make sure that they are
"safe, sound and fitting for their purpose." What this
means is that you must ensure that every part of the toy
is safe—no splinters, no toxic materials, no loose parts
that can be swallowed. Be warned, ignorance is no excuse
under the law—you must make sure that everything is safe!
The following will provide you with some good sound
guidelines.
Paint
Since kids like brightly colored toys, it's vital that you
make sure that you use paints that are completely safe
and nontoxic. Yes, your dad's old paint might still be in
good condition, and, yes, it would give a wonderfully
glossy, hard-wearing finish, but then again, it is almost
certainly poisonous! Most old paints contain all manner
of toxic mixes, everything from lead and antimony to arse-
nic. You must set out on the assumption that all old paints
are dangerous.
When 1 asked around, I was assured that all modern
paints are required by law to meet certain nontoxic, lead-
free standards. But when I took it a bit further and phoned
a paint manufacturer, they said that though their paints
do most certainly come within safe standards, they don't
necessarily come up to the standards required by the "Toy
Safety" laws. As you can see, the whole area of paints and
toy safety is somewhat difficult. I personally think that
the best advice is either to use water stains and cover them
with water-based varnish or to use acrylic paints. If you
are concerned about paints and toy safety, then it's best
if you write to various well-known paint manufacturers
and ask their advice.
Wood Types
Although I have had no personal experience in this mat-
ter, I do understand that certain exotic wood types are
dangerous if they are chewed. For example, I read of a
case in which a child chewed a wooden toy from a Third
World country, and the juices in the wood caused the
child to go into some sort of shock. II we err on the side
of safety and take it that some wood varieties are toxic,
then the best advice is to use only wood varieties that we
know to be safe. So, if we take it that modern American
and British toymakers know what they are doing, it looks
to me as if we should be going for wood types like lime,
sycamore, beech, birch, oak and pine.
Fittings
As I remember, kids are always trying to pry their toys
apart in an effort to find out how they work. This being
the case, it's a good idea to avoid nails, small pieces of
wire, and component parts that could in any way crack,
splinter or shatter. The best advice is to use brass screws,
glued dowels and glued layers.
Form
In many ways, the form a toy takes is as important as
its substance and structure. For example, if a toy has a
component part that is long, thin and spiky, or a part that
could be swallowed, or a part that could be inserted into
the ear or nose, then it follows that the toy in question
has been badly designed. If and when you are designing
your toys, or if you decide to modify this one, you must
make sure that it's safe. For example, it might be a good
idea to extend the walking girl's hair so as to make more
of a handle, but the question is—would it be safe?
Copyright 2004 Martian Auctions
960
Wyszukiwarka
Podobne podstrony:
Queen Good Old Fashion Lover Boy
tommy emmanuel just an old fashioned love song version 2
I m old fashioned
Warren Murphy Destroyer 068 An Old Fashioned War
good old fashioned lover boy
Old fashioned
Build an old fashioned smokehouse for delicious meat and bett
tommy emmanuel just an old fashioned love song
Old Fashioned Family Recipes Marilynn Mansfield
Old fashioned love (James P Johnson)
Richard Clayderman Old Fashion
Jacobsson G A Rare Variant of the Name of Smolensk in Old Russian 1964
H LCD2000 old
kids flashcards toys 1
Fashion Artist Drawing Techniques to Portfolio Presentation
7 old
Toys The The Cold Gun
BBY 3954 Old Republic Revan
więcej podobnych podstron