g
f
d
p
q
}
≈
∂
t
Breadmaker
Please read and keep these instructions
Machine à pain
Merci de bien vouloir lire et conserver ces instructions
Brotbackautomat
Lesen Sie diese Bedienungsanleitung, und heben Sie sie gut auf
Máquina de fazer pão
Leia e guarde estas instruções
Bagemaskine
Læs og gem venligst denne vejledning
Automat do pieczenia chleba
Prosimy zapoznać się z niniejszą instrukcją obsługi i zachować ją do wykorzystania w przyszłości
Хлебопечка
Внимательно изучите и сохраните данное руководство
Domácí pekárna
Přečtěte si prosím a uchovejte tyto pokyny
Ekmek yapma makinesi
Lütfen bu talimatları okuyun ve saklayın
⁄
¤
‹
›
fi
fl
·
‚ „
È
Í
Î
Ï
Ì
Ó
Ô
‰
Â
Ê
Á
Ë
E
⁄
⁄
¤
‹
›
fi
‡
⁄
g
Model 48321 (17 programmes)
f
Modèle 48321 (17 programmes)
d
Modell 48321 (17 Programme)
p
Modelo 48321 (17 programas)
q
Model 48321 (17 programmer)
}
Model 48321 (17 programów)
≈
Модель 48321 (17 программ)
∂
Model 48321 (17 programmes)
t
Model 48321 (17 programlı)
g
Model 48319 and 48320 (19 programmes)
f
Modèles 48319 et 48320 (19 programmes)
d
Modelle 48319 und 48320 (19 Programme)
p
Modelos 48319 e 48320 (19 programas)
q
Model 48319 og 48320 (19 programmer)
}
Model 48319 i 48320 (19 programów)
≈
Модели 48319 и 48320 (19 программ)
∂
Model 48319 and 48320 (19 programmes)
t
Model 48319 ve 48320 (19 programlı)
fl
F
C
D
B
A
t
∂
≈
}
q
p
d
f
g
3
2
5
4
g
Symbols
p
Símbolos
≈
Символы
f
Symboles
q
Symboler
∂
Symboly
d
Symbole
}
Symbole
t
Semboller
g
1st Kneading
1st Rising
2nd Kneading
2nd Rising
3rd Rising
Baking
Symbol
Symbol
Symbol
Symbol
Symbol
Symbol
f
1er pétrissage
1er levage
2ème pétrissage
2ème levage
3ème levage
Cuisson
Symbole
Symbole
Symbole
Symbole
Symbole
Symbole
d
1. Knetstufe
1. Quellstufe
2. Knetstufe
2. Quellstufe
3. Quellstufe
Backen
Symbol
Symbol
Symbol
Symbol
Symbol
Symbol
p
1º Amassar
1ª Fermentação
2º Amassar
2ª Fermentação
3ª Fermentação
Cozedura
Símbolo
Símbolo
Símbolo
Símbolo
Símbolo Símbolo
q
1. æltning
1. hævning
2. æltning
2. hævning
3. hævning
Bagning
Symbol
Symbol
Symbol
Symbol
Symbol
Symbol
}
1. wyrabianie
1. wyrastanie
2. wyrabianie
2. wyrastanie
3. wyrastanie
Pieczenie
Symbol
Symbol
Symbol
Symbol
Symbol
Symbol
≈
1-й замес
1-й подъём
2-й замес
2-й подъём
3-й подъём
Выпекание
Символ
Символ
Символ
Символ
Символ
Символ
∂
1. hnûtení
1. kynutí
2. hnûtení
2. kynutí
3. kynutí
Pečení
Symbol
Symbol
Symbol
Symbol
Symbol
Symbol
t
1. Yo urma
1. Kabarma
2. Yo urma
2. Kabarma
3. Kabarma
Pişirme
Sembol
Sembol
Sembol
Sembol
Sembol
Sembol
f
d
p
q
}
≈
∂
t
g
Programmes
p
Programas
≈
Программы
f
Programmes
q
Programmer
∂
Programy
d
Programme
}
Programy
t
Programlar
1
2
3
4
5
6
7
8
9
10
11
12
13
14
15
16
17
g Basic
Wholemeal
Sweet
Sandwich
French
Dough
Jam
Bread
Speciality
Gluten
Fastbake,
Fastbake,
Extra
Pizza
Quick
Cake*
Dessert*
mixes
free
small
large
bake
dough
f Simple Complet
Sucré
Sandwich
Baguette
Pâte
Confiture
Mélanges
Spécial
Sans
Fastbake,
Fastbake,
Extra-
Pizza
Pâte
Gâteau*
Dessert*
pour pain
gluten
petit
large
rapide
d
Normal
Vollwert
Süßes
Sandwich
Französisch
Teig
Marmelade
Brotback-
Spezialbrote
Gluten-
Schnellbacken,
Schnellbacken,
Extra-
Pizza-
Schneller
Kuchen*
Dessert*
mischungen
frei
klein
groß
boden
Teig
p
Básico
Trigo integral
Doce
Sanduíche
Francês
Massa
Compota
Misturas para Especialidade
Sem
Cozedura rápida, Cozedura rápida, Extra
Cozedura de
Massa
Bolo*
Sobremesa*
pão
glúten
pequeno
grande
pizza
rápida
q
Almindeligt Fuldkornsmel
Sød
Sandwich
Fransk
Dej
Syltetøj
Brød
Specialiteter
Gluten
Hurtigbagning
Hurtigbagning
Ekstra
Pizza
Uden hævning
Kage*
Dessert*
blandes
fri
lille
stor
bage
dej
} Programy Razowy
Słodki
Kanapka
Francuski
Ciasto
Dżem
Chleb
Specjalny
Gluten
Szybki wypiek, Szybki wypiek, Bardzo
Pizza
Szybkie
Ciasto*
Deser*
mieszanki
brak
mały
duży
ciasto
ciasto
≈
Основная Непросеян.
Сладкий
Сэндвич
Французский
Тесто
Джем
Готовые
Специальный
Без
Быстрая выпечка, Быстрая выпечка, Супер
Пицца
Быстрое
Кекс*
Десерт*
смеси
глютена
малый
большой
выпечка
тесто
∂
Základní Celozrnný
Sladký
Sendvič
Francouzský Tûsto
Džem
Chlebové
Specialita
Bezlepkový Rychlé pečení,
Rychlé pečení, Extra
Tûsto na
Rychlé
Koláč*
Moučník*
smûsi
malý
velký
pizzu
tûsto
t
Basit
Kepekli
Tatlı
Sandviç
Francala
Hamur
Reçelli
Ekmek
Özel
Glutenli
Hızlı Piflirme,
Hızlı Piflirme,
Ekstra
Pizza
Hızlı
Kek*
Tatlı*
karıflımları
yok
küçük
büyük
piflirme
hamur
g
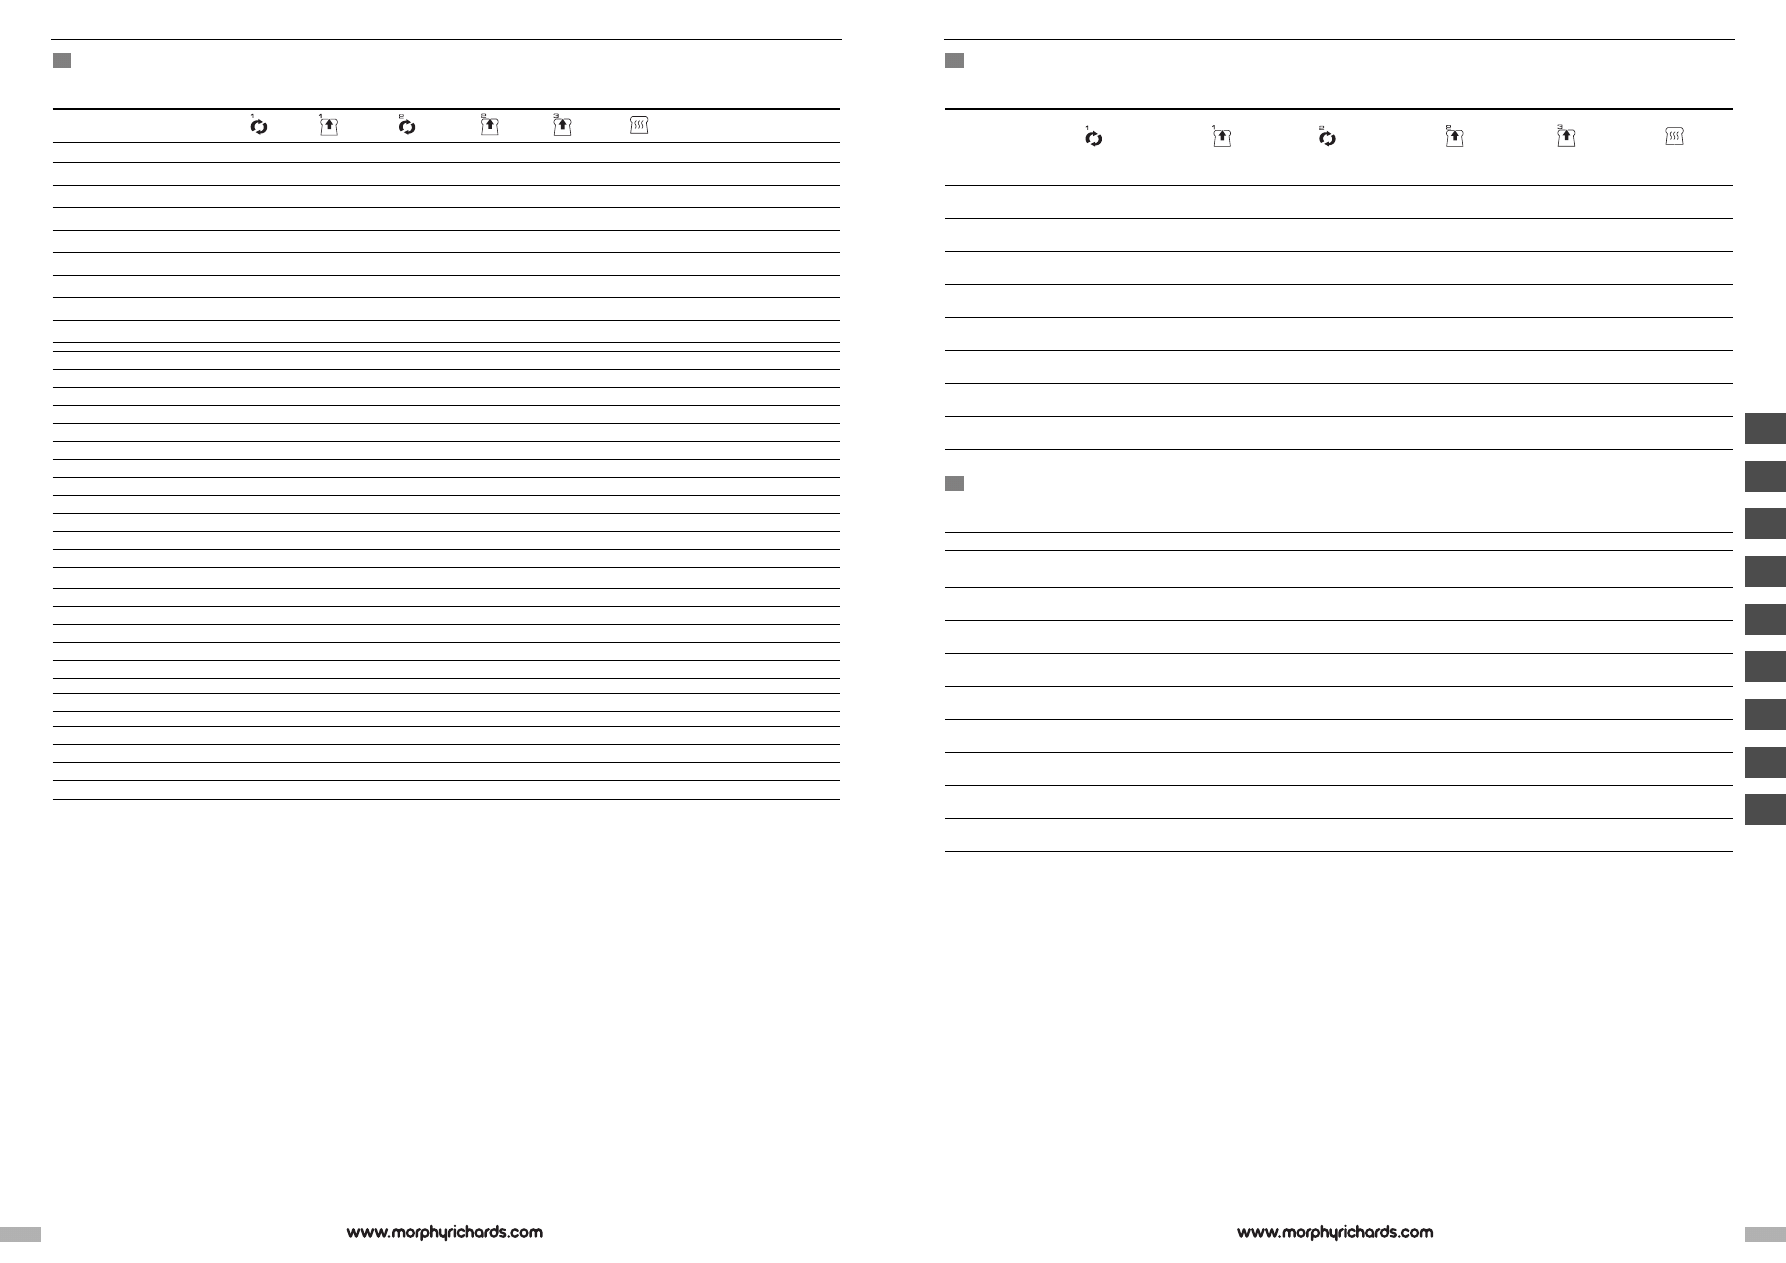
Programme Baking Times
p
Tempos de cozedura do programa
≈
Программирование времени выпечки
f
Temps de cuisson des programmes
q
Programmerede bagetider
∂
Programové časy pečen
d
Backzeiten nach Programm
}
Czasy pieczenia programów
t
Program Pişirme Süreleri
g
P
Prro
og
grra
am
mm
me
e
S
Siiz
ze
e
T
To
otta
all ttiim
me
e
K
Ke
ee
ep
p w
wa
arrm
m
f
P
Prro
og
grra
am
mm
me
e
T
Ta
aiilllle
e
T
Te
em
mp
ps
s tto
otta
all
G
Ga
arrd
de
e a
au
u c
ch
ha
au
ud
d
d
P
Prro
og
grra
am
mm
m
G
Grrö
öß
ße
e
G
Ge
es
sa
am
mttd
da
au
ue
err
W
Wa
arrm
mh
ha
alltte
en
n
p
P
Prro
og
grra
am
ma
a
T
Ta
am
ma
an
nh
ho
o
T
Te
em
mp
po
o tto
otta
all
M
Ma
an
ntte
err q
qu
ue
en
ntte
e
q
P
Prro
og
grra
am
m
S
Sttø
ørrrre
ells
se
e
T
Tiid
d ii a
alltt
H
Ho
olld
d v
va
arrm
m
}
P
Prro
og
grra
am
m
W
Wiie
ellk
ko
ośśç
ç
C
Ca
ałłk
ko
ow
wiittyy c
czza
ass
P
Po
od
dttrrzzyym
ma
an
niie
e c
ciie
ep
płła
a
≈
Программа
Размер
Общее время
Поддержание тепла
∂
P
Prro
og
grra
am
m
V
Ve
elliik
ko
osstt
C
Ce
ellk
ko
ovvýý č
ča
ass
U
Ud
drržžo
ovvá
án
níí tte
ep
plla
a
t
P
Prro
og
grra
am
m
B
Bo
oy
yu
utt
T
To
op
plla
am
m s
sü
ürre
e
S
Sııc
ca
ak
k ttu
uttm
ma
a
1
1lb
8
20
13
•
25
45
60
2:51
60
1.5 lb
9
20
14
•
25
45
60
2:53
60
2lb
10
20
15
•
25
45
65
3:00
60
2
1.5lb
9
25
18
•
35
70
55
3:32
60
2lb
10
25
20
•
35
70
60
3:40
60
3
1.lb
10
5
20
•
28
45
47
2:35
60
1.5lb
10
5
20
•
30
45
50
2:40
60
1.5lb
10
5
20
•
30
45
55
2:45
60
4
1.5lb
15
40
5
•
25
40
50
2:55
60
2lb
15
40
5
•
25
40
55
3:00
60
5
1lb
13
40
17
•
30
50
60
3:30
60
1.5lb
16
40
19
•
30
50
65
3:40
60
2lb
18
40
22
•
30
50
70
3:50
60
6
20
-
-
30
40
-
1:30
-
7
-
15
45
-
-
20
1:20
20
8
10
20
15
15
25
65
2:30
60
9
10
5
20
30
35
70
2:50
60
10
10
10
15
•
20
30
70
2:35
60
11
1.5lb
11
-
-
-
17
42
1:10
60
12
2 lb
12
-
-
-
20
43
1:15
60
13
-
-
-
-
60
1:00
60
-
14
20
-
-
-
30
-
0:50
-
15
7
5
8
•
-
-
80
1:40
60
18
10
-
-
-
-
60
1:10
60
19
10
5
20
33
40
62
2:50
60
g
• Please note, if your machine has a fruit and nut dispenser, the additional ingredients will be added automatically.*
* Only available on models 48319 and 48320
f
• Veuillez noter que si votre machine est équipée d’un distributeur de fruits secs, les ingrédients supplémentaires seront ajoutés automatiquement.
* Uniquement disponible sur les modèles 48319 et 48320
d
• Denken Sie daran, dass dieses Gerät mit einem Obst- und Nussspender ausgestattet ist. Die zusätzlichen Zutaten werden automatisch beigemischt.*
* Nur erhältlich bei den Modellen 48319 und 48320
p
• Note que se a sua máquina tiver um doseador de frutos frescos e secos, os ingredientes adicionais serão adicionados automaticamente.*
* Só disponível nos modelos 48319 e 48320
q
• Bemærk, at hvis din maskine har en frugt- og nøddedispenser, tilsættes de ekstra ingredienser automatisk.*
* Findes kun på modellerne 48319 og 48320
}
• Uwaga: jeÊli urzàdzenie jest wyposa˝one w dozownik owoców i orzechów, wtedy dodatkowe sk adniki b´dà dodawane automatycznie*.
* Dost´pny jedynie w modelach 48319 i 48320
≈
• Обратите внимание, что если прибор оснащён дозатором фруктов и орехов, дополнительные ингредиенты будут добавляться автоматически.*
* Имеется только в моделях 48319 и 48320
∂
• Pokud má vaše pekárna dávkovač ovoce a ořechů, další ingredience se přidají automaticky.*
* K dispozici pouze u modelů 48319 a 48320.
t
• Makinenizde bir meyve ve fındık dağıtıcı varsa, ilave malzemelerin otomatik olarak ekleneceğini göz önünde bulundurun.*
* Sadece 48319 ve 48320 modellerinde mevcuttur
g
Others
¼ cup
½ cup
¾ cup
1 cup
2 cup
Dried fruit 1
41
82
123
164
328
Butter 2
50
100
150
200
400
Preserving or castor sugar 3
55
110
165
220
440
Granulated sugar 4
57
113
169
226
452
Chopped fresh apple ½ cube 5
31
62
93
124
248
Frozen raspberries or fresh plums 6
25
50
75
100
200
1
2
3
4
5
6
g
Dried Fruit
Butter
Preserving or castor sugar
Granulated sugar
Chopped fresh apple ½ cube
Frozen raspberries or fresh plums
f
Fruits secs
Beurre
Sucre cristallisé ou sucre à confiture
Sucre en poudre
½ cube de pomme crue en morceaux
Framboises surgelées ou prunes fraîches
d
Trockenobst
Butter
Konservierter oder Puderzucker
Kristallzucker
Frische Apfelstückchen, halbiert
Gefrorene Himbeeren oder frische
Pflaumen
p
Frutos secos
Manteiga
Açúcar cristalizado ou fino
Açúcar granulado
Maçã fresca cortada e ½ cubos
Framboesas congeladas ou ameixas
frescas
q
Tørret frugt
Smør
Sylte- eller strøsukker
Stødt melis
Hakket frisk æble ½ i tern
Frosne hindbær eller friske blommer
}
Suszone owoce
Masło
Cukier żelujący lub drobny
Cukier granulowany
Posiekane świeże jabłko, ½ kostki
Mrożone maliny lub świeże śliwki
≈
Сухофрукты
Масло
Желирующий сахар или
Сахарный песок
Свежее яблоко, порезанное
Замороженная малина или
сахарная пудра
кубиками 1 см
свежая слива
∂
Sušené ovocet
Máslo
Konzervační nebo práškový cukr
Krystalový cukr
Čerstvě nakrájené jablko, polovina
Mražené maliny nebo čerstvé švestky
t
Kuru Meyve
Tereyağı
İnce toz şeker
Toz şeker
Doğranmış taze elma
½ küp
Dondurulmuş ahududu veya taze erik
¹/
16
15
¹/
8
30
¼
60
½
120
¾
180
1
240
1 ¹/
8
270
1 ¼
300
1
5
/
16
315
1 ½
360
1
5
/
8
390
1
15
/
16
465
2
480
g
Conversion Chart
p
Tabela de conversão
≈
Таблица пересчёта
f
Tableau de conversion
q
Konverteringstabel
∂
Převodní tabulky
d
Umrechnungstabelle
}
Tabela przeliczania jednostek
t
Dönüşüm Tablosu
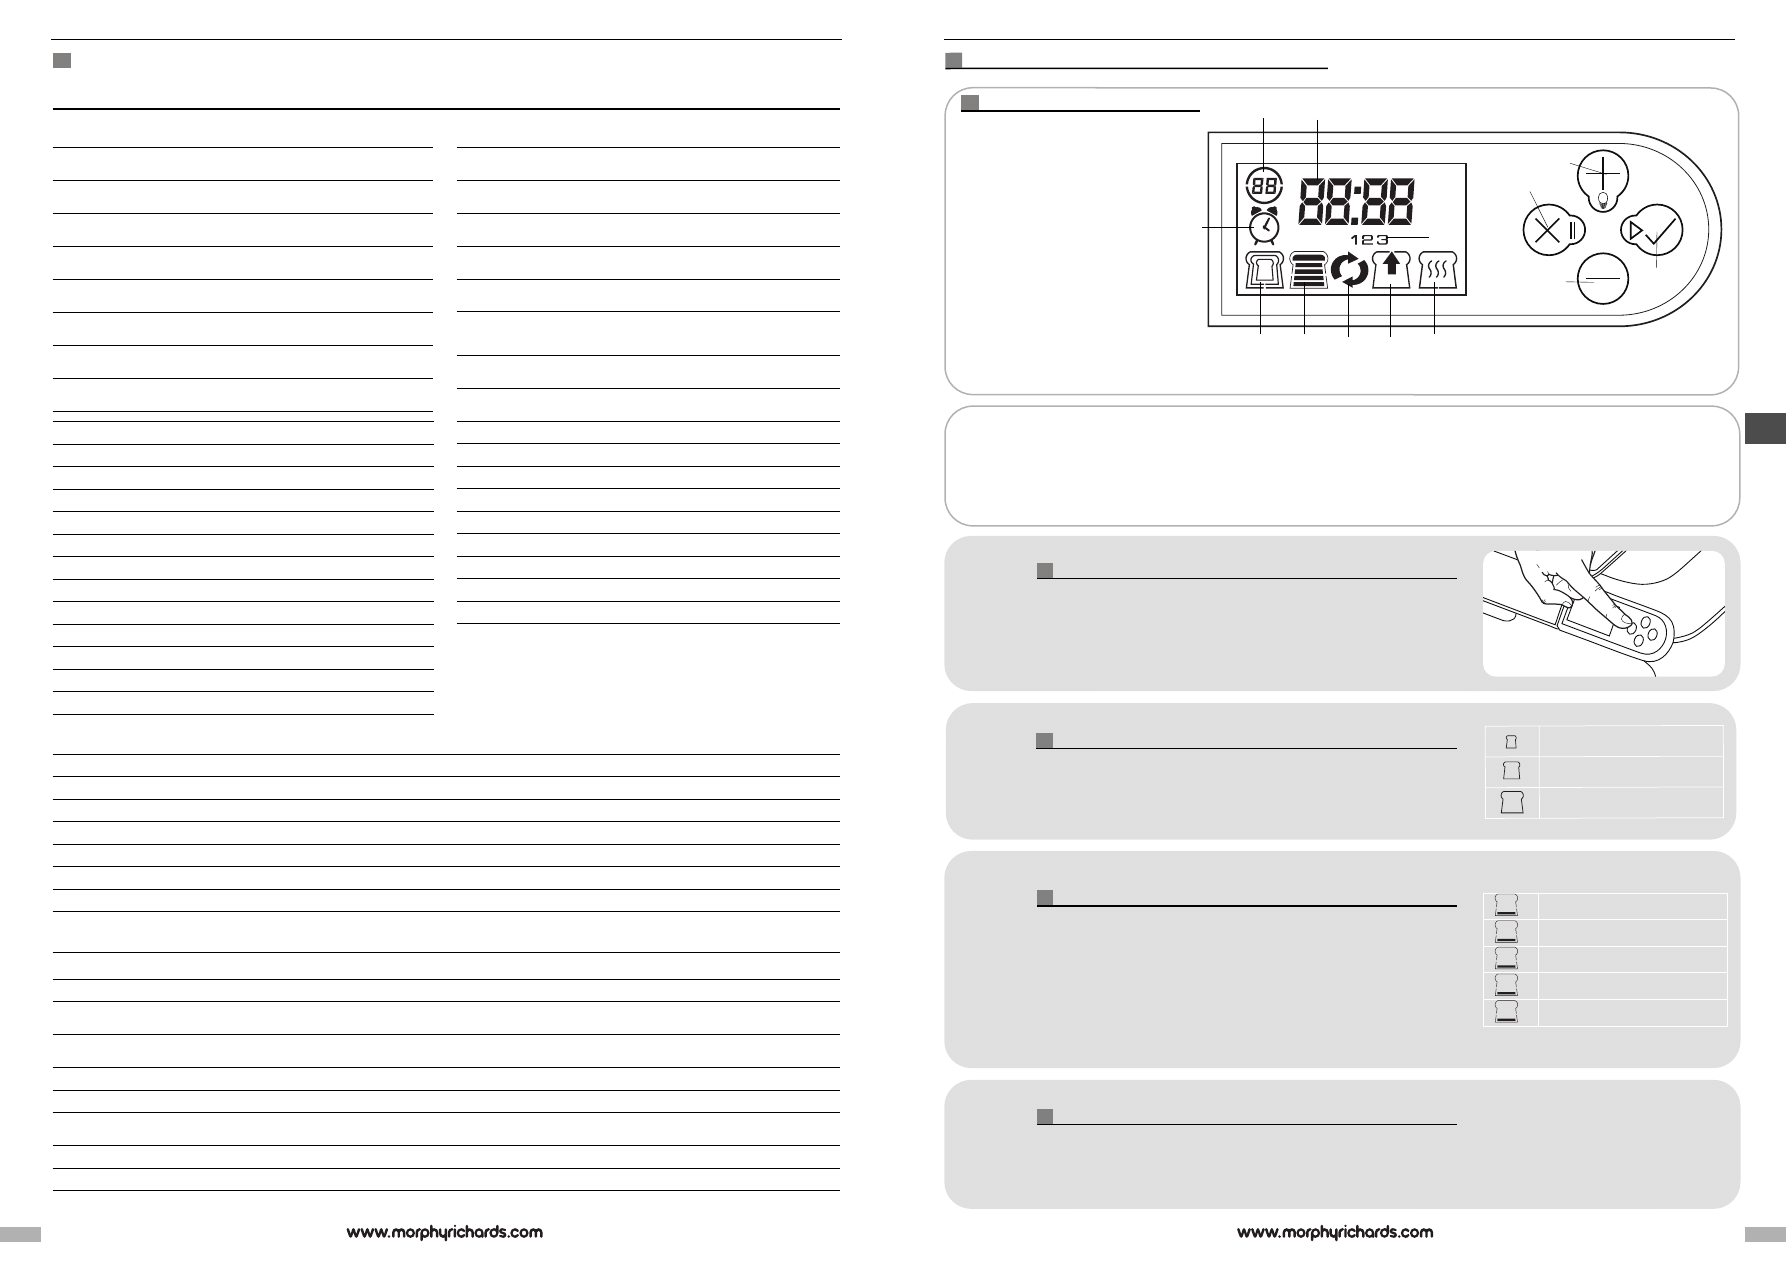
When you plug the breadmaker in, the details of a default programme automatically show on the screen. The default programme is to make
a basic white or brown 2lb sized loaf on programme 1, with the 3rd medium crust setting which will take 3 hours. If this is the programme
you want to use, once you have put your ingredients in (in the correct order) press and hold the ‘Accept/Start’ button for approximately 3
seconds and the breadmaker will start baking your loaf. If you want to choose another programme, follow the steps below.
1lb loaf (selected programmes)
1.5lb loaf
2lb loaf
Very Light
Light
Medium
Dark
Very Dark
Control panel and LCD display
‰
Programme number
Â
Cycle time
Ë
Loaf sizes
È
Crust settings
Ì
Go back/cancel/pause
Ó
Increase/light on
Ô
Decrease
Accept/start
QUICK SETUP GUIDE
The end of the Baking Process
At the end of the baking process when the countdown on screen reaches zero, the breadmaker
beeps to indicate the baking process has finished. The breadmaker automatically goes into the Keep
warm programme. This can be stopped at any time by pressing the Go back/cancel/pause Ì
1
To select the programme:
Once the breadmaker is plugged in, the default programme as detailed above will show on the
screen. To choose an alternative programme, use the ‘Increase’ Ó and ‘Decrease’ Ô buttons until
the programme number you want appears in the top left corner of the screen ‰ – see ‘Programme
descriptions’. The cycle time of the selected programme will automatically appear on the screen Â.
To select the loaf size:
Once you have chosen the programme you wish to use, press the ‘Accept/Start’ button . The
‘Loaf size’ icon Ë will illuminate. This will automatically be set to the 2lb loaf setting. To choose a
different size loaf, use the ‘Increase’ Ó and ‘Decrease’ Ô buttons. Only the loaf sizes available for
the programme selected will appear.
To select the crust setting:
When you have chosen your loaf size, press the ‘Accept/Start’ button . The ‘Crust Setting’ icon
È will then illuminate. This will automatically be set to setting 3 medium. To choose a darker or
lighter crust, use the ‘Increase’ Ó and ‘Decrease’ Ô buttons. To bake the loaf press and hold the
‘Accept/Start’ button for approximately 3 seconds, the baking process will begin and the
countdown timer  will count down to zero.
Please note that during the baking process, condensation will form on the inside of the Fruit & Nut
dispenser. This is totally normal and does not effect the quality of the bread.
2
3
4
Only the relevant controls are shown here. See ‘Features’ for a complete list.
È
Í
Î
Ï
Ì
Ó
Ô
‰
Â
Ê
Á
Ë
g
6
7
g
Water and liquids
ml
Cup
f
Eau et liquides Tasse
ml
Tasse
d
Wasser und Flüssigkeiten Becher
ml
Becher
p
Água e líquidos Chávena
ml
Chávena
q
Vand og væsker Bæger
ml
Bæger
}
Woda i płyny Szklanka
ml
Szklanka
≈
Вода и жидкости Чашка
мл
Чашка
∂
Voda a tekutiny·álek
ml
Ýálek
t
Su ve sıvılar Fincan
ml
Fincan
g
Flour types Weight in grams (gr)
Cup
White Plain Softgrain
Brown
Granary
Wholemeal
f
Types de farine Poids en grammes (gr)
Tasse
Blanche Ordinaire Fluide
Bise
Aux céréales
Complète
d
Mehlsorten Gewicht in Gramm (g)
Becher
Weiß Normal Leicht gekörnt
Braun
Mischkorn
Vollwert
p
Tipos de farinha Peso em gramas (g)
Chávena
Branca Normal De grão fino
Integral
Com cereais
Trigo integral
q
Melsorter Vægt i gram (g)
Bæger
Hvid almindeligt med bløde kerner
Mørkt
“Granary”
Fuldkornsmel
}
Rodzaje mąki Waga w gramach (g)
Szklanka
Jasna Zwykła Miękkoziarnista
Ciemna
Pełnoziarnista Razowa
≈
Сорта муки масса в граммах (г)
Чашка
Белая Простая
Грубого
С зёрнами
Непросеянная
С размягчёнными зёрнами
помола
∂
Typy mouky Hmotnost v gramech (g)
Ýálek
Bílá Obyčejná Hladká
Tmavá
Obilná
Celozrnná
t
Un tipleri Gram olarak ağırlık (gr)
Fincan
Beyaz Saf Yumuşak taneli
Esmer
Tah›l
Kepekli
¹/
8
18
20
19
17
¼
36
39
38
33
½
72
78
75
66
¾
108
117
113
99
1
144
156
150
132
1 ¹/
8
162
176
169
149
1 ¼
180
195
188
165
1 ½
216
234
225
198
2
288
312
300
264
Contents
Quick setup guide
7
Safety instructions
8
Electrical requirements
8
Features
10
About this breadmaker
10
Kneading blade
10
Program descriptions
10
Before first use
10
Using the controls
10
Fruit and nut dispenser
11
Turning on
11
Choosing your programme
11
Selecting your loaf size
11
Selecting your crust setting
11
Delay timer
11
Baking the loaf
11
Baking Cycle Icons
11
Loaf is ready
11
Keep warm
11
Internal light
11
Pause button
11
Beeper
11
Stop
11
Power interruption
11
Homemade programmes
12
Crust setting
12
Slicing and storing bread
12
Care and cleaning
12
Storing the unit
12
Getting successful results
12
Understanding baking
13
Using the right flour
13
Other ingredients
13
Bread mixes
13
Ingredient temperatures
14
Glazing
14
Programme baking times
14
Conversion charts
14
F.A.Q.
14
Troubleshooting
15
Helpline
22
Guarantee
23
Recipes
About the Recipes
15
General Method
15
Basic breads - 1
15
Basic white bread
15
Soft grain bread
15
Softgrain 50% white loaf
16
Brown loaf
16
Italian herb bread
16
Cheese & onion bread
16
Raisin bread
16
Sugar free
16
Sugar and salt free
16
Sun-dried tomato loaf
16
Wholewheat breads - 2
17
Wholewheat bread
17
Wholewheat seeded
17
Granary loaf
17
Granary 50% white
17
Sweet - 3
17
Mixed fruit loaf
17
Orange and cranberry loaf
17
Brioche
18
Sandwich - 4
18
Sandwich loaf
18
Softgrain sandwich loaf
18
French bread - 5
18
French bread
18
Dough - 6
18
White bread rolls
18
Wholewheat bread rolls
18
Hot cross buns
18
Ciabatta
19
Bagels
19
Croissant
19
Tea cake
19
Jams - 7
19
Marmalade
19
Tinned orange marmalade
19
Raspberry and apple
19
Bread Mixes - 8
20
Bread mix guidelines
20
Speciality breads - 9
20
Malt loaf
20
Irish soda bread
20
Corn bread
20
Gluten free - 10
20
Gluten free sun dried tomato loaf
20
Gluten free cheese and mustard loaf
20
Gluten free chocolate cake*
20
Gluten free fruit cake*
21
Fastbake 1- 11
21
Fastbake small white
21
Fastbake 2 - 12
21
Fastbake large white
21
Extra Bake - 13
Extra Bake only
21
Pizza - 14
21
Pizza base
21
Flavoured pizza base
21
Pasta
21
Quick - 15
21
Banana and nut bread
21
Porridge oats bread
22
Homemade I - 16
n/a
Homemade II - 17
n/a
Cake* - 18
22
Madeira cake*
22
Mixed fruit cake*
22
Packet cake mix*
22
Dessert* - 19
22
Oaty apple betty*
22
Rice pudding*
22
* Only available on models 48319 and 48320
Making your own bread easily...
The aroma of homemade bread wafting around the home is one of those great cooking
experiences. Bread, fresh out of the oven, with melting butter is a memorable taste
sensation. The Morphy Richards breadmaker can create that experience every morning.
There's very little effort involved, because the breadmaker does all the work for you.
Besides being able to do all kinds of speciality breads, including wholewheat, you can also
prepare doughs for bread rolls, pizza, cake and jam.
Everything is easy and tastes homemade - because it is.
IMPORTANT SAFETY INSTRUCTIONS
The use of any electrical appliance requires the following common sense safety rules.
Primarily there is danger of injury or death and secondly the danger of damage to the
appliance. These are indicated in the text by the following two conventions:
WARNING: Danger to the person!
IMPORTANT: Damage to the appliance!
In addition, we offer the following safety advice.
Location
•
This appliance is intended to be used in household and similar applications such as:
farm houses;
by clients in hotels, motels and other residential type environments;
bed and breakfast type environments.
It is not suitable for use in staff kitchen areas in shops, offices and other working
environments.
•
Always locate your appliance away from the edge of a worktop.
•
Ensure that the appliance is used on a firm, flat surface.
•
Do not use the appliance outdoors, or near water.
Mains Lead
•
The mains lead should reach from the socket to the base unit without straining the
connections.
•
Do not let the mains lead hang over the edge of a worktop where a child could reach it.
•
Do not let the lead run across an open space e.g. between a low socket and table.
•
Do not let the lead run across a cooker or toaster or other hot area which might damage
the cable.
•
If the supply cord is damaged, it must be replaced by the manufacturer, its service agent
or similarly qualified persons in order to avoid a hazard.
Personal Safety
•
WARNING: To protect against fire, electric shock and personal injury, do not immerse
cord, plug and appliance in water or any other liquid.
•
WARNING: Do not touch hot surfaces. Use oven mitts or oven gloves when removing the
hot bread pan. Do not cover the steam vent openings under any circumstances.
•
WARNING: Avoid contact with moving parts.
•
Extreme caution must be observed when moving an appliance with hot contents.
•
Do not use breadmaker for storage purposes nor insert any utensils, as they may create a
fire or electric shock hazard.
•
Do not use the appliance with wet or moist hands.
•
This appliance is not intended for use by persons (including children) with reduced
physical, sensory or mental capabilities, or lack of experience and knowledge, unless they
have been given supervision or instruction concerning the use of the appliance by a
person responsible for their safety.
Children
•
Never allow a child to operate this appliance.
•
Children are vulnerable in the kitchen, particularly when unsupervised and if appliances are
being used or cooking is being carried out.
•
Teach children to be aware of dangers in the kitchen, warn them of the dangers of
reaching up to areas where they cannot see properly or should not be reaching.
•
Children should be supervised to ensure that they do not play with the appliance.
Treating Scalds
•
Run cold water over the affected area immediately. Do not stop to remove clothing, get
medical help quickly.
Other Safety Considerations
•
If the mains lead of this appliance is damaged do not use it. The lead may only be
replaced by Morphy Richards Ltd or an agent of the company, since special purpose tools
are required. Telephone Morphy Richards helpline for advice.
•
The use of accessory attachments not recommended by the manufacturer may cause
damage to the breadmaker.
•
Do not place the appliance on or near heat sources such as gas or electric stove, ovens, or
burners.
•
To avoid damaging the appliance, do not place the baking pan or any object on top of the
unit.
•
Do not clean with scouring pads. Do not wash the baking pan, kneading blade, measuring
cup or spoon in a dishwasher.
•
Keep the appliance and the cable away from heat, direct sunlight, moisture, sharp edges
and the like.
•
The baking pan must be in place prior to switching on the appliance.
•
This appliance is not intended to be operated by means of an external timer or separate
remote control system.
•
Always remove the plug from the socket whenever the machine is not in use, when
attaching accessory parts, cleaning the machine or whenever a disturbance occurs. Pull
on the plug, not the cable.
Electrical Requirements
Check that the voltage on the rating plate of your appliance corresponds with your house
electricity supply which must be A.C. (Alternating Current).
WARNING: THIS APPLIANCE MUST BE EARTHED.
For UK only
If the socket outlets in your home are not suitable for the plug supplied with this appliance,
the plug should be removed and the appropriate one fitted by a qualified individual.
Note: The plug removed from the mains lead, if severed, must be destroyed as a plug with
bared flexible cord is hazardous if engaged into a live socket outlet.
Should the fuse in the 13 amp plug require changing a 13 amp BS1362 fuse must be fitted.
g
g
8
9

6.
Fruit & Nut Dispenser
If you have selected a recipe that uses the fruit and nut dispenser, you should fill it now.
Ingredients should be added as per the recipe instructions using the measuring cup
provided. Please ensure that you do not overfill the dispenser as this may stop it from
functioning.
If filling the dispenser with fruit, check that the fruit is separated before adding it. Failure to
do so may result in the dispenser not functioning, or the fruit not being distributed evenly
through the bread mixture. Ideally, fruit should be dusted with flour prior to being added
to the dispenser to stop it from sticking together.
7.
Plug in
Plug into the power supply. The breadmaker will automatically be set to program 1, 2lb
loaf and medium crust.
Selecting the programme
To select a different programme, use the ‘Increase’ Ó and ‘Decrease’ Ô buttons until the
programme number you want appears in the top left corner of the screen ‰ – Programme
Descriptions.
The cycle time of the selected programme will automatically appear on the screen Â.
The time is displayed in hours and minutes and begins to count down to zero once the
programme is started.
Once you have selected your chosen programme, press the ‘Accept/Start’ button . The
‘Loaf size’ icon Ë will illuminate.
Selecting the Loaf Size
To select the loaf size, use the ‘Increase’ Ó and ‘Decrease’ Ô buttons.
There are 3 different size loaves which can be made, depending upon which programme
you use.
The loaf size icons are:
1lb loaf (selected programmes)
1.5lb loaf
2lb loaf
Please note that not all loaf sizes are available for all programmes. Only the loaf sizes
available for the programme selected will appear.
Once you have selected your loaf size, press the ‘Accept/Start’ button . The ‘Crust
Setting’ icon È will then illuminate.
Selecting your Crust setting
To select the crust setting, use the ‘Increase’ Ó and ‘Decrease’ Ô buttons.
You can choose from five different crust settings, the crust setting icons are:
Very Light
Light
Medium
Dark
Very Dark
Once you have selected your crust setting, press the ‘Accept/Start’ button . The ‘Delay
Indicator’ icon Ê will then illuminate.
Using the Timer Delay
Once you have chosen the programme, loaf size and crust setting, you can either bake the
loaf immediately or delay the loaf baking time to end in up to 12 hours time. Go to section
11 - ‘Baking The Loaf’ section to bake the loaf immediately.
NOTE: The timer cannot be used with the Fastbake, dough and jam programmes.
NOTE: Do not use this function with recipes that use perishable ingredients such as eggs,
fresh milk, sour cream or cheese.
To delay the loaf, use the ‘Increase’ Ó and ‘Decrease’ Ô buttons while the ‘Delay
Indicator’ icon Ê is lit.
A single press of the ‘Increase’ Ó button will add 10 minutes to the time. To scroll faster
through the time press and hold the button. To decrease the time, use the ‘Decrease’ Ô
button.
The total time shown on the screen will include the baking time and delay. For example, if a
loaf takes 3 hours to bake and you have delayed the start of baking for 5 hours, the screen
will countdown from 8 hours with symbol Ê showing on the screen. When the baking
starts, the Ê symbol will disappear as the delay has finished.
Filling the Fruit and Nut Dispenser*
•
If you have selected a recipe that uses the fruit and nut dispenser, you should fill it now.
The dispenser should be filled with one cupful of dry ingredients using the measuring cup
provided. Please ensure that you do not overfill the dispenser as this may stop it from
functioning.
•
If filling the dispenser with fruit, check that the fruit is separated before adding it. Failure to
do so may result in the dispenser not functioning, or the fruit not being distributed evenly
through the bread mixture. Ideally, fruit should be dusted with flour prior to being added
to the dispenser to stop it from sticking together.
* Only applies to model 48319 & 48320.
Baking the Loaf
To start the breadmaking process, hold your finger on the ‘Accept/Start’ button for
approximately 3 seconds. The breadmaker will then beep and the screen display will stop
flashing.
Baking Cycle Icons
During the baking process the breadmaker indicates whether the ingredients are kneading,
rising or baking.
1st Kneading Symbol
2nd Kneading Symbol
1st Rising Symbol
2nd Rising Symbol
3rd Rising Symbol
Baking Symbol
Loaf is ready
The breadmaker will beep 3 times to indicate that the baking process has finished. The
clock will also show 00.00 as it has counted down to the end of the programme and the
breadmaker automatically keeps the bread warm.
Keep Warm
The clock counts up in minutes to show how long the finished loaf has been kept warm for.
This is to a maximum of 60 minutes. To stop keep warm, press the ‘red cross’ button.
Internal Light
•
The light symbol is on the same button as the ‘+’ Ó
•
You can press this button during any part of the baking process and it will stay on for 20
seconds.
Pause Button
Throughout the baking cycle, if you want to make minor adjustments to the ingredients,
you can pause the baking cycle up until ‘Knead 2’. To do this, press the
‘Go back/Cancel/Pause’ button Ì. The baking process can then be resumed by pressing
the ‘Accept/Start’ button . Please note that the process will continue automatically after
approximately 5 minutes if the pause function is not cancelled manually.
Beeper
The Beeper sounds when:
•
pressing any button
•
the fruit and nut dispenser is released
•
the programme starts
•
the programme finishes
•
‘keep warm’ finishes
Stop
The ‘stop’ function is on the ‘Go back/Cancel/Pause’ button Ì and should be pressed for
3 seconds to stop the baking cycle at any time.
Power Interruption
After a brief power supply failure:
•
If the programme has not yet reached rise 1 and the power failure was only for a few
seconds, when the power supply is re-established, the programme will automatically
continue. If the power failure is longer, the process can be restarted by pressing the
‘Accept/Start’ button .
•
If the programme has gone beyond this point, the process must be started again from the
beginning. The ingredients will have to be discarded and you must start again with fresh
ingredients.
Features
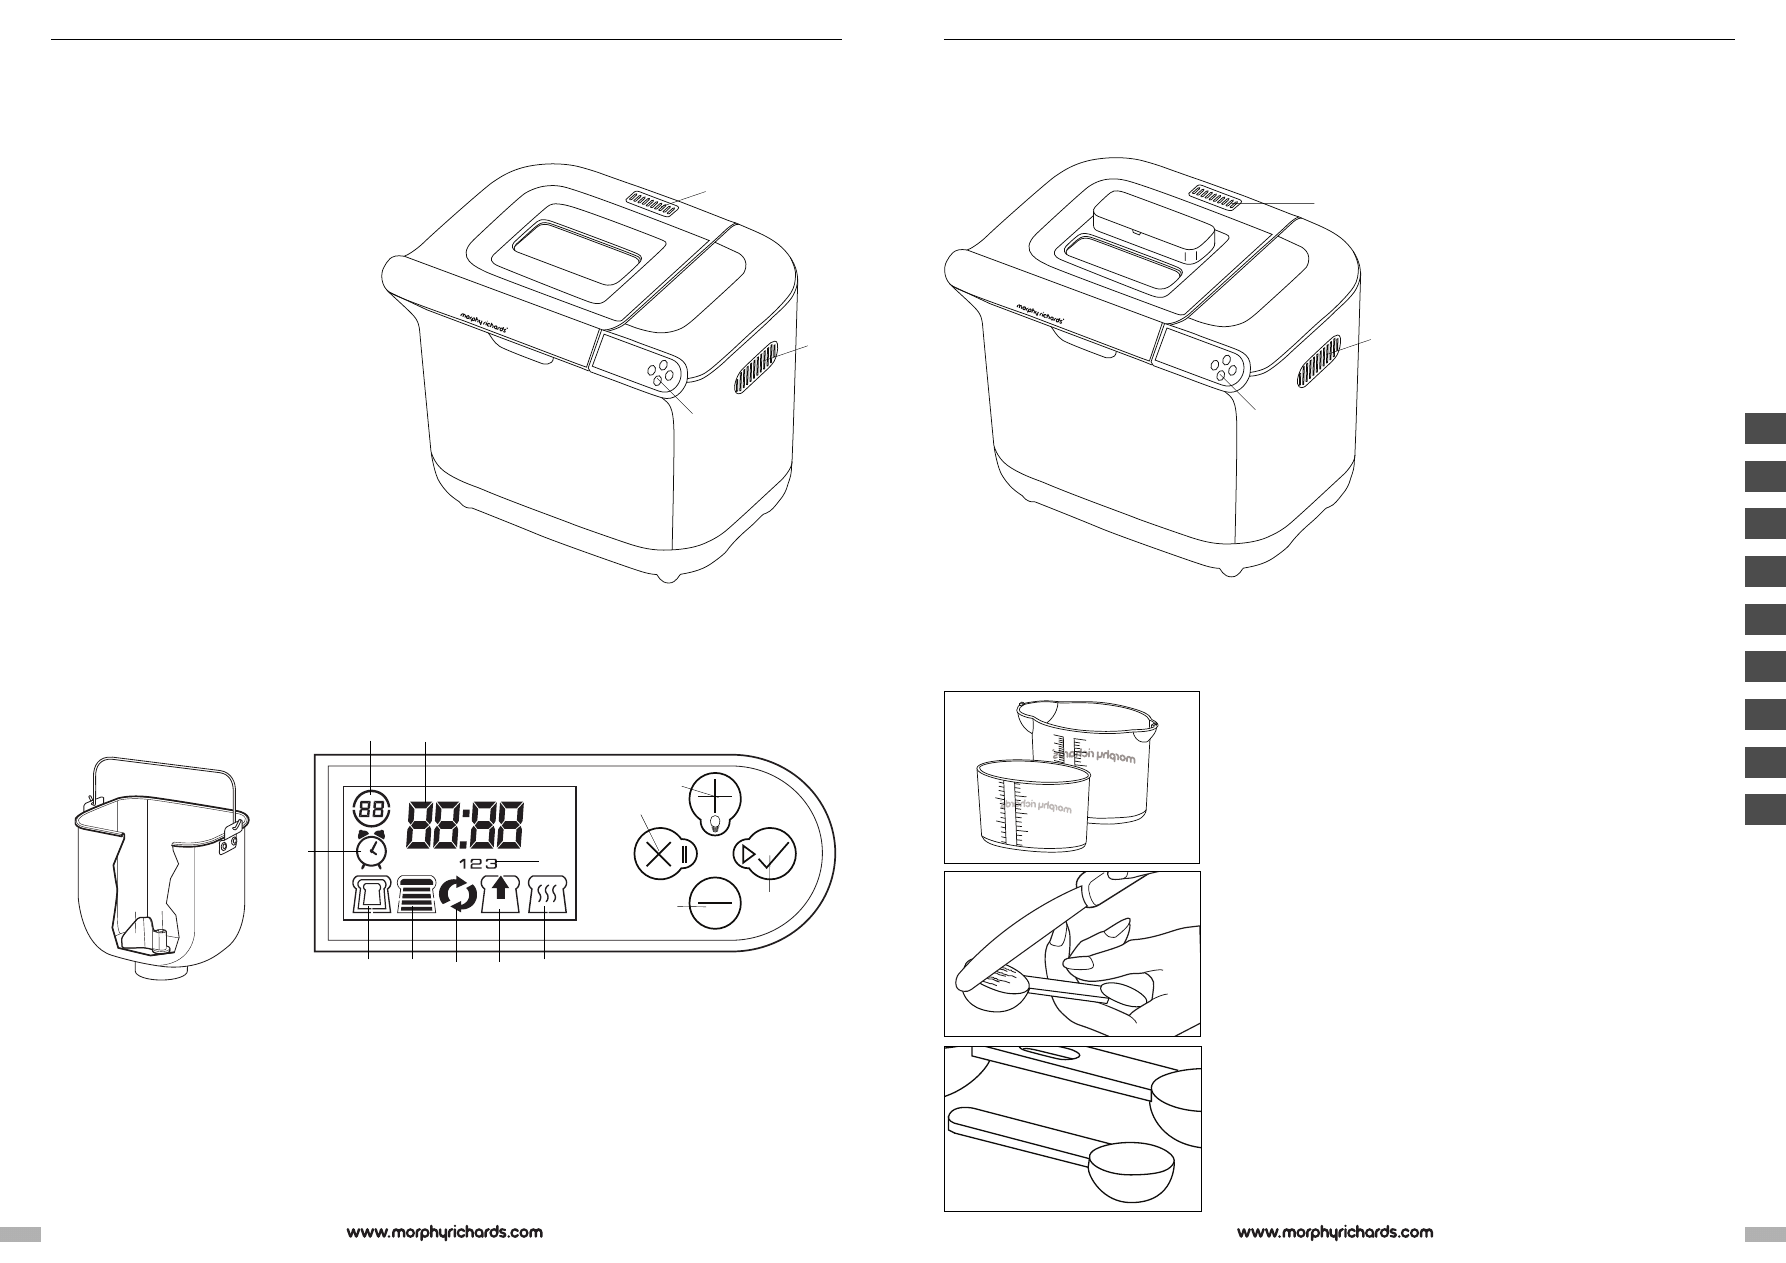
A
⁄
Air vents
¤
Viewing window
‹
Lid handle
›
Lid
fi
LCD Display (see diagram)
fl
Controls (see diagram)
‡
Fruit and nut dispenser (48323 model only)
Baking pan
E
·
Baking Pan
‚
Kneading blade
„
Rotating shaft
Control panel
F
‰
Programme number
Â
Cycle time
Ê
Timer/delay Indicator
Á
Rise / knead cycle number
Ë
Loaf sizes
È
Crust settings
Í
Knead symbol
Î
Rise symbol
Ï
Bake symbol
Ì
Go back/cancel/pause
Ó
Increase/light on
Ô
Decrease
Accept/start
About this Breadmaker
•
It has three settings to make a small 450g (1Lb,) medium 680g (1.5lb) or large 900g (2lb)
loaf. N.B. Weights are approximate and depend on recipe.
Kneading Blade
•
Clean the blade every time after use, ensure the blade rotates freely on the spindle before
each use, you can add a little sunflower oil to the joint before putting it back into the pan.
This will then be ready for next use.
NOTE: Model 48319 has a drop down blade whereas models 48320 and 48321 have a
static kneading blade.
Programme Number Descriptions
1
Basic white and brown (2:51 -3:00) For white and brown bread. Also for flavoured breads
with added herbs and raisins.
2
Wholewheat (3:32 - 3:40)
For the baking of bread containing significant amounts of wholewheat. This setting has
longer preheat time to allow the grain to soak up the water and expand. It is not advised to
use the delay timer as this can produce poor results.
3
Sweet (2:35 - 2:45)
For the baking of sweet type bread which gives a crisper crust than on basic setting. The
crisper crust is produced by the sugar caramelising.
4
Sandwich (2:55 - 3:00)
This is to bake light texture bread but with a softer and thicker crust.
5
French (3:30 - 3:50)
For the baking of light weight bread such as French bread which has a crisper crust and
light texture.
6
Dough (1:30)
This setting only makes the dough and will not bake the bread. Remove the dough and
shape it to make bread rolls, pizza, etc. Any dough can be prepared on this setting. Do not
exceed 1kg (2lb) of combined ingredients.
7
Jam (1:20)
Use this setting for making jam from fresh fruits and marmalade. Do not increase the
quantity or allow the recipe to boil over the pan into the baking chamber. Should this
happen, stop the machine immediately. Remove the pan carefully, allow to cool a little and
clean thoroughly.
8
Bread mixes (2:30)
For preparation of approximately a 1.5lb loaf, using a packet of shop bought bread mix.
These mixes usually come in two varieties: ‘Just add water’ and ‘Just add flour and water’.
9
Speciality (2:50)
The bread baked on this setting is usually smaller with a more moist and dense texture.
These breads do not use bread flour.
10
Gluten Free (2:35)
Gluten free breads are yeast leavened breads where gluten (a protein part of the
wheat/oats/barley/rye) is removed. People who cannot tolerate gluten in their diet (known
as Coeliacs), can obtain gluten free bread mix on prescription. It is found in most high
street chemists and health food stores but can be expensive.
11
Fastbake I (1:10)
For preparation of a 1.5lb white loaf in a reduced time period. Loaves made on this setting
can be shorter and the texture more moist.
12
Fastbake II (1:15)
For preparation of a 2lb white loaf in a reduced time period. Loaves made on this setting
can be shorter and the texture more moist.
13
Extra bake (1:00)
This setting is bake only and can be used to increase the baking time on selected settings.
This is especially useful to help ‘set’ jams and marmalade. When started the default time is
1 hour (1:00) minimum and counts down in 10 minute intervals. You will have to
manually switch this off by pressing the stop button, when you have completed the Extra
bake process. It is advised that you check the condition of the bread or jam after 10
minutes and at 10 minute intervals. Pressing + increases the time in increments of 10
minutes. When selecting Extra bake straight after another program, if the message H:HH
is displayed, open the lid, remove the pan and allow to cool for 10 minutes. When cool,
replace the baking pan and its contents, set program and press start.
14
Pizza dough (0:50)
This setting can be used to mix plain or flavoured pizza dough, as well as fresh pasta
dough. Once the programme is complete, the dough can be removed from the machine
and shaped in to pizza bases to be cooked in the oven, or cut in to pasta to be boiled.
15
Quick (1:40)
For white bread that is required in a shorter time. Bread baked on this setting is usually
smaller with a dense texture.
16
Homemade I
This setting allows you to alter the amount of time your bread is kneaded, risen and
cooked for, to enable you to create your own perfect loaf. The Homemade function is for
experienced breadmakers who understand how these processes affect bread and also for
more inexperienced users who wish to use trial and error to create a truly individual loaf.
The breadmaker will automatically remember the settings you alter so you don’t have to
remember them yourself. Once you have used either of the Homemade programmes,
when you select them again, your previous settings will be shown. These can then be
altered or used again.
17
Homemade II
See Homemade I for details.
18
Cake* (1:10)
This breadmaker can also be used to bake a selection of cakes. The process is as simple
as making bread; just follow the recipes provided. Alternatively you can also use the
machine to make cakes from a cake mix where all you need to do is add water. In this
instance, you should ensure the mixture is combined with the water before adding it to the
machine.
19
Dessert* (2:50)
This setting allows you to make other desserts as well as cakes in your breadmaker. The
process is again straightforward and simple; just carefully follow the recipes provided.
* Only available on models 48319 and 48320
Before First Use
Before first use, please take a few minutes to read this instruction book and to find a place
to keep it handy for reference. Pay particular attention to the safety instructions.
1
Carefully unpack the breadmaker and remove all packaging materials.
2
Remove any dust that may have accumulated during packing.
3
Wipe the outside surface of the breadmaker with a clean, damp cloth. Wash the baking
pan and kneading blade (see Care and Cleaning).
The bread pan is non-stick coated. Do not use scouring pads or any abrasives on any part
of the breadmaker.
1
For first time use oil, butter or margarine to grease the bread pan and bake empty for
about 10 minutes (select the Extra bake programme).
2
Clean once more.
3
Place the kneading blade ‚ on the shaft „ in the baking pan ·.
NOTE: In manufacture it is necessary to lightly grease some parts of the appliance. This
may result in the unit emitting some vapour when first used, this is normal.
Using your Breadmaker
1.
Take out the pan
Open the lid and remove the pan by lifting the handle, turning anticlockwise and lifting out.
Place on the work surface. It is important that the pan is filled with ingredients outside the
machine so that any accidental spillage is not ignited by the heating elements.
2.
Attach the blade
If you have not already done so, attach the kneading blade to the shaft by pushing on.
3.
Measure ingredients
Measure the ingredients required and add them all into the pan in the order listed. (See
later section ‘Measuring your ingredients’). When adding the yeast to the baking pan, take
care that the yeast does not come into contact with the water or any other liquid, as it will
start to activate immediately.
Ensure you use tepid water 21-28°C.
4.
Put pan back in
Place the baking pan back in the breadmaker, turning clockwise to lock into place. Close
the lid.
g
11
10

Measuring ingredients
The key and most important step when using your breadmaker is measuring your
ingredients precisely and accurately. It is extremely important to measure each liquid and
dry ingredient properly or it could result in a poor or unacceptable baking result. Do not use
normal kitchen teaspoons or tablespoons. The ingredients must also be added into the
baking pan in the order in which they are given in each recipe. Liquid and dry ingredients
should be measured as follows:
Measuring cup
The cup is marked in various ‘volume measurement’ scales. The recipes in this book use
the ‘cup’ volume which is based on the ‘American’ cup of 8 floz and is conveniently marked
in ¹/16 divisions.
•
If you prefer to use weight (gms) as a measurement, fill and weigh the required number of
cups and record this conversion.
ie:
2 cups = xx gms
3 cups = xxx gms
You must use a good quality set of accurate scales, we prefer to use the ‘cup’ measure for
consistency and accuracy.
Liquid measurements
Use the cups provided B. When reading amounts, the measuring cup must be placed on a
horizontal flat surface and viewed at eye level (not on an angle). The liquid level line must
be aligned to the mark of measurement.
A ‘guesstimate’ is not good enough as it could throw out the critical balance of the recipe.
Dry measurements
Dry measurements (especially flours) must be done using the measuring cups provided.
The measuring cups are based on the American standard 8 fluid oz cup - British cup is 10
fluid oz. Dry measuring must be done by gently spooning ingredients into the measuring
cup and then once filled, levelling off with a knife C. Scooping or tapping a measuring cup
will pack the ingredients and you will end up with more than is required. This extra amount
could affect the balance of the recipe. Do not sift the flour, unless stated.
When measuring small amounts of dry or liquid ingredients (ie yeast, sugar, salt, powdered
milk, honey, molasses) the small measuring spoon which is provided must be used.
Measurements must be level, not heaped as this small difference could throw out the
critical balance of the recipe D.
Your breadmaker produces delicious baked goods with ease. This machine requires only that
you carefully follow the recipe instructions. In basic cooking, normally ‘a pinch of this and a
dash of that’ is fine, but not for breadmakers. Using an automatic breadmaker requires you
accurately measure each ingredient for best results.
•
Always add ingredients in the order they are listed in the recipe.
•
Accurate measuring of ingredients is vital. Do not use larger amounts.
Understanding baking
It is often said that cooking is an art relying on the creativity of the chef, while baking bread
is much more of a science. This means that the process of combining flour, water and yeast,
results in a reaction that produces bread. You have to remember that when the ingredients
combine with each other they produce a specific result. Read the following information
carefully to gain a better understanding of the importance each ingredient plays in the
breadmaking process.
Using the right Flour
Flours, while visibly similar, can be very different by virtue of how they were grown, milled,
stored, etc. You may find that you will have to experiment with different brands of flour to
help you make that perfect loaf. Storage is also very important, as all flours should be kept in
an airtight container.
All purpose flour/plain flour
All purpose flour is a blend of refined hard and soft wheat flours especially suitable for
making cake.
This type of flour should be used for recipes in the cake/quick bread section.
Strong white flour/bread flour
Bread flour is a high gluten/protein flour that has been treated with conditioners that give
dough a greater suitability for kneading. Bread flour typically has a higher gluten
concentration than All purpose flour; however, depending on different milling practices, this
may vary. Strong plain flour or bread flour are recommended for use with this breadmaker.
Wholewheat flour/ wholemeal flour
Wholewheat flour/wholemeal flour is milled from the entire wheat kernel which contains the
bran and germ and makes it heavier and richer in nutrients than white flour. Breads made
with this flour are usually smaller and heavier than white loaves. To overcome this
wholewheat flour/wholemeal flour can be mixed with Bread flour or strong plain flour to
produce a lighter textured bread.
Self-raising flour
Self-raising Flour contains unnecessary leavening ingredients that will interfere with bread
and cake making. It is not recommended for use.
Bran
Bran (unprocessed) & Wheat Germ are the coarse outer portions of the wheat or rye grains
separated from flour by sifting or bolting. They are often added in small quantities to bread
for nutritional enrichment, heartiness and flavour. They are also used to enhance the texture
of bread.
Oatmeal
Oatmeal comes from rolled or steel-cut oats. They are used primarily to enhance flavour and
texture.
Other Ingredients
Yeasts (active dry yeast)
Yeast through a fermentation process produces gas (carbon dioxide) necessary to make
the bread rise. Yeast must be able to feed on sugar and flour carbohydrates in order to
produce this gas. Fast action granular yeast is used in all recipes that call for yeast. There
are three different types of yeast available: fresh, traditional dry active, and fast action. It is
recommended that fast action yeast be used. Fresh or compressed cake yeast is not
recommended as they will produce poor results. Store yeast according to manufacturers
instructions. Ensure your yeast is fresh by checking its expiration date. Once a package or
can of yeast is opened it is important that the remaining contents be immediately resealed
and refrigerated as soon as possible for future use. Often bread or dough, which fails to
rise is due to stale yeast being used. The following test can be used to determine whether
your yeast is stale and inactive:
1
Place half a cup of lukewarm water into a small bowl or cup.
2
Stir 1 tsp. of sugar into the water then sprinkle 2 tsp. of yeast over the surface.
3
Place bowl or cup in a warm area and allow to sit for 10 minutes undisturbed.
4
The mixture should foam and produce a strong yeast aroma. If this does not occur,
discard mixture and start again with another packet of dried yeast.
Sugar
Sugar is important for the colour and flavour of breads. It is also food for the yeast as it is
part of the fermentation process. Artificial sweeteners cannot be used as a substitute for
sugar as the yeast will not react properly with them.
Salt
Salt is necessary to balance the flavour of breads and cakes, as well as for the crust colour
that develops during baking. Salt also limits the growth of yeast so the amounts shown in
the recipes should not be increased. For dietary reasons it may be reduced, however, your
baking may suffer.
Liquids/milk
Liquids such as milk or a combination of powdered milk and water, can be used when
making bread. Milk will improve flavour, provide a velvety texture and soften the crust,
while water alone will produce a crispier crust. Some liquids call for juice (orange, apple,
etc) to be added as a flavour enhancer. Note: For most recipes we suggest the use of dry
(powdered) skimmed milk.
Eggs
Eggs add richness and a velvety texture to bread doughs and cakes.
Sunflower oil
‘Shortens’ or tenderises the texture of yeast breads. Butter or margarine can be used as a
substitute. If butter or margarine is used direct from the refrigerator it should be softened
first for easier blending during the mixing cycle.
Baking powder
Baking powder is a raising agent used in cakes. This type of raising agent does not require
rising time before baking as the chemical reaction works when liquid ingredients are added.
Bicarbonate of soda
Bicarbonate of soda is another raising agent not to be confused or substituted for baking
powder. It also does not require rising time before baking as the chemical reaction works
during the baking process.
Bread Mixes
Use the Bread mix’ setting. (programme 8)
Follow the information for bread mixes on the bread mix packet. There are two types of
bread mixes currently available.
1
Just add water.
These mixes are complete and they have all the necessary ingredients provided, even the
yeast. You only add water.
•
IMPORTANT: Follow the packet instructions as some mixes contain more than the normal
amount of yeast, which could over rise in the pan. Use 3 cups of mix maximum.
•
These mixes are more prone to over-rising and collapsing when the weather is hot and
humid. Since these mixes are complete, we cannot advise how to adjust, as with our own
recipes. Bake in the coolest part of the day, use water between 21-28°C.
2
Just add flour and water
These mixes have the necessary ingredients in separate sachets.
Remember strong white bread flour is required. A packet of this mix will produce a 700g
loaf, just over 1.5lb.
Homemade Programmes
There are 2 home made programmes (No.18 & No.19) which allow you to adapt an
existing baking programme to your own specific requirements. For example you may want
to follow the wholemeal programme (No. 2) but prefer a denser texture. You can achieve
this by using the Home made programmes. You have the opportunity to change the timings
of each stage of the process from between zero minutes to 2 hours depending on the
stage. Note, when zero minutes are selected, that stage of the cycle will not be part of the
baking programme.
Knead 1
When you scroll to programme 18 or 19 the ‘knead 1’ symbol automatically flashes on
screen with 10 minutes showing on the clock. The knead 1 cycle length can be increased
or decreased to between 6-14 minutes by pressing ‘+’ or ‘-‘ Ó, Ô. Confirm the length of
the 1st knead cycle by pressing the green tick button and the Rise 1 symbol will start
flashing.
Rise 1
20 minutes appears on the clock as the default time for this stage of the process.
The Rise 1 cycle length can be increased or decreased to between 20-60 minutes by
pressing ‘+’ or ‘-‘ Ó, Ô. Confirm the time you want by pressing the green tick button
and the Knead 2 symbol will flash on the screen.
Knead 2
15 minutes appears on the clock as the default time for this stage of the process. The
length of the 2nd knead cycle can be increased or decreased to between 5-20 minutes by
pressing ‘+’ or ‘-‘ Ó, Ô. Confirm the length of the 2nd knead cycle by pressing the
green tick button and the Rise 2 symbol will flash on the screen.
Rise 2
25 minutes appears on the clock as the default time for this stage of the process.
The length of the 2nd Rise cycle can be increased or decreased to between 5 – 120
minutes by pressing ‘+’ or ‘-‘ Ó, Ô. Confirm the time you want by pressing the green
tick button and the Rise 3 symbol will flash on the screen.
Rise 3
45 minutes appears on the clock as the default time for this stage of the process. The
length of the 3rd Rise cycle can be increased or decreased by between 2 – 120 minutes by
pressing ‘+’ or ‘-‘ Ó, Ô. Confirm the time you want by pressing the green tick button
and the Bake symbol will flash on the screen.
Bake
35 minutes appears on the clock as the default time for this stage of the process.
The length of the Baking cycle can be increased or decreased between 0 –1 hour and 20
minutes by pressing ‘+’ or ‘-‘ Ó, Ô. Confirm the time you want by pressing the green
tick button and the Crust Control symbol will flash on the screen.
Crust Setting
At this stage the clock disappears from the screen.
Very Light
Light
Medium
Dark
Very Dark
There are 5 different crust settings you can choose.
Scroll to select the crust colour you want and press green tick button to confirm and the
total cooking time programmed, appears on the screen. You can either start the
programme baking immediately by pressing the green tick button for 3 seconds or use
the Delay Timer function.
Slicing and Storing Bread
For best results place bread on a wire rack and allow to cool for 15-30 minutes before
slicing.
Use an electric knife or a sharp knife with a serrated blade for even slices.
Store unused bread tightly covered in a plastic bag at room temperature for up to three days.
If weather is hot and humid, store in the refrigerator overnight.
For longer storage (up to one month), place bread in a tightly covered container in the
freezer.
If you store the bread in the refrigerator, leave it out to bring it to room temperature before
serving.
Since homemade bread has no preservatives it tends to dry out and become stale faster
than commercially made bread.
Leftover slightly hardened bread may be cut into 1.3 cm (half inch) or 2.5cm (1 inch) cubes
and used in favourite recipes to make croutons, bread pudding, or stuffing.
Care and Cleaning
1
Caution: To prevent electrical shock, unplug the unit before cleaning.
2
Wait until the breadmaker has cooled.
•
IMPORTANT: Do not immerse or splash either the body or lid in any liquid as this may
cause damage and/or electric shock.
3
Exterior: Wipe the lid and outer body of the unit with a damp cloth or slightly dampened
sponge.
4
Interior: Use a damp cloth or sponge to wipe the interior of the breadmaker.
5
Baking pan: Clean the baking pan with warm water, soap is not necessary. Avoid scratching
the non-stick surface. Dry it thoroughly before placing it back in the baking chamber.
6
Fruit and nut dispenser: The dispenser is removed by lifting the right side first. Once the
right side has been lifted, the whole dispenser may be removed. The dispenser should be
cleaned using warm soapy water and a damp cloth/sponge. It should then be rinsed
thoroughly and left to dry naturally. To replace the dispenser, ensure the left side is slotted
in to place first. The right side can then be pushed down, back in to position.
•
Do not wash the baking pan, measuring cup, spoon or kneading blades in the dishwasher.
•
Do not soak the baking pan for long periods as this could interfere with the working of the
drive shaft.
•
If the paddle becomes stuck in the bread pan, pour hot water over it and allow to soak for
30 minutes. This will enable you to remove the paddle more easily.
•
Be sure the appliance is completely cooled before storing away.
Do not use Steel wool pads when cleaning.
Special care for the non-stick finish. Avoid damaging the coating. Do not use metal
utensils such as spatulas, knives or forks. The coating may change colour after long use,
this is only caused by moisture and steam and will not affect the performance of the unit or
quality of your bread.
Ensure that the whole kneading blade which the shaft fits in to is cleaned thoroughly after
use. After cleaning, add a drop of cooking oil to the hole before returning the blade to the
shaft. This will help prevent the blade from sticking.
•
Keep all air vents and openings clear of dust.
Storing the Unit
Be sure to dry all parts before storing including wiping any moisture from the viewing
window. Close the lid and do not store anything on top of the lid.
Getting Successful Results
1
Place all recipe ingredients into the baking pan so that yeast is not touching any liquid.
2
If you are using the machine on the Dough setting (programme 6), after the cycle is
complete, remove the dough from the breadmaker, cover in a thin coating of sunflower oil
and cover with greaseproof paper and a dry tea towel. The dough should then be left in a
warm area free from draughts, for approximately 30 minutes or until it has roughly doubled
in size.
3
Humidity can cause problems, therefore humidity and high altitudes require adjustments.
For high humidity, add an extra tablespoon of flour if consistency is not right. For high
altitudes, decrease yeast amount by approximately ¼ teaspoon, and decrease sugar and/or
water or milk slightly.
4
The DOUGH setting is great for the mixing, kneading and proofing (allowing dough to rise)
of richer doughs like croissant dough. Use the breadmaker to prepare this dough so all you
need to do is shape and bake it according to your recipe.
5
When recipes call for a ‘lightly floured surface,’ use about 1 to 2 tablespoons of flour on the
surface. You may want to lightly flour your fingers or rolling pin for easy dough
manipulation.
6
When you let dough ‘rest’ and ‘rise’ according to a recipe, place it in a warm, draught-free
area. If the dough does not double in size, it may not produce a tender product.
7
If the dough you are rolling shrinks back, let it rest covered for a few minutes before rolling
again.
8
Dough may be wrapped in plastic and stored in a freezer for later use. Bring the dough to
room temperature before using.
9
After 5 minutes of kneading, open the lid and check the dough consistency. The dough
should form a soft, smooth ball. If too dry, add liquid. If too wet, add flour (½ to 1
tablespoon at a time).
g
12
13

TROUBLE SHOOTING
Bread Sinks in the centre
Too much liquid or liquid too warm.
Measure ingredients accurately. Use liquids at temperatures between 21°C and 28°C.
Salt was not added, causing bread to over rise and collapse.
Measure ingredients accurately.
Too much yeast was added Measure ingredients accurately, if problem persists, reduce
yeast by ¼ teaspoon.
High humidity and hot ambient temperatures can cause bread to over rise and collapse.
Bake during the coolest part of the day, Try reducing the yeast by ¼ teaspoon or use liquids
direct from the refrigerator. Do not use the timer function.
High altitudes can cause the bread to over rise and then collapse during baking.
Try reducing the yeast by ¼ teaspoon.
Lid is open during baking.
Do not open the lid during baking.
Bread did not rise enough
Not enough yeast was added. Measure ingredients accurately.
Yeast is outdated or inactive.
Never use outdated yeast. Store in a cool, dark place.
Too little sugar was added.
Measure ingredients accurately.
Too much salt was added, reducing the action of the yeast.
Measure ingredients accurately.
Water was too hot and killed the yeast.
Use liquids at temperatures between 21°C and 28°C
Yeast has been activated before programme has started.
Take care that yeast does not come in contact with liquid before programme has started.
Bread rises too much
High humidity and hot ambient temperatures can cause bread to over rise.
Bake during the coolest part of the day. Try reducing the yeast by ¼ teaspoon or use liquids
directly from the refrigerator. Do not use the Timer function.
Too much yeast.
Measure ingredients accurately.
Too much liquid.
Measure ingredients accurately.
Hot liquids accelerated the yeast action.
Use liquids at temperatures between 21°C and 28°C.
Too much flour or not enough salt.
Measure ingredients accurately.
Bread dry with dense texture
Not enough liquid added.
Measure ingredients accurately.
Flour may be passed the use by date, or be dry causing wet/dry imbalance.
Try increasing liquid by 1 tbsp at a time.
Bread under baked with soggy centre
Too much liquid from fresh or canned fruit.
Always drain liquids well as specified in the recipe. Water may have to be reduced
slightly.
Large amounts of rich ingredients like nuts, butter, dried fruits, syrups and grains will
make dough heavy. This will slow down the rising and prevent the bread from baking
through.
Measure ingredients accurately. Never exceed the amounts in the recipe.
Bread over browned
Too much sugar.
Measure ingredients accurately.
Crust colour set too high.
Set crust colour to a lighter setting.
Bread has large holes in texture
Water was too hot and killed the yeast.
Use liquids at temperatures between 21°C and 28°C
Too much liquid.
Measure ingredients accurately.
Too much yeast.
Measure ingredients accurately.
High humidity and hot ambient temperatures increase yeast activity.
Bake during the coolest part of the day. Try reducing the yeast by ¼ teaspoon or use liquids
direct from the refrigerator.
Do not use the timer function.
Water was too hot and killed the yeast.
Use liquids at temperatures between 21°C and 28°C.
Bread surface is sticky
Bread was left in the machine too long and condensation collected on the baking pan.
Whenever possible, remove bread from the baking pan and cool on a wire rack before keep
warm period ends.
The wet/dry balance of the ingredients may be incorrect. Measure ingredients accurately.
H:HH Message on display
Temperature in breadmaker is too high.
Press the Stop button. Remove the baking pan, leave lid open and allow to cool. When
cool, put the baking pan back in, set programme and start the programme again.
E:EE Message on display
Temperature sensor is disconnected. Refer to Morphy Richards Helpline or local distributor.
Difficult to remove bread from the pan
The bread is sticking to the pan.
The surface of the pan needs to be oiled before everyday use. Wash the pan in hot soapy
water and thoroughly dry. Liberally coat the inner surface of the pan with oil,
butter or margarine. Follow the guide, ‘Using your breadmaker’. When the bread pan is
removed from the machine after the baking programme allow the bread to cool in the pan
for 15 minutes before turning out onto a rack. Only slice the bread when fully cooled after
20-40 minutes.
Condensation in the Fruit and Nut dispenser
Please note that if your machine has a fruit & nut dispenser, during the baking process,
condensation will form on the inside of the dispenser. This is totally normal and does not
affect the quality of the bread.
RECIPES
The recipes in this booklet have been thoroughly tested to ensure best results. Recipes
have been created by home economists specifically for this machine and may not produce
acceptable results in other similar machines.
•
Always add ingredients in the order they are listed in the recipe.
•
Accurate measuring of ingredients is vital. Do not use larger amounts
•
All of the following recipes use this same general method:
1
Measure ingredients into baking pan.
2
Use tepid water 21-28°C.
3
Insert baking pan securely into unit, close lid.
4
Select appropriate bread setting.
5
Push start button.
6
When bread is done, remove pan from unit using oven mitts.
7
Remove bread from baking pan, (and kneading blade from bread if necessary).
8
Allow to cool before slicing.
This method is modified by notes, if applicable, at the end of each recipe. These recipes
have been developed using leading brands of flour and fast action yeast.
RECIPES FOR BASIC BREAD (1)
Basic white bread
1 lb
1½ lb
2 lb
Water
¾ cup
1¹⁄
8
cup
1½ cup
Skimmed milk powder**
2 tbsp
2½ tbsp
4 tbsp
Sunflower oil
2 tbsp
2½ tbsp
4 tbsp
Sugar
1¼ tbsp
2¼ tbsp
3 tbsp
Salt
1 tsp
1¼ tsp
2 tsp
Strong white bread flour
2 cup
3 cup
4 cup
Fast action yeast
1 tsp
1¼ tsp
1¼ tsp
Use setting
1 Basic
Soft grain bread
1½ lb
2 lb
Water
1¹⁄
8
cup
1½ cup
Skimmed milk powder**
2½ tbsp
4 tbsp
Sunflower oil
2 tbsp
2½ tbsp
Sugar
2¼ tbsp
3 tbsp
Salt
1¼ tsp
2 tsp
Strong white soft grain bread flour
3 cup
4 cup
Fast action yeast
1 tsp
1 tsp
Use setting
1 Basic
**If skimmed milk not available, it can be omitted (from the recipe).
Ingredient Temperatures
All ingredients, including the machine and pan, and especially liquids (water or milk),
should be warmed to room temperature 21°C (70°F). If ingredients are too cold, below
10°C (50°F), they will not activate the yeast. Extremely hot liquids, above 40°C (104°F),
may kill the yeast.
Glazing
Give your just baked bread a professional finish. Select one of the following special glazes
to enhance your bread.
Egg glaze
Beat 1 large egg and 1 tablespoon of water together, brush generously.
Note: this glaze is only for bread where the dough has been prepared in the breadmaker
and is then being baked in the oven. The glaze should be applied when the dough is
removed from the breadmaker. Do not apply this glaze to doughs in the breadmaker.
Melted butter crust
Brush melted butter over just baked bread for a softer, tender crust.
Milk glaze
For a softer, shiny crust, brush just baked bread with milk or cream.
Sweet icing glaze
Mix 1 cup sifted icing sugar with 1 to 2 tablespoons of milk to make a glaze consistency
and drizzle over raisin bread or sweet breads.
Poppy/Sesame/Caraway seed/Oatmeal
Sprinkle your choice of these seeds generously over just glazed bread.
Conversion Chart
Liquids, flour and others
We recommend that you use the cup provided for all recipes for consistency between
brands and types of flour.
The cup provided is based on the American cup measurement of 8 Floz.
For people who prefer to use their own measuring utensils, alternative measurements are in
millilitres (ml) and cubic centimetres (cc) for liquid measurement and grams (gm) for
weight of flour, sugar and fruit.
Note: A good quality set of accurate kitchen scales with divisions and accuracy to 2 grams
are required.
A measuring jug with divisions of 2 ml is required.
The tablespoon and teaspoon provided are required to measure the smaller quantities.
A set of British standard spoons with ‘scrape’ level tops can be used.
Do not use a kitchen tablespoon or teaspoon as they are inaccurate.
F.A.Q.
Questions about general performance and operation.
Question 1
What should I do if the kneading blade comes out with the bread/
Remove it with a pair of plastic tongs before slicing the bread. Since the blade can be
disconnected from the pan, it is not a malfunction if it comes out in your bread.
Question 2
Why does my bread sometimes have some flour on the side crust?
In some cases, the flour mix may remain on the corners of the baking pan. When this
happens, it usually can be eaten or simply trim off that portion of the outer crust with a
sharp knife.
Question 3
Why isn't the dough mixing? I can hear the motor running.
The Kneading Blade or baking pan may not be inserted properly. Make sure the pan is
facing the right way and that it has ‘clicked’ and seated into the bottom of the breadmaker.
Question 4
How long does it take to make bread?
Timings for each setting are outlined earlier.
Question 5
Why can't I use the timer when baking with fresh milk?
The milk will spoil if left sitting in the machine too long. Fresh ingredients such as eggs and
milk should never be used with the delayed timer feature.
Question 6
Why do I have to add the ingredients in a certain order?
This allows the breadmaker to mix the ingredients in the most efficient manner possible. It
also serves to keep the yeast from combining with the liquid before the dough has started
to mix, which is essential on the time delay.
Question 7
When setting the timer for morning, why does the machine make sounds late at night?
The machine must start operation when the time delay reaches the start time of the
programme so that the bread will be ready. These sounds are made by the motor when
kneading the dough. It is a normal operation, not a malfunction.
Question 8
The kneading blade is stuck in the bread pan. After baking how do I get it out?
The kneading blade may ‘stick’ in place after baking. Running warm or hot water over the
blade should loosen it enough to be removed. If still stuck, soak in hot water for about 30
minutes.
Question 9
Can I wash the baking pan in the dishwasher?
No. The baking pan and kneading blade must be washed by hand.
Question 10
What will happen if I leave the finished bread in the baking pan?
Whilst still in the breadmaker for the first hour after baking is complete the bread ‘keeps
warm’ to prevent it becoming ‘soggy’. Leaving the bread in the breadmaker after the keep
warm period may result in a ‘soggy’ loaf of bread as excess steam (moisture) would not be
able to escape. Remove and allow to cool on a wire rack after baking to prevent this.
Question 11
Why did the dough only partially mix? Why didn't it mix completely?
The dough may be too heavy or dry. Also, the kneading blade or baking pan may not be
inserted properly. Ingredients may have been added in the wrong order.
Question 12
Why didn't the bread rise?
The yeast could be bad, past it’s sell by date or possibly no yeast was added at all. Also, if
the mixing was not complete, rising problems could develop.
Question 13
What is the minimum and maximum time a cycle may be delayed?
The maximum length of delay is 13 hours including the total cycle time. For example,
Setting 1 (basic small) has a cycle time of 3:20. This start is delayed by a maximum of
9:40. The minimum length of delay for each setting is 10 minutes. The delay clock
increases and decreases in increments of 10 minutes.
Question 14
How do I know when to add raisins, nuts, etc. to the bread?*
There is a beeper tone to signal that you may add raisins, nuts, etc. during the second
kneading cycle.
Note: See ‘Baking cycle times’ chart for ‘Add nuts & raisins’ time.
* Only applicable to model 48321 without fruit & nut dispenser.
In some cases, ingredients can be broken up during the initial kneading cycle. Each recipe
indicates the best time to add fruit and nuts to the dough.
Question 15
Why does my bread comes out too moist? What can I do?
Humidity may affect the dough. Add an extra tablespoon of flour. Also, high altitude may
have the same effect. Decrease the amount of yeast by ¼ teaspoon and decrease the sugar
and/or water/milk slightly.
Question 16
Why do I get air bubbles at the top of the bread?
This can be caused by using too much yeast. Decrease the yeast by ¼ tsp.
Question 17
Why does my bread rise and then collapse or crater?
The bread may be rising too much. To reduce the rate of rising, reduce the amount of yeast
and/or increase the amount of salt.
Question 18
Can I use my favourite bread recipes (traditional yeast bread) in my bread machine?
Yes, but you will need to experiment to get the right proportion of ingredients. Become
familiar with the unit and make several loaves of bread before you begin experimenting.
Never exceed a total amount of 5 cups dry ingredients (that includes the total amount of
flour, oats, oatmeal, bran). Use the recipes in this book to help determine the ratio of dry
ingredients to liquid and amounts of yeast, sugar, salt, and oil/butter/margarine to use.
We advise creating your own bread recipes using the basic mode, then progress to the
others, using the Baking cycle times chart as a guide.
Question 19
Is it important for ingredients to be at room temperature before adding them to the
baking pan?
Yes, even when the delay timer is being used. (Water must be between 21°C and 28°C).
Question 20
Why do the loaves vary in height and weight? The whole wheat/wholewheat breads are
always shorter. Am I doing something wrong?
No, it is normal for wholewheat and wholemeal breads to be shorter and denser than basic
or French breads. Wholewheat and wholemeal flour are heavier than white bread flour,
therefore they don’t rise as much during the bread baking process. This is also true for
bread containing fruit, nuts, oats and bran.
Question 21
Can I premix the yeast with water?
No, the yeast must be kept dry and put into the baking pan last, above the flour. This is
especially important when the delay timer is being used.
Question 22
Why is there a large hole in the base of the bread?
This hole has been created by the kneading blade. Sometimes this hole is larger than
normal. This is because the dough has rested to the side of the blade after the second
kneading cycle - normal with bread makers. You could position the dough evenly in the
base of the pan.
g
14
15
RECIPES FOR WHOLEMEAL BREAD (2)
Wholewheat bread
1½ lb
2 lb
Water
1 ¹⁄8 cup
1
5
⁄
8
cup
Skimmed milk powder**
1½ tbsp
3 tbsp
Sunflower oil
2 tbsp
3 tbsp
Brown sugar
2½ tbsp
2½ tbsp
Salt
1¼ tsp
1½ tsp
Strong wholemeal bread flour
3 cup
4 cup
Fast action yeast
¾ tsp
¾ tsp
Vitamin C tablet (crushed)
1x100mg
1x100mg
Use setting
2 Wholemeal
Wholewheat seeded
1½ lb
2 lb
Water
1¹⁄
8
cup
1
5
⁄
8
cup
Skimmed milk powder**
1½ tbsp
3 tbsp
Sunflower oil
2 tbsp
3 tbsp
Brown sugar
2½ tbsp
2½ tbsp
Salt
1¼ tsp
1½ tsp
Strong wholemeal bread flour
3 cup
4 cup
Fast action yeast
¾ tsp
¾ tsp
Vitamin C tablet (crushed)
1x100mg
1x100mg
Sunflower seeds †
1 tsp
2 tsp
Pumpkin seeds †
1 tsp
2 tsp
Sesame seeds †
1 tsp
2 tsp
Use setting
2 Wholemeal
† Place in the fruit and nut dispenser or add when the beeper sounds if your model does
not have a fruit and nut dispenser.
Granary loaf
1½ lb
2 lb
Water
1 cup
1½ cup
Skimmed milk powder***
2 tbsp
3 tbsp
Sunflower oil
2 tbsp
3 tbsp
Soft brown sugar
2½ tbsp
5 tbsp
Salt
1¼ tsp
2 tsp
Granary malted brown bread flour
3 cup
4 cup
Fast action yeast
¾ tsp
¾ tsp
*Vitamin C tablet
1 x 100mg
1 x 100mg
Use setting
2 Wholemeal
*Optional: By adding a vitamin C tablet, the rise of the bread can be improved.
Crush tablet between 2 teaspoons and add.
**If skimmed milk not available, it can be omitted (from the recipe).
Granary 50% white
1½ lb
2 lb
Water
1 cup
1½ cup
Skimmed milk powder**
2 tbsp
3 tbsp
Sunflower oil
2 tbsp
3 tbsp
Soft brown sugar
2½ tbsp
5 tbsp
Salt
1¼ tsp
2 tsp
Granary malted brown bread flour
1½ cup
2 cup
Strong white bread flour
1½ cup
2 cup
Fast action yeast
¾ tsp
¾ tsp
*Vitamin C tablet
1 x 100mg
1 x 100mg
Use setting
2 Wholemeal
*Optional: By adding a vitamin C tablet, the rise of the bread can be improved. Crush tablet
between 2 teaspoons and add.
RECIPES FOR SWEET BREAD (3)
Mixed fruit loaf
1 lb
1½ lb
2 lb
Water
¾ cup
1¹⁄
8
cup
1
1
⁄
3
cup
Skimmed milk powder**
2 tbsp
2½ tbsp
3 tbsp
Sunflower oil
2 tbsp
2½ tbsp
3 tbsp
Sugar
2 tbsp
3 tbsp
3 tbsp
Salt
1 tsp
1¼ tsp
1½ tsp
Strong white bread flour
2 cup
3 cup
4 cup
Nutmeg
½ tsp
¾ tsp
1 tsp
Fast action yeast
¾ tsp
1 tsp
1 tsp
Dried mixed fruit †
¼ cup
½ cup
2⁄3 cup
Use setting
3 Sweet
† Place in the fruit and nut dispenser or add when the beeper sounds if your model does
not have a fruit and nut dispenser.
Orange and cranberry loaf
1 lb
1½ lb
2 lb
Water
½ cup
6⁄8 cup
1 cup
Orange juice
½ cup
1
⁄
3
cup
1
⁄
3
cup
Orange rind
2
2
2
Skimmed milk powder**
2 tbsp
2½ tbsp
3 tbsp
Sunflower oil
2 tbsp
2½ tbsp
3 tbsp
Sugar
5 tbsp
3 tbsp
3 tbsp
Salt
1 tsp
1¼ tsp
1½ tsp
Strong white bread flour
2 cup
3 cup
4 cup
Nutmeg
½ tsp
¾ tsp
1 tsp
Fast action yeast
1 tsp
1 tsp
1 tsp
Dried cranberries †
¼ cup
½ cup
2⁄3 cup
Use setting
3 Sweet
† Place in the fruit and nut dispenser or add when the beeper sounds if your model does
not have a fruit and nut dispenser.
**If skimmed milk not available, it can be omitted (from the recipe).
Soft grain 50% white bread
1½ lb
2 lb
Water
1¹⁄
8
cup
1½ cup
Skimmed milk powder**
2½ tbsp
4 tbsp
Sunflower oil
2 tbsp
2½ tbsp
Sugar
2¼ tbsp
3 tbsp
Salt
1¼ tsp
2 tsp
Strong white soft grain bread flour
1½ cup
2 cup
Strong white bread flour
1½ cup
2 cup
Fast action yeast
1 tsp
1 tsp
Use setting
1 Basic
Brown loaf
1 lb
1½ lb
2 lb
Water
¾ cup
1 cup
1
1
⁄
3
cup
Skimmed milk powder**
1½ tbsp
2 tbsp
3 tbsp
Sunflower oil
1½ tbsp
2 tbsp
3 tbsp
Sugar
2½ tbsp
2½ tbsp
3½ tbsp
Salt
1 tsp
1¼ tsp
2 tsp
Strong brown bread flour
2 cup
3 cup
4 cup
Fast action yeast
1 tsp
1¼ tsp
1¼ tsp
Use setting
1 Basic
Italian herb bread
1½ lb
2 lb
Water
1¹⁄
8
cup
1½ cup
Skimmed milk powder**
2½ tbsp
3 tbsp
Sunflower oil
2½ tbsp
3 tbsp
Sugar
2¼ tbsp
2½ tbsp
Salt
1½ tsp
2 tsp
Strong white bread flour
3 cup
4 cup
Dried marjoram
1½ tsp
2 tsp
Dried basil
1½ tsp
2 tsp
Dried thyme
1½ tsp
2 tsp
Fast action yeast
1¼ tsp
1½ tsp
Use setting
1 Basic
Cheese & onion bread
1½ lb
2 lb
Water
1 cup
1¼ cup
Skimmed milk powder***
2 tbsp
2½ tbsp
Sugar
1 tbsp
2 tbsp
Salt
½ tsp
1 tsp
Onion granules
1½ tbsp
2 tbsp
Mature grated cheddar cheese
1 cup
1½ cup
Strong white bread flour
3 cup
4 cup
Fast action yeast
1½ tsp
1¾ tsp
Use setting
1 Basic
We recommend using the lightest crust setting on the cheese and onion bread.
**If skimmed milk not available, it can be omitted (from the recipe).
Raisin bread
1½ lb
2 lb
Water
1¼ cup
1½ cup
Skimmed milk powder**
3 tbsp
4 tbsp
Sunflower oil
3 tbsp
4 tbsp
Sugar
1 tbsp
2 tbsp
Salt
1½ tsp
2 tsp
Cinnamon
¾ tsp
1 tsp
Strong white bread flour
3 cup
4 cup
Fast action yeast
1 tsp
1¼ tsp
Raisins*
5
⁄
8
cup
¾ cup
Use setting
1 Basic
* Place in the fruit and nut dispenser or add when the beeper sounds if your model does not
have a fruit and nut dispenser.
Sugar free bread
1 lb
1½ lb
2 lb
Warm water (450C)
¾ cup
1¹⁄
8
cup
1½ cup
Skimmed milk powder**
2 tbsp
2½ tbsp
4 tbsp
Sunflower oil
2 tbsp
2½ tbsp
4 tbsp
Sweetener
1¼ tbsp
2¼ tbsp
3 tbsp
Salt
1 tsp
1¼ tsp
2 tsp
Strong white bread flour
2 cup
3 cup
4 cup
Fast action yeast
1 tsp
1¼ tsp
1¼ tsp
Use setting
1 Basic
Sugar and Salt free bread
1 lb
1½ lb
2 lb
Warm water (450C)
¾ cup
1¹⁄
8
cup
1½ cup
Skimmed milk powder**
2 tbsp
2½ tbsp
4 tbsp
Sunflower oil
2 tbsp
2½ tbsp
4 tbsp
Strong white bread flour
2 cup
3 cup
4 cup
Fast action yeast
1 tsp
1¼ tsp
1¼ tsp
Use setting
1 Basic
This loaf can have other flavourings added. Add ½ tsp of your choice of seasoning (mixed
herbs, black pepper etc)
Sun-dried tomato loaf
1½ lb
2 lb
Water
1 cup
1
1
⁄
3
cup
Skimmed milk powder**
2 ½ tbsp
3 tbsp
Sunflower oil
2 ¼ tbsp
3 tbsp
Sugar
2 ¼ tbsp
3 tbsp
Salt
1 ¼ tsp
1½ tsp
Dried mixed herbs
1 ½ tsp
2 tsp
Strong white bread flour
3 cup
4 cup
Fast action yeast
1¼ tsp
1½ tsp
Sun-dried tomatoes
3
⁄
8
cup
½ cup
Use setting
1 Basic
**If skimmed milk not available, it can be omitted (from the recipe).
g
17
16
Ciabatta
Water
1
1
⁄
3
cup
Olive oil
1 tbsp
Salt
1½ tsp
Sugar
1 tsp
Strong white bread flour
3 cups
Dried yeast
1½ tsp
Use setting
6 Dough
Method
1
Place all ingredients in pan and set to dough setting.
2
Pour the wet dough onto a floured board and cover with a bowl, leave to rest for 20
minutes.
3
Lightly flour two baking trays and place half the dough on each tray. Lightly flour, cover
and let rise for 45 minutes.
4
Dimple the dough and bake in an oven at 220°C (425°F, gas mark 7) for 25-30 minutes,
spraying with water every 5 minutes to crisp the crust.
Bagels
Warm water
1¹⁄
8
cup
Vegetable oil
2 tsp
Sugar
1 tbsp
Salt
2 tsp
Strong white bread flour
4 cups
Fast action yeast
1 tsp
Use setting
6 Dough
Method
1
Place all ingredients in pan and set to dough setting.
2
Dough will be firm.
3
Cut into 10-12 balls and roll into a sausage shape, form a ring and seal the edges.
4
Place on an oiled tray, cover and allow to rise for 20 minutes.
5
Boil the bagels in sugary water for 1 minute, turning half way through.
6
Place on oiled tray and bake in oven at 220°c (425°F, gas mark 7) for 20 minutes turning
once.
Croissant
Milk
1 cup
Egg
1
Butter
25g
Salt
1½ tsp
Sugar
4 tsp
White bread flour
3½ cup
Fast action yeast
1½ tsp
Use setting
6 Dough
Method
1
Roll dough out into a rectangle
2
Place 250g of butter on one side and fold other side over, sealing the edges.
3
Roll out into a rectangle and fold right third into the centre followed by the left third. Seal
and wrap in cling film, chill for 20 minutes
4
Repeat step 3 (rolling out, folding and chilling) twice more.
5
Roll into long rectangle and cut into triangles. Roll into croissant shape and leave to rise
for 30 minutes.
6
Glaze with egg and milk and cook for 15-20 mins at 200°C (400°F, gas mark 6)
Tea cakes
Warm water
1 cup
Butter (melted)
50g
Salt
1 tsp
Sugar
50g
Dried milk
2 tbsp
Mixed spice
1 tsp
White bread flour
400g
Dried yeast
1 tsp
Currants
2⁄3 cup
Method
1
Place all ingredients except currants in breadmaker and set to dough setting.
2
After the cycle has finished knead in the currants.
3
Make into 8-10 balls and place on greased baking sheet and leave to rise for 30 minutes.
4
Cook at 200°c (400°F, gas mark 6) for 15-20 minutes until golden brown.
RECIPES FOR JAM (7)
Marmalade
Juice from oranges
3 medium
Rind of oranges grated
2
Preserving sugar
1 cup
Water
1 tbsp
Pectin if needed
2 tsp
Use setting
7 Jam
Comments
•
Warm the jars before filling.
•
Use extra bake time if needed according to set of the marmalade and the size of the
oranges.
•
Remove the paddle with tongs before pouring the marmalade into the jars.
•
Do not lift the lid during mixing.
•
Seville oranges should be used for marmalade but are only available in January. If using
other oranges pectin will be needed to firm up the marmalade.
•
This recipe will fill approximately 1 medium (400g) jar.
Marmalade from tinned oranges
‘Ma made’ Seville oranges
1 tin (850g)
Preserving sugar
1.8 kg
Water
425ml
Use setting
7 Jam
•
After Jam programme has finished, put the mixture on extra bake for 30 minutes or until
the mixture is at its setting point.
•
To test, place a small amount on a saucer and allow to cool, draw your finger across the
surface. If the marmalade mixture wrinkles it is done.
Raspberry and apple jam
Frozen raspberries*
2 cup
Chopped baking apples (peeled and cored)
1 cup
Jam sugar
1 cup
Lemon juice
3 tbsp
Use setting
7 Jam
*Measure before defrosting
Comments
•
Warm the jars before filling.
•
Use tongs to remove the paddle before pouring
Brioche
1½ lb
2 lb
Eggs
3 med
3 large
Butter (melted)
½ cup
¾ cup
Milk
1
⁄
3
cup
½ cup
Water
3 tbsp
4 tbsp
Strong white bread flour
3 cups
4 cups
Salt
¾ tsp
1 tsp
Sugar
2 tbsp
3 tbsp
Yeast
1½ tsp
1½ tsp
Use setting
3 Sweet
RECIPES FOR SANDWICH BREAD (4)
Sandwich loaf
1½ lb
2 lb
Water
11⁄16 cup
1
1
⁄
3
cup
Soft margarine or butter
1½ tbsp
2 tbsp
Salt
½ tsp
1 tsp
Skimmed milk powder**
1½ tbsp
2 tbsp
Sugar
3 tbsp
3½ tbsp
Strong white bread flour
3 cup
4 cup
Fast action yeast
¾ tsp
1 tsp
Use setting
4 Sandwich
Soft grain sandwich loaf
1½ lb
2 lb
Water
11⁄16 cup
1
1
⁄
3
cup
Butter (melted)
1½ tbsp
2 tbsp
Salt
½ tsp
1 tsp
Skimmed milk powder**
1½ tbsp
2 tbsp
Sugar
3 tbsp
3 ½ tbsp
Strong white soft grain bread flour
3 cups
4 cups
Fast action yeast
¾ tsp
1 tsp
Use setting
4 Sandwich
RECIPES FOR FRENCH BREAD (5)
French bread
1 lb
1½ lb
2 lb
Water
¾ cup
1 cup
1¼ cup
Skimmed milk powder**
1½ tbsp
2 tbsp
2½ tbsp
Sugar
¾ tbsp
1 tbsp
1¼ tbsp
Salt
1 tsp
1 tsp
1¼ tsp
Sunflower oil
1 tbsp
1 tbsp
1½ tbsp
Strong white bread flour
2 cup
3 cup
4 cup
Fast action yeast
1 tsp
1 tsp
1¼ tsp
Use setting
5 French
**If skimmed milk not available, it can be omitted (from the recipe).
RECIPES FOR DOUGH (6)
White bread rolls
Water
1¼ cup
Skimmed milk powder**
1 tbsp
Butter (melted)
2 tbsp
Sugar
2 tbsp
Salt
1½ tsp
Strong white bread flour
3¼ cup
Fast action yeast
1½ tsp
Use setting
6 Dough
Method
1
Knead and shape the dough into 6 rolls.
2
Place on a greased baking tray.
3
Brush lightly with melted butter.
4
Cover for 20-25 minutes.
5
Allow to rise until they are double in size then glaze, if required.
6
Bake for approx 15-20 minutes at 190°C (gas mark 5, 375°F).
Wholewheat bread rolls
Water
1¼ cup
Skimmed milk powder**
2 tbsp
Butter (melted)
2 tbsp
Honey
2 tbsp
Brown sugar
1 tbsp
Salt
1½ tsp
Strong wholewheat bread flour
3¼ cup
Fast action yeast
1½ tsp
Use setting
6 Dough
Method
Follow method given for white rolls.
Hot cross buns
Water
1 cup
Butter (melted)
¼ cup
Sugar
¼ cup
Egg (beaten)
1
Salt
1 tsp
Strong white bread flour
3¾ cups
Fast action yeast
2 tsp
Cinnamon
1 tsp
Nutmeg
¼ tsp
Raisins
1 cup
Use setting
6 Dough
Method
1
Divide into 8-12 pieces. Shape and flatten slightly.
2
Score a cross on the top of each bun.
3
Glaze with egg and milk.
4
Cover and allow to rise for 30 minutes.
5
Bake in the oven at 190°C (375°F, gas mark 5) for 16-18 minutes.
**If skimmed milk not available, it can be omitted (from the recipe).
g
18
19
Gluten free fruit cake*
Light brown sugar
¾ cup
Softened butter
¾ cup
Eggs
3
Lemon juice
1 tbsp
Milk
1 tbsp
Dried mixed fruit
2⁄3 cup
White gluten free flour mix
2 cups
Gluten free baking powder
1 tbsp
Gluten free mixed spice
½ tsp
Use setting
16 Cake
*Only available on models 48319 and 48320
RECIPES FOR FASTBAKE SMALL (11)
Fastbake small white
1½ lb
Water
1¹⁄
8
cup
Skimmed milk powder**
2 tbsp
Salt
1 tsp
Sugar
4 tsp
Sunflower oil
2 tbsp
Strong white bread flour
3 cup
Fast action yeast
3 tsp
Use setting
11 Fastbake
RECIPES FOR FASTBAKE LARGE (12)
Fastbake large white
2lb
Water
1½ cup
Skimmed milk powder**
3 tbsp
Salt
1½ tsp
Sugar
5 tsp
Sunflower oil
3 tbsp
Strong white bread flour
4 cup
Fast action yeast
3 tsp
Use setting
12 Fastbake
RECIPES FOR PIZZA DOUGH* (14)
Pizza base*
Water
1 cup
Sugar
2 tbsp
Salt
½ tsp
Oil
3 tbsp
Strong white bread flour
3 cup
Fast action yeast
2 tsp
Use setting
14 Pizza dough
Method
1
Pre-heat oven.
2
Shape into a flat round shape. Place on a greased baking tray. Brush lightly with oil.
3
Cover for 15 minutes and allow to rise.
4
Add your desired topping.
5
Bake at approx 200°C (400°F, gas mark 6) until golden brown.
**If skimmed milk not available, it can be omitted (from the recipe).
Flavoured Pizza Dough*
Water
1 cup
Sugar
2 tbsp
Salt
½ tsp
Garlic puree
1 tsp
Mixed herbs
2 tsp
Oil
3 tbsp
Strong white bread flour
3 cup
Fast action yeast
2 tsp
Use setting
14 Pizza dough
Method
1
Pre-heat oven.
2
Shape into a flat round shape. Place on a greased baking tray. Brush lightly with oil.
3
Cover for 15 minutes and allow to rise.
4
Add your desired topping.
5
Bake at approx 200°C (400°F, gas mark 6) until golden brown.
Pasta*
Plain flour
2 cups
Eggs (beaten)
2
Salt
1½ tsp
Vegetable oil
2 tsp
Water (more if needed)
2 tbsp
Use setting
14 Pizza dough
Method
1
Place all ingredients in the pan.
2
Put on the pizza dough setting and help the ingredients mix using a spatula, add more
water to bind the dough if needed.
3
Once the dough forms into a smooth ball it is bound.
4
After the cycle has finished roll out and use a pasta machine or cut to desired shapes.
5
Boil in water for 7-10 minutes.
*Only available on models 48319 and 48320
RECIPES FOR QUICK BREAD* (15)
Banana and nut bread*
Ingredients group 1
Butter (melted)
2 tbsp
Milk
1 tbsp
Mashed banana
1 cup
Egg (beaten)
1
Walnuts (chopped)
½ cup
Lemon rind
1 tsp
Ingredients group 2
Plain flour
1½ cup
Bicarbonate of soda
½ tsp
Baking powder
¼ tsp
Sugar
½ cup
Salt
¼ tsp
Use setting
15 Quick
Method
1
Mix group 1 together in a separate bowl.
2
Mix group 2 together in a second bowl.
3
Pour mixture into bread pan.
BREAD MIXES (8)
Follow the information for bread mixes on the bread mix packet. Some brands of bread
mixes recommend the use of the basic programme setting. Our bread mix programme (8)
has been specially developed to achieve the best results from packet bread mix.
There are 2 types of bread mixes currently available.
1
Just add water.
These mixes are complete and they have all the necessary ingredients provided, even the
yeast. You only add water.
•
IMPORTANT: Follow the packet instructions as some mixes contain more than the normal
amount of yeast, which could over rise in the pan. Use 3 cups of mix maximum.
•
These mixes are more prone to over-rising and collapsing when the weather is hot and
humid. Since these mixes are complete, we cannot advise how to adjust, as with our own
recipes. Bake in the coolest part of the day, use water between 21-28°C.
2
Just add flour and water
These mixes have the necessary ingredients in separate sachets.
Remember strong white bread flour is required. A packet of this mix will produce a 700g
(1.5 lb.)
RECIPES FOR SPECIALITY BREADS (9)
Malt loaf
1½ lb
2 lb
Water
1 cup
1¼ cup
Salt
1 tsp
1 tsp
Sunflower oil
2 tbsp
3 tbsp
Black treacle
1½ tbsp
2½ tbsp
Malt extract
2 tbsp
3 tbsp
Plain flour
3 cup
4 cup
Fast action yeast
1 tsp
1¼ tsp
Sultanas*
½ cup
¾ cup
Use setting
9 Speciality
*Place in the fruit and nut dispenser or add when the beeper sounds if your model does
not have a fruit and nut dispenser.
Irish soda bread
2lb
Butter milk
220ml
Eggs (beaten)
2 medium
Oil
2 tbsp
All-purpose flour
3½ cup
Sugar
½ cup
Baking soda
1 tbsp
Salt
½ tsp
Raisins
1 cup
Use setting
9 Speciality
Corn bread
1½ lb
Milk
120 ml
Eggs (beaten)
3
Margarine or butter
1
⁄
3
cup
Sugar
¼ cup
Salt
1 tsp
All-purpose flour
2
3
⁄
8
cup (350g)
Cornmeal
140g
Baking Powder
5 tsp
Use setting
9 Speciality
RECIPES FOR GLUTEN FREE (10)
Gluten free breads are yeast leavened breads, where Gluten a protein part of the wheat (also
found in Oats, Barley and Rye) is removed.
People who cannot tolerate Gluten in their diet (known as Coeliacs) can obtain this flour on
prescription. It is found in most high street chemists and health food stores, it is expensive!
Contact the Morphy Richards Helpline or web site or local distributor for further recipes when
available.
The bread is excellent on the day it is made, but with all Gluten free breads when one day old or
more it will need ‘refreshing’. 2 slices placed in a microwave for 10-15 seconds will usually do
this. Any remaining fresh bread can be frozen for storage. To store Gluten free bread (or any
bread) slice the bread, re-assemble the slices back together, wrap the assembled loaf in
aluminium foil and place it in a plastic bag. Store in the freezer until required. The slices will ‘snap’
apart when required and quickly thaw, use the microwave if required.
Due to the nature of gluten free dough, it may be necessary to help ensure the ingredients are
mixed correctly during the first kneading process.
To do this, open the lid during the first kneading process (when the
icon is displayed on
screen) and scrape any unmixed ingredients which may have become stuck to the side of the
baking pan down in to the mixture.
Do this using a wooden or plastic spatula to avoid damaging the non-stick coating on the pan.
Gluten free sun dried tomato loaf
1½ lb
Eggs
3
Buttermilk
284ml
Milk
5 tbsp
Lemon Juice
2 tsp
Honey
1½ tbsp
Sun dried tomato paste
1 tbsp
Sun dried tomatoes (antipasti)
50g
Oil from antipasti
1 tbsp
Salt
1 tsp
Doves farm gluten free white bread flour
3¼ cups
Yeast
1 tbsp
Use setting
10 Gluten free
Gluten free cheese and mustard loaf
1½ lb
Eggs
1
Water
1
1
⁄
3
cup
Sunflower Oil
4 tbsp
Lemon juice
1 tsp
Salt
1½ tsp
Caster sugar
1½ tbsp
Grated strong cheddar cheese
¾ cup
Gluten free English mustard
1 tsp
White gluten free flour mix
3 cups
Xanthan gum
1 tbsp
Dried yeast
1 tbsp
Use setting
10 Gluten free
Gluten free chocolate cake*
Softened margarine
¾ cup
Vanilla essence
1 tsp
Eggs, beaten
3
Lemon juice
2 tsp
Water
¼ cup
White gluten free flour mix
1¾ cup
Guten free baking powder
2 tsp
Gluten free cocoa
2 tbsp
Use setting
16 Cake
g
20
21
YOUR ONE YEAR GUARANTEE
It is important to retain the retailer’s receipt as proof of purchase. Staple your receipt to this
back cover for future reference. Please quote the following information if the product
develops a fault. These numbers can be found on the base of the product.
Model no.
Serial no.
All Morphy Richards products are individually tested before leaving the factory. In the
unlikely event of any appliance proving to be faulty within 28 days of purchase, it should be
returned to the place of purchase for it to be replaced. If the fault develops after 28 days
and within 12 months of original purchase, you should contact the Helpline number
quoting Model number and Serial number on the product, or write to Morphy Richards at
the address shown. You may be asked to return a copy of proof of purchase. Subject to the
exclusions set out below (see Exclusions), the faulty appliance will then be repaired or
replaced and dispatched usually within 7 working days of receipt. If, for any reason, this
item is replaced during the 1 year guarantee period, the guarantee on the new item will be
calculated from original purchase date. Therefore it is vital to retain your original till receipt
or invoice to indicate the date of initial purchase. To qualify for the 1 year guarantee, the
appliance must have been used according to the instructions supplied. For example, crumb
trays should have been emptied regularly.
EXCLUSIONS
Morphy Richards shall not be liable to replace or repair the goods under the terms of the
guarantee where:
1
The fault has been caused or is attributable to accidental use, misuse, negligent use or
used contrary to the manufacturer’s recommendations or where the fault has been caused
by power surges or damage caused in transit.
2
The appliance has been used on a voltage supply other than that stamped on the
products.
3
Repairs have been attempted by persons other than our service staff (or authorised
dealer).
4
The appliance has been used for hire purposes or non domestic use.
5
The appliance is second hand.
6
Morphy Richards are not liable to carry out any type of servicing work, under the
guarantee.
7
Plastic filters for all Morphy Richards kettles and coffee makers are not covered by the
guarantee.
8
Batteries and damage from leakage are not covered by the guarantee.
This guarantee does not confer any rights other than those expressly set out above and
does not cover any claims for consequential loss or damage. This guarantee is offered as
an additional benefit and does not affect your statutory rights as a consumer.
YOUR INTERNATIONAL TWO-YEAR GUARANTEE
This appliance is covered by two-year repair or replacement warranty.
It is important to retain the retailers receipt as proof of purchase. Staple your receipt to
this back cover for future reference.
Please quote the following information if the product develops a fault. These numbers
can be found on the base of the product.
Model no.
Serial no.
All Morphy Richards products are individually tested before leaving the factory. In the
unlikely event of any appliance proving to be faulty within 28 days of purchase it should
be returned to the place of purchase for it to be replaced.
If the fault develops after 28 days and within 24 months of original purchase, you should
contact your local distributor quoting Model number and Serial number on the product,
or write to your local distributor at the addresses shown.
You will be asked to return the product (in secure, adequate packaging) to the address
below along with a copy of proof of purchase.
Subject to the exclusions set out below (1-9) the faulty appliance will then be repaired or
replaced and dispatched usually within 7 working days of receipt.
If for any reason this item is replaced during the 2-year guarantee period, the guarantee
on the new item will be calculated from original purchase date. Therefore it is vital to
retain your original till receipt or invoice to indicate the date of initial purchase.
To qualify for the 2-year guarantee the appliance must have been used according to the
manufacturers instructions. For example, appliances must have been descaled and filters
must have been kept clean as instructed.
The local distributor shall not be liable to replace or repair the goods under the terms of
the guarantee where:
1
The fault has been caused or is attributable to accidental use, misuse, negligent use or
used contrary to the manufacturers recommendations or where the fault has been
caused by power surges or damage caused in transit.
2
The appliance has been used on a voltage supply other than that stamped on the
products.
3
Repairs have been attempted by persons other than our service staff (or authorised
dealer).
4
Where the appliance has been used for hire purposes or non domestic use.
5
The appliance is second hand.
AUSTRALIAN WARRANTY
This appliance is guaranteed for 2 years against faulty material, components and
workmanship.
This warranty is in addition and does not affect your statutory rights.
Proof of purchase must be produced for any warranty benefit.
In the unlikely event of any appliance proving to be faulty, securely pack and return the item
to the place of purchase accompanied by the original receipt or invoice.
NOT COVERED BY THIS WARRANTY
(AUSTRALIAN ONLY)
•
If the appliance has not been used in accordance with the manufacturers’
recommendations or Instructions.
•
If the fault is deemed to be caused by abuse, misuse, neglect, modifications or in proper
use and or care
Eg: Kettles: Excessive build up of scale.
Toasters: Excessive build up of crumbs or foreign matter etc.
•
Connection to incorrect voltage to that stamped on the product.
•
Unauthorised repairs.
•
Appliance used other than for domestic purposes.
•
Excluding bags, filters, glass, carafes, and cutting blades.
•
Freight and insurance costs.
If for any reason this item is replaced during the 2 year guarantee period, the guarantee
on the new item will be calculated from original purchase date. Therefore it is vital to
retain your original receipt or invoice to indicate the date of original purchase.
Morphy Richards’s policy is to continually improve quality design and product quality.
The company therefore reserves the right to change any specifications or to carry out
modifications as deemed worthy at any time.
The Australian supplier ASKO Appliances reserves the right to repair, modify, exchange or
replace the faulty appliance with the same or similar model or product of equivalent value.
Porridge oats bread*
Milk
1 cup
Eggs (beaten)
2
Sunflower oil
½ tsp
Golden syrup
2 tbsp
Porridge oats
1 cup
Sugar
¼ cup
Salt
1 tsp
Plain flour
2 cup
Baking powder
½ tsp
Bicarbonate of soda
½ tsp
Use setting
15 Quick
RECIPES FOR CAKE* (18)
Important
The cakes produced in this breadmaker will not rise to fill the pan completely, they will be
approximately 55mm (2'') tall. The standard cake is a Madeira type which is moist, rich and
dense in texture. Adjustments to the recipe may be required for personal taste - less butter
and sugar to reduce the richness, less water and/or eggs to reduce moisture.
Variations
Cherries - ½ cup cherries halved (wash thoroughly to remove the excess syrup) and allow
them to drain and dry on absorbent paper; or mixed fruit - ½ cup or chocolate chips - ¼
cup.
Add any of these variations into the bread pan last, on top of the other ingredients.
Madeira cake*
Ingredients group 1
Butter (melted)
¾ cup
Vanilla essence
¼ tsp
Eggs (beaten)
3 medium
Lemon juice
2 tsp
Ingredients group 2
Plain flour
1
5
⁄
8
cup
Baking powder
2 tsp
Granulated sugar
1 cup
Use setting
16 Cake
Method
1
Mix group 1 together in a separate bowl.
2
Sieve group 2 together in a second bowl.
3
Combine groups 1 and 2 together until mixed.
4
Pour mixture into bread pan.
Mixed fruitcake*
Ingredient group 1
Butter (melted)
¾ cup
Vanilla essence
¼ tsp
Eggs
3
Lemon juice
2 tsp
Dried mixed fruit
5
⁄
8
cup
Ingredient group 2
Plain flour
1
5
⁄
8
cups
Baking powder
2 tsp
Sugar
1 cup
Ground cinnamon
¼ tsp
Ground nutmeg
¼ tsp
Use setting
16 Cake
Method
Follow method given for madeira cake mix.
Cake mix *
This programme can also be used for preparation of a shop bought cake mix. Simply follow
the instructions on the packet.
*Only available on models 48319 and 48320
RECIPES FOR DESSERT* (19)
Oat apple betty*
Medium cooking apples chopped (peeled and cored)
6
Lemon juice
1 tsp
Packed brown sugar
½ cup
All-purpose flour
½ cup
Quick cooking oats
1
⁄
3
cup
Butter or margarine, softened
6 tbsp
Use setting
17 Desserts
Old-fashioned rice pudding*
Eggs slightly beaten
3
Cream
1¾ cup
Cooked rice
1½ cup
Sugar
½ cup
Raisins (optional)
½ cup
Vanilla essence
1 tsp
Cinnamon or nutmeg
1 tsp
Use setting
17 Desserts
Please note: this is the old-fashioned and best way to bake rice pudding. With a mass of
creamy rice and a thick brown skin with the hint of cinnamon throughout. A real treat!
*Only available on models 48319 and 48320
Helpline
If you have any difficulty with your appliance, do not hesitate to call us.
We are more likely to be able to help than the store from where you bought it. Please have
the following information ready to enable our staff to deal with your query quickly.
•
Name of the product.
•
Model number as shown on the underside of the appliance.
•
Serial number as shown on underside of the appliance.
UK Helpline
0844 871 0944
Replacement Parts
0844 873 0710
Ireland Helpline
1800 409 119
Website
You may also contact us through our website, or visit the site to browse and purchase
appliances, spare parts and accessories from the extensive Morphy Richards range.
THIS SECTION IS ONLY APPLICABLE FOR CUSTOMERS IN UK AND IRELAND
REGISTERING YOUR TWO YEAR GUARANTEE
Your standard one year guarantee is extended for an additional 12 months when you
register the product within 28 days of purchase with Morphy Richards. If you do not
register the product with Morphy Richards within 28 days, your product is guaranteed for 1
year. To validate your 2 year guarantee register with us online at
N.B. Each qualifying product needs to be registered with Morphy Richards individually.
Please refer to the one year guarantee for more information.
g
22
23

BM48319M INT EE Rev 1 03/10
Wyszukiwarka
Podobne podstrony:
Automat do pieczenia chleba BBA Nieznany
Chleb pszenny na jajach i miodzie, ◄► Przepisy - AUTOMATY DO PIECZENIA CHLEBA (Instrukcje + przepisy
Chlebek turecki, ◄► Przepisy - AUTOMATY DO PIECZENIA CHLEBA (Instrukcje + przepisy) [ZE], PRZEPIS NA
Bagietki z sezamem, ◄► Przepisy - AUTOMATY DO PIECZENIA CHLEBA (Instrukcje + przepisy) [ZE], PRZEPIS
Automat do pieczenia chleba Moulinex OW2000
Automat do wypieku chleba Morpy Nieznany (2)
AUTOMAT DO PIECZENIA CHLEBA KH 1171
Automat do wypieku chleba Morpy Nieznany (3)
Chleb sezamowy na maślance, ◄► Przepisy - AUTOMATY DO PIECZENIA CHLEBA (Instrukcje + przepisy) [ZE],
Bagietki, ◄► Przepisy - AUTOMATY DO PIECZENIA CHLEBA (Instrukcje + przepisy) [ZE], PRZEPIS NA CHLEB
Automat do pieczenia chleba CH 9000 OPTIMUM
Automat do pieczenia chleba BBA 2865 CIATRONIC
Bułgarski chlebek zwany słonecznikiem, ◄► Przepisy - AUTOMATY DO PIECZENIA CHLEBA (Instrukcje + prze
Chleb wieloziarnisty, ◄► Przepisy - AUTOMATY DO PIECZENIA CHLEBA (Instrukcje + przepisy) [ZE], PRZEP
Chlebek kokosowy, ◄► Przepisy - AUTOMATY DO PIECZENIA CHLEBA (Instrukcje + przepisy) [ZE], PRZEPIS N
Chleb pszenny na maślance, ◄► Przepisy - AUTOMATY DO PIECZENIA CHLEBA (Instrukcje + przepisy) [ZE],
Chleb orkiszowy, ◄► Przepisy - AUTOMATY DO PIECZENIA CHLEBA (Instrukcje + przepisy) [ZE], PRZEPIS NA
Chleb żytni na piwie, ◄► Przepisy - AUTOMATY DO PIECZENIA CHLEBA (Instrukcje + przepisy) [ZE], PRZEP
Najprostszy chleb, ◄► Przepisy - AUTOMATY DO PIECZENIA CHLEBA (Instrukcje + przepisy) [ZE], PRZEPIS
więcej podobnych podstron