
How to Convert a Computer ATX Power Supply to a Lab Power Supply...
http://wiki.ehow.com/Convert-a-Computer-ATX-Power-Supply-to-a-La...
1 of 9
12/12/2005 4:36 PM
Create an account or log in
Toolbox
--------- Choose One ---------
6
--------- Choose One ---------
Go
Edit this Page
|
Discuss this Page
|
Page History
|
Create a Page
The How-To Manual That Anyone Can Write or Edit
Search wikiHow
Home
>
Categories
>
Hacks
How to Convert a Computer ATX
Power Supply to a Lab Power
Supply
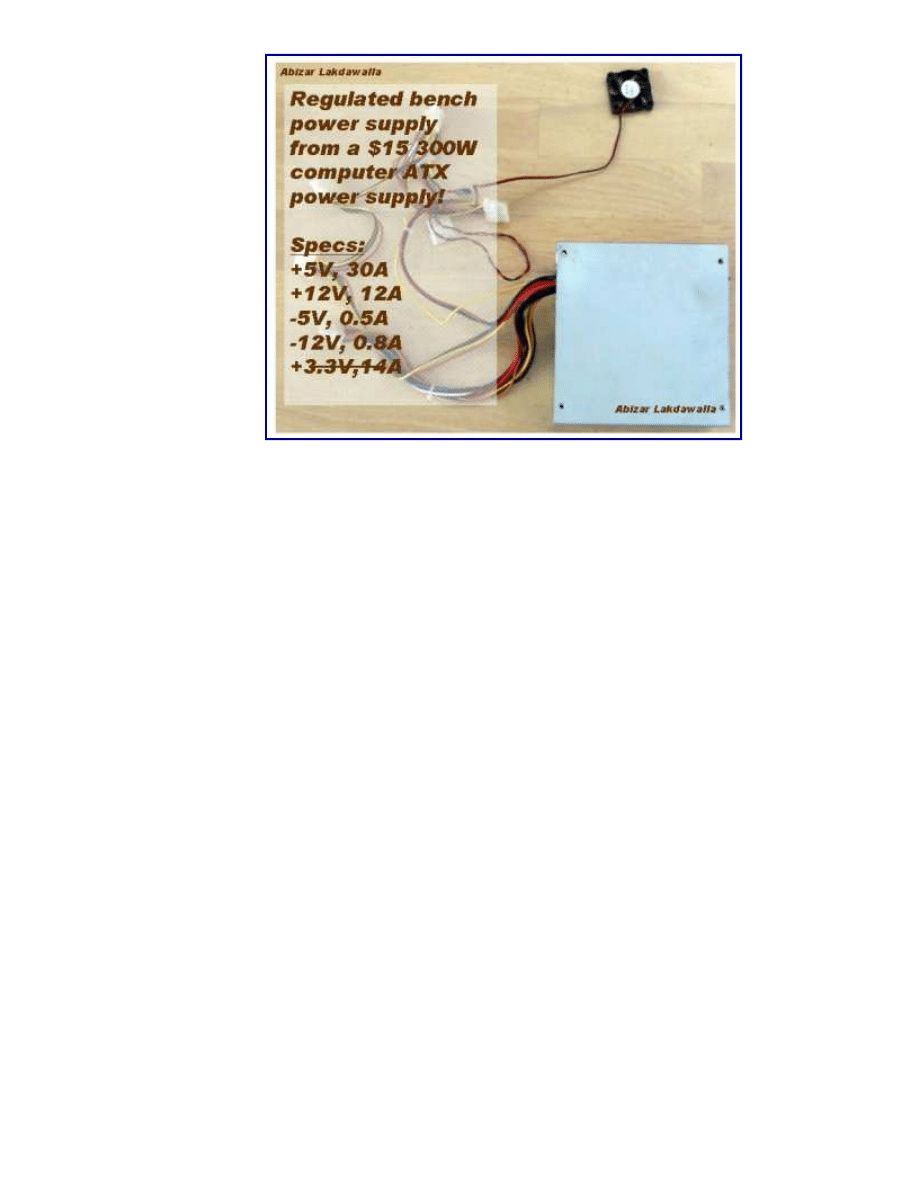
Computer power supplies are US$15 but lab power supplies are
US$100+. By converting the cheap (free) ATX power supplies that can
be found in any discarded computer you can get a phenomenal lab power
supply with huge current outputs, short circuit protection, and very tight
How to Convert a Computer ATX Power Supply to a Lab Power Supply...
http://wiki.ehow.com/Convert-a-Computer-ATX-Power-Supply-to-a-La...
2 of 9
12/12/2005 4:36 PM
voltage regulation.
Steps
Unplug the power cord from the back of the computer. "Harvest" a
power supply from a computer by opening up the case of the
computer, locating the gray box that is the power supply unit, tracing
the wires from the power supply to the boards and devices and
disconnecting all the cables by unplugging them.
1.
Remove the screws (typically 4) that attach the power supply to the
computer case and remove the power supply.
2.
Cut off the connectors (leave a few inches of wire on the connectors
so that you can use them later on for other projects).
3.
Discharge the power supply by stripping the insulation of the ends of
a black and a red wire and connecting them together.
4.
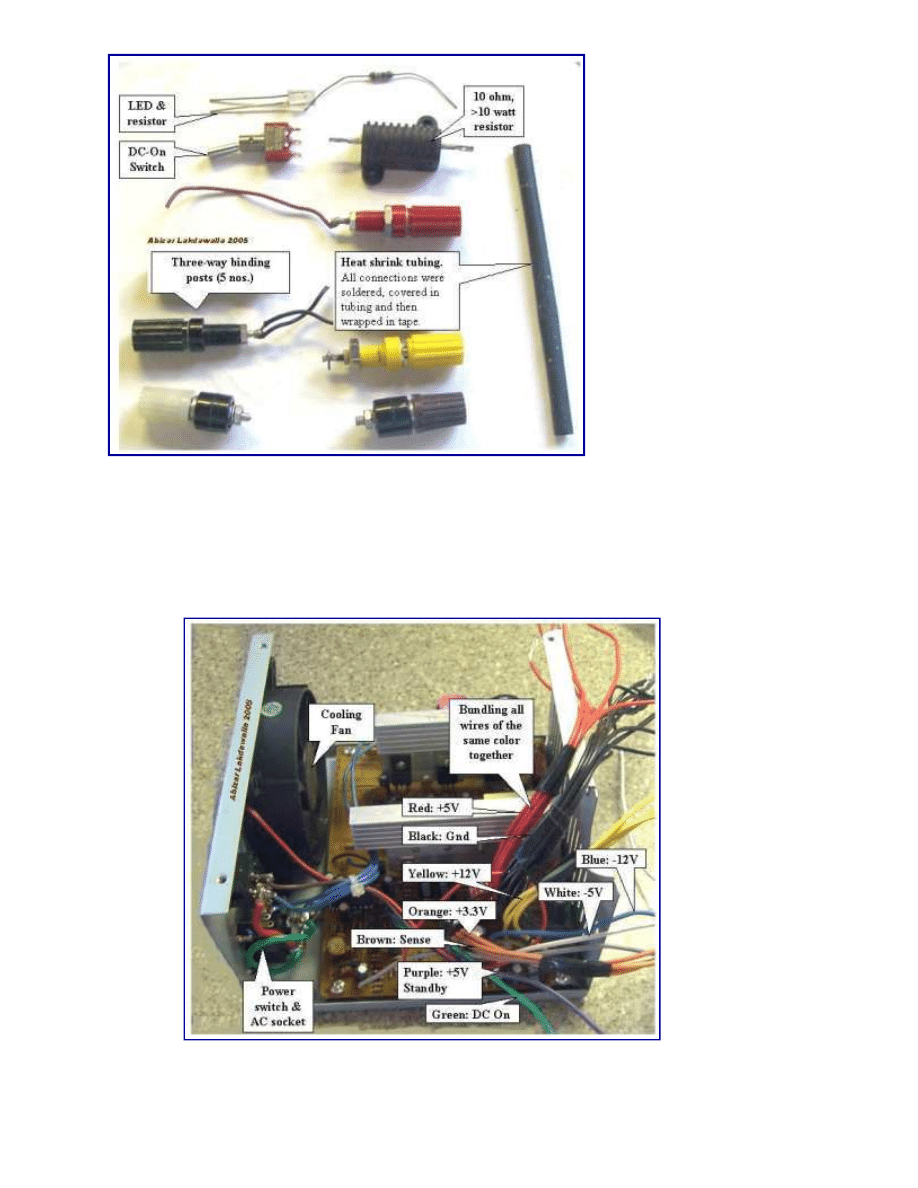
Get all the parts that you need together. I used the following: binding
posts (terminals), a LED with a current limiting resistor, a switch, a
power resistor (10 ohm, 10W or greater wattage, I had a sexy
looking 25W unit around so ...), and heat shrink tubing.
5.
How to Convert a Computer ATX Power Supply to a Lab Power Supply...
http://wiki.ehow.com/Convert-a-Computer-ATX-Power-Supply-to-a-La...
3 of 9
12/12/2005 4:36 PM
Open up the power supply unit by removing the screws connecting
the top and the bottom of the PSU case.
6.
Bundle wires of the same colors together. IMPORTANT: Make sure
that the lone brown sense wire is bundled with the orange wire. If
the brwon wire is tied to 3.3V the power supply will produce an
output.
7.
The color code for the wires is: Red = +5V, Black = 0V, Yellow =
+12V, Blue = -12V, Brown = Sense (tie to 3.3V), Orange = +3.3V,
8.

How to Convert a Computer ATX Power Supply to a Lab Power Supply...
http://wiki.ehow.com/Convert-a-Computer-ATX-Power-Supply-to-a-La...
4 of 9
12/12/2005 4:36 PM
Purple = +5V Standby (not used), Gray = power is on, and Green =
Turn DC on.
I drilled holes in a free area of the power supply case by marking the
center of the holes with a nail and a tap from the hammer. Used a
dremel to drill the starting holes followed by a hand reamer to
enlarge the holes till they were the right size by test fitting the
binding posts.Also drilled holes for the power ON LED and a Power
switch.
9.
I screwed the binding posts into their corresponding holes and
attached the nut on the back.
10.
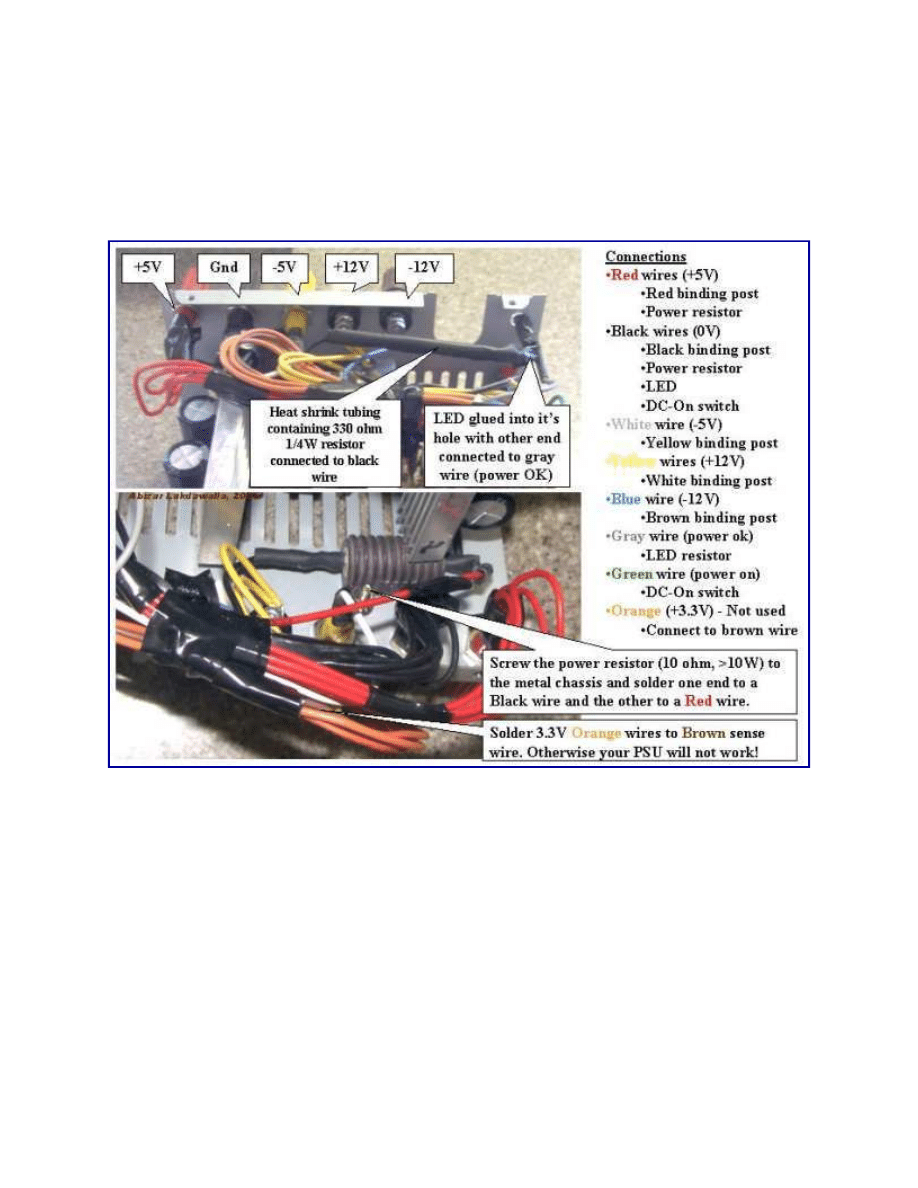
Now came the interesting part - connecting all the pieces together. I
connected one of the red wires to the power resistor, all the
remaining red wires to the red binding posts (not really necessary to
11.
How to Convert a Computer ATX Power Supply to a Lab Power Supply...
http://wiki.ehow.com/Convert-a-Computer-ATX-Power-Supply-to-a-La...
5 of 9
12/12/2005 4:36 PM
connect all but ...); connected one of the black wires to the other end
of the power resistor, one black wire to a resistor (330 ohm) attached
anode of the LED, one black wire to the DC-On switch, all the
remaining black wires to the black binding post; connected the white
to the -5V binding post, yellow to the +12V binding post, the blue to
the -12V binding post,
the
gray to the cathode of the LED; connected the green wire to the
other terminal on the switch; and hooked up the orange wires with
the brown. I made sure that the soldered ends were insulated in
heatshrink tubing. And organized the wires with a lot of electrical
tape.

How to Convert a Computer ATX Power Supply to a Lab Power Supply...
http://wiki.ehow.com/Convert-a-Computer-ATX-Power-Supply-to-a-La...
6 of 9
12/12/2005 4:36 PM
12.
I made sure that all the connections look good. Put a drop of
superglue to stick the LED to its hole. Put the cover on.
13.
Plugged in the IEC power cord into the back and into an AC socket.
Switched on the main switch on the PSU. Checked to see if the LED
light came on. If it had not, then I powered up by flipping the switch
that I had placed on the front. Plugged in a 12V bulb into the
different sockets to see if the PSU worked, also checked with a
digital voltmeter. Looked good and worked like a charm (and still
works like a charm!).
14.

How to Convert a Computer ATX Power Supply to a Lab Power Supply...
http://wiki.ehow.com/Convert-a-Computer-ATX-Power-Supply-to-a-La...
7 of 9
12/12/2005 4:36 PM
Tips
OPTIONS: You don't need an additional switch, just connect the
green and a black wire together. The PSU will be continously on.
You also don't need an LED, just ignore the gray wire. Cut in short
and insulate it from the rest.
Have converted a few more power supplies - in the older ones the
brown sense wire needed to be attached to the 5v wire for the PSU to
work.
If the power supply does not work, that is, no LED light. Check to
see if the fan has come on. If the fan in the power supply is on, then
the LED may have been wired wrong that is the positive and
negative leads of the LED may have been switched. Open the
poswer supply case and flip the purple or gray wires on the LED
around (make sure that you do not bypass the LED resistor).
The power resistor needs to be attached to the metal body as it gets
pretty warm and needs to be kept cool by conduction. If you cannot
attach the resistor with a screw, attach the resistor by tying it to a
ventilation slot with twist ties or large dia. copper wire.
I did not make a sexy looking cabinet for the power supply but feel
free to add some pizzaz to the dull gray box.
You can also convert this to a VARIABLE POWER SUPPLY - but
that is another article (hint: Uses a 317 IC with power transistor).
Warnings
Line voltage which can kill. Make sure that you have removed the
power cord before doing the conversion and have discharged the
capacitors by tying the +5V to ground or by shorting the capacitors
with the power resistor or with screwdriver.

How to Convert a Computer ATX Power Supply to a Lab Power Supply...
http://wiki.ehow.com/Convert-a-Computer-ATX-Power-Supply-to-a-La...
8 of 9
12/12/2005 4:36 PM
Things You'll Need
An obsolete computer with an ATX 250W, 300W or 400W power
supply.
Wire cutters, needle nose pliers, drill, reamer, soldering wire,
soldering iron, electrical tape, heat shrink tubing
binding posts for output terminals, LED, current limiting resistor for
the LED, power resistor to load the power supply, a low wattage
switch.
Edit this Page
Discuss this Page
Thank the Authors
Write a New wikiHow
E-mail this to a Friend
Printable Version
Initial Author:
Abizarl
.
This page has been accessed 500 times. This page was last modified
23:27, 9 Dec 2005.
Search wikiHow:
Search

How to Convert a Computer ATX Power Supply to a Lab Power Supply...
http://wiki.ehow.com/Convert-a-Computer-ATX-Power-Supply-to-a-La...
9 of 9
12/12/2005 4:36 PM
Home
|
About wikiHow
|
Help
|
Terms of UseTerms of Use
|
RSS
|
Inspired by MediaWiki
|
Visit eHow
This work is licensed under a
Creative Commons
Attribution-NonCommercial-ShareAlike 2.5 License
.
Wyszukiwarka
Podobne podstrony:
ATX power supply schematic[1]
Computer Pc Power Supply Repair for print
ATX Power Supply Tester ELEKTOR
ATX power supply connector pinout
atx Power Supply Design Guide
ATX power switch substitute
ATX Power suppl 12V 24V
Ersatz fuer ATX Power Switch
TO LAB WZG sIII 05z - harmonogram, Teoria obwodów laboratorium
Sprawko M.W, Polibuda, II semestr, to lab
The Computer Virus From There to Here
Computer Viruses and What to Do About Them
Computer Viruses as a Threat to Home Users
Development Of High Frequency Link Direct Dc To Ac Converters For Link Direct Dc To Ac Converters Fo
How to Modify an ATX Computer Power Supply
(Wydruk – ATX Switching Power Supply 13,8 V Proste zmiany w celu zwiększenia napięcia wyjściowego Ja
3 2 Lab Install Power Supply
3 2 Lab Install Power Supply
więcej podobnych podstron