publishers of Step by Step Wire Jewelry magazine . . . join the online beading community at www.BeadingDaily.com
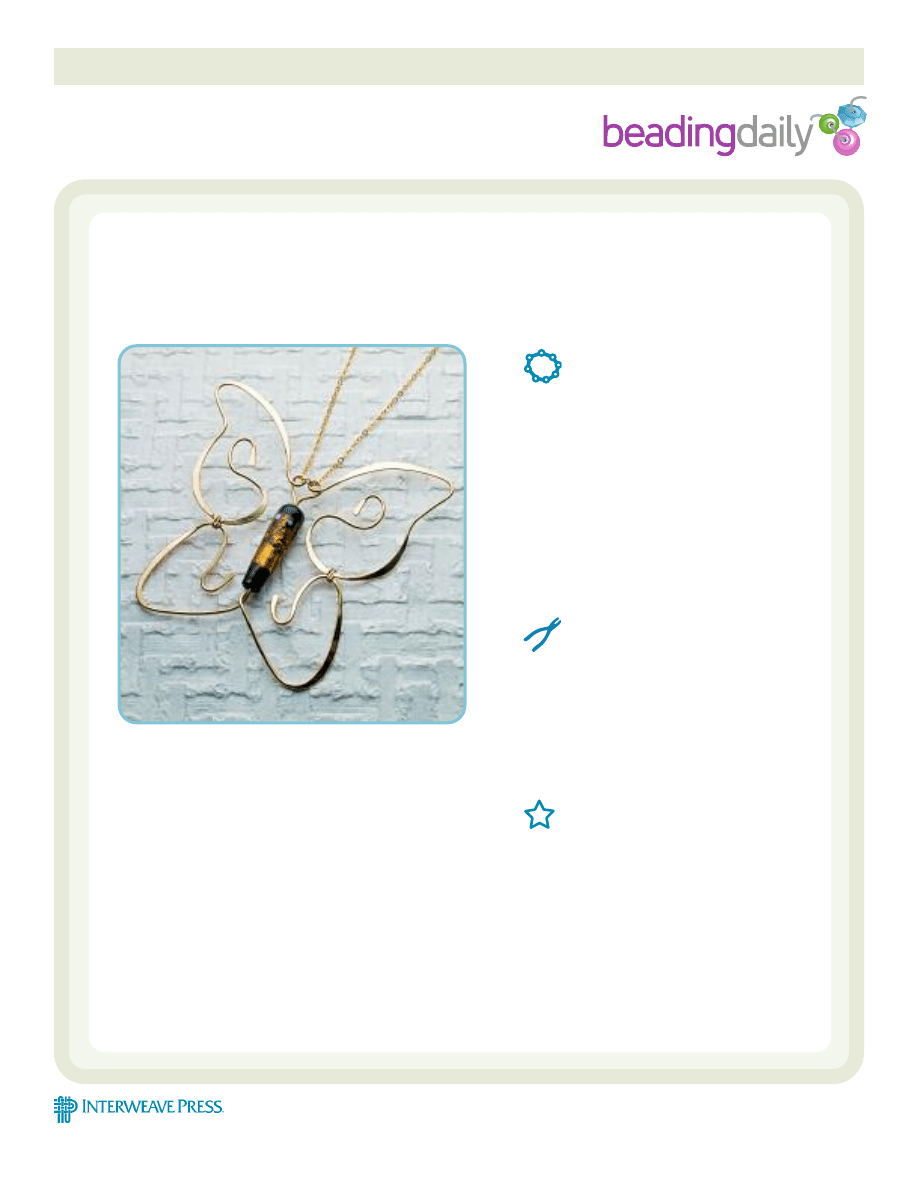
When designing this pendant I did not have a particular
bead in mind to use, so I ended up designing the bead
to match the pendant. I chose to make a bead with a
conical shape. I used silver foil in the bead to give it
some sparkle and black markings to mimic a butterfly
body. The conical shape helped to give the pendant a
long slender look even though the bead was going to
have a large hole, to accommodate the two wires that
had to come through the bead hole.
However, I am sure that lots of other shapes of beads
will work, as long as the hole is large enough. It will
require some minor adjustments in the design of the
wire pattern to accommodate a different size and shape
bead.
by Carolyn Baum
Jig-formed wire wings highlight a glass focal bead.
Butterfly Pendant
MATERIALS:
Bead with 4mm hole
14-gauge dead soft wire, 34" long (copper,
sterling, brass, or gold-filled)
20-gauge dead soft wire, 3" long
Wooden board at least 5" x 5" x 1/4"
Finishing nails
Paper
Marker
Cord or chain with clasp
Tape
TOOLS:
Planishing or ball peen hammer
Steel block
Wire cutters
Round nose pliers
Flat nose pliers
Hammer
File
TECHNIQUES:
Wirework, hammering, making a jig, beads
and wire.
RRRRRRRRRRRRRRRRRRRRRRRRRRR
project
library
Copyright Interweave Not to be reprinted. All rights reserved.
page 1
Ph
oto
of
finish
ed
pi
ece
by
Jim
Lawson;
all
oth
er
ph
otos
courtesy
o
f
th
e
auth
or
.

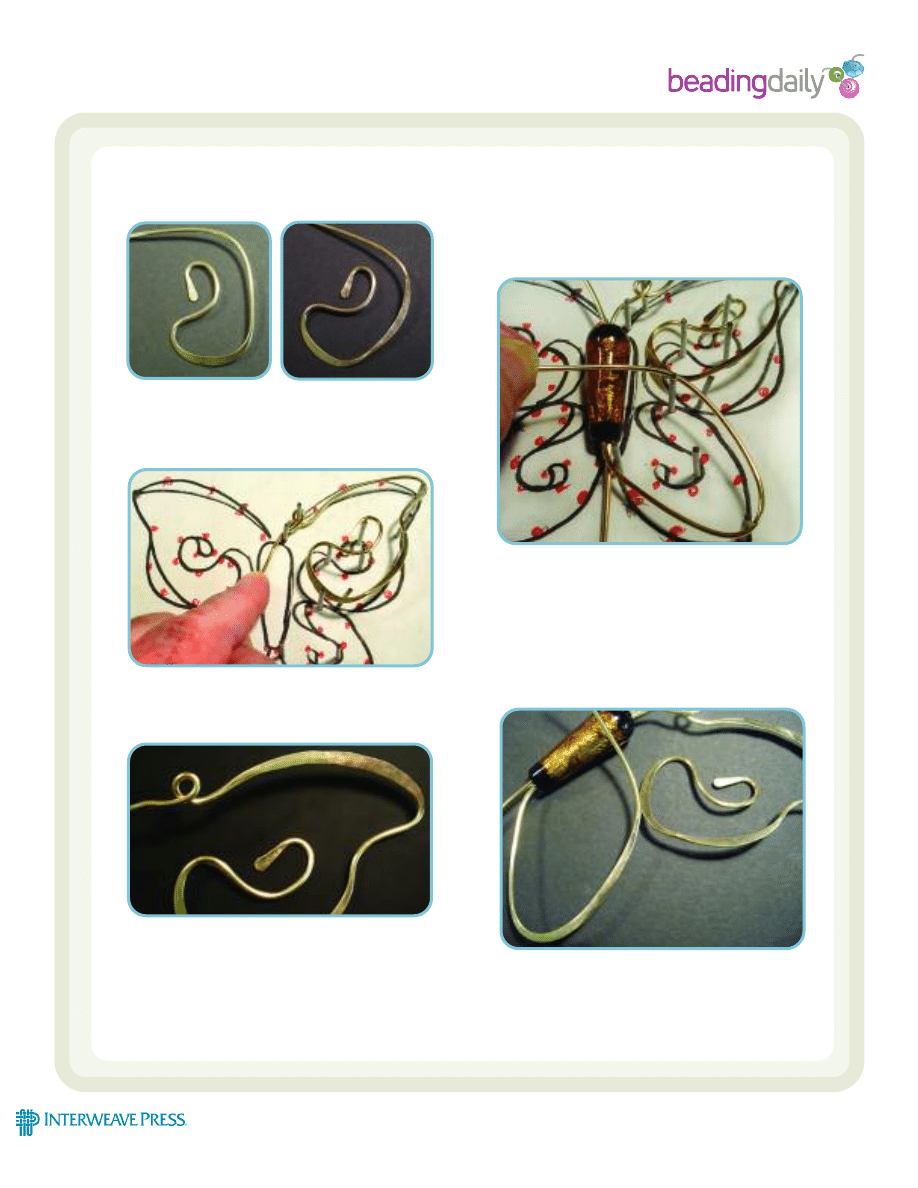
Step 1: Lay the bead in the center of a sheet of paper,
and trace around the bead. Remove the bead.
Draw a simple line design for the top of the
butterfly wing. Start drawing at the top of the
bead, and end near the center. Keep in mind
that you need a loop in the wire above the
bead to pull a chain or cord through. Try to
make it mimic the eyes of the butterfly. Start at
the bottom of the bead, and draw a simple
curved line down and then up, to end near the
center of the bead. The two halves should
touch each other at some point. Fill in with a
widened line where you want the wire to be
hammered flat.
Trace this design, and flip over to repeat on the
opposite side. Make any adjustments necessary.
Beware that too much free floating wire could
affect the wearability of the pendant.
To make the jig, place the finished drawing on a
wooden board, and tape or glue down. Hammer
the finishing nails into the board at all major
turning points of the design. It is only necessary
to do this for one side of the butterfly. Clip the
heads of the nails off with a heavy-duty wire
cutter.
Step 2: Cut two 17" pieces of 14g wire. The length may
vary depending on the final design. Check to
make sure they both fit in the bead together. If
not, file the bead hole opening larger until
both wires fit through the bead.
Begin forging the wire by hammering a teardrop
shape on the end of the wire. File the end
smooth.
Step 3: Hold the teardrop in place with round nose
pliers, and bend the wire into a C shape with
the teardrop sitting flat in the C.
Step 4: Place the C shape over the pattern, and bend
the wire around the nails for several turns.
Butterfly Pendant
Copyright Interweave. Not to be reprinted. All rights reserved.
page 2
publishers of Step by Step Wire Jewelry magazine . . . join the online beading community at www.BeadingDaily.com
Step 1
Step 3: Bending the wire.
Step 2: Hammering the wire into a teardrop.
Step 4: Shaping the wire on the jig pattern
publishers of Step by Step Wire Jewelry magazine . . . join the online beading community at www.BeadingDaily.com
Lift the wire off the board, and hammer
portions of the wire if necessary to follow the
design.
Step 5: Place the wire back on the jig, and bend the
wire around the nails until you reach the loops
above the bead. Make a loop around the nail.
Step 6: Hammer the remaining curves of the top of the
wing.
Step 7: Repeat Steps 3-6 for the second piece of 14g
wire. When forming loops for the butterfly eyes,
make sure you loop them in opposite directions
to keep the design symmetrical. Straighten out
the remaining wire on each piece. Use flat nose
pliers if necessary to straighten out the wire.
Line up the two pieces next to each other, with
the wings flared out, and pull both wires
through top of the bead.
Place the bead and wire on the board, and start
bending the wire around the nails from the
bottom up. Remove the wire from the nails.
Step 8: Hammer the first curve of the lower portion of
the wing.
Butterfly Pendant
Copyright Interweave. Not to be reprinted. All rights reserved.
page 3
Step 4: Hammering the wire to shape
Step 6: Hammering the wings
Step 5: Looping around the nail
Step 7
Step 8
publishers of Step by Step Wire Jewelry magazine . . . join the online beading community at www.BeadingDaily.com
Step 9: Place the pendant back on the jig, and finish
following the pattern with the wire. Cut off any
unnecessary wire.
Step 10: Hammer the final curves on the wire flat. In
order to do this, it may be necessary to bend
the pattern out of shape slightly to protect
the bead and finish the pattern. Bend the wire
back to your desired shape after hammering.
Repeat Steps 7-10 for the bottom wing of the
other side. Flipping the bead over and using
the same nails works well, so it is not
necessary to have nails on both sides of the
board.
Step 11: Make final adjustments to the wire, and using
the 20g wire, wrap the upper and lower wings
of each side together. Hammer if desired. Pull
your cord or chain through the loops. Adjust
the length if necessary.
CAROLYN BAUM
has a Master's degree in Art Education and has been
making glass beads since 1996. She studied
lampworking at the Corning Studio of Glass. To see
more of her work, visit her Web site at
Cbeadsandbuttons.com.
Butterfly Pendant
Copyright Interweave. Not to be reprinted. All rights reserved.
page 4
Step 10
Step 9
Wyszukiwarka
Podobne podstrony:
butterfly wire pendant
Artistic Wire Green or Magenta Single Spiral Bead Necklace & Earrings
Butterworth Finite element analysis of Structural Steelwork Beam to Column Bolted Connections (2)
motyle Polski makro, Butterflies - dokumenty
On nature Butterflies
1 wire full
Projektowanie filtrów cyfrowych Butterwortha i Czebyszewa
Wire?M V20 front page
9 Wire?M V20 No Core Cutting
12 Wire?M V20 Cutting a 4 axis part
Lokalizator ultradźwiękowy z wykorzystaniem magistrali 1 wire
chain with beaded wire bezels
4 Wire EDM V20 2axis from linearc
antena long wire
Extending Existing Wire
butterfly
więcej podobnych podstron