
icket Window Box
This pretty window box really comes alive when filled with colorful flowers. Not
only does it look attractive mounted outside on a window ledge, but it also brightens up
your window when admired from inside the house. The box is constructed around an
inexpensive pre-made plastic planter. The size can be adjusted to fit any window.
Materials
§ 30 linear feet of 1 x 2 pine
§ 2 linear feet of 2 x 2 pine
§ 1/2 linear foot of 1 x 4 pine
§ Plastic planter box*
Hardware
§ 150 1-1/4” 3d finishing nails
§ 4, 2” screws
P
2
Cutting List
Code Description
Qty. Material
Dimensions
A
Long Supports
4
1 x 2 pine
29-1/2” long
B
Short Supports
4
1 x 2 pine
7-1/2” long
C
Pickets
23
1 x 2 pine
8” long
D
Posts
2
2 x 2 pine
8-1/2”long
E
Post Cap
2
1 x 4 pine
2” x 2”
*Notes on Materials
We purchased a plastic planter box measuring 29 inches long, 5-1/4 inches deep, and 8-
1/4 inches wide. It has a lip on the top, which rests on the wooden supports we built.
You can use this design for any size box you wish, but you need to adjust the dimensions
accordingly. The support assemblies fit just under the top lip of the planter.
Constructing the Planter Supports
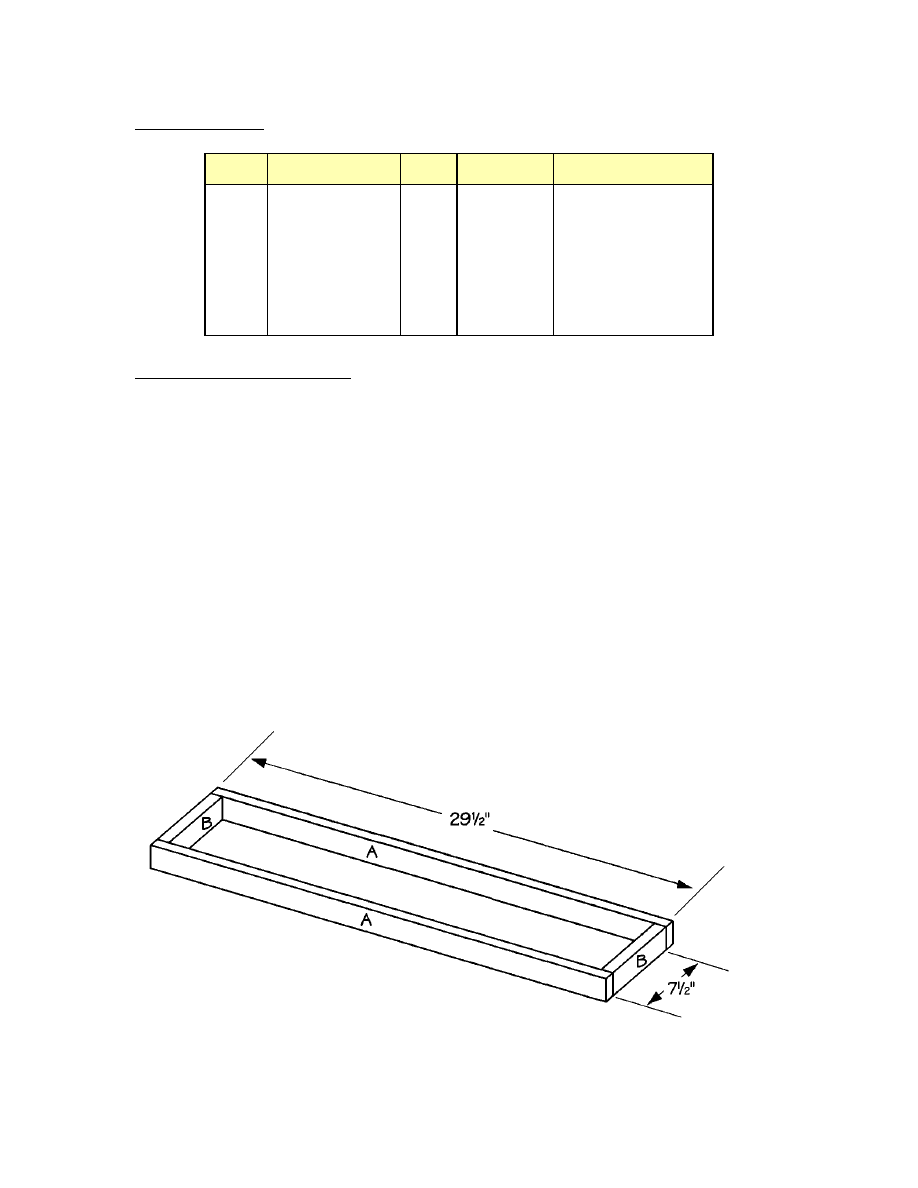
1. Cut four long supports (A) from 1 x 2 pine, each measuring 29-1/2 inches long.
2. Cut four short supports (B) from 1 x 2 pine, each measuring 7-1/2 inches long.
3. Place two long supports (A) on a level surface, parallel to each other and 7-1/2 inches
apart. Fit two short supports (B) between the long supports (A), as shown in Figure
1. Apply glue to the meeting surfaces and nail through the long supports (A) into the
ends of the short supports (B). Use two 1-1/4”long nails on each joint.
Figure 1
3
Adding the Pickets
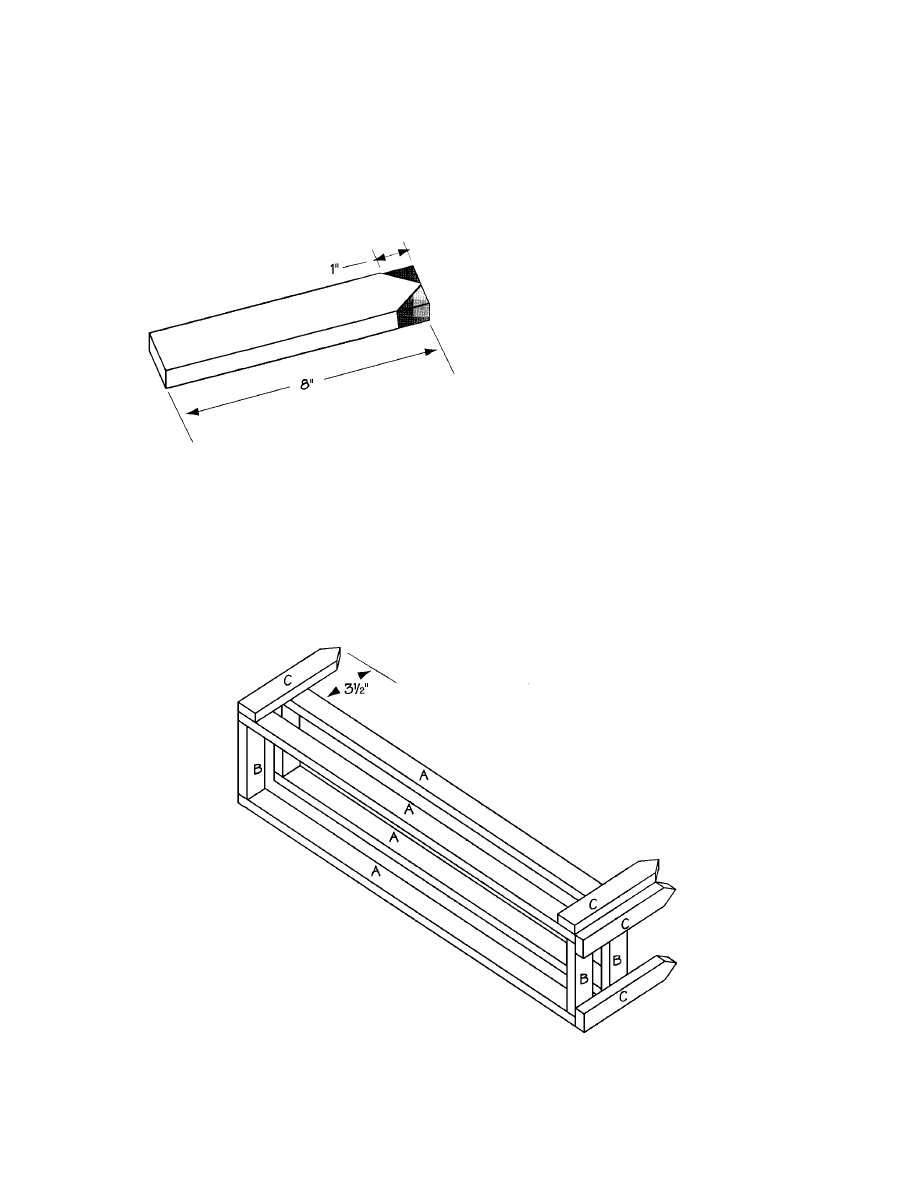
1. Cut 23 pickets (C) from 1 x 2 pine, each measuring 8 inches long.
2. Cut the corners off each of the 23 pickets (C), as shown in Figure 2.
3. Lay the two support assemblies on a
level surface, parallel to each other, 1-
1/2” apart, with the long supports (A)
on the top and bottom, and the short
supports (B) on the sides. Attach
fifteen pickets (C) to the top of both
support assemblies, starting with the
outer pickets, as shown in Figure 3,
spacing them 1/2-inch apart. These
outer pickets should be exactly flush with the ends of the long supports (A). Note
that the square end of the pickets are flush with the bottom edge of one long support
(A), and the pointed end is 3-1/2 inches higher than the top edge of the other long
support (A). Apply glue to the meeting surfaces, and nail through the pickets into
both of the long supports (A) using two 1-1/4-inch long nails on each joint.
4. Follow the procedure in Step 3 to attach four pickets to each of the short supports (B).
Figure 2
Figure 3
4
Adding the End Posts
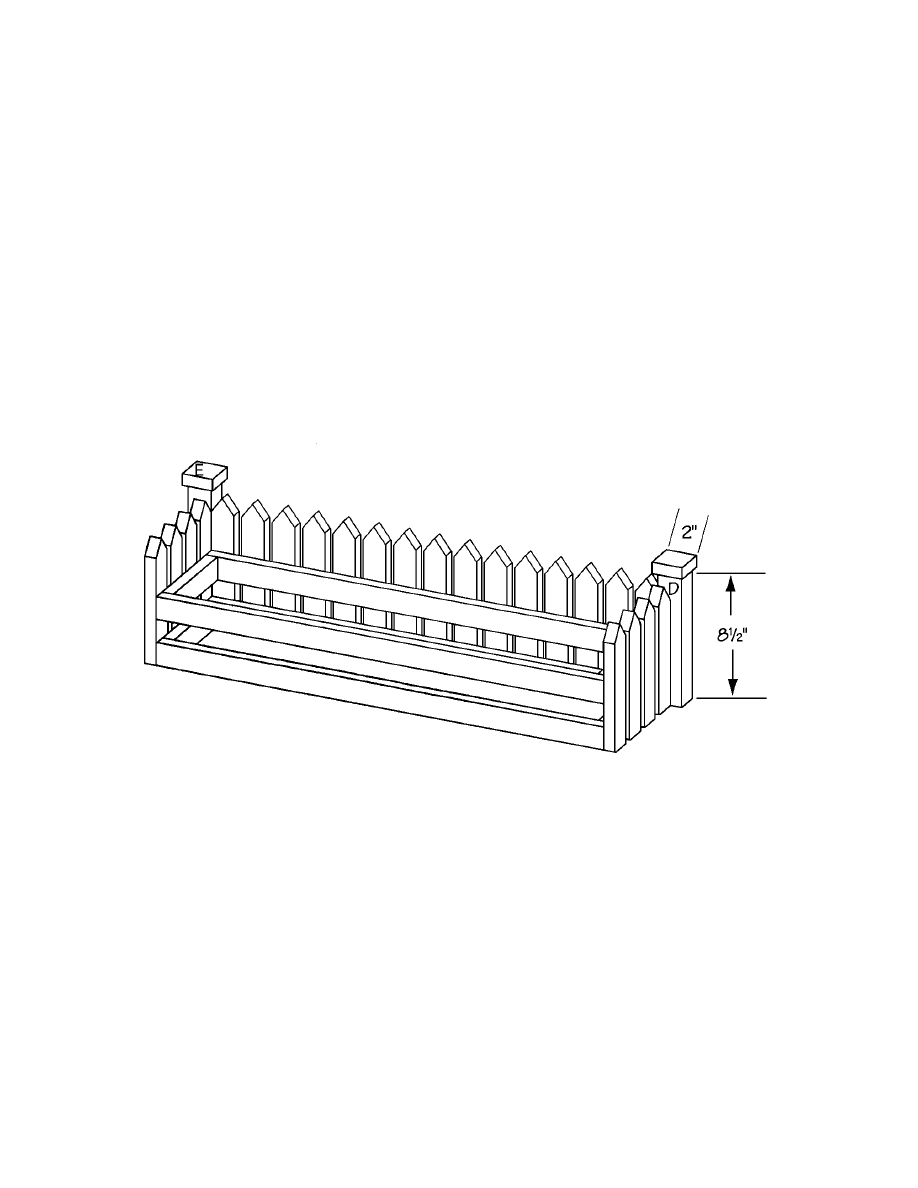
1. Cut two posts (D) from 2 x 2 pine, each measuring 8-1/2 inches long.
2. Cut two post caps (E) from 1 x 4 pine, each measuring 2 x 2 inches.
3. Center one post cap (E) over the end of one post (D). Apply glue to the meeting
surfaces and nail through the post cap (E) into the end of the post (D) using two 1-
1/4-inch-long nails.
4. Repeat Step 3 to attach the remaining post cap (E) to the second post (D).
5. Fit the posts on each end of the window box, filling in the exposed corner between
the side and front pickets (C) as shown in Figure 4. Screw through the inside corner
of the support assemblies into the post (D) using a 2” screw on each joint.
Finishing
1. Fill any cracks, crevices, or screw holes with wood filler, and thoroughly sand all
surfaces of the completed window box.
2. Seal and paint or stain your window box the color of your choice.
Figure 4
Wyszukiwarka
Podobne podstrony:
Window Box
Window Box Planter
Picket Fence Planter Box
07 Windows
Dyskietki startowe systemu Windows XP
Charakterystyka branży usług reklamowych na obszarze RP dla starszego windowsa
abc systemu windows xp 47IMHOQVXQT6FS4YTZINP4N56IQACSUBZSUF7ZI
Autoodtwarzanie w systemie Windows XP
Niestandardowe usługi, Windows porady
Sztuczki w rejestrze systemu Windows
Wyłączanie automatycznej defragmentacji dysku w Windows Vista, KOMPUTER - SERWIS - EDUKACJA, 02 Wind
Typy i Fazy Instalacji Systemu Windows, Informatyka, Instalacja Systemu
UAC Nosze - Wygodne wyłączanie kontroli użytkownika w Windows Vista, KOMPUTER - SERWIS - EDUKACJA, 0
Jak zainstalować Windows 7
Windows Vista tworzymy listę z zawartością folderu
więcej podobnych podstron