
IP-422/IP-423
Print Controller
PS-343/PS-345
PostScript3 Option
Read this manual before printing.
Keep readily available for reference.

Thank you very much for purchasing the Konica Print Controller.
This User’s Manual includes instructions for making prints, correct handling of the machine, and precautions for
safety. Please read this manual before printing.
In order to maintain a satisfactory printing performance, please keep this User’s Manual readily available for refer-
ence.
ACKNOWLEDGEMENT:
Microsoft, MS and MS-DOS are registered trademarks of Microsoft Corporation in the United States.
IBM is a registered trademark of International Business Machines, Inc. in the United States.
Windows
TM
is a trademark of Microsoft Corporation.
HP and PCL are registered trademarks of Hewlett-Packard Company.
Agfa Microtype font is a registered trademark of Agfa Corporation.
PEERLESS is a registered trademark of PEERLESS SYSTEMS CORPORATION.
Apple, Macintosh and Mac are registered trademarks or trademarks of Apple Computer, Inc.
Adobe, Adobe Logo, Acrobat, Acrobat Logo, PostScript and PostScript Logo are registered trademarks or
trademarks of Adobe Systems, Inc.
Other company names and product names used in this manual are the registered trademarks or trade-
marks of their respective companies.
COPYRIGHT
© 2002 by Konica Corporation, All Rights Reserved.

iii
Introduction
■
Introduction
The Konica print controller is designed to be a built-in server for the Konica printer/copier. It enables direct
printing from Windows-compliant computers. It can also enable use of the copier as a network printer when
an internal network interface card is used.
FCC Regulation (for U.S.A only)
Warning:
This equipment has been tested and found to comply with limits for a Class B digital device, pursuant to
part 15 of FCC rules. These limits are designed to provide reasonable protection against harmful interfer-
ence in a residential area.
This equipment generates, uses and can radiate radio frequency energy and, if not installed and used in
accordance with the instructions, may cause harmful interference to radio communications. However,
there is no guarantee that interference will not occur in a particular installation. If this equipment does
cause harmful interference to radio or television reception, which can be determined by turning the equip-
ment off and on, the user is encouraged to try to correct the interference by one or more of the following
measures:
• Reorient or relocate the receiving antenna.
• Increase the distance between the equipment and the receiver.
• Connect the equipment to an outlet on a circuit other than the circuit to which the receiver is con-
nected.
• Consult your dealer or an experienced radio/TV technician for help.
Canadian Department of Communications Regulations
Cet appareil numÈrique de la classe B est conforme á la norme NMB-003 du Canada.
This Class B digital apparatus complies with Canadian ICES-003.
Patent Notice
The product includes an implementation of LZW licensed under U.S.Patent 4,558,302.
Built-in Fonts
The print controller includes support for PCL5e Language (HP PCL clone) and includes the 80 built-in
Agfa Microtype fonts. For details on fonts, [Pleas ask your administrator.].
Note
• A part or all of this User's Guide may not be used or copied without permission.
• Konica will have no liability for any incidents caused by using the printing system and this manual.
• Information written in this User's Guide is subject to change without notice.
• Konica Corporation maintains the copyright of this printer driver.

iv
Introduction
SOFTWARE LICENSE AGREEMENT
This package contains the following materials provided by Konica Corporation (Konica): software included as part
of the printing system, the digitally-encoded machine-readable outline data encoded in the special format and in the
encrypted form ("Font Programs"), other software which runs on a computer system for use in conjunction with the
Printing Software ("Host Software"), and related explanatory written materials ("Documentation").
The term "Software" shall be used to describe Printing Software, Font Programs and/or Host Software and also in-
clude any upgrades, modified versions, additions, and copies of the Software.
The Software is being licensed to you under the terms of this Agreement.
Konica grants to you a non-exclusive sublicense to use the Software and Documentation, provided that you agree
to the following:
1.
You may use the Printing Software and accompanying Font Programs for imaging to the licensed output de-
vice(s), solely for your own internal business purposes.
2.
In addition to the license for Font Programs set forth in Section 1 ("Printing Software") above, you may use Ro-
man Font Programs to reproduce weights, styles, and versions of letters, numerals, characters and symbols
("Typefaces") on the display or monitor for your own internal business purposes.
3.
You may make one backup copy of the Host Software, provided your backup copy is not installed or used on
any computer. Notwithstanding the above restrictions, you may install the on any number of computers solely
for use with one or more printing systems running the Printing Software.
4.
You may assign its rights under this Agreement to an assignee of all of Licensee's right and interest to such
Software and Documentation ("Assignee") provided you transfer to Assignee all copies of such Software and
Documentation Assignee agrees to be bound by all of the terms and conditions of this Agreement.
5.
You agree not to modify, adapt or translate the Software and Documentation.
6.
You agree that you will not attempt to alter, disassemble, decrypt, reverse engineer or decompile the Software.
7.
Title to and ownership of the Software and Documentation and any reproductions thereof shall remain with Kon-
ica.
8.
Trademarks shall be used in accordance with accepted trademark practice, including identification of the trade-
mark owner's name. Trademarks can only be used to identify printed output produced by the Software. Such
use of any trademark does not give you any rights of ownership in that trademark.
9.
You may not rent, lease, sublicense, lend or transfer versions or copies of the Software Licensee does not use,
or Software contained on any unused media, except as part of the permanent transfer of all Software and Doc-
umentation as described above
10. In no event will Konica be liable to you for any consequential, incidental or special damages, including any lost
profits or lost saving, even if Konica has been advised of the possibility of such damages, or for any claim by
any third party. Some states or jurisdictions do not allow the exclusion or limitation of incidental, consequential
or special damages, so the above limitations may not apply to you.
11. Notice to Government End Users: The Software is a "commercial item," as that term is defined at 48 C.F.R.
2.101, consisting of "commercial computer software" and "commercial computer software documentation," as
such terms are used in 48 C.F.R. 12.212. Consistent with 48 C.F.R. 12.212 and 48 C.F.R. 227.7202-1 through
227.7202-4, all U.S. Government End Users acquire the Software with only those rights set forth herein.
Macintosh
®
is a registered trademark of Apple Computer, Inc.
Windows
®
is a registered trademark of Microsoft Corporation.
SOFTWARE LICENSE AGREEMENT

v
Introduction
SOFTWARE LICENSE AGREEMENT
(Exclusive for PostScript3 Option)
This package contains the following materials provided by Adobe Systems Incorporated (“Adobe”) and Konica Cor-
poration (Konica): software included as part of the printing system, including PostScript
®
software and other Adobe
software (“Printing Software”), the digitally-encoded machine-readable outline data encoded in the special format
and in the encrypted form (“Font Programs”), other software which runs on a computer system for use in conjunction
with the Printing Software (“Host Software”), and related explanatory written materials (“Documentation”).
The term “Software” shall be used to describe Printing Software, Font Programs and/or Host Software and also in-
clude any upgrades, modified versions, additions, and copies of the Software.
The Software is being licensed to you under the terms of this Agreement.
Konica grants to you a non-exclusive sublicense to use the Software and Documentation, provided that you agree
to the following:
1.
You may use the Printing Software and accompanying Font Programs for imaging to the licensed output de-
vice(s), solely for your own internal business purposes.
2.
In addition to the license for Font Programs set forth in Section 1 (“Printing Software”) above, you may use Ro-
man Font Programs to reproduce weights, styles, and versions of letters, numerals, characters and symbols
(“Typefaces”) on the display or monitor for your own internal business purposes.
3.
You may make one backup copy of the Host Software, provided your backup copy is not installed or used on
any computer. Notwithstanding the above restrictions, you may install the Adobe Driver Software on any num-
ber of computers solely for use with one or more printing systems running the Printing Software.
4.
You may assign its rights under this Agreement to an assignee of all of Licensee’s right and interest to such
Software and Documentation (“Assignee”) provided you transfers to Assignee all copies of such Software and
Documentation Assignee agrees to be bound by all of the terms and conditions of this Agreement.
5.
You agree not to modify, adapt or translate the Software and Documentation.
6.
You agree that it will not attempt to alter, disassemble, decrypt, reverse engineer or decompile the Software.
7.
Title to and ownership of the Software and Documentation and any reproductions thereof shall remain with Ado-
be and Konica.
8.
Trademarks shall be used in accordance with accepted trademark practice, including identification of the trade-
mark owner’s name. Trademarks can only be used to identify printed output produced by the Software. Such
use of any trademark does not give you any rights of ownership in that trademark.
9.
You may not rent, lease, sublicense, lend or transfer versions or copies of the Software Licensee does not use,
or Software contained on any unused media, except as part of the permanent transfer of all Software and Doc-
umentation as described above.
10. In no event will Konica or Adobe be liable to you for any consequential, incidental or special damages, including
any lost profits or lost saving, even if Konica has been advised of the possibility of such damages, or for any
claim by any third party. Some states or jurisdictions do not allow the exclusion or limitation of incidental, con-
sequential or special damages, so the above limitations may not apply to you.
11. Notice to Government End User’s: The Software is a “commercial item,” as that term is defined at 48 C.F.R. 2.101,
consisting of “commercial computer software” and “commercial computer software documentation,” as such
terms are used in 48 C.F.R. 12.212. Consistent with 48 C.F.R. 12.212 and 48 C.F.R. 227.7202-1 through
227.7202-4, all U.S. Government End User’s acquire the Software with only those rights set forth herein.
12. You are hereby notified that Adobe Systems Incorporated, a Delaware corporation located at 345 Park Avenue,
San Jose, CA 95110-2704 (“Adobe”) is a third-party beneficiary to this Agreement to the extent that this Agree-
ment contains provisions which relate to Licensee’s use of the Software, Font Programs, Typefaces and the
trademarks licensed hereby. Such provisions are made expressly for the benefit of Adobe and are enforceable
by Adobe in addition to Konica.
SOFTWARE LICENSE AGREEMENT

CONTENTS
vi
Introduction
SOFTWARE LICENSE AGREEMENT . . . . . . . . . . . . . . . . . . . . . . . . . . . . . . iv
Package Contents . . . . . . . . . . . . . . . . . . . . . . . . . . . . . . . . . . . . . . . . . . . . . . xii
System Requirements . . . . . . . . . . . . . . . . . . . . . . . . . . . . . . . . . . . . . . . . . . xiii
About this Manual. . . . . . . . . . . . . . . . . . . . . . . . . . . . . . . . . . . . . .xiv
Conventions Used in this Manual . . . . . . . . . . . . . . . . . . . . . . . . . xv
I Set up . . . . . . . . . . . . . . . . . . . . . . . . . . . . . . . . . . . . . 1
Chapter 1 Summary . . . . . . . . . . . . . . . . . . . . . . . . . . . . . . . . . . . . . 2
What is the print controller? . . . . . . . . . . . . . . . . . . . . . . . . . . . . . . . . . 3
Role of the print controller . . . . . . . . . . . . . . . . . . . . . . . . . . . . . . . . . . . . . . . . . . . . 3
What you can do with the print controller . . . . . . . . . . . . . . . . . . . . . . . . . . . . . . . . 6
Three Modes . . . . . . . . . . . . . . . . . . . . . . . . . . . . . . . . . . . . . . . . . . . . . . . . . . . . . . 7
Flow of processing . . . . . . . . . . . . . . . . . . . . . . . . . . . . . . . . . . . . . . . . 8
Copy mode . . . . . . . . . . . . . . . . . . . . . . . . . . . . . . . . . . . . . . . . . . . . . . . . . . . . . . . 8
Flow for printing. . . . . . . . . . . . . . . . . . . . . . . . . . . . . . . . . . . . . . . . . . . . . . . . . . . . 8
PC-Fax transmission/reception flow . . . . . . . . . . . . . . . . . . . . . . . . . . . . . . . . . . . . 9
Flow for network scanner . . . . . . . . . . . . . . . . . . . . . . . . . . . . . . . . . . . . . . . . . . . 11
Operation environment . . . . . . . . . . . . . . . . . . . . . . . . . . . . . . . . . . . . 12
II Printer . . . . . . . . . . . . . . . . . . . . . . . . . . . . . . . . . . . 14
Chapter 2 Preparing the Printer for Use . . . . . . . . . . . . . . . . . . . . 16
Checking the PC to be used. . . . . . . . . . . . . . . . . . . . . . . . . . . . . . . . 17
Using the print controller. . . . . . . . . . . . . . . . . . . . . . . . . . . . . . . . . . . 17
Printer driver types and supported OSs . . . . . . . . . . . . . . . . . . . . . . . . . . . . . . . . 17
Page notation language . . . . . . . . . . . . . . . . . . . . . . . . . . . . . . . . . . . . . . . . . . . . 18
Using this printing system with Windows 2000. . . . . . . . . . . . . . . . . . 18
Access rights and range of operation . . . . . . . . . . . . . . . . . . . . . . . . . . . . . . . . . . 18
Konica driver installation . . . . . . . . . . . . . . . . . . . . . . . . . . . . . . . . . . . . . . . . . . . . 19
Installing the Adobe driver. . . . . . . . . . . . . . . . . . . . . . . . . . . . . . . . . . . . . . . . . . . 22
Checking printing. . . . . . . . . . . . . . . . . . . . . . . . . . . . . . . . . . . . . . . . . . . . . . . . . . 25
Updating the printer driver . . . . . . . . . . . . . . . . . . . . . . . . . . . . . . . . . 26

CONTENTS
vii
Introduction
Installation problems . . . . . . . . . . . . . . . . . . . . . . . . . . . . . . . . . . . . . 27
An old version of the driver is already installed. . . . . . . . . . . . . . . . . . . . . . . . . . . 27
You are asked which file to use, the one you are installing or a new file
already on the computer.. . . . . . . . . . . . . . . . . . . . . . . . . . . . . . . . . . . . . . . . . . . . 27
Test page cannot be printed.. . . . . . . . . . . . . . . . . . . . . . . . . . . . . . . . . . . . . . . . . 28
Chapter 3 Printing with Windows . . . . . . . . . . . . . . . . . . . . . . . . . 29
Setting printer functions . . . . . . . . . . . . . . . . . . . . . . . . . . . . . . . . . . . 30
Setting the printer languages . . . . . . . . . . . . . . . . . . . . . . . . . . . . . . . . . . . . . . . . 34
Setting the number of copies to print (Copies). . . . . . . . . . . . . . . . . . . . . . . . . . . . 34
Setting the print direction (Orientation) . . . . . . . . . . . . . . . . . . . . . . . . . . . . . . . . . 34
Setting the print paper size (Paper size) . . . . . . . . . . . . . . . . . . . . . . . . . . . . . . . . 35
Selecting the type of paper (Media type/Paper type) . . . . . . . . . . . . . . . . . . . . . . 36
Printing enlarged/reduced (Scaling) . . . . . . . . . . . . . . . . . . . . . . . . . . . . . . . . . . . 36
Selecting the input tray (Paper source) . . . . . . . . . . . . . . . . . . . . . . . . . . . . . . . . . 37
Selecting the output tray (Output tray) . . . . . . . . . . . . . . . . . . . . . . . . . . . . . . . . . 37
Setting the margin (Margins) . . . . . . . . . . . . . . . . . . . . . . . . . . . . . . . . . . . . . . . . . 38
Printing multiple pages . . . . . . . . . . . . . . . . . . . . . . . . . . . . . . . . . . . . 39
Printing on both the front and rear of the paper (Duplex) . . . . . . . . . . . . . . . . . . . 40
Printing multiple pages on one sheet of paper (Pages per sheet/Layout). . . . . . . 41
Folding paper in two to make booklets (Combination) . . . . . . . . . . . . . . . . . . . . . 42
Printing one copy at a time of all pages (Collate/Sort) . . . . . . . . . . . . . . . . . . . . . 43
Outputting sorted into separate sets of copies (Offset) . . . . . . . . . . . . . . . . . . . . . 44
Stapling (Staple) . . . . . . . . . . . . . . . . . . . . . . . . . . . . . . . . . . . . . . . . . . . . . . . . . . 45
Attaching a front cover/back cover (Front cover/Back cover) . . . . . . . . . . . . . . . . 47
Making image settings . . . . . . . . . . . . . . . . . . . . . . . . . . . . . . . . . . . . 49
Halftoning . . . . . . . . . . . . . . . . . . . . . . . . . . . . . . . . . . . . . . . . . . . . . . . . . . . . . . . 49
Brightness . . . . . . . . . . . . . . . . . . . . . . . . . . . . . . . . . . . . . . . . . . . . . . . . . . . . . . . 49
Contrast. . . . . . . . . . . . . . . . . . . . . . . . . . . . . . . . . . . . . . . . . . . . . . . . . . . . . . . . . 49
Smoothing . . . . . . . . . . . . . . . . . . . . . . . . . . . . . . . . . . . . . . . . . . . . . . . . . . . . . . . 49
Toner save . . . . . . . . . . . . . . . . . . . . . . . . . . . . . . . . . . . . . . . . . . . . . . . . . . . . . . 50
Settings the resolution (Resolution) . . . . . . . . . . . . . . . . . . . . . . . . . . . . . . . . . . . 51
Printing with black and white reversed (Print as a negative image) . . . . . . . . . . . 51
Printing with left/right reversed (Print as a mirror image) . . . . . . . . . . . . . . . . . . . 52
TrueType font settings. . . . . . . . . . . . . . . . . . . . . . . . . . . . . . . . . . . . . . . . . . . . . . 52
PostScript font settings . . . . . . . . . . . . . . . . . . . . . . . . . . . . . . . . . . . . . . . . . . . . . 53
Printing overlaying another document (Overlay) . . . . . . . . . . . . . . . . . . . . . . . . . . 55
Printing watermarks (Watermark) . . . . . . . . . . . . . . . . . . . . . . . . . . . . . . . . . . . . . 56
Printing with a password (Password print) . . . . . . . . . . . . . . . . . . . . . . . . . . . . . . 58
Setting the connection between the computer and printer . . . . . . . . . 62
Windows 95/98/Me . . . . . . . . . . . . . . . . . . . . . . . . . . . . . . . . . . . . . . . . . . . . . . . . 62
Windows NT 4.0 . . . . . . . . . . . . . . . . . . . . . . . . . . . . . . . . . . . . . . . . . . . . . . . . . . 64
Windows 2000/XP . . . . . . . . . . . . . . . . . . . . . . . . . . . . . . . . . . . . . . . . . . . . . . . . . 65
Chapter 4 Printing with Macintosh . . . . . . . . . . . . . . . . . . . . . . . . 68
Setting printer functions . . . . . . . . . . . . . . . . . . . . . . . . . . . . . . . . . . . 69

CONTENTS
viii
Introduction
Setting the number of copies to print (Copies) . . . . . . . . . . . . . . . . . . . . . . . . . . . 71
Setting the print direction (Direction) . . . . . . . . . . . . . . . . . . . . . . . . . . . . . . . . . . . 71
Setting the print paper size (Paper). . . . . . . . . . . . . . . . . . . . . . . . . . . . . . . . . . . . 72
Selecting the type of paper (Media type). . . . . . . . . . . . . . . . . . . . . . . . . . . . . . . . 73
Printing enlarged/reduced (Magnification ratio). . . . . . . . . . . . . . . . . . . . . . . . . . . 73
Selecting the input tray (Paper source) . . . . . . . . . . . . . . . . . . . . . . . . . . . . . . . . . 73
Selecting the print order (Reverse print order) . . . . . . . . . . . . . . . . . . . . . . . . . . . 74
Selecting the output tray (Output tray) . . . . . . . . . . . . . . . . . . . . . . . . . . . . . . . . . 74
Setting the margin (Margins) . . . . . . . . . . . . . . . . . . . . . . . . . . . . . . . . . . . . . . . . . 75
Printing multiple pages . . . . . . . . . . . . . . . . . . . . . . . . . . . . . . . . . . . . 75
Printing on both the front and rear of the paper (Duplex printing) . . . . . . . . . . . . . 76
Printing multiple pages on one sheet of paper (Document pages/Print
pages/Layout direction) . . . . . . . . . . . . . . . . . . . . . . . . . . . . . . . . . . . . . . . . . . . . . 77
Folding paper in two to make booklets (Special mode). . . . . . . . . . . . . . . . . . . . . 79
Printing one copy at a time of all pages (Collate) . . . . . . . . . . . . . . . . . . . . . . . . . 80
Outputting sorted into separate sets of copies (Offset) . . . . . . . . . . . . . . . . . . . . . 80
Stapling (Staple) . . . . . . . . . . . . . . . . . . . . . . . . . . . . . . . . . . . . . . . . . . . . . . . . . . 81
Attaching a front cover/back cover (Front Cover/Back Cover) . . . . . . . . . . . . . . . 83
Printing with top/bottom or left/right reversed (Mirror image printing) . . . . . . . . . . 84
Printing with black and white reversed (Negative image printing). . . . . . . . . . . . . 84
Printing watermarks (Watermark) . . . . . . . . . . . . . . . . . . . . . . . . . . . . . . . . . . . . . 85
Smoothing characters and curved lines (Smoothing) . . . . . . . . . . . . . . . . . . . . . . 86
Conserving toner (Toner save) . . . . . . . . . . . . . . . . . . . . . . . . . . . . . . . . . . . . . . . 87
Making PostScript settings (File save) . . . . . . . . . . . . . . . . . . . . . . . . 87
Chapter 5 Printing Problems . . . . . . . . . . . . . . . . . . . . . . . . . . . . . 89
Problems with printing . . . . . . . . . . . . . . . . . . . . . . . . . . . . . . . . . . . . 90
No response to printer commands. . . . . . . . . . . . . . . . . . . . . . . . . . . . . . . . . . . . . 90
The paper type cannot be selected. . . . . . . . . . . . . . . . . . . . . . . . . . . . . . . . . . . . 90
Test page cannot be printed.. . . . . . . . . . . . . . . . . . . . . . . . . . . . . . . . . . . . . . . . . 90
The print settings and print results do not match. . . . . . . . . . . . . . . . . . . . . . . . . . 91
Duplex printing is not possible. . . . . . . . . . . . . . . . . . . . . . . . . . . . . . . . . . . . . . . . 91
Forms cannot be printed. . . . . . . . . . . . . . . . . . . . . . . . . . . . . . . . . . . . . . . . . . . . 91
Problems printing with the Adobe driver. . . . . . . . . . . . . . . . . . . . . . . 92
PostScript error is displayed.. . . . . . . . . . . . . . . . . . . . . . . . . . . . . . . . . . . . . . . . . 92
[Vmerror], [limitcheck], or other PostScript error is displayed. . . . . . . . . . . . . . . . 92
PostScript error is displayed no matter which computer is attempting to print.. . . 92
PostScript error is displayed for printing from a specific application. . . . . . . . . . . 92
PostScript error is displayed for printing a specific file. . . . . . . . . . . . . . . . . . . . . . 92
PostScript error is displayed for printing a specific page. . . . . . . . . . . . . . . . . . . . 93
Fonts cannot be downloaded. . . . . . . . . . . . . . . . . . . . . . . . . . . . . . . . . . . . . . . . . 93
Non fixed size paper (custom) cannot be printed correctly with a Macintosh. . . . 93
Checking incomplete jobs. . . . . . . . . . . . . . . . . . . . . . . . . . . . . . . . . . 93
III FAX . . . . . . . . . . . . . . . . . . . . . . . . . . . . . . . . . . . . . 95
Chapter 6 Fax Functions (PC-Fax) . . . . . . . . . . . . . . . . . . . . . . . . 96
Sending faxes from the computer. . . . . . . . . . . . . . . . . . . . . . . . . . . . 97
Receiving faxes with the computer. . . . . . . . . . . . . . . . . . . . . . . . . . . 97

CONTENTS
ix
Introduction
Registering recipient names and their fax numbers. . . . . . . . . . . . . . 97
Chapter 7 Sending Faxes. . . . . . . . . . . . . . . . . . . . . . . . . . . . . . . . 99
Transmission procedure . . . . . . . . . . . . . . . . . . . . . . . . . . . . . . . . . . 100
PC-Fax transmission error reports . . . . . . . . . . . . . . . . . . . . . . . . . . 102
Chapter 8 Phonebook Registration. . . . . . . . . . . . . . . . . . . . . . . 103
Registering phonebook . . . . . . . . . . . . . . . . . . . . . . . . . . . . . . . . . . 104
Registering recipient information. . . . . . . . . . . . . . . . . . . . . . . . . . . . . . . . . . . . . 104
Registering broadcast group . . . . . . . . . . . . . . . . . . . . . . . . . . . . . . . . . . . . . . . . 106
Managing phonebooks . . . . . . . . . . . . . . . . . . . . . . . . . . . . . . . . . . . 108
Saving phonebooks. . . . . . . . . . . . . . . . . . . . . . . . . . . . . . . . . . . . . . . . . . . . . . . 108
Preparing a new phonebook . . . . . . . . . . . . . . . . . . . . . . . . . . . . . . . . . . . . . . . . 108
Switching between phonebooks . . . . . . . . . . . . . . . . . . . . . . . . . . . . . . . . . . . . . 109
Phonebook usage . . . . . . . . . . . . . . . . . . . . . . . . . . . . . . . . . . . . . . 109
IV Scanner . . . . . . . . . . . . . . . . . . . . . . . . . . . . . . . . 110
Chapter 9 Summary of Scanner Functions . . . . . . . . . . . . . . . . 111
Scanner functions. . . . . . . . . . . . . . . . . . . . . . . . . . . . . . . . . . . . . . . 112
Scan data output . . . . . . . . . . . . . . . . . . . . . . . . . . . . . . . . . . . . . . . 113
Storing to a box (Scan to box). . . . . . . . . . . . . . . . . . . . . . . . . . . . . . . . . . . . . . . 113
Sending with email (Scan to E-mail) . . . . . . . . . . . . . . . . . . . . . . . . . . . . . . . . . . 114
Sending to FTP server (Scan to FTP) . . . . . . . . . . . . . . . . . . . . . . . . . . . . . . . . . 114
Chapter 10 Using the Scanner Functions . . . . . . . . . . . . . . . . . 115
Storing to a box (Scan to box). . . . . . . . . . . . . . . . . . . . . . . . . . . . . . . . . . . . . . . 116
Sending with email (Scan to E-mail) . . . . . . . . . . . . . . . . . . . . . . . . . . . . . . . . . . 119
Sending to FTP server (Scan to FTP) . . . . . . . . . . . . . . . . . . . . . . . . . . . . . . . . . 122
10-2. Registering storage locations/destinations . . . . . . . . . . . . . . . . . . . . 125
10-3. Inputting text . . . . . . . . . . . . . . . . . . . . . . . . . . . . . . . . . . . . . . . . . . . 132
10-5. Scanning documents . . . . . . . . . . . . . . . . . . . . . . . . . . . . . . . . . . . . 134
Check the computer to use. . . . . . . . . . . . . . . . . . . . . . . . . . . . . . . . . . . . . . . . . 142
Installing the network scanner driver. . . . . . . . . . . . . . . . . . . . . . . . . . . . . . . . . . 143
Connecting the computer and the hard disk . . . . . . . . . . . . . . . . . . . . . . . . . . . . 143
Importing scan data into the computer . . . . . . . . . . . . . . . . . . . . . . . . . . . . . . . . 144
Scanner driver screen . . . . . . . . . . . . . . . . . . . . . . . . . . . . . . . . . . . . . . . . . . . . . 146

CONTENTS
x
Introduction
VI Network . . . . . . . . . . . . . . . . . . . . . . . . . . . . . . . . 148
11-1. IP Peer-to-Peer . . . . . . . . . . . . . . . . . . . . . . . . . . . . . . . . . . . . . . . . 150
11-2. Preparation for Peer-to-Peer printing . . . . . . . . . . . . . . . . . . . . . . . . 150
11-3. Print controller TCP/IP settings . . . . . . . . . . . . . . . . . . . . . . . . . . . . 150
11-4. Computer TCP/IP settings . . . . . . . . . . . . . . . . . . . . . . . . . . . . . . . . 151
Communications protocol check method . . . . . . . . . . . . . . . . . . . . . . . . . . . . . . 151
11-5. IP Peer-to-Peer installation and setting . . . . . . . . . . . . . . . . . . . . . . 151
IP Peer-to-Peer installation . . . . . . . . . . . . . . . . . . . . . . . . . . . . . . . . . . . . . . . . . 151
IP Peer-to-Peer settings . . . . . . . . . . . . . . . . . . . . . . . . . . . . . . . . . . . . . . . . . . . 153
12-1. LPD/LPR . . . . . . . . . . . . . . . . . . . . . . . . . . . . . . . . . . . . . . . . . . . . . 161
12-2. Preparations for printing with LPD/LPR . . . . . . . . . . . . . . . . . . . . . . 161
12-3. Print controller TCP/IP settings . . . . . . . . . . . . . . . . . . . . . . . . . . . . 161
12-4. Windows NT 4.0 settings . . . . . . . . . . . . . . . . . . . . . . . . . . . . . . . . . 162
12-5. Windows 2000 settings . . . . . . . . . . . . . . . . . . . . . . . . . . . . . . . . . . 165
Printer TCP/IP settings . . . . . . . . . . . . . . . . . . . . . . . . . . . . . . . . . . . . . . . . . . . . 172
IPP attribute settings . . . . . . . . . . . . . . . . . . . . . . . . . . . . . . . . . . . . . . . . . . . . . . 173
13-3. Windows 2000 settings . . . . . . . . . . . . . . . . . . . . . . . . . . . . . . . . . . 173
13-4. Windows XP settings . . . . . . . . . . . . . . . . . . . . . . . . . . . . . . . . . . . . 176
VII Appendix. . . . . . . . . . . . . . . . . . . . . . . . . . . . . . . 179
Chapter 14 Appendix . . . . . . . . . . . . . . . . . . . . . . . . . . . . . . . . . . 180
14-1. IP-422/IP-423 product specifications . . . . . . . . . . . . . . . . . . . . . . . . 181
Printer function . . . . . . . . . . . . . . . . . . . . . . . . . . . . . . . . . . . . . . . . . . . . . . . . . . 181
Fax function . . . . . . . . . . . . . . . . . . . . . . . . . . . . . . . . . . . . . . . . . . . . . . . . . . . . 182
Scanner functions . . . . . . . . . . . . . . . . . . . . . . . . . . . . . . . . . . . . . . . . . . . . . . . . 182
Network functions . . . . . . . . . . . . . . . . . . . . . . . . . . . . . . . . . . . . . . . . . . . . . . . . 183
14-2. PostScript PS-343/PS-345 option product specifications. . . . . . . . . 184

CONTENTS
xi
Introduction
Memory . . . . . . . . . . . . . . . . . . . . . . . . . . . . . . . . . . . . . . . . . . . . . . . . . . . . . . . . 184
Problems with optional products . . . . . . . . . . . . . . . . . . . . . . . . . . . . . . . . . . . . . 185
PCL function list . . . . . . . . . . . . . . . . . . . . . . . . . . . . . . . . . . . . . . . . . . . . . . . . . 189
Adobe PostScript Function list . . . . . . . . . . . . . . . . . . . . . . . . . . . . . . . . . . . . . . 195
Using the accessory screen fonts . . . . . . . . . . . . . . . . . . . . . . . . . . . . . . . . . . . . 201
Installing screen fonts . . . . . . . . . . . . . . . . . . . . . . . . . . . . . . . . . . . . . . . . . . . . . 201
Installing Adobe Type Manager (ATM) . . . . . . . . . . . . . . . . . . . . . . . . . . . . . . . . 204
Downloading fonts. . . . . . . . . . . . . . . . . . . . . . . . . . . . . . . . . . . . . . . . . . . . . . . . 205
14-6. Index according to item . . . . . . . . . . . . . . . . . . . . . . . . . . . . . . . . . . 206
14-7. Purpose-oriented index . . . . . . . . . . . . . . . . . . . . . . . . . . . . . . . . . . 209

xii
Introduction
Introduction
●
Package Contents
The following items are supplied with the print controller:
• Notice Sheet
• Interface Board
• User Software CD
(Windows)
• Printer Driver
• Scanner Driver
(compatible with TWAIN)
• Network Connection Utilities
•BOOTP
•IP-P2P
•IPX-P2P
•MAP
•NW Setup
•UNIX
• Adobe Acrobat Reader
• User's Manual
(this manual)
• Release Note
(describes the latest information as well as limits of the system and the user soft-
ware.)
• Screenfonts
(Macintosh)
• Adobe Acrobat Reader
• User's Manual
(this manual)
The following items are supplied with the PostScript3 option:
• PS protection chip
• User Software CD (Including printer driver, Adobe Acrobat Reader, this User’s Manual and Release
Note*)
*Release Note describes the latest information and limits of the system and the user software.
Package Contents

xiii
Introduction
●
System Requirements
Windows
The following are required to print from Windows-compliant computers to the printing system:
• Computers on which Windows 95/98/Me/NT 4.0/2000/XP can run
• CD-ROM drive (necessary to install the printer driver or the scanner driver)
Using Windows 95/98/Me
• Microsoft Windows 95/98/Me
• 32 MB RAM or more
Using Windows NT 4.0/2000/XP
• Microsoft Windows NT 4.0/2000/XP
• 32 MB RAM or more
Parallel Port
The following are required to print to the print controller by way of the parallel port:
• Windows-compliant computers
• IEEE 1284 parallel cable
One end of the cable is required to have a DB 36 pin male connector (connected to the print controller).
System Requirements

xiv
About this Manual
●
About this Manual
This manual is used only for the Print Controller.
This manual describes how to operate the Print Controller when the Konica Copier is connected to com-
puters and used as a printer.
This manual assumes you are familiar with the basic operation of your Operating System and the Copier.
The copier is separately supplied with user’s manuals. Refer to these manuals as needed.
For detailed operations of Windows 95/98/Me and Windows NT 4.0/2000/XP, refer to the operating manu-
als for each operating system. For application operations, refer to the operating manuals provided with
each application.
This manual is composed of the following six volumes and appendices.
This volume summarizes what you can do with the Konica print controller and explains the operation
environment.
This volume explains what is necessary when using this printing system as a printer. It covers the
printer driver installation method, print settings method, print count management, and what to do in the
event of problems.
This volume explains what is necessary when using this printing system as a facsimile machine. It cov-
ers fax functions in summary and settings methods, transmission/reception methods, and fax number
registration method.
This volume explains what is necessary when using this printing system as a scanner. It covers scan-
ner functions.
This volume explains what is necessary when using this printing system as a network printer. It
explains the network function setting methods and Internet printing.
The appendices explain how to handle problems and give the product specifications, a list of built-in
fonts, the factory default, etc.

xv
Conventions Used in this Manual
●
Conventions Used in this Manual
Notation of each product
The following abbreviations are used in this manual:
(1)IP-422 Print Controller:
print controller
IP-423 Print Controller:
(2)Konica 7022/7130/7135 Printer/Copier:
Copier (or main body printer)
(3)Internal Network Controller:
network controller
(4)A printing system that combines the above
(1), (2) and (3) products:
printing system
(5)PS-343 PostScript option
PostScript option
PS-345 PostScript option
(6) Microsoft Windows 95:
Windows 95
Microsoft Windows 98:
Windows 98
Microsoft Windows Me:
Windows Me
Microsoft Windows NT 4.0:
Windows NT 4.0
Microsoft Windows 2000:
Windows 2000
Microsoft Windows XP:
Windows XP
Above OSs:
Windows 95/98/Me
Windows NT 4.0/2000/XP
Windows 95/98/Me/NT 4.0/2000/XP
Notation of names shown on the screen are written within square brackets.
(e.g.,
"
click the [OK] button.
")
Notation of folders
Folders are referred to in upper-to-lower sequence.
For example:
Select the [Printer.inf] file in the "PCL\English\Win9X" folder of the User Software CD.
Notation of a reference to this manual is written within square marks.
(e.g., [Chapter 1 Summary]).
The following indicates page reference for specific information contained in this manual.
(e.g., (
Page 1)).
When you click in the page number, you are linked to the reference page.
●
Screens used with this manual
The functional descriptions of the printer driver refer to the printer driver for the IP-422 (PS-343).
xvi
Conventions Used in this Manual
Usage of this Manual
3-1. Setting printer functions
The printer functions are set by displaying the printer settings screen.
1
Press the
button on the control panel.
2
Touch the [PRINTER] key on the LCD screen.
3
From the taskbar, select [Start]- [Settings] - [Printers].
4
For [Drives:], select the CD-ROM drive. For folder, double-click the
[\English\Printer\Win9x_Me] folder.
Limitation
● When the Adobe PostScript driver is selected, the document size can-
not be set.
MEMO
● Sending to an FTP server [Sending to FTP server ] (
Page 325)
Important
● Always set irregular size paper in the copier's bypass tray.
Caution
● If there are any files that cannot be deleted, logon again.
This is the item title.
This illustrates ei-
ther [PCL] or [Ado-
be PS] can be used
for the printer driver
setting.
This displays but-
tons on the control
panel.
This covers restric-
tions when func-
tions are
combined.
The names of win-
dows, dialog boxes,
and icons displayed
on the computer
screen are written in
brackets [ ].
This covers impor-
tant information
that you should
know.
This covers items
requiring attention
or which are pro-
hibited during op-
eration.
PCL
Adobe PS
This displays the
keys on the LCD
screen.
The related items
are explained on the
following page.
If you click the page
number on the PDF,
it moves to the re-
garded page.
Folder structure is
written from the up-
per level to lower
level.

1
This volume summarizes what you can do
with the Konica print controller and explains
the operating environment.
Chapter 1 Summary............................... 2
I Set up

I Set up
2
Chapter 1 Summary
This chapter explains what you need to know about the print controller, the flow of its process-
ing, and its operation environment.
1-1. What is the print controller? ................................................................3
1-3. Operation environment.......................................................................12
3
I Set up Chapter 1 Summary
1-1. What is the print controller?
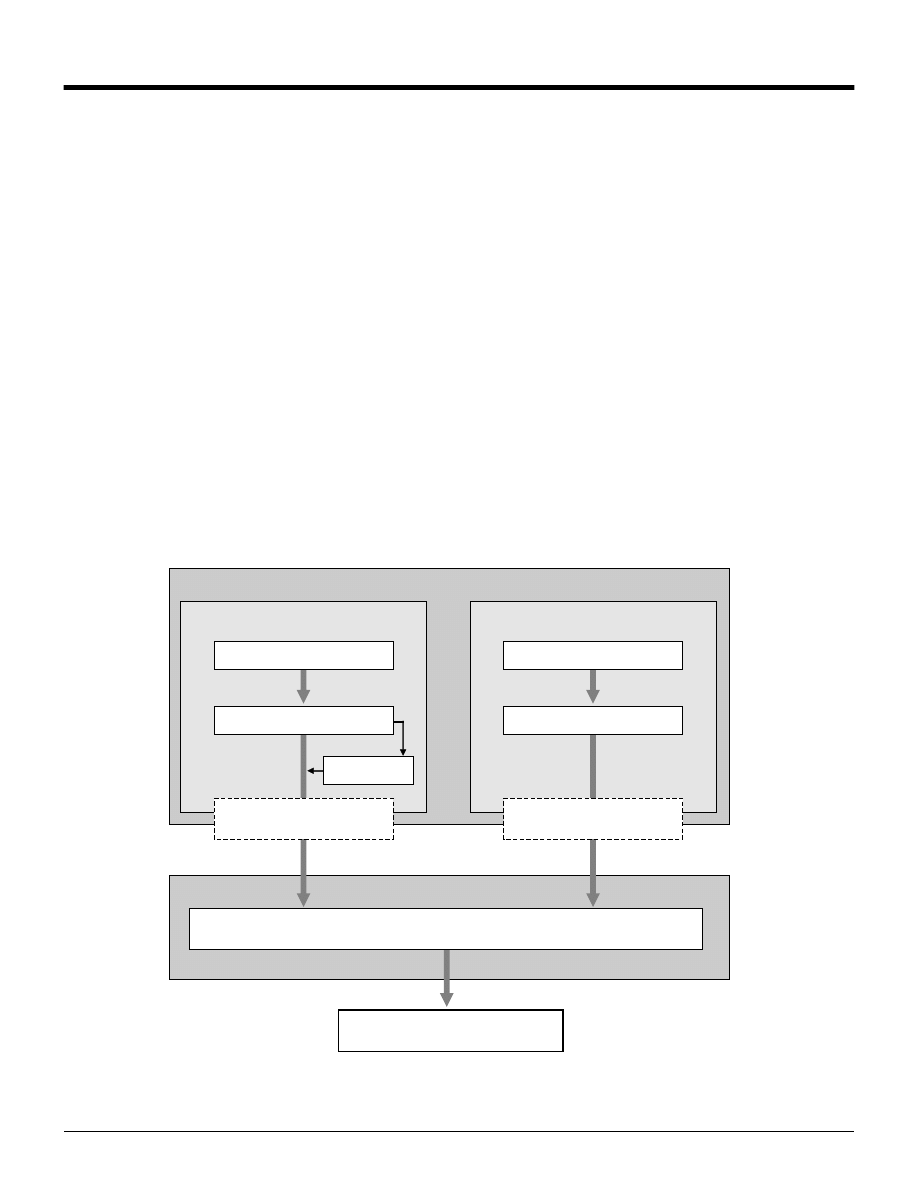
Role of the print controller
The printer controller is used built into a copier.
You can print and send faxes from applications on the PC connected to the printer controller. When using the
copier as a network printer, the network controller included in the print controller is used and you can print,
send faxes, receive faxes, and scan the network from applications on the PC.
Frow for printing (Using as local printer)
Frow for printing (Using as network printer)
Computer
Copier
Print Controller
Printing system
Parallel interface
Copier
Print Controller
Printing system
Network
HUB
Ethernet

1-1. What is the print controller?
4
I Set up Chapter 1 Summary
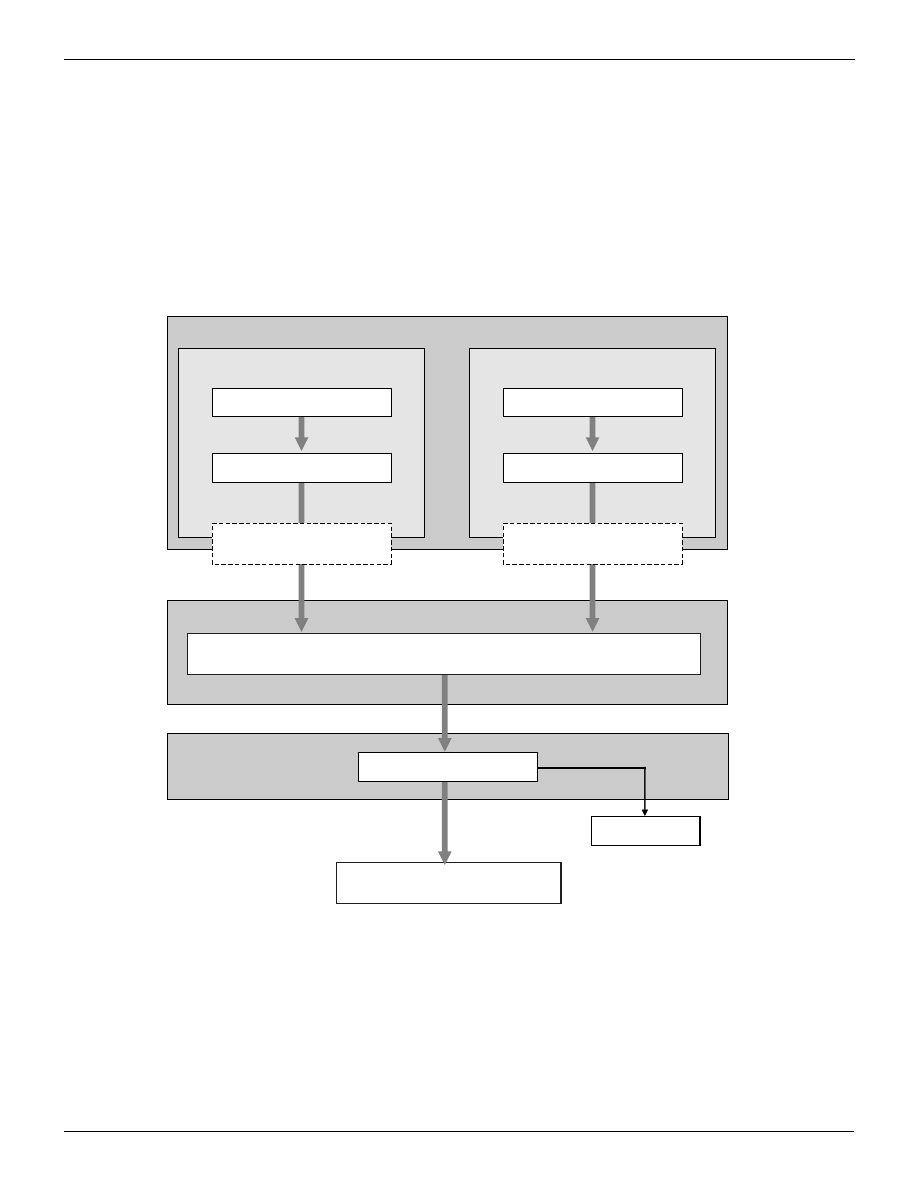
Flow for PC-Fax trasmission (Using as local printer)
Flow for PC-Fax trasmission (Using as network printer)
Computer
Copier
Print Controller
Printing system
Parallel interface
Printing with
the Copier
Fax
transmission
E-RDH memory
Copier
Print Controller
Printing system
Network
HUB
Ethernet
Printing with
the Copier
Fax
transmission
E-RDH memory
1-1. What is the print controller?
5
I Set up Chapter 1 Summary
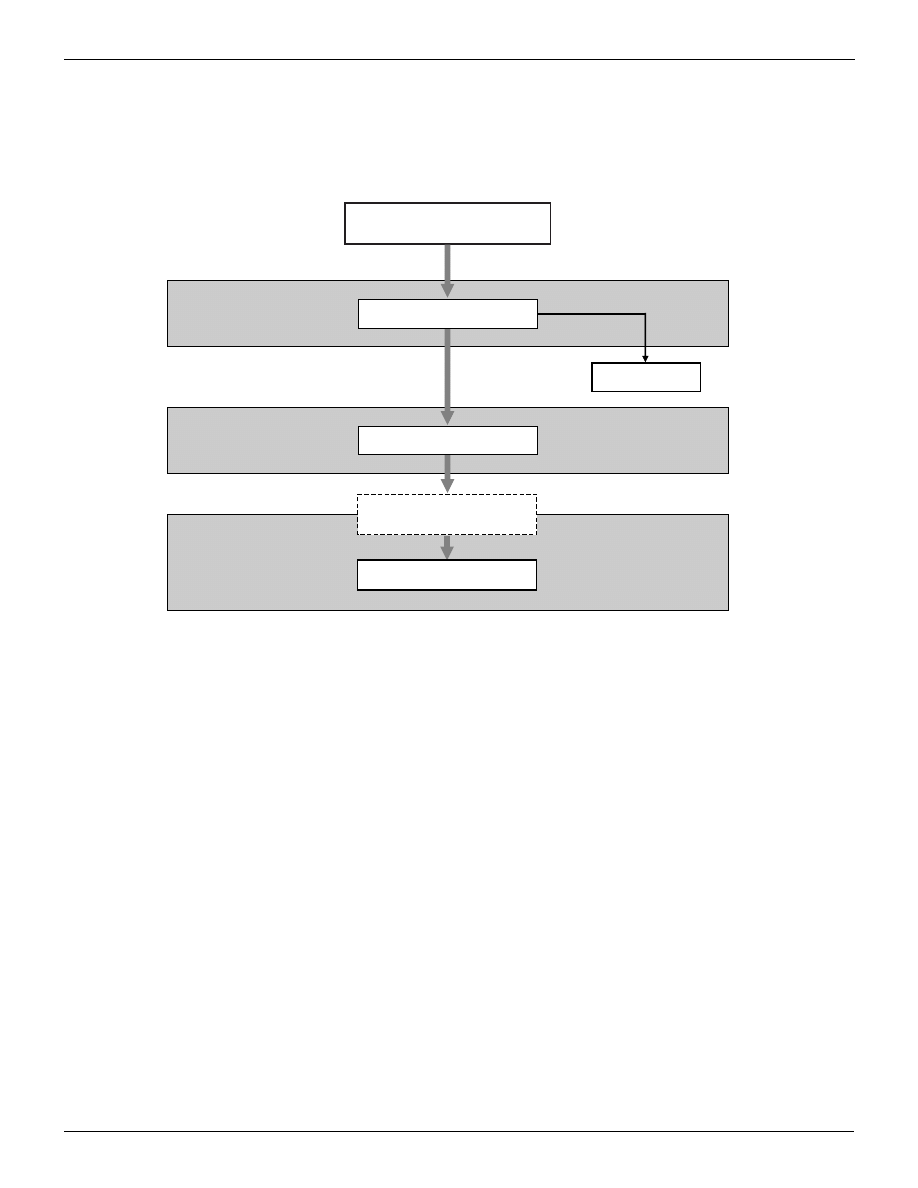
Frow for PC-Fax reception
Using as network Scanner
Copier
Print Controller
Printing system
Network
HUB
Ethernet
Fax
reception
Printing with
the Copier
E-RDH memory
Copier
Print Controller
Printing system
Network
HUB
Ethernet
Scanning
E-RDH memory
Internet
SMTP server
FTP server

1-1. What is the print controller?
6
I Set up Chapter 1 Summary
What you can do with the print controller
The print controller has the following functions.
It can receive print commands during printing.
Even while the print controller is printing or receiving data from another PC, it can receive print com-
mands from your application.
This printing system stores data temporarily in the copier's memory and uses the Electronic Recirculat-
ing Document Handler (E-RDH) to handle the printing.
The standard memory is 32 MB, which can hold about 180 pages of A4-size documents. The memory
can be expanded to up to 160 MB.
MEMO
z
For details on memory, refer to [14-3. Options] (
Functions used with the copier can also be utilized.
Even when using the copier as a printer, duplex printing and paper tray selection can be executed the
same as when the unit is used as a copier. Also, stapling and other such functions can be selected if
the optional finisher is installed.
Managing the number of sheets printed (printer EKC/ECM)
If the [Printer EKC/ECM] function is set, the number of sheets printed for each user can be managed by
password. It is possible to reject users without passwords and users who have printed all of their preset
combination.
MEMO
z
For details, [Please ask your administrator].
The print controller can also be used as a fax and scanner, in addition to use as a printer.
The print controller network controller can be used to send and receive faxes directly from/to the PC.
When the print controller is used as a scanner, scanned pictures can be imported into other applica-
tions.
MEMO
z
For details on the fax functions, refer to [ Chapter 6 Fax Functions (PC-Fax)].
(
For details on the scanner, refer to [ Chapter 9 Summary of Scanner Functions].
(
1-1. What is the print controller?
7
I Set up Chapter 1 Summary
Three Modes
The printer driver settings are primarily made from the PC, but the font list printing, controller settings, and
default settings for printing can be set with the copier control panel. Also, with the print controller, the copier
can be used as a copier or scanner by changing the mode.
The mode is switched with the [Mode switch] button on the copier control panel.
Copy mode
This uses the printer main unit as a copier.
Fax mode
This uses the printer main unit as a fax machine.
MEMO
z
For details on the fax functions, refer to [ Chapter 6 Fax Functions (PC-Fax)].
(
Scanner/printer mode
This mode is used for setting the printing system and for outputting lists, confidential documents, etc.
You can scan a document into the computer and send it as e-mail.
MEMO
z
For details on the scanner, refer to [ Chapter 9 Summary of Scanner Functions].
(
[Mode switch] button
8
I Set up Chapter 1 Summary
1-2. Flow of processing
The general flow of processing for using this printing system as a printer, fax, and scanner is as follows.
Copy mode
This printing system can be used as a printer, fax, and scanner and of course, it can also be used as a copier.
When you want to use this system as a copier, press the [Mode switch] button the control panel and light up
[Copy].
When you want to use the copier, if it is receiving a fax or functioning as a printer, pressing the [Mode switch]
button lets you make copies.
When a print job or fax is received during copying, the data is stored in the copierís E-RDH memory. When
the copying ends, the output resumes automatically.
MEMO
z
Whether the output is immediate or is scheduled as the next job depends on the copier status.
Flow for printing
Print commands sent from the application are received by the printer driver.
When this printing system is used as a local printer, data is sent to the print controller through the parallel inter-
face (IEEE1284) and when it is used as a network printer, the data is sent through the ethernet (TCP/IP, IPX/
SPX). Image rasterizing processing is executed (the characters and images to the output are developed into
bitmap data). This data is printed from the copier.
Computer
Using as network printer
Using as local printer
Application
Print command
Printer driver
Spooler
Parallel interface
(IEEE1284)
Application
Printer driver
Ethernet
(TCP/IP, IPX/SPX)
Print Controller
Printing with the Copier
PDL processing (rasterizing)
1-2. Flow of processing
9
I Set up Chapter 1 Summary
PC-Fax transmission/reception flow
Fax transmission
The transmission command sent from the application is received by the printer driver.
When this printing system is used as a local printer, data is sent to the print controller through the paral-
lel interface (IEEE1284) and when it is used as a network printer, the data is sent through the ethernet
(TCP/IP, IPX/SPX). Image rasterizing processing is executed (the characters and images to the output
are developed into bitmap data). This data is stored in the copier’s E-RDH memory is transmitted by fax
as a normal fax job.
PDL processing (rasterizing)
Computer
Application
Transmission
command
Printer driver
Parallel interface
(IEEE1284)
Application
Transmission
command
Printer driver
Ethernet
(TCP/IP, IPX/SPX)
Print Controller
Fax transmission
Using as network printer
Using as local printer
E-RDH memory
copier
Printing with the
Copier
1-2. Flow of processing
10
I Set up Chapter 1 Summary
Fax reception
The received fax data is stored in the copier’s E-RDH memory and output.
When receiving with the computer, the data can be stored from the E-RDH memory to the print control-
ler’s hard disk and imported into the computer via the Ethernet in the same manner as for scan data.
Fax reception
copier
Computer
Print Controller
E-RDH memory
Printing with the
Copier
Hard disk
Hard disk
Ethernet
(TCP/IP, IPX/SPX)
1-2. Flow of processing
11
I Set up Chapter 1 Summary
Flow for network scanner
Scanned data is stored into the print controller hard disk via the copier’s E-RDH memory.
It is possible to take hard disk data into the PC via the Ethernet. Hard disk data can be deleted with PC operations.
This data can also be sent as an email attachment via the Internet and uploaded to a file server.
Copier
Computer
Print Controller
Sending to
file server
Scanning documents
E-RDH memory
Hard disk
Ethernet (TCP/IP)
Importing data
SMTP server
FTP server
Internet
Sending
with e-mail

12
I Set up Chapter 1 Summary
1-3. Operation environment
This section explains the system requirements to use this printing system and the interfaces that can be used
for connection.
PCs and OSs that can be connected
Windows
Operating system: Windows 95/98/Me/NT 4.0/2000/XP
Memory: 32 MB min.
CD-ROM drive
Macintosh
Can only be used if the PostScript option is installed.
Operating system: Mac OS 8.x or higher (Mac OS X is not supported.)
CD-ROM drive
Network controller
Interfaces used for connection
The following two types of interfaces can be used to connect the print controller and the PC.
Parallel interface (IEEE1284)
This interface is used when using this printing system as a local printer.
Only Windows PCs can be connected through this interface and an IEEE1284 parallel cable is
required. Use a parallel cable that has an Amphenol 36-pin male connector at one end.
Ethernet
This interface is used when using this printing system as a network printer.
This interface supports the 100Base-TX and 10Base-T standards. The protocols supported are TCP/IP
(LPD/LPR, Peer-to-Peer), IPX/SPX (NetWare), and AppleTalk (EtherTalk), etc..
Important
● Do not connect both the parallel interface and the Ethernet interface to the PC at the same time. This
causes a system error.
1-3. Operation environment
13
I Set up Chapter 1 Summary
Connection diagram
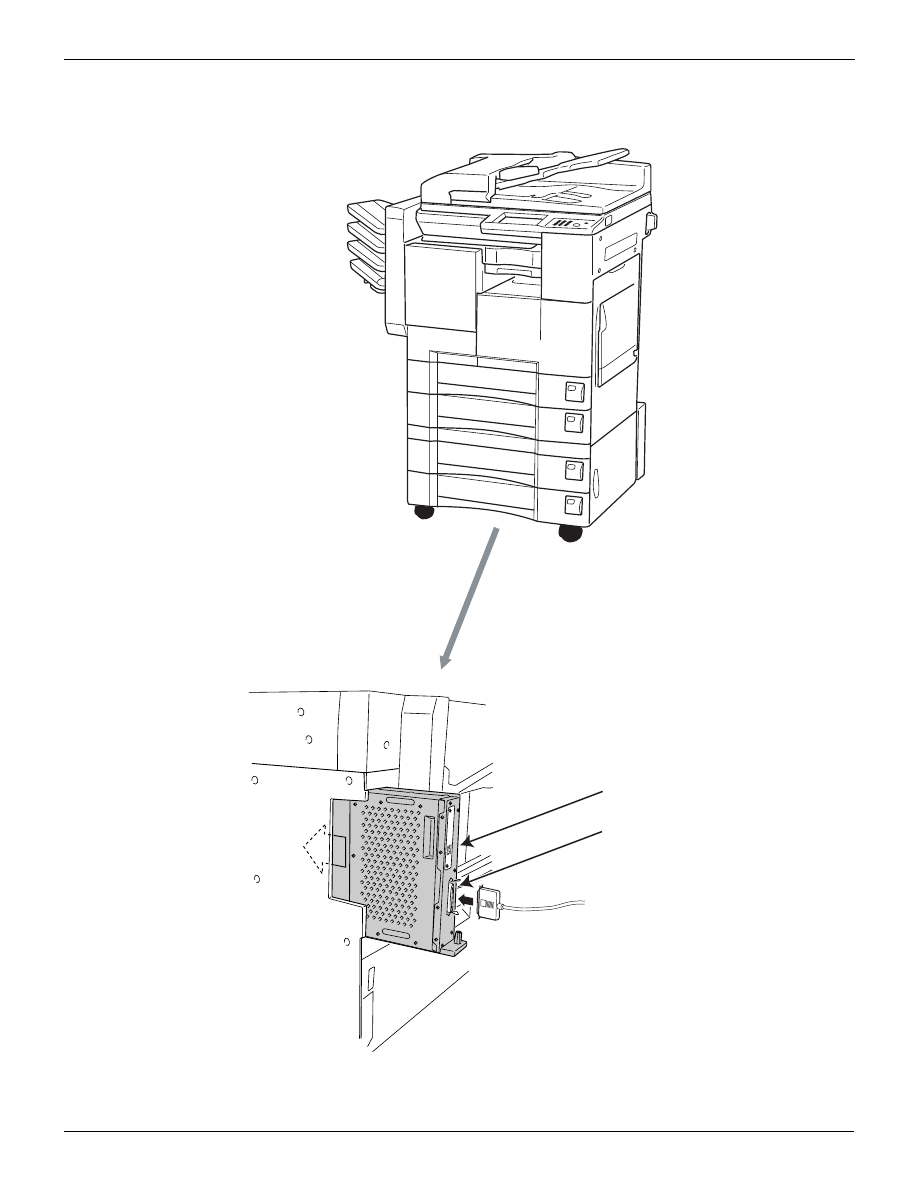
The print controller is installed on the rear of the copier. The general appearance is as shown below.
Print Controller
Ethernet (100Base-TX/10Base-T)
Parallel port
Parallel printer cable
Copier main unit

14
This volume explains printer usage.
The flow for setup..........................................15
Chapter 2 Preparing the Printer for Use......16
Chapter 3 Printing with Windows ................29
Chapter 4 Printing with Macintosh ..............68
Chapter 5 Printing Problems........................89
II Printer

15
II Printer
The flow for setup
This printing system must be set up before it is used.
The setup procedures connect the copier to the computer and install the printer driver in the computer.
When using this printing system with your computer for the first time, set up as shown in [New Setup].
To install a new printer driver in a printing system already in use, set up as shown in [Updating a Printer
Driver].
New Setup
To set up the first time:
1
Connect the copier to the computer.
MEMO
z
When connecting the copier to the computer, refer to [1-3. Operation environment] (
2
Install the printer driver.
MEMO
z
When installing the print driver, refer to [2-2. Using the print controller] (
3
Execute a test print.
Updating a Printer Driver
To update the current printer driver:
1
Delete the current printer driver.
MEMO
z
When deleting the current printer driver, refer to [2-4. Updating the printer driver] (
2
Restart the computer.
3
Install the new printer driver.
4
Execute test print.
For some printer drivers and OSs, the installation procedure for the printer driver may be different.
The procedure for deleting the old printer driver may be different on some OSs.

II Printer
16
Chapter 2 Preparing the Printer for Use
To use the print controller, first it is necessary to install the printer driver on the PC.
This chapter explains the printer driver installation method for each operating system sup-
ported.
It also explains how to update printer drivers and how to handle problems that might arise dur-
ing installation.
2-1. Checking the PC to be used...............................................................17
2-3. Using this printing system with Windows 2000 ...............................18
2-4. Updating the printer driver.................................................................26

17
II Printer Chapter 2 Preparing the Printer for Use
2-1. Checking the PC to be used
To use this printing system, it is necessary to install the printer driver. A printer driver is a program that controls
processing at data output and is installed on the PC from the [User software CD] before use.
The OSs on which this printer driver can be installed are as follows.
Windows 95
Windows 98
Windows Me
Windows NT 4.0 (Service Pack 3 or later)
Windows 2000
Windows XP
Mac OS 8.x or higher (When PostScript Option installed. Mac OS X not supported)
2-2. Using the print controller
This section explains the printer driver installed to use the print controller and the page notation language
types.
Printer driver types and supported OSs
The [User software CD] that comes with this printing system contains printer drivers. Install the required
printer driver.
Konica driver (PCL)
This driver is installed on PCs running Microsoft Windows. The OSs on which this printer driver can be
installed are as follows.
Windows 95
Windows 98
Windows Me
Windows NT 4.0 (Service Pack 3 or later)
Windows 2000
Windows XP

2-3. Using this printing system with Windows 2000
18
II Printer Chapter 2 Preparing the Printer for Use
Adobe driver (Adobe PS)
This driver is installed when the PostScript option is installed. The OSs on which this printer driver can
be installed are as follows.
Windows 95
Windows 98
Windows Me
Windows NT 4.0 (Service Pack 3 or later)
Windows 2000
Windows XP
Mac OS 8.x or higher (Mac OS X is not supported.)
MEMO
● The Adobe driver is on the [User software CD] that comes with the PostScript option.
Page notation language
Page notation language is a language that describes the characters, pictures, and other print images to the
printer when printing data is prepared on a PC. The page notation language used in this printing system are
as follows.
When used only with the print controller
PCL is used.
When the PostScript option installed
When the PostScript option is installed, either PCL or AdobePS is used.
The printer driver installation methods are explained on the following pages.
Using this printing system with Windows 2000
2-3. Using this printing system with Windows 2000
Install the printer driver on the PC running Windows 2000. Have the [User software CD] CD-ROM on hand.
Access rights and range of operation
Since Windows 2000 is an operating system designed for network management, security functions are stron-
ger than for Windows 95/98/Me.
When a new printer is added, the range of allowable operations can be specified according to the security
level (access rights) of the user.

2-3. Using this printing system with Windows 2000
19
II Printer Chapter 2 Preparing the Printer for Use
The Windows 2000 printer access rights and range global operations are as follows. After installing the
printer driver, set the access rights for users.
MEMO
● For details on setting printer access rights, refer to the Windows 2000 System Guide.
Refer to the page below for the driver installed.
Konica driver installation
Adobe driver installation
Konica driver installation
1
Switch on the power for the computer and start Windows.
MEMO
z
Close down any applications that are running.
2
Log on with a user name that has administrator rights.
MEMO
z
If you cannot log on with a user name that has administrator rights, log on with a user name that has rights
incorporating those of a Power User.
3
Put the [User software CD] in the computer's CD-ROM drive.
4
From the taskbar, select [Start] - [Settings] - [Printers].
→ The [Printers] screen is displayed.
5
Double click the [Add Printer] icon.
→ The [Add Printer Wizard] screen is displayed.
Access rights
Range of allowable operations
Off
Printer operations disabled
Printing
Document printing
Print parameter setting
Print related (paper size, input tray, and other selections)
Graphic related (resolution, half tone, and other settings)
Printer functions (selection of functions unique to a copier)
Printer management
All [Print] items
Print pause, restart, and spooler settings
Printer property change
Printer access rights setting and change
Document
management
Document setting control
Print pause, restart, reprint, cancel

2-3. Using this printing system with Windows 2000
20
II Printer Chapter 2 Preparing the Printer for Use
6
Click the [Next ›] button.
7
When connecting the printer directly to the PC, select [Local printer]. When printing via
the network with the printing system connected to another PC, select [Network
printer]. (
MEMO
z
Ensure that the [Automatically detect and install my Plug and Play printer] checkbox is not checked.
z
Before you can select [Network printer], the network controller and PC network settings must be complete. For
details, consult your network administrator.
When [Local printer] is selected
1
Click the [Next ›] button.
→ The printer port select screen is displayed.
2
Select the port to which the printer is connected.
MEMO
z
When the printer and the PC are directly connected, select the [LPT port].
z
When printing directly with the printing system via the network, select the [LPR port].
(
3
Click the [Next ›] button.
→ A screen for checking the printer manufacturer and name is displayed.
Proceed to Step 8.
When [Network printer] is selected
1
Click the [Next ›] button.
→ The [Locate Your Printer] screen is displayed.
2
Input the printer name in [Name:], then click the [Next ›] button.
→ A screen for checking the printer manufacturer and name is displayed.
Proceed to Step 8.
8
Click the [Have Disk…] button.
→ The [Install From Disk] screen is displayed.
9
Click the [Browse…] button.
→ The [Locate file] screen is displayed.
10
From [Look in], select the CD-ROM drive, then double-click the [\English\Printer\
WinNT_2000_Xp] folder.
→ [Printer.inf] is displayed as the [File name:].

2-3. Using this printing system with Windows 2000
21
II Printer Chapter 2 Preparing the Printer for Use
11
Click the [Open] button.
→ The display returns to the [Install From Disk] screen.
12
Click the [OK] button.
→ The display returns to the [Add Printer Wizard] screen.
13
Ensure that [Konica IP-xxx PCL] is selected in [Printers], then click the [Next ›] button.
→ A screen for checking the printer name is displayed.
MEMO
z
The model name of print controller is displayed in [xxx].
14
Check the printer name.
To change it, input a new printer name.
15
If you want to use this printing system as your default printer, select [Yes]; if you do
not want to use this printing system as your default printer, select [No].
16
Click the [Next ›] button.
→ The screen for checking whether or not the printer is shared is displayed.
17
To share the printer, select [Share as:]; to not share it, select [Do not share this
printer].
MEMO
z
To assign a share name to the printer, input the share name.
18
Click the [Next ›] button.
→ A screen is displayed checking whether or not you want to print a test print.
19
To print a test print, select [Yes]; to not print a test print, select [No].
MEMO
z
A test print means printing a standard Windows test page. Test prints can also be executed in [Properties].
(
20
Click the [Next ›] button.
→ A screen is displayed announcing that the [Add Printer Wizard] is complete.
21
Click the [Finish] button.
→ Install the printer driver on the PC and printing of the test page starts.

2-3. Using this printing system with Windows 2000
22
II Printer Chapter 2 Preparing the Printer for Use
22
If the test page is printed correctly, click the [OK] button.
→ The icon for the installed printer driver is displayed in the [Printers] screen.
This completes printer driver installation.
Setting options
Options installed on the copier are set so that they can be used with the printer driver.
1
From the taskbar, select [Start] - [Settings] - [Printers].
→ The [Printers] screen is displayed.
2
Right click the [Konica IP-xxx PCL] icon, then select [Properties].
→ The [Konica IP-xxx PCL Properties] screen is displayed.
MEMO
z
The model name of print controller is displayed in [xxx].
3
Click the [Setup] tab.
4
In [Available options:], select the options that are installed on the copier.
MEMO
z
For details on options installed on the copier, consult the system administrator.
5
Click the [Add] button.
→ The selected options are included in [Installed options] and can be used with the printer driver.
Installing the Adobe driver
1
Switch on the power for the computer and start Windows.
MEMO
z
Close down any applications that are running.
2
Log on with a user name that has administrator rights.
MEMO
z
If you cannot log on with a user name that has administrator rights, log on with a user name that has rights
incorporating those of a Power User.
3
Put the Post Scripit option [User software CD] in the computer's CD-ROM drive.
4
From the taskbar, select [Start] - [Settings] - [Printers].
→ The [Printers] screen is displayed.
5
Double click the [Add Printer] icon.
→ The [Add Printer Wizard] screen is displayed.

2-3. Using this printing system with Windows 2000
23
II Printer Chapter 2 Preparing the Printer for Use
6
Click the [Next ›] button.
7
When connecting the printer directly to the PC, select [Local printer]. When printing via
the network with the printing system connected to another PC, select [Network
printer]. (
MEMO
z
Ensure that the [Automatically detect and install my Plug and Play Printer] checkbox is not checked.
z
Before you can select [Network printer server], the network controller and PC network settings must be complete. For
details, consult your network administrator.
When [Local printer] is selected
1
Click the [Next ›] button.
→ The printer port select screen is displayed.
2
Select the port to which the printer is connected.
MEMO
z
When the printer and the PC are directly connected, select the [LPT port].
z
When printing directly with the printing system via the network, select the [LPR port].
(
3
Click the [Next ›] button.
→ A screen for checking the printer manufacturer and name is displayed.
Proceed to Step 8.
When [Network printer] is selected
1
Click the [Next ›] button.
→ The [Locate Your Printer] screen is displayed.
2
Input the printer name in [Name:], then click the [Next ›] button.
→ A screen for checking the printer manufacturer and name is displayed.
Proceed to Step 8.
8
Click the [Have Disk…] button.
→ The [Install From Disk] screen is displayed.
9
Click the [Browse…] button.
→ The [Locate file] screen is displayed.
10
From [Look in], select the CD-ROM drive, then double-click the [\English\Driver
\AdobePS\Win2000XP] folder.
→ [OEMSETUP.INF] is displayed as the [File name:].

2-3. Using this printing system with Windows 2000
24
II Printer Chapter 2 Preparing the Printer for Use
11
Click the [Open] button.
→ The display returns to the [Install From Disk] screen.
12
Click the [OK] button.
→ The display returns to the [Add Printer Wizard] screen.
13
Ensure that [Konica IP-xxx PostScript] is selected in [Printers], then click the [Next ›]
button.
→ A screen for checking the printer name is displayed.
MEMO
z
The model name of print controller is displayed in [xxx].
14
Check the printer name.
To change it, input a new printer name.
15
If you want to use this printing system as your default printer, select [Yes]; if you do
not want to use this printing system as your default printer, select [No].
16
Click the [Next ›] button.
→ The screen for checking whether or not the printer is shared is displayed.
17
To share the printer, select [Share as:]; to not share it, select [Do not share this
printer].
MEMO
z
To assign a share name to the printer, input the share name.
18
Click the [Next ›] button.
→ A screen is displayed checking whether or not you want to print a test print.
19
To print a test print, select [Yes]; to not print a test print, select [No].
MEMO
z
A test print means printing a standard Windows test page. Test prints can also be executed in [Properties].
(
20
Click the [Next ›] button.
→ A screen is displayed announcing that the [Add Printer Wizard] is complete.

2-3. Using this printing system with Windows 2000
25
II Printer Chapter 2 Preparing the Printer for Use
21
Click the [Finish] button.
→ Install the printer driver on the PC and printing of the test page starts.
22
If the test page is printed correctly, click the [OK] button.
→ The icon for the installed printer driver is displayed in the [Printers] screen.
This completes printer driver installation.
Setting options
Options installed on the copier are set so that they can be used with the printer driver.
1
From the taskbar, select [Start] - [Settings] - [Printers].
→ The [Printers] screen is displayed.
2
Right click the [Konica IP-xxx Postscript] icon, then select [Properties].
→ The [Konica IP-xxx PostScript Properties] screen is displayed.
MEMO
z
The model name of print controller is displayed in [xxx].
3
Click the [Device Settings] tab.
4
In [Installable Options], select the options installed on the copier, then change the contents.
MEMO
z
For details on options installed on the copier, consult the system administrator.
5
Click the [OK] button.
→ When the option settings are complete, the options can be used with the printer driver.
Checking printing
Once the printing system and the computer have been connected and the printer driver installed, printing is
possible. Try printing an actual document.
You can check printing by executing the test print from the printer driver properties or by printing from an
application.
Print settings
The basic print settings are made from the printer driver [Properties] or the application’s [Print] screen.
When making the print settings from the application’s [Print] screen, the settings you make are not
saved after that application ends. For details on making the print settings from the printer driver [Prop-
erties] screen, refer to [3-1. Setting printer functions] (
Executing a test print
The test print prints the standard Windows test page.

2-4. Updating the printer driver
26
II Printer Chapter 2 Preparing the Printer for Use
1
From the taskbar, select [Start] - [Settings] - [Printers].
→ The [Printers] screen is displayed.
2
Right click the printer icon, then select [Properties].
→ The printer driver [Properties] screen is displayed.
3
Select the [General] tab, then click the [Print Test Page] button.
→ The test page is printed and the check screen is displayed.
4
After checking the printing, click the [OK] button.
Printing from an application
This method prints data with a [Print] command from an application in use.
1
Open data with the application, then execute [Print].
→ The [Print] screen is displayed.
2
Ensure that the name of the printer you want to print on is selected in [Select Printer].
If this printer is not selected, click its icon to select it.
MEMO
z
The [Print] screen varies according to the application.
3
Set the print range and the number of copies, then click the [Print] button.
→ Check that the specified pages are printed.
2-4. Updating the printer driver
Updating with Windows 2000
1
Switch on the power for the computer and start Windows.
MEMO
z
Close down any applications that are running.
2
From the taskbar, select [Start] - [Settings] - [Printers].
→ The [Printers] screen is displayed.
3
Right click the [Konica IP-xxx PCL] icon or the [Konica IP-xxx PostScript] icon, then
select [Delete].
→ The [Printers] screen is displayed.
MEMO
z
The model name of print controller is displayed in [xxx].

2-5. Installation problems
27
II Printer Chapter 2 Preparing the Printer for Use
4
Click the [Yes] button.
5
Select [Server Properties] from the [File] menu of the [Printers] window.
→ The [Print Server Properties] window appears.
6
Open the [Drivers] tab of the [Print Server Properties] window.
7
Select the printer driver you want to delete from [Installed printer drivers:], then click
[Remove].
→ The confirmation message appears.
8
Click the [Yes] button.
→ The printer driver is deleted (uninstalled).
9
Restart the computer.
→ This completes the deletion of the printer driver.
10
Go to [Installing a Printer Driver].
MEMO
z
When installing the print driver, refer to [2-3. Using this printing system with Windows 2000] (
2-5. Installation problems
If you run into any problems during installation, check the following information.
An old version of the driver is already installed.
If an old version of the [PCL] driver is already installed, delete it, then install the newer driver.
For details on how to update the driver, refer to [2-4. Updating the printer driver] (
You are asked which file to use, the one you are installing or a
new file already on the computer.
When you install a printer driver, the computer may already have a more recent file with the same name as
the one on the [User software CD].
In this case, select the file with the more recent date. If you use the file with the older date, the operating sys-
tem may not operate normally.

2-5. Installation problems
28
II Printer Chapter 2 Preparing the Printer for Use
Test page cannot be printed.
1
Check the copier control panel LCD screen.
If nothing at all is displayed on the LCD screen, proceed to next.
If [Ready to Copy] is displayed on the LCD screen, proceed to Step 3.
If a diagnostics message or error message is displayed, refer to the copier user’s manual.
2
Press the sub power switch on the control panel.
If the copier is in auto shut-off mode, pressing this button puts the LCD screen into display mode.
3
Check that copying is possible.
If copying is possible, proceed to next.
4
Switch off the power for the copier, wait about 10 seconds, then switch the power back
on again.
5
Once the print controller can be used, print a test page again.
If the test page cannot be printed, contact your authorized service representative.

II Printer
29
Chapter 3 Printing with Windows
When the printer has been made ready for use, various printing methods and function settings
can be made from the [Properties] screen. This chapter explains the printer functions and set-
ting methods for printing with Windows.
3-5. Making image settings........................................................................49
3-8. Setting the connection between the computer and printer.............62
30
II Printer Chapter 3 Printing with Windows
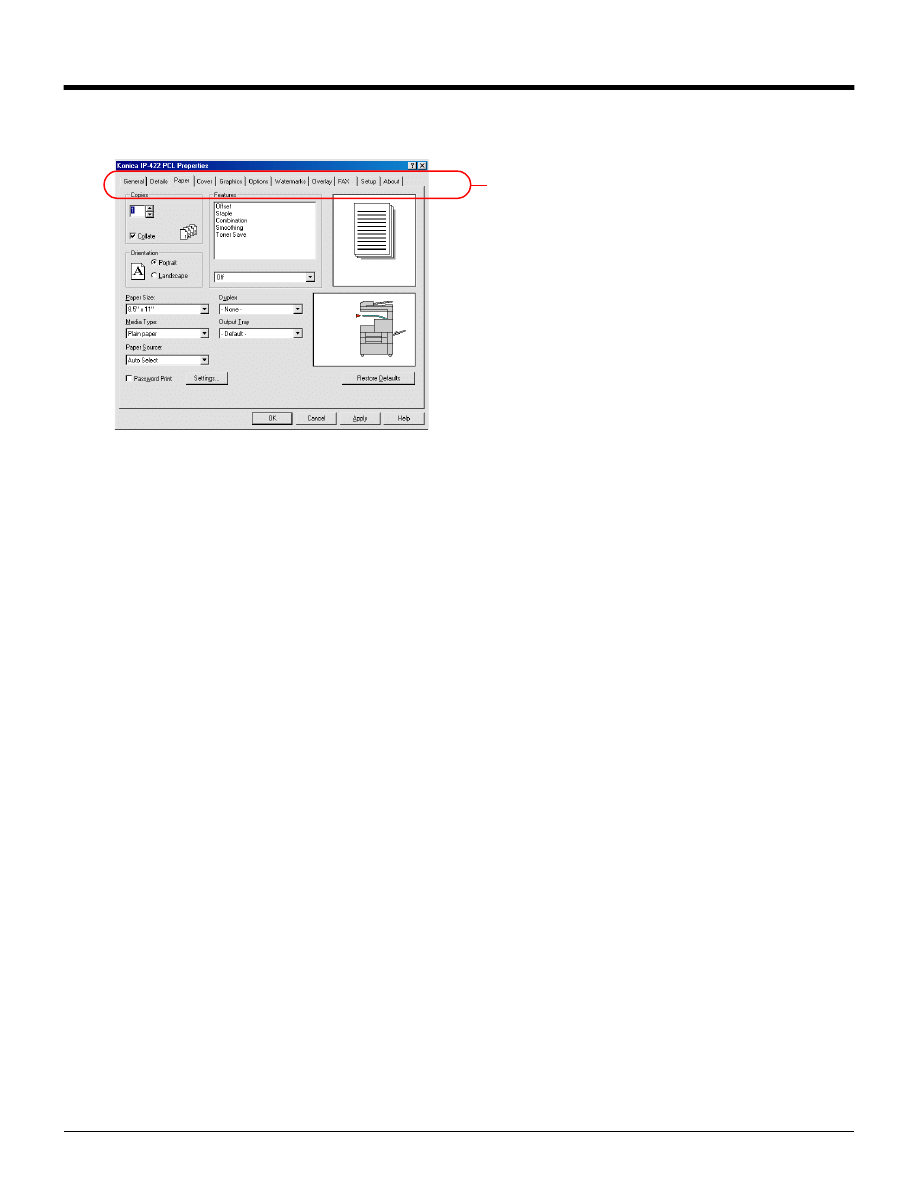
3-1. Setting printer functions
The printer functions are set by displaying the printer settings screen. The settings screen comprises multiple
screens called [tabs] for different choices. Click the tab for the function to set the choices.
There are two methods for displaying the settings screen.:
This section explains the method for displaying the screen for setting the printer functions.
Setting from the [Properties] screen
Right click the printer icon, then set from the [Properties] screen.
The choices of these settings apply to all applications used on this computer.
Setting on an application
Settings are made from the screen displayed when the [Print] command is executed from an application.
These settings only remain in effect while the application is being used. When the application ends, the
settings are deleted.
Windows 2000
Setting from the [Properties] screen
This sets the printer port and options.
1
From the taskbar, select [Start] - [Settings] - [Printers].
→ The [Printers] screen is displayed.
2
Right click the [Konica IP-xxx PCL] icon or the [Konica IP-xxx PostScript] icon, then select
[Properties].
→ The [Properties] screen is displayed.
MEMO
z
The model name of print controller is displayed in [xxx].
PCL driver
PostScript driver
Tab
3-1. Setting printer functions
31
II Printer Chapter 3 Printing with Windows
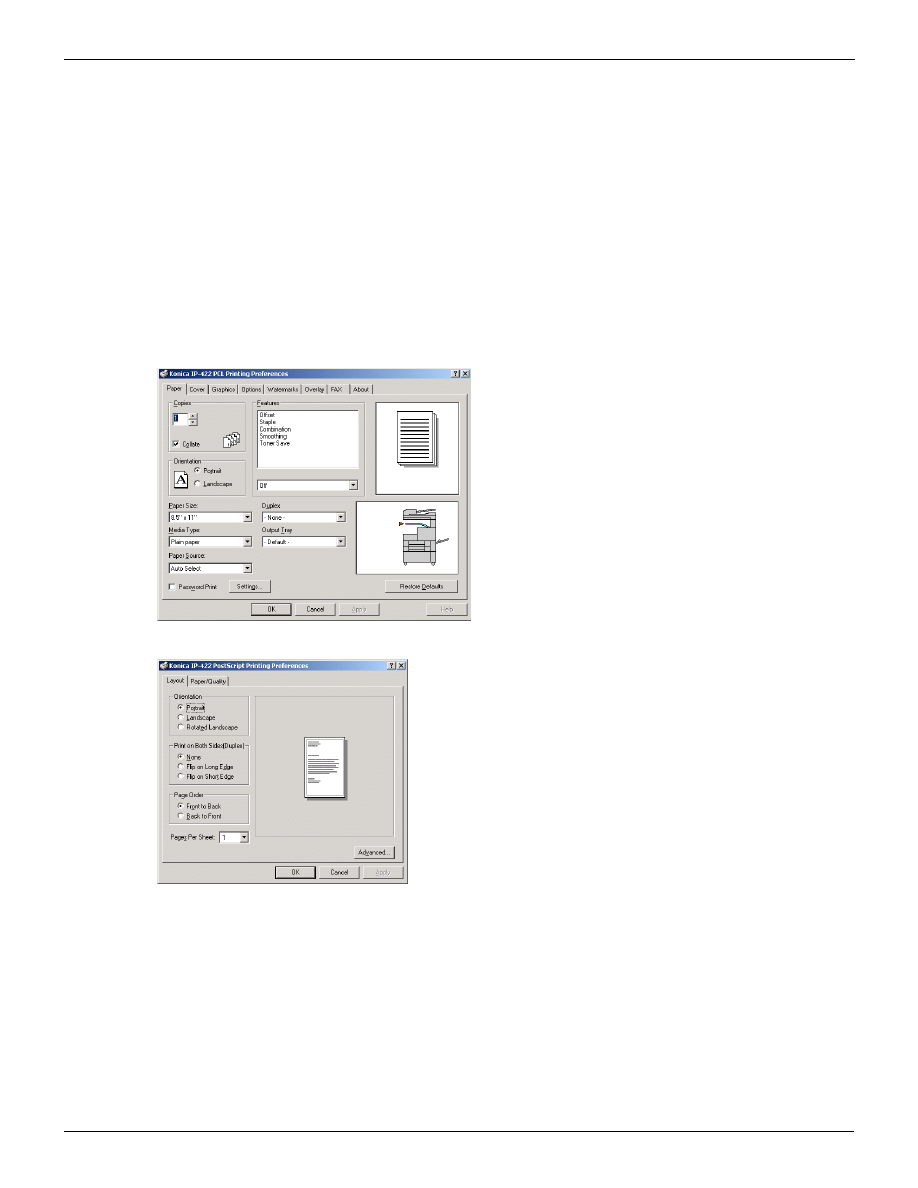
Setting from the [Printing Preferences…] screen
This makes the basic print settings
1
From the taskbar, select [Start] - [Settings] - [Printers].
→ The [Printers] screen is displayed.
2
Right click the [Konica IP-xxx PCL] icon or the [Konica IP-xxx PostScript] icon, then select
[Printing Preferences…].
→ The settings screen is displayed.
MEMO
z
The model name of print controller is displayed in [xxx].
PCL driver
PostScript driver
Setting on the application
1
Open a file with an application, then execute [Print].
→ The [Print] screen is displayed.
MEMO
z
The [Print] screen varies according to the application.
2
Right click the printer icon, then select [Properties].
→ The [Properties] screen is displayed.
PCL driver
PostScript driver
32
II Printer Chapter 3 Printing with Windows
3-2. Function list
This list contains a summary of the main settings related to printing.
MEMO
● The names of the functions are basically those displayed in Windows95/98/Me. The display of listed
items and setting values may vary according to whether options are present (and their settings).
● For details on functions not covered here, refer to your Windows guide.
Function
Summary
OSs supported
Reference
95/98/Me NT 4.0 2000/XP
Basic print settings
Setting the printer
languages
Sets the printer language for printing.
❍
❍
❍
Copies
Specifies the number of copies to print.
❍
❍
❍
Orientation
Selects landscape or portrait direction to
print on the paper.
❍
❍
❍
Paper size
Sets the size of the paper to print on.
❍
❍
❍
Media Type/Paper Type
Sets the type of the media for printing.
❍
❍
❍
Scaling
Prints enlarged/reduced.
❍
❍
❍
Paper Source
Selects the input tray containing the paper to
print on.
❍
❍
❍
Output Tray
Selects the tray which to output printed material.
❍
❍
❍
Margins
Sets the width for the margin (the section not
printed at all) for printing
❍
Printing multiple pages
Duplex
Prints consecutive pages on the front and
rear.
❍
❍
❍
Pages per sheet/Layout
Combines multiple pages of consecutive
data on one side of one sheet of paper and
automatically reduces the multiple pages to
match the paper size.
❍
❍
❍
Combination
Prints swapping the order of the pages so
that the output paper can be piled up and
folded in two to make a booklet.
❍
❍
❍
Collate/Sort
Prints one copy at a time of all the pages.
❍
❍
❍
Collate/Offset
Printing multiple copies, this shifts the output
position for each set.
❍
❍
❍
Staple
Staples.
❍
❍
❍
Front Cover/Back Cover
Prints attaching a front or back cover.
❍
❍
❍
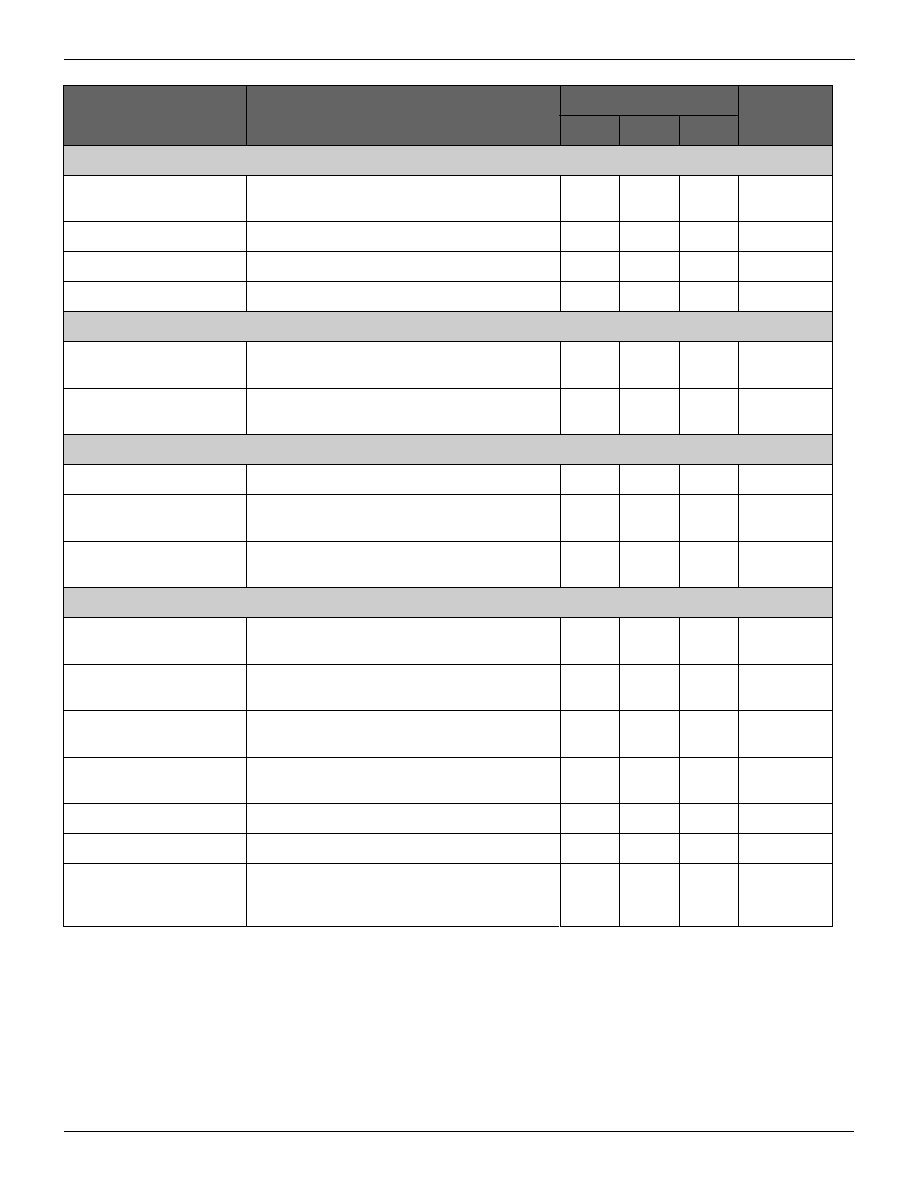
3-2. Function list
33
II Printer Chapter 3 Printing with Windows
Making image settings
Graphics
Makes settings concerning the print quality
for photographs and other images.
❍
❍
❍
Resolution
Sets the resolution for printing.
❍
❍
❍
Print as a negative image
Prints with black and white reversed.
❍
❍
❍
Print as a mirror image
Prints with left and right reversed.
❍
❍
❍
Setting the font
TrueType font settings
Sets the replacement of TrueType fonts
used in the data with the printer’s fonts.
❍
❍
❍
PostScript font settings
Makes settings concerning PostScript fonts
and output.
❍
❍
❍
Special printing
Overlay
Prints overlaying separate from data.
❍
❍
❍
Watermark
Prints [CONFIDENTIAL] or another preset
text as a watermark.
❍
❍
❍
Password Print
Prints after a registered User ID and pass-
word are input.
❍
❍
❍
Seting the connection between the computer and printer
Printer driver selection
Checks the printer driver version and adds
new printer drivers.
❍
❍
❍
Time out time
Sets the wait time until the printer is in a
usable state.
❍
❍
❍
Port settings
Makes settings for the LPT port to which the
printer is connected.
❍
Printer port assignment
Assigns a network printer to a virtual printer
port.
❍
❍
❍
Deleting the printer port
Ends the setting for the set port.
❍
❍
❍
Port addition/deletion
Adds or deletes a network or local printer.
❍
❍
❍
Spool settings
Sets the method for temporarily accumulat-
ing the print data when it is sent to the
printer.
❍
❍
❍
Function
Summary
OSs supported
Reference
95/98/Me NT 4.0 2000/XP

34
II Printer Chapter 3 Printing with Windows
3-3. Basic print settings
This makes the basic print settings.
Setting the printer languages
This sets the printer language for printing.
PCL-5E (Monochrome)
PCL-6 (Monochrome)
1
With the PCL driver [Properties], select the [Options] tab.
MEMO
z
For Windows NT 4.0, set with the [Document Defaults…] screen.
z
For Windows 2000/XP, set with the [Printing Preferences] screen.
2
In [Printer language], select printer language.
Setting the number of copies to print (Copies).
This specifies the number of copies to print.
Setting with the PCL driver
1
From the PCL [Properties], select the [Paper] tab.
MEMO
z
For Windows NT 4.0, set with the [Document Defaults…] screen.
z
For Windows 2000/XP, set with the [Printing Preferences] screen.
2
For the [Copies], click the [
▲] or [▼] button or input the number.
MEMO
z
The number of copies can be from 1 to 999.
Setting with the Adobe PS driver
1
In [Copies] on the application's [Print] screen, click the [
▲] or [▼] button or input the number.
Setting the print direction (Orientation)
This selects Iandscape or portrait direction to print on the paper.
Setting with the PCL driver
1
From the PCL [Properties], select the [Paper] tab.
MEMO
z
For Windows NT 4.0, set with the [Document Defaults…] screen.
z
For Windows 2000/XP, set with the [Printing Preferences] screen.
PCL
PCL
Adobe PS
PCL
Adobe PS

3-3. Basic print settings
35
II Printer Chapter 3 Printing with Windows
2
For the [Orientation], select [Portrait] or [Landscape].
Setting with the Adobe PS driver
1
From the Adobe PS Properties, select the [Paper] tab.
2
For the [Orientation], select [Portrait] or [Landscape].
MEMO
● When the Adobe PS driver is selected, if [Landscape] is selected, you can select [Rotated]. To reverse
printing from top/bottom, check the [Rotated] checkbox.
Setting the print paper size (Paper size)
This sets the size of the paper to print on.
MEMO
z
For details on the sizes of paper that can be set in the printer's input trays, refer to the copier's operations manual.
The paper sizes that can be selected are as follows.
Statement (5.5 x 8.5 inch)
Letter (8.5x11inch)
Legal (8.5 x 14 inch)
Tabloid (11 x 17 inch)
A3 (297 x 420 mm)
A4 (210 x 297 mm)
A5 (148 x 210 mm)
B4 (250 x 354mm)
B5 (182 x 257 mm)
B6 (128 x 182mm)
F4 (8 x 1.3 inch)
8K (267 x 390 mm)
16K (195 x 267 mm)
Setting with the PCL driver
1
From the PCL [Properties], select the [Paper] tab.
MEMO
z
For Windows NT 4.0, set with the [Document Defaults…] screen.
z
For Windows 2000/XP, set with the [Printing Preferences…] screen.
2
Select [Paper Size].
Setting with the Adobe PS driver
1
From the Adobe PS properties, select the [Paper] tab.
2
Select [Paper size].
PCL
Adobe PS

3-3. Basic print settings
36
II Printer Chapter 3 Printing with Windows
Selecting the type of paper (Media type/Paper type)
This selects the type of media to print.
The types of paper you can select are as follows.
Plain paper:
Regular copy paper
OHP (Transparency):
Overhead projector film
OHP Interleave (Blank): White paper inserted between overhead projector film
OHP Interleave (Print):
Prints the same choices on the OHP interleaf paper as on the film.
Setting with the PCL driver
1
From the PCL [Properties], select the [Paper] tab.
MEMO
z
For Windows NT 4.0, set with the [Document Defaults] screen.
z
For Windows 2000/XP, set with the [Printing Preferences] screen.
2
In [Media Type], select the media type.
Setting with the Adobe PS driver
1
From the Adobe PS properties, select the [Paper] tab.
2
In [Paper Type], select the paper size.
Limitation
● The collate function cannot be used at the same time as a [Paper Type] selection of [OHP (Transpar-
ency)], [OHP Interleave (Blank)], or [OHP Interleave (Printed)].
Printing enlarged/reduced (Scaling)
If the document size and the paper size are different, the enlargement/reduction ratio for automatically match-
ing the paper size is displayed and can be selected.
Setting with the PCL driver
1
From the PCL [Properties], select the [Option] tab.
MEMO
z
For Windows NT 4.0, set with the [Document Defaults…] screen.
z
For Windows 2000/XP, set with the [Printing Preferences…] screen.
2
In [Scaling], click the [
▲] or [▼] button or input the number.
MEMO
z
The magnification ratio can be set from 25 to 400 %.
PCL
Adobe PS
PCL
Adobe PS

3-3. Basic print settings
37
II Printer Chapter 3 Printing with Windows
Setting with the Adobe PS driver
1
From the Adobe PS properties, select the [Graphics] tab.
2
In [Scaling], click the [
▲] or [▼] button or input the number.
MEMO
z
The magnification ratio can be set from 25 to 400 %.
MEMO
● When the paper size is set to A3 in Windows 95/98, the magnification ratio can be set from 25 to 300 %.
Selecting the input tray (Paper source)
This selects the input tray containing the paper to print on.
The types of input trays that can be selected are as follows.
Auto Select:
The tray is selected automatically to match the paper size.
Tray 1-4:
Input trays (The number of trays depends on the options installed on the copier.)
Bypass Tray
Setting with the PCL driver
1
From the PCL [Properties], select the [Paper] tab.
MEMO
z
For Windows NT 4.0, set with the [Document Defaults…] screen.
z
For Windows 2000/XP, set with the [Printing Preferences] screen.
MEMO
z
When an input tray other than [Printing Preferences…] is selected, the selected tray is displayed blue on the copier
diagram.
2
The tray is selected in [Paper Source].
Setting with the Adobe PS driver
1
From the Adobe PS Properties, select the [Paper] tab.
2
The tray is selected in [Paper Source].
Selecting the output tray (Output tray)
This selects the tray which to output printed material. This can be selected when the optional output unit is
installed on the copier.
The types of output trays that can be selected are as follows.
Default:
The printer’s (copier’s) normal output tray.
Tray 1-4:
Trays on the optional output unit
PCL
Adobe PS
PCL
Adobe PS

3-3. Basic print settings
38
II Printer Chapter 3 Printing with Windows
Setting with the PCL driver
1
From the PCL [Properties], select the [Paper] tab.
MEMO
z
For Windows NT 4.0, set with the [Document Defaults…] screen.
z
For Windows 2000/XP, set with the [Printing Preferences] screen.
MEMO
z
When an output tray is selected, the selected tray is displayed blue on the copier diagram.
2
The tray is selected in [Output Tray].
Setting with the Adobe PS driver
1
From the Adobe PS properties, select the [Paper] tab.
2
The tray is selected in [Output bin].
Setting the margin (Margins)
This sets the width for the margin for printing.
When the PostScript option is installed, the settings can be made on Windows 95/98/Me.
1
Right click the Adobe PS driver on the [Printers] screen, then select [Properties].
→ The Adobe PS driver properties are displayed.
Limitation
z
The margins can be set from the application’s [Print] screen.
2
Select the [Paper] tab, then click the [Margin…] button.
→ The [Margins] screen is displayed.
3
Select the margins [Units].
4
The margin widths are set. Click the [
▲] or [▼] button or input the number.
MEMO
z
The minimum margin that can be set is (0.18 inch). The maximum margin that can be set depends on the size of the
paper.
5
Click the [OK] button.
Adobe PS
39
II Printer Chapter 3 Printing with Windows
3-4. Printing multiple pages
Duplex
(
This prints consecutive pages on the front and rear.
[Flip on long edge] or [Flip on short edge] can be selected.
Pages per sheet /Layout
(
This prints multiple pages of consecutive data combined on one side of one sheet of paper. The print
image is automatically reduced to match the selected paper size.
2-16 pages of data can be combined on one print page.
Combination
(
MEMO
z
For the PCL driver, if the [Orientation] is set to [Landscape], [Top binding] is set.
This prints swapping the order of the pages so that the output paper can be piled up and folded in two
to make a booklet.
Collate/Sort
(
This prints one entire set of multi-page data at one time.
Offset
(
When printing multiple copies, this shifts the position for each set.
Stapling
(
This staples.
Front Cover/Back Cover
(
This prints attaching a front cover or back cover.
PCL
Adobe PS
PCL
Adobe PS
PCL
Adobe PS
PCL
Adobe PS
PCL
Adobe PS
PCL
Adobe PS
PCL
Adobe PS
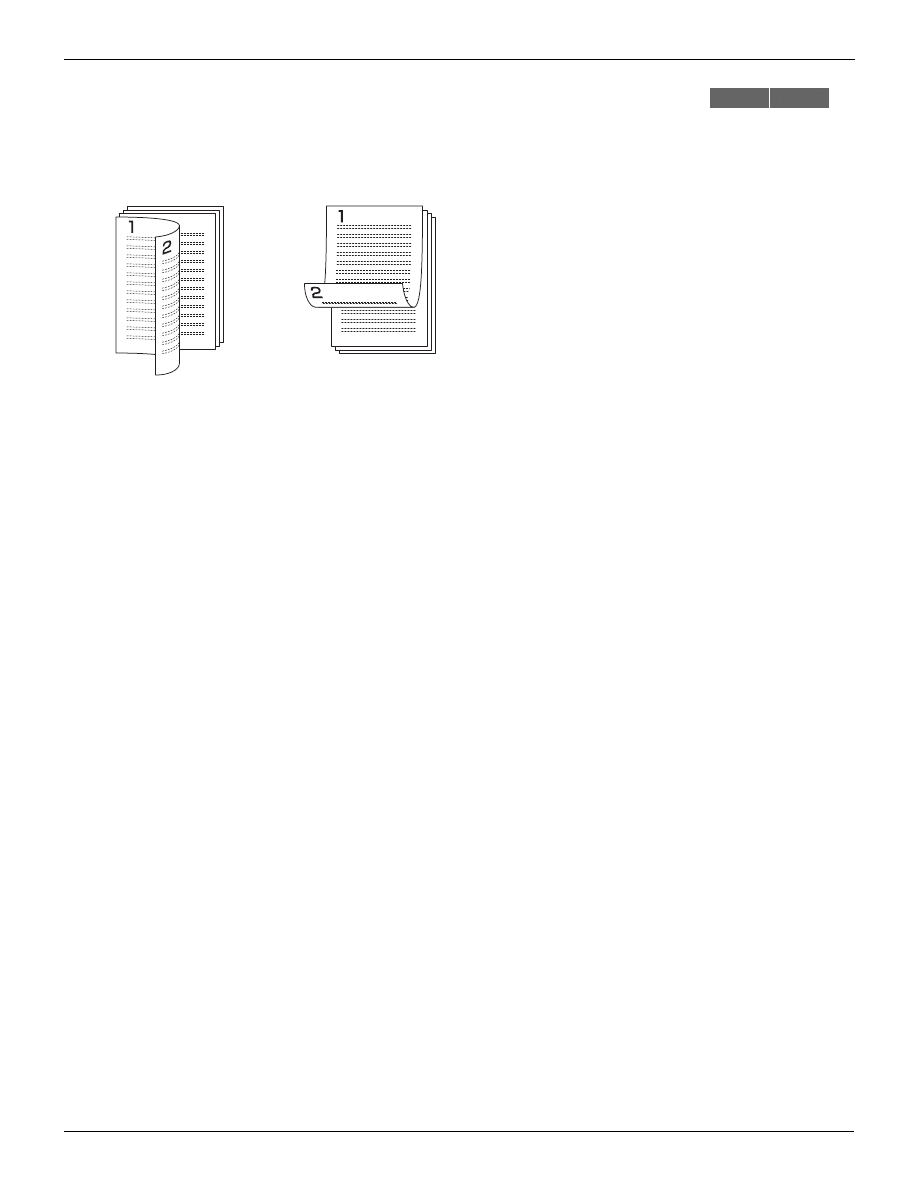
3-4. Printing multiple pages
40
II Printer Chapter 3 Printing with Windows
Printing on both the front and rear of the paper (Duplex)
This prints consecutive pages on the front and rear.
[Flip on long edge] or [Flip on short edge] can be selected.
Flip on long edge
The pages are flipped on their long edges. The front and rear have the same top.
Flip on short edge
The pages are flipped on their short edges. The front and rear have tops at opposite ends.
Setting with the PCL driver
1
From the PCL [Properties], select the [Paper] tab.
MEMO
z
For Windows NT 4.0, set with the [Document Defaults…] screen.
z
For Windows 2000/XP, set with the [Printing Preferences…] screen.
2
In [Duplex], select [Flip on long edge] or [Flip on short edge]
Setting with the Adobe PS driver
1
From the Adobe PS driver properties, select the [Paper] tab.
2
In [Duplex], select [Flip on long edge] or [Flip on short edge].
PCL
Adobe PS
Flip on long edge
Flip on short edge

3-4. Printing multiple pages
41
II Printer Chapter 3 Printing with Windows
Printing multiple pages on one sheet of paper (Pages per sheet/
Layout)
This prints multiple pages of consecutive data combined on one side of one sheet of paper. The print image
is automatically reduced to match the selected paper size.
Page combination
2-16 pages of data can be combined on one print page.
MEMO
● When printing, the print image is automatically reduced to match the selected paper size.
Setting with the PCL driver
1
From the PCL [Properties], select the [Options] tab.
MEMO
z
For Windows NT 4.0, set with the [Document Defaults…] screen.
z
For Windows 2000/XP, set with the [Printing Preferences…] screen.
2
In [Pages per sheet], select the combination type.
Setting with the Adobe PS driver
1
From the Adobe PS properties, select the [Graphics] tab.
PCL
Adobe PS
2 up
4 up
6 up
9 up
16 up
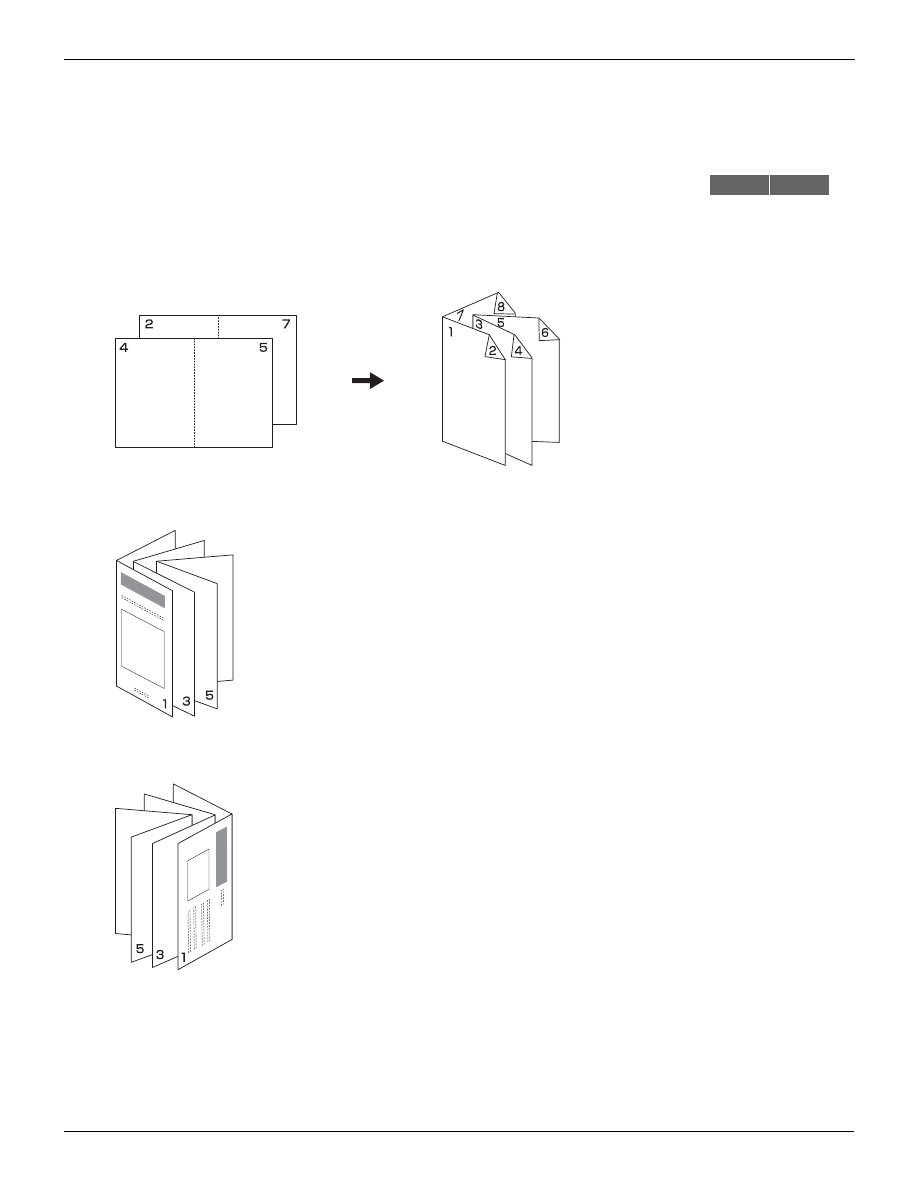
3-4. Printing multiple pages
42
II Printer Chapter 3 Printing with Windows
2
In [Layout], select the combination type.
3
When printing frames on combined pages, check the [Print page border] checkbox.
Folding paper in two to make booklets (Combination)
This prints swapping the order of the pages so that the output paper can be piled up and folded in two to
make a booklet.
Booklet
The paper is bound on the left side. This is selected when the pages proceed from left to right.
Booklet-Right (can be selected only when the Adobe PS driver is used.)
The paper is bound on the right side. This is selected when the pages proceed from right to left.
PCL
Adobe PS
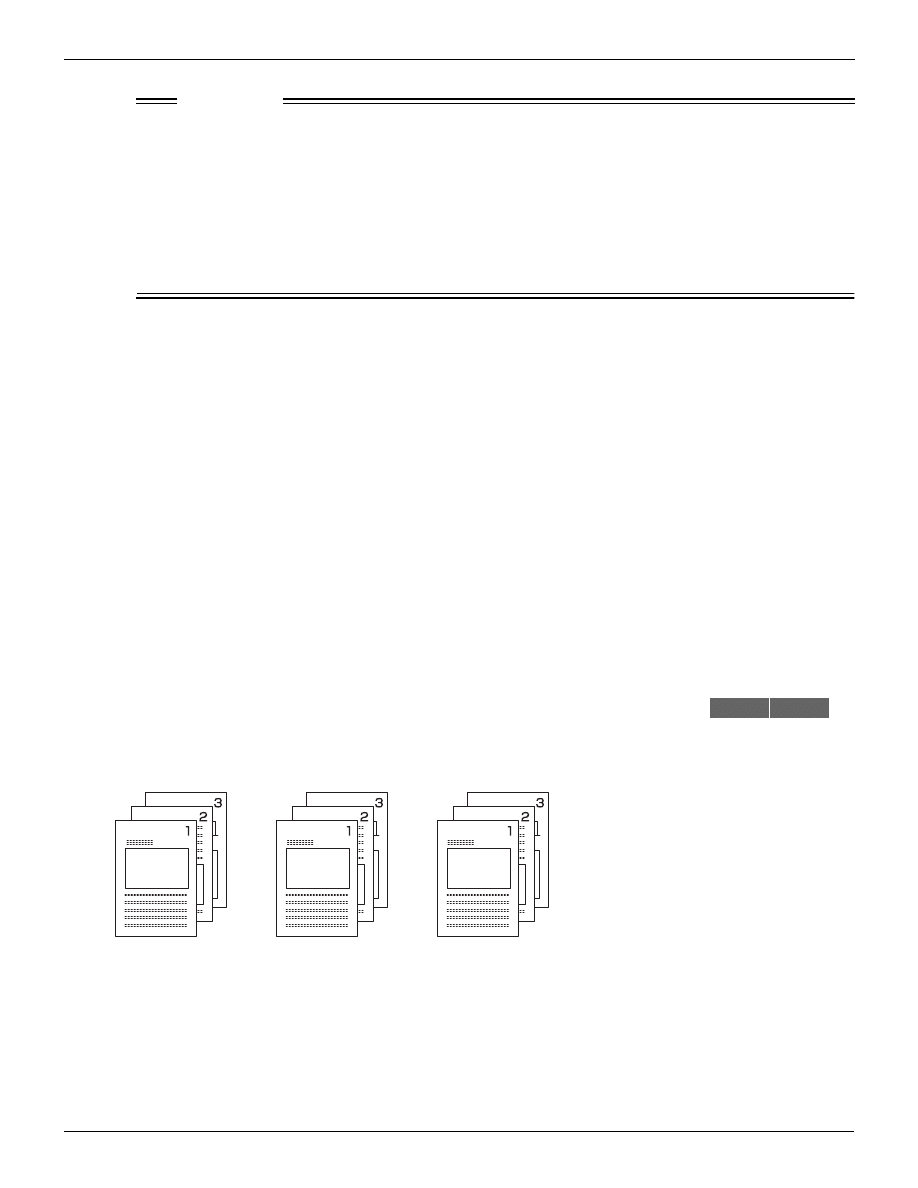
3-4. Printing multiple pages
43
II Printer Chapter 3 Printing with Windows
Limitation
● For the PCL driver, if the [Orientation] is set to [Landscape], [Top binding] is set.
● Booklet/special mode cannot be selected when any of the settings below are in effect.:
When the [Paper Size] is other than [Legal (8.5 x 14 inch)], [Tabloid (11 x 17 inch)], [A3], [B4], [B6],
[F4], [8K], and [16K].
When the [Media type] is [OHP (Transparency)], [OHP Interleave (Blank)], or [OHP Interleave (Print)]
When [Stapling], or [Duplex] is set
When [Front cover/Back cover] is set
When [Sort] is not set
Setting with the PCL driver
1
From the PCL [Properties], select the [Paper] tab.
MEMO
z
For Windows NT 4.0, set with the [Document Defaults…] screen.
z
For Windows 2000/XP, set with the [Printing Preferences…] screen.
2
In [Combination], select the [Booklet].
Setting with the Adobe PS driver
1
From the Adobe PS driver properties, select the [Device Options] tab.
2
In [Printer features], select [Combination]
3
In [Change setting for], select [Booklet] or [Booklet-Right].
Printing one copy at a time of all pages (Collate/Sort)
This prints one entire set of multi-page data at one time.
Setting with the PCL driver
1
From the PCL [Properties], select the [Paper] tab.
MEMO
z
For Windows NT 4.0, set with the [Document Defaults…] screen.
z
For Windows 2000/XP, set with the [Printing Preferences…] screen.
PCL
Adobe PS
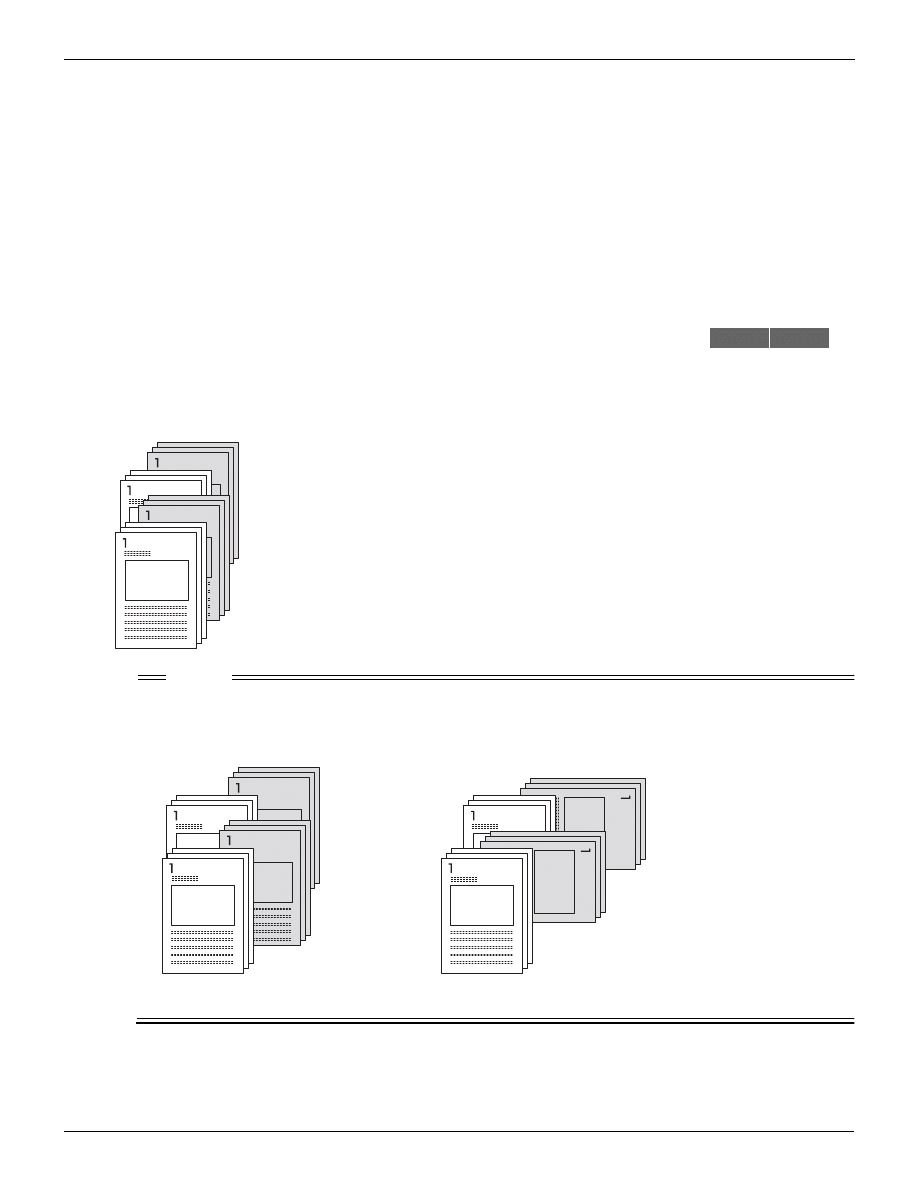
3-4. Printing multiple pages
44
II Printer Chapter 3 Printing with Windows
2
Check the [Sort] checkbox.
Setting with the Adobe PS driver
1
From the Adobe PS driver properties, select the [Device Options] tab.
2
In [Printer features], select [Sort]
3
In [Change setting for] select [Sort].
Outputting sorted into separate sets of copies (Offset)
When printing multiple copies, this shifts the output position for each set.
This is handy when outputting multiple copies to a single output tray.
MEMO
● When the copier optional paper output unit is installed, the paper is output with its position shifted for
each set.
When the paper output unit is not installed, the paper is output with the direction changed for each set.
PCL
Adobe PS
When there is a paper output unit
When there is no paper output unit

3-4. Printing multiple pages
45
II Printer Chapter 3 Printing with Windows
Setting with the PCL driver
1
From the PCL [Properties], select the [Paper] tab.
MEMO
z
For Windows NT 4.0, set with the [Document Defaults…] screen.
z
For Windows 2000/XP, set with the [Printing Preferences] screen.
2
In [Offset], select [On].
Setting with the Adobe PS driver
1
From the Adobe PS driver properties, select the [Device Options] tab.
2
In [Printer features], select [Job Offset]
3
In [Change setting for], select [On].
Stapling (Staple)
This staples.
Portrait and Landscape
Stapling with the papers joined lengthwise is called [Portrait] and stapling with the papers joined width-
wise is called [Landscape].
Number of staples and their locations
The pages are bound on either the left or right side of the paper. For stapling, you can select one- or
two-point stapling.
MEMO
z
For details on the stapling positions, refer to the copier's operations manual.
PCL
Adobe PS

3-4. Printing multiple pages
46
II Printer Chapter 3 Printing with Windows
The types of stapling that can be selected are as follows.:
Limitation
● Stapling cannot be selected when any of the following settings are in effect.
When the [Paper Size] is B6
When the [Media type] is [OHP (Transparency], [OHP Interleave (Blank)], or [OHP Interleave (print)]
When [Combination] is set
When [Sort] is not set
Single Left
Single Right
Double Left
Double Top
Double Right
Single Left
Single Right
Double Left
Double Top
Double Right
Portrait
Landscape
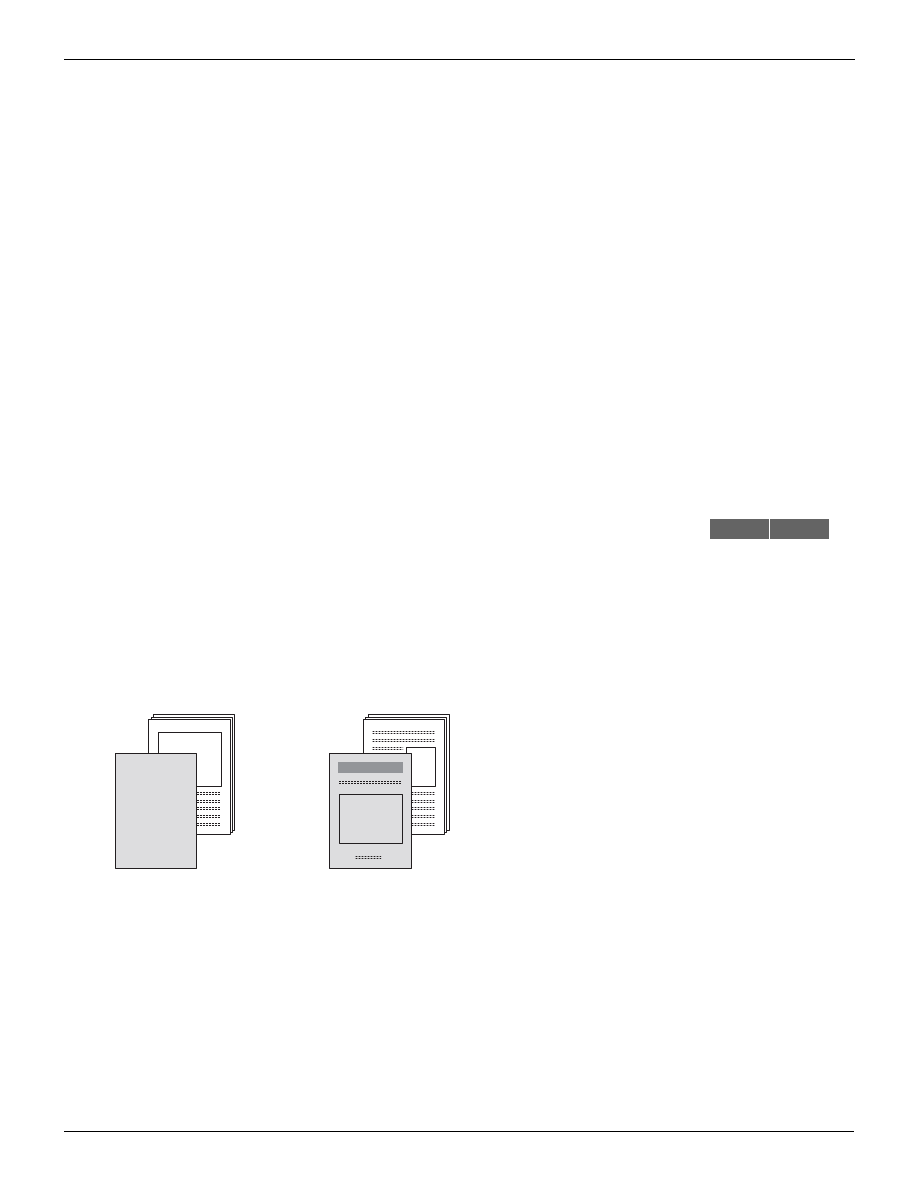
3-4. Printing multiple pages
47
II Printer Chapter 3 Printing with Windows
Setting with the PCL driver
1
From the PCL [Properties], select the [Paper] tab.
MEMO
z
For Windows NT 4.0, set with the [Document Defaults…] screen.
z
For Windows 2000/XP, set with the [Printing Preferences] screen.
2
In [Stapling], select the number and location of the staples.
MEMO
z
To set either portrait or landscape, change the [Orientation] setting.
Setting with the Adobe PS driver
1
From the Adobe PS driver properties, select the [Device Options] tab.
2
In [Printer features], select [Stapling].
3
In [Change setting for], select the number and location of the staples.
Attaching a front cover/back cover (Front cover/Back cover)
This prints attaching a front cover or back cover.
Front cover
This prints a front cover. For the front cover, select either [Blank] or [Printed].
For [Blank], one sheet of white paper is added. For [Printed], the first page of the data is printed on the
front cover.
PCL
Adobe PS
When the front cover is set to [Blank]
When the front cover is set to [Printed]
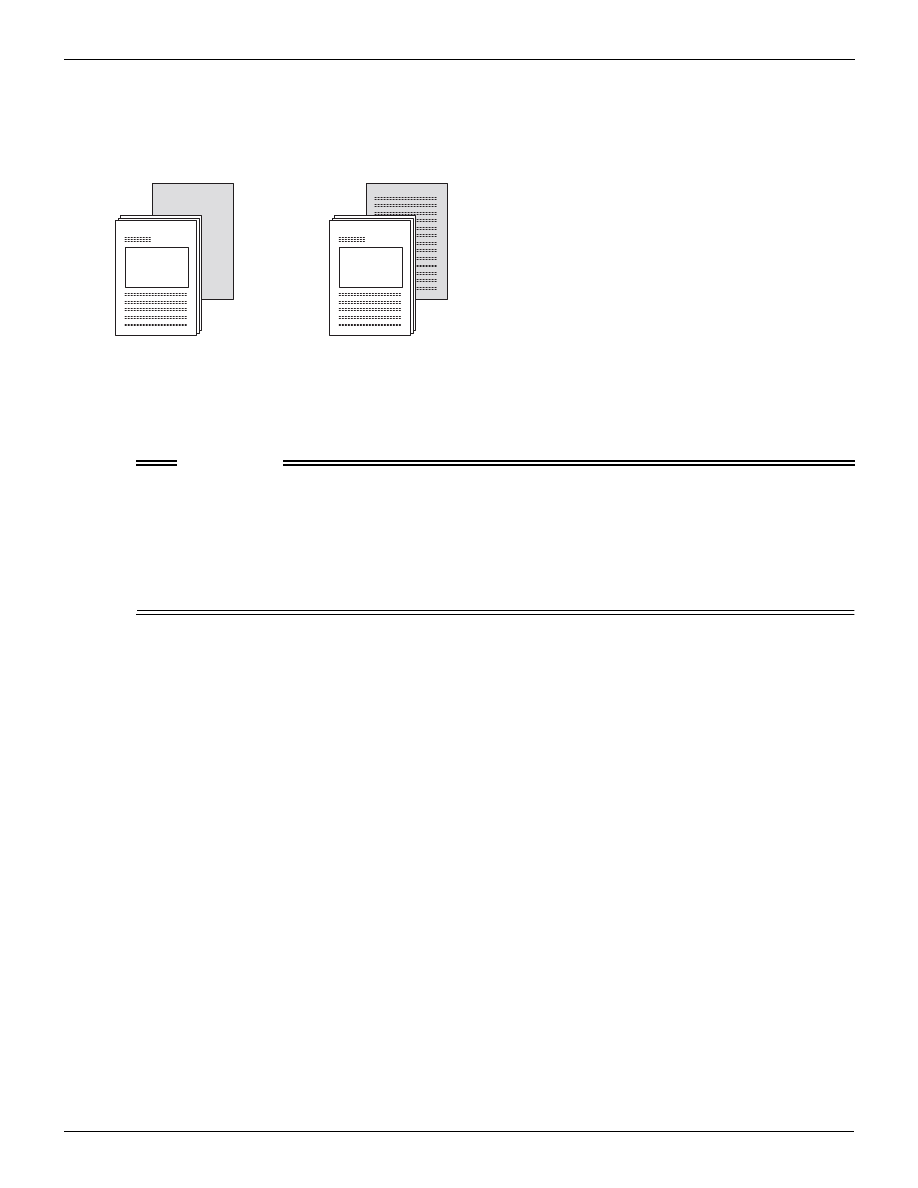
3-4. Printing multiple pages
48
II Printer Chapter 3 Printing with Windows
Back cover
This prints attaching a back cover. For the back cover, select either [Blank] or [Printed].
For [Blank], one sheet of white paper is added. For [Printed], the last page of the data is printed on the
back cover.
Input tray
Select the tray in which the paper for the front cover/back cover is. Select a tray with paper the same
size as the main text.
Limitation
● Front cover/back cover cannot be set when any of the following settings are in effect.:
When the [Paper Size] is [B6], [Postcard], [Legal], or [Statement]
When a [Media Type] of [OHP (Transparency)], [OHP Interleave (Blank)], or [OHP Interleave (Print)]
is selected
When [Combination] is set
When [Collate/Sort] is not set
Setting with the PCL driver
1
From the PCL [Properties], select the [Cover] tab.
MEMO
z
For Windows NT 4.0, set with the [Document Defaults…] screen.
z
For Windows 2000/XP, set with the [Printing Preferences] screen.
2
Check the [Front Cover] or [Back Cover] checkbox.
3
For the back cover, select either [Blank] or [Printed].
4
Select the [Tray] containing the paper to use as the front cover/back cover.
Setting with the Adobe PS driver
1
From the Adobe PS driver properties, select the [Device Options] tab.
2
In [Printer features], select [Front Cover] and/or [Back Cover].
When the back cover is set to [Blank]
When the back cover is set to [Printed]

3-5. Making image settings
49
II Printer Chapter 3 Printing with Windows
3
In [Change setting for], select [Printed] or [Blank].
4
In [Printer features], select [Front/Back Cover Tray]
5
In [Change setting for], select the input tray in which the paper for the front cover/back
cover is set.
3-5. Making image settings
This makes settings concerning the print quality for photographs and other images. Image settings are made
with the PCL driver [Graphics] tab.
Halftoning
This is expressed by changing the density of the black and white dots making up the image. Select dither for
printing at high speed. The choices that can be selected are as follows.
Solid Black and White: The image is expressed with 2 tones, black and white.
Patterned Grays:
The image is expressed by half tone.
Diffused Grays:
Select error dispersal to print with high quality emphasizing images.
Brightness
By clicking the [<], [>] or entering numbers, set brightness of the image.
Contrast
By clicking the [<], [>] or entering numbers, set contrast of the image.
Smoothing
This smoothes curved sections in printed characters and images to make jaggedness (the rough sections
seen at the edges of figures and text) stand out less.
The choices that can be selected are as follows.
Off
Does not smooth.
Type 1
Smoothes diagonal lines in general characters and figures.
Type 2
Smoothes curved sections of general characters
PCL

3-5. Making image settings
50
II Printer Chapter 3 Printing with Windows
Type 3
Smoothes the more detailed sections, for example curved line sections of decorative and fine charac-
ters.
Setting with the PCL driver
1
With the PCL driver [Properties], select the [Paper] tab.
2
In [Smoothing], select the type.
Setting with the Adobe PS driver
1
From the Adobe PS driver properties, select the [Device Options] tab.
2
In [Printer features], select [Smoothing.]
3
In [Change setting for], select Type.
Toner save
This controls the print density and conserves the toner. To conserve toner, check the checkbox.
Limitation
z
Toner save and Smoothing function connot be used at same time.
Setting with the PCL driver
1
With the PCL driver [Properties], select the [Paper] tab.
2
In [Toner Save], select [On].
Setting with the Adobe PS driver
1
From the Adobe PS driver properties, select the [Device Options] tab.
2
In [Printer features], select [Toner Save]
3
In [Change setting for], select [On].
PCL
Adobe PS

3-5. Making image settings
51
II Printer Chapter 3 Printing with Windows
Settings the resolution (Resolution)
This sets the resolution for printing. This setting is made with the Adobe PS driver [Graphics] tab.
1
From the Adobe PS properties, select the [Graphics] tab.
2
In [Resolution] select the resolution for printing.
MEMO
z
The resolution can only be [600 dpi] and cannot be changed.
Printing with black and white reversed (Print as a negative
image)
This prints photographic with the black and white sections of the document reversed like negative film.
Setting with the PCL driver
1
With the PCL driver [Properties], select the [Graphics] tab.
2
Select [Negative].
→ Black and white in the printing are reversed.
Setting with the Adobe PS driver
1
From the Adobe PS properties, select the [Graphics] tab.
2
Check the [Print as a negative image] checkbox.
→ Black and white in the printing are reversed.
Adobe PS
PCL
Adobe PS

3-6. Setting the font
52
II Printer Chapter 3 Printing with Windows
Printing with left/right reversed (Print as a mirror image)
This prints with the left/right reversed as if in a mirror.
1
From the Adobe PS properties, select the [Graphics] tab.
2
Check the [Print as a mirror image] checkbox.
→ The left and right in the printing are reversed.
3-6. Setting the font
This makes settings concerning TrueType fonts and PostScript fonts for printing.
TrueType font settings
This sets the printing process method of TrueType fonts used in the data. The choices that can be selected
are as follows.
Outline soft fonts
The font is represented as a series of curves and lines of a character. Since the amount of data is large,
printing takes longer. However, high-quality printing will start.
Bitmap soft fonts
The font is expressed the character by gathering of dots. Since the amount of data is small, printing
does not long. However, when it is enlarged, jagged lines are noticeable.
Rasters
This converts the print data into the bitmapped image according to the resolution of the printer.
1
From the PCL [Properties], select the [Options] tab.
2
From [True Type option], select the method of processing.
Adobe PS
PCL

3-6. Setting the font
53
II Printer Chapter 3 Printing with Windows
PostScript font settings
This makes settings concerning PostScript fonts and output.
Addition of Euro currency symbol
This adds the Euro currency symbol to PostScript fonts.
1
From the Adobe PS driver properties, select the [Fonts] tab.
2
Check the [Add Euro Currency Symbol to PostScript Fonts] checkbox.
PostScript output format
This selects the format for outputting PostScript files.
The choices that can be selected are as follows.
PostScript (Optimized for speed)
Select this item for normal printing.
PostScript (Optimize for portability-ADSC)
Selected when processing each page of a document as an independent object.
Encapsulated PostScript (EPS)
Selected to make a file into just one page so that it can be pasted into a document for another application and
printed.
Archive format
Selected to save PostScript files for later use.
1
From the Adobe PS driver properties, select the [PostScript] tab.
2
In [PostScript output format], select the output format.
Postscript header
This selects whether or not to send header information to the printer for each printing
The choices that can be selected are as follows.
Download header with each print job.
Select this item for normal printing.
Assume header is downloaded and retained.
This is selected when there is no need to send the header information repeatedly, for example on a local
printer. This reduces the print time somewhat.
[Send Header Now]
Click this button to download the header immediately.
Limitation
● When an [EPS format] or [Archive format] is selected, the PostScript header setting is ignored.
Adobe PS

3-7. Special printing
54
II Printer Chapter 3 Printing with Windows
1
From the Adobe PS driver properties, select the [PostScript] tab.
2
In [PostScript header], select the item.
PostScript error information printing
This prints an error message on a separate sheet of paper when a PostScript error occurs during printing.
1
From the Adobe PS driver properties, select the [PostScript] tab.
2
Check the [Print PostScript error information] checkbox.
PostScript timeout values
This sets the usable time and wait time when using the printer.
The choices that can be set are as follows.
Job timeout
This is the maximum time that can be used to print one set of data. When the set time is exceeded, the printer
stops printing and starts preparations for the next set of data.
Wait timeout
This is the time for waiting to receive data from Windows. When the set time is exceeded, the printer starts
preparations for the next set of data. The timeout is set for such cases as when the data is not sent due to a
computer error.
1
From the Adobe PS driver properties, select the [PostScript] tab.
2
In [PostScript timeout values], set the timeout time.
MEMO
z
The number of copies can be set to 0-999.
z
To disable timeouts, input [0].
3-7. Special printing
Overlay
(
This prints overlaying the document with separate form data.
Watermark
(
This prints [CONFIDENTIAL] or another preset text as a watermark.
Password Print
(
This prints after a registered User ID and password are input. This is used for printing confidential data.
PCL
PCL
Adobe PS
PCL
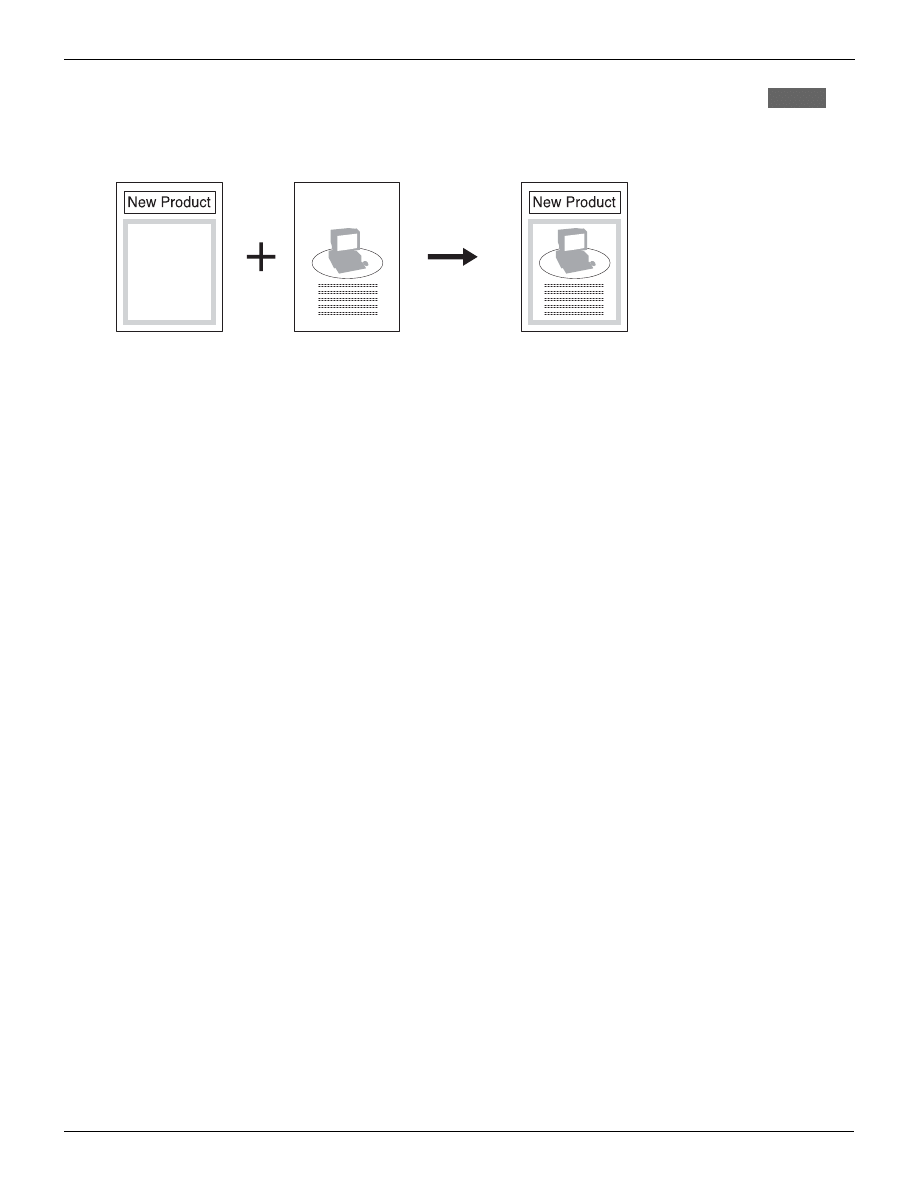
3-7. Special printing
55
II Printer Chapter 3 Printing with Windows
Printing overlaying another document (Overlay)
This prints overlaying the document with separate form data.
1
Prepare the form data with an application.
2
From the [File] menu item, select [Print].
3
Check that the [Name] is [Konica IP-xxx PCL].
MEMO
z
The model name of print controller is displayed in [xxx].
4
Click the [Properties] button.
→ The [Properties] screen is displayed.
5
Click the [Overlay] tab.
6
Click the [Select Bitmap] button.
→ The [Open overlay file] screen is displayed.
7
Select the document to print with the form data.
8
Click the [OK] button.
→ The display returns to the [Properties] screen.
MEMO
z
The file name extension of [.bmp] is given.
9
Check that the selected file name is displayed.
10
To shade the image, select the color of the shade from [Color] in [Shade].
11
Click the [
], [
] button in [Darkness], then adjust the darkness of the shade.
PCL
Form data
Prepared data
▼
▼

3-7. Special printing
56
II Printer Chapter 3 Printing with Windows
12
To change the size of the image, either click the [
▲], [▼] button with [User defined] in [Size] selected,
or key in the numbers.
MEMO
z
For the automatic setting, select [Automatically].
13
To change the position of the image, either click the
[
▲
]
, [
▼
]
button with [User defined] in
[Position] selected, or key in the numbers.
14
Click the [OK] button.
→ The display returns to the [Print] screen.
15
Click the [OK] button.
→ The form data is printed overlaid on the document.
Printing watermarks (Watermark)
This prints preset text as a watermark. This setting is made in [Watermark] tab.
MEMO
z
You can change the character choices, size, and position with the edit functions.
Setting with PCL driver
1
From the PCL driver [Properties], select the [Watermarks] tab.
2
In [Text] of [Watermarks], select the characters from the list for printing. Check the [Use
watermark] checkbox.
The choices that can be selected are as follows.
PCL
Adobe PS

3-7. Special printing
57
II Printer Chapter 3 Printing with Windows
CONFIDENTIAL
COPY
DRAFT
FILE COPY
FINAL
PROOF
TOP SECRET
MEMO
● You can also input characters into [Text].
3
In [Page] of [Watermarks], select the page for printing the watermark.
The choices that can be selected are as follows.
All but first page
First page only
No watermark
4
To print a watermark over an image, select [Top] in [Watermarks]. To print a watermark
behind an image, select [Bottom].
MEMO
● To print several watermarks on a single page, either click the [▲], [▼] button with [Count] in [Watermark]
or key in the numbers.
You can adjust the interval between watermarks by clicking the [
▲], [▼] button on [Separation].
5
In [Font], set the font.
This sets the font name, style, font size, color, and character darkness.
6
Select [User defined] in [Position], and set the character position and angle.
MEMO
● If you select [Move] from [Adjustment], you can drag a character and move it. If you select [Rotate], you
can drag a character and rotate it.
● To create a watermark, click the [NEW] button.
● To delete a watermark, click the [Delete] button.
Setting with Adobe PS driver
1
From the Adobe PS driver [Properties], select the [Watermarks] tab.

3-7. Special printing
58
II Printer Chapter 3 Printing with Windows
2
In [Select a watermark] select the characters for printing.
The choices that can be selected are as follows.
CONFIDENTIAL
COPY
DRAFT
Edit, New, Delete (AdobePS)
The choices and size of the characters in the watermark and the position they are printed at can be
changed.
It is also possible to prepare new watermarks and delete watermarks that are no longer needed.
When you click the [Edit] button, the [Edit watermark] screen is displayed.
The settings that can be changed are as follows.
Watermark text
This sets the Watermark Text, Font, Size, Style.
Angle
This sets the watermark angle.
Position
This sets what position on the paper the watermark is printed at.
To print in the center, select [Automatically].
To print at any other position, select [Position relative to the center], then input the coordinates.
Color
For a color printer, you can set the color. Input the red, green, and blue values or click the [Choose Color]but-
ton to set the color.
Preparing a new watermark
On the [Watermarks] tab, click the [New] button.
For the setting method, refer to the choices explained previously.
Deleting a watermark
Select the watermark to delete in [Watermarks], then click the [Delete] button.
Check the choices, then click the [OK] button.
Printing with a password (Password print)
This prints after a registered User ID and password are input. This is used for printing confidential data.
MEMO
● Some application software saves the choices of the printer driver settings. For files shared on a network
and files that may be printed by someone else, when printing with the [Use settings], delete the User ID
and password before saving.
PCL
User ID
Password

3-7. Special printing
59
II Printer Chapter 3 Printing with Windows
Setting a User ID and password
Register the output User ID and password.
1
From the PCL [Properties], select the [Paper] tab.
2
Check the [Password Print] checkbox.
→ The [Password Print Settings] screen is displayed.
3
Input the User ID to be registered.
MEMO
z
Input a User ID of up to 5 single-byte characters.
4
Input the password.
MEMO
z
Input a password up to 8 characters.
5
Click the [OK] button.
→ The User ID and password are set.
MEMO
z
When [Printer EKC/ECM function] is set on the copier, the User ID registered on the [Password Print Settings] screen
automatically becomes the printer EKC/ECM password.
For details on Printer EKC/ECM, [Please ask your administrator.].
6
Check the [Password Print] checkbox.
→ The [Password Print Settings] screen is displayed.
7
Check the User ID and password, then click the [OK] button.
→ This makes password print possible.
MEMO
z
The password can be changed with this screen.
8
Printing from an application
Operating from the control panel
When confidential output is set, after executing printing from an application, printing is not possible until the
User ID and password are input on the printer’s control panel.
Limitation
● Confidential output print jobs are temporarily stored on the print controller hard disk. If such a job is not
printed out within 24 hours, it is deleted automatically.
1
Printing from an application.
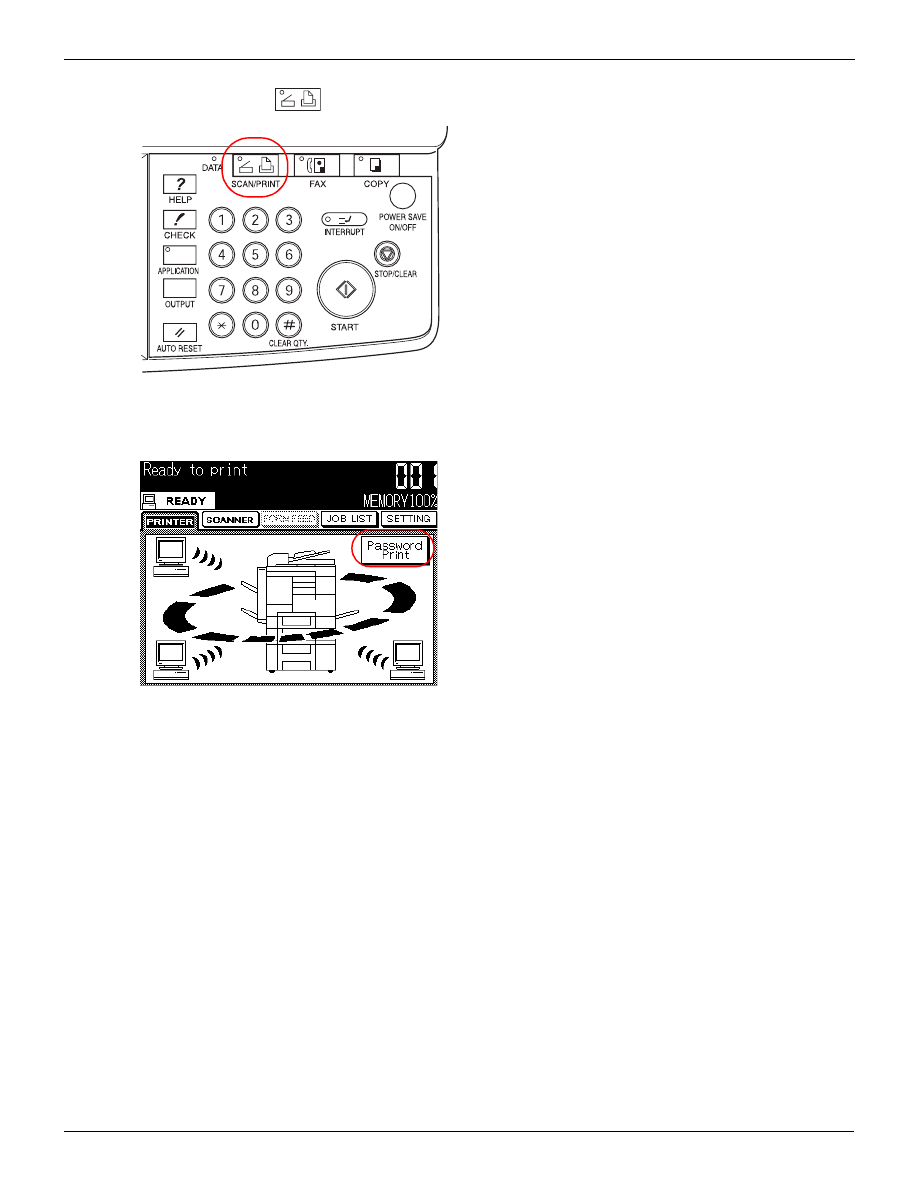
3-7. Special printing
60
II Printer Chapter 3 Printing with Windows
2
Press the copier
button on the control panel.
→ The [Printer basic mode] screen is displayed on the LCD screen.
3
Touch the [Password Print] key on the LCD screen.
→ The [Password Print] screen is displayed.
4
Input the User ID with the [0] key to the [9] key on the LCD screen.
5
Touch the [OK] key on the LCD screen.
→ The password select screen is displayed.
6
Input the password with the [0] key to the [9] key, the uppercase key and lowercase key on
the LCD screen.
MEMO
z
If you touch the [BS] key on the LCD screen, the last character is deleted; if you touch the [CLR] key, all the input
characters are deleted.
If you touch the [<<] [>>] key on the LCD screen, the list of characters that can be input is changed.
7
Touch the [OK] key on the LCD screen.
→ A list of the corresponding print jobs is displayed.
8
Select the print job, then touch the [OK] key on the LCD screen.
→ The selected print job is printed.
3-7. Special printing
61
II Printer Chapter 3 Printing with Windows
Canceling confidential output
To cancel confidential output from an application, do so from the printer control panel.
1
Press the copier
button on the control panel.
→ The [Printer basic mode] screen is displayed on the LCD screen.
2
Touch the [Password Print] key on the LCD screen.
→ The [Password Print] screen is displayed.
3
Input the User ID with the [0] key to the [9] key on the LCD screen.
MEMO
z
If you touch the [BS] key on the LCD screen, the last character is deleted; if you touch the [CLR] key, all the input
characters are deleted.
4
Touch the [OK] key on the LCD screen.
→ The password select screen is displayed.
5
Input the password with the [0] key to the [9] key, the uppercase key and lowercase key on
the LCD screen.
MEMO
z
If you touch the [BS] key on the LCD screen, the last character is deleted; if you touch the [CLR] key, all the input
characters are deleted.
If you touch the [<<] [>>] key on the LCD screen, the list of characters that can be input is changed.
6
Touch the [OK] key on the LCD screen.
→ A list of the corresponding print jobs is displayed.
7
Select the print job, then touch the [OK] key on the LCD screen.
→ The deletion confirmation screen is displayed.
8
Touch the [1] key, then touch the [OK] key on the LCD screen.
→ The selected print job is deleted.

62
II Printer Chapter 3 Printing with Windows
3-8. Setting the connection between the computer
and printer
This makes the settings for the port connecting the computer and the printer and adds drivers. These settings
are made with the PCL driver or Adobe PS driver properties.
Windows 95/98/Me
Checking the printer driver version
This checks the version of the printer driver currently being used.
Select the [About] tab.
The driver name and version can be checked.
Adding a printer driver
If you want to use a new printer driver that is not on the [Print using the following driver] list, this adds
that printer driver.
1
Click the [Details] tab.
2
Click the [New Driver] button.
→ The confirmation screen is displayed.
3
Click the [Yes] button.
→ The [Select device] screen is displayed.
For the rest of the procedure, [Please ask your administrator.].
Timeout settings
This sets the wait time until the printer is in a usable state.
The choices that can be set are as follows.
Not selected
This sets the wait time until the printer can print when print data is transmitted from the computer,
When the set time is exceeded, an error message is displayed and the print job is automatically
canceled.
Transmission retry
This sets the wait time until the printer can retry printing when data transmission from the com-
puter fails.
When the set time is exceeded, an error message is displayed and the print job is automatically
canceled.
Port settings
This can be set when [LPT*] is set as the printed connection destination. This makes settings for the
LPT port to which the printer is connected.
The choices that can be set are as follows.

3-8. Setting the connection between the computer and printer
63
II Printer Chapter 3 Printing with Windows
Spool MS-DOS print jobs
Spooling print jobs from MS-DOS-based applications
Check port state before printing
This checks whether the port is connected before printing.
Capture Printer port
This assigns a network printer to a virtual printer port.
The choices that can be set are as follows.
Device
Select the port to which the network printer is connected.
Path
The printer connection path is input.
Reconnect at logon
Each time Windows is started, choose whether or not to connect to the printer. To connect, check
the checkbox.
End Capture
This ends the setting for the set port.
1
Click the [Details] tab.
2
Click the [End Capture] button.
→ The [End Capture] screen is displayed.
3
The port to release is selected.
4
Click the [OK] button.
Port addition/deletion
This adds or deletes a network or local printer.
To add a port, click the [Add port] button, then input the network path or port name.
To delete a port, click the [Delete port] button, then select the port to delete.
Spool settings
This sets the method for temporarily accumulating (spooling) the print data when it is sent to the printer.
The choices that can be set are as follows.
Spool print jobs so program finishes printing faster
When this item is selected, the data is spooled. In addition, the spool format can be selected.
When you select [Start printing after last page is spooled], you can edit other documents and start
other applications during printing.

3-8. Setting the connection between the computer and printer
64
II Printer Chapter 3 Printing with Windows
When you select [Start printing immediately], the computer's processing is slightly slowed. Select
this when there is little free space for spooling on the hard disk. In addition, the spool format can
be selected.
Print directly to the printer
This sends print jobs directly to the printer without spooling.
Bi-directional support for this printer
This selects whether or not to use the bi-directional communications function when the printer
communicates with the computer.
Windows NT 4.0
Checking the printer driver version
This checks the version of the printer driver currently being used.
With the PCL driver [Document Defaults…], select the [About] tab.
The driver name and version can be checked.
Adding a printer driver
If you want to use a new printer driver that is not on the [Print using the following driver] list, this adds
that printer driver.
1
In PCL driver properties, click the [General] tab.
2
Click the [New Driver] button.
→ The confirmation screen is displayed.
3
Click the [Yes] button.
→ The Select device screen is displayed.
For the rest of the procedure, [Please ask your administrator.].
Timeout time setting
This sets the wait time until the printer can retry printing when data transmission from the computer fails.
When the set time is exceeded, an error message is displayed and the print job is automatically canceled.
1
From the PCL driver [Properties], select the [Ports] tab.
2
Select the port to use, then click the [Configure Port] button.
→ The [LPT port configuration] screen is displayed.
3
This inputs the wait time until the computer re-sends print data.
4
Click the [OK] button.

3-8. Setting the connection between the computer and printer
65
II Printer Chapter 3 Printing with Windows
Printer port assignment
This assigns a network printer to a virtual printer port.
1
From the PCL driver Properties, select the [Ports] tab.
2
Check the checkbox for the port to which the network printer is connected.
3
Click the [OK] button.
Deleting the printer port
This ends the setting for the set port.
1
From the PCL driver [Properties], select the [Ports] tab.
2
Uncheck the checkbox for the port to be released.
3
Click the [OK] button.
Port addition/deletion
This adds or deletes a network or local printer.
To add a port, on the [Ports] tab, click the [Add port] button, then click the [New port] button and input
the port name.
To delete a port, select the port to delete in [Ports] tab, and click the [Delete port] button.
Spool settings
This sets the method for temporarily accumulating (spooling) the print data when it is sent to the printer.
This setting is made in [Scheduling] tab.
Spool print documents so program finishes printing faster.
When this item is selected, the data is spooled. In addition, the spool format can be selected.
When you select [Start printing after last page is spooled], you can edit other documents and start
other applications even during printing.
When [Start printing immediately] is selected, the spooled data is sent immediately to the com-
puter.
Print directly to the printer
This sends print jobs directly to the printer without spooling.
Windows 2000/XP
Checking the printer driver version
This checks the version of the printer driver currently being used.

3-8. Setting the connection between the computer and printer
66
II Printer Chapter 3 Printing with Windows
1
On the PCL driver properties, click the [General] tab.
2
Click the [Printing Preferences…] button.
→ The [Printing Preferences] screen is displayed.
3
Select the [About] tab.
→ The driver name and vesion is displayed.
The driver name and version can be checked.
Adding a printer driver
If you want to use a new printer driver that is not on the [Print using the following driver] list, this adds
that printer driver.
1
On the PCL driver properties, click the [Advanced] tab.
2
Click the [New Driver...] button.
→ The [Add Printer Driver Wizard] screen is displayed.
For the rest of the procedure, refer to [Chapter 2 Preparing the Printer for Use] (
Timeout time setting
This sets the wait time until the printer can retry printing when data transmission from the computer fails.
When the set time is exceeded, an error message is displayed and the print job is automatically canceled.
1
From the PCL driver [Properties], select the [Ports] tab.
2
Select the port to use, then click the [Configure Port] button.
→ The [Configure LPT Port] screen is displayed.
3
This inputs the wait time until the computer re-sends print data.
4
Click the [OK] button.
Printer port assignment
This assigns a network printer to a virtual printer port.
1
From the PCL driver [Properties], select the [Ports] tab.
2
Check the checkbox for the port to which the network printer is connected.
3
Click the [OK] button.

3-8. Setting the connection between the computer and printer
67
II Printer Chapter 3 Printing with Windows
Deleting the printer port
This ends the setting for the set port.
1
From the PCL driver [Properties], select the [Ports] tab.
2
Uncheck the checkbox for the port to be released.
3
Click the [OK] button.
Port addition/deletion
This adds or deletes a network or local printer.
To add a port, on the [Ports] tab, click the [Add port] button, then click the [New port] button and input
the port name.
To delete a port, select the port to delete in [Ports] tab, and click the [Delete port] button.
Spool settings
This sets the method for temporarily accumulating (spooling) the print data when it is sent to the printer.
This setting is made in [Advanced] tab.
Spool print documents so program finishes printing faster.
When this item is selected, the data is spooled. In addition, the spool format can be selected.
When you select [Start printing after last page is spooled], you can edit other documents and start
other applications even during printing.
When [Start printing immediately] is selected, the spooled data is sent immediately to the com-
puter.
Print directly to the printer
This sends print jobs directly to the printer without spooling.

II Printer
68
Chapter 4 Printing with Macintosh
You can select the printing method and set functions for printing from applications.
This chapter explains the printer functions and setting methods for printing with a Macintosh.
4-6. Making PostScript settings (File save) .............................................87

69
II Printer Chapter 4 Printing with Macintosh
4-1. Setting printer functions
These are set from the screen displayed when a [Print] command is executed from an application.
These settings only remain in effect while the application is being used. When the application ends, the set-
tings are deleted.
There are the following two methods for displaying the settings screen.
Setting from the [Print] screen
Open data with the application, then from the [File] menu item, select [Print].
MEMO
z
The contents of the screen depend on the application.
Setting from the [Page (paper) Setup] screen
Open data with the application, then from the [File] menu item, select [Page Setup].
MEMO
z
The contents of the screen depend on the application.
z
For some applications, from the [File] menu item, you select [Paper settings] - [Options].

70
II Printer Chapter 4 Printing with Macintosh
4-2. Function list
This list contains a summary of the main settings related to printing.
MEMO
● The display of listed items and setting values may vary according to whether options are present (and
their settings).
● For details on functions not covered here, refer to your Macintosh guide.
Function
Summary
Reference
Basic print settings
Number of copies
Specifies the number of copies to print.
Direction
Selects landscape or portrait direction to print on the paper.
Media size
Sets the size of the paper to print on.
Manual feed media
type
Sets the type of the media for printing.
Magnification ratio
Prints enlarged/reduced.
Input method
Selects the input tray containing the paper to print on.
Reverse order print-
ing
Prints from the last page to the first.
Output tray
Selects the tray which to output printed paper.
Margins
Sets the width for the margin (the section not printed at all) for printing
Printing multiple pages
Duplex printing
Prints consecutive pages on the front and rear.
Page layout
Prints multiple pages of consecutive data combined on one side of one sheet of
paper. The print image is automatically enlarged/reduced to match the size of
the print paper.
Special mode
Prints swapping the order of the pages so that the output paper can be piled up
and folded in two to make a booklet.
Collate
Prints one copy at a time of all the pages.
Offset
When printing multiple copies, this shifts the output position for each set.
Staple
Staples.
Front cover/Back
cover
Prints attaching a front cover or back cover.
Special printing
Printing with top/bot-
tom or left/right
reversed
Prints with the top/bottom or left/right reversed. (Mirror image printing)
Black/white
reversed printing
Prints with black and white reversed. (Negative image printing)
Watermarks
Prints preset text as a watermark.
Smoothing
Smoothes curved sections so that jaggedness stands out less.
Toner save
Controls the print density and conserves the toner.
Making PostScript settings (file save)
Format
Sets the data format for writing to files.
PostScript level
Sets the PostScript level compatibility.
Format
Selects either ASCII or binary.
Font data
Sets the type of font data embedded in files.

71
II Printer Chapter 4 Printing with Macintosh
4-3. Basic print settings
Setting the number of copies to print (Copies)
This specifies the number of copies to print.
1
From the [File] menu item, select [Print].
2
Select [General].
3
In [Copies], input the number of copies to print.
MEMO
z
The number of copies can be set to 1 to 999.
Setting the print direction (Direction)
This selects landscape or portrait direction to print on the paper.
1
From the [File] menu item, select [Page Setup].
MEMO
z
For some applications, from the [File] menu item, you select [Paper settings] - [Options].
2
Select [Page Attributes].
3
In [Orientation], select the paper direction.

4-3. Basic print settings
72
II Printer Chapter 4 Printing with Macintosh
Setting the print paper size (Paper)
This sets the size of the paper to print on.
The paper sizes that can be selected are as follows.
Statement (5.5 x 8.5 inch)
Letter (8.5 x 11 inch)
Legal (8.5 x 14 inch)
Tabloid (11 x 14 inch)
A3 (297 x 420 mm)
A4 (210 x 297 mm)
A5 (148 x 210 mm)
B4 (257 x 364 mm)
B5 (182 x 257 mm)
B6 (128 x 182 mm)
F4 (8 x 13 inch)
8K (266 x 387 mm)
16K (193 x 266 mm)
Custom
1
From the [File] menu item, select [Page Setup].
2
Select [Page Attributes].
3
In [Paper], select the paper size.
MEMO
z
For details on the sizes of paper that can be set in the printer's input trays, refer to the copier operations manual.
Setting any paper size
To set a non-standard paper size, select [Custom], then input the paper width and height with the fol-
lowing procedure.
1
From the [File] menu item, select [Page Setup].
2
Select [Custom Page Default].
3
In [Units], select the length unit, then input the height and width of the paper.
4
Click the [OK] button.

4-3. Basic print settings
73
II Printer Chapter 4 Printing with Macintosh
Selecting the type of paper (Media type)
This selects the type of media to print.
The types of paper you can select are as follows.
Plain paper:
Regular copy paper
OHP (Transparency):
Overhead projector film
OHP Interleave (Blank): White paper inserted between overhead projector film
OHP Interleave (Print): Prints the same contents on the OHP interleaf paper as on the film.
1
From the [File] menu item, select [Print].
2
Select [Printer Specific Options].
3
In [Media Type], select the paper type.
Limitation
● The collate function cannot be set at the same time as a [Media type] selection of [OHP], [OHP Inter-
leave (Blank)], or [OHP Interleave (Print)].
Printing enlarged/reduced (Magnification ratio)
This specifies the magnification ratio for printing.
1
From the [File] menu item, select [Page Setup].
2
Select [Page Attributes].
3
Input the [Scale].
MEMO
z
The magnification ratio can be from 25 to 400 %.
Selecting the input tray (Paper source)
This selects the input tray containing the paper to print on.
1
From the [File] menu item, select [Print].
2
Select [General].

4-3. Basic print settings
74
II Printer Chapter 4 Printing with Macintosh
3
In [Paper Source], select the input tray containing the paper to print on.
The types of input trays that can be selected are as follows.
Auto select:
The tray is selected automatically to match the paper size.
Tray 1 to 4:
Input trays (The number of trays depends on the options installed on the copier.)
Manual Feed:
Bypass tray
Selecting the print order (Reverse print order)
This specifies the order in which pages are printed.
1
From the [File] menu item, select [Print].
2
Select [General].
3
Check the [Reverse Order] checkbox.
Not checked: The pages are printed in order from first page number to last. When the printing ends, the
sheets are stacked in reverse order of their page numbers.
Checked:
The pages are printed in order from last page number to first. When the printing ends, the
sheets are stacked in order of their page numbers.
Selecting the output tray (Output tray)
This selects the tray which to output printed paper. This can be selected when the optional output unit is
installed on the copier.
1
From the [File] menu item, select [Print].
2
Select [Printer Specific Options].
3
The tray is selected in [Output Bin].
The types of output trays that can be selected are as follows.
Default:
The printer’s (copier) normal output tray.
Trays 1 to 4: Trays on the optional output unit.
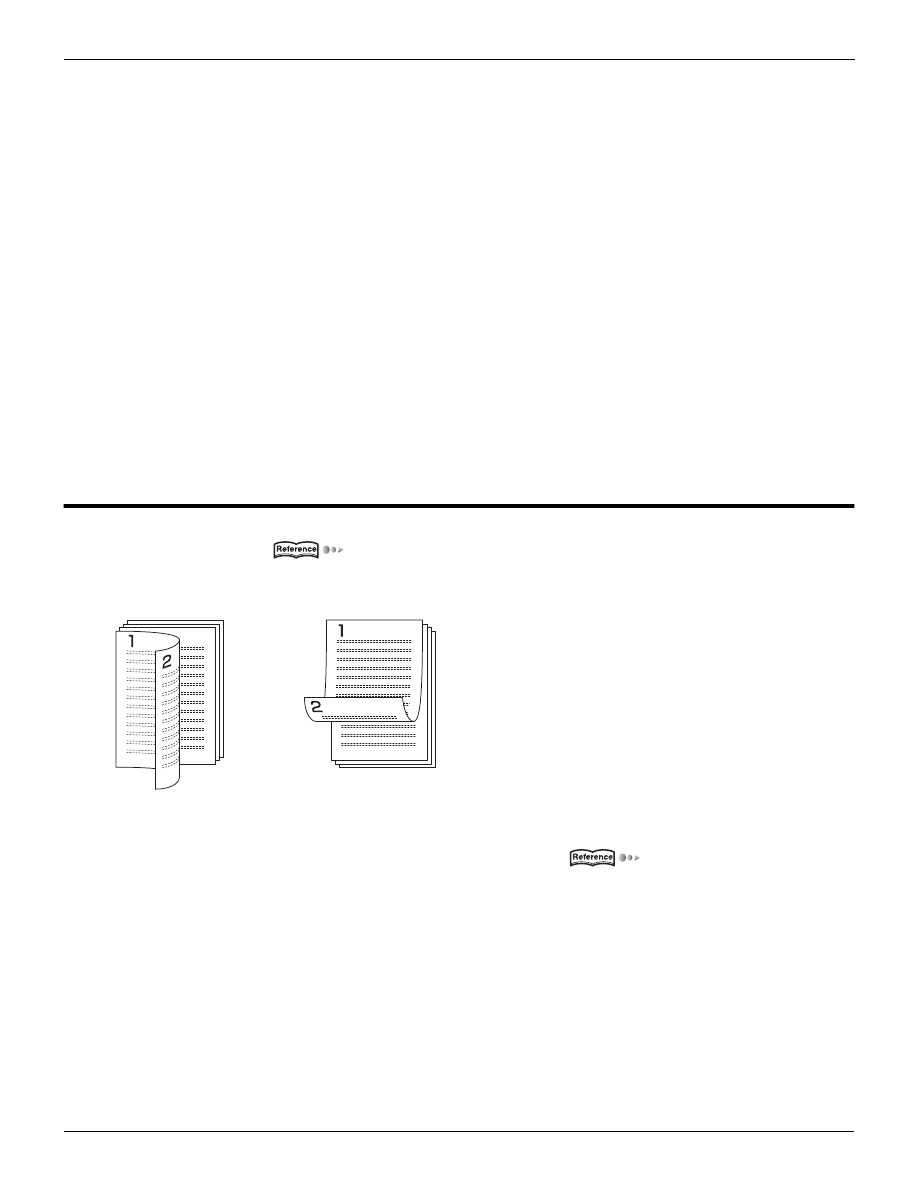
4-4. Printing multiple pages
75
II Printer Chapter 4 Printing with Macintosh
Setting the margin (Margins)
This sets the width for the margin for printing.
1
From the [File] menu item, select [Page Setup].
MEMO
z
For some applications, from the [File] menu item, you select [Paper settings] - [Options].
2
Select [Custom Page Default].
3
In [Margins], input the widths of the top, bottom, left, and right margins.
MEMO
z
The minimum margin that can be set is 0.42 cm (0.17 inch). The maximum margin that can be set depends on the
size of the paper.
4-4. Printing multiple pages
Duplex printing
(
This prints consecutive pages on the front and rear.
[Flip on long edge] or [Flip on short edge] can be selected.
Document pages/print pages/layout direction
(
This prints multiple pages of consecutive data combined on one side of one sheet of paper.
When the size of the document set by the application is larger than the print paper size, one page of the
document is printed laid out over multiple sheets of paper.
The print image is automatically enlarged/reduced to match the size of the print paper.
2 to 16 pages of data can be combined on 1 page and 1 page can be divided into 4 (2x2) to 36 (6x6)
units.
Printing multiple document pages on one sheet paper
Printing one document page on multiple sheets of paper
Flip on long edge
Flip on short edge
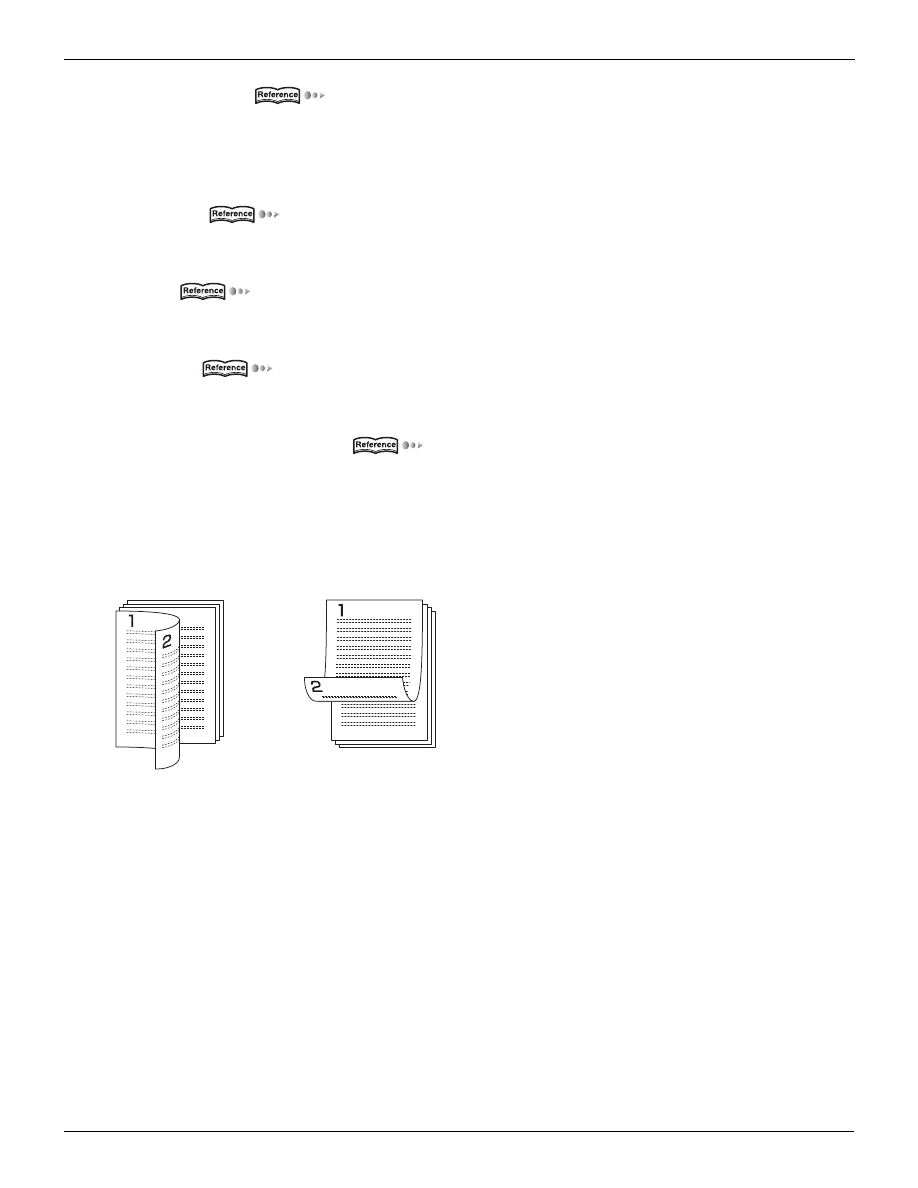
4-4. Printing multiple pages
76
II Printer Chapter 4 Printing with Macintosh
Special mode
(
This prints swapping the order of the pages so that the output paper can be piled up and folded in two
to make a booklet.
[Left binding] or [Right binding] can be selected.
Collating
(
This prints one entire set of multi-page data at one time.
Offset
(
When printing multiple copies, this shifts the position for each set.
Stapling
(
This staples.
Front cover/Back cover
(
This prints attaching a front cover or back cover.
Printing on both the front and rear of the paper (Duplex printing)
This prints consecutive pages on the front and rear.
[Flip on long edge] or [Flip on short edge] can be selected.
Flip on long edge
The pages are flipped on their long edges. The front and rear have the same top.
Flip on short edge
The pages are flipped on their short edges. The front and rear have tops at opposite ends.
1
From the [File] menu item, select [Print].
2
Select [Layout].
3
Check the [Print on Both Sides] checkbox.
4
Select the [Binding].
Flip on long edge
Flip on short edge
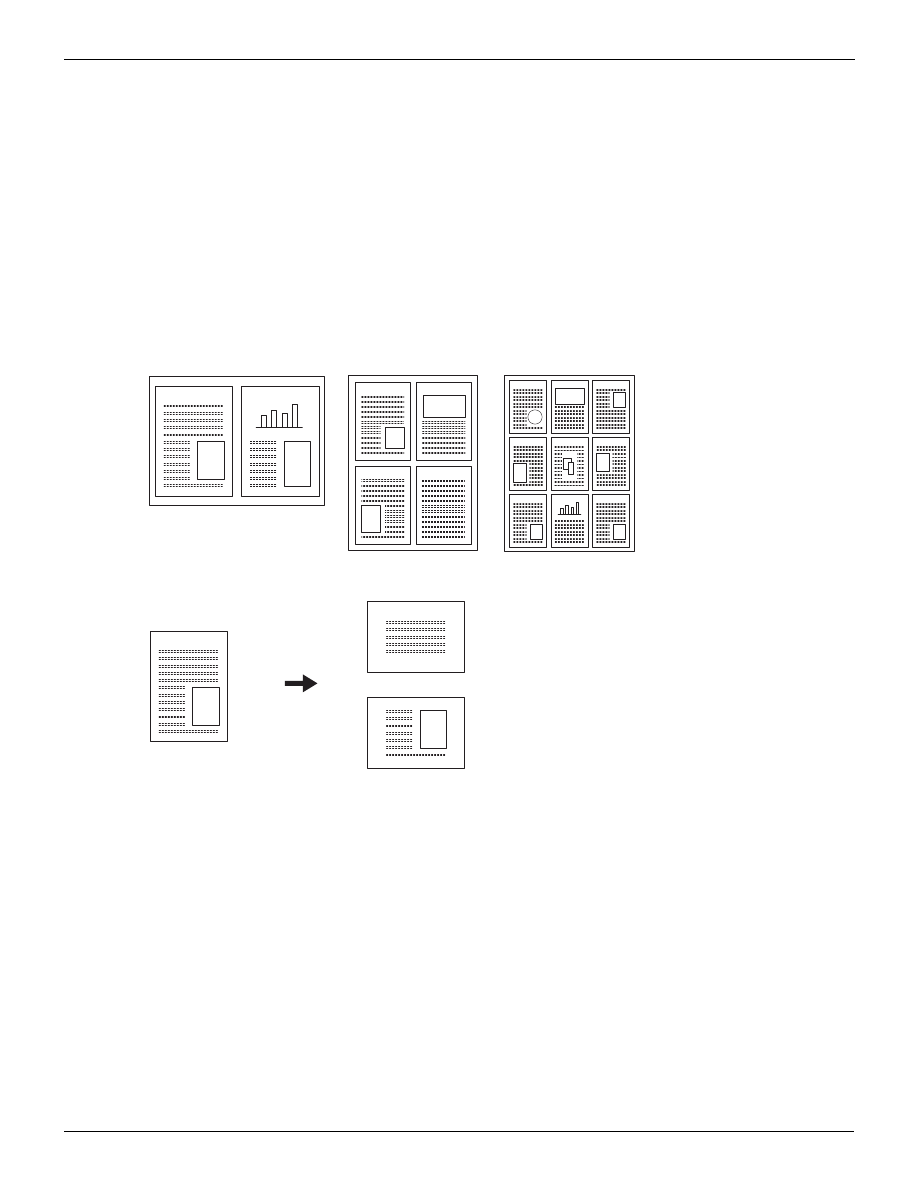
4-4. Printing multiple pages
77
II Printer Chapter 4 Printing with Macintosh
Printing multiple pages on one sheet of paper (Document
pages/Print pages/Layout direction)
This prints multiple pages of consecutive data combined on one side of one sheet of paper.
When the size of the document set by the application is larger than the print paper size, one page of the doc-
ument is printed laid out over multiple sheets of paper. The print image is automatically enlarged/reduced to
match the size of the print paper.
Document pages/print pages
2 to 16 pages of data can be combined on 1 page and 1 page can be divided into 4 (2x2) to 36 (6x6)
units.
Printing multiple document pages on one sheet paper
Printing one document page on multiple sheets of paper
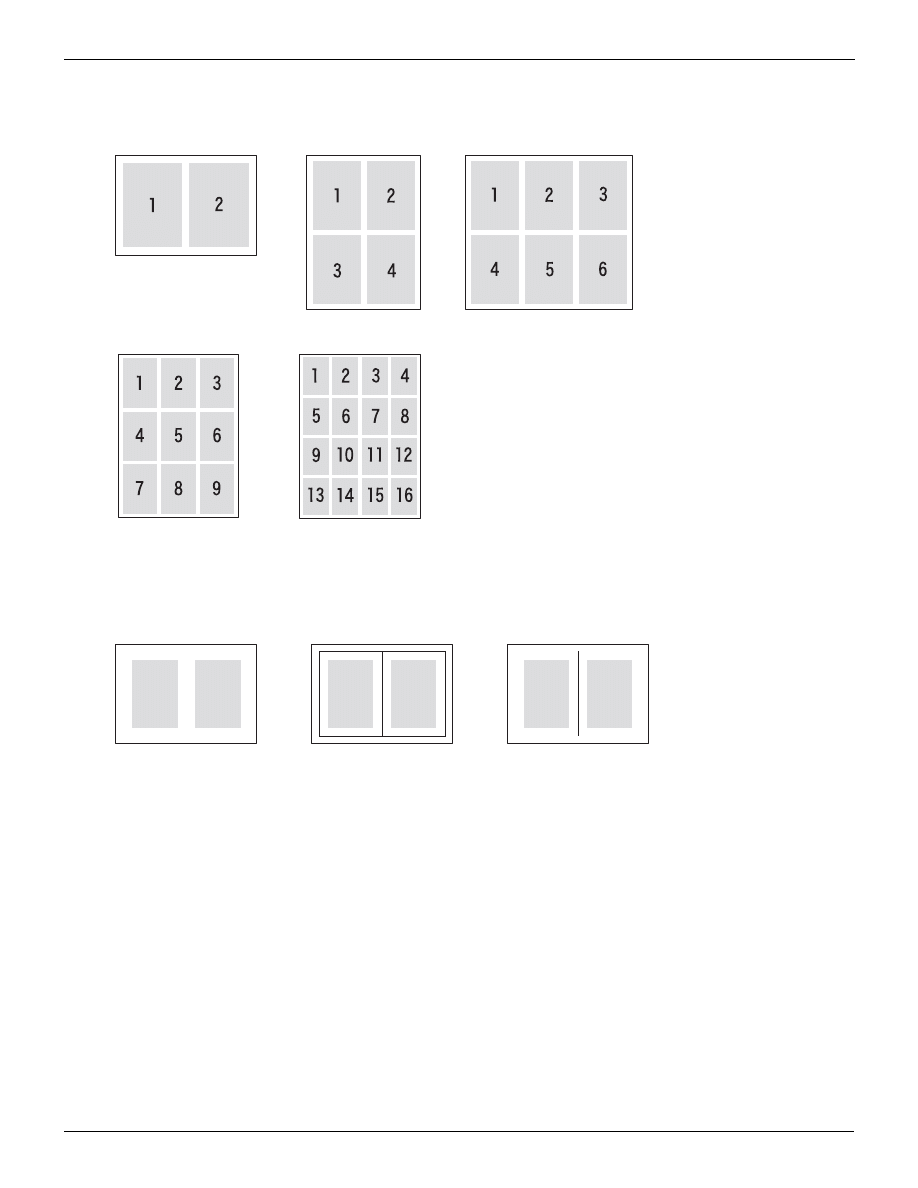
4-4. Printing multiple pages
78
II Printer Chapter 4 Printing with Macintosh
Layout direction
The order in which pages can be assigned onto one print page can be selected. [From top left to bottom
right] or [From top right to bottom left] can be selected.
Frames/lines
This prints frames or lines on combined pages.
1
From the [File] menu item, select [Print].
2
Select [Layout].
3
In [Page per sheet], select the type of combination.
4
In [Layout direction], select the document page order.
5
In [Border], select the type of frame or line.
2 pgs/sheet
4 pgs/sheet
6 pgs/sheet
9 pgs/sheet
16 pgs/sheet
None
Frame
Lines
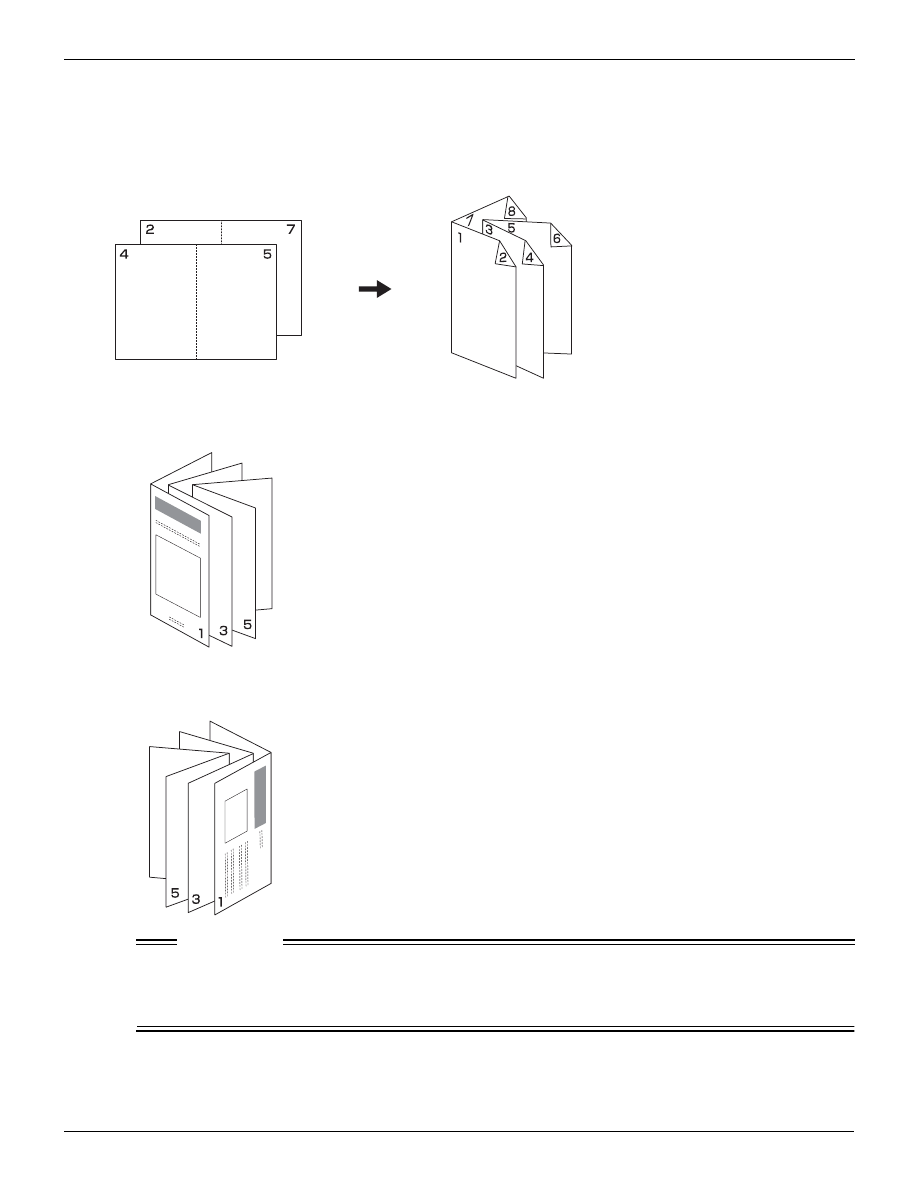
4-4. Printing multiple pages
79
II Printer Chapter 4 Printing with Macintosh
Folding paper in two to make booklets (Special mode)
This prints swapping the order of the pages so that the output paper can be piled up and folded in two to
make a booklet.
You can select either [Booklet (left binding)] or [Booklet (right binding)].
Booklet (left binding)
The paper is bound on the left side. This is selected when the pages proceed from left to right.
Booklet (right binding)
The paper is bound on the right side. This is selected when the pages proceed from right to left.
Limitation
● Booklet/special mode cannot be used when any of the settings below are in effect.
When a paper size of [Postcard] is selected.
When [Document pages/print page], [Staple], [Duplex], or [Front cover/Back cover] is set.
1
From the [File] menu item, select [Print].
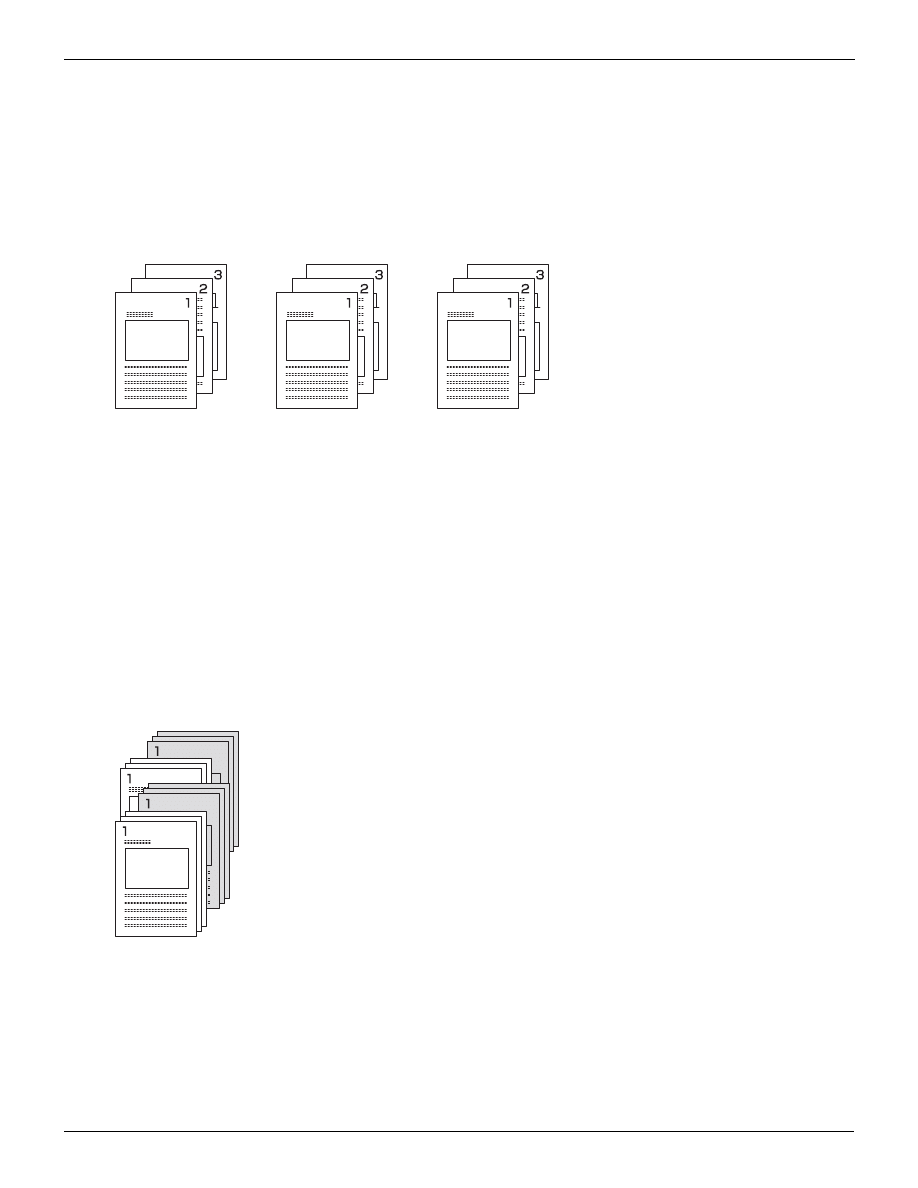
4-4. Printing multiple pages
80
II Printer Chapter 4 Printing with Macintosh
2
Select [Printer Specific Options].
3
In [Combination], select either [Booklet] or [Booklet-Right].
Printing one copy at a time of all pages (Collate)
This prints one entire set of multi-page data at one time.
1
From the [File] menu item, select [Print].
2
Select [Printer Specific Options].
3
In [Collate], select [Sort].
Outputting sorted into separate sets of copies (Offset)
When printing multiple copies, this shifts the output position for each set.
This is handy when outputting multiple copies to a single output tray.
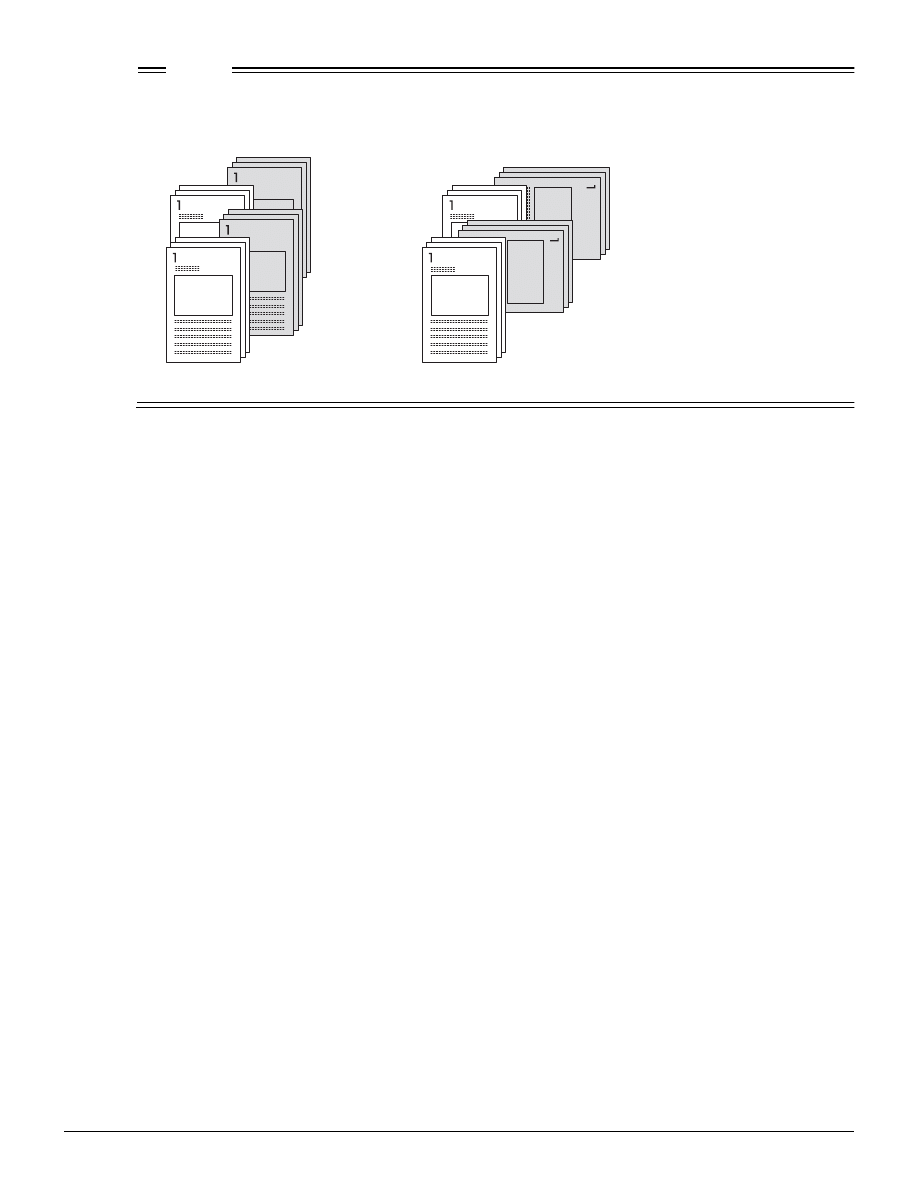
81
II Printer Chapter 4 Printing with Macintosh
MEMO
● When the copier optional paper output unit is installed, the paper is output with its position shifted for
each set.
When the paper output unit is not installed, the paper is output with the direction changed for each set.
1
From the [File] menu item, select [Print].
2
Select [Printer Specific Options].
3
In [Job Offset], select [On].
Stapling (Staple)
This staples.
Portrait and landscape
Stapling with the papers joined lengthwise is called [Portrait] and stapling with the papers joined width-
wise is called [Landscape].
Number of staples and their locations
The pages are bound on either the left or right side of the paper. For stapling, you can select one- or
two-point stapling.
MEMO
z
For details on the stapling positions, refer to the copier operations manual.
When there is a paper output unit
When there is no paper output unit
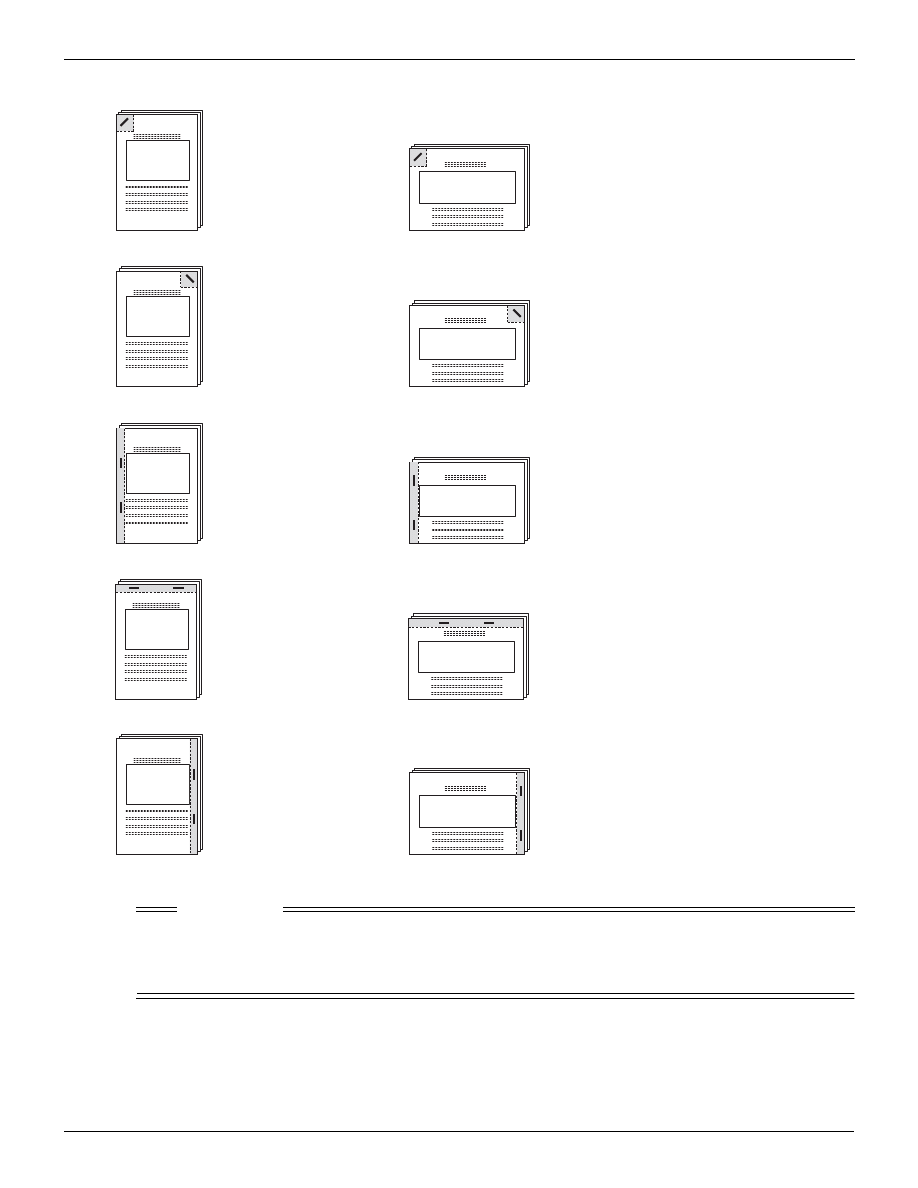
4-4. Printing multiple pages
82
II Printer Chapter 4 Printing with Macintosh
The types of stapling that can be selected are as follows.
Limitation
● Stapling cannot be set when a [Media type] of [OHP], [OHP Interleave (Blank)], or [OHP Interleave
(Print)] is set. Stapling cannot be set when a [Media type] of [OHP], [OHP Interleave (Blank)], or [OHP
Interleave (Print)] is set.
1
From the [File] menu item, select [Print].
2
Select [Printer Specific Options].
Single (Portrait)
Single Right (Portrait)
Double Left (Portrait)
Double Top (Portrait)
Double Right (Portrait)
Single (Landscape)
Single Right (Landscape)
Double Left (Landscape)
Double Top (Landscape)
Double Right (Landscape)
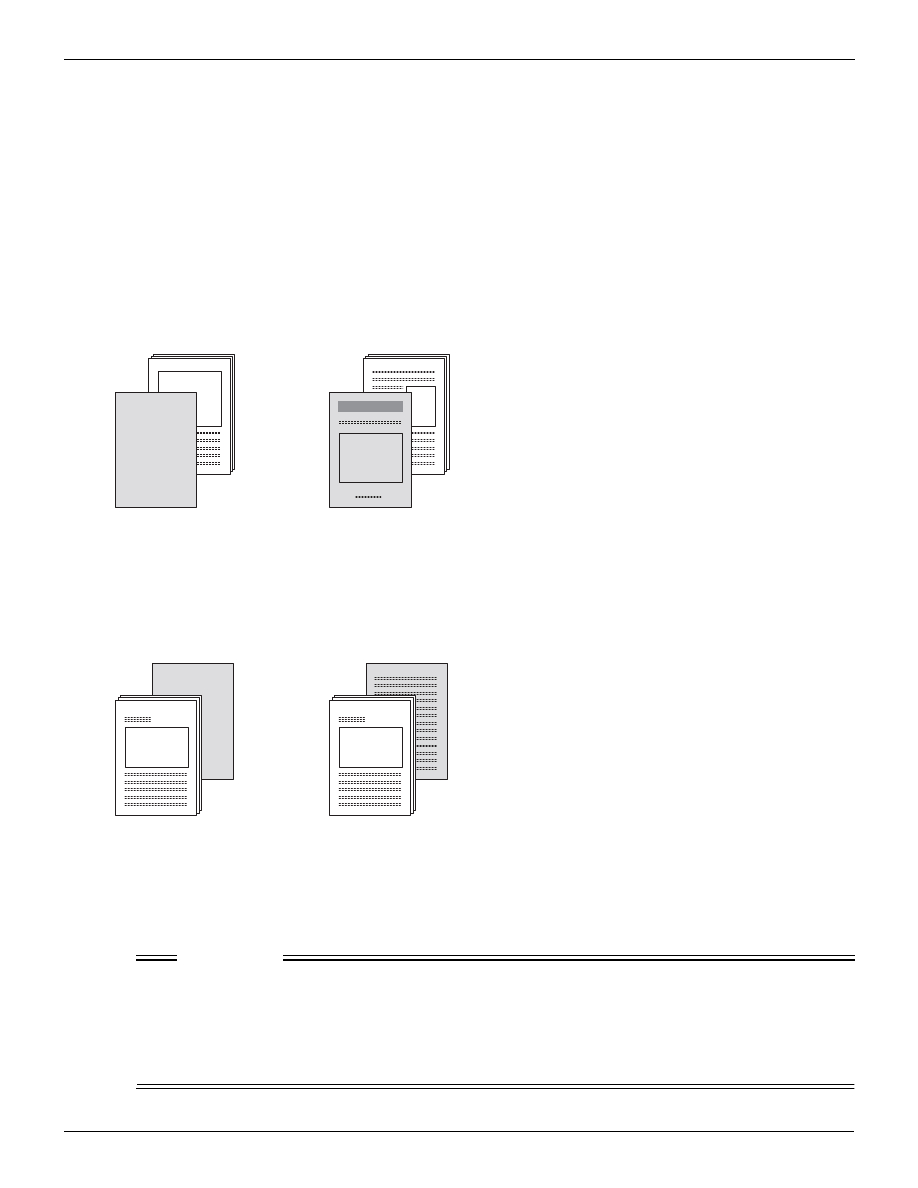
4-4. Printing multiple pages
83
II Printer Chapter 4 Printing with Macintosh
3
In [Stapling], select the stapling type.
MEMO
z
To set either portrait or landscape, change the [Direction] setting.
Attaching a front cover/back cover (Front Cover/Back Cover)
This prints attaching a front cover or back cover.
Front cover
This prints a front cover. For the front cover, select either [Blank] or [Printed].
For [Blank], one sheet of white paper is added. For [Printed], the first page of the data is printed on the
front cover.
Back Cover
This prints attaching a back cover. For the back cover, select either [Blank] or [Printed].
For [Blank], one sheet of white paper is added. For [Printed], the last page of the data is printed on the
back cover.
Front/Back Cover Tray
Select the tray in which the paper for the front cover/back cover is set. Select a tray with paper the
same size as the main text.
Limitation
● Front cover/back cover cannot be set when any of the following settings are in effect.
When [Booklet] is set
When [Sort] is not set
When a [Media type] of [OHP], [OHP Interleave (Blank)], or [OHP Interleave (Print)] is selected
When a [Paper size] of [B6], [Postcard], [Legal], or [Statement] is selected
When the front cover is
set to [Blank]
When the front cover is
set to [Printed]
When the back cover is
set to [Blank]
When the back cover is set
to [Printed]

4-5. Special printing
84
II Printer Chapter 4 Printing with Macintosh
1
From the [File] menu item, select [Print].
2
Select [Printer Specific Options].
3
In [Front Cover] or [Back Cover], select [Printed] or [Blank].
4
In [Front/Back Cover Tray], select the tray in which the paper for the front cover/back cover
is set.
4-5. Special printing
Printing with top/bottom or left/right reversed (Mirror image
printing)
This prints with the top/bottom or left/right reversed as if in a mirror.
1
From the [File] menu item, select [Page Setup].
MEMO
z
For some applications, from the [File] menu item, you select [Paper settings] - [Options].
2
Select [PostScript™ Options].
3
Check the [Visual Effects] [Flip Horizontal] or [Flip Vertical] checkbox.
→ The figure in the print example is printed with left/right or top/bottom reversed.
Printing with black and white reversed (Negative image printing)
This prints photographic with the black and white sections of the document reversed like a negative film.

4-5. Special printing
85
II Printer Chapter 4 Printing with Macintosh
1
From the [File] menu item, select [Page Setup].
MEMO
z
For some applications, from the [File] menu item, you select [Paper settings] - [Options].
2
Select [PostScript™ Options].
3
Check the [Visual Effects] [Invert Image] checkbox.
→ Black and white in the printing are reversed.
Printing watermarks (Watermark)
This prints [Draft] or another preset text as a watermark.
The following five watermarks are registered when the printer driver is installed.
MEMO
z
For [TEXT], you can use the edit functions to change the character contents and types and color.
Selecting a watermark
1
From the [File] menu item, select [Page setup].
MEMO
z
For some applications, from the [File] menu item, you select [Paper settings] - [Options].
2
Select [Watermark].
3
Select [First] or [All].
MEMO
z
For [First], the watermark is only printed on the first page, for [All], the watermark is printed on all the pages.
4
Select [PICT], [EPS], or [TEXT].
PICT
Adobe-PICT2
Confidential.pict
EPS
Adobe.B&W.eps
Adobe.color.eps
TEXT
Draft

4-5. Special printing
86
II Printer Chapter 4 Printing with Macintosh
5
Select the type of watermark to print.
Editing text
When you select [TEXT], you can change the watermark character contents, types, and color.
1
Click the [Edit] button.
→ The [Specify watermark] screen is displayed.
The settings that can be changed are as follows.
Watermark file
This selects the file in which the watermark is stored.
Watermark font/size/style
This sets the font and size for the watermark.
Watermark text
This inputs the character string for the watermark.
Color
When you click this, a list of the colors is displayed. Select the color you want by either clicking
one or clicking [Other color] and composing any color you want.
New save
This saves the changed settings as a watermark file.
Limitation
● This printing system does not support color. When colors are selected, they are printed converted to gray.
First/All
The print the watermark only on the first page, select [First], to print the watermark on all the pages,
select [All].
Foreground
The watermark is usually printed in such a way that the document can be seen through the watermark.
To print a watermark over the document, check the [Foreground] checkbox. With this type of printing,
the portion of the document under the watermark cannot be seen.
Save with Document
This stores the edited watermark settings together with the document data.
Smoothing characters and curved lines (Smoothing)
This smoothes curved sections in printed characters and images to make jaggedness (the rough sections
seen at the edges of figures and the like) stand out less.
1
From the [File] menu item, select [Print].

4-6. Making PostScript settings (File save)
87
II Printer Chapter 4 Printing with Macintosh
2
Select [Printer Specific Options].
3
In [Smoothing], select the type.
The types that can be selected are as follows.
None : No smoothing
Type 1: Smoothes diagonal lines in general characters and figures.
Type 2: Smoothes curved sections of general characters.
Type 3: Smoothes the more detailed sections, for example curved line sections of decorative and fine
characters.
Conserving toner (Toner save)
This controls the print density and conserves the toner.
1
From the [File] menu item, select [Print].
2
Select [Printer Specific Options].
3
In [Toner Save], select [On].
4-6. Making PostScript settings (File save)
This makes settings such as the PostScript format.
1
From the [File] menu item, select [Print].
2
Select [PostScript Settings].
Format
This sets the data format for writing to files.
PostScript Job
This is selected for normal printing and for writing to PostScript files (PS files).
MEMO
z
On the application’s [Print] screen, if there is no [Output to file], the data is written to a PostScript file.
EPS Mac Standard Preview
This is selected for writing to an EPS file with a bitmap format preview attached.
MEMO
z
Files written as EPS files can be laid out on other applications.

4-6. Making PostScript settings (File save)
88
II Printer Chapter 4 Printing with Macintosh
EPS Mac Enhanced Preview
This is selected for writing to an EPS file with a PICT format preview attached.
EPS No Preview
This is selected for writing to an EPS file with no preview attached.
PostScript level
This sets the PostScript language level.
Select the PostScript level supported by the printer.
The PostScript levels that can be selected are as follows.
Level 1, 2 and 3 Compatible
Level 2 Only
Level 3 Only
Format
This selects the protocol (which determines the communications procedure) for data communications
with the printer.
ASCII
This format can be printed on all printers. This is the format normally selected.
Binary
This has smaller data volumes than ASCII, so printing is faster, but it is not supported by all appli-
cations and printers.
Font Inclusion
Font data can be stored together with the document data in a file.
The methods of font inclusion are as follows.
None
All
All But Standard 13
All But Fonts in PPD file

II Printer
89
Chapter 5 Printing Problems
This chapter explains how to handle problems with the printer in printing. If the methods in this
chapter do not solve the problem, please contact your service representative.
5-2. Problems printing with the Adobe driver..........................................92
5-3. Checking incomplete jobs..................................................................93

90
II Printer Chapter 5 Printing Problems
5-1. Problems with printing
No response to printer commands.
Check the following in order.
1
Check that the [Konica IP-xxx] is selected as the printer.
MEMO
z
The model name of print controller is displayed in [xxx].
2
Check that the copier power is switched On.
3
Print a [Test page].
If you can print a test page, but jobs from the computer cannot be printed, notifying the system admin-
istrator or service representative.
The paper type cannot be selected.
Check the following in order.
1
Click the [Paper] tab and [Cover] tab [Restore Defaults] button to restore the default
state.
2
Select the paper tray containing the paper to print as the [Paper Source].
Test page cannot be printed.
Check the following, in order.
1
Check the copier control panel LCD screen.
If [Ready to Copy] is displayed on the LCD screen, proceed to Step 3.
If a diagnostics message or error message is displayed on the LCD screen, refer to the copier opera-
tion manual.
If nothing at all is displayed on the LCD screen, proceed to Step 2.
2
Press the sub power switch on the control panel.
If the copier is in auto shut-off mode, pressing this switch puts the LCD screen into display mode.
3
Check that copying is possible.
If copying is possible, proceed to Step 4.

5-1. Problems with printing
91
II Printer Chapter 5 Printing Problems
4
Switch off the copier’s main power, then restart it. Once the print controller can be
used, print a test page again.
Important
● When you switch the main power for the copier ON/OFF, wait at least 10 seconds before switching it On
again. Switching the main power On again too quickly can cause a system error.
If you still cannot print a test page, contact your service representative.
The print settings and print results do not match.
Check the following operations.
1
Check that the printer settings have not been changed.
MEMO
z
For details on printer settings, refer to [Chapter 3 Printing with Windows] (
Duplex printing is not possible.
Check the following in order.
1
Click the [Paper] tab and [Cover] tab [Restore Defaults] button and restore the default
state.
2
Check that [B6] is not selected as the [Paper size:].
3
Check that [Plain Paper] is selected as the [Media type].
4
Check that the [Combination] checkbox is not checked.
Forms cannot be printed.
If any of the following conditions occur, forms cannot be printed.
1
The form data size exceeds the maximum value.
The relationship between the maximum form data size and the amount of memory in the Print Control-
ler is as follows.

5-2. Problems printing with the Adobe driver
92
II Printer Chapter 5 Printing Problems
MEMO
z
For details on memory, refer to [14-3. Options] (
Page 184).
5-2. Problems printing with the Adobe driver
PostScript error is displayed.
For details on the PostScript errors, refer to the Adobe homepage http://www.adobe.co.jp/supportservice/
custsupport/ SOLUTIONS/214063.html.
[Vmerror], [limitcheck], or other PostScript error is displayed.
It is possible that either the printer or the copier main unit memory is insufficient. We recommend increasing
the memory.
PostScript error is displayed no matter which computer is
attempting to print.
It is possible that the print controller or the PostScript option is not installed correctly. Check their installing
again.
PostScript error is displayed for printing from a specific appli-
cation.
There may be a problem in the application. Print a test file with this application.
If the application cannot print a test file, reinstall the application.
PostScript error is displayed for printing a specific file.
It is conceivable that the file print settings are incorrect, that an included figure is corrupted, or that there is a
problem element included in the file.
Try changing the print settings and printing.
If printing is still not possible, save the file as a new file or with a different name.
Amount of memory
Maximum form data size
64 MB (no expansion memory)
about 2.6 MB
128 MB (64 MB expansion memory)
about 5.2 MB

5-3. Checking incomplete jobs
93
II Printer Chapter 5 Printing Problems
PostScript error is displayed for printing a specific page.
It is conceivable that an element or font on the page is corrupted or that the memory required is more than is
available for printing.
Try printing one element or font at a time from the page.
If the individual fonts and elements can be printed, but the page as a whole cannot be printed, we recom-
mend increasing the memory.
Fonts cannot be downloaded.
It is conceivable that the copier control panel [Printer setting menu] - [Spool setting] is [On].
Set the [Spool setting] - [Off], cut off the main power for the copier, wait at least 10 seconds, then restart the
copier and execute the font download again.
For details on font downloading, refer to the user’s manual that comes with the font.
Non fixed size paper (custom) cannot be printed correctly
with a Macintosh.
The direction in which non fixed size paper is loaded in the copier may be incorrect.
Rotate the paper direction 90 degrees and then try printing after changing the settings of the driver and copier
accordingly.
5-3. Checking incomplete jobs
If there is an incomplete job, you can check in [Incomplete jobs list] screen.
The [Incomplete job list] screen can be displayed by using the following method.
1
Touch the [Scedule list] key on [Printer basic mode] screen on the LCD screen.
→ The [Schedule list] screen is displayed.
2
Touch the [Incomplete job list] key on the LCD screen.
→ The [Incomplete job list] screen is displayed.
If the job you're looking for is not displayed, touch the [
▲], [▼] key on the LCD screen to scroll the display.

5-3. Checking incomplete jobs
94
II Printer Chapter 5 Printing Problems
Contents displayed in the incomplete job list
On the incomplete job list, you can check the mode, filename or application name, cause, etc.
The contents displayed on the incomplete job list are as follows.
MEMO
● On the LCD screen [Incomplete job list] screen, when you touch the [Fax job] key or the [Print job] key,
the display returns to the [Schedule list] screen.
● When the main power for the copier is switched off, the incomplete jobs displayed on the [Incomplete job
list] screen are deleted.
Mode
Cause
Contents
Printer
Cancel
Stopping with STOP/CLEAR, deletion from schedule list,
key counter removal/setting, cancel requests from print
controller, aborted jobs, loading inhibited due to fixing
Web count, copy inhibited until L inspection, memory
error
Incorrect ID
A job that was not output because the User ID was incor-
rect
Over limit
A job that was not output because the Printer EKC/ECM
limit value was exceeded
Memory overflow
A job that was not output because the copier memory
was full
Scanner
Hard disk full
A job for which uploading could not be completed
because the hard disk was full
Cancel
Stopping with STOP/CLEAR, deletion from schedule list,
key counter removal/setting, cancel requests from Print
Controller, aborted jobs
PC-FAX
Cancel
Stopping with STOP/CLEAR, deletion from schedule list,
cancel requests from print controller, aborted jobs, trans-
mission and fax controller not installed, pipe transmission
error, file memory full
Hard disk full
A job for which uploading could not be completed
because the hard disk was full
Memory overflow
A job that was not output because the copier memory
was full

95
This chapter explains the operations
for sending/receiving faxes using a
computer.
Chapter 6 Fax Functions (PC-Fax)..... 96
Chapter 7 Sending Faxes.................... 99
Chapter 8 Phonebook Registration . 103
III FAX

III FAX
96
Chapter 6 Fax Functions (PC-Fax)
You can send and receive faxes directly on the computer without using paper. This is called
[PC-Fax].
This chapter summarizes the PC-Fax functions and explains the general flow of their process-
ing.
6-1. Sending faxes from the computer .....................................................97
6-2. Receiving faxes with the computer ...................................................97
6-3. Registering recipient names and their fax numbers. ......................97

97
III FAX Chapter 6 Fax Functions (PC-Fax)
6-1. Sending faxes from the computer
Normally, when a fax is sent, a handwritten or printed document is set in the fax machine and transmitted.
When the PC-Fax functions are used, you can use the the computer to send and receive faxes directly with-
out using paper.
The transmission command sent from the application is received by the printer driver.
When this printing system is used as a local printer, data is sent to the controller via the parallel interface
(IEEE1284); when it is used as a network printer, the data is sent via Ethernet (TCP/IP, IPX/SPX). The Print
Controller executes rasterizing processing for the picture (converting the output characters and pictures into
bit-map data). This data is accumulated in the E-RDH memory in the copier and transmitted as a fax.
Important
● To use PC-Fax, it is necessary to install the optional fax kit on the copier main unit. For details, ask your
service representative.
6-2. Receiving faxes with the computer
You can check fax documents received with the copier on the computer's screen.
After received fax data is accumulated into the copier's E-RDH memory, it can be printed on the copier.
When this data is checked on the computer, it is stored from the E-RDH memory to the Print Controller's hard
disk, then sent via the Ethernet to the computer's hard disk.
Important
● To use PC-Fax, it is necessary to install the optional fax kit on the copier main unit. For details, ask your
service representative.
6-3. Registering recipient names and their fax
numbers.
You can register and manage recipient names and their fax numbers in the phonebook.
These transmission recipients can be put together into groups. You can send a document to all the members
of a group with just a single operation.

98
III FAX Chapter 6 Fax Functions (PC-Fax)
6-4. Using PC-Fax
OSs supported by PC-Fax
The PC-Fax functions are executed using the PCL driver. The PC-Fax functions work on the following opera-
tions systems.
Windows 95
Windows 98
Windows Me
Windows NT 4.0
Windows 2000
Windows XP
Setting the fax unit
First, ready the fax kit installed on the copier for use.
1
Display the PCL driver [Properties].
MEMO
z
For details on how to display [Properties], refer to [3-1. Setting printer functions] (
2
Select the [Setup] tab.
3
In [Available options], select [Fax option], then click the [Add] button.
[Fax option] is displayed on the [Installed options].
4
Click the [OK] button.

III FAX
99
Chapter 7 Sending Faxes
This chapter explains the procedures for sending faxes.
7-1. Transmission procedure ..................................................................100
7-2. PC-Fax transmission error reports..................................................102

100
III FAX Chapter 7 Sending Faxes
7-1. Transmission procedure
This section explains how to use a computer to send files as faxes using PC-Fax.
Fax transmission
1
Open data with the application, then execute [Print].
→ The [Print] screen is displayed.
2
Check that the [Name] is [Konica IP-xxx PCL].
MEMO
z
The model name of print controller is displayed in [xxx].
3
Click the [Properties] button.
→ The [Properties] screen is displayed.
4
Select the [FAX] tab.
5
In [Mode Selection], select the [FAX].
6
In [Resolution], select either [200 dpi] (fine mode) or [400 dpi] (super fine mode).
7
Click the [Setup] button.
→ The [Fax Mode Setup] screen is displayed.
8
To print a file after a fax is sent, select [Print After Send].
9
To set a time to send the fax later, select [Delayed Transmission], then at [Time you
want to transmit], either click the [
▲] or [▼] button or key in the time.
MEMO
z
When using timer send, check that the clocks on the computer and the copier are synchronized.If the send time is
earlier than the Copier current time, the fax is sent the next day.
Example: Send time 12:00
Copier current time 12:10
→ Fax sent at 12:00 the next day

7-1. Transmission procedure
101
III FAX Chapter 7 Sending Faxes
10
For confidential transmission, select or input the [Sub Address] and [Sender ID].
MEMO
z
It is possible to execute confidential communications with another fax model by using F codes.
z
The sub-address can be a number of up to 20 byte digits
z
Up to 20 byte numbers, #, and * can be input as the ID.
z
For details on sub-addresses and send IDs, refer to the fax kit user’s manual.
11
Click the [OK] button.
→ The display returns to the [Properties] screen.
12
Specifying the fax destination.
When inputting the fax recipient
At [Recipient], input the [Name] and [Fax No.], then click the [Add] button.
→ The recipient input into the [Recipient] is displayed.
MEMO
z
The [Name] may be up to 40 byte characters.
z
The [Fax No.] may be up to 38 byte numbers (0 to 9), hyphens, #, *, E, P, T and spaces.
z
Up to 100 recipients may be registered in the [Recipient].
Selecting the recipient from the phonebook
This procedure selects a recipient preset in the phone book.
MEMO
z
For details on phonebook registration, refer to [Chapter 8 Phonebook Registration] (
1
Click the [Phonebook] button.
→ The [Phonebook] screen is displayed.
2
Select the recipient or broadcast group to send the fax to.
3
Click the [Add Recipient] button.
→ The selected recipient is displayed in the [Recipient].
MEMO
z
When a broadcast group is selected, all the members of the group are displayed in the [Recipient].
4
Check the recipient, then click the [OK] button.
→ The display returns to the [FAX] tab.
13
Check that the party for file transmission is displayed in the [Recipient].
MEMO
z
To delete a recipient, select the recipient to delete from the [Recipients], then click the [Delete] button.
z
There is no need to change the [Error Correction Mode], [Intl Transmission Mode], and [V.34 Mode] checkboxes. For
details, refer to the fax kit user’s manual.

7-2. PC-Fax transmission error reports
102
III FAX Chapter 7 Sending Faxes
14
Click the [OK] button.
→ The display returns to the [Print] screen.
15
Click the [OK] button.
→ The fax transmission check message is displayed.
16
Click the [OK] button.
→ The fax is sent to the specified recipient.
7-2. PC-Fax transmission error reports
If an error occurs during PC-Fax transmission, an error report is printed automatically.
MEMO
z
If you do not want error reports printed automatically, use the operator panel keys and switch [Report output settings]
[PC-Fax transmission error reports] - [Off].
REMOTE STATION
Fax number for the first recipient
CREATE
Time at which PC-Fax transmission was executed on the computer
START
Time specified for the timer reservation
Cause
Cause of the error
Name
Job name or user name
PC-Fax Tx Error Report
Failed to PC-Fax Tx. Please check and try PC-Fax Tx again!
REMOTE STATION
CREATE
START
Cause
Factor
Cancel : Stop PC-Fax job, ID difer : EKC/ECM user ID differ, Limit over : EKC/ECM counter limit over
HD full : Hard disc full, Mem full : Memory over
Name
test .pdf
Mem Full

III FAX
103
Chapter 8 Phonebook Registration
You can register and manage recipient information in the phonebook.
This chapter explains how to use the phonebook.
8-1. Registering phonebook ....................................................................104
8-2. Managing phonebooks .....................................................................108

104
III FAX Chapter 8 Phonebook Registration
8-1. Registering phonebook
Registering parties to which you send fax documents into the phonebook.
Registering recipient information
1
Open data with the application, then execute [Print].
→ The [Print] screen is displayed.
2
Check that [Name] is [Konica IP-xxx PCL].
MEMO
z
The model name of print controller is displayed in [xxx].
3
Click the [Properties] button.
→ The [Properties] screen is displayed.
4
Select the [FAX] tab.
5
In [Mode Selection], select the [FAX].
6
Click the [Phonebook] button.
→ The [Phonebook] screen is displayed.
7
Click the [Personal] button.
→ The [Personal Information] screen is displayed.
8
Input the [Name], [Fax No.], [Company], and [Department].
MEMO
z
When inputting into the name column of the phonebook, add honorifics.
z
There is no need to change the [ECM], [Int.Tx], and [V.34] checkboxes. For details, refer to the fax kit user’s manual.
z
For the [Name], [Company], and [Department], up to 40 byte characters may be input.
z
[Fax No.] may be up to 38 byte numbers (0 to 9), hyphens, #, *, E, P, T and spaces.
9
Click the [OK] button.
→ The recipient is registered and displayed in the recipient column.
Creating groups of recipients
Recipients can be registered into groups, such as [suppliers] or [branch companies].
Limitation
● Broadcast transmission is not possible using groups prepared here.

8-1. Registering phonebook
105
III FAX Chapter 8 Phonebook Registration
1
On the [Phonebook] screen, click the [Folder] button.
→ The [Folder Information] screen is displayed.
2
Input the [Folder Name].
MEMO
z
The folder name may be up to 40 byte characters.
3
Click the [OK] button.
→ The folder is registered and displayed in the layer column.
4
Select the recipient to be registered into a group from the left-side directory tree.
5
Right click, then select [Copy] or [Cut].
MEMO
z
Folders can be set up to three layers deep.
6
Select the group into which to register the recipient from the left-side directory tree.
7
Right click, then select [Paste].
→ The recipient information is registered in the group.
Revising recipient information
1
On the [Phonebook] screen, select the recipient to be changed from the recipient informa-
tion column.
→ The selected recipient information is displayed inverted.
2
Click the [Edit] button.
→ The [Personal Information] screen is displayed
3
Revise any necessary items.
Deleting unnecessary recipients and folders
On the [Phonebook] screen, select the recipient or folder to delete.
1
On the [Phonebook] screen, select the recipient information or folder to be deleted.
→ The selected recipient information or folder is displayed inverted.
2
Click the [Delete] button.
→ The confirmation message is displayed.
3
Click the [Yes] button.
→ The specified recipient or folder is deleted.
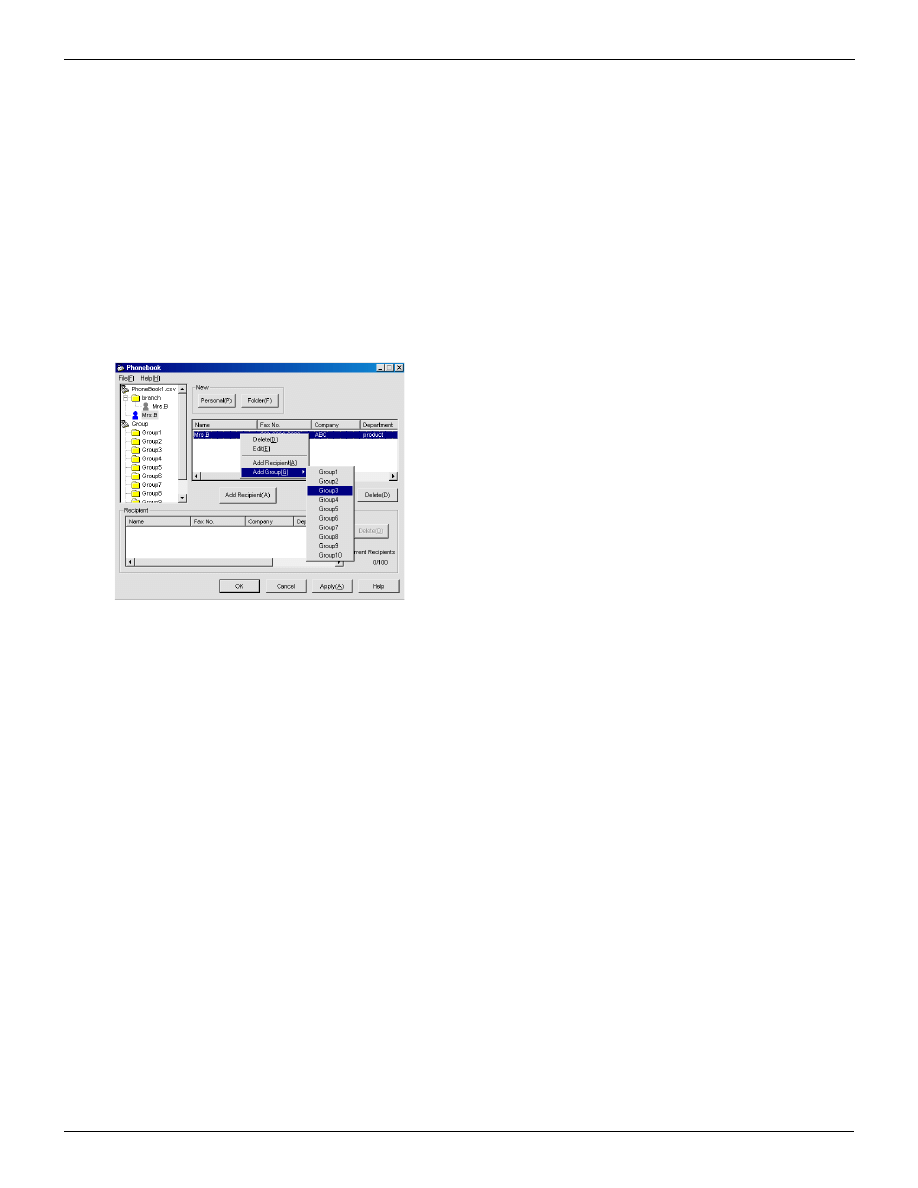
8-1. Registering phonebook
106
III FAX Chapter 8 Phonebook Registration
Registering broadcast group
You can pre-register the recipients to which you want to send the same fax. Such a group is called a [broad-
cast group].
1
On the [Phonebook] screen, select the recipient to be registered into the broadcast
group from the recipient information column.
→ The selected recipient information is displayed inverted.
2
Right click, then from the [Add Group] broadcast group list, select the broadcast group
to register into.
→ The recipient is copied into the selected broadcast group.
Deleting a recipient from a broadcast group
1
On the [Phonebook] screen, select the broadcast group in which the recipient is registered
from the broadcast group column.
→ The selected broadcast group is displayed inverted and the recipients registered in that broad-
cast group are displayed in the recipient column.
2
Select the recipient to delete from the recipient column.
→ The selected recipient is displayed inverted.
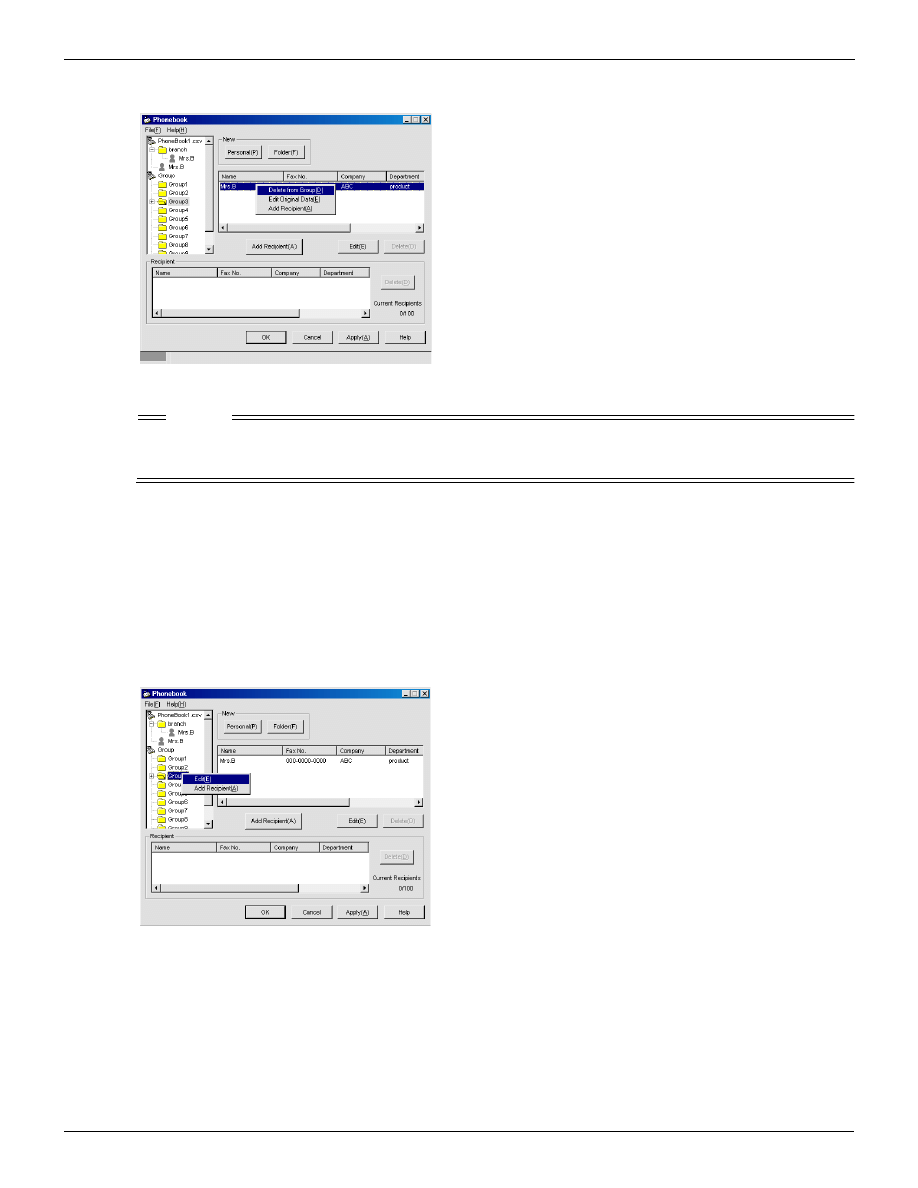
8-1. Registering phonebook
107
III FAX Chapter 8 Phonebook Registration
3
Right click, then select [Delete from Group].
→ The recipient is deleted from the broadcast group.
MEMO
● Ten broadcast groups are set. You cannot add or delete broadcast groups.
● The total number of recipients that can be registered in all 10 broadcast groups is 100.
Naming a broadcast group
1
On the [Phonebook] screen, select the broadcast group to be named from the broadcast
group column.
→ The selected broadcast group is displayed inverted.
2
Right click, then select the [Edit] screen.
→ The [Group Information] screen is displayed
3
Input the [Group Name].
MEMO
z
The group name may be up to 40 byte characters.
4
Click the [OK] button.
→ The group name is registered and displayed in the broadcast group column.

108
III FAX Chapter 8 Phonebook Registration
8-2. Managing phonebooks
The phonebook in which recipient information is registered can be named and saved as a file. You can have
multiple phonebooks for different usages.
Saving phonebooks
1
When the registration of the information in the phonebook is complete, click the [OK]
or [Apply] button on the [Phonebook] screen.
→ The [Save As] screen is displayed.
MEMO
z
For details on registering in the phonebook, refer to [8-1. Registering phonebook] (
2
Specify the storage location, then input the file name.
MEMO
z
The extension of a file is [.csv].
3
Click the [Save] button.
→ The phonebook is saved as a file.
Preparing a new phonebook
1
On the [Phonebook] screen, click [File] - [New].
→ The [IniBook.csv] folder is displayed in the layer column.
2
The recipient information is registered.
MEMO
z
For details on registering in the phonebook, refer to [8-1. Registering phonebook] (
3
Click the [OK] or [Apply] button.
→ The [Save As] screen is displayed.
4
Specify the storage location, then input the File name.
5
Click the [Save] button.
→ The phonebook is saved as a file.

8-3. Phonebook usage
109
III FAX Chapter 8 Phonebook Registration
Switching between phonebooks
This is used to switch between phonebooks on the [Phonebook] screen.
1
On the [Phonebook] screen, click [File] - [Open].
→ The [Open] screen is displayed.
2
Select the folder for the phonebook to switch to, then click the [Open] button.
→ The selected phonebook is displayed.
8-3. Phonebook usage
Specifying the recipients registered in the phonebook and sending the fax.
Sending faxes using the phonebook
1
Click the [Phonebook] button on the [Fax] tab.
→ The [phonebook] screen is displayed.
2
Select the recipient or broadcast group to which send the fax.
3
Click the [Add Recipient] button.
→ The selected recipient is displayed in [Recipient].
If you have selected a broadcast group, all the recipients in that group are displayed.
4
If there are any unnecessary recipients in [Recipient], select them, then click the
[Delete] button.
→ The unnecessary recipients are deleted from the send list.
5
Check the send list, then click the [OK] button.
→ The display returns to the [Fax] tab.
6
Click the [OK] button.
→ The display returns to the [Print] screen.
7
Send the fax.
MEMO
z
For details on sending faxes, refer to [7-1. Transmission procedure] (

110
This volume explains operating meth-
ods for scanning with the copier.
Functions........................ 111
Functions........................ 115
IV Scanner

IV Scanner
111
Chapter 9 Summary of Scanner Functions
Data scanned with the copier can be imported into the computer, sent over the Internet as
email attached files, and uploaded to file servers.
This chapter summarizes the scanner functions.

112
IV Scanner Chapter 9 Summary of Scanner Functions
9-1. Scanner functions
Data scanned from the copier RADF or platen glass is sent to the copier E-RDH memory and stored on the
print controller's hard disk as TIFF or PDF format files.
Data stored on the hard disk can be imported into the computer via the Ethernet, sent over the Internet as
email attached files, and uploaded to file servers.
When documents are scanned, the [Quality], [Magnification ratio], [Resolution], [Continuous pages], [Erase
outside of document], etc. can be specified.
Scanned data can be selected and saved or sent to three destinations, [Scan to box], [Scan to E-mail], and
[Scan to FTP].[Names need to be checked]
Important
● To use the scanner functions, the copier must have the optional hard disk. For details, ask your service
representative.
● When using the scanner functions, connect with the computer via Ethernet. The scanner functions can-
not be used from the parallel port.
● It is necessary that the network cards in the computer and this printing system have appropriate IP
addresses assigned and that the TCP/IP network is enabled. For more details on the network settings,
ask the network administrator.
113
IV Scanner Chapter 9 Summary of Scanner Functions
9-2. Scan data output
Scanned data can be selected and saved or sent from three destinations, [Scan to box], [Scan to E-mail], and
[Scan to FTP].
This section explains these three types of destinations.
Storing to a box (Scan to box)
The scanned data is stored on the hard disk in the print controller. This hard disk has [Boxes] that serve the
role of folders. Scanned data is managed with the numbers for these boxes.
When scanning a document, specify a four-digit [Box number].
Scanned data stored in one of these boxes can be imported by a TWAIN-compliant Windows application,
edited and saved. Data stored in these boxes can also be deleted by a computer on the network.
For more information, refer to [10-1. Selecting the destination] (
Box 0124
Document No.
Hard disk
Print controller
Document
Copier main unit
E-RDH
Network controller
Box 5432
Document No.
TWAIN-compliant applications
Network scanner driver
Ethernet
TCP/IP (FTP)
HUB
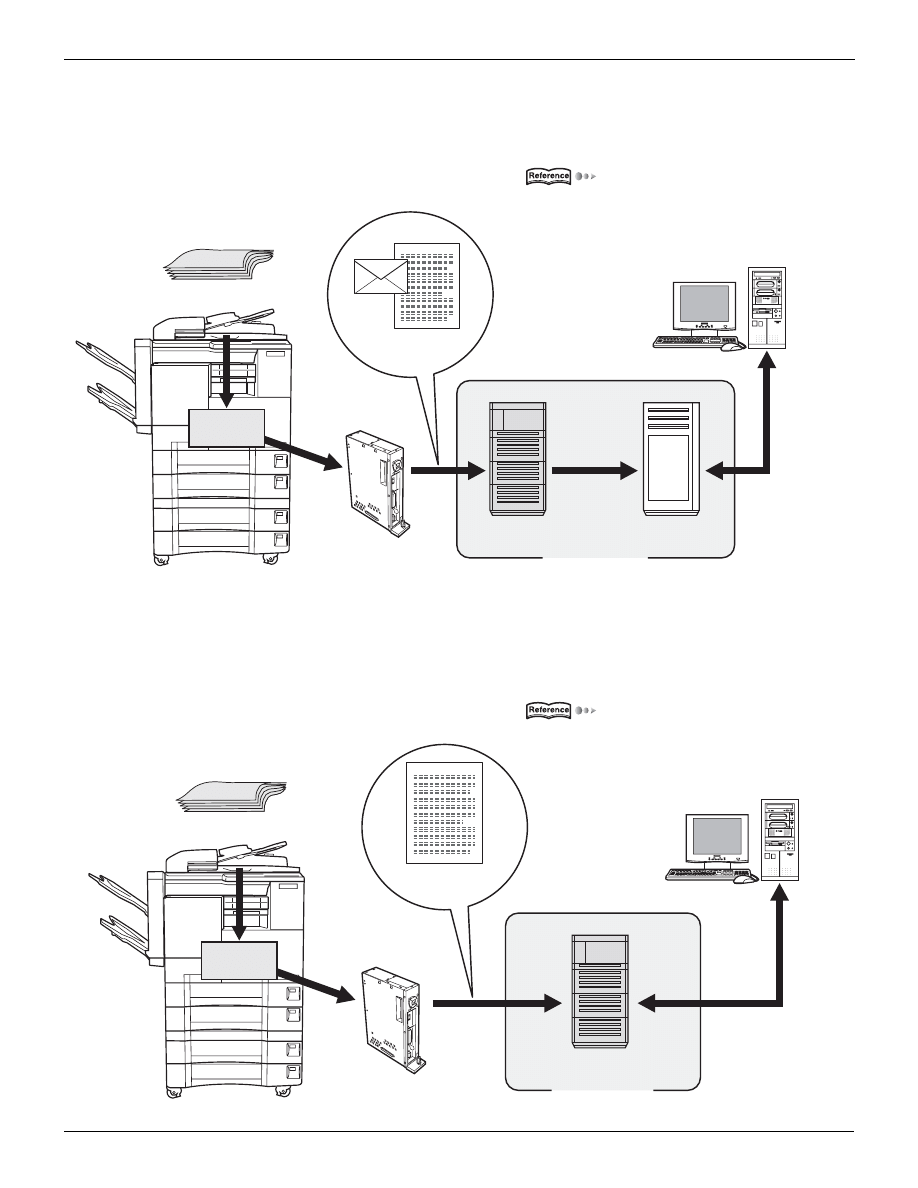
9-2. Scan data output
114
IV Scanner Chapter 9 Summary of Scanner Functions
Sending with email (Scan to E-mail)
Scan data can be sent the specified email address. Input the address and name on the copier's LCD screen
and send as an email attached file.
For more information, refer to [10-1. Selecting the destination] (
Sending to FTP server (Scan to FTP)
Scan data can be uploaded to the specified FTP server. Input the FTP server address, login password, etc.
on the copier's LCD screen.
For more information, refer to [10-1. Selecting the destination] (
E-RDH
Copier main unit
Document
Email and Scan data
Printer
Controller
Transfer to
destination
server
SMTP server
POP server
destination
Internet
E-RDH
Document
Scan data
Printer
Controller
FTP server
Download
Internet
Copier main unit

IV Scanner
115
Chapter 10 Using the Scanner Functions
This chapter explains how to use the scanner functions.
10-1. Selecting the destination................................................................116
10-2. Registering storage locations/destinations .................................125
10-4. Setting scanner functions ..............................................................133
10-5. Scanning documents......................................................................134
10-6. Importing scanned data into a computer......................................142
10-7. Using the network scanner driver .................................................142

116
IV Scanner Chapter 10 Using the Scanner Functions
10-1. Selecting the destination
Select the destination for scanned data as [Box], [E-Mail], or [FTP].
Operate from [Transmission method selection] screen.
1
Press the
button on the control panel.
→ The [Printer mode basic] screen is displayed on the LCD screen.
2
Touch the [SCANNER] key on the LCD screen.
→ The [Transmission method selection] screen is displayed on the LCD screen.
For subsequent operations, refer to the following.
Storing to a box
● It is not possible to select multiple boxes at the same time.
Sending with email
● Up to five destinations can be input manually.
● When selecting destinations from those already registered, up to 200 can be selected.
● When specifying from input manually and selecting from those already registered, up to 205 can be sent
at the same time.
Sending to FTP server
● It is not possible to select multiple destinations at the same time.
MEMO
● [Box], [E-Mail], and [FTP] can be set at the same time.
Storing to a box (Scan to box)
The scanned data is stored into a box on the print controller’s hard disk.
The scan data is managed with boxes numbered 0001-9999.
There are three methods for specifying the storage location: The method specifying only the box number, the
method inputting the storage location manually, and selecting from an already-registered box.
Specifying the box number
Inputting the storage location manually
Selecting the storage location from pre-registered boxes
Limitation
● It is not possible to select multiple boxes at the same time.
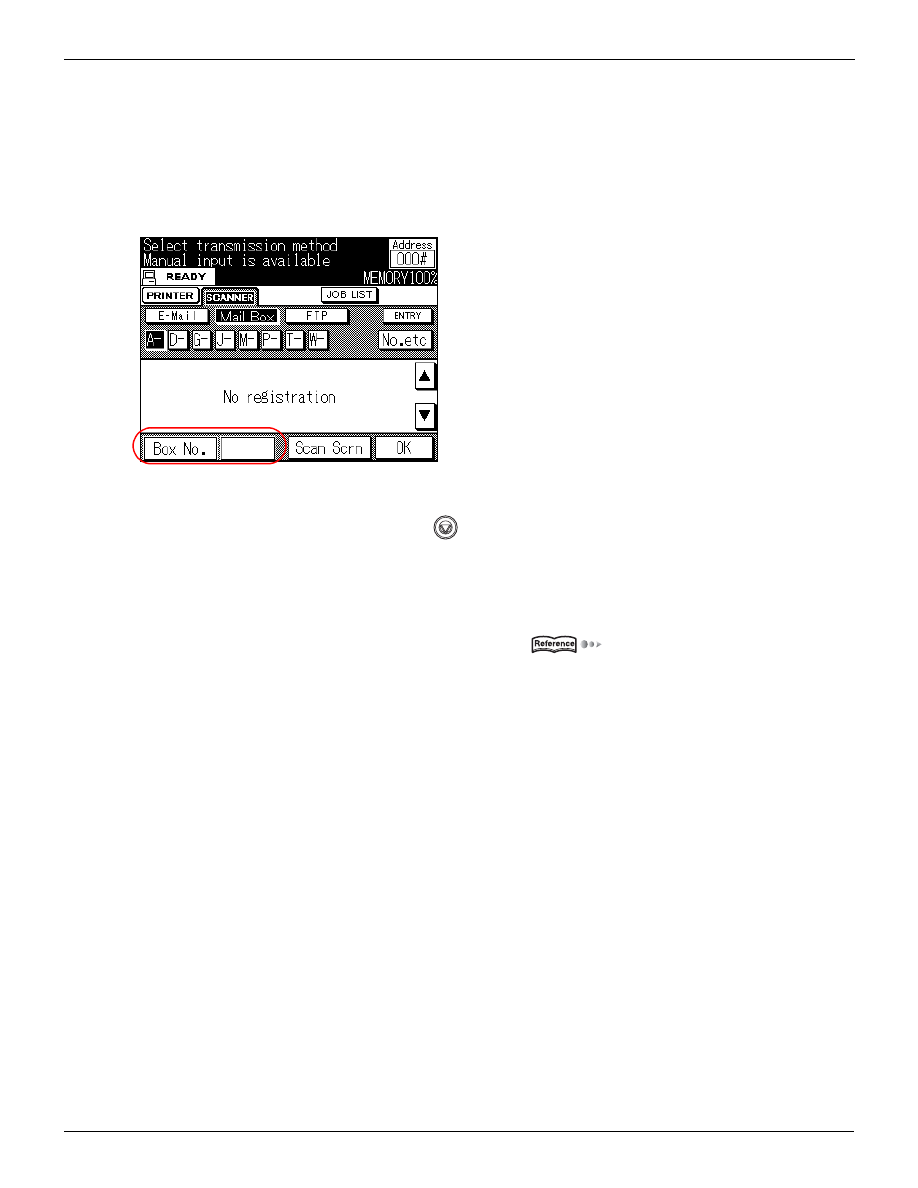
10-1. Selecting the destination
117
IV Scanner Chapter 10 Using the Scanner Functions
Specifying the box number
1
Touch the [Mail Box] key on [Transmission method selection] screen on the LCD screen.
→ [Mail Box] is displayed inverted. The [Box select] screen is displayed.
2
Input a box number from 0001 to 9998 with the number keys on the control panel.
→ The box number input as the [Box No.] on the [Box select] screen is displayed.
MEMO
z
If you input the wrong box number, press the
(Stop/Clear) button on the copier to erase the input number.
3
Touch the [OK] key on the LCD screen.
→ The [Scanner setting basic] screen is displayed.
For more information, refer to [10-4. Setting scanner functions] (
Inputting the storage location manually
1
Touch the [Mail Box] key on [Transmission method selection] screen on the LCD screen.
→ [Mail Box] is displayed inverted. The [Box select] screen is displayed.
2
Touch the [Scan Scrn] key on the LCD screen.
→ The [Box input] screen is displayed.
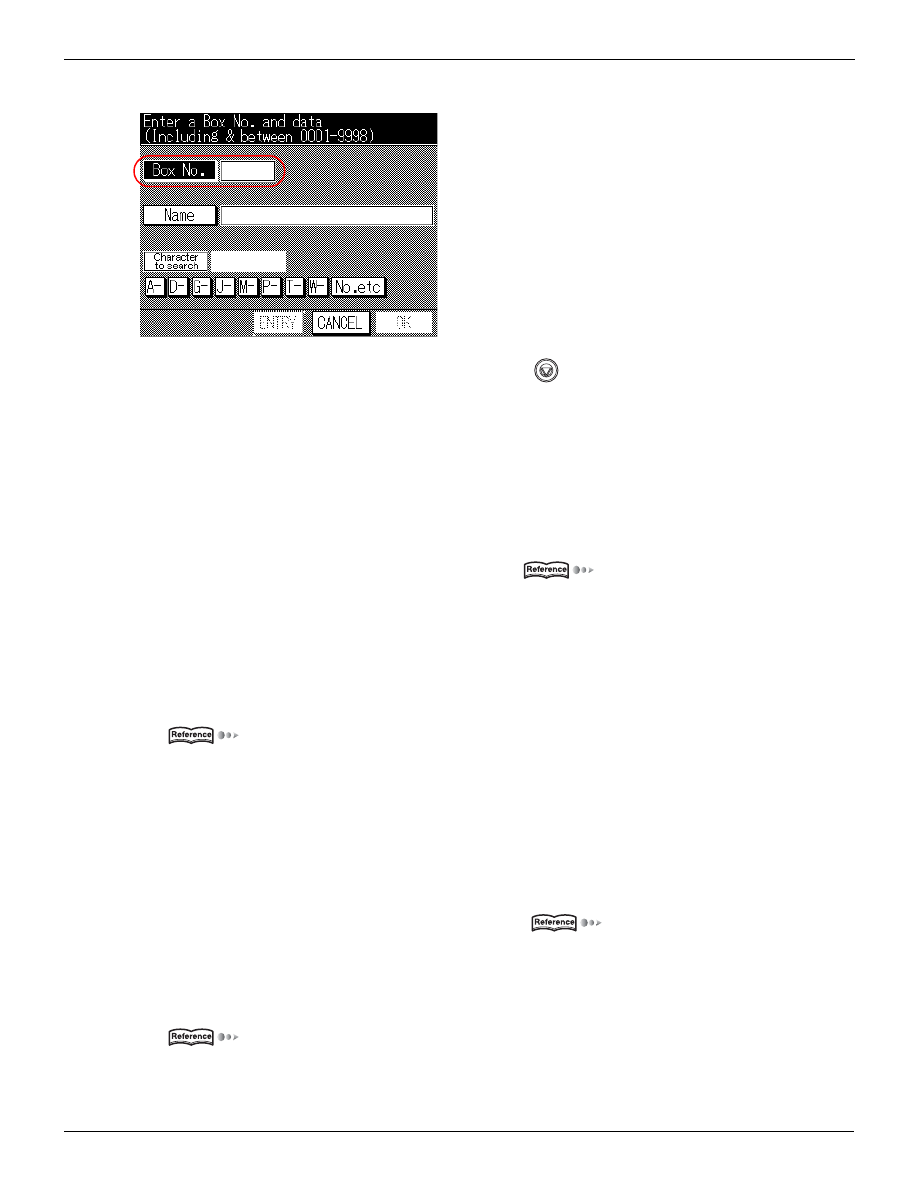
10-1. Selecting the destination
118
IV Scanner Chapter 10 Using the Scanner Functions
3
Input a box number from 0001 to 9998 with the number keys on the copier.
MEMO
z
If you input the wrong box number, touch the [Box No.] key or
(Stop/Clear) button on the control panel to erase
the input number.
4
Touch the [Name] key on the LCD screen.
→ The [Registration name input] screen is displayed.
5
Touch the character keys on the LCD screen to input the registration name.
MEMO
z
The [Registration name] may be up to 10 characters.
For details on character input, refer to [10-3. Inputting text]. (
6
Touch the [OK] key on the LCD screen.
→ The display returns to the [Box input] screen.
MEMO
z
If you touch the [A-] - [No. etc] key on the LCD screen, set the registration group, then touch the [ENTRY] key on the
LCD screen, the [Box No.], [Registration number], and [Character to Search] are registered.
For details on registering a storage location, refer to [10-2. Registering storage locations/destinations]
(
7
Touch the [OK] key on the LCD screen.
→ The display returns to the [Box select] screen.
8
Touch the [OK] key on the LCD screen.
→ The [Scanner setting basic] screen is displayed.
For more information, refer to [10-4. Setting scanner functions] (
Selecting the storage location from pre-registered boxes
MEMO
z
For details on registering a storage location, refer to [10-2. Registering storage locations/destinations]
(
1
Touch the [Mail Box] on [Transmission method selection] screen on the LCD screen.
→ [Mail Box] is displayed inverted. The [Box select] screen is displayed.
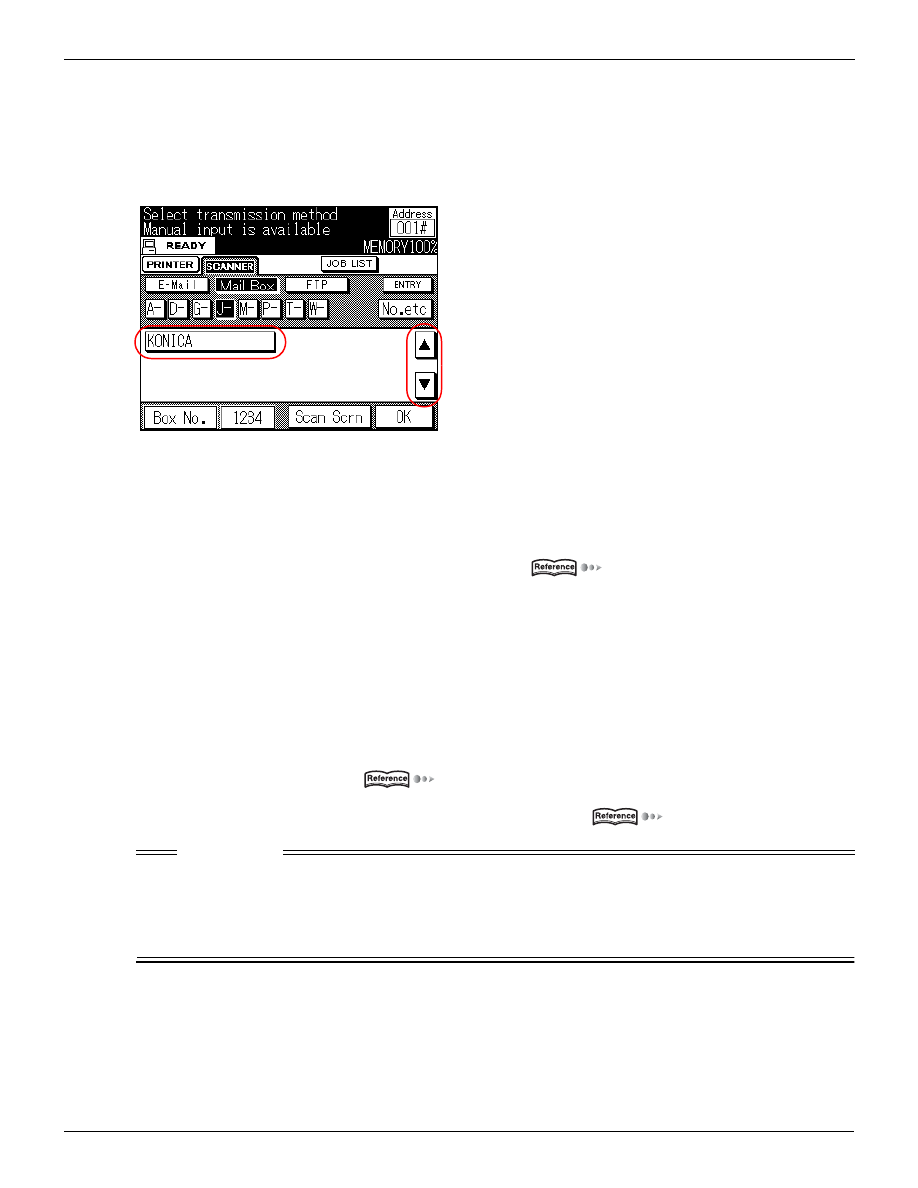
10-1. Selecting the destination
119
IV Scanner Chapter 10 Using the Scanner Functions
2
Select the group registered from [A-] - [No. etc] on the LCD screen.
→ The registration is displayed registered in the selected group.
3
Select the storage location number from the box number list.
Touch the [
▲] or [▼] key on the LCD screen to switch the screen.
→ The selected box number is displayed inverted.
4
Touch the [OK] key on the LCD screen.
→ The [Scanner setting basic] screen is displayed.
For more information, refer to [10-4. Setting scanner functions] (
Sending with email (Scan to E-mail)
The scan data is sent to the specified email address. Input the address and name on the copier's LCD screen
and send as an email attached file.
Multiple destinations can be selected.
There are two methods for inputting the destination: Inputting manually and selecting from the destinations
already registered.
Inputting the destination manually (
Selecting the destination from the destinations already registered (
Limitation
● Up to five destinations can be input manually.
● When selecting destinations from those already registered, up to 200 can be selected.
● When specifying from input manually and selecting from those already registered, up to 205 can be sent
at the same time.
Inputting the destination manually
1
Touch the [E-Mail] key on [Transmission method selection] screen on the LCD screen.
→ [E-Mail] is displayed inverted. The [Email select] screen is displayed.
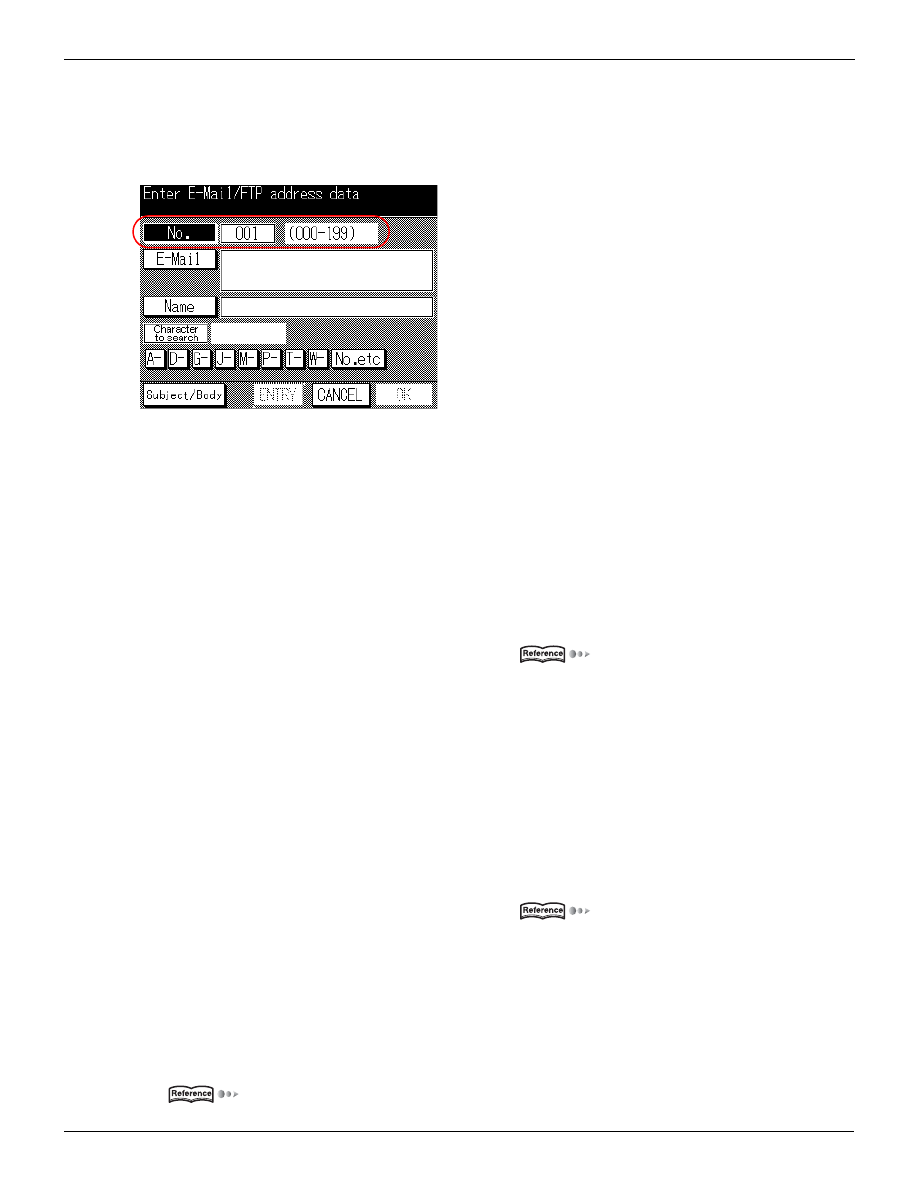
10-1. Selecting the destination
120
IV Scanner Chapter 10 Using the Scanner Functions
2
Touch the [Scan Scrn] key on the LCD screen.
→ The [Email registration/edit] screen is displayed.
3
Input the registration number from 000 to 199 with the number keys on the copier.
MEMO
z
If you input the wrong box number, touch the [No.] key on the LCD screen on the control panel to erase the input
number.
4
Touch the [E-Mail] key on the LCD screen.
→ The [Email address input] screen is displayed.
5
Touch the character keys on the LCD screen to input the email address.
MEMO
z
Up to 60 alphanumerics and symbols can be input as the [Email address].
For details on character input, refer to [10-3. Inputting text] (
6
Touch the [OK] key on the LCD screen.
→ The display returns to the [Email registration/edit] screen.
7
Touch the [Name] key on the LCD screen.
→ The [Registration name input] screen is displayed.
8
Touch the character keys on the LCD screen to input the registration name.
MEMO
z
The [Registration name] may be up to 10 characters.
For details on character input, refer to [10-3. Inputting text] (
9
Touch the [OK] key on the LCD screen.
→ The display returns to the [E-mail input] screen.
MEMO
z
If you touch the [A-] - [No. etc] key on the LCD screen, set the registration group, then touch the [ENTRY] key on the
LCD screen, the [Box No.], [Name], and [Character to Search] are registered.
For details on registering a storage location, refer to [10-2. Registering storage locations/destinations]
(

10-1. Selecting the destination
121
IV Scanner Chapter 10 Using the Scanner Functions
10
Touch the [Subject/Body] key on the LCD screen.
→ The [Subject/body input] screen is displayed.
11
Touch the [Subject] key on the LCD screen.
→ The [Subject input] screen is displayed.
12
Touch the character keys on the LCD screen to input the subject.
MEMO
z
Up to 45 alphanumerics and symbols can be input as the [Subject].
For details on character input, refer to [10-3. Inputting text] (
z
If you register a subject, the subject can be used from the [Subject list] screen.
For details on registering a subject, refer to [10-2. Registering storage locations/destinations] (
13
Touch the [OK] key on the LCD screen.
→ The display returns to the [Subject/body input] screen.
14
Touch the [Body] key on the LCD screen.
→ The [Body input] screen is displayed.
15
Touch the character keys on the LCD screen to input the body.
MEMO
z
Up to 48 alphanumerics and symbols can be input as the [Body].
For details on character input, refer to [10-3. Inputting text] (
z
If you register a body, the body can be used from the [Massage body] screen.
For details on registering the body, refer to [10-2. Registering storage locations/destinations](
Page 125).
16
Touch the [OK] key on the LCD screen.
→ The display returns to the [Subject/body input] screen.
17
Touch the [OK] key on the LCD screen.
→ The display returns to the [Email input] screen.
18
Touch the [OK] key on the LCD screen.
→ The display returns to the [Email select] screen.
The [No.], [E-Mail], [Name], [Subject], [Body], and [Character to search] are added to the destina-
tion.
To continue adding destinations, return to Step 2 and add them.
MEMO
z
When you touch the [CANCEL] key on the LCD screen, the destination is not set and the display returns to the [Email
select] screen.
z
For manual input, up to five destinations can be set.
19
Touch the [OK] key on the LCD screen.
→ The [Scanner setting basic] screen is displayed.
For more information, refer to [10-4. Setting scanner functions] (
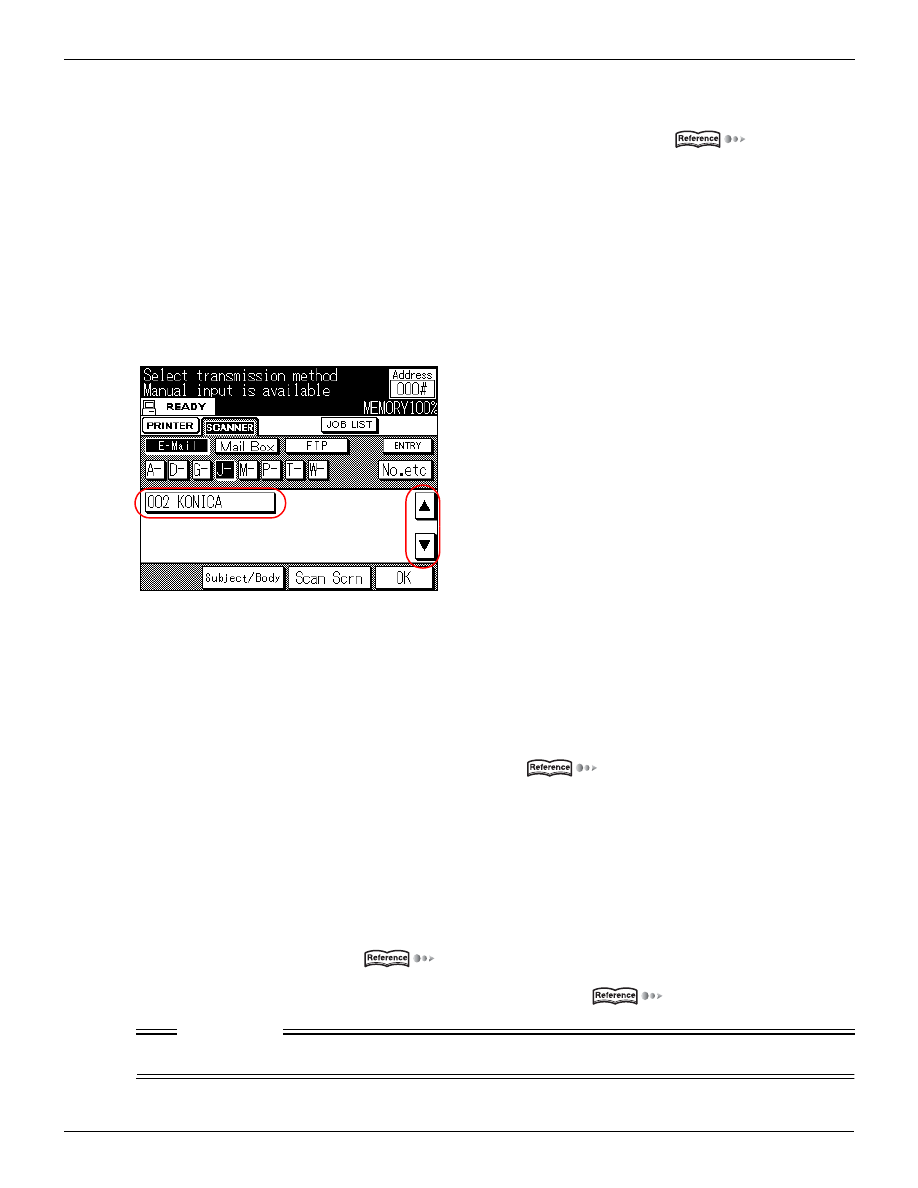
10-1. Selecting the destination
122
IV Scanner Chapter 10 Using the Scanner Functions
Selecting the destination from the destinations already registered
MEMO
z
For details on registering a box, refer to [10-2. Registering storage locations/destinations] (
1
Touch the [E-Mail] key on [Transmission method selection] screen on the LCD screen.
→ [E-Mail] is displayed inverted. The [Email select] screen is displayed.
2
Select the group registered from [A-] - [No. etc] on the LCD screen.
→ The registration is displayed registered in the selected group.
3
Select the destination from the destination list.
Touch the [
▲] or [▼] key on the LCD screen to switch the screen.
→ The selected destination is displayed inverted.
MEMO
z
Up to 200 destinations can be selected at the same time.
4
Touch the [OK] key on the LCD screen.
→ The [Scanner setting basic] screen is displayed.
For more information, refer to [10-4. Setting scanner functions](
Sending to FTP server (Scan to FTP)
Scan data can be uploaded to the specified FTP server. Input the FTP server address, login password, etc.
on the copier's LCD screen.
There are two methods for inputting the destination: Inputting manually and selecting from the destinations
already registered.
Inputting the destination manually (
Selecting the destination from the destinations already registered (
Limitation
● It is not possible to select multiple destinations at the same time.
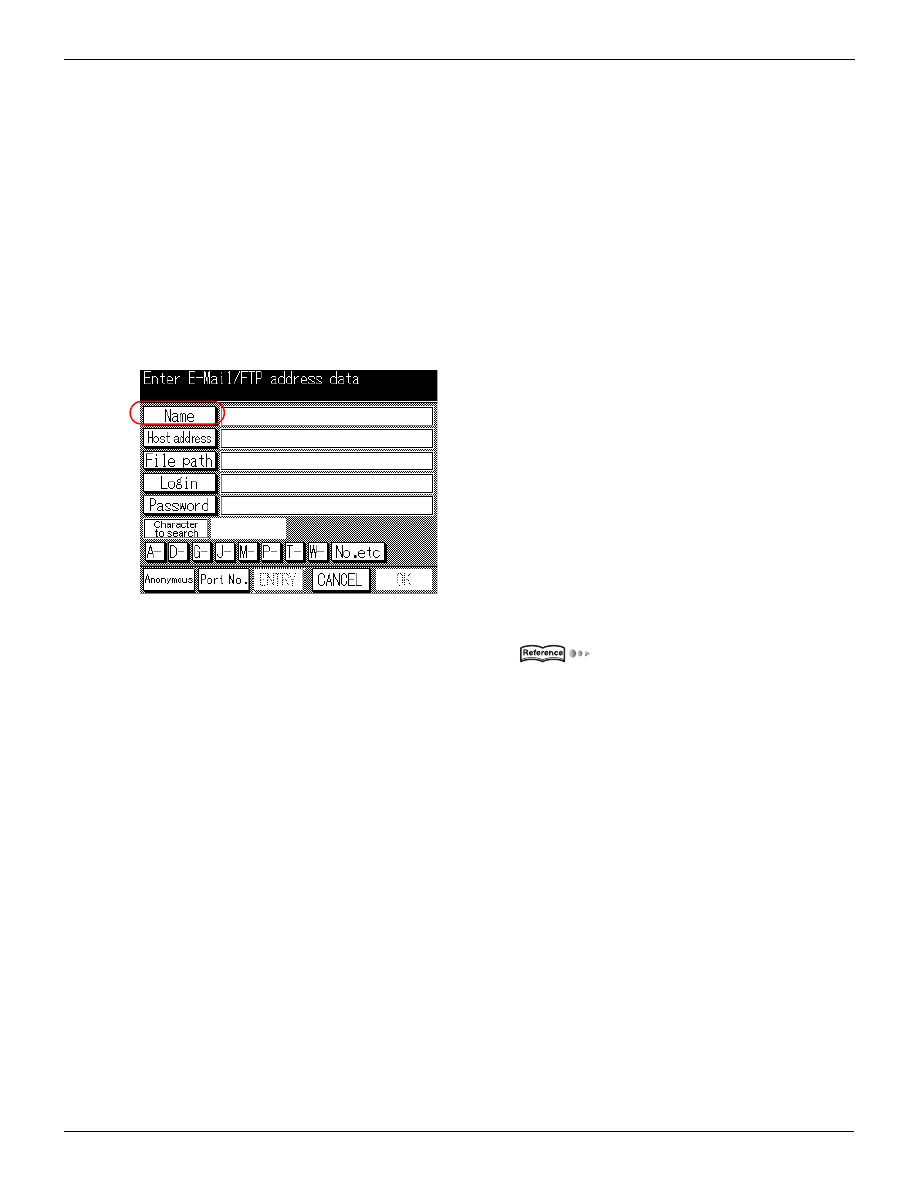
10-1. Selecting the destination
123
IV Scanner Chapter 10 Using the Scanner Functions
Inputting the destination manually
This inputs the information for the destination FTP server manually.
1
Touch the [FTP] key on [Transmission method selection] screen on the LCD screen.
→ [FTP] is displayed inverted. The [FTP select] screen is displayed.
2
Touch the [Scan Scrn] key on the LCD screen.
→ The [FTP registration/edit] screen is displayed.
3
Touch the [Name] key on the LCD screen and specify the name of the profile for the FTP
server to send to.
This inputs the destination name displayed in the destination list.
MEMO
z
The [Name] may be up to 10 characters.
For details on character input, refer to [10-3. Inputting text] (
4
Touch the [OK] key on the LCD screen.
→ The display returns to the [FTP registration/edit] screen.
5
Touch the [Host address] key on the LCD screen, then input the address of the FTP server
to send the data to or the URL.
MEMO
z
Up to 63 alphanumerics and symbols can be input as the [Host address].
6
Touch the [OK] key on the LCD screen.
→ The display returns to the [FTP registration/edit] screen.
7
Touch the [File path] key on the LCD screen and input the FTP server file storage location.
MEMO
z
Up to 96 alphanumerics and symbols can be input as the [File path].
8
Touch the [OK] key on the LCD screen.
→ The display returns to the [FTP registration/edit] screen.

10-1. Selecting the destination
124
IV Scanner Chapter 10 Using the Scanner Functions
9
Touch the [Login] key on the LCD screen and input the account necessary for logging on to
the FTP server.
MEMO
z
Up to 47 alphanumerics and symbols can be input as the [Login].
z
Touch the [Anonymous] key for logging onto an FTP server that does not require an account.
10
Touch the [OK] key on the LCD screen.
→ The display returns to the [FTP registration/edit] screen.
11
Touch the [Password] key on the LCD screen and input the Password necessary for log-
ging on to the FTP server.
Limitation
● When [Anonymous] is selected for the [Login], input the sender’s email address as the [Password].
Password input cannot be omitted.
MEMO
z
Up to 31 alphanumerics and symbols can be input as the [Password].
For details on character input, refer to [10-3. Inputting text] (
12
Touch the [OK] key on the LCD screen.
→ The display returns to the [FTP registration/edit] screen.
13
Touch the [Port No.] key on the LCD screen.
This specifies the port No. used by the FTP server.
There is normally no need to change this.
→ The [Port No. input] screen is displayed.
14
Input the User ID with [0] - [9] on the LCD screen.
Important
● Changing the port number inappropriately can create obstructions on the network. Do not change the
port number without instructions from the network administrator.
MEMO
z
The [Port No.] may be up to five characters.
15
Touch the [OK] key on the LCD screen.
The display returns to the [FTP registration/edit] screen.
16
Touch the [OK] key on the LCD screen.
→ The display returns to the [FTP select] screen.
MEMO
z
If you touch the [A-] - [No. etc] key on the LCD screen, set the registration group, then touch the [ENTRY] key on the
LCD screen, the [Name], [Host address], [File path], [Login], [Password], [Character to Search], and [Port No.] are
registered.
For details on registering a storage location, refer to [10-2. Registering storage locations/destinations]
(

10-2. Registering storage locations/destinations
125
IV Scanner Chapter 10 Using the Scanner Functions
z
When you touch the [CANCEL] key on the LCD screen, the destination FTP server information is not set and the dis-
play returns to the [FTP select] screen.
17
Touch the [OK] key on the LCD screen.
→ The [Scanner setting basic] screen is displayed.
For more information, refer to [10-4. Setting scanner functions](
Selecting the destination from the destinations already registered
MEMO
z
For details on registering destination, refer to [10-2. Registering storage locations/destinations] (
1
Touch the [FTP] key on [Transmission method selection] screen on the LCD screen.
→ [FTP] is displayed inverted. The [FTP select] screen is displayed.
2
Select the group registered from [A-] - [No. etc] on the LCD screen.
→ The registration is displayed registered in the selected group.
3
Select the destination from the destination list.
Touch the [
▲] or [▼] key on the LCD screen to switch the screen.
→ The selected destination is displayed inverted.
Limitation
● It is not possible to select multiple destinations at the same time.
4
Touch the [OK] key on the LCD screen.
→ The [Scanner setting basic] screen is displayed.
For more information, refer to [10-4. Setting scanner functions](
10-2. Registering storage locations/destinations
Registering destinations for scanned data
1
Operate from [Transmission method selection] screen.
MEMO
z
For details, refer to [10-1. Selecting the destination] (
2
Touch the [ENTRY] key on the LCD screen.
→ The [Registration/edit menu] screen is displayed.
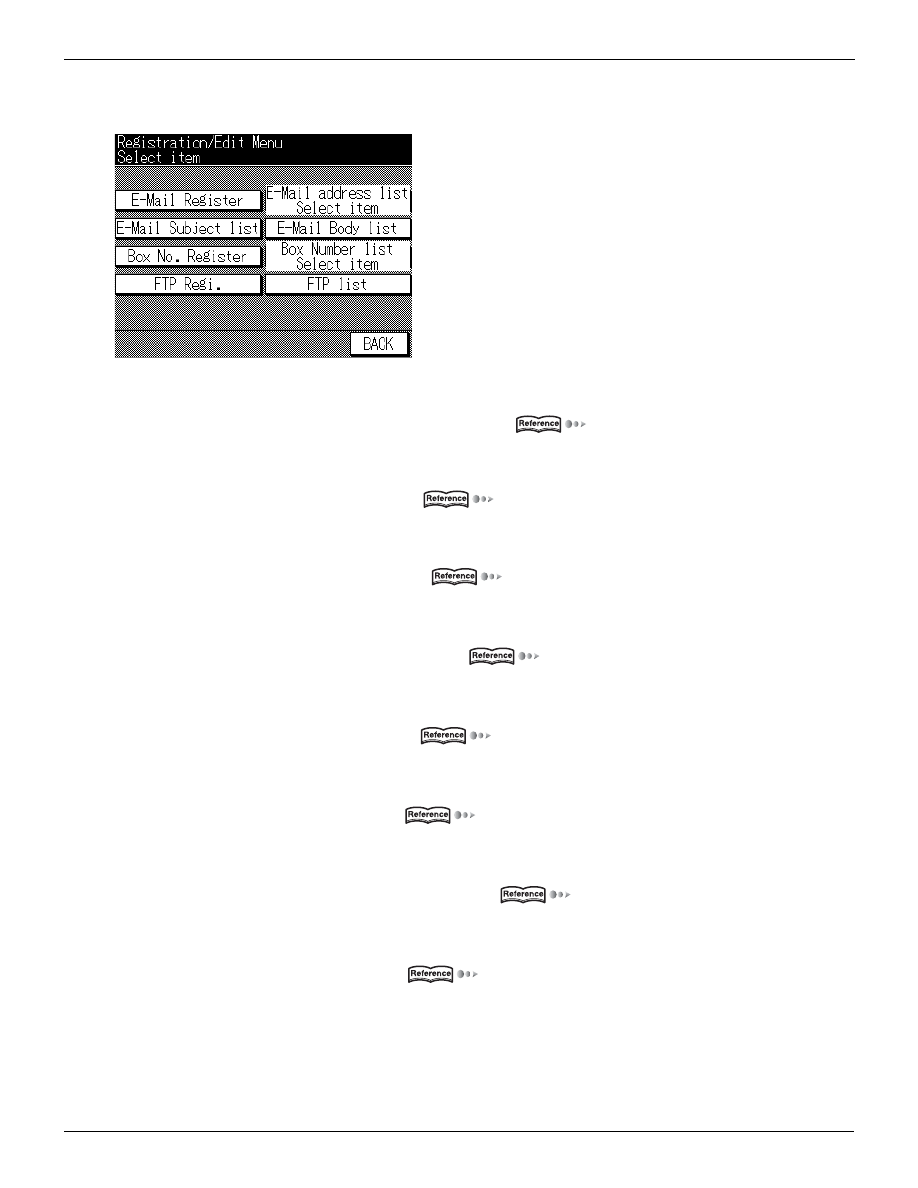
10-2. Registering storage locations/destinations
126
IV Scanner Chapter 10 Using the Scanner Functions
3
Select the registration item.
[E-Mail Register]
Registering a new email destination.
→The [E-Mail registration/edit] screen is displayed. (
[E-Mail address list select item]
The registered email destinations are displayed in a list for editing and deleting.
→The [E-Mail list] screen is displayed. (
[E-Mail Subject list]
Registering a new email subject.
→The [Subject list] screen is displayed. (
[E-Mail Body list]
Registering a new email body.
→The [Massage Body list] screen displayed. (
[Box No. Register]
Registering a new storage location.
→The [Box input] screen is displayed. (
[Box Number list select item]
The boxes registered for storage are displayed in a list for editing and deleting.
→The [Box list] screen is displayed. (
[FTP Regi.]
Registering a new FTP destination server.
→The [FTP registration/edit] screen is displayed. (
[FTP list]
The registered FTP destinations are displayed in a list for editing and deleting.
→The [FTP list] screen is displayed. (
E-Mail registration/edit screen
1
Input the registration number from 000 to 199 with the copier’s number keys.
MEMO
z
If you input the wrong number, touch the [No.] key on the LCD screen to erase the input number.

10-2. Registering storage locations/destinations
127
IV Scanner Chapter 10 Using the Scanner Functions
2
Touch the [E-Mail] key on the LCD screen.
→ The [E-Mail address input] screen is displayed.
3
Touch the character keys on the LCD screen to input the address.
MEMO
z
Up to 60 alphanumerics and symbols can be input as the [Email address].
For details on character input, refer to [10-3. Inputting text] (
4
Touch the [OK] key on the LCD screen.
→ The display returns to the [Email registration/edit] screen.
5
Touch the [Name] key on the LCD screen.
→ The [Name input] screen is displayed.
6
Touch the character keys on the LCD screen to input the registration name.
MEMO
z
The [Name] may be up to 10 characters.
For details on character input, refer to [10-3. Inputting text] (
7
Touch the [OK] key on the LCD screen.
→ The display returns to the [E-Mail registration/edit] screen.
8
Select [A-] - [No. etc] on the LCD screen to set the registration group.
When you register a group, it is displayed in the groups registered with the [E-Mail select] screen.
→ The selected group is displayed in the [Character to search] column.
9
Touch the [ENTRY] key on the LCD screen.
→ The [No.], [Name], [E-Mail], and [Character to Search] are registered.
To continue registering, repeat Steps 1-9.
MEMO
z
If the [No.], [E-Mail], [Name] or [Character to Search] is not input, [ENTRY] is not enabled.
10
Touch the [BACK] key on the LCD screen.
→ The [Registration/edit menu] screen is displayed.
E-Mail list screen
1
Touch the [
▲], [▼] and [
], [
] keys on the LCD screen and select the address.
→ The selected address is displayed inverted.
MEMO
z
The address is selected with [
▼] [▲].
z
Switch the page with
[
] [
]
.

10-2. Registering storage locations/destinations
128
IV Scanner Chapter 10 Using the Scanner Functions
2
Touch [EDIT] or [ERASE] key on the LCD screen.
→ When you touch the [EDIT] key, the [E-Mail registration/edit] screen is displayed. When [ERASE]
is touched, the selected address is deleted.
3
Touch the [BACK] key on the LCD screen.
→ The [Registration/edit menu] screen is displayed.
E-Mail subject list screen
MEMO
z
Up to 10 email subjects can be registered.
z
The subject registered by the administrator is displayed as 11th. For details on registering the administrator subject,
[Please ask your administrator.].
1
Touch the [
▲], [▼] key on the LCD screen and select the subject.
→ The selected subject is displayed inverted.
2
Touch the [EDIT] or [ERASE] key on the LCD screen.
→ When you touch the [EDIT] key, the [Subject input] screen is displayed. When the [ERASE] key
is touched, the selected subject is deleted.
3
Touch the character keys on the LCD screen to input the subject.
MEMO
z
Up to 45 alphanumerics and symbols may be input for the [Subject].
For details on character input, refer to [10-3. Inputting text] (
4
Touch the [OK] key on the LCD screen.
→ The display returns to the [Subject list] screen.
5
Touch the [BACK] key on the LCD screen.
→ The [Registration/edit menu] screen is displayed.
Email message body list screen
MEMO
z
Two email bodys can be registered.
z
The body registered by the administrator is displayed as 3rd. For details on registering the administrator body,
[Please ask your administrator.].
1
Touch the [
▲], [▼] key on the LCD screen and select the body.
→ The selected body is displayed inverted.
2
Touch the [EDIT] or [ERASE] key on the LCD screen.
→ When you touch the [EDIT] key, the [Body input] screen is displayed. When [ERASE] is
touched, the selected body is deleted.

10-2. Registering storage locations/destinations
129
IV Scanner Chapter 10 Using the Scanner Functions
3
Touch the character keys on the LCD screen to input the body.
MEMO
z
Up to 48 alphanumerics and symbols can be input as the [Body].
For details on character input, refer to [10-3. Inputting text] (
4
Touch the [OK] key on the LCD screen.
→ The display returns to the [Message body list] screen.
5
Touch the [BACK] key on the LCD screen.
→ The [Registration/edit menu] screen is displayed.
Box input screen
1
Input the box number from 0001 to 9998 with the copier’s number keys.
If you input the wrong number, touch the [Box No.] key on the LCD screen on the copier to erase
the input number.
2
Touch the [Name] key on the LCD screen.
→ The [Name input] screen is displayed.
3
Touch the character keys on the LCD screen to input the name.
MEMO
z
The [Name] may be up to 10 characters.
For details on character input, refer to [10-3. Inputting text] (
4
Touch the [OK] key on the LCD screen.
→ The display returns to the [Box input] screen.
5
Select [A-] - [No. etc] on the LCD screen to set the registration group.
When you register a group, it is displayed in the groups registered with the [Box select] screen.
→ The selected group is displayed in the [Character to Search] column.
6
Touch the [ENTRY] key on the LCD screen.
→ The [Box No.], [Name], and [Character to search] are registered.
To continue registering, repeat Steps 1-6.
MEMO
z
If the [Box No.], [Name], or [Character to search] is not input, [ENTRY] is not enabled.
7
Touch the [BACK] key on the LCD screen.
→ The [Registration/edit menu] screen is displayed.

10-2. Registering storage locations/destinations
130
IV Scanner Chapter 10 Using the Scanner Functions
Box list screen
1
Touch the [
▲], [▼] and [
], [
] key on the LCD screen and select the box number.
→ The selected box number is displayed inverted.
MEMO
z
The box number is selected with [
▼] [▲].
z
Switch the page with
[
] [
]
.
2
Touch the [EDIT] or [ERASE] key on the LCD screen.
→ When you touch the [EDIT] key, the [Box input] screen is displayed. When the [ERASE] key is
touched, the selected box is deleted.
3
Touch the [BACK] key on the LCD screen.
→ The [Registration/edit menu] screen is displayed.
FTP registration/edit screen
1
Touch the [Name] key on the LCD screen and specify the name of the profile for the FTP
server to send to.
This inputs the destination name displayed in the destination list.
MEMO
z
The [Name] may be up to 10 characters.
For details on character input, refer to [10-3. Inputting text] (
2
Touch the [OK] key on the LCD screen.
→ The display returns to the [FTP registration/edit] screen.
3
Touch the [Host address] key on the LCD screen, then input the IP address of the FTP server to
send the data to or the URL.
MEMO
z
Up to 63 alphanumerics and symbols can be input as the [Host address].
For details on character input, refer to [10-3. Inputting text] (
4
Touch the [OK] key on the LCD screen.
→ The display returns to the [FTP registration/edit] screen.
5
Touch the [File path] key on the LCD screen and input the FTP server file storage location.
MEMO
z
Up to 96 alphanumerics and symbols can be input as the [File path].
6
Touch the [OK] key on the LCD screen.
→ The display returns to the [FTP registration/edit] screen.
7
Touch the [Login] key on the LCD screen and input the account necessary for logging on to
the FTP server.

10-2. Registering storage locations/destinations
131
IV Scanner Chapter 10 Using the Scanner Functions
MEMO
z
Up to 47 alphanumerics and symbols can be input as the [Login].
z
Touch the [Anonymous] key for logging onto an FTP server that does not require an account.
8
Touch the [OK] key on the LCD screen.
→ The display returns to the [FTP registration/edit] screen.
9
Touch the [Password] key on the LCD screen and input the password necessary for logging
on to the FTP server.
Limitation
● When [Anonymous] is selected for the [Login], input the sender’s address as the [Password]. Password
input cannot be omitted.
MEMO
z
Up to 31 alphanumerics and symbols can be input as the [Password].
10
Touch the [OK] key on the LCD screen.
→ The display returns to the [FTP registration/edit] screen.
11
Touch the [Port No.] key on the LCD screen.
This specifies the port No. used by the FTP server.
There is normally no need to change this.
→ The [Port No. input] screen is displayed.
12
Input the port number with the [0] - [9] key on the LCD screen.
Important
● Changing the port number inappropriately can create obstructions on the network. Do not change the
port number without instructions from the network administrator.
MEMO
z
The [Port No.] may be up to five characters.
13
Touch the [OK] key on the LCD screen.
→ The display returns to the [FTP registration/edit] screen.
14
Touch the [A-] - [No. etc] key on the LCD screen to set the registration group.
When you register a group, it is displayed in the groups registered with the [FTP select] screen.
→ The selected group is displayed in the [Character to Search] column.
15
Touch the [ENTRY] key on the LCD screen.
→ The [Name], [Host address], [File path], [Login], [Password], [Character to search], and [Port
No.] are registered.
To continue registering, repeat Steps 1-15.
MEMO
z
If the [Host address], [File path], [Login], [Password], or [Character to Search] is not input, [ENTRY] is not enabled.
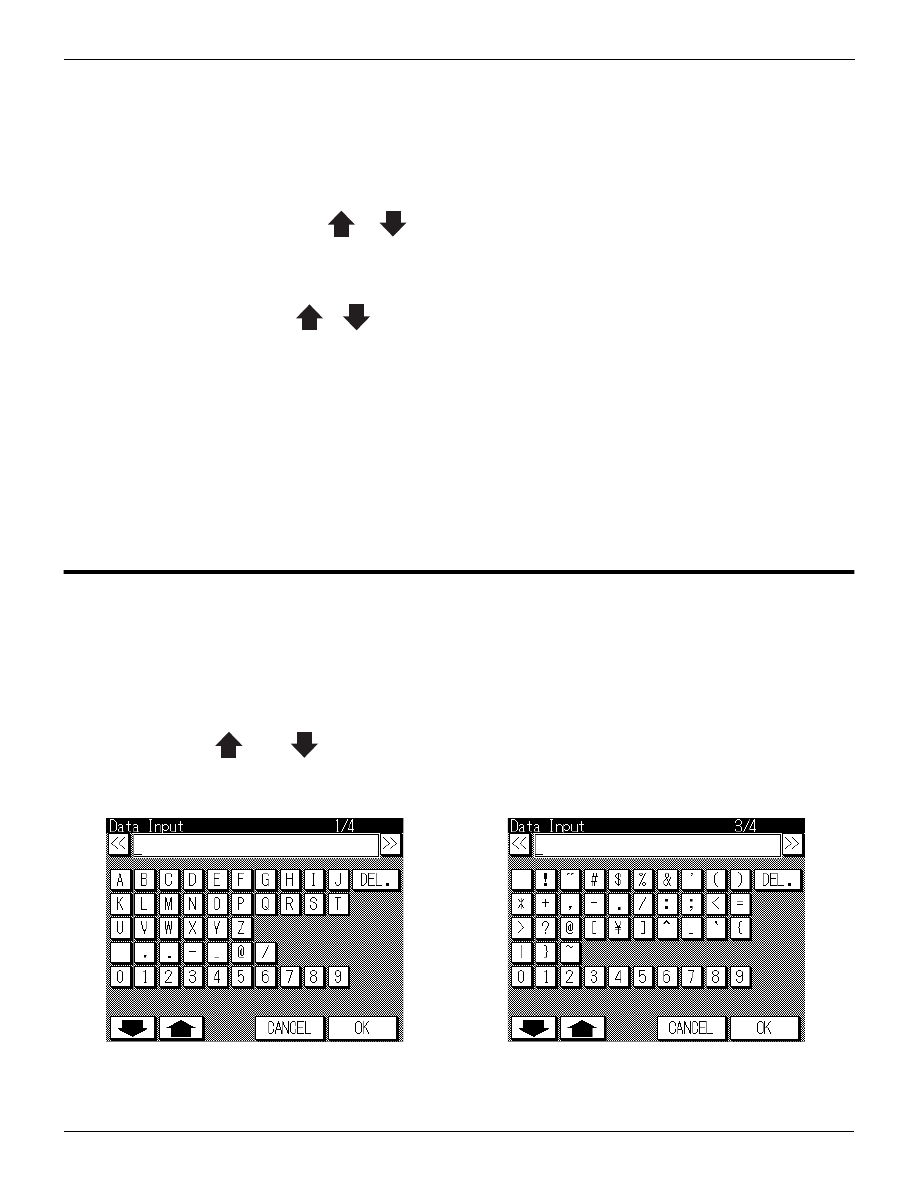
10-3. Inputting text
132
IV Scanner Chapter 10 Using the Scanner Functions
16
Touch the [BACK] key on the LCD screen.
→ The [Registration/edit menu] screen is displayed.
FTP list screen
1
Touch the [
▲], [▼] and [
], [
] key on the LCD screen and select the FTP profile name.
→ The selected profile name is displayed inverted.
MEMO
z
The profile name is selected with [
▼] [▲].
z
Switch the page with
[
] [
]
.
2
Touch the [EDIT] or [ERASE] key on the LCD screen.
→ When you touch the [EDIT] key, the [FTP registration/edit] screen is displayed. When [ERASE]
is touched, the selected FTP profile name is deleted.
3
Touch the [BACK] key on the LCD screen.
→ The [Registration/edit menu] screen is displayed.
10-3. Inputting text
This explains the operation method for the text input screen displayed when inputting a registration name and
email address.
Inputting text
1
Touch the [
] or [
] key on the LCD screen to switch to the input character type
screen.
Uppercase letter input screen
Number and symbol input screen.
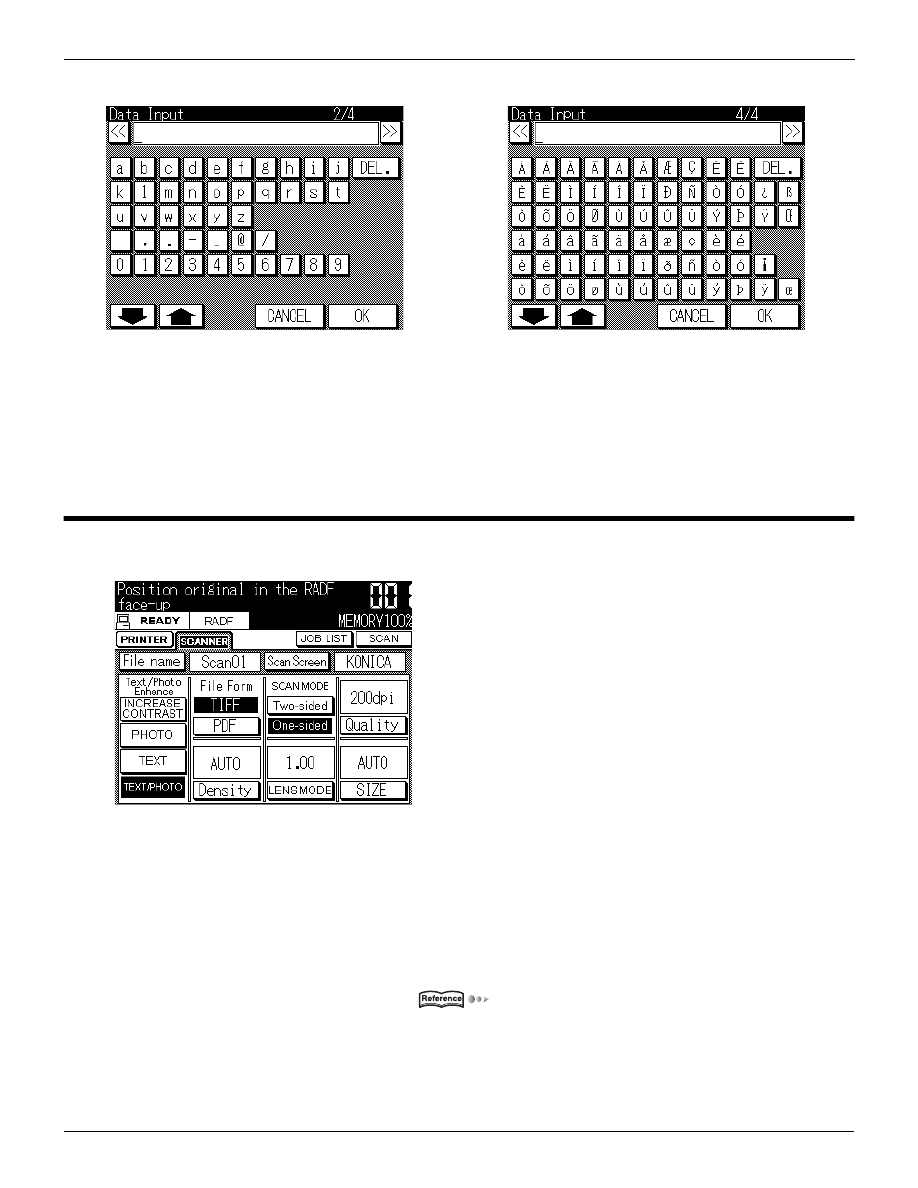
10-4. Setting scanner functions
133
IV Scanner Chapter 10 Using the Scanner Functions
Lowercase letter input screen
Special letter input screen.
2
Input characters.
MEMO
z
When you touch the [DEL.] key on the LCD screen, the input characters are deleted one at a time.
10-4. Setting scanner functions
This section explains the basic functions required for scanning documents with the copier.
The settings are made with the [Scanner setting basic] screen on the LCD screen.
Scanning mode usage
When scanning a document, you can select the Real mode which sends the scan data to the print controller
immediately after one scan operation or the Memory mode which stores the scan data from multiple scans
into the copier’s memory, then sends it all in one batch.
When scanning documents using the RADF, use the Real mode when scanning a book or other multi-page
document on the platen glass, use the Memory mode.
For details, refer to [10-5. Scanning documents]
(
.

134
IV Scanner Chapter 10 Using the Scanner Functions
10-5. Scanning documents
This explains the scanning procedure.
Operate from the [Scanner setting basic] screen on the LCD screen.
1
Before scanning, set the destination for the scan data.
MEMO
z
For details, refer to [10-1. Selecting the destination]
(
z
When changing the destination, touch the [Scan Screen] key on the LCD screen, then select the destination you want
from [Mail Box], [E-Mail] and [FTP].
2
Touch the [File name] key on the LCD screen.
→ The [Filename input] screen is displayed.
3
Input the filename for the scan data.
MEMO
z
Up to 26 alphanumerics can be input for the file name.
For details on character input, refer to [10-3. Inputting text] (
z
The filename extension [.tif] or [.pdf] is added automatically to the filename.
4
Touch the [OK] key on the LCD screen.
→ The display returns to the [Scanner setting basic] screen.
5
Select the [Text/Photo Enhance] setting appropriate to the contents of the document.
You can select from the following four settings.
Increase contrast
This applies contrast to documents written lightly and provides sharp images.
Photo
This improves the expression of tones and provides an image that is nearly that of halftone documents.
Text
The applies contrast to text for quality.
Text/photo
This discriminates automatically between text and photographs and reproduces the quality of the document
accurately.
6
Select either [TIFF] or [PDF] as the file format for the scan data.
MEMO
z
When only [Scan to box] is displayed [PDF] is not displayed.
7
Select either [Two-sided] or [One-sided] for the document to be scanned with the
[SCAN MODE] on the LCD screen.
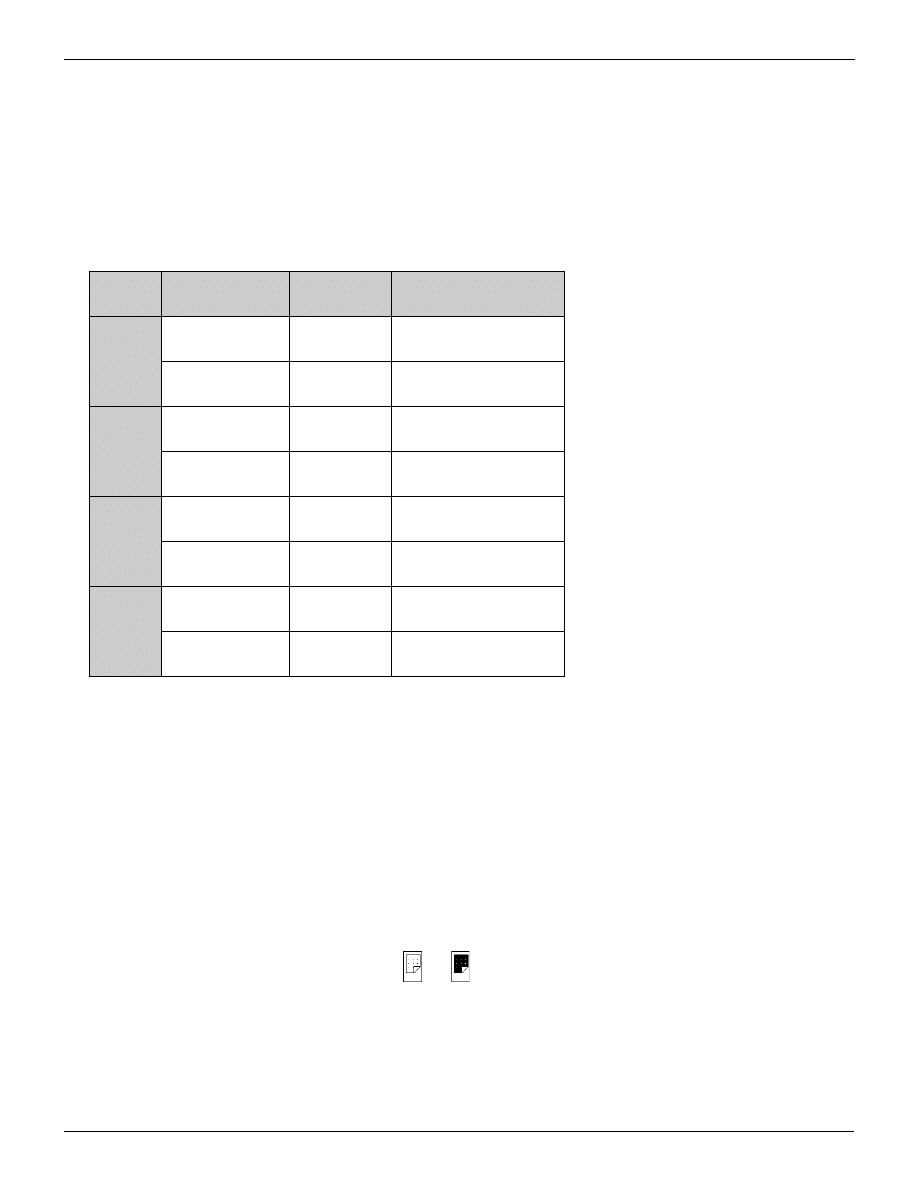
10-5. Scanning documents
135
IV Scanner Chapter 10 Using the Scanner Functions
8
Touch the [Quality] key on the LCD screen.
→ The [Quality setting] screen is displayed.
9
Select the scanning resolution from [600dpi], [400dpi], [300dpi] and [200dpi] on the
LCD screen.
Below are the approximate number of pages of A4-size documents that can be scanned at one time with the
standard memory (32 MB).
*1 When ITU-T fax chart No. 4 used
*2 When ITU-T fax chart No. 1 used
MEMO
z
If the volume of the scanned data exceeds the capacity of the E-RDH memory, the job will be registered as an error.
10
Touch the [OK] key on the LCD screen.
→ The display returns to the [Scanner setting basic] screen.
11
Touch the [Density] key on the LCD screen.
→ The [Scanning density setting] screen is displayed.
12
Select the scanning density from
to
on the LCD screen.
MEMO
z
When setting the density automatically, touch the [AE] key.
13
Touch the [OK] key on the LCD screen.
→ The display returns to the [Scanner setting basic] screen.
Reso-
lution
Document
Data vol-
ume
Number of pages that
can be scanned
200dpi
Text only*1
Approx.
60 KB
Approx. 550 pages
With images*2
Approx.
230 KB
Approx. 150 pages
300dpi
Text only*1
Approx.
110 KB
Approx. 300 pages
With images*2
Approx.
460 KB
Approx. 70 pages
400dpi
Text only*1
Approx.
170 KB
Approx. 200 pages
With images*2
Approx.
780 KB
Approx. 40 pages
600dpi
Text only*1
Approx.
330 KB
Approx. 100 pages
With images*2
Approx.
1.9 MB
Approx. 20 pages

10-5. Scanning documents
136
IV Scanner Chapter 10 Using the Scanner Functions
14
Touch the [LENS MODE] key on the LCD screen.
→ The [Magnification ratio setting] screen is displayed.
15
The scanning magnification ratio is selected with the magnification ratio keys or [
▲]
or [
▼] on the LCD screen.
The magnification ratios that can be selected are as follows.
Fixed magnification ratios
A4-A3, A5-A4
PRESET1
A4-B4
PRESET2
B4-A3
PRESET3
A4-B5
PRESET4
B4-A4
PRESET5
A3-A4, A4-A5
PRESET6
Zoom
Touch the
key on the LCD screen, then specify the zoom ratio with [
▲] [▼]or the copier’s number keys.
Independent X and Y magnification ratios
Touch the
or
key on the LCD screen, then specify the zoom ratio with [
▲] [▼] or the copier’s num-
ber keys.
Same size (1.00)
Touch the [1.00] key on the LCD screen.
16
Touch the [OK] key on the LCD screen.
→ The display returns to the [Scanner setting basic] screen.
17
Touch the [SIZE] key on the LCD screen.
→ The [Document scan size setting] screen is displayed.
18
Select the size of the document to scan with the scan size keys or [AUTO] key on the
LCD screen.
When you select the [AUTO] key, the scan size is automatically recognized by the copier.

10-5. Scanning documents
137
IV Scanner Chapter 10 Using the Scanner Functions
The scan sizes that can be selected are as follows.
A3
11x17
A4R
8
1
/
2
x14
A4
8
1
/
2
x11
R
A5
8
1
/
2
x11
8
1
/
2
x11
R
5
1
/
2
x8
1
/
2R
8
1
/
2
x11
5
1
/
2
x8
1
/
2
F4
A4R
B4
A4
B5R
F4
B5
Limitation
● When scanning using the RADF, the scan size cannot be selected.
19
Touch the [OK] key on the LCD screen.
→ The display returns to the [Scanner setting basic] screen.
MEMO
z
For detailed settings, refer to [ Application function settings] (
z
After setting the application functions, always return the LCD screen to the [Scanner setting basic] screen.
20
Set the document on the copier RADF or the platen glass.
When scanning in real mode, proceed to Step 22.
21
When scanning in memory mode, touch the [SCAN] key on the LCD screen.
→ Memory mode is set and the document is scanned.
From now on, when you touch the [SCAN] key, the document is scanned.
When scanning of all the documents is complete, proceed to Step 22.
22
Press the
(Start) button on the control panel.
→ Real mode
All the documents on the RADF are scanned.
When scanning of all the documents is complete, the scan data is uploaded to the print controller
from the copier’s E-RDH memory.
→ Memory mode
Memory mode is ended and the scan data is uploaded from the copier’s E-RDH memory to the
print controller.
MEMO
z
The direction of the image in the data imported in with an application depends on the direction in which the document
is set on the copier.
z
The document sizes that can be scanned and document setting method are the same as for copy mode. For details,
refer to the user's manual for the copier you are using. For details, refer to the operations manual for the copier you
are using.

10-5. Scanning documents
138
IV Scanner Chapter 10 Using the Scanner Functions
When [Scan to box] is set as the destination :
Scan data stored on the hard disk in the print controller is imported into the computer.
For more information, refer to [10-6. Importing scanned data into a computer]
(
.
When the destination is set to [Scan to E-mail] or [Scan to FTP] :
Scan data stored on the print controller's hard disk is transferred to the set destinations.
Important
● When [Controller settings] – [Scan Data Auto Del.] is set with the copier’s LCD screen, the scan data
stored on the print controller’s hard disk is automatically deleted after the specified interval. (The default
value is 24 hours.) If you wish to retain it longer, set [Scan Data Auto Del.] to [Off].
● When the free space in the print controller's hard disk falls below 3 %, even if the document is scanned,
it cannot be stored to the hard disk.
● When [Scan to E-Mail] or [Scan to FTP] is set as the output destination, under some network conditions,
the scanned data may be damaged. Always check that the scanned data is not damaged.
Application function settings
This section explains settings for making the scanner functions more convenient.
These settings are made with the [Scanner setting basic] screen on the LCD screen.
1
Press the
(Application function) button on the control panel.
→ The [Application function setting] screen is displayed.
Scanning dividing a spread open document into two pages (Dual page)
The bound document is scanned consecutively according to the binding direction.
Limitation
● [Dual Page] cannot be selected when the [Special Original], [Flip Side 2], or [Reverse Image] function is
set.
1
From the [Select Application Function] screen on the LCD screen, touch the [Dual Page] key.
→ The [Dual page settings] screen is displayed.
2
Touch the [Output LtoR] or [Output RtoL] key on the LCD screen according to the docu-
ment binding directory.
3
Touch the [OK] key on the LCD screen.
→ The display returns to the [Select Application Function] screen.
Reading in documents of different sizes (Mixed original)
This is set when scanning multi-page documents of different sizes using the RADF.

10-5. Scanning documents
139
IV Scanner Chapter 10 Using the Scanner Functions
Limitation
● [Mixed Original] cannot be selected when [Non Image Area Erase] is set.
1
From the [Select Application Function] screen on the LCD screen, touch the [Special Origi-
nal] key.
→ The [Original type settings] screen is displayed.
2
Touch the [Mixed Original] key on the LCD screen.
3
Touch the [OK] key on the LCD screen.
→ The display returns to the [Select Application Function] screen.
Reading in folded documents (Folded orignal)
This is set when a document with a fold is set on the RADF and the document fold is so far up and can-
not be scanned in at all.
Limitation
● [Folded Orignal] cannot be selected when [Non Image Area Erase] is set.
1
From the [Select Application Function] screen on the LCD screen, touch the [Special Original]
key.
→ The [Original type setting] screen is displayed.
2
Touch the [Folded Original] key on the LCD screen.
3
Touch the [OK] key on the LCD screen.
→ The display returns to the [Select Application Function] screen.
Memory mode settings (Memory)
When scanning multiple documents, the scanner is set to store the scan data for multiple pages in
copier’s E-RDH memory then send all the data at once. This is called [Memory mode].
1
From the [Select Application Function] screen on the LCD screen, touch the [MEMORY]
key.
→ [Memory mode] is set.
Reading in by selecting binding position (Flip side 2)
When scanning duplex documents top/bottom binded or lett/right binded, this setting lines up the tops
and bottoms correctly.
Limitation
● [Flip Side 2] cannot be selected when the [Folded Orignal] or [Non Image Area Erase] function is set.

10-5. Scanning documents
140
IV Scanner Chapter 10 Using the Scanner Functions
1
Touch the [Flip Side 2] key on [Select Application Function] screen on the LCD screen.
2
Touch the [Top/Bottom bind] or [Left/Right bind] key on the LCD screen according to the
document binding directory.
3
Touch the [OK] key on the LCD screen.
→ The display returns to the [Select Application Function] screen.
Reading in with black and white reversed (Reverse image)
This scans reversing the white sections of the document into black and the black sections of the docu-
ment into white.
Limitation
● [Reverse Image] cannot be selected when [Non Image Area Erase] is set.
1
Touch the [Reverse Image] key on [Select Application Function] screen on the LCD screen.
→ [Reverse image] is selected.
MEMO
z
When you touch the [CANCEL] key on the LCD screen, the setting is not finalized and the display returns to the
[Scanner setting basic] screen.
Erasing document frames and folds (Frame/Fold Erasure)
This erases the shadows from the book binding section and the document surroundings.
Limitation
● [Frame/Fold Erasure] cannot be selected when the [Dual Page] function is set.
1
Touch the [Frame/Fold Erasure] key on [Select Application Function] screen on the LCD
screen.
→ The [Frame/Fold Erasure] screen is displayed.
2
Touch the [Frame Erasure] key on the LCD screen.
→ [Frame Erasure] is displayed inverted.
3
Specify the length for frame erasure with the [
▲] or [▼] key on the LCD screen.
4
Touch the [Fold Erasure] key on the LCD screen.
→ [Fold Erasure] is displayed inverted.
5
Specify the length for fold erasure with the [
▲] or [▼] key on the LCD screen.
6
Touch the [OK] key on the LCD screen.
→ The display returns to the [Select Application Function] screen.
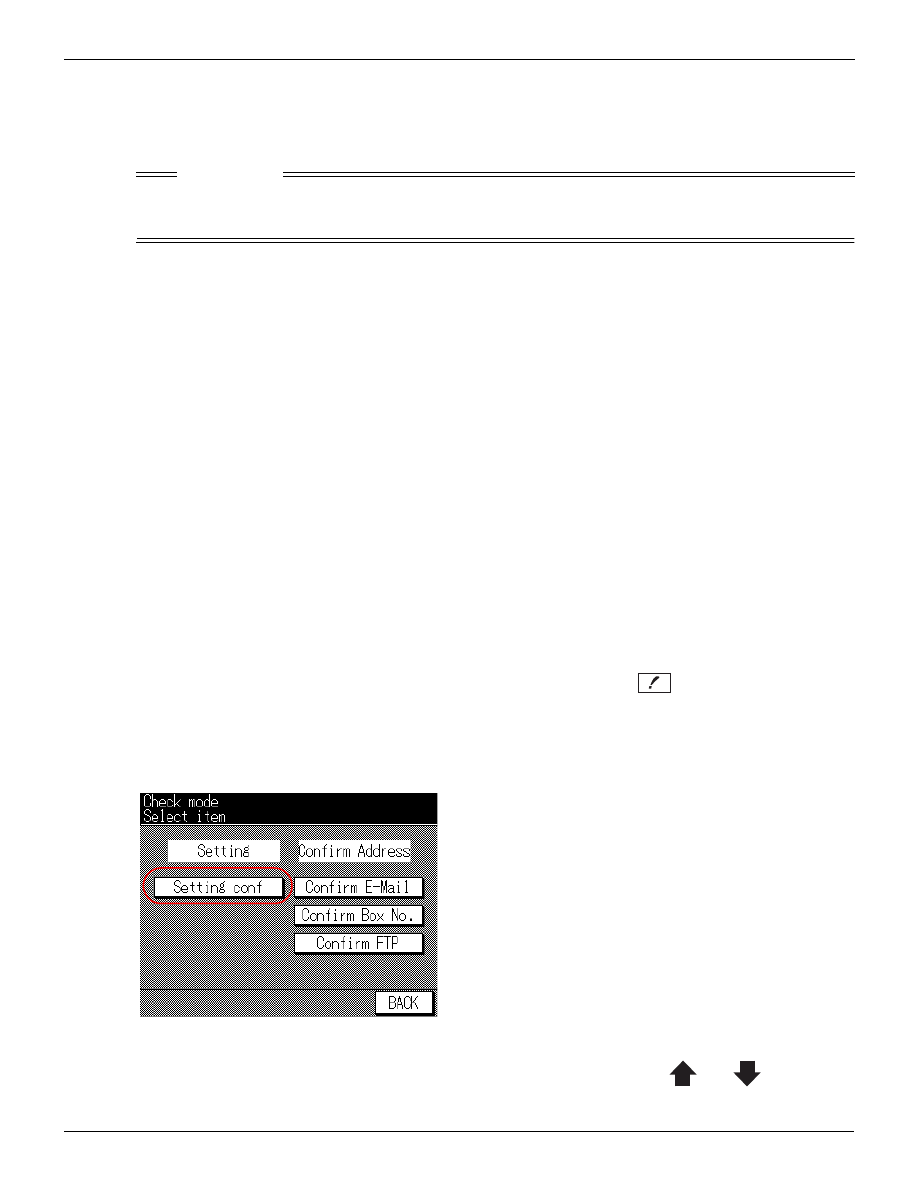
10-5. Scanning documents
141
IV Scanner Chapter 10 Using the Scanner Functions
Not scanning outside the document (Non Image Area Erase)
This function detects the size of the document set on the platen glass and does not scan the sections
outside this size.
Limitation
● [Non Image Area Erase] cannot be selected when the [Special Original], [Flip Side 2], or [Reverse
Image] function is set.
1
Touch the [Non Image Area Erase] key on [Select Application Function] screen on the LCD
screen.
→ [Non Image Area Erase] is set.
Rotating the scanned image 90 degrees (Rotation ON/Rotation OFF)
When [Rotate ON] is set with the printer key operator mode scan image rotation default, [Rotation OFF]
is displayed. If [Rotation OFF] is set, [Rotation ON] is displayed.
1
Touch the [Rotation ON] or [Rotation OFF] key on [Select Application Function] screen on
the LCD screen.
→ [Rotation ON] or [Rotation OFF] is displayed inverted.
MEMO
z
For details on the key operator operation, [Please ask your administrator.].
Checking settings
This checks a list of the set functions.
1
With the [Scanner setting basic] screen displayed, press the
(check) button on the
control panel.
→ The [Settings check mode] screen is displayed.
2
Touch the [Setting conf] key on the LCD screen.
→ The [Settings confirmation] screen is displayed.
When the item you want to check is not displayed, switch the display with [
] or [
] on the LCD
screen.

10-6. Importing scanned data into a computer
142
IV Scanner Chapter 10 Using the Scanner Functions
3
When the check is complete, touch the [EXIT] key on the LCD screen.
→ The display returns to the [Settings check mode] screen.
4
Select the destinations from [Confirm E-Mail], [Confirm Box No.] or [Confirm FTP].
→ The [Address check] screen is displayed.
5
Check the destination.
MEMO
z
To delete a destination, select the destination to delete, then touch the [DELETE] key on the LCD screen.
6
When the check is complete, touch the [BACK] key on the LCD screen.
→ The display returns to the [Settings check mode] screen.
7
Touch the [BACK] key on the LCD screen.
→ The display returns to the [Scanner setting basic] screen.
10-6. Importing scanned data into a computer
When importing scan data stored in the print controller’s box into the computer, use the [Konica network
scanner driver] and application software supporting the TWAIN scanner driver.
Limitation
● If [PDF] is selected as the file format, the scan data cannnot be imported using [Konica network scanner
driver]. For the details about the way of importing PDF format data, ask your service representative.
10-7. Using the network scanner driver
To use the [Konica Network Scanner Driver], first install it on the computer.
Check the computer to use.
The network scanner driver can be installed on the following operating systems.
Windows 95
Windows 98
Windows Me
Windows NT 4.0
Windows 2000
Windows XP

10-7. Using the network scanner driver
143
IV Scanner Chapter 10 Using the Scanner Functions
Installing the network scanner driver
Have the [User software CD] CD-ROM on hand.
1
Turn on the power for the computer and start Windows.
MEMO
z
Exit any applications that are running.
2
Put the [User software CD] in the computer's CD-ROM drive.
3
From [My Computer] on the desktop, double-click the icon for the drive in which the
user software CD has been loaded.
4
Open the [\English\Scanner] folder on the user software CD, then double-click
[Setup.exe].
→ The [Select Language] screen is displayed.
5
Select your language, then click the [OK] button.
→ The [Welcome] screen is displayed.
6
Check the contents, then click the [Next ›] button.
→ The [Start Installation] screen is displayed.
7
Click the [Next ›] button.
→ The [Installing] screen is displayed and the necessary files are copied.
→ When the copying ends, the [Installation complete] screen is displayed.
8
Click the [Finish ›] button.
→ This completes the installation of the network scanner driver.
Connecting the computer and the hard disk
The scan data stored on the print controller box is imported into the computer using the application software
supporting the TWAIN scanner driver.
There is a variety of application software that supports TWAIN scanner drivers. Here we use Adobe Acrobat
4.0. When using other application software, refer to the user’s manual for that software.
This section explains the procedure for connecting the computer and the copier’s hard disk using Adobe
Acrobat 4.0.

10-7. Using the network scanner driver
144
IV Scanner Chapter 10 Using the Scanner Functions
1
Run [Adobe Acrobat 4.0].
2
Select [File] - [Import] - [Scan].
→ The [Adobe Acrobat Scan] screen is displayed.
3
In [Device], select [Konica Network Scanner Driver].
4
In [Format], when importing the scan data one page at a time, select [Single sided];
when importing a spread-open document, select [Double sided].
5
In the [Destination], when importing scan data and inserting it into the currently open
file, select [Current Document]; when importing the scan data as a new file, select
[New document].
6
Click the [Scan] button.
7
Input the [Scanner server name (IP address)] and [Scanner name] for the scanner on
which the scan data is stored.
Limitation
● The DNS name or NetBIOS name cannot be used as the scanner server name.
8
Input the [Box No.] for the box in which the scan data to be imported in is stored.
9
Click the [OK] button.
→ The [Scanner Selection] screen is displayed.
10
Click the [Connect] button.
→ The [Konica Network Scanner Driver] main screen is displayed.
Importing scan data into the computer
The scan data stored on the print controller box is imported to the computer using the application software
supporting the TWAIN scanner driver.
Limitation
● If [PDF] is selected as the file format, the scan data cannnot be imported using [Konica network scanner
driver]. For the details about the way of importing PDF format data, ask your service representative.

10-7. Using the network scanner driver
145
IV Scanner Chapter 10 Using the Scanner Functions
1
From the list on the [Konica Network Scanner Driver] main screen, select the scan data
to import.
→ The selected scan data is displayed inverted.
MEMO
z
When changing the box number, click [Box No. Selection], then input the box number to change to with the [Scanner
box No. Set-up] screen.
z
To delete scan data, select the scanned data, then click [Delete].
z
When you click [Refresh], the newest box information is displayed.
2
Set the processing for the scan data importing.
MEMO
z
In the default settings, document data is deleted after it has been imported in.
To delete scan data from the hard disk
1
Click the [Option] button.
→ The [Variable Option] screen is displayed.
2
Check the [Delete after importing Scanner document] checkbox.
To leave the scan data in the hard disk
1
Click the [Option] button.
→ The [Variable Option] screen is displayed.
2
Uncheck the [Delete after importing Scanner document] checkbox.
3
To import scan data with the white sections and black sections of the document
reversed, check the [Use reverse display of Scanned document] checkbox.
4
To change the computer temporary storage location, click the [Folder Change] button.
→ The [Browse for Folder] screen is displayed.
5
To change the storage location, click the [OK] button.
→ The display returns to the [Variable Option] screen.
Important
● Documents are not scanned in normally if the drive specified with the [Temp forder set-up for scanner]
setting does not have enough free space. Specify a drive with adequate free space.
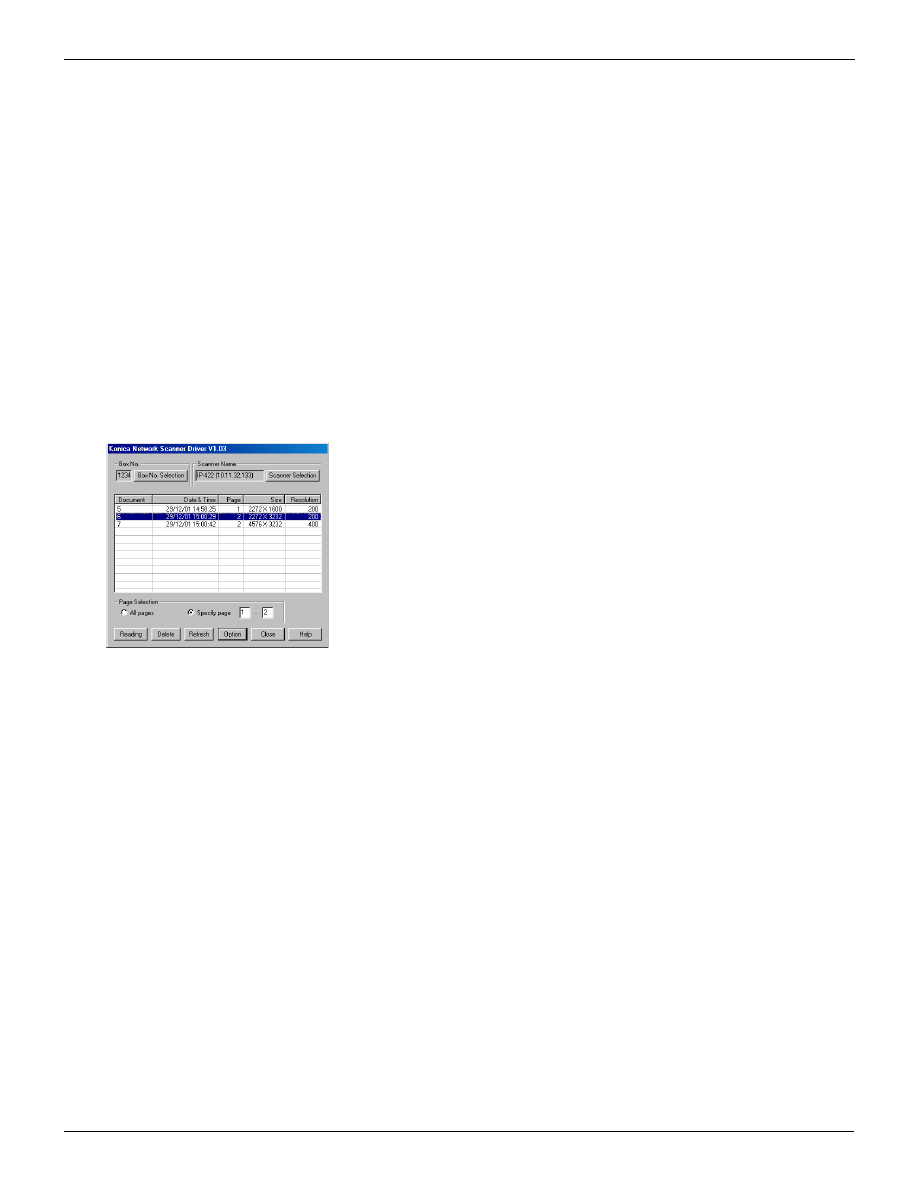
10-7. Using the network scanner driver
146
IV Scanner Chapter 10 Using the Scanner Functions
6
Click the [OK] button.
→ The display returns to the [Konica Network Scanner Driver] main screen.
7
When importing all the pages of the scan data, select [All pages]; when importing
specified pages only, select [Specify page].
MEMO
z
When operating application software that cannot handle multi-page files, [1] is displayed for the [Specify page].
8
Click the [Reading] button.
→ The scan data in the box is imported into the computer.
Scanner driver screen
This section explains the main screen for the network scanner driver.
Box No.
Currently selected box number
Scanner Name
Currently selected scanner
Document
Number assigned automatically during scanning
Date & Time
Date and time at which the document was scanned
Page
Total number of pages in the scan data
Size
Number of pixels vertical/horizontal for the first page of the scan data
Resolution
Scan data resolution
MEMO
z
You can reorder the contents of the display by clicking [Document], [Date & Time], [Page], [Size], or [Resolution].

10-7. Using the network scanner driver
147
IV Scanner Chapter 10 Using the Scanner Functions
[Reading] button
The selected scan data is read.
[Delete] button
The selected scan data is deleted.
[Refresh] button
The displayed contents are updated to the latest information.
[Option] button
The [Variable Option] screen is displayed.
[Close] button
The scanner driver ends.
[Help] button
Displays the scanner driver help.
[Box No. Selection] button
The [Scanner Box number. Set-up] screen is displayed.
The currently connected box number can be changed.
[Scanner Selection] button
The [Scanner Selection] screen is displayed.
[Add] button
The [Scanner box No. set-up] screen is displayed.
[Edit] button
The [Scanner Box No. Set-up] screen with the selected scanner information is displayed.
[Copy] button
A copy of the selected scan settings is prepared.
[Delete (D)] button
The selected scan data is deleted.
[Connect] button
The [Konica Network Scanner Driver] main screen is displayed.
[Close] button
The scanner driver ends.
[Help] button
Help is displayed.

148
This volume explains how to make the
network settings.
Chapter 11 Printing with IP Peer-to-Peer
(Windows 95/98/Me only) ... 149
Chapter 12 Settings for Printing with LPD/
LPR (Windows NT 4.0/2000/XP
only) ..................................... 160
Chapter 13 Using via the Internet (Windows
2000/XP) ............................... 171
VI Network

VI Network
149
Chapter 11 Printing with IP Peer-to-Peer
(Windows 95/98/Me only)
This chapter explains the settings required for printing with a Windows 95/98/Me computer and
the copier connected in an IP Peer-to-Peer network.
11-2. Preparation for Peer-to-Peer printing............................................150
11-3. Print controller TCP/IP settings .....................................................150
11-4. Computer TCP/IP settings..............................................................151
11-5. IP Peer-to-Peer installation and setting ........................................151

150
VI Network
Chapter 11 Printing with IP Peer-to-Peer (Windows 95/98/Me only)
11-1. IP Peer-to-Peer
Peer-to-Peer is a network configuration in which the client computers are connected directly to each other
without a server at the center of the network. Peer-to-Peer connections are used to configure a small-scale
network with a few computers.
This printer can send print jobs directly to the computers making up the Peer-to-Peer network without going
through a dedicated server. This is called [Peer-to-Peer] printing.
MEMO
z
Peer-to-Peer printing can be set and executed with Windows 95/98/Me.
11-2. Preparation for Peer-to-Peer printing
The computer and network controller are prepared with the following procedure.
1
An IP address is assigned to the network controller.
[Please ask your administrator.].
2
A Web utility or the copier LCD screen is used to make the network controller TCP/IP
settings.
Refer to [Print controller TCP/IP settings], (
3
The computer TCP/IP settings are made.
Refer to [Computer TCP/IP settings], (
4
The [IP-P2P] is installed from the user software CD.
Refer to [IP Peer-to-Peer installation and setting], (
5
The [printer driver] is installed.
Refer to [Installing a printer driver], (
11-3. Print controller TCP/IP settings
To execute IP Peer-to-Peer printing, the network controller TCP/IP settings must be complete.
MEMO
z
For details on making the network controller TCP/IP settings, [Please ask your administrator.].

151
VI Network
Chapter 11 Printing with IP Peer-to-Peer (Windows 95/98/Me only)
11-4. Computer TCP/IP settings
When executing IP Peer-to-Peer printing, the computer sending the print instructions must use TCP/IP as its
communications protocol.
Communications protocol check method
1
From the taskbar, select [Start] - [Settings] - [Control panel].
→ The [Control Panel] screen is displayed.
2
Double click the [Network] icon.
→ The [Network] screen is displayed.
3
Ensure that the [Configuration] tab [The following network components are installed] col-
umn is [TCP/IP].
MEMO
z
If the [The following network components are installed] column is not [TCP/IP], add TCP/IP, referencing the help files
for your OS as necessary.
4
Select [TCP/IP], then click the [Properties] button.
→ The [TCP/IP] screen is displayed.
5
Ensure the communications with TCP/IP are enabled.
MEMO
z
For details on the current network settings and necessary information, check your network administrator.
6
Click the [OK] button.
→ The display returns to the [Network] screen.
Important
● If an inappropriate IP address or other parameter is set, it can obstruct the entire network. Make the net-
work settings in consultation with the network administrator.
11-5. IP Peer-to-Peer installation and setting
This explains the software [IP Peer-to-Peer] required for executing Peer-to-Peer printing.
IP Peer-to-Peer installation
The IP Peer-to-Peer software is included on the [User Software CD].

11-5. IP Peer-to-Peer installation and setting
152
VI Network
Chapter 11 Printing with IP Peer-to-Peer (Windows 95/98/Me only)
1
Switch on the power for the computer and start Windows.
MEMO
z
Close down any applications that are running.
2
Put the print controller [User Software CD] in the computer's CD-ROM drive.
3
Select the CD-ROM with Windows Explorer and display the contents of the
[\English\NetUtil\IP-P2P] folder.
4
Double click [Setup.exe].
→ The setup program is started and the [Welcome] screen is displayed.
5
Check the contents of the screen, then click the [Next ›] button.
→ The [Installation Notes] screen is displayed.
6
Click the [Yes] button.
→ [Choose Destination Directory] screen will appear.
7
Click the [Next ›] button.
→ The [Select Program Folder] screen is displayed.
MEMO
z
In the default setting, [c:\ProgramFile\IP-P2P] is selected. To change the installation destination, click [Browse…]
then specify the desired installation destination.
8
Click the [Next ›] button.
→ The necessary files are copied to the hard disk and the [IP-Peer to Peer Settings] screen is dis-
played.
MEMO
z
For details on displaying the [IP-Peer to Peer Settings] screen, refer to [IP Peer-to-Peer settings] (
9
Click the [OK] button.
→ The [Printers…] window is displayed.
MEMO
z
For details on displaying the [IP-Peer to Peer Settings] screen, refer to [IP Peer-to-Peer settings] (
Deleting IP Peer-to-Peer
1
From the taskbar, select [Start] - [Settings] - [Control Panel].
→ The [Control Panel] screen is displayed.
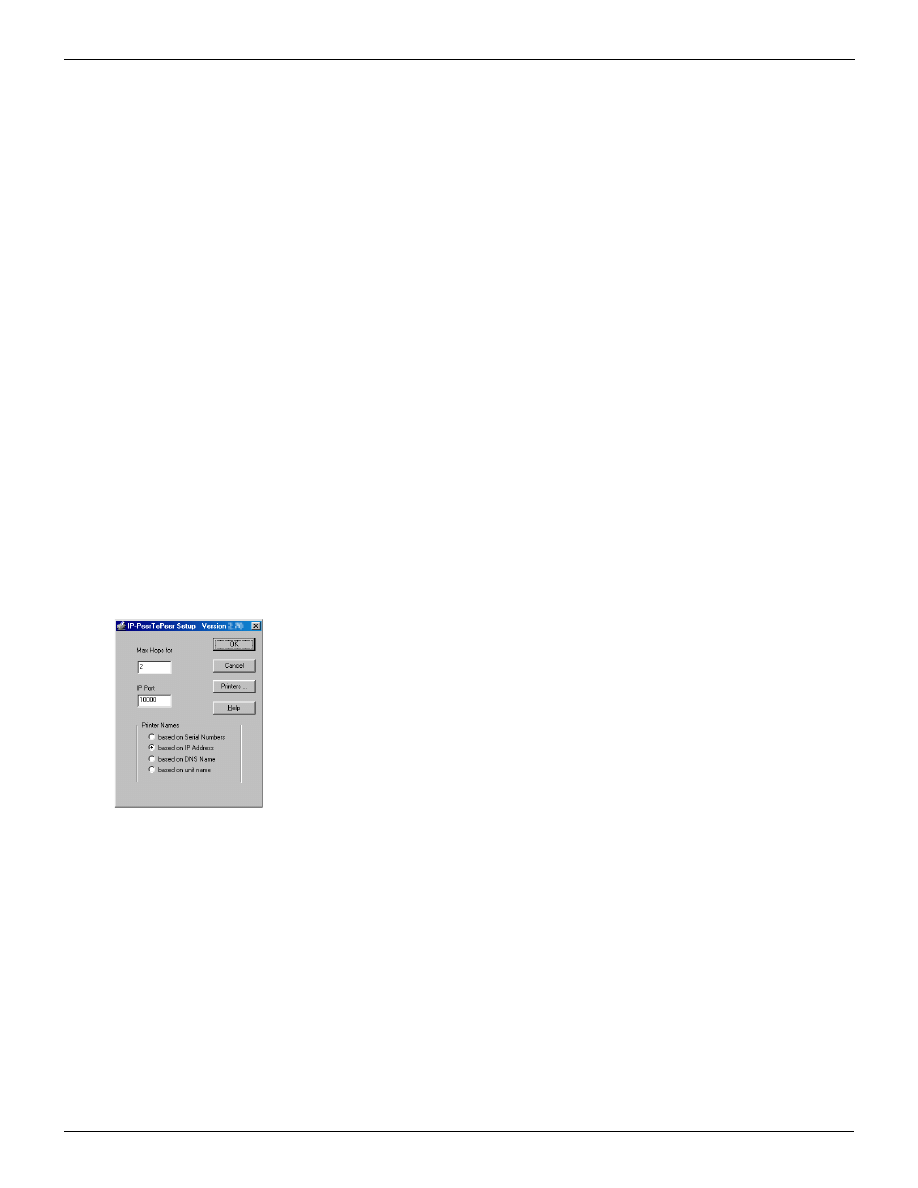
11-5. IP Peer-to-Peer installation and setting
153
VI Network
Chapter 11 Printing with IP Peer-to-Peer (Windows 95/98/Me only)
2
Double click the [Add/Remove Programs] icon.
→ The [Add/Remove Programs Properties] screen is displayed.
3
From the list, select [IP-P2P], then click the [Add/Remove] button.
→ A screen for confirming the deletion of the program is displayed.
4
Click the [Yes] button.
→ IP Peer-to-Peer is removed from the hard disk.
IP Peer-to-Peer settings
This section explains IP Peer-to-Peer settings and various operation methods.
Selecting the network controller for IP Peer-to-Peer printing
Select the network controller used for IP Peer-to-Peer printing. When this setting is made, the network
controller can be selected as the print destination.
1
From the taskbar, select [Start] - [Programs] or [Ip-p2p].
→ IP Peer-to-Peer starts and the [IP-Peer To Peer Setup] screen is displayed.
2
Input the [Max Hops for] from 0 to 15 to specify the range of the network to be detected.
MEMO
z
The default setting is [2].
z
If too high a number is specified, this creates much traffic on the network.
z
IP Peer-to-Peer broadcasts to detect network controllers on the network. The [Maximum number of hops] sets how
far a range of the network to detect equipment in. If [0] is specified, only the segment in which IP Peer-to-Peer is
started is detected. If [2] is specified, the entire network that can be accessed going through two or fewer routers is
detected.
z
[Broadcast] means communications to all the nodes (computers and other terminals on the network) on the network.
z
A segment is a section of a larger network delimited by a router.
3
Specifying the [IP Port].
The same value is set as is specified in [TCP/IP settings] - [Base port number].
MEMO
z
The default setting is [10000].
z
For details on making the printer TCP/IP settings, [Please ask your administrator.].
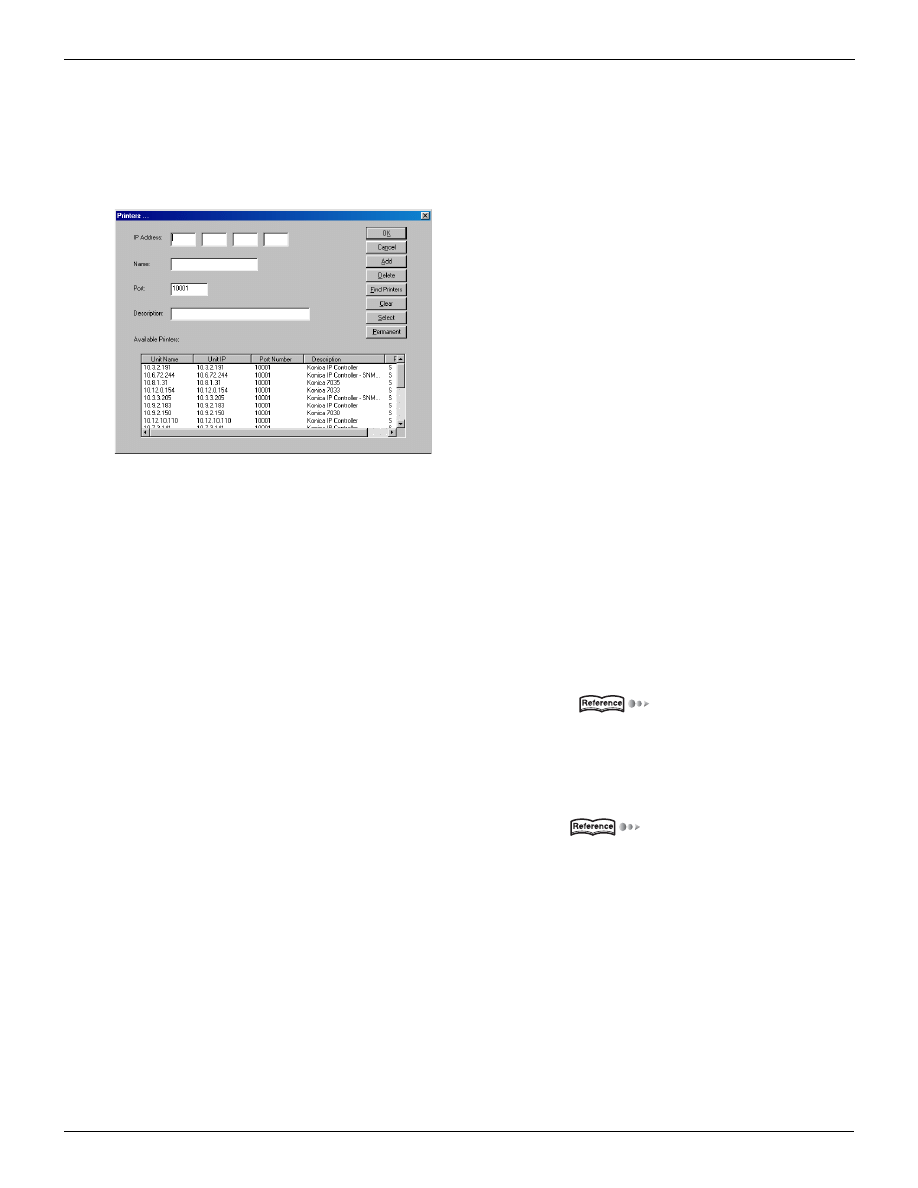
11-5. IP Peer-to-Peer installation and setting
154
VI Network
Chapter 11 Printing with IP Peer-to-Peer (Windows 95/98/Me only)
4
Click the [Printers…] button.
→ The [Printers…] dialog box is displayed.
5
Click the [Find Printers] button.
→ The network controller information is listed in [Available Printers].
The following information can be checked here. From this information, find the desired network con-
troller.
Unit Names: Name set for the network controller
Unit IP:
Network controller IP address
Port Number: Port number set for the network controller
Description: Network controller
Flags:
Network controller flag on computer
MEMO
z
For details on the network controller settings, [Please ask your administrator.].
z
From this screen, network controller information addition, deletion, and other settings can be executed. For details,
refer to [Selecting the network controller for IP Peer-to-Peer printing] (
6
From [Available Printers], select the network controller to use for printing.
MEMO
z
If there is no network controller being used, the network controller information can be added from this screen. For
details, refer to [Network controller name display method selection] (
7
Click the [Select] button.
→ The network controller is selected.
MEMO
z
To cancel a network controller selection, click the [Select] button again.
8
Click the [OK] button.
→ The display returns to the [IP-Peer To Peer Setup] screen.
9
Click the [OK] button.
→ [IP-Peer To Peer Setup] is closed.

11-5. IP Peer-to-Peer installation and setting
155
VI Network
Chapter 11 Printing with IP Peer-to-Peer (Windows 95/98/Me only)
The network controller selected here can now be selected as the output destination.
After the network controller has been selected, install the printer driver on the computer. For details,
refer to [11-6. Installing a printer driver] (
Setting the network controller information with IP Peer-to-Peer
The following settings can be made using IP Peer-to-Peer.
Network controller name display method selection
Set the network controller name for when [Print port] is selected with the printer driver settings.
Network controller information addition
Information on the network controller used for printing is added with IP Peer-to-Peer.
Network controller deletion
This deletes the network controller information.
Network controller search
This searches for the network controllers connected to the network.
Flag settings
This sets the [flag] that determine various attributes for the network controllers displayed in the list
resulting from the network controller search.
Deleting network controller information
This deletes network controller information from the list displayed as the result of the network
controller search.
Network controller name display method selection
1
The display method is selected from the [Printer Names] on the [IP-Peer To Peer Setup]
screen.
MEMO
z
For details on displaying the [IP-Peer to Peer Setup] screen, refer to [IP Peer-to-Peer settings] (
The respective contents below are listed as the printer name according to the results of this selec-
tion.
Based on Serial Numbers:The network controller serial number
Based on IP Address:
The network controller IP address
Based on DNS Name:
The network controller DNS (Domain Name Service) name
Based on unit name:
The name set for the network controller
MEMO
z
For details on the network controller settings, [Please ask your administrator.].
2
Click the [OK] button.
→ The [IP-Peer to Peer Setup] screen is closed.
From now on, the network controller information is displayed on the printer port list with the display
method set with the printer driver.
MEMO
z
If you click the [Cancel] button, the settings are cancelled.

11-5. IP Peer-to-Peer installation and setting
156
VI Network
Chapter 11 Printing with IP Peer-to-Peer (Windows 95/98/Me only)
Adding network controller information
1
This adds network controller information in [Printers…] screen.
MEMO
z
For details on displaying the [Printers…] screen, refer to [IP Peer-to-Peer settings] (
The following information is input to the input columns of the [Printers…] screen.
IP Address:The network controller IP address
Name:
The name for selecting the print destination port information when making the printer
driver settings
Port:
[1] added to the value for the base port number set for the network controller
MEMO
z
For details on the network controller settings, [Please ask your administrator.].
2
Click the [Add] button.
→ The network controller information is registered.
3
Click the [OK] button.
→ The [Printers…] screen is closed.
MEMO
z
You can cancel the settings by clicking the [Cancel] button on the [Printers…] screen.
4
Click the [OK] button.
→ The [IP-Peer To Peer Setup] screen is closed.
MEMO
z
Even if the network controller information added with this procedure is not set, it becomes the [network controller that
can be used for printing] and [default information]. For details, refer to [Flag settings] (
Page 157).
Deleting network controller information
1
On the [Printers…] screen at [Available Printers], you can click the network controller infor-
mation to delete.
MEMO
z
For details on displaying the [Printers…] screen, refer to [IP Peer-to-Peer settings] (
2
Click the [Delete] button.
→ The network controller information is deleted from [Available Printers].
Network controller search
When you click the [Find Printers] button on the [Printers…] dialog box, the network controllers con-
nected to the network are displayed in the list of [Available Printers].
MEMO
z
Here, a list is displayed of the network controllers in the range set in [IP-peer to peer settings] screen [Max Hops for].
To change the search range, return from the [Printers…] screen to the [IP-peer to peer settings] screen and change
the [Max Hops for] range.
z
If the [Max Hops for] is set too high, this increases traffic on the network.

11-6. Installing a printer driver
157
VI Network
Chapter 11 Printing with IP Peer-to-Peer (Windows 95/98/Me only)
Flag settings
[Flag] can be set that determine various attributes for the network controllers displayed at [Available
printers].
MEMO
z
The current flags are listed in the [Flags] column of [Available printers].
S flag
Network controllers for which the S flag is set are displayed in the [Available ports] list for the [Add
printer wizard]. Selecting a network controller here makes it possible to use a network printer as a
virtual local printer.
• To set the S flag for a network controller, select the network controller for which the flag is to be
set in [Connected printers] on the [Printers…] screen, then click the [Select] button. The S flag is
set for this network controller and [S] is displayed in the [Flags] column.
• If you click the button with the S flag displayed, this ends the S flag.
P flag
When a network controller has the P flag set, the information is not deleted from the [Connected
printers] screen even if you click the [Delete] button on the [Printers…] screen.
• To set the P flag for a network controller, select the network controller for which the flag is to be
set in [Connected printers] on the [Printers…] screen, then click the button. The P flag is set for
this network controller and [P] is displayed in the [Flags] column.
• If you click the [Permanent] button with the P flag displayed, this ends the P flag.
M flag
The M flag set for a network controller shows that network controller was added manually with the
[Printers…] screen.
MEMO
z
The [S], [M]. and [P] flags are set for network controllers added manually in [Printers…] screen.
Deleting network controller information
When you click the [Delete] button on the [Printers…] screen, the network controller information dis-
played in [Available Printers] is deleted.
MEMO
z
Information for a network controller for which the P flag is set, the information is not deleted even if the [Delete] button
is clicked.
11-6. Installing a printer driver
This installs the printer driver on the computer executing Peer-to-Peer printing.
MEMO
z
Select the network controller for printing in [IP Peer-to-Peer] before installing the printer driver. For details, refer to [IP
1
Switch on the power for the computer and start Windows.
MEMO
z
Close down any applications that are running.

11-6. Installing a printer driver
158
VI Network
Chapter 11 Printing with IP Peer-to-Peer (Windows 95/98/Me only)
2
Put the [User Software CD] in the computer's CD-ROM drive.
3
From the taskbar, select [Start] - [Settings] - [Printers].
→ The [Printers…] window is displayed.
4
Double click the [Add Printer] icon.
→ The [Add Printer Wizard] screen is displayed.
5
Click the [Next ›] button.
→ The screen for selecting the connection method is displayed.
6
Select [Local printer] tab, then click the [Next ›] button.
→ The display returns to the [Add Printer Wizard] screen.
7
Click the [Have Disk…] button.
→ The [Install From Disk] screen is displayed.
8
Click the [Browse…] button.
→ The [Open] screen is displayed.
9
In [Drives], select the CD-ROM drive. For the folder, double-click the
[\English\Printer\Win9X_Me] folder.
→ [oemsetup.inf] is displayed as the [File name:].
10
Click the [OK] button.
→ The display returns to the [Install From Disk] screen.
11
Click the [OK] button.
→ The display returns to the [Add Printer Port] screen.
12
Ensure that [Konica IP-xxx PCL] is displayed in the [Printers], then click the [Next ›]
button.
→ The screen for selecting the port to be used with the printer is displayed.
MEMO
z
The model name of print controller is displayed in [xxx].

11-6. Installing a printer driver
159
VI Network
Chapter 11 Printing with IP Peer-to-Peer (Windows 95/98/Me only)
13
In [Available ports], select the port (network controller) selected in [IP Peer-to-Peer].
MEMO
z
The name displayed for the network controller depends on the [IP Peer-to-Peer] settings. For details, refer to [Setting
the network controller information with IP Peer-to-Peer] (
14
Click the [Next ›] button.
→ A screen for checking the printer name is displayed.
15
Check the printer name.
To change it, input a new printer name.
16
If you want to use this printing system as your default printer, select [Yes]; if you do
not want to use this printing system as your default printer, select [No].
17
Click the [Next ›] button.
→ A screen is displayed asking whether or not you want to print a test print.
18
To print a test print, select [Yes]; to not print a test print, select [No].
19
Click the [Finish] button.
→ The printer driver is installed on the PC and printing of the test page starts.
20
If the test page is printed correctly, click the [Yes] button.
→ The icon for the installed printer driver is displayed in the [Printers…] folder.
This completes printer driver installation.

VI Network
160
Chapter 12 Settings for Printing with LPD/LPR
(Windows NT 4.0/2000/XP only)
This chapter explains the settings required for printing with LPD/LPR using Windows NT 4.0,
Windows 2000 or Windows XP
12-2. Preparations for printing with LPD/LPR .......................................161
12-3. Print controller TCP/IP settings .....................................................161
12-4. Windows NT 4.0 settings................................................................162
12-5. Windows 2000 settings...................................................................165
12-6. Windows XP settings......................................................................168

161
VI Network
Chapter 12 Settings for Printing with LPD/LPR (Windows NT 4.0/2000/XP only)
12-1. LPD/LPR
An LPD (Line Printer Daemon) is a printer daemon (mechanism for executing printing) used with a standard
print server; an LPR (Line Printer Remote) is the protocol for making print requests to a printer daemon.
Printing using this LPD/LPR is possible from computers using Windows NT 4.0/2000/XP as their operating
system.
In printing with LPD/LPR, TCP/IP is used as the communications protocol.
12-2. Preparations for printing with LPD/LPR
The computer and network controller are prepared with the following procedure.
1
An IP address is assigned to the network controller.
[Please ask your administrator.].
2
The network controller TCP/IP settings are made.
Refer to [Print controller TCP/IP settings] (
3
The computer TCP/IP settings are made.
Refer to the pages below.
Windows NT 4.0 [Checking the network service](
Windows 2000 [Checking the Unix print service](
Windows XP
[Checking the Unix print service](
4
The printer port and printer driver is added.
Refer to the pages below.
Windows NT 4.0 [Adding a printer port and installing a printer driver](
Windows 2000 [Adding a printer port and installing a printer driver](
Windows XP
[Adding a printer port and installing a printer driver](
12-3. Print controller TCP/IP settings
To execute LPD/LPR printing, the network controller TCP/IP settings must be complete.
MEMO
z
For details on making the network controller TCP/IP settings, [Please ask your administrator.].

162
VI Network
Chapter 12 Settings for Printing with LPD/LPR (Windows NT 4.0/2000/XP only)
12-4. Windows NT 4.0 settings
This section explains how to make the settings with Windows NT 4.0.
Checking the network service
Printing with LPD/LPR requires that there be [Microsoft TCP/IP printing] and [Network service] in [Network
service].
1
From the taskbar, select [Start] - [Settings] – [Control Panel].
→ The [Control Panel] screen is displayed.
2
Double click the [Network] icon.
→ The [Network] screen is displayed.
3
Click the [Services] tab.
→ The [Network Services:] list is displayed.
4
Check that [Microsoft TCP/IP Printing] is in the list.
If it is not in the list, add it from the Windows setup CD-ROM.
MEMO
z
For details on how to add a [Network Services], refer to the user’s manual for the operating system.
Adding a printer port and installing a printer driver
This adds an LPD/LPR printer port and installs its printer driver.
1
Switch on the power for the computer and start Windows.
MEMO
z
Close down any applications that are running.
2
Log on with a user name that has administrator rights.
MEMO
z
If you cannot log on with a user name that has administrator rights, log on with a user name that has rights
incorporating those of a Power User.
3
Put the [User Software CD] in the computer's CD-ROM drive.
4
From the taskbar, select [Start] - [Settings] - [Printers].
→ The [Printers] screen is displayed.

12-4. Windows NT 4.0 settings
163
VI Network
Chapter 12 Settings for Printing with LPD/LPR (Windows NT 4.0/2000/XP only)
5
Double click the [Add Printer] icon.
→ The [Add Printer Wizard] screen is displayed.
6
Select [My Computer], then click the [Next ›] button.
→ The printer port setting screen is displayed.
7
Click the [Add port…] button.
→ The [Printer Port] screen is displayed.
8
From [Available Printer Port], select [LPR Port…], then click the [New Port…] button.
→ The [Add LPR compatible printer] screen is displayed.
9
At [Name or address of server providing lpd:], input the IP address assigned to the net-
work controller.
10
For the [Name of printer or print queue on that server], input [PORT1], then click the
[OK] button.
→ The [Printer Ports] screen is displayed.
11
Click the [Close] button.
→ The display returns to the [Add Printer Wizard] screen.
The LPR port (network controller IP address) is added to the [Available ports:].
12
Check that the added port checkbox is checked, then click the [Next ›] button.
→ A screen for checking the printer manufacturer and name is displayed.
13
Click the [Have Disk…] button.
→ The [Install From Disk] screen is displayed.
14
Click the [Browse…] button.
→ The [Locate File] screen is displayed.
15
From [Look in:], select the CD-ROM drive, then double-click the [\English\Printer\
WinNT_2000_Xp] folder.
→ [Printer.inf] is displayed as the [File name:].
16
Click the [Open] button.
→ The display returns to the [Install From Disk] screen.

12-4. Windows NT 4.0 settings
164
VI Network
Chapter 12 Settings for Printing with LPD/LPR (Windows NT 4.0/2000/XP only)
17
Click the [OK] button.
→ The display returns to the [Add Printer Wizard] screen.
18
Ensure that [Konica IP-xxx PCL] is displayed selected in [Printers], then click the [Next ›]
button.
→ A screen for checking the printer name is displayed.
MEMO
z
The model name of print controller is displayed in [xxx].
19
Check the printer name.
To change it, input a new printer name.
20
Click the [Next ›] button.
→ The screen for checking whether or not the printer is shared is displayed.
21
To share the printer, select [Shared]; to not share it, select [Not shared].
MEMO
z
To assign a share name to the printer, input the Share name.
22
If necessary, select the substitute driver for the network client.
23
Click the [Next ›] button.
→ A screen is displayed asking whether or not you want to print a test print.
24
To print a test print, select [Yes]; to not print a test print, select [No].
MEMO
z
If there are any files that cannot be deleted because Windows is using them, with the service stopped, log off, then
log on again with the same user name and password. Execute from Step
(
25
Click the [Finish] button.
→ The printer driver is installed on the PC and printing of the test page starts.
26
If the test page is printed correctly, click the [Yes] button.
→ The icon for the installed printer driver is displayed in the [Printers…] folder.
This operation completes the addition of the LPR port and the installation of the printer driver.

165
VI Network
Chapter 12 Settings for Printing with LPD/LPR (Windows NT 4.0/2000/XP only)
12-5. Windows 2000 settings
This section explains how to make the settings with Windows 2000.
Checking the Unix print service
Printing with LPD/LPR requires that the Unix print services are installed and that they be usable. Check the
settings with the following procedure.
1
From the taskbar, select [Start] - [Settings] - [Control Panel].
→ The [Control Panel] window is displayed.
2
Double click [Network and Dial-up Connections] icon.
→ The [Network and Dial-up Connections] window is displayed.
3
Select [Advanced] – [Optional Network Components].
→ The [Windows Optional Networking Components Wizard] screen is displayed.
4
Select [Other Network File and Print Services], then click the [Details…] button.
→ The [Other Network File and Print Services] screen is displayed.
If [Print Services for Unix] is not checked in the list, check that and add from the Windows setup CD-
ROM.
MEMO
z
For details on how to add a [Print Services for Unix], refer to the User’s Manual for the operating system.
Adding a printer port and installing a printer driver
This adds an LPD/LPR printer port and installs its printer driver.
1
Switch on the power for the computer and start Windows.
MEMO
z
Close down any applications that are running.
2
Log on with a user name that has administrator rights.
MEMO
z
If you cannot log on with a user name that has administrator rights, log on with a user name that has rights
incorporating those of a Power User.
3
Put the [User Software CD] in the computer's CD-ROM drive.
4
From the taskbar, select [Start] - [Settings] - [Printers].
→ The [Printers] screen is displayed.

12-5. Windows 2000 settings
166
VI Network
Chapter 12 Settings for Printing with LPD/LPR (Windows NT 4.0/2000/XP only)
5
Double click the [Add Printer] icon.
→ The [Add Printer Wizard] screen is displayed.
6
Click the [Next ›] button.
7
Select [Local printer].
MEMO
z
Ensure that the [Automatically detect and install my Plug and Play printer] checkbox is not checked.
8
Click the [Next ›] button.
→ [Select the Printer Port] screen is displayed.
9
Select [Create a new port], the select [Type] – [LPR Port].
10
Click the [Next ›] button.
→ The [Add LPR compatible printer] screen is displayed.
11
At [Name or address of server providing lpd:], input the IP address assigned to the net-
work controller.
12
For the [Server printer name or print queue], input [PORT1], then click the [OK] button.
→ The display returns to the [Add Printer Wizard] screen.
13
Click the [Have Disk…] button.
→ The [Install From Disk] screen is displayed.
14
Click the [Browse…] button.
→ The [Locate File] screen is displayed.
15
From [Look in], select the CD-ROM drive, then double-click the [\English\Printer\
WinNT_2000_Xp] folder.
→ [Printer.inf] is displayed as [File name].
16
Click the [Open] button.
→ The display returns to the [Install From Disk] screen.
17
Click the [OK] button.
→ The display returns to the [Add Printer Wizard] screen.

12-5. Windows 2000 settings
167
VI Network
Chapter 12 Settings for Printing with LPD/LPR (Windows NT 4.0/2000/XP only)
18
Ensure that [Konica IP-xxx PCL] is displayed selected in [Printer], then click the [Next ›]
button.
→ A screen for checking the printer name is displayed.
MEMO
z
The model name of print controller is displayed in [xxx].
19
Check the printer name.
To change it, input a new printer name.
20
If you want to use this printing system as your default printer, select [Yes]; if you do
not want to use this printing system as your default printer, select [No].
21
Click the [Next ›] button.
→ The screen for checking whether or not the printer is shared is displayed.
22
To share the printer, select [Share as]; to not share it, select [Do not share this printer].
MEMO
z
To assign a share name to the printer, input the Share name.
23
Click the [Next ›] button.
→ A screen is displayed checking whether or not you want to print a test page.
24
To print a test print, select [Yes]; to not print a test print, select [No].
MEMO
z
If there are any files that cannot be deleted because Windows is using them, with the service stopped, log off, then
log on again with the same user name and password. Execute from Step
25
Click the [Next ›] button.
→ A screen is displayed announcing that the [Add Printer Wizard] is complete.
26
Click the [Finish] button.
→ The [Digital Signature Not Found] screen is displayed.
27
Click the [Yes] button.
→ The printer driver is installed on the PC and printing of the test page starts.
28
If the test page is printed correctly, click the [OK] button.
→ The icon for the installed printer driver is displayed in the [Printers] folder.
This completes printer driver installation.

168
VI Network
Chapter 12 Settings for Printing with LPD/LPR (Windows NT 4.0/2000/XP only)
12-6. Windows XP settings
This section explains how to make these settings with Windows XP.
Checking the Unix print service
Printing with LPD/LPR requires that the Unix print services be installed and that they be usable. Check the
settings with the following procedure.
1
From the taskbar, select [Start] - [Control Panel] - [Network and Internet Connection].
→ The [Network and Internet Connections] screen is displayed.
2
Select [Network connection].
→ The LAN or High-Speed Internet] screen is displayed.
3
Select [Advanced] menu - [Optional Networking Components].
→ The [Windows Optional Networking Components] screen is displayed.
4
Select [Other Network File and Print Services], then click the [Details…] button.
→ The [Other Network File and Print Services] screen is displayed.
If [Print Services for Unix] is not checked in the list, check that and add from the Windows setup CD-
ROM.
MEMO
z
For details on how to add a [Unix print services], refer to the copier’s user's manual for the operating system.
Adding a printer port and installing a printer driver
This adds an LPD/LPR printer port and installs its printer driver.
1
Switch on the power for the computer and start Windows.
MEMO
z
Close down any applications that are running.
2
Log on with a user name that has administrator rights.
MEMO
z
If you cannot log on with a user name that has administrator rights, log on with a user name that has rights
incorporating those of a Power User or the like.
3
Put the [User Software CD] in the computer's CD-ROM drive.

12-6. Windows XP settings
169
VI Network
Chapter 12 Settings for Printing with LPD/LPR (Windows NT 4.0/2000/XP only)
4
From the taskbar, select [Start] - [Printers and Faxes].
→ The [Printers and Faxes] screen is displayed.
5
Select [Printer Tasks] - [Add a printer].
→ The [Add Printer Wizard] screen is displayed.
6
Click the [Next ›] button.
→ The [Local or Network Printer] screen is displayed.
7
Select [Local printer attached to this computer].
MEMO
z
Ensure that the [Automatically detect and install my Plug and Play printer] checkbox is not checked.
8
Click the [Next ›] button.
→ The [Select a Printer Port] screen is displayed.
9
Select [Create a new port], the select [Type of port] - [LPR Port].
10
Click the [Next ›] button.
→ The [Add LPR compatible printer] screen is displayed.
11
At [Name or address of server providing lpd:], input the IP address assigned to the net-
work controller.
12
For the [Name of printer or print queue on that server], input [PORT1] then click the
[OK] button.
→ The display returns to the [Add Printer Wizard] screen.
13
Click the [Have Disk…] button.
→ The [Install From Disk] screen is displayed.
14
Click the [Browse…] button.
→ The [Locate File] screen is displayed.
15
From [Look in], select the CD-ROM drive, then double-click the
[\English\Printer\WinNT_2000] folder.
→ [Printer.inf] is displayed as the [File name].

12-6. Windows XP settings
170
VI Network
Chapter 12 Settings for Printing with LPD/LPR (Windows NT 4.0/2000/XP only)
16
Click the [Open] button.
→ The display returns to the [Install From Disk] screen.
17
Click the [OK] button.
→ The display returns to the [Add Printer Wizard] screen.
18
Ensure that [Konica IP-xxx PCL] is displayed selected in [Printers], then click the [Next ›]
button.
→ [Name Your Printer] screen is displayed.
MEMO
z
The model name of print controller is displayed in [xxx].
19
Check the printer name.
To change it, input a new printer name.
20
If you want to use this printing system as your default printer, select [Yes]; if you do
not want to use this printing system as your default printer, select [No].
21
Click the [Next ›] button.
→ A screen is displayed asking whether or not you want to print a test print.
22
To print a test print, select [Yes]; to not print a test print, select [No].
MEMO
z
The test print prints the standard Windows test page. Test prints can also be executed in the [Properties].
23
Click the [Next ›] button.
→ A screen is displayed announcing that the [Add Printer Wizard] is complete.
24
Click the [Finish] button.
→ The [Hardware Installation] screen is displayed.
25
Click the [Continue Anyway] button.
→ The printer driver is installed on the PC and printing of the test page starts.
26
If the test page is printed correctly, click the [OK] button.
→ The icon for the installed printer driver is displayed in the [Printers and Faxes] screen.
This completes printer driver installation.

VI Network
171
Chapter 13 Using via the Internet
(Windows 2000/XP)
This chapter explains how to use IPP (Internet Printing Protocol) to print data received via the
Internet or an intranet and the settings required for using IPP.
13-3. Windows 2000 settings...................................................................173
13-4. Windows XP settings......................................................................176

172
VI Network
Chapter 13 Using via the Internet (Windows 2000/XP)
13-1. Internet printing
This printing system supports Internet printing using IPP (Internet Printing Protocol).
Internet printing is a printing technology that exchanges print data between a computer and printer at physi-
cally separate locations over the Internet or an intranet.
If you are connected over the Internet or an intranet, you can print with print instructions sent from a computer
at a site remote from the printer. With Internet printing, the printer can be used like a fax.
MEMO
z
Internet printing can only be executed on computers running Windows 2000/XP as their operating system.
MEMO
● IPP is a standardized protocol for sending and receiving print data over the Internet or an intranet. IPP is
a protocol based on HTTP (HyperText Transfer Protocol) and can send/receive data through firewalls,
so it makes possible print instructions via the Internet.
13-2. Printer settings
This section explains the printer settings required for Internet printing.
Printer TCP/IP settings
To use the Internet printing functions, the network controller TCP/IP settings must be complete.
MEMO
z
For details on making the network controller TCP/IP settings, [Please ask your administrator.].
Internet
HUB
Router
HUB
Router
Printer (Copier)

13-3. Windows 2000 settings
173
VI Network
Chapter 13 Using via the Internet (Windows 2000/XP)
IPP attribute settings
The IPP attributes are set as necessary.
The IPP attributes are the name, installation location, and other information concerning the printer used for
Internet printing. Pre-registering the IPP attributes makes it possible to check the information concerning the
printer used for Internet printing from a remote site via the Internet.
MEMO
z
For details on IPP attributes and how to set them, refer to the Web utility user’s manual.
13-3. Windows 2000 settings
This section explains how to make these settings with Windows 2000.
MEMO
z
To execute Internet printing, it is necessary that the computer TCP/IP settings be complete, that the computer be
able to connect to the Internet, and that the printer be connected to the Intranet.
1
Switch on the power for the computer and start Windows.
MEMO
z
Close down any applications that are running.
2
Log on with a user name that has administrator rights.
MEMO
z
If you cannot log on with a user name that has administrator rights, log on with a user name that has rights
incorporating those of a Power User.
3
Put the [User software CD] in the computer's CD-ROM drive.
4
From the taskbar, select [Start] - [Settings] - [Printers].
→ The [Printers] screen is displayed.
5
Double click the [Add Printer] icon.
→ The [Add Printer Wizard] screen is displayed.
6
Click the [Next ›] button.
7
Select [Network printer].
MEMO
z
Ensure that the [Automatically detect and install my Plug and Play Printer] checkbox is not checked.
8
Click the [Next ›] button.
→ [Locate Your Printer] screen is displayed.

13-3. Windows 2000 settings
174
VI Network
Chapter 13 Using via the Internet (Windows 2000/XP)
9
Select [Connect to a printer on the Internet or on your intranet].
MEMO
z
For the printer IP address section, input the IP address allocated to the network controller. For details on network
controller IP address, [Please ask your administrator.].
z
If the DNS (Domain Name System) is set, the printer (network controller) host name can also be set. For details on
DNS settings,[Please ask your administrator.].
10
Input the output printer's URL at [URL].
Input as follows.
http://printer IP address:631/ipp
Important
● When a proxy is set with the Web browser, the printer cannot be accessed. For details on proxy settings,
check with your network administrator.
11
Click the [Next ›] button.
→ The [Connect to Printer] screen is displayed.
12
Check the [OK] button.
→ A screen for checking the printer manufacturer and name is displayed.
13
Click the [Have Disk…] button.
→ The [Install From Disk] screen is displayed.
14
Click the [Browse…] button.
→ The [Locate File] screen is displayed.
15
From [Look in], select the CD-ROM drive, then double-click the
[\English\Printer\WinNT_2000_XP] folder.
→ [Printer.inf] is displayed as the [File name].
16
Click the [Open] button.
→ The display returns to the [Install From Disk] screen.
17
Click the [OK] button.
→ The display returns to the [Add Printer Wizard] screen.

13-3. Windows 2000 settings
175
VI Network
Chapter 13 Using via the Internet (Windows 2000/XP)
18
Ensure that [Konica IP-xxx PCL] is displayed selected in [Printer], then click the [Next ›]
button.
→ A screen for checking the printer name is displayed.
MEMO
z
The model name of print controller is displayed in [xxx].
19
Check the printer name.
To change it, input a new printer name.
20
If you want to use this printing system as your default printer, select [Yes]; if you do
not want to use this printing system as your default printer, select [No].
21
Check the [Next ›] button.
The screen for checking whether or not the printer is shared is displayed.
22
To share the printer, select [Share as]; to not share it, select [Do not share this printer].
MEMO
z
To assign a share name to the printer, input the Share name.
23
Click the [Next ›] button.
→ A screen is displayed checking whether or not you want to print a test print.
24
To print a test print, select [Yes]; to not print a test print, select [No].
25
Click the [Next ›] button.
→ A screen is displayed announcing that the [Add Printer Wizard] is complete.
26
Click the [Finish] button.
The [Digital Signature Not Found] screen is displayed.
27
Click the [Yes] button.
→ The printer driver is installed on the PC and printing of the test page starts.
28
If the test page is printed correctly, click the [OK] button.
→ The icon for the installed printer driver is displayed in the [Printers] screen.
This completes printer driver installation.

176
VI Network
Chapter 13 Using via the Internet (Windows 2000/XP)
13-4. Windows XP settings
This section explains how to make these settings with Windows XP.
MEMO
z
To execute Internet printing, it is necessary that the computer TCP/IP settings be complete, that the computer be
able to connect to the Internet, and that the printer be connected to the Intranet.
1
Switch on the power for the computer and start Windows.
MEMO
z
Close down any applications that are running.
2
Log on with a user name that has administrator rights.
MEMO
z
If you cannot log on with a user name that has administrator rights, log on with a user name that has rights
incorporating those of a Power User or the like.
3
Put the [User software CD] in the computer's CD-ROM drive.
4
From the taskbar, select [Start] - [Printers and Faxes].
→ The [Printers and Faxes] screen is displayed.
5
Select [Printer task] - [Add a printer].
→ The [Add Printer Wizard] screen is displayed.
6
Click the [Next ›] button.
7
Select [A network printer, or a printer attached to another computer].
MEMO
z
Ensure that the [Automatically detect and install my Plug and Play printer] checkbox is not checked.
8
Click the [Next ›] button.
→ The [Specify a Printer] screen is displayed.
9
Select [Connect to a printer on the Internet or on a home or office network].

13-4. Windows XP settings
177
VI Network
Chapter 13 Using via the Internet (Windows 2000/XP)
10
Input the output printer URL at [URL].
Input as follows.
http://printer IP address:631/ipp
MEMO
z
For the "Printer IP address section", input the IP address allocated to the network controller.
z
For details on network controller IP address, [Please ask your administrator.].
z
If the DNS (Domain Name System) is set, the printer (network controller) host name can also be set.
z
For details on DNS settings, [Please ask your administrator.].
Important
z
When a proxy is set with the Web browser, the printer cannot be accessed.
For details on proxy settings, check with your network administrator.
11
Click the [Next ›] button.
→ The [Install Printer Software] screen is displayed.
12
Click the [Have Disk…] button.
→ The [Install From Disk] screen is displayed.
13
Click the [Browse…] button.
→ The [Locate File] screen is displayed.
14
From [Look in], select the CD-ROM drive, then double-click the [\English\
Printer\WinNT_2000_XP] folder.
→ [Printer.inf] is displayed as the [File name].
15
Click the [Open] button.
→ The display returns to the [Install From Disk] screen.
16
Click the [OK] button.
→ The display returns to the [Add Printer Wizard] screen.
17
Ensure that [Konica IP-xxx PCL] is displayed selected in [Printers], then click the [Next ›]
button.
→ The [Name Your Printer] screen is displayed.
MEMO
z
The model name of print controller is displayed in [xxx].

13-4. Windows XP settings
178
VI Network
Chapter 13 Using via the Internet (Windows 2000/XP)
18
Check the printer name.
To change it, input a new printer name.
19
If you want to use this printing system as your default printer, select [Yes]; if you do
not want to use this printing system as your default printer, select [No].
20
Click the [Next ›] button.
→ A screen is displayed checking whether or not you want to print a test print.
21
To print a test print, select [Yes]; to not print a test print, select [No].
22
Click the [Next ›] button.
→ A screen is displayed announcing that the [Add Printer Wizard] is complete.
23
Click the [Finish] button.
→ The [Hardware Installation] screen is displayed.
24
Click the [Continue Anyway] button.
→ The printer driver is installed on the PC and printing of the test page starts.
25
If the test page is printed correctly, click the [OK] button.
→ The icon for the installed printer driver is displayed in the [Printers and Faxes] screen.
This completes printer driver installation.

179
VII Appendix
This volume covers the product specifi-
cations and basic troubleshooting.
Chapter 14 Appendix......................... 180
VII Appendix

VII Appendix
180
VII Appendix Chapter 14 Appendix
Chapter 14 Appendix
This appendix contains such information as the print controller product specifications and a list
of installed fonts. It also explains the printer driver function list, the default values for various
settings (factory default), the method for initializing settings, and other such information.
14-1. IP-422/IP-423 product specifications.............................................181
14-2. PostScript PS-343/PS-345 option product specifications...........184
14-6. Index according to item..................................................................206
14-7. Purpose-oriented index ..................................................................209

181
VII Appendix Chapter 14 Appendix
14-1. IP-422/IP-423 product specifications
Printer function
Type
Built into Konica 7022/7130 series copier
Copiers supported
7022/7130 (IP-422), 7022/7130/7135 (IP-423)
Paper
U.S.A
11x17, 8.5x14, 8.5x 11, 8.5x11R, 5.5x8.5, A3, B4, A4, A4R, B5, B5R, A5R, F4
Europe
11x17, 8.5x14, 8.5x 11, 8.5x11R, 5.5x8.5, A3, B4, A4, A4R, B5, B5R, A5R, F4, 16K,
16KR, 8K
Paper input/out-
put amounts
Same as copier
Paper output
capacity
Same as copier
Mode
Copier/printer dual operation possible (A maximum of five jobs can be processed.)
Special printing
Duplex printing, media type selection, output tray selection, print quality mode selection,
alternating printing
Staple function, front cover and back cover function, version display, confidential output
Print direction
Vertical (portrait), horizontal (landscape)
Resolution
Printer resolution: 600 dpi
Scanner resolu-
tion
200dpi, 300dpi, 400dpi, 600dpi
Number of tones
Binary
Number of print
setting sheets
1 to 999
Printable area
Top/bottom/left/right margins 4.0mm
Warm up
Same as copier
CPU
AMD Elan 133MHz (IP-422), Celeron 300A (IP-423)
Program memory
FLASH ROM (compact flash)16MB
System memory
SD-RAM64MB (standard)
Option: MU-404 64MB (IP-423)
MU-405 128MB (IP-423)
MU-411 (dedicate memory) 64MB (IP-422)
Interface
Parallel port
Centronics (IEEE1284)/Amphenol 36-pin male connector
OSs supported
Windows 95/98/Me
Windows NT 4.0
Windows 2000
Windows XP
Mac OS 8.x or higher [Max OS X is not supported] (when PostScript option installed)
Printer driver
Windows 95/98/Me printer drivers
Windows NT 4.0/2000/XP printer drivers
Mac OS 8.x or higher (when PostScript option installed)

14-1. IP-422/IP-423 product specifications
182
VII Appendix Chapter 14 Appendix
Fax function
Scanner functions
Transmission stan-
dards
Super G3
Modem speeds
33,600/31,200/28,800/26,400/24,000/21,600/19,200/16,800/14,400/12,000/9,600/
7,200/4,800/2,400bps
Encoding formats
MH/MR/MMR/JBIG
Transmission time
2-second level
This is the transmission time for JBIG communications for at A4-size document contain-
ing approximately 700 characters send at standard quality (8x3.85 lines/mm) in super
G3 mode (ITU-T V.34, 28.8 bps or faster).
Communication size
A3 maximum (Maximum document length 800 meters)
Recording paper size
A3 maximum
Scan line density
Main scanning 16/8 lines/mm
Secondary scanning 15.4/7.7/3.85 lines/mm
Resolution
200x200 dpi, 400x400 dpi (super fine)
Memory capacity
2 MB (With optional expanded memory: up to 16 MB can be allocated.)
PC-Fax transmission/
reception
Possible when option installed
Quick dialing
200 numbers
One-touch dialing
40 numbers
Sequential broadcast
transmission
200 maximum
Driver
Konica Network Scanner Driver
OSs supported
Windows 95/98/Me
Windows NT 4.0/2000/XP
Protocol supported
TCP/IP
Function
Scan to box
Scan to E-Mail
Scan to FTP
Scanning speed
Same as for copier
Scannable range
Same as for copier
Magnification ratio
Changes according to read-in resolution
For 200 dpi: 75 - 400%
For 400 dpi: 38-400%
For 300 dpi: 75-400%
For 600 dpi: 25-400%
Paper sizes that can
be read in
A3/A4R/A4/A5/A5R/B4/B5R/B5/B6R/8.5 x 11R/8.5 x 11/5.5 x 8.5/5.5 x 8.5R/8.5R x 14/
11 x 17/Postcard/entire surface
Number of pages that
can be stored in the
hard disk (A4 docu-
ments)
When PAMHD002
(2GB) from A/C
mounted
Depends on the resolution and contents of the document
For 200 dpi: approx. 34000 pages of text only*1; approx. 9000 pages with images*2
For 300 dpi: approx. 18500 pages of text only*1; approx. 4400 pages with imagess*2
For 400 dpi: approx. 12000 pages of text only*1; approx. 2500 pages with imagess*2
For 600 dpi: approx. 6200 pages of text only*1; approx. 1000 pages with imagess*2
*1 When ITU-T fax chart No. 4 used
*2 When ITU-T fax chart No. 1 used
Special functions
Dual page, Non-Image Area Erase, Reverse lmage, Frame/Fold Erase, Mixed Original,
Holded Original, Memory Mode, Flip Side correction, Output
Hard disk
PCMCIA card type of 1 GB or more (For details, [Please ask your administrator.]).

14-1. IP-422/IP-423 product specifications
183
VII Appendix Chapter 14 Appendix
Network functions
Restrictions
The copier weekly timer functions can be used in printer mode, but if print data remains in the E-
RDH memory, the power is not switched off until output of that data is completed.
If the optional hard disk is not connected, and data is sent to the print controller on both the parallel
port and the network at the same time, the print controller may stop operating correctly.
Important
● These specifications are subject to improve without prior notice.
Type
Incorporated model
Frame type
IEEE802.2/802.3/Ethernet II/IEEE802.3SNAP
Connection cable
type
10Base-T/100Base-TX
Connector
RJ-45
Protocol sup-
ported
TCP/IP (BOOTP, ARP, RARP, ICMP, DHCP, SNMP, HTTP, FTP, SMTP, IPP), IPX/SPX,
AppleTalk (EtherTalk)
OSs supported
(NOS)
Novell NetWare (3.x, 4.x), Microsoft Windows 95/98/Me, Microsoft Windows NT 4.0,
Microsoft Windows 2000/XP, Mac OS 8.x or higher [Mac OS X is not supported]
Multiple protocols
Automatic discrimination
Printing methods
supported
Peer-to-Peer (TCP/IP for Windows 95/98/Me), Pserver (IPX/SPX), LPD/LPR (TCP/IP),
AppleTalk (EtherTalk), IPP (TCP/IP for Windows 2000/XP)
Dedicated utilities
IP-P2P (IP peer-to-peer)
IPX-P2P (IPX peer-to-peer)
MAP (Management Access Program)
NWSetup
UNIX-TCP/IP Programs
General utilities
Web browser (Netscape Navigator, Internet Explorer)
Operation envi-
ronment
Temperature 0-50ºC, relative humidity 5-80%
Status display
LEDs
Green LED, amber LED, one each
Settings
Stored in non-volatile memory
Radio signal
emission regula-
tions
VCCI Class I
14-2. PostScript PS-343/PS-345 option product specifications
184
VII Appendix Chapter 14 Appendix
10/100Base-T UTP cable specifications
When a 10/100Base-T UTP cable is set for connecting to the RJ45 connector on the network, the gen-
eral Ethernet standard below is used. Use a cable of at least Category 5.
14-2. PostScript PS-343/PS-345 option product specifications
This section gives the PostScript option product specifications.
14-3. Options
This section contains information on memory, hard disks, and other options.
Memory
Almost all the memory installed in the print controller is used for image rasterizing (bitmap development pro-
cessing), font cache, form function, and other processing. Part is used for system operation.
The basic memory setting for the print controller is 64 MB, which makes printing in 1-bit mode (600 dpi) pos-
sible for all sizes of paper.
The larger the capacity of the memory in the print controller, the more pages can be rasterized while waiting
for earlier jobs in the queue to print. For A4 size paper, printing 1-bit mode data uses about 4,345 KB of mem-
ory (600 dpi).
Also, the copier's E-RDH memory is used for print processing. The E-RDH memory can be expanded to up to
160 MB.
Pin number
Color
Ethernet
8
Blue/white
7
Blue
6
Orange/white
Receive-
5
Green/white
4
Green
3
Orange
Receive+
2
Brown/white
Transmit-
1
Brown
Transmit+
Type
Built into print controller
Number of print
setting sheets
1 to 999 (Windows 95/98/Me), 1 to 9999 (Windows NT 4.0/2000/XP, Macintosh)
Program memory
FLASH ROM (compact flash)32MB
Hard disk
PCMCIA card type of 2 GB or more (For details, [Please ask your administrator.].
OSs supported
Windows 95/98/Me
Windows NT 4.0
Windows 2000
Windows XP
Mac OS 8.x or higher

14-3. Options
185
VII Appendix Chapter 14 Appendix
E-RDH (Electronic Recirculating Document Handler) memory
The E-RDH is a system that stores print data temporarily in the copier main unit memory (E-RDH mem-
ory) and processes it according to the selected settings.
When printing from the print controller, the copier main unit E-RDH is used.
The copier’s E-RDH memory is 32 MB standard and can be expanded to up to 160 MB.
The print controller uses 1-bit mode. It can hold approximately 180 pages of A4 data in the 32 MB (stan-
dard) of E-RDH memory.
Under conditions such as the following, because the print controller does not have adequate memory
installed, the desired print results cannot be obtained.
When error dispersion (normal fine or fine) is specified with the printer driver, if the data is com-
plex, image processing is switched automatically to dither and so printed.
When form data is complicated (the file sizes large), the form is not printed.
In the above cases, it is recommended that the print controller's memory be expanded.
Also, when printing specifying multiple copies, booklet, job control partial stop functions, etc., the data
for all the pages (in one job) that have been rasterized with the print controller are temporarily stored in
the E-RDH memory. Therefore, when you print a document with a particularly large number of pages, if
you use these functions, it may be impossible to print it correctly.
In this case, it is recommended that the copier's E-RDH memory be expanded.
Expanding memory
To always obtain optimum printer performance, it is recommended that you expand the memory.
MEMO
● For details on expansion memory, ask your service representative.
Problems with optional products
This section gives information concerning memory and hard disk problems and explains how to solve them.
Insufficient memory
The following print problems can occur due to insufficient print controller basic memory or copier main
unit E-RDH memory.
Parts of images are left out of printing.
Forms are not printed
Error dispersion is specified, but the data is printed with dither.
Memory overflows occur.
If any of the above problems occur, use the solutions on this page.
MEMO
z
For details on the E-RDH memory, refer to [E-RDH (Electronic Recirculating Document Handler) memory]
(

14-3. Options
186
VII Appendix Chapter 14 Appendix
When parts of images are left out of printing
When the data for a single page in a print job received by the print controller is complex, for example
when it includes an extremely large amount of straight lines and other vector graphics on one page for
a graphics application, the memory used for rasterizing with the print controller may sometimes be
insufficient.
In this case, set the printer driver graphic setting to raster mode.
Forms are not printed
If any of the conditions below occur, forms may not be printed.
The form exceeds the maximum data size
The relationship between the memory installed in the print controller and the maximum size of
form data is as follows.
When [Make transparent] is specified with the [Form tab]
When forms are not printed due to insufficient memory, it is recommended that the print control-
ler's memory be expanded.
When error dispersion is specified, but the data is printed with dither
Error dispersal requires more printer memory for image processing than dither.
In this case, it is recommended the print controller's memory be expanded.
When memory overflows occur
The amount of data for print job depends on the functions selected with the printer driver (booklet, cen-
ter fold/center bind functions, 2-in-1 functions, etc.) and on the number of pages in the print documents,
so sometimes memory overflows occur in the copier’s E-RDH memory. If a memory overflow occurs,
the output for that print job is canceled.
If the [Memory overflow] error message is displayed on the LCD screen, cancel the print job, take the
steps below, then issue the print instructions again.
Check that there are currently no jobs in the copier being processed or waiting for processing,
then send the job again.
If the document has many pages, do not send the print instructions for all the pages at once, but
rather send the print instructions divided over a number of jobs.
Deleting unnecessary function specifications
If memory overflows occur frequently, it is recommended that the copier's memory be expanded.
Installed memory capacity
Maximum form data size
64 MB (no expansion
memory)
Approx. 2.6 MB
128 MB (64 MB expansion
memory)
Approx. 5.2 MB

14-3. Options
187
VII Appendix Chapter 14 Appendix
The hard disk does not operate normally
If the main power is switched off while the hard disk is operating, data may stop writing correctly and the
hard disk may stop operating normally. If the hard disk is not operating normally, initialize the hard disk
with the procedure below.
1
Switch on the copier power. The [Main menu] screen is displayed on the LCD screen.
MEMO
z
For details on the procedure for displaying the [Main menu] screen, [Please ask your administrator.].
2
Touch the [7] key on the LCD screen.
3
Touch the [OK] key on the LCD screen.
→ A screen for checking whether or not to initialize the hard disk is displayed.
4
Touch the [1] key on the LCD screen.
5
Touch the [OK] key on the LCD screen.
→ When the formatting ends, [Switch the power off, then on again] is displayed.
6
Switch the copier power switch Off, wait about 10 seconds, then switch the power back On
again.
If the above procedure does not restore normal operation of the hard disk, contact your service
representative.
Caution
● After switching Off the Copier main power, if you switch it back on without waiting, the print controller
may not operate normally and errors may be displayed.
In this case, if you switch the Copier main power Off again, wait at least 10 seconds or so, then switch
the main power On again, the system will operate normally.
Important
● When the hard disk is initialized, the scan data, confidential print data, and PC-Fax reception data is
erased.
● Setting of the Printer default settings and the Controller settings are reset to the factory default.
● When the PostScript option is installed, the font information downloaded to the hard disk is also erased.
The hard disk is full
The message below is displayed on the control panel LCD screen when the print controller's hard disk
is running low on free space.
The hard disk is full.
Free space on the hard disk.
When the message above is displayed, execute the following steps.

14-3. Options
188
VII Appendix Chapter 14 Appendix
1
Using a computer on the network to delete scan jobs stored on the print controller's hard
disk.
MEMO
z
For details on scan data erasing, refer to [Using the network scanner driver] (
Page 142).
2
This uses the control panel to output confidential output (password printing) jobs on the
print controller's hard disk.
MEMO
z
For details on confidential output from the control panel, refer to [Operating from the control panel]
(
→ The print controller's automatic timer function automatically deletes jobs stored on the print con-
troller's hard disk approximately 24 hours after the data is stored on the hard disk.
If the hard disk capacity is insufficient, transmitted print jobs stop being printed.
Also, when a scan job is transmitted, the job is automatically canceled and the message below is dis-
played.
The hard disk is full.
Scan job is canceled.
Scan jobs canceled in this way are displayed in the [Scanner error list].
MEMO
z
For details on the [Scanner error list], [Please ask your administrator.].
189
VII Appendix Chapter 14 Appendix
14-4. Function list
This lists the PCL printer driver setting items (Adobe PostScript if the PostScript option is installed).
For details on the function settings, [Chapter 3 Printing with Windows]
(
(
PCL function list
The tabs in the main text show the [Konica IP-422/IP-423 PCL] property tabs.
Tab name
Setting item
Setting value
Summary
Reference
page
General
Comment
–
This inputs a comment.
–
Separator page
[none]
Full
Simple
This selects the separator page.
–
Browse
–
Specify the folder in which the file
used is stored as the separator
page.
–
Print test
–
This prints a test page.
Details
Print to the port
COMx: (Communi-
cations port)
FILE: (Makes a file
on the disk)
LPT1: (ECP printer
port)
This sets the print port.
Printing is not possible from
serial port Comx.
–
Add port
Network
Other
This adds a port.
Delete Port
–
This deletes an unnecessary
port.
Print using the
following driver
–
This selects the driver used for
printing.
–
New Driver
–
This adds a driver for printing.
Capture Printer
Port
Device
Path
Reconnect at logon
This specifies the printer device
name/path for printing through
the network. This also sets
whether or not to automatically
connect when logging on to the
network.
End Capture
–
This deletes the network path for
an unnecessary network printer.
Time out settings
Not selected (sec-
onds)
Transmission retry
(seconds)
This sets the parallel port timeout
time (in seconds) and the wait
time (in seconds) until transmis-
sion is retried.

14-4. Function list
190
VII Appendix Chapter 14 Appendix
Details
Spool settings
Spools print jobs pro-
gram finishes print-
ing faster
• Start printing after
last page is
spooled
• Start printing after
first page is
spooled
Print directly to the
printer
Bi-directional sup-
port for this printer
This sets whether or not to spool
print data when it is sent to the
printer from an application.
Port Settings
Spool MS-DOS print
jobs
Check port state
before printing
This sets whether or not to spool
MS-DOS print jobs and whether
or not to check the status of the
LPTx: port before printing.
Paper
Copies
1 to 999
This sets the number of copies to
print.
Collate
ON
OFF
This sets whether or not to sort in
order of page numbers when
printing jobs with multiple copies
of multiple pages.
Orientation
Portrait
Landscape
This sets the direction for printing.
Features
Offset
Staple
Combination
Smoothing
Toner Save
This sets the optional functions
for printing, such as Offset and
Staples.
Select functions in the upper col-
umn, and setting options in the
lower column.
Paper Size
5.5"×8.5"
8.5"×11"
8.5"×14"
11"×17"
A3-297×420mm
A4-210×297mm
A5-148×210mm
B4-250×354mm
B5-182×257mm
B6-128×182mm
F4-8.0"×13"
8K-267×390mm
16K-195×267mm
This sets the size of the paper to
print on.
Duplex
-None-
Flip on long edge
Flip on short edge
This sets whether or not to make
a duplex printing and the paper
direction for folding.
Tab name
Setting item
Setting value
Summary
Reference
page

14-4. Function list
191
VII Appendix Chapter 14 Appendix
Paper
Media Type
Plain paper
OHP [Transparency]
OHP-Interleave [Blank]
OHP-Interleave [Print]
This sets the media type for out-
put.
Output Tray
-Default-
Tray1
Tray2
This sets the output tray.
Paper Source
Auto Select
Bypass tray
Tray1
Tray2
Tray3
Tray4
This selects the input tray con-
taining the paper to print on.
Password Print
ON
OFF
This sets whether or not to Pass-
word print.
When you select ON, enter your
User ID and Password into the
screen displayed.
Settings
User ID
Password
This sets User ID and Password
for Password Print.
Restore
Defaults
–
This returns the contents set
here to their default values.
–
Cover
Front cover
Blank
Printed
This sets whether or not to print
the first page on the front cover
when the front cover paper is dif-
ferent from the paper for the
main text.
Back cover
Blank
Printed
This sets whether or not to print
the last page on the back cover
when the back cover paper is dif-
ferent from the paper for the
main text.
Tray
Bypass tray
Tray 1
Tray 2
Tray 3
Tray 4
This sets the paper source for
the paper used for front covers
and back covers.
Restore Defaults
–
This returns the contents set
here to their default values.
–
Graphics
Halftoning
Solid Black and
White
Patterned Grays
Diffused Grays
This sets the reproduction
method of halftone area.
Brightness
-100 to 100
Adjust the Brightness of the image.
Contrast
-100 to 100
Adjust the Contrast of the image.
Negative
ON
OFF
This sets whether or not to
reverse the image.
Restore
Defaults
–
This returns the contents set
here to their default values.
–
Tab name
Setting item
Setting value
Summary
Reference
page

14-4. Function list
192
VII Appendix Chapter 14 Appendix
Options
Layout- pages
per sheet
1
2
4
6
9
16
This prints combining multiple
pages from the document into
one page of print paper.
Layout- Scaling
20 to 400%
This sets the scaling value.
True Type
options
Outline soft fonts
Bitmap soft fonts
Rasters
This sets TrueType font settings.
Printer Lan-
guage
PCL-5E (Mono-
chrome)
PCL-6 (Mono-
chrome)
This sets a printer language for
printing.
Restore Defaults
–
This returns the contents set
here to their default values.
–
Watermarks
Watermark- Text
CONFIDENTIAL
COPY
DRAFT
FILE COPY
FINAL
PROOF
TOP SECRET
This selects characters for water-
marks.
Watermark-
Page
ALL but first page
All pages
First page only
No watermark
This sets the range to apply
watermarks.
Watermark- Top
–
This sets watermarks to [Top].
Watermark- Bot-
tom
–
This sets watermarks to [Bottom].
Watermark-
Count
1 to 14
This sets the number to repeat
watermarks in one page of print
paper.
Watermark- Sep-
aration
0 to 50
This sets the interval between
watermarks, when multiple
watermarks are printed on one
page of print paper.
Font- Name
–
This selects fonts for water-
marks.
Font- Color
Black
Dark Gray
Light Gray
White
This sets the color of water-
marks.
Font- Darkness
0 to 100%
This sets the density of water-
marks.
Tab name
Setting item
Setting value
Summary
Reference
page

14-4. Function list
193
VII Appendix Chapter 14 Appendix
Font- Bold
ON
OFF
This sets whether or not to put
characters in bold type face.
Font- Italic
ON
OFF
This sets whether or not to put
characters in italics.
Font- Size
1 to 300
This sets the character size.
Position-
Automatically
–
This sets the position of water-
marks automatically.
Position-
User defined
X:0 to 100
Y:0 to 100
This sets any position of water-
marks.
Position- Angle
0 to 360°
This sets the angle of water-
marks.
Adjustment- Move
–
This changes the adjustment value.
Adjustment-
Rotate
–
This repeats adjustment.
Show layout
–
–
New
–
This creates new watermarks.
Delete
–
This deletes the current water-
marks.
Restore Defaults
–
This returns the contents set
here to their default values.
Overlay
Symbol- File
-None-
1.BMP
This sets whether or not to apply
overlay.
Symbol- Page
All but first page
All Pages
First page only
No overlay
This sets the range to apply over-
lay.
Select Bitmap
–
This displays the [Open overlay
file] screen.
Select the file for overlay in this
screen.
Shade- Color
Black
Dark Gray
Light Gray
White
This sets the color of shade.
Shade-
Darkness
0 to 100
This sets the density of shade.
Size-
Automatically
–
This sets the size where the sym-
bol is automatically applied.
Size-
User defined
10 to 100
This sets any size where the
symbol is applied.
Percent
10 to 100
This sets the percentage for any
size where the symbol is applied.
Position-
Automatically
–
This sets the position of symbol
automatically.
Position-
User defined
X:0~100
Y:0~100
This sets any position of symbol.
Show Layout
–
Restore Defaults
This returns the contents set
here to their default values.
Tab name
Setting item
Setting value
Summary
Reference
page

14-4. Function list
194
VII Appendix Chapter 14 Appendix
FAX
Mode Selection
FAX
Printer
This switches the document des-
tination between fax and printer.
FAX Mode Setup-
Resolution
200dpi
400dpi
This sets the resolution for fax
transmission.
FAX Mode Setup-
Setup
–
When you click here, the [Fax
Mode Setup] screen is displayed.
This screen is used to make vari-
ous settings for fax transmission.
Enter Recipient
- Recipient
- Name
–
This inputs the name of the fax
recipient.
Enter Recipient
- Recipient
- Fax No.
–
This inputs the fax number of the
recipient.
Enter Recipient
- Recipient
- Error Correc-
tion Mode
ON
OFF
This sets whether or not to use
ECM (error correction) for fax
transmission.
Enter Recipient
- Recipient
- Intl Transmis-
sion Mode
ON
OFF
Check this setting to slow the
communications speed for inter-
national calls.
Enter Recipient
- Recipient
- V.34Mode
ON
OFF
This is to be set when sending
faxes in super G3 mode.
Enter Recipient
- Recipient
- Add
–
Clicking here adds the contents
set with the [Direct input] column
to the [Recipient list].
Phonebook
–
Clicking here displays a list of the
fax numbers already registered
so that you can select the fax
recipient from that list.
Recipients
–
This displays detailed information
for the fax recipients already reg-
istered.
Recipients
- Delete
–
This deletes the recipient
selected in the [Recipients] from
that list.
Tab name
Setting item
Setting value
Summary
Reference
page

14-4. Function list
195
VII Appendix Chapter 14 Appendix
Adobe PostScript Function list
The tabs in the main text show the [Konica IP-422/IP-423 PostScript] property tabs.
Setup
Options- Avail-
able options
Base DB-209/
210[2Trays] Base
FAX Option DB-409/
410[1Trays] Finisher
w/2Trays Finisher w/
3Trays Finisher w/
4Trays Inner Tray w/
2Trays
This selects the expansion
equipment adding to the copier.
Add
–
This adds the expansion equip-
ment selected with [Available
options] - [Installed options].
Options-
Installed options
–
This displays the added expan-
sion equipment.
Remove
–
This removes the expansion
equipment selected with
[Installed options].
Installed memory
64MB
128MB
This sets the memory installed in
the copier.
–
About
–
–
This displays the printer driver
version information.
Tab name
Setting item
Setting value
Summary
Reference
page
General
Comment
–
This inputs a comment.
–
Separator page
[none]
Full
Simple
This selects the separator
page.
–
Browse
–
This specifies the name of
the folder in which the file
used for the separator page
is stored.
–
Print Test Page
–
This prints a test page.
–
Tab name
Setting item
Setting value
Summary
Reference
page

14-4. Function list
196
VII Appendix Chapter 14 Appendix
Details
Print to the fol-
lowing port
COMx: (Communica-
tions port)
FILE : (Creates a file on
disk)
LPT1 : (Printer Port)
This sets the print port.
Printing is not possible from
serial port Comx.
–
Add Port
Network
Other
This adds a port.
Delete Port
–
This deletes an unnecessary
port.
Print using the
following driver
Drivers
This selects the driver used
for printing.
–
New Driver
–
This adds a driver for print-
ing.
Capture Printer
Port
Device
Path
Reconnect at logon
This specifies the printer
device name/path for print-
ing through the network. This
also sets whether or not to
automatically connect when
logging on to the network.
End Capture
–
This deletes the network path
for an unnecessary network
printer.
Time out settings
Not selected (seconds)
Transmission retry
(seconds)
This sets the parallel port
time out time (in seconds)
and the wait time (in sec-
onds) until transmission is
retried.
Spool settings
Spool print jobs so pro-
gram finishes printing
faster.
• Start printing after
last page is spooled
• Start printing after first
page is spooled
Print directly to the
printer
• Spool data format:RAW
Disable bi-directional
support for this printer.
Enable bi-dinectional
support for this printer.
This sets whether or not to
spool print data when it is
sent to the printer from an
application.
Port settings
Spool MS-DOS print
jobs
Check port state
before printing
This sets whether or not to
spool MS-DOS print jobs and
whether or not to check the
status of the port before print-
ing.
Tab name
Setting item
Setting value
Summary
Reference
page

14-4. Function list
197
VII Appendix Chapter 14 Appendix
Paper
Paper size
Statement/Letter/
Legal/Tabloid/A3/A4/
A5/B4/B5/B6/F4/8K/
16K
This sets the size of the
paper used for output.
The paper sizes that can be
set depend on the specifica-
tions for the country and on
the tray.
For details, refer to the
copier's user's manual.
Orientation
Portrait/F4/8K/16K
Landscape
Rotated
This sets the direction for
printing.
Print Control
None
Flip on long edge
Flip on short edge
This sets the binding direc-
tion during finishing for paper
printed on both sides.
Paper source
Auto Select Tray
Tray 1
Tray 2
Tray 3
Tray 4
Manual feed
This sets the input tray. The
number of trays available for
selection depends on the
copier model and the options
installed.
Paper output
method
Default
Tray 1
Tray 2
Tray 3
Tray 4
This sets the output tray. The
number of trays available for
selection depends on the
copier model and the options
installed.
Paper type
Plain paper
OHP (Trans parency)
OHP-Interleave
[Blank]
OHP-Interleave
[printed]
This sets the media type for
output.
Margins - Units
Inches
Millimeters
This sets the unit for margins
set for print paper.
Margins - Top
0.18~7.67 (Inches)
4.6-145.5 (Millimeters)
This sets the amount of the top
margin.
Margins - Bottom
0.18~7.67 (Inches)
4.6-145.5 (Millimeters)
This sets the amount of the
bottom margin.
Margins - Left
0.18-5.25 (Inches)
4.6-104.8 (Millimeters)
This sets the amount of the left
margin.
Margins - Right
0.18-5.25 (Inches)
4.6-104.8 (Millimeters)
This sets the amount of the
right margin.
About
–
This displays the printer
driver version information.
–
Help
–
This displays the help file.
–
Restore Defaults
–
This returns the contents set
here to their default values.
–
Tab name
Setting item
Setting value
Summary
Reference
page

14-4. Function list
198
VII Appendix Chapter 14 Appendix
Graphics
Resolution
600dpi
This displays the output reso-
lution.
Special
- Print as a neg-
ative image
ON
OFF
This sets whether or not to
reverse white and black
when printing.
Special
- Print as a mir-
ror image
ON
OFF
This sets whether or not to
reverse left and right when
printing.
Paper handling
- Layout
1 up
2 up
4 up
6 up
9 up
16 up
This prints combining multi-
ple pages from the document
into one page of print paper.
Paper handling
- Print page bor-
der
ON
OFF
This sets whether or not to
print a border around each
document page for layout
printing.
Scaling
25 to 400%
This sets the amount of
enlargement or reduction.
Convert gray text
to PostSript gray
ON
OFF
This sets whether or not to con-
vert gray text in a document into
PostScript gray.
–
Convert gray
graphics to Post-
Script gray
ON
OFF
This sets whether or not to con-
vert gray images in a document
into PostScript gray.
–
Help
–
This displays the help file.
–
Restore Defaults
–
This returns the contents set
here to their default values.
–
Fonts
Substitute printer
fonts for True-
Type fonts when
applicable
ON
OFF
This sets whether or not to
replace TrueType fonts
within the document with
printer fonts.
–
Do not use
printer fonts.
ON
OFF
This sets whether or not to
use printer fonts for printing.
–
Add Euro cur-
rency Symbol to
PostScript Fonts.
ON
OFF
This sets whether or not to
add the Euro currency sym-
bol to PostScript fonts.
Update Soft
Fonts
–
Clicking here recognizes
software fonts.
–
Tab name
Setting item
Setting value
Summary
Reference
page

14-4. Function list
199
VII Appendix Chapter 14 Appendix
Fonts
Send Font As
- TrueType fonts
- Send True
Type fonts as
Outlines
Bitmaps
Type42
Don’t Send
This sets the method for
transmitting fonts from an
application.
–
Send Fonts As
- Threshold to
switch between
downloading
bitmap or out-
line fonts, mea-
sured in pixels
[in pixel size at
the current res-
olution]
0 to 9,999
This sets the amount of the
bitmap and outline font
switching.
–
Send Fonts As
- PostScript fonts
- Send Post-
Script fonts as
In Native Format
Don’t Send
This sets the method for
transmitting PostScript fonts
from an application.
–
Help
–
This displays the help file.
–
Restore Defaults
–
This returns the contents set
here to their default values.
–
Device
Options
Available printer-
memory
0 to 200,000
This sets the amount of
printer memory allocated
when printing documents.
–
Printer features
Job Offset
Collate
Combination
Stapling
Front Cover
Back cover
Front/Back Cover tray
Smoothing
Toner save
This displays a list of the
printer functions that can be
set for printing and their cur-
rent settings.
Printer features
- Change setting
for
–
This changes the value of the
function selected with [Printer
functions].
Installable
options
Finisher
Drawer Base
Memory Configuration
This displays a list of the sta-
tus of the copier's optional
equipment.
–
Instalbble
options
- Change setting
for
–
This changes the contents of
the expansion equipment
selected with [Expansion
options].
–
Help
–
This displays the help file.
–
Restore Defaults
–
This returns the contents set
here to their default values.
–
Tab name
Setting item
Setting value
Summary
Reference
page

14-4. Function list
200
VII Appendix Chapter 14 Appendix
PostScript
PostScript output
format
PostScript [optimized
for speed]
PostScript [optimize for
portability-ADSC]
Encapsulated Post-
Script [EPS]
Archive format
This sets the format for Post-
Script output from applica-
tions.
PostScript head-
ers
Download header with
each print job
Assume header is
downloaded and
retained
This sets whether or not to
download the PostScript
header for each job.
PostScript head-
ers
- Send Header
Now
–
Clicking here starts down-
loading of the PostScript
header.
Printing Post-
Script error infor-
mation
ON
OFF
This sets whether or not to
print a report when a Post-
Script error occurs.
PostScript time
out values
- Job timeout
0 to 999 seconds
This sets the time in seconds
for a transmitted job to be
judged to have timed out.
PostScript time
out values
- Wait timeout
0 to 999 seconds
This sets the time in seconds
for a transmitted job to be
judged to have timed out.
Advanced
- PostScript lan-
guage level
3
2
This sets the PostScript lan-
guage level used.
–
Advanced
- Data format
ASCII data
Binary communications
protocol
Tagged binary communi-
cations protocol
Pure binary data
This sets the data format
used for transmitting print
data.
–
Advanced
- Send Ctrl+D
before job
ON
OFF
This sets whether or not to
send Ctrl+D before jobs.
–
Advanced
- Send Ctrl+D
after job
ON
OFF
This sets whether or not to
send Ctrl+D after jobs.
–
Advanced
- Display alert for
applications
incompatible
with driver fea-
tures
ON
OFF
This sets whether or not to
output a warning when an
attempt is made to use an
application that is not compat-
ible with driver functions
(page layout, watermark).
–
Help
–
This displays the help file.
–
Restore Defaults
–
This returns the contents set
here to their default values.
–
Tab name
Setting item
Setting value
Summary
Reference
page

14-5. Fonts
201
VII Appendix Chapter 14 Appendix
14-5. Fonts
This section explains, using screen fonts recorded on the [User software CD], and downloading fonts to HDD
when PostScript option installed.
Using the accessory screen fonts
The following screen fonts are recorded on the [User software CD].
PCL font (TrueType font) 80 fonts
PostScript Type 1 font (only when PostScript option installed) 136 fonts
Installing these fonts on the computer provides a WYSIWYG environment in which you can create docu-
ments while checking it on the computer screen in a state close to finished state.
MEMO
z
For details on the attached fonts, [Please ask your administrator.].
Installing screen fonts
To use the fonts recorded on the [User software CD], it is necessary to install the fonts on the operating sys-
tem you are using.The installation procedure depends on the operating system used and on whether or not
the PostScript option is installed.
Watermarks
Select a Water-
mark
None
CONFIDENTIAL
COPY
DRAFT
This displays a list of the
watermarks that can be
selected for printing.
Edit
–
Clicking here displays the
[Edit watermark] screen. On
this screen, you can change
the contents of the water-
mark selected with the
[Select a watermark] column.
New
–
Clicking here displays the
[New watermark] screen. On
this screen, you can change
the contents of a new water-
mark.
Delete
–
This deletes the watermark
selected with the [Select a
watermark] column.
Print watermark
On first page only
In background
As outline only
This sets how the watermark
is to be printed on the docu-
ment.
Help
–
This displays the help file.
–
Tab name
Setting item
Setting value
Summary
Reference
page

14-5. Fonts
202
VII Appendix Chapter 14 Appendix
True Type font installation (Windows 95/98/Me/NT 4.0/2000/XP)
1
Put the [User software CD] in the computer's CD-ROM drive.
MEMO
z
When using the PostScript option, put the PostScript option [User software CD].
2
From the taskbar, select [Start] - [Settings] - [Control Panel].
→ The [Control panel] window is displayed.
3
Double click the [Font] icon.
→ The contents in the [Fonts] folder is displayed.
4
From the menu bar, select [File] – [Install New Font].
→ The [Add Fonts] screen is displayed.
5
In [Drive], select the computer's CD-ROM drive. As the folder, double-click any folder on the
[User software CD].
IP422 [User software CD]:
[\English\Screen fonts]
PS-343 [User software CD].
[\English\Screen fonts\PS Screen fonts\TrueType (Core OS) fonts]
→ Font information is displayed on the [List of Fonts].
6
Select the font to install in the [List of Fonts].
Important
z
Ensure that the [Copy font to font folder] checkbox is On.
7
Click the [OK] button.
→ The selected font is installed.
From now on, this installed font can be used.
PostScript font installation (Windows 95/98/Me/NT 4.0)
(Only when PostScript option is installed)
Install Adobe Type Manager (ATM) before installing PostScript fonts.
MEMO
z
For details on installing Adobe Type Manager, [Installing Adobe Type Manager (ATM)] (
1
Put the PostScript option [User software CD] in the computer's CD-ROM drive.
2
From the taskbar, select [Start] - [Programs] – [Adobe] – [Abode Type Manager 4.1].
→ Adobe Type Manager is started.
3
Click the [Adobe Type Manager] screen [Font] tab.

14-5. Fonts
203
VII Appendix Chapter 14 Appendix
4
In [Source], select [Browse Fonts].
5
In the directory selection section, select the [User software CD] [\English\Screenfonts\PS
ScreenFonts\Type1fonts].
→ A list of the installable fonts is displayed.
6
Select the font to install.
7
Click the [Add] button.
→ The selected font is installed.
8
Adobe Type Manager is closed.
From now on, this installed font can be used.
PostScript fonts Installation (Windows 2000/XP)
(Only when the PostScript option is installed)
MEMO
z
Since Windows 2000/XP incorporates in the operating system itself the same functions provided by Adobe Type
Manager (ATM), ATM is not needed to install PostScript fonts.
1
Put the PostScript option [User software CD] in the computer's CD-ROM drive.
2
From the taskbar, select [Start] - [Settings] – [Control panel].
→ The [Control panel] screen is displayed.
3
Double click the [Fonts] icon.
→ The contents in the [Fonts] is displayed.
4
From the menu bar, select [File] – [Install New Font].
→ The [Add Fonts] screen is displayed.
5
In [Drive], select the computer's CD-ROM drive. As the folder, double-click the
[\English\Screenfonts\PS ScreenFonts\Type1fonts] folder.
6
Select the font to install in the [List of Fonts].
Important
z
Ensure that the [Copy font to font folder] checkbox is On.
7
Click the [OK] button.
→ The selected font is installed.
From now on, this installed font can be used.

14-5. Fonts
204
VII Appendix Chapter 14 Appendix
Installing Adobe Type Manager (ATM)
1
Put the PostScript option [User software CD] in the computer's CD-ROM drive.
2
From the task bar [Start] select [Run].
→ The [Run] dialog box is displayed.
3
As the name, input [\English\Screenfonts\ATM light\atm41.exe], then click the [OK] but-
ton.
→ The setup program is started and the installation screen is displayed.
4
Check the contents, then click the [Next ›] button.
→ The [Select Country] screen is displayed.
5
Select your country, then click the [Next ›] button.
→ The [Software License Agreement] screen is displayed.
6
Check the contents, then click the [Yes] button.
→ The [User Information] screen is displayed.
MEMO
z
To install and use Adobe Type Manager, agreement to the [Software License Agreement] is required.
7
Input the user information (name and company name), then click the [Next ›] button.
→ A screen for checking the input user information is displayed.
8
Check the contents, then click the [Yes] button.
→ The [Select components] screen is displayed.
9
Check the contents, then click the [Next ›] button.
→ [Select Program Folder] screen is displayed.
10
Click the [Next ›] button.
→ The [Start Copying Files] screen is displayed.
11
Click the [Next ›] button.
→ The installation is started. After the installation is complete, the [Adobe Type Manager] screen is
displayed.

14-5. Fonts
205
VII Appendix Chapter 14 Appendix
12
Click the [Finish] button.
→ The [Setup complete] screen is displayed.
MEMO
z
If the [Display Adobe Type Manager Readme file] checkbox is checked and you click the [Finish] button, the ATM
Readme file is displayed.
13
Select the timing for restarting the computer, then click the [Finish] button.
When [Yes, I want to restart my computer now] is selected, the computer is immediately restarted.
When [No, I will restart my computer later] is selected, the computer is not restarted. Execute neces-
sary operations, close down the computer, then restart it.
→ When the computer is restarted, the ATM is enabled.
Downloading fonts
The printer font is downloaded to the hard disk in the print controller.
For details on downloading fonts, refer to the user's manual that came with the fonts.
Important
● Select [disk0] as the destination for downloading to the hard disk in the print controller. If fonts are down-
loaded to [disk1], they cannot be used.
Also, when fonts are downloaded to [disk1] the print controller may stop operating normally.
● When the font download is complete, switch the copier main power Off, wait about 10 seconds, and
switch the power back On again.The downloaded fonts cannot be used normally until the copier has
been restarted.B
MEMO
z
When downloading fonts, have spooling switched [Off].
For details on making the spool settings, [Please ask your administrator.].

206
VII Appendix Chapter 14 Appendix
14-6. Index according to item
A
Access rights ............................................................ 18
Add Printer Wizard ......................................... 19, 22
Adding driver ......................................... 62, 64, 66
address of the FTP server ..................................... 123
Adobe driver ............................................................. 18
Adobe driver installation ........................................... 22
Adobe PS ................................................................. 18
Anonymous ............................................................ 124
Application function ................................................ 138
Application function setting screen ........................ 138
Archive format .......................................................... 53
ASCII ........................................................................ 88
B
Back cover ..................................................... 47, 83
Base Port Number ................................................. 153
Bi-directional support ............................................... 64
Binary ....................................................................... 88
bitmap format preview .............................................. 87
black and white reversed ............................... 51, 84
body ....................................................................... 121
Booklet ........................................................... 42, 79
Booklet-Right ........................................................... 42
box ............................................................. 113, 116
Box No. list ............................................................. 130
box number ............................................................ 117
Brightness ................................................................ 49
Broadcast ................................................... 106, 153
broadcast group ..................................................... 106
C
cable specifications ................................................ 184
Checking settings ................................................... 141
Checking the printer driver .................... 62, 64, 65
Collate ............................................................ 43, 80
Combination ................................................... 41, 42
Communications protocol ...................................... 151
confidential transmission ........................................ 101
Connecting the computer and the hard disk .......... 143
Connection diagram ................................................. 13
Conserving toner ...................................................... 87
Contrast ................................................................... 49
Copy mode ......................................................... 7, 8
Creating groups ..................................................... 104
Custom Page Default ............................................... 72
D
default printer ................................................. 21, 24
Delayed Transmission ........................................... 100
Deleting port ................................................... 65, 67
Deleting the printer port ........................................... 63
destination ....................................... 101, 119, 123
destinations already registered .................. 122, 125
Direction ................................................................... 71
Downloading fonts ................................................. 205
driver name ........................................... 62, 64, 66
driver version ......................................... 62, 64, 65
Dual page .............................................................. 138
Duplex ..................................................................... 40
duplex printing ......................................................... 76
E
E-Mail .............................................. 114, 119, 127
email address ........................................................ 120
E-Mail body list ...................................................... 128
E-Mail registration/edit .......................................... 126
E-Mail select screen .............................................. 119
E-Mail subject list .................................................. 128
enlarged .................................................................. 73
EPS ................................................................ 53, 87
E-RDH ................................................................... 185
E-RDH memory .......................................... 112, 185
error report ............................................................ 102
Ethernet ................................................................... 12
Euro currency symbol ............................................. 53
Executing a test print ............................................... 25
Expanding memory ............................................... 185
F
fax kit .............................................................. 97, 98
Fax mode .................................................................. 7
Fax transmission ................................................... 100
file format .............................................................. 134
File Name .............................................................. 134
File path ................................................................ 123
file save ................................................................... 87
fine mode .............................................................. 100
Flag ....................................................................... 157
Flip Horizontal ......................................................... 84
Flip on long edge ............................................ 40, 76
Flip on short edge .......................................... 40, 76
Flip side 2 .............................................................. 139
Flip Vertical ............................................................. 84
Flow for network scanner ........................................ 11
Flow for printing ......................................................... 8
folded documents .................................................. 139
following network components are installed .......... 151
font .......................................................................... 52
Font Inclusion .......................................................... 88
Fonts ..................................................................... 201
Format ..................................................................... 88
Frame/fold erasure ................................................ 140
Frames .................................................................... 78
Front cover ..................................................... 47, 83
FTP list .................................................................. 132
FTP registration/edit ................................... 123, 130
FTP select ............................................................. 123
FTP server ................................................. 114, 122
Function list ......................................... 32, 70, 189

14-6. Index according to item
207
VII Appendix Chapter 14 Appendix
H
Halftoning ................................................................. 49
I
IEEE1284 ................................................................. 12
image ....................................................................... 49
image rotation ........................................................ 141
Incomplete job list .................................................... 93
input tray .................................................................. 73
Installing fonts ........................................................ 201
Interfaces ................................................................. 12
Internet printing ...................................................... 172
intranet ................................................................... 172
IP Peer-to-Peer ...................................................... 151
IPP ......................................................................... 172
IPP attribute ........................................................... 173
Ip-p2p ..................................................................... 153
J
jaggedness ..................................................... 49, 86
Job Time Out ........................................................... 54
K
Konica driver ............................................................ 17
Konica driver installation .......................................... 19
Konica Network Scanner Driver ............................. 142
L
Landscape ..................................................... 45, 81
language level .......................................................... 88
layout ....................................................................... 77
Layout direction ........................................................ 78
left binding ................................................................ 79
left/right reversed ........................................... 52, 84
Local printer ............................................ 3, 20, 23
Login ...................................................................... 124
LPD ........................................................................ 161
LPD/LPR ................................................................ 161
LPD/LPR printer .............................. 162, 165, 168
LPD/LPR printer port ....................... 162, 165, 168
LPR ........................................................................ 161
LPR Port .................................................... 166, 169
LPT .......................................................................... 62
LPT port ................................................................... 62
M
magnification ratio ........................................ 73, 136
Margins .......................................................... 38, 75
Max Hops for .......................................................... 153
Media Type .................................................... 36, 73
Memory .................................................................. 184
Memory mode ............................................ 133, 139
Microsoft TCP/IP printing ....................................... 162
Mirror image ............................................................. 84
Mixed Original ........................................................ 138
mode is switched ....................................................... 7
multiple pages on one sheet .................................... 77
N
name of the profile ................................................ 123
negative image ............................................... 51, 84
network controller information ............................... 155
Network printer ........................................ 3, 20, 23
network service ..................................................... 162
Non image area erase ........................................... 141
non-standard paper size ......................................... 72
number of copies to print ................................ 34, 71
O
Offset .............................................................. 44, 80
OHP ........................................................................ 73
on combined pages ................................................. 78
Operation environment ............................................ 12
Options .................................................................. 184
order ........................................................................ 74
order in which pages can be assigned .................... 78
Orientation ............................................................... 34
Output tray ..................................................... 37, 74
Overlay .................................................................... 55
P
Page notation language .......................................... 18
Pages per sheet/Layout .......................................... 41
Paper size ...................................................... 35, 72
Paper Source ................................................. 37, 73
Paper type ............................................................... 36
Parallel interface ..................................................... 12
Password ..................................................... 58, 124
Password print ........................................................ 58
PC-Fax .................................................................... 97
PC-Fax transmission/reception flow .......................... 9
PCL ......................................................................... 17
Peer-to-Peer .......................................................... 150
phonebook ........................................ 97, 101, 104
Plain paper .............................................................. 73
platen glass ........................................................... 112
port .......................................................................... 20
Port addition/deletion ............................ 63, 65, 67
port connecting ........................................................ 62
Port No. ................................................................. 124
Port settings ............................................................ 62
Portrait ............................................................ 45, 81
PostScript error ....................................................... 92
PostScript error information .................................... 54
PostScript files ........................................................ 87
PostScript font ......................................................... 53
PostScript format ..................................................... 87
Postscript header .................................................... 53
PostScript Job ......................................................... 87
PostScript level ....................................................... 88
PostScript output format .......................................... 53
PostScript PS-343 option product specifications .. 184
PostScript timeout ................................................... 54
PostScript Type 1 font ........................................... 201
Preparing a new phonebook ................................. 108

14-6. Index according to item
208
VII Appendix Chapter 14 Appendix
pre-registered boxes .............................................. 118
Print as a mirror image ............................................. 52
print direction ........................................................... 71
print order ................................................................. 74
print quality ............................................................... 49
Print screen .............................................................. 69
printed laid out ......................................................... 77
printer daemon ....................................................... 161
Printer mode basic screen ..................................... 116
Printer port assignment .................................. 65, 66
Printing from an application ..................................... 26
Printing on ................................................................ 76
Printing overlaying ................................................... 55
Printing rear of the paper ......................................... 40
Problems with optional products ............................ 185
product specifications ............................................ 181
protocol ........................................................ 88, 161
PS files ..................................................................... 87
R
RADF ..................................................................... 112
rasterizing .................................................................. 8
Real mode .............................................................. 133
rear ........................................................................... 76
Reconnect ................................................................ 63
reduced .................................................................... 73
Registering recipient information ........................... 104
registration name ................................................... 120
registration number .................................... 120, 126
Registration/edit Menu screen ............................... 125
re-sends ................................................................... 64
Resolution ......................................... 51, 100, 135
reverse ..................................................................... 74
Reverse image ....................................................... 140
right binding ............................................................. 79
S
Saving phonebooks ............................................... 108
Scaling ..................................................................... 36
Scan to box ................................................ 113, 116
Scan to E-Mail ............................................ 114, 119
Scan to FTP ............................................... 114, 122
scanned data into a computer ................................ 142
Scanner driver screen ............................................ 146
Scanner setting basic ............................................. 133
Scanner/printer mode ................................................ 7
Scanning mode ...................................................... 133
security level ............................................................ 18
segment ................................................................. 153
Select transmission method ................................... 125
Selecting the destination ........................................ 116
Sender ID ............................................................... 101
Setting options ............................................... 22, 25
Setting the fax unit ................................................... 98
share the printer ............................................. 21, 24
Smoothing ...................................................... 49, 86
Sort .......................................................................... 43
special mode ........................................................... 79
Spool .............................................................. 65, 67
Spool MS-DOS print jobs ........................................ 63
Spool settings .......................................................... 63
spread open document ......................................... 138
Staple ............................................................. 45, 81
Sub Address .......................................................... 101
Subject .................................................................. 121
super fine mode .................................................... 100
T
TCP/IP ................................................................... 151
TCP/IP settings .......................................... 150, 161
Text/Photo Enhance .............................................. 134
Time you want to transmit ..................................... 100
Timeout ................................................................... 62
Timeout time .................................................. 64, 66
Toner save .............................................................. 50
top/bottom reversed ................................................ 84
Transmission retry ................................................... 62
transmitted as a fax ................................................. 97
tray ........................................................ 37, 73, 74
tray which to output ................................................. 74
TrueType font ............................................... 52, 201
TWAIN scanner driver ........................................... 142
U
Unix print service ........................................ 165, 168
URL ....................................................................... 123
Usage of this Manual ............................................... xv
User ID .................................................................... 58
V
version ................................................... 62, 64, 65
virtual port ............................................. 63, 65, 66
W
Wait timeout ............................................................ 54
Watermark ...................................................... 56, 85

209
VII Appendix Chapter 14 Appendix
14-7. Purpose-oriented index
C
Connection between the computer and printer
Windows 95/98/Me ............................................62
Windows NT 4.0.................................................64
Windows 2000/XP..............................................65
Control panel operation
Inputting text ....................................................132
D
Destination
Selecting the destination
Importing scanned data into a computer..........142
Sending to FTP server (Scan to FTP)..............122
Sending with email (Scan to E-mail) ................119
Storing to a box (Scan to box) .........................116
Driver
AdobePS............................................................18
Network scanner driver ....................................142
PCL ....................................................................17
F
Fax function
Sending Faxes
PC-Fax transmission error reports...................102
Registering destination ......................................97
Sending faxes ..................................................100
Using a phonebook ..........................................109
Font
Downloading fonts ...........................................205
Installing Adobe Type Manager (ATM) ............204
Installing fonts ..................................................201
Setting the font...................................................52
I
Image settings (Windows)
Halftoning...........................................................49
Printing with black and white reversed...............51
Printing with left/right reversed...........................52
Setting the resolution ........................................51
Smoothing..........................................................49
Toner save .........................................................50
Installing
Adobe Type Manager (ATM) ...........................204
Driver installation for Windows 2000..................18
Fonts ................................................................201
Installing the network scanner driver ...............142
Uninstalling the printer driver .............................26
L
List
PC-Fax transmission error reports...................102
N
Network functions
Internet printing ............................................... 172
Printing with IP Peer-to-Peer........................... 150
Printing with LPD/LPR..................................... 160
O
Options
Memory ........................................................... 184
Setting Options
Windows 2000 ............................................ 22, 25
P
Postscript setting (Windows)
Addition of Euro currency symbol ..................... 53
PostScript error information printing.................. 54
Postscript header .............................................. 53
PostScript output format ................................... 53
PostScript timeout values.................................. 54
Postscript setting (Macintosh)
File save............................................................ 87
Printer functions
Setting printer functions
Windows 2000 .................................................. 30
Macintosh.......................................................... 69
Printing
Checking printing
Windows 2000 .................................................. 25
Printing multiple pages (Macintosh)
Attaching a front cover/back cover
(Front Cover/Back Cover)....................... 83
Folding paper in two to make booklets
(Special mode)........................................ 79
Outputting sorted into separate sets of copies
(Offset).................................................... 80
Printing multiple pages on one sheet of paper
(Document pages/print pages/layout
direction) ................................................. 77
Printing on both the front and rear of the paper
(Duplex printing) ..................................... 76
Printing one copy at a time of all pages
(Collate) .................................................. 80
Stapling (Staple) ............................................... 81
Printing multiple pages (Windows)
Attaching a front cover/back cover
(Front Cover/Back Cover)....................... 47
Folding paper in two to make booklets
(Combination) ......................................... 42
Outputting sorted into separate sets of copies
(Offset).................................................... 44
Printing multiple pages on one sheet of paper
(Pages per sheet/Layout) ....................... 41
Printing on both the front and rear of the paper
(Duplex) .................................................. 40
Printing one copy at a time of all pages
(Collate/Sort)........................................... 43

14-7. Purpose-oriented index
210
VII Appendix Chapter 14 Appendix
Stapling (Staple) ................................................45
Setting basic print function (Windows)
Printing enlarged/reduced (Scaling)...................36
Selecting the input tray (Paper Source) .............37
Selecting the output tray (Output Tray)..............37
Selecting the type of paper
(Media Type/Paper Type) ........................36
Setting the margin (Margins)..............................38
Setting the number of copies to print
(Copies). ..................................................34
Setting the print direction (Orientation) ..............34
Setting the print paper size (Paper size)............35
Setting basic print function (Macintosh)
Printing enlarged/reduced
(Magnification ratio) .................................73
Selecting the input tray (Paper source)..............73
Selecting the output tray (Output tray) ...............74
Selecting the print order (Reverse print order)...74
Selecting the type of paper (Media type) ...........73
Setting the margin (Margins)..............................75
Setting the number of copies to print
(Copies) ...................................................71
Setting the print direction (Direction)..................71
Setting the print paper size (Paper) ...................72
Special printing (Windows)
Printing overlaying another document
(Overlay) ..................................................55
Printing with a password (Password Print) ........58
Printing watermarks (Watermark) ......................56
Special printing (Macintosh)
Conserving toner................................................87
Printing watermarks ...........................................85
Printing with black and white reversed...............84
Printing with top/bottom or left/right reversed ....84
Smoothing characters and curved lines.............86
S
Scanning
Application function settings ............................138
Scanning documents .......................................134
Using the network scanner driver ....................142
Specifications
Fax functions....................................................182
Network functions ............................................183
PostScript PS-343 option product....................184
Printer functions ...............................................181
Scanner functions ............................................182
T
Text
Inputting text ....................................................132

MANUFACTURER
●
KONICA CORPORATION
●
TOKYO JAPAN
2002.8
IPLOW_INT_v100
Document Outline
- IP-423
- Introduction
- CONTENTS
- Usage of this Manual
- About this Manual
- Conventions Used in this Manual
- Screens used with this manual
- I Set up
- II Printer
- The flow for setup
- Chapter 2 Preparing the Printer for Use
- Chapter 3 Printing with Windows
- 3-1. Setting printer functions
- 3-2. Function list
- 3-3. Basic print settings
- Setting the printer languages
- Setting the number of copies to print (Copies).
- Setting the print direction (Orientation)
- Setting the print paper size (Paper size)
- Selecting the type of paper (Media type/Paper type)
- Printing enlarged/reduced (Scaling)
- Selecting the input tray (Paper source)
- Selecting the output tray (Output tray)
- Setting the margin (Margins)
- 3-4. Printing multiple pages
- Printing on both the front and rear of the paper (Duplex)
- Printing multiple pages on one sheet of paper (Pages per sheet/ Layout)
- Folding paper in two to make booklets (Combination)
- Printing one copy at a time of all pages (Collate/Sort)
- Outputting sorted into separate sets of copies (Offset)
- Stapling (Staple)
- Attaching a front cover/back cover (Front cover/Back cover)
- 3-5. Making image settings
- 3-6. Setting the font
- 3-7. Special printing
- 3-8. Setting the connection between the computer and printer
- Chapter 4 Printing with Macintosh
- 4-1. Setting printer functions
- 4-2. Function list
- 4-3. Basic print settings
- Setting the number of copies to print (Copies)
- Setting the print direction (Direction)
- Setting the print paper size (Paper)
- Selecting the type of paper (Media type)
- Printing enlarged/reduced (Magnification ratio)
- Selecting the input tray (Paper source)
- Selecting the print order (Reverse print order)
- Selecting the output tray (Output tray)
- Setting the margin (Margins)
- 4-4. Printing multiple pages
- Printing on both the front and rear of the paper (Duplex printing)
- Printing multiple pages on one sheet of paper (Document pages/Print pages/Layout direction)
- Folding paper in two to make booklets (Special mode)
- Printing one document page on multiple sheets of paper
- Outputting sorted into separate sets of copies (Offset)
- Attaching a front cover/back cover (Front Cover/Back Cover)
- 4-5. Special printing
- 4-6. Making PostScript settings (File save)
- Chapter 5 Printing Problems
- 5-1. Problems with printing
- 5-2. Problems printing with the Adobe driver
- PostScript error is displayed.
- [Vmerror], [limitcheck], or other PostScript error is displayed.
- PostScript error is displayed no matter which computer is attempting to print.
- PostScript error is displayed for printing from a specific application.
- PostScript error is displayed for printing a specific file.
- PostScript error is displayed for printing a specific page.
- Fonts cannot be downloaded.
- Non fixed size paper (custom) cannot be printed correctly with a Macintosh.
- 5-3. Checking incomplete jobs
- Chapter 6 Fax Functions (PC-Fax)
- III FAX
- IV Scanner
- Chapter 9 Summary of Scanner Functions
- Chapter 10 Using the Scanner Functions
- VI Network
- Chapter 11 Printing with IP Peer-to-Peer (Windows 95/98/Me only)
- Chapter 12 Settings for Printing with LPD/LPR (Windows NT 4.0/2000/XP only)
- Chapter 13 Using via the Internet (Windows 2000/XP)
- VII Appendix
Wyszukiwarka
Podobne podstrony:
Konica 7022 EN
Manual Konica 7022
Panel LED, Multilayer Composite Print
Adresy IP
w8 VLAN oraz IP w sieciach LAN
ADRESACJA W SIECIACJ IP
SNMP (IP)
Adresy IP
[ebook renewable energy] Home Power Magazine 'Correct Solar Panel Tilt Angle to Sun'
Multilayer Composite Print 2
5 Maerchen PRINT
jp5 print
ip 11 04
Microsoft PowerPoint IP tryb zgodnosci
lab 4 panel operatorski instrukcja
CGEIB IP
ZAPROSZENIE, Documents, IP Zielona gora, mat inf
więcej podobnych podstron