
Audi Forums
Audi Classifieds
Photo Gallery
Calendars
Search
Recalls
TSB's
Contact AF
Sponsors
Audi Lineup
Forum FAQ
AF Decals
Audi Timeslips
Register
Login
IceLink/Ipod Install in 2001 A6 (VERY long with pics)
Local Audi A4 Dealers
Visit Your Local Audi Dealer & Find Great
Offers Today! Official Site.
www.BostonAudiDealers.com
Certified Pre-Owned BMW
Find Your Next CPO BMW at a Local Dealer -
Search Official BMW Site.
BMWUSA.com/Certified
Audi A4 Warranty
Free Extended Auto Warranty Quotes. 30
Days Risk-Free. Save 60% Now!
www.ExtendMyCarWarranty.com
Printable Version
Audi Forum
>>
General
>>
DIY - Do It Yourself
>> IceLink/Ipod Install in 2001 A6 (VERY long with pics)
Page: [1]
Login
Message
<< Older Topic
Newer Topic >>
IceLink/Ipod Install in 2001 A6 (VERY long with pics) -
4/5/2006 9:11:21 AM
SouthboroAudiGuy
4th Gear Member
Posts: 791
Joined: 4/4/2006
Status:
offline
After doing LOTS of forum surfing, I made the decision on how to integrate my 30 GB iPod Photo
into my recently acquired 2001 A6. I'm posting my experiences to provide an update to what has
already been posted and to give readers a few tips I've not found spelled out elsewhere. First, a
few comments...
BACKGROUND
- There are a range of options out there for integrating iPods into hour
car
. The installation I
opted for offers a high level of integration that provides protocol mediation between your OEM
head unit and the iPod (so that your head unit/steering wheel controls can control the iPod),
customized wiring harnesses, and very high sound quality. While this is more expensive than
other solutions and requires more effort to install, I think the cost and effort is justified given the
additional sound quality and safety associated with this high level of integration.
- PLEASE do not tell me I should have used a PhatBox. I know they're wonderful and many
people love them. The iPod thing is about much more than what goes into my A6. My iPod has a
dock on my home stereo, a connection to my bedroom stereo, an interface to my digital SLR for
on-the-road image downloads, and the capacity to go with me hiking/skiing/kayaking/whatever
(as April/Verdegrrl said, "You can't throw earbuds on a Phatbox and go for a walk."). The iPod
also has seamless integration to what is generally considered the best digital music management
software and online buying experience in the industry. THAT is why I love my iPod and wanted to
integrate it as much as possible with my A6. 'nuf said.
- I purchased my IceLink from
www.enfigcarstereo.com
for $150 (+ $22 for a Panavise mounting
bracket for the cradle) and I highly recommend them. I ended up speaking to Christian for some
phone support and he was very helpful. The exact parts I ordered were listed as "Dension - I20
Audi
R ice>Link Plus" and "Panavise - 75102-600".
- This price is actually better than it looks. The IceLink includes an excellent docking cradle which
none of the other solutions offer as part of their base price. You'd have to pay $30-40 to get one,
negating any price advantages the other full-integration solutions may appear to have.
Okay, enough preamble. Let's get on with things...
PARTS LIST
The IceLink comes with the following basic parts:
- iPod docking cradle & cable
- IceLink interface module
- Wiring harness to attach interface module to head unit
INSTALLATION
Here are the steps involved in the install...
1) Remove the fuse for the head unit by looking up the location in your owners manual (was
location 37 on mine).
2) If you've got a CD changer in your trunk, disconnect the cable for it and give it a smooch for
services rendered. You will not be using it any more. Savvy readers will remove it and list it on
the AW classifieds to recoup some of the costs associated with this project.
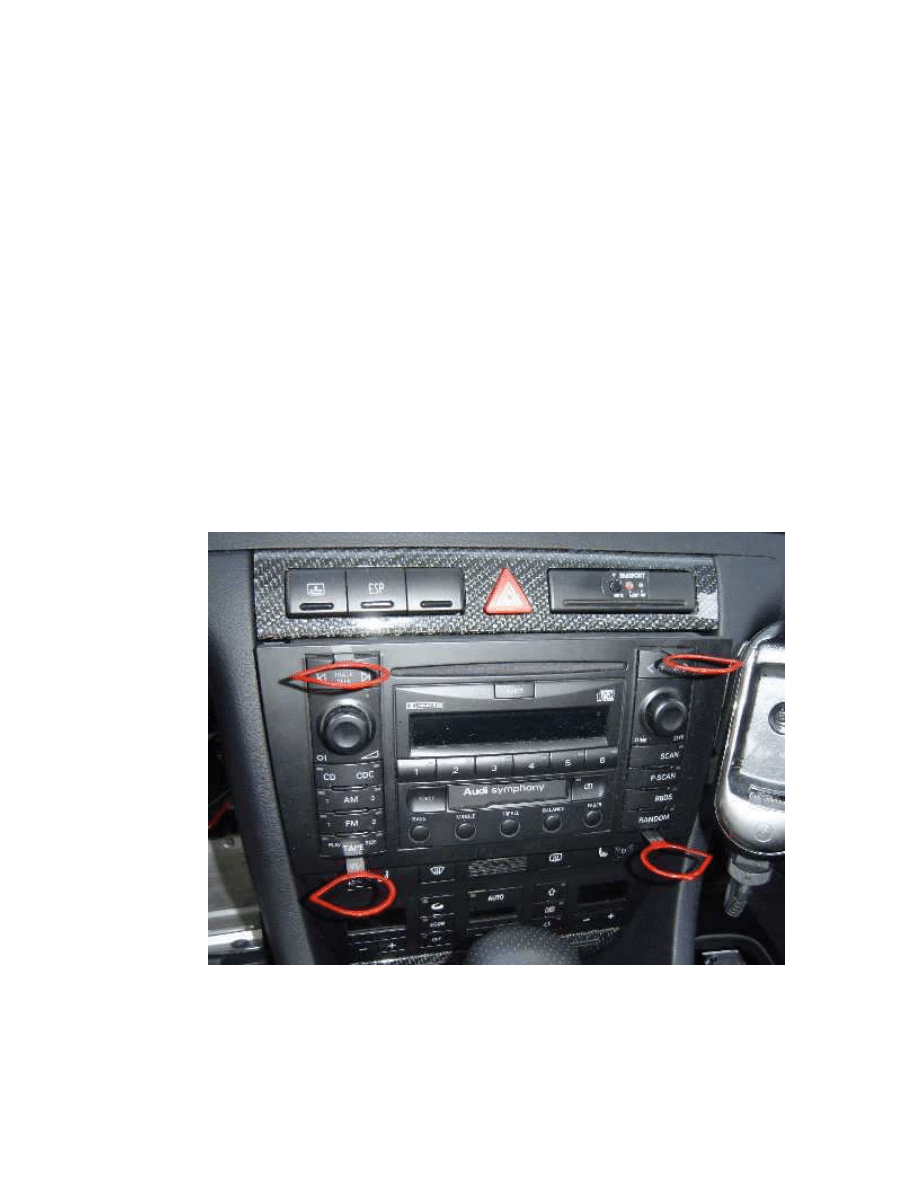
3) Remove head unit using the four keys as shown
(pic credit to Boston Driver):
4) Before you set aside the head unit, remove the radio keys by pressing down the spring tabs
and pulling out the key.
(pic credit to Boston Driver):
5) Disconnect all of the cords from the back. Don't worry -- you will not have any troubles
reconnecting them; they are all unique. The trickiest one is the little coax cable near the bottom
- make sure you squeeze the black plastic while pulling.
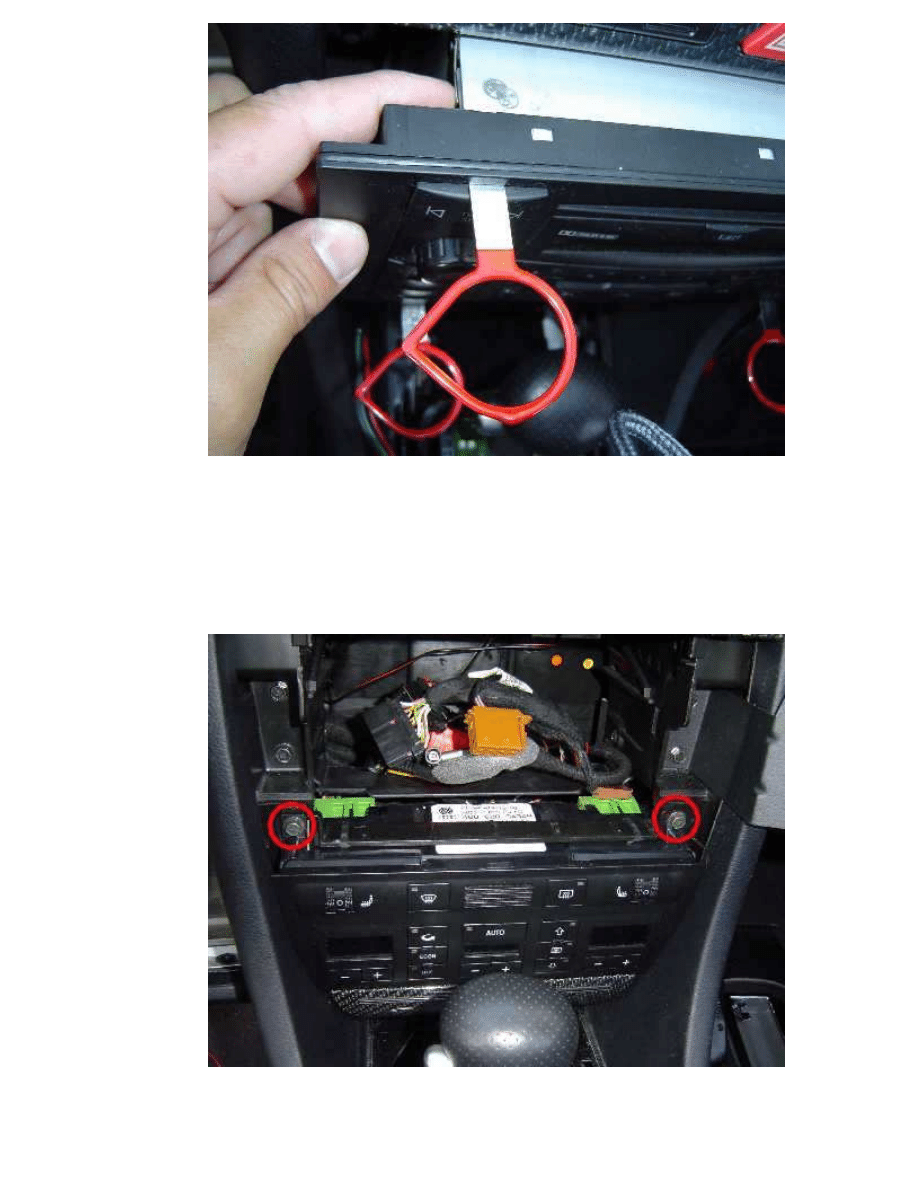
6) Remove the climate control module -- you'll need to do this if you want to use the cable
routing I suggest -- by removing the two bolts in the upper corner of the unit (red circles below).
Then, reach in from the top of the unit and push the unit out from behind. It's a little stubborn so
give it a good push.
(pic credit to Boston Driver):
7) Do NOT remove the cables for the climate control module -- you will not need to.
8) Snake the cable for the IceLink iPod docking cradle as shown in the photo below (to the right
side of the climate control module and below where the head unit slides in). Also shown in the
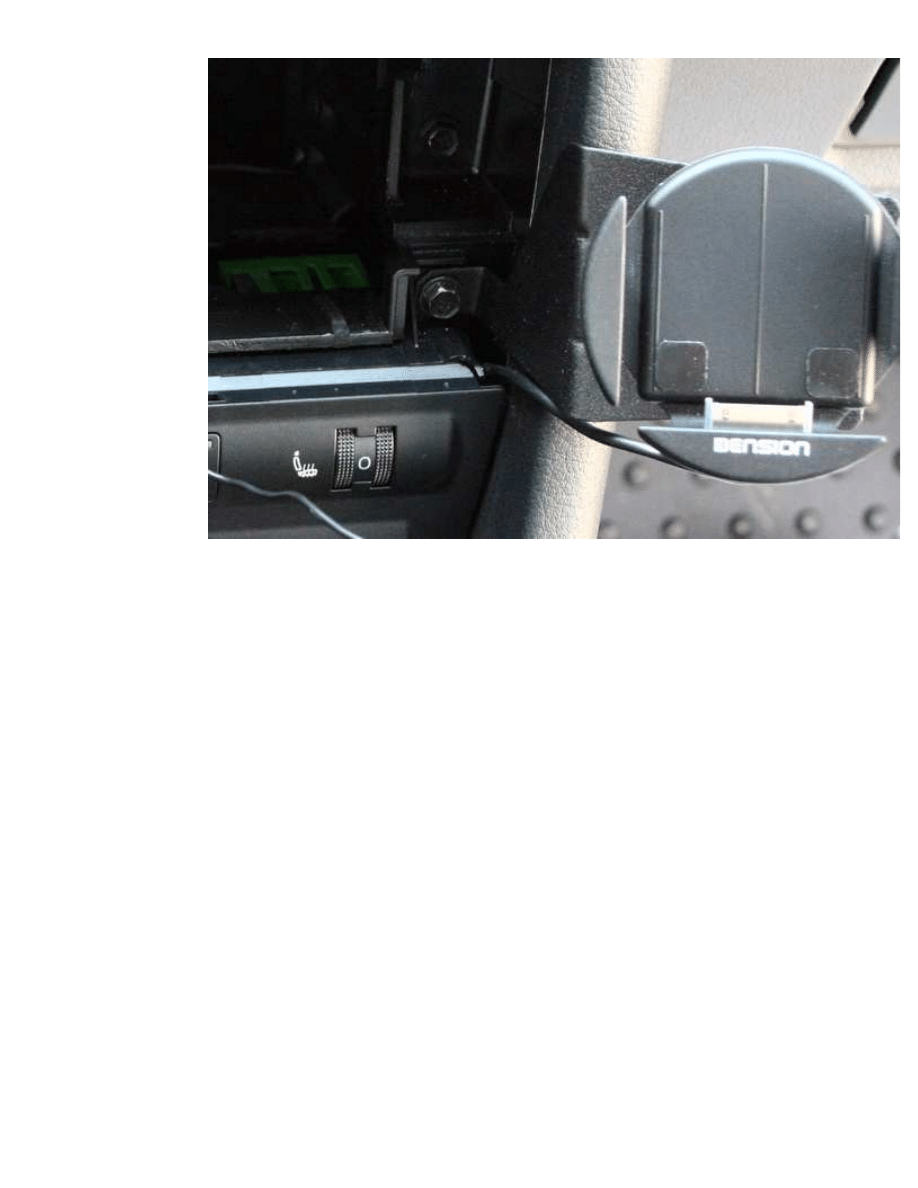
photo below is the mounting point for the Panavise bracket (the right hand retaining screw for
the climate control module).
9) Being careful to make sure the cradle cable is not pinched, reinstall the climate control module
by pushing it back into place and screwing it in with the two screws you removed. The right one
will secure the Panavise bracket as noted above. If you attach the IceLink iPod cradle to the
bracket as I did to test for proper cable placement, note that you'll need to remove it before
reinstalling the head unit (learned that one the hard way).
10) Connect the cable from the docking cradle (black cable in the photo below) to the IceLink
interface module (funny looking black thing). Then, connect the other end of the interface module
to the wiring harness that you'll connect to the CD changer port on the head unit (rainbow
colored cable).
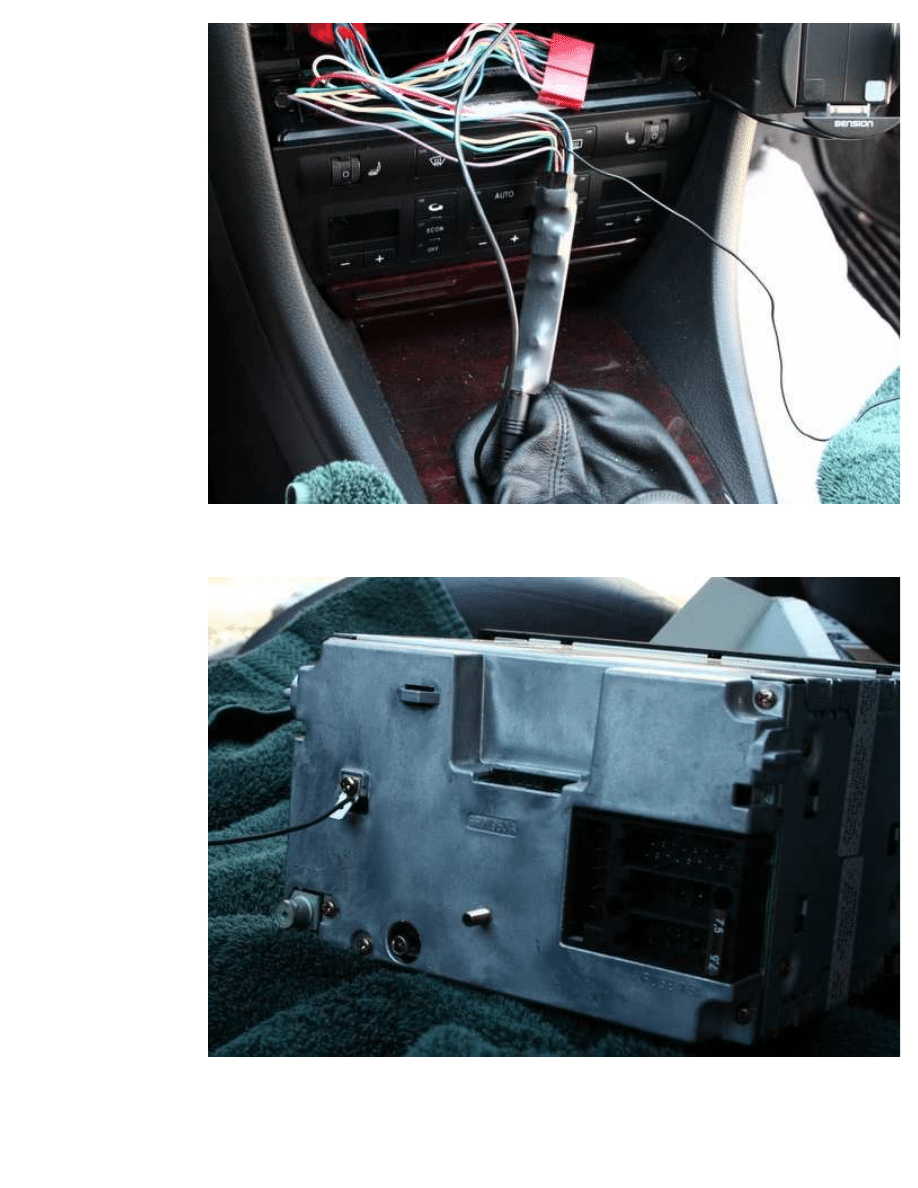
11) Wire the grounding cable from the IceLink wiring harness to the grounding point on the head
unit:
12) Attach the CD changer cable that you disconnected from the head unit to the appropriate
port of the IceLink wiring harness and tuck the IceLink interface module behind the climate
control unit as shown below:
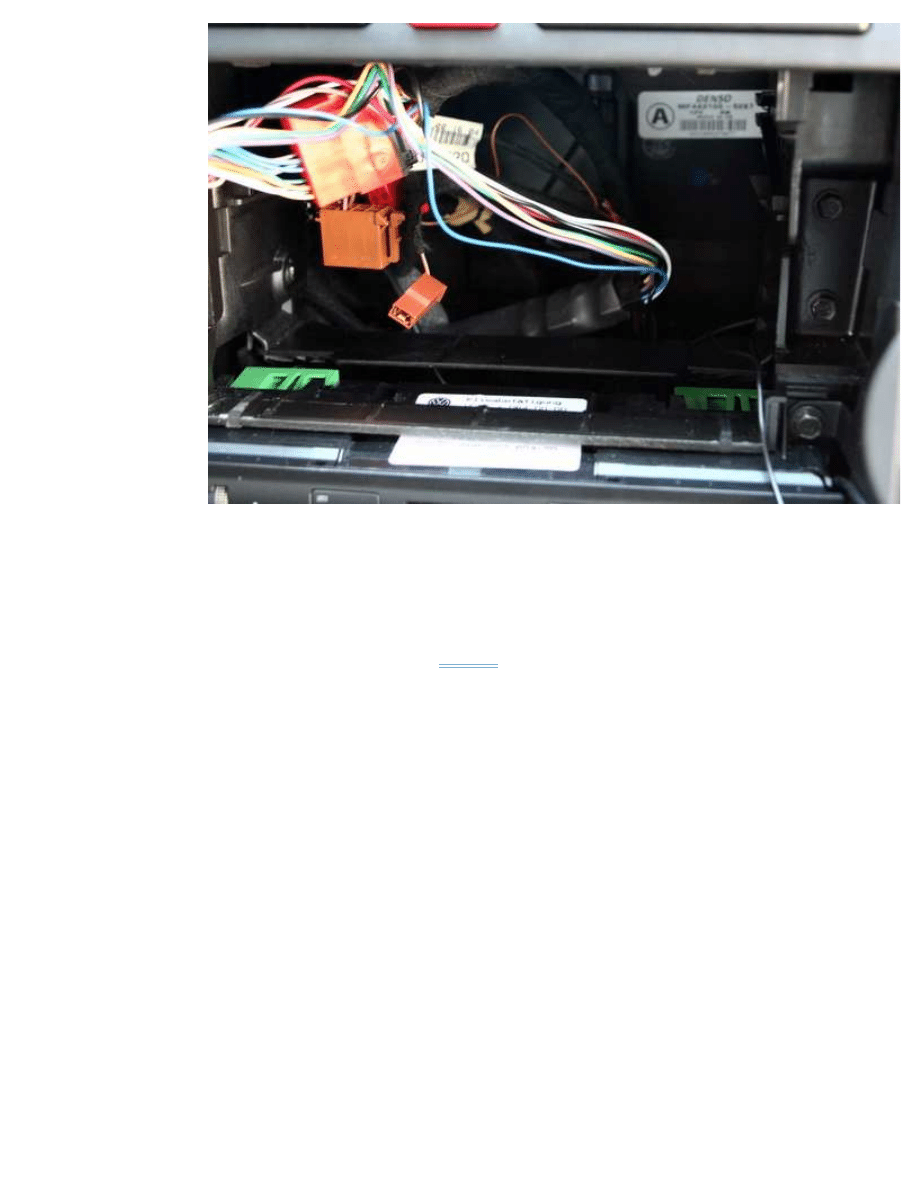
13) Reconnect all of the cables you disconnected in step #5. The IceLink wiring harness will
connect to the CD changer port.
14) Make sure all your connections are well seated, reinstall the fuse you removed in step #1,
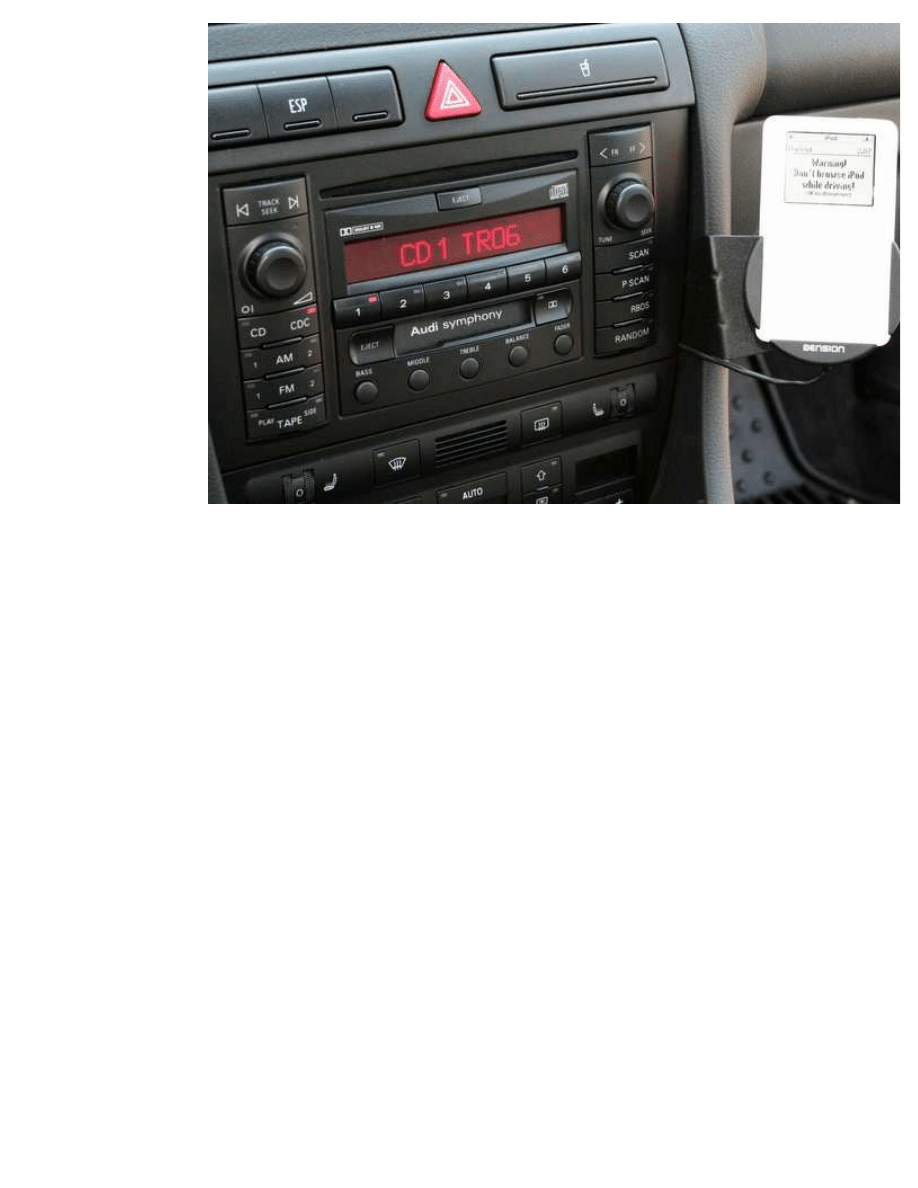
and test your work by installing your iPod in the cradle and turning on the head unit. It is
accessed by selecting the CDC button on your head unit. See the
IceLink user manual
for details on
how it will operate (NOTE: The
steering
wheel controls will not work unless the ignition is turned
on). If everything works, continue to the next step. If not, check your connections, review the
steps shown above, curse Denison, curse me, go get a beer.
15) Reinstall the head unit, making sure not to pinch the docking cradle cable. There's a little
rubber gasket which surrounds the head unit. This may catch on the Panavise mounting braket as
you reinsert the head unit, so have the ever-popular plastic putty knife handy to help keep it
where it should be as you slide the head unit in. Don't forget -- if you've got the cradle attached
to the Panavise bracket, you'll need to remove it before reinstalling the head unit. Here's what
things should look like when you're done:
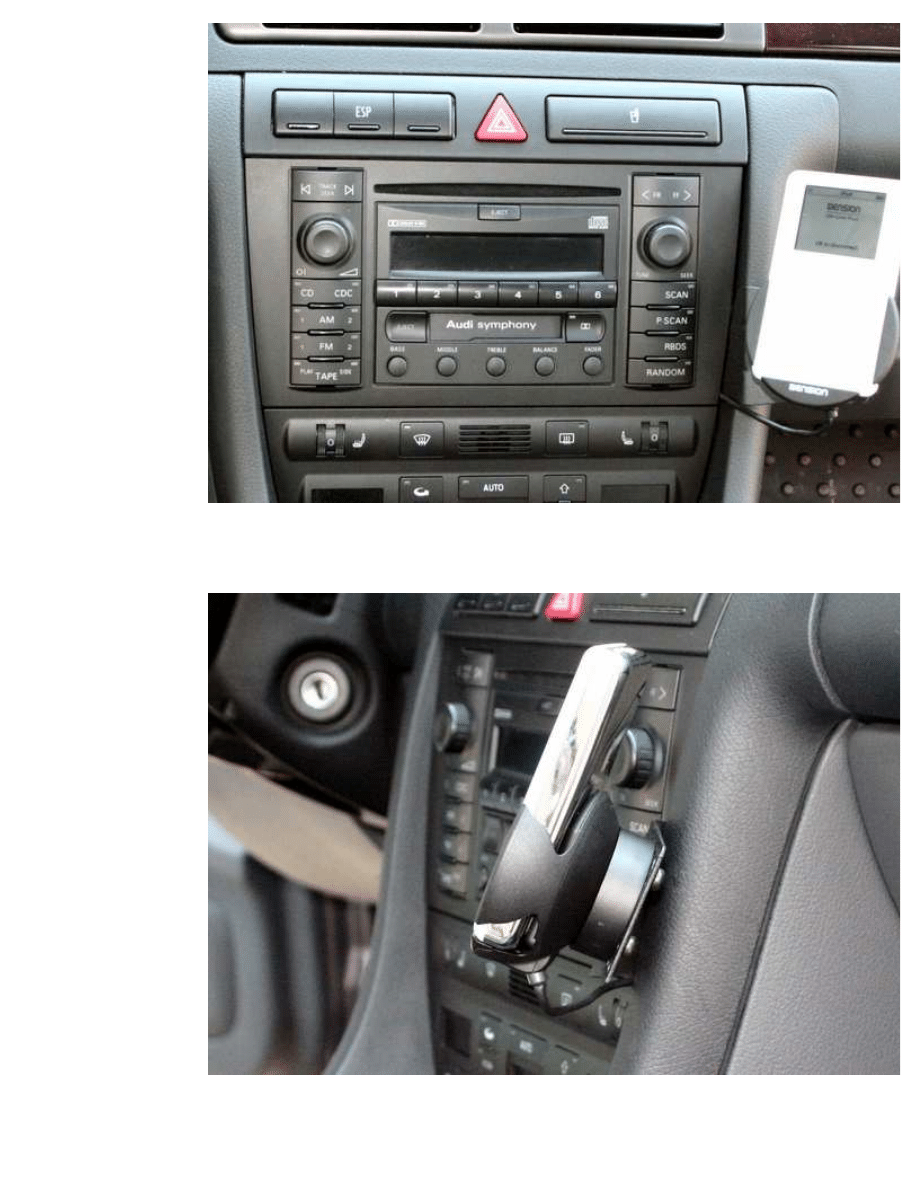
Here are a few other views of the completed install...
Side view:
Driver's view:
ADDITIONAL RESOURCES
A few additional resources I found along the way that should prove helpful:
-
IceLink Audi installation guide
-
IceLink Audi installation supplement
-
IceLink user manual
The second resource I list (the supplement) is really an excellent one -- make sure you download
it. Do NOT ask me why it is not included with the kit or why it is buried at the Denison site. This
brings me to the required "what I liked/didn't like" section...
WHAT I LIKED ABOUT THIS INSTALL
- Installation was really quite easy once I had done the required reading AND found the
supplement referenced above.
- The docking cradle is great -- iPod can be inserted/removed at any time making the solution
VERY flexible for integrating your iPod on the fly.
- Firmware is upgradeable (in theory -- see dislikes for a qualifier), offering a potential path to
compatibility with future features/iPod models/etc.
- Un-installing would be a snap, cradle/interface module can be reused in a different vehicle using
a different wiring harness (I know -- why would you want to?), and would leave the vehicle
unmarred.
The IceLink has two UI modes that offer excellent flexibility. Below is a quick overview of both.
See the user manual linked above for details.
Denison UI:
- Can access the first five alphabetically listed playlists on your iPod by selecting buttons 1-5 on

the head unit (#6 is reserved for accessing the Denison UI menu structure). TIP: I set up five
playlists in iTunes named "- CD 1" through "- CD 5" that each point to other playlists. In this
manner, I can change button assignments at will using iTunes. Great for selecting what I want to
easily access before a long trip/hot date/etc (think of Jack Nicholson with his mix tapes in the
movie "As good as it gets.").
- Can navigate other playlists through the head unit/steering wheel controls using Denison menu
structure accessed through button #6. This appears to be only moderately useful given the fact
that you have to look at the relatively small iPod interface to do this -- will have to see just how
useful this is over time. [UPDATE: Improved menu structure and other nav enhancements in
firmware update 2.15 offer some improvements which should make this feature more useful --
see "UPDATE" section below.]
- Can set various parameters for the integration solution (e.g., audio level, iPod charging, etc.)
- Can do next/previous track and FF/REW through the head unit controls. The Scan and Random
buttons also operate as expected.
- Can do next/previous track through the
steering wheel
controls.
iPod UI:
- This interface allows you to use the standard iPod interface (which is disabled when using the
Denison UI). You switch back and forth through a menu choice in the Denison UI and pulling the
iPod out of the cradle for a second and reinserting it.
- Allows you to remove the iPod, navigate to the playlist you want, and then reinsert into the
cradle. This is probably more effective for accessing a wide variety of playlists than using the
Denison UI.
- Can do next/previous track through the steering wheel controls and with the approrpriate
buttons on the head unit (I love that you can still do this when using the iPod UI).
- UPDATE (as of the 2.15 firmware update): Can do Fast Forward/Rewind, Next/Previous Playlist,
Next/Previous Album, and Next/Previous Chapter by pressing one of the numbered buttons and
then the FWD/REW button (see the firmware history below for details).
Poster's note: This is a very high level of integration between the OEM Audi head unit and the
native iPod interface. For people who really know/like the iPod UI, this gives them some very
good control over their iPods by simply pressing the large buttons on the head unit -- a much
safer option than trying to use the click wheel while driving.
WHAT I DIDN'T LIKE ABOUT THIS INSTALL
- Gathering up-to-date information took a lot of surfing -- discovering the IceLink installation
supplement noted above was KEY and it really should have been included in the kit. Clearly,
Denison is not very DIY oriented.
- Denison support really stinks. The site leaves a lot to be desired (e.g., completely non-
functional search field, hard to find what you're looking for, etc.) and answers to support
requests/self-help FAQs are way too terse to be useful (often missing important parts of the
support request or not clearly explaining things). I'm still trying to find the 2.10 firmware
download on their site [Poster's note: See UPDATE section below for how I ended up finding the
latest firmware download].
- There appears to be a little instability with the solution. While using it the other night, it got into
scan mode without my wanting it to. It also is a little slow in updating the display. Will have to
see how this plays out over time.
CONCLUSIONS

All in all, I'm happy with the experience. I think the install looks great, the functionality is very
good, and the sound quality is excellent (no more hiss from the tape interface I was using
previously). I love accessing tracks from the steering wheel and the cradle is best-in-class. If
you're reasonably comfortable doing modifications to your car, this is definitely an easy DIY
project. I hope this post proves useful for people looking to take their iPods on the road in style.
UPDATE: HOW TO DOWNLOAD AND INSTALL IceLink
FIRMWARE UPGRADES
Alright, I have to start this by reiterating that Denison's support stinks. I gave up on hearing
back from them on where I can find the firmware upgrades for download (I knew they were up to
at least 2.10 and I had 2.07) but was lucky enough to find a post that pointed to a site that
linked to a recent update. After doing a little surfing and experimentation, I discovered two
things:
1) The latest firmware upgrade is actually 2.15 (available
here
)
2) Denison's web site has NO information on it that I could find anywhere!!!
Frankly, I find that mind-numbingly awful -- particularly when you read the upgrade history (see
below) which is included in the update package.
So, back to the Denison support site to find out how to install the update... You guessed it:
NOTHING straight-forward by way of documentation on the process. I did find one
posting on their
support site
that made reference to a manual workaround. Using this as a backdrop, here's what I
did to perform the updgrade:
1) Download the lastest firmware update
2) Expand the package by running the .exe file -- it will save the update files into a folder
3) Connect your iPod to your PC
4) Using iTunes, select "Add folder to library" from the "File" menu and select the folder that the
update files were saved to
5) When the files have been added to your library -- this will take a while and will require
processing that continues after the import dialog goes away -- update (i.e., synch) your iPod
6) Update your iPod again (and again as needed) until you're sure ALL the update files have
made their way onto your iPod. The additional processing iTunes needs to get all the files into
your library continues for several minutes, so make sure your last update doesn't actually copy
anything over -- that will indicate that you've captured everything. Alternatively, go have a
coffee/beer/martini (gin please and VERY dry) in between loading the files into your iTunes
library and updating your iPod.
7) Disconnect your iPod and head out to the car
8) Turn on the radio and select the CD changer (CDC button)
9) On the iPod, browse the following menu path: Music/Genres/_config/Menu/Update and play
the "Start_Update..." file
10) While this file is playing, insert the iPod into the cradle -- the update process will start
immediately and take a few minutes
11) Once completed, the IceLink will automatically restart with the new firmware. You can see
the version number on the top right corner of the "Don't browse while driving" welcome screen
12) After you've successfully completed the upgrade, you can (and should) delete the upgrade
files from the iPod
The lastest rev of the firmware offers a greatly simplified menu structure and some nice new
features listed in the history file (located in the folder to which the update package expands
itself). I'm hoping it will also resolve some of the stability issues I mentioned above.
IceLink FIRMWARE HISTORY
Poster's note: This info is copied from the "history_21x.txt" file that comes with the 2.15 installer
package. It's worth noting that the 2.11 release had some Audi-specific bug fixes -- I've
highlighted them below.]
History of Ice>Link Plus 2.1x firmwares

~~~~~~~~~~~~~~~~~~~~~~~~~~~~~~~~~~~~~~~
--------------------------------------------------------------------------------
ICEV2 2.15
Bug fixes:
- Fixed iPod UI mode with iPod 5G (Video).
- Fixed firmware version displaying at Warning message. The new format is:
ICEV2-2.15
New features:
- Improved iPod UI mode (not available with 3G and previous iPod's). New features:
CD1 + FFWD/REWD = Fast Forward/Rewind
CD2 + FFWD/REWD = Next/Previous Playlist
CD3 + FFWD/REWD = Next/Previous Album
CD3 + FFWD/REWD = Next/Previous Chapter
[Poster's note: I think the addition of these features makes the IceLink the clear standout from a
UI standpoint. As I understand it, no other product offers as much Audi OEM head unit control
when in iPod UI mode. It may not talk to me (a nod to you Phatbox fans) or display the song
title/artist/album on the head unit, but this is a very high level of iPod control while still allowing
use of the native iPod interface.]
Known Bugs:
--------------------------------------------------------------------------------
ICEV2 2.14
Bug fixes:
- Fixed VDO CD-text feature. Now supports Track Title and Track Artist text
fields. Disc Title/Artist displaying is not supported.
Known Bugs:
--------------------------------------------------------------------------------
ICEV2 2.13 Internal release, not for general use
Bug fixes:
- Midified VDO CD-text functionality
Known Bugs:
--------------------------------------------------------------------------------
ICEV2 2.12
New features:
- Added Renault and VDO car interfaces
Bug fixes:
- Fixed Mazda Random function handling,
Known Bugs:
--------------------------------------------------------------------------------
ICEV2 2.11
New features:
- Added Honda-R2 interface. Compatibility with old type Honda headunits. (before 2003)
- added
Mazda Car
interface and Mazda support, (please see the compatibility list)
- Menu key can be selected via MP3 config file,
- The MASERATI car interface uses CD5 as ice>Link Menu key
[Poster's note: GREAT to know that I can transfer my IceLink to my Maserati if I ever want!]

- Balupunkt Navigation Car Interface config
It uses "next track" for browsing and "prev track" for selecting
Bug fixes:
- Fixed Car interface name displaying,
- "Hot freeze" problem solved. With 2.10 fw the hot ice>Link can stop working
and repaire itself after power off and cool down.
- Fixed Alpine fast seek displaying bug
- The "after more than 10 quick track changes the displayed track number on the
radio did not correspond with the number of the pressed buttons" problem has
been fixed.
- Long (more than 80 min) mp3 songs caused some problem on some radios.
From now on the minutes and seconds counter on the radios reseted to 00:00
after 59:59.
- The Blaupunkt interface became compatible with TravelPilot E1
- Track change problem fixed. It became faster and more stable with Audi
navigation Plus.
- (VW, Audi) Scan, random functions aligned to different radio specifications.
- Better compability with Fiat Stilo (from HW v2.03)
- Modified Blaupunkt interface to improve compatibility with Fiat navigation
and Blaupunkt DX-R navigation headunits
Known Bugs:
-
VW
Ice-Link is not compatible with standalone VW CD players
- First magazine scan (CDC init.) can take about 3 minutes with ALFA 147
navigation headunits.
--------------------------------------------------------------------------------
ICEV2 2.10
New features:
- Simplified menu structure
* Access iPod UI
* Playlists
* AlbumPlay
* Setup ice>Link
* Language
* Charge
* Audio Level
* Disc change
- IMPORTANT NOTE! The 2.1x firmware serie not containes the
BMW
interface
There will be a special BMW release.
Bug fixes:
- Fixed menu access bug with using Connects2 adapters.
(Tested with Renault, Peugeot, Honda.)
Known Bugs:
- The car interfaces are the same as in 2.07 firmware version, exept SONY
--------------------------------------------------------------------------------
Have fun and drive (and listen!) safely.
-Tom
< Message edited by SouthboroAudiGuy -- 4/5/2006 9:18:45 AM >
_____________________________
Contact Us
|
Link To Us
|
Sitemap
|
About AF
|
Archive
|
Advertising
|
AudiForums.com Partners
|
Audi Links
|
Legal
|
Privacy Policy
|
© Audi Forums
Honda CBR Motorcycles
|
Kawasaki Motorcycles
Audi Forums .com is not affiliated with or endorsed by AUDI AG.
My Registry Page
Post #: 1
Ads by Google
Audi CD Changer
iPod
Icelink
iPod Car Charger
Audi iPod Interface
RE: IceLink/Ipod Install in 2001 A6 (VERY long with pics) -
4/5/2006 2:53:58 PM
coolvirus
1st Gear Member
Posts: 64
Joined: 3/31/2006
Status:
offline
Very thorough and informative. Thank you.
(in reply to
SouthboroAudiGuy
Post #: 2
Login
OR
Register
now to post a reply to this forum topic.
Page:
Audi A6
Questions & Answers On Audi A6
blurtit.com
Used Audis
Compare cars side by side and narrow your
choices - Fast & Easy.
www.AutoExtra.com
Muffler Specials
We beat Car Dealer Prices Located in
Brookline on RT 9 East
Linertire.com
Audi
>>
General
>>
DIY - Do It Yourself
Jump to:
- - DIY - Do It Yourself
GO
Wyszukiwarka
Podobne podstrony:
AudiWorld com Audi A6 C5 Boor Blade Installation DIY
Fourtitude com Audi A6 C5 Brake Information PartNumbers
BentleyPublishers com Audi A6 C5 Service Reset
BentleyPublishers com Audi A6 C5 4 2L Secondary Air Injection Maintenance
BentleyPublishers com Audi A6 C5 Sunroof drain cleaning
Audizine com Audi A6 C5 2 8 30V Throttle Body Cleaning DIY
BentleyPublishers com Audi A6 C5 4 2L Secondary Air Injection Maintenance
Audi BarryStuff com Audi RS6 C5 Sirius XM Satellite Radio DIY Install
Audi A6 C5 2000 AirbagWiring
Instrukcja obslugi AUDI A6 C5 PL up by dunaj2
Audi A6 C5 Front Bumper Removal
Audi A6 C5 Podstawowe Informacje
Audi A6 C5 QuickReferenceGuide [4s]
Audi A6 C5 AirConditioner OutputDiagnosticTesting
Instrukcja obslugi AUDI A6 C5 PL up by dunaj2
Audi A6 C5 Front Bumper Removal
AudiWorld com Audi S4 B7 Snub Mount Install DIY
więcej podobnych podstron