
The Lecturer’s Toolkit is a wide-ranging, down-to-earth, practical resource for lecturers and
teachers in higher education. Jargon-free and written with authority, clarity and candour, the
Toolkit addresses a broad range of aspects of assessment, learning and teaching, and helps
develop many facets of professional practice.
Built around a central agenda of improving the quality of student learning, the Toolkit is out-
comes-focused. Retaining the strengths of its predecessors, this third edition includes new
information on inclusive teaching practice, working with international students and evidencing
reflections. Coverage includes:
●
factors underpinning successful learning;
●
designing assessment and feedback to enhance learning;
●
refreshing and improving lecturing;
●
making small-group teaching work;
●
designing and using resource-based and online learning;
●
looking after yourself, and managing feedback from your students;
●
equal opportunities and inclusive practice.
Fully updated and expanded, this third edition of the Toolkit will be an essential and flexible
resource for every higher education professional.
Phil Race is ALT (Assessment, Learning and Teaching) Visiting Professor at Leeds
Metropolitan University, UK, and for the rest of his time travels widely running staff develop-
ment workshops in universities and colleges. His other publications include Making Learning
Happen (2005) and How to Study (2003). For further information, visit www.phil-race.com.
The Lecturer’s Toolkit


The Lecturer’s Toolkit
A practical guide to assessment,
learning and teaching
Third Edition
Phil Race

First published 1998 by Kogan Press Limited
Second edition 2001, reprinted 2004, 2005, 2006 by RoutledgeFalmer
This third edition published 2007
by Routledge
2 Park Square, Milton Park,Abingdon, Oxon OX14 4RN
Simultaneously published in the USA and Canada
by Routledge
270 Madison Ave, New York, NY 10016
Routledge is an imprint of the Taylor & Francis Group, an informa business
© 1998, 2001, 2007 Phil Race
All rights reserved. No part of this book may be reprinted or reproduced or utilised
in any form or by any electronic, mechanical, or other means, now known or here-
after invented, including photocopying and recording, or in any information storage
or retrieval system, without permission in writing from the publishers.
British Library Cataloguing in Publication Data
A catalogue record for this book is available from the British Library
Library of Congress Cataloging in Publication Data
A catalog record has been requested for this book
ISBN10: 0–415–40382–0 (paperback)
ISBN10: 0–415–40383–9 (ringbinder)
ISBN13: 978–0–415–40382–5 (paperback)
ISBN13: 978–0–415–40383–2 (ringbinder)
This edition published in the Taylor & Francis e-Library, 2006.
“To purchase your own copy of this or any of Taylor & Francis or Routledge’s
collection of thousands of eBooks please go to www.eBookstore.tandf.co.uk.”

Preface to the third edition
Acknowledgements
1
Learning – a natural human process
Intended outcomes of this chapter 1
Never mind the teaching – feel the learning! 1
Theories and models of learning 1
Deep, surface or strategic learning? 4
Factors underpinning successful learning 7
How can we increase students’ motivation? 13
Developing students’ competences 17
Confidence and self-concept 20
Learning and understanding 21
Positioning the goalposts – designing and using learning outcomes 22
Conclusions about learning 26
2
Designing assessment and feedback to enhance learning
Intended outcomes of this chapter 27
Putting assessment and feedback into perspective 27
Values for assessment 29
Why should we assess? 31
Concerns about assessment 33
Pros and cons of fifteen assessment techniques 37
1 Traditional unseen, time-constrained written exams 37
2 Open-book exams 44
3 Open-notes exams 45
4 Structured exams 46
5 Essays 49
6 Reviews and annotated bibliographies 51
7 Reports 54
8 Practical work 56
9 Portfolios 58
Contents

10 Presentations 61
11 Vivas – oral exams 63
12 Student projects 65
13 Poster displays and exhibitions 67
14 Dissertations and theses 70
15 Work-based learning 72
Making formative feedback work 74
Quality of feedback 79
Feedback and competence development 81
Reducing your load: short cuts to good feedback 83
Involving students in their own assessment 85
Conclusions 93
3
Refreshing your lecturing
Intended outcomes of this chapter 95
How important is the act of lecturing? 95
Why have lectures? 97
Some things students do in lectures 98
Some productive lecture processes 99
Using handouts to enhance students’ learning 100
Causing learning to happen in lecture contexts 104
Using technologies – old and new 109
Peer-observation of lecturing 119
Making the most of lectures 121
4
Making small-group teaching work
Intended outcomes of this chapter 125
Why is small-group learning so important? 125
Deciding on group size 126
Ways of forming groups 128
Small-group process techniques 133
Leading and following 137
What goes wrong in small groups? 138
A closer look at tutorials 147
Practical pointers for group work 150
5
Resource-based and online learning
Intended outcomes of this chapter 157
Some terms and buzz-phrases 158
What are the main components of resource-based learning materials? 159
Adopt, adapt, or start from scratch? 160
A strategy for designing resource-based learning materials 161
A quality checklist for resource-based learning materials 163
vi
Contents

Learning from screens? 172
Practical pointers on resource-based learning 175
6
Looking after yourself
Intended outcomes of this chapter 186
Managing your workload 186
Managing your stress levels 187
Managing your appraisal 189
Managing your feedback from students 192
7
Issues, challenges and reflections
Intended outcomes of this chapter 206
Equal opportunities and inclusive practice 206
Plagiarism 218
Working with international students 220
Evidencing your reflections on assessment, learning and teaching 223
References and further reading
Index
Contents
vii

An important consideration in preparing this third edition of The Lecturer’s Toolkit was the feed-
back I have received on the second edition, and colleagues’ exhortations not to change things
which are already working well. Therefore this new edition retains much of the content of its pre-
decessor, but with updating where necessary, and some new sections replacing older ones, for
example in some of the practical suggestions derived from relevant volumes in the ‘500 Tips’
series, where three of the most popular books have already appeared in revised editions. To keep
to the required length of the book, I have had to remove a number of these sets of suggestions,
and suggest that more detail can still be found in the ‘500 Tips’ books. I have, however, added a
new final chapter, addressing various issues which have increased in prominence since the sec-
ond edition was published, including some ideas about equal opportunities and inclusive
teaching, working with international students, and reflecting on one’s professional practice in
learning, teaching and assessment.
This Toolkit aims to help you to underpin and develop further your professional practice as a
teacher in higher education. It is essentially a practical book, but continues to be linked where
appropriate to the increasingly extensive literature on the scholarship of assessment, learning
and teaching. Although the contents are intended to be useful to new lecturers, I found with the
earlier editions that many experienced practitioners found the book a source of practical sugges-
tions, as well as food for thought and reflection. This Toolkit is intended to serve as a practical
reader for programmes for new lecturers, as well as to augment continuing professional develop-
ment provision for experienced staff. In the UK, most universities have now in place
programmes of staff development for lecturers, which link their institutional missions to identi-
fied knowledge about learning and teaching, and underpinning professional values, all of which
I have tried to address in this Toolkit.
There continues to be pressure on university lecturers to be not just excellent researchers, but
also professionally trained and qualified at supporting students’ learning, delivering teaching,
giving useful feedback to students, and designing and implementing assessment. This pressure
comes from all sides: from students, from colleagues, from funding agencies and from institu-
tional managers. With students in the UK and elsewhere increasingly contributing towards the
funding of their higher education, they are becoming much more aware of their role as con-
sumers, and their right to demand high quality in the ways that their learning, teaching and
assessment are delivered. In the UK, students’ views are now collected through a National
Student Survey each year, and the findings of this survey are regarded very seriously (and com-
petitively) as an indicator of the teaching quality of institutions.
Preface to the third edition

Preface to the third edition
ix
What does this edition cover, and why?
There are seven chapters in this third edition. Each chapter is written to be relatively complete in
itself. References, and suggestions for further reading are collected at the end of the book. Most
of the book links to the central agenda of the quality of student learning introduced in Chapter 1,
and I hope that you will find this a useful start to whichever parts of your professional practice
you decide to review and develop first. Each chapter is prefaced by some intended outcomes,
which tell more about the particular purposes the chapters are intended to serve.
Chapter 1, ‘Learning – a natural human process’, aims to get you thinking about the funda-
mental processes which underpin your students’ learning. In this chapter, I ask you to interrogate
your own learning (past or present), and draw out five key factors which need to be catered for
in making learning truly learner-centred. All of these factors are things that you can take into
account in any of the learning, teaching and assessment contexts your students are likely to
encounter. This chapter also now includes some suggestions on expressing and using learning
outcomes, and developing students competences.
Chapter 2, ‘Designing assessment and feedback to enhance learning’, is, in some ways, the
most crucial part of this Toolkit. Of all the things that lecturers do, I believe it is assessment, and
feedback from lecturers, that most profoundly influence the ways that students go about their
learning. My intention in this chapter is to alert you to some of the tensions between effective
learning and assessment, and to encourage you to diversify your approaches to assessment, so
that as many as possible of your students will be able to use a range of assessment formats to
show themselves at their best. I am also aware of the fact that lecturers in higher education are
often severely overloaded with marking, and offer suggestions about ways of making this a more
manageable part of your professional life, without prejudicing the quality and relevance of
assessment. I have added to this chapter a discussion of the vital role of formative feedback to
students, which is now seen as an area which higher education institutions need to address, as the
results in the UK from the 2005 National Student Survey have already indicated that students’
satisfaction was least in the areas of feedback and assessment. The chapter ends with a section
on involving students in their own assessment, to deepen their learning and make them more
aware of how assessment works in other contexts.
Chapter 3, ‘Refreshing your lecturing’, explores ways to design large-group teaching situa-
tions so that students’ learning during them is optimised. Especially for those new to lecturing,
the thought of standing up before a large group of students can be somewhat intimidating. The
thrust of the chapter is about thinking through what your students will be doing during a large-
group session, and planning ways that they can be involved, and making the most of the
opportunities in large groups for students to get feedback on how their learning is progressing. I
have added to this chapter a range of suggestions aiming to help you make large-group teaching
work for your students, and tips about using technology in lecture rooms, not least the now wide-
spread usage of Microsoft’s ‘PowerPoint’.
Chapter 4, ‘Making small-group teaching work’, explores ways of getting students to partici-
pate effectively. Small-group learning situations can be deep learning experiences for students,
but need skilful facilitation to get the most out of the opportunities they provide. This chapter
focuses on the processes which can be used to help all students to engage in small-group learn-
ing situations. The chapter also looks at the place of academic tutorials in higher education, at a
time when it is increasingly difficult to provide the quality or quantity of such student–staff
encounters.

x
Preface to the third edition
Chapter 5, ‘Resource-based and online learning’, reviews briefly the field of open, distance
and flexible learning, and aims to encourage you to make the most of the wide range of learning
resource materials – paper-based and electronic – that are available to support learning. With
larger numbers of students at university, and lecturers increasingly under higher workloads, the
role of resource-based learning pathways or elements in higher education continues to grow in
significance. In this chapter, I offer particular advice for those wishing to adapt existing
resources to optimise their usefulness to their own students, and to those setting out to design
new learning resource materials for their students. The chapter continues by helping you to inter-
rogate how effectively students learn both from print-based resources, and from electronic
resources using the widening range of communication and information technologies available.
Chapter 6 is to help you to survive! It includes a range of suggestions to help you take control
of your time, workload, paperwork, meetings and so on, and on preparing for appraisal. There are
also suggestions about how to go about gathering feedback from your students about their expe-
rience of higher education in general, and your teaching in particular. Several feedback methods
are illustrated, each with their own advantages and drawbacks.
Chapter 7 is new to this edition, and brings together some ideas about the increasingly impor-
tant dimension of ‘inclusive practice’, not least responding to changes in legislation regarding
equal opportunities. There is also some discussion of the issues which often come to the fore
when working with international and cross-cultural groups of students. Finally, the Toolkit now
ends with some ideas on how you can set about not only reflecting on your practices of teaching
and assessment, but also capturing evidence of such reflections to aid your own further develop-
ment as a practitioner in higher education.
This Toolkit is again published in two versions. The bound version is aimed to be used by
individual lecturers as their own personal copies. The ring-bound photocopiable version addi-
tionally contains at the end of each chapter various tasks and activities which can be used (or
adapted) to support staff development programmes in institutions, or for private reflection by
individual lecturers.

I am grateful to thousands of lecturers at the workshops I run, in the UK and abroad, and to many
colleagues who have emailed me with feedback, which continues to help me to develop the ideas
and suggestions throughout this Toolkit. I am also indebted to large numbers of students, with
whom I continue to run interactive sessions on developing their learning skills, as I continue to
find that working with students is vital to help me think more deeply about teaching and assess-
ment. I am particularly grateful to my wife Sally Brown, with whom I continue to discuss ideas
in assessment, learning and teaching, and whose passion for creative and student-centred
approaches is an inspiration to me in my work.
Phil Race
February 2006
Acknowledgements


Intended outcomes of this chapter
When you have worked through this chapter, you should be better able to:
●
put into perspective some of the literature about how learning takes place;
●
identify five factors, in straightforward language, which underpin student learning;
●
address these factors in your day-to-day work with students;
●
design or modify intended learning outcomes associated with your teaching, so that they
align constructively with teaching approaches, and assessment processes and criteria.
Never mind the teaching – feel the learning!
Whatever sort of training we think about, or whatever sort of educational experience we con-
sider, the one thing they all need to have in common is that they lead to effective learning. There
is no single ideal way to teach. Learning would be very boring if all teachers used exactly the
same approaches. However, whatever teaching approaches we choose to use, it’s worth stopping
to think about exactly how our choices impact on our students’ learning.
The human species is unique in its capacity for learning – that is why our species has evolved
as much as it has. The record of human beings engaging in learning goes back to the dawn of
civilisation (and for quite some time before either of the words ‘education’ or ‘training’ were
invented). Yet much that has been written about how we learn tends to have language that is unfa-
miliar and sometimes even alienating to most of the people who want to learn, or indeed to those
who wish to cause learning to happen. In the first part of this chapter, my intention is to lead you
through your own responses to four straightforward questions about learning, and to propose a
simple yet powerful way of thinking about learning, in terms of five straightforward factors
which underpin successful learning. These prove to be a very tangible basis upon which to build
a strategy for designing lectures, tutorials and student assignments, and also for developing
learning materials, including computer-based and electronically transmitted learning resources.
However, before taking the practical look at learning described above, there follows a short
review of some of the most significant ideas in the related literature.
Theories and models of learning
A number of models have been put forward to explain the processes of learning, or the ways that
people acquire skills. There have been two main schools of thought on how learning happens.
Chapter 1
Learning – a natural human process

The behaviourist school takes as its starting point a view that learning happens through stim-
ulus, response and reward, in other words a conditioning process. The stimulus is referred to
as an ‘input’, and the learned behaviours as ‘outputs’. It can be argued that the present
emphasis on expressing intended learning outcomes derives from the behaviourist school of
thinking, and that clearly articulated assessment criteria are an attempt to define the learning
outputs.
The other main approach is the cognitive view, which focuses on perception, memory and
concept formation, and on the development of people’s ability to demonstrate their understand-
ing of what they have learned by solving problems. In the paragraphs below, some of the main
contributors to both models are mentioned.
One of the most popular theories of the ‘cognitive’ school arises from the work of Lewin
(1952) in ‘Field theory in social science’ which is part of Selected Theoretical Papers edited by
Cartwright. This was extended by Kolb (1984) in his book Experiential Learning: Experience as
the source of learning and development. Kolb’s model identifies that most of what we know we
learn from experience of one kind or another, and then breaks this down into four stages, turning
them into a learning cycle.
However, Coffield et al. (2004) in a large-scale systematic review of various models of learn-
ing were very critical of the Kolb learning cycle, and said:
Kolb clearly believes that learning takes place in a cycle and that learners should use all four
phases of that cycle to become effective. Popular adaptations of his theory (for which he is
not, of course, responsible) claim, however, that all four phases should be tackled and in
order. The manual for the third version of the LSI is explicit on this point: ‘You may begin a
learning process in any of the four phases of the learning cycle. Ideally, using a well-
rounded learning process, you would cycle through all the four phases. However, you may
find that you sometimes skip a phase in the cycle or focus primarily on just one’ (Kolb 1999:
4). But if Wierstra and de Jong’s (2002) analysis, which reduces Kolb’s model to a one-
dimensional bipolar structure of reflection versus doing, proves to be accurate, then the
notion of a learning cycle may be seriously flawed.
(Coffield et al. 2004)
Coffield et al. also reviewed in detail the strengths and weaknesses of various learning styles
instruments and models, some deriving from Kolb’s work. Of the popular Honey and
Mumford (1982) work in the area, particularly the ‘Learning Styles Questionnaire’ (LSQ),
they said:
Perhaps the more fundamental problem is the implicit assumption that one instrument of
80 statements can capture all the complexities and the multifaceted nature of learning as
well as the cycle of learning. In addition, Honey and Mumford based their LSQ on Kolb’s
model, but because they found its bipolar structure untenable, they designed the LSQ so
that the style preferences are aligned to the stages in the learning cycle. They have not,
however, produced an alternative to Kolb’s bipolar theory. For all these criticisms, the
LSQ remains very popular as a self-development tool with practitioners, is used exten-
sively – for instance, by industrial trainers and FE tutors – and can now be completed
online.
(Coffield et al. 2004)
2
The Lecturer’s Toolkit

Coffield et al. go so far as to ask:
Should research into learning styles be discontinued, as Reynolds has argued? In his own
words: ‘Even using learning style instruments as a convenient way of introducing the sub-
ject [of learning] generally is hazardous because of the superficial attractions of labelling
and categorizing in a world suffused with uncertainties’.
(Reynolds 1997: 128 in Coffield et al. 2004)
Another important approach is that of Ausubel (1968), who in his book Educational
Psychology: A cognitive view places particular emphasis on starting points, and asserts ‘The
most important single factor influencing learning is what the learner already knows. Ascertain
this and teach him accordingly.’ Many practices now common in training can be matched to the
cognitive psychology approach of Ausubel (1968), and his ideas of the need for ‘anchoring’
concepts, advance organisers (such as what we now commonly refer to as learning objectives or
statements of intended learning outcomes), and clearly broken down learning material. This can
be regarded as bringing together useful elements of the cognitive and behaviourist ways of
thinking about learning.
Cognitive psychology has also made use of clinical, experimental and survey-type researches,
linking personality factors of learners to their successes or failures at learning. Such research has
included the ways that learning can depend on individuals’ learning skills, their approaches to
learning, and their learning styles; see for example the work of Pask (1976), who in an article
entitled ‘Styles and strategies of learning’ compares serialist (basically step-by-step) and holist
(meaning whole-subject, broad) approaches, respectively using operational learning (in other
words learning to do one thing at a time) and comprehension learning (in other words, gaining a
deeper understanding) strategies, that tend to divide people into knowledge-seekers and under-
standing-seekers.
Skinner (1954), in a journal article entitled ‘The science of learning and the art of teaching’
presented one of the seminal papers for the behavioural school, and paid particular attention to
the importance of repeated practice, and the use of rewards to help appropriate responses to be
retained. Another way of looking at learning is to try to define it in terms of learning outcomes.
In the 1950s and 1960s behavioural objectives ruled, and one of the most influential publications
was the Bloom et al. Taxonomy of Educational Objectives, volume 1 The Cognitive Domain
being published in 1956. This approach to learning outcomes has had many forms, and can be
said to have led to much of the competence-based philosophy now underpinning National
Vocational Qualifications in Britain.
Ramsden (2003), in his book Learning to Teach in Higher Education gives a broad review of
some of the models of learning, and mentions, for example, some of the differences between sur-
face approaches to learning and deep approaches. He quotes an article by Biggs (1989), entitled
‘Approaches to the advancement of tertiary teaching’, who explains:
‘Knowing facts and how to carry out operations may well be part of the means for under-
standing and interpreting the world, but the quantitative conception stops at the facts and
skills. A quantitative change in knowledge does not in itself change understanding. Rote-
learning scientific formulae may be one of the things scientists do, but it is not the way that
scientists think.’
(Biggs 1989 in Ramsden 2003)
Learning – a natural human process
3

More recently, Biggs (2003) has brought together a comprehensive survey of the links between
teaching and learning in higher education in the second edition of his book Teaching for
Quality Learning at University where he makes a powerful case for ‘constructive alignment’ –
systematically linking intended learning outcomes, choices of teaching methods, evidence of
achievement of the outcomes and assessment methods and criteria.
The profound influence of assessment design on approaches to learning is brought into sharp
relief by Gibbs (1999) in his chapter in Assessment Matters in Higher Education edited by
Brown and Glasner, and the importance of the role of formative feedback has been thoroughly
addressed by Knight and Yorke (2003), and Sadler (1998, 2003).
Deep, surface or strategic learning?
Much of the discussion about learning revolves around three or four words which describe dif-
ferent (though overlapping) ways of going about the process of learning. In their chapter entitled
‘The link between assessment and learning’, Dunn et al. introduce the topic of approaches to
learning thus:
Many researchers have distinguished between different cognitive levels of engagement
between learning tasks. Perhaps most widely referred to is the distinction between a sur-
face approach, in which a relatively low level of cognitive engagement occurs, and a deep
approach, where a relatively high level of cognitive engagement with the task takes place.
In a surface approach to a learning task, the student perceives that it is necessary to
remember the body of knowledge. Mostly this would involve the need to rote-learn and
then recall the facts concerned. Of course there are many situations where this kind of
approach to learning task is appropriate – such as perhaps learning the chemical tables. At
the other end of the spectrum is a deep approach to a learning task, where the student per-
ceives that it is necessary to make meaning of the content concerned, to be able to
appraise it critically and to be able to apply the knowledge to other contexts or knowledge
domains.
(Dunn et al. 2004: 9–10)
Deep learning generally gets a good press in the scholarly literature. ‘Deep’ learning is, we
might argue, closer to developing real understanding. But this is difficult or even impossible to
measure. So deep learning may be the wrong approach to wean our students towards when our
assessment may only be measuring something rather less than deep learning. Deep learning
may of course be much more appropriate for those students going on to higher levels, and is
doubtless the kind of learning which leads to the most productive and inspired research.
Perhaps that is why deep learning is regarded so favourably by educational researchers on the
whole.
Surface learning gets a bad press on the whole in the literature. However, probably most of
the learning done by most people in post-compulsory education is actually only surface learn-
ing. Students learn things ‘sufficient to the day’ – the exam day or the assessment week or
whatever. When it’s been learned successfully enough to serve its purpose – pass the module,
gain the certificate, whatever, it’s ditched. It’s not entirely wasted however, something that’s
been surface-learned is a better starting point for re-learning, or for learning more deeply, than
something which has not been learned at all. But students can all tell us tales of the countless
things they have learned only well enough to give back when required to demonstrate their
4
The Lecturer’s Toolkit

achievements, which have been quite deliberately ‘eased out’ of their minds as they moved on
to the next stage on their learning journey. ‘You are what you learn’ may be a noble sentiment,
but it can be argued that our assessment processes and instruments cause students to learn far
too many things which aren’t important, diluting the quality of learning that is afforded to those
things that are important.
Despite the criticisms of surface learning approaches, sometimes it is a fit-for-purpose
choice. Where a limited amount of factual information needs to be available at will in a particu-
lar scenario, but will not be needed after that scenario is completed, surface learning can be a
wise enough choice. There are things that just are not important enough to warrant a lot of time
and energy being invested in learning them deeply.
What’s wrong with strategic learning?
Strategic learning has perhaps had the worst press of all. It’s not just accidental surface learning.
It is perhaps deliberate surface learning, consciously engaged in at the expense of deeper learn-
ing? Strategic learning is regarded as ‘learning for the exam’. It’s associated with ‘seeking out
the marks or credit’ quite consciously in essays, reports, dissertations, theses, and extends read-
ily to preparing strategically for job interviews, promotion boards, and so on.
Strategic learners tend to be successful, or at least moderately successful. Deep learners may
well deserve success, but quite often shoot themselves in one foot or other, by mastering some
parts of the curriculum very very well, but leaving other parts of the curriculum under-devel-
oped, and not getting the overall credit that they might have achieved had they spread their
efforts more evenly across the curriculum.
Surface learners can also fare well enough, if and when all that is really being measured in
our assessment systems is surface learning. Strategic learning is often thought of in terms of
doing the minimum to get by. But there are various ‘minima’. In the present degree classification
system in the UK perhaps there’s the minimum to get by and get a degree at all, and the (differ-
ent) minimum to get by and get a 2–1, and the (different again) minimum to get by and get a
first-class degree, and perhaps the minimum to get by and get a first-class degree with a margin
for safety?
So what is strategic learning? We could regard it as making informed choices about when to
be a deep learner, and when to be a surface learner. It could be viewed as investing more in what
is important to learn, and less in what is less important to learn. It could be regarded as setting
out towards a chosen level of achievement, and working systematically to become able to
demonstrate that level of achievement in each contributing assessment element.
It can also be argued that those learners who go far are the strategic ones, rather than the deep
ones. It can be argued that they know when to adopt a deep approach, and when it is sufficient to
adopt a surface approach.
Cue-consciousness
As long ago as 1974, Miller and Parlett discussed what can now be thought about as one way of
thinking about strategic learning: ‘cue-consciousness’. They proposed three approaches which
learners can use in the ways that they structure their learning in systems where assessment is a
significant driving force – an assessment regime which then in the UK was mainly comprised of
written exams. They wrote of:
Learning – a natural human process
5

●
cue-seeking learners: more likely to get first-class degrees;
●
cue-conscious learners: more likely to get upper second-class degrees;
●
cue-deaf learners: less likely to succeed.
Gibbs and Simpson (2002) expand on, and quote from, Miller and Parlett’s work as follows:
Miller and Parlett focussed on the extent to which students were oriented to cues about what
was rewarded in the assessment system. They described different kinds of students: the cue
seekers, who went out of their way to get out of the lecturer what was going to come up in
the exam and what their personal preferences were; the cue conscious, who heard and paid
attention to tips given out by their lecturers about what was important, and the ‘cue deaf ’ for
whom any such guidance passed straight over their heads. This ‘cue seeking’ student
describes exam question-spotting:
‘I am positive there is an examination game. You don’t learn certain facts, for instance, you
don’t take the whole course, you go and look at the examination papers and you say “looks
as though there have been four questions on a certain theme this year, last year the profes-
sor said that the examination would be much the same as before”, so you excise a good bit
of the course immediately...’.
(Miller and Parlett 1974: 60 in Gibbs and Simpson 2002)
In contrast these students were described as ‘cue-deaf ’:
‘I don’t choose questions for revision – I don’t feel confident if I only restrict myself to cer-
tain topics.’
‘I will try to revise everything ...’.
(Miller and Parlett 1974: 63)
Miller and Parlett were able to predict with great accuracy which students would get good degree
results.
... people who were cue conscious tended to get upper seconds and those who were cue deaf
got lower seconds.
(Miller and Parlett 1974: 55)
Knight and Yorke (2003) put the matter of cue-consciousness in perspective as follows:
Learned dependence is present when the student relies on the teacher to say what has to be
done and does not seek to go beyond the boundaries that they believe to be circumscrib-
ing the task. The construction of curricula around explicit learning outcomes risks the
inadvertent building-in of circumscriptions or, for the ‘strategic’ student seeking to bal-
ance study and part-time employment, a welcome ‘limitation’ to what they have to do.
Formal and informal feedback can be interrogated for what it can tell about what is
expected, and can become part of a vicious spiralling-in towards ‘playing it safe’, basing
action on perceptions of the implicit – as well as the explicit – expectations. It is a para-
dox that active ‘cue-seekers’ (Miller and Parlett 1974) can exhibit a form of learned
dependence, through ‘playing it clever’ (at least, superficially) by hunting for hints that
will help them to maximise the grade received for their investment of effort. Over-reliance
6
The Lecturer’s Toolkit

on the teacher can thus give achievements a meretricious ring: these may look worthier
than they actually are ...
(Knight and Yorke 2003: 134)
Since seeking cues through assessment tasks is an established student practice, we need to
ensure that the cues we give lead to meaningful and productive learning activities.
Many of the sources referred to above inform the view of learning that this chapter will now
propose. However, it has been argued by Race (2005a) that much of the literature on learning is
presented using language and concepts which most students and teachers find different from their
everyday experience, and in this chapter (and throughout this Toolkit) a more pragmatic approach
is sought, to inform appropriately teaching, learning and assessment practices. The approach out-
lined in this chapter is based on asking students (and others) questions about their own learning,
and then analysing their responses (to date from many thousands of people from a wide range of
disciplines, professions and vocations) to identify primary factors which influence the quality of
learning. These factors, as you will see in this book, can be addressed consciously and directly
both by students and teachers. Students can be helped to gain control over the factors, and teach-
ers can plan their teaching to maximise the learning payoff associated with each factor.
Factors underpinning successful learning
One of the problems common to some, if not most, of the theories of learning referred to above
is that they tend to be written using educational or psychological terminology. This does not
mean that they are wrong, but it does mean that they are not particularly valuable when we try to
use them to help our students to learn more effectively, or to help ourselves to teach more suc-
cessfully. The remainder of this chapter is intended to provide you with a jargon-free, practical
approach to enquiring into how learning happens best, which you can share with your students,
and which you can use to inform all parts of your own work supporting students’ learning.
Getting people to think of something they have learned successfully is a positive start to alert-
ing them to the ways in which they learn. It does not matter what they think of as the successful
learning experience of their choice – it can be work-related, or a sporting achievement, or any
practical or intellectual skill. Try it for yourself – answer the pair of questions which follow now
before reading on.
Learning – a natural human process
7
Question 1
(a) Think of something you’re good at – something that you know you do well. Jot it down
in the space below.
(b) Write below a few words about how you became good at this.

Most responses to 1(b) are along the lines of:
●
practice;
●
trial and error;
●
repetition;
●
having a go;
●
experimenting.
In other words, ‘learning by doing’ is a strong factor underpinning how most people learn.
There’s nothing new about this – it’s already been called experiential learning for long enough –
but let’s stay with short words like doing for the present. ‘Trial and error’ is also important.
Learning through one’s mistakes is one of the most natural and productive ways to learn almost
anything. Sadly, our educational culture – and particularly our assessment culture – leaves little
room for learning from mistakes. Too often, mistakes are added up and used against students!
Next, another question, to probe another dimension of successful learning.
Feeling the learning
The matter of feelings is something which has not been sufficiently explored by the developers
of theories of learning. Feelings are as much about what it is to be human as any other aspect of
humanity. There is a lot of discussion about student motivation (particularly when there is a lack
of motivation, but perhaps too little energy has been invested in exploring the emotions upon
which motivation depends. A relatively simple question yields a wealth of information about the
connection between feelings, emotions and successful learning. Try it for yourself.
8
The Lecturer’s Toolkit
Question 2
(a) Think of something about yourself that you feel good about – a personal attribute or
quality perhaps. Jot it down in the space below.
(b) Write below a few words about how you know that you can feel good about whatever
it is. In other words, what is the evidence for your positive feeling?
Most responses to 2(b) above are along the lines of:
●
feedback;
●
other people’s reactions;
●
praise;
●
seeing the results.

Learning – a natural human process
9
Therefore (unsurprisingly) feedback is an important underpinning factor to most people’s learning.
Receiving positive feedback
It is useful to follow up our exploration of the importance of positive feelings with some
thoughts about how students can be helped to receive positive feedback. In some cultures,
including that of the UK, there is quite a strong tendency to shrug off compliments and praise, or
to resort to the defence strategy of laughter! The effects of this behaviour detract from the value
of the positive feedback in the following ways:
●
the positive feedback is often not really taken on board;
●
the person giving the feedback may feel rejected, snubbed or embarrassed;
●
the ease of giving further praise may be reduced.
Helping students (and others) to confront these possibilities can be useful in developing their
skills to derive the maximum benefit from positive feedback. For example, simply replying
along the lines ‘I’m glad you liked that’ can make all the difference between embarrassment, and
feedback effectively delivered and received.
When extended to the domain of negative feedback, further dividends are available. It can be
very useful to train students (and ourselves!) to thank people for negative feedback, while weigh-
ing up the validity and value of it. This is much better than resorting to defensive stances, which
tend in any case to stem the flow of negative feedback, usually before the most important mes-
sages have even been said.
Doing + feedback = successful learning?
Though these two elements are essential ingredients of successful learning, there are some fur-
ther factors which need to be in place. These are easier to tease out by asking a question about
unsuccessful learning. Try it for yourself now, then read on.
Question 3
(a) Think, this time, of something that you don’t do well! This could have been the result of
an unsatisfactory learning experience. Jot down something you’re not good at in the
space below.
(b) Now reflect on your choice in two ways. First, write a few words indicating what went
wrong when you tried to learn whatever-it-was.
(c) Next, try to decide whose fault it was (if anyone’s of course) – does any blame rest with
you, or with someone else (and if so, whom?).

Typical responses to 3(b) above include:
●
I did not really want to learn it;
●
I couldn’t see the point;
●
I couldn’t get my head round it.
As for whose fault it may have been that the learning was not successful, many people blame
themselves, but a significant number of respondents blame particular teachers, trainers or
instructors – and can usually remember the names of these people, along with a lot of what they
did to damage motivation.
Wanting to learn
If there’s something wrong with one’s motivation, it’s unlikely that successful learning will hap-
pen. However, motivation (despite being very close to ‘emotion’) is a rather cold word; wanting
is a much more human word. Everyone knows what ‘want’ means. Also, wanting implies more
than just motivation. Wanting goes right to the heart of human urges, emotions and feelings.
When there’s such a powerful factor at work helping learning to happen, little wonder that the
results can be spectacular. We’ve all been pleasantly surprised at how well people who really
want to do something usually manage to do it. If people want to learn, all is well. Unfortunately,
the want is not automatically there. When subject matter gets tough, the want can evaporate
quickly. When students don’t warm to their teachers, or their learning environments, their want
can be damaged.
Making sense of what one has learned – digesting – realising – ‘making sense’
We are thinking here about making sense of what has been learned, and also the learning experi-
ence – and also making sense of feedback received from other people. Digesting is about sorting
out what is important in what has been learned. Digesting is about extracting the fundamental
principles from the background information. Digesting is also about discarding what’s not
important. It’s about putting things into perspective. Digesting, above all else, is about establish-
ing a sense of ownership of what has been learned. It’s about far more than just reflection.
Students often describe digesting as ‘getting my head around it’. They sometimes explain it as
‘realising’. When one has just realised something, one is then able to communicate the idea to
other people – tangible evidence that learning has been successful.
Thousands of people have answered the three questions we’ve looked at, and even written
their answers down. The people asked have covered all age ranges, occupations and professions.
It is not surprising to discover that very different people still manage to learn in broadly similar
ways. After all, learning is a human process – it matters little whether you’re a human trainer, a
human student, or a human manager. In face-to-face training, or large-group based education,
students are already surrounded by people who can help with the digesting stage – most impor-
tantly, each other. When students put their heads together informally to try to make sense of a
difficult idea or problem, a lot of digesting and realising occurs.
One more question!
For the final question, let’s return to successful learning, but this time without that vital ‘want’.
10
The Lecturer’s Toolkit

A wide range of things are cited by respondents to 4(b) above, but common factors keeping dif-
ferent students going include:
●
strong support and encouragement;
●
determination not to be seen to get it wrong or fail;
●
simply needing to learn something so that something else would be achievable.
Needing to learn – a substitute for motivation?
Responses to Question 4 often highlight that a successful driving force for learning is a neces-
sity. There are some subjects where it can be very difficult to generate in students a strong want
to learn, but where it may be quite possible for us to explain to them convincingly why they
really do need to learn them. For example, for many years I taught students chemical thermody-
namics. Few (normal!) students want to get to grips with the second Law of Thermodynamics,
but many need to get their heads round it. When students have ownership of a want to learn,
there is little that we need to do to help them maintain their motivation. However, helping stu-
dents to gain ownership of the need to learn something is a reasonable fallback position, and can
still help students to learn successfully.
Five factors underpinning successful learning
From my analysis of thousands of people’s answers to the four straightforward questions we’ve
explored so far in this chapter, the principal factors underpinning successful learning can be
summarised as follows.
Learning – a natural human process
11
Question 4
(a) Think of something that you did in fact learn successfully, but at the time you did not
want to learn it. Probably it is something that you’re now glad you learned. Jot something
of this sort below.
(b) Write down a few words about ‘what kept you at it’ – in other words the alternatives
that worked even when your want to learn was low or absent.
Wanting
motivation, interest, enthusiasm
Needing
necessity, survival, saving face
Doing
practice, repetition, experience, trial and error
Feedback other people’s reactions, seeing the results
Digesting making sense of what has been learned

How do these factors interact with each other?
The human brain is not a computer that works in a linear or pre-programmed way all the time.
Our brains often work at various overlapping levels when, for example, solving problems or
making sense of ideas. The wanting stage needs to pervade throughout, so that doing is wanted,
feedback is positively sought, opportunities for digesting are seized, and so on. Perhaps a more
sensible model would have wanting at the heart, and feedback coming from the outside, and
doing and digesting occurring in an overlapping way as pictured below.
In Race (2005a) I have argued that these factors all continuously affect each other, and that a
way of thinking about them is to liken them to ‘ripples on a pond’. Perhaps learning can be
started by some wanting, where the bounced-back ripples from the external world constitute the
feedback and continue to influence the doing. The effects of the feedback on the doing could be
thought of as digesting. The main benefit of such a model is that it removes the need to think
about learning as a unidirectional sequence. The model has about it both a simplicity and a com-
plexity – in a way mirroring the simultaneous simplicity and complexity in the ways in which
people actually learn.
Figure 1.1 ‘Ripples on a pond’ model of learning processes
Using the model
Probably the greatest strength of the wanting/needing, doing, feedback, digesting model of learn-
ing is that it lends itself to providing a solid foundation upon which to design educational and
training programmes. If you look at any successful form of education and training, you’ll find
that one way or another, all of these factors underpinning effective learning are addressed.
Different situations and processes attend to each of the factors in different ways.
For example, wanting is catered for by the effective face-to-face lecturer who generates
enthusiasm. Wanting can be catered for by carefully worded statements showing the intended
learning outcomes, which capture the students’ wishes to proceed with their learning. The want-
ing can be enhanced by the stimulation provided by attractive colours and graphics in
computer-based packages or on the Internet. What if there’s no wanting or needing there in the
Wanting/
needing
Doing
Digesting
Feedback
12
The Lecturer’s Toolkit

first place? Perhaps feedback can, when coupled with learning-by-doing and digesting, cause the
ripple to move back into the centre, and create some motivation.
Learning by doing is equally at the heart of any good course, and equally in any well-
designed flexible learning package or online course.
Feedback is provided by tutors, or by the printed responses to exercises or self-assessment
questions in flexible learning materials, or by feedback responses on-screen in computer assisted
learning programmes, or simply by fellow-students giving feedback to each other. Feedback can
be regarded as the process that prevents the whole ‘ripple’ simply dying away, as feedback inter-
acts with the digesting and doing stages, and keeps the learning moving.
The one that’s all-too-easy to miss out is digesting, making sense. However, all experienced
tutors know how important it is to give students the time and space to make sense of their learn-
ing and to put it into perspective. Similarly, the best learning packages cater for the fact that
students need to be given some opportunity to practise with what they’ve already learned, before
moving on to further learning.
Learning and intelligence
Gardner (1993), in his work on ‘multiple intelligences’ starts by regarding intelligence as ‘the
capacity to solve problems or to fashion products that are valued in one or more cultural setting’.
Whatever intelligence may be, it should not be thought of as simply being the capacity to per-
form well in particular assessment-related contexts or environments – for example intelligence
must be much more than merely the capacity to do well in time-constrained, unseen written
examinations. Gardner’s work usefully subdivides intelligence into multiple facets:
●
linguistic – use of language – words;
●
mathematical-logical – patterns, deductive reasoning;
●
musical – compose, perform and appreciate musical patterns;
●
bodily-kinaesthetic – use of whole body or parts of the body – coordination of movements;
●
spatial – recognising and using patterns of space – parking the car, crystallography;
●
interpersonal – working with other people, understanding their motivations, intentions and
desires;
●
intrapersonal – understanding oneself, and recognising one’s feelings, fears and motivations;
●
spiritual – embracing aesthetic, unseen and spiritual dimensions;
●
bestial – communicating effectively with animals.
Any one person’s intelligence can be regarded as a fairly unique blend of several of these facets.
Any learning experience is likely to involve several of these, adding to the picture of each indi-
vidual student being quite unique in their overall approach to learning, but without all the
difficulties discussed by Coffield et al. (2004) when thinking about learning styles.
How can we increase students’ motivation?
In many universities, staff grumble that students’ motivation is not what it used to be. There are
students who simply don’t seem to want to learn. There are students who don’t seem to see why
they may need to learn. They seem less willing to sit at our feet and imbibe of our infinite wis-
dom. There are some who even seem to believe that we are paid to do their learning for them!
Learning – a natural human process
13

Why is motivation often low?
There are many reasons for increased incidence of low levels of student motivation, including:
●
There are many more students in our higher education system. We still have those students
who are keen to learn, but they are diluted by students whose motivation is much less, and
who would not have come into our system some years ago. The proportion of students who
know exactly why they’re in higher education has decreased.
●
More students enter higher education to satisfy other people’s expectations of them, rather
than through their own motivation to succeed. Some are coaxed, cajoled or pressed by par-
ents and others, and come in as a duty rather than as a mission.
●
There is a greater culture shock on moving from school to higher education – all those dis-
tracting temptations, and scary unprecedented freedom. Many students are unprepared for
the increased responsibility for their own learning that higher education places upon them.
●
Students are much more ‘grown up’ than they used to be. Their lifestyle expectations have
increased. This means that problems with finances and difficulties with relationships take a
greater toll on the energies of more students than used to be the case.
●
The rigours of our academic systems can mean that there may be no chance of remediation
for poor assessed work, and failure can breed irrecoverably low motivation.
What are the symptoms of low motivation?
Some symptoms of failing motivation appear to us as in-class behaviours, others we see evi-
dence of as out-of-class behaviours, with yet more symptoms reflecting students’ perceptions
about ourselves.
Some in-class symptoms of low motivation:
●
coming to class late and/or leaving early, or indeed not turning up at all;
●
talking to friends in class about other things;
●
looking out of the window, scribbling, drawing, doodling, writing letters to friends, sending
text messages on mobile phones;
●
lack of engagement, not asking questions, not being willing to answer questions, nor volun-
teering responses when invited;
●
diverting lecturers from the main issues;
●
not coming in equipped with pens, paper, books, calculators, and so on;
●
taking a longer break than is intended during long sessions, or failing to return at all;
●
yawning, looking disinterested, and avoiding eye contact;
●
inappropriate social interactions in class (compare back row of cinema!).
Some out-of-class symptoms of low motivation:
●
consistent absence without reason;
●
inadequate preparation towards class work;
●
handing in scribbled last-minute work – botched, or not handing in any work;
●
low quality individual and/or group work;
●
damaging each other’s attitude;
14
The Lecturer’s Toolkit

●
work avoidance strategies – giving in too easily to doing only unimportant tasks and putting
off doing important ones;
●
ignoring lecturers out of class;
●
being found not to have contributed to group tasks – doing only what’s necessary for course-
work marks, but not doing other things;
●
not buying books, nor using library resources;
●
maintaining poor folders and disorganised collections of handouts.
Is some of it our fault?
Some explanations of low student motivation are directed in our direction! The charges against
us include:
●
our seeming indifference to time-of-day factors – Friday afternoon classes, students’ need
for an early afternoon snooze after lunch;
●
students’ experiences of the unevenness of the pressure of work – e.g. weeks go by with
nothing to hand in, then a deluge of hand-in dates;
●
some students feeling that they’ve been labelled by us already as low-achievers, and taking
all slightly critical feedback as reinforcement of their lowered self-esteem;
●
seating plans too rigid and predictable, room quality, the overall learning environment being
scruffy or unenthusing?;
●
the teachers they meet – our own looks, sounds, level of enthusiasm, perceived lack of
understanding about learning styles or the effects of the learning environment;
●
more-able students feeling that they are undervalued and under-challenged, and that we
spend too long catering for the lower-fliers;
●
insufficient acceptance on our part of a basic human need for students (like children) to win
at least some of the battles.
How can we tackle low motivation?
The following suggestions are tactics, rather than solutions. However, choosing tactics can be
our first steps towards building a strategy to counter the malaise of poor student motivation. You
will already have your own tactics to add to (or supersede) the ones suggested below.
Learning – a natural human process
15
1 Accept that motivation is a real problem.
Pretending that low motivation doesn’t
exist does not make it disappear. Treating it
as an issue to be addressed jointly with stu-
dents increases the chance that they will
recognise it themselves, and (as only they
can) make adjustments to their rationale
for being in higher education.
2 Recognise the boundary conditions of
the problem. Low motivation is essentially
a problem with full-time students, rarely
with part-timers. Low motivation is essen-
tially a problem with younger students,
rather than mature returners. When we
have large mixed-ability, mixed age classes
containing full-timers and part-timers
together, the range of motivation is even
more of a problem to all concerned.
3 Remember that students have difficult
lives. First-year students may be far from
home, family, friends, familiar streets, for
the first extended time so far. For some, it’s
like being on remand – they’ve been sent
there by other people. Some delight in their
new environment, others are homesick, but
all are expending a lot of their energy

16
The Lecturer’s Toolkit
adjusting their lives. The differences
between school and university are more
profound than perhaps they were when we
were new students?
4 Accept that many young people are
rebels. It’s a natural enough stage of grow-
ing up. But this means that they aren’t so
keen to please us, and may be more willing
to be sullen, uncooperative and passive. In
our consumer-led society (and students are
consumers) they are less likely to try to
hide their dissatisfaction. None of this
means that they aren’t intelligent, or that
they lack potential.
5 Seek different kinds of feedback from
students. We already seek lots of feed-
back, but often with repetitive, boring
devices such as tick-box questionnaires,
where students don’t really tell us anything
other than their surface responses to too-
often-asked structured questions about our
teaching. Ask students how they feel about
topics, rooms, assignments, and us! Ask
for words, not just rankings.
6 Make it OK to be demotivated. Students
sometimes feel that their low morale is yet
another failure, and it becomes a self-ful-
filling prophecy. All human beings
(ourselves included) have peaks and
troughs in motivation, and students need to
see that (for example) success can breed
more success.
7 Don’t expect students to be passion-
ately interested in things they don’t yet
understand. The passion often comes
with understanding, and the understand-
ing often comes with experience and
interaction, so concentrate on the learn-
ing-by-doing, peer feedback, and in-class
involvement. Don’t lecture to a group that
is supposed to be entirely switched on,
when we know all too well that it isn’t.
8 Don’t presuppose that our own topic is
the most fascinating thing in the life of
all the students we see. A few may end up
researching in this topic, but for most it is
just another stepping stone to the degree
that they are going to use for something
quite different to our own particular field.
Make it an interesting stepping stone, but
don’t expect all the students to take it as
seriously as we perhaps do.
9 Concentrate on their learning, rather
than our teaching. Think more carefully
when teaching about what will be going on
in their minds, rather than the information
in our minds that we’d love to transfuse to
our students. Knowledge is not infectious,
and is much more than mere information.
Enthusiasm is, however, infectious – we
can try to transmit this.
10 Keep assessment in perspective. The
assessment students do for us sits along-
side all the other assessed tasks they do for
all their other teachers. Don’t let students’
lives be dominated by assessed work, to the
exclusion of the natural joy of learning.
11 Spend more time helping all students to
become better learners. Don’t regard it as
someone else’s business. Don’t assume that
students should already be skilled learners.
Help students to gain more control over
how they learn, so that they have a greater
ownership over what they learn. Above all,
continue to help them to address why they
are learning.
12 Spend more energy on praising. Students
(like ourselves) respond well to positive
feedback. Ticks aren’t enough. It’s all too
easy for us to spend our limited time on
giving constructive critical feedback, but if
there is not enough praise there, this just
seems like condemnation to demotivated
students.
13 Continue being a student. Perhaps a
requirement for employment as a teacher
in higher education should be that we too
should always be enrolled on an academic
programme as students, and that we
should see our studies through to assess-
ment. And we should have the opportunity
to fail or succeed, just like our students.
Therein lies the essence of understanding
students’ motivations.

Developing students’ competences
Let’s stand back from what we’ve already thought about in this chapter, and go back to the cen-
tral purposes of everything we do when teaching, or designing learning resources for students.
We intend to help them to become more competent. The competences we are addressing are not
just those relating to skills which students will be able to demonstrate to us, nor are they all
amenable to our usual assessment processes and practices. The competences include those con-
nected with thinking, creativity, originality, problem-solving, and so on, as well as those linked
to mastery of defined areas of knowledge.
What’s the opposite of competence? ‘Incompetence’ is the word which immediately comes to
mind. Unfortunately, incompetence is a word with negative associations, so some time ago I
coined the word ‘uncompetence’ to mean not-yet-competent, less threatening than incompetence.
It is useful to add to our thinking about learning by exploring how we can help our students to
gain competence, and how we can help them to be aware of what is happening as they learn. This
is why I developed a model of conscious versus unconscious competence and uncompetence.
Figure 1.2 Conscious–unconscious competence–uncompetence
The ‘target’ box
We want to help our students to become consciously competent. This can be regarded as the tar-
get box on the competence–uncompetence matrix. The more we can help students to be aware of
their competences, the better their motivation. In other words, conscious competence links to the
wanting to learn factor. It breeds confidence. We can address this by expressing intended learn-
ing outcomes as clearly as we can, so that students are aware when they have reached the
position of achieving these outcomes, and know that they are able to demonstrate their achieve-
ment of them to us when we assess their performance.
Competence
Uncompetence
Conscious
Unconscious
Learning – a natural human process
17

Figure 1.3 Conscious competence: the ‘target’ box
The ‘transit’ box
There’s nothing wrong with ‘conscious uncompetence’. Indeed, knowing what one can’t yet do is
usually an essential step towards becoming able to do it. Of course, many unconscious uncom-
petences don’t even need to be addressed, including all the things one does not need to become
able to do, and so on. It is only those conscious uncompetences which relate to the topics to be
learned which need to be moved towards the target box on the diagram.
Figure 1.4 Conscious uncompetence: the ‘transit’ box
When the intended learning outcomes are clear, it is easier for students themselves to work out
what they can’t yet do, and they can often turn their conscious uncompetences into competences
without further help. However, as teachers we can often help students to gain feedback which
gives them a lot more detail of exactly how they should go about moving out of the transit posi-
tion. Similarly, students can gain a great deal of feedback from each other about how best to
make the move.
Competence
Target
Transit
Uncompetence
Conscious
Can do
Can't yet do
Unconscious
Competence
Target
Uncompetence
Conscious
Unconscious
18
The Lecturer’s Toolkit

Unconscious uncompetence – the ‘danger’ box
This is about not knowing what one can’t yet do. For most learners (students, but also ourselves),
it’s the things we don’t know we’re not yet good at which pose the greatest threat. It could be
argued that the art of teaching is about helping students to find out what lies hidden in their ‘dan-
ger’ boxes on this diagram! Clear expressions of intended learning outcomes can help students to
see that there are things they hadn’t yet identified that they needed to become able to achieve.
However, even more help can be brought to bear by assessment and feedback, where we (and
indeed fellow-students) contribute to giving students information about what they didn’t know
that they couldn’t yet do.
Figure 1.5 Unconscious uncompetence: the ‘danger’ box
It is of course possible for students to jump straight from the ‘danger’ position to the ‘target’ one,
but then it can be argued that their learning is not nearly so deep as it would have been if they had
been alerted to the detail of exactly what it was that they didn’t know they couldn’t yet do, then
tackling the situation consciously and addressing the problem.
It is increasingly recognised that an important function of higher education is to help stu-
dents to develop their key transferable skills. Some of the most important of these are those
connected with becoming self-sufficient, autonomous learners. Ideally, we need to be training
students toward becoming able to probe for themselves what might lie in the danger box in their
learning.
Unconscious competence – the ‘magic’ box?
Fortunately, we’ve all got unconscious competences as well as conscious ones. Many skilful
teachers don’t actually need to be aware of exactly wherein lies the success of their teaching.
Students who can already achieve learning outcomes don’t necessarily have to know that they are
already in a position to do so. However, it can be argued that the transition from the ‘magic’ box
to the ‘target’ one is a useful part of the learning process. For example, the excellent teacher who
finds out why his or her teaching is successful is in a much better position to help others emulate
that success. Similarly, students who find out about their unconscious competences are in a bet-
ter position to build up their confidence, and to draw from that gain in self-understanding
reflective processes that they can use in their conscious learning.
Competence
Target
Transit
Danger
Uncompetence
Conscious
Can do
Can't yet do
Unconscious
Learning – a natural human process
19

Figure 1.6 Unconscious competence: the ‘magic’ box
It can be a little unsettling to translate unconscious competences into conscious ones. It can be
compared to being able to ride a bike, and wobbling when becoming aware of the processes
involved. However, the learning which accompanies this sort of transition can be of value when
applied to new learning scenarios.
More importantly, most students find that when they are alerted to the things they did not
realise that they could already do well, they gain confidence and self-esteem. As teachers, we
need to remind ourselves that our work is not just about telling students what they need to do, but
equally about alerting to students to strengths they already have. Positive feedback is a powerful
aid to motivation, and where better to direct our positive feedback than to the things that students
may not have realised deserved our praise.
Confidence and self-concept
Students from non-traditional academic backgrounds are likely to find their confidence levels are
further undermined if their beliefs in their own abilities to succeed are undermined by concep-
tions about themselves which have made it difficult for them to achieve academically in the past.
Clegg, in Peelo and Wareham (2002) citing Dweck, argues that there is a high correlation
between self-concept and achievement and this depends on whether they see their capabilities as
being set in stone or malleable to change through hard work and strategic approaches. They dis-
cuss two positions that students can adopt in regard to their own abilities, first, that intelligence
is fixed (an entity theory of intelligence, as evidenced by IQ scores) and that there is very little
they can do to improve themselves, and second, that ability is malleable and that hard work can
lead to high achievement (an incremental theory of intelligence):
The personal commitment an individual makes to a theory of intelligence is indicative of
their self perception. Students who subscribe to an entity theory of intelligence believe that
failure is the final point, the outcome of their achievements. They need ‘a diet of easy suc-
cesses’ (Dweck, 2000: 15) to confirm their ability and are fearful of learning goals as this
involves an element of risk and personal failure. Assessment for these students is an all-
encompassing activity that defines them as people. If they fail at the task, they are failures.
Challenges are a threat to self-esteem as it is through being seen to be successful that these
students define themselves. ...
Competence
Target
Transit
Can't yet do
Danger
Uncompetence
Conscious
Can do
Unconscious
Magic
20
The Lecturer’s Toolkit

Perhaps predictably, those students who believe that intelligence is incremental have little
or no fear of failure. A typical response from such a student is ‘The harder it gets, the
harder I need to try’. These students do not see failure as an indictment of themselves and
[can] separate their self-image from their academic achievement. When faced with a chal-
lenge, these students are more likely to continue in the face of adversity because they have
nothing to prove.
(Clegg in Peelo and Wareham 2002: 176)
Such self-beliefs are remarkably persistent and can interfere powerfully in how a student
responds to negative comments in feedback from tutors:
Blaming oneself for failure indicates an incremental theory of intelligence. Students believe
they could have done something to avoid failure and will try harder next time. ...
In other words, students choose how they interpret feedback and failure so as to lessen the
emotional damage. Students deny the validity of teacher, peer and professional judgement if
it disagrees with their own self concept.
(Clegg in Peelo and Wareham 2002: 177)
Learning and understanding
Knight and Yorke (2003) acknowledge that there is a problem with the word ‘understanding’,
and also point out that the kinds of assessments students meet in post-compulsory education
have a significant effect upon the extent to which students develop understanding.
There is uncertainty about what counts as understanding. Side-stepping some important
philosophical issues, we suggest that a student who understands something is able to apply
it appropriately to a fresh situation (demonstration by far transfer) or to evaluate it (demon-
stration by analysis). Understanding cannot be judged, then, by evaluating the learner’s
retention of data or information; rather, assessment tasks would need to have the student
apply data or information appropriately. This might not be popular in departments that pro-
vide students with a lot of scaffolding because their summative assessment tasks only
involve near transfer, not far transfer. Where far transfer and evaluation are the hallmarks of
understanding, assessment tasks will not be low-inference, right or wrong tasks, but high-
inference ones, judged by more than one person with a good working knowledge of agreed
grade indicators.
(Knight and Yorke, 2003: 48)
Perhaps we have a problem in the English language in that words such as learning, knowing and
understanding overlap so much in their everyday usage. One of the problems of formulating a cur-
riculum is that in the English language people tend to use the word ‘understand’ much too loosely.
Intended learning outcomes are too often badly phrased along the lines ‘by the end of this course
students will understand x, y and z’. Nor is it much use to soften the outcomes along the lines ‘this
course will help students to deepen their understanding of x, y and z’. Yes, the course may indeed
help students to deepen their understanding, but do they know how much they are deepening it,
and can we measure how much they have deepened it? In short, we can’t measure what students
understand. We can only measure the evidence that students produce to demonstrate their under-
standing. That evidence is all too easily limited by technique of demonstrating understanding –
Learning – a natural human process
21

their written communication skills perhaps. Or whether they are note-perfect in music. We can
measure such things, and give students feedback about them, but we can’t ever be sure that we’re
measuring what is present in students’ minds. Or, when it comes to understanding, ‘if we can
measure it, it almost certainly isn’t it’.
Developing students’ understanding may well be a useful direction to go in, but we need to be
really careful to spell out exactly how far students are intended to develop their understanding,
and what evidence they need to be aiming to produce to prove that they have developed their
understanding, and what standards this evidence must measure up to, to indicate that they have
successfully developed their understanding sufficiently. We also need to think hard about which
processes are best to help students to develop their understanding, and to recognise that different
processes and environments suit different students best. We can use similar arguments about
knowing and knowledge. We only measure what students know as far as we can assess the evi-
dence which students produce. In other words, we can only measure what students show of what
they know.
Positioning the goalposts – designing and using learning outcomes
So far, this chapter has been about how learning can be caused to happen. All of this is academic
unless we also link it to what is intended to be learned, including thinking about why, when, and
where. That’s where learning outcomes come in. Indeed, Biggs (2003) places intended learning
outcomes at the centre of his model of constructive alignment.
Learning outcomes represent the modern way of defining the content of a syllabus. The old-
fashioned way was simply to list topic headings, and leave it to the imagination of the lecturer
exactly what each heading would mean in practice, and how (or indeed if) each part of that
would be assessed in due course. Nowadays, expressions of learning outcomes are taken to
define the content, level and standard of any course, module or programme. External scrutiny
interrogates assessment criteria against learning outcomes to ensure that the assessment is
appropriate in level and standard to the course or module. Even more importantly, however,
learning outcomes can be vitally useful to students themselves, who (with a little guidance) can
be trained to use the expressed learning outcomes as the targets for their own achievement.
The intended learning outcomes are the most important starting point for any new
teaching–learning programme. Learning outcomes give details of syllabus content. They can be
expressed in terms of the objectives which students should be able to show that they have achieved,
in terms of knowledge, understanding, skills and even attitudes. They are written as descriptors of
ways that students will be expected to demonstrate the results of their learning. The links between
learning outcomes and assessment criteria need to be clear and direct. Learning outcomes indicate
the standards of courses and modules, and are spotlighted in quality review procedures.
Why use learning outcomes?
●
Well-expressed statements of intended learning outcomes help students to identify their own
targets, and work systematically towards demonstrating their achievement of these targets.
●
Learning outcomes are now required, in the higher education sector in the UK, for subject
review by the Quality Assurance Agency (QAA), and will be increasingly cross-referenced
by academic reviewers against assessment processes, instruments and standards.
●
In the context of benchmarking, learning outcomes can provide one of the most direct indi-
cators of the intended level and depth of any programme of learning.
22
The Lecturer’s Toolkit

Where can learning outcomes be useful to students?
Learning outcomes should not just reside in course validation documentation (though they need
to be there in any case). They should also underpin everyday teaching–learning situations. They
can be put to good use in the following places and occasions:
1
In student handbooks, so that students can see the way that the whole course or module is
broken down into manageable elements of intended achievement, and set their own targets
accordingly.
2
At the start of each lecture, for example on a slide or transparency, so that students are
informed of the particular purposes of the occasion.
3
At the end of each lecture, so that students can estimate the extent to which they have trav-
elled towards being able to achieve the intended outcomes associated with the lecture.
4
At suitable points in the briefing of students for longer elements of their learning, including
projects, group tasks, practical work and field work.
5
On each element of handout material issued before, during or after lectures, to reinforce the
links between the content of the handout and students’ intended learning.
6
On tasks and exercises, and briefings to further reading, so that students can see the purpose
of the work they are intended to do.
7
On the first few screens of each computer-based learning programme that students study
independently (or in groups).
8
At the beginning of self-study or flexible learning packages, so that students can estimate
their own achievement as they work through the materials.
Tips on designing and using learning outcomes
It is natural enough that professional people such as lecturers may feel some resistance to having
the content of their teaching ‘pinned down’ by pre-expressed statements of intended learning
outcome. However, the rationale for using them is so strong that we need to look at some practi-
cal pointers which will help even those who don’t believe in them to be able to write them
reasonably successfully. It is in the particular public context of linking learning-expressed out-
comes to assessment criteria that most care needs to be taken. The following suggestions are
based on many workshops I have run helping lecturers to put into clear, everyday words the gist
of their intentions regarding the learning they intend to be derived from a particular lecture, or a
practical exercise, or a tutorial, or students’ study of a journal paper, and so on – each and every
element which makes up a programme of study.
Learning – a natural human process
23
1 Work out exactly what you want stu-
dents to be able to do by the end of each
defined learning element. Even when
you’re working with syllabus content that
is already expressed in terms of learning
outcomes, it is often worth thinking again
about your exact intentions, and working
out how these connect together for differ-
ent parts of students’ learning.
2 Don’t use the word ‘students’ in your
outcomes – except in dry course docu-
mentation. It is much better to use the
word ‘you’ when addressing students.
‘When we’ve completed this lecture, you
should be able to compare and contrast
particle and wave models of radiation’ is
better than stating ‘the expected learning
outcome of this lecture is that students
will ...’. Similarly, use the word ‘you’
when expressing learning outcomes in
student handbooks, handouts, laboratory
briefing sheets, and so on. Students need

24
The Lecturer’s Toolkit
to feel that learning outcomes belong to
them, not just to other people.
3 Work imaginatively with existing learn-
ing outcomes. There may already be
externally defined learning outcomes, or
they may have been prescribed some time
ago when the course or programme was
validated. These may, however, be written
in language which is not user-friendly or
clear to students, and which is more con-
nected with the teaching of the subject
than the learning process. You should be
able to translate these outcomes, so that
they will be more useful to your students.
4 Match your wording to your students.
The learning outcomes as expressed in
course documentation may be off-putting
and jargonistic, and may not match the
intellectual or language skills of your stu-
dents. By developing the skills to translate
learning outcomes precisely into plain
English, you will help the outcomes to be
more useful to them, and at the same time
it will be easier for you to design your
teaching strategy.
5 Your intended learning outcomes
should serve as a map to your teaching
programme. Students and others will
look at the outcomes to see if the pro-
gramme is going to be relevant to their
needs or intentions. The level and stan-
dards associated with your course will be
judged by reference to the stated learning
outcomes.
6 Remember that many students will
have achieved at least some of your
intended outcomes already. When intro-
ducing the intended learning outcomes,
give credit for existing experience, and
confirm that it is useful if some members
of the group already have some experi-
ence and expertise which they can share
with others.
7 Be ready for the question ‘why?’. It is
only natural for students to want to know
why a particular learning outcome is
being addressed. Be prepared to illustrate
each outcome with some words about the
purpose of including it.
8 Be ready for the reaction ‘so what?’.
When students, colleagues, or external
reviewers still can’t see the point of a
learning outcome, they are likely to need
some further explanation before they will
be ready to take it seriously.
9 Work out your answers to ‘what’s in
this for me?’. When students can see the
short-term and long-term benefits of
gaining a particular skill or competence,
they are much more likely to try to
achieve it.
10 Don’t promise what you can’t deliver. It
is tempting to design learning outcomes
that seem to be the answers to everyone’s
dreams. However, the real test for your
teaching will be whether it is seen to
enable students to achieve the outcomes.
It’s important to be able to link each learn-
ing outcome to an assessable activity or
assignment.
11 Don’t use words such as ‘understand’
or ‘know’. While it is easy to write (or
say) ‘when you have completed this mod-
ule successfully, you will understand the
Third Law of Thermodynamics’, it is
much more helpful to step back and
address the questions: ‘how will we know
that they have understood it?’, ‘how will
they themselves know they have under-
stood it?’, and ‘what will they be able to
do to show that they have understood it?’.
Replies to the last of these questions lead
to much more useful ways of expressing
the relevant learning outcomes.
12 Don’t start at the beginning. It is often
much harder to write the outcomes that
will be associated with the beginning of a
course, and it is best to leave attempting
this until you have got into your stride
regarding writing outcomes. In addition,
it is often much easier to work out what
the ‘early’ outcomes actually should be
once you have established where these
outcomes are leading students towards.

Learning – a natural human process
25
13 Think ahead to assessment. A well-
designed set of learning outcomes should
automatically become the framework for
the design of assessed tasks. It is worth
asking yourself ‘How can I measure this?’
for each draft learning outcome. If it is
easy to think of how it will be measured,
you can normally go ahead and design the
outcome. If it is much harder to think of
how it could be measured, it is usually a
signal that you may need to think further
about the outcome, and try to relate it
more firmly to tangible evidence that
could be assessed.
14 Keep sentences short. It is important that
your students will be able to get the gist of
each learning outcome without having to
re-read them several times, or ponder on
what they really mean.
15 Consider illustrating your outcomes
with ‘for example ...’ descriptions. If
necessary, such extra details could be
added in smaller print, or in brackets.
Such additional detail can be invaluable
to students in giving them a better idea
about what their achievement of the out-
comes may actually amount to in
practice.
16 Test-run your learning outcome state-
ments. Ask target-audience students
‘what do you think this really means?’, to
check that your intentions are being com-
municated clearly. Also test your
outcomes statements out on colleagues,
and ask them whether you have missed
anything important, or whether they can
suggest any changes to your wording.
17 Aim to provide students with the whole
picture. Put the student-centred language
descriptions of learning outcomes and
assessment criteria into student hand-
books, or turn them into a short
self-contained leaflet to give to students at
the beginning of the course. Ensure that
students don’t feel swamped by the enor-
mity of the whole picture! Students need
to be guided carefully through the picture
in ways that allow them to feel confident
that they will be able to succeed a step at a
time.
18 Don’t get hung up too much on perfor-
mance, standards and conditions when
expressing learning outcomes. For exam-
ple, don’t feel that such phrases as ‘on
your own’, or ‘without recourse to a cal-
culator or computer’ or ‘under exam
conditions’ or ‘with the aid of a list of
standard integrals’ need to be included in
every well-expressed learning outcome.
Such clarifications are extremely valuable
elsewhere, in published assessment crite-
ria. Don’t dilute the primary purpose of a
learning outcome with administrative
detail.
19 Don’t be trivial! Trivial learning out-
comes support criticisms of reductionism.
One of the main objections to the use of
learning outcomes is that there can be far
too many of them, only some of which are
really important.
20 Don’t try to teach something if you
can’t think of any intended learning
outcome associated with it. This seems
obvious, but it can be surprising how
often a teaching agenda can be stream-
lined and focused by checking that there
is some important learning content asso-
ciated with each element in it, and
removing or shortening the rest.
21 Don’t confuse learning outcomes and
assessment criteria. It is best not to cloud
the learning outcomes with the detail of
performance criteria and standards until
students know enough about the subject to
understand the language of such criteria.
In other words, the assessment criteria are
best read by students after they have
started to learn the topic, rather than at the
outset (but make sure that the links will be
clear in due course).
22 Don’t write any learning outcomes that
can’t (or won’t) be assessed. If it’s
important enough to propose as an
intended learning outcome, it should be

26
The Lecturer’s Toolkit
worthy of being measured in some way,
and it should be possible to measure.
23 Don’t design any assessment task or
question that is not related to the stated
learning outcomes. If it’s important
enough to measure, it is only fair to let
students know that it is on their learning
agenda.
24 Don’t state learning outcomes at the
beginning, and fail to return to them.
It’s important to come back to them at the
end of each teaching–learning element,
such as lecture, self-study package, or ele-
ment of practical work, and so on. Turn
them into checklists for students, for
example along the lines ‘Check now that
you feel able to ...’ or ‘Now you should be
in a position to ...’.
Conclusions about learning
For too long, learning has been considered as a special kind of human activity, requiring its own
jargon and vocabulary. It’s not! To learn is to be human. My main point is that wanting/needing,
doing, feedback and digesting are so close to the essence of being human that it’s possible to
keep these processes firmly in mind when designing educational courses, training programmes,
learning resources and open learning materials. In addition, it’s worth thinking about the con-
scious and unconscious sides of developing students’ competences, to become better equipped to
help students to develop their own learning skills. Even more important, it is useful to be able to
relate the fundamental factors explored in this chapter to something that is usually inextricably
linked to learning: assessment.
Furthermore, we need to remember that learning is done by people – not to them. In other
words, it is useful to use a model of learning which students themselves can understand.
Moreover, it is important to use a model of learning which students themselves believe in. The
wanting/needing, doing, feedback, digesting model can easily be introduced to students by ask-
ing them the questions used earlier in this chapter, and they then gain a sense of ownership of the
model. Similarly, students themselves readily identify with the competence–uncompetence
model illustrated in this chapter, and find it helpful in taking more control of their own learning.
It often comes as a pleasant surprise and a welcome relief that there is not something mystical or
magical about how people learn.
Finally, having paid due regard to how students (and of course we ourselves) learn, it’s vital to
become very skilled at putting into clear, unambiguous words our descriptions of what is to be
learned. Writing learning outcomes is not an activity that can be done off the cuff. Expressions
of intended learning outcome need to be drafted, edited, discussed, refined, and continuously
reviewed, if we are to define our curriculum in ways which will stand up to the increasing levels
of external scrutiny of our professional practice.
Many people returning to study later in life have hang-ups about things that went wrong in
their previous experience of education or training, and straightforward approaches to how they
learn, and clarification of what they are intended to learn, give them renewed confidence in their
own abilities to apply everyday, common sense approaches to the business of studying.

Intended outcomes of this chapter
When you’ve explored the ideas in this chapter, and tried out the most appropriate ones in the
context of your own teaching and assessment, you should be better able to:
●
design assessment processes and instruments which will be integral to your students’ learning;
●
reduce the assessment burden on yourself and on your students;
●
interrogate your assessment processes, practices and instruments to ensure that they are
valid, reliable and transparent;
●
give more and better feedback to more students in less time;
●
diversify the assessment processes and instruments you use, so that the same students are
not repeatedly disadvantaged by a few of these;
●
involve students in appropriate elements of their own assessment, to deepen further their
learning.
Putting assessment and feedback into perspective
Whether we think of ourselves as lecturers, or teachers, or facilitators of learning, the most
important thing we do for our students is to assess their work. This is why, in this book, I have
gone straight into assessment after thinking about learning. It is in the final analysis the assess-
ment we do that determines their diplomas, degrees, and future careers. One of the most
significant problems with assessment is that just about all the people who do it have already sur-
vived having it done to them. This can make us somewhat resistant to confronting whether it
was, when we experienced it at the receiving end, valid, fair and transparent, and explains why so
many outdated forms of assessment still permeate higher education practice today.
Over the last decade, many of us have seen our assessment workload grow dramatically, as we
work with increasing numbers of students, who are ever more diverse. Consequently, the time we
have available to devote to assessing each student has fallen. Even those methods and
approaches which used to work satisfactorily with relatively small numbers of students are now
labouring as we try to extend them to a mass higher education context. It is therefore more
important than ever to review the way we design and implement our assessment.
Brown and Glasner began the conclusion of their edited collection Assessment Matters in
Higher Education with the words:
Chapter 2
Designing assessment and feedback
to enhance learning

Assessment does matter. It matters to students whose awards are defined by the outcomes of
the assessment process; it matters to those who employ the graduates of degree and diploma
programmes; and it matters to those who do assessing. Ensuring that assessment is fair,
accurate and comprehensive – and yet manageable for those doing it – is a major challenge.
It is a challenge which has been grappled with by many, ... Despite the fact that there is a
considerable body of international research about assessment and related issues, we experi-
ment largely in ignorance of the way others have effected positive change, and we have
limited opportunity to learn from the lessons of others.
(Brown and Glasner 1999)
Their book makes an excellent starting place from which to work backwards through the litera-
ture on innovative assessment during the last years of the twentieth century, and more recently
Knight and Yorke (2003) explore in depth some of the things that are still going wrong in assess-
ment at the opening of the present century, and the collection edited by Peelo and Wareham
(2002) confronts both the experiences of students who fail, and the ways in which assessment in
higher education can be regarded as failing students.
In Chapter 1 of this Toolkit, I looked at feedback as a fundamental process underpinning suc-
cessful learning. Indeed, feedback on not-yet-successful learning can be even more important, as
learning by trial and error is a perfectly valid way to learn. Unfortunately, the assessment culture
within which higher education systems currently work tend to reward successful learning with
credit, and to equate not-yet-successful learning with failure. The accompanying feedback cul-
ture tends all too often to take the form of giving students critical feedback when things go
wrong, and precious little comment when things go right. In this situation, the feedback which
students receive can be almost as damaging to their motivation as the label of failure that we pin
on their not-yet-successful learning.
My overall aim in this chapter is to challenge your thinking on how best to assess students’
learning, and how to optimise the impact of our feedback on students’ learning – whether that
learning has proved successful or not. I hope too to provide food for thought to enable you to
confront the difficulties in order to move towards making assessment demonstrably fair, valid
and reliable. As a prelude to this chapter, I would like to share some overarching thoughts and
questions about teaching, learning and assessment, and the relationships between these
processes. Then I will outline some ‘concerns’ about unseen written examinations, and about
continuous assessment. The remainder of this chapter is intended to offer some thoughts about
fifteen particular forms of assessment, each with its pros and cons, and with some suggestions
for making each work better, to improve student learning.
In this chapter, I offer various practical suggestions regarding how assessment can be
improved, particularly so that assessment can be:
●
more valid, measuring that which we really intend to measure, rather than ‘ghosts’ of stu-
dents’ real learning;
●
more reliable and consistent, moving away from the subjectivity that can cause assessment
to be unfair;
●
more transparent, so that students know where the goalposts are, and so that external
reviewers can see clear links between intended learning outcomes as spelled out in course
documentation, and assessment criteria applied to students’ work;
●
more diverse, so that individual students are not disadvantaged unduly by particular forms
of assessment;
28
The Lecturer’s Toolkit

●
more manageable, both for our students and for ourselves;
●
more useful in terms of feedback, so that students’ learning is enhanced;
●
more successful in promoting deep learning, so that students get a firmer grasp of the
important theories and concepts underpinning their learning.
Values for assessment
Race et al. (2005) propose the following values and principles for assessment design.
Designing assessment and feedback to enhance learning
29
1 Assessment should be valid. It should
assess what it is that you really want to
measure. For example, when attempting
to assess problem-solving skills, the
assessment should not be dependent on
the quality and style of the production of
written reports on problem solving, but on
the quality of the solutions devised.
2 Assessment should be reliable. If we can
get the task briefings, assessment criteria
and marking schemes right, there should
be good inter-assessor reliability (when
more than one assessor marks the work),
as well as good intra-assessor reliability
(assessors should come up with the same
results when marking the same work on
different occasions). All assignments in a
batch should be marked to the same stan-
dard. (This isn’t the same as the strange
notion of benchmarking, which implies
that assignments should hit the same stan-
dards in every comparable course in
existence – an interesting but quite
unachievable idea).
3 Assessment should be transparent.
There should be no hidden agendas.
There should be no nasty surprises for
students. Students should not be playing
the game ‘guess what’s in our assessors’
minds’. Assessment should be in line
with the intended learning outcomes as
published in student handbooks and syl-
labus documentation, and the links
between these outcomes and the assess-
ment criteria we use should be plain to
see (not just by external scrutineers such
as QAA reviewers, but by students them-
selves.
4 Assessment should be authentic. There
are at least two dimensions to this. First,
we need to be striving to measure each
student’s achievement, in ways where we
are certain that the achievement belongs
to the student, and not to anyone else.
Second, we need to be measuring stu-
dents’ achievement of the intended
outcomes in contexts which are as close
as possible to the intentions lying behind
the outcomes in the first place – for exam-
ple performance skills should be
measured in performances, not just where
students are writing about performance in
exam rooms.
5 Assessment should motivate students to
learn. Assessment should help them to
structure their learning continuously dur-
ing their studies, not just in a few critical
weeks before particular assessment cli-
maxes. Assessment should allow students
to self-assess and monitor their progress
throughout a course, and help them to
make informed choices about what to
learn, how to learn it, how best to evi-
dence the achievement of their learning.
6 Assessment should promote deep learn-
ing. Students should not be driven
towards surface or ‘reproductive’ learning
because of the ways their learning is to be
assessed. They should not find themselves
‘clearing their minds of the last subject, in
order to make room for the next subject’.
7 Assessment should be fair. Students
should have equivalence of opportunities
to succeed even if their experiences are
not identical. This is particularly impor-
tant when assessing work based in

30
The Lecturer’s Toolkit
individual learning contracts. It is also
important that all assessment instruments
and processes should be seen to be fair by
all students.
8 Assessment should be equitable. While
assessment overall may be designed to dis-
criminate between students on the basis of
the extent to which they have achieved the
intended learning outcomes, assessment
practices should not discriminate between
students, and should set out not to disad-
vantage any individual or group.
Obviously, students may prefer and do bet-
ter at different kinds of assessment (some
love exams and do well in them, while oth-
ers are better at giving presentations for
example) so a balanced diet of different
means of assessment within a course will
set out to ensure that no particular group is
favoured over any other group.
9 Assessment should be formative – even
when it is primarily intended to be
summative. Assessment is a time-con-
suming process for all concerned, so it
seems like a wasted opportunity if it is not
used as a means of letting students know
how they are doing, and how they can
improve. Assessment that is mainly sum-
mative in its function (for example when
only a number or grade is given) gives
students very little information, other than
frequently confirming their own preju-
dices about themselves.
10 Formative assessment should start as
early as possible in a course or module.
There is a great deal of research evidence
that students benefit greatly by having
some early feedback on how they are
doing, and adjust their efforts accordingly.
Conversely, if we leave assessment till too
late, students who fail are frequently so
discouraged that they drop out, or lose
motivation.
11 Assessment should be timely.
Assessment that occurs only at the end of
a learning programme is not much use in
providing feedback, and also leads to the
‘sudden death’ syndrome, where students
have no chance to practise before they
pass or fail. Even where there is only end-
point formal assessment, earlier
opportunities should be provided for
rehearsal and feedback.
12 Assessment should be incremental.
Ideally, feedback to students should be
continuous. There is sense therefore in
enabling small units of assessment to
build up into a final mark or grade. This
avoids surprises, and can be much less
stressful than systems when the whole
programme rests on performance during a
single time-constrained occasion.
13 Assessment should be redeemable.
Most universities insist that all assess-
ment systems contain within them
opportunities for the redemption of fail-
ure when things go wrong. This not only
is just, but avoids high attrition rates.
14 Assessment should be demanding.
Passing an assessment or test should not
be automatic, and the assurance of quality
is impossible when students are not
stretched by assessment methods. That is
not to say that systems should only permit
a fixed proportion of students to achieve
each grade: a good assessment system
should permit all students considered
capable of undertaking a course of study
to have a chance of succeeding in the
assessment, provided they learn effec-
tively and work hard.
15 Assessment should enable the demon-
stration of excellence. The very best
students should be able to be challenged
to achieve at the highest standards.
16 Assessment should be efficient and
manageable. Brilliant systems of assess-
ment can be designed, but which are
completely unmanageable because of inef-
fective use of staff time and resources. The
burden on staff should not be excessive,
nor should be the demands on students
undertaking the assessment tasks.

Why should we assess?
If we think clearly about our reasons for assessment, it helps to clarify which particular methods
are best suited for our purposes, as well as helping to identify who is best placed to carry out the
assessment, and when and where to do it. Some of the most common reasons for assessing stu-
dents are listed below. You might find it useful to look at these, deciding which are the most
important ones in the context of your own discipline, with your own students, at their particular
level of study.
Designing assessment and feedback to enhance learning
31
1 To guide students’ improvement. The
feedback students receive helps them to
improve. Assessment that is primarily for-
mative need not necessarily count towards
any final award and can therefore be
ungraded in some instances. The more
detailed the feedback we provide, the
greater is the likelihood that students will
have opportunities for further development.
2 To help students to decide which
options to choose. For example if stu-
dents have to select electives within a
programme, an understanding of how well
(or otherwise) they are doing in founda-
tion studies will enable them to have a
firmer understanding of their current abil-
ities in different subject areas. This can
provide them with guidance on which
options to select next.
3 To help students to learn from their
mistakes or difficulties. Many forms of
formative assessment can be useful to stu-
dents to help to diagnose errors or
weaknesses, and enable students to rectify
mistakes. Nothing is more demotivating
than struggling on getting bad marks and
not knowing what is going wrong.
Effective assessment lets students know
where their problems lie, and provides
them with information to help them to put
things right.
4 To allow students to check out how well
they are developing as learners.
Assessment does not just test subject-spe-
cific skills and knowledge, but provides an
ongoing measure of how well students are
developing their learning skills and tech-
niques. Students themselves can use
assessment opportunities to check out how
they are developing their study-skills, and
can make adjustments as appropriate.
5 To classify or grade students. There are
frequently good reasons for us to classify
the level of achievements of students indi-
vidually and comparatively within a
cohort. Assessment methods to achieve
this will normally be summative and
involve working out numerical marks or
letter grades for students’ work of one
kind or another. However, continuous
assessment processes can address classi-
fying or grading students, yet still provide
opportunities for formative developmen-
tal feedback along the way.
6 To set standards. The best way to esti-
mate the standard of an educational course
or module is to look at the various ways in
which students’ achievement is measured.
The standard of the course is illustrated by
the nature of the assessment tasks, and of
course by the quality of students’ work
associated with the various tasks.
7 To allow students to make realistic deci-
sions about whether they are up to the
demands of a course or module. Students
sometimes choose a module because they
are interested in part of the subject, but
then find that substantial parts of the mod-
ule are too difficult for them, or not
interesting enough. When the assessment
profile of the module is clearly spelled out
in advance, students can see how much the
part they are interested in actually counts in
the overall picture, and can be alerted to
other important things they may need to
master to succeed in the module.
8 To determine fitness for entry to a pro-
gramme. Students often can not undertake

32
The Lecturer’s Toolkit
a course of study unless they have a sound
foundation of prior knowledge or skills.
Assessment methods to enable student pro-
gression therefore need to give a clear idea
of students’ current levels of achievement,
so they – and we – can know if they are
ready to move onwards.
9 To give us feedback on how our teach-
ing is going. If there are generally
significant gaps in student knowledge,
this often indicates faults in the teaching
of the areas concerned. Excellent achieve-
ment by a high proportion of students is
often due to high quality facilitation of
student learning.
10 To cause students to get down to some
serious learning. As students find them-
selves under increasing pressure, they
tend to become more and more strategic
in their approaches to learning, only
putting their energies into work that
counts. Assessment methods can be
designed to maximise student motivation,
and prompt their efforts towards impor-
tant achievements.
11 To translate intended learning outcomes
into reality. Assessment tasks and the
feedback students receive on their work
can show them what the intended learning
outcomes mean in practice. Often it is only
when students undertake tasks where their
evidence of achievement of the learning
outcomes is being measured, that they fully
appreciate the nature and level of the com-
petences they need to attain.
12 To add variety to students’ learning
experience. Utilising a range of different
assessment methods spurs students to
develop different skills and processes.
This can promote more effective – and
enjoyable – teaching and learning, and
can help us to ensure that all students can
demonstrate their strengths in those
assessment contexts they find most com-
fortable and appropriate for them.
13 To help us to structure our teaching and
constructively align learning outcomes
to assessments. While ‘teaching to the
exam’ is regarded as poor practice, it is
very useful to keep in mind an overview of
the various ways in which students’ knowl-
edge and skills will be assessed, so we can
help students to strike a sensible balance
regarding the time and energy they devote
to each specific element of their study.
14 To allow students to place themselves in
the overall class picture. Assessment can
give students a frame of reference,
whereby they can compare their achieve-
ments with those of their peers. Students
get a great deal of feedback from each
other – more than their teachers can give
them. Assessment helps them to find out
how they are placed in the cohort, and can
encourage them to make adjustments to
get into a better position.
15 To provide statistics for the course, or
for the institution. Educational institu-
tions need to provide funding bodies and
quality assurance agencies with data
about student achievement and progres-
sion, and assessment systems need to take
account of the need for appropriate statis-
tical information.
16 To lead towards a licence to practice. In
some professions, a degree or other quali-
fication is taken as a measure of fitness to
practice. It then becomes particularly
important to ensure that validity and
authenticity are achieved in the design of
the assessment processes and instruments.
17 To lead to appropriate qualifications.
Unlike some overseas universities, UK uni-
versities still maintain the degree
classification system. However, some uni-
versities are continuing to ponder the
introduction of a no-classifications system
coupled with the production of student
portfolios. Meanwhile, it is vitally impor-
tant that we do everything we can to ensure
that the students who deserve first class
degrees gain such awards, and that all stu-
dents are judged fairly on the evidence of
their achievement which we assess.

Concerns about assessment
Before it is possible to persuade people to review what they are presently doing, and to consider
implementing changes, it is useful to take a critical look at whether current practices actually
work as well as we think they do. Therefore I continue this chapter with a critical review of the
two principal areas of assessment which most students encounter: traditional time-constrained,
unseen written exams, and assessed coursework. In each case I will list some general concerns,
starting with concerns about the links between these kinds of assessment and the factors under-
pinning successful learning drawn from Chapter 1 of this book: wanting to learn, needing to
learn, learning by doing, learning through feedback and making sense of or digesting what has
been learned. For most of the concerns, I will add hints at how the repercussions they cause be
ameliorated – or at least confronted. Later in the chapter I offer a range of practical pointers sug-
gesting how even the most traditional methods of assessment can be put to good use.
Concerns about traditional exams
Much has been written about the weaknesses of traditional examinations – in particular time-
constrained unseen written exams. In many subject disciplines, this assessment format seems to
be at odds with the most important factors underpinning successful learning. Moreover, there is
abundant evidence that even in discipline areas where the subject matter is well defined, and
answers to questions are either correct or incorrect, assessors still struggle sometimes to make
exams valid, reliable, or transparent to students. In disciplines where the subject matter is more
discursive, and flexibility exists in how particular questions can be answered well, it can be even
harder to achieve demonstrable reliability in assessment, even when validity is well achieved.
Overall in higher education at present, with larger numbers of students, and staff time under
more pressure, there is evidence of a drift back to reliance on exams, which can be argued to be
one of the more time-efficient and cost-effective methods of assessment, where it is fairly easy
to achieve fairness and reliability, and with the added bonus that plagiarism or cheating cause
less headaches to markers than in many other forms of assessment.
Some of the principal concerns that can be expressed about unseen written exams in are sum-
marised below.
Designing assessment and feedback to enhance learning
33
1 Exams don’t do much to increase stu-
dents’ ‘want’ to learn. Students often
make choices in modular schemes strate-
gically, so that they avoid this kind of
assessment if they can. This can lead them
to choose subjects in which they are less
interested than those which they fear to
select because they will be subjected to
exams.
2 Exams are not often a good way of
alerting students to what they really
need to learn. Admittedly, students will
often only get down to serious learning
when an impending exam causes them to
revise actively, but the fact that in unseen
exams the actual assessment agenda has
to be guessed at rather than worked
towards systematically means that the
resultant learning can be unfocused, and
the assessment judgement becomes too
dependent upon the success of the
agenda-guessing.
3 Exams are not ideal occasions for
learning by doing. Though students may
do a lot of learning before formal unseen
written examinations, their actual experi-
ences of learning in such situations is
very limited. In other words, a note could
be placed on the door of the exam room
stating ‘exam cancelled; you’ve already
done all the learning that this exam could
have caused’! The learning payoff during

34
The Lecturer’s Toolkit
an assessment element should be consid-
ered more. It is therefore worth our
while revisiting our testing processes to
search for forms of assessment which
are in themselves better learning experi-
ences.
4 The amount of feedback that students
receive about exams is not optimal.
Most systems require marked exam
scripts to be regarded as secret docu-
ments, not to be shown to students on
any account! It is worth asking what rea-
sons underlie this philosophy? It is
useful to reconsider the value that stu-
dents can derive from seeing their
marked examinations papers, where it
should be possible to be able to demon-
strate to students that the examination
marking has indeed been reliable, fair,
and valid. Moreover, the natural process
of learning from mistakes should always
be accommodated, even when the assess-
ment judgements have already been
taken down to be used in evidence
against the candidates.
5 Exams tend not to do much to help stu-
dents make sense of what they have
learned. While there may be a significant
amount of ‘digesting’ concepts and theo-
ries during the time leading up to exams,
the assessment experience itself does little
to help students to gain any further deep-
ening of their grasp of these. One of the
consequences of modularising the cur-
riculum can be that some subject matter is
introduced too close to an impending
exam for the content to be satisfactorily
digested.
6 We mark exam scripts in a rush. Most
staff who mark exams agree that the task
usually has to be completed in haste, in
preparation for timetabled exam boards.
The situation has been worsened by mod-
ularisation and semesterisation
developments in most institutions, which
give tighter turnround intervals between
examinations and progression to the next
element of study. While our marking may
still be fair and reliable, it can be shocking
to students who have spent a great deal of
time preparing for unseen written exams
to find out that their scripts are marked so
quickly.
7 Unseen written exams can lead to us
placing too much emphasis on unim-
portant factors in candidates’ answers.
For example, factors such as quality of
handwriting, or neatness of overall pre-
sentation of scripts can influence
examiners, consciously or subcon-
sciously. Many students nowadays are
much more comfortable composing
essays or reports using a keyboard, and
adjusting their writing on-screen, cutting
and pasting to bring their writing to a log-
ical or coherent whole; this is much
harder to do well with pen and paper,
against the clock, in a threateningly silent
environment.
8 We’re often tired and bored when we
mark exam scripts. Because of the speed
with which exam scripts need to be
marked, and the pressure to do the task
well, we may not be functioning at our
best while undertaking the task.
9 We’re not good at marking objectively.
There is abundant data on the problems
both of inter-assessor reliability and intra-
assessor reliability, particularly with the
more qualitative or discursive kinds of
exam question.
10 Unseen written exams tend to favour
candidates who happen to be skilled at
doing exams! If we look at exactly what
skills are measured by unseen written
exams, the most important of these from
students’ point of view turns out unsur-
prisingly to be the techniques needed to
do unseen written exams, and the same
students can get rewarded time after time!
This skill may have little to do with the
competences we need to help students to
develop to become professionals in the
subject disciplines they are learning.

Designing assessment and feedback to enhance learning
35
Despite these concerns, there is a lot we can do to make exams work better or in different ways,
for example open book, open notes, time-unconstrained exams, in-tray exams, OSCEs and so on.
Some discussion is given later in this chapter, and further developed by Race et al. (2005).
Concerns about continuous assessment
Having made a broadside about the limitations of unseen written exams, I have to admit that
such exams have advantages as well, particularly that in their own way they are fair to candi-
dates, and they are not subject to most of the problems of plagiarism, unwanted collaboration,
and so on which can affect the assessment of coursework. Let me proceed to further balance the
picture by expressing some parallel concerns about continuous assessment – including that of
essays and reports.
11 Unseen written exams force students
into surface learning, and into rapidly
clearing their minds of previous knowl-
edge when preparing for the next exam.
Students are encouraged to clear their
brains of the knowledge they have stored
for each exam in turn. This of course is
quite contrary to our real intentions to
help students to achieve deep learning.
12 There are many important qualities
which are not tested well by traditional
exams. For example, unseen written
exams are limited or useless for measur-
ing teamwork, leadership, and even
creativity and lateral thinking, all of
which have their parts to play in heading
towards graduateness.
1 If students are under too much course-
work-related pressure, their ‘want’ to
learn is damaged. When almost every-
thing that students do, as part of their
learning, is measured, they naturally
adopt strategic approaches to their learn-
ing, and only concentrate on those things
that are going to be assessed. In many dis-
ciplines, we need to ensure that students’
practical work is focused on quality learn-
ing, and is not unnecessarily burdensome
regarding quantity.
2 Continuous assessment does not always
alert students to important aspects of
their need to learn. For example, when
continuous assessment is repetitive in for-
mat (too many essays or too many reports),
students may indeed become better able to
deliver in these formats, but their overall
learning is not deepened in ways that could
be achieved by matching each assessment
format to the nature of the particular
achievements of the intended learning out-
come intended to be assessed.
3 The range of learning-by-doing may be
too narrow. For example, repetitive use of
formats such as essays and reports narrow
the scope of students’ learning, and tend
to favour inordinately those students who
happen to master the skills associated
with the format at the expense of other
students who have been more successful
at learning the subject itself.
4 Coursework feedback may be eclipsed
by marks or grades. Students pay most
attention to their scores or grades when
they get back marked work, and often are
quite blind to valuable feedback which may
accompany their returned work. A way out
of this problem is to return students’ work
with feedback but without grades in the
first instance, then get them to self-assess
their own grades. Most students’ self-
assessments (when they are primed with
clear assessment criteria, linked to clear
statements defining the intended learning
outcomes) are within 5 per cent or one
grade point, and it is possible to allow

36
The Lecturer’s Toolkit
students’ own grades or scores to count. It
is well worth talking to the few students
whose self-assessment is at odds with our
own assessment, and alerting them to the
blind spots which could have caused them
to overestimate the worth of their work, or
(this happens more often) to boost their
self-esteem by reassuring them that their
work was worth more than they believed it
to be.
5 Students may not have the opportunity
to make sense of the feedback they
receive. Particularly when there is a delay
in getting feedback to students, they may
already have moved on to learning other
topics, and they don’t then make learning
from the feedback available to them a pri-
ority. Modularisation and semesterisation
have both in their own ways contributed to
making delays in receiving feedback more
significant, related to the overall learning
timescales involved.
6 It is getting harder to detect unwanted
collaboration. Particularly with assign-
ments submitted in word-processed
formats, it is difficult if not impossible to
detect every instance of plagiarism or
copying. Whether marking essays or prac-
tical reports, if there are several lecturers
or demonstrators involved in marking
them, students who have copied can be
quite skilled at making sure that different
people mark their respective work, min-
imising the chance that the collaboration
is detected. The most skilful plagiarists
will always evade our detection!
7 Too much of our time may be involved
in fairly routine kinds of marking. In
many courses, lecturers continue to try to
use the same continuous assessment
processes that worked quite well when
student numbers were much smaller. With
large numbers of students, it is essential
that human assessment and feedback
should be reserved for higher-level agen-
das, and that computer-delivered
assessment formats (in those curriculum
areas where they can be designed well)
should be exploited to provide assessment
and feedback on relatively routine mat-
ters. There has already been a significant
growth in the use of computer-aided
assessment in many subject disciplines,
saving a great deal of assessor time, while
(when used well) providing a great deal of
feedback to students, often very quickly.
8 Students may not be aware of the criteria
used to assess their work. When students
are practised in interpreting and making
use of assessment criteria, the standard of
their assessed work rises dramatically.
Alerting students to the detail of the assess-
ment agenda is regarded by some staff as a
move towards ‘spoonfeeding’. However, it
can be argued that enabling students to
demonstrate their full potential is a desir-
able goal. Involving students in
self-assessment of suitable elements of
their own work, and in peer-assessment of
appropriate assignments, can help students
to gain a substantial understanding of the
way that their work is assessed by tutors.
Moreover, there is an increased level of
expectation that assessment criteria can be
closely linked to the achievement of
expressed learning outcomes, and students
themselves can make good use of these
ways of clarifying the assessment agenda.
9 Students often get the balance wrong
between continuous assessment and
exams. Students feel the pressure to sub-
mit coursework by stated deadlines, and
may still be working on such work at a late
stage in their studies on a particular mod-
ule, when they would be better advised to
cut their losses regarding that coursework
and prepare for important exams. This par-
ticularly happens when students who fall
behind in writing up practical work, con-
tinue to try to get this work finished and
handed in, when they may be better
advised to spend their remaining time
making sure that they are well prepared for
forthcoming formal exams.

PROS AND CONS OF FIFTEEN ASSESSMENT TECHNIQUES
Assessment can take many forms, and it can be argued that the greater the diversity in the meth-
ods of assessment, the fairer assessment is to students. Each and every one of the forms of
assessment I consider in this chapter can be claimed to disadvantage those students who do not
give of their best in the particular circumstances in which it is used. Therefore, diversifying
assessment so that students experience a range of assessment methods evens out the situation,
and increases the chance that all students will be able to demonstrate their best performance in at
least some of the formats. The art of assessing therefore needs to embrace several different kinds
of activity. I would like to encourage colleagues to broaden the range of assessment processes,
and I have tried to provide practical suggestions about how to maximise the benefits of each of a
number of methods I have addressed below.
In the next part of this chapter, I will look systematically at each of fifteen forms of assess-
ment, listing a few advantages, some disadvantages, and I will offer some suggestions (sometimes
a few, sometimes a lot) for making the particular assessment device work better. None of these
lists should be considered as anything more than a starting point. Nor should the fifteen kinds of
assessment I happen to have chosen be taken as representative of a sufficiently diverse range of
assessment processes. Some of this discussion is further expanded now in Race et al. (2005).
1 Traditional unseen, time-constrained written exams
Traditional unseen written exams still make up the lion’s share of assessment in higher educa-
tion, though in some disciplines, for example mathematics, engineering and sciences courses,
this situation is considerably balanced by the inclusion of practical work, projects and other con-
tributions to the evidence on the basis of which we grade and classify students. Despite growing
concern about the validity and fairness of traditional exams, for all sorts of reasons they will
continue to play a large part in the overall assessment picture. Despite many concerns about
exams, I have tried in the following discussion to suggest a number of ways that the use of exams
can be improved. I have given more suggestions about setting exam questions than for setting
any of the other types of assessment explored in this chapter as, in general, good practice in writ-
ing exam questions overlaps with, or extends across, many of the other types.
Designing assessment and feedback to enhance learning
37
10 Learning may become driven by assess-
ment, and students may only do those
things that are assessed. Earlier in these
concerns, it was mentioned that students
tend to adopt strategic approaches to their
learning. Such approaches can be made
beneficial if the nature and range of the
assessed tasks are adjusted to make all the
learning that students do in their assessed
work as relevant as possible to the
intended learning outcomes. In particular,
it can help to reduce the size of many of
the assessments. A well-designed essay
plan (for example a mind-map, alongside
a short written introduction, and a concise
summary or conclusion) can present (say)
90 per cent of the thinking that would
have taken ten times as long to write (and
to mark) in a full essay.
11 Too little use may be made of the learn-
ing that can be achieved when students
assess their own, and each other’s, work.
Involving students in self-assessment and
peer-assessment (when well facilitated) can
deepen students’ learning, and help them to
develop awareness of the nature of assess-
ment criteria, and of the overall assessment
culture surrounding their studies.

ADVANTAGES
●
Relatively economical. Exams can be more cost-effective than many of the alternatives
(though this depends on economies of scale when large numbers of students are examined,
and also on how much time and money needs to be spent to ensure appropriate moderation
of assessors’ performance). However, any form of assessment can only be truly said to be
cost-effective if it is actually effective in its contribution to students’ learning.
●
Equality of opportunity. Exams are demonstrably fair in that students have all the same
tasks to do in the same way and within the same timescale. (However, not all things are
equal in exams – ask any hay-fever sufferer, or candidate with menstrual problems).
●
We know whose work it is. It is easier to be sure that the work being assessed was done by
the candidate, and not by other people. For this reason, exams can be considered to be an
‘anti-plagiarism assessment’ device, and although there are instances of attempting to cheat
in exam rooms, good invigilation practice and well-planned design of the room (and the
questions themselves) can eliminate most cheating.
●
Teaching staff are familiar with exams. Familiarity does not always equate with validity,
but the base of experience that teaching staff already have with traditional unseen exams
means that at least some of the problems arising from them are well known, and sometimes
well addressed.
●
Exams cause students to get down to learning. Even if the assessment method has prob-
lems, it certainly causes students to engage deliberately with the subject matter being
covered by exams, and this can be worthwhile particularly for those ‘harder’ discipline areas
where students may not otherwise spend the time and energy that is needed to make sense of
the subject matter.
DISADVANTAGES
●
Students get little or no feedback about the detail of their performance, which is therefore
wasted as far as feedback is concerned. Though it can be argued that the purpose of exams
is measurement rather than feedback, the counter-argument is that most exams, to some
extent, represent lost learning opportunities because of this lack of feedback. Where stu-
dents are given the opportunity to see their marked scripts (even with no more feedback than
seeing the subtotals and total marks awarded along the way), they learn a great deal about
exactly what went wrong with some of their answers, as well as having the chance to receive
confirmation regarding the questions they answered well.
●
Badly set exams encourage surface learning, with students consciously clearing their
minds of one subject as they prepare for exams in the next subject. In many discipline areas,
it is inappropriate to encourage students to put out of their minds important subject matter,
where they will need to retain their mastery for later stages in their studies.
●
Technique is too important. Exams tend to measure how good students are at answering
exam questions, rather than how well they have learned. The consequence is that those stu-
dents who become skilled at exam technique are rewarded time after time, while other
students who may have mastered the subject material to a greater degree may not get due
credit for their learning if their exam technique repeatedly lets them down.
●
Exams only represent a snapshot of student performance, rather than a reliable indi-
cator of it. How students perform in traditional exams depends on so many other factors
than their grasp of the subject being tested. Students’ state of mind on the day, their luck or
38
The Lecturer’s Toolkit

otherwise in tackling a good question first, their state of health, and many other irrelevant
factors creep in.
Setting unseen written exam questions: some practical suggestions
Many experienced lecturers remember with some horror the first time they put pen to paper to
write exam questions. Sometimes they felt well equipped to do so, as they had been involved in
exams as candidates for most of their lives, and thought that it was quite straightforward to write
good questions. But then the realisation dawned that the words and tasks used in exam questions
could determine students’ future careers, prospects, incomes and lifestyles. Often, only when
marking the exam scripts do lecturers first become aware of just how sensitively the questions
need to be designed, and how clearly the assessment criteria and marking schemes need to be
laid out to anticipate as many as possible of the different ways that even the most unambiguous
looking question can turn out to be answered in practice. The suggestions below can help to
spare you from some of the headaches which can result from hastily written exam questions.
Designing assessment and feedback to enhance learning
39
1
Don’t do it on your own! Make sure you
get feedback on each of your questions
from colleagues. They can spot whether
your question is at the right level more
easily than you can. Having someone else
look at one’s draft exam questions is
extremely useful. It is better still when all
questions are discussed and moderated by
teams of staff. Where possible, draft ques-
tions with your colleagues. This allows
the team to pick the best questions from a
range of possibilities, rather than use
every idea each member has.
2
Ask colleagues: ‘what would you say
this question really means?’ If they tell
you anything you hadn’t thought of, you
may need to adjust your wording a little.
3
Get one or two colleagues to do your
questions!
Sometimes even sketch
answers can be helpful. This may be ask-
ing a lot of busy colleagues, but the
rewards can be significant. You will often
find that they answered a particular ques-
tion in a rather different way than you had
in mind when you designed the question.
Being alerted in advance to the ways that
different students might approach a ques-
tion gives you the opportunity to
accommodate alternative approaches in
your marking scheme, or to adjust the
wording of your question so that your
intended or preferred approach is made
clear to students.
4
Have your intended learning outcomes
in front of you as your draft your ques-
tions. It is all too easy to dream up
interesting questions which turn out to be
tangential to the learning outcomes.
Furthermore, it is possible to write too
many questions addressing particular
learning outcomes, leaving other out-
comes unrepresented in the exam.
5
Keep your sentences short. You’re less
likely to write something that can be inter-
preted in more than one way if you write
plain English in short sentences. This also
helps reduce any discrimination against
those students whose second or third lan-
guage is English.
6
Work out what you’re really testing. Is
each question measuring decision-making,
strategic planning, problem solving, data
processing (and so on), or is it just too
much dependent on memory? Most exam
questions measure a number of things at
the same time. Be upfront about all the
things each question is likely to measure.
In any case, external scrutiny of assess-
ment may interrogate whether your
questions (and your assessment criteria)
link appropriately with the published learn-
ing outcomes for your course or module.

40
The Lecturer’s Toolkit
7 Don’t measure the same things again
and again. For example, it is all too easy
in essay-type exam questions to repeat-
edly measure students’ skills at writing
good introductions, firm conclusions, and
well-structured arguments. Valuable as
such skills are, we need to be measuring
other important things too.
8 Include data or information in ques-
tions to reduce the emphasis on
memory. In some subjects, case-study
information is a good way of doing this.
Science exams often tend to be much bet-
ter than other subjects in this respect, and
it is appropriate to be testing what candi-
dates can do with data rather than how
well they remember facts and figures.
9 Make the question layout easy to follow.
A question with bullet points or separate
parts can be much easier for (tense) candi-
dates to interpret correctly than one which
is just several lines of continuous prose.
10 Don’t overdo the standards. When
you’re close to a subject, it’s easily possi-
ble that your questions get gradually
harder year by year. For example, in
exams including quantitative questions,
there is the danger that numerical prob-
lems become more difficult in each
successive exam, partly because of the
wish to stretch students a little further
than did the worked examples they may
have seen in lectures, or the problems stu-
dents tackled in tutorials.
11 Write out an answer to your own ques-
tion. This will be handy when you come to
mark answers, but also you’ll sometimes
find that it takes you an hour to answer a
question for which candidates have only
half an hour. Lecturers setting problem-
type questions for students often forget that
familiarity with the type of problem pro-
foundly influences the time it takes to solve
it. Students who get stuck on such a ques-
tion may end up failing the exam more
through time mismanagement than through
lack of subject-related competence.
12 Decide what the assessment criteria
will be. Check that these criteria relate
clearly to the syllabus objectives or the
intended learning outcomes. Make it your
business to ensure that students them-
selves are clear about these objectives or
intended outcomes, and emphasise the
links between these and assessment.
When students are aware that the
expressed learning outcomes are a tem-
plate for the design of assessment tasks, it
is possible for them to make their learning
much more focused.
13 Work out a tight marking scheme.
Imagine that you are going to delegate the
marking to a new colleague. Write it all
down. You will find such schemes an
invaluable aid to share with future classes
of students, as well as colleagues actually
co-marking with you, helping them to see
how assessment works.
14 Use the question itself to show how
marks are to be allocated. For example,
put numbers in brackets to show how
many marks are attached to various parts
of the question (or alternatively, give sug-
gested timings such as ‘spend about ten
minutes on Part 2’).
15 Try your questions out. Use coursework
and student assignments to do pilot runs
of potential components of your future
exam questions, and use or adapt the ones
that work best for exams.
16 Proofread your exam questions care-
fully. Be aware of the danger of seeing
what you meant, rather than what you
actually wrote! Even if you’re very busy
when asked to check your questions, a lit-
tle extra time spent editing your questions
at this time may save you many hours
sorting out how to handle matters arising
from any ambiguities or errors which
could have otherwise slipped through the
proofreading process.

Designing marking schemes
Making a good marking scheme can save you hours when it comes to marking a pile of scripts.
It can also help you to know (and show) that you are doing everything possible to be uniformly
fair to all students. As your marking schemes will normally be shown to people including exter-
nal examiners and quality reviewers, it’s important to design schemes in the first place so that
they will stand up to such scrutiny. The following suggestions should help.
Designing assessment and feedback to enhance learning
41
1 Write a model answer for each ques-
tion. This can be a useful first step
towards identifying the mark-bearing
ingredients of a good answer. It also helps
you see when what you thought was going
to be a 30-minute question turns out to
take an hour! If you have difficulties
answering the questions, the chances are
that your students will too! Making model
answers and marking schemes for course-
work assignments can give you good
practice for writing exam schemes.
2 Make each decision as straightforward
as possible. Try to allocate each mark so
that it is associated with something that is
either present or absent, or right or wrong,
in students’ answers.
3 Aim to make your marking scheme
usable by a non-expert in the subject.
This can help your marking schemes be
useful resources for students themselves,
perhaps in next year’s course.
4 Aim to make it so that anyone can mark
given answers, and agree on the scores
within a mark or two. It is best to involve
colleagues in your piloting of first-draft
marking schemes. They will soon help you
to identify areas where the marking criteria
may need clarifying or tightening up.
5 Allow for ‘consequential’ marks. For
example, when a candidate makes an
early mistake, but then proceeds correctly
thereafter (especially in problems and cal-
culations), allow for some marks to be
given for the ensuing correct steps even
when the final answer is quite wrong.
6 Pilot your marking scheme by showing
it to others. It’s worth even showing
marking schemes to people who are not
closely associated with your subject area.
If they can’t see exactly what you’re look-
ing for, it may be that the scheme is not
yet sufficiently self-explanatory. Extra
detail you add at this stage may help you
to clarify your own thinking, and will cer-
tainly assist fellow markers.
7 Make yourself think about honourable
exceptions. Ask yourself whether your
marking scheme is sufficiently flexible to
accommodate a brilliant student who has-
n’t strictly conformed to your original
idea of what should be achieved. There
are sometimes candidates who write
exceptionally good answers which are off-
beam and idiosyncratic, and they deserve
credit for these.
8 Consider having more than 20 marks for
a 20-mark question. Especially in essay-
type answers, you can’t expect students to
include all the things you may think of
yourself. It may be worth having up to 30
or more ‘available’ marks, so that students
approaching the question in different ways
still have the opportunity to score well.
9 Look at what others have done in the
past. If it’s your first time writing a mark-
ing scheme, looking at other people’s
ways of doing them will help you to focus
your efforts. Choose to look at marking
schemes from other subjects that your stu-
dents may be studying, to help you tune in
to the assessment culture of the overall
course.
10 Learn from your own mistakes. No
marking scheme is perfect. When you
start applying it to a pile of scripts, you
will soon start adjusting it. Keep a note of
any difficulties you experience in adher-
ing to your scheme, and take account of
these next time you have to make one.

Marking examination scripts to optimise reliability
The following suggestions may help you approach the task of marking exam scripts efficiently,
while still being fair and helpful to students.
42
The Lecturer’s Toolkit
1
Be realistic about what you can do.
Marking scripts can be boring, exhausting
and stressful. As far as constraints allow,
don’t attempt to mark large numbers of
scripts in short periods of time. Put scripts
for marking into manageable bundles. It is
less awesome to have ten scripts on your
desk and the rest out of sight than to have
the whole pile threatening you as you
work.
2
Avoid halo effects. If you’ve just marked
a brilliant answer on a script, it can be
easy to go into the same student’s next
answer seeing only the good points and
passing over the weaknesses. Try to
ensure that you mark each answer dispas-
sionately. Conversely, when you look at
the next student’s answer, you may be
over-critical if you’ve just marked a bril-
liant one.
3
Watch out for prejudices. There will be
all sorts of things which you like and dis-
like about the style and layout of scripts,
not to mention handwriting quality. Make
sure that each time there is a ‘benefit of
the doubt’ decision to be made, it is not
influenced by such factors.
4
Recognise that your mood will change.
Every now and then, check back to scripts
you marked earlier, and see whether your
generosity has increased or decreased. Be
aware of the middle-mark bunching syn-
drome. As you get tired, it feels safe and
easy to give a middle-range mark. Try as
far as possible to look at each script afresh.
5
Remind yourself of the importance of
what you’re doing. You may be marking
a whole pile of scripts, but each individual
script may be a crucial landmark in the
life of the student concerned. Your verdict
may affect students for the rest of their
careers.
6
Take account of the needs of second
markers. Many universities use a blind
double-marking system, in which case you
should not make any written comments or
numbers on the scripts themselves, to
avoid prejudicing the judgement of a sec-
ond marker (unless of course photocopies
have already been made of each script for
double marking). You may find it useful to
use ‘post-it’ notes or assessment pro for-
mas for each script, so you are able to
justify the marks you give at any later
stage. Such aides-memoirs can save you
having to read the whole scripts again,
rethinking how you arrived at your num-
bers or grades.
7
Write feedback for students. In most
exams, the system may not allow you to
write on the scripts the sort of feedback
you would have given if the questions had
been set as assessed coursework.
However, students still need feedback,
and making notes for yourself of the
things you would have explained about
common mistakes can help you prepare
some discussion notes to issue to students
after the exam, or can remind you of
things to mention next time you teach the
same subjects.
8
Devise your own system of tackling the
marking load. You may prefer to mark a
whole script at a time, or just Question 1
of every script first. Do what you feel
comfortable with, and see what works
best for you.
9
Provide feedback for yourself and for
the course team. As you work through
the scripts, note how many students
answered each question, and how well
they performed. You may begin to realise
that some questions turned out to have
been very well written, while others could

Using exam questions as class exercises
Answering exam questions well is still one of the principal skills which students need to develop
to succeed in their studies in most subjects. In our attempts to increase the learning payoff of
taught sessions, we can help students to develop their exam skills by making use of past exam
questions. The following suggestions may help you to build related activities into your lectures
and tutorials – but don’t try to implement more than two or three of these suggestions with any
one cohort – you haven’t got time!
Designing assessment and feedback to enhance learning
43
have been framed better. You will find out
which questions proved to be the hardest
for students to answer well, even when all
questions were intended to be of an equal
standard. Such feedback and reflection
should prove very useful when designing
questions next time round.
10 Set aside time for a review. Having
marked all the scripts, you may wish to
capture your thoughts, such as sugges-
tions about changes for part of the course
or module, or the processes used to teach
it. It is really useful, however tired you
feel, to write a short draft report on the
marking as soon as you have completed it.
Otherwise, important things which are
still fresh in your tired mind will all too
quickly evaporate away.
1
Let a class have a try at an exam ques-
tion under exam conditions. Then ask
students to exchange their answers, and
lead them through marking their work
using a typical marking scheme. This
helps students to learn quickly how exam-
iners’ minds work. It is well worth using
the whole of at least one lecture slot for
such an exercise; the learning payoff for
students is likely to be considerably more
than if you’d just spent an extra hour with
one small element of their curriculum.
2
Issue two or three old exam questions
for students to try in preparation for a
tutorial. Then lead them through assess-
ing their work using a marking scheme
during the tutorial. Ask them to prepare
lists of questions on matters arising from
the exercise, both on subject content and
requirements for exams, and use their
questions to focus tutorial discussion.
3
Display an exam question on-screen in
a large-group lecture. Ask students in
groups to brainstorm the principal steps
they would take in the way they would
approach answering the question. Then
give out a model answer to the question as
a handout, and talk the class through the
points in the model answer where marks
would be earned. All this can be achieved
in less than half of the overall time of a
typical lecture, and you may be surprised
at the levels of interest and attention
which students pay to such elements in a
lecture slot.
4
In a lecture or a tutorial, get students in
groups to think up exam questions
themselves. You can base this on work
they have already covered, or on work cur-
rently in progress. Ask the groups to
transcribe their questions onto overhead
transparencies. Display each of these in
turn, giving feedback on how appropriate
or otherwise each question is in terms of
standard, wording, length and structure.
(You will get many questions this way
which you can later use or adapt for next
year’s exams or future coursework assign-
ments!).
5
Use exam questions to help students to
create an agenda. In a lecture or tutorial,
give out two or three related exam ques-
tions as a handout. Ask students in groups
to make lists of short questions that they
don’t yet know the answers to. Then allow
the groups to use you as a resource,
quizzing you with these questions. You
don’t have to answer them all at once – for

2 Open-book exams
In many ways these are similar to traditional exams, but with the major difference that students
are allowed to take in with them sources of reference material. Alternatively, candidates may be
issued with a standard set of resource materials that they can consult during the exam, and are
informed in advance about what will be available to them, so that they can prepare themselves by
practising to apply the resource materials. Sometimes, in addition, the ‘timed’ element is relaxed
or abandoned, allowing students to answer questions with the aid of their chosen materials, and
at their own pace.
ADVANTAGES
These have many of the advantages of traditional exams, with the addition of:
●
Less stress on memories! The emphasis is taken away from students being required to
remember facts, figures, formulae, and other such information.
●
Measuring retrieval skills. It is possible to set questions which measure how well students
can use and apply information, and how well they can find their way round the contents of
books and even databases.
●
Slower writers helped? If coupled with a relaxation in the timed dimension (e.g. a nominal
‘2-hour’ paper where students are allowed to spend up to three hours if they wish) some of
the pressure is taken away from those students who happen to be slower at writing down
their answers (and also students who happen to think more slowly).
44
The Lecturer’s Toolkit
some your reply will be along the lines
‘We’ll come to this in a week or two’, and
for others ‘You won’t actually be required
to know this’.
6 Get students to make marking schemes.
Give them a typical exam question, and
ask groups of students to prepare a break-
down of how they think the marks should
be allocated. Ask them to transcribe the
marking schemes to overhead transparen-
cies. Discuss each of these in turn with
the whole group, and give guidance to
how closely the marking schemes resem-
ble those used in practice.
7 Get students to surf the net. Ask them to
access the Internet to see if they can find
appropriate exam questions on the sub-
jects they are studying. Suggest that they
work in twos or threes, and bring the
questions they find to the next class ses-
sion. You can encourage them to
download the questions they find, and
make an electronic question bank.
8 Ask students in groups to think up a
‘dream’ question. Ask the groups to
make bullet-point lists of the ten most
important things that they would include
in answers to these questions. These ques-
tions will give you useful information
about their favourite topics.
9 Ask students in groups to think up
‘nightmare’ questions. With these, you
can open up a discussion of the causes of
their anxieties and traumas, and can prob-
ably do a lot to allay their fears, and point
them in the right direction regarding how
they might tackle such questions.
10 Ask students to think of way-out, alter-
native questions. Suggest that they think
of questions which are not just testing of
their knowledge and skills, but which get
them to think laterally and creatively. This
encourages deeper reflection about the
material they are learning, and will proba-
bly give you some interesting ideas to use
in future exams.

DISADVANTAGES
●
Not enough books or resources! It is hard to ensure that all students are equally equipped
regarding the books they bring into the exam with them. Limited stocks of library books
(and the impossibility of students purchasing their own copies of expensive books) means
that some students may be disadvantaged.
●
Need bigger desks? Students necessarily require more desk space for open-book exams if
they are to be able to use several sources of reference as they compose their answers to exam
questions. This means fewer students can be accommodated in a given exam room than with
traditional unseen exams, and therefore open-book exams are rather less cost-effective in
terms of accommodation and invigilation.
Tips on setting open-book exam questions
All of the suggestions regarding traditional exam questions still apply. In addition:
Designing assessment and feedback to enhance learning
45
1
Decide whether to prescribe the books
students may employ. This is one way
round the problem of availability of
books. It may even be possible to arrange
supplies of the required books to be avail-
able in the exam room.
2
Consider compiling a source-collection
for the particular exam. Check on copy-
right issues, and see if it is cost-effective
to put together a set of papers, extracts,
data, and other information from which
students can find what they need to
address the questions in the particular
exam.
3
Set questions which require students to
do things with the information avail-
able to them, rather than merely
summarising it and giving it back.
4
Make the actual questions particularly
clear and straightforward to under-
stand. The fact that students will be
reading a lot during the exam means that
care has to be taken that they don’t read
the actual instructions too rapidly.
5
Focus the assessment criteria on what
students will have done with the infor-
mation, and not just on them having
located the correct information.
6
Plan for shorter answers. Students doing
open-book exams will be spending quite a
lot of their time searching for, and making
sense of, information and data. They will
therefore write less per hour than students
who are answering traditional exam ques-
tions ‘out of their heads’.
3 Open-notes exams
These are similar to open-book exams described above, but this time students are allowed to bring
into the examination room any notes that they have prepared for the purpose. In other words, we
are talking about a situation of ‘legitimised crib-notes’! Your first thought may be that this is all
very strange, but in fact such exams can work surprisingly well. Many of the advantages and sug-
gestions for open-book exams continue to apply – the following additional matters arise.
ADVANTAGES
●
Students can achieve a very significant learning payoff simply making the notes in
the first place. The act of making revision summaries can have high learning payoff. It is
best not to place stringent limits on the amount of materials which students can bring in.

Those who bring in everything they have ever written about your topic will be disadvan-
taging themselves in that it will take them much longer to search for the relevant parts of
their notes, compared to students who have been really selective in summarising the
important parts of your topic.
●
The emphasis on memory is reduced, allowing competence to be tested more effec-
tively. Open-notes exams can also spread candidates’ abilities out more fairly, as the better
candidates will have made better notes in the first place.
●
You can write shorter questions. When it is up to the students to ensure that they have with
them important information or data, you don’t have to put so much into the questions them-
selves.
DISADVANTAGES
●
Students need rehearsal at preparing for open-notes exams. They may take two or three
practice runs to develop the art of making comprehensive but manageable summaries of the
important data or information you intend them to make available to themselves.
●
Candidates whose open notes were not very suitable are penalised quite severely. Some
of these candidates may have been better at answering traditional exam questions with no
notes.
●
Extra desk space is needed, just as for open-book exams.
TIPS ON DESIGNING OPEN-NOTES EXAMS
46
The Lecturer’s Toolkit
●
Think of giving a topic menu in
advance. This can save candidates from
trying to prepare open notes on every-
thing they have learned about your topic.
It does, of course, also mean that you are
letting them off the hook regarding trying
to learn some of the things that you don’t
include in your menu.
●
Consider having an inspection process.
For example, let it be known that yourself
or your colleagues will be keeping an eye
on the range and content of the open
notes, or even that they may be temporar-
ily retained after the exam.
4 Structured exams
These include multiple-choice exams, and several other types of formats where students are not
required to write ‘full’ answers, but are involved in making true/false decisions, or identifying
reasons to support assertions, or fill in blanks or complete statements, and so on. It is of course
possible to design mixed exams, combining free-response traditional questions with structured
ones. Some kinds of structured exams can be computer-based, and technology can be used both
to process students’ scores and to provide feedback to them. In the following discussion, I will
concentrate on the benefits and drawbacks of multiple-choice questions. Many of the same
points also apply at least in part to other types of structured exam questions, such as true–false,
short-answer, and sequencing questions.

ADVANTAGES
●
Greater syllabus coverage: it is possible, in a limited time, to test students’ understanding
of a much greater cross-section of a syllabus than could be done in the same time by getting
students to write in detail about a few parts of the syllabus.
●
Multiple-choice exams test how fast students think, rather than how fast they write. The
level of their thinking depends on how skilled the question-setters have been.
●
Students waste less time. For example, questions can already show, for example, formulae,
definitions, equations, statements (correct and wrong) and students can be asked to select
the correct one, without having to provide it for themselves.
●
Saving staff time and energy. With optical mark readers, it is possible to mark paper-based
multiple-choice exams very cost-effectively, and avoid the tedium and subjectivity which
affect the marking of traditional exams.
●
Computer-based tests can save even more time. As well as processing all of the scores,
computer software can work out how each question performs, calculating the discrimination
index and facility value of each question. This allows the questions which work well as test-
ing devices to be identified, and selected for future exams.
●
Testing higher-level skills? Multiple-choice exams can move the emphasis away from
memory, and towards the ability to interpret information and make good decisions.
However, the accusation is often made that such exams seem only to test lower cognitive
skills, and there are numerous examples which seem to support this argument. There are,
however, examples where high level skills are being tested effectively, and more attention
needs to be given to the design of such testing to build on these.
DISADVANTAGES
●
The guess factor. Students can often gain marks by lucky guesses rather than correct deci-
sions.
●
Designing structured questions takes time and skill. It is harder to design good multiple-
choice questions than it is to write traditional open-ended questions. In particular, it can be
difficult to think of the last distractor or to make it look sufficiently plausible. It is some-
times difficult to prevent the correct answer or best option standing out as being the one to
choose.
●
Black and white or shades of grey? While it is straightforward enough to reward students
with marks for correct choices (with zero marks for choosing distractors), it is more diffi-
cult to handle subjects where there is a ‘best’ option, and a ‘next-best’ one, and so on.
●
Where multiple-choice exams are being set on computers, check that the tests are
secure. Students can be ingenious at getting into computer files that are intended to be
secret!
●
The danger of impersonators? The fact that exams composed entirely of multiple-choice
questions do not require students to give any evidence of their handwriting increases the risk
of substitution of candidates.
Designing assessment and feedback to enhance learning
47

Designing multiple-choice exams
48
The Lecturer’s Toolkit
1
Continuously try out questions with
colleagues and with large groups of stu-
dents. Make sure that you select for exam
usage questions where people are select-
ing correct options for the right reasons –
and not because in one way or another the
question gives away which is the correct
option.
2
Make sure that distractors are plausi-
ble. If no one is selecting a given
distractor, it is serving no useful purpose.
Distractors need to represent anticipated
errors in students’ knowledge or under-
standing.
3
Try to avoid overlap between questions.
If one question helps students success-
fully to answer further questions, the
possibility increases of students picking
the right options for the wrong reasons.
4
Avoid options such as ‘none of the
above’ or ‘all of the above’. These
options are a let-out for students who find
it hard to decide between the other alter-
natives, and are often chosen by weaker
students in surface-thinking mode. Also,
it is surprisingly rare for such options to
be in fact the correct one, and test-wise
candidates will already have guessed this.
To complicate matters, the best students
will sometimes spot weaknesses with the
option which is intended to be correct,
and select ‘none of these’ because of this.
5
Pilot questions in formative tests before
using them in summative exams. Ideally,
multiple-choice questions that appear in
formal exams should be tried-and-tested
ones. It is worth consulting the literature on
multiple-choice question design and find-
ing out how to assess the discrimination
index and facility value of each question
from statistical analysis of the performance
of substantial groups of students.
6
Remember that students can still guess.
The marking scheme needs to take into
account the fact that all students can score
some marks by pure luck! If most of the
questions are, for example, four-option
ones, the average mark which would be
scored by a monkey would be 25 per cent,
so the real range lies between this and 100
per cent. It is important that people are
indeed allowed to get 100 per cent in such
structured exams, and that this does not
cause any problems when the marks are
blended with more traditional exam for-
mats where written answers in some
subjects still attract marks only in the 70s
even when they’re reckoned to be first-
class answers.
7
Write feedback responses to each
option. Where possible, it is useful to be
able to explain to students selecting the
correct (or best) option exactly why their
selection is right. It is even more useful to
be able to explain to students selecting the
wrong (or less-good) options exactly what
may be wrong with their understanding.
When multiple-choice questions are com-
puter-marked, it is a simple further step to
get the computer to print out feedback
responses to each student. This practice
can equally be applied to formative multi-
ple-choice tests, and to formal
multiple-choice exams. Furthermore, the
availability of feedback responses to each
decision students make lends itself to
extending the use of such questions in
computer-based learning packages, and
even computer-managed exams.
8
Ensure that students are well-practised
at handling multiple-choice questions.
Answering such questions well is a skill in
its own right, just as is writing open
answers well. We need to ensure that stu-
dents are sufficiently practised, so that
multiple-choice exams measure their
understanding and not just their technique.
9
Look at a range of published multiple-
choice questions. For example, in the UK
several Open University courses have

Designing assessment and feedback to enhance learning
49
5 Essays
In some subjects, assessment is dominated by essay-writing. Traditional (and open-book) exams
often require students to write essays. Assessed coursework often takes the form of essays. It is
well known that essay-answers tend to be harder to mark, and more time-consuming to assess,
than quantitative or numerical questions. There are still some useful functions to be served by
including some essay questions in exams or coursework assessments, but perhaps we need to face
up to the fact that reliability in marking essays is often unsatisfactory, and refrain from using
essays to the extent that they are used at present.
ADVANTAGES
●
Essays allow for student individuality and expression. They are a medium in which the
‘best’ students can distinguish themselves. This means, however, that the marking criteria
for essays must be flexible enough to be able to reward student individuality fairly.
●
Essays can reflect the depth of student learning. Writing freely about a topic is a process
which demonstrates understanding and grasp of the material involved.
●
Essay-writing is a measure of students’ written style. It is useful to include good written
communication somewhere in the overall assessment strategy. The danger of students in sci-
ence disciplines missing out on the development of such skills is becoming increasingly
recognised.
DISADVANTAGES
●
Essay-writing is very much an art in itself. Students from some backgrounds are disad-
vantaged regarding essay-writing skills as they have simply never been coached in how to
write essays well. For example, a strong beginning, a coherent and logical middle, and a
firm and decisive conclusion combine to make up the hallmarks of a good essay. The danger
becomes that when essays are over-used in assessment strategies, the presence of these hall-
marks is measured time and time again, and students who happen to have perfected the art
of delivering these hallmarks are repeatedly rewarded irrespective of any other strengths and
weaknesses they may have.
multiple-choice assignment questions, as
well as multiple-choice exams. You may be
surprised how sophisticated such questions
can be, and may gain many ideas that you
can build into your own question design.
10 Gradually build up a large bank of
questions. This is best done by collabo-
rating with colleagues, and pooling
questions that are found to be working
well. It then becomes possible to compose
a multiple-choice exam by selecting from
the bank of questions. If the bank
becomes large enough, it can even be
good practice to publish the whole collec-
tion, and allow students to practise with it.
Any student who has learned to handle a
large bank of questions can normally be
said to have learned the subject well.
11 When you’ve got a large bank of ques-
tions,
there is the possibility of
on-demand exams. Students can then
take a multiple-choice test with a random
selection of questions from the bank, at
any time during their studies, and ‘pass’
the component involved as soon as they
are able to demonstrate their competence
with the questions.

●
Essays take a great deal of time to mark objectively. Even with well thought out assess-
ment criteria, it is not unusual for markers to need to work back through the first dozen or so
of the essays they have already marked, as they become aware of the things that the best stu-
dents are doing with the questions, and the difficulties experienced by other students.
●
‘Halo effects’ are significant. If the last essay answer you marked was an excellent one,
you may tend to approach the next one with greater expectations, and be more severe in your
assessment decisions based upon it.
●
Essays take time to write (whether as coursework or in exams). This means that assess-
ment based on essay-writing necessarily is restricted regarding the amount of the syllabus
that is covered directly. There may remain large untested tracts of syllabus.
●
‘Write down the number we first thought of’! Essays are demonstrably the form of
assessment where the dangers of subjective marking are greatest. Essay-marking exercises
at workshops on assessment show marked differences between the mark or grade that dif-
ferent assessors award the same essay – even when equipped with clear sets of assessment
criteria.
Tips on setting and using essay-type questions
Most of the suggestions given earlier in this chapter about writing traditional exam questions
continue to apply – whether essays are to be used as assessed coursework or as exam questions.
Some further suggestions are given below.
50
The Lecturer’s Toolkit
1
Help students to see exactly how essays
are marked. Alert students to the credit
they gain from good structure and style.
One of the best ways of doing this is to
involve classes of students in looking at
examples of past (good, bad and indiffer-
ent) essays, and applying assessment
criteria. This can be followed by involving
students in peer-assessment of each
other’s essays.
2
Don’t leave students to guess the real
agenda. Some essay questions are so
open ended that it is hard for students to
work out exactly what is being sought.
The authors of such questions will defend
their questions by saying ‘well, it’s impor-
tant to find the students who know what to
do in such circumstances’, but the fact
remains that it is an aspect of study tech-
nique which is being rewarded, rather than
mastery of the learning involved in
answering the question.
3
Subdivide essay questions into several
parts, each with marks publicly allo-
cated. This helps to prevent students from
straying so far off the point that they lose
too many of the marks that they could
have scored.
4
Give word limits. Even in exams, it can
be useful to suggest to students that an
essay-answer should lie between (for
example) 800 and 1200 words say for a
30-minute question, and so on. This helps
to avoid the quantity-versus-quality issue,
which leads some students into simply
trying to write a lot, rather than thinking
deeply about what they are writing – and
it also helps reduce the time it takes to
mark the essays.
5
Help students to develop the skills
required to plan the content for essays.
This is particularly important in those dis-
ciplines where students will be more
accustomed to handling structured ques-
tions and problems. The danger then is
that students tackling essay questions in
exams spend far too long on them, and
penalise themselves regarding time for
the rest of the examination. One of the
best – and most time-effective – ways of

6 Reviews and annotated bibliographies
Anyone who reviews books or articles for journals or magazines will confirm that there’s no bet-
ter way of making oneself look deeply into a book or article than to be charged with the task of
writing a review of it! Getting students to write reviews is therefore a logical way of causing
them to interact in depth with the information they review. One way of getting students to review
a lot of material at once is to ask them to produce annotated bibliographies on a topic area, and
to use these as assessment artefacts.
ADVANTAGES
●
Reviewing is an active process. Reviewing material gives students a task to do which
focuses their thinking, and helps them avoid reading passively, or writing the content out in
‘transcribing’ mode.
●
Reviews are useful for revision. When students have reviewed material, the reviews are
useful learning tools in their own right, and may spare students from having to wade through
the material on subsequent revision.
Designing assessment and feedback to enhance learning
51
helping students to become better at han-
dling essay questions is to set class or
coursework tasks which require students
to prepare essay-plans rather than fully
finished masterpieces. A concept-map or
diagram can show a great deal about the
eventual ‘worth’ of students essays, and
can avoid distraction from the elements of
style and structure. Students can put
together maybe half-a-dozen essay plans
in the time it would take them to complete
one essay, and making the plans involves
far more payoff per unit time in thinking
and learning.
6 Don’t assess essays too often. Any
assessment form advantages those stu-
dents who happen to be skilled at
delivering what is being measured. This
applies to essays too, and there is a signif-
icant danger that those students who
happen to become good at planning and
writing essays continue to be advantaged
time and time again.
7 Have a clear, well-structured marking
scheme for each essay question. This
can save a lot of time when marking, and
can help guarantee that students’ answers
are assessed fairly and consistently.
8 Don’t assume that longer equals better.
It is often harder for students to write suc-
cinctly than to just ramble on. However,
students need to be briefed on how best
we want them to develop their art in writ-
ing briefly.
9 Consider involving students in peer-
assessing some essays or essay-plans.
This helps them to put their own efforts
into perspective, and to learn things to
emulate (and things to avoid!) by seeing
how other students go about devising
essays.
10 Help students to improve their tech-
nique through feedback. Consider the
range of approaches you can use to give
students useful feedback on their essays,
including statement banks, assignment
return sheets and email messages, and try
to minimise the time you spend writing
similar feedback comments onto different
students’ essays.
11 Use some class time to get students to
brainstorm titles for essays. This helps
them to think about the standard they
could anticipate for essay questions in
forthcoming exams, and gives them topic
areas to base their practice on.

●
Reviewing involves important cognitive processes. When students are required to review
material from different sources critically, they are necessarily engaged in higher-level skills
of comparing, contrasting and evaluating – far beyond passive reading.
●
Reviewing other papers and articles is useful practice for research writing. Students
who will move on to research can benefit from the training involved in writing reviews, and
gain skills in communicating their conclusions coherently.
●
Reviewing helps students to develop critical skills. Getting students to compare and con-
trast chosen sources helps them think more deeply about the subject matter involved.
●
Compiling annotated bibliographies is a way of requiring students to survey a consid-
erable amount of material. It also helps them to reduce a large field to a manageable body
of notes and references.
DISADVANTAGES
●
Reviews are necessarily quite individual. For reviews to lend themselves to assessment, it
is important that the task should be delineated quite firmly. This may go against the open-
ended approach to reviewing which we may wish students to develop.
●
There aren’t enough books! With large numbers of students and limited library resources,
students may find it difficult or impossible to get adequate access to the materials we want
them to review.
●
Reviewing individually can be lonely. Reviewing a range of resources is often best done as
a group task rather than an individual one, maximising the benefits that students derive from
discussion and debate. It then becomes more difficult to assess individual contributions to
such reviews.
Setting assessed review tasks
52
The Lecturer’s Toolkit
1
Promote variety. Ask students to select
their own subject for research, and give
them a wide range of topics to choose
from.
2
Prompt awareness of audience. Ask stu-
dents to write reviews of different kinds
of publication (learned journal, subject
magazine, next year’s students, student
newsletter, and so on), so that they
become aware of the differences in tone
and style of writing which are appropriate
for different audiences.
3
Get students to assess existing reviews.
For example, issue students with a selec-
tion of existing reviews, and ask them to
identify features of the best reviews, and
faults of the worst ones.
4
Help students to see that reviewing is
not just a matter of summarising what
everyone has said. You only have to look
at book reviews in journals to see how
some reviewers make up their contribu-
tions by summarising the ‘contents’ pages
of the material that they are reviewing.
This is not a high-level intellectual activ-
ity.
5
Decide about credit to be awarded to
‘search’ tasks. It is useful to get students
both to locate all relevant major resources
addressing a field, and to prioritise (for
example) the most important or most rele-
vant half-dozen sources.
6
Consider limiting the parameters.
Getting students to do a short comparative
review of two or three important sources
can be easier (and fairer) to assess than
when the reviews are done without any
restrictions. When such focused review
tasks are coupled with a general search, it
is possible to measure information

Designing assessment and feedback to enhance learning
53
retrieval skills as well as the higher-level
‘compare and contrast’ skills, without the
agenda for the latter remaining too wide
for objective assessment.
7 Set a tight word limit for the review.
The art of writing a good, short review is
more demanding than writing long
reviews. When students’ reviews are of
equal length, it becomes easier to distin-
guish the relative quality of their work.
However, brief students on how to draft
and re-draft their work, to ensure the qual-
ity of short reviews. Make sure that
students don’t adopt the ‘stop when
you’ve written a thousand words’
approach).
8 Think about combining collaborative
and individual work. For example, sug-
gest that groups of students do a search
collaboratively, and identify the most rele-
vant sources together. Then suggest they
write individual reviews of different
sources. Finally, consider asking them to
share their reviews, then write individual
comments comparing and contrasting the
sources.
9 Ask students to look at the same texts,
but give them different focuses. For
example, students could look at a series of
articles on pollution, and write different
reviews of them aimed to be separately
useful to conservationists, parents, indi-
vidualists, and general consumers.
10 Encourage qualitative judgement.
Prompt students to write on not only what
a book or article is about, but also about
how effective it is in providing convincing
arguments, and how well it is expressed.
11 Involve your library or information ser-
vices staff. It’s a mean trick to send off
large groups of students to rampage
through the library, without giving notice
to the staff there of what you are doing.
Discussing your plans with your faculty
librarians, for example, gives them a
chance to be prepared, and gives opportu-
nities for them to make suggestions and
give advice to you on the nature of the
task, before you give it to students.
12 Think hard about resource availability.
Make sure that there won’t be severe log-
jams with lots of students chasing
particular library resources. Widen the
range of suggested resources. Consider
arranging with library staff that any books
which will be in heavy demand are classi-
fied as ‘reference only’ stock for a
specified period, so that they can remain
in the library rather than disappearing on
loan.
13 Consider setting annotated bibliogra-
phies as formative group tasks. This can
encourage students to collaborate produc-
tively in future information-seeking tasks,
and can reduce the drudgery sometimes
experienced in tasks such as literature
searching. Giving feedback on the
reviews can be sufficiently valuable to
students to make it unnecessary to couple
the task with formal assessment.
14 Consider making the final product
‘publishable’. Aim to compile collec-
tions of the best reviews and annotated
bibliographies, for example to use in next
year’s Course Handbook, or as the basis
of an assessed task for next year’s stu-
dents.
15 Explore the possibility of involving
library staff in the assessment. Library
staff may be willing and able to assess
annotated bibliographies and reviews in
parallel with yourself, or may be willing
to provide additional feedback comments
to students.

7 Reports
Assessed reports make up at least part of the coursework component of many courses. Report-
writing is one of the most problematic study-skills areas in which to work out how and what to
advise students to do to develop their approaches. The format, layout, style and nature of an
acceptable report varies greatly from one discipline to another, and even from one assessor to
another in the same discipline. The most common kinds of report that many students write are
those associated with their practical, laboratory or field work. Several of the suggestions offered
in this section relate particularly to report-writing in science and engineering disciplines, but can
readily be extended to other subject areas.
ADVANTAGES
●
Report-writing is a skill relevant to many jobs. In many careers and professional areas, the
ability to put together a convincing and precise report is useful. Report-writing can therefore
provide a medium where specific skills relevant to professional activity can be addressed.
●
Reports can be the end-product of useful learning activities. For example, the task of
writing reports can involve students in research, practical work, analysis of data, comparing
measured findings with literature values, prioritising, and many other useful processes.
Sometimes these processes are hard or impossible to assess directly, and reports provide
secondary evidence that these processes have been involved successfully (or not).
●
Report-writing can allow students to display their talents. The fact that students can
have more control when they write reports than when they answer exam questions, allows
students to display their individual strengths.
DISADVANTAGES
●
Collaboration can be difficult to detect. For example, with laboratory work, there may be
a black market in old reports! Also, when students are working in pairs or groups in practi-
cal work, it can be difficult to set the boundaries between collaborative work and individual
interpretation of results.
●
Report-writing can take a lot of student time. When reports are assessed and count
towards final grades, there is the danger that students spend too much time writing reports
at the expense of getting to grips with their subject matter in a way which will ensure that
they succeed in other forms of assessment such as exams.
●
Report-marking can take a lot of staff time. With increased numbers of students, it
becomes more difficult to find the time to mark piles of reports and to maintain the quality
and quantity of feedback given to students about their work.
Setting assessed repor t-writing
54
The Lecturer’s Toolkit
1
Give clear guidance regarding the for-
mat of reports. For example, issue a
sheet listing principal generic section
headings, with a short description of the
purpose and nature of each main section
in a typical report. Remind students, when
necessary, of the importance of this guid-
ance in your ongoing feedback to their
reports.
2
Get students to assess subjectively some
past reports. Issue students with copies
of some good, bad and indifferent reports,

Designing assessment and feedback to enhance learning
55
and ask them to mark them independently,
simply giving each example an impres-
sion mark. Then facilitate a discussion
where students explain why they allocated
the marks in the ways they did.
3 Get students to assess objectively some
past reports. Issue groups of students
with good, bad and indifferent reports,
along with a sheet listing assessment cri-
teria and a mark scheme. Ask each group
to assess the reports. Then initiate discus-
sions and comparisons between groups.
4 Make explicit the assessment criteria
for reports. Help students to see the bal-
ance between the marks associated with
the structure of their reports, and those
given to the content and the level of criti-
cal thinking and analysis.
5 Ask students for full reports less often.
For example, if during a course students
tackle eight pieces of work involving
report writing, ask students to write full
reports for only two of these, and ask for
summary or ‘short-form’ or ‘memoran-
dum’
reports for the remaining
assignments. These shorter reports can be
structured in note form or bullet points,
and can still show much of the evidence
of the thinking and analysis that students
have done.
6 Accommodate collaboration. One way
round the problems of collaboration is to
develop approaches where students are
required to prepare reports in groups –
often closer to real life than preparing
them individually.
7 Involve students in assessing each
other’s reports. When marks for reports
‘count’ significantly, it may be desirable
to moderate student peer-assessment in
one way or another, but probably the
greatest benefit of peer-assessment is that
students get a good deal more feedback
about their work than hard-pressed staff
are able to provide. It is far quicker to
moderate student peer-assessment than to
mark all the reports from scratch.
8 Consider asking students to write (or
word-process) some reports onto pre-
prepared pro formas. This can help
where there are significant ‘given’ ele-
ments such as equipment and
methodology. You can then concentrate on
assessing the important parts of their writ-
ing, for example interpretation of data.
9 Publish clear deadlines for the submis-
sion of successive reports. For example,
in the case of practical work, allow only
one or two weeks after the laboratory ses-
sion. It is kinder to students to get them to
write up early, rather than to allow them to
accumulate a backlog of report writing,
which can interfere (for example) with
their revision for exams.
10 Prepare a standard assessment/feed-
back grid, to return to students with
marked reports. Include criteria and
marks associated with (for example) the
quality of data, observations, calculations,
conclusions, references and verdicts.
11 Start students thinking even before the
practical work. For example, allocate
practical work in advance of laboratory
sessions, and include some assessed pre-
laboratory preparation as a prelude to the
eventual report. One way of doing this is
to pose half a dozen short-answer ques-
tions for students to complete before
starting a piece of laboratory work. This
helps students know what they are doing,
rather than follow instructions blindly. It
also avoids wasting time at the start of a
laboratory session working out only then
which students are to undertake each
experiment.
12 Include some questions linked closely
to practical or field work in examina-
tions. For example, tell students that two
exam questions will be based on work
they will have done outside the lecture
room. This helps to ensure that practical
work and associated reports don’t get for-
gotten when students start revising for
exams.

8 Practical work
Many areas of study involve practical work, but it is often much more difficult to assess such
work in its own right; assessing reports of practical work may only involve measuring the qual-
ity of the end product of the practical work, and not the work itself, compromising the validity of
the assessment. The following discussion attempts to help you to think of ways of addressing the
assessment of the practical work itself.
ADVANTAGES
●
Practical work is really important in some disciplines. In many areas of physical sciences
for example, practical skills are just as important as theoretical competences. Students pro-
ceeding to research or industry will be expected to have acquired a wide range of practical
skills.
●
Employers may need to know how good students’ practical skills are (and not just how
good their reports are). It is therefore useful to reserve part of our overall assessment for
practical skills themselves, and not just the final written products of practical work.
●
Practical work is learning-by-doing. Increasing the significance of practical work by
attaching assessment to it helps students approach such work more earnestly and critically.
DISADVANTAGES
●
It is often difficult to assess practical work in its own right. It is usually much easier to
assess the end point of practical work, rather than the processes and skills involved in their
own right.
●
It can be difficult to agree on assessment criteria for practical skills. There may be sev-
eral ways of performing a task well, requiring a range of alternative assessment criteria.
●
Students may be inhibited when someone is observing their performance. When doing
laboratory work, for example, it can be very distracting to be watched! Similar considera-
tions apply to practical exercises such as interviewing, counselling, advising, and other ‘soft
skills’ which are part of the agenda of many courses.
56
The Lecturer’s Toolkit
13 Get students to design exam questions
based on the work covered by their
reports. Set groups of students this task.
Allocate some marks for the creativity of
their questions. When done over several
years, the products could be turned into a
bank of questions which could be placed
on computer for students to consult as
they prepared for exams.
14 Consider the use of computers in the
laboratories and other practical work
situations. Where facilities are available,
arrange that students can input their
experimental data directly onto a com-
puter or network. Many universities now
enable students to write up their reports
straight into a word processor alongside
the laboratory bench, using a report tem-
plate on disk. Such reports can be handed
in immediately at the end of the labora-
tory session, and marked and returned
promptly.

Questions and suggestions for assessing practical work
It is important to address a number of questions about the nature and context of practical work,
the answers to which help to clarify how best to go about assessing such work. First the ques-
tions, then some suggestions.
Designing assessment and feedback to enhance learning
57
1 What exactly are the practical skills we
wish to assess? These may include a vast
range of important skills, from deftness in
assembling complex glassware in a chem-
istry laboratory to precision and speed in
using a scalpel on the operating table. It is
important that students know the relative
importance of each skill.
2 Why do we need to measure practical
skills? The credibility of our courses
sometimes depends on what students can
do when they enter employment. It is
often said by employers that students are
very knowledgeable, but not necessarily
competent in practical tasks.
3 Where is the best place to try to mea-
sure these skills? Sometimes practical
skills can be measured in places such as
laboratories or workshops. For other
skills, students may need to be working in
real-life situations.
4 When is the best time to measure prac-
tical skills? When practical skills are
vitally important, it is probably best to
start measuring them very early on in a
course, so that any students showing
alarming problems with them can be
appropriately advised or redirected.
5 Who is in the best position to measure
practical skills? For many practical
skills, the only valid way of measuring
them involves someone doing detailed
observations while students demonstrate
the skills involved. This can be very time
consuming if it has to be done by staff,
and also can feel very threatening to stu-
dents.
6 Is it necessary to establish minimum
acceptable standards? In many jobs, it is
quite essential that everyone practising
does so with a high level of skill (for
example surgery!). In other situations, it
is possible to agree on a reasonable level
of skills, and for this to be safe enough
(for example teaching!).
7 How much should practical skills count
for? In some disciplines, students spend a
considerable proportion of their time
developing and practising practical skills.
It is important to think clearly about what
contribution to their overall assessment
such skills should make, and to let stu-
dents know this.
8 May student self-assessment of practi-
cal skills be worth using? Getting
students to assess their own practical
skills can be one way round the impossi-
ble workloads which could be involved if
staff were to do all the requisite observa-
tions. It is much quicker for staff to
moderate student self-assessment of such
skills than to undertake the whole task of
assessing them.
9 May student peer-assessment of practi-
cal skills be worth using? Involving
students in peer-assessment of practical
skills can be much less threatening than
using tutor assessment. The act of assess-
ing a peer’s practical skills is often very
good for the peer-assessors, in terms of
improving similar skills of their own, and
learning from others’ triumphs and disas-
ters.
10 Is it necessary to have a practical exam-
ination? In some subjects, some sort of
end point practical test may be deemed
essential. Driving tests, for example,
could not be wholly replaced by a written
examination on the Highway Code.
11 Reserve some marks for the processes.
Help students to see that practical work is
not just reaching a defined end point, but
is about the processes and skills involved
in doing so successfully.

9 Portfolios
Building up portfolios of evidence of achievement is becoming much more common, following
on from the use of Records of Achievement at school. Typically, portfolios are compilations of
evidence of students’ achievements, including major pieces of their work, feedback comments
from tutors, and reflective analyses by the students themselves. It seems probable that in due
course, degree classifications will no longer be regarded as sufficient evidence of students’
knowledge, skills and competences, and that profiles will be used increasingly to augment the
indicators of students’ achievements, with portfolios to provide in-depth evidence. Probably the
most effective way of leading students to generate portfolios is to build them in as an assessed
part of a course. Here, the intention is to alert you to some of the more general features to take
into account when assessing student portfolios. You may, however, also be thinking about build-
ing your own portfolio to evidence your teaching practice, and can build on some of the
suggestions below to make this process more effective and efficient.
ADVANTAGES
●
Portfolios tell much more about students than exam results. They can contain evidence
reflecting a wide range of skills and attributes, and can reflect students’ work at its best,
rather than just a cross-section on a particular occasion.
●
Portfolios can reflect development. Most other forms of assessment are more like ‘snap-
shots’ of particular levels of development, but portfolios can illustrate progression. This
information reflects how fast students can learn from feedback, and is especially relevant to
employers of graduates straight from university.
●
Portfolios can reflect attitudes and values as well as skills and knowledge. This too
makes them particularly useful to employers, looking for the ‘right kind’ of applicants for
jobs.
DISADVANTAGES
●
Portfolios take a lot of looking at! It can take a long time to assess a set of portfolios. The
same difficulty extends beyond assessment; even though portfolios may contain material of
considerable interest and value to prospective employers, it is still much easier to draw up
58
The Lecturer’s Toolkit
12 Ask students to include in their reports
‘ways I would do the experiment better
next time’. This encourages students to
become more self-aware of how well (or
otherwise) they are approaching practical
tasks.
13 Add some ‘supplementary questions’ to
report briefings. Make these questions
that students can only answer when they
have thought through their own practical
work. For example, students can be
briefed to compare their findings with a
given published source, and comment on
any differences in the procedures used in
the published work from those they used
themselves.
14 Design the right end products.
Sometimes it is possible to design final
outcomes which can only be reached
when the practical work itself is of high
quality. For example, in chemistry, the
skills demonstrated in the preparation and
refinement of a compound can often be
reflected in the purity and amount of the
final product.

interview shortlists on the basis of paper qualifications and grades. However, there is
increasing recognition that it is not cost-effective to skimp on time spent selecting the best
candidate for a post. This is as true for the selection of lecturers as for the selection of stu-
dents for jobs. Lecturers are increasingly expected to produce hard evidence of the quality
of their teaching and research, as well as to demonstrate how they teach to those involved in
their appointment.
●
Portfolios are much harder to mark objectively. Because of the individual nature of port-
folios, it is harder to decide on a set of assessment criteria which will be equally valid across
a diverse set of portfolios. This problem can, however, be overcome by specifying most of
the criteria for assessing portfolios in a relatively generic way, while still leaving room for
topic-specific assessment.
●
The ownership of the evidence can sometimes be in doubt. It may be necessary to couple
the assessment of portfolios with some kind of oral assessment or interview, to authenticate
or validate the origin of the contents of portfolios, particularly when much of the evidence is
genuinely based on the outcomes of collaborative work.
Designing and assessing por tfolios
Designing assessment and feedback to enhance learning
59
1 Specify or negotiate intended learning
outcomes clearly. Ensure that students
have a shared understanding of the level
expected of their work.
2 Propose a general format for the port-
folio. This helps students demonstrate
their achievement of the learning out-
comes in ways which are more easily
assembled.
3 Specify or negotiate the nature of the
evidence which students should collect.
This makes it easier to assess portfolios
fairly, as well as more straightforward for
students.
4 Specify or negotiate the range and
extent of the evidence expected from
students. This helps students plan the bal-
ance of their work effectively, and helps
them avoid spending too much time on
one part of their portfolio while missing
out important details on other parts.
5 Don’t underestimate the time it takes to
assess portfolios. Also don’t underesti-
mate their weight and volume if you have
a set of them to carry around with you!
6 Prepare a pro forma to help you assess
portfolios. It is helpful to be able to tick
off the achievement of each learning out-
come, and make decisions about the
quality of the evidence as you work
through a portfolio.
7 Use ‘post-it’ notes to identify parts of
the portfolio you may want to return to.
This can save a lot of looking backwards
and forwards through a portfolio in search
of something you know you’ve seen in it
somewhere!
8 Consider using ‘post-it’ notes to draft
your feedback comments. You can then
compose elements of your feedback as
you work through the portfolio, instead of
having to try to carry it all forward in your
mind till you’ve completed looking at the
portfolio.
9 Put a limit on the physical size of the
portfolio. A single box file is ample for
most purposes, or a specified size of ring-
binder can provide guidance for the
overall size.
10 Give guidance on audio or video ele-
ments. Where students are to include
video or audiotapes, it is worth limiting
the duration of the elements they can
include. Insist that they wind the tapes to
the point at which they want you to start
viewing or listening, otherwise you can
spend ages trying to find the bit that they
intend you to assess.

60
The Lecturer’s Toolkit
11 Provide interim assessment opportuni-
ties. Give candidates the opportunity to
receive advice on whether the evidence
they are assembling is appropriate.
12 Quality not quantity counts. Students
should be advised not to submit every
piece of paper they have collected over
the learning period, otherwise the volume
of material can be immense.
13 Get students to provide route maps.
Portfolios are easier to assess if the mater-
ial is carefully structured, and
accompanied by a reflective account
which not only outlines the contents but
also asserts which of the criteria each
piece of evidence contributes towards.
14 Get students to provide a structure.
Portfolio elements should be clearly
labelled and numbered for easy reference.
If loose-leaf folders are used, dividers
should be labelled to enable easy access
to material. All supplementary material
such as audiotapes, videos, drawings,
computer programs, tables, graphs, and so
on should be appropriately marked and
cross-referenced.
15 Be clear about what you are assessing.
While detailed mark schemes are not
really appropriate for portfolios, it is still
necessary to have clear and explicit crite-
ria, both for the students’ use and to guide
assessment.
16 Structure your feedback. Students may
well have spent many hours assembling
portfolios and may have a great deal of
personal investment in them. To give their
work number marks only (or pass/fail)
may seem small reward. Consider using
an assessment pro forma so that your
notes and comments can be directly
relayed to the students, particularly in
cases where required elements are incom-
plete or missing.
17 Encourage creativity. For some students,
this may be the first time they have been
given an opportunity to present their
strengths in a different way. Hold a brain-
storming session about the possible
contents of portfolios, for example which
may include videos, recorded interviews,
newspaper articles, and so on.
18 Provide opportunities for self-assess-
ment. Having completed their portfolios,
a valuable learning experience in itself is
to let the students assess them. A short
exercise is to ask them: ‘In the light of
your experience of producing a portfolio,
what do you consider you did especially
well, and what would you now do differ-
ently?’.
19 Assess in a team. If possible set aside a
day as a team. Write your comments
about each portfolio, and then pass them
round for others to add to. In this way, stu-
dents get feedback that is more
comprehensive, and assessors get to see a
more diverse range of portfolios.
20 Set up an exhibition. Portfolios take a
long time to complete and assess. By dis-
playing them (with students’ permission)
their valuable experience can be shared.
21 Think about where and when you will
mark portfolios. They are not nearly as
portable as scripts, and you may need
equipment such as video or audio play-
back facilities to review evidence. It may
be helpful therefore to set aside time
when you can book a quiet, well-equipped
room where you are able to spread out
materials and look at a number of portfo-
lios together. This will help you get an
overview, and makes it easier to get a feel
for standards.

10 Presentations
Giving presentations to an audience requires substantially different skills from writing answers
to exam questions. Also, it can be argued that the communications skills involved in giving good
presentations are much more relevant to professional competences needed in the world of work.
It is particularly useful to develop students’ presentations skills if they are likely to go on to
research, so that they can give effective presentations at conferences. It is therefore increasingly
common to have assessed presentations as part of students’ overall assessment diet.
ADVANTAGES
●
There is no doubt whose performance is being assessed. When students give individual
presentations, the credit they earn can be duly given to them with confidence.
●
Students take presentations quite seriously. The fact that they are preparing for a public
performance usually ensures that their research and preparation are addressed well, and
therefore they are likely to engage in deep learning about the topic concerned.
●
Presentations can also be done as collaborative work. When it is less important to award
to students individual credit for presentations, the benefits of students working together as
teams, preparing and giving presentations, can be realised.
●
Where presentations are followed by question-and-answer sessions, students can
develop some of the skills they may need in oral examinations or interviews. Perhaps the
most significant advantage of developing these skills in this way is that students can learn a
great deal from watching each other’s performances.
DISADVANTAGES
●
With large classes, a round of presentations takes a long time. This can be countered by
splitting the large class into groups of (say) twenty students, and facilitating peer-assess-
ment of the presentations within each group on the basis of a set of assessment criteria
agreed and weighted by the whole class.
●
Some students find giving presentations very traumatic! However, it can be argued that
the same is true of most forms of assessment, not least traditional exams.
●
The evidence is transient. Should an appeal be made, unless the presentations have all been
recorded, there may be limited evidence available to reconsider the merit of a particular pre-
sentation.
●
Presentations can not be anonymous. It can prove difficult to eliminate subjective bias.
Assessing presentations
Designing assessment and feedback to enhance learning
61
1
Be clear about the purposes of student
presentations. For example, the main
purpose could be to develop students’
skills at giving presentations, or it could
be to cause them to do research and read-
ing and improve their subject knowledge.
Usually, several such factors may be
involved together.
2
Make the criteria for assessment of pre-
sentations clear from the outset.
Students will not then be working in a
vacuum and will know what is expected
of them.
3
Get students involved in formulating or
weighting the assessment criteria. This
can be done either by allowing them to

62
The Lecturer’s Toolkit
negotiate the criteria themselves or by
giving them plenty of opportunities to
interrogate criteria you share with them.
4 Ensure that students understand the
weighting of the criteria. Help them to
know whether the most important aspects
of their presentations are to do with the
way they deliver their contributions
(voice, clarity of expression, articulation,
body language, use of audio–visual aids,
and so on) or the content of their presenta-
tions (evidence of research, originality of
ideas, effectiveness of argument, ability to
answer questions, and so on).
5 Give students some prior practice at
assessing presentations. It is useful, for
example, to give students a dry run at
applying the assessment criteria they have
devised, to one or two presentations on
video. The discussion which this produces
usually helps to clarify or improve the
assessment criteria.
6 Let the students have a mark-free
rehearsal. This gives students the chance
to become more confident and to make
some of the more basic mistakes at a point
where it doesn’t count against them.
Constructive feedback is crucial at this
point so that students can learn from the
experience.
7 Involve students in the assessment of
their presentations. When given the
chance to assess each other’s presenta-
tions they take them more seriously and
will learn from the experience. Students
merely watching each other’s presenta-
tions tend to get bored and can switch off
mentally. If they are evaluating each pre-
sentation using an agreed set of criteria,
they tend to engage themselves more
fully with the process, and in doing so
learn more from the content of each pre-
sentation.
8 Ensure that the assessment criteria
span presentation processes and the
content of the presentations sensibly. It
can be worth reserving some marks for
students’ abilities to handle questions
after their presentations.
9 Make up grids using the criteria which
have been agreed. Allocate each criterion
a weighting, and get all of the group to fill
in the grids for each presentation. The
average peer-assessment mark is likely to
be at least as good an estimate of the rela-
tive worth of each presentation as would
be the view of a single tutor doing the
assessment.
10 Be realistic about what can be achieved.
It is not possible to get twelve five-minute
presentations into an hour, as presenta-
tions always tend to overrun. It is also
difficult to get students to concentrate for
more than an hour or two on others’ pre-
sentations. Where classes are large,
consider breaking the audience into
groups, for example dividing a class of
100 into four groups, with students pre-
senting concurrently in different rooms,
or at different timetabled slots.
11 Think about the venue. Students do not
always give of their best in large, echoing
tiered lecture theatres (nor do we!). A
more intimate flat classroom is less
threatening particularly for inexperienced
presenters.
12 Consider assessing using videotapes.
This can allow the presenters themselves
the opportunity to review their perfor-
mances, and can allow you to assess
presentations at a time most suitable to
you. Viewing a selection of recorded pre-
sentations from earlier rounds can be
useful for establishing assessment criteria
with students. This sort of evidence of
teaching and learning is also useful to
show external examiners and quality
reviewers.
13 Start small. Mini-presentations of a few
minutes can be almost as valuable as 20-
minute presentations for learning the
ropes, especially as introductions to the
task of standing up and addressing the
peer group.

11 Vivas – oral exams
Viva-voce (‘live voice’) exams have long been used to add to or consolidate the results of other
forms of assessment. They normally take the form of interviews or oral examinations, where stu-
dents are interrogated about selected parts of work they have had assessed in other ways. Such
exams are often used to make decisions about the classification of degree candidates whose
work straddles borderlines.
ADVANTAGES
●
Vivas are useful checks on the ownership of evidence. They are good when authenticity
needs to be tested. It is relatively easy to use a viva to ensure that students are familiar with
things that other forms of assessment seem to indicate they have learned well.
●
Vivas seem useful when searching for particular things. For example, vivas have long
been used to help make decisions about borderline cases in degree classifications, particu-
larly when the written work or exam performance has for some reason fallen below what
may have been expected for particular candidates.
●
Candidates may be examined fairly. With a well constructed agenda for a viva, a series of
candidates may be asked the same questions, and their responses compared and evaluated.
●
Vivas give useful practice for interviews for employment. Sadly, for most vivas, what is at
stake is more serious than a possible appointment, so it is worth considering using vivas
more widely but less formally to allow students to develop the appropriate skills without too
much depending on their performance.
DISADVANTAGES
●
Some candidates never show themselves well in vivas. Cultural and individual differences
can result in some candidates underperforming when asked questions by experts and figures
of authority.
●
The agenda may ‘leak’. When the same series of questions is being posed to a succession
of students, it is quite difficult to ensure that candidates who have already been examined
aren’t able to commune with friends whose turn is still to come.
●
The actual agenda covered by a viva is usually narrow. Vivas are seldom good as mea-
sures of how well students have learned and understood large parts of the syllabus.
●
Vivas can not be anonymous! Lecturers assessing viva performance can be influenced by
what they already know about the students’ work. However, it is possible to use lecturers
who don’t know the students at all, or to include such lecturers in a viva panel.
Designing assessment and feedback to enhance learning
63
14 Check what other presentations stu-
dents may be doing. Sometimes it can
seem to students that everyone is includ-
ing presentations in their courses. If
students find themselves giving three or
four within a month or two, it can be very
demanding on their time, and repetitious
regarding the processes.

64
The Lecturer’s Toolkit
1 Remind yourself what the viva is for.
Purposes vary, but it is important to be
clear about it at the outset. For example,
the agenda could include one or more of
the following: confirming that the candi-
dates did indeed do the work represented
in their dissertations, or probing whether
a poor examination result was an unchar-
acteristic slip, or proving whether
students’ understanding of the subject
reached acceptable levels.
2 Prepare your students for vivas. Explain
to them what a viva is, and what they will
normally be expected to do. It helps to
give them opportunities to practise. Much
of this they can do on their own, but they
will need you to start them off on the right
lines, and to check now and then that their
practice sessions are realistic.
3 Think about the room layout. Sitting
the candidate on a hard seat while you
and your fellow-assessors sit face-on
behind a large table is guaranteed to
make the candidate tremble! If possible,
sit beside or close to the candidate.
Where appropriate provide students with
a table on which to put any papers they
may have with them.
4 Think about the waiting room. If candi-
dates are queuing together for long, they
can make each other even more nervous.
If you’re asking the same questions of a
series of students (in some situations you
may be required to do this for fairness),
the word can get around about what
you’re asking.
5 Prepare yourself for vivas! Normally, if
you’re a principal player at a viva, you
will have read the student’s work in some
detail. It helps if you come to the viva
armed with a list of questions you may
ask. You don’t have to ask all of them, but
it helps to have some ready! Normally,
you may need to have a pre-viva discus-
sion with other members of the examining
panel, and you need to be seen to have
done your homework.
6 Prepare the agenda in advance, and
with colleagues. It is dangerously easy
(and unfair to students) for the agenda to
develop during a series of interviews with
different students. Prepare and use a
checklist or pro forma to keep records.
Memory is not sufficient, and can be
unreliable, especially when different
examiners conducting a viva have differ-
ent agendas.
7 Do your best to put the candidate at
ease. Students find vivas very stressful,
and it improves their confidence and flu-
ency if they are greeted cheerily and made
welcome at the start of a viva.
8 When vivas are a formality, indicate
this. When students have done well on the
written side of their work, and it’s fairly
certain that they should pass, it helps to
give a strong hint about this straightaway.
It puts students at ease, and makes for a
more interesting and relaxed viva.
9 Ensure there are no surprises. Share the
agenda with each candidate, and clarify
the processes to be used. You are likely to
get more out of candidates this way.
10 Ask open questions which enable stu-
dents to give full and articulate
answers. Try to avoid questions which
lead to minimal or ‘yes/no’ replies.
11 Let students do most of the talking. The
role of an examiner in a viva is to provoke
thought and prompt candidates into
speaking fluently about the work or topics
under discussion, and to spark off an
intellectual dialogue. It is not to harangue,
carp or demonstrate the examiner’s intelli-
gence, or to trick candidates!
12 Prepare to be able to debrief well. Write
your own notes during each viva. If you
are dealing with a series of such events, it
can become difficult to remember each
feedback point that you want to give to
Using vivas

12 Student projects
In many courses, one of the most important kinds of work undertaken by students takes the form
of individual projects, often relating theory to practice beyond the college environment. Such
projects are usually an important element in the overall work of each student, and are individual
in nature.
ADVANTAGES
●
Project work gives students the opportunity to develop their strategies for tackling
research questions and scenarios. Students’ project work often counts significantly in
their final year degree performance, and research opportunities for the most successful stu-
dents may depend primarily on the skills they demonstrated through project work.
●
Projects can be integrative. They can help students to link theories to practice, and to bring
together different topics (and even different disciplines) into a combined frame of reference.
●
Project work can help assessors to identify the best students. Because project work nec-
essarily involves a significant degree of student autonomy, it does not favour those students
who just happen to be good at tackling traditional assessment formats.
Designing assessment and feedback to enhance learning
65
each student. Vivas can be very useful
learning experiences, but much of the
experience can be lost if time is not set
aside for a debrief. Such debriefing is par-
ticularly useful when students will
encounter vivas again.
13 When debriefing, ask students for their
opinions first. This can spare them the
embarrassment of having you telling them
about failings they already know they
have. You may also find useful food for
thought when students tell you about
aspects of the vivas that you were unaware
of yourself.
14 Be sensitive. Vivas can be traumatic for
students, and they may have put much
time and effort into preparing for them.
Choose words carefully particularly when
giving feedback on aspects which were
unsuccessful.
15 Be specific. Students will naturally want
to have feedback on details of things they
did particularly well. As far as you can,
make sure you can find something posi-
tive to say even when overall performance
was not good.
16 Consider recording practice vivas on
video. This is particularly worthwhile
when one of your main aims is to prepare
students for more important vivas to fol-
low. Simply allowing students to borrow
the recordings and look at them in the
comfort of privacy can provide students
with useful deep reflection on their per-
formance. It is sometimes more
comfortable to view the recordings in the
atmosphere of a supportive student group.
17 Run a role-play afterwards. Ask stu-
dents to play both examiners and
candidates, and bring to life some of the
issues they encountered in their vivas.
This can allow other students observing
the role-play to think about aspects they
did not experience themselves.
18 Plan for the next step. Get students to
discuss strategies for preparing for their
next viva, and ask groups of students to
make lists of ‘do’s and don’ts’ to bear in
mind next time.
19 Get students to produce a guidance
booklet about preparing for vivas and
taking part in them. This may be useful
for future students, but is equally valuable
to the students making it as a way of get-
ting them to consolidate their reflections
on their own experience.

DISADVANTAGES
●
Project work takes a lot of marking! Each project is different, and needs to be assessed
carefully. It is not possible for assessors to ‘learn the scheme, and steam ahead’ when mark-
ing a pile of student projects.
●
Projects are necessarily different. This means that some will be ‘easier’, some will be
tough, and it becomes difficult to decide how to balance the assessment dividend between
students who tackled something straightforward and did it well, as opposed to students who
tried something really difficult, and got bogged down in it.
●
Projects are relatively final. They are usually one-off elements of assessment. When stu-
dents fail to complete a project, or fail to get a difficult one started at all, it is rarely feasible
to set them a replacement one.
Designing student projects
Setting, supporting, and assessing such work can be a significant part of the work of a lecturer,
and the following suggestions should help to make these tasks more manageable.
66
The Lecturer’s Toolkit
1
Choose the learning-by-doing to be rel-
evant and worthwhile. Student projects
are often the most significant and
extended parts of their courses, and it is
important that the considerable amount of
time they may spend on them is useful to
them and relevant to the overall learning
outcomes of the courses or modules with
which the projects are associated.
2
Work out specific learning outcomes for
the projects. These will be of an individ-
ual nature for each project, as well as
including general ones relating to the
course area in which the project is located.
3
Formulate projects so that they address
appropriately higher level skills. The
aims of project work are often to bring
together threads from different course
areas or disciplines, and to allow students
to demonstrate the integration of their
learning.
4
Give students as much opportunity as
possible to select their own projects.
When students have a strong sense of
ownership of the topics of their projects,
they put much more effort into their work,
and are more likely to be successful.
5
Include scope for negotiation and
adjustment of learning outcomes.
Project work is necessarily more like
research than other parts of students’
learning. Students need to be able to
adjust the range of a project to follow
through interesting or important aspects
that they discover along the way.
Remember that it is still important to set
standards, and the scope for negotiation
may sometimes be restricted to ways that
students will go about accumulating evi-
dence to match set criteria.
6
Make the project briefings clear, and
ensure that they will provide a solid
foundation for later assessment. Criteria
should be clear and well understood by
students at the start of their work on pro-
jects.
7
Keep the scope of project work realis-
tic. Remember that students will usually
have other kinds of work competing for
their time and attention, and it is tragic
when students succeed with project work,
only to fail other parts of their courses to
which they should have devoted more
time alongside their projects.
8
Liaise with library and information
services colleagues. When a number of
projects make demands on the availability
of particular learning resources or infor-
mation technology facilities, it is
important to arrange this in advance with

13 Poster displays and exhibitions
When students are asked to synthesise the outcomes of their learning and/or research into a self-
explanatory poster, (individually or in groups), which can be assessed on the spot, it can be an
extremely valuable process. More and more conferences are providing poster display opportuni-
ties as an effective way of disseminating findings and ideas. This kind of assessment can provide
practice in developing the skills relevant to communicating by such visual means.
Designing assessment and feedback to enhance learning
67
such colleagues, so that they can be ready
to ensure that students are able to gain
access to the resources they will need.
9 Ensure that a sensible range of factors
will be assessed. Assessment needs to
relate to work that encompasses the whole
of the project, and not be unduly skewed
towards such skills as writing up or oral
presentation. These are likely to be
assessed in any case in other parts of stu-
dents’ work.
10 Collect a library of past projects. This
can be of great help to students starting
out on their own projects, and can give
them a realistic idea of the scope of the
work likely to be involved, as well as ideas
on ways to present their work well.
11 Arrange staged deadlines for projects.
It is very useful for students to be able to
receive feedback on plans for their project
work, so that they can be steered away
from going off on tangents, or from
spending too much time on particular
aspects of a project.
12 Allow sufficient time for project work.
The outcomes of project work may well
include that students develop time-man-
agement and task-management skills
along the way, but they need time and sup-
port to do this. Arrange contact windows
so that students with problems are not left
too long without help.
13 Consider making projects portfolio-
based. Portfolios often represent the most
flexible and realistic way of assessing pro-
ject work, and allow appendices contain-
ing a variety of evidence to be presented
along with the more important parts
showing students’ analysis, thinking,
argument and conclusions.
14 Encourage students to give each other
feedback on their project work. This
can be extended to elements of peer-
assessment, but it is more important
simply to get students talking to each
other about their work in progress. Such
feedback can help students sort out many
of the problems they encounter during
project work, and can improve the overall
standard of their work.
15 Think about the spaces and places
which students will use to do their pro-
ject work. Some of the work may well
occur off-campus, but it remains impor-
tant that students have access to suitable
places to write up and prepare their pro-
ject work for assessment, as well as
facilities and support to help them
analyse the data and materials they accu-
mulate.
16 Include a self-evaluation component in
each project. This allows students to
reflect on their project work, and think
deeper about what went well and where
there may have been problems. It can be
particularly useful to students to get feed-
back about the quality of their
self-evaluation.

ADVANTAGES
●
Poster displays and exhibitions can be a positive step towards diversifying assessment.
Some students are much more at home producing something visual, or something tangible,
than at meeting the requirements of traditional assessment formats such as exams, essays or
reports.
●
Poster displays and exhibitions can provide opportunities for students to engage in
peer-assessment. The act of participating in the assessment process deepens students’
learning, and can add variety to their educational experience.
●
Such assessment formats can help students to develop a wide range of useful, transfer-
able skills. This can pave the way towards the effective communication of research findings,
as well as developing communication skills in directions complementary to those involving
the written (or printed) word.
DISADVANTAGES
●
However valid the assessment may be, it can be more difficult to make the assessment
of posters or exhibitions demonstrably reliable. It is harder to formulate ‘sharp’ assess-
ment criteria for diverse assessment artefacts, and a degree of subjectivity may necessarily
creep into their assessment.
●
It is harder to bring the normal quality assurance procedures into assessment of this
kind. For example, it can be difficult to bring in external examiners, or to preserve the arte-
facts upon which assessment decisions have been made so that assessment can be revisited
if necessary (for example for candidates who end up on degree classification borderlines).
●
It can take more effort to link assessment of this sort to stated intended learning out-
comes. This is not least because poster displays and exhibitions are likely to be addressing a
range of learning outcomes simultaneously, some of which are subject-based, but others of
which will address the development of key transferable skills.
Planning assessed poster displays and exhibitions
68
The Lecturer’s Toolkit
1
Use the assessment process as a show-
case. Students are often rather proud of
their achievements and it can be invalu-
able to invite others in to see what has
been achieved. Think about inviting mod-
erators, senior staff, students on parallel
courses, and employers. Gather their
impressions, either using a short question-
naire, or verbally asking them a couple of
relevant questions about their experiences
of seeing the display.
2
Use posters as a way to help other stu-
dents to learn. For example, final year
students can produce posters showing
the learning they gained during place-
ments. This can be a useful opportunity
for students preparing to find their own
placements to adjust their approaches
and base them on others’ experiences.
3
Get students to peer-assess each other’s
posters. Having undertaken the task of
making posters themselves, they will be
well prepared to review critically the work
of others. This also provides chances for
them to learn from the research under-
taken by the whole cohort rather than just
from their own work.
4
Consider asking students to produce a
one-page handout to supplement their
poster. This will test a further set of skills,
and will provide all reviewers with an aide
memoire for subsequent use.

Designing assessment and feedback to enhance learning
69
5 Give sufficient time for the debrief.
Lots of learning takes place in the discus-
sion during and after the display. The
tendency is to put poster display and exhi-
bition sessions on during the last week of
the term or semester, and this can give lit-
tle time to unpack the ideas at the end.
6 Make careful practical arrangements.
Large numbers of posters take up a lot of
display space, and to get the best effect
they should be displayed on boards.
Organising this is possible in most univer-
sities, for example by borrowing publicity
display boards, but it needs to be planned
in advance. Allow sufficient time for stu-
dents to mount their displays, and make
available drawing pins, sticky tack, tape,
sticky pads, demountable display equip-
ment, and so on.
7 Stagger the assessment. Where peers are
assessing each other’s posters, to avoid
collusion, ‘fixing’, and outbursts of spite,
it is valuable to arrange that half the dis-
play is in one room and the rest in another,
or to run successive displays at different
times. Number the posters and get one
half of the group to assess the odd-num-
bered posters and the other half to assess
the even-numbered ones, and average the
data which is produced.
8 Consider getting groups to produce a
poster between them. This encourages
collaborative working and can reduce the
overall numbers of posters – useful when
student numbers are large. You could then
consider getting students within the group
to peer-assess (intra) their respective con-
tributions to the group as well as to assess
collaboratively the posters of the other
groups (inter-peer-group assessment).
9 Link assessment of poster displays to
open days. Students coming to visit the
institution when they are considering
applying for courses may well get a good
idea about what students actually do on
the courses, from looking at posters on
display.
10 Prepare a suitable assessment sheet.
Base this firmly on the assessment crite-
ria for the exercise. Provide space for
peers’ comments. This paves the way
towards plenty of opportunity for peer
feedback.
11 Use assistance. When working with large
numbers of peer-assessed posters, you
may need help in working out the aver-
aged scores. Either get the students to do
the number work for themselves or for
each other (and advise them that the num-
bers will be randomly checked to ensure
fair play). Alternatively, press-gang col-
leagues, partners, administrators, or
progeny to help with the task.
12 Provide a rehearsal opportunity. Let the
students have a practice run at a relatively
early stage, using a mock-up or a draft on
flipchart paper. Give them feedback on
these drafts, and let them compare their
ideas. This can help them to avoid the
most obvious disasters later.
13 Let everyone know why they are using
poster displays. This method of assess-
ment may be unfamiliar to students, and
to your colleagues. It is therefore valuable
if you can provide a clear justification of
the educational merits of the method to all
concerned.
14 Brief students really carefully about
what is needed. Ideally, let them see a
whole range of posters from previous years
(or some mock-ups, or photographs of pre-
vious displays) so that they have a good
idea about the requirements, without hav-
ing their originality and creativity
suppressed.
15 Use the briefing to discuss criteria and
weighting. Students will need to know
what level of effort they should put into
different elements such as presentation,
information content, structure, visual fea-
tures, and so on. If students are not clear
about this, you may well end up with bril-
liantly presented posters with little
relevance to the topic, or really dull, dense

14 Dissertations and theses
Students invest a great deal of time and energy in producing dissertations and theses, usually in
their final year. Sometimes these arise from the results of their project work. We therefore owe it
to them to mark them fairly and appropriately.
ADVANTAGES
●
Dissertations and theses are individual in nature. There are reduced possibilities regard-
ing plagiarism and cheating, and a greater confidence that we are assessing the work of
individual students.
●
There is usually double or multiple marking. Because dissertations and theses are impor-
tant assessment artefacts, more care is taken to ensure that the assessment is as objective as
possible.
●
There is usually further triangulation. External examiners are often asked to oversee the
assessment of at least a cross-section of dissertations or theses, and sometimes see all of
them. The fact that such triangulation exists is a further pressure towards making the assess-
ment reliable and valid in the first instance.
70
The Lecturer’s Toolkit
posters that try to compress the text of a
long report onto a single A1 sheet.
16 Give students some practical guide-
lines. Let them know how many A1 sheets
they can have, where their work will be
displayed, what size of font the text
should be to be readable on a poster, what
resources will be available to them in col-
lege, and how much help they can get
from outsiders such as friends on other
courses who take good photographs or
who have the knack of writing in attrac-
tive script.
17 Attach a budget to the task. In poster
displays, money shows! If you were to
give a totally free hand to students, the
ones with best access to photocopiers,
photographic resources, expensive papers,
word processors and so on may well pro-
duce better looking products than students
who have little money to spend on their
posters or displays (although it does not
always turn out this way). Giving a
notional budget can help to even out the
playing field, as can requiring students to
only use items from a given list, with
materials perhaps limited to those pro-
vided in workshops in the college.
18 Keep records of poster displays and
exhibitions. Take photographs, or make a
short video. It is not possible to retain
complete displays and exhibitions, but a
handy reminder can be very useful for use
when planning the next similar event.
Evidence of the displays can also be inter-
esting to external examiners and quality
reviewers.
19 Get someone (or a group) to provide a
‘guide booklet’ to the exhibition. This
helps the students undertaking this task to
make relative appraisals of the different
items or collections making up the exhibi-
tion as a whole.
20 Consider turning it into a celebration
as well. After the assessment has taken
place, it can be pleasurable to provide
some refreshments, and make the display
or exhibition part of an end-of-term or
end-of-course celebration.

DISADVANTAGES
●
Assessment takes a long time. Even more so than with student projects, dissertations or
theses are so individual that it is not possible for assessors to ‘get into their stride’ and forge
ahead marking large numbers of these in a given period of time.
●
Assessment can involve subjectivity. For example, it is less possible to achieve ‘anony-
mous’ marking with large-scale artefacts such as these, as the first assessor at least is likely
to have been supervising or advising the candidate along the route towards assessment.
●
Assessment can be over-dominated by matters of style and structure. While both of
these are important and deserve to contribute toward assessment of dissertations or theses,
there is abundant evidence that a well structured, fluent piece of work where the actual con-
tent is quite modest, attracts higher ratings than a less-well structured, somewhat ‘jerky’
piece of work where the content has a higher quality.
Tips on assessing disser tations and theses
Designing assessment and feedback to enhance learning
71
1 Make sure that the assessment criteria
are explicit, clear and understood by
the students. This may seem obvious!
However, theses and dissertations are nor-
mally very different in the topics and
themes they address, and the assessment
criteria need to accommodate such differ-
ences. Students will naturally compare
marks and feedback comments. The avail-
ability of clear criteria helps them see that
their work has been assessed fairly.
2 Get students to assess a few past disserta-
tions. You can’t expect them to do this at
the same level as is appropriate for ‘real’
assessment, but you can (for example) issue
students with a one-sided pro forma ques-
tionnaire to complete as they study
examples of dissertations. Include ques-
tions about the power of the introduction,
the quality and consistency of referencing,
and the coherence of the conclusions.
3 Offer guidance and support to students
throughout the process. Dissertations
usually take students quite some time to
complete. Students appreciate and need
some help along the route. It is worth
holding tutorials both individually and
with groups. This takes good planning,
and dates need to be set well in advance,
and published on a notice board or hand-
out to students.
4 Ensure that student support mecha-
nisms are available. With large class
sizes, we can not afford to spend many
hours of staff time with individual stu-
dents. However, much valuable support
can be drawn from the students them-
selves, if we facilitate ways of them
helping each other. Consider introducing
supplemental instruction processes, or
setting up friendly yet critical student syn-
dicates. Running a half-day workshop
with students counselling each other can
be valuable.
5 Beware of the possibility of bias.
Sometimes dissertations involve students
writing on topics with a sensitive cultural
or political nature. We need to be aware of
any prejudices of our own, and to com-
pensate for any bias these could cause in
our assessment. Whenever possible, dis-
sertations should be second-marked (at
least!).
6 Can you provide students with equal
opportunity regarding selecting their
dissertation themes? Research for some
dissertations will involve students in visit-
ing outside agencies, finding materials for
experiments, building models, and so on.
With resource limitations becoming more
severe, students may be forced to avoid
certain topics altogether. Try to suggest

15 Work-based learning
Increasing use is being made of assessment based on students’ performance in the workplace,
whether on placements, as part of work-based learning programmes, or during practice elements
of courses. Often, a variety of assessors are used, sometimes giving rise to concerns about how
consistent assessment practice between the workplace and the institution can be assured.
Traditional means of assessment are often unsuitable in contexts where what is important is not
easily measured by written accounts. Many courses include a placement period, and the increas-
ing use of accreditation of prior experiential learning in credit accumulation systems means that
we need to look at ways of assessing material produced by students in work contexts, rather than
just things students write up when back at college after their placements.
ADVANTAGES
●
Work-based learning can balance the assessment picture. Future employers are likely to
be at least as interested in students’ work-related competences as in academic performance,
and assessing work-based learning can give useful information about students’ competences
beyond the curriculum.
●
Assessing placement learning helps students to take placements more seriously. As
with anything else, if they’re not assessed, some students will not really get down to learn-
ing from their placements.
●
Assessing placement learning helps to make your other assessments closer to practice.
Although it is difficult to assess placement learning reliably, the validity of the related learn-
ing may outweigh this difficulty, and help you to tune in more successfully to real-world
problems, situations and practices in the rest of your assessment practice.
●
Assessing placement learning can bring you closer to employers who can help you. It is
sometimes possible to involve external people such as employers in some in-college forms
of assessment, for example student presentations, interview technique practising, and so on.
The contacts you make with employers during placement supervision and assessment can
help you to identify those who have much to offer you.
72
The Lecturer’s Toolkit
topics where financial implications are
manageable to students.
7 Check whether dissertations always have
to be bound. This may depend on which
year of the course they are set in. It may be
worth reserving binding for final year dis-
sertations, to help save students money.
8 Help students to monitor their own
progress. It helps to map the assessment
criteria in a way that helps students to
keep track of their own progress and
achievements. Computer programs are
now available which help students work
out how they are getting on, and prompt
them to the next steps they should be con-
sidering at each stage.
9 When assessing dissertations, collect a
list of questions to select from at a
forthcoming viva. Even if there is not
going to be a viva, such lists of questions
can be a useful addition to the feedback
you return to students.
10 Use ‘post-it’ notes while assessing dis-
sertations and theses. These can be
placed towards the edges of pages, so that
notes and questions written on the ‘post-
it’ notes can be found easily again. They
help you avoid having to write directly on
the pages of the dissertation or thesis
(especially when your questions are found
to be addressed two pages later!).

DISADVANTAGES
●
Reliability of assessment is difficult to achieve. Placements tend to be highly individual,
and students’ opportunities to provide evidence that lends itself well to assessment can vary
greatly from one placement to another.
●
Some students will have much better placements than others. Some students will have
the opportunity to demonstrate their flair and potential, while others will be constrained into
relatively routine work practices.
Assessing work-based learning
The following suggestions may help you to strike an appropriate balance between validity and
reliability if your assessment agenda includes assessing work-based learning, whether associated
with work placements, or arising from a need to accredit prior experiential learning.
Designing assessment and feedback to enhance learning
73
1 Explore how best you can involve
employers, professional supervisors
and colleagues. They will need careful
briefing, and negotiation may also be
required to achieve their full cooperation,
as they (like you!) are often very busy
people. Ways of involving them include
asking them to produce testimonials,
statements of competence, checklists,
grids and pro formas, or simply to sign off
students’ own statements of competence
or achievement.
2 Be clear about the purpose of the
assessment. Is the assessment being done
to satisfy a funding body, or because it is
required by the university, or because the
employers wish it to be done? Or is the
assessment primarily to aid students’
learning? Or is the assessment primarily
designed to help students develop skills
and experience which will aid their future
careers? Clarifying the purposes can help
you decide the most appropriate forms of
assessment.
3 Get the balance right. Work out care-
fully what proportion of students’ overall
assessment will be derived from their
placements. Decide whether the related
assessment should be on a pass–fail basis,
or whether it should be attempted to clas-
sify it for degrees.
4 Expect placements to be very different.
If a group of students are spread through a
number of companies or organisations,
some will have a very good experience of
placement, and others through no fault of
their own can have an unsatisfactory
experience. It is important that factors
outside students’ control are not allowed
to prejudice assessment.
5 Consider carefully whether a mentor is
well-placed to assess. There can some-
times be complex confusions of role if the
person who is the professional supporter
or friend of the student whose perfor-
mance is being assessed is also the person
who has to make critical evaluations for
assessment purposes.
6 Decide carefully whether to tutor-
assess during workplace visits. Visiting
students on placement certainly gives
tutors opportunities to gather data that
may be relevant to assessment, but if
assessment is on the agenda the whole
nature of such visits changes. One way of
separating the assessment ethos from the
workplace environment is to handle at
least some face-to-face meetings with
students off site rather than at the work-
place.
7 Consider including the assessment of a
work log. Some professions prescribe the
exact form such a log or work diary
should take, whereas in other work con-
texts it is possible for the course team or
the students themselves to devise their

Making formative feedback work
The National Student Survey in England and Wales in 2005 showed that the areas where students
expressed least satisfaction regarding their experience of final-year university studies were those
linking to assessment and feedback. John Cowan, formerly Director of the Open University in
Scotland famously described assessment as the engine that drives learning, to which I would add
that feedback is the oil that lubricates the cogs of understanding. Boud (1988) would add:
‘Assessment methods and requirements probably have a greater influence on how and what stu-
dents learn than any other single factor. This influence may well be of greater importance than
the impact of teaching materials.’
And ‘feed-forward’?
In practice, most feedback comprises not just commentary about what has been done, but sug-
gestions for what can be done next. In particular, advice about how to improve the next element
of work can be particularly helpful to students receiving feedback, especially when this advice is
received during the progress of ongoing work, so that adjustments can be made in a progressive
manner. It can be worth checking that enough ‘feed-forward’ is being given, rather than merely
feedback on what has already been done. It is also important to help students themselves to dis-
tinguish between feedback and feed-forward, and to look carefully for the latter, and regard it as
the most useful part, and consciously build upon it as their work progresses.
74
The Lecturer’s Toolkit
own formats. It is often helpful if such
logs include lists of learning outcomes,
skills, or competences that students are
expected to achieve and demonstrate,
with opportunities to check off these and
add comments as appropriate. It can be
even better to encourage students to
express as learning outcomes unantici-
pated
learning that they discover
happening to them during a placement.
Some of these outcomes may be more
important than the intended ones.
8 Ask students to produce a reflective
journal. This can be a much more per-
sonal kind of document, and might
include hopes, fears and feelings as well
as more mundane accounts of actions and
achievements. Assessing reflective jour-
nals can raise tricky issues of
confidentiality and disclosure, but ways
round such issues can be found, particu-
larly if students are asked to submit for
assessment edited extracts from their
reflective journals.
9 Consider using a portfolio. A portfolio
to demonstrate achievement at work can
include suitably anonymised real products
from the workplace (with the permission
of the employer) as well as testimonials
from clients, patients, support staff and
others.
10 Help to ensure that assessment does not
blind students to their learning on
placement. Consider asking students who
have completed work placements to write
their experiences up in the form of a jour-
nal article, perhaps for an in-house
magazine or journal. A collection of these
can help to disseminate their experiences.
Joint articles written with employers are
even more valuable, and help make links
with employers better.

What is formative assessment?
This is a highly contested term with no common understanding in the literature. Orsmond et al.
(2004) have identified from the literature a range of interpretations of the term. Pickford and
Brown (2006), quoting Cowie and Bell, use the following working definition: ‘The process used
... to recognise, and respond to, student learning in order to enhance that learning, during learn-
ing’ (Cowie and Bell 1999) (their italics). The problem could be considered to be that students
receive too much feedback after learning, rather than during learning, hence their need for much
more feed-forward.
What’s the difference between formative and summative assessment?
Sadler, who has written extensively about the powerful impact that formative assessment can
have on achievement suggests:
Summative contrasts with formative assessment in that it is concerned with summing up or
summarizing the achievement status of a student, and is geared towards reporting at the end
of a course of study especially for purposes of certification. It is essentially passive and does
not normally have immediate impact on learning, although it often influences decisions
which may have profound educational and personal consequences for the student. The pri-
mary distinction between formative and summative assessment relates to purpose and
effect, not to timing. It is argued below that many of the principles appropriate to summative
assessment are not necessarily transferable to formative assessment; the latter requires a dis-
tinctive conceptualization and technology.
(Sadler 1989)
A number of writers argue that ‘pure’ formative assessment does not include marks and grades
and Sadler concurs with this view:
A grade therefore may actually be counterproductive for formative purposes. In assessing
the quality of a student’s work or performance, the teacher must possess a concept of qual-
ity appropriate to the task, and be able to judge the student’s work in relation to that concept.
(Sadler 1989)
Nevertheless, many assessors feel that for students, particularly those working to demonstrate
capability in live and practical skills, some kind of indication of level of achievement is valuable
and that formative assessment is principally a means by which tutors can support the develop-
ment of their students’ understanding and encourage them to progress by providing feedback that
is meaningful to the individual.
The role of the tutor in providing formative feedback
The role of the teacher could broadly be described as working to reduce (but not necessarily
eliminate) the rate of error production in trial and error learning, and thereby to make learning
more efficient. (Sadler 1998). Sadler asks what good teachers do in providing feedback to stu-
dents. He argues that they bring to the task of assessment:
Designing assessment and feedback to enhance learning
75

1
Superior knowledge about the content or substance of what is to be learned.
2
A set of attitudes or dispositions towards teaching as an activity, and towards learners,
including their own ability to empathize with students who are learning, their desire to help
students develop, improve and do better, their personal concern with the validity of feed-
back and the veracity of their own judgments, and their patterns in offering help.
3
Skill in constructing or compiling tests, in devising tasks, and generally in working out ways
to elicit revealing and pertinent responses from students.
4
Evaluative skill or expertise in having made judgments about student efforts on similar tasks
in the past.
5
Expertise in framing feedback statements for students.
(Adapted from Sadler 1998)
Getting students to make use of formative feedback
Students tend to be really bad at doing anything constructive with the feedback we give them.
Often they are only interested in the mark, and sometimes they don’t even bother to read what we
have written. When receiving feedback live, they frequently fail to retain what is said to them,
apart from when their own views (or worst fears) of how they have performed are confirmed.
Sadler argues that getting a clear picture in mind of the characteristics of high quality work is
imperative:
A key premise is that for students to be able to improve, they must develop the capacity to
monitor the quality of their own work during actual production, rather than later on. This in
turn requires that students possess an appreciation of what high quality work is, that they
have the evaluative skill necessary for them to compare with some objectivity the quality of
what they are producing in relation to the higher standard, and that they develop a store of
tactics or moves which can be drawn upon to modify their own work.
(Sadler 1989)
We need to find ways to help students make good use of the hard work we put into giving them
feedback, to interpret it appropriately, to see how the comments and advice they are given links
to what they are doing, and to turn this into improvements in competence and knowledge. Sadler
proposes that it is crucial that the student works with the feedback s/he receives in order to inter-
nalise the standards that are required:
The indispensable conditions for improvement are that the student comes to hold a concept
of quality roughly similar to that held by the teacher, is able to monitor continuously the
quality of what is being produced during the act of production itself, and has a repertoire of
alternative moves or strategies from which to draw at any given point. In other words, stu-
dents have to be able to judge the quality of what they are producing and be able to regulate
what they are doing during the doing of it.
(Sadler 1989)
Giving formative feedback is not unproblematic. We can’t just assume that they know what to do
with the commentary we give them; we need to help them engage with it positively and produc-
tively. Sadler further describes:
76
The Lecturer’s Toolkit

... the common but puzzling observation that even when teachers provide students with valid
and reliable judgments about the quality of their work, improvement does not necessarily
follow. Students often show little or no growth or development despite regular, accurate
feedback. The concern itself is with whether some learners fail to acquire expertise because
of specific deficiencies in the instructional system associated with formative assessment.
(Sadler 1989)
Using formative assessment to improve student retention
In relatively recent history in UK higher education, high rates of ‘wastage’ were regarded as a
form of quality assurance. ‘Look to the right and left of you,’ students in their first lecture at uni-
versity were commonly told, ‘and remember only one of you will achieve a degree’. This
brutalist approach certainly weeded out the unconfident and those who didn’t really think they
belonged in higher education anyway, but didn’t do a lot for social justice. Today most academics
would hold back from such an approach, but some residual sentiments of that kind still remain in
some pockets of traditionalism. However, nowadays staff are more likely to be deeply concerned
to maximise the number of students who successfully complete their awards, not only because it
is nowadays a key governmental performance indicator in many countries, the ignoring of which
can result in financial penalties, but also because they work in values-driven organisations that
genuinely care about students as people, not just statistics.
Yorke (2002), who has pioneered research into student retention in the UK, proposes a num-
ber of reasons for student non-completion: among these, the lack of formative assessment ranks
highly, especially in the early stages of a programme of learning. If students haven’t a clue about
how they are doing, a negative mindset can easily develop, leading to a downward spiral and ulti-
mate drop-out.
Do students know what we’re expecting from them?
A number of studies have suggested that a key issue lies around the management of expectations
of students about what studying at degree level implies. For many undergraduate students on
degree courses, particularly those studying part-time, balancing paid work, caring responsibilities
and studying can lead to a corner-cutting approach, so that only essential tasks are completed.
This means in essence that they only do assessed work, and only this if there are heavy penalties
for non-completion. Bowl (2003) reported one of the students in her study saying:
‘If 25 per cent of your marks is from reading, you’ve got to try and show that, even if you
haven’t read. I’m not going to sit there and read a chapter, and I’m certainly not going to
read a book. But I’ll read little paragraphs that I think are relevant to what I’m writing, and
it’s got me through, and my marks have been fine. But I can’t read. If I read too much, it
goes over my head. If I’m writing something, I know what I want to say and I need some-
thing to back me up ... then I will find something in a book that goes with that. I’m not going
to try to take in the whole book just for one little bit. I have my book next to me and then I
can pick out the bits’ (Jenny, full-time community and youth work student).
(Bowl 2003: 89)
Students in her study also experience worrying levels of lack of clarity about what is expected of
them, despite having been given plenty of advice in course documentation:
Designing assessment and feedback to enhance learning
77

‘The hardship was not understanding. When they give you an assignment and say it was on
this handout. But my difficulty is not understanding what to do at first ... I think that there’s
a lack of my reading ability, which I can’t blame anyone for. I can only blame myself
because I don’t like reading. And if you don’t read, you’re not going to learn certain things.
So I suppose that’s to do with me ... it’s reading as well as putting what you read into your
essay. You can read it and understand it. I can read and understand it, but then you have to
incorporate it into your own words. But in the words they want you to say it in, not just: She
said this, and this is the way it should be. The words, the proper language. Maybe it’s
because I have difficulty pronouncing certain words. I avoid using them as they’re not
familiar to me. When I’m writing, I find that because I’m not familiar with those words, it’s
hard to write them ... I haven’t really gone into it, because I don’t want them to say, you’re
not supposed to be on this course, or anything like that. I’ve come too far now for them to
say that, so I don’t like raising the issue’ (Helen, brought up in Jamaica).
(Bowl 2003: 90)
Using formative feedback to help students develop academic skills
We are used to hearing much about the problems students experience with getting inside the aca-
demic discourse and discovering how best to undertake academic writing in ways that often
don’t come naturally to second-chance or late achieving students. However, there seems to be a
real crisis about reading among students, and one of the problems emerging about formative
assessment is the danger that those very students who are feeling swamped by all the reading
required of them, will be the ones who find themselves directed towards yet more reading of for-
mative feedback, whether this is tutor- or peer-initiated.
In the context of widening participation, perhaps we need to reconsider our expectations
about the amount of reading we require of our students. When less than 10 per cent of the 18–30
population participated in higher education, it may have been reasonable to expect that our stu-
dents would be likely to have well-developed skills relating to academic reading. With
approaching 50 per cent of the 18–30 population in higher education, it should not surprise us
that a significant proportion of our students have not attained this level of expertise in reading
for academic purposes by the time they come to study with us. Can we train all these students to
the necessary extent? Or should we perhaps be considering reducing our expectations regarding
academic reading, and focusing on the quality of reading rather than the quantity or breadth of
reading?
So what’s to be done?
Yorke (2002) provides us with confidence that we can actually make a difference to the dismal
picture of dropout and perceptions of failure:
Whereas a higher education institution can not do much about students’ background cir-
cumstances, it is probable that there is more academic failure in UK higher education than
there should be. There seems to be scope in institutions for improving the ways in which
they support students’ learning – and hence for reducing the incidence of academic failure.
In the end, this comes down to an orientation towards the enhancement of the quality of the
student experience.
(Yorke 2002: 39)
78
The Lecturer’s Toolkit

There is a case to be made for institutions to consider spending considerable time and resources on
students undertaking their first programmes of study to help them understand the purposes of for-
mative feedback and how their own self-beliefs can impact on the ways they receive it. Inevitably
this would eat into available time for content delivery, which academic staff no doubt would be
unwilling to see slimmed down, but if we are serious about retaining students as a key means of
survival in an increasingly competitive world, then tough decisions might have to be made.
Quality of feedback
If ‘assessment is the engine that drives learning’ (John Cowan), then the ways in which we give
feedback are important in gearing and lubricating the engine so that maximum effect is achieved
from the effort put in by all concerned. This section of the chapter explores a variety of ways in
which feedback can be given to students, and includes many suggestions for optimising the use-
fulness of such feedback.
How can we best give feedback to students? We can select from a wide range of processes,
but we also need to address as many as possible of a range of qualities and attributes in our strat-
egy for providing feedback.
For example, feedback needs to be:
●
Timely – the sooner the better. There has been plenty of research into how long after the
learning event it takes for the effects of feedback to be significantly eroded. Ideally feed-
back should be received within a day or two, and even better almost straightaway, as is
possible (for example) in some computer-aided learning situations, and equally in some
face-to-face contexts. When marked work is returned to students weeks (or even months)
after submission, feedback is often totally ignored because it bears little relevance to stu-
dents’ current needs then. Many institutions nowadays specify in their Student Charters that
work should be returned within two to three weeks, enabling students to derive greater ben-
efits from feedback. When feedback is received very quickly, it is much more effective, as
students can still remember exactly what they were thinking as they addressed each task.
●
Intimate and individual. Feedback needs to fit each student’s achievement, individual
nature and personality. Global ways of compiling and distributing feedback can reduce the
extent of ownership which students take over the feedback they receive, even when the qual-
ity and amount of feedback is increased. Each student is still a person.
●
Empowering. If feedback is intended to strengthen and consolidate learning, we need to
make sure it doesn’t dampen learning down. This is easier to ensure when feedback is posi-
tive of course, but we need to look carefully at how best we can make critical feedback
equally empowering to students. We must not forget that often feedback is given and
received in a system where power is loaded towards the provider of the feedback rather than
the recipient – for example where we are driving assessment systems.
●
Opening doors, not closing them. In this respect, we have to be particularly careful with
the words we use when giving feedback to students. Clearly, words with such ‘final lan-
guage’ implications as ‘weak’ or ‘poor’ cause irretrievable breakdowns in the
communication between assessor and student. To a lesser extent, even positive words such
as ‘excellent’ can cause problems when feedback on the next piece of work is only ‘very
good’ – why wasn’t it excellent again? In all such cases it is better to praise exactly what was
very good or excellent in a little more detail, rather than take the short cut of just using the
adjectives themselves.
Designing assessment and feedback to enhance learning
79

●
Manageable. There are two sides to this. From our point of view, designing and delivering
feedback to students could easily consume all the time and energy we have – it is an endless
task. But also from students’ point of view, getting too much feedback can result in them not
being able to sort out the important feedback from the routine feedback, reducing their
opportunity to benefit from the feedback they need most.
The suggestions below unpack how you can set about trying to ensure that the feedback you pro-
vide for your students addresses the factors listed above. Furthermore, some of the suggestions
below are intended to help you to maintain high-quality feedback to your students without con-
suming inordinate amounts of your precious time and energy.
80
The Lecturer’s Toolkit
1
Try to do more than put ticks. Tempting
as it is to put ticks beside things that are
correct or good, ticks don’t give much real
feedback. It takes a little longer to add
short phrases such as ‘good point’, ‘I
agree with this’, ‘yes, this is it’, ‘spot on’,
and so on, but such feedback comments
do much more to motivate students than
just ticks. Think about how students will
feel when they get marked work back.
Students can be in states of heightened
emotion at such points. If their scripts are
covered with comments in red ink (even
when it is all praise) it is rather intimidat-
ing for them at first.
2
Avoid putting crosses if possible.
Students often have negative feelings about
crosses on their work, carried forward from
schooldays. Short phrases such as ‘no’,
‘not quite’, ‘but this wouldn’t work’, and
so on can be much better ways of alerting
students to things that are wrong.
3
Try to make your writing legible. If
there is not going to be room to make a
detailed comment directly on the script,
put code numbers or asterisks, and write
your feedback on a separate sheet. A use-
ful compromise is to put feedback
comments on ‘post-it’ notes stuck to
appropriate parts of a script, but it’s worth
still using a code, asterisk or some such
device so that if students remove the
‘post-it’ notes as they read through their
work, they can still work out exactly
which points your comments apply to.
4
Try giving some feedback before you
start assessing. For example, when a class
hands in a piece of work, you can issue at
once handouts of model answers and dis-
cussions of the main things that may have
caused problems. Students can read such
information while their own efforts are
still fresh in their minds, and can derive a
great deal of feedback straightaway. You
can then concentrate, while assessing, on
giving them additional feedback individu-
ally, without going into detail on things
that you have already addressed in the
general discussion comments you have
already given them.
5
Give feedback to groups of students
sometimes. This helps students become
aware that they are not alone in making
mistakes, and allows them to learn from
the successes and failures of others.
6
Let students argue. When giving one-to-
one feedback, it is often useful to allow
students the opportunity to interrogate
you and challenge your comments (orally
or in writing) so that any issues which are
unclear can be resolved.
7
Feedback should be realistic. When
making suggestions for improvement of
student work, consider carefully whether
they can be achieved. It may not have
been possible (for example) for students
to gain access to certain resources or
books in the time available.
8
Feedback should be linked to wealth!
Check that you are not giving feedback on

Feedback and competence development
In Chapter 1 I included a model tracking the development of conscious competence. Feedback is
important in all four ‘states’ represented in the diagram in Figure 2.1 on the next page.
Feedback addressing conscious competence
Giving students feedback on things they can already do well, and know they’re already compe-
tent at doing, is trickier than may seem obvious! When students know that they have done
something well, any feedback which smacks of ‘faint praise’ can be quite damning. However, if
we wax too lyrical in our praise, it can be seen as condescending. We need to pit our wits towards
helping students to take ownership of their successes in this scenario, for example:
‘I’m sure you already realise you’ve done a really good job with this ...’ or
‘Do stop for a moment and think about how well you’ve done this, and how useful it will be for
you to continue to hone these skills – don’t lose them!’
Designing assessment and feedback to enhance learning
81
the amount of money that was spent on
the work you mark, for example when
some students can submit work produced
by expensive desktop publishing systems,
other students have no access to such
facilities.
9 Feedback should be honest. When there
are serious problems which students need
to be made aware of, feedback comments
should not skirt round these or avoid
them. It may be best to arrange for indi-
vidual face-to-face feedback sessions
with some students, so you can give any
bad news in ways where you can monitor
how they are taking it, and provide appro-
priate comfort at the same time.
10 Feedback can be given before scores or
grades. Consider whether sometimes it
may be worth returning students’ work to
them with feedback comments but no
grades (but having written down your
marks in your own records). Then invite
students to try to work out what their
scores or grade should be, and to report to
you in a week’s time what they think. This
causes students to read all your feedback
comments earnestly in their bid to work
out how they have done. Most students
will make good guesses regarding their
grades, and it’s worth finding out which
students are way out too.
11 Think about audiotapes for giving feed-
back. In some subjects, it is quite hard to
write explanatory comments on students’
work. For example, in mathematical prob-
lems, it can be quicker and easier to ‘talk’
individual students through how a prob-
lem should be solved, referring to
asterisks or code-numbers marked on
their work. Such feedback has the advan-
tages of tone of voice for emphasis and
explanation. Another advantage is that
students can play it again, until they have
fully understood all of your feedback.
12 Consider giving feedback by email.
Some students feel most relaxed when
working at a computer terminal on their
own. With email, students can receive
your feedback when they are ready to
think about it. They can read it again later,
and even file it. Using email, you can give
students feedback asynchronously as you
work through their scripts, rather than
having to wait till you return the whole set
to a class.

Feedback addressing conscious uncompetence
We’re more practised at giving this sort of feedback. Much of the feedback we routinely give stu-
dents is directed towards helping them to become better at things they already know they can’t
yet do. We can help by giving them suggestions about what to do first in their attempts to move
things upwards out of the ‘transit’ box on the diagram. We can help them prioritise which things
are worth trying to move, and which are not important enough to bother with.
Feedback addressing unconscious uncompetence
This is by far the most importance area for feedback. One of the main points of having assessed
coursework is to use this sort of feedback to help students find out much more about what they
didn’t yet know that they couldn’t yet do. In other words, we use feedback to help students to
move things out of their danger box and into their transit box, on the way towards the target box.
It could be said that the art of teaching lies in helping students to explore their danger box,
and to identify important elements hiding there, bringing them out into the open, then moving
them towards conscious competence.
The fact that this is an everyday part of helping students to learn does not mean that it is an
easy part. For a start, we are talking about giving feedback addressing unconscious uncompe-
tences. Therefore, the first hurdle is gently alerting students to things that they didn’t know were
there. There is an element of surprise. Some of the surprises will be unpleasant ones – where (for
example) students had thought that they were consciously competent in the aspect concerned.
It’s the ‘bad news’ box. The good news is that the things identified won’t be bad news any more,
once moved.
82
The Lecturer’s Toolkit
Competence
Target
Transit
Danger
Uncompetence
Conscious
Can do
Can't yet do
Unconscious
Magic
Figure 2.1 Linking feedback to competence development

Feedback addressing unconscious competence
This is another surprise box, but this time it’s a ‘good news’ box. For example, part-time mature
students bring to their educational experience a wide range of unconscious competences. These
are things that they are good at, but don’t know how useful and important the things themselves
could turn out to be. For example, they’re often really skilled at time-management and task-man-
agement. Their life experience has often allowed them to develop skills at handling a number of
different agendas at once, and prioritising between competing demands.
Moving these unconscious competences towards the conscious level almost always results in
an increase of confidence and self-esteem. If you’ve just been helped to see that you’re actually
very good at something that you hadn’t ever suspected was among your strengths, would you not
feel good about it?
Reducing your load: short cuts to good feedback
Keep records carefully ...
Keeping good records of assessment takes time, but can save time in the long run. The following
suggestions may help you organise your record-keeping.
Designing assessment and feedback to enhance learning
83
1
Be meticulous. However tired you are at
the end of a marking session, record all
the marks immediately (or indeed contin-
uously as you go along). Then put the
marks in a different place to the scripts.
Then should any disasters befall you
(briefcase stolen, house burned down, and
so on) there is the chance that you will
still have the marks even if you don’t have
the scripts any longer (or vice versa).
2
Be systematic. Use class lists, when
available, as the basis of your records.
Otherwise make your own class lists as
you go along. File all records of assess-
ment in places where you can find them
again. It is possible to spend as much time
looking for missing marksheets as it took
to do the original assessment!
3
Use technology to produce assessment
records. Keep marks on a grid on a com-
puter, or use a spreadsheet, and save by
date as a new file every time you add to it,
so you are always confident that you are
working with the most recent version.
Keep paper copies of each list as an insur-
ance against disaster! Keep backup copies
of disks or sheets – simply photocopying
a handwritten list of marks is a valuable
precaution.
4
Use technology to save you from num-
ber-crunching. The use of computer
spreadsheet programs can allow the
machine to do all of the subtotalling, aver-
aging and data handling for you. If you
are afraid to set up a system for yourself, a
computer-loving colleague or a member
of information systems support staff will
be delighted to start you off.
5
Use other people. Some universities
employ administrative staff to issue and
collect in work for assessment, and to
make up assessment lists and input the
data into computers. Partners, friends and
even young children can help you check
your addition of marks, and help you
record the data.

Reduce your burden ...
Straightforward ways to lighten your assessment and feedback load are suggested below.
84
The Lecturer’s Toolkit
1
Reduce the number of your assign-
ments. Are all of them strictly necessary,
and is it possible to combine some of
them, and completely delete others?
2
Use shorter assignments. Often we ask
for 2000, 3000 or 5000 word assignments
or reports, when a fraction of the length
can be just as acceptable. Some essays or
long reports could be replaced by shorter
reviews, articles, memorandum reports or
summaries. Projects can be assessed by
poster displays instead of reports, and
exam papers can include some sections of
multiple-choice questions particularly
where these could be marked by optical
mark scanners, or using computer man-
aged assessment directly.
3
Use assignment return sheets. These can
be pro formas which contain the assess-
ment criteria for an assignment, with
spaces for ticks/crosses, grades, marks
and brief comments. They enable rapid
feedback on ‘routine’ assessment matters,
providing more time for individual com-
ment to students when necessary on
deeper aspects of their work.
4
Consider using statement banks. These
are a means whereby your frequently
repeated comments can be written once
each, then printed or emailed to students,
or put onto transparencies or slides for
discussion in a subsequent lecture.
5
Involve students in self- or peer-assess-
ment. Start small, and explain what you
are doing and why. Involving students in
some of their assessment can provide
them with very positive learning experi-
ences.
6
Mark some exercises in class time using
self- or peer-marking. This is sometimes
useful when students have prepared work
expecting tutor-assessment, to the stan-
dard that they wish to be seen by you.
7
Don’t count all assessments. For exam-
ple, give students the option that their best
five out of eight assignments will count as
their coursework mark. Students satisfied
with their first five need not undertake the
other three at all then.
And when you still find yourself overloaded ...
No one wants to have to cope with huge piles of coursework scripts or exam papers. However,
not all factors may be within your control, and you may still end up overloaded. The following
wrinkles may be somewhat soothing at such times!
1
Put the great unmarked pile under your
desk. It is very discouraging to be contin-
ually reminded of the magnitude of the
overall task. Put only a handful of scripts
or assignments in sight – about as many as
you might expect to deal with in about an
hour.
2
Set yourself progressive targets. Plan to
accomplish a bit more at each stage than
you need to. Build in safety margins. This
allows you some insurance against
unforeseen disasters (and children), and
can allow you to gradually earn some time
off as a bonus.
3
Make an even better marking scheme.
Often, it only becomes possible to make a
really good marking scheme after you’ve
found out the ways that candidates are actu-
ally answering the questions. Put the
marking scheme where you can see it eas-
ily. It can be useful to paste it up with sticky
tack above your desk or table, so you don’t
have to rummage through your papers
looking for it every time you need it.

Involving students in their own assessment
Nothing affects students more than assessment, yet they often claim that they are in the dark as
to what goes on in the minds of their assessors and examiners. Involving students in peer- and
self-assessment can let them in to the assessment culture they must survive. Increasingly peer-
assessment is being used to involve students more closely in their learning and its evaluation,
and to help to enable students really understand what is required of them. It is not a ‘quick fix’
solution to reduce staff marking time, as it is intensive in its use of lecturer time at the briefing
and development stages. It can have enormous benefits in terms of learning gain. The following
suggestions may help you get started with student peer-assessment.
Why consider using student peer-assessment?
Introducing student peer-assessment can seem a daunting and hazardous prospect, if you’re sur-
rounded by an assessment culture where lecturers undertake all of the assessing. There are,
however, several good reasons why the prospect should not be seen as so formidable, and some
of these are proposed below.
Designing assessment and feedback to enhance learning
85
4
Mark in different places! Mark at work,
at home, and anywhere else that’s not pub-
lic. This means of course carrying scripts
around as well as your marking scheme
(or a copy of it). It does, however, avoid
one place becoming so associated with
doom and depression that you develop
place-avoidance strategies for it!
5
Mark one question at a time through all
the scripts, at first. This allows you to
become quickly skilled at marking that
question, without the agenda of all the rest
of the questions on your mind. It also
helps ensure reliability and objectivity of
marking. When you’ve completely mas-
tered your marking scheme for all
questions, start marking whole scripts.
1
Students are doing it already. Students
are continuously peer-assessing in fact.
One of the most significant sources of
answers to students’ pervading question:
‘How am I doing?’ is the feedback they
get about their own learning achievements
and performances by comparing with
those of others. It is true that feedback
from tutors is regarded as more authorita-
tive, but there is less such feedback
available from tutors than from fellow stu-
dents. Setting up and facilitating
peer-assessment therefore legitimises and
makes respectable something that most
students are already engaged in.
2
Students find out more about our
assessment cultures. One of the biggest
dangers with assessment is that students
often don’t really know how their assess-
ment works. They often approach both
exams and tutor-marked coursework like
black holes that they might be sucked
into! Getting involved in peer-assessment
makes the assessment culture much more
transparent, and students gain a better
idea of exactly what will be expected of
them in their efforts to demonstrate their
achievement of the intended learning out-
comes.
3
We can’t do as much assessing as we
used to do. With more students, heavier
teaching loads, and shorter timescales
(sometimes caused by moves to modulari-
sation and semesterisation), the amount of
assessment that lecturers can cope with is
limited. While it is to be hoped that our
assessment will still be valid, fair and reli-
able, it remains the case that the amount

Getting students to formulate their peer-assessment criteria
As mentioned already, peer-assessment works at its best when students own the assessment cri-
teria. Furthermore, it is important that the criteria are clearly understood by all the students, and
their understanding is shared. The best way of developing a set of good criteria is to involve the
students from the outset in the process. It is crucial not to put words in students’ mouths during
this process, otherwise the assessment agenda can revert to academic terminology which stu-
dents don’t understand. The following processes can be used to generate a set of peer-assessment
criteria ‘from scratch’. I have used this process with groups of nearly 200 students, as well as
with more intimate groups of 20 upwards.
It really does not matter what the task that students are going to peer-assess involves. The
process below will be described in terms of students peer-assessing ‘a presentation’, but the
process could be identical for generating student-owned assessment criteria for ‘an essay’, ‘a
report’, ‘a poster display’, ‘an interview’, ‘an annotated bibliography’, ‘a student-devised exam
paper’, and countless other assessment possibilities.
It is possible to go through all of the processes listed below, with a group of over 100 students,
in less than an hour. The more often you do this with students, the faster and better you will
become at it (and at taking short cuts where appropriate, or tailoring the steps to your own sub-
ject, and to the particular students, and so on).
In practice, you are very unlikely to need to build in all eighteen of the steps outlined in the
list below in any given instance of negotiating criteria with a group of students. Usually, at least
some of the processes below may be skipped, but it is worth thinking through the implications of
all of the stages before making your own decision about which are most relevant to the particu-
lar conditions under which you are planning to facilitate peer-assessment.
86
The Lecturer’s Toolkit
of feedback to students that lecturers can
give is less per capita. Peer-assessment,
when facilitated well, can be a vehicle for
getting much more feedback to students.
4
Students learn more deeply when they
have a sense of ownership of the
agenda.
When peer-assessment is
employed using assessment criteria that
are devised by the students themselves,
the sense of ownership of the criteria
helps them to apply their criteria much
more objectively than when they are
applying tutors’ criteria to each other’s
work.
5
The act of assessing is one of the deep-
est learning experiences. Applying
criteria to someone else’s work is one of
the most productive ways of developing
and deepening understanding of the sub-
ject matter involved in the process.
‘Measuring’ or ‘judging’ are far more rig-
orous processes than simply reading, lis-
tening or watching.
6
Peer-assessment allows students to
learn from each other’s successes.
Students involved in peer-assessment can
not fail to take notice of instances where
the work they are assessing exceeds their
own efforts. When this learning-from-
each-other is legitimised and encouraged,
students can benefit a great deal from the
work of the most able in the group.
7
Peer-assessment allows students to
learn from each other’s weaknesses.
Students peer-assessing are likely to dis-
cover all sorts of mistakes that they did
not make themselves. This can be really
useful for them, as their awareness of
‘what not to do’ increases, and they
become much less likely to fall into traps
that might otherwise have caused them
problems in their future work.

Designing assessment and feedback to enhance learning
87
1
Brainstorming: Ask all students to jot
down individually a few key words in
response to: ‘What makes a really good
10-minute presentation? Jot down some
of the things you would look for in an
excellent example of one’.
2
Sharing: Get students to work in groups.
Even in a large lecture theatre, they can
work in groups of four or five with their
near neighbours. Alternatively, if students
are free to move around the room where
the exercise is happening, they can be put
into random groups (alphabetical, or by
birthday month, or allowed to form self-
selecting groups). Ask the groups to share
and discuss for a few minutes all of their
ideas for a good presentation.
3
Prioritising: Ask the groups to make a
shortlist of (say) ‘the most important five
features of a good 10-minute presenta-
tion’. Ask each group to appoint a scribe
to note down the shortlist.
4
Editing: Get the groups to look carefully
at the wording of each item on their short-
lists. For example, tell them that when
they report back an item from their list, if
you can’t tell exactly what it means, you
will ask them to tell you ‘what it really
means is ...’. Maybe mention that some of
the more academic words such as ‘coher-
ence’, ‘structure’ and ‘delivery’ may need
some translation into everyday words
(maybe along the lines of ‘hangs well
together, one point following on logically
to the next’, ‘good interest-catching open-
ing, logical order for the middle, and firm,
solid conclusion’, and ‘clearly spoken,
well-illustrated, backed-up by facts or fig-
ures’). However, don’t put too many
words of any kind into students’ minds, let
them think of their own words.
5
Re-prioritising: Remind the groups
about the shortlisting process, and to get
their five features into order of priority.
This may have changed during the edit-
ing process, and meanings became
clearer.
6
Turning features into checklist ques-
tions: Suggest that the groups now edit
each of their features into a question for-
mat. For example, ‘was there a good
finish?’, ‘how well was the material
researched?’, and so on. The point of this
is to pave the way for a checklist of crite-
ria that will be more straightforward as a
basis for making judgements.
7
Collecting the most important questions
in the room: Now start collecting ‘top’
feature-questions. Ask each group in turn
for the thing that came top of its list. Write
these up, one at a time, on a flipchart or
overhead transparency, so that the whole
class can see the emerging list of criteria.
Where one group’s highest-rating point is
very similar to one that has already been
given, either put a tick beside the original
one (to acknowledge that the same point
has been rated as important by more than
one group), or (better) adjust the wording
slightly so that the flipcharted criterion
reflects both of the sources equally.
Continue this process until each of the
groups has reported its top criterion.
8
Fleshing out the agenda: Now go back
round the groups (in reverse order) asking
for ‘the second-most-important thing on
your list’. At this stage, the overlaps begin
to occur thick and fast, but there will still
emerge new and different checklist-ques-
tions based on further features identified
by the groups. Use ticks (maybe in a dif-
ferent colour from the overlaps of
top-rated questions) to make the degree of
concurrence visible to the whole group as
the picture continues to unfold. With a
large class, you may need to use more
than one flipchart-sheet (or overhead
transparency), but it is important to try to
keep all of the agenda that is unfolding
visible to the whole class. This means
posting up filled flipcharts where every-
one can see them, or alternating the
transparencies so that students remember
what has already come up.

88
The Lecturer’s Toolkit
9 Any other business? If the degree of
overlap has increased significantly, and
after gaining all the second-round contri-
butions, the flow of new ideas has slowed
down, it is worth asking the whole group
for ‘any fairly important things that still
aren’t represented on your list?’. Usually,
there will be a further two or three signif-
icant contributions at this stage.
10 Numbering the agenda: When all of the
criteria-questions have been noted down,
number them. Simply write numbers
beside each criterion, in the order that
they were given. During this stage, if you
notice that two criteria are more-or-less
the same, it can be worth asking the class
whether you can clump them together.
11 Weighting individually: Ask students to
work individually again next. Ask them
to weight each criterion, using an agreed
total number of marks. Choosing the
total number needs care! If there are ten
criteria, 100 marks would be too tempt-
ing regarding the possibility of some
students just giving each criterion ten
marks, and avoiding the real business of
making prioritising decisions again.
Thirteen criteria and sixty marks works
better, for example. Ask every student to
ensure that the total marks number adds
up to the agreed figure. Legitimise stu-
dents regarding ignoring any criteria that
they individually don’t think are impor-
tant: ‘If you think it’s irrelevant, just
score it zero’.
12 Recording everyone’s weighting pub-
licly: The next stage is to record
everyone’s marks on the flipcharts or
transparencies. This means starting with
criterion number 1, and writing beneath it
everyone’s marks-rating. It’s worth estab-
lishing a reporting-back order round the
room first, so that every student knows
who to follow (and encouraging students
to nudge anyone who has lost concentra-
tion and is failing to give you a score!).
‘Can you shout them out as fast as I can
write them up?’ usually keeps everyone
(including you) working at speed.
13 Optional separating: It can be worth
starting with two flipcharts from the out-
set. For example, you may wish to record
separately the criteria relating to content
and those relating to structure. This may
pave the way for peer-assessment grids
which help to separate such dimensions.
14 Discussing divergent views: Then go
through all of the remaining criteria in the
same way. Don’t worry that sometimes
consecutive scores for the same criterion
will be quite divergent. When this hap-
pens, it will be a rich agenda for
discussion later, and if you’re writing the
scores up in the same order each time, it’s
not too hard to pinpoint the particular
individual who gave an unusually high or
low rating to any criterion. You can, for
example, ask the student who rated crite-
rion 8 highest to argue briefly with the
student who rated it lowest, and see what
the causes of the divergence may be.
15 Averaging: Next, average out all the
scores. If there are students with calcula-
tors in the group, the average rating may
be forthcoming from the group without
any prompting. Otherwise, it’s usually
possible to do some averaging and round-
ing up or down to the nearest whole
number just intuitively by looking at the
numbers. Ask the whole group, ‘Does cri-
terion 7 get a five or a six please? Hands
up those who make it a five?’ and so on.
16 Shedding weak criteria: Look back at
the whole range of criteria and ratings. At
this point, there will usually be one or
more criteria that can safely be dropped
from the agenda. They may have seemed
like a good idea at the time to some of the
students, but the visible ratings tell their
own story.
17 Confirming ownership: ‘Are you all
happy to proceed with the averaged-out
version of the ratings, and with these cri-
teria?’ is the question to ask next. Mostly,

The list of processes above may appear daunting, but in fact it is quite a lot easier to do in prac-
tice than it is to write out a description of it! Also, some of the steps are in fact very quick to do.
Furthermore, as the culture of peer-assessment becomes better known to students, they them-
selves become better at generating and weighting criteria, and more skilled at applying them
well.
Setting up self-assessment tutor dialogues
Think of the following scenario. A piece of coursework is to be handed in and tutor-assessed.
This could be just about anything, ranging from a practical report, a fieldwork report, a disserta-
tion, and even an essay or set of answers based on a problems sheet.
Imagine that students are briefed to self-assess their efforts at the point of submitting the work
for tutor assessment, and are supplied with a pro forma for this self-assessment, of no more than
two pages length. Suppose that the pro forma consists of a dozen or so short, structured ques-
tions, asking students to make particular reflective comments upon the work they are handing in,
and that the principal purposes behind these questions are to:
●
cause students to reflect on what they have done;
●
give tutors assessing their work additional information about ‘where each student is’ in rela-
tion to the tasks they have just attempted;
●
form a productive agenda to help tutors to focus their feedback most usefully;
●
save tutors’ time by helping them to avoid telling students things about their submitted work,
which they know all too clearly already;
●
give students a sense of ownership of the most important elements of feedback which they
are going to receive on the work they have submitted.
Designing assessment and feedback to enhance learning
89
there will be no dissent. Just occasionally,
a student with a different view of the rat-
ings may wish to speak out against the
consensus. It is worth then offering that
any individuals who feel strongly about
the ratings can choose to be peer-assessed
by their own idiosyncratic rating scales,
but that these must now be shared with the
whole group for approval. Students rarely
wish to do this, particularly if the feeling
of ownership of the set of weighted crite-
ria is strong in the group as a whole.
18 Administrating: Turn the criteria-ques-
tions into a grid, with the criteria down the
left-hand side, and the weighting numbers
in a column alongside them, with spaces
for students to write in their peer-assess-
ment ratings. If students are going to be
asked to peer-assess several instances of
the task involved (for example maybe ten
short presentations) the grids could be
marked up so that students used the same
grid for the successive presentations (see
Figure 2.2). Alternatively, if the peer-
assessment grids are going to be used for
a small number of assessments (for exam-
ple, where all students mark three essays
or reports, and each of theirs is to be
marked by three students), it is worth hav-
ing separate sheets, with a column for
individual feedback comments relating to
the score awarded for each of the criteria
(see Figure 2.3).

90
The Lecturer’s Toolkit
Peer-assessment: grid for multiple examples
Your name:
Date:
Session:
Example being assessed
Mark out of
A
B
C
D
E
F
G
H
Criterion 1
6
Criterion 2
8
Criterion 3
4
Criterion 4
8
Criterion 5
5
Criterion 6
5
Criterion 7
2
Criterion 8
4
Total
40
Figure 2.2 Example of a grid where students peer-assess A to H (for example) presentations

Designing assessment and feedback to enhance learning
91
Figure 2.3 Pro forma for individual peer-assessments of (for example) essays or reports, with feedback
Peer-assessment with feedback: grid for a single example
Your name:
Date:
Session:
Example being assessed
Mark
Score
Feedback comments
Criterion 1
6
Criterion 2
8
Criterion 3
4
Criterion 4
8
Criterion 5
5
Criterion 6
5
Criterion 7
2
Criterion 8
4
Total
40

Some ideas for self-assessment agendas
Each of the suggestions below could take the form of a relatively small box on the pro forma,
requiring students to give their own reply to the question, but allowing space for tutors to add a
sentence of two in response to each student’s reply. Sometimes, of course, tutors would wish to
(or need to) enclose additional response information on separate sheets – often pre-prepared
handout materials dealing with anticipated problem areas or frequently made errors. A reminder:
the menu of questions below is exactly that – a menu – from which individual assessors will need
to select carefully only a few questions, those which are most relevant to the nature of the
assessed task. Also, for every separate task, it is vitally important that the self-assessment ques-
tionnaires are patently task-specific, and that students don’t see the same (or similar)
questionnaires more than once. (We all know how ‘surface’ students’ responses become to repet-
itively used course evaluation questionnaires, and how limited is the value of the feedback we
receive from such instruments!).
For each of the questions I include below, I’ve added a sentence or two about why or when it
may prove useful to assessors and students. Some parts of the menu below are much more obvi-
ous than others, and I believe it is the less-common questions that are most likely to set up deep
tutor–student dialogue.
●
What do you honestly consider will be a fair score or grade for the work you are handing in?
–
Most students are surprisingly good at estimating the worth of their work. Only those
students who are more than 5 per cent out (or one grade point) need any detailed feed-
back on any differences between the actual scores and their own estimates – saves
tutors’ time.
●
What do you think was the thing you did best in this assignment?
–
Assessors know soon enough what students actually did best, but that’s not the same as
knowing what they think they have done well. Where both are the same thing there’s no
need for any response from assessors, but on the occasions where students did some-
thing else much better (or did the original thing quite poorly) feedback is vital, and very
useful to students.
●
What did you find the hardest part of this assignment?
–
Assessors know soon enough what students do least well, but that’s not always the thing
they found hardest. When a student cites something that was completely mastered – in
other words, the assignment gives no clue that this was a struggle – it is quite essential
that the student is congratulated on the achievement involved, for example a few words
such as ‘you say you found this hard, but you’ve completely cracked it – well done!’ go
a long way.
●
If you had the chance to do this assignment again from scratch, how (if at all) might you
decide to go about it differently?
–
This question can save assessors hours! Students usually know what is wrong with the
approach they have engaged in. Let them tell you about this! This saves you having to
go on at length telling them about it. Moreover, when students themselves have diag-
nosed the weaknesses in their approach, the ownership of the potential changes to
approach lie with them, rather than us having to take control of this.
●
How difficult (or easy) did you find this assignment?
–
Don’t use number scales! Provide words or phrases which students can underline or
ring. Use student language, such as ‘dead easy’, ‘tough in parts’, ‘straightforward’, ‘a
real pain’, ‘took longer than it was worth’, ‘hard but helped me learn’, and so on.
92
The Lecturer’s Toolkit

●
What was the most important thing that you learned about the subject through doing this
assignment?
–
Answers to this question give us a lot of information about the extent to which the
assignment is delivering learning payoff to students.
●
What was the most important thing that you learned about yourself while doing this
assignment?
–
Such a question gives us information about how well (or badly) the assignment may be
contributing to students’ development of key transferable skills, including self-organi-
sation.
●
What do you think are the most important things I am looking for in this assignment?
–
This question can be sobering for assessors – it can show us how students perceive our
activities, and it can often show us a lot about how we are found to be assessing.
Students can benefit from feedback on their responses, when their perceptions of the
purposes of an assignment have gone adrift.
●
How has doing this assignment changed your opinions?
–
Not all assignments have anything to do with developing students’ views, attitudes or
opinions, but some do this, and it is important that we acknowledge this when such
issues are intentional. Such a question is better than simply asking ‘has your opinion
changed?’, where the expectation is clearly for a ‘yes’ response.
●
What’s the worst paragraph, and why?
–
This question is particularly useful as a feedback dialogue starter when assignments are
substantial, such as long reports or dissertations. Students quite often know exactly
where they were trying to firm up an idea, but struggling to express it. Their help in
bringing to our attention the exact positions of such instances can save us hours in find-
ing them, and can ensure that we have the opportunity to respond helpfully and
relevantly to students’ needs.
Conclusions
None of the forms of assessment discussed in this chapter is without its merits or its limitations
in the context of assessing various facets of the skills, knowledge and performances of students.
The challenges caused by greater numbers of students and increased assessment workloads pro-
vide an opportunity to make a radical review of the ways we assess our students. The
requirement placed upon us to match assessment criteria to intended learning outcomes give us
further opportunity to adjust our assessment so that we are attempting to measure that which is
important, rather than merely that which is relatively straightforward to measure.
In particular, we must ensure that our attempts to meet these challenges do not lead to a
retreat from those forms of assessment which are less cost-effective, but which help students to
get due credit for a sensible range of the knowledge and skills they demonstrate. Probably the
best way to do our students justice is to use as wide as possible a mixture of the assessment
methods outlined above, allowing students a range of processes through which to demonstrate
their respective strengths and weaknesses. Moreover, the fifteen assessment methods discussed
in some detail in this chapter are only a cross-section of those which could be used. Ideally, for
each area of students’ learning, we should be asking ‘what is the most appropriate way to mea-
sure this fairly, validly, and reliably?’.
Finally, we need to ensure that learning is not simply assessment-driven. It can be argued that
presently we have far too much assessment, but that neither the quality nor the diversity of this
Designing assessment and feedback to enhance learning
93

assessment is right, and there is a significant shortfall in the amount of formative feedback
which can help students towards demonstrating their optimum potential in those assessment ele-
ments which count most significantly towards their awards. Students are highly intelligent
people; if we confront them with a game where learning is linked to a rigid and monotonous diet
of assessment, they will learn according to the rules of that game. To improve their learning, we
need to improve our game, not least our feed-forward to students.
94
The Lecturer’s Toolkit

Intended outcomes of this chapter
When you’ve looked through this chapter, and applied the most appropriate ideas it contains to
your teaching, you should be better able to:
●
gain confidence in preparing and delivering lectures;
●
develop your work with large groups of students so that their learning is more productive in
your sessions;
●
think consciously about how your students learn in lectures, and about ways you can address
the principal factors underpinning successful learning in your lectures;
●
make good use of audio–visual aids when giving lectures, not least PowerPoint;
●
use handout materials to help to structure students’ learning, both during and after lectures;
●
choose from a variety of ways to get feedback on your lectures from your students;
●
prepare your large-group teaching so that it will be seen to be successful when your teach-
ing is observed or reviewed.
I have developed this chapter with five groups of colleagues in mind:
1
those who are new to large-group teaching, and who would appreciate a little help on how
best to get started on such work;
2
those for whom student class-sizes have expanded recently, and who may wish for some
ideas on how to work well with larger groups;
3
experienced colleagues who simply would like to explore whether there are fresh
approaches they may wish to try out in their large-group work with students;
4
old hands at lecturing, who may be thinking of introducing computer-based presentation
managers to replace overheads or slides;
5
colleagues who already make extensive use of handout materials, who may be concerned
that students ‘switch off ’ when they know that they will get most of the important informa-
tion in their handouts.
How important is the act of lecturing?
When you are appointed as a ‘lecturer’, it may seem reasonable to suppose that this is the most
important part of your job. This belief is increased when the main specification of your job turns
out to be a timetable, with lecture-slots as the principal fixed teaching duties each week. Most
Chapter 3
Refreshing your lecturing

people new to lecturing approach their first encounters with the process with some trepidation –
some with sheer terror. Indeed, if measurements were taken of pulse rate, palm sweat, and blood
pressure during the first few minutes on stage as a lecturer, the results would give every indica-
tion of quite a lot of stress. ‘But all their eyes are on me!’ new lecturers often think to themselves.
If you’re naturally at home on the stage in a theatre, stage fright won’t worry you – you may even
enjoy it. However, for perhaps nineteen out of twenty of us, we are not particularly comfortable
being the focus of attention of so many eyes. Fortunately, there are many ways to divert students
from watching us, and at the same time help them to think about the topics of our lectures. These
diversion tactics include:
●
using overheads or PowerPoint slides – and even dimming the lights so the slides are more
easily seen – and we are less visible!;
●
giving out handouts, so that every now and then all the eyes will be looking at printed sheets
rather than at us;
●
giving students things to do during lectures – for example decisions to make about which of
three options – on-screen or in their handouts – would be preferable;
●
getting students to discuss an idea with their immediate neighbours for a minute or two, then
sounding out the conclusions they have reached.
But it’s not enough just to look after our own comfort levels in lectures; we need to be thinking
of what’s happening in the minds of each and every member of our audience. Some of the diver-
sion tactics listed above do indeed have direct links to helping students to learn.
The history of the lecture stems from times when there were very few books, and the most
efficient way of communicating information was to read it out to people, who could take notes
of their own, and store it. Although it was indeed possible to communicate information in this
way, it was soon recognised that this did not amount to communicating knowledge. Despite the
fact that this situation is long gone, most educational systems continue to place considerable
value on the lecture situation, not least because it is something that is visible and accountable,
and because many lecturers enjoy lecturing! Nowadays, quite a lot of doubt hangs over the effec-
tiveness of lectures as a means of helping students to learn, but this is mainly because some
lecturers continue to regard lectures as occasions when they perform, and believe this is all that
is necessary for their students to learn. Now that all kinds of information technology based cur-
riculum delivery approaches are available, the central role of lectures is even more in doubt.
Giving lectures is the most public side of the work of most higher education lecturers.
Attending lectures is part of the life of most higher education students. Although some parts of
this chapter are specifically about lecturing, most of the suggestions apply to the processes of
working with large groups of students. Suggestions in this chapter include ways to help large-
group sessions deliver increased learning payoff to students. In effect, I explore many of the
ways in which the principles of active, interactive learning can be brought into the lecture theatre
or large-group classroom.
Given how important lecturing is taken to be, you may be surprised that in Chapter 2 in this
book I addressed assessment even before teaching. My justification is simple enough: students
can survive bad lectures, but they may be damaged by bad assessment. Whatever else we do, we
need to link assessment well to what students are intended to learn; how they learn it, when they
learn it and where they learn it are of much less importance. It is also fair to say that despite the
fears that new lecturers have about lecturing, the fears they have about wielding a red pen in
assessment mode for the first time are often even more substantial.
96
The Lecturer’s Toolkit

Later in the chapter, attention is turned to some of the technologies used by most lecturers,
starting with overhead projectors, and leading into suggestions for using PowerPoint effectively.
The chapter concludes with some suggestions about ways to make the most of the benefits of
observing others at work in the lecture room, and to learn from feedback when your own work is
observed. Familiarity with teaching observation pays dividends when subject review or other
forms of external scrutiny come your way.
Despite the reservations I have already expressed about lecturing in the traditional sense, in
this chapter, I will explore how large-group sessions can in fact be made very productive in
terms of students’ learning, by making optimum use of occasions when students are together.
Meanwhile, let’s continue our exploration of how to survive as a lecturer by exploring, then
hopefully exploding, some more of the myths about lectures.
Why have lectures?
There has been quite a lot written about how ineffective the traditional lecture can be in terms of
learning payoff to students. However, we’re stuck with slots with large groups on our timetables,
so it’s worth thinking about how we can make best use of such time. Long ago, the beginning of
the culture of giving lectures was probably due to the fact that only the ‘lecturer’ had the books.
When books had to be copied by hand, they were rare and valuable. Now, students can have rel-
atively easy access to all the original books and papers, not to mention a vast amount of further
material available on the Internet and online intranets, resource collections and databases. So
why does the practice of giving lectures continue? There are good reasons and bad ones – let’s
look at the worst ones first.
Some bad reasons
●
to simply respond to some students’ expectations that they are going to be taught all they
need to know;
●
to fill up students’ timetables, so that a ‘course’ or ‘programme of study’ is seen to exist;
●
to fill up your own timetable so that you’re seen to be gainfully employed;
●
to keep students ‘under control’;
●
because ‘that’s the way it’s always been done here’;
●
because ‘that’s what happened to me when I was a student’.
Some better reasons
Even nowadays when students can have their own access to source material, books, handouts and
a range of electronic learning resources, there are still several things that can best be achieved in
large-group sessions with classes. Some reasons for continuing to use large-group sessions with
students include the following:
●
to give students a shared learning experience and provide a focus, where everyone gets
together regularly;
●
to whet students’ appetites, so that they go away and really want to get down to studying;
●
to give students the chance to make sense of things they already know;
●
to clarify intended learning outcomes, and define the standards of students’ performance
which will be linked to these outcomes;
Refreshing your lecturing
97

●
to give students the opportunity of learning by doing, where they can get feedback from an
‘authority’ and from each other;
●
to add the power of tone of voice, emphasis, facial expression, and body language to printed
words, helping students to see what’s important, and what is not;
●
to provide material for later discussion, exploration and elaboration;
●
to challenge students preconceptions, assumptions and beliefs;
●
to change or develop students’ attitudes and perspectives;
●
to create occasions when some at least of the students present can ‘first see the light’ on
tricky concepts and ideas, and consolidate this by sharing the experience of ‘the light dawn-
ing’ with fellow students who’ve not yet seen the light;
●
to give large groups of students common briefings for major assessment-related tasks which
they are to undertake as they study the subject further.
Most of the above reasons for continuing to give lectures are more concerned with the broad
experience of studying than with the activities which students engage in during a particular lec-
ture. However, it is indeed possible to follow up our exploration of learning processes from
Chapter 1 to set out to cause students to learn things during a lecture. This can still be achieved,
even with very large student groups, by concentrating on what the students themselves actually
do during such lectures, and ensuring that the processes relate to effective learning. Let’s look
next at some ways of achieving this.
Some things students do in lectures
I’ve asked many hundreds of lecturers what they believe their students do during lectures, and
many thousands of students what they really do. As you may expect, many of the things students
do during lectures are far from connected to the content of the lectures. Some of the most com-
mon things students do in lectures are listed below:
●
copying down things from the blackboard or screen;
●
copying down verbatim things said by the lecturer;
●
summarising things discussed by the lecturer;
●
gazing out of the windows (if there are any);
●
looking at other students;
●
worrying because they can’t understand what is being talked about;
●
watching the clock – waiting for lunchtime, for example;
●
doodling, yawning, fidgeting, shuffling, daydreaming – even sleeping;
●
reading things that have nothing to do with the lecture;
●
listening to the match on a personal radio;
●
thinking about coursework soon to be handed in for other subjects;
●
actually doing coursework due to be handed in for other subjects;
●
worrying about accommodation problems, cash flow problems, relationships;
●
feeling generally unwell – hangover, tiredness, ’flu, time of the month.
(Please continue this list if you wish!)
Only one of the things mentioned so far is a useful learning process in its own right: ‘summarising’.
This involves processing the content of the lecture, making decisions about the relative importance
of different things, and generally making sense of or ‘digesting’ the content of the lecture.
98
The Lecturer’s Toolkit

Most of the remainder of the things in the list above are neither productive in terms of learn-
ing payoff, nor are they linked to achieving the intended learning outcomes. In particular,
copying things down (whether from the screen, or from what has been said) is far from being as
useful as people think it is. Most students will admit having been to lectures where they’d copied
all sorts of things down (even transcribed verbatim dictated episodes), but without actually
thinking about the material at all at the time. They confirm that if they were to be quizzed about
the notes they had just copied out, their answer would have to be along the lines, ‘sorry, I haven’t
actually read it yet – ask me again later!’.
In other words, the fact that a large group of students may look very busy writing during a lec-
ture is in itself no indication that any deep learning is occurring then and there. It is true that
students will often get down to learning what they have copied later, but that does not alter the
fact that during the lecture itself they were in effect wasting their time and energy on processes
with no direct learning payoff. It would have been better if they had been issued with the mater-
ial they copied down, for example in the form of a handout. However, there are problems with
straight handouts, in particular the danger that students believe that they have already captured
the content of the lecture, and think that they may safely switch off mentally altogether.
Some productive lecture processes
A number of further activities that students can engage in during lectures can be productive in
terms of learning. As we saw in Chapter 1, five overlapping processes which underpin success-
ful learning are:
●
wanting to learn – motivation, interest, enthusiasm;
●
needing to learn – seeing the reason for putting in some hard work, gaining a sense of own-
ership of the intended learning outcomes;
●
learning by doing – practising, trial and error, learning from mistakes;
●
getting feedback on how the learning is going – other people’s reactions, comments, seeing
tangible evidence for one’s achievements using what has been learned;
●
making sense of what has been learned – ‘digesting’ it, getting one’s head round it.
Figure 3.1 Processes underpinning successful learning
Wanting/
needing
Doing
Digesting
Feedback
Refreshing your lecturing
99

Below I have tried to link some productive student actions to these five central processes.
●
becoming excited about the subject, and enthused (wanting);
●
wishing to find out more about things discussed (wanting);
●
seeing why something is important (needing);
●
solving problems (learning by doing);
●
trying out theoretical principles in practice-based examples (learning by doing);
●
making decisions (learning by doing, also digesting);
●
explaining things to fellow students sitting nearby (doing, digesting, feedback);
●
asking questions (seeking feedback);
●
working out questions to find out the answers to later (preparing to seek feedback);
●
prioritising issues and information (digesting);
●
summarising (digesting);
●
making notes in a way so that important things ‘stand out from the page’ (digesting, learn-
ing by doing);
●
answering questions (learning by doing, getting feedback).
As you read the discussion below, think further how you can construct your lectures in ways that
directly address these active processes (and help to avoid the occurrence of some of the unpro-
ductive processes mentioned earlier).
Using handouts to enhance students’ learning
There are many advantages accompanying the use of handout materials. Not least is the fact that
in a few pages of handout materials, far more information can be made available to students than
they would ever have been able to write down for themselves during the lecture.
The use of handouts in large-group lectures has increased dramatically over the last few
years. This is not least due to the advent of better, faster, cheaper photocopying and reprographic
technologies. It is also linked with students’ expectations. Furthermore, handout materials pro-
vide evidence for quality review purposes, illustrating not only the content of teaching
programmes, but also the processes adopted to address student learning in lectures.
However, the dangers accompanying the use of handouts are becoming ever more apparent.
For example, students may feel little real ownership of a ‘straight’ handout (as opposed to an
‘interactive’ one, which is more akin to a learning resource). Straight handouts are still ‘other
people’s words’ to students. The principal danger is that students can be tempted to switch off
mentally, if they believe that they will be receiving (or have already got in their hands) every-
thing important that is being covered in a lecture.
Many advocates of the use of handout materials agree that it’s what students do with the hand-
outs that really matters. Handouts should be learning tools, not just compendia of information.
Ownership of knowledge is much more than simply possessing the information.
The following pages contain a checklist against which you can interrogate your own usage of
handout materials. I don’t suggest that each handout should achieve all of the factors included in
the checklist below – but that across your range of handouts you may find it useful to address
most of them in one way or another as seems most appropriate to you in the context of your own
discipline.
100
The Lecturer’s Toolkit

Refreshing your lecturing
101
Table 3.1 Interrogating your handouts
Contexts and key questions
Links to effective learning, and
Your notes and action
further questions
points
Setting the scene
What are the intended learning
Can students see what they
outcomes?
need tobe able to achieve?
How much will students want to
Motivation – wanting to learn.
achieve these outcomes?
Is it clear which of the learning
Can students see priorities to
outcomes is the most important one?
address in their learning?
Does the handout show how
Motivation – needing to learn.
students’ achievement of the
learning outcomes could be
measured in due course?
Does the handout make links
Digesting – gaining a sense of the
between the present agenda, and
place of the particular session in
topics already covered, and/or to
the overall picture.
be covered in future?
Is the handout designed on a realistic
If it’s accompanying a one-hour
scale, so that it can be fully used in
lecture, can it all be covered in
the timescale available in the session?
45 minutes or so?
Learning by doing – interactivity
Are instructions for tasks clear
Can students see exactly what
and helpful?
they are intended to be doing?
Does the handout include some
Is it encouraging learning by
past assessed tasks, for students
practice?
to practice upon?
Feedback to students
Does the handout give opportunities
(For example, where students have
for students to gain feedback about
undertaken tasks around the
their own performance and learning?
content of the handout, are
debriefings clear and useful?)
Can the handout be used to get
Does this allow useful peer-
students to work together in small
feedback to be exchanged?
groups during the session?
Does the handout include answers or
responses giving students feedback on
the tasks they attempted using the
handout?
Depth, tone, style
Is the handout fun?
Will students want to learn from it?
Is the handout a tool for learning,
rather than just an information source?
Is the depth of the content
Helping students to distinguish
appropriate for the purpose of the
between information and
session?
expected knowledge.

102
The Lecturer’s Toolkit
Contexts and key questions
Links to effective learning, and
Your notes and action
further questions
points
Does the handout challenge students’
Does it help them to make sense of
thinking, rather than just inform them?
the topic, rather than just know it?
Is all the information in the handout
Will it be regarded by students as
essential and relevant?
an important learning resource?
How clearly are important concepts
Saving students from routine
and rules expressed, if applicable?
copying of important material.
Is the language level pitched
(making sure that the learning
appropriately for the students
agenda is not obscured by language
concerned?
sophistication or simplicity)
Is the style thought-provoking rather
Will students be caused to think
than just information-providing?
for themselves?
Layout, appearance
Is there dedicated space for students
Is it encouraging participative
to make notes, write their own
learning rather than passive receiving?
thoughts, write their own questions?
Is the layout clear and attractive?
Will students want to use it again
and again?
Is the design simple?
Is the handout sufficiently concise?
Can students see the wood from
the trees?
Are there headers and page numbers
Will they be able to use the handout
to help students to navigate the
again weeks later, and still remember
handout again later?
the context in which it was first used?
Does the handout contain pictures,
Does it help by triangulating learning
drawings, graphs, diagrams, and so on
using different approaches?
to add visual impact to the words?
Follow-up after the session
Does the handout contain tasks for
Making sense of what has been
students to try after the session?
learned – gaining understanding.
Will the handout make a useful
revision aid for students?
Does the handout cite appropriate
reference material for students to
follow up after the session?
Are the briefings to external
For example not just ‘read Chapter 3
resources active and focused
of ...‘ but ‘use pp.45–8 of Chapter 3
rather than general?
to decide why ...’ and so on.
Authenticity, quality, topicality, and
so on
Has the handout been frequently
(or is it just being used yet one
changed, edited, updated?
more time as it stands?)
How old is the handout? Could it be
regarded as dated?
Is the content topical and up-to-date?
(Will students find it sufficiently
relevant?)

Refreshing your lecturing
103
Using handouts: some practical suggestions
The following suggestions summarise some of the ways in which you can ensure that your use of
handout materials helps your students to learn effectively during (and after) your lectures.
Furthermore, they may help you to take steps to demonstrate the quality of your thinking about
how your students learn, through the design of your handouts as artefacts evidencing your
approach to teaching.
Contexts and key questions
Links to effective learning, and
Your notes and action
further questions
points
Does the handout look professional?
Is the message being well supported
by the medium?
Will it be possible to use the handout
(economy of scale, workload,
again?
and so on.)
What changes will be made after this
use, and before the next use?
Student attendance
Would having a copy of the handout
(If ‘yes’, perhaps the session is not
be a sufficient substitute for attending
really putting the handout to
the session?
real use.)
Feedback to the lecturer
Does the handout include a tear-off
(If ‘yes’, is the questionnaire
short questionnaire to give the
sufficiently different to other ones
lecturer feedback on the particular
to avoid ‘death by questionnaire’?)
session?
1 Make handouts look attractive. Gone are
the days when a plain handwritten or typed
summary of a lecture was enough. The
quality of the message is now inextricably
associated with the quality of the medium;
scrappy handouts tend not to be valued.
2 Use the start of a handout to remind
students what its purposes are. It can be
useful to state on each handout the
intended learning outcomes of the partic-
ular element of work involved.
3 Use plenty of headings. There’s little
more off-putting than a solid page of
unbroken text. Where possible, make
headings stand out, by using bold print, or
large-size print. When a glance at a hand-
out gives information about the structure
of its contents, it has already started to
help people learn.
4 Use white space. For students to develop a
sense of ownership of handouts, they need
to have room to write their own notes onto
them. Space between paragraphs, space at
the top and bottom of pages, or a wide
margin on one side are all ways of giving
them this possibility of ownership.
5 Make handouts interactive. In other
words, include tasks and activities for stu-
dents to do, either in the group session
where the handout was issued, or as later
follow-up activities.
6 Include ‘committed space’ for students
to do things in handouts. Structured
tasks are best, such as ‘think of six rea-
sons why the economy is in recession and
list them below’. The fact that space has
been provided for students’ answers helps
persuade them (often subconsciously) to
have a try at the tasks rather than simply
skip them.
7 Use tasks as chances for students to
learn by doing, and to learn by getting

104
The Lecturer’s Toolkit
things wrong. Multiple-choice questions
are useful for this. The handout can serve
as a useful reminder of ‘wrong’ options
chosen, as well as a pleasant reminder of
‘correct’ choices.
8 Use handouts to get students making
notes, not just taking notes. Use hand-
outs to avoid the wasteful process of
students simply writing down things you
say, or transcribing things they see on the
screen or board. Copying things down is a
low-level learning activity. Having such
information already in handout form
allows you to spend face-to-face time get-
ting your students probing into the
meaning of the information, interpreting
it, questioning it, extrapolating from it,
analysing it, and so on.
9 Work out what you intend students to
add to the handout during your session.
For example, leave spaces for individual
‘brainstorms’ (e.g. ‘list five symptoms of
anaemia’), and for the products of buzz-
group discussions (e.g. putting some
factors in order of importance). The aim
should be that the handout students take
away at the end of the session is much
more valuable than the blank one they
were given at the start.
10 Include annotated bibliographies in
handout materials. A few words about
what to look for in each particular source
can make a big difference to the ways in
which students follow up references.
11 Where possible, store your handout
materials on disk. Go for small print
runs. It is then easy to make considerable
adjustments and additions to handouts
each successive time you use them. Avoid
the waste associated with piles of hand-
outs which you’ve subsequently replaced
with updated, improved versions.
Causing learning to happen in lecture contexts
To summarise our thinking on how we can use large-group sessions with students to maximise
the learning payoff they derive from them, I would like you to think once again about the practi-
cal model of learning introduced in Chapter 1, and the five underpinning processes: wanting,
needing, doing, feedback and digesting. Next, let’s take each of these in turn, and remind our-
selves of some of the ways that they can be embraced within the lecture situation. I will explore
below some general factors, which I hope will help you think of your own subject-specific ideas
for turning your lectures into interactive learning experiences.
Lectures and wanting to learn
Lectures can be a very effective way of creating the want to learn. Lectures can be occasions
where the want is rekindled or amplified. Even if this were the only result of a particular lecture,
it would be a useful one. Some ways we can attempt to develop students’ want to learn include:
●
radiating infectious enthusiasm for the subject;
●
posing interesting questions which excite students’ curiosity;
●
helping students to see how much they can already do, increasing their confidence;
●
illustrating to students that complex problems can often be solved one step at a time;
●
clarifying targets, performance standards and intended learning outcomes, so that students
can see exactly what they’re aiming for;
●
helping students to identify the difference between what they need to know, and those things
that are simply nice to know;
●
relating materials being taught to course objectives and exam questions (establishing the
need to know dimension).

Lectures and needing to learn
While as hinted at above, wanting to learn is a much happier driving force for the learning
process than needing to learn, the latter is much better than nothing. We can use the shared,
large-group situation to help our students to see exactly what is entailed in the expected learning
outcomes associated with each topic or theme. Some of the approaches with which we can help
students to take ownership of their particular learning needs include:
●
explaining what students may be required to do to demonstrate their learning of the topics
covered by the lecture;
●
helping students to see the purpose of learning and becoming competent in particular
aspects of the material covered;
●
allowing students to see that some parts of the subject content are expected to be hard, but
that it will be worthwhile students spending some energy on these parts.
Lectures and learning by doing
I’ve already suggested that simply writing down what is heard or seen during a lecture is not a
particularly useful kind of ‘doing’. However, there are many other activities that can be used
even with hundreds of students sitting tightly in rows, which all connect to ‘learning by doing’.
Here are some possibilities. Students can be helped to:
●
make decisions – for example picking the best option from several alternatives shown on the
screen or in their handouts, and working out why other options are less good or even incorrect;
●
solve problems – using information given to them on the screen or board, or in their handouts;
●
work out what the important issues or questions are, using information given by the lecturer,
or from their own experience;
●
engage in mini-brainstorms for a few minutes with their immediate neighbours, for example
working out what they think may be the main issues that need to be addressed in a scenario
or case study;
●
place given factors in order of importance, prior to a class discussion which shows them
whether their prioritising was effective.
Lectures and learning through feedback
The old-fashioned sort of lecture where students were seen and not heard offered little opportu-
nity for learning through feedback. However, the potential which can be derived from feedback
in modern large-group learning environments is high, by facilitating student actions including
getting students to:
●
compare notes with each other regarding decisions they made individually when given
options to choose;
●
work together in small clusters of two or three, to make decisions, or solve problems, or pri-
oritise the importance of issues, or formulate questions, and so on;
●
find out where they stand, for example in ‘show of hands’ episodes where the positions or
views of all the members of even the largest group can be surveyed in seconds;
●
explain things to each other, or arguing with each other;
Refreshing your lecturing
105

●
receive feedback from the lecturer, on decisions they have reached or options they have
selected;
●
do self-assessment exercises built into interactive handout materials (at their own pace and
in their own way), then turning to the back of their handouts to find feedback responses
designed to let them see how well they had tackled the questions.
Lectures and digesting – making sense of what is being learned
Sadly, many students are only too willing to connect lectures to indigestion – especially
1200–1300 lectures – when they are hungry not for concepts but for food! However, the digest-
ing stage of the learning process can be embraced by lecturers, in ways including:
●
giving students the chance to explain things to each other – the act of putting an idea into
words is often the fastest way to get a real grip on the idea – especially when coupled with
feedback;
●
helping students to see the big picture – in other words to make sense of what they have
already learned, and to see how it links to the things they will study next;
●
helping students to find out how successful their learning has been so far – and where the
black spots are;
●
giving students tasks where they apply what they have learned from previous lectures in the
series to new data or scenarios;
●
helping students to find out where they stand, for example letting them see how their views
and beliefs compare with those of the rest of the group by show of hands episodes in a lecture.
Beginnings, middles and endings
It has been (wryly!) said that a good lecture should involve three stages:
1
tell them what you’re going to tell them;
2
tell them it;
3
remind them what you’ve told them.
Linked to the student-centred model of learning we’ve been looking at, however, it might be
wiser to rephrase this along the following lines:
1
alert them to what they’re going to be doing (create the want or the perceived need – explain
the intended learning outcomes of the session);
2
help students get down to learning by doing – practising, experiencing, and learning by trial
and error – and receiving quick feedback on their learning in progress;
3
help students to make sense of what they’ve been doing, and the feedback they’ve derived
(such as by reminding them of the intended learning outcomes that they should now have at
least started to achieve).
We’ve already explored stage 2 of the above processes, but it’s perhaps worth saying a little more
about beginnings and endings.
106
The Lecturer’s Toolkit

Beginnings
Some ways of getting a lecture off to a productive start include:
●
expressing the intended learning outcomes for the lecture, for example using words such as:
–
‘by the end of this lecture you’ll be able to do the following four things’
–
‘in this lecture, we’ll explore three ways of analysing social policy’
–
‘when you’ve worked through the examples we’ll discuss in this lecture, you’ll be able
to use the Second Law of Thermodynamics to solve problems’
–
‘after this lecture, you should be able to begin to formulate your own project outline’;
●
giving a checklist of points that will be covered in the lecture;
●
posing a list of questions that the lecture will address;
●
providing the exam question on last year’s paper to which the material you are about to cover
relates.
In other words, it’s productive to use the first two or three minutes of a lecture to set the agenda
for that particular lecture – and also to link the agenda to things that have already been covered,
and things to come later on. Human nature being what it is, however, there are good reasons for
not just reciting the agenda or intended learning outcomes – it’s better if it can be seen in print in
a handout, and/or on the screen or board. The reasons for putting the outcomes in print as well as
speech include:
●
some students may arrive late, and miss the agenda, or disturb others’ reception of the
agenda;
●
if the outcomes are visible in a handout, they continue to serve as an agenda right through
the session, rather than being subsumed or forgotten as time goes on;
●
if questions and issues are planted in students’ minds, as the answers and solutions evolve
during the session, students are more receptive. It’s useful to have students searching (even
subconsciously) for the knowledge constituting the answers to questions.
Endings
It’s so easy for time to run out, so that we feel our only option is to stop the lecture in mid flow.
Saving the last five or even ten minutes for a purposeful ending phase for a lecture pays dividends.
For a start, any observer (or appraiser) will then recognise the signs of a structured approach to
using lecture situations. Even when time does run out, it’s more important to have a good ending
than to ‘get through’ all of the agenda that has been presented. In other words, cut short some of
the middle, and leave room for the ending. This is in fact quite easy to do, when the middle has
been centred round student-centred activities that we explored under the ‘learning by doing’ and
‘learning through feedback’ headings earlier – simply miss out an activity, or cut one a little.
Some ways of coming to a robust, recognisable conclusion include:
●
go back to the agenda of intended learning outcomes, and briefly summarise how each has
been addressed (this helps students with the digesting stage of their learning);
●
pick out any unfinished business from the agenda, to be included in a future lecture, or to be
diverted to tutorial sessions for in-depth exploration (note that this allows you to turn occa-
sions when time runs out on you into what seems like a deliberate strategy!);
Refreshing your lecturing
107

●
formulate a new agenda for the next lecture, to whet students’ appetites for what is to come
next, and to give them the opportunity to do some preparation for the next lecture;
●
set a task for all students to complete before the next lecture, or for them to bring along to
forthcoming tutorial sessions;
●
present in advance the intended learning outcomes for the next lecture, giving students the
opportunity to add focus to their preparatory work or reading.
Regularly ending by giving students something to do is a useful ploy – it helps to reduce the fid-
geting that so often occurs when a lecture is obviously about to wind up – closing of books,
rustling of papers, shifting of chairs, and so on. When students need to listen carefully so that
they know exactly what a task is, such fidgeting is almost completely avoided.
Ways of holding students’ attention till the very end include:
●
at the end of each lecture, putting up an overhead slide with the task briefing for students to
note down, for example for their preparation for future tutorials on the topic;
●
giving out slips of paper with printed task briefings already on them (students are unlikely
to begin slipping out from the lecture if they know an important, further handout – however
small – is still to be issued at the end).
Any of these techniques is better than simply having an ‘any questions?’ episode right at the end
of a lecture. An open-ended offer to take questions can lead to the majority of students with no
particular questions feeling that for them the lecture is over, and the group gradually dissolving
into shuffling and movement.
Planning 60 minutes for learning: an example for discussion
Timetables are usually developed around one-hour slots (even though concentration spans are
measured in seconds and minutes, rather than hours). Suppose you’ve got a lecture scheduled
from 1000–1100. Students will often have to be in some other lecture or tutorial in the next slot,
starting at 1100 – and many may have already been at something else scheduled from
0900–1000. The possibility of giving a 60-minute lecture (or even of facilitating a 60-minute
learning experience) is remote! If your lecture goes on past 1100, there may be hundreds of stu-
dents (and a frustrated colleague) milling around outside the lecture room waiting to get in.
Therefore, it’s clear that there are advantages in ‘reasonable punctuality’ – both regarding start-
ing and finishing. Here are some suggestions. Let me say at once, however, that I’m not
suggesting an inflexible regime for conducting large-group sessions, merely a frame of reference
to apply and customise as the occasion demands.
If you still wish to talk to a few students until 1100, do it outside the room, so that the next
class can (if punctual) walk straight in before 1100.
A way of helping students to be punctual in appointments to see you individually is to adver-
tise an ‘open hour’ when you will be pleased to see them in your room, and to post a ‘make your
own appointment’ sheet (maybe in five-minute intervals) on your door. This gives you the further
advantage that you will often be armed with the names of students intending to call to see you –
a luxury when dealing with large groups of students where it can otherwise be quite impossible
to link names to faces.
108
The Lecturer’s Toolkit

Refreshing your lecturing
109
1000 (or earlier, if the room is empty): arrive on the dot if not earlier – punctuality and profes-
sionalism are closely connected in many people’s minds. Get your handouts ready, and get
the overhead or slide containing your agenda (or list of questions to be considered during
the lecture, or intended learning outcomes for the lecture) ready. Check the projector if
you’re going to use it, clean the board if necessary, and so on. If you’re using video or slides,
data projection, or giving a practical demonstration, and so on, it’s worth booking the
room from 0900 (or even earlier) if possible, and doing all this without time pressure. If
you can’t book the room from 0900, and have a lot of setting up to do, you can often
arrange to do it before 0900, and arrange with whoever is using the room from
0900–1000 that your preparations will be guarded.
1001 Maybe (if you are quite ready to start) chat with some of the students who arrive first –
make them feel good about being punctual. Start circulating handouts.Try to avoid looking
increasingly irritated as students continue to arrive – some will not have been able to
arrive any earlier.
1005 If more than half of the class is there, make a definite start. For example, do the ‘beginnings’
bits. Reveal the agenda of intended learning outcomes relating to the next 40-odd min-
utes, and discuss it. Remind the class of the important things they should have
remembered from last time. Or tell an anecdote or joke. Ignore as best you can stragglers
who arrive late. Leave it to the punctual students to make any noisily arriving latecomers
feel resented!
1010 Enter the ‘middle’ phase – preferably with a student-centred activity rather than a direct input
from you. You can give your input in response to the results of the student-centred activity
soon enough. Continue activities, buzz-group discussions, open discussions, and short inputs
from you, with no single thing taking more than 10–15 minutes, until about 1040.
1040 Take control again, for example by asking for general questions – or if none are forthcom-
ing, asking questions yourself and putting one or two students on the spot (but not
unkindly).
1045 Do the ‘winding up’ bits – go briefly through the intended outcomes again, perhaps this
time elaborating on how these are linked to forthcoming assessment criteria; set a task,
and so on. Aim to finish at around 1050.
1050 Finish! This is best done ‘visually’ for example by replacing your papers into your case or
bag, switching off the projector, cleaning the board, and so on. However, there are still five
more minutes available, if there are pressing questions from the class, and if you want to
deal with them at this stage. However, surprising as it may seem, few students are seriously
disappointed when a lecture finishes a few minutes early!
1055 If you’ve not managed to do so already, definitely finish and walk out! Especially with large
groups, it can easily take five minutes for one group of students to leave and another to
take their places.This may mean choosing phrases on your way such as ‘Sorry, but I really
must go now’; ‘I’ll take this up next week’; ‘We’ll look further into this on Thursday at the
tutorials’; ‘Anyone who wants some further help on this, please come along to my room
this afternoon after four’.
Using technologies – old and new
Decades ago, the only equipment to be found in most lecture rooms was a lectern, and perhaps a
blackboard. Nowadays, some lecture theatres abound with technology. The simplest technolo-
gies still include blackboards (or whiteboards), but most lecture theatres are equipped at least

with an overhead projector. In this section of the chapter, I’ll present various tips on using each
of a range of technological tools, all with two main aims in mind:
1
to help you to keep your cool when using visual aids;
2
to help you to design your use of such aids keeping your students’ learning from them in
mind.
These tips are dos and don’ts based on views gathered from countless colleagues and students.
Some of them are likely to seem too obvious to deserve stating, but I hope that in each of the lists
which follows you’ll find at least some suggestions which will trigger you to experiment with
how you use technology in your lectures.
Working with overhead projectors
The overhead projector was until recently one of the most common ways of displaying visual
information to students, particularly in large-group situations, but has now been overtaken by
data projection of PowerPoint slides, which is still of course ‘overhead’ projection. We’ll look at
specific suggestions for using PowerPoint shortly, but for now let’s stay with overhead projec-
tors. Two major advantages of overhead projection are that you can face your audience as you
speak, and you do not need to darken the room. The following guidelines may help your students
to get the most from your use of the overhead projector.
110
The Lecturer’s Toolkit
1 Know your machine. Most machines
have a focus control, but this is located
differently on different types of projector.
Most machines also have a red–blue
adjustment lever (or fringe control). It’s
well worth your time to take steps to
become familiar with the particular
machine you’re going to work with. Don’t
be afraid to move it to get it into good
focus, across the whole of the screen area.
When you can, adjust the height and posi-
tioning of the projector to avoid
‘keystoning’ (the top of the image being a
different width from the bottom).
2 Ensure that your transparencies will fit
any projector. Many projectors have a
plate of approximately A4 size (and can
usually be arranged for vertical or lateral
display). Some projectors have square
screens, wider but less deep vertically
than A4 size.
3 Get the machine position right. The aim
is to ensure that all your students can see
the screen without anything obstructing
their vision (particularly you!). Put on a
slide, and sit in various seats in the room
(before the students are there) so that you
know that the screen is clearly visible, and
that the average overhead will be easily
seen.
4 Be ready for problems! If the bulb
should suddenly go, is there a ‘switch-
able’ spare? If there is, check in any case
that this works. Alternatively, have a spare
projector (which you know works) sitting
inconspicuously in a corner of the room.
5 When all else fails ... Have one or two
exercises up your sleeve which do not
depend at all on the availability of an
overhead projector. Plan these so that
while your students are engaged with
them you give yourself the time to arrange
a new projector.
6 ‘The medium is the message’. Good-
quality overheads can add credibility to
your messages. It’s worth using desktop
publishing programmes to make your
principal overhead transparencies look
professional and believable. With inkjet
and laser colour printers, it’s nowadays

Refreshing your lecturing
111
relatively easy to produce coloured trans-
parencies with graphics.
7 Be careful with coloured print or writ-
ing. Some colours, especially red, are
harder than you might imagine to see
from the back of a large room. Throw
away any orange or yellow ones from your
set of overhead pens – unless you’re using
them for colouring in blocks on diagrams
or flowcharts for example.
8 Don’t use typewritten overheads. To be
clearly visible, most fonts need to be at
sizes ‘18’, ‘24’ or larger – considerably
bigger and bolder than typical typewritten
materials. Make sure that each trans-
parency you prepare will be visible from
the back of the largest room you are likely
to use, even by someone without perfect
eyesight.
9 Keep the number of words down. A
good overhead transparency only needs to
contain the main ideas, not the details.
You can add the details as you discuss the
main points on the transparencies. Your
own ‘crib’ notes can then be written onto
a paper copy of each transparency.
10 Use landscape rather than portrait ori-
entation. This helps you to make the best
use of the top half of the screen, which is
usually more easily visible to most of your
audience.
11 Watch students’ eyes. As soon as you
notice students having to move their head
positions to see something on one of your
transparencies, it’s worth trying to move
that part up so that they can see it without
moving their gaze.
12 Get your transparencies into the right
order before your lecture. There’s noth-
ing worse than watching a lecturer sifting
and sorting to try and find the right over-
head. It’s sometimes worth arranging them
into two sets: ones you will definitely use,
and ones you might wish to use if time per-
mits, or if anticipated questions arise.
13 Use the top half of the screen. By slid-
ing your transparencies ‘up’, you can
normally make the most important pieces
of information appear towards the top of
the screen – more easily visible by stu-
dents at your sessions.
14 Try not to read out your overheads!
Your students can read much faster than
you can speak. People don’t like having
things read out to them that they can read
for themselves.
15 Give people time to take notes if they
wish. Sometimes, you may have copies of
your transparencies in handout materials
you issue to students. Otherwise, expect
that at least some students will want to jot
down the main points they see on the
screen, and make sure that they’ve done
this before you move on to another trans-
parency.
16 Minimise passive transcribing by stu-
dents.
Copying down words from
transparencies is not the most productive
of learning activities. Where possible,
issue handout materials which already
contain the wording from your principal
overhead transparencies.
17 Don’t point at the screen itself. This
would mean losing eye contact with your
students. Use a pen or pencil to rest on the
transparency, indicating the part you’re
talking about.
18 Be prepared to add things to your trans-
parencies during discussions. This
ability to edit slides ‘live’ is an advantage
of overhead projectors over computer-
based presentation managers, and can help
your students to feel that their comments
are important and valued. With trans-
parencies produced from inkjet printers,
however, don’t write on your original; put
a blank sheet of acetate over it!
19 Don’t over-use ‘progressive reveal’ tech-
niques (showing transparencies a bit at a
time by gradually moving a masking sheet
of paper). Some students feel manipulated
if they are continually ‘controlled’ in this
way. It can be better to build up a complex
overhead using multiple overlays.

Using PowerPoint effectively
Microsoft’s PowerPoint presentation software package has become so endemic that in many
institutions even the data projector is called ‘a PowerPoint’. Advice on how to design and use
PowerPoint presentations is widely available through commercial training packages (including
online materials), through institutional training programmes and elsewhere. In practice, many
lecturers including myself are happy to admit that we’ve learned more about PowerPoint from
our students’ presentations, than from any other source.
First of all, however, have you thought through your reasons for using PowerPoint in your lec-
tures? Here are some reasons people give – you can decide which are closest to your own.
●
Because you want to make a good impression on your audience. Some people may think
that if you are just using old-fashioned ways of giving presentations in your teaching that
your message itself may be outdated. However, the quality of your use of the medium is
actually more important than simply choosing an up-to-date medium.
●
Because you want to be able to edit your presentation easily and frequently. PowerPoint
presentations are very easy (and very inexpensive) to edit, even to restructure completely. It
is much easier to adjust your presentation after every experience of giving it, than it would
be to prepare a new set of overhead transparencies each time.
●
Because you want your handout material to relate directly to your presentation. In
PowerPoint, for example, you can print off handout pages containing multiple slides. You
can also annotate individual slides to make handouts with additional notes and background
information. The strongest advantage of printing out your slides as handout materials is that
your students then don’t need to do menial tasks such as simply copying your slides into
their own notes, but can do more active things such as writing their own notes onto their
printouts of your slides.
●
Because you want to show things that can’t be shown using traditional methods. For
example, if you want to show your students pictures, moving images or graphics which
would be difficult or impossible to do using overhead transparencies, you can be fairly sure
that you are justified in making your presentations computer-aided.
●
Because you want to be able to have all of your teaching presentations available. A CD-
ROM or memory stick or even a floppy disk can carry hundreds of slides of presentation
material. If your teaching repertoire is wide and varied, it might be impossible to carry it all
around with you on overheads or handouts. Carrying a memory stick or CD-ROM is much
more feasible, and you can customise a new presentation from your repertoire quite easily
once you have had some practice at editing, and print off those handouts you need locally.
●
Because you want your students to be able to have another look at your presentation
later. You can give students your PowerPoint presentation on disk, to work through at a
machine in the resources centre, or at home. You can email the presentation to students, or
place it on an intranet or even the Internet.
112
The Lecturer’s Toolkit
20 Make your own masking sheet. Tape a
pen or short ruler to what will be the top
edge, or stick a piece of sticky tack there.
The extra weight will help to ensure that
the sheet does not slip off your trans-
parencies prematurely revealing your last
line or two (which may be punch lines!).
21 Remember to switch the projector off!
Most overhead projectors make at least
some noise. When you’re not actually
showing something, it’s important that
both visually and auditorily you are not
distracting your students.

Use of colour
Now that we can, it is very tempting to use every colour in the rainbow! However, not all colours
are equally visible from the back of a large room (and indeed there are issues for students with
visual impairments or who cannot readily discriminate colours from one another). Even for
those with normal colour vision, yellow and orange are often problematic, and text or numbers
in red are very difficult for many people to discern at a distance, although they might be per-
fectly easy to discern at near or middle distances. The same text in the same size in black or
another dark colour may cause no such problems when viewed from a distance.
If using PowerPoint or similar packages, there are a number of ready-prepared layouts for use
which are easy to customise, but if you are printing onto overheads, remember that colour print-
ing is expensive and can be time-consuming, so should not be undertaken lightly. Students may
be very familiar with most of the most common designs, which might be a novelty to new users
but for the students may be a bore.
Fonts
Most on-screen words these days are word-processed – whether for PowerPoint slides, websites,
or well-produced overhead transparencies. Word-processing packages nowadays arm us with a
plethora of different fonts (typefaces), and it becomes very tempting to make full use of the
range at our disposal – but at our peril! For a start, it can be very irritating for readers to see sev-
eral different fonts on a single slide. While this may be satisfactory for those occasions where we
want to emphasise a particular word here and there by putting it into a different font, it is now
accepted that it is best to keep the changes to a minimum. Additionally, over-elaborate fonts can
provide difficulties for students with visual impairments or dyslexia. With PowerPoint slides, it
can be useful to have one particular font (and colour) for the title, and then to continue (for
example with sub-topics or bullet points) in a different font or colour. It is widely accepted now
that the sans-serif fonts (for example Arial and Comic Sans MS) minimise problems for people
with various visual difficulties, so fonts with ‘twiddly-bits’ (serifs) such as Times New Roman or
New York should be avoided on slides.
Live links
These should be used with caution, as delays and unusable links can be annoying to audiences.
With PowerPoint, you can insert hot-links to all sorts of things using the ‘Action Buttons’ facil-
ity. These links can be clicked using the mouse or remote control while on-screen in the lecture
theatre, and if a suitable modem connection is up and running take you straight to the website, or
photo, or different PowerPoint presentation, and so on. It is, of course, important to make sure
that you can get back to your presentation when you want to. It is sometimes more difficult than
you think, as you might need to click an ‘X’ box at the top right-hand corner of the screen to do
so, and this might not be possible using the particular remote control you’re using, or might be
quite hard to do with nervous fingers using your mouse or the trackpad on your laptop.
When we link on-screen into web pages, the problem of visibility and readability can
become serious. From the back of the room, it may only be the main headings that can be seen
at all well. This is not to say that you should never show web pages on-screen in lectures; you
may simply want students to register the general appearance of some pages so that they are
primed to recognise them more readily when they subsequently search them out for themselves.
Refreshing your lecturing
113

Or we may just want students in the lecture to see a particular graphic, chart, diagram, table or
photo, rather than the small-print wording surrounding it. All this is fine so long as we make
our intentions clear at the time. In other words, if we say ‘just look at this’ and point to it with
our on-screen cursor or laser pointer, and add ‘don’t try to read the text here, wait till you’ve got
the web page on your own machine’, then no one is likely to become frustrated by what they
can’t read there in the lecture room. However, the students sitting at the front are still going to
be advantaged – or even distracted – by them actually being able to see both the words and the
image we’re referring to.
‘Now you see it, now it’s gone’
This is perhaps the most significant pedagogic problem associated with using sophisticated tech-
nology in lectures to bring to students’ eyes images, data, and so on. When we’re using a lot of
different on-screen images, how much of it all do students remember, an hour or two (let alone a
week or two) after our lecture? It’s easy enough to give students printouts of our PowerPoint
slides themselves, for example using the software’s handout options of printing three-per-page
with room for them to write notes alongside, or six-per-page if all they need are the slides them-
selves. But if we’re linking to other things such as web pages, we can’t realistically print all these
out too – in any case, we may be doing a web search and moving around, and this will be differ-
ent every time. And, like any other handouts, they aren’t really being learned from unless we’re
getting students to do something with them.
We can, however, put the PowerPoint sequences, containing the links, onto an intranet, so that
students can repeat the tour for themselves, and go on their own diversions. But the problem of
‘now you see it, now it’s gone’ continues to apply at least to some extent. We know only too well
that it’s possible to sit at a computer for an hour, totally absorbed, but not really have a firm grip
on what we’ve been learning from it, unless we do more than just browse through some software
applications or tour the Internet or follow up links.
Don’t panic?
What about ‘Now you see it, now it is gone altogether!’? Just about everyone we know has tales
to tell of when the technology let them down, in front of large groups of students, unexpectedly,
and irretrievably. One or more of the following can happen at any time, any of which can take the
technological side of your roadshow right off the road:
●
a power cut – everything goes dark except the emergency exit lights;
●
a fire in the building, which means you’ve got to evacuate Theatre 2, leaving your laptop
with all your stuff in it, until tomorrow morning when the fumes that came in through the air
conditioning system have been deemed by the Fire Service to have gone again;
●
nothing happens when you press ‘next slide’ on the remote control;
●
the bulb blows in the data projector up on the ceiling;
●
the computer itself goes down;
●
the computer won’t ‘talk’ to the data projector it talked to happily yesterday;
●
the image on the big screen is just the top left two-thirds of what’s on your laptop screen;
●
the website you’re connecting to has gone down;
●
alerts about your new emails keep coming up on the big screen when you’re linked in to the
system;
114
The Lecturer’s Toolkit

●
your laptop insists that your machine is at risk and you must update your virus protection
software, and imposes the warning every minute or two on top of your PowerPoint slides;
●
you can’t find the file on your computer, and your floppy disk backup has corrupted.
It’s enough to put anyone off using anything more than chalk and talk. But it happens. The main
thing is to panic only inwardly. Your students will be really attentive now, watching how you rise
to the challenges which beset you. One really wants to just sit there and cry, but that’s not what
you want them to remember.
‘Oh, I’ll just give it another try’ can be famous last words. Sometimes, we know we know
what to do, and that it will work. But we’ve all been there on those days where someone found,
all too slowly, that there was nothing that could be done in the time available. It’s the technolog-
ical equivalent of completely forgetting one’s lines on-stage, except that there’s not usually a
helpful prompt from the wings to put one back on track. It is true that on some occasions a help-
ful student will know what to do and will bale us out.
My best advice, for use in these emergency situations, is to choose one or more of the follow-
ing tactics, as your strategy for handling the crisis:
●
Smile to yourself (through your teeth if necessary), then smile at the students, and get them
smiling back at you.
●
Think of something for the students to do for five minutes. It’s really useful if you always
have with you something for the students to do for five minutes. Have it on an overhead, so
you can show it if it’s not the overhead projector which is out of action – then they can
remind themselves of what they’re doing while you have a go at sorting the problem out for
a moment or two.
●
Alternatively, get them discussing and arguing with each other about something you’ve
already done in the lecture. Give them a decision to make, something which they’ll have dif-
ferent views about.
●
Whatever you get them to do, now’s your time for planning what you’re going to do next. If
what you were going to do next remains dependent upon the technology, it’s time to find
something else which isn’t.
●
Remember that it’s not going to be an eternity till the end of the session. The time remaining
will pass much more quickly for your students if they’re engaged in something interesting.
●
Perhaps turn it into a question-and-answer session. Ask the students to cluster into small
buzz-groups, and for each group to think of a question they’d like the answer to (preferably
about the topic you’d been addressing, but not necessarily), and to jot questions down on
slips of paper, and pass them down to you at the front. You can then choose some questions
you already know the answers to first, and work towards those questions you may wish to
throw back at the whole group.
●
Accept that there is likely to be some adjusting you’ll need to do to your next couple of ses-
sions, to get back on track to covering what you’d hoped to do before things went wrong.
The only problem then is if something goes wrong in your only lecture with that group of
students, and there are always ways of rescheduling the event if really necessary.
Most lecturers who seem to sail serenely like swans through technical disasters have learned to
do so by trial and error. It’s always a useful learning experience for us when our plans are
thwarted – indeed it can bring us back down to earth, and get us thinking with the students again.
But it’s uncomfortable and unwelcome, and uses up far more of our energy than we’d like.
Refreshing your lecturing
115

Therefore, having at least one emergency tactic can be a comfort for us at any time, and a life-
saver now and then.
Some don’ts for PowerPoint! ...
Any presentation medium can be used well or badly. The following suggestions should help you
to avoid some of the most common pitfalls with the most common of these packages,
Microsoft’s PowerPoint.
116
The Lecturer’s Toolkit
1 Don’t just use PowerPoint because
everyone else seems to be using it. This
may be a reason for making at least some
of your presentation computer-aided, but it
is worth thinking hard about whether com-
puters provide the best medium for the
exact purposes of each element of your
presentations. It is better to mix and match,
rather than to switch blindly to a different
way of supporting your presentations.
2 Don’t just use PowerPoint because the
equipment happens to be there. Some
institutions lay on data projection systems
as a matter of routine. It is still possible to
use overhead projectors, markerboards
and flipcharts too! Sometimes, these may
be pushed out of sight to make room for
the computer and projector, but they are
usually not far away.
3 Don’t cause ‘death by bullet point’!
Even though PowerPoint can introduce
bullet points to slides in a variety of ways
(fly from left, dissolve, and much more
dramatic options in recent editions of the
software), bullet points can quickly
become tiresome to an audience. It is
worth having a good reason for building
any slide step by step.
4 Don’t underestimate the problems that
can arise. You may not be able to get the
room dark enough for students to see your
presentation properly. There may be com-
patibility problems between the software
version you have used to create your pre-
sentation, and the version on the computer
through which you wish to show it. The
image size on your laptop may not be
compatible with that required by the data
projector. The resolution of the projection
equipment may not be sufficient to show
fine details of images that you carefully
placed into your presentation.
5 Don’t overdo the special effects. Doing
the whole presentation in a single format
becomes boring for your audience, but
programming a random sequence of slide
builds tends to be irritating for you as pre-
senter, as you don’t know what build
sequence will be produced when you
move to your next slide. Similarly, don’t
go overboard on the snazzy changes from
one slide to the next.
6 Don’t use it just like an overhead pro-
jector substitute! Simply transferring the
contents of your overhead transparencies
into a PowerPoint presentation does not
make full use of the medium. Try to do
other things with PowerPoint, for example
making good use of the possibilities of
moving images, web links, graphics, and
so on.
7 Don’t forget that it’s not that bright!
Except in well-equipped lecture theatres,
most data projection equipment is not
nearly as bright as a good overhead pro-
jector. This means that you may need to
take particular care with room lighting,
daylight from windows, and (worst of all)
direct sunlight.
8 Don’t forget to check the focus before
you start. Some projection systems are
fine for video projection, but turn out to
be too fuzzy for PowerPoint projection.
Modern systems have easy ways of
adjusting the focus, but older systems
may need to be set up in considerable

Refreshing your lecturing
117
detail before an acceptable image quality
is produced, or may just not be capable of
producing clear still images. Looking for
any length of time at fuzzy images can
give some members of your audience
headaches, as their eyes try in vain to
compensate for the fuzziness.
9 Don’t forget the conditions appropriate
for human sleep! Turning down the
lights, sitting comfortably in the same
place for more than a few minutes, and
listening to the sound of your voice may
be just the right conditions for your audi-
ence to drop off, particularly if the images
are monotonous or unclear.
10 Don’t forget that sunlight moves. If
you’re setting up a teaching room with
windows, first thing in the morning, you
may need to plan ahead for where any
sunlight may be later in the day.
11 Don’t put too much on any slide. There
still seem to be few PowerPoint presenta-
tions where all of the slides are perfectly
readable from the back of the room. It is
better to have twice as many slides, rather
than to cram lots of information onto each
slide. It usually takes two or more slides
to project the same amount of information
that would have taken one overhead trans-
parency.
12 Don’t put important text in the lower
half of slides. Unless all members of your
audience have an uninterrupted view of
the screen, people sitting at the back may
have to peer around their nearer neigh-
bours to read any text at the bottom of the
screen. Unlike overhead projection, you
can’t simply move a transparency up the
platen to make the final points visible to
people at the back.
13 Don’t use ‘portrait’ layout. You will
usually have the choice between land-
scape and portrait, so use landscape to
make the most of the top part of the
screen. You may already have found that
the same applies to overhead transparen-
cies.
14 Don’t import tables or text files just
because you can. The fact that you can
import such files into a PowerPoint pre-
sentation leads many into temptation.
These are very often the slides which
can’t be read from the back (or even from
the front). It is normally better to give stu-
dents such information as handouts,
rather than to try to show it to them on-
screen.
15 Don’t use the wrong colours. Colours
that look good on a computer screen don’t
always show up so well when they are
projected. If most of your presentations
will be in rooms with natural daylight, it
is usually best to stick to dark colours for
text, and light (or even white) back-
grounds. If you know you’re going to be
working in a lecture theatre where you
have full control of the lighting, you can
then be more adventurous, and use light
lettering against dark backgrounds (not
forgetting that you may be lulling your
audience to sleep when you turn down the
lights).
16 Don’t use the same slide format for all
of your slides. PowerPoint allows you to
switch your whole presentation into dif-
ferent pre-prepared styles, but the result
can be that your slides all look too similar
to have an optimum learning payoff for
your viewers. Vary the layout, colours and
backgrounds, so that each new slide
makes its own impact.
17 Don’t leave a slide on when you’ve
moved on to talk about something else. It
is better to switch the projection off, rather
than to leave up information that people
have already thought about. If you’re
within reach of the computer keyboard,
pressing ‘B’ on most systems causes the
display to go black, and pressing ‘B’ again
brings the display back. This is far simpler
and safer than switching the projector to
standby, and risking having to wait for it to
warm up again when you want to project
your next slide. An alternative is to insert a

118
The Lecturer’s Toolkit
‘black’ slide, where you wish to stop your
audience from looking at the screen. Don’t,
however, forget where you’ve placed these,
and panic about where your display has
gone!
18 Don’t talk to the screen! With overhead
projectors, it’s easy to develop good
habits, including looking at the trans-
parency rather than at the screen, and
avoiding turning your back on your audi-
ence. With projected images, you may
have no alternative but to watch the
screen, but you need to make sure that you
talk to your audience. If you can arrange
things so that you can look at a computer
screen rather than the projection screen,
the problem can be partly solved.
19 Don’t go backwards for too long! If you
need to return to a slide you showed much
earlier, it is better to switch the display off,
and find the slide you want without your
audience seeing every step. The same
applies to returning to your original place
in your presentation. In PowerPoint, if you
know you wish to go back to slide 23, key-
ing in ‘23’ then ‘enter’ will take you
straight there. It’s useful to know which
slide you were at before this, so that you
can go straight back to it after revisiting
‘23’. Right-clicking gives you the option
to return to the previously viewed slide –
which is fine if you only revisited ‘23’. In
practice, it’s useful to have a printout of
your slides, for example six per page, with
the numbers clearly shown on the printout,
so that you can navigate your entire pre-
sentation in any order at will.
20 Don’t forget to rehearse your presenta-
tion. With overhead transparencies you
always know what is coming next; with
presentation managers it is all too possible
to forget. If you look surprised when your
next slide appears, it does not do much for
your credibility with your audience.
21 Don’t underestimate the potential of
remote controls surprising you! Many
systems allow you to change slides with a
remote control connected to your com-
puter, or to the projection equipment.
Pressing the wrong button on this can
switch the system to something quite dif-
ferent (for example video input), and can
mean that you can find yourself unable to
get back to your presentation without los-
ing your cool. It is best to find out in
advance which buttons not to press, and
possibly even to place some adhesive tape
over them to reduce the possibility of
pressing them.
22 Don’t forget to check your spelling.
PowerPoint, for example, can do this for
you, but you have to instruct the software
appropriately. Be careful not to let the
software replace words automatically, or
you will get some strange slides if you are
using unfamiliar words.
23 Don’t fail to get feedback on your pre-
sentation before you run it. It is really
useful to get someone else to watch your
slides, and to ask about anything that isn’t
clear, or point out anything that could irri-
tate an audience. It’s also useful to check
your timing, and the overall length of your
presentation in practice.
24 Don’t miss out on seeing your presenta-
tion on paper. Consider printing out your
slides, for example six per page. This
helps you to get an overview of your pre-
sentation, and can sometimes alert you to
where to insert an additional slide or two.
It is also useful to have such pages in front
of you as you present, so that you can eas-
ily remind yourself of what’s on the next
slide, and navigate around your presenta-
tion at will when needed.
25 Don’t neglect to adjust and improve
your slides. It is so easy to alter a set of
slides that there’s no real excuse for not
editing your presentation frequently so
that it is always finely tuned to the partic-
ular audience and context. The most
beneficial additions are often new slides
inserted to address frequently asked ques-
tions in advance.

Peer-observation of lecturing
The final part of this chapter is about making the most of what you can learn about lecturing by
being observed by colleagues, and (even more sometimes) by observing your own colleagues at
work. Many institutions build teaching observation into quality assurance procedures as a matter
of routine. In some, however, a stranger in the classroom or lecture theatre is less common, and
may even be regarded as threatening.
It is useful to couple peer-observation of your lectures with self-evaluation of the same lec-
tures. The real benefits come when you combine both for a particular lecture, and after both you,
and your observer, have written down your observations and reflections, then sit down together
to compare notes, and discuss some of the finer details which may have applied to the particular
lecture.
The suggestions which follow now are intended to help you to see the benefits of taking part
in a peer-observation system. In particular, they aim to help you to get the most out of seeing
others teach, and getting feedback from colleagues on your own teaching.
Refreshing your lecturing
119
26 Don’t stop watching other people’s
technique. This is one of the fastest ways
of improving your own presentations.
Look for things that work well for other
people, and find out how the effects were
achieved, then emulate them. More
importantly, look for things that don’t
work, and make sure that you avoid them.
27 Don’t forget to back up your presenta-
tion. Have it with you on CD, and on a
memory stick as well as on your laptop.
When your laptop develops a problem,
you can then still get to your presentation
through other computers. There is usually
a desktop computer in a lecture theatre –
but if not, a student may be honoured to
grant you use of another laptop.
28 Don’t forget your overheads! It is still
useful to have at least a few of your com-
puter slides on traditional acetate.
Computers can go down. More likely, you
can still press the wrong button on a
remote control, and switch your projector
onto video or off altogether. At such times,
it can seem life-saving to be able to go to
overhead projector, at least temporarily.
1 Value feedback from your colleagues. It
is useful to get used to taking critical
feedback from someone you know, as
preparation to taking it well from some-
one you don’t know. It is useful to
encourage actively staff from other parts
of the institution, who already have some
experience regarding quality visits, to
make this experience available to you.
2 Don’t allow practising to go wrong.
Sometimes it is even harder to take criti-
cal feedback from someone you know
than from someone vested with authority
from outside. The criticism may be just as
valid, however!
3 Accept observation as normal. This
means that when the practice is really
needed, prior to a real quality-audit visit
for example, it is much easier to find the
time for it to happen. It also means that
many of the potential problems will have
already been recognised and dealt with.
4 Make use of opportunities to be
observed, in staff development pro-
grammes. The sooner that you become
accustomed to the experience of other
people watching your teaching perfor-
mance, the greater becomes your
confidence at handling such situations.
5 Make appropriate use of existing check-
lists. Your institution may well have
specific checklists relating to key features
of lectures or classroom work, on aspects
such as ‘planning and preparation’, ‘use of

120
The Lecturer’s Toolkit
resources’, ‘involving students’, ‘respond-
ing to individual needs’, and so on.
6 Lead in new colleagues gently. Avoid the
situation of the performances of new staff
being observed against a framework of
detailed criteria intended for practised and
experienced teachers.
7 Make sure that not all of the emphasis
is placed on presentation skills. Include
room for the quality of handouts, over-
heads, media elements, and class
exercises to be covered in the observation
criteria. This can help spread the load, so
that colleagues are not overly anxious
about their presentation skills.
8 Remind yourself that in real teaching
you are not being observed every sec-
ond. While it is possible that some
students will notice slips you may make,
you are unlikely (fortunately?) to have the
undivided attention of the whole class at
any time.
9 Beware of the possibility of getting into
a rut. When anyone has been teaching a
particular topic for a considerable time, it
is natural to tend to go on autopilot, and
be less aware of what is actually happen-
ing during teaching sessions. Teaching
observation can act as a powerful aid to
refreshing your approach.
10 Take advantage of team teaching
opportunities. When you are regularly in
the position of observing parts of your
colleagues’ teaching, and vice versa, a
considerable amount of automatic staff
development occurs as you learn from
each other’s triumphs and disasters.
11 It doesn’t take long. Suppose an observer
gives you (say) three tips at the end of an
hour, this can be very good value com-
pared to just reading a book on teaching
practices, where you may not happen to
read the things you may most need to find
out.
12 When you’ve observed someone else
teach, always give positive feedback
first. Help to put the colleague you are
observing at ease by giving the good news
first (and indeed making sure there is
always some good news!). We are all
much more likely to take on board the
‘could do betters’ if we have received the
positive statements first.
13 Try to give three positives for every one
‘could do better’. Even when there is
much to comment adversely on, it is
important to give sufficient good news. If
people are given too much adverse com-
ment, they may lose track of which are the
most important parts of the agenda that
they need to address.
14 When you are observed, treat it as free
consultancy. ‘Isn’t it wonderful to have a
colleague or friend who finds time to
engage in an educational conversation
with me?’ is a much better approach than
‘I haven’t time for all this practising’.
15 Take the attitude that all feedback is
potentially useful. Feedback is an impor-
tant part of everyday learning, and it is
constructive to regard quality visits not so
much in terms of the verdicts which may
be reached, but in terms of the availability
of valuable feedback which they may
bring.
16 Be prepared to receive positive feed-
back. In many cultures, there is a sense of
embarrassment when receiving praise.
This leads people to shrug it off, and to
fail to really take on board the value of
finding out more about what is regarded
as successful. It is worth practising
receiving positive feedback, and verbally
acknowledging it, and thanking the peo-
ple who deliver it.
17 Get practising for receiving negative
feedback. Regard criticism as useful feed-
back. Avoid the temptations to become
hostile, or to justify one’s position, or to
make excuses for things that were found to
be lacking. When critical feedback is felt
to have been openly received and taken
note of, the people giving such feedback
are much more satisfied that their job has

Refreshing your lecturing
121
been done effectively, than when they are
not at all sure that the feedback has been
listened to and heeded.
18 Practise eliciting feedback. Gain skills
in drawing out feedback, and getting the
people giving it to clarify it and expand on
it when necessary. ‘What do you consider
the best thing about the way I am handling
so-and-so?’ and ‘What is the first thing
about this that you would suggest I try to
change?’ are the sort of questions that
help in this process.
19 Share feedback on your teaching with
your students. They like to feel involved.
Ask them what they think of feedback
you’ve received. Ask them what actions
they might suggest that you consider.
Explain why you might be doing some-
thing different; this could lead to more
feedback.
Making the most of lectures
This chapter ends with some practical pointers for helping students to get the most out of your
lectures – and for making these occasions more satisfying for yourself too. These tips are
designed to optimise the learning potential of lectures, in particular with reference to teaching
and learning processes, and to remind you of ways that large-group sessions can pay real divi-
dends to students.
1 Make the most of opportunities when
you have the whole group together.
There are useful benefits of whole-group
shared experiences, especially for setting
the scene in a new subject, and talking
students through known problem areas.
Use these as sessions to develop whole-
group cohesion, as well as to give
briefings, provide introductions, intro-
duce keynote speakers, and hold practical
demonstrations.
2 Make sure that lectures are not just
‘transmit–receive’ occasions. Little is
learned by students just writing down
what the lecturer says, or copying down
information from screens or boards. There
are more efficient ways of providing stu-
dents with the information they need for
their learning, including the use of hand-
out materials, textbooks and other
learning resource materials.
3 Be punctual, even if some of your stu-
dents are late. Chat to the nearest
students while people are settling in. Ask
them ‘How’s the course going for you so
far?’ for example. Ask them ‘What’s your
favourite topic so far?’ or ‘What are the
trickiest bits so far?’.
4 When you’re ready to start, capture
students’ attention. It’s often easier to do
this by dimming the lights and showing
your first overhead, than by trying to qui-
eten down the pre-lecture chatter by
talking loudly. Do your best to ignore late-
comers. Respect the courtesy of
punctuality of those already present, and
talk to them.
5 Make good use of your specific
intended learning outcomes for each
lecture. Find out how many students think
they can already achieve some of these –
and adjust your approach accordingly!
Explaining the outcomes at the start of the
session, or including them in handout
materials given out to students, can help
them to know exactly what they should be
getting out of the lecture, serving as an
agenda against which they can track their
individual progress during the minutes
which follow.
6 Help students to place the lecture in
context. Refer back to previous material
(ideally with a short summary of the pre-
vious lecture at the beginning) and give
them forewarning of how this will relate
to material they will cover later.

122
The Lecturer’s Toolkit
7 Use handout material to spare students
from copying down lots of information.
It’s better to spend time discussing and
elaborating on information that students
can already read for themselves.
8 Face the class when using an overhead
projector, or PowerPoint in the lecture
room. Practise in a lecture room using
your transparencies or slides as an
agenda, and talking to each point listed on
them. By placing a pen on a transparency
you can draw attention to the particular
point on which you are elaborating, main-
taining vital eye contact with your
students.
9 Work out some questions which the ses-
sion will address. Showing these questions
as an overhead at the beginning of the ses-
sion is a way of helping students to see the
nature and scope of the specific learning
outcomes they should be able to address
progressively as the session proceeds.
10 Give your students some practice at
note-making (rather than just note-tak-
ing). Students learn very little just from
copying out bits of what they see or hear,
and may need quite a lot of help towards
summarising, prioritising, and making
their notes their own individual learning
tools.
11 Get students learning-by-doing. Just
about all students get bored listening for a
full hour, so break the session up with
small tasks such as problems for students
to work out themselves, applying what
you’ve told them, reading extracts from
their handout material, or discussing a
question or issue with the students nearest
to them. Even in a crowded, tiered lecture
theatre, students can be given things to do
independently for a few minutes at a time,
followed by a suitable debriefing, so that
they can compare views and find out
whether they were on the right track.
12 Variety is the spice of lectures. Make
sure that you build into large-group lec-
tures a variety of activities for students,
which might include writing, listening,
looking, making notes, copying diagrams,
undertaking small discussion tasks, ask-
ing questions, answering questions,
giving feedback to you, solving problems,
doing calculations, putting things in order
of importance, and so on.
13 Ask the students how you are doing.
From time to time ask ‘How many of you
can hear me clearly enough?’, ‘Am I
going too fast?’, ‘Is this making sense to
you?’. Listen to the answers and try to
respond accordingly.
14 Use lectures to start students learning
from each other. Getting students to
work in small groups in a lecture environ-
ment can allow them to discuss and
debate the relative merits of different
options in multiple-choice tasks, or put
things in order of importance, or brain-
storm possible solutions to problems.
After they have engaged with each other
on such tasks, the lecturer can draw con-
clusions from some of the groups, and
give expert-witness feedback when
needed.
15 Use lectures to help students make
sense of things they have already
learned. It is valuable to make full use of
the times when all students are together to
give them things to do to allow them to
check out whether they can still do the
things they covered in previous sessions.
16 Use lectures to help shape students’
attitudes. The elements of tone of voice,
facial expression, body language, and so
on can be used by lecturers to bring
greater clarity and direction to the atti-
tude-forming shared experiences which
help students set their own scene for a
topic or theme in a subject.
17 Genuinely solicit students’ questions.
Don’t just ask ‘any questions’ as you are
picking up your papers at the end of a
class. Treat students’ questions with cour-
tesy even if they seem very basic to you.
Repeat the question so all students can

Refreshing your lecturing
123
hear, and then answer in a way that doesn’t
make the questioner feel stupid.
18 Don’t waffle when stuck! Don’t try to
bluff your way out of it when you don’t
know the answers to some of the ques-
tions students may ask. Tell the
questioners that you’ll find out the
answers to their questions before your
next lecture with them – they’ll respect
you more for this than for trying to invent
an answer.
19 Use some lecture time to draw feedback
from students. Large-group sessions can
be used to provide a useful barometer of
how their learning is going. Students can
be asked to write on slips of paper (or
‘post-it’ notes) questions that they would
like you to address at a future session.
20 Use whole-class time to explain care-
fully the briefings for assessment tasks.
It is essential that all students have a full,
shared knowledge of exactly what is
expected of them in such tasks, so that no
one is disadvantaged by any differentials
in their understanding of the performance
criteria or assessment schemes associated
with the tasks.
21 Show students how the assessor’s mind
works. This can be done by devising class
sessions around the analysis of how past
examples of students’ work were assessed,
as well as by going through in detail the
way that assessment criteria were applied
to work that the class members them-
selves have done.
22 Record yourself on video every now and
then. Review the video to help you see
your own strengths and weaknesses, and
look for ways to improve your perfor-
mance. Your keenest critic is likely to be
yourself, so don’t try to resolve every lit-
tle habit or mannerism at once, just tackle
the ones that you think are most impor-
tant, little by little. It may also be useful
for a group of colleagues together to look
at each other’s videos, and offer each
other constructive comments. This is
excellent practice for inspection or other
quality assessment procedures.
23 Use all opportunities to observe other
people’s lectures. You can do this not
only in your own department, but also at
external conferences and seminars.
Watching other people helps you to learn
both from what others do well, that you
might wish to emulate, and from awful
sessions where you resolve never to do
anything similar in your own classes.
24 Put energy and effort into making your
lectures interesting and stimulating. A
well-paced lecture which has visual
impact and in which ideas are clearly
communicated can be a motivating shared
experience for students. Become comfort-
able using overhead projectors and
audio–visual equipment in imaginative
ways.
25 Watch the body language of your audi-
ence. You’ll soon learn to recognise the
symptoms of ‘eyes glazing over’ when
students are becoming passive recipients
rather than active participants. That may
signal the time for one of your prepared
anecdotes, or better, for a task for students
to tackle.
26 Don’t tolerate poor behaviour. You don’t
have to put up with students talking, eat-
ing or fooling around in your lectures.
Ask them firmly but courteously to desist,
and as a last resort, ask them to leave. If
they do not do so, you should leave your-
self for a short period to give them a
cooling down period.
27 Don’t feel you’ve got to keep going for
the full hour. Sometimes you will have
said all you need to say, and still have ten
or fifteen minutes in hand. Don’t feel you
have to waffle on. It may come as a sur-
prise to you, but your students may be
quite pleased to finish early occasionally!
28 Don’t feel that you have to get through
all of your material. Even very experi-
enced lecturers, when preparing a new
lecture, often overestimate what they can

124
The Lecturer’s Toolkit
cover in an hour. It is better to cover part
of your material well, than to try to rush
through all of it. You can adjust future ses-
sions to balance out the content.
29 Use large-group sessions to identify and
answer students’ questions. This can be
much more effective, and fairer, than just
attempting to answer their questions indi-
vidually and privately. When one student
asks a question in a large-group session,
there are often many other students who
only then realise that they too need to hear
the answer.
30 Help the shy or retiring students to
have equal opportunity to contribute.
Asking students in large groups to write
questions, or ideas, on ‘post-it’ notes
helps to ensure that the contributions you
receive are not just from those students
who aren’t afraid to ask in public. It can
be comforting for students to preserve
their anonymity in asking questions, as
they are often afraid that their questions
may be regarded as silly or trivial.
31 Come to a timely conclusion. A large-
group session must not just fizzle out, but
should come to a definite and robust end-
ing. It is also important not to overrun. It
is better to come to a good stopping place
a few minutes early, than to end up rush-
ing through something important right at
the end of the session.

Intended outcomes of this chapter
When you’ve thought through the suggestions included in this chapter (and tried out the most
relevant ones) you should be better able to:
●
confront some of the behaviours (student ones and tutor ones) which can reduce the success
of small-group work;
●
decide the optimum size of student groups for particular collaborative tasks you set;
●
choose the best way to establish the group membership for your purposes;
●
select from a range of processes such as rounds, buzz-groups, syndicates, snowballing, fish-
bowls, crossovers, brainstorming and pair-dialogues, to help your students to learn
productively and actively in small-group environments.
Why is small-group learning so important?
My aim in this chapter is to help colleagues increase the interest and diversity of the processes
used in small-group work with students. A common theme running throughout this chapter is the
need to help students to participate fully in small-group situations, so that the learning payoff
they derive from such occasions is maximised.
Small-group learning may be more important than we think. When most people think about
teaching in universities and colleges, the image that frequently comes to mind is of a large lecture
theatre full of students listening intently (or not) to a lecturer in full spate of erudition. Actually, a
large proportion of the most meaningful learning in higher education happens when students are
working in small groups, in seminars, tutorials, practicals and laboratories. Moreover, even more
learning can be happening in small-group situations beyond timetabled sessions, where students
interact spontaneously with each other, and learn from each other. With increasing pressure on us
all to deliver the curriculum in ever more efficient and effective ways, the means by which we
manage small-group teaching, and harness the potential learning payoff, come under close
scrutiny. This chapter is intended to help you to explore how we can do this to best effect.
Group learning is about getting people to work together well, in carefully set up learning envi-
ronments. The human species has evolved on the basis of group learning. Learning from other
people is the most instinctive and natural of all the learning contexts we experience, and starts
from birth. Although learning can only be done by the learner, and can’t be done ‘to’ the learner,
the roles of other people in accelerating and modifying that learning are vitally important. Other
people can enhance the quality of our learning, and can also damage it. But which other people?
Chapter 4
Making small-group teaching work

We hear much of collaborative learning, as if it’s the most natural activity in the world. But it
often seems like the least natural, particularly amongst strangers. Sociological research tells us
repeatedly that it is human nature not to be involved with people we don’t know. We might make
a mistake, or look stupid, or be attacked. We will, however, get involved with people we do know.
We’ll help them with their problems and even defend them. One key to working and learning
with other people is, therefore, the ability to lower barriers and become friends with would-be
strangers, while acknowledging differences and respecting different viewpoints.
Furthermore, much is now said about transferable skills, or key skills, particularly including
oral communication skills, problem-solving skills, self-organisation skills, and reflection. Many
of these skills can only be learned from, and with, other people, and can not be developed solely
by reading and studying what others have written about them. It is now increasingly accepted
that the most important outcomes of education and training are about developing people, and not
just what people know or understand. Employers and managers plead for employees who are
able to work well with others, and organise themselves. Working in small groups can allow stu-
dents to embrace a range of interactive and collaborative skills which are often hard to develop
in individual study situations, and impossible to develop in large-group environments such as
lectures. The small-group skills are precisely those required in employment and research, where
graduates need to be able to:
●
work in teams;
●
listen to others’ ideas sympathetically and critically;
●
think creatively and originally;
●
build on others’ existing work;
●
collaborate on projects;
●
manage time and processes effectively;
●
see projects through to a conclusion;
●
cope with the normal difficulties of interactions between human beings.
The last of these may be the most important of all. Learning in groups allows students to develop
cohesion with their peers, when classes are becoming so large as to preclude feelings of whole-
group identity, particularly under modular schemes where large cohorts of students come
together from disparate directions to study together on a unit.
Group learning has never been as important as it now is. Yet we are still in a world where most
teachers, educators and trainers are groomed in instruction rather than facilitation. Despite the
increased status of group learning, there is nothing fundamentally new in people learning together.
Some lecturers find working with small groups more anxiety-provoking than lecturing, because
of the necessity to work with students as individuals rather than in the anonymity of large groups.
Sometimes there are worries about student behaviour, that they might become too challenging, dis-
ruptive or unfocused. Otherwise, there are often anxieties about organisational issues, like how to
run a number of parallel seminars, based on a single lecture, with several tutors and research assis-
tants working with different groups. This chapter addresses some of the reasons for persevering
nevertheless, and offers some practical suggestions on overcoming a wide range of difficulties.
Deciding on group size
A number of choices exist about the selection of group size and group membership, depending
on the context of the group work and the nature of the learning outcomes which are intended to
126
The Lecturer’s Toolkit

be achieved by students working in groups. If assessed work is to be an outcome of group work,
it is worth thinking in advance how appropriate credit for the overall product can best be coupled
with credit for individual contributions to the product, particularly where there is the possibility
of the contributions being unequal.
There are no rights or wrongs to the following suggestions about ways of establishing student
groups: basically it is best to make informed decisions (or inspirational leaps) based on the con-
text and the occasion. It is useful to consider group size first.
The choice of group size will often depend on the size of the whole class, as well as on the
size, shapes, and facilities available in the rooms in which small-group work is carried out.
Sometimes, episodes in small-group format can be conducted even in a large, full lecture theatre,
with groups being formed between students sitting close enough to participate together.
However, the most important occasions where group size is likely to be crucial involve subdivid-
ing the students present at seminars, tutorials and practical classes.
Pairs
In some regards a pair is not really a group. It is usually relatively easy to group students in twos
– either by choosing the pairs yourself, random methods, or friendship pairs. Advantages include
a low probability of passenger behaviour, and the relative ease for a pair to arrange meeting
schedules. However, pairs are good for small-scale tasks, where both students know each other
well. Pairs can also be useful where a stronger student can help a weaker one. Problems can
occur when pairs fall out, or either student is absent, or lazy or domineering. It is normally
unwise to use the same pairs for long-term tasks, but useful to ring the changes of constitution of
pairs over different tasks.
Couples
In any class of students, there are likely to be some established couples. When they work
together on collaborative work, the chances are that they will put a lot more into group work than
ordinary pairs, not least because they are likely to spend more time and energy on the tasks
involved. The risks include the possibility of the couple becoming destabilised, which can make
further collaborative work much more difficult for them.
Threes
Trios can work well, as communication between three people is still easy and work can often be
shared out in manageable ways. Trios represent a very popular group size. The likelihood of pas-
senger behaviours is quite low, and trios will often work well together, sharing out tasks
appropriately. It is easier for trios to arrange meetings schedules than for larger groups. The most
likely problem is for two of the students to work together better than with the third, who can
gradually (or suddenly) become, or feel, marginalised. Threes can be difficult if two gang up on
one, and the group is still fairly vulnerable if one member is often absent or when present does-
n’t take an equal responsibility.
Fours
This is still quite small as a group size. Passenger behaviour is possible, but less likely than in
larger groups. When subdividing group tasks, it can be useful to split into pairs for some activities,
Making small-group teaching work
127

and single individuals for others. There are three different ways that a quartet can subdivide into
pairs, adding variety to successive task distribution possibilities. Fours can be very effective, and
can be a good critical mass for sharing out large projects, with opportunities both for delegation
and collaboration. Students with different abilities and qualities can play to their own strengths
within a foursome, giving each member a chance to contribute something and feel valued. Fours do
have a tendency, however, to split into two pairs, and tensions can arise. With four members (or any
other even number) there is no possibility of a ‘casting vote’ if the group is evenly split between two
courses of action.
Fives
Fives have many of the advantages of fours, and are a favoured group size for many tasks, not
least because of the ‘casting vote’ opportunity when making decisions. There are sufficient peo-
ple to provide a range of perspectives, but the group is not of unmanageable proportions. In a
group this size, however, a determined slacker may still be able to hide, unless suitable precau-
tions are taken. The possibility of passenger behaviour begins to increase significantly, and it
becomes more important for the group to have a leader for each stage of its work. However,
because of the odd number, there is usually the possibility of a casting vote when making deci-
sions, rather than the group being stuck equally divided regarding a choice of action. There are
many ways that a group of five can subdivide into twos and threes, allowing variety in the divi-
sion of tasks among its members.
Sixes
The possibility of passenger behaviour is yet more significant, and group leadership is more nec-
essary. The group can, however, subdivide into threes or twos, in many different ways. It is now
much more difficult to ensure equivalence of tasks for group members.
Seven to ten or so
Such numbers are still workable as groups, but the larger the number, the greater the possibility
of idlers loafing and shy violets being overshadowed by the more vociferous and pushy members
of the group. It can be argued that groups of this size are only really viable if a really substantial
task is to be undertaken and if considerable support and advice is given on project and team
management. Such groups can still be useful for discussion and debate, before splitting into
smaller groups for action. Passengers may be able to avoid making real contributions to the work
of the group, and can find themselves outcasts because of this. When it is necessary to set up
working groups which are larger than six, the role of the leader needs to change considerably. A
skilled facilitator is needed to get a large group collaborating well. It can be advantageous for the
facilitator to become somewhat neutral, and to concentrate on achieving consensus and agree-
ment rather than attempting to set the direction of the group.
Ways of forming groups
Strict rules on how to form groups cannot be provided, as such decisions depend so strongly on
context and purpose. The following discussion points out some of the advantages and disadvan-
tages of different ways of constituting student group membership. There are many different ways
128
The Lecturer’s Toolkit

in which you can create groups of students from a larger class. All have their own advantages and
disadvantages, and it is probably best to use a mixture of methods so that students experience a
healthy level of variety of group composition, and maximise the benefits of learning from and
with each other.
Groups with some historical or social basis
Friendship groups
If you let students select themselves into their own groups, often strategic, high-fliers will
quickly locate each other, then the middle ability ones will realise what is happening and form
groups among themselves, then the last ones left will tend to be the less able and they will clump
together through lack of any alternative. Allowing students to arrange themselves into groups
has the advantage that most groups feel a sense of ownership regarding their composition.
However, there are often some students ‘left over’ in the process, and they can feel alienated
through not having been chosen by their peers. Friendship groups may also differ quite widely in
ability level, as high-fliers select to work with like-minded students. This method is effective if
you want to be sure that marks will be distributed, but is not such a useful method of group selec-
tion if you want peers to support each other.
Geographical groups
Simply putting students into groups according to clusters as they are already sitting (or standing)
in the larger group is one of the easiest and quickest ways of dividing a class into groups. This is
likely to include some friendship groups in any case, but minimises the embarrassment of some
students who might not have been selected in a friendship group. The ability distribution may,
however, be skewed, as it is not unusual for the students nearest the tutor to be rather higher in
motivation compared to those in the most remote corner of the room!
Alphabetical (family name) groups
This is one of several random ways of allocating group membership. It is easy to achieve if you
already have an alphabetical class list. However, it can happen that students often find them-
selves in the same group, if several tutors use the same process of group selection. Also, when
working with multicultural large classes, several students from the same culture may have the
same family name, and some groups may end up as dominated by one culture, which may not be
what you intend to occur.
Other alphabetical groups
For example, you can form groups on the basis of the last letter of students’ first names. This is
likely to make a refreshing change from family-name alphabetical arrangements. Students also
get off to a good start in seeing each other’s first names at the outset.
Random groups
Many tutors find this to be the easiest and fairest way of selecting groups of students to work
together. Using lottery systems or random number generators, students are allocated to the
Making small-group teaching work
129

groups in which they are to work. Problems can arise using this method from difficulties with
group dynamics, particularly if the students have been given no preparation on how to be a good
team member. However, in industrial and commercial contexts, graduates are often required to
work in allocated teams, so this may be regarded as good preparation for real life. The following
ways of randomising group composition can add variety to student group work.
Number groups
When students are given a number (for example on a class list), you can easily arrange for differ-
ent combinations of groups for successive tasks, by selecting a variety of number permutations
(including using a random number generator if you have one on your computer). Groups of four
could be ‘1–4, 5–8, ... ’ for task 1, then ‘1, 3, 5, 7 and 2, 4, 6, 8, ... ’ then ‘1, 5, 9, 13’, and so on.
Class list rotating syndicates
Where a succession of small-group tasks is to be used, say with group size being four, it can be
worth making a printed list (or overhead transparency) of the whole class, and starting off by
forming groups by writing AAAA, BBBB, CCCC, DDDD, etc. down the list. Next time round,
write ABCD, ABCD, ABCD etc., so that everyone is in an entirely new group. Such rotation can
minimise the problems that can be caused by the occasional difficult or uncooperative student,
whose influence is then spread around, rather than lumbering the same group each time. It is
worth, however, avoiding the grouping being too much influenced by any alphabetical factors;
all too often students find themselves in alphabetically determined situations, and it is useful to
break free of this unwitting constraint in deciding group membership.
Astrological groups
When selecting group membership from a large class, it makes a change to organise the selec-
tion on the basis of calendar month of birthdate. Similarly, ‘star signs’ could be used – but not all
students know when (for example) Gemini starts and finishes in the year. This method often
leads to groups of somewhat different sizes, however, and you may have to engineer some trans-
fers if equal group size is needed. Participants from some religions may also find the method
bizarre or inappropriate.
Crossovers
When you wish to share systematically the thinking of one group with another, you can ask one
person from each group to move to another group. For example, you can ask the person with the
earliest birthday in the year to move to the next group clockwise round the room, carrying for-
ward the product or notes from the previous group and introducing the thinking behind that to
the next group. The next exchange could be the person with the latest birthday, and so on. When
doing this, you need to make sure that not too many students end up stuck in the same physical
position for too long.
Coded name labels
Often we want to mix students up in a systematic way so they work in small groups of different
compositions, and give and receive feedback from many more people than are involved in the
130
The Lecturer’s Toolkit

group size they are working in at any given time. One way of predetermining a wide variation in
group membership is to use sticky labels (or just small pieces of paper) to become each student’s
name-badge, also bearing a unique code as follows. A three-digit code of a Greek letter, normal
letter, and a number can lead to the possibility of all students finding themselves in three com-
pletely different groups for successive tasks. Six of each letters and numbers allows an overall
group of 36 students to split into different sixes three times, for example, with each student
working cumulatively with 15 other students.
Imagine that you have, for example, 25 students, and that the table below is your sheet of
sticky labels, and that you write on them codes of one Greek letter, one normal letter, and one
number, as follows.
Figure 4.1 Codes for 25 students
Give these labels out randomly (and ask students to write their names on them, especially when
it will be useful for them to become more familiar with each other’s names). Then you can use
three entirely different group configurations, each with five groups of five, as follows:
αA1
βA2
γA3
δA4
εA5
αB2
βB3
γB4
δB5
εB1
αC3
βC4
γC5
δC1
εC2
αD4
βD5
γD1
δD2
εD3
αE5
βE1
γE2
δE3
εE4
Making small-group teaching work
131

●
grouping by Greek letters;
●
grouping by Latinate letters;
●
grouping by numbers.
So, in this example, by the third group each student would have worked with 12 different stu-
dents from the whole group of 25, and would have encountered entirely different students in
each successive group.
Where the group tasks are successive stages of a larger whole, there is no need for whole
group feedback on the first two tasks, because each individual can act as rapporteur on the out-
comes of their previous task in the last configuration. This means that everyone is a rapporteur,
and each group can benefit from everything which happened in all the groups without the repe-
tition of plenary report-back. As with snowballing or pyramids, you can make the task at each
stage slightly more difficult and ask for a product from the final configuration if desired.
Crossovers are useful in making sure everyone in the group is active and also help to mix stu-
dents up outside their normal friendship, ethnic or gender groups. It takes a little forethought to
get the numbers and letters right for the cohort you are working with. It can be useful to have
some templates of the different number–letter combinations, so that you can cut up a sheet of
paper or card and give students their individual numbers (this helps avoid the possibility of
duplicating numbers when writing them out by hand in the actual session!). You can, however, do
crossovers on the spur of the moment using ‘post-it’ labels and quick calculations.
An alternative to sticky labels as above is to use a pack of playing cards, especially when the
total number of students in the room is around 50. You then have a large repertoire of ways of
getting them into different group configurations.
Fur ther ways of forming groups
Performance-related groups
Sometimes you may wish to set out to balance the ability range in each group, for example by
including one high-flier and one low-flier in each group. The groups could then be constituted on
the basis of the last marked assignment or test. Alternatively, it can be worth occasionally setting
a task where all high-fliers and all low-fliers are put into the same group, with most of the groups
randomly middle-fliers, but this (though appreciated by the high-fliers) can be divisive to overall
morale.
Skills-based groups
For some group tasks (especially fairly extended ones), it can be worthwhile to try to arrange
that each group has at least one member with identified skills and competences (for example,
doing a web search, using a word-processing package, leading a presentation, and so on). A short
questionnaire can be issued to the whole class, asking students to self-rate themselves on a series
of skills, and groups can be constituted on the basis of these.
Hybrid groups
This is a compromise solution. You may sometimes wish to organise students by ability or in
learning teams, and may at the same time wish to help them avoid feeling that they are isolated
132
The Lecturer’s Toolkit

Making small-group teaching work
133
from everyone they already know. You can permit students to select one other person they would
like to work with, and then juggle pairs to ensure some balance of ability. This can work really
well, but can be fraught with difficulty, for example, when pair choice is not coincident! It can
also make for difficulties if you try to pair up two self-selecting high-fliers with two of the less
able students: resentment and conflict can ensue. In order to avoid this problem, one can some-
times pair middle ability pairs, which make up the bulk, with more able and less able pairs, using
one’s best judgement on factors such as friendship and cooperative ability. You need to recognise,
however, that when group work is assessed, the likely mark achieved by each group can be
affected by your choices and may not be seen as fair, even though it works well in adding value
to most students’ learning experience.
Learning teams
If your aim is to build upon students’ prior experience and ability, it is possible to select group
members with specific criteria in mind. You might suggest groups form themselves (or are formed
by the tutor) into teams which include, for example, one with proven competence in numeracy,
one with excellent communication skills, an IT specialist, someone fluent in a language other than
English, someone with experience in the world of work, and so on. This provides the opportunity
for team members to take account of each other’s divergent abilities and to value them. There may
be problems with task allocation, however. Do you allocate the task of doing the drawings to the
former draughtsperson or to the group member who is inexperienced in this kind of work? Do you
give the IT tasks to the technophile or the technophobe? The team’s marks will be better if the for-
mer choice is made, but there may be more learning gain if the novice undertakes the task with
guidance from the specialist. Will the team work to its strengths, and achieve the intended out-
comes well, or should it be encouraged to work to its weaknesses and maximise the learning
payoff resulting from the tasks? If group work is assessed, it is no surprise that teams will do the
former. Forming learning teams also relies on the students and tutors having a good knowledge of
prior abilities and competence and may take some considerable organisation.
Small-group process techniques
The most significant single enemy of small-group work with students is their non-participation.
There is a wide range of small-group processes from which we can select a variety of ways to
help students to learn actively. A balanced programme of different kinds of activities can then be
devised which will promote learning to the satisfaction not only of external quality assessors but
also of the students themselves, who are likely to benefit from being stretched. Effective small-
group techniques help students derive increased learning payoff from the time students spend
working together, by:
●
enhancing their motivation to learn, by raising interest levels, and helping them see the rel-
evance of the topics they are working with;
●
giving them learning-by-doing opportunities, and allowing them to practise relevant activi-
ties, and to learn by trial and error in a safe and supportive environment;
●
allowing students to gain a considerable amount of feedback from each other, and from the
facilitator of the small-group session;
●
helping students make sense of things that they are learning together, particularly by
explaining things to each other, and making decisions together.

This chapter continues with some suggestions regarding how you may use each of eight different
ways of helping students to be participative in group situations. Some lend themselves to large-
group situations, and can be ways of helping interactive learning to occur in packed lecture
theatres as well as in smaller-group settings.
1 Rounds
Where groups are not too large, say around twenty or fewer, go around everyone in the group and
ask them to respond (for example) to a given sentence-starter, or to give a sentence or two about
what they want to find out about the topic to be explored. People often use rounds as icebreakers
or equally as part of the winding up of a session, when it can be productive to ask students for (for
example) ‘one thing you learned, one thing you liked, and one thing you did not like’. Try not to
make the round too daunting for students. It helps to provide some guidance on what is expected
of them (for example, ‘I want everyone to give their name and then identify one aspect of the
course programme they know nothing about but are looking forward to learning about’ or ‘let’s go
round and find out which single aspect of today’s session has been most useful for each person’).
In big rounds, students can be quite nervous, so make it clear that it’s acceptable to say ‘pass’ and
if people at the beginning have made your point, that concurrence with ideas expressed already is
sufficient. Alternatively, ask everyone to write down the point they intend to give, for example on
‘post-it’ notes, and as the round continues stick all the ‘post-it’ notes on a chart or wall, so that
they’re all seen to be equally important. Those students who are reticent orally are often less ner-
vous when they’ve already jotted down the point they wish to contribute.
A drawback with rounds is that it can be boring if the group is large, and the answers are
repetitive. Contributions late in the round tend not to be valued as they’re adding nothing new,
and the contributors can feel their ideas are rejected.
2 Buzz-groups
Give pairs, threes, fours or larger subdivisions of the whole class, small, timed tasks which involve
them talking to each other, creating a hubbub of noise as they work. Their outcomes can then be
shared with the whole group through feedback, on a flip-chart sheet poster, on an overhead projec-
tor transparency or otherwise as appropriate. This technique can also work well in large-group
lecture situations, though it is not usually appropriate to do more than collect the feedback from
selected groups on such occasions, otherwise reporting-back becomes too tedious, repetitive and
time consuming. The noise level in a large lecture theatre full of students ‘buzzing’ can be quite
alarming for lecturers used only to the sound of one or two voices at a time, but when it is remem-
bered that a lot of learning-by-explaining and learning through feedback is occurring in such a
noisy room, the use of the time spent is certain to be accompanied by significant learning payoff.
Buzz-groups often work best when they’re buzzing about several different things at once. For
example, in a large-group lecture, provide several buzz-group tasks, and get different groups of
students addressing selected tasks. Report-back from buzz-groups is then not tedious or repeti-
tive, and the interest level of the large group can be maintained.
3 Syndicates
This is a term often used to describe activities undertaken by groups of students working to a
brief, usually issued by the tutor, but under their own direction. Syndicate activities can take
134
The Lecturer’s Toolkit

place within the room where a larger group is working, or can be briefed for things that student
groups go off and undertake on their own. For example, students in syndicates can be asked to
undertake literature searches, debate an issue, explore a piece of text, prepare an argument,
design an artefact, prioritise a list of options, prepare an action plan, or many other tasks. To
achieve productively, they will need an explicit brief, appropriate resources and a clear descrip-
tion of the intended outcomes.
Specialist accommodation is not always necessary; syndicates can work in groups spread out
in a large room, or, where facilities permit, go away and use social areas of the campus or desig-
nated areas of the learning resource centre. On crowded campuses, however, don’t just assume
that students will be able to find somewhere suitable to work. If the task is substantial, the tutor
may wish to move from group to group, or may be available on a ‘help desk’ at a central location,
or available by email online at specified times.
It is important to have clear (sometimes quite rigid) deadlines for syndicate report-back, as it
can be very tedious when punctual syndicates have to await tardier colleagues before a plenary
sharing session can begin. Outcomes from syndicate work may be delivered in the form of
assessed work from the group or produced at a plenary meeting of the whole class as report-
backs, or poster displays, and so on.
4 Snowballing
This is also known as pyramiding. Start by giving students an individual task of a fairly simple
nature such as listing features, noting questions, or identifying problems. Then ask them to work
in pairs on a slightly more complex task, such as prioritising issues or suggesting strategies.
Third, ask them to come together in larger groups, fours or sixes for example, and undertake a
task involving, perhaps, synthesis, assimilation or evaluation. Ask them, for example, to draw up
guidelines, or to produce an action plan, or to assess the impact of a particular course of action.
They can then feed back to the whole group if required.
It can be useful to issue sheets of overhead transparency, and brief the groups to report-back
using these to present summaries of their outcomes. If several groups are involved in feedback
on the same final task, it can become somewhat repetitive, and it is often useful to give separate
contributory elements of the overall task to different groups, so that interest levels are main-
tained during the final report-back stage.
5 Fishbowls
Fishbowling ad hoc: ask for a small group of up to half a dozen or so volunteers to sit in the mid-
dle of a larger circle comprising the rest of the group. Give the inner circle a task to undertake
that involves discussion, problem solving or decision-making, with the group around the outside
asking as observers. Usually it is worth having an agreed substitution process, to allow someone
from the outer circle to take the place of someone in the inner group, but only when both agree
on the exchange. Make the task you give the inner circle sufficiently simple in the first instance
to give them the confidence to get started. The levels of the tasks can be enhanced once students
have had practice and become more confident.
Fishbowling post hoc: where several groups have undertaken a task (or some complementary
tasks) in parallel, form the inner circle using one member from each group (a volunteer or a con-
script) and start the inner circle processing the findings of the groups. Arrange that substitution
can occur when necessary or when useful, for example to allow another group member from the
Making small-group teaching work
135

outer circle to come in when the representative already in the inner circle is stuck. This can be a
useful method for managing students who are over-dominating a group, because it gives them
permission to be the centre of attention for a period of time. After a suitable interval, you can ask
others from the outer circle to replace them, thus giving the less vocal ones an opportunity for
undisturbed airtime. Fishbowls can also be useful ways of getting representatives from buzz-
groups to feed back to the whole group. Some students will find it difficult to be the focus of all
eyes and ears, so it is as well not to coerce anyone to take centre stage (although gentle prompt-
ing can be valuable). A ‘tag wrestling’ version can be used, with those in the outer circle who
want to join in gently tapping the shoulders of people in the middle whom they want to replace,
and taking over their chairs and opportunities of talking. Fishbowls can work well with quite
large groups too.
6 Brainstorming
This can be a valuable way of stimulating creative free-thinking and is particularly useful when
looking for a solution to a problem or in generating diverse ideas. Start with a question like ‘How
can we ...?’ or ‘What do we know about ...?’ and encourage the group to call out ideas as fast as
you can write them up (perhaps use two scribes on separate boards if the brainstorm flows well).
Make it clear that this is supposed to be an exploratory process, so set ground rules along the fol-
lowing lines:
●
a large quantity of ideas is desirable, so everyone should be encouraged to input at whatever
level they feel comfortable;
●
quick snappy responses are more valuable at this stage than long, complex, drawn-out sen-
tences;
●
ideas should be noted without comment, either positive or negative: no one should say ‘That
wouldn’t work because ...’ or ‘That’s the best idea we’ve heard yet’ while the brainstorm is in
progress as this might make people feel foolish about their contributions or unduly narrow
the focus of further contributions;
●
participants should ‘piggy-back’ on each other’s ideas if they set off a train of thought;
●
‘logic circuits’ should be disengaged, allowing for a freewheeling approach.
It can be useful to generate these rules with the group at the start of the brainstorm, and write
them up on a flipchart or overhead transparency so that everyone remains aware of them.
Alternatives to these ground rules include gathering contributions from everyone in turn, and
allowing people to say ‘pass’ if they have nothing to add at the time. This helps to prevent the
products of the brainstorm being unduly influenced by those members of the group who are most
vocal or who have most ideas, though it can be argued that this is not brainstorming in the truest
sense. The mass of ideas thus generated can then be used as a basis for selection of an action
plan, a programme of development, or a further problem-solving task. One of the most effective
ways of following up a brainstorm is to get everyone involved in some sort of prioritisation of the
products. For example, everyone can be invited to vote for their own top three of the things writ-
ten up on the flipcharts, maybe giving three points to what they consider to be the most
important point, two for the next most important point, and so on. The numbers can then be
added up, and a global view of the prioritisation can be seen. It can be useful to get students to
vote ‘privately’ first, so that voting does not become influenced by the initial trends that may be
seen as votes begin to point towards favourite items.
136
The Lecturer’s Toolkit

7 Pair dialogues: ‘Five (or three) minutes each way’
This can be a useful way of getting students to make sense of their own thinking on a topic or an
issue, by explaining and articulating their views uninterrupted for a few minutes. Ask students in
pairs to take it in turn alternatively to speak and to listen, talking without being interrupted for a
few minutes on a given topic. They might find this quite difficult at first, but it is an excellent
way of getting students to articulate their ideas, and also means that the quieter students are
given opportunities to speak and be heard in a non-threatening situation.
The art of listening without interrupting (other than with brief prompts to get the speaker
back on target if they wander off the topic) is a useful one that many students will need to foster
too. The products of such pair work can then feed into other activities.
Leading and following
Student group work, particularly when there is not the presence of a tutor, can depend a great
deal on the skills which the group leader brings to bear on the group. However, no amount of
leadership can work on its own, without a substantial investment in ‘followership’ by those who
don’t happen to be leading at the time.
The following discussion highlights some of the important attributes needed to make the most
of followership. There will always need to be more followers than leaders. We all know the prob-
lems that occur when too many people try to lead a group! The suggestions below may help you
to ensure that your leaders have skilled followers. They may also help to optimise the learning
that can be achieved through well thought-out following.
Making small-group teaching work
137
1 Brief groups about the importance of
followership. It can be important to legit-
imise followership as a vital factor to
underpin the success of group work.
2 Explain that followership should not
be regarded as weakness. When leader-
ship is rotating between group members,
they should regard their work when not
leading as every bit as important as when
they are directing the actions of the
group.
3 Accept that followership requires well
developed skills and attributes. For
example, patience may be needed. When
it takes a little time for the purpose or
wisdom of a leadership decision to
become apparent, it is sometimes harder
to wait for this to happen than to jump in
and try to steer the group, or argue with
the decision.
4 More followers than leaders are
needed! It is virtually impossible to have
a successful group where all members are
adopting leading stances at the same time.
Though the credit for successful group
work is often attributed to the leader, it is
often the followers who actually own the
success. It is more than good sense to
acknowledge this right from the start of
any group-work situation.
5 Followership is a valuable, transferable
key skill. In all walks of life, people need
to be followers at least for some of the
time. It can be useful to employ group-
work situations to help people to develop
skills that will make them good followers
in other contexts of their lives and
careers.
6 Good followership is not the same as
being ‘easily led’. Being ‘easily led’ usu-
ally is taken to imply that people are led
into doing things against their better
judgement. Good followership is closer to
being easily led when the direction of the
task in hand coincides quite closely to
individuals’ own judgement.

138
The Lecturer’s Toolkit
7 Followership should not be blind obe-
dience! Encourage group members to
think about how they are following, why
they are following, for how long they are
going to be content with following, and
what they are learning through follow-
ing.
8 Suggest that group members experi-
ment with a ‘followership log’. This
could be private notes to themselves of
their experiences of being led, but it is
more important to make notes on their
feelings as followers than to write down
criticisms of the actions of the leaders.
Whether the logs are treated as private or
shared notes can be decided later by
everyone involved in a group.
9 Legitimise followership notes as
authentic evidence of the operation of a
group. Such notes can tell their own sto-
ries regarding the relative contributions of
members of the group, and the group
processes that worked well, and those
which worked badly. When it is known
that followership records will count
towards the evidence of achievement of a
group, leadership itself is often done more
sensitively and effectively.
10 Followership is vital training for lead-
ership. People who have been active,
reflective followers can bring their expe-
rience of followership to bear on their
future leadership activities. Having con-
sciously reflected on the experience of
following informs leadership
approaches, and makes their own leader-
ship easier for others to follow.
11 Good followership is partly about
refraining from nit-picking. When peo-
ple have too strong a desire to promote
their individuality, it often manifests itself
in the form of expending energy in trying
to achieve unimportant minor adjustments
to the main processes going on in group
work. Good followership involves adopt-
ing restraint about minor quibbles, and
saving interventions for those occasions
where it is important not to follow without
question.
What goes wrong in small groups?
Small-group teaching can provide excellent opportunities for participants to get to know each
other, come to grips with their subject and learn actively and yet small-group format classes are
often seen by students as of questionable value compared to lectures and one-to-one sessions.
Talking to students, they often express confusion about the tasks involved and uncertainty about
their role, as well as lack of confidence about participating. They criticise tutors for inconsis-
tency of approach and treatment, for disorganisation and lack of structure and for hogging the
sessions with their own views and opinions.
When things go wrong, sometimes it’s the fault of the group members themselves. Sometimes
the blame can be directed at the facilitator. In this section, I look in turn at some of the most com-
mon ‘damaging behaviours’, and offer for each a few suggestions that can alleviate the problems
that can result from them.
Group member behaviours which damage group work
The following section looks at a range of student behaviours which can damage or even destroy
group work. These are based on the experience of many facilitators. For each of these behav-
iours, some tactics are offered below as to how facilitators can reduce the effects on group
work.

Group members being late
Sometimes lateness is unavoidable, but even then it is seen as time-wasting for the group mem-
bers who have managed to be punctual. Here are some approaches from which facilitators can
select, to reduce the problem.
Making small-group teaching work
139
1 Lead the group towards including an
appropriate ground rule on punctual-
ity. If the group members feel a sense of
ownership of such a ground rule, they are
more likely to honour it.
2 Point out that punctuality is related to
courtesy. Remind group members that
when one of them is late, it is an act of
discourtesy to all the other people who
have been kept waiting, including the
group facilitator if present.
3 Lead by example – don’t be late your-
self! If the facilitator is late, it is not
surprising that group members can fall
into bad habits. Your own actions are seen
as a reflection of how you value group
learning.
4 Make the beginning of group sessions
well worth being there for. If group
members realise that they are likely to
miss something quite important in the
early minutes of a group session, they are
likely to try harder to be punctual.
5 Give out something useful at the start
of the session. For example, issue a hand-
out setting the scene for the session, or
return marked assignments straightaway
as the session starts.
6 Avoid queuing. If the place where a
group meeting is due to be held is fre-
quently still occupied at the starting time
for the group session, it can be worth
rescheduling the group for five or ten
minutes later, so that a prompt, punctual
start can be made then, without those who
arrive early having to hang around.
Group members not turning up at all
This is one of the most common complaints made by facilitators. Student non-attendance can
have a serious effect on group work, and a variety of approaches (and incentives) can be used to
address the problem, including those listed below.
1 Ensure that it really is worth turning
up. If group members are not getting a lot
out of group sessions, they naturally value
them less, and this can lead to them being
lower priority than they could have been.
2 Keep records of attendance. Simply
making notes of who’s there and who’s
not gives the message that you’re really
expecting students to turn up and join in.
If keeping records isn’t enough, see
below ...
3 Assess attendance. For example, state
that 10 per cent of the coursework ele-
ment of a programme of study will be
based solely on attendance. This is one
way of making quite dramatic improve-
ments in attendance at small-group
sessions. However, the downside of this
way of inducing students to attend is that
some group members may be there in
body but not in spirit, and can undermine
the success of the group work.
4 Issue something during each session.
Students don’t like to miss handouts, task
briefings, or the return of assessed work.
It is important to make missed paperwork
available to students who could not have
avoided missing a session, but don’t be
too ready to do so for those who have no
real reason for absence.
5 Cover some syllabus elements only in
small-group sessions. When students
know that these elements will be assessed
alongside those covered in lectures, and

Group members not preparing
Group members can get far more out of small-group sessions if they have done at least some
preparation for them. However, many teachers and facilitators complain that students still arrive
without having thought in advance about what the session will be covering. It is difficult to cause
every group member to come prepared, and over-zealous attempts to do this are likely to cause
unprepared students to decide not to come at all. The following suggestions may help you to
strike a workable balance between getting well-prepared students, and frightening them off.
140
The Lecturer’s Toolkit
so on, their willingness to attend the
small-group sessions increases.
6 Don’t cancel small-group sessions.
Students are quick to pick up the message
that something which has been cancelled
could not have been too important in the
first place. This attitude then spreads to
other people’s small-group sessions.
1 Help students to structure their prepa-
ration.
For example, issuing an
interactive handout for them to complete
and bring to the forthcoming session is
better than just asking them to ‘read
Chapter 3 of Smith and Jones’. You could
ask them to ‘research your own answers to
the following seven questions using
Chapter 3’ instead, and leave spaces
beneath each question for them to make
notes as they read.
2 Don’t fail to build on their prepara-
tions. If group members go to the trouble
of preparing for a session, and then noth-
ing is done with the work they have done,
they are discouraged from preparing for
the next session.
3 Try starting each session with a quick
quiz. Ask everyone one or two short, spe-
cific questions, and perhaps ask
respondents themselves to nominate the
recipient of your next question. This is a
way of building on the preparation work
that students have done, and making sure
that everyone is included, rather than just
those who are most forthcoming when
you ask questions.
4 Consider asking them to hand in their
preparations sometimes. This does not
necessarily mean that you have to assess
them, but you could sift through them
while group members were busy with an
activity, to gather a quick impression of
who was taking preparation seriously. The
fact that you did this occasionally would
lead to students not wishing to be found
lacking should it happen again, and lead
to better levels of preparation.
5 Get them to peer-assess their prepara-
tions sometimes. This has the advantage
that they can find out how their own
learning is going, compared to other stu-
dents. It also helps them learn from
feedback from each other, and the act of
giving a fellow student feedback is just as
useful as receiving feedback.
Group members not doing their jobs
A lot of time can be wasted when group members go off on tangents to their intended tasks, or
procrastinate about starting the next stage of their work. Work-avoidance is human nature at least
for some of the time for some people! The following approaches may help you to keep your
group members on task.

Making small-group teaching work
141
1 Check that it really is disruption. If
you’re a passing spectator to different
groups, you may happen to arrive at one
particular group just at the moment when
one of its members is expressing a strong
feeling, or arguing a point relatively
forcefully. This may be fine with the other
members of the group, and it gives the
wrong message if the facilitator assumes
the worst.
2 Find out why a person is being disrup-
tive. Sometimes there are identifiable
reasons for such behaviour, for example
when a group as a whole has become dys-
functional, or when the task briefing is
being interpreted in different ways by
group members.
3 Watch for the same group member
being disruptive repeatedly. It is then
usually worth talking to the person con-
cerned, to find out why this may be
happening. If this does not improve the
situation, it may be necessary to reconsti-
tute the membership of groups for
successive tasks, so that the disruptive
element is fairly distributed across a
wider range of students, rather than a par-
ticular group becoming disadvantaged by
recurring disruption.
A group member dominating
These can be among the most serious enemies of effective group learning. They need to be han-
dled with considerable sensitivity, as their ‘taking over’ the work of a group may be
well-intentioned.
●
Have clear task briefings in the first
place. It is usually better to have these in
print, and for every student to have a copy.
Oral briefings are quickly forgotten, and
are much more likely to lead to deviation
from the intended tasks.
●
Make the first part of a group task rel-
atively short and straightforward. This
can cause a group to gain momentum
more quickly, and this can help to ensure
that later, more-complex tasks are started
without undue procrastination.
●
Specify the learning outcomes clearly.
When students know what they should be
getting out of a particular activity, their
engagement is enhanced.
●
Set structured tasks, with staged dead-
lines. Most effort is expended as the
deadline approaches, especially if stu-
dents will be seen to have slipped if their
task is not completed by a deadline. Act as
timekeeper if you are facilitating group
work: gentle reminders such as ‘six min-
utes to go, please’ can cause a lot of work
to be done.
Group members being disruptive
Group work is often damaged by one or more participants whose behaviour slows down or
diverts the work of others. Disruption is more of a problem in small-group contexts than in for-
mal lectures, for example, as it takes less courage to be disruptive in informal settings.
Sometimes there is no easy solution for disruptive behaviour, but the following suggestions may
help you to solve some such occurrences.

Group facilitator behaviours which can damage group work
There are many ways in which group learning facilitators can damage group work. Sometimes
facilitators know about the things they do which undermine the success of group work, but more
often they simply are not aware that things could be improved. When facilitators know they have
a bad habit, it would be tempting to simply advise ‘stop doing it!’, but often this could lead to the
reply ‘yes, but how?’. The following list of facilitator ‘faults’ is rather longer than the students’
damaging behaviours already discussed, but it can be argued that facilitators are able to address
their own shortcomings even more directly than they can help students to address theirs. As
before, each situation is annotated with some suggested tactics for eliminating or reducing the
various kinds of damage which can occur.
Facilitator ignoring non-par ticipants
It is tempting to ignore non-participants, hoping either that they will find their own way towards
active participation, or that other group members will coax them out of inactivity. Alternatively,
facilitators sometimes take the understandable view that ‘if they don’t join in, they won’t get as
much out of the group work, and that’s really up to them to decide’. However, there are indeed
some straightforward steps, from which facilitators may select, to make positive interventions to
address the problem of non-participation as and when they see it.
142
The Lecturer’s Toolkit
1 Get the group to reflect on how it is
functioning. For example, once in a
while, give them a relatively small task to
do as a group, even an exercise which is
primarily for light relief. Then when they
have completed it, ask them to think
through their answers to questions such as
the following:
●
How well do you think you did that as
a group?
●
Did someone take the lead, and if so,
how did this come about?
●
Who said most?
●
Whose ideas are most strongly pre-
sent in the solution to the task?
●
Did you always agree with the ideas
being adopted by the group?
●
Was there anything you thought but
didn’t actually say?
This can cause the group to reflect on any
elements of domination which may have
occurred, and can reduce the tendency for
domination in future group activities.
2 Lead a discussion on the benefits and
drawbacks of assertiveness. Then ask
group members to put into practice what
they have learned about assertiveness.
This can lead to students watching out for
each other’s assertive behaviours, and
reduce the chance of a particular group
member dominating for too long.
3 Confront the dominator privately. For
example, have a quiet word in a break, or
before the next group session. Explain
that while you are pleased that the domi-
nant group member has a lot to
contribute, you would like other students
to have more opportunity to think for
themselves.
4 Intervene in the work of the group.
Sometimes it is helpful to argue politely
with a person who seems to be dominat-
ing, to alert other group members to the
fact that they could be being led off-target
by this person. Be careful, however, not to
put down the dominator too much –
there’s little worse for group dynamics
than a sullen ex-dominator!

Facilitator allowing domineers
Domination has already been discussed under the bad habits that group members can engage in,
and several tactics have already been suggested there. However, if you allow domination, it can
be seen as your fault too. The following tactics may include remedies for situations where you
notice group learning being undermined by domineers.
Making small-group teaching work
143
1 Remind the whole group of the benefits
of equal participation. This is less
embarrassing to the non-participants
themselves, and can be sufficient to spur
them into a greater degree of involve-
ment.
2 Clarify the group learning briefing.
Place greater emphasis on the processes
to be engaged in by the group, and less on
the product that the group as a whole is to
deliver.
3 Consider making the assessment of
contribution to the work of the group
more explicit. When non-participants
know that participation counts, they are
more likely to join in.
4 Confront a non-participant directly.
This is best done tactfully of course. The
simple fact that it was noticed that partici-
pation was not enough is often enough to
ensure that the situation does not arise
again.
5 Try to find out if there is a good reason
for non-participation. There often is.
Sometimes, for example, a non-participant
may find it difficult to work with one or
more particular people in a group situation,
because of pre-existing disagreements
between them. It may then be necessary to
consider reconstituting the groups, or see
whether a little ‘group therapy’ will sort
out the problem.
6 Explore whether non-participation
could be a cry for help. The act of not
joining in to the work of a group can be a
manifestation of something that is going
badly for non-participants, possibly in an
entirely different area of their learning or
their lives in general.
7 Check, with care, whether the problem
is with the work rather than the group.
Non-participation can sometimes arise
because of the nature of the task, rather
than being anything to do with the compo-
sition or behaviour of the group. For
example, if the group-learning task
involves something to do with researching
the consumption of alcoholic beverages, it
is not impossible that someone whose
religion forbids alcohol resorts to non-
participation.
8 Check whether non-participation could
be a reaction against the facilitator. If
someone does not like the way that you
are organising some group learning, their
reaction could be not to join in.
1 Have a quiet word with the domineer.
This is often enough to solve the problem.
Having been seen to be too domineering
is usually enough to make a domineer
stop and think.
2 Get the whole group to do a process
review. For example, give them a rela-
tively straightforward collaborative task
to do, then ask them all to review who
contributed most, why this happened,
whether this was fair, and whether this is
what they want to happen with the next
(more important) group-learning task.
3 Watch out for why people dominate.
Sometimes, it’s because they are more
confident, and it’s important not to dam-
age this confidence. It can be better to
acknowledge group members’ confidence
and experience, and gently suggest to
them that they need to help others to
develop the same, by being able to partic-
ipate fully in the actions of the group.

Facilitator not having prepared adequately
We’ve already explored some of the tactics that can be used to solve the problem of lack of
preparation by group members. This time, the issue is lack of preparation by the facilitator. The
short answer is, of course, ‘prepare’. However, the results of this preparation need to be visible to
group members. The following approaches can help to ensure that group members can see that
you are taking group work as seriously as you want them to do.
144
The Lecturer’s Toolkit
1 Make it obvious that you have prepared
specially for the group session. There
are many ways of allowing your prepara-
tions to be visible, including:
●
coming armed with a handout relat-
ing to the particular occasion, rather
than just any old handout;
●
having researched something that has
just happened, ready to present to the
group as material for them to work
on;
●
arriving punctually or early, to avoid
the impression you were delayed by
getting your own act together ready
for the session;
●
making sure that you have indeed
done anything you promised to do at
the last meeting of the group.
2 Keep records of group sessions, and
have them with you. You would not
arrive to give a lecture or presentation
without having your notes and resources
with you, and doing the same for group
sessions gives the message that you take
such sessions just as seriously as larger-
scale parts of your work.
Facilitator being too didactic or controlling
This is one of the most significant of the facilitator behaviours which can damage group learn-
ing, and experienced facilitators can be the most vulnerable! The quality of group learning is
greatly enhanced when students themselves have considerable control of the pace and direction
of their own learning. The following suggestions may alert you to any danger you could be in.
1 Don’t try to hurry group learning too
much. It is particularly tempting, when
you know very well how to get the group
to where it needs to be, to intervene and
point out all the short cuts, tips and wrin-
kles. It is much better, however, for group
students to find their own way to their
goals, even when it takes somewhat
longer to get there.
2 Hide your knowledge and wisdom
sometimes. In other words, allow group
members to discover things for them-
selves, so that they have a strong sense of
ownership of the result of their actions. As
mentioned previously, this may be slower,
but leads to better learning. Don’t, how-
ever, make it show that you are
withholding help or advice. When you
feel that you may be giving this impres-
sion, it is worth declaring your rationale,
and explaining that it will be much better
for your group students to think it out for
themselves before you bring your own
experience to their aid.
3 Allow group students to learn from
mistakes. Tempting as it is to try to stop
students from going along every blind
alley, the learning payoff from some blind
alleys can be high. Help them back from
the brick wall at the end of the blind alley,
rather than trying to stop them finding out
for themselves that there is a brick wall
there.
4 Plan processes rather than outcomes. It
is well worth spending time organising
the ways that group students can work

Facilitator showing lack of cultural sensitivity
This is a serious group-damaging behaviour. In fact, lack of cultural sensitivity can be more dan-
gerous in small-group situations than in large-group ones. It is also one of the hardest areas to
find out about. Few people are brave enough to challenge a group-learning facilitator with this
crime! It is useful for even the most skilled group-learning facilitators to undertake a regular
self-audit on this issue. The following tactics can help.
Making small-group teaching work
145
towards their goals, rather than mapping
out in too much detail the things they are
likely to experience on the way. The
achievement of the group learning out-
comes will be much more enduring when
the group has ownership of the learning
journey towards them.
5 Ask your students. Many of the things
that can go wrong in teaching or training
could have been avoided if feedback had
been sought on the way. The best way of
getting feedback is to ask for it, not just to
wait for it. To get feedback on important
things (such as whether or not you are
being too didactic or controlling) there’s
no faster way than asking for exactly that.
6 Learn from selected colleagues.
Feedback from other group-learning facil-
itators is always useful. However, it is
worth going out of your way to seek feed-
back from colleagues who have a
particular gift for making group learning
productive, and being duly selective in
the tactics you add to your own collection.
1 Read about it. There is no shortage of
published material on equal opportunities,
cultural issues, and so on. Sometimes
when reading this literature, one can be
surprised by the thought ‘but sometimes I
do this too!’.
2 Watch other group-learning facilita-
tors, with this agenda in mind. See what
they do to avoid the pitfalls, and also
notice when they fall into them. Work out
alternative approaches which could have
circumvented such problems.
3 Don’t make assumptions. It is particu-
larly dangerous to bring to your role of
learning facilitator any preconceptions
about the different members of your
groups, such as those based on gender,
age, ethnic group, perceived social sta-
tus, and any other area where
assumptions may be unwise and
unfounded. Treating people with equal
respect is an important part of acknowl-
edging and responding to individual dif-
ference.
4 Talk to group members individually.
When you are working with a mixed
group, for example, it is in your informal,
individual conversations with members of
the group that you are most likely to be
alerted to anything which could be
offending individuals’ cultural or personal
perspectives.
5 Ask directly sometimes. It is important
to pick your times wisely, and to select
people who you believe will be willing to
be frank with you if necessary. Rather
than asking too directly (for example,
‘What do I do which could be culturally
insensitive?’), it can be useful to lead in
more gently, for example, ‘What sorts of
learning experiences do you find can be
damaged by people who are not sensitive
enough culturally?’, ‘How does this hap-
pen usually?’, and so on.
Facilitator favouring clones!
This happens more often than most people imagine. It is noticed straightaway by everyone else
in the group! It can go entirely unnoticed by the perpetrator. It is, of course, perfectly human to

have ‘warmer’ or ‘more empathetic’ feelings and attitudes towards someone who is more like
oneself than other people, or who shares significant attitudes, values, and even ‘looks’. In par-
ticular, teachers of any sort can be flattered and encouraged when they recognise ‘a disciple’
among a group of people. If you think you could be in danger of indulging in this particular
behaviour, think about which of the following approaches may be most helpful to you.
146
The Lecturer’s Toolkit
1 Go clone detecting! From time to time,
think around the types of people who
make up learning groups you work with,
and test out whether any of them are more
like you are (and particularly more like
you were) than the others. Then watch out
for any signs that you could be treating
them differently (even if only slightly).
2 Don’t over-compensate. It is just as dan-
gerous to be too hard on clones as to
favour them. The person concerned may
have no idea at all why you are being
harder on them than on other people. The
people you might (consciously or subcon-
sciously) regard as clones may have no
inkling that they are in this special posi-
tion! Subconsciously, you could be
putting them under the same sort of pres-
sures as you put yourself under long ago,
and exacting of them the standards you
applied to yourself.
Facilitator talking too much
This is one of the most common of all group-learning facilitator bad habits. However, it is just
about the easiest to do something about. The following suggestions should contain all you need
to rectify this problem, if you own it.
1 Remind yourself that most learning
happens by doing, rather than listen-
ing. Concentrate on what your group
students themselves do during group ses-
sions, rather than on what you do.
2 Don’t allow yourself to be tempted into
filling every silence. In any group
process, short episodes of silence are nec-
essary components, space for thinking.
When you happen to be expert enough to
step in with your thoughts, before other
people have had time to put theirs together,
it is all too easy to be the one to break the
silence. What seems to you like a long
silence, seems much shorter to people who
are busily thinking. Let them think, then
help them to put their thoughts into words.
When they have ownership of putting
together ideas and concepts, their learning
is much deeper and more enduring.
3 Only say some of the things you think.
Being the expert in the group (you proba-
bly are!), you’re likely to know more than
anyone else about the topic being
addressed. You don’t have to reveal all of
your knowledge, just some of it. Don’t fall
into the trap of feeling you have to defend
your expertise, or that you need to justify
your position.
4 Don’t let them let you talk too much! It’s
easier for group members to sit and listen
to you than to get on with their own think-
ing. Sometimes, they can encourage you
to fill all of the time, and opt for an easy
life.
5 Present some of your thoughts (particu-
larly longer ones) in print. Use handouts
to input information to the group, but not at
the expense of getting group members to
think for themselves. You can convey far
more information in five minutes through a
handout than you could in five minutes’
worth of talking. People can read much
faster than you can speak and, in any case,
they can read a handout again and again –
they can’t replay you speaking (unless
they’re recording it – and even then, would
they really replay it all again?).

Facilitator not providing clear objectives
In education and training it is increasingly accepted that objectives, or intended learning out-
comes, have a vital part to play in ensuring that learning takes place successfully. This is no less
true of small-group work than lectures. Moreover, the absence of clear objectives for group work
is only too readily taken by students as a signal that the group work can’t really be an important
part of their overall learning. The following suggestions may help you to put objectives or state-
ments of intended learning outcomes to good use in facilitating group learning.
Making small-group teaching work
147
1 Work out exactly what you intend each
group learning session to achieve. It is
best to express this in terms of what you
intend students themselves to gain from
the session. Make sure that the learning
outcomes are expressed in language that
students themselves can readily under-
stand, so that they see very clearly what
they are intended to achieve.
2 Publish the learning outcomes or objec-
tives in advance. This allows students to
see where any particular group session
fits in to the overall picture of their learn-
ing. It also helps them to see that their
group learning counts towards their
assessment in due course.
3 Maintain some flexibility. For example,
it is useful to have some further objectives
for any group session, designed to cover
matters arising from previous sessions, or
to address students’ questions and needs
as identified on an ongoing basis through
a programme of study. These additional
objectives can be added to the original
intentions for the session, and re-priori-
tised at the start of the session if
necessary.
4 Don’t just write the objectives or out-
comes – use them! State them (or display
them on a slide, or issue them on a hand-
out) at the start of each and every group
session, even if it is continuing to address
a list of intended outcomes which were
discussed at previous sessions.
5 Assist students in creating their own
objectives. From time to time, ask them
‘what do you need to gain from the com-
ing group session?’, for example giving
them each a ‘post-it’ note on which to jot
down their replies. Then stick the notes on
a chart (or wall, or door, or markerboard),
and ask the group to shuffle them into an
order of priority, or to group them into
overlapping clusters.
A closer look at tutorials
In this chapter so far, we’ve looked in general terms at the processes of students working
together. In the next section, let’s think of the most common small-group scenario: that of the
academic tutorial, where a tutor is present alongside a small number of students. How many stu-
dents make a tutorial? It used to be the case, in many universities, where a tutorial was either a
one-to-one encounter between a student and a tutor, or a tutor working with a group of no more
than four or five students. With present-day class sizes, elements that appear on the timetable as
‘tutorials’ can in some disciplines and in some universities involve significantly larger numbers
of students than five.
What’s an academic tutorial?
Everyone who is involved in tutorial work with students agrees that there is no clear dividing line
between academic and personal tutorials. Academic tutorials are subject-related, while personal
tutorials are normally thought of in terms of development of the ‘whole student’, but either kind

148
The Lecturer’s Toolkit
of tutorial is likely to spill over into the other domain. In this chapter, I would like to flag this
overlap now at the outset, but then focus on aspects of academic tutorials and other kinds of
small-group teaching–learning situations, recognising that quite a lot of the discussion can be
translated to personal tutorials too.
There is no agreed definition of a tutorial, and this is probably wise, as tutorials should fulfil
any one or more different roles. These may include:
●
to provide students with opportunities to learn-by-doing, practising applying things that
have been covered in lectures, handouts, and learning packages;
●
to address students’ motivation, helping to increase their confidence in their abilities to han-
dle the curriculum successfully;
●
to provide students with feedback, from each other as well as from the tutor, helping them to
find out more about how their learning is progressing;
●
to give teaching staff opportunities to find out what problems students may be encountering
with the subjects they are learning;
●
to help students ‘digest’ or make sense of the concepts they are learning;
●
to allow students to ask questions which they may not be able to ask in large-group sessions.
However, the above description does not amount to a definition of a tutorial, but only serves as a
description of some of the processes likely to be involved in the sort of tutorials that help stu-
dents to get to grips with the curriculum.
What’s a personal tutorial?
These are usually regarded as one-to-one encounters between a student and a tutor, but where the
purpose is not to extend or deepen the academic understanding of the subjects being studied, but
to support the student’s learning in a much broader sense. The tutor may be one of the lecturers
involved in the student’s course, or may be a teaching assistant or research assistant with some
tutorial duties. Students are often assigned a ‘personal tutor’ for the duration of a year of their
course, or for their entire time at university. These tutors are normally expected to exercise a
counselling or advising role when necessary, on the wide agenda of anything that may be caus-
ing concern to their respective students. However, the success of personal tutorial support is, at
best, patchy. Some tutors take it very seriously, and put themselves out to get to know their stu-
dents well, and to remain well briefed on the progress of each student. For many students,
however, their personal tutor is just a name.
A result of this situation is that for most students, the majority of personal tutoring happens in
the context of the contact they have with academic staff in those teaching–learning situations
where the staff–student ratio is low enough for advice and counselling to be available, and that
often means in what are intended to be academic tutorials.
What can students do before academic tutorials?
It’s often argued by teaching staff that a problem with tutorials is that students just don’t do the
preparatory work they were intended to undertake before attending tutorials. However well-
briefed students are, it seems inevitable that some will turn up without having done any such
work, and others will decide to miss the tutorials altogether, feeling guilty that they have not put
sufficient time or energy into preparing for them.

Making small-group teaching work
149
Some ways of maximising the probability that students will engage with preparatory work
include:
●
giving work briefings in print rather than orally; this increases the chance that students not
present at the briefing will get copies of it;
●
issuing tutorial briefings on sheets of a particular colour rather than just on white paper; this
helps students not to lose such briefings amongst other papers;
●
making briefings sheets interactive: for example include some structured questions with
boxed spaces for students to write their answers or conclusions in. This makes it much eas-
ier to spot who has done some preparation and who has not – and students don’t like to be
seen not to have written something into the boxes;
●
arranging that coursework to be handed in for assessment is gathered in at tutorials. This can
help to ensure that students attend, if only to hand in their work. It also allows tutorials to be
used to discuss problems students may have encountered with the coursework, before they
have forgotten exactly what the problems were;
●
including in tutorial time activities such as student self-assessment and peer-assessment,
depending on preparation that students are required to have done before participating.
It can be worth exploring possibilities of students doing collaborative work before tutorials, such
as meeting together (without a tutor) to help identify common problems and questions, to estab-
lish an agenda for forthcoming tutorials – or better still, perhaps, for forthcoming large-group
sessions.
What can students do during academic tutorials?
It is probably best to start by looking at things that students shouldn’t be doing in academic tuto-
rials. These include activities with low learning payoff, including:
●
making notes just by copying down things said by the tutor, or things written on the board or
screen;
●
spending most of the time listening passively, while one or two students dominate the dis-
cussion;
●
pretending that they understand what is being discussed, rather than admitting to having
problems with the material.
There are many varieties of activity with high learning payoff that students can engage in during
academic tutorials. These include (but are by no means restricted to):
●
solving problems or doing calculations, either individually or collaboratively;
●
discussing different perspectives on an issue;
●
working out different ways of approaching a problem or case-study situation;
●
applying assessment criteria to their own, or each other’s work;
●
marking examples of past students’ assignments or exam answers;
●
asking the tutor questions, or working out agendas of matters for future tutorial explo-
ration;
●
answering questions posed by each other and by the tutor;
●
doing exercises helping them to apply, and make sense of, material covered in lectures;

●
linking work they have done in practical sessions to underpinning concepts and models;
●
making summaries and checklists to help them distinguish the main points of a subject from
the background detail.
Practical pointers for group work
Already in this chapter are many suggestions for recognising and responding to some of the
things that can go wrong with small group teaching. Some additional tips are included below,
adapted from many more in ‘500 Tips on Group Learning’ (Race 2000).
Getting groups star ted
Once group work has gathered momentum, it is likely to be successful. The greatest challenge is
sometimes to get that momentum going. The first few minutes can be crucial, and you will need
all of your facilitation skills to minimise the risk of groups drifting aimlessly in these minutes.
Take your pick from the following suggestions about getting group work going right from the
start of a task.
150
The Lecturer’s Toolkit
1 Foster ownership of the task. Wherever
possible, try to arrange that the members
of the whole group have thought of the
issues to be addressed by small-group
work. When possible, allow members to
choose which group task they wish to
engage in. When people have chosen to
do a task, they are more likely to attempt
it wholeheartedly.
2 Start with a short group icebreaker.
Before getting groups under way with the
main task, it can be useful to give them a
short, ‘fun’ icebreaker so that each group’s
members get to know each other, relax,
and become confident to work with each
other. See the next section for some ideas
about icebreakers.
3 Keep the beginning of the task short
and simple. To Einstein is attributed
‘everything should be made as simple as
possible, but no simpler’. Make sure that
the first stage of each group task is some-
thing that does not cause argument, and
does not take any time to interpret. Once
a group is under way, it is possible to
make tasks much more challenging.
4 Don’t rely only on oral briefings. Oral
briefings are useful, as they can add the
emphasis of tone of voice, facial expres-
sion, and body language. However, when
only oral briefings are given for group-
learning tasks, it is often found that after a
few minutes different groups are attempt-
ing quite different things.
5 Use printed briefings. It is useful to put
the overall briefing up on an overhead
transparency or PowerPoint slide, but if
groups then move away into different syn-
dicate rooms, they can lose sight (and
mind) of the exact briefing. It is worth
having slips of paper containing exactly
the same words as in the original briefing,
which groups can take away with them.
6 Visit the groups in turn. It can make a
big difference to progress if you spend a
couple of minutes just listening to what is
happening in a group, chipping in gently
with one or two useful suggestions, then
moving on. During such visits, you can
also remind groups of the deadline for the
next report-back stage.
7 Clarify the task when asked.
Sometimes, groups will ask you whether
you mean one thing or another by the
words in the briefing. It is often produc-
tive if you are able to reply ‘either of
these would be an interesting way of
interpreting the task; you choose which
interpretation you would prefer to
address’. This legitimises the group’s

Icebreakers: some ideas
There are countless descriptions of icebreaking activities in books and articles on training; see
particularly the book by Jaques (2000) in ‘Further Reading’. An icebreaker is most needed when
members of a group don’t already know each other, and when the group is going to be together
for some hours or days. Most icebreakers have the main purpose of helping individuals get to
know each other a little better. Here are some ideas to set you thinking about what the most
appropriate icebreakers could be for your own groups. Some icebreakers can be very quick, act-
ing as a curtain-raiser for the next activity. Others can be extended into larger-scale activities at
the start of a major group project. Don’t try to rush these.
Making small-group teaching work
151
discovery of ambiguity, and can increase
the efforts they put into working out their
chosen interpretation.
8 Have an early, brief, report-back from
groups on the first stage of their task.
This can help to set expectations that
everyone will be required to be ready for
later report-back stages at the times
scheduled in the task briefing. Any group
which finds itself unprepared for the ini-
tial report-back is likely to try to make
sure that this position does not repeat
itself.
9 Break down extended tasks into man-
ageable elements. Often, if the whole
task is presented to groups as a single
briefing, group members will get bogged
down by the most difficult part of the
overall task. This element might turn out
to be much more straightforward if they
had already done the earlier parts of the
whole task.
10 Try to control the amount of time that
groups spend on successive stages of
each task. It can be useful to introduce a
sense of closure of each stage in turn, by
getting groups to write down decisions or
conclusions before moving on to the next
stage in the overall task.
1 Triumphs, traumas and trivia. Ask
everyone to think of one recent triumph in
any area of their lives (which they are
willing to share), and ask them to think of
a trauma (problem, disaster, and so on),
and something trivial – anything that may
be interesting or funny. Then ask everyone
in turn to share a sentence or so about
each. Be aware that this activity often
brings out a lot of deep feelings, so keep
this for groups whose members need to
know each other well, or already do so.
2 What’s on top? This can be a quick way
of finding out where the members of a
group are starting from. Ask everyone to
prepare a short statement (one sentence)
about what is, for them, the most impor-
tant thing on their mind at the time. This
helps people to clear the ground, perhaps
if they are (for example) worrying about a
sick child, or a driving test, and enables
them then to park such issues on one side,
before getting down to the real tasks to
follow.
3 What’s your name? Ask everyone in
turn to say their (preferred) name, why
they were called this name, and what they
feel about it. This not only helps group
members to learn each other’s names, but
also lets them learn a little about each
other’s backgrounds, views, and so on.
Bear in mind that some people don’t actu-
ally like their names much, so make
aliases acceptable.
4 Pack your suitcase. Ask individuals to
list ten items that they would metaphori-
cally pack into a suitcase if they were in a
disaster scenario. Emphasise that these
items wouldn’t have to literally fit into a
suitcase, and could include pets, but

152
The Lecturer’s Toolkit
shouldn’t include people. Ask them to
mill around a large room, finding a couple
of others who share at least two items
from their list. This enables them to get
into groups of three or four, with plenty to
talk about, before you get them started on
the actual group work.
5 What I like, and what I hate. Ask every-
one to identify something that they really
like, and something they really loathe.
Ask them then to introduce themselves to
the rest of the group, naming each thing.
This helps people to remember each
other’s names, as well as to break down
some of the barriers between them.
6 What do you really want? Ask everyone
to jot down what they particularly want
from the session about to start, and to read
it out in turn (or stick ‘post-it’ notes on a
flipchart, and explain them). This can help
group members (and facilitators) to find
out where a group is starting from.
7 What do you already know about the
topic? Ask everyone to jot down, on a
‘post-it’ note, the single most important
thing that they already know about the
topic that the group is about to explore.
Give them a minute or so each to read out
their ideas, or make an exhibition of them
on a flipchart. This helps to establish own-
ership of useful ideas within the group,
and can help facilitators to avoid telling
people things that they already know.
8 Draw a face. Ask everyone to draw on a
scrap of paper (or ‘post-it’ note) a cartoon
‘face’ showing how they feel at the time
(or about the topic they’re going to
explore together). You may be surprised at
how many ‘smiley faces’ and alternatives
that can be drawn.
9 Provide a picture, with small cartoon
figures undertaking a range of activi-
ties. Then ask people to say which activity
feels closest to the way they feel at the
moment (for example, digging a hole for
themselves, sitting at the top of a tree, on
the outside looking in, and so on). Use
this as a basis for getting to know each
other through small-group discussion.
10 Discover hidden depths. Ask people in
pairs to tell each other ‘one thing not
many people know about me’, that they
are prepared to share with the group. Then
ask each person to tell the group about
their partner’s ‘hidden secret’, such as
ballroom dancing, famous friends, ability
to build dry stone walls, or whatever. This
is a particularly good exercise when intro-
ducing new members to a group who
already know each other, or when a new
leader joins a well-established group.
11 Make a junk sculpture. Give groups of
four or five people materials such as
newspaper, disposable cups, string, sell-
otape, plastic straws, and so on. Ask them
to design and produce either the highest
possible tower, a bridge between two
chairs that would carry a toy car, or some
other form of visible output. Ask them to
think, while on task, about the group
processes involved (who led, who actually
did the work, who had little to contribute,
and so on), then ask them to unpack these
thoughts and share in plenary their sum-
marised conclusions about the group
processes.
12 Develop verbal skills. Ask students in
pairs to sit back to back. Give one of each
pair a simple line drawing comprising
squares, triangles, rectangles and circles.
Without letting their partner see the origi-
nal, ask those holding the drawings to
describe what is on the page, using verbal
instructions only, so that their partners can
draw the original on a fresh sheet of paper.
After a fixed time, let them compare the
originals with the copies, and ask them to
discuss what the task showed them about
verbal communication. A similar task can
also be designed, using plastic construc-
tion bricks.
13 Make a tableau. Ask groups of about
seven or eight students to decide on a
theme for their tableau (for example the

Learning and using names
People in general tend to take more notice of people they know. Your students will take more
notice of you if they feel that they know you – and above all – that you know them. This is par-
ticularly important when you work with small groups of students, as they are much more likely
to expect you to know who they are! Getting their names right is a useful step towards building
up the sort of relationship which fosters learning. The following suggestions provide some gen-
eral advice on how to improve your ‘hit rate’ of correct name-calling in small-group work.
Making small-group teaching work
153
homecoming, the machine age, playtime)
and ask them to compose a tableau using
themselves as key elements. Ask each
group in turn to ‘present their tableau’ to
other groups, and then to discuss how
they went about the task. Polaroid or digi-
tal photos of the tableaux can add to the
fun, but do not use this activity if you feel
that group members are likely to be sensi-
tive about being touched by others.
14 Organise a treasure hunt. Give each
group a map of the training centre or cam-
pus, and a set of tasks to complete across
the location. For example, task elements
can include collecting information from a
display area, checking out a reference
item via the Internet, collecting prices for
specific items from the catering outlet,
drawing a room plan of a difficult-to-
locate study area, and so on. Different
groups should undertake the tasks in a dif-
ferent order, so that individual locations
(and people) are not mobbed by hosts
arriving at the same time. Give a time
limit for the treasure hunt, and award
prizes for all who complete on time. This
activity helps people to get to know each
other and their learning environment at
the same time.
15 Which of these are ‘you’? Give everyone
a handout sheet containing (say) twenty
statements about the topic to be explored.
Ask each participant to pick out the three
that are most applicable to them. Then ask
everyone in turn to disclose their top
choice, asking the rest to show whether
they too were among their own choices.
16 Interview your neighbour. Ask partici-
pants in pairs to interview each other for
(say) three minutes, making notes of key
points that they may wish to report back
in summary of the interview. Then do a
round asking everyone to introduce their
neighbour to the rest of the group.
1 Learn all the easy names first. If you
have a group with three Peters in, make
sure you know them first and which one is
which! You then have a three in twenty
(say) chance of getting the first name
right!
2 Make a conscious effort to learn three
or four names a session. This way you
should build up a reasonable ability to
talk to people by name within the first few
weeks in small-group work.
3 Take particular care with difficult
names. If you have names that you find
difficult or unusual to say, write them out
clearly and check how to say them, then
write it phonetically in a way you will
recognise over the top. Use the name as
often as you can until you’ve mastered it,
regularly checking that you’ve got it right.
4 Consider students’ feelings. Think how
you feel when someone gets your name
wrong – especially someone you would
have expected to know it. One of the prob-
lems with university teaching is that new
students can feel quite anonymous and
alone, especially when part of a large
class.
5 Use preferred names. At the beginning
of the course, ask students ‘what do you
want to be called?’. The names they give
you will be more accurate than your
printed class-lists, and you’ll quickly find

154
The Lecturer’s Toolkit
Conflict in group work
Much has been written about the stages that are quite normal in group work. For example, it is
common for groups to progress through stages of ‘forming, storming, norming, and conforming’
– not necessarily in one particular order! The following suggestions may help you to minimise
the dangers associated with conflict in group work, and to maximise the benefits that can be
drawn from people who sometimes disagree.
out whether Victoria wants to be called
Vicky, Jaswinder – Jaz, Cedric – Rick,
etc.
6 Use labels. At early stages it’s useful to
give students sticky labels to write their
names on in bold felt-tip pen. This gives
you the chance to call them by the name
they prefer – and gives them the chance to
start getting to know each other.
7 Help students to learn each other’s
names. In groups with up to about twenty
students, try a round as follows: ‘Tell us
your name, and tell us something about
your name’. This can be a good ice-
breaker, and can be very memorable too,
helping people develop association links
with the names involved.
8 Help students to get to know each other
better. An alternative round is to get the
students sitting in a circle. Ask one to say
his or her name, then the person to the left
to say ‘I am ... and this is ...’. Carry on
round the circle, adding one name at each
stage, till someone goes right round the
circle correctly. A further alternative is to
ask students to introduce themselves, stat-
ing first their names, and then two ‘likes’
and two ‘dislikes’, so some memorable
details help associate the person with the
name.
9 Use your list of names to quiz students.
To help you to get to know their names,
once you have a complete list of the
names, ask people from your list at ran-
dom some (easy) questions, not to catch
them out, but to help you to put names to
faces.
10 Consider using place cards. In places
where small groups of students are sitting
in particular places for a while, it is useful
to give the students each a ‘place card’ (a
folded A5 sheet of card serves well) and
to write their names on both sides of the
card, and place the cards in front of them.
Cards can be seen at a distance much bet-
ter than labels. This allows you to address
individuals by name, and also helps them
to get to know each other.
1 Legitimise conflict. It is important to
acknowledge that people don’t have to
agree all of the time, and to open up
agreed processes by which areas of dis-
agreement can be explored and resolved
(or be agreed to remain areas of disagree-
ment). Ensure, however, that the groups
have ground rules for conflict resolution,
so that they strive to avoid slanging
matches and power games.
2 Establish the causes of conflict. When
conflict has broken out in a group, it is
easy for the root causes to become sub-
sumed in an escalation of feeling. It can
be productive to backtrack to the exact
instance which initiated the conflict, and
to analyse it further.
3 Encourage groups to put the conflict
into written words. Writing up the
issues, problems, or areas of disagree-
ment on a flipchart or marker-board can
help to get them out of people’s systems.
Conflict feelings are often much stronger
when the conflict is still bottled up, and
has not yet been clearly expressed or
acknowledged. When something is ‘up
on the wall’, it often looks less daunting,
and a person who felt strongly about it
may be more satisfied. The ‘on the wall’
issues can be returned to later when the

Making small-group teaching work
155
Gender issues in group work
When problems occur in groups due to gender issues, they can be felt more deeply than prob-
lems arising from almost any other cause. The following suggestions may help you to avoid
some problems of this sort from arising in the first place, or to alert group members themselves
to the potential problems, so that they can work round them in their own group work.
group has had more time to think about
them.
4 Establish the ownership of the conflict.
Who feels it? Whom is being affected by
it? Distinguish between individual issues,
and ones that affect the whole group.
5 Distinguish between people, actions
and opinions. When unpacking the
causes of conflict in a group situation, it is
useful to focus on actions and principles.
Try to resolve any actions which proved to
cause conflict. Try to agree principles. If
the conflict is caused by different opin-
ions, it can help to accept people’s
entitlement to their opinions, and leave it
open to people to reconsider their opin-
ions if and when they feel ready to do so.
6 Use conflict creatively. It can be useful to
use brainstorming to obtain a wider range
of views, or a broader range of possible
actions that can be considered by the
group. Sometimes, the one or two strong
views which may have caused conflict in
a group look much more reasonable when
the full range of possibilities is aired, and
areas of agreement are found to be closer
than they seemed to be.
7 Capture the learning from conflict.
When conflict has occurred, it can be ben-
eficial to ask everyone to decide
constructive things they have learned
about themselves from the conflict, and to
agree on principles which the whole
group can apply to future activities to
minimise the damage from similar causes
of conflict arising again.
8 Refuse to allow conflict to destroy
group work. You may wish sometimes to
tell groups that achievement of consensus
is an aim, or a norm, or alternatively you
may wish to ask groups to establish only
the extent of the consensus they achieve.
9 Consider arbitration processes. When
conflict is absolutely irresolvable, the
facilitator may need to set up a ‘court of
appeal’ for desperate situations. The fact
that such a process is available often helps
groups to sort out their own problems
without having to resort to it.
10 Make it OK to escape. When people
know that they can get out of an impossi-
ble situation, they don’t feel trapped, and
in fact are more likely to work their own
way out of the conflict. It can be useful to
allow people to drop out of a group, and
move into another one, but only as a last
resort. Beware of the possible effects of
someone who is seen as a conflict genera-
tor entering a group which has so far
worked without conflict!
1 Think about gender when forming
groups. There are advantages and disad-
vantages for single sex groups, depending
on the balance of the sexes, and other
issues including culturally sensitive ones.
In some cultures, females may be much
happier, for religious reasons, working in
single sex groups. However, in other cases
it may be helpful in terms of future
employment to gently encourage them to
get used to working with members of the
opposite sex.
2 Try to avoid gender domination of
groups. This can happen because of
majority gender composition of groups.
If this is inevitable because of the overall
gender balance of the whole group, try to
manage group composition so that

156
The Lecturer’s Toolkit
minority participants don’t feel isolated.
If it is unavoidable, address the issue
directly when setting ground rules.
3 Decide when single gender groups
might be more appropriate. For group
work on gender-sensitive issues, such as
child abuse, it can be best to set out to
form single sex groups.
4 Require appropriate behaviour. For
group work to be effective, all partici-
pants need to behave in a professional
way, with standards that would be
expected in an effective working environ-
ment. Outlaw sexist or offensive
behaviour, and emphasise that one per-
son’s ‘joke’ or ‘tease’ can be another
person’s humiliation.
5 Decide when to stick with existing
group compositions. When a set of
groups is working well, without any gen-
der-related or other problems, don’t just
change the group composition without a
good reason.
6 Set ground rules for talking and listen-
ing. It can be useful to agree on ground
rules which will ensure that all group par-
ticipants (irrespective of gender) are
heard, and not talked down or over by
other participants.
7 Avoid setting up excessive competition
between male groups and female
groups. When there are gender-specific
groups, don’t egg a group of one gender
on, by saying words to the effect ‘Come
on, you can do better than them’ refer-
ring to groups of the other gender.
8 Be sensitive about role assignment. For
example, try to raise awareness about the
dangers of tasks being allocated within
groups on the basis of gender stereotypes,
such as typing or making arrangements
being handled by females, and ‘heavy’
work by males.
9 Alert groups to be sensitive to leader-
ship issues. It is often the case that, for
example, male members of groups may
automatically see themselves as stronger
contenders to lead the group than their
female counterparts, and put themselves
forward. When group members are aware
that this is an issue, they are more likely to
agree on a more democratic process for
deciding who will lead an activity, or who
will report back the outcomes.
10 Avoid sexual preference oppression.
When it is known that group participants
have different sexual preferences from the
majority of the group, there is a tendency
for them to be oppressed in one way or
another by the rest of the group. It can be
delicate to raise this issue in general brief-
ings, and it may be best to respond to it as
a facilitator when it is seen to be likely to
occur.

Intended outcomes of this chapter
This chapter is intended to help you to:
●
decide what forms of resource-based learning relate best to your students’ learning needs
(for example, print-based, computer-based, online, and so on);
●
set terms such as ‘open learning’, ‘distance learning’ and ‘flexible learning’ in context;
●
choose good reasons for developing resource-based learning components in your teaching;
●
decide whether to adopt existing materials, or adapt them to your purposes, or compose new
resource-based or online learning materials;
●
choose an effective and efficient strategy for developing your own resource-based learning
materials;
●
interrogate print-based or computer-based learning resource materials using a checklist to
check how well they deliver learning payoff for your students.
This chapter is primarily about selecting from the wide range of learning resource materials
which may be available in print, on CD-ROM, or online, some of which could be directly rele-
vant to your students’ needs. You may wish to employ resource-based learning materials directly
within your own taught course, or turn them into flexible learning pathways for appropriate parts
of your curriculum. You may also be considering implementing open or flexible learning as
learning provision in their own right. The chapter also includes some suggestions about how to
go about designing new resource-based learning materials of your own, and how to adapt exist-
ing materials to be more appropriate for your students.
Resource-based flexible learning, in one form or another, is increasingly being used to pro-
vide learning pathways within higher education courses in universities, as well as to open up
distance learning pathways to students outside the universities. In the UK, the use of resource-
based learning is increasing dramatically, as universities and colleges are required to cater for
larger numbers of students, with increasingly diverse educational backgrounds, in an environ-
ment where communication and information technologies impact ever more greatly on teaching
and learning. I will start the chapter, however, by reviewing what is meant by some of the princi-
pal terms involved in resource-based learning.
Chapter 5
Resource-based and online learning

Some terms and buzz-phrases
There are several terms used widely in connection with resource-based, student-centred learning
materials, reflecting the ways in which such materials are employed. There exist many defini-
tions of these terms, so it is worth reviewing the meanings of them.
The term distance learning is used when students study at a distance from the provider of the
materials. The Open University in the UK is a major provider of distance learning programmes.
Though the Open University is principally located in Milton Keynes, it is unusual for students to
actually go there. Most students study at home (or at work, or at any other places of their own
choice). The Open University provides tutor support for students, using a combination of full-time
Open University staff based in various parts of the UK, and a much larger body of part-time tutors,
who are often lecturers in conventional colleges and universities. These tutors are used both to pro-
vide ongoing support for students studying with the Open University, and to assess students’
coursework. Assessment is usually scheduled to submission deadlines for assignments, and stu-
dents take formal examinations set by the Open University, usually taking place in examinations
centres set up in other universities or colleges. Although the Open University uses print-based
learning resource materials widely, increasing use is being made of computer-based resources and
online communication, with tutors giving feedback on assessed coursework. The Open University
itself is responsible for setting the coursework and exams, moderating the assessment by part-time
tutors, and awarding qualifications to students. Similar models of distance learning are extensively
used in other parts of the world, notably Canada, Australia and New Zealand.
The term open learning is often used for study programmes involving distance learning, as
described above. Implied in the concept of open learning is the opening up of some or all of the
following aspects of freedom to students:
●
when they do their learning;
●
where they do their learning;
●
at what pace they learn.
There are further degrees of freedom that vary considerably across the range of programmes
operating under the umbrella term of open learning. These include whether students:
●
need any qualifications before being accepted onto an open learning programme;
●
learn completely independently, or can choose to make use of tutor support;
●
have any formal mentoring provision to assist them during their studies;
●
can start a particular study module or course at any time (‘roll-on, roll-off ’) or have fixed
start dates and completion dates (usually dictated by examination arrangements);
●
can select which parts of the programme they study, and in which (if any) of the assessed
elements of the programmes they participate.
In some distance learning programmes, particularly correspondence courses, some or all of these
choices are available to students. In others, students are constrained by set start dates and assessment
dates, and by the structure of the assessments leading to the award of degrees, diplomas or certifi-
cates. The term open learning is therefore predominantly used to reflect the freedoms available to
students regarding where, when, at what pace, and how they actually undertake their studies. There
are several other terms which overlap with open and distance learning, including independent learn-
ing, individualised learning, self-study programmes, self-managed learning, and so on.
158
The Lecturer’s Toolkit

The term flexible learning can be used in connection with all of the kinds of study programme
mentioned so far in this chapter. Flexibility is about when, where, at what place, and by what
processes the learning takes place. The concept of flexible learning extends, however, to the
inclusion of open learning, or self-study elements within a conventional college-based pro-
gramme. For example, students may be attending lectures, workshops, practical sessions and
tutorials on a college campus, but at the same time studying selected elements of the curriculum
more or less under their own steam, using learning packages (which may be print-based, com-
puter-based or multimedia) to support those parts of their work. The assessment of the flexible
learning components may be entirely integrated into the overall assessment of their work, or may
be done separately, or any combination of the two.
The term resource-based learning embraces the learning materials that are used in distance,
open and flexible learning, but equally applies to the learning that is designed to occur outside
formal lectures or classes in universities and colleges. The common factor is that the curriculum
is packaged into learning resource materials, from which students learn either individually or in
small groups, with some freedom regarding when, where and how fast. The learning resources
themselves are designed in many formats, including:
●
print-based interactive learning packages;
●
traditional textbooks, journal articles, and so on, addressed by interactive study guides;
●
computer-based learning materials, supplied to students on-disk;
●
multimedia computer-based learning materials, using CD-ROM, including video extracts,
audio commentaries, and so on;
●
online computer-based materials, with electronic communication through a local intranet
and/or globally through the Internet.
What are the main components of resource-based learning
materials?
The principal components of learning materials vary considerably, depending whether the mate-
rials are print-based, computer-based or multimedia, and on whether the materials are designed
to be self-sufficient learning resources, or to refer out to existing books, papers and articles, or to
be used in conjunction with face-to-face learning situations such as lectures, tutorials or practi-
cal sessions. However, it is possible to identify some elements which characterise modern
resource-based learning materials, and which differentiate them from more traditional forms of
print-based resources such as ‘straight’ textbooks. These elements include:
●
statements of the intended learning outcomes or learning objectives;
●
structured learning-by-doing elements such as self-assessment questions, tasks, exercises,
quizzes, and so on;
●
feedback responses on-screen or in print, to the structured learning-by-doing elements;
●
open-ended learning-by-doing activities, such as assignments, exercises, readings and prac-
tical tasks, to help students to consolidate the learning they are doing from the materials;
●
tone and style more user-friendly and informal than in conventional published books and
articles;
●
tutor-marked assignments, online or submitted on paper, often with details of the marking
schemes and assessment criteria.
Resource-based and online learning
159

There may additionally be some of the following components:
●
guidance regarding prerequisite knowledge or skills, to help students to judge for them-
selves whether they are equipped to start work with the learning materials;
●
study-guide briefings to read other materials, such as particular sections or chapters of
books, journal articles, and so on, usually coupled with tasks for students to do while using
these resources;
●
pre-prepared feedback discussions on tasks which students have undertaken with learning
resource materials;
●
links to face-to-face elements of college-based courses, such as lectures, tutorial pro-
grammes, and so on;
●
study-skills commentaries, to help students undertake their own study of the materials as
effectively and efficiently as possible.
In well designed resource-based learning materials, the content itself is broken up into manage-
able chunks by the interactive elements. It is important that the content is not simply presented in
the same way as in a traditional textbook, but is punctuated by learning-by-doing and feedback
episodes, and that this is done frequently throughout the materials rather than merely at the end
of an element of learning. Tutor-marked assignments may be used when it is necessary to link
students’ work on resource-based learning materials into the assessment scheme of a whole
course or module, with the purposes being formative, summative or both. There may also be for-
mal exams, or some exam questions in a wider exam which covers the whole of the syllabus of
which part is delivered by resource-based learning, to represent the summative assessment of the
syllabus area addressed by the materials.
Adopt, adapt, or start from scratch?
A wide range of resource-based learning packages already exists, spanning all levels of study
from introductory to postgraduate. Many of these can be purchased from publishers and com-
mercial materials providers, or accessed online (or downloaded) from the Internet. Many
learning packages have also been developed in-house in particular university departments, or by
specialist producers, and it is often possible to come to site-licence arrangements with the pro-
ducers to purchase them with the view to adopting them as they stand, or to adapting them to fit
a particular course or programme. The following checklist may help you to decide whether to
adopt such packages, adapt them, or whether you may need to develop some completely new
materials for resource-based learning by your students.
●
Are there relevant materials already available? It is worth checking publishers’ cata-
logues, and databases of learning materials, held in most university libraries or learning
resource centres.
●
Are the intended learning outcomes of available materials sufficiently close to those of
your course? When the learning outcomes converge well, it is an indicator that it may be
possible to use at least parts of the materials as they stand.
●
Will the ‘not-invented-here syndrome’ come into play? When learning materials are
brought in from external sources, it is sometimes the case that lecturers (or students) do not
feel that the materials are as credible as in-house materials or programmes; any dissatisfac-
tion that lecturers may feel with the materials is quickly passed on to students, damaging in
160
The Lecturer’s Toolkit

turn the students’ trust in the materials, and their confidence in the processes of learning
from resources.
●
Have you time to develop entirely new materials? The short answer to this may be likely
to be ‘no!’, but some of the ideas in this chapter may help you to see that resource-based
learning materials can indeed be developed step by step, and that you may already have
quite a lot to start from.
What have you that you can adapt?
Lecturers usually have a wide range of materials that can be adapted to take their places in
resource-based learning packages. The materials you already have available may include:
●
your existing syllabus specification, including identified learning outcomes;
●
your own lecture notes;
●
handout materials you already use;
●
tasks and exercises you already set your students;
●
tutorials sheets;
●
assignment briefings;
●
model answers;
●
case-study materials;
●
test and exam questions.
In addition to some of these, you may already have some even more important things to draw on,
including:
●
your experience of teaching the subject involved;
●
your knowledge of students’ problems with the subject;
●
your experience of helping students with particular problems;
●
your experience of assessing students’ learning in the subject.
Many learning resource materials are produced by people who may know the subject involved, but
who may lack some of the vital experience regarding teaching, learning and assessing the subject.
Not surprisingly, materials that are developed by writers or designers who are not involved directly
in teaching a subject rarely work nearly as well as those developed by experienced lecturers.
A strategy for designing resource-based learning materials
The following ideas are adapted from a strategy I first proposed in The Open Learning
Handbook (2nd Edition) (Race 1994), and further developed in 500 Tips on Open and Online
Learning (2005b).
Resource-based and online learning
161
1 Start with the intended learning out-
comes. Express these in a clear, friendly,
jargon-free way. It is best to do this by
addressing them directly to the students
who will use the materials. For example, it
is useful to use wording along the lines of:
‘When you’ve worked through Section 6
of this package, you’ll be able to:
– explain why ...;
– list five factors which influence ...;
– predict when ... is most likely to occur;
– design a process to enable ...’

162
The Lecturer’s Toolkit
The main aim should be that students will
know exactly what they are intended to be
able to do when they will have completed
their work on each flexible learning ele-
ment. It is important to avoid words such
as ‘understand’ or ‘know’, as these don’t
tell students enough detail regarding how
they could be expected or required to
demonstrate
their understanding or
knowledge.
2 Think of tasks, activities and exercises
which will give students learning-by-
doing experience. Try not to simply use
tasks which require students to recall
things they have just learned, but rather
use tasks which help them to extend and
build on their learning as they work
through the resource-based learning mate-
rials. It is better to draft out twenty tasks,
then to use only three in the materials, than
to try to make each task good enough at
the outset to include in the materials.
3 Decide which of the tasks you can
already respond to. For example, if you
have thought of a multiple-choice ques-
tion, you can probably respond separately
to students choosing each of the options.
A congratulatory response may be appro-
priate for students who choose the best
option (often referred to as the ‘key’).
More importantly, for each of the other
options (the ‘distractors’) you can proba-
bly respond with a direct message to
students who make the mistakes or misun-
derstandings which may have led them to
choose any of these distractors. The tasks
where you can respond in print (or on-
screen in computer-based packages) are
the basis of structured self-assessment
questions.
4 Decide which tasks you can’t directly
respond to. These could be the tasks
where the human judgement of a lecturer
or tutor may be necessary to work out
what help students may need, or where
students will need detailed feedback on
what they have done well and on what
they may have missed. These tasks may
well be best as tutor-marked assignment
questions.
5 Write draft feedback responses to the
self-assessment tasks. You will almost
certainly want to edit and polish these
responses when you have feedback from
students on your first draft of the learning
materials, but it is well worth writing
these responses in some detail if neces-
sary before putting together the whole of
an element of material.
6 Link together self-assessment questions
and feedback responses. Check that your
feedback responses address as many as
possible of the problems which students
may have when they attempt the ques-
tions.
7 Link each feedback response to the
next self-assessment question. To move
students on from your response to one
particular self-assessment question, to be
ready to attempt the next one, you will
usually need to introduce some new ideas
or information. This is an element of the
content of your resource-based learning
materials, but is best kept concise and rel-
evant, so that it specifically serves to
bridge only the gap between that response
and the next question.
8 Try out the self-assessment questions
and feedback responses with ‘live’ stu-
dents. There is no quicker way of finding
out whether the questions and responses
will work well, than to use them as class-
based exercises in lectures or tutorials,
and find out how students react to them.
This helps you to select those questions
which will work effectively in resource-
based learning materials, and to adjust
and improve the wording of those which
can be made to work with a little atten-
tion, and to discard those questions where
it may not be straightforward to devise
self-sufficient feedback responses.
9 Develop the tutor-marked components
(if you are using such components). It

Although the above steps are listed as a sequence, it is best to work on them iteratively, working
on one facet of the learning package, then adjusting others to tune them in to what you have
done. For example, you can fine-tune your developing learning materials by:
●
adjusting learning outcomes to match the actual self-assessment questions that you devise;
●
adjusting self-assessment questions when you’ve tried to write responses to them;
●
adjusting the lead-in sections preceding self-assessment tasks when you’ve seen how the
tasks work in practice;
●
adjusting the feedback to self-assessment questions when you’ve seen how the questions
work with some live students in a lecture or tutorial;
●
developing the tutor-marked components when you see how students are getting on with the
self-assessment elements;
and so on.
There is no substitute for student feedback as an aid to developing effective flexible learning
materials. However, in the next section of this chapter, I present a checklist which you can use as
you write your own materials, but which you can also use to help you to gauge the quality of
existing published materials.
A quality checklist for resource-based learning materials
When selecting learning resource materials from the plethora which may be on offer, it is useful
to know what questions to ask to ensure that they will serve their purpose well. Even more
important, when designing new learning resource materials of your own, or adapting those
which are already available, it is important to have in mind at all times the ways that the materi-
als are intended to function, and how students will react to them. In the sections that follow, I
have identified a series of questions to pose, and some clarifications or suggestions arising from
many of the questions. Most of the questions can be applied to all the interactive learning mate-
rial formats, from print-based flexible learning packages to the various forms of online,
web-based and computer-based learning formats (adapted from Race 2005b).
Intended learning outcomes
Resource-based and online learning
163
could be useful here to devise marking
schemes, aiming to make it possible for
any lecturer to mark students’ work on
these components. Ultimately, you may be
able to develop the marking schemes suf-
ficiently that you could get students to
self-assess their own work (if you are not
needing such assessment data as part of
their coursework profiles).
1 Is there a clear indication of any pre-
requisite knowledge or skills? If not, you
may usefully compose a specification of
what is being taken for granted regarding
the starting point of the materials. It is
particularly important that when flexible
learning elements are being used within
college-based traditional courses, stu-
dents should know where the related
learning outcomes fit in to the overall pic-
ture of their courses.
2 Are the intended learning outcomes
stated clearly and unambiguously? This
is where you may wish to ‘translate’ the

164
The Lecturer’s Toolkit
stated intended outcomes of particular
learning packages, making them more
directly relevant to the students who will
use them. This can often be done by
adding ‘for example, ...’ illustrations
showing how and when the intended out-
comes will be relevant to their own
situations.
3 Are the intended outcomes presented in
a meaningful and friendly way? (i.e. not
‘the expected learning outcomes of this
module are that the student will ...’!). I
suggest that it is preferable to write learn-
ing outcomes using language such as
‘When you’ve worked through Section 3,
you’ll be able to ...’. It is important that
students develop a sense of ownership of
the intended learning outcomes, and it is
worthwhile making sure that the out-
comes as presented to them make them
feel involved, and that the expressed out-
comes don’t just belong to the learning
package or module.
4 Are the intended learning outcomes rel-
evant to your students’ needs? If you’re
designing materials of your own, such rel-
evance can be under your control. With
adopted or published materials, however,
it is usual that only some of the intended
outcomes are directly relevant, and you
will need to spell out to your students
exactly which these are, along with advice
about whether or not they should spend
time on other parts of the materials where
the intended outcomes are not directly
useful to them.
5 Do the intended learning outcomes
avoid jargon which may not be known
to students before starting the mater-
ial? It is of course normal for new terms
and concepts to be introduced in any kind
of learning, but it is best if this is done in
ways that avoid frightening off students at
the outset. It may remain necessary to
include unfamiliar words in the intended
outcomes of a learning package, but this
can still allow for such words to be
explained there and then, legitimising a
starting point of ‘not yet knowing’ such
words. Adding a few words in brackets
along the lines of ‘(this means in practice
that ...)’ can be a useful way ahead in such
cases.
Structure, layout and learning design
6 Is it really learning material? In other
words, is it avoiding just being informa-
tion? Especially in the case of online
learning, the danger of just presenting
screen-after-screen of information needs
to be avoided. The most common – and
most severe – criticism of many online
learning materials is that ‘it’s just an
online book!’.
7 How well does the material cater for dif-
ferent learning preferences? For
example, does it range appropriately from
text, illustrations and appropriate use of
other media when appropriate? If it’s
online or computer-based, is it possible to
print out appropriate parts easily for stu-
dents who prefer to study things on paper?
8 Do the various components provide a
complete and effective learning envi-
ronment? For example, in online learning
situations, are there paper-based materials
to work with alongside the on-screen
components? Are there suitable opportu-
nities for communication with other
students and with tutors, face-to-face or
virtually? Are there opportunities for stu-
dents to receive ongoing feedback on their
progress?
9 Is the material visually attractive,
thereby helping students to want to
learn from it? It is not always possible to
choose the materials that look best, how-
ever. Sometimes the best-looking
materials may be too expensive, or they

Resource-based and online learning
165
may not be sufficiently relevant to learn-
ing needs. At the end of the day, it is the
materials that work best that are cost-
effective, so compromises may have to be
made on visual attractiveness.
10 Is the material designed to minimise
difficulties for students with disabili-
ties? In the UK, for example, SENDA
(the Special Educational Needs and
Disabilities Act, 2001) requires that ‘rea-
sonable adjustments’ are built-in to
educational provision, in an anticipatory
manner. There is a lot of help available on
how best to do this, for example TechDis
in the UK (see www.techdis.ac.uk) pro-
vides a great deal of information and
advice on how best to make on-screen
learning materials address and cater for a
range of disabilities.
11 Does it allow differentiation? In other
words, can the material be equally useful
to high-fliers who already know a lot
about the subject concerned, and to low-
fliers who are quite new to the subject?
Does it prevent the low-fliers from feeling
inferior? Are there suitable pathways
through the material for students of differ-
ent ability or motivation, allowing all to
feel they are getting something useful
from the material in a given time?
12 In print-based materials, is there suffi-
cient white space? In such materials this
is needed for students to write their own
notes, answer questions posed by the
materials, do calculations and exercises
which help them make sense of the ideas
they have been reading about, and so on.
A learning package which allows – or
insists on – students writing all over it, is
likely to be more effective at promoting
effective learning-by-doing.
13 In online or computer-based materials,
is there plenty of activity? Students need
to be able to practise, try things out, make
mistakes, and get feedback from the mate-
rials. Their learning is much more linked
to what they do while working through the
materials than merely to what they see on-
screen.
14 Is it easy for students to find their way
backwards and forwards? Can they nav-
igate their way through the materials?
This is sometimes called ‘signposting’
and includes good use of headings in
print-based materials, or effective menus
in on-screen materials and online learning
delivered through virtual learning envi-
ronments. Either way, well-signposted
materials allow students to get quickly to
anything they want to consolidate (or
‘digest’) as well as helping them to scan
ahead to get the feel of what’s to come.
15 Can students bookmark things and
return to them at will later? With print-
based materials this is easy enough –
many students use highlighter pens to
remind them of important or tricky bits, or
stick ‘post-it’ notes to pages so they can
find them again quickly. Equivalent
processes are perfectly possible to arrange
in electronic packages.
16 Is the material broken into manageable
chunks? Students’ concentration spans
are finite. We all know how fickle con-
centration is at face-to-face training
sessions. The same applies when students
are learning from resource materials. If an
important topic goes on for page after
page – or screen after screen, we should
not be surprised if concentration is lost.
Frequent headings, subheadings, tasks
and activities can all help to avoid stu-
dents falling into a state of limbo when
working through learning packages.
17 Does the material avoid any sudden
jumps in level? A sudden jump can cause
‘shut-the-package’ or ‘log off from the
machine’ cues to students working on
their own. It is just about impossible for
authors of learning materials to tell when
they have gone one step too far too fast.
The first people to discover such sudden
jumps are always the students who can’t
understand why the material has suddenly

166
The Lecturer’s Toolkit
left them floundering. In well-piloted
materials, such difficulties will have been
ironed out long before the packages reach
their published forms, but too many mate-
rials have not allowed for this vital
process to happen.
18 Are there plenty of things for students
to do? For example, I suggest that there
should be something to do in sight on each
double-page spread in print-based materi-
als, or something to do on most screens in
online learning materials. If we accept that
learning mostly happens by practising,
making decisions, or having a go at exer-
cises, it is only natural that effective
interactive learning materials are essen-
tially packaged-up learning-by-doing.
19 Is the material encouraging deep learn-
ing rather than surface learning? The
key to this is the extent to which students
are helped to make sense of what they are
doing when they try tasks or answer ques-
tions. It is therefore important that they
are helped to stop and reflect on their
attempts rather than simply press on with
further learning-by-doing, except where
the activity is primarily designed for prac-
tice and repetition.
20 Is good use made of self-assessment
opportunities? It is important that much
of the learning-by-doing leads on to feed-
back, allowing students to self-assess how
well they have answered the questions or
attempted the various tasks as they learn.
This means that in the best learning mate-
rials, the tasks, questions and exercises
need to be structured, so that feedback
can be given to whatever students are
likely to do with them.
21 Are the tasks clear and unambiguous?
In live sessions, if a task isn’t clear to stu-
dents, someone will ask about it, and
clarification will follow. With packaged
learning resources, it is crucial to make
sure that people working on their own do
not have to waste time and energy work-
ing out exactly what the instructions mean
every time they come to some learning-
by-doing. Shortening the sentence length
of questions and activities can often make
a huge difference to how well students get
their heads around the meanings of the
tasks.
22 Are the questions and tasks inviting? Is
it clear to students that it’s valuable for
them to have a go rather than skip the
tasks or activities? It is sometimes an art
to make tasks so interesting that no one is
tempted to give them a miss, especially if
they are quite difficult ones. However, it
helps if you can make the tasks as relevant
as possible to students’ own backgrounds
and experiences.
23 Are the tasks sufficiently important?
Learning-by-doing should not be there
simply for its own sake. There should be
at least some useful learning payoff asso-
ciated with each task students attempt. An
exception can be when the odd task is
included for entertainment rather than for
learning – which can be useful when done
appropriately.
24 Is the comfort of privacy used well?
One of the strongest advantages of open
learning – whether online or on paper – is
that people can be free to learn by trial
and error, without the embarrassment of
someone like a tutor seeing their mis-
takes. Self-assessment tasks can allow
students to find out whether or not they
have mastered something, and gain feed-
back about how their learning is
progressing.
25 What about students who know they
can already do the tasks easily? If such
students are forced to work through tasks
they can already achieve perfectly well,
they can get bored and frustrated. In print-
Learning by doing – practice, repetition, trial and error

Resource-based and online learning
167
based materials students will choose to
skip these tasks, but in some computer-
based materials they can’t move on till
they have done each task and can find this
tedious. It is of course possible to avoid
this situation by having diagnostic exer-
cises which allow students who have
already mastered something to move fur-
ther on into the materials without going
through all the tasks designed for their
counterparts who need them.
26 In print-based materials, is there
enough space for students to write their
answers? In such materials, it is impor-
tant to get students writing. If they just
think about writing something, but don’t
do it, they may well forget what they
might have written!
27 In on-screen materials, will students be
caused to put fingers-to-keyboard, or
use the mouse? It is important to ensure
that students continue to make decisions,
for example by choosing an option in a
multiple-choice exercise, so that they can
then receive feedback directly relating to
what they have just done. Online learning-
by-doing can also make good use of
drag-and-drop, text entry, number entry,
and a wide range of activities with much
higher learning payoff than simply mov-
ing on to the next screen.
28 Cumulatively, does the learning-by-
doing test students’ achievement of the
intended outcomes? Perhaps one of the
most significant dangers of resource-
based learning materials is that it is often
easier to design tasks and exercises on
unimportant topics, than it is to ensure
that students’ activities focus on the things
that are involved in them achieving the
intended learning outcomes. To eliminate
this danger, it is useful to check that each
and every intended learning outcome is
cross-linked to one or more self-assess-
ment questions or activities, so that
students get practice in everything that is
important.
29 Does the learning-by-doing prepare
students for future assessment? When
students have worked diligently through a
package, the learning-by-doing they have
engaged in should collectively prepare
them for any assessments that they are
heading towards – whether it be tutor-
marked assignments, exams, practical
tests, and so on.
In-built structured feedback to students
30 Is feedback immediate? One of the
advantages of online learning or com-
puter-based learning packages is that
immediate on-screen feedback can appear
every time students make a decision, or
select an option, or enter a number, and so
on. Even in print-based materials,
responses to questions and activities can
be included elsewhere in the materials
(out of sight of the tasks themselves) so
that students can quickly check up on
whether they were successful when they
attempted the tasks.
31 Does feedback really respond to what
students have done? For example, when
they have had a go at a self-assessment
question, does the feedback they receive
give them more than just the correct
answer to the questions? If students don’t
give the correct answer to a question,
telling them the right answer is of very
limited value; students need feedback on
what was wrong with their own attempt at
answering the question. In open learning
materials of all forms, feedback needs to
be available to students in predetermined
ways, on-screen or in print.
32 Does the feedback remind students of
exactly what they actually did? Ideally,
the original task, question or activity

168
The Lecturer’s Toolkit
should still be in sight while students view
the feedback to what they did with it. With
print-based materials, this can be done by
reprinting the tasks or questions wherever
the feedback responses are located. With
on-screen materials, it is best that the task
or question – and the choice or decision
students made – remains visible on screen
when the feedback responses appear.
33 Do the feedback responses meet each
student’s need to find out:
‘Was I right?’
‘If not, why not?’.
When students get a self-assessment
question or activity right, it is quite
straightforward to provide them with
appropriate feedback. It’s when they get
them wrong that they need all the help we
can give them. In particular, they need not
only to know what the correct answer
should have been, but also what was
wrong with their own answers. Multiple-
choice question formats are particularly
useful here, as they allow different stu-
dents making different mistakes each to
receive individual feedback on their own
attempts at such questions.
34 Do feedback responses provide appro-
priate praise without patronising
students? It’s easy enough to start a
response on-screen or in print with words
such as ‘well done’. However, there are
many different ways of affirming, and
saying ‘splendid’ may be fine if the task
was difficult and we really want to praise
students who got it right, but the same
‘splendid’ can come across as patronising
if students felt that it was an easy ques-
tion. In such cases ‘yes indeed’ or
‘correct’ may be more appropriate starting
points for confirmatory feedback.
35 Do feedback responses include some-
thing that will help students who got
things wrong not to feel like complete
idiots? One of the problems of working
alone with resource-based learning mate-
rials is that people who get things wrong
may feel they are the only people ever to
have made such mistakes! When a diffi-
cult question or task is likely to cause
students to make mistakes or to pick
incorrect options, it helps them a lot if
there are some words of comfort, such as
‘this was a tough one!’ or ‘most people
get this wrong at first’.
Introductions, summaries and reviews
36 Is each part introduced in an interest-
ing, stimulating way? The first few pages
of print-based material – and the first
screen or two of on-screen material are
critical. There’s no second chance to make
a good first impression! If students are
put off a topic by the way it starts, they
may never recover that vital ‘want’ to
learn it.
37 Do introductions inspire confidence?
Attitudes are set early in any learning
experience. Confidence is perhaps the
single most important pre-determinant of
success. When students start something
feeling that they can indeed succeed, they
are much more likely to continue to be
motivated even when the material
becomes more testing.
38 Do the introductions alert students to
the way the materials are designed to
work?
Learning resource materials
should not assume that all students have
developed the kinds of study-skills
needed for open learning – particularly
those associated with taking responsibil-
ity for their own learning. Authors of open
learning materials need to share with stu-
dents the way that they intend the
optimum learning payoff to be achieved.
When students know how they are
intended to be learning, there’s more
chance they’ll use suitable approaches.

Resource-based and online learning
169
39 Are students able to get stuck into the
learning quickly? Despite what’s said
above about the need to help students to
see how the materials are intended to be
used, most students want to get straight
into actually doing something. With print-
based materials, introductory study-skills
guidance presented at the start can easily
be skipped then returned to later, but in
on-screen materials it is important not to
trap students in such introductions when
some of them will be wanting to cut to the
chase of the materials.
40 Are there clear and useful summaries
or reviews? Do these help students to
make sense of and consolidate what they
have learned? In any good face-to-face
session, lecturers take care to cover the
main points more than once, and to
remind students towards the end of the
session about the most important things
they should remember. When designing
learning resource materials, authors
sometimes think that it’s enough to put
across the main points well – and only
once! Summaries and reviews are every
bit as essential in good learning materials
as they are in live sessions.
41 Do summaries and reviews provide use-
ful ways for students to revise the
material quickly and effectively? A
summary or review helps students to
identify the essential learning points they
should have mastered. Once they have
done this, it should not take much to help
them retain such mastery, and they may
well not need to work through the whole
package ever again if they can polish their
grasp of the subject just by reading sum-
maries or reviews.
42 Can summaries provide a fast-track
function for high-fliers? Those students
who already have achieved particular
intended learning outcomes may only
need to remind themselves of those ele-
ments of knowledge, rather than work
through tasks and exercises they can
already achieve. Summaries can be partic-
ularly useful to them to check out what
they can already do, and move on quickly
to parts of the material which will deliver
further learning payoff to them.
The subject matter itself
43 Is it correct? The best-designed learning
materials will be useless if there is any-
thing seriously wrong with the subject
matter itself. While it may be perfectly
acceptable that the material may be pre-
sented in a different way than you may
have chosen to use yourself, it is useful to
check out that there is nothing that would
be mis-learned from the materials.
44 Is the material readable, fluent and
unambiguous? When students are work-
ing on their own, there is no one for them
to ask when something is not clear,
though virtual communication to a tutor,
for example, can compensate for this in
online materials. Good learning resource
materials depend a lot on the messages
getting across. Those people who never
use a short word when they can think of a
longer alternative, should not be allowed
to create learning resource materials!
Similarly, short sentences tend to get mes-
sages across more effectively than long
sentences, particularly on-screen.
45 Is the material relevant? For example,
does the content of the material keep
closely to the intended learning outcomes
as stated? It can be all too easy for the cre-
ators of learning resource materials to get
carried away with their pet subjects, and
go into far more detail than is reasonable.
This is fine so long as students know that
they’re looking at an optional extra at the
time, and can skip it if they wish.
46 Is the tone ‘involving’ where possible? In
task briefings and feedback in particular is

170
The Lecturer’s Toolkit
there plenty of use of ‘you’ for the student,
‘I’ for the author, ‘we’ for the student and
author together? This is a matter of style.
Some writers find it hard to communicate
in an informal, friendly manner – it is
quite different from the style they might
use to write journal articles or scholarly
texts. There is plenty of evidence that
communication works best in learning
materials when students feel involved, and
when they feel that the learning package is
‘talking’ to them on the page – or on the
screen – in a natural and relaxed way.
Visual learning – diagrams, char ts, pictures, tables, and so on
47 Is each non-text component as self-
explanatory as possible? In face-to-face
training sessions, students gain all sorts of
clues as to what any illustrations (for
example overheads or slides) actually
mean. Lecturers’ tone-of-voice and facial
expressions do much to add to the expla-
nation, as well as the words they use when
explaining directly. With learning pack-
ages, it is important that such explanation
is provided when necessary in print or on-
screen.
48 Do the students know what to do with
each illustration? They need to know
whether they need to learn it, label or
complete it, to note it in passing, or to
pick out the trend, or even nothing at all.
In a face-to-face session, when lecturers
show (for example) a table of data, some-
one is likely to ask, ‘Do we have to
remember these figures?’. If the same
table of data is included in learning mate-
rials, the same question still applies, but
there is no one to reply to it. Therefore,
good learning resource materials need to
anticipate all such questions, and clarify
to students exactly what the expectations
are regarding diagrams, charts, and so on.
It only takes a few words of explanation to
do this, along such lines as, ‘you don’t
have to remember these figures, but you
do need to be able to pick out the main
trend’ or ‘you don’t have to be able to
draw one of these, but you need to be able
to recognise one when you see one’.
49 Is it possible to continue to see an illus-
tration, while learning more about what
it means? In print-based materials it
helps if explanations are placed while the
figure relating to them is still in sight.
With on-screen explanations, it can be
useful to continue to show the appropriate
figure as a ‘thumbnail’, so that students
still remember what they’re making sense
of during discussion or explanations. It is
then also useful if they can (for example)
double-click the illustration on-screen to
restore it to its full size while they think
again about it at any point.
50 Is the material sufficiently illustrated?
A sketch can be more useful than 1000
words. One of the problem areas with
some learning materials is that they’re
written all in words, at the expense of
visual ways of communicating important
messages. On-screen materials are usually
better in this respect, not least because of
the relative ease of including pictures and
illustrations. However, sometimes they
are badly chosen, and small print on the
illustrations may not be readable on-
screen.

Resource-based and online learning
171
Some fur ther checklist questions
51 Does the material ensure that the aver-
age student will achieve the intended
learning outcomes? This of course is one
of the most important questions we can
ask of any learning package. If the answer
is “no!”, it’s probably worth looking for a
better package.
52 Will most students be able to work
through the material in a reasonable
time? Some things take longer working
under one’s own steam – others are
quicker that way. It is useful to have a
good idea how long it will take on average
for students to work through each element
of a learning sequence, but to recognise
and accept that some will take much
longer, and some much less time.
53 Will the average student enjoy using the
material? In some ways this is the ulti-
mate question. When students ‘can’t bring
themselves to log off from the programme
on the computer’ or ‘can’t put the package
down, because it is so interesting to work
through it’ there’s not usually much wrong
with the learning materials.
54 How up to date is the material covered?
How quickly will it date? Will it have an
adequate shelf-life as a learning resource,
and will the upfront costs of purchasing it
or developing it be justified?
55 Who will do updating as necessary?
With online and computer-based materi-
als, updating can be done quite easily by
whoever designed the material, but not
necessarily easily by other people using
the materials. With print-based materials,
updating is likely to involve revising and
reprinting substantial elements, but it may
be possible to prepare supplementary
sheets and handouts to bridge gaps in the
short term.
56 How significant is the ‘not invented
here’ syndrome? Can you work with the
differences between the approach used in
the material and your own approach? Can
you integrate comfortably and seamlessly
the two approaches with your students? If
you criticise or put down learning
resource materials your students are
using, you’re quite likely to destroy their
confidence in using the material, along
with their trust in the credibility of the
content of the material as a whole.
57 Will it be cost-effective? For example,
with physical packages, can students real-
istically be expected to acquire their own
copies? Can bulk discounts or shareware
arrangements be made? If the material is
computer-based, are the numbers of stu-
dents involved sufficient to justify the costs
of making the material available to them?
Is it suitable for networking, and is this
allowed within copyright arrangements?
58 Can students gain sufficient access to
the materials? This is particularly crucial
when large groups are involved. Could
lack of access to essential resource mate-
rials be cited as grounds for appeal by
students who may be unsuccessful when
assessed on what is covered by the mater-
ial? This particularly applies to online or
computer-based learning, where students
may have to be in particular places to
work through the materials, for example
at networked terminals in a learning
resource centre. Are part-time students
disproportionately disadvantaged in terms
of access to equipment?
59 How best can students integrate the
learning payoff they derive from the
materials into their overall learning
experience? Does the learning associated
with the materials link comfortably to
other learning formats and situations – for
example group work, lectures, work-
based learning, and so on? Will
appropriate elements of their learning
from the learning materials be further
developed and consolidated in other
learning situations?

Learning from screens?
Resource-based learning is increasingly dominated by computer-based learning packages, and
online learning through intranets and the Internet. In all of these contexts, we need to explore
how effectively ‘learning from screens’ is likely to take place. We are relatively accustomed to
interrogating ‘learning from paper’ in the contexts of handouts, books, articles, and so on, even
when it is well known that unless there is substantial learning-by-doing and feedback, the learn-
ing payoff from paper can be all too minimal. The next section of this chapter looks critically at
‘learning from screens’, and particularly at some of the questions which can be in students’
minds as they confront any particular screenful of a computer-based learning package, or online
sequence.
Perhaps the most important indicator that learning from screens is not happening successfully
is if the student at the keyboard looks for the ‘print’ command. In short, if someone learning
from a computer-based package needs to print something, it is a signal that it was not possible to
do everything that may have been intended with it on-screen.
Some advantages of screens over paper :
●
There can be instant feedback on-screen to pre-planned decision-making. For example,
choosing an option in a screen-based multiple-choice question can lead to immediate feed-
back on whether it was the best option to select, and (more importantly), ‘if not, why not?’.
172
The Lecturer’s Toolkit
60 How is the material or medium demon-
strably better than the cheapest, or
simplest, way of learning the topic?
How does the material make full use of
the benefits of open learning? Does it
really exploit the freedoms which open
learning can offer?
61 Will it make learning more efficient?
How will it save students’ time, or how
will it focus their learning more construc-
tively? How will it cause their learning to
be deeper and more meaningful?
62 How suitable will the material be for a
range of students? Will it minimise
instances of disadvantaging (for example)
people learning in a second language,
women students, mature students, techno-
phobic students, and so on? Will it be
equally possible for high-fliers and low-
fliers to make use of it at their own
speeds? Will students who already know a
lot about it be able to skip the parts they
don’t need?
63 What additional outcomes will students
derive from using the material? In other
words, what are the emergent learning
outcomes? For example, will the material
help students to develop important key
skills alongside learning the subject? For
example, will they develop keyboarding
skills and computer literacy? Will they
develop information tracking and retrieval
skills? Will they develop their learning
skills in new directions? Are these out-
comes assessed? Should they be assessed
or not? Could some of these outcomes
outweigh the intended learning out-
comes?
64 How best will feedback on the effective-
ness of the resource material be
sought? What part should be played by
peer feedback from colleagues, feedback
from student questionnaires, online feed-
back, observations of students’ reactions
to the material, and the assessment of stu-
dents’ evidence of achievement of the
intended learning outcomes?

●
Feedback can be withheld on-screen until some learning-by-doing has happened. For
example, the feedback to a selection in a multiple-choice question can be withheld in com-
puter-based learning until students have made their selections. In print-based materials, it
can be all too tempting to check out the feedback responses before having made a firm
choice.
●
Computers can add sound to on-screen feedback. Where students can use headphones,
for example, the benefits of tone-of-voice can be exploited in feedback responses to stu-
dents’ keyboard choices.
●
Computers can route students on to what they need next. For example, if students have
succeeded in several on-screen questions, they can be moved on to something which may be
more challenging to them (some harder questions), or if they are struggling with the on-
screen tasks they can be moved back to some further practice questions.
●
Computer screens are less likely to cause information overload. Paper, whether in books,
articles, or even handouts, tends to get filled up with print. The limit of screen size causes at
least some economy of information presentation. However, this advantage can only too eas-
ily be thrown away by congested screens of information, especially when what is designed
to appear on-screen is too closely linked to what might have otherwise been presented on
paper.
Some disadvantages of screens compared to paper :
●
‘Now you see it, now it’s gone!’: visual memory tends to be relatively transient. If some-
thing important is on-screen, there is every chance it will evaporate from students’ minds
after a few more screens of information.
●
Screens can’t be used anywhere. Learning from screens is dependent upon being beside a
computer and monitor.
●
Screens can’t be spread out around a teaching room or learning space as easily as
paper. This means that students can’t move around as freely as they could with print-based
learning resources.
●
Computer-based learning resources are often less easy to navigate than paper-based
learning resources. With a book, handout or article, it is easy to flick backwards and for-
wards to consolidate what has already been learned, and to spy out the landscape of what is
to come. With computer-based learning, this is not always nearly so easy.
Is this screenful actually working?
Imagine a student looking at a single tiny element of a computer-based learning programme, or
a single screen of information online on an intranet or the Internet. Any, or all, of the following
questions could go through the student’s mind while looking at a single screen of information. In
Table 5.1 below, I’ve linked these questions to the five principal processes underpinning effec-
tive learning, as outlined in Chapter 1 of this book:
●
wanting to learn;
●
needing to learn;
●
learning by doing;
●
learning through feedback;
●
digesting (making sense) of what is being learned.
Resource-based and online learning
173

174
The Lecturer’s Toolkit
Table 5.1 Interrogating a computer screenful: questions which could be in learners’ minds
Questions which could be going through a students’ mind Links to the factors underpinning successful learning
Why am I seeing this particular screenful?
Wanting to learn: could be damaged if there is not a
Why is it there?
good reason for the screenful being there.
Can I just skip it?
Needing to learn: the rationale for the screenful’s
Is it just padding?
existence should at least confirm what the student
Can I move straight on from here?
needs to get from its presence.
What are the intended learning outcomes
Wanting to learn: could be undermined if the
associated with this particular screenful?
purpose of the screenful is not self-evident.
If there aren’t any, why is it there at all?
Needing to learn: if it’s not linked to intended
learning outcomes, the message could be that it’s
not needed, and not important enough to think about.
What exactly am I supposed to do with this bit?
Learning by doing: this is addressed when the
How am I supposed to handle it? Am I intended
screenful is an interactive one, in one way or
to be jotting down my thoughts? Are there
another. The doing could be practice, learning by
on-screen tasks for me to do, such as picking
mistakes, or more sophisticated, for example
options, entering text, entering numbers,
requiring quite a bit of thought before action.
clicking boxes, moving objects around on-screen,
and so on?
Will I be able to get back to this bit if I want to,
Digesting – making sense: putting the screenful into
or need to?
perspective is an important part of making sense of
How important is this particular bit? If it’s
it. If it’s not clear from the screenful whether it will
important, will I have another chance to think
be important or not, the student may assume it is
about it, without having to go backwards to find it?
not important.
Where does this bit fit into the big picture?
Wanting to learn, needing to learn, digesting: if the
Where does it fit in to the overall intended
screenful does not clearly link to the overall
learning outcomes? How much will it count for
learning programme, the student may decide it’s just
in forthcoming assessments?
there ‘in passing’ and learn very little from it.
How will I tell whether, and when, I’ve succeeded
Learning through feedback: the availability of
with this bit?
feedback to the student, after doing something with
Will I get feedback from the computer itself?
what’s on the screen, gives the message that the
Will I have to write down, or key in, something
screenful is important enough to be taken seriously.
that will lead to later feedback from a tutor?
Will I be given something to compare to what
I’m asked to do with the screenful?
Where is this bit leading me towards? Where is
Digesting – making sense: it is easy to get lost in
it taking me from?
computer-based scenarios. It is perfectly possible to
Can I tell where I’m heading? Am I supposed to
ensure that each screenful has enough context-
remember where I’m coming from, and what I
setting included, so that this danger is minimised.
learned from previous screenfuls?
Unfortunately, this ‘navigational’ agenda is often not
addressed well enough.
Who else is involved?
These questions can link to all of the factors under
Will someone be assessing what I’ve got out of
pinning successful learning. Feedback can be forth-
this bit? Am I supposed to be doing this on my
coming on-screen, or from a tutor. ‘Learning-by-
own, or am I expected to talk to other students
doing’ can be coupled to discussing the screenful
about it? Is anyone watching me? Would I treat it
with fellow-students.The additional interaction and
differently if they were?
feedback can enhance ‘wanting to learn’ and
consolidate the ‘needing to learn’ agenda, and aid the
‘making sense’ process.

Resource-based and online learning
175
Table 5.1 Continued
Questions which could be going through a students’ mind Links to the factors underpinning successful learning
What else should I be thinking about while this
These questions can link to all of the factors
bit is on-screen?
underpinning successful learning, particularly
Should I be looking at printed resources as I go?
‘digesting – making sense’.
Should I be looking at notes I’m making as I go?
What else am I learning from this bit?
These questions can link to all of the processes
What am I learning over and above what’s on
underpinning successful learning, particularly
screen at the moment? How important are these ‘feedback’ and ‘digesting’. If the further agendas
other things I’m thinking about? Will they be
associated with the screenful are interesting, and
assessed in some way, and if so, when, how, and by seen as important, the ‘wanting’ and ‘needing’ to
whom? Will I get feedback on these other things
learn aspects are also enhanced.
I’m thinking about?
What am I learning about myself?
Questions like these involve the ‘digesting – making
How is this bit helping me to develop as someone sense’ aspect of learning, as well as developing
who can learn effectively and independently from a receptivity to feedback, and the ability to develop
computer-based resource? How am I developing
one’s own motivation.
skills at managing my own learning?
So what?
Cut! Or present the information in another way,
If there have not been any good reasons for
such as on a handout, or in an accompanying
looking at the screenful after thinking through
manual. If the screenful is not addressing at least
all of the questions above, is there any reason at
some of the questions listed above, it may as well
all for it being there?
be deleted from the on-screen agenda of the
learning package.
Practical pointers on resource-based learning
The following sets of suggestions on resource-based learning have been adapted from relevant
parts of 500 Tips on Open and Online Learning (Race 2005b), where there is a great deal more
of such advice. Many of these suggestions apply equally to the design of online, computer-based
or paper-based resource-based learning.
Which par ts of the curriculum lend themselves to resource-based learning?
It is worthwhile to think about which parts of the curriculum best lend themselves to an open or
flexible approach, whether online or paper-based. It is useful to start your resource-based learn-
ing writing with such parts, and perhaps better still to experiment with adapting existing
resources covering such curriculum areas towards a resource-based learning format first. The
following suggestions show that such starting points can be based on several different consider-
ations, and are often linked to ways that resource-based learning can augment face-to-face
college-based programmes. The following suggestions show that such starting points can be
based on several different considerations, and are often linked to ways that open learning can
naturally augment face-to-face college-based programmes.

176
The Lecturer’s Toolkit
1 Important background material. In
face-to-face programmes, a considerable
amount of time is often spent near the
start, getting everyone up to speed with
essential knowledge or skills, to the
annoyance of the students who already
have these. Making such information the
basis of an open learning package can
allow those people who need to cover this
material before the whole group starts, to
do so in their own time and at their own
pace, without holding up the rest of the
group.
2 ‘Need to know before ...’ material. For
example, when different students will be
attempting different practical exercises at
the same time, it could take far too long to
cover all the prerequisite material with the
whole group before introducing practical
work. Designing separate, short open
learning elements to pave the way to each
practical exercise, can allow these to be
issued to students so that the practical
work can be started much earlier.
3 ‘Remedial material’. In many face-to-
face courses, there are problem-topics
which can hold up a whole class while the
difficulties are addressed by lecturers or
trainers. This can lead to time being
wasted, particularly by those students for
whom there are no problems with the
parts concerned. The availability of open
learning packages (print-based or online
or both) addressing such areas can allow
such packages to be used only by those
students who need them, in their own
time, so that the progress of the whole
group is not impeded.
4 ‘Nice-to-know’ material. While ‘need-
to-know’ material is more important, open
learning elements can be particularly use-
ful to address ‘nice-to-know’ material,
and giving such material to students with-
out spending too much face-to-face time
on it. This allows contact time to be saved
for helping students with the really impor-
tant material, and for addressing their
problems. Sometimes the ‘nice-to-know’
dimension can be carried online, allowing
students with time and energy to spare to
enjoy it, without it getting in the way of
those with less energy or time.
5 Much-repeated material. If you find
yourself often covering the same ground,
perhaps with different groups of students
in different contexts or courses, it can be
worth thinking about packaging-up such
material in open learning formats. If you
yourself get bored with things you often
teach, you’re not going to pass much
enthusiasm for these topics on to your stu-
dents, and it can be mutually beneficial to
invest your energy into creating an alter-
native flexible learning pathway to cover
such material. Furthermore, if you’ve
taught something really often, you’re the
ideal person to know exactly what needs
to go online or into a learning package to
give students just the right kinds of feed-
back on their ongoing learning.
6 Material which is best ‘learned-by-
doing’.
Open learning, whether
pen-in-hand or online, is based on stu-
dents answering questions, and doing
tasks and exercises. Therefore it can be a
useful starting point for an open learning
package to base it on the sorts of activities
that you may already be giving your face-
to-face students. Standard assignments
and activities already in use in tradition-
ally delivered courses and programmes
may be adapted quite easily for open
learning usage, and have the strong bene-
fit that they are already tried and tested
elements of the curriculum.
7 Material where students need individ-
ual feedback on their progress. A vital
element of open learning is the feedback
that students receive when they have
attempted to answer questions, or had a
try at exercises and activities. The kinds
of feedback that you may already give
your face-to-face students can be pack-
aged up into open learning materials.

Blended learning
Essentially, blended learning is about integrating resource-based learning – particularly online
learning – seamlessly into the overall learning experience of students. Implementing flexible
learning with small groups of students poses few particular problems, provided the learning
materials are of good quality, and there is appropriate support for students. However, student
numbers continue to grow in college-based courses in many disciplines, and resource constraints
have meant that face-to-face time with students has to be more limited than formerly. Learning
resource materials can take some of the pressure away, but need to be firmly linked with main-
stream teaching, otherwise students may feel that the resource-based elements are peripheral.
The following suggestions aim to help you to ensure that such pathways and materials are worth
the time and effort that is involved in creating them.
Resource-based and online learning
177
What you say to students looking over
their shoulders as they try their hands at
tasks and exercises can be just as useful
on-screen online, or in print.
8 Material that you don’t like to teach! It
can be tempting to turn such elements of
the curriculum into open learning materi-
als, where students can work on them
individually (or in untutored groups), and
using face-to-face time more efficiently
to address any problems that students
find, rather than to teach them from
scratch.
9 Material that students find hard to
grasp first time. In most subjects there
are such areas. Developing open learning
materials addressing these means that stu-
dents can go through them on their own,
as many times as they need. Effectively,
the open learning material becomes their
teacher or trainer. Students can then work
through such materials at their own pace,
and can practise with the learning materi-
als until they master them.
10 Material which may be needed later, at
short notice. It is often the case that some
topics are only really needed by students
quite some time after they may have been
covered in a course or programme. When
such materials are turned into open learn-
ing formats, students can polish up their
grip on the topics involved just when they
need to.
1 Plan to make the most of economies of
scale. If there are hundreds of students, it
can become well worthwhile making good
use of online learning and appropriate vir-
tual learning environments. It may be less
cost-effective to print large numbers of
print-based open learning packages in such
contexts. The same virtual learning envi-
ronment may extend easily right across the
provision of the whole institution – but it
then becomes all the more important to
choose it well in the first place! Investigate
what it does – not just how it looks.
2 Decide which parts of the syllabus to
switch to resource-based mode. A previ-
ous section of this book gave suggestions
about which parts of the curriculum in
general lend themselves to open learning
delivery. A further section looked at the
categories of students likely to benefit
from flexible learning. Combine these
two agendas to work out in the context of
your own lecture programme which will
be the best parts to use, maximising the
benefits to the most appropriate cross-
section of your class.
3 Work out the best things to do in lec-
ture times. It is becoming increasingly
common to design open learning materi-
als to replace some of the material that
was formerly handled in lectures. It is
important to put the remaining occasions

178
The Lecturer’s Toolkit
when a whole group is together to opti-
mum usage. Such usage includes guiding
and supporting students who are doing
some or most of their learning from open
learning materials.
4 Make sure that your students don’t
regard the resource-based learning as
an optional extra. For example, use lec-
ture time to explain to the whole group
which learning outcomes are being cov-
ered by the flexible learning materials,
and what the balance is between what will
be covered in class, and the learning that
students are required to do on their own.
Explain (for example) that if half of the
module is being worked on by students in
online mode, half of the exam questions
will test their achievement of these parts
of the module.
5 Reserve some class time to answer stu-
dents’
questions about the
resource-based learning material. It can
be useful to use large-group time to collect
and address problems that students find,
and more efficient use of time than trying
to deal with students’ questions by appoint-
ment or in surgery-times. Collecting
frequently asked questions online, then
going through them in a whole-group set-
ting with students can be a useful way of
integrating open learning elements prop-
erly into the learning programme.
6 Use lectures to ‘spotlight’ rather than
to ‘cover’. Decide on the really impor-
tant elements of the course, where it is
worth the whole group having a shared
learning experience along with the
opportunity for questions and discus-
sion. Explain to students which parts you
are going to spotlight in this way, and
why. This helps them to see that they
have the responsibility for learning the
parts that are not going to be spotlighted
in this way.
7 Consider using elements of the resource-
based learning material as prerequisite
for particular lecture sessions.
For example, you can ‘require’ students to
have worked through a particular section of
their materials before attending a specific
lecture, and structuring the session such
that students who have not done this feel
sufficiently disadvantaged or embarrassed
that they don’t put themselves in such a
position in future.
8 Consider building in to the learning
materials short assignments or exer-
cises to be handed in during lecture
time. This can help to ensure that students
keep up with the intended pace.
Sometimes you could actually take in
their work and mark it, or take it in just to
check how the materials were working,
then return it to the class for peer-marking
or self-marking.
9 Get students to use the learning materi-
als as a framework for their lecture
notes. For example, use some lecture time
for students to do particular tasks around
information that is already in their open
learning materials or provided online.
This conditions them to bring the materi-
als to the large-group sessions, and
increases the probability that they will
have worked on them before the session.
It also allows you to set additional follow-
up tasks during the session.
10 Turn some lectures into tutorials! For
example, choose particular areas for stu-
dents to learn with the open learning
materials, and arrange a follow-up lecture
slot that will be devoted to questions and
discussion about the material, rather than
introducing anything further on such
occasions.
11 Turn some lectures into large-group,
interactive learning experiences.
Interactive handouts can be designed for
large-group sessions, where the handouts
themselves are in effect miniature open
learning packages, including stated
intended learning outcomes, tasks and
feedback responses. Such large-group ses-
sions not only build upon the principles of

Which students are par ticularly helped?
All sorts of people use resource-based learning in distance-learning mode whether online or
paper-based. The following categories of students are included as those who can be particularly
helped in different ways. Many parallels may also be drawn to the use of flexible learning ele-
ments in college-based programmes, where similar benefits can be delivered to a variety of
constituencies of the student population.
Resource-based and online learning
179
learning-by-doing and learning from feed-
back, but they also help students
themselves to develop approaches which
they can extend to working with fully
fledged open learning packages.
12 Explain how, and when, the resource-
based learning material content will be
assessed. It can be useful to stage some of
the assessment somewhat earlier than the
end of the course or module, so that some
face-to-face time can be reserved for
feedback to the class about any signifi-
cant problems that were found with the
part of the curriculum delivered by open
learning.
13 Consider using online assessment for
appropriate parts of the material.
Such assessment can be based on a bank
of questions, with each student being
given a random selection from the bank
on the occasion when they take a test.
The tests can be done either in a booked
computer laboratory (with invigilation if
necessary to minimise possibilities of
cheating), or could be networked over a
week or two when the purpose of the
assessment may be primarily formative.
The use of passwords can add to the
security of the tests, and the reporting
software can save you a considerable
amount of time, and avoid you having to
do tasks such as marking and making
class-score lists manually. Don’t forget,
additionally, that online assessment can
easily be extended to provide feedback to
students during or after the test – so
make the most of the opportunity to
build into the assessment software feed-
back messages to show students how
they have done – and to save you having
to explain it all to them later.
1 High fliers. Very-able students are often
frustrated or bored by traditional class-
based programmes, as the pace is
normally made to suit the average student
and may be much too slow for high-fliers.
With open learning, they can speed
through the parts they already know, or
the topics they find easy and straightfor-
ward. They can work through a package
concentrating only on the parts that are
new to them, or which they find suffi-
ciently challenging.
2 Low fliers. The least-able students in a
group are often disadvantaged when the
pace of delivery of traditional pro-
grammes is too fast for them. They can be
embarrassed in class situations by being
seen not to know things, or not to be able
to do tasks that their fellow-students have
no difficulty with. With open learning,
they can take their time, and practise until
they have mastered things. They have the
opportunity to spend much longer than
other students may take.
3 Students with special needs. For exam-
ple, people with limited mobility may
find it hard to get to the venue of a tradi-
tional course, but may have few problems
when studying at home. Students with
other problems may be able to work
through open learning materials with the
aid of an appropriate helper or supporter.

180
The Lecturer’s Toolkit
Open learning is increasingly being used
to address the particular needs of diverse
groups including carers, prisoners, men-
tally ill people, religious groups, socially
excluded people, and so on. Whether the
special needs are linked to disabilities or
to educational difficulties, open learning
can often be more easily adapted to such
students than can large-group or small-
group teaching. Not least, the fact that
these students can work at their own pace
counts significantly. Furthermore, appro-
priate software can be used to make
online learning materials accessible to
students with hearing or sight difficulties,
where it would sometimes be quite diffi-
cult to compensate for their difficulties in
live face-to-face teaching.
4 Anxious students. Some people are eas-
ily embarrassed if they get things wrong,
especially when they are seen to make
mistakes. With open learning, they have
the opportunity to learn from making mis-
takes, in the comfort of privacy, as they
try self-assessment questions and exer-
cises, and learn from the feedback
responses accompanying such compo-
nents of an interactive learning package.
5 Students with a particular block.
Students who have a particular problem
with an important component of a course
can benefit from open learning, in that
they can work as often as they wish
through materials designed to give them
practice in the topic concerned. It can be
useful to incorporate self-assessment
exercises, with detailed feedback spe-
cially included for those students who
have problems with the topic.
6 Students who like working with com-
puters. The new generations of school
leavers love computer games – sometimes
they take over their lives. The number of
older people who enjoy playing with com-
puters is also growing – there are plenty
of ‘silver surfers’ around now. All such
people can extend their pleasure in work-
ing with computers to learning intention-
ally with them.
7 Students needing to make up an identi-
fied shortfall. For example, in science
and engineering programmes, it is often
found quite suddenly that some students
in a group have not got particular maths
skills. Rather than hold up the progress of
a whole class, self-study components can
be issued to those students who need to
get up to speed in the areas involved.
When the students have a sense of owner-
ship of the need that these materials will
address, they make best use of the materi-
als.
8 People learning in a second language. In
class situations, such students are disad-
vantaged in that they may be spending
much of their energy simply making sense
of the words they hear or see projected on
slides, with little time left to make sense
of the ideas and concepts. With open
learning materials, they can work through
them at their own pace, with the aid of a
dictionary, or with the help of students
already fluent in the language in which
the materials are written.
9 Part-time students. These are often peo-
ple with many competing pressures on
their time, or with irregular opportunities
for studying, perhaps due to shift work,
work away from home, or uneven
demands being normal in their jobs. Open
learning materials allow them to manage
their studying effectively, and to make the
most of those periods where they have
more time to study. It is worth remember-
ing that most full-time university students
in the UK nowadays are actually working
significant hours most weeks to support
their education, and are in fact part-time
students.
10 People who don’t like being taught!
Surprisingly, such people are found in
college-based courses, but there are many
more of these who would not consider
going to an educational institution. Open

Writing new resource-based learning materials
The most difficult stage in starting out to design a learning resource can be working out a logical
and efficient order in which to approach the separate tasks involved.
Before really getting started on designing open learning resource material, it’s worth looking
back, and asking yourself a few basic questions once more. These include:
●
Am I the best person to create this material?
●
Have I sufficient experience of being an open (or online) learner myself?
●
Is there a materials production unit in my institution which can help me?
●
Are there any experienced materials editors there whose expertise I can depend upon?
●
Is there graphics design help and support?
●
Is there already an institutional housestyle?
●
Can someone else produce the learning materials, while I simply supply the raw material
and notes on how I want it to work in open or online learning mode?
If after asking these questions, you decide to press ahead with designing your own materials, the
following suggestions should help you to avoid wasting too much time, and particularly aim to
help ensure that the work you do is directly related to composing learning material rather than
writing out yet another textbook.
Resource-based and online learning
181
learning allows such people to have a
much greater degree of autonomy and
ownership of their studies.
11 Students who only want to do part of
the whole. Some students may only want
to – or need to – achieve a few carefully
selected learning outcomes that are rele-
vant to their work or even to their leisure
activities. With an open learning package,
they are in a position to select those parts
they want to study, whereas in face-to-
face courses they may have to wait quite
some time before the parts they are really
interested in are covered.
1 Don’t just start writing subject mater-
ial. An open learning package is much
more than just the subject matter it con-
tains, and in particular is something for
learners to do rather than just something
to read.
2 Get the feel of your target audience.
The better you know the sorts of people
who will be your learners, the easier it is
to write for them. It is worth spending
some time on the suggestions given ear-
lier in this book about making profiles of
the main groups which will make up your
target audience.
3 Express your intended learning out-
comes. It is worth making a skeleton of
the topics that your material will cover in
the form of learning outcomes, at least in
draft form, before writing anything else.
Having established the intended learning
outcomes, you are in a much better posi-
tion to ensure that the content of your
learning material will be developed in a
coherent and logical order.
4 Seek feedback on your draft learning
outcomes. Check that they are seen by
colleagues to be at the right level for the
material you are designing. In particular,
check that they make sense to members of
your target audience of learners, and are
clear and unambiguous to them. Taking
time at the outset to express these out-
comes clearly and precisely is a useful
investment.

182
The Lecturer’s Toolkit
5 Design questions, tasks and activities,
firmly based on your intended learning
outcomes. Some of the outcomes may
require several tasks and activities to
cover them. It is also useful to plan in
draft form activities that will span two or
three learning outcomes simultaneously,
to help pave the way towards integrating
your package and linking the outcomes to
each other.
6 Test your draft questions, tasks and
activities. These will in due course be the
basis of the learning-by-doing in your
package, and will set the scene for the
feedback responses you will design. It is
extremely useful to test these questions and
tasks first, with anyone you can get to try
them out, particularly learners who may be
close to your anticipated target audience.
Finding out their most common mistakes
and difficulties paves the way towards the
design of useful feedback responses, and
helps you adjust the wording of the tasks to
avoid ambiguity or confusion.
7 Plan your feedback responses. Decide
how best you will let your learners know
how well, or how badly, they have done in
their attempts at each of your tasks, activ-
ities and questions.
8 Think ahead to assessment. Work out
which of the questions, tasks and activi-
ties you have designed will be useful as
self-assessment exercises, where feed-
back responses can be provided to
learners in print in the learning package,
or on-screen if you’re designing com-
puter-based or online learning. Work out
which exercises need the human skills and
experience of a tutor to respond to them,
and will usefully become components of
tutor-marked assignments.
9 Map out your questions, tasks and
activities into a logical sequence. Along
with the matching learning outcomes, this
provides you with a strong skeleton on
which to proceed to flesh out the content
of your open learning material.
10 Work out your main headings and sub-
headings. It is wise to base these firmly
on the things that your learners are going
to be doing, reflecting the learning out-
comes you have devised. This is much
better than devising headings purely on
the basis of the subjects and topics cov-
ered, or on the original syllabus you may
have started out with.
11 Consider using question-headings. Any
piece of information can be regarded as
the answer to one or more questions.
Question-headings can often alert learn-
ers about the purpose of what follows
somewhat better than simple topic head-
ings.
12 Write ‘bridges’. Most of these will lead
from the feedback response you have
written for one question, task or activity,
into the next activity that your learners
will meet. Sometimes these bridges will
need to provide new information to set the
scene for the next activity. It is important
to ensure that these bridges are as short
and relevant as you can make them, and
that they don’t run off on tangents to the
main agenda provided by the skeleton you
have already made. This also ensures that
you make your writing really efficient,
and save your valuable time.
13 Write the introductions last. The best
time to write any introduction is when you
know exactly what you’re introducing. It
is much easier to lead in to the first ques-
tion, task or activity when you know how
it (and the feedback associated with it)
fits in to the material as a whole, and
when you already know how and why you
have arranged the sequence of activities in
the way you have chosen. Although you
may need to write draft introductions
when first putting together your package
for piloting, it is really useful to revisit
these after testing out how learners get on
with the activities and feedback
responses, and to include in the final ver-
sion of each introduction suggestions to

Resource-based and online learning
183
learners about how to approach the mater-
ial that follows, based on what was
learned from piloting.
14 Keep the big picture in sight. Figure 5.1
shows a diagrammatical illustration of the
links between intended learning out-
comes, tutor-marked assignments,
self-assessment questions, ‘bridges’ and
feedback responses. It is important for
you to think clearly about exactly which
learning context your learners will be in
as they meet each element of your materi-
als – for example whether they will be
engaged in a task, or receiving feedback
on their actions.
The Internet: harnessing e-information for e-learning
In a way, the Internet is the ultimate open learning resource – but it is actually just e-information
unless it is used actively. There is plenty of freedom. People can use it at times of their own
choice, in their own ways, at their own pace, and from anywhere that access to it is available to
them. But that said, it is not automatically a vehicle for productive and effective learning. Indeed,
it is very easy to become side-tracked by all sorts of fascinating things, and to stray well away
from any intended learning outcome. The learning payoff can be zero. The suggestions which
follow are not intended as starting points for setting out to deliver learning through the Internet,
but rather to help learners to use the Internet to obtain material to use in connection with their
studies, such as in assignments they are preparing. The following suggestions may help you to
help your students both to enjoy the Internet, and to learn well from it.
1 Play with the Internet yourself. You
need to pick up your own experience of
how it feels to tap into such a vast and var-
ied database, before you can design ways
of helping your students to get high learn-
ing payoff from using it themselves.
Experience for yourself the pleasure of
being able to surf the net, and also note
how easy it is to surf quite aimlessly.
2 After you’ve played with it, work with
it. Use the Internet to research something
yourself. You may well of course have
done this often already, but if not, give it
a try before you think of setting your stu-
dents ‘search and retrieve’ tasks with the
Internet. Set yourself a fixed time, per-
haps half-an-hour or even less. Choose a
topic that you’re going to search for,
preferably something a little offbeat. See
for yourself how best to use the search
engines, and compare the efficiency of
different engines. Find out for yourself
how to deal with 4,593 references to
your chosen topic, and how to improve
your searching strategy to whittle them
down to the ten that you really want to
use!
3 Do they need it all? Decide whether you
want your students to use the Internet, or
an intranet. An intranet is where a net-
worked set of computers talk to each
other, often using Internet conventions,
but where the content is not open to the
rest of the universe. If you are working in
an organisation which already has such a
network, and if your students can make
use of this network effectively, there will
be some purposes that will be better
served by the intranet. You can also have
controlled access to the Internet via an
intranet, such as by using hot-links to pre-
determined external sites.
4 Don’t just use it as a filing cabinet for
your teaching resources! While it is use-
ful in its own way if your students can
have access to your own notes and teach-
ing-learning resources, this is not really
using the Internet or an intranet – it may
only provide e-information after all. Too
many materials designed for use in other
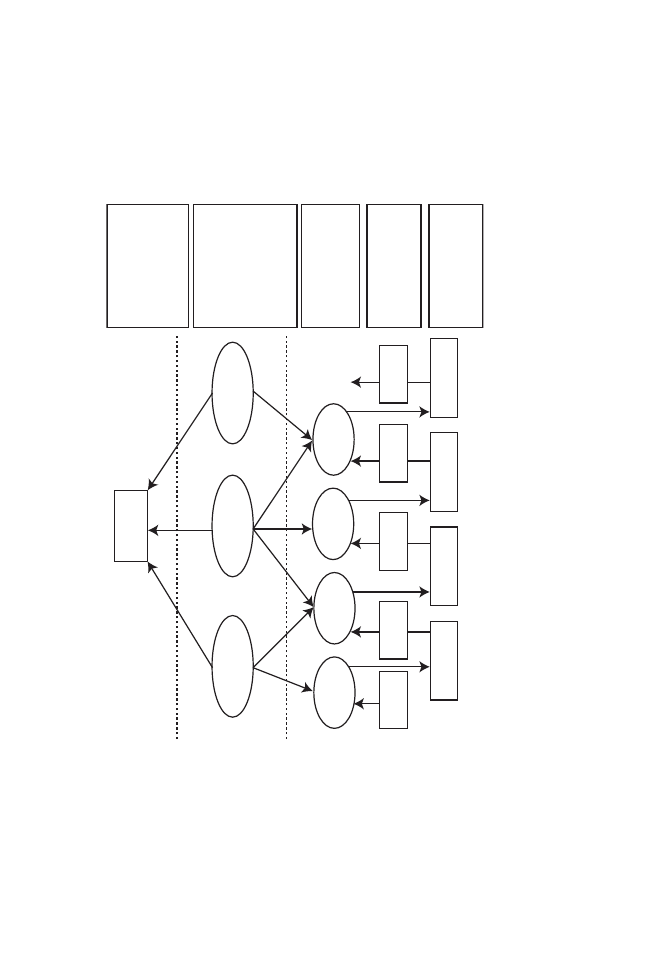
Tutor marked
assignment
Aspects of achievement of the intended learning outcomes
which need 'human' feedback, i.e. from a tutor
Aspects of achievement of the intended learning outcomes
where you can design structured feedback to appear on-screen
Learning by doing, with
feedback from an expert,
responding to individual
strengths and problems,
but without the comfort
of privacy.
Learning outcomes,
carefully worded to be
useful to e-learners as
a clear indication of the
targets they
need
to
achieve. Wording aims
to help them to
want
to
achieve them.
Self-assessment questions
to provide opportunities for
learning by doing, practice,
trial and error, repetition.
Only as much 'content' as
e-learners need to move
from the feedback from
one task to their next task.
Feedback responses,
addressing 'am I right?',
and (particularly) 'if not,
why
not?'.
Introduction
Feedback
response
Feedback
response
Feedback
response
Feedback
response
Learning
by doing
Intended learning
outcome 1
Intended learning
outcome 2
Intended learning
outcome 3
Learning
by doing
Learning
by doing
Learning
by doing
bridge
bridge
bridge
bridge
Figur
e 5.1
Designing e-learning:
a diagrammatical r
epr
esentation of a strateg
y f
or de
veloping an element of e-learning
ada
pted fr
om
Anderson and Race (2002)

Resource-based and online learning
185
forms are already cluttering up the
Internet. If all you intend your students to
do is to download your notes and print
their own copies, sending them emailed
attachments would do the same job much
more efficiently.
5 Think carefully about your intended
learning outcomes. You may indeed with
to use the Internet as a means whereby
your students address the existing
intended outcomes associated with their
subject material. However, it is also worth
considering whether you may wish to add
further learning outcomes, to do with the
processes of searching, selecting, retriev-
ing and analysing subject material. If so,
you may also need to think about whether,
and how, these additional learning out-
comes may be assessed.
6 Give your students specific things to do
using the Internet. Choose these tasks so
that it is relevant and important for your
students to find and use up-to-the-minute
data or news, rather than where the
‘answers’ are already encapsulated in eas-
ily accessible books or learning resources.
7 Give students plenty of choice. Consider
giving them a menu of tasks and activi-
ties. They will feel more ownership if they
have a significant degree of freedom in
their Internet tasks. Where you have a
group of students working on the same
syllabus, it can be worth letting them
choose different tasks, and then commu-
nicating their main findings to each other
(and to you) using a computer conference
or by email.
8 Let your students know that the process
is at least as important as the outcome.
The key skills that they can develop using
the Internet include designing an effective
search, and making decisions about the
quality and authenticity of the evidence
they find. It is worth designing tasks
where you already know of at least some
of the evidence you expect them to locate,
and remaining open to the fact that they
will each uncover at least as much again
as you already know about!
9 Consider designing your own interac-
tive pages. You may want to restrict these
to an intranet, at least at first. You can then
use dialogue boxes to cause your students
to answer questions, enter data, and so on.
Pave the way towards being able to give
students feedback about their work on the
intranet, helping them to develop parallel
skills to bring to their use of the Internet
itself.
10 Consider getting your students to
design and enter some web pages. This
may be best done restricted to an intranet,
at least until your students have picked up
sufficient skills to develop pages that are
worth putting up for all to see. The act of
designing their own web pages is one of
the most productive ways to help your stu-
dents develop their critical skills at
evaluating materials already on the
Internet.

Intended outcomes of this chapter
When you’ve dipped into the suggestions offered in this chapter, I hope you will feel able to take
more control of some of the following aspects of your overall life in higher education:
●
workload management;
●
stress management;
●
preparing for appraisal;
●
managing your feedback from students.
While other chapters in this Toolkit have been directly or indirectly about looking after your stu-
dents, most of this one is about ensuring that you survive! I am only too aware of the levels of
stress that are experienced by many lecturers, due to all manner of causes, many of which are
beyond their control, and I hope that the suggestions in this chapter will contain something for
everyone, and help to reduce – or at least manage – some of the causes and effects of stress. The
chapter continues with a discussion about appraisal – how to prepare for it, and how to approach
getting the most from it. Finally, I’ve included a range of suggestions about how you may go
about getting feedback from your students, and analysing it to your (and their) advantage.
Managing your workload
Heavier workloads have become a fact of life for most lecturers. It seems highly unlikely that
this situation will change. Managing your workload may increasingly seem like a balancing act
between teaching, research and administration. I hope the following suggestions will help you to
adjust your balance if necessary.
Chapter 6
Looking after yourself
1 Don’t waste energy on trying to turn
the clock back! What some people affec-
tionately refer to as ‘the good old days’
are very unlikely to return. One danger is
that we spend so much time talking about
how much better things once were, that
we put even more pressure on the time
and energy we have to face today and plan
for tomorrow.
2 Prioritise your own workload. It is use-
ful to go through all the tasks and roles
that you undertake, asking yourself which
are the really important ones, and which
are the ones that would not have signifi-
cant effects on your students if you were
to prune them or abandon them.
3 Cut your assessment workload. This
does not mean reduce the quality of your

Looking after yourself
187
Managing your stress levels
The lecturer’s job can be extremely stressful as staff are put under increasing pressure to teach
longer hours and in possibly unfamiliar ways, and to spend longer hours on assessment and
record keeping as well as research. At the same time, students are becoming more diverse and
have an ever widening range of requirements and expectations. An increasing proportion of staff
in higher education are becoming physically ill as a result of stress. There may indeed be very lit-
tle you can do about many of the causes of stress, but you could be surprised at how much it is
possible for us to adapt our responses to stressors. These tips cannot eliminate your stress, but
may suggest some strategies to help you deal with it.
assessment. It is widely recognised that
over-assessment is bad for students, and
in former times it was all too easy for such
patterns of over-assessment to be estab-
lished. Now may be the time to think
again about how much assessment your
students really need, and to improve the
quality of this, but at the same time signif-
icantly reduce its volume.
4 Look for more efficient ways of giving
feedback to your students. Many col-
leagues find that emailed feedback
communications end up saving a lot of
time, particularly when you can develop
your own electronic bank of ‘frequently
needed responses’ and paste them in as
needed in individual emails.
5 Make good use of learning resource
materials. Students nowadays learn a
great deal more from online, computer-
based and print-based materials than once
was the case. The quality of learning
resource materials is improving all the
time, and such materials are getting
steadily better at giving students opportu-
nities to learn-by-doing, and to learn from
healthy trial and error. Materials are get-
ting much better at providing students
with feedback on their individual progress
and performance. Making the most of
such materials can free up valuable face-
to-face time with students, so you can
deal with their questions and problems
rather than merely imparting information
to them.
6 Make good use of your administrative
and support staff. It is easy for us to find
ourselves doing tasks which they could
have done just as well, and often they
could have done them more efficiently
than ourselves.
7 Make better use of feedback from stu-
dents. Listen to their concerns, and focus
on them, making your own work more
useful to them at the same time. They
know better than anyone else where their
problems lie, so it is worth making sure
that your valuable time is spent address-
ing the right problems.
8 Don’t carry your entire workload in
your mind. We can only do one thing at a
time, so when doing important work such
as teaching and assessing students, don’t
get side-tracked into worrying about the
numerous other tasks jostling for your
attention.
1 Get better at recognising the physical
signs of stress. These include raised heart
rate, increased sweating, headaches,
dizziness, blurred vision, aching neck and
shoulders, skin rashes, and lowered resis-
tance to infection. When people are aware
that such symptoms may be caused by
stress, it helps them to look to their
approaches to work to see if the causes
may arise from stress.
2 Get better at recognising the behav-
ioural effects of stress. These include
increased anxiety, irritability, increased
consumption of tobacco or alcohol, sleep

188
The Lecturer’s Toolkit
disturbance, lack of concentration, and
inability to deal calmly and efficiently
with everyday tasks and situations.
3 Increase awareness of how the human
body reacts to stress. Essentially this
happens in three distinct stages. ‘The
alarm reaction stage’ causes defences to
be set up and increased release of adrena-
lin. ‘The resistance stage’ is when the
body will resist the stressor, or adapt to
the stress conditions. ‘The exhaustion
stage’ results when attempts by the body
to adapt have failed, and the body suc-
cumbs to the effects of stress.
4 Don’t ignore stress. There are no prizes
for struggling to the point of collapse;
indeed, this is the last thing you should be
doing. As the symptoms of stress become
apparent to you, try to identify the causes
of your stress and do something about it.
5 Get over the myths surrounding stress.
Research has shown that stress should not
be regarded as being the same as nervous
tension, and is not always a negative
response, and that some people do indeed
survive well and thrive on stress. In an
education organisation, it is more impor-
tant to manage stress than to try to
eliminate it.
6 Look to the environmental causes of
stress. These include working or living
under extremes of temperature, excessive
noise, unsuitable lighting, poor ventilation
or air quality, poorly laid out work areas,
and even the presence of vibration. In a
your own institution, finding out what peo-
ple think of such environmental conditions
is a good first step towards adjusting them.
7 Look to the social causes of stress.
These can include insufficient social con-
tact at work, sexual harassment, racial
discrimination, ageism, inappropriate
management approaches, unhealthy levels
of competition, and conflict between col-
leagues. Any or all of these, when present,
can be discovered and identified by ask-
ing people about them.
8 Look to the organisational causes of
stress. These include inappropriately
heavy workloads, ineffective communica-
tion, excessive supervision or inadequate
supervision, lack of relevant training pro-
vision, undue concern about promotion or
reward systems, and unsatisfactory role
perceptions. Once identified, all of these
causes can be remedied.
9 Cultivate the right to feel stress, and to
talk about it. Stress is at its worst when it
is bottled up and unresolved. It should be
regarded as perfectly natural for people’s
stress levels to vary in the normal course
of their work. When stress is something
that can be discussed, it is much more
likely that the causes will be addressed.
Talk about your problems. Actually voic-
ing what is stressing you to a colleague, a
line manager, the person you are closest
too or even your cat can sometimes
improve the situation. Bottling it all up
through some misplaced sense of forti-
tude can be dangerous.
10 Don’t be afraid to go to the doctor. The
worst excesses of stress can be helped by
short term medication and medical inter-
vention of some kind. People are often
unwilling to resort to a visit to their GP
for matters of stress when they wouldn’t
hesitate to seek help for a physical ail-
ment. Don’t let such feelings get in the
way of finding the kind of support you
need.
11 Take a break. Often our panics over time
management are caused not so much by
how much we have to do as much as
whether we feel we have sufficient time to
do it in. Try to take a real break from time
to time, so as to help you get your work-
load into proportion. A little holiday or a
whole weekend without college work
occasionally can make you better able to
cope with the onslaught on your return.
12 Overcome powerlessness with action.
When you are stressed out, it is often
because you feel totally powerless in the

Looking after yourself
189
Managing your appraisal
Most universities and colleges in the UK have in place appraisal programmes that link directly
into the overall mission of the institution, the local plans of the school or department, and the
needs of each individual. For people who have never been appraised, the process may seem intru-
sive and threatening. Yet other people may look forward to appraisal as an opportunity to get
some feedback on how they are doing. Many people coming into universities, especially from
industry, may have very negative experiences of appraisal, which in some contexts is used very
much as a management tool to control staff.
How is appraisal organised?
Often the person chosen to appraise you will be your nearest line manager. Ideally it will be some-
one who knows your work and the context you work in, and also be in a position to make decisions
and act on the agreements you make within the performance review process. In some universities,
it is possible for you to choose your own appraiser; in others you are allocated an appraiser and it is
then not normally possible for you to reject the institution’s choice. As far as possible, many insti-
tutions try to respect specific requests for you to be appraised by someone of the same gender or
ethnic group as yourself, but this is not always feasible or seen to be desirable. Often there is a pre-
appraisal meeting lasting ten to fifteen minutes in which appraiser and appraisee have the chance to
set the agenda for the actual appraisal, which then allows time for the appraisee to think about the
desired focus of the meeting and to prepare some pre-appraisal documentation.
What sor ts of questions may you be asked?
Many universities have a standard pro forma which can be used in preparing for appraisal.
Questions could include:
situation. It can be useful to look at the
areas you do have some control over and
try to do something about them, however
minor. This may not change the overall
picture very much, but will probably
make you feel better.
13 Try counselling. Many colleges have
someone to whom staff can turn for
trained counselling in times of great
stress. Otherwise you could look else-
where through your GP or in the phone
book under therapeutic practice or alter-
native medicine to find someone who can
guide and support you through the worst
patches. This is often more productive
than piling all your stress onto your near-
est and dearest who usually have
problems of their own!
14 Try not to personalise a situation into
hatred and blame. It is easy to fall into
the trap of seeing all your stress as being
caused by an individual or group of peo-
ple who have it in for you. Of course it
may be the case but usually high stress sit-
uations are caused by cock-up rather than
conspiracy!
15 Avoid compounding the problem. If
things are pretty stressful at work, try to
avoid making important life changes at
the same time, such as moving to a larger
house or starting a family, if these can be
deferred for a while.
16 Try to adopt a long-term perspective. It
can be really hard to project into the
future and to review current stress as part
of a much larger pattern, but if you can do
it, it helps. Much of what seems really
important now will pale into insignifi-
cance in a few weeks, months or years
time.

190
The Lecturer’s Toolkit
●
What areas of your work do you feel you can associate with a sense of achievement?
●
What evidence can you supply to demonstrate your achievements? (e.g. student evaluations,
comments from peer observations, reports from external assessors.)
●
Which activities and goals that you had planned to undertake have fallen by the wayside?
●
What are the particular reasons for these unfulfilled aims?
●
What support have you received from your line manager and other colleagues during the
period under review?
You are also likely to be asked to look forward to the next year and identify:
●
your provisional goals for the next twelve months;
●
your developmental needs over this period;
●
any training or special support you are likely to require to enable you to fulfil your plans;
●
what might interfere with your plans to achieve, and what strategies you can adopt to pre-
vent this happening.
If no appraisal pro formas are supplied, it is still a good idea for the appraisee to prepare a short
report under these headings to provide areas for discussion.
Your appraisal interview
During your appraisal you should try to review as honestly as you can how well you feel you are
doing and where you need to develop. You should not try to sweep your problems away under the
carpet, nor should you be afraid to blow your own trumpet about the things of which you have a
right to be proud. At the end of the interview, the appraiser should draw the process to a close by
summarising briefly what has been said and then should guide you towards drawing up a set of
realistic, specific and measurable goals for the next year, with timescales attached and recogni-
tion of the training, support and resources that are likely to be needed to help you to achieve
them. If your appraiser does not do this for you, then you will need to make sure that you do it
anyway.
In many institutions it is normal for a report to be written on the appraisal meeting. Often,
this is written by the appraisee and then signed with or without comments by the appraiser.
After the appraisal interview, the appraisal report will then provide a useful reference docu-
ment for the work of the year to come. There is also normally a system in place by which
training needs identified during the process are fed into an institution-wide staff development
programme.
General suggestions on preparing for your appraisal
Appraisal can be a strong positive power for the good when it is used developmentally to ensure
that individuals and groups review their own achievements, set realistic goals for the future and
think about how what they are doing fits into their whole institutional programme. The following
tips aim to guide you away from allowing appraisal to become merely a tiresome formality, and
towards it being an active and dynamic means of coordinating your work and getting the best
from yourself and the institution.

Looking after yourself
191
1 Prepare thoughtfully for your review.
Try to ensure that you have a clear idea
prior to the review, of the areas you aim to
focus on. After all, it’s your appraisal and
it’s up to you to get the most you can out
of the occasion. If you skimp on the
preparation, your appraiser may well take
cues from you and also take the process
less seriously than it deserves.
2 Try to see both sides of the process. If
you’re preparing for review, think about
how it feels to be in your position, so that
you can help your appraiser to make the
process positively developmental. See the
appraiser as a guide and support for your
process of self-review, rather than as an
interrogator who is trying to catch you
out.
3 Collect evidence of achievement. Bring
to the review, or make a list of, concrete
examples of outcomes that you have
achieved, so that any successes or
progress you claim can be backed up with
examples. For example, you might bring
along student feedback data; printouts of
your students’ achievements; examples of
your effective organisational and adminis-
trative skills; and letters and memos from
internal and external colleagues who have
acknowledged your efforts. You can also
tell your reviewer about examples of your
dealing with problems; your contributions
to strategic decisions; your promotion of
the effective work and reputation of your
college. You might like to collect these in
a loose-leaf folder with material easily
referenced so you can refer to specific
elements within the appraisal without too
much difficulty in finding them.
4 Regard the review as an opportunity.
Make it an occasion where you can raise
all the important issues you haven’t had
time to discuss earlier. Have a mental
shopping list of training you would like
agreement that you can undertake, or
aspects of your job description that you
would like to develop further. You may be
able to negotiate time or resources for
professional training of various kinds. You
might wish to gain approval for your par-
ticipation in local or national activities
relevant to your work. Remember that
professional development need not
involve high expenditure. Opportunities
exist for you to undertake personal devel-
opment through work-shadowing,
self-instruction and the use of staff devel-
opment resource materials without large
outlays of cash.
5 Review your own performance objec-
tively. Don’t over-claim success, or
downgrade your own achievements. Try
to analyse what has gone well, and why, as
well as what has been less successful, and
why. In your preparation, ask colleagues
who are not involved in your appraisal to
help you realistically evaluate how you
are doing. Ask them to help you remem-
ber the good parts that might have slipped
your memory as well as to give you dis-
passionate accounts of the perhaps
traumatic occurrences that you regard as
having gone badly.
6 Don’t be artificially modest. Without
being boastful, you can use appraisal as
an opportunity to celebrate the things of
which you are proud. Often people are not
fully aware of what individuals have done,
and how much of a cooperative activity
has in fact been the responsibility of one
person. It is amazing how often an
appraiser will say, ‘I never realised that
you are involved in so many areas’.
7 Be realistic about your part in areas
that have not been successes. There’s no
need to shoulder all the blame, but the
performance review is a chance to analyse
how much responsibility you bear for the
projects that have not succeeded, or for
the deadlines that have been missed. This
is the time for you to learn from the mis-
takes of the past and look forward to the
next era. Avoid seeing your review as rak-
ing over old ground or digging up past

192
The Lecturer’s Toolkit
errors and mistakes. Use it as a chance to
reflect and to learn from what went wrong
or did not work. Do not use this part of
your review to criticise other colleagues
or dwell on things over which you (or
your manager) have little control (particu-
larly a lack of resources).
8 Write your own private reflective log
after your appraisal. Even if you have
already produced a more formal report for
your appraiser to sign off as part of the
appraisal process, it can be helpful to have
a more personal record of your own to
refer back to. This can include how you
felt when discussing your successes or
failures, and notes to yourself about how
you will go about following up your com-
mitments arising from the review.
9 Remember that it is your review. Don’t
allow it to become a one-way process,
with your reviewer doing most of the talk-
ing. Use it as a proactive opportunity to
affect your own working life. See your
review as the most appropriate occasion
to renegotiate your job description and
make it more interesting or rewarding. If
you regard the staff review process as a
tokenistic activity in which your manager
is simply going through the motions, then
that is what it is likely to become.
10 Use a part of your review to discuss
institution-wide issues that concern
you. These might include equal opportu-
nity matters, health and safety issues, or
your concerns about teaching, learning
and assessment. The review process pro-
vides a rare chance for you to have the
undivided attention of your line manager.
11 Try to think of appraisal as a process
and not an event. Don’t regard the date
of your appraisal interview as the be-all
and end-all of appraisal. It may be quite a
crucial date, but it is only a milestone on a
continuing journey.
12 Finish the review with an agreement as
to what will happen next. Normally this
will involve a confidential written record
of the review, together with an agreed
action plan that includes deadlines and
responsibilities for both you and your line
manager. Make sure that you know who is
doing what before the end of the meeting.
Make notes in your diary so you can fol-
low up agreed actions in due course.
Contact your reviewer if you don’t feel an
agreed activity has actually been set in
train or had any outcome.
13 Review the review process. If you feel
that you have been short-changed by your
reviewer because you felt rushed, not lis-
tened to, or not taken seriously, say so and
do not countersign the formal record of
the review or action plan. If you are happy
with the way things have been done, make
this clear too so that your reviewer, in
turn, can use your satisfaction as evidence
in his or her own review.
Managing your feedback from students
The consumer’s view is being sought more and more, and with students increasingly paying for
their tuition, their views need to be taken into account more than ever. Evidence of student feed-
back is one of the things that anyone reviewing the quality of your teaching is certain to ask to see.
The most serious danger is that from the students’ point of view, giving feedback can become
a chore. It is then not taken seriously. The value of obtaining feedback is undermined whenever
there is a feeling that the purpose is merely ‘to be seen to be obtaining feedback’. The purpose of
feedback should not merely be to make things better next time round. Giving feedback can itself
be turned into part of the learning experience – particularly when feedback is the result of group
discussions. In this section, I would like to point to four questions we should be asking ourselves
at each stage of feedback processes:

Looking after yourself
193
●
Are students developing a feeling of ownership of the feedback they give?
(or is it just ticks and jottings on someone else’s questionnaire!)
●
Are we getting the feedback we need from students?
(or are we only getting the answers to our questions, rather than the things that students
need to be telling us?)
●
Is giving feedback a learning experience in itself?
(in other words, are students led into some deep and useful thinking about their studies, in
the process of providing us with feedback?)
●
How are we planning to give students the results of their feedback?
(if they see that we’re not actually taking any notice of their feedback, they’re not likely to
cooperate with our future attempts to procure feedback from them.)
Feedback on your lectures
There are many ways of getting feedback about the effectiveness of your lecture programme.
Some are very simple, and require no special effort on your part.
Body language
You can find out a great deal about how your lectures are going by keeping an eye on the ways
your students are behaving. You can easily tell the difference between ‘eyes glazing over’ (or
asleep!) and ‘eyes which are interested and alert’. However, you can’t always tell. Some students
develop the art of appearing to be interested and alert when they’re actually neither! There are of
course body language traits that can alert you to unproductive processes – shuffling, chattering,
fidgeting, and so on.
Coursework
Often, it’s only when you assess the coursework associated with a particular topic that you fully
discover how the students’ learning really went. This can give you the opportunity to use further
large-group teaching occasions to address what you’ve found out about the general state of the
group’s learning achievements. (It will be too late, of course, to do anything about discoveries
about your students’ learning which will become all too apparent when you mark their exam
scripts.)
Informal comments from par ticular students
Often, you’ll have opportunities to talk informally to some of the students – for example those
who happen to come up and ask you questions. However, the feedback you get from these stu-
dents may not be representative of the feelings of the whole group – the students who ask you
questions may be the keenest ones, or the boldest. Any students experiencing real problems with
the content of your sessions may not wish to give you any clue that they’re not yet with you.
Peer feedback
Until relatively recently, there used to be too much privacy attached to our performances with large
groups in lecture rooms. Now, most institutions of higher education have some sort of policy on

194
The Lecturer’s Toolkit
peer observation, sometimes quite informal, but still very useful. Sitting in, regularly, on col-
leagues’ sessions is one of the most productive ways to gain ideas to use in your own approaches to
working with large groups. You’ll find things they do well which you would like to try, and (just as
useful) you’ll notice things that they do less well which you will decide to avoid if at all possible. It
is really useful if you can identify one or two colleagues where you can develop peer-feedback into
something really useful, where you mutually give each other honest and constructive comments
about how the sessions are going. Many universities now use peer-observation of lectures to help
lecturers not only to develop their teaching, but also to prepare themselves for the external review
of the quality of their teaching.
If you are heading towards a teaching quality assessment of the sort where someone from
another university may observe you at work with large groups, it can be very useful to rehearse
the situation by getting one or two other lecturers – maybe from other disciplines – to observe
you quite formally as preparation. This helps you to become accustomed to the presence of out-
siders, and also to become more aware of the things that you do that are most effective and
interesting.
Feedback from seeing yourself teach
Making your own video is easier than you may think! You can choose the room, time, class, and
position that you place the camera, and when you switch it on and off, and no one but you needs
to see the video (though it is even more useful if you get a colleague or friend to watch it with
you). It can be even better to get a colleague, or a student, to operate the camera, and follow you
around and zoom in to show details of your expression or of the visual aids you may use. You can
derive a substantial amount of feedback about your own performance just by watching yourself.
Stop, star t, continue
A quick and versatile method of gaining feedback – especially from large groups of students – is
to give them self-stick notes, and ask them to write the three headings ‘stop’, ‘start’, and ‘con-
tinue’ on them as follows:
You can then ask the class a question along any one of the following lines:
●
under each heading, jot down what you’d like me to do in future lectures on this course ... or
...
●
tell me what you’d like to stop doing, start doing, and continue doing as we go further in this
course ... or ...
●
simply write down anything you’d like to tell me under each of the three headings.
Stop ...
Start ...
Continue ...

Looking after yourself
195
A variety of feedback mechanisms
Feedback can be gathered from students in many different ways, including:
●
from interviews with individual students;
●
from feedback activities with groups of students, for example using nominal group tech-
nique sessions;
●
from solicited feedback from large groups of students (for example using the ‘stop, start, con-
tinue’ agenda on self-stick notes in large-group lectures, as mentioned earlier in this chapter);
●
from questionnaires of various types;
●
from student representation on programme boards;
●
informally (for example through tutorials, seminars, one-to-one chats with students and lab-
oratory work);
●
from students’ exam performance (but then it’s too late for some!);
●
from students’ coursework performance (and particularly from their reactions to our own
feedback to them);
●
from information which may be forthcoming from external observers who may be able to
discuss with students their experience of courses, e.g. moderators and examiners.
This chapter continues with some illustrations of the advantages and disadvantages of a number
of approaches to eliciting feedback from students.
Some limitations of questionnaires
Because it’s easy to administer, the questionnaire has become the dominant method of seeking
feedback. Unfortunately, it’s also easy to fall into the temptation to produce statistics based on
questionnaire responses. If 84 per cent of students think Dr Smith’s lectures are brilliant, we’re
inclined to ignore the 16 per cent who don’t – but they may have very good reasons for disliking
the lectures. The problem is not so much with gathering feedback by questionnaire, but with the
ways feedback is processed and collated. Some of the factors which limit the value of question-
naire feedback are listed below.
1 The ‘ticky-box’ syndrome.
People
become conditioned to make instant
responses to questions. Getting through
the questionnaire quickly becomes a
virtue. Responses are made on a surface
level of thinking rather than as a result of
reflection and critical thinking. (This is
not a problem on those occasions where
instant reaction is what is wanted, but the
feedback we gather is not usually
analysed on that basis.)
2 ‘Performing dogs’ syndrome. Many
people filling in questionnaires tend to
want to please! They can usually tell
which responses will please the people
giving them the questionnaire, and the
people whose work is involved in the
issues covered by the questionnaire. If
they like the people, they are likely to
comment favourably on things, rather
than use them to show their real views.
3 Lost learning opportunities.
Questionnaires are often used after an
event rather than during it. This tends to
minimise any real learning outcomes of
the process of completing questionnaires.
The sense of ownership is reduced, when
students don’t see how their responses will
be of any direct benefit to themselves, and
may only help their successors.
4 The ‘WYSIWYG’ syndrome (what you
see is what you get). Questionnaires

196
The Lecturer’s Toolkit
Some advantages of questionnaire feedback
Despite the reservations presented above, there are some significant advantages associated with
gathering student feedback through questionnaires. The best ways of using questionnaires there-
fore depend on using the advantages deliberately, while at the same time minimising the effect of
the drawbacks.
●
Feedback questionnaires can be anonymous: this allows students the chance at least of
giving negative feedback without the embarrassment of giving it publicly.
●
Feedback questionnaires can be quick: many things can be covered in a few minutes.
●
Feedback from questionnaires is amenable to statistical analysis: this is an advantage –
but as we’ve mentioned a dangerous one!
●
Feedback from questionnaires can be fed into institutional review and quality proce-
dures.
●
Questionnaires can be used on a ‘deeper’ level: it’s possible, for example, to get students
to go through a questionnaire twice. The first time they can be briefed to respond as they
feel, the second time they can be asked to respond as they would like to feel. This can help
to get over the problem of different students preferring different things – the gap between
‘how it is’ and ‘how you’d like it to be’ is often more important – and more revealing – than
students reactions to ‘how it is’.
Some ideas on structured questions
Structured (or ‘closed’) questions are of several types including the following:
Ticking boxes or putting marks on scales
This can be done with contrasting dimensions at opposite sides of a form:
produce feedback on the particular issues
covered – but often not on other important
issues. There is a tendency to design ques-
tionnaires which will give positive
feedback, and to avoid asking those ques-
tions where there is every possibility of
critical replies.
5 ‘Blue, rosy and purple’ questionnaires.
A major limitation of most questionnaires
is that responses are coloured by how peo-
ple feel at the moment of filling them in.
If the same questionnaire were used a few
days later, some responses may be com-
pletely different. Yet the results are often
statistically analysed as though they
reflected permanent, considered reactions
to questions and issues, rather than fleet-
ing, transient reactions.
6 ‘Conditioned response’ questionnaires.
When the same questionnaire format is
used repeatedly, students can become
very bored, and may revert to answering
many of the questions in the same way as
they have often done previously. Feedback
then is not specific to the particular occa-
sion when the questionnaire is being used,
and at best represents overall feelings
rather than specific responses.
7 ‘Death by questionnaire’. Too many, too
often, badly designed, and nothing ever
happening as a result of the feedback that
is given.

Looking after yourself
197
Alternatively, the terms can be included in a table, for example:
Table 6.1
interesting
boring
too fast
too slow
approachable
unapproachable
Boring
Interesting
Too fast
Too slow
Audible
Inaudible
Visual aids easy to read
Visual aids hard to read
Aims made clear
Aims hard to work out
I learned a lot
I didn’t learn anything
My questions answered
My questions unanswered
Enjoyable
Not enjoyable
One of the things which can go wrong with such scales is when the factors at each end turn out
not to be opposites. Furthermore, if an odd number of columns is used, the middle column rep-
resents ‘safe middle ground’, and can cause students to put their responses there when they can’t
decide whether something is interesting or boring, and so on. It can be argued that it is better to
force them to make a decision by having an even number of columns. Then, those students who
really think that something is midway between the extremes have to make a conscious decision,
for example to put their tick or cross on the central line.

198
The Lecturer’s Toolkit
‘Usefulness’ measures
Various features of the teaching methods or processes can be mentioned at the left hand side of
a pro forma, with boxes for ‘very useful’, ‘quite useful’ and ‘not useful’ to tick. The dimensions
can include such things as: handout materials, visual aids, worked examples done in class. For
example:
Statements with ‘agreement’ measures
A series of statements can be checked against boxes such as ‘strongly agree’, ‘more-or-less
agree’, ‘disagree’, ‘strongly disagree’ for example.
The statements can usefully be both positive and negative, to ensure that respondents don’t
fall into the pattern of agreeing (or disagreeing) with everything they see. Part of such a ques-
tionnaire could be as follows:
Number-gradings
This is another form of structuring students’ responses, by asking them to enter numbers to indi-
cate their feelings with regard to a statement or an issue.
e.g. 5 = most useful, 4 = very useful, 3 = quite useful, 2 = of limited use, 1 = of little use, 0 = of
no use.
Table 6.2
Feature
Very useful
Quite useful
Not useful
Handouts
Seminars
Slides in lectures
In-class exercises
Independent study tasks
Table 6.3
Strongly agree
Quite agree
Disagree
Strongly disagree
I find your lectures stimulate me to
further work
I remain switched-off for most of my
time in your lectures
I am clear about the intended learning
outcomes of each part of this module
I don’t really know what is expected
of me in this subject
I find it easy to ask questions in your
lectures
I find parts of this subject very hard
to understand

Looking after yourself
199
‘More’ ‘Just right’ ‘Less’ boxes.
These could be used (for example) for students to record their feelings about the things they do
in tutorials, for example:
Table 6.4
Processes used in tutorials
More of this
Just right,
Less of this
please
thanks!
please
Practising problem solving
Seeing worked examples done
Working through case-study materials
Asking questions of the lecturer
Being asked questions by the lecturer
Having marked homework discussed individually
Having marked practical work returned and
discussed
Seeing examples of assessment criteria
Using assessment criteria directly to mark own (or
others’) work
Practising addressing previous exam questions
Prioritising
This sort of structure helps overcome the ‘ticky-box’ syndrome, as it causes students to think
more deeply about issues. For example, they can be asked to enter ‘1’ against the best feature of
Dr Smith’s classes, ‘2’ against the next-best, and so on. My recommendation regarding getting
students to prioritise teaching attributes remains ‘keep it as simple as possible’. Questions and
choices need to be clear and unambiguous. This can also be used to find out which topics in a
subject area students find the most difficult, for example:
Table 6.5
Physical chemistry: rank the topics below from ‘1’ (the one you find
Your ratings
most straightforward) to ‘8’ (the one you find most difficult)
Electrochemistry
Chemical kinetics
Thermodynamics
Phase equilibria
Colloid chemistry
Spectroscopy
Photochemistry
Mass transfer

200
The Lecturer’s Toolkit
Some ideas for open questions
Open questions allow each student to respond freely to set areas. While such questions can over-
come some of the limitations I have mentioned regarding structured questions, the fact that
students are entering their responses in their own handwriting can be a deterrent against them
expressing negative or critical views, where they may feel that they could be traced and maybe
even penalised as a result.
The two most useful features of your lectures are:
1
2
The two least useful features of your lectures are:
1
2
Suggestions for improvement:
The three topics I found most difficult to make sense of in this module are:
1
2
3

Looking after yourself
201
Computer-analysed feedback
Several software packages exist which allow student feedback to be gathered, and statistically
analysed. Students can be asked a series of multiple-choice or multiple-response questions, and
their choices of entry can be recorded by the computer, enabling statistical analysis to be done
on the responses from large groups of students. The feedback can be made anonymous, or stu-
dents’ names can be used. It is probably best to use such feedback approaches where a record is
kept of which students have given their feedback, but the individual responses are analysed on
an anonymous basis. Students are more likely to give feedback using such software, particu-
larly if the process of gathering the feedback can be made more interesting for the students
giving it, for example by providing responses back to each student on the basis of each choice
they make.
Computer-gathered feedback is not restricted to multiple-choice questions. Open-ended ques-
tions can also be included, and the software can sort and print out lists of the responses of a
whole class of students to any particular question. Open-ended feedback of this sort, when gath-
ered by computer, may be more reliable than when given in handwriting, as students may feel
less under threat regarding their views being noticed and used against them! When very large
numbers of students are involved, and sufficient access to computers is difficult to arrange, it is
possible to retain the benefits of computer analysis of feedback choices by using paper-based
questionnaires designed for optical mark reading.
Suggestions on ways of using questionnaires
So far, I’ve been quite critical about some of the most common methods used to seek and analyse
student feedback, and have referred to many of the things which can go wrong with such meth-
ods. Next, however, I offer a range of suggestions for developing some of these methods further,
taking into account the risks, and aiming to optimise the potential benefits, both to ourselves and
to our students.
1 Consider making the use of question-
naires private to individual members of
staff. For feedback about lectures (or
tutorials, or lab work) I think it best that
each lecturer designs and uses his/her
individual questionnaire, and obtains
feedback for his/her own use privately.
This doesn’t mean, however, that the
forms are to be filled in ‘privately’ by stu-
dents – it may well be better to use them
as an agenda for group feedback.
2 Make questionnaires ‘short and often,
not long and once’. Any feedback form
should be short enough not to bore or
alienate students. A good guide may be
that it should be possible for a group to
complete the form in a few minutes or so.
This means separate forms for lectures,
tutorials, and so on.
3 Use questionnaires for formative rather
than summative feedback whenever pos-
sible. Seek feedback during a programme,
so that something can still be done about
matters emerging. Feedback after comple-
tion of a programme is still useful, but is
not seen by students as so valuable as when
they have the chance to suggest changes
they themselves will benefit from directly.
4 Employ questionnaires for a wide range
of matters to do with our presentation,
style and approachability. These aspects
of, for example, lecturing, can be gathered
in the private mode suggested above.
Individual questionnaire components can
be selected/composed by each staff mem-
ber to search for comment about issues
that may be of particular concern to the
lecturer concerned.

202
The Lecturer’s Toolkit
5 Consider ‘more-public’ questionnaires
for general issues, and for summative
feedback. These can be used to measure
feedback relating to non-personal vari-
ables, such as:
●
relative workload of different topics
or modules;
●
perceived relevance of topics as seen
by students;
●
relevance of practical work to theory,
as seen by students;
●
balance of lectures, tutorials and
other teaching/learning situations.
The more ‘public’ sort of questionnaire is
more likely to have value when used
towards the end of a course or module,
and to gather summative feedback, which
can be used in reviewing the course or
module prior to the next time it will be
delivered.
6 Structured questionnaires can have the
advantage of anonymity. Even if using a
mixed questionnaire containing open-
ended questions as well, you may decide
to issue the structured and open-ended
parts separately because of this factor.
7 Try to avoid surface thinking. Students
– and anyone else involved – get bored if
they have long questionnaires to com-
plete, and the decisions or comments they
make become ‘surface’ rather than con-
sidered ones. Even though students may
be able to respond to a structured ques-
tionnaire of several pages in relatively few
minutes, the fact that a questionnaire
looks long can induce surface response
behaviour.
8 Consider the visual appearance of your
questionnaires. Go for a varied layout,
with plenty of white space, so that it does
not look like a solid list of questions. Use
a mixture of response formats, such as
deletions or selections from lists of
options, yes/no choices, tick-boxes, grad-
uated scales, and so on – make it look
interesting to complete.
9 For every part of the questionnaire,
have definite purposes, including posi-
tive ones. Don’t ask anything that could
prove to be superfluous or of passing
interest only. Ask about positive experi-
ences as well as searching for weaknesses.
10 Plan your evaluation report before you
design your feedback questionnaire. It
helps a great deal if you know exactly
how you plan to collate and use the
responses you will get from your ques-
tionnaires. Working out the things you
hope to include in your report often alerts
you to additional questions you may need
to include, and (particularly) to superflu-
ous questions which would not actually
generate any information of practical use
to you.
11 Make each question simple and unam-
biguous. If students’ interpretations of the
questions vary, the results of a survey are
not valid enough to warrant statistical
analysis of any sort. In particular, it’s
worth ensuring that in structured ques-
tions, students are only required to make
decisions involving a single factor.
12 Ask yourself ‘what does this question
really mean?’. Sometimes, your reply to
yourself will contain wording which will
work better in your questionnaire than the
original idea you started with.
13 Avoid safe middle ground in scales. For
example, the scale ‘strongly agree, agree,
undecided, disagree, strongly disagree’
may give better results if the ‘undecided’
option is omitted, forcing respondents to
make a decision one way or the other (or
to write ‘can’t tell’ on the questionnaire,
which then has the validity of a conscious
decision).
14 Be aware that some respondents will
make choices on the basis of those they
think they are expected to make. Many
respondents set out to ‘please’ the person
gathering the feedback, possibly thinking
of possible recriminations if critical selec-
tions may be traced back to their authors.

Looking after yourself
203
15 Keep prioritising questions short and
simple. For example if students are asked
to rank seven factors in order of value (or
importance), it may be easy enough to
analyse the best and worst choices, but
difficult to make a meaningful analysis of
‘middle ground’.
16 Pilot your draft questionnaire. There is
no better way to improve a structured ques-
tionnaire than to find out what students
actually do with it! Use short print runs for
questionnaires, and edit between each use.
17 Remember that students’ responses can
be influenced by their mood at the
moment of answering the question.
Ideally, you may wish to balance this
source of variation out in one way or
another, for example by issuing a similar
questionnaire at another time, and com-
paring responses, or by including some
alternative questions in other parts of your
questionnaire which ‘test’ the same
agenda so you can be alerted to inconsis-
tency in responses due to swings of mood.
18 Don’t leave big spaces for students to
fill in their replies. You can compensate
for this restriction later with ‘any other
comments?’ space. If students responses
are necessarily short, you are more likely
to get easily interpreted answers to your
questions, which helps make statistical
analysis more fruitful.
19 Decide whether you want the question-
naire to be anonymous, optional or
respondent-known.
With responses
involving handwriting, there is always the
possibility of tracing respondents, and
students may respond differently with this
possibility in mind. With computer-based
open-ended questionnaires, this dimen-
sion is simplified, but not entirely
overcome if log-in data could be used to
trace respondents.
20 Resist pressures to over-use standard
questionnaires. This applies equally to
structured or open-ended versions or
mixed-mode questionnaires. Students
quickly get bored with identical question-
naires, and are likely to fall into a
standard mode of response, where there is
considerable ‘echo effect’ carried forward
from previous decisions and responses.
The most useful feedback data is nor-
mally generated by specially produced
questionnaires relating to a specific
course or subject, or a particular aspect of
the teaching and learning in that subject.
21 Try to get a good response rate. When
questionnaires are filled in during contact
time, you are more likely to get everyone’s
views. If questionnaires are taken away by
students to be sent back later, there is a
tendency to get lower response rates, and
the students who actually go to the trouble
of responding may not be representative
of the whole group.
22 Give students some free ranging ques-
tions. For example, it’s worth considering
asking them, ‘What other questions should
be included in future editions of this ques-
tionnaire?’ and inviting them to supply
their own answers to the questions they
think of. Such data is unsuitable for any
statistical purposes, but is valuable in qual-
itative analysis of feedback from students.
23 Work out how you are going to analyse
the data from open-ended questions.
Sometimes a transcript collecting all
responses to a question is necessary
before the gist of the feedback can be dis-
cerned accurately. In other circumstances,
counting the number of times something
is mentioned in students’ responses can be
a valuable process.
24 Don’t accumulate piles of uninterpreted
questionnaire data! It’s best to make a
deliberate effort to produce a summary
report (even if only for your own private
use) for each set of data. A pile of feedback
responses quickly becomes out of date as
new developments are implemented in
courses. Also, it is worth showing students
that you take the data seriously enough to
analyse it straightaway.

204
The Lecturer’s Toolkit
Feedback from interviews with students
Interviews with students can be a valuable source of feedback. However, interviewing students is
costly in terms of time and effort; the following suggestions may help you to make it a cost-
effective process.
1 Prepare your agenda carefully. To
enable you to analyse and collate the feed-
back you get from students, it is important
that they are all asked the same questions
in the same way. It is all too tempting to
develop the agenda on the basis of the
replies of the first few students, so it is
usually worth piloting your question list
on a few students (not necessarily from
the group to be targeted) before starting
on a set of ‘real’ interviews.
2 Link interviews with other means of
getting feedback from students. If you
are already using (or planning to use)
structured or open-ended questionnaires,
you may find it worthwhile to work out
what else you will be particularly looking
for in feedback from interviews.
3 Consider the merits of using inter-
views to follow-up questionnaire
feedback. When you have already
analysed questionnaire responses by stu-
dents, you may be able to pinpoint a few
issues where you want to ask students
more detailed or more personal questions
about their experiences with a subject or
a course.
4 Consider the alternative possibility of
using preliminary interviews to estab-
lish the agenda for feedback
questionnaires. This would probably not
take the form of interviews with the
whole group, but with a representative
selection of students.
5 You may not be able to interview the
whole group. Decide how you are going
to select the students you choose to inter-
view. There are many possibilities, each
with its own advantages and drawbacks.
For example, you could select randomly
by name or student number, or you could
make a representative selection including
high-performers, middle-range-perform-
ers and low-achievers in related
assessments, or you could ask for volun-
teers (not, however, the most
representative of the possibilities).
6 Remember that students may be anx-
ious. Any kind of interview may feel to
students as if there is an assessment
dimension present, and this may cause
them to be restrained especially when it
comes to expressing dissatisfaction.
7 Ask questions which lead students to
answer rather than to refrain from
comment. For example, asking students
‘was there anything you found unsatisfac-
tory?’ may be less fruitful than asking
‘what was the thing you liked least about
the way this module was taught?’.
8 Don’t lead your witnesses! It is one thing
to ensure that students feel free to answer
questions, but another to lead them
towards the answers you want, or the
answers they may think you want. ‘Do
you like the way I used coloured over-
heads in my lectures?’ is an obvious
example of a leading question!
Feedback from groups of students
Students may be more forthcoming in a group, and you could consider posing the questions
(maybe as a handout), leaving the group to come to decisions about how the students wished to
answer them, then return to hear their answers. Students have the safety of being able to report
minority views or controversial views, without the student who actually speaks such responses
having to ‘own’ the view reported. Group interviews can actually save a considerable amount of

Looking after yourself
205
time compared to solo interviews, and allow students to compare and contrast their own per-
spectives. Students in groups can also be helped to prioritise or sequence in order of importance
their responses, making their feedback even more valuable. Group interviews can also be used to
get students to clarify or explain issues or responses which at first may be unclear.
This can be more useful than feedback from individuals, for the following reasons:
●
Feedback from groups captures discussion, reflection and debate. This is more useful
than only having the reactions of individual students.
●
A group can present negative feedback with less embarrassment than an individual.
Individuals can be more forthcoming in making inputs in a group, when their feedback is
then rendered more or less anonymous within the group.
●
Group feedback is likely to range more widely. Where a questionnaire is used as an
agenda for group feedback, the group is more likely to be willing to go beyond the agenda.
It’s essential to make good notes, when interviewing groups of students! After four or five inter-
views, you may have a good idea of the general nature of responses to your questions, but you
could have lost a lot of the specific detail. More recent interview happenings tend to ‘drown’ ear-
lier ones in one’s memory.

Intended outcomes of this chapter
When you’ve explored the ideas in this chapter, and tried out the most appropriate ones in the
context of your own teaching and assessment, you should be better able to:
●
address equal opportunities issues and work towards inclusive practice;
●
tackle or reduce problems associated with plagiarism;
●
work more effectively with international students;
●
reflect on your own teaching, and capture these reflections.
This chapter opens with three issues and challenges which often overlap in practice – developing
inclusive practice to afford students with equal opportunities, problems with plagiarism, and
working with international students. The Toolkit ends with some thoughts about reflection, and
some questions to help in capturing our reflections on our teaching.
Equal opportunities and inclusive practice
Equal oppor tunities: what does it mean?
The Staff and Educational Development Association argue that:
Teachers must be concerned that students have equal opportunities, irrespective of disabili-
ties, religion, sexual orientation, race or gender. So, everything that teachers do should be
informed by equal opportunities legislation, by institutional policy and knowledge of best
practice.
(SEDA 1998)
To this I would also add that higher education inclusive practice should go beyond mere compli-
ance with legislation, in our efforts to avoid discrimination on the grounds of age, social class
and cultural heritage.
Much has been written unpacking the term ‘equal opportunities’ and what this means in an
education context. Most higher education institutions take equal opportunities very seriously
indeed, not least for fear of falling foul of discrimination legislation, and many have well-articu-
lated equal opportunities, although few are explicit about the philosophy that underpins them.
Some are based in traditional liberal arts models of adult education, focusing particularly on
removing barriers from those historically disadvantaged in terms of access and progression.
Chapter 7
Issues, challenges and reflections

Issues, challenges and reflections
207
Others are founded in more radical approaches aiming to bring about societal changes and
recognising that ‘difference’ is socially constructed, implying a norm from which ‘non-standard’
students deviate. Others again take a pragmatic (and potentially mechanistic) approach, ensuring
the university complies with legislation and maximises recruitment from constituencies of stu-
dents that other higher education institutions have not yet picked up on.
Leicester 1996 has identified four models of equal opportunities thinking as applied to higher
education:
1
Promoting equal opportunities as removing unfair/irrelevant barriers: so that people
can compete equally for higher education. This relates to a liberal model where discrimina-
tion is seen as due to barriers which if removed – by legislation or application of resources
– produces a ‘level playing field’ which represents fairness.
2
Promoting equal opportunities as increasing ability and motivation: this goes beyond
removing barriers. Resources are directed to groups who are under-represented in higher
education which may be uninterested in it. Resources are spent to increase the aspirations of
these groups and improve their chances of competing for education. This, together with
removing barriers, is ‘positive action’.
3
Promoting equal opportunities as the development of ‘respect for all’: here the concern
is not simply for access, but for the promotion of diversity and valuing difference among
staff and students. It is concerned with the curriculum, as well as access and teaching. It is
also concerned to develop teaching appropriate to need, which may lead to ‘separate’ teach-
ing, for example, single-sex science.
4
Promoting equal opportunities as social engineering: in this model the concern is not the
educational access and experience of individuals but that of the group. It supports quota sys-
tems that recruit students because of their possession of certain characteristics, for example,
membership of a gender or ethnic group. This is positive discrimination.
(Adapted from Leicester 1996)
What’s changed regarding additional needs?
People with ‘special’ needs have been amongst our students throughout the evolution of post-
compulsory education, but in recent years a number of trends and developments have highlighted
the problems which some of them face, and the need for us to respond appropriately to their vari-
ous needs. In addition, over the last twenty years in particular, significant advances have been
made regarding detecting and identifying many additional needs, and in how best to make adjust-
ments to teaching, learning environments and assessment instruments and processes so as to
minimise any disadvantages which can arise for at least some of the manifestations of additional
need. For example, a great deal more is now known about detecting and responding to dyslexia.
Widening participation policies are gradually transforming the spectrum of students in post-
compulsory education. It now seems a distant past where only about 5 per cent of the population
entered post-compulsory education; nowadays in the UK for example the talk is about no less than
50 per cent of the population having at least some experience of higher education. This means that
a different ‘slice’ of the overall population is now present on post-compulsory education pro-
grammes and courses. That in turn means that the population in any large lecture group, for
example, now contains a proportion of learners who previously would not have been present
there. At least some of these students have additional needs of a wide range of types. For example,

208
The Lecturer’s Toolkit
any large group of students is likely to have at least some who are affected by some degree of
dyslexia. Also, post-compulsory education has become much more accessible to students with
visual impairments, hearing impairments, limited mobility and other sources of additional need.
There are significant proportions of any population affected by such conditions as diabetes, and
epilepsy, and these too are often represented in educational contexts. Alongside this picture, there
is now much more known about how best to respond to identified additional needs in the context
of programmes which are designed for all students, rather than isolate those with additional needs
into separate programmes designed specifically for them.
In addition, however, a wide range of what could be considered as mental health needs are
now represented amid any large group of students. These don’t just relate to conditions which are
directly associated with cognitive processing, but also include short-term or long-term manifes-
tations of stress, anxiety, depression, and the various conditions resulting from exposure to
mind-altering agents, not least alcohol, but also other drugs and medicines.
Student attitudes have also changed significantly in recent years, reflecting the tendency for
society as a whole to be more aware of rights, and more likely to resort to law if injustice is felt
to have happened. Students are more litigious. This greater sensitivity to customer rights is
reflected in students’ expectations of teaching and learning environments and processes.
Furthermore, should lack of appropriate attention to any identified additional need end up by
disadvantaging particular students when they come to be assessed, appeals and even legal action
can come as no surprise.
A further dimension of change is the increased attention paid to feedback from all students,
for example the National Student Survey conducted in the UK from 2005, and the ways that
quality assurance processes and systems make use of this feedback. External accountability
links firmly now to funding provision in one way or another in most post-compulsory education
systems and contexts. Within all the feedback from students which is collected, collated and
analysed, is included at least some feedback which reflects how those students with additional
needs have fared alongside those without such needs. We need to be ready to interpret all feed-
back as yet one more source of information about such needs.
Meanwhile the relevant legislation has evolved. In 2002 in the UK, the provisions of the
Special Educational Needs and Disabilities Act (SENDA) came into affect. This legislation
repealed the education exemption which had previously applied to post-compulsory educational
provision, bringing the full impact of the 1995 Disabilities Discrimination Act to bear on teach-
ing, learning and assessment in further and higher education. SENDA requires that no students
should be disadvantaged because of any additional needs they may have, and that provision (and
assessment) should include ‘reasonable adjustments’ so that such students have every opportu-
nity to demonstrate their achievement alongside those without additional needs. Moreover,
provision is required to make such adjustments in an anticipatory manner. In other words, since
it may reasonably be expected that a significant number of students in any large lecture group
may be affected by some degree of dyslexia, provision needs to be adjusted so that these students
are disadvantaged as little as is reasonably practicable.
We need also to be aware that not all additional needs have anything to do with something
which is ‘wrong’. For example, anyone learning in a second language in which they are not rea-
sonably fluent, can be regarded as working under conditions of an additional need. We may
indeed make every effort to help them to improve their fluency in the language concerned, but
this often does not allow them to develop their language skills fast enough to keep pace with the
growing complexity of language which may arise in the subject matter, or in the wording and
design of assessment tasks and activities.

Issues, challenges and reflections
209
We need to remember not to ignore or undervalue the most significant source of expertise in how
best additional needs can be addressed – namely the owners of the needs. Students themselves
usually know a great deal about any additional need they have lived with over the years. They
know what works for them, and what doesn’t work for them. We need to keep asking them, ‘how
best can I help you’ in as many contexts as possible – lectures, group work, individual work,
practical work, and preparation for assessment. Very often their answers can not only help us to
make adjustments which are really effective for them, but can spare us wasting time and energy
making changes which we imagine are going to be useful but which are often of limited value in
practice.
When additional needs remain undiagnosed, the problems are more profound. Some addi-
tional needs evolve quite gradually, not least some of those of the mental health variety. When a
student has a physical accident and ends up, for example, with mobility problems, at least the
problems are apparent, and it is relatively clear what sorts of help may be needed. It is, however,
the invisible onset of additional needs which poses the greatest problems for students and tutors
alike. Sometimes students may begin a programme of study with no knowledge of having any
additional needs, and then it gradually emerges that problems exist. The most frequent triggers
are to do with assessment of one kind or another. When students underperform in assessment
contexts, the possible causes include the effects of one or more additional needs.
While there is already a wealth of experience relating to how best to accommodate the most
commonly identified additional needs, it remains an uphill struggle for subject-based teachers in
post-compulsory education to respond to the considerable spectrum of such needs which may be
present simultaneously in a given group of students – especially when there are hundreds of stu-
dents in a group. It is also important to ensure that students without any additional needs are not
significantly disadvantaged themselves by the steps which are taken to respond to additional
needs. The phrase ‘inclusive practice’ is increasingly used to describe attempts to design teach-
ing, learning and assessment for the whole range of students in a group. In fact, it can be argued
that in many cases, whatever helps students with identified additional needs can indeed be of
help to all students, as will be shown further in the analysis of particular contexts which follows
in this chapter.
Exper t help with additional needs
Most institutions of post-compulsory education have expert help available both to students with
additional needs, and to those teaching them, responding to them and supporting their learning.
Large institutions are often able to provide or arrange quite elaborate levels of support when
needed, ranging all the way to 24-hour assistance when really needed. The ‘disabilities unit’ or
‘equality unit’ in a large institution will usually contain personnel trained in identifying and
responding to specific learning needs, and such people can provide a great deal of help to tutors
and lecturers regarding how best to approach handling particular teaching contexts when addi-
tional needs are known to be present. It is important that the dimension of additional needs is
addressed in staff development and induction programmes, so that at the very least staff become
aware of where to find expert help when needed, and at best become able to make reasonable
adjustments to all of their teaching approaches to anticipate the presence of the more common
additional needs.

210
The Lecturer’s Toolkit
Cross-cultural curriculum design
Curriculum design was originally thought of by many as being culturally neutral, since it repre-
sented a hidden but dominant discourse that was not explicitly spelled out since it was assumed
that students and staff were all ‘people like us’ apart from those who were unusual and different.
Subsequently many curriculum designers have begun to acknowledge that an inclusive curricu-
lum needs us to interrogate our own practices to enquire, for example:
●
Is the language used in the classroom making inferences about the dominant group that
excludes some students from outside this group (e.g. ‘You’ve all grown up using computers
everyday ...’)?
●
To what extent are the examples and case studies all drawn from contexts in this country,
and how far do they reflect the cultural diversity that the students represent?
●
Are any of the required activities that form part of the curriculum (e.g. field trips) or social
activities, perhaps during induction, going to be problematic for my students in cultural
terms, for example informal meetings in pubs or site visits to places of religious worship?
●
Are assumptions being made in my classrooms about student mores and behaviour (e.g. ref-
erences to students as ‘all-night party animals’) that some students would find culturally
offensive?
●
Are activities requiring stamina and application required of students late in the day during
periods of fasting (e.g. Ramadan)?
●
Are there activities which are expected of students, such as business lunches or placements
that might be problematic for students with dietary restrictions (e.g. halal or kosher)?
●
Is inappropriate behaviour by fellow students challenged and halted?
Colleagues in post-compulsory education are only too aware of the ways in which the student
communities in educational institutions are changing, as a greater proportion of the population
continue their education beyond school. Somehow, however, it is quite difficult for college
teachers to pin down what they should be doing to try to respond to the increasing diversity
resulting from widening participation, and the greater awareness of the importance of addressing
special educational needs, resulting from legislation such as the Special Educational Needs and
Disabilities Act in the UK, effective from 2002.
The context for inclusive higher education practice
How can we make the higher education learning experience inclusive? What is the role of staff
and educational development? A number of significant developments inform the context for
inclusive practice in higher education. Levels of awareness about the issues among lecturing
staff have risen substantially in recent years. The Special Educational Needs and Disability Act
(SENDA) was published in 2001, and the sector in the UK has benefited from more than five
years’ work by organisations such as TechDis, the National Disability Team and various
Learning and Teaching Support Network (LTSN) projects.
The context for inclusive practice also includes the competitive internal market in UK higher
education. Increasingly, institutions recognise a need to attract disabled students through ensur-
ing that their needs are catered for beyond compliance with legislative requirements.

Issues, challenges and reflections
211
Making lectures inclusive
When your lecture groups contain students from a number of ethnic and cultural backgrounds, it
is important to try to ensure that everyone is included, and that no one is distanced from learning
because of their particular history or background. Ryan (Carroll and Ryan 2005) offers the fol-
lowing guidelines towards helping to create supportive learning environments in lectures.
Lecturers need to create the contexts where students feel that their contributions are valued
and they are given opportunities to participate and succeed. Lecturers need to:
●
provide a range of opportunities for all students to demonstrate their abilities, such as
through choice of assessment or group discussion topics or class activities;
●
provide negotiable class discussions and assessment tasks and methods so that students
can explore their own areas of interest and demonstrate their knowledge and expertise;
●
examine whether learning objectives can be met in other, more inclusive, ways such as
through different tasks, formats or methods, or in different time frames;
●
facilitate contact between home students and students from other cultures through
organising and facilitating multicultural group work and discussion.
Carroll and Ryan (2005)
If your work is with a multicultural student population, it will be well worth you exploring this
source in much more detail; a wide range of international literature is referenced there.
Inclusive assessment
In this era of increasingly available knowledge, universities are becoming more concerned with
assessment and support, and less concerned with the delivery of content. Assessment is often the
area where good inclusive practice breaks down, as higher education institutions do not tend to
be good at advanced planning when arranging alternative assessments for disabled students.
Disabled students want an equivalent experience for fair assessment with no special deals, and
the maintenance of standards of achievement is important for all concerned.
The QAA code of practice expects curriculum designers and deliverers to address a range of
disabilities including physical and mobility difficulties, hearing impairments, visual impair-
ments, speech impairments, specific learning difficulties including dyslexia, medical conditions
and mental health problems. While this may be a statement of the obvious to higher education
practitioners today, it seemed quite challenging and problematic when it was first published in
1999. In fact, the code may have represented the first explicit requirement on higher education
institutions to address difficulties for which potential students could previously have been
excluded from higher education.
The section in the code of practice on the assessment of students states that institutions should
consider implementing procedures for agreeing alternative assessment and examination arrange-
ments when necessary that:
●
are widely publicised and easy to follow;
●
operate with minimum delay;
●
allow flexibility in the conduct of assessment;
●
protect the rigour and comparability of the assessment;
●
are applied consistently across the institution; and
●
are not dependent on students’ individual funding arrangements.

212
The Lecturer’s Toolkit
The key question is: how is this different from the way we should treat all students? Good prac-
tice in inclusive assessment is good for everyone. Promoting inclusive assessment can change
practice in general for the better.
In implementing these arrangements, the code suggests that institutions may wish to consider
the following adjustments:
●
flexibility in the balance between assessed course work and examinations;
●
demonstration of achievement in alternative ways, such as through signed presentations
or viva voce examinations;
●
additional time allowances, rest breaks and rescheduling of examinations; the use of com-
puters, amanuenses, readers and other support in examinations;
●
the availability of examinations or of the presentation of assessed work in alternative for-
mats (e.g. modifying carrier language); and
●
the provision of alternative rooms and invigilators for those using alternative arrange-
ments.
The section in the code of practice relating to students with disabilities includes a precept on
Examination, Assessment and Progression which states that:
Assessment and examination policies, practices and procedures should provide disabled stu-
dents with the same opportunity as their peers to demonstrate the achievement of learning
outcomes.
A further precept invites institutions to consider:
the range and type of assessments used and how these measure appropriately the achieve-
ment by students of those skills, areas of knowledge, and attributes as identified as intended
learning outcomes for the module or programme, and allow the strengths and weaknesses of
the students to be demonstrated.
Again, the key question here is: why not give all students opportunities to demonstrate their
achievement in alternative ways that suit them best? Putting this into practice requires designing
an assessment strategy that involves a diverse range of methods of assessment (as all forms of
assessment disadvantage some students). We need to consider how any students might be disad-
vantaged, maximise the opportunities for each student to achieve at the highest possible level,
and ensure the assurance of appropriate standards for all students.
A needs analysis for assessment requirements should be undertaken as soon as students are
involved. This will maximise time available for additional idiosyncratic adjustments to be made
for students whose needs had not been foreseen. The health and safety requirements of disabled
students who are to be engaged in practicals and field trips should be considered from the outset.
Allowing extra time for disabled students in examinations may not be the best answer. In
many instances it may make matters worse. The SPACE (Staff-Student Partnership for
Assessment Change and Evaluation) is a three-year HEFCE funded Project, based at the
University of Plymouth, developing and promoting alternative forms of assessment as a way of

Issues, challenges and reflections
213
facilitating a more inclusive approach to assessment. They have found that 71 per cent of the 100
disabled students surveyed were in receipt of special examination arrangements. Of these, 67 per
cent of the disabled students surveyed received extra time to complete work. The SPACE team
argue that this may not necessarily be the best way of supporting disabled students undertaking
assessment and are developing an Inclusive Assessment toolkit. Guidelines developed by SPACE
suggest, for example, involving students themselves in designing special examination arrange-
ments and offering alternatives to traditional dissertations including video and oral assessments.
Details of the SPACE project can be accessed at http://www.space.ac.uk/assess.php.
In the context of assessing live and practical skills, Pickford and Brown (2006) suggest the
following general tips on the design of an inclusive approach:
●
build in reasonable adjustments;
●
undertake needs analysis;
●
make best use of University Disability officers;
●
make use of disabled students.
Some reasonable adjustments for assessing live and practical skills for students with dyslexia:
●
try to separate the assessment of the content from the assessment of the expression of lan-
guage;
●
when marking students with dyslexia, decide the extent to which spelling/grammar/logical
ordering should impact on the marks;
●
provide printed instructions for all assignments in advance;
●
check which print fonts, sizes and paper colours.
Some reasonable adjustments for assessing students with visual impairments:
●
ensure that written materials are available in other media;
●
reduce the length of time it may take to make accessible materials available;
●
make it easier for students to find what they need in order to attempt the assignment;
●
set inclusive assessment briefs.
Some reasonable adjustments for the assessment of students experiencing anxiety and other
mental health issues in live and practical assignments:
●
consider offering a ‘stop the clock’ facility in time-constrained assessments;
●
provide advance organisers for all students in the early stages of higher education programmes;
●
consider offering practical assignments with staged completion time and dates;
●
think about simplifying the structure of practical tests.
Designing an inclusive curriculum
This requires the application of some ‘back to basics’ principles. Demonstrating inclusive cur-
riculum design should be an integral part of all course validation procedures. Inclusivity must
start at the first stage of curriculum design, with checks at each subsequent stage and at revali-
dation. Practical activities in the curriculum will require needs analyses and advance planning
for inclusivity.

214
The Lecturer’s Toolkit
The QAA code of practice seeks consideration of:
●
the proper and sensible links between organisation of the curriculum, its staged delivery
through teaching and learning sessions, the specified learning outcomes identified and the
appropriate scheduling of assessment;
●
how assessment supports student learning; and
●
ensuring students have adequate time to reflect on learning before being assessed.
Fostering inclusive classroom practice
Arguably the most common locus of discrimination against disabled students can be fellow stu-
dents. In group work, for example, students may be unwilling to work with a particular class
member who does not display good social skills. Student induction and modelling of good prac-
tice are crucial in addressing this kind of discrimination at an early stage. We need to work
towards a context where it becomes unthinkable for students to discriminate against one another.
In this, we should use all available sources of information and advice, including disability offi-
cers, national agencies, specialist groups and charities, and disabled students themselves.
Designing inclusive learning spaces
Why do we continue to build large lecture theatres in higher education? We need to think from the
outset about the nature and purpose of the spaces where learning takes place. This is about more
than the provision of wheelchair ramps and spaces and audio loops. Audio loops only work when
the kit is used properly. Classroom furniture should be selected by people with training in disabil-
ity issues. Tables and chairs should be suitable for short, fat and tall, thin people. Rules on food
and drink in lecture theatres may need to be reconsidered to accommodate medical requirements.
All categories of staff need to be involved in thinking about future planning for inclusivity.
Designing inclusive e-learning experiences
Make use of the experts, including organisations like TechDis (www.techdis.ac.uk) as well as
disabled users. Professional web designers may need reining in, as a trendy look and feel is often
disabling. Individual maverick curriculum designers should be discouraged from going it alone.
Good design is good design for all.
Inclusive curriculum design and deliver y
Staff may need to be weaned off excessively flashy presentations with split screens, lots of moving
pictures, tiny text and masses of colour, at least until they have a firm understanding of the accessi-
bility barriers these can create and the need to create alternatives. Good design is good design for
all and course teams should scrutinise all course materials with an eye for inclusivity issues.
The role of staff and educational development
Ways in which educational developers can change the way that teaching staff in higher education
think about inclusive practice include:

Issues, challenges and reflections
215
●
Build in awareness of inclusivity issues in induction for staff and students. Elements of
inclusivity should be included in postgraduate and continuing professional development
programmes on learning and teaching in higher education.
●
Include robust requirements for inclusive practice in institutional assessment and learning
and teaching strategies. Questions about inclusivity should be an integral part of the valida-
tion and review of all programmes.
●
Consult with and involve students and staff with disabilities in our programmes of activity,
and build in alternative assessments for disabled students at the design stage, rather than
making them ad hoc arrangements at the last minute.
●
Make best use of university disability officers and other informed colleagues to build a
knowledge base of the needs of disabled students, and make sure that disability commit-
tees/working parties are fully integrated into the institution’s systems.
●
Use staff development workshops to foster awareness of specific issues, and encourage dis-
cussion of the language used when describing disability issues.
●
Lobby national agencies and professional and subject bodies to keep disability issues fore-
grounded.
●
But perhaps most importantly, we need to encourage practitioners in higher education to
write, publish and read extensively about inclusivity.
For more information see Adams and Brown (eds) (2006) and Pickford and Brown (2006).
Responding to identified – and unidentified – additional needs
Despite the fact that in the UK (for example in the context of SENDA) the term ‘special needs’
remains in widespread usage, it is perhaps an unfortunate and discriminatory phrase. Perhaps it
would be better if we thought of ‘special’ needs as ‘additional’ needs of particular groups of stu-
dents, and I have therefore used this approach in the discussion which follows. Teaching in
higher education is essentially about responding to the needs of all students, and in various ways
this is addressed throughout this Toolkit. This section, therefore, is focused on responding to stu-
dents’ additional needs, in other words the particular needs of various categories of student
present in differing proportions among the wider populations of learners in further and higher
education.
Dyslexia
Dyslexia is the most common recorded disability, and is now recognised to be a very significant
issue in higher education. Tips for inclusive assessment include (after Brown and Pickford
2006):
●
Try to separate the assessment of the content from the assessment of the expression of lan-
guage.
●
When marking students with dyslexia, decide the extent to which spelling/grammar/logical
ordering should impact on the marks given.
●
Decide the extent to which these aspects of work should be the subject of formative feed-
back and how it will impact on summative grades.
●
Provide printed instructions for all assignments in advance. Check with individual students
which print fonts, sizes and paper colours are easiest for them to handle.

216
The Lecturer’s Toolkit
●
Find out whether affected students may work best on-screen rather than on paper.
●
Consider the suitability of mind maps and other alternatives to written communication when
students are being assessed on how well they can organise ideas.
●
In making tutor comments on students’ work, pay particular attention to the legibility of
your own writing.
●
Remember that different dyslexic students will be helped by different adjustments.
Extracted from Pickford and Brown (2006).
Mental health needs
This general heading in fact covers a very wide range of needs and conditions, ranging from
depression, anxiety, Asperger’s syndrome, mania, to schizophrenia – any of which can have sig-
nificant or even profound effects on students’ ability to handle various teaching–learning
situations. Also, there are the much more common effects which can be regarded as affecting in
one way or another students’ ‘state of mind’, including fatigue (often due to working shifts at
night to support study) and conditions related to consuming alcohol or other mind-altering
agents. Furthermore, most students at some time (and some students for most of the time) are
affected by various levels of stress, attributable to a wide range of sources – financial, emotional,
self-esteem related, and so on.
Some mental health conditions can be slow-onset, and grow in intensity so gradually that they
are not noticed for some time – including by their owners. Other conditions can be precipitated
very rapidly by life-changing events or crises.
As with other additional needs, mental health needs of most kinds lie on a continuum, rang-
ing from what we would regard as ‘normal’ (including occasional stress or anxiety) to
‘abnormal’ requiring expert help and support. Borderlines are very difficult to define.
Perhaps the most important difference between mental health needs and physical ones is that
students affected by mental health conditions are not necessarily able to give realistic responses
to our question, ‘how can I best help you with this?’. Some students may indeed have a firm
grasp on exactly how their additional needs can best be addressed, but others may be quite wrong
in their view of what is likely to be best for them. That is why it is so important that anyone
whose job is about making learning happen in post-compulsory education at least knows the
nearest sources of expert help in addressing the more significant mental health problems – coun-
sellors and other appropriately trained personnel, who invariably have their own links to the
specialists who may be needed on occasion.
What adjustments may we be able to make to compensate?
While it can be safely assumed that in a lecture theatre full of students, some will at any given
time be impeded by one or more mental health needs or conditions, it is quite impossible for a
lecturer to know exactly which conditions may need to be addressed. One can’t really ask the stu-
dents to respond to, ‘hands up those of you who have mental health problems today please’!
However, there are some general ways to respond to the possibility – indeed probability – that
in any group of students there will be some mental health needs at any time. An obvious, but
nonetheless important, aim is to avoid conflict, temper, distress or highly charged emotional
exchanges for all students at all times. For example, it is worth refraining from overreacting to
challenging or unexpected behaviours from any students, however irritating they may be to us –

Issues, challenges and reflections
217
and indeed to the rest of the students in a group. While ‘normal’ students may weather such
minor storms perfectly adequately, those with particular mental health needs may get them quite
out of proportion.
It is worth aiming to be as approachable as possible, so that students with mental health prob-
lems – transient or developing – feel able to come and seek help and advice. In any case, it is
really useful to get to know the support systems and mechanisms of your own institution really
well, so that you know exactly where to go to find expert help when needed by your students.
Getting to know the people providing such support is really useful, and allows you to seek their
advice informally before deciding whether a particular student’s problem is one which would
take you out of your own depth.
Hidden and visible disabilities
In some ways, our task is more straightforward when the disability is visible to us. When a stu-
dent arrives in a wheelchair, or with a guide dog, we are immediately prompted into thinking,
‘how best can I help this person?’ in the context of our own teaching material, learning environ-
ment, and so on. It is all the more helpful when the owner of the disability is already an expert in
how best we can respond to their situation. Other disabilities, however, are hidden. We’ve already
thought about this in the context of at least some of the mental health problems, but there are
physical disabilities which can also be quite hidden.
Diabetes, for example, is likely to be represented in any lecture theatre full of students. While
it is indeed rare for a diabetic student to collapse into a coma in a lecture, it is far from rare for a
diabetic to lose concentration during a lecture (or practical class, or seminar, or whatever) at a
time when blood sugars may be running low – before lunch, for example. Despite the notices on
the doors of many teaching rooms in post-compulsory education about ‘no eating or drinking in
this room’, the most satisfactory solution for a diabetic’s problem in a pre-lunch break teaching
session may well be to eat a banana or have a suitable drink. Indeed, confident diabetics may
well come up to you and explain that they may need to take such action from time to time. It is
worth making sure that our response to any such unexpected behaviours is restrained.
We need to be similarly open-minded to the possible reasons why students who could be suf-
fering from back pain, hypertension, heart conditions, epilepsy and all sorts of other physical
conditions including common colds and doses of influenza, might behave in our teaching–learn-
ing environments – including leaving altogether unexpectedly. If someone walks out, it is not
necessarily the case that we have been boring the person concerned!
Towards inclusive practice: conclusions
This section has ranged widely around the consequences of widening participation, particularly
the greater spread of ability within cohorts of students, and the increased presence of various
additional needs. In former times when post-compulsory education was designed for a relatively
elite proportion of the population at large, cohorts of students were much more homogeneous
than nowadays. There are two distinct approaches to coping with the changed situation:
●
to try to help all students to fit in to the educational contexts they encounter;
●
to try to adjust the educational environment to be more suitable to all the students whose
needs it is intended to address.

218
The Lecturer’s Toolkit
The most important common factor throughout this section has been that responding well to stu-
dents with identifiable ‘special needs’ is usually good for everyone else too. When we improve
our task briefings by using clearer sentences and shorter words to help dyslexic students, it helps
everyone else too. When we make best use of tone of voice to help students with visibility
impairments, it helps well-sighted students too. When we make good use of visual aids to help
students with hearing impairments, it helps students with good hearing too. In short, inclusive
practice is good for everyone.
Plagiarism
This is becoming one of the most significant problems which coursework assessors find them-
selves facing. Indeed, the difficulties associated with plagiarism are so severe that there is
considerable pressure to retreat into the relative safety of traditional unseen written exams once
again, and we are coming round full circle to resorting to assessment processes and instruments
which can guarantee authenticity but at the expense of validity.
However, probably too much of the energy which is being put into tackling plagiarism is
devoted to detecting the symptoms and punishing those found guilty of unfairly passing off other
people’s work as their own. After all, where are the moral and ethical borderlines? In many parts
of the world, to quote back a teacher’s words in an exam answer or coursework assignment is cul-
turally accepted as ‘honouring the teacher’. When students from these cultures, who happen to
be continuing their studies in the UK, find themselves accused of plagiarism, they are surprised
at our attitude. Prevention is better than the cure. We need to be much more careful to explain
exactly what is acceptable, and what is not. While some students may indeed deliberately engage
in plagiarism, many others find themselves in trouble because they were not fully aware of how
they are expected to treat other people’s work. Sometimes they simply do not fully understand
how they are expected to cite others’ work in their own discussions, or how to follow the appro-
priate referencing conventions.
It is also worth facing up to the difficulty of the question, ‘where are the borderlines between
originality and authenticity?’. In a sense, true originality is extremely rare. In most disciplines, it
is seldom possible to write anything without having already been influenced by what has been
done before, what has been read, what has been heard, and so on. There is, however, another
aspect of authenticity – the extent to which the work being assessed relates to the real world
beyond post-compulsory education. In this respect, authenticity is about making assessed tasks
as close as possible to the performances which students will need to develop in their lives and
careers in the real world.
There has been a huge increase in the amount published about plagiarism in recent years. If
you spend some time looking at the www.jiscpas.ac.uk website for example, you will realise that
plagiarism is now a topic which is engaging the minds of many writers and academics. The
growth in plagiarism can partly be attributed to the ease with which others’ work can now be
downloaded from the Internet (or copied electronically), and pasted into one’s own work with
consummate ease. Another factor is the widening participation drives currently underway in
many parts of the world, resulting in many more students in classes, and reducing the odds at pla-
giarism being noticed, especially when work is being marked by several lecturers in parallel.
Plagiarism detection software has become ever more sophisticated – to the extent where it can
be really useful to scholarly writers themselves when they wish to track quickly the exact source
of a quotation they wish to use with due acknowledgement to the source.
Some basic advice on plagiarism problems is offered by Race et al. (2005) as follows.

Issues, challenges and reflections
219
However, in the light of the growing importance of plagiarism, there are now detailed case stud-
ies galore on detecting plagiarism, dealing with it when found, and also on strategies to minimise
the occurrence of the problem.
Since ‘inadvertent’ plagiarism is a major problem in its own right – for example when stu-
dents from different cultural backgrounds fall into danger through using other authors’ words
without due acknowledgement – most institutions have already produced helpful guidance for
all students, alerting them to the boundaries which apply to correct citing and referencing of oth-
ers’ work. It is therefore important to explore how your own institution has developed tactics to
address the problem, and to develop these appropriately using the expertise which is now freely
available in the literature and on websites.
1
Distinguish between malicious and
inadvertent plagiarism. Punitive action
may be quite inappropriate when plagia-
rism is the consequence of students’ lack
of understanding of acceptable practice
regarding citing the work of others.
2
Debate issues and solutions with the
whole class. Establish ground rules for
fair play, and agreed procedures for deal-
ing with any infringements of these
ground rules. It is important that such dis-
cussions should take place before the first
assessment.
3
Act decisively when you discover copy-
ing. One option is to treat copying as
collaborative work, and mark the work as
normal but divide the total score by the
number of students involved. Their reac-
tions to this often help you find out who
did the work first, or who played the
biggest part in doing the work.
4
Be alert when encouraging students to
work together. Make sure that they know
where the intended collaboration should
stop, and that you will be vigilant to check
that later assessed work does not show
signs of the collaboration having extended
too far.
5
Help students to understand the fine line
between collaborative working and prac-
tices which the university will regard as
cheating. Sometimes it can come as a
shock and horror to students to find that
what they thought of as acceptable collabo-
ration is being regarded as cheating.
6
Don’t underestimate your students!
Clever students will always find a way to
hack into computer-marked assessments.
Bear this in mind when considering
whether to use such processes for assess-
ment or just for feedback. (If students can
hack into the security systems of NASA,
your system may not be as safe as you
may hope!).
7
Anticipate problems, and steer round
them by briefing students on what is –
and what isn’t – plagiarism or cheating.
When collaboration is likely to occur,
consider whether you can in fact turn it
into a virtue by redesigning the assess-
ments concerned to comprise
collaborative tasks for students in groups.
8
Be aware of cultural differences regard-
ing acceptable behaviour regarding
tests. Bring the possibility of such differ-
ences to the surface by starting
discussions with groups of students.
Acknowledge and discuss the extreme
pressures to avoid failure which some stu-
dents may feel themselves subject to.
Discuss with students the extent to which
emulating their teachers and using their
words is acceptable.
9
Clarify your institution’s requirements
on fair practice. Students actually want
fair play, and can be very rigorous if asked
to devise systems to guarantee this. Draw
links between the systems and the assess-
ment regulations extant in your university.
Make sure that students understand what
the regulations mean!

220
The Lecturer’s Toolkit
Working with international students
In many countries, student cohorts are now much more multinational than used to be the case,
and there are very significant benefits to students in having an educational experience enriched
by the presence around them of a range of cultural backgrounds. There are also implications for
curriculum design and teaching approaches, some of which have already been mentioned in this
chapter.
Carroll and Ryan (2005) have published one of the most comprehensive resources on teach-
ing international students. They suggest a memorable metaphor ‘canaries in the coalmine’ for the
way working with international students often alerts us to the problems other students too may
be experiencing.
One analogy we, the authors of this chapter, both use often when thinking and talking about
international students is to see them as ‘canaries in the mine’, harkening back to the time
when coalminers took canaries into mines to monitor air quality. If the canaries died, they
knew that the atmosphere threatened the miners’ well-being, too. We are also at a ‘coalface’.
The international student ‘canaries’ thankfully show us their difficulties in less dramatic
ways but nevertheless point out aspects of our teaching that all students will probably expe-
rience as challenges. By paying attention, we can change conditions to make sure that
everyone can thrive in the higher education environment. If we improve conditions for inter-
national students, we improve them for all learners.
(Carroll and Ryan 2005: 9–10).
In a later chapter, Carroll continues with a useful discussion of some specific cultural issues as
follows.
Leask (2004) likens students’ arrival at university to learning how to play a new game where
success depends on figuring out the new rules, applying them, and ‘winning’ rewards such
as good grades, positive feedback and a sense of confidence and competence as a learner.
All students find learning the new university ‘game’ challenging but international students
may be doing so in English, as a second, third or fourth language. British or Australian cul-
ture and communication styles may also be unfamiliar and in many cases very different
from the home culture (Cortazzi and Jin, 1997). Some international students may not realise
the ‘rules’ have changed and most will start out using behaviours and assumptions that have
served them well as learners up to this point. This may mean encountering unpleasant sur-
prises. For example:
●
An American student who has always received very high marks does her best at a
British university and her first coursework is returned with a mark of 50/100. How
could she have earned only half the available marks?
●
A Chinese student who has always viewed classrooms as places where you sat, listened
and tried to make sense of what was being said by the teacher is asked in an Australian
lecture to discuss a point with his neighbour. What is the point of talking to someone
who does not know the answer either?
●
A Greek student who has previously been rewarded for reading a textbook many times
then reproducing its insights in an exam is stunned by a Canadian reading list contain-
ing 25 books. How can he cope with that task and three other courses suggesting the
same number of books to read?

Issues, challenges and reflections
221
●
A British student with good A levels goes back home after a term’s work at a British
university and asks, ‘Why do my teachers keep asking about referencing my work and
giving me bad marks. I got Bs at school.’
Often when Western teachers are presented with examples like this, they accept that learn-
ing is culturally conditioned but awareness of difference can turn to dismay. How can they
as teachers familiarise themselves with students’ backgrounds when their students come
from dozens of different countries?
Teachers can help students best by becoming more knowledgeable about their own acad-
emic culture. Once teachers can see their own academic culture as ‘systems of belief,
expectations and practices about how to perform academically’, they can start to offer
explicit help to students who have chosen to learn in that academic culture. Many students
will adapt to the Western academic culture without explicit help, of course, by picking up
clues and using feedback, observation and implicit messages from teachers to check out
their own assumptions. But many others will not. The less insightful and sensitive may not
have the time or, in some cases, the confidence and support they need to gradually pick up
the rules of the game. Success comes too late or at a very high price in terms of stress, work
and worry. Such students will find explicit help vital, though everyone will probably wel-
come any help that means they can expend less time and energy trying to figure out ‘the
game’ and more time on the content and skills of the programme itself.
(Carroll in Carroll and Ryan 2005: 26–7).
Carroll continues with a discussion of some of the surprises and unexpected behaviours which
international students give lecturers – think through the implications of some of those listed
below on assessment.
●
Giving presents.
●
Answers all my questions with ‘yes’.
●
Calling me Dr X even when I have said ‘call me John’.
●
Complaining about wasting time on seminars rather than me teaching.
●
Handing in 4,000 words for an essay with a 2,500 word limit.
●
Writing very personal coursework with the main point on page 3 and lots of unneces-
sary background.
●
Repeating verbatim my lecture notes in the coursework.
●
Coming into my office after I have given the marks to argue loudly that I should give
them higher marks – several times.
●
Remaining silent in seminars even when I ask a direct question.
●
Coming up after the lecture for a 1:1 discussion and seeming to expect me to stay for as
long as it takes even though I said ‘Any questions?’ in the lecture deferring to my opin-
ion even when a preference would be appropriate (e.g. Me: ‘which essay will you do as
coursework?’ Student: ‘Please, you say’).
●
Talking loudly in lectures.
(Carroll in Carroll and Ryan 2005: 29)
Often, difficulties experienced by international students only manifest themselves when their
work is assessed, and if the assessment counts significantly towards their awards, this may
already be too late. Carroll highlights this as follows.

222
The Lecturer’s Toolkit
Often, it is not until the end of the first term when students submit an assignment and do
badly that they realise their ideas about assessment may not match your own. Again, to
know what to be explicit about, you need to look for what your international students strug-
gle with, then offer information. Spell out dates, times and deadlines; it generally takes
international students much longer to accomplish tasks compared to domestic students.
Students being assessed usually welcome explicit instructions on:
●
The length of submissions (and the fact that longer is not better);
●
The format (with explanations of what a report, poster, essay or précis might be and
possibility of a chance to try out new formats such as oral presentations and viva
voces);
●
What the assessment criteria mean and how they are applied;
●
What is being assessed (especially the percentage of the mark allocated to English lan-
guage proficiency); and
●
Which aspects of the assessment brief are compulsory and which are guidance or sug-
gestions.
Because assessment is so central to academic culture, it helps to ensure information is con-
veyed in writing as well as through discussion, explanation or example.
Being explicit about assessment also includes thinking about feedback. Explicit, sensi-
tive feedback acknowledgements students’ efforts and guides them to a more acceptable
performance. Feedback that concentrates on what students have not done (‘confusing argu-
ment’, ‘no links’) or that implies rather than states what is required (‘Is this your own
words?’, ‘What about the Hastings reports?’) is not helpful. It assumes the student knows
the preferred behaviour, can decode the question, and could do what you suggest if they
wished. This kind of feedback is rather like telling someone who is unskilled at Indian cook-
ery how not to make a curry by writing ‘coconut?’. Explicit feedback describes positive
behaviour (‘Put the main idea first then provide examples of how the idea would work in
practice’ or ‘Tell the reader when you move from describing the method to discussing
whether it is a good method or not’ or ‘If you are using someone else’s words, you must
enclose their words in quotation marks to show they are not your own words’ or ‘You should
have referred to the Hastings report because it ...’).
As a significant number of students often make similar mistakes based on similar
assumptions, it is possible to assemble statement banks to streamline the task. Confine your
comments to key points or essential information, especially in the early days, so as not to
overwhelm students.
(Carroll in Carroll and Ryan 2005: 32–3)
In the context of assessing international students, Ryan proposes the following useful checklist,
which extends in practice to just about all assessment contexts. This makes a useful checklist for
ensuring that learning, teaching and assessment are all sensibly aligned and coherent.
●
Are requirements and expectations explicit?
●
Are there hidden codes or ‘prompts’?
●
Do the assessment tasks match the learning objectives?
●
Do assessment tasks allow for different ways of demonstrating achievement of the
learning objectives?
●
Are students being assessed on what they have learnt or what they already know?

Issues, challenges and reflections
223
●
Are content and understanding, or style and facility with language being assessed?
●
If facility with languages is important, are you teaching this skill?
●
Is there a choice of topics so that students can connect with their own background
knowledge and experiences?
●
Can students work on topics that are relevant to their backgrounds and futures?
●
Are assessment tasks flexible and negotiable?
●
Is there a range of modes of presentation e.g. written, oral, ‘hands on’?
●
Is there a mixture of individual and group tasks?
●
Can students choose the weighting of the task within a range so that they can take
advantage of their strengths?
●
Are tasks self-directed?
●
Can assessment topics be provided that are less parochial and more internationalised?
●
Can opportunities for plagiarism be ‘designed out’ by the choice of assessment task and
topic?
(Ryan in Carroll and Ryan 2005: 98–9)
Evidencing your reflections on assessment, learning and teaching
After you’ve worked through this final section of the chapter, you should be better able to:
●
think in a reflective way about your teaching, and other aspects of your professional prac-
tice;
●
choose ways of capturing your thinking about your work – in other words produce evidence
of your reflection, allowing you (and others) to review your reflections;
●
use starter-questions as a productive agenda for reflecting about your teaching.
What is reflecting? How do I go about it?
‘But how can I reflect? What do you mean by reflection? How will I know when I’ve reflected
well?’ are questions which students and staff alike ask about the processes of reflection.
Moreover, ‘how can I show that I’ve reflected successfully?’, ‘What will be deemed satisfactory
evidence of my reflection?’ are their next questions.
This section aims to help by addressing all of these questions. In particular, the principle
underpinning this section is that reflection on practice can best be evidenced by answering well
thought out, relevant questions, to help one to interrogate what one has done. But it is not enough
just to think through our answers to such questions – even our best and deepest thoughts all too
rapidly evaporate away. We therefore need to capture our thoughts – in other words to furnish
evidence of our reflections. This is ideally achieved by putting pen to paper, or fingers to key-
board (for example in using a blog as a medium to capture our reflective thoughts).
Why reflect?
Reflection deepens learning and enhances practice. The act of reflecting is one which causes us
to make sense of what we’ve learned, why we learned it, and how that particular increment of
learning took place. Equally it helps us to make sense of what we’ve done, how we did it, and
how we may do it even better next time. Moreover, reflection is about linking one increment of
learning or practice to the wider perspective – heading towards seeing the bigger picture.

224
The Lecturer’s Toolkit
Reflection is equally useful when our learning (or our practice) has been unsuccessful – in such
cases indeed reflection can often give us insights into what may have gone wrong, and how on a
future occasion we might avoid now-known pitfalls.
Most of all, however, it is increasingly recognised that reflection is an important transferable
skill, and is much valued by all around us, in employment, as well as in life in general. The abil-
ity to reflect is one of the most advanced manifestations of owning – and being in control of – a
human brain. Have you reflected today? Almost certainly ‘yes!’. But have you evidenced your
reflection today? Almost certainly ‘sorry, too busy at the moment’. And the danger remains that
even the best of reflection is volatile – it evaporates away unless we stop in our tracks to make
one or other kind of crystallisation of it – some evidence. In our busy professional lives, we
rarely make the time available to evidence our ongoing reflection. But we’re already into an era
where our higher education systems are beginning to not only encourage, but also to require our
students to evidence their reflection. So what can we do to address the reflection culture gap –
how can we approach accommodating our lack of experience in evidencing our reflection, and
helping our students to gain their skills at evidencing their reflection?
So what’s the problem?
The problem, in a nutshell, is that until recently relatively few teachers in higher education have
ever been asked to reflect and to capture their reflections. Many who enter the profession have
been good students – which boils down to successful students. But that does not necessarily
mean they have had experience of – or indeed training in – how to evidence their reflection on
their developing professional practice. Now that higher education is evolving to embrace per-
sonal development plans by students, records of achievement, or progress files, the kind of
reflection that we are starting to require our students to undertake is beyond the personal experi-
ence of many of the staff who are requiring it. This is evidenced by the expressed difficulties that
staff working towards awards such as Postgraduate Certificates in Teaching and Learning in
Higher Education are only too willing to admit to, when they themselves are asked to evidence
their own reflection on the learning they experience while working towards such awards. In
short, if we aren’t very skilled at reflecting, how on earth are we going to help our students to
become skilled?
Where, when and by whom is reflection needed?
Reflection is increasingly required in education and employment. More specifically, evidence of
reflection is required, for example:
●
where students are required to build up ‘personal development planning’ portfolios, or
learning logs, or records of achievement, both as evidence to be able to present to prospec-
tive employers, and (more importantly) as a proactive process to help them to deepen their
ongoing learning as it happens;
●
where teaching staff are required (or encouraged) to build up records of their reflection on
their developing work associated with teaching, learning and assessment, so that they develop
their practices in a more efficient and focused way than if they simply left reflection to chance;
●
as part of the preparation for appraisal, and the follow-up after appraisal, where appraisees
can get much more out of the whole process, and where well-trained and sympathetic
appraisers can facilitate the reflection involved;

Issues, challenges and reflections
225
●
in most areas of professional life, where continuing professional development is required or
expected, and where it is important at any stage to be able to show that such development is
indeed being undertaken in an organised and professional way.
Some professions have led the way regarding reflective practice, not least nursing and health
care disciplines. But for other disciplines, progress has been slower. Hard-nosed engineers,
mathematicians, scientists and business professionals have tended to shrug off reflection as sub-
ordinate to subject knowledge and skills. But the wider community beyond the campuses of
higher education continues to value ‘rounded’ individuals, who can not only demonstrate subject
knowledge and skills, but can develop and grow as circumstances around them continue to
change and evolve.
Reflection: making sense of learning and experience
As proposed from the beginning of this Toolkit, ‘making sense’ of what is being (and has been)
learned is a key factor underpinning successful learning. ‘Making sense’ links to reflecting on
the experience of having done some learning-by-doing (practice, repetition, trial and error, expe-
rience, and so on). Moreover, ‘making sense’ links to thinking deeply about incoming feedback
(other people’s reactions, praise, critical comments, seeing the results of one’s teaching, and so
on). Deep reflection needs far more than simply observation, and for observation to be at its best
it needs more than just a reflective dimension (requiring in addition analytical, extrapolatory, and
other aspects as well as just inward-looking aspects).
It remains the case, however, that people find it hard (sometimes even quite alien to their
nature) to reflect, and to evidence their reflection. Teaching staff in higher education are not
alone in often finding it hard to write about reflection on their professional practice. The
‘Registered Practitioners’ of the Higher Education Academy in the UK who gained such status
by the ‘experienced staff ’ route often remember that the hardest part of writing their applications
was putting together around 500 words about ‘reflective practice and professional development’.
Writing about the latter part was for most quite straightforward, as it boils down to presenting a
little factual information about the staff development they have done in the last few years. But
writing about ‘reflective practice’ is much harder for some, not least because the language of
academe tends to be remote, formal and scholarly, whereas the language of written reflection
needs to be more personal and quite informal.
Reflection as a basis for enriching learning dialogues
Perhaps the most powerful advantage of evidencing reflection consistently and coherently is that
it opens up the possibility for dialogue with significant others, for example dialogue based upon
evidenced reflection between:
●
teachers and students, enabling learners to gain feedback on the quality and depth of their
reflection, so that they are able to improve and develop both their reflection and their
learning;
●
staff developers and teachers, enabling teachers to gain feedback on their own thinking
about their triumphs and disasters alike, to enrich their own learning about their developing
practice;

226
The Lecturer’s Toolkit
●
appraisers and appraisees, so that appraisal becomes a deeper and more meaningful process
for both parties, allowing a greater depth of relevant discussion between them at appraisal
interviews, and increased ownership of the appraisal agenda for appraisees.
The common ground among each of these three scenarios is the development of a greater sense
of ownership, both of what has already been achieved, and what remains to be achieved.
A widening agenda for evidencing reflection
It is probably unwise to attempt to ‘teach’ people to reflect (whether they be students, profession-
als, or employees). The process of reflection can indeed be illustrated to those whose reflection is
to be improved, but in the final analysis reflection remains an individual act in most circumstances
(though the increased benefit of a group of people being involved in shared reflection is even
more significant in many situations where collaborative and team activity is to be encouraged).
The most efficient way of helping people both to reflect and to evidence their reflection can
be to provide them with questions as devices to help them to focus their thinking, and direct their
thinking to those areas of their work where reflection can pay highest dividends. This section
presents some starting-point questions to illustrate the range of reflection that can be encour-
aged.
Reflection can also bring the benefit of addressing widening participation in higher educa-
tion, where there are many more students from diverse cultures and educational backgrounds in
the system than was formerly the case. This makes it all the more necessary to legitimate student
reflection, and for teaching staff to have close encounters with the range of student reflection
which can be uncovered, so as to enable them in turn to reflect and thereby to tune in better to the
‘widened’ student community.
Moreover, with increased attention to student retention in higher education, student reflection
can be one of the most powerful vehicles for alerting teaching staff to the range and nature of
problems that ‘at risk’ students may be experiencing, and allowing for compensation and adjust-
ment to be made to reduce the levels of risk. Furthermore, getting students to reflect on their
learning, their aspirations, their triumphs and their disasters can add significantly to the value of
their educational experience overall, and help them to work towards being more self-assured and
self-aware graduates.
In short, there has been no better time to get our act together regarding evidencing reflection
– both our own reflection, and that of our students.
Reflection transcends time
Although many attempts to cause people to evidence their reflection tend to be backward-look-
ing, the reflection which can be generated by simultaneous past-, present- and future-tense
questions can be much deeper.
For example, the trio of questions:
●
What worked really well for you?
●
Why do you now think this worked well for you?
●
What are you going to do next as a result of this having worked well for you?
is a much richer agenda for reflection than just any one of these questions on its own.

Issues, challenges and reflections
227
Some questions to help us to evidence our reflection on teaching
As in the example above, questions which aid deep reflection are rarely single questions, but
tend to form clusters. There is often a starter question which sets the agenda, and frequently is a
‘what?’ question. Then come the more important ones – the ‘how?’ questions and the ‘why?’
questions – and sometimes the ‘... else?’ questions which ask for even deeper thinking and
reflection.
In general, it seems too obvious to state it, but simple ‘yes/no’ questions can rarely enable the
extent of reflection which can be prompted by more open-ended questions such as ‘to what
extent ...?’. (Sadly, however, there remain far too many ‘closed’ questions on student feedback
questionnaires, and unsurprisingly the level of student reflection that such questionnaires tend to
elicit is limited.)
Below are some clusters of questions – ‘families’ of questions one could say. The first part
tends to be a scene-setting starter, and the sub-questions which follow are probing or clarifying
questions, intentionally leading towards deeper or more focused reflection. These questions are
not in any particular order. A set of questions to aid us to reflect on an element of teaching we
have just finished could use some of these as starting points, and usefully add in subject-specific
and context-specific questions to help us to flesh out the agenda for reflection.
Such questions can extend to many continuing professional development contexts, appraisal
contexts, and suggesting some agenda items for a teaching portfolio for lecturers. Whatever the
context, however, the quality of reflection which is prompted is only as good as the questions
which prompt it. In other words, for optimum reflection, much more care needs to be taken with
phrasing the questions than might have been thought necessary.
1 What did I actually achieve with this ele-
ment of teaching? Which were the most
difficult parts, and why were they difficult
for me? Which were the most straightfor-
ward parts, and why did I find these easy?
2 How well do I think I helped students to
achieve the intended learning outcomes
related to this element of teaching? Where
could I have improved their achievement?
Why didn’t I improve it at the time?
3 What have I got out of doing this element
of teaching? How have I developed my
knowledge and skills? How do I see the
payoff from doing this element of teach-
ing helping me in the longer term?
4 What else have I got out of doing this ele-
ment of teaching? Have I developed other
skills and knowledge, which may be use-
ful elsewhere at another time? If so, what
are my own emergent learning outcomes
from doing this teaching?
5 What was the best thing I did? Why was
this the best thing I did? How do I know
that this was the best thing I did?
6 What worked least well for me? Why did
this not work well for me? What have I
learned about the topic concerned from
this not having worked well for me? What
have I learned about the students through
this not having worked well for me? What
have I learned about myself from this not
having worked well for me? What do I
plan to do differently in future as a result
of my answers to the above questions?
7 With hindsight, how would I go about this
element of teaching differently if doing it
again from scratch? To what extent will
my experience of this element of teaching
influence the way I tackle anything simi-
lar in future?
8 What did I find the greatest challenge in
doing this element of teaching? Why was
this a challenge to me? To what extent do
I feel I have met this challenge? What can
I do to improve my performance when
next meeting this particular sort of chal-
lenge?

228
The Lecturer’s Toolkit
9 What was the most boring or tedious part
of doing this element of teaching for me?
Can I see the point of doing these things?
If not, how could the element of teaching
have been redesigned to be more stimulat-
ing and interesting for me?
10 Do I feel that my time and effort on this
element of teaching has been well spent?
If not, how could I have used my time
more effectively? Or should the teaching
have been designed differently? Which
parts of the teaching represent the time
best spent? Which parts could be thought
of as time wasted?
11 How useful do I expect the feedback to
be, that I receive on this element of teach-
ing? Who can give me useful feedback –
students, colleagues, assessors? What
sorts of feedback do I really want at this
point in time? What sorts of feedback do I
really need at this point in time? What are
my expectations of getting useful feed-
back now, based on the feedback (or lack
of it) that I’ve already received on past
teaching I’ve done?
12 What advice would I give to a friend
about to start on the same element of
teaching? How much time would I sug-
gest that it would be worth putting into it?
What pitfalls would I advise to be well
worth not falling into?
13 What are the three most important things
that I think I need to do arising from this
element of teaching at this moment in
time? Which of these do I think is the
most urgent for me to do? When will I
aim to start doing this, and what is a sensi-
ble deadline for me to have completed it
by?
In short, reflection on our practice can be aided by setting ourselves questions to respond to, and
capturing our responses so that we can continue to reflect on them. I hope that this final part of
the Toolkit helps you to take charge of your own reflections on your teaching and assessment-
related work, and thereby assists in your own continuous development as a professional in higher
education.

Adams, M. and Brown, S. (eds) (2006) Disabled Students in Higher Education: Working Towards Inclusive
Learning, London: Routledge.
Anderson, D. and Race, P. (2002) Effective Online Learning: The Trainer’s Toolkit, Ely: Fenman.
Ausubel, D. P. (1968) Educational Psychology: A Cognitive View, London: Holt, Rinehard and Winston.
Bandura, A. (1997) Self-efficacy: The Exercise of Control, New York: Freeman.
Bates, A. W. (1995) Technology, Open Learning and Distance Education, London: Routledge Falmer.
Bates, A W (2002) National Strategies for E-learning in Post-secondary Education and Training,
UNESCO.
Beaty, L. and McGill, I. (1992) Action Learning: A Practitioner’s Guide, Kogan Page: London.
Biggs, J. B. (1989) ‘Approaches to the enhancement of tertiary teaching’, Higher Education Research and
Development 8(1): 7–25.
Biggs, J. B. (2003) Teaching for Quality Learning at University, 2
nd
edn, Maidenhead: Open University Press.
Bligh, D. (2000) What’s The Use of Lectures? 5
th
edn, Jossey-Bass: San Francisco.
Bloom, B. S., Engelhart, M. D., Furst, E. J., Hill, W. H. and Krathwohl, D. R. (1956) Taxonomy of
Educational Objectives: Cognitive Domain, New York: McKay.
Boud, D. (1986) Implementing Student Self-Assessment, HERDSA Green Guides Vol.5, University of New
South Wales, Australia.
Boud, D. (1992) ‘The use of self-assessment schedules in negotiated learning’, Studies in Higher Education
17(2): 185–200.
Boud, D. (1995) Enhancing Learning through Self-assessment, London: Routledge.
Bowl, M. (2003) Non-traditional Entrants to Higher Education: ‘They talk about people like me’, Stoke on
Trent: Trentham Books.
Brookfield, S. (1986) Understanding and Facilitating Adult Learning, Maidenhead: Open University Press.
Brown, S. (1996) ‘The art of teaching in small groups – 1’, The New Academic 5(1), Birmingham: SEDA.
Brown, S. (1997) ‘The art of teaching in small groups – 2’, The New Academic 6(1), Birmingham: SEDA.
Brown, G. and Atkins, M. (1988) Effective Teaching in Higher Education, London, Routledge.
Brown, G. with Bull, J. and Pendlebury, M. (1997) Assessing Student Learning in Higher Education
London, Routledge.
Brown, S. and Glasner, A. (eds) (1999) Assessment Matters in Higher Education: Choosing and Using
Diverse Approaches, Maidenhead: Open University Press.
Brown, S. and Knight, P. (1994) Assessing Learners in Higher Education, London: Kogan Page.
Brown, S. and Race, P. (1997) Staff Development in Action, SEDA Paper 100, Birmingham: SEDA
Publications.
Brown, S. and Race, P. (2002) Lecturing: A Practical Guide, London: Routledge.
Brown, S., Race, P. and Bull, J. (eds.) (1999) Computer Assisted Assessment In Higher Education, London:
Routledge.
Brown, S., Rust, C. and Gibbs, G. (1994) Strategies for Diversifying Assessment in Higher Education,
Oxford: Oxford Centre for Staff Development.
References and further reading

Brown, S. and Smith, B. (1997) Getting to Grips with Assessment, SEDA Special No 3, Birmingham:
SEDA Publications.
Burge, E. J. and Haughey M. (eds) (2001) Using Learning Technologies: International Perspectives on
Practice, London: Routledge Falmer.
Carroll, J. (2002) A Handbook for Deterring Plagiarism in Higher Education, Oxford: Oxford Centre for
Staff and Learning Development.
Carroll, J. and Ryan, J. (eds) (2005) Teaching International Students: Improving Learning for All, London:
Routledge.
Claxton, G. (1998) Hare Brain, Tortoise Mind, London: Fourth Estate.
Claxton, J., Mathers, J. and Wetherell-Terry, D. (2004) ‘Benefits of a 3-way collaborative learning system:
action learning, continuous editing and peer assessment’, Edinburgh: paper presented at the BEST con-
ference: Reflection on Teaching: the Impact on Learning.
Coffield, F., Moseley, D., Hall, E. and Ecclestone, K. (2004) Learning Styles and Pedagogy in Post-16
Learning: A systematic and critical review, London: Learning and Skills Research Centre (download-
able from www.lsda.org.uk). (For a shorter review, see also Coffield, F., Moseley, D., Hall, E. and
Ecclestone, K. (2004) Should We Be Using Learning Styles? What Research Has to Say to Practice,
London: Learning and Skills Research Centre, also downloadable from www.lsda.org.uk.)
Conway, R., Kember, D., Sivan, A. and Wu, M. (1993) ‘Peer assessment of an individual’s contribution to a
group project’, Assessment and Evaluation in Higher Education, 18(1): 45–56.
Cotton, D. (2004) ‘Essentials of training design: 5: Adult learning theories and design’, Training Journal
May 2004.
Cowie, B. and Bell, B. (1999) ‘A model for formative assessment’, Assessment in Education 6(1): 101–116.
Curry, L. (1990) ‘A critique of the research on learning styles’, Educational Leadership, 48(2): 50–56.
Dunn, L., Morgan, C., O’Reilly, M. and Parry, S. (2004) The Student Assessment Handbook: New
Directions in Traditional and Online Assessment, London: Routledge.
Dweck, C. S. (2000) Self Theories: Their Role in Motivation, Personality and Development, Lillington, NC:
Taylor & Francis.
Edwards, J., Smith, B. and Webb, G. (2001) Lecturing: Case Studies, Experience and Practice, London:
Kogan Page.
Exley, K. and Dennick, R. (2004a) Giving a Lecture – From Presenting to Teaching, London: Routledge.
Exley, K. and Dennick, R. (2004b) Small Group Teaching – Tutorials, Seminars and Beyond, London:
Routledge.
Fry, H., Ketteridge, S. and Marshall, S. (2003) A Handbook for Teaching and Learning in Higher
Education: Enhancing Academic Practice, 2
nd
edn, London: Routledge.
Gardner, H. (1993) Frames of Mind: The Theory of Multiple Intelligences, Basic Books.
Gardner, H. and Hatch, T. (1989) ‘Multiple intelligences go to school: Educational implications of the the-
ory of multiple intelligences’, Educational Researcher 18(8): 4–9.
Gibbs, G. (1994a) (ed.) Improving Student Learning: Theory and Practice, Oxford: Oxford Centre for Staff
and Educational Development, Oxford Brookes University.
Gibbs, G. (1994b) Learning in Teams: A Student guide and Learning in Teams: A Student Manual, Oxford:
Oxford Centre for Staff and Learning Development.
Gibbs, G. (1995) Learning in Teams: A Tutor Manual, Oxford: Oxford Centre for Staff and Learning
Development.
Gibbs, G. (1999) ‘Using assessment strategically to change the way students learn’ in S. Brown and A.
Glasner (eds) Assessment Matters in Higher Education: Choosing and Using Diverse Approaches,
Maidenhead: Open University Press.
Gibbs, G. and Jenkins, A. (1992) Teaching Large Classes in HE, London: Kogan Page.
Gibbs, G. and Simpson, C. (2002) ‘Does your assessment support your students’ learning?’ available at
<http://www.open.ac.uk/science/fdtl/documents/lit-review.pdf>, Milton Keynes: Open University,
accessed February 2006.
230
The Lecturer’s Toolkit

Hinett, K. and Thomas, J. (eds) (1999) Staff Guide to Self and Peer Assessment, Oxford: Oxford Centre for
Staff and Learning Development.
Honey, P. and Mumford, A. (1982) The Manual of Learning Styles, Peter Honey Publications.
Jaques, D. (2000) Learning in Groups, 3
rd
edn, London: Kogan Page.
Jarvis, P. (2004) Adult and Continuing Education: Theory and Practice, 3
rd
edn, London: Routledge.
JISC (2004) Designing for Learning: An update on the pedagogy strand of the JISC eLearning programme,
Bristol: JISC.
Juwah, C. et al. (2004) ‘Enhancing student learning through effective formative feedback’, available at
<http://www.heacademy.ac.uk/resources.asp?process=full_record§ion=generic&id=353>,
accessed January 2006.
Knight, P. (ed.) (1995) Assessment for Learning in Higher Education, London: Kogan Page SEDA Series.
Knight, P. T. (2002) Being a Teacher in Higher Education, Maidenhead: Open University Press.
Knight, P. and Yorke, M. (2003) Assessment, Learning and Employability, Maidenhead: SRHE/Open
University Press.
Kolb, D. A. (1984) Experiential Learning: Experience as the Source of Learning and Development,
Englewood Cliffs, NJ: Prentice-Hall.
Kolb, D. A. (1999) The Kolb Learning Style Inventory, Version 3. Boston: Hay Group.
Laurillard, D. (2001) Rethinking University Teaching: A Framework for the Effective Use of Educational
Technology, 2
nd
edn, London: Routledge.
Leicester, M. (1996) ‘Equal opportunities in education: A coherent, rational and moral concern’, Journal of
Philosophy in Education, 30(2): 278–87, quoted in H852 Course Design in Higher Education: theory
and evidence Chapter 9, Equal Opportunities, prepared for the course team by Carole Baume 1999 for
the Open University.
Leigh, D. (1996) Designing and Delivering Training for Groups, London: Kogan Page.
Lewin, K. (1952) ‘Field theory in social science’ in D. Cartwright, (ed.) Selected Theoretical Papers,
London: Tavistock.
Litzinger, M. E. and Osif, B. (1993) ‘Accommodating diverse learning styles: Designing instruction for
electronic information sources’ in L. Shirato (ed.) What is Good Instruction Now? Library instruction
for the 90s, Ann Arbor: Pierian Press.
McDowell, L. and Brown, S. (2001) Student Assessment: Cheating and plagiarism, currently accessible
from the ‘Resources’ section of www.heacademy.ac.uk, specific link <http://www.heacademy.
ac.uk/resources.asp?process=full_record§ion=generic&id=12>.
Miller, C. M. L. and Parlett, M. (1974) Up to the Mark: A study of the examinations game, London:
Monograph 21, SRHE.
Moon, J. A. (2004) A Handbook of Reflective and Experiential Learning: Theory and Practice, London:
Routledge.
Northedge, A. (1990) The Good Study Guide, London: Open University Press.
Orsmond, P., Merry S. and Callaghan, A. (2004) ‘Implementation of a formative assessment model incor-
porating peer and self-assessment’, Innovations in Education and Teaching International 41(3):
273–290.
Pask, G. (1976) ‘Styles and strategies of learning’, British Journal of Educational Psychology 46(1):
12–25.
Peelo, M. and Wareham, T. (eds) (2002) Failing Students in Higher Education, Maidenhead: SRHE/Open
University Press.
Pickford, R. and Brown, S. (2006) Assessing Skills and Practice, London: Routledge.
Prosser, M. and Trigwell, K. (1999) Understanding Learning and Teaching: The Experience in Higher
Education, Maidenhead: SRHE/Open University Press.
Quinn, F. M. (2000) Principles and Practices of Nurse Education, 4
th
edn, Cheltenham: Nelson Thornes.
Race, P. (1994) The Open Learning Handbook, 2
nd
edn, London: Kogan Page.
Race, P. (1999) How to Get a Good Degree, Maidenhead: Open University Press.
References and further reading
231

Race, P. (ed.) (1999) 2000 Tips for Lecturers, London: Kogan Page.
Race, P. (2000) How to Win as a Final-Year Student, Maidenhead: Open University Press.
Race, P. (2001) A Briefing on Self, Peer and Group Assessment, York, LTSN Generic Centre, currently
accessible from the ‘Resources’ section of www.heacademy.ac.uk, specific link <http://www.heacad-
emy.ac.uk/resources.asp?process=full_record§ion=generic&id=9>, accessed 2 January 2006.
Race, P. (2005a) Making Learning Happen, London: Sage Publications.
Race, P. (2005b) 500 Tips on Open and Online Learning, 2
nd
edn, London: Routledge.
Race, P., Brown, S. and Smith, B. (2005) 500 Tips on Assessment, 2
nd
edn, London: Routledge.
Ramsden, P. (2003) Learning to Teach in Higher Education, 2
nd
edn, London: Routledge.
Reynolds, M. (1997). ‘Learning styles: A critique’, Management Learning, 28(2): 115–133.
Rust, C. (2001) A briefing on assessment of large groups accessible through the Higher Education
Academy Website www.heacademy.ac.uk at <http://www.heacademy.ac.uk/resources.asp?process=
full_record§ion=generic&id=12>, accessed January 2006.
Rust, R. and Wallace, J. (1994) Helping Students to Learn From Each Other, SEDA Paper 86, Birmingham:
SEDA.
Ryan, J. (2000) A Guide to Teaching International Students, Oxford: Oxford Centre for Staff and Learning
Development.
Sadler, D. R. (1989) ‘Formative assessment and the design of instructional systems’, Instructional Science
18(2): 119–144.
Sadler, D. R. (1998) ‘Formative assessment: revisiting the territory’ Assessment in Education: Principles,
Policy and Practice 5(1): 77–84.
Sadler, D. R. (2003) ‘How criteria-based grading misses the point’, Griffith University, Australia,
Presentation to the Effective Teaching and Learning Conference.
Salmon, G. (2002) E-tivities: The Key to Active Online Learning, London: Routledge.
Salmon, G. (2004) E-moderating: The Key to Teaching and Learning On-line, 2
nd
edn, London: Routledge.
Skinner, B. F. (1954) ‘The science of learning and the art of teaching’, Harvard Educational Review 24(2):
88–97.
Smith, A. P. and Duggan, F. (eds) (2004) Plagiarism: Prevention, Practice and Policy Conference
Proceedings, Newcastle: JISC Plagiarism Advisory Service.
Stefani, L. and Carroll, J. (2001) A briefing on plagiarism accessible through the Higher Education
Academy Website www.heacademy.ac.uk, at <http://www.heacademy.ac.uk/resources.asp?process=
full_record§ion=generic&id=10>, accessed January 2006.
Stowell, N. (2001) ‘Equity, justice and standards: Assessment decision making in higher education’, Paper
presented at the SRHE Annual Conference, University of Cambridge (mimeo).
Walker, J. (1998) ‘Student plagiarism in universities: What are we doing about it?’ Higher Education
Research and Development, 17(1): 89–106.
Wierstra, R. F. A. and de Jong, J. A. (2002) ‘A scaling theoretical evaluation of Kolb’s Learning Style
Inventory-2’, in M. Valcke and D. Gombeir (eds) Learning styles: Reliability and validity, 431–440.
Proceedings of the 7th Annual European Learning Styles Information Network Conference, 26–28 June,
Ghent. Ghent: University of Ghent.
Yorke, M. (2002) in M. Peelo and T. Wareham (eds) Failing Students in Higher Education, Maidenhead:
SRHE/Open University Press.
232
The Lecturer’s Toolkit

absence 139–40
academic tutorials 147–50
Adams, M. 215
adapting resource-based learning materials 160–1
additional needs, students with 113, 165, 179–80,
207–18
annotated bibliographies 51–3
appraisal, managing your 189–92
‘Approaches to the advancement of tertiary
teaching’ 3
assessment 27–94; concerns 33–7; inclusive
211–13; and international students 221–3; peer-
assessment 85–9, 90, 91; reasons for 31–2;
reducing your load 84–5; techniques 37–74;
values 29–30
Assessment Matters in Higher Education 4
Ausubel, D.P. 3
behaviour: in groups 138–42; in lectures 98–9
behaviourist school of thinking 2, 3
Bell, B. 75
bibliographies, annotated 51–3
Biggs, J.B. 3, 4, 22
blended learning 177–9
Bloom, B.S. 3
Bond, D. 74
Bowl, M. 77–8
brainstorming 136
Brown, S. 27–8, 75, 213, 215–16
buzz-groups 134
buzz-phrases 158
Carroll, J. 211, 220–3
classroom practice, inclusive 214
clones, favouring of 145–6
Coffield, F. 2–3, 13
cognitive school of thinking 2, 3
competence 17–20; and feedback 81–3
competence model 17–20, 82
computer-aided assessment 36
computer-aided presentations 112–19
computer-analysed feedback 201
confidence 20–1
conflict in groups 154–5
continuous assessment 35–7
Cowan, J. 74, 79
Cowie, B. 75
cue-consciousness 6–7
cultural sensitivity 145, 155, 210; and plagiarism
218, 219; see also international students
curriculum: cross-cultural design 210; inclusive
213–14; for resource-based learning 175–7
deep learning 4–5
diabetes 217
didactic facilitators and poor group learning 144–5
digesting 10–12, 12, 13; in lectures 106
disabled students 165, 179–80; see also inclusive
practice
discrimination 214
disruptive behaviour 141
dissertations 70–2
distance learning 158
domination of groups 141–2, 143
Dunn, L. 4
Dweck, C. S. 20
dyslexia 213, 215–16
educational development and inclusivity 214–15
Educational Psychology: A Cognitive View 3
e-learning 183, 184, 185; inclusive 214
equal opportunities 206–18
essays 49–51
exams: as class exercises 43–4; marking 41–3;
setting 39–40; types of 37–49
exhibitions 67–70
Experimental Learning: Experience as the Source
of Learning and Development 2
feedback: from colleagues 119–21, 193–4; and
competence development 81, 82, 83; formative
74, 75–6, 78; from interviews with students
Index

204–5; lectures and learning through 105–6;
quality of 79–81; questionnaires 195–203;
record-keeping 83; reducing your load 84–5;
from self-assessment 92–3; from students
192–205; to students 9, 11, 12, 12, 13, 79–83,
167–8
feed-forward 74–5
‘Field theory in social science’ 2
fishbowls 135–6
‘500 Tips on Group Learning’ 150
500 Tips on Open and Online Learning 161, 175
flexible learning 159
followership 137–8
formative assessment 75, 77
formative feedback 74–7
further reading 229–32
Gardner, H. 13
gender issues in groups 155–6
Gibbs, G. 4, 6
Glasner, A. 27–8
groups 125–56: formation 126–33; getting them
started 150–3; leading and following
137–8; problems 138–47, 154–6; processes
133–7; size 126–8
handouts in lectures 100–4
Honey, P. 2
icebreakers 151–3
inclusive practice 206–18
intelligence 13, 20, 21
international students 220–3
internet 183–5
intranet 183
Jaques, D. 151
Knight, P. 6–7, 28
Kolb, D.A. 2
language difficulties 180, 208
lateness 139
leadership 137–8
learning: by doing 7, 8, 9, 11, 12, 12, 13, 105,
166–7; in lectures 104–8; model of processes
12, 99; outcomes 22–6, 147, 163–4; processes
1–26; resources 157–85; from screens 172–5;
spaces, inclusive 214; theories 1–4; and
understanding 21–2
‘Learning Styles Questionnaire’ 2
Learning to Teach in Higher Education 3
lectures 92–124; feedback on your 193–4;
handouts 100–4; importance of 95–7; and
inclusion 211; peer-observation 119–21,
193–4; practical pointers 121–4; processes
99–109; reasons for 97–8; using technologies
109–21
Leicester, M. 207
Lewin, K. 2
library staff 53
looking after yourself 186–205
low motivation 13–16
marking: essays 50; schemes 41–3, 44; strategies
84–5
mental health issues 213, 216–17
Miller, C.M.L. 5, 6
model of learning processes 12, 99
motivation 13–16, 29
multiple-choice exams 46–9
Mumford, A. 2
names, learning and using 153–4
National Student Survey in England and Wales
2005 74
needing to learn 11, 12, 12; lectures and 105
non-attendance 139–40
non-participation in groups, dealing with 142–3
online learning 157–85
open-book exams 44–5
open learning 158
Open Learning Handbook, The 161
open-notes exams 45–6
Open University, The 158
oral exams 63–5
Orsmond, P. 75
overhead projectors 110–12
pair dialogues 137
Parlett, M. 6
Pask, G. 3
Peelo, M. 28
peer-assessment 85–9; grids for 90, 91
peer-observation 119–21, 193–4
personal tutorials 148
Pickford, R. 75, 213, 215–16
plagiarism 36, 218–19
portfolios 58–60
poster displays 67–70
PowerPoint 112–19
practical work 56–8
preparation, group members lack of 140;
facilitator’s lack of 144
presentations 61–3
projects 65–7
pyramiding see snowballing
QAA (Quality Assurance Agency) 22, 29, 211–12,
214
questionnaires 195–203
234
Index

Race, P. (other publications by) 7, 12, 29–30, 35,
37, 150, 161, 175, 218–19
Ramsden, P. 3
record-keeping 83
reflective practice 223–8
reports 54–6
resource-based learning 157–85; main components
159–60; quality checklist 163–72; strategy for
design 161–3; students particularly helped by
179–81; using existing packages 160–1;
writing new materials 181–3
retention of students 77
reviews 51–3
Reynolds, M. 3
ripples on a pond model of learning 12, 12, 99
rounds 134
Ryan, J. 211, 220–3
Sadler, D.R. 75, 76, 77
‘The science of learning and the art of reading’ 3
screens, learning from 172–3
SEDA (Staff and Educational Development
Association) 206
Selected Theoretical Papers 2
self-assessment 35–6, 37, 57, 60; questions 167–8;
tutor dialogues 89, 92–3
self-concept 20–1
SENDA (Special Educational Needs and
Disabilities Act) 208, 210
setting exams 39–40
sexism 156
Simpson, C. 6
Skinner, B.F. 3
small-group teaching 125–56; importance of
125–6
snowballing 135
SPACE (Staff–Student Partnership for Assessment
Change and Evaluation) 212–13
special needs see additional needs, students with
strategic learning 5, 6, 7, 35, 37
stress 187–9
structured exams 46–9
student retention 77
‘Styles and strategies of learning’ 3
successful learning 7–13, 99, 100
summative assessment 75
surface learning 4–5, 35
syndicates 134–5
Taxonomy of Educational Objectives 3
Teaching for Quality Learning at University 3
technologies, using 109–21
theses 70–2
timetables 108–9
time-wasting 140–1
traditional exams 33–5
tutorials 147–50
‘uncompetence’ 17–20; feedback 82
unseen written exams 33–5
visual impairments, addressing 113, 180, 213
visual learning 170
vivas 63–5
Wareham, T. 28
wanting to learn 10, 12, 12; lectures and 104
websites, useful 213, 214
work-based learning 72–4
workload, managing your 186–7
Yorke, M. 6–7, 27, 77, 78
Index
235
Document Outline
- Book Cover
- Half-Title
- Title
- Copyright
- Contents
- Preface to the third edition
- Acknowledgements
- Chapter 1: Learning – a natural human process
- Chapter 2: Designing assessment and feedback to enhance learning
- Chapter 3: Refreshing your lecturing
- Chapter 4: Making small-group teaching work
- Chapter 5: Resource-based and online learning
- Chapter 6: Looking after yourself
- Chapter 7: Issues, challenges and reflections
- References and further reading
- Index
Wyszukiwarka
Podobne podstrony:
The Four Agreements A Practical Guide to Personal Freedom A Toltec Wisdom Book by Don Miguel Ruiz T
A Practical Guide to Teaching Science in the Secondary School (Routledge Teaching Guides)
A Practical Guide to Marketing Nieznany
Borderline Personality Disorder A Practical Guide to Treatment
Practical Guide to Iec60601 1
A Guide to Hajj Umrah and Visiting the Prophet
A Practical Guide to Quantitation with Solid Phase Microextr
The Unoffiicial Teach Yourself Guide To LockPicking
A Practical Guide to High Speed Printed Circuit Board Layout
(philosophy) a practical guide to critical thinking
The Muslim diary A daily guide to worship
a grimoire for modern cunningfolk a practical guide to witch
Terry Anderson, Laura E Huggins Property Rights, A Practical Guide to Freedom and Prosperity (2003)
Santeria A Practical Guide to Afro Caribbean Magic by Luis M Nuñez
Alan Belkin A Practical Guide to Musical Composition
Practical Guide To Critical Thinking
więcej podobnych podstron