A Guide to Building Outdoor Stairs
Building a stairway can be one of the most intimidating tasks any builder–amateur or professional–tackles. But an
outdoor stairway is generally not a difficult project, as long as it is planned and executed carefully. This document
covers building procedures for a straight-run utility stairway, typically used on porches and decks.
Local building codes regulate the width and slope of a staircase, as well as how the assembly is supported and
braced, how the landing is built and whether railings are required. ALWAYS CHECK WITH YOUR LOCAL
BUILDING DEPARTMENT BEFORE DESIGNING A STAIRWAY, AND FOLLOW ALL LOCAL CODES.
The following instructions are intended as general guidelines only, and local requirements should be your primary
guide.
In this document you will find information about:
•
Stair-Building Terms
•
Designing Your Stairs
•
Building Your Stairs
TOOLS AND MATERIALS
2x10 Stringers
1x8 Risers
2x6 Pressure-Treated Cleat
STEP 1
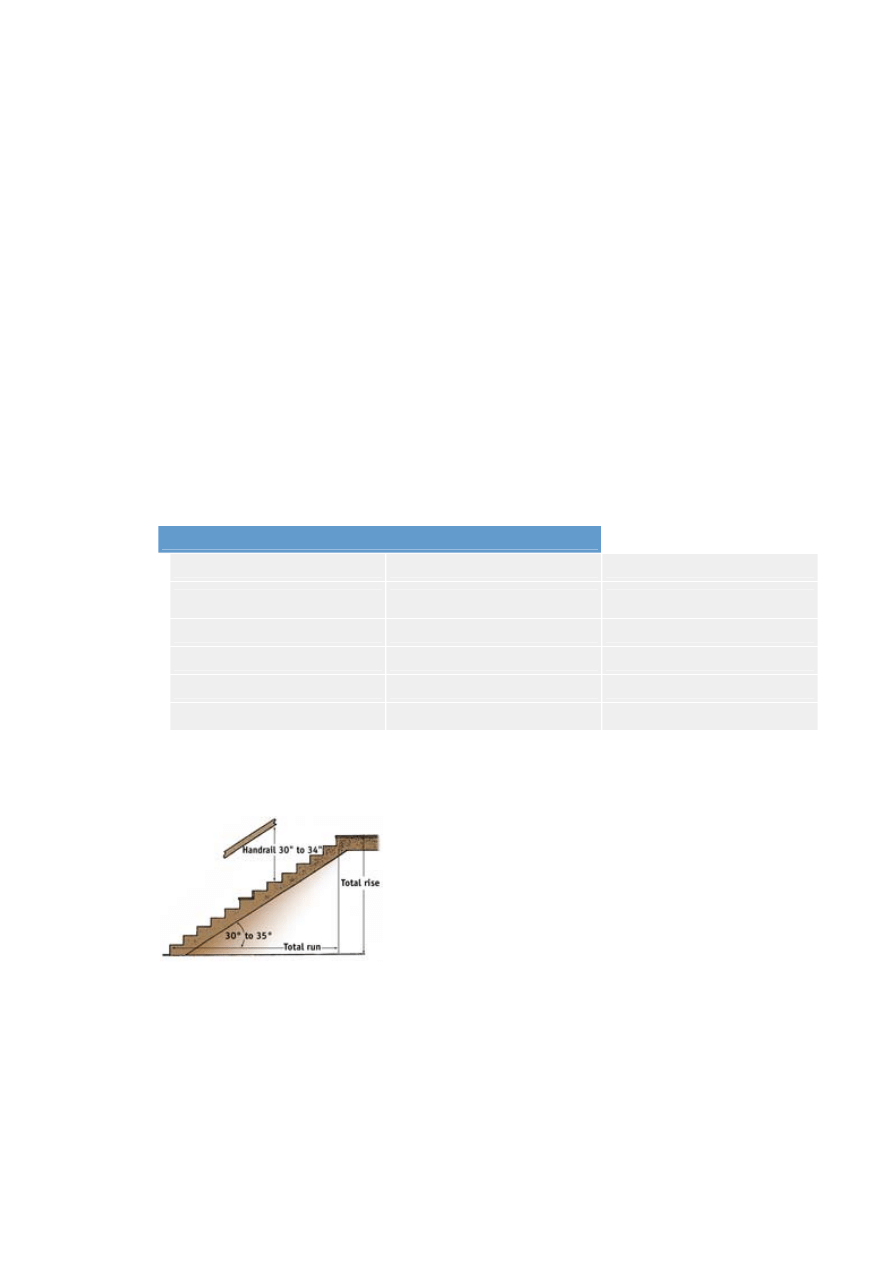
FIG. 1 - How a stairway is built
depends primarily on the total rise–
the vertical dimension from the
upper floor to the lower floor. The
total run–the horizontal length of
the stair assembly–depends on the
slope of the stairway, which is
determined by building codes.
From the Sunset book, Basic
STAIR BUILDING TERMS
•
There are five basic design elements you'll need to consider when
planning outdoor stairs:
•
The Total Run (Fig. 1) is the total horizontal distance covered by the
staircase, from the edge of the upper floor (porch or deck) to the edge
of the staircase where it rests on the landing.
•
The Total Rise (Fig. 1) is the total vertical distance from the surface of
the landing to a point level with the surface of the upper floor (Note:
You can't find the rise simply by measuring straight down from the
upper floor because the ground directly below may not be level with
the landing).
•
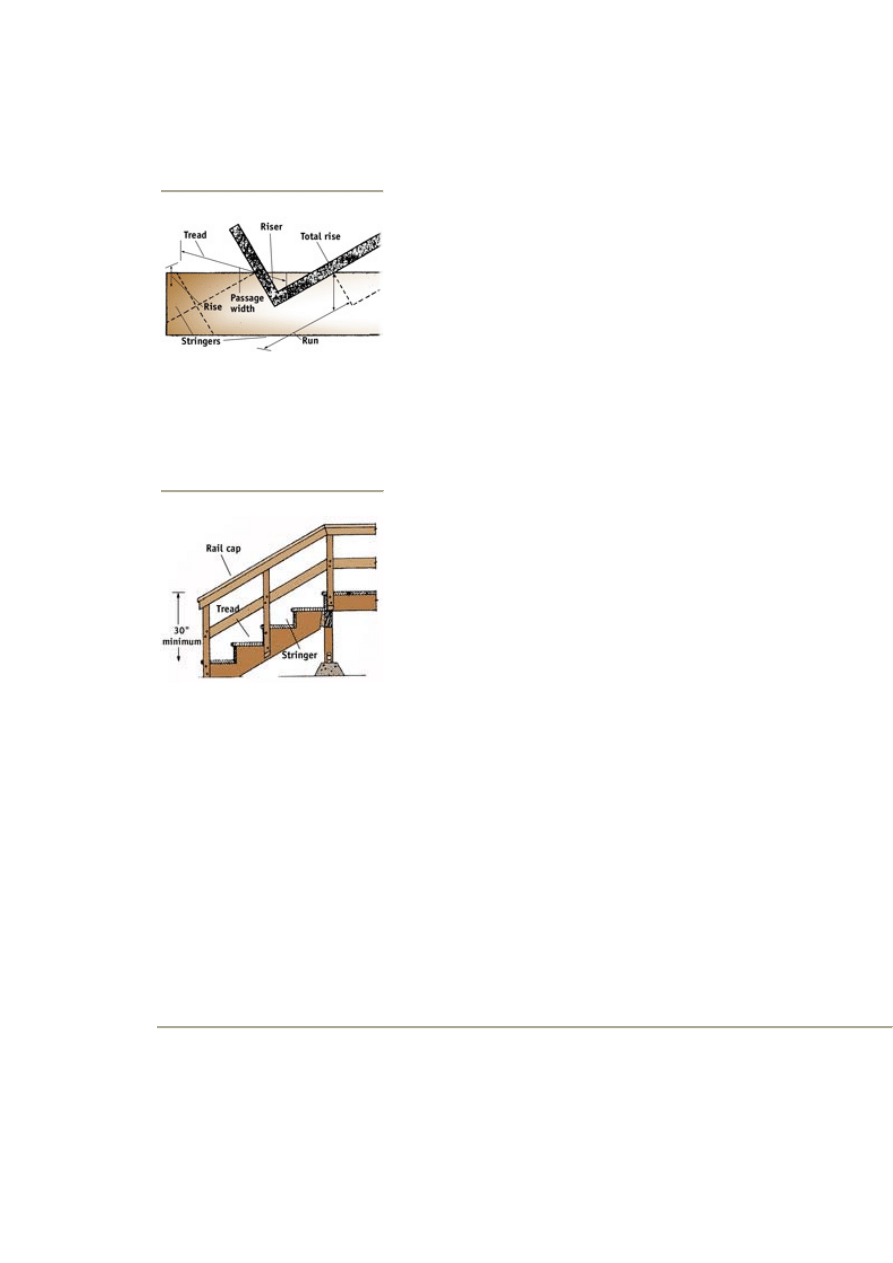
Run (Fig. 2) is the horizontal distance from the leading edge of one
tread to the leading edge of the next tread.
Carpentry Illustrated, © Sunset
Publishing Corporation.
FIG. 2 - The components of a
stairway, with basic stair-building
terms. From the Sunset book,
Decks, © Sunset Publishing
Corporation
FIG. 3 - The components of a
railing. From the Sunset book,
Decks, © Sunset Publishing
Corporation
•
Rise (Fig. 2) is the vertical distance from the surface of one tread to
the surface of the next tread.
•
Passage Width (Fig. 2) is the width of the stairway.
•
The ratio of the total rise to total run (or rise to run) determines the
slope of the stairway. As a rule, that slope should be between 30
degrees and 35 degrees; an outdoor stairway may be slightly
shallower but should not be steeper. The ideal riser height is 7" with an
11" run–which also works out well with standard lumber widths–but
you may have to vary the proportions somewhat to make the height of
each step work out evenly between the landing and the upper floor.
•
The passage width can also vary, depending on how heavily you
expect the stairs to be used. As a rule, 36" is the minimum; 48" is
better for a single person, and you may want to go to 60" to allow room
for two people to pass comfortably.
•
A stairway consists of four basic components:
•
Stringers (Fig. 2) are the sloped members that support the stairway.
2x10s are generally allowed for stairs with four treads or fewer, but
2x12s are sturdier.
•
In most cases, you'll need good quality material with no large knots,
either pressure treated or cut from heart redwood or cedar, to resist
decay. Stringers should be placed no more than 24" apart if the treads
will be 5/4 material or 36" apart for 2"-thick lumber.
•
Treads (Fig. 2) are the horizontal members that you walk on. When
building an outdoor stairway, they are typically cut from the same
material as the upper floor deck or porch–5/4" pressure-treated pine or
2"-thick lumber.
•
Risers (Fig. 2) are the vertical members at the back of each tread. 1"
surfaced boards (3/4" net thickness) are the most common material
used.
•
The Railing Assembly (Fig. 3) consists of posts, a cap rail and
vertical balusters between each post. 4x4 is the most common post
material with a 2x4 handrail. Codes regulate the overall height of the
railing assembly (usually 30" to 34") and may specify a maximum
width for the handrail.
STEP 2
DESIGNING YOUR STAIRS
•
To design the stairway, first find the total rise. Divide that number by 7
(the ideal riser height) to find the number of steps. You'll probably have

FIG. 4 - Common tread-to-riser
ratios. From the Sunset book,
Decks, © Sunset Publishing
Corporation.
a fractional remainder, so round your result up or down to the nearest
whole number.
•
Then divide the total rise by that number to find the exact height of
each riser. For example:
1) Total rise = 40-1/2"
2) 40-1/2" divided by 7" per riser = 5.78 risers
3) Round 5.78 up to 6 risers, then 40-1/2" divided by 6 = 6.75" or 6-
3/4" per riser
This document assumes that the total run is not limited, so you can
make the assembly as long as you want. Use the following table to
determine the width of the treads, depending on your riser height.
Riser Height
Run Width
6"
14"
6-1/4"
13-1/2"
6-1/2"
13"
6-3/4"
12-1/2"
7"
12"
7-1/4"
11-1/2"
7-1/2"
11"
•
To find the amount of material needed for risers, simply multiply the
number of risers by the passage width. To find the amount of tread
material, subtract 1 from the number of risers (you'll need one fewer
tread than risers) and multiply by the passage width. Remember to
double up if you'll be using two boards for each tread.
•
To find the length of the stringers, you'll need a calculator with a
square root function. First, find the total run (number of treads
multiplied by the width of each tread).
•
Then find the square of the total run (total run multiplied by itself) and
the square of the total rise and add them together.
•
The square root of the result gives you the exact stringer length; round
up to the nearest standard lumber length, then multiply by the number
of stringers you'll need.
STEP 3
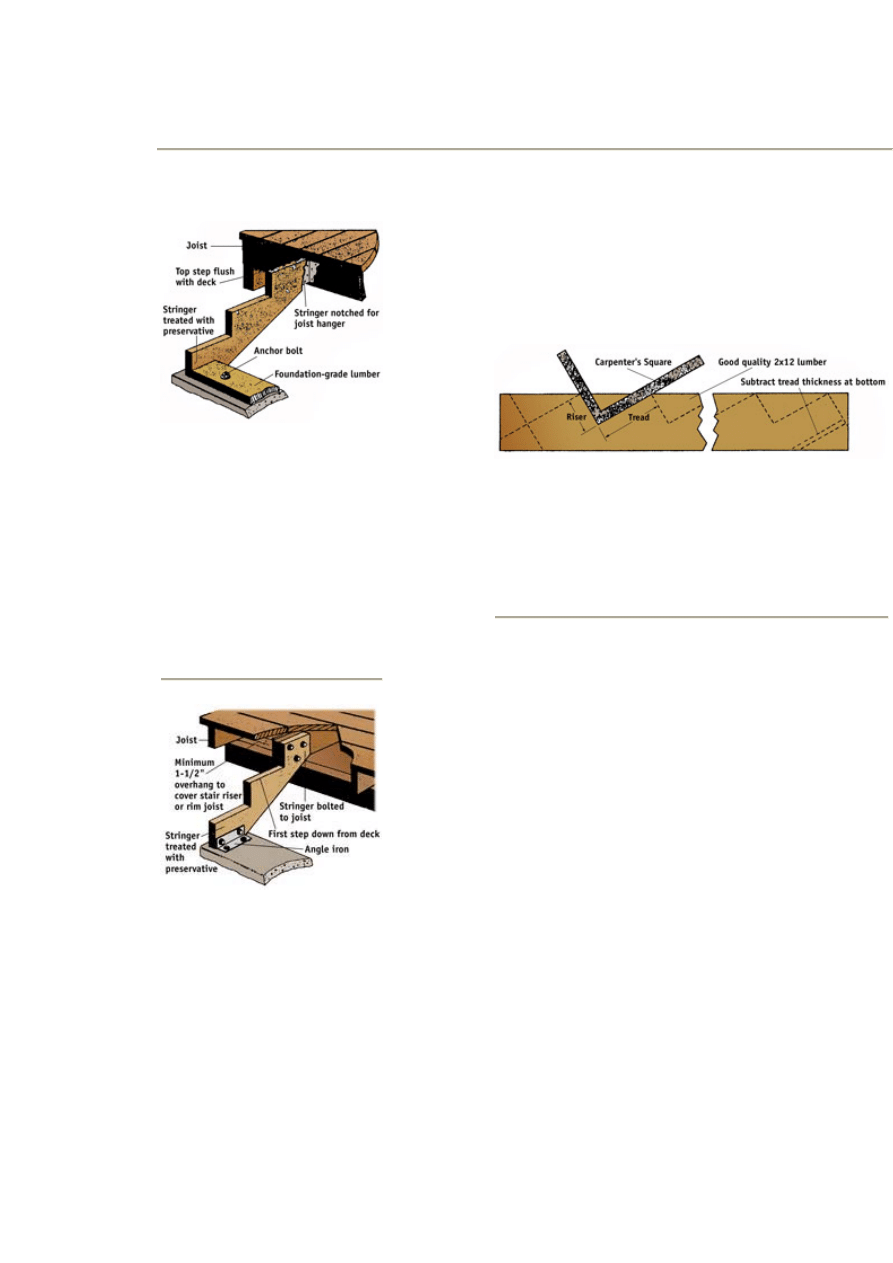
FIG. 6 - Stringers may be hung
from the rim joist with a joist
hanger so the first step is flush
with the deck surface. In this
configuration, a piece of pressure-
treated lumber is bolted to the
landing pad and the stringer is
nailed to it with 16d galvanized
nails. From the Sunset book,
Decks, © Sunset Publishing
Corporation.
FIG. 7 - The stringer can be bolted
to the end of the joist so the first
step is one step below the surface
of the deck. At the landing pad, the
stringer may be fastened to an
angle iron (the angle should be
galvanized) bolted to the concrete.
From the Sunset book, Decks, ©
Sunset Publishing Corporation.
BUILDING YOUR STAIRS
•
To build the staircase, first notch the stringers for the treads and risers.
Fasten two stair gauges to a carpenter's square at the dimensions of
the rise and run (for example, at 6-1/2" on one leg and 13" on the
other). Set the square on the stringer so the gauges are flush against
the edge and trace the notch along the edge of the square (Fig. 5).
FIG. 5 - Set the carpenter's square on the stringer so the riser
and tread dimensions are at the edge, then trace along the
square. Move the square to the previous mark and repeat the
process. Subtract one tread thickness from the layout at the
bottom so the last step is equal in height to the rest. From the
Sunset book, Decks, © Sunset Publishing Corporation.
•
"Step" your way down the stringer, repeating the process until you
have laid out the correct number of notches. Use the carpenter's
square to lay out the top cut on the stringer. The height of the last riser
should be less than the others by an amount equal to the thickness of
the tread. That way, when you nail the last tread in place, the step
down to the lower floor will be equal to the others.
•
You can set the stringer directly on the lower floor (typically a landing
pad) and bolt it in place with a piece of angle iron, or bolt a length of
pressure-treated 2x6 to the floor and nail the stringer to it.
•
If you plan to set the stringer on a 2x6, you may have to notch the
bottom of the stringer to allow for that piece.
•
Once the stringer is laid out, cut the notches partway only, using a
circular saw. Take care not to cut beyond the layout lines. Finish the
cuts with a handsaw.
•
Once you have one stringer finished, set it in place to make sure it is
cut correctly, then use it as a template to lay out your cuts on the other
stringers.
•
You can hang the stringers to the rim joist with joist hangers (Fig. 6), or
bolt them in place to a joist (Fig. 7). If you need to pour a concrete
landing pad at the bottom of the stairway, set the stringers in place

temporarily and lay out the location of the pad. Pour the pad and set
anchor bolts for the angle iron or 2x6 base. Instructions for pouring
concrete are in another brochure in this series.
•
Once the landing pad is cured, secure the stringers at the top and
bottom. Rip the risers to the same width as the height of the riser cut in
the stringers. Then cut them to length and nail them to the stringers
with 8d galvanized nails.
•
Measure the distance from the face of the riser to the edge of the
notch cut, then rip the treads to width so they extend 1" to 1-1/8"
beyond the edge of the notch. If you're using two boards side by side
as treads, rip half the dimension from each board so both will be the
same width. Cut the treads to length and nail them to the stringer with
16d galvanized nails.
•
To build the railing, first secure 4x4 posts at the top and bottom of the
stringer. Notch the posts 1-1/2" deep and bolt them to the sides of the
stringers with 1/2x4-1/2 hex bolts, using a level to keep them plumb.
Use decay-resistant lumber for the posts. They should be at least long
enough to extend 36" above the surface of the treads. Leave them a
few inches too long at the top so you can cut them after they are in
place.
•
Measure from the bottom of the stringer up the posts to the location of
the top and bottom rails. The top surface of the upper rail should be
30" to 34" above the tread; the rail should be about 6" above the tread.
Lay the railing material against the posts and lay out angled cuts for
any rails that will be fastened between the posts.
•
Cut the railings to length and toenail them with four 8d galvanized
nails. If you'll be using balusters, cut them to length and nail them to
the rails. Check local codes for spacing requirements on balusters.
Wyszukiwarka
Podobne podstrony:
Girls’ guide to building a million dollar business Susan Wilson Solovic
Herbs for Sports Performance, Energy and Recovery Guide to Optimal Sports Nutrition
Meezan Banks Guide to Islamic Banking
NLP for Beginners An Idiot Proof Guide to Neuro Linguistic Programming
50 Common Birds An Illistrated Guide to 50 of the Most Common North American Birds
Średniowiecze to okres rozwoju malarstwa przede wszystkim na?sce
Guide to the properties and uses of detergents in biology and biochemistry
Guide To Erotic Massage
A Guide to the Law and Courts in the Empire
Majowie to jedna z najbardziej tajemniczych grup ludzi na świecie
10 Minutes Guide to Motivating Nieznany
A Student's Guide to Literature R V Young(1)
A Practical Guide to Marketing Nieznany
Guide To Currency Trading Forex
HUTER - WYKL., Jeżeli kurs terminowy określonej waluty > kursu kasowego, to z tego wynika, że wal
Lockpick Leif Mccameron'S Guide To Lockpicking(1)
J T Velikovsky A Guide To Fe A Screenwriter's Workbook id 22
Answer Key Guide to Reading
Jouni Yrjola Easy Guide to the Classical Sicilian (feat Richter Rauzer and Sozin Attacks)
więcej podobnych podstron