AVVERTENZE E PRECAUZIONI PER LA SICUREZZA
ATTENZIONE! – Un’installazione errata può causare gravi ferite alle persone che
eseguono il lavoro e a quelle che useranno il prodotto. Per questo motivo, durante
l’installazione, è importante ri spettare le leggi e le norme sulla sicurezza, in vigore
sul territorio, e tutte le istruzioni riportate in questo manuale. Non procedere con l’in-
stallazione se si hanno dubbi di qualunque natura e richiedere eventuali chiarimenti
al Servizio Assistenza Moovo.
Attenzione! – Non eseguire modifiche su nessuna parte del prodotto, se non quelle
previste nel presente manuale. Operazioni di questo tipo possono solo causare mal-
funzionamenti. Il costruttore declina ogni responsabilità per danni derivanti da pro-
dotti modificati arbitrariamente.
AVVERTENZE E PRECAUZIONI PER L’USO
• Conservare con cura questo manuale per facilitare eventuali interventi futuri di manuten-
zione e smaltimento del prodotto.
• Al termine della vita del prodotto, assicurarsi che il materiale venga riciclato o smaltito
secondo le norme vigenti sul territorio.
• Per la pulizia superficiale del prodotto, utilizzare un panno umido. Importante – Non uti-
lizzare sostanze contenenti alcool, benzene, diluenti o altre sostanze simili.
DESCRIZIONE DEL PRODOTTO E DESTINAZIONE D’USO
MPT5 è una coppia di colonne da utilizzare come supporto per una coppia di fotocellule a
marchio Moovo; il prodotto è un accessorio destinato ad essere utilizzato nelle automazio-
ni a marchio Moovo, per porte, cancelli, portoni da garage e similari. ATTENZIONE! –
Qualsiasi altro uso diverso da quello descritto è da considerarsi improprio e vietato!
Ogni colonna è predisposta per alloggiare 1 fotocellula. Altre caratteristiche sono descritte
nel paragrafo “Caratteristiche tecniche del prodotto”.
VERIFICHE PRELIMINARI ALL’INSTALLAZIONE
• Verificare l’integrità dell’imballo prima di aprirlo e del prodotto contenuto all’interno.
• Verificare che la posizione prescelta per installare le colonne rispetti i criteri fissati nel
manuale istruzione delle fotocellule da supportare; verificare inoltre, che questa posizione
consenta in futuro un facile accesso per la manutenzione e che possa proteggere le colon-
ne da urti accidentali.
• Verificare che la superficie prescelta per l’installazione delle colonne sia solida e possa
garantire un fissaggio stabile.
Limiti d’impiego del prodotto
Il presente prodotto può essere abbinato esclusivamente alle fotocellule a marchio Moovo.
INSTALLAZIONE DEL PRODOTTO
Per installare una colonna e il cavo per il collegamento di una fotocellula, procedere nel
modo seguente:
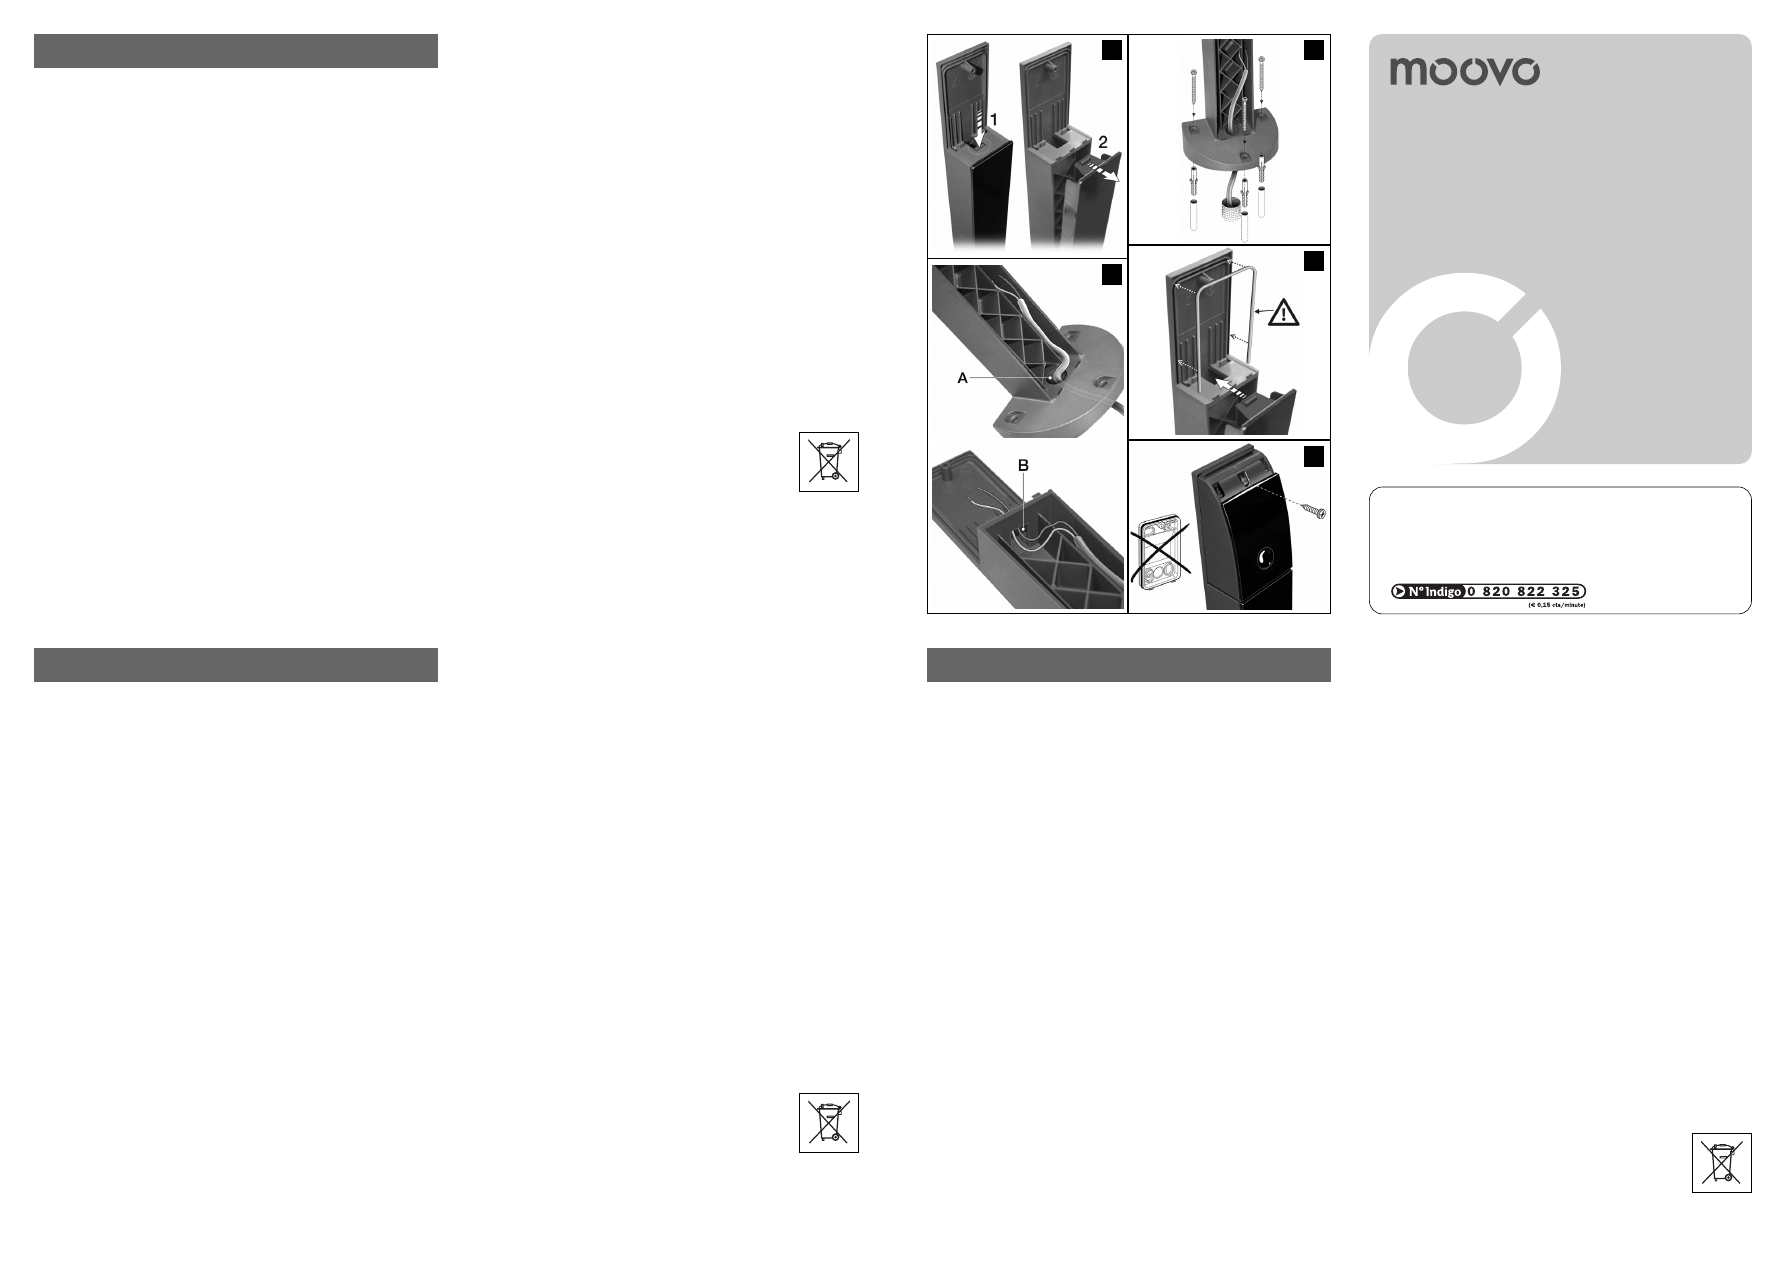
01. (fig. 1) Togliere la copertura anteriore della colonna;
02. (fig. 2) far passare il cavo di collegamento attraverso il foro A e B della colonna. Atten-
zione! – Sguainare il cavo già all’interno della colonna, subito prima del foro B;
03. (fig. 3) fissare la base della colonna sulla superficie prevista, usando viti e tasselli in
dotazione. Attenzione! – Per orientare correttamente la colonna, fare riferimento al
manuale istruzioni delle fotocellule da installare;
04. (fig. 4) rimettere nella sua sede la copertura anteriore della colonna.
05. Facendo riferimento al manuale istruzioni delle fotocellule da installare, aprire il guscio
di una fotocellula e collegare il cavo elettrico ai suoi morsetti. Nota – Se è necessario,
forare il fondo della fotocellula per facilitare il passaggio del cavo di collegamento.
06. (fig. 5) Infine, richiudere la fotocellula e fissarla sulla colonna utilizzando la vite in dota-
zione. Note – Prima di fissare la fotocellula, controllare che la guarnizione C (fig. 4) sia
perfettamente inserita nella sede presente sulla colonna. – Per togliere il tappo copri-
vite della fotocellula, fare riferimento al suo manuale istruzioni.
Per eseguire l’installazione dell’altra colonna, ripetere le stesse operazioni descritte in que-
sto capitolo.
CARATTERISTICHE TECNICHE DEL PRODOTTO
Tipologia: coppia di colonne per fotocellule Grado di protezione (con fotocellula
assemblata): IP 44
Dimensioni: base: 115 x 76 mm; H totale 490 mm; sezione della
colonna 50 x 39 mm.
SMALTIMENTO DEL PRODOTTO
Questo prodotto è parte integrante dell'automazione, e dunque, deve essere smalti-
to insieme con essa.
Come per le operazioni d'installazione, anche al termine della vita di questo prodotto, le
operazioni di smantellamento devono essere eseguite da personale qualificato.
Questo prodotto è costituito da vari tipi di materiali: alcuni possono essere riciclati, altri
devono essere smaltiti. Informatevi sui sistemi di riciclaggio o smaltimento previsti dai rego-
lamenti vigenti sul vostro territorio, per questa categoria di prodotto.
Attenzione! – alcune parti del prodotto possono contenere sostanze inquinanti o pericolo-
se che, se disperse nell’ambiente, potrebbero provocare effetti dannosi sull'ambiente stes-
so e sulla salute umana.
Come indicato dal simbolo a lato, è vietato gettare questo prodotto nei rifiu-
ti domestici. Eseguire quindi la “raccolta separata” per lo smaltimento,
secondo i metodi previsti dai regolamenti vigenti sul vostro territorio, oppu-
re riconsegnare il prodotto al venditore nel momento dell'acquisto di un
nuovo prodotto equivalente.
Attenzione! – i regolamenti vigenti a livello locale possono prevedere pesanti sanzioni in
caso di smaltimento abusivo di questo prodotto.
ITALIANO
SAFETY WARNINGS AND PRECAUTIONS
CAUTION! -Incorrect installation may cause serious physical injury to those working
on or using the system. For this reason, during installation, always strictly observe
current safety legislation and standards in the place of use and all instructions in this
manual. If in any doubt regarding installation, do not proceed and contact the Moo-
vo Technical Assistance for clarifications.
Caution! – Never make any modifications to part of the product other than those
specified in this manual. Operations of this type will lead to malfunctions. The man-
ufacturer declines all liability for damage caused by makeshift modifications to the
product.
OPERATION WARNINGS AND PRECAUTIONS
• Keep this manual in a safe place to enable future product maintenance and disposal pro-
cedures.
• At the end of the product lifetime, ensure that the material is recycled or disposed of
according to current local standards.
• For cleaning the product surfaces, use a damp cloth. Important – Never use substances
containing alcohol, benzene, diluents or other similar substances.
PRODUCT DESCRIPTION AND INTENDED USE
MPT5 is a pair of posts used to support a pair of Moovo photocells; the product is an
accessory for use on Moovo automations, on doors, gates, garage doors and similar prod-
ucts. CAUTION! - Any use other than as described herein is to be considered
improper and is strictly prohibited!
Each post is designed to house 1 photocell. Other characteristics are provided in the para-
graph “Product Technical Specifications”.
PRELIMINARY CHECKS FOR INSTALLATION
• Check the condition of the packaging before opening, and then all contents.
• Ensure that the selected position for post installation meets the requirements specified in
the instruction manual of the photocells to be mounted; also check that this position
enables easy access for future maintenance and that it guarantees protection of the posts
against accidental impact.
• Ensure that the selected surfaces for post installation are solid and guarantee a stable fix-
ture.
Product application limits
This product may be used exclusively in conjunction with Moovo photocells.
PRODUCT INSTALLATION
To install a post and cable for connection of a photocell, proceed as follows:
01. (fig. 1) Remove the front cover of the post;
02. (fig. 2) Pass the connection cable through holes A and B on the post. Caution! – Strip
the cable already inside the post, immediately before hole B;
03. (fig. 3) Fix the base of the post onto the foreseen surface, using the screws and plugs
supplied. Caution! – To ensure correct post positioning, refer to the instruction manu-
al of the photocells to be installed;
04. (fig. 4) Re-fit the front cover of the post;
05. With reference to the instruction manual of the photocells to be installed, open the
case of one photocell and connect the electric cable to its terminals. Note – If neces-
sary, drill a hole in the base of the photocell to facilitate connection cable routine.
06. (fig. 5) Then close the photocell case and secure on the post using the screws sup-
plied. Note – Before fixing the photocell, ensure that seal C (fig 4) is perfectly inserted
in the seat on the post. – To remove the screw cover of the photocell, refer to the rel-
ative instruction manual.
Repeat the same procedure as described above for all other posts to be installed.
TECHNICAL SPECIFICATIONS OF PRODUCT
Type: pair of posts for photocells Protection rating (with photocell assembled):
IP 44
Dimensions: Base: 115 x 76 mm; total H 490 mm; post section 50 x 39 mm.
PRODUCT DISPOSAL
This product is an integral part of the automation, and therefore must be disposed of
together with the latter.
As in installation, also at the end of product lifetime, the disassembly and scrapping oper-
ations must be performed by qualified personnel.
This product comprises various types of materials: some may be recycled and others must
be disposed of. Seek information on the recycling and disposal systems envisaged by the
local regulations in your area for this product category.
Caution! - some parts of the product may contain pollutant or hazardous substances
which, if disposed of into the environment, may cause serious damage to the environment
or physical health.
As indicated by the symbol alongside, disposal of this product in domestic
waste is strictly prohibited. Separate the waste into categories for disposal,
according to the methods envisaged by current legislation in your area, or
return the product to the retailer when purchasing a new version.
Caution! – Local legislation may envisage serious fines in the event of abu-
sive disposal of this product.
ENGLISH
AVERTISSEMENTS ET PRÉCAUTIONS POUR LA SÉCURITÉ
ATTENTION ! – Une installation incorrecte peut causer de graves blessures aux per-
sonnes qui effectuent le travail et à celles qui utiliseront le produit. Pour cette raison,
au cours de l’installation, il est important de respecter les lois et les normes de sécu-
rité en vigueur sur le territoire, ainsi que toutes les instructions figurant dans ce
guide. Ne pas effectuer l’installation si le moindre doute persiste et demander les
éclaircissements nécessaires au Service après-vente Moovo.
Attention ! – ne pas effectuer de modifications sur des parties du produit quelles
qu’elles soient, en dehors de celles qui sont décrites dans ce guide. Des opérations
de ce type ne peuvent que provoquer des problèmes de fonctionnement. Le
constructeur décline toute responsabilité pour les dommages dérivant de produits
modifiés arbitrairement.
RECOMMANDATIONS ET PRÉCAUTIONS POUR L’UTILISATION
• Conserver avec soin ce guide pour faciliter les éventuelles interventions futures de main-
tenance et de mise au rebut du produit.
• À la fin de la vie du produit, s’assurer que les matériaux sont recyclés ou mis au rebut en
respectant les normes locales en vigueur.
• Pour le nettoyage superficiel du produit, utiliser un chiffon humide. Important – Ne pas
utiliser de substances contenant de l’alcool, du benzène, des diluants ou autres subs-
tances similaires.
DESCRIPTION DU PRODUIT ET APPLICATION
MPT5 est un jeu de colonnes à utiliser comme support pour une paire de photocellules de
marque Moovo ; le produit est un accessoire destiné à être utilisé dans les automatismes
de marque Moovo, pour portes, portails, portes de garage et similaires. ATTENTION ! –
Toute autre utilisation que celle décrite doit être considérée comme impropre et
interdite !
Chaque colonne est prévue pour loger 1 photocellule. Les autres caractéristiques sont
décrites au paragraphe « Caractéristiques techniques du produit ».
CONTRÔLES AVANT L’INSTALLATION
• Vérifier l’intégrité de l’emballage avant de l’ouvrir, et du produit à l’intérieur.
• Vérifier que la position choisie pour installer les colonnes respecte les critères indiqués
dans le guide d’instructions des photocellules à soutenir ; vérifier également que cette
position permet un accès facile pour la maintenance future et qu’elle met les colonnes à
l’abri de chocs accidentels.
• Vérifier que la surface choisie pour l’installation des colonnes est solide et peut garantir
une fixation stable.
Limites d’utilisation du produit
Le présent produit ne peut être associé qu’aux photocellules de marque Moovo.
INSTALLATION DU PRODUIT
Pour installer une colonne et le câble pour la connexion d’une photocellule, procéder de la
façon suivante :
01. (fig. 1) Enlever le cache frontal de la colonne ;
02. (fig. 2) faire passer le câble de connexion à travers le trou A et B de la colonne. Atten-
tion ! – Dénuder le câble déjà à l’intérieur de la colonne, juste avant le trou B ;
03. (fig. 3) fixer la base de la colonne sur la surface prévue, en utilisant les vis et les che-
villes fournies. Attention ! – Pour orienter correctement la colonne, se référer au guide
d’instructions des photocellules da installer ;
04. (fig. 4) remettre en place le cache frontal de la colonne.
05. En se référant au guide d’instructions des photocellules à installer, ouvrir le carter
d’une photocellule et connecter le câble électrique à ses bornes. Note – Si néces-
saire, percer le fond de la photocellule pour faciliter le passage du câble de
connexion.
06. (fig. 5) Pour finir, refermer la photocellule et la fixer sur la colonne en utilisant la vis
fournie. Note – Avant de fixer la photocellule, contrôler que le joint C (fig. 4) est parfai-
tement introduit dans le logement présent sur la colonne. – Pour enlever le bouchon
cache-vis de la photocellule, se référer au guide d’instructions de cette dernière.
Pour effectuer l’installation de l’autre colonne, répéter les mêmes opérations décrites dans
ce chapitre.
CARACTÉRISTIQUES TECHNIQUES DU PRODUIT
Typologie : paire de colonnes pour photocellules Indice de protection (avec photo-
cellule assemblée) : IP 44
Dimensions : base : 115 x 76 mm ; H totale 490 mm ; sec-
tion de la colonne 50 x 39 mm.
MISE AU REBUT DU PRODUIT
Ce produit est partie intégrante de l’automatisme et doit donc être mis au rebut avec
ce dernier.
Comme pour l’installation, à la fin de la durée de vie de ce produit, les opérations de
démantèlement doivent être effectuées par du personnel qualifié.
Ce produit est constitué de différents types de matériaux : certains peuvent être recyclés,
d’autres doivent être mis au rebut. Informez-vous sur les systèmes de recyclage ou de
mise au rebut prévus par les règlements, en vigueur dans votre pays, pour cette catégorie
de produit.
Attention ! – certains composants du produit peuvent contenir des substances polluantes
ou dangereuses qui pourraient avoir des effets nuisibles sur l’environnement et sur la santé
des personnes s’ils étaient jetés dans la nature.
Comme l’indique le symbole ci-contre, il est interdit de jeter ce produit avec
les ordures ménagères. Par conséquent, utiliser la méthode de la « collecte
sélective » pour la mise au rebut des composants conformément aux pres-
criptions des normes en vigueur dans le pays d’utilisation ou restituer le
produit au vendeur lors de l’achat d’un nouveau produit équivalent.
Attention ! – les règlements locaux en vigueur peuvent appliquer de lourdes sanctions en
cas d’élimination illicite de ce produit.
FRANÇAIS
1
3
2
5
4
Oderzo TV, Italy
Tel. +39 0422 20 21 09
Fax +39 0422 85 35 85
www.moovo.com
Moovo is a commercial
trademark owned by
Nice S.p.a.
Codice: IST249.4854 Rev
. 00 del 09 - 04 - 2008
Pair of posts
MPT5
Hotline technique exclusivement pour la France:
EN
Installation and use instructions and
warnings
IT
Istruzioni ed avvertenze per
l’installazione e l’uso
FR
Instructions et avertissements pour
l’installation et l’utilisation
ES
Instrucciones y advertencias para la
instalación y el uso
DE
Anweisungen und Hinweise für die
Installation und die Bedienung
PL
Instrukcje instalacji i użytkowania i
ostrzeżenia
NL
Aanwijzingen en aanbevelingen voor
installering en gebruik
INSTRUKCJE I ZALECENIA DOTYCZĄCE BEZPIECZEŃSTWA
UWAGA!– Nieprawidłowo wykonana instalacja może być przyczyną poważnych ran
dla osób, które wykonują pracę oraz tych, które będą używać urządzenie. Dlatego też
podczas instalowania ważne jest przestrzeganie przepisów oraz instrukcji dotyczą-
cych bezpieczeństwa obowiązujących na danym terytorium, które zostały zamiesz-
czone w tej instrukcji. Nie przystępować do instalowania urządzenia w przypadku
wątpliwości jakiegokolwiek charakteru, zwrócić się o ewentualne wyjaśnienia do Ser-
wisu Technicznego Moovo.
Uwaga!– Nie wprowadzać zmian do żadnej części urządzenia, jeżeli nie są one prze-
widziane w niniejszej instrukcji. Operacje tego typu mogą jedynie powodować nie-
prawidłowe funkcjonowanie urządzenia. Producent zrzeka się wszelkiej odpowie-
dzialności za szkody wynikające z używania urządzeń modyfikowanych samowolnie.
INSTRUKCJE I ZALECENIA DOTYCZĄCE OBSŁUGI
• Starannie przechowywać tę instrukcję w celu ułatwienia ewentualnych przyszłych operacji
konserwacji i utylizacji urządzenia.
• Po zakończeniu okresu eksploatacji urządzenia należy upewnić się, czy materiał, z które-
go się składa zostanie ponownie wykorzystany lub zlikwidowany zgodnie z przepisami obo-
wiązującymi na danym terytorium.
• Do powierzchownego czyszczenia urządzenia należy używać lekko wilgotnej ściereczki.
Ważne – Nie stosować substancji zawierających alkohol, benzen, rozpuszczalniki lub inne
tego typu substancje.
OPIS URZĄDZENIA I JEGO PRZEZNACZENIE
MPT5 składa się z dwóch słupków przeznaczonych do zastosowania jako wspornik dla
dwóch fotokomórek, opatrzonych znakiem handlowym Moovo; jest urządzeniem dodatko-
wym przeznaczonym do zastosowania w automatach Moovo i wykorzystywanych do bram,
drzwi, drzwi garażowych i innych podobnych urządzeń. UWAGA! - Każde inne zastoso-
wanie, odmienne od opisanego w tej instrukcji jest niewłaściwe i zabronione!
Każdy słupek jest przystosowany do pomieszczenia 1 fotokomórki. Inne cechy charaktery-
styczne urządzenia są opisane w paragrafie “Parametry techniczne urządzenia”.
WERYFIKACJE WSTĘPNE DO WYKONANIA PRZED INSTALACJĄ
• Przed otwarciem opakowania należy najpierw sprawdzić jego stan, a następnie sprawdzić
stan urządzenia znajdującego się wewnątrz.
• Sprawdzić, czy położenie wybrane wstępnie dla zainstalowania słupków jest zgodne z
kryteriami, ustalonymi w instrukcji obsługi fotokomórek na nich zamontowanych; ponadto
należy sprawdzić również, czy to położenie umożliwi w przyszłości łatwy dostęp podczas
wykonywania operacji konserwacji i czy może zabezpieczyć słupki przed przypadkowymi
uderzeniami.
• Sprawdzić, czy wybrana wstępnie powierzchnia, przeznaczona do instalacji urządzenia
jest trwała i może zagwarantować stabilne przymocowanie.
Ograniczenia zastosowania urządzenia
Niniejsze urządzenie może zostać połączone wyłącznie z fotokomórkami opatrzonymi zna-
kiem handlowym Moovo.
INSTALOWANIE URZĄDZENIA
Aby zainstalować słupek i kabel umożliwiający podłączenie fotokomórki należy postępować
w następujący sposób:
01. (rys. 1) Zdjąć przednią pokrywę słupka;
02. (rys. 2) włożyć kabel łączący przez otwór A i B słupka. Uwaga!– Zdjąć izolację kabla,
znajdującego się wewnątrz słupka bezpośrednio przed otworem B;
03. (rys. 3) przykręcić podstawę słupka do wybranej powierzchni śrubami i kołkami znajdu-
jącymi się na wyposażeniu urządzenia. Uwaga!– Aby prawidłowo ustawić słupek nale-
ży odwołać się do instrukcji obsługi fotokomórek, które należy zainstalować;
04. (rys. 4) ponownie założyć przednią pokrywę słupka.
05. Nawiązując do instrukcji obsługi instalowanych fotokomórek należy otworzyć osłonę
fotokomórki i podłączyć kabel elektryczny do zacisków. Uwaga – Jeżeli to konieczne
należy wywiercić otwór w dolnej części fotokomórki, aby ułatwić włożenie kabla
łączącego.
06. (rys. 5) Wreszcie zamknąć fotokomórkę i przykręcić ją do słupka śrubą znajdującą się
na wyposażeniu. Uwagi – Przed przymocowaniem fotokomórki należy sprawdzić, czy
uszczelka C (rys. 4) została prawidłowo włożona do gniazda znajdującego się na słup-
ku.– Aby zdjąć kapturek osłaniający śrubę fotokomórki należy odwołać się do odpo-
wiedniej instrukcji obsługi.
Aby zainstalować drugi słupek należy powtórzyć te same operacje, które są opisane w tym
rozdziale.
DANE TECHNICZNE PRODUKTU
Typ: dwa słupki na fotokomórki Stopień zabezpieczenia (z zamontowaną fotoko-
mórką): IP 44
Wymiary: podstawa: 115 x 76 mm; Wys. całkowita 490 mm; przekrój
słupka 50 x 39 mm.
UTYLIZACJA URZĄDZENIA
Ten produkt jest integralną częścią automatyki, dlatego też powinien zostać zlikwido-
wany razem z nią.
Zarówno operacje instalowania jak również operacje demontażu po zakończeniu eksploata-
cji urządzenia, powinny być wykonywane przez personel wykwalifikowany.
Niniejsze urządzenie składa się z różnych rodzajów materiałów: niektóre z nich mogą być
ponownie używane, inne nadają się do wyrzucenia. Zgromadzić niezbędne informacje doty-
czące placówek zajmujących się recyrkulacją lub likwidacją materiałów, zgodnie z przepisa-
mi obowiązującymi dla tej kategorii urządzenia na Waszym terytorium.
Uwaga! - niektóre części urządzenia mogą zawierać substancje zanieczyszczające lub nie-
bezpieczne, które jeżeli zostaną rozrzucone w otoczeniu, mogą wywierać szkodliwy wpływ
na środowisko i zdrowie ludzkie.
Jak wskazuje symbol zamieszczony obok, zabrania się wyrzucania urządze-
nia razem z odpadami domowymi. Należy więc przeprowadzić “selektywną
zbiórkę odpadów”, zgodnie z metodami przewidzianymi przez przepisy
obowiązujące na Waszym terytorium lub oddać urządzenie do sprzedawcy
podczas dokonywania zakupu nowego ekwiwalentnego urządzenia.
Uwaga! - lokalne przepisy mogą przewidywać wysokie kary za nielegalną likwidację niniej-
szego urządzenia.
POLSKI
ADVERTENCIAS Y PRECAUCIONES DE SEGURIDAD
¡ATENCIÓN! – Una instalación incorrecta puede provocar heridas graves a las per-
sonas que hacen el trabajo y a aquellas que utilizarán el producto. Por dicho moti-
vo, durante la instalación es importante observar las leyes y las normas de seguri-
dad vigentes locales y respetar todas las instrucciones mencionadas en este
manual. No proceda con la instalación si tuviera alguna duda, y pida aclaraciones al
Servicio de Asistencia Moovo.
¡Atención! – No modifique ninguna pieza del producto si no está previsto en este
manual. Ese tipo de operaciones puede provocar desperfectos. El fabricante no se
asumirá ninguna responsabilidad por daños originados por productos modificados
arbitrariamente.
F
ADVERTENCIAS Y PRECAUCIONES PARA EL USO
• Conserve con cuidado este manual para facilitar las operaciones futuras de manteni-
miento o de eliminación del producto.
• Al final de la vida útil del producto, controle que el material sea reciclado o eliminado
según las normas locales vigentes.
• Utilice un paño humedecido para la limpieza superficial del producto. Importante – No
utilice sustancias que contenga alcohol, benceno, disolventes u otras sustancias similares.
DESCRIPCIÓN DEL PRODUCTO Y USO ADECUADO
MPT5 es un par de columnas que se debe utilizar para fijar un par de fotocélulas marca
Moovo; el producto es un accesorio destinado para ser utilizado en las automatizaciones
marca Moovo, para puertas, cancelas, puertas de garaje y productos similares. ¡ATEN-
CIÓN! – ¡Un uso diferente de aquel descrito es considerado inadecuado y está pro-
hibido!
Cada columna está predispuesta para alojar una fotocélula. Más características están
descritas en el párrafo “Características técnicas del producto”.
CONTROLES PRELIMINARES PARA LA INSTALACIÓN
• Controle la integridad del embalaje antes de abrirlo y la del producto situado en su inte-
rior.
• Controle que la posición escogida para instalar las columnas respete los criterios esta-
blecidos en el manual de instrucciones de las fotocélulas que deberán alojar; controle
que dicha posición permita acceder fácilmente a la fotocélula para poderle realizar en un
futuro un mantenimiento y controle que las columnas queden protegidas de golpes acci-
dentales.
• Controle que la superficie escogida para la instalación de las columnas sea sólida y que
pueda garantizar una fijación estable.
Límites de empleo del producto
Este producto debe ser combinado exclusivamente con las fotocélulas marca Moovo.
INSTALACIÓN DEL PRODUCTO
Para instalar una columna y el cable para la conexión de una fotocélula, proceda de la
siguiente manera:
01. (fig. 1) Quite la cubierta delantera de la columna.
02. (fig. 2) Pase el cable de conexión por los orificios A y B de la columna. ¡Atención! –
Pele el cable en el interior de la columna, inmediatamente antes del orificio B.
03. (fig. 3) Fije la base de la columna sobre la superficie prevista, utilizando los tornillos y
los tacos suministrados. ¡Atención! – Para orientar correctamente la columna, lea el
manual de instrucciones de las fotocélulas a instalar.
04. (fig. 4) Reinstale la cubierta delantera de la columna.
05. Tomando como referencia el manual de instrucciones de las fotocélulas a instalar,
abra la tapa de una fotocélula y conecte el cable eléctrico a los bornes. Nota – Si fue-
ra necesario, taladre el fondo de la fotocélula para facilitar el paso del cable de cone-
xión.
06. (fig. 5) Por último, cierre nuevamente la fotocélula y fíjela en la columna utilizando el
tornillo suministrado. Notas – Antes de fijar la fotocélula, controle que la junta C (fig.
4) quede colocada perfectamente en el alojamiento de la columna. – Para quitar el
tapatornillo de la fotocélula, consulte el manual de instrucciones de ésta última.
Para instalar la otra columna, repita las mismas operaciones descritas en este capítulo.
CARACTERÍSTICAS TÉCNICAS DEL PRODUCTO
Tipo: par de columnas para fotocélulas Grado de protección (con fotocélula
ensamblada): IP 44
Dimensiones: base: 115 x 76 mm; H total 490 mm; sección de la
columna 50 x 39 mm.
ELIMINACIÓN DEL PRODUCTO
Este producto forma parte integrante del automatismo y, por consiguiente, deberá
ser eliminado junto con éste.
Al igual que para las operaciones de instalación, también al final de la vida útil de este pro-
ducto las operaciones de desguace deberán ser llevadas a cabo por personal experto.
Este producto está formado de varios tipos de materiales: algunos podrán ser reciclados y
otros deberán ser eliminados. Infórmese sobre los sistemas de reciclaje o de eliminación
previstos por las normativas vigentes locales para esta categoría de producto.
¡Atención! – algunas piezas del producto pueden contener sustancias contaminantes o
peligrosas que, si se las abandonara en el medio ambiente, podrían provocar efectos per-
judiciales para el mismo medio ambiente y para la salud humana.
Tal como indicado por el símbolo de aquí al lado, está prohibido arrojar este
producto en los residuos urbanos. Realice la “recogida selectiva” para la
eliminación, según los métodos previstos por las normativas vigentes loca-
les, o bien entregue el producto al vendedor cuando compre un nuevo pro-
ducto equivalente.
¡Atención! – las normas locales vigentes pueden prever sanciones importantes en el caso
de eliminación abusiva de este producto.
ESPAÑOL
HINWEISE UND SICHERHEITSVORSCHRIFTEN
ACHTUNG! – Eine falsche Installierung kann schwerwiegende Verletzungen der Per-
sonen hervorrufen, die die Arbeit ausführen und das Produkt verwenden. Aus die-
sem Grund ist es während der Installierung wichtig, die örtlich geltenden Gesetze
und Sicherheitsvorschriften sowie alle Anleitungen dieses Handbuchs einzuhalten.
Nicht mit der Installierung fortschreiten, wenn Zweifel jeglicher Art vorliegen und
eventuelle offene Fragen mit dem Kundenservice Moovo klären.
Achtung! – An keinem Teil des Produkts Änderungen vornehmen, außer den in die-
sem Handbuch aufgeführten. Vorgänge dieser Art können eine mangelhafte Funkti-
on verursachen. Der Hersteller lehnt jede Verantwortung für willkürlich ausgeführte
Änderungen ab.
HINWEISE UND VORSICHTSMASSNAHMEN ZUR ANWENDUNG
• Dieses Handbuch sorgfältig aufbewahren, um eventuelle zukünftige Wartungsarbeiten
sowie die Entsorgung des Produkts zu erleichtern.
• Am Ende der Lebensdauer des Produkts sicherstellen, dass das Material gemäß den ört-
lich geltenden Vorschriften recycelt oder entsorgt wird.
• Zur Oberflächenreinigung des Produkts wird ein feuchtes Tuch verwendet. Wichtig - Kei-
ne Alkohol, Benzol, Verdünnungsmittel oder ähnliche Produkte enthaltende Substanzen
verwenden.
BESCHREIBUNG DES PRODUKTS UND VERWENDUNGSZWECK
MPT5 ist ein Säulenpaar, das als Träger für ein Photozellenpaar der Marke Moovo verwen-
det wird; das Produkt ist ein Zubehörteil, das für Automatisierungen der Marke Moovo für
Türen, Tore, Garagentore und ähnliches verwendet wird. ACHTUNG! – Jede andere Ver-
wendung als die beschriebene ist als falsch zu betrachten und somit verboten!
Jede Säule ist für 1 Photozelle vorgesehen. Andere Eigenschaften sind im Abschnitt „Tech-
nische Produkteigenschaften“ beschrieben.
PRÜFUNGEN VOR DER INSTALLIERUNG
• Die Unversehrtheit der Verpackung vor dem Öffnen und das darin enthaltene Produkt
prüfen.
• Prüfen, ob die zur Installierung der Säulen gewählte Position die Kriterien des Handbuchs
der zu tragenden Photozellen einhält; ebenso prüfen, ob diese Position in Zukunft einen
leichten Zugang für die Wartung ermöglicht und die Säulen vor unerwünschten Stößen
schützt.
• Prüfen, ob die zur Installierung der Säulen gewählte Oberfläche solide ist und eine stabi-
le Befestigung gewährleistet.
Anwendungslimits des Produkts
Das vorliegende Produkt kann ausschließlich mit den Photozellen der Marke Moovo kom-
biniert werden.
INSTALLIERUNG DES PRODUKTS
Zur Installierung einer Säule und des Verbindungskabels einer Photozelle wie folgt vorge-
hen:
01. (Abb. 1) Die vordere Abdeckung der Säule entfernen;
02. (Abb. 2) Das Verbindungskabel durch die Öffnung A und B der Säule führen. Ach-
tung! – Die Hülle des Kabels schon in der Säule kurz vor der Öffnung B entfernen;
03. (Abb. 3) Das Unterteil der Säule auf die vorgesehene Oberfläche mit den mitgeliefer-
ten Schrauben und Dübeln befestigen. Achtung! – Zur korrekten Ausrichtung der
Säule bezieht man sich auf die Gebrauchsanleitung der zu installierenden Photozellen;
04. (Abb. 4) Die vordere Abdeckung der Säule wieder an ihren Platz bringen.
05. Bei Beachtung der Gebrauchsanleitung der zu installierenden Photozellen, die Hülle
einer Photozelle öffnen und das Stromkabel mit ihren Klemmen verbinden. Hinweis –
Wenn notwendig, den Boden der Photozelle durchbohren, um den Durchgang des
Verbindungskabels zu erleichtern.
06. (Abb. 5) Schließlich wird die Photozelle wieder geschlossen und an der Säule mit der
mitgelieferten Schraube befestigt. Hinweise – Vor der Befestigung der Photozelle
kontrollieren, ob die Dichtung C (Abb. 4) perfekt in ihrem Sitz in der Säule eingesetzt
ist. – Um den Schraubenverschluss der Photozelle zu entfernen, beziehen Sie sich bit-
te auf die Gebrauchsanleitung.
Zur Installierung der anderen Säule die in diesem Kapitel beschriebenen Vorgänge wieder-
holen.
TECHNISCHE EIGENSCHAFTEN DES PRODUKTS
Typologie: Säulenpaar für Photozellen Schutzgrad (mit montierter Photozelle):
IP 44
Abmessungen: Basis: 115 x 76 mm; Gesamthöhe 490 mm; Schnitt der Säule
50 x 39 mm.
ENTSORGUNG DES PRODUKTS
Dieses Produkt ist ein vervollständigender Teil der Automatisierung und muss
gemeinsam mit dieser entsorgt werden.
Wie bei den Installierungsarbeiten müssen die Abrüstarbeiten am Ende der Lebensdauer
dieses Produkts ebenso durch qualifiziertes Personal ausgeführt werden.
Dieses Produkt besteht aus verschiedenen Werkstoffen: Einige können recycelt, andere
müssen entsorgt werden. Informieren Sie sich über die Recycel- oder Entsorgungssyste-
me, die in Ihrem Land für diese Produktkategorie vorgesehen sind.
Achtung! – Einige Teile des Produkts können Umwelt verschmutzende oder gefährliche
Substanzen enthalten, die die Umwelt oder die Gesundheit der Menschen schädigen
könnten, wenn sie ohne Einhaltung der Vorschriften weggeworfen werden.
Wie durch das seitliche Symbol angegeben wird, ist es untersagt, dieses Produkt in den
Hausabfall zu werfen. Somit den Müll gemäß den Vorschriften trennen, die
von den in Ihrem Land geltenden Gesetzen vorgesehen sind oder das Pro-
dukt an den Verkäufer aushändigen, wenn ein neues gleichwertiges Pro-
dukt gekauft wird.
Achtung! – Die örtlich geltenden Vorschriften können im Falle einer geset-
zeswidrigen Entsorgung dieses Produkts schwere Strafen vorsehen.
DEUTSCH
AANBEVELINGEN EN VOORZORGSMAATREGELEN VOOR DE
VEILIGHEID
LET OP! - Een onjuiste installatie kan ernstig letsel toebrengen aan de personen die
het werk verrichten en aan de personen die het product zullen gebruiken. Om deze
reden is het belangrijk dat gedurende de installatie de in het land van gebruik gel-
dende wetten en normen op het gebied van de veiligheid, alsmede de instructies uit
deze handleiding in acht worden genomen. Als u twijfels van welke aard dan ook
koestert, het product niet installeren en u voor eventuele toelichtingen tot de Klan-
tenservice van Moovo wenden.
Let op! – Geen enkel onderdeel van het product mag gewijzigd worden, tenzij der-
gelijke wijzigingen in deze handleiding zijn voorzien. Dergelijke handelingen zullen
slechts storingen in de werking veroorzaken. De fabrikant aanvaardt geen aanspra-
kelijkheid voor schade die het gevolg is van op willekeurige wijze gewijzigde pro-
ducten.
AANBEVELINGEN EN VOORZORGSMAATREGELEN VOOR HET
GEBRUIK
• Bewaar deze handleiding zorgvuldig, deze zal u tot hulp zijn bij eventuele toekomstige
onderhoudswerkzaamheden en bij de vernietiging van het afgedankte product.
• Aan het eind van de levensduur van het product dient u ervoor te zorgen dat het materiaal
volgens de plaatselijk van kracht zijnde voorschriften gerecycled of als afval verwerkt wordt.
• Gebruik voor het reinigen van de buitenkant van het product een vochtige doek. Belang-
rijk – Gebruik geen substanties die alcohol, benzeen, oplosmiddelen of andere dergelijke
middelen bevatten.
BESCHRIJVING VAN HET PRODUCT EN DE GEBRUIKSBESTEMMING
MPT5 is een stel zuilen die gebruikt worden als dragers voor een stel fotocellen van het
merk Moovo; het product is een accessoire dat bestemd is voor gebruik in automatiserin-
gen van het merk Moovo voor deuren, poorten, garagedeuren en dergelijke. LET OP! –
Ieder ander gebruik dient als oneigenlijk en dus als verboden te worden beschouwd!
Iedere zuil biedt plaats aan 1 fotocel. Andere kenmerken zijn beschreven in de paragraaf
“Technische kenmerken van het product”.
CONTROLES VOORAFGAAND AAN DE INSTALLATIE
• Controleer alvorens de verpakking te openen of de verpakking en product dat er in zit
intact zijn.
• Controleer of de plaats die gekozen is voor de installatie van de zuilen voldoet aan de cri-
teria die beschreven zijn in de instructiehandleiding van de fotocellen die op de zuilen
geplaatst zullen worden; controleer daarnaast ook of deze plaats in de toekomst gemak-
kelijk toegang biedt voor onderhoudswerkzaamheden en of de zuilen beschermd zijn
tegen stoten.
• Controleer of het voor de installatie van de zuilen gekozen vlak van stevig materiaal is dat
een stabiele bevestiging kan verzekeren.
Gebruikslimieten van het product
Dit product kan uitsluitend in combinatie met fotocellen van het merk Moovo gebruikt
worden.
INSTALLATIE VAN HET PRODUCT
Om een zuil en de kabel voor de aansluiting van een fotocel te installeren, gaat u als volgt
te werk:
01. (afb. 1) Verwijder de voorste afdekking van de zuil;
02. (afb. 2) voer de aansluitkabel door het gat A en B van de zuil. Let op! – Strip de kabel
al aan de binnenzijde van de zuil, onmiddellijk voor de opening B;
03. (afb. 3) bevestig de basis van de zuil op het voorziene oppervlak met behulp van de
bijgeleverde schroeven en pluggen. Let op! – Om de zuil in de juiste richting te plaat-
sen, volgt u de instructiehandleiding van de te installeren fotocellen;
04. (afb. 4) zet de voorste afdekking van de zuil op zijn plaats terug.
05. Volg de aanwijzingen uit de instructiehandleiding van de te installeren fotocellen, open
de omhulling van een fotocel en sluit de elektrische kabel aan op de klemmen van de
fotocel. Opmerking – Boor indien nodig een gat in de onderkant van de fotocel om de
doorvoer van de aansluitkabel te vergemakkelijken.
06. (afb. 5) Maak tot slot de fotocel weer dicht en bevestig hem op de zuil met behulp van
de bijgeleverde schroef. Opmerking – Alvorens de fotocel te bevestigen dient u te
controleren of de afdichting C (afb 4) perfect in zijn behuizing op de zuil zit. – Zie voor
het verwijderen van de afdekdop van de schroef van de fotocel de instructiehandlei-
ding van de fotocel.
Om de andere zuil te installeren, de in dit hoofdstuk beschreven handelingen herhalen.
TECHNISCHE GEGEVENS VAN HET PRODUCT
Typologie: stel zuilen voor fotocellen Beschermingsklasse (met geassembleerde
fotocel): IP 44
Afmetingen basis: 115 x 76 mm; totale H 490 mm; doorsnede van de
zuil 50 x 39 mm.
AFDANKEN VAN HET PRODUCT
Dit product maakt integraal deel uit van de automatisering en moet dan ook samen
met de automatisering worden afgedankt.
De ontmantelingwerkzaamheden aan het eind van de levensduur van dit product moeten,
net als de installatiewerkzaamheden, worden uitgevoerd door gekwalificeerd personeel.
Dit product is opgebouwd uit verschillende soorten materiaal: sommigen hiervan kunnen
gerecycled worden, anderen moeten als afval worden verwerkt. Win informatie in over de
recycling- of afvalverwerkingsystemen die voor deze productcategorie zijn voorzien door
de in uw land geldende voorschriften.
Let op! – Sommige delen van het product kunnen vervuilende of gevaarlijke substanties
bevatten die, indien ze in het milieu terechtkomen, schadelijke effecten kunnen hebben op
de omgeving of op de gezondheid van personen.
Zoals aangegeven door het symbool hiernaast, is het verboden dit product
met het gewone huisvuil weg te gooien. Volg een “gescheiden afvalverwer-
king” volgens de methodes die voorzien zijn door de in uw land geldende
voorschriften, of lever het product weer in bij de verkoper op het moment
dat u een nieuw gelijksoortig product aanschaft.
Let op! – De plaatselijk geldende voorschriften kunnen zware sancties voorzien in het
geval u de voorschriften voor afvalverwerking van dit product niet opvolgt.
NEDERLANDS
Wyszukiwarka
Podobne podstrony:
MPQ wyd 00 fotokomorka
XA4 XW4 5 szybkie programowanie wyd 00
CNC 07 30 006 00 Wspornik łożyska
Stol krzyzowy proma KRS-475 pdf CNC-07-30-003.00, Wspornik napędu
Stol krzyzowy proma KRS-475 pdf CNC-07-30-006.00, Wspornik łożyska
CNC 07 30 003 00 Wspornik napędu
CNC 07 30 005 00 Wspornik silnika
MP wyd 01 fotokomorka
00
Ergonomia 00
3 Kategorie Wyd i Podatkowe
13 ZACHOWANIA ZDROWOTNE gr wtorek 17;00
Kordecki W, Jasiulewicz H Rachunek prawdopodobieństwa i statystyka matematyczna Przykłady i zadania
39 SC DS300 R BMW 5 A 00 XX
00 NPS
III CKN 694 00 id 210233 Nieznany
00 2 Nowa Wiosna
A8 00
więcej podobnych podstron