
HP Service Manager
for the Windows
®
and Unix
®
operating systems
Software Version: 9.20
Installation Guide
Document Release Date: June 2010
Software Release Date: June 2010

2
Legal Notices
The only warranties for HP products and services are set forth in the express warranty
statements accompanying such products and services. Nothing herein should be construed as
constituting an additional warranty. HP shall not be liable for technical or editorial errors or
omissions contained herein.
The information contained herein is subject to change without notice.
Restricted Rights Legend
Confidential computer software. Valid license from HP required for possession, use or copying.
Consistent with FAR 12.211 and 12.212, Commercial Computer Software, Computer Software
Documentation, and Technical Data for Commercial Items are licensed to the U.S.
Government under vendor's standard commercial license.
Copyright Notice
© Copyright 1996-2010 Hewlett-Packard Development Company, L.P.
Trademark Notices
Java™ is a US trademark of Sun Microsystems, Inc.
Microsoft® and Windows® are U.S. registered trademarks of Microsoft Corporation.
Oracle® is a registered trademark of Oracle Corporation and/or its affiliates.
UNIX® is a registered trademark of The Open Group.

3
Documentation Updates
The title page of this document contains the following identifying information:
•
Software Version number, which indicates the software version.
•
Document Release Date, which changes each time the document is updated.
•
Software Release Date, which indicates the release date of this version of the software.
To check for recent updates or to verify that you are using the most recent edition of a
document, go to:
http://h20230.www2.hp.com/selfsolve/manuals
This site requires that you register for an HP Passport and sign in. To register for an HP
Passport ID, go to:
http://h20229.www2.hp.com/passport-registration.html
Or click the
New users - please register
link on the HP Passport login page.
You will also receive updated or new editions if you subscribe to the appropriate product
support service. Contact your HP sales representative for details.

4
Support
Visit the HP Software Support web site at:
www.hp.com/go/hpsoftwaresupport
This web site provides contact information and details about the products, services, and
support that HP Software offers.
HP Software online support provides customer self-solve capabilities. It provides a fast and
efficient way to access interactive technical support tools needed to manage your business. As
a valued support customer, you can benefit by using the support web site to:
•
Search for knowledge documents of interest
•
Submit and track support cases and enhancement requests
•
Download software patches
•
Manage support contracts
•
Look up HP support contacts
•
Review information about available services
•
Enter into discussions with other software customers
•
Research and register for software training
Most of the support areas require that you register as an HP Passport user and sign in. Many
also require a support contract. To register for an HP Passport ID, go to:
http://h20229.www2.hp.com/passport-registration.html
To find more information about access levels, go to:
http://h20230.www2.hp.com/new_access_levels.jsp

5
Contents
1 Planning for an HP Service Manager Implementation
. . . . . . . . . . . . . . . . . . . . . . . . 11
Development environment . . . . . . . . . . . . . . . . . . . . . . . . . . . . . . . . . . . . . . . . . . . . 12
Test environment . . . . . . . . . . . . . . . . . . . . . . . . . . . . . . . . . . . . . . . . . . . . . . . . . . . . 13
Reporting environment . . . . . . . . . . . . . . . . . . . . . . . . . . . . . . . . . . . . . . . . . . . . . . . 13
Client tier . . . . . . . . . . . . . . . . . . . . . . . . . . . . . . . . . . . . . . . . . . . . . . . . . . . . . . . . . . . . 14
Server tier . . . . . . . . . . . . . . . . . . . . . . . . . . . . . . . . . . . . . . . . . . . . . . . . . . . . . . . . . . . . 14
Database tier. . . . . . . . . . . . . . . . . . . . . . . . . . . . . . . . . . . . . . . . . . . . . . . . . . . . . . . . . . 14
Web tier . . . . . . . . . . . . . . . . . . . . . . . . . . . . . . . . . . . . . . . . . . . . . . . . . . . . . . . . . . . . . . 15
Help server . . . . . . . . . . . . . . . . . . . . . . . . . . . . . . . . . . . . . . . . . . . . . . . . . . . . . . . . . . . 15
Additional integrations. . . . . . . . . . . . . . . . . . . . . . . . . . . . . . . . . . . . . . . . . . . . . . . . . . 16
. . . . . . . . . . . . . . . . . . . . . . . . . . . . . . . . . . . . . . . . . . . . . . . . . . . 21
General space requirements. . . . . . . . . . . . . . . . . . . . . . . . . . . . . . . . . . . . . . . . . . . . . . 23
Server connections . . . . . . . . . . . . . . . . . . . . . . . . . . . . . . . . . . . . . . . . . . . . . . . . . . . . . 23
Login ID. . . . . . . . . . . . . . . . . . . . . . . . . . . . . . . . . . . . . . . . . . . . . . . . . . . . . . . . . . . . . . 23
Case-sensitivity. . . . . . . . . . . . . . . . . . . . . . . . . . . . . . . . . . . . . . . . . . . . . . . . . . . . . . . . 24
Connectivity with Service Manager. . . . . . . . . . . . . . . . . . . . . . . . . . . . . . . . . . . . . . . . 24
Time zones for DB2 reporting . . . . . . . . . . . . . . . . . . . . . . . . . . . . . . . . . . . . . . . . . . . . 25
Page size . . . . . . . . . . . . . . . . . . . . . . . . . . . . . . . . . . . . . . . . . . . . . . . . . . . . . . . . . . . . . 25
Multiple file allocation . . . . . . . . . . . . . . . . . . . . . . . . . . . . . . . . . . . . . . . . . . . . . . . . . . 25
Catalog the DB2 database . . . . . . . . . . . . . . . . . . . . . . . . . . . . . . . . . . . . . . . . . . . . . . . 25
Code page considerations . . . . . . . . . . . . . . . . . . . . . . . . . . . . . . . . . . . . . . . . . . . . . . . . 26

6
General space requirements. . . . . . . . . . . . . . . . . . . . . . . . . . . . . . . . . . . . . . . . . . . . . . 28
Server connections . . . . . . . . . . . . . . . . . . . . . . . . . . . . . . . . . . . . . . . . . . . . . . . . . . . . . 28
Login ID . . . . . . . . . . . . . . . . . . . . . . . . . . . . . . . . . . . . . . . . . . . . . . . . . . . . . . . . . . . . . 28
Time zones for SQL Server reporting . . . . . . . . . . . . . . . . . . . . . . . . . . . . . . . . . . . . . . 29
Microsoft SQL Server transaction log size . . . . . . . . . . . . . . . . . . . . . . . . . . . . . . . . . . 29
Connectivity with Service Manager. . . . . . . . . . . . . . . . . . . . . . . . . . . . . . . . . . . . . . . . 30
General space requirements. . . . . . . . . . . . . . . . . . . . . . . . . . . . . . . . . . . . . . . . . . . . . . 33
Server connections . . . . . . . . . . . . . . . . . . . . . . . . . . . . . . . . . . . . . . . . . . . . . . . . . . . . . 33
Login ID. . . . . . . . . . . . . . . . . . . . . . . . . . . . . . . . . . . . . . . . . . . . . . . . . . . . . . . . . . . . . . 33
Time zones for Oracle reporting. . . . . . . . . . . . . . . . . . . . . . . . . . . . . . . . . . . . . . . . . . . 34
Connectivity with Service Manager. . . . . . . . . . . . . . . . . . . . . . . . . . . . . . . . . . . . . . . . 34
Oracle tablespaces and users . . . . . . . . . . . . . . . . . . . . . . . . . . . . . . . . . . . . . . . . . . . . . 35
Oracle 32-bit client libraries . . . . . . . . . . . . . . . . . . . . . . . . . . . . . . . . . . . . . . . . . . . . . 36
Case-sensitivity. . . . . . . . . . . . . . . . . . . . . . . . . . . . . . . . . . . . . . . . . . . . . . . . . . . . . . . . 36
Setting the case-sensitivity . . . . . . . . . . . . . . . . . . . . . . . . . . . . . . . . . . . . . . . . . . . . 36
Validate the case-insensitive unique indexes. . . . . . . . . . . . . . . . . . . . . . . . . . . . . . 37
. . . . . . . . . . . . . . . . . . . . . . . . . . . . . . . . . . . . . . . . . . . . . . . . . . . . . . . 41
Installation requirements. . . . . . . . . . . . . . . . . . . . . . . . . . . . . . . . . . . . . . . . . . . . . . . . 42
System requirements . . . . . . . . . . . . . . . . . . . . . . . . . . . . . . . . . . . . . . . . . . . . . . . . . . . 43
Database resources . . . . . . . . . . . . . . . . . . . . . . . . . . . . . . . . . . . . . . . . . . . . . . . . . . 43
Server resources. . . . . . . . . . . . . . . . . . . . . . . . . . . . . . . . . . . . . . . . . . . . . . . . . . . . . 44
Service Manager server setup . . . . . . . . . . . . . . . . . . . . . . . . . . . . . . . . . . . . . . . . . . . . 45
Uninstalling the Windows server . . . . . . . . . . . . . . . . . . . . . . . . . . . . . . . . . . . . . . . . . 46

7
Database resources . . . . . . . . . . . . . . . . . . . . . . . . . . . . . . . . . . . . . . . . . . . . . . . . . . 50
Server resources. . . . . . . . . . . . . . . . . . . . . . . . . . . . . . . . . . . . . . . . . . . . . . . . . . . . . 51
Other information . . . . . . . . . . . . . . . . . . . . . . . . . . . . . . . . . . . . . . . . . . . . . . . . . . . 51
Preliminary steps . . . . . . . . . . . . . . . . . . . . . . . . . . . . . . . . . . . . . . . . . . . . . . . . . . . . . . 53
Installing the server . . . . . . . . . . . . . . . . . . . . . . . . . . . . . . . . . . . . . . . . . . . . . . . . . . . . 54
Uninstalling the Service Manager server . . . . . . . . . . . . . . . . . . . . . . . . . . . . . . . . . . . 55
Kernel resource requirements . . . . . . . . . . . . . . . . . . . . . . . . . . . . . . . . . . . . . . . . . . . . 55
AIX server . . . . . . . . . . . . . . . . . . . . . . . . . . . . . . . . . . . . . . . . . . . . . . . . . . . . . . . . . 56
HP-UX server. . . . . . . . . . . . . . . . . . . . . . . . . . . . . . . . . . . . . . . . . . . . . . . . . . . . . . . 56
Linux server . . . . . . . . . . . . . . . . . . . . . . . . . . . . . . . . . . . . . . . . . . . . . . . . . . . . . . . . 58
Solaris 9 server . . . . . . . . . . . . . . . . . . . . . . . . . . . . . . . . . . . . . . . . . . . . . . . . . . . . . 60
Solaris 10 server . . . . . . . . . . . . . . . . . . . . . . . . . . . . . . . . . . . . . . . . . . . . . . . . . . . . 62
Temporary licenses . . . . . . . . . . . . . . . . . . . . . . . . . . . . . . . . . . . . . . . . . . . . . . . . . . . . . 64
Permanent licenses . . . . . . . . . . . . . . . . . . . . . . . . . . . . . . . . . . . . . . . . . . . . . . . . . . . . . 64
Using the web site. . . . . . . . . . . . . . . . . . . . . . . . . . . . . . . . . . . . . . . . . . . . . . . . . . . . . . 67
Saving your license key/password file to your system . . . . . . . . . . . . . . . . . . . . . . . . . 69
Horizontal scaling license requirements . . . . . . . . . . . . . . . . . . . . . . . . . . . . . . . . . . . . 69
. . . . . . . . . . . . . . . . . . . . . . . . . . . . . . . . . . . . . . . . . . . . . . . . . . . . . . . . 75
Upgrading the Windows client. . . . . . . . . . . . . . . . . . . . . . . . . . . . . . . . . . . . . . . . . . . . 76
Installation requirements. . . . . . . . . . . . . . . . . . . . . . . . . . . . . . . . . . . . . . . . . . . . . . . . 76
Service Manager client setup . . . . . . . . . . . . . . . . . . . . . . . . . . . . . . . . . . . . . . . . . . . . . 77
Defining a new client connection . . . . . . . . . . . . . . . . . . . . . . . . . . . . . . . . . . . . . . . . . . 78
Connecting to a Service Manager server . . . . . . . . . . . . . . . . . . . . . . . . . . . . . . . . . . . . 80

8
. . . . . . . . . . . . . . . . . . . . . . . . . . . . . . . . . . . . . . . . . . . . . . . . . . . . . 85
Determining the web architecture needed to support your web tier . . . . . . . . . . . . . . 89
Determining if the web tier requires a dedicated production web server . . . . . . . 89
Deploying the Service Manager web tier. . . . . . . . . . . . . . . . . . . . . . . . . . . . . . . . . . . . 90
Setting web client preferences from the web.xml configuration file . . . . . . . . . . . . . . 93
Setting the WebSphere class loader mode. . . . . . . . . . . . . . . . . . . . . . . . . . . . . . . . . . . 96
Endorsed JAR files . . . . . . . . . . . . . . . . . . . . . . . . . . . . . . . . . . . . . . . . . . . . . . . . . . . . . 97
ISetting the web application server heap size. . . . . . . . . . . . . . . . . . . . . . . . . . . . . . . . 97
Configuring the web server to work with Service Manager . . . . . . . . . . . . . . . . . . . . . 98
Setting the web browser requirements . . . . . . . . . . . . . . . . . . . . . . . . . . . . . . . . . . . . 100
Installing the JRE. . . . . . . . . . . . . . . . . . . . . . . . . . . . . . . . . . . . . . . . . . . . . . . . . . . . . 100
Installing the CTI applet . . . . . . . . . . . . . . . . . . . . . . . . . . . . . . . . . . . . . . . . . . . . . . . 102
Using the telephony web client . . . . . . . . . . . . . . . . . . . . . . . . . . . . . . . . . . . . . . . . . . 103
. . . . . . . . . . . . . . . . . . . . . . . . . . . . . . . . . . . . . . . . . . . . . . . . . . 105
Upgrading the Help Server . . . . . . . . . . . . . . . . . . . . . . . . . . . . . . . . . . . . . . . . . . . . . 106
Installation considerations. . . . . . . . . . . . . . . . . . . . . . . . . . . . . . . . . . . . . . . . . . . . . . 106
Testing the Help Server . . . . . . . . . . . . . . . . . . . . . . . . . . . . . . . . . . . . . . . . . . . . . . . . 107
Installation requirements. . . . . . . . . . . . . . . . . . . . . . . . . . . . . . . . . . . . . . . . . . . . . . . 108
Service Manager Help Server setup . . . . . . . . . . . . . . . . . . . . . . . . . . . . . . . . . . . . . . 109
Accessing the Help Server from the Windows client . . . . . . . . . . . . . . . . . . . . . . . . . 111
Accessing the Help Server from the web client. . . . . . . . . . . . . . . . . . . . . . . . . . . . . . 112

9
7 Client Configuration Utility Installation
. . . . . . . . . . . . . . . . . . . . . . . . . . . . . . . . . . . . 113
Image editing guidelines and considerations . . . . . . . . . . . . . . . . . . . . . . . . . . . . . . . 118
Providing custom images from a local folder. . . . . . . . . . . . . . . . . . . . . . . . . . . . . . . . 118
Providing custom images from a web server virtual directory. . . . . . . . . . . . . . . . . . 119
. . . . . . . . . . . . . . . . . . . . . . . . . . . . . . . . . . . . . . . . . . . . . . . 125
Installation requirements. . . . . . . . . . . . . . . . . . . . . . . . . . . . . . . . . . . . . . . . . . . . . . . 126
Kernel resource requirements for HP-UX . . . . . . . . . . . . . . . . . . . . . . . . . . . . . . . . . . 126
Installing the search engine by using the installation wizard . . . . . . . . . . . . . . . . . . 127
Connecting to the search engine . . . . . . . . . . . . . . . . . . . . . . . . . . . . . . . . . . . . . . . . . 133
Using a Web Service Connection . . . . . . . . . . . . . . . . . . . . . . . . . . . . . . . . . . . . . . . . . 134
. . . . . . . . . . . . . . . . . . . . . . . . . . . . . . . . . . . . . . . . . . . . . . . . . . . . . 137

10
. . . . . . . . . . . . . . . . . . . . . . . . . . . . . . . . . . . . . . . . . . . . . . . . . . 147
Start the server from the Windows command prompt . . . . . . . . . . . . . . . . . . . . . . . . 148
Start the server from Windows services . . . . . . . . . . . . . . . . . . . . . . . . . . . . . . . . . . . 148
Start the server from the Unix command line . . . . . . . . . . . . . . . . . . . . . . . . . . . . . . 149

11
1 Planning for an HP Service Manager
Implementation
This chapter describes the ways in which you can implement HP Service
Manager 9.20 in your organization.
Topics in this section include:
•
Types of installation environments
•
Components of a production environment
•

12
Chapter 1
Types of installation environments
You can install Service Manager in several types of environments:
•
Production environment
•
Non-production environments
—
Development environment
—
Test environment
—
Reporting environment
Production environment
Installing Service Manager in a production environment allows you to deploy
your customizations and provide services to your intended user base. Most
production environments run 24 hours a day and 7 days a week, support many
simultaneous users, and process large numbers of transactions and requests.
In a production environment, you typically install the various components of
Service Manager on dedicated servers to maximize system performance.
Non-production environments
The following sections describe some of the common non-production purposes
for which you can install Service Manager.
Development environment
Installing Service Manager in a development environment allows you to
evaluate application features and customize your installation prior to
deployment in a production environment. In a development environment, you
typically install all Service Manager components on one test system with a
limited number of users and data.

Planning for an HP Service Manager Implementation
13
Test environment
A test environment is an installation that mirrors your production
environment where you can test performance, upgrades, and backup and
restore procedures. In a test environment, you typically install Service
Manager in the same configuration as your production environment.
Reporting environment
A reporting environment is an installation that mirrors the data from your
production environment that you can use to generate and view reports. In a
reporting environment, you typically install Service Manager to synchronize
data with your production environment but limit the number of users that
access the system.
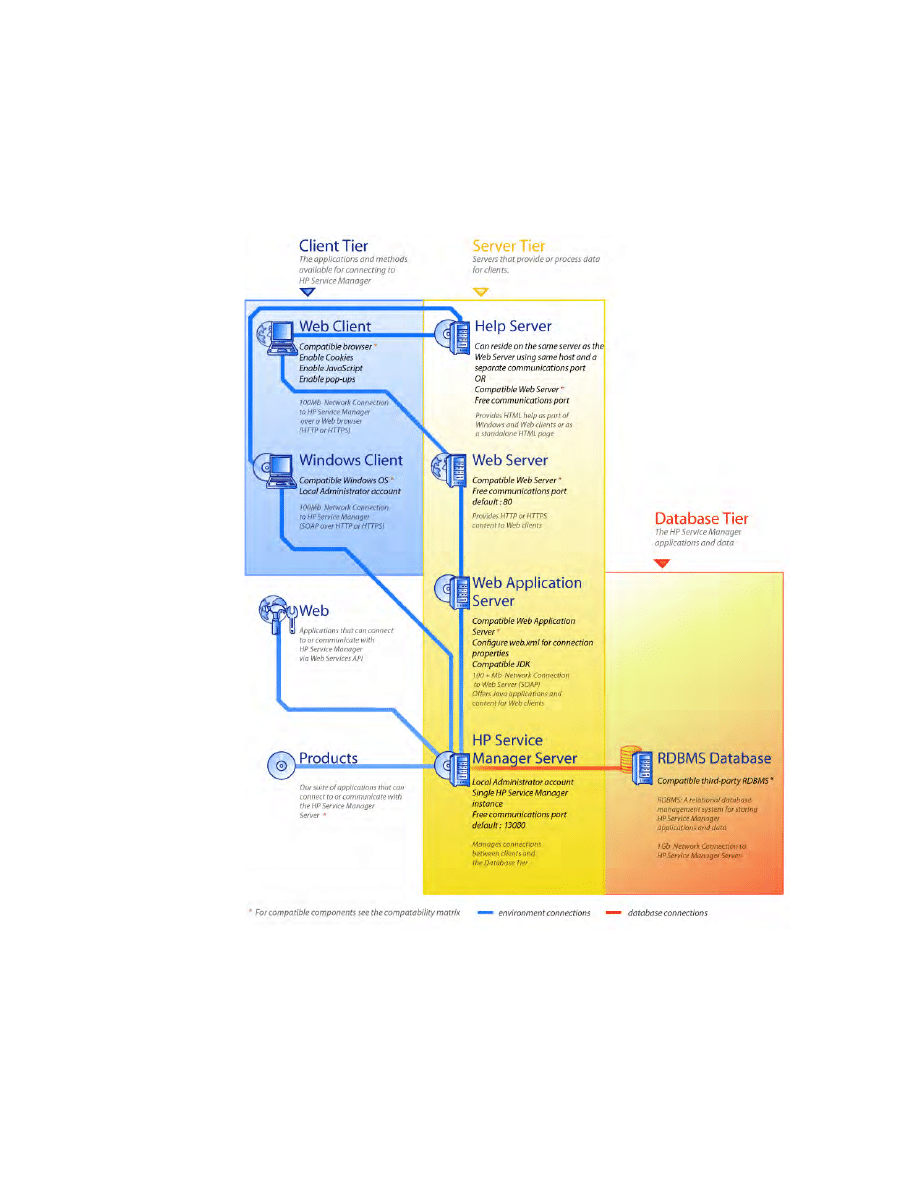
Components of a production environment
A production environment consists of the following components:
Table 1
Components of a production environment
Tier
Requirement Components
Client tier
Mandatory
Web clients (optional)
Windows clients
Server tier
Mandatory
Service Manager server
Database tier
Mandatory
RDBMS on separate server (required)
Web tier
Optional
Web application server on separate server
Web server on separate server
Service Manager
webtier-9.20.war
file deployed
Supporting servers
Optional
Help Server
Additional connections
and integrations
Optional
HP products
Web services

14
Chapter 1
Client tier
The client tier consists of two components:
•
web client
•
Windows client
The web client allows users to connect to the Service Manager server by using
a web browser. You must install the web tier to support web clients. You do not
need to install or download any additional software on the user’s desktop.
The Windows client allows users to connect to the Service Manager server
through a dedicated client. You must install the Windows client separately on
each system that you want to connect to Service Manager.
See Service Manager’s online help for a list of differences between the web and
Windows clients.
Server tier
The server tier consists of the Service Manager server. The Service Manager
server runs the Service Manager applications and manages the connections
between the client and web tiers to the database tier.
See the What's New in HP Service Manager 9.20 online help for information
about changes to the Service Manager server. See the HP Service Manager
9.20 Upgrade Guide before upgrading your server.
Database tier
The database tier consists of one or more supported RDBMS servers. Your
Service Manager application data must reside on an external RDBMS server.
For more information, see

Planning for an HP Service Manager Implementation
15
Web tier
The web tier is an optional feature that consists of the following components:
•
Web application servers
•
Web servers
•
Service Manager
webtier-9.20.war
file
The web application servers are third-party server software where you deploy
the
webtier-9.20.war
file to support connections from Service Manager web
clients.
The web servers are third-party server software that provide the HTTP or
HTTPS content to Service Manager web clients. Some web application servers
also include built-in or bundled web servers.
The Service Manager
webtier-9.20.war
file is a web archive that you must
deploy to a compatible web server to support connections from Service
Manager web clients.
See the Service Manager Compatibility Matrix for a complete and up-to-date
list of HP integrations. To access the HP Support matrices you must register
as an HP Passport user and sign in.
To register for an HP Passport ID, go to:
http://h20229.www2.hp.com/passport-registration.html.
If you already have an HP Passport account, go to:
http://support.openview.hp.com/sc/support_matrices.jsp.
Help server
The Service Manager Help Server is a preconfigured web server that enables
end users to access documentation from the Windows and web clients as well
as directly from a web browser. See
on page 105 for
more information about this optional feature.

16
Chapter 1
Additional integrations
The following HP products are integrated with the HP Service Manager
server:
•
HP Asset Manager (through Connect-It)
•
HP UCMDB (through Web Services)
•
HP Business Availability Center (through Connect-It)
•
HP Configuration Management (through Connect-It)
•
HP Operations Manager for Windows (through HP OpenView
ServiceCenter Automation, also know as SCAuto)
•
HP Operations Manager for Unix (through SCAuto)
•
HP Network Node Manager (through SCAuto)
•
Release Control (through Web Services)
•
HP DecisionCenter, through Connect-It
See the Service Manager Compatibility Matrix for a complete and up-to-date
list of HP integrations. To access the HP Support matrices you must register
as an HP Passport user and sign in.
To register for an HP Passport ID, go to:
http://h20229.www2.hp.com/passport-registration.html.
If you already have an HP Passport account, go to:
http://support.openview.hp.com/sc/support_matrices.jsp.
Planning for an HP Service Manager Implementation
17
These components are logically connected as depicted in the following
diagram:

18
Chapter 1
Implementation reference list
The Service Manager 9.20 release offers a wide variety of significant new
features. Service Manager offers various configuration and deployment
options that you should consider from the start to maximize the benefits of the
product, ease its integration into your environment, and provide a foundation
for future support and updates. The checklist below provides considerations
and recommended steps that you can incorporate into your implementation
and upgrade plans.
Follow these steps to implement Service Manager:
1
Determine the hardware required for your Service Manager production
environment.
For an estimate of the server hardware required, see the Basic Server
Sizing Worksheet for instructions. This worksheet is available for
download from the Customer Support web site’s Knowledge Base.
2
Are you upgrading from ServiceCenter?
Yes. See the HP Service Manager 9.20 Upgrade Guide for instructions.
3
Configure a connection to your RDBMS.
See
on page 21 for instructions.
4
Install Service Manager server in a development environment.
See
on page 41 for instructions.
5
Determine the clients (Windows and/or web) that will connect to Service
Manager.
See the Choosing Clients Worksheet for instructions. This worksheet is
available for download from the Customer Support web site’s Knowledge
Base.
6
Do you need to install Windows clients?
Yes. Review the Windows client installation requirements. See
7
Do you need to support web clients?
Yes. Install the Service Manager web tier in a development environment.
See
on page 85 for instructions.
8
Do you want to provide online help?

Planning for an HP Service Manager Implementation
19
Yes. Install the Help Server. See
on page 105 for
instructions.
No. Go to
9
Do you want to make customizations to your Windows clients such as
changing the splash screen, adding custom images, adding company
branding, adding default settings and connections, and configuring
connections to a Help Server?
Yes. Install the Client Configuration Utility. See
No. Install Windows clients in your development environment, and then
go to
10
Customize a Windows client with the Client Configuration Utility.
See
Client Configuration Utility Installation
11
Deploy the customized Windows client to your development environment.
12
Tailor the Service Manager applications to your environment.
a
Add or update the operator records in your development environment
with new capability words.
See the Service Manager online help for instructions about adding
new operators and a list of new capability words.
b
Optimize the Service Manager interface in your development
environment. For example, you can add public favorites and
dashboards, tailor forms for viewing in the web tier, and tailor forms
for accessibility-assisted users.
See the Service Manager online help for instructions on adding new
favorites and dashboards, tailoring forms for the web tier, and
addressing the needs of accessible-assisted users.
c
Configure the Service Manager server to accept connections and
integrations from external data sources and applications such as
Release Control, Connect-It, and Web Services.
See the Service Manager online help for instructions on enabling
integrations to other applications.

20
Chapter 1
See the Service Manager Compatibility Matrix for a list of
applications that can connect to and share data with Service Manager.
To access the HP Support matrices you must register as an HP
Passport user and sign in.
To register for an HP Passport ID, go to:
http://h20229.www2.hp.com/passport-registration.html.
If you already have an HP Passport account, go to:
http://support.openview.hp.com/sc/support_matrices.jsp.
13
Test your development environment.
Review your client and server customizations, client connections, and
overall system performance. Correct any problems and retest the
development environment.
14
Convert or push your development environment to your production
environment.
To convert the development environment connect the Service Manager
server to your production environment network and deploy necessary
clients to the production environment.
To push the development environment to your production environment,
create an unload file of your application and operator customizations and
load the file into your production environment system. See the Service
Manager online help for instructions.

21
2 Database Preparation
This chapter explains database configuration requirements that must be met
prior to installing the HP Service Manager database into your Relational
Database Management System (RDBMS).
The following recommendations assume the implementation of conventional
database tuning and performance measures. Actual results may vary on a
system-by-system basis, based on the tuning expertise available and
hardware and software selections. These recommendations are intended only
as a guide and should not be implemented on a production system without
extensive testing.
This chapter is for system and database administrators preparing to install
and support the HP Service Manager server.
Topics in this section include:
•
IBM DB2 Universal Database preparation
•
Microsoft SQL Server preparation
•
•

22
Chapter 2
IBM DB2 Universal Database preparation
This section outlines the implementation of supported IBM DB2 Universal
Databases for Service Manager. It builds from the premise that Service
Manager and DB2 Universal have already been installed.
You must complete the following procedures prior to the initial load of your
Service Manager database.
Task 1:
Allocate data space large enough to hold your data.
See
Task 2:
Allocate enough additional server connections for all your users.
See
Task 3:
Create a login ID and password for Service Manager to use when it connects to your
DB2 server.
See
Task 4:
If you plan to report on Service Manager data using DB2 tools, set up time zones.
See
Task 5:
Set the DB2 case-sensitivity
See
Task 6:
Enable connectivity for DB2
See
Connectivity with Service Manager
Task 7:
Set the page size to 32 KB.
See
Task 8:
Enable the database for multipage file allocation.
See
A fully qualified DB2 Universal Database administrator should assist with
this preparation.

Database Preparation
23
Task 9:
Catalog the database.
See
Task 10: Set database code page.
See
General space requirements
If you are establishing a new Service Manager system, allocate at least 1 GB
of data space for a test system. The amount of space necessary for a
production system varies depending on the amount of data you need to store
and your specific implementation.
Server connections
Every Service Manager thread, foreground or background, requires a
connection to your DB2 server. Service Manager background processors
require 17 connections to run. When you configure your database, make sure
that you allocate enough connections for all of your users. For additional
information, refer to your DB2 vendor documentation.
Login ID
Create a login ID and password for Service Manager to use to connect to your
DB2 server. The login must have CREATE/ALTER/DROP TABLE authority
for the target database.
Place all Service Manager data in one or more dedicated table spaces within a
single DB2 instance. These table spaces must contain Service Manager data
only. Multiple instances consume more system resources than a
single-instance solution.
CREATE/ALTER/DROP TABLE authority is only required during
installation and creation of new Service Manager tables, and only if you allow
Service Manager to issue the DDL to create tables and indexes.

24
Chapter 2
The login ID requires the following DB2 connection privileges:
•
Connect to database
•
Create tables
•
Create schemas implicitly
When you log on to Service Manager, it creates a table in the default table
space defined for that login ID.
Case-sensitivity
Service Manager supports only case-sensitive DB2.
Connectivity with Service Manager
Service Manager connects to the database through a DB2 client. To set up the
connection between the Service Manager application server and your DB2
server, you will need the following information:
•
Name of the database.
•
Login and password required to connect to the database server. This is the
login and password created in
The Service Manager initialization file is called
sm.ini
. It must be present in
the Service Manager server
RUN
directory. You can set the Service Manager
server parameters in the
sm.ini
file.
After you create the connection, you will be able run the configuration utility,
which verifies the connection and loads the system to DB2. For more
information, see
Service Manager requires the Use privilege on all tables spaces that it uses,
including temporary tablespaces.

Database Preparation
25
Time zones for DB2 reporting
If you plan to report on Service Manager data using DB2 tools, set the
sqltz
parameter in
sm.ini
file. For information about using the
sqltz
parameter,
see the System Parameters topic in the Service Manager Help.
Page size
The default page size in DB2 is 4096 bytes (4 KB). Service Manager requires
32768 byte (32 KB) pages. Be sure to create a 32 KB page-size buffer pool,
table space, and system temporary table space. Grant the login ID access to
the new table spaces.
Multiple file allocation
Enabling multipage file allocation reduces overhead of large insert operations.
It does so by causing DB2 to allocate new data pages in a table space one
multipage extent at a time, rather than one page at a time.
To enable multipage file allocation:
1
As the instance owner, disconnect all applications from the database.
2
Run the following command:
db2empfa <dbname>
Catalog the DB2 database
To catalog the database:
1
Install the DB2 client on your Service Manager server machine.
2
Catalog the database you want to connect to by using the DB2 client
utilities.
If you use different time zone settings, the dates contained in reports made by
your DB2 utility may be inaccurate.
Enable multipage file allocation on SMS table spaces only.

26
Chapter 2
3
Use the name you defined when you performed the catalog operation as
the database name for the configuration tool.
Code page considerations
Create your DB2 database with a UTF-8 code page for use with Service
Manager. All data passed from Service Manager to the DB2 client is encoded
in UTF-8; therefore, using a UTF-8-based DB2 reduces the overhead of
converting data and prevents loss of special characters.

Database Preparation
27
Microsoft SQL Server preparation
This section outlines the implementation of supported Microsoft SQL Server
databases for Service Manager. It builds from the premise that Service
Manager and SQL Server have already been installed.
You must complete the following procedures prior to the initial load of your
Service Manager database.
Task 1:
Allocate enough additional server connections for all your users.
See
Task 2:
Create a login ID and password for Service Manager to use when it connects to your
SQL Server.
See
Task 3:
If you plan to report on Service Manager data using SQL Server tools, set up time
zones.
See
Time zones for SQL Server reporting
Task 4:
Enable Truncate Log on Checkpoint for the target database.
See
Microsoft SQL Server transaction log size
Task 5:
Create an ODBC Driver system data source.
See
Connectivity with Service Manager
Task 6:
Set desired case-sensitivity.
See
Task 7:
Set the SQL server code page.
See
A fully qualified Microsoft SQL Server administrator should assist with this
preparation.

28
Chapter 2
General space requirements
If you are establishing a new Service Manager system, allocate at least 1 GB
of data space for a test system. The amount of space necessary for a
production system varies depending on the amount of data you need to store
and your specific implementation.
Server connections
Every Service Manager thread, foreground or background, requires a
connection to your SQL Server. Service Manager background processors
require 17 connections to run. When you configure your database, make sure
that you allocate enough connections for all of your users. For additional
information, refer to your SQL Server documentation.
Login ID
Create a login ID and password for Service Manager to use to connect to your
SQL Server. The login must have CREATE/ALTER/DROP TABLE authority
for the target database. When you log on to Service Manager, it creates a table
in the default table space defined for that login ID.
Place all Service Manager data in a dedicated table space within a single SQL
Server instance. This table space must contain Service Manager data only.
Multiple instances consume more system resources than a single-instance
solution.
CREATE/ALTER/DROP TABLE authority is only required during
installation and creation of new Service Manager tables, and only if you allow
Service Manager to issue the DDL to create tables and indexes.

Database Preparation
29
Time zones for SQL Server reporting
If you plan to report on Service Manager data using SQL Server tools, set the
sqltz
parameter in
sm.ini
file. For information about using the
sqltz
parameter, see the System Parameters topic in the Service Manager Help.
Granting access to the ODBC driver for reporting
To grant operator access to the ODBC driver for reporting purposes:
1
Log on to Service Manager with System Administrator privileges.
2
Click
System Administration > Ongoing Maintenance > Operators
.
3
Click
Search
to locate the Operator record to edit.
4
Select the Startup tab.
5
In the
Execute Capabilities
field, use the Fill function to select ODBC. This
grants operator access to the ODBC Driver.
6
Click
Save
.
7
Click
OK
.
Microsoft SQL Server transaction log size
During initial system load, Service Manager places a high insert transaction
load on your SQL server. To prevent the transaction log from growing too
large, set the Truncate Log On Checkpoint option for the target database on
your SQL server.
If you use different time zone settings, the dates contained in reports made by
your SQL Server utility may be inaccurate.

30
Chapter 2
Connectivity with Service Manager
General connectivity rules:
•
The database name entered in the configuration tool must correspond to
the ODBC Driver system data source.
•
Configure the ODBC Driver data source as a System DSN. Set it up to use:
—
SQL server authentication
—
ANSI quoted identifiers
—
ANSI nulls, paddings, and warnings
•
Service Manager is compatible with 64-bit Microsoft SQL Server 2005.
—
If you create the system DSN by using a 64-bit ODBC administrator,
Service Manager will not work.
—
If your Service Manager is installed on a 64-bit Windows system,
create the System DSN entry for the ODBC Driver by launching
odbcad32.exe from: C:\WINDOWS\SysWOW64.
This command creates a 32-bit SQL Native Client System DSN driver
that Service Manager uses.
•
If your Service Manager is installed on a 32-bit Windows system, Service
Manager uses the 32-bit SQL Native Client System DSN driver.
Enabling connectivity
Service Manager connects to the database through an ODBC connection. To
set up the connection between the Service Manager application server and
SQL Server, you will need the following information:
•
Name of the database.
•
Login and password required to connect to the database server. This is the
login and password created in
The Service Manager initialization file is called
sm.ini
. It must be present in
the Service Manager server
RUN
directory. You can set the Service Manager
server parameters in the
sm.ini
file.

Database Preparation
31
After you create the connection, you can run the configuration utility, which
verifies the connection and loads the system to the SQL Server. For more
information, see
Case-sensitivity
Service Manager supports both case insensitive and case-insensitive Microsoft
SQL server. To use HP Service Manager in case-insensitive mode, you must
select a case-insensitive collation on the SQL Server before installing
HP Service Manager. You can specify the desired case-sensitivity for sort
order during the creation of the database.
Setting SQL Server case-sensitivity
Set the SQL Server database to the desired collation when you create it.
•
To run in case-sensitive mode, pick a collation that ends with
_BIN
, such
as
Latin1_General_BIN
.
•
To run in case-insensitive mode, pick a collation that ends with
_CI_AS
,
such as
Latin1_General_CI_AS
.
Service Manager will automatically detect the settings and perform correctly.
Code page considerations
Create your SQL Server database with a codepage that supports the character
set of most of your data. Since SQL Server does not support a UTF-8 code
page, you might want to use data types that support multiple character sets.
If you choose a Western European code page, the system cannot store Eastern
European or Asian characters in columns defined as VCHAR, CHAR, or
TEXT data type. If you must store characters from different languages,
consider using the NVARCHAR, NCHAR, or NTEXT data types instead.

32
Chapter 2
Oracle Server preparation
This section outlines the implementation of supported Oracle databases. It
builds from the premise that Service Manager and Oracle have already been
installed.
You must complete the following procedures prior to the initial load of your
Service Manager database.
Task 1:
Allocate data space large enough to hold your data.
See
Task 2:
Allocate enough additional server connections for all your users.
See
Task 3:
Create a login ID and password for Service Manager to use when it connects to your
Oracle server.
See
Task 4:
If you plan to report Service Manager data using Oracle tools, set up time zones.
See
Time zones for Oracle reporting
Task 5:
Make sure that your tablespaces are set up properly.
See
Task 6:
Update the Unix environmental variable with the path to your Oracle 32-bit client
libraries.
See
Oracle 32-bit client libraries
Task 7:
Install an Oracle client on the Service Manager system.
See
A fully qualified Oracle administrator should assist with this preparation.

Database Preparation
33
Task 8:
Set desired case-sensitivity.
See
Task 9:
Set the database code page
See
General space requirements
If you are establishing a new Service Manager system, allocate at least 1 GB
of data space for a test system. The amount of space necessary for a
production system varies depending on the amount of data you need to store
and your specific implementation.
Server connections
Every Service Manager thread, foreground or background, requires a
connection to your Oracle server. Service Manager background processors
require 17 connections to run. When you configure your database, make sure
that you allocate enough connections for all of your users. For additional
information, refer to your Oracle documentation.
Login ID
Create a login ID and password for Service Manager to use to connect to your
Oracle server. The login ID must have the privileges listed below. When you
log on to Service Manager, it creates a table in the default table space defined
for that login ID.
Service Manager requires the following Oracle user privileges:
•
Connect
•
Create, Alter, Drop a table
Place all Service Manager data in a dedicated table space within a single
Oracle instance. This table space must contain Service Manager data only.
Multiple instances consume more system resources than a single-instance
solution.

34
Chapter 2
•
Create, Alter, Drop an index
•
Select Any Dictionary
•
Alter Session Privileges
You can provide these privileges to an Oracle user by using the following
oracle statements:
create user <smadmin> identified by <smadmin> default
tablespace <users> quota unlimited on <users>;
grant connect, resource, select any dictionary to <smadmin>;
Time zones for Oracle reporting
If you plan to report on Service Manager data using Oracle tools, set the
sqltz
parameter in
sm.ini
file. For information about using the
sqltz
parameter, see the System Parameters topic in the Service Manager Help.
Connectivity with Service Manager
Service Manager connects to the database through an Oracle client. To set up
the connection between the Service Manager server and Oracle, you will need
the following information:
•
Name of the database.
•
Login and password required to connect to the database server. This is the
login and password created in
The Service Manager initialization file is called
sm.ini
. It must be present in
the Service Manager server
RUN
directory. You can set the Service Manager
server parameters in the
sm.ini
file.
After you create the connection, you can run the configuration utility, which
verifies the connection and loads the system to Oracle. For more information,
see
CREATE/ALTER/DROP TABLE privileges are only required during
installation and creation of new Service Manager tables, and only if you allow
Service Manager to issue the DDL to create tables and indexes.
If you use different time zone settings, the dates contained in reports made by
your Oracle utility may be inaccurate.

Database Preparation
35
Setting up connectivity
Follow these steps to set up connectivity to your Oracle database:
1
Install the Oracle client on your Service Manager server machine.
2
Configure a connection to the Oracle server in the
tnsnames.ora
file.
Define the name in the
tnsnames.ora
file.
•
On Unix platforms, the
tnsnames.ora
file is located in
$ORACLE_HOME/network/admin or can be specified using the
TNS_ADMIN environment variable.
•
On Windows platforms, the tnsnames.ora file is located in the Oracle
Home
[%ORACLE_HOME%/network/admin
] directory.
3
Specify the name of the Oracle database connection in the sqldb
parameter in the
sm.ini
file. You can do this after you install the Service
Manager server by running the Configuration tool and specifying the
database name you provided in the
tnsnames.ora
file. For more
information, see
Oracle tablespaces and users
Most tables on an Oracle server hold less than 50 KB of data. Service Manager
sets the initial storage space size when creating the SQL tables.
When manually creating a new Oracle instance for Service Manager:
•
Create the database with a block size of 8 KB or a multiple thereof.
•
Create a separate table space for the Service Manager data, and make this
the default table space for the Service Manager user.
•
Set the TEMPORARY table space for the Service Manager user to an
appropriate temporary table space.
Service Manager requires 32 bit Oracle Client library, which can be
found in the Oracle 64 bit Client installation directory or Oracle 32
bit Instant Client directory. Please refer to the Oracle site to
download the proper Oracle client for the platform where you plan
to run Service Manager server.

36
Chapter 2
Oracle 32-bit client libraries
Follow these steps to set your Unix environment variable for Oracle:
1
Find the path to your Oracle client’s 32-bit shared libraries.
2
Set the Unix environment variable as shown in the following examples. In
these examples, the path to the Oracle client shared libraries is set
relative to the Oracle environment variable
$ORACLE_HOME
.
C shell:
setenv LD_LIBRARY_PATH $LD_LIBRARY_PATH:
$ORACLE_HOME/lib32
Korn shell:
export LD_LIBRARY_PATH=$LD_LIBRARY_PATH:
$ORACLE_HOME/lib32
Case-sensitivity
Service Manager supports case-insensitivity for Oracle 11.2 and later. For
earlier versions of Oracle, Service Manager requires a case-sensitive database.
Setting the case-sensitivity
You can set the case-sensitivity of a new Oracle database when creating it or
modifying the case-sensitivity of an existing database.
To set case-sensitivity on a new Oracle database:
1
While creating a new Oracle instance, choose “All Initialization
Parameters” and modify the parameters.
2
Set the case-sensitivity as described in the following table.
Be sure to mark the Override Default checkbox for the NLS_SORT
and NLS_COMP parameters.
Parameter name
Case-sensitive
Case-insensitive
NLS_SORT
BINARY
BINARY_CI
NLS_COMP
BINARY
LINGUISTIC

Database Preparation
37
3
In Service Manager, verify that parameters are in effect by querying using
the following SQL statement:
select parameter, value from nls_instance_parameters;
The value for NLS_SORT and NLS_COMP should match your selection.
To change an existing case-sensitive Oracle database with Service Manager
data to be case-insensitive:
1
Backup all Service Manager data.
Run “
sm -system_unload -system_directory:<path to where
you want to store the Service Manager data unload files>
”.
2
Log in to Oracle as a sys admin user and issue the following statements:
alter system set NLS_SORT=BINARY_CISCOPE=SPFILE;
alter system set NLS_COMP=LINGUISTICSCOPE=SPFILE;
create pfile from spfile;
3
Shut down and restart the Oracle instance.
4
Drop all Service Manager tables.
5
In Service Manager, verify that parameters are in effect by querying using
the following SQL statement:
select parameter, value from nls_instance_parameters;
The value for NLS_SORT and NLS_COMP should match your selection.
6
Remove
groupname
,
sqldebug,
and any other debugging parameters from
the
sm.ini
file, and then run “
sm -system_load
-system_directory:<path to the Service Manager data
unload files>
”.
Validate the case-insensitive unique indexes
During the initial system load, Service Manager created a set of
case-insensitive indexes for each table, based on the keys in that table. Service
Manager logs these indexes first time reads a table when the
sqldebug:1
parameter is in the
sm.ini
file. You can review the settings created for each
table by viewing the
sm.log
file.
If you are running Oracle on parallel servers, be sure to replicate the
parameter file to all instances of Oracle.

38
Chapter 2
The case-insensitive unique indexes should be as Oracle function-based
indexes where the Column Expression is:
NLSSORT("<field name>",'nls_sort=''BINARY_CI''').
To verify whether the case-insensitive unique indexes are being created with
the correct column expression:
1
Set
sqldebug:1
in the
sm.ini
file, located in the
<SM_install_location>\Server\RUN
directory.
2
Start Service Manager.
3
Check the
sm.log
file, located in the
<SM_install_location>\Server\logs
directory.
The following entry in the log file indicates that the Oracle instance is set to
case insensitive, and that you were able to connect to it successfully.
The following information in the log file indicates that the Dbdict table has an
index, DBDICTM1C989DE64, with a key called "NAME", which is
case-insensitive.
RTE I Oracle server settings for language, territory and character set:
AMERICAN_AMERICA.AL32UTF8 (AL16UTF16)
RTE I OCI Client settings for language, territory and character set:
AMERICAN_AMERICA.AL32UTF8 (UTF16)
....
RTE I Oracle instance setting for NLS_SORT is set to BINARY_CI
RTE I Oracle instance setting for NLS_COMP is set to LINGUISTIC
...
RTE I Oracle session is set up in CASE INSENSITIVE mode
RTE D Table Name: DBDICTM1
RTE D Schema Name Index Name
RTE D ------------------------------ ------------------------------
RTE D SMDB DBDICTM1C989DE64
RTE D ------------------------------ ------------------------------
(Lines continue)
Type Column Name Column Expression
---- ------------------------------ ---------------------------------------
U SYS_NC00003$ NLSSORT("NAME",'nls_sort=''BINARY_CI''')
---- ------------------------------ ---------------------------------------

Database Preparation
39
Code page considerations
Create your Oracle database with a UTF-8 code page for use with Service
Manager. All data passed from Service Manager to the Oracle client is
encoded in UTF-8, therefore using a UTF-8-based Oracle will reduce overhead
for converting data and prevent loss of special characters.

40
Chapter 2
Installing the sample database
A copy of SQL Server Express Edition is included on the installation DVD for
demonstration purposes only. You will need an enterprise-level RDBMS for
use in your development, test, and production systems.
Follow these steps to install the sample database:
1
Log in to the Windows server as a user with local administrator privileges.
2
Insert the Service Manager installation DVD into the appropriate drive of
the server.
If you are installing on a system that has auto-run enabled, the DVD
browser starts automatically. If auto-run is disabled, follow these steps to
start the DVD browser manually.
a
Navigate to the DVD directory.
b
Open
clickme.htm
.
3
Click
Install SQLServer2005 for use with HP Service Manager for testing
purposes only.
The SQLServer folder opens.
4
Double-click
SetupSQLServer.bat.
5
When prompted, press any key to exit the installation.
The sample database is now installed and has the following properties.
The default settings in the out-of-box
sm.cfg
and
sm.ini
files are set up to
work with this sample database. To connect to a different database server, set
the appropriate values using the Configuration Tool (see
Instance Name:
SMDEMO
Security Mode:
SQL
Database Name:
SMDEMO
SQL login/user:
SA
SA password:
SM@DEMODATA1
Collation:
Latin1_General_BIN

41
3 Server Installation
You can install HP Service Manager on a Windows or Unix server. This section
contains information about installation requirements and how to install the
server.
Topics in this section include:
•
Installing the server on Windows
•
•
•
•
Refer to the HP Service Manager Upgrade Guide for instructions on how to
upgrade the server.
Before you can install the Service Manager server on AIX, HP-UX, and
Solaris systems, you must install JVM 1.6. Refer to the Java documentation
for instructions on how to install JVM.

42
Chapter 3
Installing the server on Windows
For complete information about current platform requirements and
compatibility, go to the Customer Support web site at the following URL:
http://support.openview.hp.com/
Installation requirements
To install HP Service Manager on a Windows server, you’ll need the following:
•
A compatible Windows operating system
•
Current Windows updates for your operating system
•
1 GB RAM minimum (recommended)
—
For production purposes, RAM is based on the expected user load.
•
Local administrator account to install on the Windows server
For more information, see the Service Manager Compatibility
Matrix. The HP Support matrices require that you register as an
HP Passport user and sign in.
To register for an HP Passport ID, go to:
http://h20229.www2.hp.com/passport-registration.html.
If you already have an HP Passport account, go to:
http://support.openview.hp.com/sc/support_matrices.jsp.

Server Installation
43
System requirements
Make sure that your system meets the following requirements before
installing Service Manager.
Database resources
Service Manager requires the following relational database system (RDBMS)
resources.
Table 1
Windows system requirements for server installation
Requirement
Resources needed
Disk space
400 MB for server installation
TCP/IP
service name
During the Service Manager server configuration,
the system prompts you for a valid TCP/IP port. The
port number you choose for Service Manager must be
greater than 1024.
Table 2
Database requirements for server installation
Requirement
Resources needed
RDBMS server
Install and configure a supported RDMS server:
•
IBM DB2
•
Oracle
•
MS SQL Server
See the Service Manager compatibility matrix for a
list of currently supported RDBMS servers.
RDBMS client
Install and configure a supported database client for
your RDBMS server.
•
DB2 client
•
Oracle client
•
Windows ODBC DSN defined for SQL Server
See the Service Manager compatibility matrix for a
list of currently supported RDBMS clients.

44
Chapter 3
Server resources
The Service Manager server uses the following resources.
Table 3
Service Manager server system resources
Resource
Definition
Processes
The system starts one process for each sm command
line in the
sm.cfg
file. By default, each process is
limited to 50 concurrent user sessions. The system
assigns each user session or background process a
dedicated thread.
•
If you start background processes by using the sm
system start command in the
sm.cfg
file, then the
sm processes own the background process threads.
•
If you start the background processes from a user
session inside Service Manager, then the thread
controller process that owns the user session also
owns the background process threads.
To allow more than 50 concurrent user sessions, refer
to the server implementation options topic in the help.
Shared Memory
A server uses approximately 50 MB of base shared
memory and requires an additional 5 MB of shared
memory for every 50 users.
You can specify the amount of shared memory the
system allocates by using the
shared_memory
parameter in the
sm.ini
file.

Server Installation
45
Service Manager server setup
Follow these steps to install the Service Manager server:
1
Log in to the Windows server as a user with local administrator privileges.
2
Insert the Service Manager installation DVD into the appropriate drive of
the server.
If you are installing on a system that has auto-run enabled, the DVD
browser starts automatically. If auto-run is disabled, follow these steps to
start the DVD browser manually.
a
Navigate to the DVD directory.
b
Open
clickme.htm
.
3
Click
Install HP Service Manager Server for Windows
.
4
Click
Run
to start the Service Manager Server setup wizard.
5
Click
Next
to read and accept the licensing agreement.
6
Select the
I accept the terms in the License Agreement
option.
The
Next
button becomes active.
7
Do one of the following:
•
Click
Next
to accept the default installation folder.
The default installation folder is:
C:\Program Files\HP\Service Manager 9.20\Server\
•
Click
Browse
to choose a different installation location.
See the HP Service Manager 9.20 Upgrade Guide for more information
about upgrading the server from previous versions.
8
Click
Next
to prepare the installation process.
The summary information page opens.
Do not install the server over existing versions of ServiceCenter or
Service Manager. You must install into a new folder.
The Service Manager server folder name cannot contain
parentheses or use non-ASCII characters in the name. The server
cannot start if installed in a folder with a noncompliant folder
name.

46
Chapter 3
9
Click
Install
to begin copying the installation files.
You can stop the installation by clicking
Cancel
.
The Completing the Service Manager Server Setup wizard page opens
when the installation is complete.
10
To automatically configure the server, select the
Run the configuration
program after install
option.
11
Click
Finish
to exit the Setup wizard.
The server installation is complete.
If you selected the
Run the configuration program after install
option, the
Configuring HP Service Manager Server wizard opens. Complete the steps
in
12
After the configuration steps are complete, close the browser window or
click the next item you want to install.
Uninstalling the Windows server
You can uninstall the server in one of two ways:
•
Uninstall the server from Add/Remove Programs. See
•
Uninstall the server from the Service Manager installation DVD. See
Uninstalling by using the installation DVD
The Autopass installation box opens and installs autopass
automatically. Do not click
Finish
until the autopass installation is
complete.
You can also configure the Service Manager server by editing the
sm.ini
configuration file. See
The server uninstall process intentionally preserves server configuration
settings and Service Manager data on your RDBMS. You must manually
remove the configuration files and RDBMS data if you are completely
uninstalling Service Manager from your system. HP recommends that you
delete the entire server installation folder if you do not want to preserve any
existing server data.

Server Installation
47
Uninstalling by using Add/Remove Programs
Follow these steps to uninstall the server by using Add/Remove Programs:
1
Log in to the Windows server as a user with local administrator privileges.
2
Stop the Service Manager service.
For information about stopping the server, refer to the HP Service
Manager online help.
3
From the Windows main menu, click
Start
>
Settings
>
Control Panel
>
Add/
Remove Programs
.
The Add/Remove Programs dialog box opens.
4
Scroll to the Service Manager server program and click
Remove
.
A message prompts you to verify that you want to remove the program.
5
Click
Yes
.
The process takes several minutes. Additional messages indicate the
progress of the uninstall.
When you complete the uninstall, you return to the Add/Remove
Programs dialog box.
6
Click
Close
.

48
Chapter 3
Uninstalling by using the installation DVD
Follow these steps to uninstall the server by using the installation DVD:
1
Log in to the Windows server as a user with local administrator privileges.
2
Stop the Service Manager service.
For information about stopping the server, refer to the HP Service
Manager online help.
3
Insert the Service Manager installation DVD into the appropriate drive of
the server.
If you are installing on a system that has auto-run enabled, the DVD
browser starts automatically. If auto-run is disabled, follow these steps to
start the DVD browser manually.
a
Navigate to the DVD directory.
b
Open
clickme.htm
.
4
Click
Install HP Service Manager Server for Windows
.
The Service Manager Server setup wizard opens.
5
Click
Next
.
The Remove the Program window opens.
6
Click
Remove
.
The process takes several minutes. Additional messages indicate the
progress of the uninstall. After the operation is complete, the InstallShield
Wizard Completed page opens.
7
Click
Finish
.
8
Click
Exit Install
to close the DVD browser.

Server Installation
49
Installing the server on Unix
For complete information about current platform requirements and
compatibility, go to the Customer Support web site at:
http://support.openview.hp.com/
System requirements
Make sure that your system meets the following requirements before
installing Service Manager.
Table 4
Unix system requirements for the server installation
Requirement
Resources needed
Disk space
400 MB for server installation
Java
Service Manager requires Java version 1.6 be installed on the system.
Either the JDK or JRE can be used and Service Manager will search for it
at install time. Users running Linux on Intel x86 platforms do not need to
install Java; Service Manager includes Java for that platform. Users
running on Solaris need to install Java 1.6 update 20 or later.
TCP/IP
service name
During the Service Manager server configuration, the system prompts you
for a valid TCP/IP port. The port number you choose for Service Manager
must be greater than 1024.
AIX patch
levels
AIX 5.3 requires the following patch levels:
•
TL6 SP5 or later
•
TL7 SP2 or later
•
TL8 or later
AIX 6.1 requires the following patch levels
•
TL0 SP3 or later
•
TL1 or later
The Service Manager checks to see if your AIX system meets the required
TL and service patch levels. If your systems fails to meet the required
patch level, the Service Manager server displays an error message and will
not start.

50
Chapter 3
Database resources
Service Manager requires the following relational database system (RDBMS)
resources.
Service Manager will not run from a root account. You must create a separate
user ID that owns Service Manager.
Table 5
Database requirements for server installation
Requirement
Resources needed
RDBMS server
Install and configure a supported RDMS server:
•
DB2
•
Oracle
RDBMS client
Install and configure a supported database client for
your RDBMS server.
•
DB2 client
•
Oracle client

Server Installation
51
Server resources
The Service Manager server uses the following resources.
Other information
Review the following information before you install Service Manager.
Table 6
Service Manager server system resources
Resource
Definition
Processes
The system starts one process for each sm command
line in the
sm.cfg
file. By default, each process is
limited to 50 concurrent user sessions. The system
assigns each user session or background process a
dedicated thread.
•
If you start background processes by using the sm
system start command in the
sm.cfg
file, then the
sm processes own the background process threads.
•
If you start the background processes from a user
session inside Service Manager, then the thread
controller process that owns the user session also
owns the background process threads.
To allow more than 50 concurrent user sessions, refer
to the server implementation options topic in the help.
Semaphores
Service Manager uses 11 semaphores, regardless of the
number of users logged on to the system.
Shared Memory
A server uses approximately 50 MB of base shared
memory and requires an additional 5 MB of shared
memory for every 50 users.
You can specify the amount of shared memory the
system allocates by using the
shared_memory
parameter in the
sm.ini
file. You should always
allocate more shared memory in the operating system
than what you specify for Service Manager in the
sm.ini
file. That is, your system needs more shared
memory than what Service Manager requires to run.

52
Chapter 3
Table 7
Additional Unix requirements
Resource
Requirement
ANSI Terminal
If you want to run the installation from a console, run the
installation script from an ANSI terminal to avoid
rendering errors. Non-ANSI terminals such as hpterm
may produce unreadable results.
Root Access
You only need root access to modify the system kernel,
mount the Service Manager DVD, and install AutoPass.
You must create a separate user ID to run Service
Manager.

Server Installation
53
Preliminary steps
Task 1:
Determine the Service Manager installation path.
The user running the installation script must have permission to create new
directories in the chosen installation path.
Task 2:
For Oracle users, add the path to your 32-bit RDBMS client to the library path variable.
Update your system’s library path variable to include the path to the 32-bit
versions of your RDBMS client. You can add these directories as part of the
shell login or as part of a profile script.
Refer to your operating system documentation for information on setting
variables.
The following convention identifies variables that may change depending on
your particular installation:
<variable>
As you go through the installation steps and see a variable in brackets,
remember that you must replace the variable with information specific to
your system. Do not type the brackets (
< >
) as part of the command.
Table 8
Path variables by operating system
OS
Path variable to set
AIX
LIBPATH
HP-UX
SHLIB_PATH
Linux and Solaris
LD_LIBRARY_PATH
For DB2 users, the db2profile script provided by your DB2 installation
updates your system’s library and class path variables automatically.

54
Chapter 3
Installing the server
Follow these steps to install the Service Manager server:
1
Before installing the server, acquire an AutoPass license by following the
instructions in
2
Mount the DVD, and change directories to the mount location.
3
Run the executable script that matches your operating system.
4
Choose to accept the license agreement in order to proceed.
5
At the installation script prompt, type the installation directory address
where you want to install Service Manager.
Table 9
Setup scripts by operating system
OS
Setup script
HP-UX on PA-RISC
systems
setupHP11.bin
HP-UX on Itanium
systems
setupHPIA64.bin
AIX
setupaix
Solaris
setupSolaris.bin
Linux
setupLinuxX86.bin
The setup scripts assume you will run them from an X-Windows
environment. If you prefer to run the scripts from a console instead,
add “-console” to the command line. For example, to run the Solaris
setup script from a console, type the following command.
setupSolaris.bin -console.
Do not install the server over existing versions of ServiceCenter or
Service Manager. You must install into a new folder.
The system validates any directory name that you specify. If you
specify an invalid directory, the installation generates an error
message.

Server Installation
55
6
The system takes several minutes to read the contents of the DVD,
uncompress the files, and complete the server installation in the specified
directory.
7
Click
Finish
to exit the wizard.
8
To automatically configure the server, run the configure script, which is
found in your
<Install path>/directory
to update the
sm.cfg
file. Go
on page 70 for instructions.
9
Check to ensure that the
/jre
folder in the run directory is a symlink to a
Java 1.6 JRE.
Uninstalling the Service Manager server
Follow these steps to uninstall the Service Manager server:
1
Stop the Service Manager server.
2
Delete all the Service Manager server directories and subdirectories.
Kernel resource requirements
The Service Manager server requires additional shared memory and
semaphores to run. On most Unix systems, you can configure these resources
through kernel configuration parameters.
Do not use the "~" symbol when entering the path. InstallShield
treats this as a regular character, and will create a directory with
the name '~'.
You can also configure the Service Manager server by editing the
sm.ini
configuration file. See
The following kernel resource requirements are the minimum values required
to run a Service Manager server. If you are running other programs that
require kernel resources on the same system as Service Manager, then add
the Service Manager kernel resource requirements to the existing resources.
For example, if the existing system requires 100 MB in kernel resources, and
Service Manager requires an additional 50 MB, then update the kernel
resources to 150 MB.

56
Chapter 3
AIX server
You do not need to manually adjust kernel resources on AIX systems because
they are self-adjusting.
HP-UX server
The settings and considerations when using an HP-UX server are explained
below.
Shared memory
Maxdsiz parameter
The HP-UX
maxdsiz
parameter sets the maximum data segment size for each
process. This data segment can consist of virtual memory (swap space) and
real memory. The system attempts to meet your requirements with real
memory. It uses swap space to make up the difference until it reaches the
maxdsiz
limit.
Set
maxdsiz
to the maximum value. See your HP-UX help for information
about setting this parameter.
Table 10
Shared Memory requirements
Kernel
setting
Value
Remarks
shmem
1
Enables shared memory
shmmax Variable
A server uses approximately 50 MB of base
shared memory and requires an additional 5
MB of shared memory for every 50 users.
You can specify the amount of shared memory
the system allocates by using the
shared_memory
parameter in the
sm.ini
file.
You should always allocate more shared
memory than what you specify in the
sm.ini
file.
shmmni
Variable
1 semaphore ID per Service Manager system

Server Installation
57
Number of file handles
Make sure the upper limit (ulimit -n size) for file descriptors is at least 1024.

58
Chapter 3
Setting kernel parameters
Use the SAM utility to configure kernel parameters on HP-UX.
To configure kernel IPC parameters:
1
Start SAM.
2
Select the Kernel Configuration option from the main menu.
3
Select the Configurable Parameters option.
4
Modify the kernel parameters as specified in
When you finish modifying the necessary parameters, the SAM utility guides
you through the steps to restart the system. Restarting is necessary to
activate the changes.
Linux server
The settings and considerations when using a Linux server are explained
below.
Shared Memory
You must be a root user or have superuser capabilities before you start the
SAM utility.
Table 11
Shared Memory requirements
Kernel
setting
Value
Remarks
shmmax Variable
A server uses approximately 50 MB of base
shared memory and requires an additional 5
MB of shared memory for every 50 users.
You can specify the amount of shared memory
the system allocates by using the
shared_memory
parameter in the
sm.ini
file.
You should always allocate more shared
memory than what you specify in the
sm.ini
file.
shmmni
Variable
1 semaphore ID per Service Manager system

Server Installation
59
Number of file handles
Make sure the upper limit (ulimit -n size) for file descriptors is at least 1024.
Setting kernel parameters
The default shared memory limit (both SHMMAX and SHMALL) is 32 MB,
but you can change it from the
proc
file system without restarting the system.
For example, to specify 128 MB:
You can use
sysctl.conf
to control these parameters. Add the following lines
to the
/
etc/sysctl.conf
file:
This file is usually processed at startup, but
sysctl.conf
can be called later.
Security
Before you start the Service Manager server, you must disable the Linux
security feature,
exec-shield-randomize
. The out-of-box
smstart
script sends you
an error message and does not start the server if
exec-shield-randomize
is on.
However, if you use your own script instead of
smstart
, be aware that the
server can start if
exec-shield-randomize
is turned on, but it will stop later.
The
/
proc/sys/kernel/exec-shield-randomize
file controls whether
Exec-Shield randomizes VM mapping. You can turn off exec-shield-randomize
by using any of the following options:
•
Use the following command:
The default value for
/
proc/sys/kernel/exec-shield-randomize
is 1.
•
Include the following line in the
/
etc/sysctl.conf
file:
•
Include the following line in the
/
etc/grub.conf
file:
# echo 134217728 >/proc/sys/kernel/shmall
# echo 134217728 >/proc/sys/kernel/shmmax
kernel.shmall = 134217728
kernel.shmmax = 134217728
echo 0 >/proc/sys/kernel/exec-shield-randomize
kernel.exec-shield-randomize=0
exec-shield=0

60
Chapter 3
Solaris 9 server
The settings and considerations when using a Solaris 9 server are explained
below.
Shared memory
Table 12
Shared Memory requirements
Kernel
setting
Value
Remarks
forceload:sys/
shmsys
Enables shared memory
shmsys:shminfo
_shmmax
Variable
A server uses approximately 50 MB of
base shared memory and requires an
additional 5 MB of shared memory for
every 50 users.
You can specify the amount of shared
memory the system allocates by using
the
shared_memory
parameter in the
sm.ini
file. You should always allocate
more shared memory than what you
specify in the
sm.ini
file.
shmsys:shminfo
_shmmni
Variable
1 per Service Manager system

Server Installation
61
Number of file handles
The default upper limit for file descriptors is 256. Make sure the upper limit
(ulimit -n size) is at least 1024.
Follow these steps to increase the upper limit:
1
Log in to the Solaris server.
2
Run
ulimit -a
:
To increase this value to 1024, type the following command:
Setting kernel parameters
You can control kernel parameters with the
/etc/system
file. The operating
system reads the
/etc/system
file at initialization time to define the initial
kernel parameters. See your Solaris help for information on setting kernel
parameters.
bash-3.00$ ulimit -a
core file size (blocks, -c) unlimited
data seg size (kbytes, -d) unlimited
file size (blocks, -f) unlimited
open files (-n) 256
pipe size (512 bytes, -p) 10
stack size (kbytes, -s) 8192
cpu time (seconds, -t) unlimited
max user processes (-u) 29995
virtual memory (kbytes, -v) unlimited
$ ulimit -n 1024

62
Chapter 3
Solaris 10 server
The settings and considerations when using a Solaris 10 server are explained
below.
Shared memory
Table 13
Shared Memory requirements
Project
setting
Value
Remarks
max-shm-memory
Variable
A server uses approximately 50 MB of
base shared memory and requires an
additional 5 MB of shared memory for
every 50 users.
You can specify the amount of shared
memory the system allocates by using
the
shared_memory
parameter in the
sm.ini
file. You should always allocate
more shared memory than what you
specify in the
sm.ini
file.
max-shm-ids
Variable
1 per Service Manager system

Server Installation
63
Number of file handles
The default upper limit for file descriptors is 256. Make sure the upper limit
(max-file-descriptor) is at least 1024.
UDP Buffer Sizing
On AIX and Linux, warnings may be generated if the UDB buffer sizing set in
the configuration files surpasses kernel limits.
For example, on Linux the warning would look like:
23966( 23966) 08/11/2009 15:38:33 receive buffer of socket
java.net.DatagramSocket@c9d92c was set to 20MB, but the OS only
allocated 131.07KB. This might lead to performance problems.
Please set your max receive buffer in the OS correctly (e.g.
net.core.rmem_max on Linux)
0 Kernel limits can be changed by a superuser if it is deemed to enhance
performance of UDP communication.
The following table shows the settings for determining and altering kernel
limits for socket buffer sizes.
For HP-UX, the default kernel limit is 2 GB, so no change is necessary.
Table 14
Kernel limits for socket buffer sizes
Platform
Getting and changing settings:
Linux
To get setting: sysctl -w net.core.rmem_max
To change setting: sysctl -w net.core.rmem_max=8388608
Solaris
To get setting: ndd -set/dev/udp udp_max_buf
To change setting: ndd -set/dev/udp udp_max_buf 8388608
AIX
To get setting: no -o sb_max
To change setting: no -o sb_max=8388608
Note: AIX only permists sizes of 1048576, 4194304,
8388608, etc.)

64
Chapter 3
AutoPass requirements
The Service Manager installer automatically copies AutoPassJ libraries as
part of the server installation. AutoPass validates your Service Manager
license and determines what product features are enabled. You must have a
valid license to run Service Manager. You may request either a temporary of
permanent license for Service Manager
Temporary licenses
You can install a 60-day temporary license to evaluate, test, or develop your
Service Manager system using the following command line option:
sm -instantOn
A temporary license can only be installed once per system and is valid for 60
days.Within this 60-day period, you must obtain a perpetual license key
password or a trial evaluation extension to continue using the product.
During the last ten days of the evaluation period, every user who wants to log
in to the system will see a license expiration warning message. To remove the
warning message, a system administrator of the product must go to the
Webware site (www.webware.hp.com) and download a perpetual license to
use the product.
If you have not purchased all modules and you would like to consider adding
modules for review during the Instant-On process, please contact your HP
account manager.
Permanent licenses
You can request a permanent Service Manager license from the following
URL:
managed with AutoPass.
To request perpetual license passwords, you need the following items:
•
Entitlement Certificate, which contains the HP product number and order
number

Server Installation
65
•
IP address of the server
•
Your company or organization information
A permanent license is tied to your server’s IP address and requires you to
place a copy of your license file (LicFile.txt) in your server’s RUN directory.
The default value is:
licensefile:<Service Manager server installation path>/RUN/
LicFile.txt
You may specify a different license file path with the licensefile parameter. For
example:
licensefile:c:/common/LicFile.txt
If your sever obtains an IP address from DHCP, you may have to request a
new license that matches the server’s new IP address.
You can also contact the HP Password Center by using fax, E-mail, or phone.
This information is available on the Password Request Form and the License
Entitlement Certificate. To obtain product licenses, you need the License
Entitlement Certificate.

66
Chapter 3

Server Installation
67
Using the web site
Follow these steps to obtain your product licenses:
1
Go to www.webware.hp.com.
This links you to the web site - HP Password delivery service.
2
Select
Generate password(s)
on the Webware licensing menu.
3
Type your order number in the
Order number
text box. You order number is
found on the License Entitlement Certificate - Password Request Form
(HP Order Number).
4
Click
Next
.
5
Select the product you are requesting a password for on the Product
selection form by clicking the check box for the product, and then click
Next
.
6
Select the product(s) for which you want to request password(s), and then
click
Next
.
7
For each product you selected, type the number of Licenses
To Use (LTUs) - limited by number of LTUs available for the order:
•
Server host name
•
IP address for the system where the software is installed
8
Click
Next
.
9
Provide all required information on the Member sign-in form, and then
click
Sign-In
.
10
Provide all required information on the Address information form, and
then click
Next
.
11
The Receive Permanent Password Certificate form displays a copy of your
Permanent Password Certificate. It also offers additional delivery options
for your certificate.
68
Chapter 3
You should also receive an email containing your password certificate(s) and
license key/password file attachment(s) similar to the following example.

Server Installation
69
To eliminate the chances of error, HP recommends that you install license/
password(s) directly from a license key/password file, rather than attempt to
manually transcribe and edit them from the license/password certificate. Each
license key/password file can be copied to the appropriate target system and
then directly imported and installed by the application. No editing of the
license key/password file is required.
Saving your license key/password file to your system
As part of the process of obtaining a permanent AutoPass license, a
.dat
file
or several
.dat
files were sent to the E-mail address that you provided. These
files contain the licensing data required to use the applicable Service Manager
modules. After you receive these files, you must move them to the Service
Manager server.
Follow these steps to save your license key/password file to your system:
1
Rename the
.dat
file to a
.txt
file so that you can open it with a text
editor.
Example: from
J8888X1624204.dat
to
J8888X1624204.txt
2
Create a file,
LicFile.txt
, to store the license data in. The default
location for this file is:
<Service Manager server installation path>/RUN/
LicFile.txt
3
Copy the license data from the license file and paste it in the
LicFile.txt
you created.
Horizontal scaling license requirements
In order to run your system in a horizontally-scaled environment, you must
copy the LicFile.txt to all hosts running in the horizontal group. Place the
LicFile.txt file in the
<Service Manager server installation path>/
RUN/
folder. You will also need to provide the grouplicenseip parameter for
each host. The grouplicenseip value should match the IP address you provided
when applying for a license at webware.hp.com. See the Service Manager
help for more information about horizontal scaling.
You need to create this file only once. If you request any additional
licenses, you should append those licenses to the end of this file.

70
Chapter 3
Configuring the server
You can customize your Windows and Unix server installation by modifying
the HP Service Manager initialization file (
sm.ini
).
You can define the processes the system starts automatically and the system’s
startup parameters from the
sm.cfg
file. This file exists on both Windows
and Unix systems.
•
On Windows,
sm.cfg
determines how the system starts when started
from a service.
•
On Unix,
sm.cfg
determines how the system starts when started from
the smstart script.
Configuration tool
If you select the
Run the configuration program after installation
option, the
configuration tool starts automatically during your installation.
When you install the server for the very first time, the default settings are
configured for the sample database (see
Installing the sample database
While this tool is intended to configure new or test implementations running
the out-of-box sample data, you can use it whenever you want to change the
settings in your system’s
sm.ini
file.
See the Service Manager help for a complete list of the parameters stored in
the
sm.ini
file.
The configuration tool overwrites your current
sm.ini
settings. You should
back-up your system’s
sm.ini
file prior to running the configuration utility to
prevent any accidental data loss or loss of service.

Server Installation
71
Follow these steps to configure the server:
1
Run the Configure Server tool.
2
Specify the listener ports.
3
Specify the database type and connection information.
4
Verify the connection to confirm that Service Manager can connect to the
database.
5
Upload the demo data, if desired.
Table 15
Listener Port Parameters
Parameter
Default
Description
HTTP Port
(system)
13080
The communication port number to which
you want Service Manager to listen to client
connection requests.
Enable HTTPS
Port
Select this option to enable an HTTPS port.
HTTPS Port
The communication port number to which
you want Service Manager to listen to
secure client connection requests.
Table 16
Database type and connection information
Parameter
Description
Database
Type
The database you want to use to store your data.
SQL
Database
Name
•
SQL server: the ODBC DSN name
•
Oracle: the entry in
tnsnames.ora
•
DB2: the dbname
SQL User
The user that Service Manager should connect to your
Database with.
SQL
Password
The password for the user that Service Manager should use
to connect to your database with.

72
Chapter 3
Uploading the demo data also uploads the out-of-box 9.20
applications. You will want to install these if you are not upgrading
from ServiceCenter.

Server Installation
73
Starting the server
You must start the server before users can access Service Manager. See
Appendix B, Installation Verification
, for instructions on starting the server.
You can choose between several different implementation options to manage
client connections to the server. The following is a list of the most common
server implementation options:
•
Horizontal scaling implementation
•
Single servlet implementation
•
Vertical scaling implementation
•
Vertical scaling and required SSL implementation
For detailed information about selecting the implementation option that best
meets your specific requirements, you must first install the Service Manager
online help. For information about installing the online help, see

74
Chapter 3

75
4 Client Installation
You can only install an HP Service Manager Windows client on a Windows
workstation. You can support clients running on other operating systems by
installing the Service Manager web tier. This section contains information
about installation requirements and how to install the Windows client.
Topics in this section include:
•
Installing the Service Manager Windows client
•
Installing a shared Service Manager client
•

76
Chapter 4
Installing the Service Manager Windows client
You must have local administrator privileges to install the Service Manager
client.
The Windows client requires that the workspace and configuration folders are
writable. By default, the client workspace and configuration information is
stored in the following directory:
C:\Documents and Settings\user_name\Service Manager
Upgrading the Windows client
You cannot upgrade previous Service Manager clients to the Service Manager
9.20 Windows client. You must install the Service Manager 9.20 Windows
client in a new folder. HP recommends but does not require that you remove
previous Service Manager clients.
Installation requirements
You will need the following to install the Service manager client on Windows.
Make a backup of any customized Help files you have created for your Service
Manager clients. The installer for the Service Manager 9.20 Windows client
overwrites any customized help from prior clients.
Table 1
Windows client installation requirements
Requirement
Minimum
Recommended
OS
Windows XP Professional SP2
or higher
Windows Vista SP1 or higher
CPU
Pentium III 650Mhz
Pentium IV or Celeron 2.4 Ghz
RAM
256 MB
384 MB
HD
150 MB Help Server installed
150 MB with Help Server installed
300 MB with documentation installed

Client Installation
77
Service Manager client setup
Follow these steps to install the Service Manager Windows client:
1
Log in to the Windows server as a user with local administrator privileges.
2
Insert the Service Manager installation DVD into the appropriate drive of
the server.
If you are installing on a system that has auto-run enabled, the DVD
browser starts automatically. If auto-run is disabled, follow these steps to
start the DVD browser manually.
a
Navigate to the DVD directory.
b
Open
clickme.htm
.
3
Click
Install Windows Client
. The Service Manager Client Setup wizard
opens.
4
Click
Next
to read and accept the licensing agreement.
5
Select the
I accept the terms in the License Agreement
option.
The
Next
button becomes active. The Select Installation Folder page opens.
6
Do one of the following:
a
Click
Next
to accept the default installation folder.
The default installation folder is:
C:\Program Files\HP\Service Manager 9.20\Client
b
Click
Browse
to choose a different installation location.
7
Click
Next
to select the client features you would like to install.
Resolution
800 x 600 (16 colors)
1280 x 1024 (256 colors)
Network
100 Megabit
100+ Megabit
Login account
Local administrator account
Local administrator account
The Service Manager Windows client setup displays in the same language as
the operating system.
Table 1
Windows client installation requirements
Requirement
Minimum
Recommended

78
Chapter 4
8
Click
Next
to prepare the installation process. The Summary page opens.
9
Click
Install
to begin copying the installation files. You can stop the
installation by clicking
Cancel
.
The Completing the Service Manager Client Setup wizard opens when the
installation is complete.
10
Click
Finish
to exit the Setup wizard. The client installation is complete.
11
Close the browser window, or click the next item you want to install.
Defining a new client connection
The first time you access the client, the Connections window opens, which
enables you to define a connection to a Service Manager host server. You can
add and save multiple connection settings from the Connections window.
You must set your connection to an active server process. By default, the
following are the defined settings:
•
Client listener on ports 13080 (http) and 13443 (https/SSL) for HTTP
clients, including Windows, web, and SOAP-API
•
Special listener on port 12690 for SCAuto
If your server setup does not use the default settings, you must set the client
to connect to the server.
Define a new client connection
Follow these steps to define a new client connection:
1
From the Windows main menu, click
Start
>
Programs
>
HP > Service
Manager
9.20 >
Service Manager Client
. The Connections window opens.
2
Click
New
. The Connections window displays a new node in the
Connections pane.

Client Installation
79
3
Type or select the connection parameters.
Table 2
Windows client connection parameters
Parameter
Default option
Description
Name
New_configuration
The name of this configuration.
User name
User name of the
Windows user
currently logged on.
The name that you use to log in to the server.
Password
blank
The password that you use to log in to the
server.
Remember my
password
False
An option for the system store your password.
Automatically login
False
An option to log in automatically when you
start the Service Manager client.
Server host name
localhost
The name of the server that hosts the Service
Manager service.
Server port number
13080
The port number that your computer uses to
connect with the server.
Language
blank
The language to use for this session (can differ
from the language set on the computer).
Connection identified
by a color
blank
An option to change the background color of
your connection.

80
Chapter 4
4
Click
Advanced
to set other connection options. The advanced features are
optional.
5
Click
OK
to add advanced features.
6
Click
Apply
to add the connection.
7
To add additional connections, repeat step 2 through step 6.
Connecting to a Service Manager server
You can connect to multiple servers from one Service Manager client. Each
connection opens in its own window.
Follow these steps to connect to a Service Manager server:
1
From the Windows main menu, click
Start
>
Programs
>
Service Manager
Client
>
Service Manager Client
.
The Connections window opens.
Table 3
Windows client advanced connection parameters
Parameter
Description
Compress
SOAP messages
An option that compresses SOAP messages using GNU zip (gzip)
encoding. This can reduce the amount of data transmittal to and from the
server.
Use SSL
Encryption
An option that uses a Secure Socket Layer (SSL) encryption tool to protect
your data when transmitting it over the network.
Trace SOAP
traffic
An option that logs SOAP messages for debugging.
You must define a valid CA certificates file to enable SSL
encryption. A sample CA certificate file called cacerts is included
with the client installation. The default location of the
cacerts
file for a windows installation is:
C:\Program Files\HP\Service Manager 9.20\Client\
plugins\com.hp.ov.sm.client.common_9.20
For additional information about configuring the Windows client,
see the Service Manager Help.

Client Installation
81
2
Do one of the following:
•
Double-click a connection.
•
Click a connection and then click
Connect
.
Installing a shared Service Manager client
You can install the Service Manager client on a network share and have
multiple users run from the shared client installation. In a shared client
configuration, you can configure each user to have individual local settings or
require users to use common settings. The Service Manager server tracks each
client connection separately regardless of its source. Follow these steps to
install a shared instance of the Service Manager client:
1
Install the Service Manager client on a network server. For more
information, see
Installing the Service Manager Windows client
2
Create a Windows network share to the folder where you installed the
Service Manager client, and grant users access to the network share. For
example:
\\my_server\Service Manager Client
For more information, refer to the Windows online help.
3
Log in to the computer system of each user who will use the shared client.
4
Map the network share to a drive letter on the local system. For example:
Drive letter:
F:
Mapped to:
\\my_server\Service Manager Client
5
Create a Windows shortcut to the
ServiceManager.exe
file in the
network share. For example:
F:\ServiceManager.exe
By default, all users share common client settings. If you want each user
to have individual local client settings, continue to the next step.
6
Modify the target properties of the Windows shortcut to add the following
information after the executable name:
-data
%USERPROFILE%\Service Manager\

82
Chapter 4
The
-data
parameter allows you to specify a path where you want to store
client settings. The example path above places a Service Manager
f
older
in the
Document and Settings
folder of the currently logged in user.
If your path name includes spaces, you must enclose the path in
double quotation marks. For example:
F:\ServiceManager.exe -data "%USERPROFILE%\HP
Service Manager\workspace"

Client Installation
83
Uninstalling the Service Manager client or its
components
You can uninstall the Service Manager client using Windows Add/Remove
Programs.
Follow these steps to uninstall the Service Manager client or components:
1
From the Windows main menu, click
Start
>
Settings
>
Control Panel
>
Add/
Remove Programs
.
The Add/Remove Programs window opens.
2
Scroll to Service Manager Client and click
Remove
.
A message prompts you to verify that you want to remove the program.
3
Click
Yes
.
The uninstall process takes several minutes. Additional messages indicate
the progress of the uninstall.
When you complete the uninstall, you return to the Add/Remove
Programs dialog box.
4
Click
Close
.
The client uninstall process intentionally preserves your client
configuration settings. You must manually remove these files if you
are completely uninstalling Service Manager from your system. HP
recommends that you delete the entire client installation folder and
the local writable workspace and configuration folder if you do not
want to preserve any existing client settings.

84
Chapter 4

85
5 Web Tier Installation
The web tier installation allows clients to use a web interface to access the
HP Service Manager server.
Topics in this section include:
•
•
Browser requirements for the web client
•
•
Accessing Service Manager from the web client
•
Web client Computer Telephony Integration (CTI)
•
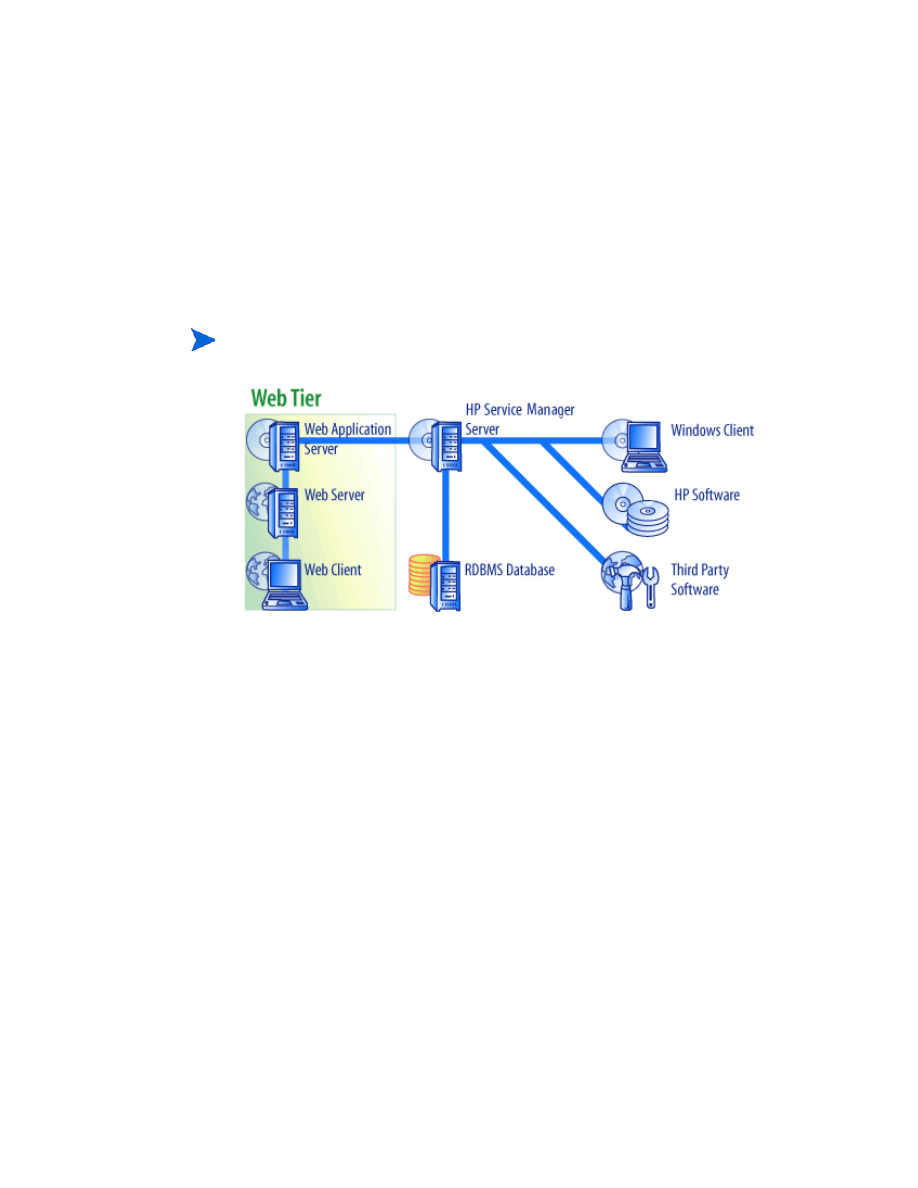
86
Chapter 5
Web tier architecture
The Service Manager web tier uses both a web server and a web application
server to allow access to Service Manager forms through a web browser. The
web server handles incoming HTTP requests while the web application server
runs the Java and JSP necessary for connecting to Service Manager.
You install the web tier on Windows or Unix platforms by deploying the
webtier-9.20.war
file to your web application server. Some web application
servers also require you install the Sun J2SE Java Development Kit (JDK).
Some web application servers such as Tomcat and WebSphere include built-in
web servers.

Web Tier Installation
87
Browser requirements for the web client
For users to access the web client through a browser, the following settings
and options must be enabled:
•
Enable cookies
•
Enable Java
•
Enable JavaScript
•
Enable pop-ups. You can add the Service Manager server URL to the
pop-up exception list.
To display the workflow graphical view, install the Sun Java Runtime
Environment (JRE).

88
Chapter 5
Installing the web tier
To install the Service Manager web tier you must complete the following
tasks:
Task 1:
Determine the web architecture needed to support your web tier.
See
Determining the web architecture needed to support your web tier
Task 2:
Deploy the Service Manager web tier to your web application server.
See
Deploying the Service Manager web tier
Task 3:
Set your web application server memory settings for your production environment.
See
ISetting the web application server heap size
Task 4:
Set global web client preferences in the web.xml file
See
Setting web client preferences from the web.xml configuration file

Web Tier Installation
89
Determining the web architecture needed to support your web tier
A Service Manager web tier requires at least one web application server to
run. Depending on the features and scale of your web tier, it may also require
a dedicated production web server and additional web application servers.
Refer to the guidelines below to determine the number of web application
servers and web servers your implementation requires.
Determining if the web tier requires a dedicated production web server
If you use any of the implementation options list below, you will need to install
and configure a dedicated production web server. If you are not running any of
the configurations listed below, then you can run your web tier from a single
web application server.
•
A trusted sign-on implementation (You want web client users to log in to
Service Manager without entering a user name and password.)
•
A load balanced implementation (You want to distribute web client
connections among multiple web application servers.)
•
A scaled implementation to support a large number of concurrent users
(You want to support 300 or more concurrent web client connections.)
Trusted sign-on implementations
A trusted sign-on implementation requires a web server to accept the
pre-authenticated HTTP header information from your authentication
software (such as SiteMinder or Integrated Windows Authentication). You
must install and configure the authentication software separately. See your
web server documentation for information about the HTML headers that your
web server expects from your authentication software.
For additional information, go to the Software Support Online site at
http://support.openview.hp.com/ and search for the following white paper:
Setting up Single Sign-on in Service Manager. SSL Setup and Single Sign-on
in Service Manager using Windows or Third Party Authentication

90
Chapter 5
Load balanced implementations
A load-balanced implementation uses a web server to route connection
requests to two or more web application servers. You must configure the web
server to identify the web application servers (also known as workers) that are
available to accept web client requests. For some web server and web
application server combinations, you may need to install additional connection
software (for example, to route requests to Tomcat web application servers
using the Apache web server, you must install the proper connector). See your
web server and web application server documentation for information about
routing HTTP requests to available worker web application servers.
Scaled implementations
A scaled implementation uses the load balanced implementation described
above to support a large number of concurrent web client users. As a general
rule, HP recommends starting one worker web application server for every
300 concurrent web client connections you want your web tier to support. To
help determine the number of connections your web tier can support, go to the
Software Support Online site and search for the following white paper:
Service Manager 7 Reference Configurations
Deploying the Service Manager web tier
The Service Manager web tier contains a J2EE-compliant web application
that runs on your web application server. Each web application server has its
own method of deploying web applications. See your web application server
documentation for specific instructions on deploying a web application.

Web Tier Installation
91
The following table provides a summary of deployment methods required.
Deploy the web tier on Tomcat
For example, use the following steps to deploy the
webtier-9.20.war
file on
Tomcat.
1
Log in to the server as a user with local administrator privileges.
2
Stop the Tomcat Web application server.
3
Insert the Service Manager installation DVD into the appropriate drive of
the server.
If you are installing on a system that has auto-run enabled, the DVD
browser starts automatically. If auto-run is disabled, follow these steps to
start the DVD browser manually.
a
Navigate to the DVD directory.
b
Open
clickme.htm
.
4
Click
Download Service Manager Web Tier
. The File Download prompt opens.
5
Click
Save
. The Save As dialog box opens.
6
Save the file to your Tomcat webapps directory. For example,
C:\Program
Files\Apache Software Foundation\Tomcat 5.5\webapps
)
Table 1
Web tier deployment methods
Web application
server
Deployment method
Apache Tomcat
Copy the
webtier-9.20.war
file to the
webapps
folder and start the web application server.
BEA WebLogic
Open the administration console and install the web
application from the
webtier-9.20.war
file.
IBM WebSphere
Open the administration console and install the web
application from the
webtier-9.20.ear
file.
JBoss
Copy the
webtier-9.20.war
file to the
webapps
folder and start the web application server.
Sun ONE
Configure to joint to JBoss and the
webtier-9.20
folder.

92
Chapter 5
7
Edit the
web.xml
file within the
webtier-
9.20 file to add your server
connection information. See
Setting web client preferences from the
You can also set your web client preference after you deploy the web
tier. You can deploy the web tier without setting web client
preferences, but the web tier will not accept client connections until
you set them.

Web Tier Installation
93
Setting web client preferences from the web.xml configuration file
You can define global web client preferences from the
web.xml
file on the web
tier server. The settings you define in this file determine the client preferences
for all web clients. See the Service Manager online help for a complete list and
more detailed explanation of each parameter.
Follow these steps to set client preferences from the
web.xml
file:
1
Open the
webtier-9.20.war
file in an archive management program.
You can download these files from the Service Manager installation DVD.
2
Extract the
web.xml
file from the archive to your local system.
3
Open the
web.xml
file in a text editor.
4
Add or edit the preferences in the file. For a list of the most commonly set
web parameters, see
Extract this file into its default path of
WEB-INF\
so that you can
preserve the path information when you archive it again.

94
Chapter 5
5
At a minimum, you must set the
serverHost
and
serverPort
parameters.
6
Save the file.
7
Start the Tomcat server.
Tomcat automatically opens the
webtier-9.20.war
file and creates a
webtier-9.20 virtual directory.
8
Add the updated
web.xml
file back into the
webtier-9.20.war
archive.
Web clients will now use the client preferences you defined in the
web.xml
file when you deploy the
webtier-9.20.war
to the web tier.
<?xml version="1.0" encoding="UTF-8"?>
<!DOCTYPE web-app PUBLIC "-//Sun Microsystems,
Inc.//DTD Web Application 2.2//EN" "http://
java.sun.com/j2ee/dtds/web-app_2_2.dtd">
<web-app>
<display-name>Service Manager</display-name>
<description>Service Manager</description>
...
<init-param>
<param-name>serverHost</param-name>
<param-value>localhost</param-value>
</init-param>
<init-param>
<param-name>serverPort</param-name>
<param-value>13080</param-value>
</init-param>
...
Set the host
Set the port
If Tomcat does not create a webtier-9.20 directory when started, check the log
files and contact support with the information found in the log files.
The
web.xml
file must include the
WEB-INF\
path.

Web Tier Installation
95
Web tier log files
The Service Manager web tier writes log files to the default log file and
location used by your web application server. See your web application server
documentation for the name and location of the log file.
Commonly set web parameters
Table 2
Commonly set web tier parameters
Parameter
Default
value
Description
cacerts
WEB-INF This parameter lists the path to the CA certificates required
for SSL support.
compress_soap
false
This parameter specifies if you want to use data compression
between web clients and the Service Manager web tier.
helpServerHost
localhost
This parameter specifies the name of the Service Manager
Help Server.
helpServerPort
80
This parameter specifies the communications port number
to which the Service Manager Help Server listens.
refreshMessages
false
This parameter determines whether the browser checks for
new messages from the application server.
refresh
MessagesInterval
15000
This parameter determines how often (in milliseconds) the
browser checks for new messages from the application
server.
serverHost
localhost
This parameter specifies the name of the Service Manager
host server.
serverPort
13080
This parameter specifies the communications port number
to which the Service Manager server listens.
ssl
false
This parameter enables the web client to encrypt
communications using the server’s demonstration
certificate.
viewactivenotes
false
This parameter determines whether you see a pop-up
message when the server sends a message.

96
Chapter 5
Setting the WebSphere class loader mode
If you are using WebSphere, you must verify that this web module has the
class loader order set to PARENT_FIRST.
1
In the administrative console of the WebSphere application server, select
Applications
.
2
Select
Enterprise Applications
.
3
Select
HP Service Manager 9.20 Web
.
4
Select
Class loading and update detection
.
5
Ensure that “Class Loader Order” is set to “Parent class loader first.”
6
Click
Apply
.
7
If you have made a change, in the message box select
Save
.
8
Select
Save
.
9
Start the application.

Web Tier Installation
97
Endorsed JAR files
Endorsed JAR files are no longer required. If you installed them in previous
installations, you should remove them.
ISetting the web application server heap size
The web application server heap size directly determines how many
connections each web application server can handle. Most application servers
require a heap size of at least 256 MB for optimal performance. If you
experience poor performance from your web client connections, try increasing
the web application server heap size. See your web application server
documentation for instructions on setting the heap size.

98
Chapter 5
Configuring the web server to work with Service Manager
IIS
Edit the
workers.properties.minimal
(IIS 5) or
workers2.properties
(IIS 6.2) file to include the following five parameters:
[uri:/sm/servlet/*]
info=Prefix mapping
[uri:/sm/*.jsp]
info=Extension mapping
[uri:/sm/*.do]
info=Extension mapping
[uri:/sm/attachments/*]
info=Extension mapping
[uri:/sm/cwc/nav.menu]
info=Extension mapping

Web Tier Installation
99
Accessing Service Manager from the web client
Use the following URLs to access Service Manager from the web tier.
•
The address for the standard web client is:
http://<server>:<port>/webtier-9.20/index.do
The address for employee self-service web client is:
http://<server>:<port>/webtier-9.20/ess.do
The address for the accessible web client is:
http://<server>:<port>/webtier-9.20/accessible.do
The accessible web client does not display record lists.
The address for the accessible employee self-service web client is:
http://<server>:<port>/webtier-9.20/accessible_ess.do
For
<server>
, type the name of the web server running the web tier. For
<port>
, type the communications port number used to connect to the web
tier.
You do not need to specify the communications port in the web tier URL if you
use the default web server port (port 80). See your web server documentation
for instructions on setting the communications port.

100
Chapter 5
Web client Computer Telephony Integration (CTI)
The web client can support connections from Computer Telephony Integration
(CTI) applications. The web client CTI implementation uses the Service
Manager Event Services application to open or update records.
Follow these steps to set up and use CTI:
Task 1:
Set up your web browser.
See
Setting the web browser requirements
Task 2:
Install a JRE.
See
Task 3:
Install the CTI applet.
See
Task 4:
Connect to the web client to receive calls.
See
Taking a call with the telephony web client
Setting the web browser requirements
Enable the following settings and options to use CTI with a web client:
•
Cookies
•
Java
•
JavaScript
•
Pop-ups (Add the Service Manager server URL to the pop-up exception
list.)
Installing the JRE
You must install a Java Runtime Environment (JRE) on each web client
system to run the CTI applet. See your Web browser documentation to
determine a compatible JRE version

Web Tier Installation
101
For example, you can follow these steps to install the Sun J2SE JRE, which
you can use with Internet Explorer or Mozilla:
1
Go to Sun java web site: http://java.sun.com/javase/downloads/
index.jsp.
2
Find the Java Runtime Environment (JRE) section, and click
Download
.
3
Accept the license agreement.
4
Navigate to your operating system (for example, Windows), and download
the latest JRE for your operating system.

102
Chapter 5
Installing the CTI applet
You must perform a one-time installation of the CTI applet on each web client
system so the web client can accept Service Manager system events from a
CTI application.
Follow these steps to install the CTI applet:
1
Log in to the web client system with a local administrator account.
2
Close all other Service Manager clients and web browser windows.
3
Open a web browser and navigate to the telephony web tier URL:
http://<server>:<port>/webtier-9.20/index.do?telephonyuser=1
For <server>, type the name of the web server running the web tier. For
<port>, type the communications port number used to connect to the web
tier.
4
If the web client system has a properly installed JRE, then the web
browser prompts the user to install the CTI applet:
5
Click the appropriate action on your browser to accept the applet (for
example,
Run
or
OK
).
6
Close and restart the web browser.
The applet installation requires a local administrator account.

Web Tier Installation
103
Using the telephony web client
The telephony web client requires a CTI application and the Event Services
application within Service Manager.
Accessing CTI from the web client
You can use the following URLs to access the telephony portions of the web
client.
•
The address for the standard telephony web client is:
http://<server>:<port>/sm/index.do?telephonyuser=1
•
The address for the accessible telephony web client is:
http://<server>:<port>/sm/accessible.do?telephonyuser=1
This address turns off record list mode and the classic menu, which do not
conform to accessibility requirements.
For <server>, type the name of the web server running the web tier. For
<port>, type the communications port number used to connect to the web tier.
Taking a call with the telephony web client
When an event comes from a CTI application, the telephony web client
prompts users to save their current work.
The telephony applet does not apply to the self-service portions of Service
Manager.
You do not need to specify the communications port in the web tier URL if you
use the default web server port (port 80). See your web server documentation
for instructions on setting the communications port.
Save your current work, and then click
Yes
to receive the incoming call (or
other event).

104
Chapter 5

105
6 Help Server Installation
You must install the HP Service Manager Help Server on a Windows system.
This section contains information about installation requirements and how to
install the Help Server. For information about starting and stopping the Help
Server, see
Topics in this section include:
•
Overview of the Service Manager Help Server
•
Installing the Help Server on Windows
•

106
Chapter 6
Overview of the Service Manager Help Server
The Service Manager Help Server provides a centralized location to access
and store all online help files. The Service Manager Help Server includes an
integrated web server that allows end users to access documentation from
either the Windows or web clients as well as directly from a web browser.
Upgrading the Help Server
You cannot upgrade previous Help Servers to the Service Manager 9.20 Help
Server. You must install the Service Manager 9.20 Help Server in a new folder
or on a different system than your previous Help Server. HP recommends that
you remove previous Help Servers, but it is not required.
Installation considerations
Installing the Service Manager Help Server enables you to:
•
Provide your users with an easily updatable help source.
•
Deploy tailored versions of Service Manager documentation. You can edit
the online help stored on the Help Server and deploy it with the integrated
web server. All clients that connect to the Help Server automatically see
the customized online help files.
Make a backup of any customized Help files you have created for your Help
Servers. The installer for the Service Manager 9.20 Help Server overwrites
any customized help from prior Help Servers.

Help Server Installation
107
Testing the Help Server
To test the Help Server from the server machine, use a direct browser
connection to:
http://<helpserverhost>:<helpserverport>/help/
For
<helpserverhost>
, type the name or IP address of the Help Server you
want to connect to.
For
<helpserverport>
, type the communications port used to connect to the
Help Server. You may omit the port number if you use the default port 80
HTML port.

108
Chapter 6
Installing the Help Server on Windows
After installing the Help Server, you can customize the server settings in the
Help Server Configuration wizard.
Installation requirements
The following are required to install the Help Server on Windows:
•
Windows 2003 or higher
•
The most current Windows updates on your operating system
•
240 MB disk space
•
256 MB RAM minimum recommended
— For testing purposes, 128 MB RAM is sufficient
— For production purposes, RAM is based on the expected user load
•
A free communications port to listen for HTTP connections requests. The
default communications port is 8083.
•
Sun Java Runtime Environment (JRE)

Help Server Installation
109
Service Manager Help Server setup
Follow these steps to install the Service Manager Help Server:
1
Log in to the Windows server as a user with local administrator privileges.
2
Insert the Service Manager installation DVD into the appropriate drive of
the server.
If you are installing on a system that has auto-run enabled, the DVD
browser starts automatically. If auto-run is disabled, follow these steps to
start the DVD browser manually.
a
Navigate to the DVD directory.
b
Open
clickme.htm
.
3
Click
Install HP Service Manager Help Server
. The Service Manager Help
Server Setup wizard opens.
4
Click
Next
to read and accept the licensing agreement.
5
Select the
I accept the terms in the License Agreement
option. The Next
button becomes active.
6
Click
Next
to continue. The Select Installation Folder page opens.
7
Type or select the path where you want to install the Help Server, and
then click
Next
to continue. The Ready to Install page opens.
8
Click
Install
. The wizard installs the Help Server on the system.
9
Click
Finish
. The Configure HP Help Server wizard closes.
10
Click
Start > All Programs > HP > Service Manager 9.20 > HelpServer >
Configure Help Server
. The Service Manager Help Server Configuration
page opens.
11
Click
Next
.

110
Chapter 6
12
Do one of the following:
a
Click
Skip
to use the default configuration settings.
b
Update the following parameters as needed.
13
Click
Next
to continue.
The Service Manager Help Server Configuration page opens.
14
Select the
Install Windows Service
option.
15
Click
Finish
.
The wizard configures the Help Server and installs the Windows service.
Table 1
Help server configuration parameters
Parameter
Default
value
Description
Server port
8083
This parameter specifies the
communications port to which you want the
Help Server to listen for HTTP requests.
Windows
Service
Name
HP Service
Manager
9.20 Help
Server
This parameter specifies the name of the
Windows service you want the Help Server
to use.

Help Server Installation
111
Accessing the Help Server
You can access the Help Server from the following interfaces:
•
Windows client, see
Accessing the Help Server from the Windows client
•
Web client, see
Accessing the Help Server from the web client
•
Web browser, see
Accessing the Help Server from a browser
Accessing the Help Server from the Windows client
To have Windows clients display online help from the Help Server, you must
configure the Windows client preferences and define the Help Server host
name and communications port.
Follow these steps to configure a Windows client to display online help from
the Help Server:
1
Log in to the Windows client.
2
Click
Window
>
Preferences
.
The Preferences window opens.
3
Click the
Help
node to expand it.
4
Click
Help Server
.
5
Enable the
Use a Help Server to access documentation
option.
6
Type the following information:
a
Host name or IP address of the Help Server
b
Communication port of the Help Server
7
Click
OK
.
The Windows client now displays the online help from the Help Server
when the user clicks the
Help
icon or select
Help
>
Help Contents
.
This setting is saved with your client preferences and is captured by the
Client Configuration utility so that you can easily deploy it to your Windows
client users.

112
Chapter 6
Accessing the Help Server from the web client
By default, web clients do not display online help. To have web clients display
online help from the Help Server, you must configure the web client
web.xml
file and define the Help Server host name and communications port.
Follow these steps to configure a web client to display online help from the
Help Server:
1
Log in to the server where you installed the web tier.
2
Open the
web.xml
file from the
sm/WEB-INF
folder of your application
server installation.
3
Type the following information:
a
helpServerHost
- Host name or IP address of the Help Server
b
helpServerPort
- Communication port of the Help Server
4
Save the
web.xml
file.
The web client displays the online help from the Help Server.
Accessing the Help Server from a browser
You can view the online help from a Help Server by typing the following URL
into a compatible web browser:
http://<helpserverhost>:<helpserverport>/help/
For
<helpserverhost>
, type the name or IP address of the Help Server you
want to connect to.
For
<helpserverport>
, type the communications port used to connect to the
Help Server. You may omit the port number if you use the default port 80
HTML port.

113
7 Client Configuration Utility Installation
You can install the Service Manager Client Configuration Utility on a
Windows system. This section contains information about installation
requirements and how to install the Client Configuration Utility.
Topics in this section include:
•
Overview of the Service Manager Client Configuration Utility
•
Installing the Client Configuration Utility on Windows
•
Customizing images used by the Windows client
•

114
Chapter 7
Overview of the Service Manager Client Configuration
Utility
The Service Manager Client Configuration Utility is an optional tailoring
component that enables you to customize a Windows installation for deploying
to end users. You can use the Client Configuration Utility to customize the
Windows client before deploying it to the rest of your organization.
The Client Configuration Utility cannot push customization changes to
previously installed Windows clients. To change existing installations of the
Windows client, you uninstall the existing client and reinstall using the
customized files you create.
The Client Configuration Utility only picks up changes made directly from the
Windows client interface or within the utility itself. The Client Configuration
Utility cannot pick up changes made directly to Windows client initialization
files.
The Service Manager Client Configuration Utility changes the following
Windows client settings:
•
Splash screen image that Service Manager displays when users open the
Windows client
•
Name of provider listed for Service Manager — for example,
Hewlett-Packard Development Company, L.P.
•
Name of the Service Manager application — for example, Service Manager
•
Location of application images and icons
•
Location of the Help Server where Windows clients can access
documentation
•
Changes that an administrator saves within the Windows client interface
prior to running the Client Configuration Utility, including:
—
Default login options
—
Connection dialog box configuration options to display
—
Default connection configuration settings
—
Help server configuration options

Client Configuration Utility Installation
115
Installation considerations
You may want to use the Service Manager Client Configuration Utility for the
following reasons:
•
To deploy tailored versions of Windows clients. You can use the Client
Configuration Utility to preconfigure Windows clients to use custom
settings and images.
•
To reduce the number of tailoring steps. When you use the Client
Configuration Utility you are not required to tailor each Windows client
individually.
Known issues
The Service Manager Client Configuration Utility has the following known
issues:
•
You must customize images before you run the Client Configuration
Utility. The Client Configuration Utility enables you to change the
location of images but not to edit them directly.
•
If you deploy a repackaged Windows client that has a predefined
connection over SSL, the Windows clients may display the connection
error message “No trusted certificate found.” This indicates that you are
installing the customized client in a different path than the original client
used. You can restore the client connection by providing the correct path to
the CA certificate file in the client Preferences dialog box.

116
Chapter 7
Installing the Client Configuration Utility on Windows
You install the Client Configuration Utility by running the installation
executable on the installation DVD. After installation, you can customize the
Windows client settings by using the Client Configuration Utility.
Installation requirements
•
Windows 2000, Windows XP Professional, or Windows Vista
•
The most current Windows updates on your operating system
•
70 MB disk space
•
256 MB RAM minimum recommended
—
For testing purposes, 128 MB RAM is sufficient
—
For production purposes, add RAM to match the expected user load
•
Access to a Service Manager Windows client installation
Service Manager Client Configuration Utility setup
Follow these steps to install the Service Manager Client Configuration Utility:
1
Log in to the Windows system as a user with local administrator
privileges.
2
Insert the Service Manager installation DVD into the appropriate drive of
the server.
If you are installing on a system that has auto-run enabled, the DVD
browser starts automatically. If auto-run is disabled, follow these steps to
start the DVD browser manually.
a
Navigate to the DVD directory.
b
Open
clickme.htm
.
3
Click the
Downloads
tab.
4
Click
Download the HP Service Manager Client-Configuration utilities
.
The Service Manager Client Configuration Utility Setup wizard opens.

Client Configuration Utility Installation
117
5
Click
Next
to read and accept the licensing agreement.
6
Select the
I accept the terms in the License Agreement
option.
The Next button becomes active.
7
Click
Next
to continue.
The Select Installation Folder page opens.
8
Type or select the path where you want to install the Client Configuration
Utility.
9
Click
Next
to continue.
The Ready to Install page opens.
10
Click
Install
.
The wizard installs the Client Configuration Utility on the system.
11
Click
Finish
.

118
Chapter 7
Customizing images used by the Windows client
You can customize the images that Windows clients use by providing alternate
versions of the images from a local folder or web server virtual directory
Image editing guidelines and considerations
The following guidelines and considerations apply to customized images:
•
All custom images must retain their original file name.
•
All custom images must retain their original relative path from the
icons/obj16
folder.
•
You only need to save customized images in the
branded/obj16
folder. If
the Service Manager client does find updated images in the
branded/
obj16
folder it uses the default images in the
icons/obj16
folder.
•
Providing custom images from a web server allows you to automatically
update images without having to reinstall the Windows client.
Providing custom images from a local folder
You can use the following steps to provide custom images with the repackaged
client. This image customization method increases the amount of hard disk
space required to install the Service Manager Windows client as the custom
images are installed in addition to the default images.
Follow these steps to customize images from a local folder:
1
Copy the images from the Service Manager client into a temporary folder.
The Service Manager client images are located in the following folder:
C:\Program Files\HP\Service Manager 9.20\Client\plugins\
com.hp.ov.sm.client.eclipse.user_9.20\src\resources\icons
\obj16
2
Edit the images you want to customize in the temporary folder.
See
Image editing guidelines and considerations
3
Delete any images that you do not customize from the temporary folder.
4
Run the Client Configuration Utility and select the local images option.

Client Configuration Utility Installation
119
The Client Configuration Utility creates the following new folder in the
Service Manager client installation:
C:\Program Files\HP\Service Manager 9.20\Client\plugins\
com.hp.ov.sm.client.eclipse.user_9.20\src\resources\icons
\branded\obj16
5
Copy your custom images to the
branded\obj16
folder.
6
Repackage the client as a zip file or another distribution format of your
choice.
Providing custom images from a web server virtual directory
You can use the following steps to provide custom images from a central web
server. This image customization method does not increase the amount of
hard disk required to install the Service Manager Windows client. In addition,
any changes you make to images on a web server are automatically applied to
Windows clients.
Follow these steps to customize images from web server virtual directory:
1
Create a virtual directory on your web server to store the custom images.
2
Copy the images from the Service Manager client into a temporary folder.
The Service Manager client images are located in the following folder:
C:\Program Files\HP\Service Manager 9.20\Client\plugins\
com.hp.ov.sm.client.eclipse.user_9.20\src\resources\icons
\obj16
3
Edit the images you want to customize in the temporary folder.
See
Image editing guidelines and considerations
4
Delete any images that you do not customize from the temporary folder.
5
Copy your custom images to the virtual directory on your web server.
6
Run the Client Configuration Utility and select the web server virtual
directory option.
The Client Configuration Utility configures the Service Manager client to
point to the URL of your web server virtual directory.
You can copy the your custom images to the local folder while the
Client Configuration Utility is open.

120
Chapter 7
Customizing the Windows client
To use the Client Configuration Utility, you must have previously installed a
Windows client.
Follow these steps to create a custom Windows client:
1
Click
Start
>
Programs
>
Service Manager Client Configuration Utility
>
Service
Manager Client Configuration Utility
.
The Client Configuration Utility opens.
2
Click
Next
to continue.
The Specify Service Manager Directory page opens.
3
Type or select the path to an existing installation of the Service Manager
Windows client.
4
Click
Next
to continue.
The Change Startup Splash Image page opens.
5
Do one of the following:
•
Click
Skip
to use the default splash image.
•
Type or select the path to the splash screen image you want to use.
The default splash screen image is named
splash.gif
and is located in
the following folder:
C:\Program Files\HP\Service Manager 9.20\Client\plugins\
com.hp.ov.sm.client.eclipse.user_9.20\src\resources\icons
\obj16
Use the following guidelines to edit the splash screen image:
•
The image must retain its original file name
•
The image must be in the Windows bitmap (gif) file format
•
The image should be approximately 500 wide by 600 pixels high. The
Client Configuration Utility crops larger images to this size.
6
Click
Next
to continue.
The Replace Provider and Application Strings page opens.

Client Configuration Utility Installation
121
7
Do one of the following:
•
Click
Skip
to use the default application text strings.
•
Type the text strings you want to use for the following items:
8
Click
Next
to continue.
The Customize Where Service Manager Application Images are Located
page opens.
9
Do one of the following:
•
Use the default application images.
–
No customization
: Select this option to use the default images.
–
Click
Skip
.
•
Select the path to your customized Windows client images.
–
Locally
: The Client Configuration Utility creates a folder named
\branded\obj16
where you can place customized images to
override the default Windows client images.
–
Remotely
: Type the URL where the Windows client can access
customized images.
Customizing images used by the Windows client
on page 118 for more
information.
10
Click
Next
to continue.
The Customize Default Login Options page opens.
Table 1
Provider and application settings
Field
Type this information
Provider
Type the company name you want to display in the Windows
client interface. The default name is Hewlett-Packard
Development Company, L.P.
Application Type the application name you want to display in the Windows
client interface. The default name is Service Manager.

122
Chapter 7
11
Do one of the following:
•
Click
Skip
if you do not want to create a default connection.
•
Select whether to display the following options on Connections dialog
box of your customized client.
•
Type the following information about the default connection you want
to create.
Table 2
Connection dialog configuration options
Field
Description
Show the
"Remember my
password" option.
Enabled by default. When disabled, the client’s
Connections dialog box will not display the “Remember
my password” check box option.
Show the server
parameters.
Enabled by default. When disabled, the client’s
Connections dialog box will not display the "Use Login/
Password" and "Use Trusted Sign-on" radio buttons, or
the "Server host name" and "Server port number". Also,
the New and Delete buttons will be disabled.
Show the
"Advanced"
options page.
Enabled by default. When disabled, the client’s
Connections dialog box will not display the "Advanced"
notebook tab. Additionally, the "Trace SOAP Traffic"
feature will not be available.
Table 3
Default connection dialog configuration options
Field
Description
Hostname
Type the network name or IP address of the Service
Manager server to which you want the Windows client
to connect.
Port Number
Type the communications port on which the Service
Manager server listens to client connection requests.
The default communications port is 13080.

Client Configuration Utility Installation
123
•
Click
Next
to continue.
The Use and Configure Help Server page opens.
12
Do one of the following:
•
Click
Skip
if you do not want to provide online help from a Help Server.
•
Select the
Use Central Help Server
option to establish a connection to a
Help Server. Type the following Help Server information.
Compress
Messages
Select true to enable message compression between the
Windows client and the Service Manager server. Select
false to have messages remain uncompressed.
Use SSL
Connection
Select true to enable an SSL connection between the
Windows client and the Service Manager server. Select
false to use a standard connection.
CA Certificate
Path
Type or select the local path to the CA certificate used
by your SSL connection. Leave this entry blank if you
are not using an SSL connection.
You can find a sample CA certificate file
cacerts
in the following
path:
C:\Program Files\HP\Service Manager 9.20\Client\
plugins\com.hp.commons_9.20\
Table 3
Default connection dialog configuration options (cont’d)
Field
Description
Table 4
Help server configuration options
Field
Description
Help Server
Host
Type the network name of the Service Manager Help
Server to which you want the Windows client to connect.
Help Server
Port
Type the communications port on which the Service
Manager Help Server listens to client connection requests.
The default communications port is 80.

124
Chapter 7
•
Click
Next
to continue. The Client Configuration Utility page opens.
13
Click
Exit
.
The client is now configured.
14
Zip the contents of the Service Manager 9.20 directories to prepare and
deploy the customized configuration of the Service Manager 9.20 client to
other users. The following two directories are necessary for a proper
deployment. The default directory paths are as follows:
—
C:\Program Files\HP\Service Manager 9.20
—
%HOMEPATH%\Service Manager
End users must have the installation DLLs in their windows\system32
directory in order for the deployed client to work properly. They should have
the following path added to their system environment variables:
<ServiceManagerHome>\plugins\com.hp.ov.sm.client.thirdparty_9.20\lib;
The Help Server host and port must be identical to the settings you
configured with the Help Server configuration wizard. See

125
8 Search Engine Installation
You can install the HP Service Manager search engine on a Windows or Unix
server. This section contains information about installation requirements as
well as how to install and configure the search engine.
The Knowledge Management applications are installed with the regular
server installation, however the search engine must be installed separately.
Topics in this section include:
•
Installing the Service Manager search engine
•
Installing the search engine by using the installation wizard
•
Installing the search engine by using the text-based installer
•
Starting and stopping the search engine
•
•

126
Chapter 8
Installing the Service Manager search engine
There are two ways of installing the Service Manager search engine. You can
install the search engine by using an installation wizard, or by using a
text-based installer. After installing the search engine, you can configure the
search engine settings.
Installation requirements
The following are required to install the Service Manager search engine:
•
512 MB RAM
•
4 - 6 GB disk space
•
800 MHz or higher processor
•
400 MB of space designated for /
tmp
(Unix) and
\TEMP
(Windows)
Kernel resource requirements for HP-UX
To run Knowledge Management on HP-UX, configure the following kernel
parameters:
The Linux installer includes a JVM, but for other operating systems, you
install a JVM to run the search engine installer.
Table 1
Knowledge Management kernel resource requirements for
HP-UX
Value
Setting
maxdsiz
1.9 GB (0x7B033000)
maxfiles
2048 KB
maxfiles_lim
2048 KB
maxssiz
160 MB (0xA000000)
max_thread_proc
1024
maxswapchunks 8192

Search Engine Installation
127
Installing the search engine by using the installation wizard
Follow these steps to install the Service Manager search engine by using the
installation wizard:
1
Insert the search engine installation DVD into the appropriate drive of the
server.
2
Start the Service Manager search engine installation wizard.
3
If you are installing on a Windows system that has auto-run enabled, the
wizard starts automatically.
If auto-run is disabled, you can manually start the wizard by using one of
the following methods.
On Windows systems:
•
From the GUI, navigate to the DVD directory, and double-click
setupwin32.exe
.
•
From the command prompt, type the following:
D:\>setupjwin32
where D identifies the DVD drive. Substitute your DVD drive
identifier.
maxtsiz
1 GB (0x40000000)
maxuprc 512
maxusers
128
nkthread 1024
nproc 517
Table 1
Knowledge Management kernel resource requirements for
HP-UX (cont’d)
Value
Setting

128
Chapter 8
On Unix systems:
For HP-UX, be sure that you have set the kernel configuration parameters
described in
Kernel resource requirements for HP-UX
•
From the GUI:
–
Mount the DVD and navigate to the DVD directory.
–
Double-click the executable script that matches your Unix system,
for example,
setupsolaris
for Solaris systems or
setupaix
for
AIX systems.
•
From the command prompt:
–
Mount the DVD and change directories to the mount location.
–
Run the executable script that matches your Unix system, for
example:
./setupsolaris
for Solaris systems
or
./setupaix
for AIX systems
The Service Manager Search Engine Setup wizard opens.
4
Click
Next
to read and accept the licensing agreement.
5
Select the
I accept the terms in the License Agreement
option. The
Next
button becomes active.
6
Click
Next
to provide the following installation parameters.
Table 2
Search engine installation parameters
Parameter
Value
Hostname
Server host name
If the search engine will be on a separate machine on a
separate domain, use the fully qualified domain, for
example,
my.machine.mydomain.com
.
Masterport
The default is 9950.
Docserver Port
(9920-9949)
The default is 9948.
Indexer Port
(9960-9979)
The default is 9967.

Search Engine Installation
129
7
Click
Next
to provide the installation directory.
The default installation directory for Windows is:
C:\Program Files\HP\Service Manager 9.29\Search Engine
If necessary, click
Browse
to choose a different location.
8
Click
Next
to review the installation summary information.
9
Click
Install
to begin copying the installation files.
To stop the installation click
Cancel
.
The InstallShield Wizard opens a dialog box when the installation is
complete.
10
If you are on a Unix system, run
InstallConfiguration.sh
, which is
found in your
<Search Engine install path>/
directory.
11
Click
Finish
to exit the Wizard.
Record the settings in
. You will need them to configure
Service Manager to communicate with the search engine.

130
Chapter 8
Installing the search engine by using the text-based
installer
Follow these steps to install the Service Manager search engine using the
text-based installer:
1
Insert the search engine installation DVD into the appropriate drive of the
server.
2
Run the installer.
3
On Windows systems:
Open the command prompt and type the following:
D:\>setupwin32 -console
where D identifies the DVD drive. Substitute your DVD drive identifier.
On Unix systems:
a
Mount the DVD and change directories to the mount location.
b
Run the executable script that matches your Unix system, for
example:
./setupsolaris -console for Solaris systems or
./setupaix -console for AIX systems.
4
At the installation script prompt, type
yes
to agree to the license
agreement.
5
At the installation script prompt, type the installation directory address
where you want to install Service Manager.
The system takes several minutes to read the contents of the DVD,
uncompress the files, and create a logs directory.
6
At the installation script prompt, type a host name, then press
Enter
.
The system validates any directory name that you specify. If you
specify an invalid directory, the installation generates an error
message.
If the search engine will be on a separate domain, use the fully
qualified domain, for example, mymachine.mydomain.com.

Search Engine Installation
131
7
At the installation script prompt, type a Masterport number, then press
Enter
. The default is 9950.
8
At the installation script prompt, type a Docserver Port number
(9920-9949), then press
Enter
. The default is 9948.
9
At the installation script prompt, type an Indexer Port number
(9960-9979), and then press
Enter
. The default is 9967.
10
The server installation completes.
11
If you are on a Unix system, run
InstallConfiguration.sh
, which is
found in your
<Search Engine install path>/
directory.
Record these settings, as you will need them to configure Service
Manager to communicate with the search engine.

132
Chapter 8
Starting and stopping the search engine
The methods for starting and stopping the search engine are described below.
On Windows systems
The installer creates a service named
KMSearch.
Use it to start and stop the
search engine. This service starts automatically after installation.
On Unix systems
Add the following to the
sm.ini
file:
For HP-UX
plugin0:libkmplugin.sl
For all other versions of Unix
plugin0:libkmplugin.so
Your installation folder has two executable scripts.
Run the
k2adminstart.sh
executable script file to start the index service for
your search engine.
Table 3
Search engine start scripts for Unix systems
Name
Purpose
k2adminstart.sh
Starts the search engine and index service
k2adminstop.sh
Stops the search engine and index service

Search Engine Installation
133
Configuring the search engine
Before you can use the search engine, you must set up connectivity, and then
index the search engine.
Connecting to the search engine
Follow these steps to connect to the search engine:
1
Log in as a user with the KM ADMIN profile.
2
Open
System Administration > Ongoing Maintenance > Environment Records >
Knowledge Management Environment
.
3
To
Assign the Default Knowledge View Group to all operators
, select the check
box.
4
Specify the
Host Name of Search Server.
This must be identical to the host
name you indicated when installing the server.
5
You can confirm that you have the correct information by looking in the
configuration file at
C:\Program Files\HP\Service Manager
7.0\Search Engine\KMSearch.cfg
.
6
Click
Verify Server
to verify connectivity to the search engine.
7
Specify the
Mapped drive for Style files.
The path default is
C:\Program
Files\HP\Service Manager 9.29\Search Engine\data\stylesets.
8
Click
Verify Path
to verify that your path and map settings are correct.
9
Make sure that both the search engine and Service Manager server have
read and write privileges in the stylesets folder.
10
Specify the
Search Engine administration port number.
This must be identical
to the port number you indicated when installing the server. If you did not
change the default port number, use the default given in the field.
If the search engine is installed on a separate machine, you will
need to share the stylesets folder from the search engine to the
Service Manager server. Use the share name and path for this
setting so that the style files path in the environment form is set to
the stylesets folder.

134
Chapter 8
11
Specify the
Search Engine indexer port number.
This must be identical to the
port number you indicated when installing the server. If you did not
change the default port number, use the default given in the field.
12
Specify the
Search Engine search port number.
This must be identical to the
port number you indicated when installing the server. If you did not
change the default port number, use the default given in the field.
13
Specify the
Max number of Documents returned from a search.
14
Specify the
Default expiration period.
The time limit specified here will be
over-ridden if the user specified an expiration date when they created a
document by using the Contribute New Document function.
15
Specify the
Style text for search results.
Use this style sheet to control the
appearance of the information the search returns. This is similar to an
HTML css stylesheet.
16
Log out of Service Manager, and then log back in again.
Using a Web Service Connection
The following additional fields on the Knowledge Management Application
Environment form enable the search engine to use a Web service to call back
to Service Manager and report which documents have been updated or deleted
in the index and which documents contain errors and were not indexed.
•
Service Manager Host Name or URL
specifies the host name or URL for the
Service Manager server. An example is localhost or 15.124.215.218.
•
Service Manager Http Port Number
specifies the port number for the Service
Manager server. An example is 13080.
•
Service Manager Login Name for Web Service Connection
specifies the user
login name that has delete rights for the kmknowledgebaseupdates table
and add and delete rights for the kmknowbaseerrors table.
Service Manager Password for Web Service Connection
specifies the password for
the login name.
As a best practice, create a new user and password designated for
this Web service connection.

Search Engine Installation
135
The Manage Knowledgebase form displays the error:
Search Engine incorrect or not found! Please check the
Environment Settings
when a user attempts to access a knowledgebase and these fields
are not set correctly.

136
Chapter 8
Indexing data with the search engine
Certain actions require a full reindex. These actions include the following:
•
Initial setup (no indexes exist)
•
Changing any value on the Type Information tab or the Field Definitions
tab
You may also want to do a full reindex if:
•
You have a large number of changes or new documents
•
Search performance is becoming sluggish
As updates are applied to the index, they are added in as incremental index
files. If you have a knowledge base that has had many changes applied, these
incremental index files can slow the search engine down since it must perform
your query on each one. A full reindex builds a new clean index that performs
better, similar to defragmenting a hard drive. Doing a full reindex on a large
knowledge base can have a significant impact on system resources because it
removes all changes for the knowledge base from the change cache.
Indexing data with the search engine
Follow these steps to index data with the search engine:
1
Log on as a user with the KM ADMIN profile.
2
Open
Knowledge Management > Manage KnowledgeBases
.
3
Click
Search
to bring up a list of knowledge bases.
4
For each knowledge base, check that the information is correct, and click
Full Reindex
. Refer to the field help for descriptions of each field.
5
If the index does not exist, it will be created. If it does exist, it will be
deleted and recreated. The
Docs
field will not be blank after an index has
been created.
After the indexes have been created, users will be able to access the indexed
documents the next time they log in.
You can only reindex or get status for your knowledge base if the search
engine has been properly configured on the environment page. A message box
will notify you if the search engine cannot be found.

137
A Legacy Integrations
Using legacy integrations with the Service Manager server requires you to set
up a read-only legacy ServiceCenter listener. A legacy integration is any
integration that depends on SCCL32 or the ServiceCenter ODBC driver.
These include Connect-It, Get-It, and Crystal Reports.
This appendix provides information on how to set up a legacy listener and
connect to Service Manager, as well as how to set up the ServiceCenter ODBC
driver.
Topics in this appendix include:
•
•
Editing the legacy sc.ini file
•
Installing the Windows service
•
•
•

138
Appendix A
Overview
You will need to complete the following tasks to connect to Service Manager
when you use SCCL32 or the legacy ServiceCenter ODBC driver.
Task 1:
Editing the legacy sc.ini file
Task 2:
Installing the Windows service
Task 3:
on page 141 (Windows servers only)
Task 4:
Task 5:
While the server runs on both Windows or Unix platforms, the ODBC driver
runs only on Windows.

Legacy Integrations
139
Editing the legacy sc.ini file
The out-of-box server
sc.ini
file is configured to connect to the Demo
Database. To connect to another RDBMS, edit the parameters in
sc.ini
.
Windows users also need to add the
ntservice
parameter to the
sc.ini
file.
This parameter provides the name used to identify the Windows service.
Follow these steps to edit the
sc.ini
file:
1
Log in to the Service Manager server with an administrator account.
2
Open a command prompt and navigate to
<Service Manager 9.20 installation path>\Server\
LegacyIntegration\RUN.
3
Open the file
sc.ini
with a text editor.
4
To connect to your Service Manager RDBMS, add the database
connectivity settings. These match the settings you used in
5
Windows users only: Add the following parameter on its own line.
ntservice:<Service Manager Legacy Readonly Service Name>
6
Save the file and exit.
Windows users continue with the next section,
Installing the Windows service
If the legacy listener will connect to a case-insensitive Oracle
database, add the parameter
sql_oracle_binary_ci
to the sc.ini
file.

140
Appendix A
Installing the Windows service
You can create a separate Windows service to use with the legacy ODBC
driver. You can manually install a ServiceCenter Windows service on any
machine where you have already installed the Service Manager server.
Follow these steps to install the Windows service:
1
Log on to the Windows server as a user with local administrator
privileges.
2
Open a command prompt and navigate to
<Service Manager 9.20 installation path>\Server\
LegacyIntegration\RUN.
3
Type
scservic -install.
This command creates a Windows service with the name specified by the
ntservice
parameter in the
sc.ini
file.
Uninstalling the Windows service
You can manually remove the Windows service on any machine where you
have already installed Service Manager server.
Follow these steps to uninstall the Windows service:
1
Log on to the Service Manager server with an administrator account.
2
Open a command prompt and navigate to
<Service Manager 9.20 installation path>\Server\
LegacyIntegration\RUN.
3
Type
scservic -remove
.
This command removes the Windows service with the name specified by the
ntservice
parameter in the
sc.ini
file.

Legacy Integrations
141
Starting a legacy listener
You can start a read-only ServiceCenter listener from the command prompt or
Windows services. Because this is not an instance of Service Manager it will
not show up in your System Status window.
Unix
Follow these steps to start a listener for your legacy integration on Unix
servers.
1
Navigate to
C:\Program Files\HP\Service Manager 9.20\Server\
LegacyIntegration\RUN
2
Run the
scstart
script.
Windows
Follow these steps to start a listener for your legacy integration on Windows
servers.
1
From the Windows Start menu, select
Control Panel > Administrative Tools >
Services.
2
Select the service you installed in
Installing the Windows service
page 140, and then click
Start
.
If you prefer, you can start the listener as an application rather than as a
service. To do so, go to the
<installation path> \Service Manager
9.20\Server\ LegacyIntegration\RUN
directory and run the following
command at the Windows command prompt:
scenter -listener:<port number> -RPCReadOnly
RPC read-only mode parameter
You must start a legacy listener with the RPC read-only mode parameter. This
parameter allows a ServiceCenter 6.2 server to connect to a Service Manager
database without interfering with the Service Manager server (it does not
create a system lock).

142
Appendix A
The RPC read-only parameter prevents Service Manager clients (Windows,
web tier, and web services) from connecting to the Service Manager server.
The only connections the ServiceCenter 6.2 RPCReadOnlyMode listener
accepts are connections from the ServiceCenter ODBC driver or Connect-It.
If you are using Connect-It 3.81, you must provide the host name and port for
both the Service Manager and ServiceCenter 6.2 ReadOnly listener.
Connect-It requires this information to use the RPC functions for reading the
event services and other ServiceCenter information. The connector writes
data to Service Manager through web services.
You can also use the legacy listener to run reports or SQL queries against
your Service Manager data without affecting the Service Manager
performance.

Legacy Integrations
143
Installing the ODBC driver
Follow these steps to install the legacy ServiceCenter ODBC driver.
1
Log on to the Windows server as a user with local administrator
privileges.
2
Insert the Service Manager installation DVD into the appropriate drive of
the server.
a
If you are installing on a system that has auto-run enabled, the DVD
browser starts automatically.
b
If auto-run is disabled, follow these steps to start the DVD browser
manually.
–
Navigate to the DVD directory.
–
Open
clickme.htm
.
3
Click
Install ODBC Driver.
The ServiceCenter ODBC driver InstallShield Wizard opens.
4
Click
Next
to read and accept the licensing agreement.
5
Select the
I accept the terms in the License Agreement
option.
The Next button becomes active.
6
Click
Next
to select your installation folder.
The default installation location is:
C:\Program Files\Peregrine Systems\ServiceCenter 6.2\ODBC
Driver
If necessary, click
Browse
to choose a different location.
7
Click
Next
to prepare the installation process.
8
Click
Install
to begin copying the installation files.
You can stop the installation by clicking
Cancel
.
A dialog box opens when the installation is complete.
9
Click
Finish
to exit.

144
Appendix A
Configuring the ODBC driver
The default installation sets up the ODBC DSN to connect to the default
legacy listener, and assumes it is on the local host. To connect to your legacy
listener, you will need to edit these settings.
Follow these steps to configure the legacy ODBC driver to connect to the
legacy read-only listener:
1
From the Windows Start menu, click
Control Panel > Administrative Tools >
Data Source (ODBC)
.
2
Open the System DSN tab.
3
Select
sc_report_odbc
and click
Configure
.
4
Configure the ODBC driver by using the following parameters.
5
Start the legacy listener. For additional information, see
6
Verify that the ODBC driver can connect.
To test the connection, use any ODBC query tool. For example, in Excel,
open:
Data > Get External Data > New Database Query.
Choose the
ServiceCenter ODBC driver as your data source. If it connects, you will
see the HP Service Manager tables.
Table 4
ODBC parameters
Field
Value
Data Source Name sc_report_odbc
Server
The host where the legacy ServiceCenter listener is
running.
The out-of-box default is localhost.
Port
The port the legacy server is set to use.
The out-of-box default is 12690.

Legacy Integrations
145
Installing Crystal Reports for use with HP Service
Manager
You can use Crystal Reports to view, update, and develop new reports with HP
Service Manager.
Follow these steps install Crystal Reports 2008 for use with HP Service
Manager.
1
Ensure proper installation of the ServiceCenter ODBC driver. See
2
Log in to the Windows server as a user with local administrator privileges.
3
Insert the Service Manager installation DVD into the appropriate drive of
the server.
If you are installing on a system that has auto-run enabled, the DVD
browser starts automatically. If auto-run is disabled, follow these steps to
start the DVD browser manually.
a
Navigate to the DVD directory.
b
Open
clickme.htm
.
4
Click
Install Crystal Reports 2008 for use with HP Service Manager only
to run
the installer in silent mode.
5
Restart your computer
6
Start the legacy listener. See
You must restart your computer before opening Crystal Reports
2008.

146
Appendix A
Download reports for HP Service Manager
The Service Manager installation DVD comes with out-of-box reports that you
can run using Crystal Reports. Using these reports requires the ServiceCenter
ODBC driver and requires that the legacy listener is started. See
on page 143 to install the HP Service Manager ODBC driver.
Follow these steps to download the reports.
1
Log in to the Windows server as a user with local administrator privileges.
2
Insert the Service Manager installation DVD into the appropriate drive of
the server.
If you are installing on a system that has auto-run enabled, the DVD
browser starts automatically. If auto-run is disabled, follow these steps to
start the DVD browser manually.
a
Navigate to the DVD directory.
b
Open
clickme.htm
.
3
Select the Downloads tab.
4
Click
Download Reports for HP
Service Manager
.
A folder containing the available reports opens.
5
Copy the desired reports to your local directory.
See the HP Service Manager Reporting by Using Crystal Reports for more
information.

147
B Installation Verification
To verify that Service Manager has successfully installed, you need to run the
Service Manager server, start the Service Manager service, and then start the
Service Manager client.
Topics in this appendix include:
•
Starting the Service Manager server
•
Starting the Service Manager service from Windows
•
Starting the Service Manager client
For information on accessing the Service Manager web client, see

148
Appendix B
Starting the Service Manager server
You must start the Service Manager server before users can connect with
client sessions. You can use several methods to start and stop the Service
Manager server and associated background process, depending upon the
operating system on which your system runs. For more information, see the
topics associated with your Service Manager server’s operating system.
Start the server from the Windows command prompt
To start the Service Manager server from the Windows command prompt, do
the following:
1
Open the Windows command prompt. Click
Start > All Programs >
Accessories > Command Prompt
.
2
Change directories to the RUN folder of your HP Service Manager
installation. For example:
cd C:\Program Files\HP\Service Manager 9.20\Server\RUN.
3
Type the following command:
sm -httpPort:13080 -httpsPort:13081
4
Press
Enter
.
Start the server from Windows services
To start the Service Manager server from Windows services, do the following:
1
Open the Services applet. From the Windows Control Panel, click
Administrative Tools > Services.
2
In the Services list, click
HP Service Manager
.
You can omit the
httpPort
and
httpsPort
parameters, if you provide them
in the Service Manager initialization file (
sm.ini
).
You must leave the command prompt open while the Service
Manager server runs. Closing the command prompt window stops
Service Manager immediately without cleaning up any processes or
releasing any record locks.

Installation Verification
149
3
Click
Start
to start the service.
Start the server from the Unix command line
To start the Service Manager server from the Unix command line, do the
following:
1
Change the directories to your HP Service Manager Run directory. For
example:
cd /HP/Service Manager 9.20/Run
2
Type the following command:
smstart
3
Press
Enter.
Windows displays a message that the Service Manager service is starting.
After several seconds, the service starts and displays Started in the Status
field. If the Service Manager service does not start, contact customer support
with any error messages.

150
Appendix B
Starting the Service Manager service from Windows
The Service Manager service can be found in the Services panel of the
Windows Control panel. The executable defined in the service is
sm.exe
and
is stored in the RUN directory.
To start the Service Manager service from Windows:
1
From the Windows Start menu, select
Control Panel > Administrative Tools >
Services.
2
Click the
HP Service
service, and then click
Start
. The service is started. If
the service does not start, contact Customer Support.

Installation Verification
151
Starting the Service Manager client
To start the Service Manager client:
1
Click
Start > All Programs > Service Manager Client,
or navigate to the
Service Manager
folder on your hard drive. The default path is:
C:\Program Files\HP\Service Manager 9.20\Client\
ServiceManager.exe
The Connections dialog box opens where you can create, manage, and use
database connections for your users.
2
Create a database connection for the System Administrator.
a
Click the
New Launch Configuration
icon.
b
In the Name field, type the System Administrator name.
c
Choose
Use Login/Password
.
d
In the User name field, type
System.Admin
.
e
In the Password field, type a password.
f
Enter or verify the information in the Server host name and Server
port number fields.
g
If desired, click the Connection identified by a color field, and select a
color for the connection.
h
Click
Connect
to start using the Service Manager client.
For detailed information about starting a client connection, see

152
Appendix B

153
Index
A
add/remove programs
uninstall Windows client, 83
uninstall Windows server, 46
administrator account, local, 109, 116
ANSI terminal, 52
Apache Tomcat, 86, 91, 94
application name, changing of, 120
autopass, 64
license, 69
license entitlement certificate, 65, 66, 67
permanent password certificate, 67, 68
autorun.exe, 40, 45, 48, 77, 91, 109, 116, 145,
B
BEA WebLogic, 91
browser requirements, web client, 87
buffer size, 63
C
CA certificates file, 115
cacerts parameter, 95
capability words, 19
changing
application names, 120
location of Windows client images, 114
provider name, 120
splash screen image, 120
splash screen in Windows client, 114
client
installation requirements, 76
uninstall, 83
web, 14, 18
Windows, 14, 18
client configuration utility, 19, 114
description of, 114
enabling help server, 123
requirements of, 116
client tier, components of, 14
communications port, help server, 108, 110
components
client tier, 14
database tier, 14
server tier, 14
web tier, 15
compress_soap parameter, 95
connection parameters, 79
connections
client configuration utility, 122
defining, 78
to DB2 Universal, 23
to MS SQL server, 28
to Oracle, 33

154
Connect-It, 137
connectivity
to DB2 Universal, 24
to MS SQL Server, 30
to Oracle, 34
Crystal Reports, 137, 145, 146
D
dashboards, 19
database tier, components of, 14
data splitting
DB2 Universal, 23
MS SQL Server, 28
Oracle, 33
DB2 Universal
connecting to, 24
login ID, 23
preparation, 22 to 26
setting up time zones for reporting, 25
splitting data on multiple databases, 23
defining connections
client configuration utility, 121
new client connection, 78
deploying tailored versions of
documentation, 106
development environment, 12, 18
docserver port parameter, 128
documentation, deploying tailored versions
of, 106
E
error, no trusted certificate found, 115
exec-shield-randomize, 59
F
forceload parameter, 60
G
grub.conf, 59
H
hardware required, 18
heap size, 97
help server
accessing from a web browser, 112
accessing from the web client, 112
client configuration utility, 123
communications ports, 108, 110
description of, 106
installation, 19
overview, 106
requirements of, 108
upgrading, 106
web server, 106
Windows client, 123
Windows service name, 110
helpServerHost parameter, 95
helpServerPort, 95
hostname parameter, 128
hpterm, 52

155
HP-UX kernel parameters
max_thread_proc, 126
maxdsiz, 126
maxfiles, 126
maxfiles_lim, 126
maxssiz, 126
maxswapchunks, 126
maxtsiz, 127
maxuprc, 127
maxusers, 127
nkthread, 127
nproc, 127
shmem, 56
shmmax, 56, 58
shmmni, 56, 58
I
images
changing location of in Windows client,
customization of, 118
path to, 118, 121
implementation checklist, 18
indexer port parameter, 128, 131
installation
Java Development Kit, 100
parameters, search engine, 128
requirements, client, 76
requirements, search engine, 126
search engine, 127, 130
Unix server, 49
Windows client, 77
Windows server, 45
IPC parameters
Solaris, 61
J
J2EE compliance, 90
J2SE Java Development Kit, 86
Java Runtime Environment, 87
installation, 100
Java web application server, 86
JSP, 86
K
k2adminstart.sh, 132
k2adminstop.sh, 132
kernel.shmall, 59
kernel.shmmax, 59
kernel configuration parameters, 55
kernel IPC parameters, 58
kernel resource requirements for HP-UX
knowledge management, 126
knowledge management
kernel resource requirements for
HP-UX, 126
L
LD_LIBRARY_PATH, 53
legacy integrations, 137
LIBPATH, 53
LicFile.txt, 69
listener port parameters, 71
local administrator account, 109, 116
log files, web tier, 95
login ID

156
M
masterport parameter, 128, 131
max_thread_proc parameter, 126
maxdsiz parameter, 56, 126
maxfiles_lim parameter, 126
maxfiles parameter, 126
maxssiz parameter, 126
maxswapchunks parameter, 126
maxtsiz parameter, 127
maxuprc parameter, 127
maxusers parameter, 127
MS SQL Server
case sensitivity, 31
connecting to, 30
login ID, 28
preparation, 27 to 31
setting up time zones for reporting, 29
splitting data on multiple databases, 28
N
nkthread parameter, 127
No trusted certificate found, Error, 115
nproc parameter, 127
ntservice parameter, 139
O
ODBC parameters, 144
operators, adding, 19
Oracle
case sensitivity, 36
connecting to, 34
login ID, 33
preparation, 32 to 39
setting up time zones for reporting, 34
splitting data on multiple databases, 33
P
parameter
licensefile, 65
parameters
cacerts, 95
connection, 79
-data, 82
kernel, 58, 126
kernel configuration, 55
max_thread_proc, 126
maxdsiz, 56, 126
maxfiles, 126
maxfiles_lim, 126
maxssiz, 126
maxswapchunks, 126
maxtsiz, 127
maxuprc, 127
maxusers, 127
ntservice, 139, 140
serverHost, 94
serverPort, 94
shared_memory, 44, 56
sqldb, 35
sqltz, 25, 29, 34
pop-ups, enabling, 87
production environment, 12, 20
provider and application settings, 121
provider name, changing of, 120
public favorites, 19
R
RDBMS servers
application data, 14
connection to, 18
database tier, 14
refreshMessages parameter, 95
refreshmessinterval parameter, 95

157
reporting tools
setting up timezones for DB2 reporting,
setting up time zones for MS SQL Server
reporting, 29
setting up time zones for Oracle
reporting, 34
requirements
client configuration utility, 116
help server, 108
Unix server, 43, 49
root access, 52
RPCReadOnly, 141
S
sample database installation, 40
SAM utility, 58
sc_report_odbc, 144
scripts
scstart script, 141
search engine, 125
applications, 125
configuration, 133
connecting to, 133
host name, 130
indexing, 136
installation, 127, 130
installation parameters, 128
installation requirements, 126
installing, 126
kernel resource requirements for
HP-UX, 126
start scripts for Unix systems, 132
search engine parameters
docserver port, 128
hostname, 128
indexer port, 128
masterport, 128
Secure Socket Layer, 80
semaphores, 51
server
connecting to DB2, 23
connecting to MS SQL server, 28
connecting to Oracle, 33
connection to Oracle, 33
help, 19
processes, Unix, 44, 51
resources, shared memory, 44, 51
Service Manager, 14
start service, 148
Web, 15, 86, 119
serverHost parameter, 95
serverPort parameter, 95
server tier, components of, 14

158
Service Manager
create a database connection, 151
hardware required, 18
integrations, 19
server, 14
start client, 151
start server, 148
start service, 150
upgrading, 18
upgrading the client, 76
setting heap size of web application server,
shared memory, server resources, 44, 51
SHLIB_PATH, 53
SHMALL, 59
shmem parameter, 56
SHMMAX, 59
shmmax parameter, 56, 58
shmmni parameter, 56, 58
shmsys parameter, 60
sm.ini, 24, 25, 29, 30, 34, 35, 40, 44, 46, 51,
smstart script, 59
SOAP, 80
Solaris, 60, 62
number of file handles, 61
Solaris parameters
forceload, 60
IPC, 61
shmsys, 60
splash screen
changing image used, 120
changing in Windows client, 114
ssl parameter, 95
sysctl.conf, 59
T
tailoring the Windows client, 114
test environment, 13
U
ulimit, 61
uninstall
client, 83
Unix server, 55
Windows server, via Add/Remove
Programs, 47
Windows server, via installation DVD, 48
Unix
root account, 50
Unix server
install, 49
processes, 44, 51
requirements, 43, 49
uninstall, 55
upgrading
client, 76
help server, 106
Service Manager, 18
URL to
web client, 99, 103
web tier, 99, 103
V
viewactivenotes parameter, 95
W
web, 95

159
browser requirements, 87
URL to, 99, 103
WebLogic, 91
web parameters
cacerts, 95
compress_soap, 95
helpServerHost, 95
helpServerPort parameter, 95
refreshMessages, 95
refreshmessinterval, 95
serverHost, 95
serverPort, 95
ssl, 95
viewactivenotes, 95
help server, 106
set class loader mode, 96
web tier, 18
components of, 15
log files, 95
setting heap size, web application server,
webtier-7.00.war, 13, 15, 86, 91, 93, 94
Windows client, 14, 18
defining default connections for, 121
enabling help server, 123
installation, 77
installing, 77
provider and application settings, 121
tailoring of, 114
Windows server
uninstall using Add/Remove Programs,
uninstall using the installation DVD, 48
Windows service name, help server, 110

160
Document Outline
- Installation Guide
- Contents
- 1 Planning for an HP Service Manager Implementation
- 2 Database Preparation
- IBM DB2 Universal Database preparation
- Microsoft SQL Server preparation
- Oracle Server preparation
- Installing the sample database
- 3 Server Installation
- 4 Client Installation
- 5 Web Tier Installation
- Web tier architecture
- Browser requirements for the web client
- Installing the web tier
- Determining the web architecture needed to support your web tier
- Deploying the Service Manager web tier
- Setting web client preferences from the web.xml configuration file
- Setting the WebSphere class loader mode
- Endorsed JAR files
- ISetting the web application server heap size
- Configuring the web server to work with Service Manager
- Accessing Service Manager from the web client
- Web client Computer Telephony Integration (CTI)
- 6 Help Server Installation
- 7 Client Configuration Utility Installation
- 8 Search Engine Installation
- A Legacy Integrations
- B Installation Verification
- Index
Wyszukiwarka
Podobne podstrony:
HP System Management Homepage Installation Guide (September 2008)
HP System Management Homepage Installation Guide (March 2008)
installation guide
04 vpuml installation guide
install guide
Installation Guide
install guide
gmax tempest install guide
Installation Guide Licensing gu Nieznany
System?nter Virtual Machine Manager Scripting Guide
Installation Guide for WindowsXP
c20h c28h c40h c60h installation guide
installation guide
install guide
Mac OS X Installation Guide
Effective Classroom Management A Teacher's Guide
03 bpva installation guide
więcej podobnych podstron