Tyrannosaurus
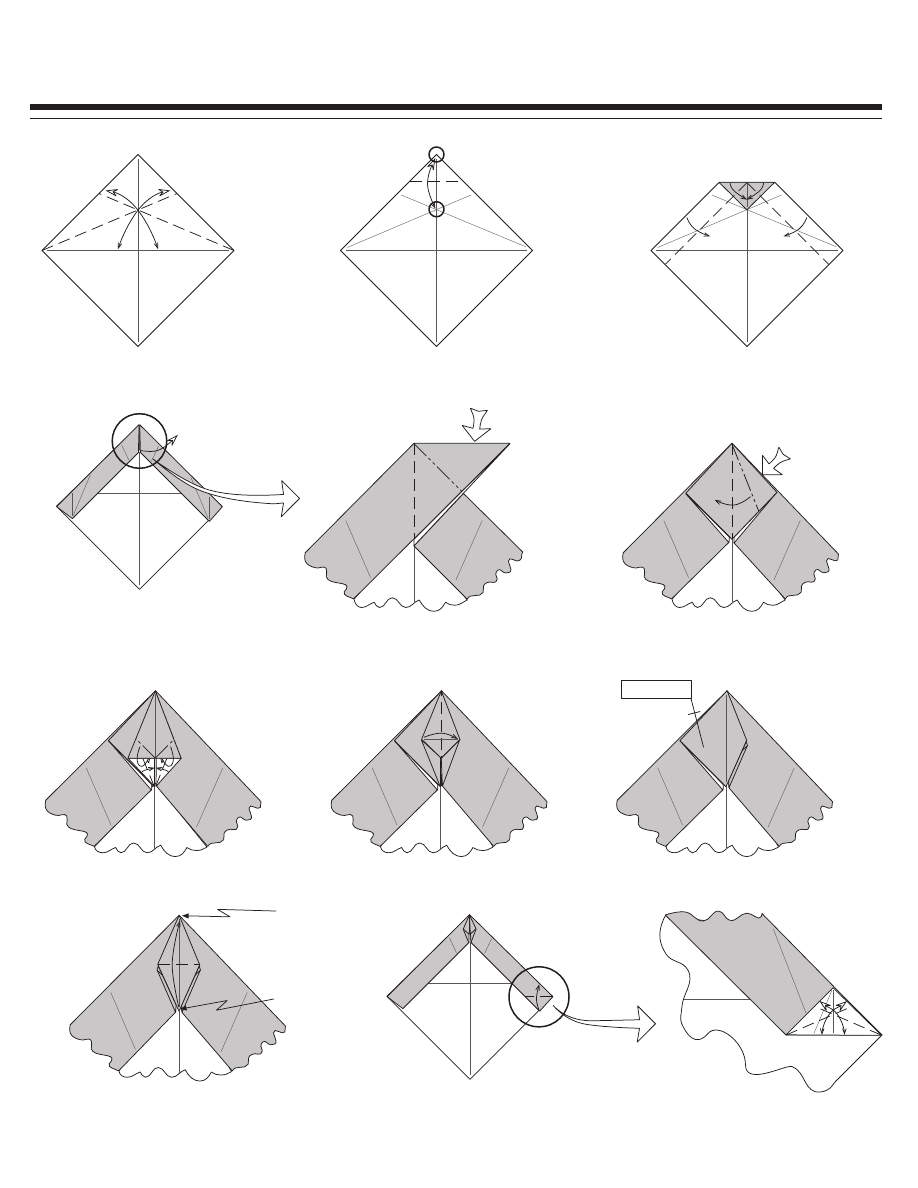
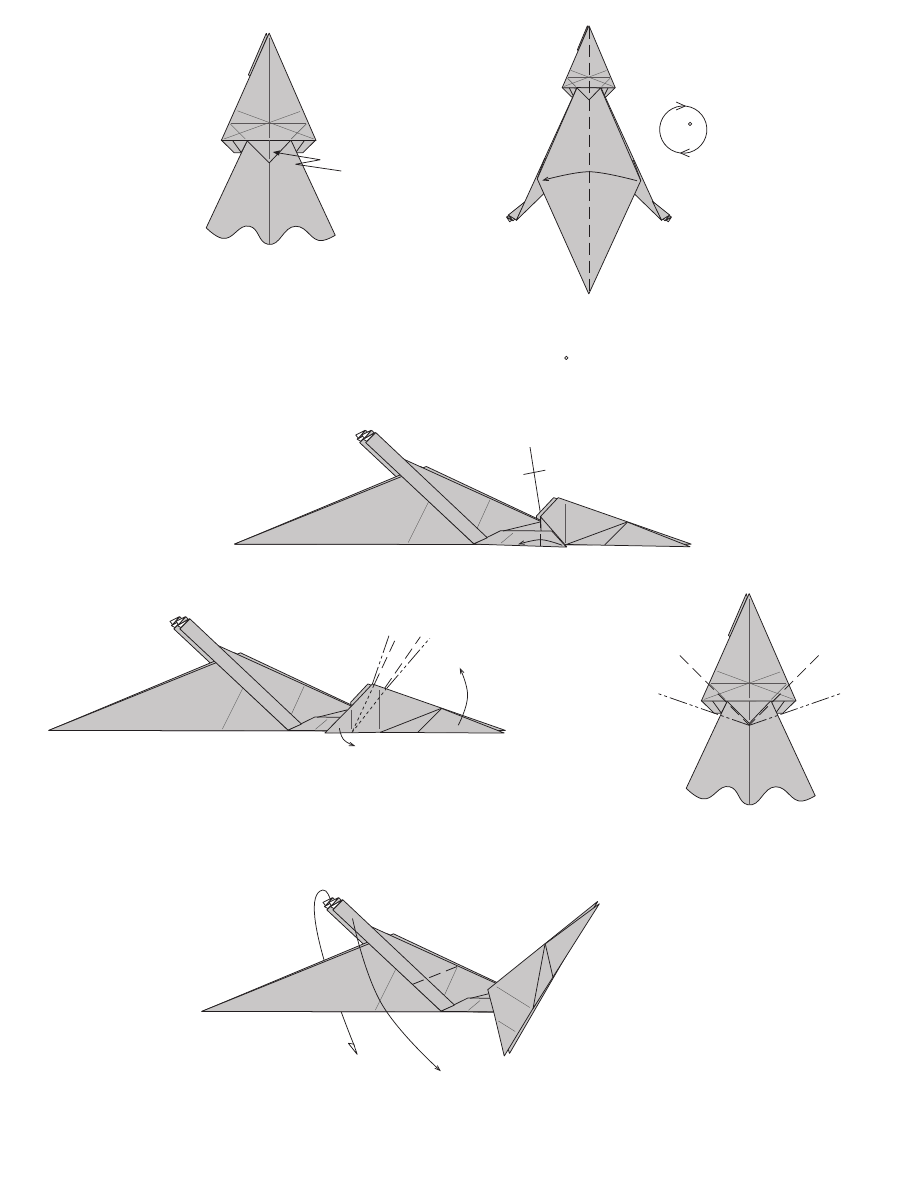
Begin with a square, white side up, with both diagonals precreased.
1
Valley fold the top edges to
the center line, creasing the
angle bisectors.
2
Valley fold the top point to the
intersection of the angle
bisectors created in Step 1.
3
Valley fold both sides of the
new top edge and the
attached paper below it to the
center line.
4
Pull out the point (the one folded
down in Step 2) hidden by the
flaps folded down in Step 3. The
next few diagrams are close-ups
of the top of the model.
5
Squash fold the point at the
top to create a small
preliminary fold.
6
Squash fold the right side of
the preliminary fold.
7
Petal fold the flap, leaving the
petal pointing down.
8
Fold the left flap of the petal
back over to the right.
9
Repeat Steps 6-8 in mirror image
on the left side of the model.
10
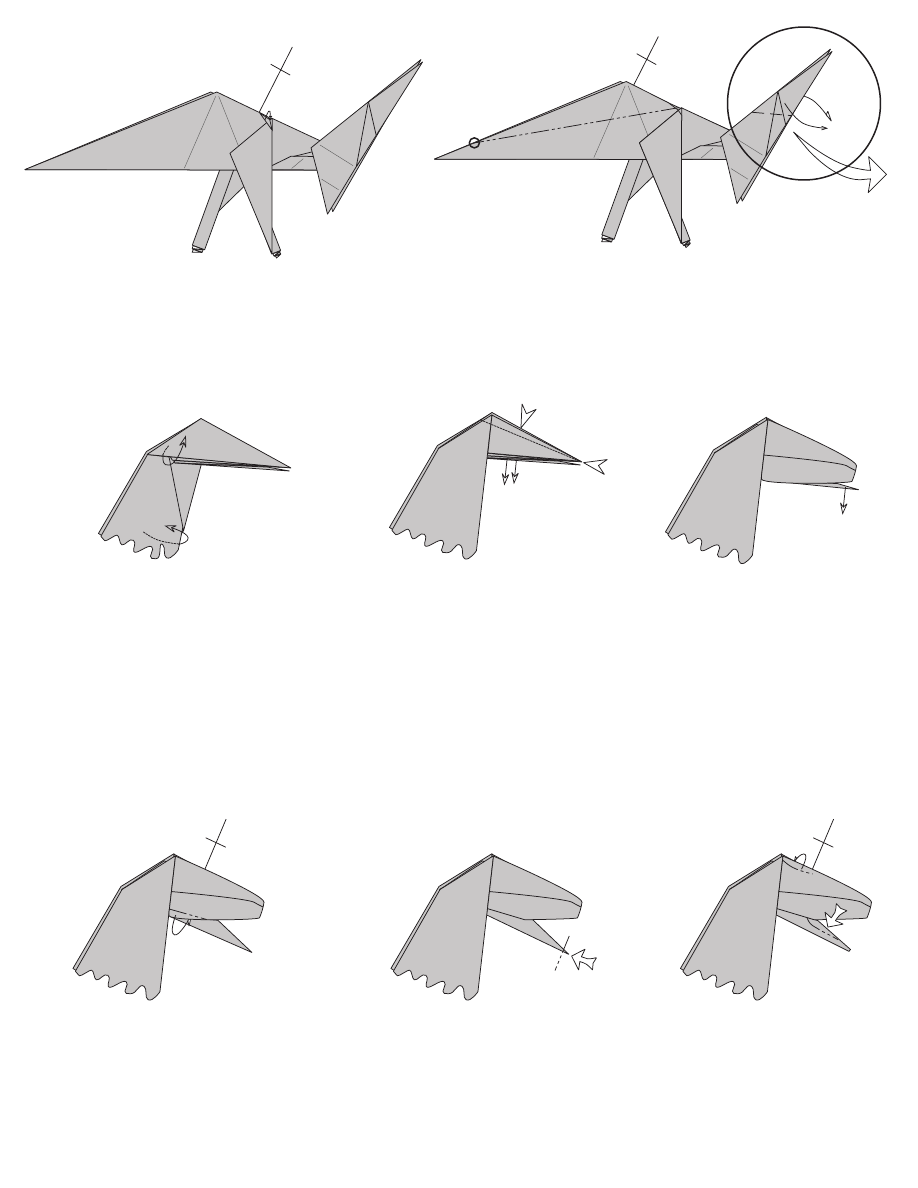
Valley fold the point created by the petal
folds up to meet the top of the model. This
point will be the lower jaw. The next step
returns to a full view of the model.
11
Valley fold the lower right corner of
the long, rectangular flap (from Step
3) up along the angle bisector. The
next few steps are close-ups of this
region.
12
Valley fold the sides of the small
white triangle to its lower edge and
unfold.
6-8 x1
head
lower jaw
13
Rabbit ear the white triangle. The
point created by the rabbit ear will
become the first toe (see Step 65).
The next step returns to a full view
of the model.
14
Repeat Steps 12-13 on the
left side of the model.
15
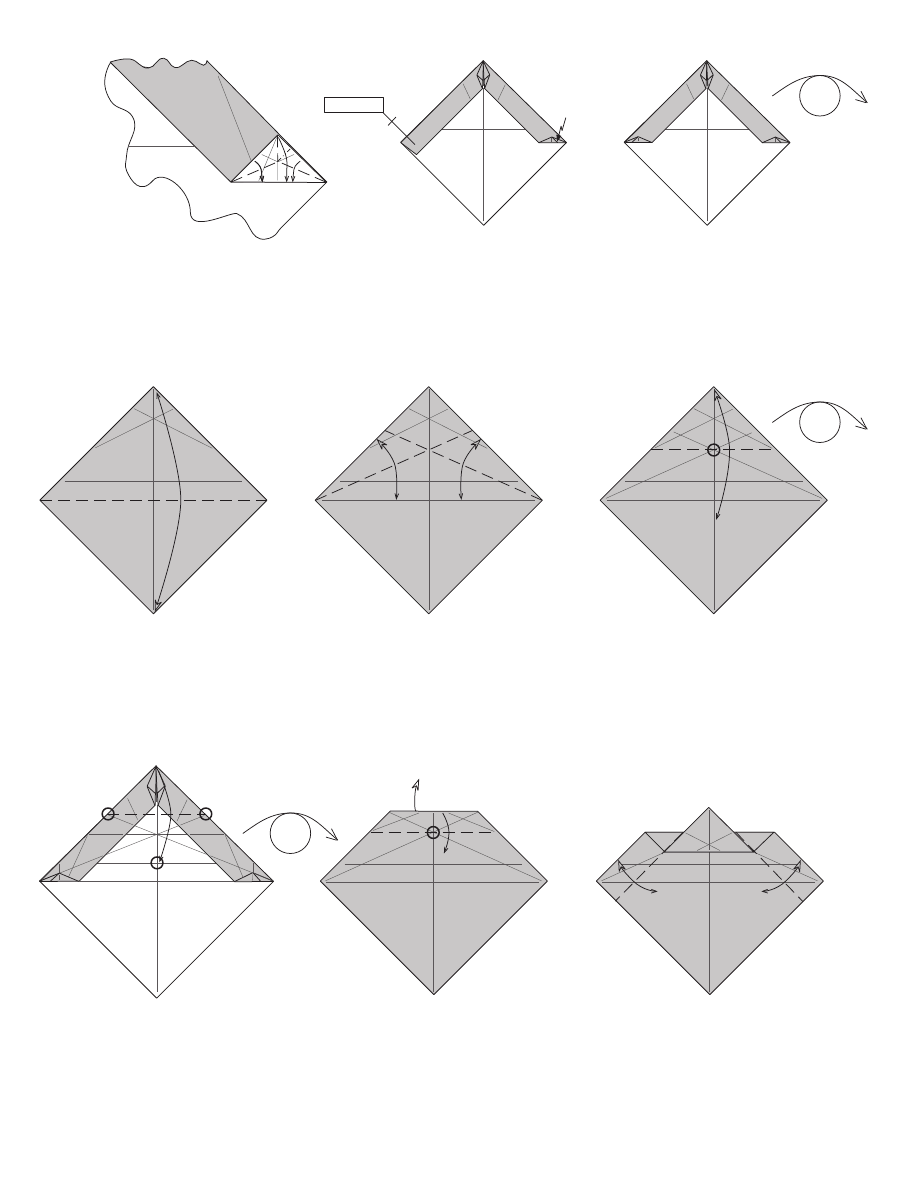
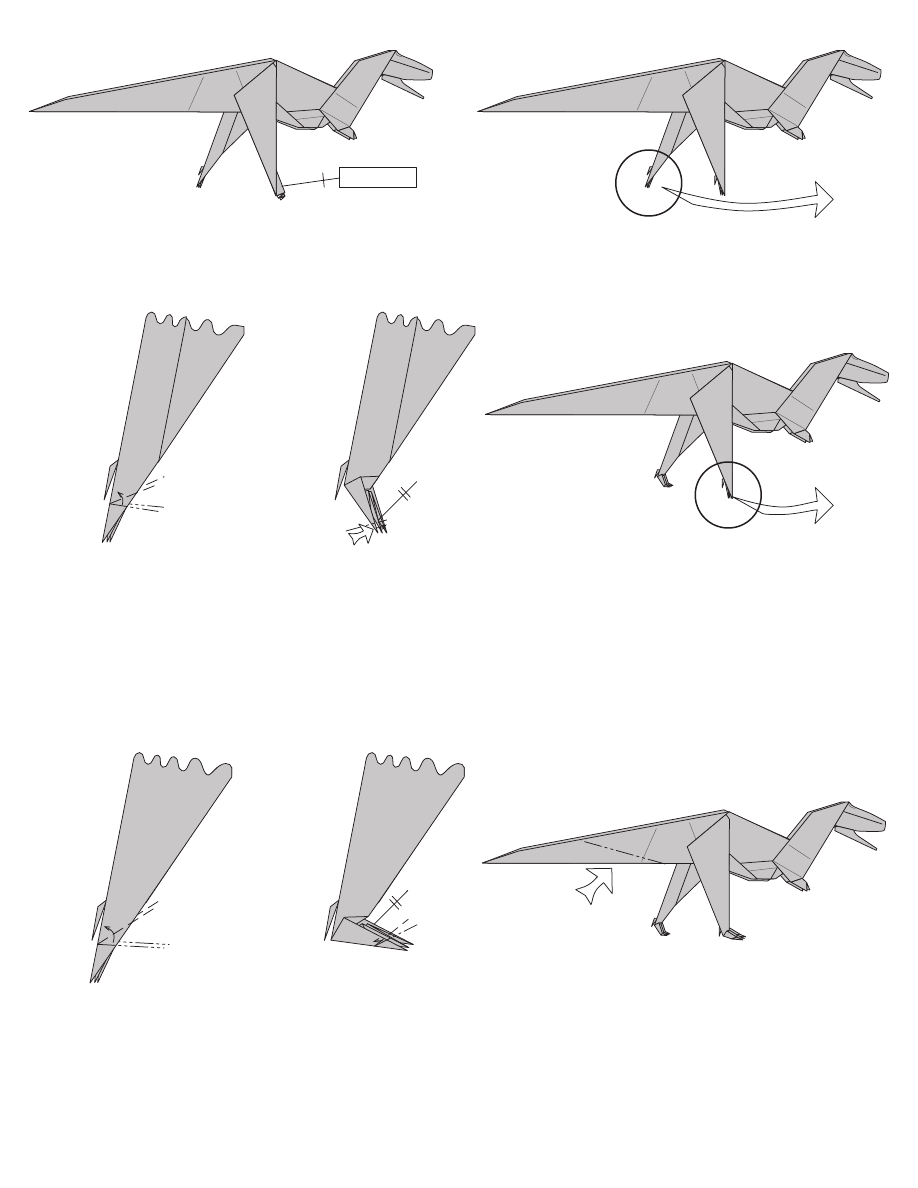
Turn the model over from
side-to-side. The next
diagrams are enlarged.
16
17
18
19
Valley fold the top point down so that
the crease connects the points where
the angle bisectors (from Step 16)
intersect the top edges. (The point falls
on the intersection of the vertical
diagonal and the original horizontal
diagonal.) Turn the model over from
side-to-side.
20
21
Valley fold the top edges to the
new horizontal diagonal line and
unfold, creating new angle
bisectors.
Valley fold the top point down
such that the crease goes
through the intersection of the
angle bisectors (from Step 17)
and unfold. Turn the model over
from side-to-side.
Valley fold the top edge down on the
crease from Step 18, allowing the
point with the lower jaw to swing up
from behind.
Valley fold the top sides inward along
the edge of the uppermost, triangular
point and unfold. (These creases also
happen to fall along the edges of the
rectangular flaps on the other side of
the model.)
Create a new horizontal diagonal
crease by valley folding the lower
point to the upper, then unfold.
12-13 x1
first
toe
22
Reverse fold the top sides inward
along the creases from Step 21. The
next diagrams are enlarged.
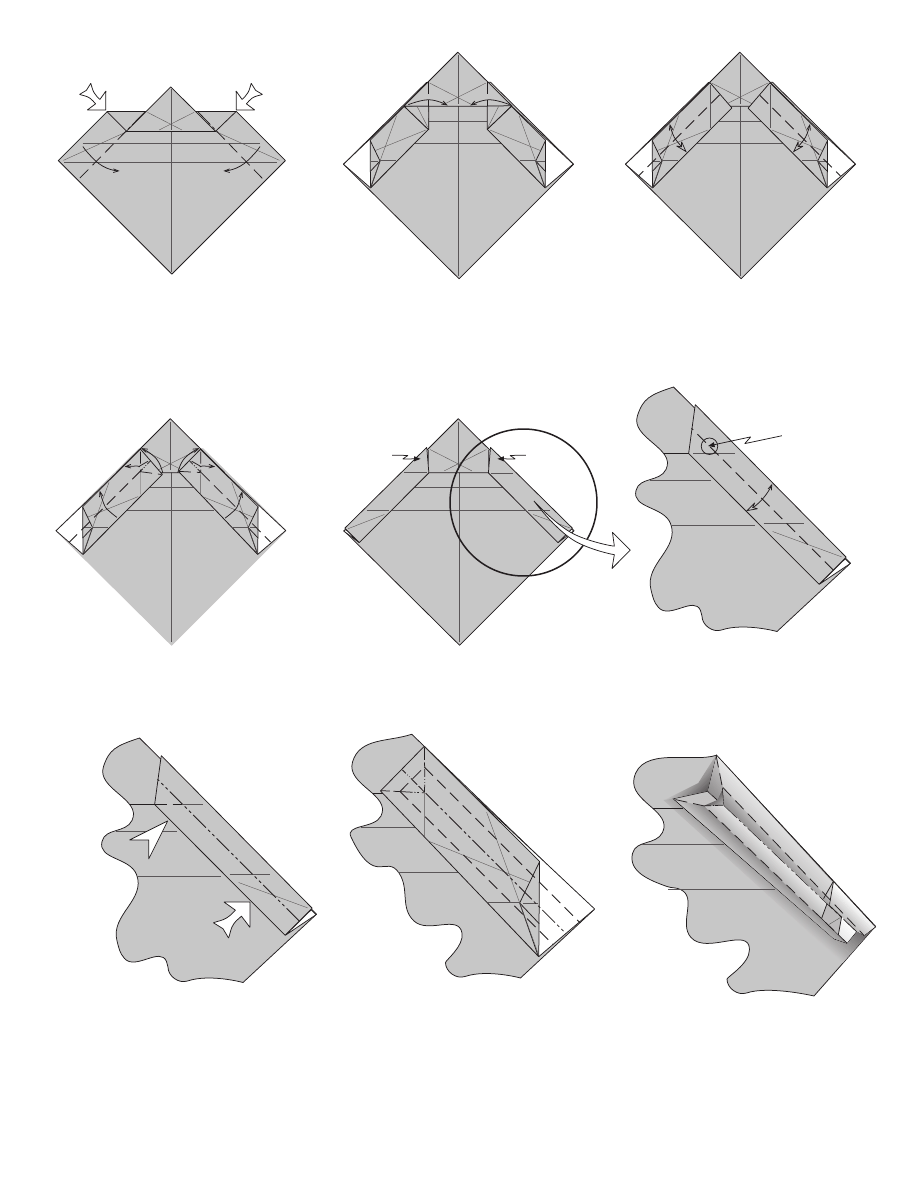
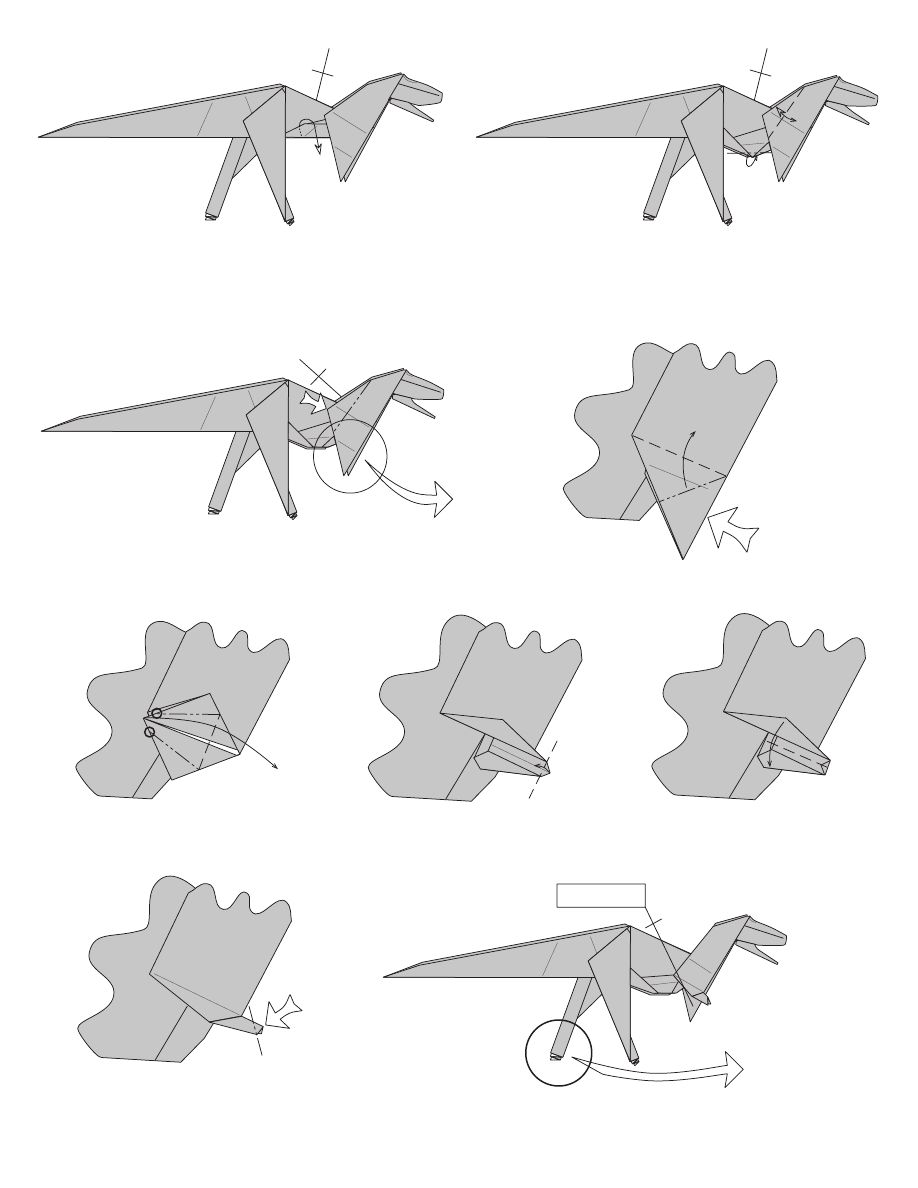
23
Valley fold the two small, triangular
points at the sides of the pleated top
point inwards.
24
Valley fold the two rectangular flaps
in half lengthwise and unfold.
25
Collapse the rectangular flaps with a
rabbit ear at the top end, leaving the
ears pointing up. These points will
be the arms.
26a
The result. The next few diagrams
are close-ups of the right side of the
model.
Valley-fold the rectangular flap in half
again. Towards the arm point, the
fold becomes increasingly difficult to
do, and you won’t be able to crease
easily on the point itself.
26b
Open sink the upper end and reverse
fold the lower end of the inner edge
of the rectangular flap using the
creases from Step 26b. The next
diagram shows the resultant crease
pattern on the inside of the flap (which
you would see if you opened the flap
back up to Step 25).
27a
27b
27c
This is the crease pattern which will
allow the sink to be performed. Note
how the folds change around the
upper end. The next diagram shows
the rectangular flap in the process of
being collapsed.
The sink in progress...
limit of
easy
creasing
arm
arm

The result. The series of pleats created
at the end of the rectangular flap will
become the second, third, and fourth
toes. The next diagram returns to a
full view of the model.
28a
28b
Repeat Steps 26b-28a in mirror
image on the left side of the model.
29
Turn the model over from side-to-
side.
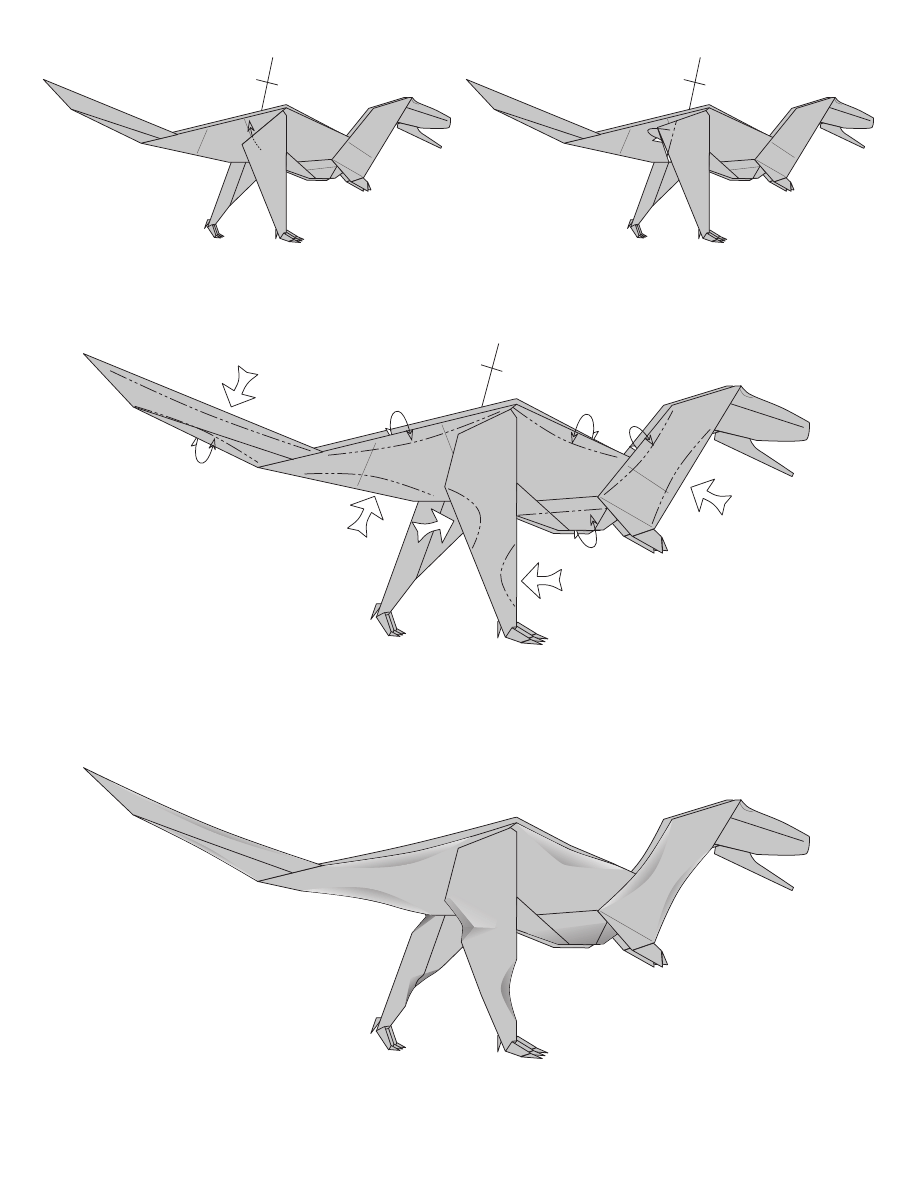
30
Valley fold the lower edge to the
vertical, center diagonal, bisecting
the angles of the bottom point,
and unfold.
31
Valley fold the top pointdown so
that the endpoints of the crease
connect the upper endpoints of
the angle bisectors from Step 30.
32
Valley fold the top sides in to the
vertical, center diagonal; this
brings the two corners at the top
in to meet the tip of the colored
point. Unfold.
33
Reverse fold the top sides in along
the creases made in Step 32. The
next diagrams are enlarged.
34
Petal fold the preliminary form at the
top of the model. Note that there is
a hidden white flap under the top-
most colored layer (indicated by the
x-ray lines); this flap is not included
with the top-most flap in the petal.
35
Reach inside the top of the petal
and pull out the hidden lower jaw
assembly (from Step 10), placing
it on top of the layers currently
covering it.
26b-28a x1
}
second-
fourth
toes
36
Turn the model over from side-to-
side.
37
Valley fold the right side in to the
center line and unfold.
38
Squash fold the right side on the
crease from Step 37.
39
Squash fold the lower horizontal
edge upwards, valley folding along
the angle bisector of the white
triangle.
40
Fold the portion of the model with
the white flap underneath and
inside the model.
41
Fold the flap back over to the right,
incorporating a rabbit ear in the
large triangle.
42
Repeat Steps 38-41 in mirror
image on the left side of the
model. The point created at
the bottom will be the tail.
43a
The next few diagrams detail
the top of the model (where
the head and lower jaw points
are located).
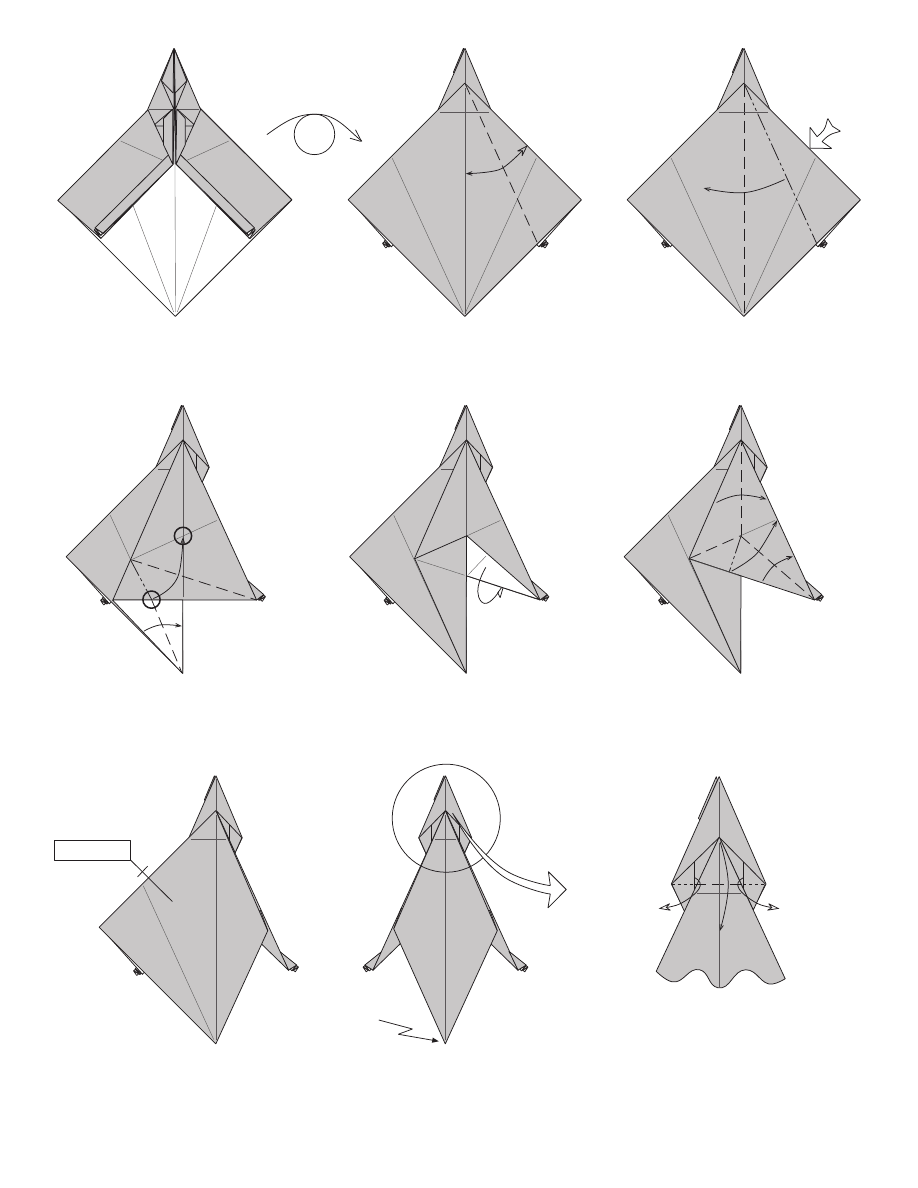
43b
Valley fold the short, broad,
triangular point down as far
as possible; simultaneously,
pull out the loose flaps at the
sides of the point.
38-41 x1
tail
46b
The result. Note the small, short,
broad, downward-pointing,
triangular point protruding from
beneath the head assembly. This
is the point referred to in Step 46.
The next diagram returns to a
view of the whole model.
44b
45
Valley fold the arm point toward the
legs and tail; repeat behind.
46a
Outside crimp the head assembly upwards while swinging the arm
points down. The mountain fold lines run alongisde the edges of the
short, triangular point noted in Step 44a. The next diagram shows
where these folds are if the model is opened up to Step 44a. (Remember
that, since the next diagram shows the inside of this step, what you
see in this step as mountain folds will appear as valley folds inside!)
The layout of the folds for the crimp
in Step 44a. The next diagram returns
to a view of the whole model.
47
Valley fold the hind leg down, squashing a tiny gusset
where the leg meets the back; repeat behind. To make a
walking stance, fold the leg behind down so that it is angled
behind the other.
44a
90
Valley fold the entire model in
half along the vertical line
(right over left), and rotate the
model 90 clockwise. The
next diagrams are enlarged.
Note!
48
Outside reverse fold the flap forming the gusset so that
the gusset is on the inside of the leg flap; repeat behind.
49
Mountain fold the top tail flaps inside to narrow the tail; note that
the fold line goes from the top of the leg to a point close to, but
not at, the tip of the tail. Repeat behind. Outside reverse fold
the head. The next few diagrams are a close-up of the head
region.
50
This is a difficult step. Grab the lower jaw
point and the next 2 layers out from it (the
three innermost layers) on both sides and pull
them gently downward (it is easy to tear the
paper if the paper is pulled too hard). As you
do this, some paper will slide out from inside
the head, and the central point on the top
should collapse inwards a bit (lowering it
between the points pulled out in Step 50; the
fold is indicated by the x-ray line) and a bit of
the tip of the snout will sink inwards to round
out the snout. This move will create a fuller
head for the model.
Pull out a single layer of paper from
inside the head; this layer is attached
to the outermost layer on the neck, which
is also pulled out to cover the visible
portion of the lower jaw complex (from
Step 10). The layer is somewhat trapped
so you may have to unfold part of the
model to free it.
51
52
Pull the lower jaw down to open the
mouth.
53
Mountain fold two layers inside at the back
of the head (where it meets the lower jaw)
inside. The innermost of these two layers
is connected with the lower jaw, so a bit of
paper from the lower jaw point may swivel
inwards with the rest of the fold. Repeat
behind.
54
Reverse fold the tip of the lower jaw
inside.
55
Mountain fold (more of a bend, really)
inwards to create brow “horn”; repeat
behind. Dent in some paper in the
lower jaw and curl it slightly. The head
is now finished; the next steps return
to a full view of the model.
56
Between the arm and leg, along the lower edge of the belly,
there is a thickness of paper which is connected to the toe
assembly. Pull out the crimped layers underneath the
surface layers to create a larger, rounder belly. Repeat
behind.
57
Fold the tips of the belly underneath. Valley fold and
unfold the back of the neck between the head and the
arm point as far as it will easily go. Repeat both moves
behind.
58
Reverse fold the back of the neck inside along the crease
made in Step 57; this will narrow the neck. Repeat
behind. The next steps are close-ups of the arm points.
64
Repeat Steps 59-63 on the remaining arm and hand.
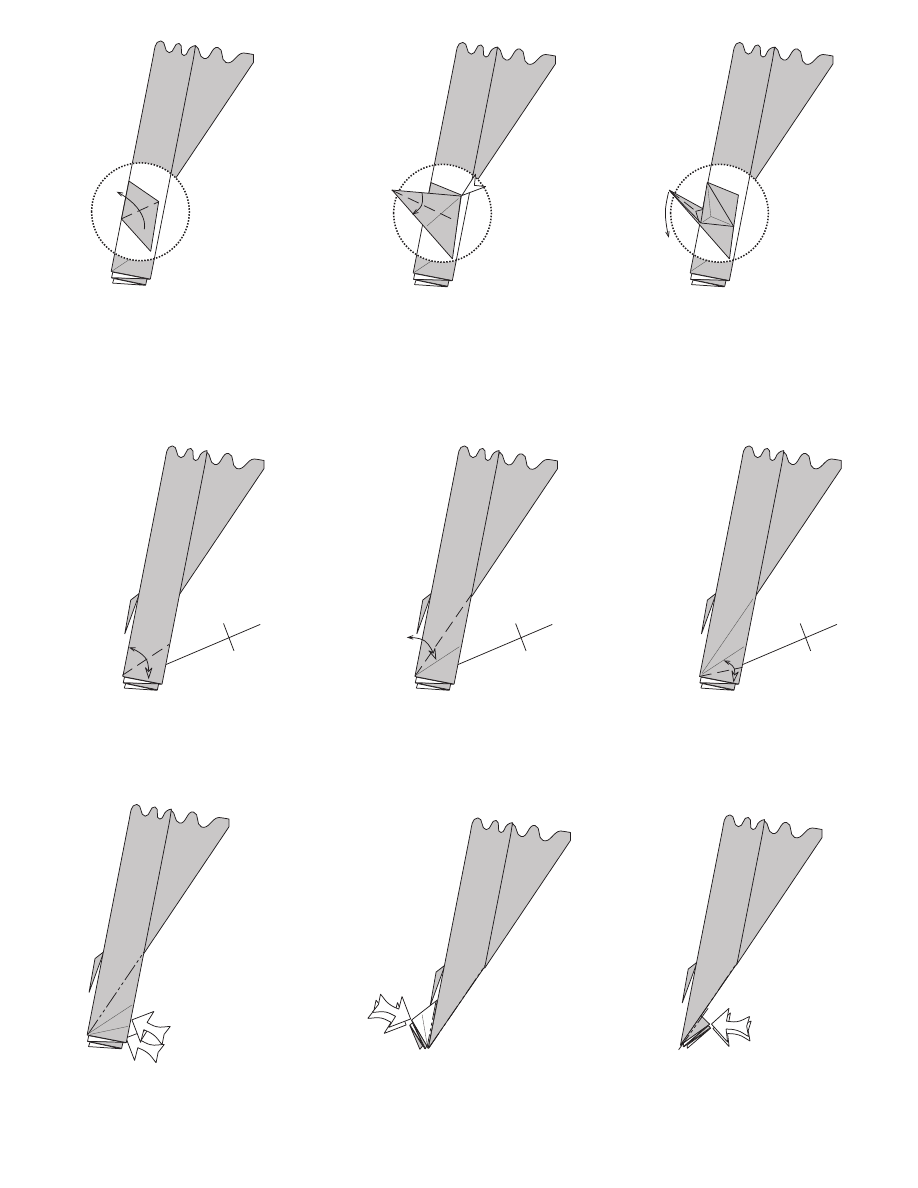
The next steps focus in on the left foot.
59
Squash fold the arm point as a preliminary base.
60
Petal fold the arm outward; note that
the ends of the petal fold do not meet
the tip of the point.
61
Valley fold the tip of the arm point in,
connecting the ends of the
asymmetrical petal from Step 60.
62
Valley fold the top half of the arm point
down, closing the petal fold.
63
Reverse fold the tip of the arm inwards
to create a two-fingered hand. The
next steps return to a full view of the
model.
59-63 x1
65
Beneath the first layer is the first toe
(the tiny rabbit ear from Step 13).
Valley fold the point out as far as
possible.
66
Valley fold the first toe in half (or as close
as possible); this will result in an
asymmetrical spread-squash of the base
of the toe point. Make sure as you
spread the point that none of the paper
will stick out from inside the leg.
67
The result. Rabbit ear the toe
downward.
68
Valley fold the top layer in half
along an angle bisector and
unfold. Repeat on the flap behind.
69
Valley fold the top layer so that
the crease from Step 68 lies on
the back edge (this is another
angle bisector). Repeat on the
flap behind.
70
Valley fold on an angle bisector
so that the lower edge meets
the crease from Step 68.
Repeat on the flap behind.
71
Reverse fold on the longest
angle bisector (from Step 69);
repeat on the remaining flap.
72
Reverse fold on the next angle
bisector (from Step 68); repeat
on the remaining flap.
73
Reverse fold on the remaining
angle bisector (from Step 70);
repeat on the remaining flap.
This forms the second - fourth
toes. The next step returns to
a full view of the model.
74
Repeat Steps 65-73 on the right foot.
65-73 x1
75a
The next steps again focus on the left foot.
Outside crimp the second-fourth
toes as a single unit, distributing
the layers evenly (three on each
side, dividing the middle toe) on
each side of the crimp.
75b
Reverse fold the tip of the innermost
(second) digit to make a toe tip;
repeat on the other third and fourth
toes. This foot is on the tips of the
toes because the left foot is in the
process of stepping off the ground.
The next diagram returns to a full
view of the model.
76
The left foot is complete. The next few diagrams
are close-ups of the right foot.
77a
As in Step 75b, outside crimp
the second-fourth toes as a
single unit, distributing the layers
evenly, but this time make a
much steeper crimp, so that the
bottom of the foot is just below
horizontal.
77b
Make a shallow inside crimp to
form the tip of the fourth toe;
repeat on the second and third
toes. The next diagram returns
to a full view of the model.
78
Shallowly reverse fold the tail; note that the upper
end of the reverse fold is a little more than halfway
down the tail point.
79
Shape the legs by denting in some paper at the
rear of the thigh and the front of the shin. Round
the neck, belly, back, and tail.
82
80
Pull out a single layer of paper from behind the
back of the thigh; repeat behind.
81
Fold the corner of the paper pulled out from Step
80 to round out the thigh; repeat behind. The next
diagram is enlarged.
FINISHED TYRANNOSAURUS
Wyszukiwarka
Podobne podstrony:
Armadillo 7 pages, English
Happy Good Luck Bat 3 pages, English
Dollar Elephant 8 pages, English
Caterpillar 4 pages, English
Shark Tooth 2 pages, English
Tiger 12 pages, English
Praying Mantis 7 pages, English
Buck the Bunny 2 pages, English
Unicorn 1 pages, English
Bird of Paradise 2 pages, English
Dog in a Doghouse 4 pages, English
Christmas Charades cards 11 pages
Penguin 1 3 pages, English
Scorpion 7 pages, English
Badger 2 2 pages, English
Bug 4 pages, English
więcej podobnych podstron