The Instructor
The Instructor
Mark Dvoretsky
The Chess Cafe
E-mail Newsletter
Each week, as a service to
thousands of our readers, we send
out an e-mail newsletter,
This
Week at The Chess Cafe
. To
receive this
free
weekly update,
type in your email address and
click Subscribe. That's all there is
to it! And, we do not make this list
available to anyone else.
E-
Mail:
Active Rooks
Rook activity is the cornerstone in the evaluation and
play of rook endgames. This activity may take diverse
forms: from attacking the enemy pawns, to the support of
one’s own passed pawns, to the interdiction or pursuit of
the enemy king.
There are indeed times when the rook must remain
passive, and implement purely defensive functions. But
even then, one must stubbornly seek out any possibility
of activating the rook, not even stopping at sacrificing
pawns, or making your own king’s position worse.
The following classic endgame serves as an excellent
illustration.
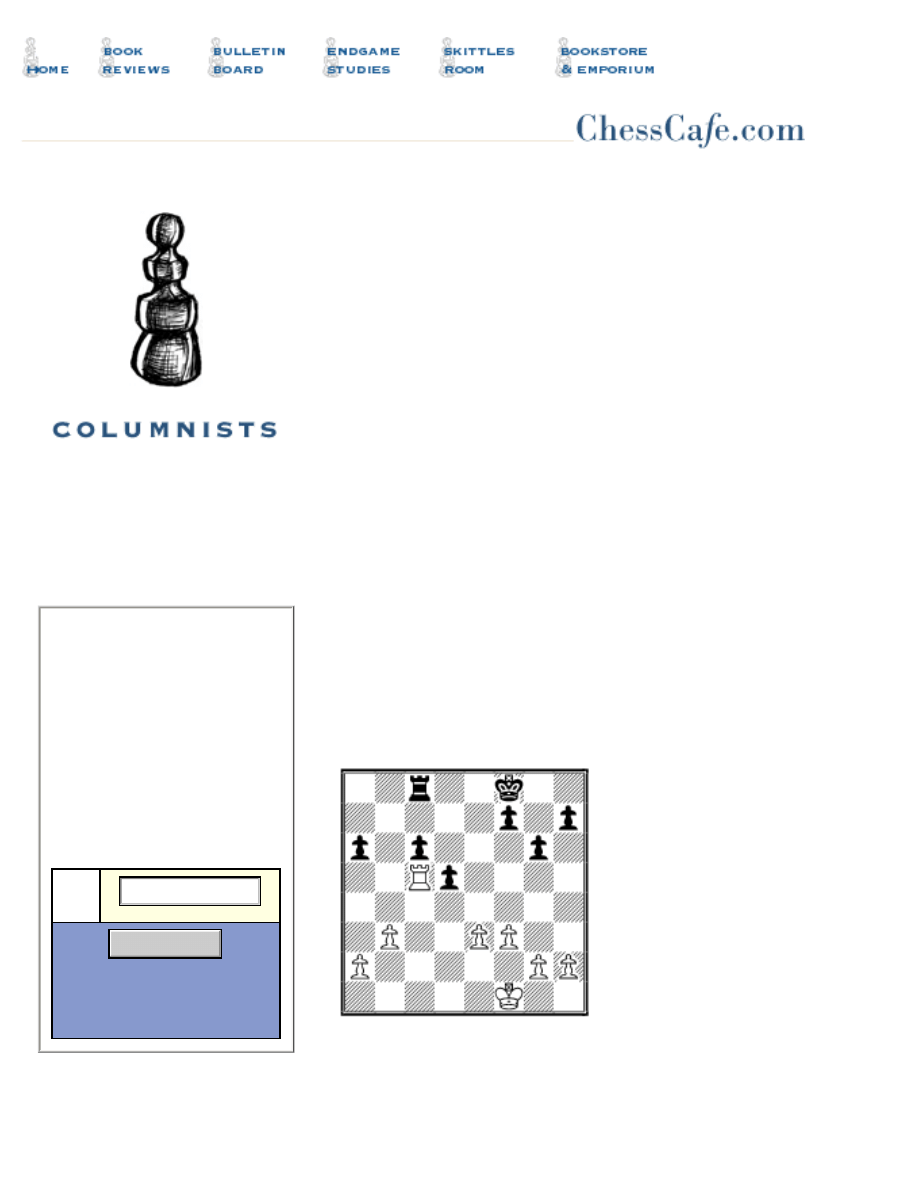
Flohr – Vidmar Nottingham 1936
32. Kf1-e2
King centralization is
paramount. A mistake would
be 32. Ra5?! c5! 33. Rxa6 c4
(Black sacrifices a pawn,
activates his forces, and
draws without trouble); or
32. b4?! Ke7 33. Ke2 Kd6
34. Kd3 Rb8!? (34...Kc7!?)
35. a3 Rb5.
32...Kf8-e7 33. Ke2-d3 Ke7-d6 34. Rc5-a5!
file:///C|/Cafe/Dvoretsky/dvoretsky.htm (1 of 19) [02/08/2003 6:48:15 PM]
Subscribe
The Instructor
Order
by Mark Dvoretsky
But not 34. Kd4?, in view of 34...Rb8 35. Ra5 c5+! 36.
Kd3 Rb6.
34...Rc8-a8 35. Kd3-d4
Now Black must think about e3-e4.
35...f7-f5!? 36. b3-b4
White improves his position,
strengthening his control of
the queenside dark squares.
Now Black must choose a
defensive plan.
36...Ra8-b8?
Too passive! On the next
move, Black’s rook will have
to return to the unenviable role of defender of the a6-
pawn.
The pawn had to be defended by the king: 36...Kc7!
(intending to continue ..Kb6). True, this would distance
the king from the center, whereas the White king, could
advance; but as compensation, the rook would be freed.
And the activity of the rook in rook endgames - is
paramount!
White would probably have replied 37. Kc5 Kb7 38.
Kd6 Re8 39. Ra3 (intending Rc3). In response, Black
should clear the road for his rook along the second rank.
A) 39...f4? is completely wrong, because of 40. ef Re2
41. g4, with f4-f5 to follow. Black cannot defend against
the passed f-pawn, because the pawn at f3 shields it from
the rear.
file:///C|/Cafe/Dvoretsky/dvoretsky.htm (2 of 19) [02/08/2003 6:48:15 PM]

The Instructor
B) Levenfish and Smyslov recommend 39..d4!? 40. ed
Re2 41. Rc3 Rxg2 (41...Rd2 42. Rc4) 42. Rxc6 Rxh2 43.
a4 g5. Black prepares Rh6+ or g5-g4. However, by
bringing his rook around behind the g-pawn - 44. Rc7+!
Kb6 45. Rg7! - White retains the advantage, since his
passed d-pawn is quite dangerous.
C) 39...g5! This simple move has, for some reason, been
overlooked in the endgame books.
40. Rc3 f4 41. ef gf, and Black keeps sufficient counterplay; for example:
42. Rxc6 Rd8+ 43. Kc5 d4 44. Re6 d3 45. Re1 Rg8, with a probable
draw.
40. g3 g4! (here too, 40...d4?! 41. ed Re2 is dubious, in
view of 42. Ra5! [ after 42. Rc3 Rxh2, the c6 pawn is
taboo] 42...h6! 43. a4! [43. Rxf5 Rxa2 44. Rf7+ Kb6 45.
Rc7 Rxh2 46. Rxc6+ Kb5] 43...Rb2 44. Rxf5 Rxb4 45.
Kc5 Rxa4 46. Rf7+, and White has a great advantage]
41. f4 Re4 42. Rc3 Rc4, or 41. fg fg 42. Rc3 Rf8, and
Black’s position is not worse.
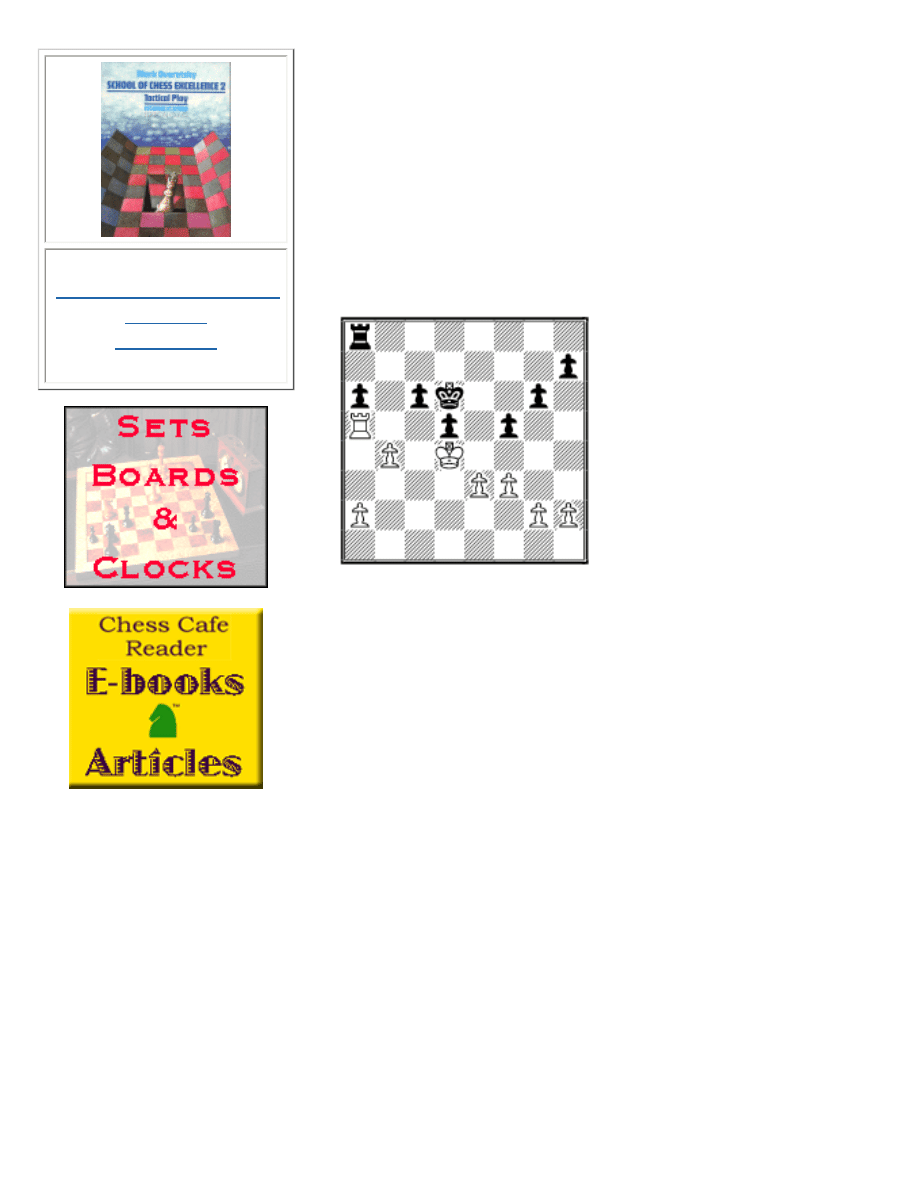
37. a2-a3 Rb8-a8
On b6, the rook might even stand worse than it does on
a8.
38. e3-e4!
White has strengthened his queenside as much as he can;
he can achieve no more here (38. a4? Rb8). Therefore,
he executes a standard technique: enlarging the
battlefield!
After exchanging the central pawns, White’s king will
attack the kingside, while the rook obtains complete
control of the 5th rank.
38...f5xe4 39. f3xe4 d5xe4 40. Kd4xe4 Ra8-a7?
file:///C|/Cafe/Dvoretsky/dvoretsky.htm (3 of 19) [02/08/2003 6:48:15 PM]

The Instructor
Black continues to wait and see. Here again, it was
necessary to free the rook from the defense of the pawn,
by sending the king over to b6: 40...Kc7!. In reply,
White should not continue 41. Kf4? Rf8+! 42. Kg3
Kb6=. Levenfish and Smyslov give this continuation: 41.
Re5!? Kb6 42. Re7 a5! 43. Rxh7 ab 44. ab Ra4 45. Rg7
Rxb4+ 46. Kf3 Rh4! 47. h3 Rh6 48. Kg4 c5 49. Kg5
Rh8 50. Rxg6+ Kb5 51. Rg7 c4, followed by ..Rc8.
Perhaps White should try the more restrained 41. h4!?
Kb6 42. g4 (42. Kf4!?) 42...Rf8 43. h5, maintaining his
advantage.
41. Ke4-f4 h7-h6
Otherwise, the king enters decisively at h6: 41...Ra8 42.
Kg5 Ra7 43. Kh6 Ke6 44. g4 and 45. h5 (Levenfish and
Smyslov).
42. h2-h4! Kd6-e6 43. Kf4-g4 Ra7-a8 44. h4-h5! g6-g5
44...gh+ 45. Kxh5 Rg8 46. g4 (Alekhine)
45. g2-g3!
White has created and fixed a new weakness - the h6
pawn. After returning his king to the center, he has taken
the f4-square under control. 45. Kf3 would have been
less accurate, considering 45...Rf8+ 46. Ke4 Rf4+.
45...Ra8-a7 46. Kg4-f3! Ra7-a8 47. Kf3-e4 Ra8-a7 48.
Ke4-d4 Ke6-d6 49. Kd4-e4 Kd6-e6 50. Ra5-e5+! Ke6-
d6
If 50...Kf6, then 51. Rc5 Rc7 52. Ra5 Ra7 53. Kd4 Ke6
54. Kc5 Rd7 55. Rxa6 Rd3 56. Rxc6+ Kf7 57. a4 Rxg3
58. Rxh6 and wins (Levenfish and Smyslov).
file:///C|/Cafe/Dvoretsky/dvoretsky.htm (4 of 19) [02/08/2003 6:48:15 PM]

The Instructor
51. Re5-e8 c6-c5
The pawn endgame after 51...Re7+ 52. Rxe7 Kxe7 53.
Ke5 is completely hopeless.
52. Re8-d8+!
Leads to a technical win. White had calculated the continuation 52...Kc7
53. Rh8 cb 54. Rh7+ (of course, 54. ab wins too) 54...Kb8 55. Rxa7 Kxa7
56. ab Kb6 57. Kf5 Kb5 58. Kg6 Kxb4 59. Kxh6 a5 60. Kxg5 a4 61. h6,
winning. And other king retreats lose the c5 pawn.
52...Kd6-c6 53. Rd8-c8+ Kc6-b6 54. Rc8xc5 Ra7-h7
Black’s rook exchanges one post for another; but this
one is no less pathetic than the first.
55. Rc5-e5 Kb6-c6 56. Re5-e6+ Kc6-b5 57. Ke4-f5
Rh7-f7+ 58. Re6-f6
Black resigned.
A few years ago, a similar pawn structure occurred in a
game played by one of my former students, Alexey
Dreev.
Dreev – Chandler Hastings 1999/2000
1. d4 Nf6 2. c4 e6 3. Nf3 d5 4. Nc3 Be7 5. Bf4 0-0 6. e3
c5 7. dc Bxc5 8. a3 Nc6 9. cd Nxd5 10. Nxd5 ed 11.
Bd3 Bb6 12. 0-0 Bg4 13. h3 Bh5 14. b4 a6
Black loses a pawn after 14...Qf6? 15. g4 Bg6 16. Bxg6
and 17. Qxd5; but 14...Re8!? was worth considering.
15. Be2!
After the older moves 15. Rc1 or 15. Ra2, Black would
reply 15...d4.
file:///C|/Cafe/Dvoretsky/dvoretsky.htm (5 of 19) [02/08/2003 6:48:16 PM]

The Instructor
15...d4
If 15...Re8, then 16. Ra2!, and Black no longer has
16...d4? because of 17. Nxd4.
16. ed (16. Nxd4? Bxd4) 16...Bxf3 (16...Qd5!?) 17.
Bxf3 Qxd4 18. Be3! Qxd1 19. Rfxd1 Bxe3 20. fe
20...Rfe8?
“This first serious
inaccuracy leads to serious
consequences,” wrote
Dreev. Instead, he
recommends 20..Rfd8 21.
Bxc6 (21. Kf2 Rxd1 22.
Rxd1 Rd8) 21...bc 22.
Rxd8+ Rxd8 23. Rc1 Rc8,
with slightly better chances for White (23...Rd6 is
weaker, because of 24. Rc5 and 25. Ra5).
21. Kf2 Re7
“Again he should have put his rook on the d-file -
21...Rad8, regardless of the tempo loss.” (Dreev)
22. Bxc6 bc 23. Rd6 (23. Rac1? Re6)
23...Rc8?!
“After the game, Murray
acknowledged that he had
intended 23...a5, and only
saw here that he remains a
pawn down after 24. Rxc6 ab
25. ab!
The best chance was
23...Rae8!: as M. Dvoretsky taught me, passivity in rook
file:///C|/Cafe/Dvoretsky/dvoretsky.htm (6 of 19) [02/08/2003 6:48:16 PM]

The Instructor
endgames leads to no good.”
Dreev explains his thinking with the following
variations:
24. Re1 Re6 25. Rxe6 Rxe6 26. Rc1 Kf8 27. Rc5 Rf6+
28. Ke2 Rg6 29. g4 Rh6; and
24. Rxc6 Rxe3 25. Rxa6 Re2+ 26. Kf1 Rb2! (26...h5 27.
Ra8!) 27. Re1 Rc8 28. Re2 Rb1+ 29. Kf2 h5.
“In either case, White would have definite problems
converting his advantage.”
Now, White’s play could be strengthened in the second line with 28.
Rc6! Ra8 29. Rec1, forcing the exchange of one pair of rooks, which
leads to an easy win. Thus, Dreev’s recommendation would not save
Black But still, it remains instructive: it shows what direction a top-class
player follows to find the best defense.
24. Rc1 Rec7 25. Rc5 Kf8 26. e4 Ke7 27. e5 f6 28. Rd3
fe 29. Ke3 Kf6?
29...Rd7 30. Rxe5+ Kd8 holds out longer.
30. Ke4 g6 31. Rdc3!
“The game is practically decided, since Black’s king is
now cut off from his weak pawns.” (Dreev)
31...Ke6 32. Rxe5+ Kf6 33. Rf3+ Kg7 34. Kd4 Rd7+
35. Kc4 Rb8 36. Rc5 Rb6 37. Kb3 Rd6 38. Ka4 h5 39
h4 Rd7 40. Ka5 Rb8 41. Rxc6, and White soon won.
The same principle of “rook activity” operates not just in
pure rook endings, but also in those cases where there
are other pieces on the board.
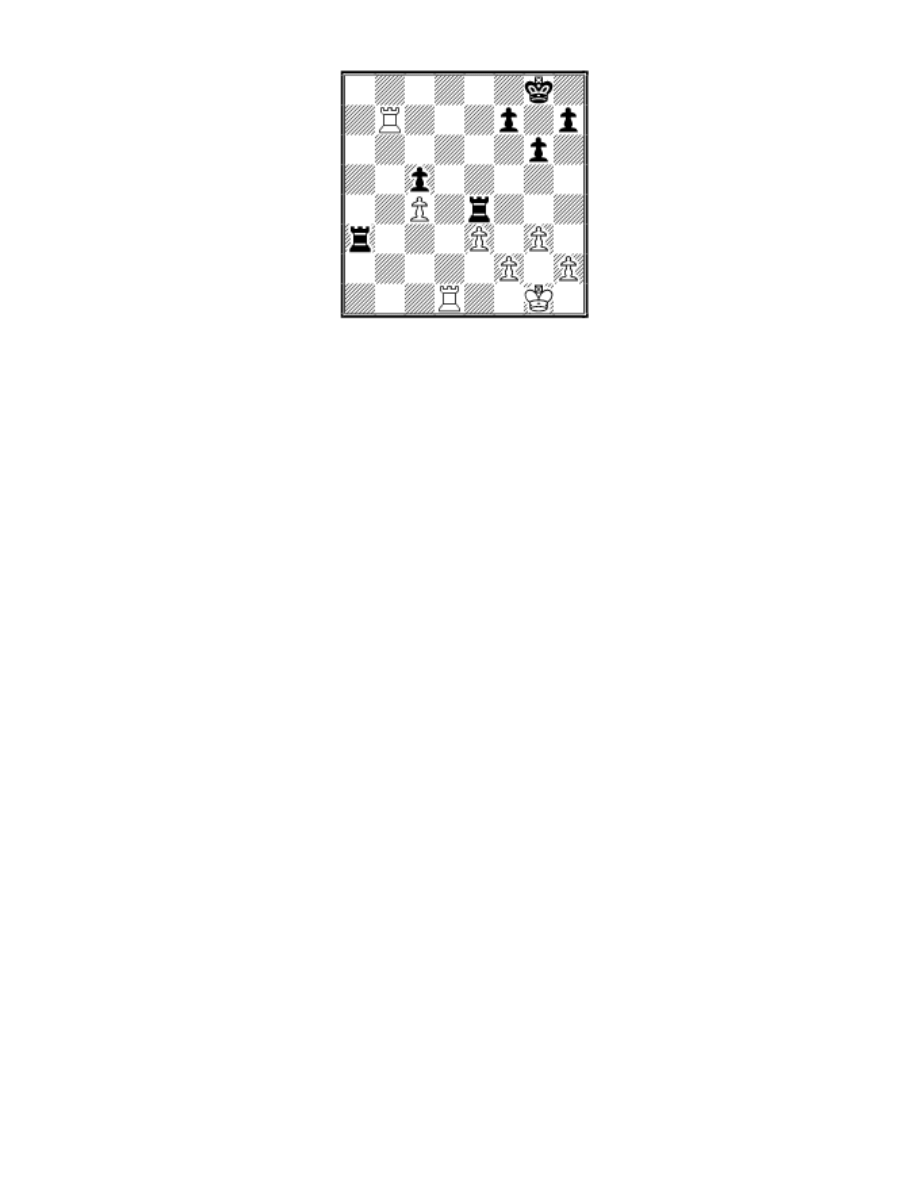
Petrosian – Balashov USSR Championship,
Leningrad 1977
file:///C|/Cafe/Dvoretsky/dvoretsky.htm (7 of 19) [02/08/2003 6:48:16 PM]
The Instructor
26...Ra8?
Of course not 26...Rxc4? 27.
Rdd7; but the text is also a
mistake. The rook should
have been more actively
placed: 26...Ra6! 27. Rdd7
Rf6, when Black draws
without any particular
difficulty.
27. Rdd7 Rf8 28. Rbc7 Rxc4 29. Kg2 h5 30. h3 (30.
h4!?) 30...Kg7
It would have made sense to play 30...Ra4!? 31. Rxc5
Raa8 (intending Rad8). The “four pawns to three on the
same side” single-rook ending is drawish; four rooks
makes Black’s task considerably more difficult. Of
course, the exchange of rooks is not hard to forestall:
White simply puts both rooks on the same file. But then
the defense is also made easier: White no longer
threatens to double rooks on the 7th.
31. Kf3 Kf6
31...g5!? deserved consideration.
32. h4! Kg7 33. Rd5?!
file:///C|/Cafe/Dvoretsky/dvoretsky.htm (8 of 19) [02/08/2003 6:48:16 PM]
The Instructor
33...Re8?
Balashov once again fails to
seize his chance to sacrifice
the c-pawn in order to ease
the pressure on his kingside.
He might even have been
able to exchange one pair of
rooks, which would have
guaranteed Black the draw he
was seeking: 33...Ra4!, and if 34. Rdxc5?!, then
34...Rfa8!
34. Rdd7!
Of course not 34. Rdxc5? Rxc5 35. Rxc5 Ra8=.
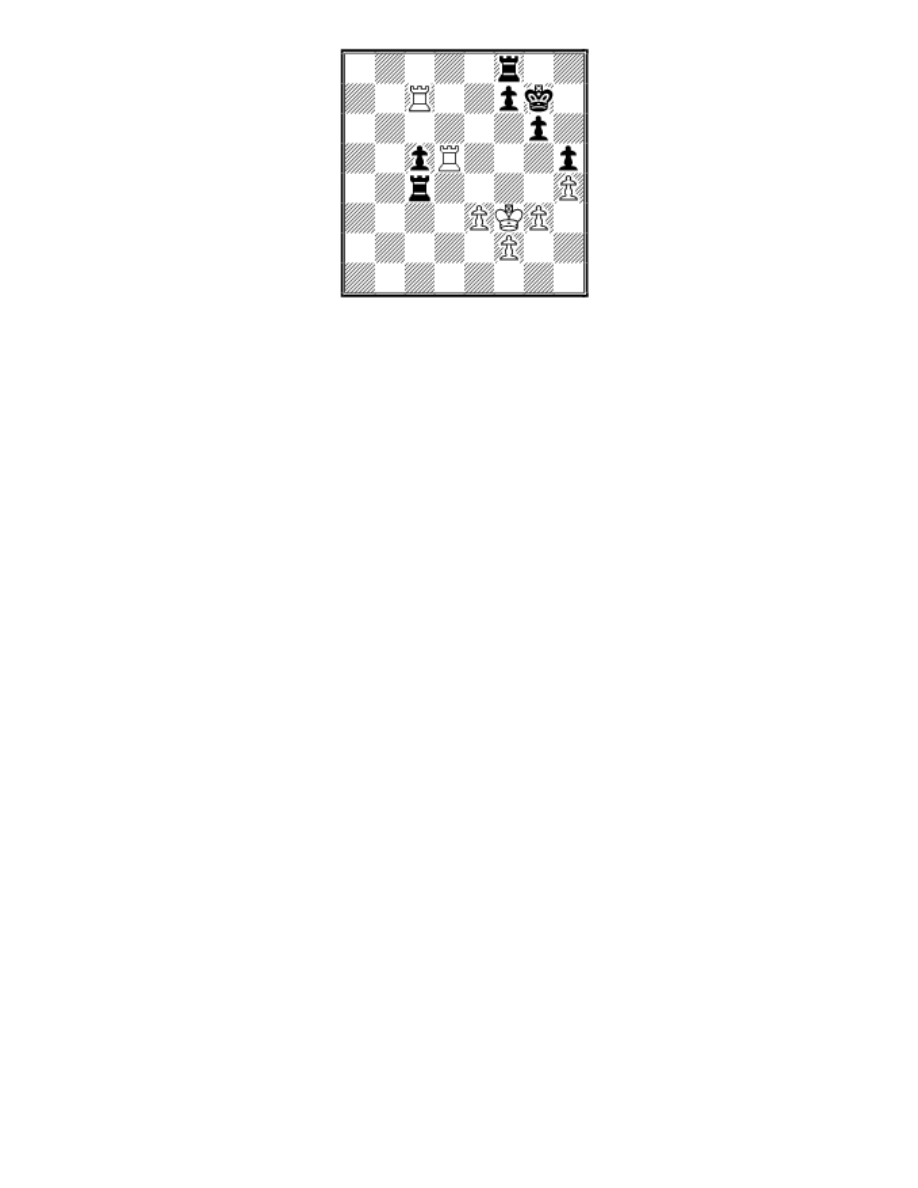
34...Rf8 35. Re7
35. e4 Rd4 36. Re7 c4 would have been inexact.
35...Kf6 36. e4 Rd4
36...Rc2 37. Ke3 c4 38. f3 Rc1 39. Kf4 Kg7 40. e5
would not have helped.
37. e5+ Kf5 38. Rxc5 Rd3+ 39. Kg2 Ra3 40. Rc6 Ke4
41. Rf6 Raa8 42. e6 (White is winning) 42...Ke5 43.
Rfxf7 Rg8 44. Rb7?!
White cannot do without the advance of his f-pawn. The
shortest route was 44.f4+ Kd6 45. Rd7+ Kxe6 46. Rde7+
Kd6 47. Re5 Rae8 (47...Raf8 48. Ra7) 48. Rf6+ Kd7 49.
Rg5 Re6 50. Rxe6 Kxe6 51. f5+, and wins. Instead of
which, Petrosian unhurriedly, in complete accord with
his style (which we also saw in an earlier stage of this
endgame), plays a waiting game, hoping to provoke an
error by his opponent, which will allow him to garner the
file:///C|/Cafe/Dvoretsky/dvoretsky.htm (9 of 19) [02/08/2003 6:48:16 PM]
The Instructor
point by easier means than plunging into tense
calculations. And he gets it!
44...Kxe6 45. Rbe7+ Kd6 46. Re2 Raf8
46...g5!? is no help: 47. hg Rxg5 48. Rf6+ (also possible
is 48. f4 Rgg8 49. Rf6+ Kd7 50. Kh3 Ra3 51. Rg2)
48...Kd7 49. Rb2! (threatening Rb7+) 49...Ke7?!
(49...Kc7) 50. Rh6 and wins.
47. Ra7 Ra8 48. Rae7 Rac8 49. R2e6+ Kd5 50. Kh3
(apparently, White has understood that he can’t do
without f2-f4, and now prepares that advance) 50...Rc7?
51. Rxg6! Black resigned.
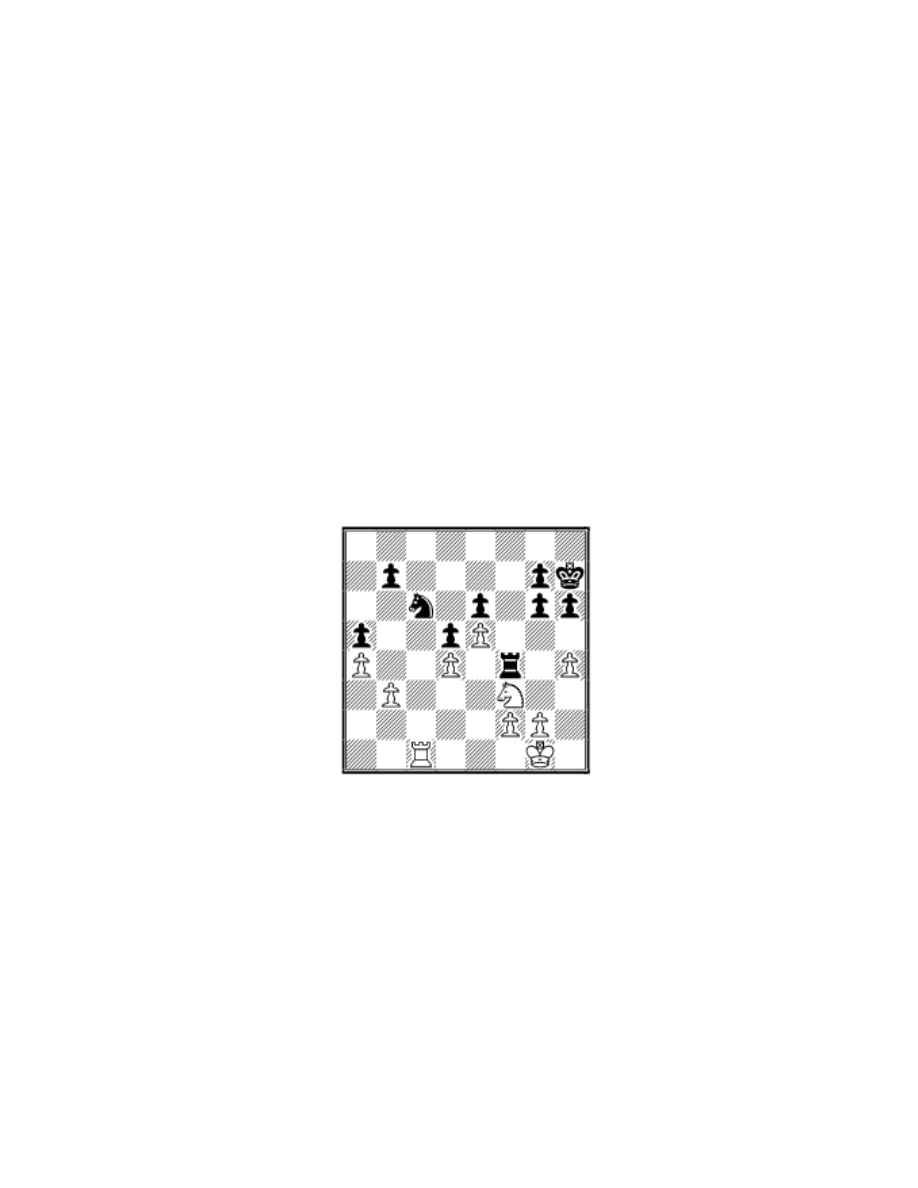
Riazantsev - Ksenofontov Moscow 1997
28. Rd1?
This looks like a completely
natural move - a central pawn
is under attack, and White
protects it. But the rook will
now remain forever passive.
This is a very serious
positional minus, as his
opponent demonstrates
convincingly.
28...Rg4! 29. Kf1?
White loses without a struggle. The prophylactic 29.
Kh2! was necessary, preventing Black’s intended g6-g5.
In that case, Black would probably have transferred his
king to e7.
29...g5 (wins) 30. hg hg 31. g3 Kg6 32. Ke2 Re4+ 33.
Kd3 g4 34. Nh4+ Kg5 35. Kc3 Re2 36. Kd3 (36. Rf1
file:///C|/Cafe/Dvoretsky/dvoretsky.htm (10 of 19) [02/08/2003 6:48:16 PM]
The Instructor
Nb4 threatens mate on c2; 36. f4+ gf 37. Nxf3+ Kg4)
36...Rxf2, and Black won.
White should have sacrificed the pawn with 28. Rc5!
Nxd4 29. Nxd4 Rxd4 30. Rxa5 (threatening 31. Rb5)
30...Rb4 31. Ra8, followed by 32. Re8. White’s rook is
very active, and he retains excellent drawing chances.
After 28. Rc5! Nxd4 29. Nxd4 Rxd4, White could also
enter a pawn endgame, and attempt to set up a fortress
there. Unfortunately, this plan fails, as Black can break
the fortress down.
A) 30. Rxa5 Rb4 31. Rb5? (instead of 31. Ra8)
31...Rxb5 32. ab
White intends g2-g4!,
ensuring the closing of the
kingside. And the queenside
can always be kept closed
with b5-b6 and b3-b4-b5.
Unfortunately, he lacks a
single tempo: 32...g5
(32...h5!? 33. f4 g5! wins,
too) 33. hg (33. h5 g4! 34. f3
g3!, with 35...g6 to follow,
wins - but not 34...gf? 35. g4!=) 33...Kg6! (33...hg? 34.
g4! Kg6 35. b6 Kf7 36. b4 Ke7 37. b5=; 33...h5! and
Black wins) 34. gh gh 35. f4 Kf5 36. g3 h5 and wins.
B) 30. Rb5? (instead of 30. Rxa5) 30...Rb4 31. Rxb4 ab
32. g4
file:///C|/Cafe/Dvoretsky/dvoretsky.htm (11 of 19) [02/08/2003 6:48:16 PM]
The Instructor
Now Black will never get
through on the kingside; on
the other hand, it’s no longer
possible to close up the
queenside. Of course, Black
must play accurately: before
transferring his king, it’s
important to make the
greatest possible
improvement in the strategic
situation on the kingside:
32...g5! 33. h5 g6! (the immediate king march doesn’t work: 33...Kg8 34.
Kf1 Kf7 35. Ke2 Ke7 36. Ke3 Kd7 37. Kd4 Kc6 38. Kd3 Kc5 39. Ke3
d4+ 40. Ke4 b6 41. f3 d3 42. Kxd3 Kxe5 43. Ke3 Kd5 44. Kd3=)
34. f3 gh 35. gh Kg7 36. Kf2 Kf7 37. Ke3 Ke7 38. Kd4
b6 39. Kd3 (insufficient is 39. a5 ba 40. Kc5 Kd7 41.
Kb5 d4 42. Kc4 Kc6 43. Kxd4 Kb5) 39...Kd7 40. Ke3
Kc6 41. Kd4 Kb7 42. Kd3 Ka6 43. Ke3 b5 44. ab+ Kxb5
45. Kd4 Kc6 46. Ke3 Kc5 47. Kd3 d4 48. Ke4 d3 49.
Kxd3 Kd5, and wins.
A positional error which would be quite normal in a 12-
year-old candidate master, is unforgivable when
committed by an experienced grandmaster.
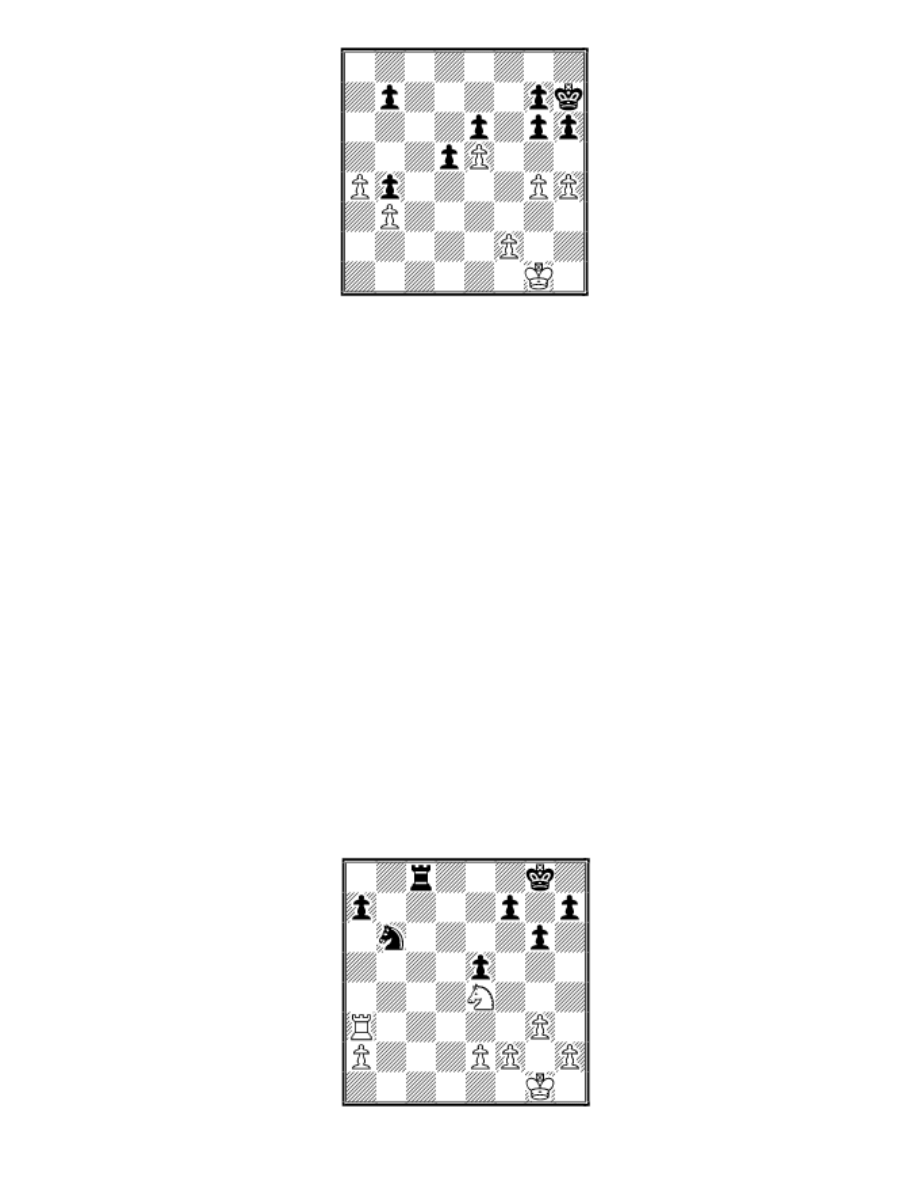
Romanishin – Benjamin Groningen 1993
White’s rook is active; therefore, it
must be exchanged. Black has a
simple draw with 28...Rc4! 29. f3
(White gets nothing from either 29.
Nc3 a5 or 29. Nf6+ Kg7 30. Ne8+
Kf8) 29...Ra4.
28...Rc7? (another mistake
would have been 28...Rc1+?
29. Kg2 Nc8 30. g4!, with
advantage to White) 29.
file:///C|/Cafe/Dvoretsky/dvoretsky.htm (12 of 19) [02/08/2003 6:48:16 PM]
The Instructor
Nf6+! Kh8 30. g4! h6 31. h4
Black’s rook is passive, and his king poorly placed; his
situation is quite dangerous.
31...Rb7 (31...Nd7 32. Ne8 Rb7 33. Nd6 would be bad
here) 32. Ra5!?
32...Re7?
It appears there was still a chance to
get out relatively lightly from this
difficult position, with 32...Nd7! 33.
Ne8 (33. Nxd7 Rxd7 34. Rxe5 Rd4,
followed by 35...Ra4=) 33...Kg8 34.
Nd6 Rc7. Benjamin, however,
continues his passive strategy.
33. g5 hg 34. hg Kg7 35.
Rc5 e4 36. a4 (White plays
for mate - 37. a5 is threatened) 36...Rb7 (36...Nxa4 37.
Rc8) 37. Rb5 a6 38. Rb4 a5 39. Rb5 Rb8 40. e3
(zugzwang). Black overstepped the time limit.
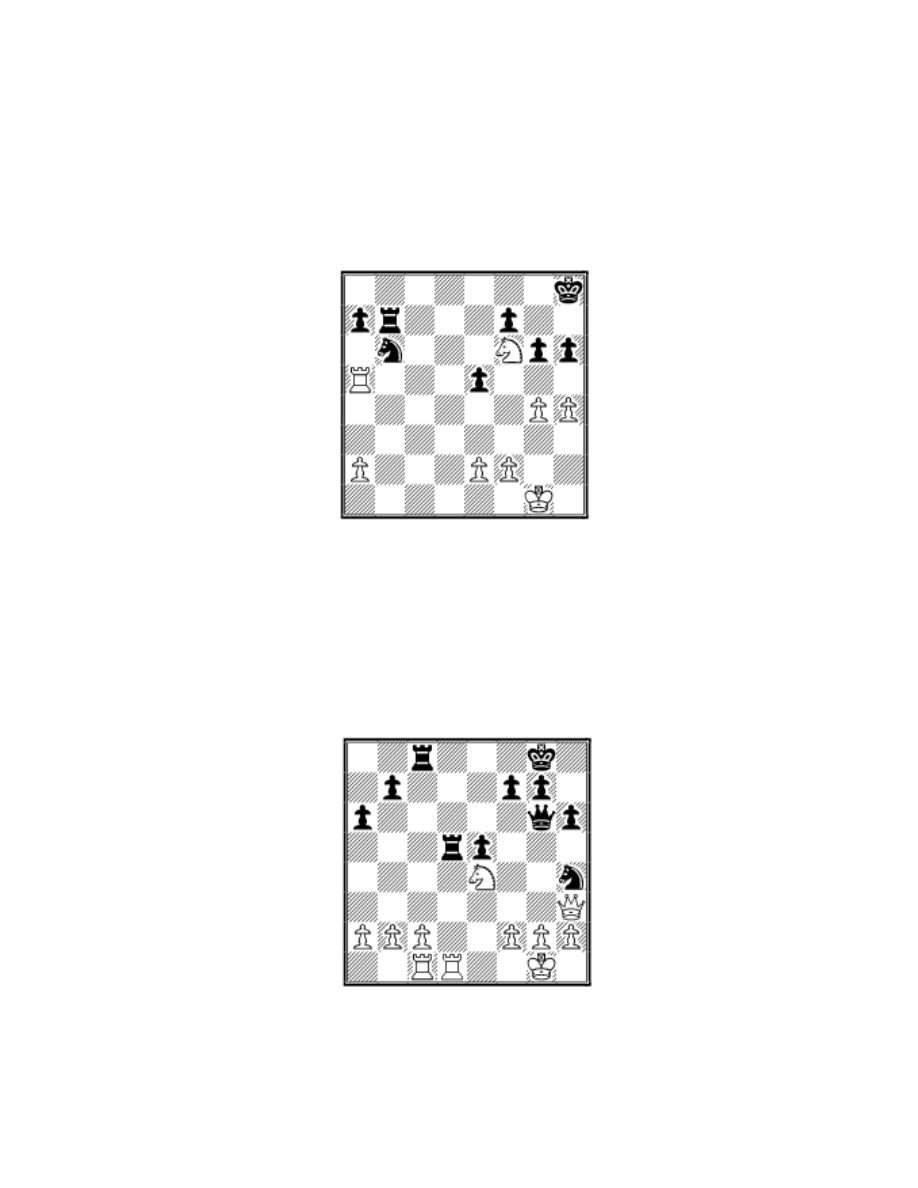
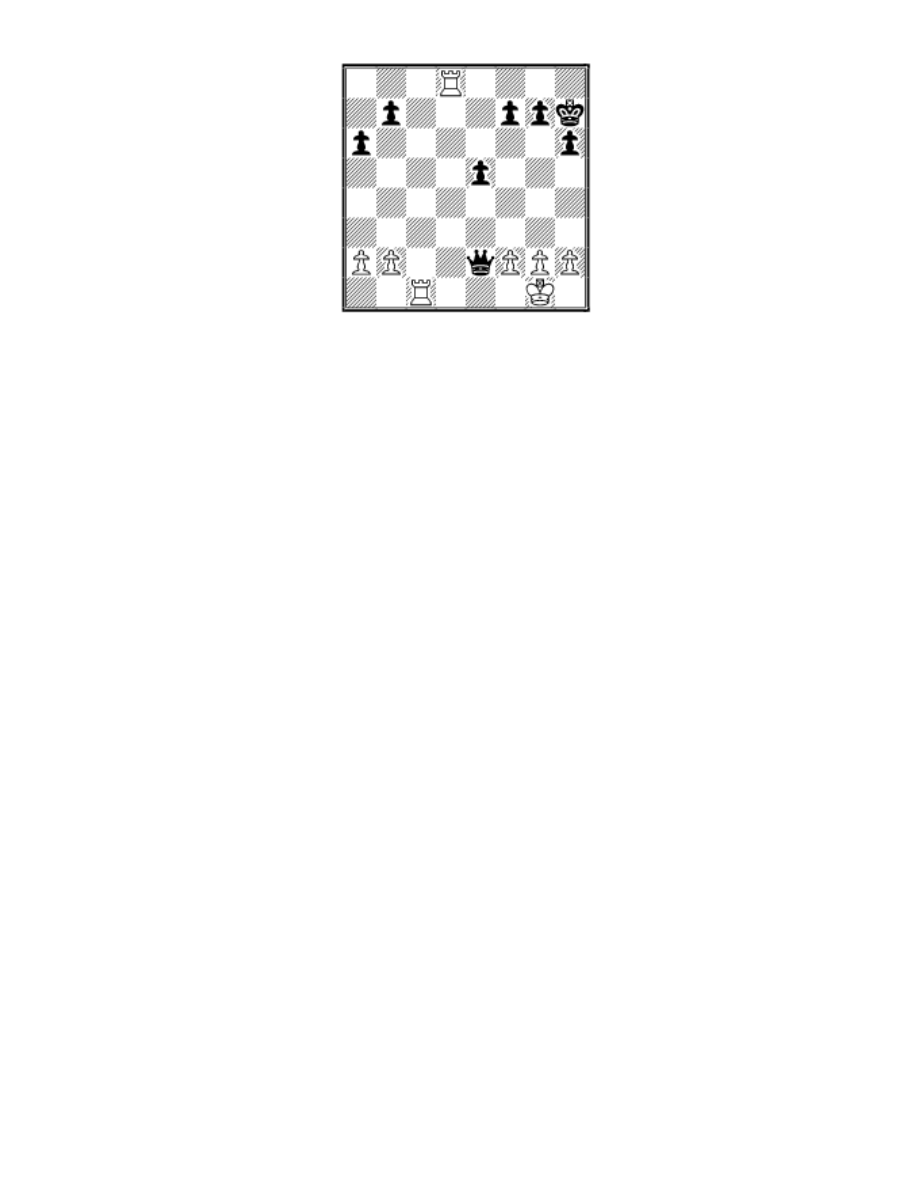
Evans – Rossolimo USA Ch, New York 1965/66
Here Rossolimo executed an elegant
combination, winning a pawn and
reaching a favorable endgame.
23...Rxc2!! 24. Qxh4 Rd4!
But not 24...Rxc1? 25. Rxc1
Rd4, in view of 26. f3! f5 27.
Qg3!
25. Qd8+!
25. f3? here allows 25...Qxg2#.
25...Rxd8 26. Rxd8+ Kh7 27. Rxc2 Qxe4 28. Rc1 Qe2!
file:///C|/Cafe/Dvoretsky/dvoretsky.htm (13 of 19) [02/08/2003 6:48:16 PM]
The Instructor
Here, not wanting to lose a
pawn, Evans chose a passive
strategy.
29. Rb1?!
The side with the two rooks
should strive to have them
attack the king or enemy
pawns together. After the
text, the only place White can double rooks will be on
the first rank.
Where the rooks are separated or confined to passivity,
either because they must hold enemy passed pawns or
because they must protect their own, the queen is
stronger than the two rooks. In the continuation,
Rossolimo skillfully combines the strengthening of his
own position with preventing the enemy rooks from
activating, resulting in a well-earned win.
I have been unable to find any significant improvement
in White’s play from this point; therefore I believe that
his decisive error (at least, from a practical standpoint)
came right here. He should have tried his luck with
active counterplay: 29. g3! Qxb2 30. Rc7 b5 (on
30...Qxa2 31. Rxb7, White easily stops the a-pawn by
doubling rooks) 31. Rxf7 Qxa2 32. Rdd7 Qa1+ 33. Kg2
e4 34. Rb7 or 34. h4!?, and in some cases, White can
even attack on the 8th rank, after playing h4-h5.
29...f5! 30. Rdd1 e4 31. Re1 Qc4 32. a3 Qa2! (keeping
the White rooks pinned down) 33. g3 Kg6 34. Kg2 Qb3
35. Kg1 Qa2 (otherwise 36. Re2) 36. Kg2 Kf6 37. f3
Ke5 38. fe fe 39. h4 Qb3 40. Kh3 Qc2 41. Rec1 Qf2 42.
Rf1 Qb6 43. Kg2 g6 44. Rf8 Qb5! 45. Rf2 e3 46. Re1
Ke4 47. a4 Qc5 48. Kh3 b5! 49. ab ab 50. Rf6 Qe5 51.
file:///C|/Cafe/Dvoretsky/dvoretsky.htm (14 of 19) [02/08/2003 6:48:16 PM]
The Instructor
Rf8 Qe7 52. Rf4+ Kd3 53. Rf3 Kd2 54. Rfxe3 Qxe3
55. Rxe3 Kxe3 56. Kg4 Ke4 57. b4 Ke5! 58. Kf3 Kd5
59. Kf4 Kc4 60. g4 Kxb4 61. g5 h5 62. Ke5 Kc5 63.
Kf6 b4 64. Kxg6 b3 65. Kh6 b2 66. g6 b1Q 67. g7 Qb3
68. Kh7 Kd6 69. g8Q Qxg8+ 70. Kxg8 Ke5 71. Kf7
Kf5! White resigned.
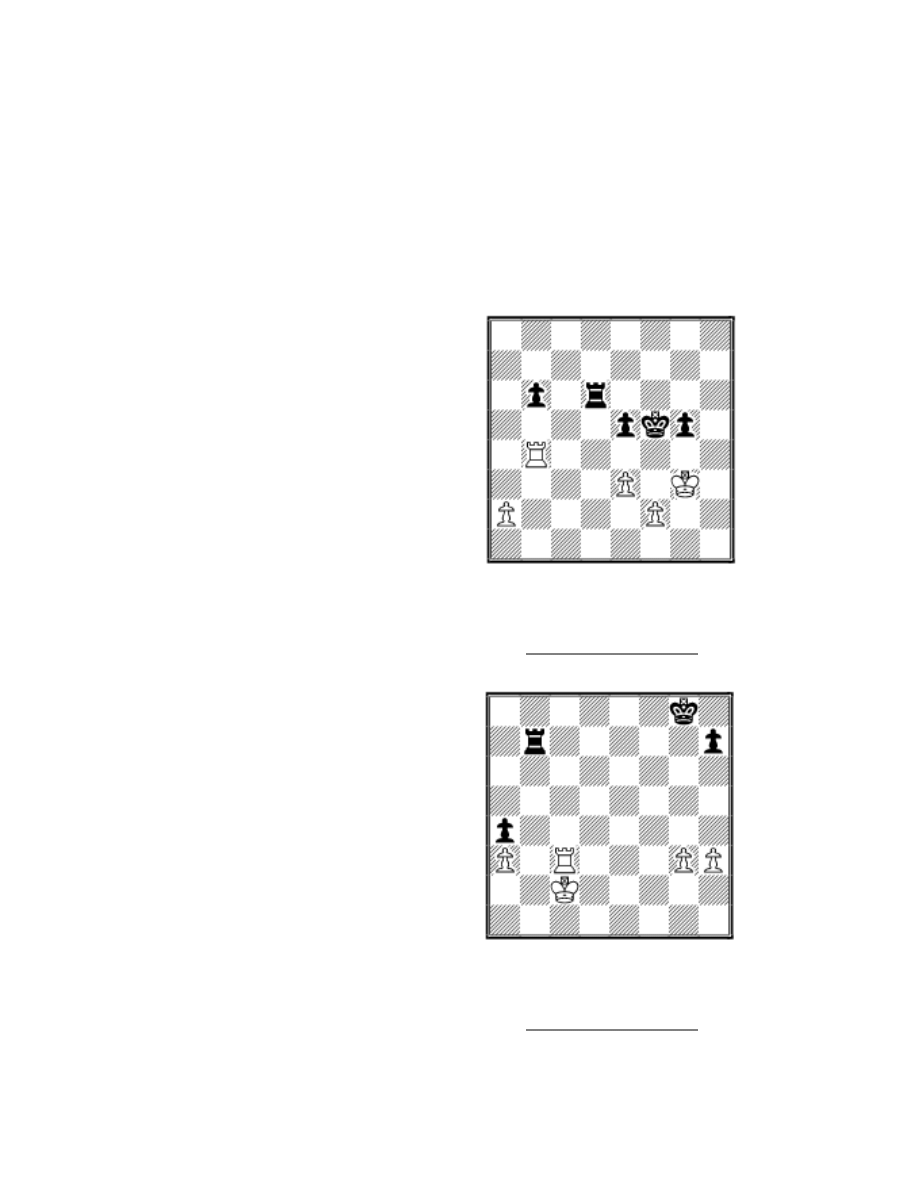
In conclusion - three exercises.
1 Black to move
2 White to move
file:///C|/Cafe/Dvoretsky/dvoretsky.htm (15 of 19) [02/08/2003 6:48:16 PM]
The Instructor
3 Black to move
Answers
1) Taimanov - Chekhov, Kishinev 1976
White wants to play e3-e4+, and then gradually
strengthen his position by a2-a4, f2-f3, Kg4, Rb5 etc. I
don’t know if his advantage would have been enough to
win with, but passive defense of such a position is both
difficult and unpleasant.
1...g4?! does not appear to lose: 2. Rxg4 (2. a4 Rg6 3.
e4+ Kg5 4. Rb5 Re6) 2...e4 3. f3 ef 4. Kxf3 Rd3! 5. Rb4
Ra3 6. Rb5+ Ke6 7. Rxb6+ Ke5 8. Rb2 Kf5, and I don’t
see how White can capitalize on his two extra pawns.
Black found a simpler solution:
1...Rd3! 2. Rxb6
White could have tried putting his opponent in zugzwang
with 2. a4!? Ra3 3. Kf3. However, after 3...g4+! 4. Rxg4
b5! 5. ab Rb3, we will have reached a drawn endgame
with two pawns to one.
file:///C|/Cafe/Dvoretsky/dvoretsky.htm (16 of 19) [02/08/2003 6:48:16 PM]

The Instructor
2...Ra3
Now it’s the White rook that must take up a passive
position. After 3. Rb2 Ra4, the draw was agreed.
I was Valery Chekhov’s trainer from 1973 to 1975, and
our work together was crowned by his victory in the
World Junior Championship. All my students were
solidly grounded in the most important principles of
endgame play; thus, Chekhov’s use of a pawn sacrifice
for his rook’s activity was, for him, merely a simple
piece of technique.
2) Larsen - Kavalek, Solingen 1970, 7th match game
White intends to continue 40. Rc4. Since Black cannot
reply 40...Rb3 41. Rxa4 Rxg3 42. Rg4+, he will have to
settle for 40...Ra7. With his rook so passive, Black’s in a
bad way - White will simply advance his king (Kc3-b4-
b5).
Which is precisely what happened in the game:
39...Kg7?? 40. Rc4 Ra7 41. Kc3 h5 42. Kb4 Kg6 43.
Rc6+ Kg7 44. Rc5 Kh6 45. Kb5 (threatening 46. Rc4)
45...Re7 46. Kxa4 Re3 47. g4 hg 48. hg Re4+ 49. Kb5
Rxg4 50. a4 Rg1 51. a5 Rb1+ 52. Kc6 Ra1 53. Kb6
Rb1+ 54. Rb5 Rf1 55. a6 Rf6+ 56. Ka5 Rf7 57. Rb6+
Kg5 58. Rb7 Rf1 59. a7 Kh6 60. Rb6+ Kg7 61. Ra6
Black resigned.
Black had to keep his rook in an active position, meeting
40. Rc4 with the counterattacking 40...Rb3!; for this
purpose, Black must make some provision against the
rook check at g4.
39...Kf7 suggests itself; it also brings the king closer to
the center. White would reply 40. g4!, aiming to continue
file:///C|/Cafe/Dvoretsky/dvoretsky.htm (17 of 19) [02/08/2003 6:48:16 PM]

The Instructor
with 41. h4 and 42. Rc4. If 40...Ke6 41. h4 Kd5, then 42.
g5!, followed by 43. Rg3. He might continue with either
44. Rg4 (attacking the a4 pawn) or 44. h5 ( when the
White rook would be behind its passed pawn).
39...h5!!
The only defense, but sufficient. Now 40. Rc4 Rb3! 41.
Rxa4 Rxg3= is useless. On 40. h4, there follows
40...Rg7! and then Rg4 - from g4, the rook attacks the g3
pawn, defends the a4 pawn, and prevents the White king
from getting in via the 4th rank.
On 40. g4 the simplest answer is 40...h4!, fixing a target
for counterattack on the 3rd rank - the pawn at h3 (41.
Rc4 Rb3). But Black also will not lose after 40...hg 41.
hg Kg7 42. Rc4 Rb3! (activity at any price!) 43. Rxa4
Rg3 44. Kb2 Rg2+ 45. Kc3 Rg3+.
Conclusion: after 39...h5! Black’s rook remains active in
all lines, which should allow him to avoid defeat.
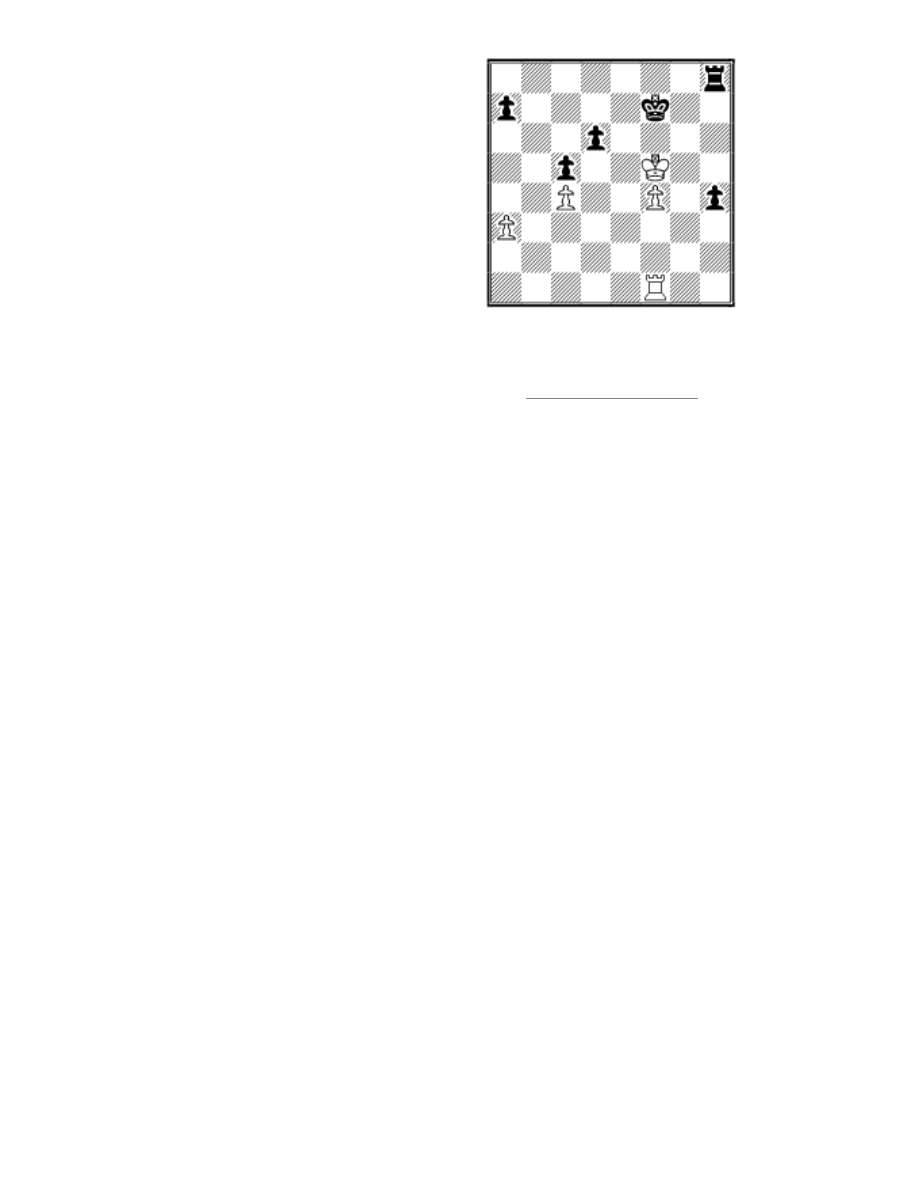
3) Obukhov - Ibragimov, USSR 1991
The passive 1. Rh1? led to rapid defeat: 1...h3 2. Rh2 a6 3. Kg4 (if 3.
Kg5, then either 3...Rg8+ 4. Kf5 Rg3, or 3...d5!) 3...Kf6 4. Rxh3 Rxh3 5.
Kxh3 d5! White resigned.
The only salvation is to activate the rook!
1. Rb1! h3 2. Rb7+ Kf8 (the only move)
White undoubtedly looked at this variation, but couldn’t
find the continuation. In fact, 3. Rb8+? Kg7 4. Rb7+
Kh6 fails, as does 3. Kf6? Rh6+ 4. Kg5 h2; and on 3.
Kg6? Rh4! 4. f5 h2 5. Rb8+ (5. f6 Rg4+) 5...Ke7 6. f6+
Kd7 7. f7 h1Q decides.
There is, however, another possibility.
file:///C|/Cafe/Dvoretsky/dvoretsky.htm (18 of 19) [02/08/2003 6:48:16 PM]

The Instructor
3. Kg5!! h2 (3...Rg8+?? 4. Kf6 wins) 4. Rb8+ Kg7 5.
Rb7+, with perpetual check.
Copyright 2003 Mark Dvoretsky. All rights reserved.
Translated by Jim Marfia
This column is available in
Chess Cafe Reader
format. Click
for
more information.
] [
[
]
] [
Copyright 2003 CyberCafes, LLC. All Rights Reserved.
"The Chess Cafe®" is a registered trademark of Russell Enterprises, Inc.
file:///C|/Cafe/Dvoretsky/dvoretsky.htm (19 of 19) [02/08/2003 6:48:16 PM]
Document Outline
- Local Disk
Wyszukiwarka
Podobne podstrony:
Mark Dvoretsky The Instr5
Mark Dvoretsky The Inst16
Mark Dvoretsky The Inst30
Mark Dvoretsky The Inst14
Mark Dvoretsky The Inst11
Mark Dvoretsky The Instru
Mark Dvoretsky The Instr9
Mark Dvoretsky The Instr8
Mark Dvoretsky The Inst17
Mark Dvoretsky The Inst13
Mark Dvoretsky The Inst28
Mark Dvoretsky The Inst25
Mark Dvoretsky The Inst18
Mark Dvoretsky The Inst21
Mark Dvoretsky The Instr2
Mark Dvoretsky The Instr4
Mark Dvoretsky The Inst20
Mark Dvoretsky The Instr6
Mark Dvoretsky The Inst26
więcej podobnych podstron