
Cook Like A Chef
How to
Cook Like A Chef
In Just One Day
Learning the 16 fundamental cooking techniques to
quickly improve your culinary skills with Jim
1

Cook Like A Chef
How To Cook Like A Chef In Just One Day
is © 2002 Cooking With Jim
TM
All rights reserved worldwide.
First edition 2002.
No part of this publication may be reproduced, stored in a retrieval
system, transmitted in any way or by any means, electronic, mechanical,
photocopying, recording or otherwise, including but not limited to
digital copying and printing without the prior agreement and written
permission of the copyright holder.
2
The author Jim Yang and ‘Quick and Easy Chinese Vegetarian
Cooking With Jim’ made their best efforts to produce a high
quality, informative, and helpful e-book. However, they make no
warranties or representations of any kind with regard to the
completeness or accuracy of the contents of this book. They
accept no liability of any kind for any losses or damages caused or
alleged to be caused, directly or indirectly, from using the
information contained in this book.

Cook Like A Chef
"I feel a recipe is only a theme, which an intelligent cook can play each
time with a variation."
~ Madame Benoit
"Cookery is not chemistry. It is an art. It requires instinct and taste rather
than exact measurements."
~ Marcel Boulestin
3

Cook Like A Chef
Contents
FOREWORD......................................................................................................................6
BASTING............................................................................................................................7
BLANCHING.....................................................................................................................8
.......................................................................................8
BRAISING & STEWING ...............................................................................................10
CUTTING.........................................................................................................................12
.............................................................................................15
) ............................................................................................15
..................................................................................................19
..................................................................................21
GARLIC - HANDLING ..................................................................................................23
PARBOIL .........................................................................................................................24
POACHING......................................................................................................................25
RICE – COOKING..........................................................................................................26
...................................................................26
MEASURING THE CORRECT AMOUNT OF WATER
............................28
.............................................................29
....................................................................30
SAUTÉ ..............................................................................................................................31
SKINNING TOMATOES AND PEPPERS...................................................................32
: ...................................................................................32
: .......................................................................................32
4

Cook Like A Chef
..................................................................................34
...............................................................................................35
............................................................................................40
......................................................................................46
5

Cook Like A Chef
Foreword
L
earning to cook is easy. It doesn’t have to be complicated.
All those fancy cooking styles and techniques you see on
television really aren’t that difficult. Learn the basics, and you can
easily master any and all of the following 16 fundamental cooking
techniques.
Are you always wondering what so many of the terms and jargon
they use on cooking shows mean? You don’t have to be
intimidated by all their fancy terms anymore, because I explain
each one of them in this cooking techniques book.
It’s arranged alphabetically so you can easily and quickly find what
you’re looking for.
Each cooking method starts with a brief explanation and
descriptions. Key points will be highlighted, and many tips are
provided to make cooking quick and easy for you.
Enjoy cooking.
6

Cook Like A Chef
Basting
B
asting is a technique used to moisten food (usually meat) while
cooking with a liquid. The liquid could be melted fat, some type
of sauce, and pan dripping, or any other type of liquid.
For example, say you’re grilling a few beef patties on a grill. You
add some barbeque sauce on, and use a brush to smear it around
– you are basting.
Basting is easily done. You can use a brush of some sort and
simply use it to brush on sauces to whatever you are cooking. A
bulb baster can also be used to drizzle the liquid over the food.
A bulb baster has a 5 to 7 inch long tube-like section with a pointy
tip. At the end, there’s a round ball made of plastic where you
store the liquid.
You can baste when you’re barbequing, roasting, grilling, or
baking.
7

Cook Like A Chef
Blanching
B
lanching is an excellent way to preserve the color, texture and
flavor of your vegetables. You’re ‘pre-cooking’ your vegetables
before cooking them.
Blanching is used primarily for vegetables. It serves several
purposes. Before freezing vegetables, it’s best to blanche first to
capture their peak color, flavor and texture. Blanching slows the
actions of the enzymes that cause the vegetables to ripen. This
also helps to preserve the vitamins and minerals of the vegetables.
A side benefit of blanching is the effect of killing off bacteria that
the vegetables may have.
How to blanche vegetables
When blanching vegetables, immerse the vegetables in boiling
water briefly.
• Fill a pot about 2/3 full of water. Add 1 to 2 tablespoons
of salt, and bring the water to a boil.
• Add your vegetables into the boiling water. Do not cover
with lid. Depending on what type of vegetables you’re
blanching the amount of time will differ. For easy to cook
vegetables such as lettuce, blanch for only a few seconds.
For more difficult to cook veggies such as broccoli, blanch
for 30 – 60 seconds. Also, the size of the individual
vegetable pieces also becomes a factor. The larger the
piece, the longer you should blanche.
8
In my Chinese Vegetarian Cooking book, blanching is used
mainly to preserve vegetable colors, and also to soften the
vegetables somewhat before stir-frying. For example, in my
recipes, blanching is
recommended to pre-cook the vegetables.

Cook Like A Chef
• When finished blanching, strain the vegetables from the
hot water.
• Immediately run the vegetables through cold water.
Tip: When you plan on blanching vegetables, make sure to cut
the vegetables in to evenly sized pieces. This way, you ensure that
all the pieces get blanched evenly.
Some people recommend blanching your vegetables for several
minutes. In my opinion, that’s way too long. I usually blanche
my vegetables for stir-frying purposes, so I prefer to have my
veggies to have a little crunchy texture. I don’t enjoy eating very
soft vegetables.
However, it’s really up to you how long you want to blanche for.
If you like your vegetables to be soft, blanche it longer. Blanche
your vegetables quickly if you like them to be more crunchy.
Some vegetables you could blanche include, broccoli, cauliflower,
Chinese broccoli (Gai Lan), cabbage, and many more.
Remember that blanching is not meant to cook the vegetables, so
speed is very important.
9

Cook Like A Chef
Braising & Stewing
W
hen you braise or stew something, you ‘wet-cook’ it.
Braising is a cooking method where you first brown meats and
vegetables in a little fat (or oil), and then let it slowly cook in a pot
with some liquid for a long period of time.
Braising is a technique used usually on tough cuts of meat – the
long cooking process softens the tough meat. At the same time,
the braised/stewed ingredients really absorb the flavors during the
long cooking process.
Tip: To prevent burning your meats while braising and stewing,
you can dice up carrots, celery, and onions to place at the bottom
of your pot so the meat doesn’t come in direct contact with the
pot. This also adds some extra flavor and aroma.
How long do you think it takes to cook vegetables? Not very
long.
So even though I titled that section braising and stewing, the
recipes really don’t take very long. However, the essence of
braising and stewing is captured in the recipes.
Here’s how I braise my tough cut meats:
• Cut the meat chunk into 1 to 2 inch sections
• Instead of the normal method of browning meats in fat, I
like to marinate it first with either soy sauce or teriyaki
sauce, and a little cornstarch.
10
In my Chinese Vegetarian cookbook, you maybe mislead to think
that most of the braised/stewed recipes take a long time to cook.
You couldn’t be more wrong. ☺ The truth is, there are no meats
at all in my vegetarian book, and in all the recipes there are only
vegetables.

Cook Like A Chef
• I then quickly stir-fry the meat on very high heat. This is
where I add in all the spices and seasonings. (Salt, hot
sauce, MSG, sugar etc…)
• After stir-frying on high heat for 30 to 60 seconds (after all
the meat is no longer pink) I then add in water, and let it
stew for a long period of time.
I find that marinating and stir-frying the tough meats on high heat
really packs the flavors into the meat when it’s finished cooking.
You can also add in garlic and ginger at the start to add more
flavor to the meat.
11

Cook Like A Chef
Cutting
C
utting and slicing up food is probably one of the most
important skills to master in Chinese cooking. Cutting your food
into uniform pieces to make the dish present nicely is half the
battle.
Unlike knives used anywhere else in the world, Chinese chefs use
a cleaver as the knife of choice. In western cooking, a cleaver is
usually used primarily to chop up large bones (because of the
weight and size of the knife).
In Chinese cooking, chefs almost always use the cleaver
exclusively to cut everything from meat and bones to tomatoes
and mushrooms.
Buying a Knife
There are two main types of cleavers that you can buy. You can
easily find the traditional carbon steel knives in Chinese hardware
stores, and you can find the stainless steel type wherever knives
are sold.
The carbon steel knives easily sharpen, however, they tend to rust
easily. The stainless steel cleavers don’t rust, but they are difficult
to sharpen.
So, if you want a sharp knife, and you can take good care of your
knife, then the carbon steel cleavers are for you. You need to
keep them clean, and always dry after washing.
Stainless steel cleavers would be good for you, if you don’t want
the hassle of maintaining and sharpening your knife.
One summer back in university, I got a knife sales job with Cutco.
I’m not sure if you’ve heard of them, but they do make good
12
Cook Like A Chef
knives – that cost you an arm and a leg. I had to buy a display set
for demonstration for $80, which was cheap considering that a
small French Chef Knife costs around $80!
13
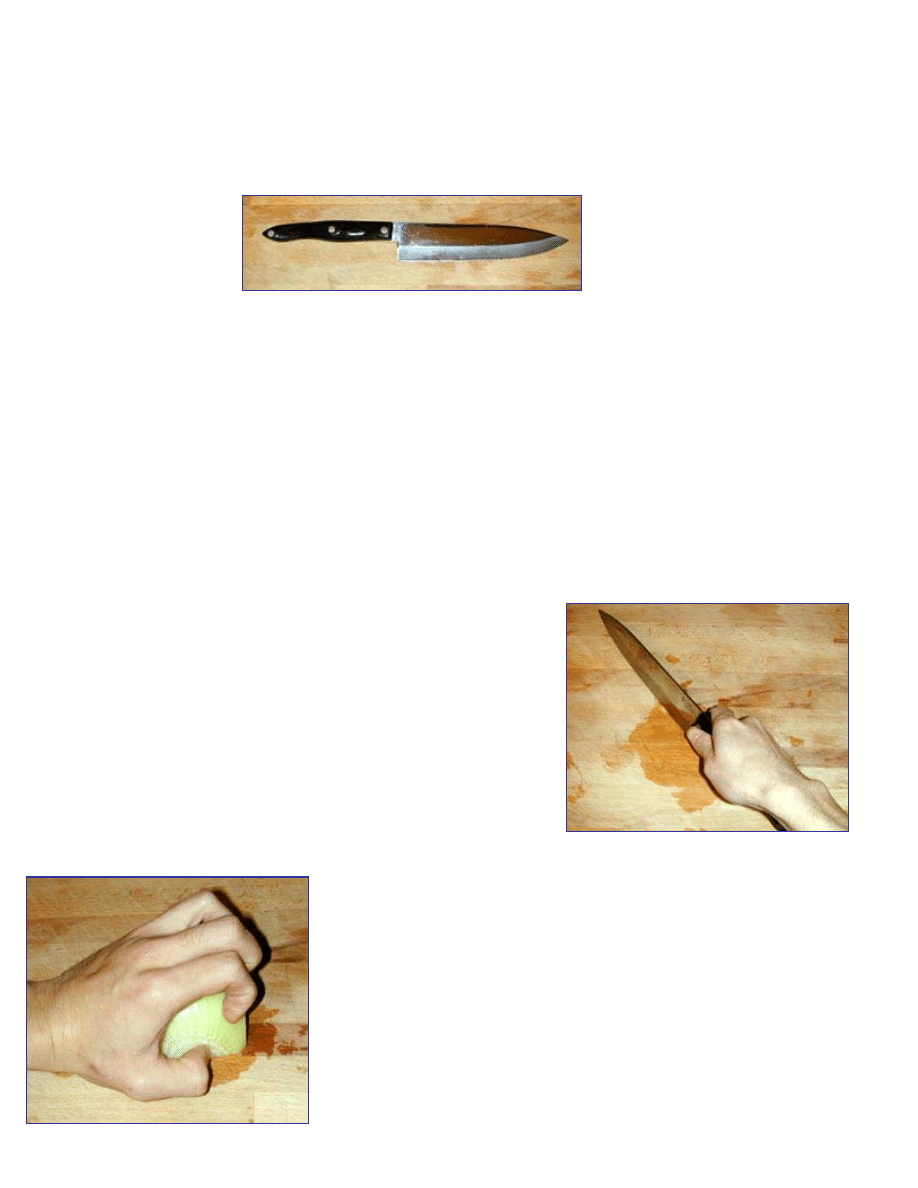
A French Chef Knife, my
preferred knife.
referred knife.
They were not cheap knives. You could easily run into the
thousands. But the knives sure worked great. In fact, after many
years, I still use the French Chef Knife that came with my set.
When you’re purchasing a Chinese cleaver, test its balance. The
knife should have a nice feel, too. It should have a good weight,
but not so heavy that you have a tough time handling it.
Gripping the Knife
To properly hold a chef’s knife, place
your index finger and thumb on
opposing sides of the blade, and
grasp the handle with your other
three fingers. Curl you index finger
slightly.
You’ll find that holding a knife this
way gives you much more control
when cutting ingredients.
General Cutting
When you are ready to cut some ingredients, hold the
food in place with your free hand. To properly hold the
food, you should curl your fingertips in toward your
palm. So when cutting, use the first knuckles of your
Cook Like A Chef
14
Cook Like A Chef
14
free hand to guide the cut, and never raise the blade higher than
your first knuckles.
This not only prevents your free hand from getting cut, it also acts
as a guide for your knife as you cut along the food.
The motion of the knife very much depends on what type of knife
you use. For a Chinese cleaver, your cutting motion should be
steady downward motion moving slightly forward as you cut, and
moving back slightly as you raise the knife.
If you were using a knife with a curved blade like a French Chef
Knife, you should have the knife always touching the chopping
board. So when you cut with a French Chef Knife, you follow a
rocking motion. When you cut downward, the heavy part of the
knife touches the chopping board, and the knife’s tip leaves the
chopping board. When you finish the cut, the heavy part is lifted,
and the weight of the knife shifts to the front.
Slicing
Slicing is one of the most basic forms
of cutting.
Hold the knife properly, and using your
knuckles as a guide, cut straight down.
When I slice, I usually use a slightly
‘sawing’ motion.
Slide the knife forward a little as you cut down, and bring it back
toward you as you go back up. I find this helps to cut faster than
just cutting straight down.
Cook Like A Chef
15
Cook Like A Chef
15
Julienne and Shredding
If you ever wonder what the chefs on television are talking about
when they mention ‘Julienne’, now you’ll know. After you slice
up something, stack a few, and cut straight through to cut them
into matchstick like pieces. So, you’re just cutting it into strips.
You can shred the ingredient into all different sizes. For a very
thin strip, cut the slices very thin, and then cut the slices into thin
strips.
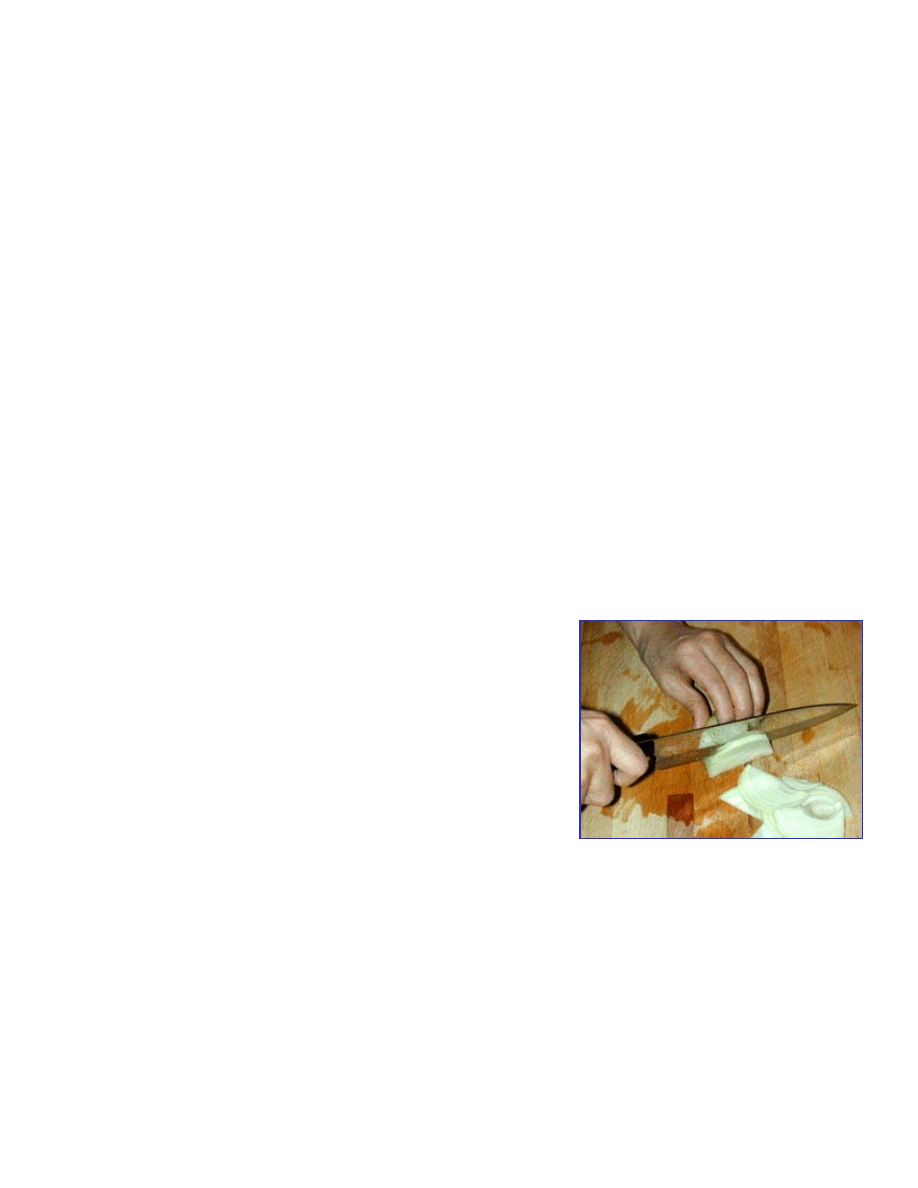
Chopping (green onions)
Chopping is exactly what it says it is –
cutting food into smaller pieces.
When I chop my green onions, I first cut them in ½ and then into
¼ sections. Then I pile them up together, and chop at once. This
is much more efficient. Done properly, you can quickly and easily
chop up green onions.
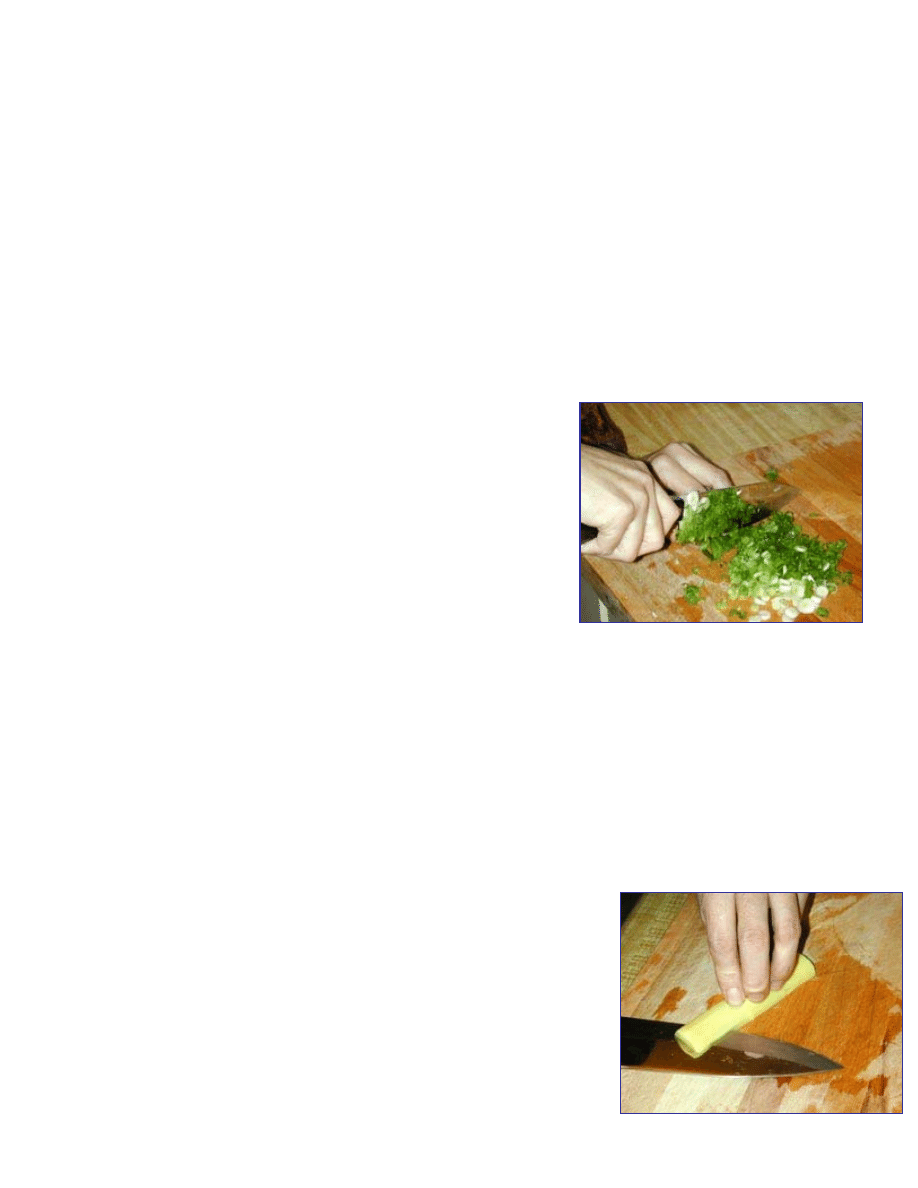
Parallel Cutting
When you want to make large, thin slices of
meat or vegetable, then you need to parallel
cut.
It’s rather simple. Place the food near the
edge of the chopping board, and hold it
firmly in place with your free hand.
I my Chinese Vegetarian cookbook,
many recipes make use of chopped
green onions. So I thought it was
important enough to have a little
section about chopping onions, and
also have a picture for you to see.

Cook Like A Chef
16
Cook Like A Chef
16
With the knife almost parallel with the chopping board, make an
incision at the thickness you desire. Then take your knife, and
slide it across.
Dicing
When dicing, you usually cut the meat or vegetable into small
cubes. First slice the ingredient, and cut into strips, then cut once
more into cubes.
Mincing
Mincing is similar to dicing, except you
cut the ingredient into much finer sizes.
Usually you would mince garlic and
ginger.
In the picture to the right, I am mincing
some garlic.
First slice up the garlic, and the cut into
strips. This speeds up the mincing.
Now, hold the knife properly, and place the palm of your
freehand on the back of the knife, and rock the knife back and
forth to mince the garlic. Scoop up the ingredients and flip them
over to ensure even mincing. This is especially important if you
were mincing some meat.
Cook Like A Chef
17
Cook Like A Chef
17
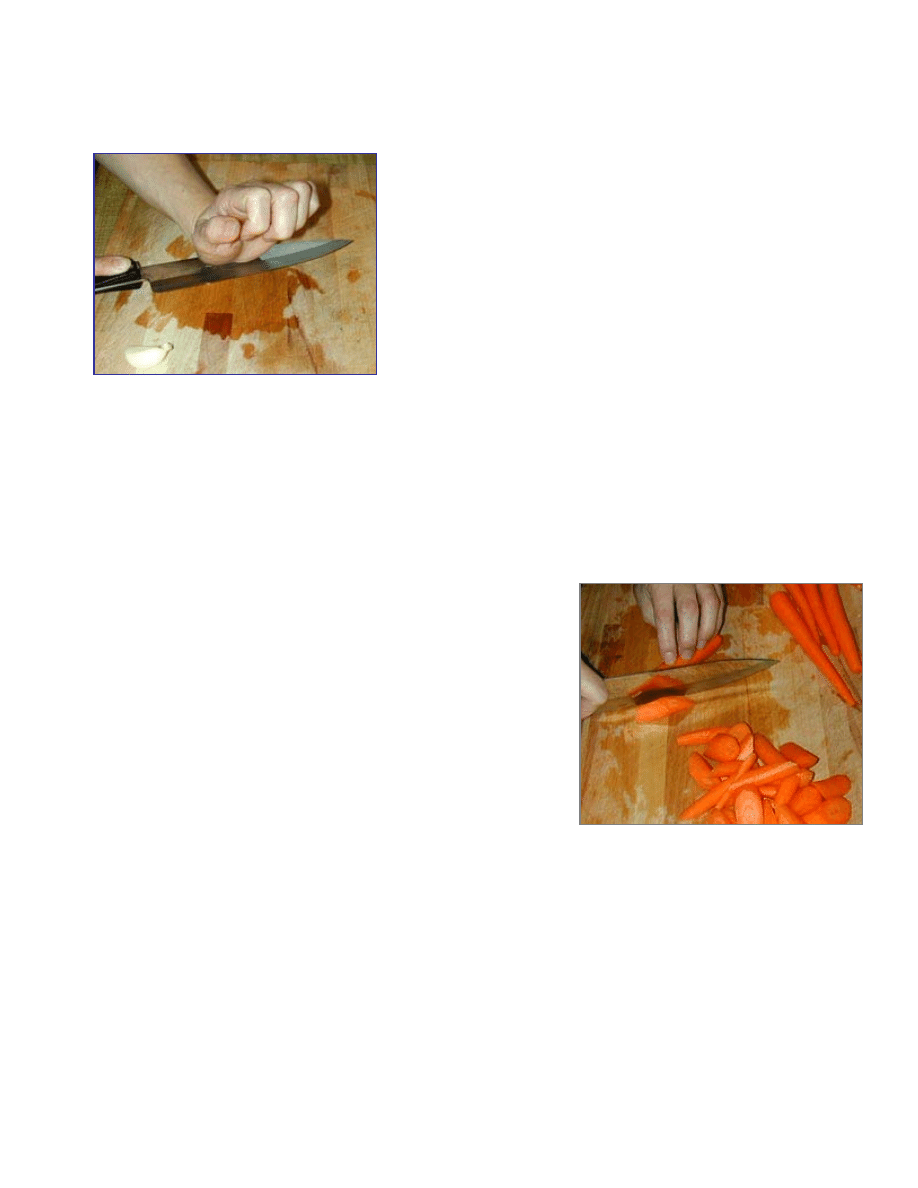
Crushing
A common way to prepare ginger and garlic in
Chinese cooking is to crush them.
Place the knife flat over the ginger or garlic, and
hold the knife steady. With the palm of your
free hand, smash the knife to crush the garlic or
ginger.
You could also make a fist, and smash the knife with the bottom
of your fist.
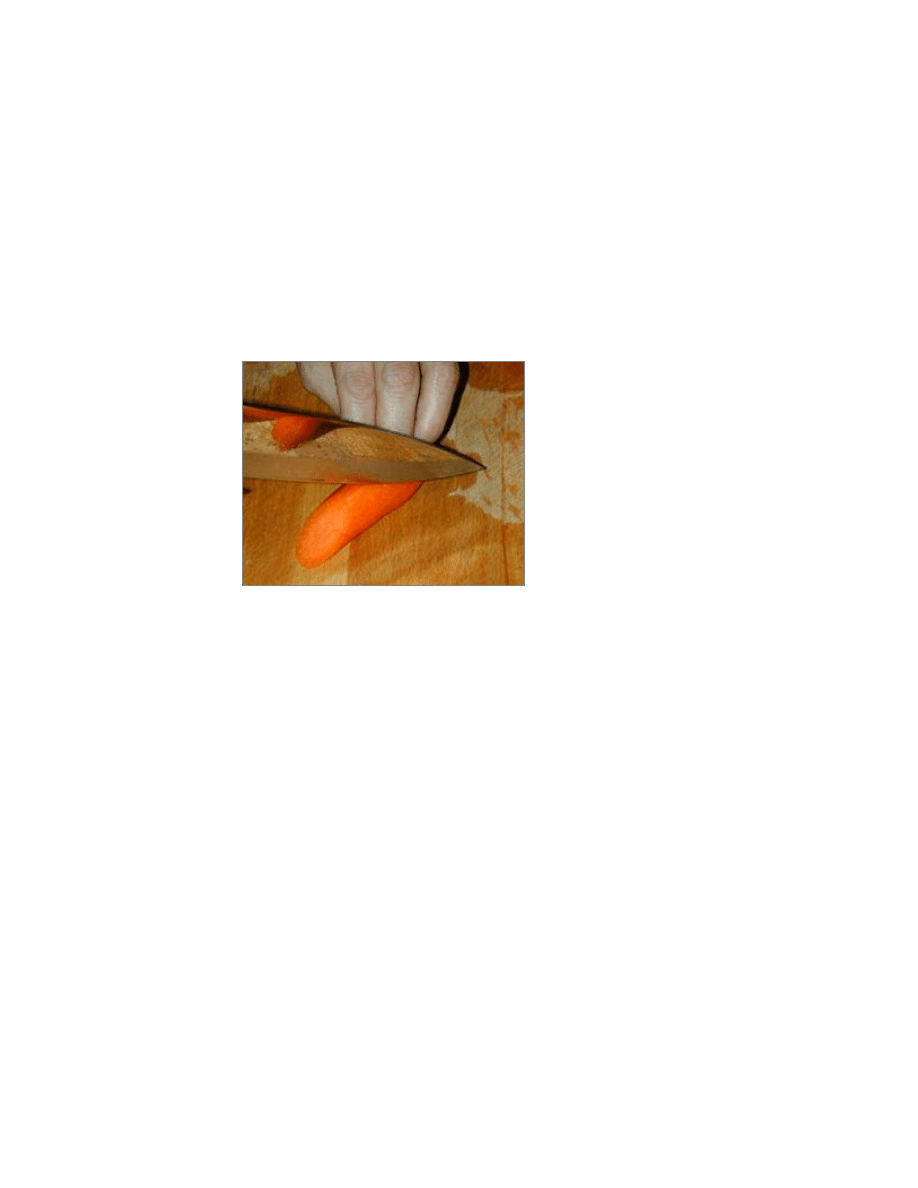
Roll-cut
Roll-cut is usually used for cutting
carrots and other long shape vegetables
into a trapezoid like shape.
Sure, you can just flat-out cut the
carrots into 2inch long round sections,
but roll-cutting the carrots gives it a
much better look.
Here’s how you roll-cut a carrot - very
simple.
Hold the carrot firm on the chopping board. Place your knife
diagonally on the carrot to start. Then cut.
After your first diagonal cut, you have a carrot with a ‘shaved’
edge that’s facing away from you. See the second image. Notice
the diagonal cut.
Cook Like A Chef
Now roll the carrot 45 degrees toward you – so the slanted edge is
facing straight up. Place your knife at where the last cut left off,
and make another diagonal cut.
By doing this, you make a carrot chunk that has two slant edges
that are about 45 degrees from each other.
Just do this for all your carrots. It’s not very hard to do.
I’m sure you’ll pick it up in no time!
18
After the first diagonal cut, roll the
carrot 45degrees toward you, so the
slanted side is facing up. Then make
another diagonal cut.
fter the first diagonal cut, roll the
carrot 45degrees toward you, so the
slanted side is facing up. Then make
another diagonal cut.

Cook Like A Chef
Kneading Dough
Y
ou can use dough in many different ways after kneading, and
there are several methods you can use to knead dough. In North
America, kneading dough is usually for baking needs. However,
in my vegetarian cookbook, kneading dough is primarily used to
make vegetarian meat.
You can knead dough in a mixer, with a dough hook, or by hand,
which is my preferred method.
The first step is to mix some water into the flour. Don’t add too
much water at first. After you’ve mixed the flour with water, it
becomes clumpy and somewhat hard. Now you can start to
knead the dough. I recommend kneading on a large flat surface,
or in a very large pot.
Kneading the Dough
When you’re ready to knead the dough, lightly spread some flour
on the flat surface.
• Grab the dough in your hands, using your palms and the
heel of your hands, push down and forward on the dough
• Now fold the dough onto itself, and push down and away
again.
• Rotate the dough about 45degrees, and push down and
away again.
• Repeat this push and fold process over and over until the
dough is the right texture.
• The kneading process takes 10 to 15 minutes.
As you’re kneading the dough, add a little more water whenever
necessary. If you find the dough is extremely difficult to knead,
then add a little more water to soften it up. Or if you find that
19

Cook Like A Chef
you’ve added too much water, and the dough is too soft, you can
add a little more flour.
Stop knead when the dough reaches the consistency you desire.
Here are some common characteristics to help you determine
whether your dough is well kneaded:
• The dough is soft and smooth, and it holds together in a
nice ball.
• It’s no longer sticky like it was
• It springs back when you lightly press it and it retracts back
if you pull on it lightly
When you’ve finished kneading the dough, round it up – make it
into a ball shape, and you’re done!
20

Cook Like A Chef
Deep-frying
T
o do this right, put enough oil in a small pot, and turn the heat
to your desired temperature. For different foods, you will deep-
fry at different temperatures.
When deep-frying, do not fry too many items in the oil at once,
since it causes the oil temperature to drop. It’s best to just fry a
few pieces at a time, so that the oil temperature remain constant
throughout the whole process.
Determining Oil Temperature
Here is the technique I used to determine the temperature of my
deep-frying oil.
To determine whether the oil is hot enough, put a pair of wooden
chopsticks into the oil. When you see bubbles coming quickly
from the chopsticks, then the oil is hot enough. I use this method
exclusively to determine the temperature of the oil.
Test this yourself. When you first put the chopsticks into the oil,
no bubbles will form because the oil is not hot enough. Let it
heat for a while, and put in the chopsticks again, you may see it
start bubbling. At this point, the oil is at about a medium
temperature.
Wait a little longer, and insert the chopsticks again, you will see
the bubbles forming a lot faster. Now the oil is at medium-high
temperature.
If you wait even a little longer, and insert the chopsticks, the
bubbles will form very quickly. The heat at this point is just a
little below the smoking point for the oil. So it’s at high heat
already.
21

Cook Like A Chef
Deep-frying Tips
1. Always deep-fry your food in small amounts to keep the oil
temperature consistent.
2. Always coat your food with some type of batter or coating
before deep-frying. This seals in the flavors, and also prevents
burning the skin of the food.
3. Test the temperature of the oil first before frying. I do this
with wooden chopsticks.
4. Avoid getting water into the oil. Otherwise, it will splash all
over.
5. When you finish deep-frying always place the deep-fried item
on some paper towel. The towels soak up the excess oil.
6. You can use the deep-frying oil several times before throwing
it out. Discard the oil when it becomes too dark and dirty
from frying too many times. Store in tightly sealed container
and refrigerate.
22

Cook Like A Chef
Garlic - Handling
The biggest fuss with garlic is that you have to peel it. The easiest
way to do this is to crush it with the flat of a large knife. See the
picture in the
. Once you crush the garlic, the skin
easily peels off. All you need to do is then cut off the end stub.
If you prefer not to crush the garlic, another method is to cut off
the end stub. This allows you to get a hold of the skin from the
bottom, and peel it.
There are several ways to prepare garlic, and it depends on what
you plan on using the garlic for. You can slice, dice, mince, and
even grate the garlic.
• Sliced or whole garlic is used mainly for braising fish
• Diced garlic is used primarily added into very hot oil to
flavor stir-fry dishes
• Minced and grated garlic are used mainly for marinating or
for making different sauces
23
G
arlic is an important ingredient in Chinese cooking. So here’s
a little section on how to prepare garlic quickly and easily.
Here’s some common ways garlic is used in Chinese cooking:

Cook Like A Chef
Parboil
P
arboiling is a technique of boiling your food that’s very similar
to blanching. Like blanching, you boil your food to partially cook
it. The main difference is that parboiling food takes longer than
blanching.
Parboiling is used for dense food such as broccoli, especially if
you were planning to cook broccoli with some easily cooked
ingredient, such as chicken and fish.
Parboiling is useful for foods such as potatoes and carrots. After
cutting your potatoes and carrots, parboil them for 5 to 7 minutes.
This will soften them up for you.
24

Cook Like A Chef
Poaching
P
oaching is a very simple way to prepare food. Poaching
minimizes nutrient loss and preserves flavor, color and texture.
You submerge food in liquid and simmer just below the boiling
point until its cooked.
Poaching is ideal for preparing fragile foods such as fish, poultry
and fruits that easily fall apart. Cooked by poaching, the fragile
foods can preserve their shape.
The temperature of the liquid is most important. It must be
maintained at just below the boiling point, allowing a slow simmer
to cook the food. If the liquid boiled or simmered vigorously, the
fragile foods may fall apart.
The easiest way is to start with medium heat, and adjust your heat
to get the desired simmer. It’s much better than starting at high
heat, bring the liquid to a boil, and then turning the heat down to
get the simmer.
You can use many types of liquid for poaching. You can use
water, court bouillon (highly seasoned liquid), flavored stock, or
even oil. Different foods require different poaching liquid. Herbs
and spices such as garlic, ginger, and lemon can be added for extra
flavor.
25

Cook Like A Chef
Rice – Cooking
R
ice is the staple food for Asian people. It’s served almost
everyday for dinner.
You may shy away from making rice for dinner because you’re
worried about making it either too dry or too wet. I can tell you
that it’s not hard to cook near ‘perfect’ rice every time! I’m going
to show you a little trick that I use when cooking rice.
There are many different types of rice on the market. For
example, long grain rice, wild rice, Japanese rice, and sweet rice
just to name a few. Which type should you buy?
For serving rice during regular meals, I always buy regular long
grain rice. Now, when it comes to long grain rice (or any type of
rice) you’re going to find so many different brands. More
decisions to make! The truth is, even though I’m no rice expert
(but I have been eating all my life), I couldn’t really tell the
difference between most of the brands.
That’s a little over statement though. There is some very high
quality rice, that when you taste it, you can taste the difference
right away. However, for regular rice purchasing, I don’t think it
matters too much which brand you buy. I usually buy Rooster
brand or Flying Horse brand.
Preparing Rice – washing and soaking
Before you cook rice, you need to wash it, and/or soak it in water
for a while. It’s not completely necessary that you wash the rice,
since most of the rice you buy these days is clean, but it’s still a
good idea to give it a quick rinse through to get rid of any dust or
dirt.
I always wash my rice before cooking it. This is how to do it:
26

Cook Like A Chef
• Fill the pot half full with water, and gently massage the rice
with you hands
• When the water becomes murky, replace it with fresh
water, and massage one more time
• Finally, I replace the water, and the rice is ready to cook.
You can repeat the above steps as many times as you want. But if
you wash the rice too thoroughly you will wash away some of the
nutrients.
Whether you soak the rice in water or not is totally up to you.
The one reason to soak rice is to shorten the cooking time, and to
allow for maximum growth for the rice.
Cooking the Rice
How much should you cook? If you not sure, follow these
guidelines:
• 1 cup of rice makes 2 – 2½ small bowls of cooked rice
• Usually 2 – 2½ cups of uncooked rice will make enough
to serve a family of 3 to 4
I always buy 40lb bags of rice, so it lasts me for several months.
For the three of us in my family, I cook usually 1½ to 2 cups of
rice. Sometimes I cook a little extra for snacking on it.
There are many different ways which you can cook rice. Note:
I’m referring only to long grain rice. You can use a pot to cook
rice on a stove, microwave cook the rice, steam the rice, make
congee with the rice, or use a rice cooker.
We’ll take a look at cooking rice the old fashioned way with a pot
and a stove, and also using rice cookers.
I used to cook rice in a pot on a stove. Now I only use rice
cooker now. It’s so much easier, and I never have to worry about
my rice getting burnt.
27
Cook Like A Chef
28
Cook Like A Chef
28
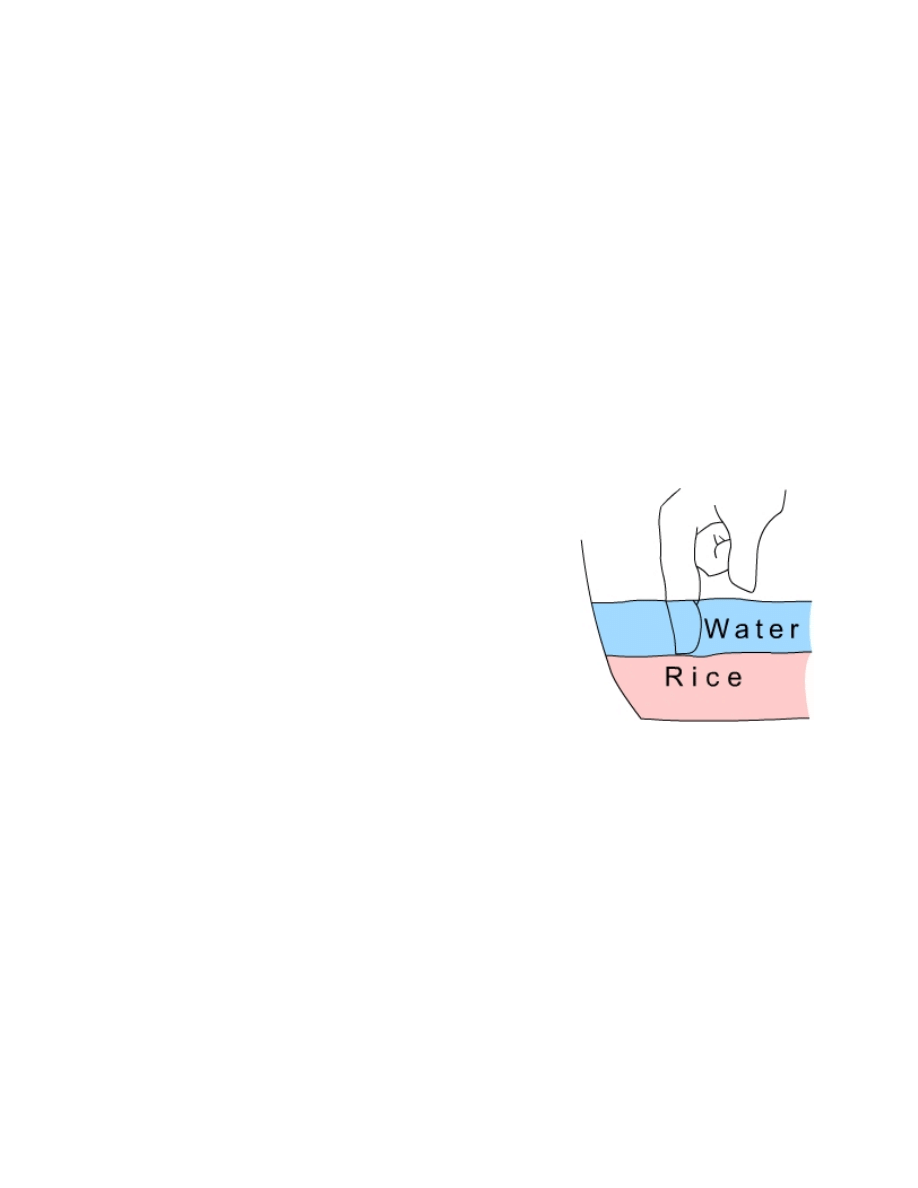
Cooking the Rice – measuring the correct amount of
water
The first thing you need to do is measure the right amount of
water after you wash the rice. It always puzzles people how much
water they should use. Every time someone in my family makes
rice, they always ask me “is this enough water?”
I can usually tell just by looking at it, but of course, there’s a much
better way to determine how much water you should use. There’s
a ‘rule of thumb’ that I follow, and that is: the water height above
the rice should be about the height of the first section of your
index finger.’
Confused? That was a bit long.
Take a look at the picture to the right.
(Hope you enjoy my little sketch.) The
amount of water above the rice is
about the same height as the first
section of your index finger.
I hope that clears it up.
This rule works especially well when
you cook about 2 cups of rice in a
medium sized pot.
You should use this rule of thumb to guide you whenever you
cook rice. Of course, you can’t follow this rule strictly. For
example, if you cook less than 2 cups, then the water level should
be less than your index finger. If you cook more rice, then the
water should be a little higher than the first section of your index
finger.

Cook Like A Chef
Cooking the Rice – the old fashioned way
Before I ever knew the rice cooker existed, I cooked rice the old
fashioned way. When I was still a kid in China, my mom cooked
rice in a tin pot on a clay stove using charcoal. Then it was
cooking rice on a stovetop. Finally, I decided to buy a rice cooker
one day, and did I fall in love with it!
But there’s nothing wrong with cooking rice the old fashioned
way.
Here’s how to cook rice the old fashioned way without ever
burning it. Note: this method requires you to pay close attention
to the rice as it cooks.
• After washing and adding water to the rice, put on a
stovetop element, and turn heat to high
• Wait until the water is boiling
• Let it boil for about 30 – 60 seconds (keep the lid a little
open to prevent overflow)
• Then turn the heat down to medium/medium high
• Let the rice cook on this temperature until most of the
water is absorbed and evaporated (make sure not to cook
too long at this temperature, unless you like very dry rice)
• Now turn the heat down to low, and let it slowly cook the
rice to perfection
• Once you have the rice the way you like it, turn the heat to
lowest possible to keep it warm until serving
Remember to always have to the lid covering the pot.
If you follow the above instructions, you’re almost guaranteed
perfect rice every time. But it’s difficult to make perfect rice all
the time. You might forget about it, or added too much water or
not enough water etc… Here’s what to do:
Problem: The rice is too dry.
29

Cook Like A Chef
Solution: Add a little more water, and stir. Add no more than ¼
cup of water. (You can always add more if necessary.) Close the
lid, and let this cook on medium temperature until the rice is how
you want it. Then turn heat down to low.
Problem: The rice is too wet or soft.
Solution: With the heat on medium, open the lid, and keep it off.
Use a spoon and stir up the rice to let the excess moisture escape.
Keep on doing this until the rice is dry enough for you.
Problem: You forgot about the rice, and the rice is completely
burnt at the bottom! (I do this all the time!)
Solution: Run cold water to the bottom of the pot to prevent the
burnt taste and smell penetrating the rest of the rice. Dish out the
edible rice as much as you could.
Cooking the Rice – with a rice cooker
This is so easy.
There are no tricks to it. All you need to do is wash the rice,
measure the right amount of water, put it into the rice cooker, and
put it on cook.
In about 15minutes or so, your rice will be done to perfection.
You won’t have to worry about burnt rice. If you find the rice is
too wet or dry, just follow the same methods outlined above.
30

Cook Like A Chef
Sauté
B
asically, sautéing is cooking food quickly in some oil or fat over
high heat. This is a very basic technique that once you learn it,
you can easily and quickly whip up something – sautéing chicken,
beef, pork, fish, or vegetables.
Sautéing seals in the flavors and minimizes the cook time. It’s
best used to cook fish and thin cuts of meat because of the short
amount of time sautéing takes. If you cooked thicker slices of
meat, they wouldn’t be cooked throughout.
You can use a sauté pan, a wok, or pretty much any type of pan.
Preheat the oil in the pan on high heat because you want the food
to cook quickly. Note: you can use either oil or butter. Butter
gives food a better taste and browns it easier than oil does.
You should use about 1 – 2 tablespoon of butter/oil for 2 pieces
of chicken cutlets or fish.
How do you know when it’s hot enough? When the butter begins
to turn pale brown, you should add in the ingredients. Place the
ingredient in to the pan, and let that side brown. After the first
side has browned, turn it over and brown the other side. You
should only flip the food over once or twice at most when
sautéing.
You should avoid the 1 most common mistake people make when
sautéing - do not use a fork to pierce the meat when you flip it, or
the juices will escape from the meat. I recommend using a spatula
of some sort, or use chopsticks.
Cooking time will also depend on the ingredient. If you were
cooking chicken or fish, it should take about 2 to 4 minutes. If
you were sautéing vegetables, it would take much less time –
about 1 to 2 minutes.
31

Cook Like A Chef
Skinning Tomatoes and Peppers
I
’m including this little bit of info on skinning tomatoes and
peppers in case you ever need to skin some.
How to easily skin tomatoes:
It’s really very simple. All you need to do is soak the tomatoes in
boiling water (or just hot water) for 2 to 4 minutes. Take them
out, and the peels will come off easily.
How to easily skin peppers:
The easiest way to get rid of peels on peppers is to grill it. You
can either do it on an open fire, or just use a stovetop element.
Skew the pepper, and grill over fire or heat until most of the skin
is blistered. Then run under cold water, and at the same time rub
the pepper with your hands. The skin will rub off easily.
Also, you could just microwave the pepper for 3 to 5 minutes.
Take it out and let it cool, and the skin should peel off easily.
32

Cook Like A Chef
Soup Stock – Making
I use pre-made soup stock powder mix from Knorr.
I admit, it’s not as nice tasting as your own soup stock, but it
SAVES me so much time, and it really tastes good. But, I do
make my own soup stock at times, although not too often.
So for those of you who are not as lazy as I am, I have a nice
section here on how to make your own stock.
Soup stock making isn’t too difficult, unless you want it to be.
You can make great use of leftovers and scraps in your fridge to
make it, or use fresh ingredients (recommended, of course).
Using scraps and leftovers is very economical, where the
ingredients would probably have been thrown out. However, you
do miss out on the freshness of using fresh ingredients.
Sometimes I make stock just to get rid of scraps and leftovers,
and sometimes, I make stock because I want nice tasting and high
quality soup base.
There are four main types of soup stock: 1) vegetable, 2) poultry,
3) red meats, and 4) seafood. Making seafood stock can get very
expensive, so I won’t talk about that here. The first three types of
stocks will be used most often – especially vegetable stock, since
you’re cooking from my vegetarian recipe book.
33
S
oup stock is often used in all styles of cooking, and that’s true
for Chinese cooking as well. In my Chinese Vegetarian
cookbook, many of the dishes use soup stock to add flavor.
However, you’ve probably noticed that I don’t very often make
my own soup stock.

Cook Like A Chef
Making vegetable soup stock
I strongly recommend using fresh vegetables for making vegetable
stock. You want to avoid using week old, or rotting vegetables.
That’s not going to do much for the flavor. ☺
Some of the most common vegetables you can use to make stock
include: carrots, onions, bean sprouts, turnips, lotus roots, water
chestnuts, etc… You can also use tomatoes, however I
recommend not using too much tomatoes since they tend to
overpower the rest of the ingredients. Use tomatoes sparingly.
The flavor of your vegetable soup stock will always be slightly
different depending on the type and the amount of vegetables you
use.
Garlic, ginger, potatoes, yams, squash, celery, mushrooms,
peppers, green onions, and cilantro are also good for making
stock. Of course, I can’t possibly name all types of veggies that
you can use to make soup stock.
If you’re unsure of how much ingredients and water to use, follow
this rule of thumb: the amount of water should be about the same
as the amount of ingredients.
Depending on how strong you like your soup stock, you can use a
little more water to make it lighter flavored, or use less water to
make it more flavored.
I also recommend adding a little salt, some black pepper, or any
other type of spice you like. This adds some extra flavoring.
Cook your soup stock on high until it’s boiling. Then turn down
the heat to medium-low and let it simmer for about one hour.
When done, remove all the vegetables and ingredients, and you
have your vegetable soup stock.
34

Cook Like A Chef
Making poultry stock
Poultry stock is my preferred soup stock to make. I really like the
taste of chicken. You can use either chicken or turkey parts, and
if you want to get adventurous, you can use duck parts as well.
I usually just use chicken, since it’s the cheapest to buy. When
you buy chicken for soup stock making, buy the cheapest kind. I
usually buy the neck, feet, and backbones. One pound of chicken
backbones usually sells for less than a dollar.
Got a lot of turkey leftover from thanksgiving? No problem! Use
that to make turkey soup stock.
When making poultry soup stock, you should use some vegetables
to enhance the flavor. Some of the ideal vegetables to use are
onions, carrots, and celery.
Here’s a basic chicken stock mixture:
• 4 – 6 pounds of chicken bones and parts
• 1 chopped white onion
• 2 – 4 sticks of celery
• 2 – 4 carrots
• Some ginger and/or garlic
• Salt and black pepper
Add these ingredients into a large pot, and add just enough water
to cover to the top of the ingredients. Bring this to a boil, and
then turn the heat down to medium-low and let it simmer for 1 to
2 hours.
Every once awhile take a spoon and skim the dirty foam from the
soup stock.
When finished cooking, discard all the ingredients and your
chicken stock is ready for use.
35

Cook Like A Chef
Making meat stock
You can use several different types of meat to make meat soup
stock: pork, beef, and lamb are the main ones. When I buy pork,
I usually buy a large chunk of pork (usually pork butt or pork
shoulder). It usually weighs 20 to 30 pounds, and lasts me for a
long time.
When I get the meat home, I de-bone the pork, and I use parts of
the skin and all the bones to make soup stock. Nothing goes to
waste.
Here’s how I make my soup stock:
• 4 – 6 pounds of pork bones, skin, and parts
• 1 large white onion
• 2 – 4 celery stalks
• 2 – 4 carrots
• Ginger and garlic
• Some salt and black pepper
Like the chicken stock, fill water just high enough to cover all the
ingredients. Bring this to a boil, and turn the heat down to
medium-low, and let simmer for 2 – 3 hours.
You can add more water during the cooking process if you feel
there isn’t enough soup stock.
You should skim the dirty foam from the soup every once awhile.
After it’s done cooking, strain the soup from the ingredients, and
its ready for use.
36
Cook Like A Chef
37
Cook Like A Chef
37
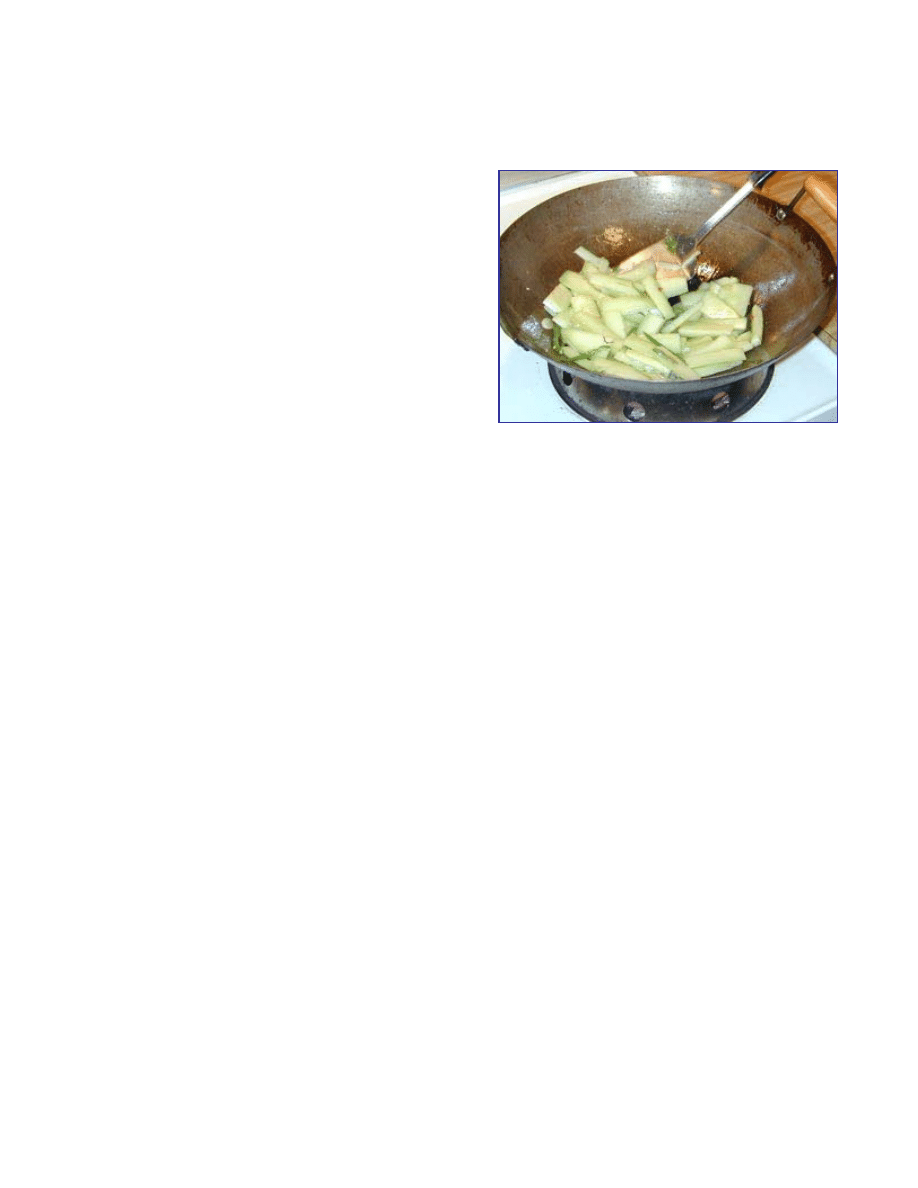
Stir-frying
S
tir-frying is the most
commonly used method to
cook food in Chinese cuisine.
When stir-frying, you cook
the food at very high
temperatures, and the food
cooks very quickly. Most
stir-fry dishes cooks within 1
or 2 minutes. Some takes
even less than 30 seconds.
The wok
Here’s what you need for proper stir-frying, a round bottom wok,
a spatula, and oil. There are many types of woks, which you can
use. Some include carbon steel woks, stainless steel woks, Teflon
coated woks, flat bottom and round bottom woks.
My wok of choice is a round bottom carbon steel wok. Even
though the carbon steel type required more care than the other
woks, it stir-fries much better than the other types. The drawback
of using a carbon steel wok is that it rusts easily, so you have to
always dry it well.
If you use a Teflon wok, you don’t need to use as much oil.
When stir-frying, the oil has two main functions. The first is to
quickly cook the food and preserve its flavors and texture, and
second is to prevent the ingredients from sticking to the wok.
I find that Teflon wok cooked food isn’t as good as food cooked
with a carbon steel wok. Worst of all, I have to use a plastic or
wooden spatula instead of my steel one.

Cook Like A Chef
The fire
I should really have titled this sub section ‘the temperature’.
There is one thing, and only one thing you need to know about
stir-frying temperature – always stir-fry on the highest heat
possible.
Aside from the wok, the fire (or temperature) you use to stir-fry is
the most important element. Always, always, always have it at the
highest temperature possible. Never mind what any other chef’s
told you. You must stir-fry at the highest temperature possible.
The whole point of stir-frying is to cook food as fast as possible
to seal in its flavors and textures.
I also recommend gas stoves over electric. You have much better
control with a gas stove, and you can heat your wok hotter and
much faster.
The smoking point
What is the smoking point? I bet you’ve never heard of the
smoking point – it’s a term I use for stir-frying. ☺
The smoking point is the ‘perfect’ time to add in your ingredients
for stir-frying – it is when the oil is at the optimal temperature.
You will see throughout my recipe book that I make reference to
the ‘smoking point’.
This is a very important point about stir-frying. How to
determine when the oil is hot enough and when is the right time
to add in the ingredients?
It’s rather simple to determine the smoking point. When you heat
the oil on high, the oil eventually gets hot enough that it begins to
smoke a little. This is the smoking point.
38

Cook Like A Chef
The temperature of smoking point for vegetable oil ranges from
450°F (corn) to 510°F (safflower).
When you see smoke coming from the oil, you should add in your
ingredients.
Often when I cook, I like to wait even a little longer after the oil
gets to the smoking point. I do this to cook something really fast.
However, if you do decide to wait even a little long beyond the
smoking point, do not wait too long. Otherwise, you risk burning
the oil, and your food will have a slight burnt flavor.
The big splash
The big oil splash is unavoidable when stir-frying – it’s a part of
stir-frying. Every time you add your ingredients to the hot oil in
the wok, oil splashes.
You can’t really avoid this.
However, you can reduce the amount of oil splashing following
these few simple guidelines:
• When stir-frying meat, make sure the meat is well
marinated, and there’s no excess water
• When stir-frying vegetables, letting the veggies dry
beforehand will reduce the amount of oil splash
• Always make sure the wok is dry before you add oil to it
You could also wear long sleeves if you’re really worried about the
oil splashing. After many years of stir-frying and oil splashing,
I’ve gotten used to the oil splashing on my hands and arms.
39

Cook Like A Chef
Stir-fry like a real chef
It’s not very difficult to stir-fry something, and become good at
stir-frying. Just keep one thing in mind – speed is of the essence.
When you stir-fry, work as fast as you can.
While you stir-fry, use the spatula to stir and flip the food
constantly. This ensures the food is cooked evenly, quickly, and
prevents the food from getting burnt.
Although most stir-fry dishes cook quickly, some do require
slightly longer cook time. For example, lotus roots and Chinese
broccoli require longer time to stir-fry than most vegetables. In
this case, you add a dash of water into the wok, and cover with a
lid. As the steam begins to come out from the lid, the ingredients
are pretty much cooked.
Here’s how to stir-fry:
• Heat oil on highest temperature until smoking point
• Quickly add in your ingredients
• With your writing hand holding the spatula, and the other
hand holding the wok, stir, toss, and flip your ingredients
quickly
• Add in you spices and seasonings
• Keep on stirring until the food is cooked
It’s very simple. All you need to do is practice at stir-frying
quickly, and adding in seasoning and spices quickly.
This is how I stir-fry my chicken:
• Marinate the chicken
• Heat oil to smoking point
• Quickly add in the chicken
• Use the spatula to stir, toss and separate the chicken to
ensure even cooking (~10 – 15 seconds)
• Quickly add in the spices: i.e. salt, hot sauce, etc… (~5
seconds)
40

Cook Like A Chef
• Mix the spices with the chicken (~5 – 10 seconds)
• Add in other ingredients such as tofu, veggies, etc…
• Stir and mix quickly until the added ingredient is cooked
(~15 – 30 seconds or longer depending on the ingredients)
• Dish up and serve hot
Now you see why you need to work quickly when stir-frying?
Many western cook shows demonstrate stir-frying on low heat,
and in a slow motion. This is not the real way to stir-fry (if you
can even call it stir-frying). You will never get the flavors, colors,
and textures stir-frying like this.
Stir-frying tips
1.
2.
3.
4.
5.
6.
7.
8.
9.
10.
Prepare everything ahead of time.
Cut the ingredients into uniform sizes to ensure even cooking.
Never try to prepare your ingredients while you stir-fry – you
just can’t.
Make sure the wok is dry before adding oil.
It’s a good idea to preheat the wok to medium temperature
before adding in oil.
If you’re not using a non-stick wok, add a decent amount of
oil (3 – 5 tablespoons). This not only prevents food from
sticking, it also helps to cook food faster.
If a recipe calls for ginger and garlic, add these first before the
ingredients. The oil extracts the flavor from the garlic and
ginger, and enhances the flavor of your dish.
Cut meat in to thin slices for stir-frying, and always stir-fry the
meat first.
You can take the meat out after it’s no longer pink and then
cook the vegetables. You don’t overcook the meat this way,
but it’s not necessary. I find that I can keep the meat in the
whole time, and it will still be very tender.
Stir-fry your ingredients according to density. Add in the more
difficult ingredients first, so it gets longer cooking time. Add
41

Cook Like A Chef
the easy to cook ingredients last such as green onions, lettuce,
etc…
11.
12.
13.
14.
15.
The less water your ingredient has when stir-frying the less the
oil will splash.
It’s a good idea to wash your vegetables ahead of time to let
some of the water dry.
Constantly stir and toss the ingredients when stir-frying.
When adding starch water to thicken the sauce, put the
ingredients to the side. Thicken the sauce before mixing with
the ingredients. Add the starch water slowly so you don’t add
too much.
Serve the dishes hot.
42

Cook Like A Chef
Steaming
S
teaming is simple and straightforward. Place your ingredients in
an enclosed environment and fill it with steam.
There are varieties of steamers you can use: pasta cookers,
bamboo steamers, stackable steamers, or you can simply
improvise with whatever you have. I prefer to use bamboo
steamers, and occasionally, pasta cookers.
Bamboo steamers are excellent for steaming food. The
construction of the bamboo steamer allows for maximum steam
to circulate throughout. If you were steaming multiple items, you
can even stack several bamboo steamers.
If you don’t have a steamer, you can make one easily. All you
need is a pot or wok (that can be covered with a lid), and some
kind of rack. If you don’t even have a rack, use a few chopsticks.
Place them crossing each other, and just place your plate on top
of the chopsticks. Steamers are also inexpensive. I bought my
bamboo steamer for around $10 dollars.
Some of the best ingredients for steaming are carrots, broccoli,
asparagus, potatoes, cauliflower, Chinese broccoli, fish, and eggs.
Steaming is one of my favorite ways of cooking fish. It not only
seals in the flavor and juices of the fish, it also makes the fish very
tender.
Here are the simple steps to steaming:
• Fill your pot or wok about ¼ to 1/3 full of water
• Turn heat on high
• Place the steamer on the stove
• Place your food inside the steamer, and cover with lid
• Steam until the food is cooked
43

Cook Like A Chef
Steaming tips
1.
2.
3.
4.
5.
6.
7.
8.
Bring water to a boil with the steamer in place. Only put the
food into the steamer when the water is boiling.
If you are steaming fish, cut a few slits in the meat, and rub on
some salt, spices, garlic etc… This adds a lot of flavor to the
fish.
When steaming, try not to open the lid too often to check on
the food. Otherwise you’re letting all the steam out.
When steaming vegetables such as eggplants, place directly
into the steamer without a plate. This ensures the top and
bottom parts are cooked evenly.
Depending on what you’re steaming, the time required will
vary. For fish it takes about 10 – 15 minutes. For vegetables 3
to 5 minutes is plenty of time, unless you like your vegetables
very soft.
For extra flavoring, twist on some lemon juice, salt, and
peppers.
Add a little soy sauce, sesame oil, and green onion strips to
fish near the end will enhance the flavor and aroma of the fish.
Placing green leaf vegetable under sticky foods will prevent it
from sticking to the steamer. This will save you a lot of clean
up time.
44

Cook Like A Chef
Thickening Sauces
S
auces are an important part of Chinese cooking. For many
dishes, creating the right thickness for the sauce is very important.
This all depends on how well you use starch water.
In case you didn’t know, starch water is used to thicken all types
of sauces. Starch water is just a combination of cornstarch and
water. As a rule of thumb, mix 2 – 4 teaspoons of starch with
about ¼ cup of water.
When you make the starch water, I suggest using your fingers to
mix it. Since starch likes to clump together, you can use your
fingers to feel if there are any clumps. Make sure to mix the
starch water well.
You will see that many recipes in my cookbook use starch water
to thicken the sauce. Even some soups use starch water to
thicken it. For example: Mushroom Egg Drop Soup and Hot and
Sour Soup. When you thicken soups with starch water, you will
need more starch water than normal. I usually prepare ½ - ¾ cup
of starch water before hand, and remix before adding into the
soup.
45

Cook Like A Chef
Tips for using starch water
1.
2.
3.
4.
5.
6.
Always use your fingers to mix the starch water.
Always remix the starch water before adding to your food.
The starch settles and separates from the water after a few
minutes. So make sure to mix it well before using.
Add starch water to your food slowly. This allows you to
control the thickness of the sauce.
When stir-frying, put the ingredients to the side and mix the
starch water with the sauce. Then mix with the ingredients.
If you find that you made the sauce too thick, you can slowly
add a little more water to reduce the thickness.
Add more starch water if you want your sauce to be thicker.
46
Document Outline
- Foreword
- Basting
- Blanching
- Braising & Stewing
- Cutting
- Kneading Dough
- Deep-frying
- Garlic - Handling
- Parboil
- Poaching
- Rice ¡V Cooking
- Saute
- Skinning Tomatoes and Peppers
- Soup Stock ¡V Making
- Stir-frying
- Steaming
- Thickening Sauces
Wyszukiwarka
Podobne podstrony:
Obrigado how to express your gratitude in Portuguese
How To Think Like A Computer Scientist Learning With Python
Leil Lowndes How to Make Anyone Fall in Love with You UMF3UZIGJVMET6TLITVXHA3EAEA4AR3CAWQTLWA
Ross Jeffries How To Induce A Hypnotic Trance In 3 Minutes Or Less And Never Get Caught
Green Tea Press Think Python, How to Think Like a Computer Scientist (2008)
How To Say I Love You In 100 Languages
How To Say I Love You In 100 Languages
Practical Wellbeing How To Clear Your Mind In 60 Seconds
AMACOM, How to Negotiate Like a Child Unleash the Little Monster Within to Get Everything You Want
How To Think Like The Worlds Greatest High Tech Titans
How To Lose 10 Pounds In A Week The Ultimate 7 Day Weight Loss Kick Start
więcej podobnych podstron