
Contents
Overview 1
Interoperating with NetWare
2
Installing and Configuring Client Service
for NetWare
3
Interoperating with UNIX
15
Configuring Interoperability with UNIX
16
Lab 9A: Installing and Configuring Print
Services for UNIX
23
Review 24
Module 9: Configuring
Windows XP Professional for
Networks Running Novell
NetWare and UNIX
Operating Systems

BETA MATERIALS FOR MICROSOFT CERTIFIED TRAINER PREPARATION PURPOSES ONLY
Information in this document, including URL and other Internet Web site references, is subject to
change without notice. Unless otherwise noted, the example companies, organizations, products,
domain names, e-mail addresses, logos, people, places, and events depicted herein are fictitious,
and no association with any real company, organization, product, domain name, e-mail address,
logo, person, places or events is intended or should be inferred. Complying with all applicable
copyright laws is the responsibility of the user. Without limiting the rights under copyright, no
part of this document may be reproduced, stored in or introduced into a retrieval system, or
transmitted in any form or by any means (electronic, mechanical, photocopying, recording, or
otherwise), or for any purpose, without the express written permission of Microsoft Corporation.
Microsoft may have patents, patent applications, trademarks, copyrights, or other intellectual
property rights covering subject matter in this document. Except as expressly provided in any
written license agreement from Microsoft, the furnishing of this document does not give you any
license to these patents, trademarks, copyrights, or other intellectual property.
2001 Microsoft Corporation. All rights reserved.
Microsoft, BackOffice, MS-DOS, Windows, Windows NT, Active Directory, ActiveX,
BackOffice, DirectX are either registered trademarks or trademarks of Microsoft Corporation in
the U.S.A. and/or other countries.
The names of actual companies and products mentioned herein may be the trademarks of their
respective owners.

Module 9: Configuring Windows XP Professional for Networks Running Novell NetWare and UNIX Operating Systems
iii
BETA MATERIALS FOR MICROSOFT CERTIFIED TRAINER PREPARATION PURPOSES ONLY
Instructor Notes
This module provides students with the knowledge and skills needed to install
and configure Microsoft
®
Windows
®
XP Professional to interoperate with
NetWare and UNIX operating systems.
At the end of this course, students will be able to:
!"
Describe how a computer running Windows XP Professional interoperates
with a NetWare server.
!"
Install and configure Client Service for NetWare.
!"
Describe how a computer running Windows XP Professional interoperates
with a UNIX server.
!"
Configuring Interoperability with UNIX.
Materials and Preparation
This section provides the materials and preparation tasks that you need to teach
this module.
Required Materials
To teach this module, you need Microsoft PowerPoint
®
file 2272A_09.ppt.
Preparation Tasks
To prepare for this module, you should:
!"
Read all of the materials for this module.
!"
Complete the labs.
!"
Review the Delivery Tips and Key Points for each section and topic.
Presentation:
30 Minutes
Lab:
15 Minutes

iv
Module 9: Configuring Windows XP Professional for Networks Running Novell NetWare and UNIX Operating Systems
BETA MATERIALS FOR MICROSOFT CERTIFIED TRAINER PREPARATION PURPOSES ONLY
Instructor Setup for a Lab
This section provides setup instructions that are required to prepare the
instructor computer or classroom configuration for a lab.
Lab A: Installing and Configuring Print Services for UNIX
!"
To prepare for the lab
1. The lab requires that the student computers be running Windows XP
Professional.
2. The instructor Windows 2000 Advanced Server computer has Print Services
for UNIX installed and a shared line printer remote (LPR) port printer
created and available.

Module 9: Configuring Windows XP Professional for Networks Running Novell NetWare and UNIX Operating Systems
v
BETA MATERIALS FOR MICROSOFT CERTIFIED TRAINER PREPARATION PURPOSES ONLY
Module Strategy
Use the following strategy to present this module:
!"
Interoperating with NetWare
This section provides an overview of interoperability with NetWare.
Introduce both Client Service for NetWare and NWLink. Discuss the
function they perform relative to providing interoperability in a NetWare
environment.
!"
Installing and Configuring Client Service for NetWare
This section of the module begins with an overview of how to install and
configure Client Service for NetWare. Demonstrate installing and
configuring Client Service for NetWare. Describe and demonstrate how to
access files and print documents to a NetWare printer.
!"
Interoperating with UNIX
This section of the module begins by providing an overview of the levels of
UNIX interoperability that are available with Windows XP Professional.
Contrast the levels of interoperability. Point out that this module focuses on
the levels of interoperability available with the standard installation of
Windows XP Professional.
!"
Configuring Interoperability with UNIX
This section of the module begins by describing the basic services available
with a standard Windows XP Professional installation. Demonstrate setting
up Print Services for UNIX and installing and using Telnet Client and
Telnet Server.
!"
Lab A: Installing and Configuring Print Services for UNIX
In this lab, students will install Print Services for UNIX and configure an
LPR printer to print to the instructor’s line printer daemon (LPD) print
device. They will then use the LPQ command to view the status of their
print job.

vi
Module 9: Configuring Windows XP Professional for Networks Running Novell NetWare and UNIX Operating Systems
BETA MATERIALS FOR MICROSOFT CERTIFIED TRAINER PREPARATION PURPOSES ONLY
Customization Information
This section identifies the lab setup requirements for a module and the
configuration changes that occur on student computers during the labs. This
information is provided to assist you in replicating or customizing Training and
Certification courseware.
The lab in this module is also dependent on the classroom
configuration that is specified in the Customization Information section at the
end of the Classroom Setup Guide for Course 2272A, Implementing and
Supporting Microsoft Windows XP Professional (Course Beta).
Lab Results
Performing the lab in this module introduces the following configuration
changes:
!"
Student computers will have a LPR printer configured to print to the
instructors LPD print service.
!"
Student computers will have Print Services for UNIX installed and
configured.
!"
Print jobs will reside in the print queue on the instructor Windows 2000
Advanced Server computer until deleted.
Important

Module 9: Configuring Windows XP Professional for Networks Running Novell NetWare and UNIX Operating Systems
1
BETA MATERIALS FOR MICROSOFT CERTIFIED TRAINER PREPARATION PURPOSES ONLY
Overview
!
Interoperating with NetWare
!
Installing and Configuring Client Service for NetWare
!
Interoperating with UNIX
!
Configuring Interoperability with UNIX
In some cases, you might need to have Microsoft
®
Windows
®
XP Professional
interoperate with other operating systems for file and print access. You can use
additional software from Microsoft and third-party vendors to obtain a complete
range of interoperability services. With Windows XP Professional you can
access files and print to NetWare and UNIX environments.
After completing this module, you will be able to:
!"
Describe how a computer running Windows XP Professional interoperates
with a NetWare server.
!"
Install and configure Client Service for NetWare.
!"
Describe how a computer running Windows XP Professional interoperates
with a UNIX server.
!"
Configure interoperability with UNIX.
Topic Objective
To provide an overview of
the module topics and
objectives.
Lead-in
This module describes the
services provided by
Windows XP Professional
that operate in a network
with UNIX and NetWare
servers.
2
Module 9: Configuring Windows XP Professional for Networks Running Novell NetWare and UNIX Operating Systems
BETA MATERIALS FOR MICROSOFT CERTIFIED TRAINER PREPARATION PURPOSES ONLY
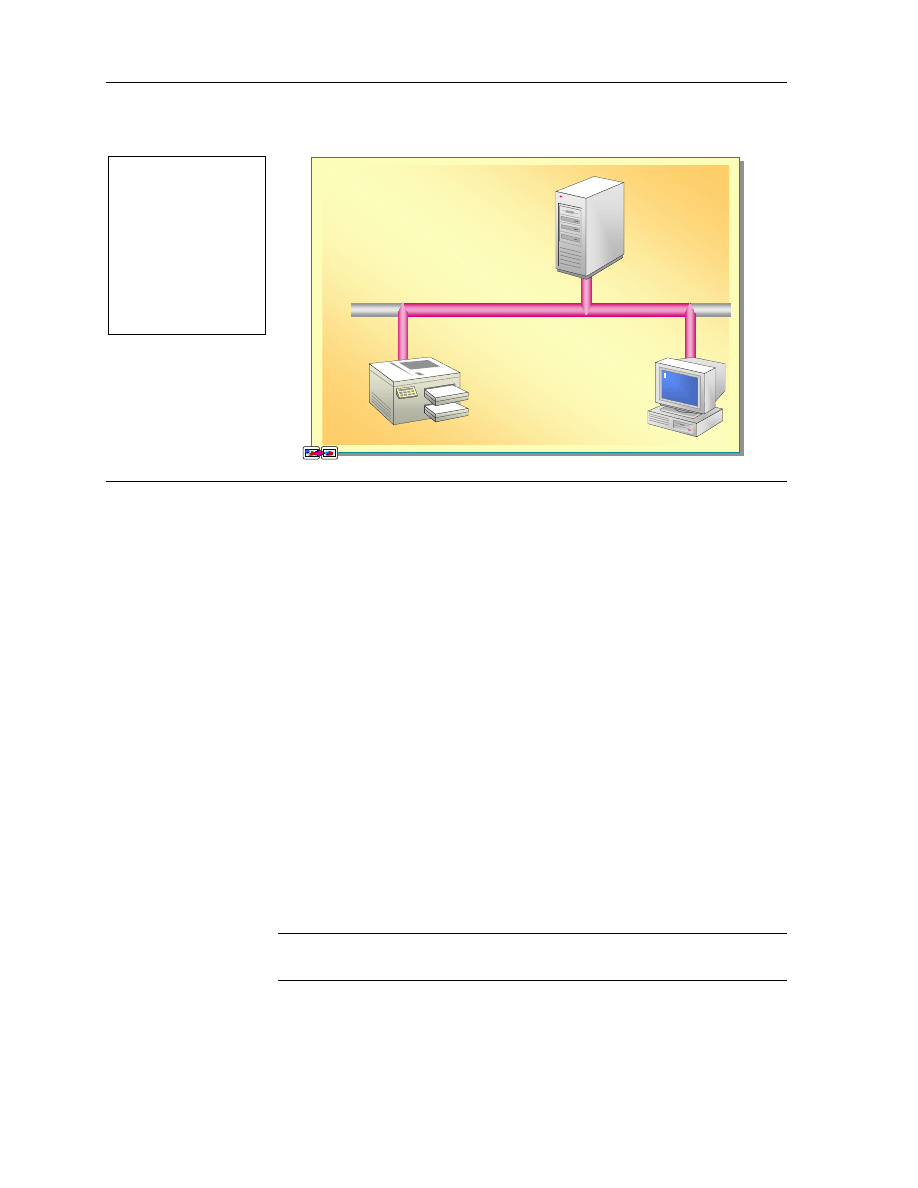
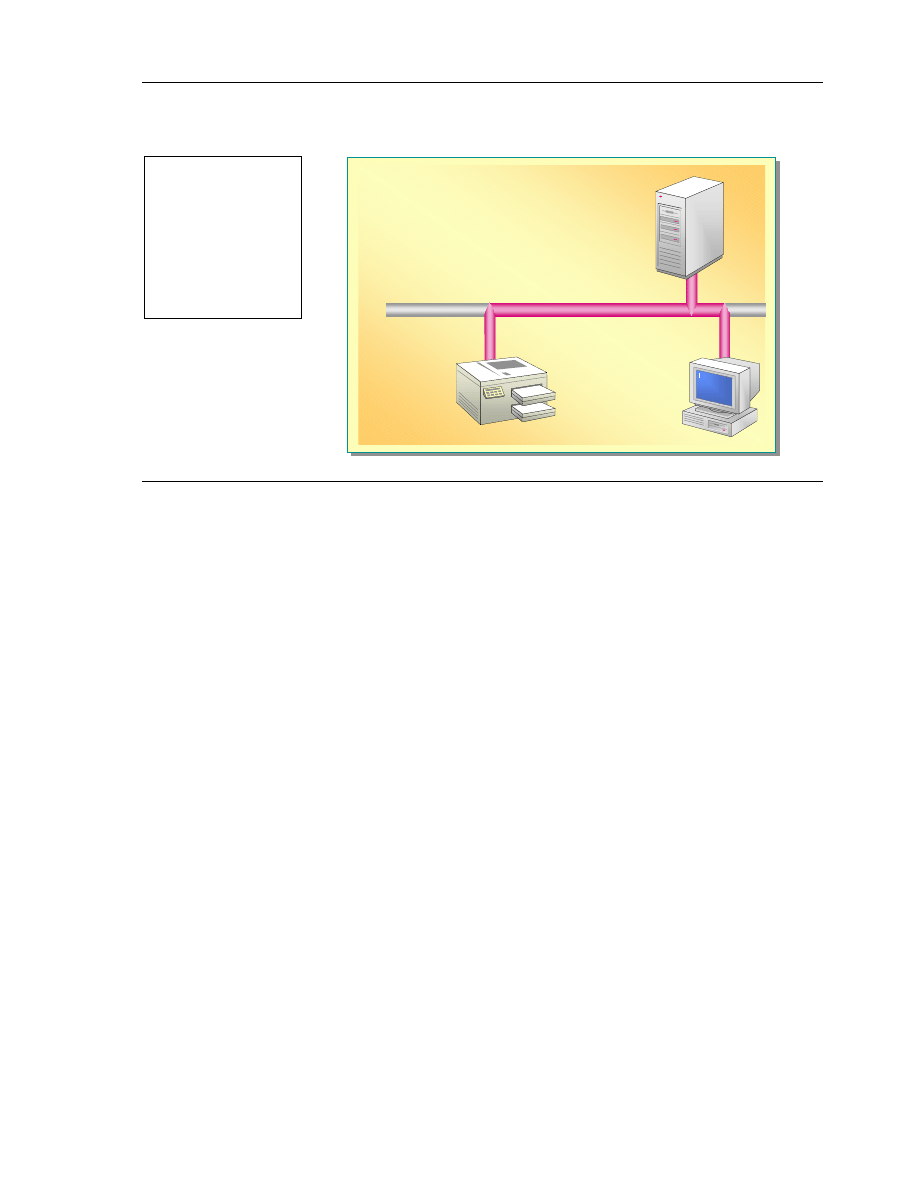
Interoperating with NetWare
With Client Service for Netware,
You Can:
NWLink
#
Print Documents to a NetWare
Printer
IPX/SPX
#
Access Files on a NetWare
Server
NetWare
Server
Windows XP
Professional
Running Client
Service for NetWare
NetWare Printer
Users operating Windows XP Professional in a network with Novell NetWare
need their computer to interoperate with NetWare servers. Specifically, users
must be able to:
!"
Access files on a NetWare server.
!"
Print to a NetWare printer.
Windows XP Professional provides Client Service for NetWare, a network
software add-in that you can use to enable your computer to interoperate with
NetWare servers. When installed on a computer running Windows XP
Professional, Client Service for NetWare enables access to files on the NetWare
server and printing to the NetWare printer.
For computers to interoperate with each other, they must be running the same
protocols. NWLink, a component of Client Service for NetWare, provides that
interoperability. NWLink is an Internetwork Packet Exchange/Sequenced
Packet Exchange (IPX/SPX)-compatible protocol that is automatically installed
when you install Client Service for NetWare.
An alternative to using Client Service for NetWare is using Novell Client for
Windows NT/2000, client software distributed by Novell. However, Client
Service for NetWare is available on the Windows XP Professional installation
CD.
You cannot install both Client Service for NetWare and Novell Client for
Windows NT/2000 on the same computer running Windows XP Professional.
Topic Objective
To provide an overview of
the way in which
Windows XP Professional
interoperates with NetWare.
Lead-in
Windows XP Professional
enables access to files and
resources in a NetWare
environment.
Note

Module 9: Configuring Windows XP Professional for Networks Running Novell NetWare and UNIX Operating Systems
3
BETA MATERIALS FOR MICROSOFT CERTIFIED TRAINER PREPARATION PURPOSES ONLY
$
$
$
$
Installing and Configuring Client Service for NetWare
!
Overview of Client Service for NetWare
!
Installing Client Service for NetWare
!
Configuring NetWare Logon
!
Configuring NWLink
!
Accessing Files on a NetWare Volume
!
Printing to a NetWare Printer
If you use a dual configuration, it is important that you know the tasks that are
necessary to install and configure Client Service for NetWare on a computer
running Windows XP Professional. You also need to know how to configure
NetWare logon, configure NWLink, access files on a NetWare volume, and
print to a NetWare printer.
Topic Objective
To introduce topics about
installing and configuring
Client Service for NetWare.
Lead-in
This section describes how
to install and configure
Client Service for NetWare,
print to a NetWare printer,
and access files on a
NetWare server.
4
Module 9: Configuring Windows XP Professional for Networks Running Novell NetWare and UNIX Operating Systems
BETA MATERIALS FOR MICROSOFT CERTIFIED TRAINER PREPARATION PURPOSES ONLY
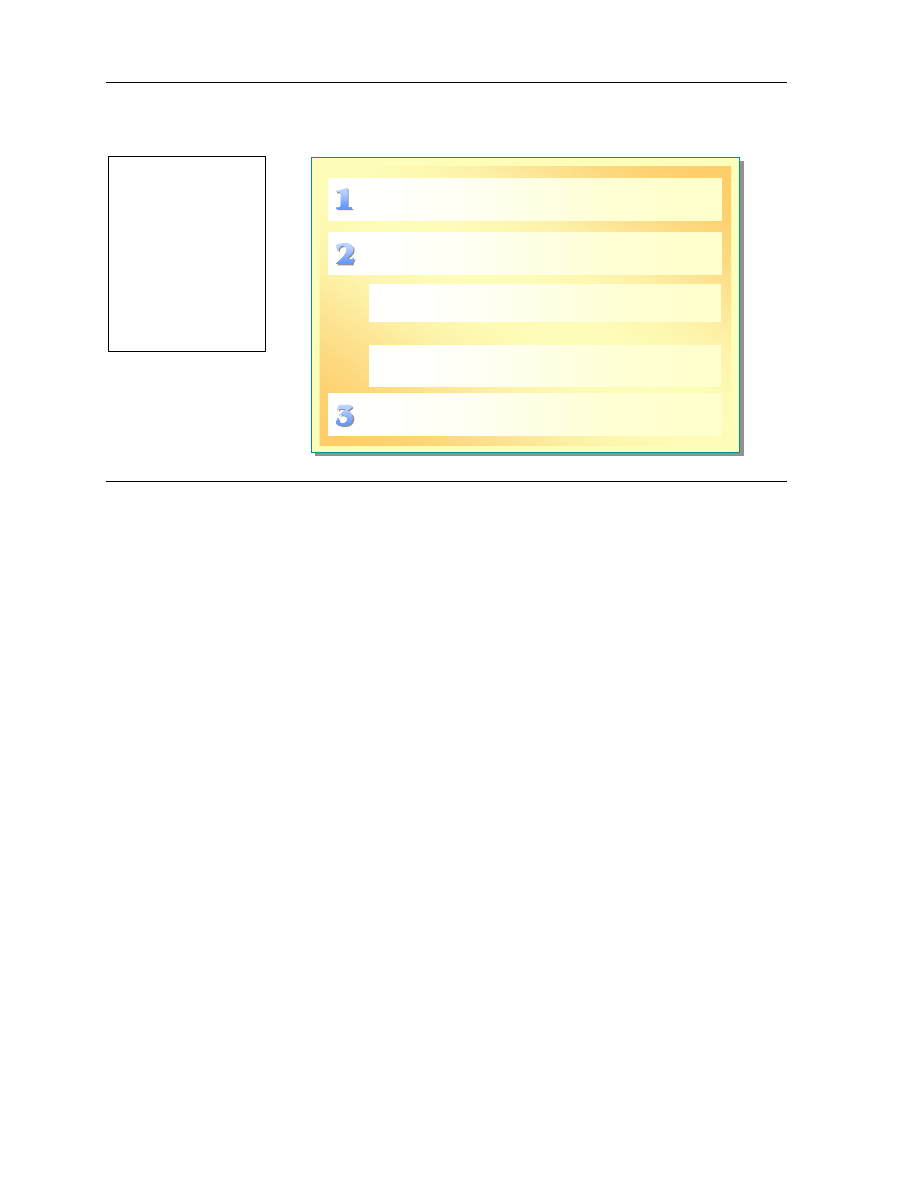
Overview of Client Service for NetWare
Install Client Service for NetWare
If Appropriate, Configure NWLink Routing
Configure NetWare Logon:
Use NetWare Bindery If Running NetWare 3x
or 4x
Use NDS If Running NetWare 4x or 5x
- OR -
Before you install Client Service for NetWare, you must find out three things
from the NetWare network administrator:
!"
Whether you are running NetWare bindery or NDS (NetWare Directory
Services) on your NetWare server to authenticate users.
NetWare bindery is a Novell network environment that contains definitions
for users and groups. The NetWare bindery-based environment is server-
centric. For example, when logging on to a bindery-based server, the user
must have a logon account and security access to that specific NetWare
server for access to the NetWare resources assigned to that individual
server. NetWare bindery is available for all versions of NetWare.
NDS is a Novell environment based on a distributed hierarchical database
model. For example, when logging on in an NDS environment, the user can
access any resource assigned to that specific NDS environment including
resources assigned to one or more distributed NetWare servers. NDS is a
newer method of authentication and is available for NetWare 4x and 5x.
!"
Which frame type you are using.
By default, this option is set to auto, which auto-detects a frame type the
next time you restart the computer. If no frame type is detected, or if
multiple frame types are detected, Windows XP Professional defaults to
802.2. If only one frame type is detected, Windows XP Professional will use
that frame type.
!"
Whether you need to communicate outside of your network
If routers exist on your network to provide access to your intranet or the
Internet, you must specify routing information that is required by Client
Service for NetWare to efficiently route your communication.
Topic Objective
To describe the tasks to
install and configure Client
Service for NetWare.
Lead-in
The installation and
configuration of Client
Service for NetWare
depends on the version of
NetWare that you will be
communicating with.

Module 9: Configuring Windows XP Professional for Networks Running Novell NetWare and UNIX Operating Systems
5
BETA MATERIALS FOR MICROSOFT CERTIFIED TRAINER PREPARATION PURPOSES ONLY
The tasks to install and configure Client Service for NetWare include:
1. Installing Client Service for NetWare.
2. Configuring NetWare logon.
After you restart your computer, the Select NetWare Logon dialog box
appears. This dialog box requires information needed by NetWare to
authenticate your computer running Windows XP Professional as a valid
client. There are two options for authentication: NetWare bindery and NDS.
Which option you choose depends on the version of NetWare running and
what your Network Administrator has chosen to implement.
3. Configuring NWLink routing, if appropriate.
6
Module 9: Configuring Windows XP Professional for Networks Running Novell NetWare and UNIX Operating Systems
BETA MATERIALS FOR MICROSOFT CERTIFIED TRAINER PREPARATION PURPOSES ONLY
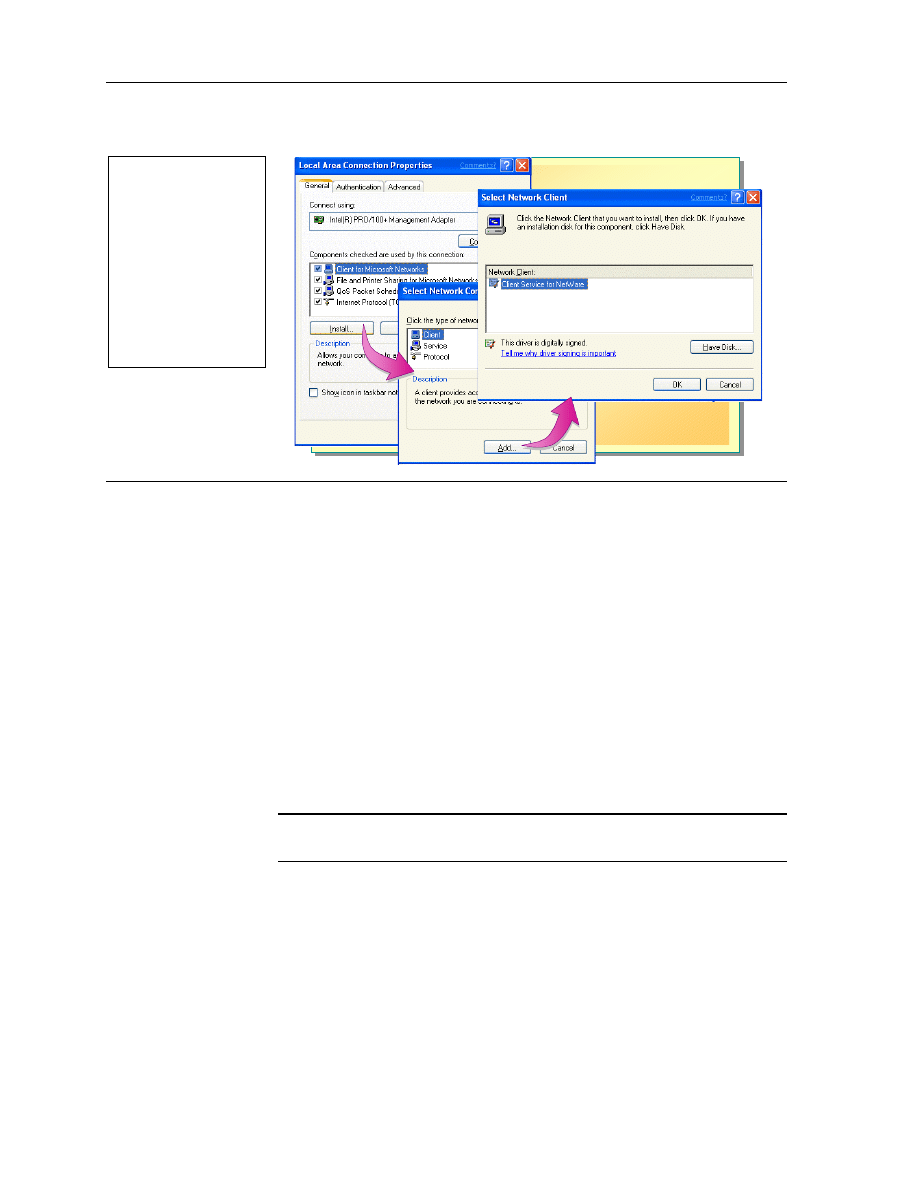
Installing Client Service for NetWare
To install Client Service for NetWare, you need administrator rights to the
computer running Windows XP Professional.
To install Client Service for NetWare:
1. Click Start, right-click My Network Places, and then click Properties
2. Right-click the local area connection for which you want to install Client
Service for NetWare and click Properties.
3. On the General tab, click Install.
4. In the Select Network Component Type dialog box, click Client and then
click Add.
5. In the Select Network Client dialog box, click Client Service for
NetWare, and then click OK.
6. When prompted, restart your computer.
You can use unattended Setup mode to configure Client Service for
NetWare for large deployments.
Topic Objective
To demonstrate how to
install Client Service for
NetWare.
Lead-in
The first step in the process
of establishing
communication with a
NetWare server is to install
Client Service for NetWare
on your computer running
Windows XP Professional.
Note
Module 9: Configuring Windows XP Professional for Networks Running Novell NetWare and UNIX Operating Systems
7
BETA MATERIALS FOR MICROSOFT CERTIFIED TRAINER PREPARATION PURPOSES ONLY
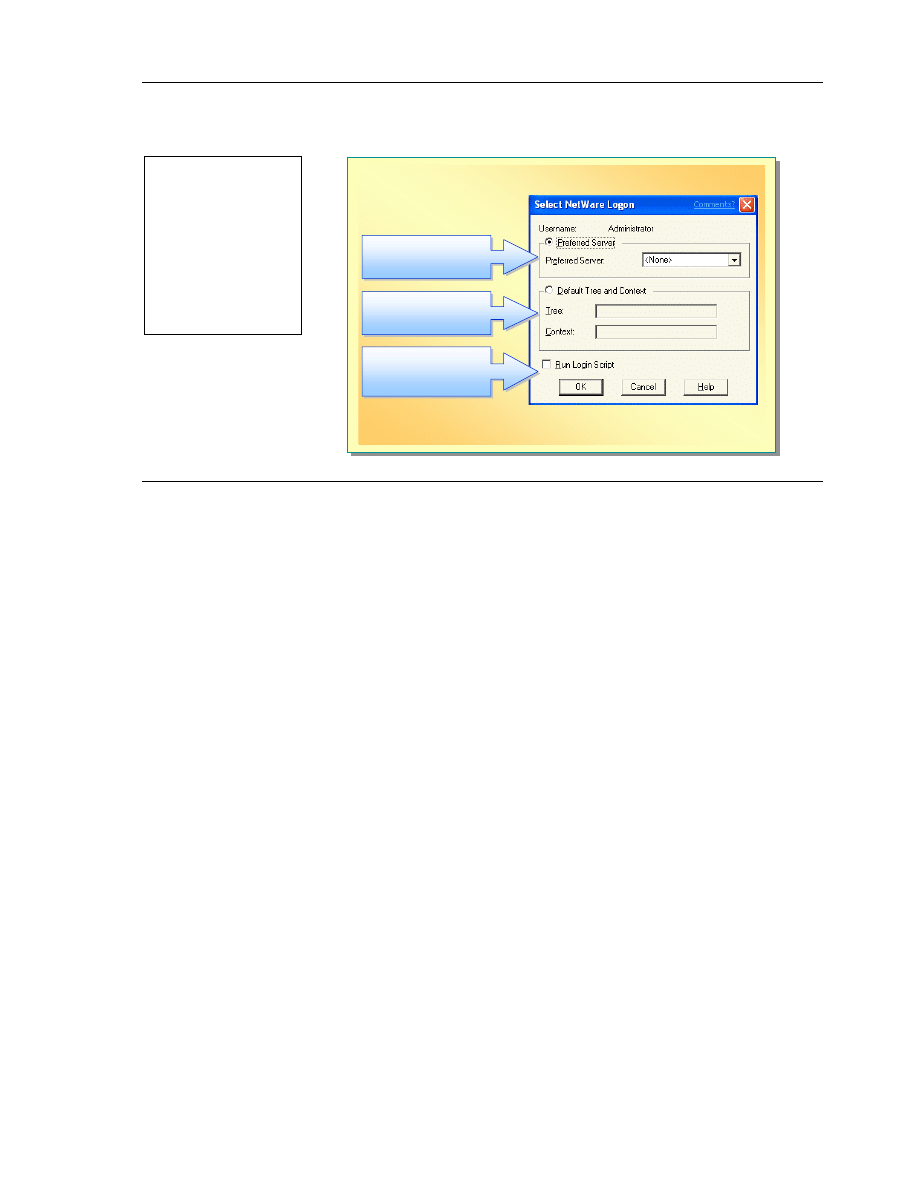
Configuring NetWare Logon
For NDS Logon
Authentication
For NDS Logon
Authentication
For Bindery Logon
Authentication
For Bindery Logon
Authentication
To Enable
NetWare Login
Scripts
To Enable
NetWare Login
Scripts
After you finish installing Client Service for Network and restart your
computer, the Select NetWare Logon dialog box appears. In this dialog box
you configure your NetWare Logon: NetWare bindery or NDS.
If you click Cancel and close the dialog box and later want to set the
parameters, or if you need to change the parameters you entered, you can access
this dialog box by opening Control Panel, clicking Other Control Panel
Options, and then clicking CSNW (Client Service for Netware).
Setting a Preferred Server in a Bindery-Based Server
Environment
In a NetWare bindery-based server environment, in the Select NetWare Logon
dialog box, click Preferred Server and type the NetWare server name where
the user account and appropriate rights for Windows XP Professional are
located. Contact your NetWare system administrator for this information.
If you do not want to set a preferred server in the Select NetWare Logon
dialog box, select None from the Preferred Server list. This connects your
computer to the first NetWare server that responds to your request so that this
NetWare server can respond to the Windows XP Professional request for
NetWare access. You are not logged on to this server, but you can use it to
browse or view other servers on the network.
Specifying the Tree and Context in an NDS Environment
In an NDS environment, specify both the tree and the context. In NDS, tree
refers to the name of the root object and context refers to the location of an
object, which in this case is the user, in the directory tree. Contact your
NetWare system administrator for the name and the format for both the tree and
the context, and then type this information into the Tree and Context boxes.
Topic Objective
To demonstrate how to
configure the NetWare
logon.
Lead-in
After you install Client
Service for NetWare and
restart your computer, the
Select NetWare Logon
dialog box appears.

8
Module 9: Configuring Windows XP Professional for Networks Running Novell NetWare and UNIX Operating Systems
BETA MATERIALS FOR MICROSOFT CERTIFIED TRAINER PREPARATION PURPOSES ONLY
Enabling NetWare Login Scripts
A NetWare login script is a list of commands that are carried out each time that
you log on to the NetWare network. For example, you can use login scripts to
set all your default settings, such as the drives your system maps to, printer
configurations, and other settings that define your environment on the NetWare
network. Login scripts enable you to create a consistent user environment.
Login scripts reside on NetWare servers. To enable the use of a script, in the
Select NetWare Logon dialog box, select the Login Script check box. When a
user is authenticated, the login script is executed for the individual account.
If NDS is being used, multiple login scripts may be invoked. If an error occurs
when trying to access a resource, review the login scripts to ensure the scripts
did not introduce a conflict in your access rights.
Module 9: Configuring Windows XP Professional for Networks Running Novell NetWare and UNIX Operating Systems
9
BETA MATERIALS FOR MICROSOFT CERTIFIED TRAINER PREPARATION PURPOSES ONLY
Configuring NWLink
For Multiple Network
Adapters and Multiple
Networks
For Multiple Network
Adapters and Multiple
Networks
Network Identification
Network Identification
NWLink is the IPX/SPX-compatible protocol that is used for communication
between NetWare and Windows XP Professional.
To route data beyond the local network, NWLink requires that both the frame
type and the IPX network number be set properly.
Frame Type and Network Number
To communicate between a computer running Windows XP Professional and
NetWare servers, you must specify NWLink with the same frame type as the
one used by the NetWare servers. The frame type defines the way in which the
network adapter, in a computer running Windows XP Professional, formats data
to be sent over a network, for example, Ethernet 802.3 or Ethernet II. You can
choose to automatically detect or manually configure the frame type. If no
frame type or multiple frame types are detected, Windows XP Professional will
set the frame type to a default value of 802.2.
The network number identifies the network that the computer is communicating
on. If the network number is different on computers within the same network
they will not be able to communicate. When a computer running Windows XP
Professional is configured to automatically detect the frame type the network
number assigned and cannot be changed.
Topic Objective
To describe how to
configure NWLink.
Lead-in
Some networks use routing
tables to transport data
more efficiently.

10
Module 9: Configuring Windows XP Professional for Networks Running Novell NetWare and UNIX Operating Systems
BETA MATERIALS FOR MICROSOFT CERTIFIED TRAINER PREPARATION PURPOSES ONLY
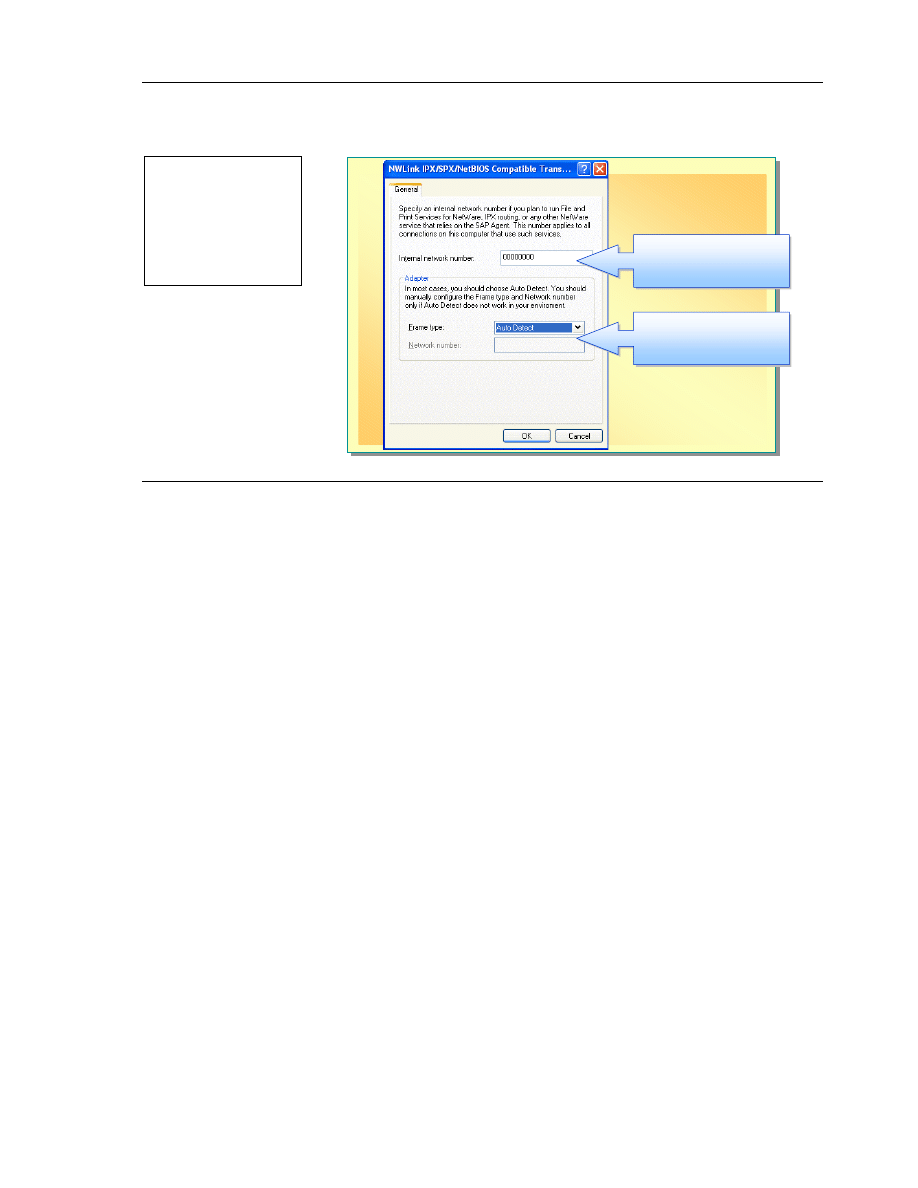
To change the network number and frame type:
1. In Control Panel, double-click Network and Internet Connections.
2. Click Network Connections.
3. Right-click a local area connection, and then click Properties.
4. On the General tab, click NWLink IPX/SPX/NetBIOS Compatible
Transport Protocol, and then click Properties.
5. In the Frame type list box, select a frame type, or leave the default of Auto
Detect.
6. In the Network number text box, type a network number, that is, a
hexadecimal number with 1 to 8 digits (1 to FFFFFFFF), and then click OK.
If Auto Detect is selected for the Frame Type, you cannot specify a Network
number.
To change the frame type and external network number on your
Windows XP Professional workstation, you must be a member of the
Administrator group on that computer.
Internal Network Number
If your computer has multiple network adapters that are connected to different
networks, you must assign an internal network number to each configured
network adapter on your computer. The internal network number, also called a
virtual network number, is associated with physical network adapters and
networks. If you do not know the appropriate numbers to use, see your
NetWare documentation. If you do not set an internal network number, the
number is automatically set to all zeros by the Windows XP Professional
operating system.
To set the internal network number:
1. In Control Panel, double-click Network and Internet Connections.
2. Click Network Connections.
3. Right-click a local area connection, and then click Properties.
4. On the General tab, click NWLink IPX/SPX/NetBIOS Compatible
Transport Protocol, and then click Properties.
5. Type a value in the Internal Network Number box, and then click OK.
Note
Module 9: Configuring Windows XP Professional for Networks Running Novell NetWare and UNIX Operating Systems
11
BETA MATERIALS FOR MICROSOFT CERTIFIED TRAINER PREPARATION PURPOSES ONLY
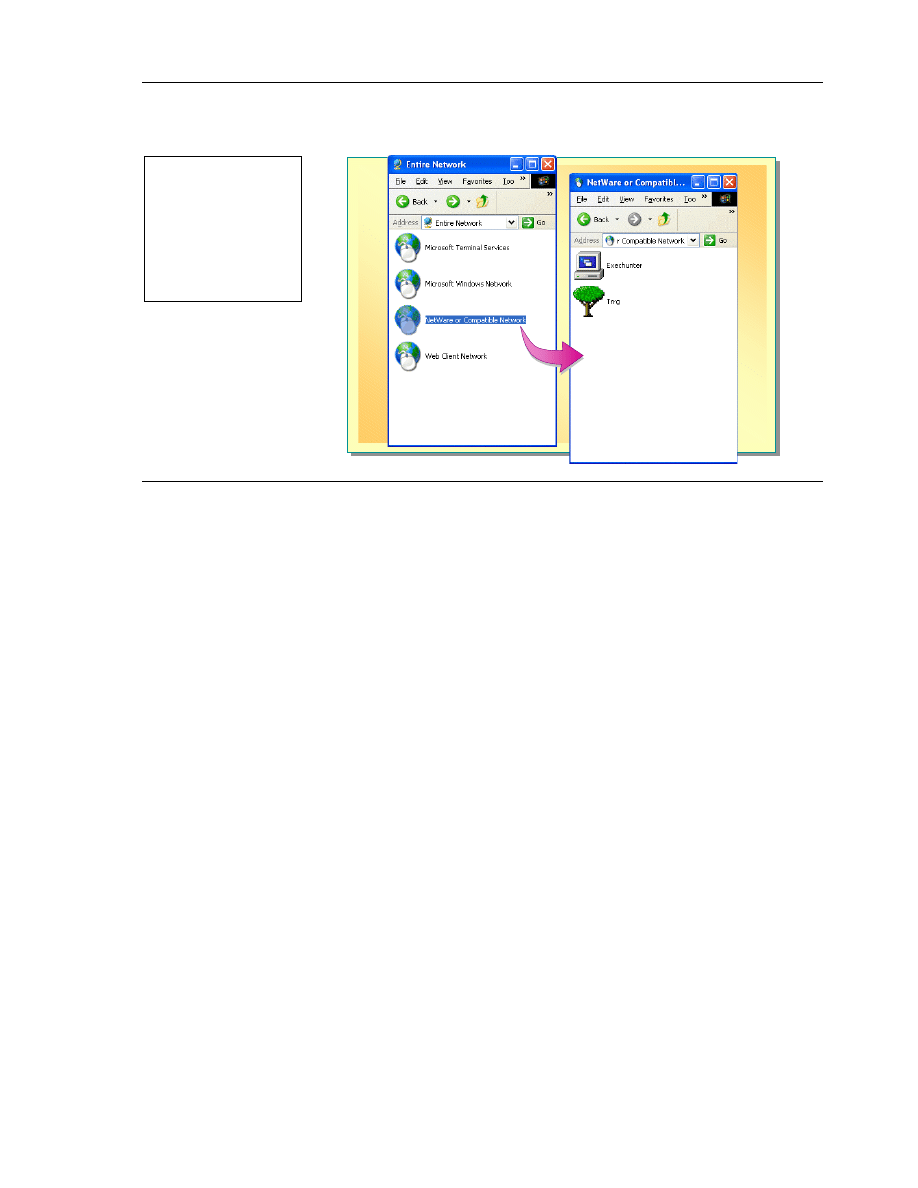
Accessing Files on a NetWare Volume
You can access files on a NetWare server either through a user interface or a
command-line.
To access NetWare files:
1. Click Start and click My Network Places.
2. Click Entire Network, and then double-click NetWare or Compatible
Network.
Tree icons for NDS directory trees and computer icons for individual
NetWare computers appear.
3. Double-click a tree to view its contents.
4. When you find the folder that you want to access, double-click it to expand
it.
When you map a network drive, by default you are connected under the user
name and password that you used to log on. To connect under a different user
name, type the user name in the Connect As text box.
To connect to an individual NetWare server, you use the net use command. The
parameters you specify are dependent on your type of authentication: bindery or
NDS.
For bindery, at the command prompt, type:
net use drive: UNCname|NetWarename
where UNCname is the Universal Naming Convention and NetWarename is
the full path to be mapped, which will include the volume name and the
directory path.
Topic Objective
To describe how to access
files on a NetWare server.
Lead-in
To test Windows XP
Professional and NetWare
communication, access a
file on the NetWare server.

12
Module 9: Configuring Windows XP Professional for Networks Running Novell NetWare and UNIX Operating Systems
BETA MATERIALS FOR MICROSOFT CERTIFIED TRAINER PREPARATION PURPOSES ONLY
For example, to use UNC naming syntax to direct drive G on the computer
running Windows XP Professional to the folder \Data\Mydata of the Apps
volume on a server called Nw4, at a command prompt type:
net use G: \\nw4\Apps\data\mydata
For the NDS version of the command prompt, type:
net use drive: \\<treename>\<OrgName.OrgName>
[/u:<UserName.OrgName.OrgName> [<password>]]
where treen am e is the name of the tree printer, O rg N am e is the tree
location to which you want to connect, and
U se rN a m e . O rg N a m e . O rg N a m e is the user name and context for this
tree (unless it is your default tree).
Module 9: Configuring Windows XP Professional for Networks Running Novell NetWare and UNIX Operating Systems
13
BETA MATERIALS FOR MICROSOFT CERTIFIED TRAINER PREPARATION PURPOSES ONLY
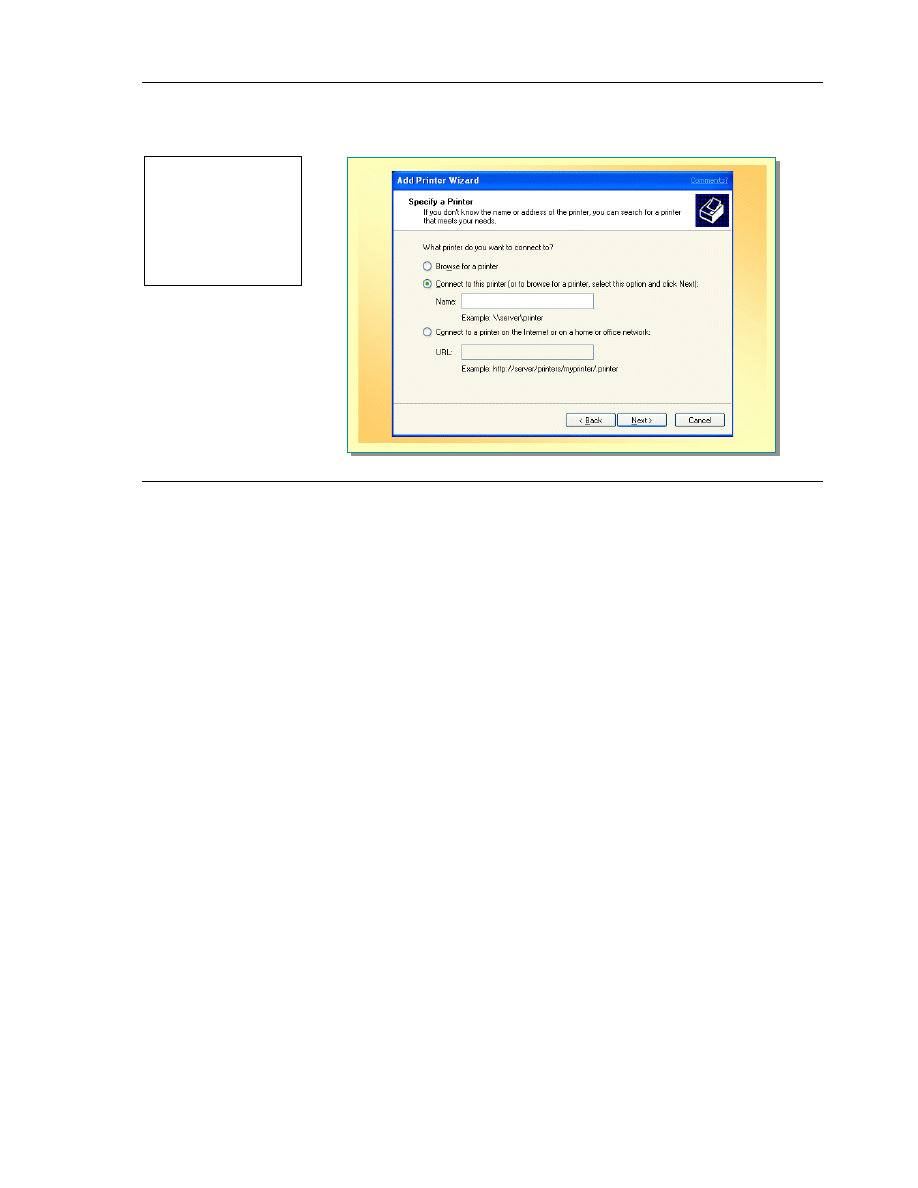
Printing to a NetWare Printer
You can access NetWare printers depending on the methods of authentication.
To connect to a NetWare printer using a Graphical User Interface (GUI):
1. In Control Panel, click Printers and Other Hardware.
2. Click Add a Printer.
3. To start the Add Printer Wizard, click Next.
4. On the Local or Network Printer page, click A network printer or a
printer attached to another computer, and then click Next.
5. On the Specify a Printer page, click Connect to this printer, type the
name of a printer in the following format: \\server_name\printer_name
(where server_name is the name of the server to which you want to connect,
and printer_name is printer to which you want to connect, and then click
Next.
Topic Objective
To enable printing to a
NetWare printer.
Lead-in
You can access a NetWare
printer using a GUI or
network command.

14
Module 9: Configuring Windows XP Professional for Networks Running Novell NetWare and UNIX Operating Systems
BETA MATERIALS FOR MICROSOFT CERTIFIED TRAINER PREPARATION PURPOSES ONLY
To find the NetWare printer, click Browse for a Printer and then click Next.
Follow the remaining instructions in the Add Printer Wizard. The icon for the
printer appears in your Printers folder.
When you connect to a NetWare printer using the command-line interface, the
command is the same regardless of authentication, however the command
parameters change depending on the type of authentication.
To connect to a NetWare printer using the command-line interface for a
bindery-authenticated environment, at the command prompt, type:
net use lpt1 \\nw4\memos
This redirects output from LPT1 to the NetWare print queue called Memos
on the server Nw4. Also, the net use command is equivalent to the NetWare
capture q=memos s=nw4 l=1 command line.
For other printing services such as IP-based printing, the Novell
Distributed Printing Services (NDPS), or the Novell Enterprise Printing
Services (NEPS), use the current Novell Client for Windows NT/2000.
Note
Module 9: Configuring Windows XP Professional for Networks Running Novell NetWare and UNIX Operating Systems
15
BETA MATERIALS FOR MICROSOFT CERTIFIED TRAINER PREPARATION PURPOSES ONLY
Interoperating with UNIX
Basic Interoperability
#
Common protocols
#
Print Services for UNIX
Full Integration and Migration:
#
Client Service for Unix 2.0 (not available
on Windows XP Professional CD)
UNIX
Server
Windows XP
Professional
UNIX Printer
TCP/IP
Windows XP Professional provides various levels of support for UNIX
connectivity. Consider the following levels of support:
!"
At the basic level of support, UNIX servers can be regarded as an Internet
resource. This is because UNIX uses some of the protocols for
communicating that are also available in Windows XP Professional, such as
Hypertext Transfer Protocol (HTTP), FTP (File Transfer Protocol), and
Telnet. These protocols enable you to access files.
!"
Print Services for UNIX is an add-on network component available in
Windows XP Professional that provides access to UNIX line printer remote
(LPR) printers.
!"
Windows Services for UNIX 2.0 and Microsoft Interix are Microsoft
programs that enable a wide range of interoperability, including the ability
to:
• Connect to NFS (Network File System). NFS is the native file format for
UNIX, equivalent to the NTFS File System in Microsoft Windows XP
Professional.
• Run UNIX shell commands (operating system level commands).
• Run distributed applications on a network computer.
Select the interoperability option that meets the needs of your user and
environment.
Topic Objective
To provide an overview of
how Windows XP
Professional interoperates
with UNIX.
Lead-in
Windows XP Professional
enables access to files and
resources on a UNIX server.

16
Module 9: Configuring Windows XP Professional for Networks Running Novell NetWare and UNIX Operating Systems
BETA MATERIALS FOR MICROSOFT CERTIFIED TRAINER PREPARATION PURPOSES ONLY
$
$
$
$
Configuring Interoperability with UNIX
!
Installing a Printer Using LPR
!
Introduction to Telnet
!
Using a Telnet Client
A standard Windows XP Professional installation without any additional
Microsoft or third-party software, provides basic connectivity to UNIX. This
level of connectivity involves utilizing the basic Internet standard Transmission
Control Protocol/Internet Protocol (TCP/IP) services and utilities within the
Windows XP Professional operating system and the services configured on the
UNIX network. This can be viewed as either a temporary change or a
permanent configuration of the workstation, as the user can transition between
the two network environments.
For access to run application and to print to UNIX-based printers, Windows XP
Professional provides both print services for UNIX and full Telnet client and
server software.
Topic Objective
To point out that
Windows XP Professional
provides various levels of
support for UNIX
connectivity.
Lead-in
Windows XP Professional
provides different levels of
support for UNIX
connectivity.
Module 9: Configuring Windows XP Professional for Networks Running Novell NetWare and UNIX Operating Systems
17
BETA MATERIALS FOR MICROSOFT CERTIFIED TRAINER PREPARATION PURPOSES ONLY
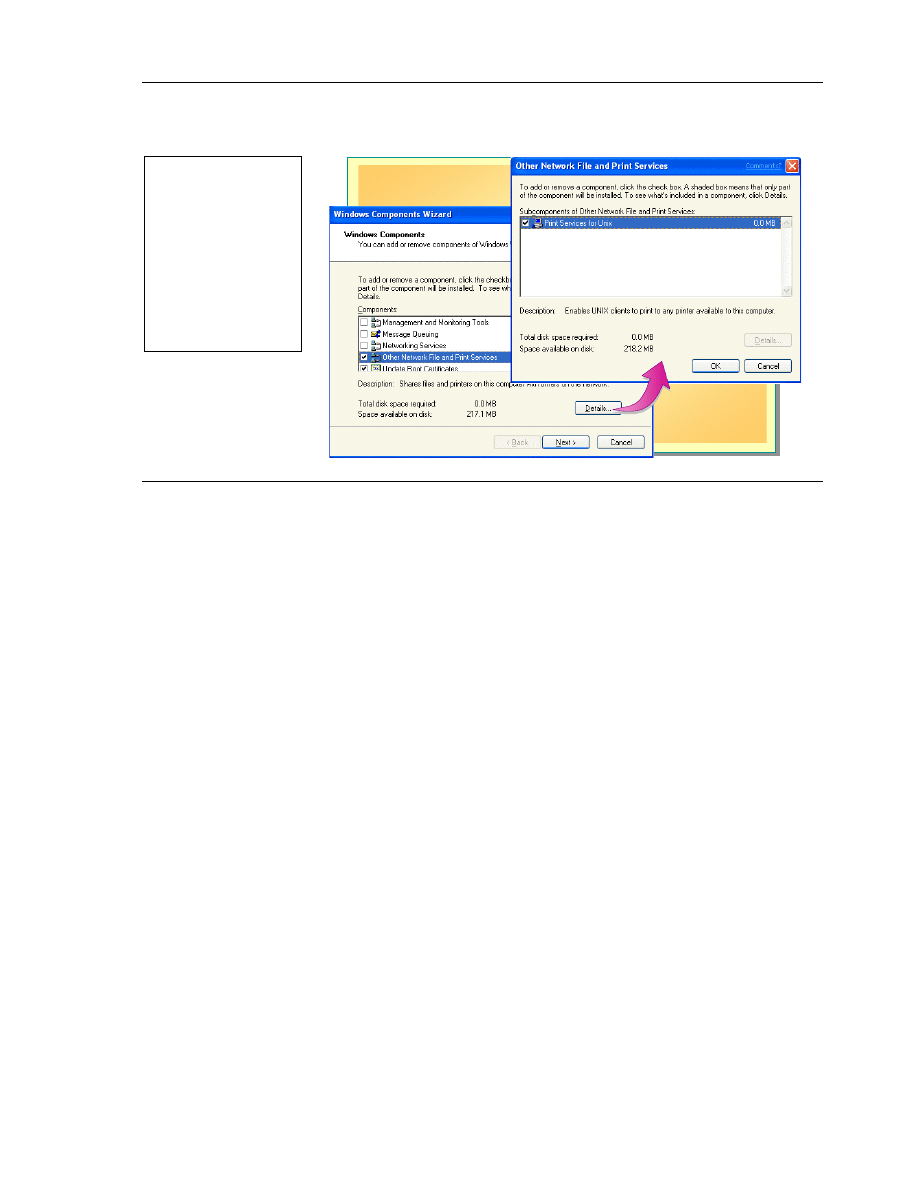
Installing a Printer Using LPR
In a mixed environment where printing services are distributed, users need to be
able to print to any or all print devices. To enable printing to UNIX printers,
you must install Print Services for UNIX, and then set up an LPR port and
install the printer. The LPR port is best suited to servers that communicate with
UNIX machines.
To install Print Services for UNIX:
1. In Control Panel, click Add or Remove Programs.
2. Click Add/Remove Windows Components.
3. Scroll and select the Other Network File and Print Services check box.
4. Click the Details button to ensure Print Services for UNIX is highlighted,
and then click OK.
5. Click Next, and then follow the wizard instructions.
A network-connected printer must have a card that supports line printer daemon
(LPD) protocol for TCP/IP printing to work properly. To set up an LPR port
and install the printer on a computer running Windows XP Professional:
1. In Control Panel, click Printers and Other Hardware.
2. Click Printers and Faxes.
3. Click Add a Printer, and then click Next.
4. On the Local or Network Printer page, click Local printer attached to
this computer, clear the Automatically detect and install my Plug and
Play printer check box, and then click Next.
5. On the Select a Printer Port page, click Create a new port, and then click
LPR Port.
If LPR port is not available, click Cancel to stop the wizard. To add the
LPR port, you must install the optional networking component, Print
Services for UNIX.
Topic Objective
To demonstrate how to
install Print Services for
UNIX.
Lead-in
To enable UNIX print
support on a computer
running Windows XP
Professional, install Print
Services for UNIX and then
install an LPR printer.

18
Module 9: Configuring Windows XP Professional for Networks Running Novell NetWare and UNIX Operating Systems
BETA MATERIALS FOR MICROSOFT CERTIFIED TRAINER PREPARATION PURPOSES ONLY
6. Click Next, and then provide the following information:
• In the Name or address of server providing lpd box, type the Domain
Name System (DNS) name or Internet Protocol (IP) address of the host
for the printer you are adding. The host may be the direct-connect
TCP/IP printing device or the UNIX computer to which the printing
device is connected. The DNS name can be the name specified for the
host in the Hosts file.
• In the Name of printer or print queue on that server box, type the
name of the printer as it is identified by the host, which is either the
direct-connect printer itself or the UNIX computer.
7. Follow the instructions in the wizard to finish installing the printer.
Module 9: Configuring Windows XP Professional for Networks Running Novell NetWare and UNIX Operating Systems
19
BETA MATERIALS FOR MICROSOFT CERTIFIED TRAINER PREPARATION PURPOSES ONLY
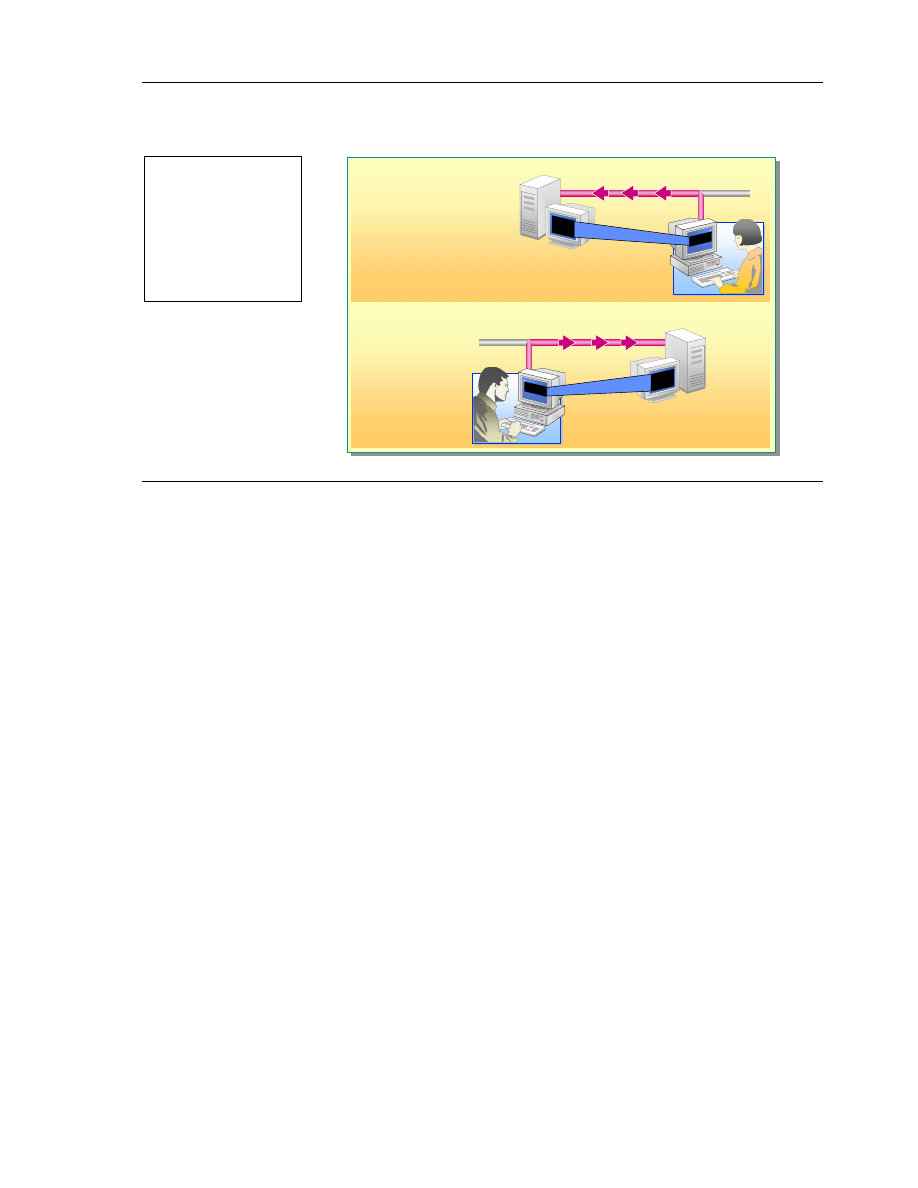
Introduction to Telnet
Telnet Server:
Telnet Client:
Issuing UNIX Commands
UNIX Server
Telnet Server
Windows XP Professional
Telnet Client
UNIX Workstation
Telnet Client
Windows XP Professional
Telnet Server
Issuing Telnet Commands
Telnet is a TCP/IP protocol found in almost all UNIX environments. Telnet
server and Telnet client software are installed as part of the standard
Windows XP Professional installation. The Telnet client and the Telnet server
work together to allow users to communicate with UNIX workstations and
servers.
Telnet Client
The Telnet client allows you to connect to a UNIX server and interact with that
server through a terminal window as if you were sitting in front of it. Typical
uses of Telnet include e-mail, file transfer, and system administration (remotely
issuing commands to the UNIX server). When you access a UNIX server
running Telnet client, you cannot use applications that interact with the desktop
on the UNIX server.
Telnet Server
The Telnet server is a connection point for Telnet clients. When Microsoft
Telnet server is running on a computer running Windows XP Professional,
users on other UNIX workstations running Telnet client software can connect to
the computer running Windows XP Professional. When a Telnet client connects
to the Windows XP Professional Telnet server, the user is asked to enter a user
name and password. By default, only user name and password combinations
that are valid on the local server can be used to log on to that server.
Once logged on, a user is given a command prompt that can be used as if it had
been opened in a command prompt window locally. By default, however, the
user cannot use applications that interact with the Windows XP Professional
desktop.
Topic Objective
To describe the Telnet
services that are available in
Windows XP Professional.
Lead-in
Windows XP Professional
provides both a Telnet
server and Telnet client.

20
Module 9: Configuring Windows XP Professional for Networks Running Novell NetWare and UNIX Operating Systems
BETA MATERIALS FOR MICROSOFT CERTIFIED TRAINER PREPARATION PURPOSES ONLY
All members of the Administrators group can use Telnet. Access to the system
through a Telnet server by other users is controlled by membership in the
Telnet Clients group. By default, this group contains one entry, “Everyone.” If
you want to restrict who can access the system using Telnet, remove
“Everyone” from the Telnet Clients group and add the users or groups that you
want to give Telnet access to the system.
The Telnet server service is not started by default. To start the Telnet service:
1. Click Start, right-click My Computer, and then click Manage.
2. In Computer Management, expand Services and Applications, and then
click Services.
3. In the details pane, right-click Telnet, and then click Start.
The Telnet server included with Windows XP Professional supports a
maximum of two Telnet clients at a time. If you need additional licenses, use
Telnet server from the Microsoft Services for UNIX. Services for UNIX
supports up to 63 Telnet clients at a time.
Note
Module 9: Configuring Windows XP Professional for Networks Running Novell NetWare and UNIX Operating Systems
21
BETA MATERIALS FOR MICROSOFT CERTIFIED TRAINER PREPARATION PURPOSES ONLY
Using a Telnet Client
The Telnet client is provided in two forms: command-line and HyperTerminal.
Command-Line Telnet Client
The command-line version of Telnet is a Windows console program. To start
the Telnet Client on Windows XP Professional:
• Click Start, click Run, and in the Open box, type:
telnet
This will start Telnet it in its prompt mode. In the prompt mode, Telnet
prompts for commands. To see the available commands, type help or type ?
Once a connection is established, the console window becomes a terminal
screen. The remote computer’s output appears in this window and your
keystrokes are sent to the remote server.
You can also change the mode of operation. To switch from terminal mode
back to prompt or local mode, press CTRL+]. To switch from prompt or local
mode to terminal mode, press ENTER.
To terminate a Telnet session, do either of the following:
!"
Press CTRL+] in the terminal mode, and then type quit
!"
Close the Telnet console window.
Topic Objective
To demonstrate using a
Telnet client.
Lead-in
Windows XP Professional
provides two methods of
using a Telnet client:
command-line and
HyperTerminal.

22
Module 9: Configuring Windows XP Professional for Networks Running Novell NetWare and UNIX Operating Systems
BETA MATERIALS FOR MICROSOFT CERTIFIED TRAINER PREPARATION PURPOSES ONLY
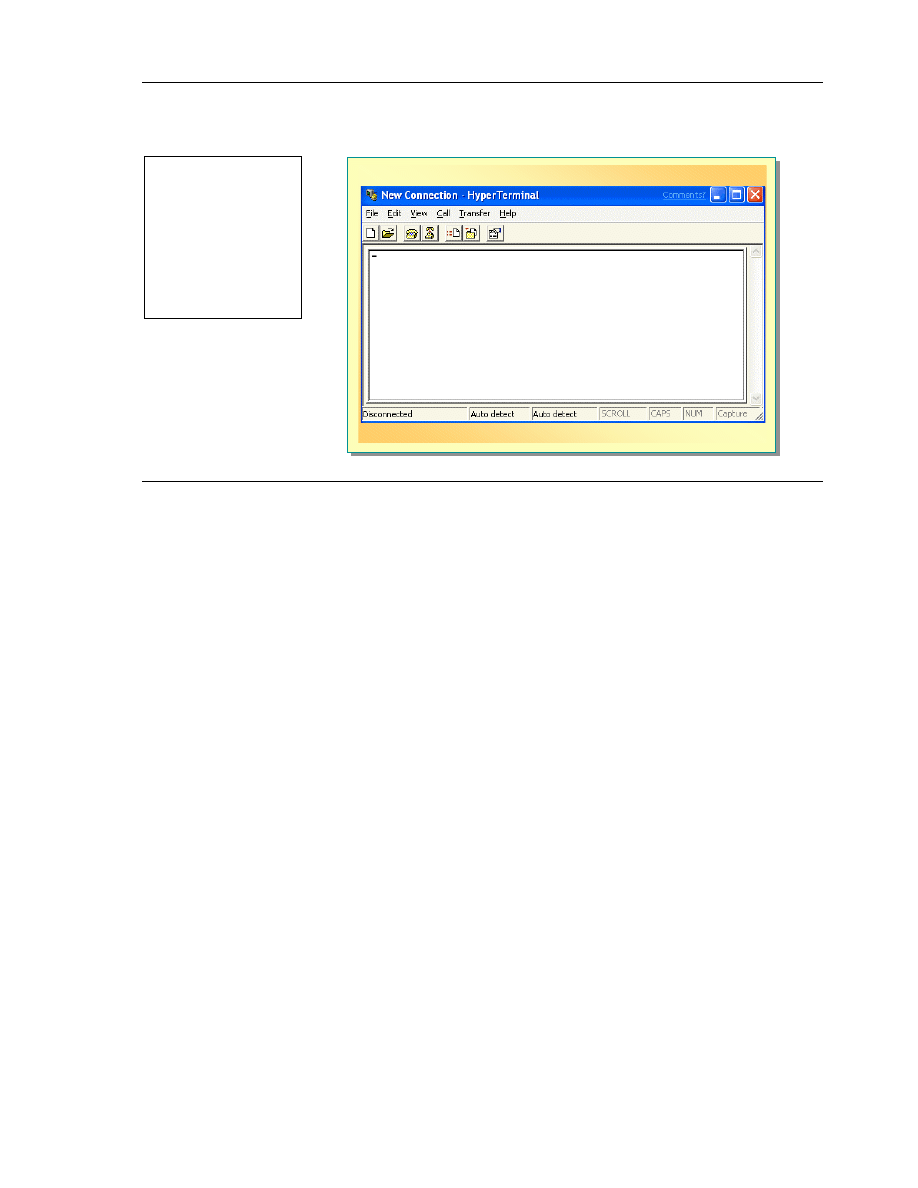
HyperTerminal Telnet Client
HyperTerminal is a utility application that creates and maintains the connection
between a computer running Windows XP Professional and other computers
using either a dial-up or network connection. It is a general-purpose Windows
application that adds the common Windows graphical user interface and
features to the application.
To start HyperTerminal:
1. Click Start, click All Programs, click Accessories, click
Communications, and then click HyperTerminal.
2. In the New Connection dialog box, type a telnet_server host name, and
then click OK.
3. If the New Connection dialog box does not open automatically, click File,
and then click New Connection.
4. In the Connect To dialog box, in the Connect using list, select TCP/IP
(Winsock), and then click OK.
This action initiates the Telnet connection as a client.
5. In the Connect To dialog box, in the Host Address box, type the IP address
of the remote host or the remote remote_host_name (where
remote_host_name is the name of the host that you want to connect to), and
then click OK.
Text Capture
The text capturing procedure involves turning on text capture in HyperTerminal
and then listing the file within a Telnet session. All the text transferred is stored
in a text file.
To capture text from a Telnet session:
1. In the HyperTerminal application, from the Transfer menu, click Capture
Text.
2. In the Capture Text dialog box, either accept the default location and file
name or enter your preferences, and then click Start.
3. In the Telnet session, begin the file listing.
4. When complete, click Transfer, click Capture Text, and then click Stop.
If the remote server has a file-transfer capability such as Xmodem,
Zmodem, or Kermit, use the transfer file capability.
5. From the Transfer menu, click one of the following:
• For binary files, click Send File or Receive File.
• For ASCII text files, click Send Text File.
6. Type the appropriate file name(s) in the dialog box that appears or use the
Browse button to locate the file.
7. Select the appropriate file-transfer protocol from the list, and then click
Send or Receive.
8. To close the Telnet session, type quit in the command window.
Module 9: Configuring Windows XP Professional for Networks Running Novell NetWare and UNIX Operating Systems
23
BETA MATERIALS FOR MICROSOFT CERTIFIED TRAINER PREPARATION PURPOSES ONLY
Lab 9A: Installing and Configuring Print Services for
UNIX
The goal of this lab is for students to successfully install and configure Print
Services for UNIX.
Objectives
After completing this lab, you will be able to:
!"
Install Print Services for UNIX on a computer running Windows XP
Professional.
!"
Configure an LPR port for printing to an LPD printer.
Prerequisites
Before working on this lab, you must have:
!"
Fundamental knowledge about UNIX printing services.
!"
Experience printing in a Windows environment.
Estimated time to complete this lab: 15 minutes
Topic Objective
To introduce the lab.
Lead-in
In this lab, you will install
and configure Print Services
for UNIX.

24
Module 9: Configuring Windows XP Professional for Networks Running Novell NetWare and UNIX Operating Systems
BETA MATERIALS FOR MICROSOFT CERTIFIED TRAINER PREPARATION PURPOSES ONLY
Review
!
Interoperating with NetWare
!
Installing and Configuring Client Service for NetWare
!
Interoperating with UNIX
!
Configuring Interoperability with UNIX
1. You are a network administrator for an organization that has computers
running Windows XP Professional, NetWare 4.x, and Windows 2000
Server. Both NetWare and Windows 2000 Server are used for file and print
access. What must you configure on the Windows XP computers to allow
them access to both the Windows 2000 and the NetWare 4.1 servers?
Configure Client Service for NetWare, and NWLink on the Windows
XP Professional computers, and then supply the NDS or bindery logon
information to the users.
2. Your computer is running Windows XP Professional and needs to be able to
connect to a UNIX server and run a consol-based application to view sales
and update information required to create daily reports for your customers.
What additional configuration is required for a computer running Windows
XP Professional to be able to run this console-based application?
None, Windows XP Professional is configured for Telnet by default,
and the users can use either Hyper Terminal or the command-prompt-
based Telnet client to access this application.
Topic Objective
To reinforce module
objectives by reviewing key
points.
Lead-in
The review questions cover
some of the key concepts
taught in the module.

Module 9: Configuring Windows XP Professional for Networks Running Novell NetWare and UNIX Operating Systems
25
BETA MATERIALS FOR MICROSOFT CERTIFIED TRAINER PREPARATION PURPOSES ONLY
3. Your network is configured with computers running Windows XP
Professional and servers running UNIX and Windows 2000 Server. You
must provide the computers running Windows XP Professional with the
ability to access documents on and print to both the Windows 2000 servers
and the UNIX servers. What can you configure on the computers running
Windows XP Professional to accomplish both of these goals?
First you must install Print Services for UNIX on the Windows XP
computers. This will accomplish the printing goal. Next you must
acquire and then install Windows Services for UNIX, and configure the
NFS client. This will enable UNIX file system access.

THIS PAGE INTENTIONALLY LEFT BLANK
Wyszukiwarka
Podobne podstrony:
Windows XP Pro Boot Disk Contents
Windows XP Pro SP1 Boot Disk Contents
How to optimize Windows XP for the best performance
16 3 2 Lab Config Windows XP Firewall
Płyta ratunkowa dla Windows XP Ultimate Boot CD for Windows UBCD4 Win
Microsoft Windows XP Professional SP3 OEM 12in1 For Laptop
Płyta ratunkowa dla Windows XP Ultimate Boot CD for Windows UBCD4 Win
Dyskietki startowe systemu Windows XP
abc systemu windows xp 47IMHOQVXQT6FS4YTZINP4N56IQACSUBZSUF7ZI
Autoodtwarzanie w systemie Windows XP
Windows XP jest uruchamiany w dwóch etapach
Rozwiązywanie problemów z uruchamianiem systemu Windows za pomocą konsoli odzyskiwania, windows XP i
Błędy systemu Windows XP
Instalacja Windows XP i Vista(FORMATOWANIE),tworzenie kopii zapasowej
Bezpośrednie łączenie dwóch komputerów w Windows XP, Windows porady
Jak tworzyć szybko pliki PDF, windows XP i vista help
Ukrywanie zasobów komputera, windows XP i vista help
Sztuczki Windows XP
więcej podobnych podstron