QuickGuide to Canon Speedlite
580EX II Modes and Functions
1
2
3
Overview
This QuickGuide is designed to provide an overview of the Canon
Speedlite 580EX II's main features and menu structure. With this
in mind, we have color-coded the three primary operating modes
that are available, along with the selections that are available in
each mode. By familiarizing yourself with how these modes and
features are organized you will be able to quickly determine what
features are available and where to find them. For more detailed
information on each feature set, please refer to the 580EX II
Instruction Manual.
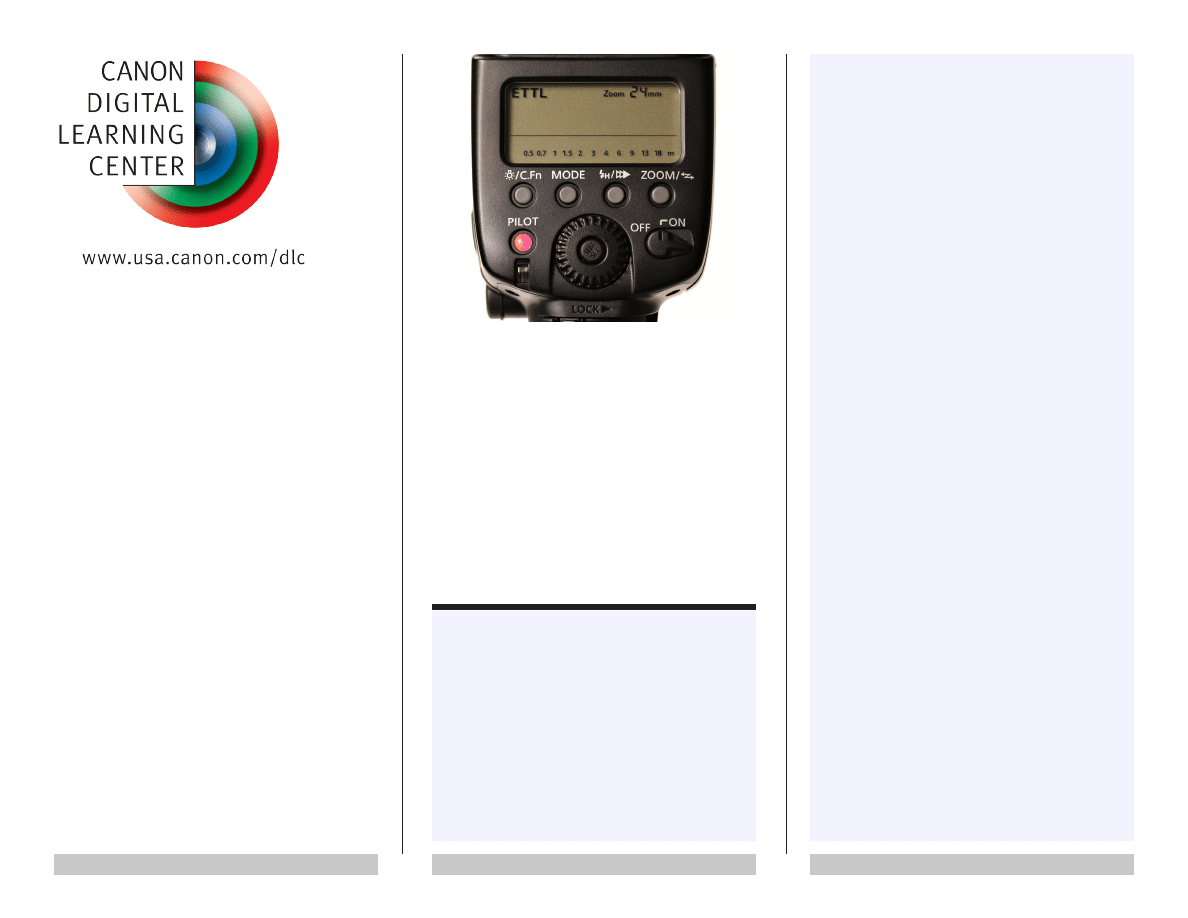
Controls
Display Illuminator/Custom Function Button
Press once to illuminate the display. Press and hold to access
the Custom Function menu. The 580EX II offers 14 custom
functions (C.Fn-00 – C.Fn-13). Note: To change the default
distance indicator from meters to feet, change C.Fn-00 to “1”.
Flash Mode Button
Press this button to cycle through the three operating modes:
E-TTL Automatic
Manual
Multi (Stroboscopic)
The display will change with each button press.
High-Speed/Shutter Curtain Sync Button
The High-speed Sync and Shutter Curtain Sync options are
available only when the 580EX II is in E-TTL or Manual mode.
Press the button until the corresponding icon appears on the
display. When no icon is visible the corresponding function is off.
Zoom/Wireless Select Button
Press this button once if you wish to manually set the flash
coverage angle. The 580EX II will otherwise adjust its coverage to
your lens' focal length automatically. Press and hold this button if
you wish to select one of the three wireless options (available only
when you are in the E-TTL Auto or Manual mode). See below for
more information.
Select Dial
This dial allows you to scroll through the options available in
a particular feature set. The Select Dial is active only when a
feature set is active (blinking).
Select/Set Button
This button allows you to cycle through specific options available
in each of the three flash modes. Once you have activated a
feature (indicated by blinking), the Select Dial will allow you to
change the feature to the setting of your choice.
Flash Exposure Bracketing (FEB)
Press the Select/Set Button
until the Flash Exposure
Bracketing icon flashes. Turn the Select Dial
clockwise
to increase the flash exposure bracket increment or counter-
clockwise to reduce it. Bracketing can be set in 1/3-stop
increments up to ± 3 stops. Press the Select/Set Button
to
set the amount. Once set, the icon will no longer blink.
Manual Zoom
Press the Zoom Button
once. When the coverage angle
indicator (upper-right of the display) blinks, turn Select Dial
to
the angle of your choice. The choices are 24, 28, 35, 50, 70, 80,
and 105mm, in 35mm full-frame equivalents. Divide by 1.6 for the
Canon APS-C equivalent.
High-Speed Sync
When this option is selected the flash will flash stroboscopically,
in sync with the shutter as it cross the focal plane. Although this
allows the 580EX II to synchronize with shutter speeds higher
than 1/200-second it also reduces light output as shutter speeds
move progressively past the standard maximum sync speed.
Second-Curtain Sync
The 580EX II is normally triggered the instant the first shutter
curtain opens. When Second-Curtain sync is selected the flash
will be triggered just before the second shutter curtain closes.
Note that given a fixed ISO setting, the longer your shutter speed,
therefore the more effect that ambient light and any resulting pre-
flash motion blur will have on the image.
E-TTL Automatic also has three wireless flash options:
Wireless [Off]
Wireless [On - Master]
Wireless [On - Slave]
To access a wireless flash option:
1. Press and hold the Zoom/Wireless Select Button
until the display blinks.
2. Turn the Select Dial
to the option of your choice.
3. Press the Select/Set Button
to set your choice. Once
set, the icon will no longer blink.
Wireless [Off]
All wireless functions are off. Only basic functions such FEC, FEB
and High-Speed/Second-Curtain Sync are available.
Wireless [On – Master]
When your Speedlite is set to this option it will function as the
Master (main) unit that controls any other Slave (secondary) units
that are set to the same Channel. It will also allow you to control
the automatic power ratio between Master and Slaves.
E-TTL AUTOMATIC MODE
This operating mode uses the camera's light meter to automati-
cally control flash output and exposure. It can control a single
Speedlite attached to the camera and can also wirelessly control
multiple Speedlites. The basic functions available in this mode
include:
Flash Exposure Compensation (FEC)
Press the Select/Set Button
until the flash exposure
compensation icon flashes. Turn the Select Dial
clockwise
to increase the flash exposure or counter-clockwise to reduce it.
Compensation can be set in 1/3-stop increments up to ± 3 stops.
Press the Select/Set Button
to lock-in your choice. Once set,
the icon will no longer blink.

4
5
6
Wireless [On – Master] (continued)
You will also be able to make the following additional selections:
Master Flash (On or Off)
When set to "On" the Master will contribute to the overall
exposure. When set to "Off" the Master will control the slaves
without firing during the overall exposure.
E-TTL Exposure Ratio (Off, A:B, A:B C)
When set to "Off" the Master and slave(s) will automatically
output the same amount of light. When set to "A:B" you can
adjust the auto-exposure ratio between the Master (A) and
slaves (B). When set to "A:B C" you can adjust the auto-
exposure ratio between the Master (A) and slaves (B) while
adding a separate, independent group of slaves (C).
Channel Select (1, 2, 3, 4)
The Master will control all slaves set to the same channel.
Slaves set to a different channel will not fire.
To make a selection:
Press the Zoom/Wireless Select Button
to cycle through the
options listed above. They will cycle in a continuous loop in the
order listed. When the option you have chosen is blinking, turn
the Select Dial
to cycle through the options in parentheses. As
each option become available it will blink. Press the Select/Set
Button
to set your choice. Once set, the option will no longer
blink.
Wireless [On – Slave]
When your Speedlite is set to this option it will function as the
Slave (secondary) unit that is controlled by a Master set to the
same channel. You will be able to make the following additional
selections:
Channel Select (1, 2, 3, 4)
The Master will control all slaves set to the same channel.
Slaves set to a different channel will not be affected.
Slave Group Select
This allows you to control the group (A, B, or C) to which the
Slave is assigned.
To make a selection:
Press the Zoom/Wireless Select Button
to cycle through the
options listed above. They will cycle in a continuous loop in the
order listed. When the option you have chosen is blinking, turn
the Select Dial
to cycle through the options in parentheses.
As each option become available it will blink. Push the Select/Set
Button
to set your choice. Once set, the option will no longer
blink.
MANUAL MODE
This operating mode allows you to manually adjust the light output
to the setting of your choice. When you are in this mode you will
be able to make the following selections:
Manual power adjustment
Power settings are adjustable from full to 1/128 in 0.3- or
0.5-stop increments (depending on custom function setting).
Press the Select/Set Button
. When the power setting
blinks, turn the Select Dial
to the power setting of your
choice. Press the Select/Set Button
to set your choice.
Once set, the display will no longer blink.
Manual Zoom (refer to E-TTL Auto instructions)
High-Speed Sync (refer to E-TTL Auto instructions)
Second-Curtain Sync (refer to E-TTL Auto instructions)
You will also be able to make the following additional selections:
Wireless [Off]
Wireless [On - Master]
Wireless [On - Slave]
To make a selection:
Press the Zoom/Wireless Select Button
to access the
options listed above. When the option you have chosen is
blinking, turn the Select Dial
to cycle through the options in
parentheses. As each option become available it will blink. Press
the Select/Set Button
to set your choice. Once set, the option
will no longer blink.
Wireless Mode [On – Master]
When your Speedlite is set to this option it will function as the
Master (main) unit that controls any other Slave (secondary) units
that are set to the same Channel. It will also allow you to control
the manual power ratio between Master and Slave groups.
Ratio (Off, A:B, A:B C)
Flashes can all fire at even power (Ratio Off), or you can
set groups A, B and C to fire at different manual flash power
levels. Press (don't hold) the Zoom/Wireless Select Button
until Ratio blinks, then turn the Select Dial
to make
your choice. Press the Select/Set Button
on the Master
unit, then turn Select Dial
to set the actual power level for
each group.
Master Flash (On or Off)
When set to "On" the Master will contribute to the overall
exposure. When set to "Off" the Master will control the slaves
without contributing to the overall exposure.
Channel Select (1, 2, 3, 4)
The Master will control all slaves set to the same channel.
Slaves set to a different channel will not be affected.
Wireless Mode [On – Slave]
When your Speedlite is set to this option it will function as the
Slave (secondary) unit that is controlled by a Master set to the
same channel. You will be able to make the following additional
selections:
Channel Select (1, 2, 3, 4)
The Master will control all slaves set to the same channel.
Slaves set to a different channel will not be affected.
Slave Group Select
This allows you to control the group (A, B, or C) to which the
Slave is assigned.
To make a selection:
Press the Zoom/Wireless Select Button
to cycle through the
options listed above. They will cycle in a continuous loop in the
order listed. When the option you have chosen is blinking, turn
the Select Dial
to cycle through the options in parentheses.
As each option become available it will blink. Push the Select/Set
Button
to set your choice. Once set, the option will no longer
blink.
MULTI MODE
This operating mode allows you to set the 580EX II to fire
repeatedly, during a single long exposure. You can set the firing
frequency (flashes per second, expressed as Hz, from 1-199 per
second), the total number of flashes during the exposure, and the
flash output. Note: Although any wireless flash settings you have
made will remain active while you are in Multi Mode, the results
can be unpredictable. It's best to test the exposure and effects
before combining wireless flash with Multi Mode.
Calculating the Shutter Speed
During stroboscopic flash, the shutter must remain completely
open while the Speedlite is flashing and close as soon as the
flashing stops. Use the formula below to calculate the necessary
shutter speed.
No. of flashes / Firing frequency = Minimum shutter speed
For example, if the number of flashes is 10 and the frequency is 5
Hz, the shutter speed should be at least 2 seconds.
Wyszukiwarka
Podobne podstrony:
Canon Speedlite 580EX Repair manual
Canon Speedlite 580EX Specifications
Canon Speedlite 580 EX II PL
Canon Speedlite 580 EX II PL
IB quick guide
Canon Speedlite Macro Twin Lite Mt 24Ex Repair Manual
A Quick Guide to XML Schema
ebooks pl lampa blyskowa canon speedlite 420ex instrukcja obslugi (osiol net) www!osiolek!com 7HV5WE
Canon Speedlite 380Ex Repair Manual
G Code Quick Guide
Canon Speedlite 380EX Instrukcja Obsługi
Marshall Intelligent Evolution Quick Guide (2005)
python quick guide
~$ry Quick Guide of IPC v1 0 0
Jaguar X TYPE 2002 Quick Guide
QUICK GUIDE FBEAT 5lingue PL
więcej podobnych podstron