Protected by copyright. Copying for private or commercial purposes, in part or in whole, is not
permitted unless authorised by AUDI AG. AUDI AG does not guarantee or accept any liability
with respect to the correctness of information in this document. Copyright by AUDI AG.
Service
6
Service Department. Technical Information
No.
12
Fitting instruction
Audi A3 1997 ➤, Audi A3 2004 ➤, Audi
A4 1995 ➤, Audi A4 2001 ➤, Audi
A6 1998 ➤, Audi A8 1994 ➤, Audi
A8 2003 ➤
Fitting instructions
Edition 05.2003
Protected by copyright. Copying for private or commercial purposes, in part or in whole, is not
permitted unless authorised by AUDI AG. AUDI AG does not guarantee or accept any liability
with respect to the correctness of information in this document. Copyright by AUDI AG.
Service
6
All rights reserved.
No reproduction without prior agreement from publisher.
Printed in Germany
002.5216.72.20
Copyright © 2003 Audi AG, Ingolstadt
Repair time overview
Contents
1
General ..............................................................................................
1.1
Components ........................................................................................
2
Service installation of key switch A3 1997➤
➤
➤
➤
as of week 27.1999 ............................
2.1
Removing glove box ................................................................................
2.2
Installing key switch ................................................................................
2.3
Installing new glove box ...........................................................................
2.4
Installing “PASSENGER AIRBAG OFF” lamp ......................................................
3
Service installation of key switch A3 2004➤
➤
➤
➤
....................................................
3.1
Removing glove box ................................................................................
3.2
Routing and attachment of glove box wiring harness ...........................................
3.3
Installing key switch ................................................................................
3.4
Installing “PASSENGER AIRBAG OFF” lamp ......................................................
4
Service installation of key switch A4 1995➤
➤
➤
➤
as of chassis no.: 8DXA 200 001 ..............
4.1
Removing glove box ................................................................................
4.2
Converting glove box ...............................................................................
4.3
Installing key switch ................................................................................
4.4
Installing glove box .................................................................................
4.5
Installing “PASSENGER AIRBAG OFF” lamp ......................................................
5
Service installation of key switch A4 2001➤
➤
➤
➤
....................................................
5.1
Removing glove box ................................................................................
5.2
Converting glove box ...............................................................................
5.3
Installing key switch ................................................................................
5.4
Installing glove box .................................................................................
5.5
Installing “PASSENGER AIRBAG OFF” lamp ......................................................
6
Service installation of key switch A6 1998➤
➤
➤
➤
as of week 36.1998 ............................
6.1
Removing glove box ................................................................................
6.2
Converting glove box ...............................................................................
6.3
Installing key switch ................................................................................
6.4
Installing glove box .................................................................................
6.5
Installing “PASSENGER AIRBAG OFF” lamp ......................................................
Model
Repair time
Audi A3 1997 ➤
70
Audi A3 2004 ➤
50
Audi A4 1995 ➤
90
Audi A4 2001 ➤
50
Audi A6 1998 ➤
110
Audi A8 1994 ➤
90
Audi A8 2003 ➤
50

Protected by copyright. Copying for private or commercial purposes, in part or in whole, is not
permitted unless authorised by AUDI AG. AUDI AG does not guarantee or accept any liability
with respect to the correctness of information in this document. Copyright by AUDI AG.
Audi A3 1997 ➤, Audi A3 2004 ➤, Audi A4 1995 ➤, Audi A4 2001 ➤, Audi A6 1998 ➤, Audi
A8 1994 ➤, Audi A8 2003 ➤
Contents
iii
6
7
Service installation of key switch A8 1994➤
➤
➤
➤
gradual introduction since October 1998 (with
front + side or front + head airbag) ..............................................................
7.1
Removing glove box ................................................................................
7.2
Converting glove box ...............................................................................
7.3
Installing key switch ................................................................................
7.4
Installing “PASSENGER AIRBAG OFF” lamp ......................................................
7.5
Installing glove box .................................................................................
8
Service installation of key switch A8 2003➤
➤
➤
➤
....................................................
8.1
Removing glove box ................................................................................
8.2
Installing key switch ................................................................................
8.3
Installing “PASSENGER AIRBAG OFF” lamp ......................................................
8.4
Installing trim panel with switch module, right with “PASSENGER AIRBAG OFF” .............
9
Encoding airbag control unit .......................................................................

Protected by copyright. Copying for private or commercial purposes, in part or in whole, is not
permitted unless authorised by AUDI AG. AUDI AG does not guarantee or accept any liability
with respect to the correctness of information in this document. Copyright by AUDI AG.
Audi A3 1997 ➤, Audi A3 2004 ➤, Audi A4 1995 ➤, Audi A4 2001 ➤, Audi A6 1998 ➤, Audi
A8 1994 ➤, Audi A8 2003 ➤
Contents
6
iv
Protected by copyright. Copying for private or commercial purposes, in part or in whole, is not
permitted unless authorised by AUDI AG. AUDI AG does not guarantee or accept any liability
with respect to the correctness of information in this document. Copyright by AUDI AG.
Audi A3 1997 ➤, Audi A3 2004 ➤, Audi A4 1995 ➤, Audi A4 2001 ➤, Audi A6 1998 ➤, Audi
A8 1994 ➤, Audi A8 2003 ➤
1 General
1
6
1
General
Service installation of the key switch for deactivating the
front passenger's airbag is not possible on the A2.
Following airbag or belt tensioner triggering, service installa-
tion of the key switch for deactivating the front passenger's
airbag is only possible after replacing the airbag control unit.
1.1
Components
1.1.1
Audi A3 1997➤ as of week 27.1999
♦
Refer to the Parts List to check that the part numbers given
are for components suitable for installation in the vehicle.
♦
The “X”s in the part number indicate different component
or colour versions. Refer to Parts List for assignment.
Components required
♦
4B0 919 237 (B98) Key switch
♦
107 857 113 JB Lock for key switch (order on the basis
of key number and/or chassis number)
♦
8L0 947 111 X XXX Interior light without sun roof with
“PASSENGER AIRBAG OFF” lamp
♦
8L0 947 106 XXX Interior light with sun roof with “PAS-
SENGER AIRBAG OFF” lamp
♦
8L1 857 095 X XXX Glove box
1.1.2
Audi A3 2004➤
♦
Refer to the Parts List to check that the part numbers given
are for components suitable for installation in the vehicle.
♦
The “X”s in the part number indicate different component
or colour versions. Refer to Parts List for assignment.
Components required
♦
4B0 919 237 A Key switch
♦
107 857 113 JB Lock for key switch (order on the basis
of key number and/or chassis number)
♦
8E0 947 XXX X XXX Interior light with “PASSENGER AIR-
BAG OFF” lamp
♦
8P0 971 679 X Glove box wiring harness
Danger!
Service installation of the key switch is not permitted on
the Audi A6 1998> with V8 engine (RS6; S6).
Note!
Note!
Protected by copyright. Copying for private or commercial purposes, in part or in whole, is not
permitted unless authorised by AUDI AG. AUDI AG does not guarantee or accept any liability
with respect to the correctness of information in this document. Copyright by AUDI AG.
Audi A3 1997 ➤, Audi A3 2004 ➤, Audi A4 1995 ➤, Audi A4 2001 ➤, Audi A6 1998 ➤, Audi
A8 1994 ➤, Audi A8 2003 ➤
1 General
6
2
1.1.3
Audi A4 1995➤ as of chassis no.: 8DXA 200
001
♦
Refer to the Parts List to check that the part numbers given
are for components suitable for installation in the vehicle.
♦
The “X”s in the part number indicate different component
or colour versions. Refer to Parts List for assignment.
Components required
♦
4B0 919 237 (B98) Key switch
♦
107 857 113 JB Lock for key switch (order on the basis
of key number and/or chassis number)
♦
8D1 857 077 Mount for key switch
♦
8D0 947 111 X XXX Interior light without sun roof with
“PASSENGER AIRBAG OFF” lamp
♦
8D0 947 106 XXX Interior light with sun roof with “PAS-
SENGER AIRBAG OFF” lamp
1.1.4
Audi A4 2001➤
♦
Refer to the Parts List to check that the part numbers given
are for components suitable for installation in the vehicle.
♦
The “X”s in the part number indicate different component
or colour versions. Refer to Parts List for assignment.
Components required
♦
8E0 919 237 (5PR) Key switch
♦
4B0 919 237 A Key switch 2003➤
♦
107 857 113 JB Lock for key switch (order on the basis
of key number and/or chassis number)
♦
8E0 947 XXX X XXX Interior light with “PASSENGER AIR-
BAG OFF” lamp
♦
8E0 971 679 X Glove box wiring harness for key switch
1.1.5
Audi A6 1998➤ as of week 36.1998
♦
Refer to the Parts List to check that the part numbers given
are for components suitable for installation in the vehicle.
♦
The “X”s in the part number indicate different component
or colour versions. Refer to Parts List for assignment.
Components required
Danger!
Service installation of the key switch is not permitted on
the Audi A6 1998> with V8 engine (RS6; S6).
Note!
Note!
Note!

Protected by copyright. Copying for private or commercial purposes, in part or in whole, is not
permitted unless authorised by AUDI AG. AUDI AG does not guarantee or accept any liability
with respect to the correctness of information in this document. Copyright by AUDI AG.
Audi A3 1997 ➤, Audi A3 2004 ➤, Audi A4 1995 ➤, Audi A4 2001 ➤, Audi A6 1998 ➤, Audi
A8 1994 ➤, Audi A8 2003 ➤
1 General
3
6
♦
4B0 919 237 (B98) Key switch ➤ 2001
♦
8E0 919 237 (5PR) Key switch MY 2002
♦
4B0 919 237 A Key switch 2003➤
♦
107 857 113 JB Lock for key switch (order on the basis
of key number and/or chassis number)
♦
4B1 857 077 Mount for key switch (LHD)
♦
4B2 857 077 Mount for key switch (RHD)
♦
N 904 997 01 (2x) Bolts
♦
4B0 947 159 X XXX Interior light with “PASSENGER AIR-
BAG OFF” lamp
♦
4B1 971 679 X Glove box wiring harness for key switch
1.1.6
Audi A8 MY 1994➤ gradual introduction since
October 1998 (with front + side or front + head
airbag)
♦
Refer to the Parts List to check that the part numbers given
are for components suitable for installation in the vehicle.
♦
The “X”s in the part number indicate different component
or colour versions. Refer to Parts List for assignment.
Components required
♦
4B0 919 237 -B98- Key switch
♦
107 857 113 JB Lock for key switch (order on the basis
of key number and/or chassis number)
♦
4D1 857 077 Mount for key switch (LHD)
♦
4D2 857 077 Mount for key switch (RHD)
♦
N 904 997 01 (2x) Bolts
♦
4B0 947 159 X XXX Interior light with “PASSENGER AIR-
BAG OFF” lamp
♦
4D0 971 679 B Glove box wiring harness for key switch
♦
4D0 857 161 Trim for hinged arm
♦
4D1 857 161 Cover for cable duct (LHD)
♦
4D0 857 161 Cover for cable duct (RHD)
♦
N 903 474 02 (2x) Bolts
1.1.7
Audi A8 2003➤
♦
Refer to the Parts List to check that the part numbers given
are for components suitable for installation in the vehicle.
♦
The “X”s in the part number indicate different component
or colour versions. Refer to Parts List for assignment.
Components required
♦
4B0 919 237 A Key switch
♦
107 857 113 JB Lock for key switch (order on the basis
of key number and/or chassis number)
Note!
Note!

Protected by copyright. Copying for private or commercial purposes, in part or in whole, is not
permitted unless authorised by AUDI AG. AUDI AG does not guarantee or accept any liability
with respect to the correctness of information in this document. Copyright by AUDI AG.
Audi A3 1997 ➤, Audi A3 2004 ➤, Audi A4 1995 ➤, Audi A4 2001 ➤, Audi A6 1998 ➤, Audi
A8 1994 ➤, Audi A8 2003 ➤
1 General
6
4
♦
4E0 927 137 XX Switch module with “PASSENGER AIR-
BAG OFF” lamp
♦
84E0 971 679 X Glove box wiring harness for key switch
Protected by copyright. Copying for private or commercial purposes, in part or in whole, is not
permitted unless authorised by AUDI AG. AUDI AG does not guarantee or accept any liability
with respect to the correctness of information in this document. Copyright by AUDI AG.
Audi A3 1997 ➤, Audi A3 2004 ➤, Audi A4 1995 ➤, Audi A4 2001 ➤, Audi A6 1998 ➤, Audi
A8 1994 ➤, Audi A8 2003 ➤
2 Service installation of key switch A3 1997➤ as of week 27.1999
5
6
2
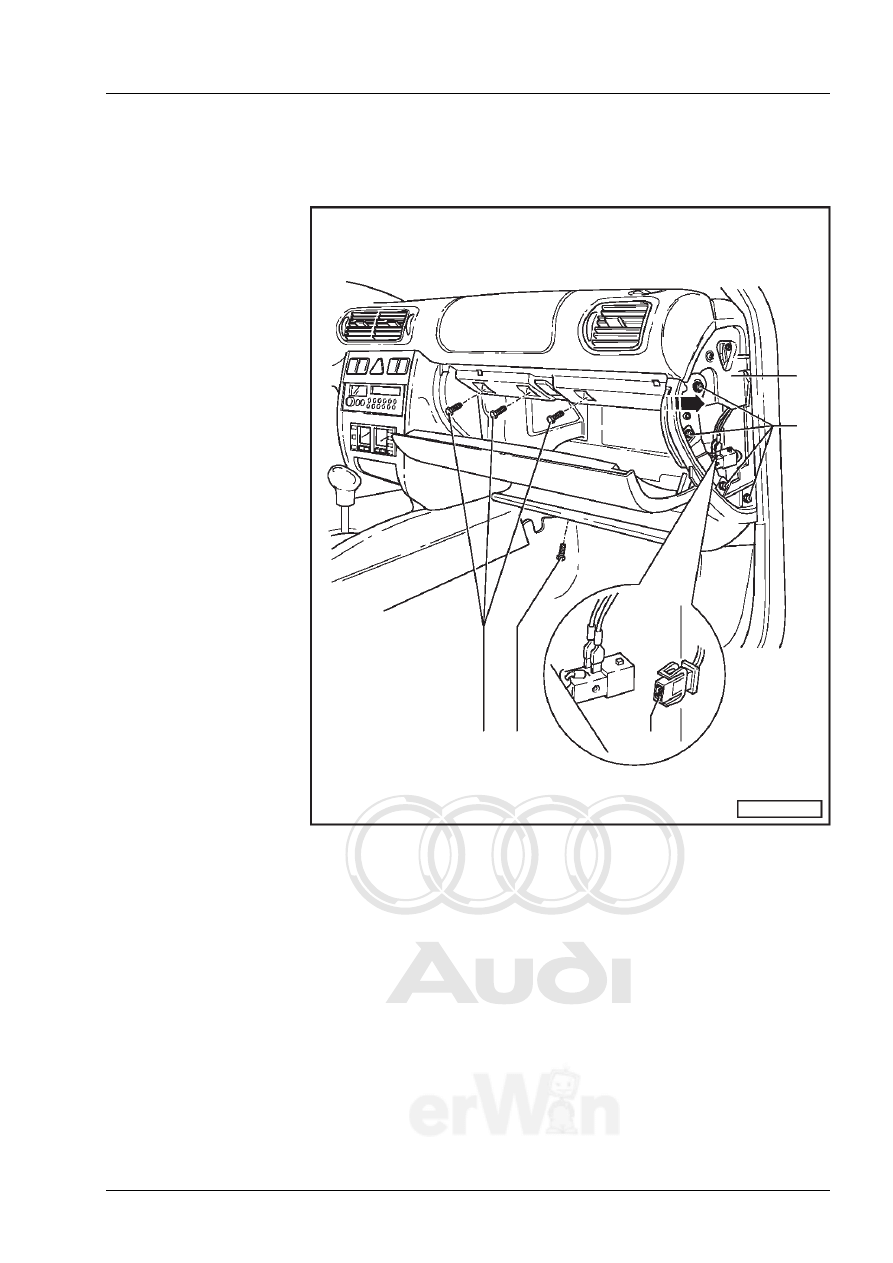
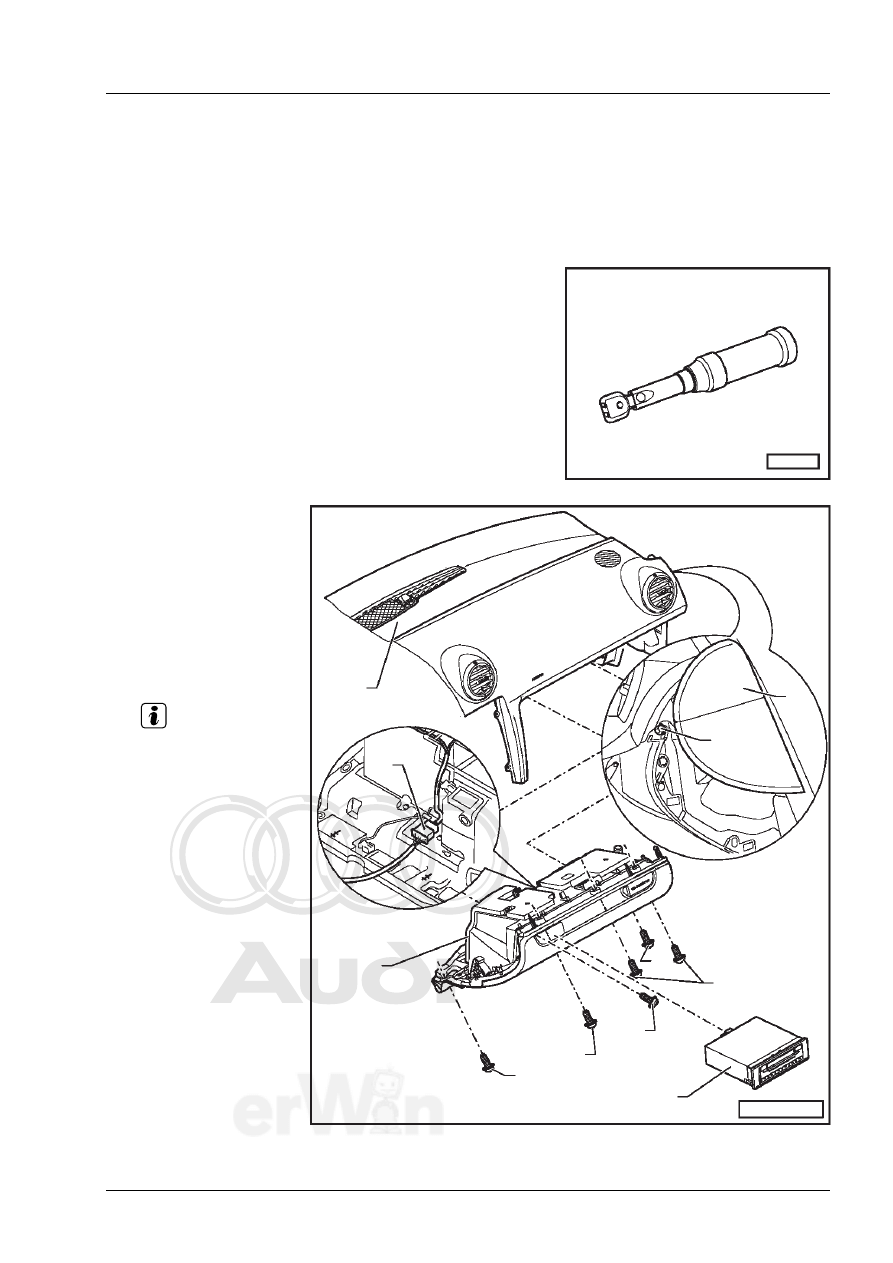
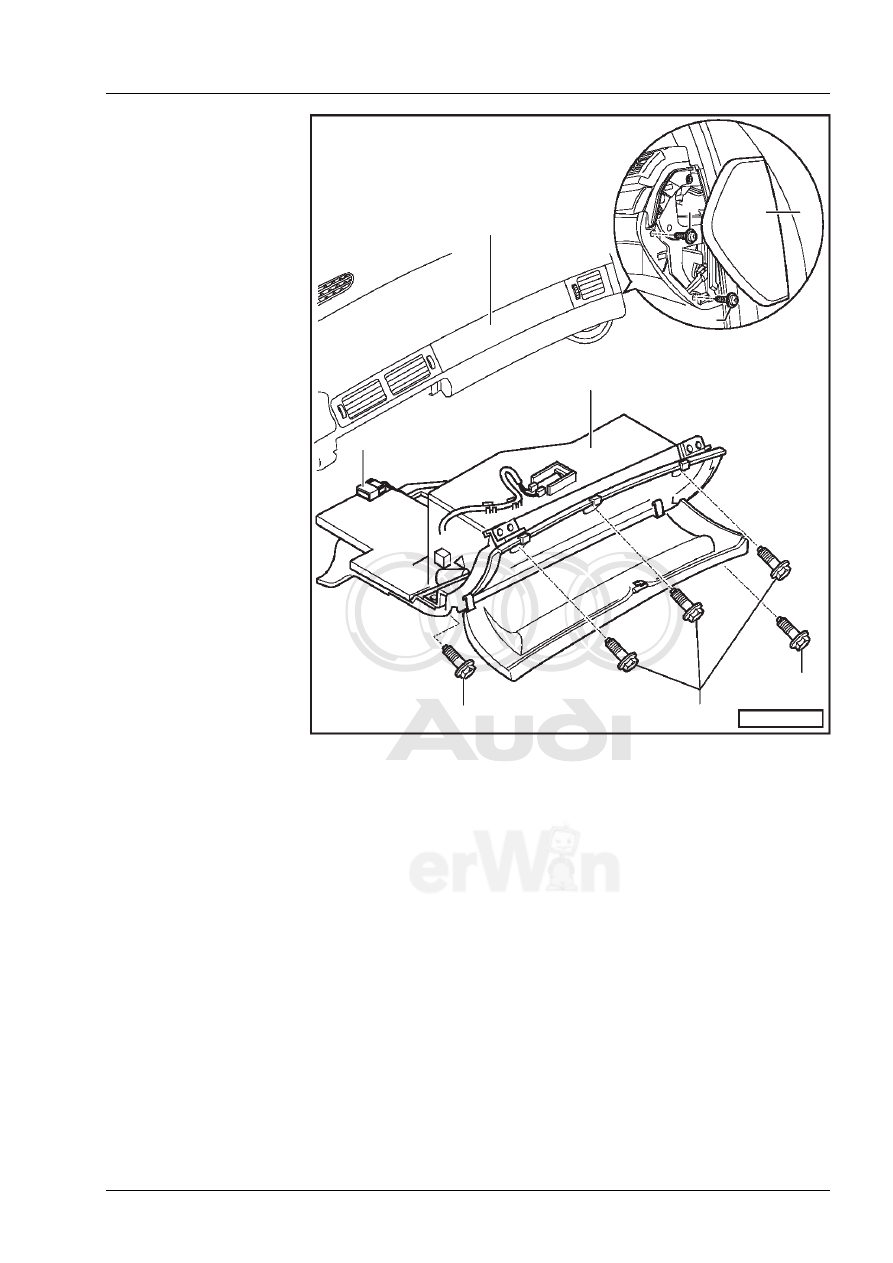
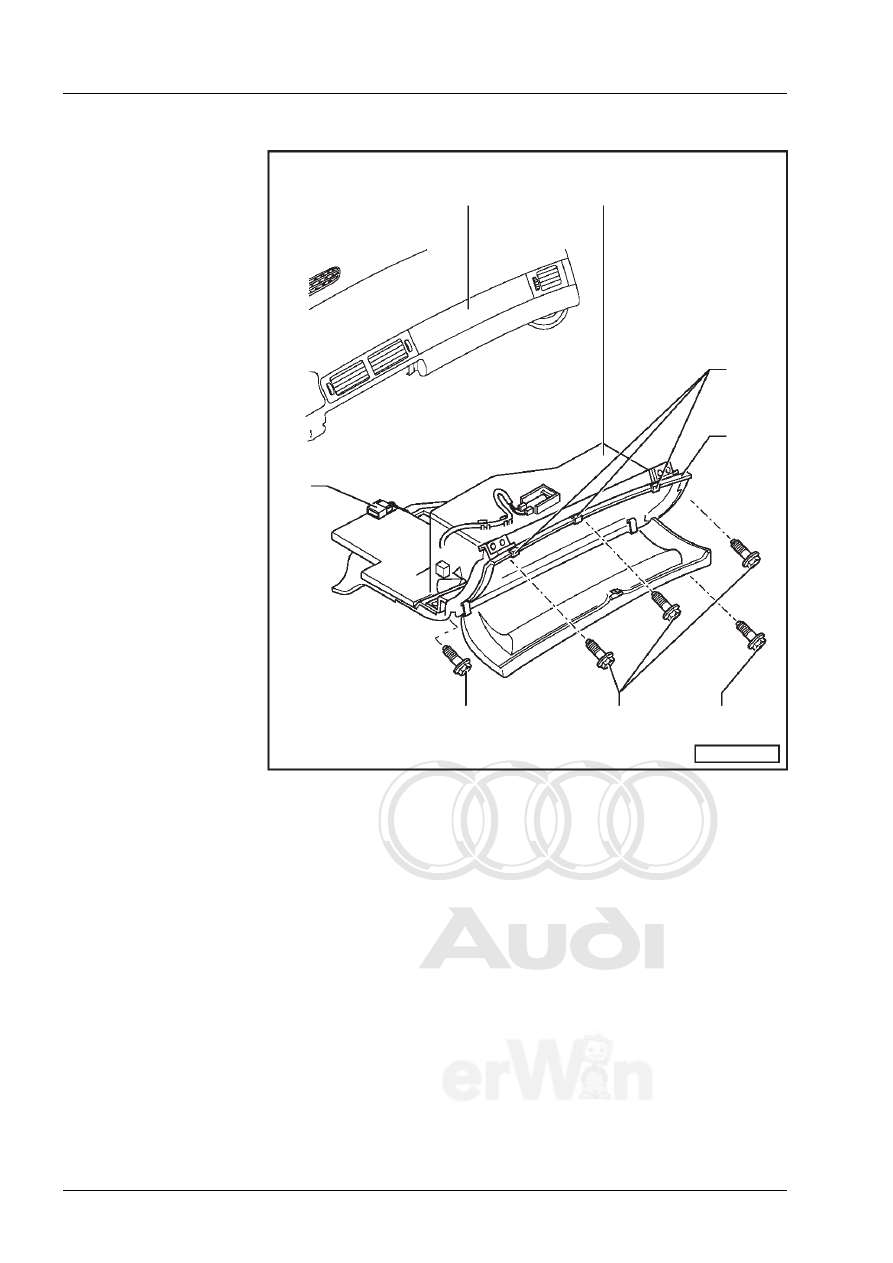
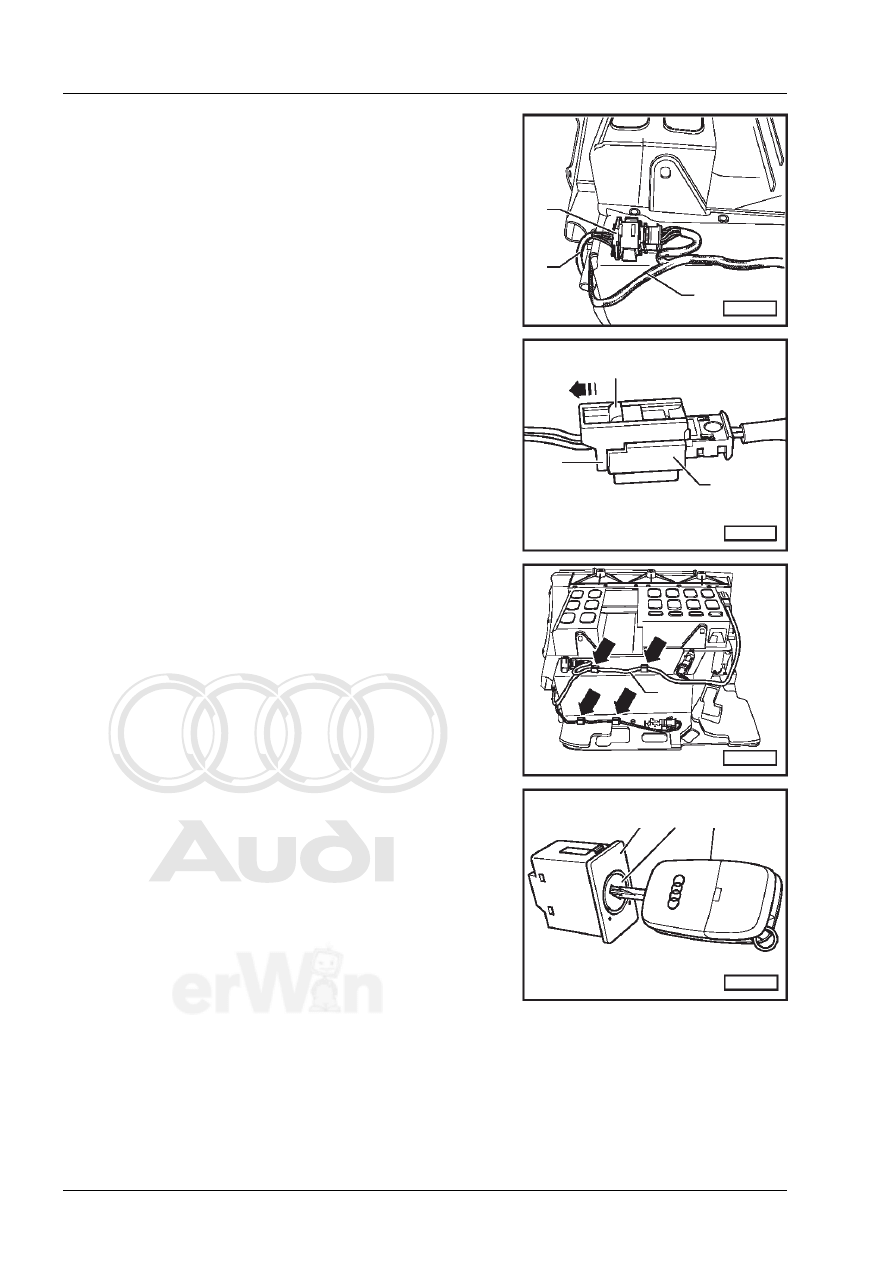
Service installation of key switch A3 1997➤ as of week 27.1999
2.1
Removing glove box
–
Unclip dash panel end trim.
–
Unplug connector -4- for glove box light.
–
Unscrew bolts -1- (4x).
–
Unscrew bolt -2-.
–
Open glove box lid and unscrew bolts -3- (3x).
–
Pull mounting plate approx. 1 cm aside in direction of ar-
row and release catch.
–
Take out glove box.
1
A70-0096
5
4
2
3
Protected by copyright. Copying for private or commercial purposes, in part or in whole, is not
permitted unless authorised by AUDI AG. AUDI AG does not guarantee or accept any liability
with respect to the correctness of information in this document. Copyright by AUDI AG.
Audi A3 1997 ➤, Audi A3 2004 ➤, Audi A4 1995 ➤, Audi A4 2001 ➤, Audi A6 1998 ➤, Audi
A8 1994 ➤, Audi A8 2003 ➤
2 Service installation of key switch A3 1997➤ as of week 27.1999
6
6
1 - Bolts (4x)
❑
Tightening torque 4
Nm
2 - Bolt (1x)
❑
Tightening torque 4
Nm
3 - Bolts (3x)
❑
Tightening torque 4
Nm
4 - Connector
5 - Mounting plate
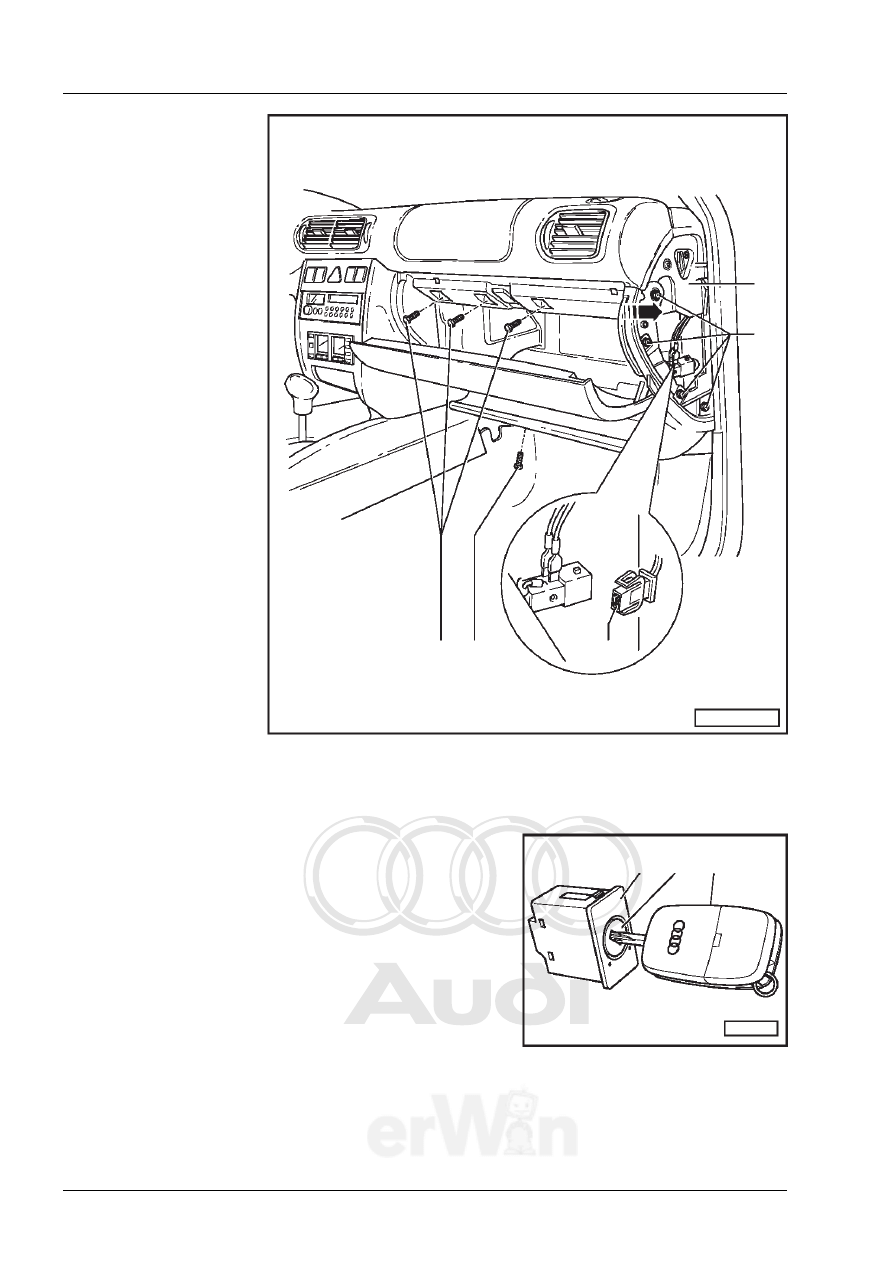
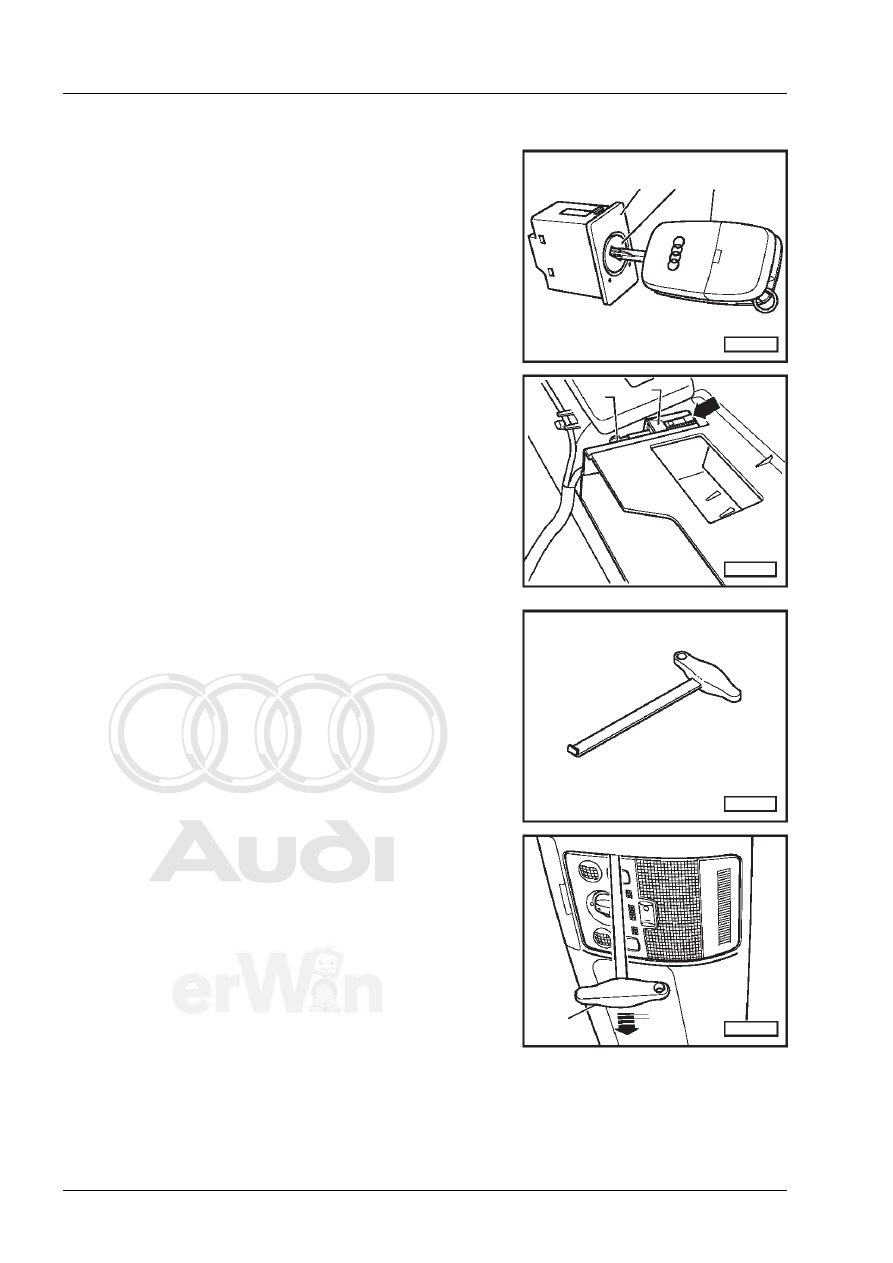
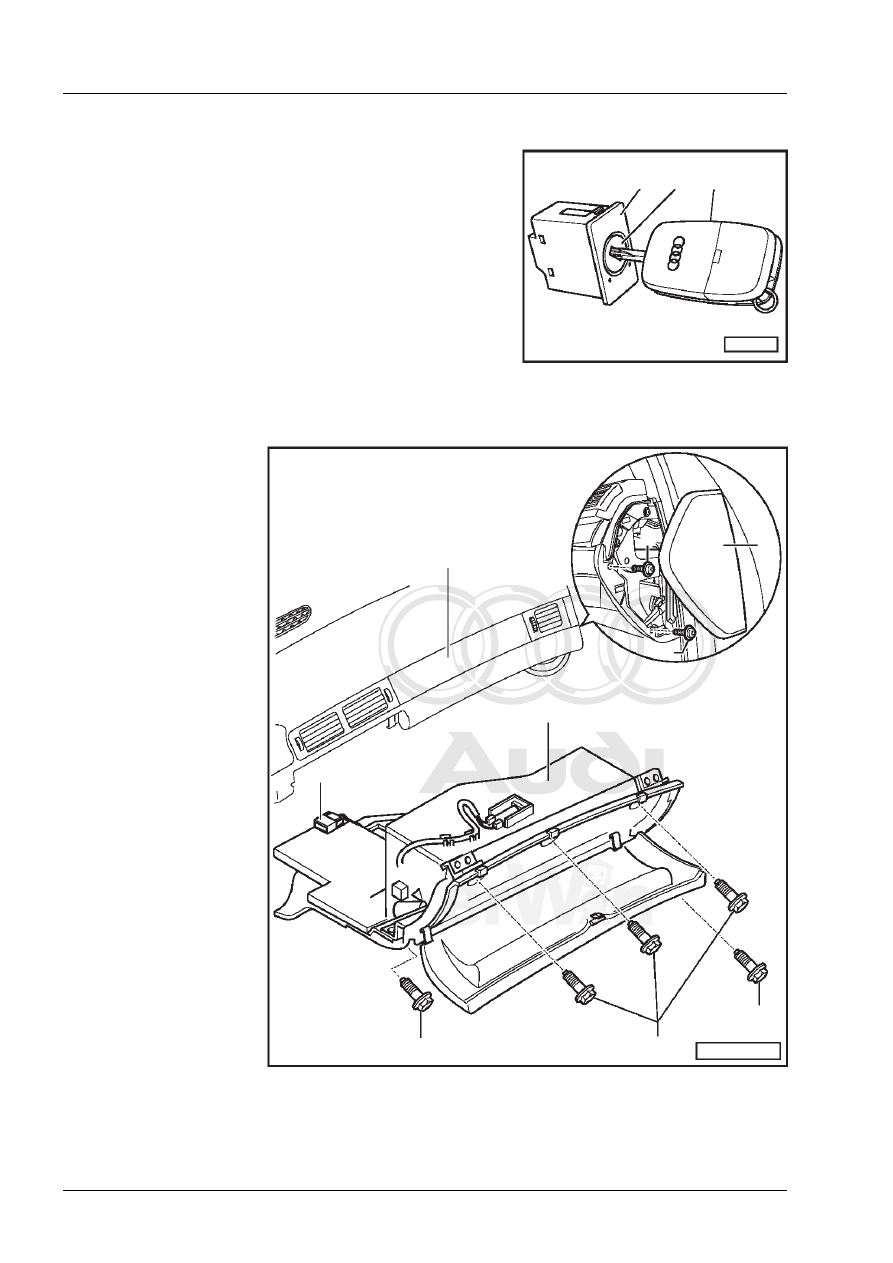
2.2
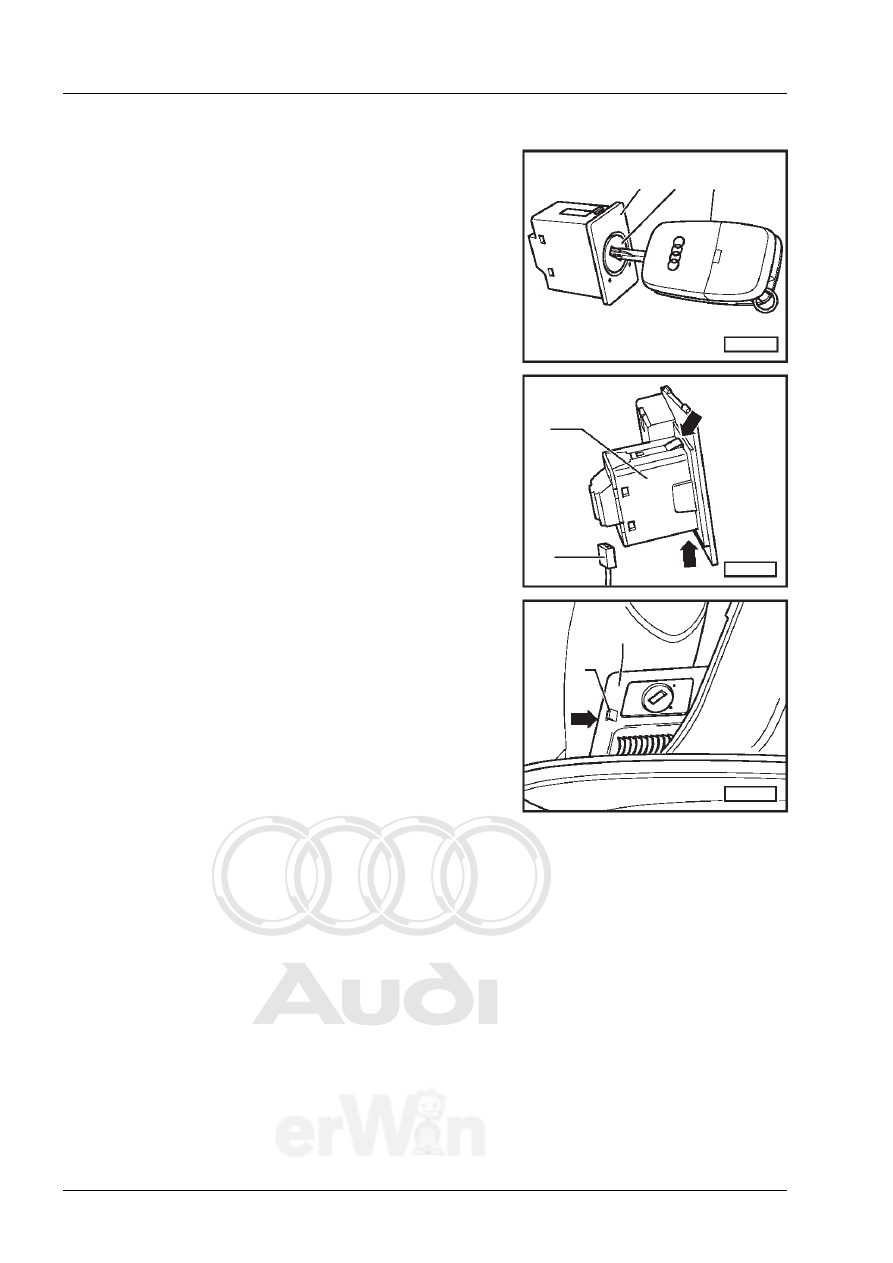
Installing key switch
–
Press lock -2- with key -3- inserted into key switch -1- until
lock -2- engages.
1
A70-0096
5
4
2
3
A69-0150
1
2
3
AIR
BA
G
OF
F
ON
Protected by copyright. Copying for private or commercial purposes, in part or in whole, is not
permitted unless authorised by AUDI AG. AUDI AG does not guarantee or accept any liability
with respect to the correctness of information in this document. Copyright by AUDI AG.
Audi A3 1997 ➤, Audi A3 2004 ➤, Audi A4 1995 ➤, Audi A4 2001 ➤, Audi A6 1998 ➤, Audi
A8 1994 ➤, Audi A8 2003 ➤
2 Service installation of key switch A3 1997➤ as of week 27.1999
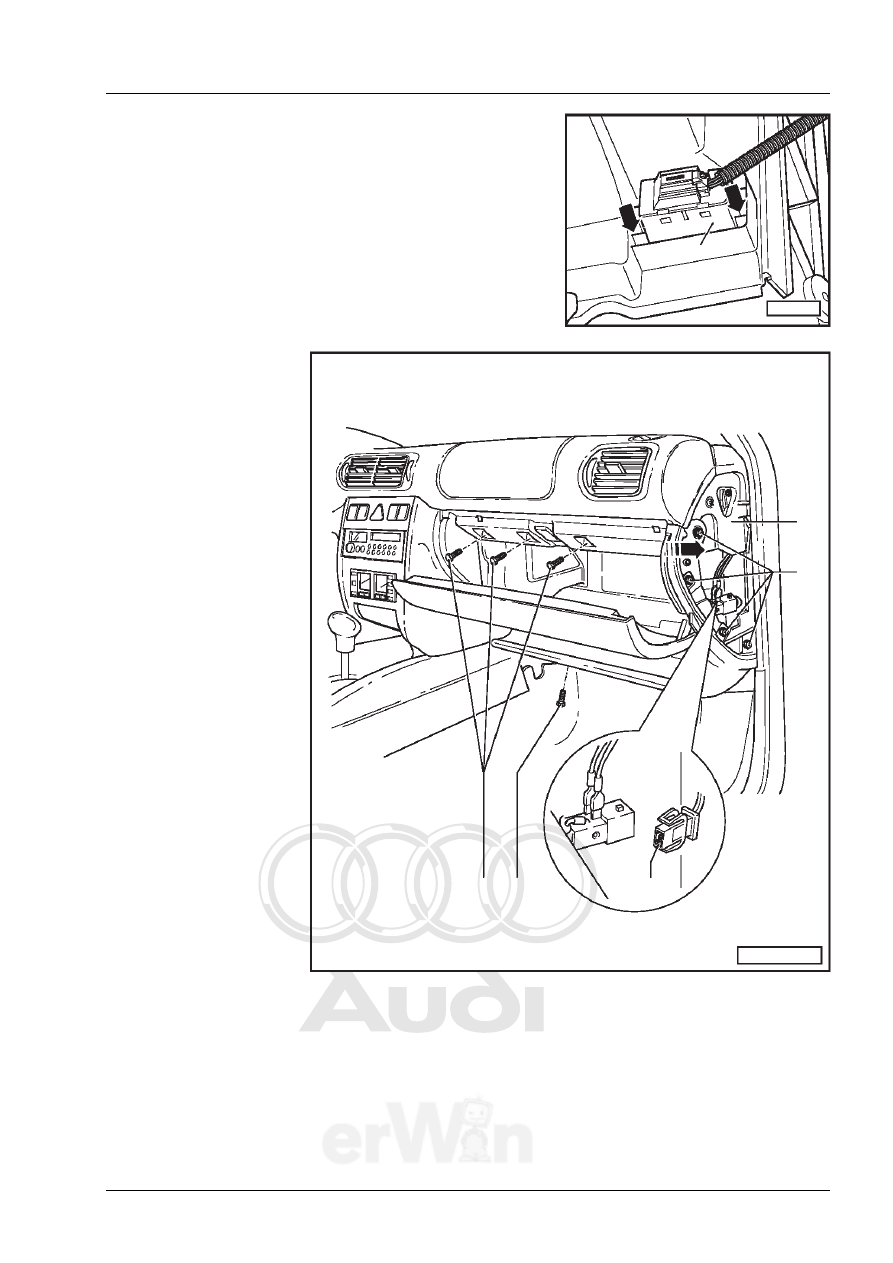
7
6
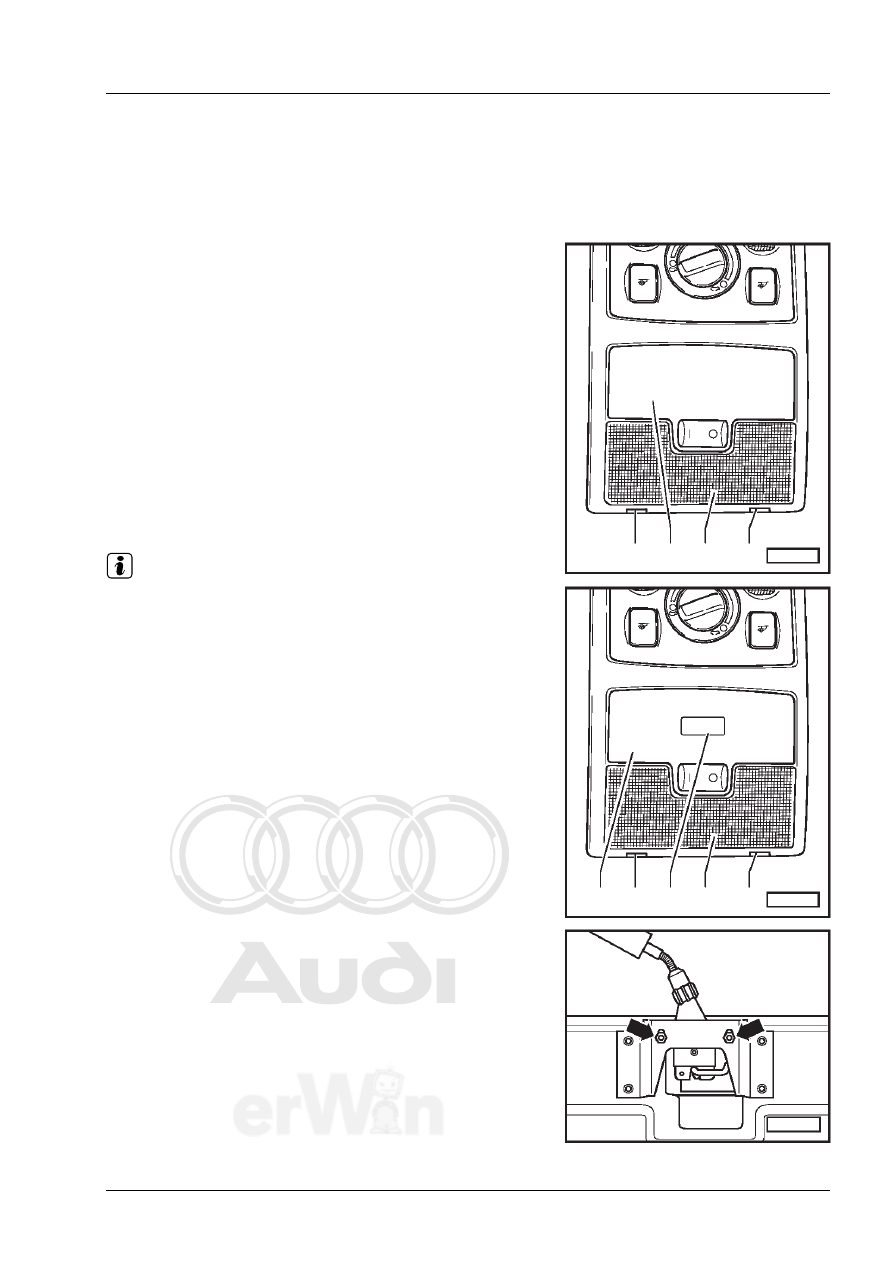
–
Press key switch -1- into new glove box until clips -arrows-
engage.
2.3
Installing new glove box
–
Place glove box in position.
–
Attach connector for glove box light and key switch.
–
Perform remaining installation operations in reverse order
of removal.
1 - Bolts (4x)
❑
Tightening torque 4
Nm
2 - Bolt (1x)
❑
Tightening torque 4
Nm
3 - Bolts (3x)
❑
Tightening torque 4
Nm
4 - Connector
5 - Mounting plate
A69-0149
1
1
A70-0096
5
4
2
3
Protected by copyright. Copying for private or commercial purposes, in part or in whole, is not
permitted unless authorised by AUDI AG. AUDI AG does not guarantee or accept any liability
with respect to the correctness of information in this document. Copyright by AUDI AG.
Audi A3 1997 ➤, Audi A3 2004 ➤, Audi A4 1995 ➤, Audi A4 2001 ➤, Audi A6 1998 ➤, Audi
A8 1994 ➤, Audi A8 2003 ➤
2 Service installation of key switch A3 1997➤ as of week 27.1999
6
8
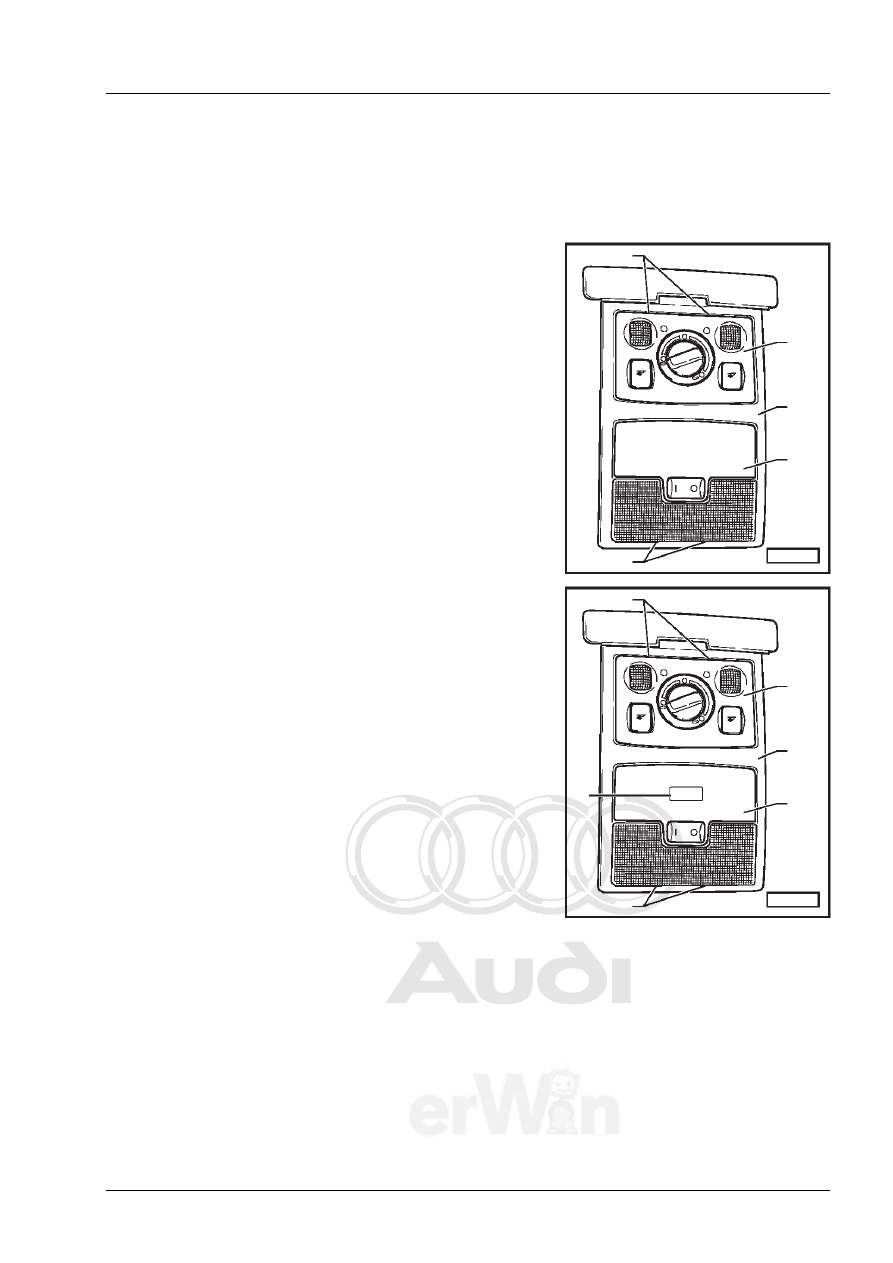
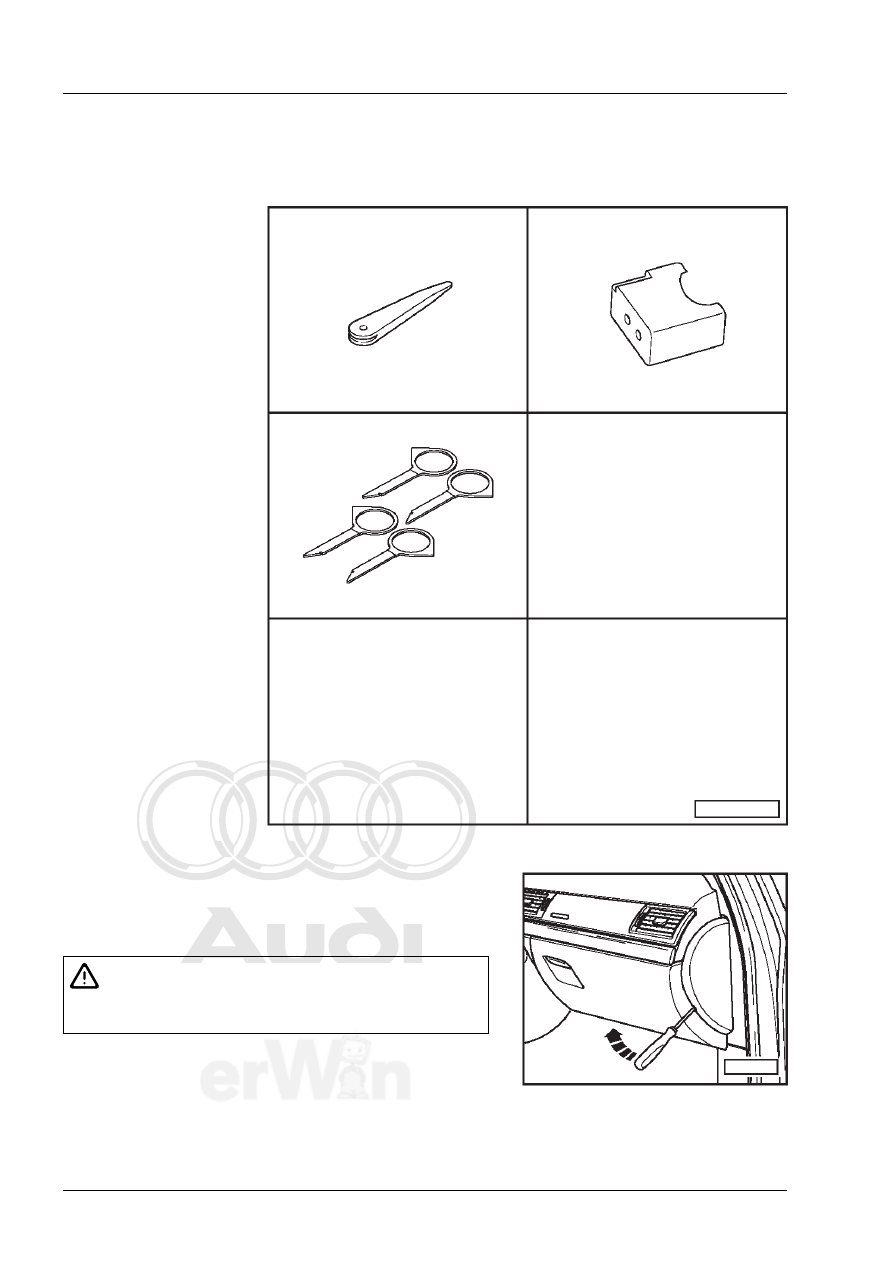
2.4
Installing “PASSENGER AIRBAG OFF”
lamp
2.4.1 Removing interior light (without “PASSENGER
AIRBAG OFF” lamp)
–
Unclip cover panels, starting at front.
–
Unscrew bolts -2- (2x).
–
Detach cover panel -1- at front.
–
Unplug connectors.
2.4.2 Installing interior light (with “PASSENGER
AIRBAG OFF” lamp)
Wiring for “PASSENGER AIRBAG OFF” lamp is already provid-
ed in interior light wiring harness.
–
Plug in interior light connector.
–
Install interior light with “PASSENGER AIRBAG OFF” lamp.
–
Encode airbag control unit for option with front passen-
ger's key switch
A70-0424
1
2
Note!
A70-0424
1
2
Protected by copyright. Copying for private or commercial purposes, in part or in whole, is not
permitted unless authorised by AUDI AG. AUDI AG does not guarantee or accept any liability
with respect to the correctness of information in this document. Copyright by AUDI AG.
Audi A3 1997 ➤, Audi A3 2004 ➤, Audi A4 1995 ➤, Audi A4 2001 ➤, Audi A6 1998 ➤, Audi
A8 1994 ➤, Audi A8 2003 ➤
3 Service installation of key switch A3 2004➤
9
6
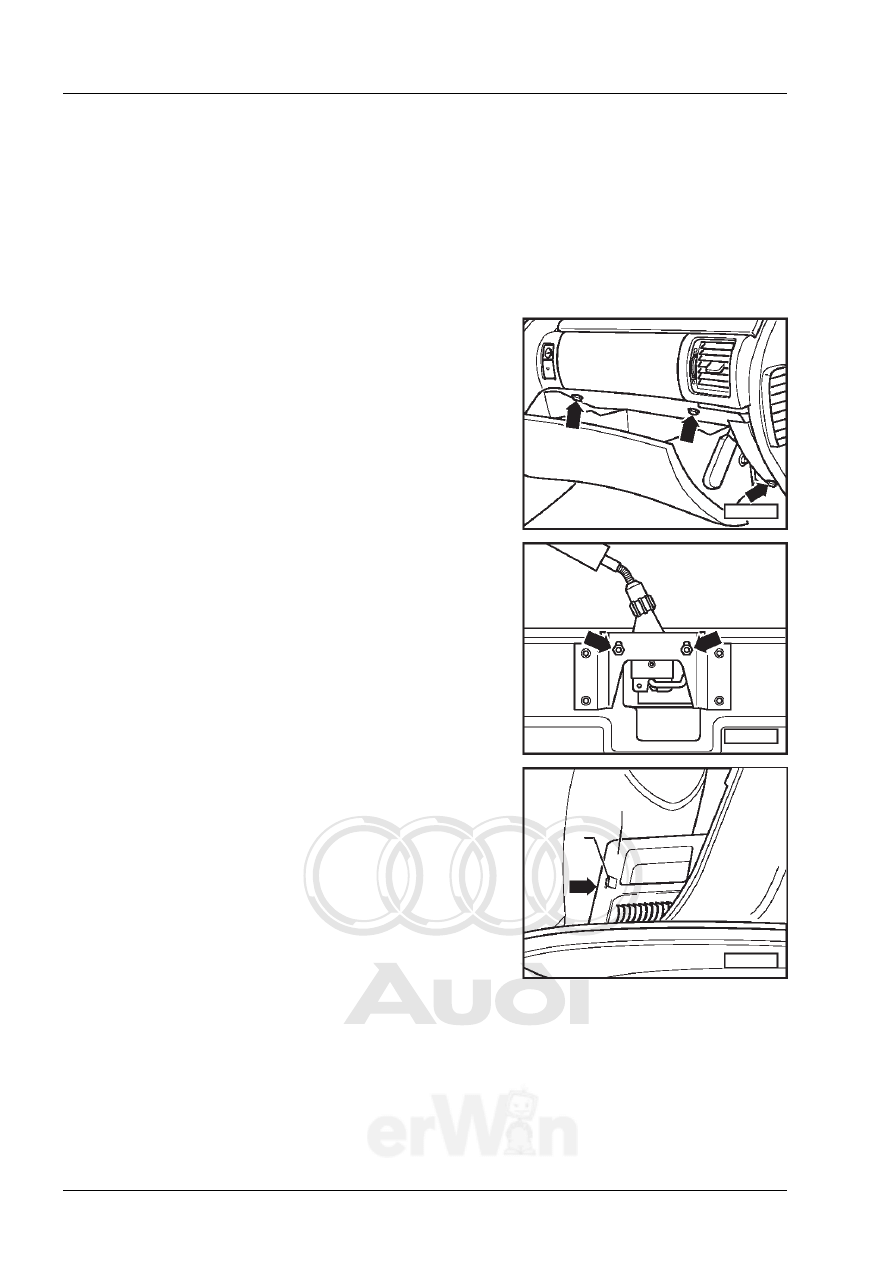
3
Service installation of key switch
A3 2004➤
3.1
Removing glove box
Special tools and workshop equipment required
♦
Torque wrench -V.A.G. 1783-
1 - Glove box
❑
With no map com-
partment
❑
With map compart-
ment
❑
With CD changer
❑
Removal and instal-
lation are identical
for all versions
♦
Removing
♦
Removal and instal-
lation are described
for a glove box with
CD changer.
♦
Mark connectors
before unplugging
to avoid inter-
change/to ensure
correct assignment.
–
Switch off all elec-
trical equipment.
–
Remove ignition
key.
–
Remove right dash
panel end trim -4-
⇒ Rep. Gr. 70.
–
Open glove box lid.
–
Remove CD changer
-9-. ⇒ Rep. Gr. 91;
Communication
–
Screw out bolt -5-.
–
From underneath, screw out bolts -6- (3x) at front edge of glove box.
W00-0990
V.A.G 1783
A68-0390
7
3
2
1
9
6
8
6
7
4
5
Note!

Protected by copyright. Copying for private or commercial purposes, in part or in whole, is not
permitted unless authorised by AUDI AG. AUDI AG does not guarantee or accept any liability
with respect to the correctness of information in this document. Copyright by AUDI AG.
Audi A3 1997 ➤, Audi A3 2004 ➤, Audi A4 1995 ➤, Audi A4 2001 ➤, Audi A6 1998 ➤, Audi
A8 1994 ➤, Audi A8 2003 ➤
3 Service installation of key switch A3 2004➤
6
10
–
Support glove box.
–
Screw out bolts -7- (2x) at rear edge of glove box.
Right-hand drive vehicles
–
Screw out bolt -8-.
All vehicles (continued)
–
Unplug glove box supply lead/wiring harness connector -2-.
–
Take out glove box.
–
Remove glove box wiring harness.
–
Use a knife to sever perforation for key switch on back of glove box and press out cover panel.
♦
Installing
Install in reverse order of removal. Pay attention to the following:
♦
Make sure connectors are heard to fully engage.
♦
Secure glove box wiring harness in clips provided
⇒ page 11
2 - Supply lead/wiring harness connector
❑
Routing and attachment of glove box wiring harness
3 - Dash panel
4 - Right dash panel end trim
❑
Removing and installing ⇒ Rep. Gr. 70
5 - Bolt, 3.5 Nm
6 - Bolts (3x), 3.5 Nm
7 - Bolts (2x), 3.5 Nm
8 - Bolt, 3.5 Nm
❑
Right-hand drive vehicles only
9 - CD changer
❑
Removing and installing ⇒ Rep. Gr. 91; Communication
Protected by copyright. Copying for private or commercial purposes, in part or in whole, is not
permitted unless authorised by AUDI AG. AUDI AG does not guarantee or accept any liability
with respect to the correctness of information in this document. Copyright by AUDI AG.
Audi A3 1997 ➤, Audi A3 2004 ➤, Audi A4 1995 ➤, Audi A4 2001 ➤, Audi A6 1998 ➤, Audi
A8 1994 ➤, Audi A8 2003 ➤
3 Service installation of key switch A3 2004➤
11
6
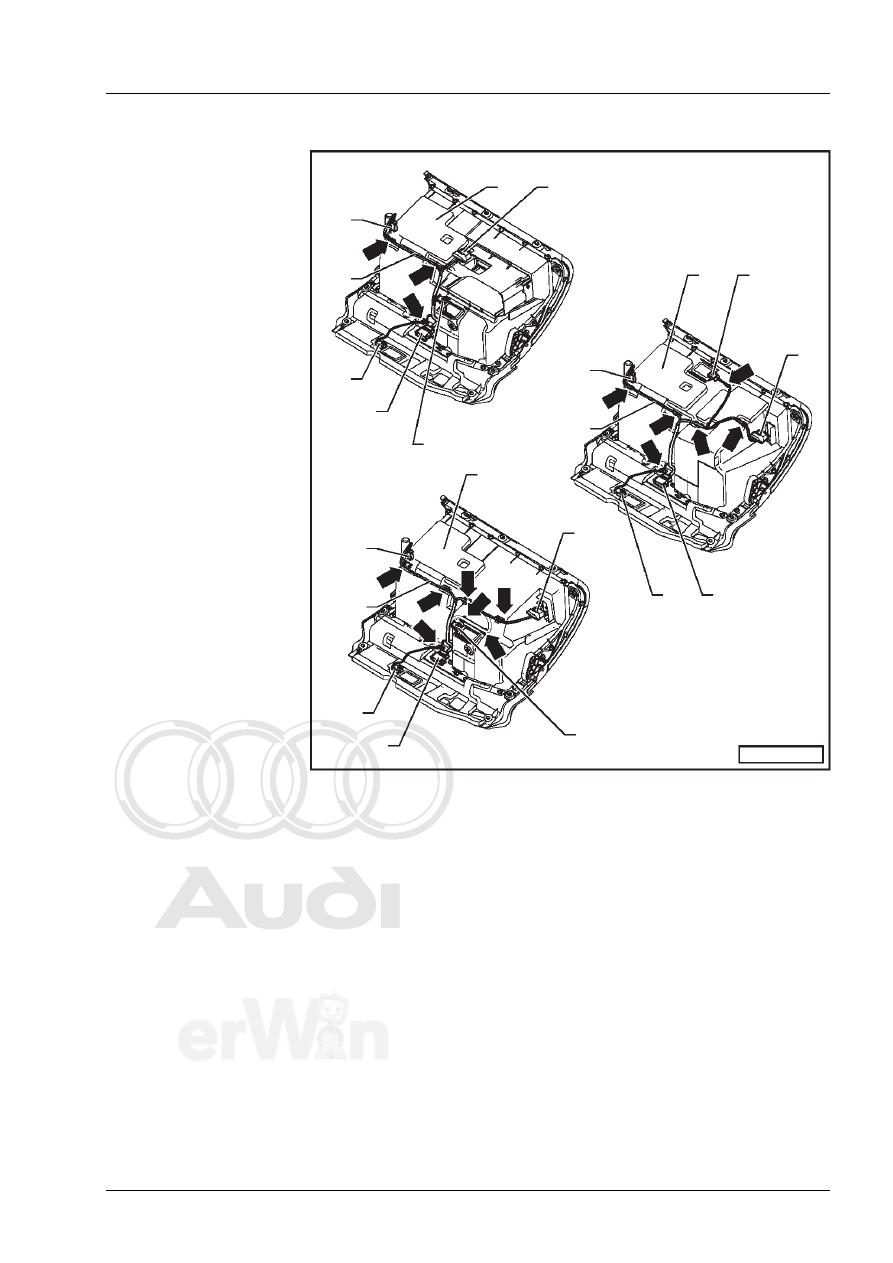
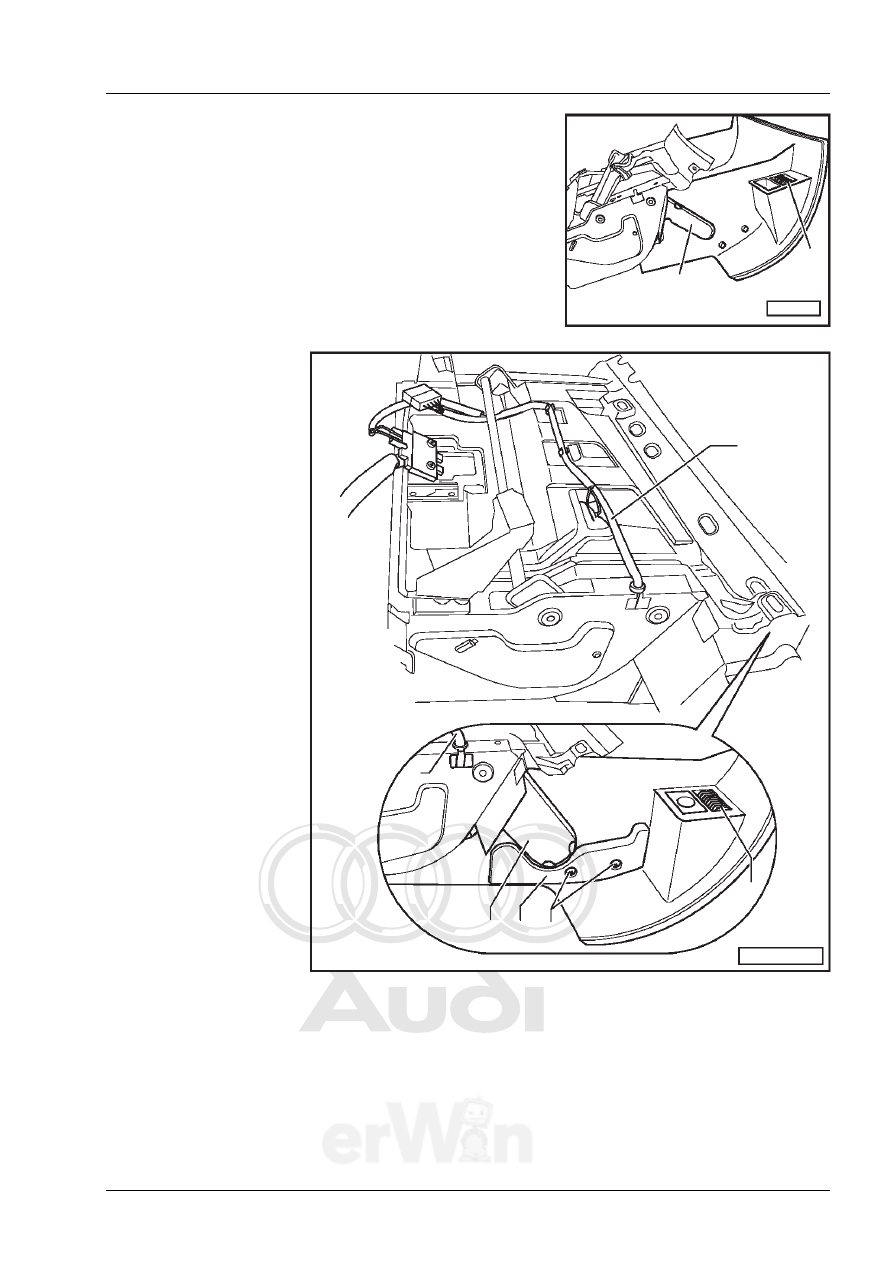
3.2
Routing and attachment of glove box wiring harness
1 - Glove box with CD
changer
2 - Key switch for front
passenger's airbag de-
activation (airbag OFF
switch)
3 - Glove box light
❑
Removing and in-
stalling
⇒ Rep. Gr. 96;
Electrical system
4 - Glove box supply lead/
wiring harness connec-
tor
5 - Footwell light
❑
Removing and in-
stalling
⇒ Rep. Gr. 96;
Electrical system
6 - Wiring harness for
glove box with CD
changer
❑
Secure wiring har-
ness for glove box
-1- with clips -ar-
rows-
7 - Illumination switch
8 - Glove box with map
compartment
9 - Glove box wiring har-
ness
❑
Secure wiring har-
ness for glove box
-8- with clips -ar-
rows-
10 - Glove box with no map compartment
11 - Glove box wiring harness
❑
Secure wiring harness for glove box -11- with clips -arrows-
A68-0391
1
2
7
6
5
4
3
8
2
3
7
9
5
4
5
4
3
10
2
7
11
Protected by copyright. Copying for private or commercial purposes, in part or in whole, is not
permitted unless authorised by AUDI AG. AUDI AG does not guarantee or accept any liability
with respect to the correctness of information in this document. Copyright by AUDI AG.
Audi A3 1997 ➤, Audi A3 2004 ➤, Audi A4 1995 ➤, Audi A4 2001 ➤, Audi A6 1998 ➤, Audi
A8 1994 ➤, Audi A8 2003 ➤
3 Service installation of key switch A3 2004➤
6
12
3.3
Installing key switch
–
Press lock -2- with key -3- inserted into key switch -1- until
lock -2- engages.
–
Press key switch -2- into glove box until clips -arrows- en-
gage.
–
Plug in connector -1-.
–
Install glove box.
3.4
Installing “PASSENGER AIRBAG OFF”
lamp
3.4.1 Removing interior light (without “PASSENGER
AIRBAG OFF” lamp)
Special tools and workshop equipment required
♦
Front end hook -3370-
–
Use front end hook -3370- to carefully detach cover panel
for reading light.
A69-0150
1
2
3
AIR
BA
G
OF
F
ON
A69-0446
1
2
3370
W00-0509
A96-0452
3370
Protected by copyright. Copying for private or commercial purposes, in part or in whole, is not
permitted unless authorised by AUDI AG. AUDI AG does not guarantee or accept any liability
with respect to the correctness of information in this document. Copyright by AUDI AG.
Audi A3 1997 ➤, Audi A3 2004 ➤, Audi A4 1995 ➤, Audi A4 2001 ➤, Audi A6 1998 ➤, Audi
A8 1994 ➤, Audi A8 2003 ➤
3 Service installation of key switch A3 2004➤
13
6
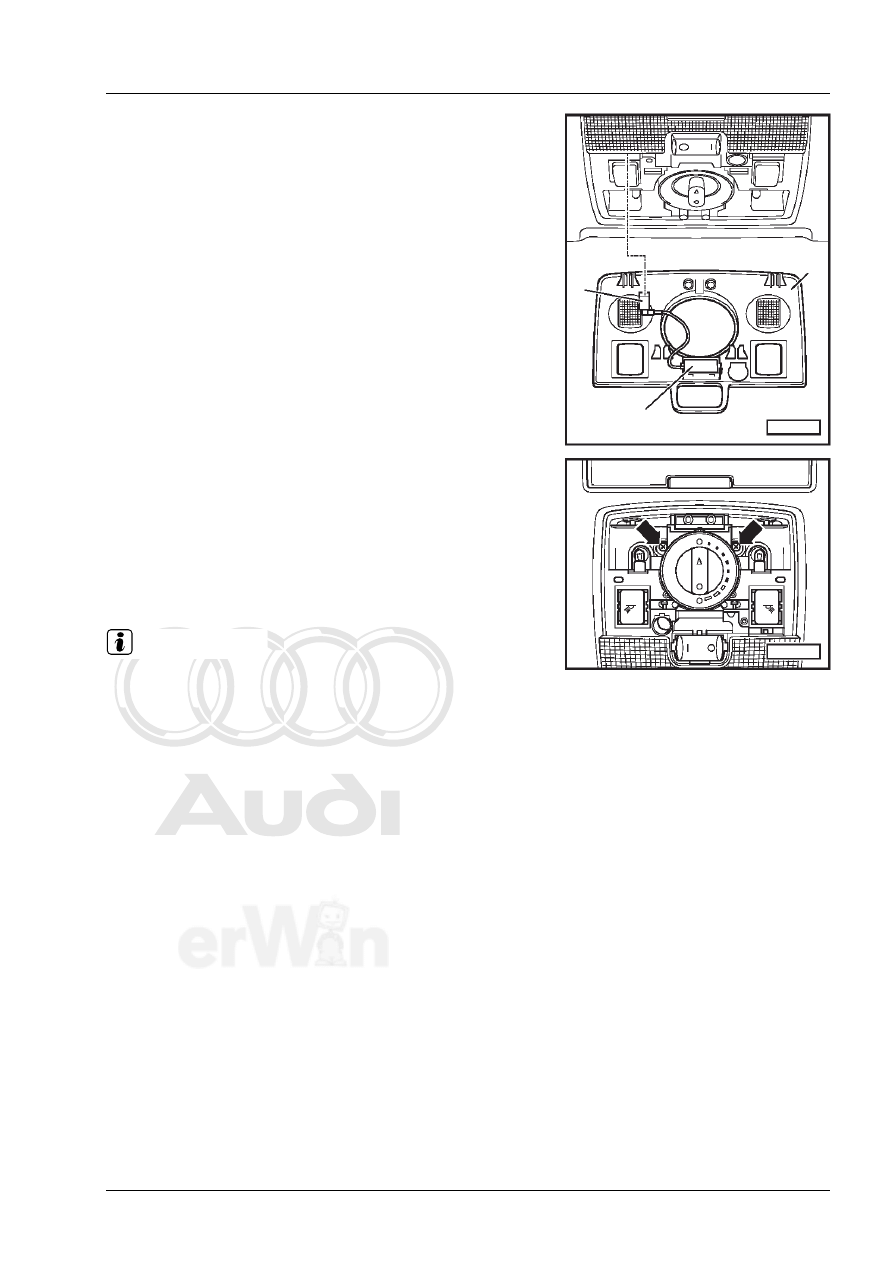
–
If applicable, unplug connector -1- of hands-free micro-
phone.
–
Screw out bolts -arrows-.
–
Swivel down interior light/reading light at front and remove
from opening in headliner.
–
Unplug connectors.
3.4.2 Installing interior light (with “PASSENGER
AIRBAG OFF” lamp)
Wiring for “PASSENGER AIRBAG OFF” lamp is already provid-
ed in interior light wiring harness.
Install in reverse order, paying attention to the following:
–
Engage and screw on interior light.
–
Press on reading light cover panel until it engages.
–
Encode airbag control unit for option with front passen-
ger's key switch
⇒ page 35
A91-0616
1
2
3
A96-0669
Note!
Protected by copyright. Copying for private or commercial purposes, in part or in whole, is not
permitted unless authorised by AUDI AG. AUDI AG does not guarantee or accept any liability
with respect to the correctness of information in this document. Copyright by AUDI AG.
Audi A3 1997 ➤, Audi A3 2004 ➤, Audi A4 1995 ➤, Audi A4 2001 ➤, Audi A6 1998 ➤, Audi
A8 1994 ➤, Audi A8 2003 ➤
4 Service installation of key switch A4 1995➤ as of chassis no.: 8DXA 200 001
6
14
4
Service installation of key switch A4 1995➤ as of chassis no.:
8DXA 200 001
4.1
Removing glove box
1 - Bolts (2x)
❑
Tightening torque 5
Nm
2 - Glove box
❑
Unclip dash panel
end trim.
❑
Unscrew bolts -1-
(2x).
❑
Unscrew bolt -3-
(1x).
❑
Open glove box.
❑
Unscrew bolts -4-
(2x).
❑
Pull out glove box
slightly.
❑
Unplug connector
for glove box light.
3 - Bolt (1x)
❑
Tightening torque 5
Nm
4 - Bolts (2x)
❑
Tightening torque 5
Nm
5 - Cross member for dash
panel
4.2
Converting glove box
–
Drill a hole with a diameter of 4 mm at each of the marks
-1- (2x).
A70-0029
2
5
1
5
2
1
3
4
A69-0178
1
1
2

Protected by copyright. Copying for private or commercial purposes, in part or in whole, is not
permitted unless authorised by AUDI AG. AUDI AG does not guarantee or accept any liability
with respect to the correctness of information in this document. Copyright by AUDI AG.
Audi A3 1997 ➤, Audi A3 2004 ➤, Audi A4 1995 ➤, Audi A4 2001 ➤, Audi A6 1998 ➤, Audi
A8 1994 ➤, Audi A8 2003 ➤
4 Service installation of key switch A4 1995➤ as of chassis no.: 8DXA 200 001
15
6
–
Mark cut-out dimensions -A- 4 mm, -B- 30 mm and -C- 30
mm.
–
Drill a hole with a diameter of 10 mm at edge of mark.
–
Use commercially available compass saw to make glove
box cut-out along mark.
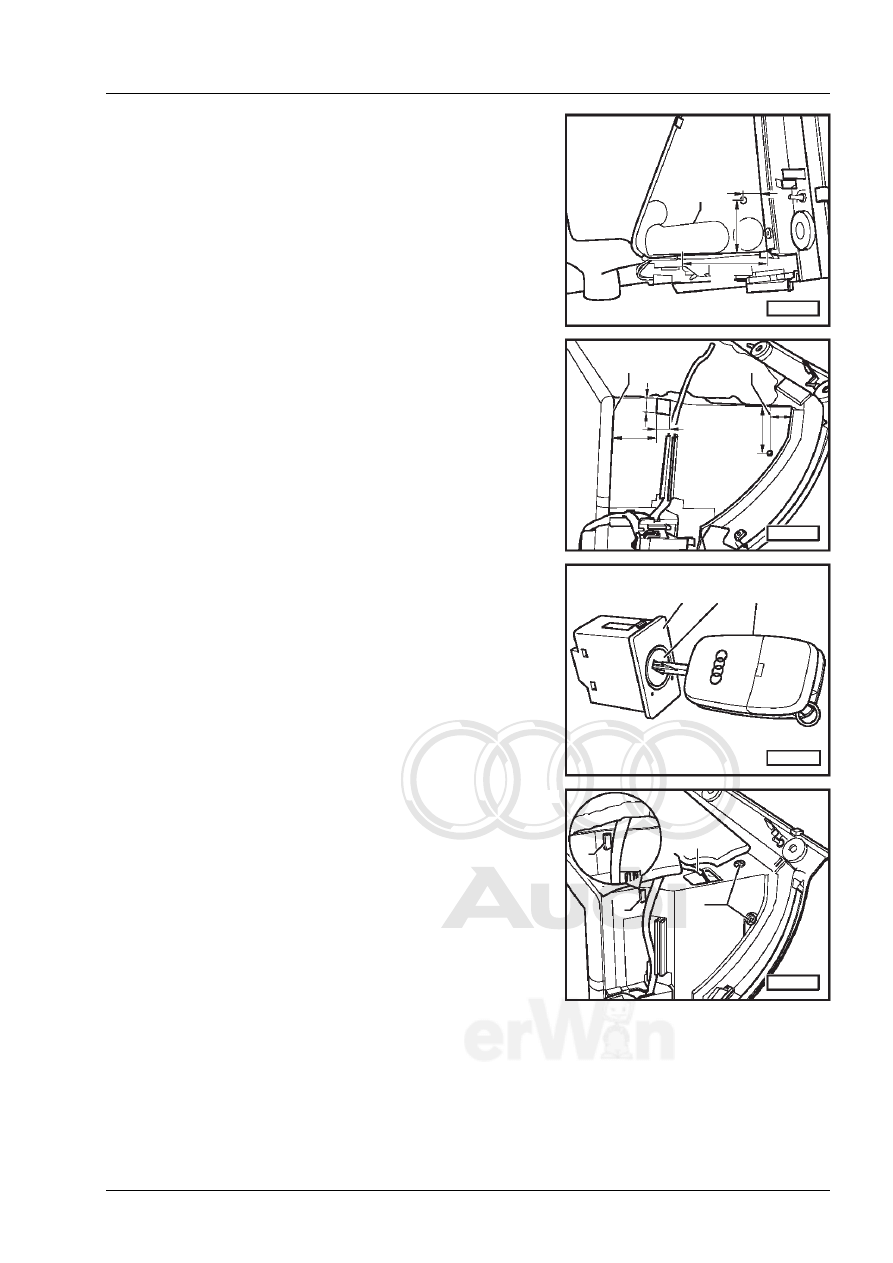
4.3
Installing key switch
–
Press lock -2- with key -3- inserted into key switch -1- until
lock -2- engages.
–
Insert key switch in key switch mount.
–
Engage key switch mount at lugs -2- (2x) and screw on
with bolts -1- (2x).
–
Unplug connector for key switch from wiring harness.
A70-0739
B
C
A
A69-0150
1
2
3
AIR
BA
G
OF
F
ON
A69-0178
1
1
2
Protected by copyright. Copying for private or commercial purposes, in part or in whole, is not
permitted unless authorised by AUDI AG. AUDI AG does not guarantee or accept any liability
with respect to the correctness of information in this document. Copyright by AUDI AG.
Audi A3 1997 ➤, Audi A3 2004 ➤, Audi A4 1995 ➤, Audi A4 2001 ➤, Audi A6 1998 ➤, Audi
A8 1994 ➤, Audi A8 2003 ➤
4 Service installation of key switch A4 1995➤ as of chassis no.: 8DXA 200 001
6
16
4.4
Installing glove box
1 - Bolts (2x)
❑
Tightening torque 5
Nm
2 - Glove box
❑
Place glove box -2-
in position.
❑
Attach connector
for glove box light
and key switch.
❑
Perform remaining
installation opera-
tions in reverse or-
der of removal.
3 - Bolt (1x)
❑
Tightening torque 5
Nm
4 - Bolts (2x)
❑
Tightening torque 5
Nm
5 - Cross member for dash
panel
A70-0029
2
5
1
5
2
1
3
4
Protected by copyright. Copying for private or commercial purposes, in part or in whole, is not
permitted unless authorised by AUDI AG. AUDI AG does not guarantee or accept any liability
with respect to the correctness of information in this document. Copyright by AUDI AG.
Audi A3 1997 ➤, Audi A3 2004 ➤, Audi A4 1995 ➤, Audi A4 2001 ➤, Audi A6 1998 ➤, Audi
A8 1994 ➤, Audi A8 2003 ➤
4 Service installation of key switch A4 1995➤ as of chassis no.: 8DXA 200 001
17
6
4.5
Installing “PASSENGER AIRBAG OFF”
lamp
4.5.1 Removing interior light (without “PASSENGER
AIRBAG OFF” lamp)
–
Unclip cover panels, starting at front.
–
Unscrew bolts -2- (2x).
–
Detach cover panel -1- at front.
–
Unplug connectors.
4.5.2 Installing interior light (with “PASSENGER
AIRBAG OFF” lamp)
Wiring for “PASSENGER AIRBAG OFF” lamp is already provid-
ed in interior light wiring harness.
–
Plug in interior light connector.
–
Install interior light with “PASSENGER AIRBAG OFF” lamp.
–
Encode airbag control unit for option with front passen-
ger's key switch
⇒ page 35
A70-0424
1
2
Note!
A70-0424
1
2
Protected by copyright. Copying for private or commercial purposes, in part or in whole, is not
permitted unless authorised by AUDI AG. AUDI AG does not guarantee or accept any liability
with respect to the correctness of information in this document. Copyright by AUDI AG.
Audi A3 1997 ➤, Audi A3 2004 ➤, Audi A4 1995 ➤, Audi A4 2001 ➤, Audi A6 1998 ➤, Audi
A8 1994 ➤, Audi A8 2003 ➤
5 Service installation of key switch A4 2001➤
6
18
5
Service installation of key switch A4 2001➤
5.1
Removing glove box
1 - Glove box
♦
Removing
–
Unclip end trim -2-.
–
Open glove box lid.
–
Slacken off the three bolts -3- at top in recesses of glove
box -1-.
–
Working from the side, slacken off bolts -5- (2x) from out-
side.
–
Working from footwell, slacken off bolts -4- (2x) from un-
derneath.
–
Take out glove box downwards.
–
Unplug connector -6- of glove box light.
A68-0211
1
2
3
4
5
6
7
5
4
Protected by copyright. Copying for private or commercial purposes, in part or in whole, is not
permitted unless authorised by AUDI AG. AUDI AG does not guarantee or accept any liability
with respect to the correctness of information in this document. Copyright by AUDI AG.
Audi A3 1997 ➤, Audi A3 2004 ➤, Audi A4 1995 ➤, Audi A4 2001 ➤, Audi A6 1998 ➤, Audi
A8 1994 ➤, Audi A8 2003 ➤
5 Service installation of key switch A4 2001➤
19
6
2 - End trim
3 - Bolts (3x)
❑
Tightening torque 5
Nm
4 - Bolts (2x)
❑
Tightening torque 5
Nm
5 - Bolts (2x)
❑
Tightening torque 5
Nm
6 - Connector
7 - Dash panel
5.2
Converting glove box
–
Remove glove box wiring harness.
–
Use a knife to sever perforation on back of glove box and
press out cover panel.
–
Install new glove box wiring harness.
A68-0211
1
2
3
4
5
6
7
5
4
Protected by copyright. Copying for private or commercial purposes, in part or in whole, is not
permitted unless authorised by AUDI AG. AUDI AG does not guarantee or accept any liability
with respect to the correctness of information in this document. Copyright by AUDI AG.
Audi A3 1997 ➤, Audi A3 2004 ➤, Audi A4 1995 ➤, Audi A4 2001 ➤, Audi A6 1998 ➤, Audi
A8 1994 ➤, Audi A8 2003 ➤
5 Service installation of key switch A4 2001➤
6
20
5.3
Installing key switch
–
Press lock -2- with key -3- inserted into key switch -1- until
lock -2- engages.
–
Insert key switch in key switch mount.
5.4
Installing glove box
1 - Glove box
❑
Place glove box -1-
in position.
❑
Attach connector
for glove box light
and key switch.
❑
Perform remaining
installation opera-
tions in reverse or-
der of removal.
2 - End trim
3 - Bolts (3x)
❑
Tightening torque 5
Nm
4 - Bolts (2x)
❑
Tightening torque 5
Nm
5 - Bolts (2x)
❑
Tightening torque 5
Nm
6 - Connector
7 - Dash panel
A69-0150
1
2
3
AIR
BA
G
OF
F
ON
A68-0211
1
2
3
4
5
6
7
5
4
Protected by copyright. Copying for private or commercial purposes, in part or in whole, is not
permitted unless authorised by AUDI AG. AUDI AG does not guarantee or accept any liability
with respect to the correctness of information in this document. Copyright by AUDI AG.
Audi A3 1997 ➤, Audi A3 2004 ➤, Audi A4 1995 ➤, Audi A4 2001 ➤, Audi A6 1998 ➤, Audi
A8 1994 ➤, Audi A8 2003 ➤
5 Service installation of key switch A4 2001➤
21
6
5.5
Installing “PASSENGER AIRBAG OFF”
lamp
5.5.1
Removing interior light (without “PASSENGER
AIRBAG OFF” lamp)
–
Prise out cover panel for interior light -3- at locations
marked -5-.
5.5.2 Installing interior light (with “PASSENGER
AIRBAG OFF” lamp)
–
Locate cable for “PASSENGER AIRBAG 0FF” lamp -5- in
area of moulded headliner opening -2-.
–
Plug in connector for interior light -3-.
–
Plug in connector for “PASSENGER AIRBAG 0FF” lamp -5-.
–
Install interior light -3-.
–
Encode airbag control unit for option with front passen-
ger's key switch
⇒ page 35
A70-0221
5
2
3
1
4
4
2
3
1
6
5
A70-0629
PASSENGER
AIRBAG OFF

Protected by copyright. Copying for private or commercial purposes, in part or in whole, is not
permitted unless authorised by AUDI AG. AUDI AG does not guarantee or accept any liability
with respect to the correctness of information in this document. Copyright by AUDI AG.
Audi A3 1997 ➤, Audi A3 2004 ➤, Audi A4 1995 ➤, Audi A4 2001 ➤, Audi A6 1998 ➤, Audi
A8 1994 ➤, Audi A8 2003 ➤
6 Service installation of key switch A6 1998➤ as of week 36.1998
6
22
6
Service installation of key switch A6 1998➤ as of week 36.1998
6.1
Removing glove box
1 - Glove box
❑
Open glove box lid
and unscrew bolts
-3- (3x).
❑
Unscrew bolts -4-
(2x).
❑
Take out glove box
downwards.
❑
Unplug connector
-2-.
2 - Connector
3 - Bolts (3x)
❑
Tightening torque 5
Nm
4 - Bolts (2x)
❑
Tightening torque 5
Nm
5 - Moulding
6 - Rubber studs
7 - Dash panel
6.2
Converting glove box
–
Remove glove box wiring harness.
–
Convert glove box if cut-outs are not provided.
4
A68-0061
1
2
3
7
6
4
5
Protected by copyright. Copying for private or commercial purposes, in part or in whole, is not
permitted unless authorised by AUDI AG. AUDI AG does not guarantee or accept any liability
with respect to the correctness of information in this document. Copyright by AUDI AG.
Audi A3 1997 ➤, Audi A3 2004 ➤, Audi A4 1995 ➤, Audi A4 2001 ➤, Audi A6 1998 ➤, Audi
A8 1994 ➤, Audi A8 2003 ➤
6 Service installation of key switch A6 1998➤ as of week 36.1998
23
6
–
Drill a hole with a diameter of 10 mm at edge of mark -1-.
–
Use commercially available compass saw to cut along
mark -1- to a depth of approx. 80 mm, dimension -A-.
–
Drill a hole with a diameter of 3 mm, dimension -B- 39 mm
and dimension -C- 16 mm.
–
Mark projection line -2- with dimension -E- 15 mm.
–
Drill a hole with a diameter of 3 mm at dimension -D- 45
mm.
–
Cut a hole 38 mm (dimension -A-) from edge -1- at glove
box, with dimensions -B- 11 mm and -C- 11 mm.
–
Install new glove box wiring harness.
6.3
Installing key switch
–
Press lock -2- with key -3- inserted into key switch -1- until
lock -2- engages.
–
Insert key switch in key switch mount.
–
Engage key switch mount at lug -1- and screw on with
bolts -2- (2x).
–
Connect cable -3- to key switch.
A70-0738
A
B
C
1
B
D
E
A70-0737
1
2
A
C
A69-0150
1
2
3
AIR
BA
G
OF
F
ON
A70-0757
1
3
2
1
Protected by copyright. Copying for private or commercial purposes, in part or in whole, is not
permitted unless authorised by AUDI AG. AUDI AG does not guarantee or accept any liability
with respect to the correctness of information in this document. Copyright by AUDI AG.
Audi A3 1997 ➤, Audi A3 2004 ➤, Audi A4 1995 ➤, Audi A4 2001 ➤, Audi A6 1998 ➤, Audi
A8 1994 ➤, Audi A8 2003 ➤
6 Service installation of key switch A6 1998➤ as of week 36.1998
6
24
6.4
Installing glove box
1 - Glove box
❑
Plug in connector
-2-.
❑
Working from un-
derneath, guide
moulding -5- with
rubber studs -6- to-
wards dash panel
-7- and engage
glove box.
❑
Screw in bolts -3-
and -4-.
2 - Connector
3 - Bolts (3x)
❑
Tightening torque 5
Nm
4 - Bolts (2x)
❑
Tightening torque 5
Nm
5 - Moulding
6 - Rubber studs
7 - Dash panel
4
A68-0061
1
2
3
7
6
4
5
Protected by copyright. Copying for private or commercial purposes, in part or in whole, is not
permitted unless authorised by AUDI AG. AUDI AG does not guarantee or accept any liability
with respect to the correctness of information in this document. Copyright by AUDI AG.
Audi A3 1997 ➤, Audi A3 2004 ➤, Audi A4 1995 ➤, Audi A4 2001 ➤, Audi A6 1998 ➤, Audi
A8 1994 ➤, Audi A8 2003 ➤
6 Service installation of key switch A6 1998➤ as of week 36.1998
25
6
6.5
Installing “PASSENGER AIRBAG OFF”
lamp
6.5.1 Removing interior light (without “PASSENGER
AIRBAG OFF” lamp)
–
Prise out cover panel for interior light -3- at locations
marked -5-.
6.5.2 Installing interior light (with “PASSENGER
AIRBAG OFF” lamp)
–
Locate cable for “PASSENGER AIRBAG 0FF” lamp -5- in
area of moulded headliner opening -2-.
–
Plug in connector for interior light -3-.
–
Plug in connector for “PASSENGER AIRBAG 0FF” lamp -5-.
–
Install interior light -3-.
–
Encode airbag control unit for option with front passen-
ger's key switch
⇒ page 35
A70-0221
5
2
3
1
4
4
2
3
1
6
5
A70-0629
PASSENGER
AIRBAG OFF
Protected by copyright. Copying for private or commercial purposes, in part or in whole, is not
permitted unless authorised by AUDI AG. AUDI AG does not guarantee or accept any liability
with respect to the correctness of information in this document. Copyright by AUDI AG.
Audi A3 1997 ➤, Audi A3 2004 ➤, Audi A4 1995 ➤, Audi A4 2001 ➤, Audi A6 1998 ➤, Audi
A8 1994 ➤, Audi A8 2003 ➤
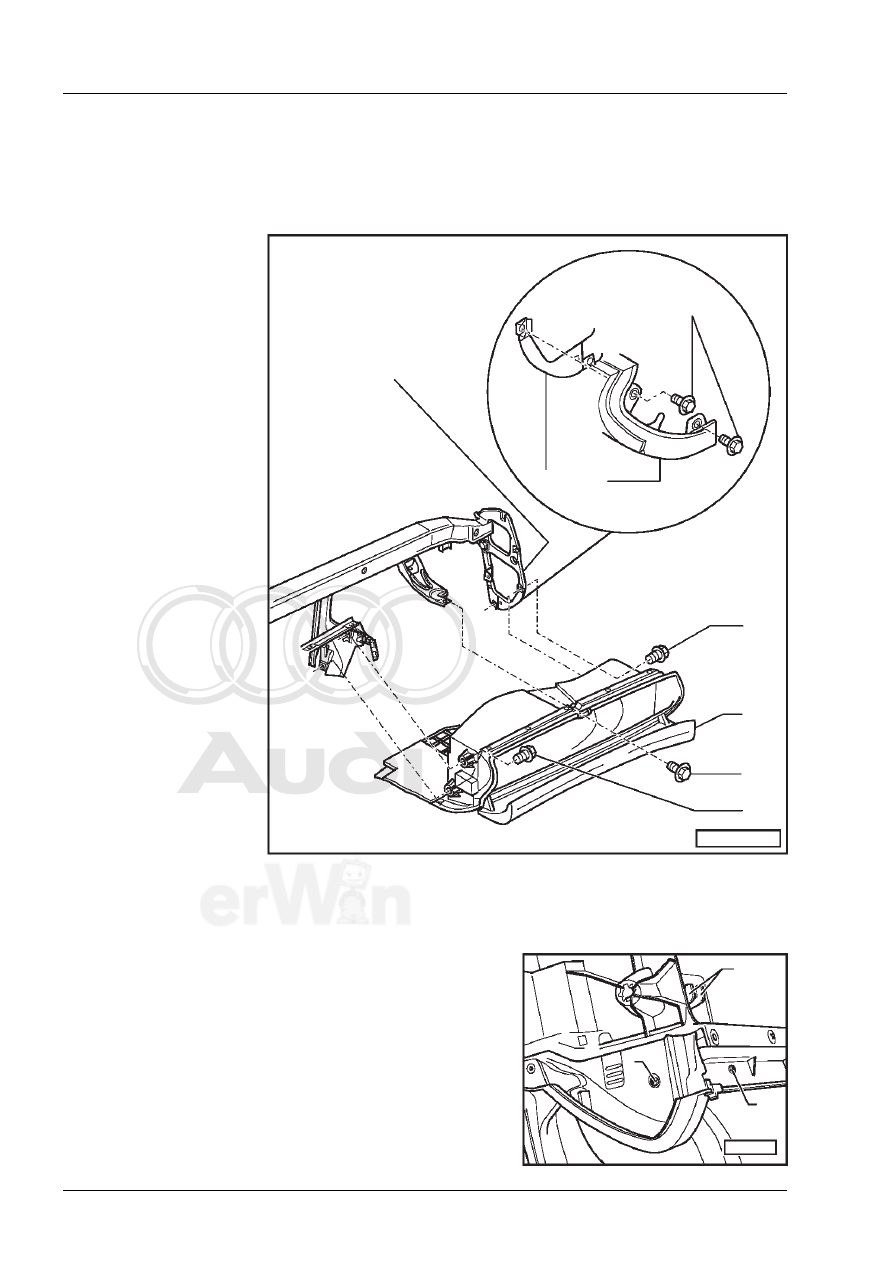
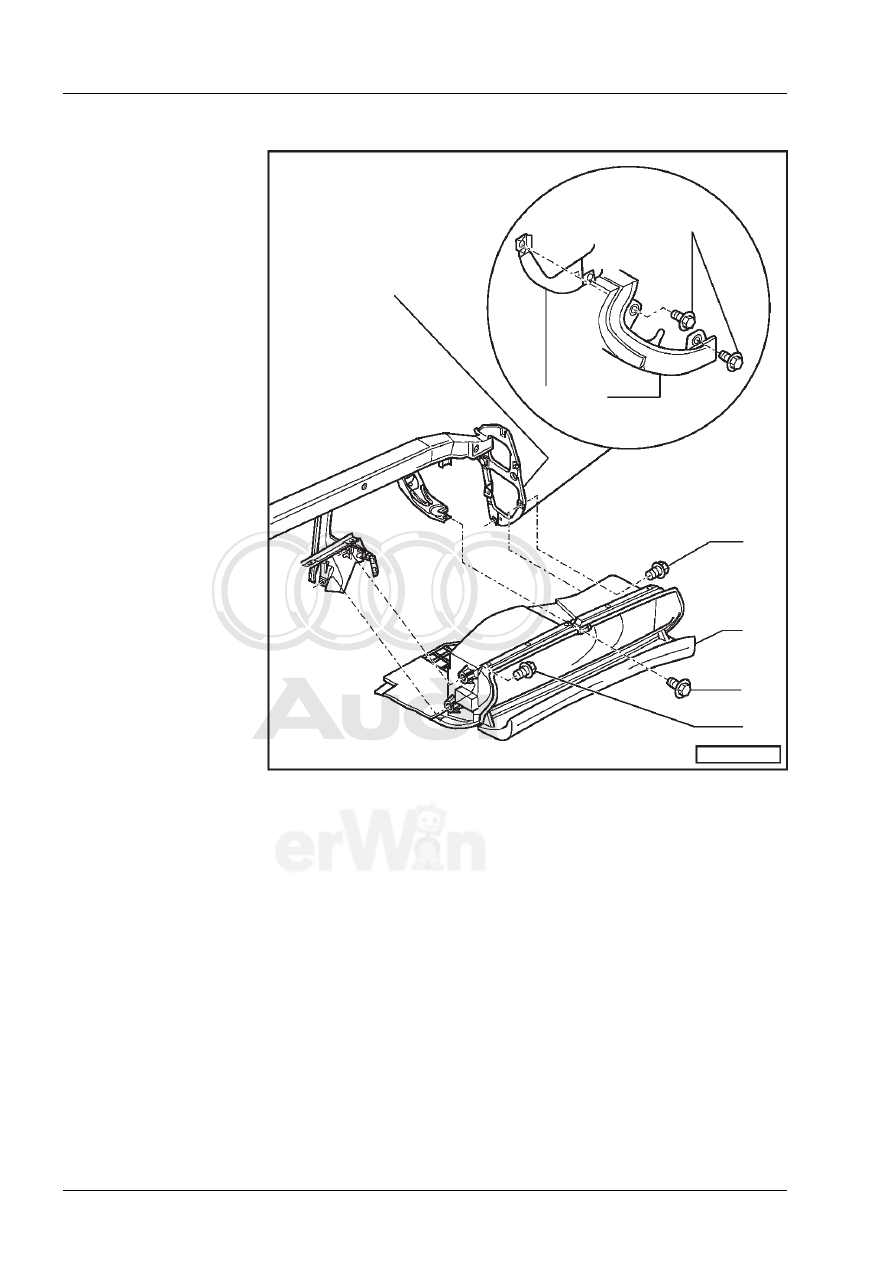
7 Service installation of key switch A8 1994➤ gradual introduction since October 1998 (with
front + side or front + head airbag)
6
26
7
Service installation of key switch
A8 1994➤ gradual introduction
since October 1998 (with front +
side or front + head airbag)
7.1
Removing glove box
–
Open glove box.
–
Unscrew frame for glove box -arrows-.
–
Pull frame with glove box to rear out of guides.
–
Unplug connectors and set down glove box in passenger's
footwell.
–
Unscrew glove box lock from glove box -arrows-.
7.2
Converting glove box
–
Use flat screwdriver to press retainer tab -2- and take out
cover panel (coin holder) -1-.
A96-0123
AIRBAG
A68-0137
A68-0205
2
1
Protected by copyright. Copying for private or commercial purposes, in part or in whole, is not
permitted unless authorised by AUDI AG. AUDI AG does not guarantee or accept any liability
with respect to the correctness of information in this document. Copyright by AUDI AG.
Audi A3 1997 ➤, Audi A3 2004 ➤, Audi A4 1995 ➤, Audi A4 2001 ➤, Audi A6 1998 ➤, Audi
A8 1994 ➤, Audi A8 2003 ➤
7 Service installation of key switch A8 1994➤ gradual introduction since October 1998 (with
front + side or front + head airbag)
27
6
–
Unclip trim -2-.
–
Remove old wiring harness -5-.
–
Install new wiring harness -5-.
–
Route wiring harness -5- beneath trim panels -4- and -3-
such that wiring harness does not rub on hinge.
–
Clip in trim -4-.
–
Use bolts -2- to screw in trim -3-.
–
Install new trim -1- with key switch
⇒ page 28
1 - Coin holder with key
switch
2 - Bolts (2x)
3 - Wiring harness trim
4 - Hinge trim
5 - Wiring harness
A68-0206
1
2
A68-0207
1
2
3
4
5
5
Protected by copyright. Copying for private or commercial purposes, in part or in whole, is not
permitted unless authorised by AUDI AG. AUDI AG does not guarantee or accept any liability
with respect to the correctness of information in this document. Copyright by AUDI AG.
Audi A3 1997 ➤, Audi A3 2004 ➤, Audi A4 1995 ➤, Audi A4 2001 ➤, Audi A6 1998 ➤, Audi
A8 1994 ➤, Audi A8 2003 ➤
7 Service installation of key switch A8 1994➤ gradual introduction since October 1998 (with
front + side or front + head airbag)
6
28
7.3
Installing key switch
–
Press lock -2- with key -3- inserted into key switch -1- until
lock -2- engages.
–
Press key switch -1- into trim until clips -arrows- engage.
–
Plug in connector -2-.
–
Press cover panel -1- into glove box until spring -2- engag-
es.
A69-0150
1
2
3
AIR
BA
G
OF
F
ON
A69-0162
1
2
A69-0161
2
AIR
BAG
AIR
OFF
1
Protected by copyright. Copying for private or commercial purposes, in part or in whole, is not
permitted unless authorised by AUDI AG. AUDI AG does not guarantee or accept any liability
with respect to the correctness of information in this document. Copyright by AUDI AG.
Audi A3 1997 ➤, Audi A3 2004 ➤, Audi A4 1995 ➤, Audi A4 2001 ➤, Audi A6 1998 ➤, Audi
A8 1994 ➤, Audi A8 2003 ➤
7 Service installation of key switch A8 1994➤ gradual introduction since October 1998 (with
front + side or front + head airbag)
29
6
7.4
Installing “PASSENGER AIRBAG OFF”
lamp
7.4.1
Removing interior light (without “PASSENGER
AIRBAG OFF” lamp)
–
Prise out cover panel for interior light -2- at locations
marked -3-.
–
Prise out interior light -1- at locations marked -3-.
–
Unplug connector for interior light -1-.
7.4.2 Installing interior light (with “PASSENGER
AIRBAG OFF” lamp)
Wiring for “PASSENGER AIRBAG OFF” lamp is already provid-
ed in interior light wiring harness.
–
Plug in interior light connector -1-.
–
Install interior light -1- with cover panel for interior light -2-.
7.5
Installing glove box
–
Screw glove box lock to glove box -arrows-.
Install in reverse order, paying attention to the following:
–
If glove box will not close or there is play, adjust lock for
glove box by moving it in elongated holes -arrows-.
–
Encode airbag control unit for option with front passen-
ger's key switch
⇒ page 35
3
A70-0758
3
1
2
Note!
3
3
4
2
PASSENGER
AIRBAG OFF
1
A70-0759
A68-0137
Protected by copyright. Copying for private or commercial purposes, in part or in whole, is not
permitted unless authorised by AUDI AG. AUDI AG does not guarantee or accept any liability
with respect to the correctness of information in this document. Copyright by AUDI AG.
Audi A3 1997 ➤, Audi A3 2004 ➤, Audi A4 1995 ➤, Audi A4 2001 ➤, Audi A6 1998 ➤, Audi
A8 1994 ➤, Audi A8 2003 ➤
8 Service installation of key switch A8 2003➤
6
30
8
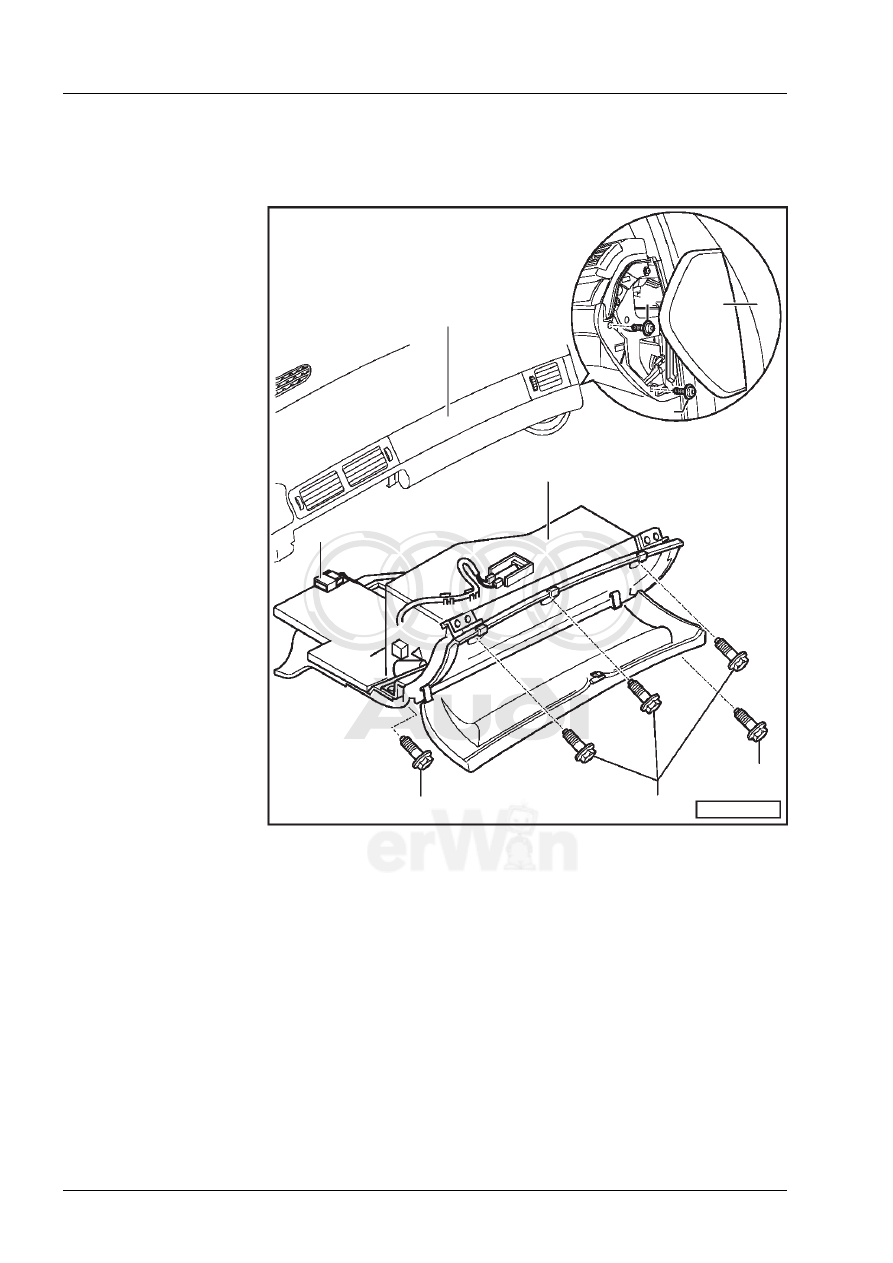
Service installation of key switch A8 2003➤
8.1
Removing glove box
Special tools and workshop
equipment required
♦
Disassembly tool -3409-
♦
Protective cap
-VAS 6223/9-
♦
Radio release tool
-T10057-
Removing
–
Disconnect battery on vehicles with knee airbag
⇒ Rep. Gr. 27.
–
Use screwdriver to prise off right dash panel end trim -ar-
row-.
T10057
3409
G68-0001
VAS 6223/9
Caution!
Heed safety precautions for working on airbags
⇒ Rep. Gr. 69.
A68-0301
Protected by copyright. Copying for private or commercial purposes, in part or in whole, is not
permitted unless authorised by AUDI AG. AUDI AG does not guarantee or accept any liability
with respect to the correctness of information in this document. Copyright by AUDI AG.
Audi A3 1997 ➤, Audi A3 2004 ➤, Audi A4 1995 ➤, Audi A4 2001 ➤, Audi A6 1998 ➤, Audi
A8 1994 ➤, Audi A8 2003 ➤
8 Service installation of key switch A8 2003➤
31
6
–
If applicable, remove CD changer as follows:
–
Insert 2 keys of radio release tool -T10057- in front of CD
changer.
♦
Top L - top left
♦
Top R - top right
–
Pull CD changer out of mounting frame.
–
Unplug connector.
–
Unplug connector for optical fibre.
–
Seal open wiring harness connector -2- of optical fibre with
protective cap -VAS 6223/9- -Item 1-.
The protective cap is designed to prevent contamination of or
mechanical damage to end face of optical fibre, which would
impair light transmission.
–
Press catches at CD changer and pull release tool out of
CD changer.
–
If applicable, remove storage compartment in glove box.
To do so, use small screwdriver to release retainer tabs -1-
and -2- in -direction of arrow-.
–
Pull storage compartment out of glove box.
–
Screw out bolts -arrows-.
–
Screw out bolts -1- and -2-.
T10057
A91-0893
A97-0760
1
2
Note!
A68-0462
2
1
A68-0305
1
2
Protected by copyright. Copying for private or commercial purposes, in part or in whole, is not
permitted unless authorised by AUDI AG. AUDI AG does not guarantee or accept any liability
with respect to the correctness of information in this document. Copyright by AUDI AG.
Audi A3 1997 ➤, Audi A3 2004 ➤, Audi A4 1995 ➤, Audi A4 2001 ➤, Audi A6 1998 ➤, Audi
A8 1994 ➤, Audi A8 2003 ➤
8 Service installation of key switch A8 2003➤
6
32
–
Unplug connector -1- for glove box wiring harness -2- from
supply lead -3-.
–
Vehicles with knee airbag: Pull catch -2- in direction of ar-
row and unplug connectors -1- and -3-.
–
Detach glove box.
–
Use a knife to sever perforation for key switch on back of
glove box and press out cover panel.
–
Remove glove box wiring harness -1-.
–
Install new glove box wiring harness -1- with wiring for key
switch.
8.2
Installing key switch
–
Press lock -2- with key -3- inserted into key switch -1- until
lock -2- engages.
3
2
1
A68-0313
A69-0382
2
1
3
A68-0314
1
A69-0150
1
2
3
AIR
BA
G
OF
F
ON
Protected by copyright. Copying for private or commercial purposes, in part or in whole, is not
permitted unless authorised by AUDI AG. AUDI AG does not guarantee or accept any liability
with respect to the correctness of information in this document. Copyright by AUDI AG.
Audi A3 1997 ➤, Audi A3 2004 ➤, Audi A4 1995 ➤, Audi A4 2001 ➤, Audi A6 1998 ➤, Audi
A8 1994 ➤, Audi A8 2003 ➤
8 Service installation of key switch A8 2003➤
33
6
–
Press key switch -2- into glove box until clips -arrows- en-
gage.
–
Plug in connector -1-.
–
Install glove box.
8.3
Installing “PASSENGER AIRBAG OFF”
lamp
8.3.1 Removing trim panel with switch module, right
without “PASSENGER AIRBAG OFF”
Special tools and workshop equipment required
♦
–
Open coin tray.
–
Slide trim for coin tray to left out of fastener -arrow- and
detach.
–
Open glove box.
–
Starting from above glove box, carefully separate trim pan-
el with switch module -1- from dash panel using disassem-
bly tool -3409-.
–
Detach trim panel with switch module in -direction of ar-
row-.
Take particular care when unfastening clip on driver side end
of trim panel.
–
Unplug connector.
8.4
Installing trim panel with switch module,
right with “PASSENGER AIRBAG OFF”
Install in reverse order, paying attention to the following:
1
2
A69-0380
A96-0552
A70-1087
3409
1
Note!
Protected by copyright. Copying for private or commercial purposes, in part or in whole, is not
permitted unless authorised by AUDI AG. AUDI AG does not guarantee or accept any liability
with respect to the correctness of information in this document. Copyright by AUDI AG.
Audi A3 1997 ➤, Audi A3 2004 ➤, Audi A4 1995 ➤, Audi A4 2001 ➤, Audi A6 1998 ➤, Audi
A8 1994 ➤, Audi A8 2003 ➤
8 Service installation of key switch A8 2003➤
6
34
–
On fitting trim panel -1- with switch module, make sure
both catches are inserted in centre of trim panel between
dash panel and monitor housing -arrows-.
–
Encode airbag control unit for option with front passen-
ger's key switch
A96-0727
1

Protected by copyright. Copying for private or commercial purposes, in part or in whole, is not
permitted unless authorised by AUDI AG. AUDI AG does not guarantee or accept any liability
with respect to the correctness of information in this document. Copyright by AUDI AG.
Audi A3 1997 ➤, Audi A3 2004 ➤, Audi A4 1995 ➤, Audi A4 2001 ➤, Audi A6 1998 ➤, Audi
A8 1994 ➤, Audi A8 2003 ➤
9 Encoding airbag control unit
35
6
9
Encoding airbag control unit
–
Connect up vehicle diagnostic, testing and information
system -VAS 5051 A- to vehicle.
–
Implement “Encoding airbag control unit” program for rel-
evant model in Guided fault-finding routine.
Document Outline
- Contents
- 1 General
- 2 Service installation of key switch A3 1997‰ as of week 27.1999
- 3 Service installation of key switch A3 2004‰
- 4 Service installation of key switch A4 1995‰ as of chassis no.: 8DXA 200 001
- 5 Service installation of key switch A4 2001‰
- 6 Service installation of key switch A6 1998‰ as of week 36.1998
- 7 Service installation of key switch A8 1994‰ gradual introduction since October 1998 (with front...
- 8 Service installation of key switch A8 2003‰
- 9 Encoding airbag control unit
Wyszukiwarka
Podobne podstrony:
30 Service Manual Installation instructions for coolbox
Instrukcja obsługi AL-700, Instrukcje serwisowe Service manual
Instructions for manually installing FreeSpace Open and mods (Windows)
31 Service Manual Installation manual for digital TV tuner
Instructions for manually installing FreeSpace Open and mods (Mac OS X)
hplj 5p 6p service manual vhnlwmi5rxab6ao6bivsrdhllvztpnnomgxi2ma vhnlwmi5rxab6ao6bivsrdhllvztpnnomg
Oberheim Prommer Service Manual
Korg SQ 10 Service Manual
MAC1500 service manual
Kyocera Universal Feeder UF 1 Service Manual
Proview RA783 LCD Service Manual
indesit witp82euy Service Manual
Glow Worm installation and service manual Hideaway 70CF UIS
Proview PZ456 LCD Service Manual
Glow Worm installation and service manual Ultimate 50CF UIS
ewm2000 service manual
Glow Worm installation and service manual Ultimate 60CF UIS
Proview SH770I LCD Service Manual
więcej podobnych podstron