
Rootkits - Detection and prevention
Andr´e Jorge Marques de Almeida
Dissertac¸˜ao para obtenc¸˜ao do Grau de Mestre em
Engenharia Inform´atica e de Computadores
J ´uri
Presidente:
Professor Jose Carlos Martins Delgado
Orientador:
Professor Carlos Nuno da Cruz Ribeiro
Vogal:
Professor Miguel Pupo Correia
Setembro 2008


Agradecimentos
Tenho a agradecer ao meu Orientador, o Professor Carlos Ribeiro, pela coragem em alinhar nesta minha
ideia arrojada de explorar um tema t˜ao obscuro, invulgar e complexo como este. Por outro lado, apoiou-
me e ajudou-me a estruturar a dissertac¸˜ao e a definir os objectivos deste trabalho, algo que me preocu-
pava desde in´ıcio.
Grande parte desta dissertac¸˜ao foi estudada e escrita no Tagus Park juntamente com outros amigos
meus destinados ao mesmo: S˜ao eles o Henrique Costa (que teve a paciˆencia rara de ler esta dissertac¸˜ao
e me indicar aspectos a melhorar), o Nuno Monteiro e o Jo˜ao Mendes, que vendo as suas f´erias limitadas
por causa da dissertac¸˜ao, ajudaram-me a tornar mais leve a execuc¸˜ao de um trabalho desta dimens˜ao.
Devo agradecimentos ao Daniel Almeida, ao S´ergio Almeida e ao Telmo Rodrigues pelas constantes
dicas e ideias que me forneceram durante v´arias discuss ˜oes que tivemos sobre estes temas, e agradec¸o
incondicionalmente ao meu irm˜ao, Filipe Almeida, por dispensar um pouco do seu precioso tempo para
ler esta dissertac¸˜ao e me indicar v´arios pontos a melhorar, n˜ao s ´o ao n´ıvel da qualidade da escrita mas
tamb´em do conte ´udo.
Seria quase criminoso, abandonar esta secc¸˜ao sem agradecer ao meu Pai e `a minha M˜ae. Quero
agradecer aos meus pais por terem feito os poss´ıveis ao seu alcance para me ajudarem. Uma vez que
n˜ao dominavam o assunto, ajudaram-me em pormenores de escrita e de construc¸˜ao fr´asica.
Lisboa, November 23, 2008
Andr´e Jorge Marques de Almeida


Abstract
This thesis pretends to explore the underworld of the complex and unwanted software that subtly mod-
ifies the behavior of the operating system without users or administrators notice. This type of software
is named “Rootkit”. This thesis does not pretend to promote the creation of these type of attacks, but
instead, help building defenses. No defense is successful if we don’t study first the point of view of the
attacker. It is precisely in this way that this work is presented: For each defense, many attack vectors
possibly used by the attacker are presented to the reader, creating room for understanding what follows.
After that, without neglecting the other side, the evidences left by the rootkits are studied and analyzed,
in an attempt to prevent their respective attack in the future.
This essay starts outlining some Rootkit techniques commonly used in Windows operating system,
with the objective of understanding where and how these methods can be applied in Linux. “Hooking”
techniques are a powerful method not only for those who attack but also for those who defend. Thus,
their relevance in this work. Hooking is a technique that intercepts the execution flow of an application,
or even Kernel, and allows the attacker to obtain important data or modify information.
It is interesting to notice the multiple places of an operating system sensible to “Hooking”. Either in
User-mode or in privileged mode, there are crucial zones sensible to slight changes, creating a different
global behaviour of the system, helping the attacker covering his tracks. This way, the system will
provide false information for an application that requests some state of the operating system.
Fortunately, knowing the inner-workings of these subversive programs, we can detect their pres-
ence if they are installed. Typically, it is always possible to detect traces of intrusion, but depending on
the technological advance of the Rootkit, this can be an extremely difficult task.
This work shows the efficiency and the dangerousness of the technique “Hardware Breakpoint
Hooking”, and also presents a method for detecting and preventing this same technique (but not infalli-
ble). Additionally, code modification attacks in user-mode are studied, to which are proposed a memory
scanning tool. Finally, a proactive detection mechanism is presented which scans many sensitive places
of the operating system during its operation.


Resumo
Esta dissertac¸˜ao pretende explorar o submundo do complexo software indesejado que modifica subtil-
mente o comportamento do sistema operativo sem que o utilizador ou administrador se aperceba. A
esse tipo de software d´a-se o nome de “Rootkit”. O objectivo desta dissertac¸˜ao n˜ao ´e o de fomentar
a criac¸˜ao deste tipo de ataques, mas antes pelo contr´ario, ajudar a criar defesas. Nenhuma defesa ´e
bem conseguida se n˜ao estudarmos primeiro o ponto de vista do atacante. ´E precisamente desta forma
que este trabalho ´e apresentado: Para cada defesa, s˜ao primeiro apresentados ao leitor as v´arias ver-
tentes que podem ser utilizadas pelo atacante, criando assim espac¸o para a compreens˜ao do que vem a
seguir. Posteriormente, sem descurar o lado oposto, s˜ao apresentadas as alternativas e estudadas todas
as evidˆencias deixadas pelos rootkits, numa tentativa de as aproveitar para que o seu respectivo ataque
possa ser prevenido no futuro.
Esta dissertac¸˜ao comec¸a por enunciar v´arias t´ecnicas de Rootkits vulgarmente utilizadas no sistema
operativo Windows, com o objectivo de perceber onde e como ´e que estas podem ser aplicadas no sis-
tema operativo Linux. As t´ecnicas de “hooking” s˜ao tranversais a todo este trabalho e s˜ao um m´etodo
poderoso tanto para quem ataca como para quem defende, da´ı a sua relevˆancia nesta dissertac¸˜ao. Hook-
ing n˜ao ´e mais do que uma t´ecnica que permite interceptar o fluxo de execuc¸˜ao de uma aplicac¸˜ao ou at´e
mesmo do Kernel, permitindo a quem a utiliza, obter dados importantes ou modificar essa mesma
informac¸˜ao.
´E interessante notar os m ´ultiplos pontos sens´ıveis do sistema operativo onde se podem instalar
“Hooks”. Tanto em modo utilizador como em modo privilegiado, existem v´arias zonas cruciais no
sistema operativo que podem ser sujeitas a ligeiras alterac¸ ˜oes, originando um comportamento global do
sistema diferente, que ir´a favorecer o atacante. Deste modo, o sistema ir´a fornecer informac¸˜ao falsa para
uma aplicac¸˜ao que queira saber como se encontra o estado do sistema.
Felizmente, conhecendo o funcionamento destes programas subversivos podemos detectar a sua
presenc¸a caso estes estejam instalados. Tipicamente, ´e sempre poss´ıvel detectar vest´ıgios de intrus˜ao
no sistema, mas dependendo do avanc¸o tecnol ´ogico do Rootkit, pode ser extremamente dif´ıcil de o
conseguir.
Este trabalho demonstra a efic´acia e a perigosidade da t´ecnica “Hardware Breakpoint Hooking”, e
apresenta um m´etodo de detecc¸˜ao e prevenc¸˜ao dessa mesma t´ecnica (n˜ao infal´ıvel). Adicionalmente, s˜ao
estudados os ataques que implicam modificac¸˜ao de c ´odigo de aplicac¸ ˜oes em modo utilizador, aos quais

´e apresentada uma ferramenta de rastreio de mem ´oria. Por fim, ´e apresentado um sistema de detecc¸˜ao
de rootkits proactivo que inspecciona v´arios pontos fundamentais do sistema operativo, durante a sua
operac¸˜ao.

Palavras Chave
Keywords
Palavras Chave
Seguranc¸a
Prevenc¸˜ao
Detecc¸˜ao
Sistema
Intrus˜ao
Subvers˜ao
Keywords
Security
Prevention
Detection
System
Intrusion
Subversion


Index
1
. . . . . . . . . . . . . . . . . . . . . . . . . . . . . . . . . . . . . . . . . . . . . .
1
. . . . . . . . . . . . . . . . . . . . . . . . . . . . . . . . . . . . . . . . . . . . . . . . .
2
. . . . . . . . . . . . . . . . . . . . . . . . . . . . . . . . . . . . .
2
3
. . . . . . . . . . . . . . . . . . . . . . . . . . . . . . . . . . . . . . . . . . . . .
3
General Malware Classification
. . . . . . . . . . . . . . . . . . . . . . . . . . . . . . . . . .
3
. . . . . . . . . . . . . . . . . . . . . . . . . . . . . . . . . . . . . . .
5
. . . . . . . . . . . . . . . . . . . . . . . . . . . . . . . . . . . . . .
5
. . . . . . . . . . . . . . . . . . . . . . . . . . . . . . . . . . . . . . . . .
5
. . . . . . . . . . . . . . . . . . . . . . . . . . . . . . . . . . . . . . . . .
5
. . . . . . . . . . . . . . . . . . . . . . . . . . . . . . . . . . . . . . . . . .
6
. . . . . . . . . . . . . . . . . . . . . . . . . . . . . . . . . . . . . . . . . . .
6
. . . . . . . . . . . . . . . . . . . . . . . . . . . . . . . . . .
6
. . . . . . . . . . . . . . . . . . . . . . . . . . . . . . . . . .
7
Direct Kernel Object Manipulation
. . . . . . . . . . . . . . . . . . . . . . . . . . . .
8
Raw access to the physical memory
. . . . . . . . . . . . . . . . . . . . . . . . . . .
8
. . . . . . . . . . . . . . . . . . . . . . . . . . . . . . . . . . .
9
. . . . . . . . . . . . . . . . . . . . . . . . . . . . . . . . . . . .
9
. . . . . . . . . . . . . . . . . . . . . . . . . . . . . . . . . . . . .
10
. . . . . . . . . . . . . . . . . . . . . . . . . . . . . . . . .
10
i

. . . . . . . . . . . . . . . . . . . . . . . . . . . . . . . .
11
. . . . . . . . . . . . . . . . . . . . . . . . . . . . . . . . .
11
. . . . . . . . . . . . . . . . . . . . . . . . . . . . . . . .
11
. . . . . . . . . . . . . . . . . . . . . . . . . . . . . . . . . . . . . .
12
. . . . . . . . . . . . . . . . . . . . . . . . . . . . . . . . . . . . . .
13
Anti-Rootkit Software Analysis
. . . . . . . . . . . . . . . . . . . . . . . . . . . . . . . . . .
14
. . . . . . . . . . . . . . . . . . . . . . . . . . . . . . . . . .
14
. . . . . . . . . . . . . . . . . . . . . . . . . . . . . . . . . . . . . . . . . . .
15
. . . . . . . . . . . . . . . . . . . . . . . . . . . . . . . . . . . . . . . . . . . . .
15
Hijacking anti-rootkit software
. . . . . . . . . . . . . . . . . . . . . . . . . . . . . .
15
. . . . . . . . . . . . . . . . . . . . . . . . . . . . . . . . . . . . . . . . . . . . . . .
16
17
. . . . . . . . . . . . . . . . . . . . . . . . . . . . . . . . . . . . . . . . . . . . .
17
Accessing the address space of a process
. . . . . . . . . . . . . . . . . . . . . . . . . . . . .
18
. . . . . . . . . . . . . . . . . . . . . . . . . . . . . . . . . . . . . . . . .
19
Function hooking via code section modification
. . . . . . . . . . . . . . . . . . . .
19
. . . . . . . . . . . . . . . . . . . . . . . . . . . . . . . . . . . . . . . .
21
. . . . . . . . . . . . . . . . . . . . . . . . . . . . . .
22
. . . . . . . . . . . . . . . . . . . . . . . . . . . . . . . . . . . . . . . . . . . . . . .
25
Detecting program byte code changes
. . . . . . . . . . . . . . . . . . . . . . . . . .
25
. . . . . . . . . . . . . . . . . . . . . . .
26
. . . . . . . . . . . . . . . . . . . . . . . . . . .
27
Finding .text section offset in memory
. . . . . . . . . . . . . . . . . . . .
28
Detecting and preventing Hardware Breakpoint Hooking
. . . . . . . . . . . . . .
30
Finding sys call table in Linux Kernel 2.6
. . . . . . . . . . . . . . . . . .
30
Formulating a pattern for detection
. . . . . . . . . . . . . . . . . . . . . .
31
. . . . . . . . . . . . . . . . . . . . . . . . . . . . . . . . . . . . . . . . . . . . . . .
32
ii

33
. . . . . . . . . . . . . . . . . . . . . . . . . . . . . . . . . . . . . . . . . . . . .
33
. . . . . . . . . . . . . . . . . . . . . . . . . . . . . . . . . . . . . . . .
33
Simple system call redirection
. . . . . . . . . . . . . . . . . . . . . . . . . . . . . . .
34
Inline hooking Kernel functions
. . . . . . . . . . . . . . . . . . . . . . . . . . . . .
34
Hooking interrupt 0x80 / Sysenter instruction
. . . . . . . . . . . . . . . . . . . . .
35
. . . . . . . . . . . . . . . . . . . . . . . . . . . . . . . . .
36
. . . . . . . . . . . . . . . . . . . . . . . . . . . . . . . . . . . . . . . .
37
. . . . . . . . . . . . . . . . . . . . . . . . . . . . . . . . .
37
A Proactive Detection Approach
. . . . . . . . . . . . . . . . . . . . . . . . . . . . .
38
. . . . . . . . . . . . . . . . . . . . . . . . . . . . . . . . . . . . . . . . . . . . . . .
41
43
. . . . . . . . . . . . . . . . . . . . . . . . . . . . . . . . . . . . . . . . . . . . .
43
Process code integrity scanner
. . . . . . . . . . . . . . . . . . . . . . . . . . . . . . . . . . .
43
. . . . . . . . . . . . . . . . . . . . . . . . . . . . . . . . . . . . . . . . . .
43
. . . . . . . . . . . . . . . . . . . . . . . . . . . . . . . . . . . . . . . . . . .
44
. . . . . . . . . . . . . . . . . . . . . . . . . . . . . . . . . . . . . .
45
Hardware breakpoint hooking attack
. . . . . . . . . . . . . . . . . . . . . . . . . . . . . . .
45
. . . . . . . . . . . . . . . . . . . . . . . . . . . . . . . . . . . . . . . . . .
45
. . . . . . . . . . . . . . . . . . . . . . . . . . . . . . . . . . . . .
46
Preventing hardware breakpoint hooking
. . . . . . . . . . . . . . . . . . . . . . . . . . . .
46
. . . . . . . . . . . . . . . . . . . . . . . . . . . . . . . . . . . . . . . . . .
47
. . . . . . . . . . . . . . . . . . . . . . . . . . . . . . . . . . . . . . . . . . .
47
Kernel Proactive Detection Approach
. . . . . . . . . . . . . . . . . . . . . . . . . . . . . .
48
. . . . . . . . . . . . . . . . . . . . . . . . . . . . . . . . . . . . . . . . . .
48
. . . . . . . . . . . . . . . . . . . . . . . . . . . . . . . . . . . . .
50
iii

. . . . . . . . . . . . . . . . . . . . . . . . . . . . . . . . . . . . . . . . . . .
50
. . . . . . . . . . . . . . . . . . . . . . . . . . . . . . . . . . . . . . . . . . . . . . .
51
53
. . . . . . . . . . . . . . . . . . . . . . . . . . . . . . . . . . . . . . . . . . . . .
54
59
88
iv

List of Figures
. . . . . . . . . . . . . . . . . . . . . . . . . . . . . . . . . . . . . . .
4
. . . . . . . . . . . . . . . . . . . . . . . . . . . . . . . . . . . . . . . . . . . .
12
. . . . . . . . . . . . . . . . . . . . . . . . . . . . . . . . . . . . . . .
18
. . . . . . . . . . . . . . . . . . . . . . . . . . . . . . . . . . . . . . . . . . . .
20
. . . . . . . . . . . . . . . . . . . . . . . . . . . . . . . . . . . . . .
21
. . . . . . . . . . . . . . . . . . . . . . . . . . . . . . . . . .
25
. . . . . . . . . . . . . . . . . . . . . . . . . . . . . . . . . . . . . . . .
27
Hardware Breakpoint Detection Automaton
. . . . . . . . . . . . . . . . . . . . . . . . . .
32
Kernel Attacks - The Big Picture
. . . . . . . . . . . . . . . . . . . . . . . . . . . . . . . . . .
34
Kernel Proactive Detection System
. . . . . . . . . . . . . . . . . . . . . . . . . . . . . . . .
39
Detecting system call redirection attack
. . . . . . . . . . . . . . . . . . . . . . . . . . . . .
49
v

vi

List of Tables
. . . . . . . . . . . . . . . . . . . . . . . . . . . . . . . . . . . . . . . . .
14
Description of the debug registers
. . . . . . . . . . . . . . . . . . . . . . . . . . . . . . . .
22
Correspondence between each system check and Kernel attack
. . . . . . . . . . . . . . . .
41
. . . . . . . . . . . . . . . . . . . . . . . . . . . . . . . . . . . . . . . . . .
50
vii

viii

1
Introduction
Your computer can be doing absolutely anything to anybody anywhere, and you’ll never know it
– Rick Cook
This chapter acts as a prelude for this thesis beginning with a short motivational introduction, fol-
lowed by a description of the goals of this work and finalizing with the roadmap of this thesis.
1.1 Motivation
The term rootkit originated in the mid-nineties. The idea was based on a set of tools (kit) whose purpose
would be to subvert the system in order to change some of its original behavior. Usually these tools
would maintain covert root access to a system and hide the intruder’s presence. This is why the resulting
term is rootkit.
A rootkit tries to remain undetected by using techniques to hide parts of the system to a User-land
program. It may hide files on the hard drive, running processes, active network connections or any
other element that may reveal unauthorized activity.
The complexity of a rootkit depends on the technique it uses to achieve its stealth to avoid detection.
The application of these techniques requires deep knowledge of the operating system and advanced
programming skills. Depending on how advanced the rootkit is, it is important to understand memory
layout, kernel objects, file and network drivers, privilege levels; some of them are not documented.
Typically, a User-land rootkit is much simpler than a Kernel-land rootkit. On the other hand, enter-
ing the kernel is a whole new world of endless possibilities. For a security expert that knows the depths
of the operating system, accessing the memory without constraints will make him find many different
ways to subvert it in order to achieve stealthiness.
Rootkits are constantly evolving and they will become a serious threat in the future, if they aren’t
yet. Every year, new pioneering techniques are demonstrated at security conferences around the globe,
and we are starting to see anti-rootkit technologies implanted in anti-virus solutions.
The latest advance has been in virtualization techniques (Microsoft, 2006), which by taking advan-
tage of virtualization technology, rootkits manage to avoid mainstream detection algorithms as they

take the place of the virtual machine supervisor. This allows them to monitor and intercept all hard-
ware calls initiated by the guest operating system. The main purpose of this thesis is to identify current
rootkit technologies, and provide solutions (or mitigating techniques) for them, discussing the pros and
cons.
1.2 Goals
This document pretends to explore some advanced hiding technologies used in rootkits along with
solutions to detect and prevent these abuses.
Some hooking techniques used on windows operating system to intercept application function calls
at runtime seem to be forgotten on Linux. This article intends to prove that they are possible and also
deserve as much attention from the security perspective as the other known hiding techniques.
The system call invocation mechanism contains many weak places that rootkits can explore in order
to subvert the original system’s behavior. The system call table and the interrupt descriptor table belong
to the most common attack vectors used from rootkits. This work intends also to detect and/or prevent
these attacks with the final goal of improving the security of the Linux operating system.
1.3 Structure of the Document
Chapter
starts with the state of the art in what concerns to rootkit technologies; chapter
shows differ-
ent methods for accessing the memory address space of a process, and ilustrates different ways of hook-
ing a function call, terminating with solutions to test the integrity of the running applications; chapter
introduces the old-age art of system call redirection, making also reference to interrupt descriptor table
redirection and presenting solutions, once again, for its detection and prevention.
Finally, this work ends in chapter
with a discussion of the results taken from this study along with
future work and conclusions.
2

2
State of the Art
By playing the part of an attacker, we are always at an advantage. As the attacker we must think of only one
thing that a defender didn’t consider.
– Greg Hoglund and James Butler
2.1 Introduction
This section presents the state of the art in what concerns to rootkit technologies. To ease the under-
standing of the following chapters, this one gives particular relevance to windows operating system
since part of this thesis resides in the exploration of existing windows rootkit techniques on Linux.
This chapter starts with a classification of malware followed by a brief introduction of the general
inner working mechanisms of a rootkit; Next, some hiding techniques are uncovered and state of the
art defenses are described for each hiding method; finally, a comparative study shows the strengths and
weaknesses of some existing anti-rootkit software and the conclusions of this chapter.
2.2 General Malware Classication
The following classification was made by Joanna Rutkowska, a Polish security expert known for her
research of stealth malware and contributions concerning improvement of Windows Vista security.
Rutkowska’s paper (Rutkowska, 2006) makes use of this taxonomy to explain different rootkit tech-
niques and their respective counter measure. Before delving further into the details, it is important to
understand this classification. Instead of classifying malware in categories such as Virus, Worms, Spy-
ware, Backdoors, etc...; Rutkowska decided to create a
big picture
of malware which will certainly
help creating our defenses against these threats. Figure
shows each type of malware.
Malware Type 0
Type 0 is malware which does not modify the system in any way, meaning that the
other applications don’t change their behavior. Malware inside this category is not considered a
rootkit since it does not use any kind of system subversion technique to hide itself and remain
undetected.
3
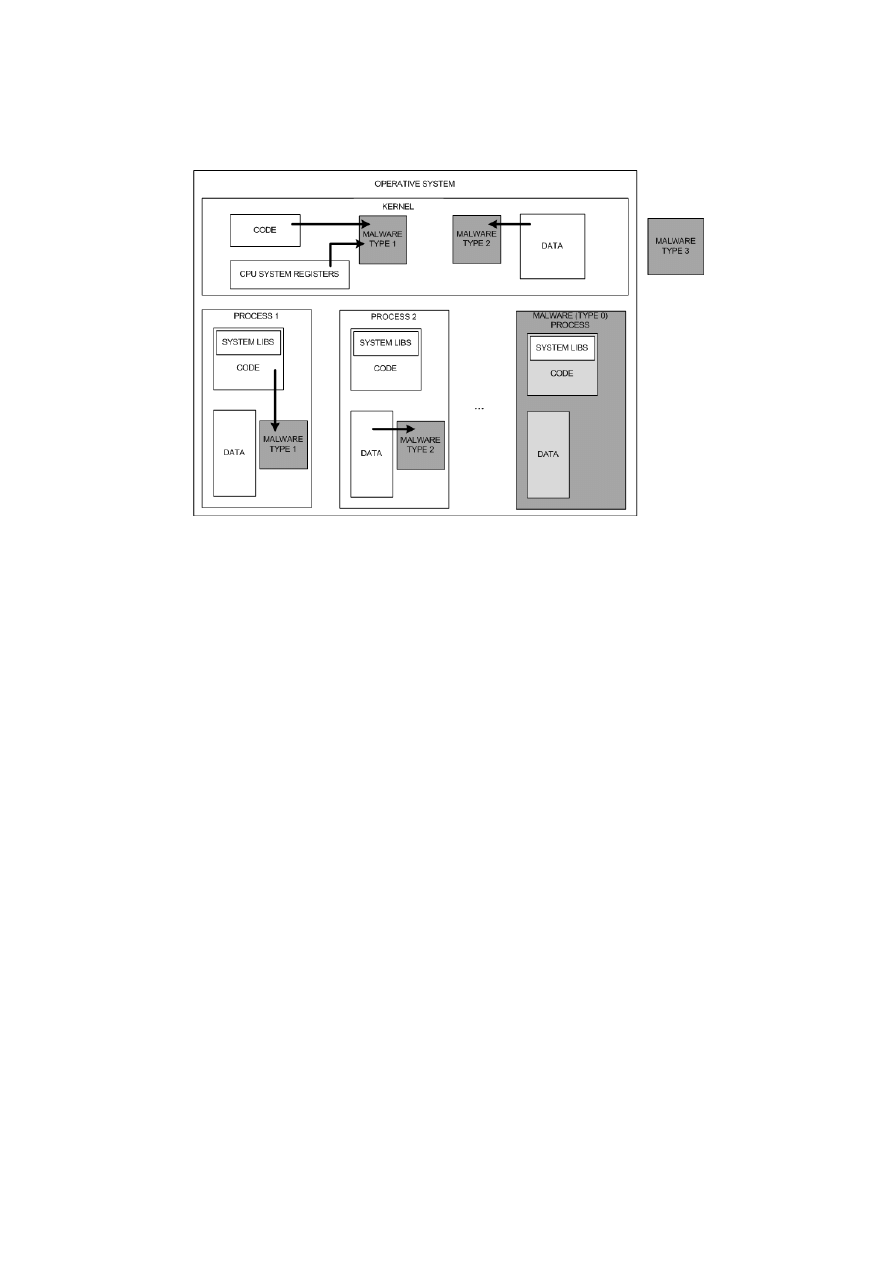
Figure 2.1: Malware classification
Malware Type 1
This type of malware modifies sections that are not generally changed by legit appli-
cations, such as code sections within executable files and BIOS code.
Since these areas should never change, a good approach for detecting this malware is in integrity
checkers. Integrity checkers are covered later in
Malware Type 2
Type 2 malware involves modification of regions that should be changed, typically
configuration files, registry data and data sections of running processes and Kernel. The attackers
challenge here is to identify dynamic regions of the system in order that he can take advantage
of. Since these areas are expected to be modified over time, it is extremely hard to detect every
system change that can be potentially harmful. Integrity checkers are unsuccessful in detecting
this category of malware, instead, we need to identify all dynamic sections of running applications
and Kernel, and understand them, in order to determine any potentially installed malware.
Despite being the perfect solution, this task is not practical to achieve. This would require the cre-
ation of an extensive list with all the sensitive dynamic places, together with their corresponding
verification method.
However, it’s not possible to determine all those sensitive places (not even by Microsoft). Software
is constantly evolving, with regular upgrades being distributed to the public which provide new
veiled methods for a rootkit to hide.
Malware Type 3
This type of malware is the latest advance in rootkit technology. This kind of rootkit,
known as Hypervisor rootkit, does not change a single bit of the operating system. Instead, it
4

acts from the outside as a host machine making use of the virtualization features provided by the
processor, intercepting all hardware calls made by the guest OS.
Detection of this technique is a heated discussion among nowadays security researchers. Most (if
not all) methods presented detect the presence of a virtual machine but cannot tell if the virtual
machine is legitimate, or if it is a rootkit. In the future most enterprise solutions will be based on
virtualization technology, which is why these detection methods are not enough.
2.3 How do Rootkits work
2.3.1
Application level
Binary kits are a set of tools designed to replace, without authorization by the systems owner, the system
binaries in order to change the original information flow from Kernel to user applications. Typically, the
information concealed is the information revealing the presence of unauthorized activity, so the user will
not suspect of an intrusion. These types of attacks are mostly used in Linux, where the code is open-
source and the system tools are easy to alter. In later versions of Windows, system files are protected (for
instance, Windows XP uses Windows File Protection), and thus, these tools are harder to be subverted.
2.3.2
Library level
Library level rootkits are those which intercept library calls, by hooking or replacing the libraries.
Library replacement is usually associated with library kits. Library kits attempt to replace system
libraries in order to intercept important functions. For example, in Linux, the T0rn 8 rootkit (Miller, 2000)
replaces the “libproc.a” library, which is used to find information from /proc file system to get access to
process information from the Kernel, which can be gathered by simple system tools like /bin/ps and top.
Another alternative is to modify the glibc/libc main system library in order to filter the information
exchanged between user and Kernel-land.
Once again, in Windows, system libraries are system files, which are generally protected by the
operating system, so it is more viable to make the library interception by entering the address space of
the processes and hooking the desired functions. Hooking is covered later in
2.3.3
Kernel Level
Kernel level rootkits use some way to get into Kernel space and directly add and/or replace code to
the operating systems core. In Windows, most Kernel rootkits make use of device drivers, while under
5

Linux, they use Loadable Kernel Modules (LKM). LKM rootkits were for a long time the favorite ap-
proach for the attackers who wanted to have control at Kernel level in Linux systems. An LKM rootkit
does not require much knowledge to be implemented, the addresses of the system calls are accessible
via the sys call table array and it’s easy to redirect system call functions to point to our code by making
use of this array. However, since Kernel 2.6 that the sys call table array is not exported which means
that an attacker will have additional work searching for a reference to it. The system owner can defeat
LKM rootkits by simply disabling Kernel module loading support before compiling the Kernel. Nev-
ertheless, it is not mandatory the use of these Kernel extensions to access the system core, as explained
later in
2.4 Hiding techniques
2.4.1
Hooking
One of the techniques a rootkit may employ to shift the execution flow of the operating system is hook-
ing.
The main goal of hooking is to alter the information returned by the system, or provide the system
with altered information from the calling application.
Due to system flexibility and backward compatibility, there are many ways a system can be hooked.
Hooks can be installed in user land or in Kernel-land and they can be considered malware type 1 or 2,
depending on which technique is used. All the methods require certain knowledge of the function being
intercepted.
2.4.1.1
What to hook?
The potential interests of a rootkit can be the following: Hide files, registry information, processes,
network connections, drivers, etc. All of this can be accomplished with hooking.
For instance, in Windows, a user land rootkit may want to hide itself by intercepting the correct
system API call that reveals its presence.
A good target would be TaskMgr.exe, the windows task manager. What the rootkit would have to do
was enter the process address space, and intercept the call to the NtQuerySystemInformation function in
ntdll.dll, by hooking it and filtering the response from the system.
Ntdll.dll is a system support library which provides dispatch stubs to windows executive system ser-
vices that will pass control to SSDT (system service dispatch table), in Kernel-land, where the actual
work is performed.
6

The only problem arising from this method is that while the windows task manager gets subverted,
any other application will be able to detect the rootkit executable, meaning the hook is only installed
for the process TaskMgr.exe. For the hook to be system wide, there are two options: Hook all processes,
which is not a very stealthy option, or go deeper into the system and install it at Kernel-land. To accom-
plish this, it is important to understand the execution flow of a process enumeration request to Kernel,
find out where to hook, and how to hook.
It is possible to hook one of multiple functions to successfully hide our process, but if we are work-
ing in user-land, a good choice is NtQuerySystemInformation, since this is the deepest we can go before
entering the Kernel. In Kernel-land, the system call ZwQuerySystemInformation in the SSDT table would
be a good place to hook.
2.4.1.2
How to hook?
I will enumerate some hooking techniques focusing on Windows operating system, with a brief descrip-
tion for each one:
Inline Hooking
This technique, also known as trampolining, patches the first bytes of the function to
hook with a jmp instruction pointing to our function. Overwritten bytes are backed up, and exe-
cuted inside our intercepting function in a different place, right before calling the original function
(trampoline). We can change the information returned by the original function or provide differ-
ent arguments to it. Microsoft’s research group has released a library called Detours (Corporation,
n.d.), which is a handy utility to ease the use of hooking.
Function pointer table hooking
This technique outlines any hook based on dispatch table modifica-
tion. The idea is to change a function pointer from a table, making it point to our function instead.
Potential tables to place hooks are:
1. System Service Descriptor Table (SSDT) – The system call table. Due to its system wide im-
pact, SSDT hooking is not only used in rootkits, but also in anti-rootkits. A system abuse can
be predicted by analyzing what system calls are being used.
2. Interrupt Descriptor Table (IDT) – Allows interception of system interrupts. Since each pro-
cessor has its own IDT, a rootkit will have to hook this table into all processors.
3. IRP tables – Device drivers communicate via IRPs (Input/Output Request Packets). Each
packet type is handled by a proper function, which is saved in the IRP table. IRP table hook-
ing aims to intercept driver requests such as reads, writes and queries. Since drivers are
extremely low level, IRP hooking is a good place to hide a rootkit.
7

4. Import Address Table (IAT) – Table containing pointers to all functions inside each module,
within a process.
Hardware Breakpoint Hook
This is an unusual technique based in the use of debug registers. Intel
x86 CPUs have special registers intended for debug use only. By storing special values into these
registers, the CPU can execute an INT 1 (interrupt 1) instruction just before any read, write, or
execute attempt to a specific memory location. Through the help of structured exception handler
(SEH), a routine is specified to handle the exception raised by interrupt 1. Once in this routine, we
can change the extended instruction pointer register (EIP) to point to our function, thus changing
the natural execution flow of the thread. When inside our function, if we want to execute the
original (hooked) function, the hardware breakpoint has to be removed before, and restored after
the call, to avoid entering in an endless recursive loop.
This method slows down the execution speed of the process being hooked because of the interrupt
cost. On the bright side (from the attackers perspective), there is not a single byte changed in the
code, so the code sections remain untouched.
2.4.2
Direct Kernel Object Manipulation
Windows Kernel stores important information in Kernel objects for book-keeping and reporting. These
objects are no more than Kernel structures, holding what the system believes exists on the system. Direct
Kernel Object Manipulation (DKOM) works by taking advantage of this fact.
The correct way to access a Kernel object is by using the Object Manager. Object Manager eases
the access to an object, such as creation, deletion and protection. DKOM accesses the object directly,
bypassing the Object Manager and thus all access checks to the object.
A rootkit that uses DKOM will subvert these objects and force the system to believe it is in a different
state. The strongest countermeasure of using DKOM relies on the fact that the attacker must know
how the structure is built, and this requires hours of debugging. Successfully exploitation of DKOM
can result in hiding processes, device drivers and network ports. There are other system changes the
attacker may find useful, such as privilege elevation of a process.
This technique is considered malware type 2, and is extremely difficult to detect, since all the ma-
nipulated sections are dynamic.
2.4.3
Raw access to the physical memory
It is possible to access Kernel memory without the need of drivers (Windows) or Kernel modules (Linux)
by making use of the physical memory device.
8

In Windows, the \Device\PhysicalMemory section object provides access to physical memory from
the user mode, specifically from the Administrators group, however, in Windows XP 64-bit, Windows
2003 Server SP1, and Windows Vista, all user mode access to this device has been blocked.
For translation between virtual memory to physical memory, a good memory layout understand-
ing is required, and it is important to keep in mind that the memory model varies between windows
versions.
W32/FanBot.A@mm (Florio, 2005) is a well written worm that uses this technique to perform the
DKOM technique. In what concerns to Linux, since nearly the beginning that some character devices,
called /dev/mem and /dev/kmem, are available to privileged applications. Despite /dev/kmem not being a
physical address, it contains the whole Kernel memory which can be manipulated by a rootkit. SucKIT
rootkit makes use of this device to intercept the system call table. Additionally, /dev/mem device provides
raw access to any physical page. Once again, it’s important to understand the UNIX memory model.
2.4.4
Layered Filter Drivers
Another alternative for intercepting the natural execution flow of a Windows system is by using filter
drivers. Layered filter drivers can extend the original features of a driver without having to rewrite it
from scratch. More importantly, there is no need to understand the complexity of the hardware.
This technique is a flexible solution for extending driver functionality that can be used for good and
evil. Many virus scanners attach a layered filter driver on the top of the file system driver, for scanning
files as soon as they are accessed and before they are passed to the user land application or get executed.
On the other hand, a rootkit can take advantage of this for stealth purposes by intercepting and
modifying the information coming in and out from the lower-level hardware, changing for instance:
file data, file enumeration and network connections. A good example of a rootkit using this method is
KLOG (Clandestiny, n.d.). KLOG is a smart approach for a keylogger: Works by attaching a filter driver
to the keyboard driver, and monitoring all the keystrokes typed.
2.4.5
DLL/Code Injection
Dynamic-link library (DLL) injection works on any operating system supporting shared libraries, but
we will focus on Windows. Despite not being seen as a rootkit, it can be used to drop a relatively
stealthy peace of code running into another process. There are many ways to force a DLL to be loaded
on a remote process and nowadays this is becoming a very common technique for hiding malware. This
is why DLL Injection is getting attention from the security community and its detection and prevention
is getting studied with great results.
9

Code injection has some advantages over DLL Injection since it does not insert a new module in
the target process. Instead, it injects just the necessary executable code into the target process, and
then starts a new thread at the beginning of the code. It is a stealthier technique, however, one should
be careful since the imported function addresses will not be correctly resolved. This means we will
have to manually load every DLL whose function we want to use with LoadLibrary(), and then get their
respective address with GetProcAddress(). LoadLibrary and GetProcAddress function pointers are correct
because they reside in Kernel32.dll, which has the same base address on all processes.
In DLL Injection we don’t have this problem because every function address is loaded when the
portable executable file (DLL) loads in the target process. Note that, in both techniques, a new thread
does not have to be necessarily created, an existing thread can be hijacked, but this can be dangerous
unless the attacker knows that the thread is safe to be hijacked. Note that once we are inside the target
process’s address space, we can hijack library calls with hooking.
There are several ways of injecting DLL/code into another process, most of them are easily detected
by the majority of anti-virus proactive defense solutions.
2.5 Detecting and Preventing
At the beginning of 2005, host based detection and prevention systems (HIDS and HIPS) concerning
rootkit technologies started to become popular, and many companies launched their products in a re-
sponse to this threat: F-Secure, Kaspersky, Microsoft... etc.
First of all, it’s important to clarify the difference between detection and prevention:
Detection assumes that the system may already be infected, and searches for signs of known techniques,
while prevention analyzes the application’s execution flow in order to avoid hostile activities, or checks
what applications are about to run (anti-virus products). No matter which side we choose, both repre-
sent added value towards best-practices on host based security.
2.5.1
Signature based detection
Signature based detection works like a fingerprint. A sequence of bytes from a file is compared with
another sequence of bytes which are known to belong to a malicious program. This concept is easy
to understand, and is the way anti-virus products have been working for years. The weakness of this
method is that it is ineffective against new and unknown malware. Besides, since this technique is
usually employed on the filesystem, it can easily be eluded by a rootkit trick, for example, by hooking
the filesystem driver.
10

For true effectiveness against a rootkit, Kernel memory should also be scanned for signatures (be-
sides filesystem). Since polymorphic obfuscation is rarely a rootkit concern, a Kernel memory scan can
reveal great results towards rootkit detection, no matter how advanced the rootkit is.
2.5.2
Heuristic based prevention
Also known as behavior based prevention, heuristic based prevention is becoming a popular approach
for preventing rootkits and general malware, employed in anti-virus solutions. It works by analyzing
execution paths, and determining through the heuristic, if a certain behavior is abusive. Comparing to
signature based detection, this one has much more probability for false positives, but on the other hand,
can be quite effective against new threats.
For example, to prevent injection of some kind into processes, Kaspersky Anti-Virus (Kaspersky Lab,
n.d.) hooks some functions in the system call table which must be used for general injection techniques.
Once these functions are called, Kaspersky analyzes the arguments, checks if they can lead to an un-
wanted operation, and alerts the user indicating what program is trying to be intrusive and what action
it is trying to do. Then the user may choose to allow, deny, or terminate the suspected application.
2.5.3
Integrity Check detection
Integrity checking is the most effective detection approach for malware type 1.
The main purpose of integrity checking is to verify if certain regions of filesystem and memory are
identical to a known trusted baseline. Digital signatures can make this task easier. Of course this baseline
should not be forged or easily bypassed, and this is where many integrity checkers fail. Integrity check-
ing will surely avoid some sophisticated rootkit techniques from taking place. The analyzed regions
should be all sections susceptible to subversion, which means code sections in memory (Kernel-land
and User-land memory), and files, usually system files. The best tools that use this method are Tripwire
and System Virginity Checker, which are covered in the next chapter.
2.5.4
Crossview based detection
This is a very popular rootkit detection approach employed by many anti-rootkit software. Crossview
based detection (X-View) compares a “high level” view with a “low level” view of the system. If the
“high level” view does not show the same contents as the “low level”, this means something is being
hidden, and the system was subverted. X-View can be used to detect hidden files, processes, registry
keys, network connections, etc.
11
The “high level” view of the system is obtained using the common API functions, provided by the
operating system. The “low level” view should be obtained without being affected by any rootkit trick
and this is certainly the hardest part when designing X-View. Obtaining the “low level” view depends
on what we are scanning. For instance, to implement X-View in a file system scan, a good approach for
obtaining the “low level” view would be to access the raw disk file sectors, and parsing them according
to the NTFS layout. Nevertheless, a smart rootkit would hook the function that reads the file sectors,
and provide to the anti-rootkit, again, the wrong information about the file system. This means that a
reliable X-View anti-rootkit can be very hard to implement.
2.5.5
Detecting DKOM
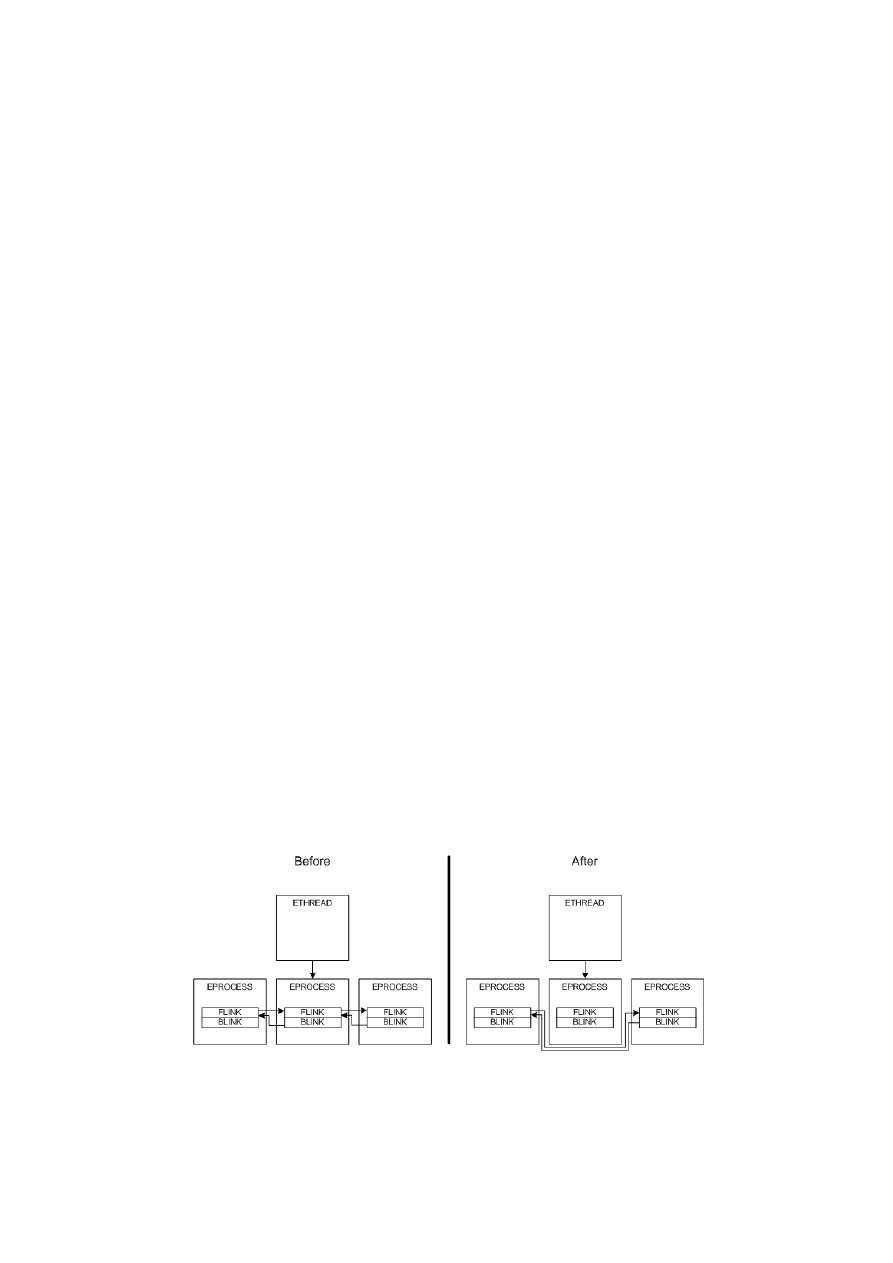
There is no general method for detecting DKOM attack, and since Kernel objects reside in dynamic
sections, integrity checkers do not help here. The attacked Kernel object must be studied in order to un-
derstand how we can verify the inconsistency. For example, process hiding works in the following way:
Every process has an associated structure called EPROCESS, which is a Kernel object. Windows Kernel
maintains a doubly linked list of all EPROCESS structures belonging to every process running in the
system. If a user-mode application requests a list of the running processes, a Kernel function traverses
this list and returns process information to the requesting application. It’s easy to understand that if we
remove an entry from this doubly linked list, the process will be invisible to user-land applications. But
despite the process being hidden, we want it to run, so the threads (ETHREAD structure) belonging to
our hidden process are still in the waiting dispatcher list of the NT scheduler. This means there are still
evidences we can hardly cover, because if we remove the threads from the dispatcher list our hidden
process will stop running. Based on this fact, Joanna Rutkowska created her tool called Klister. Klister
runs the list of threads in the dispatcher list, and searches for any associated process not present in the
doubly linked list of EPROCESS’s.
Figure 2.2: Illustration of a DKOM attack before and after hiding a process.
12

2.5.6
Detecting Hooks
Hooking is a very popular technique for rootkits, but it’s hard to be sure when a certain hook is legiti-
mate. Microsoft uses a feature called “hot patching” which allows the patching of system binaries even
if they are running in executable memory. This technique is particularly handy for reducing the number
of reboots required when updating system components.
Inline Hooks
Inline hooks cause code modification, which is easily detected by integrity scanners. Al-
ternatively, if we find a jmp instruction in the beginning of a function, we are in the presence of
an inline hook. However, integrity scan is more reliable because an attacker can find obfuscated
techniques to execute a jump instruction not in the beginning of the hooked function but some
instructions later (for example, using NOPs).
Table Hooks
In what concerns to function table redirection, these tables generally point to some place
where we can confirm it is legitimate. For example, SSDT functions always point to ntkrnlpa.exe
module. An anti-virus may use this hooking approach to implement a heuristic scanner by chang-
ing some function pointers to its own module (for instance, Kaspersky proactive defense mech-
anism redirects some system service functions to point to kl1.sys module). If these tables point
to some unknown and suspicious location, there is a strong indication that something might be
wrong.
Hardware Breakpoint Hooks
Since hardware breakpoint hooks use a debugging technique, we must
first confirm that a program is not being legitimately debugged. If not, we need to read the debug
registers for every thread context within a process and check if they are properly configured to call
interrupt 1 when an address is reached (executed, read or written). Care should be taken when
accessing the thread’s context: Using a high level API call such as GetThreadContext is dangerous
because this function may also be hijacked. The perfect solution would be to access the thread’s
context directly from Kernel memory by making use of a driver.
PatchFinder 2 Technique
Joanna Rutkowska created a tool called Patchfinder 2 (Rutkowska, 2004)
which uses a sophisticated detection technique based on runtime execution path profiling. This
method consists in the idea that a rootkit adds new code somewhere near a routine’s execution
path, in order to subvert it. Based on this fact, the number of instructions executed before and
after a certain routine is hooked will be significantly different (much greater in the hooked rou-
tine than in the clean one). Patchfinder 2 takes advantage of the single-step feature provided by
x86 processors, where an Interrupt Service Routine (ISR) can be specified to execute after each
instruction is consumed. The only thing this ISR does is to increment the variable that performs
the counting. Rutkowska also suggests a smart improvement for future work which consists in
analyzing the code flow instead of counting only the number of instructions. It’s important to
13
realize that this technique is prone to false positives: the number of executed instructions during
a system call may fluctuate, but have a stable peak. To reduce false positives, Patchfinder 2 creates
a histogram for calculating the peak, and watches for shifts on this peak that may indicate a hook
was installed in the meanwhile.
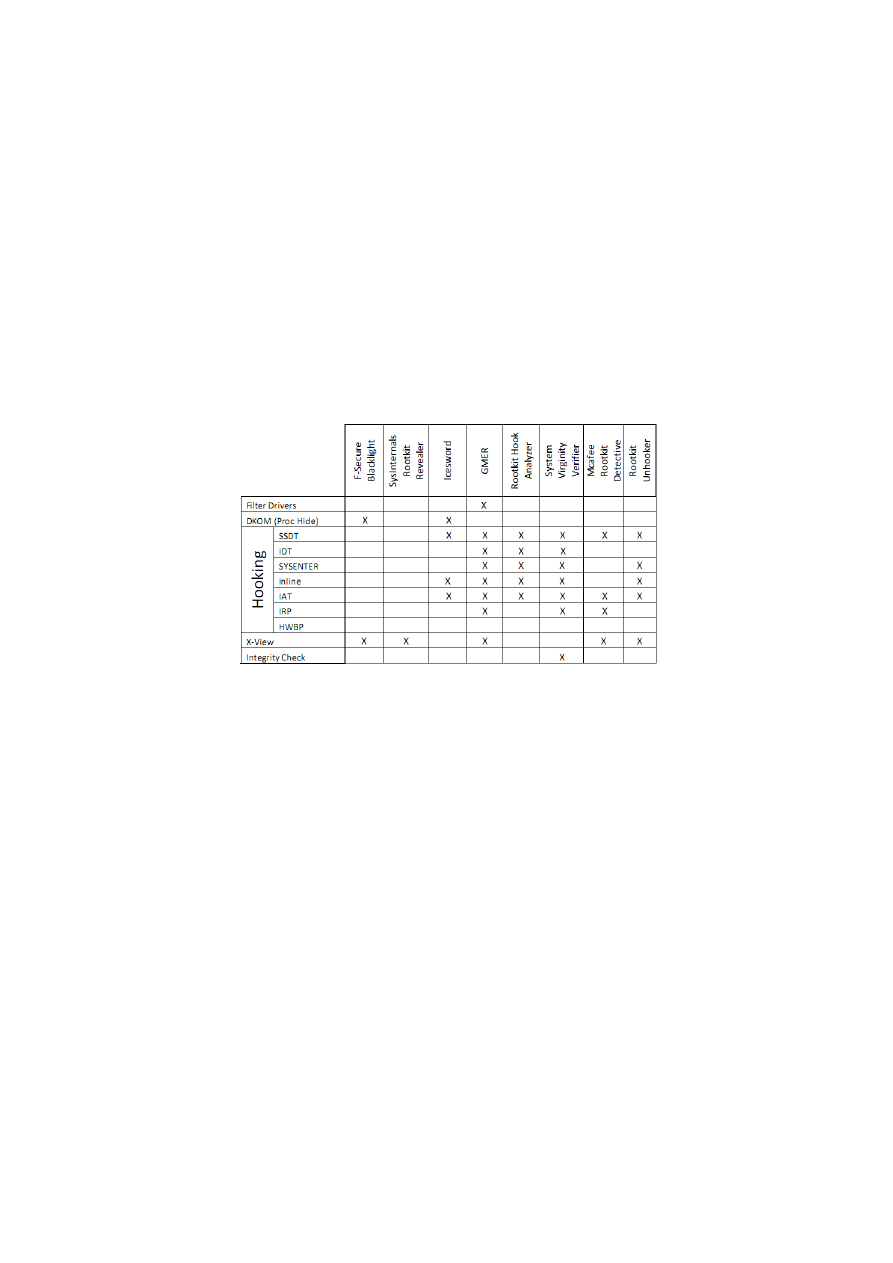
2.6 Anti-Rootkit Software Analysis
The following table shows the features implemented by eight anti-rootkit programs.
Table 2.1: Detection software - Comparative study
Crossview and integrity checking are two detection mechanisms that cannot tell which rootkit tech-
nique was employed. They can just tell that something is being hidden, or some part of memory is not
as it should be, respectively. For example, a rootkit may use an inline hook to intercept a function.
Crossview detection will only show the alert if the hook is hiding some information that can be com-
pared with a crossview analysis.
As we can see through this table, hardware breakpoint hook detection is not much of a concern
nowadays, nevertheless, it is as powerful as any other type of hook.
Layered filter drivers are easy to detect, but hard to determine if they are malware. In this case, a
deep crossview analysis may be helpful (if the filter driver is hiding something important such as files,
processes or network connections). Alternatively, a memory signature scan can also be helpful if the
rootkit’s signature is already known.
2.6.1
System Virginity Verifier
SVV (Rutkowska, n.d.)
is an integrity checking tool created by Joanna Rutkowska for windows
2000/XP/2003 that verifies in-memory code sections along with many other read-only system com-
14

ponents which are usually altered by various stealth malware (type 1) and supports disinfection.
SVV also takes additional care with false positives, because many tools use techniques which involve
code modification, which can be considered rootkit (for instance, system monitoring tools and firewalls).
2.6.2
Tripwire
Tripwire (Tripwire, n.d.) is another integrity verification tool available for all UNIX systems, whose
purpose is to identify and alert on file changes. On the first run, tripwire scans the file system and stores
in a database, cryptographic hashes for each file. On a later date, new hashes are obtained for each file
and these are compared against the information previously stored in the database.
2.6.3
VICE
VICE (Butler, 2004) is a freeware tool written by James Butler designed to detect most types of hooks. It
works by installing a device driver which scans both User-land and Kernel-land for hooks. Supported
hooks are: Inline, IAT, SSDT and IRP. The biggest problem about VICE, as with many hooking detection
tools, is in its large number of false positives, from legitimate windows hooks.
2.6.4
Hijacking anti-rootkit software
It is not hard to implement a rootkit with the ability to bypass a known anti-rootkit system. By knowing
details of the anti-rootkit software, i.e., executable file name, description, properties or other information
about the application, a rootkit can turn off its defenses and show a clean view of the system, only to the
scanning application. Even worse, a smarter rootkit may hook certain functions or patch code sections
of the anti-rootkit software, and make it completely sterile.
To mitigate this threat, a scanning application may perform the scanning with the help of another
process through the injection of a function or a DLL. With DLL injection, it’s important to hide the
injected module because a rootkit could also scan the Process Environment Block structure (PEB) of all
processes and traverse the doubly linked list of modules in order to find the anti-rootkit module.
Trojan.Linkoptimizer is a rootkit that attacks anti-rootkits. However, this application chooses to
prevent the execution of known anti-malware programs, which will certainly alert the user that the
system may be infected.
15

2.7 Summary
All the presented detection techniques have their strengths and weaknesses, but where one fails, the
other succeeds. This chapter has shown the general techniques for Windows rootkits along with the
typical approaches for detecting them, not forgetting to reference the Linux operating system when
needed. Most of the techniques covered here have been in use for years, and when a new hiding method
becomes public, defenses against it are immediately studied and implemented in anti-rootkit software.
It is interesting to watch this as an endless game, where both players are always relatively balanced.
In fact, no one will ever win or lose. A comparative study at the end of the chapter shows the top
anti-rootkits, along with their differences.
16

3
User-Land
No detection algorithm is complete of foolproof. The art of detection is just that - an art.
– Greg Hoglund and James Butler
3.1 Introduction
The previous chapter contained the explanation of three general methods used for hooking a function on
Windows. Although not being widely used on Linux rootkits, these techniques also deserve attention
since they can be used to achieve the same objectives as in Windows. The purpose of this chapter is
precisely to explore these attacks on Linux and study what can be done to detect and prevent these
threats.
By having access to the address space of a process, the execution flow can be manipulated in many
ways. The way the application sees the information and its behavior can be changed without users
consent. Since hooking is based in memory manipulation, this chapter begins by introducing three
methods that can be used to access the memory of a process. Once this is introduced, room is created to
understand how the implementations of hooking can be done.
Lets look at the following motivational scenario: An attacker penetrates a system where tripwire
is running, he is able to elevate his privileges. The attacker pretends to discover the password of the
users of that machine but he does not want to waste undetermined time trying to crack the shadows in
/etc/shadow, so he uses another approach: Access the ssh daemon address space at runtime and hook the
function auth password which authenticates the user’s password at login. When the attacker hooks this
function, he can access the arguments and steal the password. He can also verify the return value of
the function which returns zero on failure, and different from zero on success so he can avoid stealing
wrong passwords. The passwords can then be saved to a place where tripwire does not monitor such as
/tmp. The attacker just has to wait for the trojaned version of the ssh daemon to do its job and check the
file in /tmp for passwords from time to time.
The figure
does not focus any particular hook but serves to show the potential of one. In this
case, the hook is set not to hide information that reveals the presence of the attacker, but to steal infor-
mation that the attacker should not have access to. Tripwire will be quiet and will not report anything
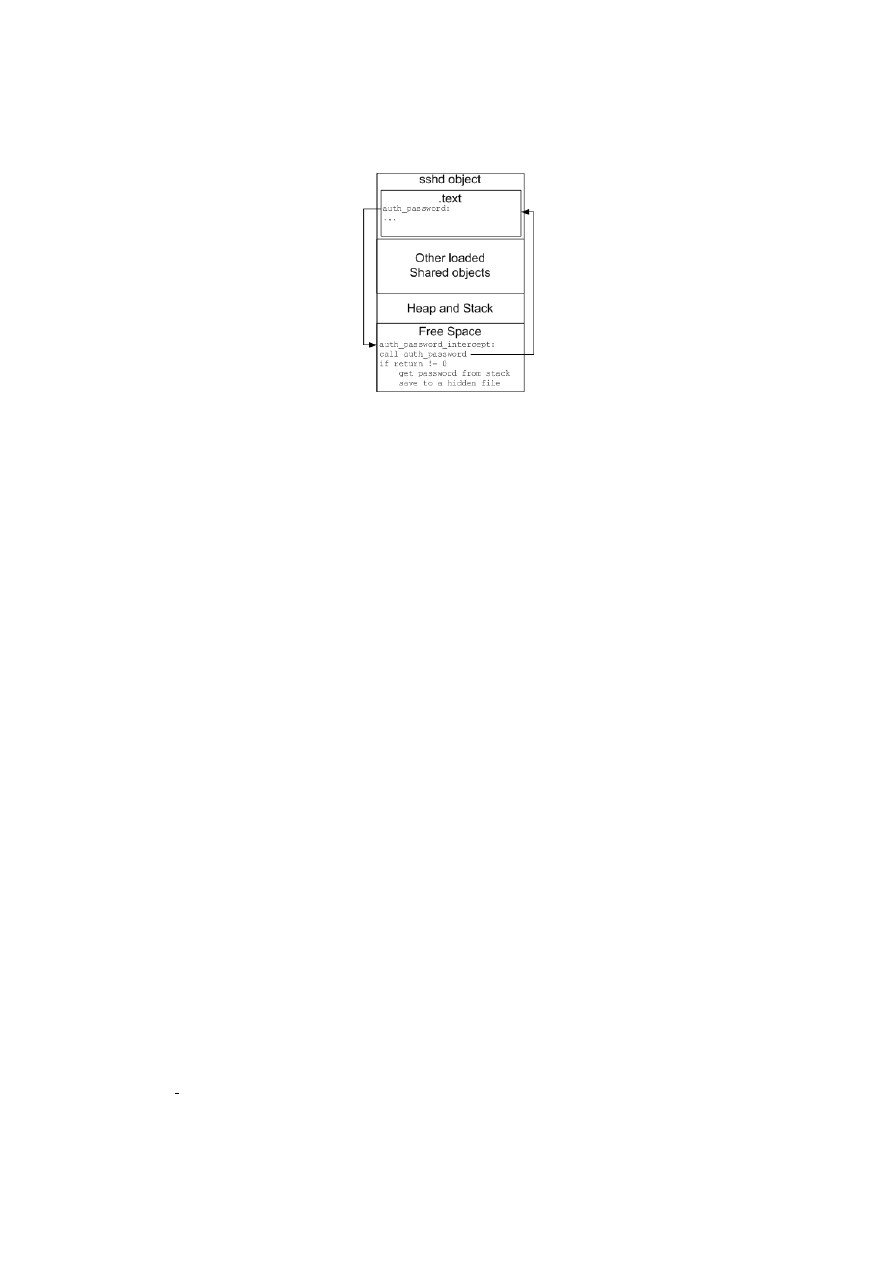
Figure 3.1: Hooking the ssh daemon at runtime
since the disk image of the ssh daemon will be untouched.
3.2 Accessing the address space of a process
When we talk about hooking, it is implicit that there must be any means to access the process memory.
In Windows operating systems, microsoft provides a strong API for manipulation of other processes.
Lets take a look at some examples:
VirtualAlloc
Allocate space on a specific process.
VirtualProtect
Change the protection of a range of commited pages in the virtual address space.
WriteProcessMemory
Write data to a certain region of memory in a specified process.
ReadProcessMemory
The same as above, but for reading.
CreateRemoteThread
Creates a thread in a specific process starting at an address. Linux does not have
a similar function.
Windows User-land rootkits take advantage of these (and other) API functions to achieve stealth-
iness (MSDN, 1999). Some proactive defense systems intercept the execution flow triggered by these
functions somewhere in the system (generally the system calls are ultimately invoked), and search for
known behavior patterns in the sequence of the calls and input arguments in order to detect abuses. In
Linux, things are different. This section shows three ways to access the address space of processes:
Using LD PRELOAD
By using this environment variable, it is possible to instruct the loader to load
additional libraries before all the others that were defined at compile time. Note that this access
18

cannot be made when an application is already running because it takes place when the dynamic
loader does its job, when the process is executed. In fact, since the access is made from a shared ob-
ject, we can access the memory of the process because we actually make part of it. For the attacker,
this technique has the disadvantage of modifying an environment variable, possibly revealing an
unwanted shared library being loaded to a careful administrator.
Using ptrace system call
The ptrace (ptrace Linux Man Page, 1999) system call is widely used by debug-
gers to examine and control the execution flow of an application. This can be achieved by changing
the process registers and directly reading and modifying the address space. With this function call
we can hook a function and intercept important information at any moment while the process
is running, contrary to the LD PRELOAD technique, which only works when the process is run.
This system call, in a way, is equivalent to some functions seen above in the API for windows.
Direct access to the process memory from a Kernel module
On Intel x86 CPU, there is a special regis-
ter called CR3 that specifies a base address of a page table in physical memory. Each process has
its own entry in the page-table directory, so when accessing the process memory from a Kernel
module, one has to be sure that the CR3 register is pointing to the correct page-table entry. Since
the CR3 register only changes when the current process changes, this technique can be hard to
implement. Nevertheless, there are tricks that can make this easier which consist in waiting for
the target process to be the ”current”. For example, if the Kernel module is intercepting a system
call, it can check to see if the current process is the target and then access its memory.
3.3 Hooking techniques
This section presents three techniques for hooking a function in a process. The first one is inline hooking,
primarily introduced by Microsoft Detours (Corporation, n.d.), and we will see how it can be applied
in Linux. The second is PLT injection, presented by the security expert Silvio Cesare which consists in
function pointer table modification, and finally, hardware breakpoint hooking, which has the advantage
of not changing read-only memory segments nor function pointer tables.
3.3.1
Function hooking via code section modification
Under Linux, inline hooking may be the simplest way to hook a function. As described in the state of
the art chapter, inline hooking works by replacing the first bytes of a function with an unconditional
jump, forcing the instruction pointer to jump to the hijacking function.
Figure
shows the bytes before the replacement in red. The HijackFunction can control the
input and/or output data flow of the function which is being intercepted. When the Function is
19
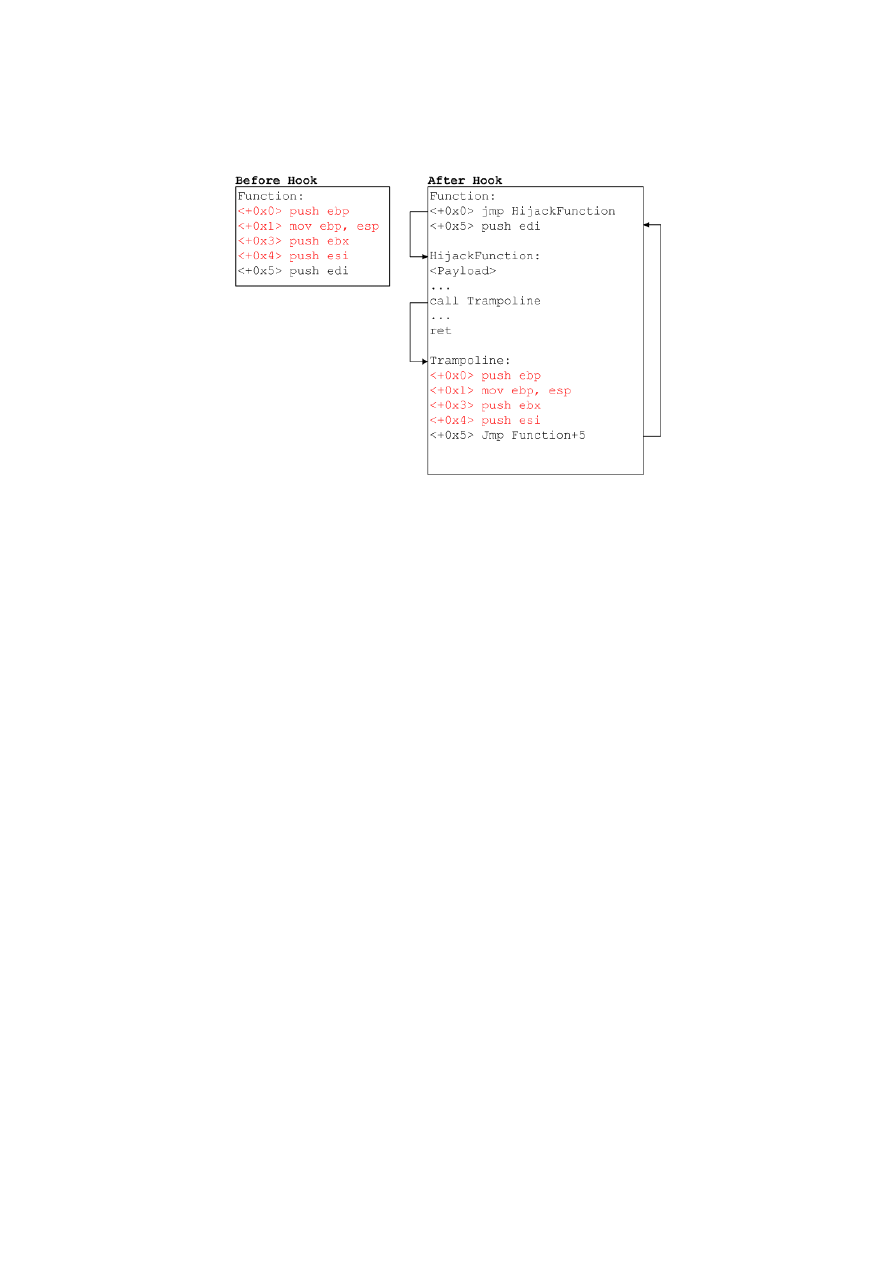
Figure 3.2: Inline function hooking
invoked, the new bytes force the instruction pointer to jump to the HijackFunction. Inside this
function, the attacker has control over the arguments and is able to modify them. It is important not to
forget to call the Function using the trampoline, which is a function that executes the old bytes that
were replaced and then jumps to the following instruction, keeping the call to the function, consistent.
The returning value can also be modified. Note that this hook implies the modification of read-only
segments of memory, more precisely, .text sections. Before writing to memory, it is important to change
the allowable accesses of the region using the function mprotect in order to avoid a segmentation fault
for writing to non-writable position in memory. The memory segment should be made writable and
after the byte code modification, the permissions of the segment should be restored.
It is easy to understand that one way to detect this attack is by searching the beginning of all func-
tions for a jmp opcode. This method can be safe from false positives because gcc compiler never puts a
jmp
in such place. In Windows, there are some anti-rootkit software that run all the functions in mem-
ory and search for a jmp opcode. This detection scheme is unreliable because the attacker may not put
the jmp opcode right at the beginning, but instead, after some useless instructions, just for the sake of
not being detected this way.
We could use nop opcodes to achieve the same result but it would ease the job of a rootkit scanner
because it wouldn’t also be stealth to put such opcodes at the beginning of hooked functions. In the
figure
the code before the jmp instruction does not do anything. The only usefullness of it is to avoid
putting the jump at the beginning, this way, deviating the attention from the rootkit detectors. A rootkit
detector that previously knows a rootkit that applies this technique, could use this code as a signature
to detect unwanted hooks.
20
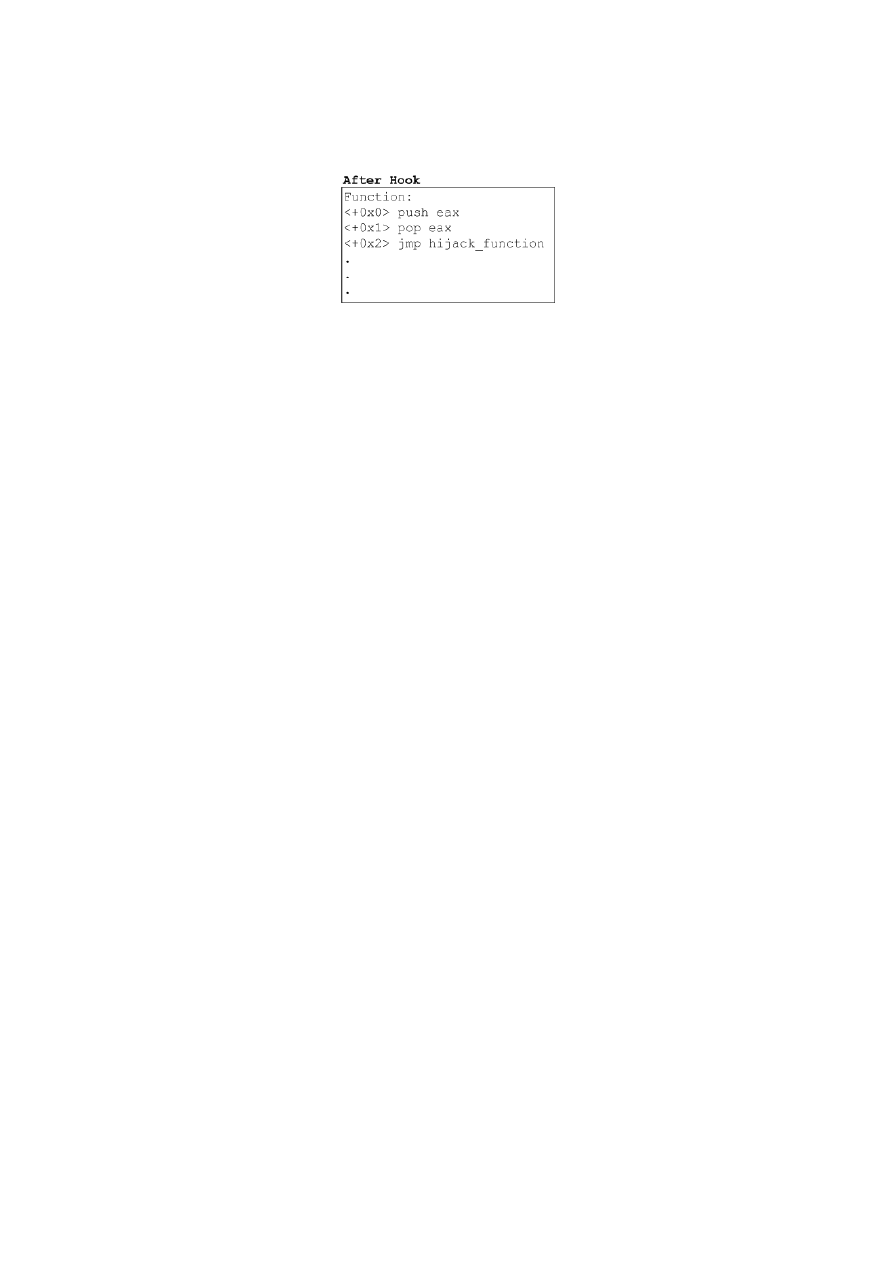
Figure 3.3: Inline function hooking (variant)
Since inline hooking relies in code section modification, and because these sections are read-only,
a memory integrity check should be enough to detect that something might be wrong, as explained in
section
3.3.2
PLT Injection
PLT Injection is a hooking technique by Silvio Cesare similar to windows import address table hooking
outlined in
(state of the art), except that this one only works for functions inside shared libraries
(besides having a different file format, of course). Hooking techniques relying on function pointer table
modification are not as accurate as inline hooking because the application may load the library itself
using library APIs.
PLT stands for Procedure Linkage Table which is a section of the elf file (ELF Specification, 1995) format
intended to redirect position-independent function calls to absolute locations. Function calls between
executables and shared objects cannot be resolved in compile time because the compiler is unable to
guess what will be every shared object function’s offset inside the process’s memory.
For every shared function, the PLT table redirects the flow to the PLT(GOT) table which does not
contain the actual function addresses when the application starts. The first call to a shared function
will jump to the dynamic linker which will resolve the real address of the function and replace it in the
PLT(GOT) table, for the subsequent calls. This method of resolving the requested symbol when it is first
referenced is called lazy loading and generally improves overall application performance, because the
dynamic linking process does not cause overhead with unused symbols.
The idea behind this method is to replace the function pointer in the .got.plt table of the elf executable
belonging to the process that contains the function to be intercepted, so that when the application in-
vokes the desired function, the instruction pointer travels to our hooking function instead of the original
one.
Despite this technique being old - almost ten years to be precise - it still can be used because the ELF
file format is unchanged. On windows, IAT hooking is widely used on many User-mode rootkits, but
21
surprisingly for Linux, I did not find any rootkits taking advantage of PLT Injection. Instead, I found
game cheats using this method to take control over the game.
Since this work does not go much deeper on this topic, I suggest reading the Silvio Cesare’s article
(Cesare, 1999) for those who are interested in the details.
3.3.3
Hardware breakpoint hooking
Once again, this topic has also been covered in the state of the art chapter
, but here we will go
deep into details and study how it can be applied on Linux x86 architecture.
This hooking method relies in the manipulation of debug registers. On the x86 architecture, there
are eight debug registers available, from DR0 to DR7 which can only be modified in privilege level zero.
The modification of these registers in another privilege level causes a general protection exception. The
following table outlines the purpose of each debug register.
Table 3.1: Description of the debug registers
DR0 - DR3
The four breakpoints. These registers store the linear address of at most four break-
points.
DR4
Reserved.
DR5
Reserved.
DR6
Helps the debugger determine which of the debug conditions have occurred.
DR7
Enable or disable breakpoints (from DR0 to DR3) and specify the debug conditions.
Note that the DR6 and the DR7 register have a specific format that must be considered when as-
signed. I suggest reading the INTEL manual (Intel, 2008) to understand the flags and fields of each one.
The proof of concept of the following implementation is in the Appendix A.
First, we need a way to get inside a process address space. In my proof of concept, I used the
LD PRELOAD environment variable to ease this task. To the LD PRELOAD variable was added a
shared library which will be controlling the hook. Libraries should export initialization and cleanup
routines using the attribute ((constructor)) and attribute ((destructor)) function
attributes, respectively, so when the shared library loads, the constructor is called and here we can in-
voke the fork function, letting the main program run. This way we can get a process for us and attach
to the child using ptrace’s argument PTRACE ATTACH. It is necessary to have a separate process because
we need to control the execution flow of the target process with debugging mechanisms. To manipulate
the debug registers of the target process we can use, once again, the ptrace system call. When the Ker-
nel interrupts the execution to give processor time to another process, it saves the debug registers in the
user segment of the application’s memory. With the PTRACE PEEKUSER and PTRACE POKEUSER
ptrace
arguments, it is possible to read and write these registers, respectively.
22

We are going to need a function to perform the interception, in the memory of the target process. Be-
cause we used the LD PRELOAD technique, the functions in our library object will exist in the memory
of the target process, so we can take advantage of this and create a function for this purpose.
Nevertheless, it is also possible to do this without using the LD PRELOAD variable at all and in-
jecting the interception code somewhere in free space of the target process, using ptrace’s argument
PTRACE POKEDATA. Despite being harder to implement, this one brings the advantage of hooking
the function at any time during the execution of the process.
Finaly, we need the address of the function we want to intercept. We can find it with the help of
GDB (The GNU Project Debugger, 2008) and then hard code the value in the code, or else we may use a
more elegant way and find the symbol’s address by parsing the ELF file on disk and locating the address
in the symbol table.
Right after attaching to the target process using ptrace, we set the hardware breakpoint. Setting
the breakpoint takes two steps: (1) Assign the address of the breakpoint to one of the first four debug
registers (DR0 to DR3). (2) Change DR7 register according to specification in order to enable the break-
point, so the CPU knows which registers are enabled and which debug conditions are defined - stop on
execution, in this case.
To perform this hook, another system call is required. The attacker needs to know when the process
stops due to the breakpoint, so here we need to get familiar with sys wait4 system call. Lets get into
the details of this system call by taking a look at the following functions:
pid t sys wait4(pid t pid, int *status, int options, struct rusage *rusage);
pid t wait(int *status);
The pid argument is the pid of the child that the parent process is waiting on. status is a pointer to
an integer that the Kernel fills with information revealing why the child process stopped. The options
argument defines different behaviours to the system call and the last one, the rusage, provide resource
usage information about the child. These last two arguments are not relevant for this study. The wait
function is a libc wrapper function that simplifies the call to sys wait4. The call wait(&status) is
equivalent to:
sys wait4(-1, &status, 0, NULL);
The value of the pid being -1, means that the parent is waiting for any child process to stop. Using
the following macros to analyze the status variable, we can understand the reason why the process
stopped:
WIFSTOPPED(status)
- returns true if the child process stopped by delivery of a signal.
WSTOPSIG(status)
- returns the number of the signal which caused the child to stop.
23

Note that there are more macros available for other purposes, take a look at the man pages (waitpid
system call, 1997) for more information. When wait returns, it’s important to verify two things to make
sure that the traced process stopped due to a hardware breakpoint: (1) status argument indicates that
the process received a SIGTRAP. (2) DR6 register of the traced process indicates that the breakpoint
occurred.
The following steps illustrate the implementation of a hardware breakpoint hook:
1. Attach ptrace to the process with PTRACE ATTACH argument.
2. Set one of the DR0 - DR3 registers to the address of the function we want to intercept.
3. Assign register DR7 according to specification, enabling the breakpoint defined in step 1 to break
on execution.
4. Continue the execution of the traced process until the wait function returns and reports that
the traced process stopped because of a SIGTRAP. At this moment, the breakpoint was reached
meaning that the instruction pointer is pointing to the beginning of the function.
5. Using ptrace (PTRACE SETREGS argument), write to the instruction pointer (EIP) register the
address of the function that will be intercepted.
6. Continue the execution of the traced process
After step 6, the instruction pointer will continue executing the code in the hijacking function, but if
we want to call the original one, we have to be careful because the breakpoint is still set. One may think
about disabling the breakpoint while executing the intercepting function, but we cannot be sure when it
is finished because it runs on a separate process. In this case, there can be used one of two alternatives:
• Use ptrace with PTRACE SINGLESTEP on every ”even” break, disabling the breakpoint before,
and enabling it after. An ”odd” break will occur when some function decides to call the target
function. The ”even” breaks will occur when the intercepting function invokes the target function.
• Change the DR register containing the breakpoint address to the address of the second instruction
of the function to be intercepted, and when a break occurs, switch the it back to the previous one
(the first instruction).
The code in the Appendix A uses the first alternative. The figure
clarifies the inner-workings of this
hook.
24
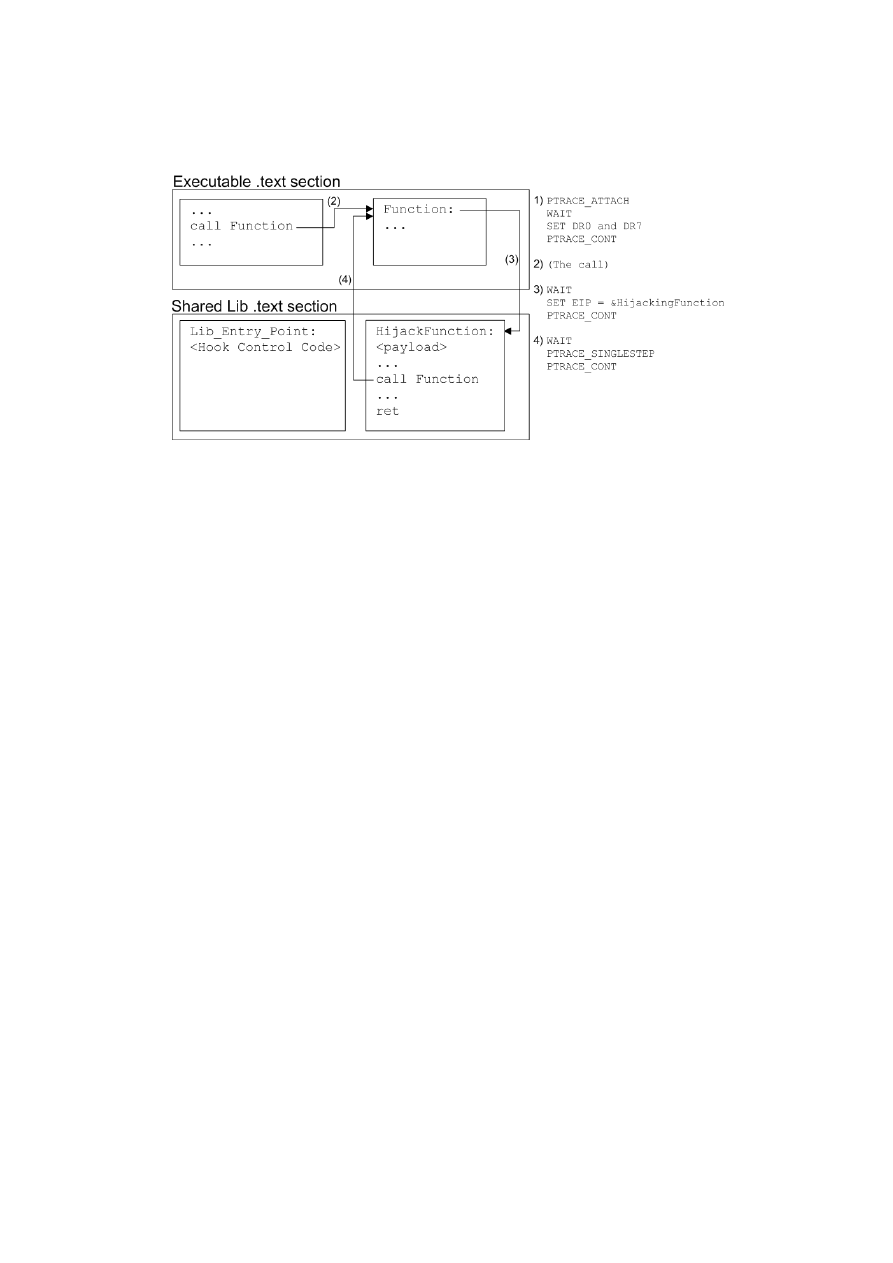
Figure 3.4: Ilustration of the Hardware Breakpoint Hooking Technique
3.4 Defenses
This section shows the implementation of two detection mechanisms each one for a specific hooking
method. The first one is designed to detect inline hooking attacks. The goal is to build a program that
scans the code sections in both memory segments and in the disk file (not only for the executable but also
for all the dynamically loaded libraries), and compare if these two versions are identical. The second
mechanism aims to detect and prevent hardware breakpoint hooking on-the-fly with the help of a Linux
Kernel module.
3.4.1
Detecting program byte code changes
Integrity checking in physical storage is well known because of tools such as Tripwire (Tripwire, n.d.).
These tools are extremely useful when it comes to rootkit detection because many malware replaces es-
sential system tools of the operating system directly in the hard disk. On the other hand, to achieve its
purpose, malware must be present in memory segments and not necessarily in disk. The disk modifi-
cation is only for a matter of persistence and also to make the installation of the rootkit simpler, but it’s
not mandatory. On Windows, today, there are several anti-rootkit applications that verify the integrity
of the memory of running applications. As said earlier, searching for a jmp opcode at the beginning of
each function is unreliable because the attacker may not put a jmp precisely at the beginning of the func-
tion. Code sections should remain unmodified until the program terminates which means that there is
another method for detecting inline hooks - and other types of memory incongruity - which is: check-
ing the integrity of process code sections. These defenses seem to be much of a concern on Windows
operating system, but not on Linux, probably because this type of attacks, regardless of being possible,
25

are rarely used. It’s important to keep in mind that in a running application, normally there are several
segments that contain code sections because the executable has is own code section, but the other shared
libraries - also known as dynamic shared objects (DSO) - also have their own.
Next follows my implementation of a memory integrity scanner for Linux. Note that the tool I
present here only scans for code sections (malware type 1, see section
), which means that a rootkit
may also find ways to hide information by changing other sections in the memory segments.
This implementation can be resumed as follows: For each running process, compare the .text (code)
section present in memory with the version inside the executable on disk, do the same for each loaded
shared object within the same process. If we are testing the integrity of something, we need a trusted
baseline to compare with. Actually, we can’t say that the disk image can be ”trusted”, because the
attacker is able to change it unless there is a disk integrity checker present. So, to bring this application
to a real scenario, there should be a database with checksums of all important processes and libraries, as
tripwire does, but for this demonstration we will consider that the disk image is trusted.
3.4.1.1
Understanding memory mapping
If we want to find where a determined section of the application is inside a memory segment, it is
important to understand how the Kernel maps an executable and their respective libraries in memory.
There are three types of ELF objects (Haungs, 1998):
• Relocatable file - an object file that contains compiled code suitable for linking with other object
files to build an executable or a shared object file. These files have a ’.o’ extension.
• Executable file - Holds the program code after being linked with all its object files and is ready for
execution. Has no extension.
• Shared object file - Also known as dynamic shared objects (DSO) or dynamic libraries, these objects
can be used in two ways: (1) The linker combine this object with other shared object or relocatable
files to produce another object file. (2) The shared object is linked at runtime with the application
(and not at compile time).
When the Kernel loads the executable into memory, it has to know where to copy the executable,
which parts it needs to copy and how to organize them in memory. The same must be done for each
shared object that the executable requires to run properly. The ELF structure contains two important
tables: The program header table and the section header table.
First, lets look at the section header table. The readelf tool shows this information:
26
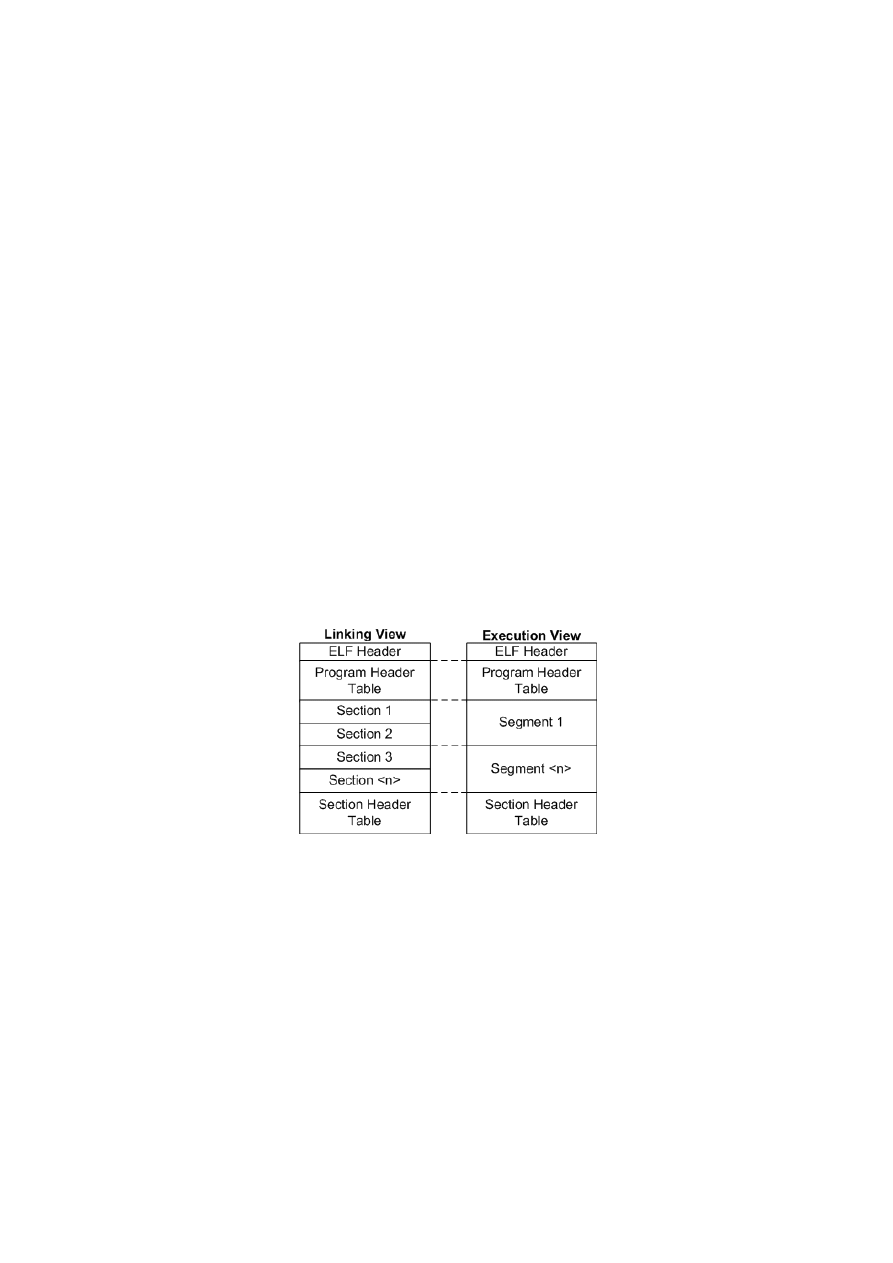
readelf -S /bin/cat
There are 27 section headers, starting at offset 0x6678:
Section Headers:
[Nr] Name
Type
Addr
Off
Size
ES Flg Lk Inf Al
...
[11] .init
PROGBITS
080489dc
0009dc
000030
00 AX
0
0
4
[12] .plt
PROGBITS
08048a0c
000a0c
0002b0
04 AX
0
0
4
[13] .text
PROGBITS
08048cc0
000cc0
0048dc
00 AX
0
0
16
[14] .fini
PROGBITS
0804d59c
00559c
00001c
00 AX
0
0
4
[15] .rodata
PROGBITS
0804d5c0
0055c0
000dfc
00 A
0
0
32
...
The previous example shows the section header table of the cat command. Each section contains
useful information when linking the program: program’s code, data, initialized and uninitialized vari-
ables relocation information and other. When the program is executed, the dynamic loader does not
look for this table, but instead it reads the program header table. The program header table contains
information about segments of memory which are virtually contiguous page frames that the Kernel al-
locates for the memory of the application. These segments, known as VMA (virtual memory areas),
are made of one or more sections so that the Kernel knows which sections belong to each VMA. The
following image shows the parallel between the sections and memory segments.
Figure 3.5: ELF file structure
The figure
taken from ELF specification (ELF Specification, 1995) shows on the left (Linking View)
the elf file structure as the linker sees it and on the right (Execution View), how the Kernel sees an
application and how it maps the segments in memory with the help of the program header table.
3.4.1.2
Using /proc/<pid>/maps
The /proc directory contains virtual files which provide useful system information about the running
Linux Kernel. Because the /proc is not a real file system, no storage space is consumed but only a limited
amount of memory. Nowadays, this pseudo file system is getting more attention from rootkit authors
27

and can also be subverted, not only to change the way the applications view the state of the Kernel but
also to guarantee that an unprivileged user can regain unauthorized system control. Assuming the /proc
device is clean and we can trust it, we can view the memory mapping of an executable and respective
library files by accessing the /proc/<process pid>/maps file.
cat /proc/self/maps
08048000-0804f000 r-xp 00000000 08:01 155058 /bin/cat
0804f000-08050000 rw-p 00006000 08:01 155058 /bin/cat
08050000-08071000 rw-p 08050000 00:00 0
[heap]
b7dd1000-b7dd2000 rw-p b7dd1000 00:00 0
b7dd2000-b7f1b000 r-xp 00000000 08:01 16765
/lib/tls/i686/cmov/libc-2.7.so
b7f1b000-b7f1c000 r--p 00149000 08:01 16765
/lib/tls/i686/cmov/libc-2.7.so
b7f1c000-b7f1e000 rw-p 0014a000 08:01 16765
/lib/tls/i686/cmov/libc-2.7.so
b7f1e000-b7f21000 rw-p b7f1e000 00:00 0
b7f2d000-b7f2f000 rw-p b7f2d000 00:00 0
b7f2f000-b7f30000 r-xp b7f2f000 00:00 0
[vdso]
b7f30000-b7f4a000 r-xp 00000000 08:01 293779 /lib/ld-2.7.so
b7f4a000-b7f4c000 rw-p 00019000 08:01 293779 /lib/ld-2.7.so
bfaee000-bfb03000 rw-p bffeb000 00:00 0
[stack]
Here, cat prints its own memory map. This file contains much of the information needed. We can
see the information for each segment of memory, in particular, each starting and ending addresses, their
access permissions and the path of the file from which the memory was mapped. We are able to see
where the heap and the stack are located. [vdso] stands for virtual dynamic shared object and it refers to
a virtual shared object exposed by the Kernel on all processes. Unless any application has changed it,
segments with ”r-xp” permissions are not writable and therefore should contain code sections.
3.4.1.3
Finding .text section offset in memory
Now lets take a look at the program header table. All the information we need to determine the offset
and the size of the .text section in the object file is inside the respective ELF’s section header table.
readelf -l /bin/cat
Elf file type is EXEC (Executable file)
Entry point 0x8048cc0
There are 7 program headers, starting at offset 52
Program Headers:
Type
Offset
VirtAddr
PhysAddr
FileSiz MemSize Flg Align
PHDR
0x000034
0x08048034 0x08048034 0x000e0 0x000e0 R-E 0x4
INTERP
0x000114
0x08048114 0x08048114 0x00013 0x00013 R-- 0x1
[Requesting program interpreter:
/lib/ld-linux.so.2
]
LOAD
0x000000
0x08048000 0x08048000 0x063c0 0x063c0 R-E 0x1000
LOAD
0x0063c0
0x0804f3c0 0x0804f3c0 0x001dc 0x00364 RW- 0x1000
DYNAMIC
0x0063d4
0x0804f3d4 0x0804f3d4 0x000d0 0x000d0 RW- 0x4
28

NOTE
0x000128
0x08048128 0x08048128 0x00020 0x00020 R-- 0x4
GNU STACK
0x000000
0x00000000 0x00000000 0x00000 0x00000 RW- 0x4
Section to Segment mapping:
Segment Sections...
00
01
.interp
02
.interp .note.ABI-tag .hash .gnu.hash .dynsym .dynstr
.gnu.version .gnu.version r .rel.dyn .rel.plt .init .plt .text .fini
.rodata .eh frame
03
.ctors .dtors .jcr .dynamic .got .got.plt .data .bss
04
.dynamic
05
.note.ABI-tag
There are many types of segments but the one that is important here is the LOAD type. The LOAD
type means that the Kernel must read at Offset and copy all bytes to a memory segment starting at
VirtAddr
until it reaches Offset + FileSiz. This is valid not only for executable objects but also
for shared libraries. The first LOAD is intended to copy all the read-only and executable memory. This
segment contains the .text section which is the one we want to find in memory. The second LOAD
segment contains all the dynamic data, and therefore, is readable and writable. For the example of
the cat command, since the Kernel is supposed to copy all the bytes since the beginning of the file
(Offset = 0x000000) until 0x063c0 (FileSiz), which is an address far beyond the ending offset of the
code section (see the section table), we can conclude that this LOAD segment contains the .text section.
Since there is only one segment that is simultaneously read-only and executable, this means that a ’r-x’
segment in the maps file will contain the code section of an object.
Now we only need to know where exactly the code section begins and ends in memory. Continuing
with the example of the cat command, if we take a look again at the maps file, the segment of memory
reserved for the cat executable which is read-only and executable, contains the code section. We can
conclude that the beginning of the text section in memory is exactly at where this segment begins, plus
the offset of the code section in the executable file. To get the ending offset we obviously just need to
sum the size of the section. In practice, the code section begins at 0x08048000 + 0xcc0 position and ends
at 0x08048000 + 0xcc0 + 0x48dc.
We know where the code sections begins and ends in the memory image and in the corresponding
file, so we are able to build our code integrity checker. The following pseudo-code outlines the memory
scan which is implemented in the Appendix B.
for each process
access /proc/<process pid>/maps
for each "r-xp" block
29

get info on the .text section for the object (in disk)
compare disk and memory image
Once again, accessing the memory of another process turns out to be easy with the help of ptrace.
By providing PTRACE PEEKTEXT as the first argument, ptrace reads a word at the location specified
by addr (third argument).
3.4.2
Detecting and preventing Hardware Breakpoint Hooking
As described earlier in this chapter, hardware breakpoint hooking relies in the use of two system calls:
sys ptrace
and sys wait4. If we are trying to detect these hooks, it would be a good idea to analyze
the sequence of calls to these important system functions and understand the information flow that
passes through them. This way, maybe we could detect when some application is trying to redirect the
instruction pointer register with hardware breakpoint hooking and we could even block this attempt.
System call interception, even when used for good purposes, is seriously discouraged mostly because it
can cause problems in SMP systems. These details are discussed in the ”Results and discussion” chapter
. But if we want to be watching the data that goes in and out of these system calls, there does not seem
to be a better choice unless we actually change the system call inside the Kernel code and recompile it,
thus, creating a new Kernel image.
3.4.2.1
Finding sys call table in Linux Kernel 2.6
Because the sys call table symbol was being targeted in most cases for malicious use, this symbol
is no longer exported in Linux Kernel 2.6, which means that we have to find a way to get it. Actually,
there is no clean way to do this.
In conversations with a friend, I was told that one could search the Kernel memory for the three
addresses of the first system calls consecutively - sys exit, sys fork and sys read - with the help of
the /proc/kallsyms device and it would point to the beginning of the table. In fact, it works but this method
turned out to be unreliable because it presupposes that the system call table is untouched. Besides that,
this technique scans the whole Kernel memory which can be slow, although this is not a big problem
since this scan is made only once.
In Phrack issue 0x3a, the article ”Linux on-the-fly Kernel patching without LKM” shows a clever,
but dirty way to get the system call table using the interrupt descriptor table (IDT). Actually, the article
goes a little further, explaining how to get the system call table from User-mode, with the help of the
/dev/kmem device, but we can easily reproduce this technique in a Linux Kernel module because in
Kernel-land, memory access has no boundaries. We are actually using a rootkit technique to perform
our defenses! It may sound weird when we think about it, but if we look at the majority of the proactive
30

defense software in Microsoft Windows for example, most of the protections are made with system
service descriptor table (the ”system call table” for Windows) hooks.
To avoid being eluded by some sort of malware, and since the system call table is always at a
fixed position during system operation, for security reasons, the module should save the address in a
configuration file.
3.4.2.2
Formulating a pattern for detection
I divided the detection in two parts, which can be understood as two states of an automaton. First, we
have to detect that a process has stopped due to a hardware breakpoint trap, and that another tracing
process is receiving that information. After this, we need to detect that do tracing process is trying to
change the instruction pointer right after this trap.
In the subsection
, we saw that the system call sys wait4 provides a status argument. By
intercepting this system call, we have access to the information that passes through it and we can un-
derstand what the application is doing with the traced process. Again, by doing the same verification
as the attacker did to the status variable we can determine if it stopped due to a hardware breakpoint
trap even before the attacker’s application.
With the following three verifications, we can make sure that the child process has stopped due to
a hardware breakpoint:
• WIFSTOPPED(status) returns true
• WSTOPSIG(status) returns SIGTRAP, meaning that the child received a breakpoint trap
• Inspect the DR6 register of the child and test if it reveals that there was a breakpoint trap due to
one of the debug registers (DR0 - DR3)
Since we are intercepting this particular system call to catch the breakpoint traps, we have scope for
all processes. At this point, the extended instruction pointer register (EIP) of the traced process should
be saved for later use. We can say that we are in the first state of our detection algorithm, now we need
to look if the parent process tries to change the EIP value of the child. Here, we use the same method
as for the first part, but this time we intercept the ptrace system call. For the tracing process to change
the EIP register of the child, it has to do the following call to ptrace:
ptrace(PTRACE SETREGS, pid, NULL, ®s)
;
The ®s variable is the address of a user regs struct structure in the calling process. This
structure contains the values of all general purpose registers of the process at that instant. With this
31
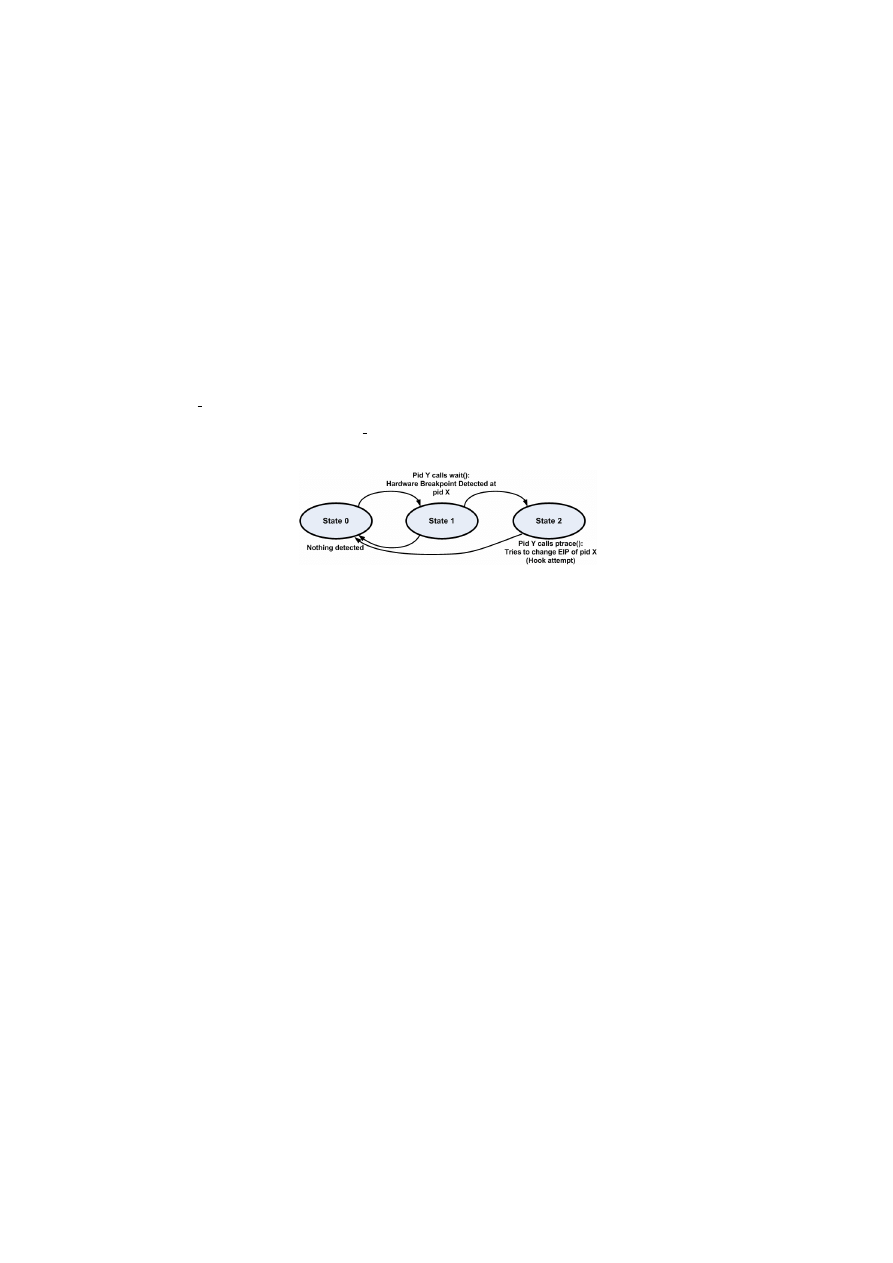
call, ptrace will replace all these registers of the child process with the ones inside the structure. If
we intercept the call and compare the EIP register inside the ®s structure with the previous one
that we saved when the trap occurred, we can detect if the execution flow is being controlled with this
debugging mechanism.
At this state, we have detected the hooking attempt. I wrote ”attempt” because we can still avoid
the hook from taking place by returning -1 to the application that called ptrace from User-land.
When do we return to the state zero of this detection automaton (when no process has been
trapped)? We can assume that when the parent process orders the child to continue with the execu-
tion (PTRACE CONT as first argument of ptrace), the process will continue and if there occurs another
hardware breakpoint, our hooked sys wait4 will catch it, and transit to state one.
Figure 3.6: The three states of this hooking detection
The code of the proof of concept is in the Appendix C.
3.5 Summary
After understanding how the access to the memory of a process works, we are able to figure how the
installation of hooks can be done. Three methods of hooking in User-land are depicted in this chapter:
The first one is called inline hooking and relies in code section modification. It is widely used in Windows
rootkits and this chapter studies its applicability under Linux. The second one was presented by Silvio
Cesare and is called PLT Injection. PLT Injection is somehow similar to Windows IAT hooking (outlined
in
), but it is slightly more complex. The last hooking technique described in this chapter is hardware
breakpoint hooking. It’s important to realize that the distinction between code sections and the other parts
of the process memory is related to the General Malware Classification section in
The second half of the chapter focuses on the defenses where two detection methods are presented
The strengths and weaknesses of these two methods are discussed later in the chapter ”Results and
discussion” at
32

4
Kernel-Land
A hidden process is particularly threatening because it represents code running on your system that you are
completely unaware of.
– Greg Hoglund and James Butler
4.1 Introduction
The last chapter focused on user mode rootkit attacks. Once we are aware of the details of the attack,
most of the user mode techniques are relatively easy to defeat since they can be better controlled from
Kernel-mode.
If the intruder gets into Kernel-mode, challenges are higher for those who seek defenses and it gets
harder to ensure that the system has not been compromised. There is no doubt that a good integrity
checker for the physical memory is extremely effective against rootkits that replace simple system util-
ities such as ls or netstat. But when the attack is performed at Kernel-mode, integrity scanning must
be made at another level, concerning dynamic and non-dynamic Kernel memory. For example the ls
command, which returns the list of the contents of a directory, delivers control to Kernel invoking the
sys getdents
. The rootkit can modify this system call in order to hide files or even processes (of the
directory listed is /proc). Kernel rootkits are installed directly into Kernel memory area modifying im-
portant Kernel structures, function pointer tables, or patching the Kernel code, in order to filter the data
that the attacker pretends to conceal from the administrator.
The current chapter covers the attack vectors used nowadays for intercepting system calls and other
subverting approaches. Also describes the implementation of two applications intended to detect the
threats.
4.2 Attacking the Kernel
This section explains several methods that can be used to intercept the execution flow of a system call.
The figure
shows the path of an invocation to a system call from the moment that a User-land appli-
cation calls, until it reaches the depths of the Kernel. The system call in the figure is sys getdents (get
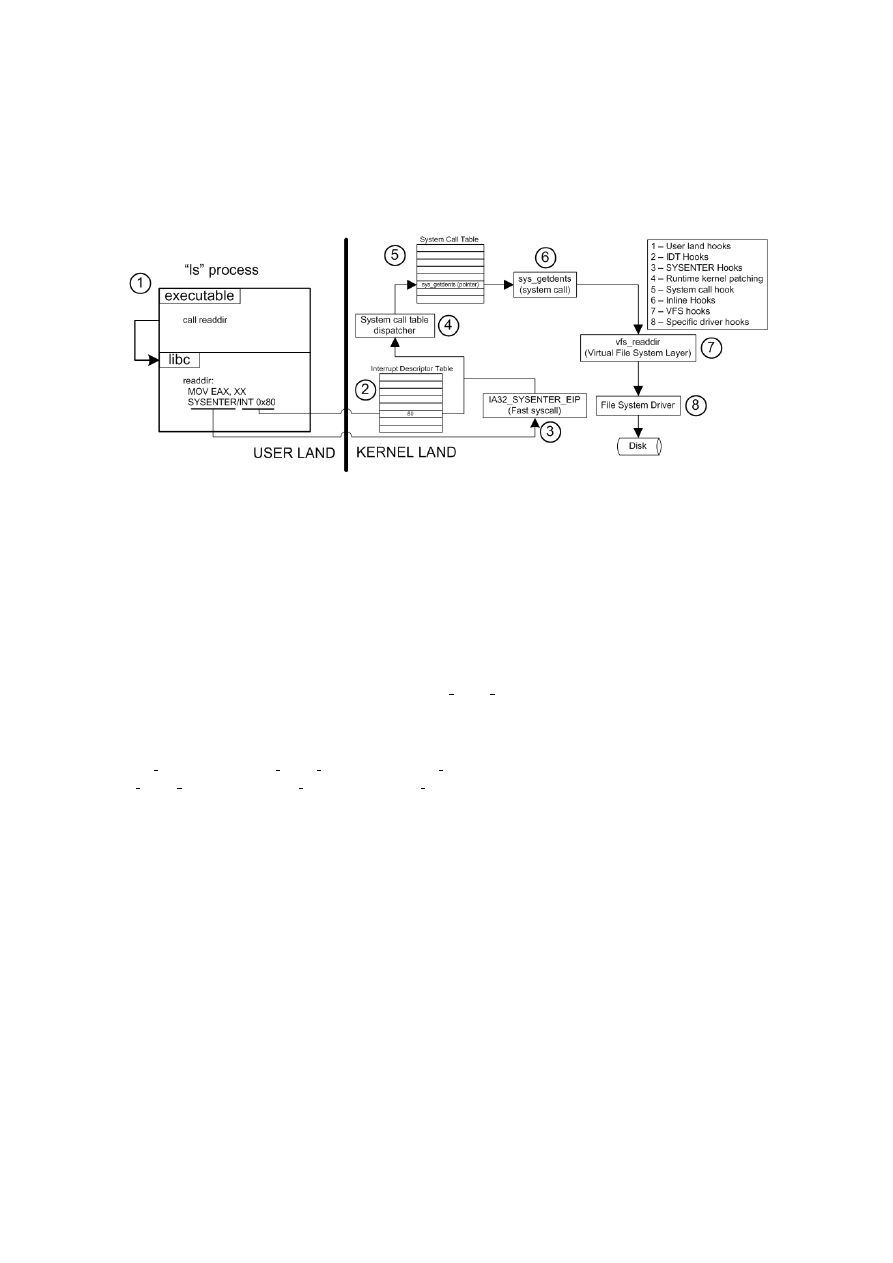
directory entries), and by taking a first glance at the image we can see that there are many places where
the interception can be installed in order to provide what the attacker wants: Control of the call.
Figure 4.1: Linux Kernel Attacks - The Big Picture
Next follows the explanation of each technique that can be used to redirect the system call table.
4.2.1
Simple system call redirection
Once the system call table is found, an entry in the table can be replaced with the address of another
function. Before Kernel Version 2.6, when the sys call table variable was exported, almost every
rootkit used this method to hide its presence.
saved syscall = sys call table[SYSCALL NUMBER];
sys call table[SYSCALL NUMBER] = new syscall;
Today, Kernel developers hardened this task because the table is not directly available to the Kernel
module, so the only challenge is to find where it is in Kernel memory. After that, it is a matter of pointer
replacement. This is the most simple way of hooking a system call, and also the easiest method to detect.
Nevertheless, today, rootkits tend to use other methods.
4.2.2
Inline hooking Kernel functions
Kernel inline hooking works in the same way as the inline hooking technique presented in
, but
this time, we are applying it at Kernel-land. This method can be used not only for system calls but
also for any other Kernel function that the attacker might find useful to intercept. The first bytes of the
function are replaced with an unconditional jump instruction forcing the program counter to branch
to a new function. The new function should call the original function with the help of a trampoline,
34

and if needed, providing modified arguments. Return value can be changed as well. By doing this, the
attacker is modifying the Kernel code directly into memory and leaving traces which are handy for an
anti-rootkit. Here, the way a detector should work is similar to the one presented for the same hooking
technique at user land in chapter 3: The Kernel memory should be verified for integrity with a trusted
baseline.
4.2.3
Hooking interrupt 0x80 / Sysenter instruction
First, it is important to understand the role of the interrupt descriptor table (IDT). This table is a data
structure designed to implement an interrupt vector table in the x86 architecture. There are 256 in-
terrupts supported which can be triggered with one of three types of interrupts: Software interrupts,
hardware interrupts and processor exceptions. The first 32 entries are reserved for processor exceptions,
and any 16 of the remaining entries can be used for hardware interrupts. The rest are available for
software interrupts.
Each entry in this table holds, between other security related information, the address of the in-
terrupt handler (or Interrupt Service Routine - ISR) that processes the interruption. When an interrupt
is triggered, the processor multiplies the interrupt number by the length of each entry in the table (8
bytes), and then adds the offset of the beginning of the table, finding the correct address of the interrupt
handler. (The i386 Interrupt Descriptor Table, 2007)
The interrupt number 0x80 is a software interrupt designed to dispatch the intended system call to
be executed for the User-mode application, this way, calling the system call function in Kernel code.
The system call function inspects the contents of the eax register and invokes the respective system
call routine indexed by the eax value (the number of the system call) in the system call table.
The location of the IDT is maintained by a 48 bits special register named IDTR which can be stored
and loaded using the sidt (store interrupt descriptor table) and lidt (load interrupt descriptor table)
instructions, respectively. An attacker can replace the interrupt service routine pointer for interrupt 0x80
(in the table) with another interrupt handler that fits the needs of the attacker, hiding information for
certain system calls. A rootkit can also make a copy of the table and change the ”official” base address of
the IDT, to point to a new table, by modifying the IDTR register. This can be stealth because the attacker
can hide modifications made to the interrupt table if the anti-rootkit scanner scans only for modifications
of the original table. Another alternative is to patch the system call function, which is located in the
Kernel code, via inline hooking.
Although, newer platforms such as Windows XP, 2003, vista and recent versions of Linux Ker-
nel 2.6 use another method to call the system services. The occurrence of an interruption causes the
CPU to load one interrupt gate and one segment descriptor from memory to know what interrupt han-
35

dler to call. This incurs in a considerable overhead that is aggravated with high frequency of system
service calls made by user mode applications. Because of performance reasons, INTEL and AMD si-
multaneously and independently developed their versions of a fast system call in alternative to the
interrupt 0x80 mechanism. INTEL came up with the SYSENTER instruction (Garg, 2006) and AMD with
SYSCALL
. Both are very similar in what concerns to its functionality, but in this work I will focus on the
SYSENTER
fast system call. When the SYSENTER instruction is invoked, processor passes control to the
”IA32 SYSENTER EIP” which is a register in one of the Model-Specific Registers (MSRs). In Linux Ker-
nel, IA32 SYSENTER EIP contains the address of the function sysenter entry, which will process
the system call as explained earlier in this subsection.
If we want to control the execution flow triggered by the SYSENTER instruction, we need to ma-
nipulate the IA32 SYSENTER EIP register, but, since this register is privileged, we are only able to read
and write to it from Ring Zero, using the rdmsr and wrmsr instructions.
The following assembly code ilustrates how this hook can be installed:
movl $0x176, ecx //location of the IA32 SYSENTER EIP register
rdmsr //read register value
movl eax, orig sysenter //store in orig sysenter
movl new sysenter, eax //store into eax register the new SYSENTER routine
wrmsr //save it to IA32 SYSENTER EIP
After the execution of this code, if SYSENTER was not already hijacked, orig sysenter should be
pointing to sysenter entry Kernel function. It is important not to forget to restore the register when
unloading the rootkit or the system will crash because every system call uses the SYSENTER instruction
and it is pointing to an invalid address. When inside the new sysenter function, one is able to check
and modify the arguments in the stack which have all the information about the invoked system call
from User-land. After the payload, the new sysenter function must jump to the orig sysenter,
this way, keeping the original system behaviour. Yet, I never saw a Linux rootkit using this technique.
Detecting a SYSENTER hook is extremely easy: Just read the value of IA32 SYSENTER EIP and
check if it has the address of sysenter entry function. If not, some malware should be controlling
the execution flow.
4.2.4
Runtime Kernel patching
Runtime Kernel patching is similar to inline hooking in the sense that it is based in Kernel memory mod-
ification. In 1998, Silvio Cesare presented several methods (Cesare, 1998) for extracting and modifying
sensitive information from the Kernel through the /dev/kmem device. Three years later, in 2001, sd and
devik published an article in the phrack magazine showing how to subvert the Kernel into using another
system call table (sd & devik, 2001), instead of the original one.
36

As explained in the second chapter, nowadays, this is not much of a concern because the /dev/kmem
device is read-only in the recent versions of the Kernel. However, if the Linux Kernel is compiled with
LKM support, it is still possible to use the same method to force the Kernel to use another system call
table created by the rootkit, possibly eluding a weak anti-rootkit if it only searches for modifications in
the original table.
Because Kernel no longer exports the sys call table symbol, this method seems to be the best
way to find its address. The system call function takes the system call number and uses it to index
into the sys call table vector to find the specific system call needed by the user land application.
Somewhere after the beginning of that function, resides the call to the actual table. We are going to
search for the following code:
call *sys call table(,%eax,4)
Which correspond to bytes "ff 14 85 XX XX XX XX" where XX bytes belong to the actual
sys call table
address, the one we are searching. The following steps resume the technique:
1. Find IDT base address with sidt instruction.
2. Seek to the entry corresponding to int 0x80 in the table.
3. Get the interrupt handler address of system call from the table entry.
4. Search for the three consecutive bytes: ff 14 85.
Now, the attacker can change the four bytes after the pattern, placing the address of a new system
call table, which he can happily modify. Since this method relies in byte code searching, it is not guar-
anteed that will work between Kernel versions, but I have tested it with many Linux 2.6 Kernels and it
seems to be quite portable. Probably because it’s unlikely that the system call mechanics are changed.
4.3 Detecting the attacks
Rootkits can be hard to detect, especially when they operate in Kernel-land because at this level they
are able to alter functions used by all running applications, including anti-rootkit software. The current
section describes what actions can be taken in order to protect the Kernel from the attacks shown in the
previous section.
4.3.1
Kernel Integrity Checking
Generally, integrity checkers are more concerned about finding suspicious activities by searching in the
physical storage. Physical storage is, indeed, important to analyze and in an infected system it may
37

contain evidences of an intrusion, however, malware only needs to survive in memory. If the attacker
concerns enough about steathiness, he should avoid the file system altogether. This means that the
consistency of the running Kernel memory also should receive attention and this is what this subsection
is all about.
Fingerprinting sensitive places
Fingerprinting works like a Kernel memory ”photograph” of sensitive places, taken at the time that
the system was clean. Later in time, the administrator can compare the current Kernel memory image
with the fingerprint taken previously, and check for system modifications.
This method can lead to false positives if the administrator does not make a fingerprint after every
relevant system change. Note that Kernel fingerprint detection is only sensitive to system changes,
which means that if the fingerprint is taken when a rootkit is active, it will not detect any system change
(unless the rootkit is removed, of course). The fingerprint should be saved in a safe place - preferably
encrypted and/or signed - where the administrator is sure that the attacker cannot reach, in order to
prevent him from taking another fingerprint of the subverted Kernel and replace the original one.
A good fingerprint should be based in the following: System call table, Interrupt Descriptor Table,
IA32 SYSENTER EIP address, IDTR register, Kernel Symbols (first bytes of the functions) and other
important function pointers such as the /proc virtual file system lookup function (which will detect the
adore-ng rootkit, for example).
Zeppoo anti-rootkit (Evron, 2006) implements this detection method pretty well.
Verifying the integrity of important dynamic regions in Kernel memory
In what concerns to dynamic Kernel memory, this is somehow similar to fingerprinting but with
the difference that the last one blindly saves the information without checking its validity.
Here, a good anti-rootkit should inspect the correctness of all regions where important information
is stored in the system, in other words, looking for kooks. These are the type of integrity checks that
are used in the next subsection with the ”Proactive Detection Approach”. Continue reading for deeper
details.
4.3.2
A Proactive Detection Approach
In this subsection, I present a proactive detection approach based in the analysis of certain parts of
the Kernel before the invocation of a system call. Note that this is different from a Proactive Defense
system - as the Kaspersky Anti-Rootkit Software for Windows - because this method does not prevent
38
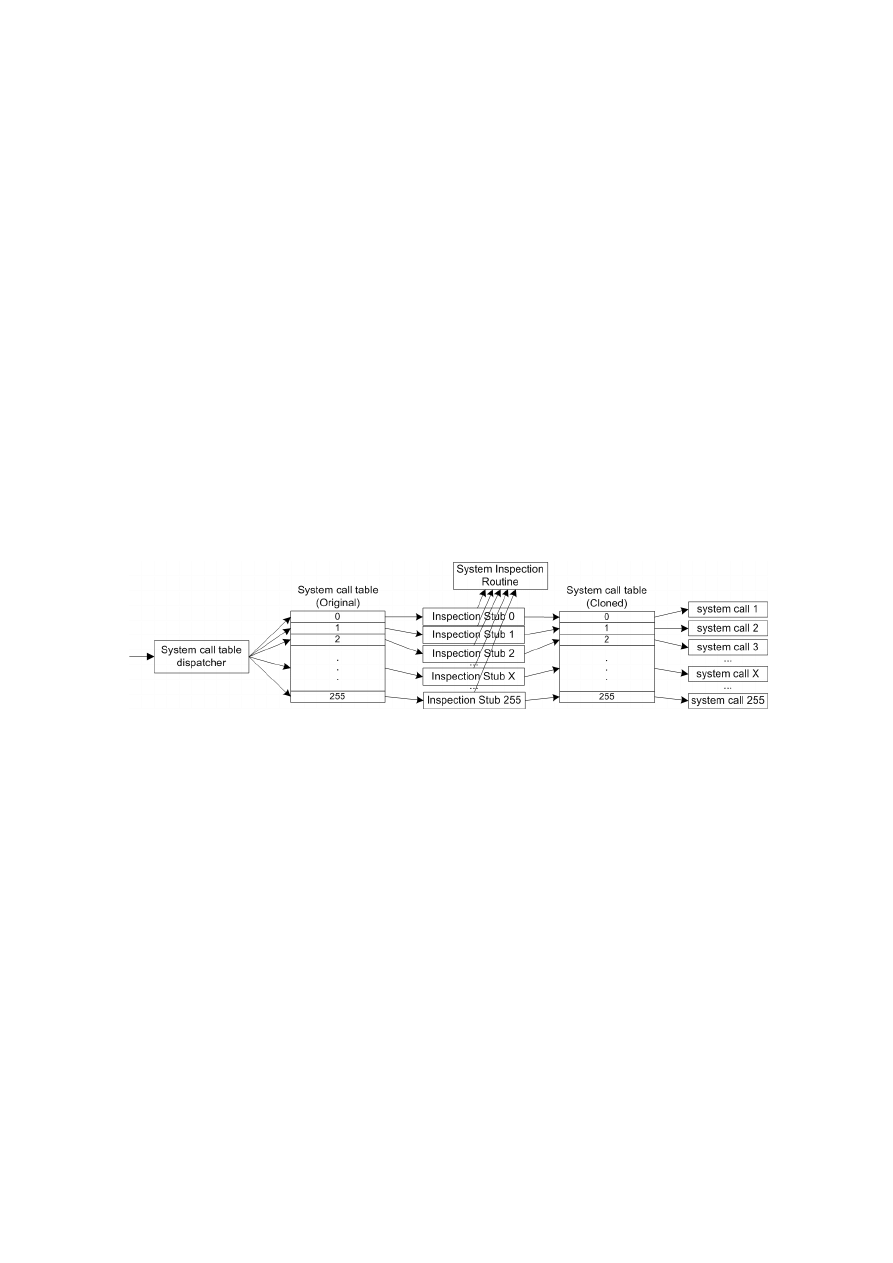
the malware from being installed, but it detects that it is in Kernel memory. The code of the proof of
concept is in the Appendix D.
Because the system call table is usually targeted by rootkits and depending on each system call
that is being called, the malware may be subverting different parts of the Kernel, it should be a good
idea to check specific locations of the system for consistency, when each system call is invoked. Being
able of executing code after a User-land request to the Kernel and before the execution of a system call,
gives us the possibility to scan certain parts of the system when it is more convenient, hence the word
”proactive”.
The basic idea behind this method is to clone the system call table, and replace every function
pointer to point to stub functions, where some verifications to the system can be performed. When the
checks are done, the actual function call is invoked with the help of the cloned table, which is still the
same as the original table before the installation of the defense system.
The figure
illustrates the implementation of this defense system.
Figure 4.2: Kernel Proactive Detection System
By looking at the figure
, the following pertinent question might outcome: ”Why not redirect
every entry in the system call table to the same Inspection Stub?”. The reason for this relies in the fact
that with a unique Inspection Stub, we would only have one way to identify the destination system call -
reading the value of EAX register - which is completely unreliable if a rootkit intercepts the system call
and changes it.
Since system calls are invoked so many times during system operation, it is important to reduce -
as much as possible - the overhead created by the checks of this detection system. Relevant checks to be
made in the ”System Inspection Routine” are described:
Check the system call table entry
When a certain system call is invoked, we can check if the corre-
sponding entry in the original system call table is correct, meaning that it should contain the ad-
dress of the respective Inspection Stub.
39

Check Call Stack
Note that when the Inspection Stub is executed, the call stack should contain always
the same functions. This leaves us with a method for detecting another possible incongruity:
Check if the call stack is something similar to the following:
[<e0a8b2cd>] Inspection Stub+0xd/0x20 [Inside module code]
[<c01040f2>] sysenter past esp+0x6b/0xa9 [Inside Kernel code]
If the call stack shows more than these two functions, probably there is rootkit code being executed.
Nevertheless, for performance reasons, the default Kernel configuration comes without frame
pointers which means that we won’t be able to have good stack traces having the EBP register
as a general purpose register. Selecting the ”Compile the Kernel with frame pointers” option (if
present) in the Kernel configuration menu, sets the CONFIG FRAME POINTER flag enabling the
EBP
register as the frame pointer. Actually, the frame pointer has no other use unless to provide
a correct stack trace, so developers decided to remove the use of it in order to have a smaller and
slightly faster Linux Kernel image for default instalations.
So, for this check to work, one has to enable this option before compiling the Kernel.
Check first bytes of the system call function and the system call table dispatcher function
Here, one
of three alternatives can be taken: (1) Check for an unconditional jump at the beginning of each
function to detect a possible inline hook. (2) Test the integrity of the first bytes with a trusted
database. This database should have previously gathered this information. (3) Check if the first
bytes are unchanged with the help of the vmlinux file
Check IA32 SYSENTER EIP
If the system uses the SYSENTER fast call, it is important to check if
the IA32 SYSENTER EIP register has the address of the correct Kernel function, which is sysen-
ter past eip.
Check ”int 0x80”
In case the system is using the old method (with the Interrupt Descriptor Table),
test if entry 0x80 in the IDT has the address of the correct interrupt service routine, which is the
system call
function.
Check for patched Kernel code
As stated above in
, we can check if the correct system call table is
being used by inspecting the byte codes in the system call function.
Check Virtual file system
If the system call is related to disk input/output, the defense system may
check some relevant function pointers of the virtual file system (Brown, 1999).
When a check in this system detects that something is wrong, it cannot stop the system call from
being executed because it will get the system unstable. Instead, it should alert the administrator and
give as much details as possible so he or her can understand what is wrong and where.
40

With this proactive detection system running, we can defend the system against most of the attacks
stated in section
Table 4.1: Correspondence between each system check and Kernel attack
Check to perform
Attack to detect
System Call Table Pointers
Simple Redirection
Verify CallStack
IDT/Sysenter/Simple Redirection
Byte Code
Inline Hooking
Sysenter
Sysenter Hook
int 0x80
IDT Hook
Patched Code
Runtime Patching
VFS
Other Lower level hooks
The table
relates each check described above with the respective attack that it intends to detect.
4.4 Summary
Several ways of attacking the Linux Kernel were explained in this chapter concerning the system call
invocation mechanism. Almost every hiding technique ends up redundantly in hooking, this is why
the term is having so much prominence in this thesis. Also, most of the communications between User-
mode and the Kernel-mode are exchanged with the help of the system call table, resulting in a common
attack vector for the attackers. The second half of this chapter covered different ways of detecting these
attacks, having them concentrated into an IDS which was built under the scope of this work.
41

42

5
Results and discussion
More-advanced rootkit techniques and their detection are being developed as you read these words.
– Greg Hoglund and James Butler
5.1 Introduction
We need to retrieve the profits of this study with an analysis for each new attack and defense technique
presented in this thesis. Generally speaking, each analysis has the goal of understanding the benefits and
the drawbacks of each method. In most cases, these methods won’t have problems with false negatives
because they are designed to detect specific attacks of rootkits. On the other hand, false positives can
be a disadvantage since there can be system changes because of the installation of specific software or
system upgrades.
5.2 Process code integrity scanner
Section
described the implementation of an application memory integrity scanner, specifically for
code sections. The tool is a simple application which scans the memory of all running processes on
the system and compares the code sections in memory with the versions in the ELF executable and
in the shared objects. I designed it to prove that the idea I had was effective against inline hooking
and other code modification attacks. This subsection intends to analyze the execution performance and
disadvantages of this detection technique.
5.2.1
Execution
Unlike other intrusive detection tools which are installed on the system, this one is different: It only
checks the system when executed and takes about two to three minutes to complete, depending on the
factors such as processor, disk access and memory bus speed. Next follows a snippet of the execution of
the tool, detecting byte modification in a process.
(...)
[05:04:50] Scanning pid 5435...
OK

[05:04:51] Scanning pid 5438...
OK
[05:04:52] Scanning pid 5683...
OK
[05:04:54] Scanning pid 5736...
OK
[05:04:56] Scanning pid 5738...
OK
[05:04:56] Scanning pid 5758...
OK
[05:04:58] Scanning pid 5765...
OK
[05:04:58] Scanning pid 5977...
WARNING - Offset:
0x08048484:
0x83e58955 (DISK) != 0xe9aaaaaa (MEM)!
WARNING - Offset:
0x08048488:
0x04c708ec (DISK) != 0x04c708aa (MEM)!
Object ‘‘/home/andre/thesis/inline/inline’’ modified in memory!
Failed
The previous example detected a simple inline hook in a running process. Both bytes in disk and
memory are reported as also the position where the modification occurred so that the administrator can
check which function was changed (if there is enough debugging information about the process).
Clearly, the way the detection tool is used is not the most handful. An administrator would prefer
the tool to be proactive, meaning that it scans the memory, periodically, when more convenient and
without blindly wasting system resources.
5.2.2
Problems
Not all processes can be scanned: Init (PID 1) simply cannot be attached to ptrace. Processes that are al-
ready being debugged also cannot be attached. This can lead to a defense mechanism from the attackers
point of view, because a simple attach to ptrace can leave the process immune to scans.
Scanning .text sections might not be enough. It is possible that there are other read-only sections
sensitive to other attacks beyond code sections that should be scanned for integrity.
Also, there could be legitimate applications changing their own code sections at runtime leading to
false positives. Fortunately, this is uncommon. The only way to minimize false positives is to provide
a built in exclusion option in the tool to ignore certain offsets of specific applications causing the false
positives.
The use of the ptrace system call causes an overhead that would not occur if the scanning was made
through a Linux Kernel Module. Unlike this tool which runs at User-level, at Kernel-level memory can
be accessed directly without suffering from the slowdown caused by the interrupt 0x80 or the sysenter
instruction. Note that CR3 register must be correctly assigned in order to access the address space of the
process to be scanned, as described in
44

5.2.3
Other approaches
A more interesting approach would be to hook the sys execve and the sys fork system calls, which are the
only way to bring a new process to memory, and inspect every application when loaded. After the first
inspection, periodic checks should be also performed from time to time.
All the information about the permissions of the sections of the loaded process image are in the
program header table, in the ELF file. The tool could use this information to find where these sections
are located so that it can check the integrity.
5.3 Hardware breakpoint hooking attack
The technique is described in
. Here we will see an example of the attack in action, and discuss the
traces it leaves to a forensic analysis.
5.3.1
Execution
The following simple C application was used to illustrate the execution of this attack:
//function to be intercepted
int simple(int value)
{
printf("Simple:
argument!
%d
\n", value);
return 5;
}
int main()
{
printf("Simple() returned:
%d
\n", simple(10));
printf("Running simple again:
\n");
printf("Simple() returned:
%d
\n", simple(11));
return 0;
}
Function simple() will be fully hijacked, meaning that its parameters and return value are modified.
The following function code is the function that will be jumped to, when the breakpoint occurs in the
attacker’s process. In other words: EIP register is changed to address of hijack simple.
//prototype of the function to be intercepted
typedef int (*simple func t) (int);
simple func t simple func;
//hijacking function
int hijack simple(int value)
{
int new value = 31338;
45

simple func = (simple func t)HIJACK ADDR;
simple func(new value); //call the original
return 31337;
}
Normal execution of the application
PID: 7239 wait 2 seconds...
Simple:
argument!
10
Simple() returned:
5
Running simple again:
Simple:
argument!
11
Simple() returned:
5
Execution of the application with hardware breakpoint hooking
PID: 7239 wait 2 seconds...
Simple:
argument!
31338
Simple() returned:
31337
Running simple again:
Simple:
argument!
31338
Simple() returned:
31337
5.3.2
Analysis of stealth
Unlike to inline hooking or PLT injection (see
), the code sections and other function pointer tables in
the process remain untouched. On the other hand, debug registers are modified, which is one of the
evidences left by this technique. Nevertheless, the fact that a process got its debug registers modified
does not mean that it is being attacked because it can be under a debug operation using hardware
breakpoints. Also, there must be another process to perform the control of the hook itself (to modify the
debug registers, wait for the process to stop at the breakpoint address and change the EIP value), which
is yet another clue that something might be wrong with the system.
Note that the method presented here uses the ptrace system call but it is also possible to implement
it at Kernel level through the help of an LKM, which is much more complex but stealthier.
5.4 Preventing hardware breakpoint hooking
The current approach to hardware breakpoint prevention is able to stop a hook attempt from taking
place by making the attacker’s code sterile and without harming the target application. This section
46

uses the example given in the previous section to show the effectiveness of this approach.
5.4.1
Execution
Execution of the application with hardware breakpoint hooking enabled and the prevention system
active
PID: 5165 wait 2 seconds...
PTRACE SETREGS: Operation not permitted
Simple:
argument!
10
Simple() returned:
5
Running simple again:
Simple:
argument!
11
Simple() returned:
5
The PTRACE SETREGS error is printed to stderr from the process controlling the hook and reveals
that it could not set the EIP register on the target process because the system call was blocked by the pre-
vention system. As a result, we can see that this prevention method avoids any change in the execution
flow if this attack is attempted.
Since the Kernel module uses the printk function to log its activity, the following line is logged to
/var/log/messages which can be fetched with the dmesg command:
WARNING: PID: 5173 - HARDWARE BREAKPOINT HOOK ATTEMPT on process 5174!
Both attacker’s process and target process are identified and debug registers used to perform the
attack are restored as soon as the LKM detects the hook attempt.
5.4.2
Problems
The refered prevention method is only effective if the attack is performed using sys ptrace and the
sys wait4
(or one of its derivatives), which is what will be probably used if it is made from User-
land. This defense can also work if a dumb rootkit uses these system calls from kernel land, which is
not so unlikely to happen as seen by the poorly written malware nowadays. At Kernel-land, the attack
is harder to control because the intruder has the same privileges as the defense system and a smarter
approach to this hook will certainly not use the above system calls, thus, bypassing this defense.
The pattern behavior used in this prevention system is unlikely to cause false positives because it’s a
very specific automaton that should not occur in legitimate applications. The detection only takes place
when the instruction pointer is modified after the breakpoint trap, which means that there must already
be some execution flow manipulation. In what concerns to the use of hooking for good purposes: for
example, if an application uses a hooking method to avoid having to restart after an update, that method
47

will not be hardware breakpoint hooking because it is slower (cost of an interruption) and consumes
resources that a software hooking technique won’t need.
5.5 Kernel Proactive Detection Approach
In the same manner as the hardware breakpoint defense tool in the previous section, this implementa-
tion is also a Linux Kernel module that logs information to /var/log/messages. On the other hand, this
system does not prevent the malicious activity from reaching its goals, leaving just an alert to the ad-
ministrator. Analysis of the accuracy, performance and drawbacks of this implementation are dissected
in this section.
5.5.1
Execution
Next follows a snippet of the logged file containing the output information printed by the detection tool
when loaded into Kernel.
SCT Defender Loaded!...
Interrupt 80 OK
Sysenter instruction OK
SCT Defender:
sys call table at c0308500
SCT Defender:
verifying sys call table integrity...
Done.
System call jump OK
SCT Defender:
Active.
When the module is loaded, the following checks are performed before the installation of the de-
fense system:
• Check Interrupt Service Routine 80 address in the interrupt descriptor table.
• Check sysenter instruction for hooks.
• Check the whole system call table.
• Check for inline hooks on every system call table.
• Check the system call jump in the system call function in Kernel code.
Due to the extreme speed of these verifications, it is acceptable to perform them when the module
is loaded because it does not incur in a significant overhead. The same is not so true when the IDS is
installed and running.
48
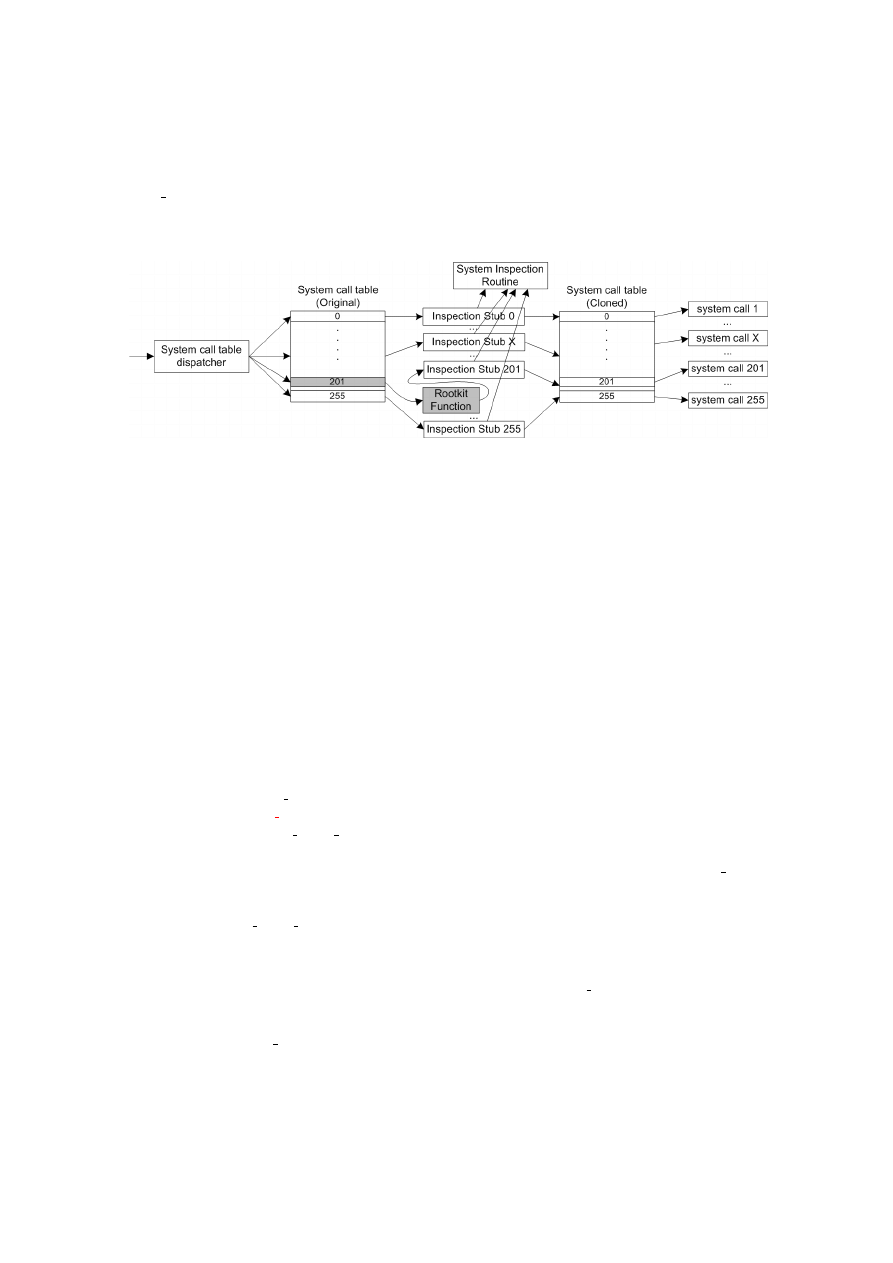
Let’s see the scenario of a system call table entry redirection. Figure
illustrates the attack of
the sys getuid32 system call hook along with this IDS installed. To ease the understanding, rootkit
information is displayed in gray color.
Figure 5.1: Detecting system call redirection attack
Two checks will detect this system change as soon as the system call is invoked by any User-land
application: (1) The entry in the system table has now the address of the attackers’s function (the one that
hooks the system call). (2) The call stack is modified, showing again, that same function. The following
warning lines are printed to /var/log/messages.
WARNING! Syscall 201 hijacked!
WARNING! 0xe0a750a8 should be inside kernel code!
WARNING! Call stack too big, something is wrong!
The first line is the check (1) alerting that the system call entry number 201 was modified. The
remaining two lines are related to the call stack check. Let’s see how the stack looks like at this time:
[<e0a858bd>] syscall stub201+0xd/0x20 [sctdefender]
[<e0a750a8>] hijack getuid32+0x18/0x20 [rootkit]
[<c01040f2>] sysenter past esp+0x6b/0xa9
The line in red reveals the presence of a function being invoked before the syscall stub201
(which belongs to the IDS). The defense system alerts because the second function in the call stack
should be sysenter past esp (pointing to the Kernel code section). Also, the call stack has three
functions of size instead of two.
For a careful attacker, the last check can be avoided: In the hijack getuid32 routine, instead of
invoking the system call directly, one can jmp to it after restoring the stack as it was, before the execution
flow reaches the hijack getuid32 function.
49

5.5.2
Performance Tests
Each system check, along with the redirection of the system call itself contributes to an overall delay of
the total time that the system call takes. The present subsection studies the total overhead produced by
the proposed defense system. Table
illustrates the estimated overhead in percentage relatively to the
original system call time.
Table 5.1: Performance tests
Average time (ms)
Percentage
Total system call time (no IDS)
520
0,0
No checks
535
2,8
All checks
1126
116,5
SCT
558
7,3
Call Stack
619
19,0
Sysenter
804
54,6
int 80
606
16,5
system call jmp code
578
11,2
Syscall Inline check
565
3,6
All checks except sysenter
752
44,6
It is crucial to analyze each check to understand which are consuming more time. The results in
the previous table were grabbed from the following test conditions: Measure the time taken during five
million invocations to the system call sys time. The “Average time (ms)” column is the average time
taken in twenty of these tests. “Percentage” column helps to understand the overhead produced by
these checks towards a system with no IDS installed. The tests were performed in an Intel Pentium M
760 Processor (2MB L2 Cache, 2.0 Ghz) with 1.3GB of RAM.
We can clearly see that the sysenter check is consuming considerable time. The reason for this is
in the rdmsr instruction. Because the remaining verifications are based on simple byte comparison in
memory (except for the call stack check which is slightly slower), they are faster and do not represent a
significant overhead in a system call.
We can minimize this overhead by taking the following into consideration: Unlike the sysenter
and int 0x80 checks, the remaining verifications are unique for each system call, which means that
we can execute the first ones with less frequency, for instance, after each ten system calls.
5.5.3
Problems
If this mechanism is implemented as described in chapter 4, there is one easy way around it. Imagine the
following attack: The attacker hooks a function in the system call table. When a User-land application
invokes the system call, the rootkit code gets executed and runs the original system call. But instead of
50

using the address in the system call table before the hook, it finds the right address of the system call by
searching the kernel, using the /proc/kallsyms device of simply searching in the System.map file.
In this case, the System Inspection Routine won’t get called and no checks to the kernel will
be made. To solve this problem, there should be periodic calls to this routine, each one intended to scan
a different system call. However, this solution has the disadvantage of not being entirely “proactive
detection”, but also “passive detection” because it performs periodic scans on self-demand.
On SMP systems this implementation may cause problems. For start, there is an IDT for each
processor, which is not being taken into consideration on this implementation. Also, the moment when
the whole system call table is cloned and then fully replaced can cause race conditioning problems with
multiple processors; This is why system call redirection is strongly discouraged by Kernel developers.
Finally, for the call stack check to work the CONFIG FRAME POINTER flag must be enabled when
the Kernel is compiled (which is not by default). Revisit
to understand the use of this flag.
5.6 Summary
The present chapter analyzed every implementation of this thesis measuring the advantages and dis-
advantages from the defender’s point of view. It begins showing that the code integrity scanner is
effective for any attack involving code modification in the memory of a process. Also, the results of
implementations concerning hardware breakpoint methods were analyzed, illustrating the attack itself
(in User-mode) and the respective prevention system. Finally, despite some issues, the Kernel defense
mechanism presented in chapter
was tested and proven to be reliable not only in terms of performance
but also in effectiveness. Though, it is not infallible.
As we could see, we cannot say that these detection methods are foolproof.
51

52

6
Conclusions
The fact that a product claims to provide some level of protection does not necessarily mean it actually does.
– Greg Hoglund and James Butler
In chapter
, I provided information about Linux hooking techniques focused on user land hooks,
but in the case of the hardware breakpoint hooking detection, with some defenses from Kernel-land.
User-land hooks are relatively easy to detect and prevent, but the same is not so true for Kernel-land
hooking. The Intel x86 debugging mechanism is powerful and can be used and abused for stealth
purposes. As we could realize, hooking is a sophisticated technology for execution flow control that is
used not only by malware but also by many anti-virus applications and host-based intrusion detection
and prevention systems.
Detection techniques do not prevent the system from being attacked in the first place. Generally,
they only indicate what is wrong with the system and where is the incongruity. Some of them only
alert when the detection tool is executed (because of a scheduled scan or on administrator’s demand).
The approach presented in chapter
is permanently running in background as a Linux Kernel module,
and logs suspicious system changes when detected. Although, it still does not prevent the attacks from
taking place because the invocations to the system calls cannot be stopped. If they are, the system will
be left in an inconsistent state. Generally, the smartest thing to do when the administrator receives the
alert of an intrusion, is to reinstall the entire system. The administrator can trust his or her personal
anti-rootkit tools for removing the threat, but can never be sure that the system is clean simply because
rootkits are a constantly growing threat. There are always new and different ways of hiding resources
in the system and some of them have never been disclosed to the public.
The results obtained ensure that the goals initially outlined in the first chapter were reached for the
studied hiding techniques. Although, we are far from stating that the work is done. In fact, a good
researcher may say that it will never be done: The reason concerns the constant evolution of rootkits.
Tests performed with the IDS’s against rootkits implementing the respective hiding technologies had
successful results, and helped to understand failures in the solution that attackers could exploit.
It’s interesting to watch the evolution of rootkits through the time: At the beginning, a rootkit was
no more than a set of tools, designed to replace certain system utilities. Nowadays, most rootkits come
in the form of a driver that enters Kernel and subverts some part of it. In the future, rootkits may

find new stealthy places, attacking not the operating system, but the hardware such as the processor’s
microcode, or other microchips in the computer. There is already a hardware based anti-rootkit card
called “Copilot”, which is a PCI card. This card is plugged on the host machine and has its own CPU.
The idea is to work independently from the potentially infected operating system, and scan physical
memory through DMA for signs of a rootkit via Kernel memory integrity checks and techniques to
detect Kernel hooks.
We can conclude that this is like the cat-and-mouse game: At some instant, rootkit authors may be
winning, but then anti-rootkit security specialists strike back, and the cycle repeats itself. This is some-
how similar to online game cheating: cheaters bypass the game protections, and then anti-cheat software
updates, and catches cheaters. This competition ends up being healthy for technology advancements
since this brings motivation to the security scenario.
Finally, despite of these methods not being foolproof, this does not mean that they don’t reserve
attention from security specialists. Let’s consider the analogy of a bank: Guards don’t just lock the
doors; there are motion sensors, cameras and other surveillance systems that do not guarantee total
security but it is another valuable step towards a perfectly safe system.
6.1 Future Work
In some aspects, this research is incomplete not only because of the subject’s obscurity - making it hard
study - but also because there is always new information on the topic coming out. Next follows a list of
extensions to the implementations and new research vectors on this thesis.
• Improve the User-land memory scanner in order to scan all read-only segments and not only
code sections of applications. Also there should be possible to exclude certain process regions, to
mitigate false positives.
• Research the defenses against stronger implementations of the hardware breakpoint attack such
as in Kernel-land. A good starting point would be the phrack paper (halfdead, 2008).
• Create a more secure and sophisticated alert mechanism for the proactive detection system. The
current implementation only logs the alerts to /var/log/messages through the printk routine.
• For performance reasons, slower checks in the proactive detection system, such as the SYSENTER,
should have lower checking rates, ie, the check should only take place at each X invocations to a
system call. The X value should be configurable.
• To mitigate the problem described in
, periodic scans should be performed in the proactive
detection system (with a configurable time interval).
54

• In the proactive detection system: Create specific checks for each system call. The
subsection
suggests the VFS layer check when a sys getdents system call is triggered. Besides this one, other
verifications could be implemented, this way, improving the overall trustworthiness of the anti-
rootkit software.
• Study direct attacks to the IDS - Analyze possible attack vectors directly to the defense system and
ways to prevent them.
55

56

Bibliography
Brown, N. (1999). The linux virtual file-system layer. (
http://cgi.cse.unsw.edu.au/˜neilb/oss/
(visited on 2008/09/29))
Butler, J. (2004). Vice - catch the hookers! (
http://www.blackhat.com/presentations/bh-usa-04/
bh-us-04-butler/bh-us-04-butler.pdf
(visited on 2008/02/10))
Cesare, S. (1998). Runtime kernel kmem patching. (
http://vx.netlux.org/lib/vsc07.html
(visited
on 2008/09/29))
Cesare, S. (1999). Plt injection. (
http://vx.netlux.org/lib/vsc06.html
(visited on 2008/08/04))
Clandestiny. (n.d.). A filter driver example using a kernel key logger key logger. (
(visited on 2008/01/11))
Corporation, M.
(n.d.).
Detours.
http://research.microsoft.com/sn/detours
(visited on
2008/01/11))
Elf specification. (1995). (
www.x86.org/ftp/manuals/tools/elf.pdf
(visited on 2008/08/20))
Evron, G. (2006). Zeppoo: Decent rootkit detection for linux. (
http://blogs.securiteam.com/index.
(visited on 2008/09/29))
Florio, E. (2005, December). When malware meets rootkits. (
http://www.symantec.com/avcenter/
reference/when.malware.meets.rootkits.pdf
(visited on 2008/01/10))
Garg, M. (2006). Sysenter - fast transition to system call entry point. (
(visited on 2008/09/29))
The gnu project debugger. (2008). (
http://www.gnu.org/software/gdb/
(visited on 2008/08/17))
halfdead. (2008). Mistifying the debugger. (
http://www.phrack.com/issues.html?issue=65&id=8
(visited on 2008/09/29))
Haungs, M. L. (1998). The executable and linking format. (
http://www.cs.ucdavis.edu/˜haungs/
(visited on 2008/09/29))
The i386 interrupt descriptor table. (2007). (
http://www.acm.uiuc.edu/sigops/roll_your_own/
(visited on 2008/09/29))
57

Intel. (2008). Intel ia-32 manual. (
http://download.intel.com/design/processor/manuals/
(visited on 2008/08/07))
Kaspersky lab. (n.d.). (
(visited on 2008/05/24))
Microsoft.
(2006).
Virtualization.
http://www.microsoft.com/whdc/system/platform/
(visited on 2008/09/29))
Miller, T. (2000, November). Analysis of the t0rn rootkit. (
http://www.securityfocus.com/infocus/
(visited on 2008/05/21))
MSDN. (1999). Memory management functions. (
http://msdn.microsoft.com/en-us/library/
(visited on 2008/09/29))
ptrace linux man page. (1999). (
http://www.linuxmanpages.com/man2/ptrace.2.php
(visited on
2008/08/05))
Rutkowska, J.
(n.d.).
System virginity verifier.
http://www.invisiblethings.org/papers/
(visited on 2008/03/04))
Rutkowska, J. (2004, January). Detecting windows server compromises with patchfinder 2. (
invisiblethings.org/papers/rootkits_detection_with_patchfinder2.pdf
(vis-
ited on 2008/04/15))
Rutkowska, J. (2006, November). Malware taxonomy. (
http://www.invisiblethings.org/papers/
(visited on 2008/02/16))
sd, & devik. (2001). Linux on-the-fly kernel patching without lkm. (
(visited on 2008/09/29))
Tripwire. (n.d.). (
http://sourceforge.net/projects/tripwire
(visited on 2008/04/17))
waitpid system call.
(1997).
http://www.linuxmanpages.com/man2/wait4.2.php
(visited on
2008/08/17))
58

I
Appendices


Appendix A
Hardware breakpoint hooking proof of concept
— Begin of “test.c” —
/ ∗ B a s i c a p p l i c a t i o n t o b e i n t e r c e p t e d w i t h t h e h a r d w a r e b r e a k p o i n t method
∗
∗ C o m p i l e :
∗ g c c −o t e s t t e s t . c
∗
∗ Author : Andre Al mei da
∗ /
# include
” s t d i o . h”
# include <
s i g n a l . h>
i n t
simple ( i n t value ) {
p r i n t f ( ” Simple : argument ! %d\n” , value ) ;
r e t u r n
5 ;
}
i n t
main ( ) {
i n t
i ;
p r i n t f ( ”PID : %d wait 2 seconds . . . \ n” , g e t p i d ( ) ) ;
s l e e p ( 1 ) ;
p r i n t f ( ” Simple ( ) r e t u r n e d : %d\n” , simple ( 1 0 ) ) ;
p r i n t f ( ”Running simple again : \ n” ) ;
p r i n t f ( ” Simple ( ) r e t u r n e d : %d\n” , simple ( 1 1 ) ) ;
r e t u r n
0 ;
}
— End of “test.c” —
— Begin of “hijack.c” —
/ ∗
∗ Hardware b r e a k p o i n t h o o k i n g p r o o f o f c o n c e p t
∗
∗ C o m p i l e :
∗ g c c −f P I C −c h i j a c k . c −o h i j a c k . o
∗ g c c −s h a r e d −o h i j a c k . s o h i j a c k . o
∗ LD PRELOAD = ” . / h i j a c k . s o ” . / t e s t
61

∗
∗ Author : Andre Al mei da
∗ /
# include <
sys/ p t r a c e . h>
# include <
wait . h>
# include <
sys/t y p e s . h>
# include <
l i n u x /u s e r . h>
# include <
s t d i o . h>
# include <
s t d l i b . h>
/ / The b e g i n n i n g o f t h e f u n c t i o n t o i n t e r c e p t
/ / C o m p i l e t h e t e s t . c a p p l i c a t i o n and c h e c k i n GDB t h e
/ / a d d r e s s o f t h e s y m b o l : s i m p l e f u n c t i o n
# define
HIJACK ADDR
0 x08048414
/ / E n a b l e DR1 and B r e a k on i n s t r u c t i o n e x e c u t i o n o n l y
# define
ENABLE DR0
0 x00000001
# i f
! d e f i n e d ( o f f s e t o f )
#
define
o f f s e t o f ( type ,memb) ( ( s i z e t ) & ( ( type ∗)0)−>memb)
# endif
typedef i n t
( ∗ s i m p l e f u n c t ) ( i n t ) ;
s i m p l e f u n c t s i m p l e f u n c ;
i n t
s e t b r e a k p o i n t ( p i d t pid ) {
i f
( p t r a c e (PTRACE POKEUSER, pid , o f f s e t o f ( s t r u c t user , u debugreg [ 0 ] ) ,
HIJACK ADDR) ! = 0 ) {
p e r r o r ( ”PTRACE POKEUSER” ) ;
r e t u r n
0 ;
}
i f
( p t r a c e (PTRACE POKEUSER, pid , o f f s e t o f ( s t r u c t user , u debugreg [ 7 ] ) ,
ENABLE DR0 ) ! = 0 ) {
p e r r o r ( ”PTRACE POKEUSER” ) ;
r e t u r n
0 ;
}
r e t u r n
1 ;
}
i n t
c l e a r b r e a k p o i n t ( p i d t pid ) {
i f
( p t r a c e (PTRACE POKEUSER, pid , o f f s e t o f ( s t r u c t user , u debugreg [ 0 ] ) ,
0 x00000000 ) ! = 0 ) {
p e r r o r ( ”PTRACE POKEUSER” ) ;
r e t u r n
0 ;
}
62

i f
( p t r a c e (PTRACE POKEUSER, pid , o f f s e t o f ( s t r u c t user , u debugreg [ 7 ] ) ,
0 x00000000 ) ! = 0 ) {
p e r r o r ( ”PTRACE POKEUSER” ) ;
r e t u r n
0 ;
}
r e t u r n
1 ;
}
i n t
h i j a c k s i m p l e ( i n t value ) {
i n t
new value = 3 1 3 3 8 ;
s i m p l e f u n c = ( s i m p l e f u n c t )HIJACK ADDR ;
p r i n t f ( ” Exe cuti ng h i j a c k s i m p l e parameter : %d , new parameter : %d\n” ,
value , new value ) ;
s i m p l e f u n c ( new value ) ;
r e t u r n
3 1 3 3 7 ;
}
p i d t s i g t r a p w a i t ( ) {
p i d t w a i t r e t ;
i n t
s t a t u s ;
while
( 1 ) {
i f
( ( w a i t r e t = wait (& s t a t u s ) ) == −1) { / / Wait f o r c h i l d ’ s s i g n a l
p e r r o r ( ” wait ” ) ;
break
;
}
i f
(WIFSTOPPED( s t a t u s ) ) {
i f
(WSTOPSIG( s t a t u s ) == SIGTRAP ) { / ∗ i t i s a b r e a k p o i n t t r a p ∗ /
r e t u r n
w a i t r e t ;
} e l s e
continue
;
} e l s e
continue
;
}
r e t u r n
w a i t r e t ;
}
void
a t t r i b u t e
( ( c o n s t r u c t o r ) )
s t a r t u p ( )
{
i n t
s t a t u s ;
p i d t pid , t e s t p i d ;
s t r u c t
u s e r r e g s s t r u c t r e g s ;
switch
( pid = f o r k ( ) ) {
c a s e −
1:
p e r r o r ( ” f o r k ” ) ;
break
;
63

c a s e
0 : / ∗ c h i l d p r o c e s s s t a r t s ∗ /
break
;
d e f a u l t
:
i f
( p t r a c e (PTRACE ATTACH, pid , NULL, NULL) ! = 0 )
p e r r o r ( ”PTRACE ATTACH” ) ;
i f
( wait (& s t a t u s ) == −1) / / Wait f o r c h i l d ’ s s i g n a l
break
;
/ / Change t h e d eb u g r e g i s t e r s
i f
( ! s e t b r e a k p o i n t ( pid ) )
break
;
i f
( p t r a c e (PTRACE CONT, pid , 0 , 0 ) ! = 0 )
p e r r o r ( ”PTRACE CONT” ) ;
while
( 1 ) {
i f
( s i g t r a p w a i t ( ) == −1) { / / Wait f o r c h i l d ’ s s i g n a l
break
;
}
/ / c h a n g i n g EIP
i f
( p t r a c e ( PTRACE GETREGS , pid , NULL, &r e g s ) ! = 0 ) {
p e r r o r ( ”PTRACE GETREGS” ) ;
break
;
}
r e g s . e i p = ( i n t ) h i j a c k s i m p l e ;
i f
( p t r a c e ( PTRACE SETREGS , pid , NULL, &r e g s ) ! = 0 ) {
p e r r o r ( ”PTRACE SETREGS” ) ;
break
;
}
i f
( p t r a c e (PTRACE CONT, pid , 0 , 0 ) ! = 0 ) {
p e r r o r ( ”PTRACE CONT” ) ;
break
;
}
i f
( s i g t r a p w a i t ( ) == −1) { / / Wait f o r c h i l d ’ s s i g n a l
break
;
}
/ ∗ c l e a r b r e a k p o i n t w h i l e we e x e c u t e t h e i n s t r u c t i o n ∗ /
i f
( ! c l e a r b r e a k p o i n t ( pid ) )
r e t u r n
;
64

i f
( p t r a c e ( PTRACE SINGLESTEP , pid , 0 , 0 ) ! = 0 ) {
p e r r o r ( ”PTRACE STEP” ) ;
break
;
}
/ ∗ r e s t o r e b r e a k p o i n t ∗ /
i f
( ! s e t b r e a k p o i n t ( pid ) )
r e t u r n
;
i f
( p t r a c e (PTRACE CONT, pid , 0 , 0 ) ! = 0 ) {
p e r r o r ( ”PTRACE CONT” ) ;
break
;
}
/ / c o n t i n u i n g t h e c y c l e t o m a i n t a i n t h e h o o k a c t i v e
}
e x i t ( 0 ) ; / ∗ e x i t p r o c e s s b e c a u s e r e t u r n r u n s t h e e x e c u t a b l e
( t h i s f o r k e d p r o c e s s ) ∗ /
}
}
— End of “hijack.c” —
Appendix B
User-Land Memory Integrity Scanner
— Begin of “memscan.c” —
/ ∗ Memory i n t e g r i t y s c a n n e r
∗
∗ C o m p i l e :
∗ g c c −o memscan memscan . c
∗
∗ Author : Andre Al mei da
∗
∗ /
# include <
s t d i o . h>
# include <
u n i s t d . h>
# include <
sys/t y p e s . h>
# include <
sys/ s t a t . h>
# include <
f c n t l . h>
# include <
s t r i n g . h>
# include <
e r r n o . h>
# include <
time . h>
65

/ / e l f i n c l u d e s
# include <
l i n k . h>
# include <
e l f . h>
# include <
sys/mman. h>
/ / p t r a c e i n c l u d e s
# include <
sys/ p t r a c e . h>
/ / d i r i n c l u d e s
# include <
d i r e n t . h>
# include <
ctype . h>
# define
HEXSIZE
8
# define
MAX PATH LEN
128
# define
PROCKALLSYMS ”/proc/kallsyms ”
# define
MAPS REFIX
”/proc/”
# define
MAPS SUFFIX
”/maps”
# i f d e f
F r e e B S D
# d e f i n e ELF ( x ) E l f ## x
# e l s e
# d e f i n e ELF ( x ) ElfW ( x )
# endif
void ∗
m a p f i l e ( char ∗ path , unsigned long ∗ s i z e , i n t ∗ fd no )
{
s t r u c t
s t a t s ;
FILE∗ f ;
f = fopen ( path , ” r ” ) ;
f s t a t ( f i l e n o ( f ) , &s ) ;
∗ s i z e = s . s t s i z e ;
∗ fd no = f i l e n o ( f ) ;
r e t u r n
mmap(NULL, s . s t s i z e , PROT READ, MAP PRIVATE , ∗ fd no , 0 ) ;
}
i n t
memscan pid ( void ∗ base , unsigned long begin addr , p i d t pid )
{
unsigned i n t
i , ec , symcount , count , r e s = 1 ;
char ∗
codePos ;
unsigned long ∗
bytecode ;
unsigned long
peekbyte ;
ELF ( Ehdr ) ∗ e = base ;
ELF ( Shdr ) ∗ shdr = ( ELF ( Shdr ) ∗ ) ( ( char ∗ ) e + e−>e s h o f f ) ;
ELF (Sym) ∗ sym = 0 ;
Elf32 Word nameIndex ;
66

Elf32 Word s t r t a b s i z e ;
char ∗
s t r t a b = 0 ;
count = 0 ;
f o r
( i = 0 ; i < e−>e shnum ; i ++) {
i f
( shdr−>s h t y p e == SHT SYMTAB) {
sym = ( ELF (Sym ) ∗ ) ( ( char ∗ ) e + shdr−>s h o f f s e t ) ;
symcount = shdr−>s h s i z e / s i z e o f ( ELF (Sym ) ) ;
}
e l s e i f
( shdr−>s h t y p e == SHT STRTAB ) {
i f
( count == 1 ) {
s t r t a b = ( char ∗ ) ( ( char ∗ ) e + shdr−>s h o f f s e t ) ;
s t r t a b s i z e = ( Elf32 Word ) ( ( char ∗ ) e + shdr−>s h s i z e ) ;
break
;
}
count ++;
}
shdr ++;
}
shdr = ( ELF ( Shdr ) ∗ ) ( ( char ∗ ) e + e−>e s h o f f ) ;
f o r
( i = 0 ; i < e−>e shnum ; i ++) {
i f
( ! strcmp ( ” . t e x t ” , &s t r t a b [ shdr−>sh name ] ) ) {
codePos = ( char ∗ ) e + shdr−>s h o f f s e t ;
f o r
( ec = 0 ; ec < shdr−>s h s i z e / 4 ; ec +=1){
bytecode = ( unsigned long ∗ ) codePos+ec ;
peekbyte = p t r a c e ( PTRACE PEEKTEXT ,
pid , begin addr + shdr−>s h o f f s e t + ec ∗ 4 , 0 ) ;
i f
( e r r n o == ESRCH) { / / a r e we t r a c i n g a non−e x i s t e n t p r o c e s s ?
p e r r o r ( ”PTRACE PEEKTEXT” ) ;
r e t u r n
0 ;
}
i f
( ∗ bytecode ! = peekbyte ) {
p r i n t f ( ”\nWARNING − O f f s e t : 0x%.8x : 0x%.8x ( DISK ) ! = 0x%.8x (MEM) ! ” ,
begin addr + shdr−>s h o f f s e t + ec ∗ 4 ,
∗ bytecode , peekbyte ) ;
r e s = 0 ;
}
}
break
;
}
shdr ++;
}
67

r e t u r n
r e s ;
}
i n t
memscan ( p i d t pid , unsigned long begin addr , unsigned long end addr , char ∗ f i l e p a t h ) {
unsigned long
s i z e ;
Elf32 Addr o f f s e t ;
void ∗
handle ;
i n t
fd no , r e s = 0 ;
i f
( ( handle = ( void ∗ ) m a p f i l e ( f i l e p a t h , &s i z e , &fd no ) ) == MAP FAILED) {
p e r r o r ( ”mmap” ) ;
r e s = 0 ;
} e l s e {
r e s = memscan pid ( handle , begin addr , pid ) ;
munmap( handle , s i z e ) ;
c l o s e ( fd no ) ;
}
r e t u r n
r e s ;
}
unsigned long
p r o c v e r i f y ( p i d t pid ) {
char
a d d r e s s e s [ HEXSIZE ∗ 2 + 1 ] ;
char ∗
e n d a d d r s t r ;
char
p e r m i s s i o n s [MAX PATH LEN+ 1 ] ;
char
c u r r e n t f i l e p a t h [MAX PATH LEN+ 1 ] ;
char
maps path [ 3 2 ] ;
unsigned long
begin addr , end addr ;
i n t
r e s = 1 , r e t r e s = 1 ;
FILE ∗ m a p f i l e ;
s p r i n t f ( maps path , ”%s%d%s ” , MAPS REFIX , pid , MAPS SUFFIX ) ;
m a p f i l e = fopen ( maps path , ” r ” ) ;
while
( f s c a n f ( mapfile , ”%s %s %∗s %∗s %∗s ” , addresses , p e r m i s s i o n s ) ! = −1){
while
( f r e a d ( c u r r e n t f i l e p a t h , 1 , 1 , m a p f i l e ) ! = 0 ) {
c u r r e n t f i l e p a t h [ 1 ] = ’ \0 ’ ;
i f
( strcmp ( c u r r e n t f i l e p a t h , ”\n” ) == 0 ) {
c u r r e n t f i l e p a t h [ 0 ] = ’ \0 ’ ;
break
;
}
i f
( strcmp ( c u r r e n t f i l e p a t h , ”/” ) == 0 ) {
/ / T h i s l i n e h a s a s l a s h , t h e e x e c u t a b l e e x i s t s , s o r e w i n d and f s c a n f
f s e e k ( mapfile , −1, SEEK CUR ) ;
f s c a n f ( mapfile , ”%s \n” , c u r r e n t f i l e p a t h ) ;
68

break
;
}
}
i f
( strcmp ( permissions , ” r−xp” ) == 0 && c u r r e n t f i l e p a t h [ 0 ] ! = ’ \0 ’ ) {
a d d r e s s e s [ HEXSIZE ] = ’ \0 ’ ;
begin addr = s t r t o u l ( addresses , NULL, 1 6 ) ;
end addr = s t r t o u l ( a d d r e s s e s + HEXSIZE + 1 , NULL, 1 6 ) ;
/ / Do t h e s c a n
r e s = memscan ( pid , begin addr , end addr , c u r r e n t f i l e p a t h ) ;
i f
( ! r e s ) {
p r i n t f ( ”\ nO b je ct \”%s \” modified i n memory ! ” , c u r r e n t f i l e p a t h ) ;
}
i f
( ! r e s && r e t r e s )
r e t r e s = 0 ;
}
}
f c l o s e ( m a p f i l e ) ;
r e t u r n
r e t r e s ;
}
i n t
p i d s c a n ( p i d t pid ) {
i n t
s t a t u s , r e s = 0 ;
i f
( p t r a c e (PTRACE ATTACH, pid , NULL, NULL) ! = 0 ) {
p e r r o r ( ”\nPTRACE ATTACH” ) ;
r e t u r n
r e s ;
}
wait (& s t a t u s ) ;
r e s = p r o c v e r i f y ( pid ) ;
i f
( p t r a c e (PTRACE DETACH, pid , NULL, NULL) ! = 0 ) {
p e r r o r ( ”\nPTRACE DETACH” ) ;
r e s = 0 ;
}
r e t u r n
r e s ;
}
void
s c a n t a s k s ( ) {
DIR ∗ d i r , ∗ r d i r ;
i n t
pid ;
69

s t r u c t
d i r e n t ∗ entry , ∗ r e n t r y ;
char
f i l e [ 2 0 ] ;
char
d i r e c t o r y [ 6 4 ] ;
char
r f i l e [ 6 4 ] ;
t i m e t mytime ;
s t r u c t
tm ∗ brokentime ;
i f
( ( d i r = opendir ( ”/proc ” ) ) == NULL) {
p e r r o r ( ” opendir /proc : ” ) ;
r e t u r n
;
}
e l s e {
while
( ( e n t r y = r e a d d i r ( d i r ) ) ! = NULL) {
i f
( i s d i g i t ( entry−>d name [ 0 ] ) ! = 0 ) {
pid = a t o i ( entry−>d name ) ;
i f
( pid ! = 1 && pid ! = g e t p i d ( ) ) {
time (&mytime ) ;
brokentime = ( s t r u c t tm ∗ ) l o c a l t i m e (&mytime ) ;
p r i n t f ( ” [%.2d : % . 2 d : % . 2 d ] Scanning pid %d . . . ” , brokentime−>tm hour ,
brokentime−>tm min , brokentime−>tm sec , pid ) ;
f f l u s h ( s t d o u t ) ;
i f
( p i d s c a n ( pid ) )
p r i n t f ( ”OK\n” ) ;
e l s e
p r i n t f ( ”\ n F a i l e d \n” ) ;
}
}
}
}
}
i n t
main ( i n t argc , char ∗∗ argv ) {
p i d t pid ;
i f
( a r g c == 2 ) {
pid = a t o i ( argv [ 1 ] ) ;
p r i n t f ( ” Scanning pid %d . . . ” , pid ) ;
f f l u s h ( s t d o u t ) ;
i f
( p i d s c a n ( pid ) )
p r i n t f ( ”OK\n” ) ;
e l s e
p r i n t f ( ”\ n F a i l e d \n” ) ;
} e l s e
s c a n t a s k s ( ) ;
r e t u r n
0 ;
}
70

— End of “memscan.c” —
Appendix C
HWBP detection and prevention module
— End of “ptracemod.c” —
/ ∗
∗ Hardware b r e a k p o i n t h o o k i n g d e t e c t i o n and p r e v e n t i o n module .
∗
∗ Author : Andre Al mei da
∗ /
# include <
l i n u x /module . h>
# include <
l i n u x / k e r n e l . h>
# include <
l i n u x / u n i s t d . h>
# include <
l i n u x / s y s c a l l s . h>
# include <
l i n u x / p r o c f s . h>
# include <
asm/ u a c c e s s . h>
# include <
l i n u x /kallsyms . h>
# include <
l i n u x /e r r n o . h>
# include <
asm/ i 3 8 7 . h>
# include
” p t r a c e . h”
# define
AUTHOR
”Andre Almeida”
# define
VERSION ”v1 . 0 ”
# define
ARCH
0
# define
PROCKALLSYMS ”/proc/kallsyms ”
# define
MODNAME
”HWBP Defender ”
# define
HEXSIZE
8
# define
KMEMBASE
0 xc0000000
/ ∗ w a i t m a c r o s ∗ /
#
define
WAIT INT ( s t a t u s )
( s t a t u s )
# define
WIFSTOPPED ( s t a t u s )
( ( ( s t a t u s ) & 0 x f f ) == 0 x 7 f )
# define
WSTOPSIG ( s t a t u s )
WEXITSTATUS ( s t a t u s )
# define
WEXITSTATUS ( s t a t u s )
( ( ( s t a t u s ) & 0 x f f 0 0 ) >> 8 )
# define
WIFSTOPPED( s t a t u s )
WIFSTOPPED ( WAIT INT ( s t a t u s ) )
# define
WSTOPSIG( s t a t u s )
WSTOPSIG ( WAIT INT ( s t a t u s ) )
/ ∗ end o f w a i t m a c r o s ∗ /
unsigned long
bp addr ;
71

i n t
d r 7 s e t ;
p i d t watch pid = −1, t a r g e t p i d = −1;
s t a t i c void ∗∗
s y s c a l l t a b l e ; / ∗ k e r n e l s y s c a l l t a b l e ∗ /
ulong g e t e i p ( s t r u c t t a s k s t r u c t ∗ ) ;
/ ∗ c o d e t o f i n d t h e s y s t e m c a l l t a b l e f r o m S u c k I T R o o t k i t ∗ /
s t r u c t
i d t r {
u s h o r t
l i m i t ;
ulong
base ;
}
a t t r i b u t e
( ( packed ) ) ;
s t r u c t
i d t {
u s h o r t
o f f 1 ;
u s h o r t
s e l ;
u c h a r
none , f l a g s ;
u s h o r t
o f f 2 ;
}
a t t r i b u t e
( ( packed ) ) ;
/ ∗ f r o m S u c k I T ∗ /
void ∗
memmem( char ∗ s1 , i n t l 1 , char ∗ s2 , i n t l 2 ) {
i f
( ! l 2 )
r e t u r n
s1 ;
while
( l 1 >= l 2 )
{
l 1 −−;
i f
( ! memcmp( s1 , s2 , l 2 ) ) {
r e t u r n
s1 ;
}
s1 ++;
}
r e t u r n
(NULL ) ;
}
/ ∗ f r o m S u c k I T ∗ /
ulong
g e t s c t ( ulong ep ) {
# d e f i n e SCLEN 512
char
code [SCLEN ] ;
char ∗
p ;
ulong r ;
memcpy(&code , ( void ∗ ) ep , SCLEN ) ;
p = ( char ∗ ) memmem( code , SCLEN, ”\ x f f \ x14 \ x85 ” , 3 ) ;
i f
( ! p )
r e t u r n
0 ;
r =
∗ ( ulong ∗ ) ( p + 3 ) ;
r e t u r n
r ;
}
72

/ ∗ f r o m S u c k I T ∗ /
/ ∗
e v e n i f t h e k e r n e l u s e s t h e s y s e n t e r f a s t
c a l l t o p r o c e s s s y s t e m c a l l s ,
∗
t h i s w i l l work t o o b e c a u s e t h e k e r n e l c o d e f o r t h e i n t 80 s t u b i s t h e r e ! ∗ /
s t a t i c
u long l o c a t e s y s c a l l t a b l e ( void ) {
s t r u c t
i d t r i d t r ;
s t r u c t
i d t i d t 8 0 ;
ulong old80 , s c t , o f f p ;
asm ( ” s i d t %0” : ”=m” ( i d t r ) ) ;
o f f p = i d t r . base + ( 0 x80 ∗ s i z e o f ( i d t 8 0 ) ) ;
memcpy(& i d t 8 0 , ( void ∗ ) offp , s i z e o f ( i d t 8 0 ) ) ;
old80 = i d t 8 0 . o f f 1 | ( i d t 8 0 . o f f 2 << 1 6 ) ;
s c t = g e t s c t ( old80 ) ;
r e t u r n
( s c t ) ;
}
/ ∗ g e t t a s k s t r u c t o f a p r o c e s s by p i d
∗ /
s t r u c t
t a s k s t r u c t ∗ g e t t a s k f r o m p i d ( p i d t pid ) {
s t r u c t
t a s k s t r u c t ∗ t a s k ;
f o r e a c h p r o c e s s ( t a s k )
i f
( task−>pid == pid )
r e t u r n
t a s k ;
r e t u r n
NULL;
}
/ ∗ s y s w a i t p i d ∗ /
s t a t i c
asmlinkage long ( ∗ o r i g w a i t 4 ) ( p i d t pid , i n t
u s e r ∗ s t a t u s ,
i n t
options , s t r u c t rusage
u s e r ∗ ru ) ;
s t a t i c
asmlinkage long o u r w a i t 4 ( p i d t pid , i n t
u s e r ∗ s t a t u s ,
i n t
options , s t r u c t rusage
u s e r ∗ ru ) {
s t r u c t
t a s k s t r u c t ∗ t a s k ;
p i d t r e t p i d ;
ulong e i p ;
r e t p i d = o r i g w a i t 4 ( pid , s t a t u s , options , ru ) ;
e i p = 0 ;
i f
(WIFSTOPPED( ∗ s t a t u s ) ) {
i f
(WSTOPSIG( ∗ s t a t u s ) == SIGTRAP ) { / ∗ i t i s a b r e a k p o i n t t r a p ∗ /
i f
( r e t p i d ! = −1){ / / w a i t 4 d i d n o t r e t u r n e r r o r ?
i f
( ( t a s k = g e t t a s k f r o m p i d ( r e t p i d ) ) ! = NULL) {
e i p = g e t e i p ( t a s k ) ;
i f
( ( task−>t h r e a d . debugreg [ 6 ] & 0 x00000001 ) == 0 x00000001 | |
( task−>t h r e a d . debugreg [ 6 ] & 0 x00000002 ) == 0 x00000002 | |
( task−>t h r e a d . debugreg [ 6 ] & 0 x00000004 ) == 0 x00000004 | |
73

( task−>t h r e a d . debugreg [ 6 ] & 0 x00000008 ) == 0 x00000008 ) {
/ ∗
Hardware B r e a k p o i n t t r i g g e r e d ! ∗ /
/ ∗ s t a t e o n e ! ∗ /
bp addr = e i p ;
watch pid = c u r r e n t −>pid ;
t a r g e t p i d = r e t p i d ;
p r i n t k ( ”HWBP t r i g g e r e d on pid %d , by pid %d\n” ,
r e t p i d , c u r r e n t −>pid ) ;
}
}
}
}
}
r e t u r n
r e t p i d ;
}
/ ∗ s y s p t r a c e ∗ /
s t a t i c
asmlinkage long ( ∗ o r i g p t r a c e ) (enum
p t r a c e r e q u e s t r e q u e s t , p i d t pid ,
void ∗
addr , void ∗ data ) ;
s t a t i c
asmlinkage long o u r p t r a c e (enum
p t r a c e r e q u e s t r e q u e s t , p i d t pid ,
void ∗
addr , void ∗ data ) {
s t r u c t
u s e r r e g s s t r u c t ∗ r e g s ;
s t r u c t
t a s k s t r u c t ∗ t a s k ;
i n t
a b o r t = 0 , r e t = −1;
ulong e i p ;
i f
( r e q u e s t == PTRACE SETREGS) {
r e g s = ( s t r u c t u s e r r e g s s t r u c t ∗ ) data ;
i f
( watch pid == c u r r e n t −>pid && t a r g e t p i d == pid ) {
i f
( ( t a s k = g e t t a s k f r o m p i d ( pid ) ) ! = NULL) {
e i p = g e t e i p ( t a s k ) ;
i f
( e i p == bp addr && regs−>e i p ! = bp addr ) {
/ ∗ s t a t e two ! warning ! ∗ /
a b o r t = 1 ;
task−>t h r e a d . debugreg [ 0 ] = 0 x0 ;
task−>t h r e a d . debugreg [ 7 ] = 0 x0 ;
p r i n t k ( ”WARNING: PID : %d − HWBP ATTEMPT on p r o c e s s %d ! \ n” ,
c u r r e n t −>pid , pid ) ;
}
}
}
}
/ ∗ r e t u r n t o s t a t e z e r o ∗ /
i f
( r e q u e s t == PTRACE CONT) {
i f
( watch pid == c u r r e n t −>pid ) {
74

watch pid = −1;
t a r g e t p i d = −1;
}
}
i f
( ! a b o r t )
r e t = o r i g p t r a c e ( r e q u e s t , pid , addr , data ) ;
r e t u r n
r e t ;
}
void
s y s c a l l h o o k ( void ) {
/ ∗
h o o k s y s p t r a c e s y s t e m c a l l ∗ /
o r i g p t r a c e = s y s c a l l t a b l e [
N R p t r a c e ] ;
s y s c a l l t a b l e [
N R p t r a c e ] = o u r p t r a c e ;
/ ∗
h o o k s y s w a i t 4 s y s t e m c a l l ∗ /
o r i g w a i t 4 = s y s c a l l t a b l e [
NR wait4 ] ;
s y s c a l l t a b l e [
NR wait4 ] = o u r w a i t 4 ;
}
/ ∗ u n h o o k s t h e s y s c a l l s ∗ /
void
s y s c a l l u n h o o k ( void ) {
s y s c a l l t a b l e [
N R p t r a c e ] = o r i g p t r a c e ;
s y s c a l l t a b l e [
NR wait4 ] = o r i g w a i t 4 ;
}
void
i n i t v a r s ( void ) {
bp addr = −1;
d r 7 s e t = 0 ;
}
/ ∗ b e g i n k e r n e l c o d e o f p t r a c e . c
∗ t h i s c o d e i s n e e d e d t o f i n d t h e EIP o f an a d d r e s s ∗ /
s t a t i c
i n l i n e i n t g e t s t a c k l o n g ( s t r u c t t a s k s t r u c t ∗ task , i n t o f f s e t )
{
unsigned char ∗
s t a c k ;
s t a c k = ( unsigned char ∗ ) task−>t h r e a d . esp0 − s i z e o f ( s t r u c t p t r e g s ) ;
s t a c k += o f f s e t ;
r e t u r n
( ∗ ( ( i n t ∗ ) s t a c k ) ) ;
}
s t a t i c unsigned long
my getreg ( s t r u c t t a s k s t r u c t ∗ c h i l d ,
unsigned long
regno )
{
unsigned long
r e t v a l = ˜ 0UL ;
75

switch
( regno >> 2 ) {
c a s e
GS :
r e t v a l = c h i l d −>t h r e a d . gs ;
break
;
c a s e
DS :
c a s e
ES :
c a s e
FS :
c a s e
SS :
c a s e
CS :
r e t v a l = 0 x f f f f ;
/ ∗ f a l l t h r o u g h ∗ /
d e f a u l t
:
i f
( regno > FS ∗ 4 )
regno −= 1 ∗ 4 ;
r e t v a l &= g e t s t a c k l o n g ( c h i l d , regno ) ;
}
r e t u r n
r e t v a l ;
}
/ ∗ end k e r n e l c o d e o f p t r a c e . c ∗ /
ulong g e t e i p ( s t r u c t t a s k s t r u c t ∗ t a s k ) {
ulong e i p o f f s e t , e i p ;
e i p o f f s e t = o f f s e t o f ( s t r u c t u s e r r e g s s t r u c t , e i p ) ;
e i p = my getreg ( task , e i p o f f s e t ) ;
r e t u r n
e i p ;
}
i n t
i n i t m o d u l e ( void ) {
u long s c t a d d r ;
p r i n t k ( ”HWBP defender : S t a r t e d . \ n” ) ;
s c t a d d r = l o c a t e s y s c a l l t a b l e ( ) ;
i f
( ! s c t a d d r ) {
p r i n t k ( ” Cannot f i n d s y s c a l l t a b l e . Aborting \n” ) ;
r e t u r n
0 ;
}
s y s c a l l t a b l e = ( void ∗ ) s c t a d d r ;
p r i n t k ( ” s y s c a l l t a b l e @ %p\n” , s y s c a l l t a b l e ) ;
i n i t v a r s ( ) ;
/ ∗ h o o k s t h e s y s c a l l s ∗ /
s y s c a l l h o o k ( ) ;
r e t u r n
0 ;
76

}
void
cleanup module ( void ) {
/ ∗ d o n t f o r g e t t o u n h o o k s t h e s y s c a l l s ∗ /
s y s c a l l u n h o o k ( ) ;
p r i n t k ( ”HWBP defender : Stopped . \ n” ) ;
}
MODULE LICENSE( ”GPL” ) ;
MODULE AUTHOR(AUTHOR) ;
MODULE DESCRIPTION(VERSION ) ;
Appendix D
Proactive Detection System
— Begin of “sctdefender.c” —
/ ∗
∗ Author : Andre Al mei da
∗ S p e c i a l t h a n k s t o D a n i e l Al me ida
∗ /
# include <
l i n u x /module . h>
# include <
l i n u x / k e r n e l . h>
# include <
l i n u x / u n i s t d . h>
# include <
l i n u x / s y s c a l l s . h>
# include <
l i n u x / p r o c f s . h>
# include <
asm/ u a c c e s s . h>
# include <
l i n u x /kallsyms . h>
# include
”main . h”
# define
AUTHOR
”Andre Almeida”
# define
VERSION ” S y s c a l l defender ”
/ ∗ p o i n t e r s t h e o u r s c t t a b l e s
∗ /
void ∗∗
m y s y s c a l l t a b l e ; / ∗ o u r c o p y o f t h e o r i g i n a l s y s c a l l t a b l e ∗ /
void ∗∗
s y s c a l l t a b l e ; / ∗ k e r n e l s y s c a l l t a b l e ∗ /
void ∗∗
c o r r e c t s y s c a l l t a b l e ; / ∗ c o r r e c t k e r n e l s y s c a l l t a b l e
a f t e r p r o a c t i v e d e f e n s e s y s t e m i n s t a l l e d ∗ /
typedef i n t
( ∗ r e a d d i r t ) ( s t r u c t f i l e ∗ , void ∗ , f i l l d i r t ) ;
s t a t i c
ulong f i n d i n t 8 0 h a n d l e r ( void ) ;
unsigned long ∗
k e r n e l s y s c a l l j m p ;
unsigned long
s t u b f u n c s h i f t = 0 ;
77

unsigned long
k e r n e l c o d e b e g i n , k e r n e l c o d e e n d , s y s e n t e r e n t r y a d d r , s y s t e m c a l l a d d r ;
s t r u c t
s t a c k f r a m e {
s t r u c t
s t a c k f r a m e ∗ n e x t f r a m e ;
unsigned long
r e t u r n a d d r e s s ;
} ;
/ ∗ g e t ’ s s y m b o l s f r o m / p r o c / k a l l s y m s USERSPACE ∗ /
unsigned long
g e t k e r n e l s y m b o l ( char ∗symbol name ) {
i n t
fd , i ;
char
v a l u e s [ HEXSIZE + 1 ] ;
char
type [ 3 + 1 ] ;
char
name [KSYM NAME LEN+ 1 ] ; / ∗ max k e r n e l s y m b o l name l e n g t h ∗ /
mm segment t o l d f s = g e t f s ( ) ;
s e t f s ( KERNEL DS ) ;
fd = sys open (PROCKALLSYMS, O RDONLY, 0 ) ;
i f
( fd >= 0 ) {
/ ∗ s t r i n g p a r s i n g ∗ /
while
( s y s r e a d ( fd , values , HEXSIZE ) == HEXSIZE ) {
s y s r e a d ( fd , type , 3 ) ;
f o r
( i = 0 ; i<KSYM NAME LEN ; i ++){
s y s r e a d ( fd , name+ i , 1 ) ;
i f
( name [ i ] == ’ \n ’ ) {
name [ i ] = ’ \0 ’ ;
break
;
}
}
/ ∗ t h e r e ’ s a match ∗ /
i f
( ! strcmp ( symbol name , name ) ) {
s y s c l o s e ( fd ) ;
s e t f s ( o l d f s ) ;
r e t u r n
s i m p l e s t r t o u l ( values , NULL, 1 6 ) ;
}
memset ( values , ’ \0 ’ , HEXSIZE + 1 ) ;
memset ( type , ’ \0 ’ , 4 ) ;
memset ( name , ’ \0 ’ ,KSYM NAME LEN+ 1 ) ;
}
s y s c l o s e ( fd ) ;
}
s e t f s ( o l d f s ) ;
/ ∗ s y m b o l n o t f o u n d ∗ /
r e t u r n
0 ;
}
78

i n t
v e r i f y s y s e n t e r ( void ) {
unsigned long
s y s e n t e r a d d r ;
asm ( ”movl $0x176 , %%ecx ; ”
”rdmsr ; ”
”movl %%eax , %0; ”
: ”=r ” ( s y s e n t e r a d d r ) : ) ;
r e t u r n
( s y s e n t e r a d d r == s y s e n t e r e n t r y a d d r ) ;
}
s t a t i c i n t
v e r i f y i n t 8 0 ( void ) {
ulong i n t 8 0 a d d r = f i n d i n t 8 0 h a n d l e r ( ) ;
r e t u r n
( i n t 8 0 a d d r == s y s t e m c a l l a d d r ) ;
}
s t a t i c i n t
v e r i f y s y s c a l l j m p ( void ) {
r e t u r n
( ∗ k e r n e l s y s c a l l j m p == s y s c a l l t a b l e ) ;
}
i n t
v e r i f y t a b l e e n t r y ( i n t s y s c a l l n u m b e r ) {
r e t u r n
( ∗ ( s y s c a l l t a b l e + s y s c a l l n u m b e r ) == ∗ ( c o r r e c t s y s c a l l t a b l e + s y s c a l l n u m b e r ) ) ;
}
i n t
v e r i f y i n l i n e ( i n t s y s c a l l n u m b e r ) {
char ∗
memp;
memp = ∗ ( c o r r e c t s y s c a l l t a b l e + s y s c a l l n u m b e r ) ;
r e t u r n
( ∗memp ! = ’ E9 ’ ) ;
}
/ ∗ f r o m S u c k I T ∗ /
s t r u c t
i d t r {
u s h o r t
l i m i t ;
ulong
base ;
}
a t t r i b u t e
( ( packed ) ) ;
s t r u c t
i d t {
u s h o r t
o f f 1 ;
u s h o r t
s e l ;
u c h a r
none , f l a g s ;
u s h o r t
o f f 2 ;
}
a t t r i b u t e
( ( packed ) ) ;
/ ∗ f r o m S u c k I T ∗ /
void ∗
memmem( char ∗ s1 , i n t l 1 , char ∗ s2 , i n t l 2 ) {
i f
( ! l 2 )
r e t u r n
s1 ;
79

while
( l 1 >= l 2 )
{
l 1 −−;
i f
( ! memcmp( s1 , s2 , l 2 ) ) {
r e t u r n
s1 ;
}
s1 ++;
}
r e t u r n
(NULL ) ;
}
s t a t i c
ulong f i n d i n t 8 0 h a n d l e r ( void ) {
s t r u c t
i d t r i d t r ;
s t r u c t
i d t i d t 8 0 ;
ulong old80 , o f f p ;
asm ( ” s i d t %0” : ”=m” ( i d t r ) ) ;
o f f p = i d t r . base + ( 0 x80 ∗ s i z e o f ( i d t 8 0 ) ) ;
memcpy(& i d t 8 0 , ( void ∗ ) offp , s i z e o f ( i d t 8 0 ) ) ;
old80 = i d t 8 0 . o f f 1 | ( i d t 8 0 . o f f 2 << 1 6 ) ;
r e t u r n
old80 ;
}
/ ∗ f r o m S u c k I T ∗ /
ulong
g e t s c t ( ulong ep ) {
# d e f i n e SCLEN 512
char
code [SCLEN ] ;
char ∗
p ;
ulong r ;
memcpy(&code , ( void ∗ ) ep , SCLEN ) ;
p = ( char ∗ ) memmem( code , SCLEN, ”\ x f f \ x14 \ x85 ” , 3 ) ;
i f
( ! p )
r e t u r n
0 ;
k e r n e l s y s c a l l j m p = ep + ( p + 3 ) − code ;
r =
∗ ( ulong ∗ ) ( p + 3 ) ;
r e t u r n
r ;
}
/ ∗ f r o m S u c k I T ∗ /
/ ∗
e v e n i f t h e k e r n e l u s e s t h e s y s e n t e r f a s t
c a l l t o p r o c e s s s y s t e m c a l l s ,
t h i s w i l l work t o o b e c a u s e t h e k e r n e l c o d e f o r t h e i n t 80 s t u b i s t h e r e ! ∗ /
s t a t i c
u long l o c a t e s y s c a l l t a b l e ( void ) {
ulong s c t ;
s c t = g e t s c t ( f i n d i n t 8 0 h a n d l e r ( ) ) ;
r e t u r n
( s c t ) ;
}
80

i n t
i n s i d e k e r n e l c o d e ( unsigned long addr ) {
i f
( addr >= k e r n e l c o d e b e g i n && addr <= k e r n e l c o d e e n d )
r e t u r n
1 ;
e l s e
r e t u r n
0 ;
}
i n t
f i n d k e r n e l c o d e l i m i t s ( void ) {
k e r n e l c o d e b e g i n = g e t k e r n e l s y m b o l ( ” s t e x t ” ) ;
k e r n e l c o d e e n d = g e t k e r n e l s y m b o l ( ” e t e x t ” ) ;
i f
( k e r n e l c o d e b e g i n == 0 | | k e r n e l c o d e e n d == 0 )
r e t u r n
0 ;
e l s e
r e t u r n
1 ;
}
s t a t i c
i n l i n e i n t m y v a l i d s t a c k p t r ( s t r u c t t h r e a d i n f o ∗ t i n f o , void ∗p , unsigned s i z e )
{
r e t u r n
p > ( void ∗ ) t i n f o &&
p <= ( void ∗ ) t i n f o + THREAD SIZE − s i z e ;
}
s t a t i c
i n l i n e unsigned long p r i n t c o n t e x t s t a c k ( s t r u c t t h r e a d i n f o ∗ t i n f o ,
unsigned long
ebp ,
i n t
s y s c a l l n u m b e r )
{
# i f d e f
CONFIG FRAME POINTER
i n t
s t a c k d e p t h = 0 ;
unsigned long
a d d r s h i f t ;
s t r u c t
s t a c k f r a m e ∗ frame = ( s t r u c t s t a c k f r a m e ∗ ) ebp ;
while
( m y v a l i d s t a c k p t r ( t i n f o , frame , s i z e o f ( ∗ frame ) ) ) {
s t r u c t
s t a c k f r a m e ∗ ne xt ;
unsigned long
addr ;
addr = frame−>r e t u r n a d d r e s s ;
ne xt = frame−>n e x t f r a m e ;
switch
( s t a c k d e p t h ) {
c a s e
0 :
a d d r s h i f t = addr − ( unsigned long ) ∗ ( c o r r e c t s y s c a l l t a b l e +
s y s c a l l n u m b e r ) ;
i f
( s t u b f u n c s h i f t == 0 )
s t u b f u n c s h i f t = a d d r s h i f t ;
e l s e i f
( a d d r s h i f t ! = s t u b f u n c s h i f t )
p r i n t k ( ”WARNING! D i f f e r e n c e between : 0x%x and 0x%x ! \ n” ,
s t u b f u n c s h i f t , a d d r s h i f t ) ;
81

break
;
c a s e
1 :
i f
( ! i n s i d e k e r n e l c o d e ( addr ) )
p r i n t k ( ”WARNING! 0x%x should be i n s i d e k e r n e l code ! \ n” , addr ) ;
break
;
d e f a u l t
:
p r i n t k ( ”WARNING! C a l l s t a c k too big , something i s wrong ! \ n” ) ;
break
;
}
i f
( ne xt <= frame )
break
;
frame = ne xt ;
s t a c k d e p t h ++;
}
# endif
r e t u r n
ebp ;
}
void
c h e c k s t a c k ( unsigned long s t a c k p o i n t e r , unsigned long s t a r t e b p , unsigned long s y s c a l l n u m b e r ) {
unsigned long
ebp = 0 ;
unsigned long
s t a c k ;
s t a c k = s t a c k p o i n t e r ;
ebp = s t a r t e b p ;
while
( 1 ) {
s t r u c t
t h r e a d i n f o ∗ c o n t e x t ;
c o n t e x t = ( s t r u c t t h r e a d i n f o ∗ )
( ( unsigned long ) s t a c k & ( ˜ ( THREAD SIZE − 1 ) ) ) ;
ebp = p r i n t c o n t e x t s t a c k ( c o n t e x t , ebp , s y s c a l l n u m b e r ) ;
s t a c k = ( unsigned long ) c o n t e x t −>p r e v i o u s e s p ;
i f
( ! s t a c k )
break
;
}
}
/ ∗
h e r e i s w h e r e t h e s y s t e m g e t s i n s p e c t e d ∗ /
void
syscheck ( unsigned long addr , i n t s y s c a l l n u m b e r ,
unsigned long
s t a c k p o i n t e r , unsigned long s t a r t e b p ) {
i f
( ! v e r i f y t a b l e e n t r y ( s y s c a l l n u m b e r ) )
p r i n t k ( ”WARNING! S y s c a l l %d h i j a c k e d ! \ n” , s y s c a l l n u m b e r ) ;
# i f d e f
CONFIG FRAME POINTER
c h e c k s t a c k ( s t a c k p o i n t e r , s t a r t e b p , s y s c a l l n u m b e r ) ;
# endif
82

i f
( ! v e r i f y s y s e n t e r ( ) )
p r i n t k ( ”WARNING: IA32 SYSENTER EIP h i j a c k e d ! \ n” ) ;
i f
( ! v e r i f y i n t 8 0 ( ) )
p r i n t k ( ”WARNING: i n t 8 0 handler h i j a c k e d ! \ n” ) ;
i f
( ! v e r i f y s y s c a l l j m p ( ) )
p r i n t k ( ”WARNING: s y s t e m c a l l jump modified ! \ n” ) ;
i f
( ! v e r i f y i n l i n e ( s y s c a l l n u m b e r ) )
p r i n t k ( ”WARNING: jmp a t t h e beginning o f t h e s y s c a l l number %d ! \ n” , s y s c a l l n u m b e r ) ;
}
unsigned long
p r o c e s s c a l l ( i n t c a l l n u m b e r ) {
unsigned long
j m p s y s c a l l , s t a c k p o i n t e r , s t a r t e b p ;
asm ( ”movl %%ebp , %0” : ”=r ” ( s t a r t e b p ) : ) ;
j m p s y s c a l l = ( unsigned long ) ∗ ( m y s y s c a l l t a b l e + c a l l n u m b e r ) ;
asm ( ”movl %%esp , %0” : ”=r ” ( s t a c k p o i n t e r ) : ) ;
/ / s y s c a l l
v e r i f i c a t i o n g o e s h e r e !
syscheck ( j m p s y s c a l l , call number , s t a c k p o i n t e r , s t a r t e b p ) ;
r e t u r n
j m p s y s c a l l ;
}
void
s y s c a l l u n h o o k ( void ) {
/ / r e s t o r e t o t h e o r i g i n a l t a b l e
i n t
i ;
f o r
( i = 0 ; i < SCT SIZE ; i ++){
s y s c a l l t a b l e [ i ] = m y s y s c a l l t a b l e [ i ] ;
}
}
void
c l o n e t a b l e ( void ) {
m y s y s c a l l t a b l e = kmalloc ( SYS CALL TABLE SIZE , GFP KERNEL ) ;
memcpy( m y s y s c a l l t a b l e , s y s c a l l t a b l e , SYS CALL TABLE SIZE ) ;
}
i n t
s y s c a l l t a b l e s c a n ( void ) {
i n t
i , v a l i d = 1 ;
f o r
( i = 0 ; i < SCT SIZE ; i ++){
i f
( ! i n s i d e k e r n e l c o d e ( ( unsigned long ) ∗ ( s y s c a l l t a b l e + i ) ) ) {
p r i n t k ( ” Function %d not i n s i d e k e r n e l code ( 0 x%.8x ) ! \ n” ,
i , ( unsigned long ) ∗ ( s y s c a l l t a b l e + i ) ) ;
v a l i d = 0 ;
}
83

}
r e t u r n
v a l i d ;
}
i n t
i n i t m o d u l e ( void ) {
u long s c t a d d r ;
i n t
i ;
p r i n t k ( ”SCT Defender Loaded ! . . . \ n” ) ;
s y s e n t e r e n t r y a d d r = g e t k e r n e l s y m b o l ( ” s y s e n t e r e n t r y ” ) ;
s y s t e m c a l l a d d r = g e t k e r n e l s y m b o l ( ” s y s t e m c a l l ” ) ;
i f
( ! v e r i f y i n t 8 0 ( ) )
p r i n t k ( ”WARNING: i n t 8 0 handler h i j a c k e d ! \ n” ) ;
e l s e
p r i n t k ( ” I n t e r r u p t 80 OK\n” ) ;
i f
( ! v e r i f y s y s e n t e r ( ) )
p r i n t k ( ”WARNING: S y s e n t e r i n s t r u c t i o n h i j a c k e d ! \ n” ) ;
e l s e
p r i n t k ( ” S y s e n t e r i n s t r u c t i o n OK\n” ) ;
i f
( ! f i n d k e r n e l c o d e l i m i t s ( ) ) {
p r i n t k ( ” k e r n e l code l i m i t s not found ! \ n” ) ;
r e t u r n −
1;
}
s c t a d d r = l o c a t e s y s c a l l t a b l e ( ) ;
i f
( ! s c t a d d r ) {
p r i n t k ( ” Cannot f i n d s y s c a l l t a b l e . Aborting \n” ) ;
r e t u r n
0 ;
}
s y s c a l l t a b l e = ( void ∗ ) s c t a d d r ;
p r i n t k ( ”SCT Defender : s y s c a l l t a b l e a t %p\n” , s y s c a l l t a b l e ) ;
p r i n t k ( ”SCT Defender : v e r i f y i n g s y s c a l l t a b l e i n t e g r i t y . . . \ n” ) ;
i f
( ! s y s c a l l t a b l e s c a n ( ) )
p r i n t k ( ” F a i l e d ! ! \ n” ) ;
e l s e
p r i n t k ( ”Done . \ n” ) ;
c l o n e t a b l e ( ) ;
c o r r e c t s y s c a l l t a b l e = kmalloc ( SYS CALL TABLE SIZE , GFP KERNEL ) ;
s y s c a l l h o o k ( c o r r e c t s y s c a l l t a b l e , s y s c a l l t a b l e ) ;
84

i f
( ! v e r i f y s y s c a l l j m p ( ) )
p r i n t k ( ”WARNING: s y s t e m c a l l jump modified ! \ n” ) ;
e l s e
p r i n t k ( ” S y s t e m c a l l jump OK\n” ) ;
f o r
( i = 0 ; i <255; i ++){
i f
( ! v e r i f y i n l i n e ( i ) )
p r i n t k ( ” I n l i n e hook found i n system c a l l %d ! \ n” , i ) ;
}
p r i n t k ( ”SCT Defender : A c t i v e . \ n” ) ;
r e t u r n
0 ;
}
void
cleanup module ( void ) {
/ ∗ u n h o o k s t h e s y s c a l l s ∗ /
s y s c a l l u n h o o k ( ) ;
p r i n t k ( ”SCT Defender e x i t i n g . . . \ n” ) ;
}
MODULE LICENSE( ”GPL” ) ;
MODULE AUTHOR(AUTHOR) ;
MODULE DESCRIPTION(VERSION ) ;
— End of “sctdefender.c” —
— Begin of “sctdefender.h” —
# i f n d e f
MAIN
# define
MAIN
# define
PROCKALLSYMS ”/proc/kallsyms ”
# define
MODNAME
” s c t d e f e n d e r ”
# define
SCT SIZE
256
# define
HEXSIZE
8
# define
SYS CALL TABLE SIZE SCT SIZE ∗ 4
void
s y s c a l l h o o k ( void ∗∗ , void ∗ ∗ ) ;
unsigned long
p r o c e s s c a l l ( i n t c a l l n u m b e r ) ;
# i f d e f
CONFIG FRAME POINTER
85

# define
STUB CODE( s y s c a l l n u m b e r ) \
unsigned long
j m p s y s c a l l = p r o c e s s c a l l ( s y s c a l l n u m b e r ) ; \
asm ( ”movl %0, %%edx” : : ” r ” ( j m p s y s c a l l ) ) ; \
asm ( ”mov %ebp , %esp ; ” \
”pop %ebp” ) ; \
asm ( ”jmp ∗%edx” ) ;
# e l s e
# define
STUB CODE( s y s c a l l n u m b e r ) \
unsigned long
j m p s y s c a l l = p r o c e s s c a l l ( s y s c a l l n u m b e r ) ; \
asm ( ”movl %0, %%edx” : : ” r ” ( j m p s y s c a l l ) ) ; \
asm ( ”jmp ∗%edx” ) ;
# endif
# endif / /
MAIN
— End of “sctdefender.h” —
— Begin of “syscalls.c” —
# include <
asm/ u a c c e s s . h>
# include
”main . h”
s t a t i c
asmlinkage void s y s c a l l s t u b 0 ( void ) { STUB CODE ( 0 ) ; }
s t a t i c
asmlinkage void s y s c a l l s t u b 1 ( void ) { STUB CODE ( 1 ) ; }
s t a t i c
asmlinkage void s y s c a l l s t u b 2 ( void ) { STUB CODE ( 2 ) ; }
. . . ( r e p e a t e d u n t i l 2 5 5 ) . . .
s t a t i c
asmlinkage void s y s c a l l s t u b 2 5 5 ( void ) { STUB CODE ( 2 5 5 ) ; }
void
s y s c a l l h o o k ( void ∗∗ s y s c a l l t a b l e , void ∗∗ c o r r e c t s y s c a l l t a b l e ) {
i n t
i ;
c o r r e c t s y s c a l l t a b l e [ 0 ] = s y s c a l l s t u b 0 ;
c o r r e c t s y s c a l l t a b l e [ 1 ] = s y s c a l l s t u b 1 ;
c o r r e c t s y s c a l l t a b l e [ 2 ] = s y s c a l l s t u b 2 ;
. . . ( r e p e a t e d u n t i l 2 5 5 ) . . .
c o r r e c t s y s c a l l t a b l e [ 2 5 5 ] = s y s c a l l s t u b 2 5 5 ;
/ / s y s c a l l t a b l e [ 2 4 ] = c o r r e c t s y s c a l l t a b l e [ 2 4 ] ;
f o r
( i = 0 ; i < SCT SIZE ; i ++) {
s y s c a l l t a b l e [ i ] = c o r r e c t s y s c a l l t a b l e [ i ] ;
}
}
— End of “syscalls.c” —
86

Glossary
API
Application Programming Interface
CPU
Central Processing Unit
DKOM
Direct Kernel Object Manipulation
DLL
Dynamic Link Library
DMA
Direct Memory Access
DR0-7
Debug Registers (0 to 7)
DSO
Dynamic Shared Objects
EIP
Extended Instruction Pointer
ELF
Executable and Linkable Format
GOT
Global Offset Table
HIDS
Host-Based Intrusion Detection System
HIPS
Host-Based Intrusion Prevention System
IAT
Import Address Table
IDS
Intrusion Detection System
IDT
Interrupt Descriptor Table
IDTR
Interrupt Descriptor Table Register
IRP
IO Request Packet
ISR
Interrupt Service Routine
LKM
Linux Kernel Module
87

OS
Operating System
PCI
Peripheral Component Interconnect
PEB
Process Environment Block
PID
Process ID
PLT
Procedure Linkage Table
SEH
Structured Exception Handler
SSDT
System Service Dispatch Table
SVV
System Virginity Checker
VFS
Virtual File System
VMA
Virtual Memory Areas
88
Document Outline
- Introduction
- State of the Art
- User-Land
- Kernel-Land
- Results and discussion
- Conclusions
- I Appendices
- Glossary
Wyszukiwarka
Podobne podstrony:
COMPUTER VIRUSES PREVENTION, DETECTION, AND TREATMENT
A Methodology to Detect and Characterize Kernel Level Rootkit Exploits Involving Redirection of the
93 1343 1362 Tool Failures Causes and Prevention
Human Papillomavirus and Cervical Cancer Knowledge health beliefs and preventive practicies
Epidemiology and Prevention of Viral Hepatitis A to E
Advances in the Detection and Diag of Oral Precancerous, Cancerous Lesions [jnl article] J Kalmar (
Detection and Function of Opioid Receptors on Cells from the Immune System
93 1343 1362 Tool Failures Causes and Prevention
Robert Houdin The Sharper Detected and Exposed
Detection and Molecular Characterization of 9000 Year Old Mycobacterium tuberculosis from a Neolithi
The Zombie Roundup Understanding, Detecting, and Disrupting Botnets
Learning to Detect and Classify Malicious Executables in the Wild
SmartSiren Virus Detection and Alert for Smartphones
Akter S , Shamsuzzaman M , Jahan F , Community acquired bacterial pneumonia aetiology, laboratory de
Computer Viruses The Disease, the Detection, and the Prescription for Protection Testimony
Generic Detection and Classification of Polymorphic Malware Using Neural Pattern Recognition
Anomalous Payload based Worm Detection and Signature Generation
więcej podobnych podstron