
ULTIMATE FOR BEGINNERS
“Ultimate for Beginners” is part of an ongoing project to provide high-quality educa-
tional material for those learning the sport of Ultimate Frisbee.
Check out the online site:
www.ultimatehandbook.com
A 10 minute video introduction to the sport of Ultimate Frisbee is now available!
“Play Ultimate”
navigates the Ultimate player through the basics of one of the
fastest growing sports in North America - Ultimate Frisbee.
To order this video:
www.playulty.com
1
Introduction
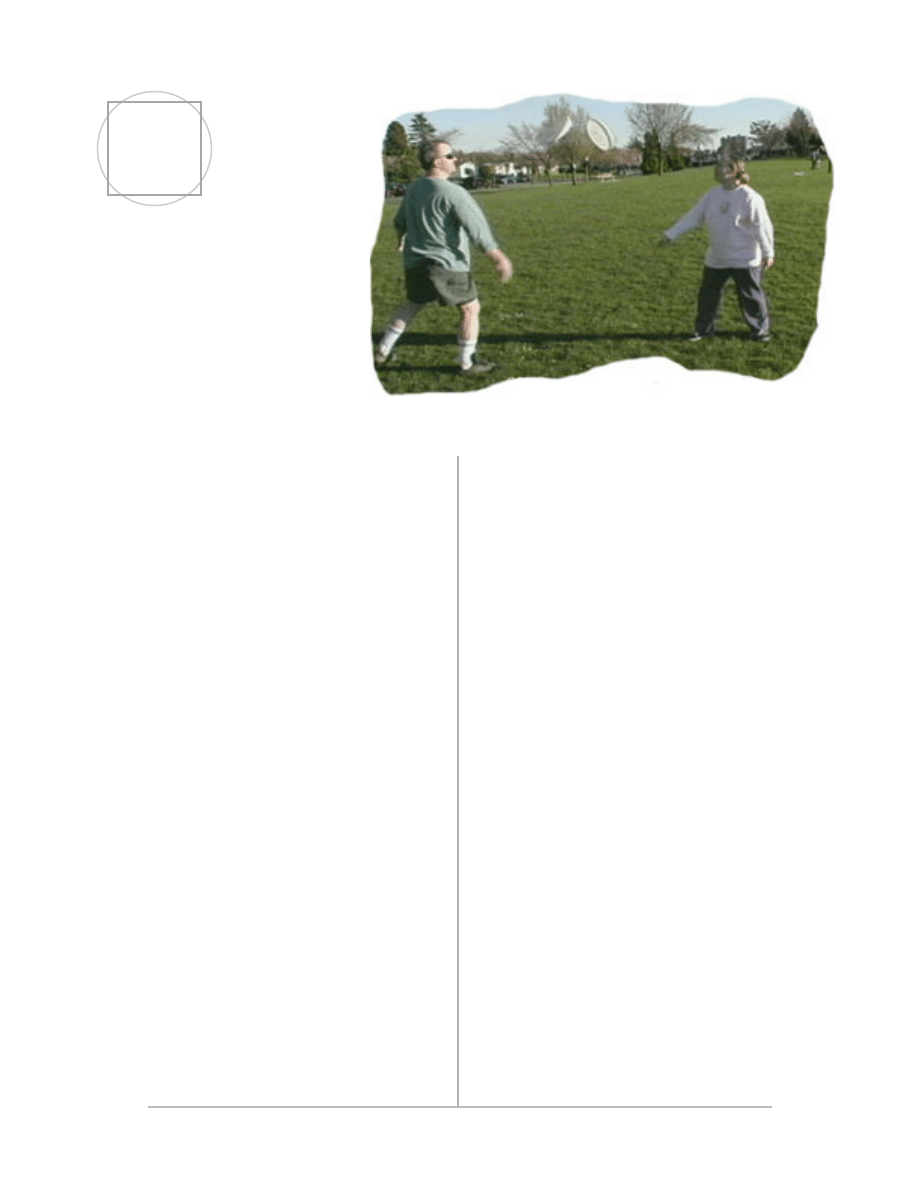
When a ball dreams… It dreams it’s a Frisbee
Dr. Stancil B. Johnson,
International Frisbee Hall of Fame inductee
U
ltimate is a noncontact, fast paced field sport played
with two teams of seven. The object is to throw a
frisbee up the field from teammate to teammate until it’s
caught in the opponent’s endzone. The game combines
elements from other sports - the running of soccer, the
jumping, pivoting, passing and continual turnovers from
offence to defense of basketball, and the long bombs into
the endzone of football. It’s played year-round.
Ultimate began in 1968 in Maplewood, New Jersey by a
bunch a students from Columbia High School. The staff
members of the school newspaper, the Colombian, and
its student council developed a new game as a gag and
activity for their high-school evenings.
“
Competitive play is encouraged,
but never at the expense of mutual
respect between players and the
basic joy of play”
The game was freeform early on, with as many as 20
or 30 players allowed per team. Initially played as
Frisbee Football, the rules were slowly modified, eventu-
ally eliminating running with the disc and the system of
downs, and establishing a set of rules for the defense.
As the students graduated the game spread to the college
level.
Today, Ultimate is played by people from all walks
of life in 35 countries throughout the world. From
the 25,000 amateur athletes that compete through the
UPA (Ultimate Players Association) and the WFDF (World
Flying Disc Federation) to the even greater number that
play in informal leagues and casual pickup games; Ulti-
mate is a sport for everyone.
The best way to learn Ultimate is to play it. Take the
opportunity to join local pick-up games. This will give
you chance to play with some experienced players and
perhaps ask them questions. Some cities and leagues even
offer skill clinics which is a great way to receive top-notch
coaching.
The 10 Rules of Ultimate
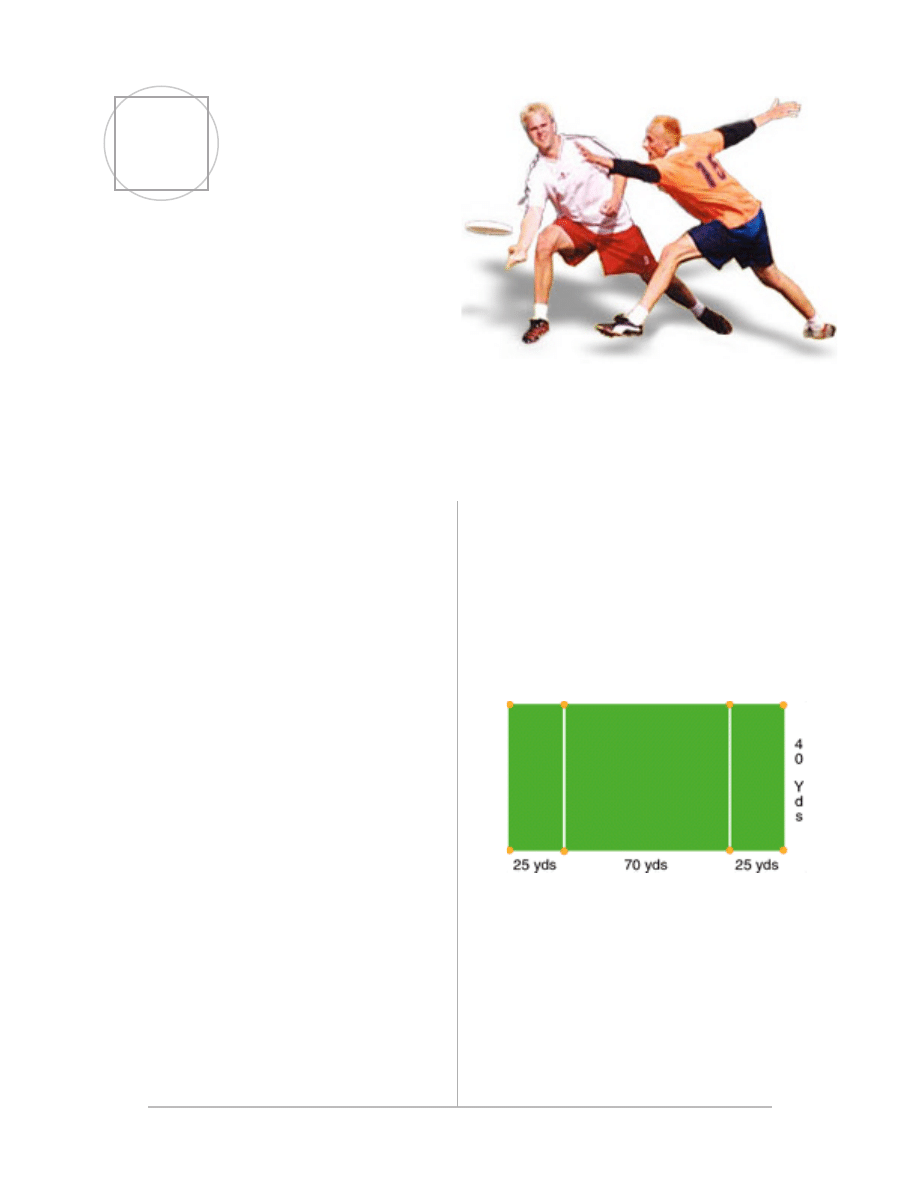
1. The Field -- A regulation ultimate field is 70 yards by 40
yards. The endzones are 25 yards deep.
2. Starting Play - There are seven players per team. Each
team lines up across the front of their endzone at the begin-
ning of each point. The team with the disc will pull (i.e.
throw) the disc to the other team. This starts gameplay.
3. Movement of the disc - The offensive team can move the
disc in any direction by successfully completing a pass to
a teammate. Once a player has the disc they cannot run
with it. Only one defensive player is allowed to guard the
handler (i.e. the player who currently holds the disc). All
1

2
other defensive players must be at least 10 feet away.
4. The Stall Count -The player with the disc (i.e. the
thrower or handler) has ten seconds to throw it. The
defender guarding the thrower (i.e. the marker) will estab-
lish this ten count (or stall count).
5. Change of possession (Turnover) -- When a pass in not
completed (e.g. out of bounds, drop, block, interception)
or a ten count occurs, the defense immediately takes posses-
sion of the disc and becomes the offense. This is called
a turnover.
6. Scoring - When the offense completes a pass into the
opposing endzone, this is a point.
7. Contact - No physical contact is allowed in the game of
ultimate. Picks and screens are also prohibited as they often
lead to injury.
8. Fouls - When a player initiates contact on another player
a foul occurs. The player who was fouled must immedi-
ately yell “foul” and gameplay promptly stops. If a foul
call disrupts possession, the play resumes as if the pos-
session was retained. If the player committing the foul
disagrees with the foul call, the play is redone.
9. Self-Refereeing - Players are responsible for their own
foul and line calls. Players resolve their own disputes.
There are no referees.
10. Spirit of the Game - Ultimate’s underlying philosophy
is sportsmanship and fair play. Competitive play is encour-
aged, but never be at the expense of respect between play-
ers, adherence to the rules, and the basic joy of play.
OFFICIAL RULES:
www.upa.org
More Info:
www.ultimatehandbook.com
3
Spirit of the
Game
The rules of Ultimate, like any sport, take
a while to learn. But the most important
concept is “Spirit”
“Spirit of the Game”, or SOTG, is the underlying philoso-
phy of Ultimate. Players are among the most courteous of
athletes and always maintain a high level of sportsmanship
and respect for their opponent. There are no referees in
Ultimate, which means that players must govern their own
conduct on the pitch. A player would never intentionally
violate the rules of the game, so there are no harsh penalties
to enforce these rules. If there is an infraction, it is the
responsibility of the players involved to call the foul. This
includes calling a foul on yourself if the person you fouled
does not call the infraction. In essence, Ultimate relies on
the honour system with the belief that no one would ever
intentionally cheat.
The rules of Ultimate, like any sport, take a while to learn.
But the most important concept is “Spirit”. Competitive
play is encouraged, but never at the expense of mutual
respect between players and the basic joy of play.
Five Ways to Bring More Spirit
to Your Games.
1) Always praise and support players on both teams.
If someone makes a great catch get your whole team
to make some noise. Alternatively, if someone makes
a mistake and is angry with themselves, it helps to
encourage them with a “Nice try red team, go get it
back!!”.
2) Introduce yourself to your opponents on the field.
While you are both stacking up, reach out a hand and
introduce yourself and wish them a good game.
3) Challenge your opponents to a silly point. All
hammer throws, skipping, holding hands, left handed
etc.
4) Share your food! Bring some extra cookies, cake or
fruit to the game and pass it around.
5) Maintain a positive attitude at all times. The most
challenging part of SOTG is to keep it going when the
going gets tough. You may be down 11- 2 but remember
that Ultimate is just a game and tomorrow the sun will
still rise if you lose. So you might as well lose with
style, spirit and class!
To the tune of “Help from my
friends” -Sung by Illegal Smile to
Hello My Name is, Vancouver Ulti-
mate League
What would you do if we gave you a name
Like Fuzzy, Rudolph or Jane?
How would you feel at the end of the game
now that we‛ll never see you again?
We‛ll get by with a little help from your food
Do you feed everybody?
And give them nametags too?
Will you play us on Sundays and give us all
something to do?
We‛ll get by if you say you‛re our friends
We can try if you say you‛re our frineds
2

4
The Cheer
One of the unique aspects of Ultimate is that you must
cheer the other team at the end of each game. We’re not
talking a quick hip-hip-hooray, that just doesn’t cut it. You
want to create something that commemorates the fun you
had with your opponents. It usually involves taking a well-
known song and re-writing the lyrics, perhaps throwing in
some choreography, and most importantly, having lots of
fun.
Remember, enthusiasm counts more than talent. No matter
how bad or good your team does during the game, it’s
hard to take yourself seriously when a bunch of people are
massacring a perfectly good song.
There are a lot of approaches you can take when developing
a cheer. Get your entire team together in a circle immedi-
ately after the game. It always helps to have a leader when
developing your cheer. The song leader plays an important
role in activating the creative spark in your team. Keep the
team on track and attentive by involving everyone. Lead a
quick team brainstorm and ask the following questions:
1) Does your opponents’ name fit with a popular song,
nursery rhyme or TV commercial? Switch the words so
that they relate to your game.
2) Did something happen during the game that was
funny, embarrassing or worthy of praise? Add a line to
your song about it.
3) If neither of the above apply, you are going to have to
turn up the creative juices!! Perhaps a short skit, opera
spoof or dramatic performance is in order?
Once you have determined the direction your cheer will
take, you have a choice: write your cheer down or commit
it to memory. We are going to suggest you don’t write down
your cheers! Memorizing cheers forces the whole team to
either participate or at least listen during the cheer writing
process. When cheers are written down, your teams’ eyes
are glued to piece of paper during the presentation and only
a couple of people will really know the song. At first, its
always hard to convince your team that memorization is the
easiest way.
Start by “talking” the cheer, line by line, until you reach
the point where you run out of words. Every time you add
a new line or verse, start from the beginning. Now you are
using all of the brains on your team to come up with more
lyrics! Add the singing when people get used to the new
version of the song.
Rehearse your cheer a few times so that you are putting
More Info:
www.ultimatehandbook.com
just as much effort into praising the other team as you
put into playing a great game! Remember, enthusiasm is
everything! You are not being judged on singing or acting
ability. People will appreciate an honest effort.
The cheer is what makes Ultimate so unique. It allows your
team to express how much fun you had and shows them
you appreciated the great time. The best way to clear the
air after an intense game is to give them a cheer they won’t
forget!!!
To the tune of “Call Me” by Blondie
Call me, down the line,
you can throw it to me anytime,
Call me, its just ne
If you huck it, I‛ll be there in time
Call me!
Cover me with dirt and grass,
we‛re sliding in the zone
throw the disc to me baby
I‛m standing all alone
Pressures on, I can‛t stand still
if I don‛t get it someone will
Call me!
5
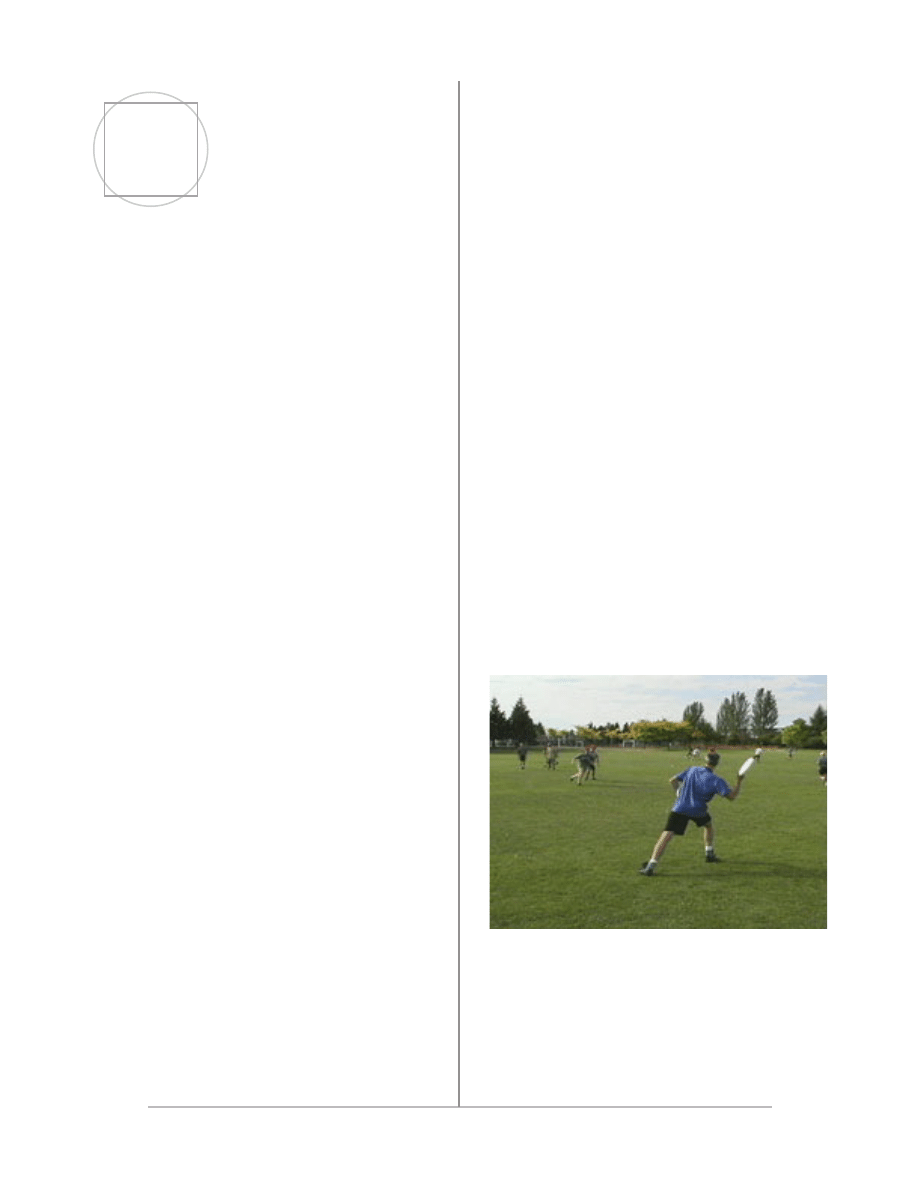
Throwing
The two most important throws in Ultimate are
the backhand and forehand. The backhand is the
throw everybody has used since day one to chuck
around a frisbee at the beach. The forehand is
the inverse version of the backhand.
Backhand
To throw a proper backhand your grip should have all four
fingers curled around the rim. The thumb lies on top of the
disc, close to the rim. Make sure to keep the grip relatively
tight, as this gives the disc stability.
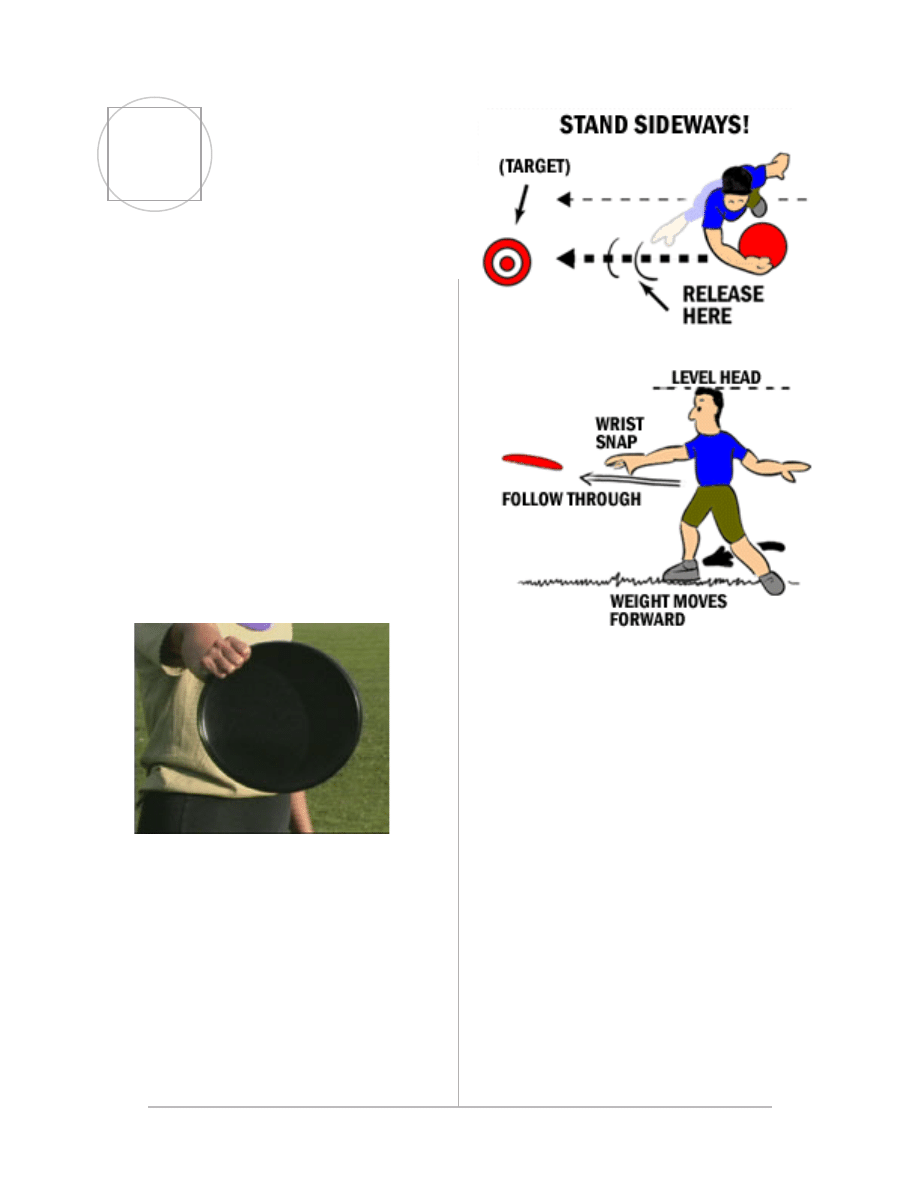
As a beginner, your natural tendency will be to face the
person you’re trying to throw to. This often results in a
throw that goes way off target. If you are a right-handed
thrower, stand with your right shoulder facing your receiver
or target. Left handers use their left shoulder. It’s impor-
tant to remember that the force of the throw not only comes
from arm strength, but also from your weight imparting
energy to the disc. Remember to keep your knees a bit
flexed so your body isn’t rigid.
Swing your arm forward with moderate force. You don’t
want to heave the disc, but rather have a smooth controlled
motion. Shift your weight forward as you’re doing this and
take a slight step ahead with your front foot. This will
give you added extension around your defense and balance
during the throw.
The point where you release the disc will determine which
direction it goes: left, right, or straight. As you release the
disc, snap your wrist forward. As it propels off of your
index finger, the disc will begin to spin. The harder you
snap your wrist, the more spin the disc will have, and it’s
the spin which keeps the disc stable during flight.
Be careful that you keep your wrist in line with your arm
as you snap the disc. If your thumb lifts upward during the
throw, the disc will lose control.
Just like a golf swing, continue your arm motion even after
the disc has left your fingers. This is known as “follow
through” and helps your throw to maintain a nice fluid
consistency.
3
6
Forehand (Flick)
The basic forehand grip is shown below. The index finger
points to the center of the disc, giving you control of the
disc angle. The middle finger lies across the inside rim.
The other two fingers are curled into your palm. The thumb
lies on top of the disc.
If you’re a right handed thrower, stand with your left shoul-
der forward and your torso pointed slightly towards your
target. Left-handers should do the opposite. Your feet
should be shoulder width apart with your throwing arm
behind your rear leg. Keep your knees flexed so your body
isn’t rigid.
Bring your arm backwards so the disc is above your rear leg
and your weight is shifted slightly back. The disc shouldn’t
be parallel to the ground but dropped down to about 45
degrees by bending at the wrist.
Your elbow is the pivot point and should not move during
the entire throwing motion. Swing your arm forward with
considerable force. To launch the disc, you want to stop
your hand with a jerk and snap your wrist. Essentially all
the energy from your arm and body will focus to the middle
finger along the rim of the disc.
Because your arm only travels a short distance, the possible
release points are much closer together. A good point of
release is just after your wrist crosses your rear leg. Follow
through is not necessary during the forehand throw.
More Info:
www.ultimatehandbook.com
Beginners often throw off the wrong foot. Make sure
your weight is on the same foot as the hand that’s
holding the disc
The disc shouldn’t be parallel to the ground but
dropped down to about 45 degrees by bending at
the wrist.
To launch the disc, you want to stop your hand
with a jerk and snap your wrist. Your elbow is the
pivot point and should not move during the entire
throwing motion.
7
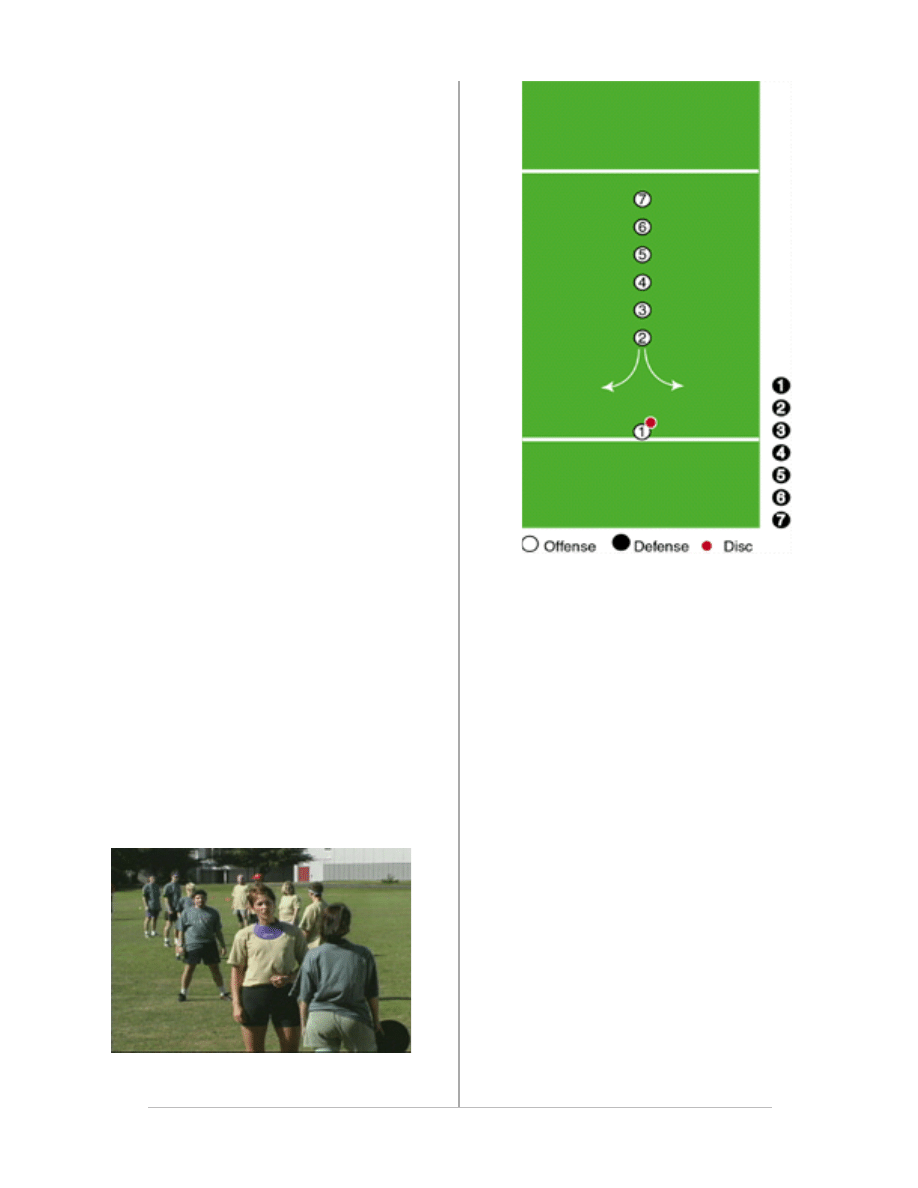
Before starting a game of Ultimate, the captains from each
team will flip a disc. A third player calls “same” or “differ-
ent” before the discs hit the ground. If the call is correct,
then that person’s team has the choice to throw or receive
the first “pull”, or alternatively to choose the endzone they
would like to defend for the first point.
Each team lines up seven players across their respective
goal line. The receiving team should maintain their posi-
tions relative to each other until the pull is thrown. This
allows the opposing team to figure out who they will check
(i.e. defend).
The Pull
Everyone is in position, happy, smiling, ready to play. The
person pulling the disc will raise their hand, indicating that
their team is ready. The opposing team will raise their
hand in turn and the game begins. The pull is thrown, the
disc sails gracefully through the air to the other end zone,
and the pulling team runs down the field to pick up their
‘checks’.
“LET THE GAMES BEGIN!!!”
The receiving team doesn’t have to catch the pull. Whoever
touches the disc first (either by catching it or picking it up
from the ground) becomes the first handler. A good idea is
to designate someone on your team to be the first handler;
This will minimize confusion. If by chance the disc hits the
ground and starts rolling, any player on the receiving team
can stop the disc without becoming the first handler.
Unless you are confident that you will catch the pull,
let the disc hit the ground. If you try to catch the
disc and fail, it’s a turnover (and usually just a few
meters away from your endzone).
If the disc lands inside your end zone, then the
receiving team has the choice to play immediately
from within the endzone or walk the disc to their
goal line. To put the disc into play, touch it to the
ground. Note: You cannot decide to play from the
goal line, and then change your mind and throw the
disc prior to reaching the goal line.
If the disc flies out of bounds, someone from the
receiving team should raise his arms and yell
“middle”. This allows you to play the disc from the
middle of the field at the point where the disc crosses
the sideline. If you don’t call “middle”, then you
must play it from the sideline.
If the disc flies out the back of your endzone, it is
considered a “Brick” and play is initiated in the
middle of the field, three meters forward of the goal
line.
Marking the Handler
The disc is pulled to the other team, a player from this
team picks up the disc (he becomes the “handler”), and a
defender from the opposing team (i.e. the “marker”) sets
up to block the throw. Once the disc is put into play, the
marker starts a stall count (at one second intervals) “Stall
one, Stall two, … up to “Stall Ten”. If the marker reaches
stall ten (the “T” of ten to be exact) before the handler
initiates a pass then it’s a turnover. If the disc is thrown,
the “marker” should yell “UP” to let teammates know the
disc is in the air.
A fast stall count is against the rules. In the event
of a fast count call by the thrower, two seconds
4
The Basics of
Ultimate
8
are deducted from the count and play is continued
without interruption. A second fast count results in
a foul. When this happens, play is reset with a count
of zero.
The marker must be closer than three meters and
greater than one disc length from the handler before
they can initiate a stall count. You cannot straddle
the thrower’s pivot foot or prevent the thrower from
pivoting.
Only one player can mark the handler at any one
time. All other defensive players must be at least 3
meters away.
The Stack
The handler is looking for an open teammate. He has ten
seconds to throw the disc but there are fourteen players
on the field, twelve of which are running in order to get
open for a pass. Needless to say, things very quickly get
chaotic and disorganized. Players will find it difficult to
get open because someone is always in their way. You will
also find that occasionally you must stop so that you don’t
inadvertently pick an opponent.
You cannot use any other player on the field to
impede the progress of your check. This is called a
“pick” and was instituted to prevent injuries, prima-
rily high-speed collisions between players.
If you find yourself in a “pick” situation, yell “pick”
and play will promptly stop. If the disc is in flight
when the call is made, and is caught by the offense,
it is returned to the “handler” and the play is re-
done. If the pass is incomplete, this is a “turnover”.
If the disc was not in flight when “pick” was called,
the play is reset. No player should move after a
pick call except the player calling the “pick”, who is
allowed to catch up to his/her “check”.
The most common strategy for reducing clogging is to form
a “stack”. The idea behind the stack is to try and make
room on the field for your receivers. The first player lines
up 15-20 yards away from the handler, and the other players
line up behind him. Try to keep 5-10 yards between players
in the stack. Because ultimate is commonly played using a
‘player-on-player’ type defense, this will force the opposing
team into a similar stack configuration. The field 10 -20
yards in front of the handler is now open for receiving
throws.
Players in the stack will make running plays to try and get
open for a pass. This is usually done in a series of cuts that
open up space between you and your defender. The player
at the front of the stack runs towards the thrower and then
cuts SHARPLY to the right or left. The sharper the cut, the
easier it is to get a few steps in front of the defense.
If your team is running hard, there should be an abundance
of passing opportunities. The most important thing for the
handler to do is ‘lead’ the receiver by throwing the disc
ahead of them, not at them. If the throw is made directly
at the receiver it will cause them to stop. Because the
defender is running behind him, he/she will be right there to
intercept the pass. Remember, if the defender is too close
to your teammate, wait for the next cut. It’s also a good
idea to make eye contact with your receiver just before they
make the cut. This will give you an indication of what’s
9
going to happen.
If the thrower does not pass to you as a cutter, circle around
and run like crazy to the back of the stack (farthest from
the disc). By the time the first runner is circling back, the
second runner should already be making a cut. Timing is
essential. You want the thrower to have a new pass option
immediately after an old one evaporates. Remember, the
handler only has 10 seconds to throw.
Holding the Force
The offense has set up a stack formation which has opened
up a lot of space on the field. As a countermeasure, the
defensive team wants to limit the area where passes can be
made by forcing the disc to one side.
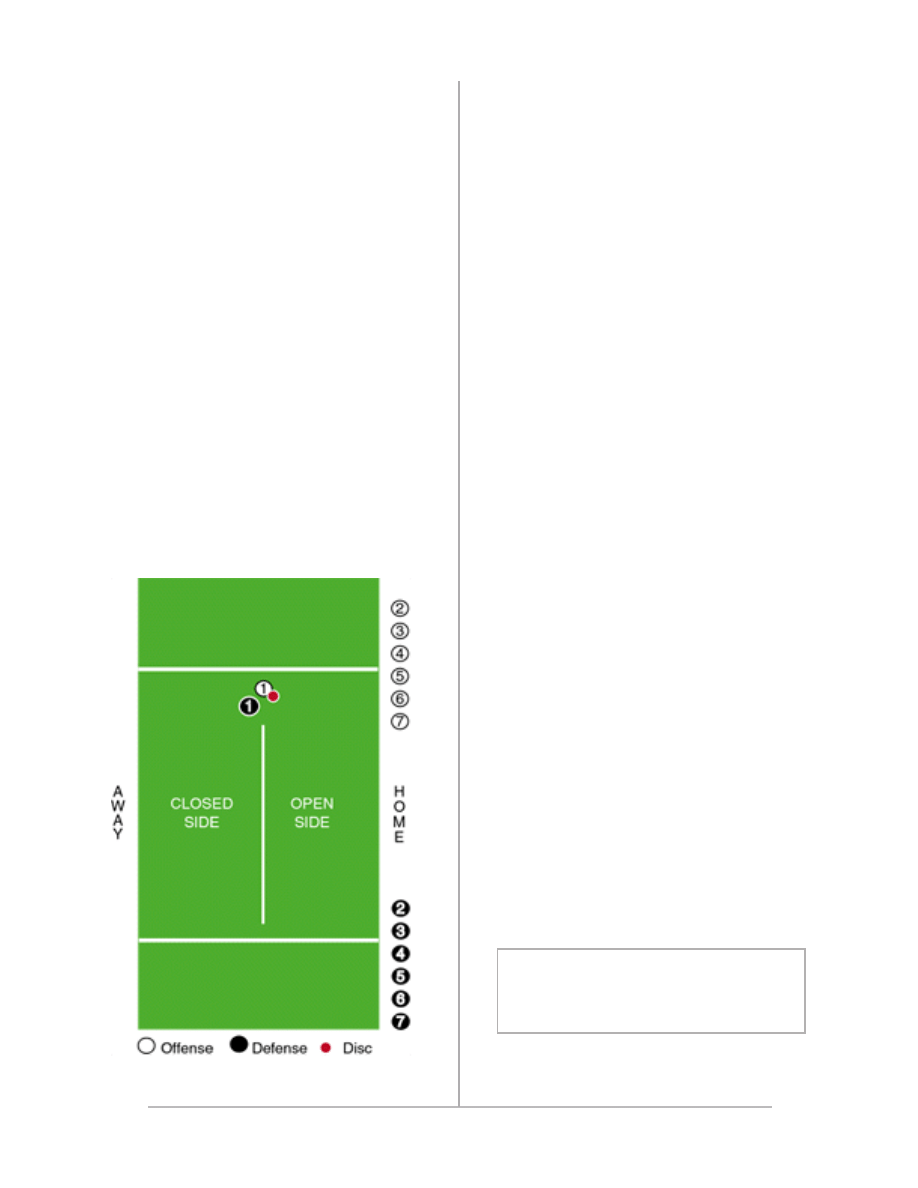
Pretend the field has an imaginary line that originates from
the disc and runs from endzone to endzone. All your stuff
and your teammate’s stuff is called the “home” side of the
field. The other side is the “away” side. At the beginning
of every point, your team should decide which way your
are going to force your opponent to throw. Your players
can now anticipate where to mark if their player catches the
disc, and what area to guard when their check is cutting
for a pass.
For example, let’s say you are forcing the thrower “home”.
This means you are making a commitment to your team-
mates that you will not let the thrower throw the disc to the
“away” or “closed” side of the field. In order to do this,
you position your body and arms (not wrapping around the
thrower as this is a foul) anywhere from a 45 to 90 degree
angle to the thrower. Maintaining this force is essential
because your teammates are depending on you to make the
thrower throw in one particular direction. If you’re forcing
to the “Home” side of the field, your teammates are trying
not to let their checks get open on the “Home” or “Open”
side.
Offensive Flow
The disc is in play and the stack and force have been
established. One of the best ways to move the disc up
the field in this situation is through “flow” offense. The
first cutter from the stack gets open and catches the disc.
Someone further along in the stack should immediately
begin to run. This way, when the receiver (now handler)
turns around, a pass option opens up right away. The new
handler completes the second pass up the field. This flow
continues until a final pass is made into the endzone, and
a point is scored. It’s this cyclical type of play, with a
series of cutting runners, that allows for very fast “flowing”
offense. The tempo of quick passes, with the opportunity
of surprise long passes, makes flow offense a powerful
strategy. If the flow breaks down, reset the stack and begin
again.
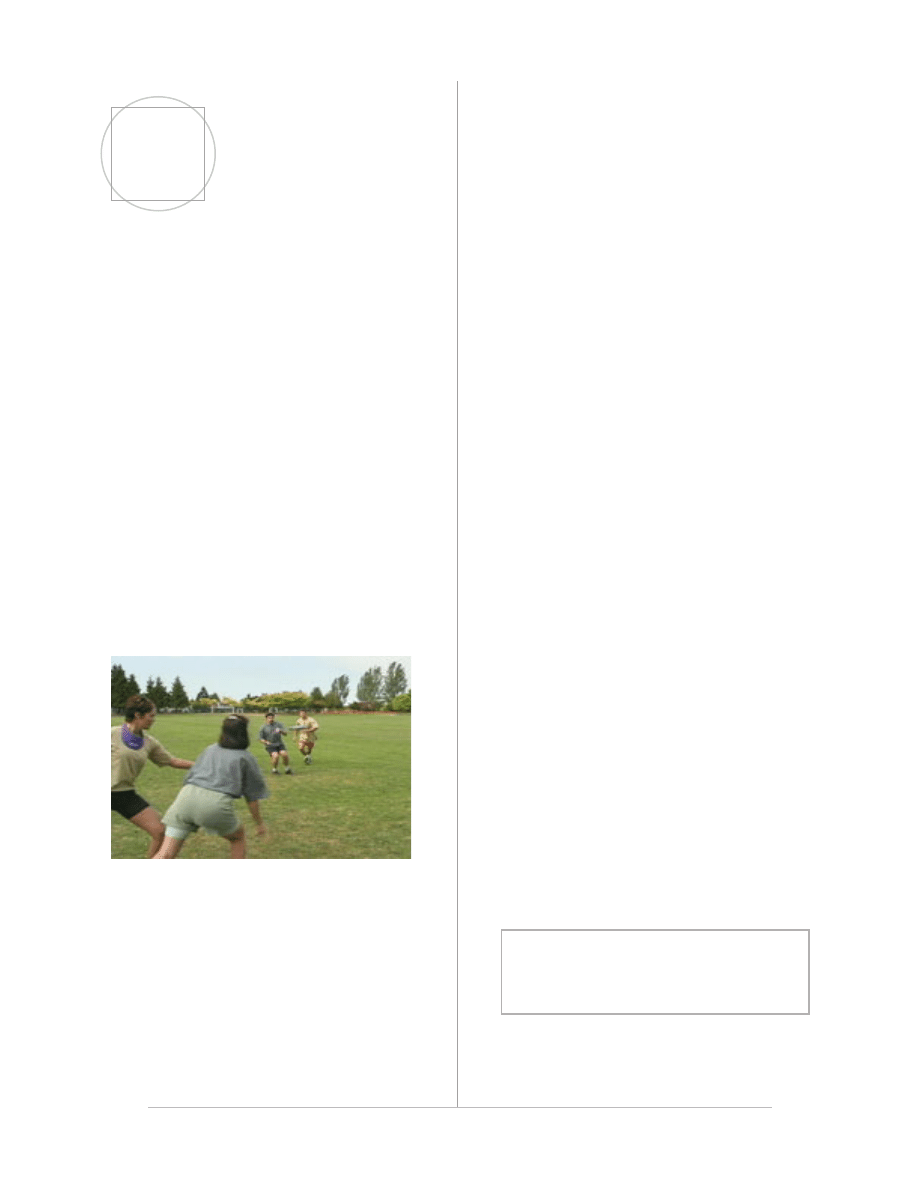
How to Score
To score, you need a member of your team to catch the
disc in the endzone. If you’re close to the endzone when
you catch the disc…. STOP!!! If teammates are yelling
“Check Feet”, that means you’re probably in the endzone.
The reason for their insistence is that if you pass the disc
after catching it in the endzone, and the receiver misses it,
no point is scored and it’s a turnover. If you catch the
disc outside the endzone then play continues. If you were
running when catching the disc and momentum carries you
into the endzone, go back to the place where you caught the
disc and resume play from there.
More Info:
www.ultimatehandbook.com
10
Advanced
Strategy
Getting Open for the Disc
As an offensive players you are making running plays to try
and get open for a pass. That means speed, sudden changes
in direction, anything that will help you break away from
your “check” (i.e. the defensive player covering you). The
defensive player will try to anticipate your movements. As
an offensive player you need to think ahead and plan your
cuts wisely. If you find a certain type of cut works against
your defender, don’t be afraid to exploit it a few times
until they catch on. As a defensive player, you need to try
and anticipate your checks behaviour so you can prevent,
intercept, or block an incoming throw.
The closer you are to your defender, the harder it is for them
to react to your movement. If you make a cut out in front of
them, the defender can see which way you are going. If you
run up close and break to one side, by the time the defender
can start moving you will be past them.
Another great way to get open is start running deep. By
running down the field you force your defender to cover
you since they don’t want you to catch a long pass. Once
you go deep the defense will often run past you, or will
at least be running near you at high speeds. Either way
you can hit the brakes and cut back in towards the disc and
usually end up with the defender behind you.
Catching
The best catch is a successful one. For incoming discs that
are below your shoulder height and above your knees, your
best bet is to “pancake” the disc between your two palms.
For more extreme situations, a two or one-handed rim catch
may be necessary. These are things you should practice
during warm-up, when doing drills with your team, or just
throwing around the disc with your friends. Not only will
your hand-eye coordination improve but you will be more
adaptive in a game situation. The most important thing is
to watch the disc all the way into your hands. Make sure
you have a secure grip on the disc before looking for the
next receiver.
Never give up on a disc. A catch that may seem beyond
your reach is often catchable if the disc begins to hang in
the air due to wind or flight angle. A good rule of thumb
is to keep chasing the disc until it hits the ground, or is
caught by a nearby player. Of course, that does not mean
you should crash into other players when trying to make
that leaping catch for the disc. Each player is entitled to
the space above their body. Hip-checking or intentionally
holding a player down to prevent them from jumping is
also not allowed. Basically, anything beyond just incidental
contact is considered a foul in Ultimate.
Transition
Ultimate is a high paced game and turnovers occur quite
frequently. If you see the disc hit the ground, yell “turno-
ver” or “TO” to let the other members of your team know
what’s happening. At the same time, find a check. When in
doubt, find the person that was checking you.
The ability to become a defensive player is not natural. One
moment you’re going one way, in control of everything, and
the next moment all that control is taken away from your
team and given to the opponent. But there is something that
you can do about it. Get the disc back by playing some
hard defense!!!
5
More Info:
www.ultimatehandbook.com
11
Drills
Throwing in Pairs
Each pair stands a comfortable distance apart and com-
pletes passes between each other. Both backhand and fore-
hand throws should be made.
Variations:
Get the throwers to throw high, floating passes to
practice high catches.
Increase the distance between the throwers to prac-
tice longer passes.
Throw to a running target.
Have the thrower pivot across before throwing. This
gets the player used to using their pivot foot.
Three Player Drill
This is a great warm-up drill before starting practice. It
consists of three positions: thrower, receiver, and marker.
The thrower and receiver setup 20 feet apart. The marker
starts his stall count at 6 (i.e. “Stall 6, 7, 8, 9, 10”) and
the thrower tries to complete a pass to the receiver. After
releasing the disc, the roles change; The receiver has the
disc and becomes the thrower, the old thrower becomes the
marker and must run down to mark the disc. If the throw is
incomplete, keep trying until you make a completion.
The more pressure the marker puts on the handler, the more
effective the drill. It’s an excellent way to learn how to
make a successful throw when there’s a defender in front
of you.
Piggy in the Middle
Split into groups of three. Have the thrower and receiver
stand 10m apart with the third player (i.e. the “piggy) in
between them. The goal is to connect passes without the
piggy getting the disc. The players are not allowed to
move. Practice banking the disc around the piggy using
both backhand and forehand throws.
Wheel Relay
Form a large circle of players all facing inwards and with
one person holding the disc. The first person passes the disc
to their right (make sure everyone is spaced well apart) and
then runs around the circle in the opposite direction (i.e.
clockwise). The disc is passes around the circle and should
meet the original thrower just as they arrive back in place.
They pass it on to the next player (to their right) who does
the same thing. This relay continues until it is the original
thrower’s turn.
Variation:
Change the directions of passing and running so that
both forehands and backhands are practiced.
Basic Cutting Drill
This drill will help your team work on timing, agility and
coordination.
Set up a stack with offense and defense facing the thrower.
The first offensive player in the stack will try and get open
for a pass. The defensive mark will try and stop the pass.
Pick one person to handle the disc. This person should be
a skilled thrower. Make several passes to one side of the
stack. Switch the pass once everyone has had a chance to
6
12
More Info:
www.ultimatehandbook.com
try the drill a few times.
There are a few things the offensive player can do to help
get open.
Avoid “banana cuts”. This is when a player cuts but
doesn’t make sharp changes in motion and the shape
of their line resembles an arc.
Draw a picture in your head of the line you are going
to run. Just like the guys with the white pen drawing
on the TV screen during football replays!
Take 3 steps, plant a foot and change direction
sharply.
Fake with your upper body. As you plant a foot,
fake your arms, head and upper body in the opposite
direction you are about to go.
Most importantly, run hard!!!
For the defender:
Stand off your mark about 2 metres/10 feet. This
distance becomes a personal preference after a while
so try different marking distances to see what works
for you.
Usually if you are marking at the front of the stack,
you want to be between the thrower and your check.
Don’t take your eyes off the cutter. Watch their hips
for hints as to which direction they are going to cut
Clear the passing lane after your cut and return to the back
of the stack. This will allow other cuts right after you. Take
turns playing offense and defense. Be sure to try a variety of
cuts. Cheer your teammates when they make a good cut, a
nice catch or a D block. This drill is a great way to warm
up before a game.

13
A Glossary of
Ultimate Jargon
(descriptions presuppose a right-handed
thrower)
backhand: a standard throw; right-handed player places
thumb on top of disc, curls fingers underneath, extends arm
to left side of body.
bid: an impressive (but failing) diving attempt to catch the
frisbee. Often used in a positive way, ex. “Nice bid”
clog: to prevent good cuts by standing in the way of your
teammates.
check: The player you are defending.
chilly: slow it down, be patient, wait a moment for the
game to get reorganized again.
cut: a run by a receiver to shake his defender.
D: defense
disk in: a verbal shout signalling that the disc is in play.
force: guarding on only one side of the thrower to make
them throw to the other side. The direction you want them
to throw is the direction of the force.
Types of Force:
Force In: force to the middle of the field
Force Out: force to the outside of the field
Force Sidelines: force to the near sidelines
Force Home/Away: force to the home or away side
Force Forehand: force the thrower to use a forehand
throw
Force Backhand: force the thrower to use a back-
hand throw
forehand: a difficult but useful throw; the thrower leads
with middle finger along rim, index finger supporting disc;
also called a flick.
handler: The offensive player with the disc
marker: the defensive player covering the thrower.
layout: dive!!! “If you didn’t catch it, you should have laid
out”
O offense
pick: an intentional or unintentional block where a player
gets between you and the player you are covering
pull: like a kickoff in football, the throw that begins the
possession.
run through: what you shout to tell another player to run
past the disc without picking it up
stack: offensive strategy in which all the players line up
down the middle of the field and alternately make cuts to
the side.
stall count: The defensive player counts up to 10 while
defending the offensive player. The offensive player must
throw the disc before the ‘t’ of ten otherwise it’s a turnover.
swill: a bad throw.
up! what you shout to alert players that the disk is in the
air.
A

14
Resources
THE ULTIMATE HANDBOOK
www.ultimatehandbook.com
A complete guide to playing Ultimate from the beginner to
advanced level.
PLAY ULTIMATE
www.playulty.com
If you didnt get this booklet with a video, Play Ultimate is a
10 minute video designed to introduce Ultimate to new
players. Hosts John and Heather break down the rules, skills
and spirit so you can get started quickly.
UPA
(ULTIMATE PLAYERS ASSOCIATION)
www.upa.org
Serves to promote and support the sport of Ultimate and
needs of its members.
ULTILINKS
www.ultilinks.com
A great source of links to other ultimate sites throughout
the world.
DISCRAFT
www.discraft.com
Supplier of Ultimate Discs
GAIA
www.gaia-ultimate.com
Supplier of Ultimate Cleats, jerseys, and other accessories.
B
Wyszukiwarka
Podobne podstrony:
NLP for Beginners An Idiot Proof Guide to Neuro Linguistic Programming
Artificial Neural Networks for Beginners
a practical guide on pharmacovigilance for beginners
Handbook for Radiological Monitors
06 Bulgarian Greek for beginners
Java for Beginners by Knowledge flow
Cambridge University Press A Guide to MATLAB for Beginners and Experienced Users J5MINFIO6YPPDR6C36
eReport Wine Making For Beginners
Practical Course Spanish Grammar for Beginners (Russian)
Latin for Beginners
Blues For Beginner
Evolution for Beginners[1]
hypnosis for beginners (1) fvuu Nieznany
Fourier Analysis for Beginners p156
Linguistics for Beginners
NLP for Beginners An Idiot Proof Guide to Neuro Linguistic Programming
Artificial Neural Networks for Beginners
a practical guide on pharmacovigilance for beginners
Handbook for Resistance Spot Welding
więcej podobnych podstron