

Questions & Answers
on
Practical Endgame Play
International Grandmaster
Edmar
Mednis
1 987
Coraopolis, Pennsylvania
Chess Enterprises, Inc.

©
Copyright 1987 by Edmar Mednis. All rights reserved.
ISBN
()..931462-69-X
Editor: B. G. Dudley
Proofreading: Thomas Magar
Cover Design: E. F. Witalis, Jr.
Witalis·Burke Associates
Pittsburgh, PA
Typesetting: Bob Dudley
Diagrams: Thomas Magar

Preface
The idea for a chess book usually comes from the author. He thinks of
something that he feels is interesting or important and sets out to write a
book about it. Since most chess authors are highly qualified in their pro
fession, the eventual book most likely is a good one. Yet public response
- in terms of sales
••
may well be disappointing. The reason is clear enough:
no one asked the prospective reader/buyer whether the projected book
would be of interest to her/him.
The genesis of this book is quite different because all the material for it
comes from the chess public. For many years I have been writing "The
Practical Endgame", a syndicated column on practical endgame play. This
book is based on the endgames played by my readers, other endgames that
were of interest to them, their questions and comments. I may think that I
know what is good for my readers; the readers know what they are interest·
ed in. Since my readers are quite a representative section of the chess pub
lic, it is fair to assume that their interests and needs are symptomatic of the
public at large.
As
a small token of my appreciation for their interest, I
have compiled a list of contributors and this appears at the end of the book.
There are two ways the reader can use this book. She/he can work
through it from beginning to end and thus learn much about many impor·
tant aspects of practical endgame play.
As
a special feature for this reader/
student, I have summarized at the end of each chapter the major chess wis·
dom discussed in that chapter. I have called this part "Principles/Rules of
Thumb for Practical Endgame Play." It is the kind of general information
that is part of each master's endgame wisdom. This knowledge gives us a
better base from which to make specific decisions during play. It is not a
1 00% foolproof "cookbook" type list of items which are always true and
therefore can be employed blindly. Please do not make such use of them!
Because the book has a very detailed table of contents, the reader can
readily look up a specific type of endgame that he needs information on.
However, to make maximum use of the book, he should play over carefully
the example that he is interested in. This way the
understanding
of that
endgame will be increased. And
understanding
is the key to successful
endgame play.
I hope that by now any analytical errors are at an absolute minimum.
I would very much appreciate your calling them to my attention.
To free space for other i mportant topics, I have covered a bit less those
on which I have already published extensively. Thus for more on rook
endgames, please see "Practical Rook Endings", published by Chess Enter·
prises; for same color bishop endgames, see "Practical Endgame Lessons";
for Q
+
P vs. Q endgames, see my endgame cassette "Queen & Pawn End
games."
To ensure that the reader and the author are on the same wavelength
regarding the meaning of the question and exclamation marks as they are
used in the characterization of moves, these are the presently accepted
meanings:
I
=
a strong move
II
=
a very strong move; a fantastic move
3

4
7
=a bad move; a weak move
77
•
a horrible move; a blunder
17
•
an enterprising move; a move worthy of consideration
71
= a dubious move, for theoretical or practical reasons
I
am happy to again be associated with Chess Enterprises and B. G.
Dudley.
New York 1 986
Edmar Mednis

Contents
Preface
3
Chapter 1 : King & Pawn Endgames
8
Section 1 : K & P Endgames
8
Subject # 1 : K + 2 P vs. K + P
8
Subject # 2: Multi-pawn endgames with a one pawn advantage
9
Subject
#
3: Tempo play with kings in positions where pawn
moves are not possible
1 1
Subject # 4: King vs. connected passed pawns
1 5
Section 2 : Simplifying I nto K & P Endgames
1 9
Subject # 5: K + ' 2 P vs. K + P
1 9
Subject # 6 : Significance of an active king i n zugzwang type
positions
21
Subject # 7: Distant opposition with blocked pawns
22
Subject # 8: Pawn majorities on opposite flanks
24
Principles/Rules of Thumb for Practical Endgame Play
26
Chapter 2: Minor Piece Endgames
28
Section 1
:
Same Color Bishop Endgames
28
Subject # 9: B + P vs. B
28
Section 2: Knight Endgames
29
Subject # 10: N + P vs. N
29
Subject # 1 1 : Pawns on the same side, one king is contained
32
Subject # 1 2: Pawns on both sides, material advantage, defender
has no counterplay
35
Subject # 13: Pawns on both sides, material advantage, defender
has counterplay
37
Section 3: Bishop vs. Knight Endgames
39
Subject # 14: Equal material, full play with pawns on both
sides, equal chances
39
Subject # 1 5: Equal material, pawns on both sides; bishop has
good scope, yet the knight is superior
42
Subject # 16: Equal material, pawns on both sides; early stage
of a characteristic "bad bishop" endgame
45
Subject # 1 7 : "Bad" bishop vs. "good" knight
45
Subject # 1 8: Both sides have passed pawns
48
Section 4: Endgames of Pawns vs. Piece
49
Subject # 19: Pawn (s) vs. bishop - the king having the pawns
is active
49
Subject # 20: Pawn(s) vs. bishop -- both kings are active
55
Subject # 21 : Two pawns for the piece, several minor pieces
on board
56
5

Section 5 : Multi-Minor Piece Endgames
58
Subject
#
22: 2 B vs. 2 B, equal material
58
Subject
#
23: 2 B vs. 2 B, pawn advantage
58
Subject
#
24: 2 B vs. B + 1'4 equal material
60
Subject
#
25: 2 B + N vs. 2 B + 1'4 equal material
63
Section 6: B + Wrong RP Endgames
64
Subject
#
26: The basic position in B + wrong RP endgames
64
Subject
#
27: Looking for the opportunity to discover the
drawing B + wrong RP endgame
65
Principles/Rules of Thumb for Practical Endgame Play
66
Chapter 3: Rook & Pawn Endgames
68
Section 1 : Material Advantage
68
Subject
#
28: R + 2 P vs. R + P, pawns on same side
68
Subject
#
29: One pawn advantage, pawns on both sides
69
Subject
#
30: R + h· and f·pawns vs. R
84
Section 2: Positional Considerations
87
Subject
#
31 : The importance of the active rook
87
Section 3: Double Rook Endgames
89
Subject
#
32: Exchanging one pair of rooks in going for the
�n
$
Subject
# 33:
Exchanging one pair of rooks in going for the
draw
91
Principles/Rules of Thumb for Practical Endgame Play
93
Chapter 4: Endgames With Opposite Color Bishops
95
Section 1 : Pure Bishop Endgames
95
Subject
#
34: Material advantage, both sides have passed pawns
95
Subject
#
35: Material advantage, pawns on both sides, no pawn
breakthrough possible
97
Subject
#
36: Material advantage, pawns on both sides, pawn
breakthrough is possible
99
Subject
#
37: Material advantage, pawns on both sides, stronger
side can create connected passed pawns
101
Section 2: R + B vs. R + B Endgames
1 03
Subject
#
38: Material advantage, the blockade can be broken
1 03
Subject
#
39: Material advantage, both rooks active
104
Principles/Rules of Thumb for Practical Endgame Play
1 06
Chapter 5: Endgames With Rooks & Minor Pieces
1 07
6
Section 1 : Rook vs. Minor Piece
1 07
Subject
#
40: Rook vs. bishop, pawns on both sides
107
Subject
#
41 : Rook vs. knight, pawns on one side only
109
Subject
#
42: Rook vs. bishop, pawns on one side only
1 10

Section 2: Rook(s) + Minor Piece vs. Rook(s) + Minor Piece
1 1 3
Subject # 43: R + B vs. R + N, material equality, pawns on
both sides
1 1 3
Subject #
44:
R + N vs. R + B, one pawn advantage
1 1 5
Subject # 45: R + N vs. R + B, one pawn advantage, pawns
on the same side
1 1 6
Subject # 46: 2 R + N vs. 2 R + N, pawns on both sides
1 1 7
Subject # 47: 2 R + B vs. 2 R + N, pawns on both sides
1 1 8
Section 3: Other Endgames With Rooks & Minor Pieces
1 20
Subject # 48: R + B vs. R + B + two connected passed pawns
1 20
Subject # 49: 2 R + N + B vs. 2 R + N + B, one pawn
advantage
1 23
Principles/ Rules of Thumb for Practical Endgame Play
1 25
Chapter 6: Endgames With Queens
1 26
Subject # 50: 0 + P vs. 0
1 26
Subject # 51 : Q + P
vs.
R + P
1 27
Subject # 52: Queen + pawns vs. 2 rooks + pawns
1 28
Subject # 53: Q + N vs. Q + B, one pawn advantage, pawns
on the same side
131
Principles/Rules of Thumb for Practical Endgame Play
134
List of Contributors
1 35
7
Chapter 1
King and Pawn Endgames
Section 1 : K
& P Endgames
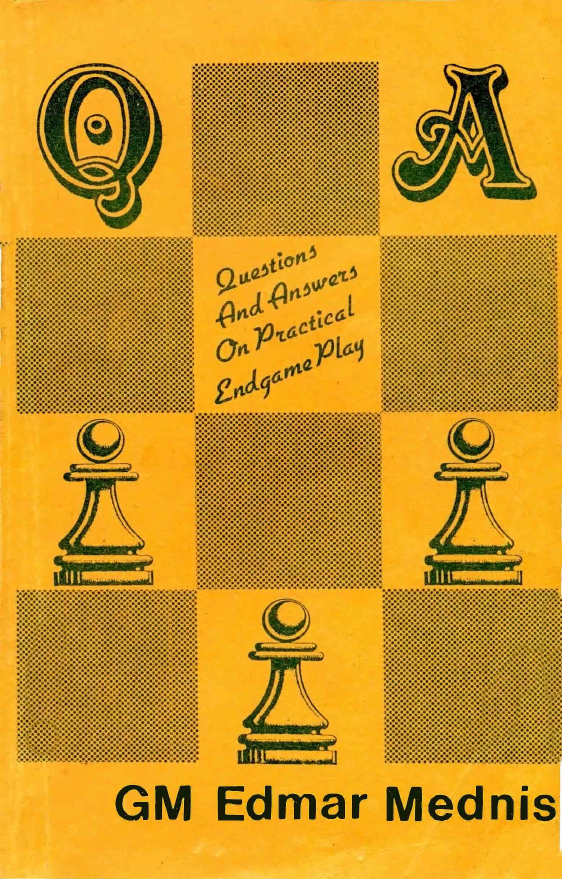
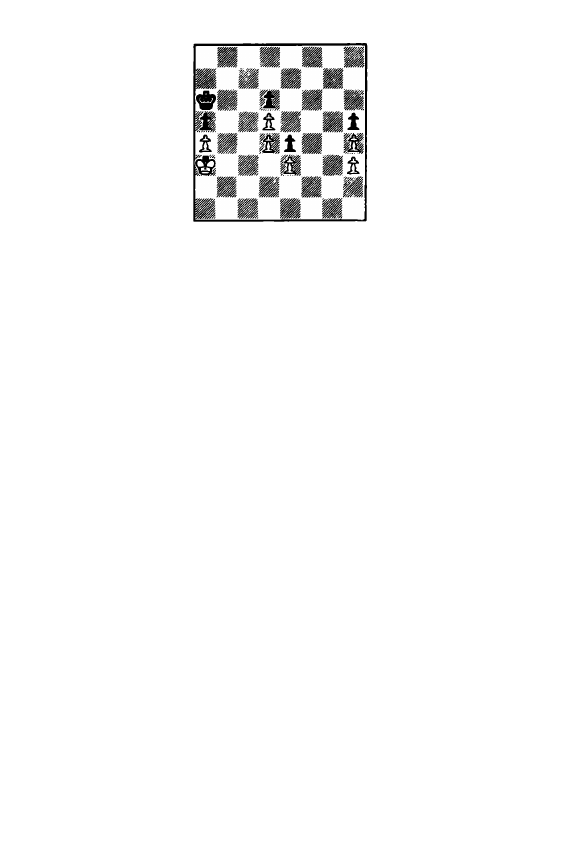
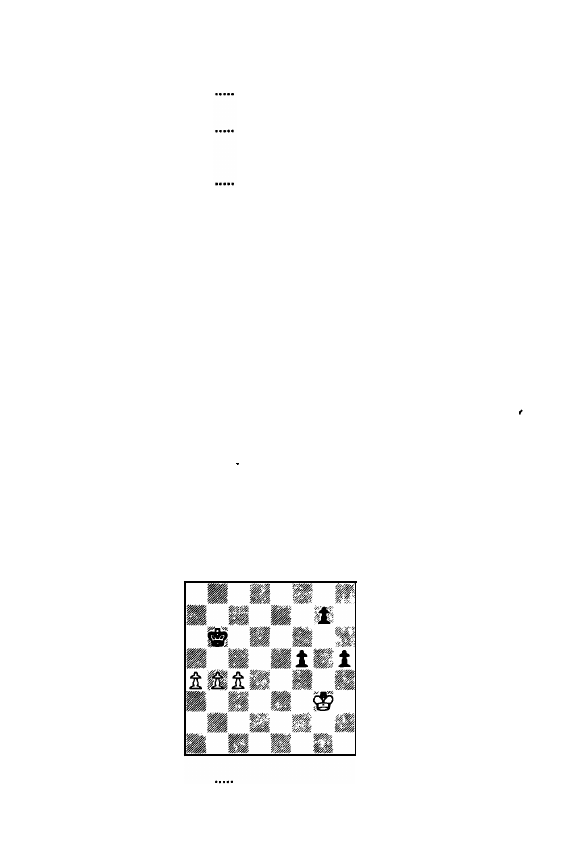
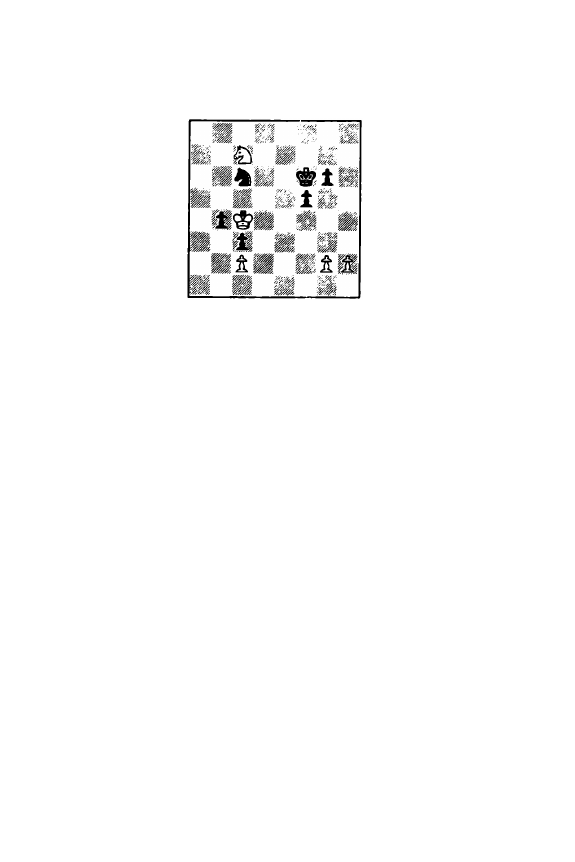
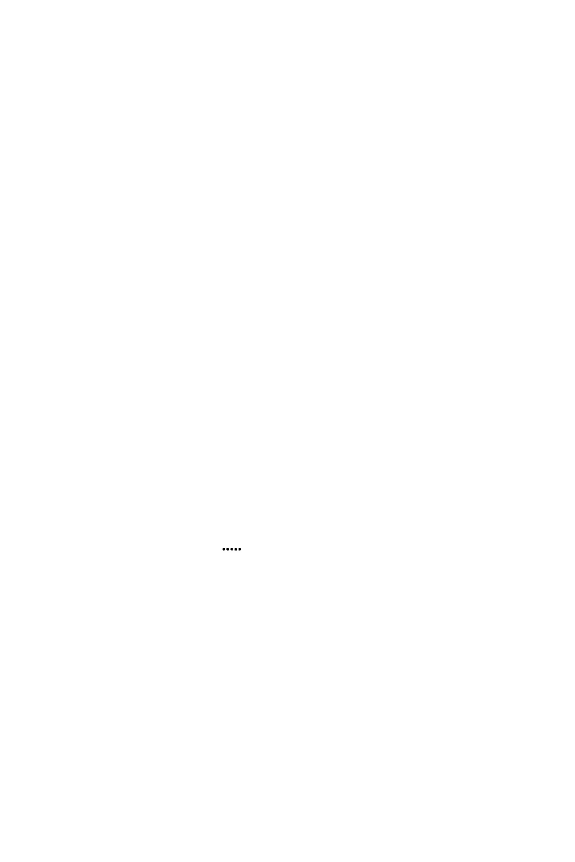
Subject # 1 : K + 2 P vs K + P
Questions: Are not endgames with the pawn configuration shown in
Diagram 1 won for the stronger side?
Are there any exceptions?
Diagram 1
Answers:
To my mind, "chess logic" would say that Black should win this posi
tion. As a matter of fact, positions having such a pawn configuration and
king placement
when the defender has a BP or RP. From
Diagram 1, a 1924 stuay by Dedrle, White to play draws, because -- thanks
to having the bishop pawn
-�
he has a tactical trick. The solution is:
1 Kd3
Kd6
X'"
Black can try either to make progress in the center or to run to the king
side with 1 ... Ke7. White then draws as follows: 2 Kd41 Kf7 3 Ke31 Kg6
4 Kf21 Kf5
Kf3 Kg6 6 Kf2 Kh5 7 Kg3 Kg6 8 Kf2 Kg7 9 Kf31 Kf7
1 0 Ke3 Ke7 1 1 Kd4 Kd7 1 2 Kd31 and we're back at our starting position !
2 Kc41
The first key to the position is that White must be able to have the op
position
as soon
as
the pawn formation is fixed.
Therefore losing is 2 Kd47
f51, e.g., 3 Ke3 Kc51 4 Kd3 Kd5 5 Ke3 Kc4 6 Kf3 Kd3 or 3 Kc4 e51
etc.
2 .....
Kc6
The second key is that 2 ... e5 is met by 3 Kd3 1 1 with the points that
3
•.•
exf4 4 Ke4 is an elementary draw and after 3
•..
Kd5 (or 3 ... Ke6) 4
fxe51 Kxe5 5 Ke3 Kf5 6 Kf31 White draws thanks to having the opposi
tion.
3 Kd4
Kb5
After
3
••.
f5 quite wrong is 4 Ke577 since after 4
•..
Kd7 5 Kd4 Kd6
Black, having the opposition, wins: 6 Kc4 e51 7 fxe5t Kxe5 8 Kd3 Kf41
9 Ke2 Kg31. However, the thematic 4 Kc41 retains the opposition and the
draw.
4
f51 1
The third key: only this tactical possibility saves the draw. Black must
8
now advance his e-pawn since after 4 ... exf5 5 KeJ White will capture the
forward f-pawn for a simple book draw.
4
....•
eSt
5
Kd5
Kb6
Or 5
.•.
Kb4. Even though White's plan is now obvious, Black can do
nothing at this moment to help his e·pawn advance. Thus White, in effect,
gains a valuable tempo for the execution of his plan.
6 Ke6
e4
7 Kxf6
e3
8
Kg7
e2
9 f6
e1=Q
10
f7
By having a BP on the 7th with his king in support, while the oppon
ent's king is too far away, White has reached a well known book draw.
Play could go:
10
Oe7
1 1 Kg8
Qg5t
12 Kh7
Qf6
13 Kg8
Qg6t
14 KhBI
Qxf7
Stalemate
Note that it is this stalemate possibility which gives White the draw.
White would lose if he would have
b-, d-,
e- or g-pawns. However, RPs
would also draw (White: Kf2, h4; Black: Kf7, g6, h6). In this case how
ever, White must immediately establish the opposition with 1 KfJ I Kf6
2 Kf41.
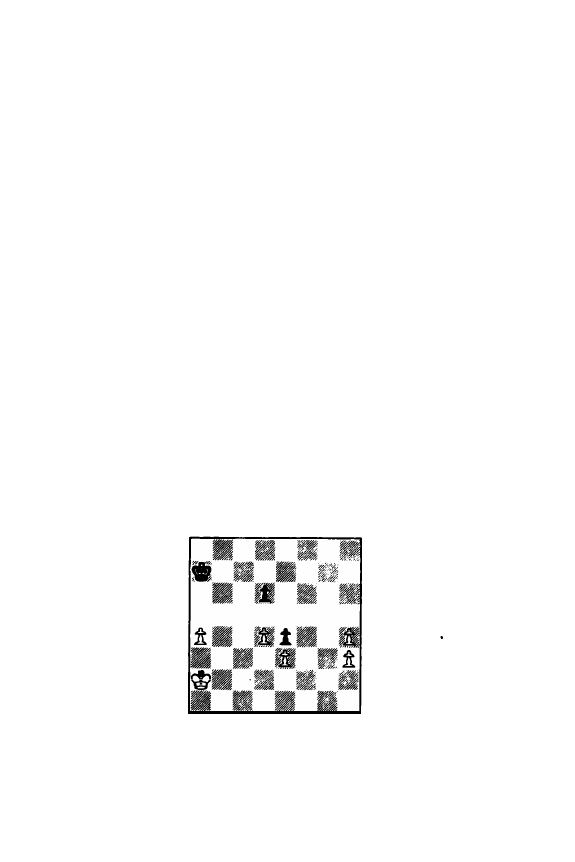
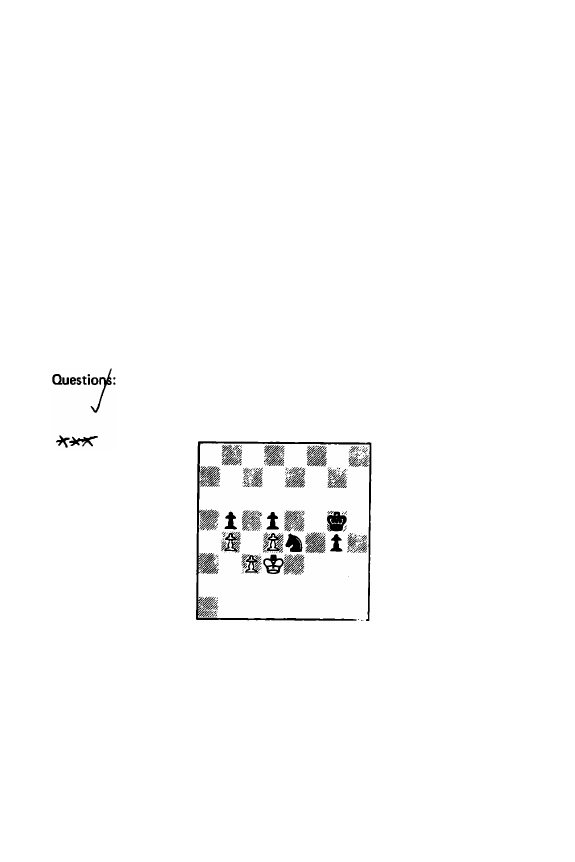
Subject # 2: Multi-pawn endgames with a one pawn advantage
Questions: What is the general approach in winning such endgames?
How should White play from Diagram 27
If White makes a strategic error in his pawn placement, can he
still win7
Diagram 2
Answers:
The general winning plan is: ( 1 ) activate your king, (2) create a passed
Pawn from your pawn majority, (3) queen your pawn directly or if this is
not possible, use it as a decoy to capture significant material elsewhere.
Exactly this approach is the correct one from Diagram 2. Y. Seirawan ·
9
L. Shamkovich, Lone Pine 1 977, after Black's 39th move. Specifically:
White wants to place his king on f4 or h4, create a passed pawn by playing
e3; if Black's king is to stop the passed d·pawn, then White's king wi II de·
vour Black's kingside. However, such a plan does not a
i
low Black a trace
of counterplay. One suggested winning line is:
40 Kg2
Kg5
41 Kh3
b6
42 e3
dxe3
43 fxe3
Kf6
44 Kh4
Kg6
45 d4
Kh6
46c5
and White wins easily.
Other reasonable starting moves are 40 Kh2 or the immediate 40 e3.
The game course, however, was quite different:
40 f47
Even though it does not throw away the theoretical win, the move is as
wrong as possible. It not only takes away access to f4 for White's king,
but, more importantly, it prevents an active posting of White's king since
now the e3 break is not possible without the assistance of White's king.
White with his last move has made his e-pawn a backward pawn and thus
Black's d-pawn by itself can hold back both White's d· and e-pawns. With
such practical problems facing him, it is not surprising that White never
finds the way from here on.
40
Ke6
41 Kf2
Kd6
42 e3
Simpler and more perceptive is 42 Kg21 with the plan of going after the
h·pawn. If Black heads for White's e-Pawn with 42 ... Kc5 he will wind up
one tempo short; if Black plays 42 ... Ke6, White breaks with 43 e31 and
wins easily after 43 ... dxe3
44
d41.
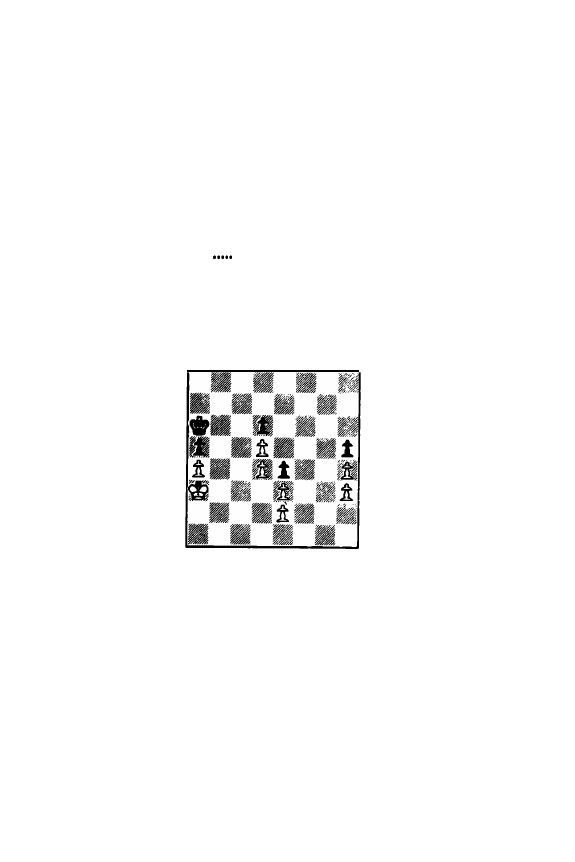
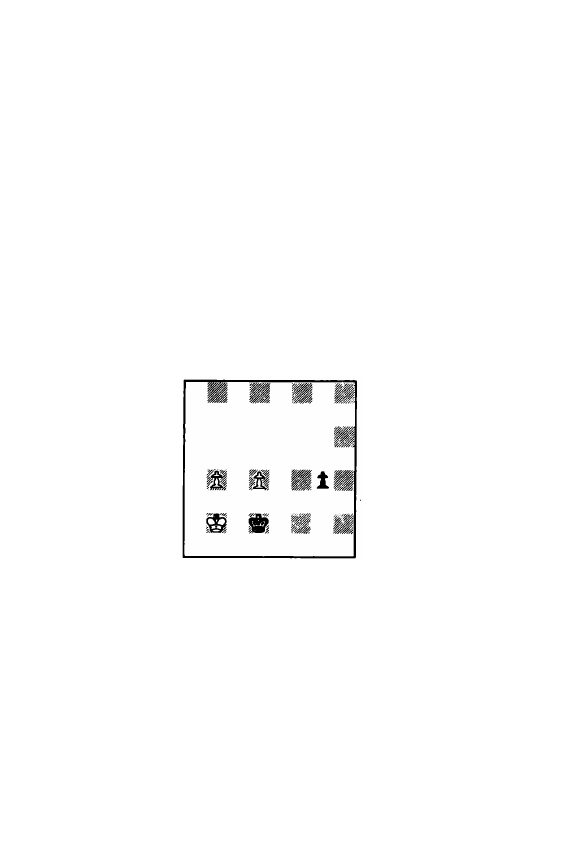
Diagram 3
42
43 Kf3
44 Kxe3
Kc5
dxe3
b61
This is both an interesting and important zugzwang position. If Black is
on move, the end is immediate: 45 ... Kd6 46 d4 etc.; 45 ... Kb4 46 Kd4
followed by 47 c5. But of course White is on move. White's plan should
10

be clear: triangulate with his king to give the move to Black. Yet White
never gets the hang of it.
The most straightforward method is 45 Kd21 Kd4 46 Ke21 (and not
46 Kc27 because of 46 ... Ke3 47 Kc3 Kf3 48 d4 Kxg3 45 d5 h4 50 d6
h3 51 d7 h2 52 d8=0 h 1 =0 53 Og5t Kf3 54 Oxf5 Oe 1 t l 55 Kb3
Qdlt 56 Kb4 Oelt 57 Ka4 Oalt l with a draw since 58 Kb577 loses to
58 ... 0a5t.) 46 ... Kc3 (46 ... Kc5 47 Ke31 ) 47 Ke3 Kb3 48 Kd21 Kb4 49
Kc2 Kc5 50 Kc3 Kc6 51 d4.
White can also start off with 45 Kf3 or 45 Kf2, so as to continue after
45 ... Kd4 with 46 Ke2, transposing into the above line. After 45 ... Kb4
White again plays 46 Ke2 Kb3 (46 ... Kc3 47 Ke3) 47 Kd21 etc.
45 Ke2
Also good enough to win as long as White knows what to do later on.
Black now is not about to fall for 45 ... Kd47 46 Kd2 Kc5 47 Kc3 (or
47 Ke3) and makes things harder with . . .
45
.....
Kb41
46 Kd27
This is nothing as is 46 Ke37 Kc51. ·More knowledgeable king maneuver
ing is required as follows: 46 Kf21 Kb3 47 Kf3 1 1 Kb4 (47 ... Kc3 48 Ke2)
48 Ke21 Kc3 (48 ... Kc5 49 Ke3) 49 Ke3 Kb3 50 Kd21 Kb4 51 Kc21 etc.
46
Kb
31
47 Ke2
Kb41
48 Kf2
Kb3!
Black is continuously forcing White to find
the difficult way.
The wins
would be elementary after 48 ... Kc57 or 48 ... Kc37 since in each case 49 Ke31
is obviously correct.
49 Ke177
White can still win with the correct triangulation 49 Kf31 Kb4 50 Ke21:
50 ... Kc5 51 Ke3; 50 ... Kb3 51 Kd2; 50 ... Kc3 51 Ke3 Kb3 52 Kd21.
49
.
.
...
Kc3
50 Ke2
Draw
Of course, the position is still won, if White can find the way. But
Black was not about to risk this and claimed the draw based on the three
fold repetition of the position that would result after 50 ... Kb4.
Subject # 3: Tempo play with kings in positions where pawn moves are
not possible
Questions: What are sister squares and coordinate squares?
Answers:
What is the correct approach in playing positions where no
pawn moves are possible?
How should White handle the position of Diagram 47 (on the
next page)
Diagram 4 is a 1 930 study by V. Halberstadt as published in the 1932
book "Opposition and Sister Squares" by Duchamp and Halberstadt, page
87. First, to get the nomenclature straight: sister squares as used by Du
champ & Halberstadt are the same as the "co-ordinate squares" discussed
by Averbakh & Maizelis in their "Pawn Endings". The use of these terms
1 1
Diagram
4
is a required broadening of the theory of opposition in K + P endings. On
a bare board the theory of opposition serves very well. But as pawns are
added and obstructions arise, the principles of opposition can no longer be
exclusively relied upon to give the correct answers regarding the indicated
king moves. For this something more general is required (i.e. theory of sis
ter squares); yet unfortunately the execution of this theory requires a more
specific and detailed approach than using, e.g. opposition as the guiding
principle. The theory of sister squares says that in a given position, for
each location of a White king, there is a corresponding correct location for
the Black king. If the Black king can always keep occupying the sister
squares to White's king position, then Black will be able to stand his ground.
Otherwise White will win.
As
can be recognized, in most open positions the
sister square will be the one establishing opposition; in cluttered positions
opposition by itself can not be relied upon to give the right answer. The
concept of sister squares will be clarified in the actual discussions from Dia
gram
4.
From a very specific viewpoint we can say that Diagram 4 is of limited
practical value because White - being two pawns ahead in a position where
Black is without counterplay - should have been able to win easier earlier
on. Nevertheless, the king play to come is very instructive and can be ap
plied equally well to more "practical" positions. A general evaluation of
Diagram 4 shows that White has two invasion points: b5 on the queenside
and f4 on the kingside. It is absolutely necessary that
both
of them exist,
because Black can easily cover
either
one. The decisive winning king loca
tions with
Bisek
on move
are as follows: a) on the queenside: White's
king on c4, Black's on b6; b) on the kingside: White's king on g3, Black's
on f5. White's general winning technique consists of maneuvering with his
king in such a way that Black will have to allow penetration on one of the
two fronts. For instance, if White's king is on c4 and Black's is forced to
go
from
b6
to a6, then White's king will quickly reverse gears and head for
the kingside. A simple move count shows that it takes White's king five
moves to get to g3, whereas from a6 Black's king in five moves can only
get to f6; then White on move plays Kf4 to win.
Let us now look at Halberstadt's solution with my comments:
1 Kb21
Forcing Black's king to
go
to the b-file, as otherwise White immediately
penetrates on the kingside. According to Halberstadt this is White's only
12
winning move, because the sister square of b2 is
b8
and Black's king can't
get to it. White can't make any immediate progress by playing 1 Kb3
be
cause the sister square to this is b7 and Black simply plays 1... Kb7 and it is
clear that after 2 Kc4 Kb6 Black is holding his ground.
1
.
....
Kb6
Or 1... Kb7 2 Kb3 Kb6 3 Kc41 and White wins. Note that b7 is the
sister square of b3 only with
White on move
-
otherwise it is a meaningless
situation with Black simply being in zugzwang.
2 Kc21
Heading for the kingside and forcing Black to follow suit. The sister
square of c2 is c8 but Black can't get to it and thus loses easily.
2
.
..
.
.
Kc7
3 Kc31
Kb7
After 3 ... Kd7 or 3 ... Kc8 White infiltrates on the queenside. After the
text Black loses on the kingside.
White wins.
4 Kd2
Kc7
5 Ke2
Kd7
6
Kf2
Ke7
7 Kg3
Kf6
8
Kf4
Halberstadt specifically claimed that 1 Ka2 does not win because Black's
king then, in effect, can get to all the queenside sister squares. Yet a deep
er look at Diagram
4
should lead to the feeling that because Black is so
completely devoid of chances for counterplay that more than one first
move could do the job. Rolland E. George has made the valuable discovery
that with the pawn structure of Diagram
4,
White wins with any location of
the kings and irrespective of who is on move.
White's most difficult task is
after the introductory moves 1 Ka2 Ka71. I am calling this new position
Diagram
5
and am designating it George 1 978 to
p
roperly credit the discov
erer. White to play and win from Diagram 5 as follows:
Diagram
5
•
BftB 81
1 Kb2
Kb8
Getting to its sister square. After 1 ... Kb771 or 1 ... Kb6?1 White wins as
from Diagram
4.
2 Kc2
Kc81
Again keeping the position on hold. Through the next two moves, B lack
is O. K. - on the queenside his king can get to al l the sister squares.
1 3
3 Kd1
4
Kd2
&
Ke1 1 1
Kd8
Kd7
It is this move that forms the basis of Mr. George's discovery that the
pawn formations of Diagrams 4 & 5 always lead to a win for White. Black
simply has no square equivalent to e1 1 In other words, when White's king
gets to e1, Black can't protect
both
invasion routes.
5 .
.
...
Ke8
What to do? After 5 ... Ke7 6 Ke21 Black also only has the choice of
where to lose: 6 ... Kd7 7 Kf2 and White wins on the kingside; 6 ... Kf7
7 Kd2 and White wins on the queenside.
6 Kf2
Black's king is too far away from f5 and White wins on the kingside.
White wins.
6
Kf7
7
Kgl
Kf6
8
Kf4
Gunter Roth of West Germany has suggested adding a White pawn to
Diagram 4. This new position is shown in Diagram 6 which I am cal ling
Roth
1 981.
Diagram 4
Now White cannot tempo around the squares e1 and e2. Therefore the
position does become the excellent illustration of the theory of sister .
squares that Halberstadt envisioned. The only correct solution starts with
Halberstadt's 1 Kb21:
1 Kb21
Kb7
After
1
... Kb6, Halberstadt's original solution applies: 2 Kc21 Kc7 3 Kc31
Kb7 (after
3
.
.. Kd7 4 Kc4 White wins on the queenside) 4 Kd21 Kc7 5
Ke1 1 Kd7 6 Kf2 and White wins on the kingside.
2 Kb31
Only so. After 2 Kc27 there is no win: 2 ... Kc81 3 Kc3 (or 3 Kb3 Kb7 1
or
3
Kb2 KbSI) 3 ... Kc7 4 Kd2 Kd7 5 Ke 1 Ke7 and Black i s safe forever-
more.
14
2
..
.
.
.
Kc7
Or 2 ... Kb6 3 Kc4 Ka6 4 Kc31 and White will infiltrate on the kingside.
3 Kc31
and White wins.
Now Black is in zugzwang and must allow White in:
a) After
3
•.•
Kd7, White wins on the queenside with 4 Kc4.
b) After
3
...
Kb6 or
3
... Kb7, White wins on the kingside starting with 4
Kd21.
j
Subject
# 4:
King vs. connected passed pawns
Questions: What are the important principles in handling the endgame of
king vs. connected passed pawns7
What is the correct play and result from Diagram 77
Diagram 7
Answers:
The most famous position for the endgame of king vs. connected passed
pawns is shown in Diagram 7. It is known as Szen's position or Szen 1 840.
Endgame theory says that
whoever is on move wins.
Even though the spe·
cific position is
theoretically
both important and interesting, it is not of
much practical importance. I just cannot imagine that exactly this position
can ever result in any
actual game.
There is, however, one exceedingly imp9rtant position in the king vs. 3
connected passed pawns endgame and I am showing this in Diagram 7A.
Diagram 7A
Al l endgames where a single king has to cope with three connected
passed pawns can lead to this position. It is a zugzwang position :
whoever
is on move
loses.
Therefore the side with the king wants to maneuver its
king in such a way that its last move has been Kg1 and now it's Black's
turn. Conversely, the pawns want to advance in such manner that in the
1 5

diagram position it is again White's move. The play from Diagram 7A can
develop as follows. (Of course, we are assuming that the B lack king is in
volved in some zugzwang situation somewhere else and that the determining
factor in the game is what happens from the Diagram 7A configuration. )
(a)
1
Kg2
g31
2 Kg1
Or 2 Kh3 f3, etc.
2
f3
3 Kf1
h3
4
Kg1
f2t
5 Kf1
h2
6
Kg2
h1=Qt
and Black wins.
From this variation that if all the pawns are on the
sixth
rank (the situa
tion after Black's 3rd move) that the pawns then win, no matter who is on
move.
(b)
1
Kf2
h31
Even though in this particular position Black can also win with 1
. • •
f3,
it
is always good practice to first advance the pawn farthest from the king.
Black wins.
2 Kg1
g3
3
Kf1
f3
(c)
1
Kh2
f31
Again the soundest plan, even though in this particular position 1 ... h3
also wins.
Also 2
••.
f2 wins.
2
Kh1
g3
3
Kg1
f2t
In a sense a "safer" win than 3
••.
h3 since after
4
Kh 1 g2t77 5 Kg1
Black's pawns are stopped and wil l be lost. Of course
4
.
.. f2 wins
if
White
has a pawn move somewhere on the board that relieves stalemate.
Black wins.
(d)
4 Kg2
h3t
5 Kf1
h2
1 Kf1
h31
The only move. Here 1
.•.
f317 loses since after 2 Kf21 h3 3 Kg3 the
pawns are stopped.
Black wins.
2 Kf2
3
Kf1
4 Kg2
g3t
h2
f3t
(e)
1 Kh1
f31
16
Again the only move. 1 ... h377 is refuted by 2 Kh21.
2 Kg1
g3
Also winning is 2
•..
h3: 3 Kh2 f2 or 3 Kf2 h2.
3
Kh1
f2
4 Kg2
h3t
and Black wins.
But Black to play loses,
since the pawns are immediately stopped:
(a)
1
g3
2 Kg21
(b)
1
f3
2 Kf21
h3
3 Kg3
(c)
1
h3
2 Kh21
f3
3 Kg3
From all of the above lines we have learned the following two most im·
portant principles:
1. The critical status of Diagram 7A as a zugzwang position
2. The king must blockade the farthest advanced pawn; conversely: ad·
vance the pawn which is farthest from the king.
Let us now utilize the above information to help understand the correct
solution to Diagram 7. I am mostly following the analysis by Maizelis from
"Pawn Endings" by Averbakh and Maizelis.
White to play wins:
1
Ke2
Kd7
2 Kf3
Kc6
First each king positions itself to be well placed to cope with any pawn
advance. Now it is time to start advancing the pawns, starting with the one
farthest from the enemy king.
3
a4
h5
4 c4
f5
5 Kg3
Kb6
Each side had threatened to immediately advance its rook pawn (the
farthest pawn !). Since this has been temporarily prevented, the knight
pawns are activated.
6 b4
Diagram 8
6
g5
In trying to ape White, Black will always be a move behind. But the
temporizing 6 ... g6 is no better: 7 a5t Ka6 8 c5 Kb5 (otherwise 9 c6 and
1 7
1 0 b5t) 9 Kg2 1 ( Reme m ber that White is aiming for Diagram 7A with
Black to move!.) Now Black has the following choices:
(a)
9
.
.
..
.
g5
1 0 Kg3 g4 (If 1 0 ... h4t 1 1 Kh3 f4 1 2 Kg4 and Black being in zugzwang
wi ll lose) 1 1 Kf21 f4 1 2 Kg2 h4 (Or 1 2 ... f3t 1 3 Kg3! h4t 14 Kf2 1 h3
1 5 Kg3 and again Black is on move and loses. ) 13 Kg1 1 1 (Diagram 7AI )
1 3 ... Ka6 (Black's pawns are stopped) 14 c6 Ka7 1 5 b5 Kb8 1 6 b6 ( 1 6 a6
also wins) 1 6 ... Ka8 1 7 a6 Kb8 (Or 1 7 ... f3 1 8 c7 and there is no stale
mate since Black has pawn moves.) 1 8 a7t Ka8 1 9 c7 and White wins.
(b)
9
.....
h4
10 Kh21 (This way of getting in front of the most advanced passed pawn
is, I believe, the clearest Also winning is 10 Kh3, as long as after 1 0 ... g5,
White plays 1 1 Kh2 1 : 1 1 ...g4 1 2 Kg2 h3t [ 1 2 ... f4 1 3 Kg1 1] 1 3 Kg3 f4t
14 Kh2 f3 1 5 Kg3) 10 ... f4 ( 1 0 ... g5 1 1 Kh3 f4 1 2 Kg4) 1 1 Kg1 1 1 g5 1 2
Kg21 g4 1 3 Kg1 1!. Again we have Diagram 7 A and White wins as above.
(Back to Diagram
8)
7 a5t
Ka6
After 7 ... Ka7 or 7 ... Kb7, 8 c5 also wins and more simply, e.g. 7 ... Ka7
8 c5 Kb7 9 b5 Kb8 1 0 Kg2!.
8
c5
h4t
If 8 ... Kb5, 9 Kg2! puts Black in zugzwang, e.g. 9 ... g4 10 Kg3 or 9 ... h4
1 0 Kh31 f4 1 1 Kg4.
9 Khll
Blockading the farthest advanced pawn. Now 9 ... Kb5 10 Kh21 g4 1 1
Kg21 f4 1 2 Kg1 1 (Diagram 7A!) loses as already shown earlier.
9
.
....
f4
10 c61
But, for heaven's sake,
not
10 Kg47? because after 10 ... Kb5 it is
White
who is in zugzwang and loses !
10
f3
1 1
b5t
Ka7
12 b6t
Also winning is 1 2 c7 Kb7
12
1 3 b6 followed by 14 a6t.
Kb8
g4t
13
a6
14 Kh2
White can also afford both 14 Kxg4 and 14 Kxh4.
and White wins.
14
glt
15 Kg1
hl
16
a7t
Ka8
17 c7
Because of being on move in Diagram 7, White queens one move earlier
than Black. I must admit that I have not given an exhaustive analysis of
Diagram 7, because that position is just not that important for the practical
player. But you should now have a good grasp of the major principles of
king vs. three connected passed pawns. And
always
remember Diagram 7 A
- that is
THE
position to know!
1 8
Section 2: Simplifying into K
&
P Endgames
V
Of course, K & P endgames do not resu lt out of the thin air. Either one
side of the other, or both
••
rightly or wrongly
••
decide to simplify down
to a K & P endgame. In this section
I
shall discuss some instructive "sim
plification moments" and the important endgames that result from them.
Subject
# 5: K + 2P vs. K + P
Question: Are the K & P endgames possible from Diagram 9 won for Black7
Diagram 9
Answer:
Because Black has a RP, the pawn structure of Diagram 9, M. Stean
·
E.
Geller, Bath 1 973, after White's 66th move, is in many ways deficient for
winning purposes.
As
we follow the game continuation, I shall say more
about it.
66
..•••
Ne6
The N & P endgame is theoretically quite drawn and thus Black is willing
to try his luck in a K& P endgame.
67 Nd3
converted into regular vertical opposition. The reason why this position is
drawn is that after 71 ... h4 72 Ke3 g4 73 hxg4 Kxg4 Black's passed pawn
is the h-pawn and White's king is close enough to stop it.
But please note that the Diagram 9 type pawn formation is won for
Black for all the other pawns (White: g3 B lack: f5, g5; White f3, Black: e5,
f5; etc. ).
67
••..•
68
Nf2
Nf4
But now the knight exchange loses: 68 Nxf47 gxf4 69 Kf2 Ke4 70
Ke2 f3t 71 Kf2 Kf4 72 h4 Kg4 and Black also wins the h-pawn and the
game.
1 9
68
Ng6
69 Ke3
Ne7
70
Nh11
Ke5
71 Nf2
Again simpler is 71 Ng31 since after 71 ... Nf5t 72 Nxf51 Kxf5 73 Kf3
White draws as discussed in the note to White's 67th move.
71
Nf5t
72 Kf3
Nd4t
73 Ke3
Nc2t
74 Kf3
Kf5
75
Nh1 1
Ne1t
76 Ke2
Ng2
77 Kf3
Nh4t
78 Ke3
Kg6
79 Nf2
White will still have to labor mightily after the text move. All of us
know by now that best is 79 Ng31 Nf5t 80 Nxf5 Kxf5 81 Kf31 with a
simple draw.
79
N
g2
t
80
Kf3
Ne1t
81
Ke2
Nc2
82 Kf3
Kf5
83 Nh1 1
Nd4t
84 Kel
Na6
85
Kf3
Nc5
86
Nf21
Nd7
87 Nd1 1
Ne5t
88 Ke3
Nc4t
89
Kf3
Ke5
90
Nf21
Kd4
91
Kg31
Ne5
White can hold the draw because after 91...Ke3 he has 92 Ng4t l l Ke2
93 Nf61.
92 Nd1
Kd3
93 Nf2t
Ke3
94 Nd11
Kd3
95 Nf2t
Kd4
96
Nd1
Nd3
97 Kf3
Ne1t
98
Kf2
Nd3t
99 Kf3
Ke5
100
Ke3
Nf4
101
Nf2
Nd5t
102 Kf3
Nf6
103 Ke3
Kf5
104
Kf3
Nd5
105 Nh1 1
Ke5
Draw
White finally got his deserved half point. But wouldn't it have been
much easier if he had known that the K & P endgame after 67 Nxe61 is
drawn7
20
Subject
# 6:
Significance of an active king in zugzwang type positions
Questions: Can White afford to recover the pawn in Diagram 1 0?
j
Can the active king be a strength even if caught in a zugzwang
situation?
Diagram 1 0
Answers:
The only way to know for sure whether White can play Nd5t followed
by Nxb4 from Diagram 1 0, K. Regan
•
M. Rohde, Goichberg/Marshall Inter·
national 1 977, analysis position after Black's 55th move, is to go through a
very careful analysis of the resulting K & P endgame:
56 Nd5t
Ke5
57 Nxb4
Nxb4
58 Kxb4
Kd4
59
g3
Both safeguarding the g-pawn and preventing Black from an immediate
f4, as after 59 Kb3 f41 and an easy win for Black. After the text move
White hopes for 59 ... g57 60 h41 and White wi ll be O.K. because the h-pawn
queens with check.
·
Since pawn moves don't do the trick, Black must use his active king.
59
. • . • •
Ke31 1
Black has a pretty tactical possibility in mind, if White plays 60 Kxc3:
60 ... g5 61 h4 gxh4 62 gxh4 f4 63 h5 f3 64 h6 f2 65 h7 f1=0 66
hB=Q Oa1 t l followed by 67 ... 0xh8. Note how Black's king first sidestep
ped a potential check and set up a skewer of White's king and queen by
Black's queen.
60 Kb31
A nice perceptive try. If now 60 ... Kf2, White has 61 Kxc3; after 60 ...
Kd4 or
60
.
.
.
Kd2, White has 61 h4; also after 60 ... g5 61 h4 the resu lting
Q & P endgame is most likely drawn. Yet Black can improve on the latter
variation by an in turn perceptive king maneuver.
60
..
.
..
Ke21
Now after 61 Kxc3 g51 Black wins as in the variation given after Black's
59th move, while 61 h4 Kd2 puts White in zugzwang.
61
Kb41
Kd2
62 Kb3
g5
63 h4
gxh4
64
gxh4
f4
21
65 h5
f3
66 h&
f2
67 h7
f1•Q
68 h8=Q
Qb5tl
69 Ka3
Qb2t
70 Ka4
Oxc2t
with a winning Q & P endgame for Black.
By capturing White's c-pawn with check whi le his own king is well
placed, Black has a won endgame, though of course care is still required.
Notice how Black was able to use his more active king even though he
was in zugzwang as far as protection of his c-pawn was concerned.
The above deep analysis shows that from Diagram 1 0 White should con
tinue to play the knight endgame with, e.g. 56 Na6 Ke5 57 Nc5, even
though Black does have realistic winning chances.
Is there a short cut to coming up with the conclusion on the K
& P
endgame without doing all of the above analysis? Well, not completely -
though our chess
intuition
should guide us in thinking that with Black's
king active on e3, good things could well be possible for him.
Subject # 7: Distant opposition with blocked pawns
How to handle king play so
as
to obtain/retain distant opposi
tion?
Can Black achieve a winning K & P endgame in Diagram 1 1 by
sacrificing his knight with a properly timed ... Nxg3?
-�· . .
Diagram 1 1
Answers:
B
• • • u
J� .{).
It is obvious from a quick glance at D iagram 1 1, LaRouche
-
S. Weil,
New York 1977, after Black's 52nd move, that Black has a substantial ad
vantage. White has two chronic weaknesses - c3 and g3 .. and the former
binds down White's king and the latter immobilizes the knight. But unfor
tunately for Black, the closed nature of the pawn formation does not allow
his king to penetrate. Therefore, Black fashions another plan: at a moment
when White's king is as far away as possible from the kingside, Black will
sacrifice his knight on g3 and thereby allow his king to penetrate the king
side. It is clear that Black wi ll not risk a loss thereby and will have substan
tial prospects for success. Even if the resulting K & P endgame is not a
theoretical win, Black wil l have good practical winning chances since it will
22
be the active one. The course of the game will bear this out:
53 Kc2
Nxg311
Since White's king is shuttling between c2 and d3, the moment to sacri-
fice is when he is on c2.
54 Nxg3
Kf4
55 Nh5t
Ke31
56 Kc1
The key to defending this position successfully is to be able to have the
opposition the moment that B lack has recaptured the knight in exchange
for the g-pawn.
White can also draw with
56
Ng3, if he follows up correctly:
a)
56
. • •
Kf3
57 Nf51
g3
58
Kd2 g2
59
Nh4t Kf2 60 Nxg2 Kxg2 61
Ke21 with White having horizontal opposition;
b)
56
.
.
.
Kf2
57
Nhil
(57 Nf57
loses, as will be seen from the game contin
uation)
57
.
.. g3
58 Kd21 1
(This move in conjunction with the next one
gains the tempo required to achieve the opposition.)
58
... g2
59
Nf4 g1=Q
60 Nh3t Kg2 61 Nxg1 Kxg1 62 Ke1 1 and White again has the horizontal
opposition and the draw.
56 .....
Kd3
57 Kb2
Kd2
•
•
• •
Bta
•
D iagram 1 2
• t
B
t.
BltJ
• Fftl ••
• •
•
•
Notice how Black is actively using his king to make it more difficult for
White to find the correct move. Remember that White must be able to
achieve opposition -- regular or distant -- as soon as Black captures the
knight. With B lack's king heading for the queenside it is confusing for
White to keep the matter of opposition clear in his head.
58 Ng3
This is O. K., if -- and this is a big if -- White knows to proceed with the
method given in the analysis to White's 56th move.
I believe that in practical play it is easier to handle the position if White
plays
5!!..KbJI
and only after
58
..
.
Kc1,
59
Ng3. Then Black's king is one
square farther from the kingside and this makes it simple for White to
achieve opposition:
59
.
.
. Kd2 60 Nh5 Ke2 61 Kc2 Kf2 62 Kd2 g3 63
Nxg3 Kxg3
64
Ke31 Kg4
(64
.
.. Kg2 65 Ke2) 65 Ke21 (diagonal opposition)
65 ... Kf4 66 Kf2 Ke4
67
Ke2.
58 .....
K
e
1
23
59 Kc2
An interesting alternative draw is 59 Kb3 Kf2 60 Nf5 g3 61 Nxg3
Kxg3 62 Ka3 1 1. White has just enough mobility along the a-file to achieve
distant horizontal opposition and thereby draw. The proof:
a) 62 ... Kf2 63 Kb21 Ke 1
64
Ka 1 1 1 (Only so. He must stay off the c-file
because c3 is not available for the king.)
64
.
.
.
Kd 1 65 Kb1 1 Kd2 66 Kb2
Kd3 67 Kb3 Ke2 68 Ka21 etc.;
b) 62 ... Kf3
63
Kb31 (And not 63 Kb27 because of 63 ... Kf21; not 63 Ka27
because of 63 ... Ke21.) 63 ... Kf2
64
Kb2 Ke3 65 Ka31 etc., with White
keeping his distant opposition.
59
• • • • .
Kf2
60 Nf577
The losing move. Mandatory is 60 Nh51 g3 61 Kd2 1 1 g2 62 Nf4 with
a draw - as discussed earlier.
60
g3
61 Nxg3
Kxg3
62 Kc1
White is lost because he can neither reach regular or distant opposition.
The attempt at the former with 62 Kd3 loses to 62 ... Kf3 63 Kd2 Kf21
64
Kd3 Ke1 ; the attempt at the latter with 62 Kb3 is foiled by 62 ... Kf31
63 Kb2 (Or 63 Ka3 Ke31
64
Kb2 Kd2;
64
Kb3 Kd3;
64
Ka2 Ke21.) 63 ...
Kf21.
62
63 Kb1
64 Ka2
Kf3
Ke3
Ke21
The thematic gaining of the distant opposition is the
only
way to win.
After
64
.
.. Kd27 65 Kb2 White has the opposition and Black is stymied
forever more, e.g. 65 ... Ke31 7 66 Ka31 1 and White has the security of dis
tant opposition.
66
Ka3
Kd1 1
66
Kb3
Kc1 1
White resigns
If Black so chooses, he can kill all of White's pawns.
Subject # 8: Pawn majorities on opposite flanks
Questions: What is the correct way of handling K & P endgame having
pawn majorities on opposite flanks?
24
Can White play Rxd2 in Diagram 1 3 and live?
/)-,
0;
Diagram 1 3
• B • �-
Answers:
I n analyzing the A & P endgame that occurred in the game V. Korchnoi
•
Smith
+
Kolkey, California 1 977, I suggested that the best way of using
Black's extra pawn
• •
the passed d·pawn
••
is to advance it as fast and far as
possible so as to tie down White's pieces. The key position in the analysis
occurred after Black's 28th move (see Diagram 1 3) and I suggested that
Black probably has a winning A & P endgame "since if White plays 29
Axd2 he risks a lost K & P endgame". After 29 ... Axd2t 30 Kxd2 we
have a very thematical ly important endgame, where White has a kingside
pawn majority and Black has a pawn majority on the queenside. Thematic
play now wou ld be:
30 .....
Ke5
Black's dual advantages consist of the more active king and a sound
queenside pawn majority. With the logical text move Black tries to prevent
White from mobi lizing his kingside pawn majority. Yet it appears that also
sufficient to win is the direct 30 ... Kd61 31 g3 Kc51, e.g. 32 Kc3 b5 33 f4
a5, as after dissolution of the queenside, B lack will penetrate decisively into
White's kingside.
31 Ke3
Fruitless is 31 Kd3 h5 32 Kc4, since 32 ... a6! keeps White's king out.
31 .....
h5!
32 Kd3
White lacks one tempo to chase B lack's king away from its domineering
location. Thus 32 g3 allows the blockading 32 ... g4! with the following
thematic continuation : 33 f4t (The interpolation of 33 hxg4 hxg4
34
f4t
changes nothing.) 33 ... gxf3 e.p. 34 Kxf3 b5 35 Ke3 (35 g4 is met by
35 ... h4; after 35 h4 Black blockades the kingside by 35 ... f4. ) 35 ... a6! 36
Kd3 a51 37 Ke3 b4 38 Kd3 a4 39 Kc4 b3 40 axb3 axb3 41 Kxb3
Kxe4 and Black's king wins on the kingside. I nstead of 32 g3, White has
no time for 32 f3, because then 32 ... h41 fixes White's kingside pawns.
Therefore White's best policy is the do-nothing one associated with the next
move, since this way no vulnerable kingside entry points are caused.
32
b5
33 Ke3
a6!
34
Kd3
a5
35
Ke3
h4!
Since White's f.,
g-
and h-pawns are close to their original locations (only
the h·pawn has moved a bit), they are able to keep out B lack's king in case
Black goes for an immediate dissolution of the queenside: 35 ... b4? ! 36
Kd3 a4 37 Kc4 b3 38 axb3 axb3 39 Kxb3 Kxe4 40 Kc2! followed by
Kd2 and Ke2 and a draw.
With the text move Black reins in White's four pawn vs. three pawn king
side majority, since a g3 by White (e.g. 36 g3) is met by 36 ... g4 ! ! and the
resulting advanced passed h-pawn in combination with the passed pawn
Black gets on the queenside from his pawn majority, is sure to win. Be
cause White is now unable to get a viable passed pawn on the kingside,
Black's king can head for the queenside to assist his pawns there.
36 Kd3
Ke61
37 Kd4
25

Or 37 Kc3 Kd7! 38 Kd3 Kc6
37
39 Kd4 Kd6.
38
a3
39 Kd3
There also is no hope in 39 e5 dxe5t
39
40 Kc3
41 axb4t
42 Kc2
Or 42 Kd3 Kb5 etc.
42
and Black wins.
43 Kb2
44 Kb1
45 Kc1
46 Kb1
47 g3
Kd6
Kc6
40 Kxe5 Kc5!
Kc5
b4t
axb4t
Kc4
b3
Kc3
b2t
Kb3
g41
41 Ke4 Kc4! etc.
Of course, all this was not obvious to me when I made my "diplomatic'·
comment that after 29 Rxd2 White "risks" a lost K + P endgame. Still, an
experienced grandmaster develops a feel for what types of basic endgames
are won and this feel was the basis for my original evaluation.
Principles/Rules
of
Thumb for Practical Endgame Play
King
&
Pawn Endgames:
(1 ) I n open board situations use opposition to achieve penetration by your
king when attacking; use opposition also to prevent your opponent's king
from penetrating.
(2) Keep your pawn formation as flexible as possible. Avoid backward
pawns.
(3) In zugzwang positions, play your king so as to "lose" a move before
reaching the critical position. King triangulation is the method generally
used to achieve this.
(4) In blockaded positions use the principle of coordinate squares to de
termine the correct king moves/maneuvers.
(5) When the king fights against three connected passed pawns it should
always first blockade the farthest advanced ones. In case the _pawns are on
the same rank, the king should be in the center of the cluster with two fi les
in between. Then he can blockade whichever pawn is advanced first.
(6) For winning purposes the RP is the worst one to have. Be wary of
having a RP in endgames where you are up a pawn, if the chances are real
istic that you may have to depend on queening it for the win.
(7) In mutual queening races always be on the look-out for tactical tricks,
since often these bring about a totally unexpected change in the original
evaluation of the results from this race.
(8) In positions where simple opposition is not feasible look for the oppor
tunity to achieve distant opposition -- whether going for the win or trying
26

to defend.
(9) If you have a majority on one side and your opponent on the other
side, advance your pawns on the side of his majority in such a way as to
prevent him from mobilizing it in a healthy, flexible way.
( 1 0) It is always an advantage to have the more active king. If your king
can securely stay on the fourth rank while the opponenfs is relegated to
his third rank, this already is a substantial advantage for you.
27
Chapter 2
Minor Piece Endgames
Section 1: Same Color Bishop Endgames
Subject
# 9:
B + P vs. B
Questions: Under what conditions is the B
+ P
vs. B endgame won7
Is Diagram 14 won7
Diagram 14
Answers:
The defending side is sure of a draw if its king can get to any square in
front of the pawn from which it can not be chased away. Otherwise the
risk of a loss is great In particular Diagram 14 is lost, irrespective of who
is on move.
As
will be seen, B lack's problem is that the king can not get
to c7 and can be chased away from c8. Thematic play with
Black to move
is:
A)
1 .....
Kc8
Black gets in front of the pawn, but can't remain there.
2 Bc61
Bc2
Of course, 2 ... Bxc6 3 Kxc6 is won for White
·
irrespective of who is on
move
• •
because White's king is on the sixth rank in front of his pawn.
3 Bb7t
Kd8
Black runs into mate after 3
..•
Kb87 4 c6 followed by 5 c7. After 3 .. .
Kd7 White's win is also easier: 4 c6t l<d6 5 Bc81 (Preventing 5 ... Bf5) 5 .. .
Be4 6 c7 Bd3 7 Bg4 Ba617 8 Bh31 (or any other reasonable place along
the diagonal) and White wins since Black's king or bishop must give ground.
4
c6
Bf5
5 c7t
Ke7
6
Ka71
The king heads for b8 from where it can both protect the pawn and
cover the c8 queening square.
28
6 .....
Kd6
7 Kb8
Bg4
8 Bc81
Chasing the bishop off its primary defensive diagonal.
8 .....
Be2
9
Bf51
Or any other reasonable square along this diagonal.
9
Ba6
10 Bd31
White wins.
Note White's winning bishop maneuvers: Black's bishop is forced off its
tong
diagonal first; then the job is completed by forcing it off the
short
diagonal.
B)
1
• • . • •
Be8
Black does not want White's bishop to arrive on b7 with check. But
even so, the bishop will be decisive there.
2 Bc61
Bf7
3 Bb5
Bd5
4 Ba61
The key move. Black's bishop wil l now be forced to give up control of
c6 and then White's pawn can start its advance.
White wins.
4
Kd7
5 Bb71
Be&
6 c6t
Kd6
7 c7
Bf5
8 Ba61
Bg4
9
Kb71
Bf5
10 Kb81
The win now is just as in the previous line: White plays BcB, then Bf5
(or anything reasonable on the h3-c8 diagonal) and finally Bd3 (or anything
reasonable on the f1·a6 diagonal).
With
White to move,
he plays
1 Bc6!,
then
2 Bb71,
advances his c·pawn
to c7 and finishes off as in the above line.
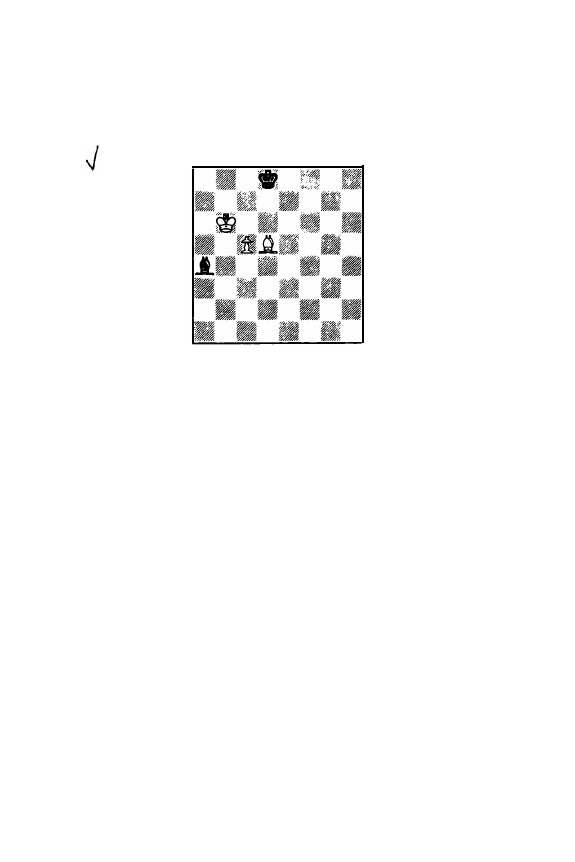
Section 2: Knight Endgames
J
*
Subject # 10: N
+
P vs. N
Questions: What are the important benchmarks in evaluating N + P vs. N
endgames?
Is Diagram 1 5 a win?
Diagram 1 5
Answers:
.
,,
· . ..
�t>.
I
If the defending king can get in front of the pawn, then all normal
29

positions are drawn. Therefore, the theoretically important positions are
where the king cannot get back. For this situation the following principles
apply:
1. The rook pawn is by far the most difficult pawn for the knight to stop,
since the knight can only maneuver to one side of it. If, for instance, in
our position White's pawn would be on
a4
rather than b4, White wi ns after
60
a5.
The knight pawn is the second most difficult pawn for the knight to
stop, because the knight's maneuvering room on the short side is limited.
Yet on a relative basis, it is much easier to stop the knight pawn than the
rook pawn.
2. The knight pawn, if it reaches the 7th rank in safety, is an assured win.
Therefore our main question is whether from Diagram 1 5, D. Rozier
·
Sutton, Correspondence 1 980-82, after Black's 59th move, the pawn can
get to b7. Further important questions will be discussed as responses to
specific queries by Mr. Rozier.
Specific Question # 1 : Is it necessary to bring the White king towards the
center or near the b- and a-files? Since it is necessary to prevent Black's
king and knight from interfering with the b-pawn's advance, White's king
should head towards the center and in particular the c-file. It is easy to
see that after something like 60 Ka6,
60
... Nd6 stops the pawn's advance.
Specific Question # 2: Should White first restrict the activity of Black's
K + N or push the pawn as far as possible immediately? Well, White would
really like to accomplish both, but it should be clear that, without restrict
ing Black's pieces, the pawn cannot be advanced very far. And remember
that it must get to the 7th rank before the win is assured.
My overall conclusion is that Diagram 1 5 is a draw because Black can
prevent the decisive advance of the pawn. Yet despite the apparent sim
plicity, this position is actually very complicated because very many differ
ent knight and king maneuvers are possible for both sides. Therefore it is
possible that some specific variation as given by me may not be the most
exact one.
60 Kc6
Specific Question #
.,:
Is this the best square for the king? It does not
really matter in the sense that the position is drawn. Also logical is 60
Kc5. Then to keep the draw Black must play 60 ... Kf6 61 Nd4 Ne7 62
Nc6 Nc8
63
b5 Ke6
64
Na7 1 Nd61 65 b6 Kd7.
60
.....
Kf7?1
In playing the N + P vs. N endgame, Black shows a dangerous disregard
for tempos (see also my comment at Black's 58th move in Subject # 1 3).
The accurate move is the active 60 ... Kf61. Then 61 Kd7 is no problem be
cause of 61... Ke51 62 b5 Nd6 63 b6 Kd5! and Black is safe. An impor·
tant principle for the defender to know is that the king is much better
placed behind the pawn (as here) than to the side of it.
61 Kc7
Mr. Rozier states that he didn't want to play an immediate 61 b5 so as
not to allow an eventual ... Nd4t or ... Na7t. I n connection with this move,
30

he has the following question:
Specific Question # 4: Is it very important to control the c8 square?
There is nothing magical about c8 or any other square. What White wants
is to prevent Black's pieces from interfering with the march of the b-pawn.
Viewed from this perspective, it is clear that White's strongest move is 61
Kd71. Then Black has extreme difficulties in getting his knight to stop the
pawn, e.g. 61 ... Ne7 62 Ne3! or 62 ... Ng7 62 Nd4!. The only promising
plan that I see is to again activate the king with 61 ... Kf61 62 b5 Ke51.
Then after
63
b6 Nd6 Black's position looks very precarious, but I think
that he can hold since
64
Kc6 can be met by
64
... Nc4 65 b7 Na5t.
61 .....
Ke6
Black's king now is sufficiently active. Still Black's task is very difficult
because of the ideal placement of White's knight on c2 from where it does
both defensive and offensive duties.
62 b5
Nd6
Black cannot play 62 ... Ne7? because of 63 Nell and White's pawn be
comes unstoppable.
63 b6
Nb5t
Usually the correct plan would be 63 ... Kd5?
64
Ne3t Kc5 but here
White has the very annoying 65 Ng5! ! and Black's knight will not be able
to get to its correct defensive square - c5 - because its king sits on itl
Therefore White's pawn will reach b7 for an assured win.
64 Kd8
White's response does not present much of a challenge to Black. After
64
Kc61 Nd6 Black must defend very accurately:
a)
64
Ncl4t Ke5!
(64
.
. .
Ke7? 65 Nf5tl wins) 65 Nf5 Nc41
b)
64
Ne3 Ke51 65 Kc7 ! Ne4! (65 ... Nb5t ? 66 Kd7 Nd6 loses to 66
Nc4t) 67 Kd7 1 Nc5t l (everyth ing else loses) 67 Kc6 Ne6! (only move! )
and I think that Black can hold.
64
.
.
.
.
.
Nd6
65 Ne3
There was still time to regroup with 65 Kc7.
65 ..
.
.
.
Nb7tl
66 Kc7
Na51
Black now can keep his knight both safe and active on the queenside.
ff1 Nc4
Nb31
68 Kb8
After 68 b7 Black has the saving 68 ... Nc5 69 b8=0 Na6t, while after
68 Kc6 Nd4t 69 Kc5 Nb3t 70 Kb4 Nd4 71 b7 Kd71 White's king has
been drawn too far away and Black succeeds by an eyelash after 72 Ka5
Kc7 73 Ka6 Nc6! and Black just has time for 74 ... Nd8 followed by 75 ...
Nxb7.
68 .....
Nc5
69 Kc8
Mr, Rozier gives this move a question mark and asks his last question.
Specific Question # S: Is there a win after 69 Ka7 or 69 Ka87 No, I
don't see any. After 69 Ka7 Kd7 70 NeSt Ke6 71 Nd3 Black has 71 ...
Nxd3 72 b7 NeS! and after 69 KaB Kd7 70 NeSt KcB 71 Nd3 Nb71
31
Black can again prevent the b-pawn's advance. Remember that to draw
Black must prevent the pawn from getting to b7 in safety.
69 .
.
. .
.
Ke7
Draw.
Black is indeed safe. But White could continue to play on in the hope
of an eventual Black error. As we have seen, such endgames are not at all
easy to defend.
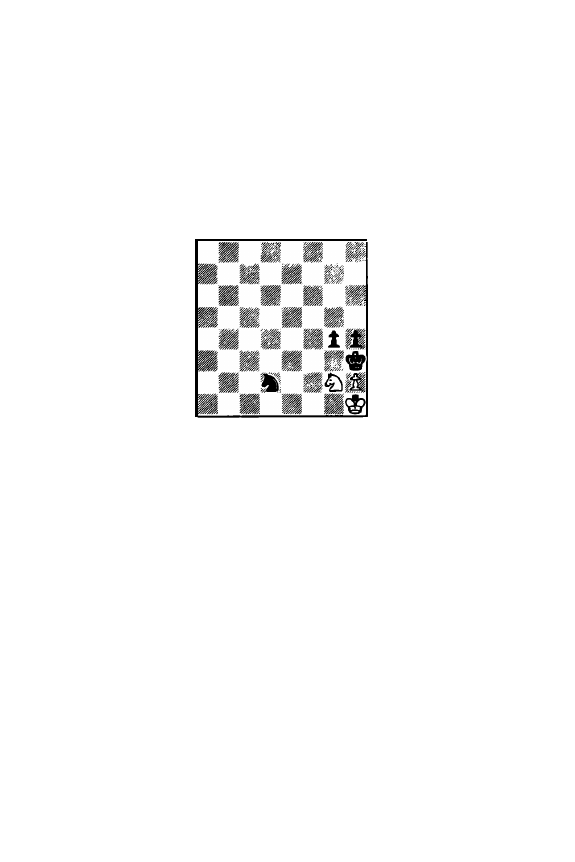
Subject # 1 1: Pawns on the same side, one king is contained
Questions: Is the contained king always a loser?
What is the proper method of playing in such positions?
What is the correct evaluation of Diagrams 1 6 - 197
Diagram 1 6
Answers:
As an introduction to our theme, let us first consider Diagram 1 6, H.
Kahn - NN, USA 1 978, Black on move. White of course threatens 2 Nf4
mate. Therefore, Black's response -- 1 ... g3 -- is forced and White achieved
an instructive draw as follows: 2 Nxh41 gxh2 3 Nf31 Nxf3 Stalemate.
I n this type of position -- where White has his pawn on h2 and king on
h1 and Black has g- and h-pawns - is it possible to set up positions winning
for Black? The answer is three-pronged:
1 ) Theoretically, very much so. With Black's king on f1, various mating
motifs are possible, with the simplest being Black's knight on f2 (e.g. in
Diagram 16 put Black's king on f1 and White's knight on g6. Black wins
with 1 ... Ne41.)
2) From any reasonable starting position, White would have to play very
poorly for such possibilities to arise.
3) There is little logic in White's king voluntarily heading for containment
on h 1 . He should try to keep his ground on the second rank, operating on
the g2 and f2 squares.
The single most important principle is that once the enemy king is con
tained, do not allow him to escape. Otherwise, the chances are high that
you will never get him back in and your advantage will have disappeared.
I shall now discuss the kind of approach you should use in coming up
with the correct plan. Let us look at Diagram 17 on the next page, with
White to move. White has the dual advantages of the active king and
32
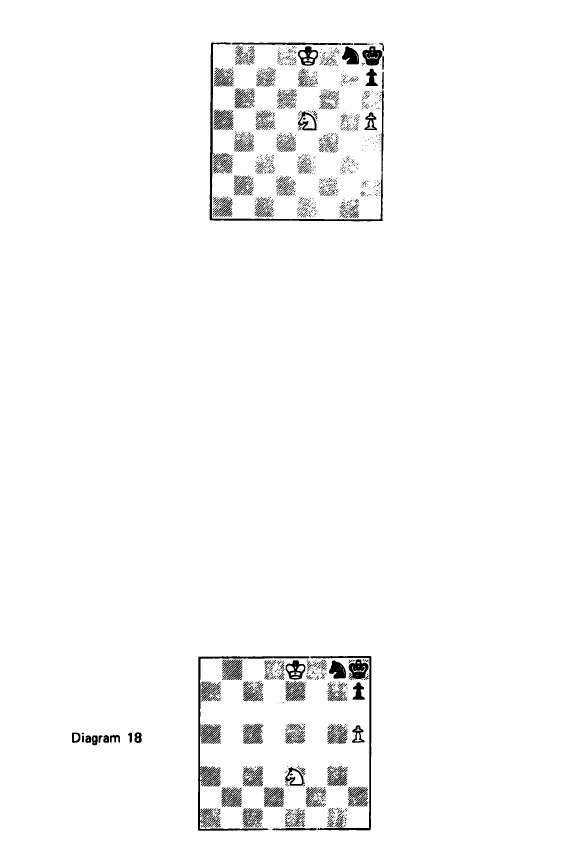
Diagram 1 7
knight, whereas Black's king is severely contained and his knight is a poten
tial problem also. But how to proceed? The idea is clear enough: 1 Kf7
Nh6t 2 Kf8 and Black is in zugzwang and must al low 3 Nf7 mate. But it
is equal ly easy to see that Black can simply play the king-freeing 1 ...h6. If
it would again
be Black's
move in this position, White would win easily
be
cause after "2
...
Kh7", 3 Ng6 puts Black in zugzwang. With Black's king on
h8, a White knight on f8 is equally effective for zugzwang. Unfortunately,
as we know, a knight can never gain a tempo and thus by knight moves
alone there is no way to put Black in zugzwang after 1 Kf7 h6. And king
moves also seem out of the question since both a Kf8 or Kg6 would free
Black's knight. Also the attempt to prevent 1 ...h6 by 1 h67 fails: 1 ...Nf6t
(not 1 ... Nxh677 2 Kf8 followed by 3 Nf7 mate) 2 Kf8 (2 Kf7 is met by
either 2
.
.
.
Nd7 or 2 ... Ng4) 2
. .
. Nd7t l l 3 Nxd7 stalemate. Thus we see that
in this last line Black's king is actually too contained.
What to do in real life? Of course, you can abandon winning attempts
and offer Black a draw. Yet this is hardly the way to achieve success in
tournament play ! Therefore the practical thing to do is to try a lot of
king and knight maneuvers from Diagram 1 7 in the hope that something
wi ll succeed. Not that anything is guaranteed, but it is certain that unless
you search for success, you will not find it.
If the game is adjourned and you have access to a good chess library,
then of course you can consult this. You wil l then find something very
similar in "Knight Endings" by Averhakh and Checkhover. On page 66
is the position shown in Diagram 1 8 and this is an endgame study by V.
Bron in 1 948. As can be seen, the only difference is that here the White
knight is on e3 rather than on e5.
. �� . .
. . � .
33
The solution to the study in Diagram 1 8, with my comments, is as
follows:
1 Kf7
Nh&t
1 ... h6 gets us into the main line more quickly.
2 Kf8
Ng8
3 Ng4
h6
The fancy
3
... Nh671 is not met by 4 Nxh6?7 stalemate, but by 4 Ne51,
followed by 5 Nf7 mate.
4 Kf71
To contain Black's knight on g8.
4
Kh7
5 Ne5
KhB
6 Nc41
Kh7
7 Nd6
As discussed in connection with Diagram 1 7, White cannot put Black in
zugzwang just by his knight moves. The only way is by king tempo moves.
But to enable this, White must keep Black's knight stalemated. For this,
White's knight must get to e8 from where it takes away both f6 from
Black's knight and g7 from B lack's king.
7
KhB
8 NeBI
Kh7
9 Ke61
Kh8
10 Kd&l
White wants to achieve the same position as after Black's 8th move, but
with
Black
on move.
10 .....
1 1 Kd71
Kh7
As
so often, the principle/concept is more important than the exact
moves.
As
can be recognized, White's 1 0th and 1 1 th moves can also be
played in the reverse order.
1 1
KhS
12 Ke&l
Kh7
13 Kf7
Mission accomplished. Since the knight can neither gain nor lose a tem
po, it is a simple matter for White's knight now to stalemate Black's king,
after wh ich Black's knight will be forced to commit suicide.
13
.
....
KhS
14 Nc7
An equivalent winning knight route is 14 Nd6 Kh7 1 5 Nc4 Kh8 1 6
Ne5 Kh7 1 7 Ng6.
White wins.
14
15 Ne&
16 Nf8
17 Kxf&
Kh7
Kh8
Nf&
With this background, it is easy to recognize that Diagram 1 7 is actually
a simplified, "forward" version of Bron's 1 948 study. The solution in fact
is:
1 Kf71
h&
34
2
Nc4
and White wins as per the Diagram 1 8 solution, where Nc4 was played
as White's 6th move.
The motif of Black's king in the corner, contained by his own h·pawn,
offers many opportunities for creative play.
Diagram 1 9
Diagram 1 9 shows the concluding part of a prize winning 1978 study by
V. Shkrl, with the solution being:
1 Ne811
Nf6t
Or 1 ... Nxe8 2 Kf8 fol lowed by 3 Bg7 mate.
2 Kf8
Nxh6
3 Nd6
Ng4
4 Nf7 mate.
Subject # 12: Pawns on both sides, material advantage, defender has no
counterplay
Questions: What is White's proper technique in going for the win in Dia·
gram 207
Should White simplify into a K & P endgame by playing 1 g57
Diagram 20
In Diagram 20, W. Maloney · N.N., New York 1 973, White on move,
White has two advantages: ( 1 ) He is up a solid pawn, and (2) Black is with·
out counterplay. Yet there also are a couple of roadblocks in the way to
the win: ( 1 ) The g5 break may not win, and (2) White's king is inactively
placed on the edge of the board.
35

The single most important point in going for the win is: avoid doing
anything irreparably wrong! Here the wrong thing is to
go
for the K & P
endgame, as happened in the game:
1 g57
Nxg5
2 Nxg5
hxg5t
3 Kxg5
Kg7
We already learned in Chapter 1 that it is risky for the superior side to
enter a K & P endgame where he is left with rook pawn (s). Here White is
left with two rook pawns and the position is a draw. Note that if instead
of the a-pawns,
we
would have equivalently placed b-pawns, then White
wins easily.
4 a4
a51
The only way to draw. The principle is: Black wants to have his pawn
up the board as far as possible, so that White's king when he captures it
will be as far away from b7 as possible. The rule of thumb to know to
correctly judge such positions is: White wins if his a-pawn is in Black's side
of the board.
5 Kf5
6 Ke5
7 Kd5
8 Kc5
9
Kb5
10 Kxa5
1 1 Kb6
12 Ka7
Draw
Kh6
Kxh5
Kg5
Kf6
Ke6
Kd71
Kc81
Kc71
Black shuttles his king between cB and c7 and White can't progress.
The correct technique in positions such as Diagram 20 is to make the
whole board your scene of interest. We call it "playing on both sides of
the board"; then when Black is busy protecting himself on the one side,
White scores decisive penetration on the other. Specifically, White's first
objective is to get his knight to f5, thereby tying down either Black's king
or knight to the defense of the h-pawn. This then would free the way to
the queenside for White's king, ensuring the decisive capture of the a-pawn.
The correct approach is:
1 Ne5tl
Kf6
2 Nc61
a6
3 Nb4
a5
If Black removes his knight from the kingside with
3
• . .
Nc5, White has a
tactical breakthrough there with 4 g5t l l hxg5t 5 Kg4 a5 6 Nd5t Ke5
7 h61.
4 Nd5t
Ke5
I n the long run too passive is 4 ... Kg7, since White's king will first get to
the center and then the queenside.
5 Ne31
With the dual threats of 6 Nc4t and 6 Nf5. Black again has nothing
better than activity.
5
6 Nf5t
36
Kd4
Kc3
7 Nxh6
8 Nf5
9
h6
Kb3
Kxa3
White's two kingside pawns are winners against Black's single a-pawn.
9
. . . . .
NfB
10 g5
Kb4
After 1 0
.
.. Kb2, White first stops Black's pawn with 1 1 Nd6 a4 1 2 Nb5
and then promotes his with 13 Kh5 and 14 g6.
White wins.
1 1 Kh5
a4
12 g6
Nxg6
13 Kxg6
a3
14 h7
a2
15 h8=Q
By going for counterplay Black final ly made it fairly close. But White
did not really have any difficult decisions to make. Playing directly on the
side of his strength -- the kingside - was good enough for the win.
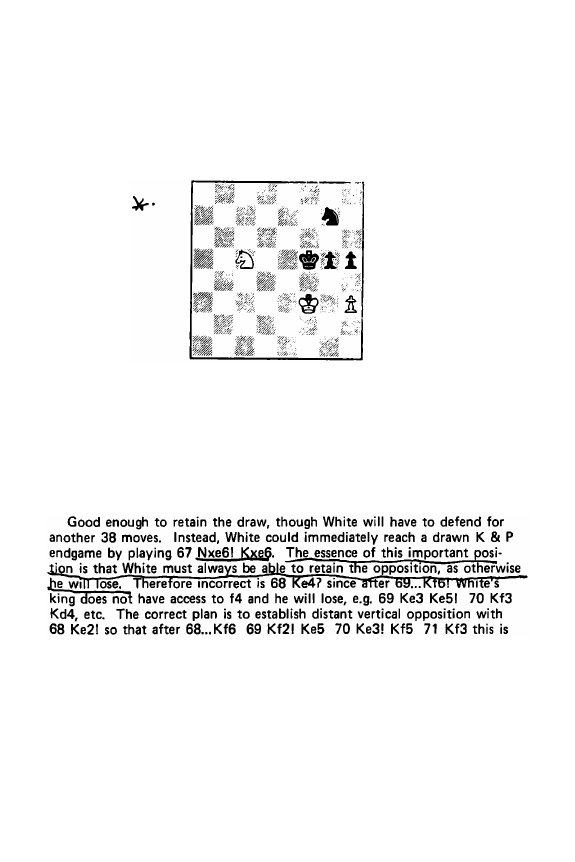
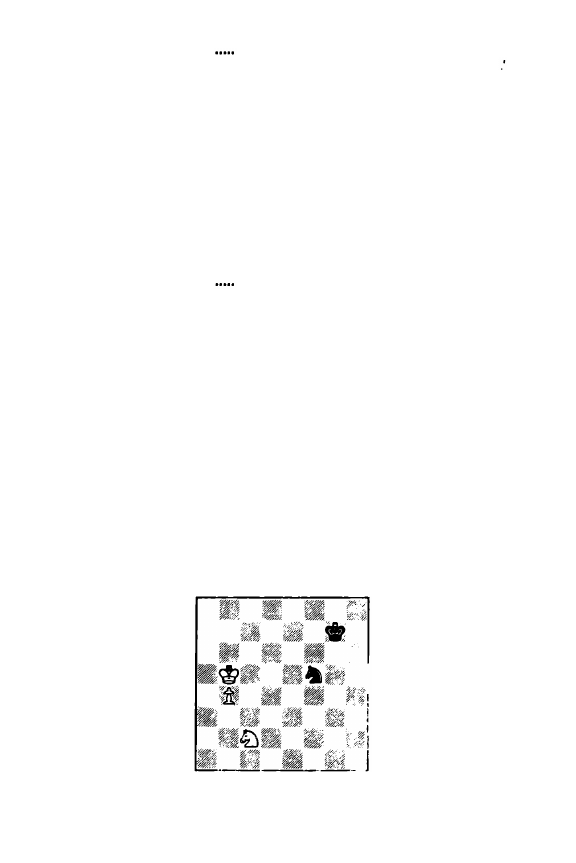
Subject # 13: Pawns on both sides, material advantage, defender has coun
terplay
Questions: How should White play from Diagram 21, i.e. should he try to
advance his pawns or worry about Black's queenside counter•
play?
Can White win?
Diagram 21
Diagram 21 shows the position in D. Rozili - Sutton, Correspondence
1 980-82, after Black's 45th move. Unlike the previous example, here
Black's knight is at the throat of Wh ite's queenside pawns. Moreover,
White's knight is also under attack, so that something most likely will have
to give in White's position. The determining factor will then be the
dynam
ics
of the position and here White has two clear advantages: his extra
pawns on the kingside are already well mobi lized as connected passed
pawns and his king can both assist these pawns and go after Black's queen
side pawns.
Mr. Rozier has added some valuable questions and comments and I have
made use of them herewith.
Specific Question : Is it better to try to win on the kingside or the queen-
37

side? Well, you want to win wherever the opportunities arise. In such an
unbalanced position, generally the best policy is to play on both sides of
the board. By this I mean to try to get the most out of the possibilities
on each side. We'll see very soon what this means in actual play.
Mr. Rozier states that he felt that to win on the kingside would be too
difficult and feared Black's queenside majority. Thus he decided to ex
change his kingside pawns for Black's queenside pawns. However, for win
ning purposes the problem that resulted was that he was left with just the
single b-pawn.
My evaluation of Diagram 21 is that it is won for White if he plays very
accurately at the very beginning. But the really important point is to real-
ize that for maximum endgame success the key is to handle such positions in
the most logical way. Whether the starting point is a 1 00% theoretical win
can usually be determined only after very exhaustive further analysis.
The game continued:
46 Nh4t
This surely looks logical since it draws the king away from the pawns.
I nstead 46 Ne6t71 Ke6 47 Nc6 Nxa2 48 NbS aS is fine for Black.
46
.
.
.
..
Kg4
Risky, of course, since the king can be caught behind enemy lines.
Therefore a meaningful alternative is 46 ... Ke6 47 fSt KeSI (making it more
difficult for White's king to approach) 48 f6 Ke6. This position is very
complicated, but I think that White should win after 49 Ng61, for instance,
49 ... Nxa2 50 Nf4t Kf7 51 Kd4 ! Nc1 52 KfS! Nxb3 53 g6t KfB 54
NeSt. Notice how, for ultimate success, White's passed pawns need the
help of both the king and knight.
47 Ng27
Mr. Rozier passes over this move without comment, but I believe that
the critical moment for this endgame is right here. With Black's king on
the "wrong" side, the thematic plan for White is to advance his pawns. Un
fortunately, the immediate 47 g6? is not good because of 47 ... Kxh4 48 g7
NdSt 49 Ke4 Ne7
50
KeS NgB and White will have to be satisfied with
the draw after 51 Kd5 c4 52 bxc4 bxc4 53 Kxc4 Kh5 etc. The only
reason why Black was able to defend was the unfortunate location of
White's king on e3 which gave Black time for Nd5
with check.
The above considerations should lead in a rather straightforward way to
the conclusion that
47 Kd3!
must be the correct way to handle matters.
Black's defenses then can fall in these categories:
a)
Capturing White's knight: 47. .. Kxh4?
48 Kxc3 Kh5 49 Kd3 is an
elementary K & P endgame win.
b)
Capturing White's a-pawn: 47 ... Nxa2?
48 g6 Nb4t 49 Ke4 Nc6 50
NfS! followed by 51 g7 queens the g-pawn.
c)
Retreating the knight: 47. .. Nd5
48 Ng2 and White will win since
Black's king can neither get back (48 ... Kf5 49 Ne3t) nor capture White's
knight [48 ... Kg3 49 Ke4! Nc3t (49 ... Ne7 50 Ne3 is a prosaic win) 50
Ke5 Kxg2 51 g6] .
d)
Protecting the knight: 4l ... b4
..
a
g6 Nd5 49 Ke4 Ne7 (49 ... Nf6t
38.

50 Ke5 NeB 51 Nf5) 50 Nf31 wins since 50 ... Nxg6 loses to 51 Ne5t.
47 .....
Nxa2
Now Black has a two pawn queenside majority and this very much
changes the complexion of the so-called "normal endgames" i.e. those
where the g-pawn doesn't queen.
48 g6
Now Black's knight gets back, but after 48 Ke4 Kh5 Black's king can
stop the pawns just long enough for his queenside majority to create suffi
cient counterplay.
48
49 g7
50 Ke4
51 f5
52 Ne3t
53 Kd5
Nc3
Nd5t
Ne71
Ng8
Kg5
As anticipated, this will lead to a N + b-pawn vs. N endgame. There is
nothing better since after
53
Ke5 a51 Black again has sufficient counter
play.
53 .
.
...
c4
54 b41
The only way to play for the win.
54
Kf6
55
Kc5
Kxg7
56 Kb6
c3
57 Kxa6
Ne7
58
Kxb5
c2
Good enough, but with 58 ... Kf71 followed by 59 ... Nxf5! Black wou ld
gain one to two tempos for getting his K + N closer to the queenside and
thus make the draw considerably more assured.
59 Nxc2
Nxf5
This endgame turns out to be barely drawn for Black. For the further
course of play turn back to Subject # 1 0.
Section 3: Bishop vs. Knight Endgames
Subject
#
14: Equal material, full play with pawns on both sides, equal
chances
Questions: When is the bishop the superior minor piece? When the knight?
Answers:
What is the proper approach in playing unbalanced, dynamically
equal endgames?
Should Black exchange rooks in Diagram 22? (on next page)
The basic principle of evaluating the bishop vis-a-vis the knight is simple:
because the bishop is a long range piece, in positions which are fairly open
and have pawns on both sides, the bishop is generally the superior minor
piece to have. Moreover, again because of its long range power, the bishop
even from far away is excel lent in coping with passed pawns. On the other
hand, the knight is superior in blockaded positions where its flexibility for
close range maneuvering comes to the fore. The knight -- being a natural
39
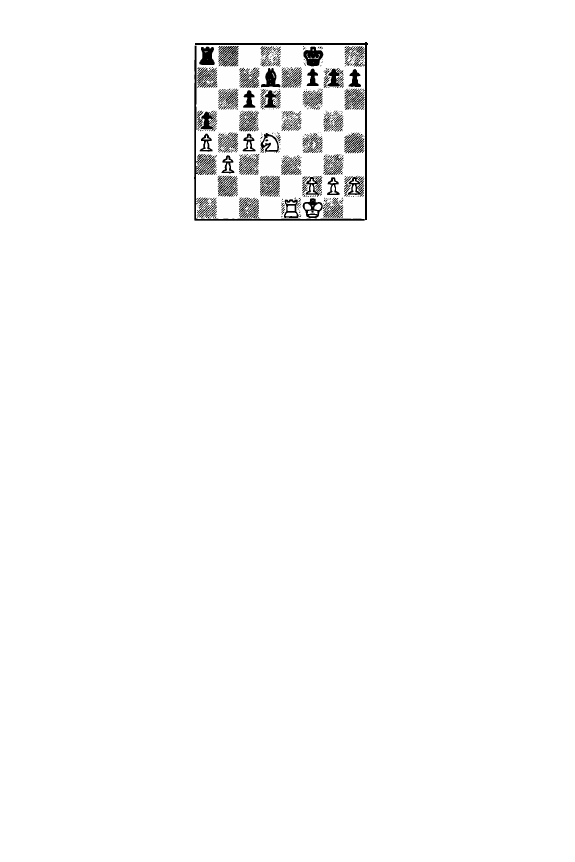
Diagram 22
blockader
••
is excellent for blockading a passed pawn if it can assume an
impregnable position in front of it.
In real life, the actual specifics of the position so often are the key ele
ments in evaluating the comparable worth of the minor piece.
We shall learn much from following the play from Diagram 22, H. Pills·
bury
·
Em. Lasker, St. Petersburg 1 895/96, after White's 22nd move.
I
judge the position as equal. Obviously there is material equality and there
is nothing inherently wrong with either side's pieces or pawns. However,
while it objectively offers equal chances, the position is unbalanced and
thus in an actual game both sides have winning and losing chances. Black
now has the option of either of two strategic approaches: he can keep
rooks on the board or aim for a minor piece endgame. Lasker decides on
the latter:
22 .....
Re8
Black hopes that with the rooks gone, his king can become active. Com·
bined with the general superiority of the bishop in open pos:t;ons, he ex
pects that this wi ll lead to good chances for him. The move is fine, though
it is not realistic to expect more than equality. Black's a-pawn is a chronic
weakness, there is nothing wrong with White's pawn formation
•·
and at this
moment the kingside is not really open.
An alternate sound plan is 22 ... Rb8 and after 23 Re3 Black can play
23 ... Rb4 or 23 ... f6 followed by 24 ... Kf7.
23 Rxe8t
KxeS
Kd8
Kc7
Kb&
h5
Kc5
24 Ke2
25 Kd2
26 Kc3
27 f4
28 h3
Each side has certain strengths: Black the more active king, White the
more actively placed minor piece. Black's bishop does have potential be·
cause most of White's pawns are on light squares, but at the moment it is
well contained. With his next move White aims to further contain the
bishop
.
.
•
29 f5
g&
• . .
whereas Black aims to free its diagonal. For drawing purposes main
taining the status quo with 29 ... Bc8 is sufficient. Then after 30 g4 hxg4
40
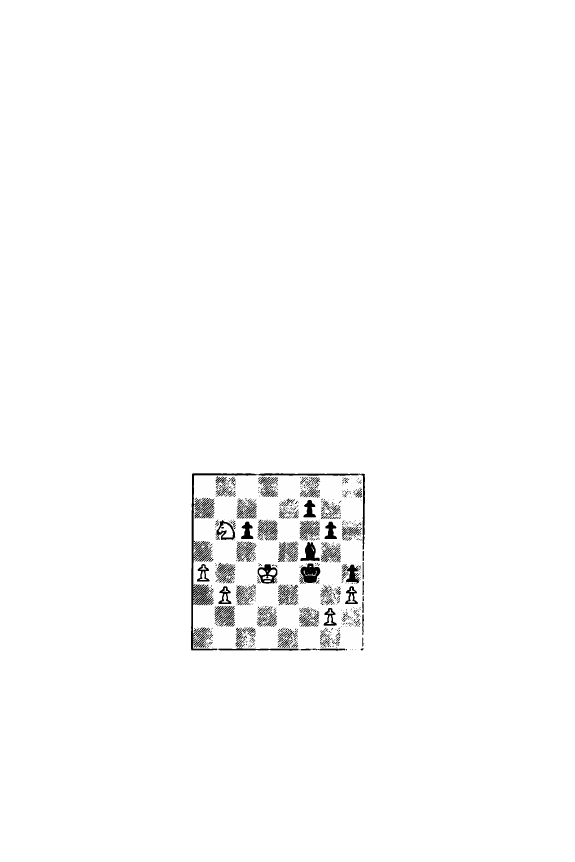
31 hxg4 Black can simplify further with 31 ... g6.
30 f6
17
White also is playing to win. He realizes that the f-pawn may well go
lost but plans to use the time that Black spends to capture it, to capture
Black's a-pawn and thereby establish an outside passed pawn. Instead, 30
fxg6 leads to static equality.
30
.
.
. . .
d5
White was threatening to win with 31 Nf3 and 32 Ng5; thus Black must
free a route back for his king. The disadvantage of the text is that it weak
ens Black's queenside pawn formation.
31 cxd5
Kxd5
Also playable is 31 ... cxd5.
32 Nf3
33
Nd2
Ke6
We are now close to the exciting and decisive stage of this endgame.
Black will have an extra pawn on the kingside, whereas White will have a
passed a-pawn.
33 .....
-
Kxf6
James Schroeder in his edition of
St
Petersburgh 1895/96
criticizes this
move and suggests instead the immediate 33 ... c5 followed by 34 ... Bc6. Yet
as GM Reuben Fine has demonstrated, the text is O.K. The decisive error
occurs later.
Diagram
23
J
34 Nc4
h41
35 Nxe5
Ke5
36 Nc4t
Kf4
37 Nb6
Bf5
38 Kd4
Fine considers this position in
Basic Chess Endings
(No. 260a) and gives
this excellent practical principle: with two outside passed pawns (i.e., one
for each side) one must get going
as
fast as one can, sit tight and hope for
the best.
V
38
.
.
...
Be47
The decisive error. Black gets going much too slowly. Note that win
ning the g-pawn still doesn't do anything immediate for Black's kingside
pawn pushes. Fine gives this drawing line: 38 ... g51 39 a5 (39 Kc5 is also
met by 39 ... Bxh31) 39 ... Bxh3 1 1 40 gxh3 (After 40 a671 Bxg2 Black is well
ahead of the game continuation) 40 ... g4 41 hxg4! (Fine here continues
41
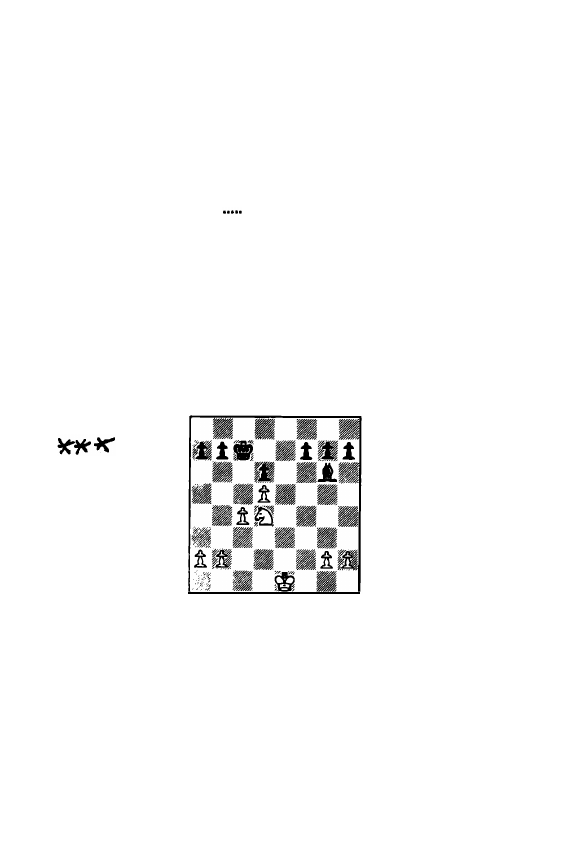
with the less accurate 41 a6) 41 ... h3 42 a6 h2 43 a7 h 1 =Q 44 aB-O Qg1 t
followed by 45 ... Cbi:b6 and complete equality.
39 a&
eSt
Required in any case after 39 ... Bxg2 40 a6.
40
Kxc6
Bxg2
41 a&
#J
42
Nd5t
Black still doesn't have a passed pawn, whereas White has two connected
passed pawns. With some fine knight maneuvers Pillsbury puts the game on
ice.
42
Ke5
43
Ne3 1 1
Bf3
44
b41
Ke&
45
b51
Passed pawns must be pushed !
45 .
.
.
.
.
Be2
46
Nd51
Resigns.
After 46 ... Bf3 47 b61 Bxd5 48 b7 White gets a new queen.
Subject #
15:
Equal material, pawns on both sides; bishop has good scope,
yet the knight is superior
Questions: Who has the superior minor piece in Diagram 247
Who is better?
Diagram 24
Answers:
Diagram 24 shows the position from J. Blackburne · K. Schlechter,
Vienna 1898, after White's 25th move. The opening was a wild and wooly
King's Gambit (1
e4
e5 2 f4 exf4 3 Bc4 d5 4 exd5 Qh4t etc.), but fairly
quickly White steered towards the endgame and our starting point is the be
ginning of a classic knight
vs.
bishop endgame. Black's bishop is rather free
since neither the White nor Black pawns decrease its scope and the position
on an over-all basis is fairly open. Such considerations usually mean that
Black stands well. But here White has a clear advantage because of the fol·
lowing specific factors:
1 . White's c4 - d5 pawn complex gives him a major space advantage.
2. Black's d-pawn is a chronic weakness, requiring constant attention from
his king.
42

3.
It is much easier for White to create a viable passed pawn from his
queenside majority than for Black to do so from his kingside majority.
4. White's knight is more useful than Black's bishop because it has more
potential, since White's pawns can be safeguarded well and Black's king
must remain passive.
However, this does not mean that Black is without drawing resources.
The overridiny reason for Black's loss is that he thio1ks that he can draw by
not doing anything. Perhaps he underestimated Blackburne's endgame skill
or was too complacent about his problems. Let's follow the game course:
25 .....
Bd37!
On the face of it the move is harmless enough, but the dubious mark is
added because it is the start of a completely faulty approach. The first
question that Black should consider is how to place his queenside pawns
so that White's task in mobi lizing his majority there is made as difficult as
possible. One ratior1al possibility is 25 ... a6 (preventing Nb5t) followed by
26 ... b6. But even more appropriate seems 25 ... a5! followed by 26 ... b6.
The idea behind this set-up is to force White to exchange his a-, b- and
c-pawns for Black's queenside pawns so that White is left only with the
d-pawn. Even though this then is a passed pawn, the fact that Black re
mains with a sound kingside majority should allow Black a certain enough
draw.
26 b3
27 Kd2
28
g3
29 a3
30 Ke3
31 Nf3
Kd771
Be471
Bb171
Be471
Bb1
Ke771
The king stood well enough on d7. Moreover, the important factor here
is that Black fails to take any steps to mobilize his kingside majority. As
will be later seen, White's two pawns on the kingside tie down Black's three
pawns there, while White creates a very powerful passed d-pawn. Correct is
the obvious
31
.
. .
h61 followed by
32
... g5. If White plays
32
h4, then Black
prepares with
32
..
.
f61 and again follows up with ... g5. This way each side
has a thematic strength, whereas in the game only White is the achiever.
32 b41
The first meaningful step on the queenside.
32 ..
.
.
.
Bf5?1
33 c51
The second meaningful step. White sure knows what to dol
33 ..
.
.
.
Bd7
34 Kd41
Posting the king on a powerful central square.
34
.
...
.
Be871
35 Nd21
Bd771
Black may well be lost by now, but even so there is no excuse for not
getting his kingside pawns into position for some activity with 35 ... h6 fol
lowed by ... g5.
36 Nc41
37 bxc5
dxc5t
f6
43
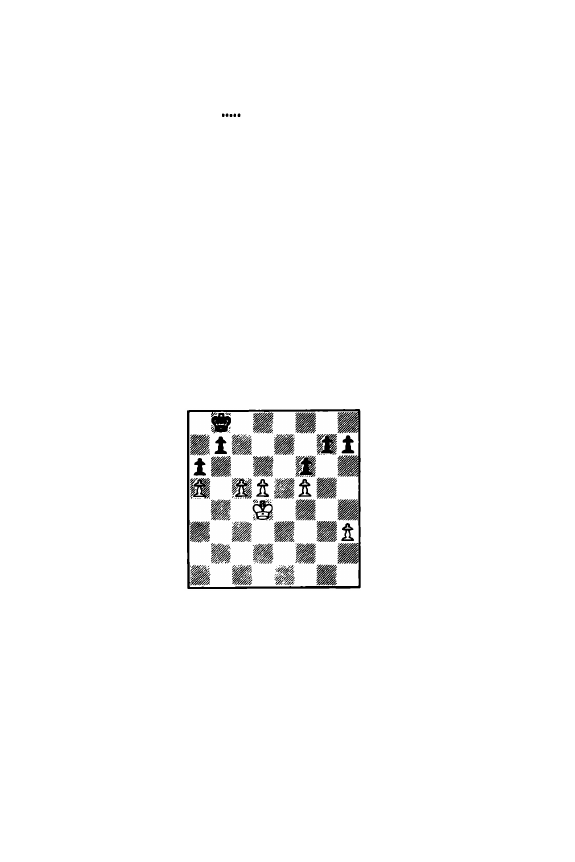
38 Nb21
White prepares to run his a-pawn to a5 so as to further immobilize Black
Black's queenside. At the very least Black should "risk" ... g5 soon ·· such
as now.
38
39 a41
40 a51
Bf571
Kd771
a&
Otherwise with a6 (perhaps the immediate 41 a6) White would create
passed c· and d-pawns. But now White's a-pawn blockades both Black's
queenside pawns. With total success on the queenside and the center White
now turns his attention to the kingside.
41 Nc4
Kc7
42 Nd&
Bd7
43 Ke41
Ba471
44 g41
Bc2t71
Black absolutely refuses to lift a finger in his own behalf. For better or
worse
44
• . .
g6 had to be tried.
45 Kd4
Bg&
46 h31
Kb871
Though still losing, 46
..•
h5 47 Nf51 hxg4 48 hxg4 would at least ex·
change off a set of pawns.
Diagram 25
47 Nf&l
Bxf5
48
gxf5
48
...
. .
Kc771
Though this K + P endgame is lost, Black should at least try 48 ... g51,
since to win White must know to open the position with 49 fxg6 e.p. l.
49 Ke4
Kd7
50 Kf41
Ke7
51 Kg41
Kd7
52
h4
Kc8
53 h51
h&
Otherwise 54 h6 wins.
54 Kf4
Kc7
55 Ke4
Resigns.
With Black's kingside majority paralyzed, White breaks through in the
center, e.g. 56
••.
Kd7 56 d& Kd8 57 Kd6 Kd7 68 c6t! bxc6t 59 Kc5
KdB
60
Kxc6.
44

Subject #
16:
Equal material, pawns on both sides; early stage of a char
acteristic
"bad" bishop endgame
Question: Should Black fear having the position of Diagram 267
Diagram 26
Answer:
, ..,;� a t a
•
l a &t1 rs •
' ; ;.�
:
In Diagram 26, P. Oliver · NN, France 1 981, Black has an isolated d·pawn
on the same color as his bishop. Protection of this pawn will require the
help of the bishop and most likely the pawn will reduce the scope of the
bishop. This means that the bishop will be at least "somewhat bad". Still,
should Black have to worry if he lands in the Diagram 26 position?
In answering such a question it is very important to always keep in mind
the difference between a theoretical answer and a practical one. True,
Black's only permanent weakness is the d-pawn, yet he is caught in a char
acteristic superior knight/inferior bishop endgame -· as will be discussed in
detail in the next subject. It is easy for a theoretician to say "it should be
an easy draw". But
go
ahead and draw it in a
practical
game! I n actual
play White's winning chances are always considerable, because the knight is
a very nimble attacker and here can try to operate on both sides of the
board. Just one inaccuracy on Black's part (which in the game forced
Black to play the further weakening ... b5) and his position becomes critical.
In a practical game I would never
voluntarily
accept the type of position
that Black has here. I mean, I would only accept it if the alternatives were
very clearly worse.
Subject # 17:
"
Bad'
'
Bishop vs. "Good" Knight
�
Questions: What is the correct technique in playing positions such as Dia
gram 27 for the win?
Answers:
How should Black defend?
It is already won for White?
After some maneuvering on White's part, Diagram 26 led to Diagram 27,
P. Oliver - NN, France 1 981, Black on move. In it White has two clear ad
vantages: the superior king, placed on the unassailable d4 square and the
superior minor piece. Because Black's bishop will be tied up in defending
the isolated d-pawn, White's nimble knight will be much the more danger·
ous attacker. Other important aspects of the position wil l be brought out
as part of the game course:
45

Diagram 27
1 .....
Kd67
This looks like the losing move to me and, in any case, is absolutely
wrong. A careful look at Diagram 27 shows that even though his position
is inferior, Black actually has only one fundamental weakness
··
the d-pawn.
Therefore, if Black can prevent the creation of new weaknesses in his posi
tion, his chances for a draw are very bright. The correct plan, is, of course,
1
.
.. Bc6!, which prevents 2 Na4 and therefore keeps Black's queenside safe.
In connection with this quite correct suggestion, Mr. Olivier makes the fol
lowing two general comments:
( 1
)
"An eventual NfJ wi
II
be met by K f5" - Perhaps, but as a general
principle, Black's king shou ld keep an eye on the queenside and therefore
Black's safest response is the simple ... h6.
(2) "White's plan to play a5, preceded by b4 should be met by ... a5 and
... a4" - I would not touch any of Black's queenside pawns as this only
creates holes in Black's position.
2
Na41
b5
Unfortunately this horrible weakening move is forced since 1
..
. Kc6 al
lows White's king to penetrate decisively by
3
Ke5.
3 Nc5
Bc8
4 b4
The result of Black's faulty 1 .
..
Kd6? is that both his king and bishop
cannot move. As soon as Black's pawn moves will be exhausted, something
will have to give. However, White has a problem also and that is that the
knight can neither gain nor lose a tempo and therefore White also must be
dependent on pawn moves to retain the zugzwang.
4 .
....
h6
5
g3
g47
Now Black is definitely lost. Black's queenside pawns and center squares
are already very vulnerable and to keep chances for a draw he must keep
his kingside as safe as possible. After the text White's pieces get access to
f4 and Black wil l not be able to prevent penetration of his kingside. Much
more attractive for Black is to immediately execute the plan recommended
by Mr. Olivier on move
1 6:
5 ... Bf51 6 Nxa6 Bd7 7 Nc5 Be8. I would
think that Black ultimately should lose, but since Black's kingside is sound,
penetration by White's pieces is very difficult and White would have to
maneuver perfectly to be able to progress.
46
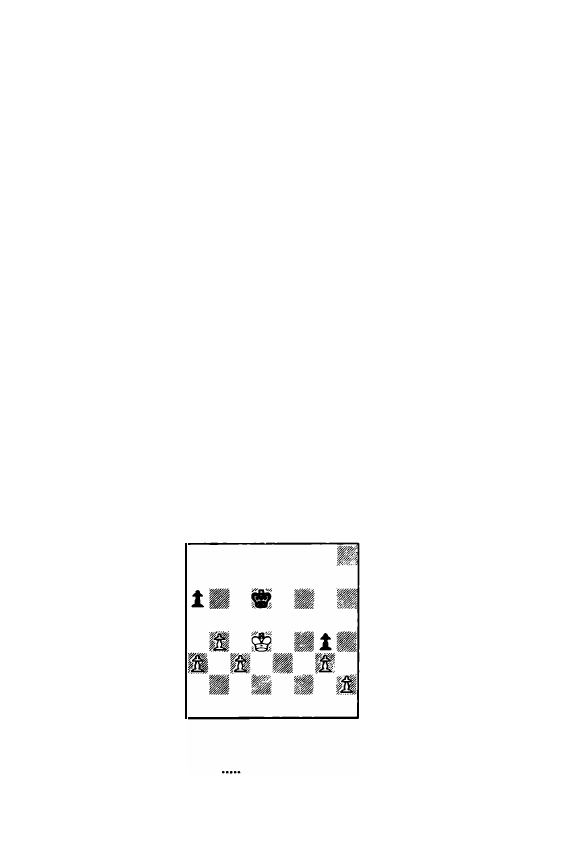
6 Nd3
7 Nc5
8 Ke371
Bcl7
Bc8
However, with this sequence White leaves his knight insufficiently pro
tected, which Black can exploit with 8 ... a51 and after 9 Kf4, Black can
simply play 9
•••
a4. Then later if White gets too frisky on the kingside,
Black can infiltrate on the queenside starting with
•..
d41. It is difficult to
understand why Black does not take advantage of this opportunity.
The systematic way of making progress is 8 Nb31 Bf5 9 Ke3 Ke5 1 0
Nc5 Bc8 1 1 Nd3t Kd6 1 2 Kf4 and Black will not be able to safeguard his
kingside.
8 .....
9
Nd3t
Ke57!
Ke6
Here 9 ... Kd6 1 0 Kf4 transposes into the above note.
·
10 Kd4
Kd6
1 1 Nc5
h5
Because of zugzwang Black has no choice, but here the pawn becomes
vulnerable to an attack from White's knight.
12 Nd3!
From now on White plays very exactly. Black's immediate problem is
that he cannot play 12 ... Bf5, 12 ... Bd7, nor 12 ... Bb7 because of 13 Nf4.
12
••••.
Be6
13 Ka3
Ke7?1
Such passivity is hopeless. Required is 13 ... Kc6 since then after 14 Nc5
Bc8 1 5 Kd3 Black again has 1 5 ... a5. Even so, Black's kingside is so com·
promised that White must win after 1 6 Kd41 axb4 ( 1 6 ... a4 17 Ke5!) 1 7
cxb4 Kd6 1 8 a4 bxa4 1 9 Nxa4. While Black wil l be busy stopping the
b-pawn, White wil l capture the d-pawn and thereafter the kingside.
Diagram 28
14 Nc5
Bc8
15 Kd3!1
Kd6
16 Kd4
Resigns.
•.t.•
•
• • • •
R t � t B . t
• • • •
He is in zugzwang again and must lose the a-pawn. Mr. Olivier raises the
question whether Black could not hold the position after the further moves:
1 6
Bf5
1 7 Nxa&
Bcl7
18 Nc5
Ba8
47
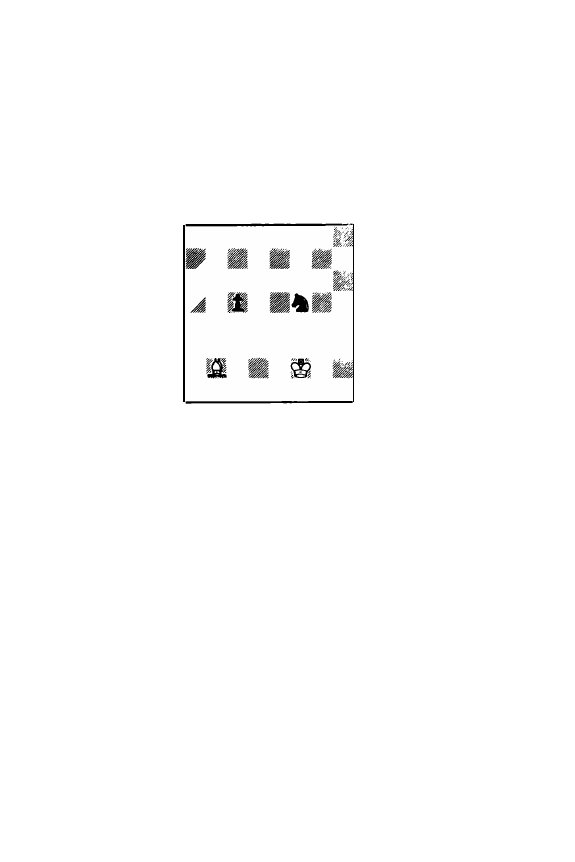
The answer is of course, No. Not only is he a full pawn down, but still
has weaknesses on b5, d5 and h5, no counterplay at all and very import
antly, White's king can get into Black's kingside via f4. A fairly direct
method for White is 1 9 Ke3 Ke5 20 Nd3t Kd6 21 Kf41 Bd7 22 Nc5
Be8 23 Kf51 Bc6 (23 ... d4 24 Ne4t Kd5 25 Nf6t Kc4 26 cxd4) 24 Nb31
Bd7t 25 Kf6 Be8 26 Nd4 Bd7 27 Nf5t Kc6 28 Ke51
Subject # 18: Both sides have passed pawns
Questions: In a position where both sides have passed pawns, which is the
better minor piece7
Who has the advantage in Diagram 297
Diagram 29
. . .
�
•
• •
ft
.•
. . . '�
•
• • . ft
• • • •
Answers:
It is not possible to generalize which piece is better in positions where
both sides have passed pawns. The only safe principle is that the bishop is
the more effective minor piece in stqpping far advanced passed pawns be
cause he can do it from far away, whereas it takes the knight many moves
to get back. In other situations the key is always the specific position. We
see that in Diagram 29, C. Marvel - NN, USA correspondence 1973, after
White's 41st move, White's bishop has no particular power. In fact, Black's
knight has an excellent location on f5 and is somewhat more useful than
the bishop. Black's connected passed pawns are well advanced and can
move in unison, whereas White's pawns are separated too far and thus can
not be made to work together. The above factors mean that Black has the
advantage. However, White can draw since he can liquidate both of Black's
pawns at the cost of his bishop. The game was called a draw here with
White offering it. A logical continuation could be:
41 .....
Ke6
To help stop the g-pawn.
42 Ke2
c4
43 Kd2
Ne7
Playing for the win. Obviously 43 ... c3t is fine for a safe draw.
44 a7
Kn
45 Bc31 1
It is very important for the White king to get access to the pawns by
making the bopawn move forward and this give up control of c3. Moreover,
such a pawn formation allows the bishop to blockade them with ease.
48
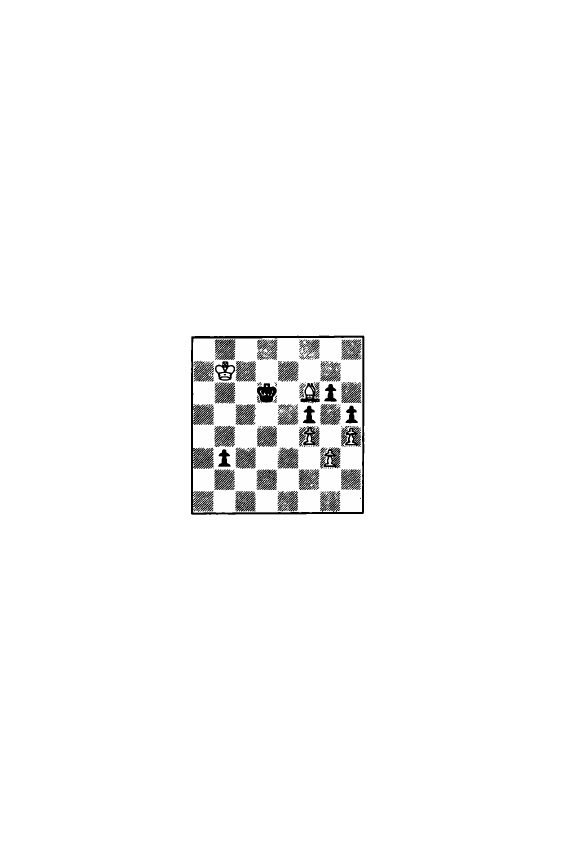
Unsatisfactory are 45 h471 Nd5 and 45 Ke371 c31 (46 Bxc377 Nd5t),
with White in each case having to work much harder for the potential draw.
45
••.•.
b3
The draws after 45 ... bxc3t 46 Kxc3 and 45 ... Nd5 46 Bxb4l Nxb4 47
Kc3 are elementary since in each case Black is left without pawns.
46 Bb2
Nd5
47 h4
Drawn
There is no way either side can strengthen its position. For example:
47 ... Nb6 48 Kc31 Na4t 49 Kxc4 Nxb2 50 Kxb3.
Section 4: Endgames of Pawns vs. Piece
Subject * 19: Pawn(s) vs. Bishop · the king having the pawns is active
Questions: How many pawns equal a minor piece7
Is this always true in an endgame7
Who has the advantage in Diagram 307
What are the key positions for the endgame of bishop vs. 3
connected passed pawns7
Diagram
30
Answers:
For material balance purposes the correct equation is three pawns equal
a bishop or a knight.
However, to develop an appropriate feel for endgame play we have to
understand the shadings also. The general principle is that as the amount
of material on the board decreases, the power of the pawns increases. I n
the ultimate simple case
··
bishop
or.
knight vs. three pawns
··
i t i s obvious
that only the pawns' side has winning chances.
To correctly evaluate dynamic positions, it is necessary to first complete
the forcing play and only then sit back and do the evaluation. This applies
fully to the situation in Diagram 30, J. Frankie
-
M. Vul<ic, New York 1976,
Black on move. A mechanical count only gives Black one pawn for the
piece, but this is only the start of the action. Black has the active king and
with White's bishop tied to defending against the b-pawn, Black's king will
penetrate into White's kingside and capture at least two of White's pawns.
Therefore in Diagram 30 only Black has winning chances and these are
quite good. But only an extensive analysis will reveal whether he has a
forced win. Black has two reasonable first moves: he can immediately start
49
the invasion with 1 ...Kd5 or he can first force White's bishop to make a de·
cision by playing 1 ... Ke6. Both of these will be covered in turn.
I.
1
••.•.
Kd5
The game continuation and played instantly by Black even though he
had 1 % hours on the clock. It does not present particular difficulties for
White since the bishop on f6 routinely protects the key h·pawn, the capture
of which would make Black's h·pawn a very menacing
outside
passed pawn.
2 Kb6
Ke4
3 Kc5
Kf3
4 Kc4
Kxg3
5 Kxb3
Kxf4
Black has only gained a passed inside f-pawn, which the combination of
White's K + B can stop easily enough.
6 Kc21
Kg3
7 Kd1
f4
8 Ke1
Kg21
9 Bcl4
Draw
Black no longer has winning chances but can force the draw with 9 .
.
. Kh3
10 Bf2 ( 1 0 Bf6 Kg21) 10 ... Kg4 followed by 1 1 ...g5.
I I .
1 .....
Ke617
The bishop is forced to give up protection of the h·pawn since of course
it has to stay on the a1-h8 diagonal. Both here and later on White has to
make important decisions. Only with the benefit of hindisght can we tell
which are the right ones.
(A)
2 Bb2
Or 2 Be5; or 2 Bg7; or 2 BhB.
These are perfectly reasonable retreat squares for the bishop, yet all suf
fer from the same problem: the h·pawn cannot be protected. Even though
White can theoretically stil l draw, the result of these choices is less comfor·
table play and a less sure outcome.
2
Kd5
3 Kb6
Ke4
4 Kc5
Kf3
White now has a crucial choice to make: to go after the b-pawn or to
run to the kingside
as
fast as possible. It turns out that either one, handled
perfectly,
is correct. Note that choosing the b-pawn blockading 2 Bb2 gives
White this option. After the other three moves White must go after the
b-pawn. Even though thanks to hindsight we know that this is also correct,
in a practical game it is never smart to voluntarily limit one's options.
(1 )
5 Kd4
This approach looks perfectly reasonable to me. However, it turns out
to be much more complicated than it looks.
5
Kxg3
6 Ke3
Kxh4
7 Kf3
White seems to have made excellent defensive progress: Black's b-pawn
is stopped and his king contained. Yet the key elements are that Black
50

already has three pawns for the piece and can mobilize these with:
Diagram
31
7
...••
g51
• • • •
• • •
• • • •
White's only two choices are either to take or not to take. One draws,
the other loses.
·
(a)
8 fxg5?
Black now wins because one of his three isolated pawns is already on the
sixth
rank. Therefore, the bishop must watch this pawn so that it cannot
help his king stop the others.
8
9 Bc1t
10 Bb2t
1 1 Kf4
12 Kf3
13 Kf4
Kxg5
Kf&l
Ke&
h41
Kd5
Kc4
Black's king penetrates decisively, while his kingside pawns remain self·
protective.
Black wins.
(b)
14 Kf3
15 Kg2
16 Kh3
8 Bf&l
Kd3
f4
f31
Black is now forced to give up his most valuable b-pawn and then is left
with only two pawns for the piece on the kingside. Even though White's
prospects soon look bleak, he can stil l draw with perfect play.
8
b2
9 Bxb2
g4t
10 Kg2
g3
(See the diagram at the top of next page)
Black's active king and two passed pawns are very menacing against
White's impotent looking bishop. White again is at an important crossroad:
(i)
1 1 Kf3?
Not allowsing Black's king to get to g4, thereby mobilizing the connected
passed pawns. But what it allows is worse: penetration along the h·file.
1 1
Kh3
12 Bd4
Kh21
13 Bg1t
51
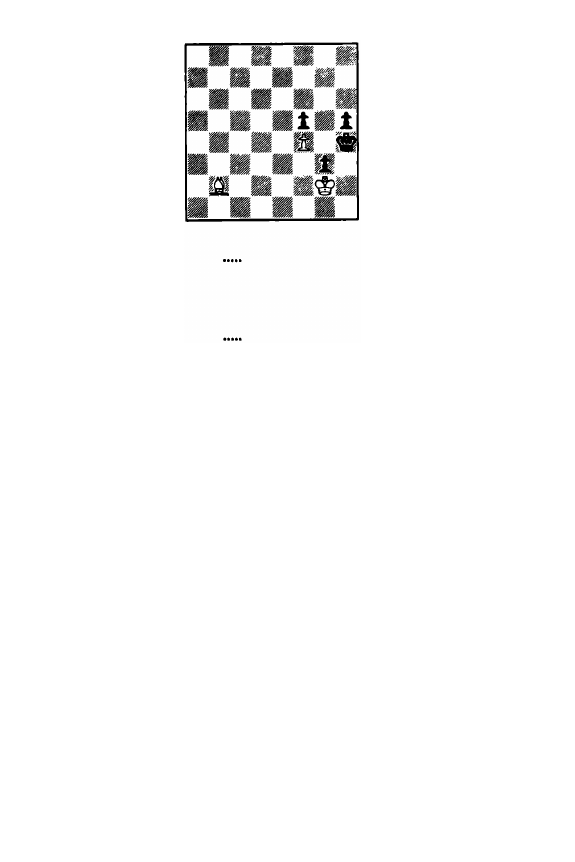
Diagram 32
After 10 ... g3
Otherwise Black plays 1 3 ... h4 followed by 14 ... g2.
13
Kxg1
14 Kxg3
Kf1
15 Kh4
Kg2
16 Kxh5
White also loses by one tempo after 1 6 Kg5 Kg3 1 7 Kxf5 h4.
Black wins.
16
Kf3
17 Kg6
Ke4
(ii)
1 1 Bc1 7
Protecting the f·pawn and coming closer to the kingside. Yet the bishop
is too passively placed now to cope with Black's initiative.
1 1
•••••
Kg4
12 Bd2
h4
13 Be1
White cannot keep protecting his pawns by 13 Be3 (or 13 Bc1 ) because
of 13 ... h3t 14 Kg1 Kf3 1 5 Bd2 h2t 1 6 Kh 1 Kf21 and there is nothing
to be done about the coming 1 7 ... g2t 18 Kxh2 g1 =Qt.
13
• • • • •
h3t
14 Kg1
Kxf4
We now have the very important endgame of bishop vs. three connected
passed pawns. For this the following two rules of thumb formulated by
Reuben Fine are useful to know:
(1 ) A win is possible only if all three pawns can succeed in crossing the
fourth rank.
(2) When the pawns are on the sixth or seventh ranks the battle is hope·
less.
Here already two of Black's pawns are on the sixth and the third is sure
to join them.
15 Bb4
Kg4
16 Bel&
f4
17 Bc7
f3
18 Bel&
f2t
19 Kf1
Kf3
Black wins.
52
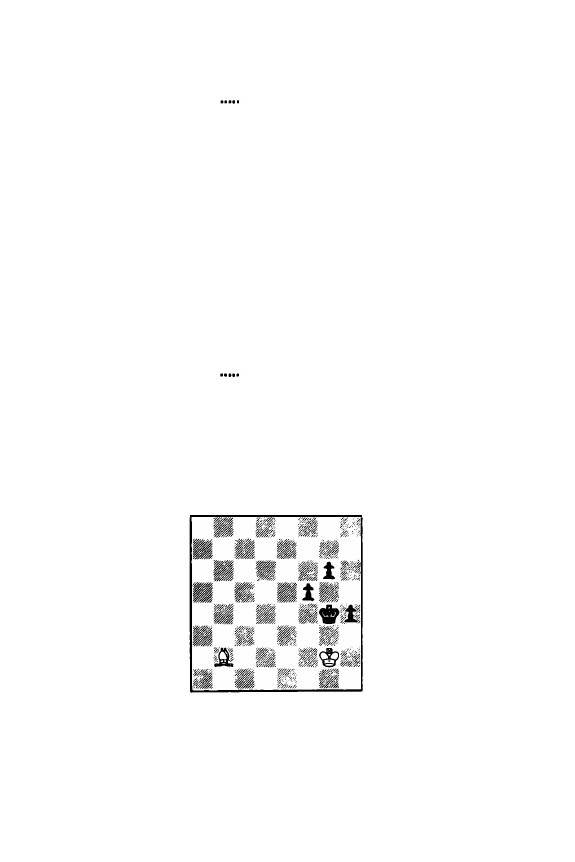
(iii)
1 1 Be51
The f-pawn must be protected, of course, and from the active location
the bishop can also control the crucial g1-a7 diagonal.
1 1
Kg4
12 Bd&l
h4
13 Be5
h3t
14 Kg1
Kf3
15 Bd&l
h2t
If 1 5 ... g2, 1 6 Kh21 sets up an unimpregnable blockade.
16 Kh1
Kf2
17 Bc5tl
Kf3
18 Bd6
Draw.
Neither side an progress.
(2)
5 Kc4
Immediately going for the b-pawn. Black now does capture all of White's
kingside, but his pawns are not sufficiently advanced for the win.
5 .....
Kxg3
6 Bf61
Only so. After 6 Kxb37 Kxh4 White's king is too far from the kingside
and Black's h-pawn becomes unstoppable.
6
b2
7 Bxb2
Kxh4
8 Kd31
Kg3
9 Ke21
h4
After the immediate 9
...
Kg2 White has 1 0 Bf6.
10 Kf1 1
Otherwise 10 ... Kg2 wins.
10
•••••
11 Kg21
Diagram 33
Kxf4
Kg4
With White's king in front of the pawns and two of Black's pawns not
yet beyond the fourth rank, the position is drawn. However, White must
know how to handle it. The general principle is: the pawns must be block·
aded. To ensure that this can be achieved, the bishop
must be activated to
attack the pawns from behind.
The problem with the bishop attacking the
pawns from the front is that as the pawns advance, the bishop's scope de-
creases.
53

12 Bf61
The above discussion clearly suggests that this is the correct plan. Losing
is the passive plan 1 2 Bc1 71 g5 1 3 Bd27 f4 14 Be1 . Now we have # 143
in Fine's
Basic Chess Endings
and Black wins as follows: 14 ... Kf51 1 5 Ba5
(or 1 5 Kh3 Ke41 1 6 Kg4 Ke3 1 7 Kxg5 h3) 1 5 ...
g4'
1 6 Bd8 h3t (note
that now all of Black's pawns are on the fifth rank or beyond.) 1 7 Kh2
Ke4 1 8 Bb6 Kf3 19 Bc7 Ke3 20 Bb8 f3 21 Kg1 Ke2 22 Bg3 f2t 23
Bxf2 h2t 24 Kxh2 Kxf2 25 Kh 1 Kg31 etc.
1 2 .....
g5
After 1 2 ... h3t White stops the pawns after 1 3 Kh2 f4 14 Be7 1 g5 (or
14 ... f3 1 5 Bc5) 1 5 Bxg51 Kxg5 16 Kxh3 and reaches a drawn K & P end·
game.
13 Bd81
f4
14 Be71
Now
we
have Fine's # 142. Notice how the active bishop prevents the
�pawn from advancing beyond its fourth rank.
14 .....
f3t
After 14 ... Kh5 1 5 Bd61 stops the �pawn's advance; after 1 4 ... Kf5 1 5
Bd81 keeps the status quo.
15 Kf2
The correct technique is for the king to stop the fartherst advanced
pawn.
Or 1 5 ... h3, 1 6 Bd6.
15
Kf4
1 6 Bxg5tl
Kxg5
17 Kxf3
Draw.
(B)
2 Bc31
The simplest and best defense. By making sure that he can retain the
h·pawn, White avoids all of the problem decisions discussed earlier.
2
Kd5
3
Kb&
Ke4
4 Kc5
Kf3
5 Kc4
Kxg3
6 Be1tl
The less accurate 6 Bf671 b21 would transpose to the previous variation.
6
.
..
.
.
Kxf4
7 Kxb3
Ke3
Black here is, in effect, a tempo ahead of the game continuation (i.e.
1 ... Kd5), but since White has chosen the most effective defense, he still
draws easily.
8 Kc2
f4
9 Bd2t l
Kf3
10 Kd1
Draw.
Black can draw easily with 10 ... Kg4 and 1 1 ... g5, but has no way of
making progress.
I have spent a considerable amount of time on this endgame because it
contains all the important thematic strategies in the fight of bishop vs.
pawns. Always remember: the bishop must be activated and kept active!
54
Subject #
20:
Pawn(s)
VL
bishop
-
both kings are active
Questions: How important is it that the bishop side has a viable pawn?
Can White win from Diagram 347
Diagram 34
Answers:
If the side with the bishop also has a pawn which can be turned into a
passed pawn, its winning prospects increase significantly. This is so because
the opponent can only stop the passed pawn with his king and this should
give your king + bishop time to vanquish the enemy pawns.
In Diagram 34, W. Radspinner
•
D. Vespo, Indianapolis, 1 977, after
White's 56th move, White has two advantages. Because Black only has two
pawns for the piece, White has a material advantage. Moreover, White's
active king is able to capture Black's g-pawn and this will turn White's
g-pawn into a passed one. Therefore White should have good winning
chances, but a definitive answer cannot be given until
we
calculate the re
sults of the mutual queening races to come. Best play now is:
56
•••••
Kb31
Black also needs passed pawns on the queenside, because the existing
ones can be stopped. If 56 ... Kd3, White wins routinely after 57 Kf5 Kd2
58 Kxg4 e1=Q 59 Bxe 1 t Kxe1
60
Kxf3. Black actually played 56 ... Kd3
in the game and was successful because White ("at the age of 79, tired after
5 hours of play") responded with 57 Be1 77 and was forced to resign after
57
••.
Ke3.
57 Kf5
Kxb2
58 Kxg4
Kxa3
59 Kxf3
b5
60 Kxe2
Each king has been devouring the other's pawns and what we now get is
an old fashioned pawn race where White turns out to be one tampo ahead.
60
b4
61 g4
b3
62 Bd4
b2
63 Bxb2t
Kxb2
64 g5
a5
66
g&
a4
66 g7
83
67 g8=Q
a2
68 Qg7t
l
Kb1
55
We have now a theoretically very important position in the endgame of
Q vs. RP. If White's king would be far away (i.e. h2), this endgame is
drawn. But if the king is close, winning chances become quite real. In our
case, the following rule applies, as cited by Averbakh and Maizelis on page
290 of their book
Pawn Endings:
"White wins if he can get his king to b3
in two moves or to d3, d2 or d1 in one move." The latter situation applies
here and White wins as follows:
69 Qg1t
Kb2
70
Od4tl
Kb1
71 Qb4t
Kc1
After 7 1 ...Ka1 White also plays 72 Qc3t. If 71 ...Kc2 White wins with
72 Oa3 Kb1 73 Qb3t Kc1 17 74 Kd31 a1=Q 75 Oc2 mate. The winning
technique consists of achieving mate through the cooperation of queen and
king.
72 Qc3t
Kb1
73
Kd21
a1=Q
74 Qc2 mate.
Subject
#
21 : Two pawns for the piece, several minor pieces on board
Questions: Who is better in Diagram 357 Why7
Diagram 35
Answers:
• • • g
....... .
••• t .
•
•
& t �l
•
The type of position shown in Diagram 35, Garner- Newsom, USA 1976,
is both common and important. Therefore you always want to evaluate it
correctly. White has two
good
pawns for the piece,
but this is never
enough.
Therefore Black has the advantage. However, White does have
drawing chances because of his sound pawn formation and the fact that
Black's bishop cannot attack White's pawns. It turns out that Black's job
is much easier if he is on move.
Black on move wins easily:
1
.
..
.
.
hxg31
2
hxg3
Na71
3
Ke1
Black is planning to
go
after the vulnerable a-pawn with ... Bc6, Ba4 and
Nb5. Therefore, White's king has to try to reach b2.
3 .
..
..
Bc6
4 Kd1
N
b51
Forcing White to misplace the knight on b1.
56

Black wins.
5 Nb1
6 Kc1
7 Kb2
8 Nd2
Ke71
Be8
Bh5 1 1
Be21
Notice how White's K + N + kingside pawns have been paralyzed and
Black wins by penetrating with his king on the kingside. If White plays
9 a4, that just makes the pawn more vulnerable. Even though Black's
bishop could not attack White's pawns directly in the play above, the fact
that it is an extra piece allowed it to control a lot of other key squares.
White on move has good drawing chances:
1 axb41
The side trying to draw welcomes routine pawn exchanges such as this
one. Moreover, we learned earlier that White cannot allow the isolation of
his a-pawn.
1
. . . . .
axb4
2 g41
Passed pawns must be pushed! Obviously White's hopes come from the
g-
and f-pawns. White cannot yet be sure of drawing, but this clearly is the
way to go.
2
•.••.
3 bxc3
bxc3
Na71
Black must play aggressively if he hopes to succeed. The defensive 2 ...
Ne77 4 Nf3 Bc8 5 Kg31 Ng6 (Otherwise 6 Kh4 and 7 Kg5) 6 Nh4! !
Nxh4 7 Kxh4 allows White to draw since the Black bishop is truly impo
tent and White can shuttle back and forth with his king between g3 and h4.
Black's king never has time to go to the queenside, since then White's king
would penetrate into Black's kingside and actually win.
4 f5
Nb51
5 Nb1
Ka7
Now that White's knight is paralyzed, Black wants to use his bishop to
help the king penetrate on the kingside.
6 Ka3
Bc8
7 Kf4
Kf7
8 Kg5
Kg7
9 f6t
Unfortunately White is in zugzwang. Thus after 9 Kh4 Black wins with
9 ... Kh6! 10 g5t Kg7 etc.
9
• . • • .
Kh7
But not 9 ... Kf7?? 1 0 Kh6 and White's pawns wi ll win.
Black wins.
10 Kh5
Bd7
1 1 g5
BeSt
Black will follow with 1 2 .
.
. Bg6 and win. Thus we saw that with energet·
ic play Black can just -- by one tempo - mobilize his bishop effectively and
thereby win. This example shows how general ly insufficient two pawns are
for a minor piece if the extra piece can be effectively brought into play.
57
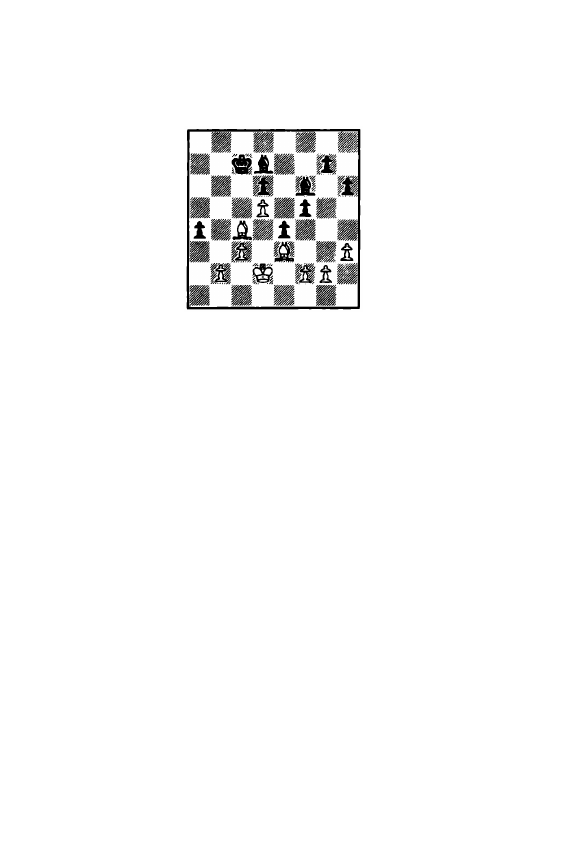
Section 6: Multi-Minor Piece Endgames
Subject # 22: 2 B vs. 2 8, equal material
Questions: What are the respective plans for White and Black in Diagram 367
Should Black accept a draw offer?
Diagram 36
Answers:
Diagram 36 is Leatherman
•
S. McDonald, USA Correspondence 1 977-78
where Black accepted a draw offer. I believe that the agreement to a draw
is reasonable. However, whatever advantage there exists does rest with
Black. There is material equality and White has a pawn majority on the
queenside, whereas Black's is on the kingside. At the moment it is easier
for Black to mobilize his majority than for White to do something with his.
A particular strategic deficiency in White's pawn formation is that his
h·pawn is on h3; this gives Black the opportunity to undermine its support
with a potential ... f4 and ... f3.
Black's immediate play in the position is clear: he'll mobilize his kingside
pawns by playing ... g5 and ... f4 (the latter prepared if required by ... Be5).
White's immediate best plan is not so clear and he can choose from a num
ber of reasonable possibilities: ( 1 ) immediate queenside play by Kc2, fol·
lowed by b3 (or b4); (2) kingside defensive set-up with Ke2, having in mind
f3; (3) kingside defensive set-up with Bf1 , having in mind queenside/central
follow-up with Kc2 and c4. In all cases correct play should lead to a draw.
On an immediate basis it is, however, easier for Black to make the correct
strategic decisions.
Subject # 23: 2 B vs. 2 B, pawn advantage
Questions: What are the main characteristics of the 2 B vs. 2 B endgame?
Shouldn't White be able to win Diagram 37 fairly easily?
Answers:
The endgame of 2 B vs. 2 B is the most symmetrical kind of endgame.
There can't be any talk of having the superior minor piece or the superior
bishop. Each side has the opportunity to control a segment of the board
completely and to get to any square. Each side can work to keep the
status quo withs bishop moves or to try to bring about zugzwang by "losing
a move". In open board positions the two bishops can develop tremendous
offensive power; paradoxically the two bishops also are excellent on defense
58
as they can protect all access squares as well as be able to achieve counter
play.
Diagram 37
I n Diagram 37, U; Andersson
•
R. Byrne, Biel Interzonal 1 976, after
White's 45th move, White is ahead a passed e-pawn. Yet Black is able to
achieve a draw because of a deep understanding of the defensive power of
the two bishops:
45 .....
Kg81
The first correct step is to bring the king closer to the e-pawn. Now 46
e5 is harmless becau.se of 46 ... Bd5 47 Bf5 Kf7.
46 b3
The pawn looks uncomfortable here, but there is no choice since Black
threatened 46 ... b3 fol lowed by ... Bd4 and/or Bc6.
46
•..••
Bd81
According to GM Byrne the only drawing method. The bishop must be
used to prevent White's e-pawn from getting to e7.
47
Kh2
Ba&l
The third key move in a row. Now that Black's king + KB are placed
well enough defensively to cope with the e-pawn, the QB starts looking for
counterplay. The objective is the b-pawn via 48 ... Bd3 and 49 ... Bc2.
48 g4
Bd3
49
Bf5
Kf71 1
Black utilizes the first chance t o ge t his king closer t o the e-pawn.
Faulty is 49
.•.
Bc2? because of 50 BeSt and 51 Bd5. White then has pro
tected everything and his bishops are very active.
50
e5
Be21
51 Bc2
The point of Black's 45th, 46th and 49th moves is best shown off after
51 e6t7 1 Kf6, when the e-pawn has been stopped and Black is sure to cap
ture either the b- or e-pawn.
51 .....
Bf31
On to d5 from where it wil l attack the b-pawn and guard the e6 square.
52 Kg3
Bd5
53
h4
g51
54
h5
Bb&
Black has set up an optimum defensive position and is going to keep the
status quo.
55
Kh3
Bd81
59
56 Bg&t
Kg7!
Also playable is 56 ... Ke6 since there is nothing for White in 57 Bf5t Kf7
58 e6t Bxe6 59 Bxe6t Kxe6. But Black is not about to budge from his
"fortress".
57 Bc2
Kf7
68 Kh2
Bb6
59
Kgl
Kg71
Draw.
Black's bishops have a grip on the position and neither White's king nor
e-pawn can get anywhere, e.g. 60 Be7 Kf7 61 Bf6 Kf81 etc. Attempts at
complications just boomerang for White. GM Byrne gives the following as
one example:
60
Bf571 Bxb3 61 e6 Kf6 62 e7 Bxa4 63 Bg6 Ke61 and it
is Black who has a slight advantage after
64
Bxb4 axb4 65 e8=0 Bxe8
66
Bxe8 b3.
Subject # 24: 2 B vs. B
+
N, equal material
Questions: Why are two bishops superior to bishop + knight or two
knights?
Who is better in Diagram 387
How should White handle this position?
Diagram 38
Answers:
In the first place, two bishops are not
always superior
to B + N or 2 N.
The two bishops may be passively placed or be handicapped by a poor
pawn formation or the other side may have very active pieces or a spatial
advantage. Under such conditions it is even possible that the side with the
bishops stands worse. Nevertheless, in the majority of endgames, having
the two bishops is a tangible advantage. There are two main reasons for
this. Endgame positions tend to be fairly open ones and in such positions
the bishop is the superior minor piece. A pair of bishops can develop tre
mendous power and really rake the board. Moreover, two bishops on ad
joining diagonals have absolute control over the sector that they face.
Therefore, they can both do tremendous damage as well as set up an im
pregnable defense. When you have a
characteristic
two bishops endgame,
never exchange off one of your bishops unless this is sure to increase your
advantage.
Diagram 38 shows the position from B. Till - K. Mann, Pan-American
Intercollegiate Championship 1 983, after Black's 30th move. The character-
SO

istic feature of it is that White has the two bishops versus bishop + knight.
Ever since the queens were exchanged on move 14, the position has been
an endgame. The key changes since then: ( 1 ) All rooks were exchanged,
which I think was a "neutral" development, and (2) White very stupidly
played his h-pawn to h4. This had no positive features at all and two very
negative ones: the g-pawn has been seriously weakened and Black has the
potential of getting a passed h-pawn after a ... g5, hxg5, .. .fxg5, followed by
... h4. I want to stress that pawns should never be moved in the endgame,
unless something positive is accomplished thereby.
In general terms, White has two characteristic advantages in Diagram 38:
the two bishops in a fairly open position and the queenside pawn majority.
This should mean that White has the advantage, though the weakness of the
g-pawn lessens its absolute value. Overall, White has a slight edge and
should run absolutely no risk of losing. Yet he very quickly gets a lost po
sition and loses with.out putting up any kind of a fight. How so? Well, I
have said before that "you wil l lose a won endgame if you do not under
stand what the principles of that particular endgame· are about".
As
we
will see, White loses this superior, "riskless" position, because he does not
have a clue what is important in the coming play:
31 Be4
Nd6
32 Bd3
This retreat is strategically justified if White is playing for a win. After
32 Bd5t Be61
33
Bb4 Bxd5 (33 ... Ke77 34 Bxb7 1 ) White must be satisfied
with the equal opposite color endgame resulting after 34 Bxd6 since 34
cxd57 Nf5 just leads to a new weak pawn on d5.
32
..
.
. .
Bf51
33
Bxf57?
This may not lose, but the two question marks are fully justified
be
cause it is as wrong as could be. White does not realize that he is in a
characteristic, slightly superior "two bishop" endgame and therefore quite
wrongly voluntarily enters an inferior minor piece endgame.
Of course the correct move is 33 Be2, followed by attempting to mo
bilize the queenside pawns. There is no need to worry about 33 ... Bb1 71 be
cause White has 34 a4, whereupon 34 ... Bc271 just loses more time and al
lows 35 c51 Nf5 36 Bc4t Ke7 37 Bd5 with a huge advantage for White.
Note how quickly the combination of the two bishops and queenside ma
jority exerts its strength.
33
.....
Nxf5
Notice how the dynamics of the position have changed: White's remain
ing bishop is impotent for attacking purposes whereas B lack's knight already
menaces White's chronically weak g-pawn. Black already has the advantage,
but with correct defense White should hold.
34 Ba5
There is nothing that White can do to Black and thus his hope must be
that he can prevent Black's plans. Keeping the bishop on the c1-h6 diagon·
al does prevent Black's ... g5, but allows Black's king to infiltrate via c5 and
then br or d4. Unfortunately White's king cannot help out since it is stuck
to protect the g-pawn. Therefore 34 Bel , with the idea of freeing the king
for central support, also is worth considering.
61
34
•••••
Ke&
36 Bb6
F
After 35
. . •
Kd6 White can probably hold with 36 a41 Kc6 37 a5.
36 hxg&
fxg5
37 Bd871
Now White is lost. Clearly he does not understand the pawn color situa
tion. It is imperative to keep Black's kinside pawns on the dark squares
so
that the bishop can attack them and thus create sufficient counterplay.
Therefore mandatory is 37 g41 hxg4 (forced since 37 ... Ng7 allows 38 Bd8! )
38 fxg4 and the vulnerability of Black's e· and g-pawns should give White
sufficient chances for the draw. However, White's king on f3 will have a
much better defensive location than in the game.
37
g4
38 Bc7
Nd41
39 fxg47
Since this is patently hopeless, 39 f4 must be tried. Then after 39 ... exf4
40 Bxf4 White's g-pawn is easily protectable, while 39 ... e4 40 Bb61 Nf5
makes it much harder for Black to infiltrate than in the game, since e4 is
no more available for his pieces.
39
•••••
-
hxg4
From now on the play is easy to understand. White is stuck to protect·
ing the g-pawn and Black's pieces therefore have a free hand in the center
and the queenside. Black's play is thematic in exploiting the features of
the superior m inor piece .
..O b4
41
Bb6
42 Bc7
Kf5
Ke4
The K & P endgame after 42 Bxd4 Kxd4 43 c5 Kd3
44
Ke1 Kc3 45
a3 Kb3 is also quite lost.
42
43 b5
44 cxb6
45 b6
Nc2
axb5
Na31
Nc4
White's queenside pawns now are both paralyzed and vulnerable.
46 Ka2
Kd4
47 Bd8
Kc3
48 Bf6
Kd4
49 Bd8
Na&
50
Bg5
Nc6
51
Bf6
Nb4
52 a3
Nd5
53 Bd8
Nc3t
54 Kf2
Ne4t
55 Kg2
Nd2
56
e4
Nc4
57 Kf2
Kd31
58 Ka1
Ke3
Black could of course immediately ram the e-pawn down White's throat
with
58
...
e4,
59 ... e3,
60
... e2 followed by a knight jump to e3/e5/d2 de·
pending on White's defense.
62
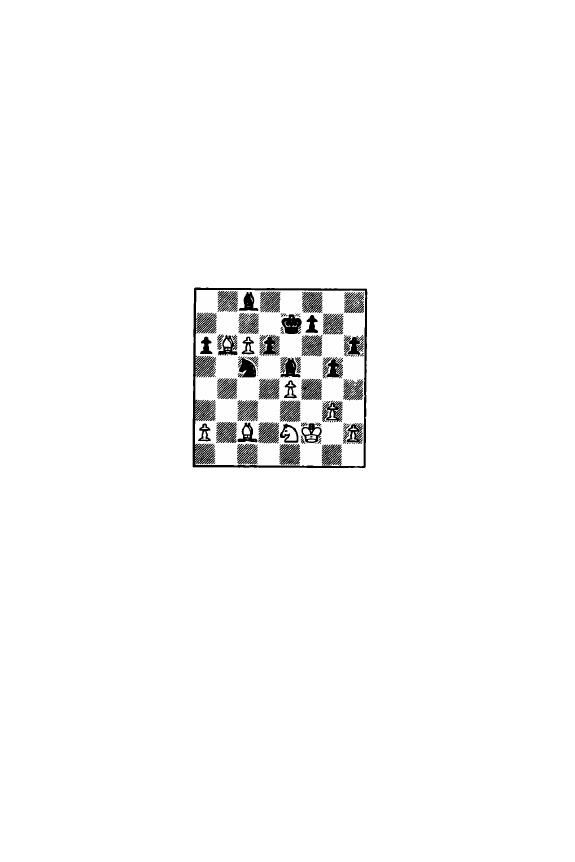
59 Bc7
e4
60 Bb8
Kf3
61 Bc7
e3
62 Kf1
e2t
63 Ke1
Nb2
Resigns
Do note that once White played 39 hxg47 he never had a chance. For
the practical player it is of utmost i mportance to avoid those positions
which are 100% hopeless.
Subject #
25: 2 B + N
VL
2 B + N, equal material
Questions: In the endgames with many minor pieces, what elements are
most important?
What is the thematic play in Diagram 397
How lar�e is White's advantage?
Diagram 39
Answers:
With many minor pieces on the board, the relative "goodness" or "bad
ness" of one of these becomes less important. The key element in such
endgames becomes pawn structure. The important point in Diagram 39 -
a 1 976 Lemke position - is that White has a passed pawn deep in Black's
territory and this pawn is secure. Therefore White has the advantage.
Black's pieces are well placed in general, hold back the c-pawn well enough
and Black's pawn formation is satisfactory. With careful and good play
Black should be able to draw. A logical sequence now is:
1 Ke3
Centralizing the king and preparing 2 Nd4.
1 ....
h51
Getting the kingside pawns going to obtain some counterplay and at
least bring about the routine exchange of some pawns. Remember that the
side wanting to draw always welcomes routine pawn exchanges. Instead,
inferior is 1 ...Ne671 because it allows White's KB to enter the fray via 2
Bb31 Nd8 3 Bd51.
2 Nd4
h4
3 Nf31
Here 3 gxh4 allows 3 ... g41 followed by 4 ... Bxh2. And 3 c771 hxg31
4 Nc6t J<e8 leads to less than .nothing since neither 5 Nxe57 nor 5 Bxc57
63
are playable because of 5 ... gxh2 .
. 3 .....
hxg3
4 hxg3
8xg31
Black is very happy to exchange pawns whenever he can do this for
"nothing'·. Risky is 4 ... fS?I 5 Nxe5 fxe5, since with pawns on both sides,
White's bishop pair can become very dangerous.
5 Nxg5
Be1
6 Nf3
8c3
7 Nd4
8xd4t
Undesirable, yet unavoidable since White was threatening 8 Nf5t. How·
ever, the reduced amount of material remaining should allow Black to draw.
8 Kxd4
Ne6t
9 Kc31
After 9 Kc4 Black can draw with the tactical 9
.
.. Nd81 1 0 Ba4 BeSt 1 1
Kb4 NxcStl 1 2 BxcS Bxa2 and Black will exchange off White's last pawn,
e.g. 13 Bd5 Bb1 followed by 14 ... f5 or 13 Kc3 BeS followed by 14 ... f5,
or 13 Bf2 KeSI
9
10 Kb4
1 1 8e3
Ng51
Nf31
Ne5
White has a continuing slight advantage, but Black's position is sufficient·
ly stable to hold.
Section 6:
8
+ Wrong RP Endgames
Subject * 26: The basic position in 8 + wrong RP endgames
Question: What positions in the
8
+ wrong RP endgame are drawn?
Diagram 40
Answer:
The basic position is shown in Diagram 40. When we speak of the
wrong B and RP combination we mean that the bishop cannot cover the
queening square of his RP .. here the h·pawn. For this situation the follow·
ing statement is 100% correct:
Endgames of the lone king against a rook
pawn and the wrong color bishop are always drawn if the king can reach
the queening square.
Here Black can get to h8 and the position is drawn.
For instance, 1 Kh4 Kg7 2 Kg5 Kh7 3 Bf5t l<g7 4 hSt Kh8 5 KgS Kg8
S BeSt Kh8 7 h7 stalemate. White can stalemate Black in many ways but
cannot win as long as Black always returns to the safety of the h8 corner.
64
It does not even matter whether White has one or two or more h-pawns.
But note that for Black the critical part is that he must be able to reach
hB. If i n Diagram 40 we put White's bishop on f7 and White's king on fB,
then White to move wins with 1 KgB! Kg5 2 Kg7. However, if it is Black's
move he draws with 1 ... Kh7 1 followed by 2 ... Kh8.
Because Diagram 40 is such a guaranteed draw, you always want to aim
for it if you have an inferior endgame. Also remember that Black does not
want to have any pawns on the board which could bring about a zugzwang
position. An h-pawn is never a problem, but a g-pawn or a combination of
g- and h-pawns could be dangerous in certain positions.
Subject
#
27: Looking for the opportunity to discover the drawing B
+
wrong RP endgame
Questions: Does White have drawing chances in Diagram 4 1 ?
If so, what i s the strategic theme involved?
Diagram 41
Answers:
Diagram 41 shows the position from Roche
•
B. Altschuler, World Open,
New York 1976, aft2r White's 40th move. We can quickly see that Black's
passed e-pawn will cost White his bishop. Yet it turns out that White can
draw, because of two factors: ( 1 ) Black only has one pawn left, and (2)
White can bring about a drawn B + wrong RP endgame. Of course, at the
moment Black has a g-pawn and not an h-pawn, but as we wil l see White
has the opportunity for a bit of magic.
Let us follow the game continuation:
40 .....
41 Bxe3
e3
Bxe3!
The only way to create problems for White is to take the g5 square
away from his king. After 41 ... Kxe3?! White can draw by the simple
method of capturing Black's pawn: 42 Kg4 Be7 43 h4 Ke4 44 h5 g5 45
h6 Ke5 46 h7 Bf6 47 hB=Q BxhB 48 Kxg5.
42 h41
The correct move which should lead to the draw. White prevents Black's
potential ... g5 and prepares his drawing maneuver. This will consist of
forcing Black's g-pawn to become an h-pawn.
65

42 .....
Ke4
43 Kh31
The clearest way to achieve White's goal. Instead, in the game White
played the truly horrible 43 h57?, enabling Black's g-pawn to remain on the
board as a winning g-pawn : 43 ... g5
44
Kg4 Ke5! 45 h6 Kf6 46 Kh5 Kf5
(Black also wins after 46 ... Kf7 or a tempo move with the bishop on the c l ·
f4 diagonal. After the text Black's g-pawn i s safe for a l l time and Black's
extra piece will force White's king into zugzwang position leading to the
loss of both pawns. ) 47 h7 Bd4 48 Kh6 Bc3 49 Kh5 Bg7 1 50 g3 Bc3
51 Kh6 Bd4 52 Kh5 Bg7 1 53 g4t Kf4 54 Kg6 Bc3 55 Kh5 Bd41 White
resigns.
43
Kf5
44 g4t
Kf6
45 g5t l
Kf5
The K & P endgame after 45 ... Bxg5 46 hxg5t Kxg5 47 Kg3! is drawn
because White has the opposition.
46 h51 1
This i s the "magic" part of White's defense. Black's g·pawn is
forced
to become a non·winning h·pawn.
46
.
.
.
.
.
gxh5
47 Kg2
Draw
White has reached the Diagram 40 type position and is safe.
Principles/Rules of Thumb For Practical Endgame Play
Minor Piece Endgames
( 1 ) The bishop is the superior piece in open position, especially where
there are pawns on both sides of the board.
(2) The bishop is effective in coping with far advanced passed pawns be·
cause he can stop the pawn even from far away.
(3)
The bishop can "lose a move"; what this means is that a bishop can
maneuver on its important diagonal back and forth and can choose the mo
ment that it returns to
the
key square. This is a very important strategy in
zugzwang type positions.
(4) IN B + P vs. B positions, if the defensive king can get to any square in
front of the pawn from which it cannot be chased away, the position is a
sure draw. If the king cannot achieve this, the risk of a loss is great.
(5) In N + P vs. N endgames, if the defensive king can get in front of the
pawn, then all normal positions are drawn.
(6) In N + P vs. N endgames, if the NP reaches the 7th rank in safety and
the defensive king is not in front of it, the position is an assured win.
(7) The RP is the most difficult pawn for the knight to stop; the second
most difficult pawn for the knight to stop is the NP.
(8) The knight by itself can never gain or lose a move and thus can not
achieve zugzwang position. Every new knight move leads to an inherently
new position.
66

(9) The knight is the supreme blockader. I n cluttered or blockaded posi·
tions, it is the superior minor piece.
( 1 0) I n minor piece endings where each side has an outside passed pawn,
you want to get your pawn going as quickly as possible.
( 1 1 ) If the bishop's scope is hindered by a central pawn on the same color
as the bishop and the bishop's help is needed to protect it, then the bishop
is "a bad bishop". If more pawns on the same color as the bishop decrease
its scope further while requiring its defensive help, then the bishop becomes
"very bad". Such "very bad bishops" endgames are lost most of the time.
( 1 2) Where the bishop has to cope with connected passed pawns, the
bishop wants to get the pawns on squares opposite its color so that it can
blockade them. On the other hand, the pawns want to advance in unison
and keep on the same color as the bishop.
( 1 3) A bishop or a knight is worth three pawns.
( 1 4) As the amount of material on the board decreases, the power of the
pawns increases.
( 1 5) I n endgames of bishop vs. pawns, the bishop must be activated and
kept active.
( 1 6) If the only material on the board is bishop vs.
three isolated
pawns,
the pawns will win if one pawn has reached the sixth rank in security.
( 1 7) If the only material on the board is bishop vs.
three connected
pawns,
a win is possible
only
if all pawns can safely cross the fourth rank, i.e. be
on the fifth rank or further.
( 1 8) In the endgame of bishop vs. pawns, if the bishop side has a pawn
which has prospects of becoming passed, this factor significantly increases
that side's chances.
( 1 9) In normal positions, two pawns -· even if they are "good" ·· are never
sufficient compensation for a minor piece.
(20) Generally, in endgames the two bishops are superior to two knights or
B + N. There are two reasons for th is: ( 1 ) endgame positions tend to be
open ones, and (2) the two bishops on adjoining diagonals have total
control over the sector that they face. Never voluntarily exchange off one
of your bishops unless you increase your advantage thereby.
(21 ) Endgames of the lone king against a rook pawn and the wrong color
bishop (the bishop does not cover the pawn's queening square) are always
drawn if the king can reach the queening square.
(22) In the above endgame, the defending side does not want to have
knight pawn (s) or a combination of NP + RP since these canditions could
lead to zugzwang positions where the stronger side's RP is turned into a
winning NP.
(23) Where the opponent has a bishop + NP, but the bishop is the wrong
color for the adjoining RP, and you have a RP or a NP + RP combination,
look for the opportunity to turn your opponent's NP into a RP using the
method of Diagram
41.
67
Chapter
3
Rook and Pawn Endgames
Section 1 : Material Advantage
Subject #
28: R + 2 P vs.
R
+ P, pawns on same side
Questions: How easy is it for Black to draw Diagram 42?
What is thematic play for both sides?
Diagram 42
An;wers:
The general rule of thumb is that "normal" positions with a one
pawn advantage where all pawns are on one side are drawn. This should be
particularly true for endgames where the pawn reduction is down to R + 2
P vs. R + P. However, as such normal endgames go, White has a favorable
case in Diagram 42, L. Shamkovich
•
M. Grinsburg, Maryland 1 976, after
White's 72nd move. White's pawns are well mobilized, his king active and
the rook flexibly and actively placed. However, Black's K + R + pawn also
stand well and the position is a theoretical draw.
Black's objective must be to prevent any further progress by White's
king or pawns. Therefore, wrong is the "active" 72 ... Rb1 7 because of 73
Ra7t and Black has no satisfactory king move: (a) 73 ... KfB 74 f5l Rb6
75 RaBt Kg7 76 f6t Kh7 77 RfBI Rb7 7B ReB Rb6 7B Re7 KgB BO
Kh6l RbB B1 Ra7 ReB B2 Ra51 RbB (B2 ... ReB is also met by B3 e6! )
B3 e61 fxe6 84 Kg6 and White wins. (b) 73 ... Ke6 74 f5t ! Kxe5 75
Re7tl l<d6 76 Rxf7. White has reached the Lucena position and wins.
See Subject
#
29 for a demonstration of this.
For preventing the advance of the f·pawn Black's rook is already on the
proper rank and therefore he wants to keep the status quo with 72 ... Rc5!.
Then White cannot progress, e.g. 73 Ra7t KfB 74 Kf6 (74 Ra6 Ke7 ! ) 74 ...
Rc6t 75 Kf5 Rc5 76 Kg5 Rb5l. The attempt to infiltrate with the king
by sacrificing the f-pawn with 77 f517 Rxe5 7B Kf6 leads to a theoretically
drawn position after 7B ... Re1 ! 79 Rxf7t l<gB!. See Subject
#
29 for a
demonstration of this.
However, in the game Black committed the cardinal error of:
72
...
.
.
f6t71
Black is being fancy when the simple move wi ll do. He expects the
routine 73 Kf5? fxe5 74 fxe5, whereupon Black plays 74 ... Rb61 and
68

having reached Philidor's position, has a routine draw. But White has a non
routine, active king move.
73 Kg61
fxe5
74 f5
Rb6t
75 Kg7
Rb1
Black's only hope is to activate his rook and pray that the passed e-pawn
will give chances for a draw. The immediate 75 ... e4? loses the pawn after
76 Ra4! in a position where Black's king wil l be kept away from the
f-pawn's queening square. White therefore will reach the winning Lucena
position.
76 f6t
Ke6
77 Re8t7
Here White reciprocates Black's error. He places the rook so that it
watches the e-pawn, but the resultant disadvantage is that the rook gets in
the way of the king. Subsequently GM Shamkovich demonstrated the fol
lowing winning method : 77 Ra6t ! (keeping the rook active) 77 ... Kf5 (equi
valent is 77 ... Kd5) 78 f7 Rb7 79 Rf6t Kg5 (or 79 ... Ke4
80
Kg6 Rxf7
81 Rxf7 and White's king will get back in time to stop the pawn.)
80
Re6
Kf5 81 ReS e4 82 Kg8 Rxf7 83 Kxf7 Kf4 84 Ke6! and White wins as
later in the game.
77
. • • • •
78 f7
Kf5
Rb777
This passive retreat condems the rook and therefore Black to quick and
certain death. The rook has to be kept active with 78 ... Rg1 t! 79 Kf8
Rh 1 1 (Shamkovich ). If then 80 Ke7,
80
... Rh71 and while White untangles
his rook and king so that the f·pawn can advance, Black's king + pawn
move forward sufficiently to achieve the draw.
79 Kg8
Rxf7
80 Kxf7
e4
81 Re711
For White to win, his king must get back quickly to assist in stopping
the pawn. This fine tempo move forces Black's king to give way so that
White's can rush back. It is like an echo of the famous 1 928 study by
Reti (White: Ke7, Rd4; Black: Ke5 d5). White to move and win: 1 Rd2!
d4 2 Rd1 1 1 Kd5 3 Kd71 Kc4 4 Ke6 and White wins.
81
Kf4
82 Ke61
e3
83 Kd5
Kf3
84
Kd4
Resigns.
White catches and wins the e-pawn after 84 ..
.
e2 85 Kd3.
Subject
# 29:
One pawn advantage, pawns on
both sides
Questions: Is Diagram 43 won for White?
What is thematic play for both sides?
In general, how should White play such positions?
Answers:
To discuss the important subject of correct play ("technique") in A & P
endgames I will use as the starting point the position shown in Diagram 43
on the next page. This is E. Lomer
·
Sahlender, West German Team Cham-
69
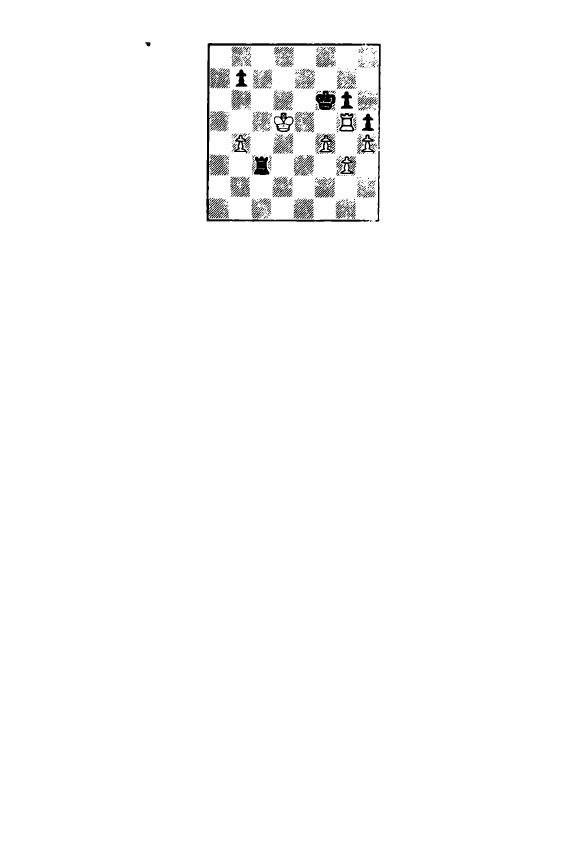
Diagram 43
pionship 1984, after Black's 53rd move. The result of the game was most
important because White needed to win for his team to tie the match. Un
fortunately, it is never enough just to
want
to win. To actually achieve this
you must know how to try to get the most out of the particular position.
A quick look at Diagram 43 should be enough to determine that White's
prospects for a win must be bright. His pluses are clear: he is up a good
pawn, his rook both securely protects the kingside pawns while keeping
Black's g-pawn under attack and his king has a good chance of getting at
Black's b-pawn. Yet there also are factors which make the win difficult:
the lack of mobility of White's kingside pawns, Black's rook's active loca
tion and very importantly, the considerable reduction in the number of
pawns remaining. The latter factor means that Black only has to worry
about protecting three pawns and White only has four pawns to try to win
with. Moreover, there is the real risk that White wil l be left with a A + P
vs. A endgame whic is theoretical ly drawn.
Is our starting position a theoretical win for White? More than thirty
hours of analysis has led me to think "yes"
··
yet there is one possible sub
variation where matters are not absolutely clear. Someone who is writing a
definitive theoretical treatise on A & P endgames would need to be 100%
sure whether White has a forced win. Yet the situation is different for the
practical player. If you are White, you want to do everything that is logi
cal to do in order to win. If you are Black, you want to put up the best
defense possible
··
and whatever wil l be, will be.
The starting position will be approached from White's viewpoint. But,
of course, throughout I will give Black's best defenses and explain the
reasons thereof.
To win White will have to come up with a definitive, correct plan.
Nevertheless, the first and overriding requirement is never to do anything
which is obviously wrong.
My discussion will first cover the wrong approaches; the correct method
will be presented last and by then it will be much easier to appreciate its
logic.
The specific parts will be the actual game continuation, Mr. Lamer's
suggested winning plan and my suggested winning plan.
Part I : The Game Continuation
=
The Wrong Way
70
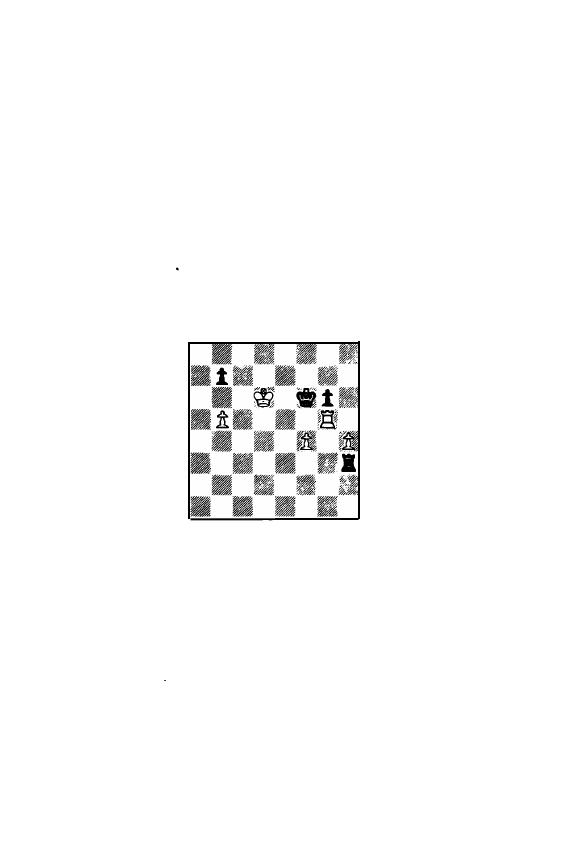
54 g477
A move that must be labeled "criminal": White not only quite unneces
sarily exchanges off a pawn (something which as a general principle the side
up material does not want to do), but, moreover, as a direct result, turns
his completely secure kingside into shambles. It is a move whose logic is
impossible to understand. Please, never ever play anything like itl After
the text move, White does not have the slightest winning chances.
54
.
. . . . ·
hxg4
55
Rxg4
Rc7
Good enough, but even stronger, as pointed out by Mr. Lamer is 55 ... b5!
with the threat of 56 ... Rc4. After 55 ... b51 White does not have the slightest
advantage and must aim for the draw with 56 Rg5 and 57 h5 or 56 f5
(56 ... gxf5 57 Rf4; 56 ... Kxf5 57 Rg5t followed by 58 Kd6).
j
Diagram
44
56 b5
Rc1
57 Kd&
Rc3
58
Rg5
Rh3
59
Rg4
Kf5
60 Rg5t
Kf&
Drew
The mutual queening race after 61 Kc7 Rxh4 62 Kxb7 Rxf4 63 Rg1
Rb4
64
b& g5 65 Kc7 g4 b7 Kg5 leads to an endgame of king vs. king.
Part I I : Mr. Lamer's Analysis
=
The Wong Way
54 f57
According to Mr. Lamer's analysis this move leads to a win for White,
but as we will see this is not so. I call it the "brute force" method. White
sacrifices a pawn on the kingside so that his rook can penetrate into Black's
queenside. As a general principle, it is the kind of move/variation which
should only be used if more normal methods are insufficient. The practical
dangers associated with such a plan are considerable: not on ly do two of
White's pawns disappear, but Black's f-pawn is turned into a passed pawn
and thus into potential counterplay. Therefore, be very careful about exe
cuting such a plan. Do it only if,
( 1 )
you have analyzed it to be a
1 00%
certain win, or (2) all the normal approaches are obviously without pros
pects.
Analyzing this continuation will, however, give us the opportunity to
learn much about the very important subject of mutual queening races.
54
. .
.
.
.
gxf5
71
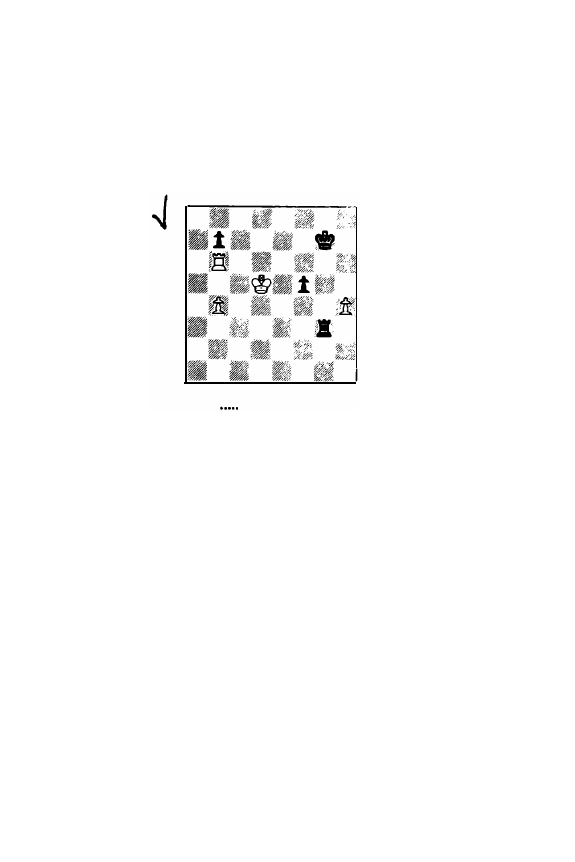
55 Rxh5
Rxg3
56 Rh&t
After the direct 56 Rh7?1 Black can mobilize the passed f-pawn immed
iately by 56
• . .
f41. Black then has an easy draw, e.g. 57 Rxb7 f31 or 57 Ke4
Rb31 58 Rxb7 f3 etc.
56
..
.
..
Kg7
This unpleasant retreat is forced since 56 ... Rg67? 57 Rxg6t Kxg6 58
Ke51 allows a K & P endgame where White ·· having the outside passed
pawn •· wins easily.
57 Rb&
Diagram 45
57
Rh3!
The plan of winning White's h-pawn while retaining the f-pawn is both
logical and good, though Black must be careful about the method chosen.
Inferior is 57 ... Rg471 (suggested by Mr. Lomer) because then White has
58 h51.
Black also can play the immediate 57 ... f4. Mr. Lomer states that this
loses because of "58 Rxb7t followed by 59 Ke4". Yet if we continue the
analysis (after 58 Rxb7t Kf6 59 Ke4) we find that Black is O.K. : 59 .. .f31
60
Ke3 Rh3! 61 Rh7 f2t ! ! 62 Kxf2 Rb31 63 Rb7 Rh3!
64
b5 Rxh4
65 b6 Ke6. The key in such a variation is that White's king is cut off from
his only remaining pawn by Black's rook while Black's king can get close
enough to the b-pawn to help stop it.
58 Rxb7t
If instead White plays to eliminate Black's f-pawn by 58 Ke5 Rxh4 59
Kxf5, then Black's king gets back in time after 59 ... Kf71 60 Rxb7t Ke8
followed by 61 ... Kd8. Such variations show up one of the negatives in
Diagram 43: the risk that he will wind up with an unwinnable R + P vs. R
endgame.
58 .....
59 b5
Kg&
Rxh4
Black's f-pawn and king combination are placed well enough so that in
this mutual queening race Black has a comfortable theoretical draw. Yet,
as we shall see, it is quite possible to misplay this endgame.
60 Kc5
If
60
b6 Black has 60 ... Rb4. The idea of the text therefore is to prevent
Black from immediately placing his rook behind White's pawn.
72
60
.....
Rh1
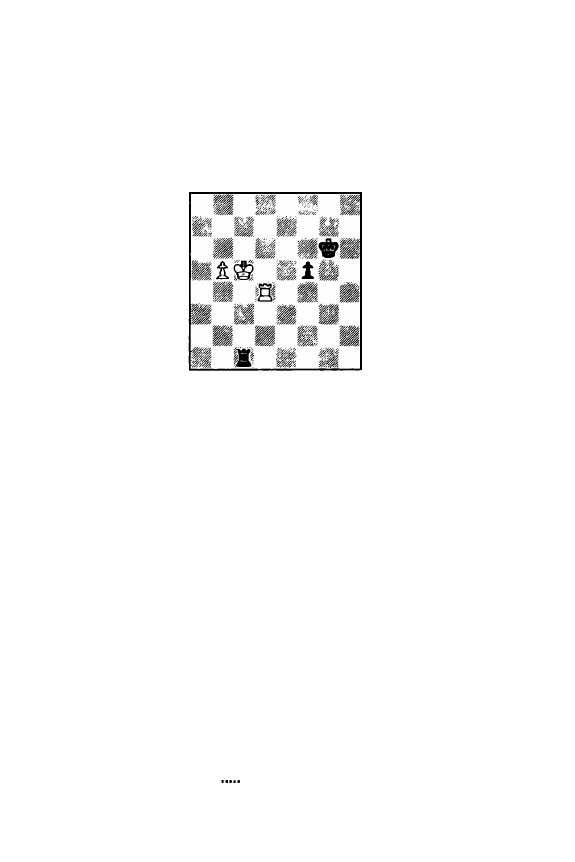
Since Black's rook can prevent White's pawn from queening either from
the back (b1 ) or side (hB), there is no need yet to determine the rook's lo
cation. Therefore the thematic move is to immediately get the pawn going
with
60
.
.
. f41.
61 Rd7
Rb1
The accurate move here is 61 ... Rc1 t !, followed by 62 ... f4.
62 Rd4
Rc1 t?
Not only inconsistent but finally a critical loss of time. In order is 62 ...
Kg51. Then after 63 b6 f4
64
Rb4 Rxb4 65 Kxb4 f3 both sides queen.
I
Diagram 46
63 Kd5?
According to Mr. Lamer White now wins. But what on earth can be the
point of the text move? Isn't the idea behind 62 Rd4 rook interference
with
63
Rc4? White in fact wins after 63 Rc41 :
63
.
.
. Re1 (or 63 ... Rb1
64
b6
Kg5 65 R b4)
64
b6 Kg5 65 b7 ReB 66 Kb6 RbB 67 ReB! Rxb7t
68
Kxb7 f4 69 Kc6! f3 70 Kd51 Kf4 71 Kd41 f2 72 RfBt Kg3 73 Ke3.
63 .
.
.
.
.
Kg5
Mr. Lomer completes his analysis here with 63 ... f4(??)
64
b6 f3 65 b7
f2 66 bB=Q f1=0 67 OgBt and White wins. But this is irrelevant since
White has
64
Rxf4 and, moreover, there is no reason for Black to allow
White's !>-pawn to queen.
64 b6
f41
Remember that passed pawns must be pushed!
65 Rb4
Or 65 b7 Rb1 66 Kc6 f3 67 RdB Kf4! 6B bB=Q RxbB 69 RxbB f2
70 Kd5 Ke3 with a draw.
66 .....
66 Kc6
67 Kd7
Rd1 t l
Rc1 t l
After 6 7 Kb5 f3 6B b7?? f 2 69 bB=Q f1 =0t i t i s Black who queens
with check and thereby starts the winning attack.
67 .....
Rd1 t
68 Ke7
Re1 t
69 Kd7
After 69 Kf7 f3 70 b7?? f2
69
71 bB=O f1 =Qt
Rd1 t
Rc1t
f3
72 KgB Og21 1 Black wins.
70 Kc7
71 Kb8
Draw.
73

And so with a perfect defense Black is able to draw from the position
that Mr. Lamer abandons as a simple win for White. I have gone into con·
siderable detail to demonstrate how easy it is to misplay (and misanalyze)
a position which theoretically is quite drawn. Each side, throughout, must
try to mobilize its passed pawn as rapidly as possible. Moreover, the effort
to stop the enemy pawn must be as efficient
as
possible. In such positions
it is quite common that one tempo makes the difference between drawing
and losing.
Part I l l : The Correct Method
In most positions you have the choice of immediately embarking on
what I call a "grand plan" or on what I call a "simple plan". The grand
plan is the definitive and specific method or variation at the end of which
you have achieved your objective. Sounds quite straightforward, yet in a
real life situation it is not easy to come up with the correct plan. Both the
game continuation and Mr. Lamer's suggested variation are examples of
grand plans which were incorrect.
Yet very often there is a continuation which is easy to see and execute.
Therefore, I call it a "simple plan". You always want to first look whether
such an approach is not possible in your position. It should be fairly ob
vious that in Diagram 43 Black's rook is on its ideal square. By being on
the c·file it prevents White's king from crossing over to the queenside to get
at Black's b-pawn, and, specifically, from c3 the rook is attacking White's
g-pawn. If White can - for nothing •· chase Black's rook away from c3, is
this not the only logical starting move? Therefore White plays:
54 Kd41
At the very least Black now has to make a series of most unpleasant de·
cisions. Should he keep the rook active by keeping it trained on g3?
Should he prevent White's king from crossing the c·file? And if so, should
he position the rook offensively or defensively? The correct answer wil l
not appear without a tremendous amount of specific analysis. Most likely
Black is lost no matter what he plays. Yet some variations turn out to be
quite hopeless, whereas others present at least some hope. But even if in
theory there would be a defense, in over-the-board play it would be very
difficult to find this. Therefore the type of move exemplified by 54 Kd41
is always the right way to start, because it offers Black the chance to go
wrong in many ways. And note that White, if he wants, can always return
to the starting position by just playing the king back to d5.
Let us now look at Black's logical responses.
A)
54
•.•••
Rb3
(See
Diagram 47 at the top of the next page)
Advantage of plan: rook keeps up the attack on the g-pawn
Disadvantage of plan: White's king is allowed to cross the c-file to get at
Black's b-pawn
55 Kc5
b&tl
The only move worth considering. Otherwise White wins easily with
56 b5 and 57 Kb6.
56 Kb6
Rb1
74
Diagram 47
After 54 ... Rb3
The only rational alternative is 56 ... Kf7, but then White wins easily by
exchanging pawns on the kingside as follows: 57 f51 gxf5 58 Rxf5t Kg6
59 Rg5t Kh6 60 g41 hxg4 61 Rxg4 Kh5 62 Rf4. White's rook protects
both his h· and b-pawns and White's king captures Black's pawn for an easy
win.
57 f51
We shall see in a moment why this breakthrough - ineffective in Part I I
••
is decisive here.
57
•••••
gxf5
58 Rxh5
Now we can compare the results of the same breakthrough as was played
in Part I I. We see that here: ( 1 ) White is not sacrificing anything, (2) White
has a sound passed h·pawn, and (3) White's king wi ll capture Black's b-pawn
the moment Black's rook leaves the b-file. Therefore the position
••
with
White up a sound pawn
••
rnust be an assured win.
White's specific plan is also clear: he will exchange his g-pawn for Black's
f-pawn, thereby positioning his rook for defense of both pawns. Then
White's king will capture Black's b-pawn for free.
58
••••.
Rb3
69 Rg51
Since White has the clear winning plan described above, it is foolish to
complicate matters by playing 59 Rh6t71. After the text move, 59 ... Ke6 is
easily met by
60
g4 f4 61 Rf5 f3 62 h5.
59
White wins.
60 g41
61 Rxg4
62 Rc4
Rb1
fxg4
Kf5
With both of White's pawns safe,
63
Kxb6 will give White a two pawn
advantage in a position which is both theoretically and in practice an easy
win.
Hindsight tells us that the defense with 54
. .
. Rb3 offers Black no real
hope for a successful defense.
B )
54
.•...
Rc1
(See Diagram 48 on the next page)
75
Diagram 48
Advantages of plan: ( 1 ) Black prevents White's king from reaching the
queens ide.
(2) Black's rook is kept generally active.
Disadvantage of plan : The immediate attack on White's g·pawn is relieved.
55 Rb6
Since White's king can not get to the queenside, the rook must do so.
This direct way is the correct way, since again 55 f571 increases Black's
drawing prospects: 55 ... gxf5 56 Rxh5 b51 57 Rh6t Kg7 58 Rb6 Rc4t
59 Ke5 f41
60
gxf4 Rxb4. The basic endgame of R + h- and f-pawns vs.
R is a theoretical draw with the defending king placed in front of the
pawns as here. Moreover, there is some chance that Black's b-pawn can be
of use.
56 .....
Rg1 1
This is the basic point behind keeping the rook active with 54 ... Rc1 . The
play after the defensive 55 ... Rc7 will be discussed in Part I l l
-
C, where
Black continues with 54
.
.
.
Rc7.
·
56 Ke4!
With pawns on both sides of the board, White must pay total attention
to both sides. The point of the text move is to prevent the activation of
Black's king by denying him access to the important f5 square.
Black again has a choice of defenses: to return his rook to defend the
b-pawn or to trade his b-pawn for White's g-pawn. I shall consider each of
these possibilities.
( 1 )
56 .....
Re1t71
Diagram 49
After 56 ... Re1
76
After chasing White's king back to the kingside, Black will defend his
b-pawn. Though there appears much logic behind such a plan it will fail
because White's king + rook will be left much more active than their Black
counterparts.
57 Kf3
Re7
58 g41
With this pawn break White activates his king for kingside play. Black
has nothing better than to capture.
58
• • • • •
hxg4t
69 Kxg4
Already the consequences of Black's 56th move are clear: White's rook
and king are active and the extra pawn on the kingside will be turned into
a passer.
59
Rd7
60 Rb6t
Kg7
61 h51
Most likely 61 f5 is also good enough, but since a passed RP is generally
the most difficult pawn to promote in a R + P endgame, it is so much safer
to create a passed f-pawn instead.
61
gxh5t
Rd5t
Rd7
Rd5t
Rd7
62 Kxh5
63 Kg4
64 Kg5
66 f5
66 Rb51
White does need a definitive plan of how to progress decisively from his
marvelous position. The text move aims to get the rook to the 7th rank.
Since Black has no counterplay, White is assured of achieving his plan.
66
Kf7
01
Rc51
Kf8
68 b5
Rg7t
If Black does nothing, White will play 69 b6 followed by 70 Rc7. If
Black's king heads for the queenside, then of course White's f-pawn queens.
69 Kf6
Rf7t
70 Ke6
Re7t
71 Kd6
Re1
71 ... Rf7 leads to a lost K & P endgame after 72 ReSt Kg7 73 Rc7.
72 ReSt
Kf7
73 Rc7t
Kf6
74 Rxb7
Rd1 t
Even more hopeless is 74 ... Kxf5 75 Rf7t Kg6 76 Rf2 with Black's
king horribly cut off.
White wins.
75 Kc5
76 Rd71
77 Kc6
Rf1
Rxf5t
Black's king is still cut off from the pawn and White wi ll achieve the
thematic Lucena position and therefore win. The continuation could be:
77 ... Ke6 78 Rd4 Rf1 79 b6 Rcl t 80 Kb7 Ke7 81 KbB Rb1 82 b7 Rcl
77
(If 82 ... Rc1,
83
Ra4 followed by 84 Ka7) 83 Ka7 Ra1 t 84 Kb6 Rb1 t
85 Kc6 Rc1 t 86 Kb51 Rb1 t 87 Rb4.
From the above we see that Black cannot survive a position with a pas·
sive rook if White's rook and king are active. The fact that the ultimate
win takes a lot of moves is irrelevant, because there is the absolute certain·
ty of White's win.
(2)
56
. • . . .
Rxg3
Diagram
50
Though Black is, of course, happy enough to snip off White's g-pawn,
this by itself is of no great shakes since Black's kingside pawns remain im·
mobile. The great value of the text move is that Black's rook is kept active.
Always remember that the
key
principle in playing R & P endgames is:
activate your rook and keep it active! This applies equally well whether
you are striving to win or laboring to draw.
67 Rb6t
Kf7
The attempt to come over to the queenside with 57 ... Ke7 58 Rxb7t
Kd6 leaves the kingside too vulnerable after 59 Rb6t �7
60
Rb5t with
the threat 61 Rg5.
58
Rxb7t
Ke6
Black's king should prefer e6 over f6 because from here the king safe·
guards d5 and thus prevents the White king incursion via that square.
59
Rb6t
Kf7
60 b6
Rb31
The only chance for defending is to activate the rook. Notice that by
advancing his pawn with the rook in the clumsy in·front·of·the·pawn loca
tion, White has given Black's rook more scope
behind
White's pawn -- spe
cifically the important b4 square.
Black has no chances at all if he goes for White's h-pawn because that
would deactivate the rook too long:
60
... Rh371 61 Rc61 Rxh4 (60 ... Rb3
is now too late because White has 62 b61.) 62 Ke51 Rh1 63 Rc7t l<e8
64
b6 Kd8 65 Rg71 Rb1 66 Rxg6 and by having two good passed pawns
White's win is simple enough. Note that 66 ... Rb5t 67 Kd4 Rb4t allows
68
Kc61 Rxf4 69 Rg8t 14:J7 70 b7.
After
60
.
.
.
Rb3 White must make a fundamental choice: advance the
b-pawn without help from the king or to rush the king over to the queen
side and abandon the kingside. There is no way to make the correct deci
sion based on "intuition". Instead, a tremendous amount of actual research
78
is required to come up with the truth. I shall take a detailed look at both
alternatives, starting with the "safer" one.
(a)
61 Rb8
Diagram 51
Since White's rook is in front of his pawn, the only way to clear the way
is to first advance the rook.
61
. . . . .
Ke6
62 b61
As is readi ly apparent, Black's king and rook stand very well and there
fore to make progress White must mobilize his passed pawn.
62
.
....
Rb4t
63 Ke3
Kd7
The king must help stop the pawn since a rook check with 63 ... Rb3t71
just liberates White's king. Moreover, Black cannot play the more active
looking
63
.
.. Kd671 because of
64
Rg81, e.g.
64
... Rb3t 65 Kd4 Rg4t 66
Kc3 Rxf4 67 b7.
64 b71
Obviously the pawn will not promote but will sacrifice itself so that
White can get at Black's kingside. Since any Black rook move along the
b-file allows White's king to penetrate into Black's position, his king must
come over. Yet that will have the obvious disadvantage of taking it far
away from the kingside.
64 .
.
.
. .
Kc7
65 Rg8
Kxb7
Forced since the "more desirable" 65 ... Rxb77 allows a lost K & P end
game after 66 Rg7tl.
66 Rxg6
The queenside has been liquidated so that the decision will be made on
the kingside. Black's drawing chances come from the fact that if his king
can quickly get back to the kingside, that even if White wins the h-pawn for
nothing, the position is a
theoretical
draw. A theoretical draw, yes, but in
real life to defend perfectly the rook vs. rook + h- and f-pawn endgame is a
most arduous and unpleasant task and even grandmasters lose it half the
time.
66 .....
Kc71
The king must head toward the f-pawn. Instead 66 ... Rb3t7 leads to an
inferior version of the main line continuation, because Black's king remains
79
too far away.
Dl
Re6
White on his part tries to prevent Black's king from crossing into the
kingisde. Instead, 67 Rg5 Kd7 68 Rxh5 gives White a two pawn advantage
and Black a theoretically drawn position. Yet to hold the draw B lack must
be prepared to defend perfectly wel l over
50
moves. Notice that every time
White moves a pawn, the
50
move rule count starts anew so that White can
press and press and press until he himself gets tired or Black cracks under
the pressure.
Dl .....
Rblt
Black must make a most difficult decision : does he want to defend the
endgame just discussed after 67 ... Kd7 68 ReS when White at his leisure
can choose to play Rxh5 (if he has nothing better), or does he want to go
after White's h-pawn7 The danger with this latter decision is that the result
ing position may in fact be theoretically lost. I n a real game, with the
clock ticking, which is the correct decision? There is no easy answer and
the basis for a decision most likely will be personal. If you have great con
fidence in your ability to hold a theoretically drawn position, choose the
67 ... Kd7 method. If your intuition tends to be excellent, go for the h-pawn
because if you are right, then the draw will be less laborious.
68 Ke4
Rh3
69 f5
Rxh4t
70 Ke5
Kd71
The king must be brought over to help out. It is not enough to just
activate the h-pawn, e.g. 70 ... R h 1 7 71 Kf6 h4 72 Ke71 h3 73 f6 h2 74
Re2 and White wins. This is not surprising because White has two major
advantages: his king can help his passed pawn and Black's rook has the in·
active-in-front-of-his-pawn position.
71 Kf6
Unfortunately the winning try 71 f6 fails to 72 ... Re4t and 71 Rh6
allows Black's king to come over with 71 ... Ke71.
71 .....
Rf41
By immediately attacking the f-pawn Black makes it so much harder for
White to advance it. Moreover, by defending his own pawn from the side
Black is able to keep his rook active.
72 Re7t
Diagram 52
72
Kd61
80
Black must keep his king active. Losing is 72 ... Kd87 because of 73 ReS I
Rf1 (or 73 ... Kd7 74 Kg5 Rf1 75 Kxh5 Kd6 76 ReSt and 77 Kg6; or
73 ... h4 74 Kg5 Ra4 75 f6) 74 Kg51 Rh1 75 f6 Kd7 76 f7 Rf1 77 Kg6
h4 78 ReS.
73 Rh7
Neither have I found a forced wi� after 73 Re3 Kd71 74 Kg6 (74 Kg5
Rf1 ! I 74 ... h4 75 f6 Rg4t 76 Kf7 Rg3!.
73 .....
h4
74 Kg5
I nstead 74 Rh5 allows Black to activate his king with 74 ... Kd5! and
later bring it over to help his passed pawn.
74 .....
Rf1 1
75 Rxh4
After 75 f6 Black draws with 75 ... h31 76 Rxh3 Ke6.
75 .....
Ke7!
Everything else loses. The theme throughout is that the king must get
back to help stop the pawn.
76 Rh7t
Kf81
77 Kf6
Kg81
Obviously the mate threat must be attended to, but also Black must do
it so that the king can stay on the
short
side of the pawn when chased
away from the queening square. Black loses after 77 ... Ke8? 78 Rh8t Kd7
79 Rf81 followed by 80 Kg7, 81 f6, 82 Kf7 and having reached the Lucena
position, White wins.
78 Ra7
79 RaBt
80 Rf8
Drawn.
Rf21
Kh7
Ra21
Black's rook has plenty of checking room along the long side (because
his king is not in the way) and the position is a well known theoretical
draw.
And so we see that if Black plays perfectly throughout he can draw after
61 Rb8. Of course, White's practical winning chances are great, but there
is no
theoretical
win. Do note that the method used by Black is very in·
structive and thematic for rook endgames: activate and keep the rook active.
Moreover, in positions when only a single pawn is on the board, the king
must be able to help stop the passed pawn.
(b)
61 Ke51
Diagram 53
• • •••
. .
After 61 Ke5
81
The king gets activated immediately and White threatens the decisive
62 Rb7t. Again Black's only hope is active rook play.
61
...
.
.
Ra3t
62 Kd61
Necessarily impl ied in White's plan is to leave the kingside pawns to
their own fate. For this White's pawns turn out to be well placed since
they sufficiently contain Black's pawns so that Black is forced to capture
both of White's pawns to get viable passed pawn (s) himself. And this takes
valuable time in a position where time is the critical element.
62
.
....
Re4
The alternative is to first try to get White's king (and perhaps White's
rook) onto an inferior square and then to try to capture the kingside pawns
in a more favorable way either by the rook or the king. However, I have
not been able to come up with a plan that works for Black. One illustra
tive example is: 62 ... Rd3t
63
Kc7 Rb3
64
Rb8 Rb4 65 b6 1 Rc4t
(65 ... Rxf4 loses to
66
b7 Rc4t 67 Kd6 Rb4 68 Rh81) 66 Kd61 Rb4
67 Kc5 Rb1 68 Rd8 with an easy win for White who has retained his
kingside and wil l soon promote his b-pawn.
Nevertheless I do not claim that I have exhausted all the possibilities of
such an alternate approach. Perhaps Black does somehow have a hidden
magical draw.
63 Rc61
White improves the position of his rook
so
that it does not block his
pawn. Moreover, the rook helps to contain Black's king.
63
Rxf4
64 b6
Rxh4
65 b7
Rb4
66 Kc7
Rxb7t
Worse is 66 ... h471 67 Rb61 Rc4t 68 Kd6 Rd4t 69 Ke5 AdS 70
b8=Q Rxb8 71 Rxb8 since White's king is already safely back.
67 Kxb7
This position is won for White since Black's king is cut off from assisting
his pawns and White's king has sufficient time to get back. The conclusion
could be . . .
·
67
.....
h4
68 Rd61
h3
89 Kc61
The key to winning is to keep Black's king contained as long as possible
while allowing White's king to get back as quickly as possible.
White wins.
69
g5
70 Kd51
g4
71 Ka41
g3
72 Kf3
g2
73 Kf2
Black's pawns have been stopped and will now be picked off by White's
rook.
82
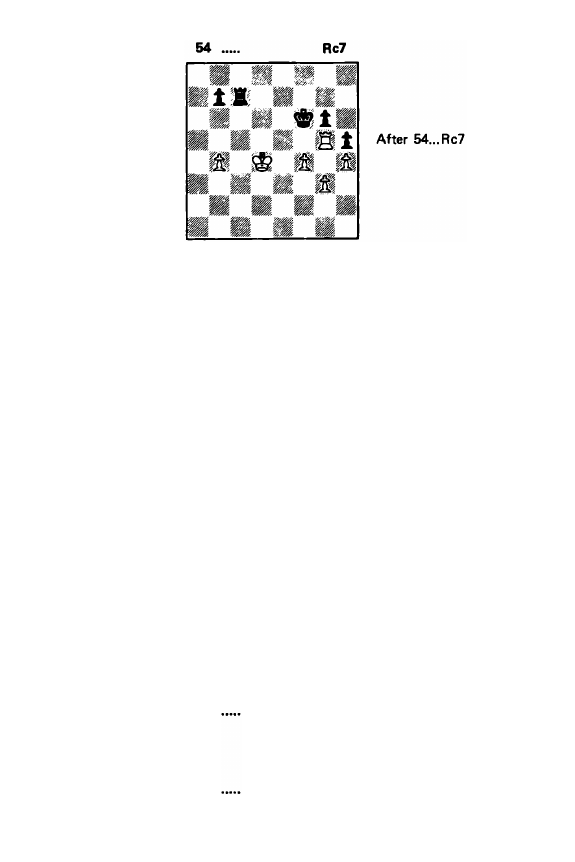
(c)
Diagram 54
Advantage of plan : Black protects the b-pawn and prevents White's king
· from entering the queens ide
Disadvantage of plan : The rook becomes passive
55 Rb51
Since Black is not able to menace White's g-pawn, White can immediately
activate his rook.
55 .....
Ke6
Black lacks a good move. Thus after 55 ... Rd7t 56 Kc4 or 55 ... Re7
56 Rc51 White's king can get into B lack's queenside and the winning
method is similar to that discussed after 54
.
.
.
Rb3.
56 f5tl l
White's rook stands well on b5, but White's king can not quite penetrate
anywhere. This temporary pawn sacrifice allows White to achieve this. Yet
note the preconditions for the pawn sacrifice: White's rook is actively
placed; Black's rook is passive.
56 .....
gxf5
Obviously 56 ... Kf6 57 fxg6 Kxg6 58 Ke5 cannot be any better for
Black than the text move.
57 Rb6t
Kf7
58 Ke51
This is the ultimate point of 56 f5t l l. Though material is temporarily
even, all three of Black's pawns are vulnerable to White's active K + R duo.
If Black now plays passively he risks losing his kingside for nothing. There
fore he tries activity.
58 .....
Rc3
59 Kf4
The pawns will not run away. White can choose the most comfortable
moment to capture them.
59
60 Kxf5
61 Rxb7t
62 Rh71
Rc4t
Rg4
Ke8
The theoretical ly surest win is where White is up
two
good pawns.
62
Rxg3
63 Rxh5
Rb3
83
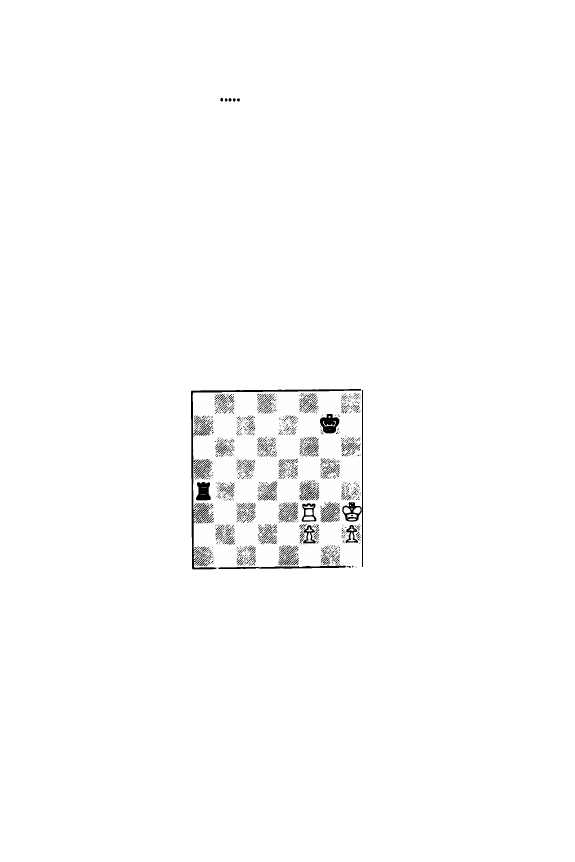
64 Ke&l
The mate threat allows White not only to activate his king but also to
smoothly protect his b-pawn.
White wins.
64
Kd8
66 Kd&l
Kc8
66 Kc&l
Kb8
67 b5
With just the b-pawn this position is a theoretical draw, but the addition
al h-pawn makes it an easy and certain win.
The reader may now feel like asking: "Why did you spend so much time
on such a simple position?" I did it for two reasons. First, because the
variations that could arise cover all the most important theoretical and stra·
tegic benchmarks in R & P endgames. Secondly, because the position was
nowhere as simple as it appears to the chessically naked eye. As my final
comment, I want you to note that Black did best in those variations where
he maximized the activity of his rook.
Subject * 30: R + h· and f-pawns vs. R
Questions: Is the position shown in Diagram 55 a certain draw?
How should Black defend?
Diagram 55
Answers:
The endgame of
R +
h· and f-pawns (or a- and c-pawns) vs. rook is very
important theoretically and also of considerable practical importance. Just
in our last example one of the important variations simplified down to th is
endgame. When the defensive side has a proper defensive formation, the
endgame is unquestionably a theoretical draw. However, it is much easier
to say it is a draw than it is to draw it. The defense has to be accurate all
the way through, with one misstep often sufficient to lead to the loss. This
endgame is
always
played out by the stronger side and even in international
play is won more than half the time. The defending side should never light
ly accept such an endgame, because it has ahead of it a most arduous and
lengthy task with no guarantee of ultimate success. I mean, choose to de
fend such an endgame only if the alternatives are very clearly worse.
Diagram
55
shows the position from B. Gross - P. Whitehead, Berkeley
1 974, White on move. This is as favorable a position as possible for the
84
defender. White has yet to begin to achieve his goals, whereas Black's king
is on the ideal defensive square (g7) and Black's rook can readily reach its
ideal defensive spot - a 1 . The following are the guidelines for proper defen
sive play by Black's king (as given by David Hooper in "A Pocket Guide To
Chess Endgames"):
(a) The king should stay at g7 until forcibly driven away.
(b) The king answers a check from a pawn by blockading it.
(c) The king can usually answer a rook check on the g-file by moving to
either side.
(d) The king answers a rook check on the rank by moving forward.
The overriding assignment for Black's rook is to prevent White's king
from penetrating Black's position. Therefore Black's rook will need to as
sume an appropritate active location with the single most useful square
being a1.
·
Now we are ready for the game course:
1 Re3
2
Kg3
3 h3
4 f3
5 Re4
6
Kh4
Kg&
Ra1
Ra4
Ra1
Rg1t
Kf5?
It has already become clear that Black doesn't know the theory behind
this endgame. Otherwise, instead of going on king and rook sorties, he
would keep his king on g7 and shuttle with his rook between a1 and b1 .
7 Ra4?1
Nor is White's approach fruitful. The general winning method consists of
advancing both pawns and then sacrificing the h-pawn at the appropriate
moment to achieve a winning R
+
f-pawn position. The start of the correct
technique is 7 Rg41, followed If possible by Kg3, h4, h5, Rh4.
7
Rf1
8
Kg3
Rg1t
9
Kf2
Rb1
10 Rg41
Rb2t?
The correct plan is to head back with the king: 1 0 ... Kf61.
11
Kg3
Rb1
12 Rf4t?
Thereby undoing the fruits of his 1 0th move. Correct is 1 2 h41 Rh1
1 3 Kg21 followed by 14 h5.
12
...
.
.
Kg&
1 3
Kh4
Rb5
14 Rg4t
Kh&
Playable but simpler is 14 ... Kf7 or 14 ... Kf6.
16 f4
Rf5
16
Kg3
Ra5
17 Rg8
Ra1 1
18 Rg5
R
g
1t
19 Kh4
Rf1
Considerably simpler is to shuttle the rook between al and b 1 .
85

20
Kg4
Rg1t17
In effect deactivating the rook while allowing White's king to penetrate.
Correct and required is the obvious 20 ... Ra1. Then 21 Kf5 is harmless be·
cause of 21
•..
Ra5t etc.
21 Kf5
Rh1
22
Rg&t
Kh7
23
Rg3
Kh671
Costs a tempo and puts the king on an inferior square. Correct is 23 ...
Ra1 though Black's position remains uncomfortable after 24 Re3!.
24
Kf&l
Ra1
25
Re3
Ra&t
26 Re&
Ra37
It is absolutely mandatory to prevent further penetration by White's
king by playing 26 ... Ra7!.
27
f671
The accurate move order is 27 Kf7tl Kh7 28 f5.
27 .....
Rxh37
Here was the last chance for 27 ... Ra7!. Because of the presence of
White's h-pawn it is not certain that Black can draw, but chances do exist.
The greedy text plays right into a well known book loss.
28 Kf7t
Kh7
Also 28 ... Kg5 loses to 29 f6.
29
f&
Ra3
With White to move he has a book win (See for example, Hooper, page
1 31 , 8: 2h(i)). However, if Black now were on move he draws with ... Ra81
which prevents White's king from getting to the eighth rank.
30 Kf81
Ra8t
31 ReS
Ra1
32
Kf717
But what has this to do with the position? Passed pawns must be
pushed! With the obvious 32 f71 White wins, e.g. 32 ... Kg6 33 Re6t Kh7
34 Rf6 or 32 ... Ra7 33 Re1 Ra8t (33 ... Kg6 34 Kg8! Rxf7 35 Rg1 t Kf6
36 Rf1 t) 34 Ke7 Ra7t 35 Kf6 Ra6t 36 Re6 Ra8 37 ReB.
32
..
.
..
Kh617
Black allows his king to be driven away and thereby loses. The draw
was to be had with 32 ... Ra7t 33 Re7 Ra81 and White can't progress. As a
specific theoretical point I can add that with White's rook on e7 Black can
also have his rook on a1 (i.e. 33 ... Ra1 ) since after 34 Kf8t Kg6 35 f7
Black has the saving 35 ... Kf6.
86
33
Rh8t
34
Kg7
35
f7
36 Kf8
37 Ke7
38
Ke&
Kg5
Ra&
Rg&t
Ra&
Ra7t
Resigns.
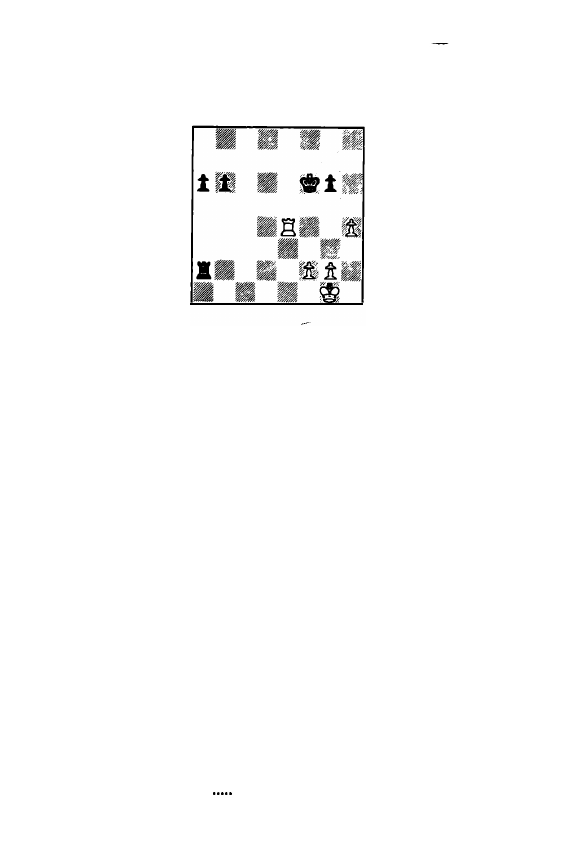
section 2: Positional Considerations
Subject
# 31 :
The importance
of
the active rook
Questions: Is Black better in Diagram 567 Why?
How can he exploit this?
Diagram 56
Answers:
• • • �;§!; t
• • • •
•
B ft B
I
In Diagram 56, N. Javert - D. Eisen, USA correspondence 1 972n3,
White on move, Black has two advantages: ( 1 ) the active rook which is in
position to attack the b-pawn, and (2) the queenside pawn majority. This
latter factor means that Black - at will
••
can create a passed pawn there
and White's king isn't there to help stop it. White obviously can't do any
thing about item (2) so that his correct approach must be to try to activate
his rook. Remember: in R & P endgames the single most important factor
is the active rook. After the indicated 1 Rc41 h5 2 Rc7 1 White's counter
play gives him good drawing chances. Yet in the game White played:
1
g47
Now White is clearly lost since his rook is forced to take up a defensive
location.
1 .....
Ra31
The key move because White now has no satisfactory way to protect
the h·pawn. If 2 Re3, then 2 ... a51 followed by 3 ... b5 and 4 ... a4 when
White can't exchange rooks because the outside passed pawn wil l give Black
a won K & P endgame. Similarly, after 2 b4 Ra41 Black wins since ... a5
can't be prevented. Therefore White's rook is forced to a most awkward
location.
2
g5t
3 Rb4
Kf5
The active 3 Re7 Rxb3 4 Rxh7 is hopeless here because with Black's
king still on the kingside White's pawns have no hope for a meaningful
advance while B lack's pawns start their win with 4 ... a5!
3
.
.
.
..
b5
4 Kg2
White has to activate his king. After the defensive 4 Kf1 Ke5 5 Ke2
Black has a fairly routine win with 5 ... Kd5 6 Kd2 Kc5 7 Kc3 a5 followed
by 8 ... a4.
4
5 Kg3
Ke5
Kd5
87

6 Kg4
7 Rf4
8
Rf7
Kc5
Rxb3
Rb1
Even though Black has reached a theoretically won position, impeccable
play is required to win. With the text Black makes sure that his rook stays
active.
9
Rxh7
Rg1 t
10 Kh3
b4
1 1 Kh2
Rg4
12 f3
Rd4
13 h51
The only chance. White also needs passed pawnsl
1 3 .....
a511
Time is of greater essence in queening races than stray pawns and here
1 3 ... gxh57 loses a tempo since White's g-pawn immediately gets to the sixth
rank. Another important principle is that
connected passed pawns should
be kept connected for maximum efficiency.
Therefore inaccurate is 1 3 ...
b371 14 hxg6 Rd8 because White's 15 Rb7 attacks the b-pawn.
14 hxg&
Rd8
The g-pawn must of course be stopped. If now 1 5 g7 Rg81, while after
1 5 Rb7 Black can chase White's rook away with 1 5 ... Kc61 since Black's
pawns are now self-supporting. White's only chance therefore is to also
mobilize the f-pawn.
16 f4
16 f5
b3
Kc61
This is somewhat "cleaner" than the immediate queening race after 16 ...
a4 17 Rb7 Kc4 18 f6 a3 19 f7 a2 20 g7 a1=0 when, after White queens,
Black will be first with his mating attack. However, White could have
"forced" this continuation by playing 1 6 Rb7.
17 Ra7
a41
Keep the pawns connected!
18 g7
b2
19 Re&tl
The best try since White forces Black to misplace the king. The wi n is
elementary after 19 Re1 a3 20 f6 a2 21 f7 b1=01 22 f8=0 (or 22 g8=0)
22 ... 0b8t l followed by 23 ... Rxf8.
After the text Black's king must go to the b-file since 19 ... Kd77 20 Re1
allows White to threaten 21 Rd1 t, while 19 ... Kc57 allows the f-pawn to
queen with check.
19
20
Ra1
21 f&
22 f7
23
ts-0
Kb5
a3
a2
b1
..
Q
Rd2tl
Only drawing is 23 ... 0xe1 7 24 Oxd8 a1=q because White can eventually
exchange off a pair of queens and then queen the g-pawn. I n general, in
positions such as after White's 23rd move, where both kings are exposed
and where major material is present (queen
+
rook(s) or two queens on
each side), the side which starts the checking can win. So also here.
88
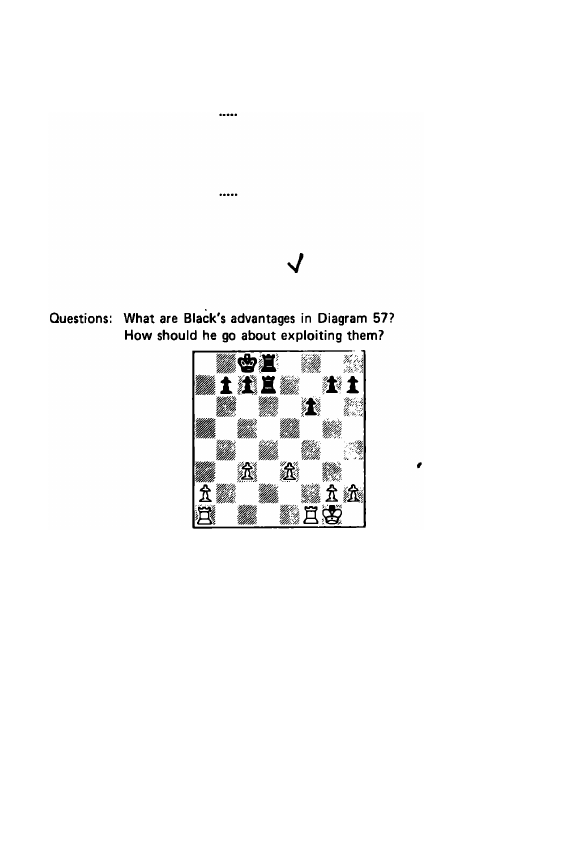
24 Kh3
25 Kh4
Qd3t
Black also wins after the "bit better" 25 Kg4: 25 ... Rg2t 26 Kf4 Og3t
27 Kf5 Oxg5t etc.
25
26 Kg4
27 Kf4
28 Ke5
Or 28 Ke4 Oe6t etc.
28
Resigns.
Rh2t
Oh3t!
Rf2t
a1=0t!
He gets mated by force after 29 Rxal Oe3t 30 Kd6 Rd2t 31 Kc7
Ob6t 32 Kc8 Rc2t 33 Kd7 Rc7t
34
Kd8 Ob8.
Section 3: Double -Rook Endgames
Subject
#
32: Exchanging one pair of rooks in going for the win
/
Diagram 57
Answers:
Black has two significant advantages in Diagram 57, Kendall
·
J. J. Smith,
USA correspondence 1 973n4, after White's 21st move: ( 1 ) the superior
pawn formation,
a
nd
(2)
the active rooks. Black's rooks not only control
the only open file, but can use this route to penetrate decisively into White's
position. Black can do this in two ways. He can attack and win one of
White's vulnerable pawns with the direct 21 ... Rd3. Or he can do as in the
game:
21 .....
Rd2!
I like this active plan. Black uses the active rooks to threaten a doubling
on White's second rank. Since White cannot allow this, Black wil l obtain a
single rook endgame where he has a pawn advantage plus the active rook.
As a general principle, White wil l have less potential counterplay having just
a single rook than if Black had played 21 ... Rd3.
22 Rfe1
Black's plan can't be prevented but White cou ld have saved a tempo
compared to the game by playing
22 Rf2! Rxf2 23 Kxf2 Rd2t 24 Kf3.
22
• . . . .
Rc21
89

23 Rec1
24 Rxc2
25 Kf1
26 a4
Rdd2
Rxc2
Kd7
Rxc3
Black has won a pawn for nothing, has this in the form of a passed
c-pawn and still has the active rook.
Theoretically,
of course, this is a won
position. Yet in real life . . .
27 Ke2
Rc2t
28 Kf3
c5
"Passed pawns must be pushed" is a principle that I have been continual·
ly emphasizing. Here too this plan is fully playable and satisfactory. Yet
on a more sophisticated level we can see that the text move does loosen
Black's position a bit and before his king has been activated. Moreover,
White is now able to exchange off his vulnerable a-pawn. The strongest
move for Black is 28 ... Kc61 since then 29 aS? can be met by 29 ... KbS! 30
Rbl t Ka6 and White's a-pawn will soon be lost.
29
h4
Kc6
30 a51
c4
31 aS
bxa6
32 Rxa6t
Kb71
33
Rd6?1
White saves a move with the immediate 33 Ral, even though the posi·
tion remains lost.
33 .....
Rb21
34 Rd1
There is no time for pawn grabbing with 34 Rd7t Kc6 3S Rxg7 c3
36 Rg8 KcSI 37 Ke4 Kc4! since soon White's rook will have to sacrifice
itself for the c-pawn. However, the passive text should not offer much
hope iether.
34 .....
Rb5?1
Aiming for the principle "Rooks belong
behind
passed pawns". Unfor
tunately here Black does so to the exclusion of everything else: loss of two
tempos, removal of his rook from a very active location and allowing White
to activate his king. Much simpler is to get the king to assist the c-pawn's
advance by playing 34 ... Kc6! and if 3S Rc1, 3S ... KcS!. Then having an ex
tra passed pawn and the better position, Black's win is just a matter of
time.
35 Rc1 1
36 Ke41
37 Kd4
Rc5
Kc61
Kd67?
Black has some kind of a hallucination here. Consistent and winning is
37 ... RdSt ! 38 Kc3 (38 Kxc4? ReSt wins the rook) 38 ... KcSI. Black then
has safeguarded his passed pawn and after the coming 39 ... Rd3t has a cer-
tain win.
38
e41
Taking away the dS square from Black's rook means the death knell for
the c-pawn.
39 .....
c3!7
One last try. If now 39 Rxc3? Rxc3 40 Kxc3 Black's king penetrates
90
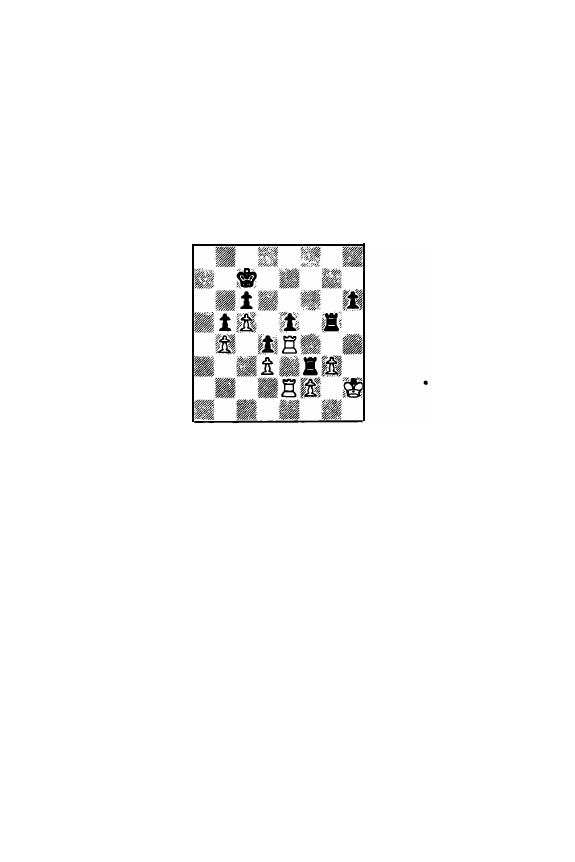
with 40 ... Ke5 41 Kd3 Kf4 and wins. However, White has no need to rush
with the taking of the pawn.
39 Rc21
h5
Draw.
After 40 g31 g5 41 Rxc3! Rxc3 42 Kxc3 gxh4 43 gxh4 Ke5! 44 Kd3
Kf4 45 Kd4 Kg4 46 e51 fxe5t 47 Kxe5 Kxh4 48 Kf41 White's king gets
back just in time.
Subject # 33:
Exchanging one pair
of
rooks in going for the draw
Questions: What are the main characteristics of Diagram 587
Which side is better?
Who would benefit from the exchange of a pair of rooks?
Diagram 58
I
Answers:
Diagram 58 shows the position from Macaulay - E. Schiller, London
Team Matches 1 982, after Black's 38th move. The game had been adjourn
ed at this point, with Black having sealed 38 ... Rf5-f3. Black needed to
draw this game so that his team could advance to the finals.
The adjourned position is somewhat deceptive. Black's rooks look active,
but in fact have little to do since White's position is inherently very solid.
On the other hand, Black's e- and h-pawns are vulnerable to an attack and,
moreover, Black's king is too far away from the center. All of this means
that White has a significant advantage and Black must defend perceptively
and creatively to hold.
39 Rd21
Black's weaknesses will not run away so that there is no reason to jump
the gun with either 39 Rxe5 Rxe5 40 Rxe5 Rxf2t or 39 Kg2 Rxd3.
39
• • . . •
Rgf5
40
Kg2
h5
The clumsy placement of the rooks makes the normal 40 ... Kd7? unplay
able, since 41 g4! wins the e-pawn for nothing.
41 Rh41
White has a number of reasonable ways to proceed and going for the
vulnerable h-pawn seems the best. The attempt at getting at Black's king
with 41 Re1 Kd71 42 Ra1 can be parried by 42 ... Ke6 43 Ra7 Rf7!. More
critical is the play after 41 Rxe5 Rxg3t (4 1 ... Rxf2t?! 42 Rxf2 Rxe5 43
Rf7t �8 44 Rf41 puts Black in a most unpleasant bind.) 42 Kxg3 Rxe5
91

43 Kf4 Re1 !
44
Kg5. But it appears that Black can defend with 44 ... Kd7 !
45 Kxh5 (or 45 f4 Rg1 t and if 46 Kf6, 46 ... Rg3!) 45 ... Rg1 ! since 46 f4 is
met by 46 ... Ke6, followed by 47 ... Kf5. And 46 Re2 Rd 1 1 47 Re4 Rxd3
48 f4 Rd1 1 also gives Black sufficient counterplay.
41 .....
Kd7
42 Rxh5
Rxh51 1
It is Black's defensive plan associated with this move that gives this
game its value: rather than being even in material, he chooses to be a pawn
downl The major principle in rook endgames is "Keep your rooks active"
and Black executes this perfectly. Judging Black's possible plans from the
above perspective, it is easy to see that bad must be 42 ... Rxf2t? 43 Rxf2
Rxh5 44 Rf61 and with Black's king stuck to protect the c-pawn and his
rook inactive, Black's prospects are extremely bleak. Little better is 42 ...
Rxg3t71 since after 43 Kxg31 Rxh5 44 Kg41 Rh1 45 Kf51 White's king +
rook develop devastating pressure: a) 45 ... Rh5t 46 Kf6! followed by 47
Ra2 or 47 Re2; b) 45 ... Re1 46 Ra21 and the incursion of White's rook
will be decisive.
43 Kxf3
Rh1 1
Now it is Black's rook which is active and this factor seems sufficient
to hold the position.
44 Kg4
45 Re2
Ke6
Allowing Black to demonstrate the opportunity for a marvelous stale
mate concept. However, 45 f4 exf4 46 gxf4 is met by 46 ... Rg1 t followed
by 47 ... Kf5; therefore 46 Kxf4 gives the best prospects for progress. Black
must go for counterplay and the critical position occurs after 46 ... Rb1 47
Re2t Kf6 48 g4 Rxb4 49 g5t Kf7 50 Kf5 Rb1 1. This position is no·
where close to clear, but I think that Black should hold.
45
.
..
.
.
Kd51
"Into the valley of death" is the literary way that Mr. Schiller describes
this move.
46 Kf5
Alas, the devastating appearing 46 f4 exf4 47 gxf4 (threatening 48 Re5
mate) is foiled by 47 ... Rh4t l l 48 Kf5 Rxf4t 49 Kxf4 stalemate! No bet·
ter is 47 Kf517 Rh6t 48 Kxf4 Rf5t l ("Stalemate races against checkmate"
- Schiller) 49 Kg4 Rg5t l 50 Kf3 Rxg3t l 51 Kxg3 stalemate.
46
Rh5t
47 Kf6
Rh&t
48 Kf5
Rh5t
49 Kg&
Rh1
50 Kg7
Rh2
51 Kf&
Rh&t
52 Kg5
Rh1 1
Short of time, White has been saving it by king moves. But now he
must try something else. But what? There are no reasonable rook moves.
As for pawn moves: a) 53 f4 leads to the thematic stalemate draw; b) 53
f37 risks 53 ... Rd 1 1 when the position after 54 Kf5 Rxd3 55 Rxe5t Kc4 is
more likely to be in Black's rather than White's favor; c) 53 g4? is the game
continuation. All of this leads to the logical conclusion that the position
after 52 ... Rh 1 1 is drawn.
92

53 g47
Under the psychological pressure of having to play for a win, White com
mits a time pressure error.
53
• • • • •
Rh31
Notice how Black's rook •• having been kept active - is able to execute
all kinds of threats.
54 Kf577
Obviously a hallucination, as White overlooks the following "zwischen
check". In order is the modest 54 Rd2 after which Black can satisfy him
self with the preventive 54 .
. .
Rf3 or go for more with the ambitious 54 ... e41 ?
But who then i s better i s absolutely unclear.
54
Rf3t
55 Kg&
Rxd3
56 g5
Rf31
57 Kh5
Ke&l
Black stil l has the active rook and the king now joins to stop the g-pawn.
Black's position is won.
58
59
60
61
62
63
64
65
g6
g7
Rxe5
Kg4
Re4
Rd4
Rxd3
Kg3
Kf&
Kxg7
Rxf2
Kf&
d3
Ke51
Rf4t
Rd4!
Draw?!
Black here offered a draw since this was all his team needed. White re
fused( ! ), but acquiesced soon thereafter ·· after his queenside had become
defoliated. Of course, our final position is totally won for Black since he
wins White's queenside pawns while retaining his own, e.g. 66 Rb3 Kd5 67
Kf3 Kc4 68 Rb1 Kc3 69 Ke3 Rh41 70 Ke2 Rxb4 etc.
Principles/Rules of Thumb For Practical Endgame Play
Rook and Pawn Endgames
( 1 ) Activate and keep your rook active ·• whether going for the win or
trying to draw.
(2) Rooks belong behind passed pawns, both yours and your opponent's.
(3) With all pawns on the same side, in normal positions a one pawn advan
tage is insufficient to win. The defending side should strive to prevent the
mobilization of the enemy pawn majority and in particular the encroach·
ment of his pawns into your part of the board.
(4) The side playing to win wants to look for the opportunity to simplify
into the winning Lucena position.
(5) The side trying to draw wants to aim for Philidor's position.
(6) Passed pawns must be pushed!
(7) In positions where you have a passed pawn, the least active location
for your rook is to be in front of this pawn.
93

(8) Endgames of R + h· and f-pawns (or a· and c-pawns) vs. R are theoretic
ally drawn if the defensive king can straddle the pawns. However, in practic
al play the actual job is very difficult and more than half of such endgames
are lost.
(9) If you have connected passed pawns, advance them in unison
so
that
they remain connected and thereby self-supporting.
( 1 0) As a broad generalization, endgames with double rooks follow the
same principles as single rook endgames.
( 1 1 ) However, since double rooks impact a lot more attacking power than
a single rook, many characteristic endgames which are drawn with a single
rook can be won thanks to double rook power. A particularly important
case is a one pawn advantage where all the pawns are on the same side. I n
the majority of double rook endgames this i s a win.
( 1 2) Because the double rooks can generate a lot more counterplay than a
single rook, many characteristic endgames which are lost with a single rook
can be saved into a draw thanks to double rook power.
94

Chapter 4
Endgames With Opposite Color Bishops
section 1 : Pure Bishop Endgames
subject * 34: Material advantage, both sides have passed pawns
Questions: What is the most important factor in opposide color bishop
endgames?
How can White realize his material advantage from Diagram 59?
Diagram 59
Answers:
Endgames having opposite color bishops are unique because a very impor·
tant strategy of endgame play - exchanging pieces
··
is not possible. There
fore such endgames require even more attention to correct pawn play than
other types, The word that is the key to the majority of opposide color
bishop endgames is B LOCKADE. The side down material will try to set up
a blockade. Whether this can be achieved will determine whether the posi
tion can be held or goes lost.
As an introduction to our theme - as well as to demonstrate the need to
be ever careful ·• I have selected Diagram 59, NN · E. Chong, USA 1973
with Black on move. White has a two pawn advantage and has three passed
pawns. However, by putting them on the light squares he has increased
Black's .. chances for a successful blockade. To make progress White now
will have to demonstrate considerable care and tactical creativity. Black
on move has three possible plans:
( 1 )
1
..
.
.
.
Ke7
Trying to blockade. Perfectly logical, but White can break the blockade
by sacrificing his forward passed pawn.
2 d8=Qt
I
Kxd8
Obviously, 2
.
.. Bxd8 3 d6t can't be any better for Black.
3 d&
Bb8
4 c7t
Bxc7
5
dxc7t
Kxc7
6
Kb5
Because White's bishop covers the a-pawn's queening square, White has
an easy win.
(2)
1 .....
Bb8
95

Playing for a stalemate trap. This is the game continuation. Black hopes
for
2
d67 Bxd6t I 3 Kxd6 stalemate.
2 Bg2
Avoiding the above trap, but by itself insufficient to win. Correct is the
active
2
Be41, as will be seen in the next variation.
2
.•...
Bc771
Making it easy for White. Necessary is 2
. .
. Be51 when 3 d6? fails because
of 3
••.
h 1 =QI: (a) 4 Bxh1 Bxd6t ! 5 Kxd6 stalemate; (b) 4 c7t Kxd7 with a
draw since 5 Bh3t77 is not playable. Therefore White would have to dis·
cover the winning plan starting with 3 Be41
(3)
3
d61
Bxd6t
4 Kxd6
h1=0
5
c7 mate.
1 .....
Be51
Activating the bishop is Black's last defense. Of course, again 2 d6? is
refuted by
2
.
.
. Bxd6tl since 3 Kxd6 is stalemate and after 3 Kb6 Bc7t
White will not be able to break Black's blockade on c7.
2 Be41
To win, the bishop must be able to check along the hJ.c8 diagonal.
Therefore also good is
2
Bf31
2
.•••.
Bg31
This again makes things harder for White. After 2 ... Kc7 White has the
choice between the prosaic 3 Kb5 winning the a-pawn (3 ... Bc37 ! 4 d6t !
Kd8 5 Bf51 followed by 6 c7 mate) or the blockade breaking 3 d8=Qt !
Kxd8 4 d6 followed by c7.
3 d61
h1=0
Of course, 3 ... Bxd6t 4 Kxd6 h 1 =Q again allows 5 c7 mate.
4 c7tl
There is no win after 4 Bxh 1 ? Bxd6t l 5 Kb6 Bc7t and Black has an
impregnable blockade.
4
Kxd7
5
Bf5t
Ke8
6 cS=Qt
Kf7
7 Qe6t
Kf8
8 Of6t
Kg8
9 Be6tl
Care is required until the very end. The greedy 9 Qg6t?! Kh81 1 0
Oxg3? allows the shocking 1 0 .. . Qd5t l l with an unavoidable stalemate.
and White wins.
96
9
Kh7
10 Of7t l
Kh6
1 1 Qf8t l
Kg5
12 Og7t
Kf4
13 Qg4t
subject
# 35:
Material advantage, pawns on both sides, no pawn break
through possible
Question: How should Black go about trying to win from Diagram 607
• t B t rl t
Diagram 60
• •
• •
m �- .ft 8A •
•
•
•
•
• • • •
Answer:
I n two important ways Black is wel l off in Diagram 60, NN · J. B. Skeels,
USA
1 973,
Black on move: he has a sound two pawn advantage and White
is without counterplay. Such a position with same color bishops would be
an easy win. However, with opposite color bishops this is not so because of
the following two factors: ( 1 ) White can readily and safely place all his
pawns on light squares, thus negating the Black bishop's attacking power,
and (2) Black's d·pawn is already on d4, thus making it very difficult to
achieve the thematic pawn advance on the queenside with ... c4. The ad·
vance of the d-pawn has also released the pressure against White's e·pawn.
All of this allows White to set up a blockade on d3.
The above means that Black's job is far from easy and the game in fact
was drawn. Our first conclusion should be that the chances for a win by
means of a brute force advance of the c·pawn are small. I nstead, the cor·
rect winning strategy should consist of using the passed d·pawn as a de·
flector to tie down White's pieces so that Black's king can infiltrate into
White's position (most likely the kingside). Black should be most wary of
a premature advance of his own pawns if this would in any way help White
set up a blockade.
The proper technique for Black is as follows:
1
....
.
Kd6
2 Kd3
Ke51
By centralizing the king on e5 Black achieves the following: attacks
White's e-pawn, protects his own central pawns and prepares for eventual
infi ltration via f4. Instead faulty is 2 .
..
e57 which both makes it harder for
Black's king to reach the kingside and opens the road to Black's queenside
for White's bishop.
3 b3
As good as any, with Wh ite removing the b-pawn from an eventual attack
by Black's bishop. Worse would be 3 b47 1 as the b-pawn can then easily
become fodder for the bishop.
3 .....
h51
Making White's bishop give ground since 4 Bh3 is unsatisfactory because
97

after 4
..•
Bh6 Black threatens to win the h-pavvn with
5
.
.. Be3 and 6 ...
E!_
g1 .
4 Bf3
Bh6
5 Ke2
Bf41
6
h3
After 6 g3 Black continues with 6 ... Be3 and 7 ... Bg1 , loosening up White's
kingside, anyway. Already we can see that White's king can't help out on
the kingside since then Black's d-pawn becomes a power.
6 .....
Bg31
7 Kd3
Bh21
Black prepares to protect the d·pawn with ... Bg1 so that his king can go
to f4.
8 Ke2
9 Kd3
10 Ke2
1 1 Kd3
Kf4
Bg1
Be3
e5
Without fault here and with the objective of wal ling in White's bishop
some more.
12 Ke2
Kg3
White now is in zugzwang: his bishop cannot move, and if the king goes
to d3, then Black's king penetrates further to f2. Therefore White starts
advancing his queenside. Notice that up to now Black's material superiority
has had only an indirect role: to tie up White's pieces.
13 b4
Bh61
Waiting for White to run out of pawn moves. Now after 14 a4 b51
White's b-pawn will be lost.
Or
1 5
a3 Bel !.
14 Kd3
Kf21
15 Kc2
15
Ke31
16 a3
Bf8!
There is no hurry about ... dlt. Black first wants to put his bishop on
the most effective square: b6.
98
17 Kb3
Be7
18 Ko4
Kd21
Cutting White's king off from defense.
19 g4
h4
20 Kb3
After 20 Bg2, 20 ... Ke2! is the finisher.
20
d3
21 Kb2
Bd81
22
a4
Bb6
23 b5
cxb5
24 axb5
g51
Completely hemming in White's bishop.
26 Kb1
Bd41
White is again in zugzwang and must give further ground.
26 Ka2
Kc2
27 Ka3
d2
and Black wins
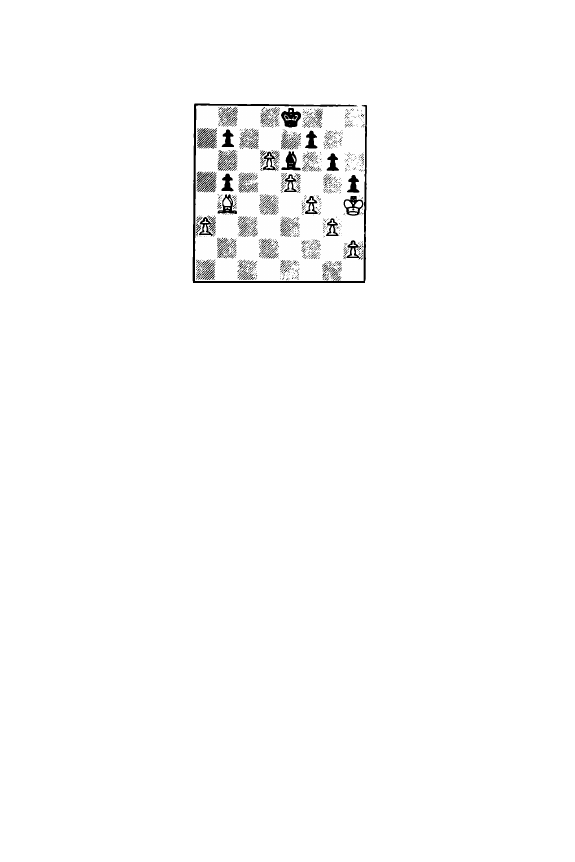
Subject
#
36: Material advantage, pawns on both sides, pawn breakthrough
is possible
Question : How should White go about trying to win from Diagram 617
Diagram 61
Answer:
Several important points wi ll be revealed in the play from Diagram 61,
Salpado - L. Raterman, California 1 977, after Black's 40th move. Counting
pawns we see that numerically White is only one pawn ahead, but because
Black's doubled lrpawns lack offensive value, in practical terms White is up
two pawns: the
d-
and e-pawns. It is only the presence of opposite color
bishops that make the win difficult and -- as a matter of fact -- without the
presence of the queenside pawns this position is drawn. Even though at
first glance it appears that -- because White's bishop is of the wrong color
for the a-pawn -- White wil l not be able to win if the position simplifies
down to B + a-pawn vs. Black's lrpawns, this is in fact not so.
But first things first. White's first job is to mobilize his kingside pawns
and this is done easily enough by a straightforward advance:
41 h3
Kd7
42 g4
hxg4
Of course, both here and on move 44 Black welcomes the routine ex-
change since it leaves White with less material to try to win with.
43 hxg4
Bc4
44 f5
gxf5
45 gxf5
Bb3
46 Kg5
Bc4
47 Kf&
White has efficiently mobilized his kingside pawns and now activates his
king. It is quite apparent that White's pawn break must occur on e6 and it
is equally apparent that Black can muster three defenders on that square
while White can only have two supporters. Therefore the e6 advance will
have to involve the sacrifice of the e-pawn so that the f-pawn can be liber
ated.
47 .....
Bb3
48 Kg71
Ke81
The best defense. After 48 ... Bc4 49 e6t ! fxe6 50 f6 e5 51 f7 Bxf7
52 Kxf7 White can retain the d-pawn for a very simple win: 52 ... e4 53
Kf61 e3 54 Ke5 e2 55 Kd5 etc.
49 Kf6
White can play 49 Bc31 immediately to be followed by 50 e6!, but first
wants to save some thinking time on the clock.
49
Kd7
50 Kg5
Bc4
51
Bc3!
A good practical move, ensuring that after an eventual ... e5 White simply
captures.
51 .....
52 Kf&
Bd5
Bc4
Black has no defense to the coming breakthrough. The attempt to con·
tain White's king with 52 ... Be4 loses to 53 e6tl (but not 53 Kxf77? Bxf5
with a permanent blockade of e6 and a draw) 53 ... fxe6 54 fxe6t Kxd6
55 Bb4t Kc7 56 e7 Kd7 57 Kf7 Bd5t 58 KfB.
53 Kg7
Ke8
Or 53 ... Bb3 54 e6tl fxe6 55 f61 e5 56 Bxe5 leading to the game posi·
tion after 56
. .
. KeB.
54 e61
55 f61
fxe6
The sacrifice of the e-pawn has given White two passed pawns, which
wi ll cost Black his bishop.
55
56 Bxe5
57 f7t
58 d7t
59 Kxf7
e5
Bd5
Bxf7
Kxd7
This is
not
the standard wrong B · RP combination which wou ld allow
Black to hide his king safely in the corner
••
see Chapter 2, Section 6. The
difference (and problem for Black!) is that Black has two very much un·
wanted b-pawns. Reuben Fine in Basic Chess Endings gives excellent rules
of thumb for the kind of position in which Black has pawn(s) : "In general
the extra material is only a handicap for the defender. When he has one
b-pawn the game is generally but not always a draw, whi le with doubled
b-pawns the game is usually lost." In our case the position is a certain
loss.
59
.
.
.
.
.
60 Ke7
Kc&
b6
There are no prospects in retreating, but "attacking" is also insufficient
since then after White wins the b-pawns, Black's king can be prevented from
getting back:
60
... Kc5 61 Kd7 Kc4 62 Bd6 Kd5 63 Kc7 Kc4
64
Bb4
Kd5 65 Kxb7 Ke6 66 Kc61 Ke5 67 Kxb5 Ke6 68 Kc6 etc.
61 Bel&
Kb7
Though a most rare guest in practical play, such positions are well known
in endgame theory. For example, Cheron gives (No. 772 in the 1 957 Ger·
man edition) the following position of Horwitz 1 880: White: Kd6, Bf4, a3;
Black: Kb7, b6 b5. The caption reads "White wins". This is essentially
what we have here. In fact Horwitz and Salpedo demonstrate the same
winning plan.
62 Kd7
Ka8
100
63 Kc7
Ka7
64 Kc8!
Resigns.
After
64
..
. Ka8 65 Bb81 Black is in zugzwang and the forced 65 ... b4
allows 66 axb4 transforming White's a-pawn into an easily winning b-pawn.
If
64
..
. Ka6, White's king squeezes Black's away from the queenside to win
as follows: 65 Kb81 Ka5 66 Kb7 Ka4 67 Kxb6 Kb3 68 Kxb5.
Subject
#
37: Material advantage, pawns on both sides, stronger side can
create connected passed pawns
Questions: Can White win from Diagram 62?
What are some of the principles in evaluating B + 2 connected
passed pawns vs. B endgames?
Diagram 62
Answers:
R M . m
fJ JJ.IJI M
i . fi
• •
. .
There is little question that Black seems on the ropes in Diagram 62, J.
Peters - A. Beliavsky, World Student Championship, Venezuela 1 976, White
on move. White is up a passed h-pawn and, moreover, White's bishop can
attack three of the four remaining Black pawns. Yet it seems that the ex
istence of opposite color bishops is just enough to save Black. The instruc
tive game course was:
1 h6
2 Bb&
Kg8
White makes a major strategic decision: he immediately goes after Black's
pawns and voluntarily gives up his h-pawn. A very logical alternative is to
try to create a passed pawn on the queenside while retaining the h-pawn.
However, neither during the game nor subsequently has I M Peters been able
to find a way of accomplishing this without allowing the ki nd of massive
pawn exchanges that presage a draw. I have not been able to do so either.
In some positions White can wind up two pawns up -- as he does in the
game -- but the positions are drawn. For instance, White can start off with
2 f4 Kh7
3
Bg7. But after 3 ... e5 it's difficult to see how or why White
can achieve any more than he does in the game.
2
.....
Kh7
3 Bd8
e51
Stronger than the expected 3 ... e6 because it makes it easier for Black to
get White's f-pawn exchanged off.
4 Ba5
101

After 4 Bc7 Black draws with 4 ... d51 5 Bxe5 Kxh6, e.g. 6 Bd6 Kg51
Kxh6
and if 7 Bxb471, 7 ... Kf4.
4 . .....
5 Bxb4
6 Bxd6
Kg51
Kf471
At the moment Black stil l has not grasped the correct strategy. Correct
is the immediate 6 ... Kf51 followed by 7 ... Bc6. The text costs a tempo.
7 c4
Be&
8
Kc2
Kf5 1 1
Even though now a move behind, Black discovers the essence of the po
sition: his king and bishop must be mobilized to cope with White's coming
passed pawns on the queenside. At the moment the bishop is placed ideal
ly where it is and Black's king must get back to at least e6. I nferior there
fore is 8 ... Kxf37! 9 Bxe5 and Black's king will have difficulties in establish
ing a good defensive location. Even worse is 8 ... Bxf37 because after 9 b4
Bc6 1 0 Kb3 followed by 1 1 a4 and 1 2 b5 White's connected passed pawns
move forward very quickly.
So
often in opposite color bishop endgames the key element is not ma
terial but the ability to achieve a blockade.
9 Bb8
Ke61
10 f4
exf41
1 1 Bxf4
Kd71
12 Kc3
Kc81
13 Kb4
Here the game was called a draw. To understand the "inscrutable" de
cision, we should continue the thematic play. White's plan is to establish
connected passed pawns and he cannot be prevented from achieving this.
13
Kb7
14 Ka&
Bd7
15 b4
Be8
1 6 a4
An immediate draw occurs after 1 6 b5 axb5 1 7 cxb5 Bxb51 -- White
has the wrong B
-
RP combination.
1 6
Bd7
17 b5
axb5
18 axb5
There are no prospects in 1 8 cxb5 because Black plays 1 8 ... Bf5 followed
by 1 9 ... Bd3 and whenever White plays aS, Black draws with ... Bxb51
18
Be&
19 Kb4
Bf7
20 c5
If White now would be on move again, he would win by 21
eSt
Kb6
22 Be3t Kc7 23 Kc5.
20
Be81
21 Ka5
Bd7
Draw.
White cannot progress since his king is needed to protect the b-pawn and
without the king's protection the c-pawn can't get to c6. Black's bishop
just has enough room to shuttle between d7 and e8. From this discussion
102
and the one after move 1 8 we see that there are many positions in opposite
color bishop endgames where two connected passed pawns do not win. As
a
matter of fact to have an assured win, White needs to get both pawns to
the sixth ran k in safety. By comparison, same color bishop endgames hav
ing connected passed pawns are routine wins.
Section 2: R + B vs. R + B Endgames
Subject
# 38:
Material advantage, the blockade can
be
broken
Questions: What is the most important principle in R + opposite color
bishop endgames?
How can Black make progress from Diagram 637
Diagram
63
Answers:
Just as in pure opposite color bishop endgames, so also for endgames
where each side also has a rook, the single most important factor is the
blockade. The side down material will try to blockade the opponent's
passed pawn (s) and in order to win this blockade must be broken. A
thematic and instructive position is shown in Diagram
63,
H. Kmoch - A.
Nimzovich, Niendorf 1 927, after White's 50th move. Black here not only
is a pawn up but also has connected passed pawns on the queenside. But,
White's bishop quite effectively blockades the advance of the a-pawn, while
the rook keeps back the b-pawn. There is no "normal" way to make pro
gress. Yet there is a creative tactical way:
50
..
.
..
Rb41 1
To get his passed pawns going, Black is wil ling to sacrifice his rook!
Black's simple threat is 57 ... Ra4 followed by 52 ... Ra1 and the win of the
a-pawn. Therefore White must capture.
51 cxb4
Better to give a pawn than the bishopl After 57 Bxb47 axb4 52 cxb4
Kb5 and 53 ... Kxb4 Black's win is elementary.
51
.....
a41
At the price of a rook, Black has turned his c-pawn into a passed one
and now threatens 52 ... Kb51 followed by pushing the passed pawns. White
now correctly ensures that his bishop can participate in the defense.
52 b5tl
Kxb5
53 Ba3
c3
54 Rb1
Kc41
1 03
Getting the king into the game since the pawns do need assistance.
55 f4
Hoping to eventually create a passed pawn by playing f5.
55
.
..
..
Kxd41
Black is in no rush. Not only does he now have four connected passed
pawns, but also the bishop can be activated more flexibly.
56 Kf2
Kc4
57 Ke1
d4
58 Ke2
Kd5
59
Kf3
Bb71
The immediate 59 ... Ba6 (with the threat 60 ... Bd3) could have been tem
porarily thwarted by 60 Rd1. Now Black plans to get the bishop to d3 or
e4 with gain of time, e.g. 60 Ke2 Ba6t followed by 61 ...d3. White is de
fenseless.
60 Re1
61 Kf2
62 f5
Kc4t
b2
A last desperate try. Otherwise Black plays 62 ... Kb3 with a routine win.
62
exf5
63 e6
Bc6
Resigns.
White's pawn gets stopped but Black's march inexorably forward:
64
e7
K
b3 66
Bc5 c2 etc.
Subject
# 39:
Material advantage, both rooks active
Questions: Apart from the importance of the blockade, are there other
unique principles involved in playing R + opposite color bishop
endgames?
What would thematic play be from Diagram
647
Diagram
64
Answers:
The other important principle in R
+
opposite color bishop endgames
deals with rook activity -- whether in going for the win or in trying to draw.
Because of the inherent power of the rook, a R + B combination is very
menacing since it can attack a point which the enemy bishop - by definition
••
cannot help to defend. Therefore, many more attacking prospects are
offered by R
+
opposite color bishop endgames than by R
+
other minor
1 04
piece endgames. Please note that it is not the "attack" which is stronger,
but the defense which is considerably weaker.
The opportunities and importance of active rook play are well shown
from Diagram
64,
a club game in USA 1 976, White on move. Black is up
two pawns, connected and passed. White can capture one Black pawn but
that still leaves him one down and Black's passed pawns remain intact.
Overall, White has some practical chances for a draw, but with correct play
Black should win. The game course was:
1 Rb&
Bg3
Which pawn should Black give up? This way White gets a passed a-pawn.
I would have preferred 1 ... a5, a safer course in practical play.
2 Rxa&
Rb81
3 Ra377
Just horrible. White puts his rook on a useless square, does nothing posi
tive himself and does not even prevent the Black rook's invasion. Logical
are either the defensive 3 Bb5 or the active 3 Ra7, threatening 4 Be6.
3
• • • • •
Rb2
4 d47
Making matters worse. An absolute must was 4 Ra7!, keeping the Be6
threat in the air and allowing the a-pawn to advance.
4
• • • • •
Bf2
5 dxc571
•·
Ensuring" that his rook won't get to the active a7 square. For better
or worse White had to play 5 d5.
5
Bxc51
6 RaB
Rc21
7 Bb5
g51
8 a4
g4
In general connected passed pawns should be advanced in unison. An
exception is allowed here because the advance of the g-pawn creates annoy
ing mating threats.
9 ReB
There is no defense to what is coming, e.g. 9 Bc6 g3 1 0 Bg2 Rc1 t etc.
9
. . . .
.
g3
1 0 Be&
Ra27
Stronger is 1 0 ... Rh2 mate.
1 1 Bd5
Rxa477
Black's i rrelevant greed allows White to set up a defensive formation.
Again 1 1 ... Rh2 mates.
12 Re777
White "insists" on being mated. After the correct 1 2 Re2! White has
reasonable chances of defending because Black's pawns are now partly
blockaded. White will next play 13 Kg2 and make it very hard for Black
to
break the blockade at f3.
12
1 3 Rxf7t
14 Rf8
Better late than never!
Ra21
Kg&
Rh2 mate.
105

Principles/Rules of Thumb For Practical Endgame Play
Endgames With Opposite Color Bishops
( 1 ) The key principle for defending a material down pure opposite color
bishop endgame is to aim for a blockade. Therefore, the side up material
should avoid playing his passed pawn (s) so that the enemy bishop and king
can safely blockade them. I n particular, connected passed pawns should
not be placed on the color of your own bishop.
(2) The material up side should be most careful in how it advances its
pawns, lest the opponent's chances for a successful blockade increase. A
unique characteristic of pure opposite color bishop endgames is that you
can never break a blockade by offering to exchange pieces.
(3) I n positions where routine pawn breakthroughs are not possible, look
for sacrifices to achieve the goal of a winning passed pawn.
(4) To win B + 2 connected passed pawns vs. B endgames, both pawns
must be able to reach the sixth rank in safety.
(5) In R + B vs. R + B endgames the major strategic theme again is the
blockade. The side down material will try to blockade the enemy passed
pawn(s).
(6) Since the rook is a major piece, endgames of R + B vs. R + B offer
increased winning chances because of rook activity, as well as increased
drawing chances for the defender if his rook can be activated for counter
play. The increased winning chances come from the fact that if the R + B
attack a point, the defender's bishop cannot help out.
1 06
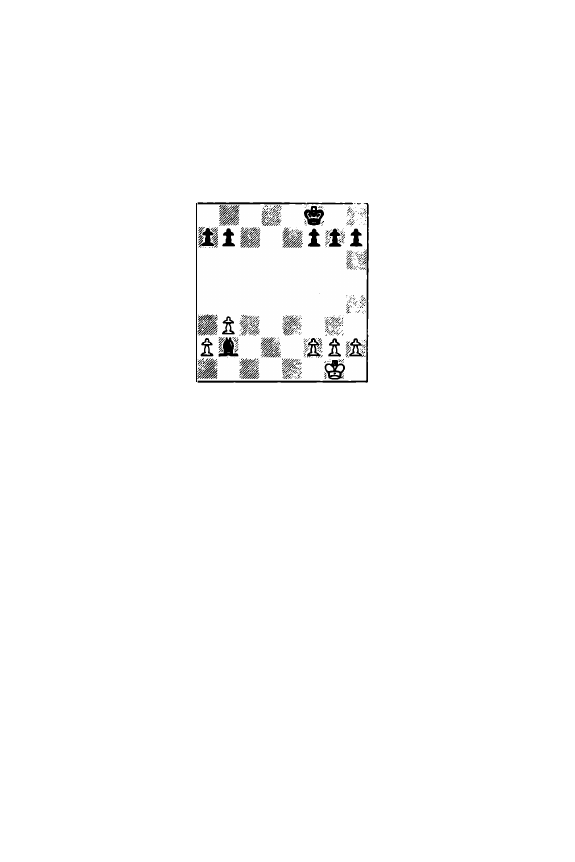
Chapter
5
Endgames With Rooks and Minor Pieces
Section 1 : Rook vs. Minor Pieces
Subject
# 40:
Rook vs. bishop, pawns on both sides
Questions: What is the correct material relationship between a rook and a
minor piece?
How should Diagram 65 be evaluated?
What is the thematic play from it?
• • a
Diagram 65
8 fff 8 R
• •
.§ ,�
Answers:
The correct material balance is rook = minor piece plus 1 Ya pawns. Of
course, such a situation can't occur since we cannot split a pawn. But it
gives us the following very clear evaluations. Strictly on a
material basis:
( 1 ) If you sacrifice a rook for a minor piece and get two pawns also, you
are ahead in material by about half a pawn.
(2) If you sacrifice a rook for a minor piece and only get one pawn addi·
tionally, you are behind in material by about half a pawn.
Diagram 65 is an analysis position from NN
-
K. DeSmet, Belgium 1 982,
Black on move. Black could have obtained this position. Should he have?
While playing an actual game it is always necessary to keep in mind both
the practical and theoretical considerations. I n our case, Black had a choice
between Diagram 65 and what he played. Whether he made the right de
cision depends on what the other choice(s) were. If Black's position was
just a bit worse, then it is clearly suicidal to go for Diagram 65. If on the
other hand, the other choice is clearly losing, then Diagram 65 is worth a
try.
I n the above discussion, I am already saying that Black's position is very
bad. The reasons for this are clear:
1. White has a definite material advantage of about Ya pawn
2. White's pawn formation is perfect
3. The position is sufficiently open so that White's rook has excellent op
portunities
4. White's king can be brought into play easily
1 07

5. There are a large number of pawns remaining and these are on both
sides of the board
6. Black has absolutely no compensation for his material disadvantage
The above factors mean that Black should never voluntarily accept Dia
gram 65 and only do so if the alternatives are very clearly worse.
Is
the position a
theoretical
win, in other words, if White and Black
both play perfectly, does White win? I think so, though in chess it is very
hard to be 100% sure of almost anything. But in any case, unless Black de
fends perfectly, he will lose very easily. Thus positions of this sort are lost
almost always in practical play, even if at the start they may not be 100%
theoretically lost. A likely continuation could be:
1 .....
f
6
The only way to improve Black's king position. The immediate mobili
zation of the queenside with 1 ... b57 leaves Black's king a prisoner on f8,
since a subsequent ... f6 loses to Re6 and the rook penetrates into Black's
queenside. But after the text move, 2 Re67 is not playable since 2 ... Be51
traps the rook and necessitates 3 f4.
2 Kf1
The rook stands well on the e-file, therefore, the first priority is to
activate the king. White could play 2 b4, but after 2 ... Bd4 he either has to
exchange pawns (and get nothing tangible for that) or leave Black's c-pawn
as a passed pawn. Pawns should only be moved when there is a clear bene
fit from this. Otherwise you are only spoiling your future potential.
2
. • • • •
Kf7
3 Ke2
Be5
Blocking off the e-file. The alternative is 3 .. .f5, but after 4 Rh4 Black
has absorbed pawn weaknesses for uncertain benefit.
4 Kd3
b5
To prevent 5 Kc4. Of course, White's h-pawn is poisoned and thus
4 ... Bxh277 will cost the bishop after 5 g3.
5 g3
g5
6 a41
a&
7 Re21
There is nothing to do on the 4th rank so the rook retreats to the 2nd
to be ready to infiltrate into Black's position via the a-file. Notice the ef
ficient and economical way that White is playing: king is centralized, just
two pawn moves (one to open the a-file, the other to safeguard the king
side), just one rook move, but this with a clear plan.
Black lacks a satisfactory plan/response since 7 ... Ke677 loses the bishop
after 8 f4. Also 7 ... Bd47 is poor because after 8 axb5 axb5 9 b41 followed
by 1 0 Rc2, White wins the c-pawn for nothing.
7
Bel&
8
axb5
axb5
9 Re21
Ke6
10 Ra51
To make Black's queenside majority immobile while also allowing White's
king access to
c4.
10 .....
b4
1 08
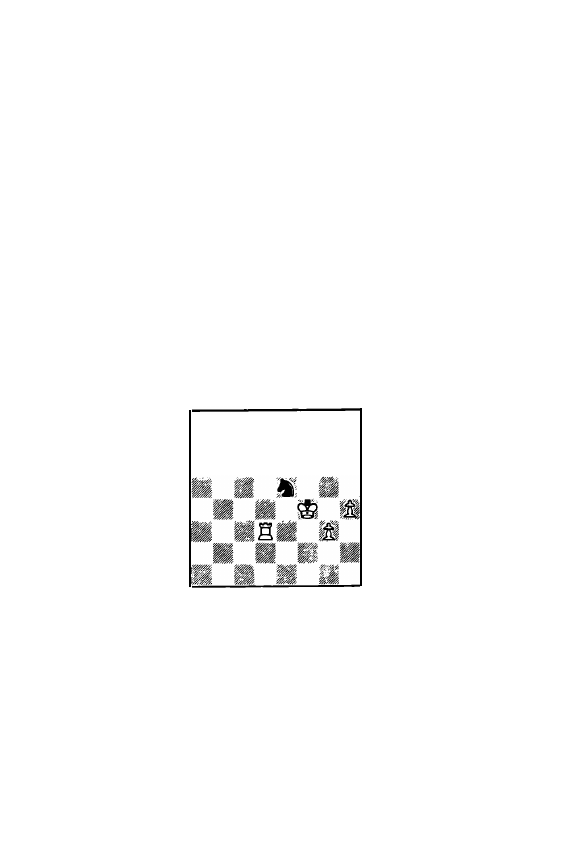
1 1 Kc41
Simplest, since White obtains a won K & P endgame. The "thematic"
1 1 Ra7 (activating the rook! ) also is strong.
1 1
.••.•
Ke5
12 Rxc5t
Bxc5
Hopeless also is 1 2 ... Ke4 1 3 Rc6.
White wins.
13 Kxc5
Ke4
14 Kxb4
Kf3
15 Kc5
Kxf2
1 6 b4
f5
1 7 b5
f4
18 gxf41
gxf4
19 b6
f3
20
b7
Kg2
21 b8=Q
f2
22 Qg3t
Kh1
23 Oxf2
Subject
#
41 : Rook vs knight, pawns on one side only
Questions: Is it significant that there are pawns only on one side of the
board7
Can White win from Diagram 667
• • • •
•
• • •
• & 1 fl 1 .
Diagram 66
1
Answers:
It is always in the interest of the side down material that the remaining
pawns be only on one side. This way there is both less to defend and
easier to do so because the area to be covered is smaller. Moreover, the
side going for the win has less opportunities because all of his chances lie
on one side only.
Therefore, in rook vs. minor piece endgames, with the pawn formations
"normal", one pawn for the exchange is sufficient to be able to draw. I n
Diagram 66, P. Berdion
·
NN, USA 1 973, White on move agreed to a draw
and I have no quarrel with that. Black's pawn formation is sound enough
to draw. Still there would have been nothing wrong with White playing on
for a few more moves to make sure that Black understands the correct
drawing technique. Thematic play would be:
1 Rd8
Nf1
1 09
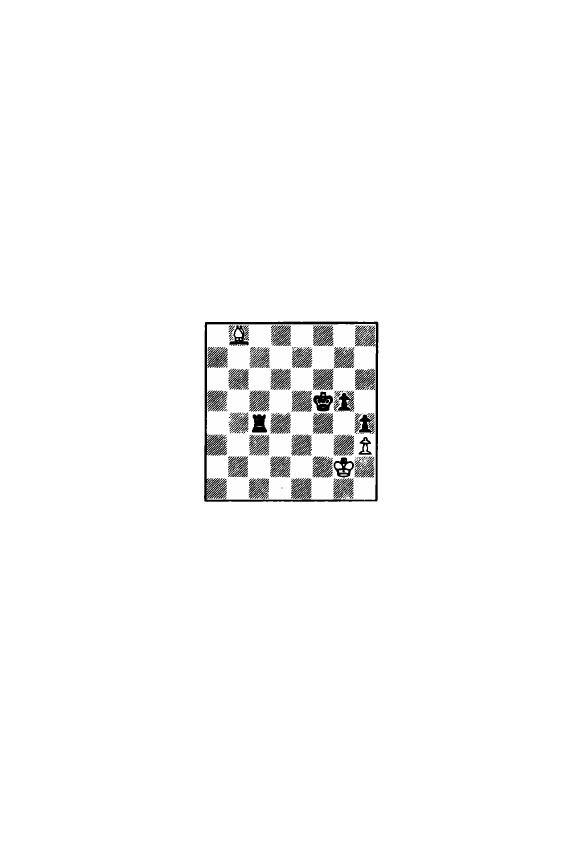
2 Rf8
Ke7
3
Rg8
Kf61
I nadvisable is 3 ... e5t71 since it weakens Black's defensive formation and
achieves nothing positive. The defender should always refrain from creat
ing new weaknesses.
4 Ke4
Nd6t
5 Kf4
Both 5 Kd37 and 5 Kd47 are bad because of 5 ... Nf5(t). We see now
that in our starting position White also has a weakness: the g-pawn.
5
. . . . .
Nf71
Drawn.
With Black continuing to guard the e5 and g5 squares as well as prevent
ing annoying rook checks, White cannot expect to make progress.
Subject
#
42: Rook vs. bishop, pawns on one side only
Questions: Doesn't Black win easily from Diagram 677
Is there anything that could complicate Black's task?
Diagram 67
Answers:
Strictly on material considerations Black has a huge advantage: he has
R + P vs. bishop or a material superiority of approximately 2% pawns. Of
course, the great bulk of positions that simplify down to R + P vs. minor
piece are straightforward wins. However, there is one class of positions
which cannot be won. This is where the pawn has been advanced too far,
with the result that it is both vulnerable and takes away a key invasion
square from the king. Therefore, at the start of a R + P vs. minor piece
endgame, you always want to first activate and penetrate with your king
and only after this has been accomplished to start advancing the pawn.
This brings us to Diagram 67, Campos - Henao, World Student Cham
pionship, Venezuela 1976, after White's 51st move. It turns out to be a
most frustrating position for Black. The reason is that after the exchange
of Black's g-pawn for White's h-pawn a theoretically drawn position occurs.
R + RP on the 5th or 6th rank vs. bishop is drawn if White's pieces are
properly placed (as here) and he defends correctly (something which is not
at all easy to dol ). Therefore Black is never in a position to break with
... g4 and how else is he to progress? This turns out to be most difficult to
do and many analysts have therefore evaluated Diagram 67 as drawn.
1 1 0
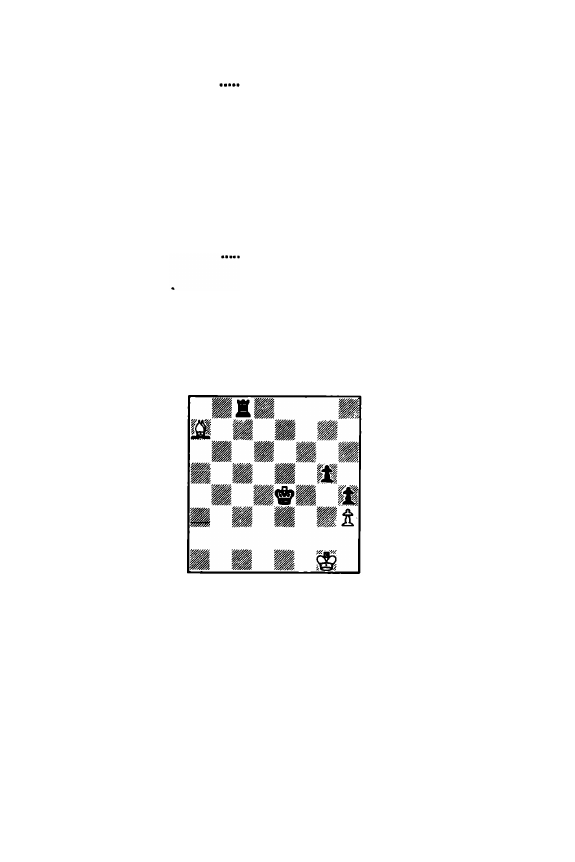
Nevertheless, with a series of problem-like maneuvers Black can achieve the
win. First we will follow the game continuation :
51
Ke4
52 Bd6
Rc2t
53 Kh1
Kf3
54 Bb8
This position looks bleak for White but is in fact fully defensible. Black
still cannot play 54 ..
.
g4 because the position after 55 hxg4 is a theoretical
draw. Moreover, as long as White's bishop remains on the h2-b8 diagonal,
Black's king cannot get to g3. Therefore Black must try to chase White's
bishop away from the present diagonal, but this can only be done by the
combination of rook and king. Thus, to hope for an eventual decisive
march forward, B lack's king must first head backward
.
•
.
54
Rc1t
55 Kh2
Ke4
56 Kg2
Rc2t
57 Kh1
Kd51
58 Kg1
Rc81
59 Ba7
Forced because
59
Bh2? leads to a routinely lost K & P endgame after
59
..•
Rc1 t
60
Kg2 Rc2t 61 Kg1 Rxh21 62 Kxh2 Ke4.
Diagram
68
59
•••••
Ke4
•
• • • •
The key position. Black's king is ready to penetrate. How should White
resist? There are two possible ways:
( 1 )
60 Kg2?
=
the game continuation.
Since this allows Black's king to penetrate via f4, Black's win is rather
simple.
60 .....
61 Bb6
62 Kh1
Kf41
Rc2t
After 62 Kf1 the simplest is 62 ... Kg3 63 Be3 g41
64
hxg4 h3.
62 .....
Kg3
63 Be3
Kxh3?1
Considerably more thematic --
as
well as faster -- is 63 ... Rb21
64
Bd4
Rb1
t
65 Bg1 g41 66 hxg4 h3 67 g5 h2 (J. Kaplan).
64 Bxg5
Rh2t
1 1 1

66 Kg1
66 Kh1 1
Rg2t
Rb2
Unfortunately 66 ... Rxg5 is stalemate, something that Black overlooked
when playing
63
..•
Kxh371. Therefore Black must re-maneuver. He can do
this successfully because White's pieces can be pushed into a possible bind,
leading to a position known as a theoretical win for Black.
ff1 Be3
Rb1 t
68 Bg1
Kg4
69 Kh2
h3
70 Bd4
Re1 1
71 Bb6
Re2t
72 Kh1
h2
Because White's bishop is off the h2-b8 diagonal, this move is possible
and winning.
73 Bc7
Kh3
74 Bg3
Rd2
75 Be1
Rb21
Resigns.
(2)
60 Kf21
=
best defense
With the idea that 60
.•.
Kf4 is parried by 61 Belt. Therefore Black must
use a very sophisticated approach.
60
.
.
. .
.
Rc71
61 Bb8
Of course, 61 Bb67! would lose as in the game above: 61
..•
Rc2t 62
Kg1 Kf3 etc.
61 .....
62 Bel&
Rb71
Kd51
Black has now woven a net around the possible good squares for the
bishop and therefore the bishop must retreat to an off center location.
Note that b8, c7, d6, e5, f4, g3 and h2 (because of 63 ... Rh2t and
64
.
.
.
Rxh2) are not available and neither are fB, e7, c5, b4. Therefore White's
response is forced and it allows Black to execute his long prepared plan :
to get his rook to g3 when White's king is cut off from the h-pawn by
being on f2. As you recall White's king had to go to f2 to prevent Black's
king from first reaching f4 and thence g3.
63 Ba3
Rb31
Played with the crucial gain of a tempo.
64 Be7
Rg3!
Mission accomplished. White's king cannot get back to protect his h
pawn, whereas Black's king will be able to protect his g-pawn.
Black wins.
1 1 2
65 Kf1
K
e6
66 Bd8
Kf5
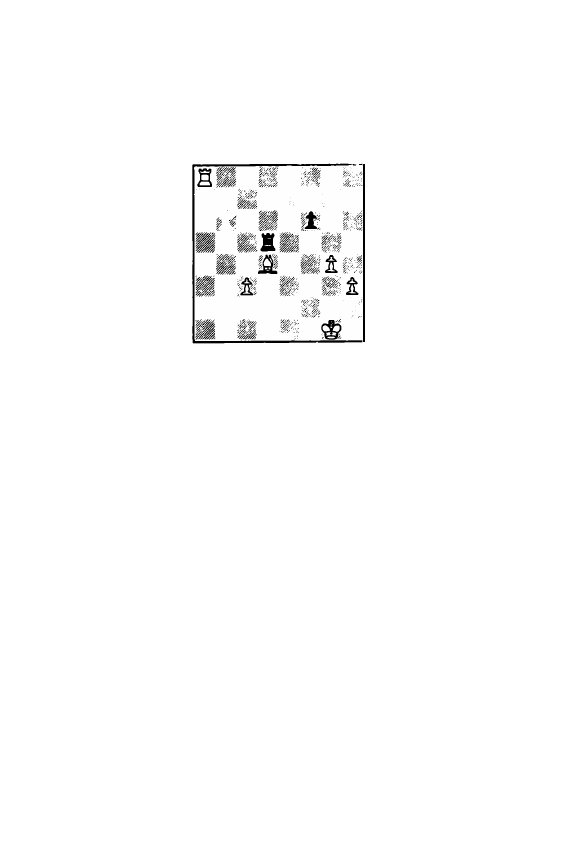
Section 2: Rook(s) + Minor Piece vs. Rook(s)
+
Minor Piece
Subject
# 43:
R + B vs. R + N, material equality, pawns on both sides
Questions: In what positions is R + B the preferred combination?
I n what positions is R + N the superior one?
Who is better in Diagram 69?
What is the thematic play from it7
�ti
�;;\t�t':
1
�'::�""
�
Diagram 69
Answers:
ft ��
•
�'.;,;
"""'/·
The bishop is a long range piece and so is the rook. The combination is
most effective in open or relatively open positions where there are pawns
on both sides of the board. The knight is a short range piece and an excel
lent blockader. It is most effective in cluttered or blockaded positions and
in such positions is the preferred helper to the rook.
In Diagram 69, J. Frankie
-
M. Chen, Boston 1973, after White's 32nd
move, White has a slight advantage because of the more active rook, a cen·
trally placed bishop with potential on both sides (the superior minor piece
in such a relatively open position) and a queenside pawn majority. This
latter factor offers White the opportunity to create a viable passed pawn
there, with Black's king too far away to be an effective defender. However,
Black's position is fundamentally sound and White's advanced kingside
pawns are a bit weak. These factors allow Black, with careful defending,
to draw:
32 .....
Rd71
And not the active appearing 32 ... Ra5? which allows White to mobilize
his queenside with 33 b41 Rxa2 (or 33 ... Ra6 34 a4! followed by a5)
34 Bxb6.
33 a4
Aiming to get at Black's a-pawn by playing 34 a5. White has no time
for king centralization with 33 Kf2 because 33 ... Nf4l threatens both 34 ...
Nxh3t and 34 ... Nd3t. Also after the text move Black has to activate his
knight.
33 .....
Ne51
34 Kg2
34 a5 is met by 34
.
.. Nf3t followed by 35 ... Nxd4. No advantage can be
expected from 34 Bxe5 dxe5 since, because of the threat of 35 ... Rd1 t 36
Kf2 Rd2t, White must resort to the passive 35 Kf1 .
1 13

34
35
Be3
36 Kf3
37 Ke4
38
Bc1
Nc61
Ke61
Ne5t
Nc4
Rd1 1
Demonstrating the usefulness of his 35th move: since White can't play
29 Rxa7 with
check,
Black's rook can be activated.
39
Bf4
Nxb2
40
Rxa7
Rd7
41
Re6
Nc4
42 a51
Since there is no hope of winning the b-pawn for nothing, White plays a
nice "exchanging combination" which gives him a passed c-pawn.
42
•••••
Nxa5
43
Rxb6t
Kf7
44 Rd671
The exchanging off of White's active rook makes it
so
much easier for
Black to defend. The correct plan is to improve the activity of White's
rook while keeping the knight
as
inactive as possible:
44
Ra6! Nc4 45
Rc61 Na5 46 Rc81. The passed c-pawn is a real threat and Black will have
to
defend quite accurately.
44 .....
45 Bxd6
46 Bf4
Rxd&
Ke&
Nc&l
The knight is a born blockader and it is not in White's power to chase it
away from this post. This endgame is quite drawn.
47
Bg3
g6
48 Bf2
Kd&
49 Bd4
f5t
Good enough to draw, though it requires accurate calculation. Of course,
Black could simply keep the status quo with 49
.••
Ke6.
50 gxf5
gxf5t
51 Kd3
51 Kxf5 Nxd4t 52 cxd4 Kd5 is a drawn K & P endgame because White
is left with the h-pawn: 53 Kg5 Kxd4 54 Kh6 Ke5 55 Kxh7 Kf6 56 h4
(56 Kg8 Kg5) 56 ... Kf7 57 h5 KfBI etc.
51 .....
Ne5t
52
Ke3
Of course, 52 Bxe5t Kxe5 leads to the same type of play
as
i n the pre
vious note. Therefore White refuses to exchange, but of course this also
leads to nothing.
52
Ng
6
53 Bf6
Kd5
54 Bg5
Kc4
55 Bf6
Kd5
56 Bd8
Kc4
57 Ba5
Kd5
58 Bc7
Kc4
Drew.
1 14
Subject
# 44: R + N vs. R +
8,
one
pawn
advantages
Questions: What moves for Black are logical from Diagram 70?
What is the correct evaluation of this position?
Diagram 70
Answers:
Diagram 70 shows the position from Mocellin
·
Ginod, France 1982,
with Black on move and about to seal. What should he seal? Well, to de
termine that we should first correctly evaluate the position. White is ahead
a sound passed c-pawn, has a powerfully placed knight and his rook behind
the passed pawn. However, Black's rook and bishop are very actively placed.
Since Black has no weaknesses and there are few pawns remaining, Black
should feel confident of drawing. I think that Black has three logical moves:
( 1 )
1 ... Kg7
:
essentially keeping the status quo.
(2)
1 .
..
hxg4
:
bringing about a routine exchange of pawns and thus heading
closer to the draw. This is what I would have played.
(3)
1
.
.
.
Bd4
: trying to chase White's rook away from the c-file, so that
Black can play his rook to the active "behind the passed pawn" location on
c2.
However, Black had sealed something completely different:
1
...
..
h4tn
Analytically speaking, this is a rather dubious attempt at getting more
than a draw. Black wil l now be two pawns down and with so little attack
ing material left, the chances for a mate are very slight. Yet psychological
ly it works out very well. White was quite surprised by it and quickly lost
his way.
2
Kxh41
Why not? White can probably draw after 2 Kf3 f5! 3 gxf5 gxf5 4 Ne3
Ah2 5 Ad3, but why shouldn't he go for more?
2
.
..
.
.
Rg2
Continuing in his enterprising way: Black prevents White's king's return
to g3. I will now consider the following two moves:
(1 )
3 Kg51
The king as an attacker! White is quite safe after it. He threatens to
free himself with f5 and there is no way to prevent it.
3
Kg7
4 f51
f&t
1 1 5
5 Kf4
Of course not 5 Nxf677 because of 5 ... Be7.
5
g6t
6 Ke4
Re2t
7 Ne31
Kf7
Hopeless is 7 ... Rh27 because of 8 Kd5!.
8 Rd3
With excellent winning chances for White. White wil l now work to un·
tangle his pieces with 9 Kf3.
(2)
3 Nf67
The game continuation after which White went on to even lose. How·
ever, objectively speaking, White's position is still good enough to draw.
(a) 3
.•.
Bd4 4 Nd7t Ke7 (4
•.•
Kg7 5 Rd3) 5 Rd31 and White is safe.
(b) 3
.•.
Kg7 4 NeSt l<h8 (White is safe after 4 ... Kh6 5 g5t Kh7 6 Nf6t
Kg7 7 Ne4) 5 Rd3 Be7tl 6 g5 Bb4 7 Re3 Bc5 8 Rf3. Black can of
course win the exchange with 8 ... Bf2t 9 Rxf2 Rxf2. But even if White
would lose the c-pawn, his extra pawn on the kingside is sufficient for the
draw.
Subject # 45: R + N vs. R + B, one pawn advantage, pawns on the
same
side
Questions: With a material advantage and pawns on the same side, which
minor piece is the preferred one?
How should Black proceed from Diagram 7 1 7
• a • rl t
Diagram 71
• • •
f�
Answers:
8 M t 8 �i
,, -��
�- R D r.
• R<it>R
With pawns ori the same side only, the area to be covered is relatively
small. To win an endgame having a one pawn advantage, the knight is the
superior minor piece to have because its greater flexibility allows it to at·
tack more points. I n Diagram 7 1 , an analysis position from J. Fedorowicz
·
A. Bisguier, New York International 1 977, after White's 54th move, Black
has several advantages: an extra pawn, the active rook, the superior minor
piece. Moreover, White's king is in some danger of being mated. For maxi·
mum attacking power Black's king should join the fray:
54
.
.
.
.
Kg41
Black now threatens 55 ... Rh 1 t 56 Kg2 Rg1 mate, so that White's king
1 16
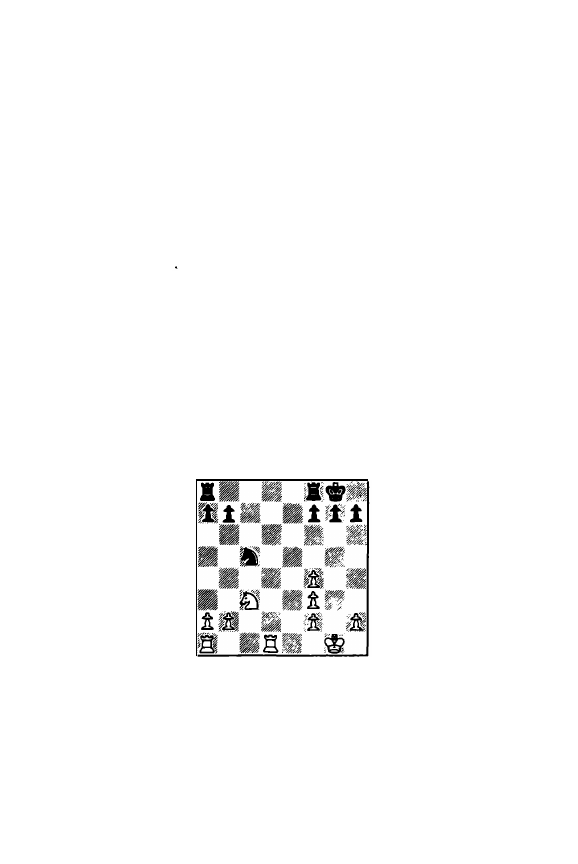
must flee.
55 Ke2
56 Kel
57 Bc4
Rh1
Rb1 1
Rc1 1
Forcing White's bishop to an inferior square, because 58 8e67 loses to
58 ... Re1 t 59 Re2 Rxe2t
60
Kxe2 Nd4t and 58 Bb57 loses to 58 ... Rc3t
59 Ke2 Nd4t.
58 Ba&
59 Ke2
60 Rb2
60 Kf1 7 leads to mate after 60 ... Rc1 t
60
..•..
61 Ra2
Rclt
Khll
61 Ke2 Re1 .
Kg21
Nd4t l
A regrouping with the purpose of getting at White's f-pawn.
62 Ke1
Rf3
63 Bf1t
Kg1
64 Ba6
Nc&l
65 Bc4
Ne51
66 Ba&
Ng4
Black wins; after winning the f-pawn, Black's further task is elementary.
Notice how important in the final play was the inherent flexibility of
Black's knight.
Subject # 46: 2
R
+ N
vs.
2
R
+ N, pawns on both sides
Questions: What is the most important principle in playing R
+
N vs. R
+
N (and 2 R + N vs. 2 R + N) endgames?
I n Diagram 72 how big a problem are White's tripled f-pawns?
Diagram 72
Answers:
Since in R
+
N vs. R + N endgames both sides have the same pieces, the
most important principle deals with the major piece on the board, the rook.
Therefore, activate and keep your rook active!
In Diagram 72, M. Robertson - M. Roza, I llinois 1 974, after White's 1 6th
move, we see a position which has gone directly from the opening into the
endgame. White is up a pawn, though in the form of a tripled f-pawn.
White's isolated tripled f-pawns are weak and ugly looking, yet a pawn is a
pawn and therefore I judge the situation on the kingside as approximately
1 1 7

equal. Elsewhere White has just established control of the open d-file. At
the moment chances seem to be in dynamic balance, but perceptive play is
required to retain this. The game continued:
16 .....
Ne671
Immediately attacking the forward f-pawn will not give results. Thematic
is to challenge White's control of the d-file with 1 6 ... Rfd8!.
17 Ne271
There was no need for this passive retreat. More logical is the active
1 7 f5! and if 1 7 ... Nf4, 1 8 Rd4.
17 .....
18 Rac1 !
Rac81
Rxc171
Why rush to exchange and give White control of the c-file? Because
White has two active rooks, Black should safeguard his king from back rank
mates by playing 1 B ... h6 or 18 ... g6.
19 Rxc1
Re871
The rook is not placed fruitfully here. In order is 19 ... g61 followed by
20 ... Rd8.
20
a4
Playable but rather irrelevant to the position. More sensible is 20 Kf1
protecting the knight. And strongest is 20 f51 Ng5 21 Kg21 and because
of Black's back rank weakness White will be able to activate both his rook
and knight.
20 .....
21
b4
h6
Nc57
An exchanging combination which makes White's rook the active one.
Correct is the defensive 21 ... Re71 protecting Black's second rank from in
cursion by White's rook. White's advantage after 21 ... Re71 is minimal.
22 Rxc5
Rxe2
23 Rc7
Possible of course is first 23 ReSt Kh7 and then 24 Rc7, yet it is not
clear where White would prefer Black's king to be.
23 .....
Ra2
The game score becomes completely i llegible after this move. However,
if White now plays:
24 a51
. . . he wins a queenside pawn and obtains excellent winning chances.
Subject # 47: 2 R + B vs. 2 R + 1\4 pawns on both sides
Questions: Why is White better in Diagram 73 (on the next page)?
Answers:
Is there a way that he can trade in these advantages for some
thing even better?
Diagram 73 (on the next page) shows the position from E. Mednis - J.
Fedorowicz, New York I nternational 1977, after Black's 29th move. One
obvious advantage for White is that Black's b-pawn is always vulnerable to
White's bishop. Moreover, both of White's rooks are actively placed. If
White could quickly double rooks on the h-file Black's h-pawn could be in
trouble. Therefore:
1 1 8
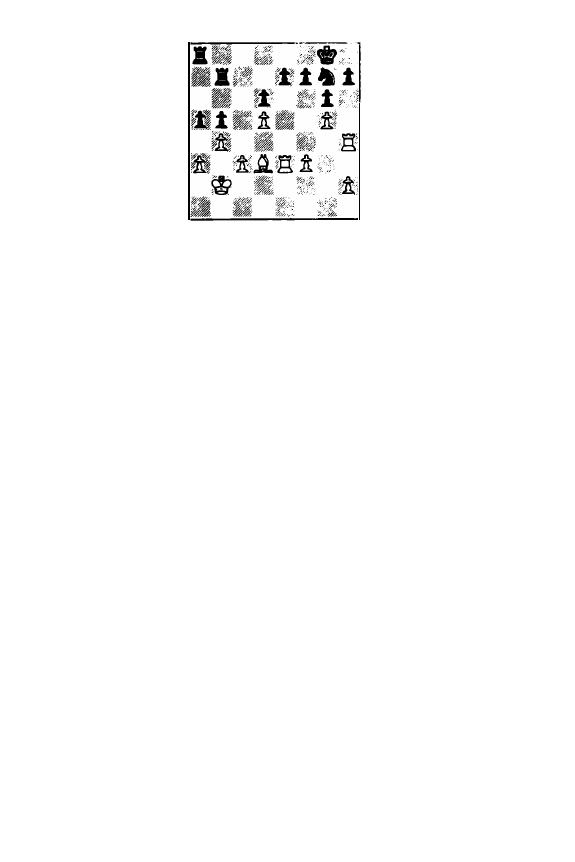
Diagram 73
30 f41
White combines play against the b-pawn with that against Black's h-pawn.
The threat is simply'31 Reh3 Nh5 32 Be2. Note that White's kingisde
play is only possible because both pairs of rooks remain on the board.
Since the above plan cannot be defended against, Black tries to create some
play by opening the a-file.
30
•.•..
axb4
31
cxb41
Rba7
My original plan was to simply protect the a-pawn by 32 Bc2 and then
to go ahead with play on the h-file. Further calculation seemed to indicate
that Black gets fair chances for counterplay along the c-file after 32 ... Rc8
33
Reh3 Nh5 34 Bd1 Rac7. Subsequent -- at home -- analysis showed that
in point of fact this was not to be feared.
Still, in a tournament game when you have a position of great strength
you do not want to allow any counterplay that may be dangerous. More
over, in a superior position there often are opportunities for trading the
existing advantages for a new, enhanced set. Using this approach I decided,
after some reflection, to continue with:
32 Bxb51
33
Rhh3
34
Rxe3
Nf5
Nxe3
After the sacrifice of the exchange, this is the starting position. On a
purely materialistic balance, White does not have quite enough compensa
tion. However, on positional considerations White has more than enough.
Two connected passed pawns which can be assisted by the bishop in their
advance -· this packs a tremendous punch. Of course, White's pre-sacrifice
advantages also were considerable. Still, the master always looks for a dy·
namic way to exchange one set of advantages for a new set consisting of
expanded advantages.
I
felt confident that this was being achieved with
32 Bxb51.
Theoretically this position must be rated as won for White. This does
not mean, however, that it plays itself. Accuracy is required to both pre
vent counterplay and the establishment by Black of a viable defensive for·
mation. Black's extra pawn is on the kingside so that his next move is a
logical attempt at creating some counterplay.
34
.•.•.
e&
1 1 9
36 Bc4
exd5
This allows the bishop a strong stable location. However, the attempt
to pressure the bishop with 35 ... Rc7 36 KbJ Race is refuted by 37 dxe61
Rxc4 38 e7, leading to a won R + P endgame for White.
36 Bxd5
Rb8
37 Kb3
Kf8
38
a41
Passed pawns must be pushed! White's K + R + B stand well enough so
that White should immediately start to exploit the strength in his position:
the passed pawns. If Black does nothing the pawns wi ll move inexorably
forward: b5, Kb4, a5, b6 etc.
With his reply Black hopes to either activate the rook -- or i n case of the
exchange - to bring the king over to the queenside for defense. It does not
work out, but there is nothing satisfactory.
38
ReS
39
Rxe8tl
Kxe8
40
a51
Kd8
41 Ka4
Kc8
' Also 41 ... Kc7 is met by 42 Kb51 and Black's K
+
R are in zugzwang.
Neither is there time for rook activity, e.g. 41 ... Re7 42 a6 Re1 43 Kb5
Ra1
44
Kb6 followed by 45 a7.
42 Kb51
The king is a fighting piece in the endgame and therefore should be made
made active and
kept
active. The king is particu larly helpful when in front
of or to the side of passed pawns, as this way he can be of greatest assis
tance in their advance. Less clear is 42 b5 Rc7 1 43 b6 Rc5, with Black
getting counterplay.
After the text, if Black plays 42 ... Kc7, then 43 a6 puts him in zugzwang.
42
Kb8
43
Kb&l
Re7
44 a&
Rc7
There is no hope. If
44
.
.. Ra7 45 b5 and the rook must move, where
upon 46 Bb7 wins.
45 Bb71
The threat of 46 a7 mate requires the reply, which leads to an elemen-
tary K
+
P endgame win.
45
46 axb7
47 Kc5
Rxb7t
d5
Resigns.
Section 3: Other Endgames With Rooks
And
Minor Pi
e
ces
Subject # 48: R + B + N vs. R + B + two connected passed pawns
Questions: Who has the advantage in Diagram 74 (on the next page)?
How should White handle the position?
Answers:
Diagram 74 (on the next page) shows the position in NN - P.
L.
Michael,
USA 1 973, after Black's 28th move. Counting material we see that Black
1 20

Diagram 74
has two pawns for the piece and these are in the form of connected passed
pawns on the kingsicle. Very rarely in a normal type of position are two
passed pawns superior to a piece and it is also infrequent that two passed
pawns are sufficient compensation for a piece. Therefore, after a relatively
brief look at Diagram 74 I would conclude that White has some kind of an
advantage but whether this should be sufficient to win is unclear.
A more thorough evaluation of Diagram 74 will give the following addi·
tional conclusions:
( 1 ) Black's passed pawns can be so placed that it is easy to protect them.
(2) White can easily blockade the passed pawns because he already has the
rook + knight on the kingside and the bishop can readily move there via e 1 .
(3) From their blockading positions White's pieces will have little attack·
ing power.
(4) Black has no fundamental weaknesses that White can attack.
(5) There is no straightforward way that White can expect to establish a
passed pawn.
With the above as a background we can now better appreciate the game
continuation (the wrong way) and the follow-up correct way for White to
handle the position :
( 1 ) Game Continuation = The Wrong Way
29
c471
By itself this does no damage, but I've added the dubious mark to indi
cate that White is unaware of the correct plan.
29
• • • • •
h3
As
a general principle Black would want to leave the pawns on the dark
squares so that White cannot set up a blockade on g3. In other words,
Black would like to be able to play ... g4 and ... g3. However, at the moment
this is not possible since 29
.
.. g4 30 Be1 g37? loses to 31 Bxg3. Black there
fore satisfies himself with advancing the h-pawn forward to h3 where it is
safe and bound to cramp White's defenses. This is a perfectly reasonable
approach.
30 c57
White puts the pawn en prise. Correct is 30 Be1 to blockade the g-pawn.
30
. . . . .
d57
1 2 1
Black fails to notice that after 30 ... g41 31 Ne2 dxc5 White cannot cap.
ture with 32 Bxc577 because of 32
.
.. ReS.
31 Nf377
Allowing Black's kingisde pawns to march. The correct 31 Be1 would
draw without difficulty.
31
g41
32 Nxe5t
Ke6
33 Bc37
Because of the presence of opposite color bishops, some drawing chances
are retained by 33 Nxg4!. The attempt to blockade the g-pawn tactically
by 33 Be1 ? is refuted by 33 ... Kxe5! I 34 Bc3t Ke4! 35 Bxh8 g3 and Black
will make a new queen.
33
.•...
Rc87
This also is rather irrevelant to the needs of the position which
demand
that Black get the kingside pawns going. The thematic 33 ... g31 wins easily.
34 b47
White still doesn't realize that the real enemy is Black's
connected
passed pawns. Drawing chances were retained by 34 Nxg41.
34
g3
35
Re2
h21
36 Re1
g2
37 c6
bxc6
Resigns.
(2) White's Correct Way
29
Be1 1
A piece up, it is i n order to first stop Black's potential play on the king
side.
_ 29
•...•
h3
Might as well advance it to here where it is quite safe. Of course, there
is the disadvantage that White's bishop can now effectively blockade the g3
square. Yet there is no way to improve Black's position: 29 ... g477 is not
playable, 29
. • .
e47 limits Black's bishop and 29 ... Be4 is met by 30 Nh3 when
30 ... g4? is not playable because of 31 Ng5.
30 Bg3
By covering the h2 square this gives White's rook some freedom.
30
•••••
g4
Protecting the h-pawn while also advancing one square closer to queen
ing.
31 Rf2
Activating the rook is now safe.
31 .....
Be4
Keeping the bishop as active as possible.
32 Bh2
The safest blockading position as the farthest advanced pawn is now
stopped.
32
•••••
Rg8
33 N
e
2
Bf3
Threatening 34 ... Bxe2 followed by 35 ... g3.
1 22
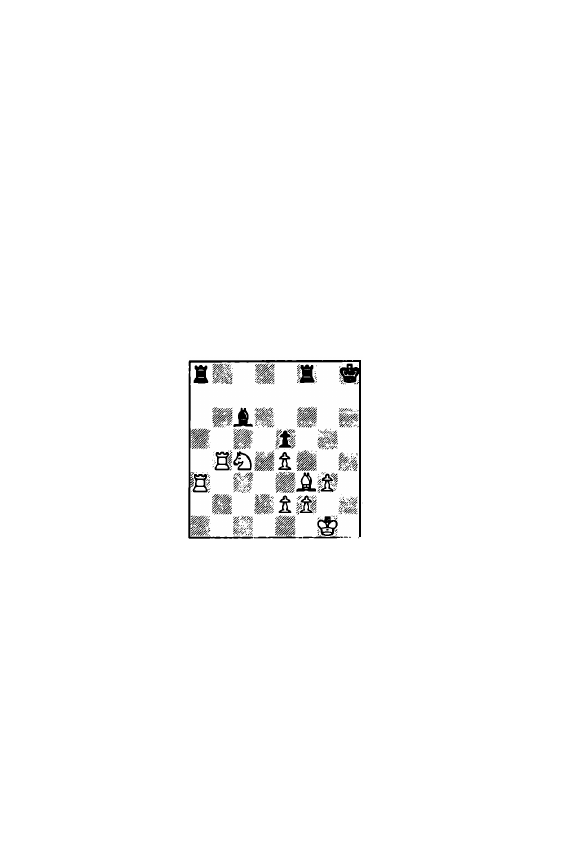
34 Ng3
With some advantage to White. It is clear that White's minor pieces
have completely stopped Black's kingside pawns. White's rook therefore is
now free for attacking purposes. Can White win from here? And how to
go
about it?
Even though White is clearly better, the job of establishing the exact,
hoped for winning method is extremely difficult. If the game would be
adjourned here it is very easy to spend 20 hours or so looking for the right
method. This method must consist of the "proper" advance of the queen·
side pawns to try to force some kind of vulnerable weakness in Black's po
sition. Most likely White's king should move to the kingside so as to free
the knight for attacking purposes.
Even after all of this I am not certain that White has a win. But what
is clear - and important ·· is that White has played correctly from Diagram
74 to snuff out any "threats that Black could have on the kingside.
Subject # 49: 2 R
+
N
+
B vs. 2 R
+
N
+
B, one pawn advantage
Questions: I n Diagram 75 what is Black's thematic play?
What is White's thematic play?
Diagram 75
Answers:
�ti.t �x��• �j .t
The play ensuing from Diagram 75, Legore · D. Eisen, USA correspon·
dence 1 977·78, after White's 31st move, is what practical play is about.
Though Black is up a pawn and has two connected passed pawns on the
queenside, the win is nowhere routine because White's pieces are actively
placed there and thus inhibit the ready advance of Black's queenside. The
strategic benchmarks of the position are: Black must try to get he queen·
side going; Wh ite must prevent this, whi le making something of his extra
pawn on the center/kingside. Success for each side wil l depend on how
wel l it is able to achieve the above objective(s). Black now played:
31
. . . .
.
b6
To prevent 32 Na5. The weakening of the queenside is unwelcome, but
can't be avoided as e.g. 31 ... Rf6? ! is met by 32 Bg4 Nc5 33 f3! and Black
has no good way of protecting his e·pawn (33 ... Na6 34 Rb2 ReB 35 Na51
leads to problems on Black's queenside).
32 Bg41
It is clearly in White's interest to trade one of his doubled e-pawns for
1 23
Black's e-pawn. This both normalizes White's pawn formation and makes
the remaining e-pawn a passed pawn.
32
Nc5
33 Nxe5
Bxe4
34 fl
Bb7
35
e41
g6
Thanks to his e-pawn White has good central influence and the active
piece placement also serves to keep Black at bay. Therefore Black correctly
first improves the position of his king.
36 Rb21
Kg7
37 Rba2
a&l
White tries to force Black's queenside pawns forward so that they be-
come more vulnerable and Black resists this as much as possible.
38
Nc4
h5
39 Bhl
Rf&
40
Rb2
So
far White has played perfectly but starting here he fails to take the
best practical steps. Black's major hope is his
connected
passed pawns;
therefore eliminating one of them by 40 e5! Rxf3 41 Rxf3 Bxf3 42 Nxb6
makes great sense.
40 .....
41 Na5
b5
Bc8
A passive square for the bishop but after 41 ... Rf7 42 Rc2! Na4 43
Be6 it is stil l the White bishop that is the superior one.
42 Bg21
Be&
43
Rc3
Playable, but not as logical as making use of the pawn majority in the
center with 43 e5l followed by
44
f4.
43
44 Rc7t
45 Rbc2
Na4
Rf7
Ra71
It is important to prevent White's rook(s) from controlling the 7th rank,
e.g. 45
.
.
. b471 46 Rxf7t Bxf7 47 Rc7 with excellent counterplay for
White as 47 ... b37 is not feasible and 47 ... Rb871 allows 48 Nc6.
46 R7c6
Rfe7
47 Rd67
Before thinking about further aggressiveness, White had to prevent the
mobilization of Black's b-pawn with 47 Bf1 1 as then 47 ... b47 is surprised
by 48 Bc41.
47 .....
b41
Passed pawns must be pushed!
48 Bf17
This offers now no prospects as the b-pawn just continues its run. As
Eisen points out, the only practical chance was the piece sacrifice after 48
Rcc6 b3 49 Nxb3! Bxb3
50
Rxg6t Kf7 51 Rcf6t l<e8 52 R xa6. Never
theless, since Black has lots of
pieces
remaining, his chances of mounting an
effective attack against White's king are excellent.
1 24
48
bl
49 Rcc6
b2

50 Bd3
Red7!
The remaining motifs deal with promoting the b-pawn, with White being
defenseless against it, e.g. 51 Rxe6 Rxd3 52. Rxg6t Kf7 53 Rcf6t KeB or
51 e5 Rxd6 52 exd6 Ba2 53 Rc7t Rxc7 54 dxc7 Nb6. White's game
move is irrelevant.
51 g4
52 fxg4
53 Rxd6
54 Nc6
hxg4
Rxd6
Rc7!
Or 54 Rxe6 Rc3! or 54 e5 Rc3 55 Be4 Re3 56 Bc2 Rxe5 etc.
54
Bc4!
55 Bc2
Bb5
Resigns.
Principles/Rules of Thumb For Practical Endgame Play
Endgames With Rooks and Minor Pieces
( 1 ) The value of a rook is a minor piece + 1
Y:z
pawns. This means that under
normal conditions one pawn for the exchange is insufficient compensation,
whereas two pawns for it is already a material advantage.
(2) In rook vs. minor piece endgames, with pawns on both sides of the
board, having only one pawn for the exchange usually leads to a loss.
(3) I n rook vs. minor piece endgames, with pawns on one side only,
usually one pawn for the exchange is sufficient to draw.
(4) If a rook vs. minor piece endgame has simplified down to R + P vs.
minor piece, the correct winning plan is to first activate and penetrate with
the king and only then advance the pawn. The reason for this is that there
is a relatively large class of positions which are drawn if the pawn has been
advanced too far.
(5) I n R + B vs. R + N endgames, the R + B combination is generally the
more effective one in open or relatively open positions where there are
pawns on both sides of the board. R + N is the preferred combination in
cluttered or blockaded positions. I n all cases - since the rook is a major
piece to be used
es
an attacker - activate your rookl
(6) With a material advantage (the usual case being one pawn) and pawns
on one side only,
R
+ N is usually superior to R + B because the flexibility
of the knight allows the R + N side to attack more points in the enemy
position.
(7) The most important principle in playing R + N vs. R + N (and 2 R + N
vs. 2
R
+ N) endgames is to activate and keep your rook(s) active !
(8) I n multipiece endgames where your opponent has sacrificed a piece to
obtain passed pawn (s), make sure to first stop the pawns. Only then work
to exploit your material advantage.
1 25
Ch
a
pter 6
Endgames With Queens
Subject #
50: a + P vs. a
Questions: Which pawn (s) are the best to have?
Which are the worst?
Answers:
When we speak of the 0 + P vs. 0 endgame we are referring to the situa
tion where the defender's king is sufficiently far away from the pawn so
that it cannot help in the defense. It should be clear that if the king is in
front of the pawn that the position is a certain draw.
The endgame of 0 + P vs. 0 is a very important one for endgame theory.
This is because it is the ultimate simplification in 0 & P endgames. Yet it
is not all that important in practical play. Firstly, pure 0 & P endgames
are not that common. Secondly, the simplification down to where only a
single pawn remains is very infrequent. I have been playing in tournaments
well over 35 years and have not had a single case of it.
Though much theoretical work has been done already, there still is a lot
to learn regarding exactly which positions are wins and which are drawn.
I
expect that the major computer chess programs, such as Hitech, will help us
establish the definitive conclusions. I n the meanwhile, for the type of sit·
uation shown in Diagram 76, this is the present knowledge for each pawn :
Diagram 76
• • • •
• • • •
• • • •
• • • •
( 1 ) Center Pawns (d· and e-pawns)
Once the pawn reaches the 7th rank, it is a sure win. The problem is
getting it there. Because there is lots of room for checking on both sides
of the pawn, it is extremely difficult to advance it. Even after it reaches
the 6th rank, the position most likely is still a theoretical draw.
(2) Bishop Pawn (c- and f·pawns)
From a practical standpoint the best pawn to have is the bishop pawn.
It is considerably easier to advance than a center pawn because the check·
ing possibilities from the short side are considerably reduced. Once the
pawn reaches the 7th rank, the position is a theoretical win, even though
the road will be longer and more complicated than for a center pawn.
1 26
(3) Knight Pawn (b- and g-pawns)
This pawn is something of a mixed bag for winning purposes. It is rela·
tively easy to advance to the 7th rank, but once there it stil l may not be a
theoretical win.
(4) Rook Pawn (a- and h-pawns)
Theoretically this is by far the worst pawn to have and the Diagram 76
type of position is an assured theoretical draw. However, the correct de
fensive technique is both difficult and laborious and in practical play it is
very easy to lose this endgame. Many positions with the pawn on the 7th
rank cannot be won because the stronger side's king cannot find shelter.
Subject # 5 1 : Q + P
vs.
R + P
Questions: Isn't Diagram 77 an easy win for Black?
Is the endgame of R + g-pawn vs 0 a draw?
Diagram 77
Answers:
What happens from Diagram 77, Godin - McDonald, Connecticut 1 97B,
after White's 52nd move, is a perfect illustration of the adage that "a game
is not over unti l it is over" or in other words "always be careful !". White's
position must be called "hopeless": he is down a queen for a rook and his
king is an eyelash away from being mated. Black has a number of elemen
tary wins, including 52 ... 0e2, 52 ... 0f6, 52 ... 0a7 and 52 ... Kc2. I nstead he
played:
52 .....
Kxb37
An instance of human greed, because the b-pawn is obviously irrelevant
to the needs of the position. Even more importantly it gives White the op
portunity for a tactical surprise:
53 a71 !
Now things are much more difficult, since if B lack captures the a-pawn ,
White captures Black's g-pawn. Yet there still is a way to win by taking
advantage of the poor situation of White's king: 53 ... 0f5! 1 . Any checks by
White's rook are prevented; 54 a8=0 allows mate after 54 .
.
. 0h5t 55 Kg1
Oxd 1 ; 54 Ra1 loses to 54 .
.
. 0h5t 55 Kg1 Oh2t 56 Kf1 Oh 1 t ; the easiest
win after 54 Kg1 is 54 ... 0c5t ! 55 Kh1 Oh5t followed by 56 ... 0xd1 mate.
53 ..
.
..
Oxa77
Of course, this automatic move is
understandable;
it simply is not the
1 27
correct one.
54 Rd3t
Kc4
55 Rc3t
Here and on the following moves White tempts Black into allowing
stalemate. However, the simple 55 Rxg31 is better because for the 0 vs.
R + P endgame to come it is in White's interest not to allow Black's king
to get near White's pawn.
55
Kd5
56 Rd3t
Ke5
57 Re3t
Kf4
58 Rf3t
Kg4
59 Rxg3tl
Here Black acquiesced to the draw by playing 59 ... Kxg3 stalemate. But
what if he continued the game by playing 59 ... Kf4? Note of course that
the disappearance of Black's g-pawn has relieved the stalemate situation.
What of the general theory of 0 vs. R + Pawn(s) endgames?
0 vs. R endgames (involving various pawn counts), though well developed
in endgame theory, are both difficult and complicated. Queen v. Rook/
Minor Piece Endings by Averbakh et al devoted 1 35 analysis packed pages
to this subject, of which 53 pages are for the case of 0 vs. R + P. Clearly
it is impossible to do much generalizing here. Regarding the specific posi
tion: the g-pawn back home is a favorable case for the defender and based
on the analysis of Diagrams 74, 75, 78 (all with colors reversed) in the
Averbakh book, I would call our position a theoretical draw. However, it
is very easy for White to make a misstep with his king or rook and very
often just a single error is sufficient to cause a theoretically lost position.
In a practical game, the stronger side should always play out such positions.
The winning chances are good, the losing chances are zero -- is this not the
ideal practical situation?
Subject # 52: Queen
+
pawns vs. 2 rooks + pawns
Questions: Who has the advantage in Diagram 78?
What is the best way for White to use his queen?
How should Black employ his rooks?
• • •••
. . �- .
Diagram 78
Answers:
• • • •
Diagram 78 shows the position from R. Byrne - J. Tarjan, 1 984 U. S.
1 28

Championship, after Black's 38th move. The play from here on is both in
teresting and instructive. The endgame of queen vs. two rooks is a very im
portant one. From a strictly materialistic consideration the queen plus a
pawn balances the two rooks. Here the queen's side is up a pawn, but it is
a doubled one and in fact was lost. Therefore materially the position will
soon be equal. The next factor to be considered must be piece activity.
We have a rather open board here and all the major pieces (Wh ite's queen
and Black's rooks) have excellent scope, thus continuing the equivalence.
It is the pawn formation that makes the difference. Even after losing
the b2 pawn, White wil l have two connected passed pawns on the queen
side. In general, connected passed pawns are powerful and they also are
very dangerous against rook(s). Yet Black also has a favorable pawn situa
tion : the f-pawn is a passed pawn. Black's correct plan must
be
to try to
delay the successful advance of White's passed pawns long enough so that
his own passed pawn can become a threat.
So, does White have a win? Yes, it seems so. But the resulting positions
are exceedingly difficult to judge correctly during play. This very much en·
hances the chance (or risk) of an error, voiding the win.
39 Qc51
A
multi-purpose, generally centralizing move: Black's 39 ... Rf2t is pre
vented, the h-pawn is indirectly protected ( ... Rxh3 loses the rook after
Oc8t), the queen is in a position to help the pawns advance as well as
lend support to the king.
39
.
. . . .
Re1 !
Black must get at the b2 pawn, otherwise his rooks will be stymied in
their attempts to bother White's king and the forward b- and c-pawns.
White has no satisfactory way of protecting b2 (e.g. 40 Kd2 is met by
40 ... Rb1 41 Oa3 Rf2t) and thus he immediately mobilizes his pawns.
Remember that in endgames containing passed pawns, the single most im
portant principle is: passed pawns must be pushed!
40
b41
Re2t
41 Kb3
Rff2
42 c41
Rxb2t
43
Ka4
Rf1 1
Black must place his rooks so that they can be useful in defending a
gainst the passed pawns, in attacking White's king and in helping the f-pawn
advance. For this, they must have maximum flexibility. Therefore they
should not be on the same rank (as here on the 7th) and not be under
attack by the queen (as the f2 rook is). Thus, for instance, the desirable
plan of 43 ... Ra2t 44 Kb5 Ra8?? fails because the f2 rook hangs.
44 Qd4
White plays in accordance with the general principle that in queen end
games, the center (d4, d5, e4, e5) is the best location for the queen. Of
course, as is obvious, from d4 the queen controls a lot of important terri
tory.
However, here
··
and it happens often enough in chess to be most frus
trating (or exhi larating if one gains from it)
··
the general principle is over
shadowed by a specific problem. In other words, after the text move Black
can achieve a rook deployment which gives him surprisingly good counter-
1 29

chances.
Hindsight tells us that it would have been safer if Black's coming plan is
prevented. Therefore let us look at the winning prospects after 44 Oc8t!
Kh7 and now the sophisticated 45 Ka3! with the idea of forcing the rooks
to take up less flexible roles. Black can then either move the b2 rook or
protect it. As I see it, the two main lines are:
( 1 ) 45 ... Rfb1 : 46 b5 g6 (46 ... Rb3t 47 Ka4 Rb4t 48 Ka5 just chases the
king to a more active location) 47 Od7 Kg8 48 Qd8t ! Kh7 (48 ... Kg7? 49
Qd4t followed by 50 Oxb2 gives Wh ite a won K & P endgame) 49 Qf6!
Rb3t
50
Ka4 Kg8 (50 ... Rb4t 51 Ka5 Rxc4? loses the rook to 52 Oxf7t)
51 Oc61 Kg7 52 c51 f5 (52 ... Rxb5 is a tempo too late in the K & P end
game) 53 Qb7t! (If 53 b6?, 53 ... R3b2 ! leads to perpetual check) 53 ... Kf6
(Or 53 ... Kh6 54 c6 R3b2 55 Ka5 Ra1 t 56 Kb6 Rab1 57 Kc5 Rc2t
59 Kd6 Rd1 t 59 Ke6 Re2t 60 Kf7 and the king escapes to the kingside.)
54 c6! R3b2 55 Ka5 Ra1 t 56 Kb6 Rab1 57 Oa6! and the pawns win,
e.g. 57 ... Rc2 58 c7 Rbc1 59 Ka7t l<e7
60
b6 etc.
(2) 45 ... Rc2: 46 b5 f5 (46 ... Rf4 47 Kb4) 46 b6 Rf3t 47 Kb4 Rb2t 48
Kc5 Rfb3 49 Oxf5t g6
50
Qf6 and White will win.
Thus we see that if Black plays perfectly, as in variation ( 1 ), White's task
is long and slow. But eventually the win is there. Moreoever, it is comfor
table play since Black does not have anything that looks dangerous.
44
.....
Ra2t
45 Kb5
Ra81
As
GM Byrne tells it, this move came as something unexpected. Black
safeguards the back rank and is ready to use the rook as an attacker from
the front, threatening a ... Rb8t.
46 Qe5
Upset by Black's unexpected resources, White hurries to prevent a ... Rb8t.
Byrne felt that he had no choice.
I n fact, there is even an alternative win: the thematic ("passed pawns
must be pushed") and cold blooded 46 c51. The main line appears to be:
46 ... Rb8t 47 Ka41 Ra1 t 48 Kb3 (Not 48 Oxa 1 ?7 because of 48 ... Ra8t)
4a .. Rb1 t 49 Kc31 and Black lacks a satisfactory continuation:
a) 49 ... R 1 xb47 50 Oxb4 Rxb4 51 Kxb4 is a won endgame, e.g. 51...Kf8
52 Kb51 Ke7 53 Kb6! Kd8 54 Kb7! etc.
b) 49 ... Rf8
50
Kc2! Rf1 51 c61 not only makes White's pawns more mo
bile since the king is not in the way, but even 51 ...f57 is prevented because
White has 52 Oc4t.
c) 49 ... Rf1
50
b5! 1 Rf3t (50 ... Rxb57 allows 51 Qd8t l Kh7 52 Qd3t fol
lowed by 53 Oxb5) 51 Kc4 g5 52 c6! Rf4 53 Oxf4 gxf4 54 c7 ReS 55
b6 KfB 56 Kd41 followed by 57 b7.
46
.
.
..
.
Rf81
It is this third point that White had overlooked: the rook is not only
safe but supports from
behind
the f-pawn's advance.
47 c5
f5
48 c6
Rc1 ?
A very poor
practical
move, after Black's previous excellent defensive
1 30
play. Surely the only practical hope is the counterplay with 48 ... f4 !. GM
Byrne admits that during the game he did not see a win after it. The ob
vious 49 c7? allows a draw after 49 ... Rc1 !, e.g. 50 Od5t Rf7! 51 Od8t
Rf8 52 Kb6 f3! and the power of the f-pawn forces White to take per
petual check.
Of course, GM Tarjan had considered 48 ... f4! in his deliberations. But
as he tells it he had discovered that 49 Oc3! wins by threatening both
Oc4t and the advance of the c-pawn. As it turns out, Black's rook on f1
is trapped out of play just long enough for the position to be lost. The
three key variations after 49 Oc3! are:
( 1 ) 49 ... Kh8
50
c7 ReS 51 Kb6 followed by 52 Kb7
(2) 49 ... Rb8t 50 Kc5
(3) 49 ... Rb1
50
c7 ReS 51 Oc4tl l<h8 52 Oxf4
Tarjan adds that ·he did not think that GM Byrne would miss 49 Oc3!.
Who knows7 It is possible that once the position after 48 ... f4 had appeared
on the board, that White would have taken a fresh look and discovered the
win. Still, the objective in lost positions is to always make things as diffi
cult as possible for your opponent. The choice of 48 ... f4! would have
made this so; the text presents no problems at all.
49 Qf41
GM Byrne says that he literally rushed this move - he was just so re
lieved to have such an opportunity. Not only is the dangerous f-pawn
stopped, but this is even accomplished with the gain of time by the attack
on the rook. Thus White can now get his own pawns rolling.
49
.••••
Rd1
50 c7
ReS
The threat was 51 Oc4t followed by 52 c8=Q
5 1 Kc61
Rf8
52 b5
Resigns.
Black's pawn is stopped and White's cannot be stopped.
Subject # 53: a + N vs. a + 8, one pawn advantage, pawns on the
same
side
Questions: Is the knight or the bishop the preferred companion for the
queen7
Is Diagram 79 a theoretical win 7
What is White's most thematic play7
Diagram 79
• 8�·
1 3 1

Answers:
The bishop is known as a long range piece, but, of course, the queen is
the
premier long range piece. Therefore, the bishop is limited in how it
can contribute to the queen's inherent power. However, the flexibil ity of
the knight is very useful for the queen to have. I n most normal positions,
therefore, the knight is the preferred minor piece companion.
Diagram 79 is J. R. Capablanca
·
A. Alekhine, World Championship
Match 1 927, Game
#
29, after Black's 39th move. White is up a pawn and
in the game won on move 70.
There are two valid ·- and partly interdependent
·-
questions here: ( 1 )
Does White have a theoretical win?, and (2) What is best play for White?
The nature of the position makes it almost impossible (i.e. without
spending perhaps 100 hours on analysis) to come up with a 100% certain
answer to the first question. The non-forcing nature of the position means
that a tactical solution does not exist and therefore positional maneuvering
is required. Yet the presence of queens means that there is an extremely
large number of reasonable move possibilities (for both sides!) available.
For such a position
·-
having pawns on only one side
· - ,
there are two
very favorable factors for White here:
( 1 ) The large number of pawns ( 5 P vs. 4 P formation) means that White
can mathematically force a passed d·pawn.
(2) The knight because of its flexible
-·
though short range
-·
nature is the
perfect minor piece to have in playing for a win in positions with pawns on
one side only. The lack of flexibility of Black's bishop reinforces this
aspect.
The above means that White's practical chances of wi nning are excellent.
I would estimate that in the hands of someone who truly understands chess,
is careful and patient, White would win 90% of the time. The immense
practical problem face by Black is demonstrated by the course and result of
the game. Alekhine, who was an excellent, creative and careful endgame
player, and who was in top sporting form during the match, couldn't hold
the draw, even though Capablanca demonstrably didn't play with maximum
accuracy.
I shall take a three fold look at the position, through : ( 1 ) Actual game
course, (2) Analysis by James
A.
Schroeder, and (3) My suggestions.
( 1 ) Actual Game Course (with brief comments:
40
Qa8t l<h7 41 Nf3 Bf6 42 Qa6 Kg7 43 Qd3 Qb7 44 e4 Qc6 45 h3
Qc7 46 d5 exd5 47 exd5 Qc31
It may appear somewhat surprising that at this moment exchanging
queens is Black's best play. The key benefit of it is that this enables
Black's king to participate in stopping the d·pawn. White acquiesces to the
exchange since after e.g. 48 Qe4, Black's queen finds an attractive home on
c5. Nevertheless, keeping the queen's
on
was in White's interest.
48 Qxc3 Bxc3 49 Kf1 Kf6 50 Ke2 Bb4 51 Nd4 Bc5 52 Nc6 Kf5 53
Kf3 Kf6 54 g4 hxg4t 55 hxg4 Kg57
This attempt at immediate king activity boomerangs. Keeping the status
132
quo with 55 ... Bb6 or 55 ... Bd6 is correct. After the latter, Capablanca gives
the following line : 56 Ke4 Kg5 57 Ne5 f5t 58 Kd4 Bb8 59 d6 Bxd6!
60
Nf7t Kxg4 61 Nxd6 Kf3 with a draw.
56 Ne5! Bd4
Black must lose at least another pawn no matter how he plays.
Two other possibilities: a) 56 ... Ba3 57 d6! Kf6 58 d7 Ke7 59 Nxf7
Kxd7 60 Ne5t and 61 Nxg6; b) 56 ... f5 57 d6! fxg4 t 58 Kg2! Kf5 59
d7 Bb6
60
Nc6.
57 Nxf7t Kf& 58 Nd8 Bb& 59 Nc& Bc5 60 Kf4! Bxf2
Equally hopeless in the long run is 60 ... g5t 61 Kf3 etc. ; White will
protect his g-pawn with f3, move his king to e4 and then use h is knight
with decisive effect.
61 g5t Kf7 62 NeSt Ke7 63 Nxg&t Kd& 64 Ke4 Bg3 65 Nf4 Ke7 66
Ke5 Be1 67 d&t Kd7
68 g& Bb4 69 Kd5 Ke8 70 d7t Elack resigns.
(2) Analysis by James R. Schroeder
40 Nc6
The queen check is inherently pointless and a knight move is required.
White's idea after the text is to continue with Qc2, Qc4, e4 and d5. Black
on his part wants to delay/prevent this.
o
40
...
Qd6 41 Qc2 Qd5t ! 42 e4 Qb5 43 Qc3 Kh7
Black can also play 43 ... 0e2, forcing the queenless endgame after 44 Qf3
Oxf3t 45 Kxf3. It is uncertain that White's winning chances are greater
than in the actual game course above. After the text, Schroeder suggests
that White improve the position of his Q + N and then play d5. Unques
tionably this is the correct approach, but as he himself asks "Can this be
accomplished?" Perhaps, but the difficulties must be huge, because White's
pieces stand awkwardly and Black's Q + B have excellent defensive posts.
(3)
My Suggestions
White's general strategic approach and objective is clear enough : he wants
to place his Q + N on "attractive" squares and then achieve a passed d-pawn
by means of e4 and d5. Yet as so often in chess, the execution is so much
more difficult than the plan ! I think the first need that White has is to put
his knight on a comfortable, trouble free spot and therefore I suggest:
40 Nf3!
Bf&!
41 Qd3
Kg7
42 e4
Qc8
43 h3
Qc7
44 Nd2!
Unlike in the game, White will play d5 only after he has placed his
knight more usefully than on f3.
44
Qc8
45
Nc4!
Qd7
46 d5
e
xd5
47 exd5
Though far from theoretically guaranteed -- and the position still
must
133

be played out -- White's chances of making further progress from here are
bright.
Principles/Rules of Thumb For Practical Endgame Play
Endgames With Queens
( 1 ) For the endgame of Q + P vs. Q, where the defending king is away
from the pawn, for winning purposes this is the situation :
(a) The best pawn to have is the c- or f. pawn because it is relatively
easy to advance and once it reaches the 7th rank it is a certain win.
(b) Once the
d-
or e-pawn reaches the 7th rank it is an assured win.
However, it is very difficult to get them to the 7th rank.
(c) The b- and g-pawns are relatively easy to advance to the 7th rank,
once there may not be theoretical wins.
(d) The
a-
and h-pawns are
theoretical
draws. However, in practical
play it is very difficult to achieve the draw.
(2) Most endgames of K + Q vs. K + R + P are theoretical wins. Even
where they are theoretical draws, the side having the queen should play
them out because it is very difficult to draw them in actual play.
(3) The correct material balance is 2 rooks
=
queen + pawn. In such an
endgame with major pieces it is exceedingly important for each side to
activate its major pieces.
(4) Because of the queen's inherent power, its most effective location is in
the center: d4, e4, d5, e5.
(5) The knight is the preferred minor piece companion to the queen be
cause its flexibility greatly enhances the queen's power potential.
134

List Of Contributors
Bruce Altschuler
Pal Benko
Pedro Berdion
Robert Byrne
Matthew Chen
Edmund Chong
Mark Coleman
R. Coquard
Peter Danenhower
Karl DeSmet
Gianni Donati
Dave Eisen
Keith Fraser
Ronald
�-
George
Roy Henock
Phillip King
Harold W. Kahn
Jonathan Kolkey
Craig Kuntz
Jerry Lemke
Eric Lerner
Edmund Lamer
Paul M. Lowry
Harry Lyman
Thomas Magar
William Maloney
Ken Mann
Clifford P. Marvel
-. McDonald
Phillip L. Michael
Borislav Milic
Pierre Olivier
Sergio Pederzoli
Robert Potvin
William Radspinner
L.
Raterman
Mary Robertson
Gunter Roth
Denis Rozier
Eric Schil ler
James R. Schroeder
Vasser Seirawan
Leonid Shamkovich
J. B. Skeels
James Jay Smith
Fred Sorensen
Robert J. Stachowski
James Tarjan
Mark Templer
G. N. Thompson
Simon Weil
Paul Whitehead
Robert L. Wil liamson
Manfred Zitzman
Bernard Zuckerman
135

Fine Books From Chess Enterprises, Inc.
Openings:
Donaldson : Meran Defense
Druash : Alapin's Opening
Eckert : Sicilian Scheveningen : Keres' Attack
Estrin: Gambits
Estrin : Three Double King Pawn Openings
Grefe: The Offbeat Sicilian
Filipowicz & Konikowski : 4 ... d5 in the Cordel Defense
Grefe & Silman: Center Counter
Janicki: Anglo-Benoni Two Knights Defense
Janicki: Anglo-Benoni Four Knights Defense
Janicki & Konikowski : Flohr-Mikenas System, English
Jansa & Pribyl: How To Play The Pirc
Kapitaniak: The Polish Defense
Kapitaniak : Sicilian Defense, Wing Gambits
Konikowski: Arkhangelsk System, Ruy Lopez
Konikowski: Modern Benoni Four Pawn Attack
Konikowski : Petrosian System, Queen's Indian
Konikowski : Queen's Gambit Declined, Exchange Variation
Konikowski: Tartakower System, Queen's Gambit
Kuligowski: Developments in the French Defense
Kuligowski: Developments in the King's Indian Defense
Kuligowski: Developments in the Reti System
Leverett : Sicilian Defense, Velimirovic Attack
Marfia: Queen's Gambit With Bf4
Marfia : Queen's Indian With 4 g3
Schiller: Blackmar Diemer Gambit
Schiller: Catalan, second edition
Schiller: French Winawer Poisoned Pawn
Schiller: How To Play The Reti
Schiller: How To Play The Queen's Indian
Schiller & Goldman : Sicilian Dragon Yugoslav Attack
Schiller: Sicilian, Modern Richter Rauzer
Schiller: Sicilian, Richter Rauzer with a6
Schiller: Sicilian, Classical Richter Rauzer
Schiller : Orthodox Variation, Queen's Gambit
Shamkovich & Schiller: Caro-Kann 4 ... Nd7
Tejler & Marfia: Euwe Defense, Blackmar Diemer Gambit
Wall : Larsen's Opening
Wall: Owen's Defense
Wall : 500 French Miniatures
Wall: 500 Italian Miniatures
Wall: 500 King's Gambit Miniatures
Wall : 500 Ruy Lopez Miniatures
Wall : 500 Sicilian Miniatures
Wall: 500 Sicilian Miniatures Collection I I
Walton : Sicilian, Polygaevsky Variation
Watson: 4 Nc3 Gambit in the Queen's Gambit & Slav
Watson : Taimanov & Knights Tour Benoni
W:at.son: 6 ... Nc6 in the Sacmisch Variation, King' s Indian
WI!hams : The Real American Wilkes-Barre Variation
$6.50
$3.50
$5.50
$5.00
$5.00
$6.00
$3.25
$6.00
$5.00
$5.00
$5.00
$7.50
$6.00
$5.00
$6.00
$6.00
$6. 50
$4.00
$5.00
$5.50
$5.50
$5.50
$6.00
$2.50
$3.50
$5.50
$7.95
$6. 50
$6. 50
$6. 50
$6.50
$5.00
$5.00
$6.00
$6. 50
$5.00
$2. 50
$6.00
$5.00
$5.95
$5.00
$5.00
$5.95
$5.00
$6.00
$5.50
$5.00
$5.00
$5.00
$3.25
Document Outline
- scan001_1L
- scan001_2R
- scan002_1L
- scan002_2R
- scan003_1L
- scan003_2R
- scan004_1L
- scan004_2R
- scan005_1L
- scan005_2R
- scan006_1L
- scan006_2R
- scan007_1L
- scan007_2R
- scan008_1L
- scan008_2R
- scan009_1L
- scan009_2R
- scan010_1L
- scan010_2R
- scan011_1L
- scan011_2R
- scan012_1L
- scan012_2R
- scan013_1L
- scan013_2R
- scan014_1L
- scan014_2R
- scan015_1L
- scan015_2R
- scan016_1L
- scan016_2R
- scan017_1L
- scan017_2R
- scan018_1L
- scan018_2R
- scan019_1L
- scan019_2R
- scan020_1L
- scan020_2R
- scan021_1L
- scan021_2R
- scan022_1L
- scan022_2R
- scan023_1L
- scan023_2R
- scan024_1L
- scan024_2R
- scan025_1L
- scan025_2R
- scan026_1L
- scan026_2R
- scan027_1L
- scan027_2R
- scan028_1L
- scan028_2R
- scan029_1L
- scan029_2R
- scan030_1L
- scan030_2R
- scan031_1L
- scan031_2R
- scan032_1L
- scan032_2R
- scan033_1L
- scan033_2R
- scan034_1L
- scan034_2R
- scan035_1L
- scan035_2R
- scan036_1L
- scan036_2R
- scan037_1L
- scan037_2R
- scan038_1L
- scan038_2R
- scan039_1L
- scan039_2R
- scan040_1L
- scan040_2R
- scan041_1L
- scan041_2R
- scan042_1L
- scan042_2R
- scan043_1L
- scan043_2R
- scan044_1L
- scan044_2R
- scan045_1L
- scan045_2R
- scan046_1L
- scan046_2R
- scan047_1L
- scan047_2R
- scan048_1L
- scan048_2R
- scan049_1L
- scan049_2R
- scan050_1L
- scan050_2R
- scan051_1L
- scan051_2R
- scan052_1L
- scan052_2R
- scan053_1L
- scan053_2R
- scan054_1L
- scan054_2R
- scan055_1L
- scan055_2R
- scan056_1L
- scan056_2R
- scan057_1L
- scan057_2R
- scan058_1L
- scan058_2R
- scan059_1L
- scan059_2R
- scan060_1L
- scan060_2R
- scan061_1L
- scan061_2R
- scan062_1L
- scan062_2R
- scan063_1L
- scan063_2R
- scan064_1L
- scan064_2R
- scan065_1L
- scan065_2R
- scan066_1L
- scan066_2R
- scan067_1L
- scan067_2R
- scan068_1L
- scan068_2R
- scan069_1L
Wyszukiwarka
Podobne podstrony:
final questions+and+answers+on+practical+endgame+play+ +mednis
Cisco CCIE Practice Exam 2 Questions and Answers
QUESTIONS AND ANSWERS
electrical certificates 17th edition questions and answers
Deshimaru Roshi Questions and Answers
22)20 09 Present continuous questions and answers IVa
Behavioral Interview Questions and Answers
Financial Accounting & Banking Interview Questions and Answers
Competency Based Interview Questions and Answers
Unofficial Questions and Answers (Peggy Erickson)
Technical Interview Questions and Answers
Case Interview Examples Case Interview Questions and Answers
Problem Solving Interview Questions and Answers
Leadership Interview Questions and Answers Examples of Skills for Leaders
Question and answer match
Questions and Answers about the Financial Crisis
20060605 Questions and Answers at a Presentation 2
#0170 – Questions and Answers at a Presentation
więcej podobnych podstron