
© Future Technology Devices International Ltd. 2006
Future Technology Devices
International Ltd.
Windows XP Installation Guide

Table of Contents
Part I Welcome to the Windows XP Installation Guide
2
Part II Installing FTDI Device Drivers
3
................................................................................................................................... 4
1 Installing CDM Drivers
Part III Uninstalling FTDI Devices
14
................................................................................................................................... 15
1 Uninstalling CDM Drivers
Part IV Troubleshooting
17
................................................................................................................................... 17
1 Windows XP cannot find drivers for my device
................................................................................................................................... 18
2 Windows XP forces a reboot after installing a device
................................................................................................................................... 19
3 Driver installation fails and Windows XP gives error code 10
................................................................................................................................... 20
4 FT232BM or FT245BM device hangs randomly during operation under Windows
XP
................................................................................................................................... 21
5 Windows XP displays an error and then terminates installation
Part V Revision History
22
Part VI Contact Information
23
Part VII Disclaimer
24
Index
25
Windows XP Installation Guide
I
© Future Technology Devices International Ltd. 2006

2
Welcome to the Windows XP Installation Guide
© Future Technology Devices International Ltd. 2006
1
Welcome to the Windows XP Installation Guide
The purpose of this document is to provide users of FTDI chips with a simple procedure for
installing drivers for their devices under Windows XP.

3
Windows XP Installation Guide
© Future Technology Devices International Ltd. 2006
2
Installing FTDI Device Drivers
FTDI have previously provided two types of driver for Windows: a D2XX direct driver and a virtual
COM port (VCP) driver. Previously, these drivers were mutually exclusive and could not be
installed at the same time. The new Windows combined driver model (CDM) allows applications to
access FTDI devices through either the D2XX DLL or a COM port without having to change driver
type. However, it should be noted that an application can only communicate through one of these
interfaces at a time and cannot send commands to the D2XX DLL and the associated COM port at
the same time.
The CDM driver comes in two parts. The bus layer provides D2XX style functionality and is always
installed. The CDM driver will determine whether a COM port should be exposed by reading the
EEPROM of FT232R, FT245R and FT2232C devices. In the case of FT232BM, FT245BM,
FT8U232AM and FT8U245AM devices, the CDM driver will default to always installing a COM port.
This behaviour can be changed and EEPROM settings ignored by changing the driver INF files as
detailed in
AN232B-10 Advanced Driver Options
. Please note that modifying the INF files of a
Microsoft WHQL certified driver will invalidate the certification.
4
Installing FTDI Device Drivers
© Future Technology Devices International Ltd. 2006
2.1
Installing CDM Drivers
To install CDM drivers for an FTDI device under Windows 2000, follow the instructions below:
·
If a device of the same type has been installed on your machine before and the drivers that are
about to be installed are different from those installed already, the original drivers need to be
uninstalled. Please refer to the
section of this document for further
details of this procedure.
·
Download the latest available CDM drivers from the
and unzip them to a location
on your PC.
·
If you are running Windows XP or Windows XP SP 1, temporarily disconnect your PC from the
Internet. This can be done by either removing the network cable from your PC or by disabling
your network card by going to the "Control Panel\Network and Dial-Up Connections", right-
clicking on the appropriate connection and selecting "Disable" from the menu. The connection
can be re-enabled after the installation is complete. This is not necessary under Windows XP
SP 2 if configured to ask before connecting to Windows Update. Windows XP SP 2 can have
the settings for Windows Update changed through "Control Panel\System" then select the
"Hardware" tab and click "Windows Update".
·
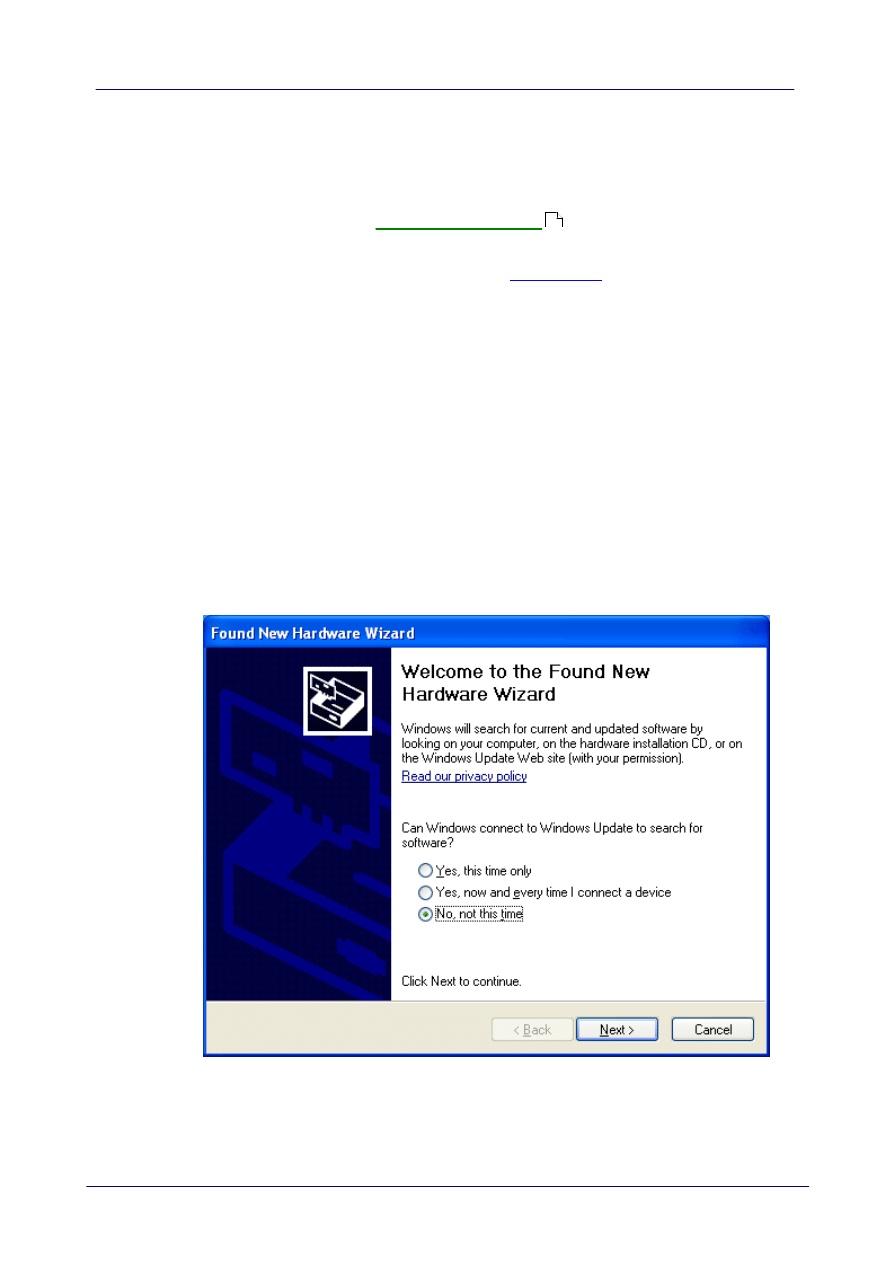
Connect the device to a spare USB port on your PC. If the device is based on the FT2232C, the
Microsoft composite device driver is automatically loaded silently in the backgound. Once the
composite driver has been installed Windows Found New Hardware Wizard will launch. If there
is no available Internet connection or Windows XP SP 2 is configured to ask before connecting
to Windows Update, the screen below is shown. Select "No, not this time" from the options
available and then click "Next" to proceed with the installation. If there is an available Internet
connection, Windows XP will silently connect to the Windows Update website and install any
suitable driver it finds for the device in preference to the driver manually selected.
15

5
Windows XP Installation Guide
© Future Technology Devices International Ltd. 2006
·
Select "Install from a list or specific location (Advanced)" as shown below and then click "Next".
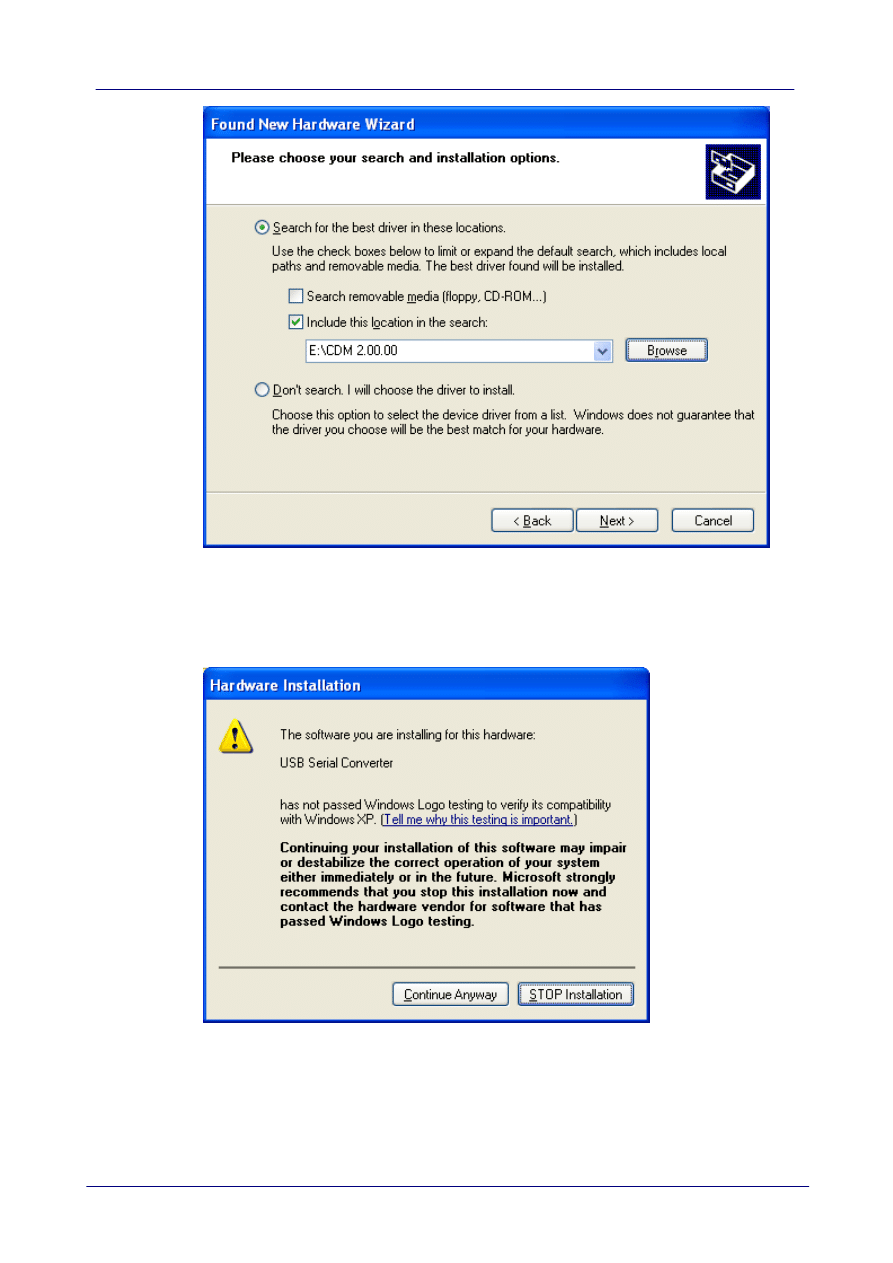
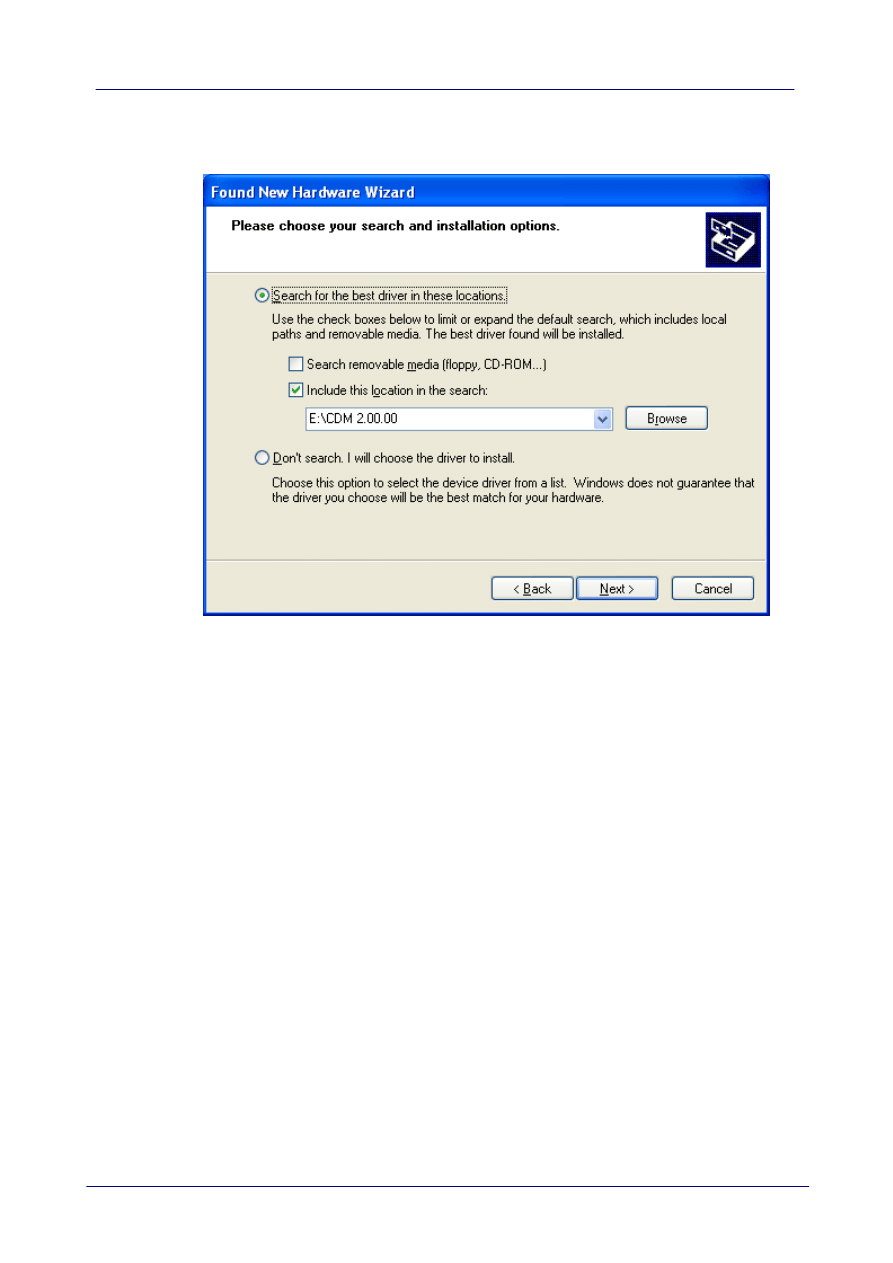
·
Select "Search for the best driver in these locations" and enter the file path in the combo-box
("E:\CDM 2.00.00" in the example below) or browse to it by clicking the browse button. Once the
file path has been entered in the box, click next to proceed.
6
Installing FTDI Device Drivers
© Future Technology Devices International Ltd. 2006
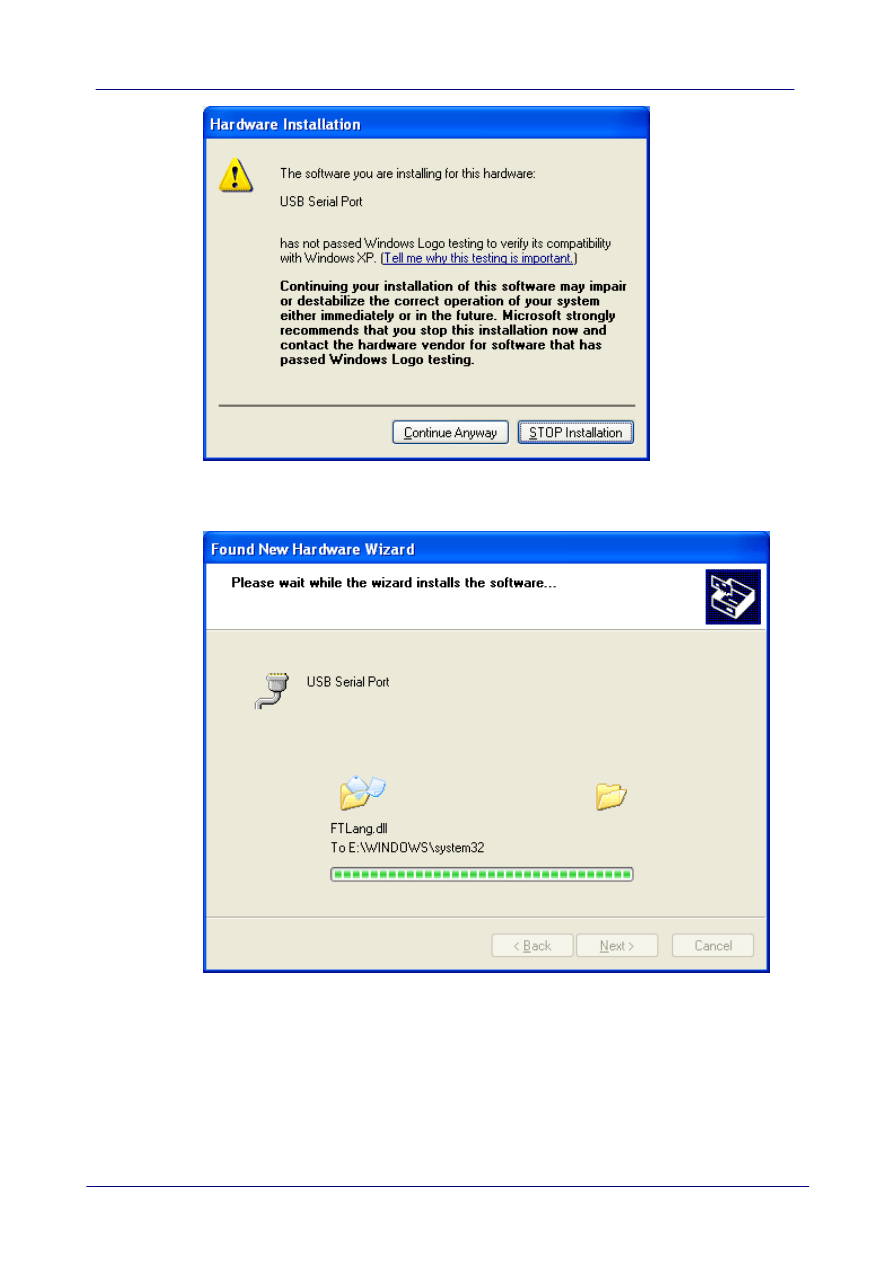
·
If Windows XP is configured to warn when unsigned (non-WHQL certified) drivers are about to
be installed, the following screen will be displayed unless installing a Microsoft WHQL certified
driver. Click on "Continue Anyway" to continue with the installation. If Windows XP is configured
to ignore file signature warnings, no message will appear.
7
Windows XP Installation Guide
© Future Technology Devices International Ltd. 2006
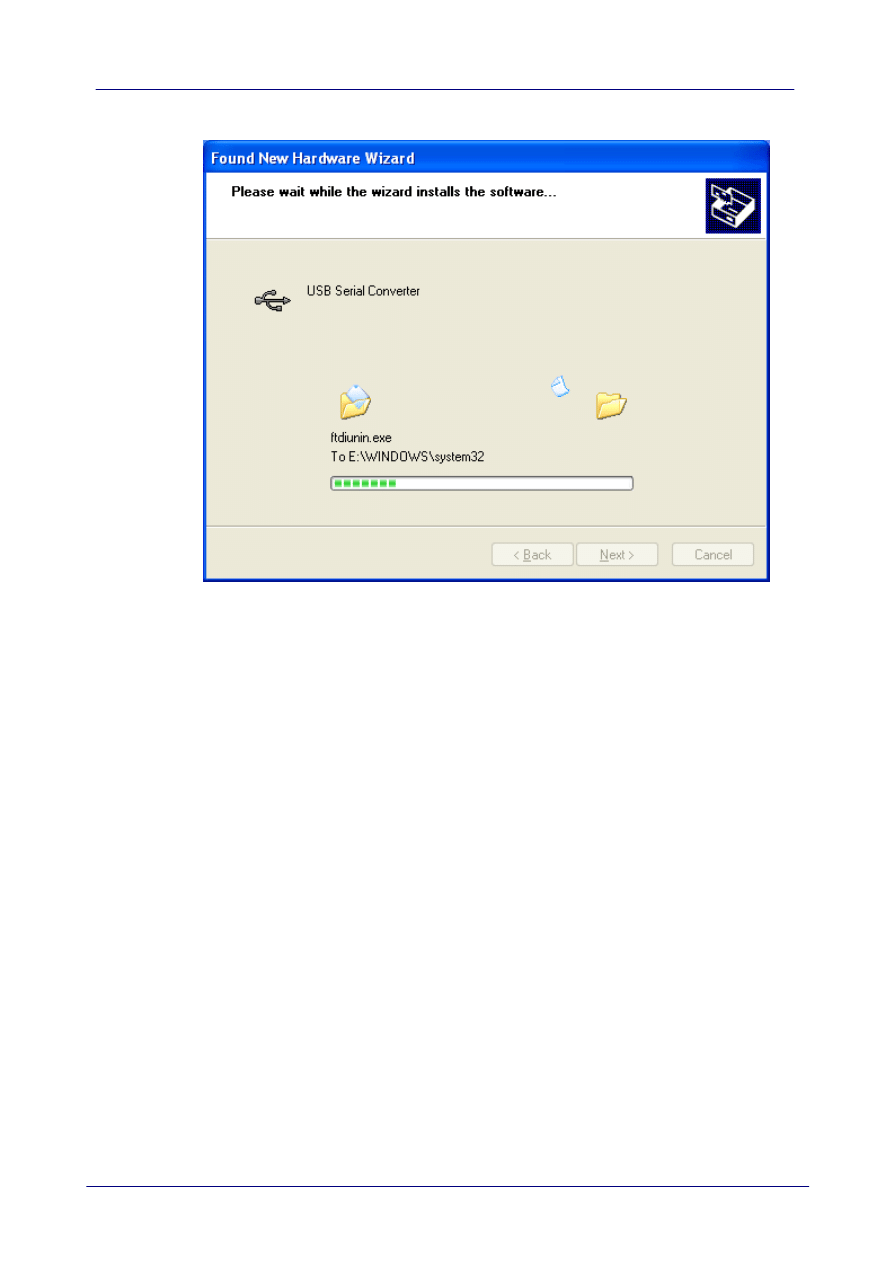
·
The following screen will be displayed as Windows XP copies the required driver files.
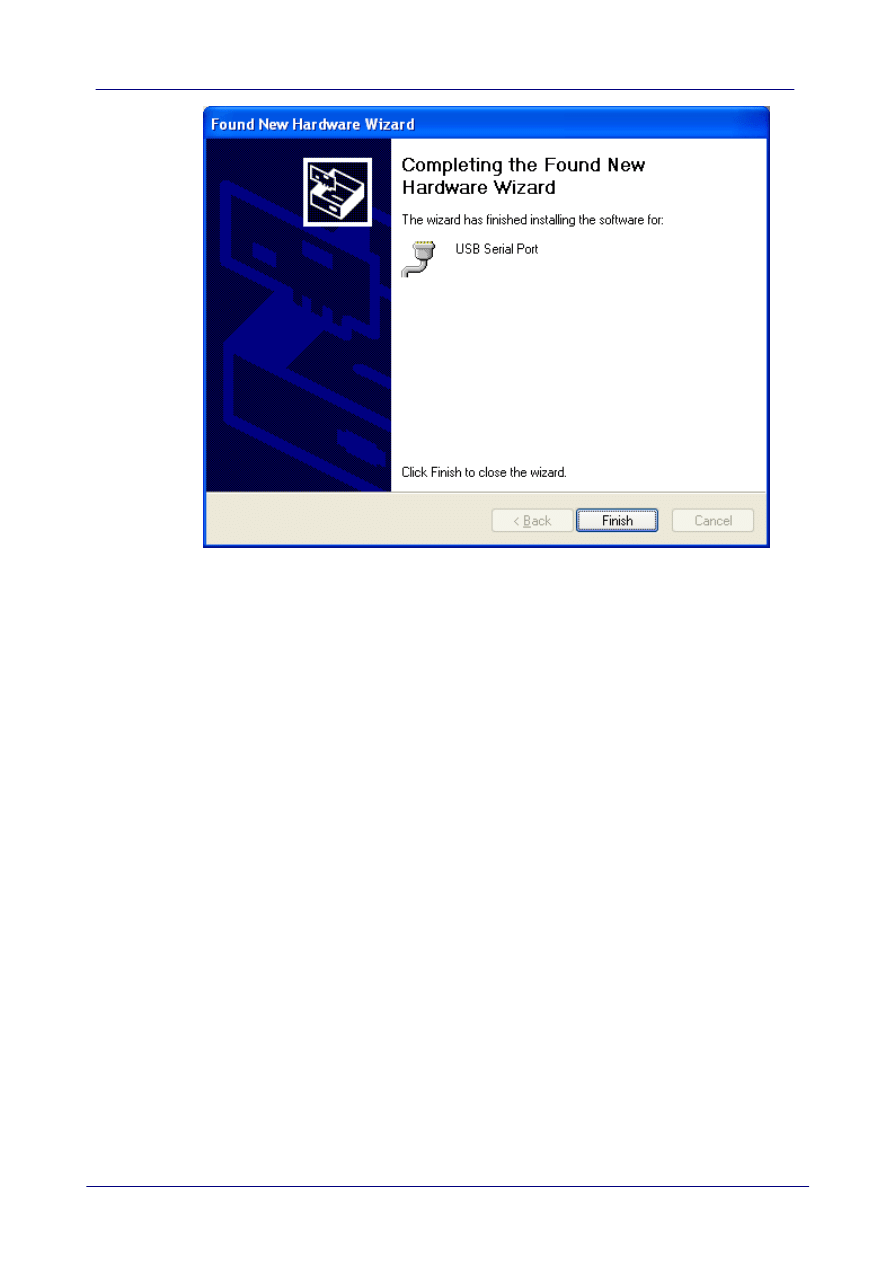
·
Windows should then display a message indicating that the installation was successful. Click
"Finish" to complete the installation for the first port of the device.

8
Installing FTDI Device Drivers
© Future Technology Devices International Ltd. 2006
·
If the device is based on the FT2232C, the Found New Hardware Wizard will continue by
installing the USB Serial Converter driver for the second port of the FT2232C device. The
procedure for installing the second port is identical to that for installing the first port from the first
screen of the Found New Hardware Wizard. If the device is not based on the FT2232C, the
COM port emulation driver is loaded as indicated in the following steps.
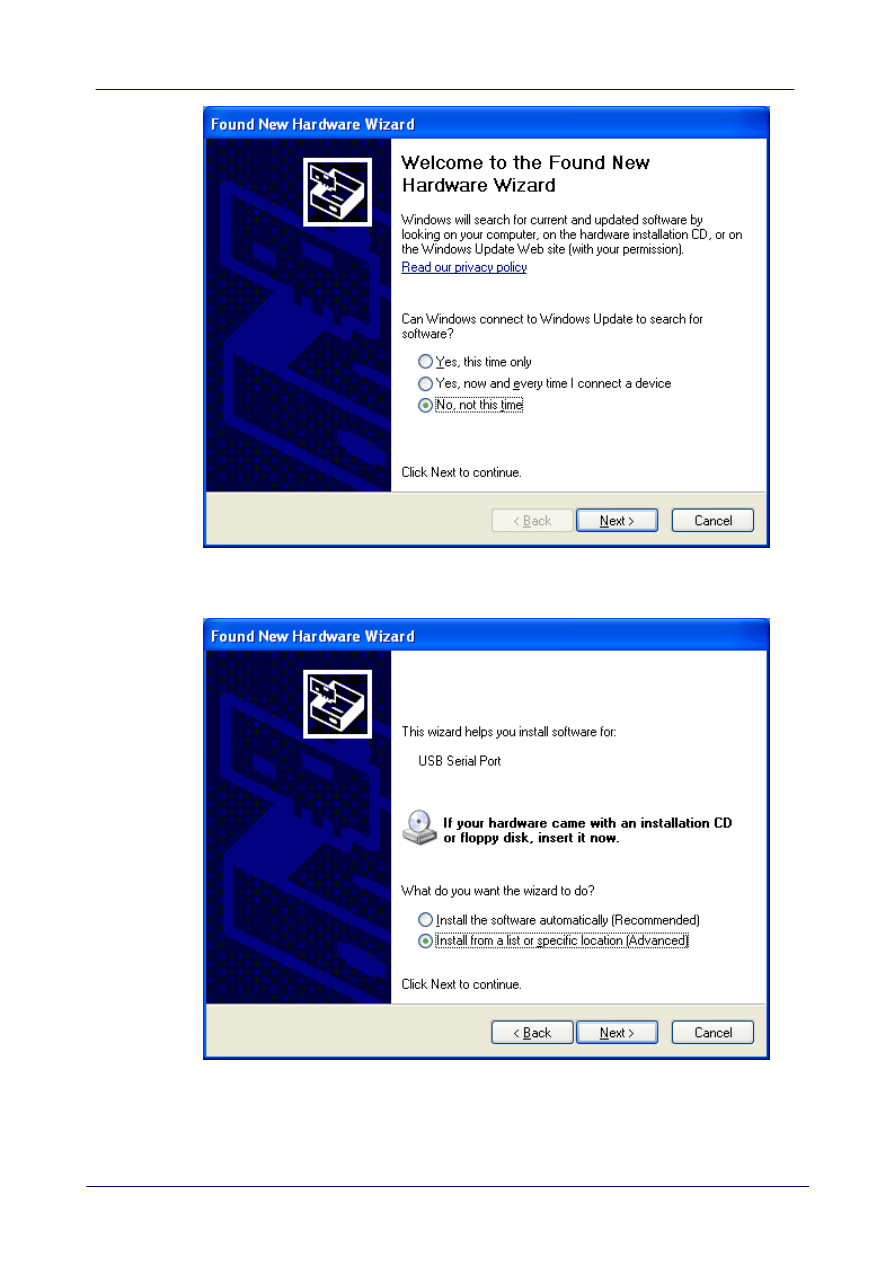
·
The Found New Hardware Wizard will launch automatically to install the COM port emulation
drivers. As above, select "No, not this time" From the options and click "Next" to proceed with
the installation.
9
Windows XP Installation Guide
© Future Technology Devices International Ltd. 2006
·
Select "Install from a list or specific location (Advanced)" as shown below and then click "Next".
10
Installing FTDI Device Drivers
© Future Technology Devices International Ltd. 2006
·
Select "Search for the best driver in these locations" and enter the file path in the combo-box
("E:\CDM 2.00.00" in the example below) or browse to it by clicking the browse button. Once the
file path has been entered in the box, click next to proceed.
·
If Windows XP is configured to warn when unsigned (non-WHQL certified) drivers are about to
be installed, the following screen will be displayed unless installing a Microsoft WHQL certified
driver. Click on "Continue Anyway" to continue with the installation. If Windows XP is configured
to ignore file signature warnings, no message will appear.
11
Windows XP Installation Guide
© Future Technology Devices International Ltd. 2006
·
The following screen will be displayed as Windows XP copies the required driver files.
·
Windows should then display a message indicating that the installation was successful. Click
"Finish" to complete the installation for the first port of the device.
12
Installing FTDI Device Drivers
© Future Technology Devices International Ltd. 2006
·
If the device is based on the FT2232C, the second port must also be installed. The procedure
for installing the second port is identical to that for installing the first port from the first screen of
the Found New Hardware Wizard for the USB Serial Port device. If the driver is Microsoft WHQL
certified, this is done automatically.
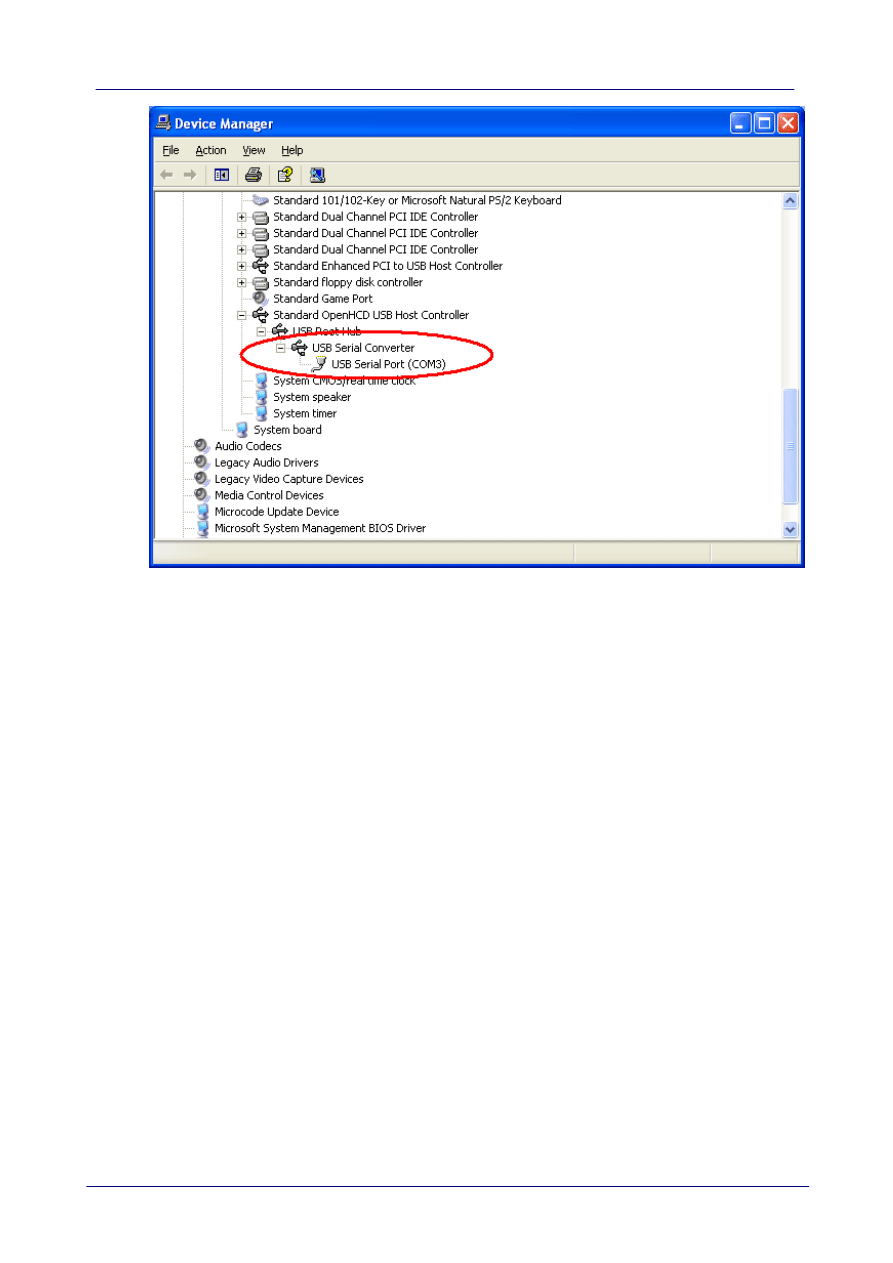
·
Open the Device Manager (located in "Control Panel\System" then select the "Hardware" tab and
click "Device Manger") and select "View > Devices by Connection", the device appears as a
"USB Serial Converter" with an additional COM port with the label "USB Serial Port". If the
device is based on the FT2232C, two ports will be available from a composite USB device.
13
Windows XP Installation Guide
© Future Technology Devices International Ltd. 2006
·
In the case of the FT2232C, port A of the FT2232C will be installed as COMX and port B will be
installed as COMX+1 where COMX is the first available COM port number.

14
Uninstalling FTDI Devices
© Future Technology Devices International Ltd. 2006
3
Uninstalling FTDI Devices
When uninstalling devices from Windows XP, it should always be done through the Add/Remove
Programs utility as this uses the FTDI driver uninstaller program to remove files and registry entries
to leave a clean system. Other methods may leave fragments of the driver that may interfere with
future installations.
The FTDI uninstaller willl also remove drivers which were pre-installed using DPInst.
15
Windows XP Installation Guide
© Future Technology Devices International Ltd. 2006
3.1
Uninstalling CDM Drivers
To uninstall CDM drivers for FTDI devices, follow the instructions below:
·
Disconnect any FTDI devices that are attached to the PC.
·
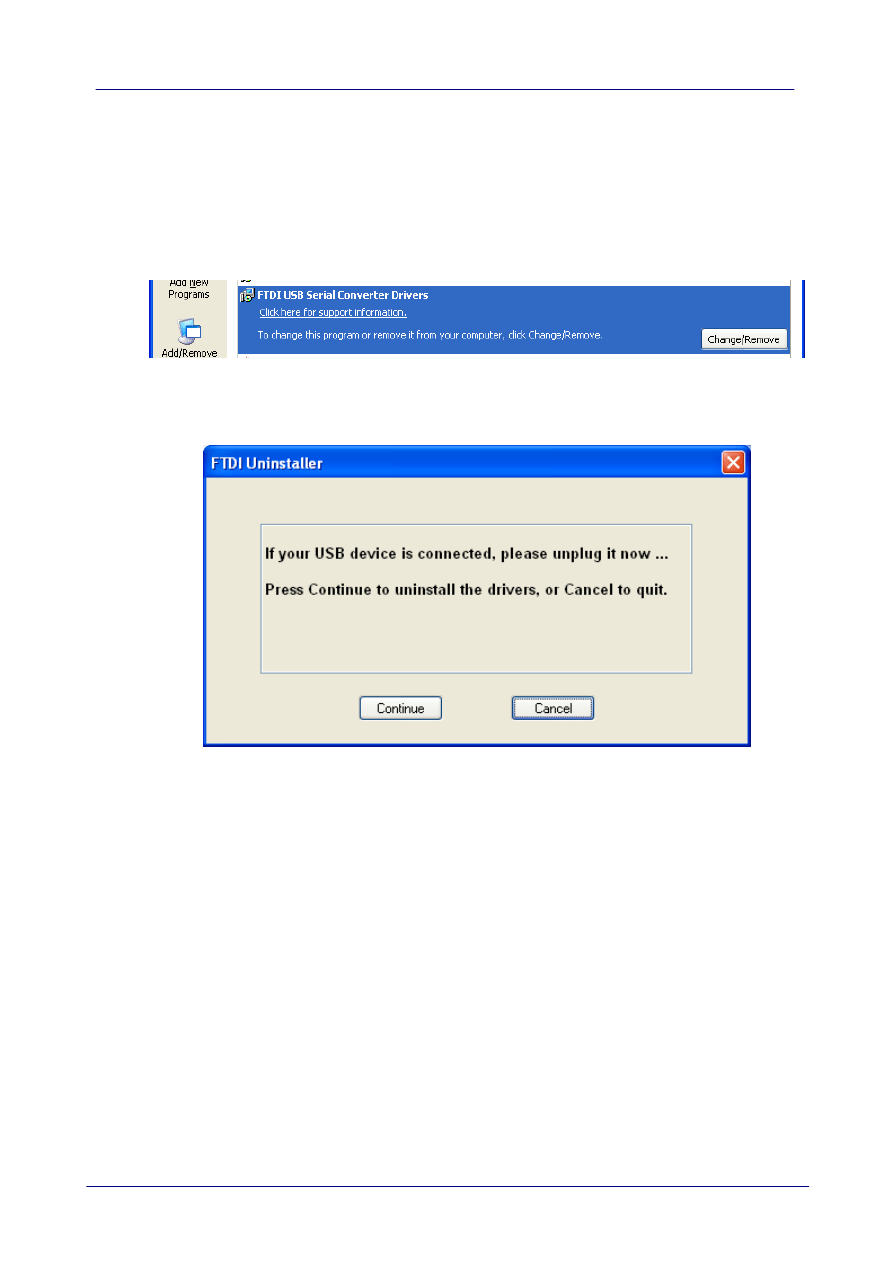
Open the Add/Remove Programs utility located in "Control Panel\Add/Remove Programs".
Select "FTDI USB Serial Converter Drivers" from the list of installed programs.
·
Click the "Change/Remove" button. This will run the FTDI uninstaller program. Click "Continue"
to run the uninstaller or "Cancel" to exit.
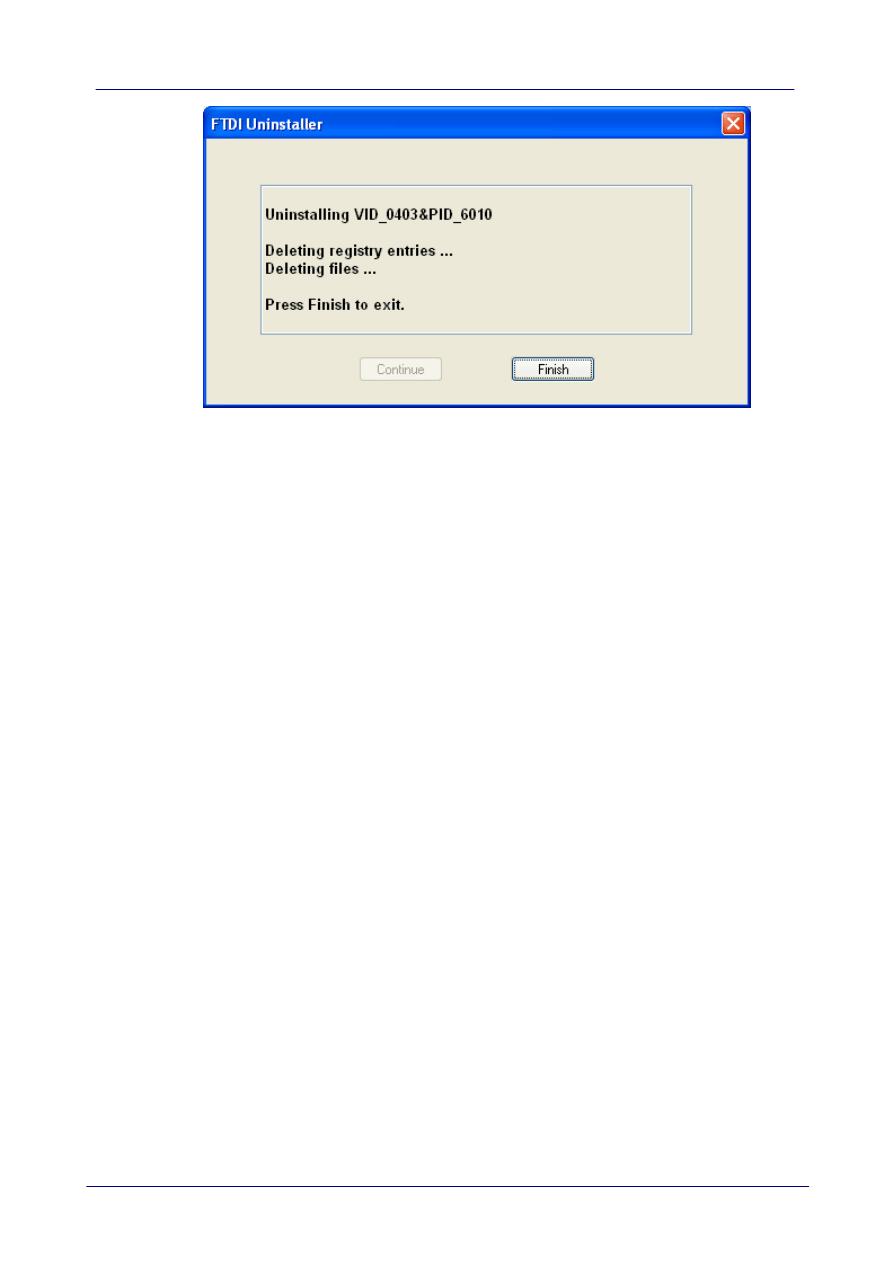
·
When the uninstaller has finished removing the device from the system, the caption on the
"Cancel" button will change to "Finish". Click "Finish" to complete the process.
16
Uninstalling FTDI Devices
© Future Technology Devices International Ltd. 2006

17
Windows XP Installation Guide
© Future Technology Devices International Ltd. 2006
4
Troubleshooting
4.1
Windows XP cannot find drivers for my device
This error can occur if the VID and PID programmed into the device EEPROM do not match those
listed in the INF files for the driver. The VID and PID programmed into the device EEPROM may
be found by using the
utility from the
. These can then be checked against
the VID and PID entries in the driver INF files. If they do not match, that driver cannot be installed
for that device without either re-programming the device EEPROM or modifying the list of VID and
PID numbers in the INF files.
Please note that only your own company VID and PID or FTDI's VID (0x0403) and FTDI PID issued
for use by your company should be used in the EEPROM and INF/INI files.

18
Troubleshooting
© Future Technology Devices International Ltd. 2006
4.2
Windows XP forces a reboot after installing a device
This problem can occur if an application is accessing a file while the New Hardware Wizard is
trying to copy it. This usually occurs with the FTD2XX.DLL file. If installing a D2XX device,
selecting not to restart the computer then unplugging and re-plugging the device may allow the
device to function properly without restarting. Restarting the machine will allow the device to work
correctly.

19
Windows XP Installation Guide
© Future Technology Devices International Ltd. 2006
4.3
Driver installation fails and Windows XP gives error code 10
Windows error code 10 indicates a hardware error or failed driver installation. This error may
appear if a device has insufficient power to operate correctly (e.g. plugged into a bus powered hub
with other devices), or may indicate a more serious hardware problem. Also, it may be indicative of
USB root hub drivers being incorrectly installed.
Please refer to the example schematics on the
for standard device configurations. If
the error persists, please contact the FTDI support department.

20
Troubleshooting
© Future Technology Devices International Ltd. 2006
4.4
FT232BM or FT245BM device hangs randomly during operation
under Windows XP
This is not caused by the driver, but is a hardware compatibility problem. Some newer USB 2.0
hubs and host controllers can be susceptible to noise and can cause random device failures. This
can be overcome by fitting 47pF capacitors to ground on the USBDP and USBDM lines on the USB
connector side of the 27
W
series resistors.
21
Windows XP Installation Guide
© Future Technology Devices International Ltd. 2006
4.5
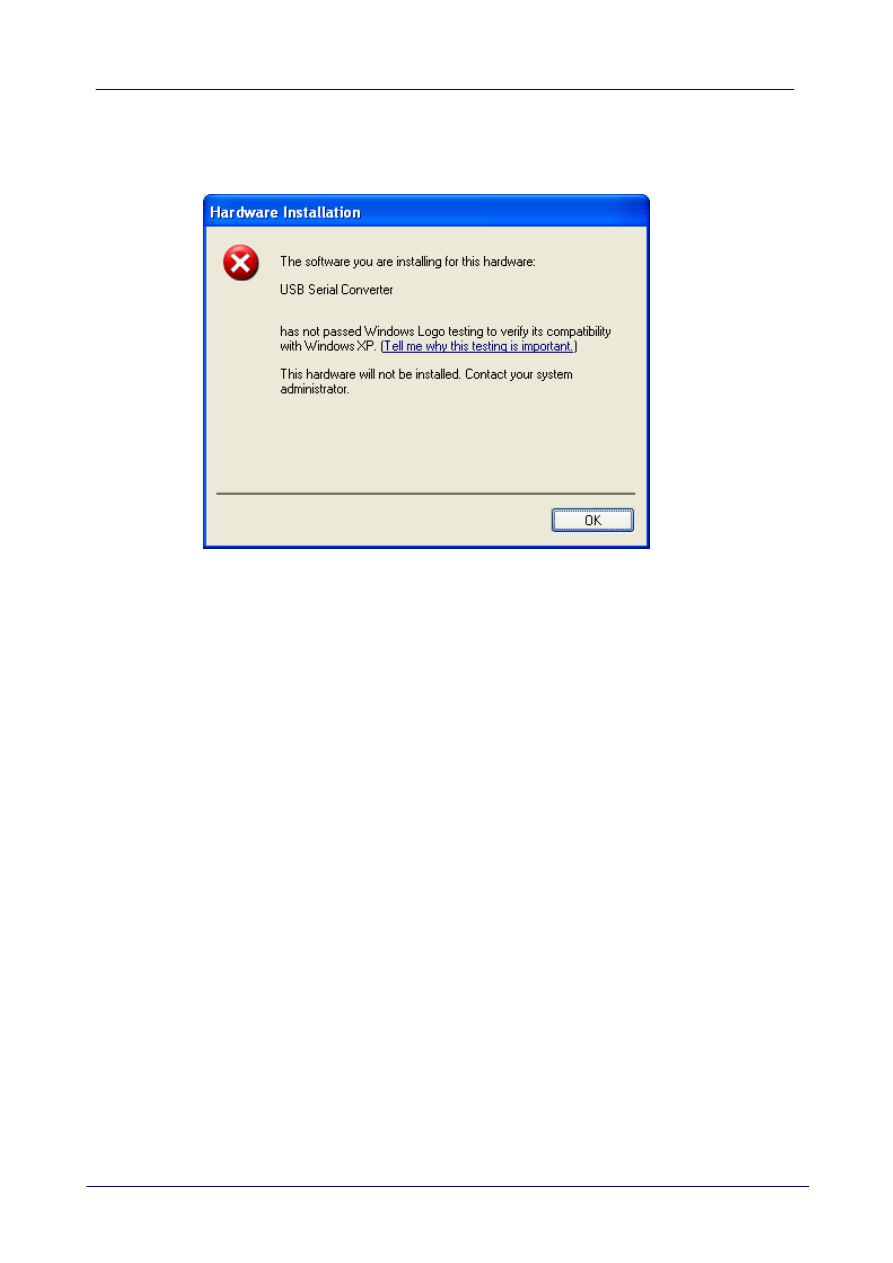
Windows XP displays an error and then terminates installation
If the following screen is displayed with this message, Windows XP has been configured to block
the installation of any drivers that are not WHQL certified.
Two options are available to successfully install the device. Either a certified version of the driver
can be installed (if available) or the driver signing options can be changed to either warn or ignore
to allow the installation to complete.
To change the current driver signing setting, go to "Control Panel\System", click on the "Hardware"
tab and then click "Driver Signing". The desired signing option may then be selected.

22
Revision History
© Future Technology Devices International Ltd. 2006
5
Revision History
Version
Release Date
Comments
1.0
January 2005
Initial release
2.0
June 2006
Modified to reflect new driver model

23
Windows XP Installation Guide
© Future Technology Devices International Ltd. 2006
6
Contact Information
Head Office - Glasgow, UK
Future Technology Devices International Limited
373 Scotland Street
Glasgow
G5 8QB
United Kingdom
Tel: +44 (0) 141 429 2777
Fax: +44 (0) 141 429 2758
E-Mail (Sales): sales1@ftdichip.com
E-Mail (Support): support2@ftdichip.com
E-Mail (General Enquiries): admin1@ftdichip.com
Web Site URL:
Web Shop URL:
http://apple.clickandbuild.com/cnb/shop/ftdichip
Branch Office - Taiwan
Future Technology Devices International Limited (Taiwan)
4F, No 16-1, Sec. 6 Mincyuan East Road
Neihu District
Taipei 114
Taiwan
ROC
Tel: +886 2 8791 3570
Fax: +886 2 8791 3576
E-Mail (Sales): tw.sales@ftdichip.com
E-Mail (Support): tw.support@ftdichip.com
E-Mail (General Enquiries): tw.admin@ftdichip.com
Web Site URL:
Branch Office - Hillsboro, Oregon, USA
Future Technology Devices International Limited (USA)
5285 NE Elam Young Parkway
Suite B800
Hillsboro, OR 97124-6499
USA
Tel: +1 (503) 547-0988
Fax: +1 (503) 547-0987
E-Mail (Sales): us.sales@ftdichip.com
E-Mail (Support): support2@ftdichip.com
E-Mail (General Enquiries): admin1@ftdichip.com
Web Site URL:
Agents and Sales Representatives
Please visit the
page of the
for the contact details of our distributor(s)
in your country.

24
Disclaimer
© Future Technology Devices International Ltd. 2006
7
Disclaimer
© Future Technology Devices International Limited , 2002 - 2006
Neither the whole nor any part of the information contained in, or the product described in this
manual, may be adapted or reproduced in any material or electronic form without the prior written
consent of the copyright holder.
This product and its documentation are supplied on an as-is basis and no warranty as to their
suitability for any particular purpose is either made or implied.
Future Technology Devices International Ltd. will not accept any claim for damages howsoever
arising as a result of use or failure of this product. Your statutory rights are not affected.
This product or any variant of it is not intended for use in any medical appliance, device or system
in which the failure of the product might reasonably be expected to result in personal injury.
This document provides preliminary information that may be subject to change without notice.

Index
- D -
Drivers 4
- I -
Installation 2, 3, 4
Introduction 2
- U -
Uninstall 14, 15
- W -
Welcome 2
Windows XP 2, 3, 4, 14, 15
Windows XP Installation Guide
25
© Future Technology Devices International Ltd. 2006
Document Outline
- Welcome to the Windows XP Installation Guide
- Installing FTDI Device Drivers
- Uninstalling FTDI Devices
- Troubleshooting
- Revision History
- Contact Information
- Disclaimer
Wyszukiwarka
Podobne podstrony:
Windows XP Installation Guide
Instalacja Windows XP (install 2)
Windows XP Instalacja i naprawa cwiczenia praktyczne cwwxin
Windows XP Instalacja i naprawa cwiczenia praktyczne
Windows XP Instalacja i naprawa cwiczenia praktyczne cwwxin
Windows xp INSTALACJA krok po kroku
nsa windows xp security guide addendum
Windows 98 Installation Guide
Windows XP Instalacja i naprawa Ćwiczenia praktyczne
Windows XP Installation Manual
Windows XP Instalacja i naprawa cwiczenia praktyczne 2
Windows 2000 Installation Guide
Windows XP Instalacja i naprawa cwiczenia praktyczne cwwxin
Instalacja Windows XP i Vista(FORMATOWANIE),tworzenie kopii zapasowej
Instalacja Windows XP na dyskach SATA, systemy
Integracja dodatku SP3 z obrazem płyty instalacyjnej Windows XP
JAK ZAINSTALOWAĆ WINDOWS XP, Do Systemu, Instrukcje instalacji
Formatowanie, tworzenie partycji i instalacja Windows XP
Instalacja Windows XP na dyskach SATA
więcej podobnych podstron