CA226: Lab01 - Using WinMIPS64 Simulator
This lab introduces WinMIPS64, a Windows based simulator of a pipelined implementation of the MIPS64 64-bit processor.
1. Starting and configuring WinMIPS64
Start WinMIPS64 from the task bar.
A window (denoted the main window) appears with six child windows and a status line at the bottom. The six windows are Pipeline, Code, Data, Registers, Statistics, and the Clock Cycles Diagram.
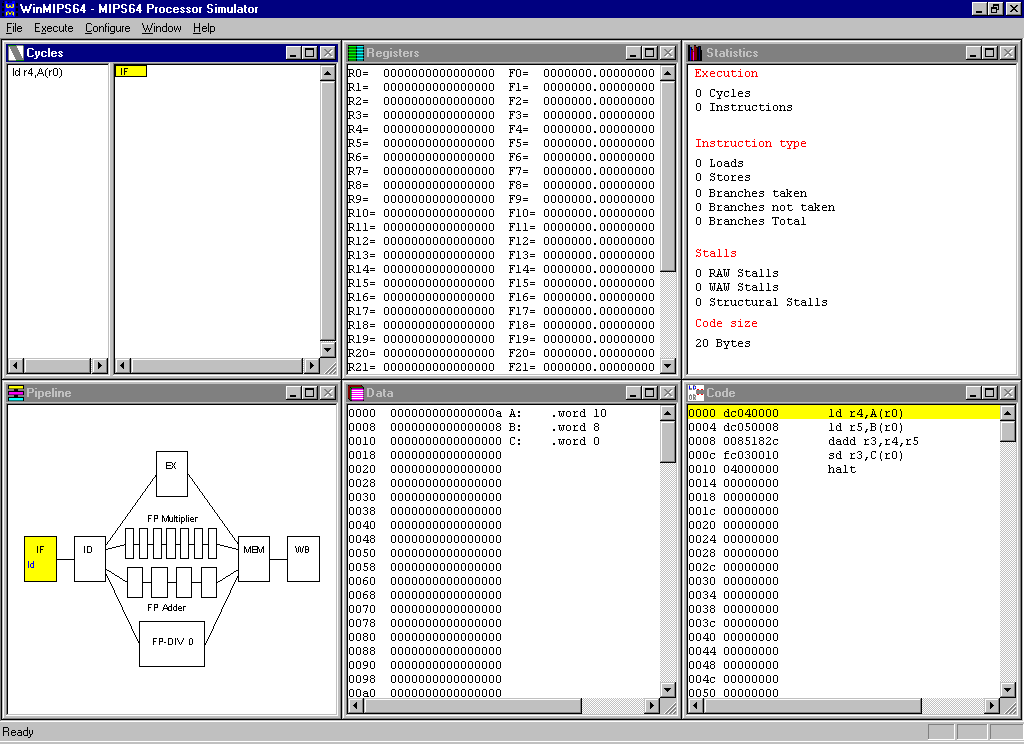
Pipeline window
|
This window shows a schematic representation of the five pipeline stages of the MIPS64 processor and the units for floating point operations (addition / subtraction, multiplication and division). It shows which instruction is in each stage of the pipeline. |
Code window |
This window shows a three column representation of the code memory, showing from left to right 1) a byte address, 2) a hex number giving the 32-bit machine code representation of the instruction, and 3) the assembly language statement. Double-left-clicking on an instruction sets or clears break-points. |
Data window |
This window shows the contents of data memory, byte addressable, but displayed in 64-bit chunks, as appropriate for a 64-bit processor. To edit an integer value double-left-click. To display and edit as a floating-point number, double-right-click. |
Register window |
This window shows the values stored in the registers. If the register is displayed in grey, then it is in the process of being written to by an instruction. If displayed using a colour, the colour indicates the stage in the pipeline from which this value is available for forwarding. This window allows you to interactively change the contents of those 64-bit integer and floating-point registers that are not in the process of being written to, or being forwarded. To do this, double-left-click on the register you want to change and a pop-up window will ask you for new content. Press OK to confirm the change. |
Clock Cycle diagram |
This window gives a representation of the timing behaviour of the pipeline. It records the history of instructions as they enter and emerge from the pipeline. An instruction that causes a stall is highlighted in blue: instructions held up as a result of a stall are grayed. |
Statistics |
This window provides statistics on the number of simulation cycles, instructions, the average Cycles Per Instruction (CPI), the types of stalls, and numbers of conditional branches and Load/Store-instructions. |
Status Line |
The status line at the bottom normally displays "Ready", but will during program simulation provide useful information on the current status of the simulation. |
To make sure the simulation is reset, click on the File menu and click Reset MIPS64.OKOK
WinMIPS64 can be configured in many ways. You can change the structure and time requirements of the floating-point pipeline, and the code/data memory size. To view or change standard settings click Configure/Architecture (read this as: click Configure to open the menu, then clicking on Architecture) and you will see the following settings:
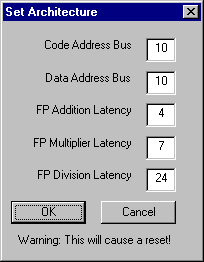
You can change the settings by clicking in the appropriate field and editing the given numbers. Any changes to the Floating-point latencies will be reflected in the Pipeline window. The Code Address Bus refers to the actual number of wires in the address bus. So a value of 10 means that 210 = 1024 bytes of code memory will be displayed in the Code window. When you are finished, click OK to return to the main window.
Three more options in the Configuration menu can be selected: Multi-Step, Enable Forwarding and Enable Delay Slot. Of these Enable Forwarding should be enabled, that is, a small hook should be shown beside it. If this is not the case, click on the option.
You can change the size and/or position of child windows or bring up only one window using the maximise option for that window.
2. Loading a test program.
Use a standard text editor to create this file sum.s, which is a MIPS64 program that calculates the sum of two integers A and B from memory, and stores the result into the memory on location C.
;***************************************
;*** winMIPS64 //sum.s// C=A+B *****
;*** (c) 2003 CA226, DCU *****
;***************************************
.data
A: .word 10
B: .word 8
C: .word 0
.text
main:
ld r4,A(r0)
ld r5,B(r0)
dadd r3,r4,r5
sd r3,C(r0)
halt
A small command line utility asm.exe is provided to test a program for syntactical correctness. To check, this program type
C:\winmips64>asm sum.s
In order to be able to start the simulation, the program must be loaded into the main memory. To accomplish this, select File/Open. A list of assembler programs in current directory appears in a window, including sum.s.
To load this file into WinMIPS64, do the following:
Click on sum.s
Click the Open button
The program is now loaded into the memory and the simulation is ready to begin.
You can view the content of code memory using the Code window, and observe the program data in the Data Window.
3. Simulation
3.1 Cycle-by-cycle Simulation
At any stage you can press F10 to restart the simulation from the beginning.
At the start you will note that the first line in the Code window with the address 0000 is coloured yellow. The IF stage in the Pipeline window is also coloured in yellow and contains the assembler mnemonic of the first instruction in the program. Now inspect the Code window and observe the first instruction ld r4,A(r0). Look in the Data window to find the program variable A.
Clock 1:
Pressing Execute/Single Cycle (or simply pressing F7) advances the simulation for one time step or one clock tick; in the Code Window, the colour of the first instruction is changed to blue and the second instruction is coloured in yellow. These colours indicate the pipeline stage the instruction is in (yellow for IF, blue for ID, red for EX, green for MEM, and purple for WB).
If you look in the IF stage in the Pipeline window, you can see that the second instruction ld r5, B(r0) is in the IF stage and the first instruction ld r4,A(r0) has advanced to the second stage, ID.
Clock 2:
Pressing F7 again will re-arrange the colours in the Code window, introducing red for the third pipeline stage EX. Instruction dadd r3,r4,r5 enters the pipeline. Note that the colour of an instruction indicates the stage in the pipeline that it will complete on the next clock tick.
Clock 3:
Pressing F7 again will re-arrange the colours in the Code window, introducing green for the fourth pipeline stage MEM. Instruction sd r3,C(r0) enters the pipeline. Observe the Clock Cycle Diagram which shows a history of which instruction was in each stage before each clock tick.
Clock 4:
Press F7 again. Each stage in the pipeline is now active with an instruction. The value that will end up in r4 has been read from memory, but has not yet been written back to r4. However it is available for forwarding from the MEM stage. Hence observe that r4 is displayed as green (the colour for MEM) in the Registers window. Can you explain the value of r4? Note that the last instruction halt has already entered the pipeline.
Clock 5:
Press F7 again. Something interesting happens. The value destined for r5 becomes available for forwarding. However the value for r5 was not available in time for the dadd r3,r4,r5 instruction to execute in EX. So it remains in EX, stalled. The status line reads "RAW stall in EX (R5)", indicating where the stall occurred, and which register's unavailability was responsible for it.
The picture in the Clock Cycle Diagram and the Pipeline window clearly shows that the dadd instruction is stalled in EX, and that the instructions behind it in the pipeline are also unable to progress. In the Clock Cycle Diagram, the dadd instruction is highlighted in blue, and the instructions behind are shown in gray.
Clock 6:
Press F7. The dadd r3,r4,r5 instruction executes and its output, destined for r3, becomes available for forwarding. This value is 12 hex, which is the sum of 10+8 = 18 in decimal. This is our answer.
Clock 7:
Press F7. The halt instruction entering IF has had the effect of "freezing" the pipeline, so no new instructions are accepted into it.
Clock 8:
Press F7. Examine Data memory, and observe that the variable C now has the value 12 hex. The sd r3,C(r0) instruction wrote it to memory in the MEM stage of the pipeline, using the forwarded value for r3.
Clock 9:
Press F7.
Clock 10:
Press F7. The program is finished
Look at the Statistics window and note that 2 loads and 1 store have been counted, and also 1 RAW stall. 10 clock cycles were needed to execute 5 instructions, so CPI=2. This is artificially high due to the one-off start-up cost in clock cycles needed to initially fill the pipeline.
The statistics window is extremely useful for comparing the effects of changes in the configuration. Let us examine the effect of forwarding in the example. Until now, we have used this feature; what would the execution time have been without forwarding?
To accomplish this, click on Configure. To disable forwarding, click on Enable Forwarding (the hook must vanish).
Repeat the cycle-by-cycle program execution, re-examine the Statistics window and compare the results. Note that there are more stalls as instructions are held up in ID waiting for a register, and hence waiting for an earlier instruction to complete WB. The advantages of forwarding should be obvious.
3.2 Other execution modes
Click on File/Reset MIPS64. If you click on File/Full Reset, you will delete the data memory, so you will have to repeat the procedure for program loading. Clicking on File/Reload or F10 is a handy way to restart a simulation.
You can run simulation for a specified number of cycles. Use Execute/Multi cycle... for this. The number of cycles stepped through can be changed via Configure/Multi-step.
You can run the whole program by a single key-press - press F4. Alternatively click on Execute/Run to.
Also, you can set breakpoints. Press F10. To set a break-point, double-left-click on the instruction, for example on dadd r3,r4,r5. Now press F4. The program will halt when this instruction enters IF. To clear the break-point, double-left-click on the same instruction again.
CA226-Lab00 Page 6
Wyszukiwarka