749849337958684660

To make- a simitor mounł, you will need the fol-lowing ilems:- .
One 4in/10cm lid, cumplele with locking platc.
One 6in.T?cm (ramę, minus perspęx or glass.
One 6in'15crn rirde of firm card.
7 sąuare in‘18cm of quilt padding.
8 square in'21cm of vclvet.
A needle, strong scissors, thread: plus ihe usual
miniaturę materials with which to arrange the lid.
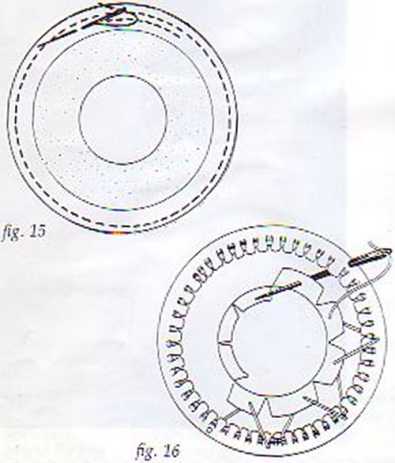
Use the backing from the frame as a guide for mark-ing the 6ia']5cm cirde of card and cut just inside the marked linę because the veivet will take up space when folded over the edge of the card. Place the ve!vet square face downwards and put the card in the centre. Mark lin‘2.xm all around the card cirde, using a chnlk pcncil if the fabric i? dark. Cut out the velvet drcle. Thread the needle and double knot the end. Pierce through the velvet so the knot lies on the piled surface '/dn/ómm away from the edge of the fabric. Make a cirde ol smali even stitches around the edge and finish with the thread running loosely out next to the knot. Makeanotnerrow of stitches Vain.6mm inside the first row in the same manner (see Tig. 15).
Place the drcle of card on the padding, mark the edge and cut out a circle of padding to match the card. Remove the padding to one side and fit the card inside the frame. Place the lid in Ihe centre and mark the edge, having measured equal distances from edge to edge so the lid is exaclly central. Cut out the centre of the card and fil the lid into ihe opening. If it fits rightly, enlnrge the opening slightly because the velvet will take up room when it is folded back through the opening.
Replace the card on the padding and mark the centre opening; trim the padding to match, and then secure the padding and the card together with adhesiee. Trim the edge of the padding at a diagonal angle in order to taper the depth. Place the velvet cirde facing pile downwards and posilion the padded card on top with the padding against the bark of the velvet. Slowly draw up the threads and evenly gather in the velvet until it folds back smoothly and firmly around the edge of the card. Secure the gathering with smali stitches.
Pierce the centre of the vdvet cirde with scissor points and cut out a drcle Ifcjn/lcm smaller than the centre of the card- Snip into the edge ol :he cirde ai reguła r inlervals, cutting just fcelow Ihe edge of the card, to enable the velvet to fold back. Using firmly knotted double thread, catch the two velvet edges togelher with taut regular oversewmg stitches to pro-duce a firm, smooth surface, (sec Fig. 16). Secure the thread with stitches, trim away any surplus fabric bulk and fil the padded velvet cirde inside the frame. Posi* rion the backing card in behind the mount and secure with pins. Apply adhesiee in the centre and secure the assembled pot Kd inside tlie mount.
Anolher presentation can be prepared by simply padding the card as described without remoemg the centre. The miniaturę can ihen be secured to the velvet surface with adhesiee, produdng a raised centrepiece like the one on page S.
Wyszukiwarka
Podobne podstrony:
To make a similar mount, you unii need the fol* lowing ilems:- One 4iuTI)cm lid, complcte with locki
dzwonek Christmas Fold-out Card: the Bell To make this card you will need not only paper, scissors a
some?sic preposition quiz 1 Marks: 12 You will need the most commonty used prepositbns here: in, on
PG054 Numbers Arabie numerals are usually used in Japan but sometimes, especially on menus, you will
page# This little Christmas tree will fit in any room.Tabletop Tree To make the Tabletop Tree: You w
77815 img047 3 PRACTICAL TATTINGEDGING D_ This pattern is much simpler than it looks. You will need
retrieve Notę the information you will need to activate. To save this information, click Print.
MYOPS18 Snowflake Stencil Use this stencil to make as many snowflakes as you want. v*: *• ^ .* v WHA
img047 3 PRACTICAL TATTINGEDGING D_ This pattern is much simpler than it looks. You will need to win
img051 3 PRACTICAL TATTING Slip 1: Edging I think this one is fairly elear. You will need to wind th
img051 3 PRACTICAL TATTING Slip 1: Edging I think this one is fairly elear. You will need to wind th
img047 3 PRACTICAL TATTINGEDGING D_ This pattern is much simpler than it looks. You will need to win
img051 3 PRACTICAL TATTING Slip 1: Edging I think this one is fairly elear. You will need to wind th
77815 img047 3 PRACTICAL TATTINGEDGING D_ This pattern is much simpler than it looks. You will need
więcej podobnych podstron