
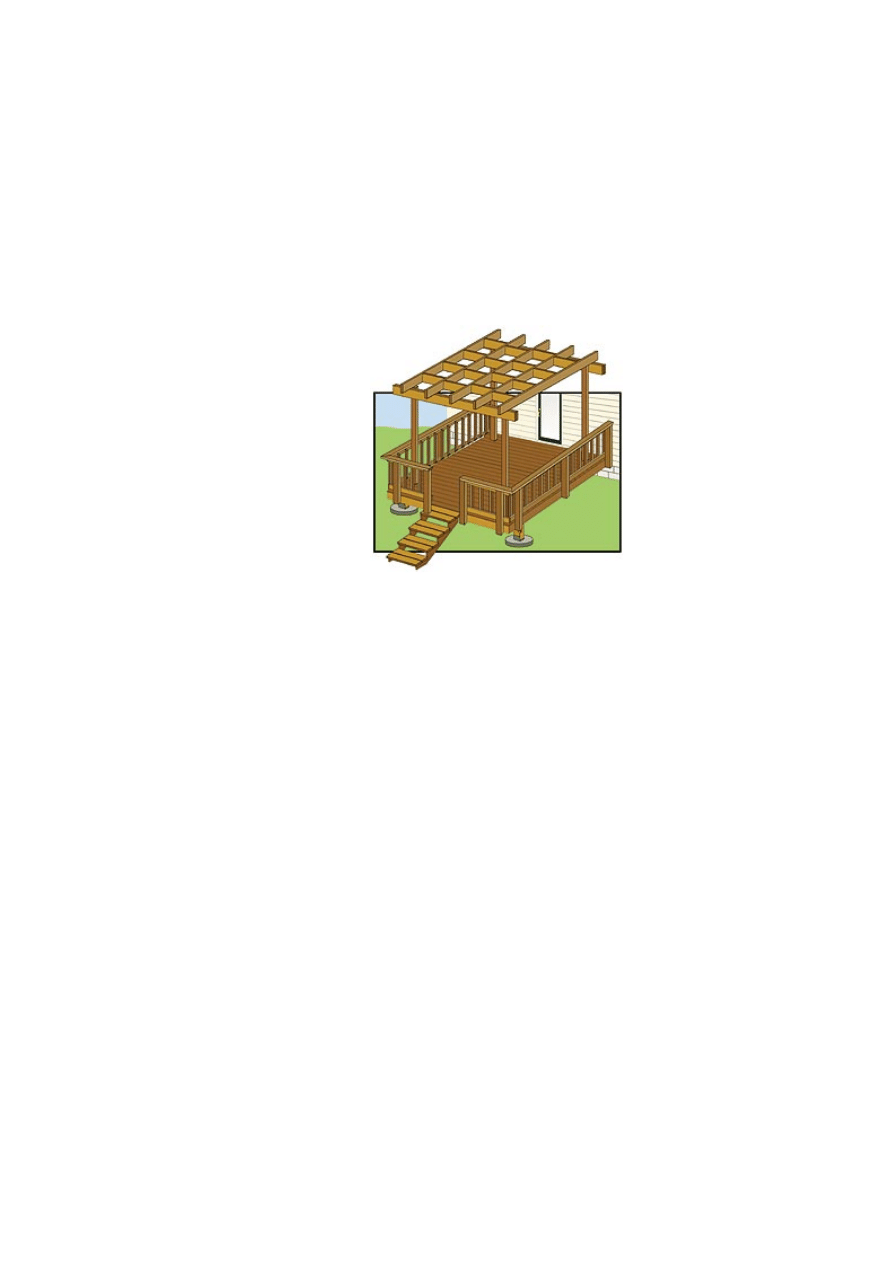
Build a Pergola
Project Level: Advanced
A pergola gives a deck
character and provides a
focal point for decoration and
design. Pergolas are great for
vines, other climbing plants
and hanging baskets. If you
don't have a green thumb,
dress the pergola with lights,
ribbon or streamers for
special occasions. This
pergola makes a great
weekend project - a good
helper would make the job go much more smoothly. Lowe's is
happy to provide this information as a service to you.
A pergola adds elegance to your home.
Click a text link below to shop for that item.
Click the information icon
for a product buying guide.
Tools
• Mason's line
• Chalk line
• Tape measure
• Jig saw
• Drill/driver with
bits
• Ladder
• Hammer
• Water level
• Circular saw
• Miter saw
(optional)
• Hammer
• Ratchet and socket
• Dust mask
• Goggles
• Hearing protection
Materials
• 15 pounds- 2 1/2"
galvanized screws
• 8- 6"x1/2" carriage
bolts
• 8- 7"x1/2" carriage
bolts
• 4- 4"x4"x10' treated
posts
• 4- 2"x8"x10' treated
boards
• 5- 2"x6"x10' treated
boards
• 6- 2"x6"x8' treated
boards
Check with your local building authorities before
beginning, to find out if any permits are required.
Construction Note
These instructions are for a basic
pergola with square rafter ends. You may alter the design and
cut shapes in the rafter ends for a more decorative effect.
Example Dimensions
• The deck has 2x8 joists 16" on center (OC).
• The pergola will be 8' square with 4x4 posts, doubled 2x8
beams, 2x6 rafters 24" OC and 2x6 bracing blocks 24"
OC.
Whether joists are set 12", 16" or 24" OC
there will always be joists at multiples of 48"OC.
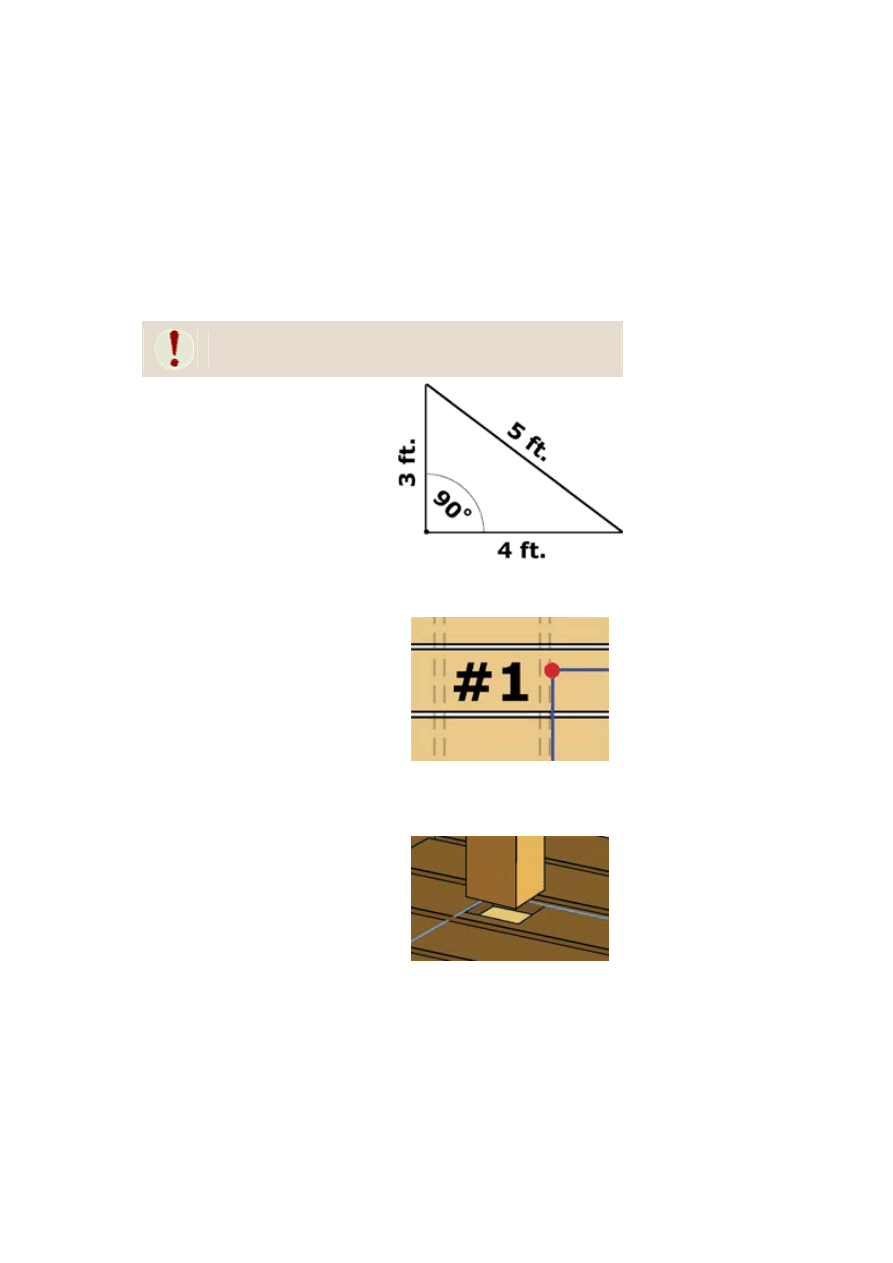
Image A: The 3, 4, 5 method is a
highly accurate method of determining
right angles.
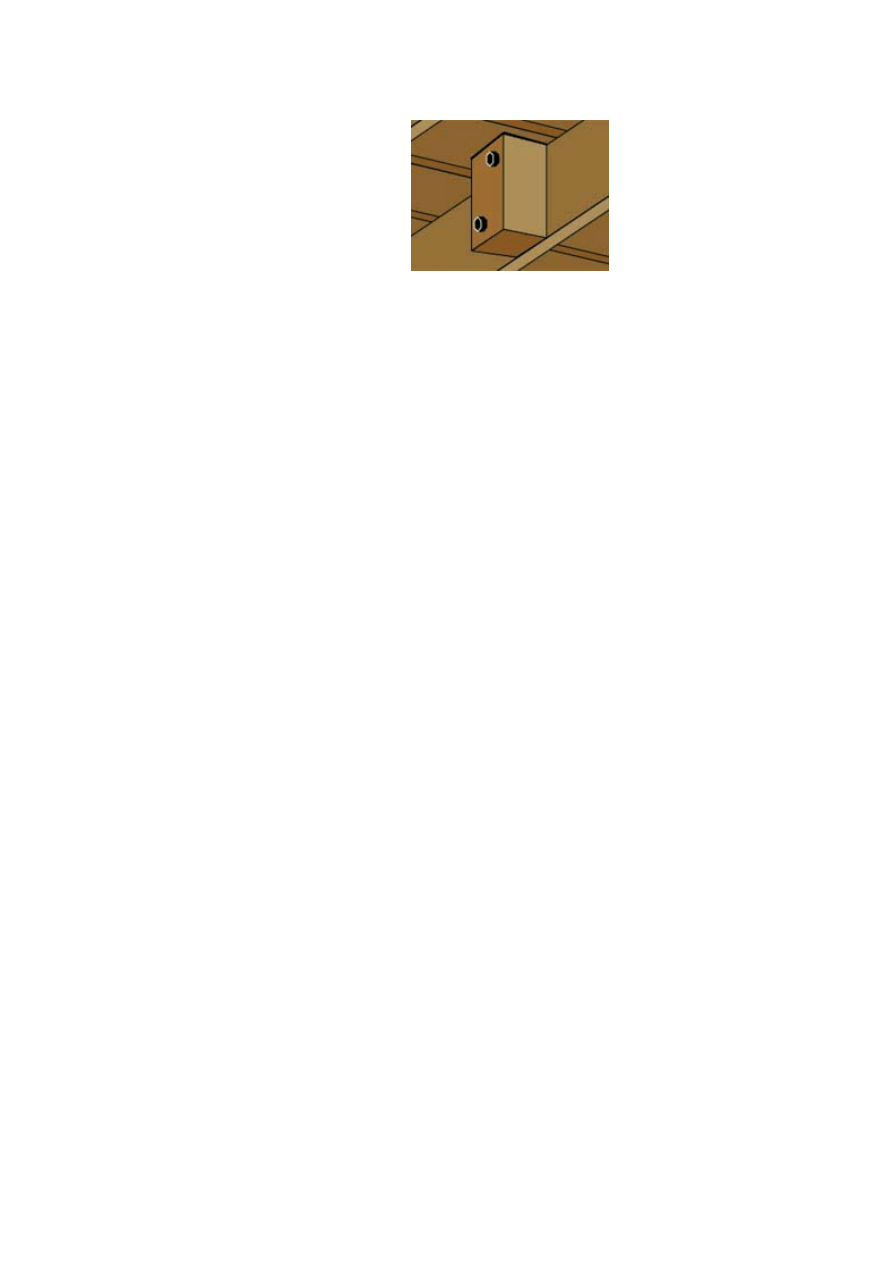
Image B: Notice here that the deck
joist is located on the outside edge of
the mark.
Image C: Tracing a piece of 4x4 on
the decking will guarantee an accurate
hole.
Laying Out The Site
1.
Determine the
approximate area where
you want the pergola.
Locate a deck joist at one
of the corners and mark
the decking flush with the
inside edge of the joist
(mark 1). Measure 8'
along the joist and make
another mark (mark 2). Snap a chalk line between the
two marks flush with the inside edge of the joist.
2.
Partially drive a 6d nail into the decking at mark 1. Tie
mason's cord to the nail and pull it perpendicular to the
chalk line. Use the following method to square the cord
with the chalk line.
3, 4, 5 Method: Measure 3' along the chalk line and
mark, measure 4' along the cord and mark it, then adjust
the cord until the distance between the two marks is 5'
(see image "A").
Measure 94 1/2" along the mason's cord and make a
mark (mark 3). Snap a chalk line between mark 3 and
mark 1.
3.
Repeat step 2 from mark 2 to locate mark 4.
4.
Marks 3 and 4 should be flush with the inside edge of a
deck joist. Snap a chalk line between marks 3 and 4,
flush with the inside edge of the deck joist (see top view
of Image "B").
5.
Stand a small piece of 4x4 on the decking at mark 1.
Align the outside edges of the 4x4 with the chalk lines.
Trace the other two sides of the 4x4 onto the decking.
Use a jig saw or a reciprocating saw to cut out the hole
for the 4x4. (see Image "C") Perform the same steps at
marks 2, 3 and 4.
Setting The Posts And Beams
1.
Have a helper slide a 10' 4x4 post into the hole at mark
1. Align the bottom of the post flush with the bottom of
the deck joist, while the helper holds it plumb. Drill two
offset 1/2" holes through the post and the joist.
(offsetting the holes helps maintain the strength of your
framing members.) Secure the post to the joist with
6"x1/2" carriage bolts (see Image "D"). Set the posts at
marks 2,3 and 4 the same way.
2. Measure up 8' 6" from the top of the decking on post 1
and mark it. Use a water level to transfer the mark on
Image D: Securing posts to joists with
offset carriage bolts will make for a
very stable structure.
post 1 to the other posts. Cut each post off at the marks.
3. Square two 10' 2x8s and cut them to 10' exactly. Screw
the 10' 2x8s together flush. The fasteners should be in
rows of three, spaced approximately 24" apart and driven
in from alternate sides to ensure the boards don't
separate.
4. Measure the distance from the outside of post 1 to the
outside of post 3 and subtract that number from 120"
(The length of the doubled 2x8 beam).
5. Divide the difference from above by 2, to determine the
overhang of the beam at each post.
6.
Measure in from each end of the beam and mark for the
overhang.
Example: Outside of post 1 to the outside of post 3 = 94
1/2"
120"-94 1/2"= 25 1/2"
25 1/2" divided by 2 =12 3/4"
The beam overhang on each side of the posts is 12 3/4".
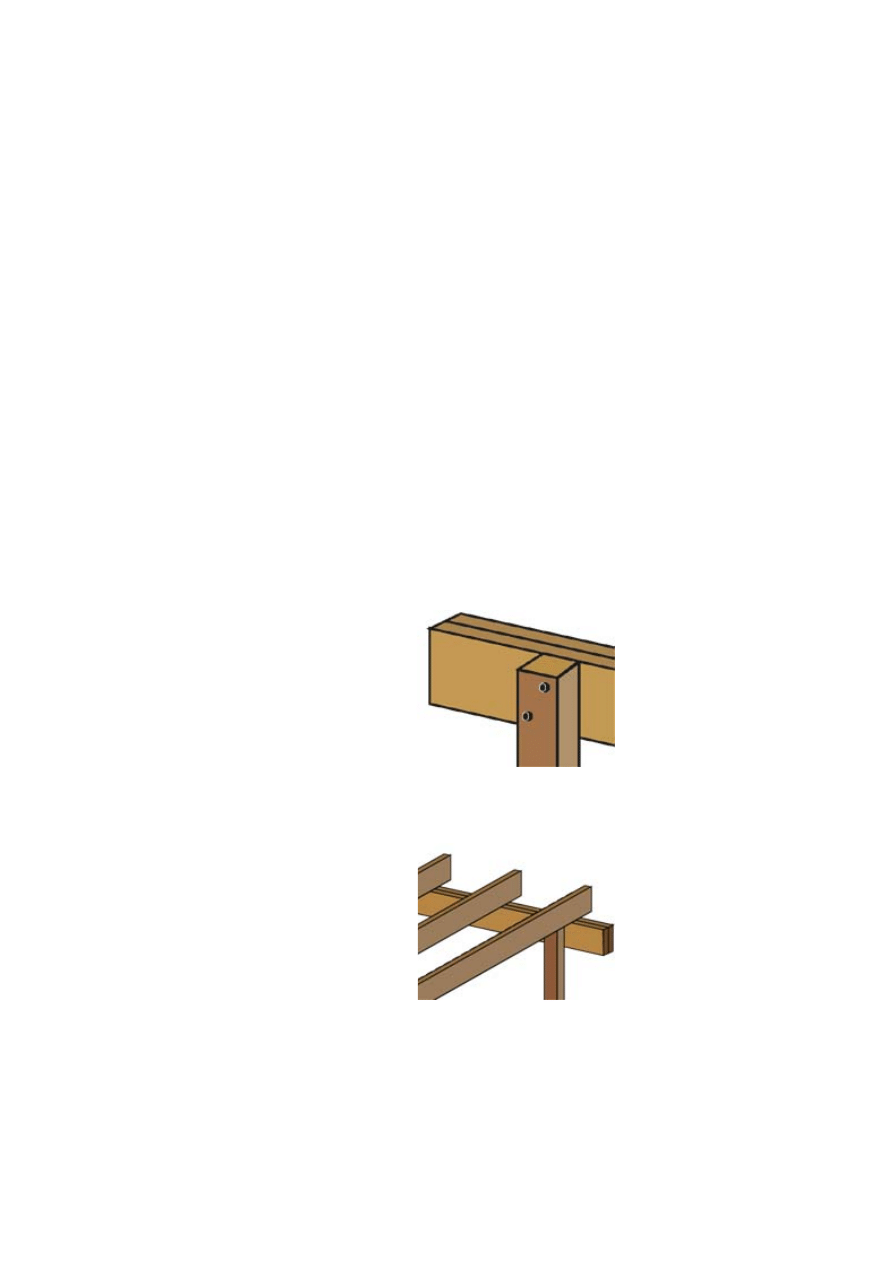
Image E: For a sturdy beam, secure
posts to beams with offset carriage
bolts. Notice the 12 3/4" overhang.
Image F: Perfect rafter placement is
essential. Your pergola will look
thrown together if you rush through
this step.
Set the beam with the top of the
beam flush with the tops of posts
1 and 3. Also align the overhang
marks flush with the outsides of
the posts. At each post, Drill two
1/2" offset holes through the
beam and post. Secure the beam
to the posts with 7"x1/2" carriage
bolts (see Image "E"). Set a
second beam on posts 2 and 4.
Setting The Rafters
1. Set the rafters 24" OC. Find
and mark the center of
each beam. Measure from
the center of the beam and
mark it every 24". You
should have five marks on
each beam, one in the
center and two on each
side. The marks represent
the centers of the rafters
(see top view of Image
"F").
2.
Measure the distance
between the beams from outside face to outside face and
add 12". The extra 12" allows the rafters a 6" overhang
at each beam. Cut five 2x6s to length.
Example: The distance from outside face to outside face
of the beams is 102"
102" 12" = 114"
The rafters should be cut to 114".
3.
Center the rafters on the marks and screw them to the
beams. The rafters should overhang each beam by 6".
Installing Brace Blocks
1. Measure between the rafters and cut brace blocks from
2x6 boards (For rafters 24" OC the braces should measure
approximately 22 1/2").
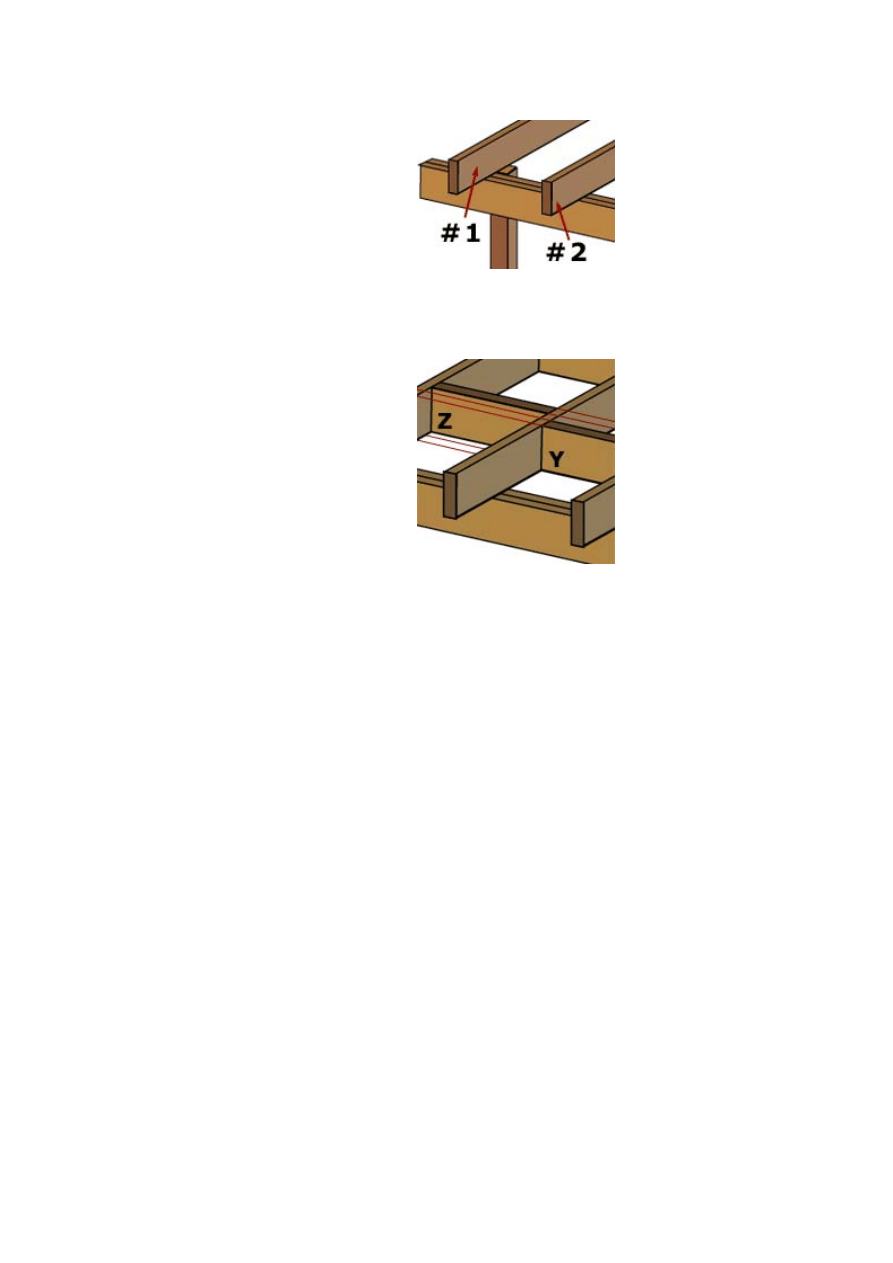
Number the rafters from left to
right (see Image "G").
2. Measure 10" back from the inside face of the beam along
rafters 1 and 2 and mark them. Continue measuring and
marking the left side rafters 24" OC. You should have four
sets of marks. Secure the bracing blocks between the
rafters.
3. Go to the next set of rafters (Rafters 2 and 3) and
Image G: Numbering your rafters
will make steps 1 through 4 of
"Installing Brace Blocks" much
easier.
Image H: Notice how brace blocks Z
and Y are offset.
measure from the inside face of the beam 13" and mark
each rafter. Then make marks 24" OC and install brace
blocks. Between rafters 3 and 4 mark and install brace
blocks as you did between rafters 1 and 2. Between
rafters 4 and 5 mark and install brace blocks as you did
between rafters 2 and 3. Offsetting the brace blocks
allows you screw through the rafter into the end of the
brace block instead of toenailing. (see Image "H")
4. Stain and seal
the pergola to
match the deck.
The completed pergola.
Wyszukiwarka
Podobne podstrony:
What You Really Need to Know to Sell Your Home Using Feng Shui by Jane Purr (2000)
How To Sell Your Home In Two Weeks Word For Email
DHT Listen to your heart
Combustion Pollutants In Your Home
Biological Pollutants in Your Home
Add a Purple Gradient to Your Photos
How to translate to your language
Is Marijuana?ngerous to your Physical Health
Listen to your heart Roxette
Listen to your heart
Welcome to your life
Farmer, Philip Jose Riverworld 1 To Your Scattered Bodies Go
Listen to your heart
41st Lecture My Favorite Extra Advice to Add to Your Game Plan
Bring the cloud to your datacenter Microsoft Azure Stack
How to record to your PC hard disk with Ngrab
więcej podobnych podstron