
35
In This Chapter
5
Using the Tutorials
This Introduction presents information that is useful to
know before you start performing the tutorials for
Autodesk
®
Mechanical Desktop
®
. It provides a summary
of how the tutorials are structured, and the methods
you can use to issue commands. You learn how to
manipulate the position of the Browser to best suit your
work space.
As you work through the tutorials, you use a set of
drawing files that are included with your software. In
this section, you learn how to locate, back up, and
maintain these drawings.
■
Finding the right tutorial
■
Accessing commands
■
Controlling the appearance of
the Desktop Browser
■
Backing up tutorial files

36
|
Chapter 5
Using the Tutorials
How the Tutorials are Organized
Read the Key Terms and Basic Concepts sections at the beginning of each
tutorial before you begin the step-by-step instructions. Understanding this
information before you begin will help you learn.
Key Terms
Lists pertinent mechanical design terms and definitions
for the lesson.
Basic Concepts
Gives you an overview of the design concepts you learn in
the lesson.
The tutorials begin with basic concepts and move toward more advanced
design techniques. They are presented in three design categories: part mod-
eling, assembly modeling, and surface modeling.
For best results, run Mechanical Desktop 6 to perform the tutorials in chap-
ters 1 through 16, and Mechanical Desktop 6 with the power pack to perform
chapters 17 through 19.
Chapters 6 Through 15
Part Modeling
These tutorials guide you through the basics of part modeling. Starting with
a basic sketch, you learn how to create fully parametric feature-based models
and generate drawing views.
Chapters 16 Through 18
Assembly Modeling
The assembly modeling tutorials show you how to create, manage, and doc-
ument complete assemblies and subassemblies, and create exploded views of
your assembly design. You also learn how to use assembly techniques to
build a combined part in the Part Modeling environment.
Chapters 19 Through 21
Surface Modeling
These tutorials cover the techniques of surface modeling. You start by learn-
ing how to create and edit different types of surfaces. Then you create a sur-
face and use it to cut material from a parametric part. You also learn how to
surface a wireframe model from the ground up.
Chapters 22 Through 24
2D and 3D Parts and Calculations
These tutorials focus on features in the Mechanical Desktop 6 with the power
pack. Included are tutorials working with standard parts and the shaft
generator and 3D finite element analysis (FEA) features. The exercises in
these tutorial chapters are designed to help you understand and use the
power pack features to simplify your work.
Accessing Mechanical Desktop Commands
|
37
Accessing Mechanical Desktop Commands
Mechanical Desktop provides several methods to access commands and
manage your design process.
The following are samples of the access methods available to you:
Browser
Right-click the window background and choose New Part.
Context Menu
In the graphics area, right-click and choose Part ➤ New
Part.
Toolbutton
New Part
Desktop Menu
Part ➤ Part ➤ New Part
Command
AMNEW
The step-by-step procedures in the tutorials indicate the command name in
the opening procedural text. The appropriate toolbutton is displayed in the
margin next to the preferred access method. In the tutorials, the context
menu method is used when the menus are sensitive to what you are doing.
The Browser method is used when you can save time and steps. You can use
any of the alternate methods as well.
If you are in Model mode, you can toggle between the Part and Assembly
context menus. If you are in Scene mode, the Scene menu is available. When
you are working in Drawing mode, you can toggle between the Drawing and
Annotate context menus.
Here is an example of how methods are used in the tutorials:
3
Use
AMNEW
to create a new part.
Context Menu
In the graphics area, right-click and choose Part ➤ New
Part.
NOTE
To find the location of a particular toolbutton, refer to Appendix A.
38
|
Chapter 5
Using the Tutorials
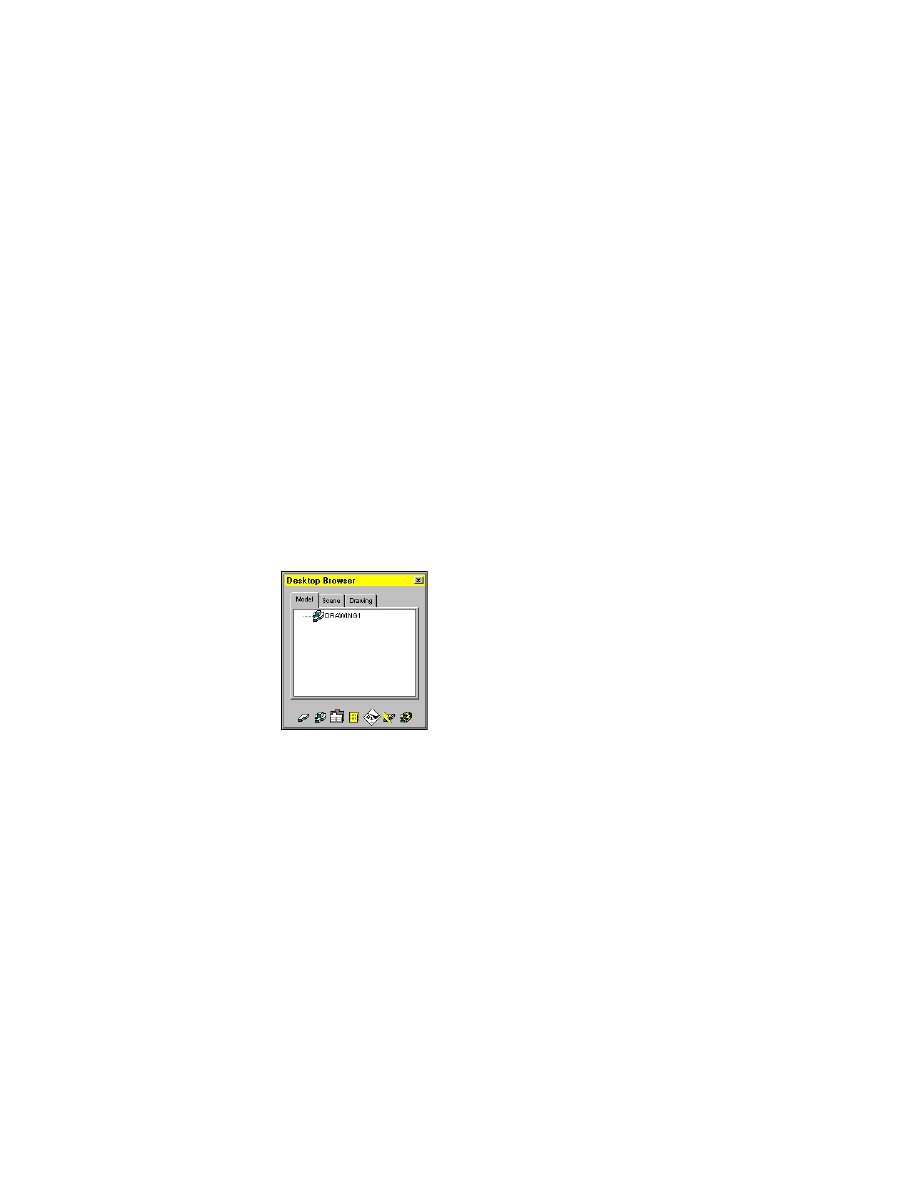
Positioning the Desktop Browser
The Desktop Browser is a graphical interface that is useful in both creating
and modifying your designs. You can do much of your work in the Browser
as you proceed through the lessons in the tutorials.
By default, the Browser is located on the left side of your screen. You may
want to move, resize, or hide the Browser to suit your working conditions.
This section provides instructions to control the size, shape, and location of
the Browser, and to return it quickly to the default location.
The Browser behaves differently when it is in the Auto Hide state. The follow-
ing are procedures for positioning the Browser both in and out of the Auto
Hide state.
To minimize and expand the Desktop Browser
To minimize the Browser double-click the gray area above the tabs.
To expand the Browser, double-click the gray area again.
To minimize the Browser in the Auto Hide state, right-click the gray area and
choose Auto Hide ➤ Collapse.
After you minimize the Browser in Auto Hide, you control the expand and
collapse function by moving your cursor onto and off of the Browser.
To turn off Auto Hide, right-click the gray area and choose Auto Hide ➤ Off.
With Auto Hide off, the Browser remains expanded when you move your cur-
sor away from it.
To move the Browser out of the default position
To move the Browser to another location on the screen, right-click the title
bar and choose Move. Click the title bar and drag the Browser to a location
on your screen.
To return the Browser to the default position
To return the Browser to the default position, double-click the title bar. The
Browser is docked in the default position along the left side of the graphics
screen.
To return to the previous location, right-click the gray area and turn off Allow
Docking.
Positioning the Desktop Browser
|
39
To hide and unhide the Browser
To hide the Browser, right-click the gray area above the tabs and choose Hide.
To unhide the Browser, choose View ➤ Display ➤ Desktop Browser.
To move the Browser off the screen with Auto Hide, right-click the gray bar
above the tabs and choose Auto Hide ➤ Left (or Right).
After you move the Browser off the left or right side of the screen with Auto
Hide, if you move your mouse to the corresponding edge of the screen, the
Browser is displayed along that edge. Move your mouse off the Browser, and
the Browser returns to the location off the screen.
To turn off Auto Hide, right-click the gray area and choose Auto Hide ➤ Off.
The Browser remains positioned on the screen when you move your cursor
away from it.
To move the Browser directly from Auto Hide to another location on your
screen, choose Auto Hide ➤ Allow Docking. Click the title bar and drag the
Browser to a new location. The Browser is docked in the new location.
To resize the Browser
Right-click the title bar and choose Size. Then drag a corner to resize the
Browser.
To return the Browser to its previous size, double-click the title bar.
40
|
Chapter 5
Using the Tutorials
Backing up Tutorial Drawing Files
For each tutorial, you use one or more of the master drawing files that con-
tain the settings, example geometry, or parts for the lesson. These files are
included with Mechanical Desktop. Before you begin the tutorials, back up
these drawing files so you always have the originals available. Any mistakes
you make while you are learning will not affect the master files.
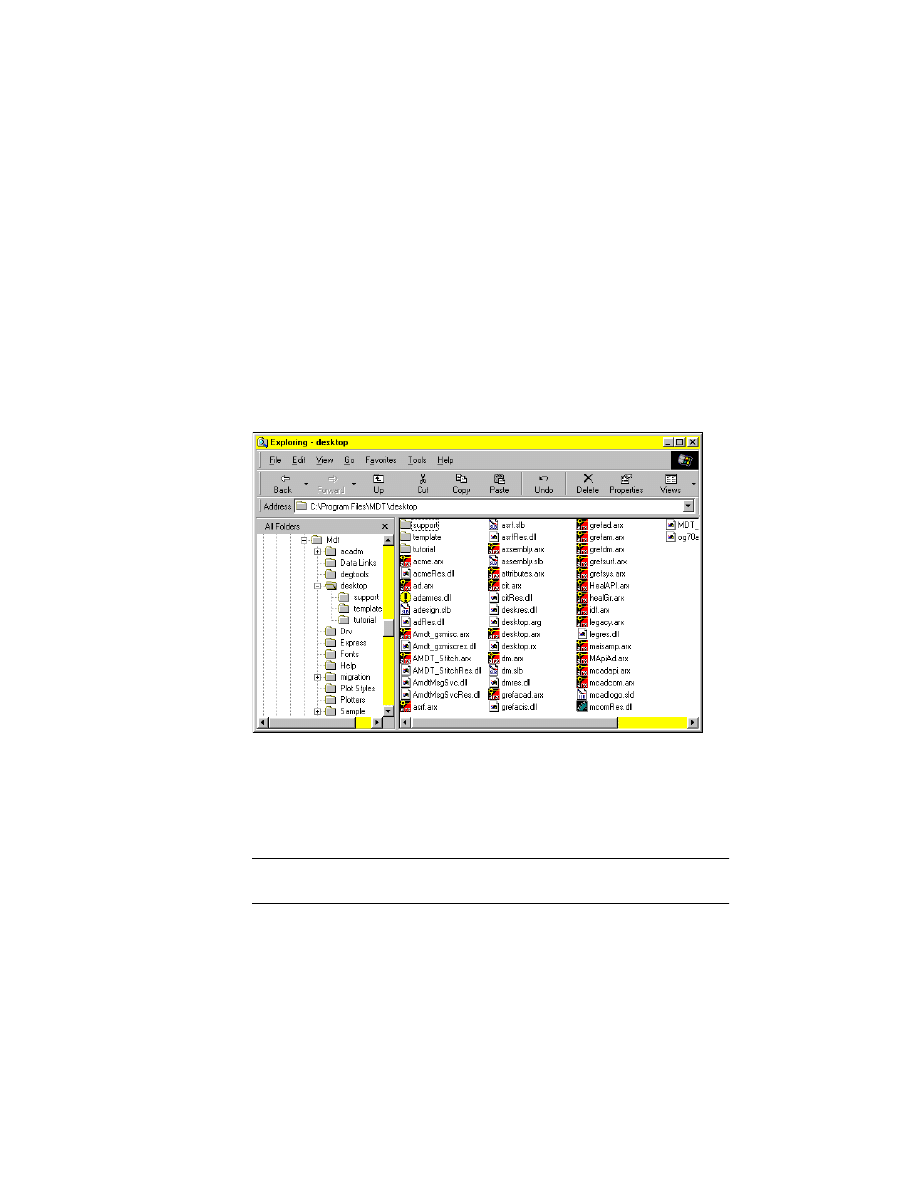
To back up tutorial drawing files
1
From the Windows Start menu, choose Programs ➤ Windows Explorer.
2
In the folder where Mechanical Desktop is installed (by default this is Program
Files\Mdt\desktop), choose File ➤ New ➤ Folder.
3
Create a new folder called tutorial backup.
4
Open the desktop\tutorial folder that contains all the tutorial drawing files
and copy them into your new folder.
Now you can use the tutorial drawings in the desktop\tutorial folder as you
work through the tutorials in this book.
NOTE
Keep your working tutorial files in the desktop\tutorial folder so that
external references in the assembly tutorials can update correctly.
Wyszukiwarka
Podobne podstrony:
11 3 4 6 Lab Using the CLI to Gather Network?vice Information
DUI0379C using the assembler
Roszak, Rewers, Pliszka USING THE 3D
Barron Using the standard on objective measures for concert auditoria, ISO 3382, to give reliable r
11 3 4 6 Lab Using the CLI to Gather Network (2)
Using the PSpice Library Translator
A ZVS PWM Inverter With Active Voltage Clamping Using the Reverse Recovery Energy of the Diodes
Developing your STM32VLDISCOVERY application using the MDK ARM
Developing your STM32VLDISCOVERY application using the Atollic TrueSTUDIO
How to Install & Update the Language Packs the Tutorial
DUI0473C using the arm assembler
Artificial Neural Networks The Tutorial With MATLAB
8 1 2 7 Lab Using the Windows?lculator with Network?dresses
Guide to using the tests
Introduction to business modeling using the UML
guide to using the tests Notatek pl
Assessment of Borderline Pathology Using the Inventory of Interpersonal Problems Circumplex Scales (
więcej podobnych podstron