Fredbuster
Page 1
02/02/03
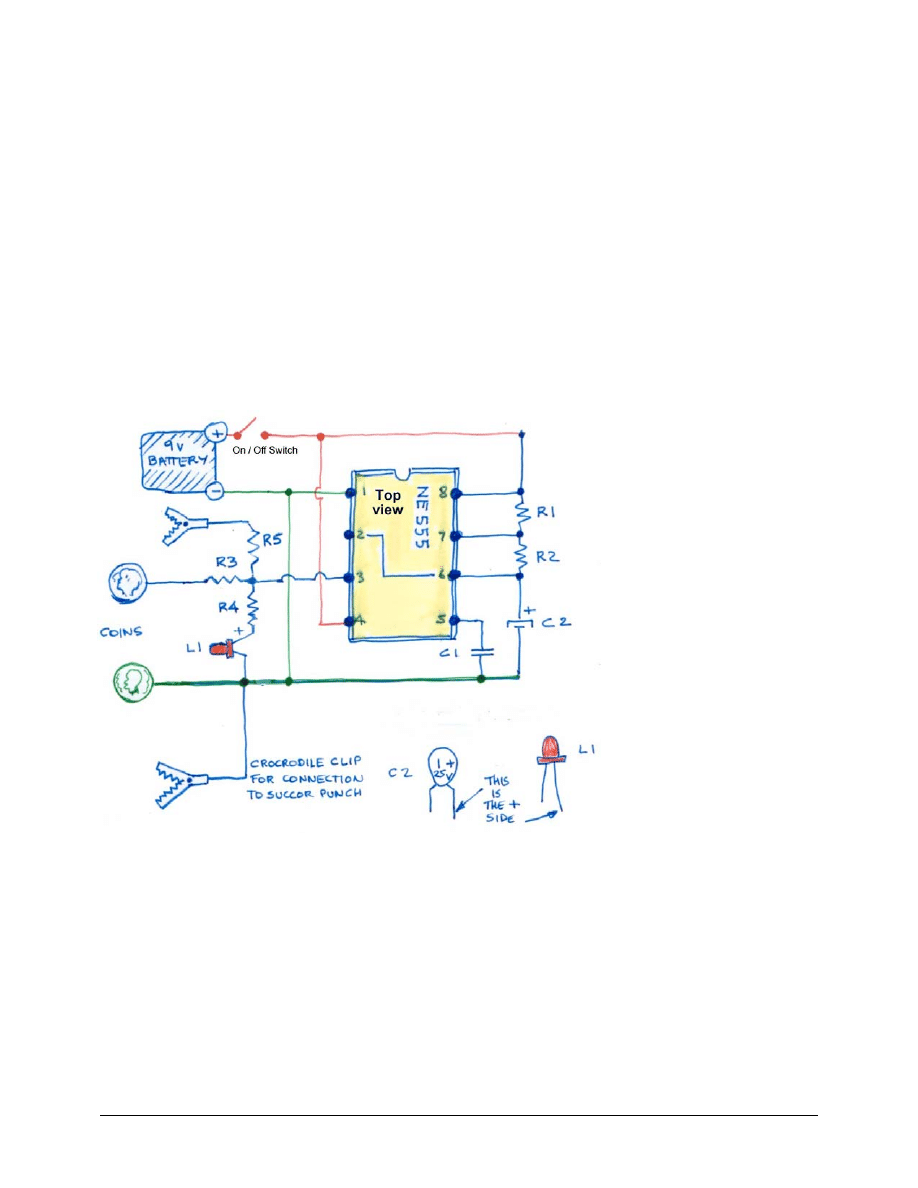
Building your Own Zapper
Disclaimer:
This circuit is very similar to the one used in Don’s Terminator, but the Terminator contains
other devices & feature not shown here. This document only refers to the basic square wave generation of
the zapper.
This project will be particularly useful to power a Succor Punch, for example, or for experimentation.
Components have been provided for both the zapper function and the succor punch function.
This circuit is based on a 555 timer, officially called NE555. It makes an excellent square wave oscillator,
is readily available and is inexpensive. It is housed in an 8 pin package. It can operate from 4.5 volts to 15
volts.
The frequency is not dependant on the voltage. A 9 Volts battery is a convenient way to power it for
portability. A standard 9v battery will last approximately 9days with this design.
The frequency and duty cycle
(ratio of On and Off time) are
defined by the resistors R1,
R2 and capacitor C2.
When R2 is much larger than
R1 the duty cycle is very
close to 50%, so the On and
Off times are of the same
duration, which is what we
want.
The Capacitor C1 is only used
for stability and the value is
not critical, but it should be
low, in the order of 10 to 47
pico farad (same as 0.01 to
0.047 micro farad)
R4 is used to limit the current flowing into the LED (light emitting Diode) a standard 3 mm red LED light
is used here. A lower resistor value will make the light brighter, but will drain the battery faster. The
minimal value acceptable would be 2.2k
R3 This resistor protect the circuit in case someone short circuits the coins temporarily. It is relatively small
compared with the skin resistance.
R5 : This resistor protects the circuit for short circuits condition. Actually the Succor Punch acts like a short
circuit, (the coil has very low resistance) so this condition can be sustained permanently without damaging
the circuit.

Fredbuster
Page 2
02/02/03
Power Consumption:
A number of combinations of R1, R2 and C2 can produce the same frequency, but
the power consumption may not be the same. The circuit described here will work for around 9 days
nonstop connected to a Succor Punch, with a standard 9v battery. Longer operating times are obtained with
higher quality batteries. It would last longer as a Zapper mode than as a Succor Punch.
The frequency we are looking for is 15Hz. This mean we
will have fifteen On - Off cycles per second. One On -
Off cycle will last approximately 66.6 milliseconds.
This square wave can be observed with an oscilloscope.
It cannot be measured with a voltmeter as it changes too
rapidly for it. So the real test of the circuit is visual, by the
blinking rate of the LED light.
If you made an error in the construction, it is possible that the blinking rate is so fast that the light appears
to be On all the time.
Selecting the components:
The components are easily found:
C2 1 micro farad, 35 volts tantalum capacitor, the bottom leg is the plus (silver line and
plus sign on that side)
C1 103k, 10P 2A153J (alternative appearances)
The LED light, the longer leg is the plus side
R1 and R2 must be folded to fit on the board. If using 2 resistors, solder then as below
R2 single resistor R2 double resistor
On / Off switch
A NE555 device: the dot, on the bottom left of the device (in this image) indicates pin 1. In
some devices, a notch indicates the top. Pin 1 is always at the left of the notch.
A piece of Vero board, or similar electronic project board. They have holes equally
spaced, some have little solder pads on the back. Some have tracks already laid out in
straight lines; you may have to be careful to cut the unwanted tracks in this case.
Some do not have soldering pads, and you use the legs of the components to make the
connections.
A 9v battery connector, they usually come with a
red and black wires attached. The red is the plus side.
Fredbuster
Page 3
02/02/03
You may also want to insert your project in a box and add a switch. The switch would be interrupting the
positive side (red wire) of the battery cable.
To make sure you get the proper values for the resistors, I have attached the color-codes for 10% precision
resistors. Resistor with 1% precision are coded differently, using 1% resistors would be an overkill in this
design.
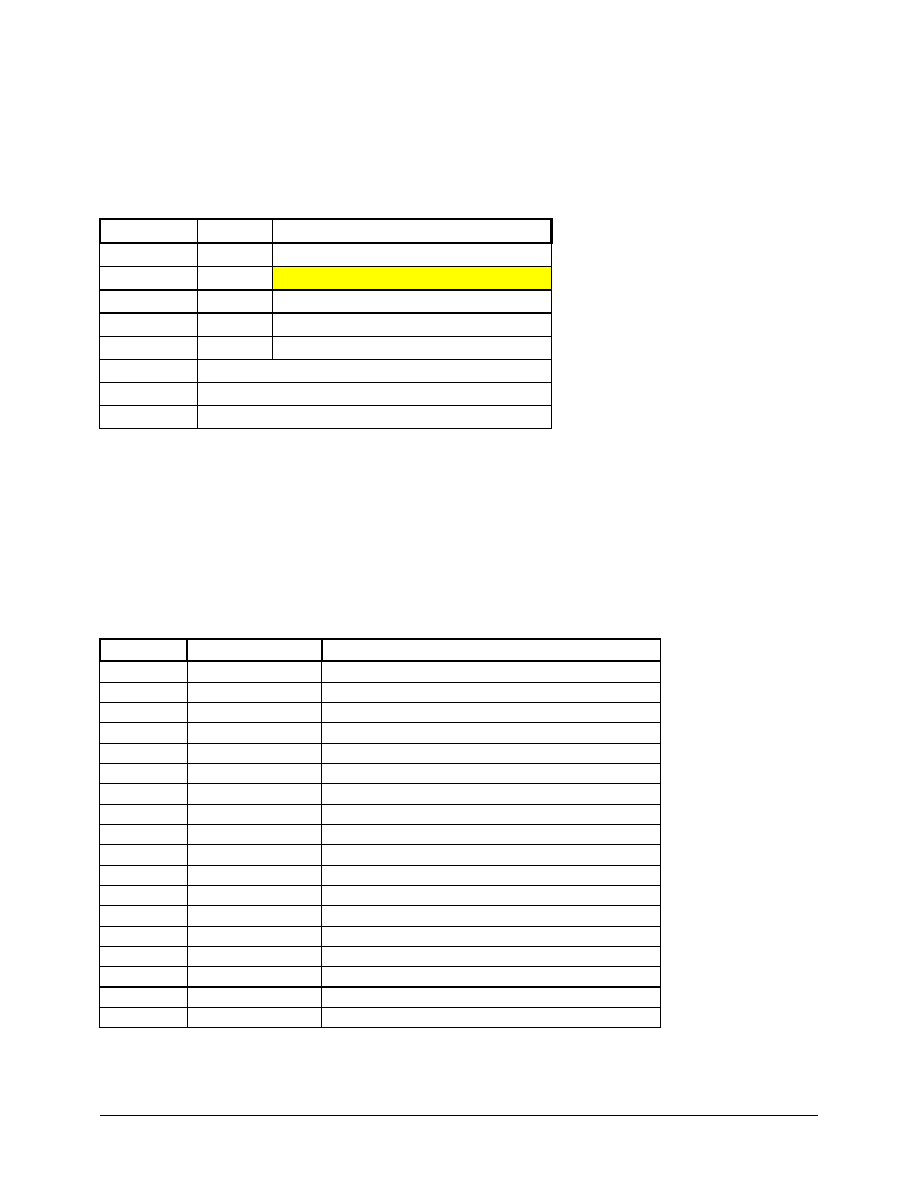
Component Value
Colors
R1
3.3k
Orange, Orange, Red
R2
See table below
R3
1k
Brown, Black, Red
R4
3.9k
Orange, White, Red
R5
4.7k
Yellow, Purple, Red
C1
0.01micro farad (or 10 Pico farad)
C2
1 micro farad, 16 or 25 volts
L1
3ml LED
Resistor values are expressed by color bands, plus a band for the tolerance.
Tolerance colors: Gold=5% , silver = 10%. I have not shown the tolerance color here, 10% is fine but
remember the following:
33k with 10% precision means that the real value in reality is between 29.70k and 36.30k.
33k with 5% precision means that the real value in reality is between 31.35k and 34.65k.
So check the table below to see what kind of marging you get. In practice 10% is fine.
Cycle duration = 1 / Frequency, so 1 / 15Hz = 0.066 seconds (66 milli seconds)
Frequency
R2
Colors
12.14
56k
green, blue, orange
14.10
47k
yellow, purple, orange
14.60
39k + 6.2k
orange, white, orange + blue, red, red
14.84
39k + 5.6k
orange, white, orange + green, blue, red
15.00
39k + 4.7k
orange, white, orange + yellow, purple, red
< zapper
15.57
39k + 3.9k
orange, white, orange + orange, White, red
15.65
39k + 3.3k
orange, white, orange + orange, Orange, red
17.00
39k
orange, white, orange
19.93
33k
orange, orange, orange
24.34
27k
red, purple, orange
29.60
22k
red, red, orange
30.70
20k + 1.2k
red, black, orange + brown, red, red
31.00
20k + 1k
red, black, orange + brown, black, red
31.15
20k + 820 ohm
red, black, orange + grey, red, brown
31.48
20k + 620 ohm
red, black, orange + blue, red, brown
31.56
20k + 560 ohm
red, black, orange + green, blue, brown
32.00
20k + 470 ohm
red, black, orange + yellow, purple, brown
< crystal programming
32.44
20k
red, black, orange
Fredbuster
Page 4
02/02/03
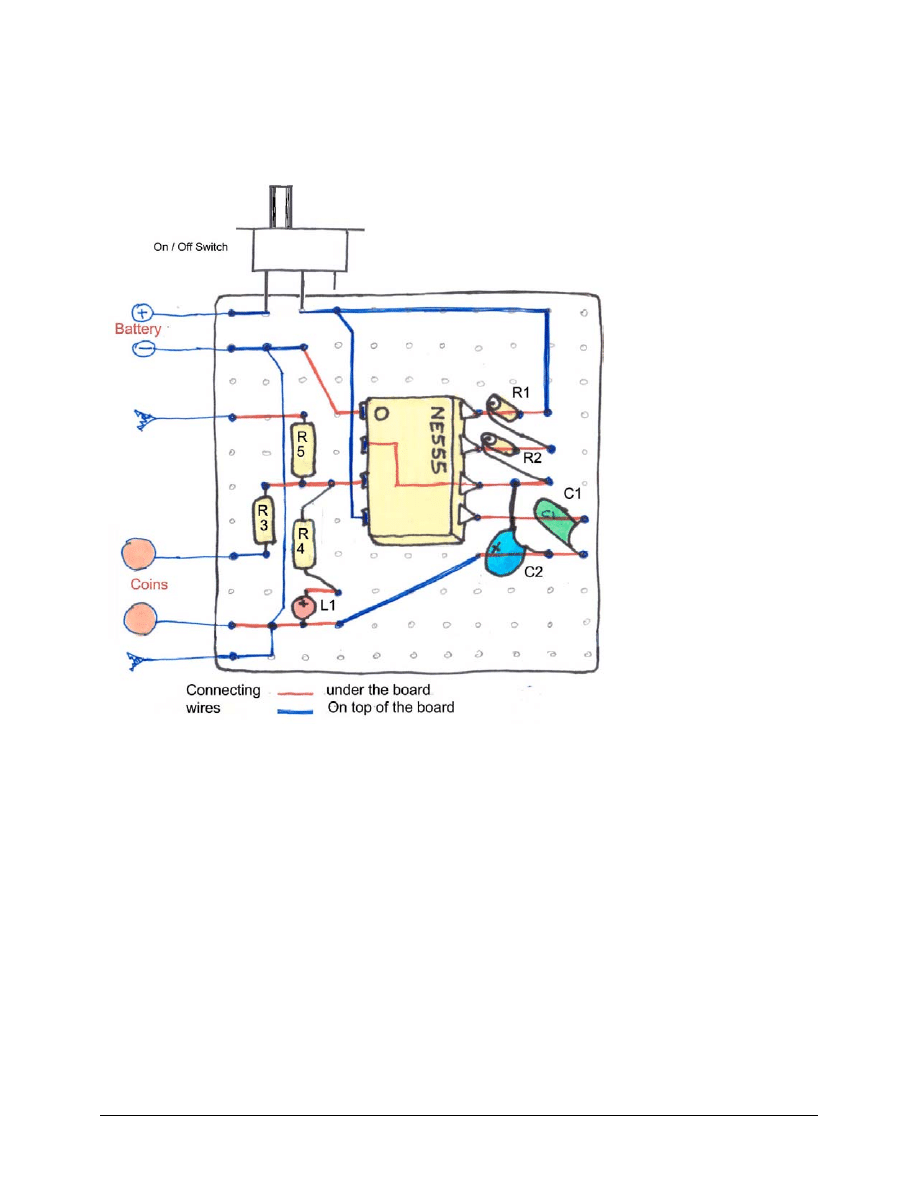
Construction:
It is a good idea to position all the components properly before starting to solder them.
Position the NE555 at the center of the board first and bend some pins so that it does not fall when you turn
the board over to solder.
Insert R1 and R2, bend the
legs to fit the board and use
the cut out legs as wires to
make other connections.
Make sure the longest leg of
L1 is connected to the Plus
and C2 plus side (marked by
a plus sign on the body) is
connected as indicated,
otherwise the circuit will not
work, or not for long.
L1 should be inserted on the
back of the board if you wish
to insert your project in a
box. It could then show
through a hole in the box.
Before connecting the power,
it is VERY IMPORTANT to
check that all connections are
correct and that the polarity
of the battery is right.
If a wire is missing or the battery polarity incorrect, the NE555 will be dead and the circuit will never work.
If the circuit is fine and works, it will work pretty much for ever. I have some timers still working after 10
years of use, and they are on 24 hours a day.
Installing the Circuit in a Box:
You will have to get a small plastic box for your circuit. Drill a hole for the light, drill a hole for the switch
and one for the SP wires. You can use a small jack connector if you wish to disconnect the SP cable (the
one terminated with the crocodile clips).
You can also add a velcro strip to hold your zapper on you arm or leg.
Depending if you have soldered the LED light on the front of back of the board, install the circuit in the box
so that the light faces the hole. Use glue to hold in place. A hot glue gun is the handiest way to secure parts
inside the box so they do not move.
Fredbuster
Page 5
02/02/03
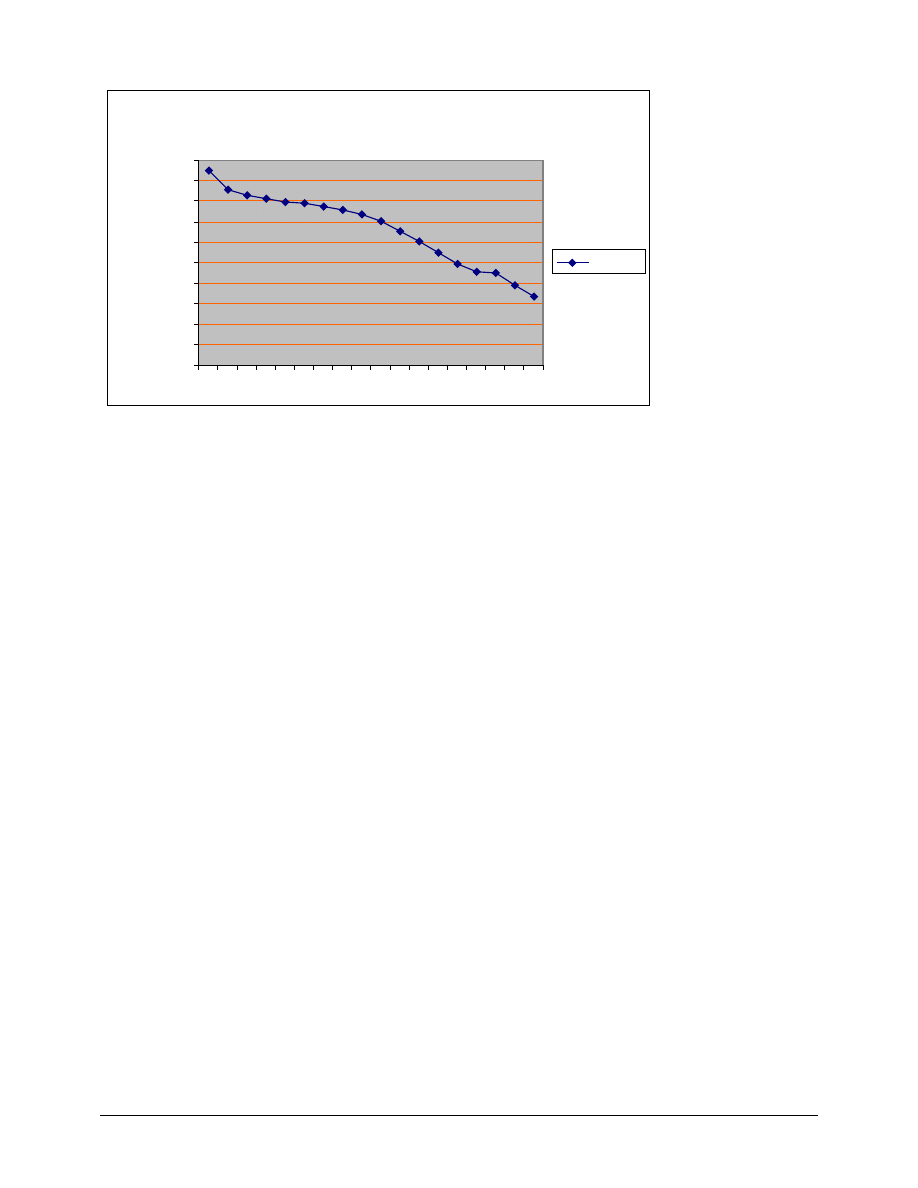
1
8 reading were taken over 9 day. The zapper stopped at the end of the 9
th
day when battery was at 3.36
volts. It had ran for 214 hours of continuous operation.
Questions and Answers:
Q:
is this the same circuit as Dr Clark zapper ?
A:
Yes, but the frequency is different, here we use 15hz
Q:
Why use 15Hz ?
A:
We use 15Hz because it seems to kill parasites very effectively. It also feels good to balanced, healthy
people and boosts our awareness. A theory is that it will be the earth’s resonant frequency in the future.
Q:
is this the same circuit as in Don’s Terminator ?
A:
Yes, same frequency but the component values may be different. This has no effect on the output. I just
did not want to copy his design. The circuit itself is a well-known electronic circuit freely available.
Q:
Will the circuit be damaged if I short-circuit the coins or Sp output?
A:
No, the output is protected by resistors to limit the current drain.
Q:
Will the NE555 component be damaged if I power it the first time with a faulty wiring?
A:
Yes, you will have to replace the NE555, fix the fault and start testing again
Q:
Can I make the light brighter?
A:
Yes, make resistor R4 smaller. The lowest value acceptable is 2.2k. but the battery will not last as long.
Q:
Do I have to use coins?
A:
No, you could also use a coil of copper wire like a Loohan coil. Coins made of copper are easy to solder
and glue on a box. There may be health benefits to use copper on the skin. Anything metalic which can be
soldered would do, I guess.
Q:
Does the presence of orgonite affect battery life?
A:
No, It does not at all. I personally experimented with 3 zapper circuits, one with no orgonite and one
between two blocks of orgonite. Voltages were absolutely identical, see discharge curve above.
Zapper Battery Discharge Curve
0.00
1.00
2.00
3.00
4.00
5.00
6.00
7.00
8.00
9.00
10.00
1
3
5
7
9
11
13
15
17
Volts
Series1
Wyszukiwarka
Podobne podstrony:
BUILDING YOUR OWN WORDPRESS SITE
How and When to Be Your Own Doctor
Print your own organs[1]
Making your own Tablets
Be a Romantic Scientist Distill your own perfume
MOLDING YOUR OWN CARBON FIBER COMPONENTS
Creating a Board aka Forum on your own PC !
(Gardening) Grow Your Own Beans And Peas
build your own cupcake
make your own jump rings
How to make your own power Bleeder
Egelhoff Tom C How To Market, Advertise, And Promote Your Business Or Service In Your Own Backyard
How to Make Your Own Perfume
Opening Your Own Service Shop
CNC Robotics Build Your Own Workshop Bot By Geoff Williams (McGraw Hill TAB Robotics 2003) 321s
Alcohol Fuel (Making Your Own)
Bazooka How To Build Your Own
Make your own origami crane
więcej podobnych podstron