114
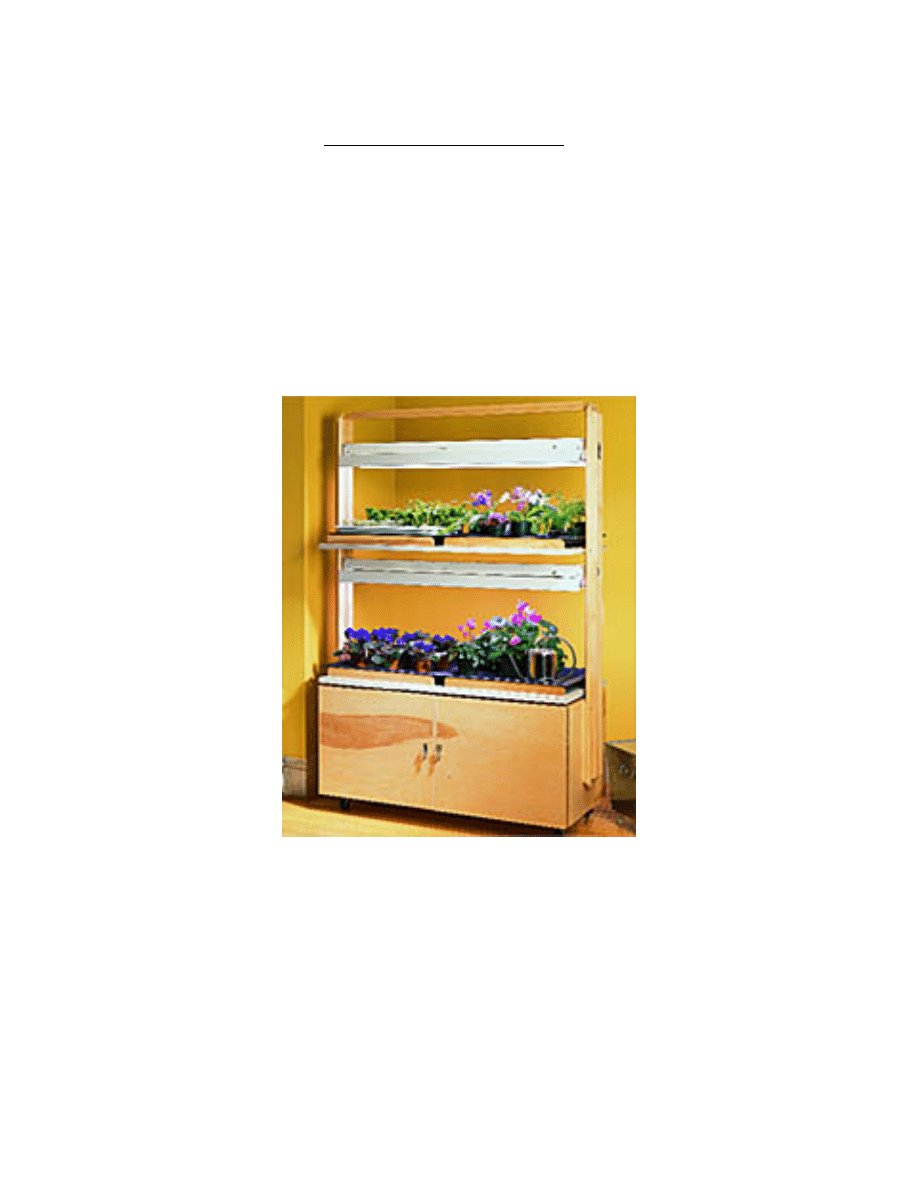
GROWING RACK
Copyright 2004 Martian Auctions
511
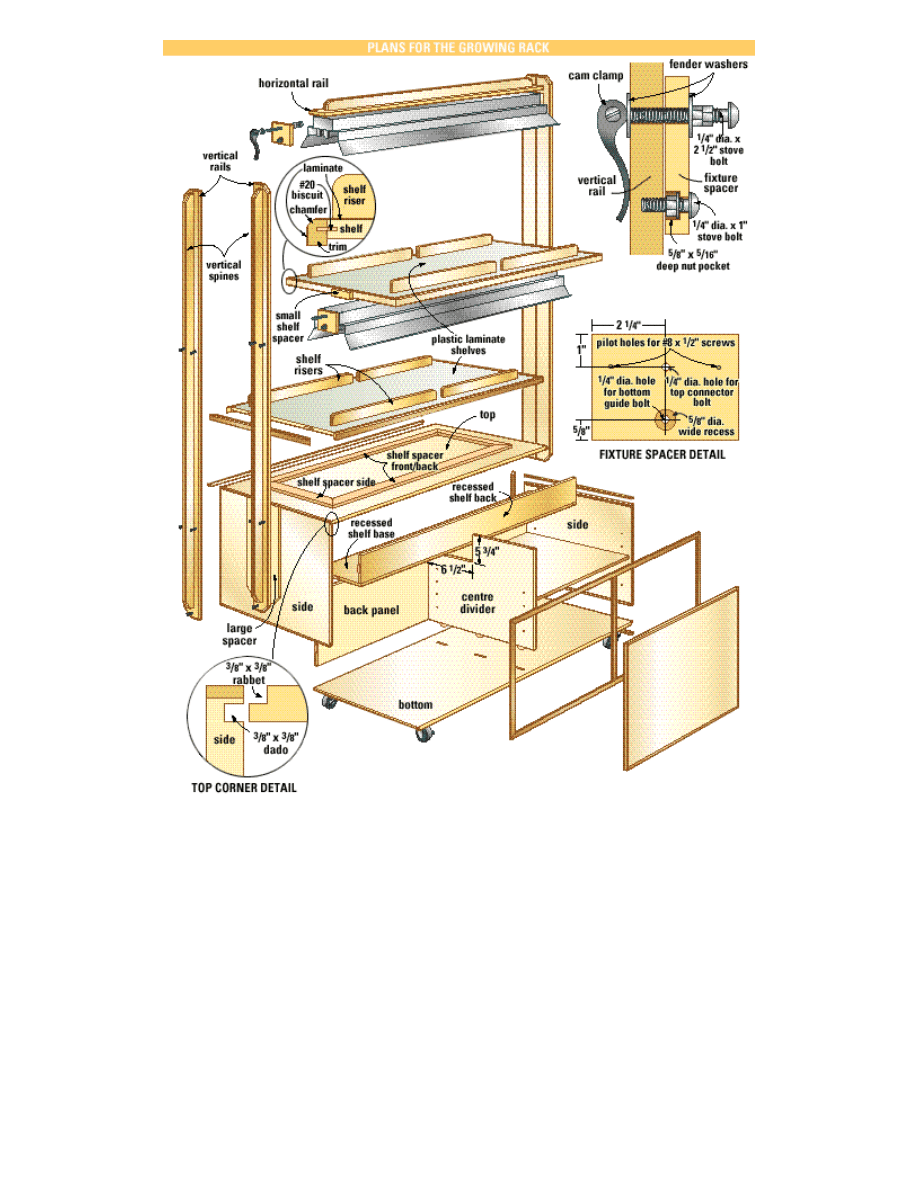
Make the Base Case
Begin by cutting panels for the sides, top and bottom. I used birch ply for these parts, but any 3/4"-thick sheet material will
do. Next, cap the top and bottom edges of the side panels with 1/4"-thick strips of solid hardwood. The rest of the exposed
plywood edges are capped later. Make the strips slightly wider than the thickness of your sheet material so the edges
overhang the plywood, allowing it to be sanded flush later.
I used rabbet and dado grooves for the interlocking joinery that connect the corners of the box. First, cut the 3/8" x 3/8"
rabbets on the ends of the top and bottom pieces, then cut the matching dado grooves in the side members.
Now is also the time to prepare plywood panels for the cabinet back, recessed shelf base, shelf back, and the centre
divider. Although you're almost ready to assemble the box, first drill 5/16" dia. x 3/8"-deep holes on the inside faces of the
Copyright 2004 Martian Auctions
512
side panels and on both sides of the centre divider, to receive the adjustable-shelf-pin sleeves. Assemble the recessed
shelf, then attach the shelf, back panel, and centre divider to the box using #20 biscuits. The plans show how it all fits
together and where to plunge slots for the biscuit.
Dry-fit the base unit, then reassemble it with glue and clamps. Measure and equalize the diagonals to square the unit before
you set it aside to dry.
Next, use a tablesaw to prepare plywood panels for the doors and adjustable shelves, then cover all exposed plywood
edges on the base unit and the doors and shelves using the solid birch strips. The base unit rolls on lockable casters. Install
these now.
I borrowed a couple of tricks from the kitchen-counter trade to make the two plant shelves for this project. Begin by
preparing two 3/4" -thick plywood shelf panels and enough 3/4" x 1"-solid birch trim to wrap around the edges. Mark and cut
the edging to fit with mitred corners, then fasten it to the ply using glue and #20 biscuits.
The high-pressure plastic laminate comes next. I used my tablesaw spinning a standard
80-tooth carbide-tipped combination blade to cut the laminate panels to size for the top and
edges. To minimize chipping, make your cuts with the good side facing up and use a
feather board or pushstick to keep the material pressed flat against the saw table. Cut all
the laminate pieces you'll need for the shelf sides and tops, allowing about 1" of excess all
around.
I prefer LePage's Pres-Tite Green Professional Quality contact cement for securing
laminate. It cleans up with soap and water, and doesn't emit toxic fumes. Spread some on
the back of the laminate and corresponding shelf faces before setting the parts aside to
dry.
When the adhesive is no longer tacky, roll the laminate on to the substrate, keeping the
edges aligned as you work. When you're done, apply pressure to the entire surface with a
roller or the palm of your hand, working from the centre outwards, to consolidate the bond.
I used a hand-held router spinning a flush-trimming bit to remove the excess laminate from
the top of the shelves. Next, I installed laminate on the shelf edges before using a 45*
chamfering bit to reveal an angled face of solid wood around the perimeter.
The water-tight plastic plant trays are suspended from 13/4"-high risers attached to the top of
the shelves. Make the risers from 3/4"-thick solid birch, then use the bandsaw to cut a
decorative 5/8" -radius curve on the top corners. Sand, then install the risers using #8 x 2"
screws, driven up through the underside of the shelves.
I also added a spacer under the lower shelf to raise it up slightly from the top of the base unit.
Cut the four sides of the spacer frame from 3/4" solid birch, then assemble the parts using
#20 biscuits and glue to strengthen the mitred corners. When dry, centre the frame on the
bottom of the shelf and secure it with #10 x 11/4" screws. Countersink the heads so they don't
interfere with the shelf when installed.
Fasten the shelf to the top of the base unit with #8 x 13/4" screws driven up through the
underside of the cabinet top. Don't use glue. The shelf needs to come off later for finishing.
Cut the rail and spine stock you'll need from 3/4"-thick hardwood. To make these parts more
pleasing to the eye, trim the outside corners to a 45o angle and chamfer the edges to match the profile routed on the
shelves. Just leave the guide slots square.
With this done, attached the spines to the corresponding rails using glue and #8 x 11/4" screws. Pre-drill for the screws and
counterbore their heads so they can be covered with tapered plugs. Mitre the corners of the large spacers to a 45° angle to
match the profile on the ends of the rails. The corners of the small spacers are rounded over with sandpaper.
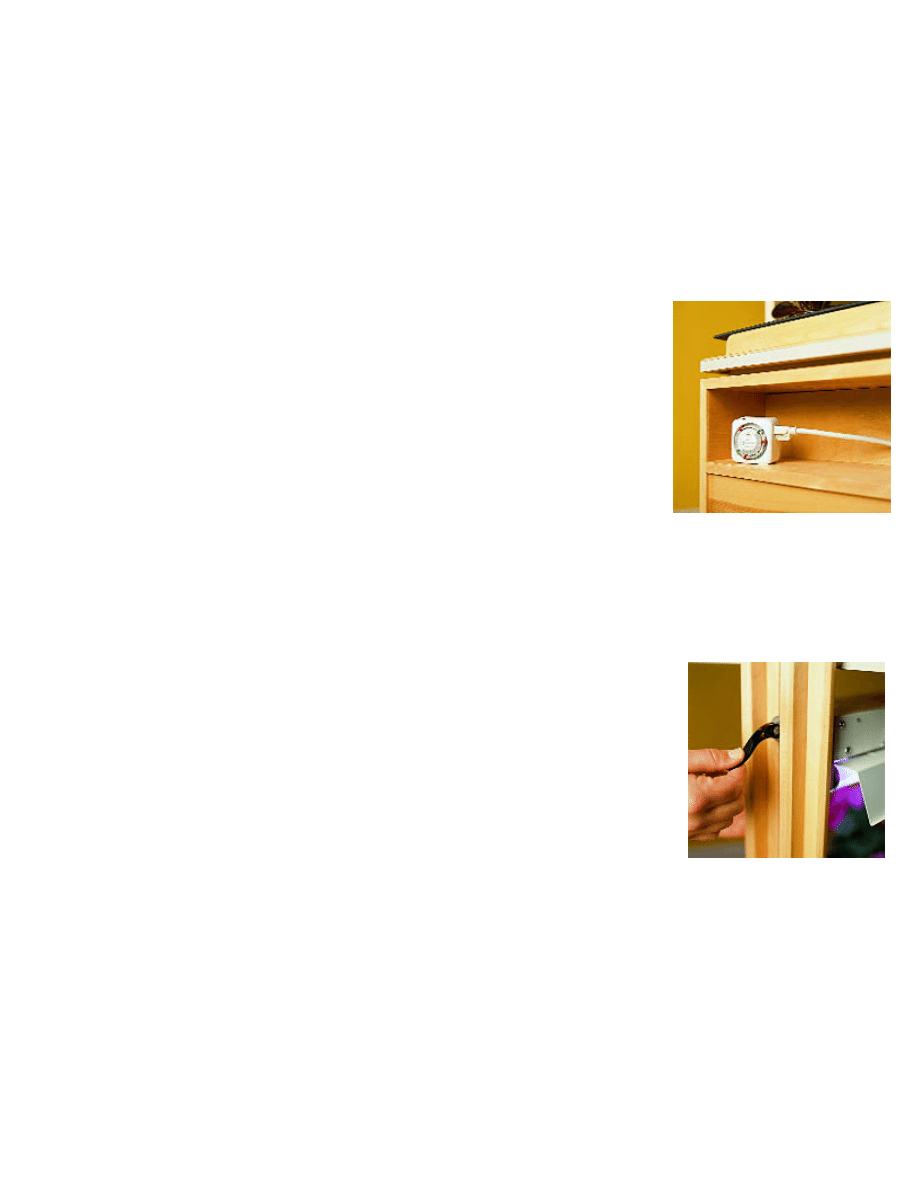
An electric timer saves effort and
makes lighting more consistent,
which is essential for optimum plant
growth.
Light intensity is controlled by
varying the lamp height. A
well-adjusted cam clamp
makes locking quick and
simple.
Copyright 2004 Martian Auctions
513
Next, attach the large spacers to the ends of the base unit with glue and #8 x 1" screws. But before you install the rails, take
time to cut temporary spacers to maintain a consistent slot gap while you work. The spacers should be a hair wider than
1/4", to allow the bolts that guide the fluorescent fixtures to travel freely in the slots as they slide up and down for
adjustment.
Attach the upright assemblies using glue and #8 x 13/4" screws, with nickel-plated cup washers under the heads. As you
install the upper shelf, it's a good idea to clamp a couple of temporary braces to the vertical rails. These will support the
shelf while you work. With the shelf and small spacers in position between the rails, drill pilot holes for #8 x 2" screws. Next,
remove the shelf and widen the pilot holes in the rails and spacers with a 3/16"-dia. bit. This prevents the narrow spacers
from splitting as the screws are driven home. With the shelf back in position, install screws (with cup washers under the
heads).
Let There Be Light
Home centres carry all sorts of 48" fluorescent light fixtures, but for this project the best choice is the type that comes
prewired with a grounded electrical cord.
Before you begin, notice how a system of spacer blocks and bolts are added to the ends of the fixtures to make a
connection with the vertical rails. Cut the spacer blocks from 1/2"-thick hardwood, then pair up each spacer with one of the
fixture end plates. Take the time to mark the spacers and end plates to keep track of the pairings. The holes you will drill
may not align if the pieces aren't returned to their original homes.
Use a drill press to bore a 1/4"-dia. hole through the centre of each end plate and
corresponding spacer to receive the bolt that connects the fixtures to the rail assemblies.
While you're at it, switch to a smaller bit and drill pilot holes for the screws that secure the
spacers to the end plates.
With holes drilled and bolts installed, secure the spacer blocks to the corresponding end
plates with #8 x 1/2" pan-head screws, inserted through the pilot holds you drilled earlier.
Reinstall the end plates on the fixtures.
At first it may appear that the 1/4" dia. x 21/2" bolts used to connect the fixtures to the rail
assemblies are too long. Don't be fooled. Tighten a pair of 1/4"-dia. nuts together on the
bolt, close to the head, to serve as adjustable spacers. The spacers are used to alter the thread
length that protrudes through the rail slots for the cam clamps. These clamps won't work
properly unless the bolts they thread onto are just the right length. Spin the nuts onto the bolts,
then add a fender washer to each before inserting the bolts through the fixture ends.
Tilt the light assemblies into place between the rails and engage the bolts in the rail slots. Add
a fender washer and cam clamp to the end of each bolt protruding through the rails. Check to
make sure the lights slide up and down without binding, then lock them in place by engaging the cam clamps.
Finishing Up
Remove the light assemblies and plant shelves before sanding the entire project up to the 220-grit level. I like the look of
natural birch, so I brushed on three coats of semi-gloss polyurethane, sanding with 600-grit paper between coats. Don't
forget about the chamfered edges on the plant shelves while you're finishing.
When everything's dry, reinstall the shelves and light assemblies with fluorescent tubes. Finish up by attaching the doors
with piano hinge, then add the shelf pin sleeves, magnetic door catches, and door pulls.
Any basic electrical timer works fine for controlling the lights. For safety, use only a GFI-protected (ground fault interrupter)
circuit to power this unit. Load up the base with supplies and tools and you're ready to get growing.
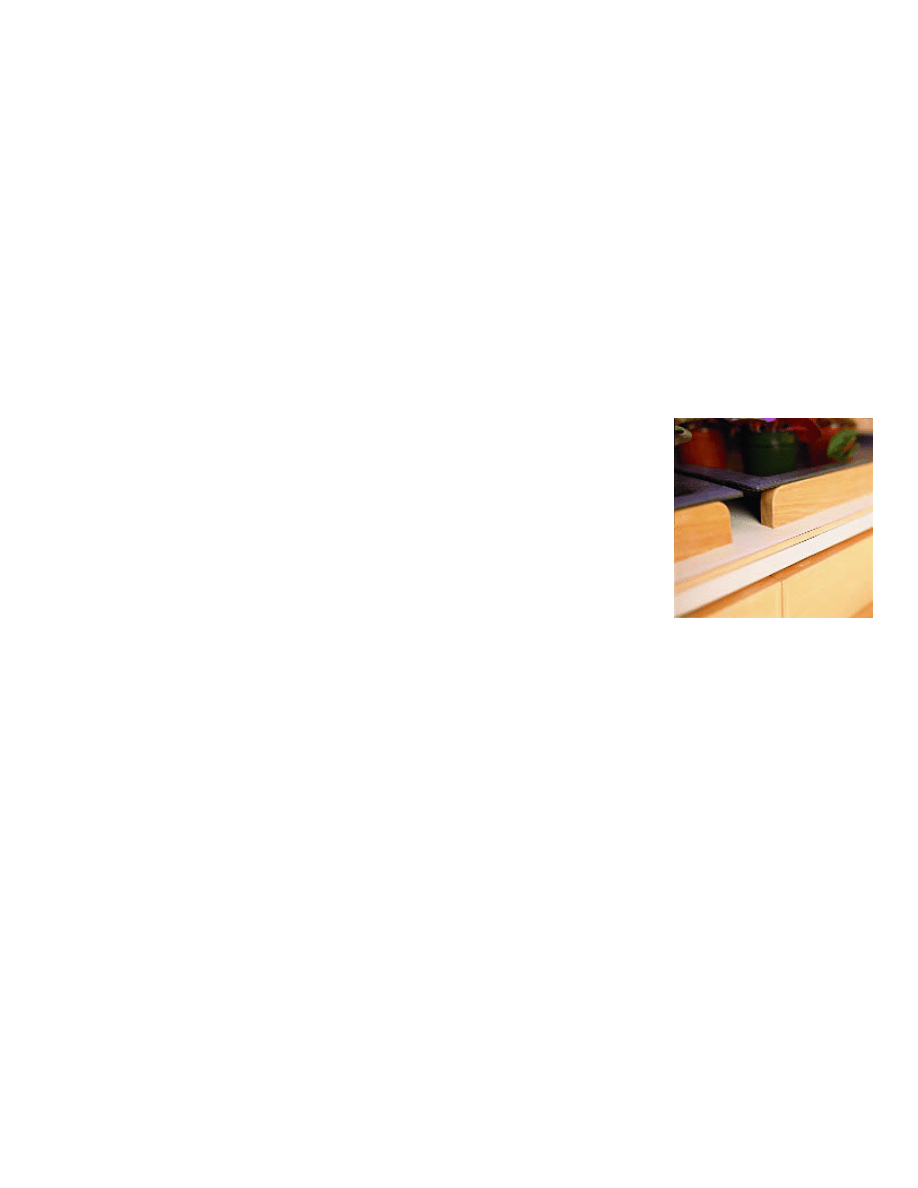
Locate the wooden risers to
match your plastic seedling
trays. The risers make it easier
to pick up the trays when
necessary.
Copyright 2004 Martian Auctions
514

You will need:
For the Base Unit
Material
Size
Quantity
Top and bottom
birch ply
3/4" x 20 3/4" x 47 1/4"
2
Sides
birch ply
3/4" x 19 1/2" x 20 3/4"
2
Centre divider
birch ply
3/4" x 18 1/2" x 20"
1
Recessed shelf base
birch ply
3/4" x 6 1/2" x 46 1/2"
1
Recessed shelf back
birch ply
3/4" x 5" x 46 1/2"
1
Back panel
birch ply
3/4" x 12 3/4" x 46 1/2"
1
Doors
birch ply
3/4" x 19 1/2" x 23 1/2"
2
Adjustable shelves
birch ply
3/4" x 19 3/4" x 22 1/4"
2
Edging
hardwood
1/4" x 3/4" x 70' *
1
For the Supports and Braces
Vertical rails
hardwood
3/4" x 2 1/2" x 66"
4
Vertical spines
hardwood
3/4" x 1" x 63"
4
Horizontal rail
hardwood
3/4" x 3" x 49"
1
Horizontal spine
hardwood
3/4" x 1" x 47"
1
Large spacers
hardwood
1/2" x 4 1/2" x 15"
2
Small spacers
hardwood
1/2" x 3/4" x 4 1/2"
2
Fixture spacers
hardwood
1/2" x 3 1/4" x 4 1/2"
4
For the Fixed Shelves
Shelf panels
birch ply
3/4" x 20 1/2" x 46 1/2"
2
Edging
hardwood
3/4" x 1" x 25'*
1
Shelf surface
plastic
laminate
24" x 48"
3
Shelf risers
hardwood
3/4" x 1 3/4" x 22"
8
Shelf spacer sides
hardwood
3/4" x 3" x 19"
2
Shelf spacer front and back hardwood
3/4" x 3" x 45"
2
Accessories and Hardware
Fluorescent fixtures
48"-long
2
Timer
1
Power Bar
1
Plant trays
LV#PK404
4
Door pull
trowel
LV#01W94.08
1
Door Pull
fork
LV#01W94.07
1
Magnetic catches
2
Casters
3" dia.
4
Bolts
1/4" dia. x 1"
4
Bolts
1/4" dia. x 2 1/2"
4
Nuts
1/4" dia.
12
Fender washers
1/4" dia.
8
Cam clamps
LV#05J51.01
4
Copyright 2004 Martian Auctions
515

Shelf pin sleeves
24
Shelf pins
8
Cup washers
nickel plated for #8 screws
24
Piano hinges
3/4"-wide x 20"
2
Piano hinge screws
#5 x 1/2"-long
approx.
100
Flathead screws
#8 x 2"
36
#8 x 1"
18
#8 x 1 3/4"
22
#8 x 1 1/4"
40
Pan head screws
#8 x 1/2"
8
#8 x 3/4"
16
*total length required
Copyright 2004 Martian Auctions
516
Wyszukiwarka
Podobne podstrony:
Key Rack
Herb Drying Rack
Growing Up North Exploring the Archaeology
growing pains
HP BladeSystem for growing businesses
Drying Rack
Popular Mechanics Replacing A Steering Rack
GROWING UP aniay
Clothes Rack
62 STEERING GEAR POWER RACK & PINION
Bathroom Towel Rack
Magazine Rack
wine rack
(Gardening) Growing Herbs At Home
Billiards Cue Rack and Scoreboard (Part 2)
Growing gourmet mushrooms from A to Z
eCourse Wine Rack FAQs
więcej podobnych podstron