
©Copyright 2004 European Integrated Systems, Ltd.
All rights reserved
WWW.EISKITS.COM
Installation instructions for
European Integrated Systems, Ltd.
BMW to Bluetooth® Wireless
Technology equipped Car-Kit
Interface
Vehicles covered in this document:
1997 – 2/2002 5 Series Sedans (including DSP
equipped)
Handsfree car-kit:
Sony Ericsson HCB-30
Version r1.3
©Copyright 2004 European Integrated Systems, Ltd.
All rights reserved
WWW.EISKITS.COM
Table of Contents
1. Introduction
2. BMW Microphone Installation
3. Harness
Installation
4. HCB-30
Bluetooth Module Installation
5. Configuration/Setup
6. Warranty/Disclaimer
Information
The Bluetooth word mark and logos are owned by the Bluetooth SIG,
Inc. and any use of such marks by European Integrated Systems, Ltd.
is under license. Other trademarks and trade names are those of their
respective owners.
©Copyright 2004 European Integrated Systems, Ltd.
All rights reserved
WWW.EISKITS.COM
Thank you for purchasing our BMW interface. This interface is
designed to partial integration of your BMW’s built in mobile
phone capabilities and your Bluetooth wireless technology
enabled mobile phone. Below is a list of components that you
should have received from us or have purchased separately.
We will then discuss the features and operation of your new
interface.
You will need the following components to complete the
installation:
• Interface
box
•
Wiring harness with multiple connectors (custom for your car)
•
Sony Ericsson HCB-30 or other phone kit
•
BMW Microphone (part number 84 31 8 380 338)
If you purchased your HCB-30 kit through us, the wiring
harness will be ready to go. If you purchased your own, you
will need to connect the four power wires to the harness.
Splice the four wires per the HCB-30 installation manual.
Splicing material not provided by EIS. This kit provides
integration of a Bluetooth wireless technology enabled phone
with the car’s stereo for radio mute and use of the built in BMW
cell phone speakers. The BMW microphone is also utilized.
The steering wheel buttons work for answering a call and
hanging up, as well as activating voice dial and volume control
during a call. The radio display indicates "PHONE" when a call
is in progress (on later model 5 series only). The phone can
be set to automatically connect with the car upon starting the
car (or pressing the unlock button on the key) and the interface
and BMW electronics stay active and connected to your phone
after you turn the car off to allow you to complete a call in
progress. We do not offer support for display of the calling
number on the radio, etc. at this point.
Everything is in the trunk and there are no wires to run. You
also have the advantage that if you are leasing your car you
can re-use the Sony Ericsson portion of the kit with another
brand if you go away from BMW.
©Copyright 2004 European Integrated Systems, Ltd.
All rights reserved
WWW.EISKITS.COM
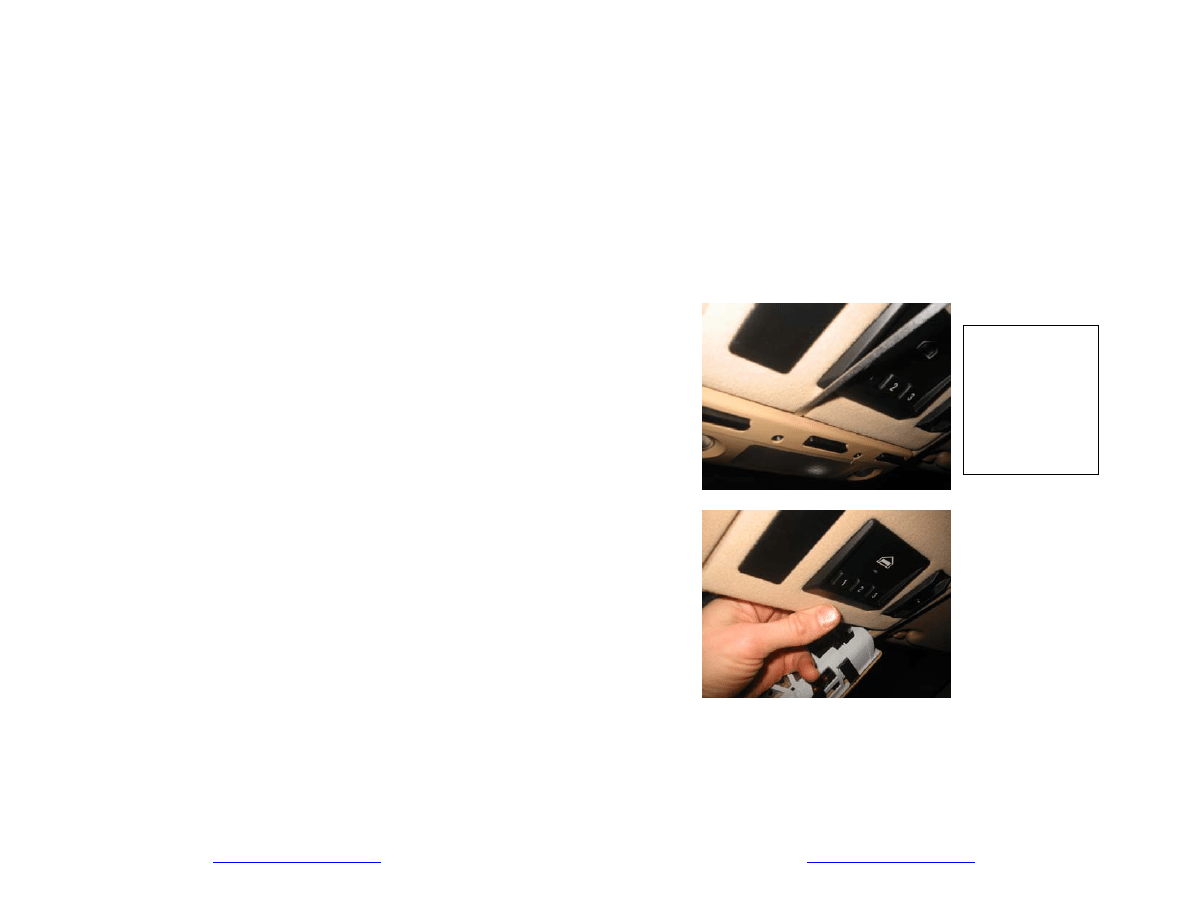
Section 2. Installation of the BMW
Microphone
Installation of the BMW microphone requires removal of the
overhead console cover so as to access the wiring for the mic.
Below are pictures of the steps for removal of the cover.
Gently pry apart
the overhead light
panel from the
back of the panel
using a small
screwdriver or
other suitable tool
(butter knife).
©Copyright 2004 European Integrated Systems, Ltd.
All rights reserved
WWW.EISKITS.COM
Using just finger
pressure, pull
down the cover
plate that has the
microphone grill
in it.
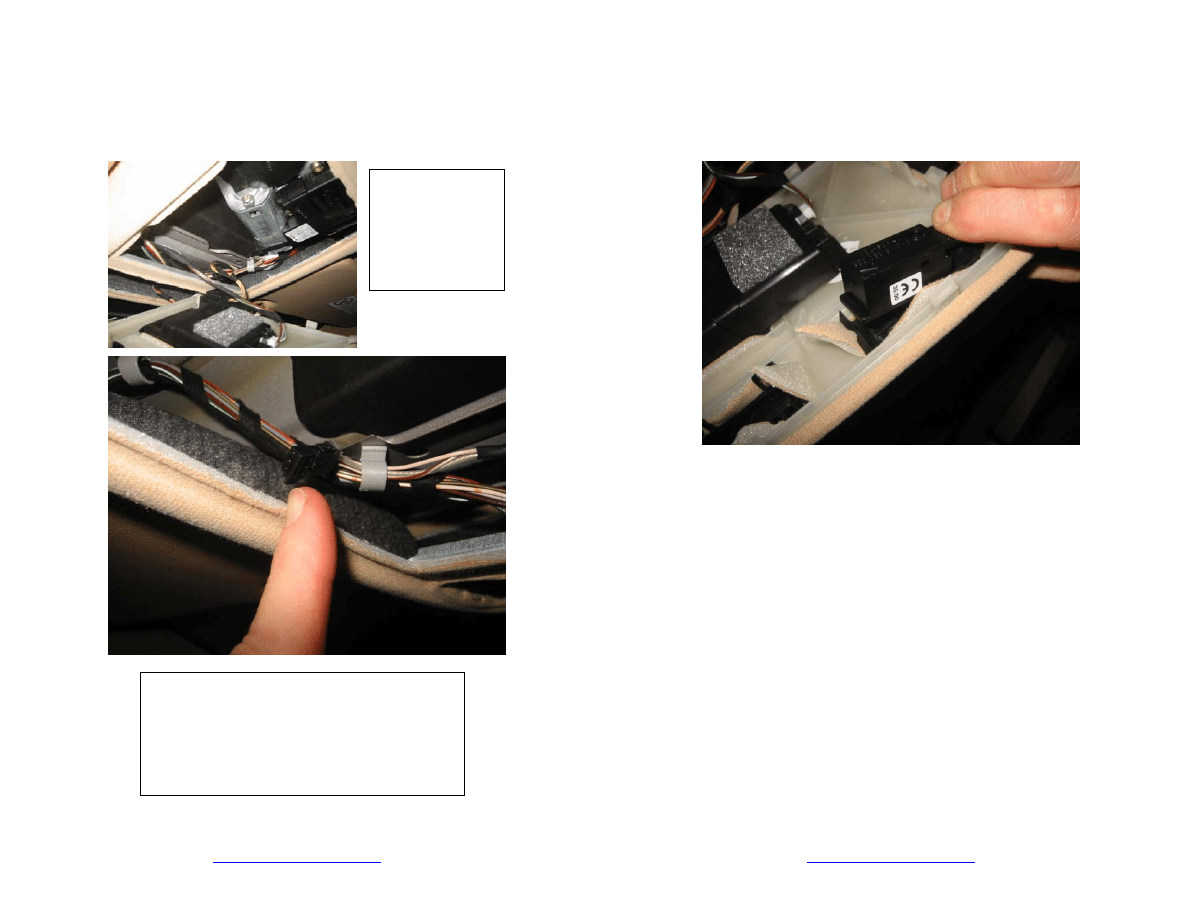
Locate the correct three conductor wire. It will
be a black connector and should have one wire
that in clear in color. Detach the wire from the
cable holders so that you have enough wire to
reach where the mic goes. Connect the
microphone.
©Copyright 2004 European Integrated Systems, Ltd.
All rights reserved
WWW.EISKITS.COM
Here is the mic as you are ready to press it into the grill. Note
that the arrow should point toward the front of the vehicle.
Reinstall the cover and light panel in the reverse
order of removal.
©Copyright 2004 European Integrated Systems, Ltd.
All rights reserved
WWW.EISKITS.COM
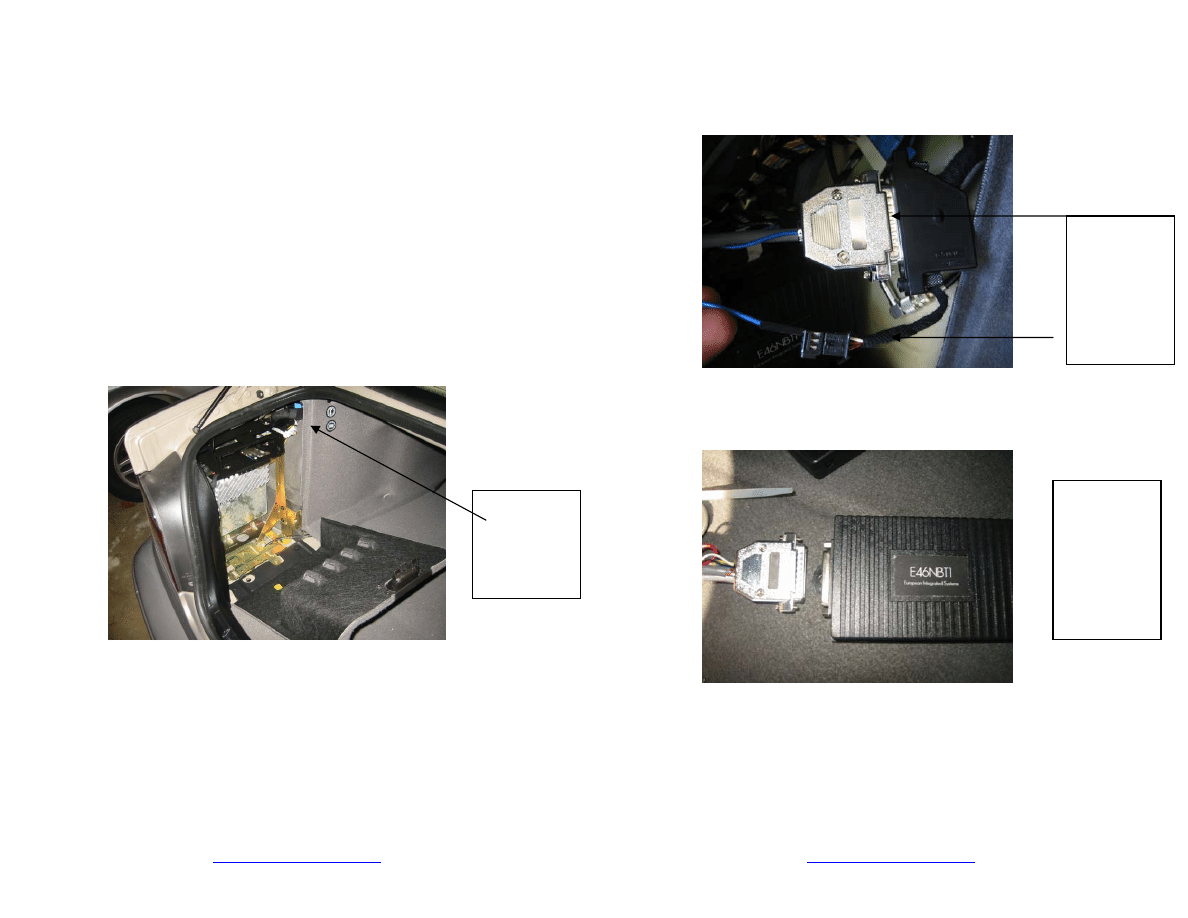
Section 3. Installation of the wiring harness
Lets get to the trunk and locate the cabling you will need to
have access to. On the left side of the trunk is a door that you
would use to change CDs in the CD changer. You may need a
small flathead screwdriver to remove the clips so as to pull
back the cover panel forward of the door to gain access to the
cabling (wrapped in black foam).
Drivers Side trunk – attach DB25 connector
Just pop open the door for access to the BMW CD changer to
install this. You may wish to add a tie wrap to ensure
permanent attachment.
Look for
harness(s) in
this area.
©Copyright 2004 European Integrated Systems, Ltd.
All rights reserved
WWW.EISKITS.COM
There is sometimes more than one 3 conductor cable – please
ensure that the color specified is in the connector – if not,
please contact us.
Connect
cable and
blue wire to
pin 3
(white/yel) of
3 conductor
cable.
Attach the
other 25 pin
connector to
the EIS
Interface Box
and
screw
down.
©Copyright 2004 European Integrated Systems, Ltd.
All rights reserved
WWW.EISKITS.COM
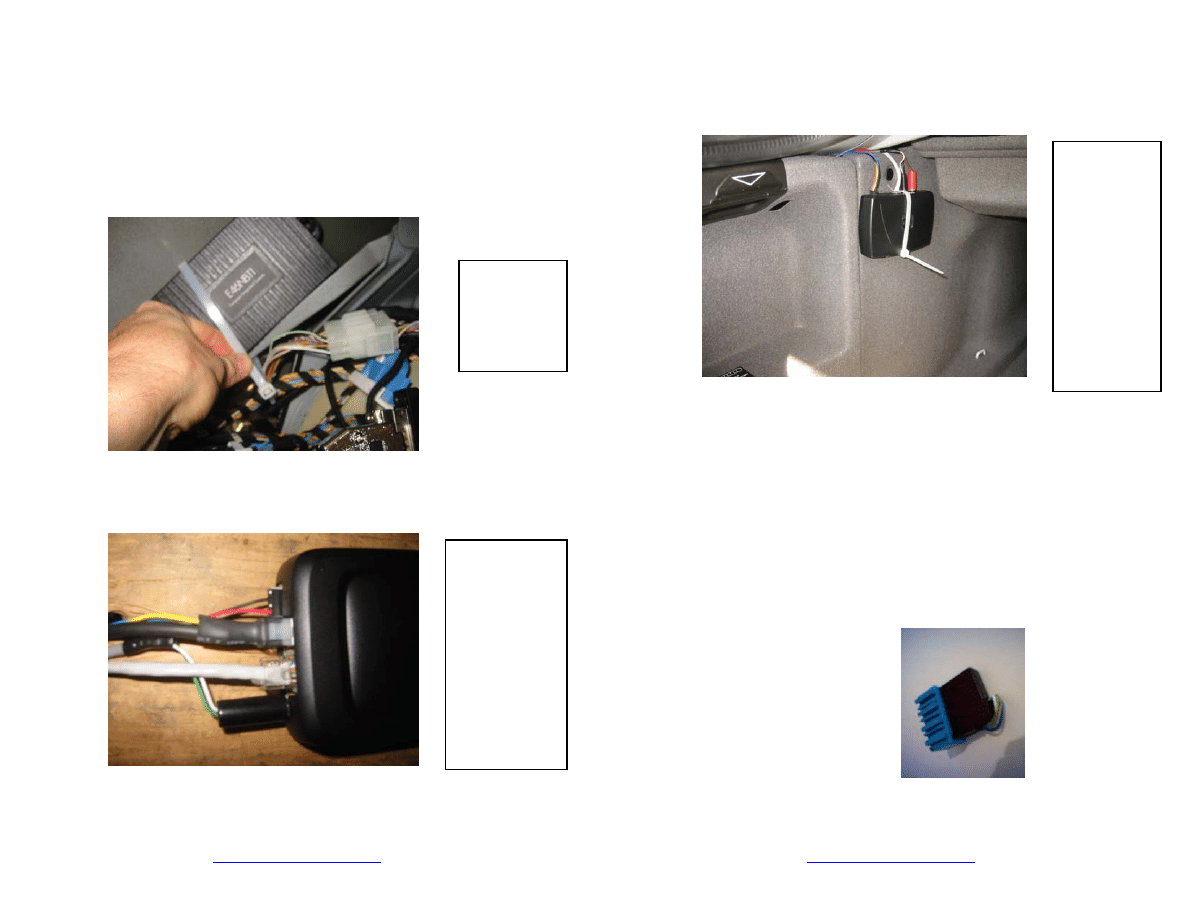
Section 4: Module installation
Secure EIS
Box
(locations are
at customers
discretion)
Attach Harness
to the HCB-30
module.
Note the
speaker wire
connection
positions. Red
is on pin 1
(closest to
center of
module).
©Copyright 2004 European Integrated Systems, Ltd.
All rights reserved
WWW.EISKITS.COM
Location of the HCB-30 (or other) BT module is at customers
discretion but it should be placed in a location that will aid in
the communication to the phone.
Clean up and cut tiewraps (not included) and you are ready to
test….
NOTE:
Please be aware that some E39 5 series cars were delivered
without what is called an “SES jumper plug.” This is a blue
plug that attaches to the blue connector in the same area as the
25 pin black connector you just found for using our interface.
This plug is necessary for your kit to function. It is BMW part
number: 84110018038 and it costs $8.00 to $16.00
It often looks like:
Example
location using
the holes in
the liner
where the
plastic info
buttons were.
There are
many
possible
locations that
will work.
Pictured is a
Nokia kit.

©Copyright 2004 European Integrated Systems, Ltd.
All rights reserved
WWW.EISKITS.COM
Section 5: Configuration and testing
PAIRING:
You have completed the hard part, now lets
check to make sure it all works and “pair” your phone to your
car.
1. First, get out the manual for your telephone – we can’t
begin to list all procedures for the plethora of
Bluetooth compatible phones out there.
2. You will need to enable BT (Bluetooth) on your
phone.
3. Get your phone on the page that encompasses
“pairing with a handsfree or headset device.”
4. Turn on the car’s ignition (it should have been off for
at least 5 minutes).
5. Push and hold the small “talk” (button symbol looks
like someone speaking) phone button on the steering
wheel. While holding the small button in, push and
release the big R/T button. Release the small “Talk”
phone button. You should hear a quick series of
beeps.
6. After about 5 seconds, the kit goes though another
sequence of beeps, then in about 10 more seconds,
"BTPAIRING" will be on the radio. NOTE: Radio
display is only applicable to late model 5 series cars.
7. Turn off your car ignition and do not operate anything
on the car for 5 minutes. I.e. do not open/close any
doors or door locks. Remember that the interface is
designed to stay active not only when the ignition is
on but when it senses any traffic on the car’s data
network. We want to ensure that the interface powers
down completely before we go to the next step.
8. Turn your ignition back on. Start the pairing
sequence on the phone. You should now have your
phone search for a new device. It will then prompt
you to enter a passcode to “pair.” The passcode for
the HCB-30 is 0000. You may need to do this more
than once for it to be accepted. You will then have to
connect to the found device (should be displayed in
the phone as “HCB-30”) from the phone the first time.
©Copyright 2004 European Integrated Systems, Ltd.
All rights reserved
WWW.EISKITS.COM
Sometimes this requires multiple attempts – depends
of phone model.
9. Once you have added the HCB-30 to your device list,
take the ignition key out and wait 5 minutes. If you
wish to pair more than one phone to the kit, please
see the notation at the end of this section.
10. Once this is complete, your phone and the car are
linked. The phone and the car will automatically
connect and you will be ready to place and receive
calls (automatic connection is dependent on the BT kit
you are using, the phone model, and the phone’s
settings – some require you to press the “Talk” button
to connect).
11. There are likely other options for your specific phone,
including the choice whether to “pair” automatically.
Review these and set them to your liking – it may take
a bit of trial and error to determine the best settings
for your needs.
Ok, now its time to try your phone via your steering wheel! If
you are familiar with the operation of the HCB-30, the easiest
thing to remember is that the small “talk” button simulates
pushing the top button on the HCB-30. This button is used for
answering calls, activating voice dial, connecting to a paired
phone, and on some phones hanging up a call. The R/T
button in most cases simulates the bottom button on the HCB-
30 and is used for hanging up the call with some phones.
Please refer to the manual that came with the HCB-30 for more
details.
Voice dial:
1. Push and hold the phone button until the beep and
a short mute on the radio. Release the phone button.
2. The kit mutes the radio again and makes another
beep. Say the voice tag to dial.
Assuming that you have some voice dial entries in your phone,
say them and your call should then begin. In some cases, your
radio may begin playing again until the call is answered (while
ringing). The other button would be used in this case to end
the call. Some phones permit the re-activation of voice
command or dial whilst in the middle of a call – this would be
useful for example if you have to place a call to your voicemail

©Copyright 2004 European Integrated Systems, Ltd.
All rights reserved
WWW.EISKITS.COM
at the office and then enter a string of numbers for your
password.
When a call comes in, press the small “talk” to pick up the call
and press it again or the R/T button to end the call (phone
dependent). You can also place a call from the phone keypad
as well. The choice to have the call automatically routed
through the car should be configurable in your phone.
Your steering wheel volume control buttons affect the volume
of the caller’s voice and the volume of the ringer. However,
you can only set the volume during a call (when the radio is
muted) – you will notice a beep once your reach the minimum
or maximum of the volume range. Please visit our website for
answers to some typical questions about voice dial, phone
placement, etc. There are a number of inherent factors and
variables in phone/BT compatibility, voice recognition ability,
audio quality, and RF interference for which we cannot be held
responsible; nor to which do we make any guarantee.
Additional PAIRING Notation:
Pairing your car and phone from the driver’s seat using the
steering wheel buttons is designed for pairing only one phone
to the car. Each time you follow this sequence you remove
any paired phones that have previously been set up. Should
you need to pair multiple phones to the car (i.e. one for you
and one for your spouse). You will need to follow the
directions in your HCB-30 manual. You will also need to use
the button set from the HCB-30 to do this. Simply unplug the
RJ-45 type connector and plug in the button. You can do
everything from the trunk and when you are done, replace the
RJ-45 connector and use the phones and car-kit as normal.
©Copyright 2004 European Integrated Systems, Ltd.
All rights reserved
WWW.EISKITS.COM
Section 6: Warranty Information
We stand behind every module we produce and we want you
to feel that you have made a sound decision to purchase from
us. We are grateful that you have taken one further step to
safer driving and encourage you to remember that your first
priority is always to driving your car, being attentive, and being
safe.
We warrant this product against defects in material and
workmanship as follows:
Your module is backed by our 90 day performance warranty –
this includes repair or replacement for failures resulting from
defects in manufacture. If, upon return of product, it is
determined to be defective, European Integrated Systems, Ltd.
(“EIS”) will repair or replace the Product at no charge during
the warranty period.
EIS will also provide free software upgrades if they become
available during your warranty period.
This warranty does not cover cosmetic damage or damage due
to improper installation, to acts of God, accident, misuse,
abuse, negligence, commercial use, or modification of, or to
any part of the Product.
We also provide you with the opportunity to return your kit
within 30 days if the product fails to do what we say it will do.
Refund of the purchase price less 5% restocking charge will be
refunded via the method of purchase.
We cannot be held responsible for failures resulting from
installation errors or modifications.
To the extent permitted by law, all warranties are waived, other
than the warranty stated above. The warranties of
merchantability and fitness for a particular purpose are waived
to the extent provided by law.

©Copyright 2004 European Integrated Systems, Ltd.
All rights reserved
WWW.EISKITS.COM
Product Disclaimer
Repair or replacement as provided under the warranty (above)
is the exclusive remedy of the consumer. EIS shall not be
liable for any incidental damage, including but not limited to
damage, real or perceived, to your vehicle due to installation
and use of this product, or consequential damages for breach
of any expressed or implied warranty on this product. Except to
the extent prohibited by applicable law. To the extent
permitted by law, all warranties are waived, other than the
warranty stated above. The warranties of merchantability and
fitness for a particular purpose are waived to the extent
provided by law.
We cannot guarantee that you will have perfect success in
voice dial recognition – this is a function of not only the BT
module but also the phone itself and the conditions
(background noise). Road and wind noise play a factor as
well.
Wyszukiwarka
Podobne podstrony:
Komputer pokładowy instalacja w BMW E39
bmw E39 E46 E53 nie dziala dmuchawa
TEST KONSOLI ZEGARA, BMW E39 PDFy
Lusterko wsteczne z kompasem do BMW E39
opis instalacji elm327 bluetooth
bmw E39 samoczynne dizalanie centralnego zamka
Akcesoria multimedialne do BMW E39(1)
bmw E39 brak mocy w modelach do 01 11 02
Złącze AUX w BMW E39(1)
BMW E39 Wymiana wężyków spryskiwaczy
bmw E39 E53 nie dziala dmuchawa
Zmieniarka CD w BMW E39
bmw E39 cieple powietrze na nogi z klimatyzacji
bmw E39 E46 E53 nie dziala dmuchawa
TEST KONSOLI ZEGARA, BMW E39 PDFy
więcej podobnych podstron