2005 ACCESSORIES & EQUIPMENT
Front Seat - RAV4
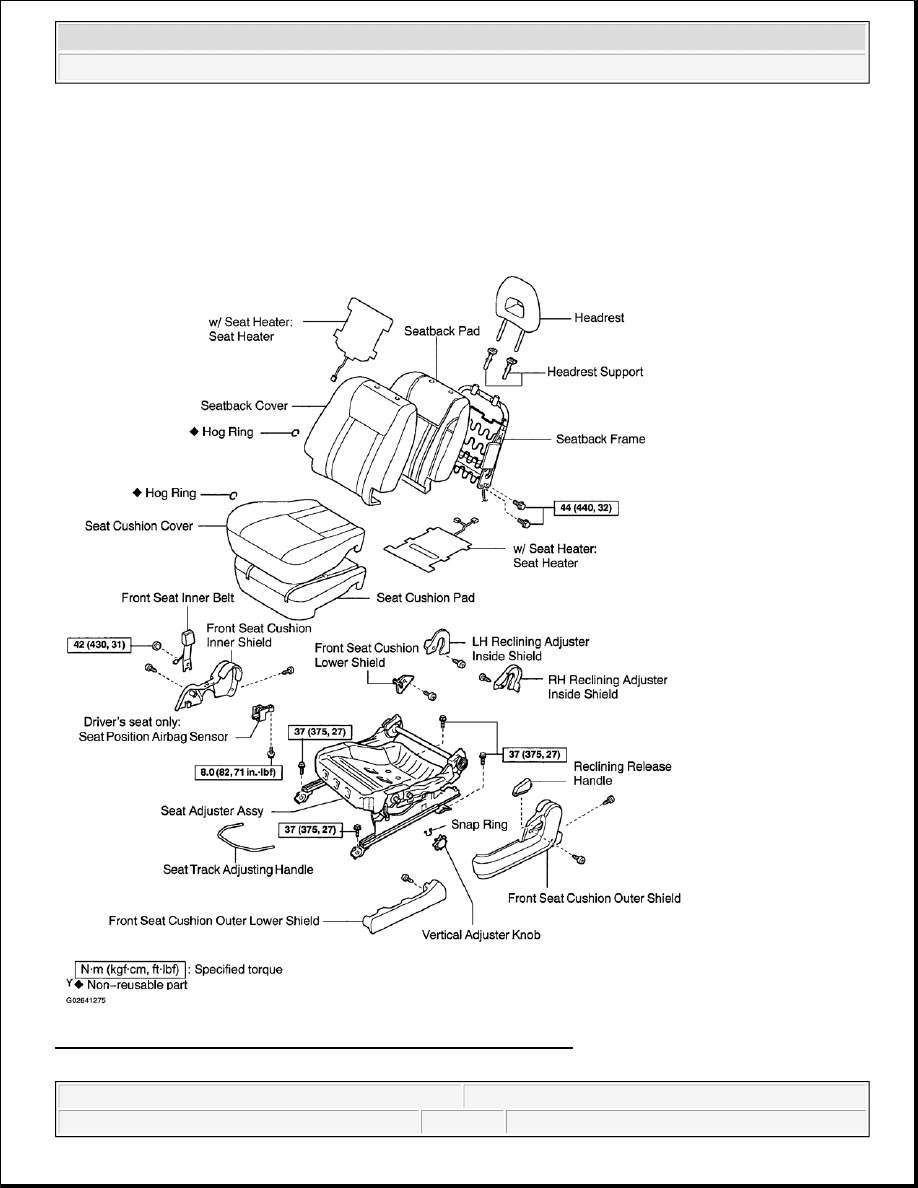
COMPONENTS
Fig. 1: Identifying Front Seat Components & Torque Specifications
Courtesy of TOYOTA MOTOR SALES, U.S.A., INC.
2005 Toyota RAV4
2005 ACCESSORIES & EQUIPMENT Front Seat - RAV4
2005 Toyota RAV4
2005 ACCESSORIES & EQUIPMENT Front Seat - RAV4
Microsoft
Tuesday, July 21, 2009 10:41:02 AM
Page 1
© 2005 Mitchell Repair Information Company, LLC.
Microsoft
Tuesday, July 21, 2009 10:41:06 AM
Page 1
© 2005 Mitchell Repair Information Company, LLC.

FRONT SEAT ASSEMBLY
REMOVAL
HINT:
A bolt without a torque specification is shown in the standard bolt chart (see SPECIFIED TORQUE FOR
STANDARD BOLTS ).
Remove the 4 bolts and front seat.
DISASSEMBLY
1. REMOVE HEADREST
2. REMOVE VERTICAL ADJUSTER KNOB
Using a screwdriver, pry out the snap ring and remove vertical adjuster knob.
HINT:
Tape the screwdriver tip before use.
3. REMOVE RECLINING ADJUSTER RELEASE HANDLE
Using a screwdriver, pry out the release handle.
HINT:
Tape the screwdriver tip before use.
4. REMOVE FRONT SEAT CUSHION OUTER SHIELD
Remove the 3 screws, cushion outer shield and cushion outer lower shield.
CAUTION:
Wear safety gloves, because the cutting surface of the seatback
frame and seat adjuster may injure your hand.
Work must be started at least 90 seconds after the ignition switch is
turned to the LOCK position and the negative (-) terminal cable is
disconnected from the battery.
(The SRS is equipped with a back-up power source. If work is started
within 90 seconds after disconnecting the negative (-) terminal cable
of the battery, the SRS may deploy.)
NOTE:
Be careful not to damage the body.
2005 Toyota RAV4
2005 ACCESSORIES & EQUIPMENT Front Seat - RAV4
Microsoft
Tuesday, July 21, 2009 10:41:02 AM
Page 2
© 2005 Mitchell Repair Information Company, LLC.
Fig. 2: Removing Front Seat Cushion Outer Shield
Courtesy of TOYOTA MOTOR SALES, U.S.A., INC.
5. REMOVE FRONT SEAT CUSHION INNER SHIELD
Remove the 2 screws and cushion inner shield.
6. REMOVE FRONT SEAT INNER BELT
Remove the bolt and inner belt.
7. REMOVE SEATBACK ASSEMBLY
a. Remove the hog rings.
b. Turn over the seatback cover.
c. Remove the 4 bolts and the seatback assembly.
d. w/ Seat heater: Disconnect the connector.
2005 Toyota RAV4
2005 ACCESSORIES & EQUIPMENT Front Seat - RAV4
Microsoft
Tuesday, July 21, 2009 10:41:02 AM
Page 3
© 2005 Mitchell Repair Information Company, LLC.

Fig. 3: Removing Front Seat Cushion Inner Shield
Courtesy of TOYOTA MOTOR SALES, U.S.A., INC.
8. REMOVE SEATBACK COVER
a. Remove the headrest supports.
b. w/ Side airbag:
Using a screwdriver, pry out the bracket as shown.
c. Remove the seatback cover with pad from the seatback frame.
d. Remove the hog rings, then remove the seatback cover.
NOTE:
Be careful not to damage the airbag.
2005 Toyota RAV4
2005 ACCESSORIES & EQUIPMENT Front Seat - RAV4
Microsoft
Tuesday, July 21, 2009 10:41:02 AM
Page 4
© 2005 Mitchell Repair Information Company, LLC.

Fig. 4: Removing Seatback Cover
Courtesy of TOYOTA MOTOR SALES, U.S.A., INC.
9. REMOVE SEAT CUSHION COVER
a. w/ Seat heater:
Remove the clip from the adjuster assy.
b. Remove the hog rings, then remove the cushion cover with pad from the adjuster assy.
c. Remove the hog rings, then remove the cushion cover from the pad.
10. REMOVE RH RECLINING ADJUSTER INSIDE SHIELD
Remove the screw and adjuster inside shield.
11. REMOVE LH RECLINING ADJUSTER INSIDE SHIELD
Remove the screw and adjuster inside shield.
12. REMOVE SEAT TRACK ADJUSTING HANDLE
13. REMOVE FRONT SEAT CUSHION LOWER SHIELD
2005 Toyota RAV4
2005 ACCESSORIES & EQUIPMENT Front Seat - RAV4
Microsoft
Tuesday, July 21, 2009 10:41:02 AM
Page 5
© 2005 Mitchell Repair Information Company, LLC.

14. Driver's seat only: REMOVE SEAT POSITION AIRBAG SENSOR
Remove the bolt and airbag sensor.
INSPECTION
INSPECT RECLINING LOCK POSITION AND SLIDING LOCK POSITION SLIPPING OFF
a. When reclining the seat, inspect that the outer and inner reclining are released at the same time.
HINT:
When the reclining lock positions slip off, disassemble the seat to adjust the positions.
b. When sliding the seat, inspect that the outer and inner tracks are locked at the same time.
HINT:
When sliding lock positions slip off, and adjust the positions.
REASSEMBLY
1. Driver's seat only: INSTALL SEAT POSITION AIRBAG SENSOR
Install the airbag sensor with a new bolt.
Torque: 8.0 N.m (82 kgf.cm, 71 in.lbf)
2. INSTALL FRONT SEAT CUSHION LOWER SHIELD
3. INSTALL SEAT TRACK ADJUSTING HANDLE
4. INSTALL RH RECLINING ADJUSTER INSIDE SHIELD
Install the adjuster inside shield with the screw.
5. INSTALL LH RECLINING ADJUSTER INSIDE SHIELD
Install the adjuster inside shield with the screw.
6. INSTALL SEAT CUSHION COVER
a. Install the cushion cover to the cushion pad with new hog rings.
b. Install the cushion cover with pad to the adjuster assy with new hog rings.
HINT:
When installing the hog rings, take care to prevent wrinkles as little as possible.
2005 Toyota RAV4
2005 ACCESSORIES & EQUIPMENT Front Seat - RAV4
Microsoft
Tuesday, July 21, 2009 10:41:02 AM
Page 6
© 2005 Mitchell Repair Information Company, LLC.

c. w/ Seat heater:
Install the clip to the adjuster assy.
7. INSTALL SEATBACK COVER
a. Install the seatback cover to the seatback pad with new hog rings.
b. Install the seatback cover with pad to the seatback frame.
HINT:
When installing hog rings, take care to prevent wrinkles as little as possible.
c. w/ Side airbag:
Install the bracket to the seatback frame.
d. Install the headrest supports.
8. INSTALL SEATBACK ASSEMBLY
a. w/ Seat heater:
Connect the connector.
b. Install the seatback assembly and tighten the 4 bolts temporarily, starting from the front side bolt on
the outer side tighten them completely.
Torque: 44 N.m (440 kgf.cm, 32 ft.lbf)
c. Install the seatback assembly to the seat adjusters assy with new hog rings.
HINT:
When installing hog rings, take care to prevent wrinkles as little as possible.
9. INSTALL FRONT SEAT INNER BELT
Install the inner belt with the bolt.
Torque: 42 N.m (430 kgf.cm, 31 ft.lbf)
10. INSTALL FRONT SEAT CUSHION INNER SHIELD
Install the cushion inner shield with the 2 screws.
2005 Toyota RAV4
2005 ACCESSORIES & EQUIPMENT Front Seat - RAV4
Microsoft
Tuesday, July 21, 2009 10:41:02 AM
Page 7
© 2005 Mitchell Repair Information Company, LLC.
Fig. 5: Installing Front Seat Cushion Inner Shield
Courtesy of TOYOTA MOTOR SALES, U.S.A., INC.
11. INSTALL FRONT SEAT CUSHION OUTER SHIELD
Install the cushion outer shield and Install the cushion outer lower shield with the 3 screws.
12. INSTALL RECLINING ADJUSTER RELEASE HANDLE
13. INSTALL VERTICAL ADJUSTER KNOB
14. INSTALL HEADREST
2005 Toyota RAV4
2005 ACCESSORIES & EQUIPMENT Front Seat - RAV4
Microsoft
Tuesday, July 21, 2009 10:41:02 AM
Page 8
© 2005 Mitchell Repair Information Company, LLC.
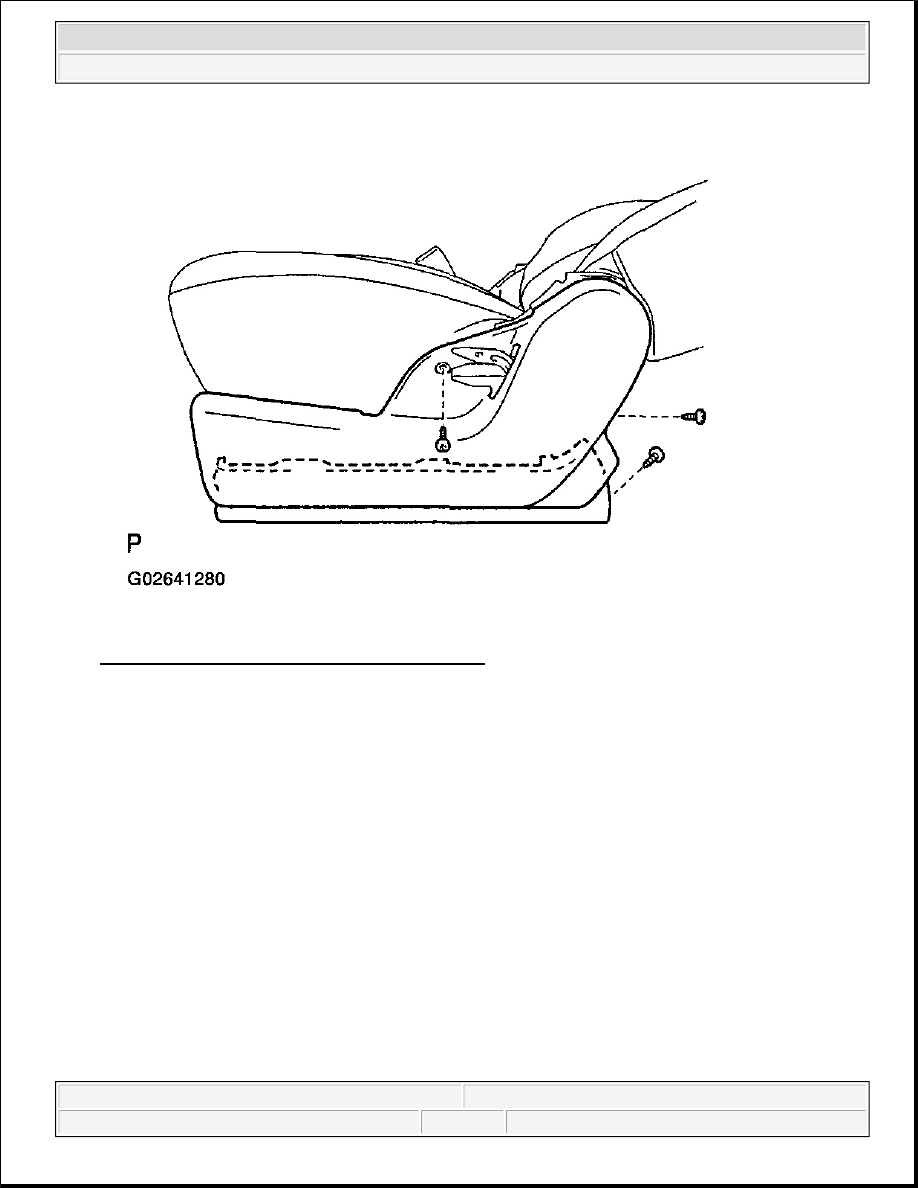
Fig. 6: Installing Front Seat Cushion Outer Shield
Courtesy of TOYOTA MOTOR SALES, U.S.A., INC.
INSTALLATION
a. Slide the front seat to the frontmost position.
b. Without holding the seat track adjusting handle, mount the seat to the vehicle.
HINT:
If holding the seat track adjusting handle, the adjusted frontmost position will slip off.
c. Tighten the bolts on the rear side temporarily, tighten them completely starting from the bolt on the inner
side.
Torque: 37 N.m (375 kgf.cm, 27 ft.lbf)
d. Slide the seat to the rearmost position to install the bolts on the front side.
NOTE:
Make sure that seat adjuster locks.
2005 Toyota RAV4
2005 ACCESSORIES & EQUIPMENT Front Seat - RAV4
Microsoft
Tuesday, July 21, 2009 10:41:02 AM
Page 9
© 2005 Mitchell Repair Information Company, LLC.

Torque: 37 N.m (375 kgf.cm, 27 ft.lbf)
2005 Toyota RAV4
2005 ACCESSORIES & EQUIPMENT Front Seat - RAV4
Microsoft
Tuesday, July 21, 2009 10:41:02 AM
Page 10
© 2005 Mitchell Repair Information Company, LLC.
Wyszukiwarka
Podobne podstrony:
power seats front
M39h Seats
ARTICLE SUSPENSION STRUT FRONT REPLACE INSTALL
front matter 004
26 Front Suspension
Front vowels handout
pcb front
ARTICLE SUSPENSION STRUT FRONT DISASSEMBLE REASSEMBLE
72 Seats
Osprey PL WB II WS 002 Dania i Norwegia 1940 Front Skandynawski
FRONT SUSPENSION
Wire?M V20 front page
Testy do Friszke i najważniejsze informacje do sesji, HIST, FRONT MORGES- porozumienie działaczy pol
Front End Replacing Tie Rod Ends
Front End Alignment Basics
11 drive shaft and front axle
M 5519 Dress with gathered front
Do badania Front Focusa Back Focusa
więcej podobnych podstron