Techniques for Studying
Bacteria and Fungi
World-Class Support for Science & Math

Techniques for Studying
Bacteria and Fungi
1. Introduction . . . . . . . . . . . . . . . . . . . . . . . . . . . . . . . . . . . . . . . . . .3
2. General Techniques . . . . . . . . . . . . . . . . . . . . . . . . . . . . . . . . . . . .3
Aseptic Technique
Equipment and Work Area
Media Preparation
Sterilization Procedures
Transferring Tube Cultures
Transferring Plate Cultures
Care of Cultures
Cleanup and Disposal
3. Specific Techniques: Bacteria . . . . . . . . . . . . . . . . . . . . . . . . . . .11
Morphology
Staining
Biochemical Properties
Separation of Unknowns
Laboratory Activities
4. Specific Techniques: Fungi . . . . . . . . . . . . . . . . . . . . . . . . . . . . .18
Division I. Gymnomycota
Division II. Mastigomycota
(Chytridiomycetes, Oomycetes)
Division III. Amastigomycota
(Zygomycetes, Ascomycetes, Basidiomycetes, Deuteromycetes)
5. General Media and Special Media . . . . . . . . . . . . . . . . . . . . . . .27
Further Reading . . . . . . . . . . . . . . . . . . . . . . . . . . . . . . . . . . . . . . . .31
Juliana T. Hauser
Microbiology Department
Carolina Biological Supply Company
©2006 Carolina Biological Supply Company
Printed in USA

3
1. Introduction
If the human eye could resolve images as well as the light microscope, we
would see bacteria and fungi virtually everywhere. They grow in air, water,
foods, and soil, as well as in plant and animal tissue. Any environment that
can support life has its bacterial or fungal population.
Bacteria and fungi affect man in various ways. Some cause human diseases
such as typhoid fever, syphilis, athlete’s foot, tuberculosis, and leprosy, while
others cause plant diseases such as Dutch elm disease, corn smut, late blight
of potatoes, soft rots of vegetables, and crown gall, which is characterized by
tumor formation. Most microorganisms do man little or no harm, however,
and many are vital to our well-being and continued existence on earth.
Bacteria and fungi are involved in the recycling of matter, purification of
sewage, and filtration of water in the soil. They are essential to the
production of cheeses, sauerkraut, pickles, alcoholic beverages, and breads.
Biotechnology firms use microorganisms to produce antibiotics, amino acids,
interferons, enzymes, and human growth hormones.
Bacteria and fungi are convenient organisms for research in genetics,
physiology, cytology, and biochemistry because they grow rapidly, are easy
to manipulate, and require only minimal laboratory space compared to mice
or guinea pigs. As prokaryotes, bacteria have the advantage of being
relatively simple organisms. On the other hand, fungi, which are eukaryotes
and thus much more complex genetically, grow so quickly that a number of
generations can be obtained in only a short period of time.
2. General Techniques
Aseptic Technique
In most microbiological procedures, it is necessary to protect instruments,
containers, media, and stock cultures from contamination by microorganisms
constantly present in the environment. Aseptic technique involves the
sterilization of tools, glassware, and media before use as well as measures to
prevent subsequent contamination by contact with nonsterile objects.
Equipment and Work Area
To culture bacteria or fungi, you need the following materials:
1. Disinfectant solution such as 70% ethanol, 4% household bleach solution,
or Lysol
®
.
2. Alcohol or gas (Bunsen) burner.
3. Inoculating loop for bacteria, yeasts, and fungi with abundant spores;
scalpel or half-spearpoint needle for other fungi.

4
4. Stock culture (the original culture from which other cultures will be
started).
5. Sterile medium in petri dishes or culture tubes.
6. Soap for washing hands.
7. Lab coat or old, clean shirt, especially while you are staining cultures.
Before working with bacterial or fungal cultures, always wash your hands
with soap and water. Next, prepare a work area. Select an area that is as free
from drafts as possible. Turn off the air-conditioner and fans, and close all
windows and doors. Wipe the work area with 70% ethanol or a similar
disinfectant solution. Arrange your materials conveniently on the clean work
surface. Do not smoke, eat, or drink while working with cultures.
Media Preparation
The first step in media preparation is to assemble the equipment and
ingredients. You will need a balance, spatula, weighing paper, 1-L graduated
cylinder, glass stirring rod, a large flask or beaker, and culture tubes or petri
dishes. You can either use a recipe to prepare a particular medium from
scratch or purchase any of the commercially available dehydrated media. The
media most commonly used are nutrient agar (bacteria), potato dextrose agar
(fungi), and Sabouraud dextrose agar (fungi). Recipes for a number of special
media can be found in Chapter 5.
After assembling the equipment and ingredients, weigh the dry ingredients
accurately. Place a sheet of weighing paper on the pan to protect the balance
and to facilitate transferring the material into a flask. Using the weighing
paper as a funnel, pour the dry ingredients into a large flask or beaker. Add
the proper amount of distilled water and swirl the flask to dissolve the dry
material. Agar-containing media must be heated slowly, just to boiling, to
dissolve the agar. Gently agitate the medium during the heating process by
either stirring or shaking the flask. Watch the flask carefully: agar burns easily
and boils over quickly.
Pour the liquid agar or broth into bottles or culture tubes and cap them
loosely. Autoclave the medium in the bottles or culture tubes to sterilize it. If
the medium is to be used to pour dishes, autoclave it in the plugged flask in
which it was mixed. When sterilization is complete, lay the tubes on a slant
tray. Tighten the tops for storage only after the agar solidifies.
If plates are to be poured, disinfect the work area and stop all air drafts. Let
the flask cool until it is easy to handle (20 to 40 minutes). Lay out sterile petri
dishes and light a Bunsen burner. Remove the stopper from the flask and
flame the mouth. Lift the cover of the dish at just enough of an angle to pour
in the medium. Pour the agar slowly to avoid bubble formation; if bubbles do
form, pass the burner flame quickly over the surface of the agar several

5
times, which should cause the bubbles to burst. Pour enough agar to fill the
dish about one-half full, replace the cover, and allow the dish to stand
undisturbed until the agar solidifies.
Sterilization Procedures
Many microorganisms produce highly resistant spores that remain viable
even after exposure to dry heat or boiling water for several hours. Steam
under pressure is used to increase the temperature enough to kill any con-
taminating microorganisms. Steam penetrates wrappings and loosely capped
articles, sterilizing the contents. The home pressure cooker works on this
principle. An autoclave is, in essence, a large, self-contained pressure cooker
that goes through the heating, sterilizing, and cooling cycles automatically.
If an autoclave is not available, you can use a large pressure cooker on a
stove as long as you follow a few rules:
1. Read the directions for your brand of cooker and follow them carefully.
2. Make sure there is sufficient water in the cooker.
3. Don’t start timing until 15 pounds per square inch (psi) have been
reached.
4. At the end of 15 minutes, allow the pressure cooker to cool slowly.
Media should be sterilized for 15 minutes at a temperature of 121°C and a
pressure of 15 psi. Glassware and contaminated articles like old stock
cultures should be autoclaved for 30 minutes at 121°C and 15 psi.
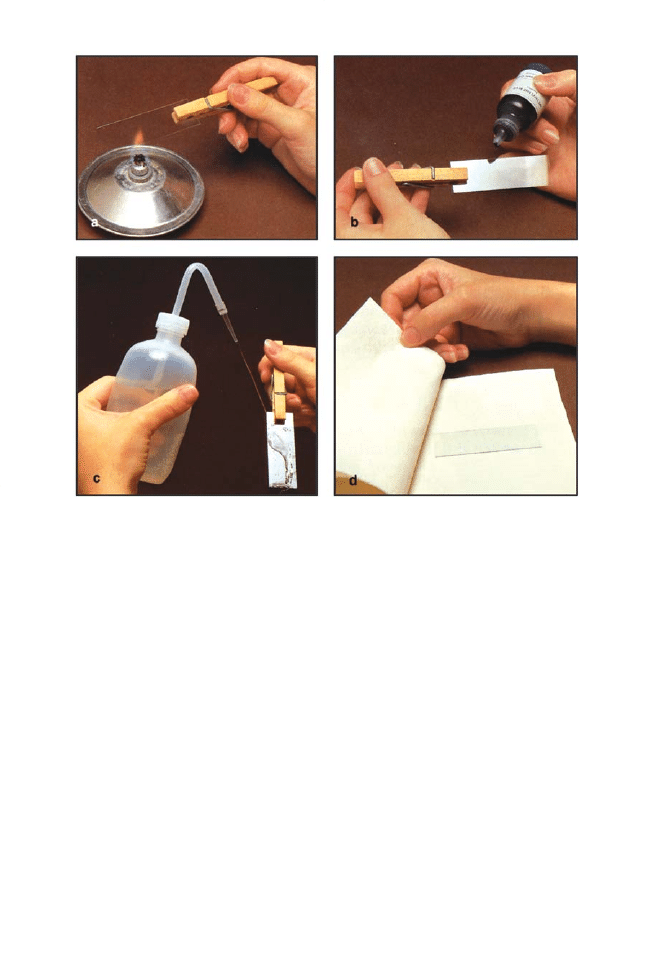
Transferring Tube Cultures
Slants
After wiping the work area with a disinfectant and washing your hands with
soap and water, light the alcohol or gas burner. Hold the stock culture tube
and a sterile agar slant tube in the palm of one hand (Fig. 1a). Pick up the
inoculating loop with the other hand, grasping it a little farther back than you
would a pencil. Hold the wire in the flame until it glows red (Fig. 1b). Pass the
lower end of the handle through the flame several times. Any part of the wire
or holder that will be inserted into the tube
must be flamed.
Remove the caps or cotton plugs from the stock tube and the sterile tube with
the “loop” hand (Fig. 1c).
Do not lay the loop or caps down or allow them to
touch anything. Sterilize the mouths of the tubes by passing them through
the flame several times (Fig. 1d). Insert the inoculating loop into the stock
culture tube. Touch the loop to the top of the slant to cool it. Pick up a small
quantity of bacteria, yeast, or fungal spores from the stock culture tube with
the loop (Fig. 1e). Remove the loop from the culture tube, being careful not to
touch the sides, and insert it into the sterile tube. Streak the loop back and
forth from the bottom to the top of the slant (Fig. 1f).
6
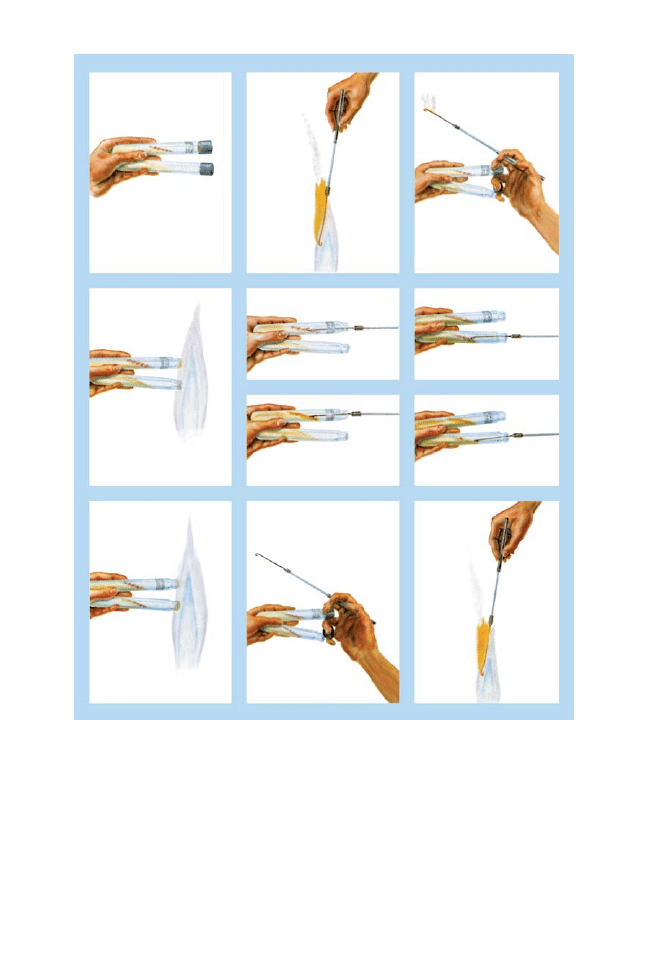
Figure 1. Transferring slant tube cultures of bacteria and fungi. (a) Hold the stock
culture tube and the sterile agar slant tube in the palm of one hand. (b) Sterilize the
inoculating loop by flaming it. (c) Remove the cap from each tube and (d) flame the
mouths of the tubes. (e) Pick up a small quantity of bacteria, yeast, or fungal spores
from the stock culture tube. (f) Insert the loop of bacteria into the sterile tube and
streak back and forth from the bottom to the top of the slant. (g) For other fungi, use
a half-spearpoint needle to remove the block of agar containing mycelium or fruiting
cultures. (h) Place the block of agar into the sterile tube face down near the bottom
of the slant. (i) Withdraw the loop or needle and flame the mouths of the tubes.
(j) Replace the caps and (k) flame the loop or needle.
a
b
c
f
h
e
g
d
i
j
k

7
Withdraw the loop and flame the mouths of the tubes (Fig. 1i). Replace the
caps or cotton plugs (Fig. 1j) and flame the loop until it glows red (Fig. 1k).
Place the loop in a holder or lay it on the workbench. Label the new tube with
your name, the name of the organism, the medium used, the incubation
temperature, and the date.
When transferring other fungi, use the half-spearpoint needle or bent
inoculating needle to cut a small block of agar containing mycelium or
fruiting structures (Fig. 1g). Remove the needle with its block of agar, being
careful not to touch the sides of the tube with the agar block. Insert the agar
block of fungi into the sterile tube, placing the agar piece face down near the
bottom of the slant (Fig. 1h). Flame the mouths of the tubes. Replace the caps
or plugs. Flame the loop and label the inoculated tube as described above.
Broth Cultures
Never pipet microorganisms by mouth. Use a pipet with a rubber bulb or a
pipetting device such as a Pi-Pump
®
.
Light the burner. Hold the stock tube securely between the thumb and
forefinger of one hand and agitate it by gently tapping or stroking the end of
the tube with the other hand. Hold the tube of sterile medium in the same
hand as the stock tube. Remove the caps but
do not lay them down. Flame
the mouths of the tubes. Draw about 0.1 mL of the microorganism-containing
suspension into the pipet. Insert the end of the pipet into the sterile tube and
release the contents into the broth. Remove the pipet from the tube, flame
the mouths of both tubes, and replace the caps. Gently agitate the inoculated
tube and label it. Place plastic pipets in autoclavable bags; sterilize reusable
glass pipets in a disinfectant solution.
A broth culture may also be transferred with a loop. In order to inoculate with
enough of the stock culture, several loopfuls of stock suspension should be
transferred to the tube of sterile medium.
Transferring Plate Cultures
Concentrated Growth
Clean all work surfaces with a disinfectant solution. It is
essential to reduce
airflow as much as possible during the transfer of plates to avoid con-
tamination.
To transfer bacteria, yeasts, or fungi with abundant spores, place the stock
tube in the palm of one hand. With the other hand, flame an inoculating loop.
Remove the cap or cotton plug with the “loop” hand and flame the mouth of
the tube. Insert the cooled loop into the stock tube and pick up a small
quantity of the culture (more than for transfer to a tube). Replace the cap or
plug. Gently raise the cover of the petri dish. Touch the loop to the top of the
dish and streak from side to side all the way to the bottom edge. The finished
plate will have a zigzag pattern from edge to edge (Fig. 2). Lower the cover
and flame the loop. Label the dish as you would a tube. All petri dishes
incubated at temperatures above 25°C should be placed upside down to
prevent condensed water from dripping onto the agar and causing colonies
to run together.
Isolation Streaking
The isolation streaking technique (Fig. 3) produces individual colonies for
observing morphology or separating mixed suspensions of bacteria as
described in Chapter 3, “Separation of Unknowns” (page 14).
Hold the stock tube in one hand. Flame the loop with the other hand and
remove the cap or plug from the tube. Flame the mouth of the tube. Insert the
cooled loop into the tube and remove a small quantity of the culture (about
the same as for a tube). Replace the cap or plug. Raise the cover of the petri
dish at just enough of an angle to insert the loop. Streak only the top one-
fourth of the plate (Area 1) in a zigzag pattern and replace the cover. Remove
the loop, flame it, and allow it to cool. Turn the dish 90° (Area 2). Lift the
cover and touch the loop to the center of the agar to make sure that it is cool.
Make one streak from Area 1 into Area 2. Then streak Area 2 in a zigzag
pattern until one-fourth of the plate is covered. Remove the loop and flame it.
Then repeat the above steps twice more, streaking from Area 2 to Area 3 and
from Area 3 to Area 4.
Fungal Plates
Yeasts and fungi with abundant spores (e.g.,
Penicillium, Aspergillus, and
Rhizopus) can be transferred in the same way as bacteria.
For nonsporulating fungi or those whose spores are enclosed within a fruiting
structure (e.g.,
Sordaria fimicola), cut a block of agar with a flame-sterilized
8
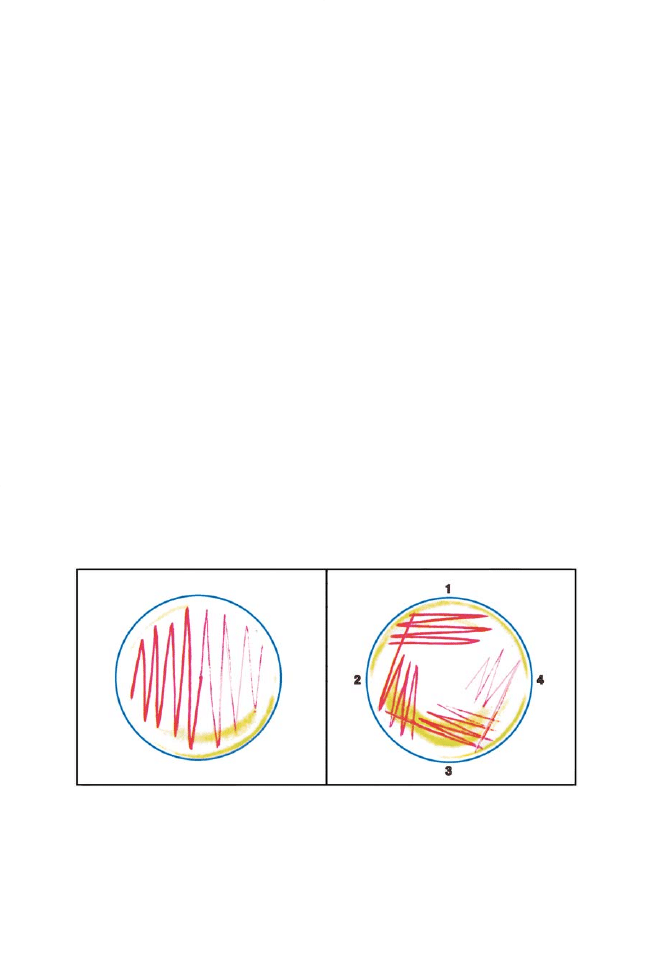
Figure 2. (Left.) Typical zigzag streaking pattern for inoculating plates.
Figure 3. (Right.) Isolation streaking technique. Streak the top one-fourth of the dish
(Area 1). Flame the loop and make one streak from Area 1 into Area 2. Then continue
streaking in a zigzag pattern until the second one-fourth of the dish (Area 2) is covered.
Repeat above steps twice more by streaking Area 3 from Area 2 and Area 4 from Area 3.

9
half-spearpoint needle, bent inoculating needle, or scalpel. Lift the cover of a
sterile agar dish only enough to insert the block of agar face down in the center
of the dish.
Care of Cultures
Temperature
Most fungi grow well at room temperature (about 25°C). Most nonpathogenic
(as well as some pathogenic) bacteria also grow well at room temperature.
Chromobacterium violaceum, Neisseria subflava, Spirillum volutans,
Thiobacillus thioparus, and most Bacillus and Enterobacter species grow best
at a slightly higher temperature (30°C). Most bacterial pathogens, the enteric
bacteria (e.g.,
Escherichia coli), and Clostridium, Corynebacterium,
Lactobacillus, Staphylococcus, and Streptococcus species grow well at body
temperature (37°C).
Bacillus stearothermophilus grows best at 55 to 65°C,
temperatures that would be lethal to most other bacteria.
Storage and Maintenance of Stock Cultures
For short-term storage of a few weeks, inoculate stock cultures into screw-cap
tubes. With strict aerobes and fungi, leave the cap loose until growth is
luxuriant and then tighten it. Store most cultures at room temperature.
Spirillum volutans and Thiobacillus thioparus should be stored in an in-
cubator at 30°C at all times. For anaerobic bacteria (
Clostridium species) and
microaerophiles (
Lactobacillus species and Spirillum voluntans), screw the
top down tightly after subculturing.
If cultures must be stored for several months and subculturing is not
practical, screw-cap tubes containing luxuriant growth may be stored in the
refrigerator. This is the cheapest and most practical method. Several stock
cultures of each species should be stored, however, because some cultures
do not survive refrigeration or may undergo genetic mutation.
Freeze-drying is now popular for extended storage of several years but
requires specialized techniques and equipment. Carolina™ freeze-dried cul-
tures contain lyophilized pure strains of viable bacteria and fungi. They can
be stored for at least three years at 4°C and normally require only 24 to 48
hours to produce luxuriant growth after rehydration. To activate, dissolve the
freeze-dried culture in rehydration medium and incubate it at the appropriate
temperature for 24 hours. After incubation, inoculate to the appropriate
growth medium, either broth or agar, and again incubate. Freeze-dried
cultures should be subcultured twice before staining.
Most bacteria and fungi will remain viable for prolonged periods of time in
culture if they are transferred to fresh medium every two to three weeks.
Spirillum volutans and Vibrio fischeri must be transferred twice each week
and
Thiobacillus thioparus once a week. Physarum polycephalum needs to be
transferred as soon as the organism has covered the agar surface.

Cleanup and Disposal
After transfer work is completed, the area should again be cleaned with a
disinfectant solution. Wash your hands thoroughly. If it is not possible to
autoclave old stock cultures and glassware, cover them with 70% ethanol or a
similar disinfectant overnight. The cultures should then be incinerated if
possible.
Accidents do and will happen when working with bacteria and fungi. If a tube
or petri dish breaks, report the accident to the instructor or assistant
immediately. The spill should be covered with 70% ethanol for a few minutes.
Then sweep up the spilled material very carefully and put it with other
contaminated wastes to be autoclaved or incinerated.
Do not pick up glass
fragments with your fingers or stick your fingers into the culture itself.
Don’t
panic: bacteria and fungi are not vengeful and do not crawl across the floor to
attack the one who dropped them!
10
11
3. Specific Techniques: Bacteria
Morphology
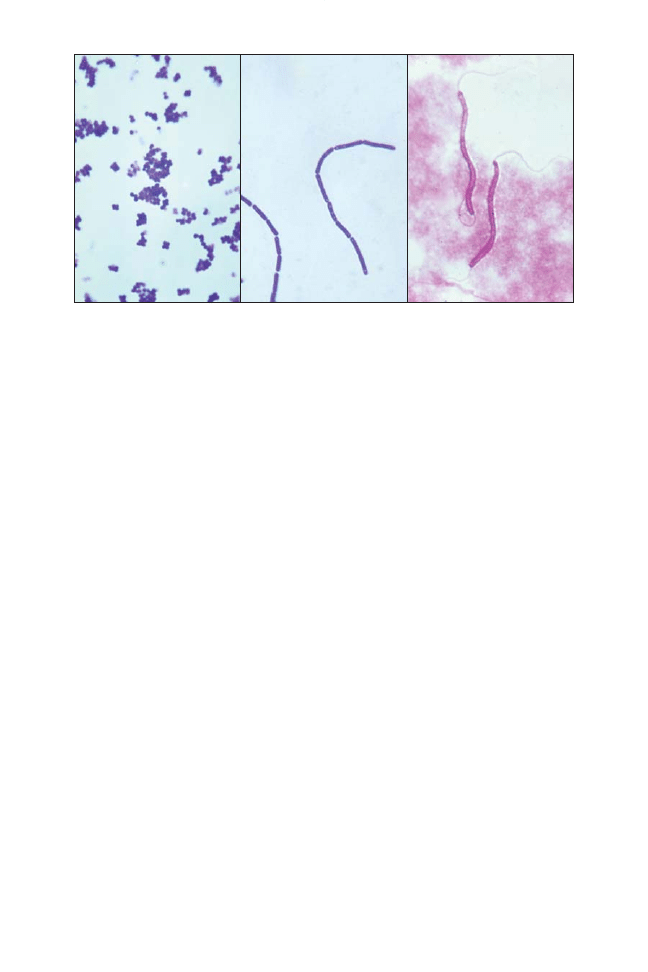
Bacteria vary greatly in size, but their cell shapes are of three basic types
(Fig. 4): coccus (sphere-shaped), bacillus (rod-shaped), and spirillum (spiral-
or comma-shaped). Some bacteria exist singly, while others are attached in
chains or packets.
Staining
Bacterial cells can be colored with a stain to provide contrast with the
background or to make cellular organelles visible.
Simple Stains
A simple stain consists of an aqueous or alcoholic solution of a single dye.
Some of the more commonly used stains are methylene blue, basic fuchsin,
and crystal violet. The procedure for simple staining is as follows.
1. Place a drop of distilled water on a clean slide.
2. Flame the inoculating loop and the mouth of the culture tube.
3. Remove a small quantity of bacteria from the slant.
4. Flame the mouth of the tube and replace the cap.
5. Mix the bacteria with the water on the slide and spread thinly.
6. Allow the smear on the slide to air-dry.
Figure 4. The three basic shapes of bacteria: coccus (left), bacillus (center), and
spirillum (right).
7. Using a clothespin or similar holding device, pass the slide, smear side
up, through a flame three times (Fig. 5a) to fix the bacterial cells. Fixing
kills the bacteria and causes them to stick to the slide.
8. Allow the slide to cool.
9. Flood the slide with basic fuchsin, methylene blue, or crystal violet
(Fig. 5b) and allow to stand one minute.
10. Rinse the slide gently with tap water (Fig. 5c). Do not let the stream of
water strike the smear directly, or you will wash off the stained cells.
11. Carefully blot the slide dry with bibulous paper (Fig. 5d).
12. Slides can be made permanent with mountant and a coverslip.
13. Observe under an oil immersion lens.
12
Figure 5. Staining a bacterial smear. (a) Pass the slide, smear side up, through a flame
three times. (b) Flood the smear with a stain and let stand one minute. (c) Rinse the
slide gently with water, making sure the stream of water does not strike the smear
directly. (d) Carefully blot the slide dry.

13
Gram Stain
Differential stains, which are more complex than simple ones, are used to
divide bacteria into groups. Bacteria stain differentially because they differ in
cell wall composition. The Gram stain separates almost all bacteria into two
large groups: the Gram-positive bacteria, which stain blue (Fig. 6), and the
Gram-negative bacteria, which stain pink (Fig. 7). This classification is basic to
bacteriological identification.
1. Prepare the smear, air-dry, and heat-fix by following Steps 1 through 8 in
the “Simple Stains” staining instructions above.
2. Flood with Hucker ammonium oxalate crystal violet for 60 seconds.
3. Rinse with tap water.
4. Flood with Gram’s iodine solution for 60 seconds.
5. Rinse with tap water.
6. Decolorize with 95% ethanol. Allow the ethanol to drip across the slide
until the runoff is almost clear.
7. Rinse with tap water.
8. Flood with safranin for 60 seconds.
9. Rinse with tap water.
10. Blot carefully.
11. Observe with an oil immersion lens.
Morphological observations and the Gram stain are the first steps in
identifying an unknown bacterium. Differential media are then used for
definite identification.
Figure 6. Gram-positive bacteria. Figure 7. Gram-negative bacteria.
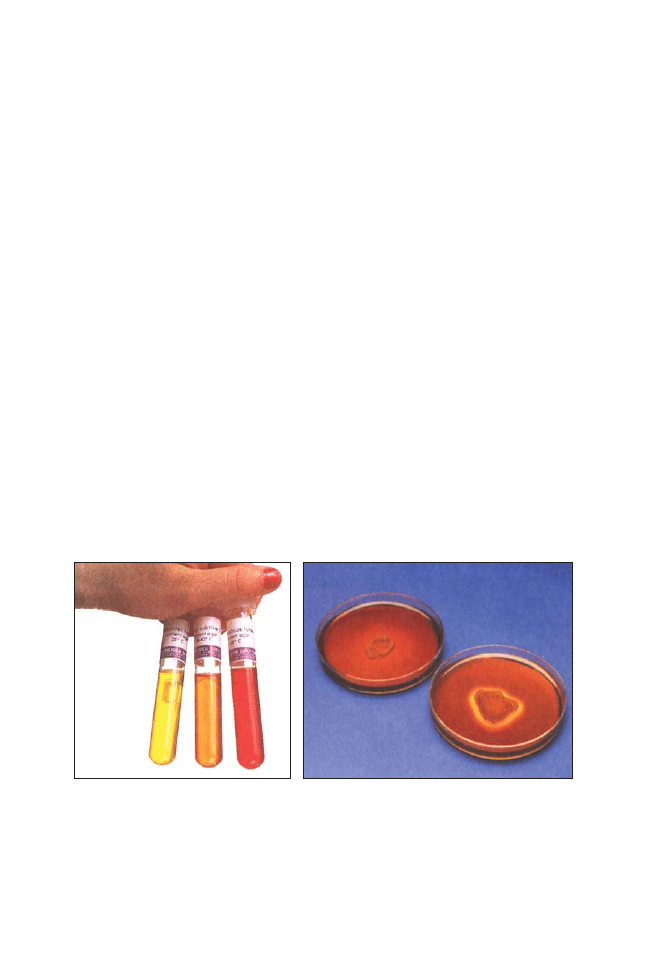
Biochemical Properties
Because of their microscopic size, bacteria are difficult to identify by direct
observation. A more precise method is to determine whether or not the
bacteria utilize a particular biochemical pathway. Many bacteria use carbo-
hydrates as energy sources. The Bacterial Fermentation Kit (15-4710) allows
students to differentiate among several bacterial species by observing
whether the bacteria can ferment various carbohydrates (Fig. 8). Students can
further classify bacteria by determining whether they can hydrolyze starches
(Fig. 9), lipids, and proteins with the Bacterial Biochemical Identification Kit
(15-4715).
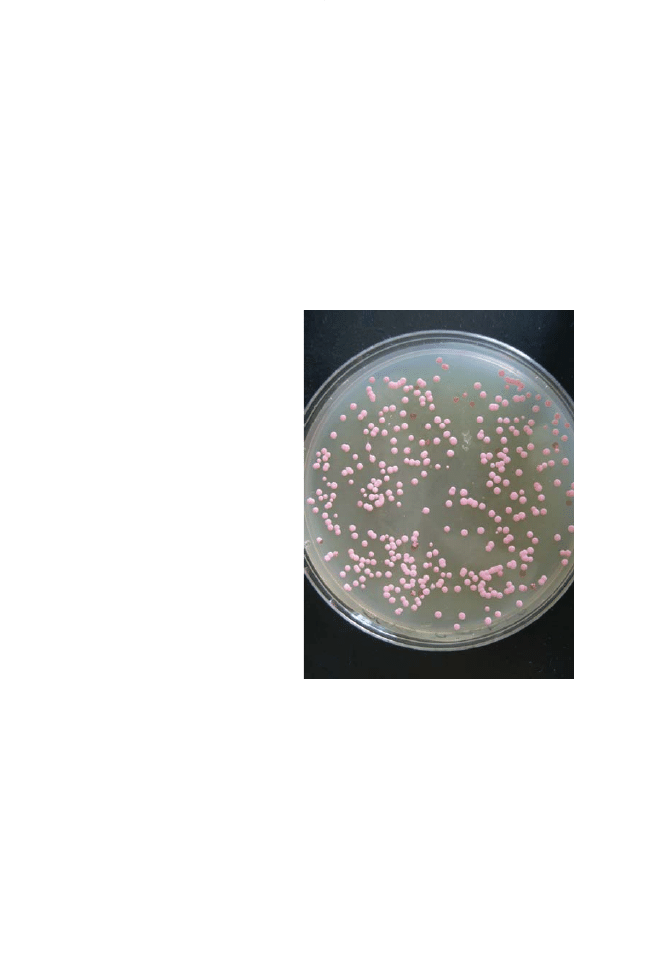
Separation of Unknowns
For a student exercise in separating unknown bacteria, we offer two broth
cultures of mixed bacteria (15-4760 Mixed Suspension of Introductory
Bacteria and 15-4765 Mixed Suspension of Pigmented Bacteria). To separate
the bacteria, first perform a Gram stain. Then, streak a loopful of broth on a
nutrient agar dish, as described in Chapter 2, “Isolation Streaking.” Incubate
for five to seven days at room temperature. Observe daily. The colors of the
colonies will depend upon the bacteria in your culture (Fig. 10):
Red colony:
Serratia marcescens.
Yellow colony:
Sarcina lutea.
White colony:
Bacillus subtilis.
Pinkish-gray colony:
Rhodospirillum rubrum (grows very slowly).
Perform Gram stains of each colony to confirm the results.
14
Figure 8. Ability of different bacteria to
ferment the carbohydrate dextrose.
Some bacteria produce acids as end
products of dextrose fermentation
(center). Others produce both acid and
gaseous end products (left). Some
cannot ferment dextrose at all (right).
Figure 9. Starch hydrolysis. Some bacteria do
not hydrolyze starch (left), while others do
(right), leaving a clear ring in the agar around
the bacterial culture.

15
Figure 10. A plate streaked for isolation.
Laboratory Activities
Effects of Environment on Growth
Bacteria grow when environmental conditions are favorable. If conditions are
not suitable, growth occurs slowly or not at all, and death may even occur.
Some factors that affect growth are water, food, oxygen, pH, and
temperature. The Bacterial Anaerobe Culture Kit (15-4676), pH Tolerance of
Microbes Kit (15-4716), and the Carolina™ Germicidal Effects of UV Light Kit
(15-4640 and 15-4641) allow students to investigate specific environmental
factors. With the Bacterial Investigative BioKit
®
(15-4727) students test for the
presence of bacteria in different environments and observe the effects of
different temperatures and media on bacterial growth. Students can also
explore the effects of osmotic pressure (15-4714 Tastefully Shrinking
Microbes Kit), boiling (15-4717C Carolina™ Spore Wars Kit), natural inhibitors
(15-4723 The Spicy Inhibitors Kit), and chemical preservatives (15-4662
Foiling Spoilage with Chemical Preservatives Kit).
Effects of Antibiotics and Disinfectants
Many ways have been devised to kill bacteria in order to prevent con-
tamination or spread of disease. These include physical methods (heat,
ultraviolet light) and chemical means (disinfectants, antibiotics). Disinfectants
are chemical substances that kill or retard the growth of microorganisms. The
Disinfectant Sensitivity BioKit
®
(15-4735; Demonstration Kit 15-4734) allows
students to test the effects of common household disinfectants on the growth
of bacteria. Antibiotics are substances produced by living organisms that in-
hibit the growth of microorganisms. The Antibiotic Sensitivity BioKit
®
(15-
4740) allows students to test the effects of eight antibiotics on bacterial
growth (Fig. 11). The Antibiotic Production Kit (15-4739) demonstrates the
production of penicillin and streptomycin by living microorganisms and the
effects of these two antibiotics on bacterial growth.
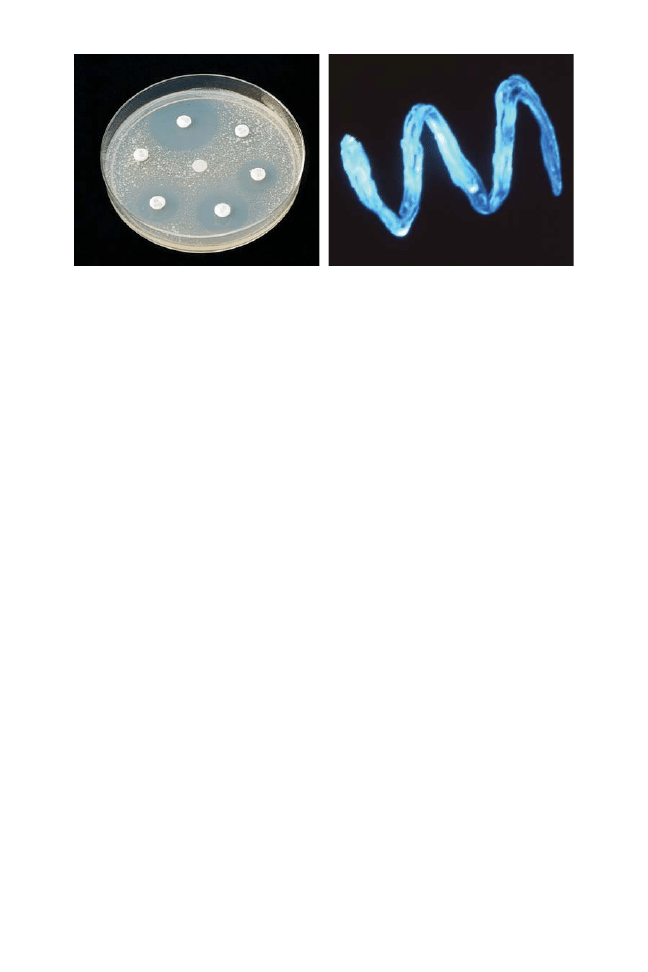
Bioluminescing Bacteria
Vibrio fischeri (15-5722) (Fig. 12) is a bioluminescing marine bacterium that
commonly inhabits fish. It requires some salt in the medium in order to grow,
and it is usually cultured on saltwater agar or, preferably, photobacterium
agar.
V. fischeri should be inoculated more heavily than other bacteria. The
cultures should be placed
in the dark (e.g., a cleaned, disinfected cabinet or a
covered box) at room temperature with caps loosened. A subculture should
be made 18 to 24 hours before bioluminescence is to be observed. Allow at
least five minutes for the eyes to adjust to the dark in a room with no light
leakage. (Note: A classroom with the lights out and the shades drawn will not
provide enough darkness).
Photosynthesizing Bacteria
Rhodospirillum rubrum (15-5300) is a photosynthetic bacterium. It grows
anaerobically (a tightened screw cap) in sunlight and aerobically in the dark.
R. rubrum multiplies slowly, requiring five to seven days for growth to be
visible along inoculated areas. It should be inoculated more heavily than
most other bacteria. As its name implies,
R. rubrum is spiral-shaped.
Nitrogen-Fixing Bacteria
Members of the genus
Rhizobium (15-5270) have the ability to utilize
atmospheric nitrogen when living in a symbiotic relationship with the roots of
a host leguminous plant like clover, alfalfa, or soybean. Most other bacteria
as well as higher plants must have nitrogen compounds present in the
medium or in the soil. The
Rhizobium Inoculum with Clover Seeds (15-4720)
may be used to demonstrate the nitrogen-fixing nodules that form on the
roots of the host clover plant.
16
Figure 11. Antibiotic sensitivity test from
15-4740 Antibiotic Sensitivity BioKit
®
.
Figure 12.
Vibrio fischeri photographed in
total darkness using only light emitted
from the bacteria.
17
Halobacterium
sp. NRC-1
Halobacterium belongs to the most recently identified domain of life, the
Archaea. As such, it is phylogenetically distinct both from the Bacteria and the
Eukaryota. Like bacteria, it is a prokaryote without a nuclear envelope.
Halobacterium cells are rod-shaped and, like bacteria, its cells are much smaller
than most eukaryotic cells. However, some of its characteristics are distinctly
different from those of bacteria and more similar to those of eukaryotes.
Most known Archaea are extremophiles; that is, they are organisms that
thrive in and even require extreme environments. This includes extremes of
pH, pressure, and temperature. Most methanogens require an anaerobic
environment. It is difficult to safely provide these extreme conditions in most
teaching labs or classrooms, which has until now severely restricted the use
of Archaea in education. However,
Halobacterium thrives in an extreme salt
environment, which can be
easily and safely provided. In
nature,
Halobacterium occurs in
such hostile environments as
the Great Salt Lake, the Dead
Sea, and solar salt pools.
In the laboratory,
Halobacterium
can be handled using the same
techniques, streaking, etc., as
described for bacteria. However,
Halobacterium grows on a
hypersaline medium on which
almost no other microorganisms
can even survive (Fig. 13). In fact,
Halobacterium can survive only
in hypersaline environments. This
allows beginning students to
practice and master basic skills of
sterile technique with little chance
of contaminating their cultures or
work area. Additionally,
Halo-
bacterium is not known to cause
disease in humans. However, we
recommend that standard
microbiological safety procedures be followed whenever using
Halobacterium
or any other microbe. Cultures can be incubated at 20°C to 45°C, with the
optimal growth at 42°C.
Halobacterium is a model organism both for basic
courses and for advanced research.
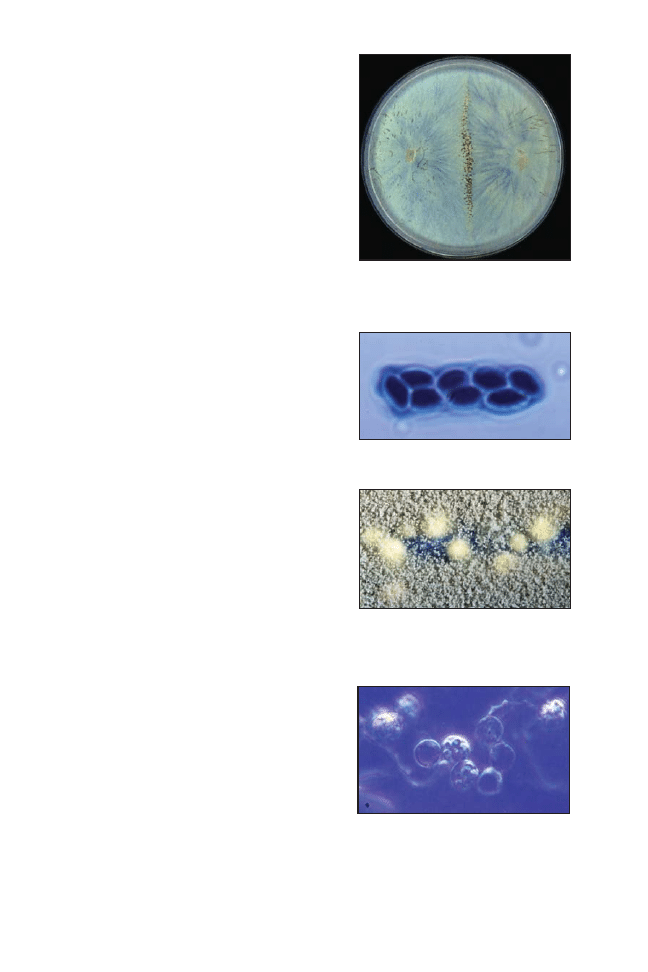
Figure 13.
Halobacterium plate culture.

18
4. Specific Techniques: Fungi
The members of the Fungi Kingdom (Myceteae) are parasitic or saprophytic
organisms that exist in either a unicellular or filamentous form (hyphae)
surrounded by a cell wall. Fungi either absorb or engulf their food. The
Myceteae are subdivided into three divisions.
Division I. Gymnomycota
The Gymnomycota, commonly called the slime molds, exhibit phagotrophic
nutrition, i.e., they engulf their food.
Found in nature under cool, humid, dark conditions, the slime mold
Physarum polycephalum (15-6190, 15-6192, and 15-6193) (Fig. 14) offers
students a unique opportunity to
work with living protoplasm.
Physarum is easy to culture and
handle and exists in two forms: as a
motile, multinucleate mass of
protoplasm called a plasmodium
and as a dry, resistant structure
called a sclerotium. With the
Introduction to
Physarum Kit (15-
5829) students observe cytoplasmic
streaming and plasmodial fusion
and investigate factors influencing
plasmodial growth and sclerotia
formation. The Chemotaxis in
Physarum polycephalum Kit (15-5825B)
presents methods and procedures that enable students to design and
conduct active investigations of chemotaxis in slime molds.
The plasmodium can be cultured on 2% water agar, fed oat flakes, and kept in
the dark. Reactivate a piece of dried sclerotium by placing it on damp filter
paper or 2% water agar. When the active plasmodium begins to appear, feed
it by placing oat flakes at its margins. After 24 to 48 hours, a portion of the
plasmodium may be transferred to another plate of 2% water agar; continue
feeding with oak flakes. The streaming of protoplasm in the veins of the
plasmodium may be observed on an agar dish at the edges of the growth
using a low-power objective.
Dictyostelium discoideum (15-5995 and 15-5996) is a cellular slime mold.
Unlike
Physarum, the cells of Dictyostelium always retain their individuality
even though they aggregate in a mass called a pseudoplasmodium.
Dictyostelium is cultured in lactose agar dishes or tubes inoculated with
bacteria as a food source. A nonmucoid strain of
Escherichia coli (15-5066) is
inoculated on lactose agar. Several sporocarps from a mature culture of
Dictyostelium are then streaked across the agar in the area inoculated with
bacteria. Individual amoebae will be present in 12 to 24 hours, and the first
Figure 14.
Physarum polycephalum
plasmodium.
aggregations of amoebae into pseudoplasmodia (slugs) (Fig. 15a) can be
observed within this period of time. Pseudoplasmodia will be present in 36 to
48 hours, and many of them will have begun to migrate (Fig. 15b). After 48 to
72 hours, the pseudoplasmodium stops migrating and formation of the
sporocarp begins (Fig. 15c). By 72 hours mature sporocarps should be
present (Fig. 15d).
Division II. Mastigomycota
The Mastigomycota exhibit absorptive nutrition, i.e., food in the environment is
digested and then absorbed. They produce motile cells during their life cycles.
Class Chytridiomycetes
The Chytridiomycetes (chytrids) differ from all other fungi in that their motile
cells (zoospores) have a single, posterior flagellum. The chytrids require the
presence of a thin liquid film for zoospore maturation and dispersal (Fig. 16).
Add about 0.3 mL of sterile water to a slanted agar screw-cap tube. Inoculate
the water with a chytrid species like
Hyphochytrium (15-6055), Phlyctochytrium
(15-6170), or
Rhizophydium (15-6220) and place the fresh culture on a slant tray
with the cap slightly loosened. After six to ten days in the dark, the culture
will have established itself along the whole slant, and the excess water will
have evaporated. Tilt the tray daily to allow water to wash over the entire
agar surface.
19
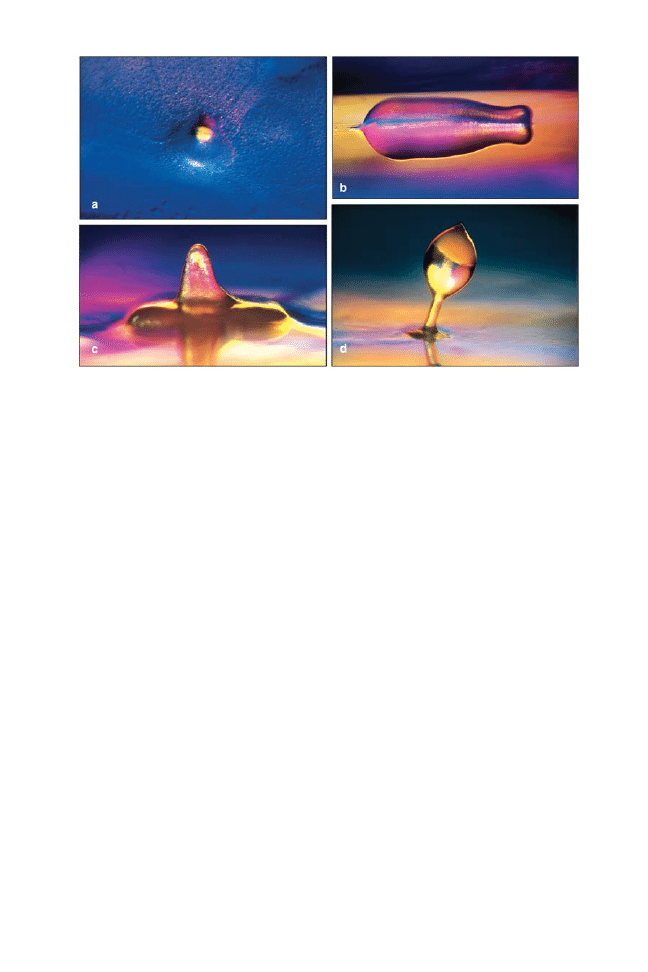
Figure 15.
Dictyostelium discoideum. (a) Aggregation of amoebae into pseudoplasmodia
(slugs). (b) Migrating pseudoplasmodium. (c) Formation of sporocarp. (d) Mature
fruiting sporocarp.
20
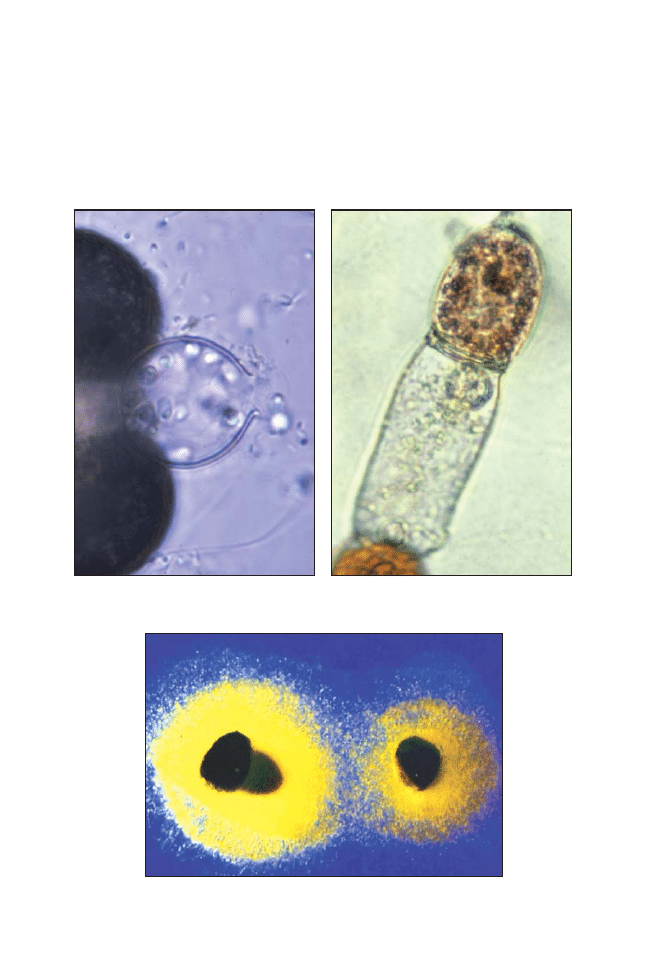
Figure 16. The chytrid
Rhizophydium
exhibiting escaping zoospores.
Figure 17. The chytrid
Allomyces javanicus.
Antheridium (top); oogonium (center).
Figure 18. The water mold
Saprolegnia growing on split
hemp seed.
The chytrid
Allomyces can be used to demonstrate alternation of diploid (2n)
and haploid (n) generations. The sporophytic plant (2n) and the gametophytic
plant (n) are easily identified on a plated culture. The sporophyte produces
colorless asexual zoosporangia (the structures producing zoospores) and
numerous brown, resting sporangia. The gametophyte produces colorless
oogonia (the structure producing female gametes) and orange antheridia (the

21
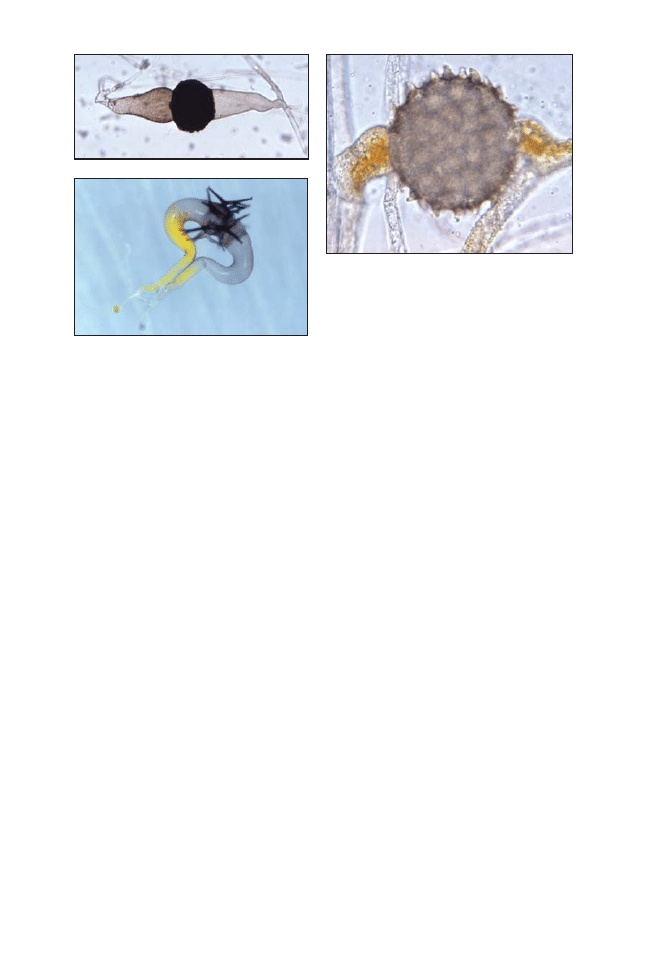
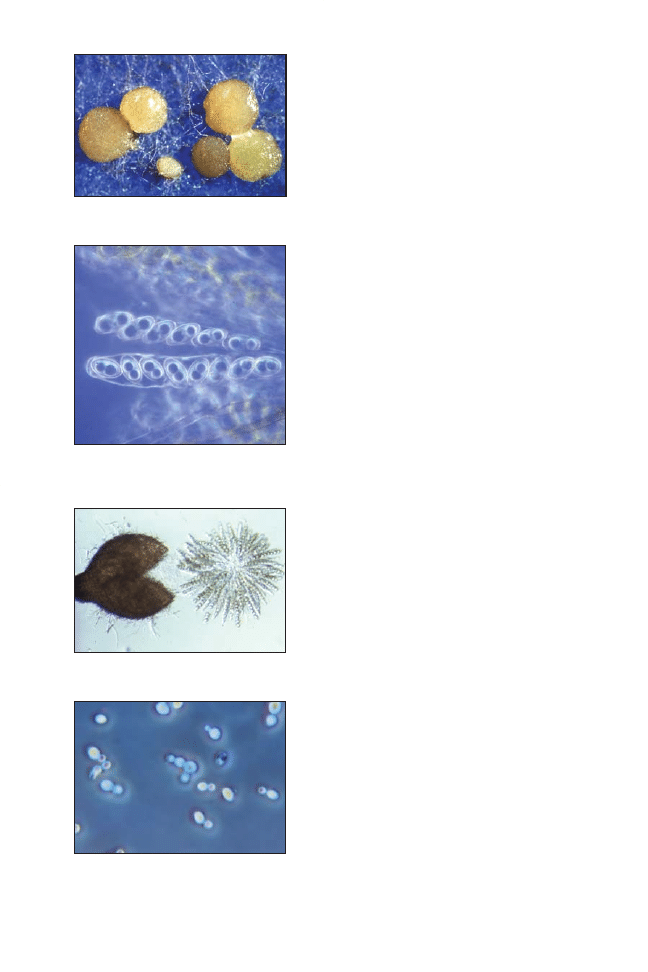
Figure 19. Sporangia of the shotgun
fungus
Pilobolus crystallinus.
Figure 20.
Rhizopus sporangia.
structures producing male gametes) in close proximity (Fig. 17).
Allomyces
arbuscula (15-5914) and Allomyces javanicus (15-5916 and 15-5917) are both
cultured on Emerson Yp Ss agar.
Class Oomycetes
The Oomycetes, commonly called water molds, are either unicellular or
filamentous. The hyphae of the filamentous Oomycetes are coenocytic (without
cross-walls). The Oomycetes produce motile asexual spores, the zoospores,
which are biflagellate, as well as nonmotile sexual spores, the oospores.
Achlya (15-5901) and Saprolegnia (15-6271) may be cultured in cornmeal agar
dishes. For ease of manipulation in the classroom, it is often desirable to
culture the water molds in water on split hemp seed (Fig. 18) or cucumber
seed. Using a sterile razor blade or scalpel, cut a small section of water mold
and agar from the edge of the water mold stock culture and place it on an
appropriate agar dish. Inoculate the culture at 20 to 25°C. After the mycelium
has covered part of the dish, place sterile split hemp seeds or cucumber
seeds (autoclaved for 30 minutes at 121°C and 15 psi) on their cut sides along
the outer edge of the new growth.
Saprolegnia takes about three days for good new growth and Achlya takes
about four days. After a few days, notice the mycelium attaching to the inner
portions of the seed. With sterile tweezers, lift hemp or cucumber seeds with
mycelia attached from the agar plate and place four of them in sterile petri
dishes containing about 20 mL of sterile lake water. Change the water every
day for three to seven days to observe sporangia, which contain the
zoospores, and oogonia, which contain the oospores.
Division III. Amastigomycota
The Amastigomycota exhibit absorptive nutrition like the Mastigomycota, but
they differ in that they do not produce motile cells during their life cycles. The
Amastigomycota are divided into classes by the type of sexual reproduction
exhibited.
22
Figure 21. Zygospores.
(a)
Rhizopus stolonifer.
(b)
Mucor hiemalis.
(c)
Phycomyces blakesleeanus.
a
c
b
Class Zygomycetes
The Zygomycetes or conjugation fungi reproduce sexually by the fusion of
gametes (conjugation) from two opposite mating types to form a thick-walled
zygospore.
Phototropism
Pilobolus crystallinus (15-6207) (Fig. 19), called the shotgun fungus, is found in
nature growing on dung. The common name comes from the forceful discharge
of the sporangia, which can be shot upward to a height of 1.8 m (6 ft). The
Pilobolus sporangiophore (i.e., the hyphae bearing the sporangium) is
phototropic and often discharges the sporangium with enough accuracy to
strike within 3 to 5 mm of a point light source. The
Pilobolus Kit (15-5800) is
designed to demonstrate this phototropic ability.
Pilobolus is cultured on rabbit dung agar plates. Mature sporangiophores are
present in five to eight days following subculture. To subculture, cut a block
of agar with sporangia and place it upside down on a fresh plate of rabbit
dung agar.
Conjugation
Rhizopus stolonifer (15-6222 and 15-6224) is an excellent organism for
demonstrating conjugation and formation of zygospores. Using aseptic
technique, place a few sporangia of two opposite mating strains of
Rhizopus
on opposite sides of a cornmeal-dextrose-peptone agar dish. Incubate at
room temperature. The asexual sporangia begin forming around the edge of
the plate two days after inoculation (Fig. 20). The zygospores form a day or
two later on the line where the hyphae of the two strains meet. When looking
for zygospores (Fig. 21a) with a microscope, it may be necessary to part the
mycelium with forceps or a teasing needle. Zygospores that have formed on
the agar surface may be overgrown by and hidden under the mycelium.
R. stolonifer spores are so light and easily
disseminated that other cultures in the
laboratory often become cross-con-
taminated.
Mucor hiemalis (15-6112 and
15-6113) (Fig. 21b) and
Phycomyces
blakesleeanus (15-6180 and 15-6181)
(Fig. 21c) are easier to work with and their
zygospores readily observed (Fig. 22).
Class Ascomycetes
The Ascomycetes or sac fungi produce
sexual spores called ascospores borne in
a bag-shaped structure, the ascus. The
presence or absence of an ascocarp (a
fruiting body containing the asci) and
ascocarp shape are used in classifying
the Ascomycetes.
Ascomycete Fruiting Types
S c h i z o s a c c h a r o m y c e s o c t o s p o r u s
(15-6281) produces naked asci, i.e., asci
not enclosed in an ascocarp (Fig. 23). All
stages of
Schizosaccharomyces, from
ascus formation to mature ascospores,
can be observed as described in the
following section on yeasts.
Eurotium chevalieri (15-6032) develops
cleistothecia, which are completely
closed ascocarps. Greenish-gray conidia
(asexual spores) of
E. chevalieri form
first, three to four days after inoculation.
The yellow cleistothecia form in five to
seven days. Cleistothecia can be scraped
off the agar and placed in a drop of water
on a slide. Gently crush the cleistothecia
under the coverslip to observe
ascospores inside the globular asci
scattered among the hyphae.
Anthracobia muelleri (15-5926A) is an
ascomycete that demonstrates the
development of apothecia, which are
open, cuplike ascocarps (Fig. 26). It fruits
on rabbit food agar. After inoculating,
place the culture near a light source and
maintain at room temperature. In about
14 days, tiny fruiting structures begin to
Figure 22. Plate showing line of
zygospores formed at the juncture
of plus and minus mycelia of
Phy-
comyces blakesleeanus.
Figure 23. Naked ascus of
Schizo-
saccharomyces octosporus.
Figure 24.
Talaromyces flavus, an
ascomycete similar to
Eurotium
chevalieri, exhibiting gray conidia
and green cleistothecia.
Figure 25. Squashed cleistothecium
of
Talaromyces flavus, an ascomycete
similar to
Eurotium chevalieri,
exposing globular asci. Note the var-
ious stages of ascospore formation.
23
24
form at the periphery of the plate. The
apothecia may be scraped off the agar,
added to a drop of water on a glass slide,
and gently crushed to reveal the tubelike
asci (Fig. 27).
Sordaria fimicola (15-6291) produces a
flask-shaped ascocarp called a
perithecium that is closed except for a
small opening at the apex.
Sordaria forms
several hundred perithecia within 5 to 10
days after inoculation on
Sordaria culture
agar. Within each mature perithecium are
many asci clustered together (Fig. 28).
The ascospores of
Sordaria are forcibly
discharged from the ascus and stick to
the sides of the culture container.
The Ascomycete Fruiting Set (15-5822) of
four plate cultures is available for
demonstrating these fruiting types.
Yeasts
Saccharomyces cerevisiae (15-6252) and
Schizosaccharomyces octosporus (15-6281)
are two yeasts widely used in the
laboratory. Both can be cultured on
Sabouraud dextrose agar or any other
good mycological agar.
Saccharomyces cerevisiae reproduces
asexually by budding (Fig. 29). To observe
budding, subculture onto fresh Sabouraud
dextrose agar and incubate at 30°C for
one to two days. Prepare a wet-mount
slide of the yeast and stain with
methylene blue if desired.
Schizosaccharomyces octosporus repro-
duces asexually by fission (transverse
division). To observe fission, subculture
onto yeast malt agar. Prepare slides daily
over a period of four days to observe the
fission into daughter cells (Fig. 30).
Continue to observe a culture over a period
of a week for the formation of ascospores
inside the bag-shaped ascus (Fig. 23).
Figure 26. Mature apothecia of
Anthracobia muelleri.
Figure 27. Squashed apothecium of
Anthracobia muelleri revealing the
ascospores inside the tubelike asci.
Figure 28. Squashed perithecium of
Sordaria fimicola exposing asci.
Figure 29. Budding
Saccharomyces
cerevisiae cells.
Genetic Recombination
Sordaria fimicola, a dung
ascomycete, is used extensively in
studies of mutation and bio-
chemical genetics. Different
mating types are found in
S. fimicola. The Sordaria Genetics
BioKit
®
(15-5847 classroom kit,
15-5859 demo kit) and the S
ordaria
Genetics Kit (15-5848) provide
interesting exercises in fungal
genetics for the laboratory.
If
S. fimicola is crossed with
either tan or gray mutants on
Sordaria crossing agar (Fig. 31),
hybrid asci are produced that
contain four dark (wild-type) and
four light (mutant) ascospores.
The order of ascospores in the
ascus reflects the order in which
the chromosomes are segregated
during meiosis. If crossing over
has occurred, the sequence of
mutant to wild-type spores will
be 2:2:2:2 or 2:4:2. If crossing
over has not occurred, the
sequence will be 4:4.
To view the asci, use a toothpick to remove a few dark perithecia from the
crossing dish. Place them in a drop of water on a microscope slide and add a
coverslip. Gently press on the coverslip to crush the perithecia and reveal the
asci with ascospores. A careful search of the dishes will reveal the location of
perithecia containing hybrid asci.
Class Basidiomycetes
The Basidiomycetes, often called club fungi, produce sexual spores on a
club-shaped structure, the basidium. This class includes mushrooms,
puffballs, and the rusts and smuts, which are plant pathogens.
Coprinus
cinereus (15-5979 and 15-5979B) is cultured on potato dextrose agar to
which sterile rabbit dung has been added.
C. cinereus is commonly called
the “inky cap” mushroom because the cap dissolves into an inky black mass
at maturity. Basidia can be observed by cutting a thin, wedge-shaped piece
from a fresh cap. Basidiospores (the sexual spores) can be observed by
preparing a wet-mount slide from the gills. The Mushroom Review Set
(15-5792) consists of a large box culture of
C. cinereus ready to fruit and
30 Gilled Fungi Bioreview
®
Sheets.
25
Figure 30.
Schizosaccharomyces octosporus
demonstrating fission.
Figure 31. A crossing plate inoculated with
wild-type (dark blocks) and mutant strains
(tan blocks) of
Sordaria fimicola.
26
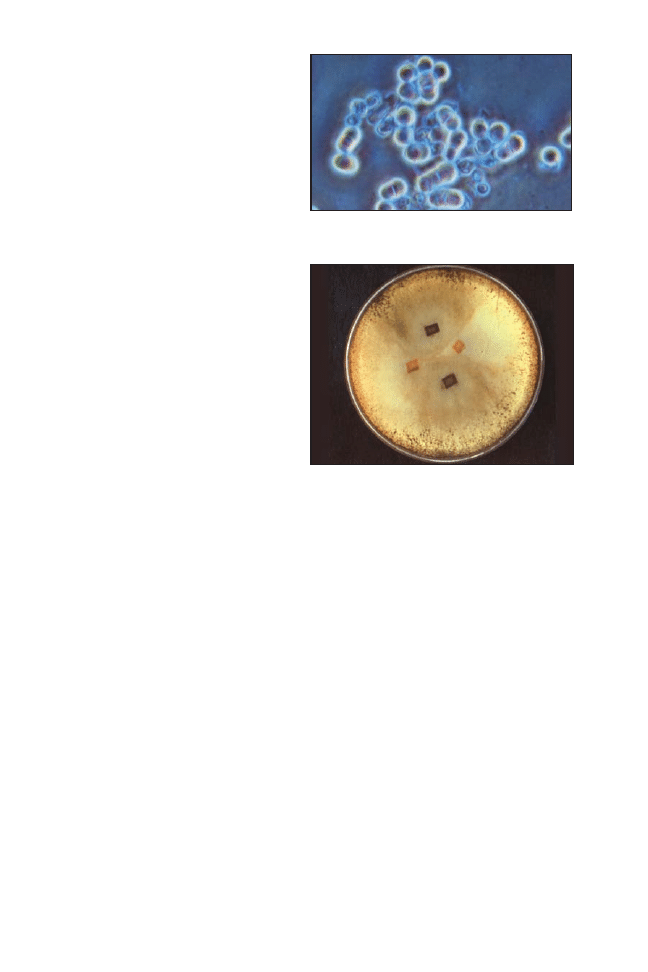
Schizophyllum commune (15-
6275B) has a gray, fan-shaped
fruiting body (Fig. 32). It has been
used widely in physiology,
genetics, and morphogenesis
studies. It is easily cultivated on
yeast malt agar and fruits one to
two weeks after transfer.
Form-Class Deuteromycetes
The Deuteromycetes or imperfect
fungi have either a poorly
understood or no known sexual
stage. Since the sexual spores and
fruiting bodies are characteristics
used in classification, these fungi
are placed in a class by themselves
called a form-class.
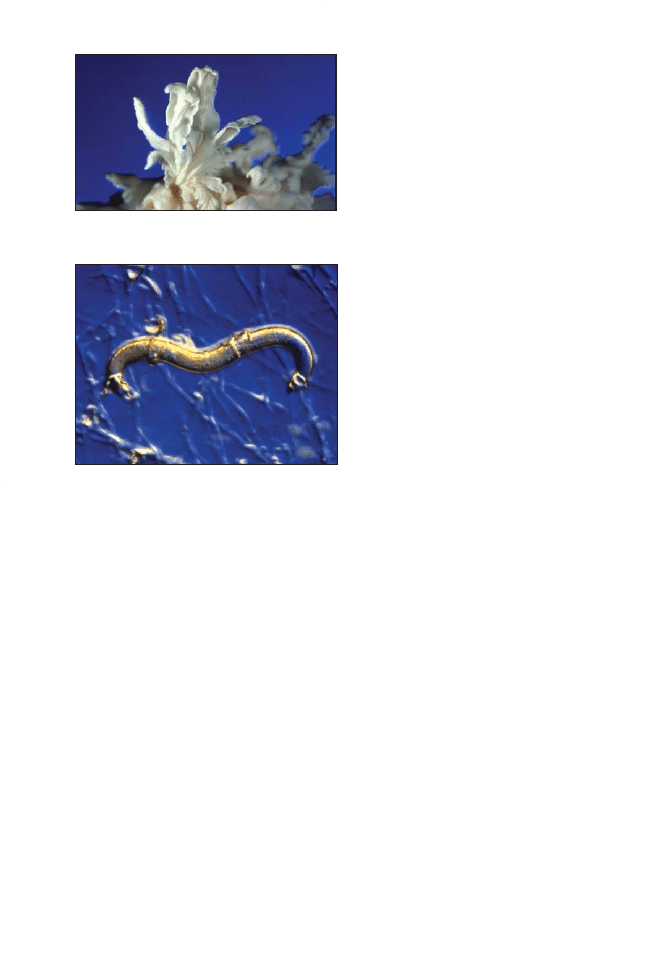
Arthrobotrys conoides (15-5930) is
a soil-inhabiting Deuteromycete
that is carnivorous on nematodes
(roundworms). When inoculated
with the nematode
Rhabditis
(13-3258),
A. conoides forms loops
of hyphae that trap the nematode
(Fig. 33). Once it is trapped, the
fungus produces additional hyphae
that penetrate the body of the nematode and then digest and absorb its
contents. The Carolina™ Carnivorous Fungus Kit (15-5802) allows a classroom
to observe this phenomenon.
Figure 32. The basidiomycete
Schizophyllum
commune.
Figure 33. The nematode
Rhabditis caught in
the hyphal traps produced by
Arthrobotrys
conoides.

5. General Media and Special Media
The following general media and special media are available through
Carolina Biological Supply Company.
General Media
Description
Nutrient Agar
General media for most bacteria.
Tryptic Soy Agar
General media for most fastidious bacteria.
Brain Heart Infusion Agar
General media for most fastidious bacteria.
Potato Dextrose Agar
General media for growing most molds.
Sabouraud Dextrose Agar
General media for growing yeasts, molds,
and other aciduric fungi.
Yeast Malt Agar
General media for growing yeasts, molds,
and other aciduric fungi.
Special Media
In addition to premixed dehydrated media, we use the following media in our
laboratories. All are sterilized at a temperature of 121°C and a pressure of 15
pounds per square inch (psi) for 15 minutes. When preparing media, use only
distilled water and always use bacteriological grade agar. Note that these are
also available as prepared media. For ordering information including item
numbers and pricing information, please refer to the most recent
Carolina™
Science catalog, call toll free 800-334-5551, or visit the Carolina Biological
Supply Company Web site at www.carolina.com.
Recipes for Special Media
27
Acetobacter Agar
(For
Acetobacter aceti)
Yeast extract
5.0 g
CaCO
3
10.0 g
Agar
18.0 g
Dextrose
5.0 g
D-Mannitol
2.0 g
Distilled water
1.0 L
Note: Put in screw-cap tubes only. Tubes
must be gently rotated just before slanting
to resuspend precipitate.
Azotobacter Supplemental Agar
(For
Azotobacter chroococcum)
Soil extract
100 mL
(see Soil Extract recipe below)
Dibasic potassium phosphate
1.0 g
Magnesium sulfate heptahydrate
0.2 g
Sodium chloride
0.2 g
Ferrous sulfate heptahydrate
0.005 g
Mannitol
20.0 g
Distilled water
900 mL
Agar
20.0 g
Note: Adjust pH to 6.0 using 1 Normal HCl
(to lower pH) or 1 Normal KOH (to raise
pH) before adding agar.

28
Bread Crumb Agar
(For
Armillariella mellea)
Bread crumbs, plain/unflavored
50 g
Agar
9 g
Distilled water
500 mL
Caulobacter Agar
(For
Caulobacter crescentus)
Peptone
2.0 g
Yeast extract
1.0 g
MgSO
4
.
7H
2
O
0.2 g
Agar
10.0 g
Distilled water
1.0 L
Cornmeal-Dextrose-Peptone
(For
Rhizopus zygospore formation)
Cornmeal agar
17.1 g
Dextrose
8.0 g
Peptone
1.8 g
Distilled water
1.0 L
Enriched Nutrient Agar
(For
Vibrio anguillarum)
Heart infusion broth
12.5 g
Nutrient broth
5.4 g
Yeast extract
2.5 g
Agar
20.0 g
Distilled water
1.0 L
Gluconobacter Agar
(For
Gluconobacter oxydans)
Yeast extract
5 g
Peptone
3 g
Mannitol
25 g
Agar
20 g
Distilled water
1 L
Halobacterium Agar
(For
Halobacterium sp. NRC-1)
Sodium chloride
250 g
Magnesium sulfate, heptahydrate
20 g
Trisodium citrate, dihydrate
3 g
Potassium chloride
2 g
Casamino acids
5 g
Yeast extract
5 g
Deionized water
1.0 L
Note: Adjust pH to 7.2 using 5 M NaOH or
concentrated HCL. After adjusting pH, add:
bacteriological grade agar
20.0 g
Honey Peptone Agar
(For
Eurotium chevalieri)
Pure honey
60.0 g
(made from clover)
Peptone
10.0 g
Agar
20.0 g
Distilled water
1.0 L
Lactose Agar
(For
Dictyostelium discoideum)
Lactose
1.0 g
Peptone
1.0 g
Agar
20.0 g
Distilled water
1.0 L
Mannitol Special Agar
(For
Azotobacter vinelandii)
Yeast extract
5.0 g
Peptone
3.0 g
Distilled water
1.0 L
Note: Adjust pH to 7.4 using 1 Normal HCl
(to lower pH) or 1 Normal KOH (to raise
pH) before adding agar. It takes
approximately 3 mL of 1 Normal KOH to
adjust 1 L of media. After adjusting pH,
add:
Mannitol
25.0 g
Agar
20.0 g

29
Oat Flake Agar
(For
Physarum polycephalum)
Agar, 1.5% in distilled water
Old-Fashioned Quaker
®
Oats, 4 cm per tube
Note: Cover flakes with 1.5% melted agar.
Steam until oat flakes are swollen. With an
old inoculating loop handle, form flakes
into a slant. Plug with nonabsorbent cotton
and autoclave in a slanted position.
Peptone-Succinate Agar
(For
Spirillum volutans)
(NH
4
)
2
SO
4
1.00 g
MgSO
4
.
7H
2
O
1.00 g
MnSO
4
.
H
2
O
2.00 mg
FeCl
3
.
6H
2
O
2.00 mg
Succinic acid
1.68 g
Peptone
5.00 g
Agar
1.50 g
Distilled water
1.00 L
Note: Adjust pH to 7.0 with KOH.
Photobacterium Agar
(For
Vibrio fischeri)
Difco™ Bacto™ tryptone
5.00 g
Yeast extract
2.50 g
Ammonium chloride
0.30 g
Magnesium sulfate
0.30 g
Ferric chloride
0.01 g
Calcium carbonate
1.00 g
Monobasic potassium phosphate
3.00 g
Sodium glycerol phosphate
23.50 g
Sodium chloride
30.00 g
Agar
20.00 g
Distilled water
1.00 L
Note: Put in screw-cap tubes only. Tubes
must be gently rotated just before slanting
to resuspend precipitate.
Rabbit Dung Agar
(For
Pilobolus crystallinus and
Coprinus cinereus)
Fresh rabbit dung
500 mL
Note: Place in a dry flask. Autoclave for 30
minutes. Pour 4 to 5 pellets into a
16-
× 150-mm test tube and 8 to 10 pellets
into a dish, jar, or box. Cover with a thick
layer of sterilized 2% agar.
Rabbit Food Agar
(For
Anthracobia muelleri)
Rabbit food pellets
25.0 g
Agar
15.0 g
Distilled water
1.0 L
Note: Boil the rabbit food in the distilled
water. Let steep 30 minutes. Filter through
cheesecloth. Add agar to filtrate.
Rhizobium-X Agar
(For
Rhizobium leguminosarum)
Soil extract
200 mL
(see Soil Extract recipe below)
Yeast extract
1 g
Mannitol
10 g
Distilled water
800 mL
Agar
20 g
Note: Adjust pH to 7.2 using 1 Normal HCl
(to lower pH) or 1 Normal KOH (to raise
pH) before adding agar.
S-6 Broth
(For
Thiobacillus thioparus)
Na
2
HPO
4
1.20 g
KH
2
PO
4
1.80 g
MgSO
4
.
7H
2
O
0.10 g
(NH
4
)
2
SO
4
0.10 g
CaCl
2
0.03 g
FeCl
3
0.02 g
MnSO
4
0.02 g
Na
2
S
2
O
3
10.00 g
Distilled water
1.00 L

30
Soil Extract
(For Azobacter Supplemental Agar
and Rhizobium-X Agar)
Hyponex
®
African violet soil
77.0 g
Sodium carbonate
0.2 g
Distilled water
200.0 mL
Note: Autoclave for 60 minutes. Filter
through 6 layers of cheesecloth.
Sordaria Crossing Agar
(For
Sordaria fimicola)
Cornmeal agar
17.0 g
Sucrose
10.0 g
Dextrose
7.0 g
KH
2
PO
4
0.1 g
Yeast extract
1.0 g
Distilled water
1.0 L
Sordaria Culture Agar
(For
Sordaria fimicola)
Cornmeal agar
17.0 g
Dextrose (glucose)
2.0 g
Yeast extract
1.0 g
Distilled water
1.0 L
Tomato Juice-
Yeast Extract-Milk Medium
(For
Lactobacillus acidophilus,
Lactobacillus casei, and
Lactococcus lactis)
Note: Filter the juice off canned whole
tomatoes. Adjust the pH to 7.0 using
1 Normal HCl (to lower pH) or 1 Normal
KOH (to raise pH). Tomato juice is typically
pH 4.5.
Low-fat skim milk
100 g
Tomato juice
1 L
Yeast extract
5 g
Distilled water
900 mL
Note: Autoclave at 113°C for 20 min. This
will keep the milk sugars from carmelizing.
V8
®
Vegetable Juice Agar
(For
Chaetomium globosum)
V8
®
vegetable juice
200.0 mL
CaCO
3
3.0 g
Agar
20.0 g
Distilled water
1.0 L
Note: Add a strip of sterile filter paper to
agar after inoculation.

31
Further Reading
Alexopoulos, C.J., and C.W. Mims. 1979.
Introductory Mycology, 3rd edition.
John Wiley and Sons, New York.
Buchanan, R.E., and N.E. Gibbons, eds. 1974.
Bergey’s Manual of
Determinative Bacteriology, 8th edition. The Williams and Wilkins
Company, Baltimore.
Mycology Guidebook Committee, Mycological Society of America, Stevens,
R.B., ed. 1981.
Mycology Guidebook. University of Washington Press,
Seattle.
Pelczar, M.J., Jr., and E.C.S. Chan. 1981.
Elements of Microbiology. McGraw-
Hill Book Company, New York.
Singleton, P., and D. Sainsbury. 1978.
Dictionary of Microbiology. John Wiley
and Sons, Chicester.

Carolina Biological Supply Company
2700 York Road, Burlington, North Carolina 27215
Phone: 800.334.5551 • Fax: 800.222.7112
Technical Support: 800.227.1150 • www.carolina.com
CB160680611
Wyszukiwarka
Podobne podstrony:
Angelo Farina Simultaneous Measurement of Impulse Response and Distortion with a Swept Sine Techniq
Richard Bandler And John Grinder Patterns Of The Hypnotic Techniques Of Milton Erickson
Comparative Analyses of the Bacterial Microbiota of the Human Nostril and Oropharynx
Biological performance of uncoated and octacalcium phosphate
Dictionary of Weightlifting, Bodybuilding, and Exercise Terms and Techniques
Code mutation techniques by means of formal grammars and automatons
Biologic Effects of Lead on School Children of Urban and Suburban Tokyo
An Assessment of the Efficacy and Safety of CROSS Technique with 100% TCA in the Management of Ice P
Insensitive Semantics~ A Defense of Semantic Minimalism and Speech Act Pluralism
Estimation of Dietary Pb and Cd Intake from Pb and Cd in blood and urine
Development of Carbon Nanotubes and Polymer Composites Therefrom
Analysis of soil fertility and its anomalies using an objective model
Modeling of Polymer Processing and Properties
DICTIONARY OF AUSTRALIAN WORDS AND TERMS
A Chymicall treatise of the Ancient and highly illuminated Philosopher
Song of Myself Individuality and Free Verse
Extensive Analysis of Government Spending and?lancing the
Comparison of Human Language and Animal Communication
więcej podobnych podstron