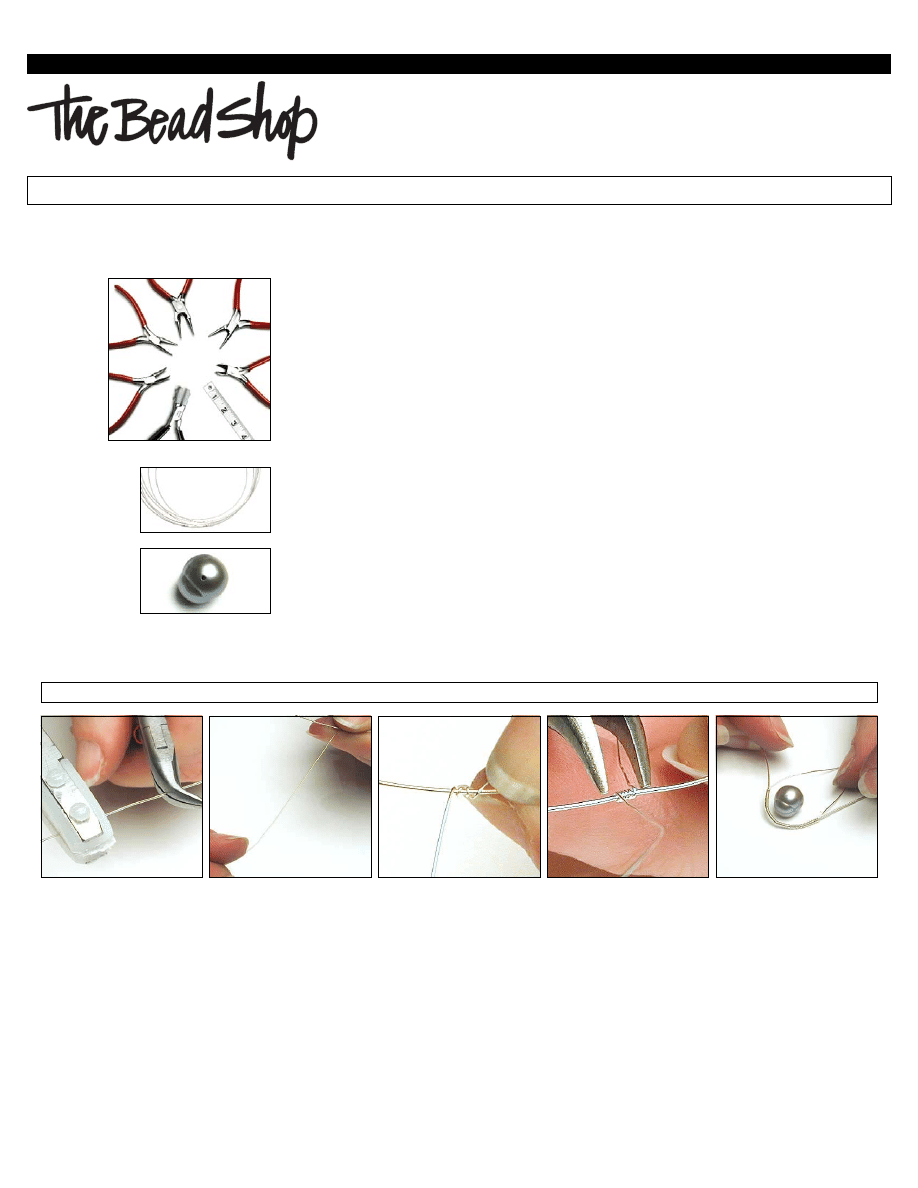
TOOLS NEEDED
A. Bent-nose chain pliers
B. Needle-nose chain pliers
C. Rosary OR
D. Round-nose pliers
E. Wire cutters
F. Tape measure or ruler
G. Wire straighteners
1 — 10mm pearl or other smooth, round bead
4' Sterling silver wire, 28-gauge (extra in case you need some for practice) and
2' Sterling silver wire, 24-gauge
Copyright 2005 Bead Happy Inc. All Rights Reserved
©
1
A
B
C
D
E
F
G
ONLY AT
BEADSHOP.COM
TM
Wire-Wrapped Bead Bezel
Making the Wire-Wrapped Bead Bezel
Step 1
Cut 12'' of 24-gauge
wire. Hold the wire with
your pliers and run the
wire straightener jaws
along the wire in the
direction away from
you, removing any
kinks. This is the base
wire that you will
coil around.
Step 2
Cut 20'' of 28-gauge
wire. This is the wire
that you are going to
coil with around the
base wire. Use the wire
straighteners, if
necessary, to smooth
out this wire also.
Step 3
Hold both wires in one
hand and smooth
them together. To begin
coiling the 28-gauge
around the 24-gauge
base wire, find the
spot 4'' from one end.
Start coiling the fine
gauge wire around the
24-gauge wire.
Step 4
Make neat, even coils
close to each other.
If necessary, use the
bent chain nose pliers
to bring them
closer together.
Step 5
Continue to wrap until
there is enough coiled
wire to fit around the
diameter of your bead.
Stop and test the
length, as needed.
ONLY AT
BEADSHOP.COM
ONLY AT
Copyright 2005 Bead Happy Inc. All Rights Reserved
©
2
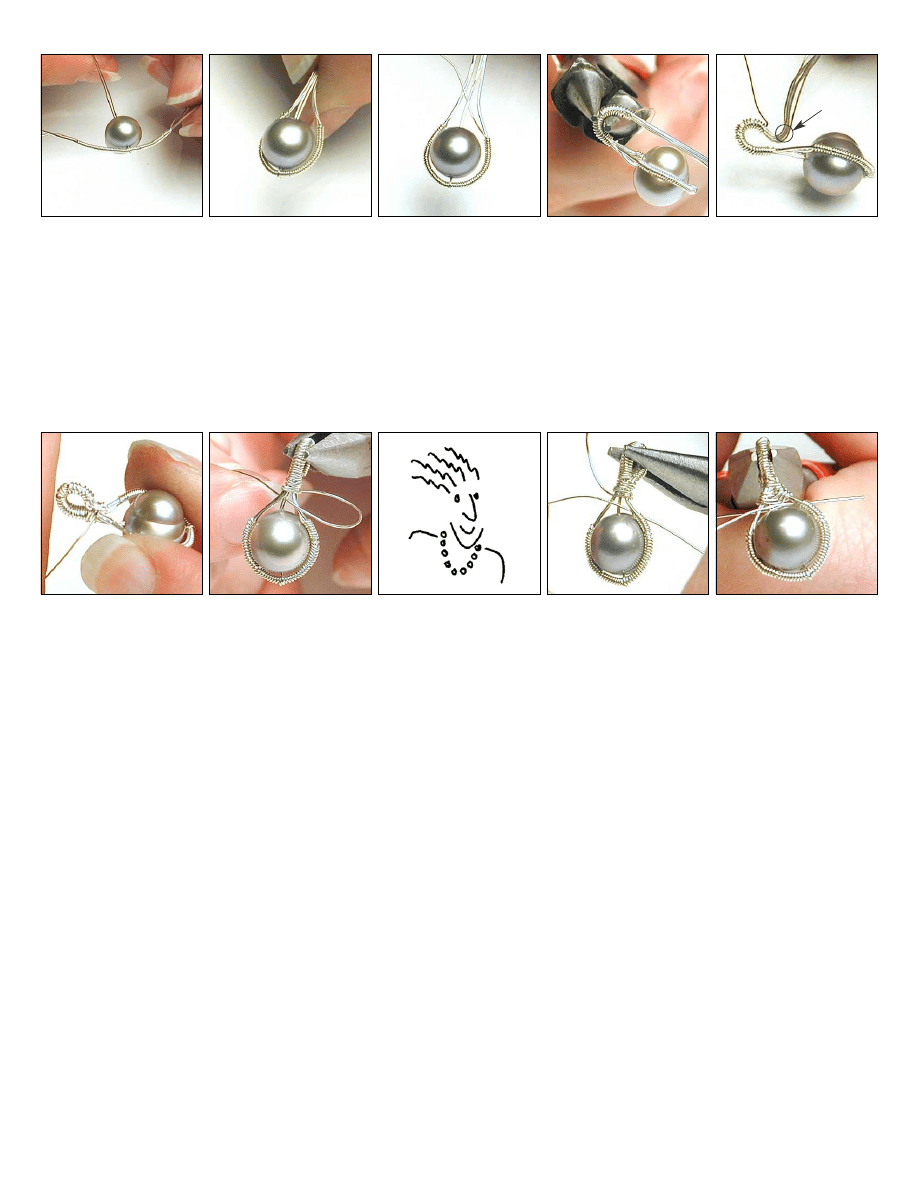
Step 6
Cut a piece of 28-gauge
wire 18'' long. Gently
fold it in half and
center around the
middle of the coil. Feed
the ends of this wire
through the hole of
the bead.
Step 7
Bunch all of the wires
together and choose the
longest 28-gauge wire
to do the weave.
Step 8
Start by wrapping all
wires together to form
the bail. Leave some
open space above the
bead before beginning
the wrap.
Step 9
Wrap around the
bunched wires with
the longest wire,
(approx. 1/2-3/4'').
Gently curve the wires
around a round nose
pliers to form
the bail.
Step 10
Curve the wires in
slightly, using your
round-nose pliers.
Leave out one of the
longest wires to weave
with. Below this curve
is where the remaining
wire swill be clipped away.
Step 11
Wrap the wire several
times around all wires
to secure the loop.
Step 12
Weave the end of your
wire in and around the
center wire going in a
figure 8. Alternate on
each side going back
around the center wire.
Make the weave as neat
and as tight as possible.
This will make your
bezel look its best.
Step 13
Continue to fill the space on top of the pearl by
weaving. To finish, wrap the wire along the side
wire at the end and tuck the end of wire along
the coil on the side of the bead to hide it. Cut any
excess wire using wire cutters. With practice, you
can use 26-gauge (replacing 24) and 30-gauge
(replacing 28). We hope you've enjoyed this
project. Happy Beading!
Clip
Wyszukiwarka
Podobne podstrony:
o robieniu biżuterii ogólnie
Kurs robienia na szydełku
kurs robienia pisanek
Kurs robienia na szydelku
Kurs robienia na drutach
Bizuteria kurs Jewellery handmade jewelery jevelery kolczyki bransoletki naszyjniki koraliki(CRAFTS)
Bizuteria kurs Jewellery handmade jewelery jevelery kolczyki bransoletki naszyjniki koraliki(CRAFTS)
Bizuteria kurs Jewellery handmade jewelery jevelery kolczyki bransoletki naszyjniki koraliki(CRAFTS)
Bizuteria kurs Jewellery handmade jewelery jevelery kolczyki bransoletki naszyjniki koraliki(CRAFTS)
Bizuteria kurs Jewellery handmade jewelery jevelery kolczyki bransoletki naszyjniki koraliki(CRAFTS)
Bizuteria kurs Jewellery handmade jewelery jevelery kolczyki bransoletki naszyjniki koraliki(CRAFTS)
Bizuteria kurs Jewellery handmade jewelery jevelery kolczyki bransoletki naszyjniki koraliki(CRAFTS)
więcej podobnych podstron