
GAUTION!! THIS IS AN ELECTRICAL DEVICE AND MUST BE USED WITH DISCRETION. THE
PURCHASER AGREES TO ASSUME ALL LIABILITY FOR ANY DAMAGES AND BODILY
INJURY WHICH MAY RESULT FROM THE USE OR MISUSE OF THIS PRODUCT. WE MAKE NO
CLAIMS AS TO THE USER'S SAFETY OR STOPPING POWER OF THIS DEVICE.
ITMl/STG2 100,000 VOLT INTIMIDATOR/STUN GUN
The following plans show how to construct a flashlight sized device capable of stunning a would be rapist
or attacking subject. It is easily carried in a side holster or placed behind a bar, ~in a glove compartment
etc. The device produces an intimidating plasma or lightning like discharge that in most cases discourages
an encounter. This effect occurs as a visual audible display between the contacts immediately when power
is applied. A physiological effect requires contact to certain parts of the anatomy to produce the stunning
disabling function. The contact approach is recommended only as a last resort. The electrical output energy
is small and usually will not cause any tissue ,
damage. However an element of surprise is produced allo~ing the victim precious moments to escape or
use other more severe deterrents.

CIRCUIT THEORY REF FIG 1
Your ITMl circuit consists of two basic sections: (A)
INVERTER POWER SUPPLY and (B) CAPACITOR DISCHARGE- SECTION.-

The INVERTER SECTION consists of switching transistors (Ql) and (Q2) that alternately switches the
primary windings of a saturable care transformer (Tl). A high voltage square wave is induced in the
secondary of Tl via the switching action and is rectified by diade bridge D3, 4, 5 & 6. Base current drive
for Ql and Q2 is obtained by a tertiary feedback winding on Tl and is applied in the correct phase to turn
the appropriate transistor "on". This base current is limited by resistor R2. Diades Dl and D2 provide a
return path for the base current flowing in the opposite transistor respectively. Rl serves to unbalance the
circuit to initiate switching. A voltage of approximately 400 volts is obtained in this circuit from the 9.6
volt Nicad battery Bl. Higher powered operation may be obtained by increasing Bl to a 12 volt battery
pack, however, more space is required and care must be taken not to over rate the components if continued
use is anticipated. A convenient jack for recharging the Nicad battery is also included.
The CAPACITOR DISCHARGE SECTION consists of two opposite phased high voltage pulse
transformers T2, T3 being current pulsed via SCR1 shorting a charged capacitor C2 across their primaries.
C2 and the primary inductance of T2, T3 provides a ringing wave whose negative overshoot commutates
SCR1 to turn "off". Tt is important that this primary inductance be sufficient so when combined with
capacitor C2 allows a ringing frequency with a period considerably larger than the required commutation
turn off time of the SCR1. Diode D8 provides energy recovery of the negative overshoot component of this
discharge pulse.
Transformer T2, T3 now force induces "out of phase" high voltage pulses in their respective secondaries
with a high instantaneous peak current (this system is similar to a Capacitor Discharge Ignition). Diode D7
and R3 limit the DC current to the SCR1 and prevents DC lock on, which alBa provides a high impedance
to the negative turn "off" pulse.
SCR1 is triggered by the UJT pulse timing circuit consisting of Q3. Pulse repetition rate is determined by
capacitor C3 and the charging trimpot R6. SCR1 switch rate can be
adjusted "from one to 50 pps". Higher pulse rep rates may have a tendency to overload the inverter power
supply, where it will be unable to supply the current necessary to successfully charge C2, consequently
with its charge voltage dropping off.
The voltage ouput is about from 50-100,000 volts at a peak current of 1-2 amps. The energy waveforms
consists of a train of 30 microsec pulses decaying exponentially. This produces a moderate ly painful
electric shock and is what causes the temporary jamming of the nervous system hut will not electrocute due
to the low average current plusc the fact- that the current flow is only across a small section of the
body, that is between the contact electrodes. The peak
power of this device is 25,000 watts plus.
The outputs of T2 and T3 are the output contacts of the device. T2 and T3 are phased for different outputs.
Now when 51 switch is actuated a continuous sparking occurs between these points producing the visual
and audible effect. Contact now is any point between the pins.
CONSTRUCTION STEP FOR KTT
1. Unpack and identify all components. Check color codes of all resistors and match to parts list.
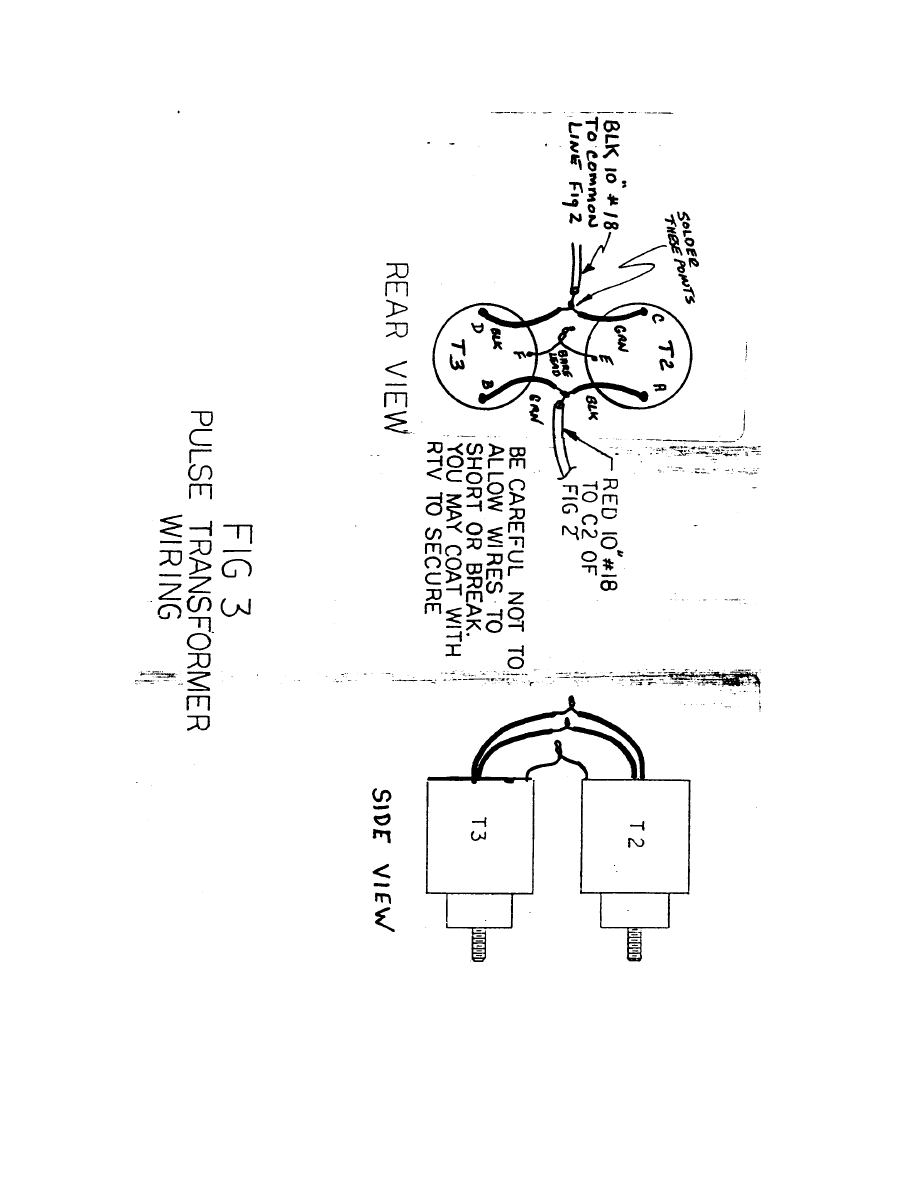
2. Wire T2 and T3 pulse transformer as shown FIG 3 and connect 15" #18 wire leads to points shown. Use
care not to break the delicate leads from these components. It is suggested that the serious builder consider
purchasing this part assembled and potted into the enclosure (EN1) as it is a high voltage device and
requires careful attention.
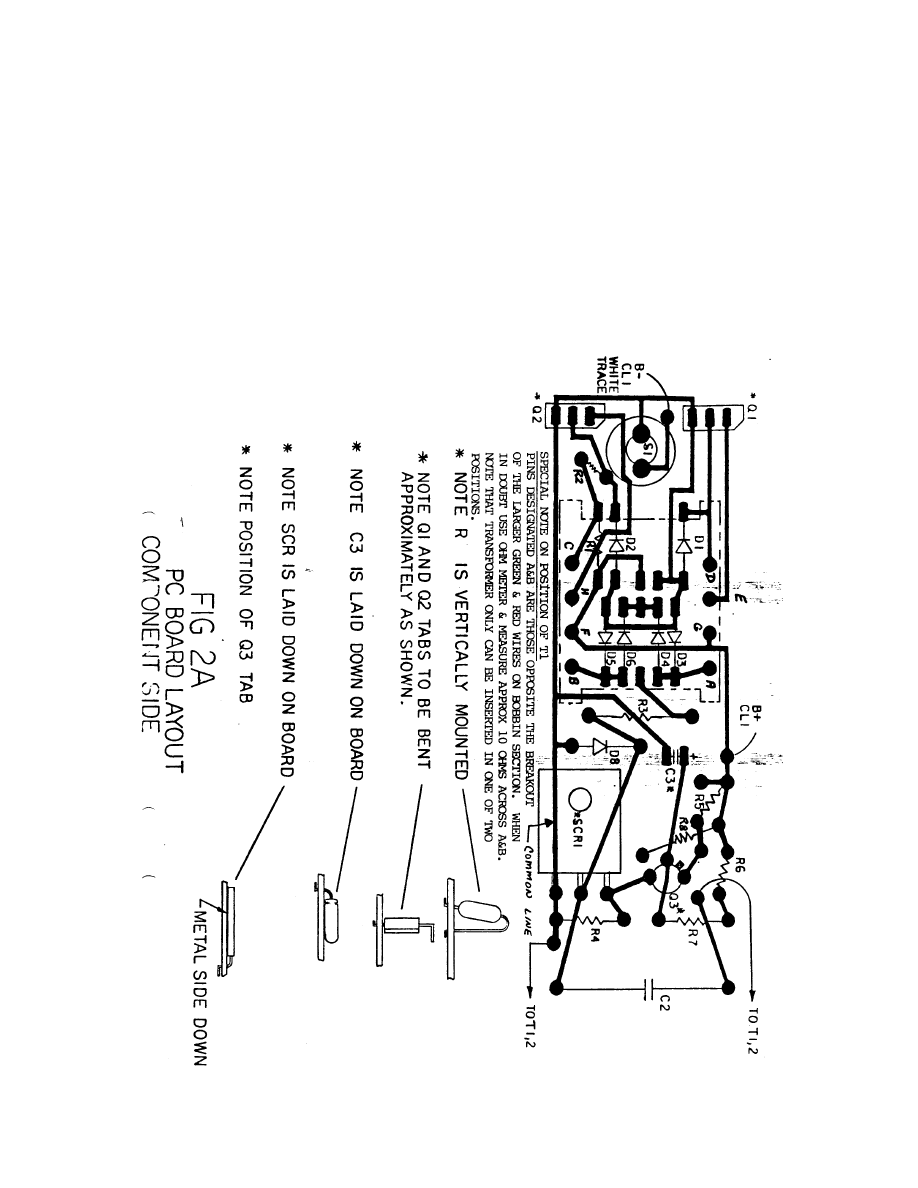
3. Assemble board as shown FIG 2. Note position of transistors, polarity of diodes and capacitors. Note that
when using the special PC transformer T1 that>( can be inser ted two ways. One way to determine the
correct position is to measure the resistance of the two windings and identify them. The one with the lower
reading goes toward Q1 and Q2. Transformer when purchased through INFORMATION UNLIMITED will
have the code mark as shown FIG 2.

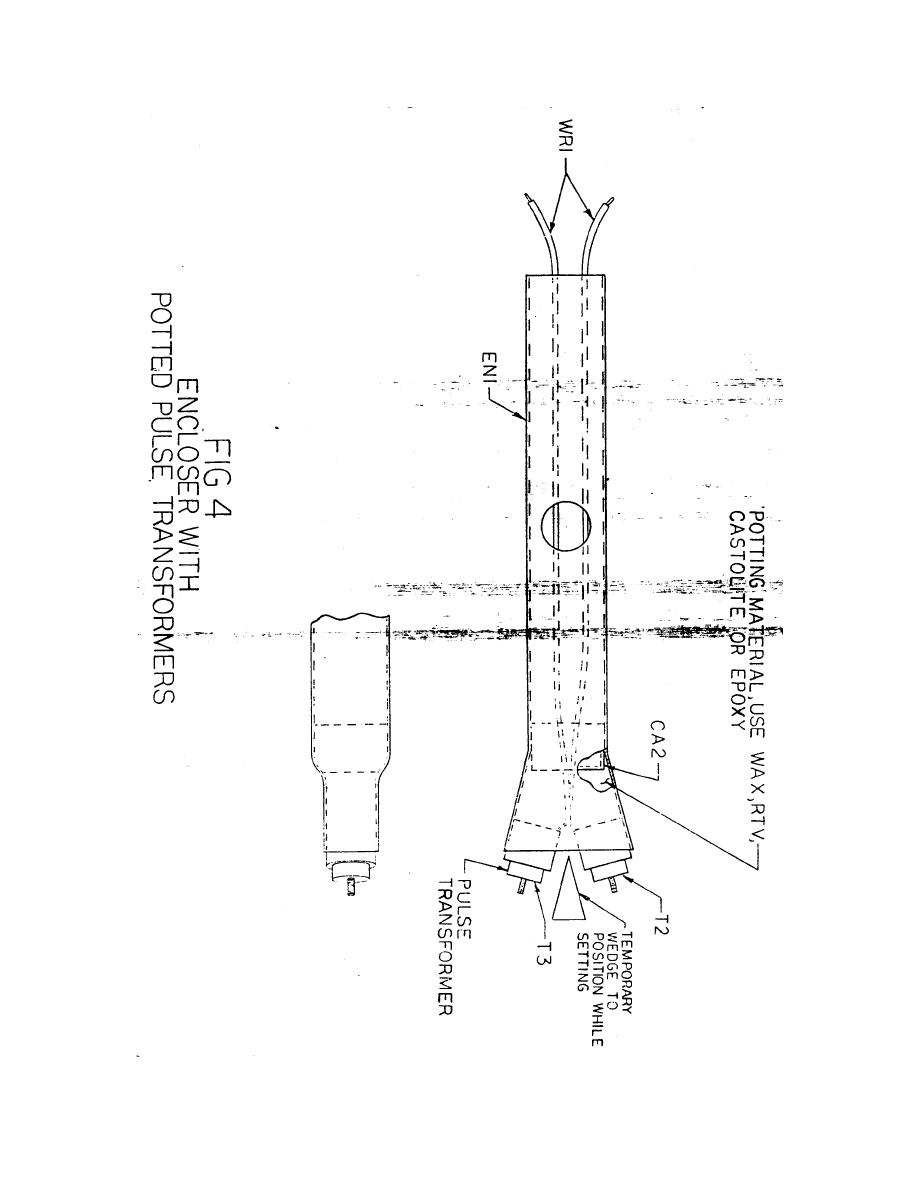
4. Insert T2, T3 assembly into ENl enclosure as shown FIG 4. Position as shown and glue or bond this
assembly to inside wall of EN1. 5ecure using wedge etc.
5. Poke two hales into cap CA!, hales must seal in liquid potting meterial around wires. Thread these
wires from T2, T3 assembly into enclosure as shown with open end facing rear of unit. Check proper
position of hole for controI switch.
6. 5ecure entire assembly in a vertical position and fill in spaces around T2 and T3 with a potting
compound. UseRTV (room temp vulcanizing) paraffin wax or epoxy.
Note the latter is unforgiving and parts cannot be salvaged if there is an error. Allow to set.
7. Solderer leads from T2, T3 to points shown.
8. Connect up a freshly charged pack (BH1) of 8 AA Nicad 1.2 volt cells to CLl clip.
9. Connect a voltmeter to point W FIG 1. Momentarily press S1 and note a voltage of approximately 400
VDC. If no voltage is present circuit must be trouble shot.
If you did your homework and Murphy's First Law of "whatever can go wrong will go wrong" is broken
you should detect a HV pulsing at the output pins of T2 and 3.
10. Adjust R6 for a discharge of from 5 to 30 shots per seco This should correspond to a battery current of
1 to 2 amps when measured by connecting a current meter across 51. Caution this action shorts out 51. The
pulse rep rate should not be set where the battery current exceeds 2 amps.
NOTE: Wave shapes and test points are on FIG 1 for those wishing to verify proper circuit performance.
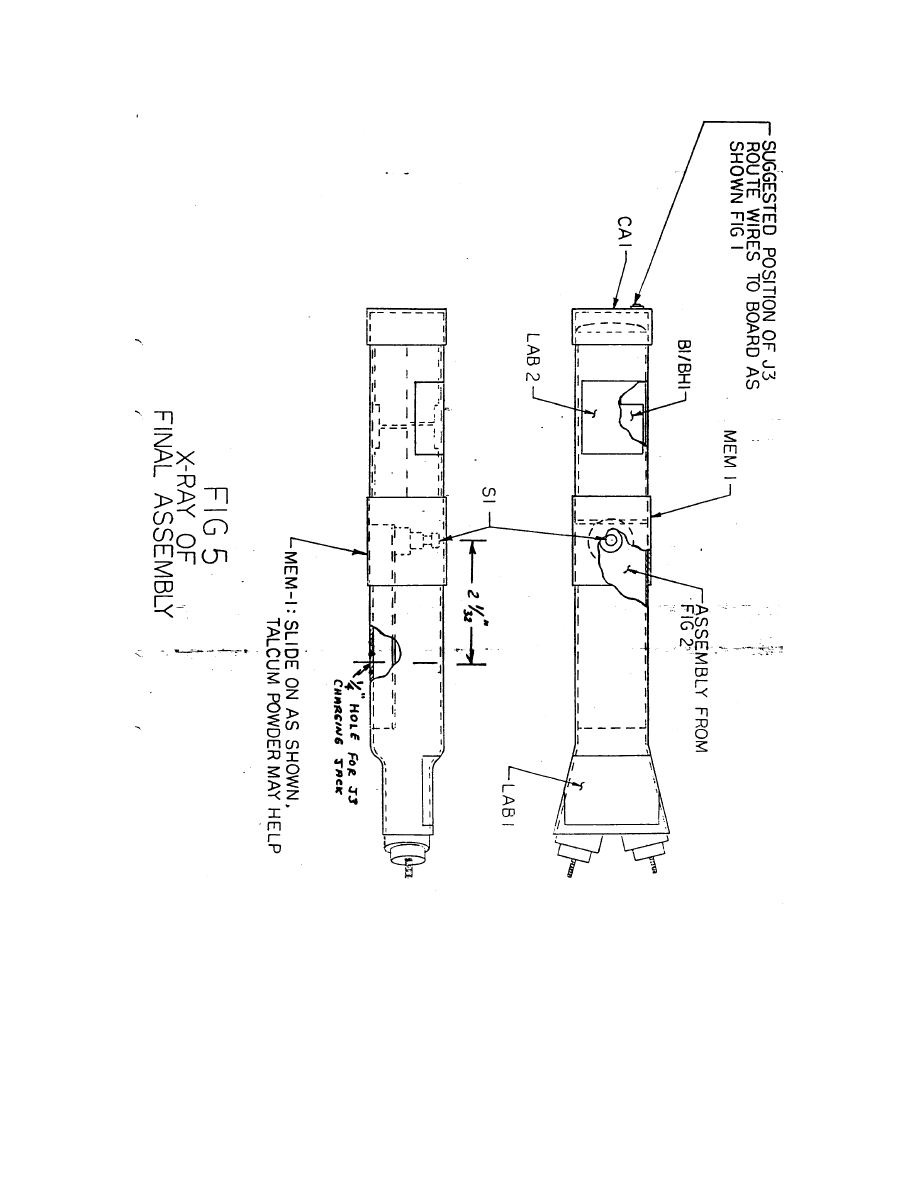
11. Place assembly from FIG 2 into enclosure as shown FIG 5. lise RTV or other suitable adhesive to
secure in olace. Make sure there is ample room for battery Bl located ~s sho~m.
(It is a good idea to place a foam rubber support as shown FIG 5 to secure the assembly board when push
button is activated). Battery is inserted inta rear of unit and should allow cover (CA1) to fit properly as
shown. *Note position of J3 if used and place a hale at convenient location. Note centering of switch Sl in
access hale. Sleeve on membrane (MEM1) and attach labels as shown.
*12. Check charger action measuring a charge current of 30- 40ma., if J3 and R8 are internally installed.
13. To use device other than for the intimidating affect requires contact to certain parts of the subjects
anatomy. Device will produce a temporary stunning effect and may paralyse. It is not recommended to be
used in any type of a potential hostile situation unless a suitable back-up is available.
SPECIAL NOTE IN SITUATIONS WHERE RAPE, ETC., ARE UNPREVENTABLE AN ATTEMPT TO
CONTACT THE GENITAL AREA WILL PRODUCE OBVIOUS RESULTS.
CAUTION! THIS IS AN ELECTRICAL DEVICE AND MUST BE USED WITH DISCRETION. THE
PURCHASER AGREES TO ASSUME ALL LIABILITY
FOR ANY DAMAGES AND BODILY INJURY WHICH MAY RESULT FROM THE USE OR MISUSE
OF THIS PRODUCT. WE::-MAKE -NO CLAIMS AS TO- THE USER'S SAFETY OR STOPPING
POWER OF THIS DEVICE. INJURY MAY BE CAUSED BY SECONDARY REACTIONS.
PRELIMINARY
Your ITM1 - Intimidator is designed to produce an intimidating affect that will discourage a potentially
hostile or aggressive encounter up to distances of 10-15
feet. A stunning paralysing effect is produced on contact allowing valuable time to get help or use a more
severe deterrent.
It is designed to fit in ahoIster, glove box or large coat pocket. Activation is by simply pushing the security
membrane switch nating the spark discharge. IN MOST CASES ACTUAL

PHYSICAL CONTACT MAY BE AVOIDED BY THE INTIMIDATING VISUAL AND AUDIBLE
DISPLAY OF THE UNIT as it produces lightning-like discharges emitting from its output end.
FACTS YOU SHOULD KNOW BEFORE USING
1. Your intimidator device is psychologically affective for a distance of up to 20 feet. Most attackers
usually keep their distance once exposed.
2. When contact is made to the subject, he may be stunned and paralyzed for up to several minutes.
3. No manufacturer can claim any electrical device is completely safe to use. Therefore neither do we.
Secondary reactions can cause a person to fall, involuntary break a
bane by muscular spasm etc. In general the intimidator is electrically safe when tested in a controlled lab
environment and will not cause e1ectrocution.
4. The high voltage output can penetrate the heavest of clothing and due to the contact spacing will deliver
high1y jamming electrical pulses that will over-ride the nervous system causing temporary paralysis and
loss of vo1untary control.
SUPPLEMENTARY INSTRUCTIONS
1. Obtain a fresh charged pack of 8-1;2 volt NICAD
batteries and insert into holder BHl -Note proper polarity.These are available through your local hardware,
Radio Shack etc., they are only rated at 9.6 volts and you may use alkaline batteries for a hotter spark
however they cannot be recharged. Always follow the manufacturer's instructions simply plug charger into
jack or remove battery pack and allow at lease 12 hours.
2. Remove cover CAl and careful1y insert battery into
clip. Place in compartment and route any wires away that
will prevent from properly~:fitting. CAUTION! DO NOT WASTE BATTERY POWER BY FOOLING
AROUND. NICADS GO DEAD ALL AT ONCE! Test by activating for severa1 seconds nating a
healthy spark discharge. Again alkaline batteries may be used hut cannot be recharged.
3. Do not attempt to contact external objects as serious danger can result to certain equipment coming in
contact with the units output. Any device using electronic circuitry is especial1y prone to this. Remember
your unit produces high volt pu1ses and can wipe out computers and other sensitive circuits. Any actua1
contact shou1d on1y be made when intended and directly to the subject's anatomy as shown on the sketch.
4. Always attempt to discourage by displaying the audible and visual effects of the device. A high voltage
label is included and may be placed anta the unit. It 1s more for intimidating than it is for safety. If close
contact must be made, only lise that necessary to subdue your attackers. A one to four second exposure
usually is sufficient.
Note in hostile situations a suitable back up such as a hand gun or other more se'Jere deterrent should be
considered.
REMEMBER NO ONE CAN GUARANTEE THAT THE ATTACKERS MAY NOT
HAVE A MORE SEVERE DETERRENT AND WILL NOT HESTITATE TO USE IT CAUTION!
CAUTION!
Attempt to avoid gang situations or where drugs are used. Reactionary defences could involve lethal use of
other more terminating weapons against you.
The power of your unit can be demonstrated by obtaining a Styrofoam cup full of water & discharging the
unit on the side noting a immediate puncture & burn with water now leaking out.

NOTE - Always use battery manufacturers recommendations when charging or using Nicads.
A special jack on the end allows convenient recharging of the Nicad battery. See FIG 5. Charge at 30ma for
14-16 hours. special chargers are available.
CAUTION!! THIS IS AN ELECTRICAL DEVICE AND MUST BE USED WITH DISCRETION. THE
PURCHASER AGREES TO ASSUME ALL LIABILITY FOR ANY DAMAGES AND BODILY
INJURY WHICH MAY RESULT FROM THE USE OR MISUSE OF THIS PRODUCT. WE MAKE NO
CLAIMS AS TO THE USER'S SAFETY OR STOPPING POWER OF THIS DEVICE.
ITM1 - PARTS LIST
Rl
1
1K 1/4 watt resistor
R2
l
100 to 200 ohm 1 watt resistor
R3
l
2.2 to 2.7K 1 watt
R4
1
27-39 ohm 1/4 watt resistor
R5,8
2
100 ohm 1/4 watt resistor
*R6
1
Selected resistor-nominally 68K 1/4 W See note FIG l
R7
1
22 to 27K 1/4 watt resistor
C1
l
10 mfd @25V to 35V elect cap
C2
1
3.9 mfd @350V cap $1.50
C3
l
1 mfd @25V to 50V elect cap
*J3
l
3.5mm jack
D1,2
2
1N4001 diode 50V
D3,4,5,6
7,8
6
IN4007 diode 1000V or UF4007/BYV26E
Q1,2 2 D40D5 NPN pwr tab tran
Q3
1
2N2646 UJT
SCRl 1 MCR 106-8 or C107D or 2N4444
BH1
1
8AA cell battery pack
T1
1
Type I pc transformer $12.50
T2,3 2 50 KV pulse transformer (25KV @200V)..$12.50
FTl
l
3" foam -tape
CLl
l
lO" battery clip
Sl
l
push button switch
WR1 15"
#18 vinyl wire red & black
WR2 3"
#24 vinyl wire
**MEMl
1-1/2" Rubber inner tube membrane - See FIG 5
ENl
l
Special fab enclosure ..$6.50
CA1
l
1-5/8" plastic cap
CA2
l
1-1/2" plastic cap
PCITM l
printed circuit board .$9.50
LABl l High voltage label
LAB2 l Special intimidator label
OPTIONAL ITEMS
Battery charger 12 volts $9.50 Bl 8 1.2 volt
nicad batteries
(local
hardware
store-or- Radio Shack)
potted T2 « T3 in enclosure FIG 4 .,-$14,50
**USE AS SLEEVE OVER UNIT. ACTS AS MEMBRANE FOR ACTIVATING PUSH BUTTON
SWITCH Sl AND MOISTURE PROOFING.
BLASTER/DEVASTATOR DEVICE Is our most popular
plasma discharge of over 100,000 watts with the brisance of
a pistol shot. It can burn living tissue producing a
stunning or disabling effect. It is intended to be used
against a vicious animal or other attacking subject. Rugged hand-held and completely self-contained unit
has a membrane safety switch and power indicator lamp. Patented dual
contact method helps to prevent the unit from being taken away from the user while providing ease in
operation.
Wyszukiwarka
Podobne podstrony:
(EE project) BROAD BAND 2MHz OPTICAL FIBER RECEIVER U6NERKQGZGGI5GTI2JHKHPASTV5SNBXM7QR6ECA
(EE project) BROAD BAND 50MHz OPTICAL FIBER RECEIVER VERSION A VOJGZ2JKTPIG7U65EU4PVIEF5STBD4XSJ7MUY
(EE project) BROAD BAND 5MHz OPTICAL FIBER RECEIVER 3KGBQ5QXD34N3KOK4GW4KJVZWBUET47KKQVPX6A
(EE project) 63 67
(EE project) Hardwire buggsändare(1)
(EE project) FM sändare 88 108MHz(1)
(EE project) FM Mottagare TDA7000(1)
(EE project) Remote two wire positioner(1)
(EE project) Trådlös telefonbugg (analog)(1)
(EE project) Glimmtändare
(EE project) Micropower Wireless Motion Detector(1)
(EE project) digit 5x7(1)
(EE project) FM sändare FM 79 (r=2500m)(1)
Prezentacja ZPR MS Project
Free Energy Projects 2
Microsoft Office Project Project1 id 299062
project
więcej podobnych podstron