
By Jane Daniell
Materials Required:
Red card: 2 pieces at 2cm square,
1 piece 2cm x 3cm and 1 piece 12cm x 14cm.
Shiny Black card 6cm x 8cm.
White textured card 6cm x 6cm.
Green card 10cm x 10cm.
Scrap of Pink paper.
Strip of White card 1.5cm x 14cm.
Tracing paper.
Pink and Black pens.
Carbon paper and a hole punch.
Gold dimensional paint.
Sharp scissors and sticky fixers.
Glue stick.
Card mount: SF01G-OV-GO-30, White.
Moving Santa
18
Actual Size
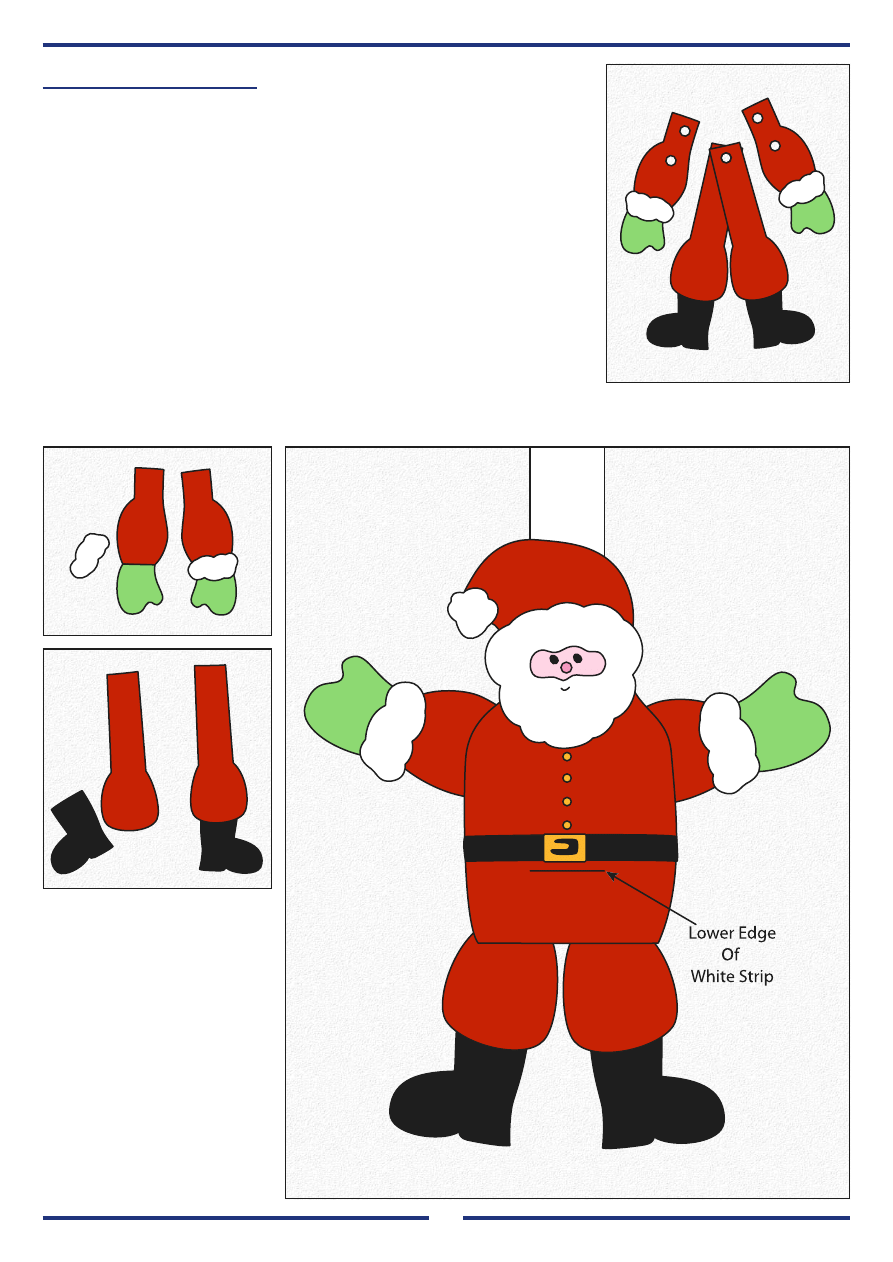
Glue each leg to the top
of the boots overlapping
the boots by about 3mm
at the join.
Glue the pink paper
behind the hole in the
beard, using a black pen
draw in the eyes and a
happy smile. Add a round
nose using pink pen.
Glue the beard and face
onto the hat and glue the
pom-pom onto the end of
the hat.
Glue the black
belt onto the
body where
shown. Carefully
paint a buckle
and buttons in
gold dimensional
paint.
Glue the
top of the legs
together at an
angle as shown
so the boots
point outward.
When the glue is
dry punch a hole
in the centre of the top. Punch two holes into the
top of each arm where marked with crosses.
To Make The Card:
Trace all the pattern pieces from the diagram
on the first page onto tracing paper and mark the
crosses on (to help with assembly later). Trace
each piece onto the appropriate coloured card
slipping the carbon paper between the tracing
and card to transfer the lines. Carefully cut out
all the Santa pieces.
Lay the pieces on the assembly diagram to
check positions and overlaps before glueing
them. Note that the arms, hands, legs and boots
are ‘handed’ so make sure you join left hand
pieces with each other and right hand pieces
with each other, don’t mix them up.
Lay each arm with it’s hand in position and
just touching. Glue the back of each cuff and
place over the joins.
19
Actual Size
Assembly Diagram
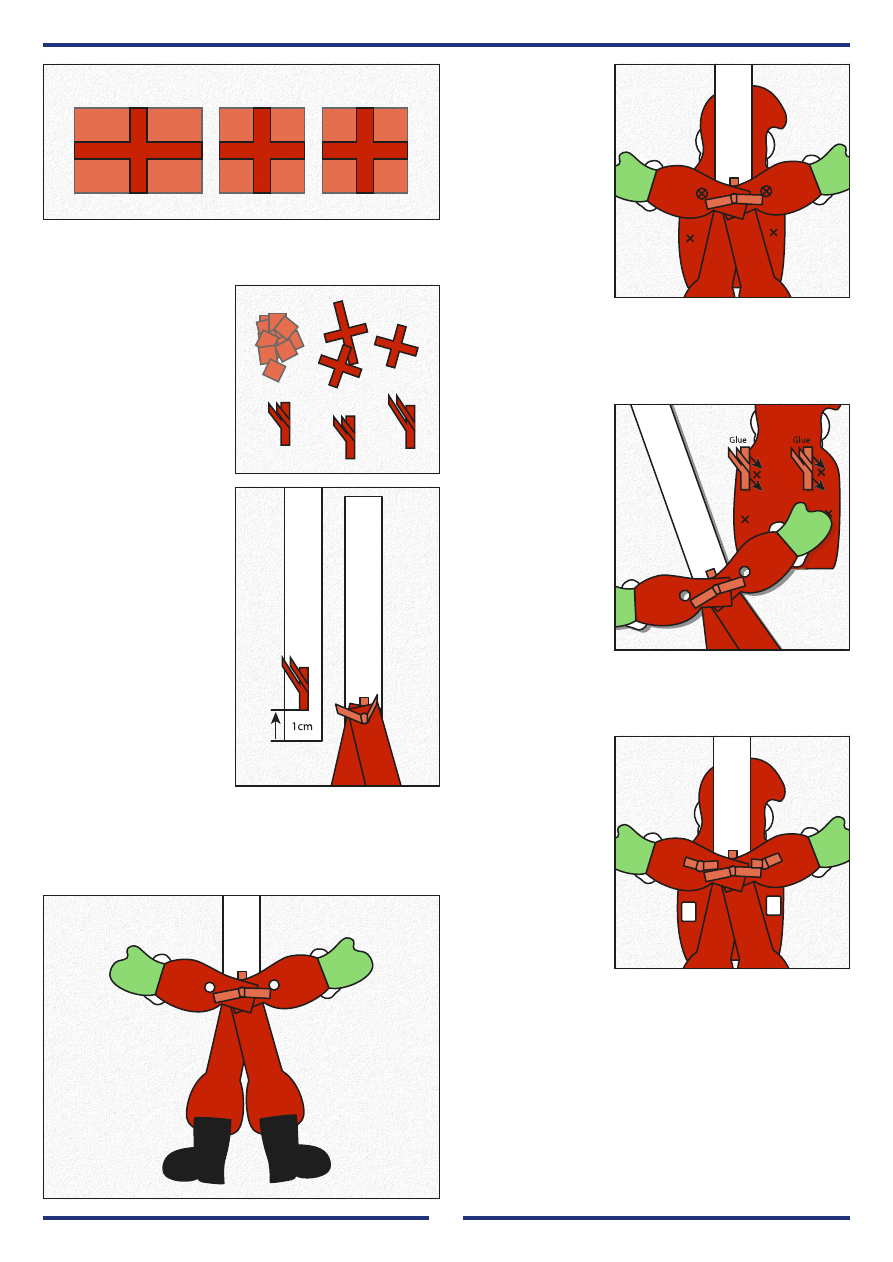
To check
everything is posi-
tioned correctly
place the arm and
leg assembly over
the body with the
arms pointing out
as shown, you
should be able to
see the marked
crosses through
the two holes in
the arms. If you can’t get them to centre exactly,
mark new crosses (as close as possible to the old
ones) through the holes using a different colour
pen so you can tell which are which.
Place the body
face down on the
work surface and
glue the remain-
ing two crosses
onto the body
using the marked
dots to centre
them onto.
Place the arm
and leg assembly
back over the
body, slipping the cross prongs through the inner
holes on each arm. Fold the prongs outward until
flat to secure. Place a small piece of sticky fixer
onto either side of
the body over the
two crosses still
showing on the
body.
Position Santa
onto the card and
mark a 2cm slot a
little above his eye
level onto the card
behind him. Cut
the slot and slip
the strip of white card through to the inside.
Position Santa onto the card with his arms out
and feet just below the bottom of the oval. Peel
off the backing from the sticky fixers each side
and press Santa into place. The top of the white
pull strip should be just below the top of the
card, if it is a little too high give it a trim.
Add the holly leaves to the bottom left and
top right of the card. The berries are made from
hole punched dots.
Draw a cross onto each of the three small red
pieces of card as shown. The width of each cross
bar must be no more
than 4mm, this is
important. Snip away
the four corner pieces
around each cross and
discard them. Fold
two opposite prongs
upward on the square
crosses, fold the
longer two prongs
upward on the larger
cross.
Glue the larger
cross onto the white
strip approx. 1cm
from the bottom as
shown. Place the legs
over the two cross
prongs which are
folded up, slot the
prongs through the
punched hole and
place on the work
surface.
Place each arm (thumbs pointing up) either
side of the legs, slot the cross prongs through the
punched hole near the end of each arm, fold the
the prongs outward until flat to secure.
20
Actual Size

Hello,
We hope you enjoy this free project. You may hand make copies of this project,
to give away or sell, as many times as you like. You may not use the pattern,
project, text or pictures for any other purpose nor make the project using
any automated process.
The project was taken from a back issue of the Craft Creations Magazine.
All the articles on our web site are at least one year old. If you want the latest
projects, designer profiles, gallery pages and more, then you need to subscribe
to the quarterly Craft Creations Magazine.
Subscription Benefits Include:
*
A free gift with every issue.
*
Two discount vouchers off Craft Creations products with every issue.
*
A £2.50 off post and packing voucher with every issue.
*
New product information.
*
Prize competitions in every issue.
You can subscribe to the quarterly Craft Creations Magazine or purchase any
of the back issues from our online shop.
The details above are correct as of 1st January 2003, but are subject to change without prior notice.
Craft Creations Limited, Ingersoll House, Delamare Road, Cheshunt, Hertfordshire, EN8 9HD, England.
Tel: 01992 781900 Fax: 01992 634339
Wyszukiwarka
Podobne podstrony:
Moving Average, giełda(3)
Moving Lips Cinema as Ventrilo Rick Altman id 308750
doc0940 8 Point Moving Average Filter on tinyAVR and megaAVR devices
Guppy Multiple Moving Average
Altman Rick Moving Image Moving Nieznany (2)
Howl´s moving?stle
DB Systems Super High Grade Pre amp and DB 4 Moving Coil Cartridge Pre Amp
Moving Sculpture
24 movinghouse
Moving Average Convergence, giełda(3)
0'MovingO7
DB Systems Super High Grade Pre amp and DB 4 Moving Coil Cartridge Pre Amp
TP Moving Pictures
The Moving Finger Stephen King
#0715 – Outsiders Moving In
Energy and Fuels 2006, 20, 155 158, Novel Process for Recycling Waste Plastics To Fuel Gas Using a M
The Moving Picture Boys on the Coast by Victor Appleton
moving bogs the
moving cloud
więcej podobnych podstron