162
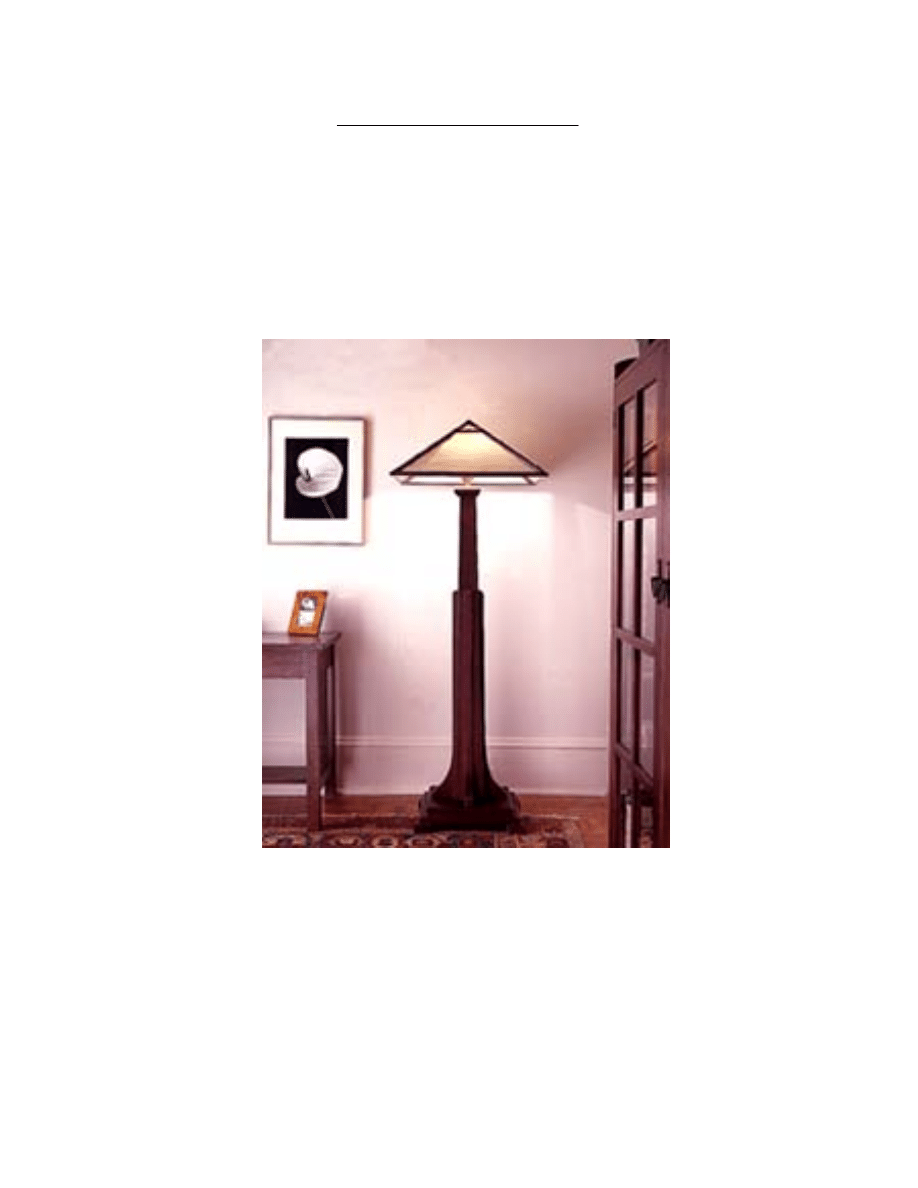
FLOOR LAMP
Copyright 2004 Martian Auctions
734
Copyright 2004 Martian Auctions
735
Stock preparation
Begin by ripping the four post boards to
size and crosscutting them 2 or 3 in.
longer than the finished length. Spread
glue on the mating surfaces of two of the
boards, then clamp them together with
their edges perfectly aligned. Repeat this
process with the remaining two boards.
Set up the router with a 5/8-in. straight bit
and an edge guide. Clamp one of the post
halves between bench dogs, then rout a
5/16-in.-deep groove down the center of
the blank (Photo 1). Repeat for the
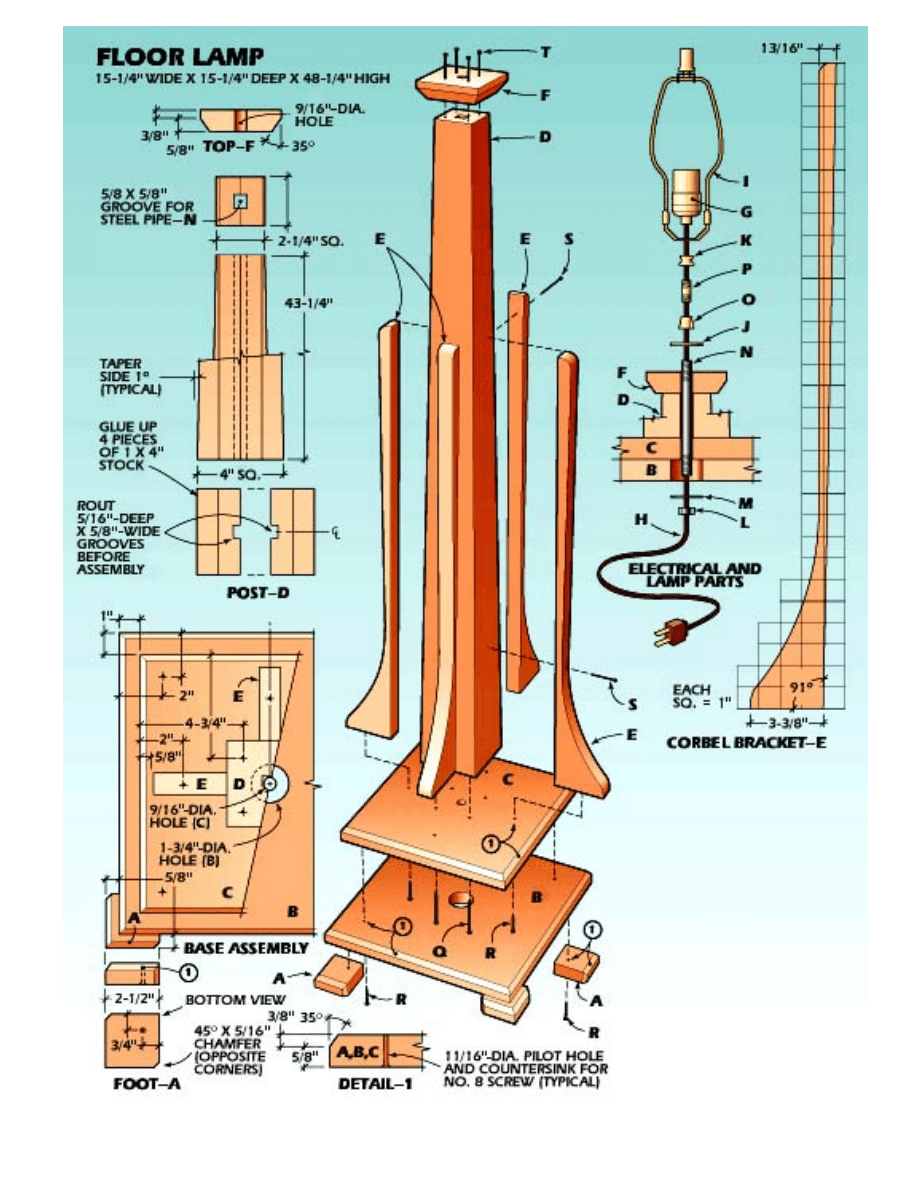
MATERIALS LIST––FLOOR LAMP
Key No.
Size and description (use)
A
4
1 x 2 1/2 x 2 1/2" oak (foot)
B
1
1 x 14 x 14" oak (lower base)
C
1
1 x 12 x 12" oak (upper base)
D
1
4 x 4 x 43 1/4" oak (post)
E
4
1 x 4 x 30" oak (corbel bracket)
F
1
1 x 3 3/4 x 3 3/4" oak (top)
G 1
3-way-turn
knob
socket
H
1
10-ft. brown cord set
I
1
10" harp (size depends on shade)
J
1
1/4 IP x 1 1/2" brass check ring
K 1
1/4 IP x 7/16" tapped brass
spindle
L
1
1/4 IP steel hexnut
M
1
1/4 IP x 1 1/2" steel washer
N 1
1/2" O.D. x 46" steel pipe with 1/4
IP threads on both ends
O 1
1/4 IP female x 1/8 IP female brass
tapered coupling
P
1
1/8 IP x 1" steel nipple
Q
4
3" No. 8 fh screws
R
8
1 1/2" No. 8 fh screws
S
8
4d finishing nails
T 4
6d finishing nails
Copyright 2004 Martian Auctions
736
second post half. Then, crosscut each half
of the post to finished length. Spread glue
on the mating faces of the post halves,
then clamp them together. Be sure to
align the ends and edges of the post
halves before setting the assembly aside.
Lay out the post taper on two opposite
sides of the blank, then use a band saw to
make the cuts (Photo 2). Remember to
keep the saw kerf to the waste side of the
layout lines. Next, clamp the post between
bench dogs and use a sharp plane to
remove the saw marks and bring the taper
right to the layout lines. Transfer the
tapered profile to the other two sides and
repeat the procedure to finish shaping the
post. Sand the surfaces smooth.
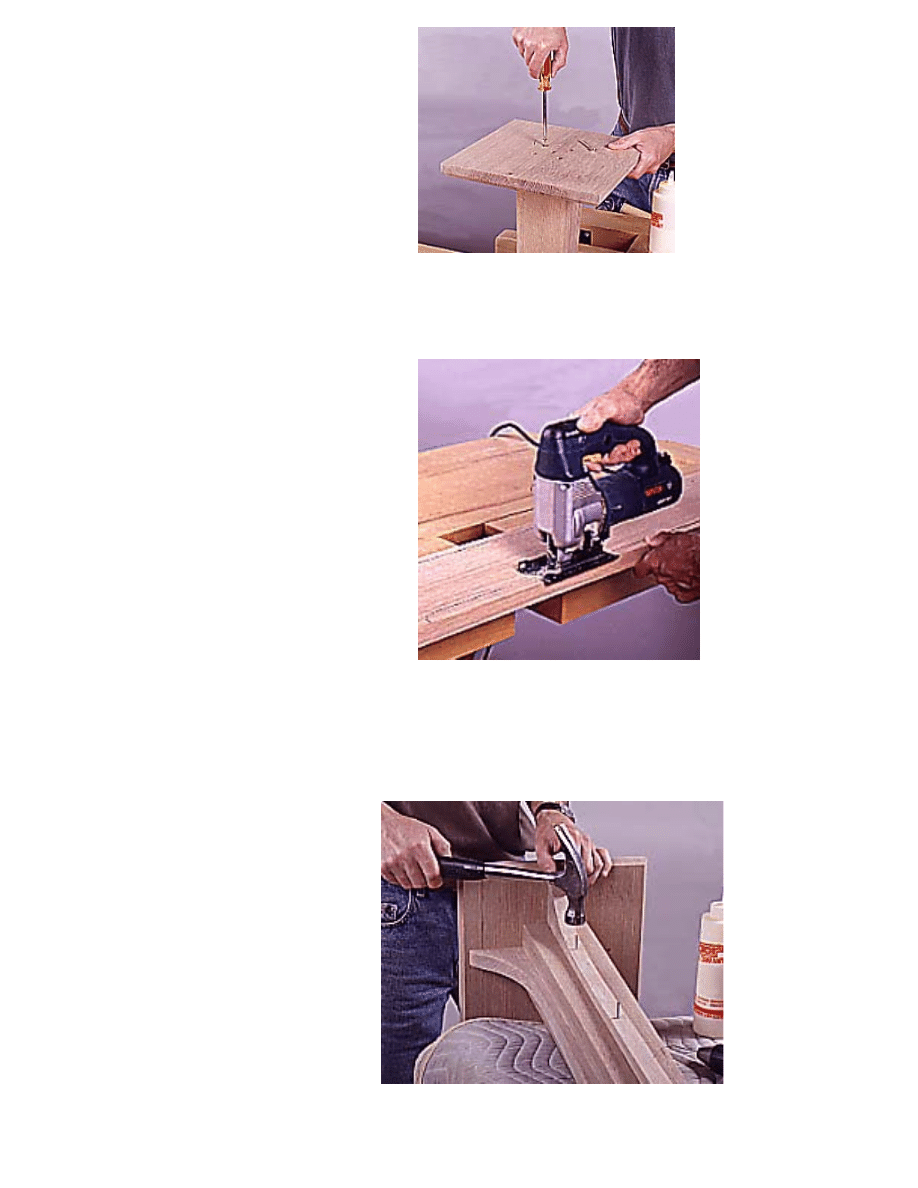
Cut the lamp top cap from a piece of 1-in.-
thick stock, then use a table saw and
miter gauge to cut a 35 degrees bevel on
all sides (Photo 3). Next, bore a 9/16-in.-
dia. hole through the center of this cap
and sand the piece smooth. Then place
the cap on top of the post, adjusting it for
an even overhang on all edges. Bore pilot
holes for 6d finish nails, then apply glue
and nail the cap in place (Photo 4). Set
the nails below the wood surface and fill
the holes with a stainable wood filler.
Glue two oversized blanks together for the
base panels. You can use joining plates to
align the boards while gluing them. Just
be sure to keep the plates far enough
back from the finished ends of the panels
so they will not be exposed when you
make the final cuts. After the glue cures
on the panels, rip and crosscut them to
size. Make sure that both panels are
perfectly square. Use a table saw to cut
the bevels around the panel edges. Bore
a 9/16-in.-dia. hole in the center of the
upper panel, then bore and countersink
pilot holes for fastening it to the post.
Sand this panel smooth, then use 3-in.
No. 8 fh screws and glue to fasten this
panel to the post (Photo 5).
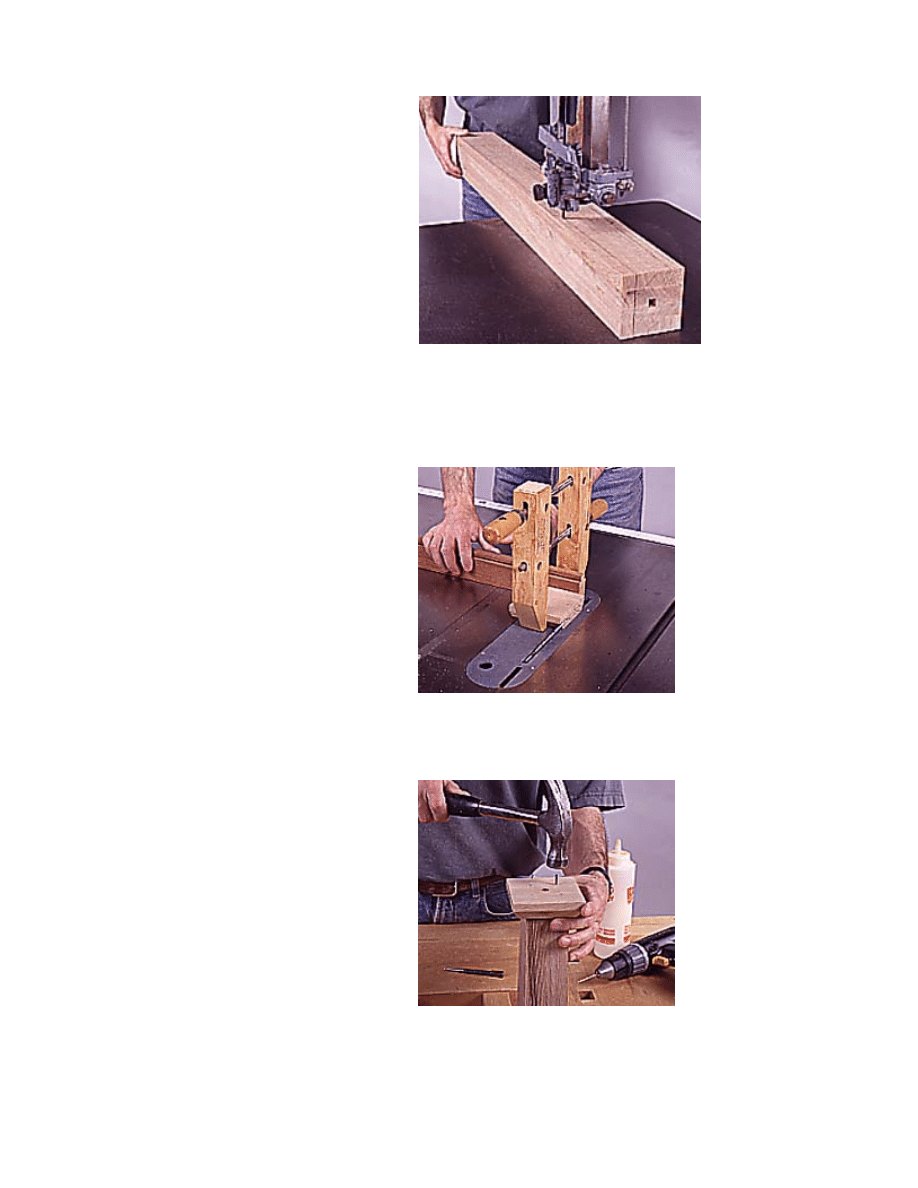
1--Rout a groove down the center for both
halves of the lamp post. Use a 5/8-in.-dia.
straight bit and a router edge guide.
2--Lay out the taper on opposite sides of
the post. Then, cut off the waste with a
band saw. Mark the other sides and cut
them.
3--Cut the top cap to size, then use a table
saw to cut a bevel on the bottom edge.
Clamp the block to the miter gauge.
4--Bore a 9/16-in. hole through the top
cap, then glue and nail the cap to the top
of the post. Bore pilot holes for the nails.
Copyright 2004 Martian Auctions
737
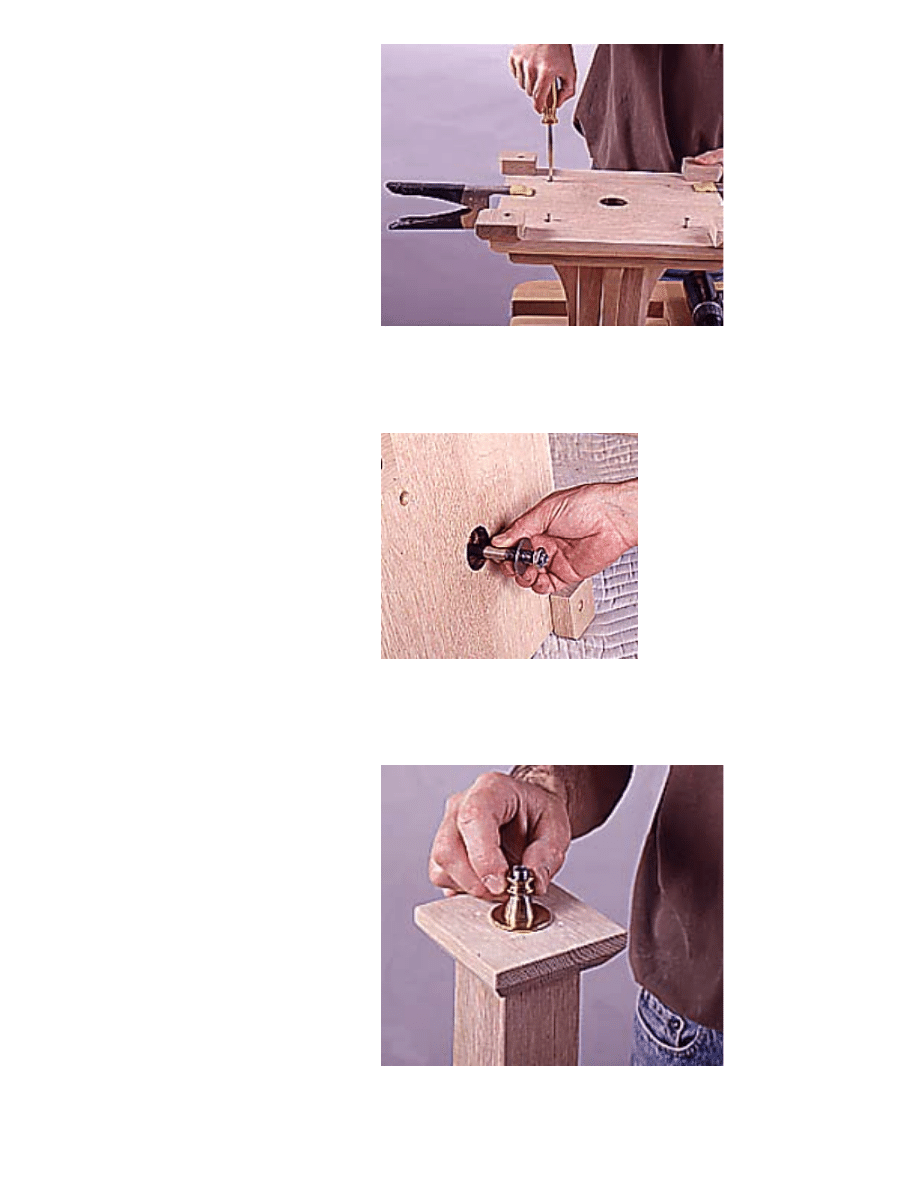
Next, make a template for the corbel
brackets from 1/4-in.-thick plywood or
hardboard. After cutting out your template,
hold it in place against the lamp post and
base. Once you are satisfied with the fit,
use it to trace the shape onto oversized
blanks for the actual brackets. Clamp a
blank between bench dogs, with the
bracket outline overhanging the bench.
Then, use a sabre saw to make the cut
(Photo 6). Repeat the same process for
each bracket. Sand all the brackets.
5--Cut the upper base to size and bore a
9/16-in. hole through its centerpoint.
Attach it with glue and screws.
6--Lay out the corbel shapes on a board.
Then clamp the stock between bench
dogs and cut the outline with a sabre saw.
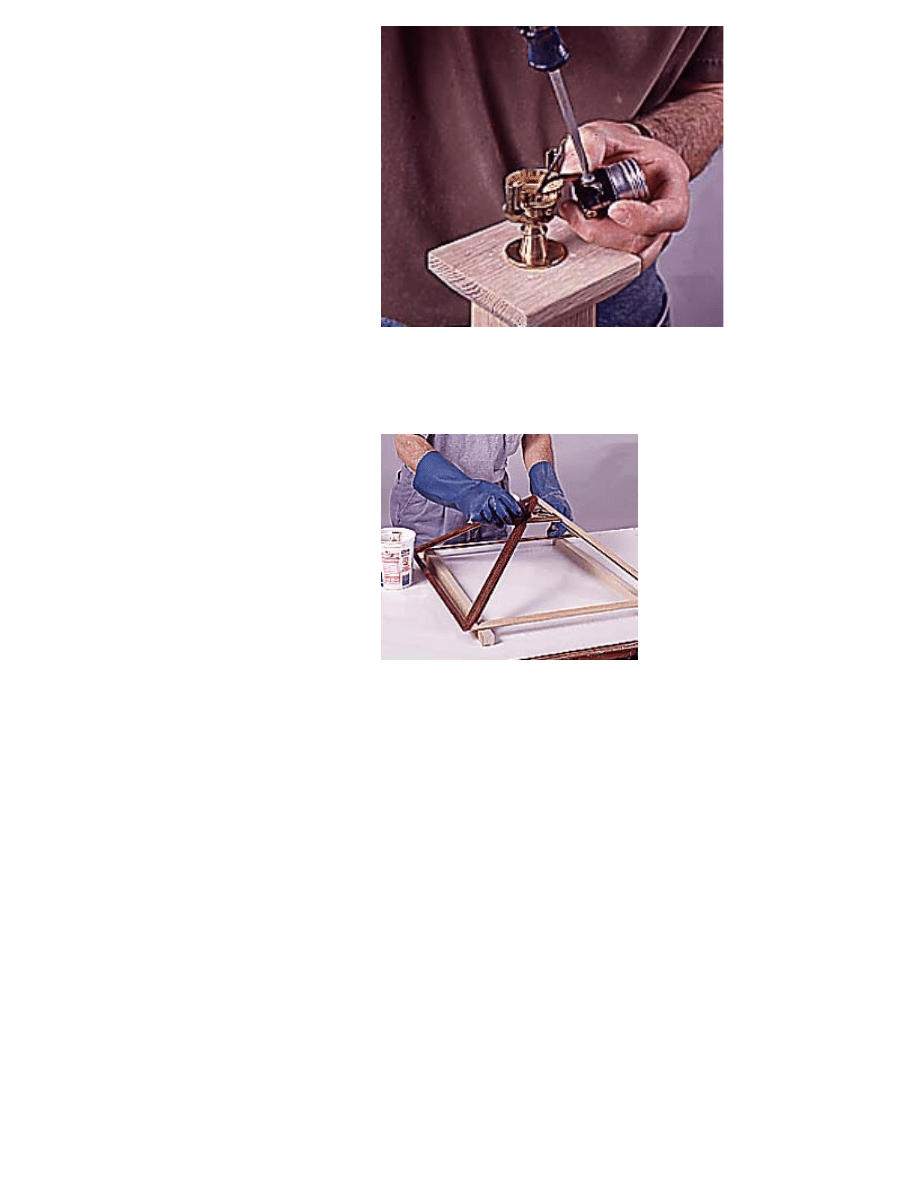
Assembly
Place small guide marks on the post and
base to indicate the locations of each
bracket. Then apply glue to the back and
bottom edges of each bracket and use 4d
finish nails to pin them to the post (Photo
7), making sure to bore pilot holes and set
the nailheads. Then bore and countersink
pilot holes and drive one 1 1/2-in. No. 8 fh
screw through the base into the bottom
end of each bracket.
Cut the feet to size and shape, then bore
and countersink pilot holes for attaching
them to the lower base. Set the feet aside
and bore a 1 3/4-in.-dia. hole through the
7--Attach the corbel brackets to the post
sides with glue and nails. Attach them to the
base with screws driven from below.
Copyright 2004 Martian Auctions
738
center of the lower base panel. Then, bore
and countersink pilot holes for fastening
this panel to the upper base panel. Sand
the panel smooth, mark the location of
each base foot, then apply glue to the
joints and fasten the feet with screws.
Clamp the lamp post upside down in the
bench vise, then spread glue and position
the lower base panel over the upper base
panel. Adjust the parts for equal overhang
on all edges. Then temporarily clamp them
together and fasten the parts together with
screws (Photo 8).
Installing lamp parts
Next, lay the lamp post on a padded table
and slide the threaded steel pipe into the
base hole (Photo 9). Before pushing the
pipe all the way into the base, slip a
washer over the end and thread on the
steel nut. You can adjust how much the
pipe protrudes past the top of the hole by
tightening or loosening the nut. The pipe
should extend about 3/8 in. beyond the top
cap.
Place the brass check ring over the top
end of the tubing, then thread on the
tapered brass coupling. This fitting makes
the transition between the 1/4 IP thread of
the long pipe and the 1/8 IP thread of the
steel nipple that connects the lamp
fixtures. Next, thread the 1-in.-long steel
nipple into the top end of the coupling.
Allow this nipple to extend out of the
coupling by about 3/4 in. Then place the
tapped brass spindle over the nipple and
tighten it against the coupling (Photo 10).
The spindle will lock the nipple in place.
Push the lamp cord through the bottom of
the steel pipe until it extends out the top of
the nipple by about 3 in. Then feed the
cord through the socket base and thread
the base onto the nipple until it bottoms out
on the harp bracket. Tighten the lockscrew
on the base.
Connect the lamp cord to the terminals on
the socket (Photo 11), and push the
excess cord back down through the post
so that the socket can sit firmly on its base.
8--Cut the feet and lower base to size.
Then attach the feet-and join the two base
pieces-with glue and screws.
9--Install a washer and nut on one end of
the steel pipe, then slide it into the post's
hole. Adjust the height by turning the nut.
10--Slide the brass check ring over the
steel pipe. Then thread on the tapered
coupling, steel nipple and brass spindle.
Copyright 2004 Martian Auctions
739
Then, snap the socket cover in place by
pushing it down until you hear a click.
Install the harp by compressing it and
slipping each end into its bracket. Then,
slide a locking ring over each bracket.
Before staining the lamp, apply masking
tape to the parts for protection during the
finishing process. Apply stain and finish,
using the techniques described in "Rocking
Chair." Once the finish has cured, remove
the masking tape and install a bulb and
lampshade. Our shade came unfinished,
so we could match the finish on the rest of
the piece (Photo 12).
11--Slide the lamp cord through the pipe
and thread the socket onto the nipple.
Attach the wires to the socket screws.
12--The lampshade comes unfinished.
Remove the glass panels, then stain and
apply a finish to match the lamp base.
Copyright 2004 Martian Auctions
740
Wyszukiwarka
Podobne podstrony:
Floor Lamp (Mission Style)
birdhouse floor lamp lampa stojaca
Floor beam ver 1 Student id 178 Nieznany
Luftwaffe Hangar, hangar floor
lamp 02
Ceramic Floor Tile
launch cresetter oil lamp reset tool introduction
ćw nr 2 badanie lamp fluorescencyjnych (2)
bmw E38 awaria tylnych lamp
Badanie lamp metalohalogenkowyc Nieznany
FreeNRG Notes from the edge of the dance floor
Oprawy przemyslowe do lamp wysokopreznych
Lava Lamp, Pirotechnika
pomiary wielkości fotometrycznych lamp fluore
Wyznaczanie napięcia zapłonu i gaśnięcia lamp y jarzeniowej, Pracownia Zak˙adu Fizyki Technicznej P
Pomiary wielkości fotometrycznych lamp fluorescencyjnych z wykorzystaniem walca fotometrycznego 0001
więcej podobnych podstron