HandymanWire - Building Window Boxes
HandymanWire
Appliances
Attics
Automobiles
Basements
Cabinets &
Counters
Ceilings
Decks
Doors & Windows
Drywall
Electrical
Flooring
Garages
Heating
Masonry
Miscellaneous
Outside
Painting
Plumbing
Roofing
Siding
Trim
Wallpaper
Search Our Site
Window Boxes
Window Boxes
Many houses' styles are brightened and
improved with colorful flowers in window
boxes. These boxes are simple to build
and in a weekend you can dress up your
home and add the color and beauty the
flowers can bring.
There are a variety of approaches you can use. I will discuss these two in this
article.
Planting directly in the box.
I have used this method for many years. The
box holds the dirt directly inside it, and
therefore should be made of pressure treated
wood. I have tried cedar, but it didn't last as
long as the pressure treated wood. The soil and
peat moss is added to the box and freshened
each year and the flowers do just fine. This is a
relatively simple approach.
Planting in a planter inside a box.
If you build the box to hold a planter you can make the box out of any wood
although I would use pressure treated wood at least for the bottoms and the
inside should be painted as well as the outside. The advantage here is you can
lift the planter out of the box to pot the plants and change out the soil. I think this
method is best for second story windows or any window too high to get to from
the ground.
Determining the size
To make your planter, it will have to be custom designed for your windows. And
this of course, besides the cost and pleasure of doing it yourself is why you will
file:///C|/Documents and Settings/colin cave/My Documents...odworking plans/outside/planters/Building Window Boxes.htm (1 of 4)17/03/2005 21:36:11
SEARCH

HandymanWire - Building Window Boxes
Handymanwire
Expert Forums
Article Index
FAQ Index
Hint Index
want to make them in the first place. The box should be as wide as the window
and frame including trim. You can vary that of course to your taste but I find this
seems to be the most appealing (my own opinion). Measure the width of your
window and frame and this is your boxes length.
If you are going to place a long plastic planter in the box rather than plant
directly in the box, go to the store and buy your planters now. Their width, depth
and even length will determine the size box you will make. You can use the
general directions given here, but make your dimensions fit your planters' size at
a minimum. If you are planting directly into the box, you can use the dimensions
I provide, but recognize they are not critical. Varying them slightly will not alter
the final look.
Pressure treated wood is hard to come by in all the sizes you need, though it is getting better. My
boxes are built, to a degree based on the available lumber size. I have found pressure treated 1x8's, so
7 ½ inches has become my largest dimension. This keeps you from having to joint two boards
together.
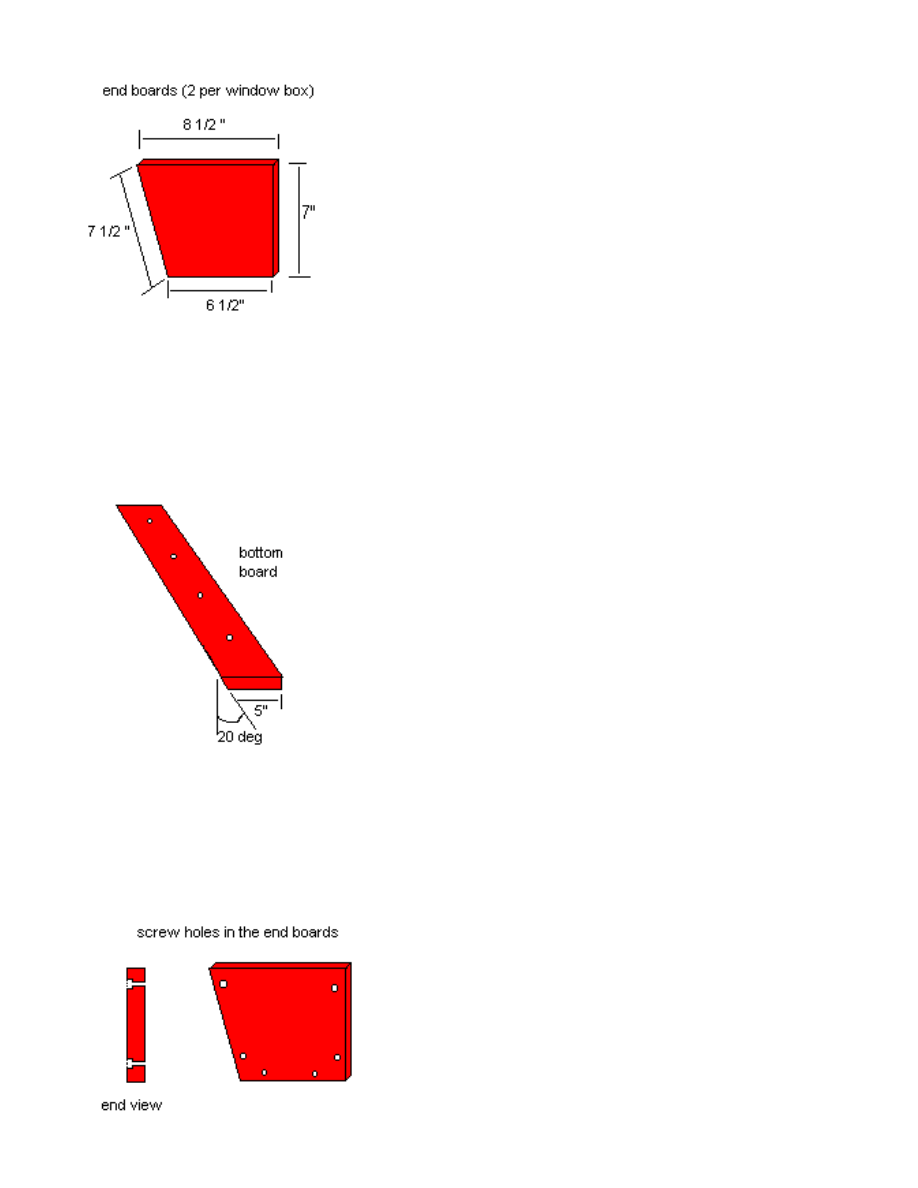
The box will then be 8 ½ inches wide at the top, 6 ½ inches wide at the bottom and roughly 7 inches
deep.
Building the window box
Start by cutting the end boards.
file:///C|/Documents and Settings/colin cave/My Documents...odworking plans/outside/planters/Building Window Boxes.htm (2 of 4)17/03/2005 21:36:11
HandymanWire - Building Window Boxes
Next cut the front, back and bottom boards. The dimensions
for the length should be the one determined by your windows. The width of the front board will be
the total width of your board, 7 ½ (assuming you are using 1x8's). The back board is cut square 7
inches wide. The bottom board should be cut 5 inches wide with a 20 degree angle to make it meet
the front board squarely on the front. (5 inches will be the short dimension).
To assemble your box, use galvanized exterior wood
screws and galvanized 6d finishing nails. The screws should be 1 ½ long. I always countersink the
screws and cover them with elmer's wood filler. Drill ¼ inch holes, about an 1/8 in deep, 2 for each
the front, bottom and back. Then drill the hole all the way through the end boards with a bit about the
size of your screws threads.
Now screw the end boards on to the front, back and
bottom. The exterior screws shouldn't need a pilot hole in
the front, back and bottom boards, however if they are
hard going in, put a little soap on the threads to make
them go in easier.
file:///C|/Documents and Settings/colin cave/My Documents...odworking plans/outside/planters/Building Window Boxes.htm (3 of 4)17/03/2005 21:36:11

HandymanWire - Building Window Boxes
Next nail along the front and back at the bottom into the bottom board fastening it to the front and
back boards. Countersink all the nails and then cover all nail holes and screws with the wood putty.
Drill a ¾ inch hole every 6 inches into the bottom board along the center of the board to allow water
to drain out.
Finally, prime and then paint the boxes an accent color to compliment your house's colors.
Mounting
Mounting the boxes always seems to present a problem. I hate putting holes in a house. I have found
that mounting them from the window's sill works well. But I have also seen them screwed directly
into the side of the house where the siding was wood. In any case I will describe the method I have
used to hang them from the sill. Buy 3 inch T brackets. Two for each box. These should be painted to
match the window sill.
Evenly spaced from either side, bolt them to the window box. Use galvanized or stainless steel bolts/
nuts etc. The horizontal top part of the T should be just above the back of the window box. Using
stainless steel screws, screw the top of the T into the window sill.
Finally
For planting it is best to have plenty of peat moss mixed in with the dirt to hold the moisture so you
don't need to water as often. I always place a small stone over the holes to keep the dirt from washing
through.
Tell your friends about this page
!
http://www.handymanwire.com
your resource for advice on home improvement and repairs.
©2004, Handyman USA LLC.
All rights reserved.
file:///C|/Documents and Settings/colin cave/My Documents...odworking plans/outside/planters/Building Window Boxes.htm (4 of 4)17/03/2005 21:36:11
Document Outline
- Local Disk
Wyszukiwarka
Podobne podstrony:
Building a basic cupboard
Visual Basic i DirectX Programowanie gier w Windows
Visual Basic i DirectX Programowanie gier w Windows vbdirx
Visual Basic i DirectX Programowanie gier w Windows vbdirx
Visual Basic i DirectX Programowanie gier w Windows
Visual Basic i DirectX Programowanie gier w Windows vbdirx
Visual Basic i DirectX Programowanie gier w Windows 2
Visual Basic i DirectX Programowanie gier w Windows vbdirx 2
Building traditional casing for new windows
The Basic Building Blocks of Malware
07 Windows
Dyskietki startowe systemu Windows XP
Charakterystyka branży usług reklamowych na obszarze RP dla starszego windowsa
3 ABAP 4 6 Basic Functions
Amadeus Basic Podręcznik szkoleniowy
Building a Greenhouse
więcej podobnych podstron