

Introduction
This booklet answers some of the basic questions asked
by the newcomer to vibration measurement. It gives a
brief explanation to the following:
See Page
Why do we measure vibration? 2 & 3
How to quantify the vibration level 5
The vibration parameters, Acceleration,
The piezoelectric accelerometer 8
Practical accelerometer designs 9
Accelerometer characteristics 11
Accelerometer frequency range 12
Avoiding errors due to accelerometer resonance 13
Choosing a mounting position for the
accelerometer 14
How to mount the accelerometer 15 & 16
Environmental Influences — General 17
Environmental Influences — Temperature 18
See Page
Environmental Influences — Cable Noise
Other Environmental Influences
Force and impedance measurements
Logarithmic scales and decibels
Why use an accelerometer preamplifier?
Constant bandwidth or constant percentage
Filter bandwidth considerations
Vibration as a machine condition indicator
Vibration trouble shooting charts
Revision September 1982
1
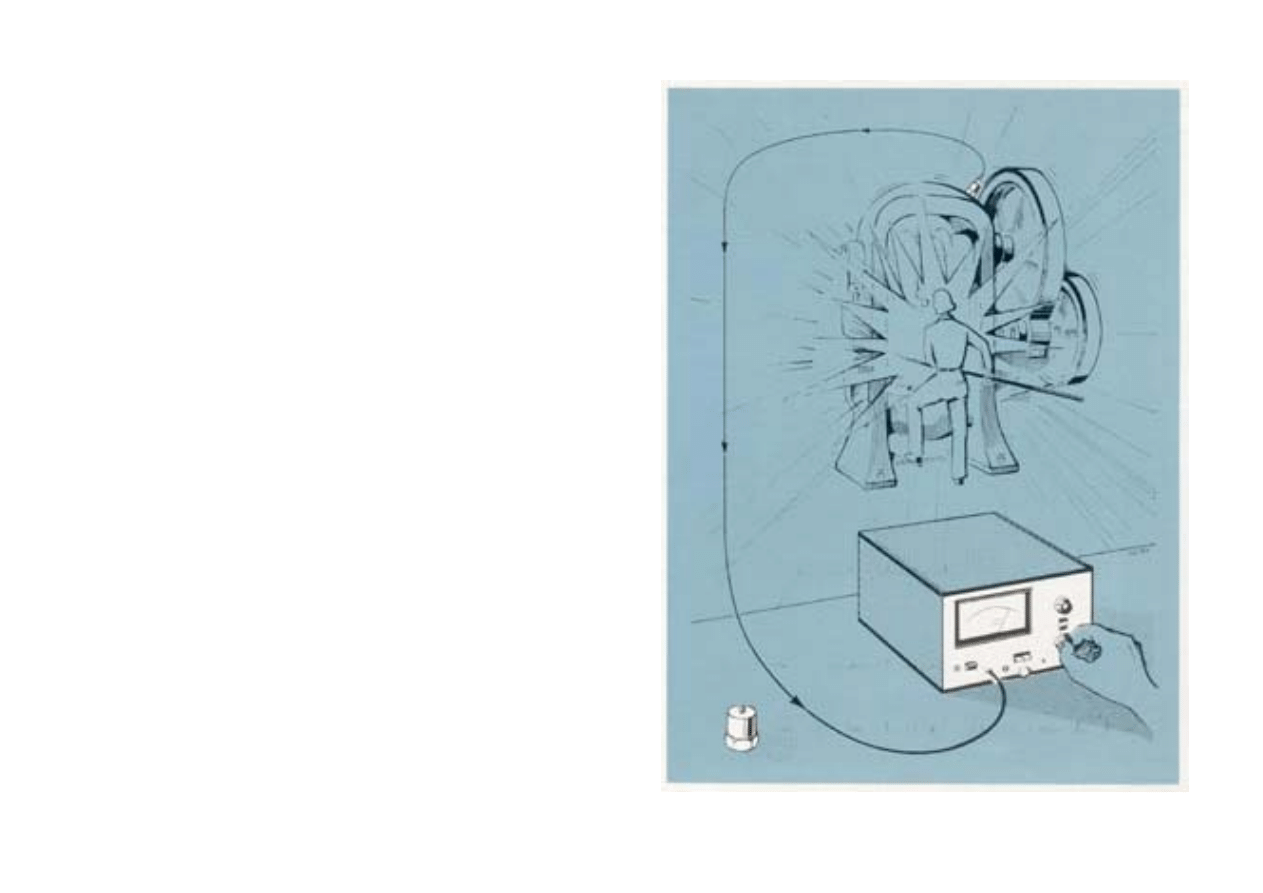
Background
Since man began to build machines for industrial use,
and especially since motors have been used to power
them, problems of vibration reduction and isolation have
engaged engineers.
Gradually, as vibration isolation and reduction tech-
niques have become an integral part of machine design,
the need for accurate measurement and analysis of me-
chanical vibration has grown. This need was largely sa-
tisfied, for the slow and robust machines of yesteryear,
by the experienced ear and touch of the plant engineer,
or by simple optical instruments measuring vibratory dis-
placement.
Over the last 15 or 20 years a whole new technology of
vibration measurement has been developed which is suit-
able for investigating modern highly stressed, high speed
machinery. Using piezoelectric accelerometers to convert
vibratory motion into an electrical signal, the process of
measurement and analysis is ably performed by the vers-
atile abilities of electronics.
2
Where does it come from?
In practice it is very difficult to avoid vibration. It usually
occurs because of the dynamic effects of manufacturing
tolerances, clearances, rolling and rubbing contact be-
tween machine parts and out-of-balance forces in rotat-
ing and reciprocating members. Often, small insignifi-
cant vibrations can excite the resonant frequencies of
some other structural parts and be amplified into major
vibration and noise sources.
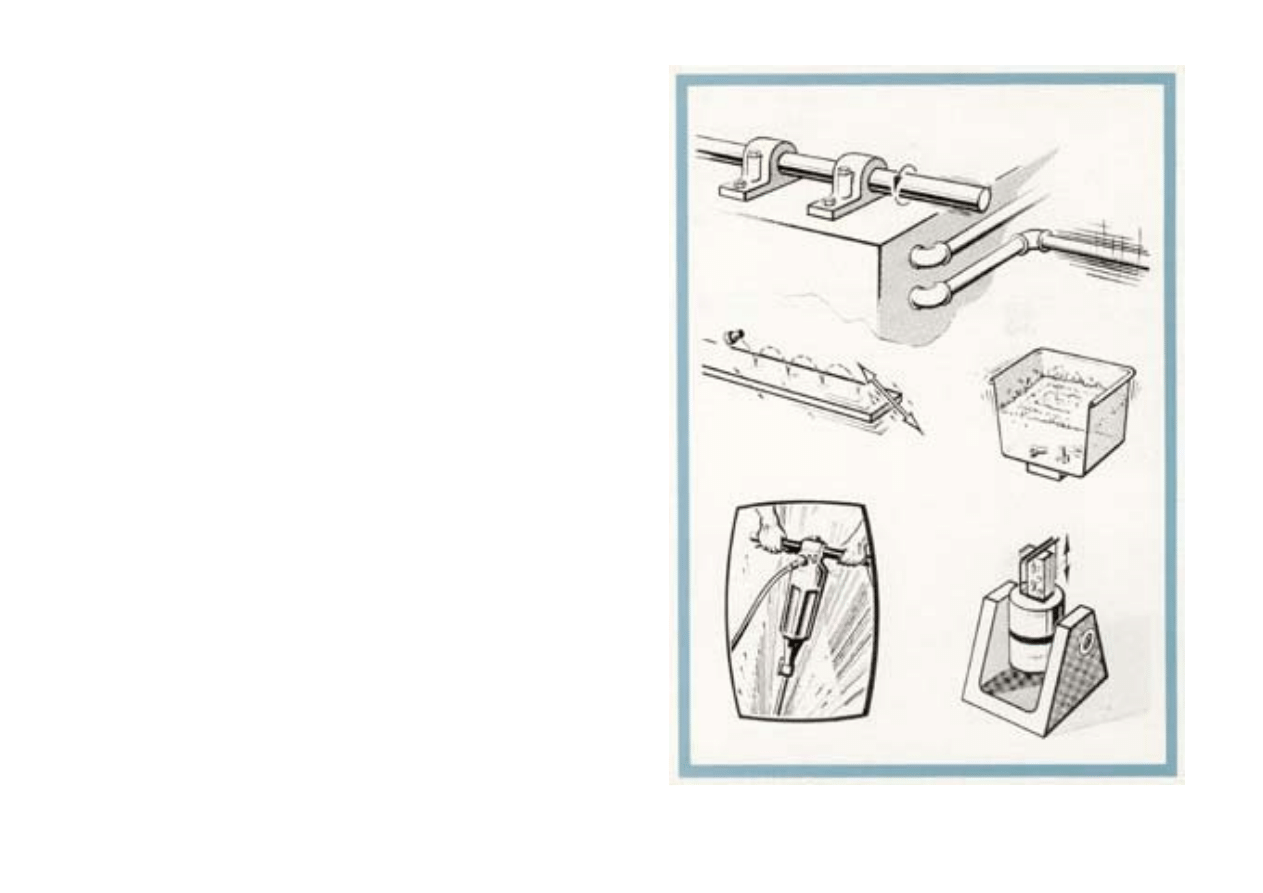
Sometimes though, mechanical vibration performs a use-
ful job. For example, we generate vibration intentionally
in component feeders, concrete compactors, ultrasonic
cleaning baths, rock drills and pile drivers. Vibration test-
ing machines are used extensively to impart a controlled
level of vibration energy to products and sub-assemblies
where it is required to examine their physical or func-
tional response and ascertain their resistability to vibra-
tion environments.
A fundamental requirement in all vibration work,
whether it is in the design of machines which utilize its
energies or in the creation and maintenance of smoothly
running mechanical products, is the ability to obtain an
accurate description of the vibration by measurement
and analysis.
3
What is Vibration?
A body is said to vibrate when it describes an oscillating
motion about a reference position. The number of times
a complete motion cycle takes place during the period of
one second is called the Frequency and is measured in
hertz (Hz).
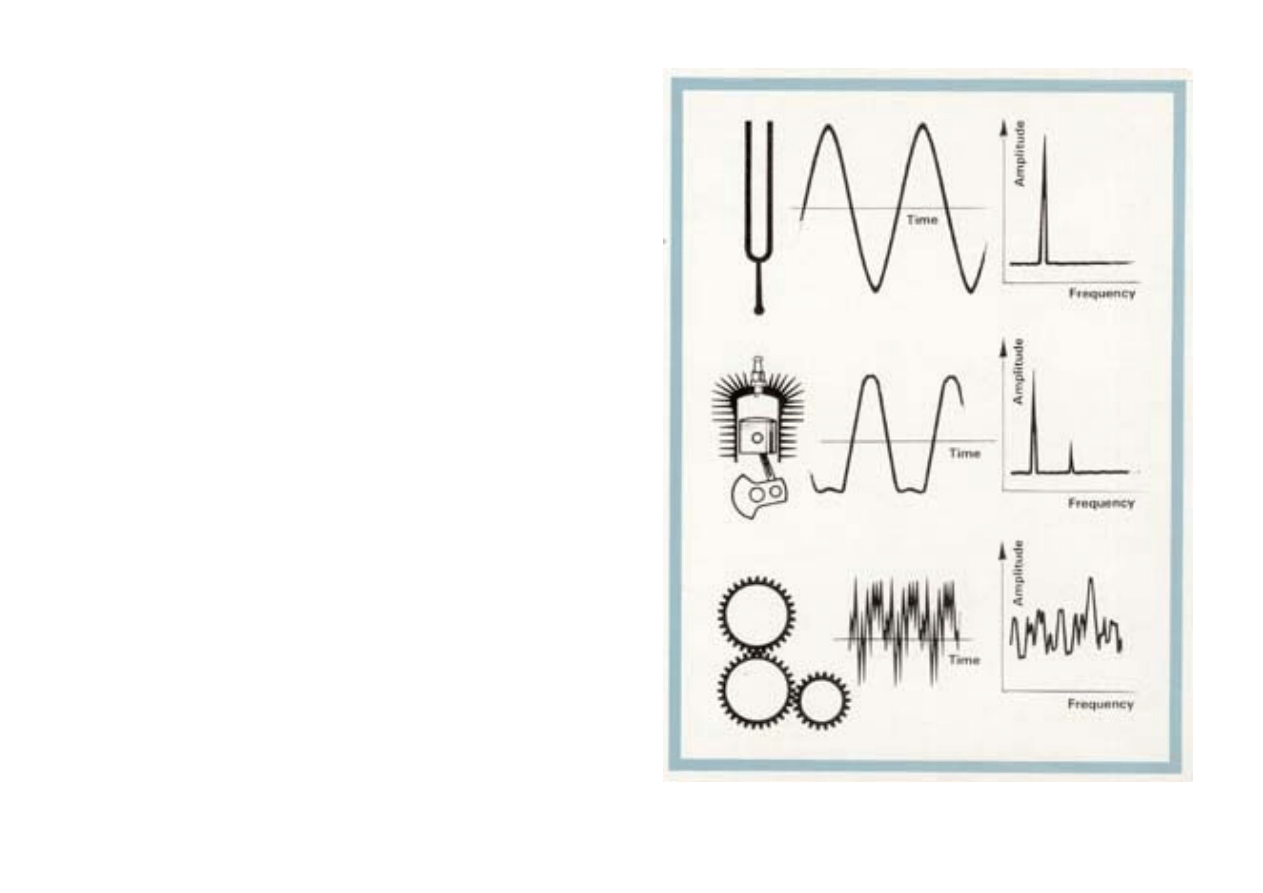
The motion can consists of a single component occuring
at a single frequency, as with a tuning fork, or of several
components occuring at different frequencies simultane-
ously, as for example, with the piston motion of an inter-
nal combusion engine.
Vibration signals in practice usually consist of very many
frequencies occuring simultaneously so that we cannot
immediately see just by looking at the amplitude-time
pattern, how many components there are, and at what
frequencies they occur.
These components can be revealed by plotting vibration
amplitude against frequency. The breaking down of vibra-
tion signals into individual frequency components is
called frequency analysis, a technique which may be con-
sidered the cornerstone of diagnostic vibration measure-
ments. The graph showing the vibration level as a func-
tion of frequency is called a frequency spectrogram.
When frequency analyzing machine vibrations we nor-
mally find a number of prominent periodic frequency
components which are directly related to the fundamen-
tal movements of various parts of the machine. With fre-
quency analysis we are therefore able to track down the
source of undesirable vibration.
4
Quantifying the Vibration Level
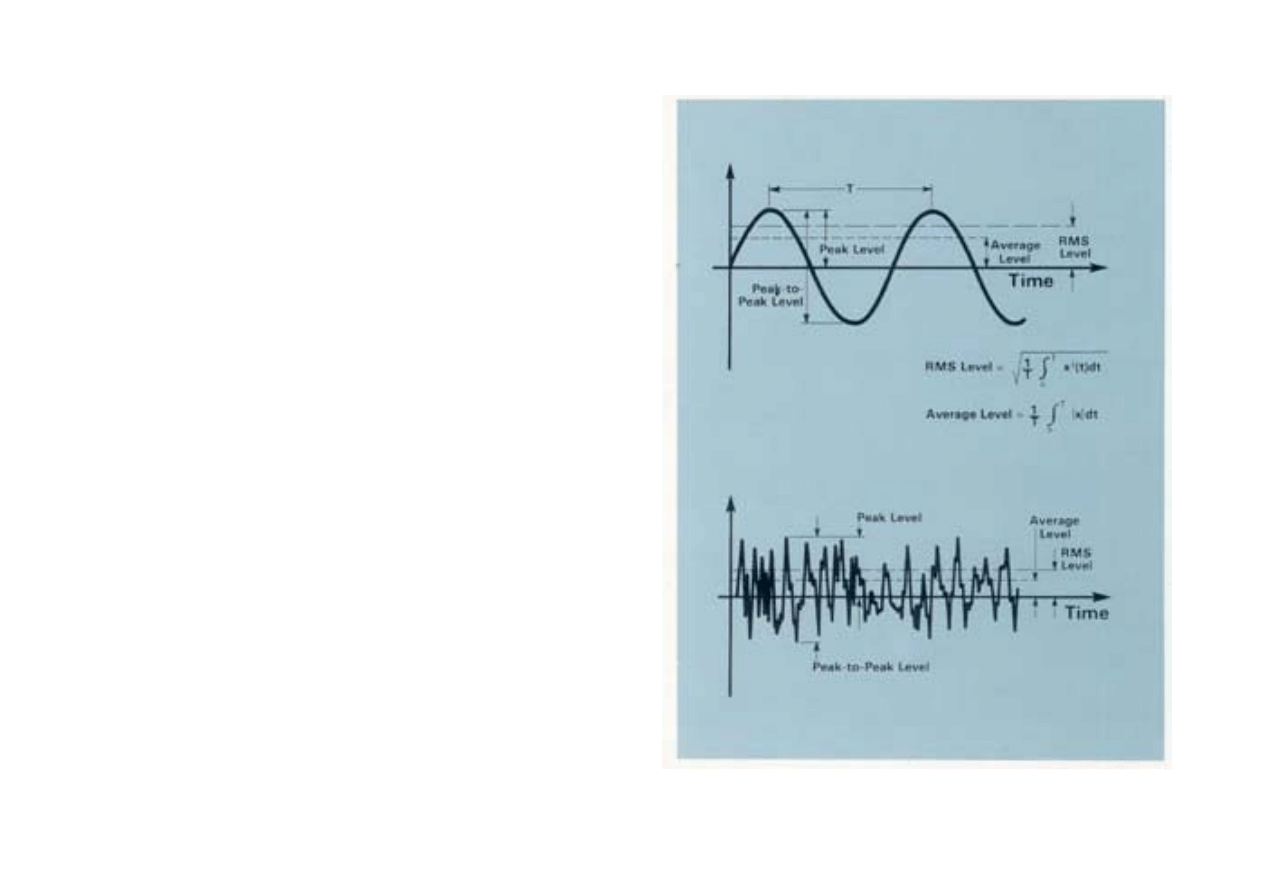
The vibration amplitude, which is the characteristic
which describes the severity of the vibration, can be qu-
antified in several ways. On the diagram, the relation-
ship between the peak-to-peak level, the peak level, the
average level and the RMS level of a sinewave is shown.
The peak-to-peak value is valuable in that it indicates the
maximum excursion of the wave, a useful quantity
where, for example, the vibratory displacement of a ma-
chine part is critical for maximum stress or mechanical
clearance considerations.
The peak value is particularly valuable for indicating the
level of short duration shocks etc. But, as can be seen from
the drawing, peak values only indicate what maximum level
has occurred, no account is taken of the time history of the
wave.
The rectified average value, on the other hand, does take
the time history of the wave into account, but is consid-
ered of limited practical interest because it has no direct
relationship with any useful physical quantity.
The RMS value is the most relevant measure of ampli-
tude because it both takes the time history of the wave
into account and gives an amplitude value which is di-
rectly related to the energy content, and therefore the
destructive abilities of the vibration.
5
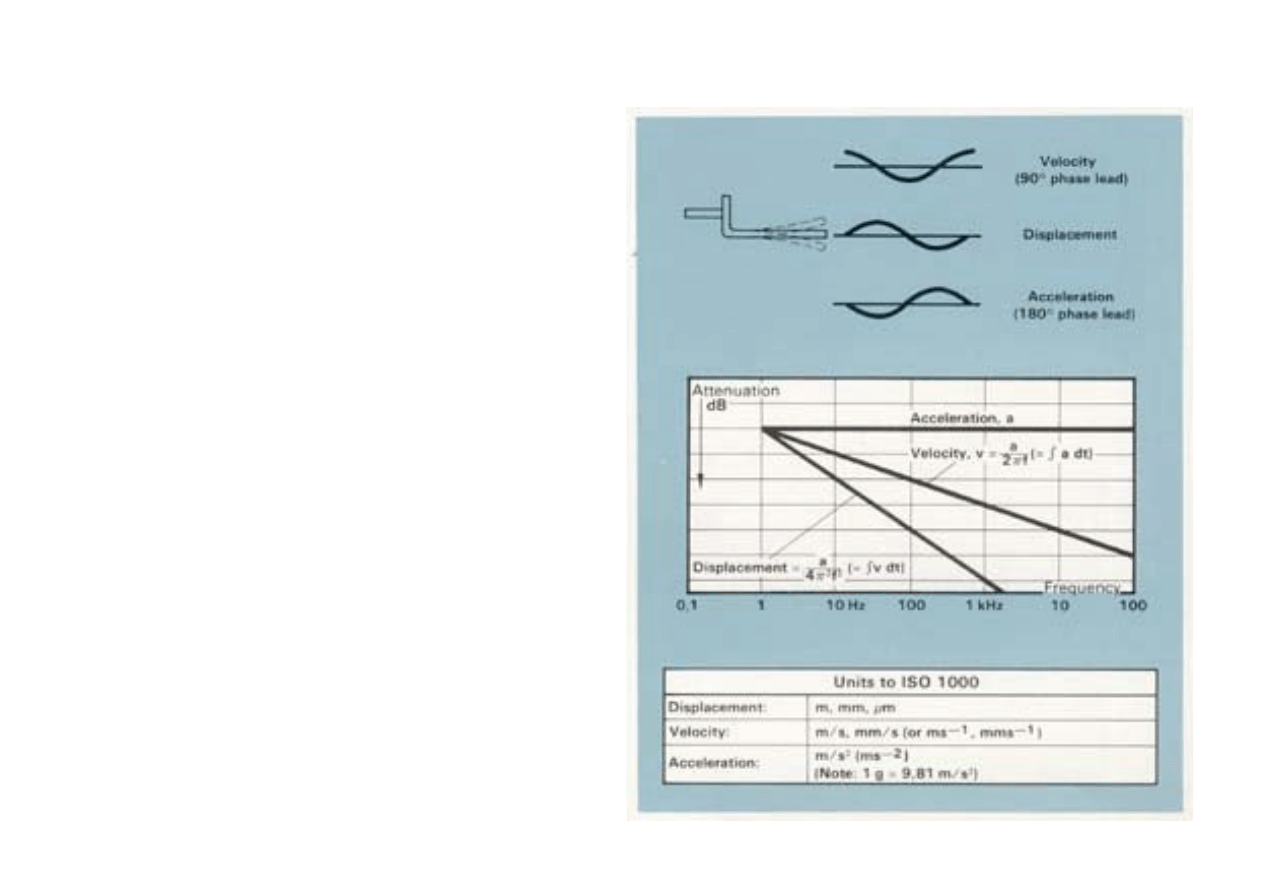
The Vibration Parameters, Acceleration, Velocity and Displacement.
Measuring Units
When we looked at the vibrating tuning fork we consid-
ered the amplitude of the wave as the physical displace-
ment of the fork ends to either side of the rest position.
In addition to Displacement we can also describe the
movement of the fork leg in terms of its velocity and its
acceleration. The form and period of the vibration remain
the same whether it is the displacement, velocity or ac-
celeration that is being considered. The main difference
is that there is a phase difference between the ampli-
tude-time curves of the three parameters as shown in
the drawing.
For sinusoidal signals, displacement, velocity and acceler-
ation amplitudes are related mathematically by a func-
tion of frequency and time, this is shown graphically in
the diagram. If phase is neglected, as is always the case
when making time-average measurements, then the ve-
locity level can be obtained by dividing the acceleration
signal by a factor proportional to frequency, and the dis-
placement can be obtained by dividing the acceleration
signal by a factor proportional to the square of fre-
quency. This division is performed by electronic integra-
tors in the measuring instrumentation.
The vibration parameters are almost universally mea-
sured in metric units in accordance with ISO require-
ments, these are shown in the table. The gravitational
constant "g" is still widely used for acceleration levels al-
though it is outside the ISO system of coherent units.
Fortunately a factor of almost 10 (9,81) relates the two
units so that mental conversion within 2% is a simple
matter.
6

Considerations in choosing Acceleration,
Velocity, or Displacement parameters
By detecting vibratory acceleration we are not tied to
that parameter alone, with electronic integrators we can
convert the acceleration signal to velocity and displace-
ment. Most modern vibration meters are equipped to
measure all three parameters.
Where a single, wide frequency band vibration measure-
ment is made, the choice of parameter is important if
the signal has components at many frequencies. Meas-
urement of displacement will give the low frequency
components most weight and conversely acceleration
measurements will weight the level towards the high fre-
quency components.
Experience has shown that the overall RMS value of vi-
bration velocity measured over the range 10 to 1000 Hz
gives the best indication of a vibration's severity. A prob-
able explanation is that a given velocity level corre-
sponds to a given energy level so that vibration at low
and high frequencies are equally weighted from a vibra-
tion energy point of view. In practice many machines
have a reasonably flat velocity spectrum.
Where narrow band frequency analysis is performed the
choice of parameter will be reflected only in the way the
analysis plot is tilted on the chart paper (as demon-
strated in the middle diagram on the opposite page). This
leads us to a practical consideration that can influence
the choice of parameter. It is advantageous to select the
parameter which gives the flattest frequency spectrum in
order to best utilise the dynamic range (the difference be-
tween the smallest and largest values that can be mea-
sured) of the instrumentation. For this reason the veloc-
ity or acceleration parameter is normally selected for fre-
quency analysis purposes.
Because acceleration measurements are weighted tow-
ards high frequency vibration components, this
parameters tends to be used where the frequency range
of interest covers high frequencies.
The nature of mechanical systems is such that appreci-
able displacements only occur at low frequencies, there-
fore displacement measurements are of limited value in
the general study of mechanical vibration. Where small
clearances between machine elements are being consid-
ered, vibratory displacement is of course an important
consideration. Displacement is often used as an indica-
tor of unbalance in rotating machine parts because rela-
tively large displacements usually occur at the shaft rota-
tional frequency, which is also the frequency of greatest
interest for balancing purposes.
7
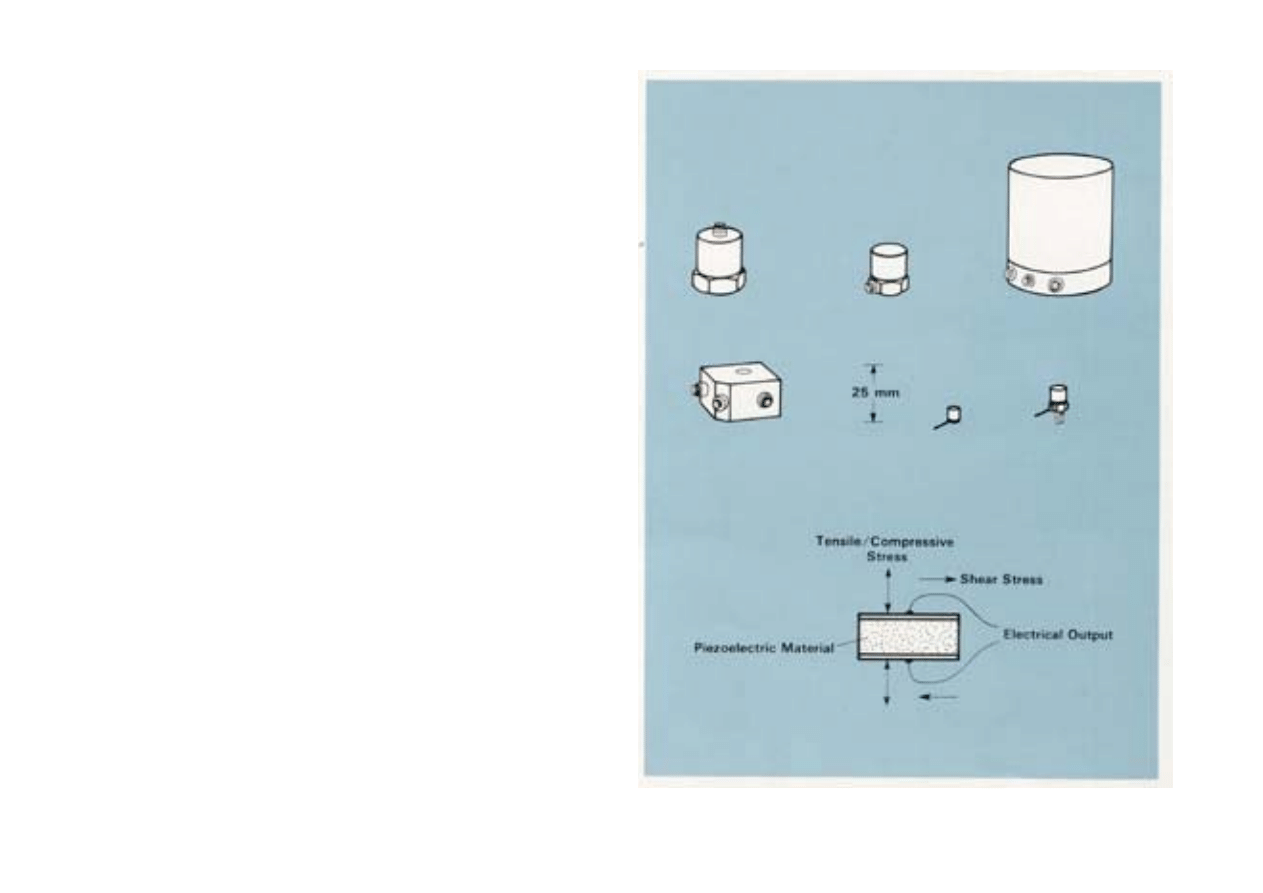
The Piezoelectric Accelerometer
The transducer which, nowadays, is more-or-less univer-
sally used for vibration measurements is the piezoelec-
tric accelerometer. It exhibits better all-round characteris-
tics than any other type of vibration transducer. It has
very wide frequency and dynamic ranges with good line-
arity throughout the ranges. It is relatively robust and re-
liable so that its characteristics remain stable over a long
period of time.
Additionally, the piezoelectric accelerometer is self-gene-
rating, so that it doesn't need a power supply. There are
no moving parts to wear out, and finally, its acceleration
proportional output can be integrated to give velocity and
displacement proportional signals.
The heart of a piezoelectric accelerometer is the slice of
piezoelectric material, usually an artificially polarized fer-
roelectric ceramic, which exhibits the unique piezoelec-
tric effect. When it is mechanically stressed, either in
tension, compression or shear, it generates an electrical
charge across its pole faces which is proportional to the
applied force.
8
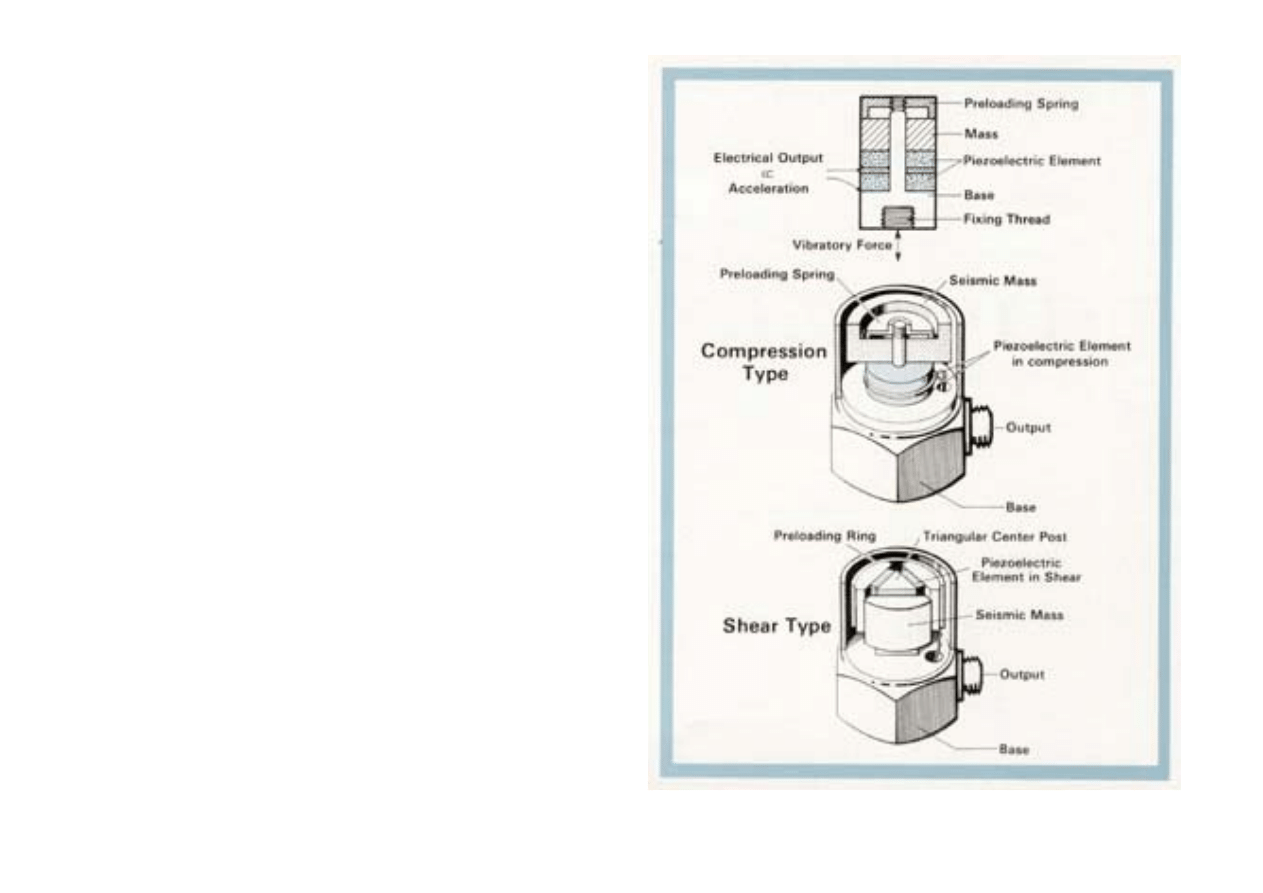
Practical Accelerometer Designs
In practical accelerometer designs, the piezoelectric ele-
ment is arranged so that when the assembly is vibrated
the mass applies a force to the piezoelectric element
which is proportional to the vibratory acceleration. This
can be seen from the law, Force = Mass x Acceleration.
For frequencies lying well under the resonant frequency
of the complete spring-mass system, the acceleration of
the mass will be the same as the acceleration of the
base, and the output signal magnitude will therefore be
proportional to the acceleration to which the pick-up is
subjected.
Two configurations are in common use:
The Compression Type where the mass exerts a com-
pressive force on the piezoelectric element and
The Shear Type where the mass exerts a shear force on
the piezoelectric element.
9
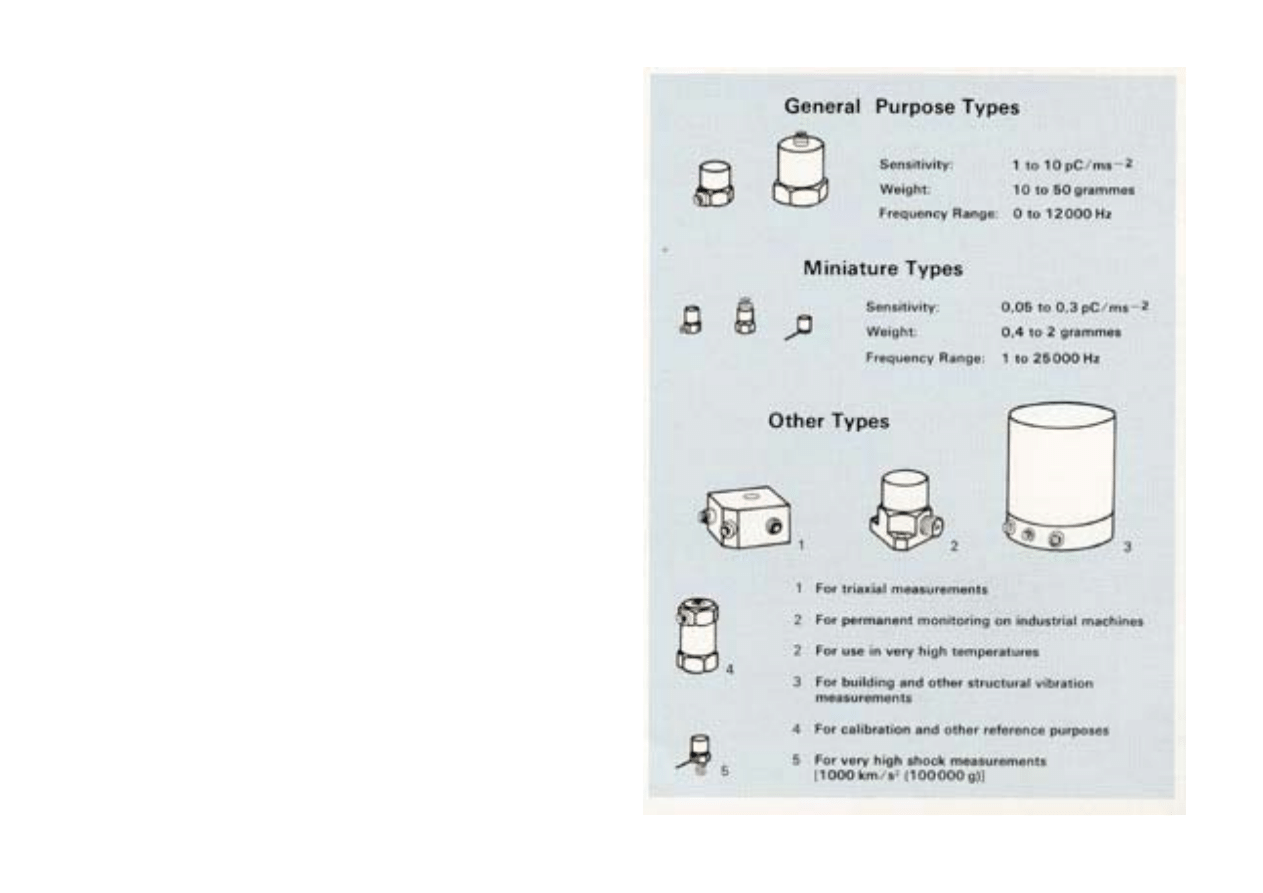
Accelerometer Types
Most manufacturers have a wide range of accelerometers,
at first sight may be too many to make the choice easy. A
small group of "general purpose" types will satisfy most
needs. These are available with either top or side mounted
connectors and have sensitivities in the range 1 to 10 mV
or pC per m/s
2
. The Brüel & Kjær Uni-Gain® types have
their sensitivity normalized to a convenient "round figure"
such as 1 or 10 pC/ms
-2
to simplify calibration of the
measuring system.
The remaining accelerometers have their characteristics
slanted towards a particular application. For example,
small size acclerometers that are intended for high level or
high frequency measurements and for use on delicate
structures, panels, etc. and which weigh only 0,5 to 2
grammes.
Other special purpose types are optimized for: simulta-
neous measurement in three mutually perpendicular
planes; high temperatures; very low vibration levels; high
level shocks; calibration of other accelerometers by com-
parison; and for permanent monitoring on industrial
machines.
10
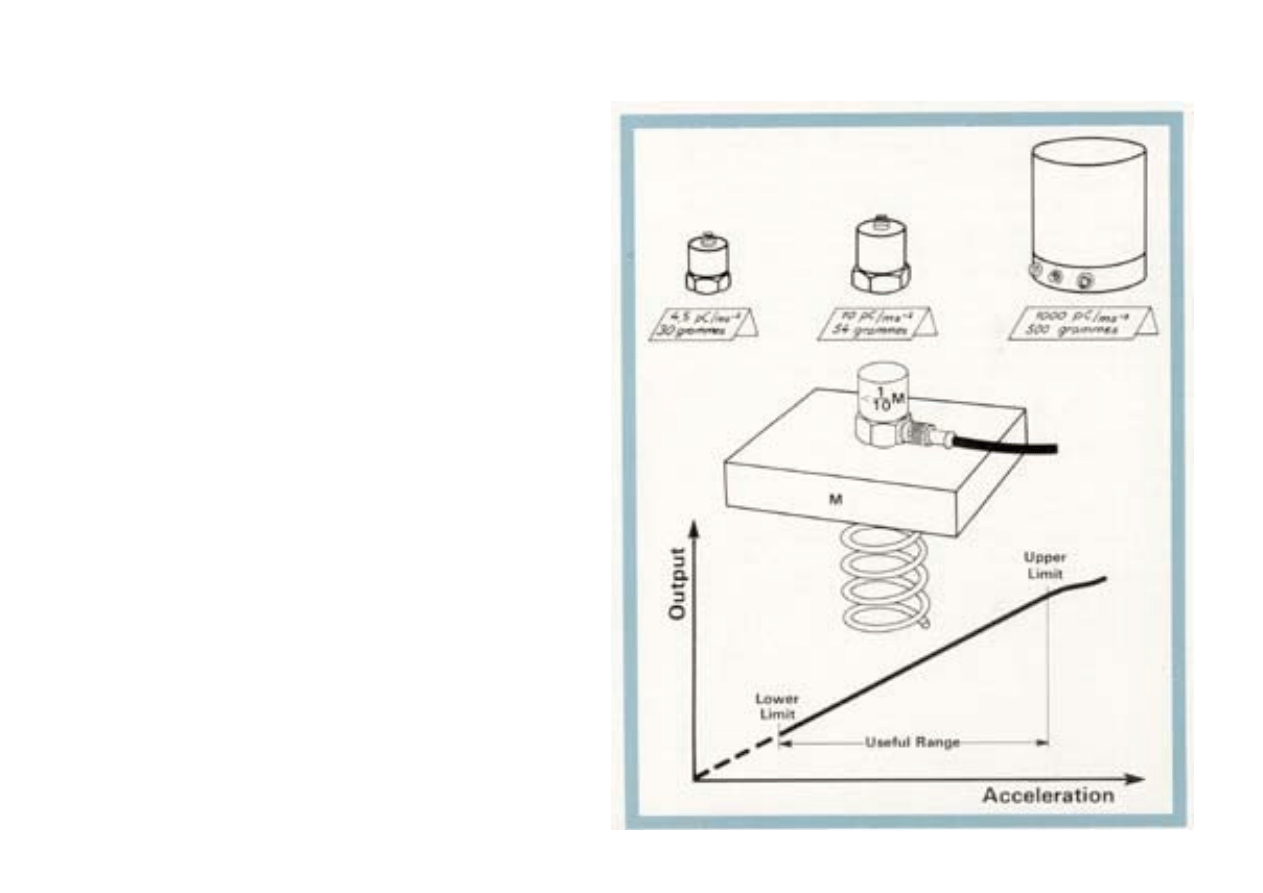
Accelerometer Characteristics (Sensitivity, Mass and Dynamic Range)
The sensitivity is the first characteristic normally consid-
ered. Ideally we would like a high output level, but here
we have to compromise because high sensitivity nor-
mally entails a relatively big piezoelectric assembly and
consequently a relatively large, heavy unit.
In normal circumstances the sensitivity is not a critical
problem as modern preamplifiers are designed to accept
these low level signals.
The mass of the accelerometers becomes important
when measuring on light test objects. Additional mass
can significantly alter the vibration levels and frequen-
cies at the measuring point.
As a general rule, the accelerometer mass should be no
more than one tenth of the dynamic mass of the vibrat-
ing part onto which it is mounted.
When it is wished to measure abnormally low or high ac-
celeration levels, the dynamic range of the accelerome-
ter should be considered. The lower limit shown on the
drawing is not normally determined directly by the accel-
erometer, but by electrical noise from connecting cables
and amplifier circuitry. This limit is normally as low as
one hundredth of a m/s
2
with general purpose instru-
ments.
The upper limit is determined by the accelerometer's
structural strength. A typical general purpose acceler-
ometer is linear up to 50000 to 100 000 m/s
2
, that is
well into the range of mechanical shocks. An acceler-
ometer especially designed for the measurement of me-
chanical shocks may be linear up to 1000km/s
2
(100000 g).
11
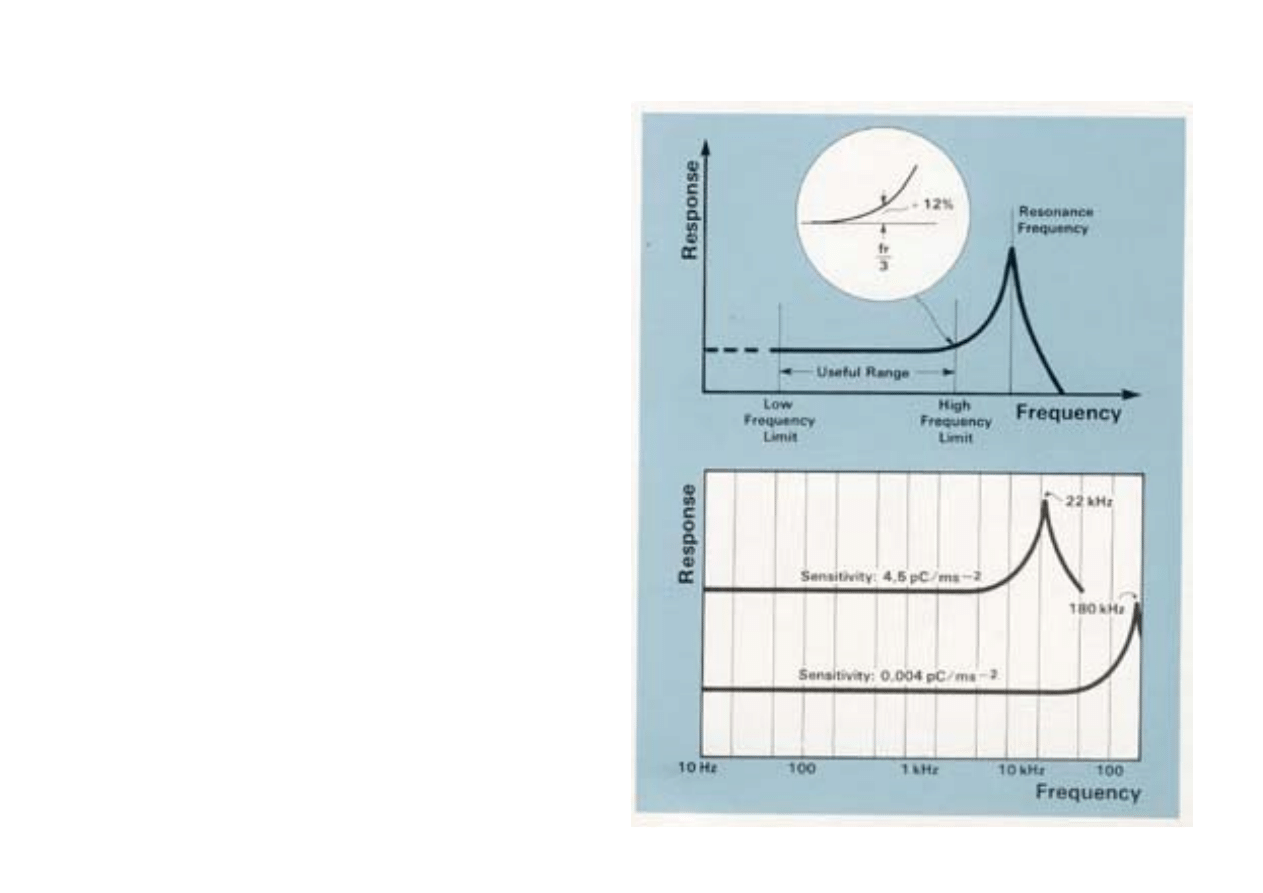
Accelerometer Frequency Range Considerations
Mechanical systems tend to have much of their vibration
energy contained in the relatively narrow frequency
range between 10 Hz to 1000 Hz but measurements are
often made up to say 10 kHz because there are often in-
teresting vibration components at these higher frequen-
cies. We must ensure, therefore, when selecting an ac-
celerometer, that the frequency range of the accelerome-
ter can cover the range of interest.
The frequency range over which the accelerometer gives
a true output is limited at the low frequency end in prac-
tice, by two factors. The first is the low frequency cut-off
of the amplifier which follows it. This is not normally a
problem as the limit is usually well below one Hz. The
second is the effect of ambient temperature fluctuations,
to which the accelerometer is sensitive. With modern
shear type accelerometers this effect is minimal, allow-
ing measurements down to below 1 Hz for normal envir-
onments.
The upper limit is determined by the resonant frequency
of the mass-spring system of the accelerometer itself.
As a rule of thumb, if we set the upper frequency limit
to one-third of the accelerometer's resonance frequency,
we know that vibration components measured at the up-
per frequency limit will be in error by no more than
+ 12%.
With small accelerometers where the mass is small, the
resonant frequency can be as high as 180kHz, but for
the somewhat larger, higher output, general purpose ac-
celerometers, resonant frequencies of 20 to 30kHz are
typical.
12
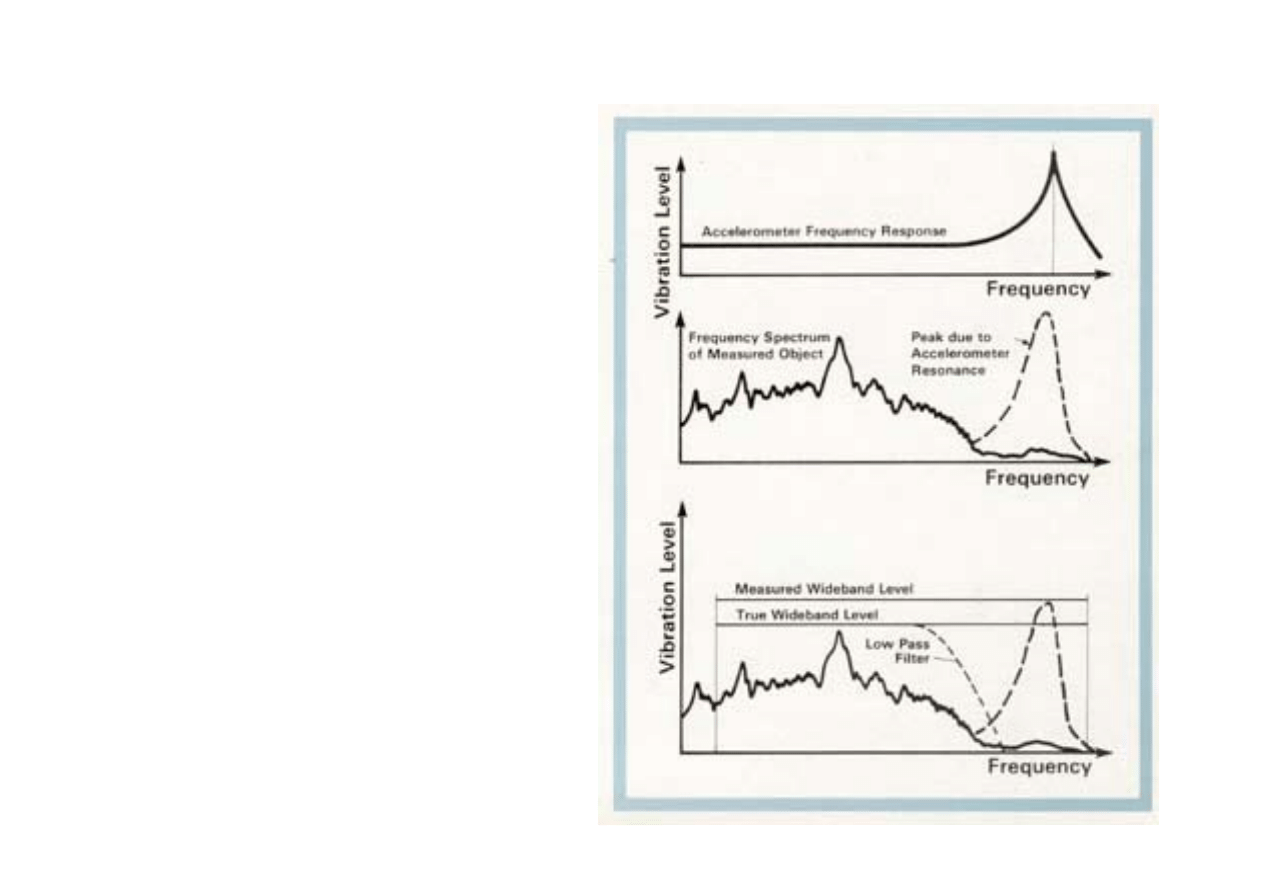
Avoiding Errors due to Accelerometer Resonance
As the accelerometer will typically have an increase in
sensitivity at the high frequency end due to its reson-
ance, its output will not give a true representation of the
vibration at the measuring point at these high frequen-
cies.
When frequency analyzing a vibration signal, one may
easily recognize that a high frequency peak is due to the
accelerometer resonance, and therefore ignore it. But if
an overall wideband reading is taken which includes the
accelerometer resonance it will give a totally inaccurate
result if, at the same time, the vibration to be measured
also has components in the region around the resonant
frequency.
This problem is overcome by choosing an accelerometer
with as wide a frequency range as possible and by using
a low-pass filter, which is normally included in vibration
meters and preamplifiers, to cut away the undesired sig-
nal caused by the accelerometer resonance.
Where measurements are confined to low frequencies.
high frequency vibration and accelerometer resonance ef-
fects can be removed with mechanical filters. They con-
sist of a resilient medium, typically rubber, bonded be-
tween two mounting discs, which is mounted between
the accelerometer and the mounting surface. They will
typically reduce the upper frequency limit to between
0,5 kHz to 5 kHz.
13
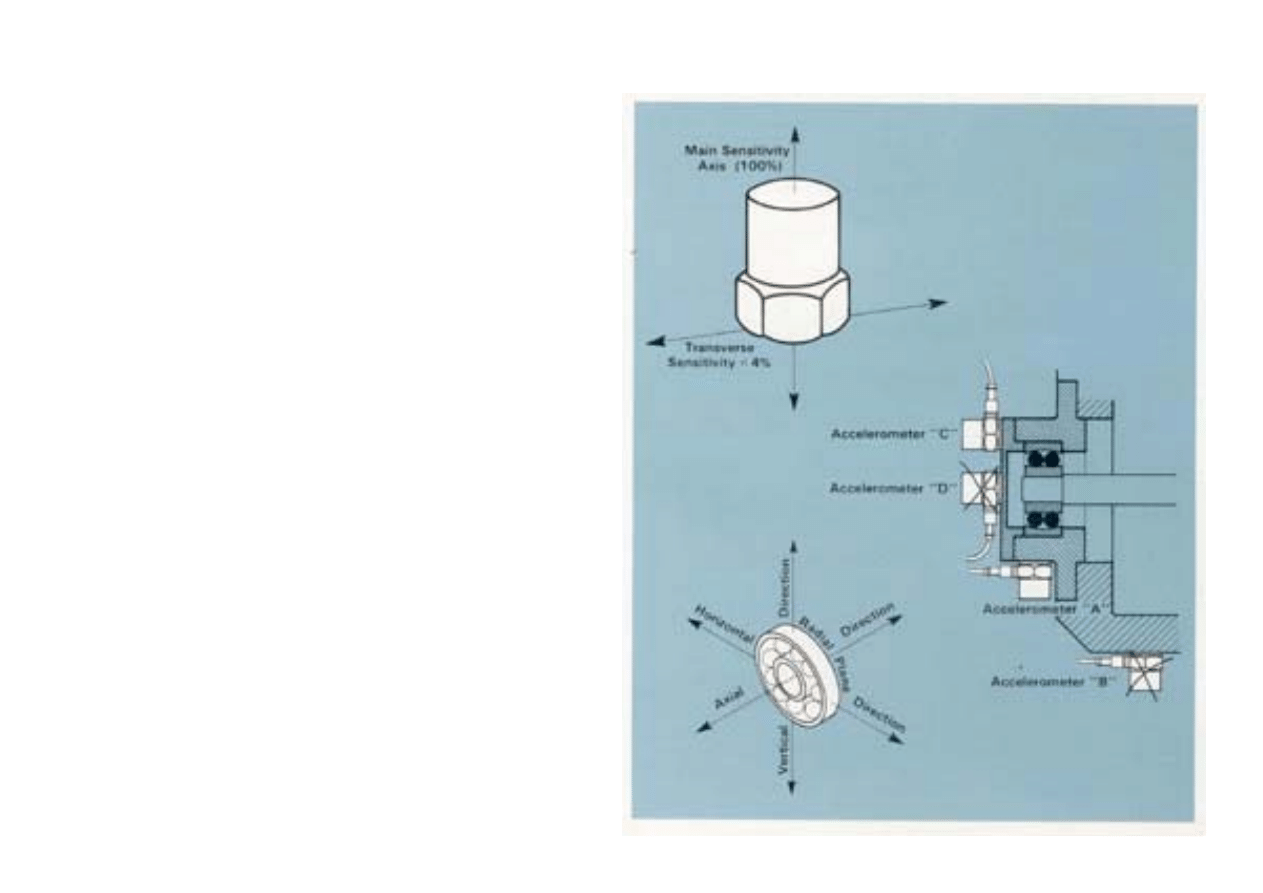
Choosing a Mounting Position for the Accelerometer
The accelerometer should be mounted so that the de-
sired measuring direction coincides with its main sensi-
tivity axis. Accelerometers are also slightly sensitive to vi-
brations in the transverse direction, but this can nor-
mally be ignored as the transverse sensitivity is typically
less than 1% of the main axis sensitivity.
The reason for measuring vibration on the object will us-
ually dictate the position of the measuring point. Take
the bearing housing in the drawing as an example. Here,
acceleration measurements are being used to monitor
the running condition of the shaft and bearing. The accel-
erometer should be positioned to maintain a direct path
for the vibration from the bearing.
Accelerometer "A" thus detects the vibration signal from
the bearing predominant over vibrations from other parts
of the machine, but accelerometer "B" detects the bear-
ing vibration, probably modified by transmission through
a joint, mixed with signals from other parts of the ma-
chine. Likewise, accelerometer "C" is positioned in a
more direct path than accelerometer "D".
The question also arises — in which direction should
one measure on the machine element in question? It is
impossible to state a general rule, but as an example, for
the bearing shown, one could gain valuable information
for monitoring purposes by measuring both in the axial
direction and one of the radial directions, usually the
one expected to have the lowest stiffness.
The response of mechanical objects to forced vibrations
is a complex phenomenon, so that one can expect, espe-
cially at high frequencies, to measure significantly differ-
ent vibration levels and frequency spectra, even on adja-
cent measuring points on the same machine element.
14
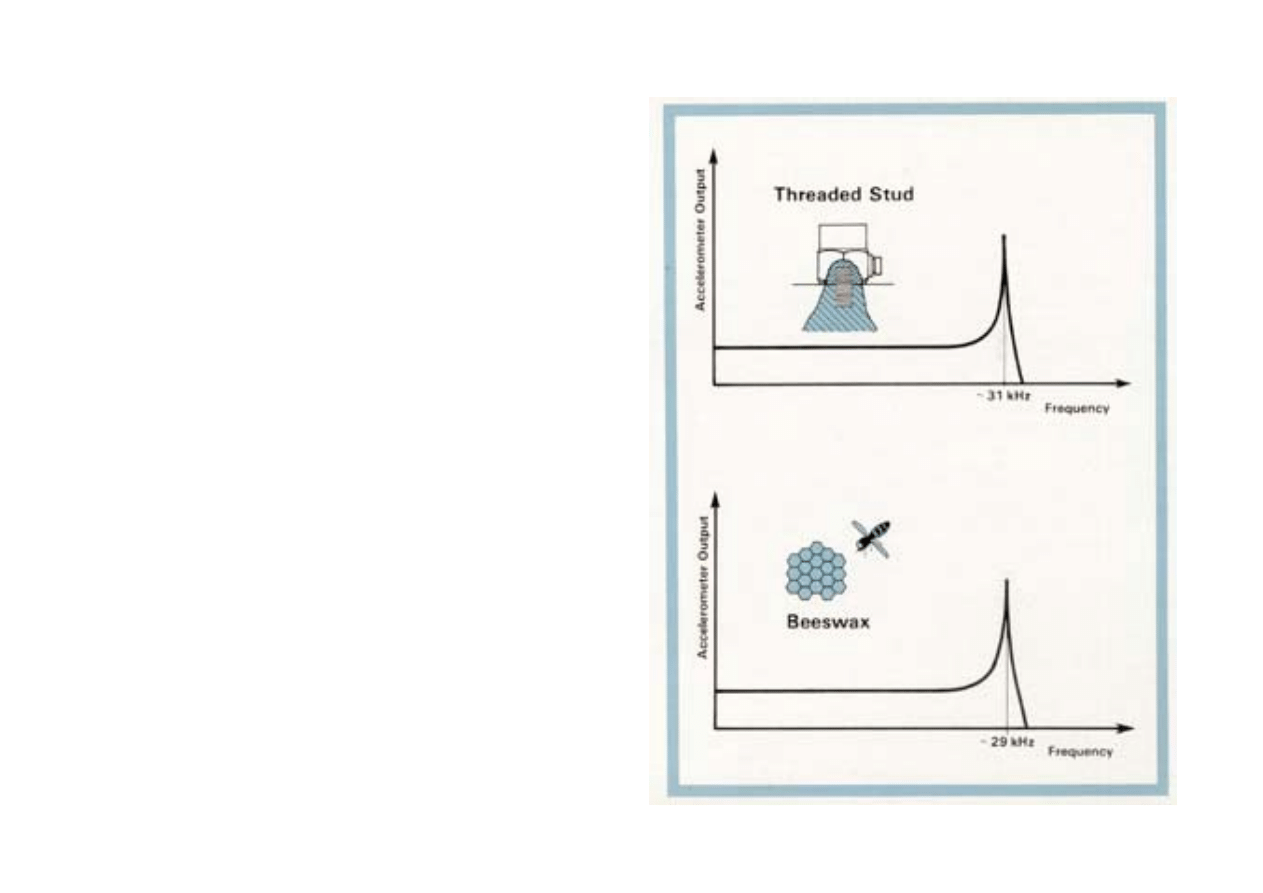
Mounting the Accelerometer
The method of mounting the accelerometer to the mea-
suring point is one of the most critical factors in obtain-
ing accurate results from practical vibration measure-
ments. Sloppy mounting results in a reduction in the
mounted resonant frequency, which can severely limit
the useful frequency range of the accelerometer. The
ideal mounting is by a threaded stud onto a flat, smooth
surface as shown in the drawing. A thin layer of grease
applied to the mounting surface before tightening down
the accelerometer will usually improve the mounting stiff-
ness. The tapped hole in the machine part should be suf-
ficiently deep so that the stud is not forced into the base
of the accelerometer. The upper drawing shows a typical
response curve of a general purpose accelerometer
mounted with a fixing stud on a flat surface. The reso-
nant frequency attained is almost as high as the 32kHz
mounted resonant frequency attained under calibration
where the mounting surface is dead flat and smooth.
A commonly used alternative mounting method is the
use of a thin layer of bees-wax for sticking the acceler-
ometer into place. As can be seen from the response
curve, the resonant frequency is only slightly reduced (to
29kHz). Because bees-wax becomes soft at higher tem-
peratures, the method is restricted to about 40°C. With
clean surfaces, bees-wax fixing is usable up to accelera-
tion levels of about 100 m/s
2
.
15
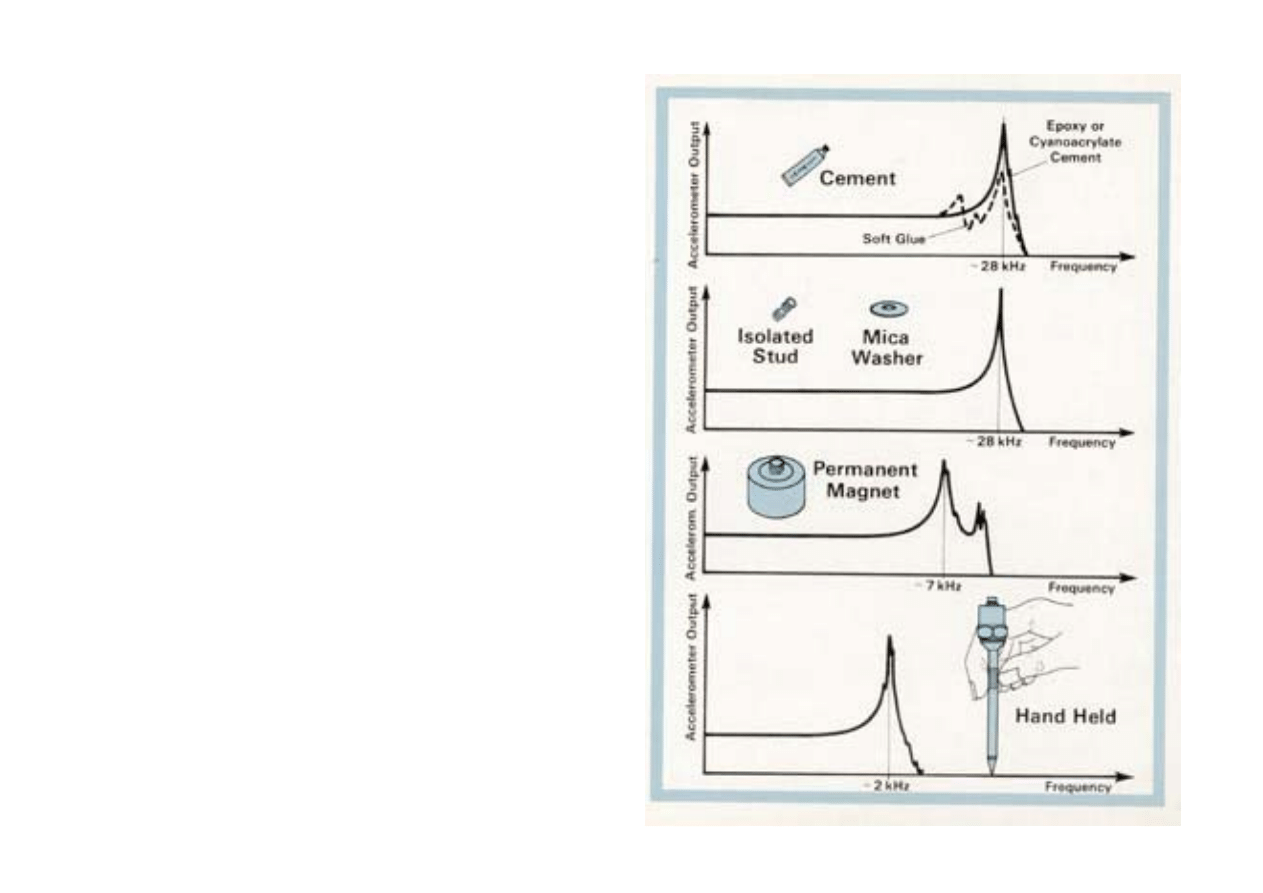
Mounting the Accelerometer
Where permanent measuring points are to be esta-
blished on a machine and it is not wished to drill and tap
fixing holes, cementing studs can be used. They are att-
ached to the measuring point by means of a hard glue.
Epoxy and cyanoacrylate types are recommended as soft
glues can considerably reduce the usable frequency
range of the accelerometer.
A mica washer and isolated stud are used where the
body of the accelerometer should be electrically isolated
from the measuring object. This is normally to prevent
ground loops, but more about that under "Environmental
Influences". A thin slice should be peeled from the thick
mica washer supplied. This fixing method also gives
good results, the resonance frequency of the test acceler-
ometer only being reduced to about 28 kHz.
A permanent magnet is a simple attachment method
where the measuring point is a flat magnetic surface. It
also electrically isolates the accelerometer. This method
reduced the resonant frequency of the test accelerome-
ter to about 7 kHz and consequently cannot be used for
measurements much above 2kHz. The holding force of
the magnet is sufficient for vibration levels up to 1000
to 2000 m/s
2
depending on the size of the accelerome-
ter.
A hand-held probe with the accelerometer mounted on
top is very convenient for quick-look survey work, but
can give gross measuring errors because of the low over-
all stiffness. Repeatable results cannot be expected. A
low-pass filter should be used to limit the measuring
range at about 1000 Hz.
16

17
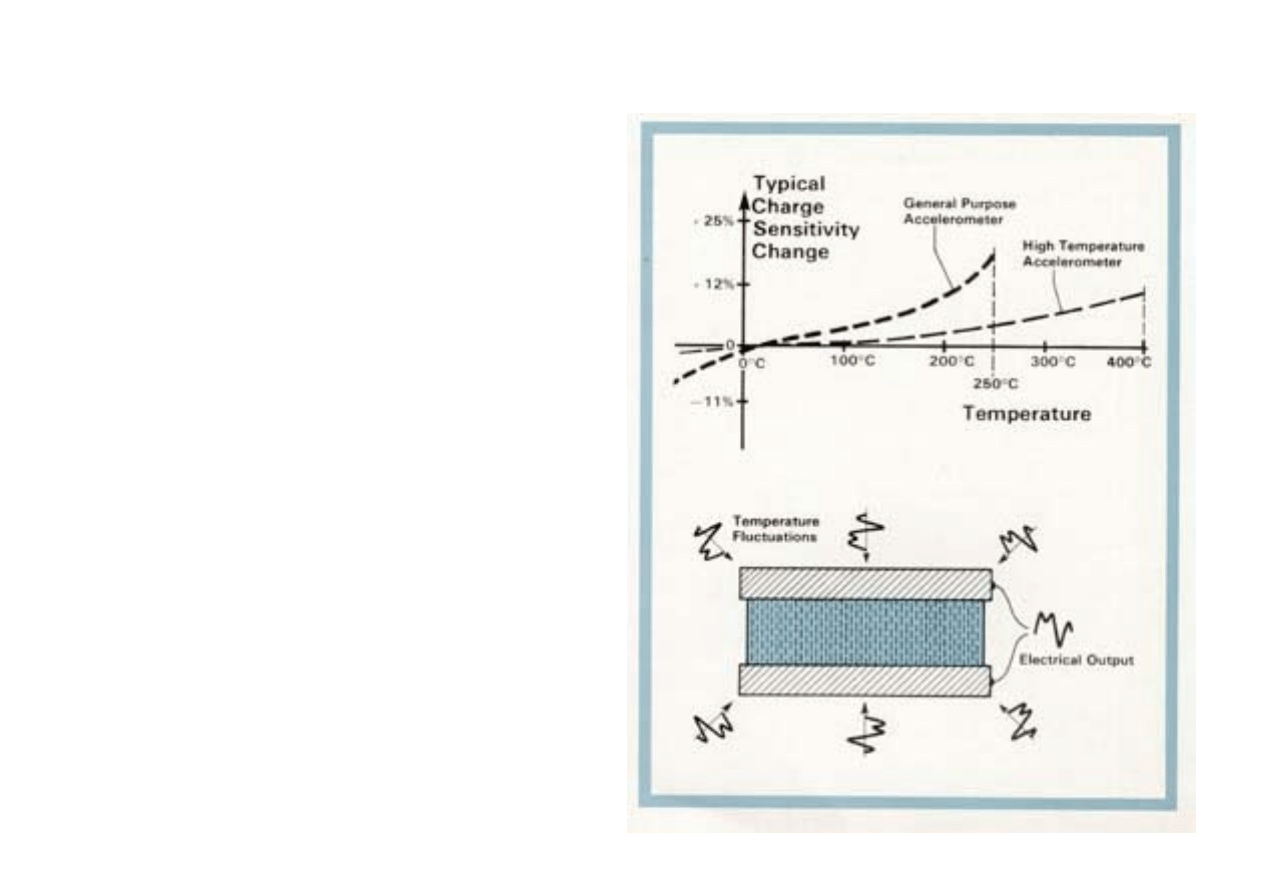
Environmental Influences — Temperature
Typical general purpose accelerometers can tolerate tem-
peratures up to 250°C. At higher temperatures the pie-
zoelectric ceramic will begin to depolarize so that the
sensitivity will be permanently altered. Such an acceler-
ometer may still be used after recalibration if the depola-
rization is not too severe. For temperatures up to 400°C,
accelerometers with a special piezoelectric ceramic are
available.
All piezoelectric materials are temperature dependent so
that any change in the ambient temperature will result
in a change in the sensitivity of the accelerometer. For
this reason all B & K accelerometers are delivered with a
sensitivity versus temperature calibration curve so that
measured levels can be corrected for the change in accel-
erometer sensitivity when measuring at temperatures sig-
nificantly higher or lower than 20°C.
Piezoelectric accelerometers also exhibit a varying output
when subjected to small temperature fluctuations, called
temperature transients, in the measuring environment.
This is normally only a problem where very low level or
low frequency vibrations are being measured. Modern
shear type accelerometers have a very low sensitivity to
temperature transients.
When accelerometers are to be fixed to surfaces with
higher temperatures than 250°C, a heat sink and mica
washer can be inserted between the base and the mea-
suring surface. With surface temperatures of 350 to
400°C, the accelerometer base can be held below
250°C by this method. A stream of cooling air can pro-
vide additional assistance.
18
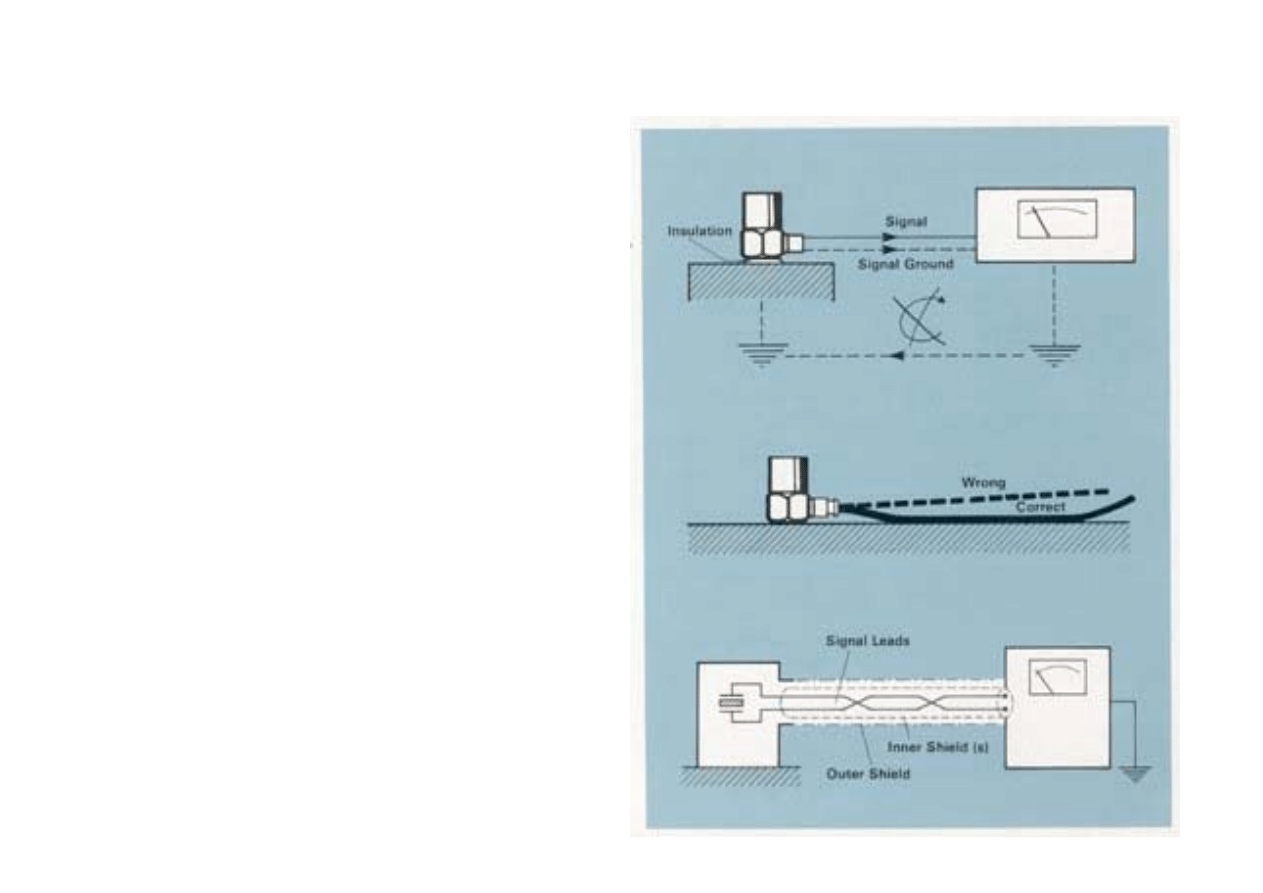
Environmental Influences — Cable Noise
Since piezoelectric accelerometers have a high output im-
pedance, problems can sometimes arise with noise sig-
nals induced in the connecting cable. These distur-
bances can result from ground loops, triboelectric noise
or electromagnetic noise.
Ground Loop currents sometimes flow in the shield of
accelerometer cables because the accelerometer and
measuring equipment are earthed separately. The
ground loop is broken by electrically isolating the acceler-
ometer base from the mounting surface by means of an
isolating stud and mica washer as already mentioned.
Tribo-electric Noise is often induced into the acceler-
ometer cable by mechanical motion of the cable itself. It
originates from local capacity and charge changes due to
dynamic bending, compression and tension of the layers
making up the cable. This problem is avoided by using a
proper graphited accelerometer cable and taping or glu-
ing it down as close to the accelerometer as possible.
Electromagnetic Noise is often induced in the acceler-
ometer cable when it lies in the vicinity of running ma-
chinery. Double shielded cable helps in this respect, but
in severe cases a balanced accelerometer and differen-
tial preamplifier should be used.
19
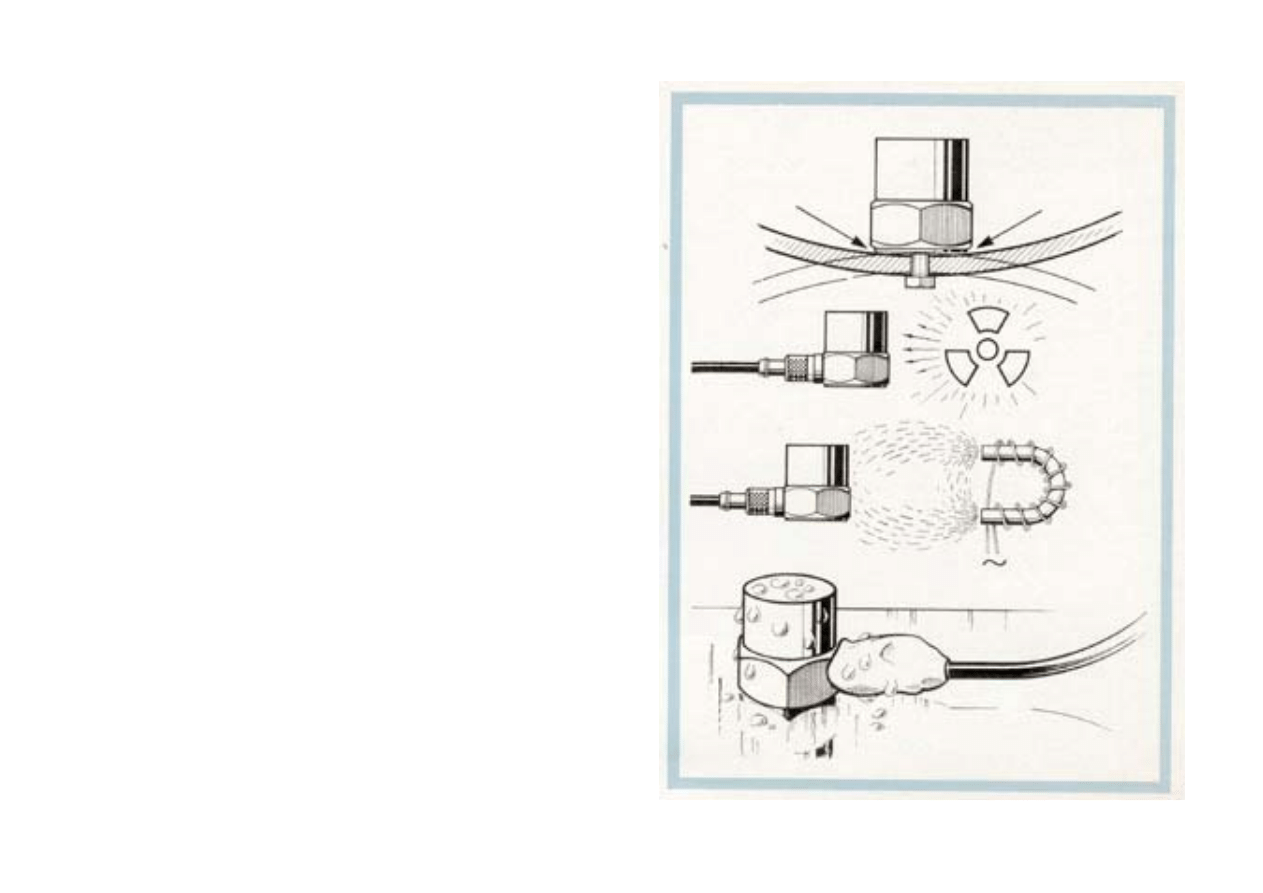
Other Environmental Influences
Base Strains: When an accelerometer is mounted on a
surface that is undergoing strain variations, an output
will be generated as a result of the strain being transmit-
ted to the sensing element. Accelerometers are designed
with thick, stiff bases to minimize this effect: Delta
Shear®types have a particularly low base strain sensitiv-
ity because the sensing element is mounted on a centre
post rather than directly to the accelerometer base.
Nuclear Radiation: Most B & K accelerometers can be
used under gamma radiation doses of 10k Rad/h up to
accumulated doses of 2 M Rad without significant
change in characteristics. Certain accelerometers can be
used in heavy radiation with accumulated doses in ex-
cess of 100 M Rad.
Magnetic Fields: The magnetic sensitivity of piezoelec-
tric accelerometers is very low, normally less than 0,01
to 0,25 m/s
2
per k Gauss in the least favourable orienta-
tion of the accelerometer in the magnetic field.
Humidity: B & K accelerometers are sealed, either by
epoxy bonding or welding to ensure reliable operation in
humid environments. For short duration use in liquids,
or where heavy condensation is likely, Teflon sealed ac-
celerometer cables are recommended. The accelerome-
ter connector should also be sealed with an acid free
room temperature vulcanizing silicon rubber or mastic.
Industrial accelerometers with integral cables should be
used for permanent use in humid or wet areas.
20
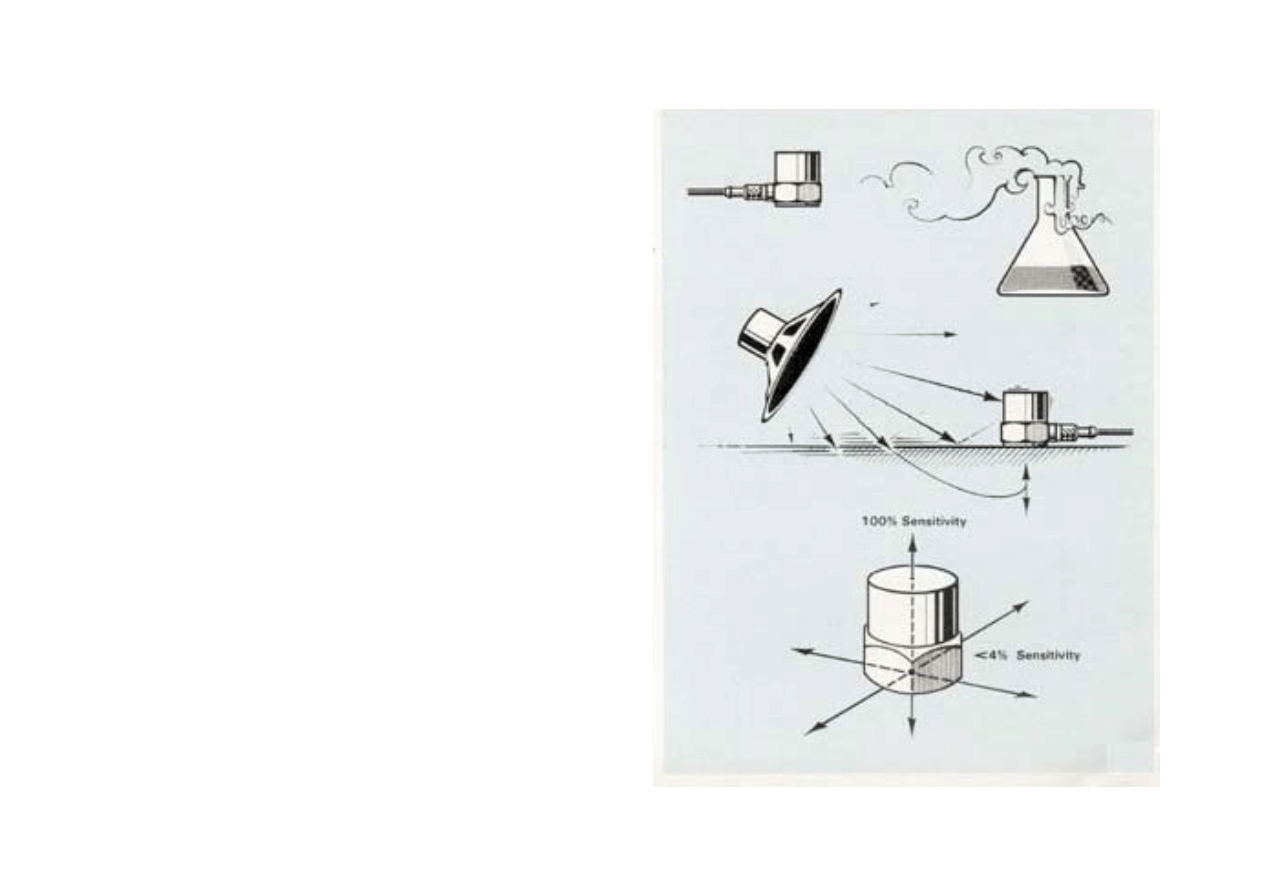
Other Environmental Influences
Corrosive Substances: The materials used in the con-
struction of all Brüel & Kjær accelerometers have a high
resistance to most of the corrosive agents encountered
in industry.
Acoustic Noise: The noise levels present in machinery
are normally not sufficiently high to cause any signifi-
cant error in vibration measurements. Normally, the
acoustically induced vibration in the structure on which
the accelerometer is mounted is far greater than the air-
borne excitation.
Transverse Vibrations: Piezoelectric accelerometers are
sensitive to vibrations acting in directions other than
coinciding with their main axis. In the transverse plane,
perpendicular to the main axis, the sensitivity is less
than 3 to 4% of the main axis sensitivity (typically < 1%).
As the transverse resonant frequency normally lies at
about 1/3 of the main axis resonant frequency, it should
be considered where high levels of transverse vibration
are present.
21
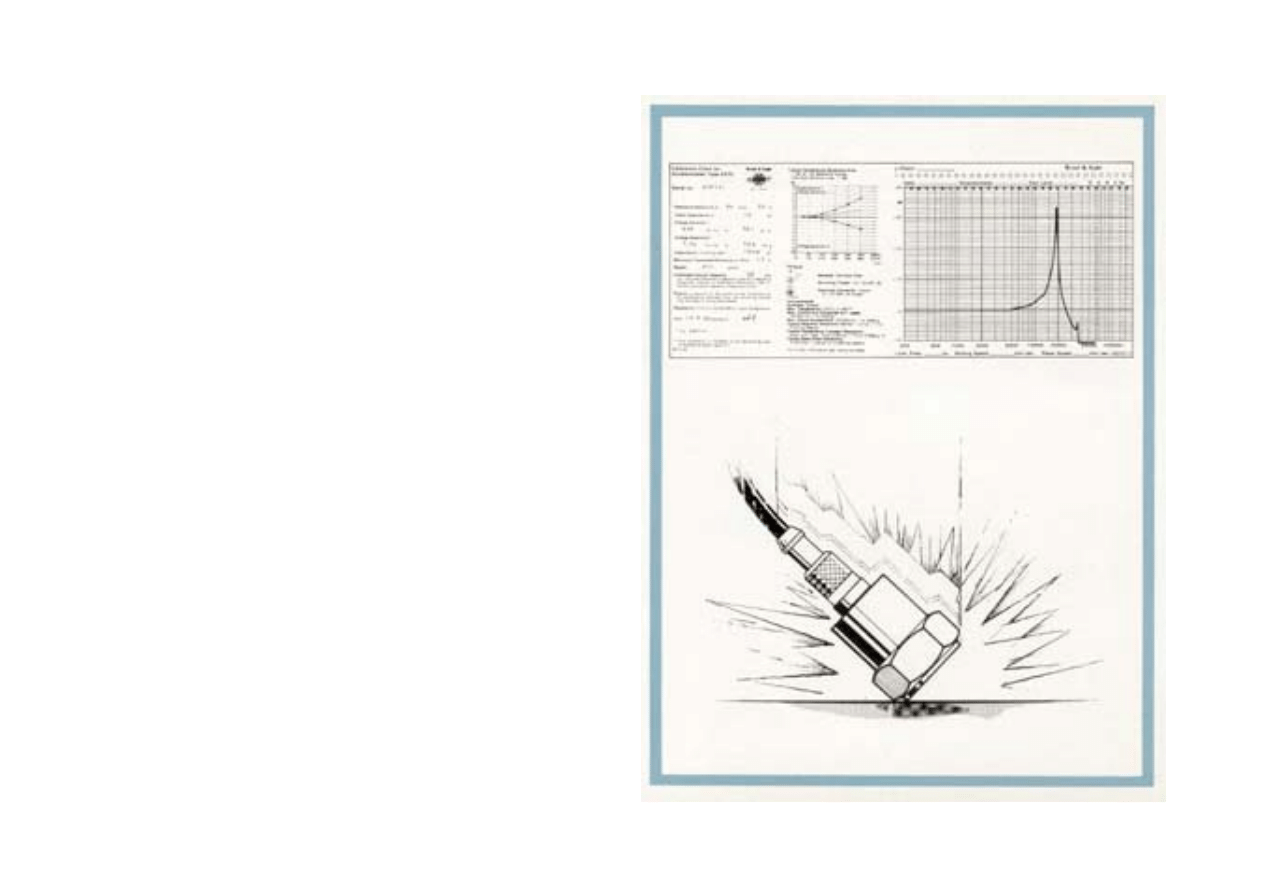
Accelerometer Calibration
Each Brüel & Kjær accelerometer is supplied individually
calibrated from the factory and is accompanied by a com-
prehensive calibration chart. Where accelerometers are
stored and operated within their specified environmental
limits, i. e. are not subjected to excessive shocks, temper-
atures, radiation doses etc. there will be a minimal
change in characteristics over a long time period. Tests
have shown that characteristics change less than 2%,
even over periods of several years.
However, in normal use, accelerometers are often sub-
jected to quite violent treatment which can result in a
significant change in characteristics and sometimes even
permanent damage. When dropped onto a concrete floor
from hand height an accelerometer can be subjected to a
shock of many thousands of g. It is wise therefore to
make a periodic check of the sensitivity calibration. This
is normally sufficient to confirm that the accelerometer
is not damaged.
22
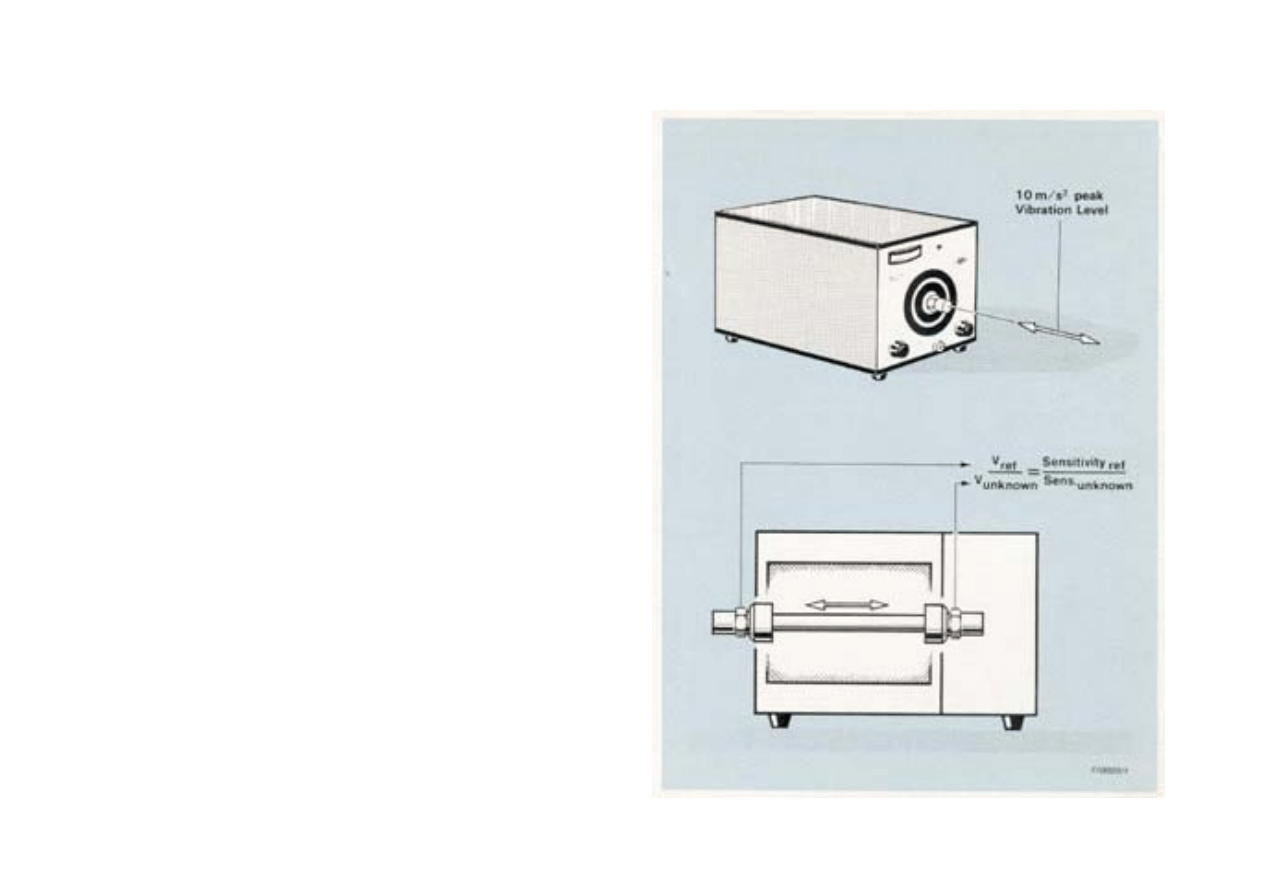
A Simple Calibrator
The most convenient means of performing a periodic cali-
bration check is by using a B & K battery-powered
calibrated vibration source. This has a small built-in
shaker table which can be adjusted to vibrate at pre-
cisely 10 m/s
2
.
The sensitivity calibration of an accelerometer is checked
by fastening it to the shaker table and noting its output
when vibrated at 10m/s
2
. Alternatively an accelerome-
ter can be reserved for use as a reference. This is
mounted on the shaker table with the accelerometer to
be calibrated. The ratio of their respective outputs when
vibrated will be proportional to their sensitivities, and as
the sensitivity of the reference accelerometer is known.
the unknown accelerometer's sensitivity can be accu-
rately determined.
An equally useful application for the portable calibrator
is the checking of a complete measuring or analyzing se-
tup before the measurements are made. The measuring
accelerometer is simply transferred from the measuring
object to the calibrator and vibrated at a level of
10 m/s
2
. The meter readout can be checked and if a le-
vel or tape recorder is being used, the 10 m/s
2
calibra-
tion level can be recorded for future reference.
23
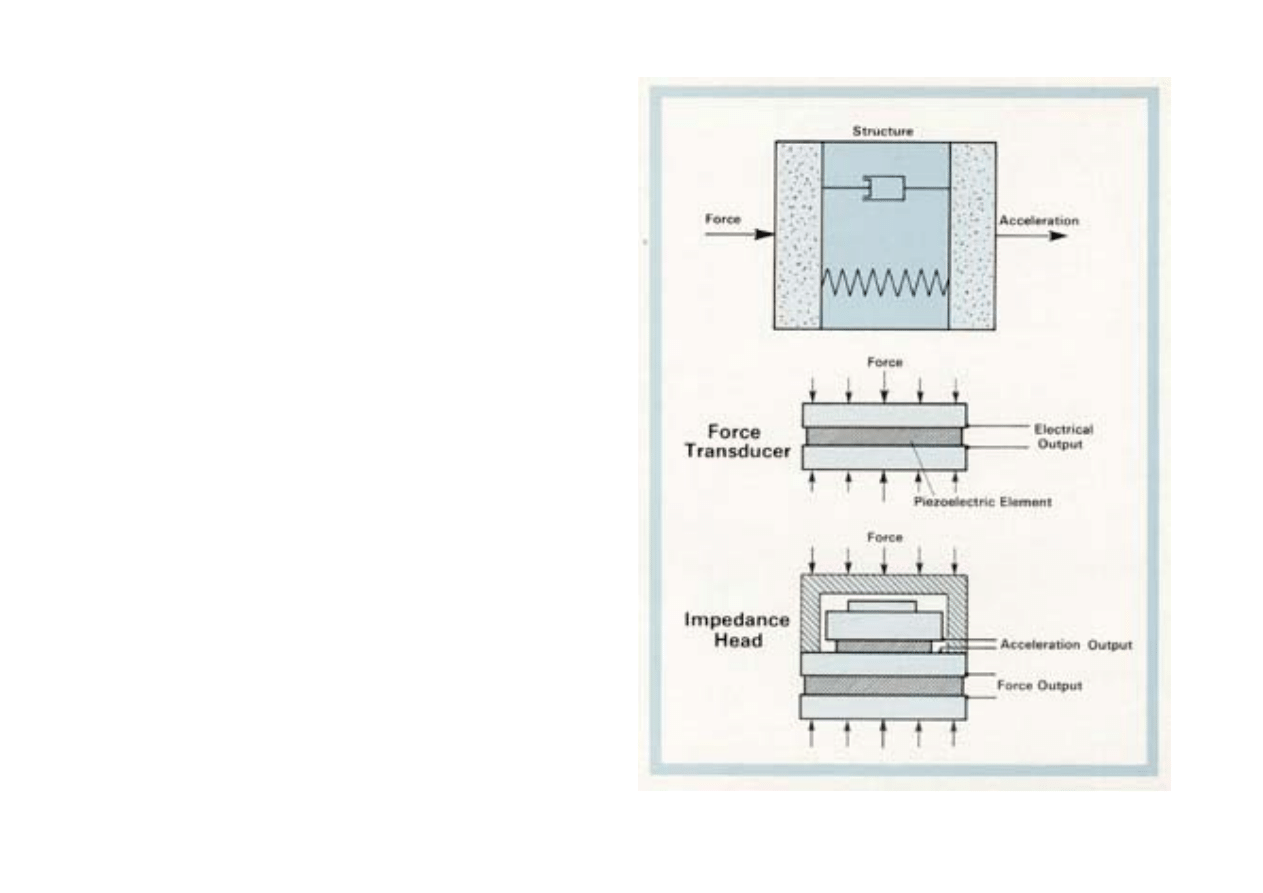
Force and Impedance
Measurements
Force transducers are used in mechanical-dynamics
measurements together with accelerometers to deter-
mine the dynamic forces in a structure and the resulting
vibratory motions. The parameters together describe the
mechanical impedance of the structure.
The force transducer also uses a piezoelectric element,
which when compressed gives an electrical output pro-
portional to the force transmitted through it. The force
signals can be processed and measured with exactly the
same instrumentation used with accelerometers.
For point impedance measurements on very light struc-
tures, the accelerometer and force transducer can be
combined into a single unit called an impedance head.
Most impedance measurements, however, are per-
formed using a separate accelerometer and force trans-
ducer.
24
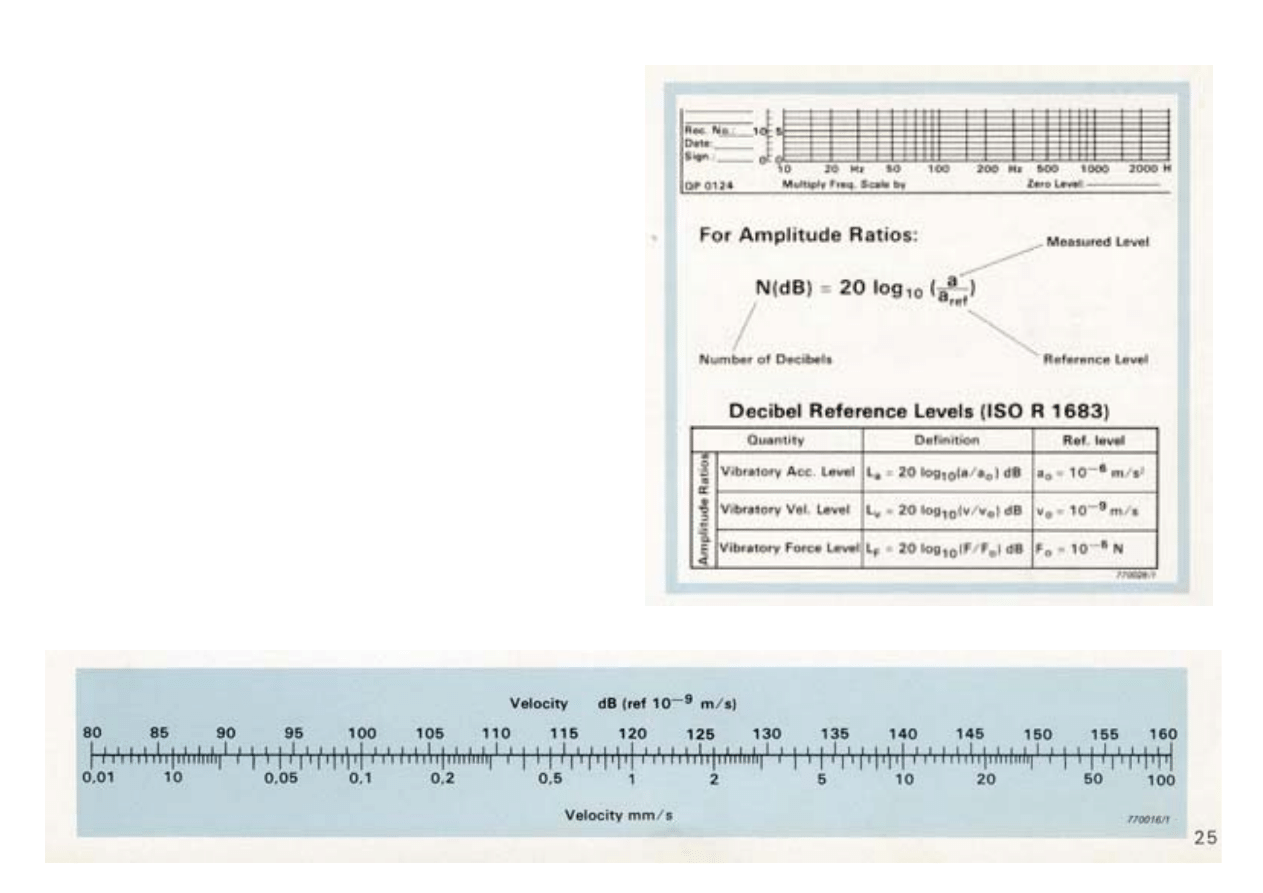
Logarithmic Scales and Decibels
We often plot frequency on a logarithmic scale. This has
the effect of expanding the lower frequencies and com-
pressing the higher frequencies on the chart, thus giving
the same percentage resolution over the whole width of
the chart and keeping its size down to reasonable propor-
tions.
Logarithmic scales are also used to plot vibration ampli-
tudes; this enables the decibel scale to be used as a help
in comparing levels. The decibel (dB) is the ratio of one
level with respect to a reference level, and therefore has
no dimensions. But in order to quote absolute vibration
levels, the reference level must be stated.
For example, we can say that one vibration level is
10 dB greater than another level without any further ex-
planation, but if we wish to say that a vibration level is
85 dB we have to refer it to a reference level. We should
say therefore, that the vibratory velocity is 85 dB ref.
10-
9
m/s. (See chart below).
As yet, standard dB reference levels are not commonly
used in vibration measurement. The reference levels rec-
ommended by standardisation for vibration work are
shown in the table.
25
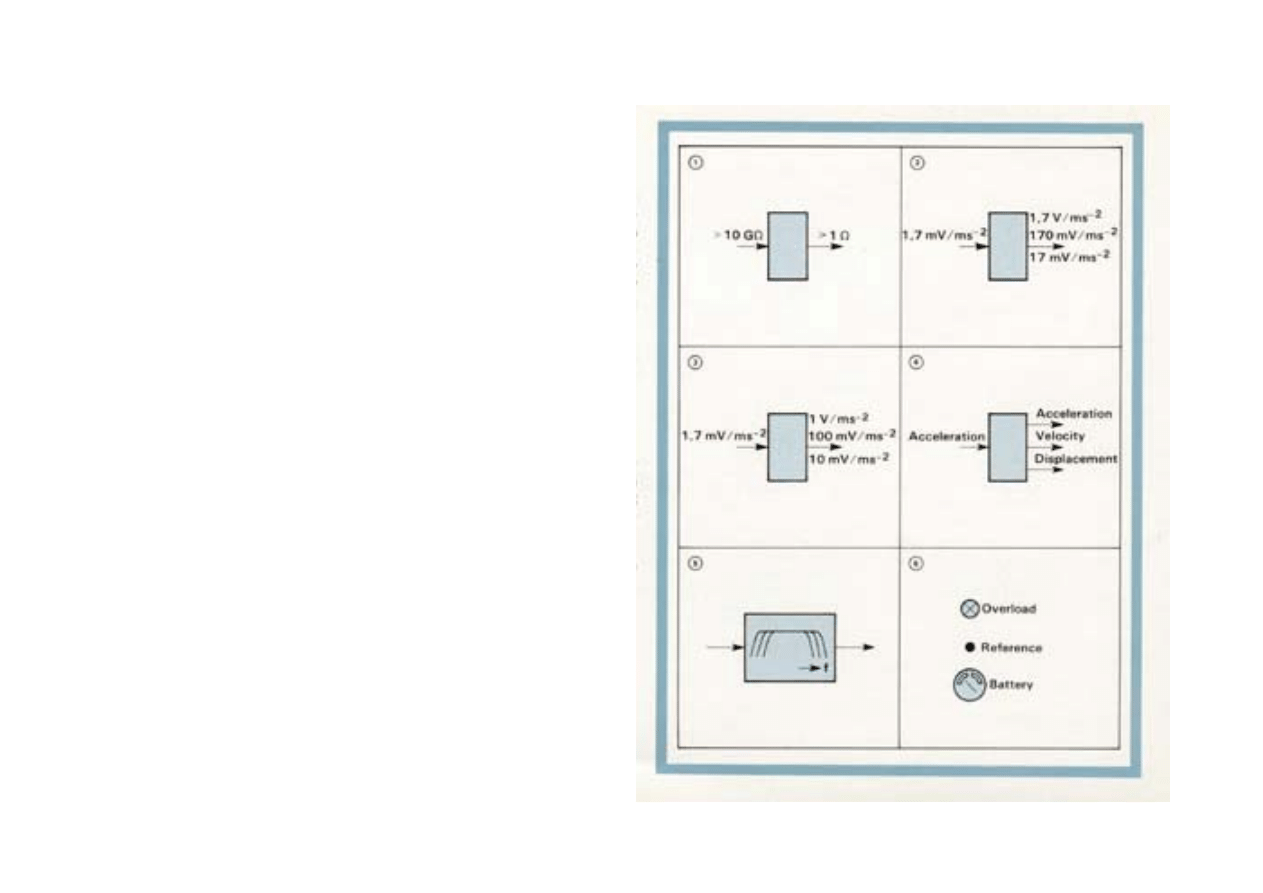
Why use an Accelerometer
Preamplifier?
Direct loading of a piezoelectric accelerometer's output,
even by relatively high impedance loads, can greatly re-
duce the accelerometer's sensitivity as well as limit its
frequency response. To minimise these effects the accel-
erometer output signal is fed through a preamplifier
which converts to a much lower impedance, suitable for
connection to the relatively low input impedance of mea-
suring and analyzing instrumentation (1).
With measuring amplifiers, analyzers, and voltmeters a
separate accelerometer preamplifier is used while vibra-
tion meters intended for use with piezoelectric acceler-
ometers normally have the preamplifier built-in.
In addition to the function of impedance conversion,
most preamplifiers offer additional facilities for condition-
ing the signal. For example (2) A calibrated variable gain
facility to amplify the signal to a suitable level for input
to, for example a tape recorder; (3) A secondary gain ad-
justment to "normalize" awkward" transducer sensitivi-
ties; (4) Integrators to convert the acceleration propor-
tional output from accelerometers to either velocity or
displacement signals; (5) Various filters to limit the up-
per and lower frequency response to avoid interference
from electrical noise, or signals outside the linear por-
tion of the accelerometer frequency range; (6) Other facil-
ities, such as overload indicator, reference oscillator,
and battery condition indicator are also often included.
26
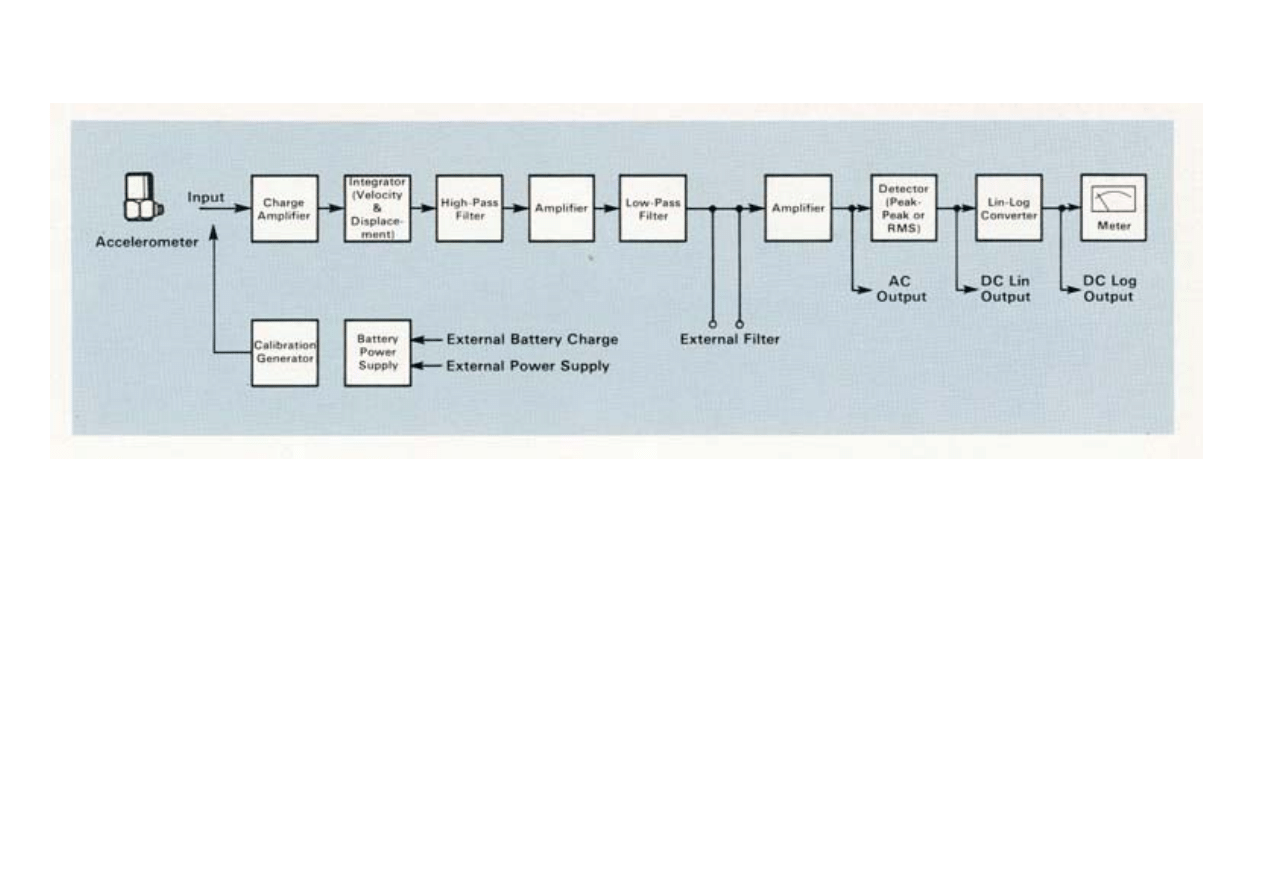
The Vibration Meter
The block diagram shows how a typical modern vibration
meter is built-up. The accelerometer is connected to a
charge amplifier input stage with an input impedance of
several G
Ω so that a separate preamplifier is not neces-
sary. With a charge amplifier input, long input cables
from the accelerometer, (up to several hundred meters),
can be used without any appreciable loss in sensitivity.
An integrator stage allows velocity and diplacement par-
ameters, as well as acceleration, to be measured.
The high-pass and low-pass filters can be adjusted so as
to limit the frequency range of the instrument to the
range of interest only, thus reducing the possibility of in-
terference from high and low frequency noise. After
proper amplification the signal is rectified to a DC signal
suitable for displaying on a meter or chart recorder. The
detector can either average the RMS level of the signal
or register the peak to peak level, and if required can re-
tain the maximum value occurring. This is a particularly
useful feature for measuring mechanical shocks and
short duration (transient) vibrations.
After passing through a linear to logarithmic converter
the signal is displayed on a logarithmic meter scale
covering two decades.
An external bandpass filter can be connected to the vibra-
tion meter so that frequency analysis can be performed.
Output sockets are provided so that the rectified and un-
rectified vibration signal can be fed to an oscilloscope,
tape recorder, or level recorder.
27
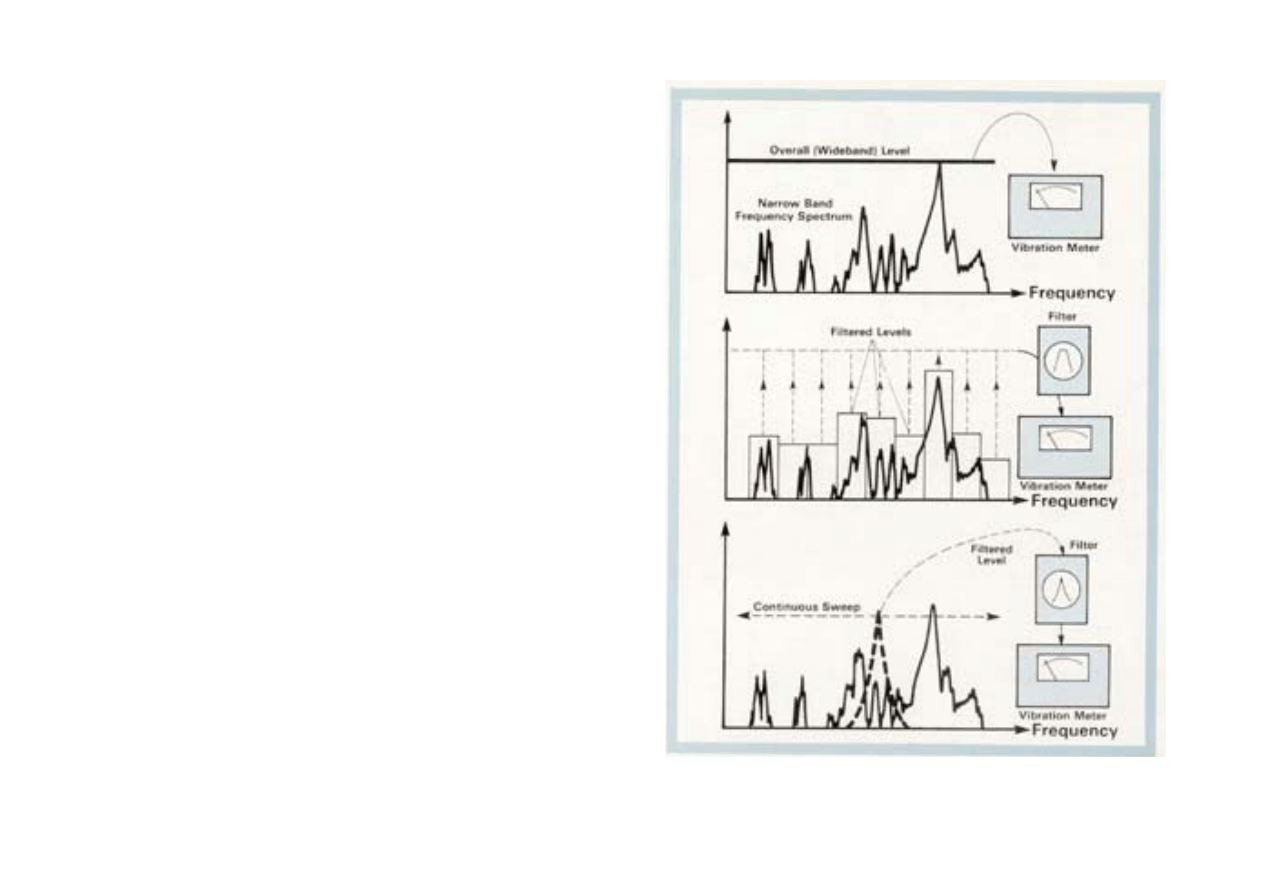
What is Frequency Analysis?
The vibration meter will give us a single vibration level
measured over a wide frequency band. In order to reveal
the individual frequency components making up the wide-
band signal we perform a frequency analysis.
For this purpose we use a filter which only passes those
parts of the vibration signal which are contained in a nar-
row frequency band. The pass band of the filter is moved
sequentially over the whole frequency range of interest
so that we obtain a separate vibration level reading for
each band.
The filter can consist of a number of individual, conti-
guous, fixed-frequency filters which are frequency
scanned sequentially by switching,
or alternatively, continuous coverage of the frequency
range can be achieved with a single tunable filter.
28
Constant Bandwidth or
Constant Percentage Bandwidth
Frequency Analysis?
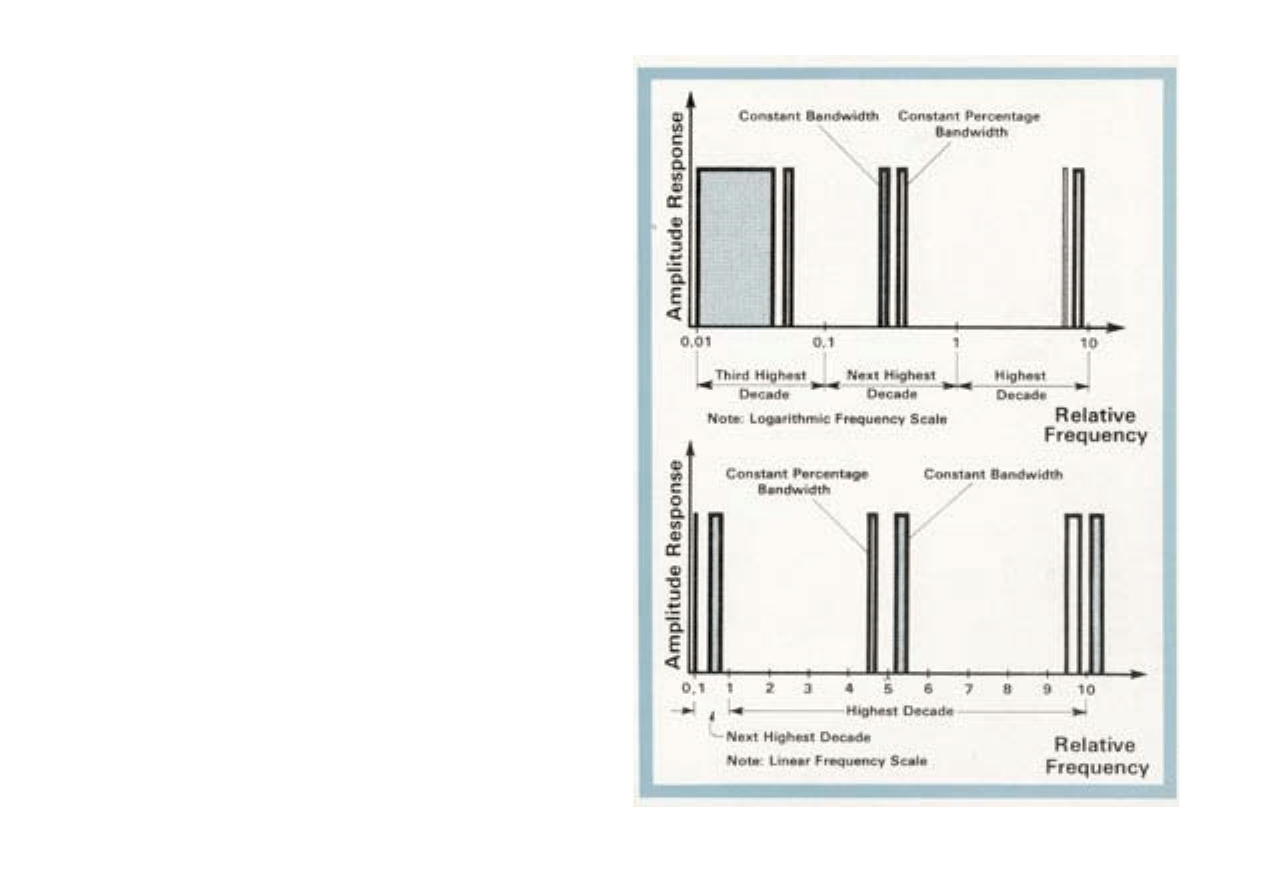
There are two basic types of filter used for the frequency
analysis of vibration signals. The constant bandwidth
type filter, where the filter is a constant absolute band-
width, for example 3 Hz, 10 Hz etc. and the constant per-
centage bandwidth filter where the filter bandwidth is a
constant percentage of the tuned centre frequency, for
example 3%, 10% etc. The two drawings show graphi-
cally the difference in these two filter types as a function
of frequency. Note that the constant percentage band-
width filter appears to maintain a constant bandwidth,
this is because it is plotted on a logarithmic frequency
scale which is ideal where a wide frequency range is to
be covered. On the other hand, if we show the two types
of filter on a linear frequency scale, it is the constant
bandwidth filter which shows constant resolution. The
constant percentage bandwidth filter plotted on a linear
frequency scale shows an increasing bandwidth with in-
creasing frequency which is not really practical.
There is no concise answer to the question of which
type of frequency analysis to use. Constant percentage
bandwidth analysis tends to match the natural response
of mechanical systems to forced vibrations, and allows a
wide frequency range to be plotted on a compact chart.
It is subsequently the analysis method which is most
generally used in vibration measurements.
Constant bandwidth analysis gives better frequency reso-
lution at high frequencies and when plotted on a linear
frequency scale is particularly valuable for sorting out
harmonic patterns etc.
29
Filter Bandwidth Considerations
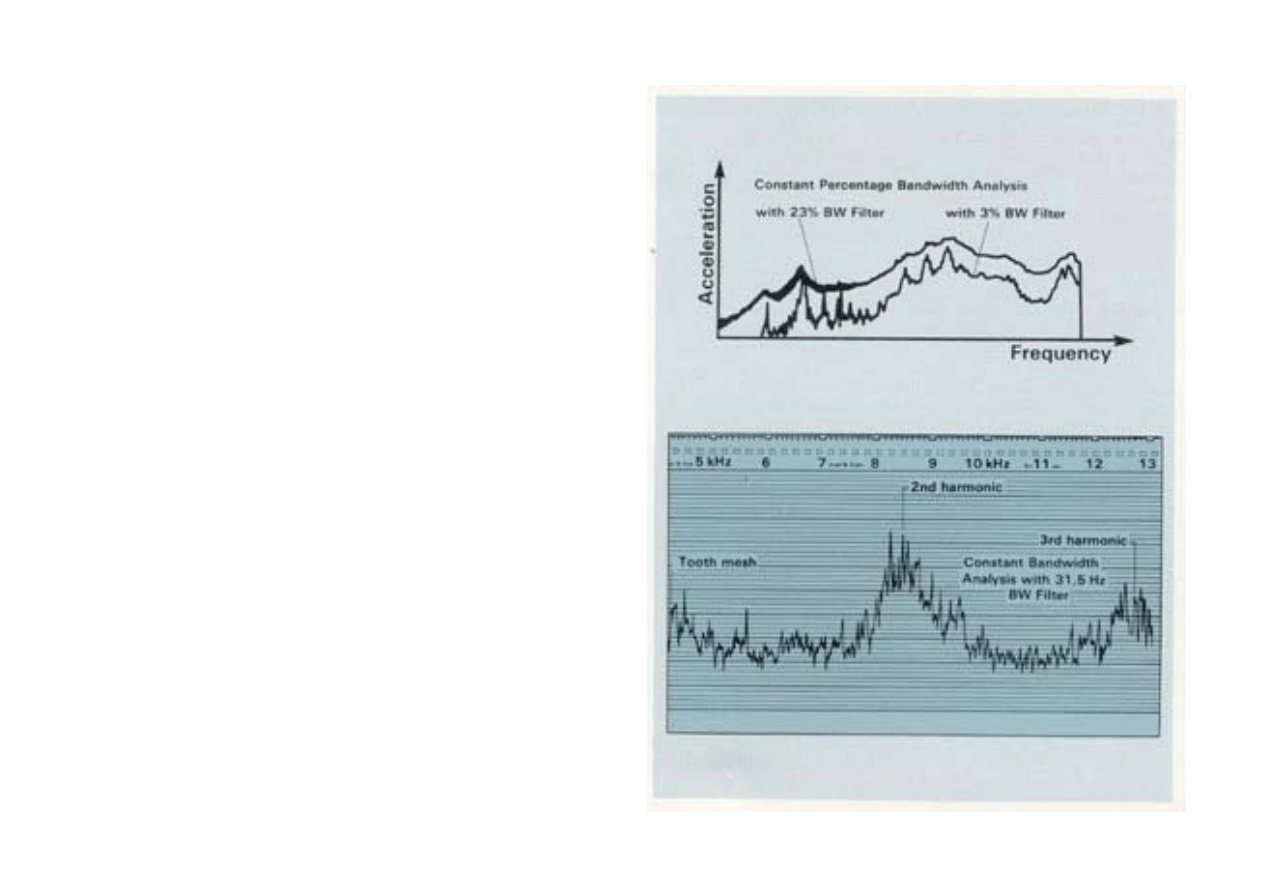
The selectivity of the filter, that is the narrowness of the
passband, governs the resolution of the frequency analy-
sis obtained. Vibration spectra from a gearbox are shown
in the drawing to the right. The upper spectrum was re-
corded using a 23% constant percentage bandwidth fil-
ter, while the lower spectrum, of the same signal, was
recorded using a 3% bandwidth filter. It can be seen that
by using a narrower bandwidth filter more detail is ob-
tained so that individual peaks in the vibration spectrum
can be isolated.
The disadvantage with narrow bandwidth analysis is that
the time required to obtain a particular accuracy gets
considerably longer as the filter bandwidth gets nar-
rower.
Because of the long time needed to cover a wide fre-
quency range with narrow bandwidth analyzers a prelimi-
nary analysis is often made with a wide filter bandwidth
in order to reveal particularly interesting parts of the fre-
quency spectrum. The analyzer is then switched to a nar-
row bandwidth to make a detailed analysis of the part of
interest. At higher frequencies a constant bandwidth an-
alyzer switched to. for example, 3 Hz bandwidth enables
extremely detailed analysis to be performed.
To sum up. the best selection of bandwidth and analysis
method is in most cases that which gives adequate reso-
lution over the whole frequency range and which allows
the analysis to be carried out. in the shortest time.
30
Defining the Filter Bandwidth
An ideal filter would pass all frequency components oc-
curing within its bandwidth and reject completely all oth-
ers. In practice, electronic filters have sloping skirts so
they do not completely eliminate frequency components
lying outside their specified bandwidth. This promotes
the important question, how do we specify the filter
bandwidth?
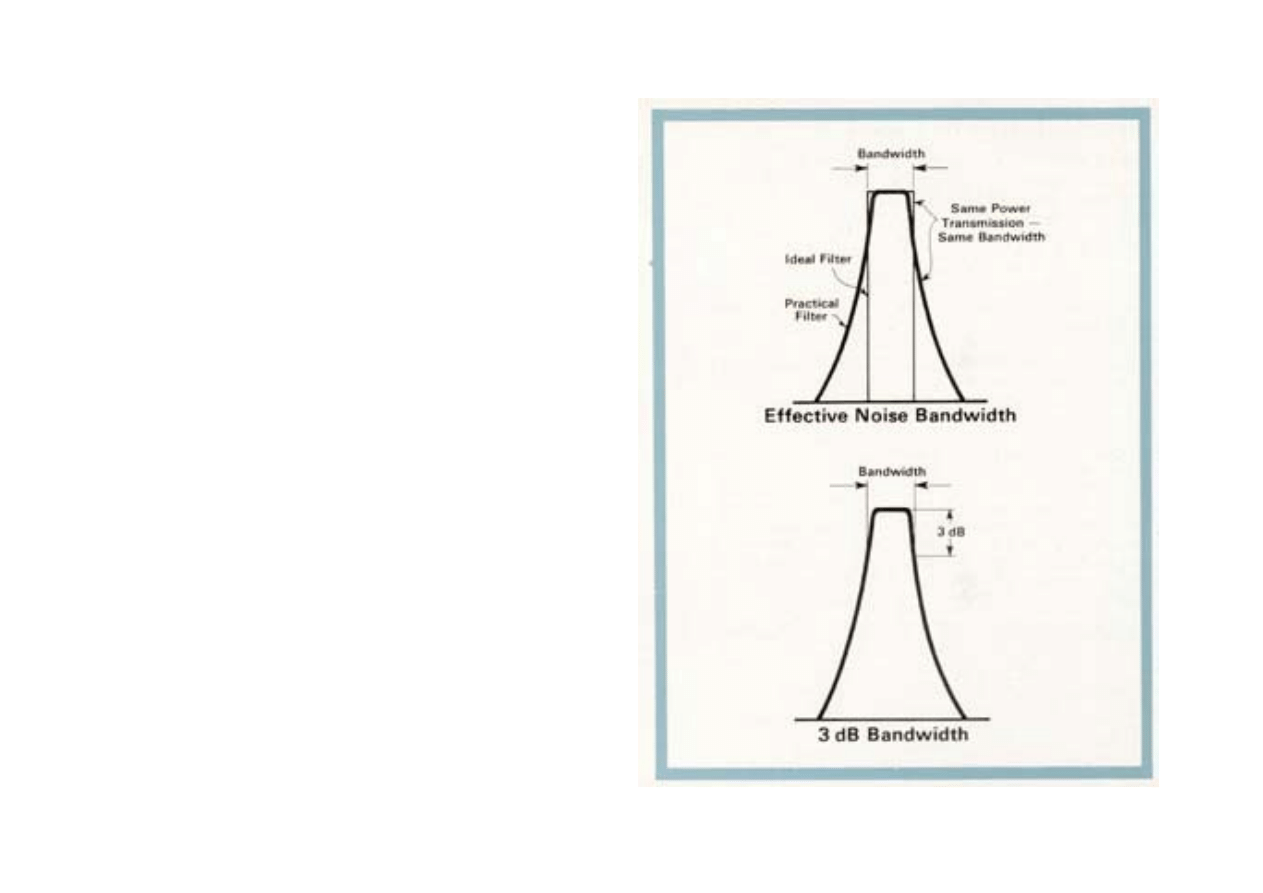
Two methods of measuring the filter bandwidth are com-
monly used. The most often used, defines the bandwidth
as the width of the ideal straight sided filter which
passes the same amount of power from a white noise
source as the filter described. The second definition is
the width of the filter characteristic where the filter at-
tenuation is 3 dB lower than the normal transmission le-
vel. Only filters with a relatively poor selectivity will have
a 3 dB bandwidth substantially different from the effec-
tive noise bandwidth.
31
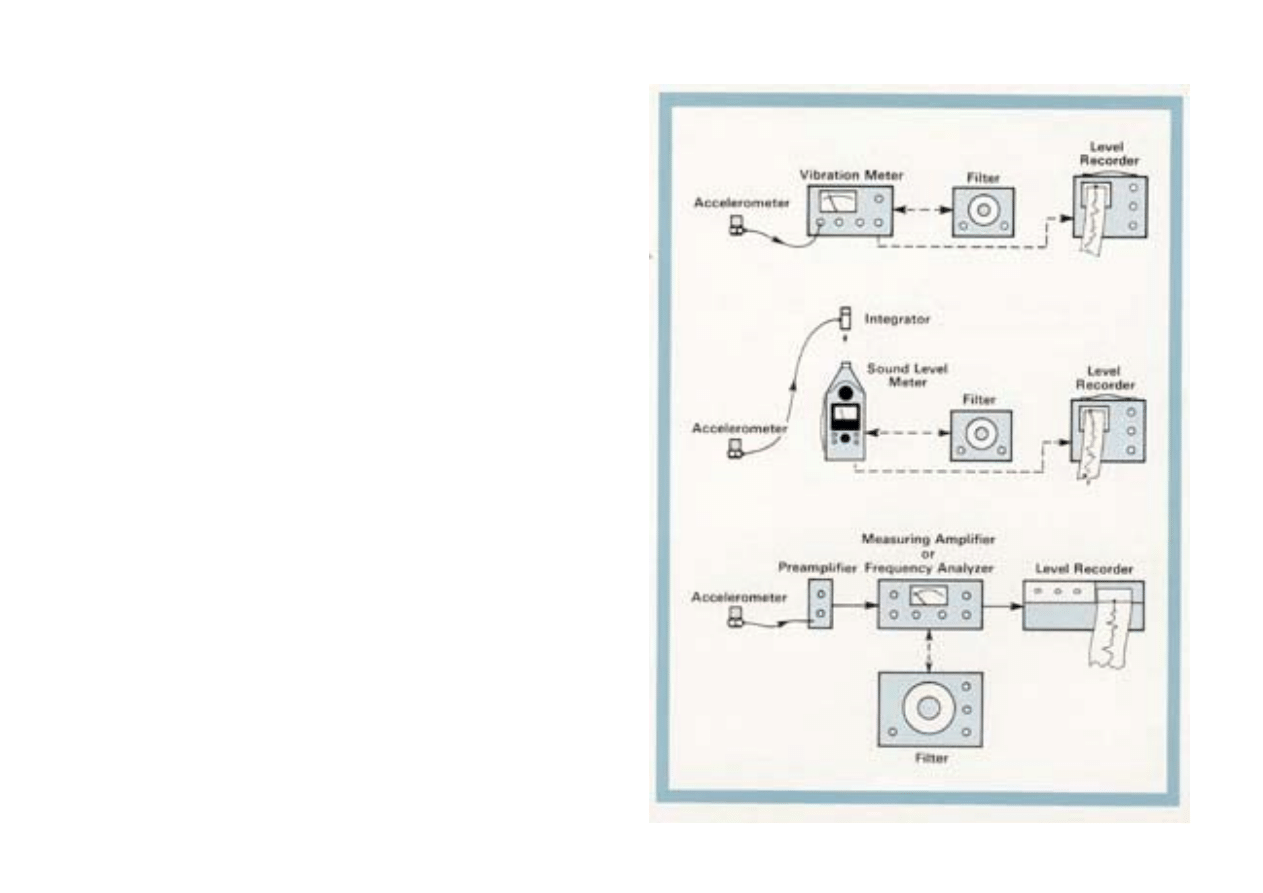
Measuring Instrumentation
A portable, general purpose vibration meter as described
on p. 27 will usually be the most convenient measuring
instrument to use but vibration measurements can also
be made in the field with a suitable B & K sound level
meter. The microphone is substituted by an integrator
adaptor and accelerometer to enable the meter to mea-
sure the RMS level of acceleration, velocity and displace-
ment. However these meters do not have the conveni-
ence of a charge amplifier input and need to be cali-
brated separately for each measuring parameter. Battery
operated filters can be added to enable octave, third-oc-
tave, and narrow bandwidth analysis to be performed.
Mains-operated laboratory oriented instrumentation of-
fers greater versatility, especially in the detailed analysis
and data reduction spheres. A basic measuring chain
would consist of accelerometer, preamplifier, and a mea-
suring amplifier, possibly with an external filter. The
measuring amplifier and filter are often combined into
one instrument which is called a Frequency Analyzer or
Spectrometer.
The ultimate in operating convenience and analysis
speed is obtained with a real-time analyzer, where a
targe number of parallel frequency bands are evaluated
almost instantaneously and shown on a continuously up-
dated display screen. Real-time analyzers are usually
equipped with a digital output and remote control facili-
ties so that they can be connected to a tape punch, com-
puter etc., to make fully automatic analysis systems.
32
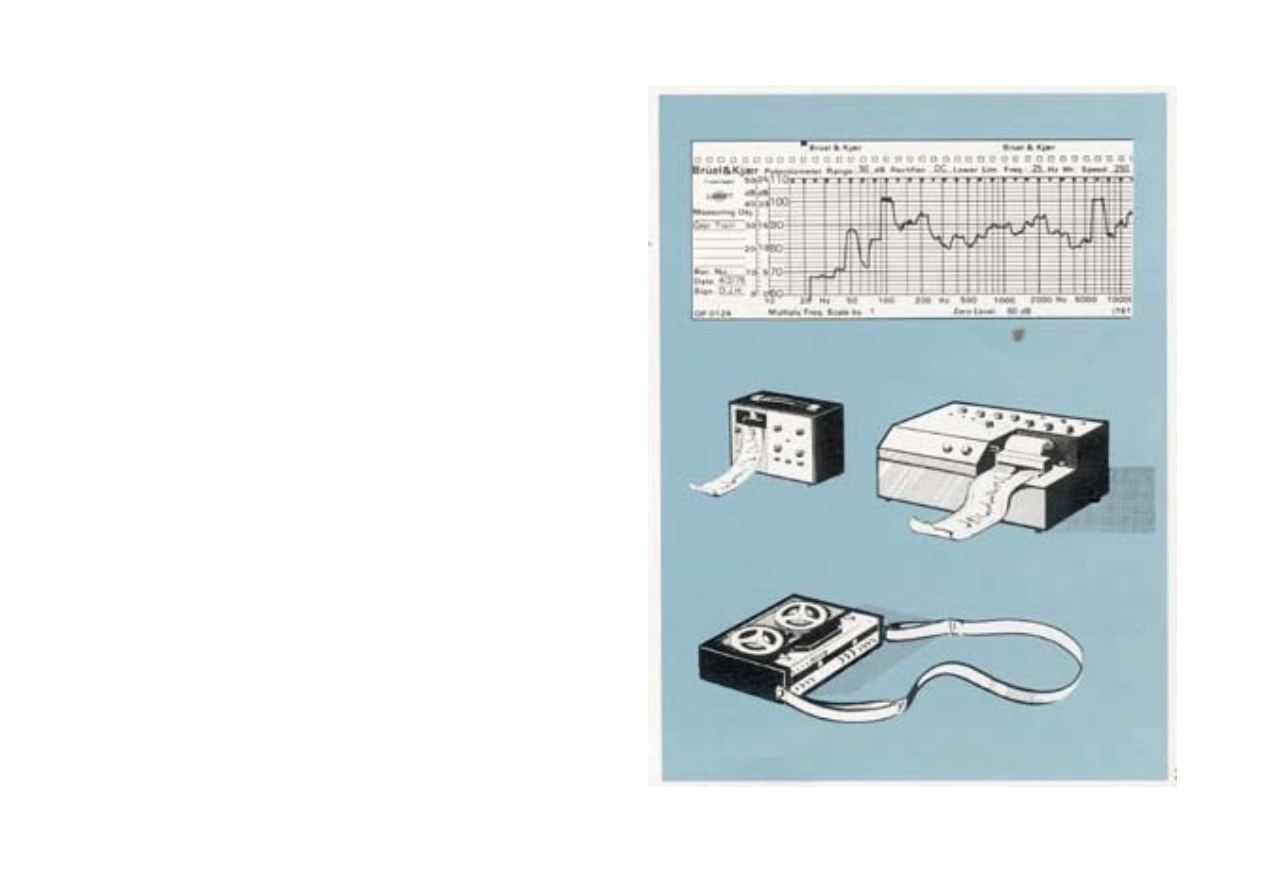
Recording Results
Where more than a few vibration measurements are
made, or frequency analyses are performed, it is a se-
vere drawback to have to manually plot results on a re-
cord sheet. The use of a level recorder will facilitate the
automatic recording of time and frequency spectra on a
precalibrated paper chart. Here again we can choose be-
tween small battery operated instruments intended for
use with portable vibration analysis equipment, or mains
operated recorders which have the additional facilities re-
quired to take full advantage of laboratory oriented analy-
sis equipment.
Tape recorders are widely used in vibration measure-
ments to collect data in the field for later analysis in the
laboratory. By replaying the tape at a higher speed, very
low frequency signals can be brought into the frequency
range of ordinary frequency analyzers. Speeding up the
tape replay is also used to reduce frequency analysis
time.
Where the signal recorded is rather short in duration, for
example mechanical shocks, or the vibration signal re-
corded when a train passes over a bridge, normal se-
quential analysis is not possible due to the short sample
of signal available. In this case, the piece of recording
tape bearing the signal is made into a continuous loop
so that on replay it appears as a periodic signal, which
can be analyzed in the normal way.
A digital recorder is also available which will capture
short duration signals and reproduce them when desired
in almost any speed transformation ratio.
33
frequency and harmonics, due to periodic variations
such as eccentricity. The first upper and lower sidebands
will appear at the tooth mesh frequency (ft) plus and mi-
nus the gear rotation frequency (fg), the second side-
bands at ft ± 2fg, and so on. Around the tooth mesh har-
monics a similar pattern may be present (i.e. 2ft ±fg
etc.)
It is often impracticable to alter forcing frequencies
(shaft speeds, gear ratios etc.) so other methods of redu-
cing undersirable vibration levels are used. For example.
detuning the machine element (altering its resonant fre-
quency) by changing its mass or stiffness; by attenuating
the transmission of vibration with isolation materials, or
by adding damping materials to reduce the vibration am-
plitude.
Using Vibration Measurements
Single, wide frequency band vibration measurements are
a useful quick-look vibration indicator, which can be
used for example when evaluating the general condition
of a machine or the effectiveness of vibration isolation
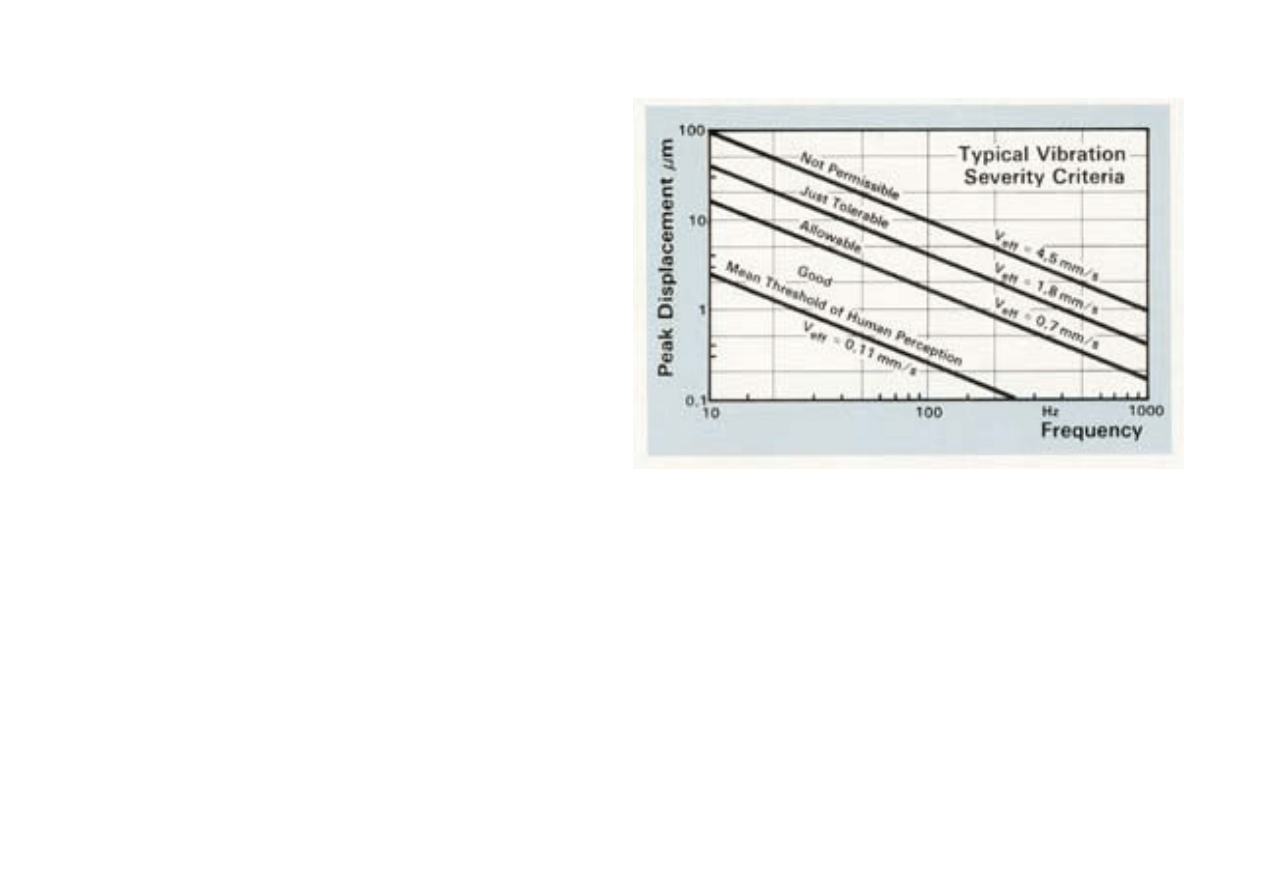
measures. The actual level measured will be judged
more or less severe by comparison with previously or
subsequently measured levels or with published severity
criteria. An example of the latter is shown in the draw-
ing, extracted from standards and recommendations for
judging the vibration severity of rotating machinery. (ISO
2372 & 2373, German VDI 2056: 1964; British BS
4675: 1971, and German DIN 45 665: 1968).
For diagnostic purposes, for example in the course of pro-
duct development, frequency analysis is necessary.
Some frequency components in the vibration frequency
spectrum can be immediately related to particular forcing
functions, for example, shaft rotation speeds, gear tooth
meshing frequencies etc. We will almost always find ad-
ditional significant frequency components in the spec-
trum which are also related to the fundamental motions.
The most significant are usually harmonics (a multiple) of
one of the fundamental frequencies. Harmonics often
arise because of distortion of the fundamental frequen-
cies or because the original periodic motion is not purely
sinusoidal. If they coincide with the resonant frequen-
cies of other machine elements, then possibly consider-
able vibration levels can result, which can become a ma-
jor noise source or result in the transmission of high for-
ces to other machine parts.
With gear wheels, tooth form deflection under load and
tooth wear will give rise to a tooth meshing frequency
component and harmonics. Furthermore, side band com-
ponents are often generated around the tooth meshing
34
Vibration as a Machine Condition Indicator
Machines seldom break down without warning, the
signs of impending failure are usually present long be-
fore breakdown makes the machine unusable. Machine
troubles are almost always characterised by an increase
in vibration level which can be measured on some exter-
nal surface of the machine and thus act as an indicator.
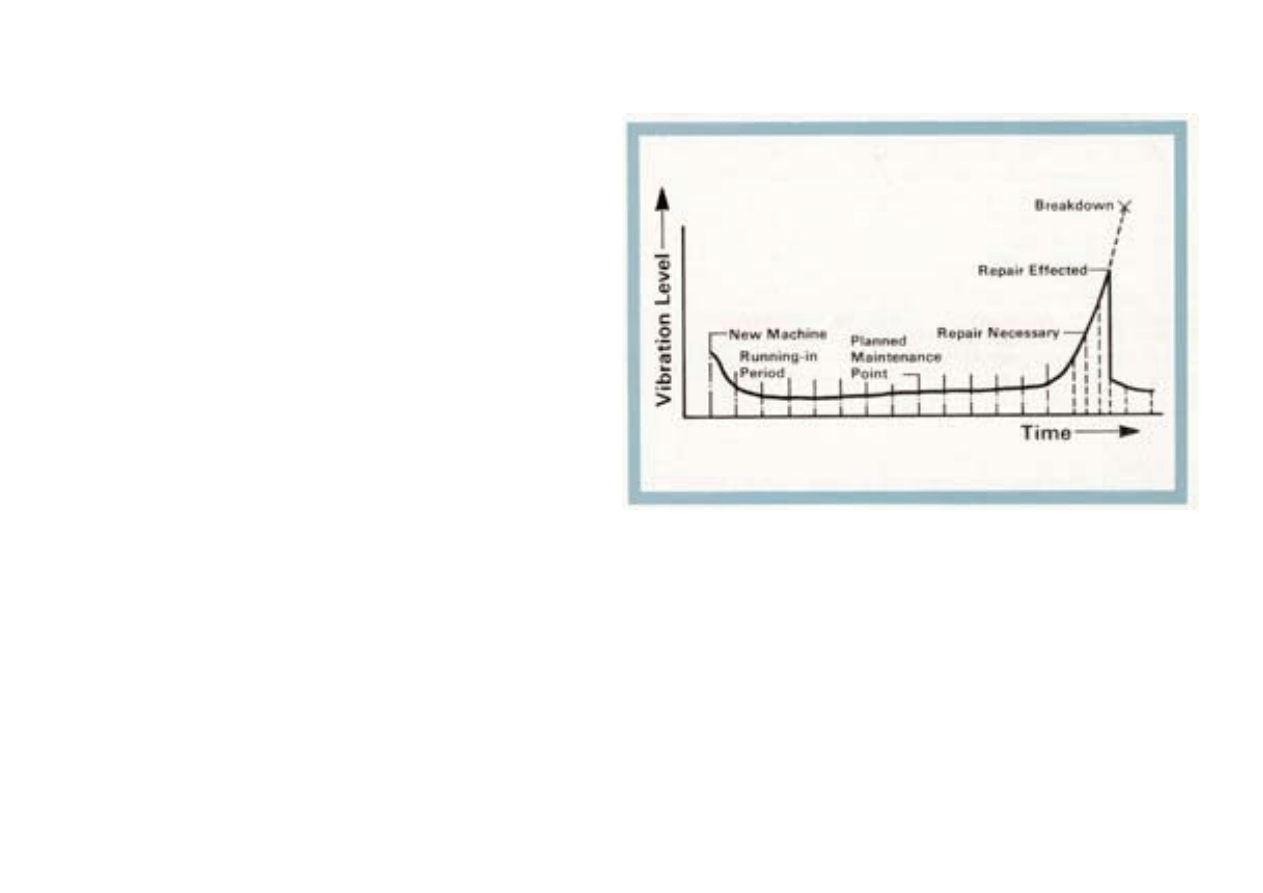
The bathtub curve shown is a typical plot of vibration le-
vel against time that demonstrates this effect. With nor-
mal preventive maintenance, repairs are carried out at
fixed intervals based on minimum life expectancy for
wearing parts. By delaying repair until vibration levels in-
dicate the need, but before breakdown, unnecessary
strip-down (which often promotes further faults) and de-
lays in production are avoided.
This "on condition" maintenance of machinery has
proven to give appreciable economic advantage by increa-
sing the mean time between shutdown while still preven-
ting the surprise and damaging effects of catastrophic fai-
lure during service. These techniques are now widely
used especially in the continuous process industries.
The vibration level which may be allowed before under-
taking a repair is best determined through experience. At
present, general opinion suggests that the "action level"
should be set at two to three times (6 to 10 dB above)
the vibration level considered normal.
We have already seen that with frequency analysis of vi-
bration signals we are able to locate the source of many
of the frequency components present. The frequency
spectrum of a machine in a normal running condition
can therefore be used as a reference "signature" for
that machine. Subsequent analyses can be compared to
this reference so that not only the need for action is indi-
cated but also the source of the fault is diagnosed.
The diagnostic chart on the following two pages will help
isolate the cause of excess vibration when the offending
frequencies can be discovered through frequency analy-
sis.
35
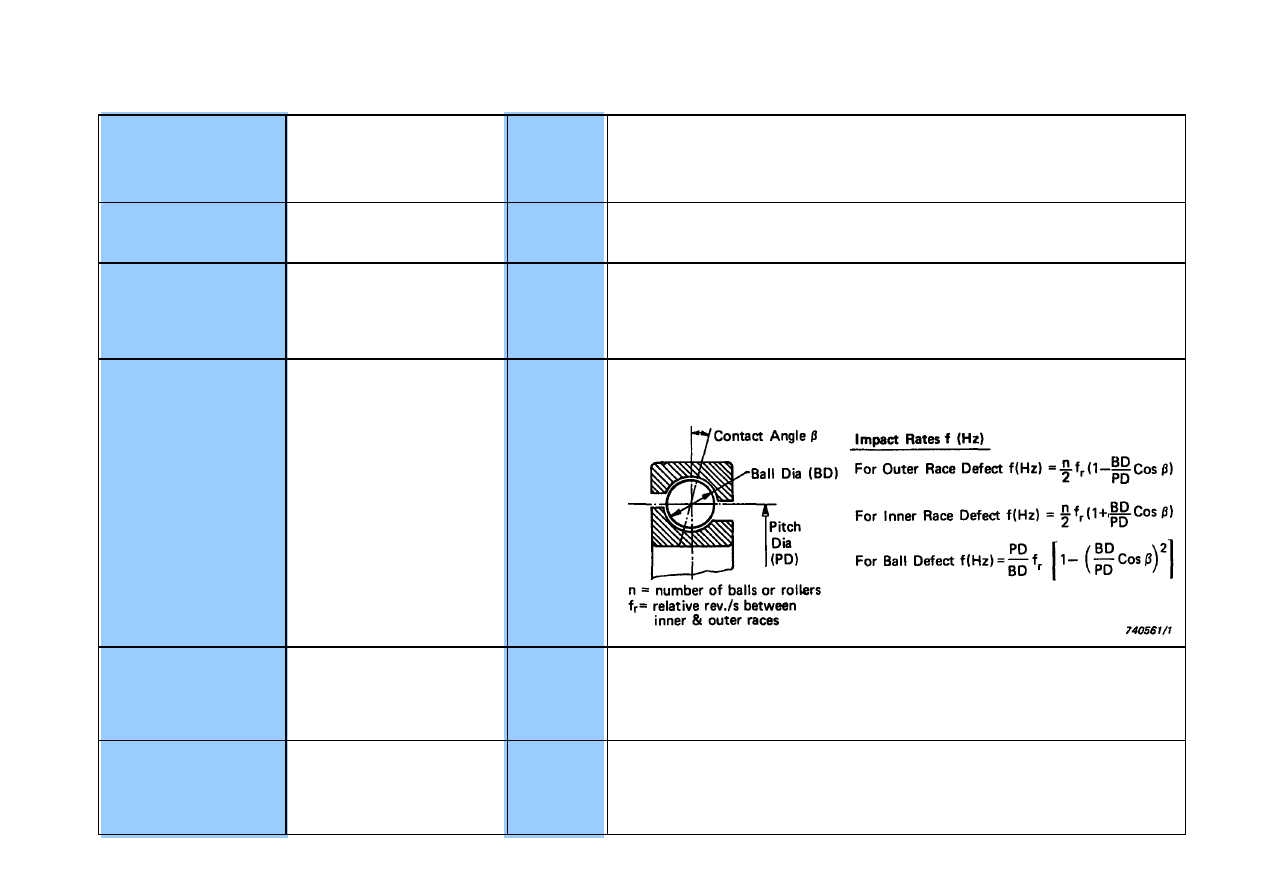
Vibration Trouble Shooting Chart (A)
Nature of Fault
Frequency of Dominant
Vibration (Hz=rpm/60)
Direction Remarks
Rotating Members
out of Balance
1 x rpm
Radial
A common cause of excess vibration in machinery
Misalignment &
Bent Shaft
Usually 1 x rpm
Often 2 x rpm
Sometimes 3 & 4 x rpm
Radial
&
Axial
A common fault
Damaged Rolling
Element Bearings
(Ball, Roller
,
etc.)
Impact rates for
the individual
bearing components*
Also vibrations at
high frequencies
(2 to 60kHz) often
related to radial
resonances in
bearings
Radial
&
Axial
Uneven vibration levels, often with shocks.
*Impact-Rates:
Journal Bearings
Loose in Housings
Sub-harmonics of
shaft rpm, exactly
1/2 or 1/3 x rpm
Primarily
Radial
Looseness may only develop at operating speed and
temperature (eg. turbomachines).
Oil Film Whirl or
Whip in Journal
Bearings
Slightly less than
half shaft speed
(42% to 48%)
Primarily
Radial
Applicable to high-speed (eg. turbo) machines.
36

Vibration Trouble Shooting Chart (B)
Nature of Fault
Frequency of Dominant
Vibration (Hz = rpm/60)
Direction Remarks
Hysteresis Whirl
Shaft critical speed
Primarily
Radial
Vibrations excited when passing through critical shaft
speed are maintained at higher shaft speeds. Can sometimes
be cured by checking tightness of rotor components
Damaged or worn
gears
Tooth meshing
frequencies (shaft rpm
x number of teeth)
and harmonics
Radial
&
Axial
Sidebands around tooth meshing frequencies indicate
modulation (eg. eccentricity) at frequency corresponding
to sideband spacings. Normally only detectable with
very narrow-band analysis.
Mechanical
Looseness
2 x rpm
Also sub- and inter-harmonics as for loose
journal bearings
Faulty Belt Drive
1, 2. 3 & 4 x rpm
of belt
Radial
Unbalanced
Reciprocating
Forces
and Couples
1 x rpm and/or
multiples for higher
order unbalance
Primarily
Radial
Increased
Turbulence
Blade & Vane
passing frequencies
and harmonics
Radial
&
Axial
Increasing levels indicate increasing turbulence.
Electrically
Induced Vibrations
1 x rpm or 1 or 2
times sychronous
frequency
Radial
&
Axial
Should disappear when turning off the power.
37
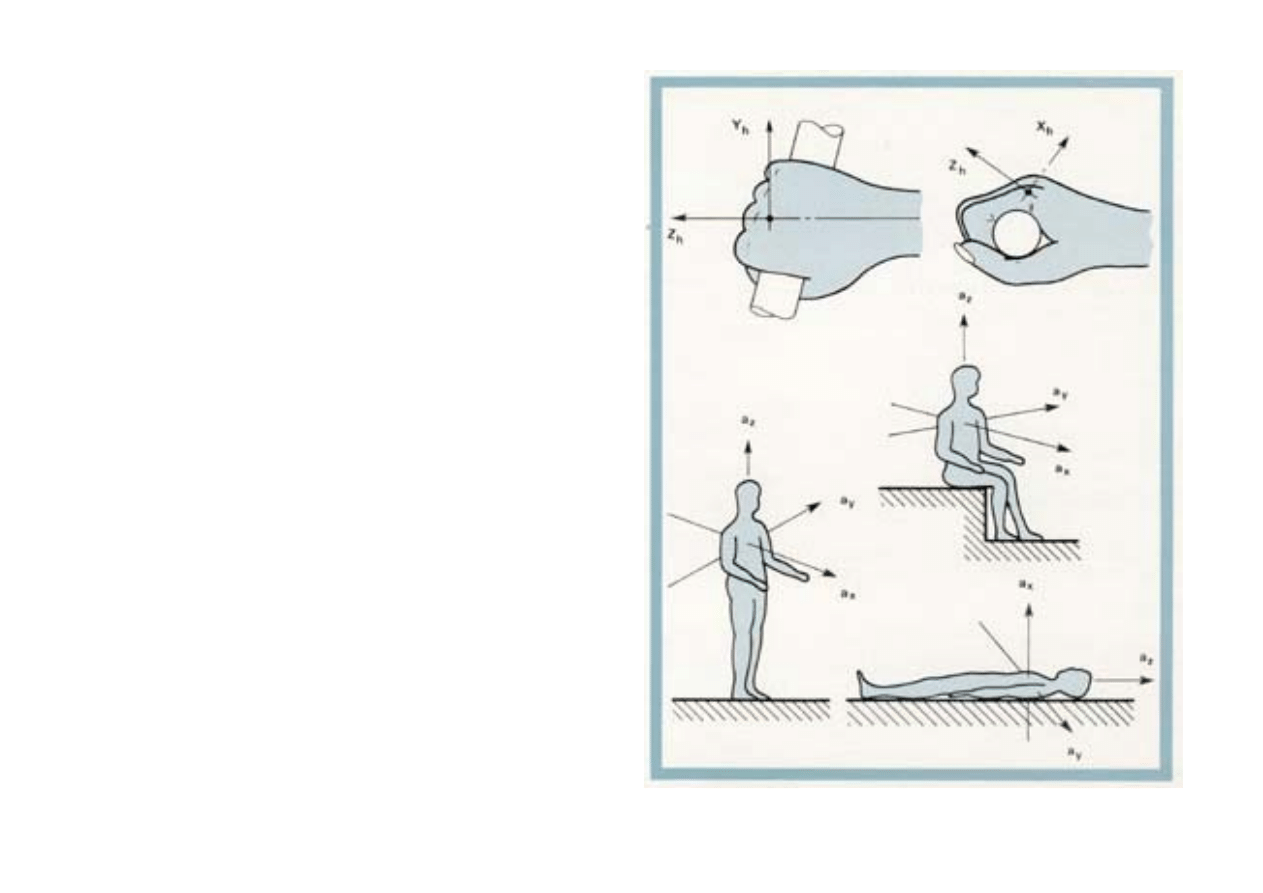
Vibration and the Human Body
It has long been recognized that the effects of direct vi-
bration on the human body can be serious. Workers can
be affected by blurred vision, loss of balance, loss of con-
centration etc. In some cases, certain frequencies and le-
vels of vibration can permanently damage internal body
organs.
Researchers have been compiling data over the last 30
years on the physiological effects of vibrating, hand-held
power tools. The "white finger" syndrome is well known
among forest workers handling chain saws. A gradual de-
generation of the vascular and nervous tissue takes
place so that the worker loses manipulative ability and
feeling in the hands.
Standards are at present under preparation which will
recommend maximum allowable vibration spectra at the
handles of hand-held power tools.
38
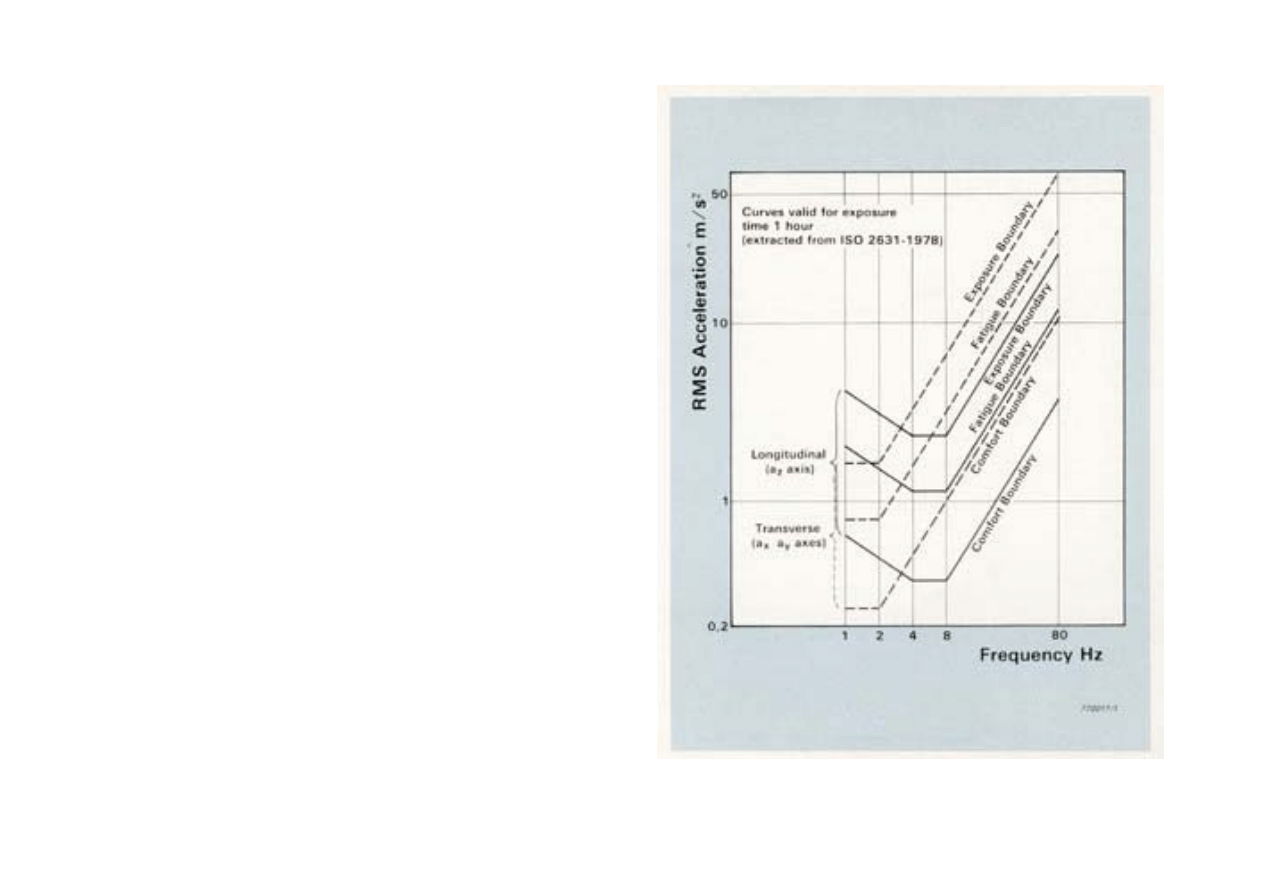
Vibration and the Human Body
The first published international recommendation con-
cerned with vibration and the human body is ISO 2631
— 1978 which sets out limitation curves for exposure
times from 1 minute to 12 hours over the frequency
range in which the human body has been found to be
most sensitive, namely 1 Hz to 80 Hz. The recommenda-
tions cover cases where the human body as a whole is
subjected to vibration in three supporting surfaces,
namely the feet of a standing person, the buttocks of a
seated person and the supporting area of a lying person.
Three severity criteria are quoted: 1) A boundary of re-
duced comfort, applicable to fields such as passenger
transportation etc. 2) A boundary for fatigue-decreased
efficiency, that will be relevant to vehicle drivers and ma-
chine operators, and 3) The exposure limit boundary,
which indicates danger to health.
It is interesting to note that in the longitudinal direction,
that is feet to head, the human body is most sensitive to
vibration in the frequency range 4 to 8 Hz. While in the
transverse direction, the body is most sensitive to vibra-
tion in the frequency range 1 to 2 Hz.
A battery-operated vibration meter dedicated to the meas-
urement of vibratory motion with respect to its ability to
cause discomfort or damage to the human body is now
available.
39

We hope this booklet has served as an informative introduction to
the measurement of vibration and will continue to serve as a
handy reference guide. If you have other questions about measure-
ment techniques or instrumentation, contact your local Brüel &
Kjær representative, or write directly to :
Brüel & Kjær
2850 Nærum
Denmark
40

Document Outline
- Front cover
- Table of contents
- Introduction
- Why do we measure vibration?
- Where does it come from?
- What is Vibration?
- How to quantify the vibration level
- The Vibration Parameters, Acceleration, Velocity and Displacement.
- Measurement Units
- Which parameter to measure
- The Piezoelectric Accelerometer
- Practical Accelerometer Designs
- Accelerometer Types
- Accelerometer Characteristics (Sensitivity, Mass and Dynamic Range)
- Accelerometer Frequency Range Considerations
- Avoiding Errors due to Accelerometer Resonance
- Choosing a Mounting Position for the Accelerometer
- How to mount the accelerometer
- Mounting the Accelerometer
- Environmental influences - General
- Environmental Influences — Temperature
- Environmental Influences — Cable Noise
- Other Environmental Influences
- Accelerometer Calibration
- A Simple Calibrator
- Force and Impedance Measurements
- Logarithmic Scales and Decibels
- Why use an Accelerometer Preamplifier?
- The Vibration Meter
- What is Frequency Analysis?
- Constant Bandwidth or Constant Percentage Bandwidth Frequency Analysis?
- Filter Bandwidth Considerations
- Defining the Filter Bandwidth
- Measuring Instrumentation
- Recording Results
- Using Vibration Measurements
- Vibration as a Machine Condition Indicator
- Vibration Trouble Shooting Chart (A)
- Vibration and the Human Body
- Back cover
Wyszukiwarka
Podobne podstrony:
Bruel & Kjaer Measurements in Building Acoustics
bruel kjaer
więcej podobnych podstron