
COMPARISON OF THE TRIBOLOGICAL PROPERTIES
OF DIFFERENT COLD WORK STEELS AT TEMPERATURES
UP TO 250
°
C
G. A. Fontalvo
Materials Center Leoben
Franz-Josef Strasse 13
A-8700 Leoben
Austria
C. Mitterer
Department of Physical Metallurgy and Materials Testing
University of Leoben
Franz-Josef Strasse 18
A-8700 Leoben
Austria
Abstract
Tools for cold forming are subjected to mechanical and thermal loads, re-
sulting in abrasion, adhesion, tribooxidation, and surface fatigue, i.e. wear
mechanisms which determine tool life. The manufacture of austenitic stain-
less steel, for example, is especially difficult due to the strong tendency of
that steel to work harden and to adhere to the tool material. In the present
work the tribological behavior of five different cold work steels at tempera-
tures ranging up to 250
◦
Cwas investigated. Cold work steel discs were worn
against austenitic stainless steel balls in ambient air using a high-temperature
tribometer. Wear tracks on the discs and balls were characterized using scan-
ning electron microscopy (SEM), electron probe microanalysis (EPMA) and
an optical profiler. This combination allowed for the determination of the
wear mechanisms at low and high temperatures. At room temperature, the
adhesion of austenitic slider material to the cold work steels dominates the
wear behavior, plowing the austenitic slider and protecting the discs from
wear. The increasing plowing action of loose wear debris and strength loss
223

224
6TH INTERNATIONAL TOOLING CONFERENCE
cause an increase in the wear of the cold work steels at elevated temperatures.
Keywords:
cold work steel, friction, wear, high temperature, austenitic stainless steel,
carbide content
INTRODUCTION
Tools for cold forming are subjected to mechanical and thermal loads,
resulting in abrasion, adhesion, tribooxidation and surface fatigue. The
progress of these wear mechanisms determines tool life. The interactions
that take place at the interface between two or more bodies in relative motion
control the tribological behavior of the materials involved [1]. As interface
interactions determine reliability as well as tool lifetime in any machining
process, it is very important to maintain adequate control of friction and wear
during sliding contact. A fundamental knowledge base of the mechanisms of
tribological interactions is necessary to establish that control. Friction is de-
termined by the contributions of asperity deformation, adhesion and plowing
by hard asperities and wear debris, whereas the main wear mechanisms are
adhesion, abrasion, surface fatigue and tribo-oxidation. For a particular ap-
plication, these mechanisms contribute to a certain extent to the tribological
behavior, giving rise to the fact that friction and wear are system-dependent
properties. Although many theories have been developed through the years
to explain the phenomenology of friction and wear [1, 2, 3, 4], none allows
the prediction of the tribological behavior of materials in any given situa-
tion. The manufacturing of austenitic stainless steel is especially difficult
due to the strong tendency of these steels to work harden and to adhere to
tool material [5]. In many cases, even a minor change in the tool shape due
to wear debases the surface quality of the workpiece. Because of the com-
plexity of tribological systems, simple laboratory tests are commonly used
to study tribology. They often allow information suitable for the selection
and optimization of material combinations to be obtained. The present work
was carried out to compare the dry sliding behavior of different cold work
steels at their working temperature and to relate their tribological properties
to their microstructure. For this purpose, different cold work steel discs
were worn against austenitic stainless steel balls using a high-temperature
tribometer.

Comparison of the Tribological Properties of Different Cold Work Steels at...
225
EXPERIMENTAL
Steel discs of 40 mm diameter and 10 mm thickness were made of five dif-
ferent cold work steels which are commercially available. The samples were
first quenched and tempered to a hardness of 60 HRC, then mirror-polished
to an average roughness of 5 nm and ultrasonically cleaned in ethanol. Dry
sliding tests were carried out in ambient air at three different temperatures
(25
◦
C , 150
◦
C and 250
◦
C ) using a CSEM high-temperature tribometer. The
sliding speed and the normal load were kept constant at 0.1 m/s and 2 N,
respectively. Austenitic stainless steel balls (DIN 1.4301) of 6 mm diameter
and with a hardness of 274 HV1 were used as counterbodies. The number
of laps performed and the wear track radius was 50 and 10 mm, respectively,
resulting in a sliding distance of 3.14 m. The wear tracks of the samples
were characterized using scanning electron microscopy (SEM; Cambridge
Instruments Stereoscan 360) and white light interferometry (Wyko NT1000).
The latter was also used to determine the wear volume of the discs and the
amount of material transferred to the discs after ball-on-disc testing. Wear
debris were stuck to a copper-strip and characterized using energy-dispersive
electron probe microanalysis (EPMA; Link eXL).
RESULTS AND DISCUSSION
MICROSTRUCTURAL CHARACTERIZATION
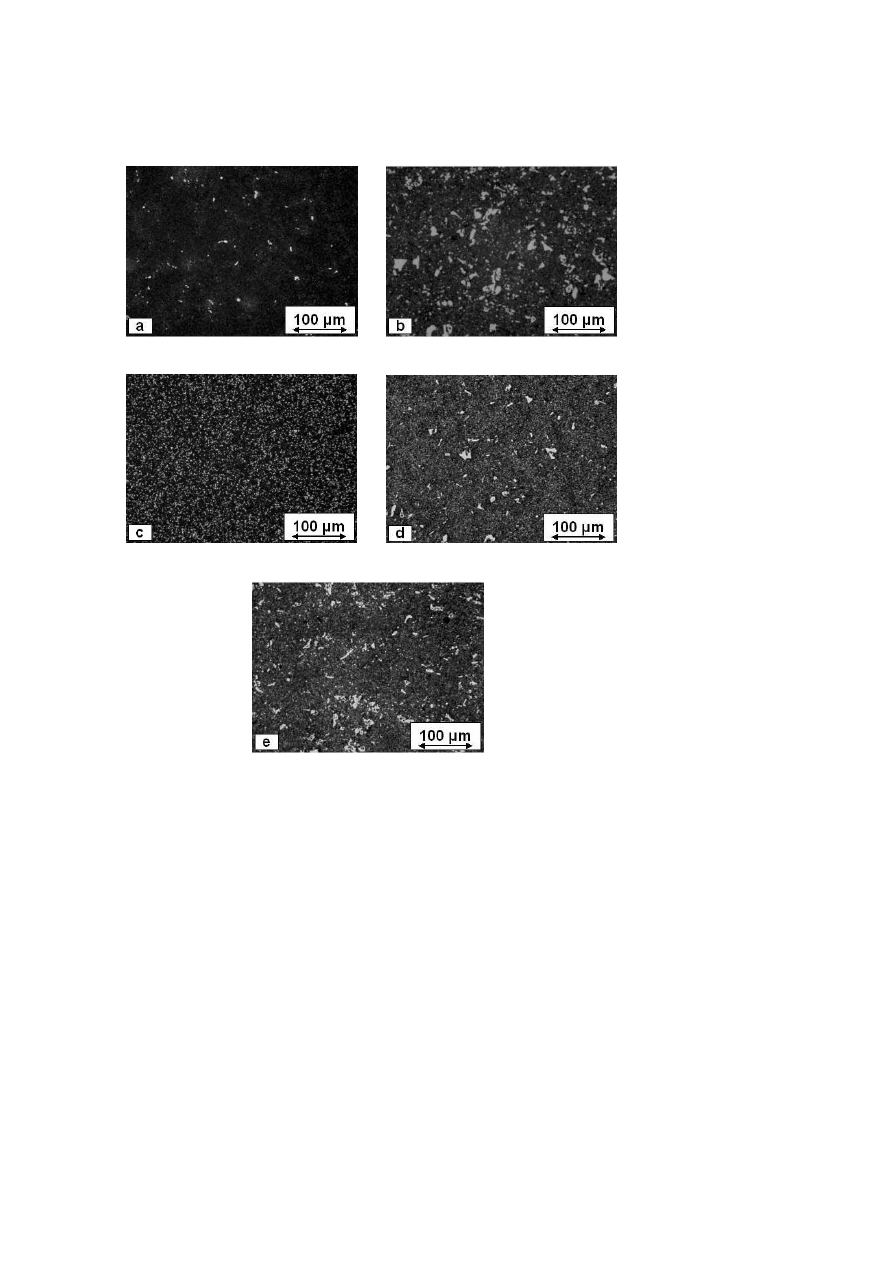
In this paper, we will refer to the five cold work steels investigated as steel
1 to steel 5, as indicated by the order of their optical micrographs shown in
Fig. 1.
One sample of each steel was etched using a 5% HNO
3
solution, so that
the carbides appear white and the matrix dark under the microscope. The
main differences among the steels are the carbide contents and sizes. The
first three steels Figs. 1a , 1b and 1c, contain the same alloying elements
but they have different carbide contents. Unlike the other steels, steel 3 is
prepared by powder metallurgy. It shows the highest carbide content and
the lowest carbide size of the steels tested. Steels 4 and 5, Fig. 1d and 1e,
respectively, are similar to steel 2 from the point of view of microstructure,
but they have been developed to be more ductile than steel 2. Thus, their
alloy content is slightly different and they show a lower carbide content.
226
6TH INTERNATIONAL TOOLING CONFERENCE
(a) steel 1
(b) steel 2
(c) steel 3
(d) steel 4
(e) steel 5
Figure 1.
Optical micrographs of the five cold work steels investigated.

Comparison of the Tribological Properties of Different Cold Work Steels at...
227
FRICTION BEHAVIOR
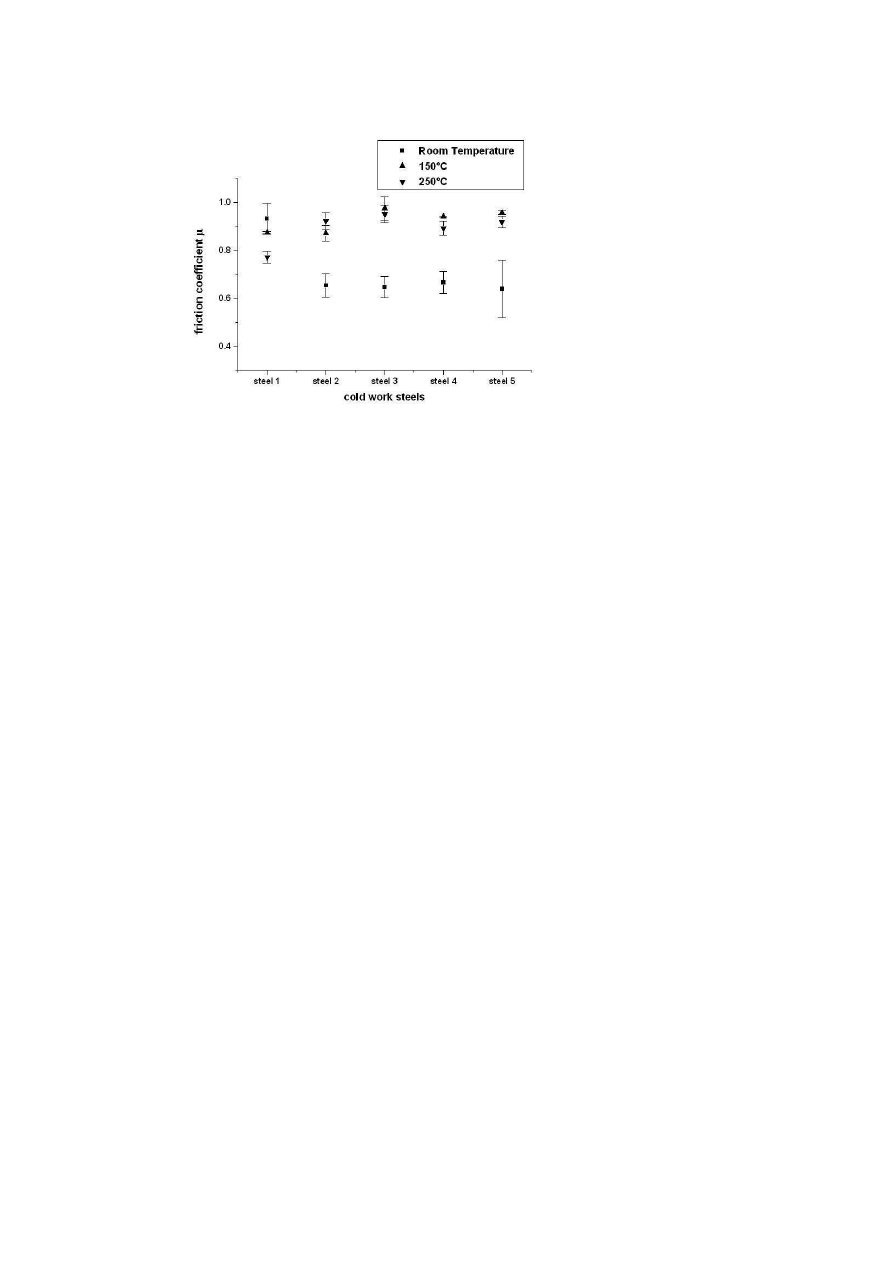
The measured mean friction coefficients are shown in Fig. 2. It can be
seen that the steels 2, 3, 4 and 5 have friction coefficients of about 0.65 at room
temperature and about 0.9 at 150 and 250
◦
C , respectively, although slight
differences in the friction coefficient between these steels can be observed,
particularly at the highest temperature. In contrast, steel 1 shows a high
friction coefficient at room temperature which decreases as temperature rises.
During ball-on-disc testing, the friction coefficient is expected to have
three dominating components, each of them caused by one of the primary
friction mechanisms adhesion, asperity plowing and debris plowing. The
microstructure of the cold work steels and its influence on the components
of the friction coefficient should provide an explanation of their frictional
behavior. Although all steels have a martensitic matrix, there is a significant
difference in the volume fraction of carbides between them. Poggie and Wert
observed a decrease of friction coefficient and wear rate of tool steels with
increasing carbide volume fraction [6]. At room temperature, a reduction
in the adhesive interaction between the austenitic steel slider and the cold
work steel discs could be expected as a consequence of the increasing car-
bide volume fraction. Since steel 1 has the lowest carbide volume fraction
of all samples investigated, it can be assumed that the adhesive component
of the friction coefficient of steel 1 cannot be reduced in the same extent as
for the others steels, compare Fig. 2. At higher temperatures, the plowing
components presumably play a major role. Here, the carbide volume frac-
tion should again affect the friction behavior as it determines the resistance
against plowing. Thus, a higher carbide volume fraction results in higher
friction coefficients. This premise is supported by the results of the ball-
on-disc tests at 250
◦
C , see Fig. 2, where steel 3 shows the highest friction
coefficient and steel 1 the lowest.
WEAR BEHAVIOR
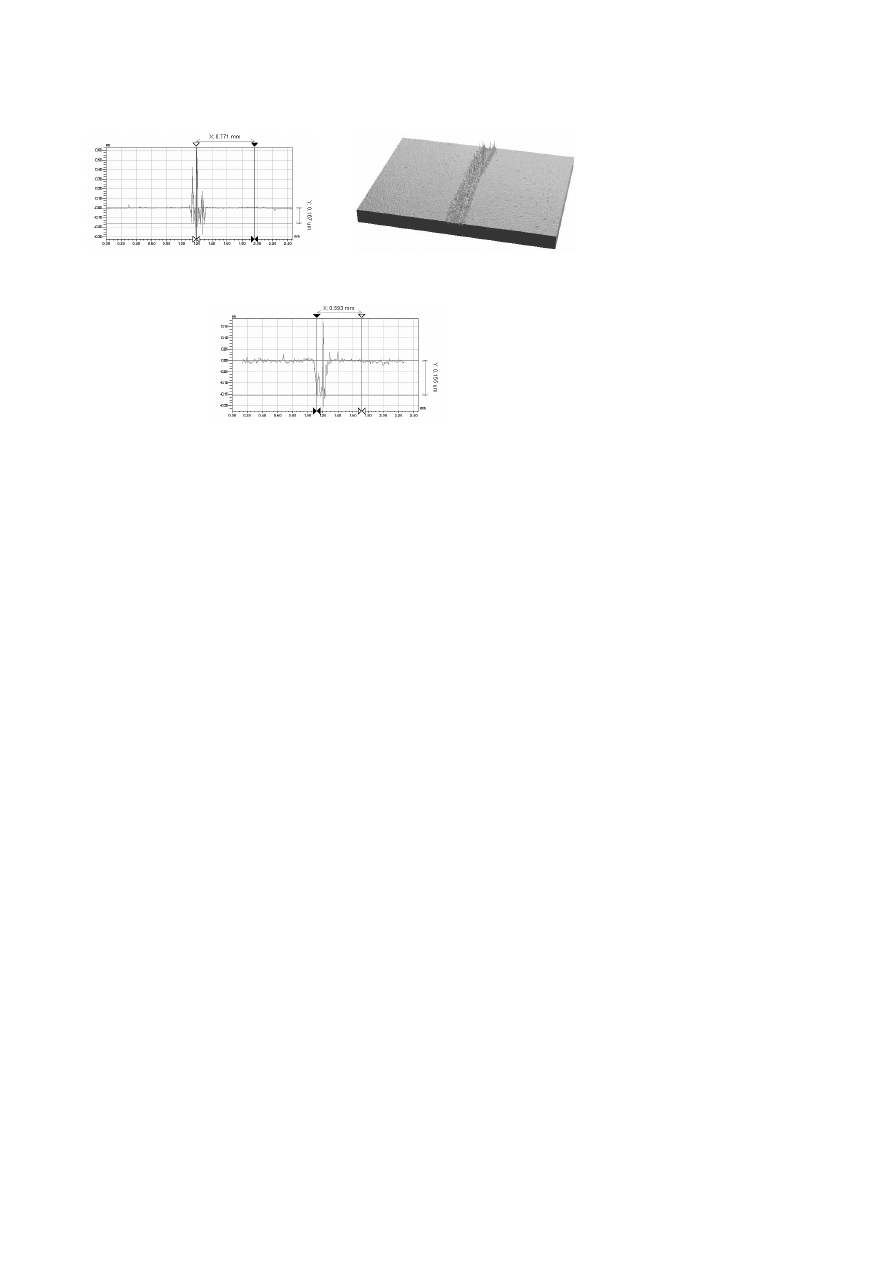
Fig. 3a shows the surface profile of the wear track of a steel 1 disc
after ball-on-disc testing. The way in which the surface roughness dramati-
cally changes within the wear track can be clearly seen; there is transferred
material and evidence of plowed grooves. As temperature increases, these
plowed grooves become wider and there is almost no evidence of transferred
material, as Fig. 3c clearly shows.
228
6TH INTERNATIONAL TOOLING CONFERENCE
Figure 2.
Mean friction coefficient for the five cold work steels investigated against
austenitic steel for a sliding distance of 50 laps at different temperatures.
The software of the optical profiler can be used to estimate the volume
occupied by the space between the actual surface profile and a plane rep-
resenting the ideal surface. A zero level is established and interpreted as
cross-horizontal section through the roughness profile at height zero, which
intercepts both sample material and air, see Figs. 3a and 3c. The negative
volume is defined as the volume above the actual sample surface and below
the zero level, or approximately the amount of material been worn away i.e.,
the wear volume, when the amount of material transferred to those areas
below zero level is neglected. The positive volume is defined as the volume
below the actual sample surface and above the zero level, or the amount
of material transferred. Although the surface peaks and valleys outside the
wear track are also account for in the volume calculation, their influence on
the results is small as previous measurements indicated. Furthermore, the
effect of surface features outside of the wear track was almost constant for
all samples investigated since surface roughness does not vary significantly
among the steels.
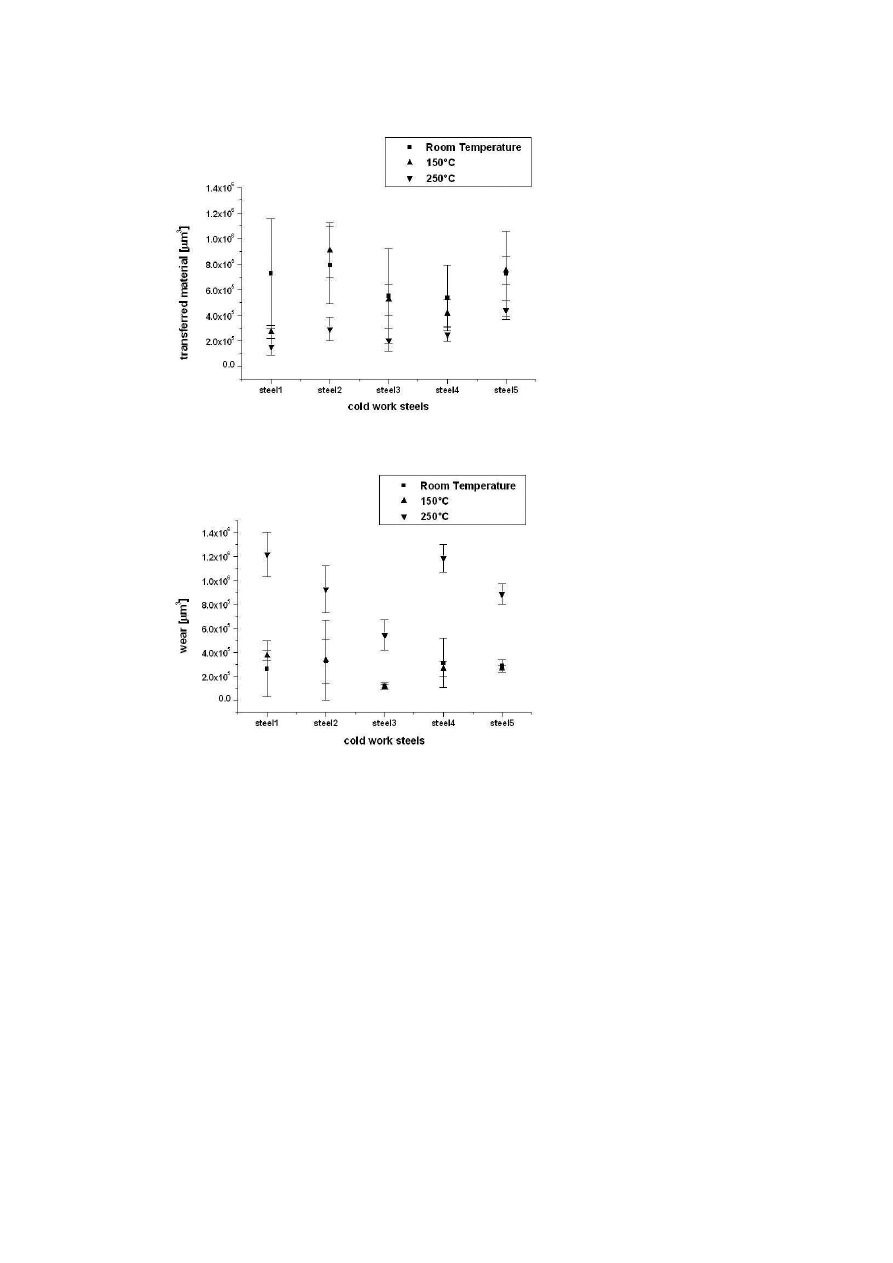
Fig. 4a shows the results of calculating the amount of material transferred
onto the discs following the method explained above, Fig. 4b shows the
Comparison of the Tribological Properties of Different Cold Work Steels at...
229
(a) two-dimensional profile after testing at room
temperature
(b) three-dimensional image of the same wear
track as in a)
(c) two-dimensional profile after testing at
250
◦
C
Figure 3.
Surface of the wear tracks on steel 1 after ball-on-disc testing against austenitic
stainless steel balls.
wear volumes. It can generally be concluded that, as temperature rises, the
amount of transferred material decreases and wear increases. Once again,
the behavior of steel 1 is different from that of the other steels. At 150
◦
C , the
amount of material transferred onto the discs of steels 2 to 5 is nearly as high
as at room temperature. In contrast, at elevated temperatures the material
transferred onto steel 1 is low and almost the same at 150 and 250
◦
C . Steel
3 shows the lowest amount of transferred material at room temperature and
the lowest wear volume at any temperature compared to the other steels.
The differences in adhesive wear behavior at room temperature and at
250
◦
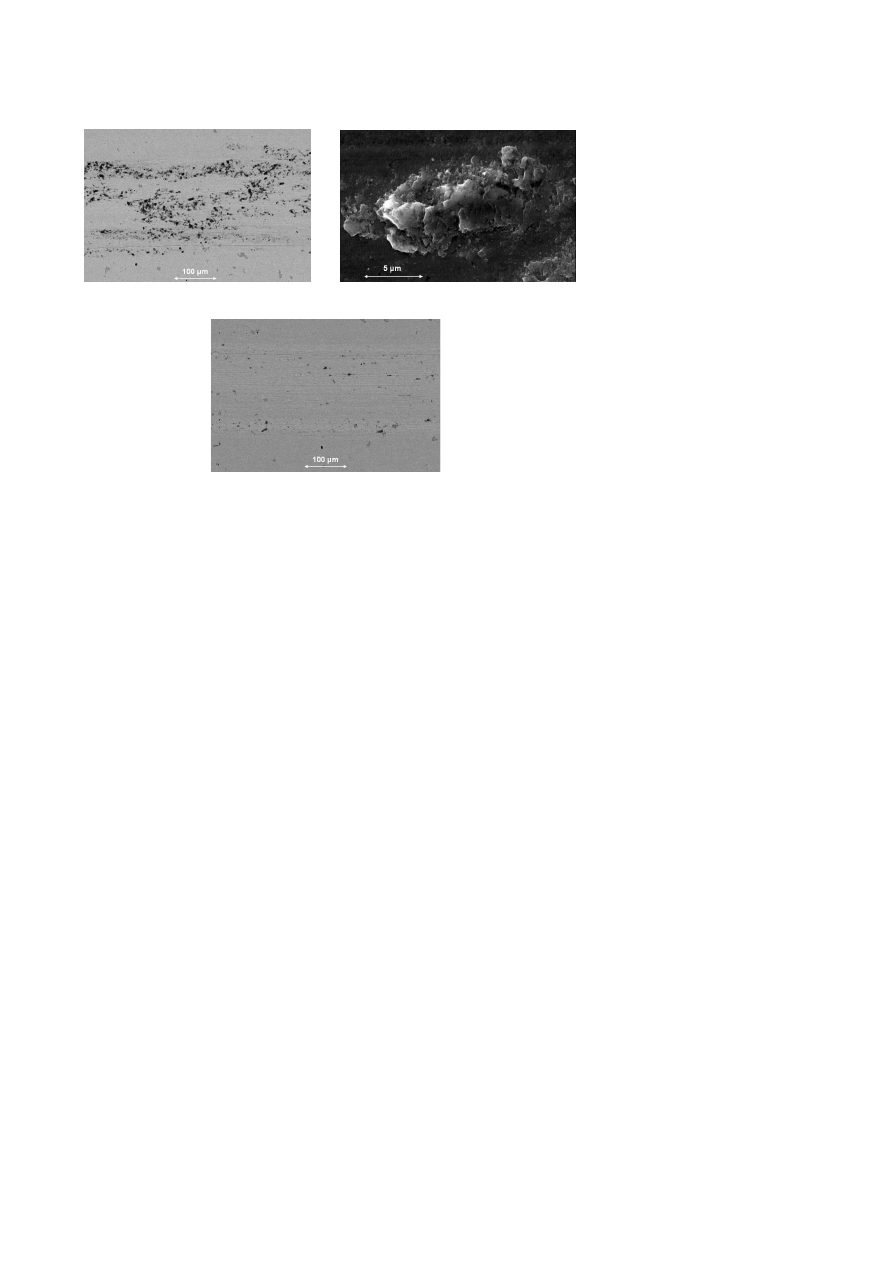
C can clearly be seen in the SEM micrographs shown in Fig. 5. At
room temperature, large numbers of lumps of austenitic slider material can
be found on the wear track, see Figs. 5a and 5c, as indicated by SEM
and EPMA. However, there is also evidence of plowed microgrooves. At
250
◦
C , almost no material transfer takes place, but the plowed grooves are
more evident, see Fig. 5b. It can also be seen from Fig. 4c that the disc wear
at 150
◦
C is about the same as at room temperature. Furthermore, no loose
230
6TH INTERNATIONAL TOOLING CONFERENCE
(a) Sample A
(b) Sample B
Figure 4.
a) Amount of material transferred from the austenitic stainless steel to the cold
work steel discs and b) disc wear for 50 laps sliding distance.
Comparison of the Tribological Properties of Different Cold Work Steels at...
231
(a) room temperature
(b) detail of Fig 5a
(c) at 250
◦
C
Figure 5.
SEM micrographs of wear tracks obtained by ball-on-disc testing of austenitic
stainless steel balls on steel 1 discs.
wear debris was visible to the naked eye at room temperature. At 150
◦
C ,
loose wear particles could be found only for steels 1 and 4. Unfortunately,
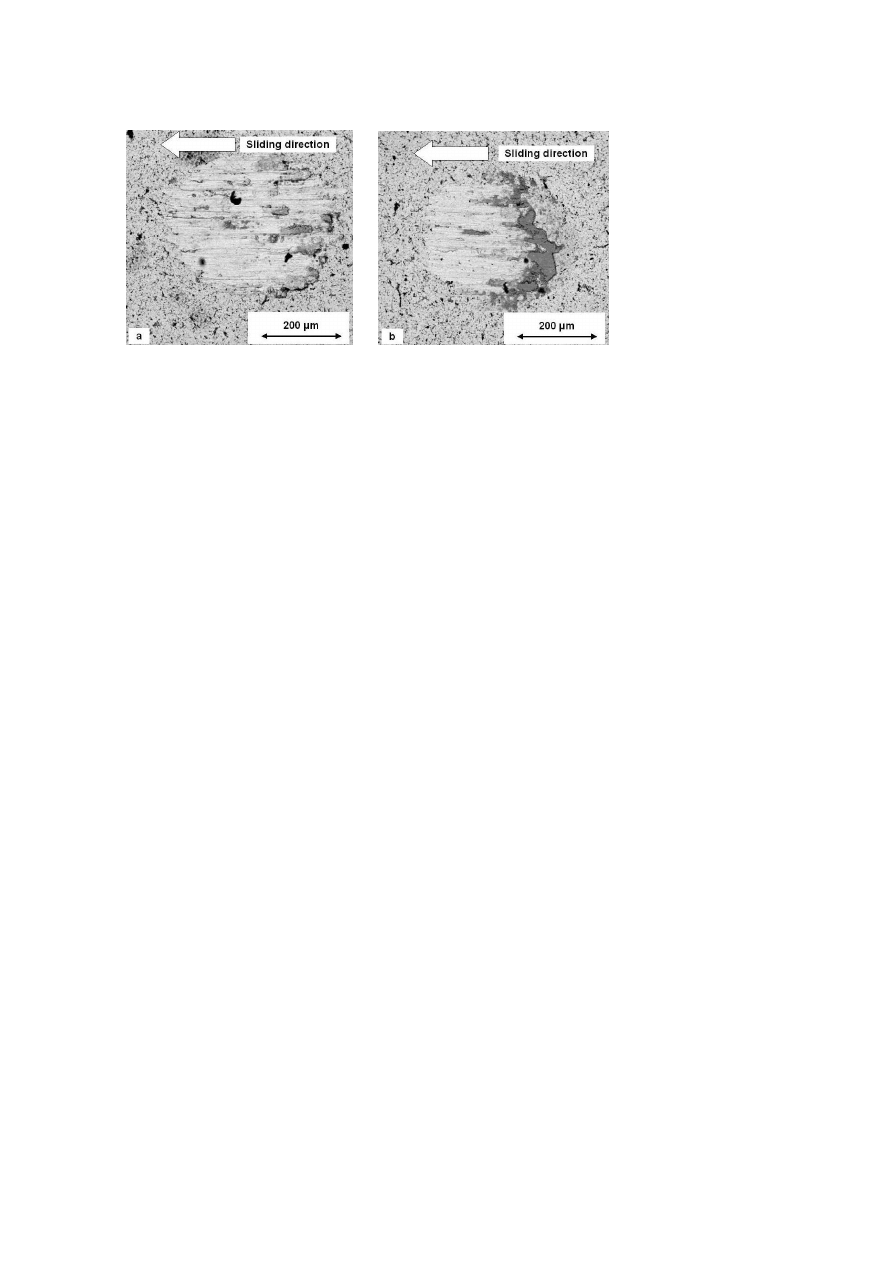
the material recovered was not sufficient for proper analysis. Fig. 6a, where
a SEM micrograph of the wear scar of the austenitic steel slider after testing
at room temperature is shown, confirms this observation. Virtually no wear
debris or lumps can be seen but plowed grooves are visible. On the other
hand, at 250
◦
C wear debris accumulate on the side of the wear scar which
comes at first in contact with the steel disc during rotation, see Fig. 6c.
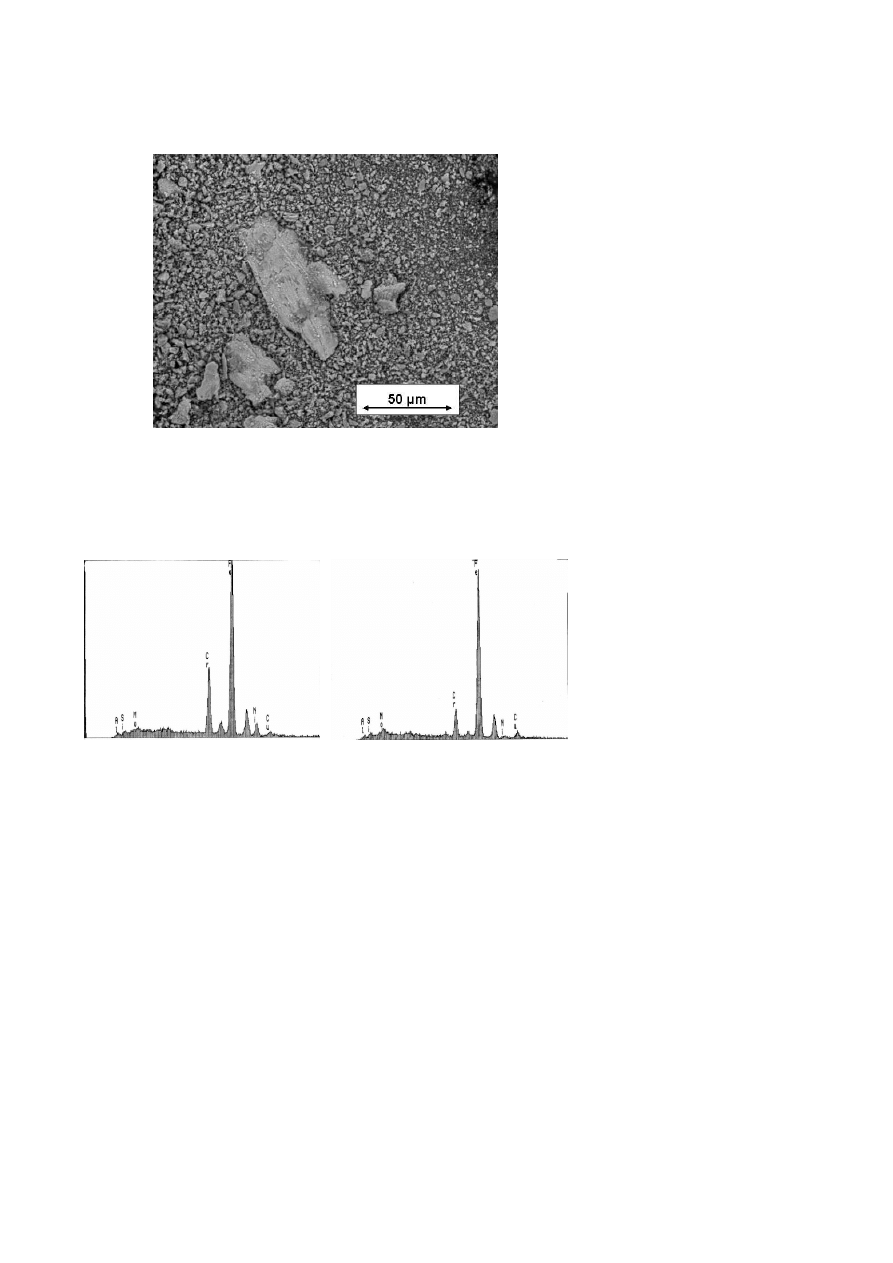
Figure 7 shows a SEM micrograph of the accumulated wear debris on the
ball after it has been stuck to a copper-strip. Some big wear particles can
be seen but the vast majority of wear particles are small with a size of about
2 to 5 'µm. The results of EPMA of the largest wear particle seen in Fig. 7
are shown in Fig. 8a. The Ni peak demonstrates that the large particle is
mainly composed of ball material as nickel is not an alloy element from any
232
6TH INTERNATIONAL TOOLING CONFERENCE
(a) room temperature
(b) at 250
◦
C
Figure 6.
SEM micrographs of the austenitic stainless steel balls after testing against steel
2.
of the steels investigated. The fine wear particles, however, are primarily
composed of disc material as shown by EPMA, see Fig. 8b, where the Ni
peak is not as pronounced as in Fig. 8a.
In the tribological situation being investigated two different wear mecha-
nisms are present pre- dominantly, i.e. adhesion and plowing. Adhesion of
material from the austenitic steel slider to the rotating disc primarily occurs at
room temperature. As temperature rises, ball and disc wear due to the plow-
ing action by wear debris increasingly determines wear. The microstructure
of the steels should play a very important role in both mechanisms. As
previously mentioned, it is commonly accepted that a high carbide content
should reduce the adhesion of counterbody material when sliding against a
steel surface provided that the counterbody material is softer than the steel
[6]. The reason for that behavior is that a metal-metal contact is necessary
for material transfer (where the counterbody is a metal). This explains why
steel 3 shows the lowest amount of transferred material at room temperature.
The fact that both steels 2 and 5 show a relatively high amount of transferred
material in comparison to steels 1 and 4 which have a lower carbide content,
leads to the conclusion, that the carbide content, but probably also the carbide
size and distribution, could affect the resistance against adhesive wear. As
suggested by many previous investigations [7, 8], the formation of discrete
Comparison of the Tribological Properties of Different Cold Work Steels at...
233
Figure 7.
SEM micrograph of the wear debris collected after ball-on-disc testing of
austenitic stainless steel balls against steel 5 at 250
◦
C.
(a)
(b)
Figure 8.
(a) EDX-analyses of the big flake-like wear particle in Fig.7, (b) EDX- Analysis
of the little wear particles in Fig. 7.

234
6TH INTERNATIONAL TOOLING CONFERENCE
particles during wear occurs by a surface fatigue process. It is conceivable
that the contact of the soft slider to the hard carbides could lead to higher
slider fatigue on a microscopic scale, and thus relieve the adhesion of the
fatigued volume as soon as it comes into metal-metal contact. It can easily
be imagined that the area of contact affected by this mechanism depends on
the carbide content and carbide distribution as both determine the probability
of the prior metal-carbide contact and the posterior metal-metal contact, and
on the carbide size. Although steel 3 has the highest carbide content, and
thus the highest probability of carbide-metal contact compared to the other
steels, it also has the lowest probability of metal-metal contact necessary for
adhesion of wear particles. In other words, the resulting adhesive behavior
is a superposition of two mechanisms: On the one hand, there is a reduction
of metal-metal contact due to a higher carbide content and a corresponding
reduction in the transfer of material, while on the other hand, an increase
in the micro-scale-fatigue of the austenitic steel slider results in an increase
of the production of wear particles which adhere to the discs. Heating the
samples prior to ball-on-disc testing takes about two hours, i.e. a sufficient
time for a thicker than the natural oxide layer to be formed on the samples,
particularly at 250
◦
C . The wear reducing effects of oxidation have been
recognized for years [9], and it is thus plausible that the oxide layer reduces
the adhesion of ball material on the discs as Fig. 4a shows.
Many investigators have pointed out that there is a minimum wear particle
size necessary for material to leave a surface in the form of a loose wear par-
ticle [?, 11]. The wear particles generated during sliding are retained within
the wear scars and grow by agglomeration until they reach a critical size.
The agglomeration of particles increases as temperature rises. Nevertheless,
the wear particles can remain adhered to a surface due to adhesion forces be-
tween solid surfaces and, by further agglomeration, develop compact layers
which can become load-bearing [9]. If the wear particles are removed from
the surface, there is more wear damage due to the plowing action of the hard
particles. In our experiments at room temperature, the transferred particles
mainly stuck to the steel disc and plowed the ball, but evidently some of
the wear particles were removed and plowed the disc as well. The reason
for the high hardness of the wear particles from the austenitic ball, which
has a lower hardness than the cold work steels, lies in the fact that modest
amounts of plastic strain can cause a rapid martensitic transformation, mak-
ing the particles hard enough to abrade the tool steels. Grain refinement and

Comparison of the Tribological Properties of Different Cold Work Steels at...
235
work hardening could also play a role in increasing the hardness of wear
particles [12]. At higher temperatures it appears that the removal of wear
particles becomes easier compared to room temperature. First, wear par-
ticles are removed from the surface, then they agglomerate on one side of
the ball wear scar and then they plow the disc. As a consequence of wear
particle removal and strength loss at higher temperatures, wear at 250
◦
C is 3
to 6 times higher than at room temperature, compare Fig. 4b, where a higher
carbide content reduces the plowing action of the wear particles. The ball
is protected from wear by the agglomeration of wear particles on its surface
which decreases contact with the disc, resulting in a decrease of the diameter
of the wear scar of the ball at 250
◦
C , compare Figs. 8a and ??b.
CONCLUSIONS
Within this work, the tribological behavior of several cold work steels in
ball- on-disc sliding experiments against austenitic stainless steel balls has
been determined in the temperature range between 25 and 250
◦
C . It has
been found that the carbide content determines friction behavior of the cold
work steels by reducing the adhesive component of the friction coefficient
and by increasing the resistance against plowing. At room temperature, the
adhesion of austenitic slider material to the cold work steels dominates the
wear behavior, plowing the austenitic slider and protecting the discs from
wear. The increasing plowing action of loose wear debris and strength loss
cause an increase in the wear of the cold work steels at elevated tempera-
tures. Summing up, the carbide content, carbide distribution and carbide
size determine the friction and wear behavior of the cold work steels against
austenitic stainless steel.
ACKNOWLEDGMENTS
Financial support of this work by the Technologie Impulse G.m.b.H. in the
frame of the K-plus competence center program and by Boehler Edelstahl
GmbH and Boehler Uddeholm AC is highly acknowledged. The authors
are also grateful to Gerhard Hawranek for performing the SEM and EPMA
investigations.
REFERENCES
[1] N. P. SUH, in "Tribophysics" (Prentice Hall, Boston, 1986).

236
6TH INTERNATIONAL TOOLING CONFERENCE
[2] F. P. BOWDEN and D. TABOR, in "The Friction and Lubrication of Solids" (Clarendon
Press, Oxford, 1954).
[3] E. RABINOWICZ, in "Friction and wear of materials" (John Wiley and Sons Inc.,
New York, 1965).
[4] Y. BERTHIER, M. GODET adn M. BRENDLE, Tribology Trans. 32(4) (1989) 490.
[5] E. SCHEDIN, in Applications on Stainless Steel ’92, Proceedings of the Conference
on Applications of Stainless Steels, (Jernkontoret, Stockholm, 1992) p. 137.
[6] R. A. POGGIE and J. J. WERT, Wear 149 (1991) 209.
[7] I. KRAGELSKY, in "Friction and Wear" (Butterworths, London, 1965).
[8] N. P. SUH, Wear 25 (1973) 111.
[9] F. H. STOTT, Tribology International 31 (1998) 61.
[10] S. TUERKER OKTAY, N. P. SUH, Journal of Tribology 114 (1992) 379.
[11] E. FINKIN, Materials in Engineering Applications 1 (1979) 154.
[12] D. A. RIGNEY, Tribology International 30 (1997) 361.
Wyszukiwarka
Podobne podstrony:
1 3 16 Comparison of Different Characteristics of Modern Hot Work Tool Steels
Comparison of Different Fibers in the Solid Phase Microextra
A comparison of different balance tests
18 Comparison of Processes (C)
comparison of PRINCE2 against PMBOK
Comparison of Human Language and Animal Communication
A Comparison of two Poems?out Soldiers Leaving Britain
A Comparison of the Fight Scene in?t 3 of Shakespeare's Pl (2)
Comparison of the Russians and Bosnians
43 597 609 Comparison of Thermal Fatique Behaviour of Plasma Nitriding
52 737 754 Relationship Between Microstructure and Mechanical Properts of a 5%Cr Hot Works
Comparision of vp;atile composition of cooperage oak wood
więcej podobnych podstron