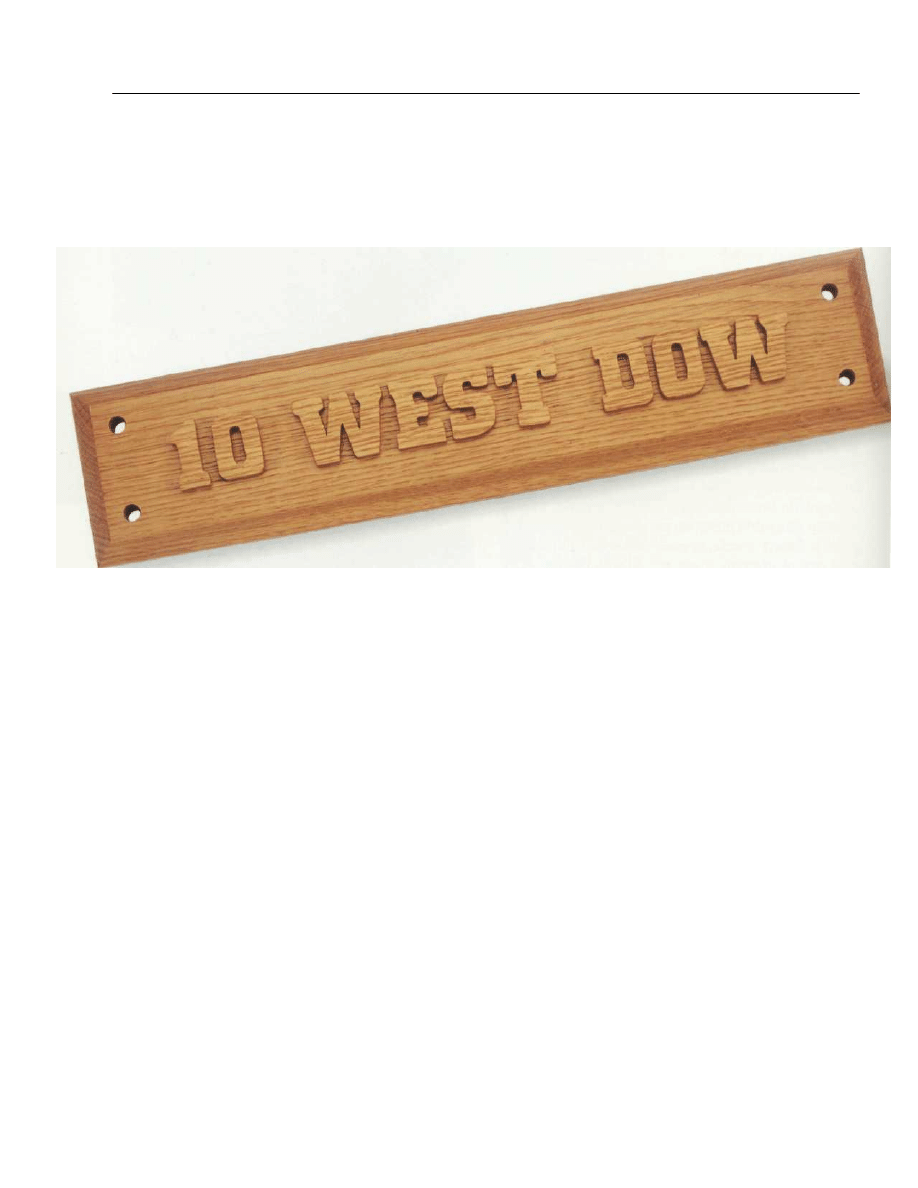
Raised Letter Address Plaque
W
hen we first got married, one of the joys and pleasures was having our own home. Some of the first things we did when
we moved into our infinitesimally minute cottage were to paint the front door bright red and design an address
plaque. The red door didn't go down too well, but the
plaque was a huge success! The neighbors admired it, the
mailman said it added a touch of class—in fact the whole
street made comments. So, if you want to make someone
a unique gift, one that will beautify their home—be it ever
so humble a house, cottage, bungalow, farm, ranch or
riverboat—then a fretted address plaque is a great idea.
Copyright 2004 Martian Auctions
938
Copyright 2004 Martian Auctions
939

THOUGHTS ON DESIGN
Of all the projects in the book, the name board is perhaps
both the easiest and the most complex. I say this because,
while the fretting techniques are truly easy—just about
as simple and direct as can be—the design is something
again. The problem is, of course, how to achieve a good
visual effect—meaning a balance between the solid wood
and the pierced areas—while at the same time getting the
message across and achieving a structure that is sound.
For example, it's no good at all having a design that is
so complex that it needs to be viewed closeup with a
magnifying glass, or a house name that is more an epic
saga than one or two words. Also, the shape of the pierced
areas needs to be carefully thought through so that the
imagery is rounded and easy to cut. You don't want lots
of spiky, sharp-angled imagery that is almost impossible
to cut.
We are not suggesting that you necessarily use the sun-
burst image and the word "Home." After all, it would be
more than a little bit strange if you, your neighbors and
all our readers had identical boards. What we have in
mind is that you use our imagery as an inspirational guide.
In fact, you can use just about any imagery that takes your
fancy—birds, horses, cattle, mountains, trees or whatever.
The chief design problem is being able to link the name
and the imagery so that the total message gets across. Let's
say, for example, that you are giving this board to your
grandmother who lives by the sea in a cottage called
"Harbor View." You might well have a galleon riding the
waves, or seashells, or a crab, or an anchor, or gulls, or a
steamer, or whatever sea-salt-and-briny imagery that
suits. And your great aunt—the one who lives in the
mountains—could have a plaque with peaks, or bears, or
fir trees. So let your imagination run wild!
MAKING THE PLAQUE
First things first, you need to decide on the wood. I say
this because in many ways the choice of the wood is essen-
tial to the design. While the wood must withstand the
wind and the rain and be relatively easy to work, it must
also be fitting for the task. For example, while oak is a
good choice for our plaque which is to remain unpainted
and mounted on a cottage near the sea, if you live in a
pine forest or you plan to have the board painted, then
you might as well use an inexpensive wood like pine.
When you have chosen your wood, and once you have
achieved what you consider is a good design—with the
spelling of the name double-checked—trace off the de-
sign, press transfer the imagery through to the wood, and
shade in the areas of waste that need to be cut away.
This done, take your drill and run pilot holes through the
shaded areas. How you fret out the waste areas depends
on your particular tool kit. I used an electric scroll saw,
but you could just as well use a coping saw, a bow saw
or even a large fretsaw.
No matter your choice of tool, the procedure is much
the same. Make the pilot holes. Unhitch the saw blade
and enter it through the hole. Refit the blade and adjust
the tension. Then variously move and maneuver both the
workpiece and the saw, so as to run the line of cut to the
waste side of the drawn line.
When you have fretted out the design and used the
graded sandpapers to rub the rough edges to a smooth
finish, cut out the base board and bring it to a good finish.
Use waterproof glue to bond the two boards together.
Finally, having first protected the wood with oil, paint
or whatever seems appropriate, it's time to present the
board as a gift. And if you really want to make it special,
you could offer to mount the board on the wall, gate, post
or other appropriate place.
SPECIAL TIP
If you are going to mount the board directly on a wall,
say beside the front door, it's best to use brass or bronze
screws and have the board distanced from the wall by an
inch or so. That way, when the ram runs down the wall
and dribbles behind the board, there is space enough for
a good flow of drying air.
STEP-BY-STEP STAGES
1 Having settled on a good, easy-to-work style of let-
tering, spend time drawing the letters up to size.
Copyright 2004 Martian Auctions
940
Copyright 2004 Martian Auctions
941
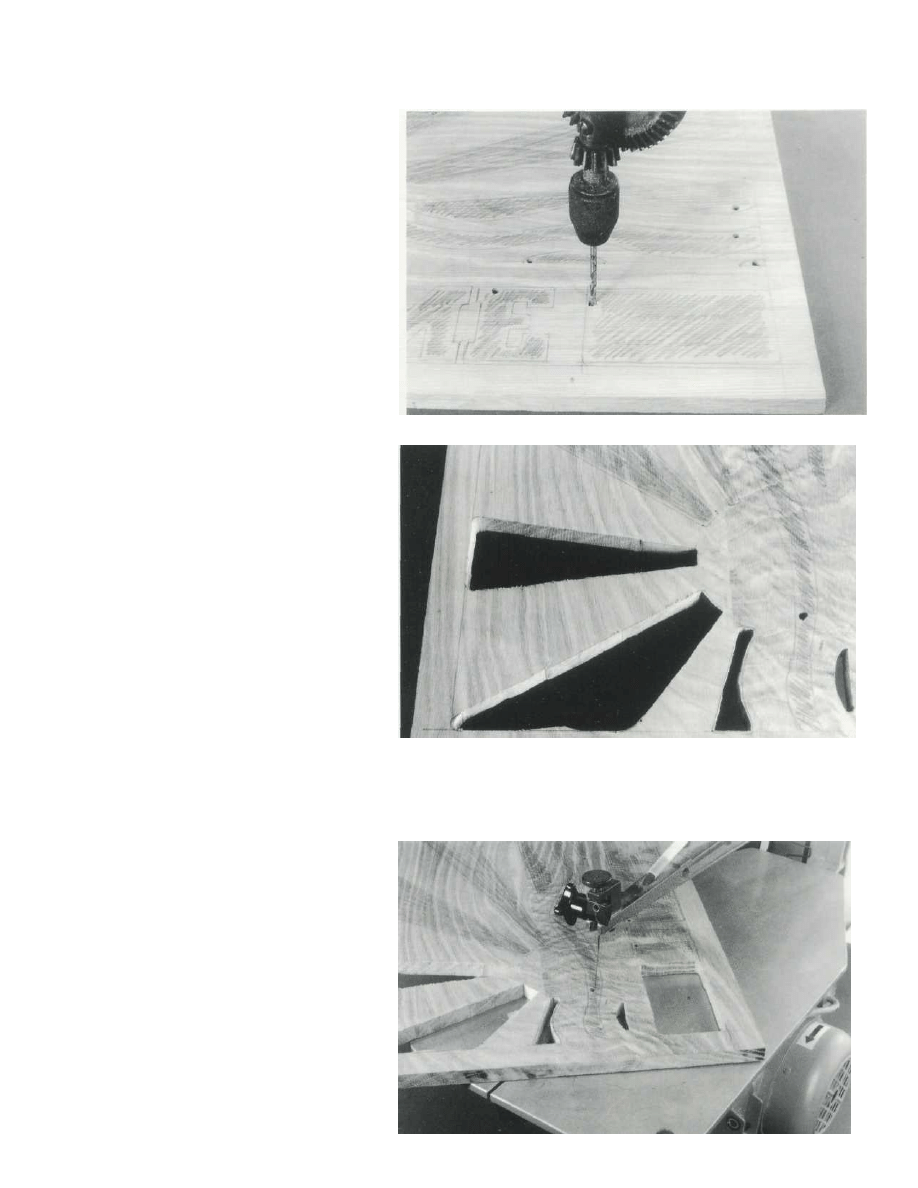
2 Run small pilot holes through the
areas that need to be cut away. Be
mindful if you are using a hand saw, that
as some blades have pin fixings, you will
have to choose a larger bit size.
3 As you can see, I had a bit of trouble
keeping the line of cut on course. The
problem was that the blade needed
changing, the wood was amazingly tough
and stringy, and I needed a rest. The only
good thing you can say is that the bad
cuts occur well to the waste side of the
drawn line.
4 If you find that the workpiece
doesn't want to move smoothly, then
it's a good idea to rub a wax candle over
both the surface of the cutting table and
the underside of the workpiece. And
don't be stingy with the blades. If the
blade looks saggy or burns the wood, then
change it!
Copyright 2004 Martian Auctions
942
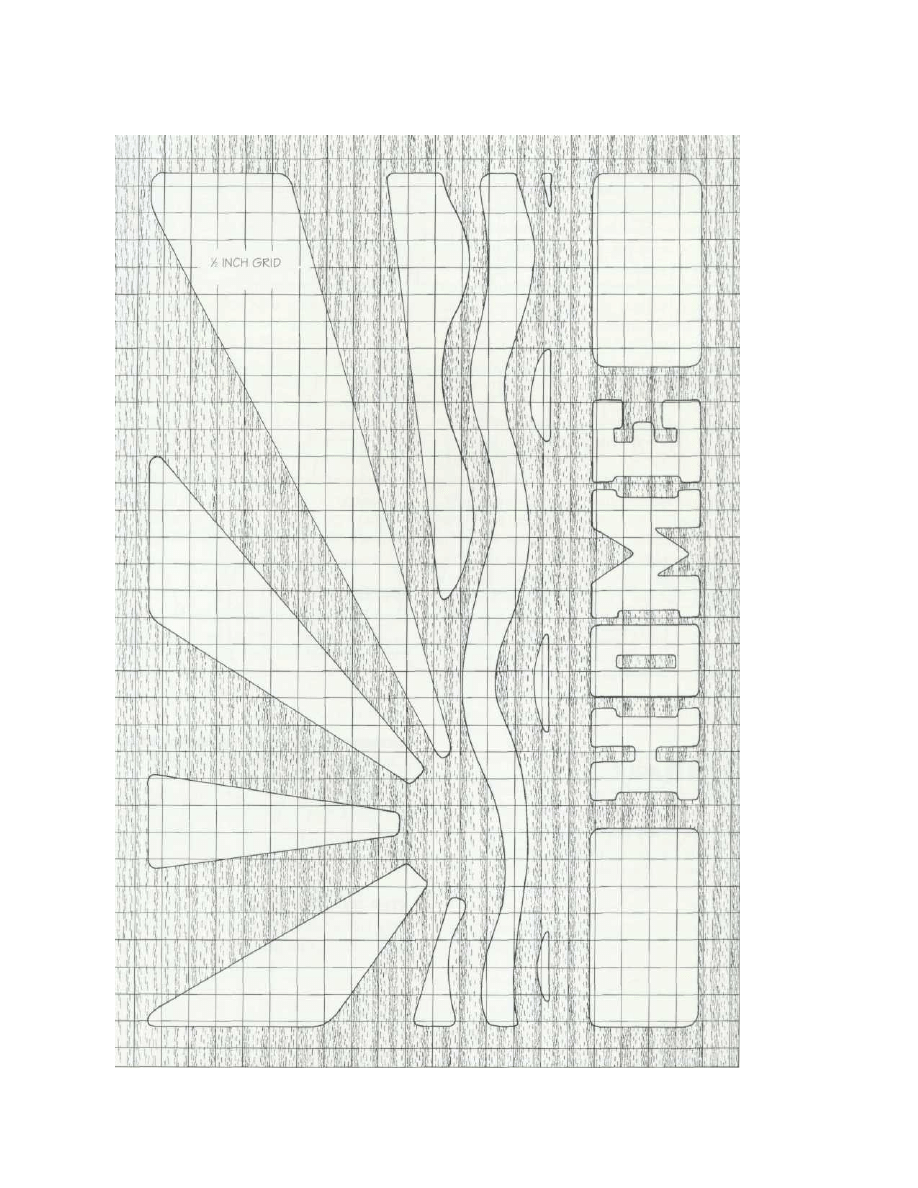
FRETTED LETTERS IN RELIEF
If your workshop is anything like mine, you are forever
wondering what you can do with the offcuts. Well, there
we were fretting out the letter shapes when one of the
kids next door, Michelle Edwards, asked me if she could
have the "M" and "E" waste cutouts from the word
"HOME," so that she could stick them on her bedroom
door. And so it was that the idea came to us that we could
design a house board that used the cutouts rather than
the holes, if you see what I mean.
PROCEDURE
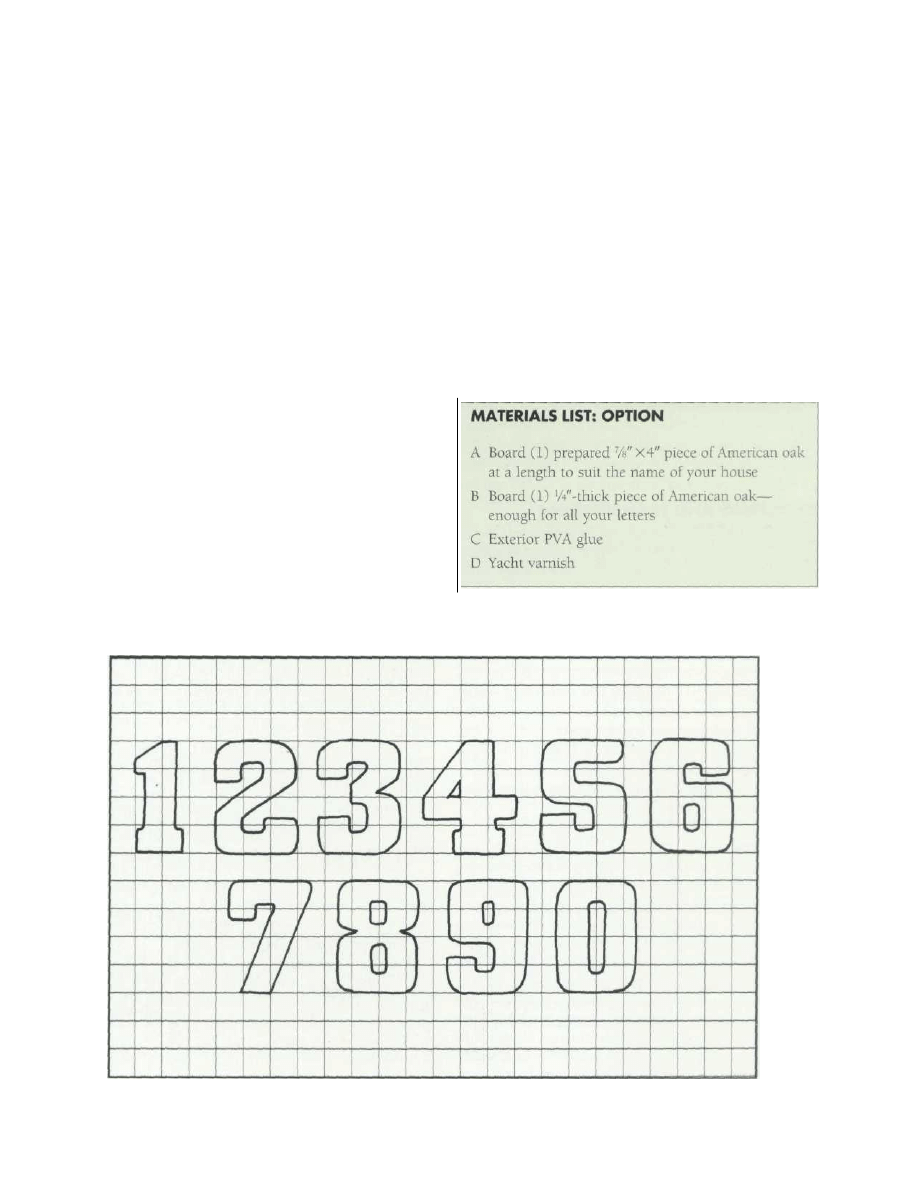
First, you need to draw the letter and/or number forms
up to size—ours are 1 1/2" high—and trace them off. Ar-
range the tracing on the 1/4" wood so that the grain runs
from side to side through the letters. Pencil press transfer
the traced lines through to the wood.
As for the fretting out procedure, it's much the same
as already described (see page 80), only easier. If you
think about it, you will see that you only have to run the
pilot holes through the enclosed forms—like the O and
A—and you don't have to worry about saving the ground
around the letters. All you do is run the line of cut in
from the edge of the wood, travel around the letter and
then move on to the next form.
Once you have beveled off the edges of the ground
board, then comes the tricky task of setting out the various
guidelines. I use the word tricky advisedly, because if the
spacing between the letters is wrong, or the baseline on
which the letters sit is crooked, or whatever, then the
whole thing will be messed-up. The best procedure is to
work the spacing out on tracing paper, and then use a
square and straight edge to very carefully mark the base
board with all the guidelines.
When you are happy with the guidelines and the spac-
ing, smear the back of the letters with the PVA glue and
dab them down on a piece of scrap wood to remove the
excess. Then position them on the board and press down
firmly. With all the letters/numbers in place, stand back
to check the alignment and then leave them be until the
glue has set. Finally, drill the four fixing holes and give
the whole works a generous coat of yacht/spar varnish.
NUMBER PATTERNS
Copyright 2004 Martian Auctions
943
STEP-BY-STEP STAGES
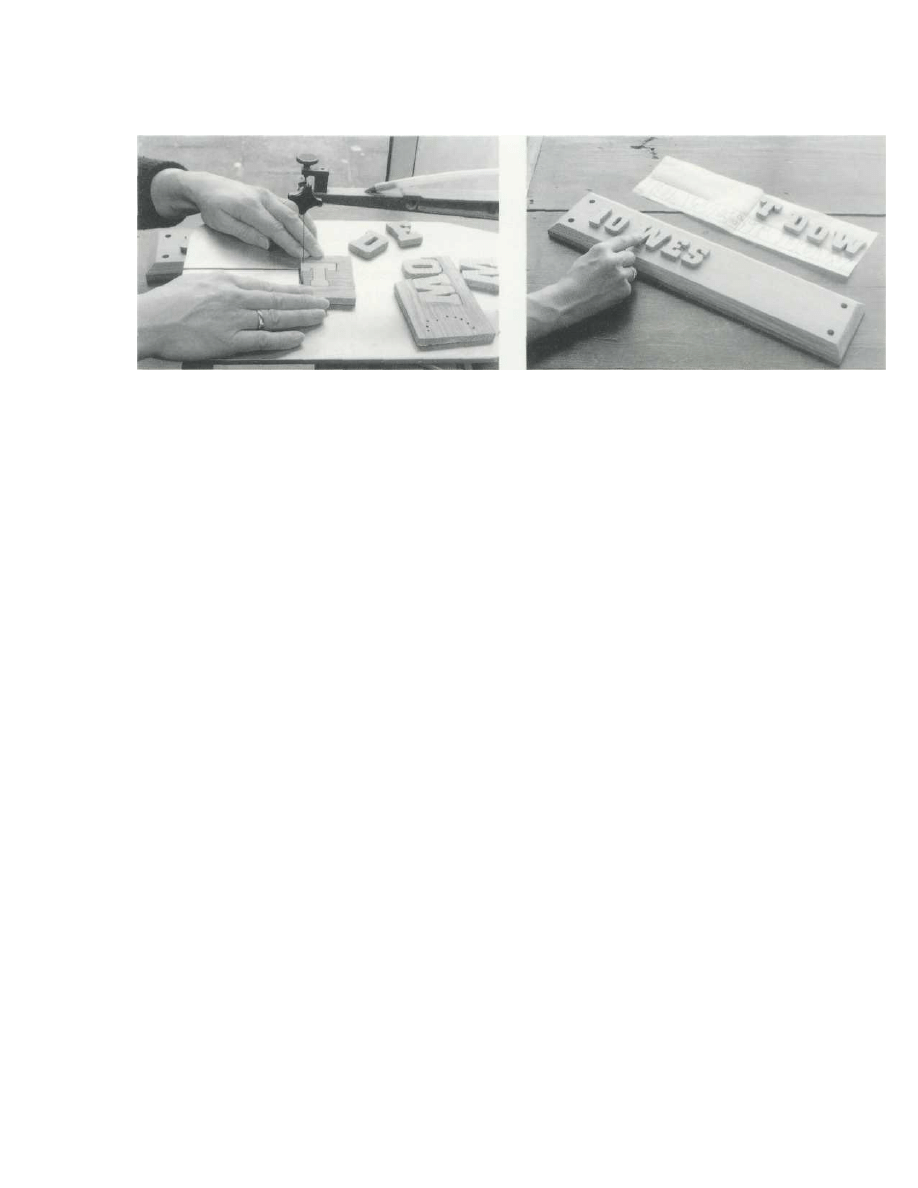
1 Press transfer the various letters and numbers
through to the 1/4"-thick wood. Shade in the waste so
that there is no doubting the line of cut. Then fret out the
letters and numbers on the scroll saw. Work at a very
steady, easy pace, all the while making sure that the line
of cut is fractionally to the waste side of the drawn line.
2 Check and double-check the spacing. Label the
back of each letter "glue side," and then very carefully
glue them in place. Do your best to avoid using so
much glue that it oozes out.
DESIGNING AND TRANSFERRING
One of the chief difficulties for many woodworking begin-
ners is that they make mistakes when it comes to design-
ing and transferring. They make the first mistake when
they draw the designs up to size, and the second when
they transfer the designs through to the wood. The pity
of it is that, by the very nature of things, the designing
and transferring mistakes occur in the early stages. What
invariably happens is that the beginners get so frustrated
with the techniques of designing and transferring—what
with using the wrong paper and with pencil lead getting
smeared all over the paper and the wood—that they give
up on the project before they ever get around to the won-
drously exciting woodwork.
If you are having difficulties, then the following tips
will help you sort out your problems.
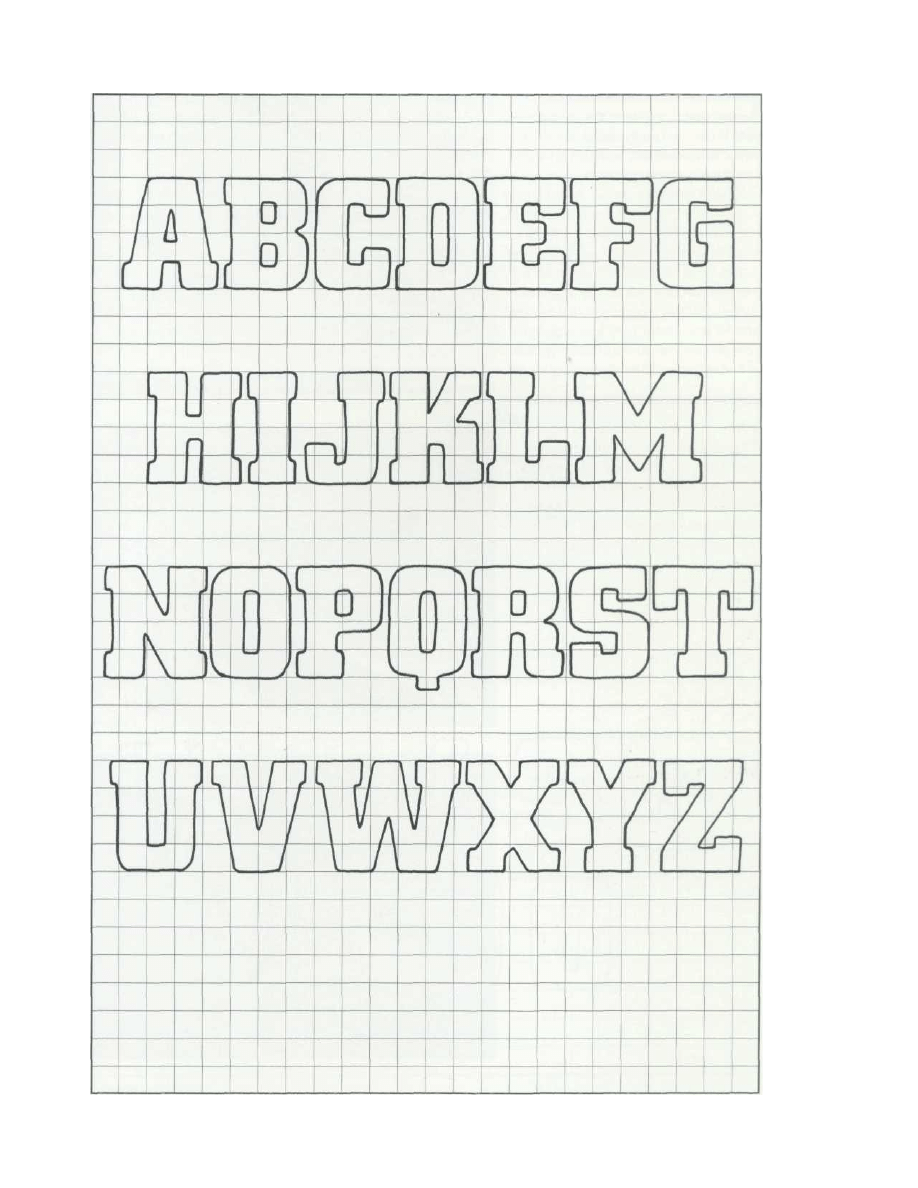
Designing
Designing is the procedure of working out the structure,
pattern and form of a project by making various drawings,
taking photographs and making models or prototypes.
For example, with this address plaque the lettering
needed a lot of thought. The problem was that while I
personally prefer what might be described as classic Greek
and Roman letter forms—with serifs and thick and thin
strokes—it was pretty plain to see that such a style would
be totally unsuitable in terms of wood and fretsaw work.
So we searched around in books until we came up with
a strong, bold letter style, one that looked as if it might
lend itself to being fretted out with a scroll saw. Then we
modified the style slightly so that all the little angles be-
came curves. We used a ruler and square to draw the
letters to size on thin layout paper, and then, using tracing
paper with ruled guidelines and a square, we played
around with the spacing of the letters until the word
looked right. Be warned that you must always use a square
in all lettering projects. If you don't, you will finish up
with a badly spaced, wobbly mess!
We did much the same thing with the sunburst design.
Having settled on the idea of the sunburst, we drew the
elements of the design on scraps of layout paper. We
fiddled around with the placing and the size and then
drew up a master design on white illustration board. Then
we took a final tracing.
It sounds a bit complicated, but the whole idea of
working in this way is that all the many roughs, ideas,
alternatives, variations, scribbles and sketches are worked
out on the relatively inexpensive layout paper, before they
are ever transferred to the quality paper.
We take a tracing from the master drawing so that we
can use the tracing in the workshop—where it generally
gets creased, damaged and used to destruction. The master
drawings, however, are stored safely away for next time.
Copyright 2004 Martian Auctions
944

DESIGN TOOLS
A set square is an essential piece of drawing equipment. It's best to
gel t h e see-through type so you can see what's going on under the
square.
Paper, Illustration Board, Layout
and Tracing Paper
We use layout paper for the initial scribbles and sketches,
good-quality glazed white illustration board for drawing
out the master designs, and best-grade tracing paper for
the transferring. It's not that we are fussy or faddish, and
it's certainly not that we can afford to splash our money
around. It's just that over the years we have learned that
using the choice papers generally gets the job done faster
and with fewer mistakes. Certainly you might think that
we could use a flimsy-grade tracing paper for transferring,
but again, experience has taught us that using a cheap-
grade paper is a bad bet. It tears easily, it bleeds when
used with ink and it doesn't take kindly to being scratched
and scraped. And the same could be said about the pen-
cils, the illustration board and all the other designing ma-
terials—the best is cheapest in the end! All that said, you
can cut costs by visiting a printer and buying offcuts and
ends of rolls/packs.
Masking Tape
We use an all-purpose paper, low-tack sticky tape to se-
cure the card and tracing paper to the drawing board, and
the tracing paper to the wood. We never use transparent
tape simply because it is too sticky and damages both the
paper and the wood.
Gridded Working Drawings
A scaled square grid can be placed over a working drawing
so that the object illustrated can be reduced or enlarged
simply by changing the size of the grid. For example, if
the grid is described as a "1" grid" or "one grid square to
1"" and the object is 6" long, and you want to finish up
with an item 12" long, then all you do is double the scale
and read each square off as being 2". And, of course, when
you come to drawing the design up to size, you simply
draw up a grid of the suggested size and transfer the con-
tents of each square in the design through to your drawn
grid.
Tracing and Pencil-Press Transferring
I usually describe the procedure of taking a tracing from
the master design and then transferring the design
through to the surface of the wood as "pencil-press
transferring."
The procedure is: Work up the design on layout paper,
make the master drawing with a hard pencil and take a
tracing with a hard pencil. Next, pencil in the back of the
tracing with a soft 2B pencil. Turn the tracing right side
up, fix it to the wood with tabs of masking tape, and then
rework the traced lines with a hard pencil or ball-point
pen. This done, remove the tracing and rework the trans-
ferred lines on the wood. Finally, spray the surface of
the wood with artist's fixative to prevent the pencil from
smudging.
TRANSFERRING SCALED DRAWINGS
Having drawn a grid over the original design and another grid at a
scale to suit—in this case 1 wanted to double up, so it is twice the
size—then all you do is painstakingly transfer the contents of each
square.
Copyright 2004 Martian Auctions
945
Wyszukiwarka
Podobne podstrony:
więcej podobnych podstron