136
PLYWOOD
DESK
Copyright 2004 Martian Auctions
622

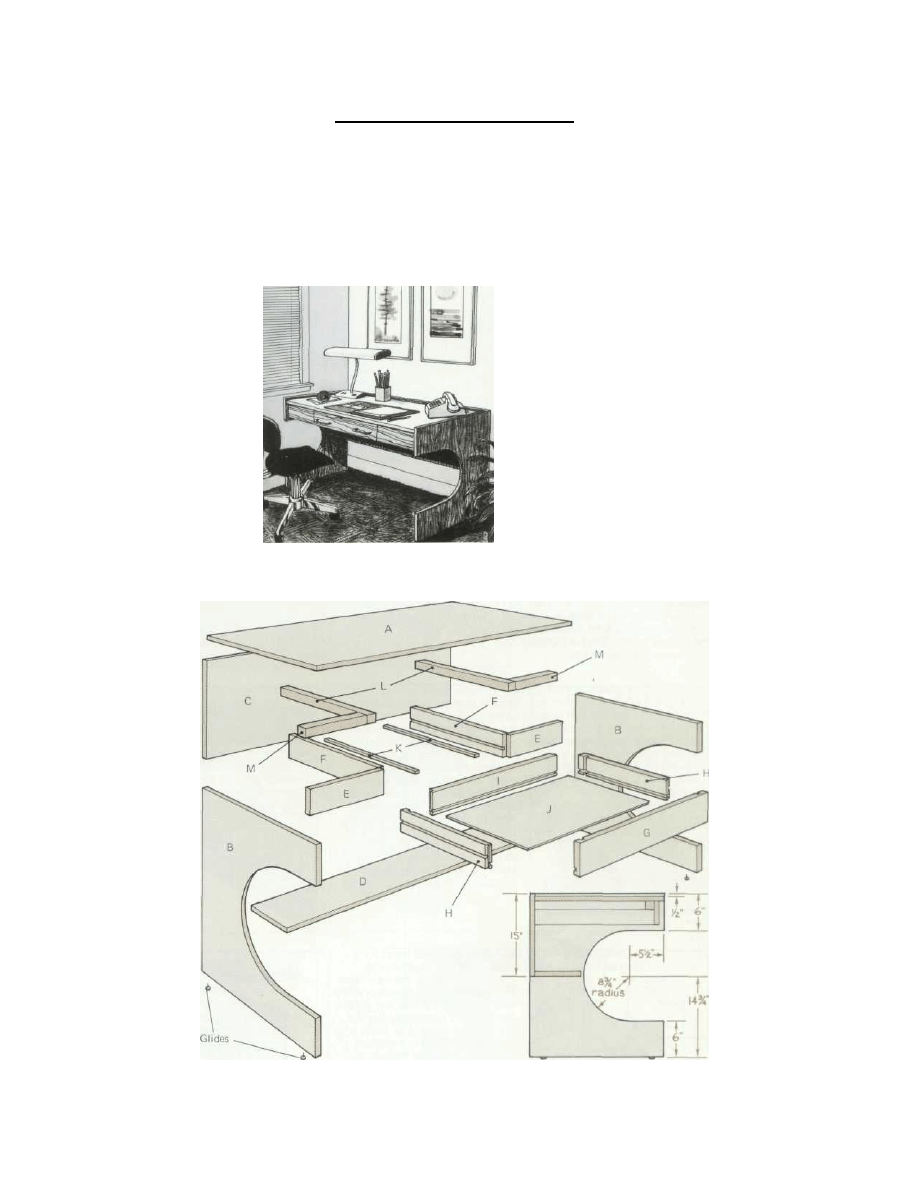
Simple in design and inexpensive, this
plywood desk is made from a single 4-
x 8-foot panel. Plywood is available
with many hardwood veneers; it can
also be covered with plastic laminate,
which is well suited for a work surface.
Since you have many options for the
materials and colors of the desk, you
could use one wood veneer or one
laminate throughout, mix wood
veneers, or mix a wood veneer and
plastic
When you cut plywood with a power
saw, the better side of the wood must
be kept face down so that it does not
splinter as the teeth of the saw pass
through it. If you use a handsaw,
whose teeth cut on the downward
stroke, cut the wood with the good side
facing up.
When the desk is completed, cover
the exposed edges of the plywood with
strips of the same laminate or veneer
that cov-ers the faces of the panels.
Tools and materials: Radial arm saw
with a dado head and a fine-tooth
blade Saber saw Electric drill with 2"
Screwmate drill bit. Steel tape rule,
combination square, pencil. Clamps.
Screwdriver, hammer, rubber
roller. Sanding block, No, 100
sandpaper Wood glue, contact
cement A candle stub Veneer tape
3/4" wide. Wood (see above) Four
nail-in metal or plastic glides Four doz
2" No. 10 flathead wood screws.
Copyright 2004 Martian Auctions
623
You can cut all plywood pieces
required for this proiect from a
standard 4- x 8-ft. panel of 3/4in.
plywood Use a steel tape rule to
measure off the widths of parts A, B,
C, D, E, F, H. and I across the
plywood panel Be sure to add the
kerf (the thickness of the cut made
by your saw blade) to each
measurement Make a short test cut
in the upper right-hand corner of the
panel and measure its width (Or
measure, mark, and cut one piece
at a time, using the dimensions in
the chart on page 49, and always
cut just outside the pencil line on the
plywood.) Use the framing square to
draw cutting lines across the
plywood. Measure off the lengths of
parts B. E, F, G. H, and I, and use
the square to mark off their edges
Use a compass, yardstick, or string
and nail to draw the circular part of
B Use a saber saw for the curves
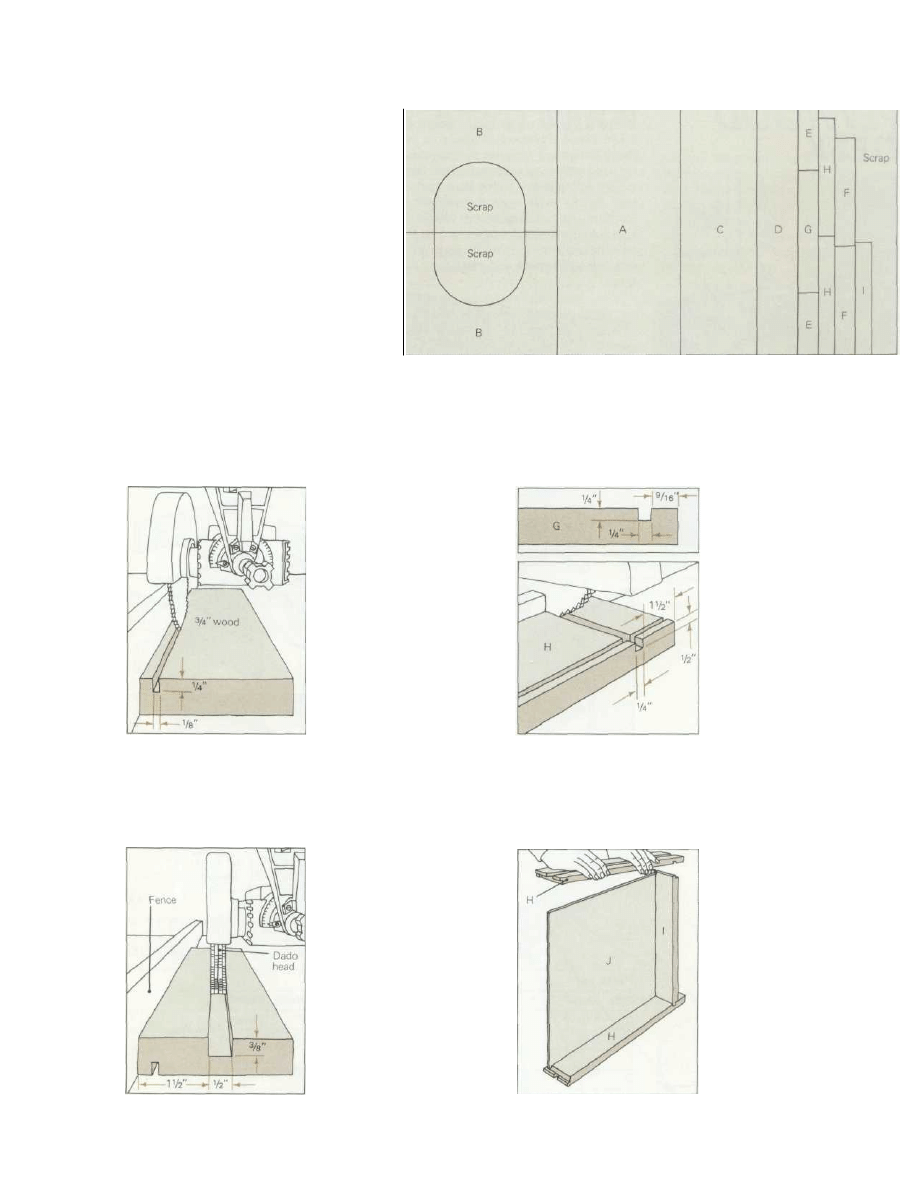
1. To make dado cuts
for the drawer bottom on
the four sides of the
drawer (G, H. and I), fit
the radial arm saw with a
'1/8-in. dado head
Position the dado head
1/2 in above the saw
table Cut through a
piece of scrap wood 3/4
thick, then measure the
cut, it should be 1/8 in,
wide and 1/4 in deep
Make adjustments, if
necessary, until part J
fits snugly into the cut
Then cut dadoes along
the ength of the drawer
sides (H), back (I), and
front (G) 1/4 in from the
bottom edges of each
part
4. Set the dado head to
make a 1/4-in.-wide cut
and raise it to 1/2 in above
the saw table Cut through
a piece of 3/4-in. scrap
wood If the tongues you
made in Step 3 do not fit
snugly into this dado,
adjust the saw to make a
dado that will fit snugly
Then cut two vertical
dadoes on the inner face
of the drawer front (G)
9
/16 in from each end
Also cut one vertical dado
1/4 in. wide and 1/2 in.
deep on the inner face of
each drawer side (H) 1 1/2
in from the back ends
2. Ad|ust the dado head
for a 1/2-in.-wide cut.
Position the blade 3/8 in,
above the saw table Cut
another piece of scrap
wood and measure the
cut, adjusting the blade,
if necessary, so that the
cut is exactly 1/2 in, wide
and 3/8 in deep Then
cut dadoes along the
length of the two drawer
sides (H) on the faces
opposite the 1/8-in.
dadoes cut in Step 1,
positioned 1 1/2 in, from
the lower edges. Make
identical cuts on the
inner faces of the drawer
supports (F)
5. To check that the
drawer assembly fits
snugly, slip together one
side and the back and
slide in the bottom (J)
Then add the other side
and the front If they do
not fit snugly, make
adjustments before you
go any further Sand
dadoes that are too tight;
discard parts that are too
loose and cut
replacements When
everything fits properly,
pull the pieces apart and
reassemble them in the
same sequence, this time
gluing all joints as you go
Copyright 2004 Martian Auctions
624
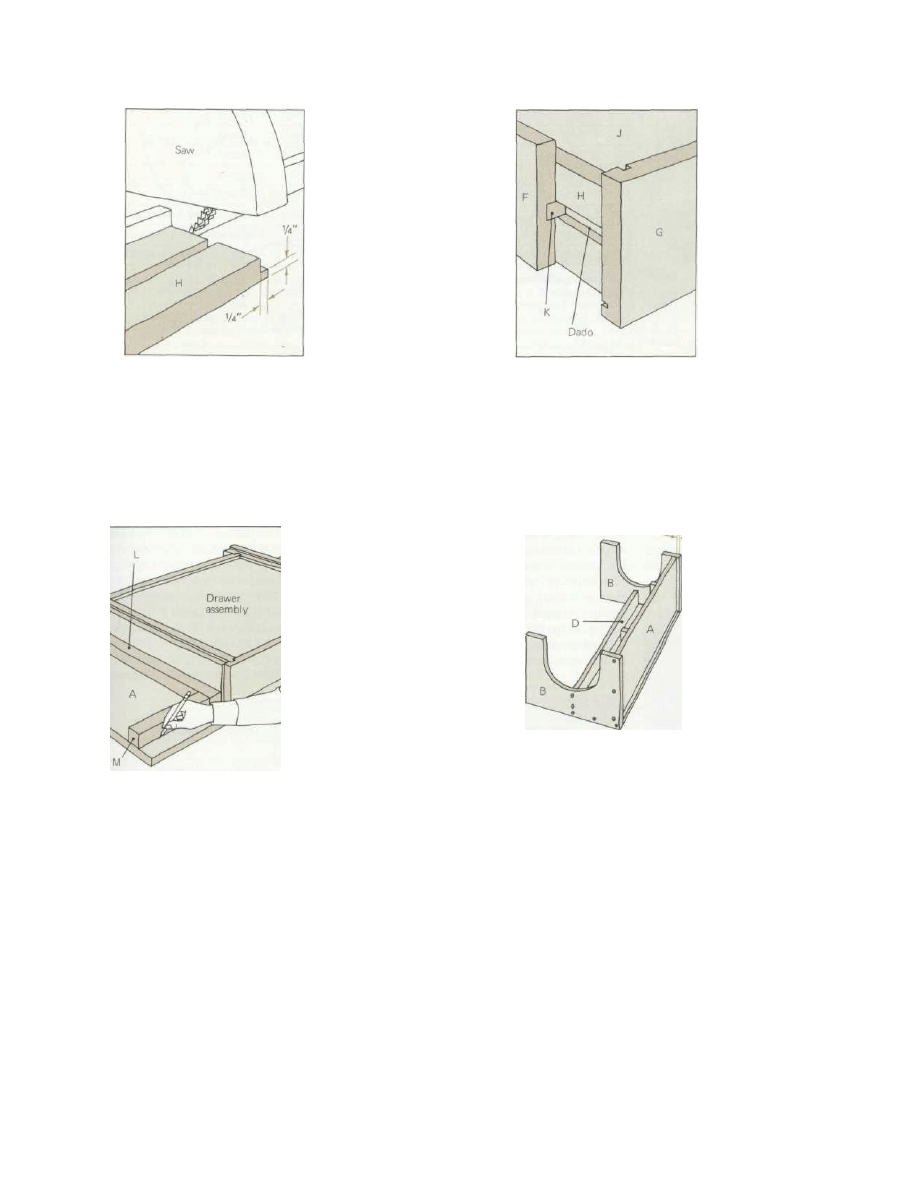
3. Cutting away a section
1/4 in. wide and 1/2 in.
deep from the front ends
of the drawer sides (H)
and both ends of the
drawer back (I) will create
tongues 1/4 in thick. To do
so. lower the dado head
to 1/4 in above the table.
Make a mark '1/4 in. from
each end of I and from the
front ends of parts H Lay
each drawer side flat on
the table with the 1/8-in.
dadoes you have already
cut facing down; then cut
away the 1/4 in, between
your marks and the ends
of the parts Lay the
drawer back on the table,
its Win. dado facing down,
and cut 1/4-in. sections
from both ends, making
two tongues.
7. Place the desk top (A)
upside down Place the
supports and slides into
the sides of the drawer,
leaving a slight clearance
on each side, then
position this assembly
carefully on the desk top.
Place two glue blocks (L)
beside the supports, and
place the other blocks (M)
perpendicular to them
Mark the positions of the
four glue blocks carefully
on the desk top.
6. Fit the hardwood slides
(K) into the dadoes in the
drawer supports (F). They
should fit snugly. If they
are too tight, sand the
dadoes. If they are too
loose cut new slides
When the slides fit
properly, glue them in
place After the glue dries,
place the supports beside
the drawer to see if the
drawer sits well on the
slides and can move
easily along them; if not,
sand down the slides Rub
a candle over the slides
and along the dadoes to
lubricate them
11. Prop the desk top (A)
between the sides so that
its top surface is vertical
and 1/2 in. below the top
edges of the back and
sides. Drill three holes
through each side and
into the top, using the
Screwmate bit Attach the
top with six screws Turn
the desk upright and drill
six more holes through
the back of the desk and
into the top, and insert
screws Put the shelf (D)
in place, its bottom flush
with the bottom edge of
the back, and attach it to
the sides in the same way
as the top, using two
screws on each end and
six along the back
Copyright 2004 Martian Auctions
625
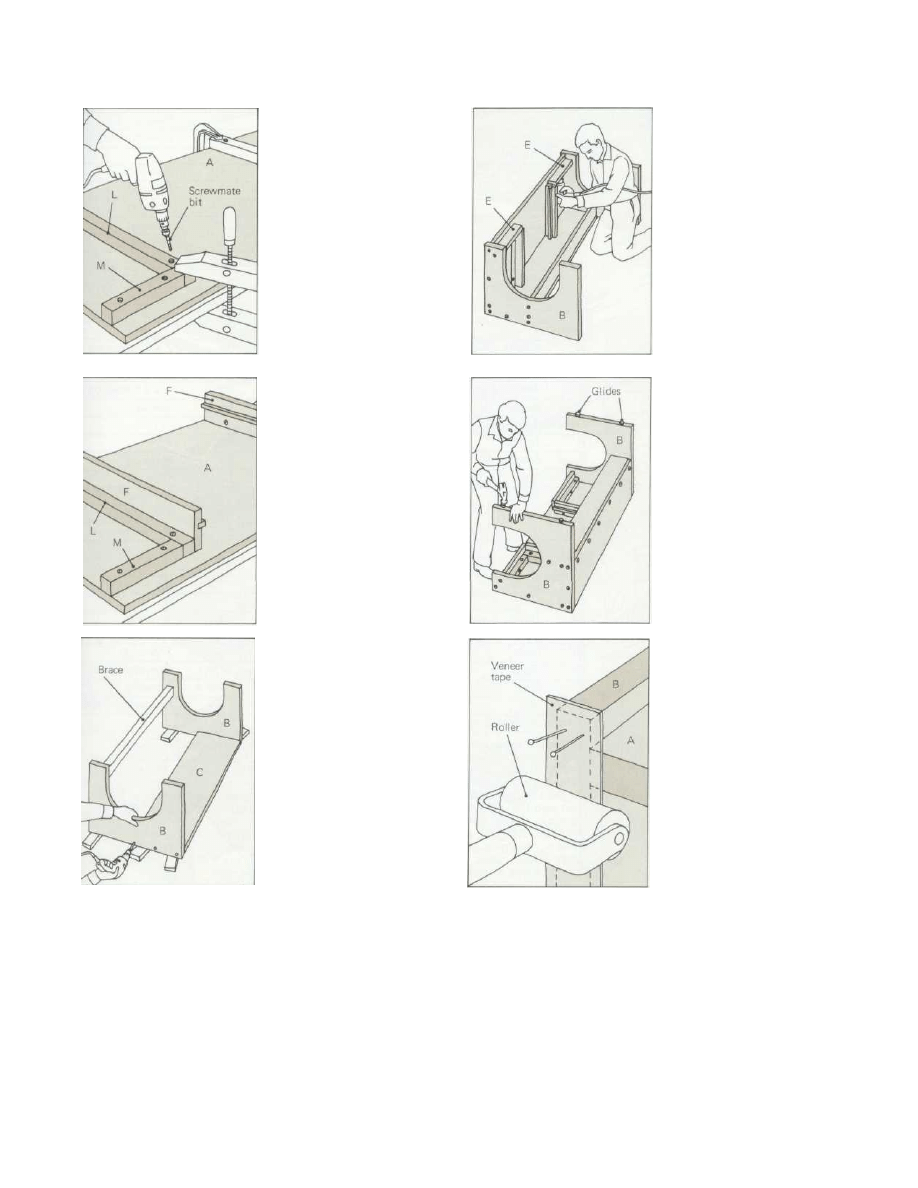
8. Remove the drawer
and supports from the
desk top. Align the glue
blocks on the marks you
just drew Use a 2-in No
10 Screwmate bit to drill
countersink, clearance,
and pilot holes
simultaneously through
each block and into the
desk top. Drill holes for
two screws into each glue
block about 2 in. from
each end
.
12. Put the fronts (E) in
place so that they rest
against the glue blocks
(M) and the sides (B) of
the desk. Use the
Screwmate bit to drill a
hole through each side
into the centers of the
edges of the front pieces
Drill one hole through the
center of each glue block
M into each front piece
Place glue on the outside
edges of the front pieces
and over the faces of the
glue blocks. Insert 2-in.
screws into pilot holes
9
. Spread glue on the
bottom of each block,
then screw all four of
them to the desk top with
2-in. No. 10 flathead wood
screws. Put the drawer
supports (F) in place
beside the glue blocks.
Use the Screwmate bit to
drill holes through each
drawer support into the
glue blocks about 4 in
from each end.
13. Turn the desk onto
its top, and hammer two
glides into the bottom
edge of each side (B)
about 3 in from the front
and back corners
10. Lay the desk sides (B) on their back edges
(so the Us face upward) with the back (C)
between them. Align the edges and corners, and
prop up the sides so they are perpendicular to the
back, then nail a temporary brace between the
sides. Drill three holes through each side into the
back, using the Screwmate bit. Apply glue to the
edges of the back and assemble the parts with 2-
in screws. Remove brace.
14. Cover the cut edges
of the plywood wherever
they are exposed with
3/4-in. veneer tape that
matches the faces of the
plywood. Measure the
exposed edges, cut strips
of tape to the proper
length, cover them with
contact cement, and let
cement become tacky.
Carefully position the tape
and press it in place with
a rubber roller. If
necessary, sand the tape
down to the width of the
plywood with No. 100
paper. Be careful not to
damage the veneer on the
faces of the plywood
Stain and finish the
veneer
Copyright 2004 Martian Auctions
626
Wyszukiwarka
Podobne podstrony:
więcej podobnych podstron