Practical
Knight
Endings
GM Edmar Mednis


Practical
Knight
Endings
Grandmaster Edmar Mednis
1993
Chess Enterprises

© Copyright 1993 by Edmar Mednis. All rights reserved.
ISBN 0-945470-35-5
Typset:
B. G. Dudley
Chess Enterprises,
107 Crosstree Road, Moon Township, PA 15108-2607
Preface
One of the many marks showing that the inventor of
chess was a
is making the B ishop and Knight - two
absolutely
pieces - about equivalent in material value.
In my
book Practical Bishop Endings
I addressed the important
principles and techniques of
same color and
color Bishop endings. The
is inherently a
straightforward piece. The
of
endings are
inherently logical and straightforward also.
and
understanding these
when added to the not very
large number of
presented in the
above
book,
is enough for the practical
Knight endings is quite another matter.
As
every begin
ner realizes, the Knight is a very
More knowledge
and effort are required to handle
endings well as
compared to Bishop endings. Of course, Knight endings also
have important principles and these need to be mastered. But
Knight endings need a lot more. A
comparison with
gives the following
the special need
in
is sophistication; Knight endings require lots
of creativity and calculation. Since there is more to know in
Knight
Practical Knight Endings
is, of necessity, longer
than
Endings.
Most of the material in the book is based on my writings
on endgames in magazines.
As
required, the material has been
rewritten, expanded and corrected. Sources have been the
standard ones: magazines,
books
and personal contacts. When
appropriate, direct credit is given in the text. Of course, any
errors remain my responsibility. I would appreciate your calling
them to my attention.
To ensure that the reader and the author are on the
3

same wavelength regarding the meaning of the questions and
exclamation marks as they are used in the characterization of
moves, these are the presently accepted meanings:
=
a strong move
! !
=
a very strong move; a fantastic move
?
=
a bad move; a weak move
??
=
a horrible move; a blunder
!?
=
an enterprising move; a move worthy of
consideration
? !
=
a dubious move, for theoretical or practical
reasons
This is my fifth book for Chess Enterprises. I am happy
to be associated with this fine publishing firm and it president,
Bob Dudley.
Edmar Mednis
New York, 1993
4

Contents
Preface
3
Introduction
7
Part
1:
Material Advantage
10
Chapter
1:
Knight
vs.
Pawn
10
Chapter 2: Knight and Pawn
vs.
Knight
16
Chapter
3:
Material Advantage
-
All
Pawns on the
SameSide
30
Section
1.
Introduction
30
Section 2. Knight and 2 Pawns
vs.
Knight and
Pawn
34
Section
3.
Knight and
3
Pawns
vs.
Knight and
2Pawns
51
Section
4.
Knight and
4
Pawns
vs.
Knight and
3
Pawns
63
Section
5.
Knight and
5
Pawns
vs.
Knight and
4
Pawns
68
Chapter
4:
Material Advantage -Pawns on
Both
Sides
69
Section
1.
General Principles
69
Section 2. The Stronger Side Has a Passed Pawn
Section
3. Both
Sides Have Passed Pawn(s)
76
Section
4.
The Stronger Side Can Force
(Create) a Passed Pawn
86
Section
5.
The Stronger Side Cannot Force
(Create) a Passed Pawn
98
Part
11:
Positional Considerations
109
Chapter
5:
Passed Pawns
110
Section
1.
The Role of Passed Pawns - General
Considerations
110
Section 2. Outside Passed Pawns
121
Section
3.
Protected Passed Pawns
134
5

Chapter 6: Pawn Structures
Section 1: The Queenside Pawn Majority
Section 2: Characteristic Deficiencies in
Pawn Structures
Chapter 7: The Active King and Knight
Section 1: The Active King
Section 2: The Active Knight
Section
3: The Active King and the Active
Knight
Chapter
8: Small Advantages in Knight Endings
6
144
144
151
160
160
167
170
179
Introduction
Characteristics of the Knight
The Knight's strong points
are:
(1) It can jump over pieces - thus is effective in blocked
positions or for general infighting.
(2) It can change color readily - thus can attack or
control any square on the board.
The Knighfs weak points are:
(1) It can only travel a short distance at a time - thus is
particularly ineffective in stopping passed pawns which are far
away.
(2) Every move must involve not only a change of the
color of square the Knight occupies, but each move brings
about a clearly different position - thus it is unable to keep the
"status quo" and is incapable of bringing about a zugzwang
situation.
In both of the above matters, the Knight is much inferi
or to the Bishop. Its difficulties in stopping passed pawns which
are far away will be illustrated many times, starting with
Chapter 1 . The second weakness will be demonstrated by
means of the following two thematically important examples.
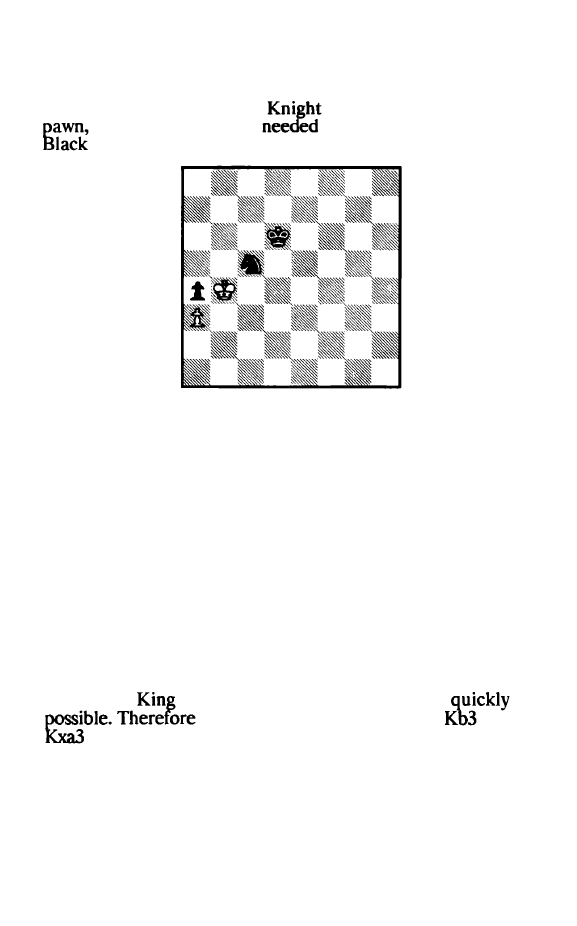
Diagram 1 (on the next page) shows a typical zugzwang
case. White's King is trapped in front of his pawn and will not
be able to
out
as
as
Black's King can remain on either
c7 or c8. we replace
Kni�ht by a Bishop of either
col or, the position is a trivial win, Irrespective of who is on
move. Yet, with a Knight, the question of who is on move is
crucial. The principle is straightforward:
If the Knight and Black King stand on the same color,
then it is bad to be on move.
7
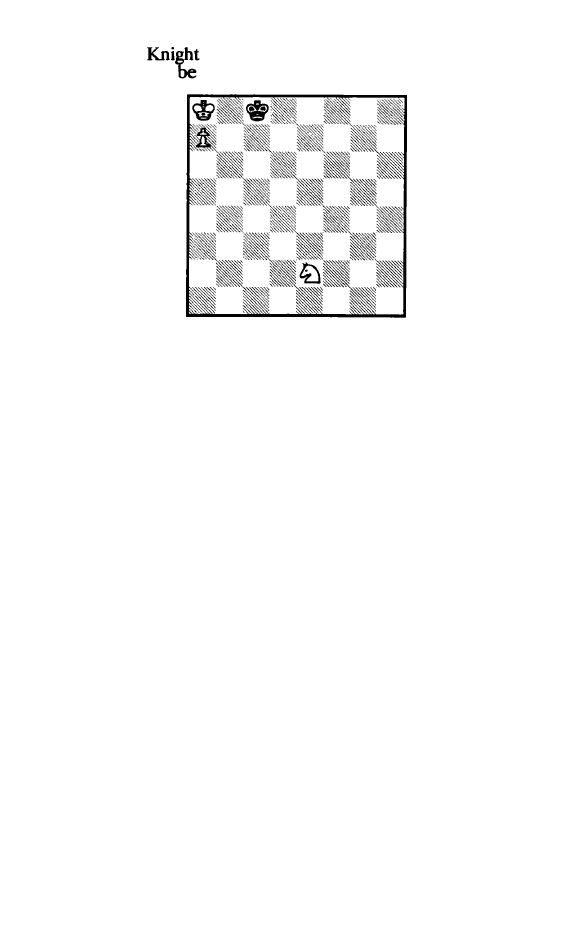
If the
and Black King stand on opposite colors,
then it is good to
on move.
Diagram 1
Therefore, for the specific case of Diagram 1, the fol
lowing is true.
White on move only draws; Black on move loses.
Black on move loses very quickly:
l.
..
Kc7 2 Nd4 Kc8 3 NbS
(or 3 Nc6) 3
...
Kd7 4 Kb7
White wins.
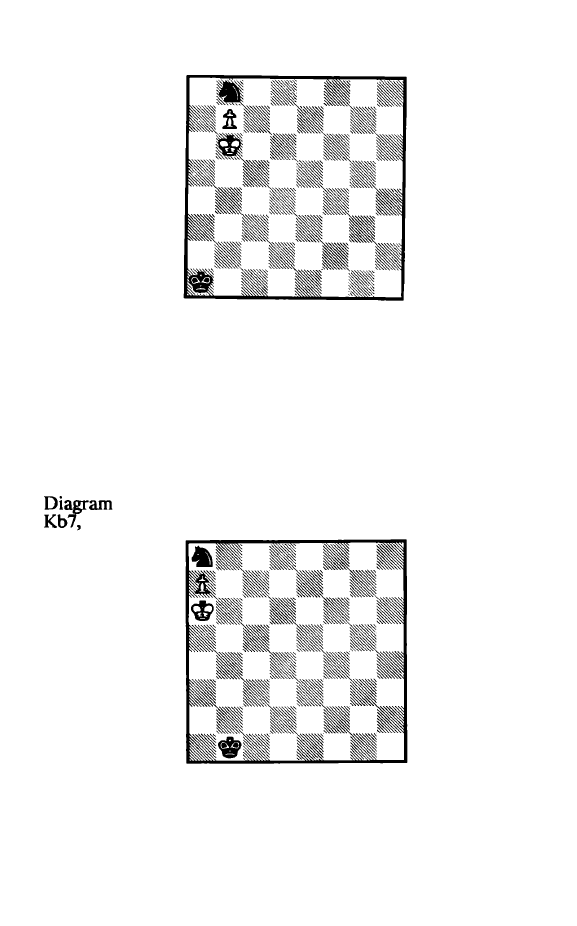
Yet, if White is on move, it does not matter how the
Knight jumps around - there is no win. For example:
1 Nd4 Kc7 2 NbS+ Kc8 3 Nd6+
Unfortunately for White, the Knight must move and
thus give up control of c7.
3
.
..
Kc7 4 Nc4 Kc8 5 Nb6+ Kc7 6 Nd7 Kc8!
Draw.
There is no way for White to progress because he
cannot prevent Black from shuttling back and forth between c7
and c8. Try the above exercise: put White's Knight on any light
square - and you will see that there is no win; put the Knight on
any dark square - and you will see that everything wins.
8
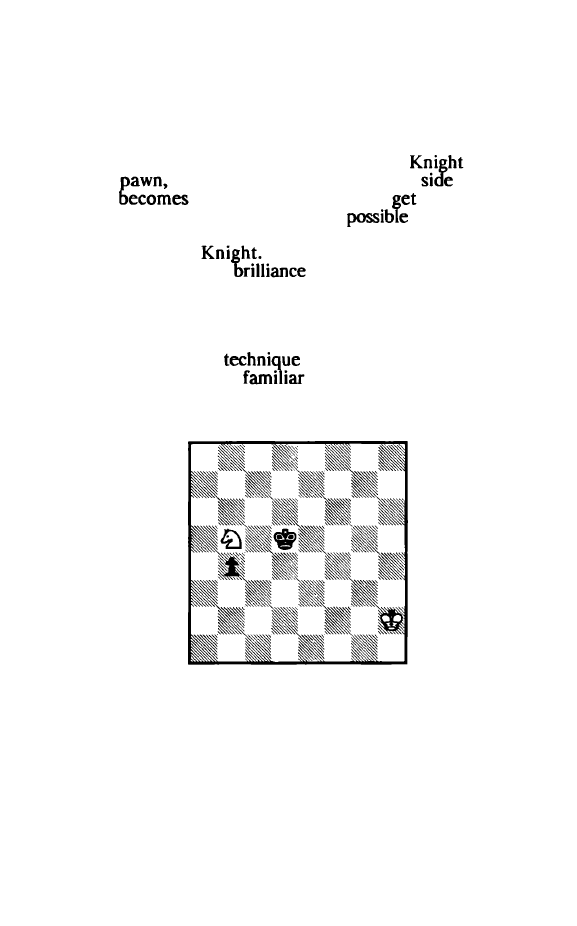
Just as frustrating for the stronger side is the situation of
Diagram 2, which is the conclusion of an endgame study by
Kakovin and Motor. It is drawn irrespective of who is on move.
White's King keeps Black's
glued on c5 to protect its
while Black's King is
to protect its Knight. With
to move, the best try would be:
Diagram 2
l
...
KdS
After l...Kc6, 2 Kc4?? loses after 2 ... Na6, yet the active
2 Ka5! holds easily.
2 KbS Kd4 3 Kb4!
Keeps the draw in hand. But please note that if the
immobile Knight on c5 is replaced by a BishoP. on either the
dl =a4 or a4-e8 diagonal, then Black wins easily even though
he has the wrong Bishop for his a-pawn.
3
..•
Kd3
One last tactical try.
4 KxcS Kc3 S KdS!
The
must be in position to reach c2 as
as
losing is the offside 5 Kb5??: 5 ...
6 Kc5
7 Kc4 Kb2 and Black wins.
5
..•
Kb3 6 Kd4 Kxa3 7 Kc3! Ka2 8 Kc2 a3 9 Kcl
Draw.
9

Part I
Material Advantage
Chapter 1: Knight vs. Pawn
Except for one situation, it is only the side with the
that has
chances. The exception is where the
is hemmed in by
own
RP
on the 2nd or 7th rank. This
thematic case is illustrated in Diagram 3, when White has a
mate in two:
Diagram 3
1 Ng4! h2 2 NB
mate.
This theme is used periodically
as
the concluding motif
in endgame studies. Its
in practical games is rare. If
it will occur once to you,
is a lot!
Except for the above "forced suicide•', the pawn can only
be a positive factor. Obviously, where the defending King is in
front of the pawn, the position is a trivial draw. If the defending
King cannot get in front of the
the Knight should do so.
Then the following principle
A Knight immediately in front of the passed pawn can
be
itself stop the pawn, except for the
RP
on the 7th rank.
The usual case is shown in
4. It is drawn no
matter who moves. For instance with
to move he even
10
has the following thematic elegant draw:
Diagram
4
l.
.. Nd7 + 2 Kc7 NcS! 3 b8 =Q Na6 + 4 Kb7 Nxb8
Draw.
Of course, there is no reason for Black to go for such
fancy stuff in the example above. Yet that drawing motif is a
very important one and often is the only way to cope with a
passed pawn on the 7th rank.
Because this Knight fork is not possible against a
RP
on
the 7th rank, the Knight by itself loses. If we now look at
5, we see that there is no defense. White threatens 1
trapping and winning the Knight. Black on move can try:
Diagram 5
l. ..
Nc7+ 2 Kb7 NbS
,
but there is no Knight fork after 3
11
a8=Q
and Black loses.
This is our first demonstration of the very important
principle that the
RP
is the most difticult passed pawn for the
Knight to stop.
When faced with positions where the
is away
from the
i.e. in the back of it or on the
of it, the
question
whether the Knight can
in front of it.
There is never a simple answer. Many
Knight maneu
vers must be considered to determine if there is a successful
route back for the
It is less question of theoretical
knowledge or a flash of
and more of hard, resource
ful analysis. Consider first Diagram 6 which is the end of a
1938 endgame study by N. Grigoriev. Black threatens 1 .. Kc5,
chasing the Knight away and then queening his pawn. There is
a series of Knight jumps, however, which lead to the opportuni
ty
for White to use the
shown from Diagram 4. Thus
White first of all must be
with that technique and then
work very hard to see how the Knight could get back so as to
utilize it. The drawing method is:
Diagram 6
1 Nc7+ Kc4
White has it easier after other King moves: l...Kd4 2
Kg2 b3 3 Nb5 + followed by 4 Na3 or l...Kc6 2 Ne6 Kb5 3
Nd4+ Kc4 4 Nc6! b3 5 Na5 + .
2 Ne8!!
12
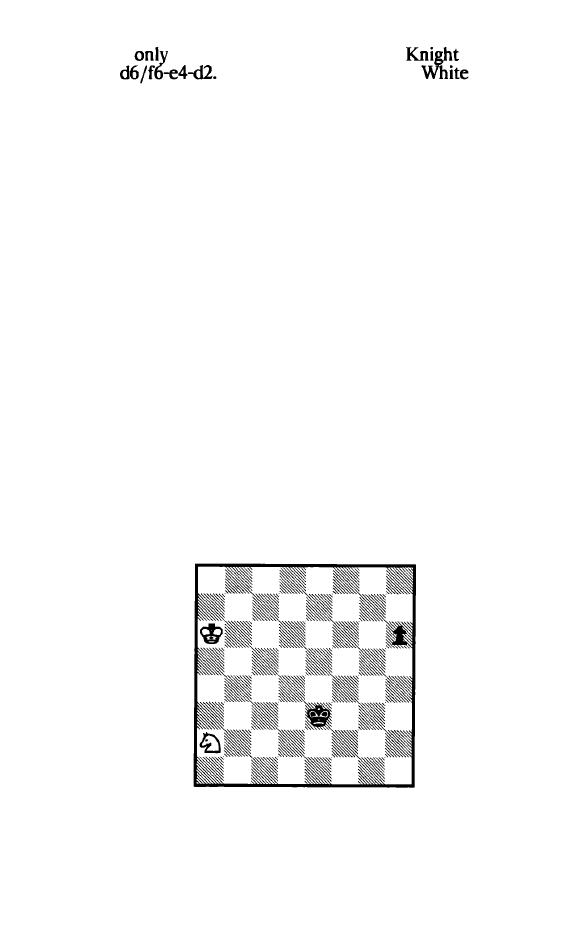
The
move. White plans to get the
back via
the route
If Black tries to stop this,
has the
auxiliary route c7-b5-a3.
2
000
KcS
Or 2 ... b3 3 Nd6+ Kb4 (3 ... Kd3 4 Nb5 b2 5 Na3) 4 Ne4
b2 5 Nd2.
3 Nf6 Kd4 4 Ne8! KeS
If 4 ... b3 5 Nd6 Kc3, the Knight gets back as follows: 6
Ne4+ ! Kc2 7 Nd6! b2 8 Nc4! bl=Q 9 Na3+ and 10 Nxbl.
5 Nc7 Kd6! 6 Ne8+ !
Only so. The Knight needs to retain mobility. Losing is
6 Nb5 + ? Kc5 when we have our starting point with Black
having already gotten in ... Kc5. Black then wins easily: 7 Nc7
b3 8 Ne6 + Kc4 etc. After the text Black has nothing better
than to acquiesce to one of the thematic drawing lines.
6 oooKcS 7 Nf6 Kd4 8 Ne8! b3 9 Nd6 Kc3 10 Ne4+ !
Kc2 11 Nd6! b2 12 Nc4 b1 =Q 13 Na3+
Draw.
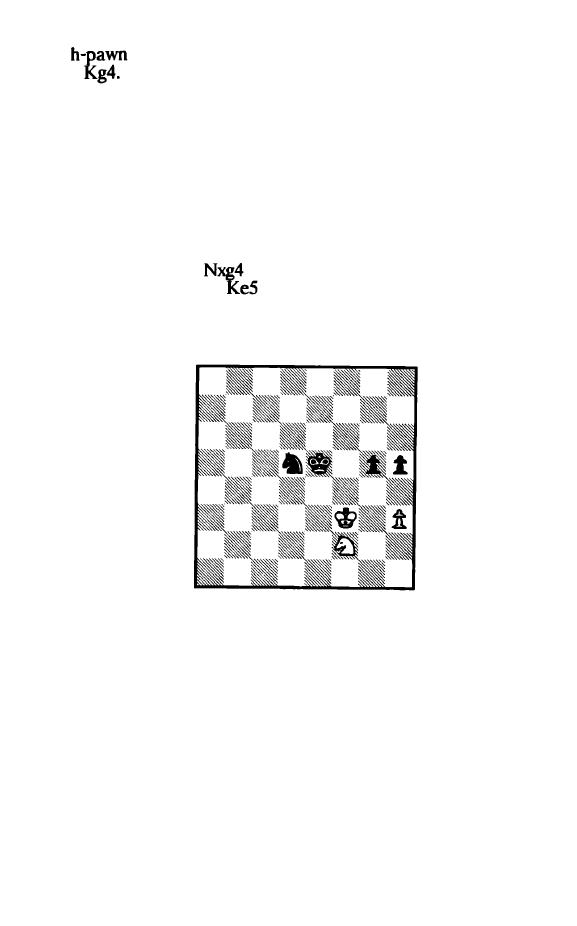
Earlier it was demonstrated why the RP is the most
difficult one for the Knight to stop. Yet if the pawn is far
enough away from queening, there are instances when the
Knight can get back in time. A fine example of this is from
Diagram 7
13
Diagram 7, a 1932 study by N. Grigoriev. Do not bother
memorizing
the specifics as they are not that important for
future cases. What is important is to realize that the Knight is
very agile. That appreciation plus a lot of hard work is the road
to success for discovering the correct
which often are
quite surprising ones. Whtte to play
draw as follows:
1 Nb4!
The key question is whether the Knight can get back in
time to h2. The two most likely jumps to h2 are from f1 or
The prospects of reaching f1 are poor and therefore �4 is
only square worth fighting for. White's chances of gettmg to
are a lot better from b4 than from c3 or cl. Therefore, only
text is worth trying.
l
.••
hS 2 Nc6
As was already seen by the play from Dia�ram 6, the
Knight has access to more routes when its startmg point is
farther from the King. Without prospects are 2 Nd5+ ?, Kf3! or
2 Nc2+ Kf2!.
2
..•
Ke4!
To prevent the Knight from reaching
e5.
After 2 ... h4 3
Ne5 White already is safe.
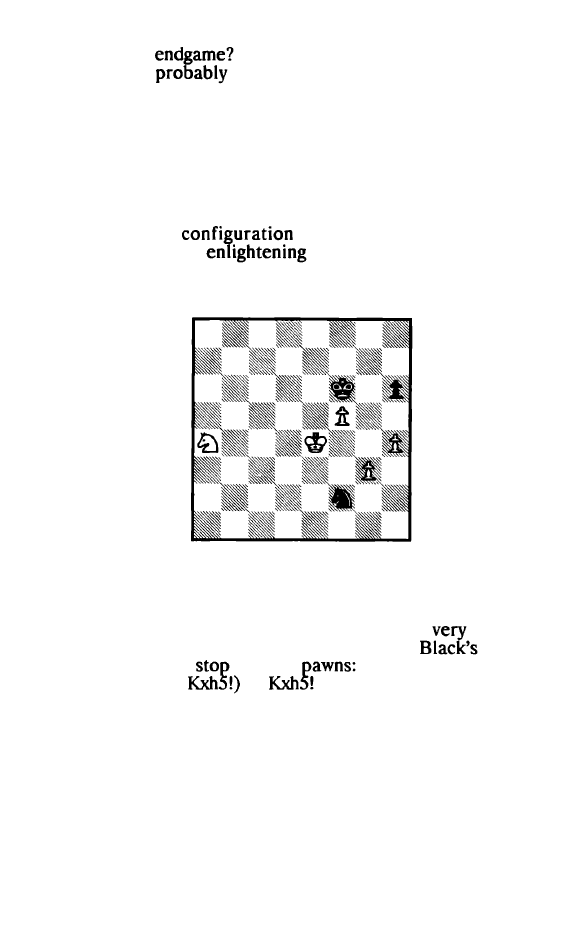
3 NaS!!
This
retreat utilizes the same tech
nique as in
previous
where the far away e8 square
was the starting point for the successful road back.
The logic behind the correctness of the text is as fol
lows: the key way posts for the Knights's return are the square
eS,
e3
and d2. Which square is the springboard for reaching
them? The answer, of course, is c4 and that is what the Knight
heads for.
Losing is 3 Nd8? h4 4 Ne6 KfS! 5 Nd4+ Kg4 when the
Knight's return has been blocked off.
14
3
•••
h4
Black
as
well
since 3 ... Kd4 and 3 ... Kd3 lead
nowhere after 4
+) ,
3 ... Kd5 allows 4 Nb3 h4 S Nd2.
4 Nc4
By now it should be clear that only this can work since 4
Nb3? Ke3! leaves the Knight shut off.
4
...
Kf3
The
gets back immediately after 4 ... h3: S Nd2+
followed by 6
and 7 Nh2.
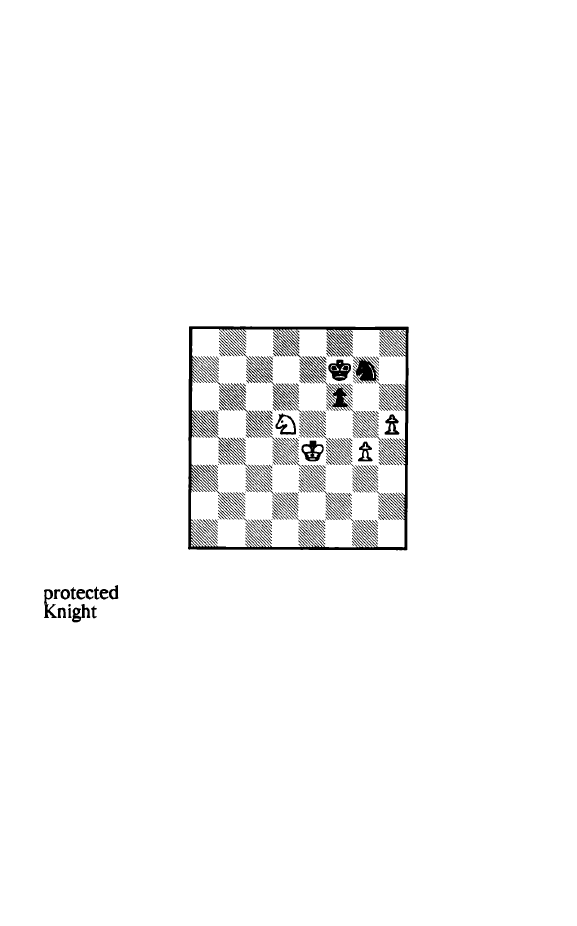
S NeS+ !
But now there is not time for S Nd2 + ? because after
S ... Ke2! 6 Ne4 h3 7
+ Kf2 the Knight either gets chased
away or is trapped on h
What White must keep in mind throughout is that the
Knight is interested in getting to h2 - the square in
front
of the
pawn.
S
...
Kg3
6 Nc4!
Back again, for a new step forward!
6
••.
h3 7 Ne3 h2
If 7 ...
Kt3,
8 Nfl; if 7 .
..
Kf2
,
3 Ng4+.
8 Nfl + Kg2 9 Nxh2
Draw.
15
Chapter 2
Knight and Pawn vs. Knight
The most basic of all Knight endings is that of Knight +
pawn
vs.
Knight. Much is known about it and therefore the key
principles can be stated with great confidence. I will be discuss
m� what I consider to be
normal situations,
i.e. those where the
and Knights are already near the pawn or can reach it
enough.
The defending King obviously wants to be in front of
the pawn, thereby inhibiting the l?awn's advance.
In
all
reason
able cases the positions are routme draws.
Therefore, in this
chapter I will be considering only those situations
where the
defending King is to the side of the pawn or in the rear of it.
The
important knowledge will be presented in conjunction with the
following seven key principles:
(1) Once the Pawn has reached the seventh rank in safety, the
win is assured.
This principle makes the objective of how to handle the
N + P
vs.
N endgame easy to state and clear to follow: advance
the passed
as
as possible so that it can reach the
7th rank.
first
analysis was provided by I. Kling
in 1867. One of his instructive positions is shown in Diagram 8.
White wins, irrespective of who is on move.
Diagram 8
16
The winning technique
always consists of chasing away
the defending Knight.
With White to play, this is how it is done:
1 Nb4!
White's
stands well enough at the moment so it is
logical for the
to get off the edge of the board.
1
...
Kc5
Passive defense is hopeless: 1. .. Kc7 2 NdS + Kd6 3
Nf6! and already Black's Kmght must give up control of the
queening square.
2 Nd3 + KdS 3 Nf4+ Kd6 4 Ng6!
Black's King has succeeded in
White's Kni�ht
out of f6; therefore, the Knight heads for so as to undernune
the Black Knight's position on d7.
4 ... KdS S Nf8 Ne5!
B lack
the immediate end because of the
thematic
6 b8 = Q?? Nc6 + . Yet the inevitable is just
delayed by a bit.
6 Ka8! Nc6 7 Nd7!
The Knight now proceeds to chase away Black's Knight
from c6 and that will be the end because with White's King on
a8 Black will have no more opportunities for a Knight fork.
7 ... Kd6 8
Nb6
White's Knight can menace Black's from, for instance,
aS, b4 or eS. There is no way that Black's King can guard all
these squares simultaneously.
8
.••
Kc7 9 NdS + !
After 9 Nc4 Nb8 Black is safe for the moment, though,
of course, White still wins soon enough by retracing his steps
17

with 10 Nb6!.
9.- Kd7 10 Nb4
White wins
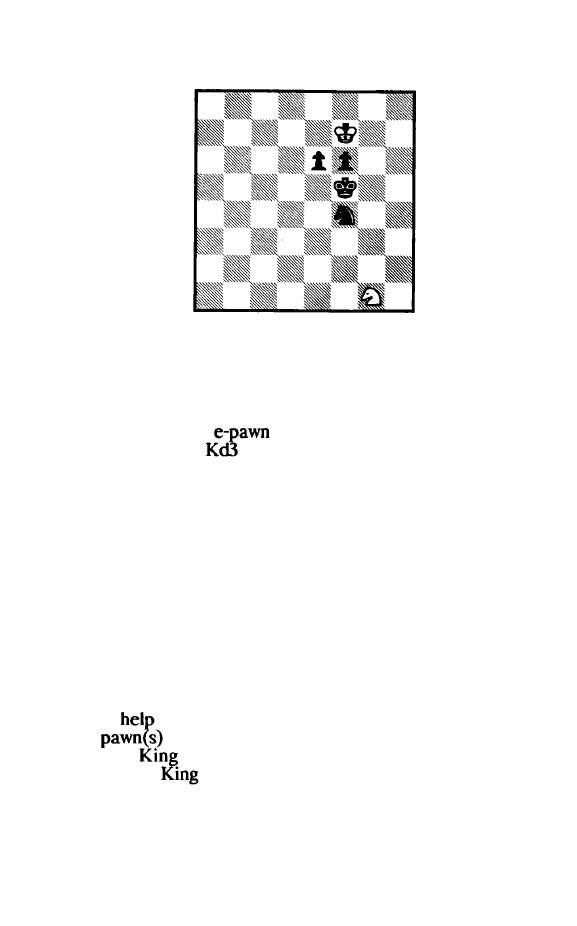
A typical example from tournament
is Diagram 9,
T. Weinberger - P. Ostojic, 1975 Cleveland
after
Black's 71st move. Because Black will �et his e-pawn to e2 in
safety, he is sure to win. The game contmued:
Diagram 9
72 Kf4
White avoids 72 Kf3 because he wants to leave open t3
for his Knight. After 12
Kl3,
Black wins
as
follows: 12 ... Nd7!
(preventing 73 Ne5 +) 73 Nb4+ Kd2 74 Nc2 Ne5 + 75 Ke4
e2.
72
..•
e2 73 NeS +
The game was adjourned here with White sealing this
move. He resigned without resuming play. The reason:
73 ... Kc2!
It is useful to choose a King route which avoids both
checks and eventual Knight forks.
74 Nt3 Kdl
This formation is equivalent to that of the previous
18
example when Black's Knight had already been driven to c6.
75
Kg3
Or 75 Ke3 Ng4+ 76 Kd4 Nh2!.
7S
•..
Ne4 + 76 Kg2 Nd2
Black wins
The strength of a pawn on the 7th rank is so great that
often it wins even if the
also has a pawn.
An
instruc
ture example is shown in
10, an endgame study
the
Argentine composer J. Mugnos published in JAQUE in
The :winning
uses the principles demonstrated in the
prevtous two
Diagram 10
1 Kg6!
for the active location on f7 after which the
deflection of
Knight will start.
1
.••
Kb4
Retreating the King is no help at all as it even gets in
the way of his
The following variation is illustrative of
that: l...Kd6 2
(3 Ne8+ is the threat) 2 ... Ke5 3 Ne6! Nb5
4 Kf8 Nd6 5 Nd8! (6 Nf7 + is the threat) 5 ... Kf6 6 Nb7 (or 6
Nf7). White has deflected the Knight and queens his pawn.
2 Kf7!
19
Premature is 2 Ne6? since after 2 ... Ne8 3 Kt7 Nd6 +
Black has gained sufficient time to advance his pawn and
obtains a theoretically drawn Q + N
vs.
Q endgame: 4
Kf8 c5
S
Nd8 c4 6 Nb7 c3! etc.
2
...
c5 3 Ne6 NbS 4 Ke8!
The
heads to d7 to chase away Black's Knight
from d6. After Kf8? Nd6 Black draws as given in the note
after White's 2nd move.
4 ... Nd6+
After 4 ... c4 White queens first and then
Black's
pawn : S Kd7 c3 6 e8 = Q c2 7 Qc8 ! Nc3 8
Kb3 9
Nd4+.
5 Kd7 Ne4 6 Nc7 Nf6+
If 6 ... c4, 7 NdS + followed by 8 e8=Q wins; if 6 ... Kc4,
then 7 Kc6 is the end.
7 Ke6 Nb5
A last gasp : 8 c8 =Q?? Ng7+.
8 Kt7!
White wins
White's King completes his instructive series of maneu
vers by returning to t7. After having caused Black's Knight to
give up control of the queening square.
Because of the great difficulties the
has in
coping with the
RP,
the next three principles
with that
important pawn:
(2) The
RP
on the 6th rank usually wins
Once the RP has reached the 6th rank in safety, the
game is won in the vast majority of cases.
An
excellent practi
cal example is the play from Diagram 1 1 (on the next page), H.
Pfleger - B. Larsen, Manila 1974, after White's 58th move. The
20
mutual h-
f
awns both add a real life element
as
well
as
prevent
the trivia solution of 58 ... Nb4 followed by 59 ... Nxa6 and a
draw.
As far as our theme is concerned, White's a-pawn is
already on the 6th rank and will become a passed pawn after
the imminent Kxa7. White won
as
follows:
Diagram 1 1
58
...
Kg5
Activating the King so
as
to eliminate White's h-pawn.
Obviously Black must do something
as
otherwise White
will just gobble up Black's a-pawn and then promote his own.
The
to sacrifice the Knight for the
fails be
cause of
variation : 58 ... Nb4
Nf3! Kf5 60
Nxh4+ Kf4 61 Ng2+ !
62 h4.
59 Nt3+ Kf4
60
Nxh4 Kg3 61 Ng2! Kxh3
After 61. .. Kxg2 62 h4 one of the rook pawns will queen.
Black actually resigned after White's 61st move
as
he apparent
ly did not want to be shown the pretty win after ...
62 Nf4+!!
Drawing away Black's Knight just long enough from the
a-pawn.
21
62 ... Nxf4
63
Kxa7 Nd3
Or
63
... Nd5 64 Kb7; or
63
... Ne6 64 Kb6.
64 Kb6! Nb4
65
a7
White wins
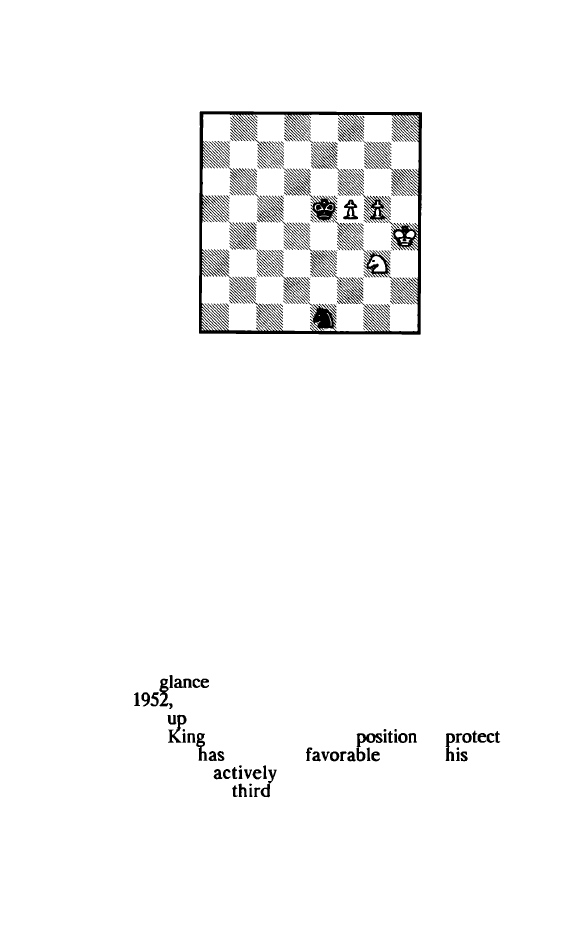
(3) A draw against the
RP
on the 6th rank is possible only in a
very few favorable ("lucky") situations, and only if the defend
ing King can attack the pawn from the rear.
As already suggested in the previous principle, the
drawing chances in practice are very poor. To have any chances
at all, the defending
must be actively placed, i.e. be at
tacking the pawn from
rear. A theoretical example of a
draw is Diagram 12, an endgame study by Richard Reti in
1929. It is drawn irrespective of who is on move. Black's King
and Knight have ideal defensive locations whereas White is
handicapped by havin.g his
awkwardly placed on c7.
(Another study by Rett in 1929
demonstrated that White
wins if his
is on
cS.)
Black on move draws starting with
l.
..
Nf7! -
will be occuring in our main line on the third
move. The main line with White to move is as follows:
Diagram 12
1 Kb8 Nb5! 2 Kb7 Nd6+
Of course, Black loses immediately after 2
.
..
Nxc7?? 3 a7
3 Ka7
22
By
with his King, White has given the
move to Black
our starting position. Therefore, Black's
Knight must give
its active location, but by an eyelash the
draw is still
3 ... Nf7! 4 Ne6
Aiming for c5. After a King move Black draws with 4 ...
Nd8( +).
4
...
Kb5!
White's Knight must be kept away from
c5.
Therefore,
losin� is 4 ... Nd6? when White plays 5 Nc5!, reaching the Reti
position with the Knight on
c5.
The main line then is 5 ... Nb5 +
6 Kb7 Kb4 (6 ... Nd6+ 7 Kc7! Nb5 + 8 Kc6! Na7 + 9 Kb7 Nb5
10 Ne4 - see the main line continuation.) 7 Kb6 Nd6 8 Ne4!
Nc8 + 9 Kc7! Kb5 10 Kb7 Ka5 1 1 Nc5 Nd6 + 12 Kc7 Nb5 +
13 Kc6 Na7+ 14 Kb7 Nb5 15 Ne4! Kb4 16 Kb6 Kc4 17 Nc3!
Nd6 18 Kc7 Kc5 19 a7 White wins. White's winning method is
of course quite instructive; nevertheless its existence demon
strates how close Black always is to the abyss in the fight
against a
RP
on the 6th rank.
5 Nd4+ KaS! 6 Nc6+ KbS 7 Nb4! Nd8!
Losing is 7 ... Kxb4?? 8 Kb8 Nd8 9 Kc7 Ne6 + 10 Kb6.
Black's only attention must be devoted to stopping the a-pawn.
8 Kb8 Nc6+ ! 9 Kb7 NaS+ 10 Kc7 Nc6!!
Draw
White has not way of improving his position, e.g. 1 1 Kb7
Na5 + 12 Kc8 Kb6 etc.
(4)1f the
RP
is not yet on the 6th rank, the question always is
whether it can get there under normal, i.e. favorable, circum
stances. The position is won if the answer is ''yes".
A model
for arriving at the correct answer is
13, M.
-
M. Tal, USSR Championship
White on move.
23
Diagram 13
It is clear that White is
close
to a theoretical win, yet the
offside Knight and the pawn still being on only the third rank
make the answer
as
yet uncertain. We must start the play to get
nearer the clarity:
1 Kg6 NeS+ 2 Kf6 Nd3!
The Knight has to try to hinder the
advance
from a safer location because the obvious 2 ..
.
is refuted by
3 Nd4!! When after 3 ... Nxd4 4 h4 the
decissive ad
vance cannot be
while 3 ...
4 Kg5 Ng2 5 Nc2!
leads to a
(6 Kg4 and 7 Kg3).
We can now add the following important
in a
more formal way: in positions with a RP, a
sacrifice is
often the key maneuver to deflect the opponent's Knight and
thus gain the 1-2 tempos required for victory.
3 h4 Nf4 4 NcS+?
The move that throws away the win. Not only does it
allow Black's King to come closer, but also the Knight winds up
on a square which offers little future. G.M. Averbakh has
demonstrated that a thematic win can be gained with the
centralizing 4 Nd4! : 4 ... Kc8 5 Kf5 Nh5 (Or 5 ... Nd5 6 h5 Ne7+
7 Ke6 Ng8 8 Nf5 Kd8 9 Kf7) 6 Ne2! Ng7 + (The threatened 7
forces Black's Knight to a passive location.) 7 Kf6! Ne8+
8
Kd7 {After 8 ... Nc7 White keeps Black's Knight passive
24
by 9 Nf4!.) 9 h5 Ke7 10 h6 {The
RP
on the 6th rank and the
defender passive is an assured win.) 10 ... Nd6 (Mter 10 ... Nf6
White wins with 1 1 Nf4 Nd7 12
Nf6 13 Nd5 + !.) 1 1 h7
Nn 12 Kg7 Nh8! 13
(But not
Kxh8?? Kn!! and Black
draws - see Diagram
13 ... Nn 14 Ne4 Nh8 15 Nd6!! and
White wins.
4
•..
Kc6 5
Nd3 NbS+ !
Overlooked by White when he played 4 Nc5 +?. Black's
Knight gains a stable attacking location and it will cost White
valuable time to chase it away.
Of course, 5 ... Nxd3?? would have justified White's play
since after 6 h4 the pawn is unstoppable.
6Kg6 Ng3
to the winning variation given under White's
4th move,
Knight has a lot more scope now and the
position is a theoretical draw.
7
Nf2 Kd6 8 Nbl!
The only way to chase away Black's Knight, yet White is
forced to lose
time and this allows Black's King to
come closer.
course, White's Knight remains poisoned.
8
...
Ne2 9 Kf6
Both 9 Kf5 {9 ... Ke7) and 9 Kg5 (9 .
..
Ke6) allow Black's
King to get closer to the pawn. Yet after Black's response to
the text we see clearly the change in the position : White's
is still on the 4th rank while Black's King has progressed
b7 to d6.
9
...
Nf4 10 Ng3 Kd7
Black's
tries to get to the Kingside via e8,
f8
etc.
Also drawing -
more simply so - is 10 ... Nd5 + 1 1
{1 1 Kf7 Nf4
Ne2 is the game course.) 1 l ...Ke7 12 hS
13 h6 Ne7 14 NhS Kg8! and Black is safe.
25
Diagram 14
11 Kf7
Harmless. White should have challenged Black with 1 1
Ne2! when 1 1 ...Nxe2?? loses to 12 h5 and 1 l...Nh5 +?? loses to
12 Kg6. Therefore, Black must play l l ... NdS + 12
Kf7
Ne3 13
h5 Ng4!. He still draws because White cannot get his
to
the 6th rank while preventing Black's
from
One possible sequence is 14 Ng3 NeS +
Kf6 Ng4+ 16
Ne5 17 Kf5 Nf7 18 Kf6 Ke8 19 Kg7 Ke7 (Averbakh) and
Black holds because White cannot advance his pawn.
ll
•..
Kd6! 12 Ne2
There is no win, but now Black draws instantaneously.
12
...
Nxe2
The game was called a draw here. The further course
could have been ...
13 hS Nf4 14 h6 Nc6
Drawn
Because White's
is on f7, Black draws since 15 h7
allows 15 ... Ng5 +. In
a K + N combination can
a
RP
on the 6th rank, e.g. 15 Kf6 Nf8 16 Kf7 Nc6 17 Kg8
etc.
26
(S) Other pawns on the 6th rank usually draw, if the defending
King is actively placed in the back of the pawn.
An excellent example - of great practical value - is
shown in Diagram 15. It is drawn no matter who is on move.
For instance, with White to move:
Diagram 15
1 Nd6
1 e7 fails to l...Nd5 2 e8=Q Nf6+.
l
... NdS 2 Nc4 Ke4 3 Kd6 Kd4!
With Black's King active to the rear of the
it can
help its Knight keep the excellent post on d5.
addition,
because the
is only on the 6th rank, various Knight de
flection
fail, e.g. 4 Ne3 Nxe3 5 e7 Nf5 + .
4 Na3 Ke4 S NbS Ne3! 6 Kd7
Black now needs to show some care. Thus 6 ... Nd5??
l
oses
to 7 Nc3 + ! Nxc3 8 e7 since the
queens with check;
6 ... Nf5?? allows 7 Nd6 + . Therefore
plays
6 ... Kf4!
Drawn
We're back to our starting position!
Wins are usually only possible if some special factor(s)
27
allow the stronger side to achieve by force a very favorable
position. Such a case is illustrated from Diagram 16, E. Paoli
M. Kovacs,
1971. Black on move. At the moment
White's King
Knight have excellent defensive locations,
yet Black, by sacrificing one of his pawns will be able to mis
place White's forces. Black won
as
follows:
Diagram 16
t
...
Ke3 2 Nt3
After the passive retreat 2 Kh3, Black wins routinely
with 2 ... f3.
2
•••
h3!! 3 Nh2
White is forced to deactivate the Knight. The h-pawn
will be won, but the game lost.
3
•••
Kf2! 4 Kxh3
After 4 Nf3 Black wins by the thematic Knight deflec
tion sacrifice 4 ... Nh4!!.
4
...
Ne3!
White's Knight now cannot move.
S Kh4 Kg2 6 KgS Kg3!
White resigns
Because of zugzwang White loses the Knight.
28

Two additional principles should always be kept in mind
when deciding to enter or play a N + P
vs.
N endgame. These
are:
(6) After the RP, the most difficult pawn for the Knight to
handle is the NP.
The b- and g-pawns are also close to the edge of the
board and therefore tend to cramp the Knight's activity.
(7) The defending King should always
be
in position to
be
able
to attack the pawn from the rear. This is a much superior loca
tion for the King than to
be
to the side of the pawn.
29
Chapter 3
Material Advantage - All Pawns on the Same Side
Section 1: Introduction
The general exchanging principles also apply to Knight
endgames:
- The side up material wants to exchange Knights.
- The side down material wants to achieve
routine
exchanges of pawns.
Just as it is �enerally true in other endgames, so too in
Knight endgames 1t is in the interest of the defender to have
pawns only on one side. This minimizes the area that must be
defended and thus significantly increases the chances for a
draw.
The following three principles are more specific to
Knight endgames:
(1) Under normal conditions a two pawn advantage is a sure
win.
A typical position from a practical game is shown in
Diagram 17.
Diagram 17
30
The winning technique consists of first creating connected
passed pawns and then carefully advancing them. With White
on move, a model continuation is:
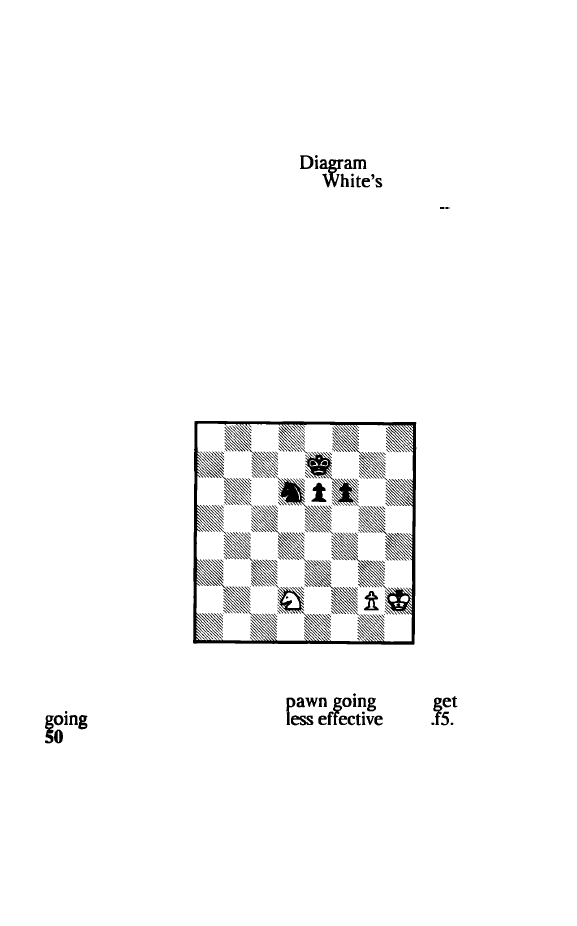
1 Ke4 Nd7 2 f4 NcS + 3 Kf3 Nd3 4 tS gS!
The best defense. After 4 ... gxf5? ! 5 Nxf5 White's
connected passed pawns are secure, sound and ready to be
mobilized, making the win relatively easy to achieve. However,
after the text things are not so obvious because after 5 hxg5 +?!
Kxg5 Black's King has successfully blockaded the g-pawn and
White will have to work very hard to make his pawns mobile
a�ain. Also inadvisable is 5 h5?! Ne5 + 6 Ke4 Nt7 and Black's
pteces are well placed for the blockade.
What White needs is to achieve the pawn exchange on
his terms, i.e. without giving Black the opportunity to blockade
on g5.
5 Kg3! NcS
After 5 ... gxh4+?! 6 Kxh4 it is now White's King which
controls g5 and White is already prepared to play 7 g5 +.
6 Nd5+ Ke5 7 Nc3! Kf6
After 7 ... Kd4 8 hxg5! Kxc3 9 g6 the passed pawns win.
8 Kh3!
Placing Black in zugzwang: a Knight move loses to 9
Ne4+; a
move allows 9 hxg5. Therefore, Black must
capture and
White connected passed pawns in a favora
ble position.
8
..
ogm4 9 Kxh4 Nd3
After 9 ... Ke5, White's King moves forward: 10 Kg5!
10 Ne4+ Ke5 11 Ng3!
By protecting the f-pawn, White enables the g-pawn to
31
advance.
11
•••
Net 12 gS!
Diagram 18
White has now achieved connected passed pawns in the
mobile side-by-side position. His win is assured as long as
White follows these guidelines:
(1) advance the pawns carefully and, as much as possible, in
unison
(2) keep the King and Knight active so that they can help the
pawns' advance.
12
.••
NtJ+ 13 Kg4! Nd4 14 KhS! Nc6 15 Kg6 Kf4 16 NbS+
KeS 17 f6 Nd8 18
rT
Ne6 19 Kh6! Kd6 20 Nf4! Nf8 21 g6!
Ke7 22 Kg7 Nd7 23 NdS+ Ke6
24
f8=Q
White wins.
(2) When down two pawns, a draw is only possible in those
rare situations when an impregnable blockade can
be
organ
ized
or the defender's King is unusually active.
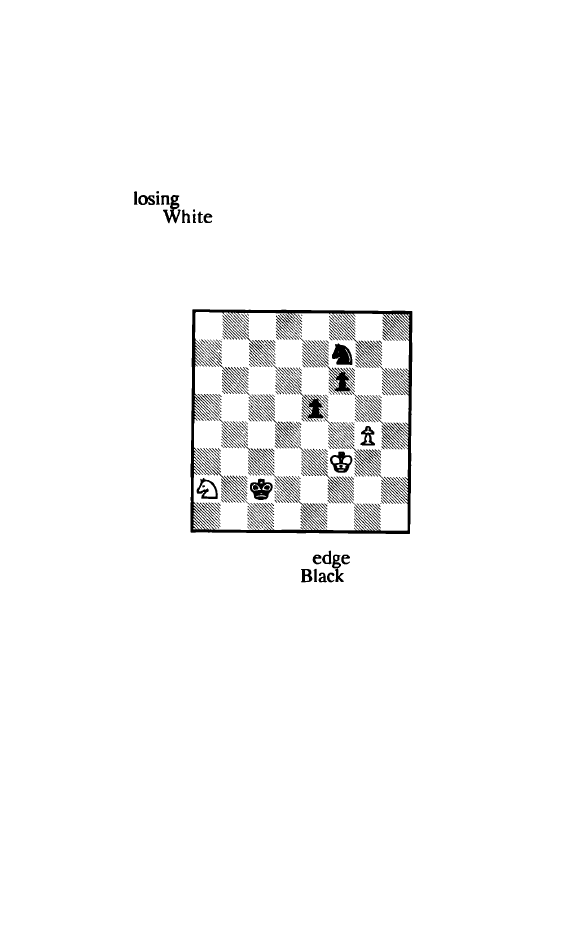
At irst
Diagram 19, M. Taimanov - B. Spassky,
Leningrad
White on move, must look like a certain win
for Black: he is
two pawns, the pawns are connected and not
blockaded, the
and Knight are in
to
the
pawns. Yet White
one very
factor:
King is
placed exceedingly
behind both pawns and these
pawns are only on the
rank. This factor, helped by the
32
specific "quirkiness" of the position allows White to draw:
Diagram 19
1 NtJ Kg4
It turns out that nothing works for Black. GM Averbakh
provides the following alternatives:
(I)
l...e5 2 Nh4+ Kg5 3 Nt3 + Kg4 4 Kxf6 e4 5 Ne5+ Kg3 6
Nc4 with a draw. The
cannot get to even the 6th rank.
(2) l...Ke4 2 Nd2+
3 Nfl f5 (or 3 ... Ke2 4 Kxf6! Kxf1 5
Ke5) 4 Kf6 Kd4 5 Ng3 followed by 6 Nxf5. We will
see
an echo
of this in the game continuation.
1 Nh2+ Kh3 3 Nfl f5 4 Kf6 Draw!
Not a thing can be done about the coming 5 Ne3 fol
lowed by 6 Nxf5.
(3) In endgames with a one pawn advantage the stronger side
has always much better winning chances than in the corre
sponding Bishop vs. Bishop endgame.
The superior winning chances derive from the Knight's
capability of operating on squares of either color. Therefore, it
is able to
its own pawn to advance,
as
well
as
to attack the
enemy
no matter what color they are on. Moreover, a
blockading
can be checked off his square and then the
stronger side's
can advance.
33
Compare this to the Bishop endgame: if the defender
places its pawns on a color
that of the enemy Bishop
and has his King on a safe
square, then there ts
absolutely no way for the stronger side to penetrate.
Section 2: Knight + 2 Pawns vs. Knight + Pawn
This section takes a thorough look at the N + 2P
vs
N + P
endgame because it is the most important one. The reason for
its importance is very simple: it is the basic form into which
more complicated endgames can be reduced.
Two broad principles encompass the N + 2P vs N + P
endgame with the significant knowledge presented thereunder.
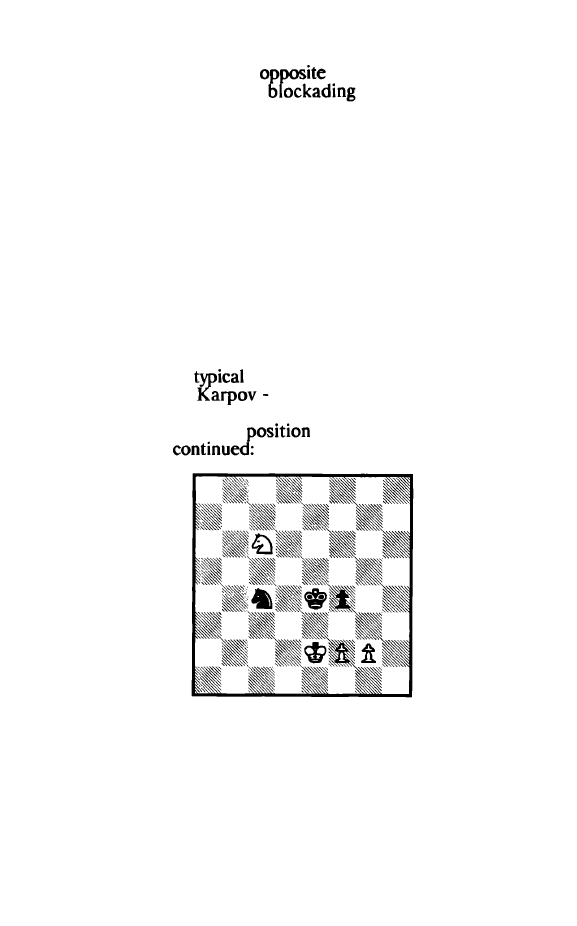
(1) N + 2P vs. N + P is drawn, unless the stronger side already
has a passed pawn or some other significant advantage.
The kind of
position that is quite drawn is shown
in Diagram 20, A.
V.
Korchnoi, 1974 Final Candi
dates Match, Game 20, after Black's 44th move. There is not a
thing wrong with Black's
and he can feel sure of the
draw. The game
Diagram 20
45 f3 + KdS 46 Nb4+ KeS
Of course, not the "active" 46 ... Kd4?? because 47 Nd3
wins the pawn and the game.
34
47 Ncl
KfS
48 Kd3 NeS+ 49 Kd4 Ng6! 50 KdS Nh4 51 Net
Ng6!
Draw.
Black's King is well placed for the defense and the
Knight ties down White's Knight to the defense of the g-pawn.
There is absolutely no way for White to make any progress.
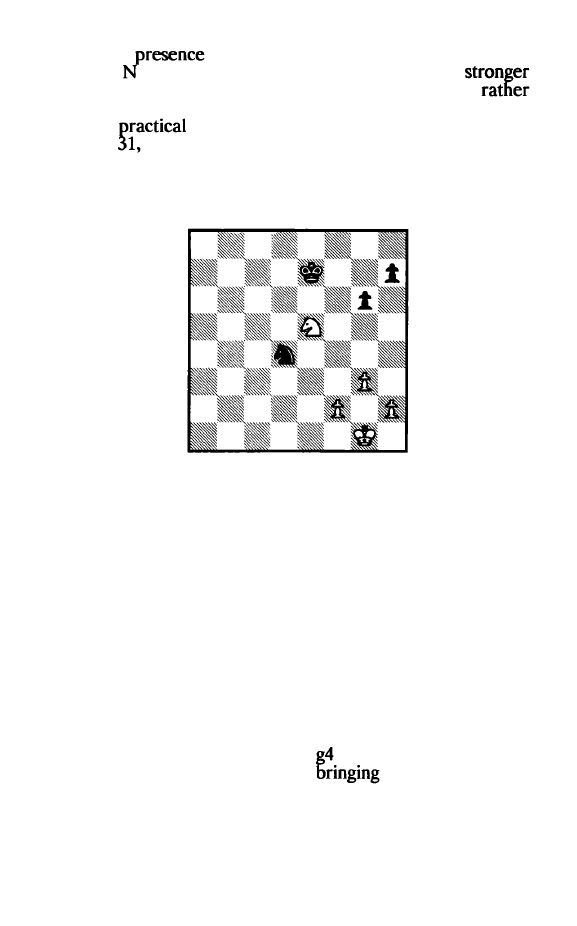
Knowing principle (1) allows White to handle with ease
the position in Diagram 21, E. Mednis - B. Amos, Siegen
Olympiad 1970, After Black's 101st move:
Diagram 21
102 Nxg3!
White is quite happy to enter a securely drawn N + 2P
vs .. N + P endgame. In a practical game, foolish is the greedy
102 Kxc2?! even though 1t appears that White can draw after
102, .. g2: 103 Nc3+ Kb4 104 Ne2 Ka3 105 Ng1 b5 106 Ne2
Ka2 107 Nc1 + Ka1 108 Ne2 b4 109 Ng1 a4 ! 1 10 Ne2!
(White loses after 1 10 bxa4?? Ka2!) 1 10 ... Ka2 (1 10 ... a3 offers
no winning chances since Black's
remains boxed in on the
a-file. After 1 10 ... g1 =Q 1 1 1 Nxg1
White is saved by a
Knight check: 1 12 bxa4 b3 + 1 13 Kd2! b2 4 Ne2 b1 = Q 1 15
Nc3 +) 1 1 1 Ncl + Ka3 1 12 Ne2 axb3+ 1 13 Kb1 and White is
safe.
102
...
Nd4 103 Kc3
Draw.
Offered by Black. White's position is not as active as
Black's was in the previous example, but it is sound enough for
35
a certain draw. A
continuation is 103 ... Ne6 104 Ne4 Nc5
105 Nd6+ Kc6 (105 ...
106 b4) 106 Nc4 Na6 107 Kb2 Kb5
108 Kc3 when Black has shown no progress.
Drawn also is Diagram 22, M. Stean- E. Geller, Euro
pean Team Championship, Bath England, 1973, after Black's
50th move. However, as drawn positions
this is a fairly
favorable one for Black: his pawns are
King position
good, while White's Knight is momentarily passive. The theore
ticians can dismiss such
as 110bvious draws
..
, but in real
life they are played out.
it is important to not only know
how to defend them for a draw, but also how to squeeze them
in trying for the win. GM Geller did try to win this position for
over 50 moves.
Diagram 22
Nevertheless, the weaker side should have no qualms in
accepting a Diagram 22 type position in trying to secure the
draw. Unlike, for instance, saving a draw
m
the R + B vs. R
endgame, which requires significant specific theoretical knowl
edge as well as great care, normal sensible
is all that is
required here. For the play to come, follow
1deas involved
and do not be distracted by occurrences such as repetition of
moves. These are also valid parts of practical chess strategy.
51 Ke4!
Quite correctly White's King wants to be where the
action will be: the kingside.
36
51
•••
Nd6+ 52 Kf3 NfS 53 Nd2 Ng7
The immediate 53 ... h5 is of course playable, but Black is
in no hurry. White cannot prevent that, anyway, and Black
wants to get closer to the time control at move 56 before
making any irreversible decision about pushing
Always
remember that Pawn moves cannot be taken
54 Kg4 Kg6 55 Ne4 h5 + 56 Kg3 Kt'S 57 Nd6+ KeS 58 Nc4+
Kd5 59 Nb6+ Ke4
60
Nd7!
Knights are most effective in attacking pawns from
behind.
White heads for f6 where it would accomplish one of
the following: force Black's
back, tie down Black's Knight
to the defense of the h-pawn or
the h-pawn forward.
60
.•.
NfS + 61 Kf2 Kf4
Compared to the startin� diagram position Black has
made definite progress in activatmg his King.
62 Nf6! Ng7
On his part, White's perceptive Knight maneuvers have
caused Black's Knight to retreat. Throughout the game Black
avoids playing ... h4, because with White's pawn on h3, Black's
g-pawn could not advance without allowing a routine pawn
exchange. The result of having a pawn formation of White: h3;
Black: gS, h4 is that Black's
is considered to be "fiXed"
on gS, while White effectively
control of g4. Such positions
offer Black scant winning chances.
63 h3!
Black was planning 63 ... g4 followed by ... h4, thereby
further
on White's space on the kingside. The text
prevents this for
time. The Pawn on h3 is a bit more vulner
able than on h2, but White can protect it well enough. White's
move turns out to be the last pawn move in the game since
Black gets no attractive moment for playing either ... g4 or ... h4.
Without a capture or pawn move this �ame can proceed only
50 moves before either side can cla1m a draw. Here that
37
moment is after move 1 13.
63 ..
.
KeS 64 Nd7 + Ke6
65
NcS + Kt'S 66
Kt3!
B lack has chased away the Knight, but now White's
King gets a location one rank forward.
66
.••
Ne6 67 Nd3
White can enter a drawn K & P endgame after 67 Nxe6
Kxe6
68
Ke2! when White establishes the distant opposition.
This is sufficient to draw because the presence of the h-pawn
robs
Black of the usual winning opportunities.
67 ... Nf4
68
Nt2 Ng6 69 Ke3 Ne7 70
Nhl!
An excellent defensive maneuver, which keeps reap
pearing. White 11threatens11 a Ng3 attacking Black's h-pawn,
while also being ready to return to t2 to protect his own pawn.
There is no way for Black to break this plan.
70
•.•
KeS 71 Nt2
Diagram
23
Again, just
as
on move 67 (and later on move 79) White
can enter a drawn K & P
after 71 Ng3 Nf5 + 72 Nxf5
Kxf5 73 Kf3
.
In all instances
Stean declines the
tion. From a
standpoint this is well justified.
can
be sure that
Knight endgame is a theoretical draw. Yet the
K & P endgame is either a theoretical draw or a theoretical
38
loss. If you know for sure, go for it. But do not guess! A
guess means turning a drawn Knight endgame into a lost K &
endgame, whereas a correct guess just speeds up the achieve
ment of a draw. It is
to realize that the existence of
the available draw in
K & P endgame is specific for the
pawn formation and the
locations. In other words, White
can achieve either the
or distant oppositions as they are
required.
71
..•
NfS+ 72
Kt3
Nd4+ 73 Ke3 Nc2+ 79
Kt3
Kt'S 75 Nh1!
Ne1 + 76 Ke2 Ng2 77
Kt3
Nh4+ 78 KeJ Kg6 79 Ntl
Continuing with the tried and true. Again 79 Ng3 is
playable when 79 ... Nf5 + 80 NxfS KxfS 81 Kf3 is the same
drawn position given above and 79 ... Ng2+ 80 Kf3 Nf4 allows
the drawing 81 h4!.
79
.••
Ng2+
80
Kt3
Ne1 + 81 Ke2 Nc2
82 Kt3
Kt'S 83 Nh1!
We have the same position as after White's 70th move,
except that Black's Knight is on c2 rather than e7. This is of
little importance. What matters is that White's Knight knows
the right maneuver: Nhl ! with the ideas Nf2 or Ng3.
83
..•
Nd4+
84
KeJ Ne6
8S Kt3
NcS
86
Ntl
Here too simpler seems 86 Ng3 + Kg6 87 Nh 1.
86
.••
Nd7
87
Nd1 !
Here a bit of a
of plans is advisable. After 87
Nh1?! NeS+ 88 Kf2 (88
Nc4+ 89 Kt3? Nd2+
90
Ke3
Ne4) 88 ... Kf4 89 Ng3 Nd3 + 90 Kg2 h4 White has been
pushed back into a very passive and unattractive position.
Unless required, there is just no sense in ceding so much space
to the enemy.
87
.••
NeS+ 88 Ke3 Nc4+ 89
Kt3
KeS
90
Ntl! Kd4
Black quite lo�ically attempts to penetrate with the
King. Nevertheless, With the help of tactics, White is able to
keep Black out. Note also how important it is for Black to keep
39
his
on h5
as
otherwise White penetrates with his King
after
91 Kg3! NeS
The immediate 91...Ke3 allows both 92 h4 g4 93 Nxg4+
and 92 Ng4 + ! hxg4 (otherwise 93 Nf6) 93 Kxg4 - in each case
all of Black's pawns will be gone.
92
Nd1 Kd3 93 Nfl+ Ke3 94 Nd1 + Kd3 95 Nfl+ Kd4
An
unwanted retreat, yet the active 95 ... Ke2 is foiled by
96 h4! g4 97 Nxg4! !
(97 ... hxg4 98 h5) 98 K4 Nf6 99 Kg5
Kt3
100 Kxf6 Kg4 101
Kxh4 102 Kf4, with a draw.
96 Nd1 ND3 97 Kt3 Ne1 + 98 Kf2 ND3 + 99 Kt3 KeS 100
Ke3 Nf4 101 Nf2 NdS+ 102 Kt2
Diagram 24
We are pretty much back to the position seen thirty
moves earlier!
102 ... Nf6 103 Ke3 Kt'S 104 Kf3 NdS 105 Nh1! KeS
Draw.
Offered by Black who finally decides to give up the
ghost. White would have played 106 Ng3! which forces the
undesirable 106 ... h4 when Black's winning chances are scant
after 107 Ne4 Kf5 108 Nd6+ etc. Black cannot keep his pawn
formation whole with 106 ... Nf6 (or 106 ... Nf4) because of 107
Nxh5! Nxh5 108 Kg4.
40
A long
Yes, definitely. Not particularly inter
esting? Quite
so. Of practical value? Very much so!
And that's what this book is about!
To enable the stronger side to win with the
� of pawn
configurations shown in Dia�rams 20-22, somethmg special
must exist. One such situation 1s shown in Diagram
25,
D.
Rajkovic - R. Maric, Yugoslavia 1974, White on move. At the
moment White is
UP. two pawns, yet after the imminent loss of
the f-pawn White w1ll be left with the apparently unwinnable N
+ 2P vs. N + P
discussed earlier. However,
White finds a most
maneuver to make life un
pleasant for Black. If Black captures the f-pawn, he will wind
up with
an
imprisoned Knight. This is how it was done:
Diagram 25
1 Ke3!!
Insufficient is 1 Kt3?! because Black's Knight becomes
active after l...Nd3!: 2 Kg4 (or 2 g4 hS! when neither
3
Nh6 nor
3
gS + KxfS will win because Black's pieces are
active.)
2 ... Ne5 +
3
KhS KxfS 4 Kxh6 Kg4 and again
active
piece location will
White's
5 hS Nn + ! 6 Kg7 (6
Kg6 NeS+ 7 Kf6
6 ...
7
Kxfi
Kg4. In all of these
variations White is handicapped by having his Knight offside.
1
...
Nb3!?
This is the only way to prevent White from success -
fully protecting the f-pawn. After other Knight moves White
41
wins with the simple 2 Kf4. After the text, 2 g4? again allows
2 ... h5! with a draw. White must, therefore, continue with his
original plan.
2 Kf3! Kxt5 3 Nc3!!
The
must join the fray as otherwise Black's
Knight cannot
The impetuous 3 g4 + ? allows
Black to draw: 3 ...
4 Nc3 h5! 5 gxh5 Kf5 6 h6 Nf4 7 h5
Ne6! and Black will blockade the forward pawn with 8 ... Nf8 -
analysis by GM Rajkovic.
3
•••
Ng1 + 4 Kf2!
The trapped Knight must not be allowed to escape
which would happen after 4 Kg2? Kg4! 5 Ne4 Ne2.
4 ... Kg4 S Ne4 Nt3
Black acquiesces to a lost K
& P
The alterna
tive is to lose the
Knight: 5 ... Kf5 Nd2! (the K
& P
endgame after 6
Kxe4 is drawn because Black's
is
very active.) 6 ...
7 Nfl ! Nh3 + (7 ... Nf3 8 Ne3 + ; 7 ...
8
Kxgl) 8 Kg2 h5 9
6 Nf6+ Kf5 7
Kxt3
Kxf6 8 Ke4!
While all the potential endgames from Stean - Geller
were drawn, here White wins by force, because there are just
enough differences. The active
is the key and the pawn
placement is
right. If now 8 ...
White gains the opposi
tion with 9
and wins thereby. Yet note that the immediate
8 Kf4?? h5 9 Ke4 Ke6 gives Black the opposition and the
draw.
8
...
Ke6 9 g4! Kf6 10 KdS!
The active King penetrates further and White wins.
10
.•.
hS 11 gS+ Ke7 12 KeS
Kf7
13 Kd6!
Black resigns.
White's further progress is inevitable: 13 ... Kg7 14 Ke7!
42
Kg6 15 Kf8! Kh7 16 Kf7
Kh8
17 Kg6! etc.
(2) N + 2 P vs. N + P gives excellent winning chances if the
extra pawn is in the form of a sound passed pawn.
If we again go back and look at Diagrams
20-22
and the
ensuing play,
J
ou will see that the stronger side could not
create a passe pawn without allowing a routine exchange of a
pair of pawns, which would have brought about a drawn N
+
P
vs. N endgame. However, if the stronger side already has a
viable passed pawn, this changes the complexion of the posi
tion considerably. In all cases the winning chances are excel
lent; in some positions the win an be forced. An excellent
example of a won position is Diagram
26, R.
Sanguinetti - N.
Padevsky, Nice Olympiad 1974, after Black's 63rd move.
Diagram 26
Here White has a number of large pluses: a nice passed
h-pawn (the
RP
bein� the most annoying pawn for a
to stop), centralized act1ve King and centralized active
Knight. On the other side, Black's King is passive and his
Knight is even more so. Therefore, it should come as no sur
prise that White has a forced win:
64 Nf4!
Frees d5 for White's King, while taking away e6 from
Black's King.
64
.•.
Ne8
43
Hoping to bring the Knight into the game. Because of
Black's passive piece placement,
the f-pawn to split
White's pawns brings no relief: 64 .. .f5 +
Kf6
66
Nd5 +
KgS (66 ... Kf7 67 h6 etc.) 67 f6 Ne8 68
and White wins
(analysis by GM Padevsky).
65 KdS! Nc7 + 66 Kc6! Na6
Insufficient, but 66 ... Ne8 allows 67 Kd7 when both
67 ... Ng7 and 67
.
..
Kf8
lose to
68
h6, while 67 .. .f5 is foiled by
68
gS.
67 Nd3!!
Imprisoning Black's Knight and
to capture
it with
68
Kb7. There is no hope in 67 ... Nb8+?!
Kc7 Na6+
69 Kb7 since White wins routinely after 69 ... Kg7 70 Kxa6 Kh6
71 Nf4 KgS 72 Ne6 + . Black therefore aims for immediate
counterplay, setting also a sophisticated trap.
67
..•
Kg7!?
68
Kd6!!
Heading for the Kingside is now required. There is no
time for
68
Kb7? Kh6 69 Kxa6 because after 69 .. .f5!! 70 gxfS
KxhS White cannot save his remaining pawn.
68
...
Kf7
Or
68
... Kh6 69 Ke7 KgS 70 Nt2 fS 71 Nh3 + Kxg4 72
h6 and the pawn queens.
69 Kd7!
Note how relentlessly White's King move deeper into
Black's territory. Black's Kin� again has to give ground because
69 ... Nb8+ 70 Kc7 loses as gJVen in the note after White's 67th
move.
69 ... Kg7 70 Ke7! Nc7 71 Nf4!
the Knight placements as after move 65,
but with the huge
that White's King has penetrated
44
decisively. The end is near.
71
•..
Na6 72 Ne6+
Black resigns.
White wins easily with the two connected passed pawns.
However, the position of
27, T. Weinberger
P., Ostovic, Cleveland 1975, after
49th move, is no
where as favorable for the stronger side as was Di:1gram 26.
Black does have a safe, sound, extra passed pawn. Yet because
the respective Kings and Knights are about equivalent as far as
active placement is concerned, the position is tenable for
White. Nevertheless, to first hold and ultimately draw such
positions is a most thankless task. In practical play the winning
chances for the stronger side are always very hi$h. White loses
this game without apparently making any maJor errors. His
moves seem plausible enough, yet to draw such positions two
needs are required: (1) knowing the proper strategic defensive
approach, and (2) utmost technical care in executing the de
fense. The instructive game course is:
Diagram 27
49
•••
eS!
Not so much to get the
but to
the King
via e6 and
dS.
Therefore
is 49
..
g4?!
Is this a good move or not? Its purpose of course, is to
prevent .. .f5, but if that move is so good, why didn't Black play
45
it on his previous move? Anyway, there are two reasons why I
do not like it. Firstly, the pawn is more exposed and vulnerable
on �4 than back home on g2. Secondly, the
is a tempo
behmd in marchin� forward toward the center.
and
better is the immediate
50
Kg3.
50 ... Ke6 51 Kg3 KdS 52
KfJ
Kd4!
Note how Black first activates his King as much as
possible before undertaking anything else.
53 Nb3+
I would have
the blockadin� 53 Nfl Kd3 54
Ne3! with the idea
However, the text 1s also satisfacto
ry,
if properly followed up.
53 ... Kc4! 54 Nd2+ Kd3 55
Nb3
Nf7!
Heading for
where the Knight would serve a dual
purpose: 1)
the g-pawn, 2) go to e4 at its conven
Ience. There is nothing immediate in the position, e.g.:
(1) 55 ... Ne4? ! 56 Ncl + forces the retreat 56 ... Kd4 57 Ne2+
Kd5 since 56 ... Kc2? 57 Kxe4 Kxcl 58 g5 is an immediate
draw.
(2) 55 ... e4+ ? ! 56 Kf4 e3 57 Kt3! is premature because all that
Black has "achieved" is to weaken his e-pawn. The position is
not yet ripe for the advance of the
as White's King is
placed too well. Always be careful
pawn moves - you can't
take them back!
56 NcS+ Kd4 57 Ne6+
Since Knights are most effective in attacking pawns
from behind, more efficient here is 57 Nd7! NgS + 58 Ke2 Ne4
59 Nb6! and how is Black to progress? White's King blockades
the e-pawn while also
the
e3 square and his
Knight is ready to return to
to
the f-pawn.
57 ... Kd5 58 Nc7+ Kd6 59 NbS+?!
46
Dubious on its own merits and on the way to commit
ting the decisive error. It surely was logical (and correct) to
chase the King back with 59 Ne8 + ! Ke7 and then to play either
60
Nc7 or 60 Ng7. With Black's King back on e7 it is clear that
he has made no progress for winning purposes.
59 ... KcS
60
Nc3?
The
moment. The knight must be kept active with
60 Nc7!. Then
holds after both 60 ... Ng5 + 61 Ke3 and
60 ... Kd4 61 Ne6 + Kd3 62 Nc5 + etc. However, after the
passive text, Black's King
+
Knight are able to penetrate.
60 ... Kd4 61 Ne2+ Kd3 62 Ncl + KC2 63 Na2
Diagram 28
Placing the Knight on the
cannot work out well.
But also after the central
63
Ne2
plays
63
... Kd2! followed
by 64 ... Ng5( +) and his forces are in.
63 ... Kd2!
The decisive maneuver. Black's e-pawn is now ready to
start its winning run. White has no time for 64 Ke4 Ng5 + 65
Kf5 because after 65 ... e4! there is no way to stop the pawn.
64 Nb4 NgS+ 65 Kf2 Ne4+ 66 Kt3 Nc3!
With Black's King + Knight working to�ether, it is
certain that the e-pawn can advance. All that remams for Black
47
is to exercise the necessary care so that White cannot sacrifice
his Knight for the e-pawn while also being able to exchange off
Black's remaining pawn.
67 Nc6 e4+
68
Kf4 e3 69 gS
If 69 Nd4, 69 ... Ne2+ is the end.
69
..•
NdS+
Of course, not 69 ... fxg5 + 70 KxgS e2?? (70 ... Nb5! still
wins because the pawn gets to the 7th rank) 71 Nd4! el =Q 72
Nf3 +, with a draw.
The Knight check has two points. In the first place, 70
Ke4 allows 70 ... e2! since after 71 Nd4 the e-pawn queens with
check.
70 Kg4 Kd3!
Taking away d4 from the Knight. None of White's tac
tics work, e.g. 70
e2 71 g7 el =Q 72 g8=Q Qgl + followed
by 73 ... Qxg8, or
Nb4 + Nxb4 71 gxf6 Nc6 72 f7 NeS +.
71 gxf6 Nxf6+
Black wins.
The second point of 69 ... Nd5 + : the Knight not only
protected his f-pawn, but is also able to recapture with check.
After the text we have reached the Diagram 9 position dis
cussed earlier. The conclusion was 72 Kf4 e2 73 NeS + when
White
in view of 73 ... Ke2! 74 Nf3 Kdl 75 Kg3 Ne4+
Not only instructive, but also surprising is the course of
play from Diagram 29 (on the
page), C. Zuidema - P.
Benko,
Olympiad 1972, After
51st move. Black has
two
faultless, connected, passed central pawns,
whereas White's passed h-pawn can be readily stopped - and
yet it turns out that Black cannot win. There are two reasons
for this.
the fact that White's passed pawn is a h-pawn
makes it
for Black's Knight to cope with it. Secondly,
White's pawn and Black's pawns are just close enough so that
48
White's King can do two jobs: protect his pawn and help stop
Black's pawns. White's technique in gaining the draw is impec
cable:
Diagram 29
52 Kg3!
White's Knight has a flexible and active central location
so that there is no point in unnecessarily
it. If Black
now plays 52 ... Kh5, then 53 Nf6 + chases it
Therefore
Black embarks on a piece
the Knight will
be
used to stop the h-pawn and
King will try to assist his
pawns' advance.
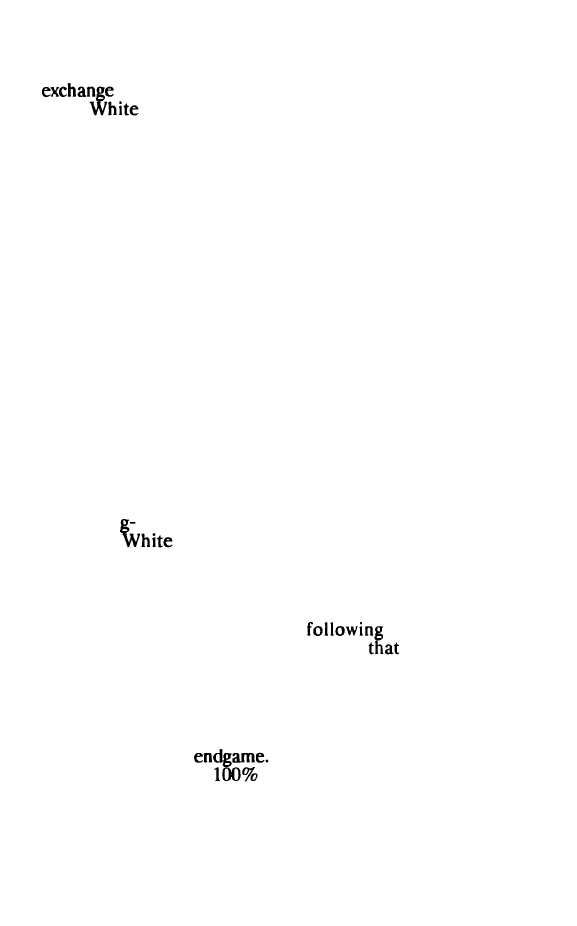
52
.•.
Nc6 53 Kh3! Nd8 54 Kg3 Nt7 55 Kh3 Nb6 56 Kg3 Ng4
57 Kh3
Kf7
58 h5!
Now that Black's King has given up control of h5, White
can and
should
advance the pawn. This mcreases his counter
chances.
53
..•
Ke6 59 Nc3!
From here the Knight serves both to keep out Black's
King and blockade the pawns, e.g. 59 ... e4? 60 Nxe4!
59
•••
Nh6
60
Kh4 Nt7
Necessary to prevent 61 Kg5, but the Knight here is
49
passive and therefore of little help for its pawns' coming
advances.
61 Ne2!
The Kin� must retain his active position so that at the
moment the Kmght has to shoulder the defense load.
61
•..
Kf6
Basically a holding operation. Black sees that
immediate is good enough to win and thus takes some time
for reflection, possibly time
until adjournment or to
hope for a misstep on White's part.
direct 6l...Kd5 leads to
the same position as in the game after Black's 71st move and
White draws with 62 h6!. To make
Black eventually
will have to advance his pawns, yet
ttme never seems to be
ripe. No matter which pawn Black moves, that frees squares for
White's pieces to set up a blockade. For instance, 6l ...e4 62
Kg3 Ke5
63
Nf4! or 6l...f4 62 Kg4 Nh6+
63
Kg5 t3 53 Ng3.
62 Nc3 Kg7 63 NdS! Kh6 64 Ne7!
the Knight active. If now 64 .. .f4, then 65 Kg4
followed by
(depending
Black's play)
when the Knight sacrifices itself for both of
pawns.
64
...
Nd6 6S Ng8 + ! Kg7 66 Ne7 Kt7 67 NdS Ke6
68
Nc7+
Equivalent is the immediate 68 Nc3. With the text
White demonstrates that Black's King lacks access to d6.
68
..
. Kd7 69 NdS Nt7 70 Nc3! Ke6 71 Ne2
Exactly the same position has arisen as after White's
61st move when Black played 61. .. Kf6. Black now makes a
more determined effort, but White turns it away with some
deft tactics.
71 ... KdS 72 h6!!
See Diagram 30 on the following page.
50
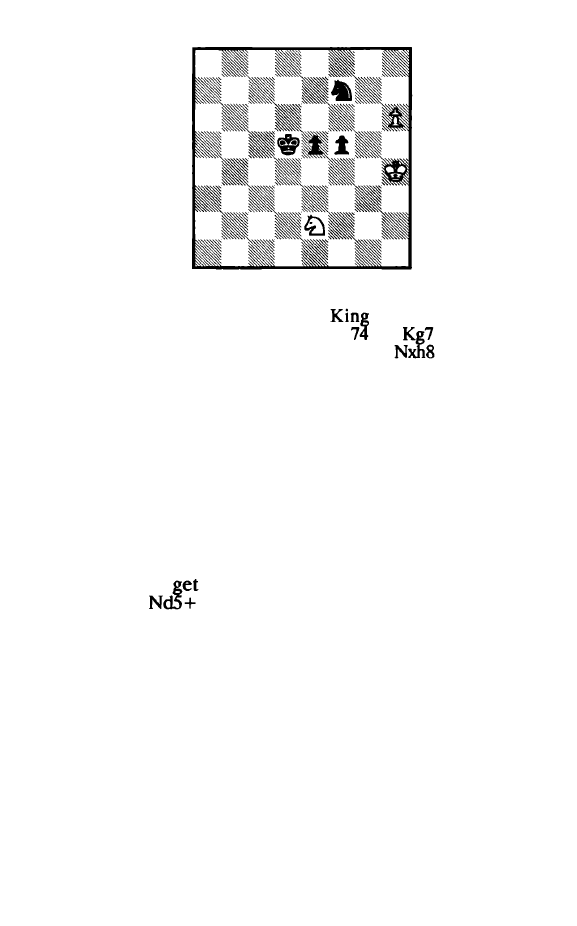
Diagram 30
With Black's King too far away from the kingside,
White's pawn can advance. If the
heads back, White
draws as follows: 72 ... Ke6 73 KhS Kf6
h7!
(or 74 ... Nh8
75 Ng3 Ng6 76 Kh6) 75 h8= Q + ! Kxh8 (75 ...
76 KgS) 76
Kg6 Nd6 77 Kf6 e4 78 KeS.
72
••.
Nxb6 73 KgS Ke4
Obviously the only try.
74 Kxh6 f4
Draw.
The game was ad
j
ourned here and subsequently called
a draw without resumption of play. The following important
principle applies here: The Knight usually stops King + two
connected passed pawns if its own King can help out.
White's
King does just
back in time: 75 KgS! Ke3 76 Nc3!
f3
(76 ... e4?! 77
and 78 Nxf4) 77 KfS! f2 (77 ... Kd3 78 Ne4)
78 Ndl + Ke2 79 Nxf2 Kxt2 80 KxeS.
Section 3: Knight + 3 Pawns vs. Knight + 2 Pawns
For this case also, there are two broad important prin
ciples.
(1) N + 3 P vs. N + 2 P endgames are drawn, but only if the
position is a "normal" one.
51
The
of more pawns, compared to the basic N
+ 2 P
vs.
+ P endgame, significantly increases the
side's winning chances. The defending side must have a
normal, symmetrical pawn formation to hold the draw.
An
excellent
example of such a drawn position shown in
Diawam
L. Christiansen - J. Kaplan, Cleveland 1975, after
Whtte's 38th move. The only problem that Black has is that the
f-pawn is missing. With good play Black is sure to hold the
draw. Play continued:
Diagram 31
38
...
Ne6
Black's only interest here is to make the time control on
move 40. Therefore there is little to discuss in regard to the
reasoning behind his moves.
39 Kg2 Kf6 40 N
c4
Kg7
41 Ne3
The game was adjourned here with White sealing his
move. Home analysis showed that with correct defense Black
can draw.
41
...
Kf6 42 f4 hS!
A well thought out move. Its primary purpose is to
prevent White from mobilizing his pawn chain via a later g4.
After the text, for White to get in
will require allowing the
routine exchange of h-pawns, thus
Black closer to the
draw.
52
The secondary puf{)ose is to enable Black to play an
opportune ... h4, thus agam ach ieving the welcome routine
of h-pawns.
Of
course, quite wrong is 42 ... g5? as after
43 f5
gets a protected passed pawn and a most likely
win.
43 Kf3 Nd8
Since his King is already well placed, Black now maneu
vers the Knight to a good defensive location. At this moment
43 ... h4? is premature since after
44
g4 Black's h-pawn will turn
out to be a serious weakness.
44
h3 Nt7 45 Ke4 Ke6!
Keeping White's King out of d5.
46 Nc4 Kf6
Yet now the position has changed sufficiently so that 47
Kd5 can be met by 47 ... g5!, with Black achieving a welcome
pawn swap.
47 Nd2 Ke6! 48 Nf3 Nd6+ 49 Kd3 Kf6 SO NgS
Kf5
Black's King and Knight have good active locations,
while his
and h-pawns are readily defensible. For winning
purposes
has made no progress, as compared to our
starting position.
51 Ke3 Nc4+ 52 Kf3 Nd2+ 53 Ke2
See Diagram 32 on the
page. This move
allows a forced draw, yet it is very clear
Black was quite
well holding it, anyway.
53 ... Ne4!
Black grabs the opportunity to simplify into a theoreti
cally drawn K + P
i do want to caution the practical
player to be at least
sure before entering
voluntarily
a
pawn down K + P endgame. The important practical point is
53
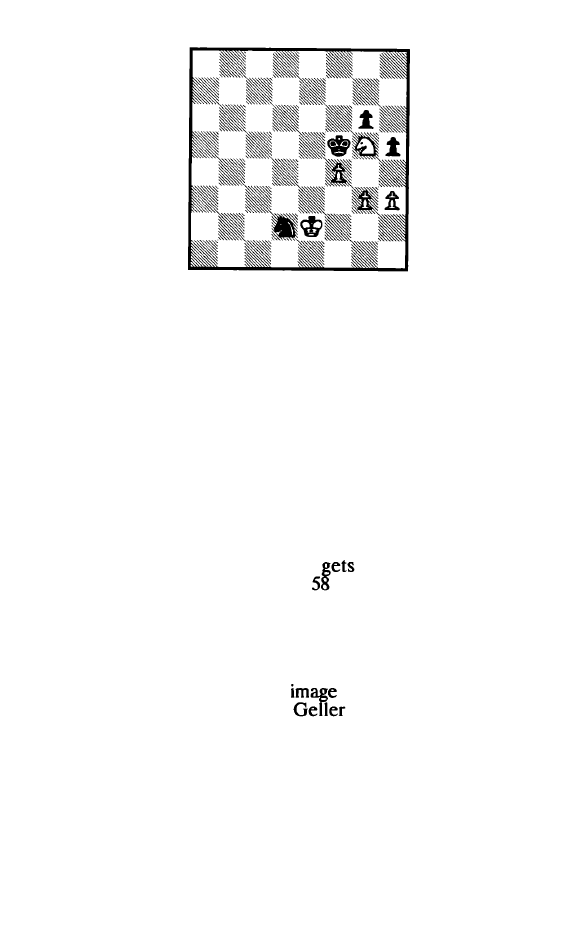
Diagram 32.
after
White's
52nd
move
that Black has no theoretical need to do so, since after e.g.
53 ... Nc4 he keeps the drawish status quo.
54 Nxe4 Kxe4 55 h4
Forced as otherwise Black plays ... h4 with an obvious
draw: 55 Kf2 h4 56 Kg2 Ke3 37 Kh2 Kf3! 53 gxh4 Kxf4.
55 ... Kt'S! 56 Kf3 KF6! 57 Ke3 Kt'S 58 Kf3
Draw.
Offered by White. The problem with the pawn forma
tion from White's viewpoint is that to make progress he will
have to play g4 and will then be left with an unwinnable f- and
h-pawn vs. g-pawn structure. For instance, 58 ... Kf6 59 g4
hxg4+ 60 Kxg4 Kt7 61 Kg4 Kg7 and no matter whether White
advances the f- or h-pawn, Black
safely in front of the
remaining pawn. Moreover, after
... Kf6 White's King is not
able to penetrate directly, e.g. 59 Ke4 Ke6 60 Kd4 Kd6 61
Kc4 Kc6 and Black keeps the vertical opposition. Then 62
K
?4
?? even allows Black's King to penetrate with 62 ... Kd5 and
wm.
Something like a mirror
- for Black - of Diagram
31 is shown in Diagram 33, E.
- L. Portisch, Portoroz
Play-Off 1973, after White's 53rd move. Again the pawn forma
tion is a rather normal one, except that instead of missing the f
pawn as in Diagram 31, here Black has no h-pawn.
As
you will
see, also his play will be the mirror image of that from Dia-
54
31. With accurate and logical play GM Portisch is able to
the position for a draw - until something unbelievable
happens at the very end!
Diagram 33
53
...
KfS
But not 53 ... g5? 54 fxg5 when White has a passed h
pawn and fantastic winning chances. While it is quite true that
Black wants to exchange pawns, he only wants to do it on
his
terms.
This means a symmetrical type of exchanfe, such as f
pawn for f-pawn, or Black's g-pawn for White s h-pawn or
Black's f-pawn for White's g-pawn. The last thing that Black
wants to allow is a passed pawn.
54 g3 NcS SS Kg2 Nd3
56 Kt3
NcS 57 Nd6+
As
will be seen in the course of the game, it is insuffi
cient for White to play only with the King + Knight. It was
necessary to start utilizing the pawn majority with 57 g4 + !.
White thereby gains space and an eventual .. .f5 can be met by
g5! when Black's g-pawn can turn out to be a serious weakness.
57
...
Ke6 58 Ne4 Nd7!
An excellent defensive spot. Since at this time there is
nothing vulnerable in White's camp, .. attacking .. moves such
as ... Nb3 or ... Nd3 serve no purpose. Exchanging Knights leads
to a normally lost K + P endgame.
55
59 Ke3
Also 59 g4 is met by 59 .. .f5!, with an attack on the
Knight.
59
••.
fS!
The
maneuver which is the mirror image of
that from Diagram
It paralyzes White's pawn majority since
a later g4 allows the
.. .fxg4 pawn exchange and
with it a more
for Black N + 2P vs. N + P
endgame. The text turns out to be the last pawn move in the
game. This was Black's sealed move and the game was re
sumed after a four hour break for another two sessions (32
moves) of play.
With the
of hindsight we can now say that from
Diagram 33 Black
have played the immediate 53 .. .f5!.
GM Portisch was reluctant to make such a committal decision
before reaching the time control on move 56.
60 Ng5+ Kf6
Black's King is going to remain near his weakened g
pawn. There is little point in the "aggressive" 60
. . .
Kd5.
61 Kd4 Kg7! 62 Ne6+
62 Kd5? ! leads nowhere: 62 ... Nf6 + 63 Ke6? Nh5 and
White's g-pawn goes lost.
62
...
Kt7
63
Nc7 Nf6 64 NdS Nd7!
Black has achieved what to him looks like an impregna
ble defensive formation and he is not about to
from it
for the best of reasons. Therefore he
64 ... Ne4?!
65
Nf2
66
g5! Nxh3 67 Ke3! when his Knight is trapped and
may well go lost.
65 Nc7 Nf6 66 NdS Nd7 67 Nc3 Nf6
68
KeS NhS!
56
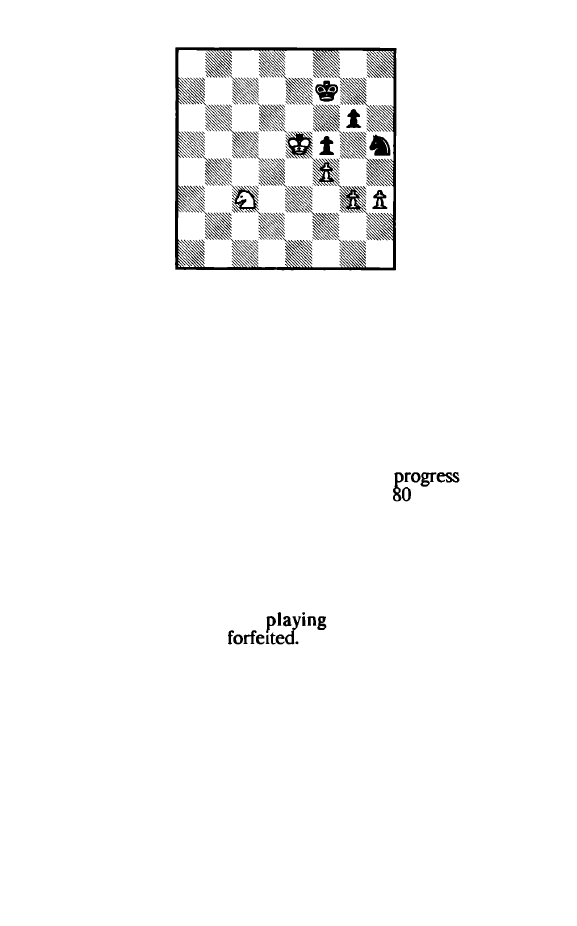
Diagram 34
Please note how the lack of having played 57 g4 + ! has
given Black's Knight more scope.
69 Ne2 Ke7! 70 KdS Nf6+ 71 KeS NhS 72 Kd4 Nf6 73 Ke3
NdS+ 74 Kt3 Kt7! 75 Net Kg7!
Black is more than happy to keep the status quo.
76 Nd3 Kt7 77 Kf2 Kg7 78 NeS Nf6 79 Ke3 Kh7
80
Nd3
It is obvious that White has made no
over the
last twenty moves. He again refrains from
g4 because of
80 ... Nd5 + 81 Kf3 fxg4+ etc. GM Geller cannot get himself to
concede the draw. See what happens soon . . .
80
•••
Kh6 81 NeS Kg7
82
Nc4 Kt7 83 Kf3 NdS
84
Ke2 Kg7
8S
Kd3 Nf6
86
Ke3 Kt7
White overstepped the time limit and lost.
As GM Geller was
87 Kf3 his flag fell and
obviously he had to be
How can this have happened
in such an "easy to play" position? The explanation is almost
unbelievable.
As
a result of a massive mental block - induced
no doubt by over-exertion of his nervous system - he had
marked down on his score sheet move 84 (instead of the cor
rect 88) as the end of the time control. Thus "with the time
control over" Geller paid no more attention to the clock until
he was forfeited. This was more than a single tragedy as exactly
this missing half point prevented him from reaching the 1974
57
Candidates Matches. Talking about "bad luck": the observant
reader will have no doubt noticed that out of two Knight
with a one pawn advantage (see also Diagram 24!)
scored exactly one half point! The meaning of this:
Grandmasters too are very human and under the pressure of
competitive play strange things can and do occur.
(2) In N + 3P vs. N + 2P endgames, any steps toward dissimi
larity of pawn configurations significantly increase the strong
er side's winning chances. A passed pawn is almost a sure win.
Whenever the pawn formations are not balanced or
symmetrical, the
side has excellent chances for pene
tration and victory.
lack of symmetry necessarily means
that many squares are either weak or insufficiently guarded
and the
inherent agility can exploit such factors. This
is in
contrast to the Bishop who is rather limited in its
options because it can only work on squares of its own color.
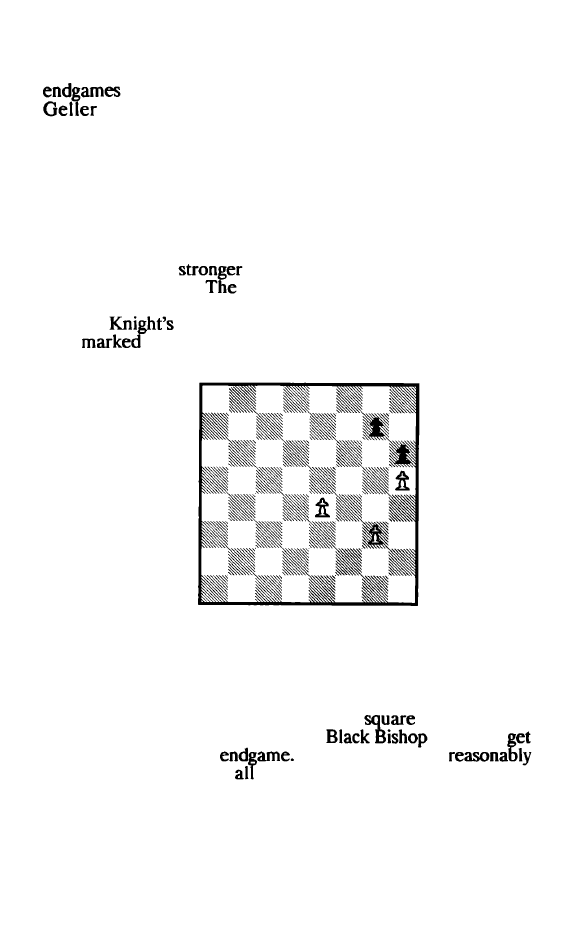
Diagram 35
Let us illustrate this important point by considering the
thematic pawn configuration of Diagram 35. For the sake of
reality add Kings; White's at f4 and Black's at e6 are surely
reasonable locations. We can turn this position into a same
color Bishop endgame by adding, e.g., a White Bishop on e3
and a Black Bishop on f6, giving us dark
Bishops, or by
putting a White Bishop on e2 and a
on a4 we
a light square Bishop
No matter - given
correct play by Black -
these endgames are drawn. Black
can prevent White's King from penetrating, while the Bishop
58
by itself cannot achieve anything either. However, replace the
Bishops with Knights and the situation changes markedly!
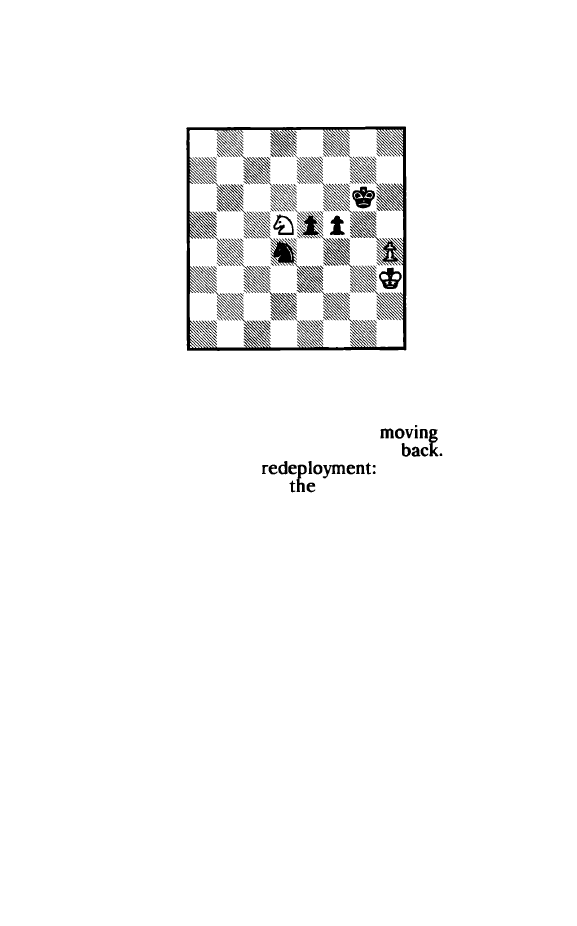
Now consider Diagram 36, which arose in H. Rossetto -
L. Stein, Amsterdam Interzonal
1964,
after Black's 73rd move.
Diagram 36
The pawn formation is exactly the same
as
in Diagram
35, except that,
as so
often happens in real life, it is Black who
is up the pawn. this position arose from a N + 4P vs. N + 3P
endgame - see the next section for play up to this point. At first
glance it may
that White's position is defensible, yet
that is incorrect.
Knight will soon be able to push back
White's King and then Black's King will start penetrating. This
is how it happened.
74 Nb3 e4!
The advanced
is safe and there is no reason to
tarry. If now 75 Kd4,
7S ... Kf4!. It falls upon the Knight to
try to hold back Black's King.
75 Nd4+ Ke4 76 Nc6+ Kd6
Of course, not 87 ... Kd5? 77 Ne7+ winning the g-pawn.
77 Nd4?!
Passive resistance will not work. Knight activity is
always of essence in such endgames and therefore the only
59
worthwhile try is 77 Nd8!.
77
•.•
KdS! 78 Ne2 Ke5
Black has successfully obtained his first objective: his
King is safe from checks and after the imminent ... NdS + ,
White's King will be pushed back.
79 g3?!
Leads to a vulnerable h-pawn, thereby speeding up the
loss. In inferior positions,
always refrain from crating new
weaknesses.
this only makes matters worse. There
was nothing better
the retreat 79 Kf2. in the long run
White would lose similarly to the game continuation, but would
not have the additional handicap of an indefensible h-pawn.
79
•.
.gS!
Yes, of course! Black keeps the bind created by the
advanced h-pawn. White's h-pawn has become very vulnerable
because Black can easily attack it. On the other hand, Black's
h-pawn only
appears
weak, because White is in no position to
menace it.
80
gxb4 gxb4 81 Ngl NdS +
82 Kf2
Kd4!
King penetration starts.
83 Ne2+ Kd3
84
Ncl + Kc2!
After the immediate 84 ... Kd2 White could continue the
checks with 85 Nb3 + . With the text movejmaneuver Black
ensures that when his King gets to the decisive d2 square,
White's Knight will have no checks.
85
Ne2 Kd2
36
Nd4 Nf4
The vulnerability of the h-pawn is now obvious. White's
attempt to go after Black's h-pawn will be too little too
late.
the defensive 87 Nb3 + Kd3 88 NcS + Kd4 89 Nb3 +
KeS loses the h-pawn for nothing. With a two pawn advantage
60
Black then has an elementary win.
87
NfS Nxh3+ 88 Kfi e3!
The pawn will get to the 7th rank in safety and thereby
ensure the win.
89 Nxh4 e2 +
90
Kg2 NgS! White resigns.
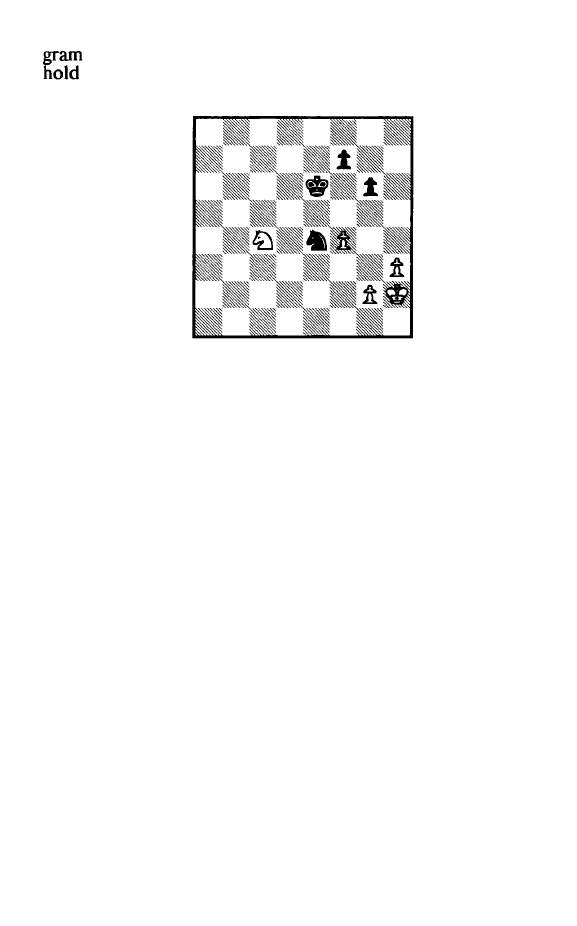
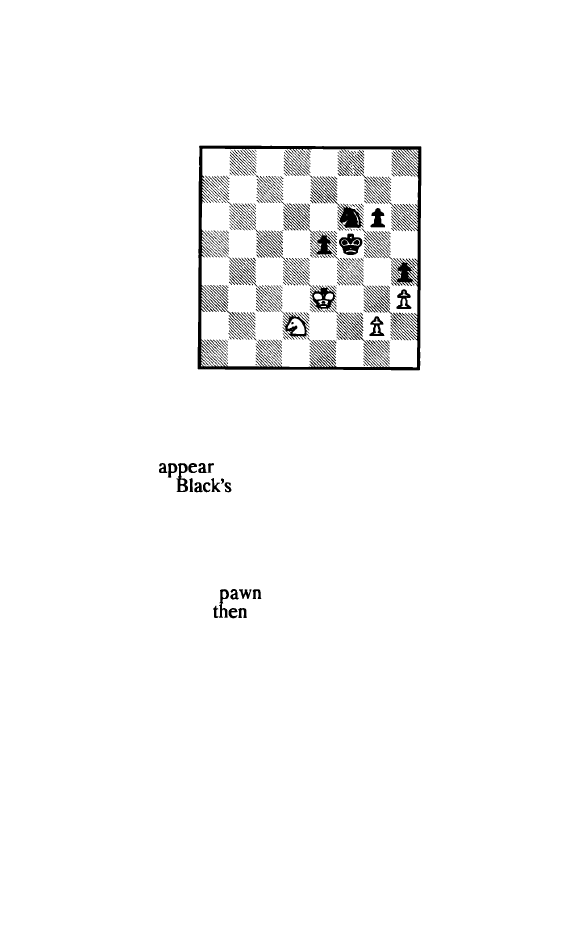
Compared to the
diagram, Diagram 37, R.
Bemard - Janicki, Lublin 1974, after Black's 41st move, is a
more favorable case for the defender because his forces have
assumed somewhat more active locations. Nevertheless, the
extra pawn in the form of a passer and the holey Black posi
tion, mean that White's Knight will be able to maneuver suc
cessfully and thus in due course set up his King for the decisive
penetrating march. Though the position is theoretically won for
White, it is not yet resignable by Black.
Diagram 37
42 Nb2
A
sophisticated
The Knight is to first go
to d3 and then possibly to
before the King is centralized. on
d3 the Knight combines its offensive and defensive functions
better than from c4.
42
..
.gS?!
The same type of error as in the previous game: the
61
defending side weakens its remaining pawn.
As
the game goes,
this has no direct bearing, but nevertheless is wrong since it
decreases the flexibility of
defenses. Correct is to
keep the status quo via 42 ...
43 Nd3 + Kf6!.
43 Nd3 NbS
44
Ke3 Nc3 45 Ntl!
On the way to h3 from where it will force Black's g
pawn to declare its intentions. No matter what they are, White
will regain control of f4.
45
•••
NbS 46 Nh3 gxh4
E
�
ually unattractive is 46 ... g4 47 Nf4 Ke5 48 Nd3 + !
(48 Nxh5 . ! Nc3! is unclear) 48 ... Kf6 49 Nb4! Ke5 (49 ... Nc3
50
Kd3 !) 50 Nc6 + Kf6 5 1 Nd4! followed by 52 Kf4 when the
centralized White pieces control the board.
47 gxh4 Ke5 48 Nf4 Nc3 49 Nd3+ Kf6 SO Nel!
Another fine Knight maneuver. It heads for t3 where it
will accomplish two important objectives: keep out Black's
King from e5, while protecting the h-pawn. Then White's King
will be free to start penetrating via the queenside along the d
file.
SO ... Ke5 51 Nt3+
Kf6
52 Kd3 NbS 53 Kc4 Nd6+ 54 KdS
The rest is relatively easy. Still it is instructive how
White makes use of both the King and Knight for the coming
advance of the e-pawn.
54 ... Nt7 SS e5 +
Kf5
56 e6 Nh6 57 Nd4+
Continual care is required. The obvious 57 e7? throws
away the win after 57 ... Ng8 ! when 58 e8 = Q = R = B allows
58 ... Nf6+, while 58 e8=N Ne7+ 59 Kd4 Ng6 also looks draw
ish.
57 ... Kf6 58 Kd6 Ng8 59 Nc6 Nh6
60
e7 Nt5+ 61 Kd7 Nxe7
62 Nxe7
62
Black's Kni
�
t has gone lost, yet White's Knight will still
have to come up w1th some nice maneuvers for the win.
62
. . •
KeS
63
Ke8 Ke6! 64 Kf8 KF6!
Black's
is doing his best to contain the White King.
To win, White's
must start a long journey so that
Black's
is pulled away from his pawn just long enough for
White to
a won K + h-pawn
vs.
K endgame.
65 NdS + ! KeS 66 Ne3 Kf4 67 Ngl + ! Kg3 68 Kg7
Black
resigns.
After 68 ... Kxg2 69 Kg6 Kg3 70 KxhS Kf4 7 1 Kg6
Black's King cannot get back in time.
Section 4: Knight + 4 Pawns vs. Knight + 3 Pawns
The situation here is quite clear: N + 4P
vs.
N + 3P
endgames are almost always won.
The burden is just too great for the defender: he has
three pawns to worry about and the enemy Knight will be too
versatile on the attack. There are two methods/goals that
should be used in going for the win: (1) create an enemy pawn
weakness, attack and capture the pawn, thereby gainmg a
routinely won endgame two pawns up, and or (2) simplify down
into a won N + 3P
vs.
N + 2P
where the extra pawn
is a viable passed one, as shown in
36 and 37.
A perfect example of how to win from a semi-blockaded
pawn formation is shown by the play from Diagram 38, M.
Taimanov - G. Stahlberg, Zurich Candidates 1953, after
Black's 43rd move. Again a Bishop endgame would be drawn,
yet a win is certain with Knights. White's pluses are obvious: he
1s up a sound
and has a clear spatial
Yet
Black has no
weaknesses. How
White
progress? The immediate task is as follows: (1) centralize the
King on e4, followed by (2) trying to crate a weakness in
Black's camp.
63
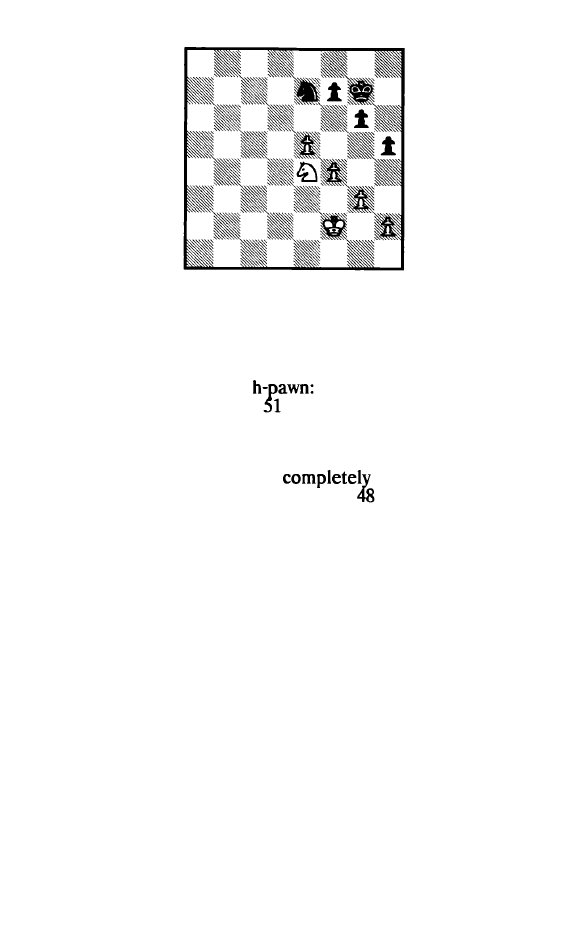
Diagram 38
44
Kf3 Kf8 45 Nd6 Nc6 46 Ke4 Ke7 47 t5!
With White's King + Knight activated it is time to start
action. The text is the first assault on Black's pawn formation.
Black cannot afford to capture as that saddles him with an
isolated, chronically weak
47 ... gxf5 +? 48 Nxf5 +
Kf8
49 Nd4! Ne7 50 Ne2! Kg7
Nf4
Kh6
52 h4!, when Black is
in zugzwang. The Knight must move and White's King pene
trates decisively via f5.
Of course, it would be
wrong for White to
"prepare" the f5 advance with 47 h3 and
g4 since that allows
Black to exchange off the h-pawns and reach a drawish posi
tion.
The stronger side must avoid routine pawn exchanges.
47
...
Nb4 48 f6+ !
Also good is 48
�6
fxg6 49 Nb5! followed by
50
Nd4,
leading to the type of posttion shown in Diagram 37. Neverthe
less, the text is even stronger as it ensures White a fantastic
space advantage and allows his King to penetrate. White's
remaining task will then be to devise a way to break the semi
blockade.
Black's King now has to head back since, if 48 ... Ke6, 49
Nb7 threatens both 50 NcS mate and 50 Nd8+, thus forcing the
retreating 49 ... Kd7 50 Nc5 + Ke8, anyway.
64
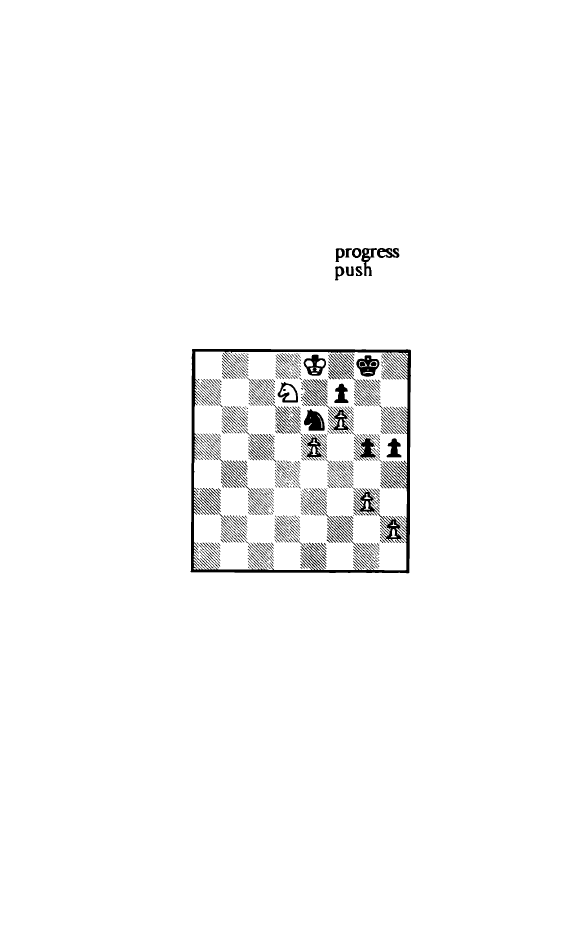
48
..•
Kf8 49 Nb7 Na6 SO KdS Nc7+ 51 Kd6 NbS+ 52 Kd7
Nd4 53 NcS!
Establishing control of e6. White's next objective is to
break - at the proper moment, with e6. If Black now plays
53 . . . Nf3, Wh ite contin ues as in the game with 54 Kd8 !
(54 ... Nxe5 55 Nd7 + wins).
53
..•
NtS
S4
Kd8!
The immediate 54 e6?! fxe6 55 Kxe6 is premature
because it is unclear how White is to
after 55 ... Nd4+.
Therefore White prepares to first
Black's King back
further.
54
•..
Nd4 SS Nd7 +
Kg8 56
Ke8! Ne6 57 Ke7!
gS 58 Ke8!
Diagram 39
Black is now almost in zugzwang: his King cannot afford
to move, he has almost exhausted the pawn moves, and if the
Knight gives up its location on e6, White plays Nc5 followed by
e6. Black's only hope are some Knight checks, but White's
King, by triangulation, puts a stop to those.
58
..•
Nc7+ 59 Kd8! Ne6+
60
Ke7! Nd4
60
.
.. g4 just delays the inevitable by a bit: 61 Ke8! Nc7 +
62 Kd8! Ne6 +
63
Ke7 etc.
61 NcS Nc6+ 62 Kd6 NaS 63 e6!
65
Note how
White's pieces are now placed
for this advance while Black's
been chased "far" away.
63
... fxe6 64 Ke7! Nc6+
65
Ke8 Ne5 66 Nxe6 Nt7
White has simplified down to a very favorable case of
the N + 3P vs. N + 2P endgame: a powerful far advanced
passed
assisted by active King and Knight. White's win is
not in
67 Ke7 g4
68
Ng7!
The
approach: prior to undertaking decisive
operations,
for good measure captures the h-pawn.
68
..
.
Nh6 69 NxhS NfS+ 70 Ke8 Nd6+ 71 Kd7! NfS 72 Ng7
A pretty tactical motif, which gains a tempo and speeds
up the wan. Of course, the
72 Ke6 also wins in due
course: 72 ... Nd4 + 73 Ke5
+ 74 Kf5 Nxh2 75 Nf4! Kn 76
Ng6 etc.
If Black now exchanges
the K + P endgame is
hopeless. Black's position is
72 ... Nh6 73 Ke7 Nt7 74 NfS
Black resigns.
The f-pawn will cost Black his Knight: 74 ... Ng5 75
Nh6 + followed by 76 f7. A technical masterpiece by GM
Taimanov.
In our last example we will
see
how to simplify the basic
N + 4P
vs.
N + 3P endgame down to a winning N + 3P
vs.
N
+ 2P one, where the extra pawn is in the form of a sound
passed pawn. Good technique means the ability to achieve
simpler winning positions from more complicated ones. I will
return once more to H. Rossetto - L. Stein, Amsterdam Inter
zonal 1964, this time to the situation after White's 44th move,
as shown in Diagram 40. Black is aiming for the position of
Diagram 36, but how to
there? At the moment White's
position appears
his pieces are well placed in the
center while Black's h-pawn seems to require continual protec-
66
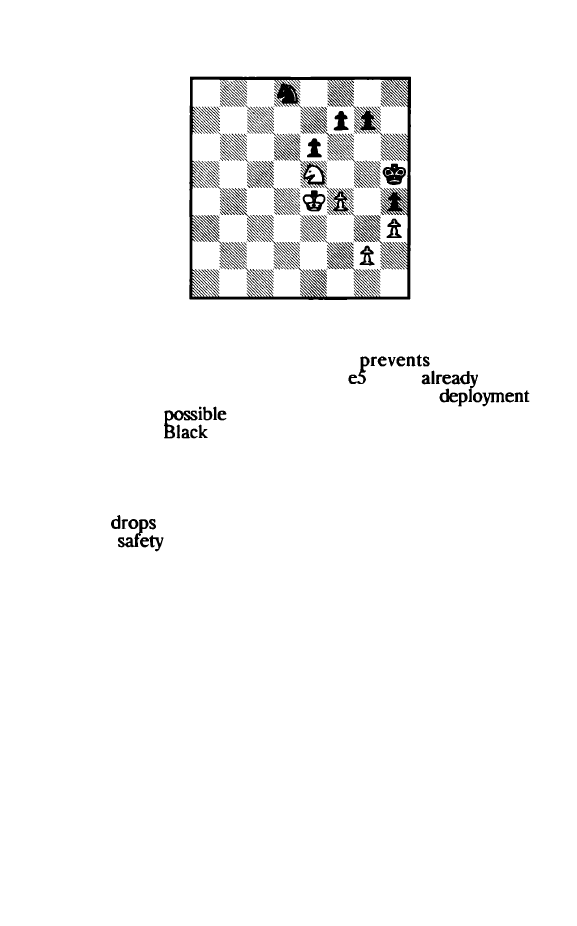
tion,. Yet note how GM Stein pushes White back, step-by-step:
Diagram
40
44
...
f6 45 Nt3 Nc6
Black activates his Knight and
Nd4. Quite
wrong now is
46
f5? because after
46
... Black
gets a
protected passed pawn. After 45 Nt3 White's force
ts the optimum
for defense. Therefore it should be left
as is. It is up to
to make progress!
46 Kd3 Nb4+ 47 Ke4 Na6!
Instead the immediate 47 ... Nd5?! allows 48 f5 and
47 ... g6?
the e-pawn after 48 Nd4. Thus Black first en
sures the
of the e-pawn.
48 Kd4 Nc7! 49 Ke4 g6!
By safeguarding f5 Black eliminates the danger from
White's f5 advance and enables his Knight to start active
maneuvers.
50 Kd4 Nd5 51 Ke4 Nc3+ !
The start of a long road to f5. Yet it must be executed
with precision, e.g., an immediate 51...Ne7? allows 52 Nd4.
Black must ensure that White's Knight does not get the oppor
tunity to reach the key d4 square.
67
52
Kd3 Nb5 53 Ke4 Nd6+ 54 Kd3 NfS!
The first major intermediate goal has been achieved:
from f5 the Knight prevents White's Nd4 and protects the h
pawn. Therefore Black's King now is freed for action on the
central front.
55 Nd2 Kh6! 56 Ne4 Kg7 57 Nd2
Kf7
58 Ne4 Ke7!
With Black's King centrally placed, there is no way to
prevent the coming ... e5 which will
Black a sound passed
e-pawn. Yet note that Black has
this advance until his
Kmg can both protect the passed pawn as well as exploit its
strength.
59 Nd2 eS!
60
fxeS fxeS 61 Ke4 Kf6
Black has a won position.
Black has achieved a safe and sound passed pawn. For
instance, 62 Nt3 is parried by 62 ... Ng3 +
63
Kd5 e4 64 Nxh4?
g5. The next dozen moves consisted of quiet maneuvering, with
the decisive action be�inning on more 74 - see the play from
Diagram 36 in the previous section.
Section 5: Knight + 5 Pawns vs. Knight + 4 Pawns
The conclusion for this is loud and clear: The endgame
of N + 5 P vs. N + 4 P is a sure win.
This endgame occurs seldom in tournament play. At the
very least, the stronger side will achieve a favorable N + 4 P
vs.
N + 3 P endgame. Therefore it is a sure win and the tech
niques for that endgame guarantee success here also.
68
Cbapter 4
Material Advantage - Pawns On Both Sides
Section 1: General Principles
(1) Winning Prospects and Techniques
To increase its winning prospects, the stronger side
always wants pawn to exist on both sides of the board.
The general winning procedures is the same as for
Bishop endgames and consists of the following steps:
(1)
Centralize your King and Knights.
(2) Create a passed pawn on the side having the extra pawn.
(3) If the defending Knight blockades the passed pawn, deflect
it by offering to exchange Knights.
(
4) If the defending King is busy
the
pawn,
penetrate with your King on the other
of
board and
capture sufficient pawns to win the game.
(2) Drawing Prospects and Technique
The defending side's drawing chances are better than in
the corresponding Bishop endgames.
There are two reasons for this:
(1)
The versatility of the
Knight increases chances for counterplay. (2) A passed pawn,
even if obtai ned at heavy materi al cost, can severely
immobilize the stronger side's Knight. The Bishop can stop a
pawn from far away, whereas the Knight obviously must
quite close.
The two general a proaches in aiming for a draw are:
(1) Exchange off as many pawns as possible, with the ultimate
goal of leaving the stronger side with just one pawn. This
approach is true for
all
endgames.
69
(2) Create a passed pawn
so
as to tie down the stronger side's
Knight.
Section 2: The Stronger Side Has A Passed Pawn
If the stronger side has already obtained a passed pawn,
its
chances are excellent. This is particularly so if its
and
are well placed.
41, W. Schmidt -
H.
J.
aan
Zee 1 1
1972, with
on move, is a good
of a won position. The characteristics of it are: (1)
The
is a sound passed pawn, (2) Black's Knight is
momentarily a bit awkwardly placed, but on an over-all basis
the King and Knight are located well enough, (3) Black has
only three pawns left.
Diagram 41
The paucity of material remaining does give White
some slight drawing chances, but with accurate play the win is
there:
1
•••
Nb2!
The Knight must
be
extricated from its unsafe location.
From b2 it plans to head for a4 to attack the c-pawn.
A
error would have been
l...t3?
because of 2 Ng4 when the
of 3 Ne3
+
forces Black to abandon the f-pawn {2 ... Nb2 3
NeS
+
Kb3 4 Nxt3 with a draw).
2 Kc2?
70
Such passivity is equivalent to voluntarily awaiting the
undertaker. Imperative is the active 2 Ne8!. Black's road to
then is
harder: 2 ... Na4 3 Nd6+ KdS 4
Ne8
5 Nc7+ (5 Ke3
6
Kxf3
Nxc3 followed by 7 ... Nd6
and 8 ... Nxb4) 5 ... Kc6! 6 Nxa6 (6 Ne6 Nxc3 7 Nd4+ Kb6! 8
Nxt3 NS followed by 9 ... Nxh4) 6 ... Kb6! {White is safe after
6 ... Nxc3? 7 Ke3!) 7 Nb8 Kc7 8 Na6+ Kb7 9 Nc5 + NxcS 10
bxcS Kc6 with a won K +
P
endgame.
2
...
Na4 3 Ne4 Kd5 4 Nd2 Nb6 5 Kd3 Nc4 6
Nb3
NeS+
Black has regrou
� {and centralized!) his K + N and is
thus ready to win on e1ther side of the board. If now 7 Ke2,
Black wins with 7 ... Kc4 8 NcS aS!.
7 Kd2 t3 8 Nd4 fl! 9 Ke2 Kc4
Black's
continues to be most thematic: the f-pawn
is used as a
to draw away White's King from the
so that Black' King can capture both pawns there.
hopeless now is 10
Kxf2
Kxc3 followed by
... Kxb4.
10 Ne6 Kxc3 11 NcS Kxb4 12 Nxa6+ KaS! 13 NcS Ng4
White
resigns.
Black retains the f-pawn and a two pawn advantage for
an easy win.
A
somewhat similar state exists in Diagram 42,
J.
Sza
lajdewicz -
R.
Mallee, Lublin Ill 1975, after White's 51st move.
Diagram 42
71
Black is ahead a passed b-pawn, yet is
by
having isolated
pawns. To win, Black's King
have
to penetrate into
kingside, at the cost of the b-pawn.
Even after penetration Black's play will have to be most exact.
51 ... Ne4+ 52 Kf3 NcS 53 Ke3 Ne6!
For Black's King to progress, White's Knight must be
from
d4
from where it controls
e6
and menaces the f
premature is S3 ... b3? 54 Kd2 b2 SS Kc2 Nd3 56
when White has an excellent defensive formation. For
instance, if Black tries to move his
toward the queenside,
White plays Nd4 with an attack on the
S4 Ne2 h4!
Preventing White's Ng3 forevermore helps safeguard
Black's kingside.
SS Kd3 Ke7 56 Kc4 Kd6 57 Kxb4
White
as well capture since he has no reasonable
waiting moves.
of course, now Black's King gets into
White's kingside.
57 ... KdS 53 Kc3 Ke4 59 Kd2 Kf3!!
Black's King has penetrated, all
but the win is
nowhere routine. Black's first problem is
because of the
presence of h-pawns (the RPs are the worst pawns to have for
in K
i
P
the K + P endgame
after ...
60
Nxf4. Kxf4
Ke2 1s drawn:
6l...Kg4 62 Kf2 Kh3 63
f4
64
Khl t3 65
6l. .. Ke4 62 Kf2 f4 63
t3 +
64
Kf2 Kf4
Kel ! Ke3
66 Kfl f2 67 h3 Kt3 stalemate.
If White now
the routine
60
Kel ?!, he is immedi
ately in zugzwang after .
.
. Kg2.
60
Kdl!
Kg2 61 Kel h3!
72
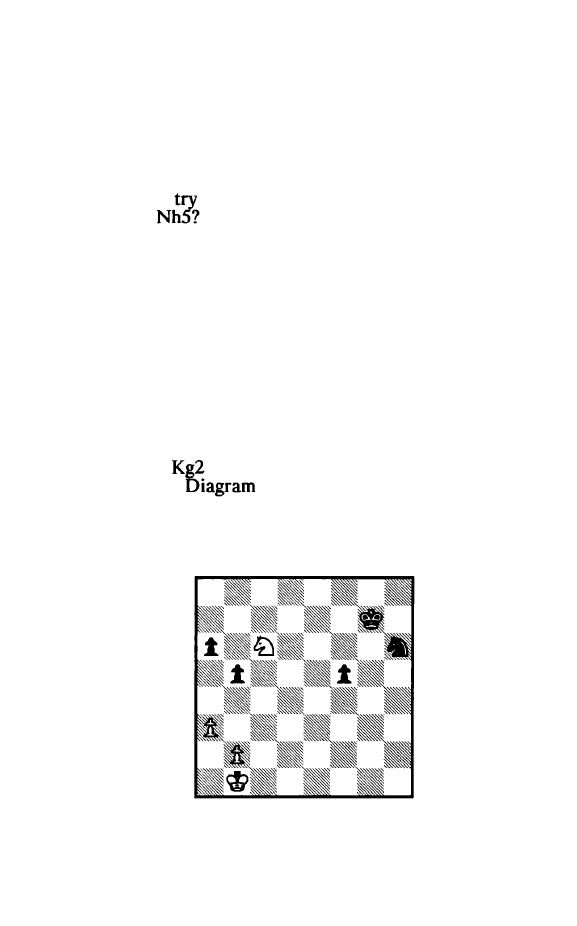
Black's second problem is that after 61 ... Kxh2? 62 Kf2!
his King cannot �et off the edge of the board (62 ... Kh3 63
Kf3!) and the posttion becomes drawn. With the necessary text
he now zugzwangs White, albeit at the cost of opening up g3
for White's Knight.
62 Ng3 Nd4
63
Nfl!
The only
at a defense. In the game White lost rou
tinely after 63
Nt3 +
64
Ke2 Nxh2 65 Ng7 Nfl
66
Nxf5
Ng3+ 67 Nxg3 Kxg3
68
Kfl
h2,
White resigns.
After the text 63 ... Nt3 +
64
Ke2 Nxh2? 65 Nxh2 Kxh2
66
Kf2 again leads to a drawn K + P endgame. Mallee, never
theless, has demonstrated the following problem win:
63
. . .
Kgl! 64 Ne3 Nt3+ 6S Ke2 Nxh2 66 Nxt5 Nfl 67 Nh4
Also 67 Nd4 fails to 67 ... Nd2!!
67 ... Nd2!!
68
Kxd2
68 Nf5 only delays the inevitable after 68 ... Nt3 + 69
Ke2 h2 70 Ng3
71 Nh1 ! Nd4 + ! (Not 7l...Kxh1? 72 Kfl
with a draw - see
1) 72 Kel Nf5 73 Nf2 Ng3! 74 f4
Nxf5 75 Nh 1 Ng3 76 Nf2 Kf3 and Black wins.
This final position demonstrates once more how diffi
cult it is for the Knight to cope with a
RP.
Diagram 43
73

A cursory look at Diagram 43, B. Ivkov - R. Fischer,
Bled
1961, after White's 57th move, may lead to the conclusion
that the result would be the same as in the previous two
examples. After all, Black is up a safe and sound f-pawn and
both sides have two good pawns on the queenside. Yet there is
a crucial difference: White's active Knight is able to menace
Black's queenside pawns and Black's forces are too far away
for effective help. With a deft series of maneuvers White is
able to sufficiently weaken Black's queenside pawn formation
so that the pawns become vulnerable to exchanges. Then he
successfully sacrifices the Knight for the f-pawn.
57
•••
Nt7 58 Kc2!
On the way to
the King so that it can help
stop the f-pawn or to head for
queenside pawns. Black's
King also heads for the center.
58
••.
Kf6
59 Nb4!
At the moment White's King is close enough to the f
pawn so that the Knight can start bothering the queenside
pawns.
59
..
.a5 60
Nc6 a4 61 Nd4 Nd6 62 b3! KeS
The previous moves were obvious enough, but here
Black overlooks White's diabolical
Only 62 ... f4!
wining chances, though, after 63
axb3 64 Kxb3
65
Nt3 + White's position is sufficiently defensible.
63 Nxf5!! Nxf5
Or 63 ... axb3 + 64 Kxb3 Nxf5 65 a4; or 63 ... Kxf5 64
bxa4 bxa4 65 Kc3 Nc8
66
Kb4 Nb6 67 Kb5.
64 bxa4 bxa4
65
Kc3
Draw.
There is nothing to be done about 66 Kb4 followed by
67 Kxa4. A triumph of the strategy of gaining a draw by
74

eliminating the stronger side's
- and a most impressive
thematic and creative effort by
Ivkov.
Diagram 44
Compared to the rather normal
in the previ
ous three examples, Diagram
44, J.
Bellon - A. Pomar,
Orense 1976, after Black's 29th move, appears exotic. Yet a
cool evaluation shows the following features:
(1) White has transformed his queenside majority into a passed
pawn (actually
doubled
passed pawns),
(2) White's extra a-pawn, though of little offensive power, has
definite defensive value because if Black captures one a-pawn
he will would not have a passed a-pawn himself,
(3) since White has a three pawn majority on the queenside,
Black's only hope is his one pawn kingside majority.
The unbalanced nature of the position requires creative
by White to ensure the win. GM Bellon comes through in
style:
30 Kd2! Ke7 31 Kd3!
White thematically centralizes the
so that it can
take part wherever the action will be. It
be risky to go
after the a-pawn with 31
Nc6+?!
since Black gets
coun
terchances on the kingside. White already has a
to win and therefore the major need at present is to
contain
expected counterplay.
75
31
...
Kf6
32 Nc4 g6!
Black aims to create a passed h-pawn, as that would
White the most difficulty. Unsatisfactory now is 33 hxg6?!
after 33 ... fxg6! followed by 34 ... h5 Black gets a
dangerous passed pawn. White also correctly avoids
the a-pawn and instead concentrates on preventing
kingside play.
33 Nd6! gxhS 34 gxhS KgS 35 Nxt7+ KxhS 36 Ke4! Kg6 37
Nxh6!!
The crowning point of White's play. The dangerous h
pawn is eliminated and the active King will help the passed
pawns carry the day.
37 ... Kxh6 38 KeS Kg6 39 Kd6 NbS+ 40 Kxe6 Nd4+
Useless is
40
.
.. Nxa3 because Black doesn't gain a
pawn thereby. With the text Black tries to set up a
formation.
41 KdS NI'S 42 c6 Kt7 43 c7 Ne7 +
44
Kd6 Ke8 45 f4!
There is no way that the short range Knight can cope
with passed pawns on both flanks.
45 ... Nc8+ 46 Kc6 Ne7 + 47 Kb7 Kd7 48 c4
Black resigns.
The
march inexorably forward: 48 ... Nc8 49 cS
Ne7 SO fS
51 f6 etc.
Section 3: Both Sides Have Passed Pawn(s)
As already briefly discussed, it is in inferior N
+ P
endgames that the creation of a passed pawn becomes a
powerful drawing tool because the Knight - as a result of its
short range - is
handicapped in coping with passed
pawn(s). For situation
both stdes have J?assed pawns it is
difficult to give hard and fast rules. Mostly It's a question of
careful calculations and tactical creativity in considering the
76
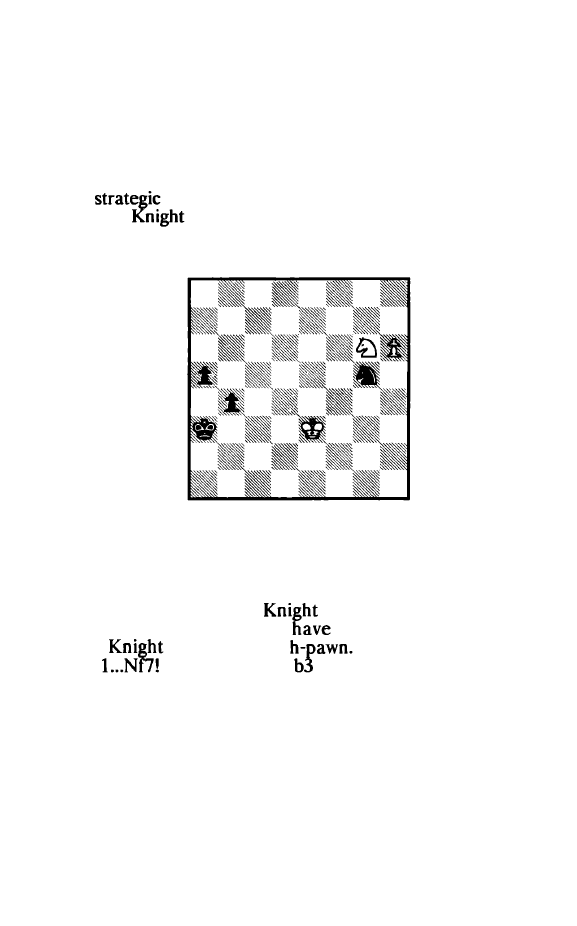
proper King maneuvers and Knight jumps. The single most
amportant principle to keep in mind is that
the
RP
is by far the
most difficult pawn for the Knight.
An
excellent practical example of the type of play that
can result is shown from Diagram 45, N. Minev - K. Honfi,
Bern 1974, with White on move. Black has two strong connect
ed passed pawns on the queenside, yet White's h-pawn which is
already on the 6th rank creates good counterplay. The two
major
considerations are: (1) The h-pawn is difficult
for Black's
to stop, and (2) K + RP on the 7th rank
vs.
Queen is drawn if the stronger side's King is too far away and
the Queen does not control the queening square.
Diagram 45
With perfect play Diagram 45 is a draw. The game was
drawn, though with a serious error by each side thrown in:
1 Ne5!
The best move: the
heads back to stop the b
pawn. White's King then will
sufficient time to chase
Black's
away from the
The immediate 1 Kf4
allows
when after 2 h1
3 Ne5 Nxe5! 4 Kxe5 b2 7
h8
=
Q b 1
=
Q the Q +
P
endgame gives Black good practical
chances for the win.
l. .. b3 2 Kf4 Nh7!
White has a routine draw after 2 ... Ne6+ 3 Kf5 Nf8 4
Kf6 followed by 5 Kg7.
77
,.
3 KtS?
Now White is lost. The King can always get to Black's
Knight. Therefore White's first business should have been to
back his Knight to stop the b-pawn. The
method
was Nd3! b2 4 Nxb2 Kxb2 S NfS a4 6 Kg6 Nf8+ 7
a3 8
Kxt3 a2 9
h7.
3 ... Kb2?
Black reciprocates. The win was to be had with 3 ... Kb4!,
preventing 4 Nc4+. IM Minev provides the following varia
tions as convincing proof:
(1) 4 Kg6 Kc3! S Kxh7 b2 6 Kg7 b1 =Q 7 h7 Qxh7+ a4 and
the pawn cannot be stopped,
(2) 4 Nd3+ Kc4! S Nb2+ Kc3 6 Na4+ Kb4 7 Nb2 a4 8 Kg6
a3
9
Nd3 + Kc3, winning.
4 Nc4+ !
Only so: the Knight is safely back and White is safe.
White loses after 4 Nd3 +? Kc2! and 4 Kg6? Kc3!.
4
...
Kc3 5 Na3 b2
Or S ... a4 6 Kg6 Kb4 7 Nb1 a3 8 Nxa3! leading to the
same position as in the game.
6 Kg6 Kb3
There is nothing is 6 ... Nf8+ 7 Kt7 etc.
7 Nbl a4 8 Kxh7 a3 9 Nxa3! Kxa3 10 Kg8
Draw.
After 10 ... b1 =Q 1 1 h7 Qg6 + 12 Kh8! Black must
choose between stalemating White or allowing the h-pawn to
queen.
Considerably more sophistication is required to correct
ly handle the
of Diagram
46, which is the conclusion of
a marvelous
study by the Dutch composer
J.
H. Marwitz.
78
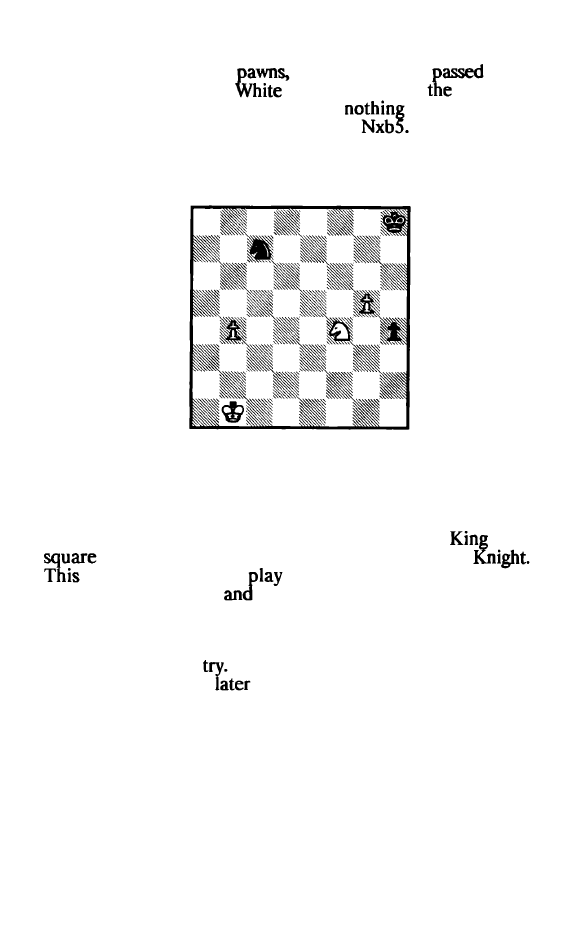
White has a significant advantage by virtue of having two
widely separated passed
yet Black's single
pawn
is the "naughty'' h-pawn.
to play and win is
task - but
how? The obvious
1
Ng6 + ? leads to
after l...Kg7 2
Nxh4 Nd5 3 b5 Nc3 + followed by 4 ...
No better is
1
Kb2? Nd5! when both 2 Nxd5? h3 or 2 b5? Nxf4 3 b6 Nd3+ 4
Kc3 Nc5 lead to wins for
Black.
Other "normal" moves by the
King also are foiled by l...Nd5!, as is
1
Nh3?.
Diagram
46
And the winner is . . .
1 Kal!!
A surprising, though with the above discussion in mind,
readily understandable solution. White places his
on a
where it is momentarily out of reach for Black's
gives White time to
Nh3 and then the King will be
able to start advancing
assist the b-pawn.
l ... Nd5!
Still the best
After l...Kg7 2 Nh3! White wins simi
larly to what happens
on.
2 b5!
Kg7
After 2 ... Nxf4? 3 b6 Black's Knight lacks a tempo
gaining check to get back in time to stop the pawn.
79
3 Nh3!
Here too there is not time for 3 Nxd5? because Black
reaches a theoretically drawn position with 3 ... h3 4 Nf4 h2 5
Nh5 + Kg6 6 Ng3 Kxg5 7 b6 Kg4 8 Nh1 Kf3 9 b7 Kg2 10
b8=Q Kxhl. Note how similar this motif is to that of the previ
ous example.
3 ...
Kf7
Also losing is 3 ... Kg6 4 Kb2! Kh5 5 Kb3 because there
is not time for 5 ... Kg4: 6 g6 Kxh3 7 g7 Nf6 3 b6 Kg2 9 b7 h3
10 b8=Q h2 1 1 Qb7+ Kg1 12 Qb6+ Kg2 13 Qxf6 and White
wins.
4 Kb2 Ke6 5 Kb3 Kd6 6 Ka4! Kc7 7
Ka5
White's b-pawn is now secure and the combination of
the far advanced and widely separated passed pawns is too
much for Black's Knight. Still, White wins only by a hair.
7 ... Kb7 8 g6 Ne7 9 g7 Ng8 10 b6!
Passed pawns must be pushed!
10 ... Nf6 11 Kb5 Ng8 12 NgS!
The return of the Knight into the fray will be decisive.
Black loses
after 12 ... Nh6 13 Nn! Ng8 14 Nd8+ and
12 ... Nf6 13
Ng8 14 Nc5+ etc.
12 ... Ne7! 13 Ne6! h3 14 Nd8+ Kc8 15 Nc6! Ng8 16 Ka6 h2
17 b7 + Kd7 18 b8=Q h1 =Q 19 Qd8+ !
White wins.
At last success: 19 ... Ke6 loses to 20 Qxg8 +; 19 Kxc6
drops the Queen after
20
Qa8 +.
At the moment material is equal in Diagram 47, A.
Donchenko - R. Holmov, Dubna 1973, after Black's 43rd
move. Yet it is readily
that the c-pawn is on its last
legs and then Black
have the material advantage of a
passed f-pawn. However, the significant factor in the position
80
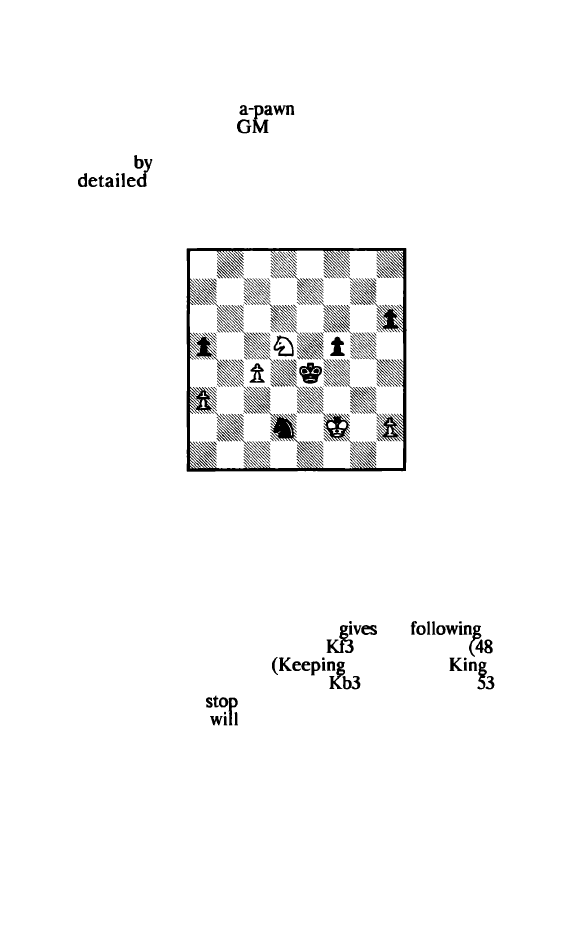
will turn out to be the RPs: Black's Knight is well placed to
capture White's a-pawn, whereas White's Knight can go after
Black's h-pawn. In the resulting play Black will have the active
Kin� and Black's passed
will be further advanced than
Whate's passed h-pawn,
Holmov in a detailed analysis in
Shahmaty Bjulletzn,
#5, 1975, has convincingly proven that
Black wins force from Diagram 47. Much of thas analysis is
too
for our needs, but the major conclusions are
valuable and I have made grateful use of them. White now
played:
Diagram 47
44 Ne3
White protects the c-pawn and if chased away by 44 .. .f4,
will go after the h-pawn via g4. On the face of it this is a logical
approach. Extensive subsequent analysis, however, has shown
that Black's task would have been considerably more difficult
after 44 Nf6 + ! Ke5 45 Nd7 + ! ( 45 Ng8 leads to play similar to
the game continuation.) Holmov then
the
as the
main line: 45 ... Kd4
46 c5 Ne4+ 47
Nxc5 48 Nb6
Nb8
is met by 48 ... a4!) 48 ... Ne6!
out White's
from
f4.) 49 h4 h5! 50 Nc8 Kc4 51 Nd6+
52 Nxf5
Kxa3
Ke3
(White has to try to
the a-pawn. After 53 Ng3?! Kb2! 54
Nxh5 a4 Black's RP
be well ahead of White's.) 53 ... Kb2!
54 Kd2 a4 55 Ne3! Nd4! 56 Kd3 Nf3 57 Nc4+ Kb3 58 Na5+
Kb4 59 Nc6+ Kc5
60
Nd8
(60
Nb8 Kd6!)
60
.
. .
Kd5 61 Kc3
Nxh4 62 Kb4 Nf3 63 Nn Ke6!
64
Nh6 Ne5 65 Kxa4 h4 and
Black wins. White's King has indeed conquered the a-pawn,
81

but now is too far away from the passed h-pawn!
44
...
f4 45 Ng4 Nxc4 46 a4
White can choose whether the a-pawn is captured on a3
or a4, but it is hardly
that it makes little difference.
After the immediate
46
White's best is 47 Nt7 Nb5
48
Nd8, yet Black still wins after
48
... a4 49 Nc6 a3
50
Nb4 Nc3
51 h4
a2
52 Nc2 (or 52 Nxa2 Nxa2 53 h5 Nb4
54
h6 Nd3+ 55
Kfl Ne5 56 h7 Ng6 and the h-pawn has been one move too
slow.) 52 ... Nd1 + 53 Ke1 Ne3 54 Na1 Kd3 (Or the simple
54 ... Ng2+ and 55 ... Nxh4.) 55 h5 Nc2+ etc.
46
•••
Nb6
47 Nxb6 Nxa4 48 Nf7
back via 48
loses after 48 ... Nb2 49 Ke2
Nc4
50
h4 a4
Nxf2+ Kd4
h5
a3
53 h6
a2
54 h7 f3+ 55
Kxf3 Ne5 + 56 Ke2 Nf7 when White's h-pawn has been
stopped while Black's a-pawn queens.
Moreover, if White's King
to stop the
then
Black wins with the
48
Nb2 49 Kd2
50 Kc3
Ne5! 51
h3 f3 53 Kd2 Nh2! 54 Nf6+ Ke5 55
Nh5 f2
48.
..
Nc3 49 NgS +
The other route is 49 Nd6+ Kd5
50
Nb7 (50 Nc8 Kc5!)
50 ... a4 51 Kf3 Ne4! 52 Kxf4
a3
53 Na5 Nc5!, but White's
Knight is cut off from stopping the a-pawn.
49
.••
Kd3 50 Ne6 Kc4!
Just as in the previous note, Black's goal is to prevent
White's Knight from getting back to stop the a-pawn. Black's
forces are well placed, White's King is too far away - therefore
Black's success 1s assured.
51 Nxf4 a4 52 Ng6 a3 53 Ne5+ KbS!
White resigns.
The
end would have been: 54 Nf3 a2 55 Nd4+
Kc4 56 Nc2
57 Na1 + Kb2. Note again the difficulty the
Knight has with a RP.
82
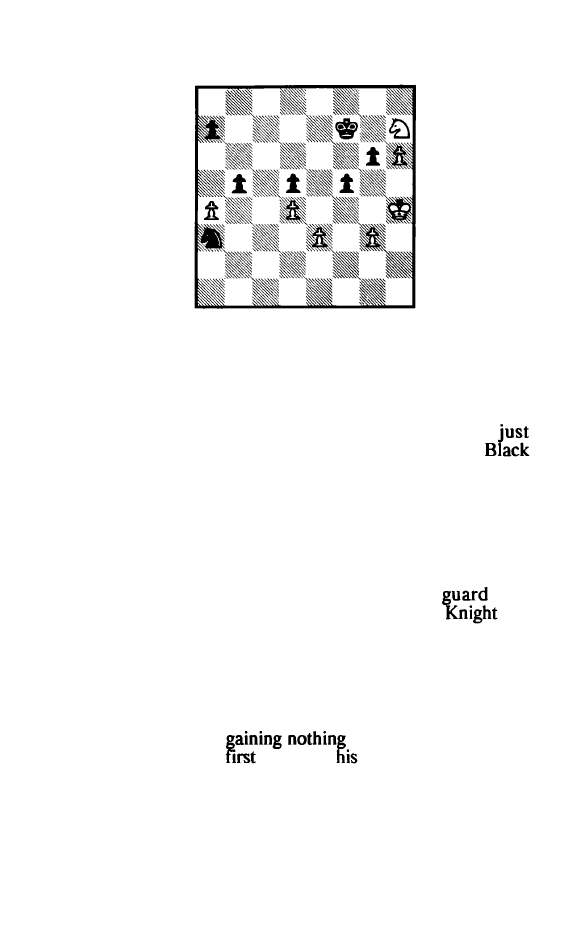
We will now consider situations with more pawns.
Diagram 48
Diagram 48 shows P. Brandts - E. Mednis, New York
1952, after Black's 46th move. White has the advantage: he has
the active King, the active Knight, a passed far advanced h
pawn, and after the imminent capture of the g-pawn will
be
a
pawn up. Black's drawing prospects rest with qmckly creating a
passed pawn on the queenside (as can be seen he has
started on this) to tie down White's Knight there. Then
hopes to utilize his Knight to get at White's kingside pawns.
The game course shows that Black is just able to achieve his
aim:
47 NgS+ Kg8! 48 axbS NxbS 40 Ne6 aS! SO KgS Nd6!
The g-pawn can't be defended (50 ... Kf7?? 51 h7;
50
. . .
Kh7? 51 Nf8+) and the Knight is needed to
both
the f-pawn and the
f7
square. Luckily for Black, the
will
only have to
be
inactive for a short period.
Sl Kxg6 a4 52 NcS
The strength of White's h-
p
awn has been neutralized by
Black's a-pawn. Since 52 h7 +?. Kh8 just makes White's h
pawn vulnerable while
m
turn, White's Knight
must head back. Black
advances
passed pawn as far as
possible and then send his Knight after White's pawns.
83
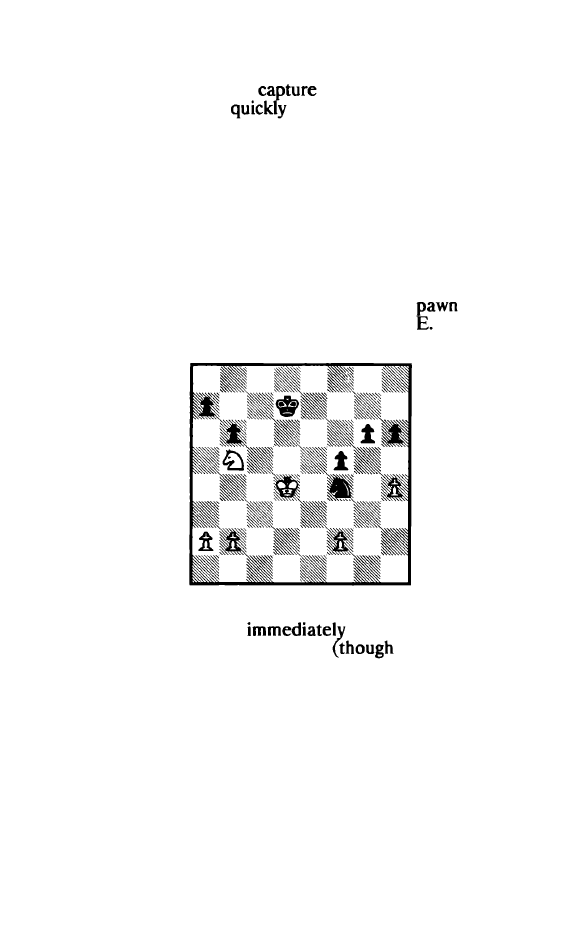
S2
•.
.a3
53 Nb3 a2 54 Kf6 Ne4+ SS KeS
White wants to first
the d-pawn
so as
to obtain
another passed pawn
as
as
possible.
SS
...
Nxg3
56
KxdS Nfl 57 KeS Nxe3 58 Nal
After the immediate 58 Kf4, Black gains time for de
fense with 58
.
.
. Nc2 59 d5 Nd4!.
S8
...
Kh7 59 Kf4 Nc4
60 Kxf5
Kxh6
Draw.
There are no winning chances left.
A fine example of how to handle a two
majority
on one side is shown starting from Diagram 49, Mednis - R.
Fischer, 1963/64 U.
S.
Championship, after Black's 41st move.
Diagram 49
Of course, Black does not have such a majority yet, but
my "generosity'' makes it
possible. After coming
through time pressure well enough
missing a forced
draw) and now having another hour on the clock, I thoughtless
ly - both literally and figuratively - played:
42 Nxa7??
There is no rational explanation for such a move. White
takes off an unimportant pawn far from the scene of action
84

while forgetting about everything else. Just a few seconds of
actual
thinking
would have shown that only the active 42 Ke5!
makes sense. Then 42 ... Ng2 is harmless because of 43 h5 gxh5
44 Kxf5. Moreover, 42 ... Nd3 + 43 Kf6 Nxf2 44 Kxg6 f4 45
Nd4 also looks quite safe for White. After 42 Ke5! a draw is
the likely result.
42
•..
Ng2 43 KeS?!
Giving Black two connected passed pawns is
to
be
Therefore, a better practical try was
h5 gxh5
44
h4 45 Ke2 h3
46 Kfl, even though White's prospects
remain bleak after
46 ... Nh4 47 Kgl Nt3 +.
43
.•.
Nxh4 44 Kf4 g5 + 45 Kg3 Ng6 46 a4
White does have an extra pawn on the queenside, but
GM Fischer will with ease demonstrate how to make it harm
less.
46
...
f4+ 47 Kg2 g4 48 Nb5 NeS!
Black executes the thematic piece play strategy: with
this move centralizing the Knight and on the next move, the
King.
49 Nc3 Ke6! 50 b4 Nc6!
Black paralyzes White's queenside play. He does not
even give Whtte a chance for a viable passed pawn there.
51 t3?!
It is
wrong to make it easier for Black to obtain
connected
pawns. Better is 51 b5.
51
.••
b5 52 b5 NeS! 53 fxg4 hxg4 54 Kf2 Nd3+ 55 Ke2 NrS!
Black's
ties down White's, while establishing
itself on an active
GM Fischer's technique, whereby
he continually maximizes his chances, while minimizing those
of his opponent, is exemplary.
85
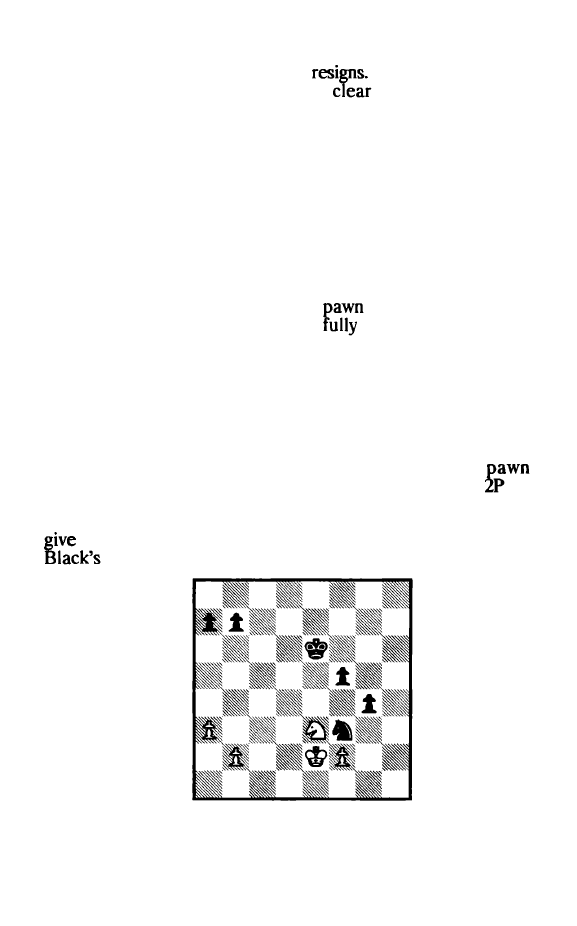
56 Kfi Kt'S 57 Kg2 KeS 58 Kf2 Nd3 + 59 Ke2 g3! 60 Kf3
Net + 61 Ke2 g2 62 Kf2 t3
White
I could have done so with a
conscience already
some moves earlier. Black's next moves will be 63 ... Nd3( +
)
,
64 ... Nf4, 65 ... Nh3( +
)
.
Section 4:
The Stronger Side Can Force (Create) A Passed Pawn
If the stronger side doesn't yet have a passed pawn, it
wants to create one. therefore, once the preliminary steps of
King and Knight centralization have been accomplished, it is
time to work on creating a passed pawn on the side having the
extra pawn. Part of the time direct
advances will do the
job. However, the opponent will be
aware of this aim and
will try to prevent it. Then the winning procedure consists of
penetratin� into the other side of the board, while the defender
ts busy trymg to prevent the creation of a passed pawn on the
"normal" side.
This interplay of factors is well illustrated from our first
example, Diagram 50, E. Fucak
-
S.
Cvetkovic, Yugoslavia
1968, Black on move. Black has a nice, normal, "one
advantage" position. The extra pawn is part of a healthy
vs.
P kingside majority. His next step should be to further mobilize
his kingside pawns as this will tie White down on that side and
Black the opportunity to penetrate into White's queenside.
next move opens both vistas for exploration:
Diagram
50
86
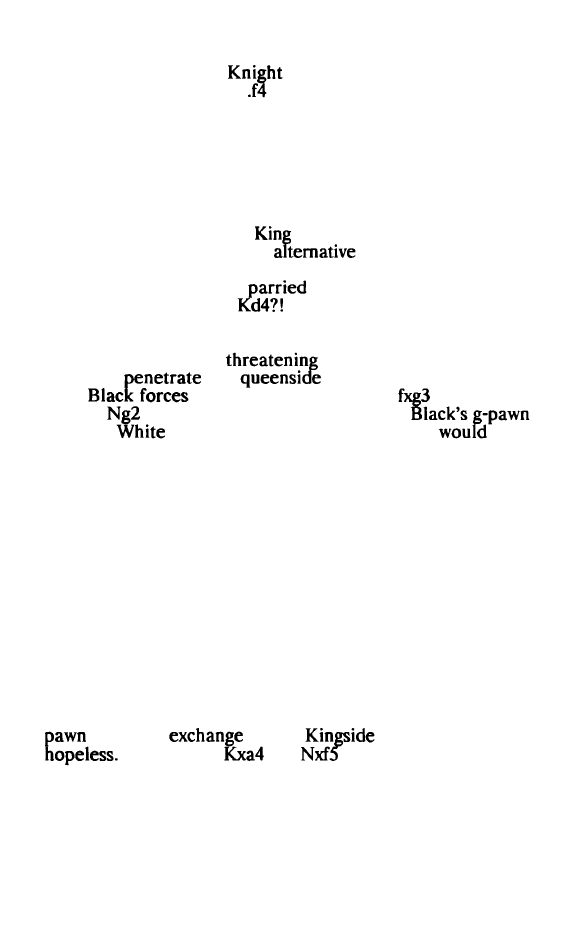
l
..•
NeS!
The centralized
covers both sides of the board
beautifully, threatenin� 2
..
and being itself ready to jump to
c4. White is at defenstve crossroads: which side of the board
should he work on?
2 Ng2?!
He decides to prevent the immediate advance of the f
pawn. Yet the cost is heavy since the decentralization of the
Knight allows both Black's
and Knight to menace White's
queenside. I believe that the
was better: 2 b3 f4 3
Ndl!, giving Black two options:
(1) 3 ... Kd5, which can be
by 4 Nc3 + Kc5 (4 ... Kd4? 5
Nb5+) 5 Ne4+ when 5 ...
is risky because of 6 Nd6 and it
is uncertain if Black can win, e.g. 6 ... Kc3 7 b4 Kb3 8 Nxb7
Kxa3
9 b5 Kb4 10 Nd6, with the threat 11 Nc8.
(2) 3 ... Nf3! is correct,
4 ... Nd4+. If 4 b4, Black's
King will
the
starting with 4 ... Kd5; if 4
Kd3,
a passed pawn: 4 ... g3! 5
fxg3 6 Ne3
Ke5! 7
Nd4 8 b4 Nf5 and in due course
will cost
his queenside. Nevertheless, this
have
been a better chance for White, since after the text move Black
has an easier time in penetrating.
2
...
Nc4! 3 Nf4+ KeS 4 Nd3+ Kd4 S a4 NeS!
Recentralizing the Knight makes White's Knight give
way, thus allowing Black's King to get at White's pawns.
6 Nf4 Kc4! 7 Ne6 Kb4 8 Ke3 b6!
By preventing a Nc5( + ), Black safeguards his queen
side.
9 Kf4?!
As
Black is bound to win White's queenside, a routine
for pawn
on the
must be inherently
Only 9 Nd4
10
of
fers a bit of practical
87
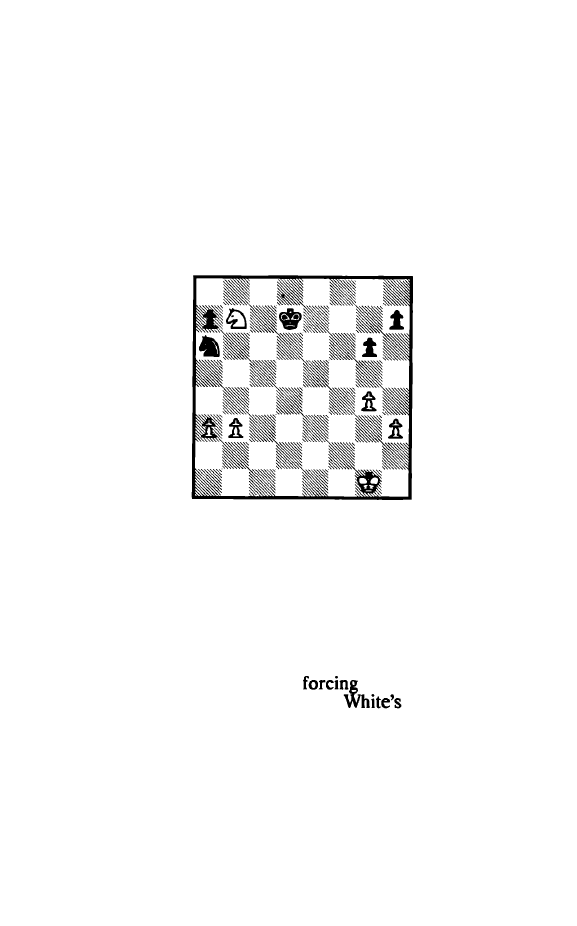
chances, though of course Black's position remains won after
10 ... Kb3.
9
••.
Nd3 + 10
KxfS
Nxf2 11 Kf4 Nd3+ 12 Kxg4 Nxb2 13 Kf3
Nxa4
Two connected passed pawns win routinely. The conclu
sion was:
14
Ke3
NcS 15 Nd4 aS 16 Nc6+
Kc3
17 Nd4 a4 18 Nb5 +
Kb4 19 Nd4 a3 20 Nc2+ Kb3 21
Kd2 a2
22
Kcl Kc3 White
resigns.
Diagram 51
The stronger side's task is considerably harder from
Diagram 51, D. Lazic - M. Dimitrijevic, Kragujevac 1977, after
Black's 36th move. White's only advantage is the extra pawn;
Black has the active King and the potentially more active
Knight. White's first order of business must be to consolidate
the pawn advantage and the first step is to centralize the King:
37 Kf2! Kc6 38 Na5+ Kb5
The text does succeed in
back White's Knight
(
39
b4?
Ka4
40 Nc4 Kb3), but allows
King to achieve
a domineering central role. A bit more promising for longer
term resistance is 38 ... Kd5!.
39 Nc4 NcS 40 Nd2 a5 41
Ke3
88
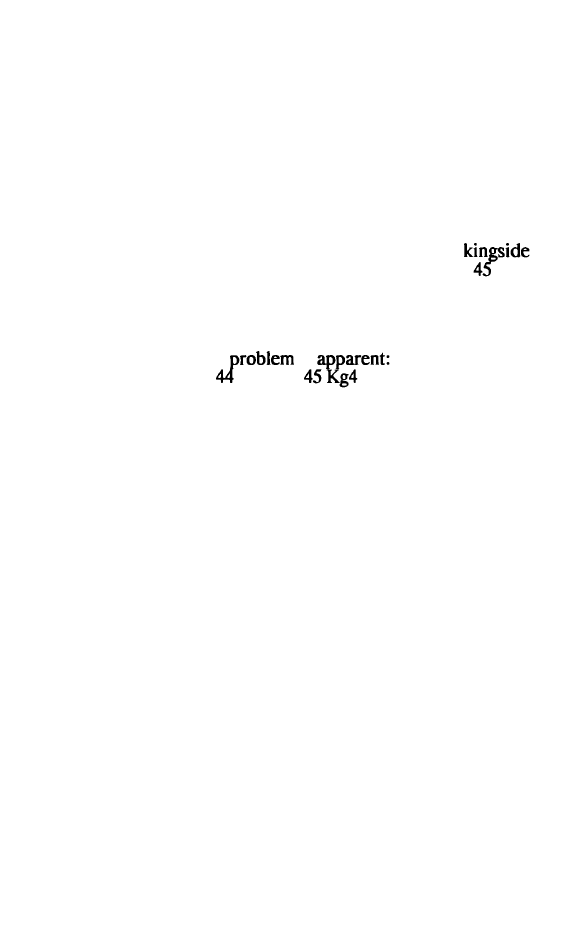
The queenside is sufficiently protected so that White's
King is ready to head for Black's kingside pawns.
41. .. Ne6 42 h4! a4
If Black does nothing, White walks in with Ke4, Ke5,
etc., while retaining his queenside majority.
43 b4
It is difficult to resist having a protected passed pawn.
However, a clearer win is to be had with the direct
penetration approach: 43 bxa4 + ! Kxa4 44 Ke4
Kxa3
Ke5
Nc7
46 Ne4! Kb3 47 Nf6 h6 48 Ng8 etc.
43 ... Nc7
44
Kd4
Already the first
is
if 44 Kf4?!, Black
gets counterplay after ... Nd5+
Nxb4!.
44
... h5 45 g5 Kc6 46 KeS Nd5 47 Kd4?!
White unnecessarily gets cold feet. The King should
remain active and the Kmght used for defense via 47 Nb 1!.
Black then is, in effect, in zugzwang and White wins easily, e.g.
47 ... Ne7
48
Kf6 Kd6 49 Nc3 etc.
47 ... Ne7 48 Kc4 NfS 49 bS +
Activity is a must, as 49 Nf3?! Nd6+ 50 Kd3 Kd5 has
Black threatening both 5l...Nb5 and 5l...Nc4.
49 ... Kb6 50 Kb4 Nxh4 51 Nc4+ Kc7 52 NeS! Kd6
See Diagram 52 on the next page.
If Black temporizes with his King, White takes off the a
pawn and wins routinely with the two connected passed pawns.
Therefore Black has to free his Knight. The text forces White
to advance the b-pawn with the result that its weakness will
prevent White from capturing the a-pawn. Yet, all this effort is
for naught - White still has a win.
89
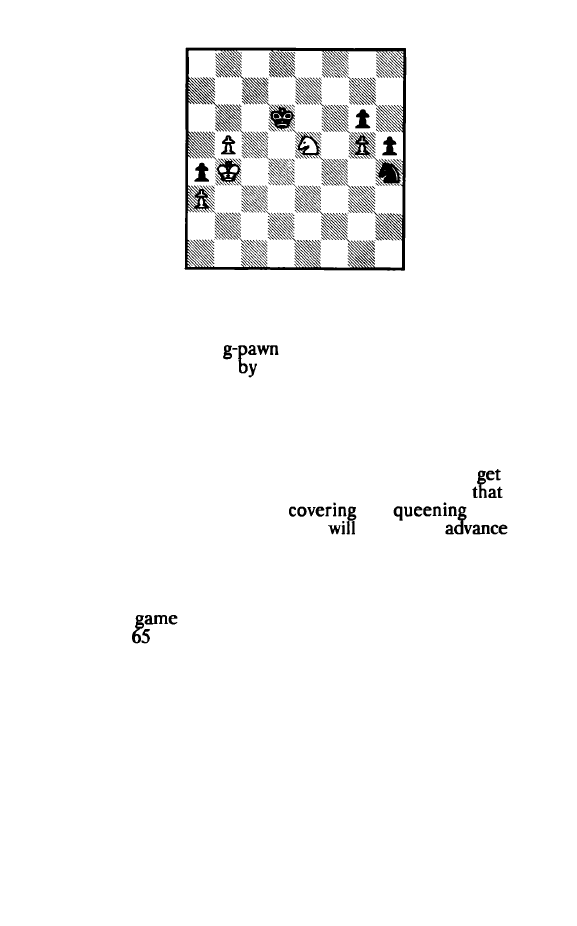
Diagram 52
53 b6 NfS
S4
Nxg6 Kc6 SS
KaS
Kb7
S6
Nf4 h4 57 g6
With the a-pawn for now immaterial, what we have is an
endgame of a b- and a
vs.
the h-pawn. This same situa
tion existed in the study J. H. Marwitz in the previous sec
tion - see Diagram 46. The solution in this practical game is
quite similar.
S7
•.•
Ng7 58
KbS
NfS 59 Nh3 Ng7
60
NgS!
The winning procedure will be
as
follows: (1) To
the
b-pawn to the 7th rank, White needs to check on d8, so
(2)
the Knight can get to c6, thus
the
square.
During this process, Black's h-pawn
be free to
so
that White must time his moves most exactly.
60
.•.
Ne8 61
KaS
Ng7 62 Nt7 h3 63 Nd8+ Kc8
The
continuation is reached sooner after 63 .
. .
Kb8
64 Ka6 h2
Nc6+.
64 b7+ Kc7 6S Ka6 h2 66 Nc6! hl =Q 67 h8=Q+ Kd7
Obviously 67 ..
.
Kxc6?! drops the Queen after
68
Qb7+.
{This would also have been the conclusion if Black had played
90
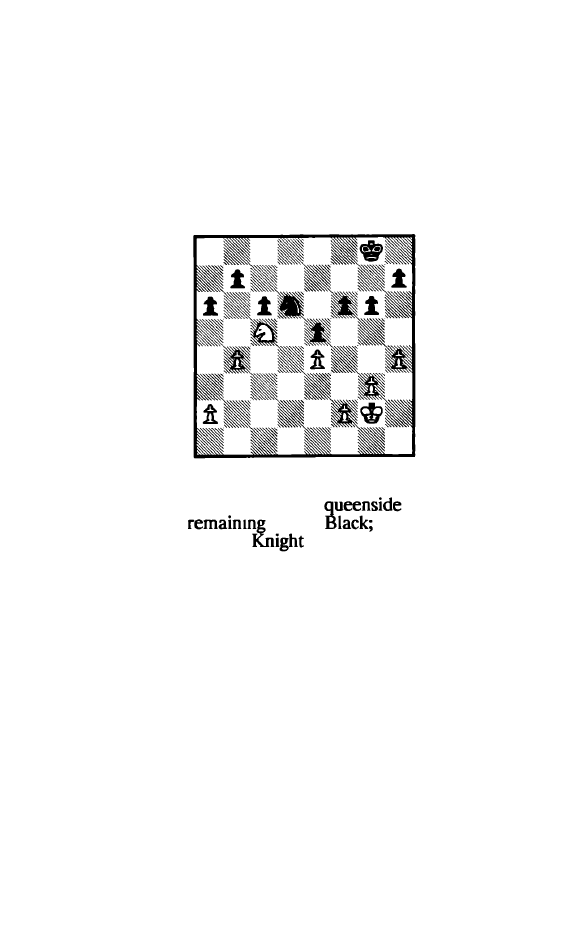
66
.
..
Kxc6?!.)
68 Qb7+ Kd6
68
... Ke8 runs into mates by 69 Qe7 or 69 Qc8;
68
.
. .
Ke6
drops the Queen to 69 Nd4 + or 69 Nd8 +.
69 Qe7 + ! KdS 70 Nb4+ K
c
4 71 Qt7 +
Black resigns.
After 71. .. Kc5 72 Qxg7 White is up a Knight and a
passed pawn.
Diagram 53
In Diagram 53, Bajec
-
G.
Tringov, Ljubljana 1969,
White to move, Black is up a sound
pawn. The large
number of pawns
favors
however, the excel
lent placement of White's
makes it very hard for Black
to create a passed pawn from his queenside majority. As will
be seen, Black will need a very creative method to accomplish
this. in any case, Black's first object must be King "activation".
Here also this means King centralization
1 t3 Kt7 2 Kt2 Ke7 3 a4 b6!! 4 Nxa6
White might as well take, as after the passive 4 Nd3
Nb7! Black even has the luxury of choosing either ..
.
aS
or .
.
.
c5
as his break.
4
...
Kd8
Black plans to walk over to b7, forcing White to give
91

back the
with bS. A 11nonnal11 continuation now would be
S Ke2
6 Kd3 Kb7 7 bS cxbS 8 axbS NxbS, when Black has
obtained a passed pawn and will win using the techniques of
Section 2.
Since such a course is rather prospectless for White, he
decides to try to take advantage of the absence of Black's King
from the kingside to generate some action there. Note also that
S
aS
fails after S ... bxaS 6 bxaS Nc4 and White loses the a-pawn
for nothing.
5 hS!? gxhS!?
Black accepts the challenge. of course, he could have
continued with the nonnal S ... Kc8, but then White would have
gained a routine exchange of one kingside pawn.
6 Kg2 Kc8 7 Kh3 fS!?
Black again chooses the most dynamic way. The simple
7 ... Kb7 also wins and does so 11Simpler".
8 exf5
Worse is 8 Kh4?! fxe4 9 fxe4 Kb7 10 bS cS! 1 1 KxhS
Nxe4 and Black's two passed pawns lead to an easy win.
8
•••
Nxf5 9 bS cS!
There is no reason why 9 ... cxbS should not be good
enough in the long run. However, the text is stronger as it
immediately gives Black a powerful passed pawn.
10 Kg2?!
To follow up active play with passive is seldom advisa
ble. Only 10 aS!? is worth trying, even though 10 .
. .
c4 1 1 axb6
c3 12 Nb4 Nd4 must ultimately lead to a win for Black since
he will capture the b-pawns and then be two pawns up.
10
•••
h4!
92
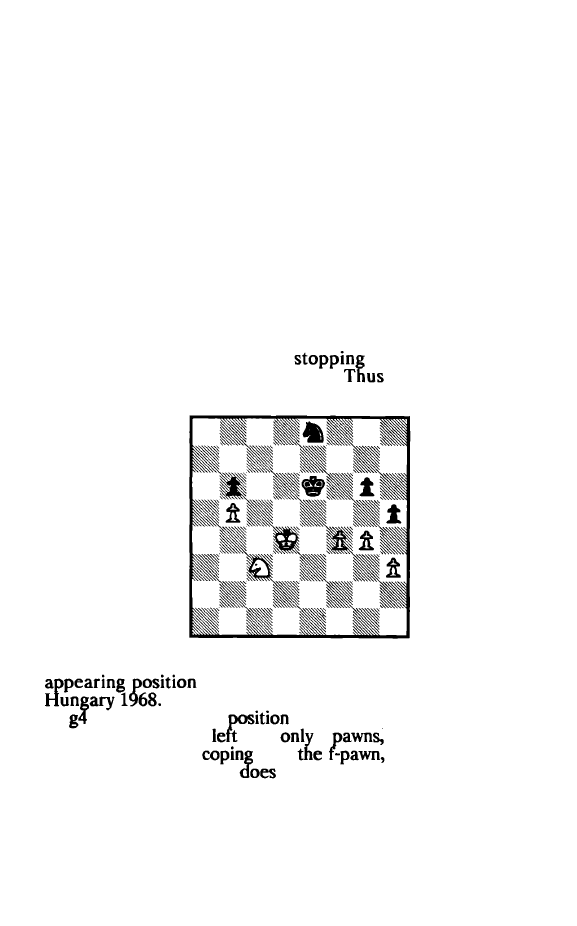
Either dissolving the doubled pawns or creating a
powerful passed h-pawn.
11 f4 exf4!
Unusual, but well thought out. White's resulting passed
f-pawn will be impotent, whereas Black will have two powerful
and widely separated passed pawns.
12 gxf4 c4! 13 Nb4
c3
14
Kt3
Nd4+ 15 Kg4 c2 16 Nd3?!
White overlooks the pretty response. Necessary is 16
Nxc2 Nxc2 17 Kxh4, though 17 ... Nd4 18 Kg5 Ne6+ 19 Kf3
Nc5 or 19 ... Nxf4 wins for Black.
16
.•.
NfS!!
White resigns.
White's King is tied to
the h-pawn and his
Knight is chained to the cl square.
Black's King can
unperturbed and decisively penetrate into White's position.
Diagram 54
White is fortunate that it is his move in the routine
of Diagram 54, L. Portisch -
G.
Barcza,
If Black would be on move, he would capture
on and the resulting
then is drawn for the following
reasons: (1) White is
with
3
(2) Black's King is
properly placed for
with
and (3) the weak
ness of White's b-pawn
not allow White's Knight to go
after Black's b-pawn since Black's Knight then attacks White's
93
pawn with ... Nd6.
To win, GM Portisch must come up with a non-routine,
beautiful and strategically well justified plan:
1 fS + !!
gdS
Not
is worse: l...Kn?! 2 gxh5! gxh5 3 Ke5!
(White has
a
passed pawn and a domineering
for nothing.) 3 ... Nc7 h4! Ne8 5 Nd5 and White wins
2 gxh5
White has created an outside passed pawn - the RP
the most difficult one for the Knight to stop - and will
use
time that Black's King needs to stop it, to activate his
own King and Knight.
2
•.•
Kf6 3 NdS + !
White must strike quickly less his advantage is gone.
Too slow is 3 h4?! f4! when Black has surprisingly
coun
terchances, e.g. 4 Ke4 Kg7! 5 Kxf4 Kh6 6 Ke5
and Black
holds.
3
...
Kg5 4 KeS! KxhS 5 Ke6 f4 6 Kd7!
Time continues to be of essence. Insufficient is the
6 Nxf4 +?!: 6 ...
7 NdS Ng7 + 8 Kd7 Nf5 9 Kc7 Nd4
Kxh6 Nxb5! 1 1
Kh4 12 Nf4 Kg3, with a draw.
6
•••
Ng7 7 Nxb6 NfS 8 Nc4
Compared to the previous note, White is a decisive
ahead on the queenside. This enables his b-pawn to live,
the Knight can get back in time to stop the f-pawn.
8
..•
Nd4 9 b6
Nb3
10 Kd6!
Preventing 10 ... Nc5( +) and sealing Black's fate.
94
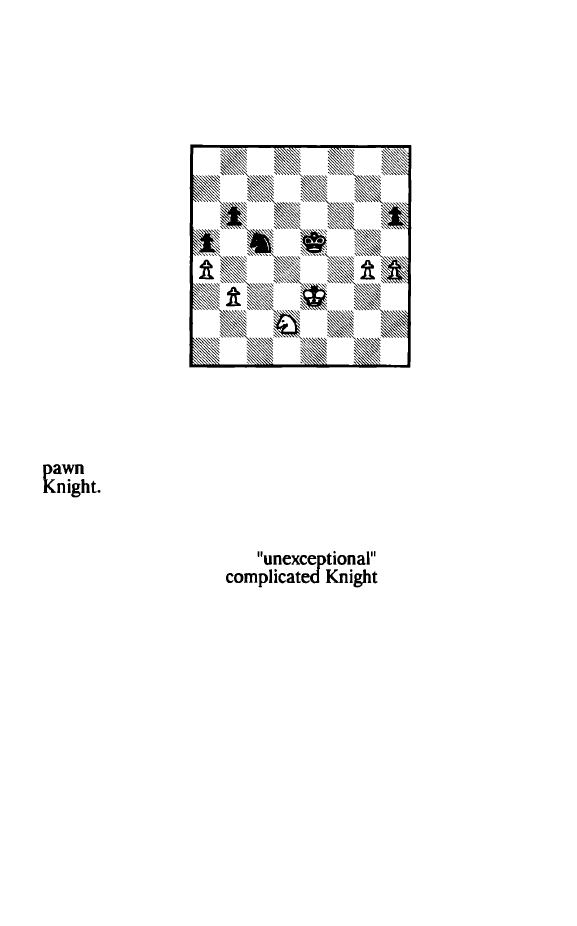
10
...
t3
11
b7 f2
12 Ne3 NaS
13 h8=Q
Nc4+ 14
Ke6
Nxe3
15
QeS+ Black resigns.
g3.
White picks off the f-pawn with a check either on f4 or
Diagram 55
The position of Diagram 55, R. Holmov - V. Moiseev,
Uzh�orod 1972, after Black's 42nd move, appears to be unex
ceptional. White is up a good pawn on the kingside, the queen
side is symmetrical with each side handicapped by a weak b
and at the moment Black has the more active King and
White's general plan is the usual one: create a passed
pawn on the kingside and while Black is busy stopping it, pene
trate Black's queenside to capture both pawns.
I
have selected this
position to demon
strate how exceedingly
endgames are. The
Knight is Just so versatile that both sides have many logical
possibilities to explore. To get even close to the truth, a
tremendous amount of work is required. GM Holmov has
published a detailed analysis of this ending in
Shakhmatny
Biulletin,
#5 of 1973 and I have made grateful use of some of
his work.
Even though White's general plan is apparent, he must
make a specific decision now: should he aim to crate a passed
pawn on the f- or h-file? And the answer is . . .
43 hS!
95
The h-file! the reasons are strategically clear: the h
is the more difficult one for the Knight to stop and if the
stopsjcaptures it, he will be one square farther away from
the queenside than if he had captures the g-pawn. Therefore
the text is superior to 43 g5.
43
..•
N
e6
I have chosen the text
as
the main line, because to me it
is the most rational defense since it aims to make the g5 break
more difficult to achieve. The two main alternatives are:
(1)
43
.••
Ke6
This is the game continuation. White won
as
follows: 44
Kd4 Nc7 45 Nc4 Nf6 [Here also there are two alternatives: (a)
45 ... Nc5 leads to a lost K &P endgame after
46 Nxa5 Nxa4 47
bxa4 bxa5 48 Kc5; (b) the activation of the
with 45 ... Kf6
46 Kd5 Kg5 also turns out to be insufficient:
Kc6 Nf6 (Or
47 ...
�48
Kxd7 Kxh5 49 Nxb6
50 b4!; or 47 ... Nc5 48
Nxa5!
4 49
Kxb6
Nd7+ 50
Kxh5 51 Nc6 Kg5 52 a5
Nf6 53 e7 Ne8 54 Kh6! and the a-pawn
48 Nxb6
Kxg4
is
48
..
.
Nxg4 49 Nc4 Kxh5
b4!
axb4
51 a5
b3 52
Ne5 + 53 Kc7 and again the a-pawn can't be
49 Nc4 Kxh5 50 b4! axb4 51 a5 b3 52 Nb2! Ne5 +
53
and again the a-pawn can't be stopped.) 49 Nc4 Kxh5
50 b4! axb4 51 aS b3 52 a6 Ng4 53 Nb2! Ne5 + 54 Kc7,
winning.] 46 Ne3! (With White's King in position to head for
b5, there is no reason to allow Black immediate counterplay.
Moreover,
46 ..
.
Kd6 is
because of 47 Nf5+ followed
by
48
Nxh6.)
46 ..
.
Kf7
Kc4 Nd7
48
Nf5! Ne5+ 49 Kb5 Nxg4
50
Kxb6
Ke6 51 Nxh6! (The culmination of White's plan start
ing with
46 Ne3!: Black is left without
and counterplay.
The slow
cannot
with
widely
51...Nxh6
Kxa5 Kd7 53 Kb6 Kc8
Ka7!
There is nothing to be done about the coming
advance the b-pawn.
(2)
43
••.
Nd7
Black protects the b-pawn, but allowing the g5 break
96

leads to a fairly routine loss:
44
Nf3+ Ke6 {After
44
.
.
. Kf6 45 Kd4 Black must either
allow immediate penetration by the
or
into the
main line with 45 ... Ke6.) 45 g5! hxg5
46
after
46 ... Kf6 White's King has a
route to the
47
Ne4+
48 Kd4! Kh6 49
b5!? 50
a4 51 bxa4
Nb6+
Kc6 Nxa4 53
and White wins.) 47 h6 Kg6
48
h7
Kg7 49 Kd4 Kh8 50
Nc5 51 Nf3! Kxh7 52 Nd2 (Now
that h is pawns are protected, White can crunch both of
Black's.) 52 ... Kg6 53 KbS Nd7 54 Kc6 Ne5 + SS Kxb6 fol
lowed by 56
KxaS,
winning.
44 Nt3+ Kf6
Without prospects is 44 ... Kd5?! 45 g5! hxg5 46 h6 Nf8
47 Nxg5.
45 Kd3 Nc7
Diagram 56
Black prepares to try to keep out White's King from
both b5 and d5.
The significant alternative is to go for a counterattack
with 45 ... Ng5. GM Holmov demonstrates the
forced
win against it:
46 Nd2 Nh3
... Ke5 47 Kc4 Kf4
48
49 Kxb6 KxhS (Or 49 ...
50 Kxa5 Kxh5 51 Kb6 Nd6
Nc4! etc.) 50 b4! axb4 51 aS Nf7 52 Kc7 and the a-pawn
cannot be stopped.] 47 Kc4 Nt2 48 Kb5 Nxg4 49
Kxb6
Ke6 {If
97
49 ... KgS, White's
gets to run: SO b4! axb4 51
aS
NeS
52 a6 Nd7+ 53
SO K aS Nf6 51 Kb6 N hS 52
aS
Nf4 53
a6 Nd5+ 54 Kb7 Kd7 SS a7 Nc7 56 b4! and White wins, since
Black is defenseless against he winning advance of the b-pawn
to b6.
46 Kc4 Ke6
g5.
Because of zugzwang Black has to allow either Kb5 or
47 gS! hxg5 48 NxgS+ Kf6
The win is
as thematic after 48 ... Kf5: 49 Nf3! Kf6
50 Nd4 Kg5 51
Ne6 52 Kd5 Nc5 53 Nd4 K h5 54 Kc6
Kg5 55
Kxb6
.
49 Ne4+ Kg7 SO Nc3! Kh6 51 NdS Ne6 52 Nxb6 KxhS 53
Nd7 KgS 54 NcS Nc7 SS Nb7 Kt'S
56
NxaS
White wins.
Section 5:
The Stronger Side Cannot Force (Create) A Passed Pawn
There can be a number of reasons why a passed pawn
cannot be forced under satisfactory conditions from a one
advantage
The two most important reasons are
location
King has the more active loca
and pawn configuration (the
side's pawns are
backward, blockaded or partly
doubled). This sec
tion will consider four thematic situations.
The following important principle should always be
remembered:
if the stronger side cannot turn its one pawn
advantage into a useful passed pawn, its winning chances are
significantly reduced. Often there is no win.
Our first
Diagram 57, K. Regan - M. Rohde,
New York
International 1977, after
Black's 49th move, shows Black handicapped by both of the
factors mentioned above. Clearly, White's Kin� is the more
active one in getting to the queenside. Black's Kmg is also too
98

far back at present to expect to penetrate White's
Moreover, to create as passed pawn on the queenside,
will have to break with ... b3, thereby sacrificmg a pawn. The
silver lining here is that the resulting passed c-pawn will be a
far advanced one and this prevents White's
from wander
ing too far afield. My over-all evaluation is:
has fair
practical drawing chances, but Black probably has a theoretical
win.
Diagram 57
50 Ke2
Both necessary to prevent the threatened SO ... b3 and
desirable
so
that the King can head for c4.
50
•.•
Nc6
After the more active SO ... NdS, White does best
being active himself: 51 Kd3! (51
weakens the
Sl...Nf4 + 52 Kc4 Nxg2 53 Kxb4
54 Kxc3 Nf3
Nxh2 56 KdS and the passed c-pawn should give sufficient
counterchances to stymie Black on the kingside.
51 Kd3 NeS+
There seems little
in
White's King for
ward. More to the
is
e.g.
Kc4 Kf6, when 53
KcS?? is refuted by ... b3.
52 Kd4 fS 53 Ne8+
99
White correctly aims to use his Knight to go after the b
pawn. Of course, 53 Kxe5?? fails to 53 ... b3.
53
..•
Kf7
Though at first �lance the text appears to be less active
than 53 ... Kh6, centralizing the King is the more logical ap
proach.
S4 Nc7 Ng4?
But tradin� off the queenside pawns for just the h-pawn
is a bad bargain smce Black risks winding up with a theoretical
ly quite drawn ending.
The correct plan is to hold on to the queenside pawns
for as long as
starting with 54 ... Nc6 + !. For example:
55 Kc4 Kf6!
NdS+?! Ke5 57 Nxb4 Nxb4 58 Kxb4 Kd4! 59
g3 Ke3 ! ! 60 Kb3! (60 Kxc3? loses to 60 ...
61 h4 gxh4 62
f4 63 h5 f3 64 h6 f2 65 h7 fl =Q
h8=Q Qal + fol
by 67 ... Qxh8.)
60
... Ke2! 61 Kb4! Kd2 62 Kb3
63 h4
64
f4 65 h5 f3 66 h6 f2 67 h7 fl = Q
h8 = Q
Ka3 Qb2+ 70 Ka4 Qxc2+ leads to a won Q & P
endgame.
Therefore, White would have to vary with 56 Na6 Ke5
57 Nc5 or even earlier with 55 Kd3. However, in either case
Black keeps realistic winning chances.
SS Nd5!
Correct and clearest. though White also draws with 55
Kc4 Ne3+ 56 Kxb4 Nxc2+ 57 Kxc3 Ne3
Nfl 59 Kd3!
Nxh2
60
Ke3. However, wrong is 55 h3? b3!
Kxc3 bxc2 57
Kxc2 Ne3 + 58 Kc3 Nxg2, when Black has marvelous winning
chances because the f-pawn is passed and White's h-pawn quite
vulnerable.
ss
...
b3 56 Kxc3 bxc2 57 Kxc2 Nxh2
ss
Kd2!
As already discussed in Chapter 3, Section 2, normal
positions of N + 2P
vs.
N + P with all pawns on the same side
100
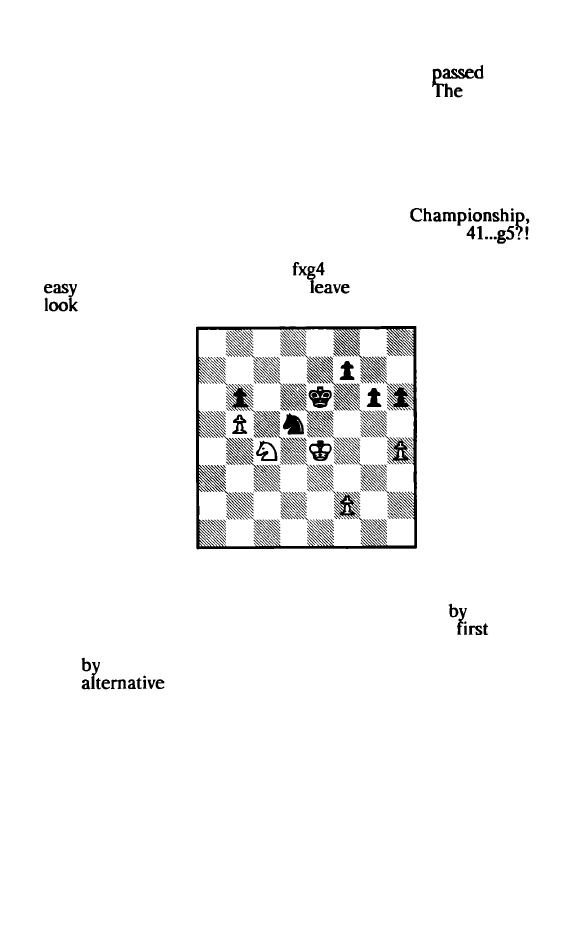
are fairly easy draws. Here, White has no difficult in protect
ing the g-pawn, while Black can't hope to create a
pawn
except by the routine exchange of a pair of pawns.
position
is drawn.
SS
..
.gS 59 Ke2 Ke6
60
Ncl KeS 61
Kf2
Kd4 62 NbS+ KdS 63
Nc7+ KeS 64 Kg3
Draw.
Routine play will not work for Black from Diagram 58,
A. Sznapik
-
0.
Romanishin, World Student
aracas 1976, after White's 41st move. For instance,
42 hxg5 hxg5 43 f3 f5 + 44 Kd4 leaves Black with no viable
follow-up, e.g. 44 ... g4 45 fxg4
46 Ke4 allows White an
draw. Therefore, Black must
the kingside alone and
for other plans.
Diagram 58
Black's particular problem is that there is only one
White pawn available for capture on the queenside and,
moreover, Black's b-pawn is vulnerable to an attack White's
Knight. There are two viable plans for Black. The
is to
simply exchange off the b-pawns and aim to win on the king
side taking advantage of the weakness of White's h-pawn.
The
is to head for the queenside while leaving the
kingside pawns as is. In either case, Black's first move is the
same:
41
•••
Nc3+ 42 Kf4
The passive 42 Kf3 makes little sense, because after
101
42 ... Nxb5 43 Nxb6 Nd4+
44
Kf4 h5! (45 Kg5? Nt3 +) the best
that White can achieve is the game continuation.
4
2
•..
NxbS
An interesting practical and psychological moment,
because Black ch
ooses
the line which entails zero risk for him
while, he hopes, still retaining sufficiently realistic pros cts for
the win. Theoretically, the more ambitious 42 ... Nc4!?
stronger: 43 Ke4 f6! ( 43 ... h5 44 Kf4 Kd5 45 Ne3 +
46
Ke5 allows White
44
Kf4 Kd5 45 Ne3 + Kc5
46
Kxb5 47 Nxf6 Kc4
Ne4 and now 48 ... Kd5 ! keeps
King out, while preparing the b-pawn's advance.
43
Nxb6 Nd4 44 Na4 NfS
4S
Kg4 Kf6
Now there are two alternatives:
(1) 46 hS??
=
Game continuation.
This is just horrible because on h5 the pawn will be in
imminent danger of going lost for nothing.
46
•.
.g5 47 NcS Ng7 48 Ne4+ KeS 49 Nxg5
Fails for a simple tactical reason, but the "normal" 49
Ng3 leads to an elementary prosaic loss of the h-pawn: 49 .. .f5 +
50 Kf3
f4 51 Ne2 Nxh5.
49
.••
hxg5 SO KxgS
Or 50 h6 Ne8 when 51 h7? is refuted by 5l...Nf6+.
so
...
Ne6+
st Kh6 Kf6 s2
Kh7 Ng7!
Black is setting up a zugzwang position.
53
h6
NfS 54 f4 Ke6
White resigns.
Zugzwang is here and the h-pawn goes lost.
(2) 46 NcS
=
Correct continuation.
102
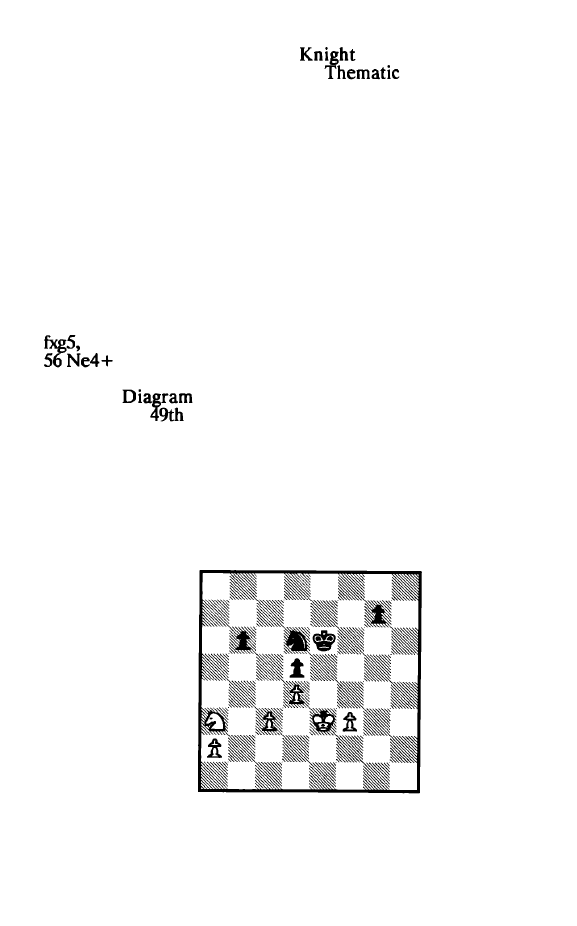
White should bring the
back, create no new
weaknesses and hope for the best.
play now would
be:
46
...
b5+ 47 Kh3 KeS 48 Nd3+ Ke4 49 Net
f6
49 ... Kf4 50 Nd3 + Kf3? allows 51 Ne5+.
50 Nc2 Kt3 5 1
Nb4
Ne7!
White has a sure draw after 51. .. Kxf2? 52 Nd5 g5 53
Nxf6 g4 + 54 Nxg4.
52 Nd3
with continuing drawing chances for White.
After 52 ... Ke2, White has 53 Nc5!; after 52 ... g5 53 hxg5
White plays 54 Kh2!, when 54 ... Ke2 55 Nc5 Kxf2? allows
followed by 57 Nxg5.
In
59,
V.
Korchnoi - B. Spassky, Sochi 1966,
after Black's
move, White's chances are poor for turning
his extra pawn on the queenside into a viable passed pawn. In
addition, White's pawn configuration is just too inflexible to
directly accomplish anything by pawn advances. Therefore,
White should leave his pawns alone and aim first for penetra
tion into Black's side of the board. Sophisticated King and
Knight maneuvers will be required to make progress.
GM
Korchnoi's maneuvering - utilizing the whole board - is of the
highest order.
Diagram 59
103
Since White's
is poorly placed on the edge of the
baord, the first step
be to get it centralized:
50 Ne2! g5 51 Kd3 b5?!
A
controversial move. On the one hand, it prevents a4
and
much ensures that Black's two pawns can hold back
White's
pawns on the queenside; on the other hand, the
b-pawn becomes now much more vulnerable to an attack by
White's King. In such unclear situations, the guiding spirit
should be the rule of thumb which says: 11Don't touch a pawn
unless there is a very good reason for it, because you can't
move it back!11 Because the text violated this 11rule11, I have
attached the dubious mark.
52 Ne3 Nt7 53 Kc2
With White's King & Knight well centralized, the next
question is where to try to penetrate. Obviously the first logical
choice is the queenside. Recognizing White's plans, Black send
his Knight to defend.
53 ... Nd8! 54 Kb2! Nc6 55 Kb3
The bit of triangulation on moves 54 and SS by White
has caused Black to now be on move. To
immediate
Black's
is forced, giving
time to rede
ploy
Knight
having to worry about penetration by
Black's King.
55 .. Kd6 56 Ndl Ke6 57 N£2.
Kf6
Black is in no condition to play S7 ... KfS 58 Nd3 g4?
because White wins easily after 59 fxg4+ Kxg4 60 NeS + NxeS
61 dxeS KfS 62 Kb4.
58 Nd3
What has White accomplished by
his apparently
well placed Knight from
e3
to d3? Well, it
well on
e3,
but
104
had no prospects for further meangful action. From d3 it can
head into Black's position via b4, c5 or
e5.
58 ... Ke6 59 Kb2 Kd6
60
NcS NaS 61 Kcl!
White is
the possibilities for King penetration
on both sides
so
that Black finds it impossible to cope with
all the threats. If now 6l...Nc6, White has 62 Na6! Na5
63
Kd3
Nc6 (63 ... Ke6? loses to
64
Nc7+ .)
64
Ke2 Ne7 65
Kf2
Nf5 66
Nb4 Ke6 67 Nc2! Kd6 68 K�2 Ke6 69 Kh3 when Black will
not be able to
out White's
while simultaneously
the
b- and d-pawns.
example, 69 ... Nh6
the
after 70 Na3 - one more example of the faults
in 5l...b5?!.
Convinced that passive defense is hopeless,
GM
decides to activate his Knight. This, however, allows
King to get to the curcial b4 square.
6l
..•
Nc4 62 Nd3! Ke6
By now it's too late for the
to try to return:
62 ... Na5 63 Ne5! Ke6 64 Kb2 Kf5 65
Kf4 66 Kb4 and
White wins. Thus Black's King immediately heads for the
Kingside.
63 Kb3! Nd2+
64 Kb4 Nbl
Perhaps a bit of a better
practical
try is 64 ... Nxf3?! as
then the immediate 65 Kxb5?! allows 65 ... g4! with excellent
counterchances. Instead, White needs to first play 65 Nt2! and
only then capture the b-pawn.
65
Nf2. Kt'S 66 Nb3
White plans to protect the c-pawn just long enough to
be
able to take off the b-pawn and start the a-pawn on its run.
Passive play by Black is
hopless, e.g. 66 ... Kf6 67 Ngl Kf5
68 Ne2 Nd2 69 Kxb5
70 a4 etc. Black, therefore, sends
his King into White's position, even at the cost of giving up any
dreams of having a passed g-pawn.
105
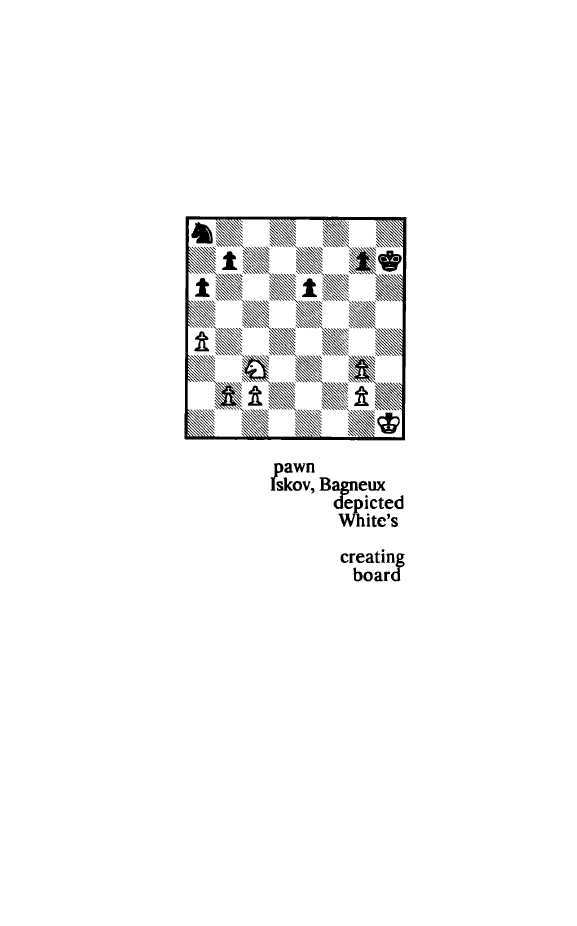
66
..
.g4 67 fxg4+ Kxg4 68 Nfl+ Kf3 69 Ndl Ke2 70 KxbS!
The key, ever since
64
Kb4, has been to turn the a-pawn
into a tiger. The text enables this; the next move ensures it.
70
•..
Kxdl 71 Kb4! Kc2 72 a4
Black resigns.
The a-pawn can't be stopped: 72 ... Nxc3 73 aS Ne4 74
a6 Nd6 75 a7.
Diagram 60
Another unbalanced
configuration is shown in
Diagram 60, A. Adorjan - G.
1975, after Black's
25th move. The kind of situation
happens often
enough to be considered important.
extra pawn is in
the form of a normal 3P
vs.
2P queenside majority, though
without any near term prospects of
a passed pawn
therefrom. On the other side of the
the pawn story
seems to be all Black's: a passed e-pawn while his g-pawn can
handle both of White's g-pawns.
Therefore dynamic factors become the significant ones.
Black's King is shunted off to one corner of the board and his
Knight misplaced on exactly the other corner. As soon as
White activates his Knight, various Black pawns will be in
trouble:
26 Ne4!
With a powerful central location: the Kni ht threatens
106
to go to g5 to
the e-pawn and to c5 to menace both the
h- and e-pawns.
has to give.
26
...
Nc7?!
As so often happens in an actual game, the defender
chooses a line wherem he has some counterchances - here
coming from holding on to the e-pawn. Nevertheless, the cost
is very high: White obtains a 3P vs. P queenside majority and
Black's a-pawn remains vulnerable. Better chances for a draw
were to be had with the defensive and
26 ... b5! 27
axb5 axb5 28 Ng5 + Kg6 29 Nxe6 Kf6 30 Nd4
The small
number of pawns remaining and the offensive impotence of
White's extra g-pawn mean that White faces serious technical
difficulties in realizin� his material advantage. Moreover, it is
Black who has the acttve King, e.�. 31 Kgl Ke5 32 Nt3 + Ke4,
making White's task even more difficult.
27 aS!
Black's queenside thwarts
defense
based on ...
White again threatens 28
28 Nd6) and
the only way to save the
is 27 ... Nb5 28 Nc5 Nd6,
allowing the e-pawn to go.
is reluctant to part with that
pawn because his dreams of counterplay would be dashed.
Nevertheless, it was the right decision.
27 ... Kg6?! 28 Nd6
Kf6
29 Kgl! KeS 30 Nxb7 Kd4 31 Kf2 g6
The bankruptcy of Black's 11COunterplay11 strategy is
demonstrated by the choice of the text move. Black has no
meaningful way of pressing an attack and therefore satisfies
himself in
the g-pawn against a potential Ne6 +
(e.g. 3l...Nd5 32 Nd8
33 Ne6+ )
.
32 Nd8 eS 33 Nc6+ Ke4 34 c4
Keeping Black's Knight away from both b5 and d5. It
has to search for longer routes now.
34
•..
Ne8 35 Ke2!
107
The centralized King blockades the passed pawn and
keeps Black's King out of the queenside.
3S ... Nd6 36 b3 NfS 37 g4 Nh4
Runs into a pretty refutation. Black had
satis
factory, anyway. The K & P
after 37 ... Nd4+
Nxd4
is hopeless and 37 ...
38
Kf4 allows White to choose
between 39 Ne7, 39
and 39 b4.
38 Nxe5!
Black resigns.
His Knight gets trapped after 38 ... Kxe5 39 g3 Ng2 40
Kf2.
108
Part
11
Positional Considerations
Of course, position consideration also exist in situations
where one side has a material advantage - as demonstrated in
many of the examples in Part I. Nevertheless, the controlling
element in Part I was having a material advantage. In this part
the key feature is sitional in nature.
Because the Knight is a short range piece, there is one
major difference between Knight endgames and those of other
pieces: the increased
of passed pawns. Therefore a
considerable amount
will be spent on passed pawns
and this is the first subject to be considered.
109
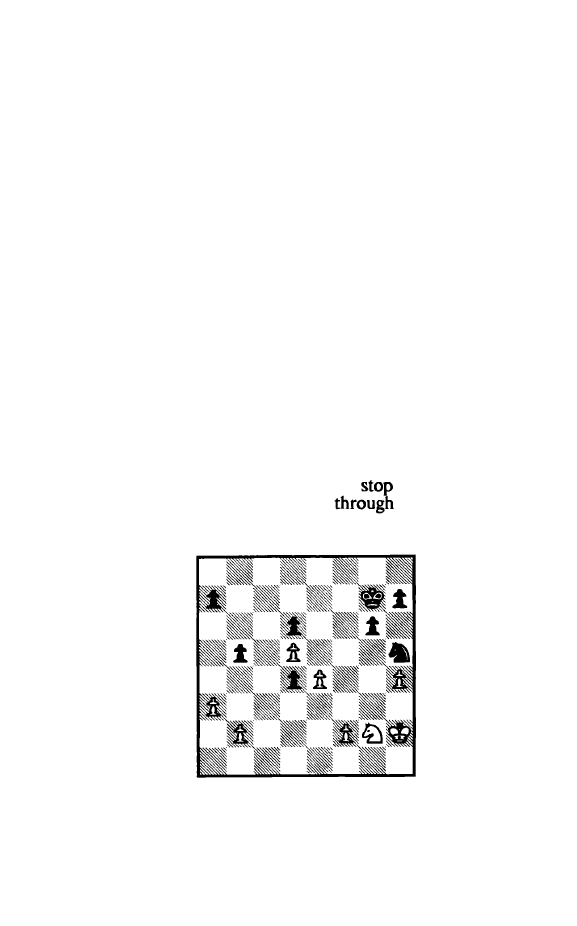
CHAPTER
5:
PASSED PAWNS
Section
1:
The Role of Passed Pawns
•
General Considerations
The Knight's characteristics have both a good side and a
bad side in endgames with passed pawns:
Good side
=
Because of its flexibility, the Knight can control
any square in front of its passed pawn and thereby help it
advance.
Bad side
=
Because it is a short range piece, the Knight cannot
help its passed pawn advance unless it already is close to it;
correspondingly, the Knight has great problems in catching up
to a far advanced enemy passed pawn.
The two general situations are: 1.) only one side has a
passed pawn, II.J both sides have passed pawns.
I. Only One Side Has A Passed Pawn
If the passed pawn is secure and the defenders are not
near, this gives excellent winning chances. Apart from the
obvious situation where the pawn queens by force, what often
happens is that as the defenders rush to
the passed pawn,
they are forced to leave open a road
which the enemy
forces can infilitrate decisavely into another part of the board.
Diagram 61
1 10

An excellent
is from Diagram 61
,
P. Benko - S.
Tartakower, Budapest
after Black's 39th move. Black's
pawn on d4 is isolated and may appear 11Sickly11, yet
pieces are not in a position to effectively cope with it.
Black scored an instructive win as follows:
40 Nel
Getting ready to blockade on d3. GM Benko's Analysis
shows that the alternatives are no better:
a) 40 f4
d3
41 e5 Nxf4! 42 exd6 Kf7 43 Ne3 d2 44 Kg3
Nxd5 45 Ndl Ke6 and Black wins.
b)
40
Kh3 Kf6 41 f4 Nxf4 + ! ! 42 Nxf4 Ke5, when 11White's
chances look dim11 (Benko ).
40 ..
.
Kf6
41 Nd3
The logical follow
to the
move. There is
little point in 41 Nf3 d3
Kg2
43 Kfl h6!
44
Kel
Nh3! 45 b3 g5 46 hxg5 + hxg5 47 Kd2 g4 48 Nh2 Nxf2
with a routine win (Benko ).
41 .. .g5!
Black must work to infiltrate with his King or alterna
tively create two widely separated passed pawns. Thus Black
wins routinely after both 42 Kh3 Nf4 + 43 Nxf4 gxf4 44
d3 45 Kf3 Ke5 and 42 hxg5 + Kxg5 43 e5 (otherwise
... Nf4 wins) 43 ... dxe5 SS d6 Nf6 4S NxeS KfS ( 46 d7
Nxd7!) etc.
42 Kg2 gxh4 43 f4
White hopes to build an impregnable wall, but Black
demonstrates that the ultimate key to the position is his passed
d-pawn.
43
•.•
b3+ !
44
Kxh3 Nxf4+!
45
Nxf4
KeS 46 Kg3
Kxe4 47
Ng2 KxdS
Black already has three
for the piece and
White's Queenside remains
For instance,
48
b3
1 1 1
d3 followed by 49 ... Kd4. White's King cannot help the Knight
on the Queenside as then the h-pawn will run. Whtte is lost.
48 Kf3 Kc4 49 Nf4 Kb3 50 Nd3 d5 51 Nb4 Kxb2 52
Nxd5
Kxa3
53 Nc7 Kb4! 54 Ne6 Kc3 55 Nc7 Kc4
Black
won. The last moves are not available. A likely end could be
56 Na6 b4 57 Ke2 b3 58 Kd2 d3 59 Kcl h5 etc.
Even when the defenders are well pleased, the passed
pawn is usually a tangible advantage. Consider now Dtagram
62,
L.
Polugaevsky
-
H.
Mecking, 1977 Match, Game 1 1, after
Black's 39th move. While the d-pawn
can
be
securely blockad
ed, Black has potential infiltration routes via b4 and f4. White
therefore must defend very carefully. The first step is to block
ade on d3:
Diagram 62
40 Nc5! Kd6 41 Nd3!
White played this move quickly, thus
Black to
seal his response. This was to be a most difficult
as
Black has at least four reasonable moves. Moreover, the nature
of the position is such that the variations cannot
be
calculated
to a conclusion in the very limited time (1 hour) available.
Thus, Black has to rely mostly on his intuition. GM Polugaev
sky's second, GM Vladimir Bagirov, had to
do
the heavy analy
sis work during the adjournment and has published his find
ings. What they show is that the ad
j
ourned
is extreme
ly complicated. What I will be givmg is
main lines of
Bagirov's work.
1 12

41.
••
Nc6!
The extensive analysis showed that the text is the best
way to retain winning chances. The logical alternatives are: 1)
41
• . .
Nxd3?!
was the game continuation which led to a rather
clearly drawn K & P
42 Kxd3 Kc5 43 aS! Kb4 44
Kxd4 Kxb3 45 Kd5
46
a6 Kb5 47 Ke6 Kxa6
48
Kxf6
h6 49 Ke5! Kb5 50 f4! gxf4 51 Kxf4 aS 52 Ke3 Kc5 53
h4 Kd5 54 Kd3 Ke5 Draw.
2)
41
••.
Na2:
42 Kd2 43 Kc2 a5
44
Kb2 Nc3 45 Kc2 Ne2
46 b4! Ng1 47 bxa5 Nxf3 48 Nb4 + Kc5 49 a6 Kb6 50
Nd5 + Kxa6 51 Nxf6 Nxh2 52 Kd3 Ka5 53 Kxd4
Kxa4 with equality, as the Kingside pawns will also soon disap
pear.
3)
41.
••
NdS:
42 Nf2 Kc5! 43 Ne4+ Kb4
44
Kd3 Kxb3 45
Kxd4 Nf4 46 aS! Kb4 47 a6 Kb5 48 Nxf6 Kxa6 50 Kc4
with equal chances. Because of his active position, White's
King is well placed to cope with the a-pawn, while the extra
Kingside pawn gives White couterplay on the Kingside.
The
practical
of course, is how to
select
from the maze
possibilities as Black's best
move.
As
Bagirov's work has shown, there is no real substitute
for time and effort. Yet when in doubt, stick to basic principles:
on
c6
the Knight is centrally placed while protecting the valu
able passed pawn.
42 Nfl KcS! 43 Nd3+
White must first practice defensive measures, since 43
Ne4 + ? Kb4 44 Kd3 Kxb3 45 Nxf6 h6! 46 Ng8 Kxa4 47
Nxh6 Kb3! leaves Black's
too active, compared to both
the variations after 4l...Nd5
the later main line.
43 ... KdS
44
Nf2 aS! 45 Ne4 h6!
46
Nxf6+ KcS 47 Kd3
Kb4 48 Ng8
Since in the long run the situation on the Queenside is
hopeless, White must create courterchances on the Kingside.
113
48
••.
Kxb3 49
Nxh6
Kxa4
SO
Nf7
Kb3 51
NxgS
a4 51 Ne4
Nb4+ !
White is safe after 52 ... a3 53 Nd2 + : 53 ... Kb2? ! 54
Nc4+; 53 ... Kb4 54 Kc2. Therefore, Black plays out his major
trump: since the
RP
is the most difficult pawn for the Knight to
stop, Black ainns to mobilize it
as
quickly
as
possible.
53 Kxd4
a3
Diagram
63
The obvious 54 Nc3? does not lose to the
54 ... Nd5? (with the idea 55 Nxd5 a2) because of 55 g5!
56
Instead, the prosaic 54 ... Nc6+ 55 Kd3 Ne5 + 56 Kd4
+ 57 Kd3 Ne5 + 58 Kd4 Nxg4 does the job, e.g. 59 h4
Nf6 60 Kd3 Nh5 61 Kd4 Nf4 etc.
Therefore, White's defensive plan must be much more
sophisticated:
54 Ndl + ! Kcl 55 Kc4!
a1 56 Nb3
N
c6! 57
N
a
l + !
There is no other defense to the threatened 57 ... Na5 + .
With the text White uses a well known method in defending
against the RP: he sacreifices the Knight to imprison the
stronger side's King.
57
..•
Kbl 58 Kd3!
NeS+
59 Kdl
Nxf3+ 60
Kdl Kxal
61
Kcl!
Drawn
1 14
Black's Knight cannot deny simultaneously both cl and
c2 to White's King. This exact position is drawn even without
the Kingside pawns -
see
Diagram 1 !
11.
Both Sides Have Passed Pawns
The main line play from Diagram 62 could
be
considered to have been an introduction to the situation
both sides have passed pawns. Now I shall consider "purer"
Because Knights are slow movers, the most tmpor
tant
in
where both sides have passed pawns
becomes how
advanced the respective passed pawn is. In
other words, the side with the further advanced passed pawn
has the advantage.
Diagram
64
The first instructive example is Diagram
64,
Domont - I.
Rogers, Biel
1 1
1983, Black on move. The locations of the
respective a-pawns look unreal, but are quite genuine. Because
Black's a-pawn is ready to queen, White's Knight is much more
tied to its passive location than is Black's Knight. Moreover,
Black's King can get at the enemy passed pawn faster than
White's King can do the same. This factor liberates Black's
Knight for the important offensive duty. Black won as follows:
l
..
Kd6! 2
Kg6
Kc7 3
Kxf6
Nxc3 4 Ke7 Ne4 5 a7
After 5 f6 Nxf6 6 Kxf6 Kb6 7 Kf5 Kxa6 8 Kf4 Kb5
Black's
gets decisively into White's
9 Ke3 Kc4
10 Na1
1 1 Ke2 Kxd4 (not
of 12 Kd2!
1 15
Kxal 13 Kcl - the same motif as in the
example) 12
Kd2 Ke4! 13 Kc2 d4 14 Kb2 d3 15
Ke3 16 Kxa2 d2
17 Nxd2 Kxd2 18 Kb3 Kd3 19 Kb4 Kd4 20 Kb3
cS
21 Kc2
Kc4 and Black wins.
S
..•
Kb7 6 Kd7 cS!!
Ensuring that Black remains with the
ensures
the win. White draws after 6 ... Kxa7? 7 Kxc6
8 Kb5 or 8
Kd6.
7 dxcS Kxa7 8 c6 NcS+ 9 NxcS
to GM Ro�ers, White's best try was 9 Kd6!
Nxb3 10 c7, but
still wms after 10 ... Kb7! 1 1 Kd7 Nc5 +
12 Kd8 a1 = Q 13 c8=Q+ Kb6.
9
..•
a1 =Q 10 c7 Qg7+ 11 Kd6 Qf8+ 12 KxdS QxfS + 13
Kc6 Qc8 14 Kd6 Qe8 15 Na4 Kb7
White resigns
A far advanced passed pawn can easily outweigh the
material disadvantage of a pawn. This is well illustrated from
Diagram 65, A. Sydor - I. Dorfman, Warsaw 1983, after Black's
54th move. White has an extra pawn and two passed pawns, but
Black's far advanced passed pawn is full compensation. Play
continued:
Diagram 65
SS c4
1 16
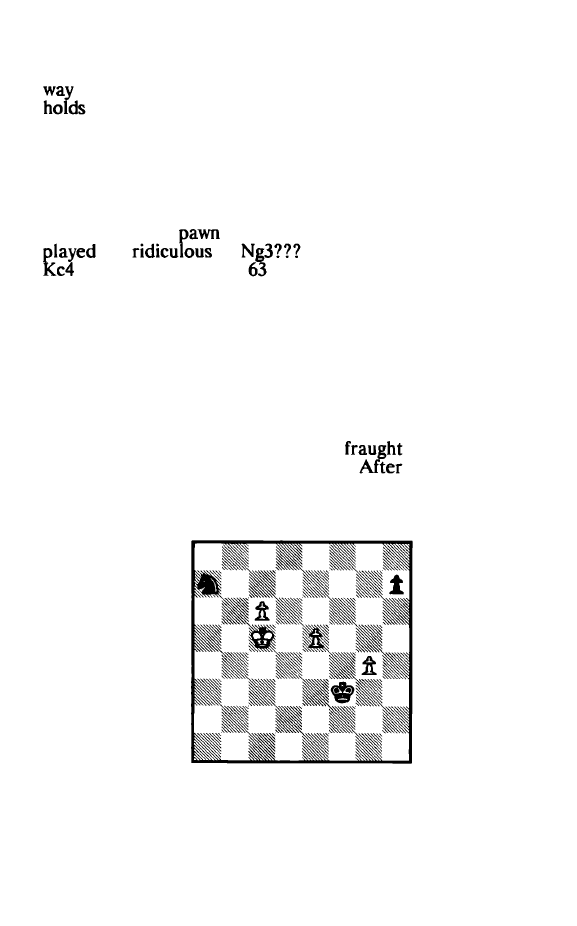
Short of time, White decides to mobilize both of his passed
pawns. This should have been sufficient to draw, yet a simpler
is given by GM Dorfman: 55 Kb3 Ke5 56 Kc2 and White
after both 56 ... Nxe4 57 Nxe4 Kxe4 58 Kd2 Kf4 59 Ke1
Kxg4 60 Kf2! h5 61 c4 h4 62 c5 and 56 ... Kf4 57 Kd2! Kg3
58 Kel.
55
•••
Kc5 56 Kb3 Kd4 57 cS Ne6! 58 c6 Ke3 59
Nbl t2 60
Nxfl
The nasty
must be eliminated. In the game White
the
60
and lost after 60 .
.
. Nd4 + 61
Nxc6 62 Kd5 Kf4!
Nfl Ne5 64 g5 Nf3 65 e5 Nxe5
66 Kd4 Nn White resigns.
60
...
Kxf2
61 Kc4
KB
There are no winning chances after 6 l . .. Ke3, e.g. 62
Kd5 Nc7 +
63
Ke5 followed by 64 Kf5.
62 Kd5 Nc7+ 63 Kd6 NbS+
64
KcS Na7
The only try for a win though
with some risk,
since the Knight is placed on the edge.
64 ... Nc7, White
draws with 65 Kd6 or 65 e5.
6S e5
Diagram 66
This endgame shows off the great difficulty that the
1 17
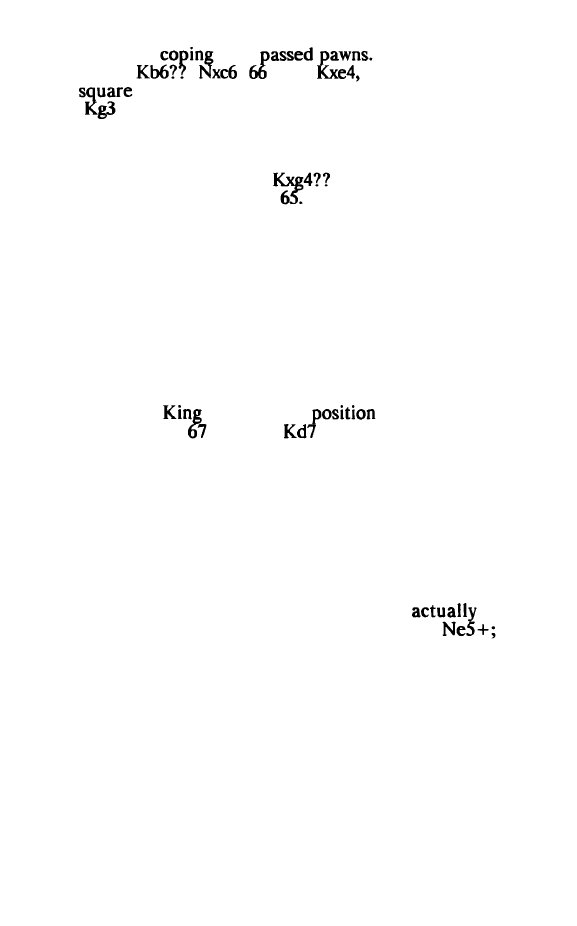
Knight has in
with
Instead of the text
losing is 65
Kxc6
since White's King is
one
too far away after 67 Kc5 Kf4 68 Kd4 Kxg4 69
Ke3
70 Ke2 Kg2.
6S ... Nc8
Black loses after 65 ...
66 Kb6 Nc8 + 67 Kc7
Ne7 68 Kd7, as he does after
.. Kf4 66 Kd6 Nxc6?? 67 e6!
since 67 ... Na7 is met by 68 Kd7 and 67 ... Nd4 by 68 e7 as Black
lacks the check on f5. Instead of 66 ... Nxc6?? the draw can be
retained with 66 ... Nb5 + 67 Kc5 or 67 Ke6.
66
KdS!
But not 66 e6?? Kxg4 and Black wins because White's
King cannot penetrate fast enough.
66
... Kxg4 67 Ke6 KgS!
Black's
must be in a
to help stop the e
pawn. Losing are ... h5? 68
Nb6 + 69 Kc7 Nd5 + 70
Kd6 as well as 67 ... Kf4? 68 Kd7 Nb6+ 69 Kc7 Nd5 + 70 Kd6
Nb6 71 e6.
68 c7
Simplest, though White also draws with 68 Kn h5 69
e6 h4 70 e7 h3 71 e8+Q Nd6+ 72 Kf8 Nxe8 73 Kxe8 h2
74 c7.
However, the routine 68 Kd7? now
loses:
68 ... Nb6 + 69 Kc7 Nc4!: (a) 70 e6 Kf6 71 Kd7
(b)
70 Kb7 Kf5! 71 c7 Kxe5 72 c8+Q Nd6+; (c) 70 Kb8 Nxe5 71
c7 Nc6+ 72 Kb7 Ne7.
68 ... hS 69 Kd7 Nb6+ 70 Kc6 Nc8 71 Kd7
71 e6?? Kf6 wins for Black as he then has ... Ne7, block
ading and winning.
71 ... Nb6+ 72 Kc6
Draw
1 18
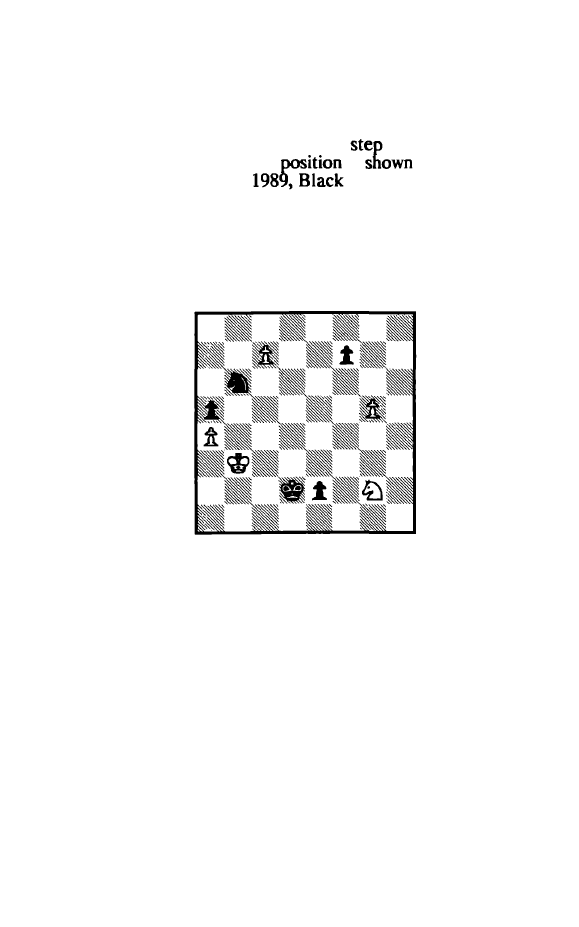
Neither side can afford to avoid the move repetition.
The play from Diagram 66 was a wonderful example of the
role of the Knight in coping with passed pawns.
The ultimate endgame with far advanced passed pawns
is when both sides have the pawn one
away from queen
ing. A wonderfully instructive
is
m
diagram 67,
Dudkin - Gofman, USSR
on move. It is true that
Black's passed pawn is ready to queen, whereas White's lacks
the support of the King to do
so.
Yet the c-pawn is a tremen
dous power also and Black may not underrate it. I shall first
look at Black's immediate promotion and then the much more
sophisticated, correct plan. My work is mostly based on GM
Vladimirov's published anaylsis.
Diagram 67
A)
Black
rushes
to
queen: l. .. el =Q? 2 Nxel Kxel 3 Kc3
White's King now is liberated and this gives just enough
counterplay to draw.
3
•..
NdS+
The draw is simpler after 3
.
.. Nxa4+ 4 Kc4 Nb6 + 5
KbS Nc8 6 KxaS Ke2 7 KbS! Ke3 8 Kc6 Kf4 9 Kd7 Na7
10 Ke7 KxgS 1 1 Kxf7
.
4 Kc4 Nxc7 S KcS
White's pride and joy has gone lost, but the new theme
1 19

of the Knight being a short distance piece and having particu
lar problems with passed RPs allows White to achieve the
draw.
s
...
Ke2
There is no time for 5 ... Ne6 + 6 Kb6
ecause
after 7
Kxa5
Ne4 8 Kb6 Nd2 9 KcS f5 10 aS!
+ 1 1 KdS
NxaS 12 Ke5 Black's pawn goes lost.
6
Kb6
NdS+ 7
KxaS
Nc3
White's King is also fast enough after 7 ... Ke3 8 Kb5
Nc3 + 9 Kc6! Nxa4 10 Kd6 Kf4 11 Ke7.
8 Kb6! Nxa4+ 9 Kc6 Nc3 10 Kd6 Ne4+ 11 Ke7 NxgS 12 Kf6
Draw
B) Bringing about zugzwang starting with
l. ..
Kd1!
=
Game
continuation
Because 2 Ka3 now or later allows Black to queen with
White's King misplaced, Black starts triangulating with his
King
so
as to put White's Knight in zugzwang.
2 Ne3 +
Hopeless is 2 Kc3 because of 2 ... Nd5 + 3 Kc4 Nxc7 4
Kc5 Ne6 + 5 Kb5 Nf4! - the e-pawn is much more valuable
than either White's or Black's Knaght.
2 ... Kcl
3
Ng2 Kd2 4 Nh4 Ke1!!
-See Diagram 68 on the
next page.
Only so. The materialistic 4 ... e1 =N? 5 g6 hxg6 6
Nxg6 Nc8 7 Kc4 allows White to capture Black's last pawn.
The game comtinuation was 4 ... Kcl 5 Ng2 Kd l 6
Ne3 + Ke1? (Black could still
into the winning line with
6 ... Kcl 7 Ng2 Kd2 8 Nh4
7 Nd5!! Nc8 8 Nf4 Nb6 9
Nd5. The game was now called a draw, though Black could
have continued to play on without risk. Nevertheless, with
120
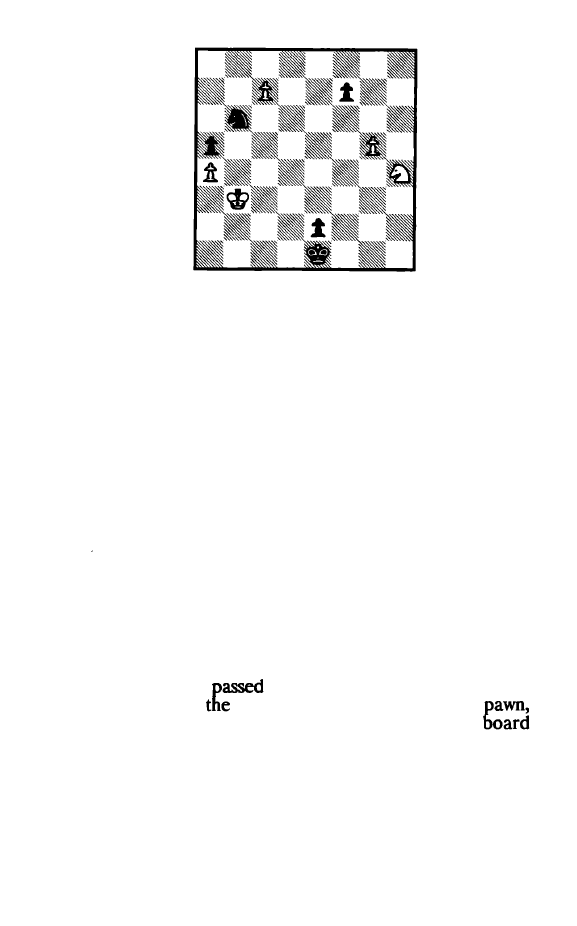
Diagram 68
thematic play White does draw after 9 ..
.
Nc8: 10 Nf4 Kd2 1 1
Nxe2 Kxe2 1 2 Kc4 Ke3 13 Kb5 Kd4 (13 ... Kf4 1 4 Kxa5
Kxg5 15 Ka6 f5 16 Kb7 is also drawn) 14 Kc6! (White loses
after 14
Kxa5??
Kc5) 14 ... Ke5 15 Kd7 Na7 16 Ke7, simplify
ing down to equality after 16 ... Kf5 17
Kxt7
Kxg5 18 Ke6! etc.
Ng2+
After 5 Nt3 + Kd1 ! the zugzwang is instantaneous.
S
.•.
Kfl ! 6 Ne3+ Kgl! 7 Nc2
Kfl
8 Kc3
Just as unpalatable is 8 Ka3 e1 = Q 9 Nxe1 10 Kb3
Kd2 etc.
8
...
Nd5 + 9 Kc4 Nxc7 10 KcS Ne6+ 11 Kb6 Nd4
Black
wins
Section 2:
Outside Passed Pawn
It is well known that in King and pawn endgames, the
side with the outside
pawn has a major advantage. The
reason is that while
defending King is stopping this
the other King can penetrate into the other stde of the
and generally gain enough material to win the game. Yet in
Queen and pawn, Rook and pawn and Bishop and pawn
endgames, the quetion of the outside passed pawn is generally
121
Irrelevant. All these are
range pieces and thus have no
diffi
c
u
lty in
any
of a passed pawn from far away.
However, in
endgames, the outside passed pawn again
becomes a
factor. The reason ts that the Knight,
being a short range
has great difficulty in stopping far
away passed pawns.
definition, the outside passed pawn is
the passed pawn farthest away from the major ultimate scene
of action.
A
perfect example of the realization of the
of
having the outside passed pawn is shown from Diagram
D.
Bronstein -
A.
Chistyakov, 1978 Moscow Championship, after
Black's 50th move. White's passed g-pawn is much greater
threat than Black's potential passed c-pawn and he won
as
fol
lows:
Diagram 69
51
gS!
Passed pawns must
be
pushed!
51
...
Nd4 52 g6 Ne6 53
Kf7!
Insufficient is 53 g7?! Nxg7 54 Kxg7 c4 and Black hs a
certain draw. White, of course, wants to queen for nothing and
therefore with the text move prevents Black's threatened
53 ... Nf4 54 g7 Nh5+, followed by 55 .. .Nxg7.
53
...
c4?
122
GM Bronstein now demonstrates a forced win. IM C.
Crouch has pointed out that things are not so clear after
53 ... Nd4!: (1) 54 Kf6 Ne6 repeats the
(2) 54 Nf3 Ne6
also seems to hold; (3) 54 g7 Nf5
g8+N c4 gives Black
sufficient
White's winning chances rest only with
54 Nfl !, working to
Black's Knight the crucial f5 square.
S4 Ne4! Nd4
Black looks to sacrifice the
via f5. On the obvi
ous 54 ... b4, winning is the non-obvious NcS!! : 55 ... Kxc5 (Or
55 ... c3
56
bxc3 bxc3 57 Nxe6 c2 58 Nf4+ Ke4 59 Ne2)
60
Kxe6 c3 61 bxc3 bxc3 62 g7 c2 63 g8+Q cl =Q 64 Qc8+.
55 Nc5!!
Again there is nothing in 55 g7? Nf5 56 g8 = Q?
Nh6+ .
55
.••
Nt5
Both 55 ... Kxc5 and 55 ... a5 are met by 56 Kf6! and the g
pawn cannot
be
prevented from queening.
56 Nxa6 Nh4
And
so
Black succeeds in sacrificing the Knight, but the
fact that White's Knight has captured on a6
White suffi
cient material to win. If 56 ... c3, White wins
57 b3! and 58
Nb4.
57 a3 Nxg6 58 Kxg6 Kd4 59 Nb4 c3 60 b3 c2!? 61
Nxc2+ Kc3
Black has set a nice trap into which a careless White
can fall: 62 a4? bxa4 63 bxa4 Kc4! 64 Kf6 KcS 65 Ke6 Kb6!
66
Kd5 Ka5, with a draw.
62 Nal!
Black resigns
Both White's pawns are safe and bringing back the King
wins easily.
123
Diagram 70
However, to demonstrate that the outside passed pawn
is an advantage, you must actually try to utilize it.
An
excellent
example of what
not
to do is shown from Diagram 70,
S.
Martinovic - A. Gipslis, Belgrade 1968, White on move. White
has a passed b-pawn, whereas Black's extra pawn on the King
side, being doubled, will not be able to become passed. Yet
note how White absolutely goes nowhere:
1 Kg2?!
King centralization with 1 Kf2! is in order.
l
..
.gS 2 Kf3?!
Logical is 2 Nd4! Kg6 3 Nc2, followed by 4 b4.
2
...
Kg6 3 Ke3
Note that it has taken White three moves instead of the
normal two to go from g1 to
e3.
Again 3 Nd4! makes more
sense.
3
...
Kh5 4 h3 Nc3
After 4 ... Nb4, strong is
5
Kd4!.
Kd3?
124
White apparently has not yet noticed that he also has a
Good
chances were still to be had after 5 Nd4!
+ 6
Kf3
Kg6 7
followed by b4.
s
...
Ne4! 6 g4+ Kg6 7 Ke3
Black now has enough counterplay for the draw and in
particular he will also get a passed
No better than the
text are 7 Nd4 Nf2+ 8 Ke3
9
Kh5! 10 fxg5
with
(Maric) or 7 fxg5
8 Nf8+ Kg7 9 gxf5
10
1 1 Ne6 + Kf6 12 Kxb3 Kxf5, with
Black having no problems at all in drawing.
7
.•.
Nc3! 8 gxfS +
KxtS
9 Nd4+ Kg6 10 fS+ KbS 11 Kt3
Kh4 12 Kg2 g4 13 hxg4 Kxg4
Both sides have outside passed pawns now and the
chances are fully equal.
14 b4 NdS 15 bS Kf4 16 Kh3 Ke4 17 Ne6
KxtS
18 Nf8
h6 19 Kh4
Draw.
Diagram 71
Though the outside passed pawn is usually an advan
tage, that does not mean that it is a cure-all for any and all
situations. This is shown from Diagram 71, D.Kopec - W.
Browne, Canada 1976, after Black's 32nd move. Despite the
reduced number of pawns, Black does have a clear advantage,
since his passed e-pawn is a sound, protected one whereas
White's c-pawn is more of a weakness than strength. White
125
should work now to improve the
of his Knight and
King. For this, moves such
as
33
or 33
Nd4
come into view.
Instead, he becomes mesmerized with the idea of achieving a
Knight endgame where White will have the outside passed
pawn:
33 RbS?! Ne4 34 Rb8?! Rxb8 35 Nxb8 Kf6!
White's mission has been accomplished, yet the war is
lost. In the first place, the c-pawn is just a bit of ari outside
pawn. And even more
it is quite weak
much care and
little power.
White is
36 Nd7 + Ke7 37 Ne5 g5! 38 h3
f6
39 Nd3 Kd6 40 Kh2
e5! 41 g3
Since the center is all Black's, White aims quite correct
ly at creating a truly useful outside passed pawn, the h-pawn.
But Black's central activity comes first.
41.
•.
Nd2! 42 c5+ Kd5 43 h4 e4
44
Nel Nc4!
Ensuring that the Knight can get back via e5 to stop the
h-pawn.
45 c6 Kxc6 46 h5 Ne5 47 Kh3 Nt7 48 g4 Kd5 49 Kg3
Kd4 50
Kf2
Nh6 51 Nc2+ Kc3!
Black's active King, in combination with the extra pawn
in the form of a passed e-pawn, is decisive.
52 Ne3 Kd3 53 NfS NxfS 54 gxf5 e3+
White resigns
Black queens with mate after 55 Ke1 g4 56 h6 g3 57
h7 g2 58 h8=Q g1 =Q.
In complicated - even wild looking positions - it is
important to remember the inherent power of the outside
passed
in Knight endgames. Thas principle is illustrat
ed
from
72, M. Taimanov - B. Larsen,
Leningrad Interzonal
after White's 45th move.
126
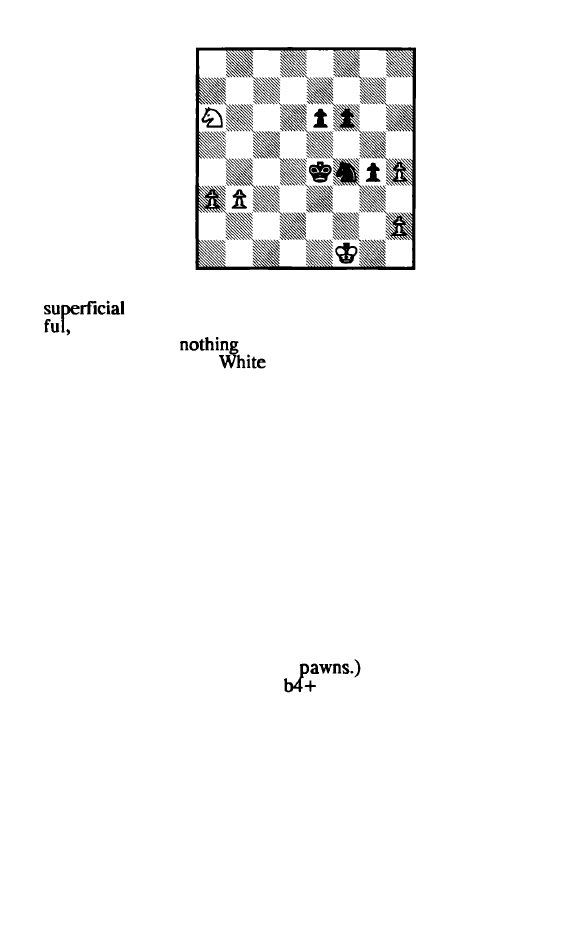
Diagram 72
Larsen had quite wrongly airmed for this position. On a
basis Black's passed
e-
and f-pawns appear power
aided as they are by the actively placed King and Kni�ht.
yet this power is
compared to that residing in White's
outside passed pawns.
has a won position:
45
•••
Kt3 46 Nb4!
The Knight heads back to stop the most dangerous
passed pawn: the e-pawn.
46
••.
e5 47 Nc2! e4
Draw??!
What a curious finish! After White's 47th move Larsen
offered a draw, whereupon Taimanov correctly asked him to
first make his move. Larsen did and after 30 minutes thought
Taimanov accepted. In fact, after either one of his normal
moves, White wms by force: {1) 48 b4 e3 49 Nxe3 Kxe3
50
b5 Nd5 51 h5 and the h-pawn queens.
(2)
48
a4 e3 49 Ne1 + ! (Not 49 Nxe3? Kxe3
50 a5
Ke4! 51
a6 Nd5, stopping all of White's
49 ... Ke4 50
a5
Kd5
51 Nc2! e2+ 52 Kf2 Kc5 53
Kb5 54 Nd4+ 1
Kxb4
55
Nxe2 and one of the Rook pawns will be victorious.
The Rook pawn is by far the most difficult one for the
Knight to stop. There are two reasons for this. Firstly, it is the
most outside pawn. Secondly, once the RP has reached the 7th
127
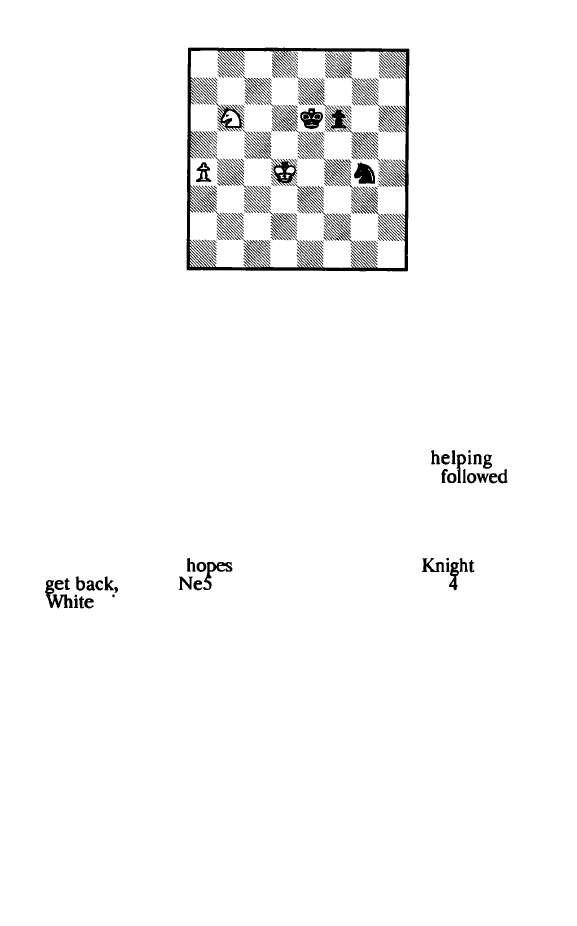
Diagram 73
rank, the Knight by itself cannot cope with the enemy King and
thus will go lost. A clean crisp example of the first reason is
shown from Diagram 73, Vilela - Augustin, Prague
1980,
White
on move. White only has one pawn and it is only on the fourth
rank. Yet being the a-pawn, it wins:
1 KcS!!
Black's Knight by itself will not be able to stop the pawn
and it is imperative to prevent the King from
out.
Insufficient is
1
a5? because of l...Kd6! 2 a6 Ne5!
by
3 ... Nc6.
l
...
fS
Putting his
on the f-pawn, since the
cannot
e.g.
l .
..
2 a6 Nd7+ 3 Kc6! Nb8+ Kb7 and
wms.
2 aS f4 3 a6 t3 4 Nc4!
Whereas Black's Knight cannot handle the Rook pawn,
the less outside Bishop pawn is no problem for White's Knight.
4
•••
f2 S Nd2 Nf6 6 Kc6!
Care is always required. The impatient 6 a7? allows
6 ... Ne4+ ! and a draw.
128

6
...
Ne4
7
Nfl
Black resigns
Diagram 74
The
power of a RP on the 7th rank can be
demonstrated
Diagram 74, Kikilashvili - Neuronov,
U.S.S.R. 1977, White on move. In earlier play, White had sacri
ficed three (!)
to get his h-pawn on the 7th. This should
have been
to draw. Play continued:
1 Kg3!
White's King wants to
to g7 which will force Black's
Knight to give up watch over
key h8 square.
l
...
c5 2 Kg4 c4 3 Nb4!!
White's Knight must be placed so that it can combine
effectively defense and offense. In the game White
the
Knight on a clumsy square with 3 Nb2? !. After 3 ...
he
committed a
error, 4 Kf5?, and lost as follows:
4 ... Nh8! 5 Ke6
6 Nd1 e4 7 Kxe7 f5 8 Kf6 e3 9 Nxe3
Kxe3 10 Kxf5 (After 10 Kg7 c3 1 1 Kxh8 c2 12 Kg8 cl =Q
13 h8= Q Qc8+ Black's
is the winner.)10 ... c3 1 1 Kf6
c2 12
cl =Q 13
Kf4! 14 Kg7 KgS! 15 h8 =Q
Qc7 +
Kg8 Kg6 and White resigned.
However, instead of 4 KfS?, the more direct 4 Kh5!
seems to draw: 4 ... e4 5 Ndl! Kd4 6 Kg6 Nh8+ 7
c3
(After 7 ... e3??? 8 Nxe3 Kxe3 9 Kxh8 c3 10 Kg7 c2 1 1
cl =Q 12 Qh6+ Black's Queen is lost.) 8 Nxc3 Kxc3 9 Kxh8
129
e3
10 Kg7 e2 1 1 h8=Q el =Q 12 Qc8+ ! Kb3! 13 Qb7+ 14
Qd5 + and White's threats of perpetual check will force the
gain of the e-pawn and with it a draw.
3
...
Kc7
Equally instructive is the
after 3 ... Kc5 4 Nc2 c3 5
Kh5! Kd6 6
Ke6 7
and now the Knight heads to
deflect black's
from
of his
8 Net! f4
(Or 8 ... e4 9 Ng2! followed by 10 Nf4+.) 9
c2 10 Nc5+
Kf5 1 1 Nb3!, with Black having nothing better than to acqui
esce in the repetition of moves after ll. .. Ke6 12 Nc5 + etc.
(analysis by Gufeld and Milic).
4 KhS! Kd7 5 NdS! Kd6
back with 5 ... Ke8 is foiled by the active 6
Nc7 + : (1) 6 ...
7 Ne6+ Ke8 8 Nc7+ etc., (2) 6 ... Kd8 7
Nd5 e6 8 Kg6! Nh8+ 9 Kg7! and Black must rush to draw
with 9 ... Ke8! (10 Nxf6+ Ke7 1 1 Ng8+ Ke8 12 Kxh8 Kf8
etc.).
6 Nc3!
f5
7 Kg6 Ke6 8 Kg7! Nh8! 9 Na41! f4 10 NcS +
KdS 11 Kxh8 t3 12
Kg7 Drawn
Both sides will queen, with the resulting Q + N
vs.
Q +
3P endgame offering Black no real winning chances (analysis
by Gufeld and Milic).
Of course, examples such as the previous one are rare in
practical play. Yet, an important part of any master's "bag of
tricks" for endgame play is the knowledge that a RP in the role
of an outside passed pawn can turn around an otherwise rou
tine evaluation of a position. An instructive example from
play is shown from
75, E. Mednis - Spassky,
Student Championship,
1958, after Black's 40th
move. Black is a
up and White can't regain it with 41
Nxg5? because
4l...Nc5. Nevertheless, it is White who is
significantly better because of the
of
a
passed a-pawn. The game was to be
here and
I
was preparing to seal, GM Spassky offered me a draw. I re
fused it via sealing my move:
130
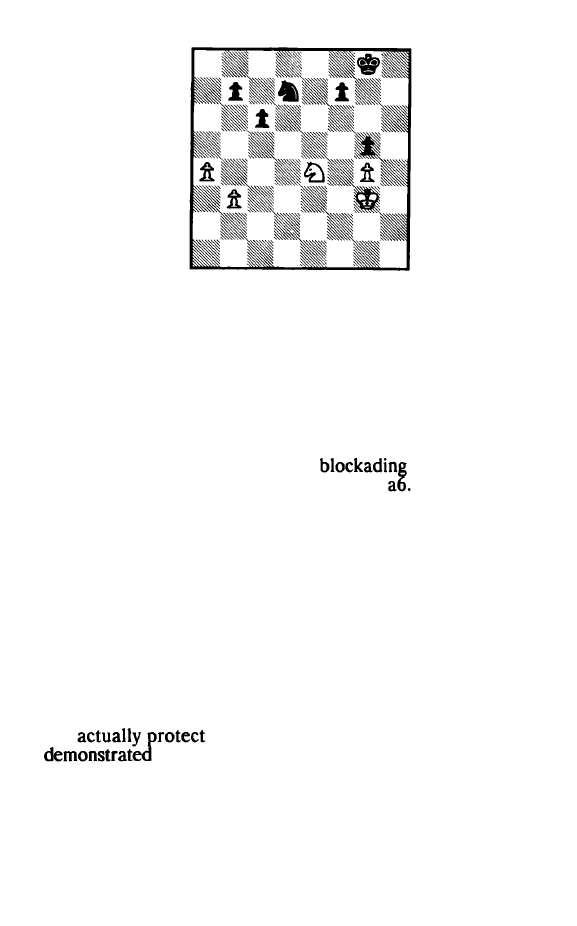
Diagram 75
41 aS!
The immediate 41 Nd6? has no punch because of
4 l . .. b6. But after the text 42 Nd6 becomes a threat which
cannot be parried. Black has to try to find a way to minimize
the damage to come.
41.
••
Kf8!
After a full night of analysis Black finds the only correct
defense, activating the King and
White's to-be
passed a-pawn by placing the Knight on
Then White's
passed pawn is kept back
as
far
as
possible.
Inferior is 4l...b5? 42 b4!, and even after Black's best
defense, 42 ... Kf8 43 NcS Ke7, with 44 a6! Nb6 45 Kf3 Kd6
46 Ke4 White establishes such a total bind ove the position
that Black's situation is hopeless. For instance, 46 ... Na8 47
Kd4 Kc7 (or 47 .. .f6 48 Ne4+ Ke6 49 KcS) 48 Ne4 Kb6 49
NxgS Kxa6 50 Nxf7, when Black's pieces are in no condition
to stop the g-pawn.
42 Nd6 NcS!
Though this may appear useless, since the Knight does
not
the b-pawn, GM Spassky's analysis had
that he must keep his Knight
as
active
as
possi
ble. Again inferior is 42 ... b5? 43 a6 Nb6 ( 43 ... Ke7? 44 Nc8 +
131
followed by 45 a7.)
44
a7 Na8 45
Kt3
Ke7
46 Ne4 f6 47 Ke3
Ke6
48
Kd4 when Black has kept his material advantage, but it
is White who has a won position. A thematic
for
Knight
then is 48 .. .f5 49 Nxg5 + Kf6 50
+ !
51
Kxh7 52 Kc5 Kg7 53 Kxc6 Kf6 54 Kb7 and
wms. In such variations, the abyssmal location of Black's
Knight on a8 is just too much of a burden to overcome.
Therefore,
GM
Spassky, at the cost of his extra pawn,
transfers the Knight to the much more superior blockading
square of a6. I must admist that in my analysis I had given
scant attention to the text move - giving up a pawn while still
White a passed a-pawn just looked "obviously hope
less."
only "excuse" for my inattention could be youth - I
was only 21!
43 Nxb7! Na6
Obviously both 43 ... Nxb7??
&
43 ... Nxb3?? lose to
44
a6.
44 Kf3
Ke7
4S
Ke4
So far so good - and I felt quite confident here. White
has the outside passed pawn
and
the active King. With such
obvious advantages why shouldn't White have an easy win?
What reasonable moves does Black have? Black loses a
after 45 ... Ke6?
46 Nd8+; after either 45 .. .f6 or 45 ... Kd7,
pia�
46 Kd4! and then displaces Black's Knight by 47 Nc5.
45
•••
cS!!
It was only after this move that I realized that there may
not be a win after all: Black prevents Kd4 and threatens to
walk over to c7 and
White's Knight. White therefore
must play either
46
or
46 Ke5.
After 46 Ke5 Kd7! (Not 46 .. .f6 + ? 47 Kf5 Kd7 48
Kxf6 Kc7 49 Nxc5 Nxc5 50 b4! and White wins.) 47 Nd6
Black draws by a hair as follows: 47 .. .f6+ 48 Kd5 Nc7 + ! 49
Kxc5 Na6 + ! ! (White
a pleasant Q + b-pawn vs. Q
after 49 ...
50
Kb6! Kxd6 51 a6 Nc7 52 a7!
f5
gxf5 g4 54 f6 g3 55 Kb7! etc.) 50 Kb6 Kxd6 51 Kxa6
132
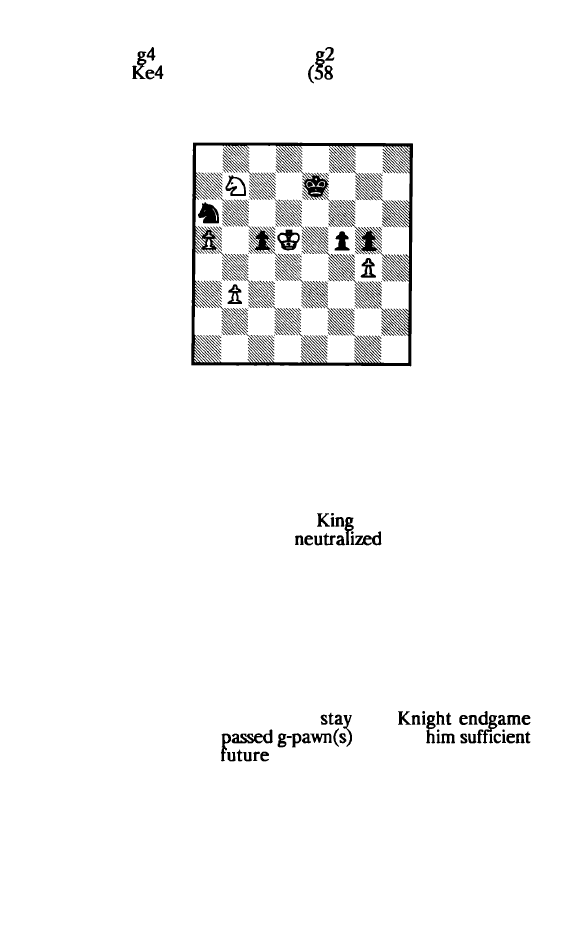
f5 52 gxf5
53 Kb5 g3 54 a6
55 a7 gl =Q 56 a8=Q
Qc5 + ! 57
Qd4+ ! 58 Kb5
b4?? Qal +} 58 ... Qc5+
with perpetual check.
46 KdS fS!!
Diagram 76
With White's King now removed by one square from
the Kingside, Black immediately establishes counterplay by
creating a passed pawn there.
47 NxcS
The alternative is 47 gxf5 g4! 48 Ke4 g3 49 Kf3 Kf6
50 Kxg3 Kxf5 when Black's active
ensures the draw. The
sacrifice 52 Nxc5 Nxc5 52 b4 is
by 52 ... Nd7.
47
•••
fxg4!
While it is true that the K & P endgame after 47 ... Nxc5
48
Kxc5 f4 49 Kd4 Kd6 is drawn, White can do better with 49
a6! (instead of 49 Kd4} 49 ... f3 50 a7 f2 51 a8 = Q f1 =Q,
when the Q & P endgame with an extra pawn and well placed
pieces gives excellent winning chances.
Black therefore prefers to
in a
where - he hopes - the
will give
counterchances. The
shows GM Spassky to be right.
Obviously now
48
Nxa6?? loses to
48
... g3.
133
48 Ne4 Kd8!
Black's King must
out the Knight in
stopping/blockading the pawns.
inferior is 48 ... Kd7?
because after 49 Nf6+ Kc7 SO Nxg4 White is blockading the
g-pawn one square earlier.
49 Kc6
We have an instructive and thematic positon where
White, in effect, is a pawn up and each side has passed pawns
on opposite wings. Being on the g-file, Black's passed pawn is
far enough away from the Queenside (an "outside passed
pawn") and being on its fifth rank it is sufficiently advanced to
tie down White's Knight.
I
have not been able to
find a win
White.
49
..
.g3
There was no need for this sacrifice and also no appar
ent benefit from it. Perhaps Black wanted to make sure that in
some nebulous future he Is not thwarted in a stalemate bid by
an extra g-pawn.
SO Nxg3 Kc8 Sl Ne4 g4 52
Kb6
Or 52 KbS Nc7 + 53 Ka4 Kb7 54 b4 Kc6 and black
has a
firm blockade. Then after 55 Nc3 g3 56 b5 +
Kb7! (After ... Nxb5? 57 Nxb5 g2 58 Nd4+ Kd5 59 Nf3
Ke4
60
Ngl White wins by one tempo.) 57 Ne2 (57 b6 Nd5!
58 Ne2 Nxb6 draws.) S7 ... Nxb5! 58 Kxb5 g2 Black has a
theoretical draw.
S2
...
Nb4 53 KbS
Neither is there a win after 53 a6 Kb8.
S3
...
Nc2 54 KcS?!
This allows Black to set up a blockade. Black's task
would be considerably more difficult after the immediate 54
b4!, though 54 ... Kb7 should hold, e.g. 55 Ka4 Nd4 56 bS Ne2
134
57 Nc5+ Kb8 58 Nd3 g3 59 Nel Nf4 60 b6
61 Nt3 Nd5
62 Kb5 Nc7 + ! 63 bxc7 + (Or 63 Kc6 Na6!)
.. Kxc7 64 Ka6
Kb8 and Black just draws. Note that both here and in the varia
tion given after White's 52nd move, White's problem is that he
is left with a RP. With any other pawn White would win.
S4
. . •
Kb7 SS b4 Ka6! 56
Ng3 Na3
Black's King and Knight have excellent defensive loca
tions and White cannot make any progress.
57
Ne2 Ncl Draw
A fantastic defensive performance by Black!
Section 3:
Protected Passed Pawn
The inherently superior passed pawn to have is what is
called the
protected passed pawn,
i.e. a
r
assed pawn which is
protected by another pawn. The value o the protected
pawn comes from its security, because it cannot be
by
an
pawn and it can be
by a piece only at the
cost of
piece's life. Once
endgame is reached, this
security frees its King and piece(s) for attacks in other parts of
the board, while the protected passed pawn pins down the
enemy to prevent its ultimate queening.
Of all the pieces, it is the Knight which is the premier
blockader. Moreover, because of the nature of its jump-moves,
it is able to attack from its blockading location the pawn that is
protecting the "protected passed pawn". Therefore, Knight
endgames are the best endgames to airm for when you have to
cope with a protected passed pawn. Of course, the protected
pawn is a clear advantage in Knight endgames also, but
so than in other endgames. In this section I will discuss the
factors that help determine the value of the protected passed
pawn in Knight endgames.
What to me seems the most
example of
the value of the protected passed pawn in
endgames is
shown by Diagram 77, M. Basman
-
P. Benko, Hastings
135
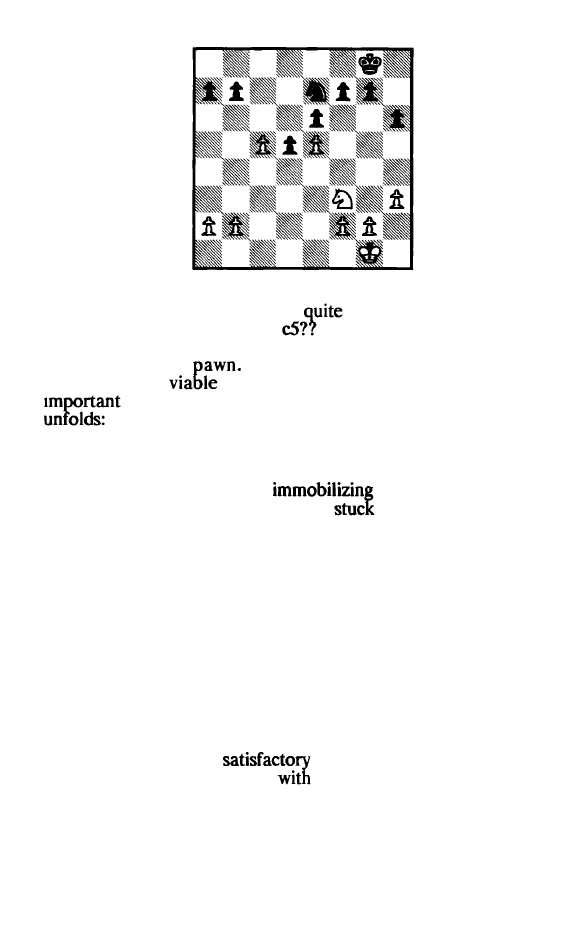
Diagram 77
1973/74, after White's 24th move and the play therefrom. Just
on the previous move White had
erroneously offered the
exchange of Queens (23
Qc3
-
Qc6
xc5 24 dxc5) to arrive
at Diagram 77. Black's d-pawn is a wonderful and secure
protected passed
On the other hand, White has no
prospects for a
passed pawn on the Queenside. Other
features of the positon will become clear as the play
24
...
Nc6!
With a dual purpose:
White's Knight and
preventing b4. Because his Knight is
to protecting the e
pawn, White has scant chances for meaningful counterplay on
the Kingside. This gives Black plenty of time to work on infil
trating via the Queenside.
2S a3 aS 26 b3
White prevents the rtxing of his Queenside with
26
.
. .
a4,
but loses a tempo for activating his King. Either situation is
unpleasant.
26
...
Kf8 27
Kfi
Ke7 28 Ke2 Kd7 29 Kd3
As
will be seen, White cannot stabilize his Queenside in
any event. There is no
defense, but better practical
chances are offered by 29 h4,
the idea of
30
g4 and 31 gS;
136
if 29 ... h5, then White can
30 Ke3 and 31 Kf4 and either
redeploy his Knight or try
29 ... Kc7 30 g4 gS!
Stopping any potential Kingside play.
31 Kc3 b6! 32 cxb6+ Kxb6 33 Kd3
33 a4 is also met by 33 ... Kc5; equally hopeless is 33 b4
axb4 + 34 axb4 Kb5.
33 ... Kc5 34 Ke3 a4!
Opening up infiltration squares. If now 35 b4 + Kc4
Black's King is in and he has the dominant protected passed
a) 36 Nd2+ Kc3 37 Nt3 Nxb41 38 axb4
a3,
winning; b)
Kd2 Na71 37 Kc2 Nb5 38 Kb2 Kd3, winning.
35 bxa4 Kc4 36 aS NxaS 37 Nd4 KcS 38 Kd3 Nc4 39 f4
The loss can be only delayed with 39 Nb3 + Kb6! etc.
39
.•.
Nb2+ 40 Kc2
Or
40 Kc3 Nd1 + 41 Kd3 Nf2+ 42 Kc3 gxf4 etc.
40 ... Kxd4 41 fxgS hxgS
White resigns
The K + P endgame after 42 Kxb2 Kxe5 is hopeless.
The decisive element was Black's protected passed d-pawn,
even though it never had to move.
Historically, the favorite example of the value of the
protected passed pawn in Knight
as presented in
reference
books
on the endgame {GM
Fine, GM Yuri
Averbakh etc.) has been
78, H. N. Pillsbury - I.
Gunsberg, Hastings 1895, after
26th move. White has a
secure passed c-pawn, yet it seems rather blockaded and if
Black would have time for 27 ... Nc6, the defense could not be
broken. However, with a characteristic pawn break White is
able to undermine Black's insecure central pawn formation.
137
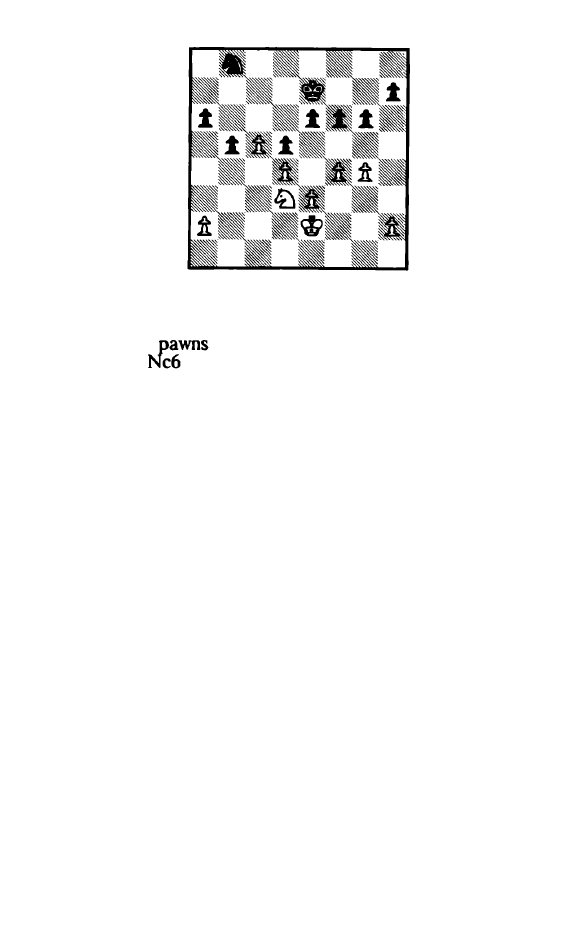
Diagram 78
27 fS!! gS
If 27 ... gxf5
28
gxf5 exf5, 29 Nf4 will give White con
nected passed
in the center,
as
will 27 ... exf5
28
gxf5 g5
29 Nb4; 27 ...
loses to 28 Nf4 Nb4 29
a3
Nc2 30 Nxe6
Nxa3 31 Nc7 a5 32 Nxd5+.
28 Nb4! aS 29 c6!
The momentary awkward location of the black Knight
allows this tactical shot. The threatened 30 c7 forces Black's
reply.
29
..•
Kd6 30 fxe6 Nxc6 31 Nxc6 Kxc6 32 e4!!
The key to the White's previous play: he wins the K & P
endgame by one tempo
as
a result of creating in the center far
advanced connected passed pawns. This is an important theme
in K & P endgames, but does not have much to do with the
theme of the protected passed pawn in Knight endgames
Black might
as
well take, since 32 ... Kd6 33 exd5 Ke7
34 Ke3 Kd6 35 Ke4 Ke7 36 Kf5 b4 37 d6+ Kxd6 38 Kxf6
is hopeless.
32 ... dxe4 33 dS + Kd6 34 Ke3 b4
Or 34 .. .f5 35 gxf5 b4 36 f6 a4 37
r7
Ke7 38 d6+ Kf8
138
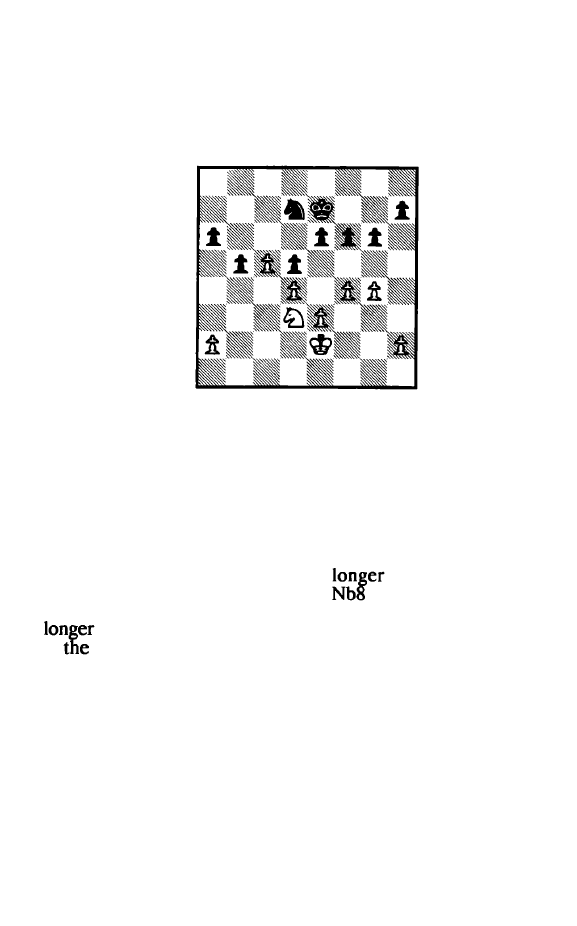
39 d7 etc.
35 Kxe4 a4 36 Kd4 hS 37 gxhS
a3
38 Kc4 t5 39 h6 f4 40 h7
Black resigns. This last round game enabled the unheralded
Pillsbury to finish first, ahead of Tchigorin, World Champion
Emanuel Lasker, Tarrasch, Steinitz, etc.
Diagram 79
However, if we return to the previous game
just a half
move earlier, the evaluation becomes different. Dtagram 79
shows the position in H. N. Pillsbury -
I.
Gunsberg, Hastings
1895, after White's 26th move. In the game, Gunsberg played
the careless 26 ... Nb8?. Instead, Emanuel Lasker subsequently
recommended:
26
.•
.a5!
Because White's Knight no
has access to b4,
Black is ready to continue wtth 27 ...
and 28 ... Nc6, with a
stable position. After the text, Pillsbury's pawn break is no
successful. The following analysis is by Emanuel Lasker
in
tournament book:
27 fS?! gS! 28 c6 Nb6 29 NcS exfS 30 gxfS Kd6 31
Nb7 + Kxc6 32 NxaS+ Kc7!
Lasker here gives the following evaluation: "Black has,
if anything, the better chances, as he threatens 33 ... Nc4 fol
lowed by 34 ... Nd6."
139

Because the defensive Knight is such a great blockader,
even positions where the protected passed pawn is an extra
pawn may not be won. Such positions usually have the blockad
mg Knight attacking the "protecting" pawn. First, we will con
sider positions where all the
are on the same side. In
Diagram
80,
Y.
Averbakh
White is up a protected passed
f-pawn, but his g-pawn is vulnerable. There is no win, e.g.:
Diagram
80
1 Kt3
Or 1 Kd4 Kf7 2 Ke5 Ke7 and there is no way for
White to progress.
l
..•
Nd7! 2 Ke4
White's King is too passive after 2 Ne4 Ne5 + 3 Kg3
Kh6.
2
•.•
Nf6+ 3 KeS Kt7 4 Kd6 Ne8+ 5 Kd7 Nf6+ 6 Kd8 Kf8
Draw
Even if we misplace Black's King by a
in Dia
80
to give Diagram 81 (on the following
Y.
Aver
1955, there seems to be no win:
1 KB!
There again is
in 1 Kd4 Kg7 Ke5
Kf7 3 Kd6
Ne8+ 4 Kd7 Nf6+ 5 Kd8
140
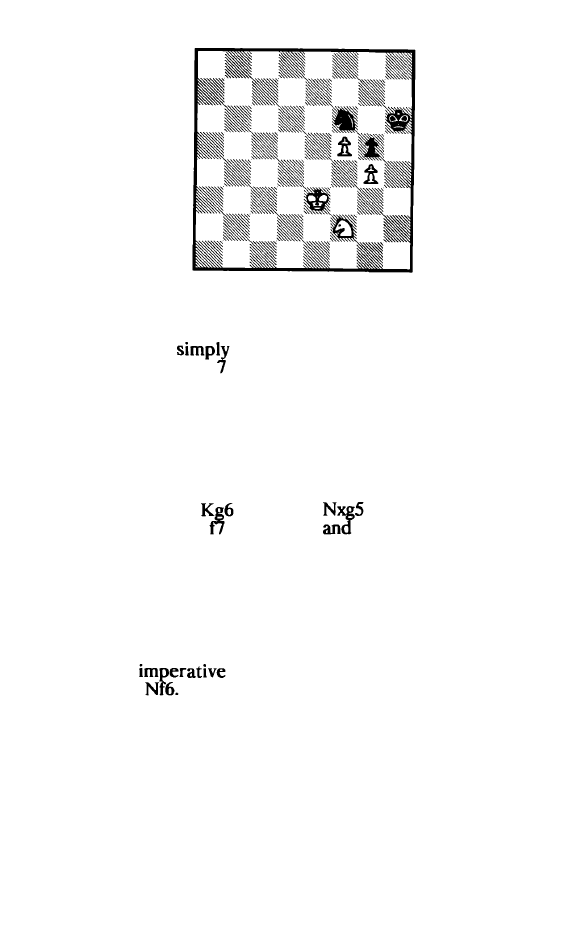
Diagram 81
l.
..
Nd7!
The passive
l .
. . Kg7? 2 Ne4 Nh7 (forced), allows
White's King to
march in: 3 Ke3 Kf7 4 Kd4 Ke7 5
Ke5
Kf7 6 Kd6 Kf8 Ke6 Kg7 8 Ke7 Kh6 9 Kf7.
2 Ke4
Again, there is nothing in 2 Ne4 Ne5 + 3 Kg3 Nf7 etc.
2
••.
Kg7
3 KdS Kf7!
Averbakh gives as the main line 3 ... Nf6+? 4 Ke6 Ng8
5 Ne4 Nh6 6 f6+
(6 ... Kg8 7
Nxg4 8 f7+ Kg7 9
Nh7) 7 Nd6! Nxg4 8 Kg7 9 Ke7
White wins.
4 Ne4
nand winsn - Averbakh. Yet Black has a defense:
4
•••
Ke7! S Kd4 Ke8!!
It is
that White's Knight not have a check
after 6 Nxg5
6 NxgS
What else? After 6 Ke3 or 6 Kc4? ! Black has
6 ... Ne5( + ).
141
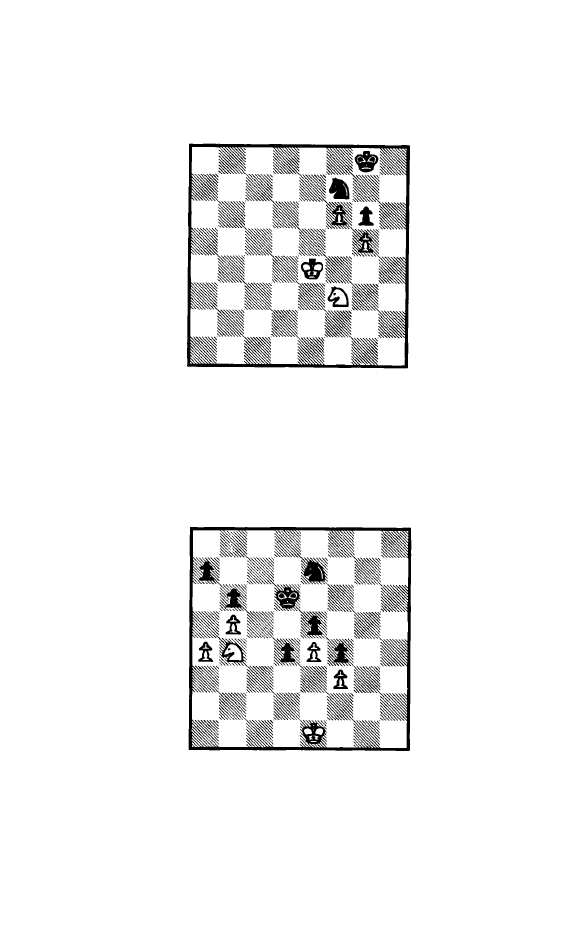
6
..•
Nf6 7 Ke5 Nxg4+ 8 Ke6
Kt'S
9 Nh7 + Kg7
Draw
White does win if we move the position up by one rank
because Black has less maneuvering room. In Diagram
82,
A verbakh
1955,
the win is achieved
as
follows:
Diagram
82
1 Kf4! Nd8 2 Ke5 Nf7 + 3 Ke6 Kf8 4 Kd7! Nh8 S Ne5 Nf7
6 Nxg6+
Also
6
Nxt7 Kxf7
7 Kd6
Kf8 8 t7! Kxf7 9
Kd7 wins.
6
...
Kg8 7 Ne7 + Kf8 8
g6
White wins.
Diagram
83
A thematic example where
an
extra pawn in the form of
a protected passed pawn is insufficient to wm, even with pawns
142
on both sides of the board is shown in Diagram
83,
M. Botvin
nik - G. Lissitsin, Moscow 1935, White on move. White's
Knight has access to the ideal defending/attacking d3 square
and this is sufficient to hold the game:
1 Kd2 Ng6
l...KcS 2 Nd3 + Kc4?! 3 NxeS + Kb3 4 Nc6 cannot
offer Black winning chances.
2 Kd3 Nf8 3 Kc4 Ne6 4 Nd3! Ng4
The K &
after 4 ... Nc5 5 NxcS! bxcS 6 aS! is
drawn, e.g. 6 ... Kd7 7
c4+ 8 Kxc4 Kd6 9 Kb4 d3 10 Kc3
KcS 11 b6 axb6 12 axb6 Kxb6 13 Kxd3 KbS 14 Kc3 KcS 15
Kd3 Kb4 16 Kd2! etc. {Fine).
S Net Ke6 6 Kb4!
It is useful to leave d3 available to the Knight. In the
game White chose the passive 6 Kd3, but still held on after
6 ... Kd6 7 Kc4 Nh3 8 Nd3
9 Ne1 Ke6 10 Kd3 {10 Kb4!)
10 .... Nh3 1 1 Kd2 Kf6 12
Ke7 13 Ke2 Kd6 14 Nd3 NgS
15 Nb2 Nf7 16 Nd3 Nd8 17 Nb2 Nb7 18 Kd2 Nc4 19 Kc2
Ke6
20
Kd1 etc. The text is a suggestion by GM Fine.
6 ... Nh3 7 Nd3 Ngl 8 Net Kf6
The attempt to infiltrate the Kingside will not work
because White's King can now penetrate Black's side of the
board. But if 8 ... Ne2 9 Kb3 Ng3 10 Nd3 Nfl 11 Kc2 Kf6 12
Kd1 Black's King remains chained to his e-pawn.
9 Kc4 KgS?! 10 KdS Kh4 11 KxeS Kg3 12 Kxd4 Nxf3+ 13
Nxt3
Kxf3
14 eS
Drawn {Fine)
Whatever winning chances there are belong to White
after 14 ... Kg2 15 e6 f3 17 e7
f2
18 e8 =Q fl =Q 19 Qg8+
Kh3
20
Qh7+ followed by 21 Qxa7. This shows that attempts
by Black to play for a win by abandoning his center pawns can
beoomerang very easily.
143

Chapter 6
Pawn Structures
Because the Knight is inherently a short range piece, by
far the most important element of
structures in Knight
endgames is the existence of
pawn(s) and in particular
the outside passed
important aspects of passed
pawns in Kmght
were thoroughly covered in earlier
sections. Here I will take a look at the remaining important
subjects regardin� pawn structures: the Queenside pawn major
ity and charactenstic deficiencies in pawn structures.
Section 1: The Queenside Pawn Majority
The side having a pawn majority on the Queenside
generally has some endgame advantage. Assuming that the
pawn majority is healthy and can lead to a passed pawn, this
pawn would be
an outside passed pawn.
If the enemy
gets tied down to stopping such a pawn, your King and
Knight have excellent chances for decisively infiltrating on the
other side.
Please note that I am using the tenn "Queenside pawn
maJority' because it is the common one and is in by far the
maJority of cases also the accurate description. Yet the truly
accurate expression would be the genenc one: Qualitative
Pawn Majority On One Side. You can visualize that if both
sides are castled on the Queenside, that then it is the
Kingside
pawn majority that is the potential advantage.
A very favorable case of the Queenside pawn majority is
shown in Diagram 84 (on the following page), I. Radulor -
J.
Pinter, Pernik 1978, after White's 31st move. Even
it is
Black who already has a passed pawn, the
potential
passed pawn on the Queenside is the significant factor in the
position. Black does have the more active King, yet the fact
that White's Knight is the active one more than outweighs the
King factor. The game continued:
31.
••
f5
144
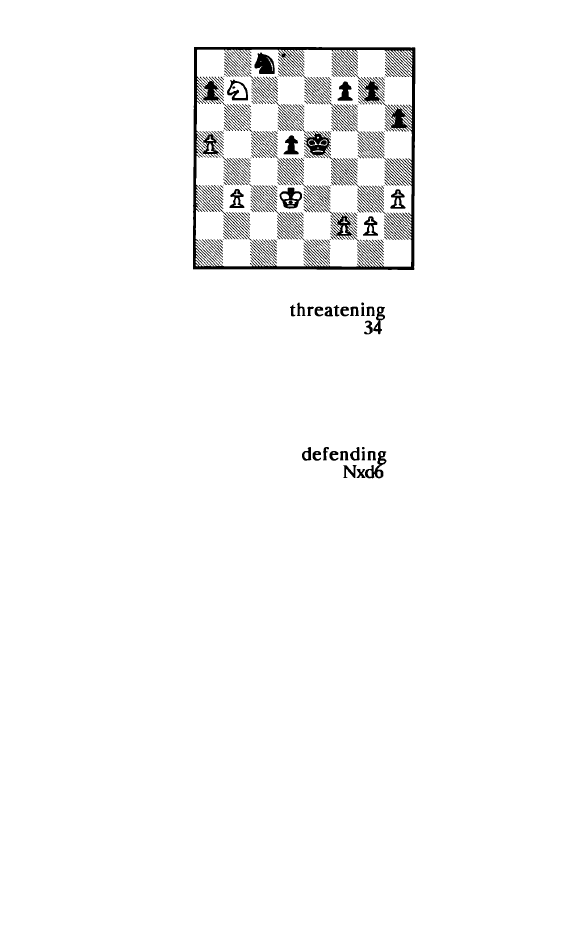
Diagram
83
The attempt at improving the Knight position with
31. .. Nd6? fails a
fter 32 Nd8!,
33 Nc6 + . If then
32 ... Kf6, 33 Kd4; tf 32 ... a6, 33 Nc6+ Ke6
Nb8 Nb7 35 b4.
32 b4! g5?
Allowing White's b-pawn to get to b5 must be suicidal:
White is ready to create a powerful outside passed pawn while
the important defensive c6 square is denied Black. Only
32 ... Nd6 offered chances for
because, at this
moment, the K
& P
endgame after 33
Kxd6 34 Kd4 Kc6
appears drawn.
33 b5! h5
Now it's too late for 33 ... Nd6 34 Nxd6 Kxd6 since after
35 Kd4 White gets a decisive outside passed pawn.
34 Nd8! g4 35 hxg4 hxg4
35 ... fxg4 gets the same 36 g3 response. Black has
succeeded in only exchanging off one Kingside pawn, leaving
him with two potentially vulnerable pawns there.
36 g3 Kd6 37 Kd4 Ne7
After 37 ... Kd7, White puts Black in zugzwang with 38
Nc6 Kd6 39 a6! (IM Minev).
145
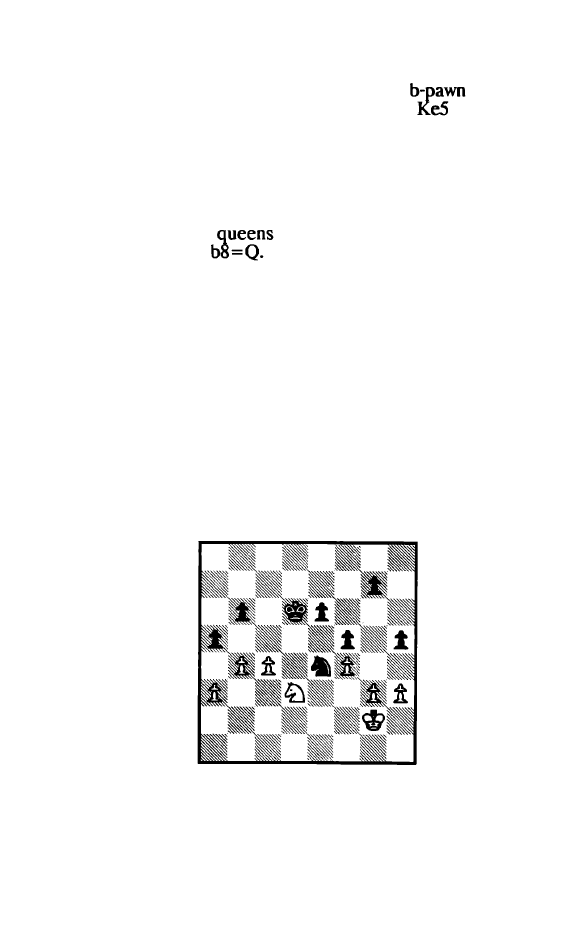
38 Nf7 + Ke6 39 KcS! d4
After 39 ...
Kxf7 40 b6 axb6 41 axb6 the
queens.
Passive defense with 39 ... Nc8 loses to
40 Nd8+
41 Nc6+
Ke4 42 Nxa7+ !. We are seeing again the problem the Knight
has in stopping outside passed pawns.
40 NgS+ Kf6 41 Nh7 + !
Kg7
Now Black's King is too far away from the Queenside,
but if 41. .. Ke5 White
with check after 42 b6! axb6 43
axb6 d3 44 b7
d2
45
42 Kxd4 Kxh7 43 KcS Nc8
44
Kc6 f4 45 Kd7 fxg3 46 fxg3
Nb6 47
axb6
Black resigns
And so the Queenside majority won by itself. While
Black was kept busy safeguarding his pawns elsewhere, White
infiltrated the Queenside.
Where the Queenside pawn majority is sound, but
chances for crating a viable outside passed pawn scant, the
position most likely is in dynamic balance. This means that with
correct play the game will be drawn, but that there are plenty
of opportunities for one side to misplay things.
An
instructive
example is shown' from Diagram 85, A. Kotov
-
S.
Reshevsky,
Zurich Candidates 1953, after Black's 49th move.
Diagram 85
White has a healthy Queenside pawn majority, yet the
146

prospects for a successful break with c5 are
8
oor. In the
meanwhile Black is ready to respond to 5 Kf3? with
50 ... Nd2+, winning the c-pawn. White therefore prevents that
threat by activating his Knight:
50 NeS a4?!
Black seriously misjudges the position and by playing
for a win risks a loss. With the text, he
fixes
White's a-pawn on
a3 and plans to play the Knight to bl, capturing the pawn. Yet
the position turns out to be much more complicated than that.
Correct is the routine
50
..
.
axb4
51
axb4
when White's Queen
side is secure, yet also there is no way to progress there. There
fore: continuing equality.
51 Kf3 g5
The first cloud starts to
on Black's horizon. It
turns out that after the direct
52 Ke3 Nbl? 53 Kd3
Nxa3 54 b5 Black's Knight is trapped. This same motif will
appear later also.
52 Ke3! g4
White has effectively centralized his King and suddenly
Black has no attractive continuation on either side of the
board.
Witness the other two main lines:
(a) 52 ... Nc3? 53 Kd3 Nbl 54 Kc2 Nxa3+ 55 Kb2 h4 56
Kxa3
57 Nn + Ke7 58 NxgS. The g-pawn gets stopped and
wins.
(b) 52 ...
53 Nf7 + Ke7 54 NxgS and to extricate the
Knight
will lose at least the h-pawn.
53 hxg4 hxg4 53 Nxg4 Nc3?
Black keeps dreaming of a win on the Queenside when
the need was to search for a drawing line. For that the normal
54 ... Nxg3 55 Nf2 Nfl + 56 Kd3 e5 sequence should be good
enough.
147
SS NeS!
Nbl
56 Kd3 NxaJ 57 bS!
Traps the Knight, as already
in the note to Black's
51st move. Inferior is the fancy 57
(threatening 58 Kb2)
because of 57 ... b5! 58 c5 + Kd5 when Black's Knight is safe
and the position drawn.
S7
••.
NxbS
Black
two pawns for his Knight since after the
11normal11 57 ...
he would wind up with less: 58 Nd7+ Kb4
59 Nxb6 Nbl
60
Nxa4! Kxa4 61 b6 and the pawn queens.
58
cxbS KcS 59 Nt3 KxbS 60 Nd4+ Kb4 61 Kcl! eS
Black hopes to weaken White's pawns and to use his
connected passed pawns to keep White's King passive. But his
situation is soon shown to be hopeless.
62 fxeS KcS 63 e6 Kd6
64
Kc3 bS
6S
Kb4 Ke7 66 KcS!
a3
67
KdS
Black resigns
The Kni�ht stops Black's pawns leaving White's King in
charge of a routmely won K
& P
endgame.
Of course, having the Queenside pawn majority will not
by itself lead to an advantage. You must purposefully work to
capitalize on it, by either mobilizing the pawns, the King or
both. Otherwise the potential
is a
one.
Instructive indeed is the sequence of
Diagram (on
the
A. Karpov
-
J.
Final Candidates
Match
1990,
2, after Black's 27th move.
It is
a classical thematic position: White has a
sound
majority, Black a healthy Kingside majority,
with neither majority as yet mobilized. White's
should
mean a tangible advantage, yet
see
how quickly it
28 f4?!
GM Timman calls this nnot a good move11• Instead he
was worried about the immediate
28
Kf3! f5 29 Ke3
e5 30
148
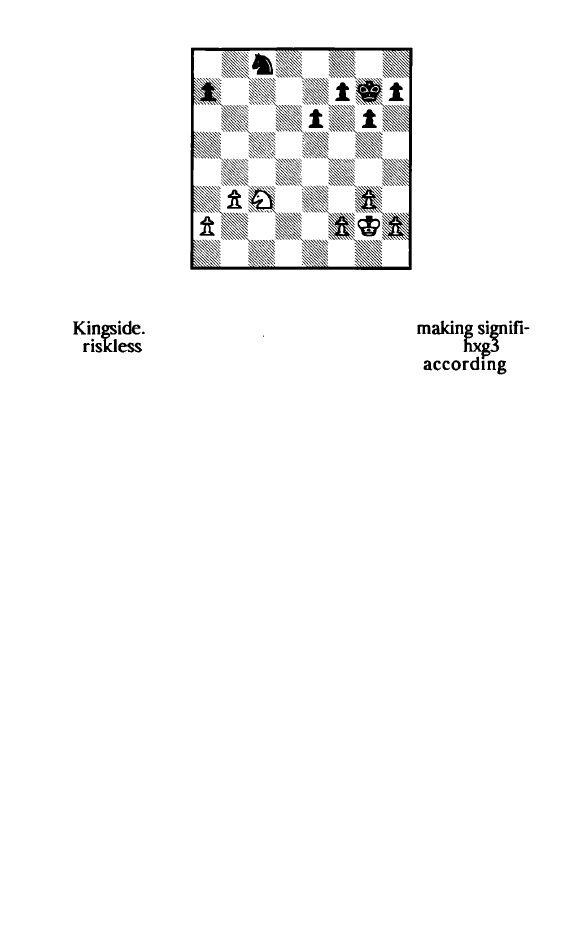
Diagram 86
Nb5!. In the post mortem, best play for both sides seemed to
be 30
... Kf6 31 Kd3 Kg5! (Black must look for counterplay on
the
After 3l...Ke6?! 32 Kc4! White is
cant
progress.) 32 f3 h5 33 Kc4 h4 34 Kd4
35
hxg3 e4! 36 fxe4 f4! 37 gxf4 + Kxf4, when,
to
Timman, "the g-pawn should guarantee the draw". I think that
this is correct, yet
as
long
as
White is in position to sacrifice his
Knight for the g-pawn, White's prospects on the Queenside
mean that only he has winning chances. Remember what
happened in the play from Diagram 84!
With the text White makes it possible to exchange off
Black's e-pawn for his f-pawn, but at the large cost of a lost
tempo for King activation. Timman remarks that "after the text
Black is not worse".
28 ..
.
fS 29 Na4
The Knight's routing leads nowhere. Better is 29
Kf3.
29 ... Kf6 30 NcS Nb6 31 Nd3
31 a4?! Ke7 32 aS Nd5 only weakens White's Queen
side pawns.
3l ... Nd7 32 Nb4?!
Continuing to lose valuable time. In order is 32 Kf3,
149
with a drawn K
& P
resulting after 32 ... e5 33 fxe5 +
NxeS 34 Nxe5 Kxe5 35
32 ... eS 33 Nc6 a6 34 fxeS NxeS 35 Nd4
Already it is too late for 35 Nxe5? Kxe5 36 Kf3 Kd4!
and the extra tempo allows Black's King to get into White's
Queenside for the win.
35 ... Ke7 36 Kfl?!
More lost time. Correct is 36 h3 followed by 37
Kf2
and
38 Ke3.
36 ... Kd6 37 Ke2 Kd5
Because of White's tarrying, it is Black's King who is
lord of the board. The text keeps the
but it could
have been enlarged with 37 ... Kc5! 38 Nc2
followed by
39 .. .f4! (Timman), when Black has created a powerful "outside"
pawn. Note the change of the theme of the position:
the potential danger for White now is the Queenside,
the f-pawn becomes an outside passed pawn.
38 Nc2 Ke4?!
Black gets a wonderfully active centralized King, yet
affords White the chance to
mobilize his Queenside.
Instead correct is 38 ... a5! 39
a3
b4? a4 critically weakens
the c4
39 ... Ke4 when after 40 h3 White's position is
very
but still defensible.
39 a4! Nt3 40 b4
Simpler is 40 h4 and after 40 .. .f4, 41 Kf2. Yet under
standably, after the previous passive suffering, Karpov prefers
activity.
40 ... Nd4+
A "safety first" approach to the last move of the time
control. More consistent as
40 ..
.
Nxh2, even
sub quent
anal�is showed that the position is drawn after
bS axb5 42
150
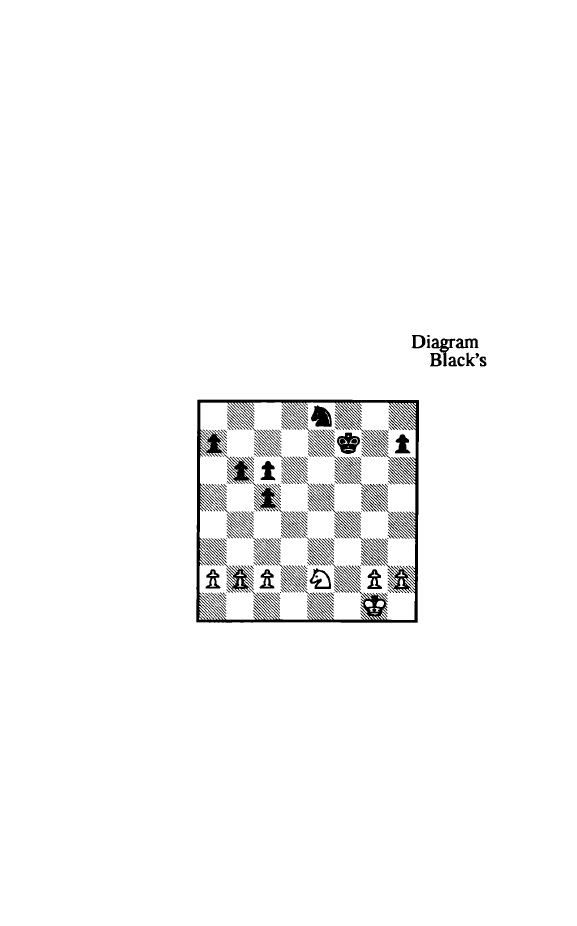
axb5 KdS when after either 43 Ke3 or 43 Nd4 White can sacri
fice his Knight in time for enough of Black's pawns.
41 Nxd4 Kxd4 42 bS
Draw
After 42 ... axb5 43 axb5 KcS 44 Ke3 Kxb5 45 Kf4 KcS a
draw results after
46 Kg5 Kd4 or 46 h4 Kd4.
Section 2:
Characteristic Deficiencies in Pawn Structures
If a double pawn is part of a pawn majority, this is a
serious handicap.
The reason is simply that it is much more
difficult to create a passed pawn from such a formation. A
model exploitation of this factor is shown from
87,
K.
Pytel
-
J.
Bielczyk, Polanica Zdroj,
1976,
after
23rd
move.
Diagram
87
White has a qualitative pawn majority on the Kingisde
and excellent prospects for creating a viable passed pawn
there. Black's extra pawn, being doubled, will be much less of a
help in creating a passed pawn on the Queenside. White's
pieces at the moment are modestly placed; therefore, his first
order of business is to activate them. There will be time
enough to start mobilizing the Kingside pawns.
24
Kf2! Nd6 2S Kt3 Kf6 26 Kf4! Nc4 27 b3 Na3 28 c3 aS 29
151

Ng3!
Because Black's Knight has succeeded in loosening up
White's Queenside, Black's chances there must be taken sen
ously. Thus the immediate 29 g4?! is premature because of
29 ... c4 30 g5 +
But after the text, 29 ... c4 can be met by 30
Ne4+ Kg6 (30 ...
31 Ng5+) 31 KeS!, with White's King in
position to penetrate Black's Queenside. Nevertheless, Black's
chances are real enough after 31...cxb3 32 axb3 b5! and this
was the way to go. As played, Black turns out to be slow on
either side of the board.
29 ... h6?! 30 Ne4+ Ke6 31 c4!
Giving Black no more chances for ... c4, and thereby
making the creation of a passed pawn a much more difficult
job.
31 .. .a4 32 g4! axb3 33 axb3 Nc2 34 h4!
White's K + N stand well enough so that it is time to
get the pawns going.
34 ... Nd4 35 Nd2
According to IM Pytel, the immediate 35 g5 hxg5 36
Kxg5! is winning. Yet it as more than understandable that
White has no interest in making such a decision before the
time control on Move
40. Moreover, there is no need for it.
35 ... Kf6 36 Ne4+ Ke6 37 Nd2 Kf6 38 Ke4 Ke6
Black's c-pawn disappears after 38 ... b5? 39 cxb5 cxb5
40 Kd5 (40 ... Ne6 41 Ne4+ ). However, after the text White can
paralyze Black's majority long enough with ...
39 b4! Kd6 40 bxcS + KxcS
After 40 ... bxc5 41 Nf3! White has a riskless won posi
tion, yet the counterplay after the text is too slow.
41 KeS! bS 42 gS! hxgS 43 hxg5 Nc2
152
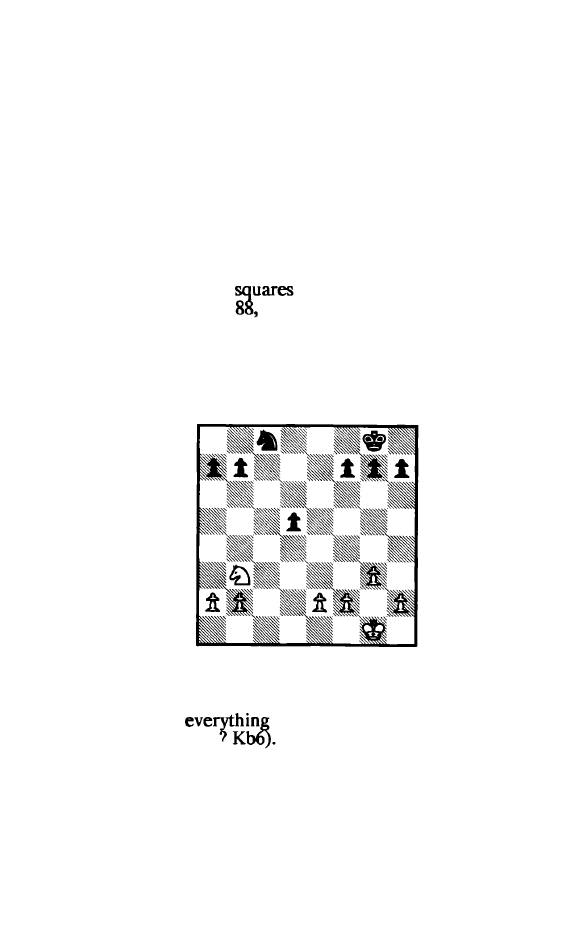
43.�.bxc4 just drops the Knight after 44 Ne4+ Kb4 45
Kxd4.
44
g6 Ne3
45
Kf4!
Preventing the Knight from getting back ( 45 g7?? Ng4 +
46 KeS Nh6 is a last nice finishing touch to White's exemplary
play.
45
..•
bxc4 46 Kxe3
Black resigns
The isolated d-pawn by itself is not a serious problem.
This is because the flexible Knight can be used to either pro
tect the pawn or the key
around it, as the need may
be.
The play from Diagram
V.
Korchnoi - G. Kasparov, Semi
Final Candidates Match 1983, Game 8, after Black's 25th
move, demonstrates the correct approach to coping with this
situation. Apart from having the tsolated d-pawn, there is
nothing wrong in Black's camp and with the proper care he
draws without too much sweat:
Diagram
88
26 Nc5
There is nothing in
26 t3 Kf8
27 Kf2 Ke7
28
Ke3 Kd6
29 Nd4 Ne7 and
is secure in Black's position (30
NbS+? KcS 31 Nxa7? .
26
•••
Nd6 27 Kg2
153
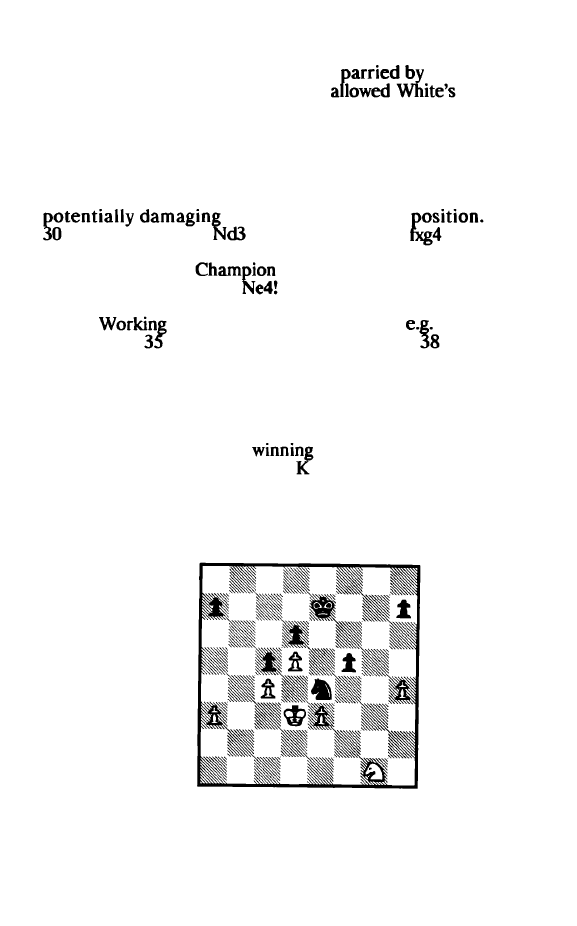
Here too analysis by Kasparov and Shakarov shows that
27 f3 f6
28
Kf2 Kn 29 Ke3 is easily
29 ... b6! (Not
29 ... Nc4+?
30
Kd4 when Black has
pieces to
become very active.) 30 Nd3 Ke6 and Black is safe since 31
Kd4 is met by 31...Nb5 +.
27
.••
Kf8 28
KB
Ke7 29 Kf4 f6 30 h4!
White tries to both grab some space as well as to induce
weaknesses in Black's
Thus
... h5?! 31 t3 b6 32
Ke6 33 g4! hxg4
34
Ne4 35 h5
would lead to some permanent weakness of Black's g-pawn.
The coming World
refuses to bite.
30
.•
.g6! 31 g4 b6 32 Na6
33 t3 Nc5 34 Nc7 d4!
to exchange off his weakness,
35 Nb4 d3!.
Neither can
b4 d3 36 Nd5 + Ke6 37 e4 d2
Nc3 Nd3 +
39 Ke3 Nxb4
40
Kxd2
lead to any advantage for White. After
34 ... 4! Black is not worse.
35 NdS+ Ke6 36 Nb4 aS 37 Nd3 KdS 38 gS
t5
39 Kg3 Nxd3
Draw
Since Black has no
chances either,
GM
Kaspa
rov simplifies into a dead drawn &
P
endgame.
Pawn formations which have unquestioned strengths in
opening and middlegame play can well
turn
out
to
be a weakness
in endgames.
Diagram 89
154
Consider now Dia�ram 89, M. Petursson - M. Marin,
Manila lnterzonal 1990, with Black on move. The pawn forma
tion on the left side of the board is a frequent guest in
where Black has chosen the
Indian or Benoni
White's d5 pawn, supported
c4 pawn, has taken control
of the c6 and
e6
squares in
side of the board and pro
vides White a useful
advant�e during the
and
middlegame pha .
as the position dwindles
to the
endgame, the negatives start to come out loud and clear: e5 is
accessible to Black's pieces and the c4 pawn is vulnerable to an
attack,
in a
endgame. By itself these factors
would not be
but
added to something else - in
89 the weakness of White's h-pawn - the combination
can deadly. IM Marin, with his outstanding play, proves that
Black has a forced win:
l
...
Nf2+ !
Black repositions the Knight
so
that it can readily attack
both vulnerable points: c4 and h4. According to IM Marin,
after
l .
.. Kf6? White can set up a defensive formation with 2
Nh3!.
2 Ke2 Ng4 3 Nt3
Obviously 3 Nh3? loses to 3 ... Ne5.
3
...
Kf6 4 Nd2 NeS S Ktl h6!
The immediate 5 ... Nd3 + 6 Ke2 Nb2 7 Kf2 Ke5 leads
to nothing after 8 Nf3 + (8 ... Ke4? 9 Ng5 + ). Therefore Black
brings the h-pawn to safety on h5 in a way that he is on move
again with White's King on f2.
6 Kg3 hS! 7 Ktl Ng6 8 Nt3
Black's King break in after 8 Kg3?! Ke5 9 Kh3 f4!
8
...
NeS! 9 Nd2
After 9 Nxe5? Kxe5 10 Kf3 Black puts White in
Zugzwang with 10 ... a6! 11 a4 aS and wins easily, e.g. 12 Kf2
155
Ke41 13 Ke2 f4 etc.
9 ... Nd3+ 10
Kf3
IM Marin gives the
variation after 10 Ke2:
10 ... Nb2 1 1 Kf2 KeS 12 Kf3 a6!
Kg3 aS! 14 Kf3 a4! 15
Kg3 Nd1 ! 16 Kf3 Nc3 nand White is in
and loses ...
This is obvious after 17 Nfl Nb1 as well as
Ne4+.
It is less obvious after 17 Kg2, though 17 .. .f4 18
fxe3 19
Kxe3 Nd1 + 20 Ke2 Nb2 21 Ke3 KfS 22 Kf3 Nd3 should be
good enough to win.
10 .. .a6! 11 a4
After 1 1 Ke2 Nb2 12 Kf2 KeS 13 Kf3 aS! 14 Kg3,
decisive is 14 ... Nd3! 15
Kf3
f4 and Black breaks through.
11. .. Ke5 12 Ke2 Nb2 13 aS f4 14 Kf3 fxe3 15 Kxe3
Kf5
16
Kf3
Nd3! 17 Ke2
White's ug wang is complete after 17 Kg3 NeS.
17 ... Ne5 18 Ke3 Kg4 19 Ke4 Ng6!
White resi ns
IM Marin gives the following exhaustive analysis as
that White is lost:
20
Nf3 Nxh4 21 NeS+ (21 Nxh4 Kxh4
KfS Kg3 23 Ke6 h4 24 Kxd6 h3
25
Kc7 h2
26
d6 h 1 = Q 27
d7 Qe1 ! wins) 21...dxe5 22 d6 NfS 23 d7 Nd6+ 24 KdS Nb7
25 Kc6 Nd8+ 26 KxcS h4 27 Kd6 h3 28 Ke7 Nb7 29 cS h2
30 c6 h1=Q 31 c7 Qh7+ and Black wins.
A
weak point in a blocked position is usually defensible.
But if the opponent also has
a
considerable spatial advantage, be
very careful you do not wind up with another permanent weak
ness in your position.
Witness what happens from Diagram 90
(on the next
G.
R. Hubner, Training Match,
Hamburg
Game 4,
Black's 33rd move. Black has an
obvious weakness on
b6,
yet that is defensible readily enough.
However, White's spatial advantage which derives from the d5
-
e4 - f4 pawn formation cramps Black's style. For Black not to
become suffocated he will need to make some decision about
his Kingside pawn formation.
As
we will soon
see,
it better be a
156
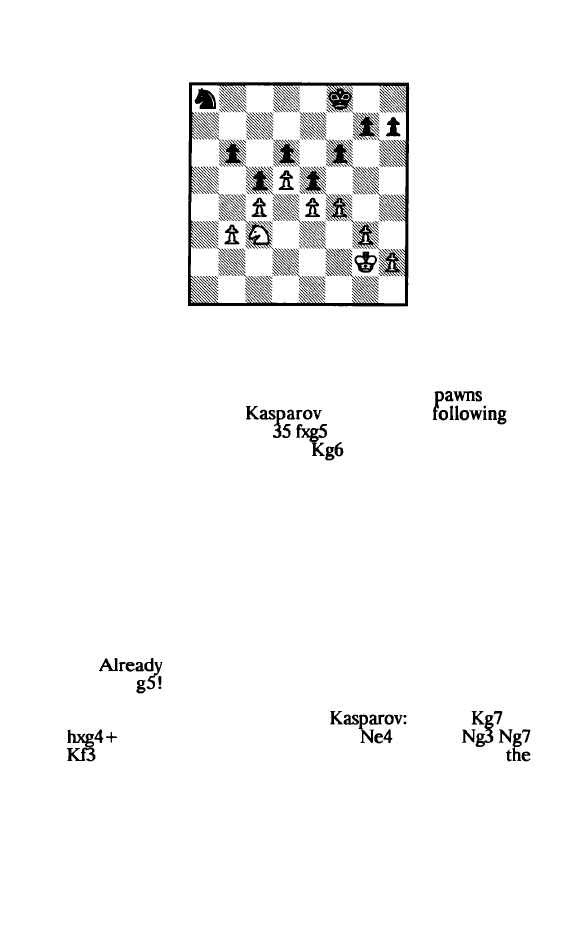
correct decision!
Diagram
90
34 Na4 Kt7
Short of time, Black tries not to make a "risky" decision.
Yet what is required is to l?revent White from getting into
Black's Kingside. For that it 1s best if Black places
on g5
and h5. Therefore,
GM
suggests the
as
Black's best defense: 34 ... g5!
(Black is safe after 35
Kf3
h5!) 35 .. .fxg5 36 g4 Kg7 37 Kg3
38 h4 gxh4+ 39 Kxh4
h6!. White's King cannot progress by himself and if White
starts bringin� back the Knight, Black activates his with ... Nc7
etc. The position remains drawn.
35 Kf3
Playable, but better is 35 ... g5!. White prevents that with
his next.
36 h4! h6??
the decisive error. Correct is 36 ... h5! and after
37 f5, 37 ...
and again White will not be able to break
through on the Kingside. However, if 37 ... gxf5? White has the
following instructive win, as given by
38 exf5
39
g4
40
Kxg4 Kh6 41 Nc3 Nc7 42
Ne8 43
44
followed by Ke3, Kd3, Kc3 and breaking through on
Queenside with b4.
157
37 g4! g5
By now, doing something loses and
nothing loses.
GM Kasparov provides the following analysis:
37 ... exf4 38
Kxf4 g5 + 39 hxg5
40 Kf5 Nc7 41 e5! dxe5 42 Nxb6
and White wins; {b)
Kg7 38 h5!
Kf7 39 Kg3
40 Nc3
Nc7 41 Ndl Ne8 42 Ne3
Kf7 43 hxg6+ Kxg6
44
Kh7 45
Ne7 followed by Nc8.
Kasparov does not consider 37 ... h5 as a defense.
Presumably 38 f5 will lead to play similar to that given in the
variations above.
38 txg5 txg5
After 38 ... hxg5 39 h5 the passed protected h-pawn is a
terror, yet after the text Black has weakn
esses on h6 (and d6)
added to the original one on
b6.
39 h5 Ke7 40 Nc3 Nc7 41 Ndl Ne8 42 Ne3 Ng7 43 Ke2 Kd7
44
Kd3 Kc7
45
Kc2 Kc8
on the Kingside allows White to win as follows:
45 ... Kd7
b4 Ke7 47 Kb3
Kf8 48
bxc5 bxc5 49 Ka4 Ne8
50
Nf5 Nf6 51 Nxh6 Nxe4 52 Nf5 53 h6 Kn 54 h7! Nxh7 55
Nxd6+ Ke7 56 Ne4 Nf6 57 d6+ Ke6 58 Nxf6 Kxf6 59 Kb5 e4
60
Kc6 (Kasparov).
46 b4!
Black is secure enough on the Kingside, but will not be
able to also protect the Queenside.
46
...
Kc7 47 Kb3 Kb7 48 Ka4
Kb8
After 48 ... Ka6 49 Nf5! Nxf5 50 exf5 White's Queen
mates Black on a8.
49 bxc5 bxc5 50 Ka5! Kb7
If 50 ... Ka7 White again forces a won Q + P
with 51 Nf5: 5l. .. Nxf5 52 gxf5 g4 53 f6 g3 54 n g2 55
158
gl = Q 56 Qe7+ Ka8 57 Kb6 Qbl + 58 Kc6.
Sl
KbS Kc7 52 Ka6 Kc8 53 Kb6 Kd7 54 Kb7 Ne8
White has been
in effect, a won K & P end
game. If instead, 54 ... Kd8,
further with 55
Kc6 Ke7 56 Kc7 Ne8+ 57 Kb6! Ng7
Kc6 (Kasparov).
SS
NfS Nf6 56 Nxh6 Nxe4 57 NfS Nf6 58 h6 e4 59 Kb6 Nh7
60 KbS
Black resigns
GM
Httbner does not want to
be
shown
GM
Kasparov's
method: the King returns to e2, then White plays Ng3
and
with Nxe4.
159
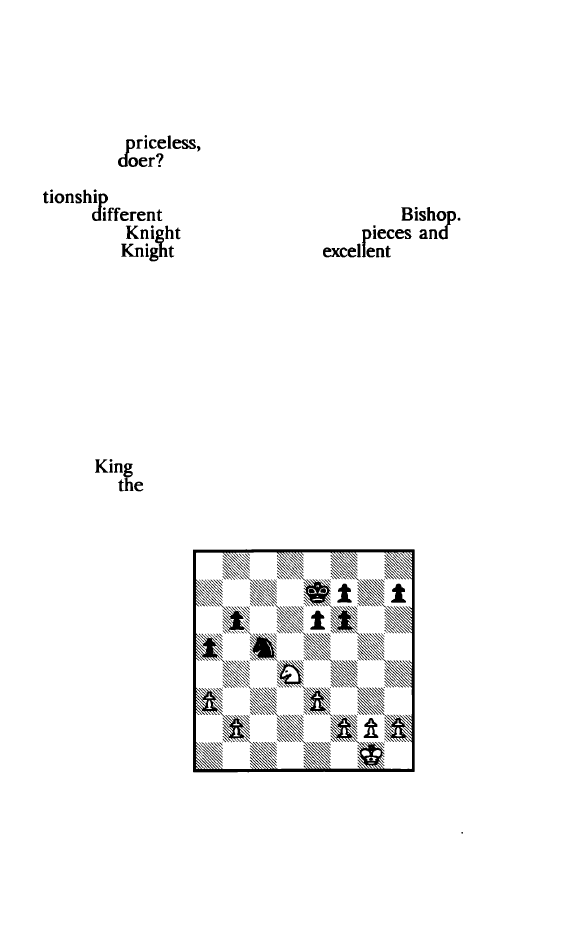
Chapter 7
The Active King And Knight
What is the value of an active King? Of course, the King
himself is
but is it possible to assign a net worth to
him as a
GM Mikhail Tal has suggested that its value
then is about 3 points, i.e. that of a minor piece. Such a rela
makes sense to me. However, its field of activity is
quite
from that of the long range
Yet the
King and
are both short range
therefore
King and
endgames give an
demonstration of
the use of these pieces, both in combat with each other and
when used
as
a team.
The advantages of the better King and the better Knight
can turn out to be transient ones. The fle ible Knight can often
check away the enemy King from its active location; the more
active Knight can be deflected away by a defending Knight.
Moreover, the inability of the Knight to bring about zugzwang
positions limits its power
as
an attacker.
Here I will look at three distinct situations: first, the
active
and active Knight separately, and then the combi
nation of
active King and active Knight.
Section 1: The Active King
Diagram 91
160
I will start off with a most instructive and for
play
example, as shown in Diagram 91, A.
- B.
Ivkov,
Paulo 1978, after Black's 22nd move.
In earlier play the Brazilian IM had rushed to exchange
off pieces without bothering to notice that Black's uncastled
Kin� is much more actively
than White's castled Kin�.
White's pawn formation is
(Black is the one handi
by doubled pawns) and his Knight centralized - yet the
in Kings is too much to overcome. Black won as
follows:
23 Kf1
Kd6
24
Ke2 Kd5
25
Nt3
for d2 to keep Black's King out of c4, but has
the demerit
deactivating the
Yet there is nothing
e.g. 25 b4 axb4 26 axb4
27 b5 Nc5 followed by
. .
. Kc4 will be the kiss of death for the b-pawn. After
25
Kd2
GM I vkov gives the fol lowing winn ing line for B lack:
25 ... Ne4 + 26 Ke2 Kc4 27 f3 Nc5
28
Kd2 e5 29 Nf5 (or 29
Ne2) 29 ... Kb3
.
25
.•.
e5 26 Nd2 e4!
By taking away access to
d3
from White's
Black
severely cramps White's defenses. Because after 27
Black
can support his e4 strongpoint with 27 .. .f5, White strives to
prevent that by his next move.
27 g4 Na4 28 b3 Nc3+ 29 Kt1
Since from e1 the King has no future, White sends him
back to the Kingside.
29
...
b5! 30 Kg2 a4 31 b4 KeS!
White's Queenside has been loosened up (c4!) and the
a3 pawn made vulnerable, but before undertaking decisive
action there, Black puts his
vulnerable Kingside in
order. In any case,
32 Kg3 Nxb4?? 33 axb4 a3 fails
to 34 Nbl.
161
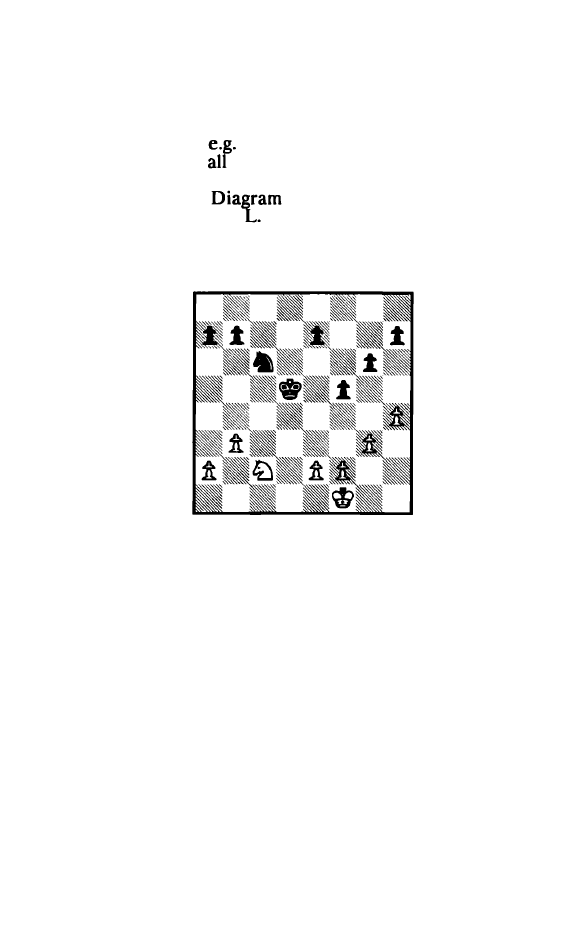
32 Kg3 f4! 33
gxf5
KxfS
34 f3 Ke5 35
Kfl
15!
36
Kg3 Ndl 37
fxe4 Nxe3 38 exfS NxfS + 39 Kf3 Kd4 40 Kf4 Nd6
White
resigns
Black's active King will penetrate decisively into
White's Queenside,
41 h4 Kc3 42 Ke5 Nc4 + 43 Nxc4
Kxc4 and Black wins
pawn races.
Compared to
91, White is better off in Dia
gram 92, M. Taimanov -
Polugaevsky, U.S.S.R. Champion
ship 1976, after Black's 26th move, yet Black's powerfully
centralized King gives him a clear advantage. In fact, White's
position is close to critical.
Diagram 92
27 e3?
By creating a permanent weakn
esses
on
f3
and
d3
while
delaying Kin� activation by a move, White already makes his
position critacal. Mandatory is 27 Ke1, when all the K & P
endgames after 27 ... Kc5
28
Kd2 Nb4 (or
28
.
. .
Nd4 29 Nxd4) 29
a3 are just drawn.
27
•..
Kc5
28 a3
Unavoidable since
28
Ke2? Nb4 wins for Black. But
after the text Black can force further weaknesses in White's
Queenside.
28
.•
.aS! 29 a4
162
White now gets squeezed into a pretzel. Therefore
worth trying was 29 Ke2!? a4 30 bxa4, though White's pros
pects are most unpleasant after 30 .
.
. Kc4.
29
...
Nb4
30 Net
Enabling the Knight to go to d3 if Black's Knight now
moves. After 30 Nd4 Na2! 31 Nc2 Black wins with 31...Ncl 32
Nd4 Kb4.
30 ... e5! 31 Ke2 e4 32 Kd2 Nc6! 33 Nc2
Or 33 Kc3 NeS followed by
34
.
.. Ng4 - another legacy of
27 e3?.
33 ... Ne5 34 hS
As
as
it seems, White is already in zugzwang: a
Knight move
34 ... Kb4; 34 Kc3 loses to 34 ... Ng4; 34 Ke2
loses to 34 ... Nd3, threatening 35 ... Ncl +.
34 ... Nt3+ 35 Kc3 gxhS 36 Na3 h4! 37 gxh4 hS 38
NbS
Nxh4
39 Nd4 Nt3
The outside
pawn in the form of the h-pawn is
so
powerful that
can afford to give up the f-pawn,
40
Nxf5 h4 41 Kb2 Kb4 42 Kc2 h3 44
h2 45 Nh 1
followed by ... Ne6 and Nc4. Still, White's
of remaining a
pawn down in a hopeless position makes no sense at all.
40 Ne6+ Kd6 41 Nf4 h4 42 Kc4 Ng1
White resigns
White had sealed 43 Kb5, but
without continu
the
in view of 43 ... h3 44
45
Kxa5
Kc6
by
46
... Nxf2.
It is important that the side with the active Kin� does
not become too complacent because the agile Knight Is very
capable of
counterplay. This is well demonstrated
from
93
the
I. Boleslavsky - P.
Keres,
Absolute
after Black's 58th
move. Black's active King gives him the advantage, yet the
163
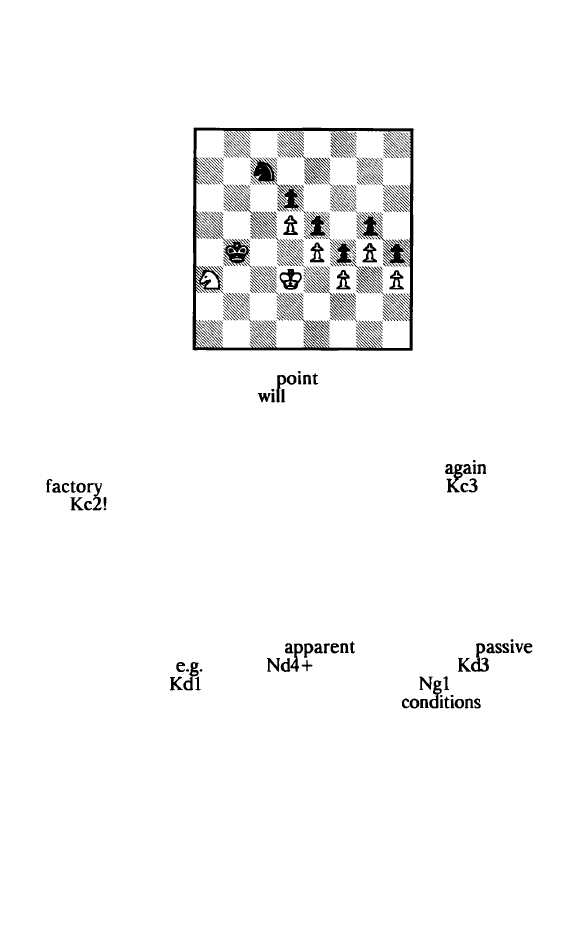
fundamental pawn weaknesses on d6 and g5 makes the ulti
mate result uncertain. The game continued:
59 Nc2+?
Diagram 93
A poor move. At this
White apparently felt that
strictly defensive measures
be sufficient to draw. Since this
will be insufficient, immediate activity with 59 Nc4! should
have been tried. The main line to me then seems to be 59 ... Nb5
60 Nb6 Nd4 61 Nc4 Kc5 (61...Nxf3 62 Nxd6 is O.K. for White)
62 Na5! Kb6 (62 ... Nxf3
63
Nb7+ Kb6 64 Nxd6 is
satis
for White) 63 Nc4 + Kc7 64 Nd2 Kd7 65
Ne2+
66
when 66 ... Ngl ?? 67 Kdl Nxh3 68 Kel traps Black's
Knight. It is of course possible that a way exists to improve
Black's play in the above line, yet White has chances for real
counterplay.
S9 ... Kb3 60 Net Na6 61 Kd2 Kc4! 62 Nd3 Nc7 63 Kc2 NbS
64 Nb2+
By now it has become
to White that
play will not do,
64 Nel
65 Kd2 Kb3! 66
Kb4!
67 Kd2 Kc4 68
Kc3 69 Kcl Ne2+ 70 Kdl
and Black
wins. However, White starts his activity under
signif
icantly inferior to those available at Move 59.
64
..•
KcS 65 Na4+
Kb4 66
Nb6 Nd4+ 67 Kd3 Nxt3 68 Nd7
White has nothing better than this bluff, but it should
164
have been called: 68 ... Ng1 69 Nxe5 dxe5 70 d6 f3 71 Ke3 fl!
72 Kxf2 Nxh3 + 73 Kf3 Nf4 74 d7 Ne6 and White can resign.
Instead, by trying to be careful, Black allows White genuine
counterplay.
68 ... Nd4? 69 Nf6 Nb3 70 Ke2 NcS 71 Kf3 Nb3 72 Ke2 NcS
73 Kf3 Kc3! 74 Ne8 Kd2 75 Nxd6 Ke1 76 Nc4 Kfl ! 77 Nd2+
Black's active King prevents 77 Nxe5? because after
77 ... Nb3! Black mates either on d4 or d2.
77
•••
Kg1 78 Nc4 Nd7?
Black puts too much credence on his active King and
not enough on the active Knights for both sides. GM Botvinnik
has demonstrated the following win: 78 ... Nb3! 79 Ke2 {Other
wise 79 ... Nd4 Mate) 79 ... Nd4 + 80 Kd3 f3 81 d6
f2
82 Ne3
Ne6 83 Kc4 Nf4! 84 d7 Ng2.
79 Nd6 NcS
80
Nc4 Nd7? 81 Nd6 Kh2??
Still enamored by the active King, Black even loses.
Nter 8l. .. Nc5 White could have claimed a draw because of
three fold
of the position (in view of 82 Nc4), but a
draw is a lot
than a loss.
82 Nf7 Kxh3
83
NxgS + Kh2
84
d6 h3
85
Nxh3! Kxh3
86
gS
Black's Knight cannot stop both passed pawns, while
White's passive King can do its job.
86
...
Nc5
87
g6 Ne6
88
d7 NgS+
89
Ke2 Kg3
90
d8=Q
Black
resigns
The flip side of the active Kin� is one so passively
placed that it not only has no hope of bemg worth 3 points, but
1s an insufferable liability. Such an instructive Situation is
shown from Diagram 94 (on the following page), S. Tartakower
- M. Botvinnik, Groningen 1946, after Black's 41st move
(4l . .. h5). Not only is White's
useless, but is in imminent
danger of being mated after 42 ...
43
..
. g3,
44
. .
. g2. White lost
as follows:
165
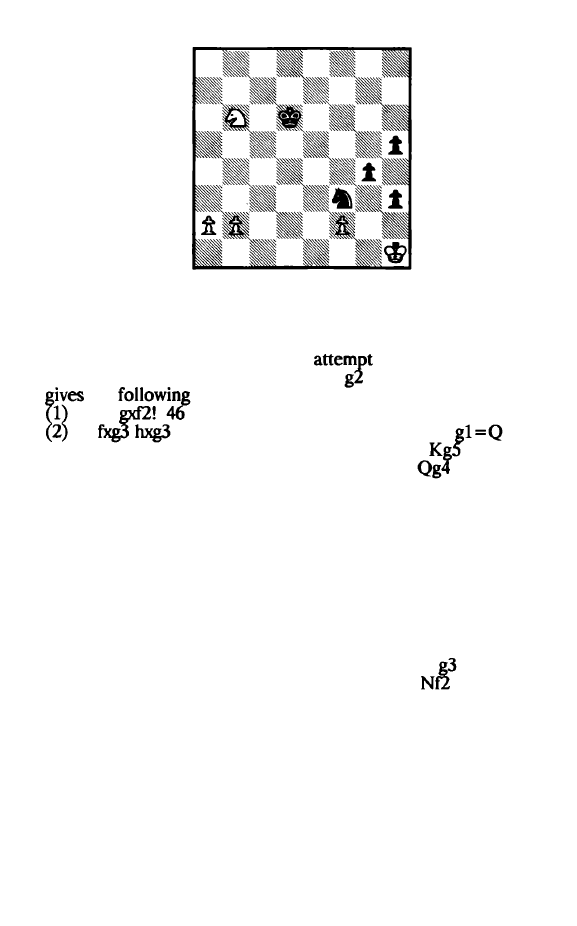
Diagram 94
42 Nc4+
The Knight heads back to help its King. Of course,
unless White can mobilize his Queenstde pawns he is sure to
lose in the long run. However, the
with 42 a4 fails by a
move after 42 ... Nd2! 43 aS h4 44 a6
when GM Botvinnik
the
variations:
45 a7
a8 =Q fl =Q+ 47 Kh2 Nt3 +.
45
46
a7 g2+ 47 Kh2 Nt3 +
48
Kxh3
49
a8 = Q Qh2+ 50 Kg3 Ne5 + 51 Kf3 Qf2+ 52
(52 Ke4
Qf3 + 53 Kd4 Qd3 Mate) 52 ... Qg3 + 53 Kf5
+ 54 Kf6
Qg6 Mate.
42
.••
KdS 43 Ne3 + Ke4
44
a4
A better practical try is 44 b4 when Black must play
44 ... Nd4! (preventing the immediate 45 b5}, followed by
45 .
.
.
Kt3,
winning by a tempo.
44
...
Kd3 45 NdS Ke2 46 Nf4+
Kxf2
47 Nxh3+
White is also a tempo short after 47 Nxh5
48 Nxg3
Kxg3 49
a5
h2
50
a6 Ng5 51 a7 Ne4 52 a8=Q
Mate. But
notice that Black cannot allow the b-pawn to queen in such
variations.
After the text Black can also win with 47 ... gxh3, but GM
Botvinnik chooses a more thematic continuation which does
166
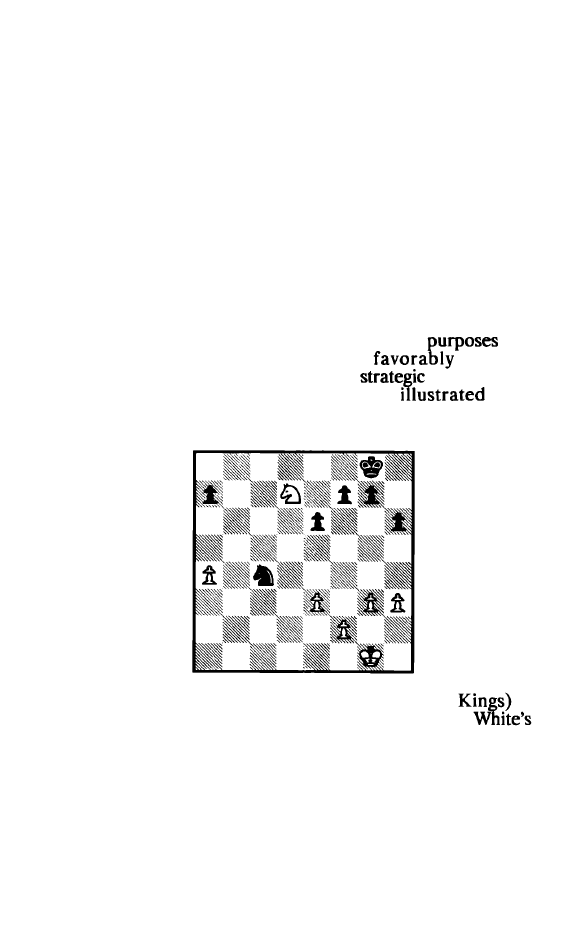
not require a particularly demanding calculation.
47
•..
Kfl ! 48 Nf4 g3 49 Ng2 Ktl! 50 aS h4 51 Nf4 Kfl
To ensure that after ... h3, White can't capture with
check.
52 Ng2 h3 53 Ne3+ Ktl 54 Ng4+ Ke2
White resigns
The "bad" King gets mated.
Section 2: The Active Knight
There is little point in looking at the trivial situations
where one Knight is placed so well that it routinely gobbles up
the vulnerable enemy pawns. For instructional
the
important cases are where the more
situated
("active") Knight can cause a long term
deficiency in
the enemy camp. This will be wonderfully
from
Diagram 95, A. Yusupov -
V.
Ivanchuk, Linares 1991, after
White's 32nd move.
Diagram 95
On the Kingside everything (including the
is
rather equivalent, each player has an isolated a-pawn,
Knight is the one deeper into enemy territory. Yet it is Black
who has the truly
active
Knight because it can achieve some
thing significant in short order, thereby giving Black a signifi
cant advantage. In my comments that follow I have made
167
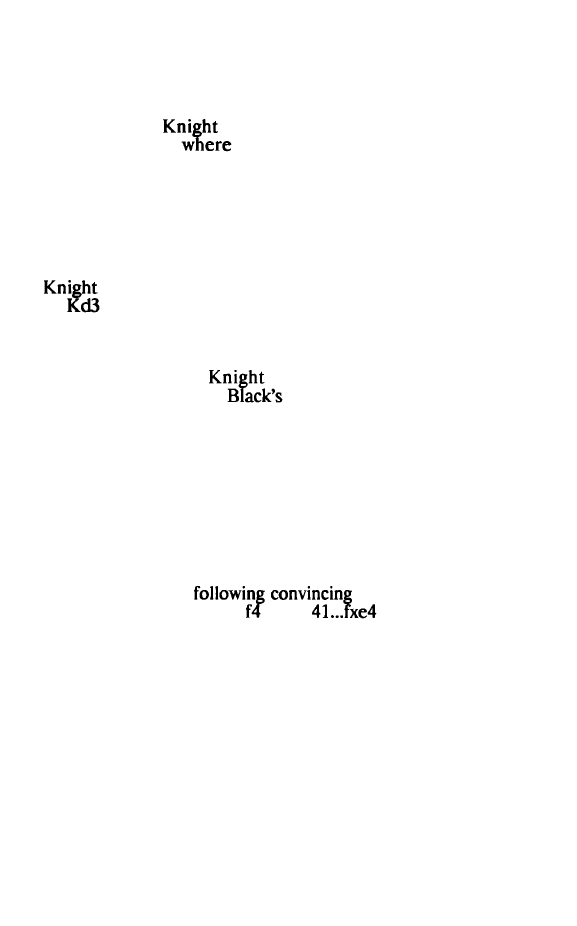
grateful use of GM Yusupov's fine analysis in
Informant
#51.
32
•..
Nb2! 33 aS Nc4!
34
a6 fS! 35 Kfl Kt7
Black's
has chased White's a-pawn deep into
Black's territory
it is vulnerable to an attack by both
Black's King and Knight. Moreover, Black's King gains a
valuable tempo by the attack on White's strayed Knight and
thus can assume a powerful centralized location.
36 Ke2
Further .. activity .. by 36 Nb8? leads to an immobile
after 36 ... Na5 37 Ke2 Ke7 and a lost K & P endgame:
38
Kd6 39 Kc3 Nc6! etc.
36 ... Ke7 37 NcS Kd6 38 Nb7 + !
Keeping the
truly active, by affording it the
opportunity to get into
Kmgside.
As
will
be
seen later,
this will turn out to
be
White's saving grace.
38
.•.
KdS 39 t3 eS?
A bad move for two reasons: (1) It leads to a loosening
of Black's Kingside, thereby giving White undeserved counter
chances, and (2) Black's strong Knight repositioning via
39 ... Ne5! is not only delayed but even
r
revented. After 39 ... Ne5
Black threatens to simply snip of White's a-pawn after
40 ... Nc6 and 4l...Nb4. Therefore 40 NaS is forced when GM
Yusupov gives the
variation:
40
.
..
Nc6 41
e4 + (Or 41 Nb3 eS! 42
Kc4)
42 fxe4 + KcS 43
Nb3 + Kc4 44 Nd2 + KbS and after capturing the a-pawn,
Black's prospects for a win are bright.
After the text move, the position is already drawn -
though not without sweat on White's part.
40 g4! g6
GM Yusupov gives the following alternatives:
(1)
40
.
.
.fxg4 41 e4 + Kd4 42 hxg4 g6 43 Nd8 KcS 44 Nt7 hS
168
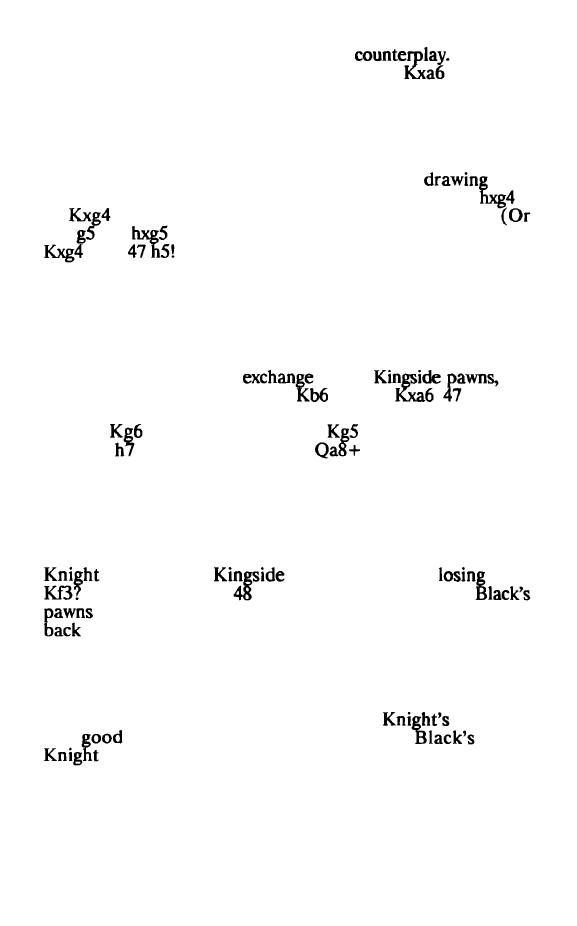
45 g5 followed by
46
Nh8 with sufficient
(2) 40 ... f4 41 e4 + Kc6 42 Nd8 + Kb6 43 h4
44
h5 fol
lowed by 45 Ne6, again with full counterplay.
41 Nd8 Nd6 42
gxf5
In his notes GM Yusupov gives the text a dubious mark
and instead recommends 42 h4 as the simpler
line:
42 ... fxg4 43 fxg4 e4 (White is safe after 43 ... h5
44 Kf3
+
45
Nf5 46 Kg5 with the threat 47 h5.) 44 Kf2 h5
44 ...
45
hxg5 46 Ke2 Kc4 47 Ne6.) 45 Kg3 hxg4 46
Nf5
Nxe3 + 48 Kf4 'with a draw''. However, if we
continue this by just a bit with 48 ... gxh5! 49 Kxe3 h4, it be
comes clear that Black's pawn can't be stopped. Therefore it is
highly dubious that 42 h4 does the job.
42
•.
.gxfS
43 h4! KcS
44
e4! fxe4
White is happy to
all the
but
44
.. .f4 also does not win: 45 Kd3
46
Kc3
Nc6 Nt7
48 Kc4 Kb6 49 Kd5!
a5
50 Nxa5!
Kxa5
51 Ke6 Kb4 52
Kxt7
Kc3 53
Kd4 54 Kxh6 Ke3 55
Kxf3 56 h5 Kxe4 57
h6 t3 58
t2 59 h8=Q fl =Q 60
(Yusupov) and the Q
& P endgame is drawn.
45 fxe4 Kb6
Obviously 45 .. Nxe4 allows
46
Nt7 with a draw. After the
text White's King must be used to stop the a-pawn while the
menaces the
pawns. Therefore
is 46
h5! 47 Ne6 Ne8!
Ng5 Nf6 49 Nt7 Nd7 when
are safe, White's a-pawn goes lost and his King can't get
to the Queenside in time.
46 Kd3! KbS! 47 hS! Kb6! 48 Ne6!
Thanks to triangulation, Black has forced White's
Knight to give up its best location, yet the
activity is
sti ll
enough to draw. In the early play
active
led to his advantage; now White's active Knight saves
the draw.
169
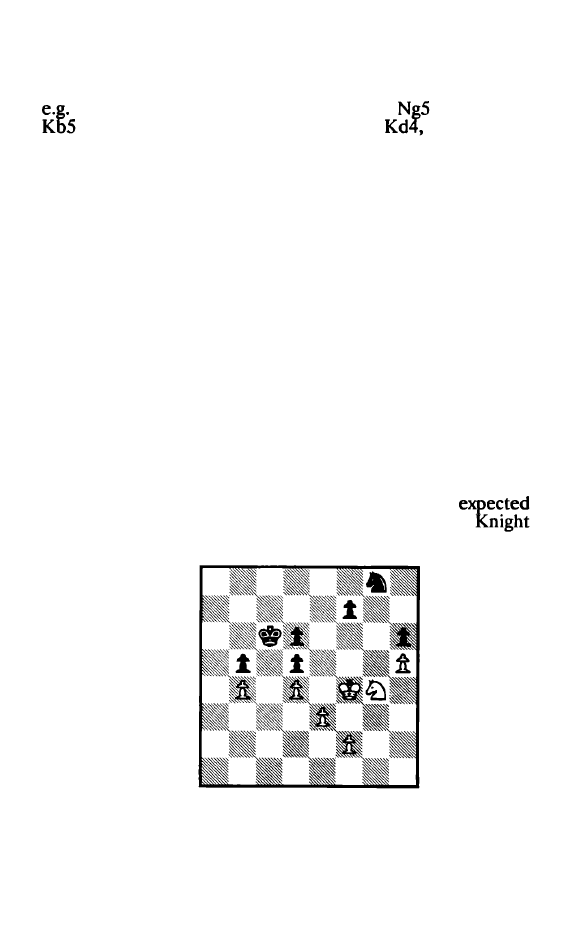
48
•.•
Kxa6 49 NcS+ Kb5 50 Nd6 Nf7 51 Kc3 Kc6
Nor is there a win after 5l...a5 52 Kb3 a4 + 53 Ka3,
53 ... Kc4 54 Kxa4 Kd4 55 Nf6 Ke3 (55 ...
56 Ng4) 56
Kf4 57 Kc5 Kg5 58 Nd7 Kxh5 59
with a draw
(Yusupov).
52 Nf6 KcS 53 Nd7 + Kb5 54 Nf6 a6 55 Nd7 Kc6
56
Nf6 KcS
57 Nd7 + Kb5 58 Nf6 NgS
Here too 58
. .
.
a5
59 Kb3 a4 (Or 59 ... Kc5 60 Ka4) 60
Ka3 leads to nothing more than in the note to Black's 51st
move.
59 Ng4! Nxe4+ 60 Kc2 Ng3 61 Nxh6 e4
Black can't save the e-pawn (61...Nxh5 62 Nf7) and the
endgame of N + a-pawn
vs.
N is a routine draw.
62 Nf7 Nxh5 63 Nd6+
Draw
Section 3: The Active King and The Active Knight
Since we already saw the tremendous power that just
the active King by himself can generate, it is to be
that the combination of an active King with an active
would be doubly powerful. If the defensive side also is
Diagram 96
170
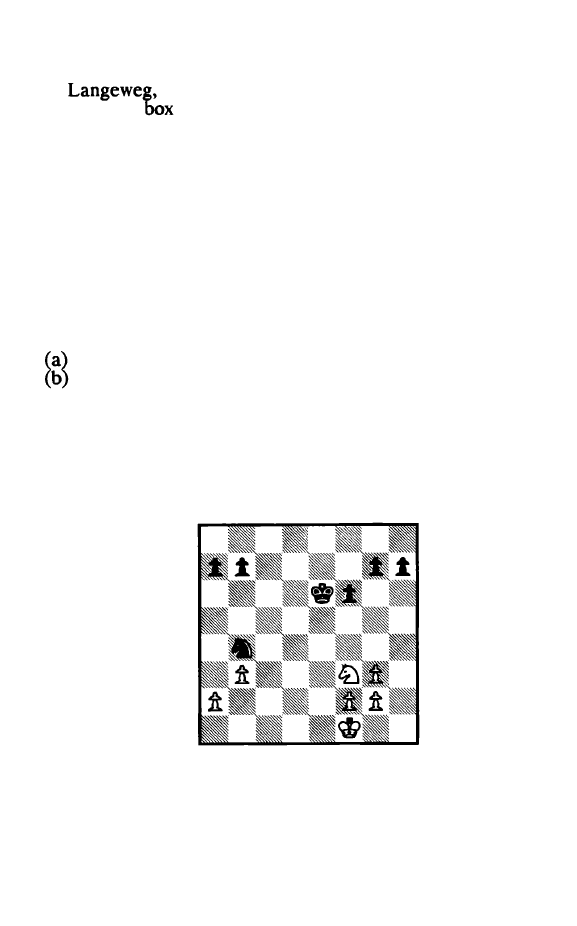
burdened with a chronic structural weakness, then indeed its
life expectancy is short. Consider now Diagram 96, J. Smejkal -
K.
Wijk aan Zee 1975, White on move. Black's
King is in a
and his Knight is back home to protect the
problem child on h6. White's active King
+
Knight duo breaks
through immediately with:
1 Nxh6! Nxh6
In lieu of experiencing the inevitable, Black actually
resigned. I am continuing with the main line as given by IM N.
Minev.
2 KgS Ng8 3 h6 Nxh6 4 Kxh6 Kd7 S Kg7 Ke6
White has the proper tempo moves with the f-pawn also
after the other King steps onto the e-file:
5 ... Ke7 6 f3! Ke6 7 f4 Ke7 8 fS Ke8 9 f6.
5 ... Ke8 6 f4! Ke7 7 fS etc.
6 f4! Ke7
6 ... Kf5 7 Kxf7 Ke4 is much too slow; 6 .. .f5 fails after 7
Kg6.
7 fS Ke8 8 f6
White wins
Diagram 97
The weaknesses don't have to be all that fundamental
for the position to be indefensible. This is shown from Diagram
171
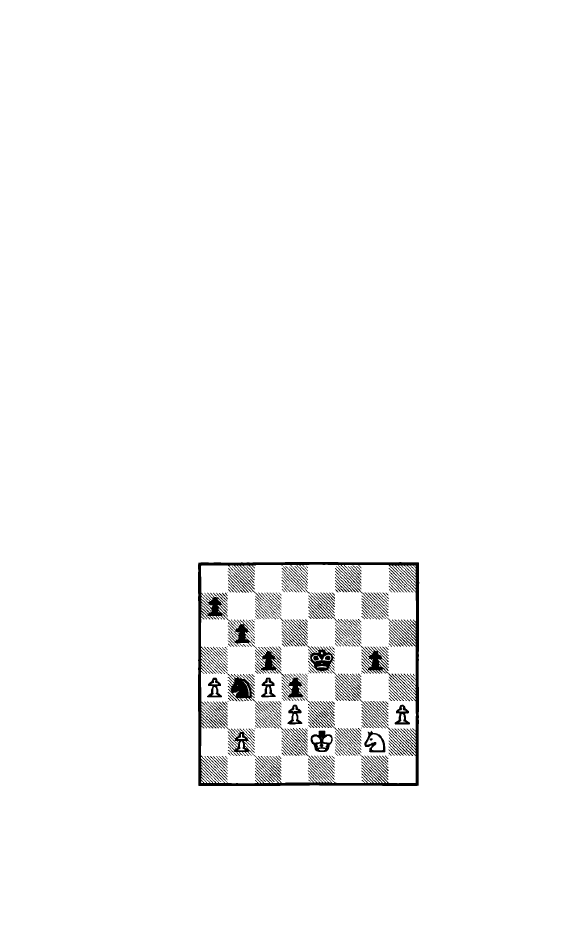
97, R. Ervin - P. Benko, Lone Pine 1976, after Black's 25th
move. If White's King would already be on e2, White could
hold the game. But here there is no defense:
26 a3
After 26 a4 Nd3! 27 Nd2 (27 Ke2? allows 27 ... Ncl +)
27 ... Kd5 28 Ke2 Kd4 Black also infiltrates decisively into
White's Queenside.
26
.•.
Nc2! 27 a4 KdS
28
Ke2 Nal! 29 b4
Or 29 Nd2 Kd4 followed by 30 ... Kc3.
29
•..
Nc2 30 bS Nd4+
Now that White's Queenside has been loosened up,
unlike the situation that existed at Move 28, the K & P end
game is a sure win.
31 Kd3 Nxt3 32
gxf3
KcS 33 Kc3 hS 34 f4
f5
White resigns
The likely continuation is 35 Kb3 Kd4 36 Kb4 b6 37
Kb3 Kd3 38 Kb4 Ke2 etc.
In positions which are blocked or semi-blocked often
the winning method is to sacrifice the Knight
so
that the King
can penetrate.
Diagram 98
172
This is well illustrated from
98, A. Zichichi -
V. Hort, Venice 1969, White on move.
has more
the more active King and the more active Knight. Yet
seems to have covered all the bases. How is Black to break
through?
t Net Kf4 2 Kf2 Nc6!
The Knight gets repositioned first to eS and then to f4
so that it not only menaces d3 but also attacks other key
squares.
3 Ng2+ Kt'S 4 Net NeS S Kg3 Ng6 6 Kf3 Nf4 7 Kg3 aS 8
Kh2
After 8 b3 Black wins the b-pawn and the game with
8 ... Ne2+ 9 Kt2 Ncl. After the text routine
is insufficient,
e.g. 8 ... g4?! 9 hxg4 +
10 Kg1 Kg3
Kfl and White,
though passive, is safe.
measures are required to
allow the King to penetrate.
8 ... Nxh3!! 9 Kxh3 Kf4 tO Kg2 Ke3
Black's King has been unleashed onto White's Queen
side and the pawns will drop like flies. White decides to acti
vate his
and Knight smce passive play is without pros
pects,
Kfl g4 1 2 b3 g3 13 Kg2 Ke2 14 Nf3 Kxd3 15
Kxg3
etc.
t t Nt3 Kxd3 t2 Kf2 Kxc4 13 Ke2 Kb3 t4 NxgS Kxb2! tS
Kd3 Kb3 t6 Ne4 Kxa4 17 Kc4
White's K + N have succeeded in establishing satisfac
tory defensive positions, but four good connected passed pawns
are too much for the Knight to cope with.
t7 ...
Ka3
t8 Nf6 a4 19 NdS Kb2 20 Nxb6 a3 2t Na4+ Kc2 22
NxcS
a2 23
Nb3 Kb2!
White resigns
Drawing prospects depend on either exchanging off all
the stronger side's pawns or creating sufficient counterplay. A
model execution of the first approach is demonstrated from
173
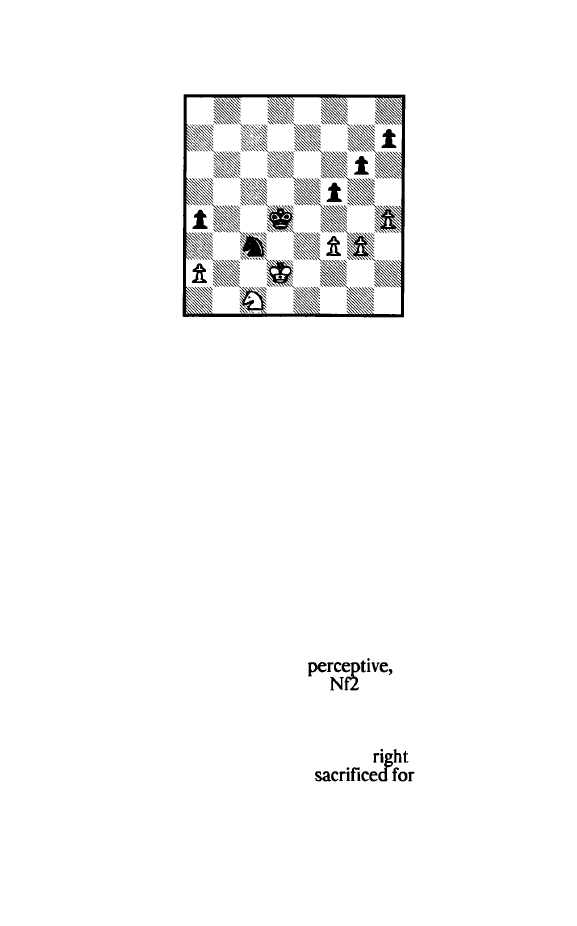
Diagram 99, L. Evans - D. Verduga,
Los
Angeles 1980, White
on move.
Diagram 99
Black's King and Knight have domineering locations
and White's prospects look indeed bleak. For instance, 1
Ne2+? Nxe2 2 Kxe2 Kc3 1eads to a lost K & P endgame, while
1 Kc2? allows Black the same type of winning sacrifice as in
the previous example: l...Nxa2! 2 Nxa2 Ke3 when Black will
devour White's Kingside and win. The only drawing chance is,
as GM Evans puts it so well, "liquidating pawns as fast as
possible while keeping Black's King out". Therefore:
1 g4! grl4?!
This helps White all across the board: a pawn is ex
chan�ed off and White's King liberated. More in the spirit of
keepmg a bind is l...f4, though White keeps drawing chances
after 2 gS! (Evans).
2 fxg4 Ne4+?!
And here 2 ... Nd5! is more
aiming to keep a
bind on both sides, e.g. 3 Nd3 Ne3 4
Nc4+ !.
3 Ke2 Nf6 4 Kt3 Kc3 S Kf4! Kb2 6 Ne2 a3 7 Nd4!
White's King has been liberated all
and now White
must ensure that his Knight can be
the a-pawn.
174
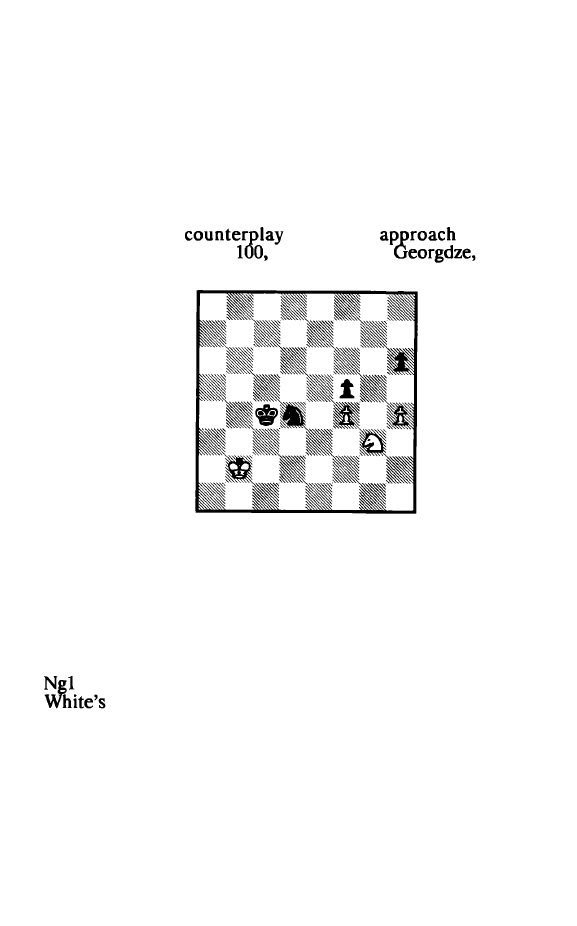
7
•••
Kxa2 8 NbS Kb2 9 Nxa3 Kxa3 10 hS!! gxhS 11 gxhS
NxhS+
White is also safe after 1 1 ... Kb4 12 Kf5! Ng8 (12 ... Nxh5
13 Kg5) 13 Ke6 followed by 14
Kf7
.
12 KgS Ng7 13 Kh6
Draw
Black's last pawn will bite the dust.
Goin� for
is the only
that can
save White
m
Diagram
G. Barcza - T.
Decin
1975, White on move.
Diagram 100
Black's King and Knight are ready to penetrate into
White's Kingside and White's King is in no condition to pre
vent that. The only hope that White has is to send his Knight
after Black's h-pawn. Therefore:
1 NhS! Kd3
White's task is easier after l...Ne2 2 Kc2! Kd4 3 Kd2
4 Nf6! Nh3 (4 ... Nt3 + 5 Kg2 Nxh4 6 Ng8 h5 7 Nf6 allows
Knight to capture the h-pawn and sacrifice itself for
the f-pawn.) 5 h5! Nxf4 6 Ng8 Nxh5 7 Nxh6 f4 8 Ke2 Ke4 9
Ng4 and with White K + N well placed to stop the f-pawn, the
draw is certain.
2 Nf6! Ne2 3 hS!
175

But not 3 Ng8?? h5 4 Nf6 Ng3! and White's pawns will
go lost while Black's survive.
3
•..
Nxf4 4 Ng8 NxhS 5 Nxh6 f4 6 Nf7!
Since White's King can't get back to the Kingside, the
active Knight has to do the job by itself. The pawn must be
prevented from crossing f3 in
For White's Knight f7 is
the ideal location since it can reach
of the critical squares:
e5 and g5.
6 ... Nf6 7
Kcl Ke3
8 NgS Ne4 9 Nf7!
Losing is 9 Nh3?? f3 10 Kc2 Ng5! 1 1 Nxg5
f2.
But after
the text 9 ... f3 is parried by 10 NeS
f2
1 1 Ng4+ followed by 12
Nxf2.
9
...
Ke2
10 NeS Nd2
11 Kb2
Ne4
1 l...Nc4+ 12 Nxc4 f3 is foiled by 13 Kc2
f2
14 Nd2.
12 Kc2 Draw
Black has no way of progressing.
Diagram 101
Even in desperate situations the potential activity of the
Knight can give heart to the defender.
An
instructive and lucky
(for me) example is shown from Diagram 101, E. Mednis - S.
Reshevsky, U. S. Championship 1957/58, after White's 54th
176
move.
Black has the more active King, more active Knight and
the better pawn formation - small wonder that White is lost!
Yet, where "there is an active Knight, there is hope" and White
goes about trying to activate his Knight:
S4
•.•
d4! SS Kf2 Nf6 56 Kg2 Ne4 57 Nf4! Nxg3 58 Nd3 Ne4 59
NeS+ Kf4 60 Nc4
White must �o for counterplay on the Queenside, even
at the cost of allowmg Black's King penetration because rou
tine play a pawn down with the inferior position is simply wait
ing for the undertaker.
60
...
Nf6 61 NxaS Ke3 62
Kfl
White must prevent 62 ... Ke2, enabling the f-pawn to run
victoriously.
62
•••
Kd2 63 b4!! o:b4 64 Nc6
White's goal is simple: he wants to exchange off as many
pawns as possible.
64
...
b3?
In wanting too much, Black comes up with too little.
The simple and prosaic 64 ... Kxc2 65 Nxd4 + Kxb2 66 Nxf5
Kc3! was the only way to win. Black's pawn reaches b3 (i.e. the
6th rank) in safety and White's
is kept away in the passive
"to the side of the pawn" location. thematic illustrative varia
tion then is: 67 Ke2 b3 68 Ne3 Ne4 69 Nd1 + Kc2 70 Ne3 +
Kc1 71 Nd1 (71 Nc4 Nd6!) 71...Nc5 72 Ke1 Nd3 + 73 Ke2
Nf4+ 74 Ke1 Ng2+ 75 Ke2 Kc2 and Black wins.
6S o:b3
d3 66 b4!
White's only hope is that the
b-pawn can tie
down Black's
long enough for
to eliminate all of
Black's pawns.
just turns out to be possible - by one
tempo.
177

66
.•.
Kcl 67 Nd4! NdS
Easier for White is 67 ... d2 68 Nb3 + Kc2 69 Nxd2 Kxd2
70 Kf2! Nd5 73 Kt3 Kd3 74 b5 Kd4 75 b6! Kxb6 76 Kf4.
68 bS Kxb2 69 Nt3! Kc3 70 Kel Nb6 71 Kdl Nc4 72 Kel
White has set up an unusual blockade, which Black
cannot break. For instance, 72 ... d2+ 73 Nxd2 Nxd2 74 b6
Nf3 + 75 Kf2 Nd4 76 b7 Nc6 77 Ke3 Kc4 78 Kf4, with a
draw.
72 ... f4 73 Kdl Kb4 74 b6!! Nxb6 75 Kd2 Kc4 76 NeS+ Kd4
77 Nxd3 t3 78 NeS!
Draw
White comes just in time after 78 ... Kxe5 79 Ke3.
178
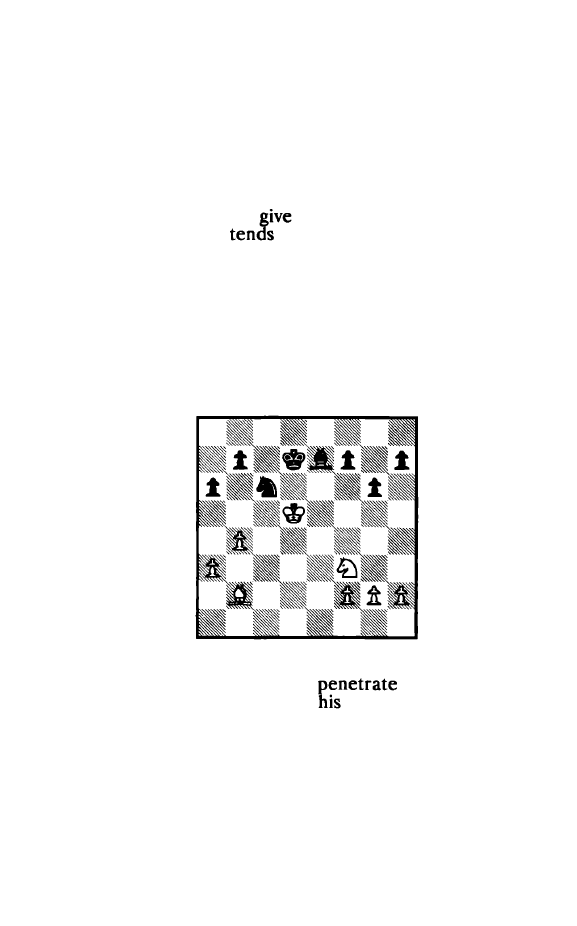
Chapter S
Small Advantages in Knight Endgames
The practical player should strive to win slightly superi
or positions, whether they be middlegames or endgames. In
particular, slightly superior endgames are pleasant to play since
the reduction in material means that the nsk of a loss has been
decreased while the prospects of a win remain. Small advan
tages in Knight endgames
excellent prospects for a win
because the defender
to underestimate the superior
side's chances. After all, the Knight is but a minor piece - and a
short range one at that - so how much damage can occur? Yet,
especially the Knight
is excellent in exploiting small advantages
because of its wonderful flexibility and agility. Here I will take
a look at some interesting instructive examples.
First I will show the course of play from Diagram 102,
M. Botvinnik - R. Holmov, Moscow Teams 1969, after White's
30th move.
Diagram 102
White here has the smallest of advantages: the more
active King. yet the King cannot
further, Black's
minor pieces are well placed and
pawn formation sound.
The position is quite drawn, but GM Holmov does not appre
ciate the possible dangers and quickly lands in an untenable
situation:
30
...
h5?!
179
The routine text is inexact.
As
GM Botvinnik has
ed out, the perceptive 30 ... Bd8! is in order to chase
King away from its excellent center location with 3l...Ne7 + . It
should be added that exchange of
offers no promise to
White, as Black's position in a pure
endgame is rock
solid.
31 Bg7! Bd8
Also after 31 ... Bd6 White "prevents" the Knight check
on e7 by means of 32 Bf6!
32 Bf8! Bb6
White is clearly better after 32 ... Ne7 + 33 Bxe7 Bxe7
34 NeS + Ke8. In this sequence, the damage from 30 ... h5?!
comes through very clear: because of the weakness on g6,
Black cannot chase the
away with .. .f6. While the text is
O.K., the plan behind it -
exchange of Bishops - is not. In
any case, I would leave the Bishop on the h4 - h8 diagonal and
play 32 ... Bf6.
33 BcS Ne7+
33 ... Bc7 or 33 ... Bd8 make more sense because the Black
Bishop is a good defender.
34 Kc4 BxcS?!
And here 34 ... Bc7 makes Black's defensive job a lot
easier.
35 KxcS Kc7?
Already the decisive error because White's Knight can
now cause a fundamental weakening of Black's Kingside.
Correct is 35 ... Nc8! and after 36 NgS, 36 ... Ke7. Black's position
then remains defensible.
36 NgS!
What a difference one move can make! Black now is
180
forced to create a major permanent weakness:
(1) 36 .. .f5 37 Kd4 Nc6+ (Or 37 ... Kd6 38 Nf7+ Kd7 39 KeS.)
38 KdS Kd7 39 KcS Kc7
40
Ne6 + (Pachman).
(2) 36 ... b6+ 37 Kd3 f6 38 Nh7 Ng8 39 KdS Kd7
40
Nf8+.
In each of these sequences White wins a pawn.
36 ... f6 37 Nh7 fS
Worse is 37 ... Ng8 38 KdS Kd7 39 Nf8+.
38 h4! f4
Black is already almost in
After 38 ... b6+ GM
Botvinnik gives the following variation:
Kd4 Kd6 40 Nf8!
Nc6+ 41 Ke3 NeS 42 Kf4 and the g-pawn goes lost.
39 Nt8 b6+?!
GM Botvinnik considers Black's best chance to be
39 .. .f3! 40 g3 NfS 41 Nxg6
when after 42 Kd4 White
will capture the f-pawn and thus
a pawn up, but Black keeps
reasonable practical drawing chances.
40 Kd4 NfS+
It's too late now for
40
... t3?! 42 g3 NfS+ because White
has 43 Kd3!.
41 Ke4 Nxh4
Or 4l...t3 42
Kxf3
Nxh4+ 43 Kg3 Nf5 +
44
Kf4.
42 Ne6+ Kc6 43 Nxf4 Kb5
Instead 43 ... g5 allows a won K & P endgame after
44
gxf4 45 gxh4. According to GM Botvinnik, this is what
Holmov had overlooked when playing 39 ... b6+ ?!.
44
g3 NfS 45 Nxg6 Nh6 46 NeS!
The coming Knight maneuver stops Black's counterplay
181
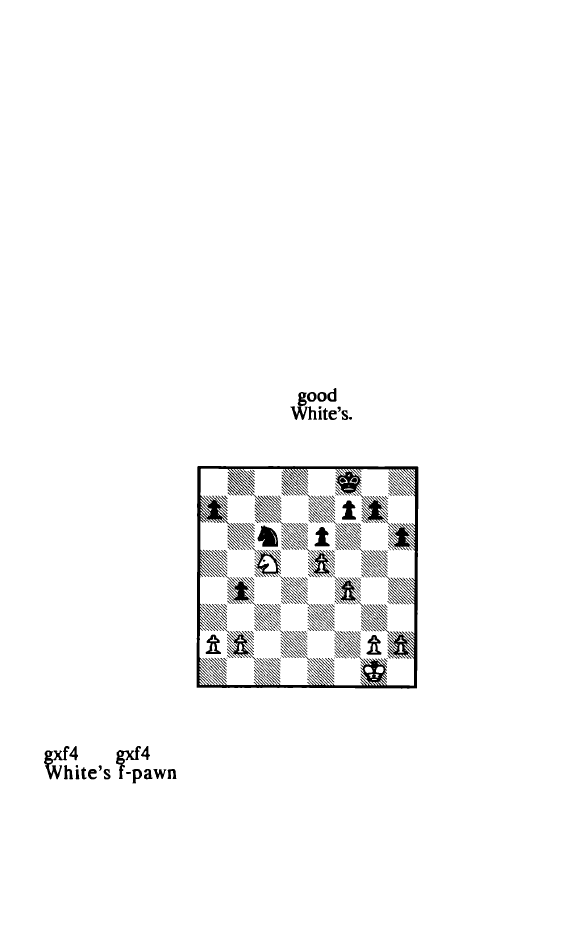
on the Queenside, allowing White to realize his advantage on
the Kingside.
46
•••
Ka4 47 Nc4 Kb3
The win is also routine after 47 ... Kb5 48 Nb2; it is
pretty after 47 ... b5 48 Ne5 Kxa3 49 Nc6!.
48 Nxb6 Kxa3 49 Nd5 Kb3 50 f4 Kc4 51 Nc7 Kxb4 52
Nxa6+
Black resigns.
After 52 ... Kc4 53 Nb8 Ng4 54 Nd7 White has an
elementary win.
Whereas White had no structural superiority at the start
of the previous example, his slight advantage in Diagram 103,
V. Bagirov - E. Sveshnikov, Lvov 1978, after White's 32nd
move, is all structural: the potential weakness of Black's b
pawn and more central space because of the e5 pawn. Yet
otherwise Black stands well: a
Knight and a King one
tempo closer to the center than
Therefore it is nothing
short of astounding how quickly Black self-destructs:
Diagram 103
32
.•
.g5?
Apparently Black only expects 33 g3?! when after 33
34
Kg7 a set of pawns have been exchanged and
is a new structural weakness. Therefore
chances are equal.
182
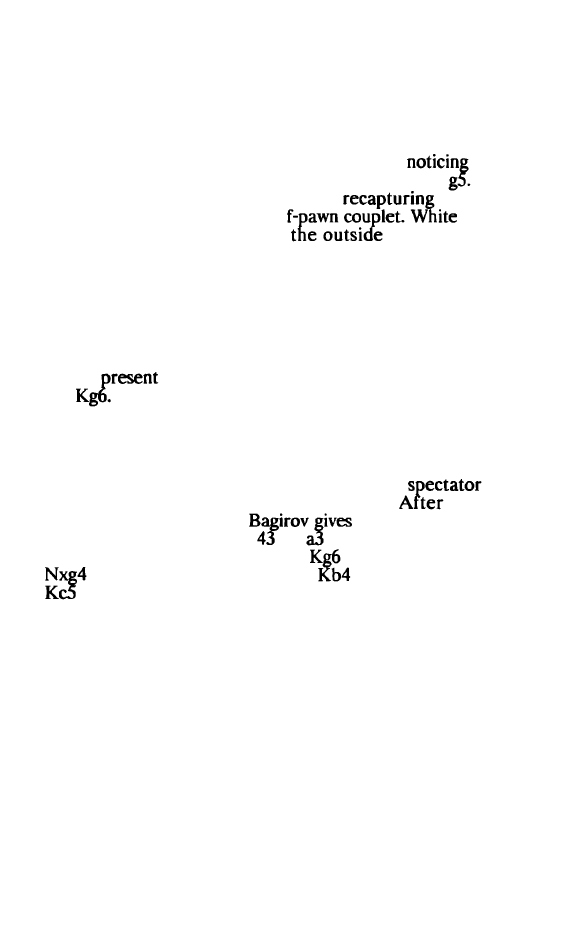
Correct instead is the modest and sensible 32
. .
. Ke7 33
Kf2 f6! 34 exf6 + gxf6. White's central grip has been broken
and Black's position is fully defensible.
33 fxgS! hxgS?!
This also is too routine, with Black not
that he
is creating a new long term structural wealr.ness on
Neces
sary is 33 .
.
. Nxe5 34 gxh6 Kg8. Mter
the h-pawn
Black will have a sound e- and
retains a
clear edge because of having
passed pawn and
opportunities of infiltrating the Queenside but Black is not
without chances.
34 Nd3 Kg7 35 Kfl fS?!
By allowing White's only weakness - the e-pawn - to
disappear, Black lands himself in a hopeless situation. At least
for the
Black should
try
to keep the status quo and play
35 ...
36 exf6+ Kxf6 37 Ke3 Kt'S 38 h3
a5
39 g4+ ! Kg6 40 NcS Kf6
41 Ne4+ Kg6
After the text Black's King remains a
while
White's starts his work on the Queenside.
the active
alternative, 41 ... Ke5, GM
the following convinc
ing variation: 42 NxgS a4
h4
44 b3 Ne7 45 Nf3 + Kf6
46
Kd4 Nd5 47 Nd2
Kn
48 Ne4
49 Kc4 Ne3 + SO Kxb4
51 Kxa3 KfS 52 NcS eS 53
e4 54 Nxe4! Kxe4 SS
and White's pawns win.
42 Kd3 Ne5+ 43 Kd4 Nd7
44
Kc4 Nf6 45 Nc4 e5 46 Nb7 Ne4
47 NxaS
The start of a successful dismantlin� of Black's Queen
side. Black's counterplay comes too late smce White's pieces
can stop the e-pawn whereas Black is defenseless against
White's Queens1de advances. The outside passed pawn wins
again!
47
.••
Nfl 48 Nc6 Kf6 49 Nxb4 Nxh3 50
a4
Ke6 51 KcS! e4 52
183
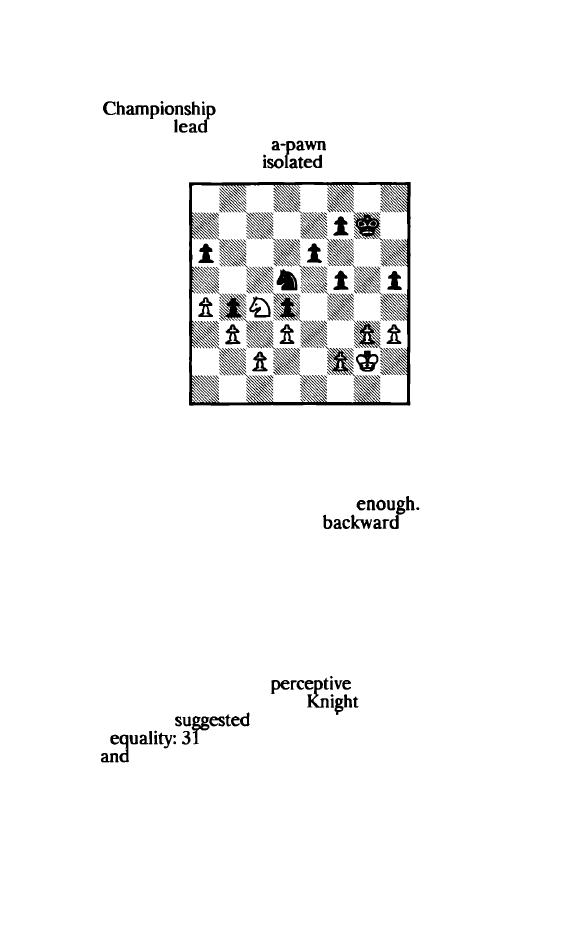
a4 e3 53 Nc2
e2
54 a6 Nf4 55 a7 Nd3+ 56 Kb5
Black resigns
A brief look at Diagram 104, G. lskov - B . larsen,
Danish
Match 1975, Game 1, after Black's 30th
move, can even
to the erroneous conclusion that White
has some advantage: Black's
may be vulnerable, Black
has doubled f-pawns and an
h-pawn.
Diagram 104
The truth, however, is just the opposite: it is Black who
is slightly better because of spatial advantage and the opportu
nity to build a strong center with .. .f6 and
. . .
e5. Black
does
not
have to worry about the h-pawn because White can't get at it
and Black can defend the a-pawn well
On the other
hand, it is White's c-pawn that is a
pawn, will be of
no offensive help and is potentially vulnerable. Therefore, the
player with the slight disadvantage must understand the es
sence of the position so as not to stumble into trouble. Yet, just
as in the previous example, soon (within seven moves!) he is
lost. This ts how White brought it about:
31 f4
Playable, but not very
because it weakens the
e3 square at a time when Black's
has ready access to it.
GM Larsen has
the followmg accurate way to head
towards
Na5! Ne7 32 Nb7 Nc6 33 f4! followed by
34
Kf3
35 g4.
31 ... f6 32 h4??
184
An
absolutely criminal move. White creates a
term
potential problem on h4 and forecloses the possibility
liqui
dating the Kingside pawns after a later g4, while
not
an iota of value in return. GM Larsen suggests the
32
Kt2, followed by activating the Knight with 33 Na5, aiming for
the plan presented in the previous note.
32
...
Kf8 33 Kf3 Ke7 34 Kf2. Kd7 35 Kf3 Kc7 36 Kf2. Ne7! 37
aS??
After 11Criminally touching his h-pawn on Move 32,
White now does the same to the a-pawn. The only �ain from
the text is that his Knight has partial access to b6
-
a ndiculous
Iy small return for creating a hopelessly vulnerable a-pawn.
Now White is totally lost. His position is unpleasant, of course,
but that is hardly the reason for making the situation worse. A
normal sequence would be 37 Kt3 Kc6 38
Kt2
ng6 39
Kt3
e5
39 fxe5 (Or 39 Nd2 Kd5 etc.) 39 .. .fxe5 40 Nd2 Kd5 followed
by ... e4.
37 ... Nc8 38 kel Kc6 39 Kf2 Kd5 40 Kel e5 41 Kt3 Ke6 42
Kel Ne7 43 Kf2.
Because of the weakness of the h-pawn, White cannot
avoid
on e5, thereby dissolving Black's doubled
pawns.
Larsen gives the following example: 43 Nd2 Ng6
44 Kf3 Kd5! (44 ... gxf4? 45
Nxh4 + 46
N�6 47 Nf3
allows White a successful
when
rs in zugz
wang and must play 45 fxe5.
43
..•
Ng6
44
fxeS fxeS 45 Kf3 ne7 46 Ndl Nc8 47 Kel Nd6 48
NtJ?!
Throwing away the a-pawn is plain silly. After the
normal 48 Nc4, GM Larsen grves two methods for Black to
reach a won
(1) 48 ... Nb7 followed by ... Nc5 and ... e4;
(2) 48
.
.. Nb5
by ... Na3 forcing White's King to protect
the c-pawn, and then ... e4.
48 ... Nb7 49 Ng5+ Kf6 50 Nh7+ Ke7 51 Ng5 Nd8
Of course, the immediate 51 ... Nxa5 is fine, but the pawn
185
won't run away.
52 Nt3 Nc6 53 Kf2 Kf6 54 Ndl NxaS
Black is a second pawn up while retaining all his previ
ous advantages: space, center, opportunity to create either a
passed e- or passed f-pawn,
of c2. The only
remaining question is Black's exact plan.
Larsen decides
on tieing down White's King to c2 and then creating a passed f
pawn.
SS Kel Nc6
56
Kf2 Ne7 57 Kel NdS 58 Nc4 Ke6 59 Kt3 Nc3
60 Nb6 NbS
61 Kel Na3 62 Na4 Kd6
There is no reason to allow White to activate his Knight
after 62 ... Nxc2
63
Nc5 +.
63 Kdl f4!
Also 63 ... e4 wins, but Black chooses that passed pawn
which is further from White's King. Black will use the time that
White needs for stopping the f-pawn to break through on the
Queenside.
64
gd4 exf4
65
Nb6 Ke6 66 Kel Nxcl 67 Kt3 Kt'S 68 NdS aS!
69 Ne7+
After 69 Nxf4, 59 ... a4 is the crusher.
S9
••.
Ke6 70 Nc6 a4
White resigns
Our last example,
105, G. Fuster - S. Gligoric,
Portoroz Interzonal 1958,
White's 41st move, shows a
which is theoretically 100% drawn and should be at
a 99% practical draw.
The time control has been reached, the game is ad
journed overnight, all pawns are on the same side, there are no
weaknesses in White's pawn structure. Black's only slight
advantage is a
bit
more space. A pure Bishop endgame - with
on either color - is a total draw and even with the
Knights on board, there should be no doubt of the
186
result: draw. Yet, nothing goes right with IM Fuster's handling
of the position:
Diagram 105
41
•••
NcS
There is nothing in the "active" 41...Kc3 42 Na4+ Kd2
43 Kfl Kdl
44
Nb2 + etc.
42 Ndl Nb3 43 Nb2
Why put the
on the edge when a good central
is avai lable?
course, better is 43 Ne3 ! and if
... Ke5,
44
h4, aiming for a routine exchange of the h-pawns.
43
•..
Nd2
44
Ndl Nc4
45 Kfl
White has "managed" to stalemate his Knight, but the
position remains quite drawn, as long as White doesn't play e3,
which would allow B lack's King to march in to d2 via d3.
Nevertheless, instead of the text move, perceptive is 45 h4!,
so
that if Black wants to get in ... gS and .. .f4 he has to allow the
routine exchange of the h-pawns.
45
..
.g5! 46 Kg2 h5 47 h4?!
Played at quite the wrong moment since the pawn now
is more vulnerable on h4 than it would have been on h3. GM
Gligoric
as correct 47 Kfl and after 47 ... h4 48 gxh4
gxh4 49
Black lacks a viable plan to go for a win.
187
Even so the position remains quite drawn despite
White's inferior 43rd, 45th and 47th moves.
47 .. .g4
48
Kgl e3
Black might as well try to confuse White since the
Knight
remains
so
drawn. Of course the
&
49 fxe3 + ! Nxe3 50 Nxe3 Kxe3 51
52
Kxf4 53 Kg2 Ke3 54 Kfl is quite drawn also because
can never expect ... g3 to work. However, IM Fuster,
already short of time, decides not to risk this endgame.
49 Kg2?
exf2
SO
Nxf2
This is the better recapture as the Knight gets into posi
tion to go to d3 and then f4.
so
•••
Ne3 + st Kgt r4 s2 gxf4??
White promptly
the point of his 50th move and
suddenly is lost.
As
GM
pomts out, White draws after
52 Nd3! f3 (52 ...
fxg3
53
is even simpler.) 53 Nf4 Ndl ! 54
exf3
gxf3
55 Nxh5 Ke3 56 Nf4.
S2
... Nt5 53 Ndl?
White just allows Black to walk all over him. Some
practical chances are offered by 53 e4.
S3 ... Ke4!
S4
e3 Kf3!
The combination of the active King, active Knight and
far advanced passed pawns win easily.
SS Kh2
Nxh4 56 Kgl nt5 57
Kfl
h4 58 Kgl g3
White resigns
An
endgame that White truly deserved to lose. If you do
everything wrong, shouldn't you lose?
188

$12.95
Grandmaster Edmar Mednis resumes his best-selling
Practical Chess Endings series with this comprehensive
treatment of knight endings
.
This book continues the
emphasis upon guidance through principles, rather than
any memorization
.
1 05
diagrammed positions provide
the reader with ample practice to comprehend and apply
the elements of proper handling of knight endings in
their own games. While the very nature ofthe knight
moves makes knight endings more complex
,
this
"practical" guide will remove the mystery from this
type of ending
.
There is material for study here for all
levels of players
.
ISBN 0-450470-3 5-53
Document Outline
- IMG_0247
- IMG_0249_1L
- IMG_0249_2R
- IMG_0250_1L
- IMG_0250_2R
- IMG_0251_1L
- IMG_0251_2R
- IMG_0252_1L
- IMG_0252_2R
- IMG_0253_1L
- IMG_0253_2R
- IMG_0254_1L
- IMG_0254_2R
- IMG_0255_1L
- IMG_0255_2R
- IMG_0256_1L
- IMG_0256_2R
- IMG_0257_1L
- IMG_0257_2R
- IMG_0258_1L
- IMG_0258_2R
- IMG_0259_1L
- IMG_0259_2R
- IMG_0260_1L
- IMG_0260_2R
- IMG_0261_1L
- IMG_0261_2R
- IMG_0262_1L
- IMG_0262_2R
- IMG_0263_1L
- IMG_0263_2R
- IMG_0264_1L
- IMG_0264_2R
- IMG_0265_1L
- IMG_0265_2R
- IMG_0266_1L
- IMG_0266_2R
- IMG_0267_1L
- IMG_0267_2R
- IMG_0268_1L
- IMG_0268_2R
- IMG_0269_1L
- IMG_0269_2R
- IMG_0270_1L
- IMG_0270_2R
- IMG_0271_1L
- IMG_0271_2R
- IMG_0272_1L
- IMG_0272_2R
- IMG_0273_1L
- IMG_0273_2R
- IMG_0274_1L
- IMG_0274_2R
- IMG_0275_1L
- IMG_0275_2R
- IMG_0276_1L
- IMG_0276_2R
- IMG_0277_1L
- IMG_0277_2R
- IMG_0278_1L
- IMG_0278_2R
- IMG_0279_1L
- IMG_0279_2R
- IMG_0280_1L
- IMG_0280_2R
- IMG_0281_1L
- IMG_0281_2R
- IMG_0282_1L
- IMG_0282_2R
- IMG_0283_1L
- IMG_0283_2R
- IMG_0284_1L
- IMG_0284_2R
- IMG_0285_1L
- IMG_0285_2R
- IMG_0286_1L
- IMG_0286_2R
- IMG_0287_1L
- IMG_0287_2R
- IMG_0288_1L
- IMG_0288_2R
- IMG_0289_1L
- IMG_0289_2R
- IMG_0290_1L
- IMG_0290_2R
- IMG_0291_1L
- IMG_0291_2R
- IMG_0292_1L
- IMG_0292_2R
- IMG_0293_1L
- IMG_0293_2R
- IMG_0294_1L
- IMG_0294_2R
- IMG_0295_1L
- IMG_0295_2R
- IMG_0296_1L
- IMG_0296_2R
- IMG_0297_1L
- IMG_0297_2R
- IMG_0298_1L
- IMG_0298_2R
- IMG_0299_1L
- IMG_0299_2R
- IMG_0300_1L
- IMG_0300_2R
- IMG_0301_1L
- IMG_0301_2R
- IMG_0302_1L
- IMG_0302_2R
- IMG_0303_1L
- IMG_0303_2R
- IMG_0304_1L
- IMG_0304_2R
- IMG_0305_1L
- IMG_0305_2R
- IMG_0306_1L
- IMG_0306_2R
- IMG_0307_1L
- IMG_0307_2R
- IMG_0308_1L
- IMG_0308_2R
- IMG_0309_1L
- IMG_0309_2R
- IMG_0310_1L
- IMG_0310_2R
- IMG_0311_1L
- IMG_0311_2R
- IMG_0312_1L
- IMG_0312_2R
- IMG_0313_1L
- IMG_0313_2R
- IMG_0314_1L
- IMG_0314_2R
- IMG_0315_1L
- IMG_0315_2R
- IMG_0316_1L
- IMG_0316_2R
- IMG_0317_1L
- IMG_0317_2R
- IMG_0318_1L
- IMG_0318_2R
- IMG_0319_1L
- IMG_0319_2R
- IMG_0320_1L
- IMG_0320_2R
- IMG_0321_1L
- IMG_0321_2R
- IMG_0322_1L
- IMG_0322_2R
- IMG_0323_1L
- IMG_0323_2R
- IMG_0324_1L
- IMG_0324_2R
- IMG_0325_1L
- IMG_0325_2R
- IMG_0326_1L
- IMG_0326_2R
- IMG_0327_1L
- IMG_0327_2R
- IMG_0328_1L
- IMG_0328_2R
- IMG_0329_1L
- IMG_0329_2R
- IMG_0330_1L
- IMG_0330_2R
- IMG_0331_1L
- IMG_0331_2R
- IMG_0332_1L
- IMG_0332_2R
- IMG_0333_1L
- IMG_0333_2R
- IMG_0334_1L
- IMG_0334_2R
- IMG_0335_1L
- IMG_0335_2R
- IMG_0336_1L
- IMG_0336_2R
- IMG_0337_1L
- IMG_0337_2R
- IMG_0338_1L
- IMG_0338_2R
- IMG_0339_1L
- IMG_0339_2R
- IMG_0340_1L
- IMG_0340_2R
- IMG_0341_1L
- IMG_0341_2R
- IMG_0342_1L
- IMG_0342_2R
- IMG_0343_1L
- IMG_0343_2R
- IMG_0500
Wyszukiwarka
Podobne podstrony:
więcej podobnych podstron