399
In This Chapter
16
Assembling Parts
You can build part assembly models from two or more
parts, or parts grouped in subassemblies. Like part
features, parts and subassemblies act as building blocks.
Autodesk
®
Mechanical Desktop
®
builds individual parts
and subassemblies into an assembly.
In this tutorial, you create an assembly model of a pair
of slip pliers from four parts. Three of the parts originate
in files that are externally referenced to the assembly
file.
Using externally referenced parts creates a truly parametric
assembly design. Changes to an external reference can be
made from within the assembly or in the original file.
■
Using external parts in an
assembly
■
Using assembly constraints
■
Analyzing the assembly
■
Creating assembly scenes
■
Using assembly tweaks and trails
■
Creating assembly drawing
views
■
Editing an external reference
and updating an assembly

400
|
Chapter 16
Assembling Parts
Key Terms
Term
Definition
3D constraint
In assembly modeling, an associative link between two or more parts that controls their
locations relative to each other and to their placement within the assembly.
Assembly Catalog
The means of attaching and cataloging local and external parts and subassemblies in
the Assembly Modeling environment. Use the All and External tabs to specify contents,
which can be instanced, copied, renamed, replaced, externalized, removed, localized,
sorted, unloaded, and reloaded.
assembly tree
A graphical hierarchy that illustrates the order in which parts and subassemblies are
combined in the current assembly. The assembly tree is managed in the Desktop
Browser.
attach
The act of connecting a reference file to the current assembly file. The attachment
remains with the current file after the file is saved.
definition
All information about a part or subassembly, including its name, location, and
attributes.
detach
Permanently removing a file as an external reference in an assembly.
external reference A part or assembly that resides in a file other than the current part or assembly file.
insert constraint
Aligns center points and planes of two circles in a specified direction. Solves translation
degrees of freedom. Used to constrain a bolt in a hole, for example.
localized part
Changes the definition of a part from external to local, severing the link to the external
file. Changes made to a localized part affect only the current part or assembly file; other
part or assembly files that reference the part are not affected.
mate constraint
Causes a plane or axis on one part to be coincident with a plane, point, or axis on
another part in a specified direction. Removes a translational degree of freedom.
rename definition
In the Part or Assembly Catalog, an attached external part or subassembly may be
renamed. The alias name is displayed beside the drawing name in parentheses.
scene
A 3D orientation of an assembly that you can use to create a 2D view in Drawing
mode. You use scenes to provide exploded or assembled views of your assembly
without destroying the constraints.
trail
In an exploded view, a line that shows how parts in an assembly are assembled.
tweak
Adjusts the position of parts in an assembly scene to avoid overlap in some views or to
make some parts more visible.

Basic Concepts of Assembling Parts
|
401
Basic Concepts of Assembling Parts
You create assemblies from parts, either combined individually or grouped
in subassemblies. Mechanical Desktop builds these individual parts and
subassemblies into an assembly in a hierarchical manner according to rela-
tionships defined by constraints. Using the Desktop Browser, you can
restructure the hierarchy of an assembly as needed, while retaining the
design constraints. See “Using the Desktop Browser” on page 414.
As in part modeling, the parametric relationships allow you to quickly
update an entire assembly based on a change in one of its parts.
You can build 3D solid assembly models from two or more parts or subassem-
blies. Like part features, parts and subassemblies act as building blocks.
The following process for building assemblies and subassemblies is similar to
that for building parts:
■
Lay out the assembly.
■
Create the base part.
■
Create the remaining parts.
■
Create the assembly and subassemblies.
■
Analyze the assembly.
■
Modify the assembly as necessary.
When you create an assembly file, you can create your parts in the assembly
drawing, or you can reference external files.
Using externally referenced parts gives you more flexibility over the control
of your assembly. If you need to make modifications to any of your parts, you
can open the individual part file and make changes to it. Because more than
one drawing can be open in the same Mechanical Desktop session, you can
immediately see the effects of your changes in the assembly file. You can also
edit external references from within the assembly file. This is particularly use-
ful in smaller assemblies. Depending on your system resources, you can edit
external files individually if they are part of a large assembly.
After you have assembled your parts, you need to check the assembly for
interferences. You may also want to perform mass property calculations on
your parts to ensure that they are structurally sound.
Finally, you need to document your design. To make it easier to visualize your
design, you may want to adjust, or tweak, your assembly and add trails to
indicate how your parts fit together. Then, you set up your drawing views
and add information, such as reference dimensions and annotations, before
finalizing the drawing for plotting.
402
|
Chapter 16
Assembling Parts
Starting Assembly Designs
An assembly design might begin as an overall conceptual design. You may
know how the parts are assembled but you may not know all the details
about each part.
Before you begin, decide how you want to lay out your assembly.
■
Start with a design idea.
■
Decide whether you need to create new parts, or if you can use existing
parts.
■
Start drawing the parts.
Although you can begin designing immediately and reorganize the hierarchy
of your assembly later, for this lesson you assemble parts in a logical order,
starting at the top level in the assembly tree. One part has already been cre-
ated in the tutorial file for this lesson. The other three parts reside in separate
files. You attach the files and then instance the parts into the assembly.
To begin, open the file s_plier.dwg in the desktop\tutorial folder.
NOTE
Back up the tutorial drawing files so you still have the original files if you
make a mistake. See “Backing up Tutorial Drawing Files” on page 40.
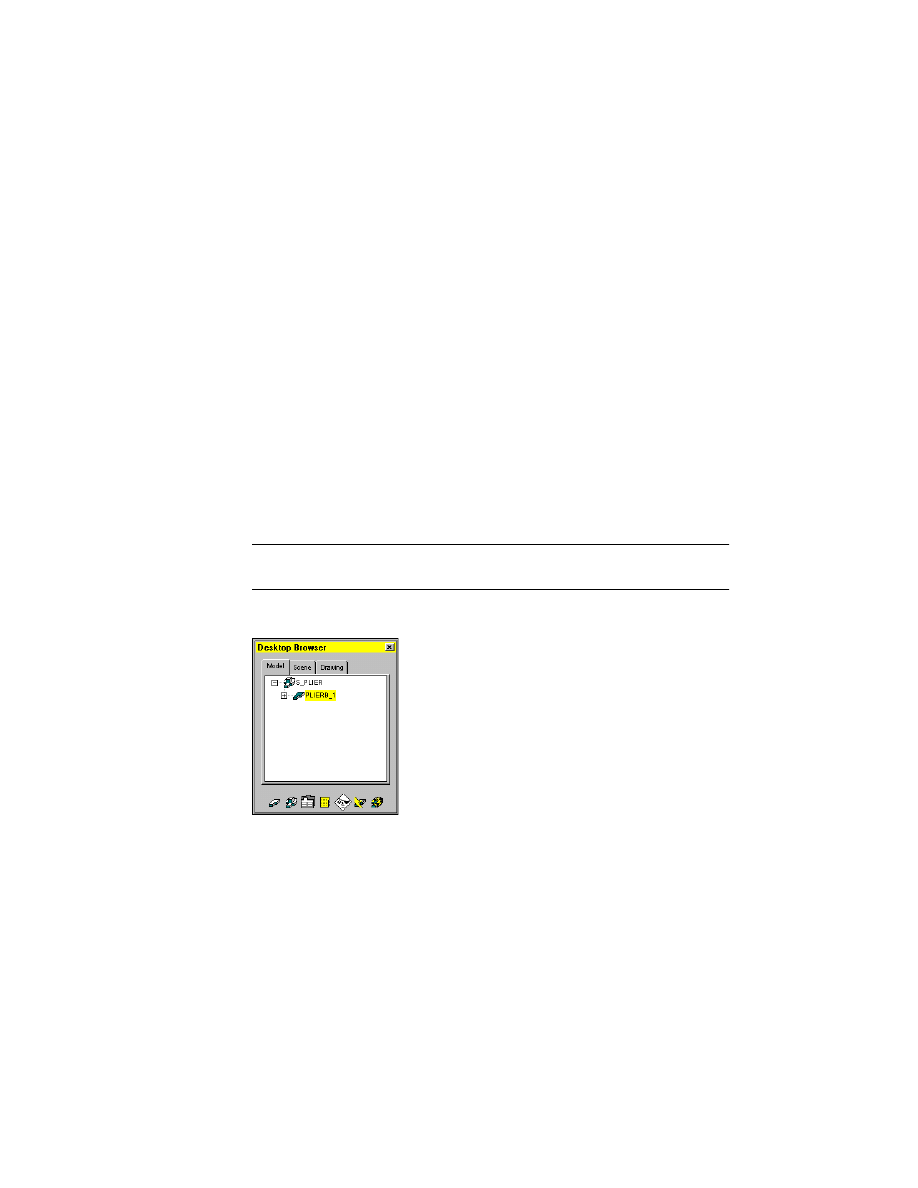
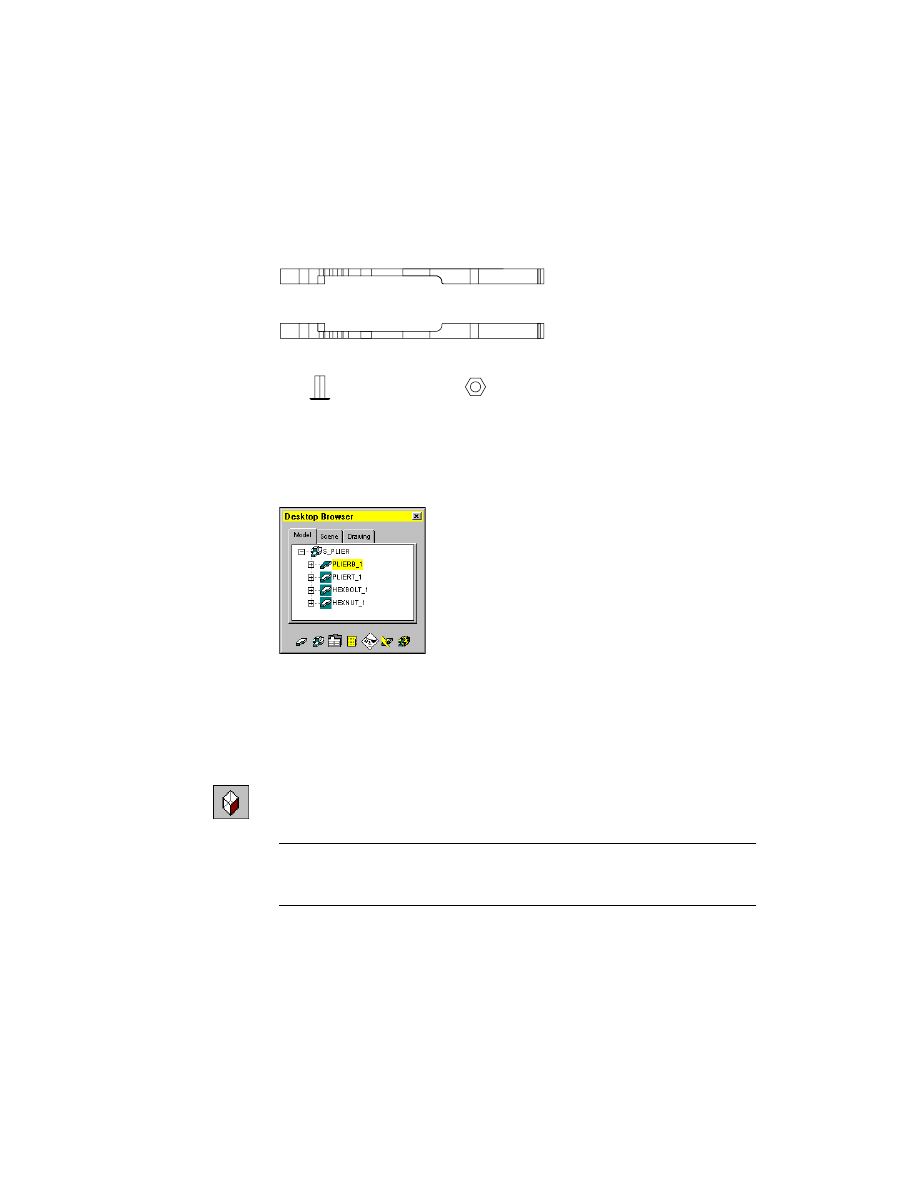
In the Browser, the PLIERB part is nested under the assembly icon.
Next, you reference three other parts to create the assembly.
Using External Parts in Assemblies
|
403
Using External Parts in Assemblies
The parts that make up the assembly model can be created and maintained
in other files. These parts are called externally referenced parts. When a part
changes, all instances of that part in other files are automatically updated.
Using parts from other files as external references is similar to external refer-
encing (xref) in AutoCAD. Because they are external, you can reuse referenced
parts in future assemblies. You can start a library of commonly used parts in a
directory where you can easily locate them. Externally referenced parts can be
instanced in the current file at any time.
To attach and instance an external part
1
Use
AMCATALOG
to attach the external parts.
Context Menu
In the graphics area, right-click and choose Assembly
Menu ➤ Catalog.
2
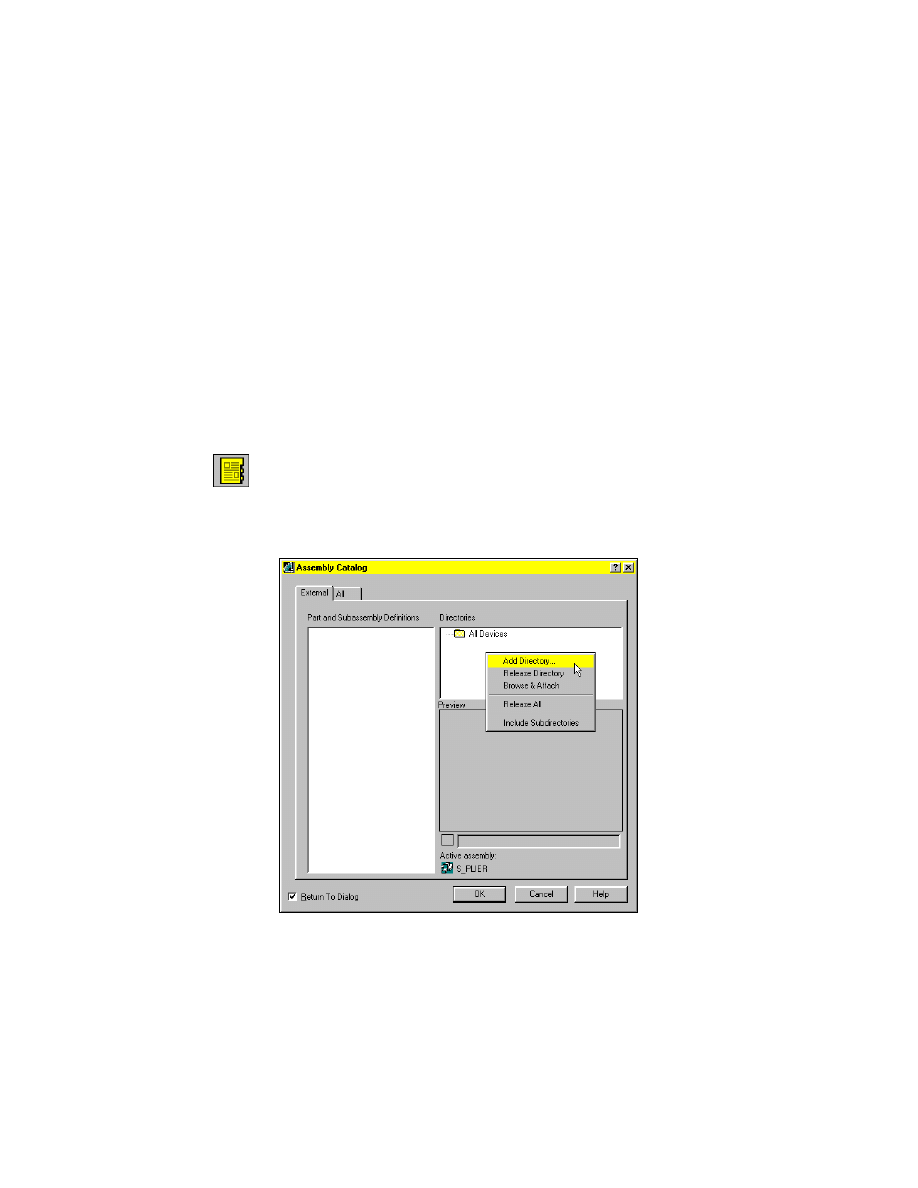
In the Assembly Catalog, verify that the External tab is selected and Return
to Dialog is checked.
In the Directories window, right-click and choose Add Directory.
404
|
Chapter 16
Assembling Parts
A Browse for Folder dialog box lists your network connections and
directories.
3
In the Browse for Folder dialog box, specify the desktop\tutorial folder to be
your working directory.
Choose OK.
NOTE
If you have installed Mechanical Desktop in a different location, browse
through your directories to locate the correct folder.
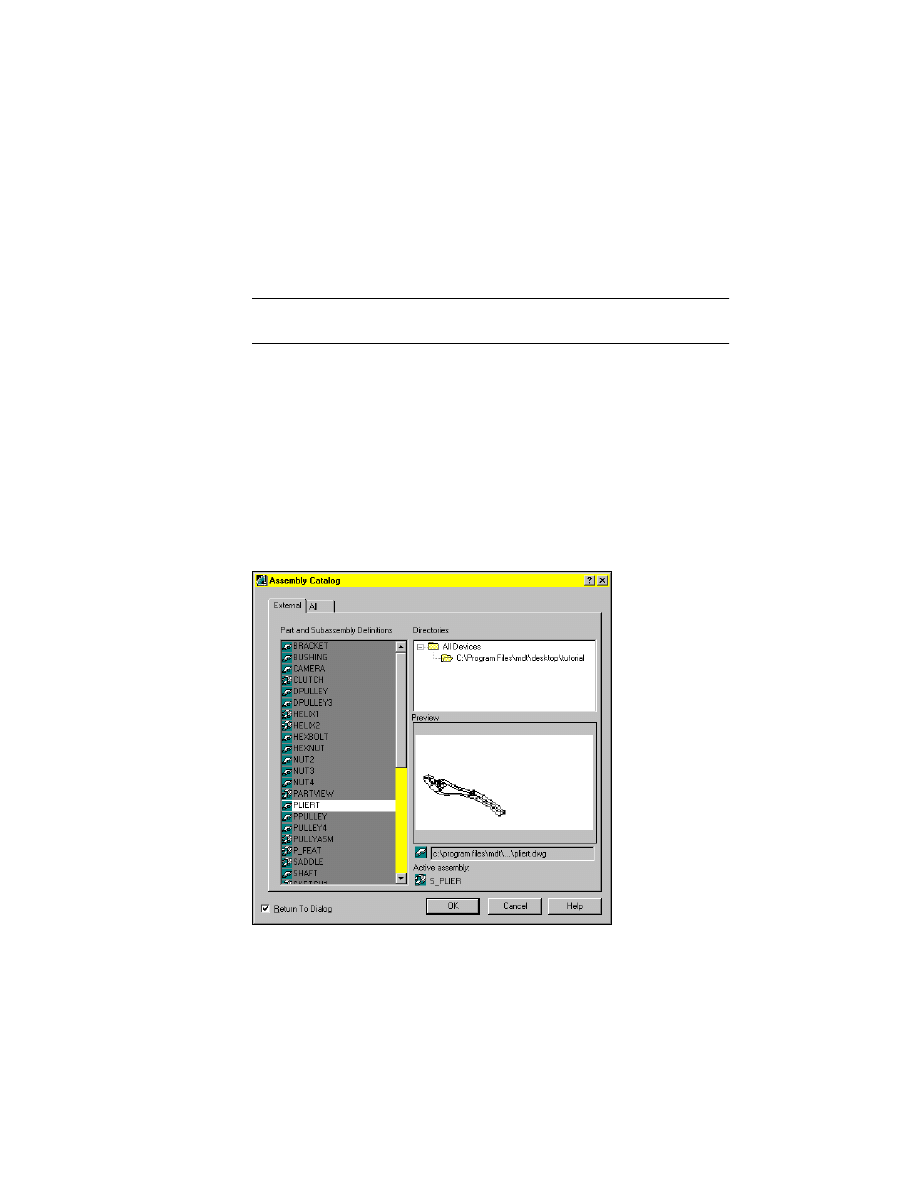
All drawing files in the desktop\tutorial folder are listed under Part and Subas-
sembly Definitions on the External tab.
4
In the desktop\tutorial folder, double-click the PLIERT definition to insert an
instance into the drawing, responding to the prompts.
Specify new insertion point:
Specify a point below PLIERB
Specify insertion point for another instance or <continue>:
Press
ENTER
You can also right-click the definition in the Catalog and choose Attach.
The pliert.dwg file is attached to the current assembly, and an instance is
inserted into the current assembly. In the Assembly Catalog, PLIERT is dis-
played on a white background.
Using External Parts in Assemblies
|
405
Notice that each of the external files is preceded by an icon, indicating
whether it is a part or assembly file.
5
Attach and instance the HEXNUT and HEXBOLT parts to the current
assembly.
As you instance each part, you return to the Assembly Catalog. In the Part
and Subassembly Definitions list, each attached part is displayed on a white
background. When all parts are instanced into the assembly, choose OK.
Examine the Browser. Four parts are nested under the assembly definition.
Each part is followed by a number. As you create instances of a part, each
instance is numbered to indicate the order in which you added them to the
assembly.
Notice that PLIERT, HEXBOLT, and HEXNUT have teal colored icons. This
indicates that the parts are externally referenced.
6
Change to an isometric view of your drawing.
Desktop Menu
View ➤ 3D Views ➤ Front Right Isometric
Now you are ready to start the assembly process.
NOTE
For information about using the shortcut method in the Desktop
Browser to localize and externalize assembly component definitions, see “To
localize an external part with the Browser” on page 417.
hexbolt
plierb
pliert
hexnut
406
|
Chapter 16
Assembling Parts
Assembling Parts
After parts or subassemblies have been created, you apply constraints to
position them relative to one another. Each time you apply a constraint to a
part, you eliminate some degrees of freedom (DOF). The number of degrees
of freedom determines the movement of a part in any direction; the more
constraints applied, the less the part can move.
A degrees of freedom symbol illustrates the instance order of the parts and
how the parts can move. The DOF symbol shows how many degrees of free-
dom are not solved and help you visualize and apply constraints to parts.
Apply multiple assembly constraints on two parts to fully position them rel-
ative to each other. A bolt might still turn (rotational degree of freedom is not
solved), but as long as the bolt and hole are aligned on their axes, and the
bolt face is flush with the hole, no other constraints are needed.
Because the parts and their assembly constraints are parametric, they can be
edited. The assembly constraints applied on each part are permanently
stored with the assembly to allow parametric updating if the parts change.
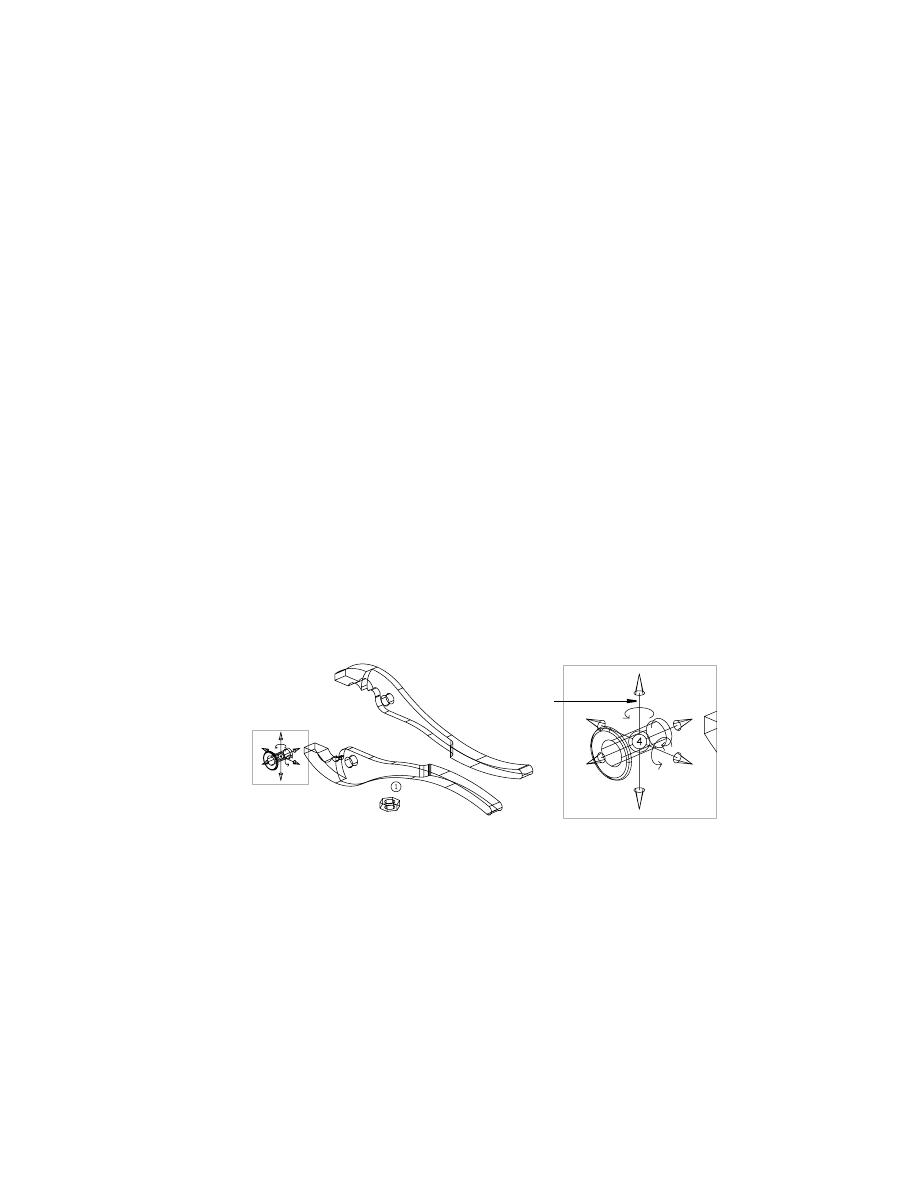
To display a DOF symbol
1
Use the Browser to display the DOF symbol for HEXBOLT_1.
Browser
Right-click HEXBOLT_1, and choose DOF Symbol.
The DOF symbol is displayed in the center of HEXBOLT. It indicates that the
bolt can move in any direction.
DOF symbol
Assembling Parts
|
407
Constraining Parts
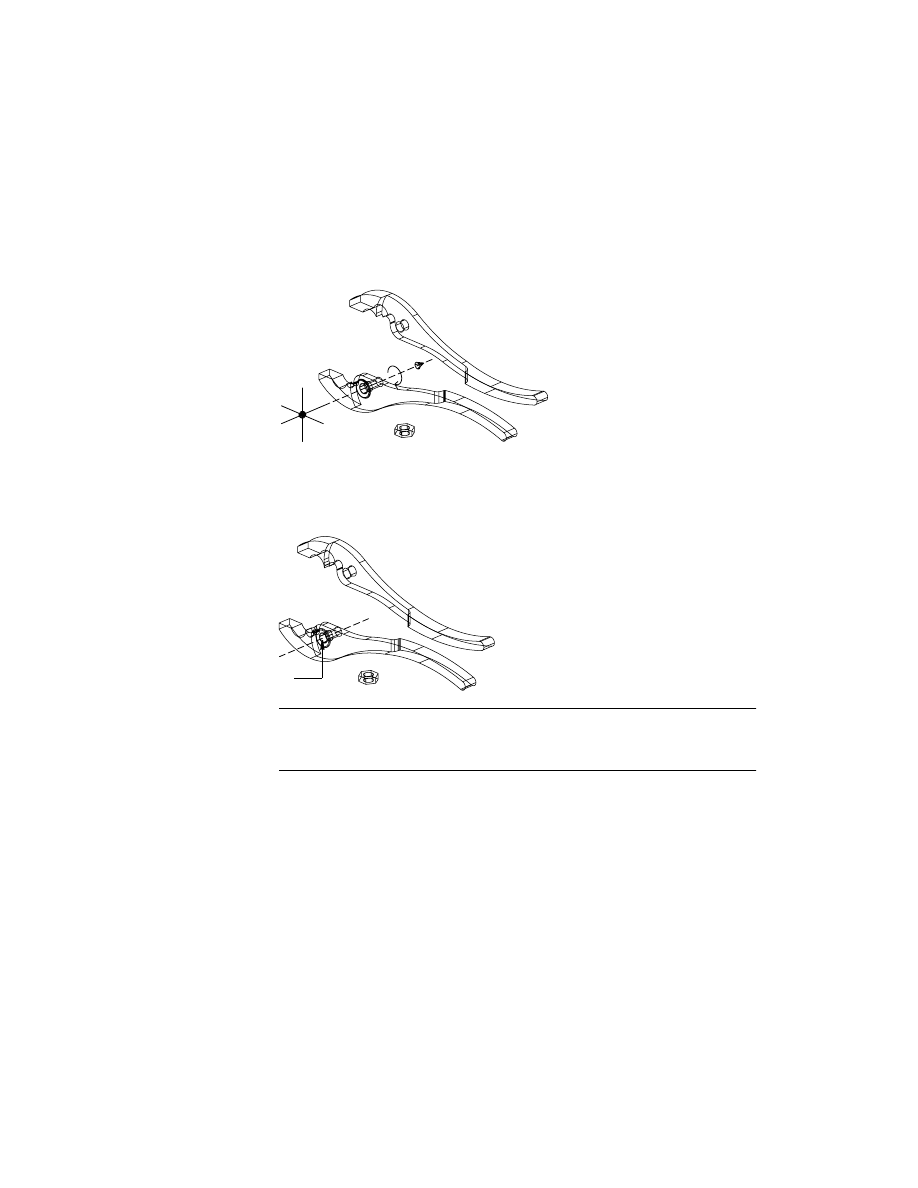
Use a mate constraint to join the PLIERT and HEXBOLT parts. Zoom in as
needed to make the selection easier.
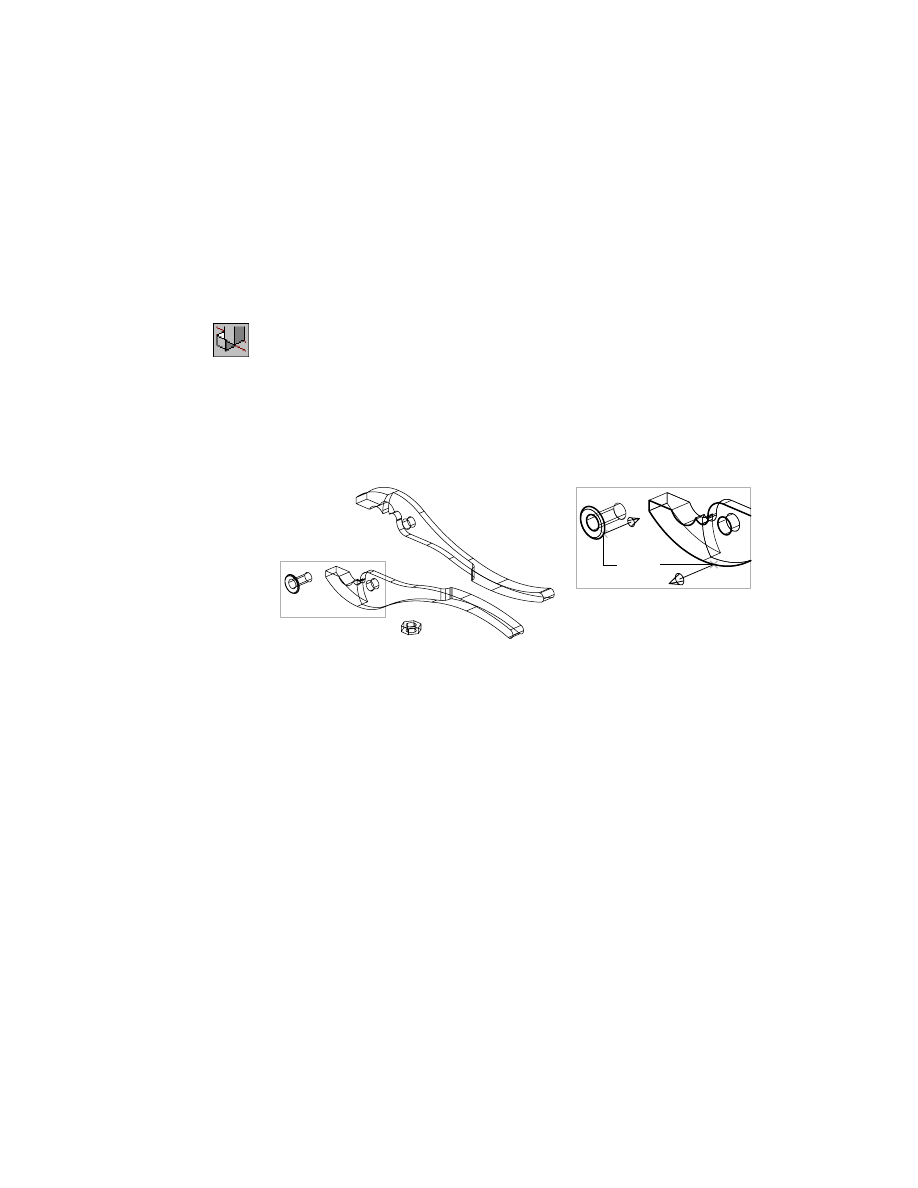
To add a mate constraint between parts
1
Use
AMMATE
to select the first set of geometry, responding to the prompts.
Context Menu
In the graphics area, right-click and choose 3D
Constraints ➤ Mate.
Select first set of geometry:
Select HEXBOLT (1)
First set = Axis, (arc)
Select first set or [Clear/fAce/Point/cYcle] <accEpt>:
Enter a
First set = Plane
Enter an option [Clear/aXis/Point/Flip/cYcle] <accEpt>:
Enter y to cycle to face, or press
ENTER
2
Select the second set of geometry to complete the mate constraint.
Select second set of geometry:
Select PLIERT (2)
Second set = Axis, (arc)
Select second set or [Clear/fAce/Point/cYcle] <accEpt>:
Enter a to highlight the corresponding face of PLIERT
Second set = Plane
Enter an option [Clear/aXis/Point/Next/Flip/cYcle] <accEpt>:
Enter y to cycle to the next face, or press
ENTER
Enter offset <0.0000>:
Press
ENTER
To select geometry, enter responses on the command line, or use the animated
cursor to cycle through options. Click the left (red) mouse button to cycle.
Then, press the right (green) mouse button to accept. You may also use the
animated cursor to select a face by picking in the area defined by the face, then
cycling to other logical faces before accepting.
1
2
408
|
Chapter 16
Assembling Parts
The corresponding faces of the HEXBOLT and PLIERT parts are mate
constrained.
NOTE
The DOF symbol is useful during constraining but has been turned off
for clarity in the illustrations.
3
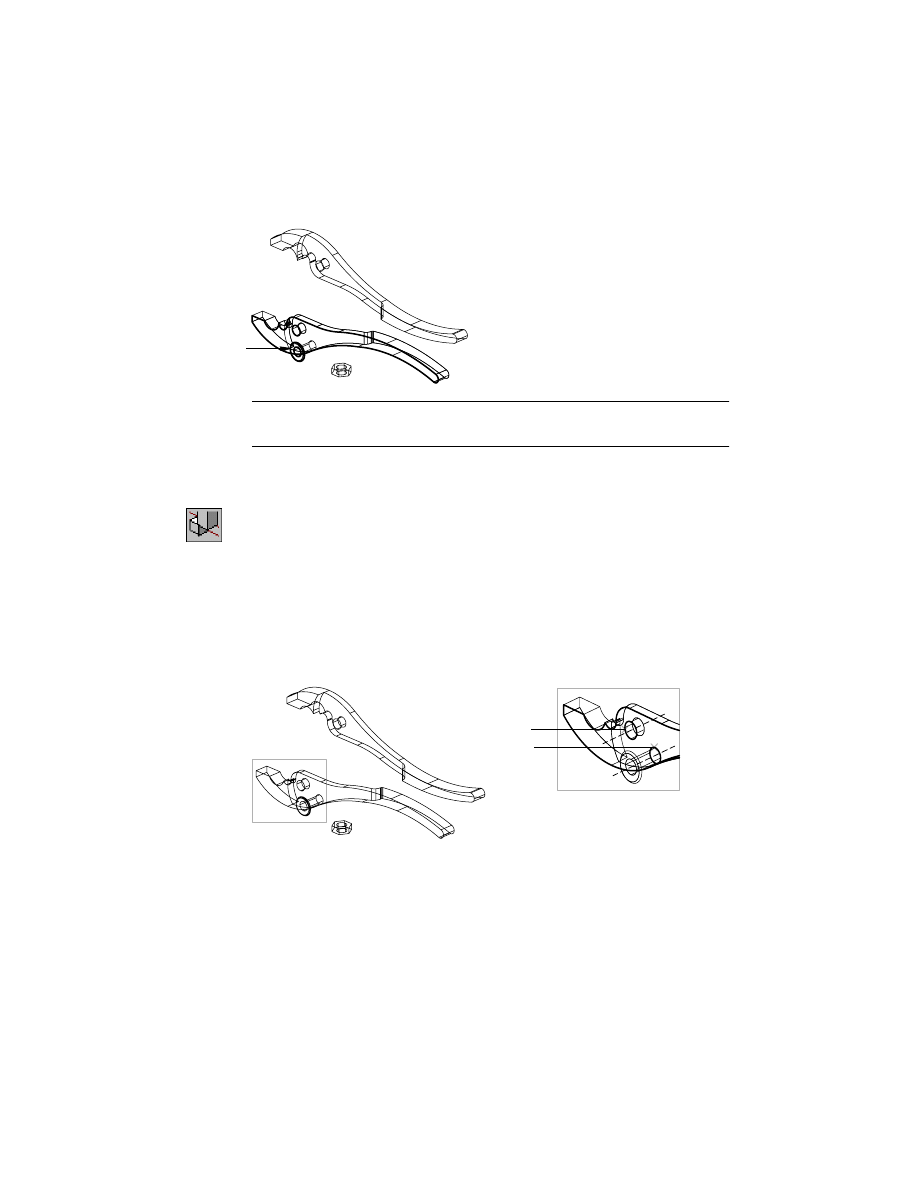
Use
AMMATE
to constrain HEXBOLT to the bolt hole on PLIERT
along their
axes, following the prompts.
Context Menu
In the graphics area, right-click and choose 3D
Constraints ➤ Mate.
Select first set of geometry:
Select the end of the HEXBOLT (3)
First set = Axis, (arc)
Select first set or [Clear/fAce/Point/cYcle] <accEpt>:
Press
ENTER
Select second set of geometry:
Select the bolt hole of PLIERT (4)
Second set = Axis, (arc)
Select second set or [Clear/fAce/Point/cYcle] <accEpt>:
Press
ENTER
Enter offset <0.0000>:
Press
ENTER
mated planes
4
3
Assembling Parts
|
409
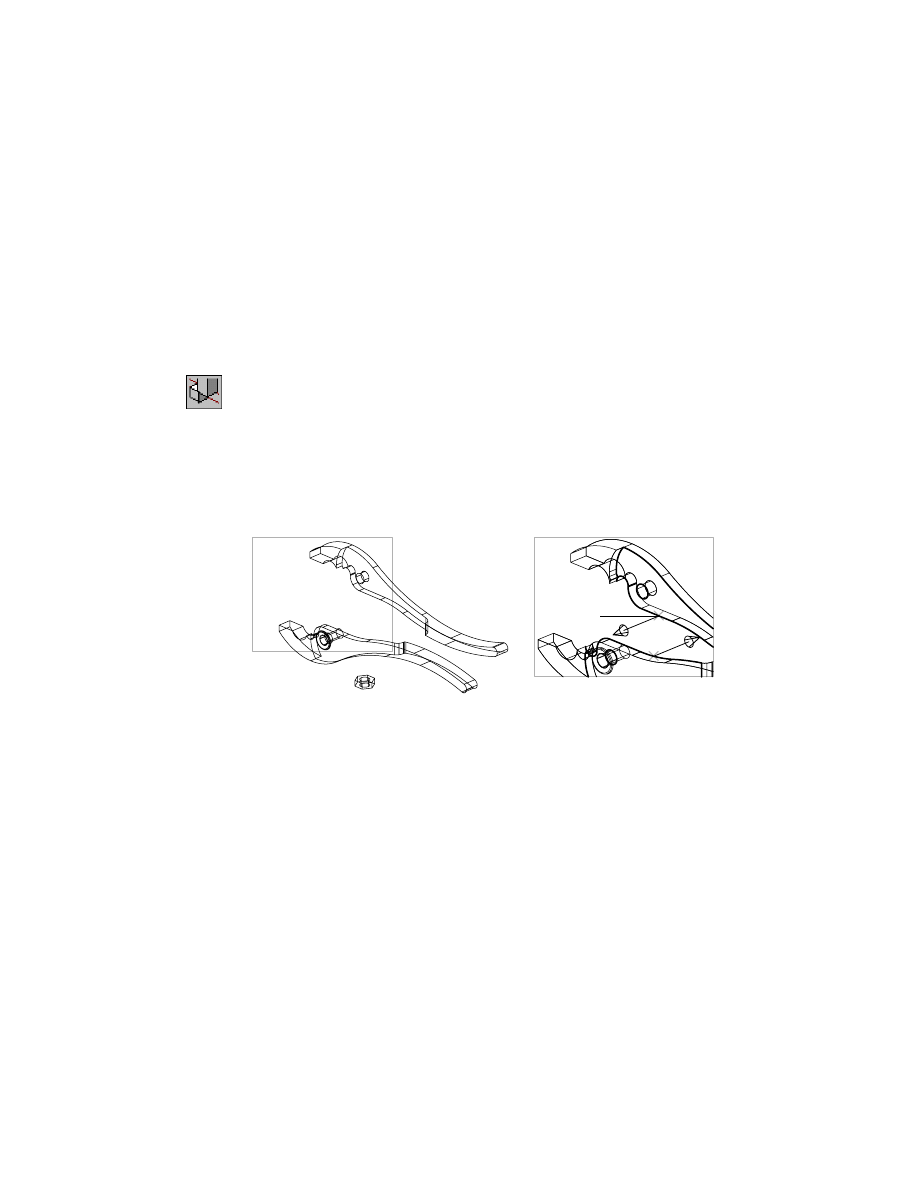
In addition to a mate constraint on the faces of the bolt head and pliers, the
HEXBOLT and the PLIERT bolt hole are constrained along their axes.
4
Examine the DOF symbol.
It should show that only the rotational degree of freedom remains unsolved.
In this case, it does not need to be solved.
You could use the insert constraint to solve the same degrees of freedom as
the two mate constraints. By choosing the faces of HEXBOLT and PLIERT, the
parts would be aligned on their axes and mate constrained on their corre-
sponding faces.
NOTE
To make part selections easier, use
MOVE
to reposition a constrained
part. The part will automatically move back to its constrained position once you
have added a new assembly constraint.
mated lines
410
|
Chapter 16
Assembling Parts
To mate to a grounded part
1
Turn on the DOF symbol for PLIERB.
Browser
Right-click PLIERB_1 and choose DOF Symbol.
The DOF symbol is represented by a number within a circle, indicating that
it has no degrees of freedom. Because it is the first part created in the assem-
bly drawing, PLIERB becomes the grounded part. As you apply assembly con-
straints, the grounded part remains stationary. If you move the grounded
part, all parts constrained to it also move.
2
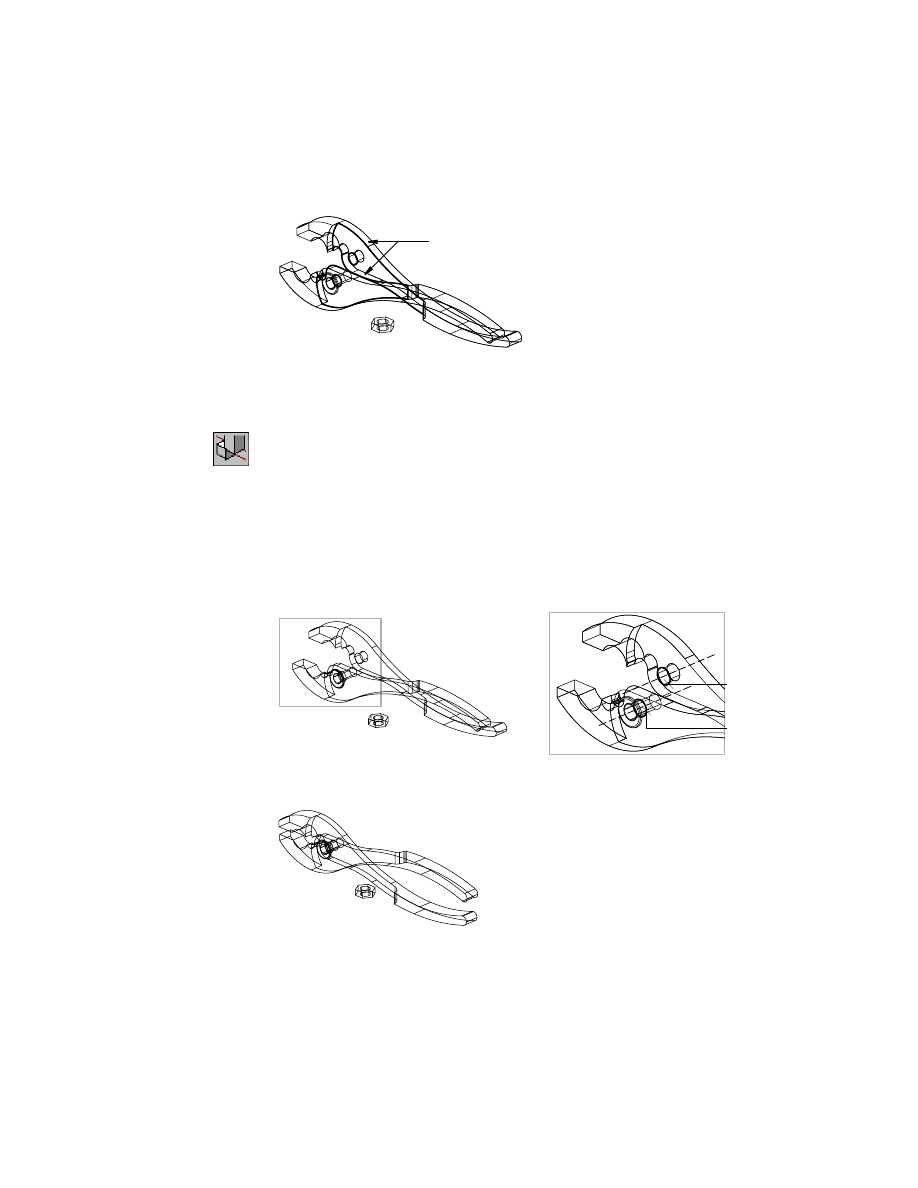
Mate the PLIERB and PLIERT parts, responding to the prompts.
Context Menu
In the graphics area, right-click and choose 3D
Constraints ➤ Mate.
Select first set of geometry:
Select the inside face of PLIERB (5)
First set = Axis, (arc)
Select first set or [Clear/fAce/Point/cYcle] <accEpt>:
Enter a to highlight the face
First set = Plane
Enter an option [Clear/aXis/Point/Flip/cYcle] <accEpt>:
Enter y to cycle to the next face, or press
ENTER
3
Select the second set of geometry to complete the mate constraint.
Select second set of geometry:
Select the inside face of PLIERT (6)
Second set = Axis, (arc)
Select second set or [Clear/fAce/Point/cYcle] <accEpt>:
Enter a to highlight the face
Second set = Plane
Enter an option [Clear/aXis/Point/Next/Flip/cYcle] <accEpt>:
Enter y to cycle to the inside face, or press
ENTER
Enter offset <0.0000>:
Press
ENTER
6
5
Assembling Parts
|
411
The two parts of the pliers body are now plane mated on corresponding faces.
To mate parts on their axes
1
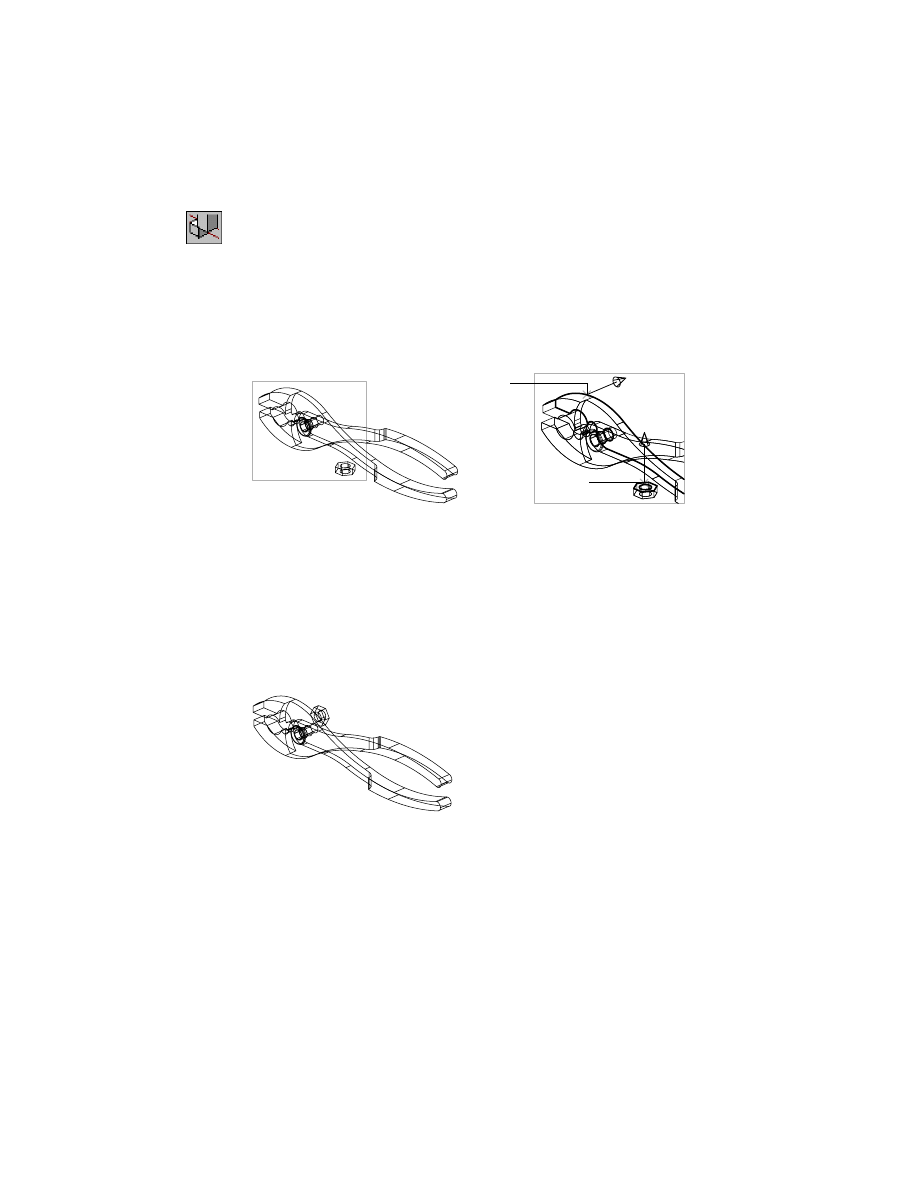
Mate the HEXBOLT part to the PLIERB
part along their axes, responding to
the prompts.
Context Menu
In the graphics area, right-click and choose 3D
Constraints ➤ Mate.
Select first set of geometry:
Select the bolt hole of PLIERT (7)
First set = Axis, (arc)
Select first set or [Clear/fAce/Point/cYcle] <accEpt>:
Press
ENTER
Select second set of geometry:
Select the bolt hole of PLIERB (8)
Second set = Axis, (arc)
Select second set or [Clear/fAce/Point/cYcle] <accEpt>:
Press
ENTER
Enter offset <0.0000>:
Press
ENTER
The PLIERB and PLIERT parts are line mated along the axes of the holes, and
the bolt passes through both parts.
mated planes
8
7
412
|
Chapter 16
Assembling Parts
2
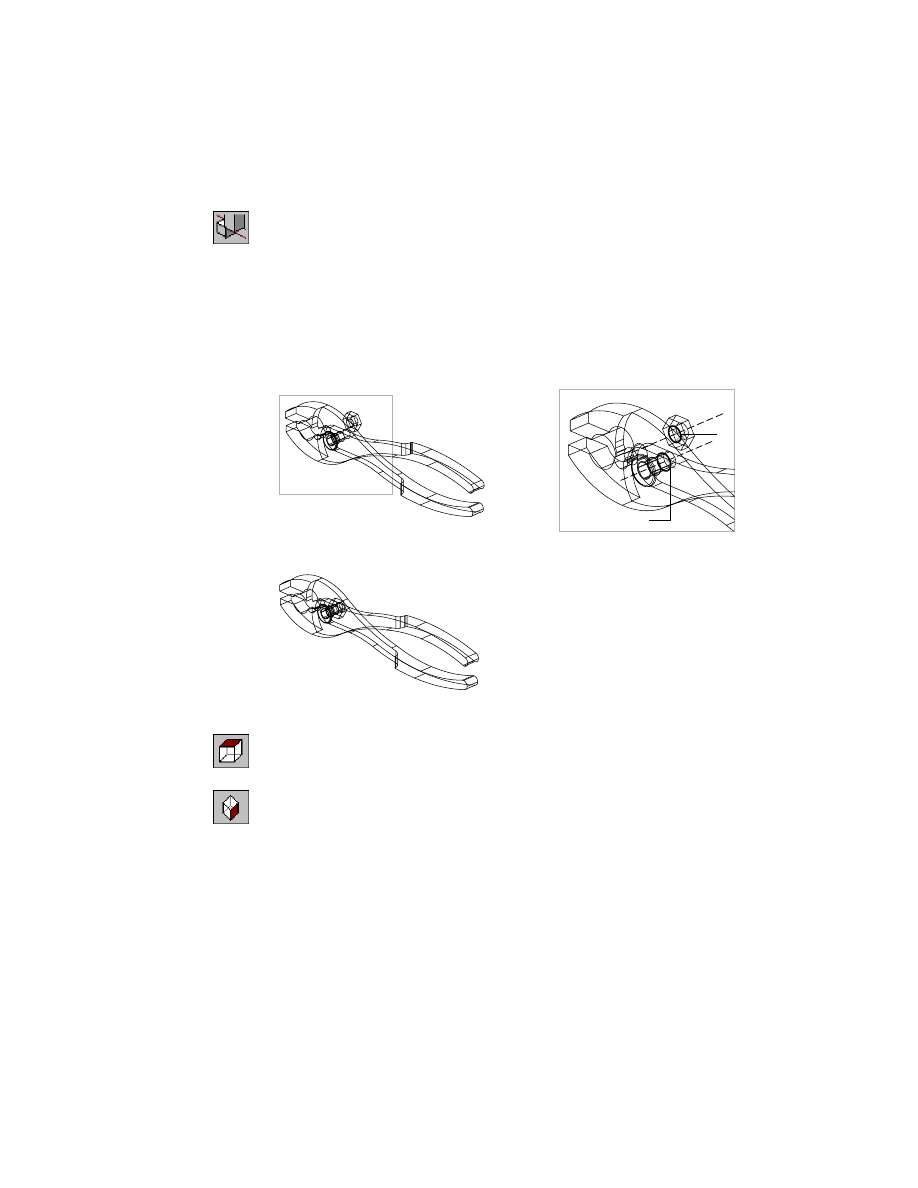
Mate the HEXNUT to the face of the pliers, responding to the prompts.
Context Menu
In the graphics area, right-click and choose 3D
Constraints ➤ Mate.
Select first set of geometry:
Select the top face of HEXNUT (9)
First set = Axis, (arc)
Select first set or [Clear/fAce/Point/cYcle] <accEpt>:
Enter a to highlight the face
First set = Plane
Enter an option [Clear/aXis/Point/Next/Flip/cYcle] <accEpt>:
Enter n to highlight the top face, if necessary, and then press
ENTER
3
Select the second set of geometry to complete the mate constraint.
Select second set of geometry:
Select the outside face of PLIERB (10)
Second set = Axis, (arc)
Select second set or [Clear/fAce/Point/cYcle] <accEpt>:
Enter a to highlight the face
Second set = Plane
Enter an option [Clear/aXis/Point/Next/Flip/cYcle] <accEpt>:
Enter f to flip the direction arrow away from PLIERB, and then press
ENTER
Enter offset <0.0000>:
Press
ENTER
HEXNUT is plane mated to the face of PLIERB.
9
10
Assembling Parts
|
413
4
Mate the nut to the bolt along their axes to pass the bolt through the hole.
Context Menu
In the graphics area, right-click and choose 3D
Constraints ➤ Mate.
Select first set of geometry:
Select the bolt hole on HEXNUT (11)
First set = Axis, (arc)
Select first set or [Clear/fAce/Point/cYcle] <accEpt>:
Press
ENTER
Select second set of geometry:
Select the bolt hole on PLIERB (12)
Second set = Axis, (arc)
Select second set or [Clear/fAce/Point/cYcle] <accEpt>:
Press
ENTER
Enter offset <0.0000>:
Press
ENTER
The parts are now assembled.
5
Check that the parts are assembled correctly.
Desktop Menu
View ➤ 3D Views ➤ Top
6
Return to the isometric view.
Desktop Menu
View ➤ 3D Views ➤ Front Right Isometric
Save your file.
11
12

414
|
Chapter 16
Assembling Parts
Using the Desktop Browser
As you assemble parts, a graphical hierarchy of the assembly is illustrated in
the Desktop Browser. Each 3D constraint applied to an assembly component
is listed below the component. You can tell at a glance which constraints
exist between which components, because the other component to which
the constraint applies is shown in the hierarchy. When you hold the cursor
over a constraint, feature, or tweak in the Browser, a tooltip displays perti-
nent data. For instance, the offset value is displayed for a mate constraint,
type and size data is displayed for a hole feature, and a distance value is dis-
played for a tweak. In scenes, explosion factors are displayed in a tooltip.
Using the Browser, you can both edit the hierarchy of an assembly and move
components into an empty assembly file. To restructure the hierarchy, you
either drag components, or use the cut and paste options in cases where the
Browser display is long and detailed. The design constraints for restructured
assemblies remain unchanged.
For more information about using in the Browser to restructure assemblies,
see “Restructuring Assemblies” on page 504 in chapter 18.
You can use the Browser to add, change, delete, and copy, and to localize and
externalize component definitions. To see how this works, edit the mate con-
straint on the hexbolt. Then change the color of a part, make copies, and
externalize a component definition.
To edit an assembly constraint with the Browser
1
Change your display to two viewports.
Command
2
2
Zoom to enlarge the hexbolt.
Context Menu
In the graphics area, right-click and choose Zoom.
3
In the Browser, right-click the Mate pl/pl constraint under HEXBOLT_1, and
choose Edit.
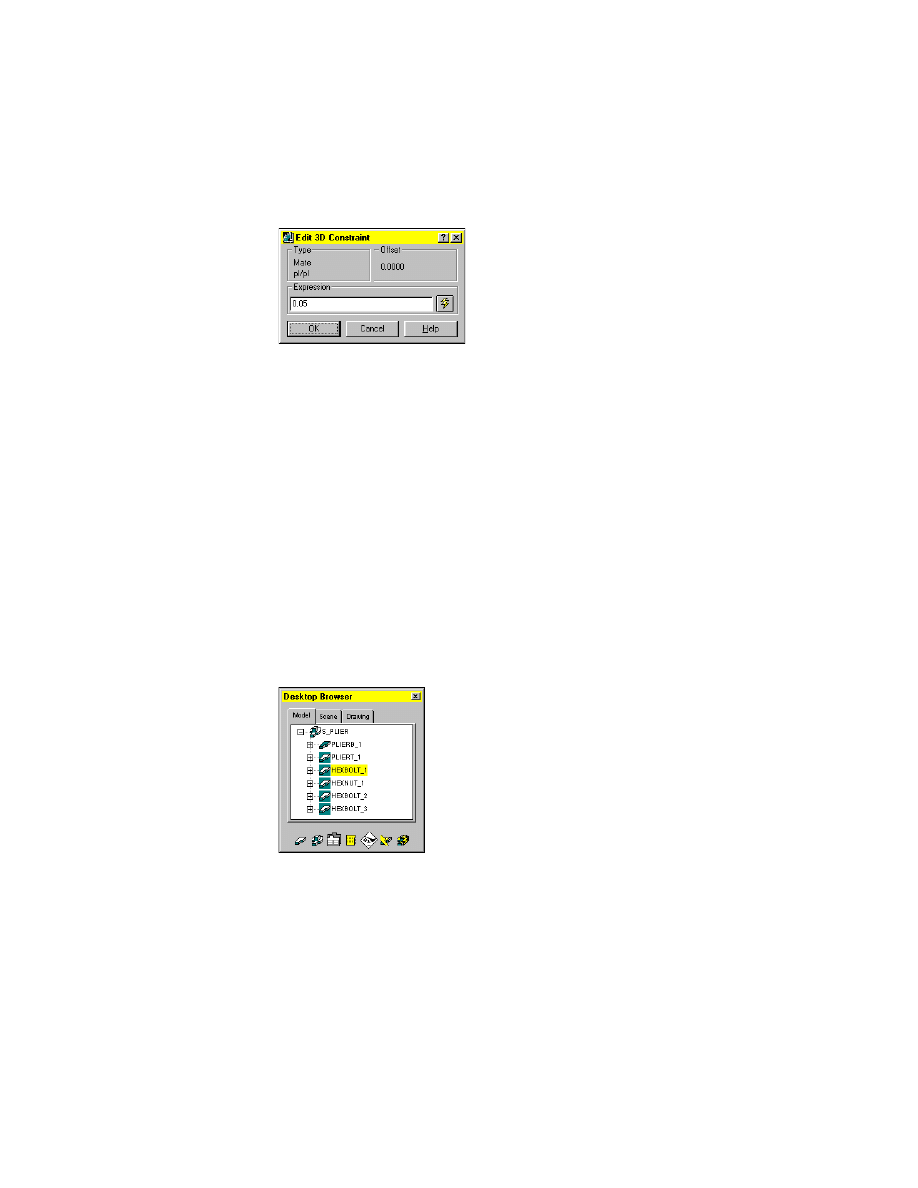
Assembling Parts
|
415
4
In the Edit 3D Constraint dialog box, change the offset to 0.05. Click the
Update icon.
You can see the hexbolt offset the new distance. Experiment with changing
the offset again, using the Update icon to see the change.
Choose Cancel. The original offset distance of 0.00 remains in effect.
You can easily edit values and see them take effect without permanently
changing your assembly. Use the Update icon in the Edit 3D Constraint dia-
log box to see the change, and then choose Cancel to return to the original
values.
To copy a part with the Browser
1
Collapse the assembly tree to better visualize the changes you make.
Browser
Right-click S_PLIER and choose Browser Node ➤ Collapse.
2
Make a copy of HEXBOLT_1.
Browser
Right-click HEXBOLT_1 and choose Copy.
3
Place one or more copies near the pliers, and then press
ENTER
.
You can see the new hexbolts listed in the Browser hierarchy, each numbered
in the sequence you added them.

416
|
Chapter 16
Assembling Parts
To change the color of a part with the Browser
1
Activate HEXBOLT_1.
Browser
Right-click HEXBOLT_1 and choose Activate Part.
2
Open the Select Color dialog box to change the color of HEXBOLT_1.
Browser
Right-click HEXBOLT_1 and choose Properties ➤ Color.
3
In the Select Color dialog box, select Red, and then choose OK.
This color applies to all instances of HEXBOLT.
4
Activate the assembly to view the changed color
Browser
Right-click S_PLIER and choose Activate Assembly.
Next, change the bolt color to the original and remove the experimental copies.
5
Activate HEXBOLT_1
Browser
Right-click HEXBOLT_1 and choose Activate Part.
6
Open the Select Color dialog box to change the color of HEXBOLT_1 back to
white.
Browser
Right-click HEXBOLT_1 and choose Properties ➤ Color.
7
In the Select Color dialog box, select White, and then choose OK.
8
Activate PLIERB_1 to return the bolts back to their original color.
Browser
Right-click PLIERB_1 and choose Activate Part.
To delete part copies with the Browser
1
Delete the HEXBOLT copy.
Browser
Right-click HEXBOLT_2 and choose Delete.
2
Repeat for the other copies if needed.
Your experimental copies are no longer visible in the Browser assembly
hierarchy.

Getting Information from Assemblies
|
417
To localize an external part with the Browser
1
Localize the external parts HEXBOLT_1 and HEXBOLT_3.
Browser
Press CTRL and select HEXBOLT_1 and HEXBOLT_3.
Right-click the selected parts and choose All Instances ➤
Localize.
This shortcut method enables you to localize and externalize parts without
opening the Assembly Catalog. When you select a local part in the Browser,
the externalize option is available.
For more information about local and external assembly components, see
“Creating Local and External Parts” on page 481.
You are now ready to check the assembly for mass properties and interference.
Getting Information from Assemblies
Now that all the parts are constrained, you can check for interference and
obtain mass property information for some of the parts or the entire assembly.
Checking for interference between two or more parts in the assembly can detect
design problems before manufacturing starts. Mass property information can
tell you whether the dimensions or materials of a part need to be changed to
achieve the desired results. This analysis is critical for making decisions early in
the design phase that can prevent manufacturing problems later.
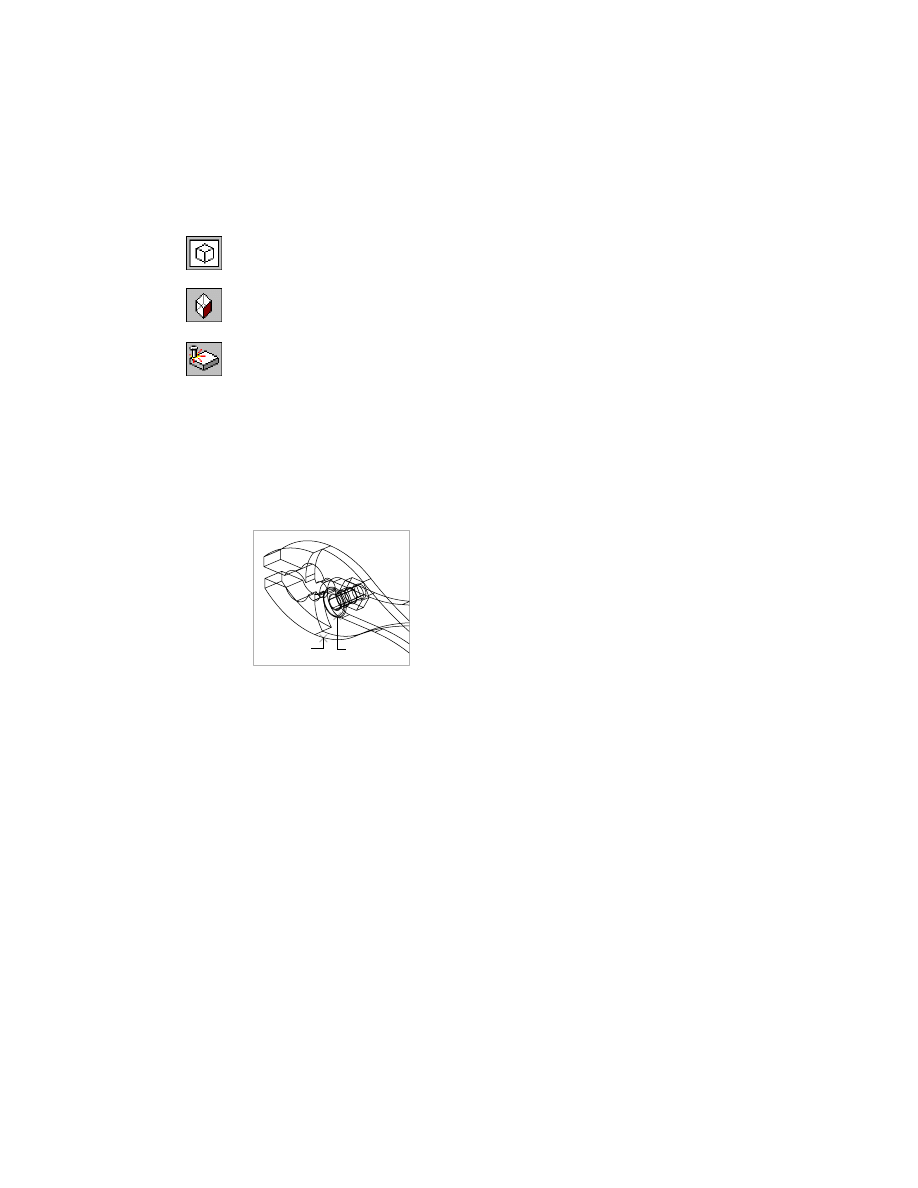
Checking for Interference
An interference analysis detects interference between two parts or all parts.
You can move up or down the assembly tree, selecting parts as you proceed.
Next, you will perform an interference analysis on the entire pliers assembly.
418
|
Chapter 16
Assembling Parts
To check for interference
1
Change to one viewport.
Command
1
2
Change to the right isometric view.
Desktop Menu
View ➤ 3D Views ➤ Front Right Isometric
3
Use
AMINTERFERE
to check for interference, responding to the prompts.
Context Menu
In the graphics area, right-click and choose Analysis ➤
Check Interference.
Nested part or subassembly selection? [Yes/No] <No>:
Press
ENTER
Select first set of parts or subassemblies:
Select the PLIERT part (1)
Select first set of parts or subassemblies:
Press
ENTER
Select second set of parts or subassemblies:
Select the HEXBOLT part (2)
Select second set of parts or subassemblies:
Press
ENTER
Parts/subassemblies do not interfere.
If you have trouble selecting a part, use the Browser to change its color.
4
Check for interference between the PLIERB
and HEXBOLT parts.
The parts should show no interference.
Next, you will calculate the mass properties for the assembly.
Calculating Mass Properties
Once an assembly is completed, you can calculate its mass properties. Toler-
ance values control the accuracy of the mass property information. The
material types can be different for each part, resulting in accurate mass prop-
erty values no matter how complex the assembly.
2
1
Getting Information from Assemblies
|
419
To calculate mass properties
1
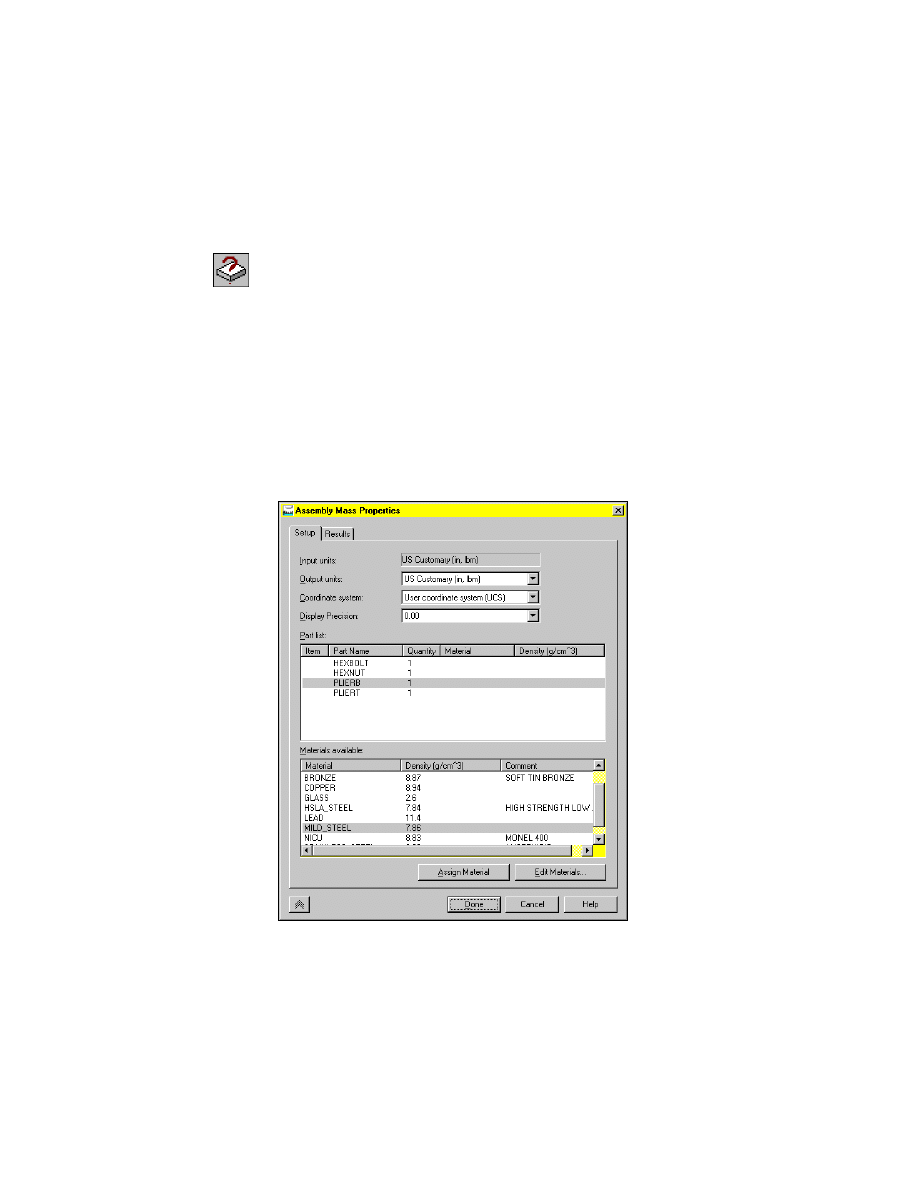
Use
AMASSMPROP
to select the parts for the mass properties calculation, fol-
lowing the prompts, and open the Assembly Mass Properties dialog box.
Context Menu
In the graphics area, right-click and choose Analysis ➤
Mass Properties.
Enter an option (parts/subassemblies) [Name/Select] <Select>:
Press
ENTER
Select part and subassembly instances:
Select PLIERB
Select part and subassembly instances:
Press
ENTER
2
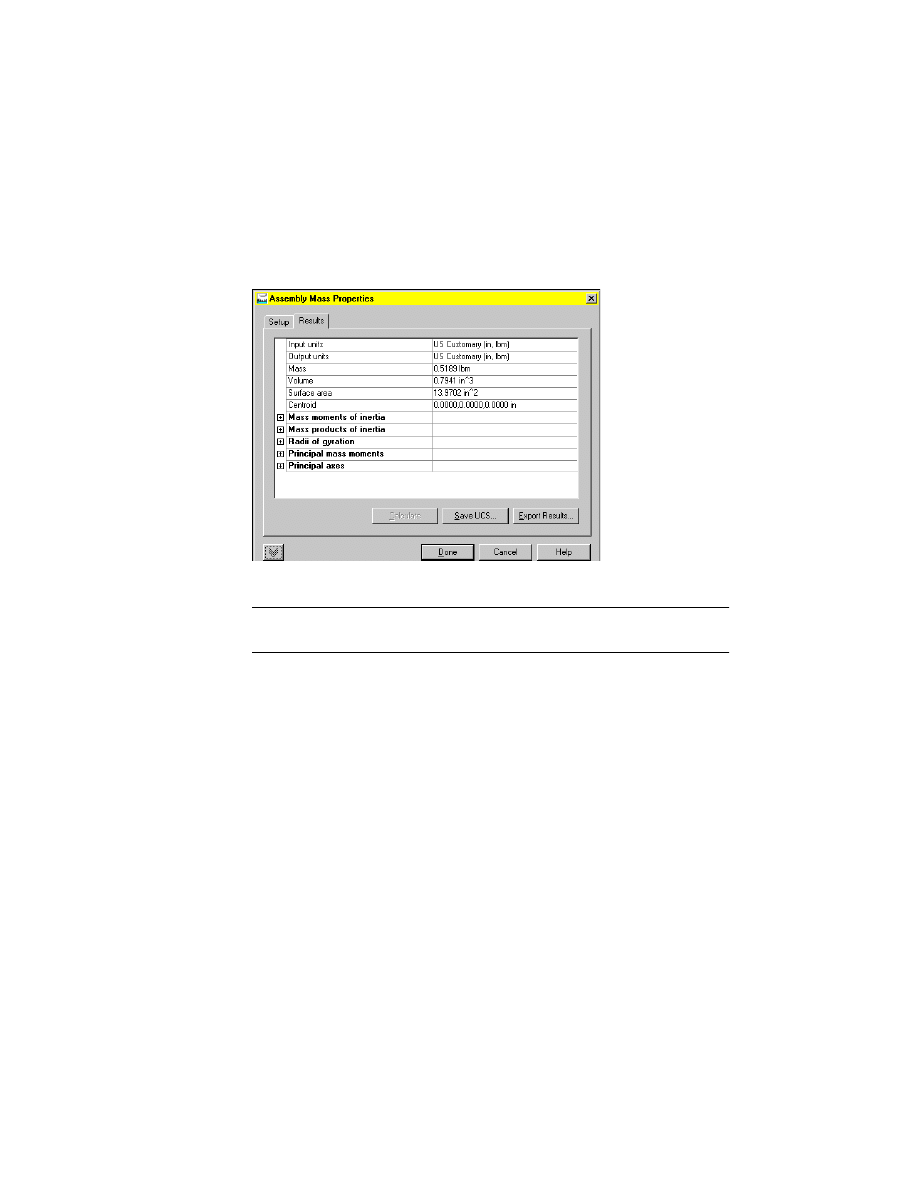
In the Assembly Mass Properties dialog box, select the Setup tab and specify:
Input units:
US Customary (in, lbm)
Output units:
US Customary (in, lbm)
Coordinate system:
User coordinate system (UCS)
Display Precision:
Enter 2.0
Part List:
Select PLIERB
Materials available:
Select Mild_Steel.
420
|
Chapter 16
Assembling Parts
3
Select the Results tab. The results window for PLIERB remains empty until
you calculate the results.
4
Choose Calculate. Message dialogs appear warning that density is not speci-
fied for the other parts in the assembly. Choose OK to proceed.
Mass properties are calculated according to the values you set.
Choose Done.
NOTE
You can save mass properties calculations to a file to use in design analysis,
and you can export the results.
Next, you create scenes of the assembly.
Creating Assembly Scenes
Now that you have instanced the parts and applied the assembly constraints,
you can create and lay out assembly scenes. A scene is an exploded view that
separates the parts of an assembly or subassembly to show how they fit
together. You can create a scene quickly; it updates automatically every time
you change the assembly. The separation of the parts is based on an explo-
sion factor you set and the assembly constraints you used to position the
parts. You can create multiple exploded scenes of the same assembly and save
them for later use.
Creating Assembly Scenes
|
421
Assembly trails indicate the path of the assembly explosion. With the excep-
tion of the grounded part, assembly trails can be created for all parts. When
you create assembly trails, a new layer is automatically created for them. You
can automatically create trails when you create tweaks.
First, you set an explosion factor and then create an exploded assembly
scene. Then you add trails to show how parts are assembled. From a scene,
you create drawing views.
To create an exploded view
1
Use
AMNEW
to create a new scene.
Context Menu
In the graphics area, right-click and choose New Scene.
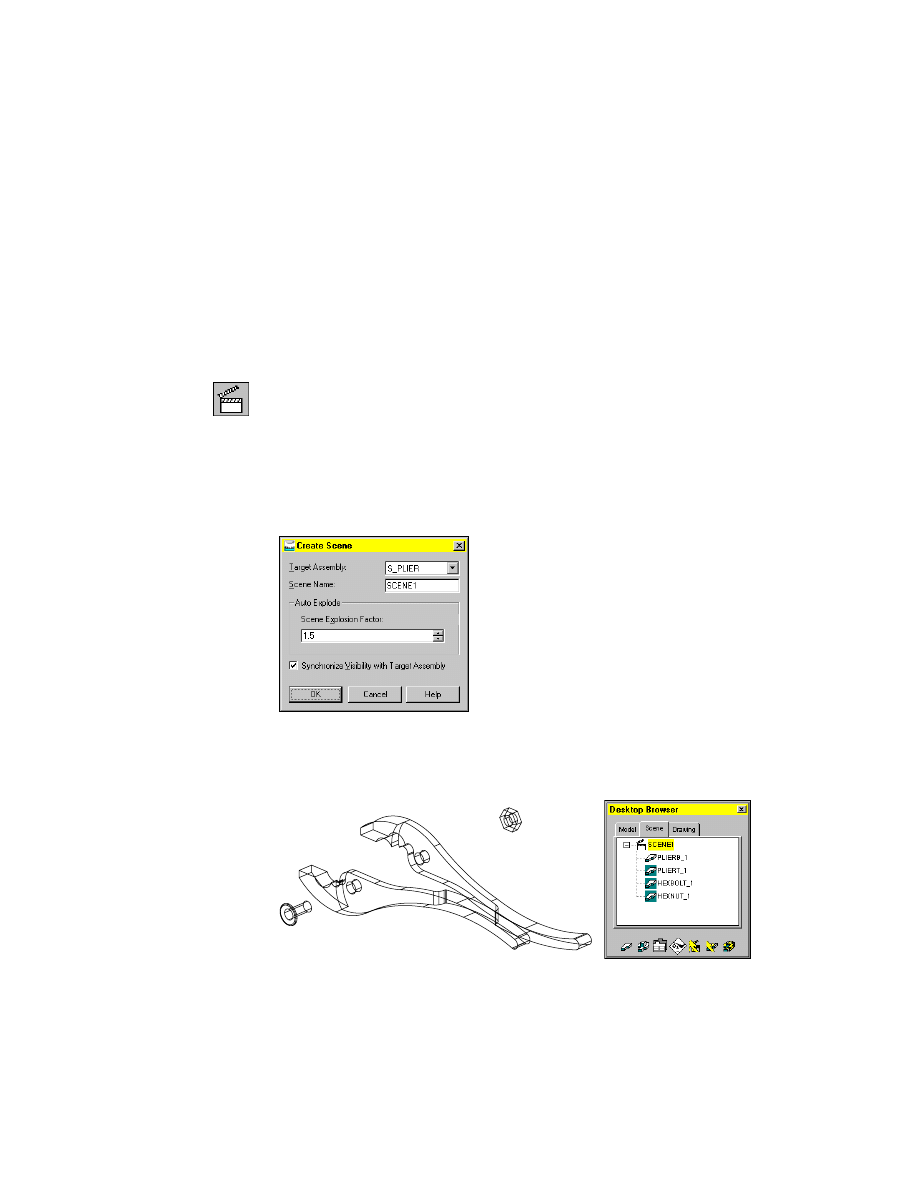
The Create Scene dialog box is displayed.
2
In the Create Scene dialog box, specify:
Target Assembly:
S_PLIER
Scene Name:
SCENE1
Auto Explode: Scene Explosion Factor:
1.5
Synchronize Visibility with Target Assembly:
Select the check box
Choose OK.
The exploded assembly scene is displayed. Its name is shown below the com-
mand line. The Browser shows all parts in the scene.
422
|
Chapter 16
Assembling Parts
Next, align the exploded parts in the assembly scene. You can tweak the posi-
tion and orientation of individual parts or rotate them for better visibility.
In the Browser, verify that the Scene tab is selected. Unless the scene is acti-
vated, you cannot tweak parts to adjust their position or add trails to show
how they are assembled.
To align scene parts
1
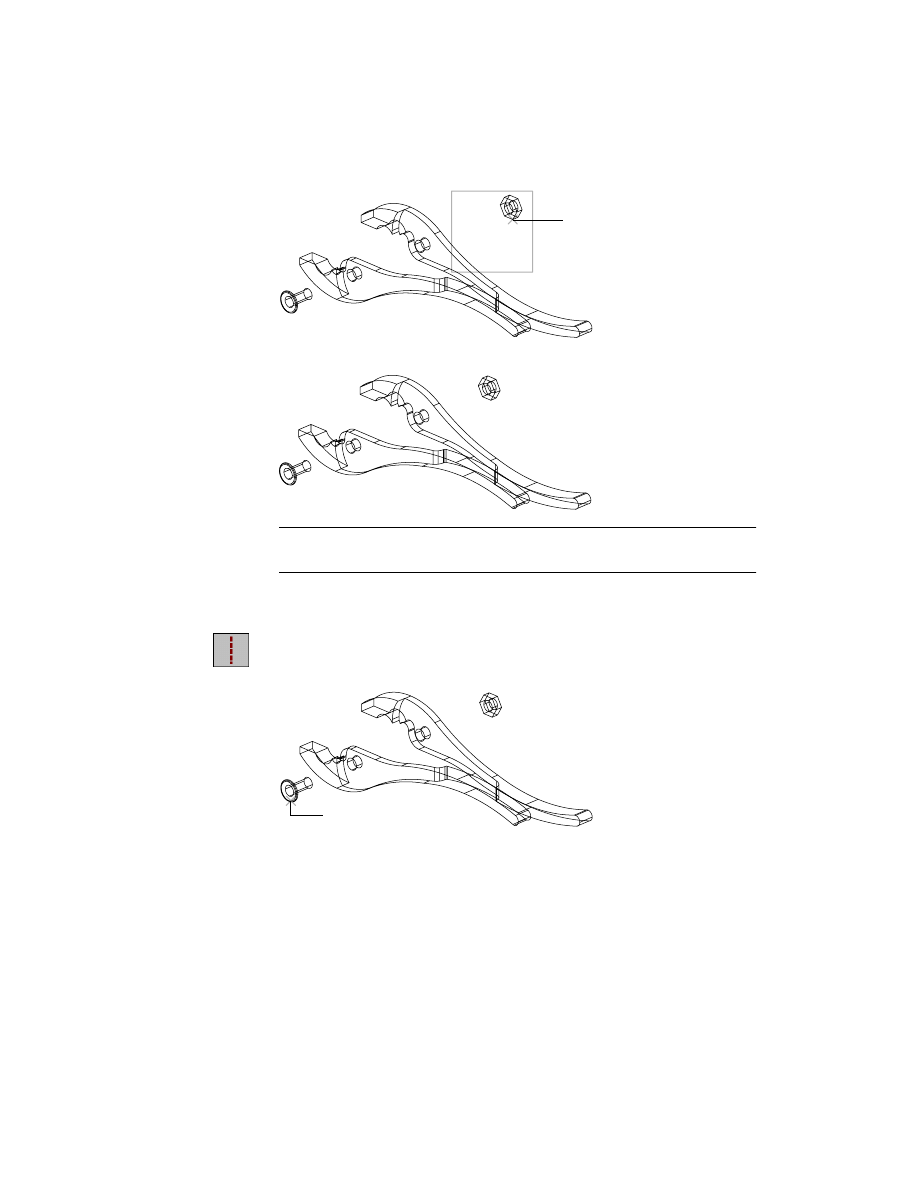
Use
AMTWEAK
to move the HEXNUT part closer to the other parts, respond-
ing to the prompt.
Context Menu
In the graphics area, right-click and choose New Tweak.
Select part or subassembly to tweak:
Select HEXNUT (1)
2
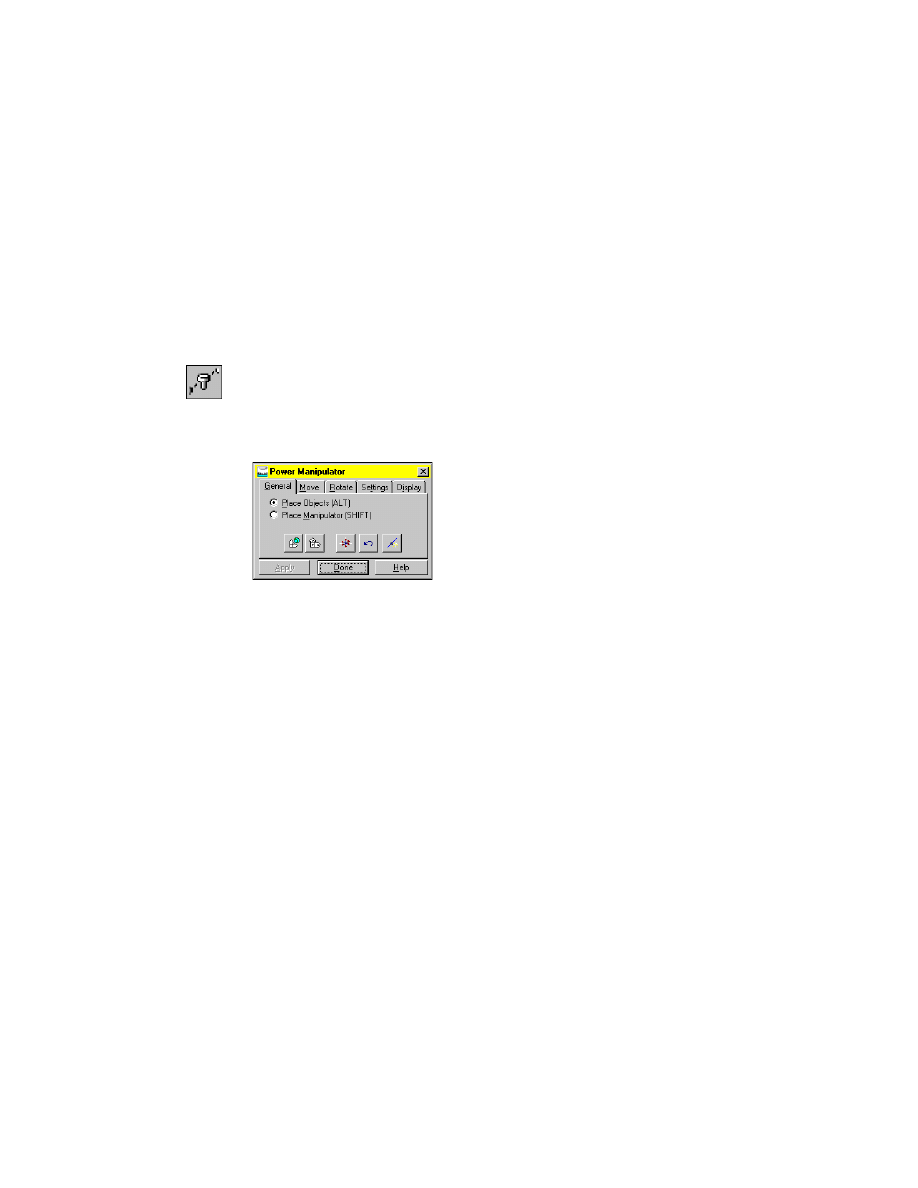
In the Power Manipulator dialog box, on the General tab, verify that Place
Objects (ALT) is selected.
Choose Done.
The Power Manipulator dialog box is displayed automatically only the first
time you create a new tweak. After that, to access the Power Manipulator
dialog box, right-click the Power Manipulator symbol on your screen, and
select Options.
3
Continue on the command line.
Select handle or Geometry
[undo/UCS/WCS/Select/Options/Pancenter/Type/tRails/X/Y/Z] <Accept>:
Enter z
Enter tweak distance [Rotate]<1.0000>:
Enter .25
Select handle or Geometry
[undo/UCS/WCS/Select/Options/Pancenter/Type/tRails/X/Y/Z] <Accept>:
Press
ENTER
.
Creating Assembly Scenes
|
423
The HEXNUT
position is tweaked by the specified distance.
NOTE
The grounded part of an assembly or subassembly cannot be tweaked.
Its position is fixed.
4
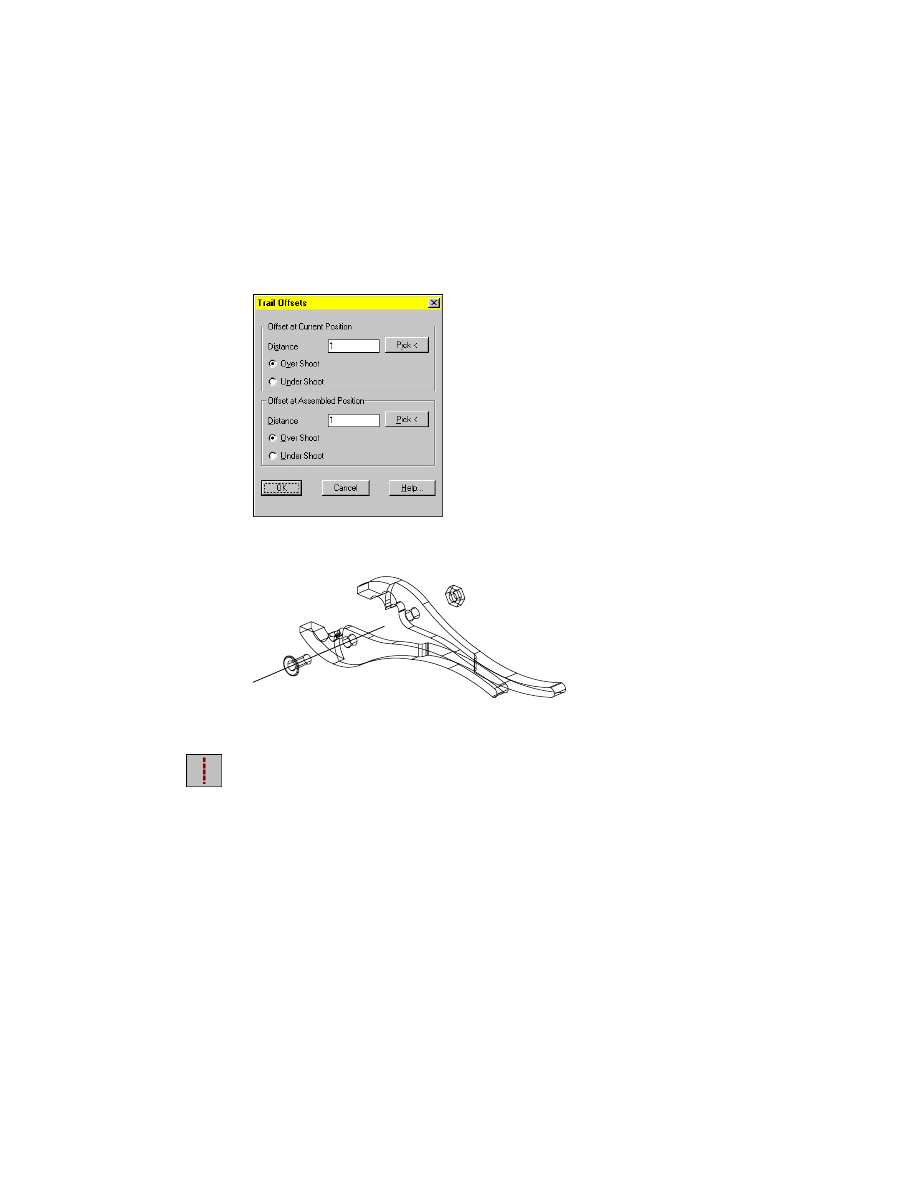
Use
AMTRAIL
to show the direction of the explosion and tweak paths,
responding to the prompt.
Context Menu
In the graphics area, right-click and choose New Trail.
Select reference point on part or subassembly:
Select the end of HEXBOLT (1)
1
1
424
|
Chapter 16
Assembling Parts
5
In the Trail Offsets dialog box, specify:
Offset at Current Position: Distance:
Enter 1
Over Shoot:
Select the option
Offset at Assembled Position: Distance:
Enter 1
Over Shoot:
Select the option
Choose OK.
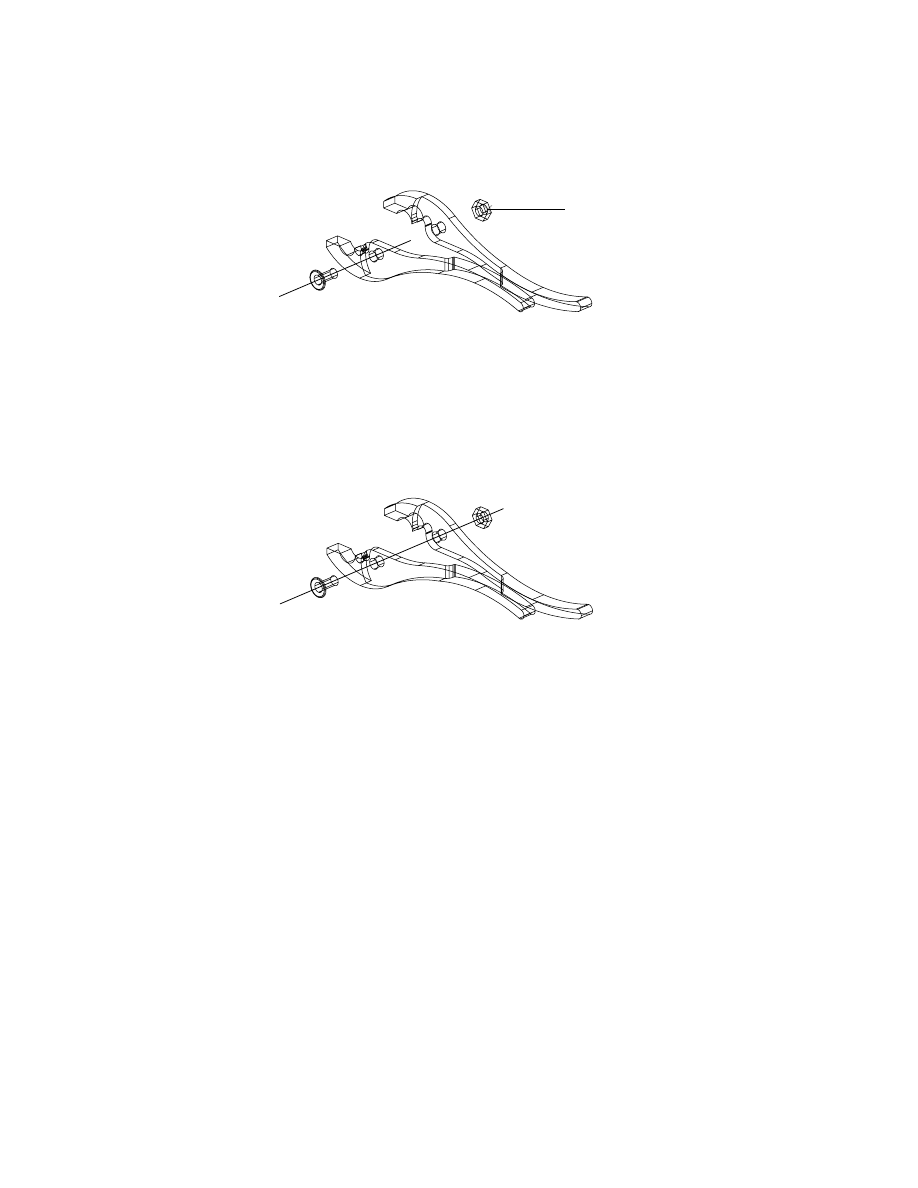
The assembly trail for HEXBOLT
is displayed.
6
Apply assembly trails to the PLIERB and HEXNUT parts, responding to the
prompt.
Context Menu
In the graphics area, right-click and choose New Trail.
Select reference point on part or subassembly:
Select the outside hole of HEXNUT (2)
Creating Assembly Drawing Views
|
425
7
In the Trail Offsets dialog box, specify:
Offset at Current Position: Distance:
Enter 1
Over Shoot:
Select the option
Offset at Assembled Position: Distance:
Enter 1
Over Shoot:
Select the option
Choose OK.
The assembly drawing automatically updates the current scene to reflect the
tweaks and assembly trails.
Save your file. Choose OK in the External Part Save dialog box to bring all
parts up to date.
Next, you create drawing views of the assembly scene.
Creating Assembly Drawing Views
After you complete the assembly model and the scene, you can create 2D
orthogonal views or 3D isometric and exploded views of the entire assembly.
Then you add reference dimensions.
You can set up as many drawing layouts as you need to document your
design. Because this assembly is small, you create only one layout.
Before creating the base view of the pliers assembly, modify a plotter setup to
include a custom paper size. Then set up the drawing layout to arrange the
drawing views on paper.
2
426
|
Chapter 16
Assembling Parts
To add a custom paper size to a plotter setup
1
Use
AMMODE
to switch to Drawing mode.
Browser
Choose the Drawing tab.
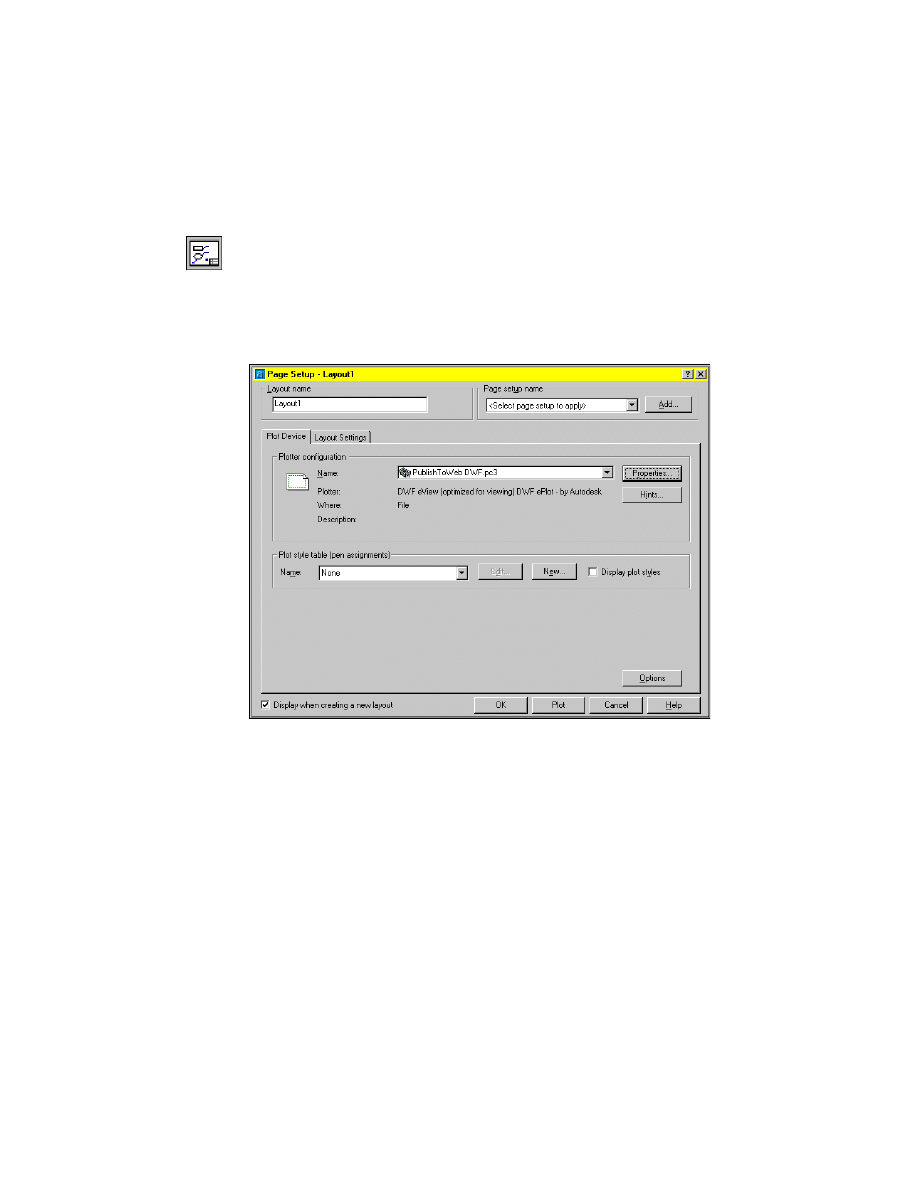
2
Add a custom paper size to an existing plotter.
Browser
Right-click Layout1 and choose Page Setup.
3
In the Page Setup dialog box, select the Plot Device tab and specify:
Name:
DWF Classic.pc3
Creating Assembly Drawing Views
|
427
4
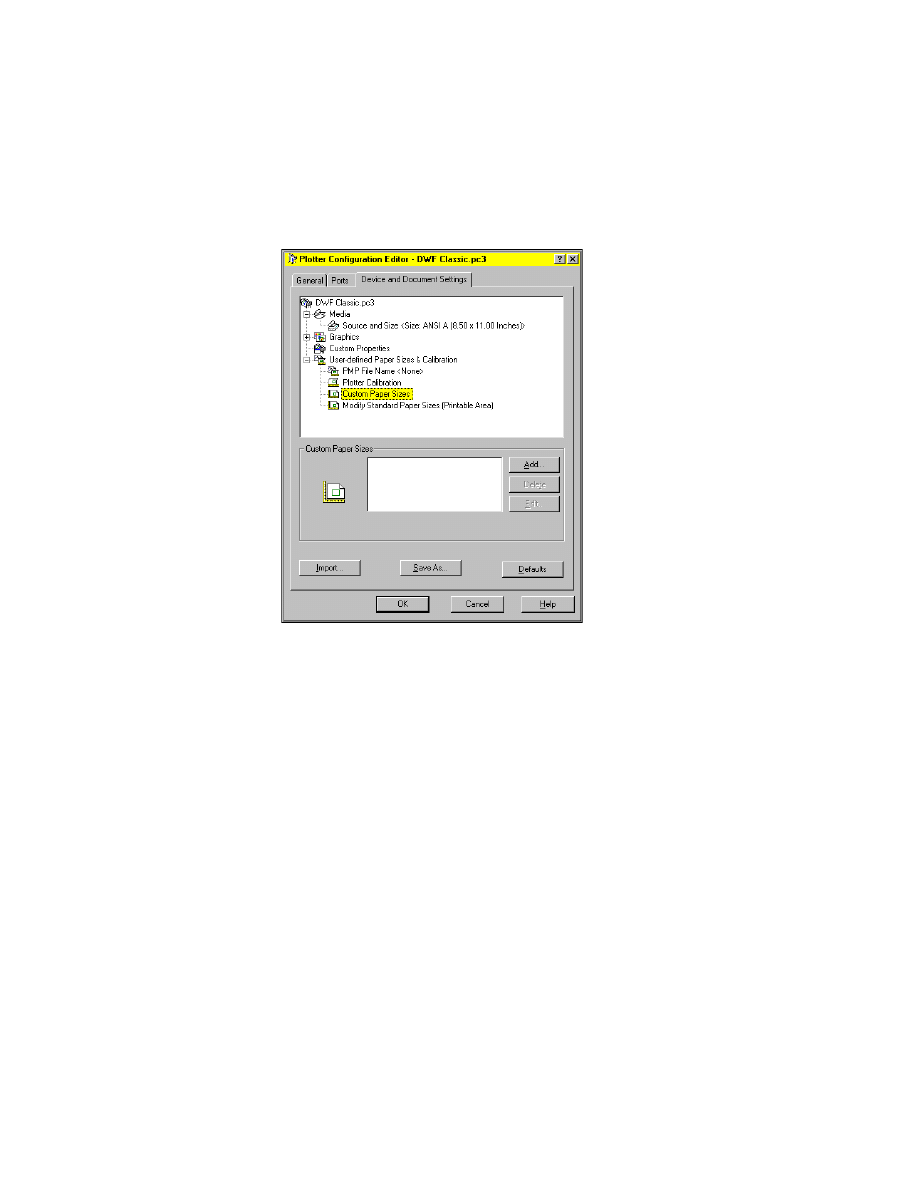
Choose Properties.
5
In the Plotter Configuration Editor dialog box, expand User-Defined Paper
Sizes and Calibration. Select Custom Paper Sizes and choose Add.
6
Use the Custom Paper Size Wizard to define a paper size of 18 x 12 inches
with no indents. Choose Next until the setup is finished.
7
Save your changes to the DWF Classic.pc3 file.
Next, you set up the drawing layout and insert a title block.
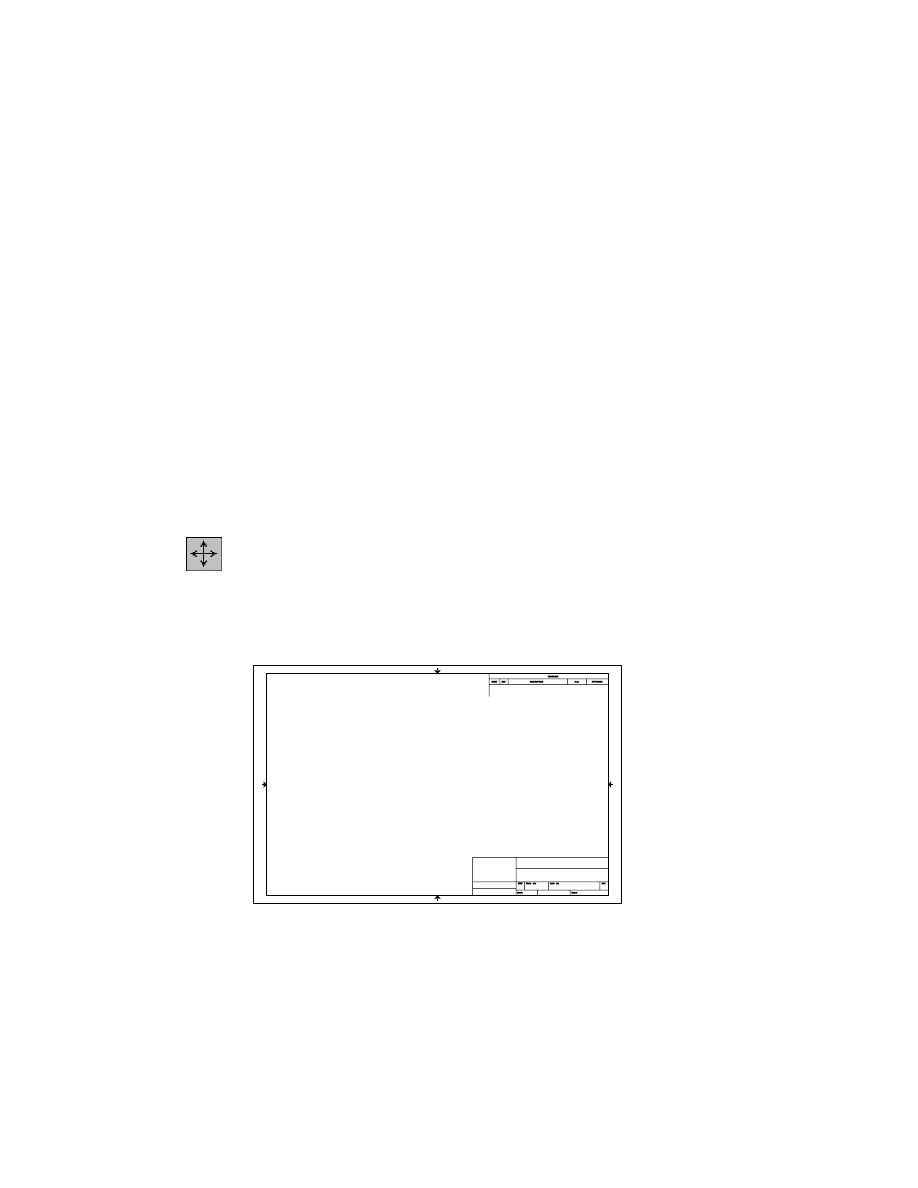
428
|
Chapter 16
Assembling Parts
To set up a drawing layout
1
In the Page Setup dialog box, select the Layout Settings tab and specify:
Paper Size:
User 1 (18.00 x 12.00 inches)
Plot Scale:
1:1
Choose OK.
2
Use
MVSETUP
to insert a title block.
Browser
Right-click Layout1 and choose Insert Title Block.
In the AutoCAD text window, respond to the prompt as follows:
Enter number of title block to load or [Add/Delete/Redisplay]:
Enter 8
3
Continue on the command line.
Create a drawing named ansi_b.dwg? <Y>:
Enter n
Enter an option [Align/Create/Scale viewports/Options/Title block/Undo]:
Press
ENTER
The title block is inserted into the drawing.
4
Use
MOVE
to center the title block in the layout, responding to the prompts.
Desktop Menu
Modify ➤ Move
Select objects:
Select the title block
Select objects:
Press
ENTER
Specify base point or displacement:
Specify a point
Specify second point of displacement or <use first point as displacement>:
Specify another point
Next, define drawing views to display the assembly.
Creating Assembly Drawing Views
|
429
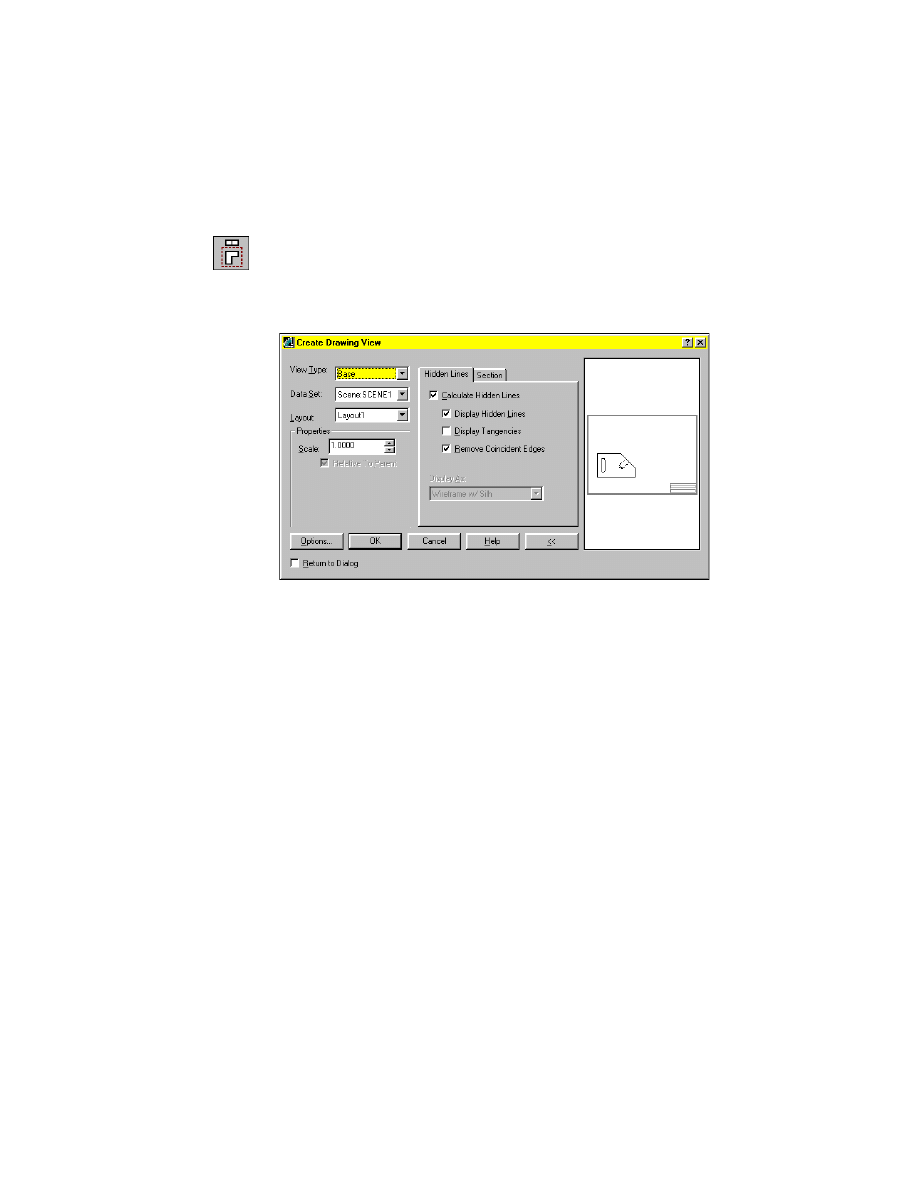
To create a base assembly drawing view
1
Use
AMDWGVIEW
to create a base view.
Context Menu
In the graphics area, right-click and choose New View.
In the Create Drawing View dialog box, specify:
Type:
Base
Data Set:
Scene: SCENE1
Choose OK.
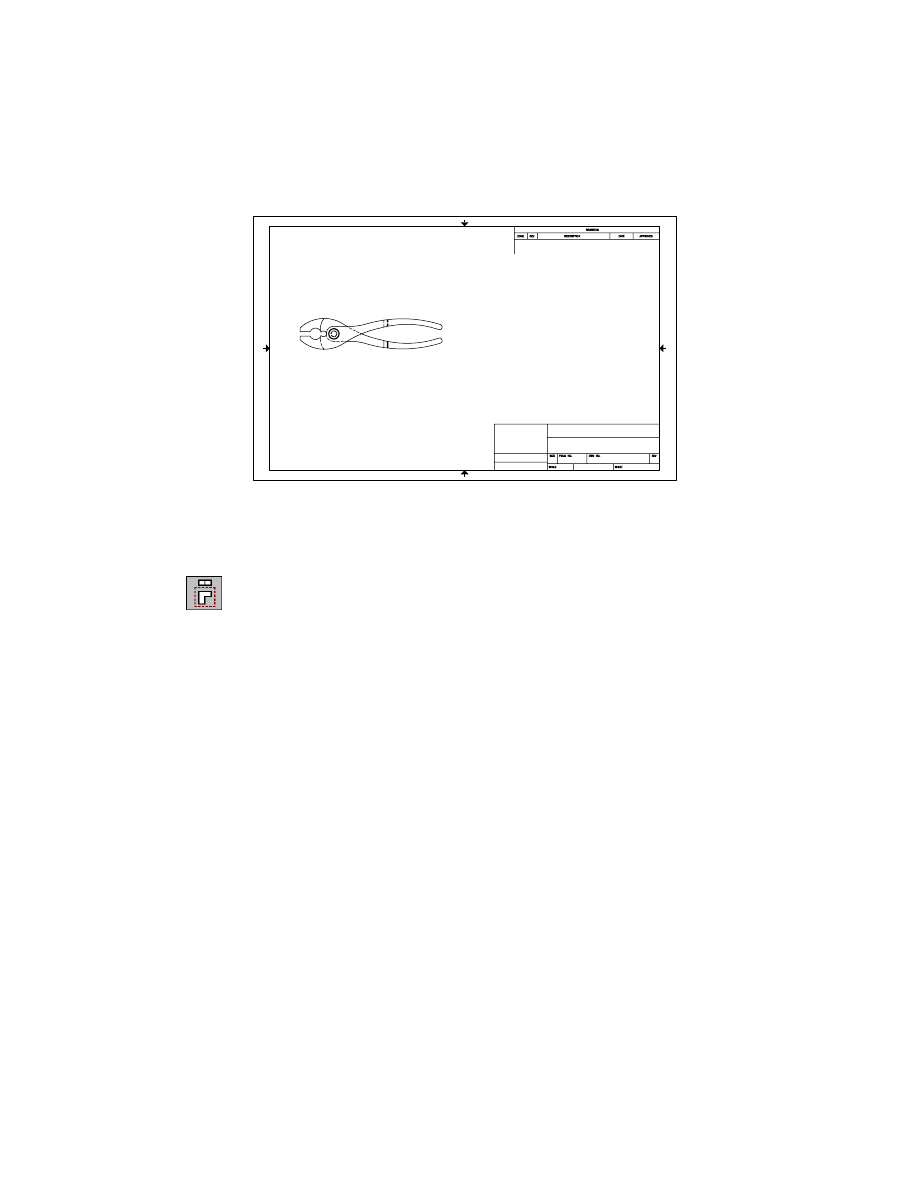
2
Respond to the prompts as follows:
Select a planar face, work plane, or [Ucs/View/worldXy/worldYz/worldZx]:
Enter z
Select work axis or straight edge [worldX/worldY/worldZ]:
Enter x
Adjust orientation [Flip/Rotate] <accEpt>:
Press
ENTER
Specify location of base view:
Specify a point
Specify location of base view:
Specify another point or press
ENTER
430
|
Chapter 16
Assembling Parts
The base drawing view is displayed.
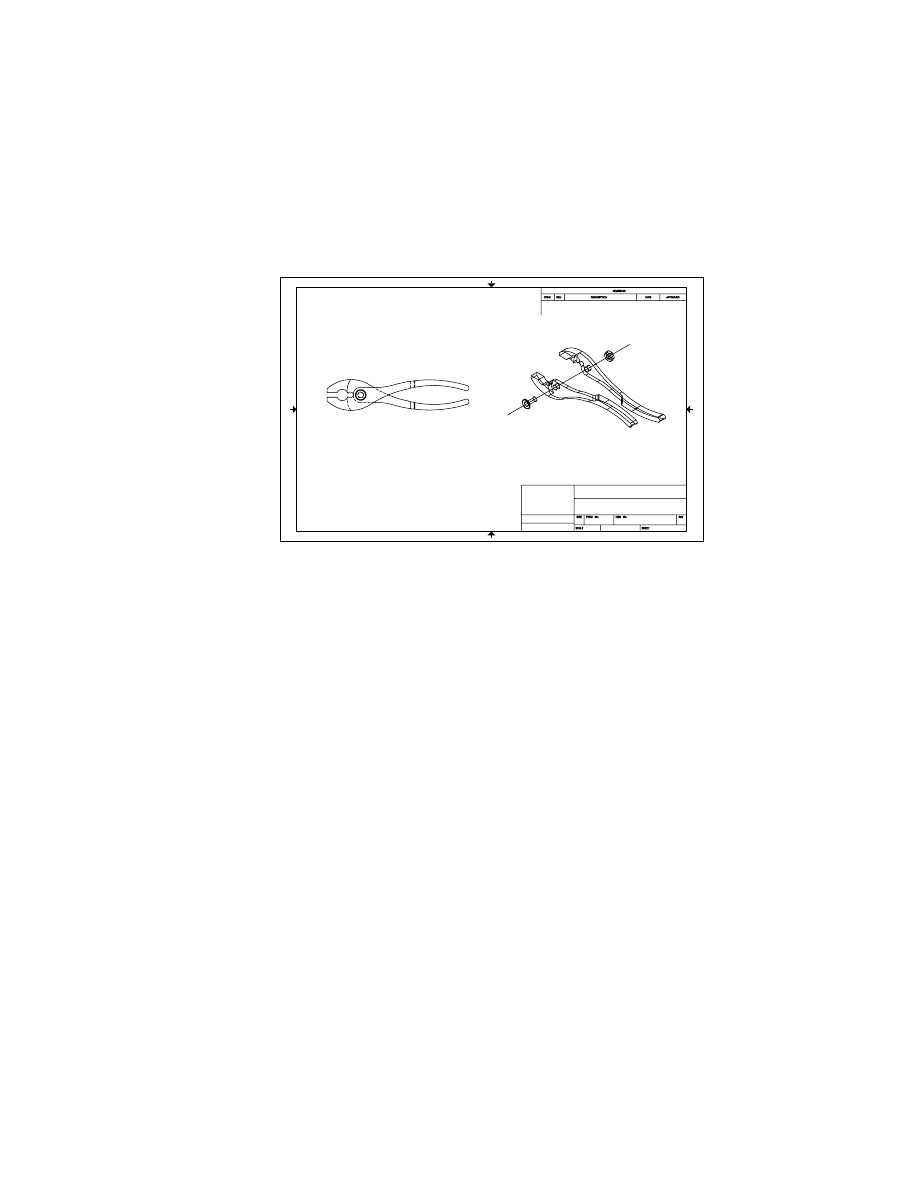
Next, create an isometric view of the assembly.
To create an isometric assembly drawing view
1
Create an isometric view.
Context Menu
In the graphics area, right-click and choose New View.
In the Create Drawing View dialog box, specify:
View Type:
Iso
In the Hidden Lines tab, specify:
Calculate Hidden Lines:
Clear the check box
Choose OK.
Creating Assembly Drawing Views
|
431
2
Respond to the prompts as follows:
Select parent view:
Specify the base view
Specify location for isometric view:
Specify a point to place the isometric view
Specify location for isometric view:
Specify another point or press
ENTER
Examine the Browser. The views are nested under a Scene icon which is
nested under Layout1.
Save your file.
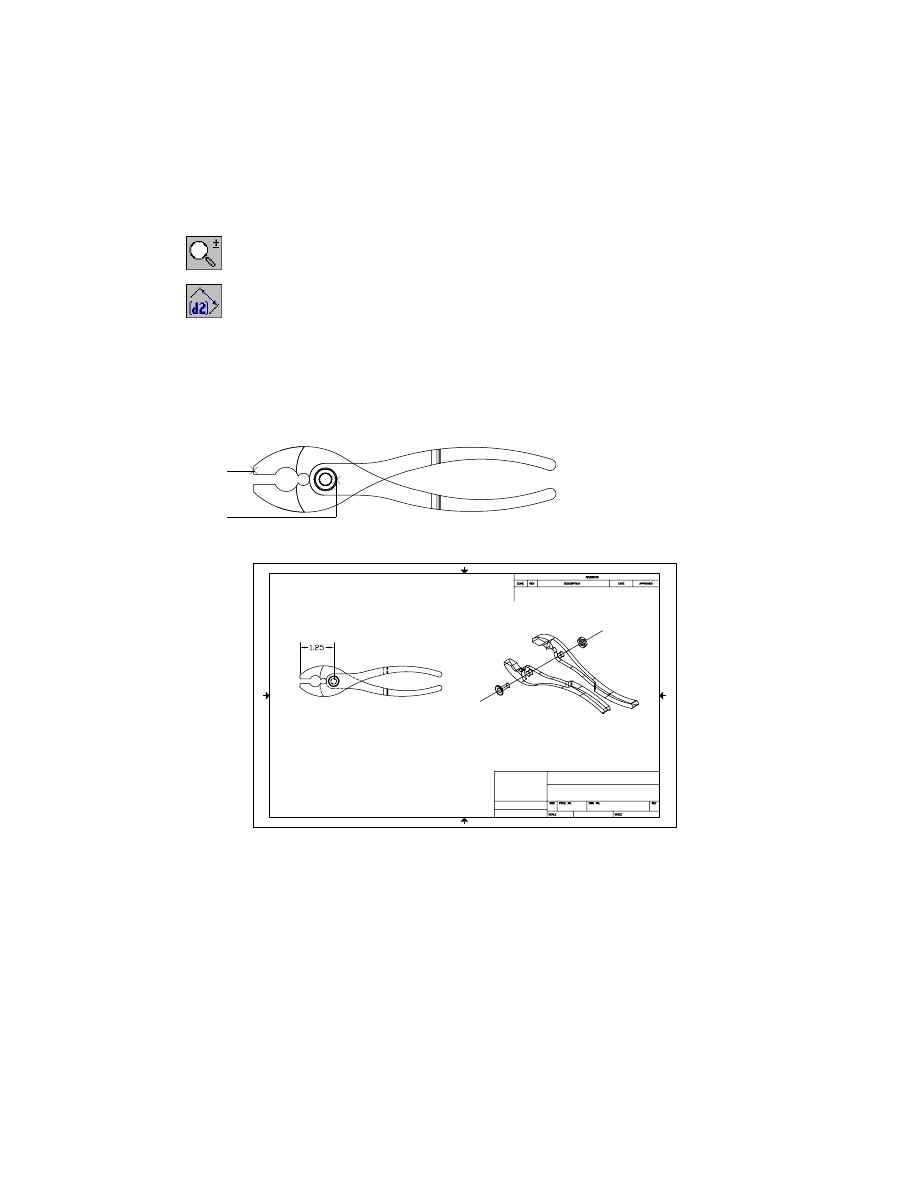
Now you can add reference dimensions, which can be moved, frozen, and
thawed in each drawing view. Reference dimensions are not parametric, but
they update when the model changes.
432
|
Chapter 16
Assembling Parts
To add a reference dimension
1
Zoom in to enlarge the area you want to dimension.
Context Menu
In the graphics area, right-click and choose Zoom.
2
Use
AMREFDIM
to add a reference dimension, following the prompts.
Context Menu
In the graphics area, right-click and choose Reference
Dimension.
Select first object:
Select the endpoint of the pliers (1)
Select second object or place dimension:
Select the bolt (2)
Specify dimension placement:
Specify a point above the pliers
Specify placement point or [Undo/Hor/Ver/Align/Par/aNgle/Ord/reF/Basic]:
Press
ENTER
Select first object:
Press
ENTER
The reference dimension is added to the current view.
Save your file.
Now that you have created drawing views, you edit a part and automatically
update the drawing views.
1
2

Editing Assemblies
|
433
Editing Assemblies
Design or specification changes require most assembly designs to be docu-
mented and edited frequently. You modify parts, rearrange parts and features
in the hierarchy of the assembly tree, and change or delete constraints.
Because the parts and assembly are parametric, changes are fast and updates
are immediate.
Editing an external part definition automatically changes the assembly
model wherever the part is instanced.
Editing External Subassemblies
The process for editing external subassemblies and combined parts is much
like the one for editing external parts. To begin, you activate the subassembly
by double-clicking it in the Browser or entering information on the com-
mand line. When external files are active in the ref-edit state, they are not
available for simultaneous use by others.
The active subassembly retains its color on the screen, while other geometry
is dimmed. Non-active instances of the active subassembly dim one-half as
much. This indicates which instance is active and reflects all of the instances
that will be updated as a result of the change.
When active, you can edit the subassembly. The editing operations take place
as if the active subassembly was an open document. You alter subassemblies
by adding or removing components, changing constraints, adding new fea-
tures, or restructuring the assembly. Newly created non-part based geometry
such as surfaces and wires are created in the master assembly until made part
of a component.
You can save your changes to an external subassembly file in several ways.
■
Use an option in
AMUPDATE
to commit the changes to the external file.
■
Activate a part or subassembly that is contained in another file and, in the
resulting dialog box, commit to changes.
■
Activate another subassembly that is external to the active subassembly.
■
Save the assembly and choose either to not save changes or to save the
pending changes to any external files.
434
|
Chapter 16
Assembling Parts
Editing External Parts
To update all instances of a part in assemblies, you need to edit the original
part. You alter part features by changing dimensions, changing the
constraints, or adding new features. The changes take effect in the assembly.
In this tutorial, you edit the external PLIERT part from within your assembly
drawing. This is called editing in place. In the following steps, you add another
hole to the PLIERT part, and modify assembly constraints.
To edit an external part in place
1
Use
AMMODE
to return to Model mode.
Browser
Select the Model tab.
2
Use
AMACTIVATE
to activate the PLIERT part.
Context Menu
In the graphics area, right-click and choose Part ➤
Activate Part.
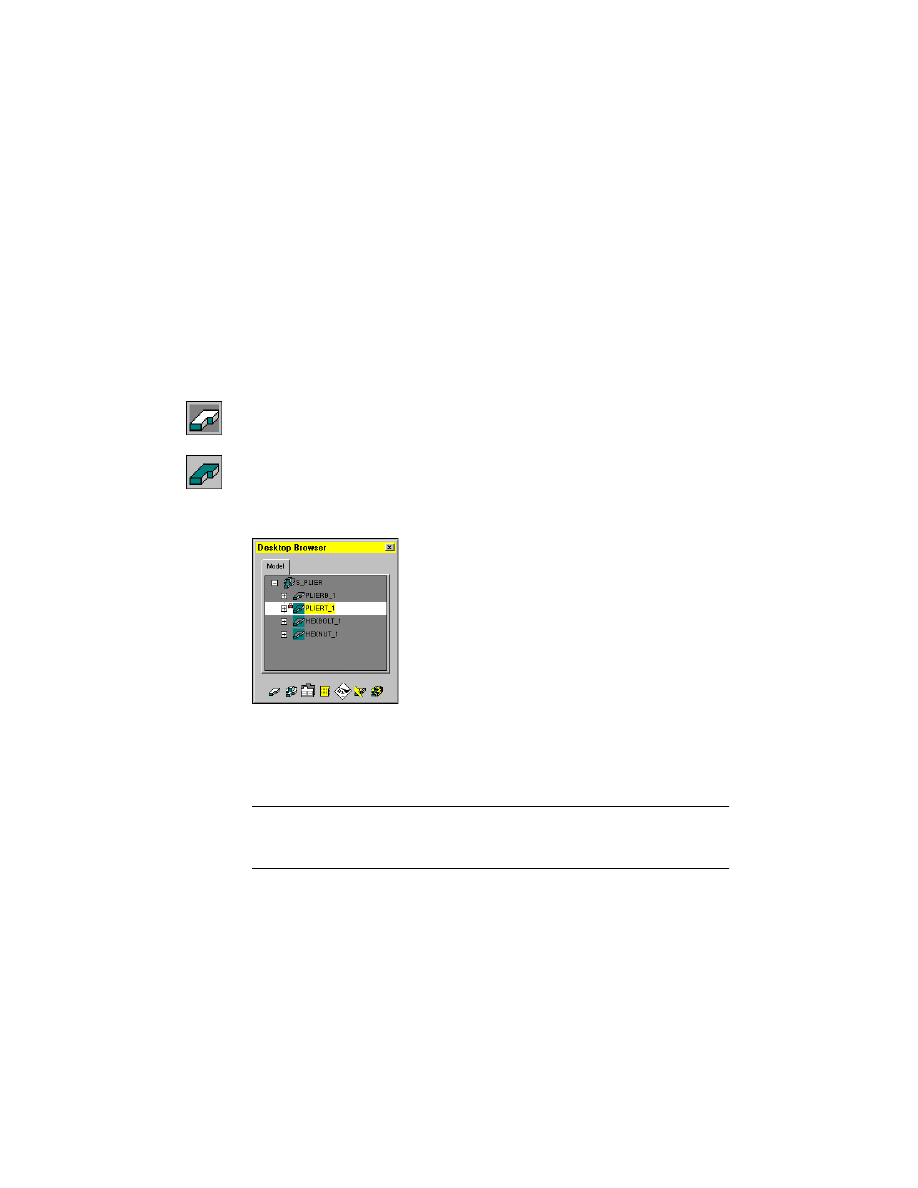
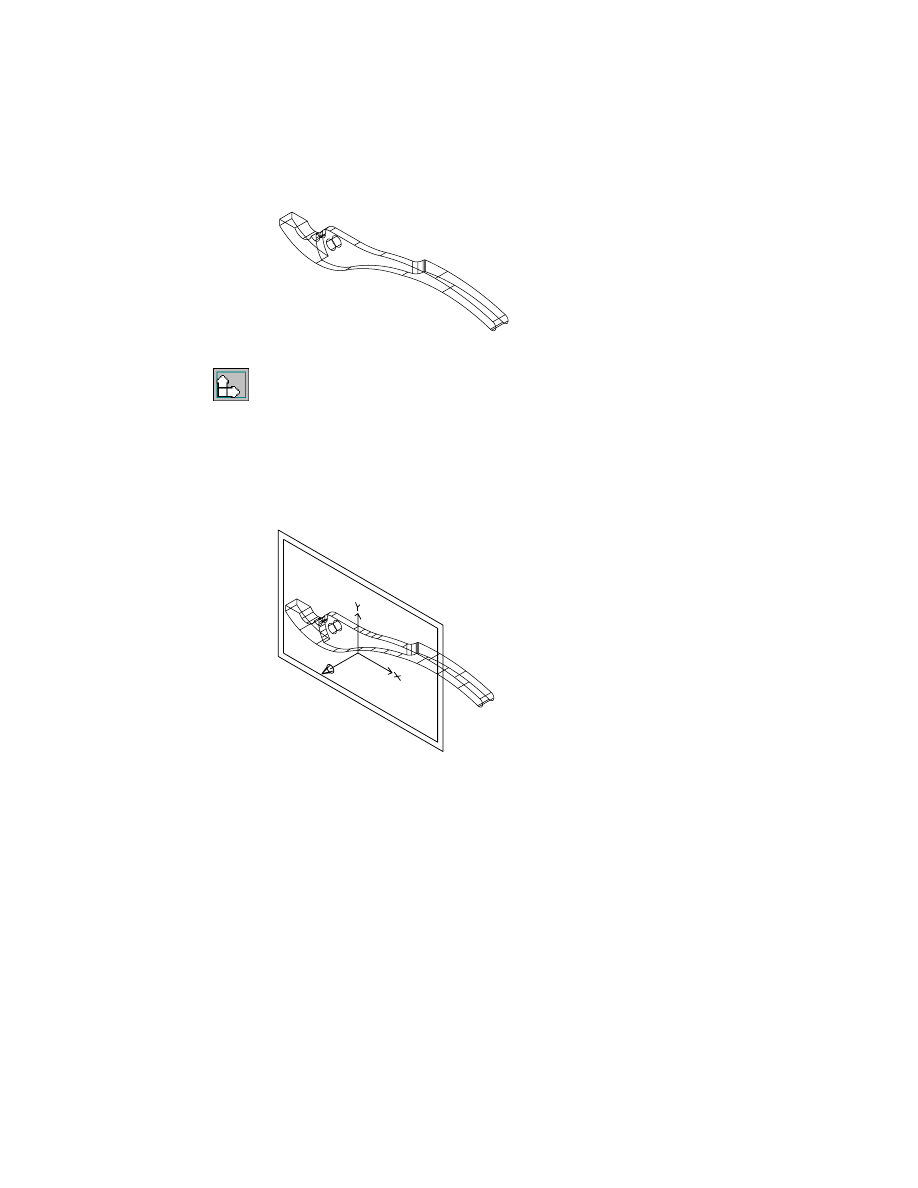
The inactive parts are grayed out in the Desktop Browser, and dimmed on
screen.
By dimming the inactive parts, it is easier for you to work on the active exter-
nal part without moving other parts.
3
Notice the red lock preceding the PLIERT icon in the browser. This indicates
that the file has been locked and cannot be modified by another user.
NOTE
For clarity, the visibility of the other parts has been turned off in this sec-
tion. If you prefer, turn off the visibility of PLIERB, HEXBOLT, and HEXNUT before
you activate PLIERT.
Editing Assemblies
|
435
4
Zoom in on PLIERT.
5
Use
AMSKPLN
to create a new sketch plane, responding to the prompts.
Context Menu
In the graphics area, right-click and choose New Sketch
Plane.
Select work plane, planar face or [worldXy/worldYz/worldZx/Ucs]:
Make sure the front face of the part is highlighted, and press
ENTER
Plane=Parametric
Select edge to align X axis or [Z-flip/Rotate] <accept>:
Make sure the UCS icon is upright and the Z axis points away from the part,
and then press
ENTER
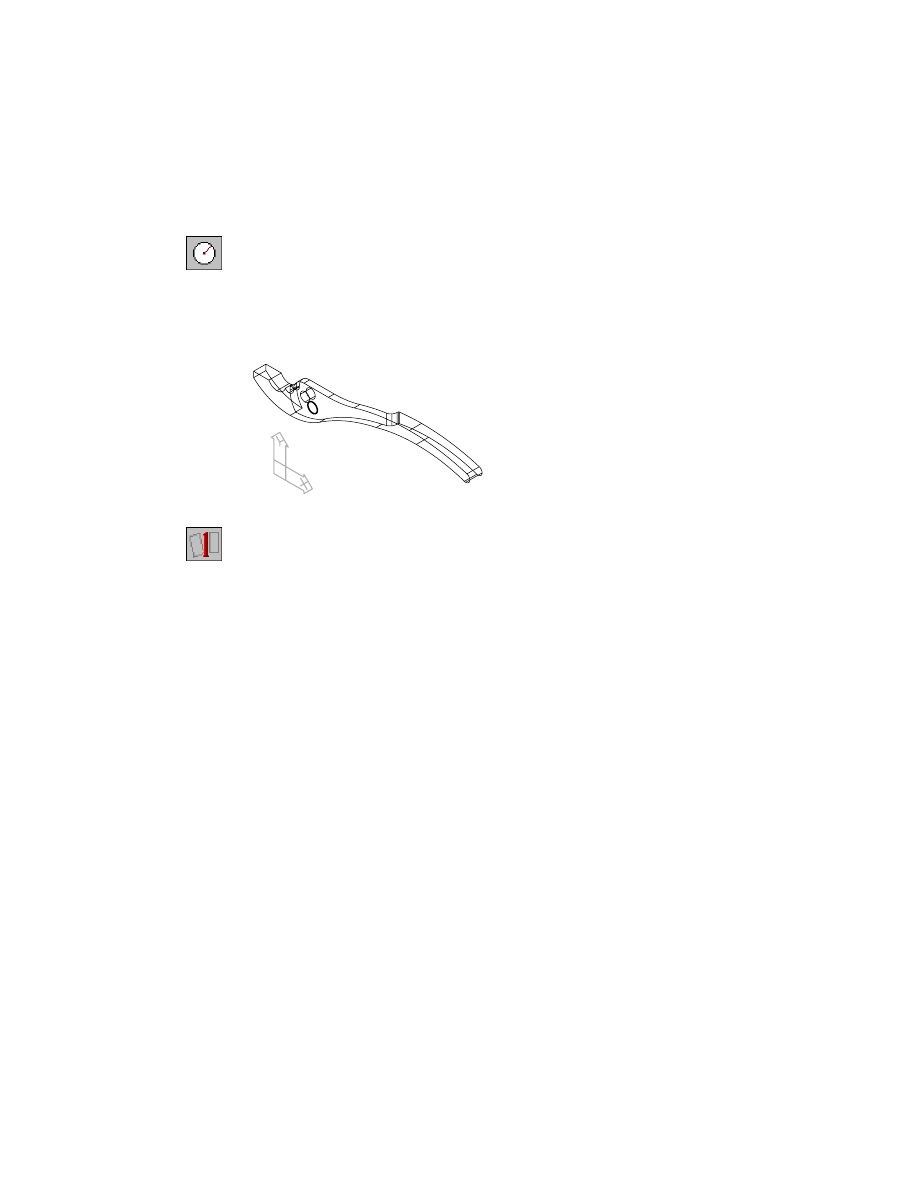
The sketch plane is defined on the front face of the pliers. Now, create the
new slip hole to increase movement of the slip pliers.
436
|
Chapter 16
Assembling Parts
To create a new feature on an external part
1
Use
CIRCLE
to place a new hole, responding to the prompts.
Context Menu
In the graphics area, right-click and choose 2D Sketching
➤ Circle.
CIRCLE Specify center point for circle or [3P/2P/Ttr (tan tan radius)]:
Select a point near the existing hole
Specify radius of circle or [Diameter]:
Draw a circle approximately the same size as the other hole
2
Use
AMPROFILE
to solve the sketch.
Context Menu
In the graphics area, right-click and choose Sketch Solving ➤
Single Profile.
Mechanical Desktop indicates that three dimensions are required to fully
constrain the sketch.
3
Use
AMPARDIM
to add the parametric dimensions, responding to the
prompts. Zoom in as needed to magnify the holes.
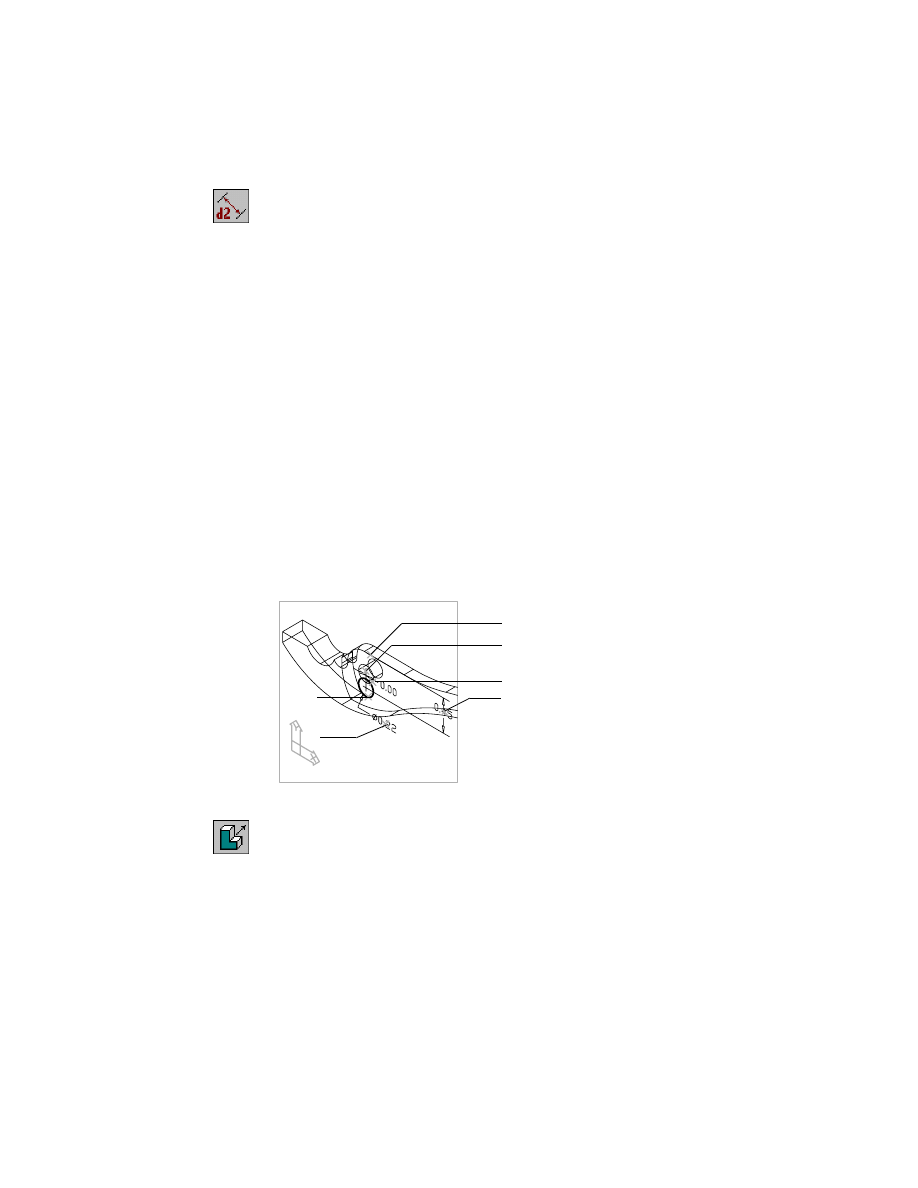
Editing Assemblies
|
437
Context Menu
In the graphics area, right-click and choose Dimensioning ➤
New Dimension.
Select first object:
Select the circle (1)
Select second object or place dimension:
Specify a point for the location of the dimension (2)
Enter dimension value or [Undo/Radius/Ordinate/Placement point]
<0.2003>:
Enter .22
Solved underconstrained sketch requiring 2 dimensions or constraints.
Select first object:
Select the circle (1)
Select second object or place dimension:
Select the existing extruded hole (3)
Specify dimension placement:
Specify a point for the location of dimension (4)
Enter dimension value or [Undo/Hor/Ver/Align/Par/aNgle/Ord/Diameter/pLace]
<0.0454>:
Enter 0
Solved underconstrained sketch requiring 1 dimensions or constraints.
Select first object:
Select the circle (1)
Select second object or place dimension:
Select the top line on PLIERT (5)
Specify dimension placement:
Specify a point for the location of dimension (6)
Enter dimension value or [Undo/Hor/Ver/Align/Par/aNgle/Ord/Diameter/pLace]
<0.5093>:
Enter .45
Solved fully constrained sketch.
Select first object:
Press
ENTER
The circle is now constrained.
4
Use
AMEXTRUDE
to extrude the new hole through the pliers.
Context Menu
In the graphics area, right-click and choose Sketched &
Work Features ➤ Extrude.
In the Extrusion dialog box, specify:
Termination:
Through
Operation:
Cut
5
4
3
6
3
1
2
438
|
Chapter 16
Assembling Parts
Choose OK to exit the dialog box.
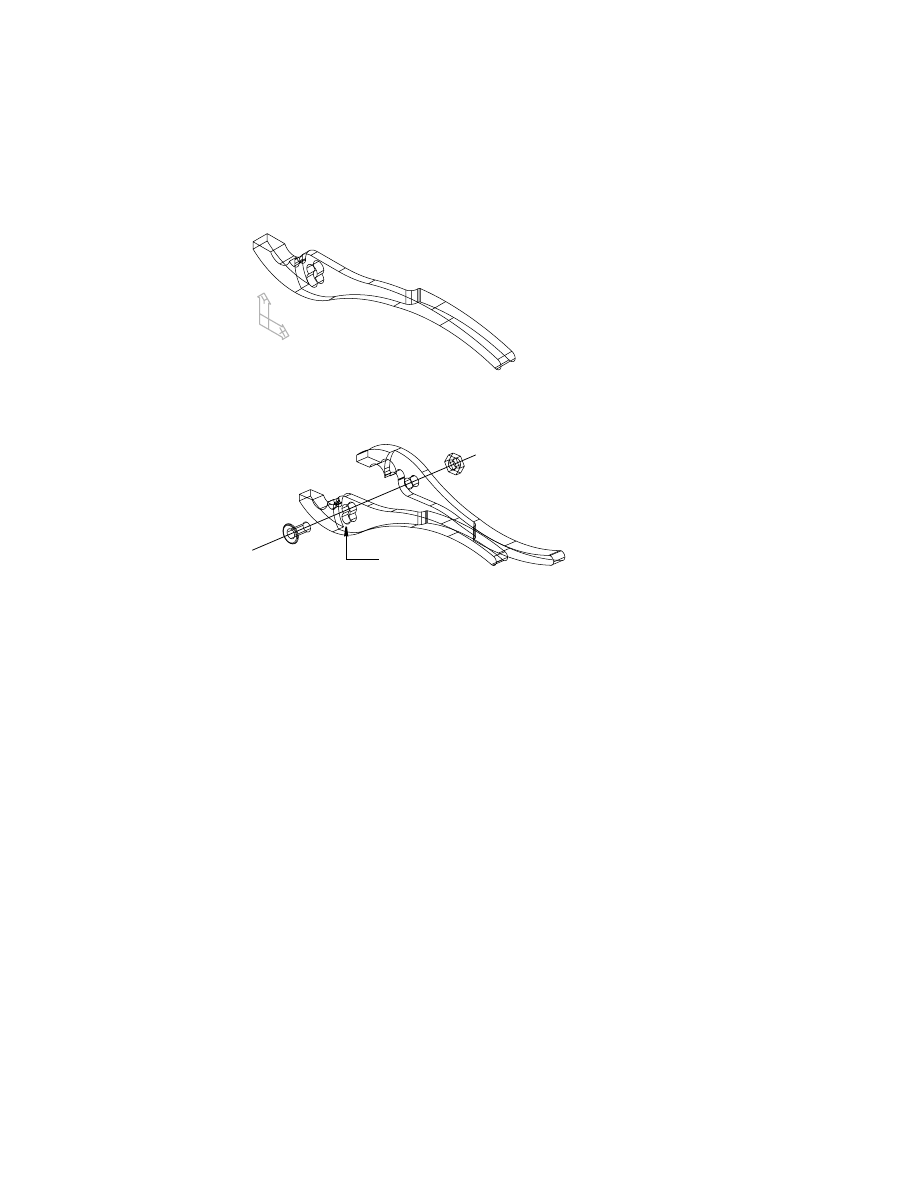
The new hole is extruded, and its position is constrained to the original hole.
Save your file.
5
The External Part Save dialog box indicates a change in the PLIERT drawing.
Choose OK to save the changes you have made.
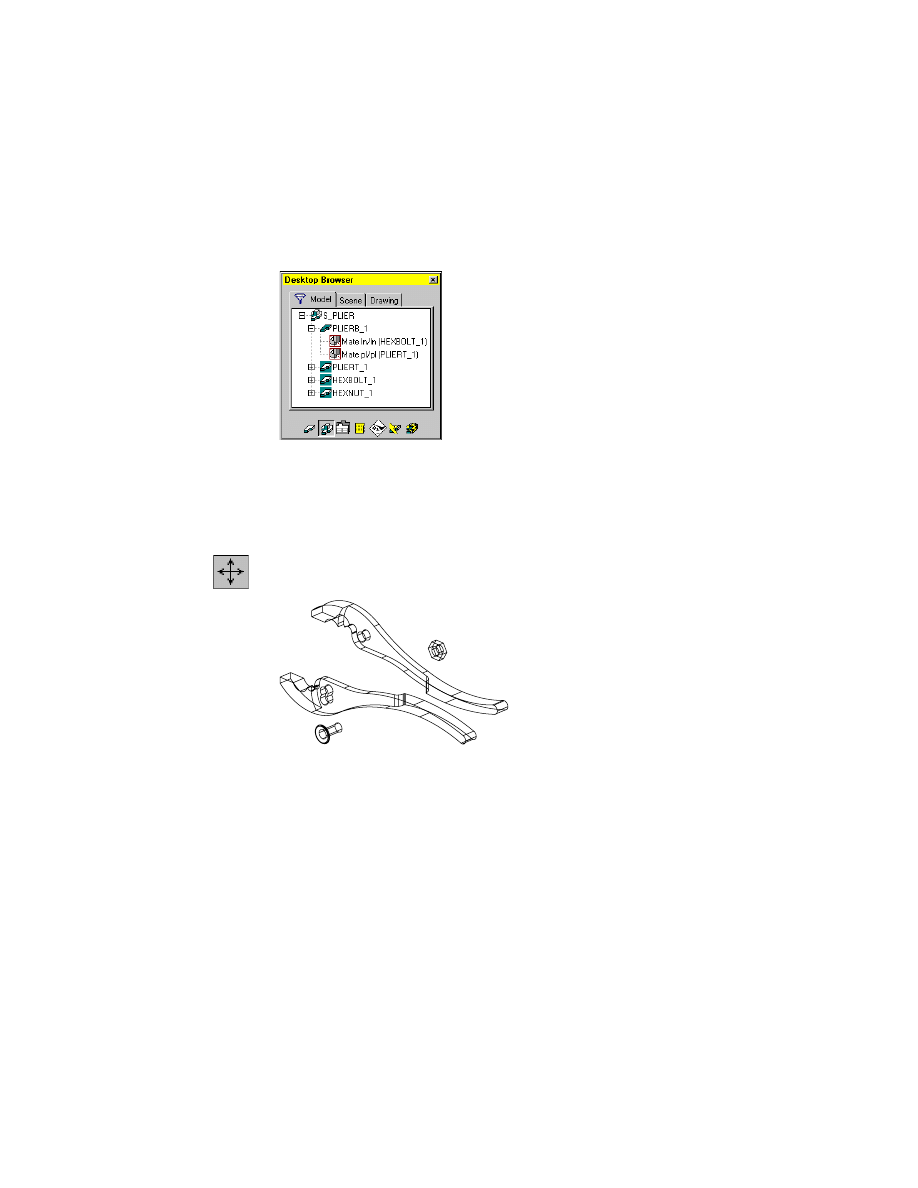
The Browser returns to normal. The inactive parts are no longer dimmed, and
the assembly reflects the new PLIERT part.
Editing Assembly Constraints
Using the Browser, you can selectively delete, edit, and add constraints to
realign or change relationships of parts.
Use
MOVE
to reposition the parts as you edit and add constraints. If you do
not want the parts to reassemble throughout editing, set
AMAUTOASSEMBLE
to 0 (off). To reassemble parts after you add a constraint, select the Update
icon on the Desktop Browser.
new bolt hole
Editing Assemblies
|
439
To delete an assembly constraint
1
In the Desktop Browser, click the plus sign on PLIERB_1 to expand the hier-
archy. Select the Assembly filter at the bottom of the Browser to filter out all
information except the assembly constraints.
2
In the Browser, click the plus sign on HEXBOLT_1 to expand the hierarchy.
Right-click the Mate ln/ln constraint of HEXBOLT_1
,
and choose Delete.
3
Delete the Mate pl/pl constraints of HEXBOLT_1
.
4
Delete constraints for PLIERB, PLIERT, and HEXNUT.
5
Use
MOVE
to separate the parts to apply the new constraints.
Context Menu
In the graphics area, right-click and choose 2D Sketching ➤
Move.
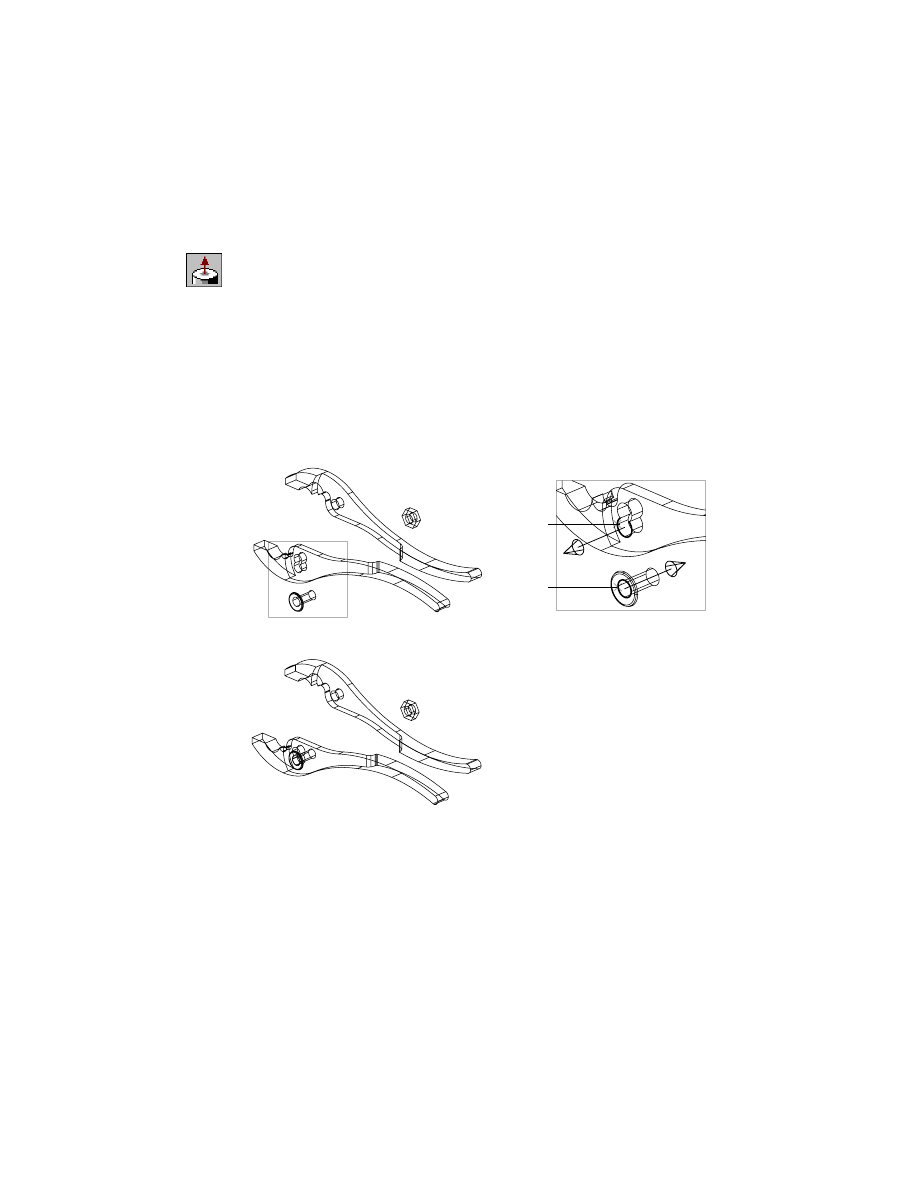
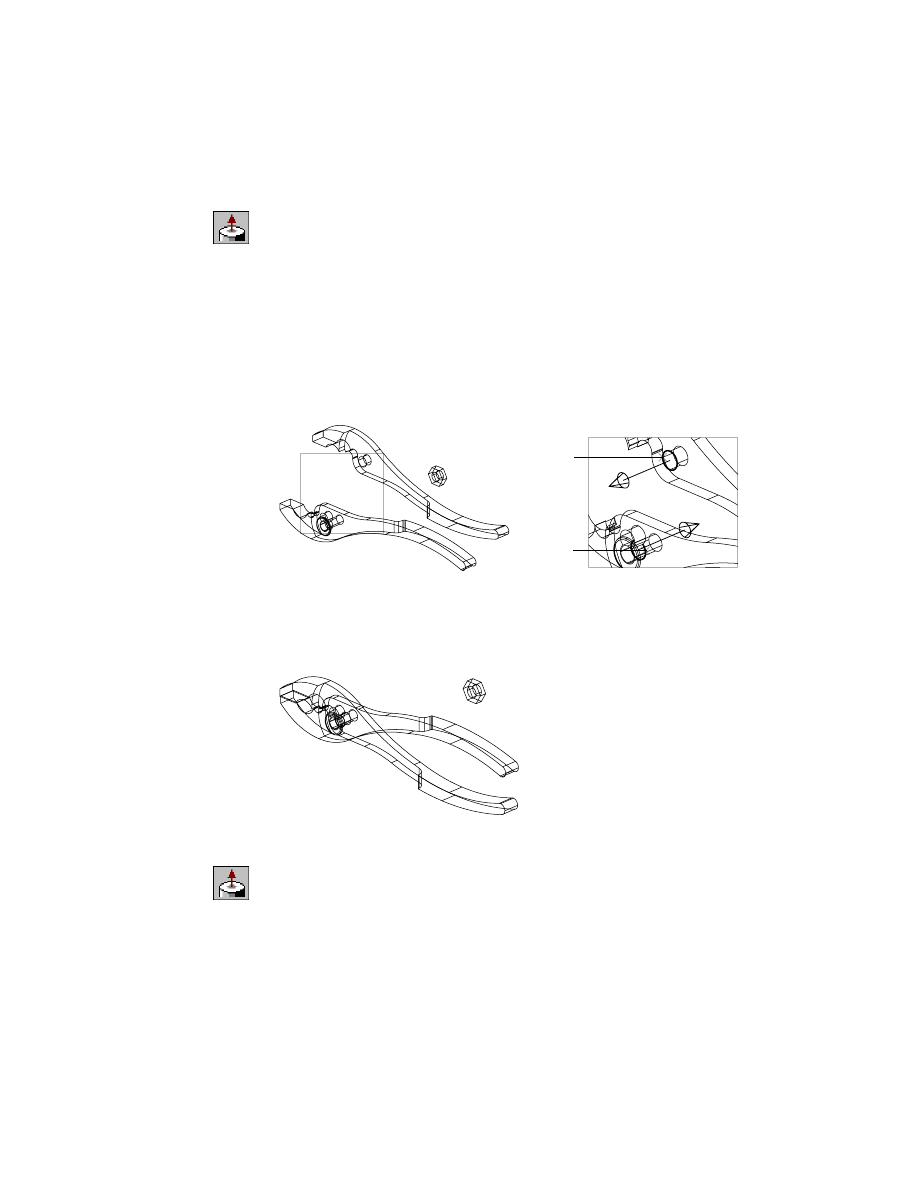
Next, you apply new assembly constraints. You use an insert constraint to
align HEXBOLT to the new hole along their axes while mating the face of
PLIERT and the corresponding face of the bolt head.
Use the DOF symbol to illustrate how many rigid body degrees of freedom
are eliminated for each part.
440
|
Chapter 16
Assembling Parts
To apply an assembly constraint
1
Use
AMINSERT
to constrain PLIERT_1
and HEXBOLT_1, responding to the
prompts.
Context Menu
In the graphics area, right-click and choose 3D
Constraints ➤ Insert.
Select first circular edge:
Select the new bolt hole of PLIERT (1)
First set = Plane/Axis
Enter an option [Clear/Flip] <accept>:
Flip the direction arrow toward HEXBOLT
,
and press
ENTER
Select second circular edge:
Select the bolt shaft near the head (2)
Second set = Plane/Axis
Enter an option [Clear/Flip] <accept>:
Flip the direction arrow toward PLIERT
,
and press
ENTER
Enter offset <0.0000>:
Press
ENTER
The bolt is now inserted through the new hole.
Now you can align the new hole in PLIERT and the corresponding hole in
PLIERB along their axes.
2
1
Editing Assemblies
|
441
2
Use
AMINSERT
to constrain PLIERB and PLIERT
,
responding to the prompts.
Context Menu
In the graphics area, right-click and choose 3D
Constraints ➤ Insert.
Select first circular edge:
Select the new bolt hole of PLIERT (3)
First set = Plane/Axis
Enter an option [Clear/Flip] <accept>:
Flip the direction arrow toward PLIERB and press
ENTER
Select second circular edge:
Select the hole on the inner face of PLIERB
(4)
Second set = Plane/Axis
Enter an option [Clear/Flip] <accept>:
Flip the direction arrow toward PLIERT and press
ENTER
Enter offset <0.0000>:
Press
ENTER
The PLIERB and PLIERT parts are constrained to each other on the inside face
and along the axes of the lower hole of PLIERT and the single hole of PLIERB.
Transactional degrees of freedom are solved. In this case, you want to allow
the pliers and hexbolt to rotate on the axes, so you leave the rotational
degree of freedom unsolved.
3
Use
AMINSERT
to constrain the facing planes of HEXNUT and PLIERB at the
bolt holes, responding to the prompts.
Context Menu
In the graphics area, right-click and choose 3D
Constraints ➤ Insert.
4
3
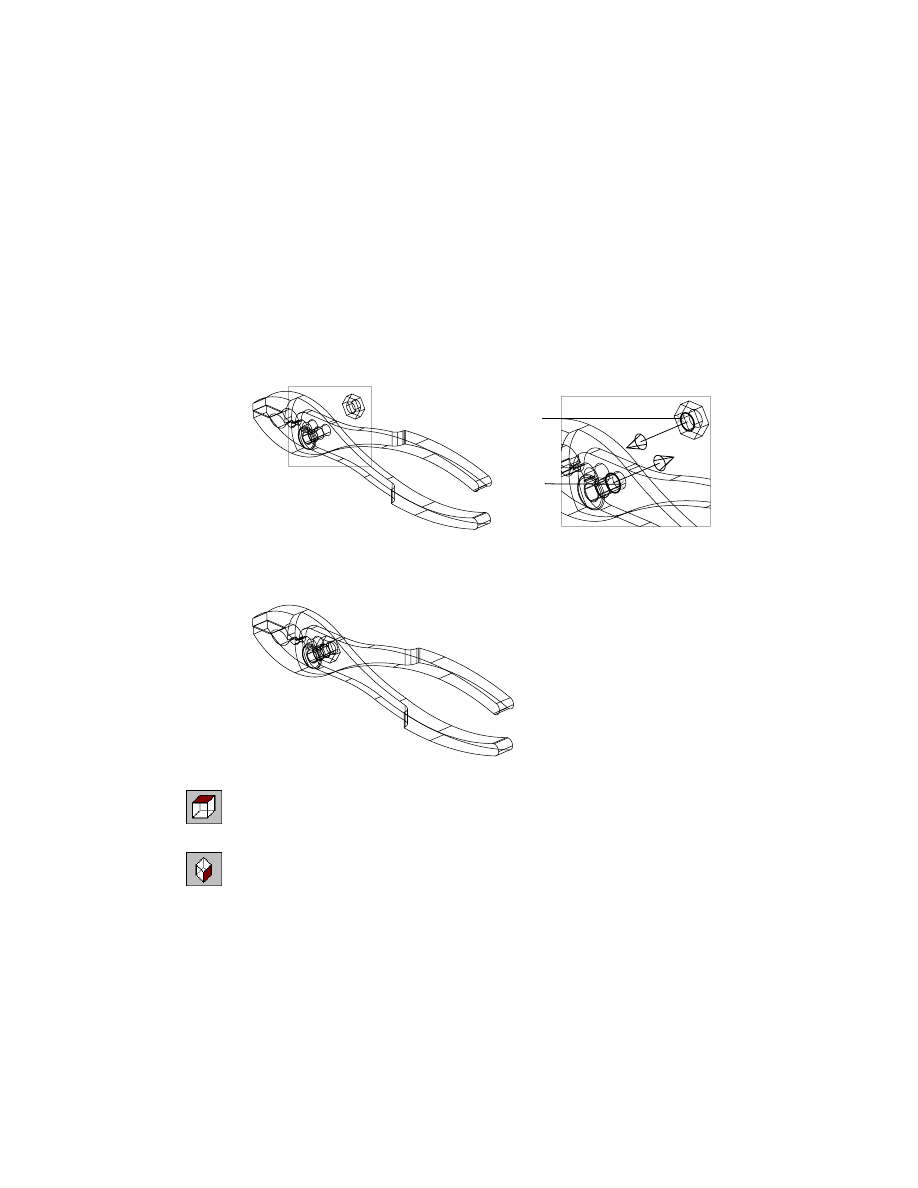
442
|
Chapter 16
Assembling Parts
Move parts so you can easily see selection points.
Select first circular edge:
Select the bolt hole on PLIERB
(5)
First set = Plane/Axis
Enter an option [Clear/Flip] <accept>:
Flip the direction arrow toward HEXNUT
and
press
ENTER
Select second circular edge:
Select the hole on HEXNUT
(6)
Second set = Plane/Axis
Enter an option [Clear/Flip] <accept>:
Flip the direction arrow toward PLIERB
and press
ENTER
Enter offset <0.0000>:
Press
ENTER
The PLIERB and PLIERT parts are constrained on their facing planes. The bolt
passes through both parts, and the holes and bolt shaft are aligned along
their axes.
4
Check that the parts are assembled correctly.
Desktop Menu
View ➤ 3D Views ➤ Top
5
Return to the isometric view.
Desktop Menu
View ➤ 3DViews ➤ Front Right Isometric
Save your file.
6
5
Wyszukiwarka
Podobne podstrony:
więcej podobnych podstron